:max_bytes(150000):strip_icc():format(webp)/windows11contextmenu-f4d6ebb14db4444d851b4338aa553e21.png)
How to Create and Use Adjustment Layers in After Effects

How to Create and Use Adjustment Layers in After Effects
Have you ever used After Effects for professional video editing? Adobe After Effects is a significant video editing software that is used to add animating effects, transitions, intros, outros, and visual effects. You can launch this software on Windows and Mac effectively. Using this high-end software allows you to work on team projects as it consists of auto-saving features.
Moreover, you can add adjustment layers on After Effects to make your video editing more efficient. If you don’t know what the adjustment layer in After Effects is, this article will help you. By reading this article, you can easily learn how to create adjustment layers in your video clips using After Effects.
Part 1: What is the Adjustment Layer in After Effects?
The adjustment layer can save you time and energy from adding effects to multiple clips individually. It does not alter the composition of your video clip until you start applying the effects. Once you add the effect in the adjustment layer, it will replace the effect on all the layers under it.
You can add the adjustment layers in your timeline for creating visual effects such as film grain or color grading. Using the adjustment layer, you can produce transition effects by adding effects to shorter compositions. However, if you want to use the adjustment layer properly, you should select its position carefully in the layer’s stack.
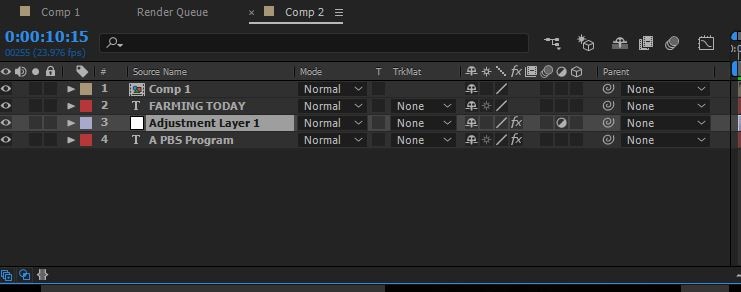
Moreover, always keep in mind that anything placed under the adjustment layer will have a direct effect. In contrast, anything above the adjustment layer won’t get affected. Hence, you can use adjustment layers in After Effects for your convenience to apply all kinds of effects from color to distortion.
Part 2: How to Add Adjustment Layers in After Effects?
Do you want to learn how to add an adjustment layer in After Effects? In this section, we will shed light on two ways through which you can add an adjustment layer to your video clips in After Effects:
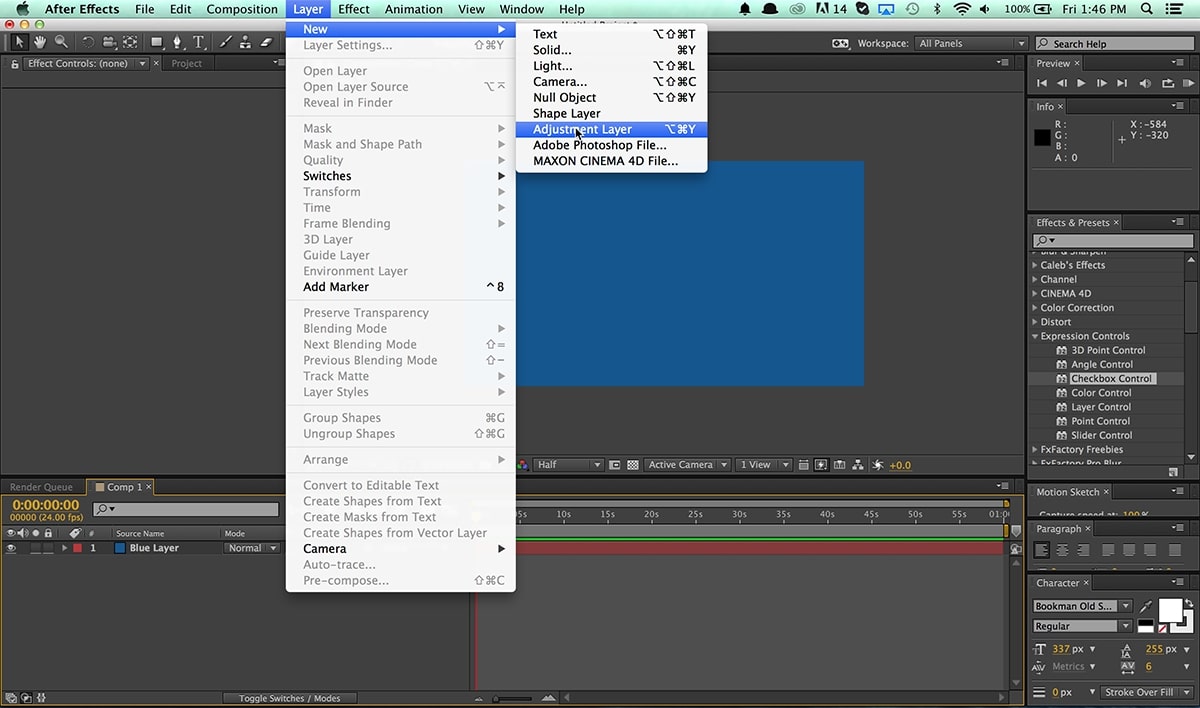
Way 1: After opening After Effects and uploading your project, go to the “Layers” tab. Tap on the “New” button and choose “Adjustment Layer.”
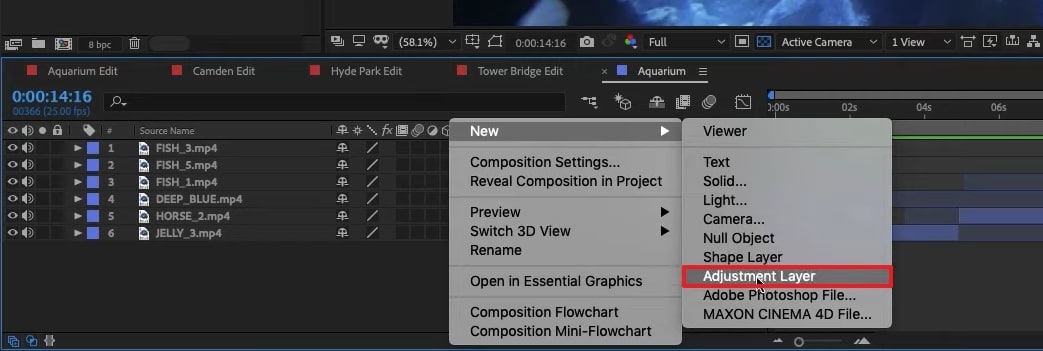
Way 2: Once done with uploading the project on After Effects, go to the blank space in the timeline section on the left side. Right-click using your mouse and select the option “New.” Afterward, click on “Adjustment Layer” to proceed. This will add the adjustment layer on the top of your layers stack.
Tips – Keyboard Shortcuts of Adjustment Layers in After Effects
Do you want to save time while creating an adjustment layer in After Effects? Through the following table, you can learn the shortcuts that you can utilize to generate adjustment layers quickly.
| For Windows | For MacBook |
|---|---|
| Ctrl+Alt+Y | Command+Option+Y |
Part 3: Popular Effects You Can Try With Adjustment Layers in After Effects
In this section, you can find out different effects that you can try with the adjustment layer in After Effects. By applying these effects with an adjustment layer, you can transform your video drastically.
1. Animated Ink Text
Do you want to give a unique sense of style to your added text in the video? This particular effect can add animation to your text to produce engaging and distinctive visuals for your text. To make animated ink text illustrations efficiently, you can check the following steps:
Step1 Once you have uploaded the project on After Effects, you can begin with the process. First, open the composition settings and modify the width, height, frame rate, resolution, and background color according to your choice.
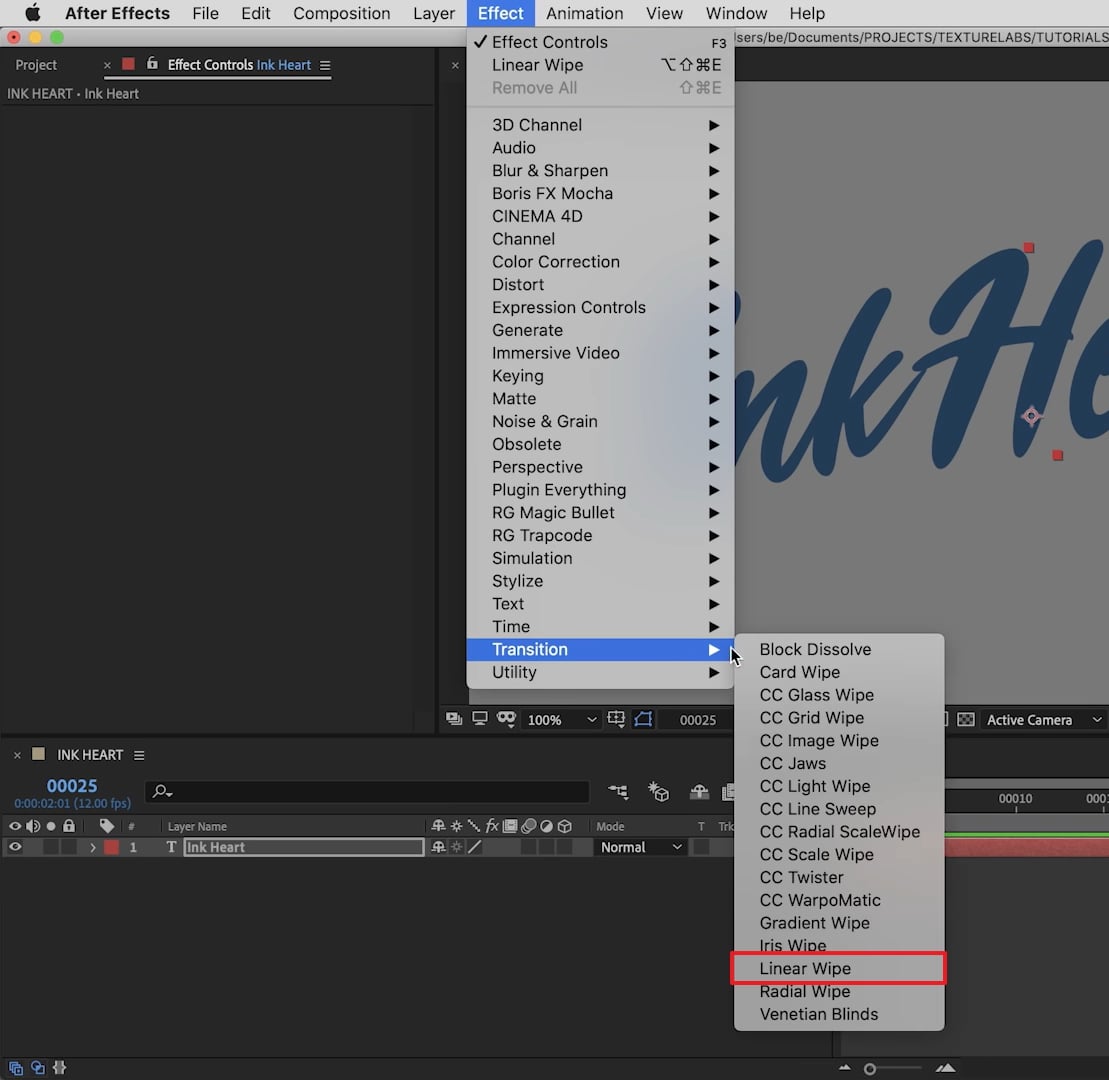
Step2 Make sure to select a suitable text font and color to craft a vibrant output. Afterward, head to the “Effect” tab and select tap on “Transition.” From there, select “Linear Wipe.” Now adjust the settings of the “Linear Wipe” effect from the left panel.
Step3 Now add an adjustment layer to your timeline and select “Distort” from the “Effect” tab. From the “Distort” drop-down menu, choose “Turbulent Displace.” After making its settings, such as adjusting the evolution time, head back to the “Effects” tab and select “Blur and Sharpen.” From there, click on “Fast Box Blur.”
Step4 Manage the threshold value properly and then add a new effect called “Stylize.” From its drop-down menu, click on “Roughen Edges.” Afterward, you can add some elements, such as ink droplets, to create a more vibrant look. To ensure a flawless illustration, make sure to match the color of ink droplets with your text color.
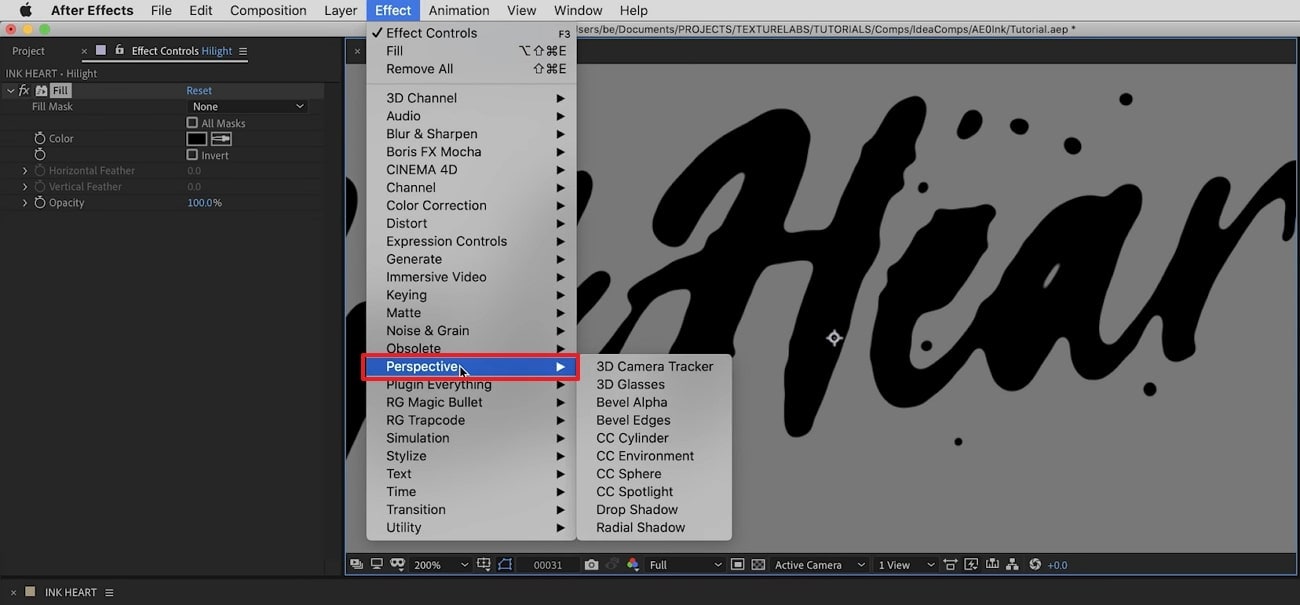
Step5 If you want to give a highlight effect to your animated text, you can add 2nd adjustment layer. Afterward, you can select a bold color for your text, such as black, and add a “Perspective” effect. You can adjust the light color and intensity to create compelling results.
Moreover, you can also add blur and matte effects for more modifications. You can use the blending mode to adjust all the colors. Also, you can apply noise and grain effects to eliminate all the harsh edges from the text.
2. Add Blur Effect
There are various blur effects, such as Gaussian blur, motion blur, radial blur, etc. You can add any of the blur effects in your video clip to craft a smoother look. In After Effects, you can find a variety of blur effects that can help you change your video’s perspective. To use an adjustment layer for adding the blur effect, here are the accurate steps:
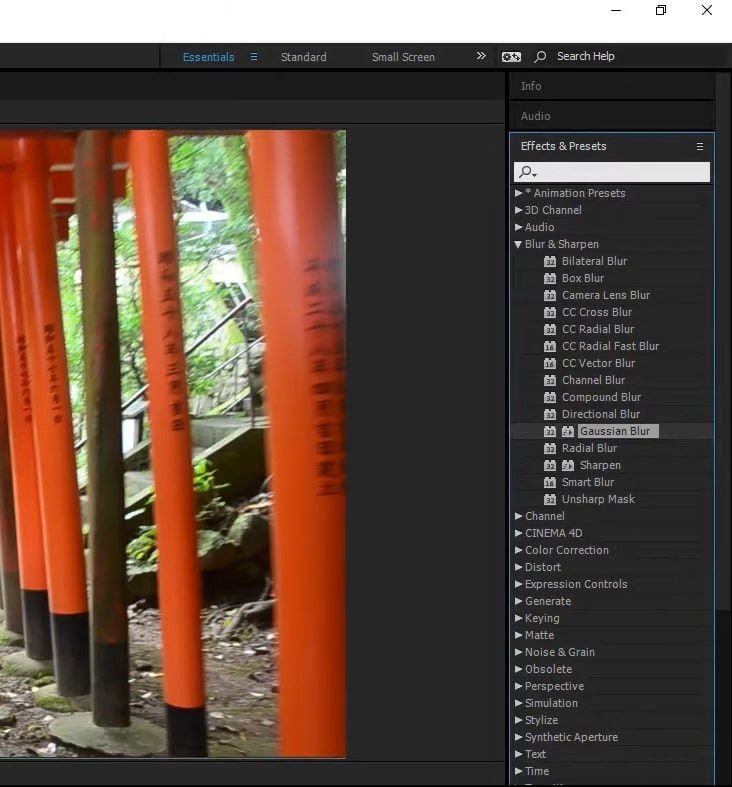
Step1 Once you have imported the video clip to the timeline of After Effects, add an adjustment layer. Afterward, go to the “Effects” tab and locate any of your preferred effects, such as Gaussian blur. After locating this effect, apply it to the adjustment layer.
Step2 After applying the effect to the adjustment layer, you can change its settings from the left side. From the left panel, you can change the blurriness value and blur dimensions according to your choice.
3. Color Correction
Color correction effects can add and manage the colors in your videos effortlessly. You can change the basic corrections of your video by adjusting the brightness, contrast, hue, exposure, highlight, and other elements. Here are the simple steps to use the adjustment layer for color correction:
Step1 After uploading the video on After Effects, go to the “Layer” tab and add an adjustment layer from there. Once done, you can search for the color correction effect on this tool.
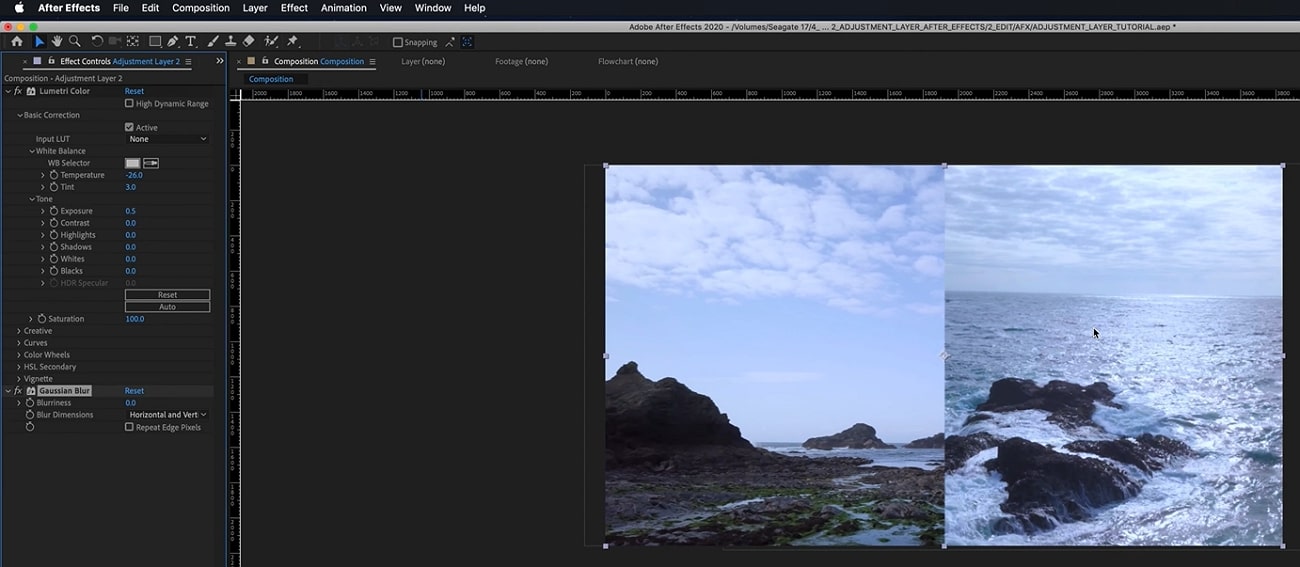
Step2 Once you have found the suitable color correction effect, apply it to the adjustment layer. You can always change the settings of the applied effect from the left panel.
Conclusion
Many beginners are unaware of the term called adjustment layer in video editing. By reading this article, you can find out brief and authentic details about the adjustment layer. Moreover, we have also addressed how to add an adjustment layer in After Effects in simple and easy steps. You can also check about the common effects that people use in Adobe After Effects, using adjustment layers to enhance their videos.
Part 3: Popular Effects You Can Try With Adjustment Layers in After Effects
In this section, you can find out different effects that you can try with the adjustment layer in After Effects. By applying these effects with an adjustment layer, you can transform your video drastically.
1. Animated Ink Text
Do you want to give a unique sense of style to your added text in the video? This particular effect can add animation to your text to produce engaging and distinctive visuals for your text. To make animated ink text illustrations efficiently, you can check the following steps:
Step1 Once you have uploaded the project on After Effects, you can begin with the process. First, open the composition settings and modify the width, height, frame rate, resolution, and background color according to your choice.
Step2 Make sure to select a suitable text font and color to craft a vibrant output. Afterward, head to the “Effect” tab and select tap on “Transition.” From there, select “Linear Wipe.” Now adjust the settings of the “Linear Wipe” effect from the left panel.

Step3 Now add an adjustment layer to your timeline and select “Distort” from the “Effect” tab. From the “Distort” drop-down menu, choose “Turbulent Displace.” After making its settings, such as adjusting the evolution time, head back to the “Effects” tab and select “Blur and Sharpen.” From there, click on “Fast Box Blur.”
Step4 Manage the threshold value properly and then add a new effect called “Stylize.” From its drop-down menu, click on “Roughen Edges.” Afterward, you can add some elements, such as ink droplets, to create a more vibrant look. To ensure a flawless illustration, make sure to match the color of ink droplets with your text color.
Step5 If you want to give a highlight effect to your animated text, you can add 2nd adjustment layer. Afterward, you can select a bold color for your text, such as black, and add a “Perspective” effect. You can adjust the light color and intensity to create compelling results.
Moreover, you can also add blur and matte effects for more modifications. You can use the blending mode to adjust all the colors. Also, you can apply noise and grain effects to eliminate all the harsh edges from the text.

2. Add Blur Effect
There are various blur effects, such as Gaussian blur, motion blur, radial blur, etc. You can add any of the blur effects in your video clip to craft a smoother look. In After Effects, you can find a variety of blur effects that can help you change your video’s perspective. To use an adjustment layer for adding the blur effect, here are the accurate steps:
Step1 Once you have imported the video clip to the timeline of After Effects, add an adjustment layer. Afterward, go to the “Effects” tab and locate any of your preferred effects, such as Gaussian blur. After locating this effect, apply it to the adjustment layer.

Step2 After applying the effect to the adjustment layer, you can change its settings from the left side. From the left panel, you can change the blurriness value and blur dimensions according to your choice.
3. Color Correction
Color correction effects can add and manage the colors in your videos effortlessly. You can change the basic corrections of your video by adjusting the brightness, contrast, hue, exposure, highlight, and other elements. Here are the simple steps to use the adjustment layer for color correction:
Step1 After uploading the video on After Effects, go to the “Layer” tab and add an adjustment layer from there. Once done, you can search for the color correction effect on this tool.
Step2 Once you have found the suitable color correction effect, apply it to the adjustment layer. You can always change the settings of the applied effect from the left panel.

Conclusion
Many beginners are unaware of the term called adjustment layer in video editing. By reading this article, you can find out brief and authentic details about the adjustment layer. Moreover, we have also addressed how to add an adjustment layer in After Effects in simple and easy steps. You can also check about the common effects that people use in Adobe After Effects, using adjustment layers to enhance their videos.
3GP Video Format: What Is 3GP Format And How To Open It?
Everyone uses the internet nowadays as it is a necessary part of our lives. We exchange multimedia files and texts messages on various apps. The files that we share on the internet have a specific extension for the files. It is essential to know about the different available and widely used formats so that you can use and access the file easily.
The article below will focus on and share great details about the 3GP file format. The multimedia format is popularly used for its great benefits, such as audio and video transfer. Do you want to know more about the 3GP format? Let’s get started!
In this article
02 Advantages and Disadvantages About Video Format?
03 How Can You Open and Play 3GP Video Format?
04 How Edit 3GP Video More Creatively?
Part 1. What Is 3GP Video Format?
The multimedia files that we share on the internet have the extension as ‘.3GP’. It is an audio and video container made under the proprietorship of the 3rd Generation Partnership Project. The 3GP format stores and transmits the data that is shared between 3G-enabled devices. All 3G devices, along with some 2G and 4G devices, support 3GP file format video recording and playback.
3GP format needs less broadband demand which makes the phone run fluently. Along with taking less space as compared to other formats, it saves multimedia content efficiently. 3GP file format was designed to match the high speed of data transition between 3G networks.
Part 2. Advantages and Disadvantages About Video Format?
The 3GP format was designed to work at a high level on 3G devices. The above section of this article sheds light on what the 3GP file format is. Now that you have adequate knowledge of the format, let’s proceed and talk about the pros and cons of the file format.
Advantages of 3GP Format
- The biggest plus point of using the 3GP format is its size. The format is small in size but can store disk space. The small size of the format uses tiny amounts of data.
- The format is great because it creates an environment for business connections and improves communication. You can share text messages, videos, and multimedia files with your team members.
- 3GP file format is widely used because it has low bandwidth and also it has decreased mobile storage requirements.
- 3GP files are transferred and shared very efficiently. Hence, sharing video files has become a lot easier with this format.
- 3GP files are fast for both streaming and downloading, even if you have a weak or problematic internet connection.
Disadvantages of 3GP Format
- The quality of the audio file is damaged while compressing the file to reduce its size, as compared to the original file.
- Not every program supports 3GP file format; hence users face compatibility issues.
- Compared to the original video, the 3GP video files, after compressing, lose their quality, and the resolution is also compromised.
Part 3. How Can You Open and Play 3GP Video Format?
Do you know there are various file formats and different platforms support different formats? If we specifically talk about the 3GP format, it is supported by VLC Media Player, QuickTime Player, and 5KPlayer. Let’s discuss them:
VLC Media Player
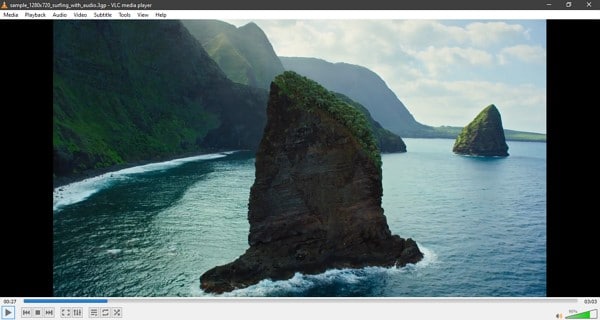
VLC Media Player is a free open-source platform that can play 3GP file format. It is developed by the VideoLAN project. VLC Media Player is a cross-platform media player software and media streamer available for Windows, Mac, Linux, and Unix.
Mobile users can use it irrespective of the device type; Android, iPhone, iPad, and iPod users can use it. VLC can be used to play 3GP format along with any format that you may encounter.
QuickTime Player
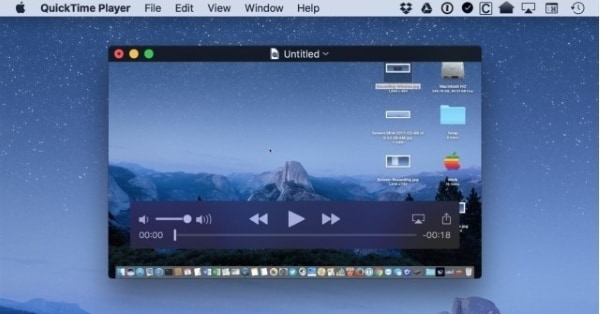
QuickTime Player was made under Apple Inc. proprietorship. It is an extendible multimedia framework and can only be used on macOS devices because the Windows-supported version was ceased after 2016. It can handle picture and digital video formats, including a 3GP file format. Although, the MOV file extension represents the QuickTime Player. QuickTime Player is pre-installed on all Mac devices.
5KPlayer
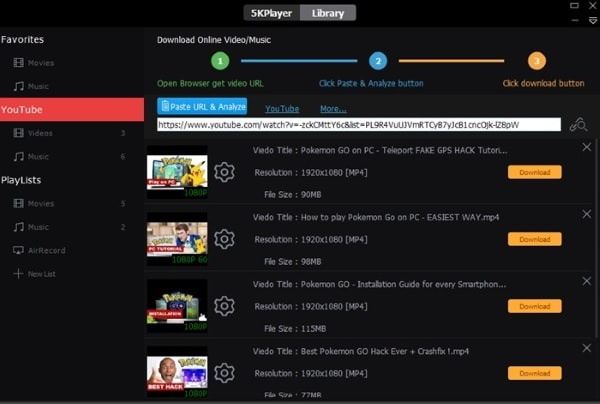
5KPlayer is developed under the proprietorship of DearMob. It is a music and video player. 5KPlayer has built-in support for AirPlay. You can stream audio and video via AirPlay without any loss in the quality of the media file. It supports different formats for multimedia, including a 3GP file format. 5KPlayer provides you the facility to download videos from 300+ sites, including YouTube, Vimeo, and Dailymotion.
3.1. Steps to Open and Play 3GP Format on VLC Media Player
Now that you know about the different platforms that support the 3GP format let us share the steps on how you can open and play 3GP video files on VLC Media Player.
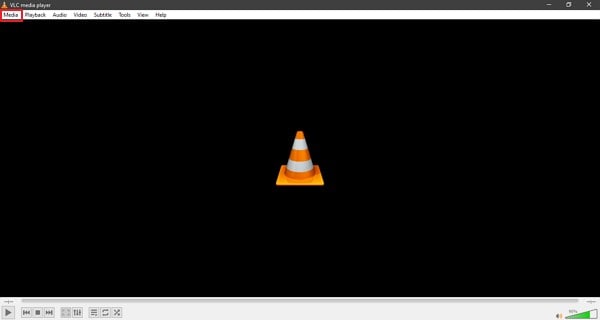
Step 1: After you have installed VLC Media Player on your device, launch it. Head to the ‘Media’ tab from the main screen by accessing the top menu. Or else, simply open VLC Media Player to drag and drop the media file there.
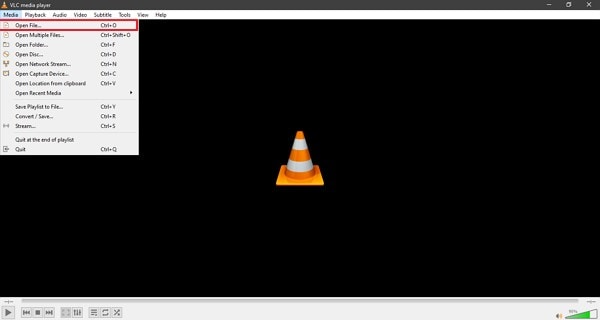
Step 2: Select the ‘Open File’ option from the Media section and locate the 3GP video file on your device. Add the file to VLC and enjoy watching it.
Part 4. How Edit 3GP Video More Creatively?
What else could be better for editing your videos than Wondershare Filmora ? Whenever you want a good video editor, you will find Filmora on top of the list. The video editor comes with an extensive range of features that you cannot even count. Moreover, it offers endless editing capabilities.
For editing unique and stunning 3GP format videos, try Filmora. It comes with both Basic and also Advanced editing features. Do you want to know more about it? Let us tell you. Filmora offers basic and standard editing tools like cut, trim, split, and join.
If we look at the advanced features, they include Green Screen, Scene Detection, Power Tool, Video Snapshot, and whatnot. Moreover, you also get various AI editing features like Auto Highlight, Auto Reframe, Auto Normalization, and much more than this.
What else does Filmora provide to its users? Let’s share a step-by-step guideline about how to edit 3GP file format videos on Filmora along with its other features.
Step 1: Import 3GP Video File
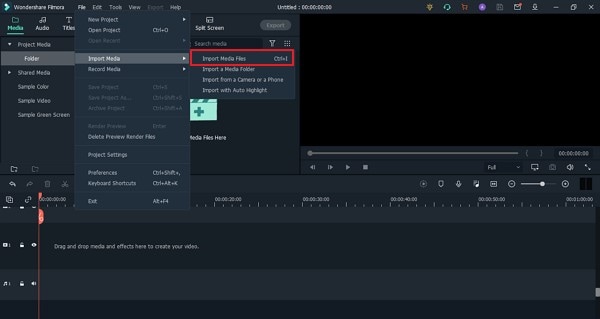
Start by launching Filmora Video Editor on your device and head to the ‘File’ tab from the top menu bar. There, hover on the ‘Import Media’ option; this will open a sub-menu with an option of ‘Import Media Files’; click on it.
For Win 7 or later (64-bit)
For macOS 10.12 or later
Step 2: Drag to Timeline
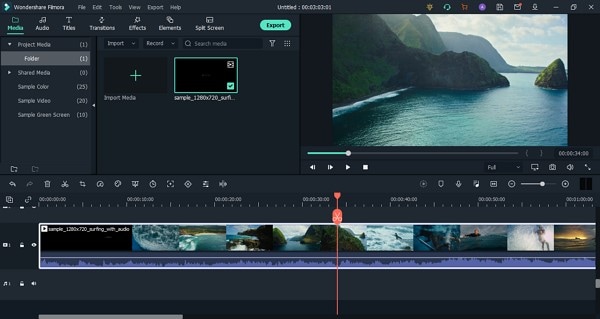
You can locate the video file from the device and import it to the software. After a successful import, the media file will appear on the screen, drag and drop it to the ‘Timeline’ to start the editing.
Step 3: Add Audio Effects
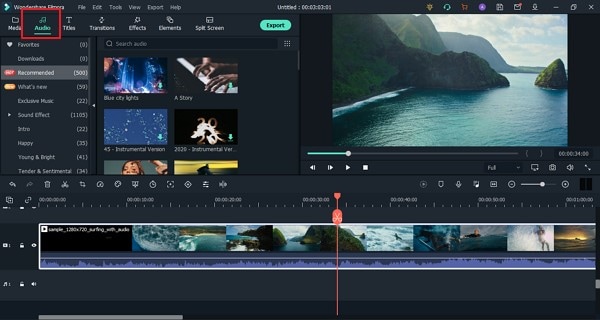
Start by adding audio effects to your video and making it more captivating. For this, head to the ‘Audio’ tab and select the most suitable sound from the provided options like Travel Vlog, Folk, Young & Bright, etc.
Step 4: Use Interesting Elements
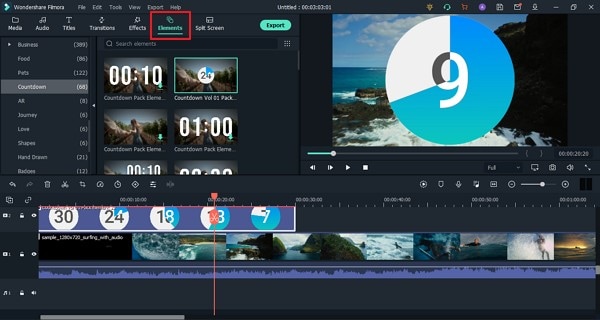
What kind of elements do you like? With Filmora, you get Countdown, Laser Eye, Subscription, Share, and a lot other cooler options are available under the ‘Elements’ section.
Step 5: Add Attractive Titles
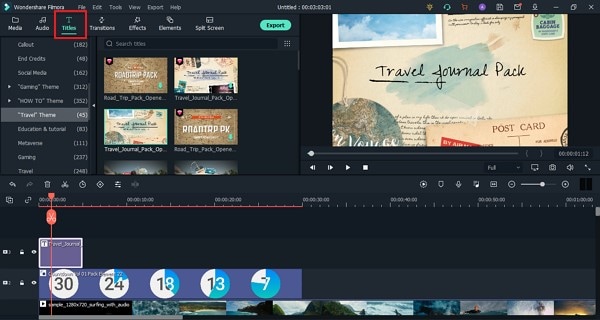
Are you looking for title templates? Have you looked at the ‘Titles’ section in Filmora? You will get beautiful templates according to the latest trends and occasions.
Step 6: Export 3GP File
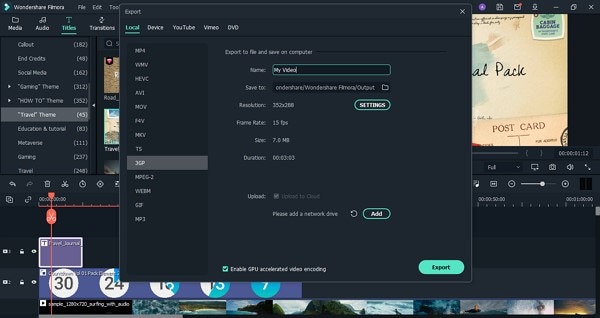
Once you are done, export the 3GP format file. For this, click on the ‘Export’ button, select the output file format and proceed to save the file.
Bottom Line
We hope that the above article has shared sufficient information with you regarding the 3GP file format. We discussed its pros and cons, ways to open it, and also edit it. As we are concluding, let’s talk a little more about Wondershare Filmora. The video editor is an excellent choice for editing and creating mind-blowing videos.
You get various Basic and also Advanced features that can enhance your video. With Filmora, you can efficiently work with features like Silence Detection, Keyframing, Advanced Color Tuning, and much more. If you wish to create fantastic videos, use Wondershare Filmora.
For Win 7 or later (64-bit)
For macOS 10.12 or later
02 Advantages and Disadvantages About Video Format?
03 How Can You Open and Play 3GP Video Format?
04 How Edit 3GP Video More Creatively?
Part 1. What Is 3GP Video Format?
The multimedia files that we share on the internet have the extension as ‘.3GP’. It is an audio and video container made under the proprietorship of the 3rd Generation Partnership Project. The 3GP format stores and transmits the data that is shared between 3G-enabled devices. All 3G devices, along with some 2G and 4G devices, support 3GP file format video recording and playback.

3GP format needs less broadband demand which makes the phone run fluently. Along with taking less space as compared to other formats, it saves multimedia content efficiently. 3GP file format was designed to match the high speed of data transition between 3G networks.
Part 2. Advantages and Disadvantages About Video Format?
The 3GP format was designed to work at a high level on 3G devices. The above section of this article sheds light on what the 3GP file format is. Now that you have adequate knowledge of the format, let’s proceed and talk about the pros and cons of the file format.
Advantages of 3GP Format
- The biggest plus point of using the 3GP format is its size. The format is small in size but can store disk space. The small size of the format uses tiny amounts of data.
- The format is great because it creates an environment for business connections and improves communication. You can share text messages, videos, and multimedia files with your team members.
- 3GP file format is widely used because it has low bandwidth and also it has decreased mobile storage requirements.
- 3GP files are transferred and shared very efficiently. Hence, sharing video files has become a lot easier with this format.
- 3GP files are fast for both streaming and downloading, even if you have a weak or problematic internet connection.
Disadvantages of 3GP Format
- The quality of the audio file is damaged while compressing the file to reduce its size, as compared to the original file.
- Not every program supports 3GP file format; hence users face compatibility issues.
- Compared to the original video, the 3GP video files, after compressing, lose their quality, and the resolution is also compromised.
Part 3. How Can You Open and Play 3GP Video Format?
Do you know there are various file formats and different platforms support different formats? If we specifically talk about the 3GP format, it is supported by VLC Media Player, QuickTime Player, and 5KPlayer. Let’s discuss them:
VLC Media Player
VLC Media Player is a free open-source platform that can play 3GP file format. It is developed by the VideoLAN project. VLC Media Player is a cross-platform media player software and media streamer available for Windows, Mac, Linux, and Unix.
Mobile users can use it irrespective of the device type; Android, iPhone, iPad, and iPod users can use it. VLC can be used to play 3GP format along with any format that you may encounter.

QuickTime Player
QuickTime Player was made under Apple Inc. proprietorship. It is an extendible multimedia framework and can only be used on macOS devices because the Windows-supported version was ceased after 2016. It can handle picture and digital video formats, including a 3GP file format. Although, the MOV file extension represents the QuickTime Player. QuickTime Player is pre-installed on all Mac devices.

5KPlayer
5KPlayer is developed under the proprietorship of DearMob. It is a music and video player. 5KPlayer has built-in support for AirPlay. You can stream audio and video via AirPlay without any loss in the quality of the media file. It supports different formats for multimedia, including a 3GP file format. 5KPlayer provides you the facility to download videos from 300+ sites, including YouTube, Vimeo, and Dailymotion.

3.1. Steps to Open and Play 3GP Format on VLC Media Player
Now that you know about the different platforms that support the 3GP format let us share the steps on how you can open and play 3GP video files on VLC Media Player.
Step 1: After you have installed VLC Media Player on your device, launch it. Head to the ‘Media’ tab from the main screen by accessing the top menu. Or else, simply open VLC Media Player to drag and drop the media file there.

Step 2: Select the ‘Open File’ option from the Media section and locate the 3GP video file on your device. Add the file to VLC and enjoy watching it.

Part 4. How Edit 3GP Video More Creatively?
What else could be better for editing your videos than Wondershare Filmora ? Whenever you want a good video editor, you will find Filmora on top of the list. The video editor comes with an extensive range of features that you cannot even count. Moreover, it offers endless editing capabilities.
For editing unique and stunning 3GP format videos, try Filmora. It comes with both Basic and also Advanced editing features. Do you want to know more about it? Let us tell you. Filmora offers basic and standard editing tools like cut, trim, split, and join.
If we look at the advanced features, they include Green Screen, Scene Detection, Power Tool, Video Snapshot, and whatnot. Moreover, you also get various AI editing features like Auto Highlight, Auto Reframe, Auto Normalization, and much more than this.
What else does Filmora provide to its users? Let’s share a step-by-step guideline about how to edit 3GP file format videos on Filmora along with its other features.
Step 1: Import 3GP Video File
Start by launching Filmora Video Editor on your device and head to the ‘File’ tab from the top menu bar. There, hover on the ‘Import Media’ option; this will open a sub-menu with an option of ‘Import Media Files’; click on it.

For Win 7 or later (64-bit)
For macOS 10.12 or later
Step 2: Drag to Timeline
You can locate the video file from the device and import it to the software. After a successful import, the media file will appear on the screen, drag and drop it to the ‘Timeline’ to start the editing.

Step 3: Add Audio Effects
Start by adding audio effects to your video and making it more captivating. For this, head to the ‘Audio’ tab and select the most suitable sound from the provided options like Travel Vlog, Folk, Young & Bright, etc.

Step 4: Use Interesting Elements
What kind of elements do you like? With Filmora, you get Countdown, Laser Eye, Subscription, Share, and a lot other cooler options are available under the ‘Elements’ section.

Step 5: Add Attractive Titles
Are you looking for title templates? Have you looked at the ‘Titles’ section in Filmora? You will get beautiful templates according to the latest trends and occasions.

Step 6: Export 3GP File
Once you are done, export the 3GP format file. For this, click on the ‘Export’ button, select the output file format and proceed to save the file.

Bottom Line
We hope that the above article has shared sufficient information with you regarding the 3GP file format. We discussed its pros and cons, ways to open it, and also edit it. As we are concluding, let’s talk a little more about Wondershare Filmora. The video editor is an excellent choice for editing and creating mind-blowing videos.
You get various Basic and also Advanced features that can enhance your video. With Filmora, you can efficiently work with features like Silence Detection, Keyframing, Advanced Color Tuning, and much more. If you wish to create fantastic videos, use Wondershare Filmora.
For Win 7 or later (64-bit)
For macOS 10.12 or later
02 Advantages and Disadvantages About Video Format?
03 How Can You Open and Play 3GP Video Format?
04 How Edit 3GP Video More Creatively?
Part 1. What Is 3GP Video Format?
The multimedia files that we share on the internet have the extension as ‘.3GP’. It is an audio and video container made under the proprietorship of the 3rd Generation Partnership Project. The 3GP format stores and transmits the data that is shared between 3G-enabled devices. All 3G devices, along with some 2G and 4G devices, support 3GP file format video recording and playback.

3GP format needs less broadband demand which makes the phone run fluently. Along with taking less space as compared to other formats, it saves multimedia content efficiently. 3GP file format was designed to match the high speed of data transition between 3G networks.
Part 2. Advantages and Disadvantages About Video Format?
The 3GP format was designed to work at a high level on 3G devices. The above section of this article sheds light on what the 3GP file format is. Now that you have adequate knowledge of the format, let’s proceed and talk about the pros and cons of the file format.
Advantages of 3GP Format
- The biggest plus point of using the 3GP format is its size. The format is small in size but can store disk space. The small size of the format uses tiny amounts of data.
- The format is great because it creates an environment for business connections and improves communication. You can share text messages, videos, and multimedia files with your team members.
- 3GP file format is widely used because it has low bandwidth and also it has decreased mobile storage requirements.
- 3GP files are transferred and shared very efficiently. Hence, sharing video files has become a lot easier with this format.
- 3GP files are fast for both streaming and downloading, even if you have a weak or problematic internet connection.
Disadvantages of 3GP Format
- The quality of the audio file is damaged while compressing the file to reduce its size, as compared to the original file.
- Not every program supports 3GP file format; hence users face compatibility issues.
- Compared to the original video, the 3GP video files, after compressing, lose their quality, and the resolution is also compromised.
Part 3. How Can You Open and Play 3GP Video Format?
Do you know there are various file formats and different platforms support different formats? If we specifically talk about the 3GP format, it is supported by VLC Media Player, QuickTime Player, and 5KPlayer. Let’s discuss them:
VLC Media Player
VLC Media Player is a free open-source platform that can play 3GP file format. It is developed by the VideoLAN project. VLC Media Player is a cross-platform media player software and media streamer available for Windows, Mac, Linux, and Unix.
Mobile users can use it irrespective of the device type; Android, iPhone, iPad, and iPod users can use it. VLC can be used to play 3GP format along with any format that you may encounter.

QuickTime Player
QuickTime Player was made under Apple Inc. proprietorship. It is an extendible multimedia framework and can only be used on macOS devices because the Windows-supported version was ceased after 2016. It can handle picture and digital video formats, including a 3GP file format. Although, the MOV file extension represents the QuickTime Player. QuickTime Player is pre-installed on all Mac devices.

5KPlayer
5KPlayer is developed under the proprietorship of DearMob. It is a music and video player. 5KPlayer has built-in support for AirPlay. You can stream audio and video via AirPlay without any loss in the quality of the media file. It supports different formats for multimedia, including a 3GP file format. 5KPlayer provides you the facility to download videos from 300+ sites, including YouTube, Vimeo, and Dailymotion.

3.1. Steps to Open and Play 3GP Format on VLC Media Player
Now that you know about the different platforms that support the 3GP format let us share the steps on how you can open and play 3GP video files on VLC Media Player.
Step 1: After you have installed VLC Media Player on your device, launch it. Head to the ‘Media’ tab from the main screen by accessing the top menu. Or else, simply open VLC Media Player to drag and drop the media file there.

Step 2: Select the ‘Open File’ option from the Media section and locate the 3GP video file on your device. Add the file to VLC and enjoy watching it.

Part 4. How Edit 3GP Video More Creatively?
What else could be better for editing your videos than Wondershare Filmora ? Whenever you want a good video editor, you will find Filmora on top of the list. The video editor comes with an extensive range of features that you cannot even count. Moreover, it offers endless editing capabilities.
For editing unique and stunning 3GP format videos, try Filmora. It comes with both Basic and also Advanced editing features. Do you want to know more about it? Let us tell you. Filmora offers basic and standard editing tools like cut, trim, split, and join.
If we look at the advanced features, they include Green Screen, Scene Detection, Power Tool, Video Snapshot, and whatnot. Moreover, you also get various AI editing features like Auto Highlight, Auto Reframe, Auto Normalization, and much more than this.
What else does Filmora provide to its users? Let’s share a step-by-step guideline about how to edit 3GP file format videos on Filmora along with its other features.
Step 1: Import 3GP Video File
Start by launching Filmora Video Editor on your device and head to the ‘File’ tab from the top menu bar. There, hover on the ‘Import Media’ option; this will open a sub-menu with an option of ‘Import Media Files’; click on it.

For Win 7 or later (64-bit)
For macOS 10.12 or later
Step 2: Drag to Timeline
You can locate the video file from the device and import it to the software. After a successful import, the media file will appear on the screen, drag and drop it to the ‘Timeline’ to start the editing.

Step 3: Add Audio Effects
Start by adding audio effects to your video and making it more captivating. For this, head to the ‘Audio’ tab and select the most suitable sound from the provided options like Travel Vlog, Folk, Young & Bright, etc.

Step 4: Use Interesting Elements
What kind of elements do you like? With Filmora, you get Countdown, Laser Eye, Subscription, Share, and a lot other cooler options are available under the ‘Elements’ section.

Step 5: Add Attractive Titles
Are you looking for title templates? Have you looked at the ‘Titles’ section in Filmora? You will get beautiful templates according to the latest trends and occasions.

Step 6: Export 3GP File
Once you are done, export the 3GP format file. For this, click on the ‘Export’ button, select the output file format and proceed to save the file.

Bottom Line
We hope that the above article has shared sufficient information with you regarding the 3GP file format. We discussed its pros and cons, ways to open it, and also edit it. As we are concluding, let’s talk a little more about Wondershare Filmora. The video editor is an excellent choice for editing and creating mind-blowing videos.
You get various Basic and also Advanced features that can enhance your video. With Filmora, you can efficiently work with features like Silence Detection, Keyframing, Advanced Color Tuning, and much more. If you wish to create fantastic videos, use Wondershare Filmora.
For Win 7 or later (64-bit)
For macOS 10.12 or later
02 Advantages and Disadvantages About Video Format?
03 How Can You Open and Play 3GP Video Format?
04 How Edit 3GP Video More Creatively?
Part 1. What Is 3GP Video Format?
The multimedia files that we share on the internet have the extension as ‘.3GP’. It is an audio and video container made under the proprietorship of the 3rd Generation Partnership Project. The 3GP format stores and transmits the data that is shared between 3G-enabled devices. All 3G devices, along with some 2G and 4G devices, support 3GP file format video recording and playback.

3GP format needs less broadband demand which makes the phone run fluently. Along with taking less space as compared to other formats, it saves multimedia content efficiently. 3GP file format was designed to match the high speed of data transition between 3G networks.
Part 2. Advantages and Disadvantages About Video Format?
The 3GP format was designed to work at a high level on 3G devices. The above section of this article sheds light on what the 3GP file format is. Now that you have adequate knowledge of the format, let’s proceed and talk about the pros and cons of the file format.
Advantages of 3GP Format
- The biggest plus point of using the 3GP format is its size. The format is small in size but can store disk space. The small size of the format uses tiny amounts of data.
- The format is great because it creates an environment for business connections and improves communication. You can share text messages, videos, and multimedia files with your team members.
- 3GP file format is widely used because it has low bandwidth and also it has decreased mobile storage requirements.
- 3GP files are transferred and shared very efficiently. Hence, sharing video files has become a lot easier with this format.
- 3GP files are fast for both streaming and downloading, even if you have a weak or problematic internet connection.
Disadvantages of 3GP Format
- The quality of the audio file is damaged while compressing the file to reduce its size, as compared to the original file.
- Not every program supports 3GP file format; hence users face compatibility issues.
- Compared to the original video, the 3GP video files, after compressing, lose their quality, and the resolution is also compromised.
Part 3. How Can You Open and Play 3GP Video Format?
Do you know there are various file formats and different platforms support different formats? If we specifically talk about the 3GP format, it is supported by VLC Media Player, QuickTime Player, and 5KPlayer. Let’s discuss them:
VLC Media Player
VLC Media Player is a free open-source platform that can play 3GP file format. It is developed by the VideoLAN project. VLC Media Player is a cross-platform media player software and media streamer available for Windows, Mac, Linux, and Unix.
Mobile users can use it irrespective of the device type; Android, iPhone, iPad, and iPod users can use it. VLC can be used to play 3GP format along with any format that you may encounter.

QuickTime Player
QuickTime Player was made under Apple Inc. proprietorship. It is an extendible multimedia framework and can only be used on macOS devices because the Windows-supported version was ceased after 2016. It can handle picture and digital video formats, including a 3GP file format. Although, the MOV file extension represents the QuickTime Player. QuickTime Player is pre-installed on all Mac devices.

5KPlayer
5KPlayer is developed under the proprietorship of DearMob. It is a music and video player. 5KPlayer has built-in support for AirPlay. You can stream audio and video via AirPlay without any loss in the quality of the media file. It supports different formats for multimedia, including a 3GP file format. 5KPlayer provides you the facility to download videos from 300+ sites, including YouTube, Vimeo, and Dailymotion.

3.1. Steps to Open and Play 3GP Format on VLC Media Player
Now that you know about the different platforms that support the 3GP format let us share the steps on how you can open and play 3GP video files on VLC Media Player.
Step 1: After you have installed VLC Media Player on your device, launch it. Head to the ‘Media’ tab from the main screen by accessing the top menu. Or else, simply open VLC Media Player to drag and drop the media file there.

Step 2: Select the ‘Open File’ option from the Media section and locate the 3GP video file on your device. Add the file to VLC and enjoy watching it.

Part 4. How Edit 3GP Video More Creatively?
What else could be better for editing your videos than Wondershare Filmora ? Whenever you want a good video editor, you will find Filmora on top of the list. The video editor comes with an extensive range of features that you cannot even count. Moreover, it offers endless editing capabilities.
For editing unique and stunning 3GP format videos, try Filmora. It comes with both Basic and also Advanced editing features. Do you want to know more about it? Let us tell you. Filmora offers basic and standard editing tools like cut, trim, split, and join.
If we look at the advanced features, they include Green Screen, Scene Detection, Power Tool, Video Snapshot, and whatnot. Moreover, you also get various AI editing features like Auto Highlight, Auto Reframe, Auto Normalization, and much more than this.
What else does Filmora provide to its users? Let’s share a step-by-step guideline about how to edit 3GP file format videos on Filmora along with its other features.
Step 1: Import 3GP Video File
Start by launching Filmora Video Editor on your device and head to the ‘File’ tab from the top menu bar. There, hover on the ‘Import Media’ option; this will open a sub-menu with an option of ‘Import Media Files’; click on it.

For Win 7 or later (64-bit)
For macOS 10.12 or later
Step 2: Drag to Timeline
You can locate the video file from the device and import it to the software. After a successful import, the media file will appear on the screen, drag and drop it to the ‘Timeline’ to start the editing.

Step 3: Add Audio Effects
Start by adding audio effects to your video and making it more captivating. For this, head to the ‘Audio’ tab and select the most suitable sound from the provided options like Travel Vlog, Folk, Young & Bright, etc.

Step 4: Use Interesting Elements
What kind of elements do you like? With Filmora, you get Countdown, Laser Eye, Subscription, Share, and a lot other cooler options are available under the ‘Elements’ section.

Step 5: Add Attractive Titles
Are you looking for title templates? Have you looked at the ‘Titles’ section in Filmora? You will get beautiful templates according to the latest trends and occasions.

Step 6: Export 3GP File
Once you are done, export the 3GP format file. For this, click on the ‘Export’ button, select the output file format and proceed to save the file.

Bottom Line
We hope that the above article has shared sufficient information with you regarding the 3GP file format. We discussed its pros and cons, ways to open it, and also edit it. As we are concluding, let’s talk a little more about Wondershare Filmora. The video editor is an excellent choice for editing and creating mind-blowing videos.
You get various Basic and also Advanced features that can enhance your video. With Filmora, you can efficiently work with features like Silence Detection, Keyframing, Advanced Color Tuning, and much more. If you wish to create fantastic videos, use Wondershare Filmora.
For Win 7 or later (64-bit)
For macOS 10.12 or later
Easy Ways to Remove Motion Blur In Photoshop
The motion blur effect is created in photos when the picture is taken in poor light conditions or due to a fast-moving object. Moreover, if the shutter speed of the camera is too low, it will also produce a motion blur effect. In such a situation, the captured picture may look out of focus and tedious. In order to fix this issue, this article can help you.
By reading this article, you can learn how to remove motion blur in Photoshop with simple steps. Moreover, we will also provide the best alternatives to Photoshop that you can utilize to remove motion blur from your photos.
Part 1: How to Remove the Motion Blur in Photoshop?
To fix a motion blur in an image, you would require a professional tool such as Adobe Photoshop . Photoshop is a well-recognized tool comprising tons of features for image editing and graphic designing. It offers selection tools that enable you to choose the specific parts of a photo efficiently. You can also add layers to your photo to modify and edit specific areas of the image.
You can also apply appealing filters from this platform to transform an ordinary image drastically. Moreover, using this precise tool, you can also fix motion blur in Photoshop. You can choose the blurry areas of your photo through its selection tools. Thus, with a few clicks, you can eliminate the flaws from your image easily.
Steps to Fix Motion Blur in Photos Using Photoshop
If you are new to Photoshop and don’t know how to fix motion blur in photos, then follow the instructions described below:
Step1 Open the Photoshop tool on your PC or Mac and upload your photo. From the “Layers” section, press “Ctrl + J” or “Command + J” to copy the first layer. Afterward, convert the first layer by choosing the option “Smart Object.”

Step2 Now head to the “Filter” section and tap on “Sharpen” to proceed. Afterward, proceed with the option of “Shake Reduction” by clicking on it. Now Photoshop will automatically reduce the blur effect. From the displayed panel, uncheck the option called “Artifact Suppression.”

Step3 To continue, open the “Advanced” tab from the left panel and enhance the size of your rectangular. Manage the position of the rectangle according to your preference. By doing so, you can see the details of the image clearly.

Step4 From the left panel, manage the options like “Blur Trace Bounds” and “Smoothing” according to your desire. Once done, press the “OK” button. For adding more modifications, add a blank layer and choose the “Clone Stamp Tool.” Afterward, select “Soft Round Brush” from the general brushes.

Step5 Now adjust the Opacity to 100% and Flow to 50%. Moreover, select “Current & Below” as the sample. Press the Alt key to take a sample of any flawless part of your photo and apply it to the blurry area. Make sure that the color of the sample taken is the same as the blurry area in the photo.

Part 2: Remove the Motion Blur with an Alternative to Photoshop
It may be possible that you don’t get satisfactory results from Photoshop removing motion blur. Or, if you find the interface of Photoshop intimidating, it can affect your productivity. For your assistance, this section will bring you the best alternatives to Photoshop.
1. IMAGamigo
IMAGamigo is an online tool that allows you to perform different operations on pictures efficiently. To fix motion blur, it offers a Deblurrer feature. Using this feature, you can automatically remove blur from your photos without any external effort. It also provides other distinct features such as Background Remover, Restorer, Colorizer, Upscale, etc.
To use this tool, first, navigate to its official website. From its tools, select “Deblurrer” to proceed. A new window will open on your screen instantly. Scroll down a little bit and locate the area saying, “Drop Image Here.” Click on this area and upload your image. Afterward, the tool will automatically start analyzing the picture. Once the process gets finished, click on the Download button to save your photo.

2. Vance.AI
This online platform is also a well-trusted tool by professionals and content creators. It provides AI-supported tools such as AI Image Denoiser, AI Image Upscaler, AI Photo Enhancer, etc. You can use its AI Image Sharpener to eliminate motion blur from pictures. It supports all popular image file formats, such as JPEG, PNG, and JPG. Thus, without any installations, you can quickly utilize this tool to fix motion blur photos.
To use this tool, access the official webpage of Vance.AI and select the “AI Image Sharpener” feature. Once done, click on the “Upload Image” option and import your blurry photo. Afterward, a new window will be open from which you can adjust the settings. Select the “Sharpen” option and choose the preferred Sharpen Mode. Afterward, click on the “Start to Process” option. Once the process ends, you can download the picture with a single click.

3. AKVIS Refocus AI
AKVIS is an offline tool that produces high-end results at a fast processing speed. You can find multiple options in this tool, such as Airbrush, Retoucher, Sketch, Decorator, etc. When it comes to fixing blurry pictures, this tool provides an exclusive feature called “Refocus AI.” Through this feature, you can instantly increase the sharpness of your photo. Also, it offers different modes such as Motion Blur, Radial Blur, Refocus-AI, and Tilt-Shift.
To fix motion blur:
Step1 Launch this tool and navigate to its Refocus AI option.
Step2 Select Refocus AI as your mode and upload the blurry picture. The default preset will be AKVIS Default AI.
Step3 Disable the “Image Sharpening” feature and navigate to the “Motion Deblur AI” section.
Step4 From there, adjust your Focus accordingly.
Step5 For more enhancements, enable the Image Sharpening feature and adjust the parameters.

Bonus Tip – How to Add Motion Blur to Your Images?
Do you want to add motion blur to your images? Many people like to intentionally add a motion blur effect in their images to add an artistic element. If you are interested in doing so, the best desktop tool you can try is Wondershare Filmora . This tool offers trending and high-quality effects that you can easily apply to your images.
Free Download For Win 7 or later(64-bit)
Free Download For macOS 10.14 or later
To add a motion blur effect:
Step1 Launch Filmora and create a new project.
Step2 Import your photo on this tool and drop it into the timeline.
Step3 Split the clip where you want to add the blur effect.
Once done, go to the Effects tab and search “Blur.” By doing so, you would be able to check all the blur effects on your screen. Choose and apply the blur effect to the split part of your clip. Once done, hit the Export button.

Conclusion
Photoshop is an excellent tool to edit and modify your pictures in great quality. You can use this article to take guidance to remove motion blur from photos. However, if you are not getting desired results from Photoshop, we have also provided the best alternatives to Photoshop to remove motion blur. Moreover, to create a motion blur effect in your images, you can explore the Wondershare Filmora tool.
Part 1: How to Remove the Motion Blur in Photoshop?
To fix a motion blur in an image, you would require a professional tool such as Adobe Photoshop . Photoshop is a well-recognized tool comprising tons of features for image editing and graphic designing. It offers selection tools that enable you to choose the specific parts of a photo efficiently. You can also add layers to your photo to modify and edit specific areas of the image.
You can also apply appealing filters from this platform to transform an ordinary image drastically. Moreover, using this precise tool, you can also fix motion blur in Photoshop. You can choose the blurry areas of your photo through its selection tools. Thus, with a few clicks, you can eliminate the flaws from your image easily.
Steps to Fix Motion Blur in Photos Using Photoshop
If you are new to Photoshop and don’t know how to fix motion blur in photos, then follow the instructions described below:
Step1 Open the Photoshop tool on your PC or Mac and upload your photo. From the “Layers” section, press “Ctrl + J” or “Command + J” to copy the first layer. Afterward, convert the first layer by choosing the option “Smart Object.”

Step2 Now head to the “Filter” section and tap on “Sharpen” to proceed. Afterward, proceed with the option of “Shake Reduction” by clicking on it. Now Photoshop will automatically reduce the blur effect. From the displayed panel, uncheck the option called “Artifact Suppression.”

Step3 To continue, open the “Advanced” tab from the left panel and enhance the size of your rectangular. Manage the position of the rectangle according to your preference. By doing so, you can see the details of the image clearly.

Step4 From the left panel, manage the options like “Blur Trace Bounds” and “Smoothing” according to your desire. Once done, press the “OK” button. For adding more modifications, add a blank layer and choose the “Clone Stamp Tool.” Afterward, select “Soft Round Brush” from the general brushes.

Step5 Now adjust the Opacity to 100% and Flow to 50%. Moreover, select “Current & Below” as the sample. Press the Alt key to take a sample of any flawless part of your photo and apply it to the blurry area. Make sure that the color of the sample taken is the same as the blurry area in the photo.

Part 2: Remove the Motion Blur with an Alternative to Photoshop
It may be possible that you don’t get satisfactory results from Photoshop removing motion blur. Or, if you find the interface of Photoshop intimidating, it can affect your productivity. For your assistance, this section will bring you the best alternatives to Photoshop.
1. IMAGamigo
IMAGamigo is an online tool that allows you to perform different operations on pictures efficiently. To fix motion blur, it offers a Deblurrer feature. Using this feature, you can automatically remove blur from your photos without any external effort. It also provides other distinct features such as Background Remover, Restorer, Colorizer, Upscale, etc.
To use this tool, first, navigate to its official website. From its tools, select “Deblurrer” to proceed. A new window will open on your screen instantly. Scroll down a little bit and locate the area saying, “Drop Image Here.” Click on this area and upload your image. Afterward, the tool will automatically start analyzing the picture. Once the process gets finished, click on the Download button to save your photo.

2. Vance.AI
This online platform is also a well-trusted tool by professionals and content creators. It provides AI-supported tools such as AI Image Denoiser, AI Image Upscaler, AI Photo Enhancer, etc. You can use its AI Image Sharpener to eliminate motion blur from pictures. It supports all popular image file formats, such as JPEG, PNG, and JPG. Thus, without any installations, you can quickly utilize this tool to fix motion blur photos.
To use this tool, access the official webpage of Vance.AI and select the “AI Image Sharpener” feature. Once done, click on the “Upload Image” option and import your blurry photo. Afterward, a new window will be open from which you can adjust the settings. Select the “Sharpen” option and choose the preferred Sharpen Mode. Afterward, click on the “Start to Process” option. Once the process ends, you can download the picture with a single click.

3. AKVIS Refocus AI
AKVIS is an offline tool that produces high-end results at a fast processing speed. You can find multiple options in this tool, such as Airbrush, Retoucher, Sketch, Decorator, etc. When it comes to fixing blurry pictures, this tool provides an exclusive feature called “Refocus AI.” Through this feature, you can instantly increase the sharpness of your photo. Also, it offers different modes such as Motion Blur, Radial Blur, Refocus-AI, and Tilt-Shift.
To fix motion blur:
Step1 Launch this tool and navigate to its Refocus AI option.
Step2 Select Refocus AI as your mode and upload the blurry picture. The default preset will be AKVIS Default AI.
Step3 Disable the “Image Sharpening” feature and navigate to the “Motion Deblur AI” section.
Step4 From there, adjust your Focus accordingly.
Step5 For more enhancements, enable the Image Sharpening feature and adjust the parameters.

Bonus Tip – How to Add Motion Blur to Your Images?
Do you want to add motion blur to your images? Many people like to intentionally add a motion blur effect in their images to add an artistic element. If you are interested in doing so, the best desktop tool you can try is Wondershare Filmora . This tool offers trending and high-quality effects that you can easily apply to your images.
Free Download For Win 7 or later(64-bit)
Free Download For macOS 10.14 or later
To add a motion blur effect:
Step1 Launch Filmora and create a new project.
Step2 Import your photo on this tool and drop it into the timeline.
Step3 Split the clip where you want to add the blur effect.
Once done, go to the Effects tab and search “Blur.” By doing so, you would be able to check all the blur effects on your screen. Choose and apply the blur effect to the split part of your clip. Once done, hit the Export button.

Conclusion
Photoshop is an excellent tool to edit and modify your pictures in great quality. You can use this article to take guidance to remove motion blur from photos. However, if you are not getting desired results from Photoshop, we have also provided the best alternatives to Photoshop to remove motion blur. Moreover, to create a motion blur effect in your images, you can explore the Wondershare Filmora tool.
Step by Step to Cut Videos in Adobe Premiere Pro
Video editing is an essential skill in a world that has a growing focus on creative fields. And if you work with videos, knowing which clips to use and where to cut is essential in conveying your story and increasing its impact. So, if you are a beginner and want to familiarise yourself with steps and terms used in video editing, in this article, we will go through the steps you will need to cut your video file in Adobe Premiere Pro and Wondershare Filmora.
This guide uses Adobe Premiere Pro 2022 and Wondershare Filmora X.
How to cut video in Adobe Premiere Pro?
Once you have Adobe Premiere Pro open on your computer, follow the steps listed below.
Step 1: Create a new project in Premiere Pro.
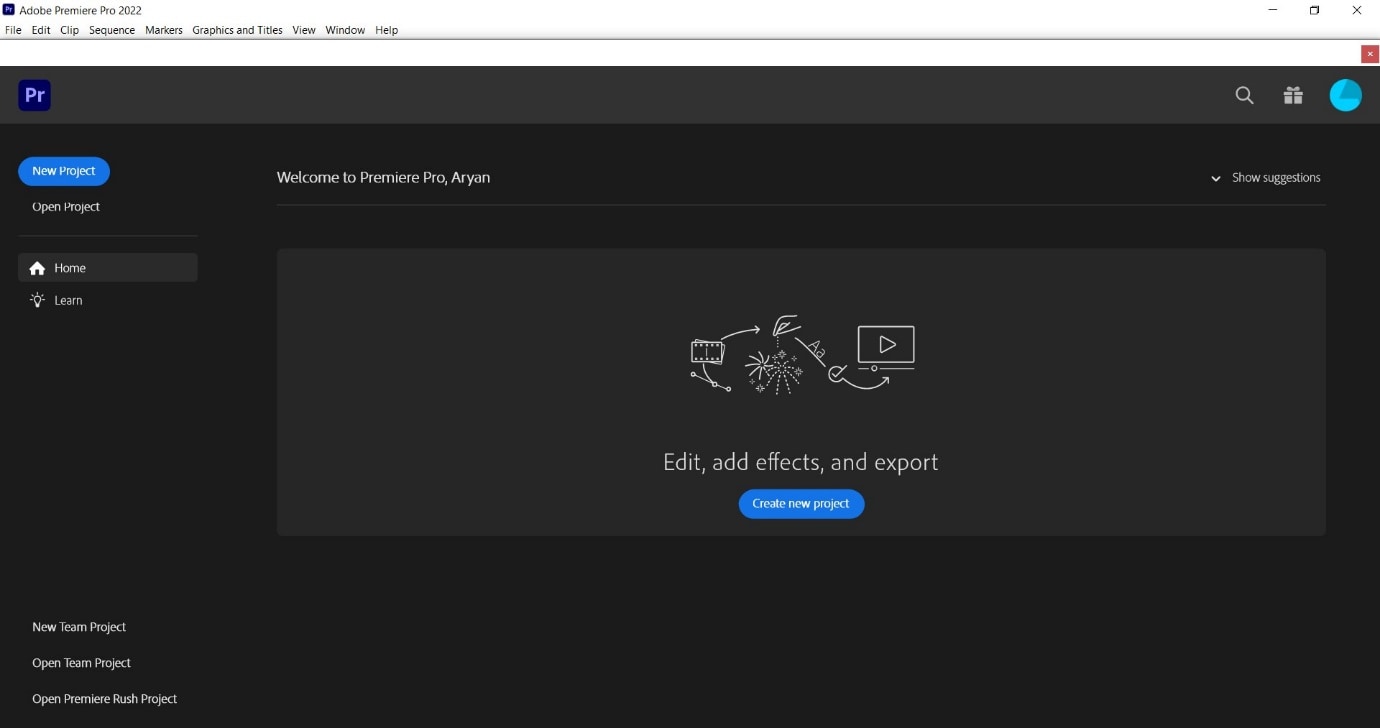
During project creation, we recommend keeping an eye on the file name set and the storage location; this can help reduce the time spent in locating the Premiere Project.
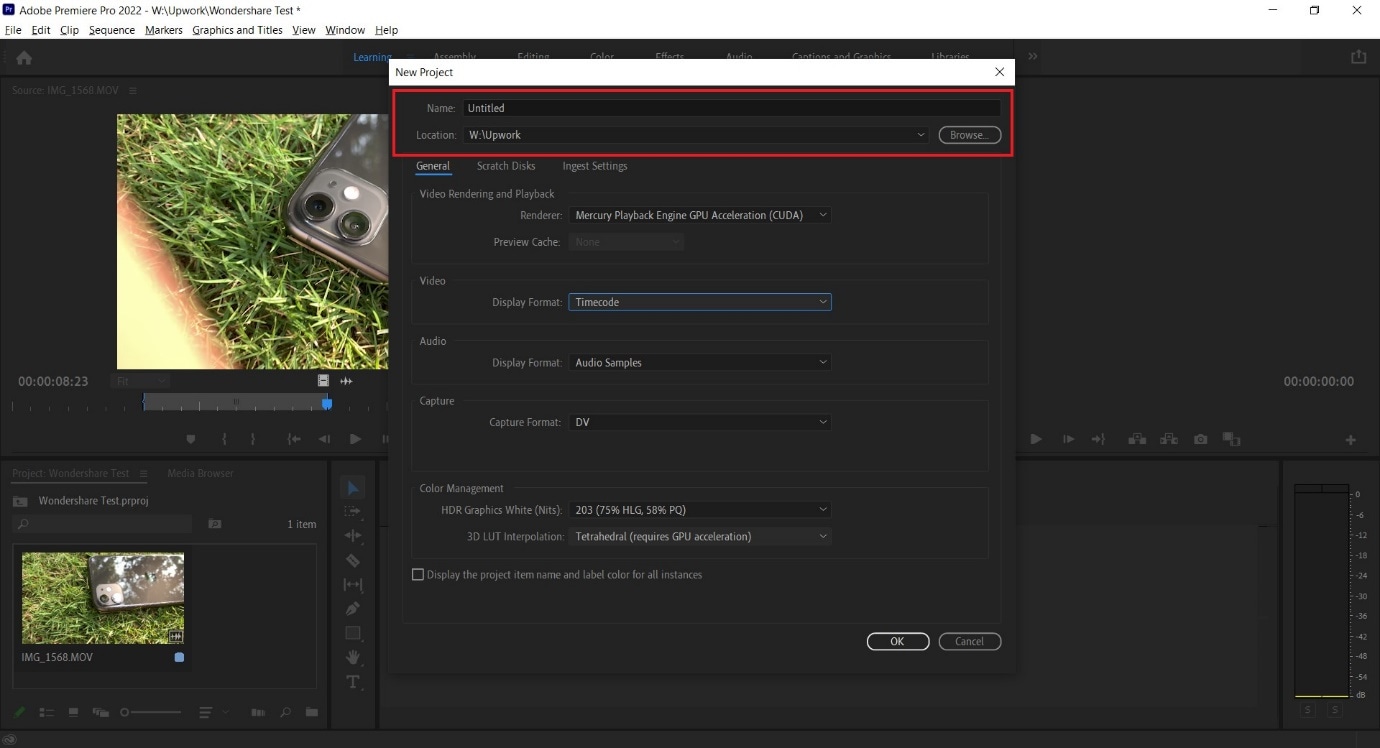
Step 2: Import a video file into Premiere Pro with a double click in the marked area and choose the file from its stored location.
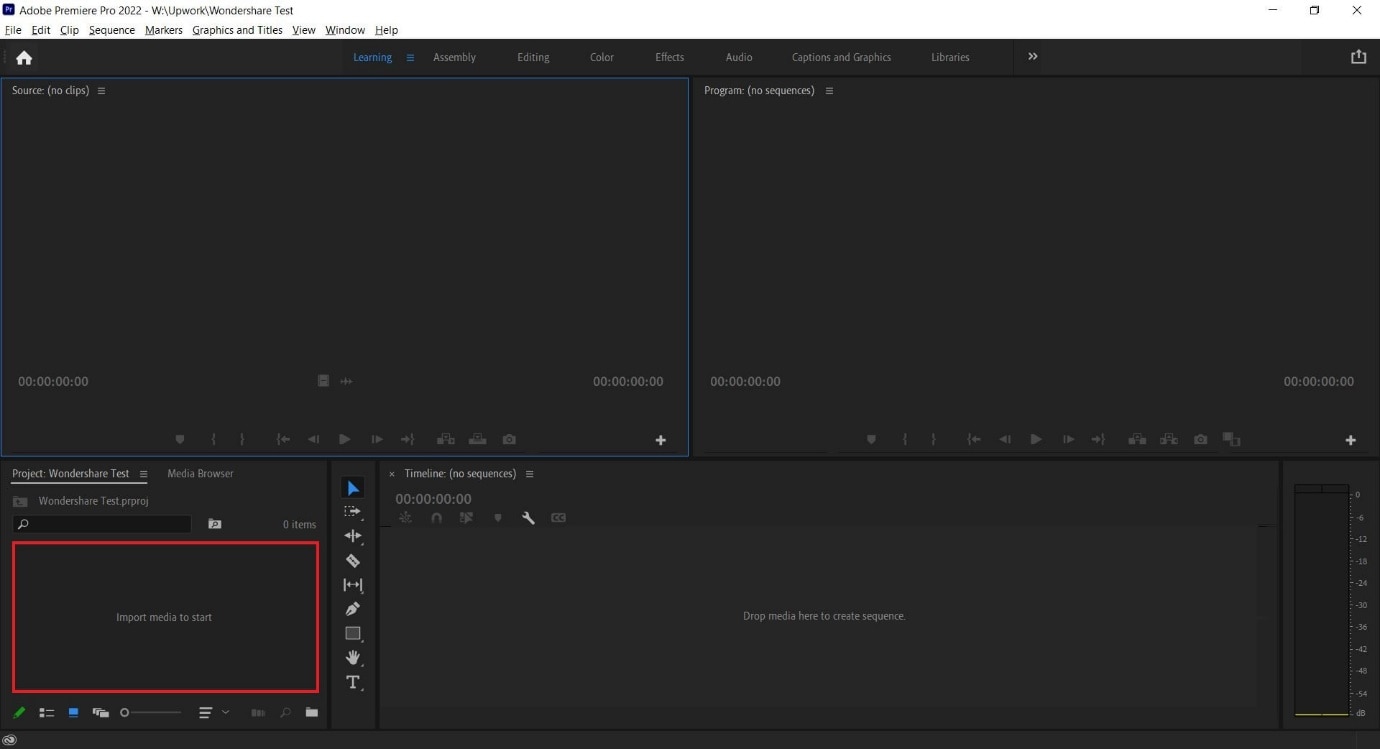
Step 3: Double click on any imported media to activate it and send it to the Source Window.
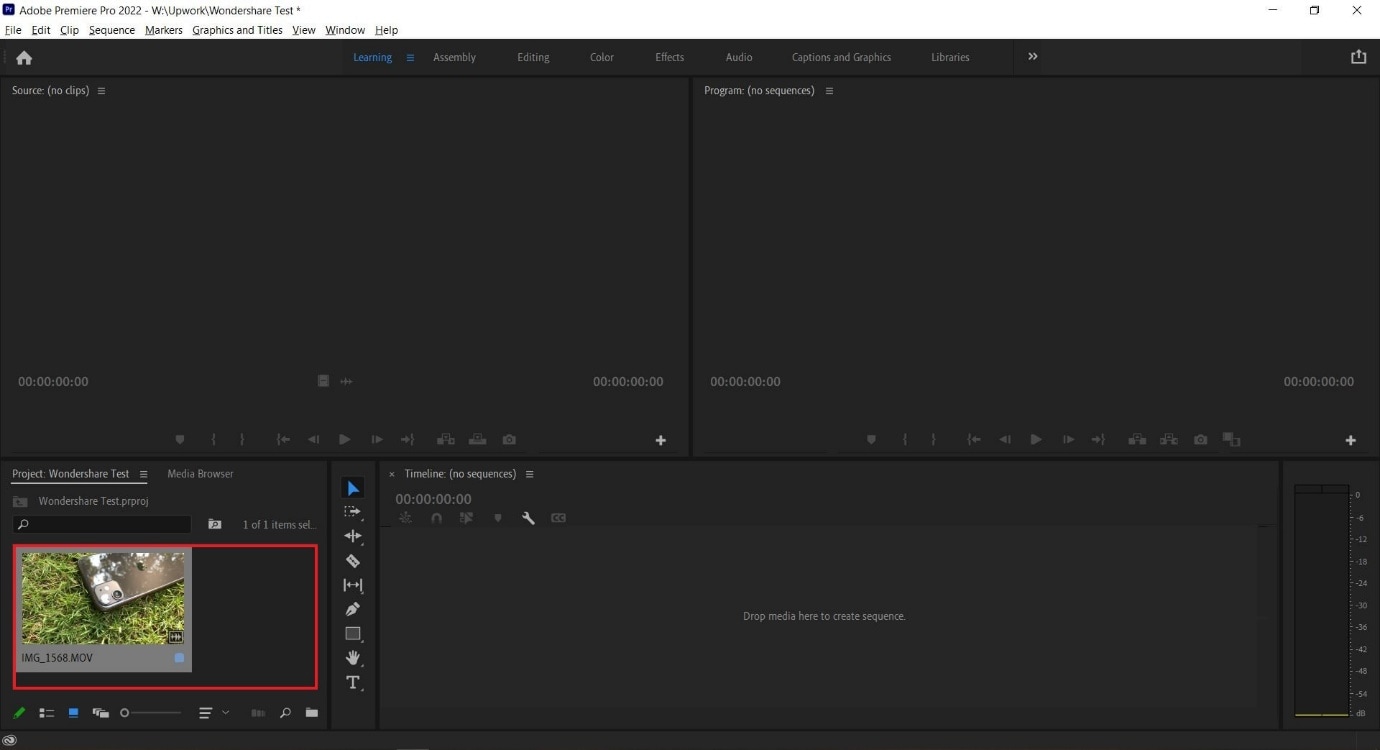
You can continue to import more media by double-clicking within the marked area. For better organization, users can also create Bins, which are folders within a Premiere Pro File that are often in use to sort out imported media.
Users can create Bins with a right-click in the red box marked area (refer to image above).
Step 4: Select either the whole clip or a part of it from the Source Window and drag it onto the Timeline.
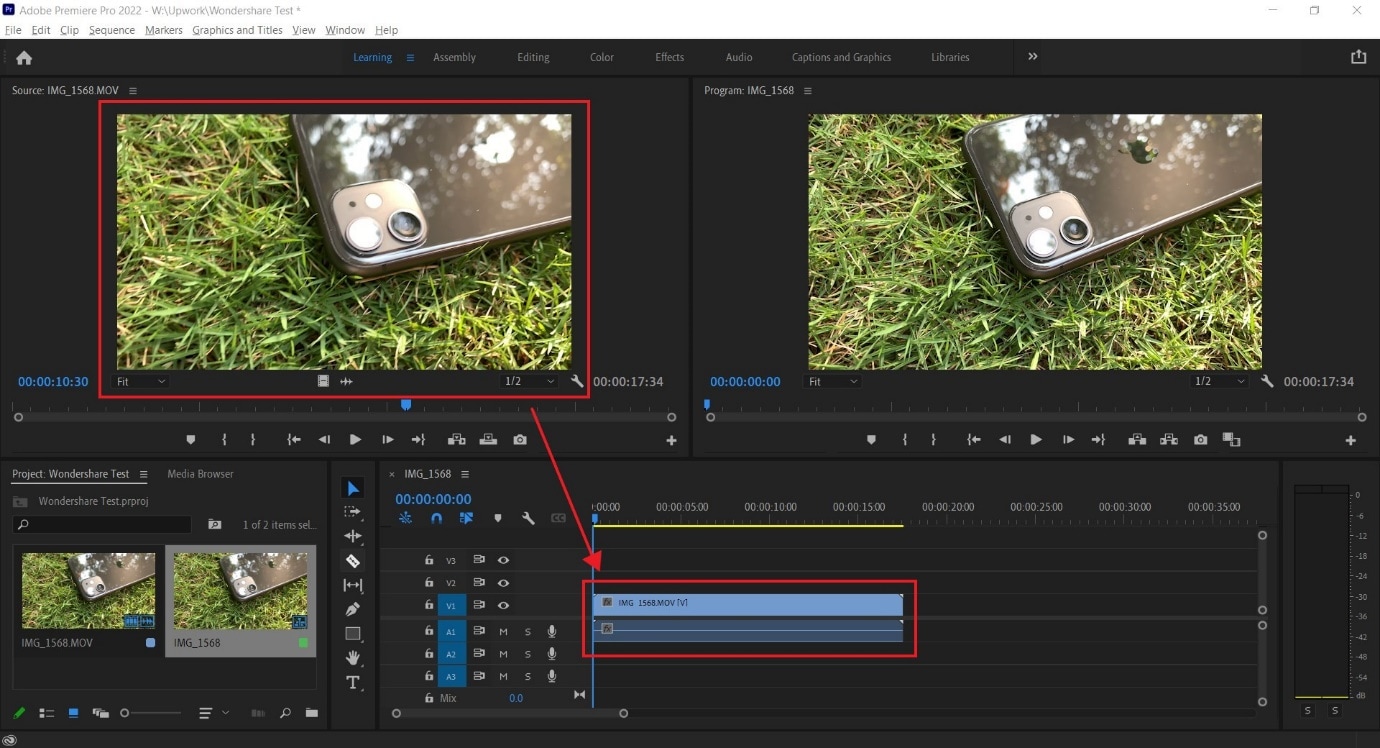
Step 5: Select the Razor Tool from the Tools Window. Now, pick the point where you want to introduce a cut and confirm with your left mouse button; this will split your video track into two parts.
Make a second cut where desired, following which you can move around the newly generated clip or delete it.
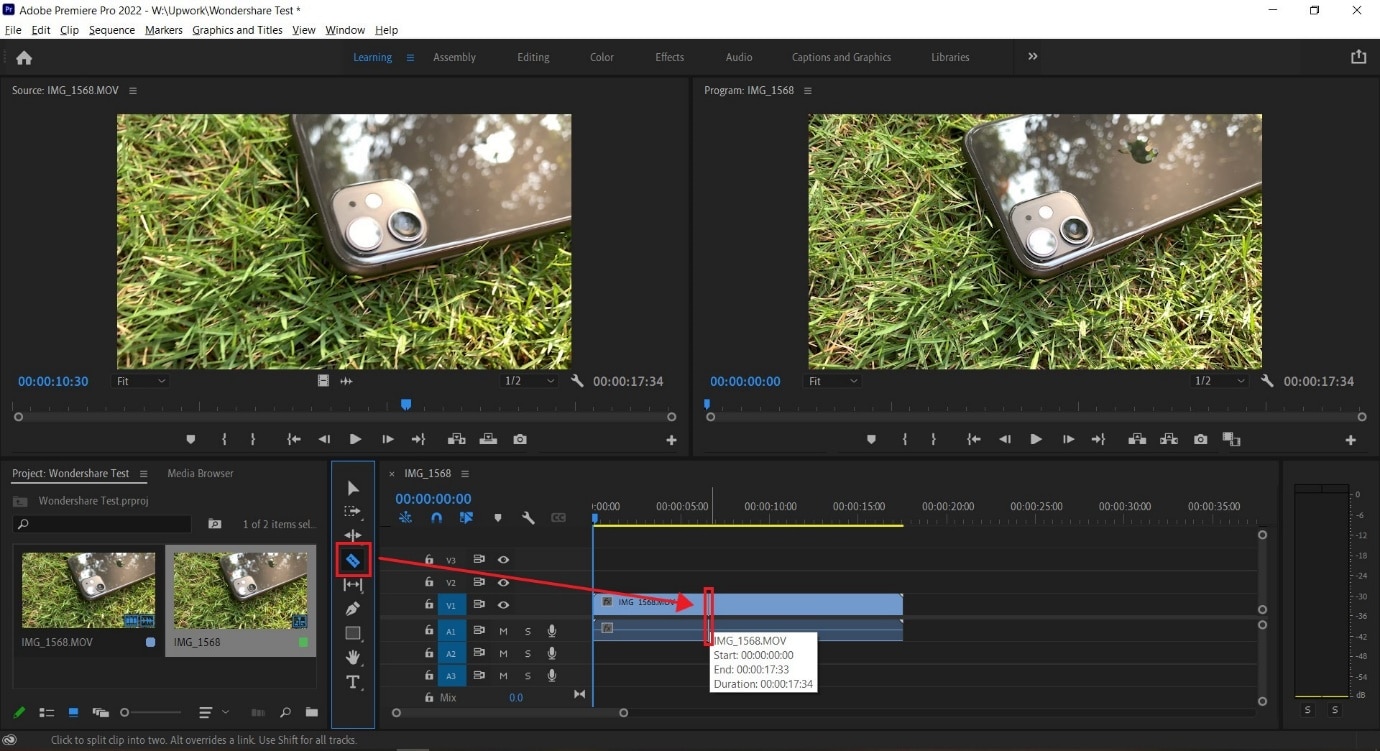
**Tip:**You can also select the Razor Tool by pressing C on the keyboard_._
We also recommend using the Snap in Timeline feature (activated with (S) on your keyboard or by choosing the magnet option), which will match your mouse pointer with the Playhead to ensure your cut will match the exact frame shown on your screen.
-—————————————————————————————————————————————-
Some more tips for Adobe Premiere Pro:
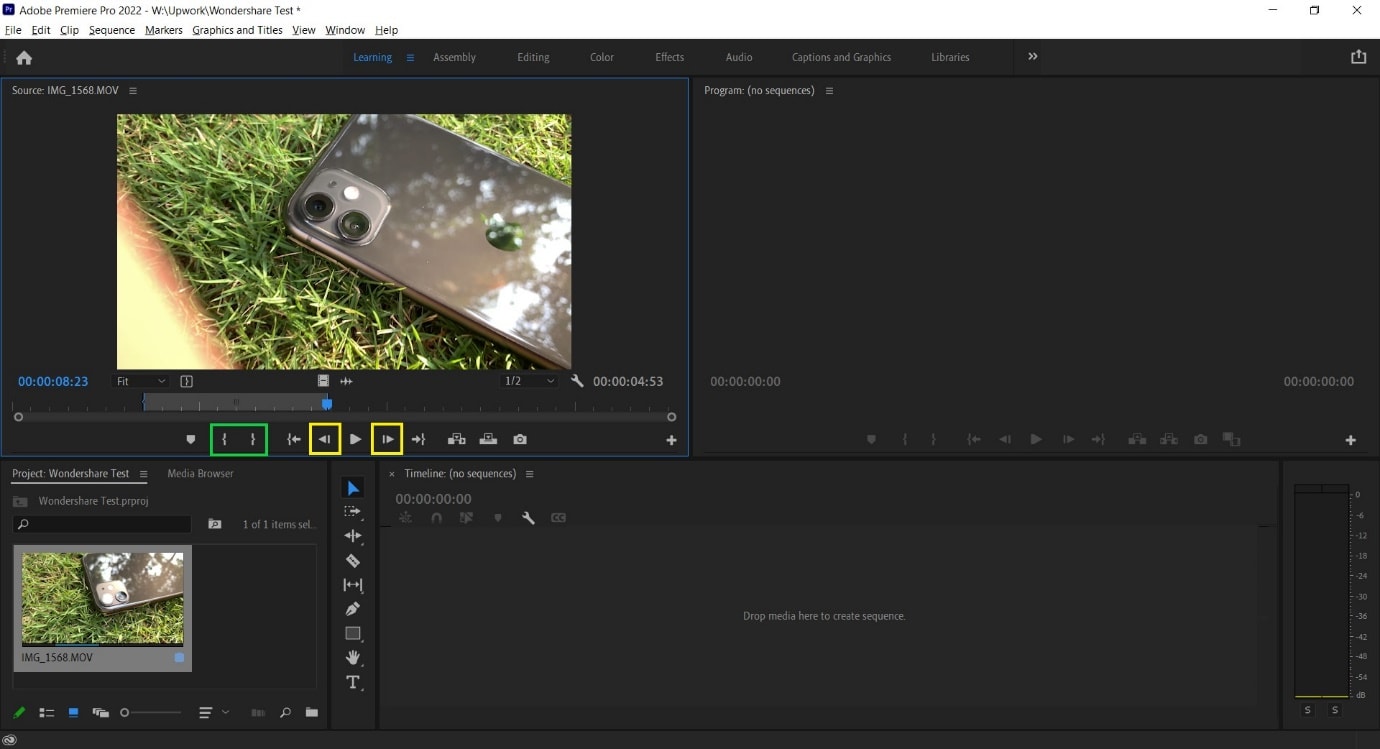
- Using the I and O keys on your keyboard while playing a video in the Source Window will allow you to set an In Pointand an Out Point. These markers will allow you to move a specific part of your video file into the Timeline, thus, reducing the amount of time spent making the right cut.
We have tagged the Mark In and Mark Out buttons with a Green Box in the image below.
- Clicking on the Step Frame Buttons [marked in Yellow] will also help increase the accuracy of your cut by allowing you to select the exact moment you desire.
- You can also mark a Point of Interest in your video file with the help of Markers in Premiere Pro. These afford you the ability to come back to the moment at a later time and see why it interested you in the first place, as editing sessions can often take hours at an end.
An alternative way to cut video with Wondershare Filmora
In Wondershare Filmora Video Editor , the steps to cut a video are simplified and don’t require as many steps as seen earlier. Opening the application throws you straight into a project, and following this, you can import a video file and begin editing. From the process you will learn below, it is easy to assume that Wondershare Filmora is more convenient for beginners and provides software features that match paid professional software.
For Win 7 or later (64-bit)
For macOS 10.14 or later
Note: If you don’t have Wondershare Filmora installed, you can get the video editor by visiting its official website . Once the setup program download completes, execute it and begin the installation process.
Once you have the editing software open, follow the steps listed below.
Step 1: Import a video file by clicking on the import window.
The default project setting for Filmora X is 1920x1080 at 25 frames per second. Users can change this to match their video file by going into Project Settings under the File tab or by accepting the automatic prompt that appears when dragging the video file onto the Timeline.
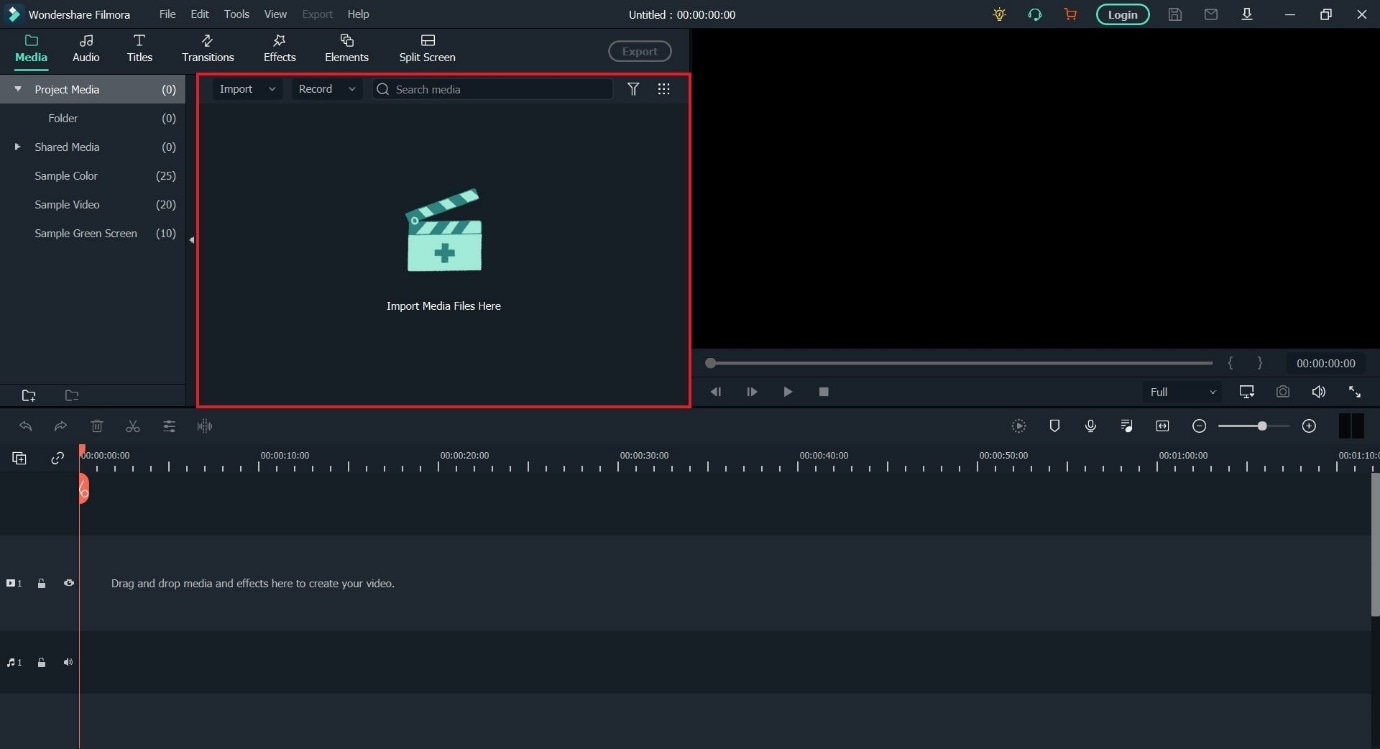
Note: If you have a PC with weak hardware, Wondershare Filmora gives you the option to create Video Proxies that will reduce the load on your computer by creating smaller clips that are lower in size, resulting in a smoother and faster experience. You can also do this in Premiere Pro, but Filmora does it for you automatically once given permission.
Step 2: Drag the video file onto the Timeline to begin previewing it in the Playback Window and commence editing operations.
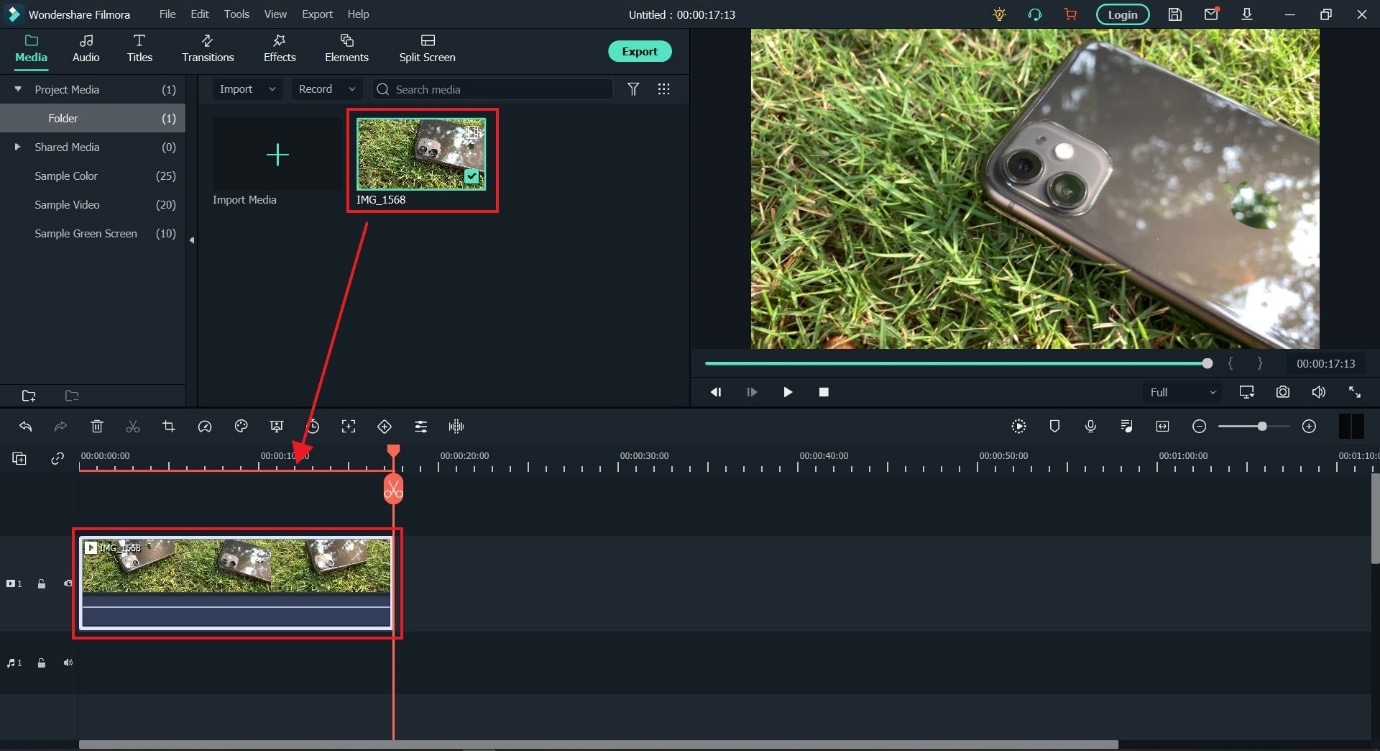
Step 3: Locate where you want to cut in the video file and click on the orange scissors option to split the video file.
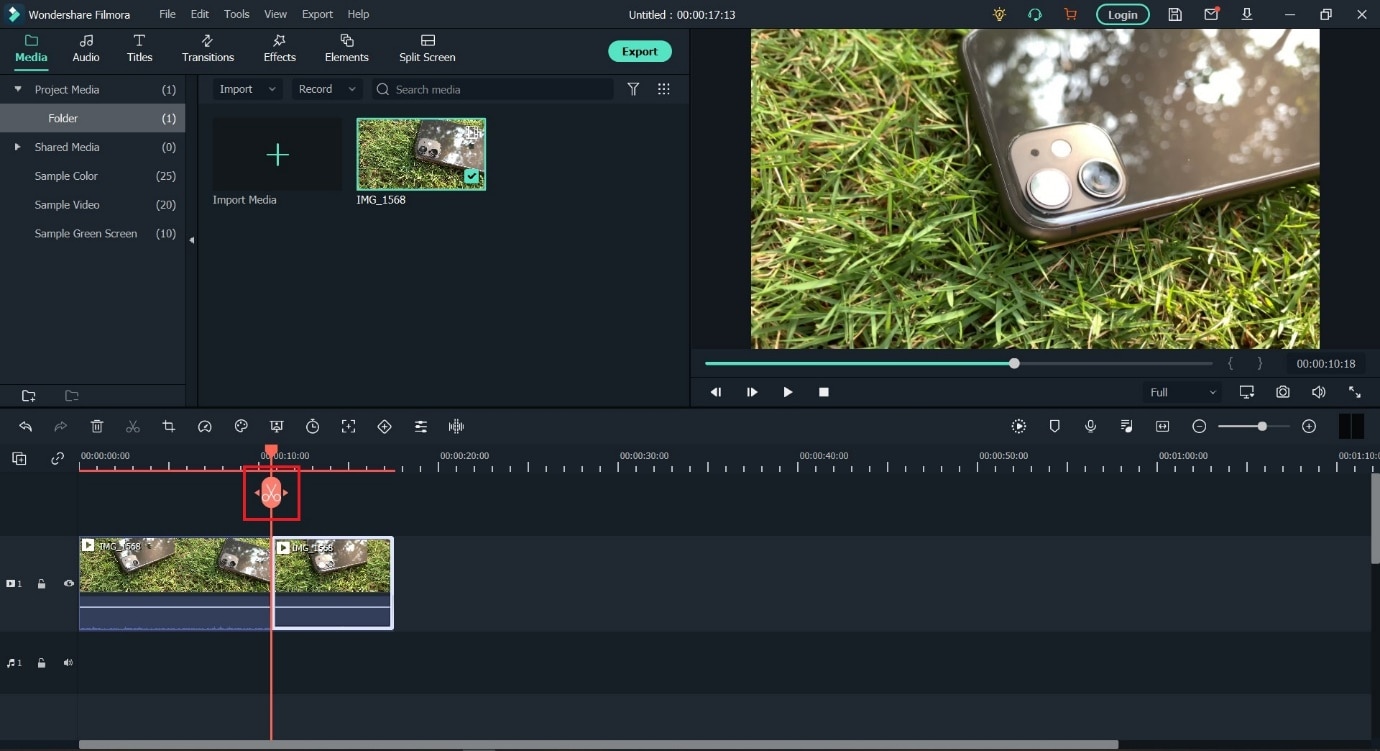
Tip: You can also use the keyboard shortcut (CTRL+B) to cut without using a mouse click, in case you make use of a trackpad while editing.
The Bottom Line
As said earlier, knowing where to cut is essential in improving the feel of your video, and we hope this guide showed you exactly how to perform the actions to create your best project. If you are a beginner, the simplistic approach of Wondershare Filmora will be more welcoming and easier to navigate. In addition, the software is also free to download, with added features that you can activate by paying a monthly, yearly, or one-time fee. Adobe Premiere Pro is an option worth considering if you plan on using third-party plugins and other applications from the Creative Cloud Suite.
During project creation, we recommend keeping an eye on the file name set and the storage location; this can help reduce the time spent in locating the Premiere Project.

Step 2: Import a video file into Premiere Pro with a double click in the marked area and choose the file from its stored location.

Step 3: Double click on any imported media to activate it and send it to the Source Window.

You can continue to import more media by double-clicking within the marked area. For better organization, users can also create Bins, which are folders within a Premiere Pro File that are often in use to sort out imported media.
Users can create Bins with a right-click in the red box marked area (refer to image above).
Step 4: Select either the whole clip or a part of it from the Source Window and drag it onto the Timeline.

Step 5: Select the Razor Tool from the Tools Window. Now, pick the point where you want to introduce a cut and confirm with your left mouse button; this will split your video track into two parts.
Make a second cut where desired, following which you can move around the newly generated clip or delete it.

**Tip:**You can also select the Razor Tool by pressing C on the keyboard_._
We also recommend using the Snap in Timeline feature (activated with (S) on your keyboard or by choosing the magnet option), which will match your mouse pointer with the Playhead to ensure your cut will match the exact frame shown on your screen.
-—————————————————————————————————————————————-
Some more tips for Adobe Premiere Pro:
- Using the I and O keys on your keyboard while playing a video in the Source Window will allow you to set an In Pointand an Out Point. These markers will allow you to move a specific part of your video file into the Timeline, thus, reducing the amount of time spent making the right cut.
We have tagged the Mark In and Mark Out buttons with a Green Box in the image below.
- Clicking on the Step Frame Buttons [marked in Yellow] will also help increase the accuracy of your cut by allowing you to select the exact moment you desire.
- You can also mark a Point of Interest in your video file with the help of Markers in Premiere Pro. These afford you the ability to come back to the moment at a later time and see why it interested you in the first place, as editing sessions can often take hours at an end.

An alternative way to cut video with Wondershare Filmora
In Wondershare Filmora Video Editor , the steps to cut a video are simplified and don’t require as many steps as seen earlier. Opening the application throws you straight into a project, and following this, you can import a video file and begin editing. From the process you will learn below, it is easy to assume that Wondershare Filmora is more convenient for beginners and provides software features that match paid professional software.
For Win 7 or later (64-bit)
For macOS 10.14 or later
Note: If you don’t have Wondershare Filmora installed, you can get the video editor by visiting its official website . Once the setup program download completes, execute it and begin the installation process.
Once you have the editing software open, follow the steps listed below.
Step 1: Import a video file by clicking on the import window.
The default project setting for Filmora X is 1920x1080 at 25 frames per second. Users can change this to match their video file by going into Project Settings under the File tab or by accepting the automatic prompt that appears when dragging the video file onto the Timeline.

Note: If you have a PC with weak hardware, Wondershare Filmora gives you the option to create Video Proxies that will reduce the load on your computer by creating smaller clips that are lower in size, resulting in a smoother and faster experience. You can also do this in Premiere Pro, but Filmora does it for you automatically once given permission.
Step 2: Drag the video file onto the Timeline to begin previewing it in the Playback Window and commence editing operations.

Step 3: Locate where you want to cut in the video file and click on the orange scissors option to split the video file.

Tip: You can also use the keyboard shortcut (CTRL+B) to cut without using a mouse click, in case you make use of a trackpad while editing.
The Bottom Line
As said earlier, knowing where to cut is essential in improving the feel of your video, and we hope this guide showed you exactly how to perform the actions to create your best project. If you are a beginner, the simplistic approach of Wondershare Filmora will be more welcoming and easier to navigate. In addition, the software is also free to download, with added features that you can activate by paying a monthly, yearly, or one-time fee. Adobe Premiere Pro is an option worth considering if you plan on using third-party plugins and other applications from the Creative Cloud Suite.
During project creation, we recommend keeping an eye on the file name set and the storage location; this can help reduce the time spent in locating the Premiere Project.

Step 2: Import a video file into Premiere Pro with a double click in the marked area and choose the file from its stored location.

Step 3: Double click on any imported media to activate it and send it to the Source Window.

You can continue to import more media by double-clicking within the marked area. For better organization, users can also create Bins, which are folders within a Premiere Pro File that are often in use to sort out imported media.
Users can create Bins with a right-click in the red box marked area (refer to image above).
Step 4: Select either the whole clip or a part of it from the Source Window and drag it onto the Timeline.

Step 5: Select the Razor Tool from the Tools Window. Now, pick the point where you want to introduce a cut and confirm with your left mouse button; this will split your video track into two parts.
Make a second cut where desired, following which you can move around the newly generated clip or delete it.

**Tip:**You can also select the Razor Tool by pressing C on the keyboard_._
We also recommend using the Snap in Timeline feature (activated with (S) on your keyboard or by choosing the magnet option), which will match your mouse pointer with the Playhead to ensure your cut will match the exact frame shown on your screen.
-—————————————————————————————————————————————-
Some more tips for Adobe Premiere Pro:
- Using the I and O keys on your keyboard while playing a video in the Source Window will allow you to set an In Pointand an Out Point. These markers will allow you to move a specific part of your video file into the Timeline, thus, reducing the amount of time spent making the right cut.
We have tagged the Mark In and Mark Out buttons with a Green Box in the image below.
- Clicking on the Step Frame Buttons [marked in Yellow] will also help increase the accuracy of your cut by allowing you to select the exact moment you desire.
- You can also mark a Point of Interest in your video file with the help of Markers in Premiere Pro. These afford you the ability to come back to the moment at a later time and see why it interested you in the first place, as editing sessions can often take hours at an end.

An alternative way to cut video with Wondershare Filmora
In Wondershare Filmora Video Editor , the steps to cut a video are simplified and don’t require as many steps as seen earlier. Opening the application throws you straight into a project, and following this, you can import a video file and begin editing. From the process you will learn below, it is easy to assume that Wondershare Filmora is more convenient for beginners and provides software features that match paid professional software.
For Win 7 or later (64-bit)
For macOS 10.14 or later
Note: If you don’t have Wondershare Filmora installed, you can get the video editor by visiting its official website . Once the setup program download completes, execute it and begin the installation process.
Once you have the editing software open, follow the steps listed below.
Step 1: Import a video file by clicking on the import window.
The default project setting for Filmora X is 1920x1080 at 25 frames per second. Users can change this to match their video file by going into Project Settings under the File tab or by accepting the automatic prompt that appears when dragging the video file onto the Timeline.

Note: If you have a PC with weak hardware, Wondershare Filmora gives you the option to create Video Proxies that will reduce the load on your computer by creating smaller clips that are lower in size, resulting in a smoother and faster experience. You can also do this in Premiere Pro, but Filmora does it for you automatically once given permission.
Step 2: Drag the video file onto the Timeline to begin previewing it in the Playback Window and commence editing operations.

Step 3: Locate where you want to cut in the video file and click on the orange scissors option to split the video file.

Tip: You can also use the keyboard shortcut (CTRL+B) to cut without using a mouse click, in case you make use of a trackpad while editing.
The Bottom Line
As said earlier, knowing where to cut is essential in improving the feel of your video, and we hope this guide showed you exactly how to perform the actions to create your best project. If you are a beginner, the simplistic approach of Wondershare Filmora will be more welcoming and easier to navigate. In addition, the software is also free to download, with added features that you can activate by paying a monthly, yearly, or one-time fee. Adobe Premiere Pro is an option worth considering if you plan on using third-party plugins and other applications from the Creative Cloud Suite.
During project creation, we recommend keeping an eye on the file name set and the storage location; this can help reduce the time spent in locating the Premiere Project.

Step 2: Import a video file into Premiere Pro with a double click in the marked area and choose the file from its stored location.

Step 3: Double click on any imported media to activate it and send it to the Source Window.

You can continue to import more media by double-clicking within the marked area. For better organization, users can also create Bins, which are folders within a Premiere Pro File that are often in use to sort out imported media.
Users can create Bins with a right-click in the red box marked area (refer to image above).
Step 4: Select either the whole clip or a part of it from the Source Window and drag it onto the Timeline.

Step 5: Select the Razor Tool from the Tools Window. Now, pick the point where you want to introduce a cut and confirm with your left mouse button; this will split your video track into two parts.
Make a second cut where desired, following which you can move around the newly generated clip or delete it.

**Tip:**You can also select the Razor Tool by pressing C on the keyboard_._
We also recommend using the Snap in Timeline feature (activated with (S) on your keyboard or by choosing the magnet option), which will match your mouse pointer with the Playhead to ensure your cut will match the exact frame shown on your screen.
-—————————————————————————————————————————————-
Some more tips for Adobe Premiere Pro:
- Using the I and O keys on your keyboard while playing a video in the Source Window will allow you to set an In Pointand an Out Point. These markers will allow you to move a specific part of your video file into the Timeline, thus, reducing the amount of time spent making the right cut.
We have tagged the Mark In and Mark Out buttons with a Green Box in the image below.
- Clicking on the Step Frame Buttons [marked in Yellow] will also help increase the accuracy of your cut by allowing you to select the exact moment you desire.
- You can also mark a Point of Interest in your video file with the help of Markers in Premiere Pro. These afford you the ability to come back to the moment at a later time and see why it interested you in the first place, as editing sessions can often take hours at an end.

An alternative way to cut video with Wondershare Filmora
In Wondershare Filmora Video Editor , the steps to cut a video are simplified and don’t require as many steps as seen earlier. Opening the application throws you straight into a project, and following this, you can import a video file and begin editing. From the process you will learn below, it is easy to assume that Wondershare Filmora is more convenient for beginners and provides software features that match paid professional software.
For Win 7 or later (64-bit)
For macOS 10.14 or later
Note: If you don’t have Wondershare Filmora installed, you can get the video editor by visiting its official website . Once the setup program download completes, execute it and begin the installation process.
Once you have the editing software open, follow the steps listed below.
Step 1: Import a video file by clicking on the import window.
The default project setting for Filmora X is 1920x1080 at 25 frames per second. Users can change this to match their video file by going into Project Settings under the File tab or by accepting the automatic prompt that appears when dragging the video file onto the Timeline.

Note: If you have a PC with weak hardware, Wondershare Filmora gives you the option to create Video Proxies that will reduce the load on your computer by creating smaller clips that are lower in size, resulting in a smoother and faster experience. You can also do this in Premiere Pro, but Filmora does it for you automatically once given permission.
Step 2: Drag the video file onto the Timeline to begin previewing it in the Playback Window and commence editing operations.

Step 3: Locate where you want to cut in the video file and click on the orange scissors option to split the video file.

Tip: You can also use the keyboard shortcut (CTRL+B) to cut without using a mouse click, in case you make use of a trackpad while editing.
The Bottom Line
As said earlier, knowing where to cut is essential in improving the feel of your video, and we hope this guide showed you exactly how to perform the actions to create your best project. If you are a beginner, the simplistic approach of Wondershare Filmora will be more welcoming and easier to navigate. In addition, the software is also free to download, with added features that you can activate by paying a monthly, yearly, or one-time fee. Adobe Premiere Pro is an option worth considering if you plan on using third-party plugins and other applications from the Creative Cloud Suite.
Also read:
- 2024 Approved Learn to Create Custom Sequence Presets in Premiere Pro for Efficient Video Editing. Ensure Consistency and Speed up Your Workflow with Personalized Settings
- New The After-Effects Match Colour Feature Bestows Numerous Benefits. Thus, in the Following Discussion, We Will Discuss This Feature and an Equally Proficient Efficient Alternative Tool for Colour Matching
- Tips for Choosing Location and Scheduling Music Video
- New In 2024, 3D Ray Traced Settings In After Effects A Comprehensive Guide
- Add Fade in Windows Video Editor
- New How to Make a Slideshow on iPhone
- In 2024, Finding the Best Voice Changers for WhatsApp Free and Paid
- Easy Way to Add Effects to Art Video
- New Detailed Steps to Rotate Videos in Lightworks for 2024
- New Do You Waste Time Making Transparent Background in Paint
- Split a Clip in DaVinci Resolve Step by Step
- New 2024 Approved How to Convert Videos to Slow Motion? Complete Guide
- New 2024 Approved 8 Websites to Find 3D Text PNG
- New Do You Want to Know How to Import or Adjust Clips in Wondershare Filmora? Dont Worry because Importing or Adjusting Video Clips in This Tool Is Pretty Easy
- New Bandicut Video Editor Download and Review
- Updated Guide to Add Transition Effects in Premiere Pro for 2024
- 2024 Approved Top 5 Best Video to PPT Converters You Should Know
- How to Create a Glitch Text Effect?
- Updated 2024 Approved Best Video Format Converter for PC and Online
- Updated In 2024, How to Add Text Animation Online
- Updated In 2024, Progressive Solutions to Adding VHS Effects to Video with Ease
- New How to Make a Countdown Video
- New 2024 Approved How to Add Motion Titles
- How To Add Motion Blur Effect To Photos in GIMP for 2024
- Updated Time Bending Brilliance The Ultimate Slow Motion Video Makers for 2024
- New How to Create Vintage Film Effect 1990S for 2024
- In 2024, How to Make A Funny Vlog for TikTok?
- Updated 2024 Approved Easiest Fix Included! Top 5 Ways to Convert HDR to SDR Videos
- Updated With the Datamoshing Effect, the User Can Damage the Video Clips to Offer a Glitch Effect. The Article Introduces Datamosh After Effects Its Workability in the Industry
- New In 2024, How to Create a Slideshow with Movavi Slideshow Maker
- Updated In 2024, How To Be A Successful YouTuber
- New How to Create Emoji on Mac That Take Less Than 10 Mins for 2024
- Updated Whether Youre a Professional Animator or a Beginner Into This. If You Want to Use the OBS Studio Chroma Key, Weve Presented some Efficient Ways to Proceed. Learn More Here
- In 2024, A Full Guide to Funcall Voice Changer and Its Alternatives
- 2024 Approved How to Add Video Effects with Movavi Slideshow Maker
- Updated 2024 Approved How to Create and Use Adjustment Layers in After Effects
- Updated Things About Transparent PNG Remove and Convert
- In 2024, Tactics to Create Transparent Image in Minimal Steps
- Have You Ever Tried to Remove Motion Blur From Photos? This Article Will Address How to Remove the Motion Blur Effect Using Photoshop and Its Alternatives
- 2024 Approved Learn About some of the Best Apps for Photo Collage for PC
- New Makeup Video Is One of the Video Types that Many Vloggers Are Creating. If You Are Also the One Who Wants to Share Makeup Experiences in Videos, Then You Can Follow the Guide Below to Make a Makeup Video with Simple Steps
- Updated Create Slow Motion Videos Using Final Cut Pro with Ease for 2024
- Top 6 Text to Speech Generators for YouTube Videos Windows, Mac, And
- New How to Change Frame Rate in Premiere Pro for 2024
- Updated Attaining Slow Motion Video Trend Finding The Best CapCut Templates for 2024
- Updated Something About Skin Care Vlog Ideas
- New 2024 Approved How to Make a Vacation Slideshow in 5 Minutes
- In 2024, How to Create Photoshop GIF The 100 Easy Way
- 2024 Approved Are You the One Who Is Confused About What to Opt Between Camtasia vs Captivate? No More Confusion! Here We Are Going to Reveal the Answer to Camtasia vs Captivate Which Is Better? Learn More
- The Top 5 Android Apps That Use Fingerprint Sensor to Lock Your Apps On Poco F5 Pro 5G
- Sign .docm file Online with DigiSigner
- How to Unlock Xiaomi Redmi Note 12 Pro 4G Phone Password Without Factory Reset?
- New How to Animate - Adobe Animate Tutorial for All
- The Ultimate Guide to Get the Rare Candy on Pokemon Go Fire Red On Realme Narzo N55 | Dr.fone
- For People Wanting to Mock GPS on Vivo Y36 Devices | Dr.fone
- In 2024, How To Bypass Activation Lock On Apple Watch Or Apple iPhone 13 Pro?
- How To Transfer WhatsApp From Apple iPhone 6s to other iPhone 15 Pro devices? | Dr.fone
- In 2024, How to Detect and Stop mSpy from Spying on Your Motorola Moto G14 | Dr.fone
- In 2024, 5 Ways To Teach You To Transfer Files from Vivo Y02T to Other Android Devices Easily | Dr.fone
- In 2024, Delete Gmail Account With/Without Password On Infinix Note 30 Pro
- In 2024, PassFab Apple iPhone 14 Plus Backup Unlocker Top 4 Alternatives
- How to Fix Life360 Shows Wrong Location On Itel P55? | Dr.fone
- In 2024, How to Cast Vivo S17e Screen to PC Using WiFi | Dr.fone
- Here Are Some Reliable Ways to Get Pokemon Go Friend Codes For Nokia C12 | Dr.fone
- In 2024, 6 Proven Ways to Unlock Oppo Find X7 Ultra Phone When You Forget the Password
- Updated Add Emojis to Videos on YouTube/Facebook/Snapchat Step by Step Guide
- In 2024, Easy Guide to Infinix Zero 30 5G FRP Bypass With Best Methods
- How to fix iCloud lock from your Apple iPhone 13 and iPad
- How to Change Google Play Location On Motorola G54 5G | Dr.fone
- New In 2024, Record and Edit an Animoji or Memoji Karaoke Music Video
- In 2024, How to Change your Nokia C02 Location on Twitter | Dr.fone
- In 2024, Will Pokémon Go Ban the Account if You Use PGSharp On Motorola Edge 40 Neo | Dr.fone
- 3 Solutions to Find Your Apple iPhone 14 Pro Max Current Location of a Mobile Number | Dr.fone
- Authentication Error Occurred on Lava Yuva 3? Here Are 10 Proven Fixes | Dr.fone
- Will the iPogo Get You Banned and How to Solve It On Apple iPhone 12 | Dr.fone
- In 2024, How to Unlock iPhone 13 without Passcode or Face ID | Dr.fone
- In 2024, Set Your Preferred Job Location on LinkedIn App of your Apple iPhone 15 Pro Max | Dr.fone
- Android Screen Stuck General Itel P55 Partly Screen Unresponsive | Dr.fone
- Fixes for Apps Keep Crashing on Asus ROG Phone 7 Ultimate | Dr.fone
- Will iSpoofer update On Motorola Moto G34 5G | Dr.fone
- Unlocking the Power of Smart Lock A Beginners Guide for Infinix Hot 40 Pro Users
- 11 Proven Solutions to Fix Google Play Store Not Working Issue on Itel P55 | Dr.fone
- How to Unlock Nokia G310 Without Password?
- In 2024, Here are Some Pro Tips for Pokemon Go PvP Battles On Poco M6 Pro 4G | Dr.fone
- What To Do When Samsung Galaxy F04 Has Black Screen of Death? | Dr.fone
- How to Share Location in Messenger On Oppo A18? | Dr.fone
- In 2024, How To Unlock SIM Cards Of Meizu Without PUK Codes
- Disable screen lock on Gionee F3 Pro
- Updated Best 10 Photo Animator Templates for 2024
- In 2024, How To Unlock Cricket Apple iPhone 12 Pro Max for Free
- Complete Review & Guide to Techeligible FRP Bypass and More For Oppo A38
- 9 Mind-Blowing Tricks to Hatch Eggs in Pokemon Go Without Walking On Nokia C12 | Dr.fone
- A Step-by-Step Guide to Finding Your Apple ID From Your Apple iPhone 7
- In 2024, For People Wanting to Mock GPS on Huawei P60 Devices | Dr.fone
- How to Flash Dead Oppo Find N3 Flip Safely | Dr.fone
- 3 Methods to Mirror Poco M6 5G to Roku | Dr.fone
- In 2024, How to Unlock Realme Narzo N53 Phone Pattern Lock without Factory Reset
- In 2024, Top 11 Free Apps to Check IMEI on Lava Yuva 3 Pro Phones
- Title: How to Create and Use Adjustment Layers in After Effects
- Author: Chloe
- Created at : 2024-05-20 03:37:27
- Updated at : 2024-05-21 03:37:27
- Link: https://ai-editing-video.techidaily.com/how-to-create-and-use-adjustment-layers-in-after-effects/
- License: This work is licensed under CC BY-NC-SA 4.0.

