
How to Create Fantastic Glitch Effects with Filmora? Read This Guide to Find Out How to Apply Glitch Effects on Your Videos and Make Custom Glitch Effects

How to Create Fantastic Glitch Effects with Filmora? Read This Guide to Find Out How to Apply Glitch Effects on Your Videos and Make Custom Glitch Effects
You don’t need outdated VCRs or any other broken technology to produce glitch effects. Instead, you can use a video editing program for Mac and PCs, such as Filmora , to transform your videos into glitch-effect masterpieces. You can also use the glitch effects to provide striking shot transitions or opening titles. Keep reading this article on how to apply various glitch video effects in Filmora 11:
Part 1: What is a Glitch Effect?
A glitch effect occurs when a section of your video temporarily changes look or “glitches” for a short while. Although transient glitches are typical, they can occasionally linger for a few seconds or more.

You can use a glitch effect to temporarily change the appearance of the image in the video to give the impression that a machine is processing it. Additionally, it gives your finished piece a fantastic, dreamlike aspect.
Part 2: When Should you Apply a Glitch Effect?
A few years back, we had no choice but to watch glitchy movies on rusty VCR devices. Nowadays, retro video effects are very popular in TV movies and even games. You can use these effects in many ways, like making fake vintage footage or emulating a glitching computer.
Filmmakers frequently employ glitching in their videos to give the impression that a character has been affected by a technical abnormality, is having a flashback, or is being watched by someone else via a digital camera system. Something happens when the person or image flashes, often without their knowledge. In addition, you can apply the glitch effect to a composition to evoke a feeling of dramatic irony.
Part 3: Tutorial to Chromatic Aberration Effect
Chromatic aberration refers to how old lenses tend to split colors. This effect is very common in Old media like VHS or LaserDisc.

Here is a complete breakdown of each component of the Retro look and how you can make your glitch effects in Filmora 11:
Step1 Download Wondersshare Filmora 11 on your Pc by visiting filmora.wondershare.com.

Step2 Open Filmora and click on the Effects tab.
Step3 Search Chromatic aberration and drag the effect right onto your clip. It will give you a fantastic pre-made version of the effect.
Part 4: How to Customize Glitch Effect with Filmora
You can add final touches to your video clips by customizing Filmora’s effects to take your glitch effect to the next level. You can mix and match different effects in your video to create your custom glitch effect in Filmora 11.
Free Download For Win 7 or later(64-bit)
Free Download For macOS 10.14 or later
Step1 Once you have your clip on the timeline, select your clip and click on Edit. Now choose Duplicate to create two more copies.

Step2 Put the new copies on the layer above the others and make sure everything is lined up exactly. To create the glitch effect, separate the color channels on your Clips into the primary colors red, green, and blue.

Step3 Double-click on the top clip.

Go to Color and open the White Balance option to make this layer completely red. Next, drag both Temperature and Tint sliders to a hundred.

Step4 Now click the little eye icon on the timeline to hide the top layer and move on to the middle layer.
Step5 Double-click on your middle clip and go to Color, then select White Balance and set your Temperature to -100 and your Tint to 100.

Step6 Finally, hide this layer just like before. Repeat the same steps for the last clip but make this clip the blue layer by leaving the Temperature at zero and setting the Tint to -100.

Step7 Double-click the clip in the top layer, click the Video Tab, and open the Compositing options. Set the Blending Mode of this top layer to Soft Light.

Now click on the clip in your preview window and move the image over by pressing the left Arrow key on your keyboard a few times. Once you’re happy with the top clip, hide that layer by clicking the eye icon.

Step8 To make the middle layer visible, double-click the clip in your mid layer and set the Blending Mode of this layer to Screen.

Now click on your clip in the preview window and press the Right key as many times as you did before. Finally, make all the layers visible by clicking the eye icon.

Vignette
A vignette is a dark border that fades around the frame’s edges in Filmora. You can easily add a vignette effect to your video by using these steps:
Step1 First, click the Effects Tab and type in Vignette.
Step2 Next, drag the Vignette Radius effect to a layer above your previous three layers.
Step3 Now adjust the length to match the other clips.
VHS static effects
A VHS effect is a grainy distortion that resembles an old analog video cassette recording. To apply the VHS static effects:
Step1 Click the Effects tab.
Step2 Search for the VHS static and drag it to a new layer above everything else.
Step3 Extend one of the effects to match the length of your previous clips.
VCR Distortion
VCR Distortion effect will make your video look highly glitched. To apply this effect:
Step1 Click on the Effects tab.
Step2 Search for VCR Distortion, then drag and drop this effect over your previous layer.
Part 5: Tips to Create Awesome Glitch Effects
- One of the best ways to use the VCR Distortion effect is to cut it short and intersperse it around your video in random parts.
- The glitch Distortion effect is very intense, so we recommend cutting this effect very short and dropping it at random parts of your video.
- You can also use these effects as a sneaky way to hide Cuts in your video.
Summary
You can use glitch effects created or inspired by faulty video equipment as a powerful storytelling tool. These effects can help you change the tone of the entire video by adding a specific visual aesthetic and making the narrative simpler to convey and more approachable for the audience.
We recommend using Filmora 11 for adding built-in glitch effects. You can also use this app to create custom glitch effects within a few minutes.
Free Download For macOS 10.14 or later
Step1 Once you have your clip on the timeline, select your clip and click on Edit. Now choose Duplicate to create two more copies.

Step2 Put the new copies on the layer above the others and make sure everything is lined up exactly. To create the glitch effect, separate the color channels on your Clips into the primary colors red, green, and blue.

Step3 Double-click on the top clip.

Go to Color and open the White Balance option to make this layer completely red. Next, drag both Temperature and Tint sliders to a hundred.

Step4 Now click the little eye icon on the timeline to hide the top layer and move on to the middle layer.
Step5 Double-click on your middle clip and go to Color, then select White Balance and set your Temperature to -100 and your Tint to 100.

Step6 Finally, hide this layer just like before. Repeat the same steps for the last clip but make this clip the blue layer by leaving the Temperature at zero and setting the Tint to -100.

Step7 Double-click the clip in the top layer, click the Video Tab, and open the Compositing options. Set the Blending Mode of this top layer to Soft Light.

Now click on the clip in your preview window and move the image over by pressing the left Arrow key on your keyboard a few times. Once you’re happy with the top clip, hide that layer by clicking the eye icon.

Step8 To make the middle layer visible, double-click the clip in your mid layer and set the Blending Mode of this layer to Screen.

Now click on your clip in the preview window and press the Right key as many times as you did before. Finally, make all the layers visible by clicking the eye icon.

Vignette
A vignette is a dark border that fades around the frame’s edges in Filmora. You can easily add a vignette effect to your video by using these steps:
Step1 First, click the Effects Tab and type in Vignette.
Step2 Next, drag the Vignette Radius effect to a layer above your previous three layers.
Step3 Now adjust the length to match the other clips.
VHS static effects
A VHS effect is a grainy distortion that resembles an old analog video cassette recording. To apply the VHS static effects:
Step1 Click the Effects tab.
Step2 Search for the VHS static and drag it to a new layer above everything else.
Step3 Extend one of the effects to match the length of your previous clips.
VCR Distortion
VCR Distortion effect will make your video look highly glitched. To apply this effect:
Step1 Click on the Effects tab.
Step2 Search for VCR Distortion, then drag and drop this effect over your previous layer.
Part 5: Tips to Create Awesome Glitch Effects
- One of the best ways to use the VCR Distortion effect is to cut it short and intersperse it around your video in random parts.
- The glitch Distortion effect is very intense, so we recommend cutting this effect very short and dropping it at random parts of your video.
- You can also use these effects as a sneaky way to hide Cuts in your video.
Summary
You can use glitch effects created or inspired by faulty video equipment as a powerful storytelling tool. These effects can help you change the tone of the entire video by adding a specific visual aesthetic and making the narrative simpler to convey and more approachable for the audience.
We recommend using Filmora 11 for adding built-in glitch effects. You can also use this app to create custom glitch effects within a few minutes.
In This Article, We Will Show You How to Rotate Videos Using Obs
Obs is video editing software that is used to create and edit videos. It is a powerful tool that can be used to do a variety of things, such as add text, music, and special effects to videos. It also allows you to cut and trim videos, and to merge them with other videos. Additionally, obs allows you to live stream your videos, which can be a great way to share them with others. Overall, obs is a powerful tool that can be used to create and edit amazing videos.
The main interface of Obs Studio is relatively simple, and it is easy to use. The top of the screen contains a number of icons that allow you to access different features of the software, such as the video editor, the live streamer, and the settings. The bottom of the screen contains a timeline, which allows you to easily edit your videos. The timeline also contains a number of tools that allow you to trim your videos, add text and music, and more. Overall, the main interface of Obs Studio is simple and easy to use.
There are many benefits to using obs, including:
- It is free to download and use.
- It is a powerful tool that can be used to create and edit amazing videos.
- It allows you to live stream your videos, which can be a great way to share them with others.
- There are many online communities where you can find help and advice from other users.
- Overall, obs is a great program that can be used to create and edit amazing videos.
There are many reasons why you might want to rotate a video. For example, if you captured a video of a person or object upside down, you would want to rotate it so that it is right-side up. Or, if you recorded a video in landscape mode but want to view it in portrait mode, you would need to rotate the video.
Luckily, there are a number of ways to rotate videos on different devices. In this article, we will show you how to rotate videos using Obs.
Step-by-step on how to rotate videos using Obs
How to rotate using the rotate tool in the video editor?
First, to use the rotate tool in the Edit tab, simply follow the steps below:
Step 1: Open the video editor and drag your video to the editor.

Step 2: Click on the Edit > Transform > Rotate 90 degrees CW tool to rotate it 90 degrees clockwise.

Step 3: Click on the Edit > Transform > Rotate 90 degrees CW tool to rotate it 90 degrees counterclockwise.

Step 4: Click on the Edit > Transform > Rotate 180 degrees tool to rotate it 180 degrees.

How to rotate using the advance controls in obs?
Second, to use the filters in obs, follow the steps below:
Step 1: Open obs and click on the Edit tab > Transform > Edit transform. You can also click Ctrl + E.

Step 2: Go to the Rotation section.

Step 3: Select the rotation degree you want to use.

Step 4: Click on enter on your keyboard to rotate it.
How to rotate using right-clicking on the video?
Third, to use right-clicking on the video, follow the following:
Step 1: Open obs and right-click on the clip that you want to rotate.
Step 2: Click on the Transform > Rotate 90 degrees CW tool to rotate it 90 degrees clockwise.

Step 3: Click on the Transform > Rotate 90 degrees CW tool to rotate it 90 degrees counterclockwise.

Step 4: Click on the Edit > Transform > Rotate 180 degrees tool to rotate it 180 degrees.

An Easy Way to Rotate Videos Using Filmora
To conclude, there are a number of ways to rotate videos on different devices. In this article, we have shown you how to rotate videos using Obs. Meanwhile, we have another suggestion which is using Filmora Video Editor to rotate videos. Filmora is a Wondershare product that helps you to rotate videos without quality loss. With its easy-to-use interface, you can rotate videos with just a few clicks. If you are interested in it, please feel free to check the guide below:
For Win 7 or later (64-bit)
For macOS 10.14 or later
Step-by-step on how to rotate videos using Filmora
How to rotate videos using Filmora?
First, to rotate videos using Filmora, follow the steps below:
Step 1: Import the video you want to rotate into Filmora.

Step 2: Click on the “Edit” button in the toolbar.

Step 3: Go to Transform > Rotate.

Step 4: Select the rotation angle you want to use.

Step 5: Click on the ‘Ok’ to rotate it.

Second, if you want to rotate a video and flip it, follow the steps below:
Click on the flip option that you want to use, either upside down or sideways, vertically or horizontally.

Click on ‘Ok’ to apply the rotation and the flip.
Third, if you want to rotate a video by a specific number of degrees, follow the steps below:
To conclude, Filmora provides a number of ways for you to rotate your videos as well as using Obs. If you are looking for an easy way to rotate your videos without quality loss, then Filmora is the best option for you.
Step 2: Click on the Edit > Transform > Rotate 90 degrees CW tool to rotate it 90 degrees clockwise.

Step 3: Click on the Edit > Transform > Rotate 90 degrees CW tool to rotate it 90 degrees counterclockwise.

Step 4: Click on the Edit > Transform > Rotate 180 degrees tool to rotate it 180 degrees.

How to rotate using the advance controls in obs?
Second, to use the filters in obs, follow the steps below:
Step 1: Open obs and click on the Edit tab > Transform > Edit transform. You can also click Ctrl + E.

Step 2: Go to the Rotation section.

Step 3: Select the rotation degree you want to use.

Step 4: Click on enter on your keyboard to rotate it.
How to rotate using right-clicking on the video?
Third, to use right-clicking on the video, follow the following:
Step 1: Open obs and right-click on the clip that you want to rotate.
Step 2: Click on the Transform > Rotate 90 degrees CW tool to rotate it 90 degrees clockwise.

Step 3: Click on the Transform > Rotate 90 degrees CW tool to rotate it 90 degrees counterclockwise.

Step 4: Click on the Edit > Transform > Rotate 180 degrees tool to rotate it 180 degrees.

An Easy Way to Rotate Videos Using Filmora
To conclude, there are a number of ways to rotate videos on different devices. In this article, we have shown you how to rotate videos using Obs. Meanwhile, we have another suggestion which is using Filmora Video Editor to rotate videos. Filmora is a Wondershare product that helps you to rotate videos without quality loss. With its easy-to-use interface, you can rotate videos with just a few clicks. If you are interested in it, please feel free to check the guide below:
For Win 7 or later (64-bit)
For macOS 10.14 or later
Step-by-step on how to rotate videos using Filmora
How to rotate videos using Filmora?
First, to rotate videos using Filmora, follow the steps below:
Step 1: Import the video you want to rotate into Filmora.

Step 2: Click on the “Edit” button in the toolbar.

Step 3: Go to Transform > Rotate.

Step 4: Select the rotation angle you want to use.

Step 5: Click on the ‘Ok’ to rotate it.

Second, if you want to rotate a video and flip it, follow the steps below:
Click on the flip option that you want to use, either upside down or sideways, vertically or horizontally.

Click on ‘Ok’ to apply the rotation and the flip.
Third, if you want to rotate a video by a specific number of degrees, follow the steps below:
To conclude, Filmora provides a number of ways for you to rotate your videos as well as using Obs. If you are looking for an easy way to rotate your videos without quality loss, then Filmora is the best option for you.
Step 2: Click on the Edit > Transform > Rotate 90 degrees CW tool to rotate it 90 degrees clockwise.

Step 3: Click on the Edit > Transform > Rotate 90 degrees CW tool to rotate it 90 degrees counterclockwise.

Step 4: Click on the Edit > Transform > Rotate 180 degrees tool to rotate it 180 degrees.

How to rotate using the advance controls in obs?
Second, to use the filters in obs, follow the steps below:
Step 1: Open obs and click on the Edit tab > Transform > Edit transform. You can also click Ctrl + E.

Step 2: Go to the Rotation section.

Step 3: Select the rotation degree you want to use.

Step 4: Click on enter on your keyboard to rotate it.
How to rotate using right-clicking on the video?
Third, to use right-clicking on the video, follow the following:
Step 1: Open obs and right-click on the clip that you want to rotate.
Step 2: Click on the Transform > Rotate 90 degrees CW tool to rotate it 90 degrees clockwise.

Step 3: Click on the Transform > Rotate 90 degrees CW tool to rotate it 90 degrees counterclockwise.

Step 4: Click on the Edit > Transform > Rotate 180 degrees tool to rotate it 180 degrees.

An Easy Way to Rotate Videos Using Filmora
To conclude, there are a number of ways to rotate videos on different devices. In this article, we have shown you how to rotate videos using Obs. Meanwhile, we have another suggestion which is using Filmora Video Editor to rotate videos. Filmora is a Wondershare product that helps you to rotate videos without quality loss. With its easy-to-use interface, you can rotate videos with just a few clicks. If you are interested in it, please feel free to check the guide below:
For Win 7 or later (64-bit)
For macOS 10.14 or later
Step-by-step on how to rotate videos using Filmora
How to rotate videos using Filmora?
First, to rotate videos using Filmora, follow the steps below:
Step 1: Import the video you want to rotate into Filmora.

Step 2: Click on the “Edit” button in the toolbar.

Step 3: Go to Transform > Rotate.

Step 4: Select the rotation angle you want to use.

Step 5: Click on the ‘Ok’ to rotate it.

Second, if you want to rotate a video and flip it, follow the steps below:
Click on the flip option that you want to use, either upside down or sideways, vertically or horizontally.

Click on ‘Ok’ to apply the rotation and the flip.
Third, if you want to rotate a video by a specific number of degrees, follow the steps below:
To conclude, Filmora provides a number of ways for you to rotate your videos as well as using Obs. If you are looking for an easy way to rotate your videos without quality loss, then Filmora is the best option for you.
Step 2: Click on the Edit > Transform > Rotate 90 degrees CW tool to rotate it 90 degrees clockwise.

Step 3: Click on the Edit > Transform > Rotate 90 degrees CW tool to rotate it 90 degrees counterclockwise.

Step 4: Click on the Edit > Transform > Rotate 180 degrees tool to rotate it 180 degrees.

How to rotate using the advance controls in obs?
Second, to use the filters in obs, follow the steps below:
Step 1: Open obs and click on the Edit tab > Transform > Edit transform. You can also click Ctrl + E.

Step 2: Go to the Rotation section.

Step 3: Select the rotation degree you want to use.

Step 4: Click on enter on your keyboard to rotate it.
How to rotate using right-clicking on the video?
Third, to use right-clicking on the video, follow the following:
Step 1: Open obs and right-click on the clip that you want to rotate.
Step 2: Click on the Transform > Rotate 90 degrees CW tool to rotate it 90 degrees clockwise.

Step 3: Click on the Transform > Rotate 90 degrees CW tool to rotate it 90 degrees counterclockwise.

Step 4: Click on the Edit > Transform > Rotate 180 degrees tool to rotate it 180 degrees.

An Easy Way to Rotate Videos Using Filmora
To conclude, there are a number of ways to rotate videos on different devices. In this article, we have shown you how to rotate videos using Obs. Meanwhile, we have another suggestion which is using Filmora Video Editor to rotate videos. Filmora is a Wondershare product that helps you to rotate videos without quality loss. With its easy-to-use interface, you can rotate videos with just a few clicks. If you are interested in it, please feel free to check the guide below:
For Win 7 or later (64-bit)
For macOS 10.14 or later
Step-by-step on how to rotate videos using Filmora
How to rotate videos using Filmora?
First, to rotate videos using Filmora, follow the steps below:
Step 1: Import the video you want to rotate into Filmora.

Step 2: Click on the “Edit” button in the toolbar.

Step 3: Go to Transform > Rotate.

Step 4: Select the rotation angle you want to use.

Step 5: Click on the ‘Ok’ to rotate it.

Second, if you want to rotate a video and flip it, follow the steps below:
Click on the flip option that you want to use, either upside down or sideways, vertically or horizontally.

Click on ‘Ok’ to apply the rotation and the flip.
Third, if you want to rotate a video by a specific number of degrees, follow the steps below:
To conclude, Filmora provides a number of ways for you to rotate your videos as well as using Obs. If you are looking for an easy way to rotate your videos without quality loss, then Filmora is the best option for you.
Create a Movie with Windows Movie Maker
Are you interested in making movies? Well, If your answer is yes, you’re in luck! Windows Movie Maker is a great way to make movies on your computer. You can use it to create family videos, school projects, or even movies for fun. This might seem like too much work, but trust us, it’s not! With this amazing program, anyone can make movies on windows. There are only a few things to keep in mind, and you’ll be on your way to becoming a movie maker in no time.
Video Windows Movie Maker makes it easy to put your movies together. You just have to drag and drop the video clips you want to use into the movie maker. Then, you need to follow certain steps to complete your project. In the section below, we will discuss in detail the steps to make a movie from Windows Movie Maker.
Let’s get started.
How to Make a Video with Windows Movie Maker
Here are the steps you need to take to make movies on windows 10:
Step1 Import Media Into Movie Maker
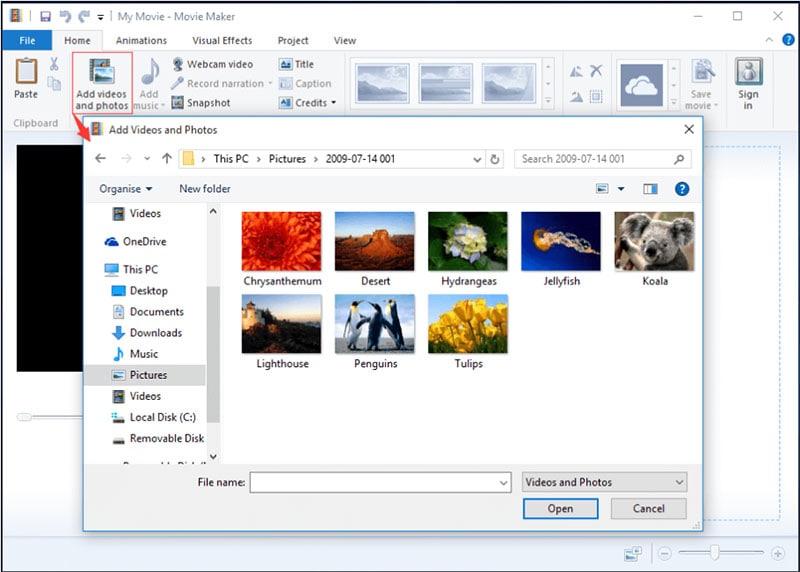
The first thing you need to do is get all of your video footage and images into Windows Movie Maker.
Media file formats can be imported into this program:
- Audio Files: aif, .aifc, .aiff, .asf, .au, .mp2, .mp3, .mpa, .snd, .wav, and .wma
- Image Files: .bmp, .dib, .emf, .gif, .jfif, .jpe, .jpeg, .jpg, .png, .tif, .tiff, and .wmf
- Movie Files: asf, .avi, dvr-ms, .m1v, .mp2, .mp2v, .mpe, .mpeg, .mpg, .mpv2, .wm, and .wmv
To import media:
- Click “File” > “Import into collections.”
- Browse to the location of the file you want to import, select it, and then click “Open.”
Your selected file will now appear in the “Collections” pane. You can double-click on the imported file to preview it. If you’re happy with what you see, great! You can now move on to step two. If the files are not good, no worries - you can always delete them and try again. Just right-click on the file and select “Delete,” or press the “Delete” key on your keyboard.
Step2 Basic Editing from Timeline
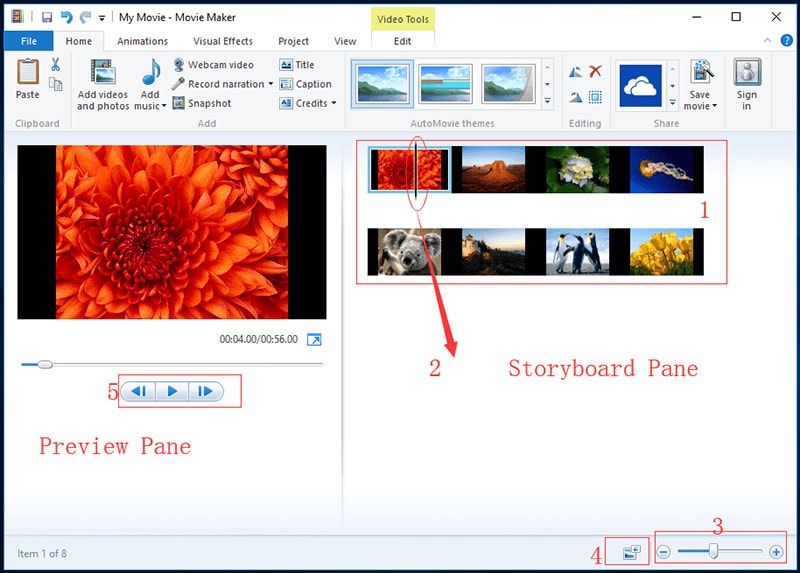
After you have imported all of your desired clips and images into Windows Movie Maker, it is time to start editing them into your movie. Here are the things that you need to do to edit your clips and images:
- For cutting the image, you need to select the part of the image that you want to cut. To do this, just click on the image and drag it to where you want it to be cut. The cutting process will automatically happen when you release your mouse button.
- To combine the images, you need to select the images that you want to combine. To do this, click on one image and then hold down the “Ctrl” key while clicking on the other images that you want to combine. Once you have selected all the images you want to combine, just right-click on any of the selected images and choose “Combine Clips.”
- To split clips in the timeline, select the clip you want to split by clicking on it. Then, position your mouse cursor to where you want to split the clip and click on the “Split Clip” button. The clip will be automatically split into two separate clips.
By doing these minor things, you can edit your clips and images in the timeline according to your preference. Now, you are one step closer to creating your very own movie!
Step3 Add Video Effects
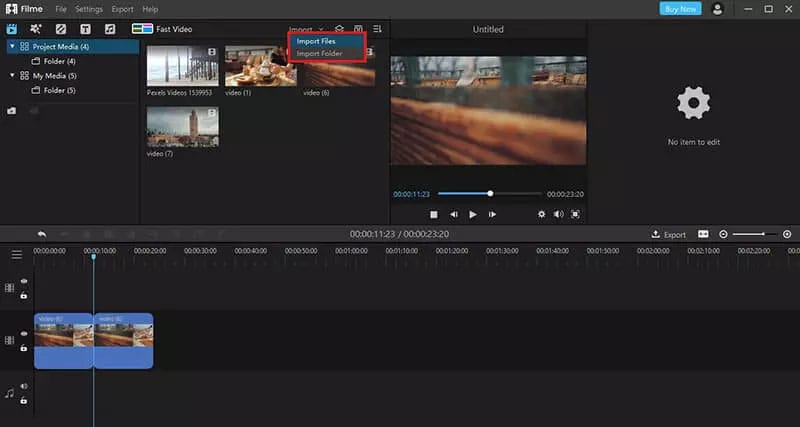
Video effects are a great way to make your movies look more professional. Windows Movie Maker has various built-in effects that you can use to improve the quality of your videos. These effects can be applied to your movie’s video and audio tracks. Moreover, they can add transitions between clips and even change the way your video looks.
There are hundreds of different effects that you can use in Windows Movie Maker. So experiment with them until you find a style that suits your needs. With a bit of practice, you’ll be making movies that look like they were made by a professional in no time!
To add video effects in the video movie maker windows:
- Select the clip you want to modify, and then click on the “Effects” tab. From there, you can browse through the available effects and preview them before adding them to your project.
- Once you’ve found an effect you like, simply drag and drop it onto the clip.
- You can also add multiple effects to a single clip if you want.
- Just remember that too many effects can make your video look cluttered and difficult to watch. So be sure to use them sparingly.
When you’re happy with your added effects, click on the “Ok” button to save your changes.
Step4 Edit Audio & Titles
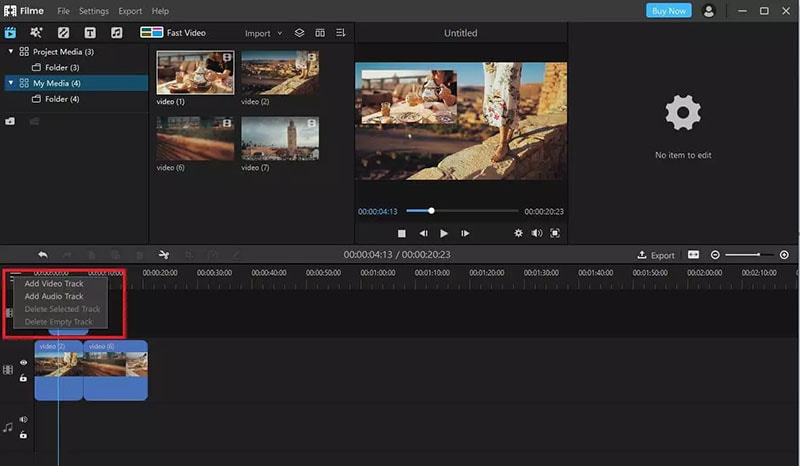
Audio and Title are both crucial aspects when you want to make movie windows 10 movie perfectly. You can edit both of these in Windows Movie Maker. Editing is one of the most creative aspects of making a movie. In Windows Movie Maker, you easily edit your audio and titles in the video. Even if you want to do the editing multiple times, you can do so without any problem. All you need to do is have the latest version of Windows Movie Maker installed on your computer.
To Edit the Audio & Tiles:
- Go to the ‘Home’ tab and click on the ‘Add music’ button.
- Find the audio file that you want to add to your movie. You can either use a song from your personal collection or look for one online.
- Once you have found the perfect audio, drag and drop it into the timeline.
- If you want to edit the audio, right-click on it and select ‘Edit’. You can then make changes to the audio, such as volume, duration, etc.
- To add titles, go to the ‘Home’ tab and click on the ‘Add title’ button.
- A new window will open where you can type in the text for your title. You can also change the font, color, and size of the text.
- Once you are happy with your title, click on the ‘OK’ button, and it will be added to your timeline.
- If you want to edit the title, simply double-click on it and make changes as needed.
Step5 Export and Save Video
The last step that you need to follow after completing the video is to export and save it. It is always important to save your work so that you can access it later or make changes if needed.
To export and save the video:
- Click on File
- Click on Save movie
- Choose the quality and file size that you want
- Give the video a name
- Save it to your computer
Movie Maker Alternative to Create Videos
Filmora is a video creating and editing software developed by Wondershare. Although it is not as widely known as some of its competitors, it has many features that make it a great alternative to Windows Movie Maker. Anyone can use this software to create high-quality videos, from beginners to professionals. The software is compatible with both Windows and Mac operating systems.
One of the great things about Filmora is that it is very user-friendly. The interface is straightforward and easy to navigate and comes with top-notch editing features and rich effects. So, if you have never used video editing software before, you can figure out how to use Filmora easily. Another plus is that free trials are available to try out the software before you commit to buying it.
Steps to Edit Video with Filmora
Now that you know a little bit more about this movie maker alternative, let’s go over the steps to edit videos with Filmora.
Free Download For Win 7 or later(64-bit)
Free Download For macOS 10.14 or later
Step1 Import your video into the software. You can do this by clicking on “Import” and selecting the file from your computer.

Step2 Once your video is imported, you can see it in the “Project Library”. You can drag and drop it from here into the “Video Timeline” located at the bottom of the screen.

Step3 Now that your video is in the timeline, you can start editing it. To do this, simply click on the item in the timeline you want to edit and then make your changes in the “Video Inspector” panel on the screen’s right-hand side.

You can make changes, including cropping the video, adjusting the volume, adding filters and effects, and more.
Step4 Once you are happy with your edits, you can preview your video by clicking on the “Play” button in the tight and save it if it seems perfect to you.
If you are satisfied with what you see, then you can go ahead and export your video. To do this, click on “File” located in the top left-hand corner of the screen and then select “Export”. From here, you can choose what format you want to export your video and where you want to save it on your computer.
Conclusion
If you’re looking for an easy way to make movies on your Windows computer, then you should definitely check out Windows Movie Maker. This free from Microsoft makes it simple to create and edit videos, and it’s perfect for beginners. Another alternative for making movies on Windows is to use the Filmora video editor. This program is more robust and has multiple features just like Movie Maker.
Free Download For macOS 10.14 or later
Step1 Import your video into the software. You can do this by clicking on “Import” and selecting the file from your computer.

Step2 Once your video is imported, you can see it in the “Project Library”. You can drag and drop it from here into the “Video Timeline” located at the bottom of the screen.

Step3 Now that your video is in the timeline, you can start editing it. To do this, simply click on the item in the timeline you want to edit and then make your changes in the “Video Inspector” panel on the screen’s right-hand side.

You can make changes, including cropping the video, adjusting the volume, adding filters and effects, and more.
Step4 Once you are happy with your edits, you can preview your video by clicking on the “Play” button in the tight and save it if it seems perfect to you.
If you are satisfied with what you see, then you can go ahead and export your video. To do this, click on “File” located in the top left-hand corner of the screen and then select “Export”. From here, you can choose what format you want to export your video and where you want to save it on your computer.
Conclusion
If you’re looking for an easy way to make movies on your Windows computer, then you should definitely check out Windows Movie Maker. This free from Microsoft makes it simple to create and edit videos, and it’s perfect for beginners. Another alternative for making movies on Windows is to use the Filmora video editor. This program is more robust and has multiple features just like Movie Maker.
How to Add a Lower Third to Your Video
Preparation
What you need to prepare:
- A computer (Windows or macOS)
- Your video materials.
- Filmora video editor
Step 1
Download and Install the Filmora video editor . After it’s done installing, let the app run automatically and click on “New Project”.
Step 2
Go to My Media and click on “Import Media” to load your photos or images into the video editor.

Step 3
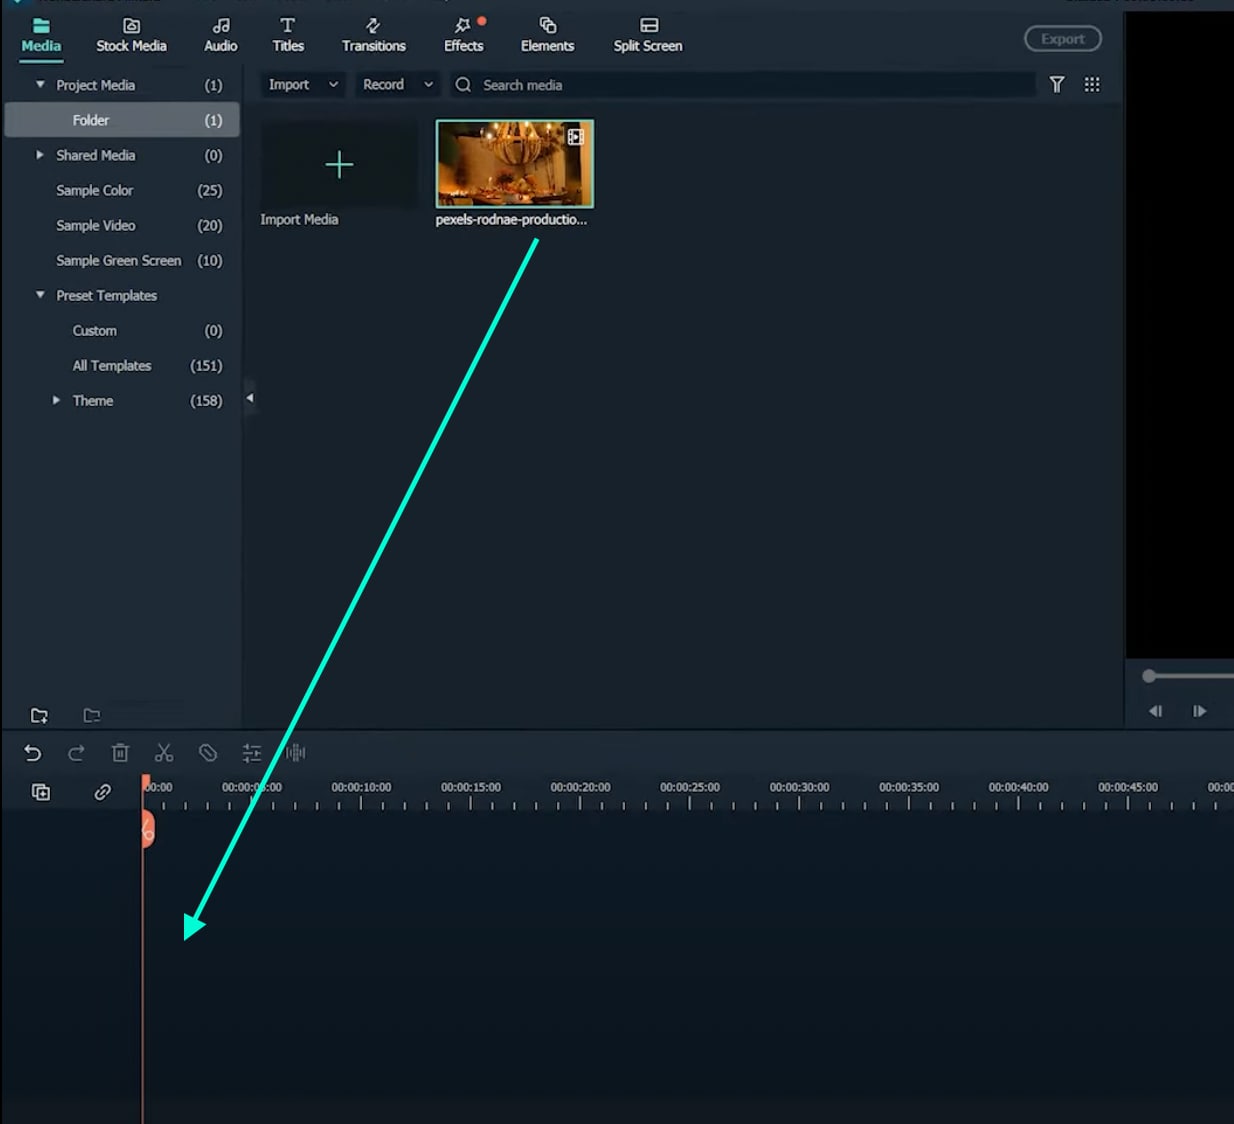
Drag the media you want to use to the Timeline.
Step 4
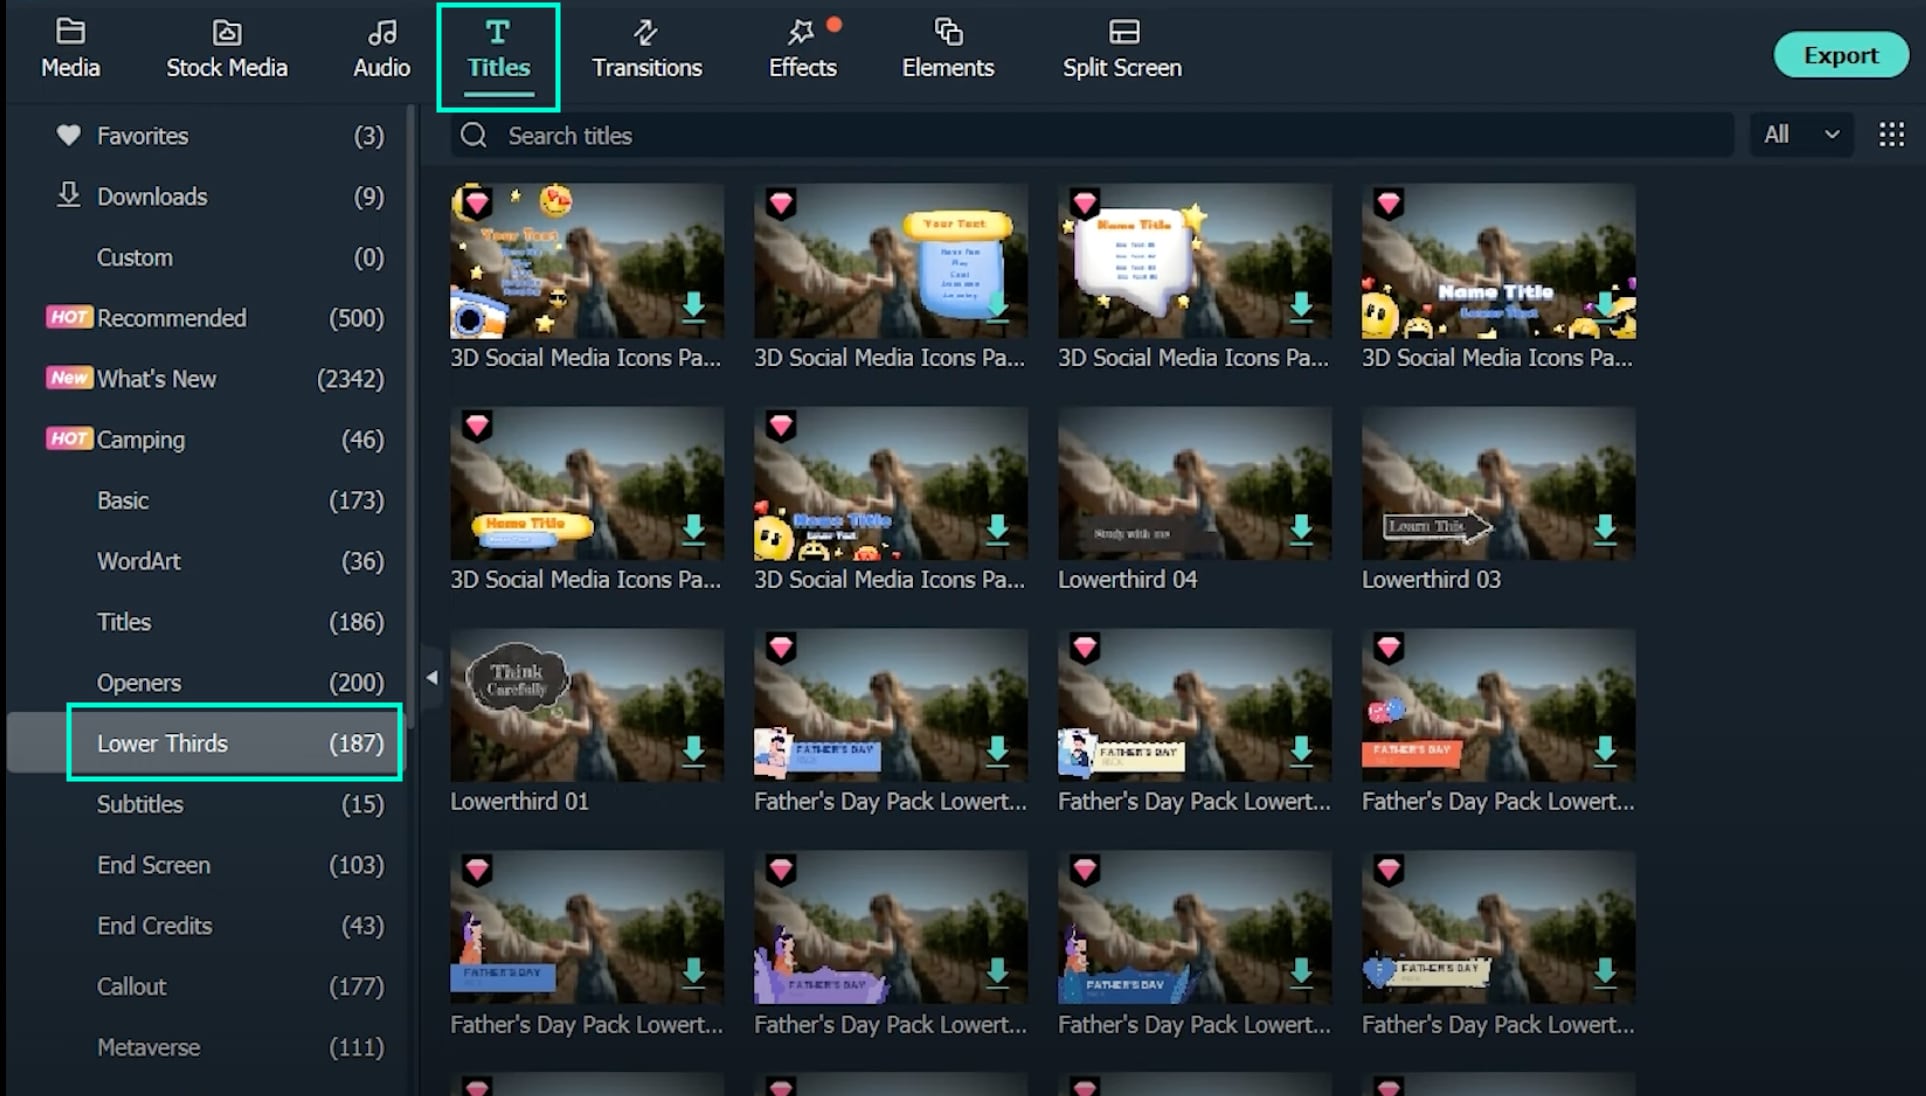
Head over to Titles → Lower Thirds. Then, drag the one you like to use to the Timeline and place it above the clip you imported earlier.
Step 5
Double-click on the Lower Third Title clip. Then, edit the text inside the new panel that pops up. Here, you can change its size, color, font, and a few other features. When you’re done, click OK.

Step 6
All that’s left to do now is to watch the final preview and Export the video. Render the video first and then hit the blue Export button. Congratulations on adding a lower-third animated title to your video in Filmora.

Summary
What you’ve learned:
- How to add and create unique titles in Filmora
- Edit and customize text in the Filmora video editor
- How to open a new project in Filmora and export it when you’re done
What you need to prepare:
- A computer (Windows or macOS)
- Your video materials.
- Filmora video editor
Step 1
Download and Install the Filmora video editor . After it’s done installing, let the app run automatically and click on “New Project”.
Step 2
Go to My Media and click on “Import Media” to load your photos or images into the video editor.

Step 3
Drag the media you want to use to the Timeline.

Step 4
Head over to Titles → Lower Thirds. Then, drag the one you like to use to the Timeline and place it above the clip you imported earlier.

Step 5
Double-click on the Lower Third Title clip. Then, edit the text inside the new panel that pops up. Here, you can change its size, color, font, and a few other features. When you’re done, click OK.

Step 6
All that’s left to do now is to watch the final preview and Export the video. Render the video first and then hit the blue Export button. Congratulations on adding a lower-third animated title to your video in Filmora.

Summary
What you’ve learned:
- How to add and create unique titles in Filmora
- Edit and customize text in the Filmora video editor
- How to open a new project in Filmora and export it when you’re done
What you need to prepare:
- A computer (Windows or macOS)
- Your video materials.
- Filmora video editor
Step 1
Download and Install the Filmora video editor . After it’s done installing, let the app run automatically and click on “New Project”.
Step 2
Go to My Media and click on “Import Media” to load your photos or images into the video editor.

Step 3
Drag the media you want to use to the Timeline.

Step 4
Head over to Titles → Lower Thirds. Then, drag the one you like to use to the Timeline and place it above the clip you imported earlier.

Step 5
Double-click on the Lower Third Title clip. Then, edit the text inside the new panel that pops up. Here, you can change its size, color, font, and a few other features. When you’re done, click OK.

Step 6
All that’s left to do now is to watch the final preview and Export the video. Render the video first and then hit the blue Export button. Congratulations on adding a lower-third animated title to your video in Filmora.

Summary
What you’ve learned:
- How to add and create unique titles in Filmora
- Edit and customize text in the Filmora video editor
- How to open a new project in Filmora and export it when you’re done
What you need to prepare:
- A computer (Windows or macOS)
- Your video materials.
- Filmora video editor
Step 1
Download and Install the Filmora video editor . After it’s done installing, let the app run automatically and click on “New Project”.
Step 2
Go to My Media and click on “Import Media” to load your photos or images into the video editor.

Step 3
Drag the media you want to use to the Timeline.

Step 4
Head over to Titles → Lower Thirds. Then, drag the one you like to use to the Timeline and place it above the clip you imported earlier.

Step 5
Double-click on the Lower Third Title clip. Then, edit the text inside the new panel that pops up. Here, you can change its size, color, font, and a few other features. When you’re done, click OK.

Step 6
All that’s left to do now is to watch the final preview and Export the video. Render the video first and then hit the blue Export button. Congratulations on adding a lower-third animated title to your video in Filmora.

Summary
What you’ve learned:
- How to add and create unique titles in Filmora
- Edit and customize text in the Filmora video editor
- How to open a new project in Filmora and export it when you’re done
Also read:
- 2024 Approved Learn How to Create a Kinetic Typography Text Effect in Filmora, One of the Best Video Editors for All Skill Levels. Check Out This Simple Step-by-Step Guide
- 2024 Approved Unveiling Secrets to Pristine BG Removal Techniques in Figma
- Audio Alchemy Made Accessible Discover Free Transformation Techniques for Sound
- Can You Use Siri to Unlock Your iPhone? The Pros and Cons Explained
- If You Want to Make an Intro Video, Then Adobe After Effects Will Be a Great Choice. This Article Will Show the Steps to Create an Intro Video with After Effects by Your Own
- In 2024, How to Zoom Video in VLC Media Player
- Navigating the LunaPic Interface Like a Pro
- New Whatre the Best Alternatives to Pexels?
- Undercover Data Collection on Pinterest & Tumblr to Maintain Free Status
- Title: How to Create Fantastic Glitch Effects with Filmora? Read This Guide to Find Out How to Apply Glitch Effects on Your Videos and Make Custom Glitch Effects
- Author: Chloe
- Created at : 2024-12-06 22:02:25
- Updated at : 2024-12-11 19:12:42
- Link: https://ai-editing-video.techidaily.com/how-to-create-fantastic-glitch-effects-with-filmora-read-this-guide-to-find-out-how-to-apply-glitch-effects-on-your-videos-and-make-custom-glitch-effects/
- License: This work is licensed under CC BY-NC-SA 4.0.