:max_bytes(150000):strip_icc():format(webp)/ArtificalIntelligenceChatbotConcept-c0e491e36fae46ef84b670334af5095f.jpg)
How to Create Freeze Frame Clone Effect

How to Create Freeze Frame Clone Effect
Preparation
What you need to prepare:
- A computer (Windows or macOS)
- Your video materials.
- Filmora video editor
Step 1
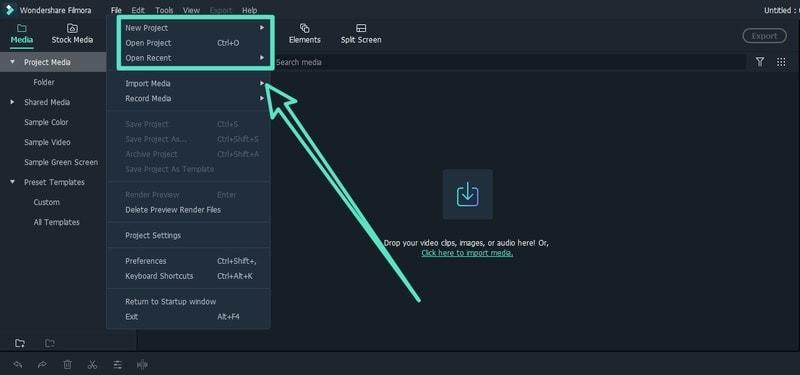
Download and install Wondershare Filmora on your computer. Launch Filmora and click on New Project on the welcome screen. Alternatively, go to File menu and select New Project option.
Step 2
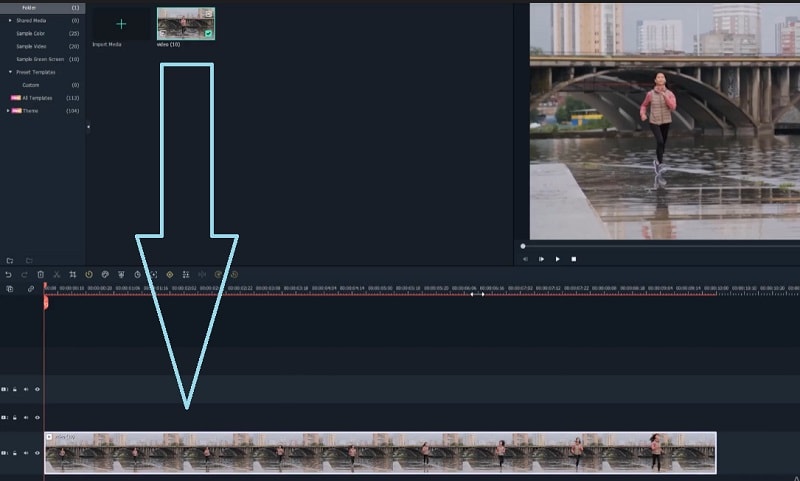
Import your video clip to Project Media folder. Go to File> Import Media and click on Import Media Files option. Select the video clip from your hard drive. Otherwise, you can drag and drop the video clip directly into the Project Media folder. Finally, drop the video clip from Project Media folder onto the timeline.
Step 3
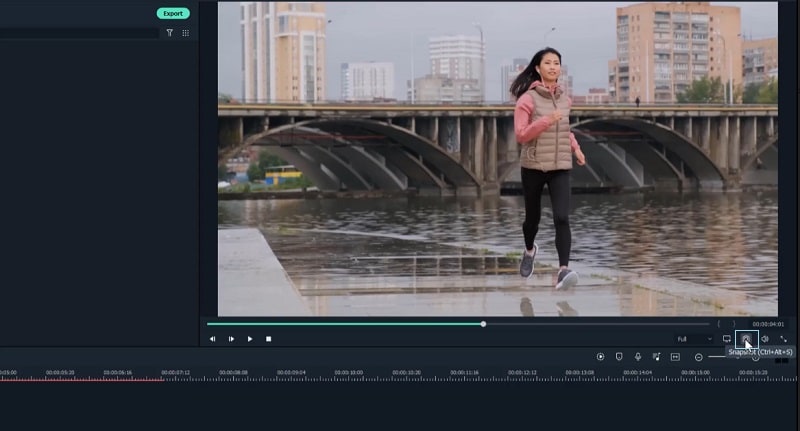
Place the marker where you want the frame to freeze. Click on Camera icon under Program window. This will take a snapshot of the current frame and place it under Project Media folder. Drag and drop the snapshot onto the timeline.
Step 4
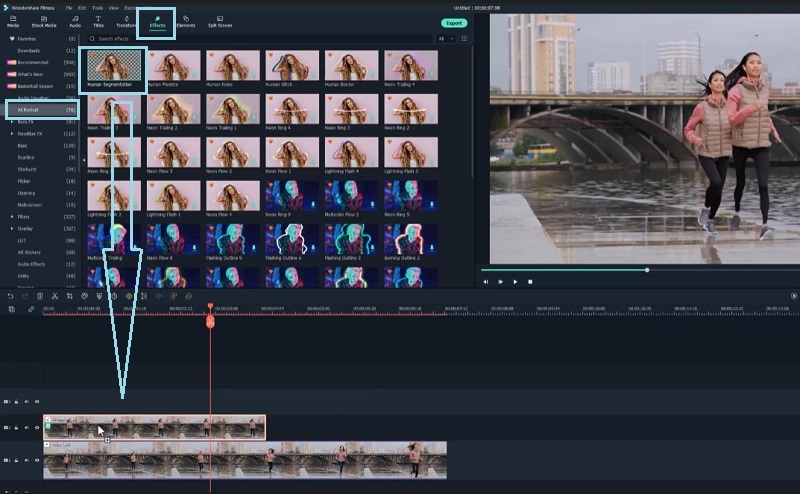
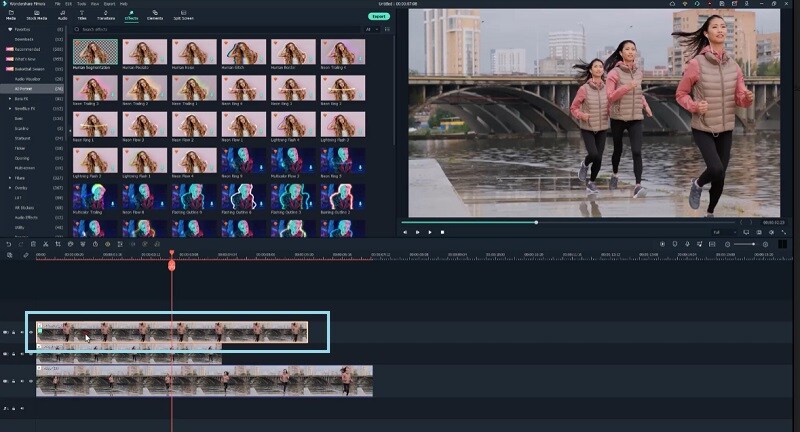
Match the duration of the snapshot with the point where you want the frame to freeze. Go to Effects> AI Portrait> Human Segmentation and drop the effect on the snapshot layer to make the background disappear.
Step 5
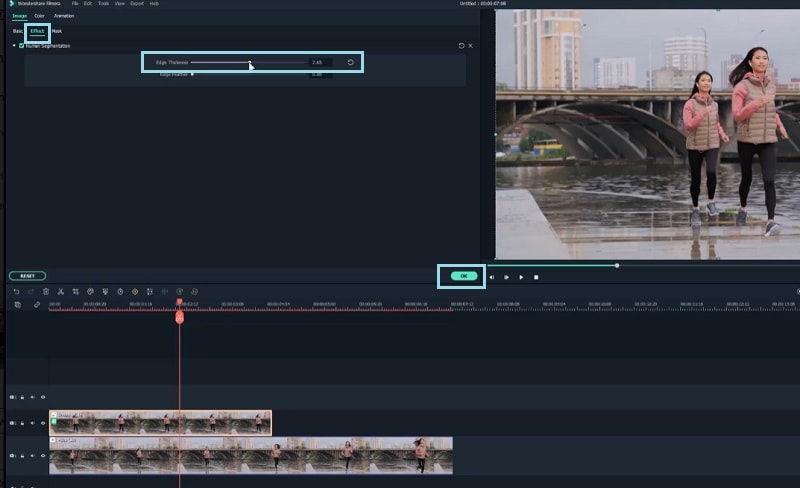
Double-click on the snapshot layer. Go to Effect and adjust the Edge thickness so that it looks perfect. Click on OK button and play the video to check out the effect.
Step 6
Perform Step 3 to Step 5 again where you need to select a frame to freeze, take snapshot, drop onto timeline and remove background. Finally, play the video to check out the freeze frame clone effect. Save the video on your hard drive by click on Export button.
Summary
What you’ve learned:
- How to take snapshot from a video for freeze frame
- How to remove background from snapshot
- How to mix snapshots and video for cloning effect
What you need to prepare:
- A computer (Windows or macOS)
- Your video materials.
- Filmora video editor
Step 1
Download and install Wondershare Filmora on your computer. Launch Filmora and click on New Project on the welcome screen. Alternatively, go to File menu and select New Project option.

Step 2
Import your video clip to Project Media folder. Go to File> Import Media and click on Import Media Files option. Select the video clip from your hard drive. Otherwise, you can drag and drop the video clip directly into the Project Media folder. Finally, drop the video clip from Project Media folder onto the timeline.

Step 3
Place the marker where you want the frame to freeze. Click on Camera icon under Program window. This will take a snapshot of the current frame and place it under Project Media folder. Drag and drop the snapshot onto the timeline.

Step 4
Match the duration of the snapshot with the point where you want the frame to freeze. Go to Effects> AI Portrait> Human Segmentation and drop the effect on the snapshot layer to make the background disappear.

Step 5
Double-click on the snapshot layer. Go to Effect and adjust the Edge thickness so that it looks perfect. Click on OK button and play the video to check out the effect.

Step 6
Perform Step 3 to Step 5 again where you need to select a frame to freeze, take snapshot, drop onto timeline and remove background. Finally, play the video to check out the freeze frame clone effect. Save the video on your hard drive by click on Export button.

Summary
What you’ve learned:
- How to take snapshot from a video for freeze frame
- How to remove background from snapshot
- How to mix snapshots and video for cloning effect
What you need to prepare:
- A computer (Windows or macOS)
- Your video materials.
- Filmora video editor
Step 1
Download and install Wondershare Filmora on your computer. Launch Filmora and click on New Project on the welcome screen. Alternatively, go to File menu and select New Project option.

Step 2
Import your video clip to Project Media folder. Go to File> Import Media and click on Import Media Files option. Select the video clip from your hard drive. Otherwise, you can drag and drop the video clip directly into the Project Media folder. Finally, drop the video clip from Project Media folder onto the timeline.

Step 3
Place the marker where you want the frame to freeze. Click on Camera icon under Program window. This will take a snapshot of the current frame and place it under Project Media folder. Drag and drop the snapshot onto the timeline.

Step 4
Match the duration of the snapshot with the point where you want the frame to freeze. Go to Effects> AI Portrait> Human Segmentation and drop the effect on the snapshot layer to make the background disappear.

Step 5
Double-click on the snapshot layer. Go to Effect and adjust the Edge thickness so that it looks perfect. Click on OK button and play the video to check out the effect.

Step 6
Perform Step 3 to Step 5 again where you need to select a frame to freeze, take snapshot, drop onto timeline and remove background. Finally, play the video to check out the freeze frame clone effect. Save the video on your hard drive by click on Export button.

Summary
What you’ve learned:
- How to take snapshot from a video for freeze frame
- How to remove background from snapshot
- How to mix snapshots and video for cloning effect
What you need to prepare:
- A computer (Windows or macOS)
- Your video materials.
- Filmora video editor
Step 1
Download and install Wondershare Filmora on your computer. Launch Filmora and click on New Project on the welcome screen. Alternatively, go to File menu and select New Project option.

Step 2
Import your video clip to Project Media folder. Go to File> Import Media and click on Import Media Files option. Select the video clip from your hard drive. Otherwise, you can drag and drop the video clip directly into the Project Media folder. Finally, drop the video clip from Project Media folder onto the timeline.

Step 3
Place the marker where you want the frame to freeze. Click on Camera icon under Program window. This will take a snapshot of the current frame and place it under Project Media folder. Drag and drop the snapshot onto the timeline.

Step 4
Match the duration of the snapshot with the point where you want the frame to freeze. Go to Effects> AI Portrait> Human Segmentation and drop the effect on the snapshot layer to make the background disappear.

Step 5
Double-click on the snapshot layer. Go to Effect and adjust the Edge thickness so that it looks perfect. Click on OK button and play the video to check out the effect.

Step 6
Perform Step 3 to Step 5 again where you need to select a frame to freeze, take snapshot, drop onto timeline and remove background. Finally, play the video to check out the freeze frame clone effect. Save the video on your hard drive by click on Export button.

Summary
What you’ve learned:
- How to take snapshot from a video for freeze frame
- How to remove background from snapshot
- How to mix snapshots and video for cloning effect
Dollar-Store DIY Hacks to Use for Filmmaking on a Budget
Filmmaking is usually an expensive hobby, but slowly over time, it’s become more affordable. Regular gear like cameras and lights are slightly cheaper, but there are plenty of ways to DIY regular items to use as film gear.
Making DIY film gear may not give you the same look as professional gear, but it could be a fun project and give you similar looks on a budget. In this article, let’s look at some dollar-store DIY hacks that you can use for filmmaking on a budget.

Tip 1. Add foreground elements to improve the frame of videos
Let’s start with something we can do to enhance your framing. Sometimes we want to direct our audience’s attention to a specific part of the frame. In this case, it’s the talent of placing an object in the shot’s foreground that can help us do that. While also making a more attractive frame. At the dollar store, try using something like these fake plants.

You can place it in front of your lens. Then focus on the talent behind it, giving a blurry foreground that perfectly frames the talent. Here’s how the shot looks with and without foreground elements.

![]()
Note: Remember, you can also use a different angle than simply approaching the object from the front. You can try and use different perspectives until you find the shot or footage you are looking for.
Tip 2. Adjust lights with poster boards
The shot below looks dark and boring because the background has no light. Here’s the shot with and without the lights.

A practical light is a light that shows up on screen rather than lighting talent from off-screen. For example, some dollar stores have small LED accent lights for around three dollars.
Others even have lights with adhesive backings that allow you to place them all over the room—creating great lighting accents with small eye-catching pockets of light.

On film sets, crews use a bounce to reflect light from one light source in another direction. At the dollar store, we can find something like this poster board to get a similar effect.

By reflecting the light onto the bounce, we get softer, more spread-out light when it’s reflected. Then you will get the result in a nicer look. Using poster boards, you can do multiple things with light.
- Use white to bounce light.
- Use black as a flag to shape or block light.

- You can also use green for a small green screen when filming a product video
You might have seen how big production companies create those alienated landscapes, such as in the movie Avatar and many more.
The concept is recording your object in front of a green screen behind it. Then, it’s much easier to add a separately filmed background to the final footage with a video editor like Filmora.

Tip 3. Smooth audio with felt pads or socks
Do you ever have audio pop while you are recording? It can get annoying. So, to fix the issues, we are now teaching you three practical ways.
1. Felt pads
Felt pads with adhesive backs can be stuck onto noisy props like a coffee mug. This way, we won’t hear the mug hitting the table when we’re recording sound.

2. Socks as pop filters
Professionals use what they call a pop filter because a pop filter can reduce the loud pops from their mouths. But what is pop? Pops usually occur when people say words that start with the letter P or B.
Then what is a pop filter? You might have seen in some YouTube videos, especially live streamers, where they use a microphone with a plate on its head; that’s called a pop filter. You can purchase pricey gear like a pop filter, or we can get a pack of cheap socks at the dollar store and place them over the mic.
It will make your voiceover slightly quieter, but it should also get rid of the popping. So keep adding socks until you hear no more pops in your voiceover.

Conclusion
See how easy it was! Keep in mind these dollar store hacks in your next video. And you can edit your footage like a pro with an easy-to-use video editor like Wondershare Filmora . Keep exploring different ideas and perspectives to record.
Free Download For Win 7 or later(64-bit)
Free Download For macOS 10.14 or later
Tip 2. Adjust lights with poster boards
The shot below looks dark and boring because the background has no light. Here’s the shot with and without the lights.

A practical light is a light that shows up on screen rather than lighting talent from off-screen. For example, some dollar stores have small LED accent lights for around three dollars.
Others even have lights with adhesive backings that allow you to place them all over the room—creating great lighting accents with small eye-catching pockets of light.

On film sets, crews use a bounce to reflect light from one light source in another direction. At the dollar store, we can find something like this poster board to get a similar effect.

By reflecting the light onto the bounce, we get softer, more spread-out light when it’s reflected. Then you will get the result in a nicer look. Using poster boards, you can do multiple things with light.
- Use white to bounce light.
- Use black as a flag to shape or block light.

- You can also use green for a small green screen when filming a product video
You might have seen how big production companies create those alienated landscapes, such as in the movie Avatar and many more.
The concept is recording your object in front of a green screen behind it. Then, it’s much easier to add a separately filmed background to the final footage with a video editor like Filmora.

Tip 3. Smooth audio with felt pads or socks
Do you ever have audio pop while you are recording? It can get annoying. So, to fix the issues, we are now teaching you three practical ways.
1. Felt pads
Felt pads with adhesive backs can be stuck onto noisy props like a coffee mug. This way, we won’t hear the mug hitting the table when we’re recording sound.

2. Socks as pop filters
Professionals use what they call a pop filter because a pop filter can reduce the loud pops from their mouths. But what is pop? Pops usually occur when people say words that start with the letter P or B.
Then what is a pop filter? You might have seen in some YouTube videos, especially live streamers, where they use a microphone with a plate on its head; that’s called a pop filter. You can purchase pricey gear like a pop filter, or we can get a pack of cheap socks at the dollar store and place them over the mic.
It will make your voiceover slightly quieter, but it should also get rid of the popping. So keep adding socks until you hear no more pops in your voiceover.

Conclusion
See how easy it was! Keep in mind these dollar store hacks in your next video. And you can edit your footage like a pro with an easy-to-use video editor like Wondershare Filmora . Keep exploring different ideas and perspectives to record.
Free Download For Win 7 or later(64-bit)
Free Download For macOS 10.14 or later
4 Ways to Rotate Videos on Windows PC
There are times where you may need to rotate a video into landscape if the video is shot in portrait. This is because watching a video in portrait orientation on a computer is horrible as the video screen size is compressed and the two sides have black screen. Instead, you can rotate video Windows into landscape, you can watch the same video comfortably. Besides, there are times when the entire video is shot at a certain angle as the video device was not properly aligned.
If you are a Windows user, rotating a video in Windows through Windows Media Player is not possible. However, Windows 10 comes with Photos app that contains a video editor to rotate a video and save it permanently. If you use VLC Media Player, you can rotate any video temporarily as well permanently at any desired angle. You can also rotate a video online without installing any software. In this article, we will illustrate how to rotate a video in Windows.
Way 1. Use Photos App
If you are a Windows 10, you can use the pre-installed Photos app to rotate a video and save it permanently. Photos app comes with an inbuilt video editor where rotating a video in Windows 10 is so easy. If you are using an older version of Windows, you can relate Photos app with Windows Movie Maker. Anyway, here are the steps to rotate any video on Photos app.
Step 1: From Start menu, search for “Photos” and open Photos app.

Step 2: Select Video Editor option which is available at the top of the screen. Once, Video Editor opens, click on New Video Project button.

Step 3: Put a name for the project and click on Ok. Thereafter, click on Add button and select the video file from your hard drive that you want to rotate.

Step 4: Drag and drop the video file into Timeline. Thereafter, Click on Rotate icon to turn the video by 90 degrees. You can click again to rotate the video further by 90 degrees again.

Step 5: Once done, click on Finish Video option and save the video file in the destination folder.
Way 2. Use Filmora
The best software on how to rotate a video in Windows 10 to Windows 7 is Wondershare Filmora . It is a professional video editor and there are loads of features to edit the video including rotation. You can make a video more attractive and crisp to publish on professional platforms like YouTube. Here are the steps to rotate a video on Filmora.
Step 1: Download and install Filmora. Open the software and import the video file that you want to rotate. Then drag and drop it on Timeline.
For Win 7 or later (64-bit)
For macOS 10.12 or later
Step 2: From Video Editing panel, expand Transform option and use the slider on Rotate option to rotate the video at any angle. Once done, click on OK button.

Step 3: Go to Export option and click on Export button. The new video files with its new rotation will be saved in the destination folder.

Way 3. Use VLC Media Player
Most Windows users generally install VLC Media Player to watch movies. This is because Windows Media Player supports only limited file formats. Most movie files that you download online are supported by VLC but not on Windows Media Player. Here are the steps on how to rotate a video in Windows temporarily using VLC Media Player.
Step 1: Open VLC Media Player. Go to Media menu and click on Open File option. Select the video file from your hard drive that you want to rotate.
Step 2: Once the video opens, go to Tools menu and click on Effects and Filters option.

Step 3: On Adjustments and Effects window, click on Video Effects tab.
Step 4: Under Video Effects tab, click on Geometry tab.
Step 5: Turn of Transform checkbox and click on drop-down menu to select the required option. You can rotate the video by 90 degrees, 180 degrees and 270 degrees.

Step 6: To rotate the video at any desired angle, turn on Rotate checkbox and select the desired angle.

Step 7: Finally, click on Save and then Close button.

Please note that when you rotate a video temporarily, it is for a one-time watch only. When you open the video again in any other media player, it will have the original orientation.
Way 4. Use EZGIF Online Tool
If you have short video files and you want to upload them on social media platforms, you can convert them into GIF files. You can convert any video file to EZGIF. Therefore, instead of video files, if you want to rotate GIF files, EZGIF is highly useful as an online tool. In fact, you can also convert GIF files into MP4 files. Here are the steps to follow to rotate short video files using EZGIF online tool.
Step 1: Open your web browser and open Ezgif.com.
Step 2: Click on Video to GIF option.
Step 3: Click on Choose File button and select the short video file from your hard drive.

Step 4: Click on Upload Video button and wait for the conversion. Thereafter, download the GIF file.
Step 5: To rotate the GIF file, go to Rotate option. Click on Choose File button.

Step 6: Select the GIF file and click on Upload.
Step 7: You can select from provided rotation options or mention rotation angle explicitly and click on Apply Rotation button.

Wait for the rotation effect and download the file on your hard drive.
FAQs about Rotate Video in Windows 10
1. How do I rotate a video in Windows 10?
To rotate a video in Windows 10, you can use the built-in Photos app. Open the app and select the video you want to rotate. Click on the Edit & Create button at the top of the screen and select Rotate left or Rotate right to adjust the video orientation.
2. Can I rotate a video in Windows Media Player?
No, you can’t rotate a video in Windows Media Player. This feature is only available in the Photos app. However, you can use a third-party video editing software to rotate your videos.
3. How do I save the rotated video?
After rotating the video in the Photos app, click on the Save a copy button at the top of the screen. You can then choose the destination folder and file name for the newly rotated video.
4. What should I do if the video is upside down after rotating it?
If the video is upside down after rotating it, you may have rotated it in the wrong direction. Try rotating it in the opposite direction and see if that fixes the issue. If not, you may need to use a third-party video editing software to rotate the video.
5. Can I rotate a video without losing quality?
Rotating a video can sometimes result in a loss of quality, especially if the video is compressed or low-resolution. However, using a good video editing software can help minimize the loss of quality. Make sure to save the rotated video in the same format and resolution as the original file to avoid further loss of quality.
Conclusion
We have provided you all the possible ways to rotate video Windows. If you want to rotate with pre-installed software, you have Photos app. If you have VLC Media Player installed, you can do the rotation temporarily and permanently. You can also use Ezgif online tool to rotate animated files without installing any
For macOS 10.12 or later
Step 2: From Video Editing panel, expand Transform option and use the slider on Rotate option to rotate the video at any angle. Once done, click on OK button.

Step 3: Go to Export option and click on Export button. The new video files with its new rotation will be saved in the destination folder.

Way 3. Use VLC Media Player
Most Windows users generally install VLC Media Player to watch movies. This is because Windows Media Player supports only limited file formats. Most movie files that you download online are supported by VLC but not on Windows Media Player. Here are the steps on how to rotate a video in Windows temporarily using VLC Media Player.
Step 1: Open VLC Media Player. Go to Media menu and click on Open File option. Select the video file from your hard drive that you want to rotate.
Step 2: Once the video opens, go to Tools menu and click on Effects and Filters option.

Step 3: On Adjustments and Effects window, click on Video Effects tab.
Step 4: Under Video Effects tab, click on Geometry tab.
Step 5: Turn of Transform checkbox and click on drop-down menu to select the required option. You can rotate the video by 90 degrees, 180 degrees and 270 degrees.

Step 6: To rotate the video at any desired angle, turn on Rotate checkbox and select the desired angle.

Step 7: Finally, click on Save and then Close button.

Please note that when you rotate a video temporarily, it is for a one-time watch only. When you open the video again in any other media player, it will have the original orientation.
Way 4. Use EZGIF Online Tool
If you have short video files and you want to upload them on social media platforms, you can convert them into GIF files. You can convert any video file to EZGIF. Therefore, instead of video files, if you want to rotate GIF files, EZGIF is highly useful as an online tool. In fact, you can also convert GIF files into MP4 files. Here are the steps to follow to rotate short video files using EZGIF online tool.
Step 1: Open your web browser and open Ezgif.com.
Step 2: Click on Video to GIF option.
Step 3: Click on Choose File button and select the short video file from your hard drive.

Step 4: Click on Upload Video button and wait for the conversion. Thereafter, download the GIF file.
Step 5: To rotate the GIF file, go to Rotate option. Click on Choose File button.

Step 6: Select the GIF file and click on Upload.
Step 7: You can select from provided rotation options or mention rotation angle explicitly and click on Apply Rotation button.

Wait for the rotation effect and download the file on your hard drive.
FAQs about Rotate Video in Windows 10
1. How do I rotate a video in Windows 10?
To rotate a video in Windows 10, you can use the built-in Photos app. Open the app and select the video you want to rotate. Click on the Edit & Create button at the top of the screen and select Rotate left or Rotate right to adjust the video orientation.
2. Can I rotate a video in Windows Media Player?
No, you can’t rotate a video in Windows Media Player. This feature is only available in the Photos app. However, you can use a third-party video editing software to rotate your videos.
3. How do I save the rotated video?
After rotating the video in the Photos app, click on the Save a copy button at the top of the screen. You can then choose the destination folder and file name for the newly rotated video.
4. What should I do if the video is upside down after rotating it?
If the video is upside down after rotating it, you may have rotated it in the wrong direction. Try rotating it in the opposite direction and see if that fixes the issue. If not, you may need to use a third-party video editing software to rotate the video.
5. Can I rotate a video without losing quality?
Rotating a video can sometimes result in a loss of quality, especially if the video is compressed or low-resolution. However, using a good video editing software can help minimize the loss of quality. Make sure to save the rotated video in the same format and resolution as the original file to avoid further loss of quality.
Conclusion
We have provided you all the possible ways to rotate video Windows. If you want to rotate with pre-installed software, you have Photos app. If you have VLC Media Player installed, you can do the rotation temporarily and permanently. You can also use Ezgif online tool to rotate animated files without installing any
For macOS 10.12 or later
Step 2: From Video Editing panel, expand Transform option and use the slider on Rotate option to rotate the video at any angle. Once done, click on OK button.

Step 3: Go to Export option and click on Export button. The new video files with its new rotation will be saved in the destination folder.

Way 3. Use VLC Media Player
Most Windows users generally install VLC Media Player to watch movies. This is because Windows Media Player supports only limited file formats. Most movie files that you download online are supported by VLC but not on Windows Media Player. Here are the steps on how to rotate a video in Windows temporarily using VLC Media Player.
Step 1: Open VLC Media Player. Go to Media menu and click on Open File option. Select the video file from your hard drive that you want to rotate.
Step 2: Once the video opens, go to Tools menu and click on Effects and Filters option.

Step 3: On Adjustments and Effects window, click on Video Effects tab.
Step 4: Under Video Effects tab, click on Geometry tab.
Step 5: Turn of Transform checkbox and click on drop-down menu to select the required option. You can rotate the video by 90 degrees, 180 degrees and 270 degrees.

Step 6: To rotate the video at any desired angle, turn on Rotate checkbox and select the desired angle.

Step 7: Finally, click on Save and then Close button.

Please note that when you rotate a video temporarily, it is for a one-time watch only. When you open the video again in any other media player, it will have the original orientation.
Way 4. Use EZGIF Online Tool
If you have short video files and you want to upload them on social media platforms, you can convert them into GIF files. You can convert any video file to EZGIF. Therefore, instead of video files, if you want to rotate GIF files, EZGIF is highly useful as an online tool. In fact, you can also convert GIF files into MP4 files. Here are the steps to follow to rotate short video files using EZGIF online tool.
Step 1: Open your web browser and open Ezgif.com.
Step 2: Click on Video to GIF option.
Step 3: Click on Choose File button and select the short video file from your hard drive.

Step 4: Click on Upload Video button and wait for the conversion. Thereafter, download the GIF file.
Step 5: To rotate the GIF file, go to Rotate option. Click on Choose File button.

Step 6: Select the GIF file and click on Upload.
Step 7: You can select from provided rotation options or mention rotation angle explicitly and click on Apply Rotation button.

Wait for the rotation effect and download the file on your hard drive.
FAQs about Rotate Video in Windows 10
1. How do I rotate a video in Windows 10?
To rotate a video in Windows 10, you can use the built-in Photos app. Open the app and select the video you want to rotate. Click on the Edit & Create button at the top of the screen and select Rotate left or Rotate right to adjust the video orientation.
2. Can I rotate a video in Windows Media Player?
No, you can’t rotate a video in Windows Media Player. This feature is only available in the Photos app. However, you can use a third-party video editing software to rotate your videos.
3. How do I save the rotated video?
After rotating the video in the Photos app, click on the Save a copy button at the top of the screen. You can then choose the destination folder and file name for the newly rotated video.
4. What should I do if the video is upside down after rotating it?
If the video is upside down after rotating it, you may have rotated it in the wrong direction. Try rotating it in the opposite direction and see if that fixes the issue. If not, you may need to use a third-party video editing software to rotate the video.
5. Can I rotate a video without losing quality?
Rotating a video can sometimes result in a loss of quality, especially if the video is compressed or low-resolution. However, using a good video editing software can help minimize the loss of quality. Make sure to save the rotated video in the same format and resolution as the original file to avoid further loss of quality.
Conclusion
We have provided you all the possible ways to rotate video Windows. If you want to rotate with pre-installed software, you have Photos app. If you have VLC Media Player installed, you can do the rotation temporarily and permanently. You can also use Ezgif online tool to rotate animated files without installing any
For macOS 10.12 or later
Step 2: From Video Editing panel, expand Transform option and use the slider on Rotate option to rotate the video at any angle. Once done, click on OK button.

Step 3: Go to Export option and click on Export button. The new video files with its new rotation will be saved in the destination folder.

Way 3. Use VLC Media Player
Most Windows users generally install VLC Media Player to watch movies. This is because Windows Media Player supports only limited file formats. Most movie files that you download online are supported by VLC but not on Windows Media Player. Here are the steps on how to rotate a video in Windows temporarily using VLC Media Player.
Step 1: Open VLC Media Player. Go to Media menu and click on Open File option. Select the video file from your hard drive that you want to rotate.
Step 2: Once the video opens, go to Tools menu and click on Effects and Filters option.

Step 3: On Adjustments and Effects window, click on Video Effects tab.
Step 4: Under Video Effects tab, click on Geometry tab.
Step 5: Turn of Transform checkbox and click on drop-down menu to select the required option. You can rotate the video by 90 degrees, 180 degrees and 270 degrees.

Step 6: To rotate the video at any desired angle, turn on Rotate checkbox and select the desired angle.

Step 7: Finally, click on Save and then Close button.

Please note that when you rotate a video temporarily, it is for a one-time watch only. When you open the video again in any other media player, it will have the original orientation.
Way 4. Use EZGIF Online Tool
If you have short video files and you want to upload them on social media platforms, you can convert them into GIF files. You can convert any video file to EZGIF. Therefore, instead of video files, if you want to rotate GIF files, EZGIF is highly useful as an online tool. In fact, you can also convert GIF files into MP4 files. Here are the steps to follow to rotate short video files using EZGIF online tool.
Step 1: Open your web browser and open Ezgif.com.
Step 2: Click on Video to GIF option.
Step 3: Click on Choose File button and select the short video file from your hard drive.

Step 4: Click on Upload Video button and wait for the conversion. Thereafter, download the GIF file.
Step 5: To rotate the GIF file, go to Rotate option. Click on Choose File button.

Step 6: Select the GIF file and click on Upload.
Step 7: You can select from provided rotation options or mention rotation angle explicitly and click on Apply Rotation button.

Wait for the rotation effect and download the file on your hard drive.
FAQs about Rotate Video in Windows 10
1. How do I rotate a video in Windows 10?
To rotate a video in Windows 10, you can use the built-in Photos app. Open the app and select the video you want to rotate. Click on the Edit & Create button at the top of the screen and select Rotate left or Rotate right to adjust the video orientation.
2. Can I rotate a video in Windows Media Player?
No, you can’t rotate a video in Windows Media Player. This feature is only available in the Photos app. However, you can use a third-party video editing software to rotate your videos.
3. How do I save the rotated video?
After rotating the video in the Photos app, click on the Save a copy button at the top of the screen. You can then choose the destination folder and file name for the newly rotated video.
4. What should I do if the video is upside down after rotating it?
If the video is upside down after rotating it, you may have rotated it in the wrong direction. Try rotating it in the opposite direction and see if that fixes the issue. If not, you may need to use a third-party video editing software to rotate the video.
5. Can I rotate a video without losing quality?
Rotating a video can sometimes result in a loss of quality, especially if the video is compressed or low-resolution. However, using a good video editing software can help minimize the loss of quality. Make sure to save the rotated video in the same format and resolution as the original file to avoid further loss of quality.
Conclusion
We have provided you all the possible ways to rotate video Windows. If you want to rotate with pre-installed software, you have Photos app. If you have VLC Media Player installed, you can do the rotation temporarily and permanently. You can also use Ezgif online tool to rotate animated files without installing any
[Spooky Halloween] Best 15+ Halloween Countdown Video Clips
Halloween is fast approaching, and as a content creator, you’re looking to take advantage of the season and give your viewers unique Halloween vibes in your videos, but you don’t know how to go about it. Don’t panic, we got just the right idea for you. Some might ask; What idea? Well, it’s none other than a Halloween countdown video clip.
Adding a Halloween countdown clip to your video is a great way to spice it up. However, it can be quite difficult to find a perfect clip that will suit the theme of your video. To help you out, we’ve curated a list of the best 15 Halloween countdown video clips that you can use in your videos to make them fancier.
- Fog Stones Halloween Dead
- Scary Sadako ghost
- Transferring Halloween Cupcakes From The Tray To The Table Moments
- Skeleton breaking screen
- Dark Monster Halloween Horror
- Face Portrait Halloween Clown
- A Family Wearing Handmade Halloween Mask At Home
- Halloween Buckets Stacked Together
- Carving Of Pumpkin For Halloween
- Dough Halloween Cookies Bakery Products
- Woman Decorating for Halloween [TikTok]
- Girl Blonde Portrait Halloween
- An Outdoor Table With Halloween Theme Settings
- A Kid In A Mummy Costume Holding A Halloween Bucket
- Stop Motion Of Halloween Candy
Halloween Countdown Clips Editor The best editor helps you add a Halloween countdown clip to your video.
Free Download Free Download Learn More

Part 1: Top 10 Halloween-Themed Footage for Halloween Countdown Clock Video
Here we provide footage exclusively for horizontal videos, so that you can use them for your videos for YouTube, Vimeo, Twitch, etc. If you just want some clips for TikTok, Ins story, or anything else, go ahead Halloween footage for vertical videos.
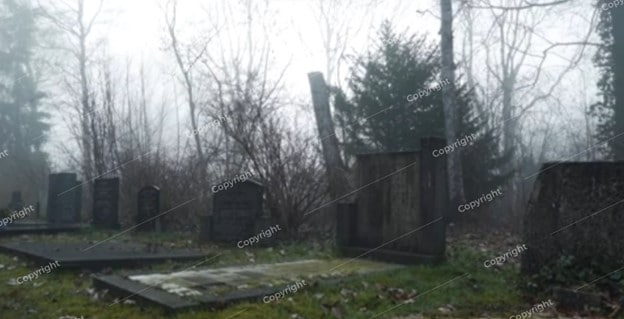
1. Fog Stones Halloween Dead
Spooky graveyard with scary tombstones is another good way to go about it when you are looking for vacation countdown clock videos. The mixture of the turbulent and serene environment is enough to set the Halloween mood and even scare some folks.
Remember the scene from the movie “The Fog” and its famous dialogues: When the fog rolls in the terror begin! If you do not, take a look at a scene and judge for yourself if scary enough or not.
2. Scary Sadako ghost
What’s better than the Sadako ghost 7-day video call threat on Halloween? Well, nothing! So, why not create a prank video for your friends and family, especially those afraid of Sadako? Plus, Sadako creates a perfect backdrop for the countdown. Look at this Philippines creator who went to great lengths to scare his friends via a Sadako video call.
But you do not have to go through all that costume and scenery setup. Instead, you can use the video footage on any premium video and apply Sadako ghost via Green Screen.

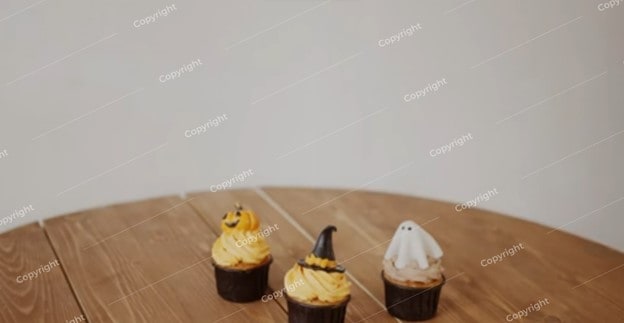
3. Transferring Halloween Cupcakes From The Tray To The Table Moments
Halloween is adored for its trick-or-treat, but what about the party? What will you serve? Cupcakes sound like a good idea. But how will you entice your guest with your Halloween cupcakes? Well, you can include the cupcakes in the invitation video. While you can find many Halloween creative and savory cupcake recipes on YouTube, you can use stock footage to have them in the video.
4. Skeleton breaking screen
The broken screen is the classic prank suitable for any event and day. But simply using apps or replacing the wallpaper on your friend’s or spouse’s mobile doesn’t cut in this age and day. With new technology coming in, you have to get creative. Plus, it’s for Halloween, meaning dead skulls are a must.
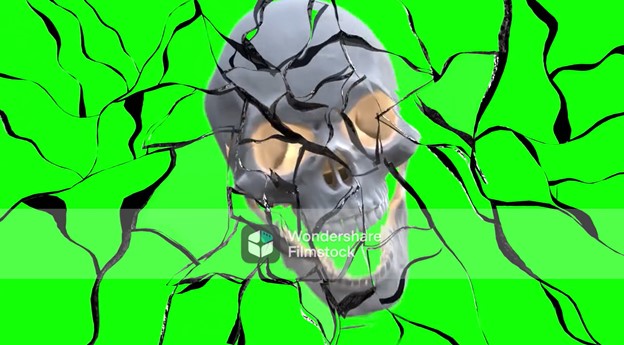
5. Dark Monster Halloween Horror
Halloween house horror is another great backdrop for scaring your friends after a vacation countdown clock. You will find tons of videos on Halloween Horror houses on the internet. Look at how Jackie from Super Enthused (YouTube channel) gets scared while touring the 10 Halloween horror houses at the theme park. That was really scary, and this Halloween countdown effect can also help you do the same to your viewers.
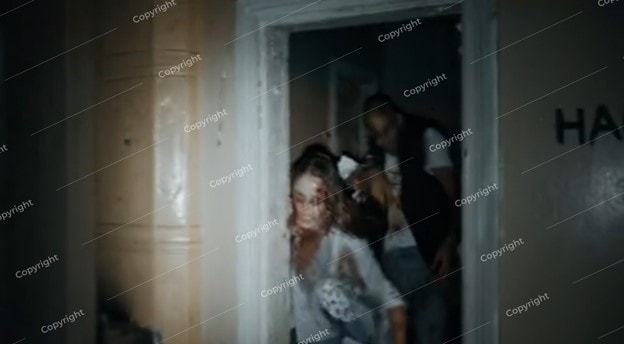
6. Face Portrait Halloween Clown
Scary clowns against a kid’s window have been the long norm of scaring the small ones. No doubt, such pranks can scare anyone, not just kids. If you do not believe me, look at the reaction video from Infinite featuring scaring clowns’ pranks.
But how about dropping such a scary face bomb in a vacation countdown clock video? You can easily get your hands on creepy clowns’ portraits for videos via premium stock libraries like Filmora’s Filmstock.
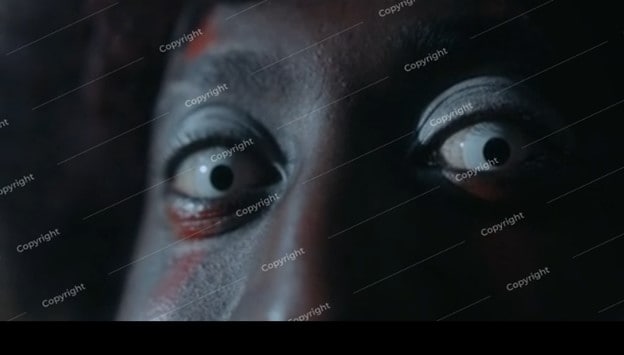
7. A Family Wearing Handmade Halloween Mask At Home
Another not-so-fancy, subtle, and understated appeal for the Halloween vacation countdown clock video is a family together with Halloween masks. Given everyone will be in their costumes, you can also consider distributing self-made masks for everyone. You can take ideas from any of the numerous videos about Halloween mask design ideas.
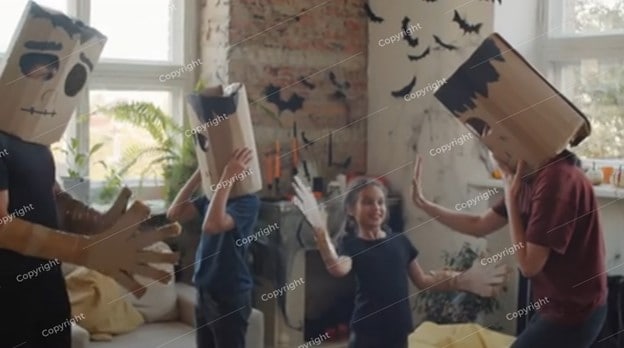
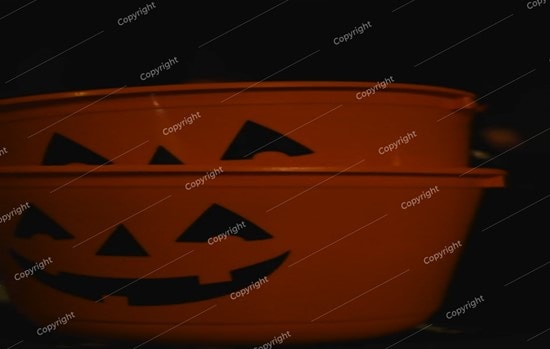
8. Halloween Buckets Stacked Together
What’s the simplest and most fitting footage for the Halloween vacation countdown clock? Well, it is the scary pumpkins. Carving out Jack-o’-lantern has long been the Halloween “tradition,” and featuring it in your countdown timer at the party is the most classic way to go about it. The vibe from simple Halloween buckets stacked together is on the next level; if you do not believe me, look at Angie Bellemare’s Halloween Bucket ideas and creativity:
9. Carving Of Pumpkin For Halloween
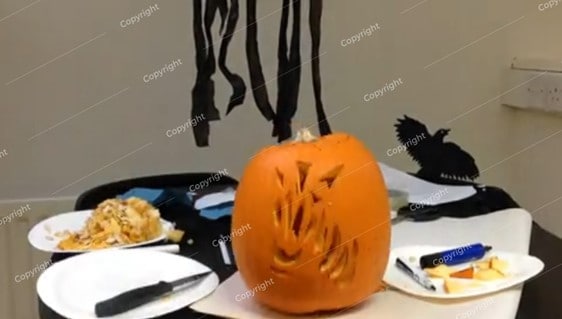
Another Jack-o’-lantern idea for the vacation countdown clock video is the DIY Pumpin projects in the video. It doesn’t sound like much, but it really is enough to give the best feeling about Halloween without really indulging in the scary stuff. Take a look at how Jenn designs her Pumpkin Stack Fall Planter:
10. Dough Halloween Cookies Bakery Products
If Halloween is more about spending time with friends and family, a bunch of laughter, fun, and creating memories, then it cannot get better than focusing on the sweet stuff, like the dough used to cook the Halloween cookies. When you imagine the scenario of dough mixing for the Halloween countdown timer video, it does not sound like much! But they are cool-looking and set the perfect backdrop for a countdown timer video:
You can use such clips individually or mix them with other stock video footage mentioned here to create a perfect Halloween vacation countdown clock video clip.

Halloween Footage for Vertical Videos [TikTok/Instagram Story]:
The above list discusses the panoramic footage suitable for big screens. If your screen is rather a vertical one, then you might be looking for vertical stock footage for the Halloween vacation countdown clock clip. Here are some vertical footage ideas and links to stock footage to create the perfect vertical vacation countdown clock video for Halloween:
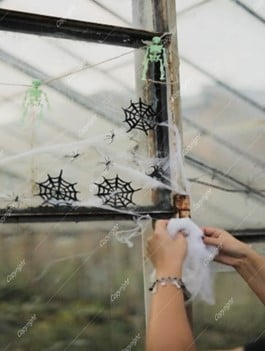
1. Woman Decorating for Halloween [TikTok]
Another simple backdrop for the Halloween countdown timer video is the decorations process to transform your indoors or outdoors for Halloween. And while you can use your own footage of decorating the house, chances are you may have missed filming yourself while decorating the house, given not everyone films themselves decorating the house and use it for their TikTok video. Here’s a video from Spooky Bones featuring the indoor decoration process for Halloween.
2. Girl Blonde Portrait Halloween
Another simple idea for a vertical countdown timer for Halloween is a scary face. In fact, if you are looking for the users to focus on the timer instead of footage is to use a slo-mo video, like this one from Tay. Tay tells a story about a real haunted house in her neighborhood while wearing scary Halloween makeup.
Of course, you can replace the story; and instead, use a clock with a girl wearing Halloween makeup.

3. An Outdoor Table With Halloween Theme Settings
If you are looking to feature the vacation countdown clock outdoors in a vertical setup, then a table with a Halloween theme might create the perfect setting. After all, Halloween is all about setting the perfect theme, and featuring a non-relevant indoor or scary video outdoors spoils the theme. Take a look at how Stephanie Cunningham on TikTok showcases her outdoor table decoration setup for Halloween.

4. A Kid In A Mummy Costume Holding A Halloween Bucket
If you are going for the classic mummy theme on Halloween, then how can you include any other footage than an actual mummy in the vertical countdown timer video? There are many ways to go about when looking to feature a mummy in the countdown clock; one idea is to show you made the mummy costumes, like Vina’s getup video on TikTok.

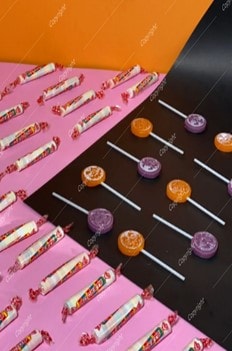
5. Stop Motion Of Halloween Candy
Hosting a Halloween party for kids and in search of the perfect vertical footage for a Halloween vacation countdown clock video? It cannot get better than simply featuring a bunch of candy to lure the kids toward the countdown clock. When you look at this video and imagine using a clock for the countdown clock.
Part 2: How to Apply a Halloween Countdown Clock to Your Video?
To make a unique Halloween Countdown Clock that ticks boxes around, you need software like Wondershare Filmora to implement the right element seamlessly.
Filmora library is filled with numerous such videos that will create the perfect backdrop for Halloween vacation countdown clock clips.
Coming to using the footage in your videos and making the Halloween countdown clock; well, you can do that easily using the Filmora Video editor (the video editor includes the Filmstock plug-in for easy navigation).
- Aside from Halloween-themed video footage, Filmora’s Filmstock also includes numerous audio, image, and other such elements.
- Filmora, primarily, is a video editor. You can combine all the elements like the stock footage videos discussed above and scary soundtracks and create a clock-down timer video easily.
- From trimming to splitting, to cool effects, there are several editing tools in Filmora.
- Transitions**, filters, text animations, and other editing features** are all supported.
Here’s how to use Filmora to Create a Halloween Countdown Clock Video
Free Download For Win 7 or later(64-bit)
Free Download For macOS 10.14 or later
Step1 Download and install Filmora on your Mac or PC.
Step2 Start the installed software and click Import from the main interface to upload the Halloween countdown clip. Alternatively, you can just drag-n-drop the video.
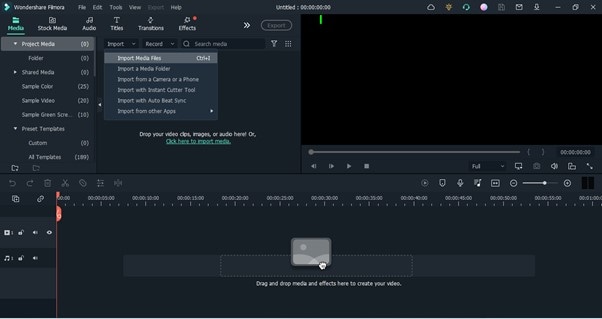
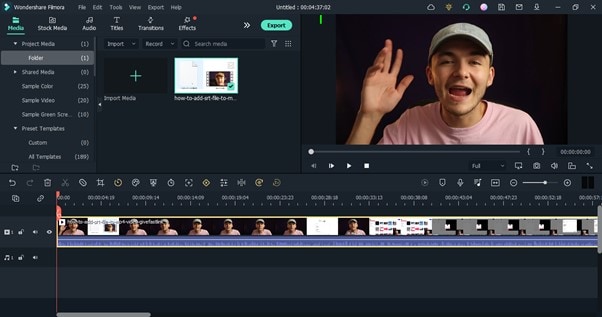
Step3 Drag-n-drop the uploaded video to the timeline.
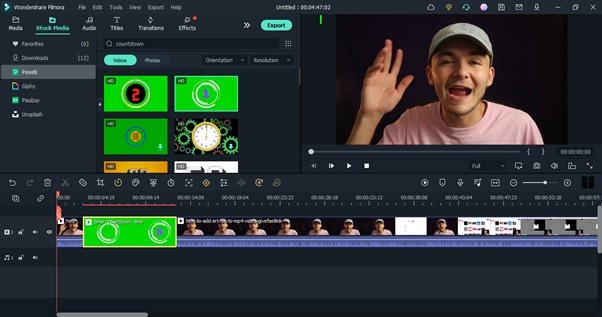
Step4 Next, click on Stock Media and select the countdown effect that you want to use in the Halloween video. Then, drag-n-drop it to the timeline.
Step5 double click on the countdown effect and adjust it according to your requirement. You can adjust the time length too.
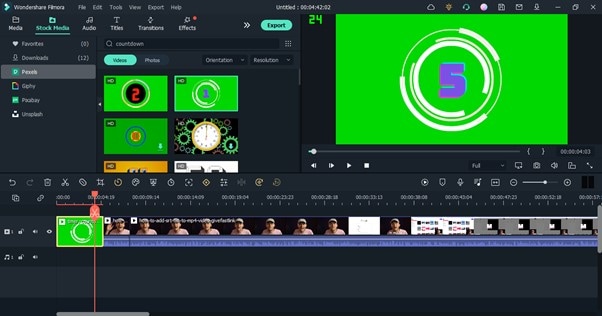
After that, play the video to preview it.
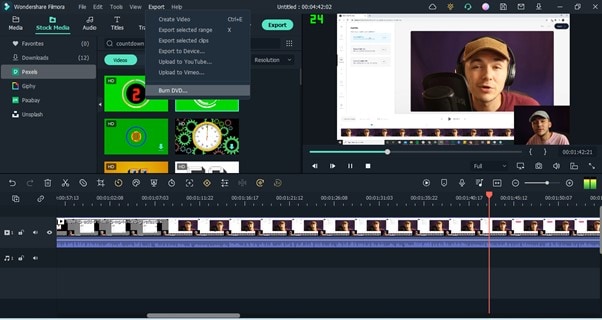
Step6 If you’re satisfied with the editing, scroll to the top of the screen and click Export, then, select ‘Burn DVD’.
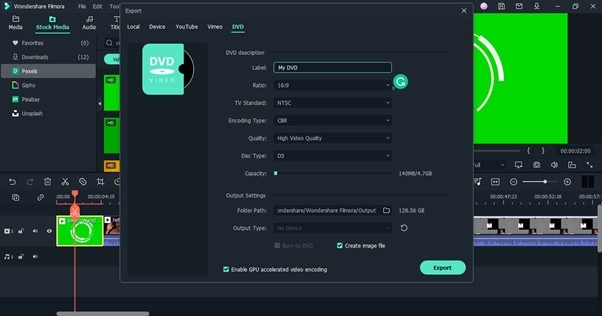
Step7 Enter a name for your file in the Label box of the pop-up that appears on your screen, then in the Folder Path, choose the location where you want the file to be saved. Click the ‘Export’ button to finish.
Conclusion
There you have it - the top 15 Halloween countdown videos that can be used to spice up videos. Not to mention, you can find the stock footage on this page via Filmstock’s vast library containing tons of such videos. Also, is better to use subtle and not-so-horrifying clips if you want everything to be serene in the Halloween vacation countdown clock video.
Free Download For Win 7 or later(64-bit)
Free Download For macOS 10.14 or later
Halloween Countdown Clips Editor The best editor helps you add a Halloween countdown clip to your video.
Free Download Free Download Learn More

Part 1: Top 10 Halloween-Themed Footage for Halloween Countdown Clock Video
Here we provide footage exclusively for horizontal videos, so that you can use them for your videos for YouTube, Vimeo, Twitch, etc. If you just want some clips for TikTok, Ins story, or anything else, go ahead Halloween footage for vertical videos.
1. Fog Stones Halloween Dead
Spooky graveyard with scary tombstones is another good way to go about it when you are looking for vacation countdown clock videos. The mixture of the turbulent and serene environment is enough to set the Halloween mood and even scare some folks.
Remember the scene from the movie “The Fog” and its famous dialogues: When the fog rolls in the terror begin! If you do not, take a look at a scene and judge for yourself if scary enough or not.

2. Scary Sadako ghost
What’s better than the Sadako ghost 7-day video call threat on Halloween? Well, nothing! So, why not create a prank video for your friends and family, especially those afraid of Sadako? Plus, Sadako creates a perfect backdrop for the countdown. Look at this Philippines creator who went to great lengths to scare his friends via a Sadako video call.
But you do not have to go through all that costume and scenery setup. Instead, you can use the video footage on any premium video and apply Sadako ghost via Green Screen.

3. Transferring Halloween Cupcakes From The Tray To The Table Moments
Halloween is adored for its trick-or-treat, but what about the party? What will you serve? Cupcakes sound like a good idea. But how will you entice your guest with your Halloween cupcakes? Well, you can include the cupcakes in the invitation video. While you can find many Halloween creative and savory cupcake recipes on YouTube, you can use stock footage to have them in the video.

4. Skeleton breaking screen
The broken screen is the classic prank suitable for any event and day. But simply using apps or replacing the wallpaper on your friend’s or spouse’s mobile doesn’t cut in this age and day. With new technology coming in, you have to get creative. Plus, it’s for Halloween, meaning dead skulls are a must.

5. Dark Monster Halloween Horror
Halloween house horror is another great backdrop for scaring your friends after a vacation countdown clock. You will find tons of videos on Halloween Horror houses on the internet. Look at how Jackie from Super Enthused (YouTube channel) gets scared while touring the 10 Halloween horror houses at the theme park. That was really scary, and this Halloween countdown effect can also help you do the same to your viewers.

6. Face Portrait Halloween Clown
Scary clowns against a kid’s window have been the long norm of scaring the small ones. No doubt, such pranks can scare anyone, not just kids. If you do not believe me, look at the reaction video from Infinite featuring scaring clowns’ pranks.
But how about dropping such a scary face bomb in a vacation countdown clock video? You can easily get your hands on creepy clowns’ portraits for videos via premium stock libraries like Filmora’s Filmstock.

7. A Family Wearing Handmade Halloween Mask At Home
Another not-so-fancy, subtle, and understated appeal for the Halloween vacation countdown clock video is a family together with Halloween masks. Given everyone will be in their costumes, you can also consider distributing self-made masks for everyone. You can take ideas from any of the numerous videos about Halloween mask design ideas.

8. Halloween Buckets Stacked Together
What’s the simplest and most fitting footage for the Halloween vacation countdown clock? Well, it is the scary pumpkins. Carving out Jack-o’-lantern has long been the Halloween “tradition,” and featuring it in your countdown timer at the party is the most classic way to go about it. The vibe from simple Halloween buckets stacked together is on the next level; if you do not believe me, look at Angie Bellemare’s Halloween Bucket ideas and creativity:

9. Carving Of Pumpkin For Halloween
Another Jack-o’-lantern idea for the vacation countdown clock video is the DIY Pumpin projects in the video. It doesn’t sound like much, but it really is enough to give the best feeling about Halloween without really indulging in the scary stuff. Take a look at how Jenn designs her Pumpkin Stack Fall Planter:

10. Dough Halloween Cookies Bakery Products
If Halloween is more about spending time with friends and family, a bunch of laughter, fun, and creating memories, then it cannot get better than focusing on the sweet stuff, like the dough used to cook the Halloween cookies. When you imagine the scenario of dough mixing for the Halloween countdown timer video, it does not sound like much! But they are cool-looking and set the perfect backdrop for a countdown timer video:
You can use such clips individually or mix them with other stock video footage mentioned here to create a perfect Halloween vacation countdown clock video clip.

Halloween Footage for Vertical Videos [TikTok/Instagram Story]:
The above list discusses the panoramic footage suitable for big screens. If your screen is rather a vertical one, then you might be looking for vertical stock footage for the Halloween vacation countdown clock clip. Here are some vertical footage ideas and links to stock footage to create the perfect vertical vacation countdown clock video for Halloween:
1. Woman Decorating for Halloween [TikTok]
Another simple backdrop for the Halloween countdown timer video is the decorations process to transform your indoors or outdoors for Halloween. And while you can use your own footage of decorating the house, chances are you may have missed filming yourself while decorating the house, given not everyone films themselves decorating the house and use it for their TikTok video. Here’s a video from Spooky Bones featuring the indoor decoration process for Halloween.

2. Girl Blonde Portrait Halloween
Another simple idea for a vertical countdown timer for Halloween is a scary face. In fact, if you are looking for the users to focus on the timer instead of footage is to use a slo-mo video, like this one from Tay. Tay tells a story about a real haunted house in her neighborhood while wearing scary Halloween makeup.
Of course, you can replace the story; and instead, use a clock with a girl wearing Halloween makeup.

3. An Outdoor Table With Halloween Theme Settings
If you are looking to feature the vacation countdown clock outdoors in a vertical setup, then a table with a Halloween theme might create the perfect setting. After all, Halloween is all about setting the perfect theme, and featuring a non-relevant indoor or scary video outdoors spoils the theme. Take a look at how Stephanie Cunningham on TikTok showcases her outdoor table decoration setup for Halloween.

4. A Kid In A Mummy Costume Holding A Halloween Bucket
If you are going for the classic mummy theme on Halloween, then how can you include any other footage than an actual mummy in the vertical countdown timer video? There are many ways to go about when looking to feature a mummy in the countdown clock; one idea is to show you made the mummy costumes, like Vina’s getup video on TikTok.

5. Stop Motion Of Halloween Candy
Hosting a Halloween party for kids and in search of the perfect vertical footage for a Halloween vacation countdown clock video? It cannot get better than simply featuring a bunch of candy to lure the kids toward the countdown clock. When you look at this video and imagine using a clock for the countdown clock.

Part 2: How to Apply a Halloween Countdown Clock to Your Video?
To make a unique Halloween Countdown Clock that ticks boxes around, you need software like Wondershare Filmora to implement the right element seamlessly.
Filmora library is filled with numerous such videos that will create the perfect backdrop for Halloween vacation countdown clock clips.
Coming to using the footage in your videos and making the Halloween countdown clock; well, you can do that easily using the Filmora Video editor (the video editor includes the Filmstock plug-in for easy navigation).
- Aside from Halloween-themed video footage, Filmora’s Filmstock also includes numerous audio, image, and other such elements.
- Filmora, primarily, is a video editor. You can combine all the elements like the stock footage videos discussed above and scary soundtracks and create a clock-down timer video easily.
- From trimming to splitting, to cool effects, there are several editing tools in Filmora.
- Transitions**, filters, text animations, and other editing features** are all supported.
Here’s how to use Filmora to Create a Halloween Countdown Clock Video
Free Download For Win 7 or later(64-bit)
Free Download For macOS 10.14 or later
Step1 Download and install Filmora on your Mac or PC.
Step2 Start the installed software and click Import from the main interface to upload the Halloween countdown clip. Alternatively, you can just drag-n-drop the video.

Step3 Drag-n-drop the uploaded video to the timeline.

Step4 Next, click on Stock Media and select the countdown effect that you want to use in the Halloween video. Then, drag-n-drop it to the timeline.

Step5 double click on the countdown effect and adjust it according to your requirement. You can adjust the time length too.

After that, play the video to preview it.
Step6 If you’re satisfied with the editing, scroll to the top of the screen and click Export, then, select ‘Burn DVD’.

Step7 Enter a name for your file in the Label box of the pop-up that appears on your screen, then in the Folder Path, choose the location where you want the file to be saved. Click the ‘Export’ button to finish.

Conclusion
There you have it - the top 15 Halloween countdown videos that can be used to spice up videos. Not to mention, you can find the stock footage on this page via Filmstock’s vast library containing tons of such videos. Also, is better to use subtle and not-so-horrifying clips if you want everything to be serene in the Halloween vacation countdown clock video.
Free Download For Win 7 or later(64-bit)
Free Download For macOS 10.14 or later
Also read:
- New Premiere Pro Text Effects Beginner Guide for 2024
- New In 2024, Frame Rates, Speed, and Wondershare Filmora An Overview
- Updated Find a Video Background Change Online that Works for You. This Article Contains Tools that Can Edit Video Backgrounds Online with Little Effort for 2024
- Updated In 2024, Discover the Process of Slowing Down Time-Lapse Videos on Your iPhone
- New How To Create A YouTube Intro
- Are You Ready to Learn About Something Free yet Amazing? We Are Talking About All Format Video Players for PC that You Should Know , Lets Begin for 2024
- Want to Know the Simplest Way to Match the Colors of Your Photos in Photoshop? The Following Discussion Will Help Match Color in Photoshop, Almost Effortlessly
- Add Motion Blur in After Effects for 2024
- New 7 Ways Add Subtitles to MKV Videos on All Platforms for 2024
- Want to Make Professional-Looking Videos? Keep Reading to Give Your Videos a Cinematic Feel with the Audio Mixer of Filmora
- In 2024, How to Use Rule of Thirds in Video
- Updated Top 10 Old Film Overlays to Make Your Videos Look Vintage for 2024
- 2024 Approved Learn How to Merge Audio and Video Like a Pro with This Step-by-Step Guide to Using FFmpeg. Create Seamless Videos and Improve Your Video Production Skills
- In 2024, The Complete Guide to Making Fortnite Montage
- Updated | How to Livestream Zoom on Facebook for 2024
- 2024 Approved How to Apply Gaussian Blur Effect to Videos In Premiere Pro?
- Updated In 2024, How to Merge FLV Files Windows, Mac,Android, iPhone & Online
- What Are the Best 10 GIF Creator, In 2024
- 2024 Approved Are You Looking for Ways to Add Background to Green Screen Video Online? Worry Not, as in This Article; We Shall Discuss Using a Green Screen Background Adder in Filmora
- In 2024, 10 Innovative AR Teaching Examples to Tell You What Is AR in Teaching
- Updated The Way to Make Dynamic Video Collages for 2024
- Updated In 2024, An Ultimate Guide to Flexclip Online Trimmer
- In 2024, How to Become a Youtuber?
- Updated In 2024, Green Screen YouTube Videos
- New Facts About GIF Background You Didnt Know
- Updated 15 Best CapCut Templates for Slow Motion Editing
- New Create Kinetice Typography Text Effect in Filmora
- New Create A Freeze Frame Sequence In Your Videos for 2024
- New Motion Blur Photo With GIMP Step-By-Step Guide for 2024
- 2024 Approved Best Ways to Blur Zoom Background for Free
- Updated Brighten a Video in Windows 10 Easily When Video Clips You Recorded on Your Windows 10 Computer or Those Downloaded From YouTube Are Too Dark or Too Bright, You Can Easily Adjust the Color Levels in a Few Clicks
- New 2024 Approved How to Be a YouTube Vlogger
- New Best Online GIF to Image (PNG/JPG) Converter
- Updated 2024 Approved Progressive Solutions to Add VHS Effects to Video with Ease
- Updated 2024 Approved Top 8 Memoji Makers to Make a Memoji on PC, Android & iPhone
- New Lets Learn How to Convert a Normal Video Into a Film Shot in the 1920S with Wondershare Filmora
- Updated Top 31 Video Trimmers That Will Save You Time in Ediitng
- New Different Ways to Crop TikTok Video in High-Quality
- 8 Frame Rate Video Converters You Must Try for 2024
- New Comprehensive Guide to Add LUTs in Premiere Pro with Ease
- New 4K Videos Are the in Thing because of Their Flexibility and High Resolution. Stick Around to Learn How to Choose the Best Frame Rate for 4K Videos
- In 2024, 8 Best Free Title Maker You Must Try and Put to Use
- Updated How to Use LUTs in Adobe Premiere Pro
- 2024 Approved Polish and Enshrine Your Music Videos with the Best Editing Software, Filmora. Add Cuts to Your Beat, Light Leaks, and Much More
- New In 2024, How To Make Flying Objects in Wondershare Filmora
- In 2024, Top 10 AirPlay Apps in Vivo Y100A for Streaming | Dr.fone
- In 2024, Top 5 Nokia XR21 Bypass FRP Tools for PC That Actually Work
- How To Do OnePlus Nord CE 3 5G Screen Sharing | Dr.fone
- In 2024, About Meizu FRP Bypass
- In 2024, 4 Things You Must Know About iPhone XS Activation Lock
- Reasons for Nubia Z50 Ultra Stuck on Boot Screen and Ways To Fix Them | Dr.fone
- Fixes for Apps Keep Crashing on Nokia C12 Pro | Dr.fone
- How to Remove Apple iPhone 11 Pro Max Device from iCloud
- In 2024, 5 Easy Ways to Copy Contacts from Infinix Note 30 VIP Racing Edition to iPhone 14 and 15 | Dr.fone
- How to Remove a Previously Synced Google Account from Your Vivo Y28 5G
- How To Transfer Data From iPhone 11 Pro To Other iPhone 15 Pro devices? | Dr.fone
- Complete Guide to Hard Reset Your Realme Narzo 60 5G | Dr.fone
- How to Fix when Apple Account Locked On Apple iPhone 14?
- In 2024, How to Change Netflix Location to Get More Country Version On Honor X50 GT | Dr.fone
- Change Location on Yik Yak For your Samsung Galaxy A25 5G to Enjoy More Fun | Dr.fone
- In 2024, Learn How To Lock Stolen Your iPhone 11 Properly | Dr.fone
- Best 10 Mock Location Apps Worth Trying On Apple iPhone SE (2022) | Dr.fone
- In 2024, 9 Mind-Blowing Tricks to Hatch Eggs in Pokemon Go Without Walking On OnePlus 11 5G | Dr.fone
- How To Deal With the Samsung Galaxy A25 5G Screen Black But Still Works? | Dr.fone
- Title: How to Create Freeze Frame Clone Effect
- Author: Chloe
- Created at : 2024-05-20 03:37:28
- Updated at : 2024-05-21 03:37:28
- Link: https://ai-editing-video.techidaily.com/how-to-create-freeze-frame-clone-effect/
- License: This work is licensed under CC BY-NC-SA 4.0.

