:max_bytes(150000):strip_icc():format(webp)/laptop-2443739-5b55bc7c46e0fb00378df55b.jpg)
How to Create Intro Video with KineMaster for 2024

How to Create Intro Video with KineMaster
The intro is considered to be the most important part of a video. The intro comes first in a video and the first impression is crucial in retaining the viewers. If the intro is gripping and engaging, the viewers are likely to check the rest of the video. In order to create a stunning video, you need to have the best video editor. If you are a smartphone user, KineMaster intro maker should be your first choice.
You must have seen videos with stunning intro having KineMaster watermark on social media and video streaming platforms. Starting from beginners to professional video creators, KineMaster is an easy choice for them to make video intro. KineMaster is a powerful intro maker where you will find several templates, effects, and modes to create stunning intros for your videos. We will illustrate the steps to create intro video with KineMaster Intro Maker.
Part 1. Steps to Create Intro Video with KineMaster
KineMaster video editor is one of the most intuitive apps and that is why creating amazing intro videos is super easy. KineMaster app is available for both Android and iOS users. There are awesome assets, amazing templates, and useful blending modes available to design your desired intro video. You can create 4K intro videos at 60 FPS comfortably. Here are the steps to create intro KineMaster video.
Step 1: Go for KineMaster intro download as per your smartphone OS. Launch KineMaster app and tap on Create New icon on the home screen.
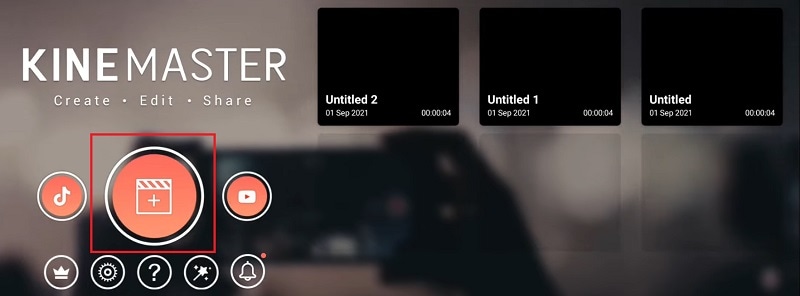
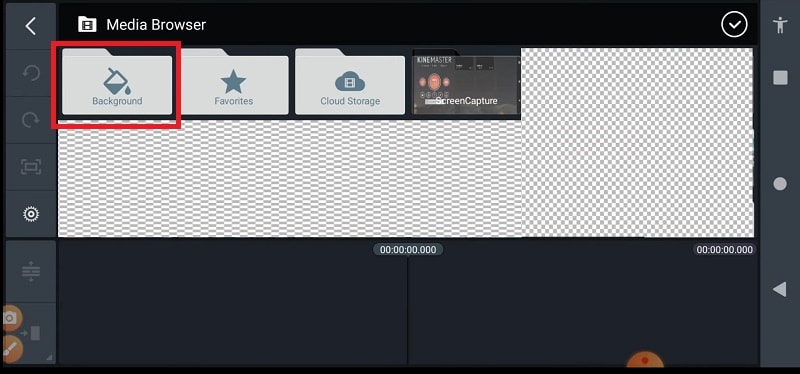
Step 2: Select an aspect ratio such as 16:9 or 9:16 or 1:1 as per your requirements. On the next screen, tap on Background and select a background as per your preference.
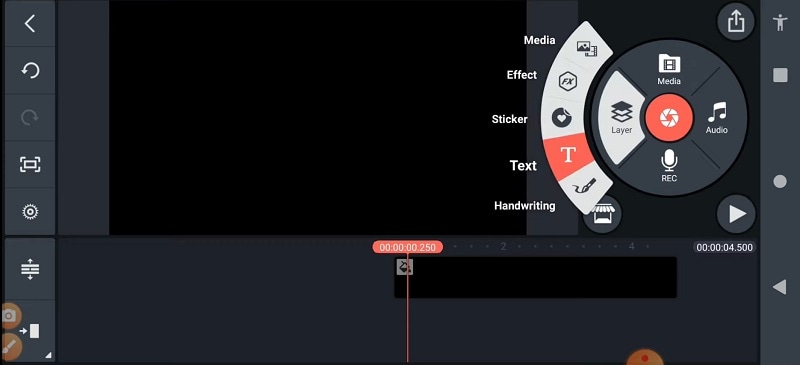
Step 3: On the layer at the bottom and select Text option. Type in your text that you want to show in the intro and tap on Ok button. You can change the font and style from the right panel.
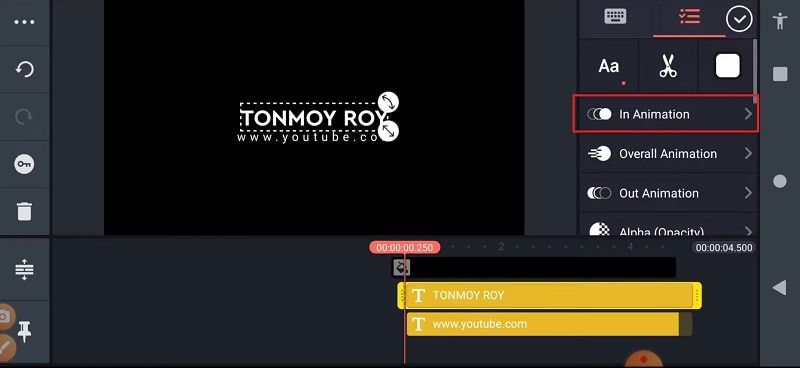
Step 4: Select the text layer and from the right panel, tap on In Animation option to animate the text. Select a desired animation template that you think is appropriate.
Step 5: Tap on the text layer again and tap on Effect option to add a text effect. Choose any desired Effect from the list. You can also tap on Get More to check out more effect templates.
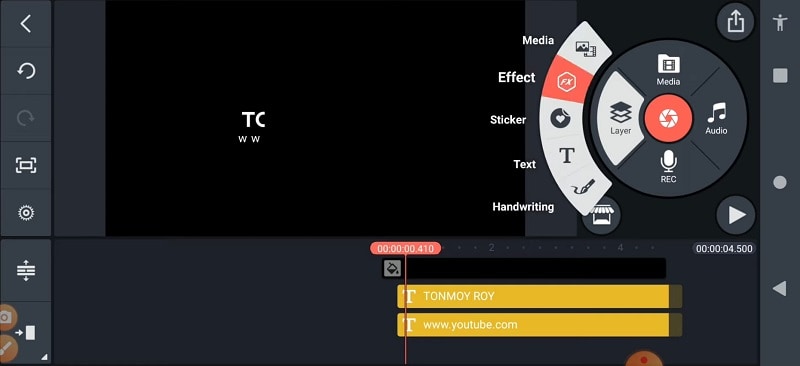
After you apply an effect, select the Effect layer from the timeline and go to Settings to make any adjustment. You can play and watch the intro video. Besides, you can add background photo or video and add graphical elements to enhance the intro animation.
Part 2. How to Create 3D Intro with KineMaster
We have illustrated how to create a text intro video and you can try out different animations and effects and come up with creative intro video. There is a viral trend in showing 3D intro to get more traction. You can use KineMaster to create amazing 3D intro videos easily that can go along with your video content. Here are the simple steps on how you can create 3D video with KineMaster.
Step 1: Install KineMaster from Play Store or App Store as per your smartphone OS. Launch KineMaster app after installation and tap on Create New icon.
Step 2: Select an aspect ratio and tap on Background option. Select a background color as per your preference. Otherwise, you can tap on Media Browser if you want to add a pre-decided photo or video as a background. We recommend a background video to amplify the 3D effect.
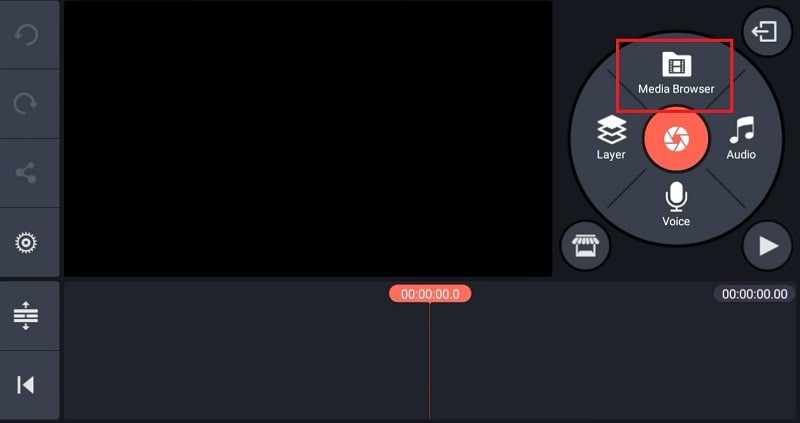
Step 3: It is time to add a 3D title. You can tap on Layer icon and Text icon to type in any title that you can turn into 3D with text effect or style. You can also tap on Media icon to select a ready-made 3D text with a transparent background. After adding the text, you can stretch it to increase the size as per your preference.
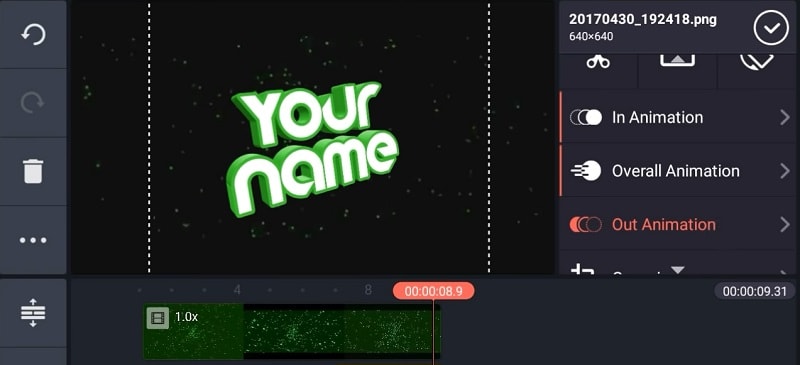
Step 4: From the right panel, tap on In Animation option and select a desired animation template. Similarly, tap on Out Animation option and select any animation whichever you think it is fit.
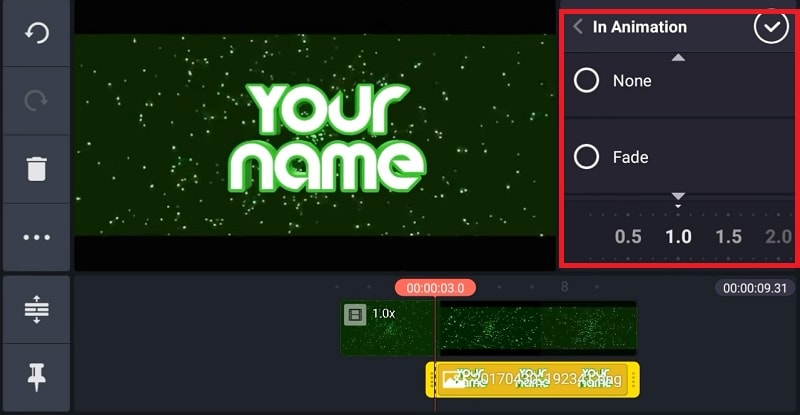
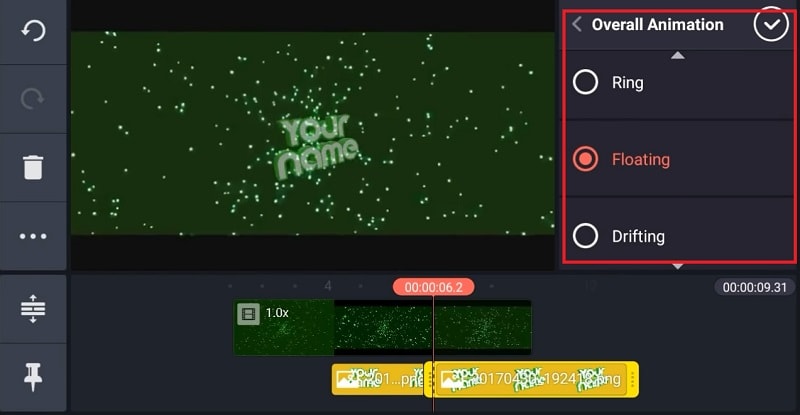
Step 5: From the right panel, tap on Overall Animation, select an animation template such as floating to enhance the 3D effect.
Part 3. Related FAQs of KineMaster Intro Video
What app most YouTubers use to make intros?
Apart from KineMaster, most YouTubers use Wondershare Filmora to make amazing videos. Filmora has a wider range of video effects, animations, and stock photos and videos. On top of that, the text animation and effect templates are tailor-made for intro videos.
Is KineMaster good for making YouTube videos?
Yes, KineMaster is good for creating engaging YouTube videos. You can create amazing intro and outro for your YouTube video on your smartphone. You can blend your photos and videos together and create amazing YouTube videos and stunning texts and titles. Besides, you can use chroma keys, transitions, reverse timing, and multi-layer features.
Can KineMaster handle 4K?
Yes, KineMaster is perfect for editing 4K video taken with high-end cameras. After editing the videos, you can export them in 4K resolution up to 60 FPS. However, you will need a high-end smartphone for KineMaster to handle 4K video editing smoothl
The intro is considered to be the most important part of a video. The intro comes first in a video and the first impression is crucial in retaining the viewers. If the intro is gripping and engaging, the viewers are likely to check the rest of the video. In order to create a stunning video, you need to have the best video editor. If you are a smartphone user, KineMaster intro maker should be your first choice.
You must have seen videos with stunning intro having KineMaster watermark on social media and video streaming platforms. Starting from beginners to professional video creators, KineMaster is an easy choice for them to make video intro. KineMaster is a powerful intro maker where you will find several templates, effects, and modes to create stunning intros for your videos. We will illustrate the steps to create intro video with KineMaster Intro Maker.
Part 1. Steps to Create Intro Video with KineMaster
KineMaster video editor is one of the most intuitive apps and that is why creating amazing intro videos is super easy. KineMaster app is available for both Android and iOS users. There are awesome assets, amazing templates, and useful blending modes available to design your desired intro video. You can create 4K intro videos at 60 FPS comfortably. Here are the steps to create intro KineMaster video.
Step 1: Go for KineMaster intro download as per your smartphone OS. Launch KineMaster app and tap on Create New icon on the home screen.

Step 2: Select an aspect ratio such as 16:9 or 9:16 or 1:1 as per your requirements. On the next screen, tap on Background and select a background as per your preference.

Step 3: On the layer at the bottom and select Text option. Type in your text that you want to show in the intro and tap on Ok button. You can change the font and style from the right panel.

Step 4: Select the text layer and from the right panel, tap on In Animation option to animate the text. Select a desired animation template that you think is appropriate.

Step 5: Tap on the text layer again and tap on Effect option to add a text effect. Choose any desired Effect from the list. You can also tap on Get More to check out more effect templates.

After you apply an effect, select the Effect layer from the timeline and go to Settings to make any adjustment. You can play and watch the intro video. Besides, you can add background photo or video and add graphical elements to enhance the intro animation.
Part 2. How to Create 3D Intro with KineMaster
We have illustrated how to create a text intro video and you can try out different animations and effects and come up with creative intro video. There is a viral trend in showing 3D intro to get more traction. You can use KineMaster to create amazing 3D intro videos easily that can go along with your video content. Here are the simple steps on how you can create 3D video with KineMaster.
Step 1: Install KineMaster from Play Store or App Store as per your smartphone OS. Launch KineMaster app after installation and tap on Create New icon.
Step 2: Select an aspect ratio and tap on Background option. Select a background color as per your preference. Otherwise, you can tap on Media Browser if you want to add a pre-decided photo or video as a background. We recommend a background video to amplify the 3D effect.

Step 3: It is time to add a 3D title. You can tap on Layer icon and Text icon to type in any title that you can turn into 3D with text effect or style. You can also tap on Media icon to select a ready-made 3D text with a transparent background. After adding the text, you can stretch it to increase the size as per your preference.

Step 4: From the right panel, tap on In Animation option and select a desired animation template. Similarly, tap on Out Animation option and select any animation whichever you think it is fit.

Step 5: From the right panel, tap on Overall Animation, select an animation template such as floating to enhance the 3D effect.

Part 3. Related FAQs of KineMaster Intro Video
What app most YouTubers use to make intros?
Apart from KineMaster, most YouTubers use Wondershare Filmora to make amazing videos. Filmora has a wider range of video effects, animations, and stock photos and videos. On top of that, the text animation and effect templates are tailor-made for intro videos.
Is KineMaster good for making YouTube videos?
Yes, KineMaster is good for creating engaging YouTube videos. You can create amazing intro and outro for your YouTube video on your smartphone. You can blend your photos and videos together and create amazing YouTube videos and stunning texts and titles. Besides, you can use chroma keys, transitions, reverse timing, and multi-layer features.
Can KineMaster handle 4K?
Yes, KineMaster is perfect for editing 4K video taken with high-end cameras. After editing the videos, you can export them in 4K resolution up to 60 FPS. However, you will need a high-end smartphone for KineMaster to handle 4K video editing smoothl
The intro is considered to be the most important part of a video. The intro comes first in a video and the first impression is crucial in retaining the viewers. If the intro is gripping and engaging, the viewers are likely to check the rest of the video. In order to create a stunning video, you need to have the best video editor. If you are a smartphone user, KineMaster intro maker should be your first choice.
You must have seen videos with stunning intro having KineMaster watermark on social media and video streaming platforms. Starting from beginners to professional video creators, KineMaster is an easy choice for them to make video intro. KineMaster is a powerful intro maker where you will find several templates, effects, and modes to create stunning intros for your videos. We will illustrate the steps to create intro video with KineMaster Intro Maker.
Part 1. Steps to Create Intro Video with KineMaster
KineMaster video editor is one of the most intuitive apps and that is why creating amazing intro videos is super easy. KineMaster app is available for both Android and iOS users. There are awesome assets, amazing templates, and useful blending modes available to design your desired intro video. You can create 4K intro videos at 60 FPS comfortably. Here are the steps to create intro KineMaster video.
Step 1: Go for KineMaster intro download as per your smartphone OS. Launch KineMaster app and tap on Create New icon on the home screen.

Step 2: Select an aspect ratio such as 16:9 or 9:16 or 1:1 as per your requirements. On the next screen, tap on Background and select a background as per your preference.

Step 3: On the layer at the bottom and select Text option. Type in your text that you want to show in the intro and tap on Ok button. You can change the font and style from the right panel.

Step 4: Select the text layer and from the right panel, tap on In Animation option to animate the text. Select a desired animation template that you think is appropriate.

Step 5: Tap on the text layer again and tap on Effect option to add a text effect. Choose any desired Effect from the list. You can also tap on Get More to check out more effect templates.

After you apply an effect, select the Effect layer from the timeline and go to Settings to make any adjustment. You can play and watch the intro video. Besides, you can add background photo or video and add graphical elements to enhance the intro animation.
Part 2. How to Create 3D Intro with KineMaster
We have illustrated how to create a text intro video and you can try out different animations and effects and come up with creative intro video. There is a viral trend in showing 3D intro to get more traction. You can use KineMaster to create amazing 3D intro videos easily that can go along with your video content. Here are the simple steps on how you can create 3D video with KineMaster.
Step 1: Install KineMaster from Play Store or App Store as per your smartphone OS. Launch KineMaster app after installation and tap on Create New icon.
Step 2: Select an aspect ratio and tap on Background option. Select a background color as per your preference. Otherwise, you can tap on Media Browser if you want to add a pre-decided photo or video as a background. We recommend a background video to amplify the 3D effect.

Step 3: It is time to add a 3D title. You can tap on Layer icon and Text icon to type in any title that you can turn into 3D with text effect or style. You can also tap on Media icon to select a ready-made 3D text with a transparent background. After adding the text, you can stretch it to increase the size as per your preference.

Step 4: From the right panel, tap on In Animation option and select a desired animation template. Similarly, tap on Out Animation option and select any animation whichever you think it is fit.

Step 5: From the right panel, tap on Overall Animation, select an animation template such as floating to enhance the 3D effect.

Part 3. Related FAQs of KineMaster Intro Video
What app most YouTubers use to make intros?
Apart from KineMaster, most YouTubers use Wondershare Filmora to make amazing videos. Filmora has a wider range of video effects, animations, and stock photos and videos. On top of that, the text animation and effect templates are tailor-made for intro videos.
Is KineMaster good for making YouTube videos?
Yes, KineMaster is good for creating engaging YouTube videos. You can create amazing intro and outro for your YouTube video on your smartphone. You can blend your photos and videos together and create amazing YouTube videos and stunning texts and titles. Besides, you can use chroma keys, transitions, reverse timing, and multi-layer features.
Can KineMaster handle 4K?
Yes, KineMaster is perfect for editing 4K video taken with high-end cameras. After editing the videos, you can export them in 4K resolution up to 60 FPS. However, you will need a high-end smartphone for KineMaster to handle 4K video editing smoothl
The intro is considered to be the most important part of a video. The intro comes first in a video and the first impression is crucial in retaining the viewers. If the intro is gripping and engaging, the viewers are likely to check the rest of the video. In order to create a stunning video, you need to have the best video editor. If you are a smartphone user, KineMaster intro maker should be your first choice.
You must have seen videos with stunning intro having KineMaster watermark on social media and video streaming platforms. Starting from beginners to professional video creators, KineMaster is an easy choice for them to make video intro. KineMaster is a powerful intro maker where you will find several templates, effects, and modes to create stunning intros for your videos. We will illustrate the steps to create intro video with KineMaster Intro Maker.
Part 1. Steps to Create Intro Video with KineMaster
KineMaster video editor is one of the most intuitive apps and that is why creating amazing intro videos is super easy. KineMaster app is available for both Android and iOS users. There are awesome assets, amazing templates, and useful blending modes available to design your desired intro video. You can create 4K intro videos at 60 FPS comfortably. Here are the steps to create intro KineMaster video.
Step 1: Go for KineMaster intro download as per your smartphone OS. Launch KineMaster app and tap on Create New icon on the home screen.

Step 2: Select an aspect ratio such as 16:9 or 9:16 or 1:1 as per your requirements. On the next screen, tap on Background and select a background as per your preference.

Step 3: On the layer at the bottom and select Text option. Type in your text that you want to show in the intro and tap on Ok button. You can change the font and style from the right panel.

Step 4: Select the text layer and from the right panel, tap on In Animation option to animate the text. Select a desired animation template that you think is appropriate.

Step 5: Tap on the text layer again and tap on Effect option to add a text effect. Choose any desired Effect from the list. You can also tap on Get More to check out more effect templates.

After you apply an effect, select the Effect layer from the timeline and go to Settings to make any adjustment. You can play and watch the intro video. Besides, you can add background photo or video and add graphical elements to enhance the intro animation.
Part 2. How to Create 3D Intro with KineMaster
We have illustrated how to create a text intro video and you can try out different animations and effects and come up with creative intro video. There is a viral trend in showing 3D intro to get more traction. You can use KineMaster to create amazing 3D intro videos easily that can go along with your video content. Here are the simple steps on how you can create 3D video with KineMaster.
Step 1: Install KineMaster from Play Store or App Store as per your smartphone OS. Launch KineMaster app after installation and tap on Create New icon.
Step 2: Select an aspect ratio and tap on Background option. Select a background color as per your preference. Otherwise, you can tap on Media Browser if you want to add a pre-decided photo or video as a background. We recommend a background video to amplify the 3D effect.

Step 3: It is time to add a 3D title. You can tap on Layer icon and Text icon to type in any title that you can turn into 3D with text effect or style. You can also tap on Media icon to select a ready-made 3D text with a transparent background. After adding the text, you can stretch it to increase the size as per your preference.

Step 4: From the right panel, tap on In Animation option and select a desired animation template. Similarly, tap on Out Animation option and select any animation whichever you think it is fit.

Step 5: From the right panel, tap on Overall Animation, select an animation template such as floating to enhance the 3D effect.

Part 3. Related FAQs of KineMaster Intro Video
What app most YouTubers use to make intros?
Apart from KineMaster, most YouTubers use Wondershare Filmora to make amazing videos. Filmora has a wider range of video effects, animations, and stock photos and videos. On top of that, the text animation and effect templates are tailor-made for intro videos.
Is KineMaster good for making YouTube videos?
Yes, KineMaster is good for creating engaging YouTube videos. You can create amazing intro and outro for your YouTube video on your smartphone. You can blend your photos and videos together and create amazing YouTube videos and stunning texts and titles. Besides, you can use chroma keys, transitions, reverse timing, and multi-layer features.
Can KineMaster handle 4K?
Yes, KineMaster is perfect for editing 4K video taken with high-end cameras. After editing the videos, you can export them in 4K resolution up to 60 FPS. However, you will need a high-end smartphone for KineMaster to handle 4K video editing smoothl
Easy Way to Inset Text in Video
Adding text to any video can serve to improve the quality of the video or emphasize a section of the video. But unlike adding text to an image, adding even simple text to a video can be quite difficult. But there are video editing tools that can significantly simplify this process.
Before we look at one of the best video editing tools that you can use to add text to your video, let’s first look at why adding text to your video may be important.
Why Insert Titles to Videos?
Adding a title or any other kind of text to your video can be important for several reasons, including the following;
1. Content Becomes Memorable
Adding text to the video can serve to make the whole content of the video or a section of the video more memorable. If there is a section of the content that you want your audience to remember, adding a colorful bit of text may make the content easier to grasp and therefore more memorable.
2. Call to Actions
Any marketer understands the value of a well-positioned call to action and the best way to add a customized call to action is to add text to the video. Calls to action can help you sell products or get your audience to sign up for a service or event.
3. Brand Awareness
Text that you add to the video can also be used to enhance brand awareness and visibility. These can be in the form of the company’s slogan and logos that can serve to remind your audience of the value of your brand and its trustworthiness.
4. Aesthetic Value
When done correctly, titles and texts in videos can turn a bland ordinary-looking video into an aesthetically pleasing art piece that your audience will only be too happy to engage with. The more appealing your video is, the greater the chance that your target audience will be willing to engage with your brand and click on your calls to action.
How to Insert Title to Video
Adding text and titles to any video can be made easier by the software you choose to use. One of the best tools to edit any aspect of any video is Wondershare Filmora . Filmora is a great choice because it makes adding text and titles that match your video’s content very easy. It is therefore an ideal tool to choose if you want to add titles that will enhance your brand’s visibility.
Free Download For Win 7 or later(64-bit)
Free Download For macOS 10.14 or later
The following guide will help you easily add text, titles, openers, and end credits to any video using Filmora .
Step1 Install Filmora on your computer and launch the program. Then open the video that you want to edit in Filmora. You can do that by simply dragging and dropping the video into the program’s main interface.
Step2 To add a title to the video, click on the “Titles” tab at the top and select a title that best suits your video project. You can use the preview function to see what it looks like before adding it to the video.

If you are happy with the title that you have selected, drag and drop it onto the timeline or right-click on it and select “Apply.”
Step3 To add an opener to the video, click on the “Openers” menu under “Titles.” Then choose the specific opener that you want to add and select “Apply” to add it to the video.
Step4 To add end credits to the video, simply select “End Credit” under “Titles” and when you find the type of end credits that you want to use, right-click on it and select “Apply.”
You can then click on the titles, end credits, and openers to edit the text by changing the color and fonts to match your brand.
How to Improve Title Effects in Video
Simply adding a title or text to the video will not do much to improve the quality of the video. You need to add effects that will not only make the videos more appealing but will also correspond with your brand colors.
Thankfully, Filmora makes adding various kinds of effects to the text very easy. The following are some of the options that you have;
Editing Title and Text Effect Duration
Typically, when you add a text effect to a video using Filmora , the duration is set at 5 seconds. You can however very easily change this duration to suit your video’s needs.
The easiest way to do that is to drag one of its edges. But you can also select the text and click on the duration icon to enter the new direction in the dialogue box that appears.
You can also change the default duration so that the new timing applies to all the text effects that you create when editing videos. To do that, go to File> Preferences > Editing < Effect Duration
Customize Text Effect
To customize the text that you added to the video, double-click on it in the timeline. This will open the text editing panel where you can change the font style including the font, size, color, and alignment as well as the animation of the text.
Apply Text Animations
Filmora offers more than 80 animation presets to choose from. You can access the “Animation” tab in the text editing panel to see a list of all available animations. Double-click on the animation you want to use and use the “Preview” window to see how it works out/

If you are happy with the animation and would like to include it in your project, click on “OK” to use it.
Advanced Title Editing
If you would like to go just a little bit further in editing your text, click on the “Advanced” button to open the Advanced Text Editing panel.

Here, you will see more options including the ability to add more elements such as adding new text boxed shapes or images.
With each of these elements, you can also change the font color, animation, opacity, border, fill and shadow.
Related FAQs about Text Video Editing
1. Can I Edit the Text in a Video?
Yes. Once you have added the title or text to the video, you can just as easily edit it in various ways. As we have seen, Filmora gives you a wealth of options to customize the title in various ways including changing the font size, color, and type all from the text editing panel. You can even completely remove the title from the video and add a new one. The preview window in Filmora allows you to see any changes that you make in real-time and adjust them accordingly to fit into your project.
2. Why Should I add Text to my Video?
Adding text and titles to any video can be very important for several reasons. For instance, you can decide to add text to emphasize a point, add a call to action and even help your audience to follow along with the content when the audio is turned off. Titles and any other text that you add to a video can also make the content more understandable, engaging, and clearer. But the effectiveness of the text will depend on how and where you place the text within the video and the video editor you choose can be very instrumental in this regard.
3. How Can I Make the Text in My Video Look Good?
First, you need to decide on the color, effects, and animations that you would like to use, and to decide these things you will need to take your brand and colors into consideration. Once you have all these details, you then need to choose a video editor that offers a wide range of fonts and colors to choose from. Thankfully, Filmora offers all the colors, fonts, and animations you could ever need, allowing you to customize the text any way you want.
4. How Do I Replace Text on my Video?
Sometimes you just need to remove the text that you already have on the video and replace it with new text. Again, how successful you are in this will depend on the tool you choose to use. Some video editors will only allow you to add new text but fall short when you need to remove the text or replace it with something else.
Filmora is one of the few tools that makes it easy to delete a title. You can just click on the title and then select the “Delete” icon in the toolbar to remove it. Then you can simply use the text editing panel to add new text again.
Free Download For macOS 10.14 or later
The following guide will help you easily add text, titles, openers, and end credits to any video using Filmora .
Step1 Install Filmora on your computer and launch the program. Then open the video that you want to edit in Filmora. You can do that by simply dragging and dropping the video into the program’s main interface.
Step2 To add a title to the video, click on the “Titles” tab at the top and select a title that best suits your video project. You can use the preview function to see what it looks like before adding it to the video.

If you are happy with the title that you have selected, drag and drop it onto the timeline or right-click on it and select “Apply.”
Step3 To add an opener to the video, click on the “Openers” menu under “Titles.” Then choose the specific opener that you want to add and select “Apply” to add it to the video.
Step4 To add end credits to the video, simply select “End Credit” under “Titles” and when you find the type of end credits that you want to use, right-click on it and select “Apply.”
You can then click on the titles, end credits, and openers to edit the text by changing the color and fonts to match your brand.
How to Improve Title Effects in Video
Simply adding a title or text to the video will not do much to improve the quality of the video. You need to add effects that will not only make the videos more appealing but will also correspond with your brand colors.
Thankfully, Filmora makes adding various kinds of effects to the text very easy. The following are some of the options that you have;
Editing Title and Text Effect Duration
Typically, when you add a text effect to a video using Filmora , the duration is set at 5 seconds. You can however very easily change this duration to suit your video’s needs.
The easiest way to do that is to drag one of its edges. But you can also select the text and click on the duration icon to enter the new direction in the dialogue box that appears.
You can also change the default duration so that the new timing applies to all the text effects that you create when editing videos. To do that, go to File> Preferences > Editing < Effect Duration
Customize Text Effect
To customize the text that you added to the video, double-click on it in the timeline. This will open the text editing panel where you can change the font style including the font, size, color, and alignment as well as the animation of the text.
Apply Text Animations
Filmora offers more than 80 animation presets to choose from. You can access the “Animation” tab in the text editing panel to see a list of all available animations. Double-click on the animation you want to use and use the “Preview” window to see how it works out/

If you are happy with the animation and would like to include it in your project, click on “OK” to use it.
Advanced Title Editing
If you would like to go just a little bit further in editing your text, click on the “Advanced” button to open the Advanced Text Editing panel.

Here, you will see more options including the ability to add more elements such as adding new text boxed shapes or images.
With each of these elements, you can also change the font color, animation, opacity, border, fill and shadow.
Related FAQs about Text Video Editing
1. Can I Edit the Text in a Video?
Yes. Once you have added the title or text to the video, you can just as easily edit it in various ways. As we have seen, Filmora gives you a wealth of options to customize the title in various ways including changing the font size, color, and type all from the text editing panel. You can even completely remove the title from the video and add a new one. The preview window in Filmora allows you to see any changes that you make in real-time and adjust them accordingly to fit into your project.
2. Why Should I add Text to my Video?
Adding text and titles to any video can be very important for several reasons. For instance, you can decide to add text to emphasize a point, add a call to action and even help your audience to follow along with the content when the audio is turned off. Titles and any other text that you add to a video can also make the content more understandable, engaging, and clearer. But the effectiveness of the text will depend on how and where you place the text within the video and the video editor you choose can be very instrumental in this regard.
3. How Can I Make the Text in My Video Look Good?
First, you need to decide on the color, effects, and animations that you would like to use, and to decide these things you will need to take your brand and colors into consideration. Once you have all these details, you then need to choose a video editor that offers a wide range of fonts and colors to choose from. Thankfully, Filmora offers all the colors, fonts, and animations you could ever need, allowing you to customize the text any way you want.
4. How Do I Replace Text on my Video?
Sometimes you just need to remove the text that you already have on the video and replace it with new text. Again, how successful you are in this will depend on the tool you choose to use. Some video editors will only allow you to add new text but fall short when you need to remove the text or replace it with something else.
Filmora is one of the few tools that makes it easy to delete a title. You can just click on the title and then select the “Delete” icon in the toolbar to remove it. Then you can simply use the text editing panel to add new text again.
How to Create Intro with Renderforest
When individuals hear about free online items, they frequently associate them with being of poor quality, ineffective, or unreliable. Renderforest, on the other hand, is an exception. This can be precisely what you need if you’re seeking a cheap—or even free—high-quality online video editing platform. The service offers both freemium and premium solutions. The more expensive solutions provide the most flexibility.
What is Renderforest?
A free online tool for making animated videos and slideshows is Renderforest. The web platform makes it simple, quick, and affordable for organizations and individuals to produce slideshows, explainer and promotional business movies, logo animations, and much more.
The online video creation platform Renderforest enables people and companies to produce “broadcast grade” videos for personal or professional usage. Anyone may register as a user in just a few easy steps, and using it is free.
Users can produce an infinite number of high-quality videos, export them, and then share them online or on social media.
The web platform already provides various tailor-made options for blog animations, wedding and photo slideshows, instructional films, and video invites for personal use.
Additionally, the platform offers simple-to-use alternatives for company presentations, invites to events, promotional films, kinetic typography, explainer videos, testimonials, and more.
Renderforest’s Primary Attributes include:
- Videos of high quality
- A sizable collection of animation templates and storylines
- Access to more than 195,000 Royalty-free stock footage clips with an intuitive online movie editor
- One-click video publishing to YouTube channels or Facebook pages
- A music library with commercial licenses for use in making videos
Added characteristics:
- A voiceover generator for text
- Create an infinite number of color schemes
- Countless font uploads
- Obtainable 1,000,000+ premium video templates
- Including a custom watermark
- A reseller’s permit
- Working in teams
How it Works
Choose a video template from their selection by browsing. Once you register, you can utilize any of the hundreds of editable templates that they have available.
You will be presented with various categories when you choose video templates, from promotional templates to logo animation templates to slide displays and everything in between.
You may freely post high-quality photographs, audio, and voice-over, an incredibly fantastic feature. The ability to share their tales in a way that customers can relate to is given to business owners by this.
After you’ve finished editing, the video must render for a while before it’s prepared for publishing. Click the edit button if you want to make some changes to the video or are unsatisfied with it. The video can be edited as many times as you like.
Users can directly post their videos on social media platforms, including Facebook, Twitter, Google+, Pinterest, and Instagram, through the website.
Renderforest maintains all your projects on your dashboard for as long as you use the service, so you don’t have to fear that you’ll lose your work..
Pricing
Regarding costs, Renderforest provides four different kinds of subscription options. The Free, Amateur, Pro, and Business plans are among them. The Free program makes a fantastic study aid. It’s possible to take your time with it, hone your talents, and upgrade to the paid plans after becoming familiar with the platform.
Regarding the free plan, you may watch and share your films on social media but not download them. You must utilize one of the paying subscriptions to download your videos. Choose the Business package if you don’t want Renderforest’s watermark to appear on your video. If you select monthly billing, it will cost you $149.99 per month or $49.99 per year.
If you want to take your company to the next level with distinctive videos, think about selecting one of the expertly produced video production packages. The starting package, which starts at $699, is the least priced.
Tutorial on How to Create an Intro Using Renderforest
Professional video creators are likely aware that starting a video without a suitable introduction is equivalent to sneaking into someone’s house without permission. A good intro is a doorbell to let people know you’ve arrived.
A strong introduction ensures that more people will view your film. Adults have an attention span of about 12 seconds, according to studies from 2000. It is now only 8 seconds. You have 8 seconds to entice viewers to watch your video, so don’t waste it. A captivating introduction will give your content a professional touch and pique your audience’s interest. This task is worthwhile if you want to advertise your videos successfully.
These days, you don’t necessarily need to hire a pro to make a film if you need one. The majority of the available tools are free. We’ll demonstrate in this lesson how to use Renderforest to create a polished video intro. Our intro maker will let you start strong, whether for a fun birthday video or commercial use.
When you’re prepared to begin producing your videos, go to Renderforest, register for an account, or sign in if you already have one.
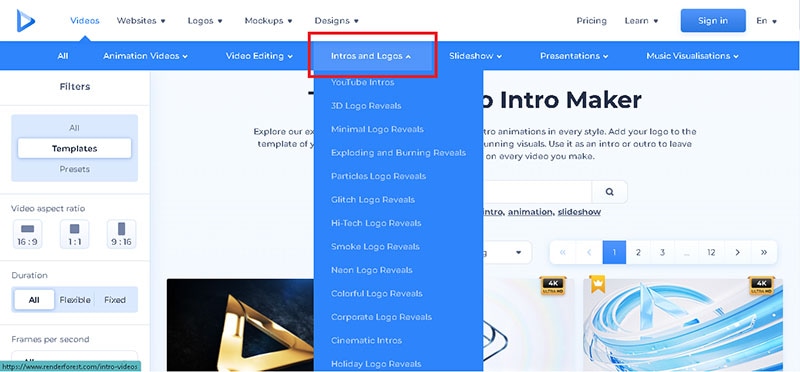
Check out the vast selection of templates under “Intros and logos“ in the “Create Video“ section of the navigation menu. Here, you can select the intro you like most and begin altering it, or use our advanced search filters to locate the specific content you require.
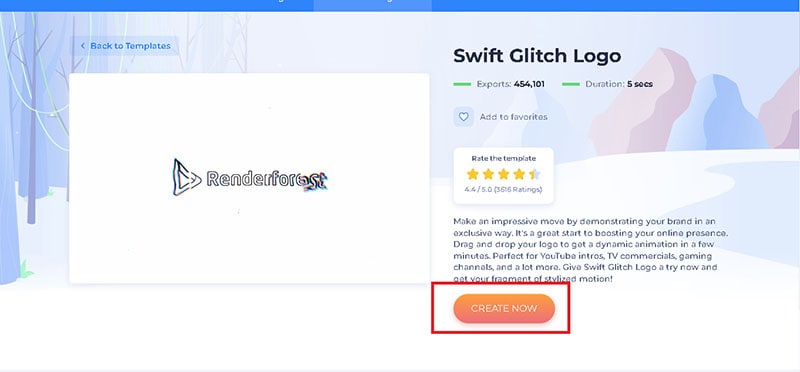
We’ll use the “Swift Glitch Logo“ template for this tutorial, enabling you to present your logo with glitch effects. This template may produce intro and outro movies for presentations, your YouTube channel, lobby backgrounds, and other uses.
Select your preferred template and click the “Create now“ button to start.
Your logo should now be uploaded with a transparent background (PNG). You can upload it in one of three ways: using an image URL directly from your device or selecting an existing file from your “Media library.” If you don’t already have one, you may make one right away using our logo maker tool, which is also accessible in the editor.
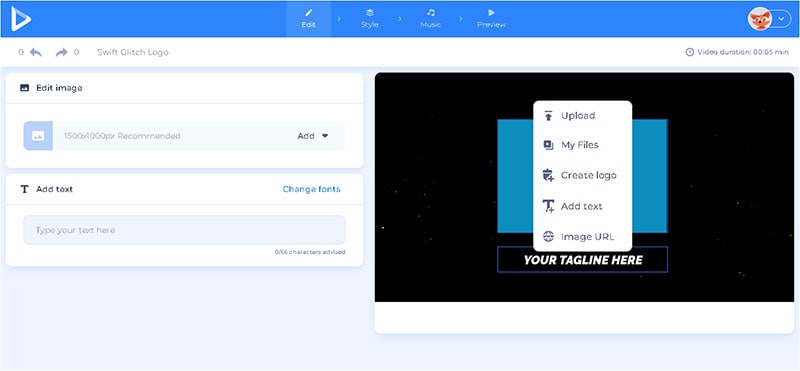
Write your company’s name, tagline, or other brief words in the text field once you’ve added your logo. To save the changes, don’t forget to click “Save and close.”
You can select the overall design of your logo and the preferred font style in the “Style” section.
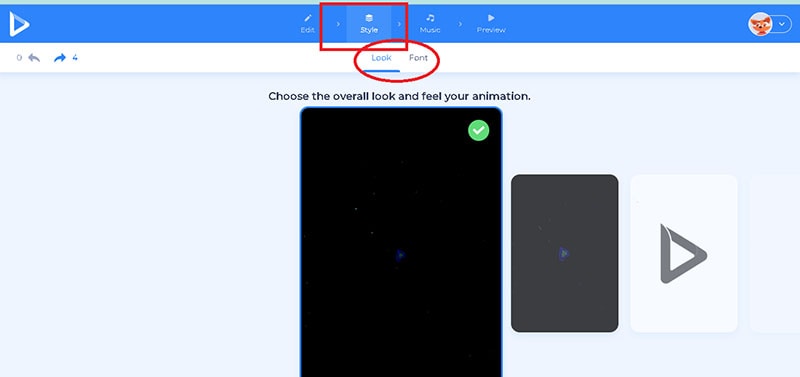
Select your preferred color scheme in the “Color“ section now. You can choose between two color schemes made by our design team and manually selectable custom colors in this section.
Go to the “Music“ area to select a song for your intro. You can add one or pick from our “Music collection.” You can record a voice-over in the editor or upload one for your introduction.
Well done! Let’s check out your introduction in the “Preview“ area now. Click “Free preview“ to check your video and ensure you like the outcome. Click back and tweak the introduction if you need to make any adjustments.
Instantly create professional introduction videos in your browser! Utilize our intro maker, and let its unique touch set your videos apart from the competition.
Enjoy making videos with Renderforest, where your imagination is the only restriction.
Renderforest Pros & Cons
This section is for you if you need to learn quickly about Renderforest’s advantages and disadvantages and are short on time. We’ve studied all the relevant reviews available and created a list of advantages and disadvantages for you to consider.
To determine if this is the best product for your company’s needs, look over these Renderforest advantages and disadvantages.
Pros
- Many lovely and contemporary templates
- a 4K video export feature
- 5-in-1 solution
- use is limitless for all services
- Quick and friendly client support
Cons
- With free version, watermark
- Only paying customers have access to font modification
- Costly single-project packages
- Free high-quality video preview unavailable
- a few templates allow for limited customisation
Competition to Renderforest
Animoto and PowToon are a couple of the site’s main rivals. These are excellent online video editing tools, but Renderforest stands out because it is simple to use and enables even novice users to create, share quickly, and download “broadcast grade videos.”
Renderforest vs PowToon
One of the most popular Renderforest Video alternatives available is PowToon. It’s challenging to decide which of these two platforms is superior because they are the best on the market. What you want as a business owner ultimately determines everything.
PowToon is a similar business that focuses on corporate videos but doesn’t provide the extra things Renderforest delivers (logo maker, graphic design, mockups, website builder). Pro customers pay $89 per month ($20 if invoiced annually), which is significantly more expensive than the alternative. Fortunately, they offer a complimentary bundle so you can sample the goods.
PowToon offers many more customizing choices than Renderforest because it is a video-based platform, but it will cost you.
Renderforest is a more cost-effective option if you need a range of services for your small business. PowToon is a better option for more prominent firms seeking a professional video creation platform.
Currently, some internet video services might be pricey and time-consuming to use. Renderforest will be welcomed by many small businesses looking for an economical and user-friendly online video editing platform.
Renderforest combines the top tools under a single subscription bundle in terms of features. In the end, you can manage your website, branding, and marketing visual production for less than $25 per month.
Fortunately, you don’t have to believe us. You may experience all the main advantages of Renderforest yourself by giving it a try. Check out the pros and drawbacks list in our Renderforest review if you need more assistance.
Free Download For Win 7 or later(64-bit)
Free Download For macOS 10.14 or later
Complete Guide to Change Video Resolution in Filmora
With the vast number of devices available in the market today, storing data and video files has become difficult. Frequently in cases where the devices share different forms of resolution, it makes sharing videos a hassle.
In those situations, changing the resolution of your video can be a great idea. It will also allow you to save storage. In this article, you’ll adjust the resolution in just a few clicks by Wondershare Filmora. But before we learn how to change a video’s resolution, let’s look into what a video resolution is!
Part 1. What Is a Video Resolution?
A video resolution, in short, is the quality of the video visible. A video is rendered at a specific rate whenever you watch a movie or go to a cinema. A screen is made up of tiny pixels and arranged in an order that determines the resolution of a screen.
Video resolution is rendered in a vertical and horizontal orientation. Therefore, whenever you play a video on YouTube, the resolution scale is available for you to choose from, i.e., 480p, 720p, 1080p, etc.
In most cases, a resolution is dictated by the full abbreviation. So, for example, a 720p video is 1280 x 720, and a 1080p video is a 1920 x 1080 resolution.

![]()
Note: The number written before is the number of horizontal pixels in a video. And the number written after is the vertical pixels in a video.
Before we adjust the resolution of a video, let’s look at a comparison between different types of video resolution.
Part 2. 7 Different Types of Video Resolution
It has been established that a video resolution is not a constant number and changes according to the screen. Scroll below to look at the different forms of video resolutions available!
360p
The full resolution is 480 x 360. This resolution is a minimal video resolution. On a big screen, 360p will look blurry. That is why a 360p resolution is the best for smaller devices such as Mobile phones.
480p
The full resolution is 853 x 480. Although an upgrade from the latter, this resolution is available on many devices. It’s mainly used in devices such as smaller TVs, laptops, and Desktop computers. It is also available for Burn-in DVDs.
720p
The full version of the resolution is 1280 x 720. This resolution is called HD, short for High Definition. 720p quality looks good almost on every device and is also reasonably available.
Most modern devices, such as Mobile phones, Touch Tablets, Laptops, and PCs, are calibrated in 720p Resolution.

1080p
The resolution in its complete form is 1920 x 1080. This resolution is also known as FHD, short for Full High Definition. 1080p resolution is the quality in which many high-quality devices are constructed. As a result, the screens of these devices have a clear and clean display.

![]()
Note: It is usually recommended to share videos on social media in 1080p resolution.
1440p
This resolution is also called QHD (Quad HD). The length and width of this resolution are 2560 x 1440. As the name suggests, its quality is quad (four times) than that of a standard 720p resolution.
The screens of devices constructed in this resolution usually have a high-end purpose. For example, this resolution is commonly used in Gaming monitors and High-end smartphones.

2160p
The screens constructed in this resolution are considered among the best available in the market. 2160p (3840 x 2160) is also known as UHD, which is short for Ultra High Definition. It is also known as 4K because it offers four times the power of 1080p or FHD (Full High Definition.)
These screens are usually available for high-end competitive gaming monitors or big screen LCD and LED Television. In addition, some of the flagship smartphones are also built with 4K resolution.

4320p
This resolution is also known as 8K. The length and width of the pixel arrangement are 7680 x 4320. The pixels are arranged in these screens to offer sixteen times the average power of a 1080p (FHD) monitor.
This resolution is only available on several devices, such as commercial TVs and monitors. However, this is the most significant resolution available in the modern market. Therefore, even if your monitor cannot support a larger resolution, you can test whether your PC can render an 8K resolution.

Part 3. Why Do You Need to Change a Video Resolution?
There are numerous cases where you will want to change the resolution of a video. Some of them are described below.
Decreasing a Video Resolution
Sometimes, you are trying to upload a video from a smartphone. Or, in general, you want to transfer videos to a smartphone. The resolution of your video can play a significant role in the transfer process.
If your video file has a higher resolution, it will take up more space on your phone. As well as, if your PC has a higher resolution, say a 4K resolution, and your phone is of 1080p resolution. You might not be able to play it.
To counter situations like these, you need to change the resolution of your video.
Increasing a Video Resolution
Similarly, there are instances where you would need to change the resolution of your video to increase it.
A good example would be to burn a low-quality DVD. To maintain good quality on a DVD, you need to increase its resolution before transfer.
Changing the exact resolution of a video is only possible in some cases because you cannot change the precise pixel of the video it is recorded in. But software like Wondershare Filmora allows you to change the resolution of your video easily.
Now let’s move to understanding the steps involved in changing the resolution of a video!
Part 4. Steps to Change Video Resolution in Filmora
To change the resolution of a video, you would need a basic video editor. This video editor needs to support the features that enable you to adjust a video resolution. In this case, Filmora is the best option.
Wondershare Filmora
Free Download For Win 7 or later(64-bit)
Free Download For macOS 10.14 or later
It has an attractive system UI that allows inexperienced users to learn how to use it quickly. It also has a diverse stock media collection. Not only that, but It gives you access to dependable features for changing the speed of a video.

Scroll below to learn how to download the latest version!
Step1 Download Filmora
Begin by installing the latest version of Wondershare Filmora if you don’t do already. Then, run the installer of this app on your PC or Mac.
Now that you have downloaded the app let’s change the resolution!
Step2 Import Video Clips
Your next step after launching Filmora is to import video clips you want to resize. To accomplish this, follow the steps outlined below:
- Locate and select the Import icon on the top left side of the Filmora Home Interface.
- It will take you to your computer’s library.
- Select the videos to be edited and then click OK.

If you need clarification about the resolution of the video that you imported, you can also check them before adding it to the timeline.
- Right-Click on the video in the import window.
- In the pop-up column, go to Properties.
It opens a window that will tell you the basic info about your video clips. Here you can also preview the resolution.

Now that we have our clips imported, it is time to add them to the timeline below!
Step3 Add The Video Clips to Timeline
To add Video clips to the timeline, go through the steps as guided:
- Hold Right click to drag and select the video clips in the import window.
- Release Right-click when in the timeline.

Doing so would have added the video clips to the timeline. Instead, it has created a workplace to edit our videos.
You can trim, add effects, and join multiple clips in this process. After finishing the editing process, it’s time to select an export format.
Step4 Export Your Video
You can export into video formats in two ways with Filmora. It can be either selecting a format for your video. Or you can also choose to export your video to a particular device.
Video Format Resolution
Wondershare Filmora is a fantastic software that allows you to access a variety of formats for your videos. These export formats include MP4, WMV, F4V, MOV, TS, 3GP, and more. To select a format for your video, follow the steps as guided:
- Click on Export.
- In the left column, click on the video format you need.
- Click Export on the bottom right corner of the window.

Exporting a video in a specific format not only allows you to change the format of a video but also allows you to change the resolution simultaneously.
Default Resolution Settings
Some formats have a built-in resolution. Whenever you choose a specific format for a video, the resolution of the video will be shifted to the resolution of that format, i.e., TS has a default 1080p resolution.
![]()
Note: Another thing to remember is that most video formats have defaulted to 1080p. But there are some formats whose resolutions vary according to their style. A good example is a 3GP format, which is set to 352 x 488 by default.
Customize the Resolution
But if you don’t find the resolution stable for your device, you can also change this default resolution in simple steps. In the export window, follow the steps mentioned ahead:
- In the preset tab, go to > settings.
- In the video tab, click on the resolution.
- In the drop-down menu, select the resolution that you desire.
You can also select a custom resolution by these steps:
- In the drop-down menu, click on Custom.
- Here, you can change the height and width according to your wish.

Exporting a Video to a Specific Device
Selecting a format for your video can help if you want to change the resolution. But in cases where you want to export a video to a particular mobile device. Such as an iPhone or an iPad, you can select the device export option.
In the device export option, you can select a custom device. Filmora allows you to choose from a wide variety of machines available when you choose a custom device; the resolution will be set to optimal for that particular device.
Select a Folder to Export Your Video
After you are done calibrating the resolution settings, you can move on to select the export location for your video. You can do so by the steps mentioned:
- In the main Export window, navigate to the Save
- Click on the Folder
- It will direct you to your PC library.
- Select the directory you want to export your video to.
- Click Select Folder.

Final Step
The last step to export your video is clicking on the Export icon in the bottom right corner of the window. It opens up a render window. Wait for a few minutes until the video finishes exporting.
When the export is finished, a window will pop up as a reminder. You can also find the target folder by clicking on Find Target.

Congratulations! You have successfully learned how to change the resolution of a video using Wondershare Filmora.
Conclusion
Rapid video technology advancement is leading to the development of higher-resolution devices. The greatest resolution in the modern day is the 8K; soon, everyone will be using 8K devices. So, it is beneficial to learn how to change a video’s resolution.
By following the steps mentioned in this article, you can now change the resolution of your video using Filmora.
Before we adjust the resolution of a video, let’s look at a comparison between different types of video resolution.
Part 2. 7 Different Types of Video Resolution
It has been established that a video resolution is not a constant number and changes according to the screen. Scroll below to look at the different forms of video resolutions available!
360p
The full resolution is 480 x 360. This resolution is a minimal video resolution. On a big screen, 360p will look blurry. That is why a 360p resolution is the best for smaller devices such as Mobile phones.
480p
The full resolution is 853 x 480. Although an upgrade from the latter, this resolution is available on many devices. It’s mainly used in devices such as smaller TVs, laptops, and Desktop computers. It is also available for Burn-in DVDs.
720p
The full version of the resolution is 1280 x 720. This resolution is called HD, short for High Definition. 720p quality looks good almost on every device and is also reasonably available.
Most modern devices, such as Mobile phones, Touch Tablets, Laptops, and PCs, are calibrated in 720p Resolution.

1080p
The resolution in its complete form is 1920 x 1080. This resolution is also known as FHD, short for Full High Definition. 1080p resolution is the quality in which many high-quality devices are constructed. As a result, the screens of these devices have a clear and clean display.

![]()
Note: It is usually recommended to share videos on social media in 1080p resolution.
1440p
This resolution is also called QHD (Quad HD). The length and width of this resolution are 2560 x 1440. As the name suggests, its quality is quad (four times) than that of a standard 720p resolution.
The screens of devices constructed in this resolution usually have a high-end purpose. For example, this resolution is commonly used in Gaming monitors and High-end smartphones.

2160p
The screens constructed in this resolution are considered among the best available in the market. 2160p (3840 x 2160) is also known as UHD, which is short for Ultra High Definition. It is also known as 4K because it offers four times the power of 1080p or FHD (Full High Definition.)
These screens are usually available for high-end competitive gaming monitors or big screen LCD and LED Television. In addition, some of the flagship smartphones are also built with 4K resolution.

4320p
This resolution is also known as 8K. The length and width of the pixel arrangement are 7680 x 4320. The pixels are arranged in these screens to offer sixteen times the average power of a 1080p (FHD) monitor.
This resolution is only available on several devices, such as commercial TVs and monitors. However, this is the most significant resolution available in the modern market. Therefore, even if your monitor cannot support a larger resolution, you can test whether your PC can render an 8K resolution.

Part 3. Why Do You Need to Change a Video Resolution?
There are numerous cases where you will want to change the resolution of a video. Some of them are described below.
Decreasing a Video Resolution
Sometimes, you are trying to upload a video from a smartphone. Or, in general, you want to transfer videos to a smartphone. The resolution of your video can play a significant role in the transfer process.
If your video file has a higher resolution, it will take up more space on your phone. As well as, if your PC has a higher resolution, say a 4K resolution, and your phone is of 1080p resolution. You might not be able to play it.
To counter situations like these, you need to change the resolution of your video.
Increasing a Video Resolution
Similarly, there are instances where you would need to change the resolution of your video to increase it.
A good example would be to burn a low-quality DVD. To maintain good quality on a DVD, you need to increase its resolution before transfer.
Changing the exact resolution of a video is only possible in some cases because you cannot change the precise pixel of the video it is recorded in. But software like Wondershare Filmora allows you to change the resolution of your video easily.
Now let’s move to understanding the steps involved in changing the resolution of a video!
Part 4. Steps to Change Video Resolution in Filmora
To change the resolution of a video, you would need a basic video editor. This video editor needs to support the features that enable you to adjust a video resolution. In this case, Filmora is the best option.
Wondershare Filmora
Free Download For Win 7 or later(64-bit)
Free Download For macOS 10.14 or later
It has an attractive system UI that allows inexperienced users to learn how to use it quickly. It also has a diverse stock media collection. Not only that, but It gives you access to dependable features for changing the speed of a video.

Scroll below to learn how to download the latest version!
Step1 Download Filmora
Begin by installing the latest version of Wondershare Filmora if you don’t do already. Then, run the installer of this app on your PC or Mac.
Now that you have downloaded the app let’s change the resolution!
Step2 Import Video Clips
Your next step after launching Filmora is to import video clips you want to resize. To accomplish this, follow the steps outlined below:
- Locate and select the Import icon on the top left side of the Filmora Home Interface.
- It will take you to your computer’s library.
- Select the videos to be edited and then click OK.

If you need clarification about the resolution of the video that you imported, you can also check them before adding it to the timeline.
- Right-Click on the video in the import window.
- In the pop-up column, go to Properties.
It opens a window that will tell you the basic info about your video clips. Here you can also preview the resolution.

Now that we have our clips imported, it is time to add them to the timeline below!
Step3 Add The Video Clips to Timeline
To add Video clips to the timeline, go through the steps as guided:
- Hold Right click to drag and select the video clips in the import window.
- Release Right-click when in the timeline.

Doing so would have added the video clips to the timeline. Instead, it has created a workplace to edit our videos.
You can trim, add effects, and join multiple clips in this process. After finishing the editing process, it’s time to select an export format.
Step4 Export Your Video
You can export into video formats in two ways with Filmora. It can be either selecting a format for your video. Or you can also choose to export your video to a particular device.
Video Format Resolution
Wondershare Filmora is a fantastic software that allows you to access a variety of formats for your videos. These export formats include MP4, WMV, F4V, MOV, TS, 3GP, and more. To select a format for your video, follow the steps as guided:
- Click on Export.
- In the left column, click on the video format you need.
- Click Export on the bottom right corner of the window.

Exporting a video in a specific format not only allows you to change the format of a video but also allows you to change the resolution simultaneously.
Default Resolution Settings
Some formats have a built-in resolution. Whenever you choose a specific format for a video, the resolution of the video will be shifted to the resolution of that format, i.e., TS has a default 1080p resolution.
![]()
Note: Another thing to remember is that most video formats have defaulted to 1080p. But there are some formats whose resolutions vary according to their style. A good example is a 3GP format, which is set to 352 x 488 by default.
Customize the Resolution
But if you don’t find the resolution stable for your device, you can also change this default resolution in simple steps. In the export window, follow the steps mentioned ahead:
- In the preset tab, go to > settings.
- In the video tab, click on the resolution.
- In the drop-down menu, select the resolution that you desire.
You can also select a custom resolution by these steps:
- In the drop-down menu, click on Custom.
- Here, you can change the height and width according to your wish.

Exporting a Video to a Specific Device
Selecting a format for your video can help if you want to change the resolution. But in cases where you want to export a video to a particular mobile device. Such as an iPhone or an iPad, you can select the device export option.
In the device export option, you can select a custom device. Filmora allows you to choose from a wide variety of machines available when you choose a custom device; the resolution will be set to optimal for that particular device.
Select a Folder to Export Your Video
After you are done calibrating the resolution settings, you can move on to select the export location for your video. You can do so by the steps mentioned:
- In the main Export window, navigate to the Save
- Click on the Folder
- It will direct you to your PC library.
- Select the directory you want to export your video to.
- Click Select Folder.

Final Step
The last step to export your video is clicking on the Export icon in the bottom right corner of the window. It opens up a render window. Wait for a few minutes until the video finishes exporting.
When the export is finished, a window will pop up as a reminder. You can also find the target folder by clicking on Find Target.

Congratulations! You have successfully learned how to change the resolution of a video using Wondershare Filmora.
Conclusion
Rapid video technology advancement is leading to the development of higher-resolution devices. The greatest resolution in the modern day is the 8K; soon, everyone will be using 8K devices. So, it is beneficial to learn how to change a video’s resolution.
By following the steps mentioned in this article, you can now change the resolution of your video using Filmora.
Also read:
- Want to Play a Video in the Loop on Your Mac? Here Is How You Can Make a Video Loop in QuickTime in Simple Steps for 2024
- New Easy Steps to Export Video in Filmora for 2024
- New Windows Movie Maker Review
- In 2024, Are You Finding It Challenging to Convert GIFs Into JPG or PNG Images? Do Not Worry! The Best Free Online Tool and Software to Change Your GIF Into PNG or JPG Images Are Below
- New 2024 Approved Enhance Your Film Production with These 5 Silence Detection Tools
- Top 5 Free Online Video Filter Editors Improve Your Videos with Filters for 2024
- How To Create a Polaroid Collage?
- How to Loop a Video in PowerPoint for 2024
- How to Slow Down Time-Lapse Videos on iPhone for 2024
- Updated Perfectly Use the Audio Mixer in Filmora
- 2024 Approved Zoom In and Out on Discord (Desktop + App + Browser Solutions)
- Updated Working Out All Important Details of Slowing Down Video in After Effects
- New How to Put Emoji on Mac That Take Less Than 10 Mins
- New Lets Create a New Premiere Pro Project, Import some Video, and Control Video Playback Speed. Also, Find Alternative Software (WonderShare Filmora) to Control Playback Speed in Minutes
- Top 6 Best Alternatives to Clownfish Voice Changer for 2024
- 2024 Approved 6 Best MP4 Mergers to Join Videos Easily
- Updated In 2024, Guide on VHS Technology and Its Influence on Video Editing
- In 2024, Top Tips for Camtasia Freeze-Frame
- A Detailed VPNa Fake GPS Location Free Review On Nokia C210 | Dr.fone
- How to Repair corrupt MP4 and AVI files of Xiaomi Redmi 12 with Video Repair Utility on Mac?
- Which is the Best Fake GPS Joystick App On Xiaomi Redmi Note 12T Pro? | Dr.fone
- 7 Solutions to Fix Chrome Crashes or Wont Open on Asus ROG Phone 8 Pro | Dr.fone
- Updated Top 10 Best and Fast Ways to Turn Image Into Gif for 2024
- How to Reset a Locked Realme GT 5 Phone
- In 2024, What to do if your iPhone 14 has bad ESN or blacklisted IMEI?
- Bricked Your OnePlus Ace 2V? Heres A Full Solution | Dr.fone
- How does the stardust trade cost In pokemon go On Oppo F25 Pro 5G? | Dr.fone
- In 2024, Can I use iTools gpx file to catch the rare Pokemon On Apple iPhone 14 Pro Max | Dr.fone
- How To Reset Your Apple iPhone XS? | Dr.fone
- Pokemon Go No GPS Signal? Heres Every Possible Solution On Vivo S17 Pro | Dr.fone
- In 2024, How to Reset a Locked Infinix Note 30i Phone
- Title: How to Create Intro Video with KineMaster for 2024
- Author: Chloe
- Created at : 2024-05-20 03:38:34
- Updated at : 2024-05-21 03:38:34
- Link: https://ai-editing-video.techidaily.com/how-to-create-intro-video-with-kinemaster-for-2024/
- License: This work is licensed under CC BY-NC-SA 4.0.

