
How To Create Quiz Videos Detailed Guide for 2024

How To Create Quiz Videos: Detailed Guide
Quiz videos are becoming popular on YouTube but creating good content takes work. You’ll have to spend time on it, find the right questions and spend resources on powerful video editing software. In this guide, we’ll show you what a quiz video is, its advantages, and how you can use Filmora to make interactive video quizzes.
So, what are you waiting for? Read on to learn how to create quiz videos for Youtube!
Part 1. What Is A Quiz Video?
A quiz video is a type of content that provides viewers with a series of questions that are typically about a particular topic or subject matter and may also provide additional information about the topic. You can use the video for various purposes, including educational, entertainment, and marketing.

To make an appealing video quiz, you have to look at it from various angles, such as its purpose, type, and relevancy.
Moreover, a well-made quiz video will demand the viewer’s attention and encourage them to take action without being intrusive or annoying. One of the best ways is to provide visual captions that can explain the point being made in an engaging, fast-paced, and entertaining way.
Part 2. What Are The Advantages Of A Quiz And How To Use It?
Quizzing is a great way to engage your audience and encourage them to interact with your content. They can be used to create thought-provoking content, impart knowledge, and improve learning outcomes.
When used correctly, a quiz can be a powerful learning tool. But how do you use it effectively? And what are some of the advantages?
To answer these questions, we’ve provided some advantages of creating video quizzes and some scenarios where you can use them.
Advantages
Here are some advantages of video quizzes:
Draw Attention
A quiz can draw the viewer’s attention to the topic under discussion. Specifically, if you are a teacher, you can use GK question videos in your classroom to emphasize the content you are teaching and can better assess your students’ knowledge.
Increase Interactivity
Quizzes are a great way to increase engagement and interaction with your audience. By incorporating video into your questions, you can add an element of excitement and increase the likelihood that people will want to participate.

A Good Way To Introduce A Topic
Quizzes are an excellent way to introduce a new topic or subject matter. They can help you provide context and background information to help people understand the concepts you’re trying to teach or introduce.
Increase One’s Impressions Of Your Content
By adding a quiz, you can increase the time that someone spends on your page or channel as they work to answer the questions. This is valuable because it allows you to introduce a new topic in a fun and interactive way, along with getting more impressions on your content.
Scene
Here are some scenes where you can use the quizzes:
Educational
You can use quizzes in any educational setting, such as a classroom, online course, or YouTube video, to provide knowledge to others and assess their understanding.
Speech
Quizzes can also be used in speeches to add interest and engagement. For instance, a motivational speaker can play a quiz during their talks to the audience to help them understand his point better and get their response.
Presentation
Adding a fun quiz to your presentation can help to break the monotony and keep your audience engaged throughout the session.
Social media
Quizzes can aid in generating engagement on your social media page. For example, you can use them to drive traffic to your website or blog or simply to get people talking about your brand.
Part 3. How To Make An Interactive Quiz Video In Filmora?
Suppose the above advantages have compelled you to create an interactive quiz video to engage your audience and get them involved in your content. In that case, you can use Filmora software which makes it easy to make quiz videos with its built-in interactive video editing tools.
Here’s how you can make an interactive quiz video using Filmora :
Free Download For Win 7 or later(64-bit)
Free Download For macOS 10.14 or later
Step1 Upload Your Materials
In the first step, it is essential that you complete in-depth research and find reliable information for your quiz video. Afterward, go to the Filmora website and download the software that is compatible with your system. Install the program on your PC/laptop and launch it.
On the homepage, select the “Create New Project” option, and choose “Click here to upload a media file” to upload your video. Alternatively, you can drag and drop the background video from your system to the Filmora interface.
Finally, drag and drop the background video into the timeline.

Step2 Make An Intro
Now, start by creating an introduction. You can do this by opening the “Media” tab, selecting a template, and dropping it in the timeline once it is downloaded.
Then, go to the “Titles” tab, choose a text style you like, and drop it in the timeline. Finally, align both the template and your video file.
To add text to your intro, click on the text track in the timeline. Enter the intro text, ideally the quiz topic, then customize the text color and style as desired. The Advanced option also lets you animate your text. Save the changes by clicking “OK.”
Step3 Add A Quiz To The Timeline
Next, add the GK questions and answers to your video using the “Titles” tab. You should adjust the display time and text on the timeline as needed.

Step4 Increase Interactivity In Your Quiz Video
To make your video more engaging, go to the “Transition” tab and add an interesting transition effect. You can also add effects or countdown elements between questions or reveal the answer.
Step5 Repeat The Process And Export Your Final Video
After completing the previous steps, you can now create the entire quiz video by repeating the above steps.
Once you are done, click the “Play” icon to preview your work, and select the “Export” icon to either save the clip to your device or upload it directly to your YouTube channel.
Conclusion
In this detailed guide, we’ve explored what a video quiz is, its advantages, and scenes where you can use them. We’ve also walked you through the step-by-step process of making an interactive video quiz using the Wondershare Filmora software.
Hopefully, you’ve enjoyed reading this article and can now create quiz videos for your presentation, classroom, or YouTube videos.
Free Download For macOS 10.14 or later
Step1 Upload Your Materials
In the first step, it is essential that you complete in-depth research and find reliable information for your quiz video. Afterward, go to the Filmora website and download the software that is compatible with your system. Install the program on your PC/laptop and launch it.
On the homepage, select the “Create New Project” option, and choose “Click here to upload a media file” to upload your video. Alternatively, you can drag and drop the background video from your system to the Filmora interface.
Finally, drag and drop the background video into the timeline.

Step2 Make An Intro
Now, start by creating an introduction. You can do this by opening the “Media” tab, selecting a template, and dropping it in the timeline once it is downloaded.
Then, go to the “Titles” tab, choose a text style you like, and drop it in the timeline. Finally, align both the template and your video file.
To add text to your intro, click on the text track in the timeline. Enter the intro text, ideally the quiz topic, then customize the text color and style as desired. The Advanced option also lets you animate your text. Save the changes by clicking “OK.”
Step3 Add A Quiz To The Timeline
Next, add the GK questions and answers to your video using the “Titles” tab. You should adjust the display time and text on the timeline as needed.

Step4 Increase Interactivity In Your Quiz Video
To make your video more engaging, go to the “Transition” tab and add an interesting transition effect. You can also add effects or countdown elements between questions or reveal the answer.
Step5 Repeat The Process And Export Your Final Video
After completing the previous steps, you can now create the entire quiz video by repeating the above steps.
Once you are done, click the “Play” icon to preview your work, and select the “Export” icon to either save the clip to your device or upload it directly to your YouTube channel.
Conclusion
In this detailed guide, we’ve explored what a video quiz is, its advantages, and scenes where you can use them. We’ve also walked you through the step-by-step process of making an interactive video quiz using the Wondershare Filmora software.
Hopefully, you’ve enjoyed reading this article and can now create quiz videos for your presentation, classroom, or YouTube videos.
How to Create Glowing Edge Effect in TikTok Dancing Video
Preparation
What you need to prepare:
- A computer (Windows or macOS)
- Your video materials.
- Filmora video editor
Step 1
Download Filmora and run the program. Once it starts, click on “New Project”.
Step 2
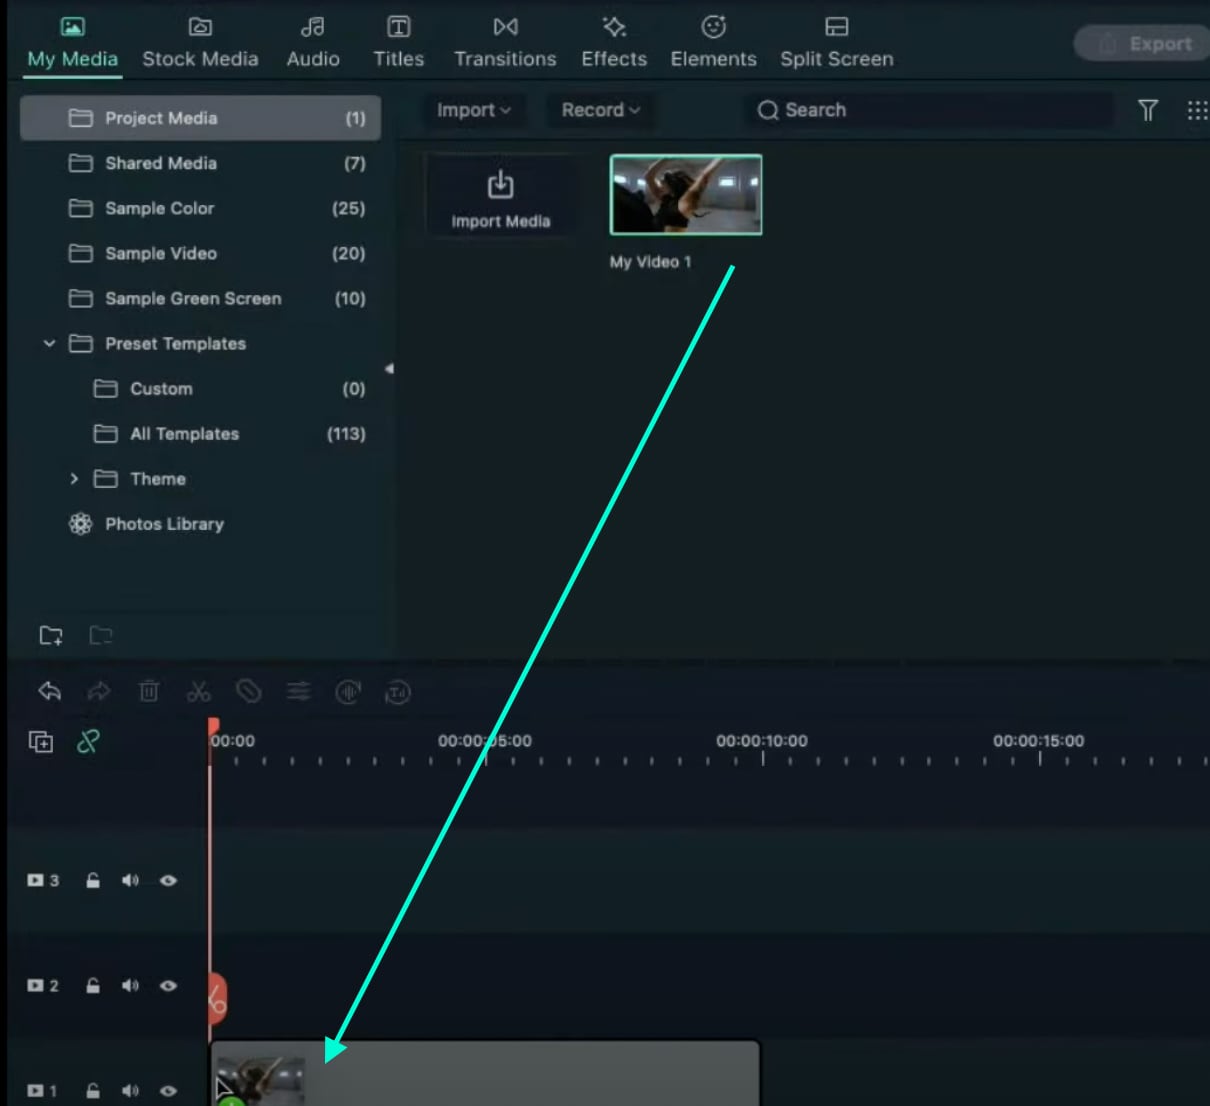
Go to My Media and Import any video you want to add a glowing edge effect to. Then, drag the video to Track 1 on the Timeline.
Step 3
Copy the Clip from Track 1 and paste it on Track 2.
Step 4
Go to the Effects tab and apply the “Pixelated Edges” effect to the clip on Track 1. Then, hide Track 2 by clicking the “eye” button.

Step 5
Double-click on the Clip in Track 1. Go to Video → Effects. Here, change the color to anything you want. This will determine what color your glowing edge effect will be. When you’re done choosing a color, click OK.

Step 6
Next, Unhide the Track 2. Double-click on the clip in Track 2 and go to Video → Basic. Scroll down and change the Blending Mode to “Difference”. Click OK and Export the clip at a higher rate. Click on the blue Export button at the top center.

Step 7
Delete the clip on Track 1. Then, move the clip from Track 2 to Track 1. Now, Import the clip that you just Exported and drag it to Track 2.

Step 8
Go to Effects and find the Blur effect. Drag the Blur effect to the clip on Track 2.

Step 9
Double-click on the clip in Track 2. Go to Video → Effects. Change the Zoom Rate to 1. Click OK. Now, find the Glow effect in the Effects tab and apply it two times to the clip on Track 2. Copy the Track 2 clip and paste it on Track 3.
Step 10
Search for the Wash effect in the Effects tab and apply it twice to the Track 2 clip again. Just drag it two times on top of the clip.
Step 11
Double-click on the clip in Track 2 and change its Blending Mode to “Screen”. Do the same thing for the clip in Track 3.
Step 12
You’re done. The glow effect will now be applied to your video. You have successfully created a glowing edge effect in any dancing video you want. Congratulations!

Summary
What you’ve learned:
- How to add a glowing edge effect on any video you want
- How to add other effects to clips in Filmora
- Edit the settings and features of these effects and make them more unique
What you need to prepare:
- A computer (Windows or macOS)
- Your video materials.
- Filmora video editor
Step 1
Download Filmora and run the program. Once it starts, click on “New Project”.
Step 2
Go to My Media and Import any video you want to add a glowing edge effect to. Then, drag the video to Track 1 on the Timeline.

Step 3
Copy the Clip from Track 1 and paste it on Track 2.
Step 4
Go to the Effects tab and apply the “Pixelated Edges” effect to the clip on Track 1. Then, hide Track 2 by clicking the “eye” button.

Step 5
Double-click on the Clip in Track 1. Go to Video → Effects. Here, change the color to anything you want. This will determine what color your glowing edge effect will be. When you’re done choosing a color, click OK.

Step 6
Next, Unhide the Track 2. Double-click on the clip in Track 2 and go to Video → Basic. Scroll down and change the Blending Mode to “Difference”. Click OK and Export the clip at a higher rate. Click on the blue Export button at the top center.

Step 7
Delete the clip on Track 1. Then, move the clip from Track 2 to Track 1. Now, Import the clip that you just Exported and drag it to Track 2.

Step 8
Go to Effects and find the Blur effect. Drag the Blur effect to the clip on Track 2.

Step 9
Double-click on the clip in Track 2. Go to Video → Effects. Change the Zoom Rate to 1. Click OK. Now, find the Glow effect in the Effects tab and apply it two times to the clip on Track 2. Copy the Track 2 clip and paste it on Track 3.
Step 10
Search for the Wash effect in the Effects tab and apply it twice to the Track 2 clip again. Just drag it two times on top of the clip.
Step 11
Double-click on the clip in Track 2 and change its Blending Mode to “Screen”. Do the same thing for the clip in Track 3.
Step 12
You’re done. The glow effect will now be applied to your video. You have successfully created a glowing edge effect in any dancing video you want. Congratulations!

Summary
What you’ve learned:
- How to add a glowing edge effect on any video you want
- How to add other effects to clips in Filmora
- Edit the settings and features of these effects and make them more unique
What you need to prepare:
- A computer (Windows or macOS)
- Your video materials.
- Filmora video editor
Step 1
Download Filmora and run the program. Once it starts, click on “New Project”.
Step 2
Go to My Media and Import any video you want to add a glowing edge effect to. Then, drag the video to Track 1 on the Timeline.

Step 3
Copy the Clip from Track 1 and paste it on Track 2.
Step 4
Go to the Effects tab and apply the “Pixelated Edges” effect to the clip on Track 1. Then, hide Track 2 by clicking the “eye” button.

Step 5
Double-click on the Clip in Track 1. Go to Video → Effects. Here, change the color to anything you want. This will determine what color your glowing edge effect will be. When you’re done choosing a color, click OK.

Step 6
Next, Unhide the Track 2. Double-click on the clip in Track 2 and go to Video → Basic. Scroll down and change the Blending Mode to “Difference”. Click OK and Export the clip at a higher rate. Click on the blue Export button at the top center.

Step 7
Delete the clip on Track 1. Then, move the clip from Track 2 to Track 1. Now, Import the clip that you just Exported and drag it to Track 2.

Step 8
Go to Effects and find the Blur effect. Drag the Blur effect to the clip on Track 2.

Step 9
Double-click on the clip in Track 2. Go to Video → Effects. Change the Zoom Rate to 1. Click OK. Now, find the Glow effect in the Effects tab and apply it two times to the clip on Track 2. Copy the Track 2 clip and paste it on Track 3.
Step 10
Search for the Wash effect in the Effects tab and apply it twice to the Track 2 clip again. Just drag it two times on top of the clip.
Step 11
Double-click on the clip in Track 2 and change its Blending Mode to “Screen”. Do the same thing for the clip in Track 3.
Step 12
You’re done. The glow effect will now be applied to your video. You have successfully created a glowing edge effect in any dancing video you want. Congratulations!

Summary
What you’ve learned:
- How to add a glowing edge effect on any video you want
- How to add other effects to clips in Filmora
- Edit the settings and features of these effects and make them more unique
What you need to prepare:
- A computer (Windows or macOS)
- Your video materials.
- Filmora video editor
Step 1
Download Filmora and run the program. Once it starts, click on “New Project”.
Step 2
Go to My Media and Import any video you want to add a glowing edge effect to. Then, drag the video to Track 1 on the Timeline.

Step 3
Copy the Clip from Track 1 and paste it on Track 2.
Step 4
Go to the Effects tab and apply the “Pixelated Edges” effect to the clip on Track 1. Then, hide Track 2 by clicking the “eye” button.

Step 5
Double-click on the Clip in Track 1. Go to Video → Effects. Here, change the color to anything you want. This will determine what color your glowing edge effect will be. When you’re done choosing a color, click OK.

Step 6
Next, Unhide the Track 2. Double-click on the clip in Track 2 and go to Video → Basic. Scroll down and change the Blending Mode to “Difference”. Click OK and Export the clip at a higher rate. Click on the blue Export button at the top center.

Step 7
Delete the clip on Track 1. Then, move the clip from Track 2 to Track 1. Now, Import the clip that you just Exported and drag it to Track 2.

Step 8
Go to Effects and find the Blur effect. Drag the Blur effect to the clip on Track 2.

Step 9
Double-click on the clip in Track 2. Go to Video → Effects. Change the Zoom Rate to 1. Click OK. Now, find the Glow effect in the Effects tab and apply it two times to the clip on Track 2. Copy the Track 2 clip and paste it on Track 3.
Step 10
Search for the Wash effect in the Effects tab and apply it twice to the Track 2 clip again. Just drag it two times on top of the clip.
Step 11
Double-click on the clip in Track 2 and change its Blending Mode to “Screen”. Do the same thing for the clip in Track 3.
Step 12
You’re done. The glow effect will now be applied to your video. You have successfully created a glowing edge effect in any dancing video you want. Congratulations!

Summary
What you’ve learned:
- How to add a glowing edge effect on any video you want
- How to add other effects to clips in Filmora
- Edit the settings and features of these effects and make them more unique
How to Use a Stabilization Tool in Filmora
Does your video shake so much? Shaking movement on your camera is often inevitable, especially if you don’t use a camera stabilizer or a camera with no built-in image stabilization. As a result, it can make your video look distracting and difficult to watch.
But you don’t need to worry. You can use a stabilization tool in Filmora . A stabilization tool is a feature that can help to correct for camera shake and other types of movement. If you are a handheld shooter, you will find this tool extremely helpful.
Part 1: When do you need to stabilize your video?
Now, let’s talk about when you should stabilize your video. If you’re shooting something that is moving, like people or animals, you will definitely want to stabilize your video. This will help ensure that the video is smooth and steady.
Another time you may want to stabilize your video is if you’re shooting in a low-light situation. It will help to ensure that your video is not too shaky.
Finally, if you’re shooting a video that’s going to be displayed on a large screen, you may want to stabilize your video. Stabilizing your video will help ensure the output is crisp and clear.
Part 2: How to stabilize your video with Filmora
Filmora has a stabilization feature that can help to smooth your video and make it look more professional. If you haven’t installed Filmora yet, you can download it for free.
Free Download For Win 7 or later(64-bit)
Free Download For macOS 10.14 or later
So, should you have a wobble movement in your video, follow these steps to make it smoother in no time:
Step1 Launch Filmora 11 and create a new project.
Step2 Import your video to Filmora.
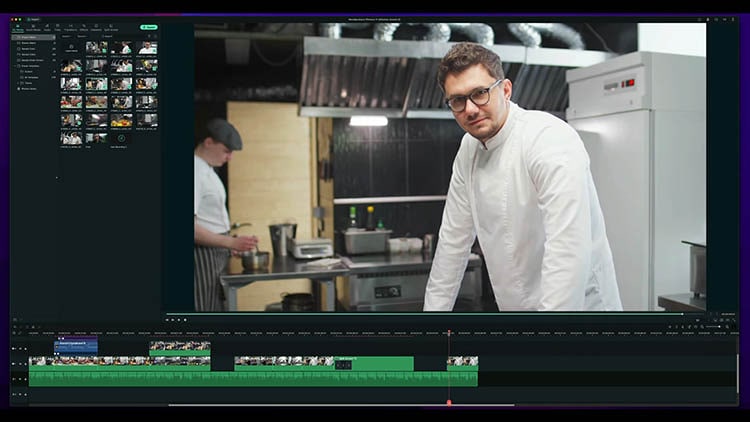
Step3 After you import your video to Filmora, the Stabilization must have been off. So, switch the Stabilization toggle on, then a loading bar will start going up to analyze the clip.
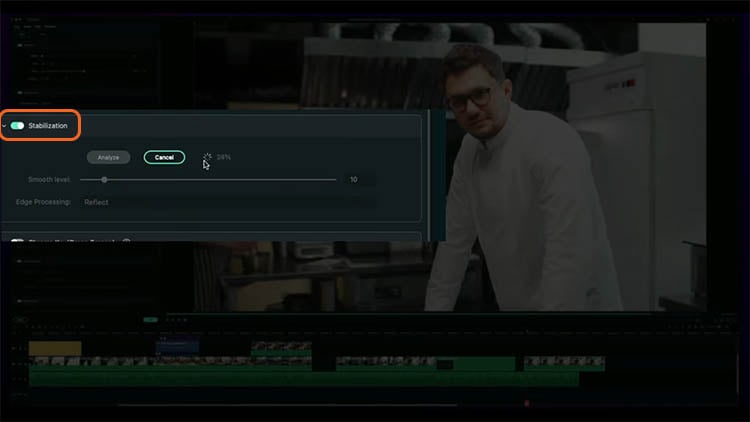
Step4 Once it finishes analyzing, the smooth level will default to 10. See the preview whether you like how it turns out.
Before
After
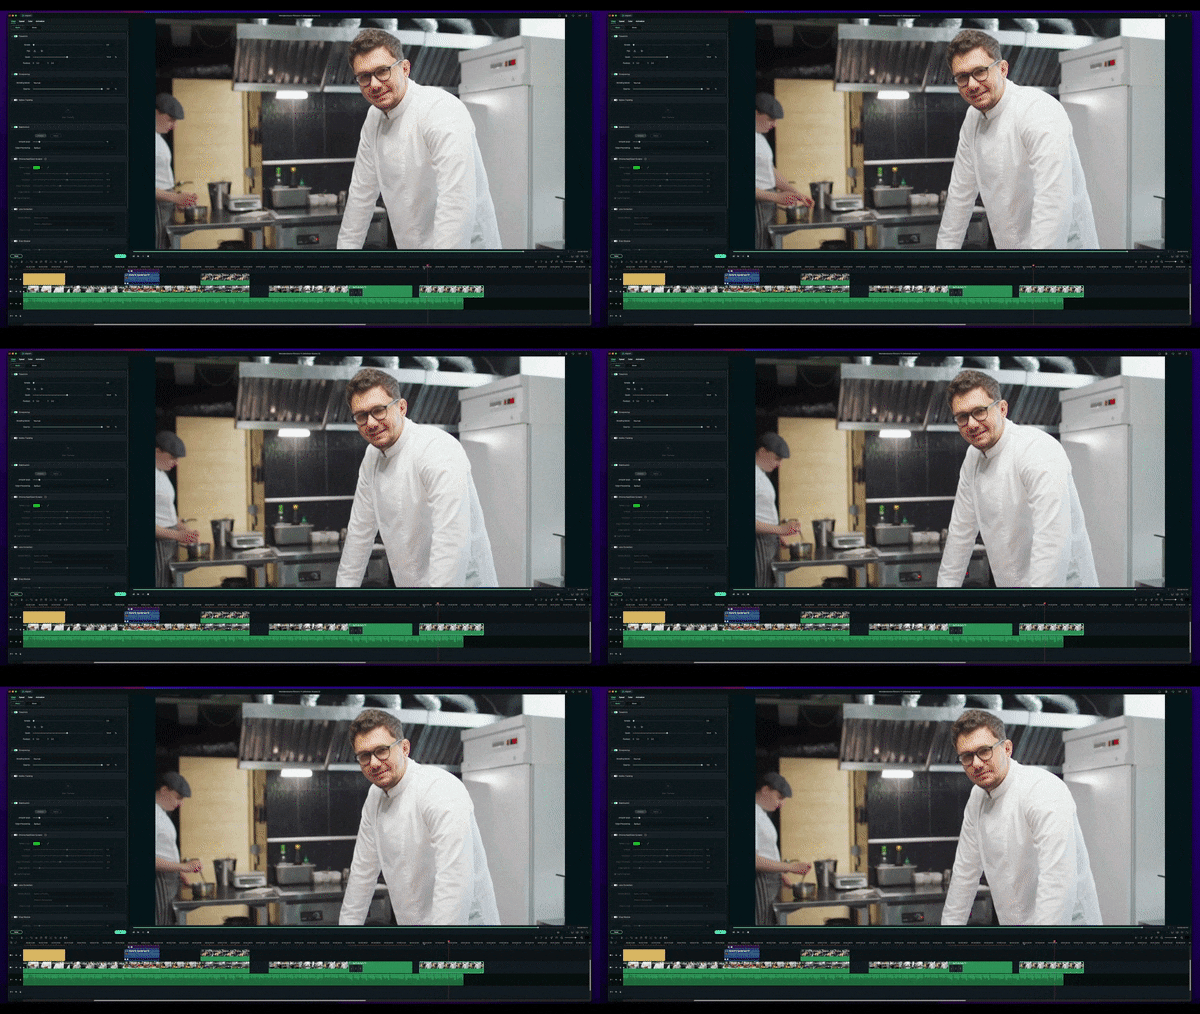
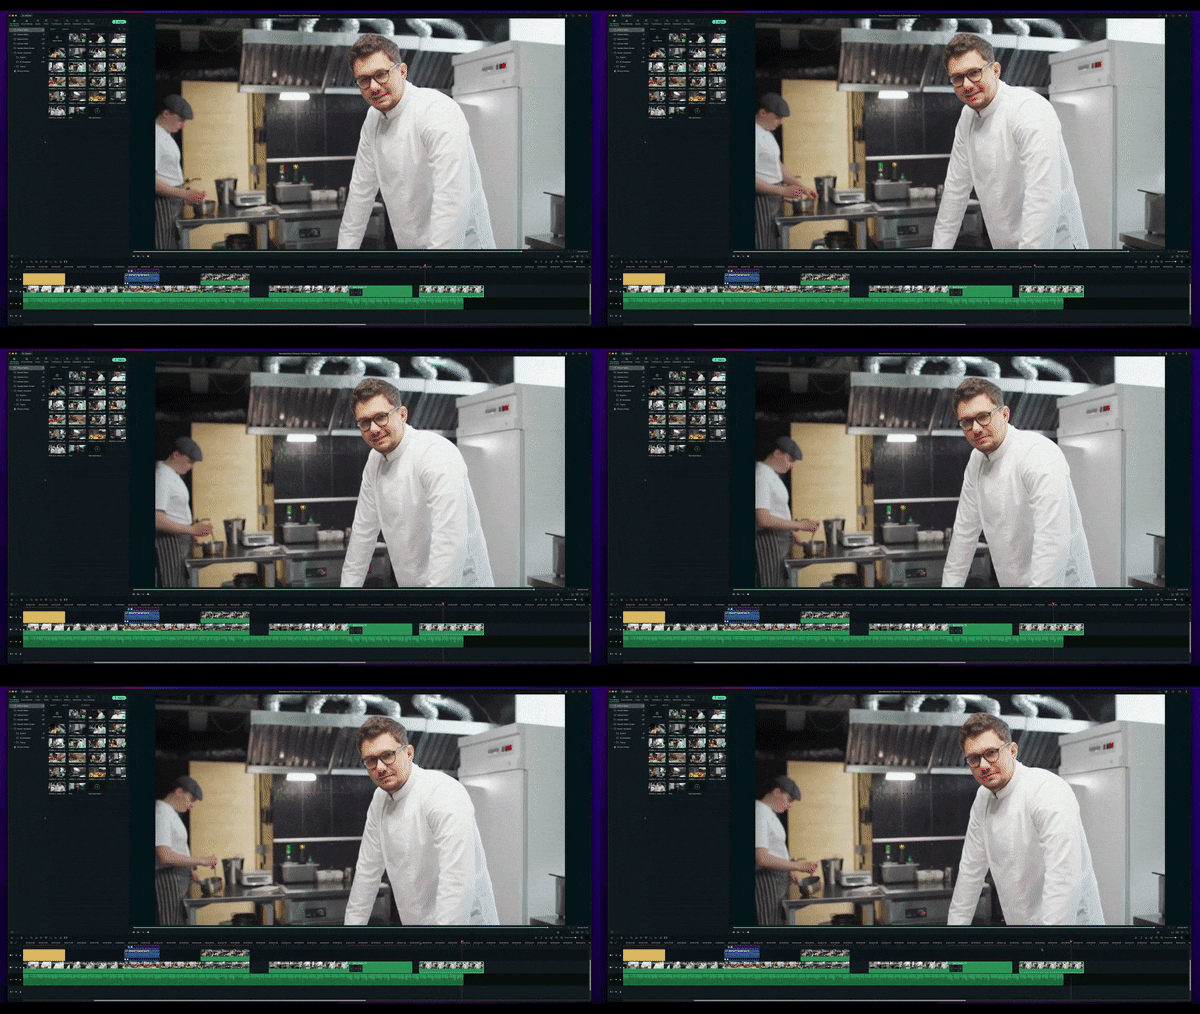
Please note that the center point of your image will always be the most stable. The more shaky a clip is, the more it will crop into that image.
If you are unsatisfied with the default setting, increasing the Smoothness Level will result in more cropping to the image. On the contrary, if you put the Smoothness Level down to zero, you are no longer cropping into the image, but the result won’t be as smooth.
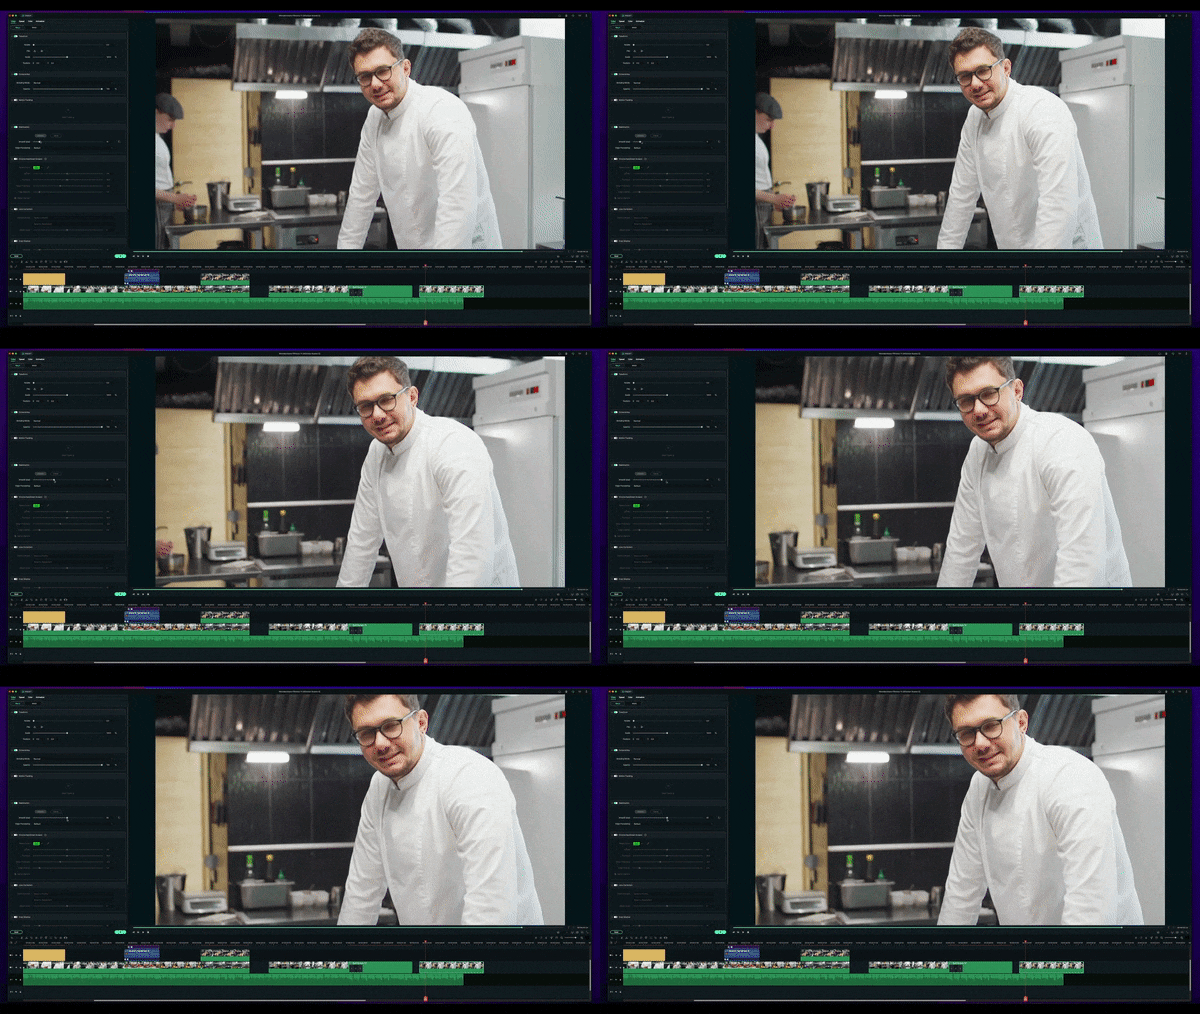
Should the cropping bother you, such as it crops the subject’s hair out of the frame, you can adjust it with Edge Processing.
If you change it to None, you will see the black bars that simulate how it stabilizes the clip. Try to hit play on the preview screen, and then you can see more clearly how the tool keeps the center of the frame to make it stable and less shaky.
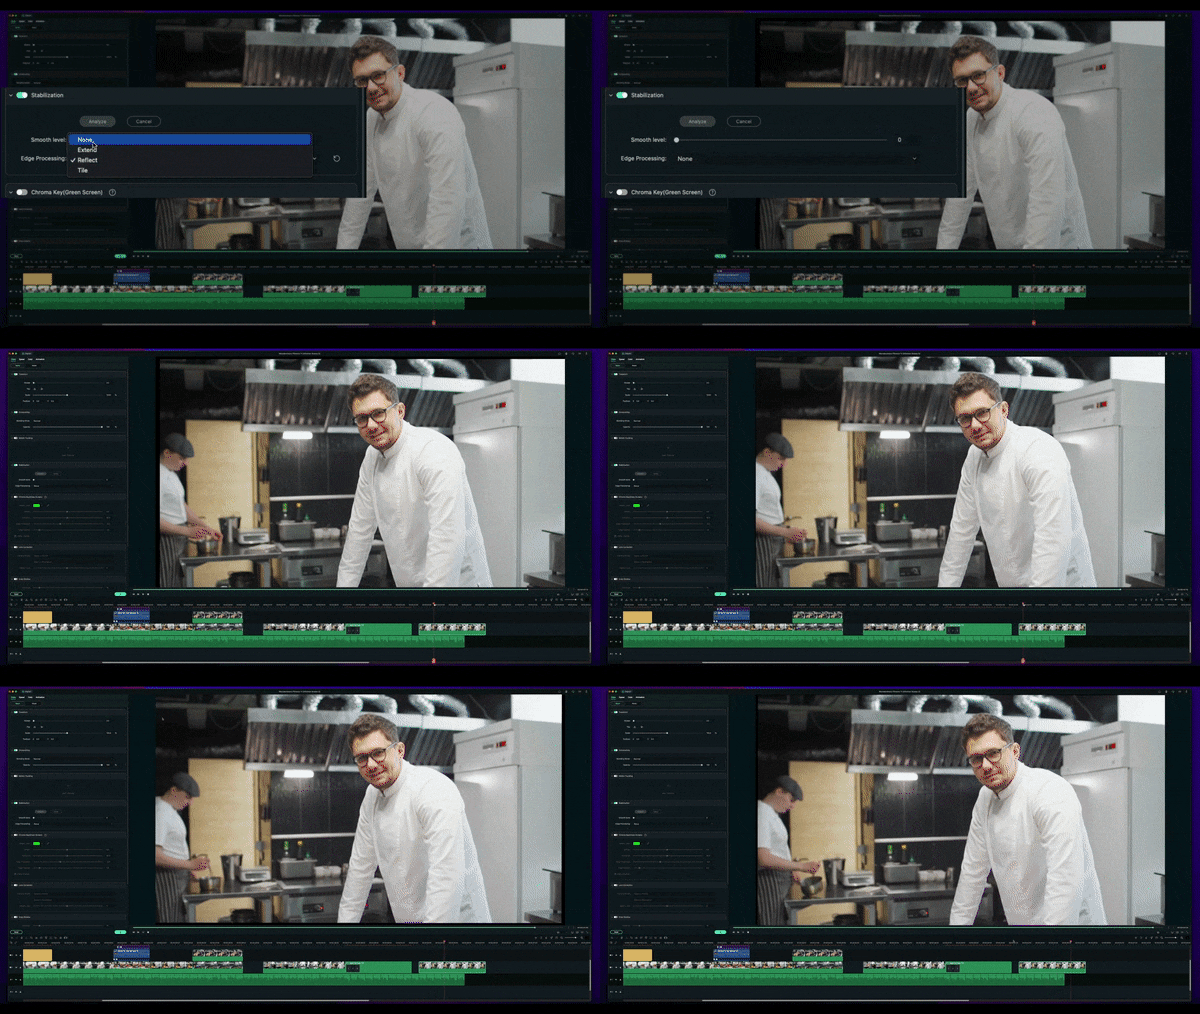
As Reflect is the default, the Extend uses artificial intelligence to extend the pixels, as you are often aware in Photoshop.
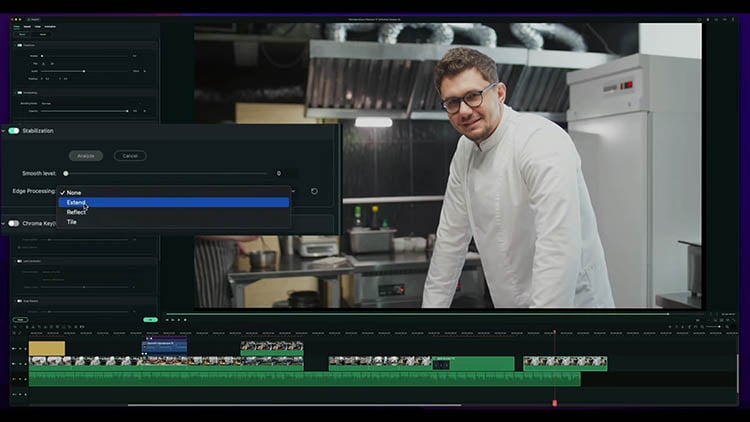
Besides the three, there is also the Tile option. Each of them would give a different result. You can try and use the one that works best for you.
Summary
When you’re shooting a video, you must have wanted it to be as smooth and stable as possible. By stabilizing your video, you can help ensure it’s smooth and easy to watch.
Filmora offers a Stabilization feature that allows you to easily improve your video’s quality. Simply select the video clip you want to stabilize and click the stabilization button. Filmora will do the rest, giving you a smooth and stable video.
Free Download For macOS 10.14 or later
So, should you have a wobble movement in your video, follow these steps to make it smoother in no time:
Step1 Launch Filmora 11 and create a new project.
Step2 Import your video to Filmora.

Step3 After you import your video to Filmora, the Stabilization must have been off. So, switch the Stabilization toggle on, then a loading bar will start going up to analyze the clip.

Step4 Once it finishes analyzing, the smooth level will default to 10. See the preview whether you like how it turns out.
Before

After

Please note that the center point of your image will always be the most stable. The more shaky a clip is, the more it will crop into that image.
If you are unsatisfied with the default setting, increasing the Smoothness Level will result in more cropping to the image. On the contrary, if you put the Smoothness Level down to zero, you are no longer cropping into the image, but the result won’t be as smooth.

Should the cropping bother you, such as it crops the subject’s hair out of the frame, you can adjust it with Edge Processing.
If you change it to None, you will see the black bars that simulate how it stabilizes the clip. Try to hit play on the preview screen, and then you can see more clearly how the tool keeps the center of the frame to make it stable and less shaky.

As Reflect is the default, the Extend uses artificial intelligence to extend the pixels, as you are often aware in Photoshop.

Besides the three, there is also the Tile option. Each of them would give a different result. You can try and use the one that works best for you.
Summary
When you’re shooting a video, you must have wanted it to be as smooth and stable as possible. By stabilizing your video, you can help ensure it’s smooth and easy to watch.
Filmora offers a Stabilization feature that allows you to easily improve your video’s quality. Simply select the video clip you want to stabilize and click the stabilization button. Filmora will do the rest, giving you a smooth and stable video.
Best Ways to Slow Down Motion in CapCut
Since the slow-motion trend captured everyone’s attention, it never went out of fashion. Keeping this in view, many content creators followed the trend and created slo-mos. In filmmaking, slow motion assisted in emphasizing high-action scenes and details. Many tools and software like Adobe After Effects or Adobe Premiere Pro can do this.
Smartphone video editors were introduced to enhance the application of slow motion. One of these editors is CapCut , a multifunctional video editor capable of slo-mo creation. This article will focus on how to do slow-mo in CapCut. With tools brief review, you can find the detailed guide on the CapCut slow-mo effect . Along with learning how to do some in CapCut, we’ll look into its alternative.
Slow Motion Video Maker Slow your video’s speed with better control of your keyframes to create unique cinematic effects!
Make A Slow Motion Video Make A Slow Motion Video More Features

Part 1: CapCut Video Editor: An Exceptional Mobile App for Video Editing
CapCut is an editing application that caters to the needs of both Android and iPhone users. Whether you are working as a seasoned editor or a team member, it assists all. It harbors numerous video editing tools like the CapCut slow-motion effect. Moreover, users can also access keyframe editor, effects and filters, stock videos, and more.

The tool offers a sleek user interface with cutting-edge AI technology for automated editing. The interface looks artistic and organized for accessible editing. Along with video editing, users can perform audio, text, and image editing. You can access its Resource collection on its site, which is full of tips and tutorials. To give you a broader vision of CapCut slow-mo effect, here are some of its features:
- Video Filters and Effects: CapCut has a free collection of effects and filters to enhance your footage. The video effects and filters add uniqueness and hide any irregularities in videos. The collection keeps updating, and you can use Business, Ads, and other categories.
- Stock Videos: Use CapCut’s free stock media instead of roaming through the internet. If you must show your abilities as an editor, then try its royalty-free videos. These videos are editable, and you can apply multiple pre-installed animations and stickers to them.
- Keyframe Animation: Although CapCut offers a range of stock animations, you can create one. With its keyframe functioning, users can create custom animations. It offers custom settings like scale, position, opacity, and more adjustments.
- Background Remover: If you want to erase messy backgrounds and replace them, CapCut can assist. Its background remover eliminates video backgrounds with accuracy. Moreover, you can replace them with solid or gradient colors, images, and videos.
- Video Upscaler: This tool is available online and enhances video resolution up to 4K. The tool is compatible with diverse video contexts and gives professional outcomes. The tool is backed by AI, and hence, you just need to upload the video for upscaling.
Part 2: How to Create a Slow Mo on CapCut? A Guide
There are two seamless methods of creating slow-mo on CapCut via “Normal” and “Curve” options. The normal method involves slowing down videos via basic playback speed alteration. However, the Curve method involves multiple speed templates for this. If you do not find an expected speed template, you can utilize the “Custom” option. Following is the procedural guide to the CapCut slow-mo effect:
Step 1
After downloading and launching CapCut on your device, access its main menu. From the main menu, click the “New Project” option and upload a video.

Step 2
Once you have added the video, navigate towards the toolbar at the bottom. From there, locate and select the “Edit” option.

Step 3
From the appearing options, select the “Speed” option for the CapCut slow-mo effect.

Step 4
In the speed display, adjust the position of the slider to add the slo-mo effect. Further, go to the “Normal” section to start speed manipulation.

Step 5
Drag the playback speed slider toward the left side of the screen. This will add a slow-mo effect and will increase the video’s duration. In this section, you can also expand the “Make it smoother” option to enhance the quality. Moreover, you can also enable the “Pitch” option to maintain audio quality. Afterward, click the “ü” icon at the bottom right corner to finalize the slo-mo effect.

Part 3: CapCut Slow Mo Alternative: Wondershare Filmora for Smartphone Users
After seeing how to slow down videos on CapCut, you must think that it is so easy. However, there is an alternative editor that offers a minimal interface with similar qualities. Wondershare Filmora is a professional slow-motion creator catered to your needs. Whether you are skilled or just beginning your journey, it can assist you.
Using this CapCut slow-motion video has its benefits, as it offers multiple speed change options. You can change video speed using Normal playback speed or speed “Curve” alteration. In this section, we’ll teach you how to create a slow motion in Filmora. We are going to use the Curve technique to manipulate speed professionally.
Step-by-Step Guide to Slow Down Video in Filmora App
You can find multiple speed templates here to craft a cinematic-level slow motion. By utilizing the Custom speed setting options, this effect is possible. To fashion professional-grade and artistic slow motion in Filmora, follow these steps:
Step 1Import Videos After Creating a New Project
Download the Filmora app from the Play Store or App Store and launch it. Then, click the “New Project” tab and import a video from the device gallery.

Step 2Access the Speed Curve Option
After importing the video, navigate towards the timeline panel and select the video. From the options appearing in the bar at the bottom, select “Speed.” In the speed section, select the “Curve” section to access speed settings.

Step 3Adjust the Speed Curve Settings
From the appearing options, click the “Customize” option and start editing. To create the slo-mo effect, drag the slider in the downward direction. If you notice, the slider points are distant from each other. It is to edit videos and slow down videos at different durations. Once you are done editing in this CapCut slow-mo effect alternative, hit “Export.”

Bonus Part: Edit Your Slow Mo Video on Desktop with Filmora Desktop
No doubt Wondershare Filmora offers precise editing features compared to other apps. However, skilled and professional editors just prefer the desktop version to bring precision. In addition, there is an optical flow option and an extensive timeline panel. Both these features ensure professional outcomes and a smooth slow-motion effect.
Wondershare Filmora is a powerful alternative to CapCut slow-motion download. The software has a range of video editing features that open unlimited editing opportunities. With its various effects and filters, you can seize the audience’s attention. In addition, the software is compatible with Linux and macOS devices for diversity.
Free Download For Win 7 or later(64-bit)
Free Download For macOS 10.14 or later
Step-by-Step Guide to Create Slow Motion in Filmora for Desktop
In this method, we’ll use Filmora’s Uniform Speed functionality to generate a slow-motion video. This feature uses a simple speed slider to enhance or decelerate video speed. Find the guide to Filmora’s Uniform Speed feature attached below:
Step 1Access the Speed Tab to Start Editing
After opening a project in Filmora, select the video in the timeline and access the settings panel. From there, go to the “Speed” > “Uniform Speed” option and change the slider’s position. By dragging it towards the left side, you can add a slow-motion effect.

Step 2Add Optical Flow Effect
To add a layer of smoothness to your slow-motion video, access “AI Frame Interpolation.” You can find this option at the bottom of the Uniform Speed tab. Expand this option and select the “Optical Flow” option.

Step 3Activate Rendering and Export Video
To analyze the outcome of activating optical flow, navigate towards the timeline panel. From the given options, click on the “Render Preview” icon and wait for its completion. Once the rendering is complete, click the “Export” button after the preview.

Video Editing Features of Filmora
CapCut and Wondershare Filmora both possess AI powers to ensure seamless video creation. However, Filmora offers more video editing features, and all of them offer customization. The interface is just perfect for every professional or non-professional. With its accessible interface, you must try the following video editing tools:
1. Screen Recorder
For the seamless generation of tutorials and ‘How to” videos, this editor offers a screen recorder. The recorder is embedded with custom settings to cater to each user’s requirements. You can accommodate screen resolution, microphone settings, and cam settings with it.
2. Keyframing
Transform your illustrations into reality using Filmora’s keyframe editing feature. You can add keyframes at different points in the timeline to adjust the movements. There are custom settings like position, scale, opacity, color, and more for each keyframe.
3. Split Screen
Make your videos happening and captivating simultaneously with Filmora’s split screen option. This allows you to add distinct videos and auto-adjust them at different split screens. You can also enable manual visual, audio, and AI editing for each split video.
4. Assets Backup & Sync
Why worry about finishing a project at once when you can edit it later with Filmora? With its cloud backup option, you can start editing a video where you left off. In addition, the tool also offers synchronization across devices. This means you can access your videos, downloaded assets, and other storage data with a simple login.
5. AI Text-Based Editing
As discussed earlier, the AI algorithms allow you to edit with full efficiency. This feature of Filmora enhances productivity via text-to-speech function. It creates captions out of a video and allows you to seamlessly cut videos by removing text.
Conclusion
In conclusion, this article considered how to do slow-mo in CapCut. In addition, we saw how you can create a slow-motion video on a smartphone using CapCut. During times that demand the creation of sophisticated slow-motion content, we suggest Filmora. This editing software offers a myriad of editing tools and techniques, facilitating the creation and adjustment of slow motion.
Make A Slow Motion Video Make A Slow Motion Video More Features

Part 1: CapCut Video Editor: An Exceptional Mobile App for Video Editing
CapCut is an editing application that caters to the needs of both Android and iPhone users. Whether you are working as a seasoned editor or a team member, it assists all. It harbors numerous video editing tools like the CapCut slow-motion effect. Moreover, users can also access keyframe editor, effects and filters, stock videos, and more.

The tool offers a sleek user interface with cutting-edge AI technology for automated editing. The interface looks artistic and organized for accessible editing. Along with video editing, users can perform audio, text, and image editing. You can access its Resource collection on its site, which is full of tips and tutorials. To give you a broader vision of CapCut slow-mo effect, here are some of its features:
- Video Filters and Effects: CapCut has a free collection of effects and filters to enhance your footage. The video effects and filters add uniqueness and hide any irregularities in videos. The collection keeps updating, and you can use Business, Ads, and other categories.
- Stock Videos: Use CapCut’s free stock media instead of roaming through the internet. If you must show your abilities as an editor, then try its royalty-free videos. These videos are editable, and you can apply multiple pre-installed animations and stickers to them.
- Keyframe Animation: Although CapCut offers a range of stock animations, you can create one. With its keyframe functioning, users can create custom animations. It offers custom settings like scale, position, opacity, and more adjustments.
- Background Remover: If you want to erase messy backgrounds and replace them, CapCut can assist. Its background remover eliminates video backgrounds with accuracy. Moreover, you can replace them with solid or gradient colors, images, and videos.
- Video Upscaler: This tool is available online and enhances video resolution up to 4K. The tool is compatible with diverse video contexts and gives professional outcomes. The tool is backed by AI, and hence, you just need to upload the video for upscaling.
Part 2: How to Create a Slow Mo on CapCut? A Guide
There are two seamless methods of creating slow-mo on CapCut via “Normal” and “Curve” options. The normal method involves slowing down videos via basic playback speed alteration. However, the Curve method involves multiple speed templates for this. If you do not find an expected speed template, you can utilize the “Custom” option. Following is the procedural guide to the CapCut slow-mo effect:
Step 1
After downloading and launching CapCut on your device, access its main menu. From the main menu, click the “New Project” option and upload a video.

Step 2
Once you have added the video, navigate towards the toolbar at the bottom. From there, locate and select the “Edit” option.

Step 3
From the appearing options, select the “Speed” option for the CapCut slow-mo effect.

Step 4
In the speed display, adjust the position of the slider to add the slo-mo effect. Further, go to the “Normal” section to start speed manipulation.

Step 5
Drag the playback speed slider toward the left side of the screen. This will add a slow-mo effect and will increase the video’s duration. In this section, you can also expand the “Make it smoother” option to enhance the quality. Moreover, you can also enable the “Pitch” option to maintain audio quality. Afterward, click the “ü” icon at the bottom right corner to finalize the slo-mo effect.

Part 3: CapCut Slow Mo Alternative: Wondershare Filmora for Smartphone Users
After seeing how to slow down videos on CapCut, you must think that it is so easy. However, there is an alternative editor that offers a minimal interface with similar qualities. Wondershare Filmora is a professional slow-motion creator catered to your needs. Whether you are skilled or just beginning your journey, it can assist you.
Using this CapCut slow-motion video has its benefits, as it offers multiple speed change options. You can change video speed using Normal playback speed or speed “Curve” alteration. In this section, we’ll teach you how to create a slow motion in Filmora. We are going to use the Curve technique to manipulate speed professionally.
Step-by-Step Guide to Slow Down Video in Filmora App
You can find multiple speed templates here to craft a cinematic-level slow motion. By utilizing the Custom speed setting options, this effect is possible. To fashion professional-grade and artistic slow motion in Filmora, follow these steps:
Step 1Import Videos After Creating a New Project
Download the Filmora app from the Play Store or App Store and launch it. Then, click the “New Project” tab and import a video from the device gallery.

Step 2Access the Speed Curve Option
After importing the video, navigate towards the timeline panel and select the video. From the options appearing in the bar at the bottom, select “Speed.” In the speed section, select the “Curve” section to access speed settings.

Step 3Adjust the Speed Curve Settings
From the appearing options, click the “Customize” option and start editing. To create the slo-mo effect, drag the slider in the downward direction. If you notice, the slider points are distant from each other. It is to edit videos and slow down videos at different durations. Once you are done editing in this CapCut slow-mo effect alternative, hit “Export.”

Bonus Part: Edit Your Slow Mo Video on Desktop with Filmora Desktop
No doubt Wondershare Filmora offers precise editing features compared to other apps. However, skilled and professional editors just prefer the desktop version to bring precision. In addition, there is an optical flow option and an extensive timeline panel. Both these features ensure professional outcomes and a smooth slow-motion effect.
Wondershare Filmora is a powerful alternative to CapCut slow-motion download. The software has a range of video editing features that open unlimited editing opportunities. With its various effects and filters, you can seize the audience’s attention. In addition, the software is compatible with Linux and macOS devices for diversity.
Free Download For Win 7 or later(64-bit)
Free Download For macOS 10.14 or later
Step-by-Step Guide to Create Slow Motion in Filmora for Desktop
In this method, we’ll use Filmora’s Uniform Speed functionality to generate a slow-motion video. This feature uses a simple speed slider to enhance or decelerate video speed. Find the guide to Filmora’s Uniform Speed feature attached below:
Step 1Access the Speed Tab to Start Editing
After opening a project in Filmora, select the video in the timeline and access the settings panel. From there, go to the “Speed” > “Uniform Speed” option and change the slider’s position. By dragging it towards the left side, you can add a slow-motion effect.

Step 2Add Optical Flow Effect
To add a layer of smoothness to your slow-motion video, access “AI Frame Interpolation.” You can find this option at the bottom of the Uniform Speed tab. Expand this option and select the “Optical Flow” option.

Step 3Activate Rendering and Export Video
To analyze the outcome of activating optical flow, navigate towards the timeline panel. From the given options, click on the “Render Preview” icon and wait for its completion. Once the rendering is complete, click the “Export” button after the preview.

Video Editing Features of Filmora
CapCut and Wondershare Filmora both possess AI powers to ensure seamless video creation. However, Filmora offers more video editing features, and all of them offer customization. The interface is just perfect for every professional or non-professional. With its accessible interface, you must try the following video editing tools:
1. Screen Recorder
For the seamless generation of tutorials and ‘How to” videos, this editor offers a screen recorder. The recorder is embedded with custom settings to cater to each user’s requirements. You can accommodate screen resolution, microphone settings, and cam settings with it.
2. Keyframing
Transform your illustrations into reality using Filmora’s keyframe editing feature. You can add keyframes at different points in the timeline to adjust the movements. There are custom settings like position, scale, opacity, color, and more for each keyframe.
3. Split Screen
Make your videos happening and captivating simultaneously with Filmora’s split screen option. This allows you to add distinct videos and auto-adjust them at different split screens. You can also enable manual visual, audio, and AI editing for each split video.
4. Assets Backup & Sync
Why worry about finishing a project at once when you can edit it later with Filmora? With its cloud backup option, you can start editing a video where you left off. In addition, the tool also offers synchronization across devices. This means you can access your videos, downloaded assets, and other storage data with a simple login.
5. AI Text-Based Editing
As discussed earlier, the AI algorithms allow you to edit with full efficiency. This feature of Filmora enhances productivity via text-to-speech function. It creates captions out of a video and allows you to seamlessly cut videos by removing text.
Conclusion
In conclusion, this article considered how to do slow-mo in CapCut. In addition, we saw how you can create a slow-motion video on a smartphone using CapCut. During times that demand the creation of sophisticated slow-motion content, we suggest Filmora. This editing software offers a myriad of editing tools and techniques, facilitating the creation and adjustment of slow motion.
Also read:
- [New] In 2024, Swift Shuffling Strategies Efficiently Send Data Home
- [Updated] Discovering the Timeline for YouTube Earnings for 2024
- [Updated] In 2024, Elevate Video Branding Incorporating Watermarks Into YouTube Media
- 2024 Approved Create Slow Motion Videos Using Final Cut Pro with Ease
- Google I/O 2023 Hits - Bard's Latest AI Enhancements and Breakthroughs
- In 2024, How Can You Transfer Files From Itel A60 To iPhone 15/14/13? | Dr.fone
- In 2024, How to Unlock Apple ID From your Apple iPhone 11 without Security Questions?
- In 2024, Recommended Video Background Changers
- New 2024 Approved Different Ways to Crop TikTok Video in High-Quality
- New Creating Testimonial Videos For Health And Wellness Business Industry for 2024
- New How to Loop a Video with iMovie on Mac and iPhone
- New Want to Create a Stunning Intro Video on Your Smartphone? Legend Intro Maker Is a Popular Choice. Learn the Steps to Design Intro Video Legend Intro Maker
- Seamlessly Transfer Images From Google Photos to iCloud with Our Step-by-Step Guide
- Step-by-Step Save GIFs From FB on Different Devices for 2024
- Ultimate Guide to Optimal Hard Drive Backup Tools for Secure Computing Protection
- Updated 2024 Approved Achieving GoPro Slow Motion with Quality An In-Depth Overview
- Updated In 2024, Blender - A Video Editor for All Professor
- Title: How To Create Quiz Videos Detailed Guide for 2024
- Author: Chloe
- Created at : 2024-12-09 20:22:58
- Updated at : 2024-12-11 16:12:36
- Link: https://ai-editing-video.techidaily.com/how-to-create-quiz-videos-detailed-guide-for-2024/
- License: This work is licensed under CC BY-NC-SA 4.0.