:max_bytes(150000):strip_icc():format(webp)/the-best-halloween-live-wallpaper-for-2019-4691483-019a40e91504436ca9fc9f1944d89c15.jpg)
How to Create Realistic Fire Effects

How to Create Realistic Fire Effects
Do you know that many cinema films and big-budget companies use visual effects to create realistic fires? It saves them from potential danger in production and helps them manage the time required to create a project. In this article, you will get pro tips and easy ways to add Fire effects by Wondershare Filmora.
![]()
Note: let’s not count Michael Bay and Christopher Nolan productions because their movies have a higher budget, and creating fake fire is easy.
Part 1. What do you need to create fire effects?
Using simple tools such as Filmora and visual effects, you can create a realistic fire effect with an easy setup. For filming the effect, we will need
- A good camera
- A light source
- Video editing software - Wondershare Filmora
- Basic editing skills
However, the light source is key to the fire effects. It will be beneficial if you have a warmer color light or a light that can change its temperature. You can use tungsten light bulbs or small circular LEDs that are pretty famous with Vloggers and tick-tock users.
Part 2. How to make a realistic effect fire?
After getting prepared, it’s time to do the real things. Follow the steps below to create a realistic fire effect like a pro.
Step1 Record your footage
While recording the video, you can slightly shake your light source, which will give it the flickering effect of the flame. Here, you can do this in two ways.
Shaking the light manually
Just make sure when you are shaking the light, it is not shaken aggressively, or it will lose its realism to a real fire.

Shaking the light using a dimmer
You can also use some skills to create the flickering effect of the fire without literally shaking the LED light. Dimmers come to help. A dimmer is a device that enables you to change the temperature of the LED light. If you have a dimmer, your work will be more accessible.
A regulator on the dimmer will help you switch between low and high tones. It will flicker the light on the object like a flame and make it look like it was placed in front of a real fire.

Step2 Record the object
Our next step will be to record the object on which the effect is taking place. Ensure the camera is placed under a good light source so that the picture is not dim and the object is exposed. Make sure the camera is placed at the level of the eye so that it will help you record your video clearly and accurately.
Also, keep in mind to zoom out the camera lens, which will fix the frame of the video so that the object or the person is entirely on the screen. Another tip for creating a realistic fire effect would be the person acting as the object. The more natural the acting is, the more realistic would be the fire effect.
Step3 Edit the footage
We are being safe and saving time by not using actual fire. The goal of creating a fake fire would be the effect and reaction of the object or the actor.
1. Download a professional video editing software - Wondershare Filmora
Visit Wondershare Filmora official site if you haven’t already downloaded it.
![]()
Note: download the latest version of filmora. It will give you a pro version and help you to create more realistic fire effects.
2. Create a new project and import the recorded clips
Before adding the fire effects to your video, you must ensure that you are familiar with the editing software. Your first step would be to add your clips to the timeline. Drag the footage from the library and enter it into the timeline.

3. create the fire effect more realistic by adding smoke
The next step would be to add smoke to the fire. As it is only fair that the fire makes the smoke so. Adding the smoke will create the fire effect more realistic. Follow the below steps to get your cinematic video!
#Step1 Search for smoke effects
To add the smoke effect, click on the element’s icon on the bar above and search for smokescreen 2.
#Step2 Add a smoke effect
Once you have searched and found the smoke screen 2 effects, then import that effect onto your timeline so that you can begin editing.

Once you’ve added the fire effect, you will notice the change on the screen in the top right corner.
#Step3 Add duration
The next step would be to set the duration of the smokescreen effect so that it matches the length of the video. To do so,
- Click on the edge of the smoke screen effect.
- Drag it to the right if the effect appears smaller than the video clip.
- And drag it to the left if it is larger than the video clip.
- As soon as it matches the length of the video, leave the drag, and it will fit right into place.
#Step4 Make some changes to the smoke effect
Once you have matched the duration of the smoke screen effect to the video clip, our next step would be to make some changes. These changes will make the smokescreen appear more pleasing—double-click on the smokescreen effect, which will open the transform menu.
We would first focus on the transform panel. Here you would have many options, but our focus would be on rotation, scale, and position.
![]()
Note: make sure to rotate the smoke screen effect by simply sliding the slider or dragging the slider right or left to your desire.
- You would have created an angle of the smokescreen to make it more natural.
- Now, we would have to adjust the scale of the smokescreen effect.
- Drag the slider to the right to expand the smoke to spread on the screen. It will help the smoke screen do appear more natural.
- You can adjust how much the smoke screen is visible on the screen by decreasing the opacity.
Adjust the slider to the left so it blends in with the flickering of the light we created. Now playback the video from the big screen to get an idea of the effect you added. And here are our parameters for reference.

Cool, isn’t it? Now we have added smoke to our timeline. Combined with the flickering light effect, we are closer to our goal.
Step4 Add flames or sparks
To mimic a real fire, we also have one more element that is missing, And that will be the sparks and the flames. And if you want to bring the fire effect of your video to the pro level, we would have to use the film stock effects. Flames and sparks are also available in the Wondershare Filmora.
#Step1 Search for Fire Tab

- To do so, click on the bar above the element’s icon.
- Once you have opened the elements tab, look to your left window, where further options are available.
- From these options, click on the fire tab.
- A new window will pop up in the library panel.
#Step2 Add the flame to the timeline
Click on a large scale 14 and drag it into your timeline above the smoke effect and the clip. Doing so would have created two extra layers after the video tab.

#Step3 Adjust the flame effect
Now, we have to do steps similar to the ones above the first job. But first, you have to click on the edges of the effect. Then, match it to the length of your video.
Now, remember if the length of the effect is more than that of the video clip. You can adjust it by clicking on the edge and dragging it to the left. And if it appears to be smaller than the video clip, drag the edge to the right to match the length.
#Step4 Blend the video
When you look at the effect as you play the video from the start, you will notice that the effect is a little more intense than we want. To change it to your desires, you can follow the following steps.
- First of all, double-click and open the transform
- Experiment with the rotation and the scale and position; make your choice.
- Then move on to the compositing panel and focus on the blending mode.
- Here, you will notice a drop-down panel and select the screen option from all the other options.
- Doing so would help you blend the spark effect video much better.
If you focus on the spark effect that appears on the screen, you will notice that it seems to be much more intense than we require. If you want to blend it further, you can use the opacity adjuster and decrease the transparency. Then, adjust the slider till you feel it to be just right.
And the following are ideal parameters of our adjustment just for you to refer to.

Final results
Now can easily create a realistic-looking fire effect by Wondershare Filmora.

Best editing views
See how easy it was to create a fire effect without using real fire. A fire effect you can use:
- To make your car catch on fire.
- You are screaming at the top of your lungs in a yard where your garden is on fire.
- Act like your husband forgot to watch the stove on with the dish in the kitchen.
You can create all these scenarios by using camera tricks and lighting effects. And a few skills in video editing, easily! How cool is that?
If you are a beginner or a frequent user of Wondershare Filmora, following the steps explained above will help you quickly get the hang of how to add fire effects to your videos.
Also, if you have a YouTube channel or a content creator, adding these effects will add unique creativity to your videos and ultimately boost your approach.
Free Download For Win 7 or later(64-bit)
Free Download For macOS 10.14 or later
Part 1. What do you need to create fire effects?
Using simple tools such as Filmora and visual effects, you can create a realistic fire effect with an easy setup. For filming the effect, we will need
- A good camera
- A light source
- Video editing software - Wondershare Filmora
- Basic editing skills
However, the light source is key to the fire effects. It will be beneficial if you have a warmer color light or a light that can change its temperature. You can use tungsten light bulbs or small circular LEDs that are pretty famous with Vloggers and tick-tock users.
Part 2. How to make a realistic effect fire?
After getting prepared, it’s time to do the real things. Follow the steps below to create a realistic fire effect like a pro.
Step1 Record your footage
While recording the video, you can slightly shake your light source, which will give it the flickering effect of the flame. Here, you can do this in two ways.
Shaking the light manually
Just make sure when you are shaking the light, it is not shaken aggressively, or it will lose its realism to a real fire.

Shaking the light using a dimmer
You can also use some skills to create the flickering effect of the fire without literally shaking the LED light. Dimmers come to help. A dimmer is a device that enables you to change the temperature of the LED light. If you have a dimmer, your work will be more accessible.
A regulator on the dimmer will help you switch between low and high tones. It will flicker the light on the object like a flame and make it look like it was placed in front of a real fire.

Step2 Record the object
Our next step will be to record the object on which the effect is taking place. Ensure the camera is placed under a good light source so that the picture is not dim and the object is exposed. Make sure the camera is placed at the level of the eye so that it will help you record your video clearly and accurately.
Also, keep in mind to zoom out the camera lens, which will fix the frame of the video so that the object or the person is entirely on the screen. Another tip for creating a realistic fire effect would be the person acting as the object. The more natural the acting is, the more realistic would be the fire effect.
Step3 Edit the footage
We are being safe and saving time by not using actual fire. The goal of creating a fake fire would be the effect and reaction of the object or the actor.
1. Download a professional video editing software - Wondershare Filmora
Visit Wondershare Filmora official site if you haven’t already downloaded it.
![]()
Note: download the latest version of filmora. It will give you a pro version and help you to create more realistic fire effects.
2. Create a new project and import the recorded clips
Before adding the fire effects to your video, you must ensure that you are familiar with the editing software. Your first step would be to add your clips to the timeline. Drag the footage from the library and enter it into the timeline.

3. create the fire effect more realistic by adding smoke
The next step would be to add smoke to the fire. As it is only fair that the fire makes the smoke so. Adding the smoke will create the fire effect more realistic. Follow the below steps to get your cinematic video!
#Step1 Search for smoke effects
To add the smoke effect, click on the element’s icon on the bar above and search for smokescreen 2.
#Step2 Add a smoke effect
Once you have searched and found the smoke screen 2 effects, then import that effect onto your timeline so that you can begin editing.

Once you’ve added the fire effect, you will notice the change on the screen in the top right corner.
#Step3 Add duration
The next step would be to set the duration of the smokescreen effect so that it matches the length of the video. To do so,
- Click on the edge of the smoke screen effect.
- Drag it to the right if the effect appears smaller than the video clip.
- And drag it to the left if it is larger than the video clip.
- As soon as it matches the length of the video, leave the drag, and it will fit right into place.
#Step4 Make some changes to the smoke effect
Once you have matched the duration of the smoke screen effect to the video clip, our next step would be to make some changes. These changes will make the smokescreen appear more pleasing—double-click on the smokescreen effect, which will open the transform menu.
We would first focus on the transform panel. Here you would have many options, but our focus would be on rotation, scale, and position.
![]()
Note: make sure to rotate the smoke screen effect by simply sliding the slider or dragging the slider right or left to your desire.
- You would have created an angle of the smokescreen to make it more natural.
- Now, we would have to adjust the scale of the smokescreen effect.
- Drag the slider to the right to expand the smoke to spread on the screen. It will help the smoke screen do appear more natural.
- You can adjust how much the smoke screen is visible on the screen by decreasing the opacity.
Adjust the slider to the left so it blends in with the flickering of the light we created. Now playback the video from the big screen to get an idea of the effect you added. And here are our parameters for reference.

Cool, isn’t it? Now we have added smoke to our timeline. Combined with the flickering light effect, we are closer to our goal.
Step4 Add flames or sparks
To mimic a real fire, we also have one more element that is missing, And that will be the sparks and the flames. And if you want to bring the fire effect of your video to the pro level, we would have to use the film stock effects. Flames and sparks are also available in the Wondershare Filmora.
#Step1 Search for Fire Tab

- To do so, click on the bar above the element’s icon.
- Once you have opened the elements tab, look to your left window, where further options are available.
- From these options, click on the fire tab.
- A new window will pop up in the library panel.
#Step2 Add the flame to the timeline
Click on a large scale 14 and drag it into your timeline above the smoke effect and the clip. Doing so would have created two extra layers after the video tab.

#Step3 Adjust the flame effect
Now, we have to do steps similar to the ones above the first job. But first, you have to click on the edges of the effect. Then, match it to the length of your video.
Now, remember if the length of the effect is more than that of the video clip. You can adjust it by clicking on the edge and dragging it to the left. And if it appears to be smaller than the video clip, drag the edge to the right to match the length.
#Step4 Blend the video
When you look at the effect as you play the video from the start, you will notice that the effect is a little more intense than we want. To change it to your desires, you can follow the following steps.
- First of all, double-click and open the transform
- Experiment with the rotation and the scale and position; make your choice.
- Then move on to the compositing panel and focus on the blending mode.
- Here, you will notice a drop-down panel and select the screen option from all the other options.
- Doing so would help you blend the spark effect video much better.
If you focus on the spark effect that appears on the screen, you will notice that it seems to be much more intense than we require. If you want to blend it further, you can use the opacity adjuster and decrease the transparency. Then, adjust the slider till you feel it to be just right.
And the following are ideal parameters of our adjustment just for you to refer to.

Final results
Now can easily create a realistic-looking fire effect by Wondershare Filmora.

Best editing views
See how easy it was to create a fire effect without using real fire. A fire effect you can use:
- To make your car catch on fire.
- You are screaming at the top of your lungs in a yard where your garden is on fire.
- Act like your husband forgot to watch the stove on with the dish in the kitchen.
You can create all these scenarios by using camera tricks and lighting effects. And a few skills in video editing, easily! How cool is that?
If you are a beginner or a frequent user of Wondershare Filmora, following the steps explained above will help you quickly get the hang of how to add fire effects to your videos.
Also, if you have a YouTube channel or a content creator, adding these effects will add unique creativity to your videos and ultimately boost your approach.
Free Download For Win 7 or later(64-bit)
Free Download For macOS 10.14 or later
Step by Step to Cut Videos in Lightworks
Have you ever tried to edit a video, but found that it was too difficult? In this article, we will take a look at the software Lightworks and learn how to cut videos using it.
In this blog post, we will cover the cutting of videos in Lightworks. We will talk about what Lightworks is and how to download it. We’ll also cover the general interface so you know which buttons do what. Finally, we’ll talk about exporting a finished video and getting started with your next project in Lightworks!
What is Lightworks?
Lightworks is an editing software created by a company called Lightworks. It’s a free video editor that is incredibly powerful and has been used to edit some of the most popular films of recent years.
The software was originally designed for professional filmmakers, but it’s now available for anyone to use for any type of project. You can download Lightworks from the website here - https://www.lightworks.com/
Downloading the Software
First, download the Lightworks software from the website. You can do this by clicking on the big green button that says “Download the Latest Version”. When you click on it, you’ll be prompted to select your operating system and download the appropriate package.
Click “Next” and you’ll see a license agreement and a prompt for installation details. Fill in your information and click “Next” again to start your installation.
When installation is complete, launch Lightworks by double-clicking on the Lightworks icon in your files section.
The first time you open Lightworks, you’ll need to go through a few steps of initializing before using it for editing videos. This includes setting up your project settings and choosing whether or not to keep a backup of your previous work.
We will cover these initial steps separately in future blog posts, so don’t worry if it’s all unclear right now!
The Interface
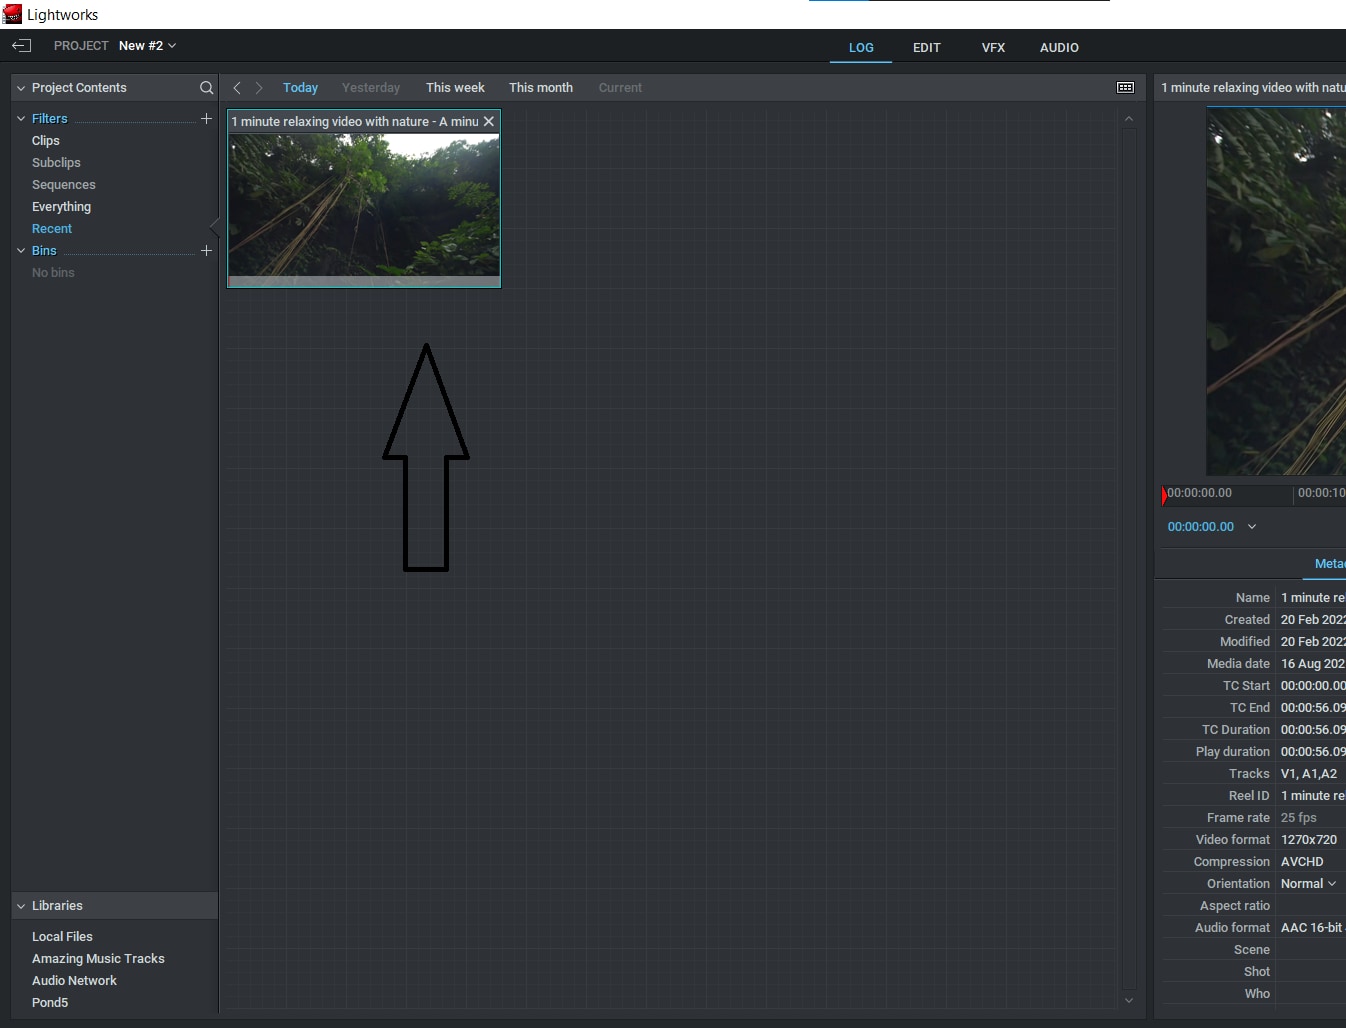
New users to the software will notice that there are four different windows. The first window is the Project window. This window shows you all of the footage you have loaded into your project, as well as any clips you’ve added to your project (see below) and edits you’ve made. You may also notice a timeline in this window; this is where you’ll be placing your clips to create your video.
The Toolbar is located at the top of all four windows and gives quick access to commonly used features like adding clips, cropping, cutting clips, and more.
The Edit List Window displays all of the clips that are available for use in your Project Window or Timeline. They’re not ordered chronologically; they’re ordered by how they were imported into Lightworks.
The Timeline Window displays a list of edited scenes from your edited project for viewing purposes only - it does not contain anything about editing or timeline manipulation tasks.
The Monitor Window displays information about what’s being displayed on screen at any given time. It can be used to preview videos before exporting them, previous scenes from the timeline, or rendered video frames after applying render effects.
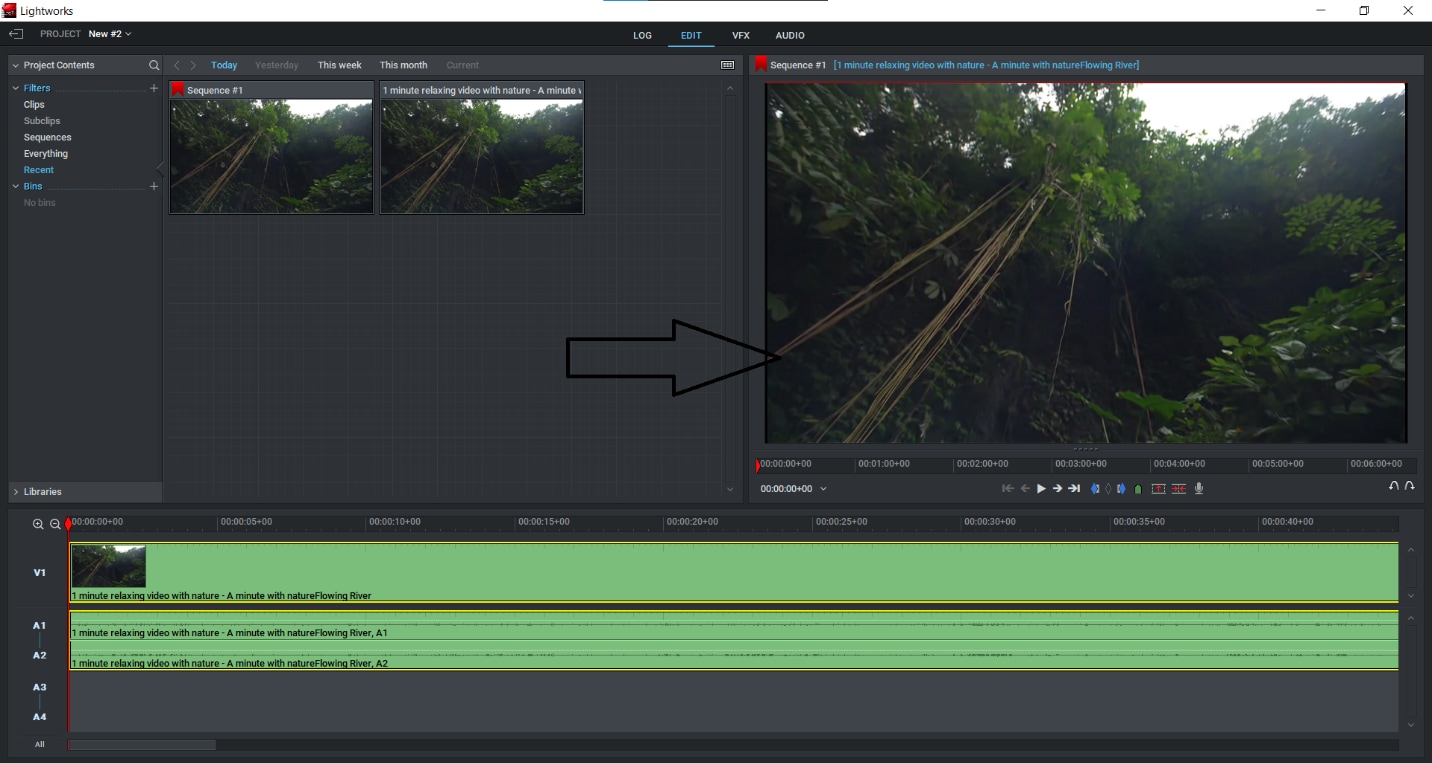
Step by Step in Cutting Videos in Lightworks
It’s not difficult to cut or divide a clip in Lightworks, and it doesn’t require a lot of time or effort. The following are the simple actions you’ll need to do to get started:
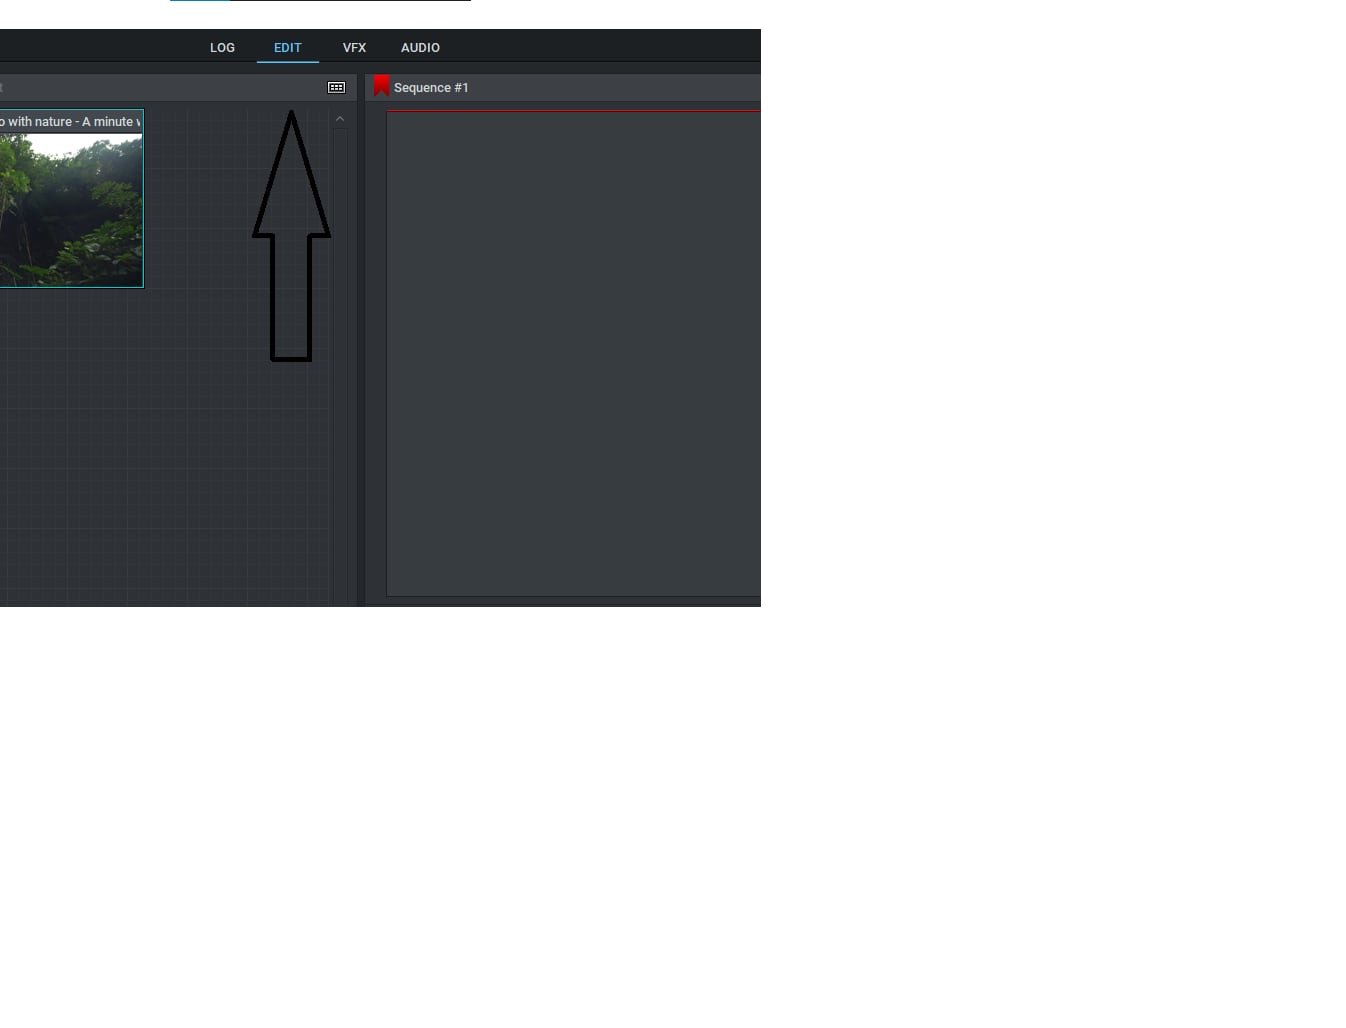
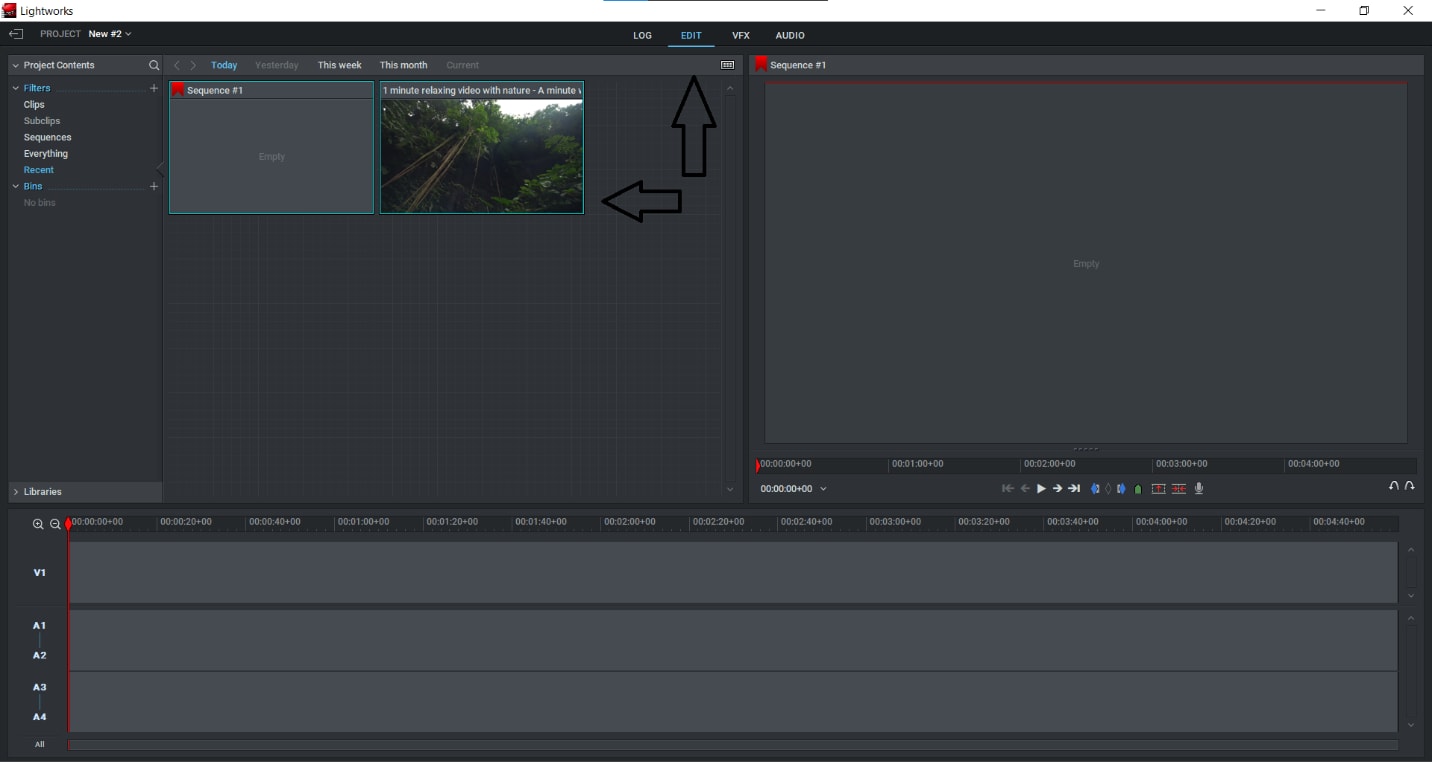
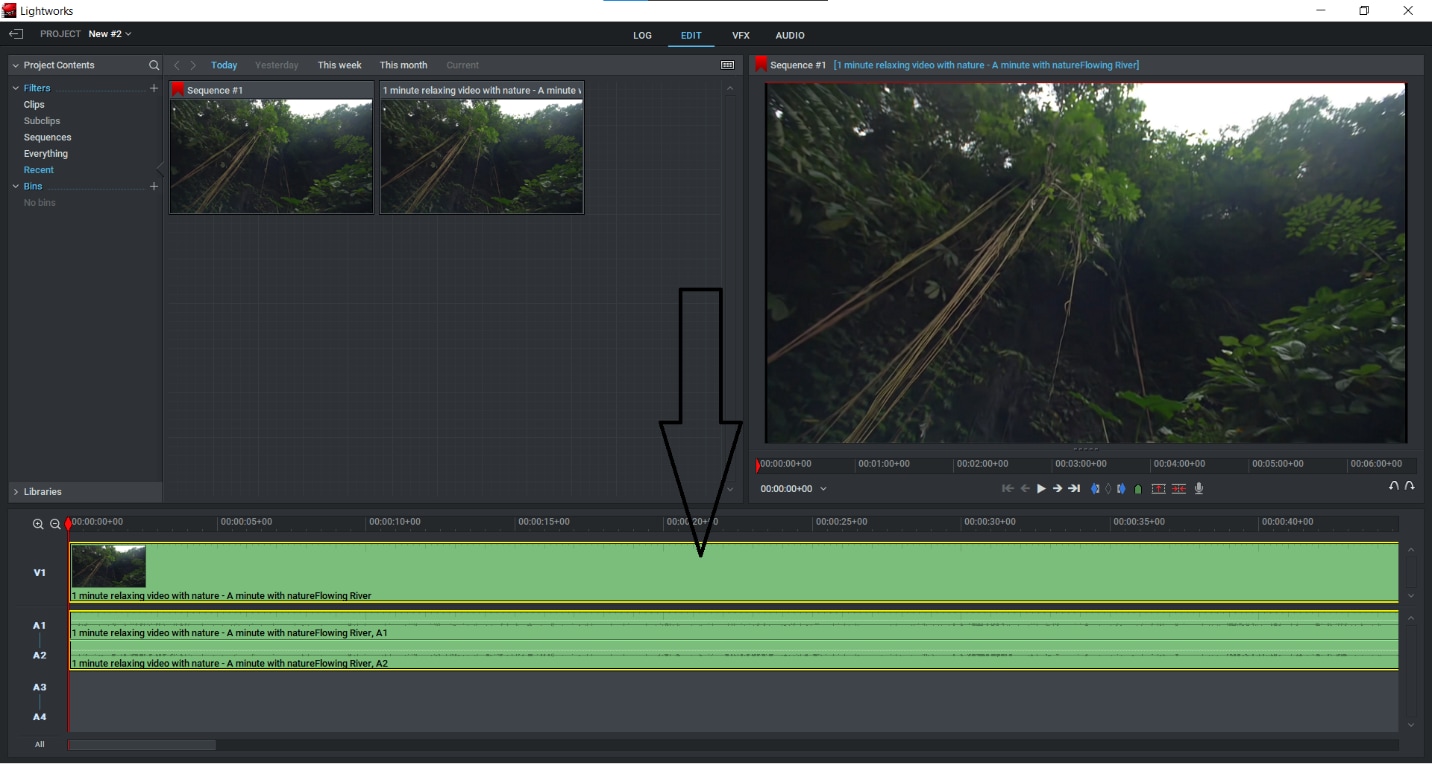
Step 1: First and foremost, you must import your movie into Lightworks. The simplest way to do this is to drag the clip you wish to work with onto the timeline:
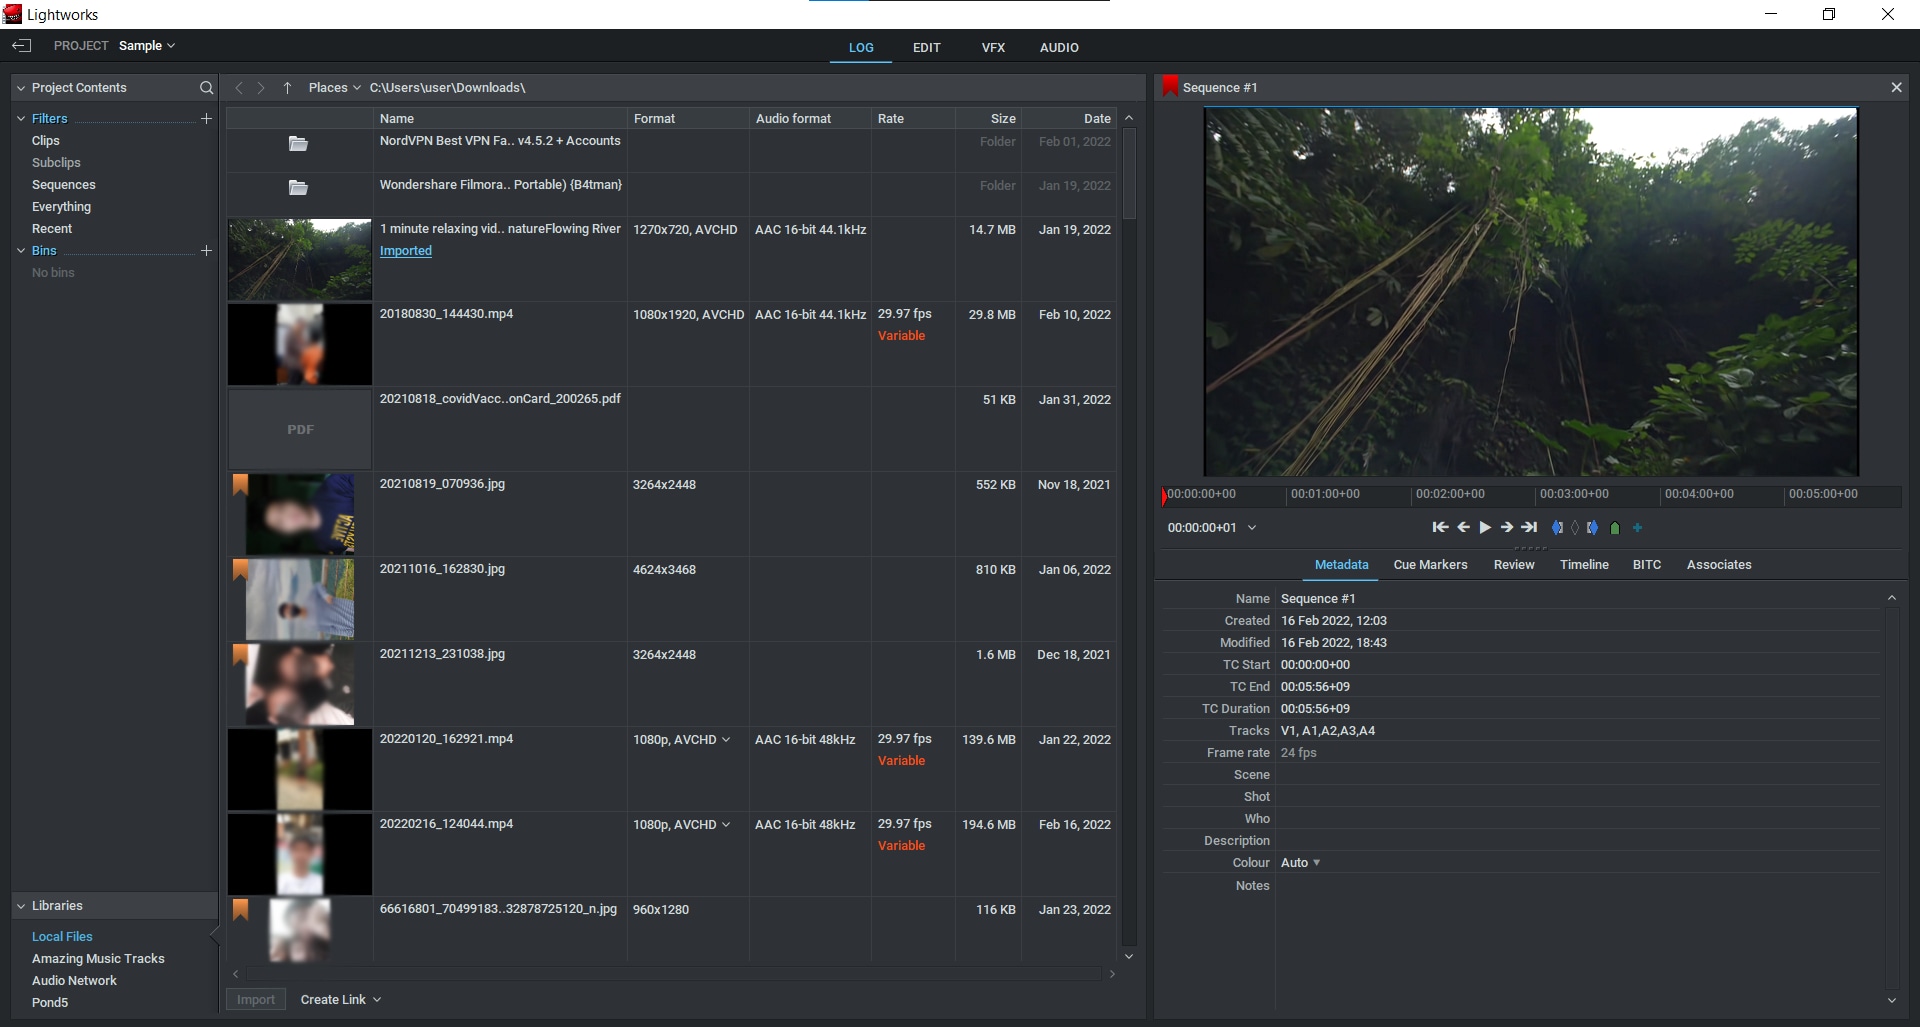
Step 2: After you’ve uploaded your clips to the timeline, you’ll be able to begin trimming them. To do so, simply slide the play head to the point where you wish to cut the clip and press the “C” key on your keyboard:
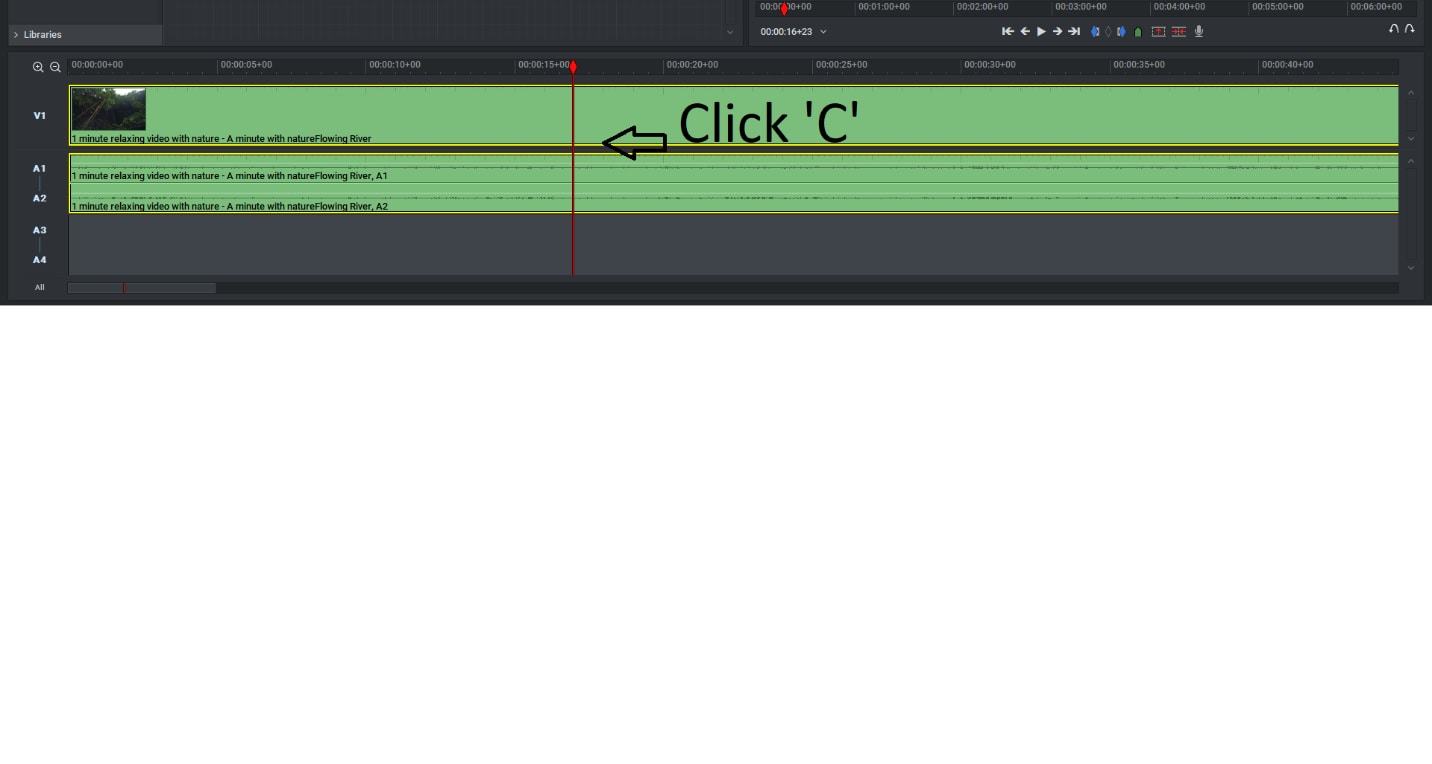
Step 3: After you’ve cut the part you need, you’ll need to erase the rest. To do so, use your mouse to select the part you don’t want to erase, then use your mouse to pick the “Delete” option, or just click the “delete” button on your keyboard:
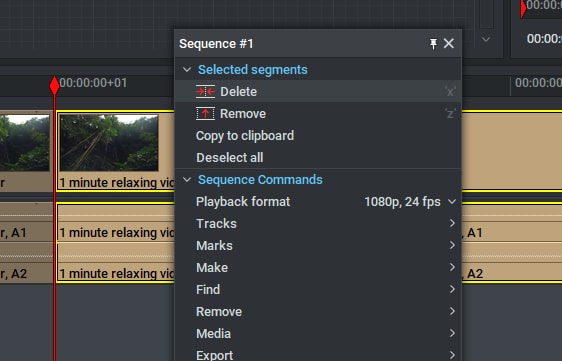
Step 4: When you’re finished, right-click the “ALL” option in the lower-left corner of the Timeline and select “Export” from the menu that appears:
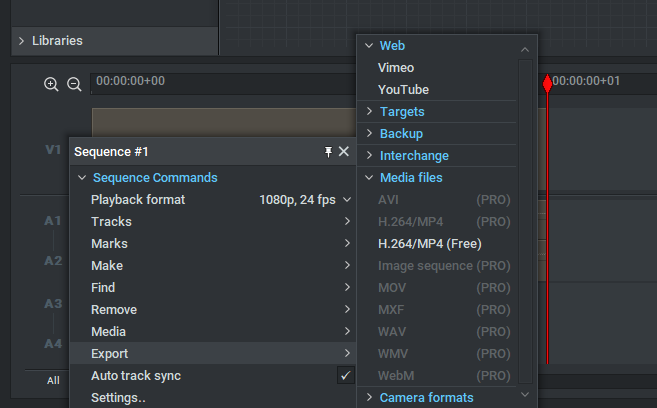
And that is how to use Lightworks video editing software to cut and trim a clip, which is a very fundamental component of video editing and one of the simplest tasks to undertake. So, I hope you’ve learned how to chop and trim a video after reading this article.
Exporting a Finished Video
Lightworks is a video editing software that has been used in Hollywood since the 1990s. It’s an open-source program, which means it’s free to download and use for anyone who wants a powerful video editing tool.
To export your video, you’ll need to save it in one of the formats that Lightworks supports. Your options include AVI, MPEG-1/2/4, MOV, DIVX1/2/3, WMV9, MKV or another supported format.
Once you’ve saved your video file in one of these formats, you can upload it to YouTube or Facebook from within Lightworks to share with friends and family immediately!
Learning how to cut videos in Lightworks is an invaluable skill for any filmmaker. The software can be used to edit footage captured by professionals or amateurs alike, so it’s very versatile for what you need. Today, we are going to show you how to get started cutting videos in Lightworks. But there’s other way to do it, and it is using Filmora.
An easier way to cut videos using Filmora
Filmora Video Editor is an intuitive video editor that allows you to cut and resize videos with just a few clicks of your mouse. Whether you’re looking to edit the length of your footage or change the aspect ratio, Filmora has you covered!
For Win 7 or later (64-bit)
For macOS 10.14 or later
Step by Step on How to Cut Videos using Filmora
Step 1: There are a few ways to start this process. The first way is to go to File and click Import Media.
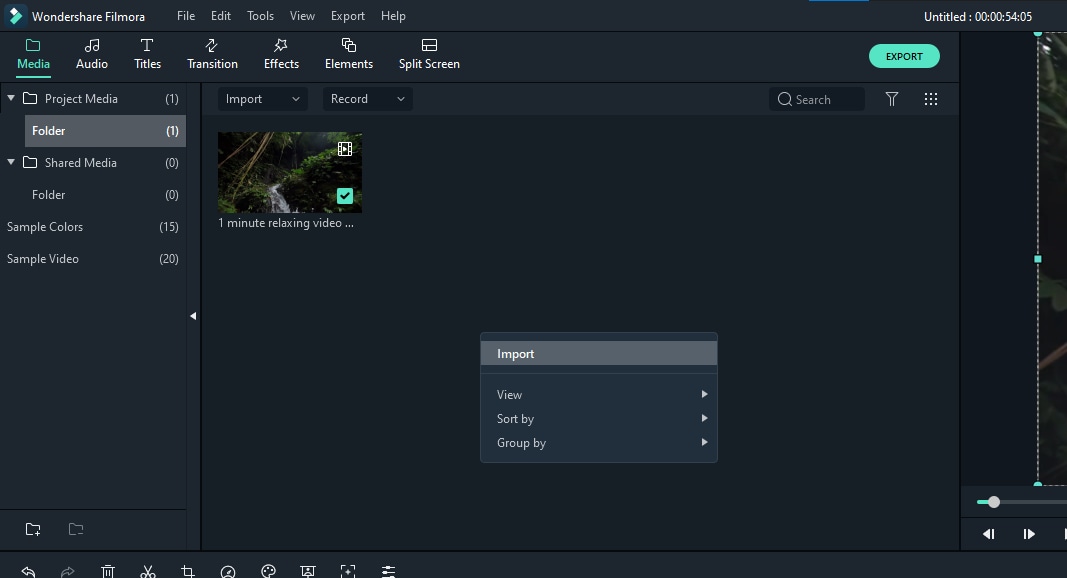
Step 2: This will open up a window where you can choose files from your computer or browse for them on the internet.
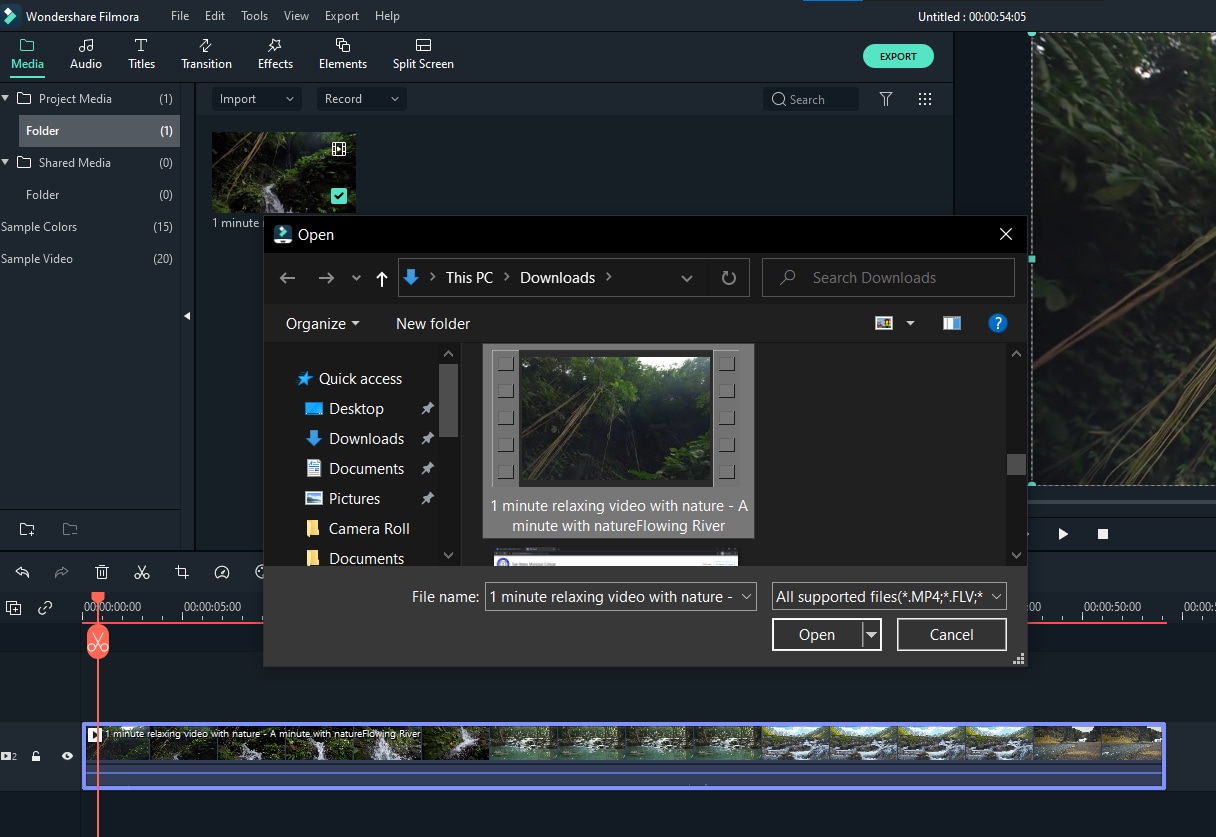
Step 3: The second way is to click the video icon in the left toolbar, then import the video from your camera roll or select from your file directory.
Step 4: Once you have selected a video, click OK and Filmora will start importing it.
Step 5: In order to cut a video, select a section of the timeline by clicking on it with your mouse. You can then move it around by dragging it back and forth along the timeline until you’ve created an appropriate cut point. Selecting a cut point is as easy as clicking and dragging on the time bar on the right side of the screen, which will let you set precise points of cuts anywhere in your video timeline!

Step 6: Once you’ve selected a cut point, click the scissor-like icon in the middle of the bar. After that, choose right-click on the left or right section, depending on what part you wanted to cut, of the time bar. Then, delete.
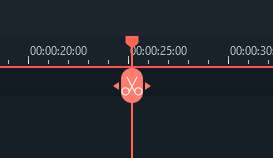
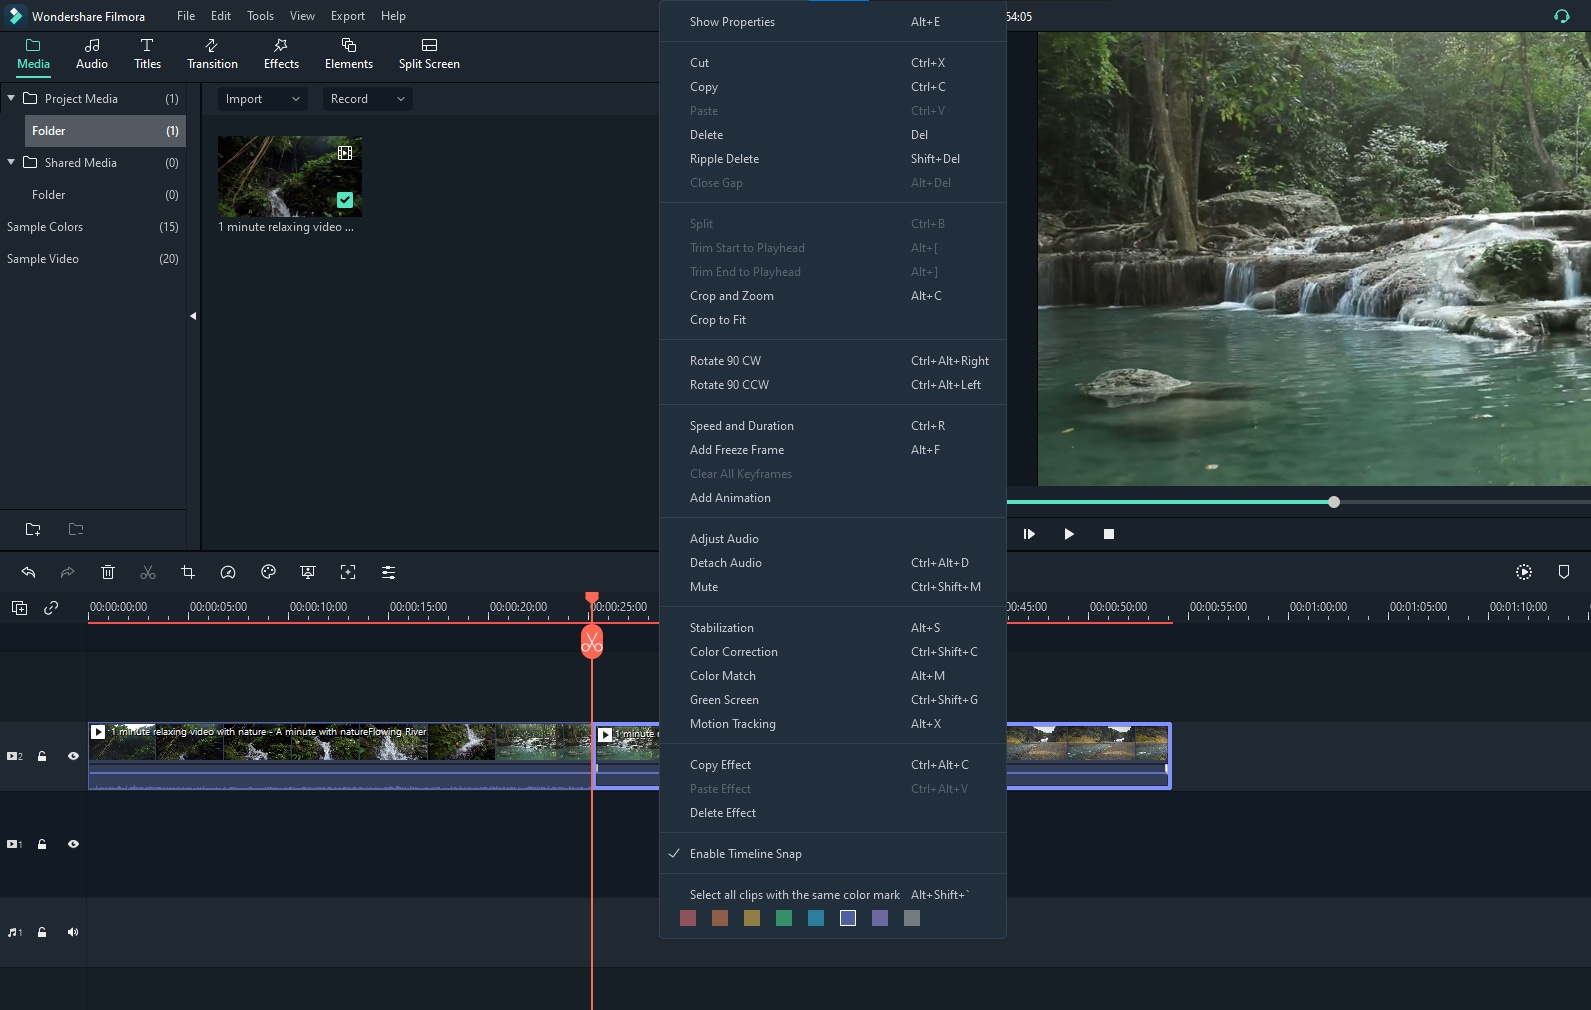
Step 7: You can repeat these steps in order to cut any videos. Then, save the project by clicking ctrl + s or exporting the video.
Conclusion
Cutting Videos is easier with the right knowledge. Filmora and Lightworks allow you to edit your videos and both are beginner-friendly.
The Toolbar is located at the top of all four windows and gives quick access to commonly used features like adding clips, cropping, cutting clips, and more.

The Edit List Window displays all of the clips that are available for use in your Project Window or Timeline. They’re not ordered chronologically; they’re ordered by how they were imported into Lightworks.

The Timeline Window displays a list of edited scenes from your edited project for viewing purposes only - it does not contain anything about editing or timeline manipulation tasks.

The Monitor Window displays information about what’s being displayed on screen at any given time. It can be used to preview videos before exporting them, previous scenes from the timeline, or rendered video frames after applying render effects.

Step by Step in Cutting Videos in Lightworks
It’s not difficult to cut or divide a clip in Lightworks, and it doesn’t require a lot of time or effort. The following are the simple actions you’ll need to do to get started:
Step 1: First and foremost, you must import your movie into Lightworks. The simplest way to do this is to drag the clip you wish to work with onto the timeline:

Step 2: After you’ve uploaded your clips to the timeline, you’ll be able to begin trimming them. To do so, simply slide the play head to the point where you wish to cut the clip and press the “C” key on your keyboard:

Step 3: After you’ve cut the part you need, you’ll need to erase the rest. To do so, use your mouse to select the part you don’t want to erase, then use your mouse to pick the “Delete” option, or just click the “delete” button on your keyboard:

Step 4: When you’re finished, right-click the “ALL” option in the lower-left corner of the Timeline and select “Export” from the menu that appears:

And that is how to use Lightworks video editing software to cut and trim a clip, which is a very fundamental component of video editing and one of the simplest tasks to undertake. So, I hope you’ve learned how to chop and trim a video after reading this article.
Exporting a Finished Video
Lightworks is a video editing software that has been used in Hollywood since the 1990s. It’s an open-source program, which means it’s free to download and use for anyone who wants a powerful video editing tool.
To export your video, you’ll need to save it in one of the formats that Lightworks supports. Your options include AVI, MPEG-1/2/4, MOV, DIVX1/2/3, WMV9, MKV or another supported format.
Once you’ve saved your video file in one of these formats, you can upload it to YouTube or Facebook from within Lightworks to share with friends and family immediately!
Learning how to cut videos in Lightworks is an invaluable skill for any filmmaker. The software can be used to edit footage captured by professionals or amateurs alike, so it’s very versatile for what you need. Today, we are going to show you how to get started cutting videos in Lightworks. But there’s other way to do it, and it is using Filmora.
An easier way to cut videos using Filmora
Filmora Video Editor is an intuitive video editor that allows you to cut and resize videos with just a few clicks of your mouse. Whether you’re looking to edit the length of your footage or change the aspect ratio, Filmora has you covered!
For Win 7 or later (64-bit)
For macOS 10.14 or later
Step by Step on How to Cut Videos using Filmora
Step 1: There are a few ways to start this process. The first way is to go to File and click Import Media.

Step 2: This will open up a window where you can choose files from your computer or browse for them on the internet.

Step 3: The second way is to click the video icon in the left toolbar, then import the video from your camera roll or select from your file directory.
Step 4: Once you have selected a video, click OK and Filmora will start importing it.
Step 5: In order to cut a video, select a section of the timeline by clicking on it with your mouse. You can then move it around by dragging it back and forth along the timeline until you’ve created an appropriate cut point. Selecting a cut point is as easy as clicking and dragging on the time bar on the right side of the screen, which will let you set precise points of cuts anywhere in your video timeline!

Step 6: Once you’ve selected a cut point, click the scissor-like icon in the middle of the bar. After that, choose right-click on the left or right section, depending on what part you wanted to cut, of the time bar. Then, delete.


Step 7: You can repeat these steps in order to cut any videos. Then, save the project by clicking ctrl + s or exporting the video.

Conclusion
Cutting Videos is easier with the right knowledge. Filmora and Lightworks allow you to edit your videos and both are beginner-friendly.
The Toolbar is located at the top of all four windows and gives quick access to commonly used features like adding clips, cropping, cutting clips, and more.

The Edit List Window displays all of the clips that are available for use in your Project Window or Timeline. They’re not ordered chronologically; they’re ordered by how they were imported into Lightworks.

The Timeline Window displays a list of edited scenes from your edited project for viewing purposes only - it does not contain anything about editing or timeline manipulation tasks.

The Monitor Window displays information about what’s being displayed on screen at any given time. It can be used to preview videos before exporting them, previous scenes from the timeline, or rendered video frames after applying render effects.

Step by Step in Cutting Videos in Lightworks
It’s not difficult to cut or divide a clip in Lightworks, and it doesn’t require a lot of time or effort. The following are the simple actions you’ll need to do to get started:
Step 1: First and foremost, you must import your movie into Lightworks. The simplest way to do this is to drag the clip you wish to work with onto the timeline:

Step 2: After you’ve uploaded your clips to the timeline, you’ll be able to begin trimming them. To do so, simply slide the play head to the point where you wish to cut the clip and press the “C” key on your keyboard:

Step 3: After you’ve cut the part you need, you’ll need to erase the rest. To do so, use your mouse to select the part you don’t want to erase, then use your mouse to pick the “Delete” option, or just click the “delete” button on your keyboard:

Step 4: When you’re finished, right-click the “ALL” option in the lower-left corner of the Timeline and select “Export” from the menu that appears:

And that is how to use Lightworks video editing software to cut and trim a clip, which is a very fundamental component of video editing and one of the simplest tasks to undertake. So, I hope you’ve learned how to chop and trim a video after reading this article.
Exporting a Finished Video
Lightworks is a video editing software that has been used in Hollywood since the 1990s. It’s an open-source program, which means it’s free to download and use for anyone who wants a powerful video editing tool.
To export your video, you’ll need to save it in one of the formats that Lightworks supports. Your options include AVI, MPEG-1/2/4, MOV, DIVX1/2/3, WMV9, MKV or another supported format.
Once you’ve saved your video file in one of these formats, you can upload it to YouTube or Facebook from within Lightworks to share with friends and family immediately!
Learning how to cut videos in Lightworks is an invaluable skill for any filmmaker. The software can be used to edit footage captured by professionals or amateurs alike, so it’s very versatile for what you need. Today, we are going to show you how to get started cutting videos in Lightworks. But there’s other way to do it, and it is using Filmora.
An easier way to cut videos using Filmora
Filmora Video Editor is an intuitive video editor that allows you to cut and resize videos with just a few clicks of your mouse. Whether you’re looking to edit the length of your footage or change the aspect ratio, Filmora has you covered!
For Win 7 or later (64-bit)
For macOS 10.14 or later
Step by Step on How to Cut Videos using Filmora
Step 1: There are a few ways to start this process. The first way is to go to File and click Import Media.

Step 2: This will open up a window where you can choose files from your computer or browse for them on the internet.

Step 3: The second way is to click the video icon in the left toolbar, then import the video from your camera roll or select from your file directory.
Step 4: Once you have selected a video, click OK and Filmora will start importing it.
Step 5: In order to cut a video, select a section of the timeline by clicking on it with your mouse. You can then move it around by dragging it back and forth along the timeline until you’ve created an appropriate cut point. Selecting a cut point is as easy as clicking and dragging on the time bar on the right side of the screen, which will let you set precise points of cuts anywhere in your video timeline!

Step 6: Once you’ve selected a cut point, click the scissor-like icon in the middle of the bar. After that, choose right-click on the left or right section, depending on what part you wanted to cut, of the time bar. Then, delete.


Step 7: You can repeat these steps in order to cut any videos. Then, save the project by clicking ctrl + s or exporting the video.

Conclusion
Cutting Videos is easier with the right knowledge. Filmora and Lightworks allow you to edit your videos and both are beginner-friendly.
The Toolbar is located at the top of all four windows and gives quick access to commonly used features like adding clips, cropping, cutting clips, and more.

The Edit List Window displays all of the clips that are available for use in your Project Window or Timeline. They’re not ordered chronologically; they’re ordered by how they were imported into Lightworks.

The Timeline Window displays a list of edited scenes from your edited project for viewing purposes only - it does not contain anything about editing or timeline manipulation tasks.

The Monitor Window displays information about what’s being displayed on screen at any given time. It can be used to preview videos before exporting them, previous scenes from the timeline, or rendered video frames after applying render effects.

Step by Step in Cutting Videos in Lightworks
It’s not difficult to cut or divide a clip in Lightworks, and it doesn’t require a lot of time or effort. The following are the simple actions you’ll need to do to get started:
Step 1: First and foremost, you must import your movie into Lightworks. The simplest way to do this is to drag the clip you wish to work with onto the timeline:

Step 2: After you’ve uploaded your clips to the timeline, you’ll be able to begin trimming them. To do so, simply slide the play head to the point where you wish to cut the clip and press the “C” key on your keyboard:

Step 3: After you’ve cut the part you need, you’ll need to erase the rest. To do so, use your mouse to select the part you don’t want to erase, then use your mouse to pick the “Delete” option, or just click the “delete” button on your keyboard:

Step 4: When you’re finished, right-click the “ALL” option in the lower-left corner of the Timeline and select “Export” from the menu that appears:

And that is how to use Lightworks video editing software to cut and trim a clip, which is a very fundamental component of video editing and one of the simplest tasks to undertake. So, I hope you’ve learned how to chop and trim a video after reading this article.
Exporting a Finished Video
Lightworks is a video editing software that has been used in Hollywood since the 1990s. It’s an open-source program, which means it’s free to download and use for anyone who wants a powerful video editing tool.
To export your video, you’ll need to save it in one of the formats that Lightworks supports. Your options include AVI, MPEG-1/2/4, MOV, DIVX1/2/3, WMV9, MKV or another supported format.
Once you’ve saved your video file in one of these formats, you can upload it to YouTube or Facebook from within Lightworks to share with friends and family immediately!
Learning how to cut videos in Lightworks is an invaluable skill for any filmmaker. The software can be used to edit footage captured by professionals or amateurs alike, so it’s very versatile for what you need. Today, we are going to show you how to get started cutting videos in Lightworks. But there’s other way to do it, and it is using Filmora.
An easier way to cut videos using Filmora
Filmora Video Editor is an intuitive video editor that allows you to cut and resize videos with just a few clicks of your mouse. Whether you’re looking to edit the length of your footage or change the aspect ratio, Filmora has you covered!
For Win 7 or later (64-bit)
For macOS 10.14 or later
Step by Step on How to Cut Videos using Filmora
Step 1: There are a few ways to start this process. The first way is to go to File and click Import Media.

Step 2: This will open up a window where you can choose files from your computer or browse for them on the internet.

Step 3: The second way is to click the video icon in the left toolbar, then import the video from your camera roll or select from your file directory.
Step 4: Once you have selected a video, click OK and Filmora will start importing it.
Step 5: In order to cut a video, select a section of the timeline by clicking on it with your mouse. You can then move it around by dragging it back and forth along the timeline until you’ve created an appropriate cut point. Selecting a cut point is as easy as clicking and dragging on the time bar on the right side of the screen, which will let you set precise points of cuts anywhere in your video timeline!

Step 6: Once you’ve selected a cut point, click the scissor-like icon in the middle of the bar. After that, choose right-click on the left or right section, depending on what part you wanted to cut, of the time bar. Then, delete.


Step 7: You can repeat these steps in order to cut any videos. Then, save the project by clicking ctrl + s or exporting the video.

Conclusion
Cutting Videos is easier with the right knowledge. Filmora and Lightworks allow you to edit your videos and both are beginner-friendly.
Have You Ever Created a Slow Motion Video on Your Phonr or Camera? This Article Will Show You some Knowledge About Slow Motion Photography
Scenes that might otherwise be monotonous can be made more interesting by the use of slow-motion photography in movies and television shows. For instance, a battle sequence between two characters can be portrayed in its entirety, but if it is later replayed in slow motion, the intensity of the action is amplified significantly.
Let’s dive in!
1. What is slow motion?
Filmmakers use the slow-motion effect to create the illusion that the passage of time has been slowed down on the screen. In the early 20th century, an Austrian priest named August Musger was the one who came up with the idea. Playing normally recorded material at a slower pace is another method for creating the illusion of slow motion.
When a film is recorded at 25 frames per second, but played back at 24 frames per second, it will seem as if it is being shown in slow motion because all of the movements will be slightly slower than when they were actually performed. This is because the film was recorded at 25 frames per second, but the playback was done at 24 frames per second.
Because there are not enough frames to show all of the details of each frame when a 24-frame animation is played at a 25-frame rate (or a 30-frame animation at a 32-frame rate), certain frames have to be repeated (every 5th one in this case). When there is a dramatic event taking place, this manipulation of the film speed makes the action on screen appear even more dramatic or “tensioned.”

2. Understanding frame rates
When filming video, there are a set number of frames per second that you can choose from. One picture is all you get when you take a still photograph. Click. That is only one example. A frame is the name of that picture. With video, however, you take 30 or 24 images per second, which you then combine. You now have footage.
The video is a combination of tens of thousands of frames or images that are flashing before your eyes. With a normal frame rate of 24 frames per second, you are essentially taking 24 pictures per second and stitching them together to create video. When you stretch it out in post for slow motion, you double or triple the frame rate, which results in more images per second and eliminates empty gaps and jarring actions.
This is how video that has been sped up for slow motion may still preserve its quality. But you can’t just choose a frame rate based on taste. Frame rates vary depending on the different types of emotions. 60 fps will do if the video is a slo-mo of a person’s emotion. However, if your shot contains a lot of movement and you want to show it, such as when automobiles collide or explode, you may require a higher frame rate, such as 120 fps.

3. Post processing
This is when it gets a bit complicated. Some cameras come equipped with a slow-motion feature. To capture the video in slow motion at a higher frame rate, go to your settings. You might not have this built-in slow-motion feature in other models.
Therefore, even though the footage was taken at a higher frame rate, the camera is playing the movie back at the same pace it was shot at, so when you shoot at a higher frame rate, you end up with footage of a normal speed. There is a solution to that. The footage’s speed can be adjusted during post-production.
The 24/30 fps editing timelines are pre-set. The majority of the video you capture at this frame rate plays back just nicely on this timeline. You must stretch out video that was shot at a higher frame rate to match this timeline, though. That effectively doubles or triples the length of a video, depending on the multiple of the timeline’s typical frame rate.

4. Lighting
While watching TV or movies, you might have observed anything. The majority of the extremely slow photos happen in broad daylight. Not after dark or in dimly lit areas. The reason for this is that sufficient lighting is required in order to capture motion. Lighting becomes crucial as your frame rate exceeds 300 frames per second. Therefore, if you must take these pictures, you must do so in a studio environment with lots of artificial lighting.
To create that cinematic magic, you can use high CRI lighting. On the screen, a flickering light may spell doom. Flickering lights have the potential to damage slow-motion film even though they would be OK for any other scene. Because there is no risk of voltage fluctuation, LED lights are a safe bet. The reason for this is that some models do not require an electrical outlet to function. Prior to departure, make sure you have checked each and every light.
If you are filming during the day and you point your camera toward the sun, you may end up with a significant amount of glare that cannot be hidden up in the post-production stage nor can it be ignored. This is not merely a problem that occurs throughout the daytime. Flares can also be obtained from moving vehicles and various other sources of light. If you use a flat lens when you’re out at night, you can eliminate the risk of something like that happening.

5. Why use slow motion?
When you first begin working with slow-motion video, you need to ask yourself, “What exactly is the purpose behind me choosing this effect?” Once you have an answer to that question, you may move on to the next step.
In most cases, there are often two primary causes for it.
1. It makes sense to present emotions on the screen for a longer period of time in order for the audience to be able to absorb and comprehend it in its whole if they are shown for a longer period of time since moments that are packed with emotions seem to endure longer than ordinary ones.
2. The second strategy is to draw attention to striking visuals that you might have overlooked in other circumstances and that contribute significantly to the aesthetic value of your setting. A flutter of the eyelid, a butterfly stretching its wings, rains falling on a flower petal, shards of fire breaking free, etc. are all examples of how quickly things may happen. You need to have a good reason for using slow motion, and you shouldn’t abuse the effect too much too. You should only do so at those moments where it makes logical sense to do so.

Subconscious slow-motion. Overusing or misusing a function ruins its appeal. Filming isn’t an exact science, but it does nothing unnecessary. For a cinematic effect, slow-motion should be introduced carefully.
Free Download For Win 7 or later(64-bit)
Free Download For macOS 10.14 or later
Free Download For macOS 10.14 or later
The Craziest 10 AI Editors You’ve Seen
The Craziest 10 AI Editors You’ve Ever Seen
An easy yet powerful editor
Numerous effects to choose from
Detailed tutorials provided by the official channel
Technological advancements in the field of video editing have opened new opportunities and possibilities for the editors to unleash their creativity and AI-based video editors are a major contribution to the field. With these intelligent tools, the cumbersome process of video editing has not only become quick but also hassle-free and results in excellent pro videos. So, if you too have been looking for one such artificial intelligence videos editing tools, you are reading on the right page.
In this article
01 [What is AI video editing tools?](#Part 1)
02 [Things To Consider While Selecting An Ai Editing Tool](#Part 2)
03 [Top 10 AI Video Editors](#Part 3)
Part 1 What is AI video editing tools?
In simplest terms, the software that uses artificial intelligence for editing videos is termed AI editing tools. These programs make use of AI algorithms to perform advanced editing tasks for creating visually appealing and interesting videos. The AI tools have not only helped in accelerating the video editing tools but also assists in taking care of complex functions with ease. A good AI editing tool can perform multiple tasks like determining the shots, applying filters, adding transitions, proposing changes, color correction, face detection, and more.
Part 2 Things to consider while selecting an AI editing tool
An array of AI editing tools is available and selecting one can be a confusing task. So, while choosing one of these programs, several criteria can be considered and some of these are listed below.
● Allows editing videos in a hassle-free manner.
● Quick use and processing.
● User-friendly interface.
● Capability to process all types of videos in high resolution.
● Comes with all the needed features.
● The learning curve is not very steep.
Part 3 Top 10 AI Video Editors
After reviewing several AI-based editing software, we have selected the top 10 in the category. Check out the list below.
01Magisto
This is a powerful video editing tool that is simple and quick to use. You simply need to add the content file and select the styling type as needed along with audio and other content after which everything will be taken care by the software. The program is also capable of optimizing the video to reach the maximum number of people and this is done based on real-time analytics. This is a paid tool and is apt for creating marketing videos.

02Recreate
For creating and editing interesting videos for social media platforms, this is an apt tool that allows video customization through fonts, transitions, colors, overlays, and several other elements. Using this software, your written content can be converted into videos as the AI technology finds music as well as visuals automatically to match your requirements. Additionally, the program also supports features like recording voice-overs, removing the background, generating AI voices, and more.

03Synthesia
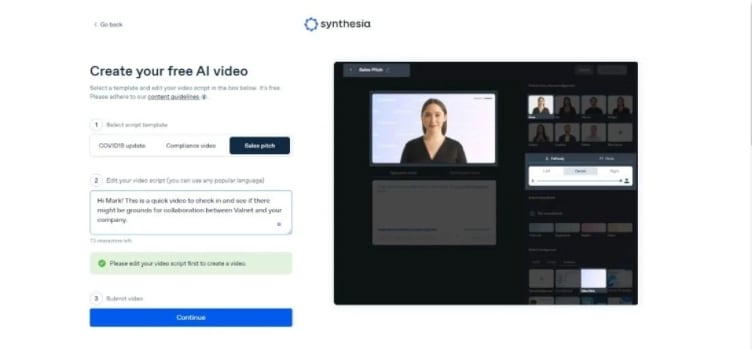
This is an excellent video editing tool that is AI-based that can be used for digital marketing, training, communication, and several other tasks. The tool allows creating of interesting videos from the scripts and these footages can be up to 30 minutes long. Support for around 40 languages makes the program apt for all types of users. Some other key features of the software include duplicating the video, multi-sliding videos, customization options for voice, and more. The interface is simple and the process is also hassle-free.
04RawShorts
This is an online AI-based tool that can help convert the texts and the articles into videos for social media platforms and others. The technology of the tool will analyze your text content to know the main idea on which your video is to based. Then it automatically looks for the content needed including the voice and creates as well as edits the footage. A free trial version of the program is also available though it comes with several limitations. The drag and drop interface of the tool further makes it user-friendly.

05Lumen5
For bulk editing of videos quickly, this is a good tool to consider. The interface is simple which along with the drag and drop feature makes the tool apt even for beginners. An array of video templates is available to match your theme requirements and the tool after identifying your requirements will lookout for the perfect music, content, layout, and other elements. There is also a library in the software from where you can find the desired collection of videos, images, and other media files.

06Kamua
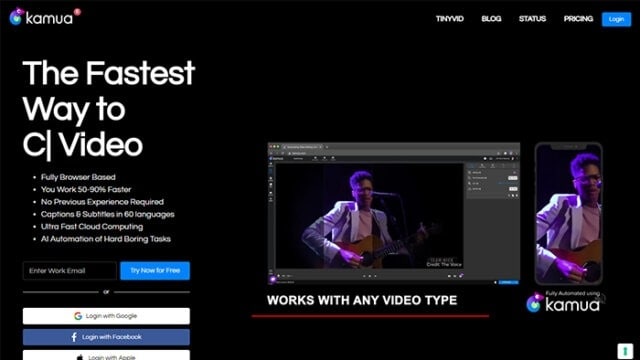
For simple and quick editing of your videos, Kamua is a great tool to use. This is a browser-based program that supports all basic functions like resizing, captioning, and more. With its cloud computing feature, a large number of files can be processed quickly and the tool supports adding the subtitles automatically to your project and that too in more than 60 languages. The tool also has a free version for the users who first wish to test before buying the subscription.
07InVideo
This is another widely used online tool supporting advanced video editing functions. The AI-based technology of the software will let you convert your text into the desired videos effortlessly. The Intelligent Video Assistant of the software will also check for any hidden mistakes in your videos and will also correct them. You can add multiple effects to your videos using the tool to create eye-catchy footage.

08QuickStories
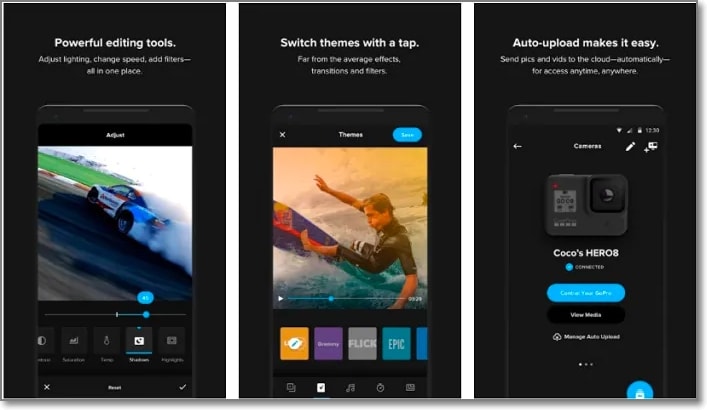
Using this AI-based editing tool, your video footage captured through a camera, GoPro as well as other devices can be edited like a pro to take them to an all-new level. The software support functions like intelligent tagging, night colors, white balancing, color rendering, and much more.
09Designs.ai
Using this online AI-based designing tool you can create posters, logos, banners, and several other videos with ease and in high quality. Text to video technology is supported by the program and you can even add voiceovers. Supporting more than 20 languages, the program also comes with a collection of images, clips, as well as audio files that can be used as needed. Transitions, animations, and other effects and elements can be added to improve the overall video look.

10**Wondershare Filmora Video Editor **
When it comes to video editing tools, the list remains incomplete without mentioning a versatile tool called Wondershare Filmora, This Windows and Mac-based software is easy and quick to install after which it is all set to create excellent videos using its extensive range of features. Using the tool, you can add transitions, effects, rotate, split, merge, and perform a host of other functions as well. Audio-based functions like audio compression, noise reduction, automatic audio syncing, and others are also supported. The interface of the tool is simple and the process of editing is hassle-free.
For Win 7 or later (64-bit)
For macOS 10.12 or later
● Ending Thoughts →
● AI-based video editing tools are intelligent programs that help in customizing the videos automatically.
● A number of these desktop and online tools are available to help you edit the footage.
● Depending on your files, editing, and other functions required, the selection of an appropriate tool can be done.
Technological advancements in the field of video editing have opened new opportunities and possibilities for the editors to unleash their creativity and AI-based video editors are a major contribution to the field. With these intelligent tools, the cumbersome process of video editing has not only become quick but also hassle-free and results in excellent pro videos. So, if you too have been looking for one such artificial intelligence videos editing tools, you are reading on the right page.

In this article
01 [What is AI video editing tools?](#Part 1)
02 [Things To Consider While Selecting An Ai Editing Tool](#Part 2)
03 [Top 10 AI Video Editors](#Part 3)
Part 1 What is AI video editing tools?
In simplest terms, the software that uses artificial intelligence for editing videos is termed AI editing tools. These programs make use of AI algorithms to perform advanced editing tasks for creating visually appealing and interesting videos. The AI tools have not only helped in accelerating the video editing tools but also assists in taking care of complex functions with ease. A good AI editing tool can perform multiple tasks like determining the shots, applying filters, adding transitions, proposing changes, color correction, face detection, and more.
Part 2 Things to consider while selecting an AI editing tool
An array of AI editing tools is available and selecting one can be a confusing task. So, while choosing one of these programs, several criteria can be considered and some of these are listed below.
● Allows editing videos in a hassle-free manner.
● Quick use and processing.
● User-friendly interface.
● Capability to process all types of videos in high resolution.
● Comes with all the needed features.
● The learning curve is not very steep.
Part 3 Top 10 AI Video Editors
After reviewing several AI-based editing software, we have selected the top 10 in the category. Check out the list below.
01Magisto
This is a powerful video editing tool that is simple and quick to use. You simply need to add the content file and select the styling type as needed along with audio and other content after which everything will be taken care by the software. The program is also capable of optimizing the video to reach the maximum number of people and this is done based on real-time analytics. This is a paid tool and is apt for creating marketing videos.

02Recreate
For creating and editing interesting videos for social media platforms, this is an apt tool that allows video customization through fonts, transitions, colors, overlays, and several other elements. Using this software, your written content can be converted into videos as the AI technology finds music as well as visuals automatically to match your requirements. Additionally, the program also supports features like recording voice-overs, removing the background, generating AI voices, and more.

03Synthesia
This is an excellent video editing tool that is AI-based that can be used for digital marketing, training, communication, and several other tasks. The tool allows creating of interesting videos from the scripts and these footages can be up to 30 minutes long. Support for around 40 languages makes the program apt for all types of users. Some other key features of the software include duplicating the video, multi-sliding videos, customization options for voice, and more. The interface is simple and the process is also hassle-free.

04RawShorts
This is an online AI-based tool that can help convert the texts and the articles into videos for social media platforms and others. The technology of the tool will analyze your text content to know the main idea on which your video is to based. Then it automatically looks for the content needed including the voice and creates as well as edits the footage. A free trial version of the program is also available though it comes with several limitations. The drag and drop interface of the tool further makes it user-friendly.

05Lumen5
For bulk editing of videos quickly, this is a good tool to consider. The interface is simple which along with the drag and drop feature makes the tool apt even for beginners. An array of video templates is available to match your theme requirements and the tool after identifying your requirements will lookout for the perfect music, content, layout, and other elements. There is also a library in the software from where you can find the desired collection of videos, images, and other media files.

06Kamua
For simple and quick editing of your videos, Kamua is a great tool to use. This is a browser-based program that supports all basic functions like resizing, captioning, and more. With its cloud computing feature, a large number of files can be processed quickly and the tool supports adding the subtitles automatically to your project and that too in more than 60 languages. The tool also has a free version for the users who first wish to test before buying the subscription.

07InVideo
This is another widely used online tool supporting advanced video editing functions. The AI-based technology of the software will let you convert your text into the desired videos effortlessly. The Intelligent Video Assistant of the software will also check for any hidden mistakes in your videos and will also correct them. You can add multiple effects to your videos using the tool to create eye-catchy footage.

08QuickStories
Using this AI-based editing tool, your video footage captured through a camera, GoPro as well as other devices can be edited like a pro to take them to an all-new level. The software support functions like intelligent tagging, night colors, white balancing, color rendering, and much more.

09Designs.ai
Using this online AI-based designing tool you can create posters, logos, banners, and several other videos with ease and in high quality. Text to video technology is supported by the program and you can even add voiceovers. Supporting more than 20 languages, the program also comes with a collection of images, clips, as well as audio files that can be used as needed. Transitions, animations, and other effects and elements can be added to improve the overall video look.

10**Wondershare Filmora Video Editor **
When it comes to video editing tools, the list remains incomplete without mentioning a versatile tool called Wondershare Filmora, This Windows and Mac-based software is easy and quick to install after which it is all set to create excellent videos using its extensive range of features. Using the tool, you can add transitions, effects, rotate, split, merge, and perform a host of other functions as well. Audio-based functions like audio compression, noise reduction, automatic audio syncing, and others are also supported. The interface of the tool is simple and the process of editing is hassle-free.
For Win 7 or later (64-bit)
For macOS 10.12 or later
● Ending Thoughts →
● AI-based video editing tools are intelligent programs that help in customizing the videos automatically.
● A number of these desktop and online tools are available to help you edit the footage.
● Depending on your files, editing, and other functions required, the selection of an appropriate tool can be done.
Technological advancements in the field of video editing have opened new opportunities and possibilities for the editors to unleash their creativity and AI-based video editors are a major contribution to the field. With these intelligent tools, the cumbersome process of video editing has not only become quick but also hassle-free and results in excellent pro videos. So, if you too have been looking for one such artificial intelligence videos editing tools, you are reading on the right page.

In this article
01 [What is AI video editing tools?](#Part 1)
02 [Things To Consider While Selecting An Ai Editing Tool](#Part 2)
03 [Top 10 AI Video Editors](#Part 3)
Part 1 What is AI video editing tools?
In simplest terms, the software that uses artificial intelligence for editing videos is termed AI editing tools. These programs make use of AI algorithms to perform advanced editing tasks for creating visually appealing and interesting videos. The AI tools have not only helped in accelerating the video editing tools but also assists in taking care of complex functions with ease. A good AI editing tool can perform multiple tasks like determining the shots, applying filters, adding transitions, proposing changes, color correction, face detection, and more.
Part 2 Things to consider while selecting an AI editing tool
An array of AI editing tools is available and selecting one can be a confusing task. So, while choosing one of these programs, several criteria can be considered and some of these are listed below.
● Allows editing videos in a hassle-free manner.
● Quick use and processing.
● User-friendly interface.
● Capability to process all types of videos in high resolution.
● Comes with all the needed features.
● The learning curve is not very steep.
Part 3 Top 10 AI Video Editors
After reviewing several AI-based editing software, we have selected the top 10 in the category. Check out the list below.
01Magisto
This is a powerful video editing tool that is simple and quick to use. You simply need to add the content file and select the styling type as needed along with audio and other content after which everything will be taken care by the software. The program is also capable of optimizing the video to reach the maximum number of people and this is done based on real-time analytics. This is a paid tool and is apt for creating marketing videos.

02Recreate
For creating and editing interesting videos for social media platforms, this is an apt tool that allows video customization through fonts, transitions, colors, overlays, and several other elements. Using this software, your written content can be converted into videos as the AI technology finds music as well as visuals automatically to match your requirements. Additionally, the program also supports features like recording voice-overs, removing the background, generating AI voices, and more.

03Synthesia
This is an excellent video editing tool that is AI-based that can be used for digital marketing, training, communication, and several other tasks. The tool allows creating of interesting videos from the scripts and these footages can be up to 30 minutes long. Support for around 40 languages makes the program apt for all types of users. Some other key features of the software include duplicating the video, multi-sliding videos, customization options for voice, and more. The interface is simple and the process is also hassle-free.

04RawShorts
This is an online AI-based tool that can help convert the texts and the articles into videos for social media platforms and others. The technology of the tool will analyze your text content to know the main idea on which your video is to based. Then it automatically looks for the content needed including the voice and creates as well as edits the footage. A free trial version of the program is also available though it comes with several limitations. The drag and drop interface of the tool further makes it user-friendly.

05Lumen5
For bulk editing of videos quickly, this is a good tool to consider. The interface is simple which along with the drag and drop feature makes the tool apt even for beginners. An array of video templates is available to match your theme requirements and the tool after identifying your requirements will lookout for the perfect music, content, layout, and other elements. There is also a library in the software from where you can find the desired collection of videos, images, and other media files.

06Kamua
For simple and quick editing of your videos, Kamua is a great tool to use. This is a browser-based program that supports all basic functions like resizing, captioning, and more. With its cloud computing feature, a large number of files can be processed quickly and the tool supports adding the subtitles automatically to your project and that too in more than 60 languages. The tool also has a free version for the users who first wish to test before buying the subscription.

07InVideo
This is another widely used online tool supporting advanced video editing functions. The AI-based technology of the software will let you convert your text into the desired videos effortlessly. The Intelligent Video Assistant of the software will also check for any hidden mistakes in your videos and will also correct them. You can add multiple effects to your videos using the tool to create eye-catchy footage.

08QuickStories
Using this AI-based editing tool, your video footage captured through a camera, GoPro as well as other devices can be edited like a pro to take them to an all-new level. The software support functions like intelligent tagging, night colors, white balancing, color rendering, and much more.

09Designs.ai
Using this online AI-based designing tool you can create posters, logos, banners, and several other videos with ease and in high quality. Text to video technology is supported by the program and you can even add voiceovers. Supporting more than 20 languages, the program also comes with a collection of images, clips, as well as audio files that can be used as needed. Transitions, animations, and other effects and elements can be added to improve the overall video look.

10**Wondershare Filmora Video Editor **
When it comes to video editing tools, the list remains incomplete without mentioning a versatile tool called Wondershare Filmora, This Windows and Mac-based software is easy and quick to install after which it is all set to create excellent videos using its extensive range of features. Using the tool, you can add transitions, effects, rotate, split, merge, and perform a host of other functions as well. Audio-based functions like audio compression, noise reduction, automatic audio syncing, and others are also supported. The interface of the tool is simple and the process of editing is hassle-free.
For Win 7 or later (64-bit)
For macOS 10.12 or later
● Ending Thoughts →
● AI-based video editing tools are intelligent programs that help in customizing the videos automatically.
● A number of these desktop and online tools are available to help you edit the footage.
● Depending on your files, editing, and other functions required, the selection of an appropriate tool can be done.
Technological advancements in the field of video editing have opened new opportunities and possibilities for the editors to unleash their creativity and AI-based video editors are a major contribution to the field. With these intelligent tools, the cumbersome process of video editing has not only become quick but also hassle-free and results in excellent pro videos. So, if you too have been looking for one such artificial intelligence videos editing tools, you are reading on the right page.

In this article
01 [What is AI video editing tools?](#Part 1)
02 [Things To Consider While Selecting An Ai Editing Tool](#Part 2)
03 [Top 10 AI Video Editors](#Part 3)
Part 1 What is AI video editing tools?
In simplest terms, the software that uses artificial intelligence for editing videos is termed AI editing tools. These programs make use of AI algorithms to perform advanced editing tasks for creating visually appealing and interesting videos. The AI tools have not only helped in accelerating the video editing tools but also assists in taking care of complex functions with ease. A good AI editing tool can perform multiple tasks like determining the shots, applying filters, adding transitions, proposing changes, color correction, face detection, and more.
Part 2 Things to consider while selecting an AI editing tool
An array of AI editing tools is available and selecting one can be a confusing task. So, while choosing one of these programs, several criteria can be considered and some of these are listed below.
● Allows editing videos in a hassle-free manner.
● Quick use and processing.
● User-friendly interface.
● Capability to process all types of videos in high resolution.
● Comes with all the needed features.
● The learning curve is not very steep.
Part 3 Top 10 AI Video Editors
After reviewing several AI-based editing software, we have selected the top 10 in the category. Check out the list below.
01Magisto
This is a powerful video editing tool that is simple and quick to use. You simply need to add the content file and select the styling type as needed along with audio and other content after which everything will be taken care by the software. The program is also capable of optimizing the video to reach the maximum number of people and this is done based on real-time analytics. This is a paid tool and is apt for creating marketing videos.

02Recreate
For creating and editing interesting videos for social media platforms, this is an apt tool that allows video customization through fonts, transitions, colors, overlays, and several other elements. Using this software, your written content can be converted into videos as the AI technology finds music as well as visuals automatically to match your requirements. Additionally, the program also supports features like recording voice-overs, removing the background, generating AI voices, and more.

03Synthesia
This is an excellent video editing tool that is AI-based that can be used for digital marketing, training, communication, and several other tasks. The tool allows creating of interesting videos from the scripts and these footages can be up to 30 minutes long. Support for around 40 languages makes the program apt for all types of users. Some other key features of the software include duplicating the video, multi-sliding videos, customization options for voice, and more. The interface is simple and the process is also hassle-free.

04RawShorts
This is an online AI-based tool that can help convert the texts and the articles into videos for social media platforms and others. The technology of the tool will analyze your text content to know the main idea on which your video is to based. Then it automatically looks for the content needed including the voice and creates as well as edits the footage. A free trial version of the program is also available though it comes with several limitations. The drag and drop interface of the tool further makes it user-friendly.

05Lumen5
For bulk editing of videos quickly, this is a good tool to consider. The interface is simple which along with the drag and drop feature makes the tool apt even for beginners. An array of video templates is available to match your theme requirements and the tool after identifying your requirements will lookout for the perfect music, content, layout, and other elements. There is also a library in the software from where you can find the desired collection of videos, images, and other media files.

06Kamua
For simple and quick editing of your videos, Kamua is a great tool to use. This is a browser-based program that supports all basic functions like resizing, captioning, and more. With its cloud computing feature, a large number of files can be processed quickly and the tool supports adding the subtitles automatically to your project and that too in more than 60 languages. The tool also has a free version for the users who first wish to test before buying the subscription.

07InVideo
This is another widely used online tool supporting advanced video editing functions. The AI-based technology of the software will let you convert your text into the desired videos effortlessly. The Intelligent Video Assistant of the software will also check for any hidden mistakes in your videos and will also correct them. You can add multiple effects to your videos using the tool to create eye-catchy footage.

08QuickStories
Using this AI-based editing tool, your video footage captured through a camera, GoPro as well as other devices can be edited like a pro to take them to an all-new level. The software support functions like intelligent tagging, night colors, white balancing, color rendering, and much more.

09Designs.ai
Using this online AI-based designing tool you can create posters, logos, banners, and several other videos with ease and in high quality. Text to video technology is supported by the program and you can even add voiceovers. Supporting more than 20 languages, the program also comes with a collection of images, clips, as well as audio files that can be used as needed. Transitions, animations, and other effects and elements can be added to improve the overall video look.

10**Wondershare Filmora Video Editor **
When it comes to video editing tools, the list remains incomplete without mentioning a versatile tool called Wondershare Filmora, This Windows and Mac-based software is easy and quick to install after which it is all set to create excellent videos using its extensive range of features. Using the tool, you can add transitions, effects, rotate, split, merge, and perform a host of other functions as well. Audio-based functions like audio compression, noise reduction, automatic audio syncing, and others are also supported. The interface of the tool is simple and the process of editing is hassle-free.
For Win 7 or later (64-bit)
For macOS 10.12 or later
● Ending Thoughts →
● AI-based video editing tools are intelligent programs that help in customizing the videos automatically.
● A number of these desktop and online tools are available to help you edit the footage.
● Depending on your files, editing, and other functions required, the selection of an appropriate tool can be done.
Also read:
- In 2024, Best Ways to Blur Zoom Background for Free
- New Learn Color Correction in After Effects with These Videos for 2024
- How to Create a Text Effect Video with Filmora for 2024
- Updated As Video Editing Has Become a Pillar Stone in Post-Production Work, You Might Need to Upgrade Your Knowledge About It. In This Article, You Will Learn How to Rotate the Video
- Updated Detailed Guide to Resize Your Video in VLC
- Updated How to Create Motion Text Effects for Your Video?
- 2024 Approved Step by Step to Rotate Videos Using OBS
- New Best Cloud Storage Service for Videos
- In 2024, MAGIX Vegas Pro Review A Professional Video Editing Software
- 2024 Approved For Converting GIF to MOV Format, You Dont Need to Search From A-Z. Here Is an Amazing Guide, that Gives You Complete Details About Both Offline and Online Gif-to-MOV Converters. Catch Them Below and Experience a Pro Editing Time
- 2024 Approved Top Things People Know About Wedding Slideshow
- New 3 Different Methods to Correct Color Distortion in Videos
- Updated In 2024, Best Photo Video Maker Apps with Song PC, Mobile, Online
- 2024 Approved How to Loop a Video in Canva Editor
- Looking for the Different Ar Video Effects to Include in Your Film? Check Out This Article for the Best 10 Augmented Reality Effects and the Fun Ar Effects in Filmora for 2024
- 2024 Approved Here, the Main Discussion Is Regarding the Split of the Audio From the Video in the Sony Vegas Pro. There Are Also some Details About the Substitute, Which Is Wondershare Filmora
- How to Make a Slideshow with Movavi Slideshow Maker
- Updated 2024 Approved What Is the Best Filmora Slideshow Templates? Experts Choice
- New In 2024, Change Video Speed with FFmpeg
- New 2024 Approved How to Add Filter to Video Online
- New Steps to Add Subtitles in Canva
- In 2024, 6 Instant Mp4 to GIF Online Tools
- New What Are AR Emoji Stickers & How to Add Them to Your Video for 2024
- New In 2024, Understanding More About CapCut Lenta Template and Slow-Motion Videos
- Updated Best 5 Solutions on How to Add Emojis to iPhone for 2024
- Video Maker with Song for 2024
- New In 2024, 15 Best CapCut Templates for Slow Motion Editing
- New 5 Best Video Denoisers
- Want to Immediately Know All About Discord GIF, In 2024
- Updated Different Ways To Trim Video In Premiere Pro for 2024
- Detailed Tutorial to Rotate a Video in Cyberlink PowerDirector for 2024
- Learn How to Slow Down Time-Lapse Videos on iPhone to Make Detailed and Captivating Slow-Motion Effects in Your Time-Lapse Captures
- Updated 2024 Approved How to Create Liquid Water Reveal Intro?
- 2024 Approved How To Use Face Tracking In After Effects To Make Your Videos Pop
- Updated 12 Impressive AI Video Ideas for Making Engaging Video Content for 2024
- 2024 Approved FLV Editors for Windows 11/10/8.1/8/7 Easily Edit FLV Videos on PC
- How to Make GIFs From Videos on Mac
- Top 4 Android System Repair Software for Motorola Edge+ (2023) Bricked Devices | Dr.fone
- In 2024, How To Fix Apple iPhone 15 Could Not Be Activated/Reached Issue
- What is Geo-Blocking and How to Bypass it On Oppo Find N3 Flip? | Dr.fone
- For People Wanting to Mock GPS on Honor Magic 5 Devices | Dr.fone
- Is GSM Flasher ADB Legit? Full Review To Bypass Your Samsung Galaxy A34 5G Phone FRP Lock
- In 2024, 3 Ways of How to Get Someones Apple ID Off Apple iPhone 13 mini without Password
- Error Solved Excel 2023 file is not in recognizable format
- How to recover deleted photos from Android Gallery without backup on Samsung Galaxy S23 Tactical Edition
- In 2024, How to Come up With the Best Pokemon Team On Apple iPhone 7 Plus? | Dr.fone
- How To Transfer WhatsApp From Apple iPhone 15 Plus to other iPhone 15 Pro devices? | Dr.fone
- Updated Material Preparation | Virbo AI Live Stream for 2024
- Title: How to Create Realistic Fire Effects
- Author: Chloe
- Created at : 2024-05-20 03:37:22
- Updated at : 2024-05-21 03:37:22
- Link: https://ai-editing-video.techidaily.com/how-to-create-realistic-fire-effects/
- License: This work is licensed under CC BY-NC-SA 4.0.

