:max_bytes(150000):strip_icc():format(webp)/lg-channels-guide-1800-x-0f720f6afeb842c299c88baa42f3bd88.jpg)
How to Create Sports Intro and YouTube Endscreen?

How to Create Sports Intro and YouTube Endscreen?
Are you deep into sports? Have you created a sports channel on YouTube but are still clueless? You do not need to panic. The article has got you covered.
There is an extensive range of sports channels on YouTube struggling and surviving. It includes gaming, exercise, athletics, basketball, hockey, and tennis sports. A promising sports background music in the intro and outro makes it appealing for the audience. Hence, the article will focus on three platforms for exercise downloading impeccable background music.
The step-by-step guide to creating an outstanding sports intro will also be sketched out. So, what are we waiting for? Time to commence this!
In this article
01 How to Create an Epic Sports Intro?
02 How to Edit a Sport Style YouTube Outro or End Screen?
03 3 Recommended Sites to Download Background Music for Exercise Videos
Part 1: How to Create an Epic Sports Intro?
Do you own a sports channel? Continue exploring the section to know more!
A sports channel needs a promising intro to keep the audience interested in the content. An exceptional intro to a sports channel with great music enables you to gain subscribers. The sub-section would cover an extensive procedure to make a startling sports intro with yoga background music or other sport. So, let us start? Shall we?
For Win 7 or later (64-bit)
For macOS 10.12 or later
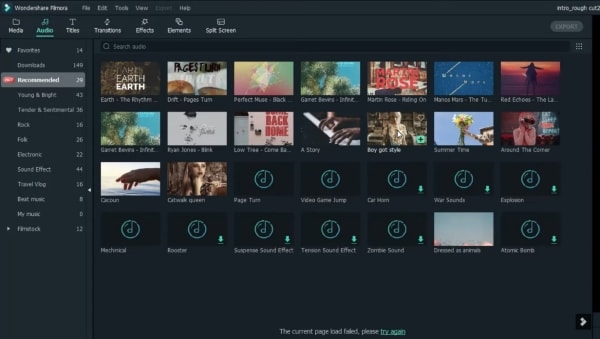
Step 1: Open Wondershare Filmora from your computer. Now, head to the “Audio” panel to drop a powerful track to the timeline. Use the “Media” panel to import the sports video clips for your intro.
Step 2: Keep the highlights and trim the clips to be in sync with the music. After the editing is concluded, shift your focus to the “Titles.” Move to the Titles panel and use title animations for the “Energy Sports” pack.
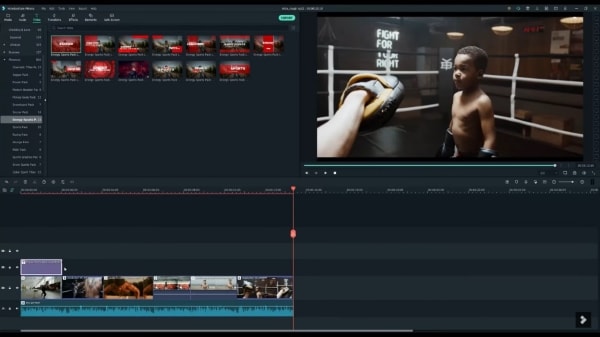
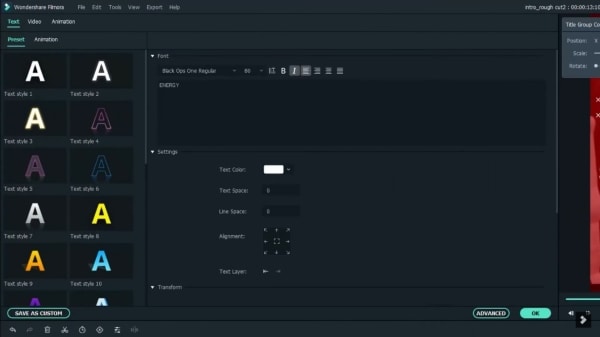
Step 3: Drag and drop the titles on the top of the footage. It would be best to match the duration of the video clips with the titles. Now, double-click the title to rename it according to your need.
Step 4: To make the ending more powerful, right-click on the last video clip and click on “Speed and Duration.” Enhance the speed to make it engaging. Moving on, navigate to the “Effects” panel.
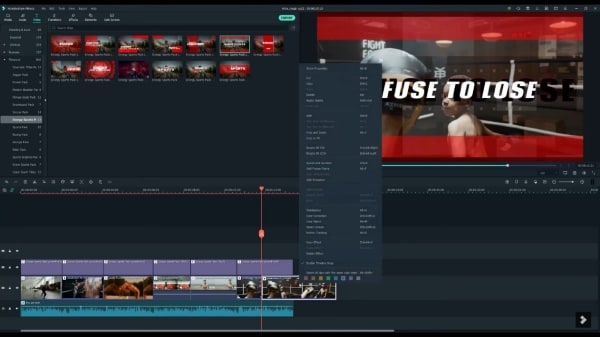
Step 5: From there, pick the “Shake” filter and drag and drop the “Chaos 1” to the last clip. Similarly, click on the “Distortion” filter to drop the “Chromatic Aberration” effect onto the last clip.
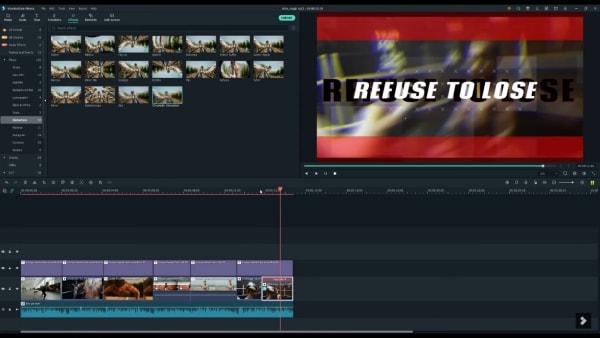
Step 6: Now, it is time to add transitions to create a smooth connection between the clips. Click on “Transitions” and then “Energy Sports” pack. Drag and drop both transitions in between the clips. A creative and captivating sports intro has been created with solid sports background music.
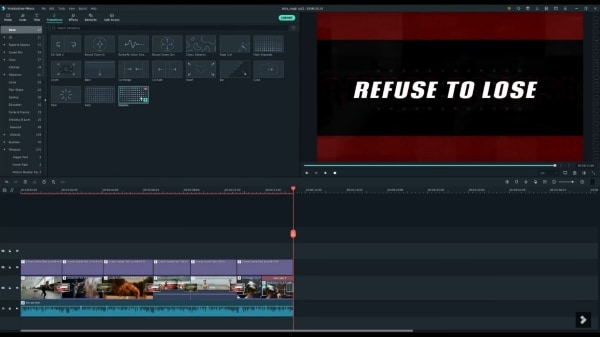
Part 2: How to Edit a Sport Style YouTube Outro or End Screen?
Communicating with the users about a channel doesn’t have to be with words. The background music for exercise expresses the aims of a channel more perfectly. The same goes for a profound sport-style outro which tells the audience that we are ending on a high note.
The sub-section takes the opportunity to offer a step-by-step to edit a sport-style YouTube end screen. So, come with us as we explore it together! Let us go!
For Win 7 or later (64-bit)
For macOS 10.12 or later
Step 1: To begin, launch Wondershare. Import the targeted video clips that you need as an engaging YouTube outro. After that, click on “Split Screen.” Please choose your favorite split-screen design and drag it to the timeline.
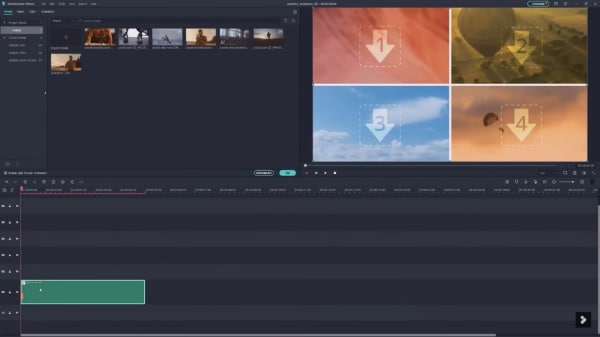
Step 2: Use the imported videos to drag them on the preview window in the split-screen design as selected. You can adjust the scale and position through the mouse click. Now, drag and drop the video onto the timeline and trim it as needed.
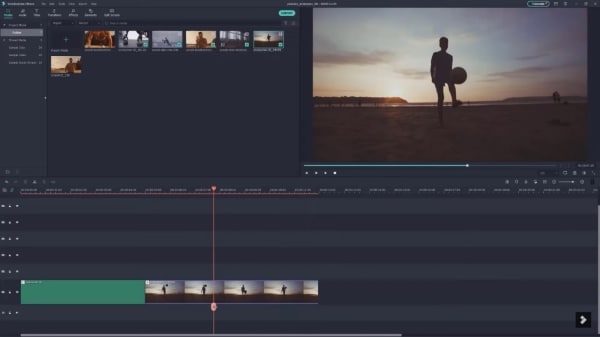
Step 3: Head to the “Effects” tab and search for blur in the space bar. Drag and drop the square blur to the second part of the video. Adjust the blur intensity as required. Import another video and add it to the timeline.
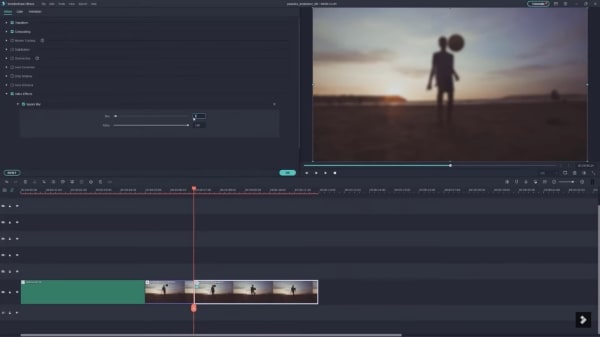
Step 4: Insert dissolved transitions between the first two cuts to smooth the process. Now, it is time to add an avatar image. Import the profile picture to the timeline above the second track. Head to the utility category under the “Effects” tab and drag the “Image Mask” to the image on the timeline.
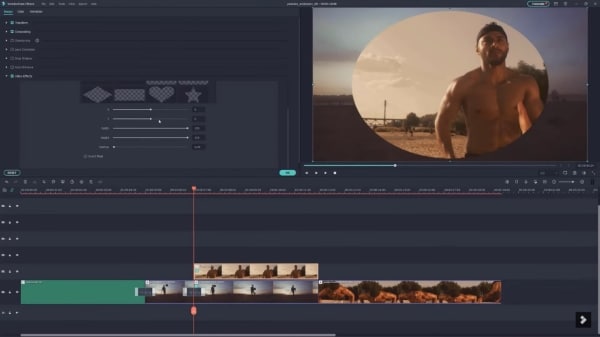
Step 5: Double click on it to alter the masking width so that the circle mask can fit on the image. Scale down the picture and set it to the center of the frame. Navigate to the “Elements” panel and pick the YouTube subscribe button. Drag it to the third track afterward.
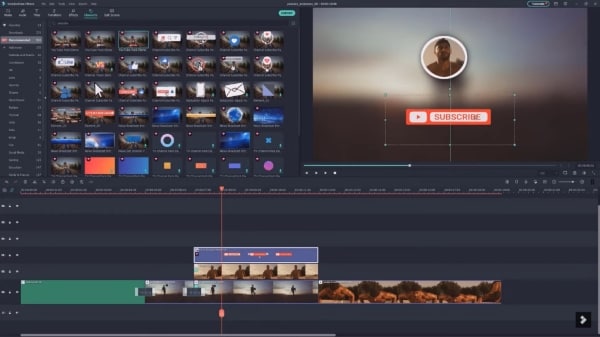
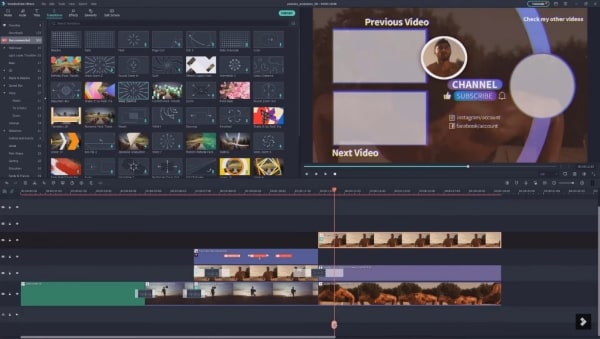
Step 6: Place the location on the preview window as you need. Now, move to the social media category in the “Titles” to choose the perfect one and add it to the timeline above the last clip. The user is instructed to add a transition at the beginning of the clip. Rename the social media names of your sports channel, and you are done with the process.
Part 3: 3 Recommended Sites to Download Background Music for Exercise Videos
Sports background music is one of the significant ways to keep the audience motivated for sports and exercise. It helps enhance the subscribers’ multifold. Therefore, the importance of promising yoga background music cannot be neglected.
Mixkit
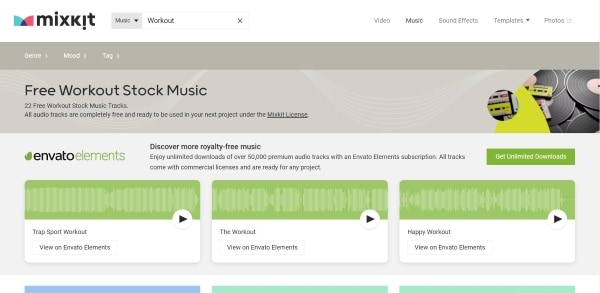
Mixkit is a renowned place to access royalty-free marketplaces, bringing revolution to the market and content creators. It is extremely workable to download background music for exercise in seconds. Based on genre, mood, and tag, you can search for a suitable music track.
The trap sport workout, motivating mornings, positive energy, super strong, and the greatest comeback is one of the most exemplary tracks from Mixkit. The audio can be listened to before making the decision. The genre offers ambient, cinematic, funk, hip-hop, acoustic, classical, and electronica.
TunePocket
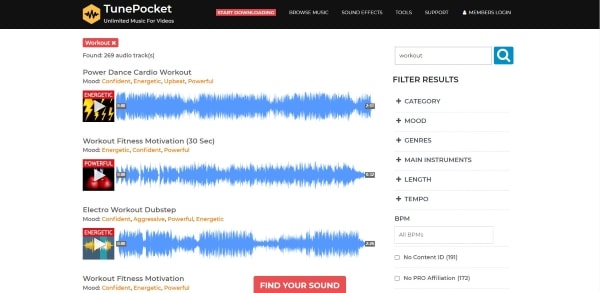
Changing the narrative of music platforms, TunePocket pretty much takes the lead. The filter results make the process flawless. You can tailor the search results by playing with category, mood, genres, instruments, length, and tempo.
The duration of each sports background music is also mentioned to give the content creators an idea. Power dance workout, workout fitness motivation, summer western dance, young gamers, and sports power electro, and techno blast are some examples of outstanding music tracks.
Envato Elements
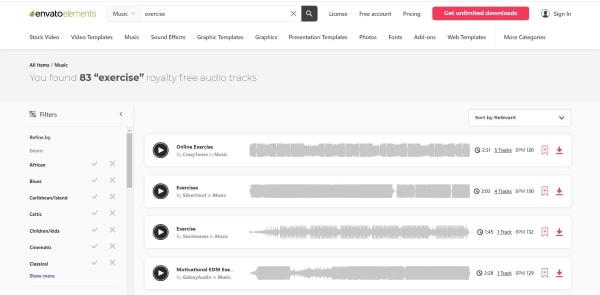
The next on the list is Envato Elements making wonders in the business. The search filters are refined as the user deems necessary. Online exercise, motivational EDM, fitness, workout, corporate meditation, and exercise are some amazing examples of royalty-free music. The search results can be tailored according to relevancy and popularity.
Concluding Remarks
There is an awful load of sports channels on YouTube. The content creators are trying their best to beat the competitors. It is crucial to access energetic background music for exercise to make intro and outro engaging.
The article recommended three apps to download sports background music. The step-by-step guide to creating an inspiring sports intro and editing sports style YouTube outro via Filmora.
Wondershare Filmora
Get started easily with Filmora’s powerful performance, intuitive interface, and countless effects!
Try It Free Try It Free Try It Free Learn More >

02 How to Edit a Sport Style YouTube Outro or End Screen?
03 3 Recommended Sites to Download Background Music for Exercise Videos
Part 1: How to Create an Epic Sports Intro?
Do you own a sports channel? Continue exploring the section to know more!
A sports channel needs a promising intro to keep the audience interested in the content. An exceptional intro to a sports channel with great music enables you to gain subscribers. The sub-section would cover an extensive procedure to make a startling sports intro with yoga background music or other sport. So, let us start? Shall we?
For Win 7 or later (64-bit)
For macOS 10.12 or later
Step 1: Open Wondershare Filmora from your computer. Now, head to the “Audio” panel to drop a powerful track to the timeline. Use the “Media” panel to import the sports video clips for your intro.

Step 2: Keep the highlights and trim the clips to be in sync with the music. After the editing is concluded, shift your focus to the “Titles.” Move to the Titles panel and use title animations for the “Energy Sports” pack.

Step 3: Drag and drop the titles on the top of the footage. It would be best to match the duration of the video clips with the titles. Now, double-click the title to rename it according to your need.

Step 4: To make the ending more powerful, right-click on the last video clip and click on “Speed and Duration.” Enhance the speed to make it engaging. Moving on, navigate to the “Effects” panel.

Step 5: From there, pick the “Shake” filter and drag and drop the “Chaos 1” to the last clip. Similarly, click on the “Distortion” filter to drop the “Chromatic Aberration” effect onto the last clip.

Step 6: Now, it is time to add transitions to create a smooth connection between the clips. Click on “Transitions” and then “Energy Sports” pack. Drag and drop both transitions in between the clips. A creative and captivating sports intro has been created with solid sports background music.

Part 2: How to Edit a Sport Style YouTube Outro or End Screen?
Communicating with the users about a channel doesn’t have to be with words. The background music for exercise expresses the aims of a channel more perfectly. The same goes for a profound sport-style outro which tells the audience that we are ending on a high note.
The sub-section takes the opportunity to offer a step-by-step to edit a sport-style YouTube end screen. So, come with us as we explore it together! Let us go!
For Win 7 or later (64-bit)
For macOS 10.12 or later
Step 1: To begin, launch Wondershare. Import the targeted video clips that you need as an engaging YouTube outro. After that, click on “Split Screen.” Please choose your favorite split-screen design and drag it to the timeline.

Step 2: Use the imported videos to drag them on the preview window in the split-screen design as selected. You can adjust the scale and position through the mouse click. Now, drag and drop the video onto the timeline and trim it as needed.

Step 3: Head to the “Effects” tab and search for blur in the space bar. Drag and drop the square blur to the second part of the video. Adjust the blur intensity as required. Import another video and add it to the timeline.

Step 4: Insert dissolved transitions between the first two cuts to smooth the process. Now, it is time to add an avatar image. Import the profile picture to the timeline above the second track. Head to the utility category under the “Effects” tab and drag the “Image Mask” to the image on the timeline.

Step 5: Double click on it to alter the masking width so that the circle mask can fit on the image. Scale down the picture and set it to the center of the frame. Navigate to the “Elements” panel and pick the YouTube subscribe button. Drag it to the third track afterward.

Step 6: Place the location on the preview window as you need. Now, move to the social media category in the “Titles” to choose the perfect one and add it to the timeline above the last clip. The user is instructed to add a transition at the beginning of the clip. Rename the social media names of your sports channel, and you are done with the process.

Part 3: 3 Recommended Sites to Download Background Music for Exercise Videos
Sports background music is one of the significant ways to keep the audience motivated for sports and exercise. It helps enhance the subscribers’ multifold. Therefore, the importance of promising yoga background music cannot be neglected.
Mixkit
Mixkit is a renowned place to access royalty-free marketplaces, bringing revolution to the market and content creators. It is extremely workable to download background music for exercise in seconds. Based on genre, mood, and tag, you can search for a suitable music track.
The trap sport workout, motivating mornings, positive energy, super strong, and the greatest comeback is one of the most exemplary tracks from Mixkit. The audio can be listened to before making the decision. The genre offers ambient, cinematic, funk, hip-hop, acoustic, classical, and electronica.

TunePocket
Changing the narrative of music platforms, TunePocket pretty much takes the lead. The filter results make the process flawless. You can tailor the search results by playing with category, mood, genres, instruments, length, and tempo.
The duration of each sports background music is also mentioned to give the content creators an idea. Power dance workout, workout fitness motivation, summer western dance, young gamers, and sports power electro, and techno blast are some examples of outstanding music tracks.

Envato Elements
The next on the list is Envato Elements making wonders in the business. The search filters are refined as the user deems necessary. Online exercise, motivational EDM, fitness, workout, corporate meditation, and exercise are some amazing examples of royalty-free music. The search results can be tailored according to relevancy and popularity.

Concluding Remarks
There is an awful load of sports channels on YouTube. The content creators are trying their best to beat the competitors. It is crucial to access energetic background music for exercise to make intro and outro engaging.
The article recommended three apps to download sports background music. The step-by-step guide to creating an inspiring sports intro and editing sports style YouTube outro via Filmora.
Wondershare Filmora
Get started easily with Filmora’s powerful performance, intuitive interface, and countless effects!
Try It Free Try It Free Try It Free Learn More >

02 How to Edit a Sport Style YouTube Outro or End Screen?
03 3 Recommended Sites to Download Background Music for Exercise Videos
Part 1: How to Create an Epic Sports Intro?
Do you own a sports channel? Continue exploring the section to know more!
A sports channel needs a promising intro to keep the audience interested in the content. An exceptional intro to a sports channel with great music enables you to gain subscribers. The sub-section would cover an extensive procedure to make a startling sports intro with yoga background music or other sport. So, let us start? Shall we?
For Win 7 or later (64-bit)
For macOS 10.12 or later
Step 1: Open Wondershare Filmora from your computer. Now, head to the “Audio” panel to drop a powerful track to the timeline. Use the “Media” panel to import the sports video clips for your intro.

Step 2: Keep the highlights and trim the clips to be in sync with the music. After the editing is concluded, shift your focus to the “Titles.” Move to the Titles panel and use title animations for the “Energy Sports” pack.

Step 3: Drag and drop the titles on the top of the footage. It would be best to match the duration of the video clips with the titles. Now, double-click the title to rename it according to your need.

Step 4: To make the ending more powerful, right-click on the last video clip and click on “Speed and Duration.” Enhance the speed to make it engaging. Moving on, navigate to the “Effects” panel.

Step 5: From there, pick the “Shake” filter and drag and drop the “Chaos 1” to the last clip. Similarly, click on the “Distortion” filter to drop the “Chromatic Aberration” effect onto the last clip.

Step 6: Now, it is time to add transitions to create a smooth connection between the clips. Click on “Transitions” and then “Energy Sports” pack. Drag and drop both transitions in between the clips. A creative and captivating sports intro has been created with solid sports background music.

Part 2: How to Edit a Sport Style YouTube Outro or End Screen?
Communicating with the users about a channel doesn’t have to be with words. The background music for exercise expresses the aims of a channel more perfectly. The same goes for a profound sport-style outro which tells the audience that we are ending on a high note.
The sub-section takes the opportunity to offer a step-by-step to edit a sport-style YouTube end screen. So, come with us as we explore it together! Let us go!
For Win 7 or later (64-bit)
For macOS 10.12 or later
Step 1: To begin, launch Wondershare. Import the targeted video clips that you need as an engaging YouTube outro. After that, click on “Split Screen.” Please choose your favorite split-screen design and drag it to the timeline.

Step 2: Use the imported videos to drag them on the preview window in the split-screen design as selected. You can adjust the scale and position through the mouse click. Now, drag and drop the video onto the timeline and trim it as needed.

Step 3: Head to the “Effects” tab and search for blur in the space bar. Drag and drop the square blur to the second part of the video. Adjust the blur intensity as required. Import another video and add it to the timeline.

Step 4: Insert dissolved transitions between the first two cuts to smooth the process. Now, it is time to add an avatar image. Import the profile picture to the timeline above the second track. Head to the utility category under the “Effects” tab and drag the “Image Mask” to the image on the timeline.

Step 5: Double click on it to alter the masking width so that the circle mask can fit on the image. Scale down the picture and set it to the center of the frame. Navigate to the “Elements” panel and pick the YouTube subscribe button. Drag it to the third track afterward.

Step 6: Place the location on the preview window as you need. Now, move to the social media category in the “Titles” to choose the perfect one and add it to the timeline above the last clip. The user is instructed to add a transition at the beginning of the clip. Rename the social media names of your sports channel, and you are done with the process.

Part 3: 3 Recommended Sites to Download Background Music for Exercise Videos
Sports background music is one of the significant ways to keep the audience motivated for sports and exercise. It helps enhance the subscribers’ multifold. Therefore, the importance of promising yoga background music cannot be neglected.
Mixkit
Mixkit is a renowned place to access royalty-free marketplaces, bringing revolution to the market and content creators. It is extremely workable to download background music for exercise in seconds. Based on genre, mood, and tag, you can search for a suitable music track.
The trap sport workout, motivating mornings, positive energy, super strong, and the greatest comeback is one of the most exemplary tracks from Mixkit. The audio can be listened to before making the decision. The genre offers ambient, cinematic, funk, hip-hop, acoustic, classical, and electronica.

TunePocket
Changing the narrative of music platforms, TunePocket pretty much takes the lead. The filter results make the process flawless. You can tailor the search results by playing with category, mood, genres, instruments, length, and tempo.
The duration of each sports background music is also mentioned to give the content creators an idea. Power dance workout, workout fitness motivation, summer western dance, young gamers, and sports power electro, and techno blast are some examples of outstanding music tracks.

Envato Elements
The next on the list is Envato Elements making wonders in the business. The search filters are refined as the user deems necessary. Online exercise, motivational EDM, fitness, workout, corporate meditation, and exercise are some amazing examples of royalty-free music. The search results can be tailored according to relevancy and popularity.

Concluding Remarks
There is an awful load of sports channels on YouTube. The content creators are trying their best to beat the competitors. It is crucial to access energetic background music for exercise to make intro and outro engaging.
The article recommended three apps to download sports background music. The step-by-step guide to creating an inspiring sports intro and editing sports style YouTube outro via Filmora.
Wondershare Filmora
Get started easily with Filmora’s powerful performance, intuitive interface, and countless effects!
Try It Free Try It Free Try It Free Learn More >

02 How to Edit a Sport Style YouTube Outro or End Screen?
03 3 Recommended Sites to Download Background Music for Exercise Videos
Part 1: How to Create an Epic Sports Intro?
Do you own a sports channel? Continue exploring the section to know more!
A sports channel needs a promising intro to keep the audience interested in the content. An exceptional intro to a sports channel with great music enables you to gain subscribers. The sub-section would cover an extensive procedure to make a startling sports intro with yoga background music or other sport. So, let us start? Shall we?
For Win 7 or later (64-bit)
For macOS 10.12 or later
Step 1: Open Wondershare Filmora from your computer. Now, head to the “Audio” panel to drop a powerful track to the timeline. Use the “Media” panel to import the sports video clips for your intro.

Step 2: Keep the highlights and trim the clips to be in sync with the music. After the editing is concluded, shift your focus to the “Titles.” Move to the Titles panel and use title animations for the “Energy Sports” pack.

Step 3: Drag and drop the titles on the top of the footage. It would be best to match the duration of the video clips with the titles. Now, double-click the title to rename it according to your need.

Step 4: To make the ending more powerful, right-click on the last video clip and click on “Speed and Duration.” Enhance the speed to make it engaging. Moving on, navigate to the “Effects” panel.

Step 5: From there, pick the “Shake” filter and drag and drop the “Chaos 1” to the last clip. Similarly, click on the “Distortion” filter to drop the “Chromatic Aberration” effect onto the last clip.

Step 6: Now, it is time to add transitions to create a smooth connection between the clips. Click on “Transitions” and then “Energy Sports” pack. Drag and drop both transitions in between the clips. A creative and captivating sports intro has been created with solid sports background music.

Part 2: How to Edit a Sport Style YouTube Outro or End Screen?
Communicating with the users about a channel doesn’t have to be with words. The background music for exercise expresses the aims of a channel more perfectly. The same goes for a profound sport-style outro which tells the audience that we are ending on a high note.
The sub-section takes the opportunity to offer a step-by-step to edit a sport-style YouTube end screen. So, come with us as we explore it together! Let us go!
For Win 7 or later (64-bit)
For macOS 10.12 or later
Step 1: To begin, launch Wondershare. Import the targeted video clips that you need as an engaging YouTube outro. After that, click on “Split Screen.” Please choose your favorite split-screen design and drag it to the timeline.

Step 2: Use the imported videos to drag them on the preview window in the split-screen design as selected. You can adjust the scale and position through the mouse click. Now, drag and drop the video onto the timeline and trim it as needed.

Step 3: Head to the “Effects” tab and search for blur in the space bar. Drag and drop the square blur to the second part of the video. Adjust the blur intensity as required. Import another video and add it to the timeline.

Step 4: Insert dissolved transitions between the first two cuts to smooth the process. Now, it is time to add an avatar image. Import the profile picture to the timeline above the second track. Head to the utility category under the “Effects” tab and drag the “Image Mask” to the image on the timeline.

Step 5: Double click on it to alter the masking width so that the circle mask can fit on the image. Scale down the picture and set it to the center of the frame. Navigate to the “Elements” panel and pick the YouTube subscribe button. Drag it to the third track afterward.

Step 6: Place the location on the preview window as you need. Now, move to the social media category in the “Titles” to choose the perfect one and add it to the timeline above the last clip. The user is instructed to add a transition at the beginning of the clip. Rename the social media names of your sports channel, and you are done with the process.

Part 3: 3 Recommended Sites to Download Background Music for Exercise Videos
Sports background music is one of the significant ways to keep the audience motivated for sports and exercise. It helps enhance the subscribers’ multifold. Therefore, the importance of promising yoga background music cannot be neglected.
Mixkit
Mixkit is a renowned place to access royalty-free marketplaces, bringing revolution to the market and content creators. It is extremely workable to download background music for exercise in seconds. Based on genre, mood, and tag, you can search for a suitable music track.
The trap sport workout, motivating mornings, positive energy, super strong, and the greatest comeback is one of the most exemplary tracks from Mixkit. The audio can be listened to before making the decision. The genre offers ambient, cinematic, funk, hip-hop, acoustic, classical, and electronica.

TunePocket
Changing the narrative of music platforms, TunePocket pretty much takes the lead. The filter results make the process flawless. You can tailor the search results by playing with category, mood, genres, instruments, length, and tempo.
The duration of each sports background music is also mentioned to give the content creators an idea. Power dance workout, workout fitness motivation, summer western dance, young gamers, and sports power electro, and techno blast are some examples of outstanding music tracks.

Envato Elements
The next on the list is Envato Elements making wonders in the business. The search filters are refined as the user deems necessary. Online exercise, motivational EDM, fitness, workout, corporate meditation, and exercise are some amazing examples of royalty-free music. The search results can be tailored according to relevancy and popularity.

Concluding Remarks
There is an awful load of sports channels on YouTube. The content creators are trying their best to beat the competitors. It is crucial to access energetic background music for exercise to make intro and outro engaging.
The article recommended three apps to download sports background music. The step-by-step guide to creating an inspiring sports intro and editing sports style YouTube outro via Filmora.
Wondershare Filmora
Get started easily with Filmora’s powerful performance, intuitive interface, and countless effects!
Try It Free Try It Free Try It Free Learn More >

You’re likely familiar with recording gameplays if you’re involved in the gaming community. The desire to share our gameplay adventures has never been more widely spread. YouTube and Twitch serve as popular hubs for gamers to showcase their skills and build communities.
However, with various game recorders, finding the perfect fit for your next gameplay recording can be challenging. We’ve tested many options to ease your search and made a list to enhance your gaming experience.
In this article
- Part 1. Discussing the Advancements in Game Recording in the Digital Realm
- Part 2. Top Best Game Recorders To Consider for Efficient Recording
- Part 3. Make Screen Recording Simple and Easy: Wondershare Filmora
- Conclusion
Part 1: Discussing the Advancements in Game Recording in the Digital Realm
Game recording has evolved from basic methods to sophisticated tools. In the past, gamers used VHS recorders connected to consoles. Moreover, screen capture software like Fraps became popular in the early 2000s. Afterward, built-in recording features within PlayStation 4 and Xbox One simplified the process.
Platforms like Twitch emerged for live streaming in the late 2010s. Cloud gaming services have revolutionized recording by allowing gameplay on remote servers. Finally, modern game recorders emerged to provide instant replay and webcam integration.
Chronological Understanding of the Advancements in Game Recordings
- Users can now capture gameplay in stunning 4K resolution for top-notch visual quality.
- Frame rate settings ensure smooth playback of recorded videos.
- Bitrate settings let you control recording quality and file size.
- Players can use GPU power for faster and more efficient video encoding.
- Multi-channel audio recording lets you record gameplay audio, microphone input, and other sources. Also, it separates tracks for easy editing and control.
- An infusion of overlays in the webcam adds a personalized touch to gameplay videos, building competition in quality offering.
- Network switching within software is possible without any cross-platform shift, from recording to live streaming.
Example
PewDiePie is one of the leading stars in YouTube stardom. His game screen recording is proof of how online entertainment has changed. He earned his initial fame by playing horror games with funny commentary. People loved his infectious personality and unique style. Furthermore, he expanded his content to include games, vlogs, and entertaining stuff. Now, he has a fan base of 111M, positioning him as the most influential figure in online gaming.
Part 2: Top Best Game Recorders To Consider for Efficient Recording
Most of us play games for fun while wanting to share the gameplay with friends. The game screen recorder helps you share the screen with others to enjoy with them. Let’s go through the options of tools that can record gameplay screens efficiently:
Best Game Recorders for PC
1.Movavi
2.OBS
3.Bandicam
4.XSplit
5.Aqua Demo
6.GoPlay
7.Action! Game Recorder
8.Wondershare DemoCreator
1.Movavi
Movavi lets you do full-screen or custom area recording with various functionalities. Using this tool, you can annotate the screen while recording for real-time experience. For improving viewer’s attention, you can also illuminate mouse cursor and keystrokes within the recording screen. It also features a noise reduction feature to get rid of intrusive voices. Movavi can take scrolling screenshots to capture content that doesn’t fit on one screen.

Pros
- This game screen recording tool has a user-friendly interface and is easy to use without the need for training.
- The tool allows you to capture audio and video simultaneously and separately.
Con
- It offers limited features when it comes to video manipulation while recording games.
2.OBS Studio
Open Broadcaster Software is the best screen recorder for games when it comes to finding open-source recorders. This recorder enables you to record multiple scenes at a time. It offers seamless transitions to switch between the scenes. Users can use the audio mixer feature of the tool for noise suppression and gain. The tool also provides the configuration option to add new sources and replace existing ones.

Pros
- You can capture multiple windows simultaneously with the help of this tool, giving diversified opportunities.
- This screen recorder allows you to preview sources and scenes before live streaming.
Con
- OBS is challenging for beginners due to its steep learning curve.
3.Bandicam
Gamers can record high-resolution gameplay in 4K UHD and 480FPS with Bandicam. Upon utilizing this tool, they record gameplay and voice to share with friends on YouTube. This Lolio game recorder uses a webcam and mic to record gameplay with the player’s live face and voice. Plus, you can also save the audio track of the gameplay record in separate WAV files.

Pros
- This game recorder compresses high-quality video to save space.
- Bandicam supports the latest hardware acceleration from AMD, Intel, and NVIDIA.
Con
- It only works on Windows and does not support Mac, Android, or Linux.
4.XSplit
Content creators and game players can use this all-in-one streaming and recording tool. This video game recorder allows you to switch from a solo camera to a podcast easily. You can start streaming to any broadcast platform with the native plugin of the tool. XSplit Broadcaster enables you to add multiple animation and broadcast effects to your scenes.

Pros
- Users can record multiple scenes at the same time with this screen recorder. This helps you in covering more content in similar timeframes.
- You can do custom transitions of various scenes with the help of this tool.
Con
- Installing XSplit Broadcaster in your system slows down the running of the PC dramatically.
5.Aqua Demo
Aqua Demo is the best way to record gameplay on a PC to produce high-quality video. You can easily record gameplay as the interface of the tool is intuitive and easy to use. It supports various video formats, including AVI, MP4, and MOV, to save the recordings. Users can do editing while recording to make it engaging and interactive.

Image Name: best-game-recorder-for-pc-2024-5.jpg
Image Alt:
Pros
- This tool allows you to record video using the sound of a PC, microphone, or both.
- You can easily schedule when video recording should take place with this tool.
Con
- AceThinker Aqua Demo offers a limited trial version to its users for screen recording.
6.GoPlay
GoPlay is the best software to record gameplay as it allows you to record yourself while gaming. With the help of this software, users can do basic editing of the video before live streaming. Plus, it allows you to record fast-paced games up to 60fps for smooth results. The software offers the feature to remove unwanted noise in the video.

Pros
- This screen recorder offers you the option to dub your own voice within the video recording.
- It helps to adjust the audio of each track on the timeline.
Con
- Unlike other screen recorders, it has a small number of transitions and effects.
7.Action! – Game Recorder
Action! stands out as one of the best screen recorder for games, as it uses low CPU space. Gamers can record smooth HD video of gameplay up to 120fps. You can make 20 times smaller video recordings with the help of this tool. Also, users are able to apply different editing effects to the recorder clips. This tool even enables you to control video recording with a smartphone.

Image Name: best-game-recorder-for-pc-2024-7.jpg
Image Alt:
Pros
- Action supports the webcam and microphone commentary during recording.
- It displays current and average FPS while playing games and saves benchmark results.
Con
- People face usability issues like problems with frame rate drops while recording.
8.Wondershare DemoCreator
Users can use DemoCreator on Windows and Mac to record the screen of gameplay. No doubt, it is a cool game recording software available to users. It also offers lag-free recording for uninterrupted gameplay records. You can plan and automate recording sessions with the help of this software. This game recorder provides a dynamic cursor effect for a visual guide of your audience.

Pros
- Wondershare DemoCreator offers dual monitor recording for an expanded view.
- User can create their own virtual avatars for presenting the content through video.
Con
- The tool has limited functionality in the free version, so you have to buy its premium subscription.
10+ Screen Recorder without Watermark
https://www.youtube.com/watch?v=CVmVxhxfnlU
Part 3: Make Screen Recording Simple and Easy: Wondershare Filmora
Gaming has made a significant impact on people as the associated industry keep producing new games with the latest technology. Moreover, the popularity of streaming games online has also increased. In this case, gamers need an effective game recorder software. Wondershare Filmora is the most efficient solution to effective screen recording. This video game recorder tool can capture any area of your selection.
Filmora also has various built-in editing tools and recording effects. You can also customize the ratio and size of your recording screen by changing the height and width. This tool records the screen and captures the audio from your microphone at the same time. Gamers can schedule their recording with the Record Timer feature. Moreover, you can customize your keystrokes and make hotkey combinations.
Other Features of Wondershare Filmora
- Split Screen: The Split Screen feature has up to 250+ pre-made templates that help you create animated video collages. You can have up to 6 screens for gameplaying or live chat channels on your screen. There are thousands of effects and filters you add to each of the screens.

- AI Thumbnail Creator: Filmora provides a Thumbnail feature that can generate exclusive thumbnails for your videos. It supports advanced text and image editing tools with 58+ templates. You can get stunning thumbnails for your gameplay in seconds with the help of AI.

- AI Vocal Remover: If you are having trouble with unnecessary background noise, remove it with the AI vocal remover feature. Streamers can separate the vocals from their microphone and gameplay. Also, you can dub videos freely without losing audio quality.

Steps-by-Step Guide to Screen Record With Wondershare Filmora
Wondershare Filmora provides the best way to record gameplay on your PC, as it gives you the necessary features. So, let’s discuss the steps on how to record a professional gameplay recording. The following are the steps to record gameplay with Filmora:
Step 1 Launch and Create a New Project on Filmora
After downloading Filmora on your PC and launching the software, go to the “Create Project” tab on the left-side panel. Here, you can click the “New Project” option to open the main editing interface.

Step 2 Record Gameplay on Your PC
On the main interface, click the “Record” option above the media panel. From the drop-down panel, select the “Record PC Screen” option. After that, a small panel screen with the name “Wondershare Screen Recorder” will appear on your PC.

Step 3 Adjust Recording Settings for Gaming
Now, adjust the screen recording settings according to your preference. You can change the screen’s dimensions from full screen to target window. Also, choose to turn on the microphone, audio, and camera by clicking on their icons. Now, hit the dropdown menu of “Settings,” and change the frame rate and other video options. Once you are satisfied with the settings, hit the “Start Recording” button to start.

Conclusion
Gamers need to find the best tool to share their gaming moments in 2024. Filmora is a standout choice among the game recording software for PCs. The software is reliable and enriched with features that are easy to use. You can record, edit, and share your exciting gameplay adventures with the audience. If you’re on the lookout for the best game recorder for your PC, Filmora is a solid recommendation.
- Part 2. Top Best Game Recorders To Consider for Efficient Recording
- Part 3. Make Screen Recording Simple and Easy: Wondershare Filmora
- Conclusion
Part 1: Discussing the Advancements in Game Recording in the Digital Realm
Game recording has evolved from basic methods to sophisticated tools. In the past, gamers used VHS recorders connected to consoles. Moreover, screen capture software like Fraps became popular in the early 2000s. Afterward, built-in recording features within PlayStation 4 and Xbox One simplified the process.
Platforms like Twitch emerged for live streaming in the late 2010s. Cloud gaming services have revolutionized recording by allowing gameplay on remote servers. Finally, modern game recorders emerged to provide instant replay and webcam integration.
Chronological Understanding of the Advancements in Game Recordings
- Users can now capture gameplay in stunning 4K resolution for top-notch visual quality.
- Frame rate settings ensure smooth playback of recorded videos.
- Bitrate settings let you control recording quality and file size.
- Players can use GPU power for faster and more efficient video encoding.
- Multi-channel audio recording lets you record gameplay audio, microphone input, and other sources. Also, it separates tracks for easy editing and control.
- An infusion of overlays in the webcam adds a personalized touch to gameplay videos, building competition in quality offering.
- Network switching within software is possible without any cross-platform shift, from recording to live streaming.
Example
PewDiePie is one of the leading stars in YouTube stardom. His game screen recording is proof of how online entertainment has changed. He earned his initial fame by playing horror games with funny commentary. People loved his infectious personality and unique style. Furthermore, he expanded his content to include games, vlogs, and entertaining stuff. Now, he has a fan base of 111M, positioning him as the most influential figure in online gaming.
Part 2: Top Best Game Recorders To Consider for Efficient Recording
Most of us play games for fun while wanting to share the gameplay with friends. The game screen recorder helps you share the screen with others to enjoy with them. Let’s go through the options of tools that can record gameplay screens efficiently:
Best Game Recorders for PC
1.Movavi
2.OBS
3.Bandicam
4.XSplit
5.Aqua Demo
6.GoPlay
7.Action! Game Recorder
8.Wondershare DemoCreator
1.Movavi
Movavi lets you do full-screen or custom area recording with various functionalities. Using this tool, you can annotate the screen while recording for real-time experience. For improving viewer’s attention, you can also illuminate mouse cursor and keystrokes within the recording screen. It also features a noise reduction feature to get rid of intrusive voices. Movavi can take scrolling screenshots to capture content that doesn’t fit on one screen.

Pros
- This game screen recording tool has a user-friendly interface and is easy to use without the need for training.
- The tool allows you to capture audio and video simultaneously and separately.
Con
- It offers limited features when it comes to video manipulation while recording games.
2.OBS Studio
Open Broadcaster Software is the best screen recorder for games when it comes to finding open-source recorders. This recorder enables you to record multiple scenes at a time. It offers seamless transitions to switch between the scenes. Users can use the audio mixer feature of the tool for noise suppression and gain. The tool also provides the configuration option to add new sources and replace existing ones.

Pros
- You can capture multiple windows simultaneously with the help of this tool, giving diversified opportunities.
- This screen recorder allows you to preview sources and scenes before live streaming.
Con
- OBS is challenging for beginners due to its steep learning curve.
3.Bandicam
Gamers can record high-resolution gameplay in 4K UHD and 480FPS with Bandicam. Upon utilizing this tool, they record gameplay and voice to share with friends on YouTube. This Lolio game recorder uses a webcam and mic to record gameplay with the player’s live face and voice. Plus, you can also save the audio track of the gameplay record in separate WAV files.

Pros
- This game recorder compresses high-quality video to save space.
- Bandicam supports the latest hardware acceleration from AMD, Intel, and NVIDIA.
Con
- It only works on Windows and does not support Mac, Android, or Linux.
4.XSplit
Content creators and game players can use this all-in-one streaming and recording tool. This video game recorder allows you to switch from a solo camera to a podcast easily. You can start streaming to any broadcast platform with the native plugin of the tool. XSplit Broadcaster enables you to add multiple animation and broadcast effects to your scenes.

Pros
- Users can record multiple scenes at the same time with this screen recorder. This helps you in covering more content in similar timeframes.
- You can do custom transitions of various scenes with the help of this tool.
Con
- Installing XSplit Broadcaster in your system slows down the running of the PC dramatically.
5.Aqua Demo
Aqua Demo is the best way to record gameplay on a PC to produce high-quality video. You can easily record gameplay as the interface of the tool is intuitive and easy to use. It supports various video formats, including AVI, MP4, and MOV, to save the recordings. Users can do editing while recording to make it engaging and interactive.

Image Name: best-game-recorder-for-pc-2024-5.jpg
Image Alt:
Pros
- This tool allows you to record video using the sound of a PC, microphone, or both.
- You can easily schedule when video recording should take place with this tool.
Con
- AceThinker Aqua Demo offers a limited trial version to its users for screen recording.
6.GoPlay
GoPlay is the best software to record gameplay as it allows you to record yourself while gaming. With the help of this software, users can do basic editing of the video before live streaming. Plus, it allows you to record fast-paced games up to 60fps for smooth results. The software offers the feature to remove unwanted noise in the video.

Pros
- This screen recorder offers you the option to dub your own voice within the video recording.
- It helps to adjust the audio of each track on the timeline.
Con
- Unlike other screen recorders, it has a small number of transitions and effects.
7.Action! – Game Recorder
Action! stands out as one of the best screen recorder for games, as it uses low CPU space. Gamers can record smooth HD video of gameplay up to 120fps. You can make 20 times smaller video recordings with the help of this tool. Also, users are able to apply different editing effects to the recorder clips. This tool even enables you to control video recording with a smartphone.

Image Name: best-game-recorder-for-pc-2024-7.jpg
Image Alt:
Pros
- Action supports the webcam and microphone commentary during recording.
- It displays current and average FPS while playing games and saves benchmark results.
Con
- People face usability issues like problems with frame rate drops while recording.
8.Wondershare DemoCreator
Users can use DemoCreator on Windows and Mac to record the screen of gameplay. No doubt, it is a cool game recording software available to users. It also offers lag-free recording for uninterrupted gameplay records. You can plan and automate recording sessions with the help of this software. This game recorder provides a dynamic cursor effect for a visual guide of your audience.

Pros
- Wondershare DemoCreator offers dual monitor recording for an expanded view.
- User can create their own virtual avatars for presenting the content through video.
Con
- The tool has limited functionality in the free version, so you have to buy its premium subscription.
10+ Screen Recorder without Watermark
https://www.youtube.com/watch?v=CVmVxhxfnlU
Part 3: Make Screen Recording Simple and Easy: Wondershare Filmora
Gaming has made a significant impact on people as the associated industry keep producing new games with the latest technology. Moreover, the popularity of streaming games online has also increased. In this case, gamers need an effective game recorder software. Wondershare Filmora is the most efficient solution to effective screen recording. This video game recorder tool can capture any area of your selection.
Filmora also has various built-in editing tools and recording effects. You can also customize the ratio and size of your recording screen by changing the height and width. This tool records the screen and captures the audio from your microphone at the same time. Gamers can schedule their recording with the Record Timer feature. Moreover, you can customize your keystrokes and make hotkey combinations.
Other Features of Wondershare Filmora
- Split Screen: The Split Screen feature has up to 250+ pre-made templates that help you create animated video collages. You can have up to 6 screens for gameplaying or live chat channels on your screen. There are thousands of effects and filters you add to each of the screens.

- AI Thumbnail Creator: Filmora provides a Thumbnail feature that can generate exclusive thumbnails for your videos. It supports advanced text and image editing tools with 58+ templates. You can get stunning thumbnails for your gameplay in seconds with the help of AI.

- AI Vocal Remover: If you are having trouble with unnecessary background noise, remove it with the AI vocal remover feature. Streamers can separate the vocals from their microphone and gameplay. Also, you can dub videos freely without losing audio quality.

Steps-by-Step Guide to Screen Record With Wondershare Filmora
Wondershare Filmora provides the best way to record gameplay on your PC, as it gives you the necessary features. So, let’s discuss the steps on how to record a professional gameplay recording. The following are the steps to record gameplay with Filmora:
Step 1 Launch and Create a New Project on Filmora
After downloading Filmora on your PC and launching the software, go to the “Create Project” tab on the left-side panel. Here, you can click the “New Project” option to open the main editing interface.

Step 2 Record Gameplay on Your PC
On the main interface, click the “Record” option above the media panel. From the drop-down panel, select the “Record PC Screen” option. After that, a small panel screen with the name “Wondershare Screen Recorder” will appear on your PC.

Step 3 Adjust Recording Settings for Gaming
Now, adjust the screen recording settings according to your preference. You can change the screen’s dimensions from full screen to target window. Also, choose to turn on the microphone, audio, and camera by clicking on their icons. Now, hit the dropdown menu of “Settings,” and change the frame rate and other video options. Once you are satisfied with the settings, hit the “Start Recording” button to start.

Conclusion
Gamers need to find the best tool to share their gaming moments in 2024. Filmora is a standout choice among the game recording software for PCs. The software is reliable and enriched with features that are easy to use. You can record, edit, and share your exciting gameplay adventures with the audience. If you’re on the lookout for the best game recorder for your PC, Filmora is a solid recommendation.
- Part 2. Top Best Game Recorders To Consider for Efficient Recording
- Part 3. Make Screen Recording Simple and Easy: Wondershare Filmora
- Conclusion
Part 1: Discussing the Advancements in Game Recording in the Digital Realm
Game recording has evolved from basic methods to sophisticated tools. In the past, gamers used VHS recorders connected to consoles. Moreover, screen capture software like Fraps became popular in the early 2000s. Afterward, built-in recording features within PlayStation 4 and Xbox One simplified the process.
Platforms like Twitch emerged for live streaming in the late 2010s. Cloud gaming services have revolutionized recording by allowing gameplay on remote servers. Finally, modern game recorders emerged to provide instant replay and webcam integration.
Chronological Understanding of the Advancements in Game Recordings
- Users can now capture gameplay in stunning 4K resolution for top-notch visual quality.
- Frame rate settings ensure smooth playback of recorded videos.
- Bitrate settings let you control recording quality and file size.
- Players can use GPU power for faster and more efficient video encoding.
- Multi-channel audio recording lets you record gameplay audio, microphone input, and other sources. Also, it separates tracks for easy editing and control.
- An infusion of overlays in the webcam adds a personalized touch to gameplay videos, building competition in quality offering.
- Network switching within software is possible without any cross-platform shift, from recording to live streaming.
Example
PewDiePie is one of the leading stars in YouTube stardom. His game screen recording is proof of how online entertainment has changed. He earned his initial fame by playing horror games with funny commentary. People loved his infectious personality and unique style. Furthermore, he expanded his content to include games, vlogs, and entertaining stuff. Now, he has a fan base of 111M, positioning him as the most influential figure in online gaming.
Part 2: Top Best Game Recorders To Consider for Efficient Recording
Most of us play games for fun while wanting to share the gameplay with friends. The game screen recorder helps you share the screen with others to enjoy with them. Let’s go through the options of tools that can record gameplay screens efficiently:
Best Game Recorders for PC
1.Movavi
2.OBS
3.Bandicam
4.XSplit
5.Aqua Demo
6.GoPlay
7.Action! Game Recorder
8.Wondershare DemoCreator
1.Movavi
Movavi lets you do full-screen or custom area recording with various functionalities. Using this tool, you can annotate the screen while recording for real-time experience. For improving viewer’s attention, you can also illuminate mouse cursor and keystrokes within the recording screen. It also features a noise reduction feature to get rid of intrusive voices. Movavi can take scrolling screenshots to capture content that doesn’t fit on one screen.

Pros
- This game screen recording tool has a user-friendly interface and is easy to use without the need for training.
- The tool allows you to capture audio and video simultaneously and separately.
Con
- It offers limited features when it comes to video manipulation while recording games.
2.OBS Studio
Open Broadcaster Software is the best screen recorder for games when it comes to finding open-source recorders. This recorder enables you to record multiple scenes at a time. It offers seamless transitions to switch between the scenes. Users can use the audio mixer feature of the tool for noise suppression and gain. The tool also provides the configuration option to add new sources and replace existing ones.

Pros
- You can capture multiple windows simultaneously with the help of this tool, giving diversified opportunities.
- This screen recorder allows you to preview sources and scenes before live streaming.
Con
- OBS is challenging for beginners due to its steep learning curve.
3.Bandicam
Gamers can record high-resolution gameplay in 4K UHD and 480FPS with Bandicam. Upon utilizing this tool, they record gameplay and voice to share with friends on YouTube. This Lolio game recorder uses a webcam and mic to record gameplay with the player’s live face and voice. Plus, you can also save the audio track of the gameplay record in separate WAV files.

Pros
- This game recorder compresses high-quality video to save space.
- Bandicam supports the latest hardware acceleration from AMD, Intel, and NVIDIA.
Con
- It only works on Windows and does not support Mac, Android, or Linux.
4.XSplit
Content creators and game players can use this all-in-one streaming and recording tool. This video game recorder allows you to switch from a solo camera to a podcast easily. You can start streaming to any broadcast platform with the native plugin of the tool. XSplit Broadcaster enables you to add multiple animation and broadcast effects to your scenes.

Pros
- Users can record multiple scenes at the same time with this screen recorder. This helps you in covering more content in similar timeframes.
- You can do custom transitions of various scenes with the help of this tool.
Con
- Installing XSplit Broadcaster in your system slows down the running of the PC dramatically.
5.Aqua Demo
Aqua Demo is the best way to record gameplay on a PC to produce high-quality video. You can easily record gameplay as the interface of the tool is intuitive and easy to use. It supports various video formats, including AVI, MP4, and MOV, to save the recordings. Users can do editing while recording to make it engaging and interactive.

Image Name: best-game-recorder-for-pc-2024-5.jpg
Image Alt:
Pros
- This tool allows you to record video using the sound of a PC, microphone, or both.
- You can easily schedule when video recording should take place with this tool.
Con
- AceThinker Aqua Demo offers a limited trial version to its users for screen recording.
6.GoPlay
GoPlay is the best software to record gameplay as it allows you to record yourself while gaming. With the help of this software, users can do basic editing of the video before live streaming. Plus, it allows you to record fast-paced games up to 60fps for smooth results. The software offers the feature to remove unwanted noise in the video.

Pros
- This screen recorder offers you the option to dub your own voice within the video recording.
- It helps to adjust the audio of each track on the timeline.
Con
- Unlike other screen recorders, it has a small number of transitions and effects.
7.Action! – Game Recorder
Action! stands out as one of the best screen recorder for games, as it uses low CPU space. Gamers can record smooth HD video of gameplay up to 120fps. You can make 20 times smaller video recordings with the help of this tool. Also, users are able to apply different editing effects to the recorder clips. This tool even enables you to control video recording with a smartphone.

Image Name: best-game-recorder-for-pc-2024-7.jpg
Image Alt:
Pros
- Action supports the webcam and microphone commentary during recording.
- It displays current and average FPS while playing games and saves benchmark results.
Con
- People face usability issues like problems with frame rate drops while recording.
8.Wondershare DemoCreator
Users can use DemoCreator on Windows and Mac to record the screen of gameplay. No doubt, it is a cool game recording software available to users. It also offers lag-free recording for uninterrupted gameplay records. You can plan and automate recording sessions with the help of this software. This game recorder provides a dynamic cursor effect for a visual guide of your audience.

Pros
- Wondershare DemoCreator offers dual monitor recording for an expanded view.
- User can create their own virtual avatars for presenting the content through video.
Con
- The tool has limited functionality in the free version, so you have to buy its premium subscription.
10+ Screen Recorder without Watermark
https://www.youtube.com/watch?v=CVmVxhxfnlU
Part 3: Make Screen Recording Simple and Easy: Wondershare Filmora
Gaming has made a significant impact on people as the associated industry keep producing new games with the latest technology. Moreover, the popularity of streaming games online has also increased. In this case, gamers need an effective game recorder software. Wondershare Filmora is the most efficient solution to effective screen recording. This video game recorder tool can capture any area of your selection.
Filmora also has various built-in editing tools and recording effects. You can also customize the ratio and size of your recording screen by changing the height and width. This tool records the screen and captures the audio from your microphone at the same time. Gamers can schedule their recording with the Record Timer feature. Moreover, you can customize your keystrokes and make hotkey combinations.
Other Features of Wondershare Filmora
- Split Screen: The Split Screen feature has up to 250+ pre-made templates that help you create animated video collages. You can have up to 6 screens for gameplaying or live chat channels on your screen. There are thousands of effects and filters you add to each of the screens.

- AI Thumbnail Creator: Filmora provides a Thumbnail feature that can generate exclusive thumbnails for your videos. It supports advanced text and image editing tools with 58+ templates. You can get stunning thumbnails for your gameplay in seconds with the help of AI.

- AI Vocal Remover: If you are having trouble with unnecessary background noise, remove it with the AI vocal remover feature. Streamers can separate the vocals from their microphone and gameplay. Also, you can dub videos freely without losing audio quality.

Steps-by-Step Guide to Screen Record With Wondershare Filmora
Wondershare Filmora provides the best way to record gameplay on your PC, as it gives you the necessary features. So, let’s discuss the steps on how to record a professional gameplay recording. The following are the steps to record gameplay with Filmora:
Step 1 Launch and Create a New Project on Filmora
After downloading Filmora on your PC and launching the software, go to the “Create Project” tab on the left-side panel. Here, you can click the “New Project” option to open the main editing interface.

Step 2 Record Gameplay on Your PC
On the main interface, click the “Record” option above the media panel. From the drop-down panel, select the “Record PC Screen” option. After that, a small panel screen with the name “Wondershare Screen Recorder” will appear on your PC.

Step 3 Adjust Recording Settings for Gaming
Now, adjust the screen recording settings according to your preference. You can change the screen’s dimensions from full screen to target window. Also, choose to turn on the microphone, audio, and camera by clicking on their icons. Now, hit the dropdown menu of “Settings,” and change the frame rate and other video options. Once you are satisfied with the settings, hit the “Start Recording” button to start.

Conclusion
Gamers need to find the best tool to share their gaming moments in 2024. Filmora is a standout choice among the game recording software for PCs. The software is reliable and enriched with features that are easy to use. You can record, edit, and share your exciting gameplay adventures with the audience. If you’re on the lookout for the best game recorder for your PC, Filmora is a solid recommendation.
- Part 2. Top Best Game Recorders To Consider for Efficient Recording
- Part 3. Make Screen Recording Simple and Easy: Wondershare Filmora
- Conclusion
Part 1: Discussing the Advancements in Game Recording in the Digital Realm
Game recording has evolved from basic methods to sophisticated tools. In the past, gamers used VHS recorders connected to consoles. Moreover, screen capture software like Fraps became popular in the early 2000s. Afterward, built-in recording features within PlayStation 4 and Xbox One simplified the process.
Platforms like Twitch emerged for live streaming in the late 2010s. Cloud gaming services have revolutionized recording by allowing gameplay on remote servers. Finally, modern game recorders emerged to provide instant replay and webcam integration.
Chronological Understanding of the Advancements in Game Recordings
- Users can now capture gameplay in stunning 4K resolution for top-notch visual quality.
- Frame rate settings ensure smooth playback of recorded videos.
- Bitrate settings let you control recording quality and file size.
- Players can use GPU power for faster and more efficient video encoding.
- Multi-channel audio recording lets you record gameplay audio, microphone input, and other sources. Also, it separates tracks for easy editing and control.
- An infusion of overlays in the webcam adds a personalized touch to gameplay videos, building competition in quality offering.
- Network switching within software is possible without any cross-platform shift, from recording to live streaming.
Example
PewDiePie is one of the leading stars in YouTube stardom. His game screen recording is proof of how online entertainment has changed. He earned his initial fame by playing horror games with funny commentary. People loved his infectious personality and unique style. Furthermore, he expanded his content to include games, vlogs, and entertaining stuff. Now, he has a fan base of 111M, positioning him as the most influential figure in online gaming.
Part 2: Top Best Game Recorders To Consider for Efficient Recording
Most of us play games for fun while wanting to share the gameplay with friends. The game screen recorder helps you share the screen with others to enjoy with them. Let’s go through the options of tools that can record gameplay screens efficiently:
Best Game Recorders for PC
1.Movavi
2.OBS
3.Bandicam
4.XSplit
5.Aqua Demo
6.GoPlay
7.Action! Game Recorder
8.Wondershare DemoCreator
1.Movavi
Movavi lets you do full-screen or custom area recording with various functionalities. Using this tool, you can annotate the screen while recording for real-time experience. For improving viewer’s attention, you can also illuminate mouse cursor and keystrokes within the recording screen. It also features a noise reduction feature to get rid of intrusive voices. Movavi can take scrolling screenshots to capture content that doesn’t fit on one screen.

Pros
- This game screen recording tool has a user-friendly interface and is easy to use without the need for training.
- The tool allows you to capture audio and video simultaneously and separately.
Con
- It offers limited features when it comes to video manipulation while recording games.
2.OBS Studio
Open Broadcaster Software is the best screen recorder for games when it comes to finding open-source recorders. This recorder enables you to record multiple scenes at a time. It offers seamless transitions to switch between the scenes. Users can use the audio mixer feature of the tool for noise suppression and gain. The tool also provides the configuration option to add new sources and replace existing ones.

Pros
- You can capture multiple windows simultaneously with the help of this tool, giving diversified opportunities.
- This screen recorder allows you to preview sources and scenes before live streaming.
Con
- OBS is challenging for beginners due to its steep learning curve.
3.Bandicam
Gamers can record high-resolution gameplay in 4K UHD and 480FPS with Bandicam. Upon utilizing this tool, they record gameplay and voice to share with friends on YouTube. This Lolio game recorder uses a webcam and mic to record gameplay with the player’s live face and voice. Plus, you can also save the audio track of the gameplay record in separate WAV files.

Pros
- This game recorder compresses high-quality video to save space.
- Bandicam supports the latest hardware acceleration from AMD, Intel, and NVIDIA.
Con
- It only works on Windows and does not support Mac, Android, or Linux.
4.XSplit
Content creators and game players can use this all-in-one streaming and recording tool. This video game recorder allows you to switch from a solo camera to a podcast easily. You can start streaming to any broadcast platform with the native plugin of the tool. XSplit Broadcaster enables you to add multiple animation and broadcast effects to your scenes.

Pros
- Users can record multiple scenes at the same time with this screen recorder. This helps you in covering more content in similar timeframes.
- You can do custom transitions of various scenes with the help of this tool.
Con
- Installing XSplit Broadcaster in your system slows down the running of the PC dramatically.
5.Aqua Demo
Aqua Demo is the best way to record gameplay on a PC to produce high-quality video. You can easily record gameplay as the interface of the tool is intuitive and easy to use. It supports various video formats, including AVI, MP4, and MOV, to save the recordings. Users can do editing while recording to make it engaging and interactive.

Image Name: best-game-recorder-for-pc-2024-5.jpg
Image Alt:
Pros
- This tool allows you to record video using the sound of a PC, microphone, or both.
- You can easily schedule when video recording should take place with this tool.
Con
- AceThinker Aqua Demo offers a limited trial version to its users for screen recording.
6.GoPlay
GoPlay is the best software to record gameplay as it allows you to record yourself while gaming. With the help of this software, users can do basic editing of the video before live streaming. Plus, it allows you to record fast-paced games up to 60fps for smooth results. The software offers the feature to remove unwanted noise in the video.

Pros
- This screen recorder offers you the option to dub your own voice within the video recording.
- It helps to adjust the audio of each track on the timeline.
Con
- Unlike other screen recorders, it has a small number of transitions and effects.
7.Action! – Game Recorder
Action! stands out as one of the best screen recorder for games, as it uses low CPU space. Gamers can record smooth HD video of gameplay up to 120fps. You can make 20 times smaller video recordings with the help of this tool. Also, users are able to apply different editing effects to the recorder clips. This tool even enables you to control video recording with a smartphone.

Image Name: best-game-recorder-for-pc-2024-7.jpg
Image Alt:
Pros
- Action supports the webcam and microphone commentary during recording.
- It displays current and average FPS while playing games and saves benchmark results.
Con
- People face usability issues like problems with frame rate drops while recording.
8.Wondershare DemoCreator
Users can use DemoCreator on Windows and Mac to record the screen of gameplay. No doubt, it is a cool game recording software available to users. It also offers lag-free recording for uninterrupted gameplay records. You can plan and automate recording sessions with the help of this software. This game recorder provides a dynamic cursor effect for a visual guide of your audience.

Pros
- Wondershare DemoCreator offers dual monitor recording for an expanded view.
- User can create their own virtual avatars for presenting the content through video.
Con
- The tool has limited functionality in the free version, so you have to buy its premium subscription.
10+ Screen Recorder without Watermark
https://www.youtube.com/watch?v=CVmVxhxfnlU
Part 3: Make Screen Recording Simple and Easy: Wondershare Filmora
Gaming has made a significant impact on people as the associated industry keep producing new games with the latest technology. Moreover, the popularity of streaming games online has also increased. In this case, gamers need an effective game recorder software. Wondershare Filmora is the most efficient solution to effective screen recording. This video game recorder tool can capture any area of your selection.
Filmora also has various built-in editing tools and recording effects. You can also customize the ratio and size of your recording screen by changing the height and width. This tool records the screen and captures the audio from your microphone at the same time. Gamers can schedule their recording with the Record Timer feature. Moreover, you can customize your keystrokes and make hotkey combinations.
Other Features of Wondershare Filmora
- Split Screen: The Split Screen feature has up to 250+ pre-made templates that help you create animated video collages. You can have up to 6 screens for gameplaying or live chat channels on your screen. There are thousands of effects and filters you add to each of the screens.

- AI Thumbnail Creator: Filmora provides a Thumbnail feature that can generate exclusive thumbnails for your videos. It supports advanced text and image editing tools with 58+ templates. You can get stunning thumbnails for your gameplay in seconds with the help of AI.

- AI Vocal Remover: If you are having trouble with unnecessary background noise, remove it with the AI vocal remover feature. Streamers can separate the vocals from their microphone and gameplay. Also, you can dub videos freely without losing audio quality.

Steps-by-Step Guide to Screen Record With Wondershare Filmora
Wondershare Filmora provides the best way to record gameplay on your PC, as it gives you the necessary features. So, let’s discuss the steps on how to record a professional gameplay recording. The following are the steps to record gameplay with Filmora:
Step 1 Launch and Create a New Project on Filmora
After downloading Filmora on your PC and launching the software, go to the “Create Project” tab on the left-side panel. Here, you can click the “New Project” option to open the main editing interface.

Step 2 Record Gameplay on Your PC
On the main interface, click the “Record” option above the media panel. From the drop-down panel, select the “Record PC Screen” option. After that, a small panel screen with the name “Wondershare Screen Recorder” will appear on your PC.

Step 3 Adjust Recording Settings for Gaming
Now, adjust the screen recording settings according to your preference. You can change the screen’s dimensions from full screen to target window. Also, choose to turn on the microphone, audio, and camera by clicking on their icons. Now, hit the dropdown menu of “Settings,” and change the frame rate and other video options. Once you are satisfied with the settings, hit the “Start Recording” button to start.

Conclusion
Gamers need to find the best tool to share their gaming moments in 2024. Filmora is a standout choice among the game recording software for PCs. The software is reliable and enriched with features that are easy to use. You can record, edit, and share your exciting gameplay adventures with the audience. If you’re on the lookout for the best game recorder for your PC, Filmora is a solid recommendation.
How to Use LUTs in Lumafusion & Free LUTs Resource
LumaFusion is one of the most complex iPad and iPhone video editing apps. Many of its customers adore it, and it has some incredible capabilities that you’d find incompetent editing software. They’ve effectively opened up the realm of LUTs to iPhone and iPad users.
LumaFusion LUTs are individual files that act as containers in LumaFusion. This container file includes standard LUT data as well as LumaFusion-specific color preset data. A LumaFusion LUT Preset file is similar to a Super LUT. LumaFusion can only employ one standard LUT at a time; however, LumaFusion LUT presets enable simultaneous Color Grading and Color Corrections.
How will LUTs help with color correction in Lumafusion
Colors in today’s cameras are vibrant, but they may continuously be improved. Color correction corrects the color that’s already there, whether it’s boosting the exposure to brighten a darker photo or increasing the saturation to make the colors pop. Color correction in other NLEs can be difficult, but not in LumaFusion.
The Color Presets tab in the Color & Effects section is where you begin color correcting footage. There are various presets from which to pick. I wouldn’t use these settings on my videos because they’re too stylized, but they’re there. You may alter any of the presets to your taste, so some of the more dramatic ones can be toned down. By picking the original setting, purists can color-fix their raw footage without using LumaFusion. Moving the sliders till the color seems perfect is all that’s required from there.
Exposure, contrast, highlights, shadows, mid-tones, and saturation and hue are all controlled by sliders. The color sliders can be used for a more forceful approach. But proceed with caution. The sliders are delicate, and it’s easy to overdo them. Play around with the sliders until you get the look you want. If you don’t like it, toss it in the trashcan and start over.
Color grading and color correction are not interchangeable terms. Color correction is a technical requirement, but color grading is primarily creative. You’ll have no command over the color grading process if you’re working with film material where primary colors aren’t even visible. Before diving into the creative LUTs, make sure you complete adequate color correcting.
Color grading, unlike color correction, adjusts the shot’s color to modify the atmosphere or feel. The only way to do that in LumaFusion is to play around with the color sliders under the Color Presets tab, but that’s not ideal. As previously stated, the three sliders are sensitive and limited. LumaFusion isn’t designed for color grading, which is OK. Thankfully, LumaFusion allows you to use LUTs.
Always color correct your footage before utilizing any LUTS, which entails changing the White-balance, Highlights, Contrast, and Shadows. Do not apply the LUTS to your footage directly.
How to use LUTs in Lumafusion?
Videographers, colorists, and editors use LUTs because they are efficient. Rather than starting from zero every time you work on a video editing project, you may speed up the color grading process using a LUT with predefined color profiles. It’s elementary to import LUTs. Simply import the preset files into LumaFusion and add the preset to your footage like an Instagram filter.
The Import button in the Color & Effects editor is the easiest way to load LUTs.
- Double click on any video/photo clip on the timeline to access the Clip Editors.
- At the bottom of the Clip Editor UI, select the Color & Effects tab.
- The import button is located directly below the effect preset library.
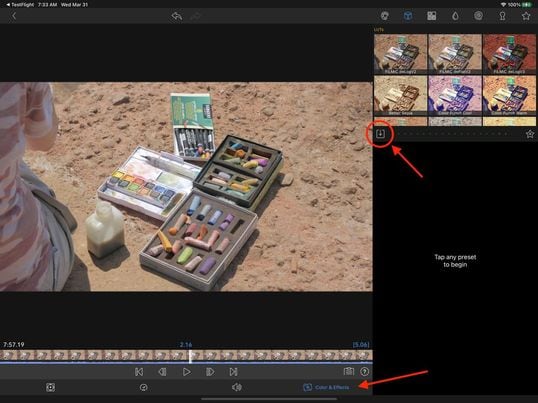
How to use LUTs in Lumafuison
LUTs must be loaded via the LumaFX clip editor at the moment. Follow the steps below to accomplish this:
- To access the LumaFX UI, double-tap any video/photo clip in the timeline.
- At the bottom of the LumaFX UI, select the ‘Color & Effects’ tool.
- In the upper right panel, press the cube icon.
- The import button is located directly below the effect preset library.
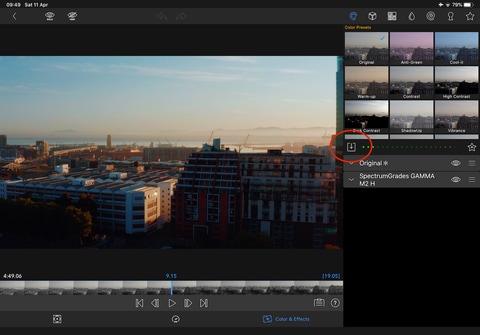
Load LumaFX LUTs
- Once hit, it will display your transfer site options; select your desired transfer site and navigate to the folder where your LUTs are stored.
- Select and import all of the LUTs in the folder.
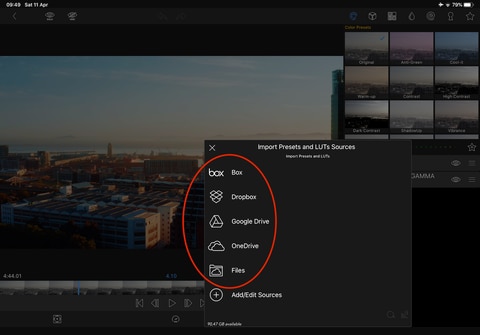
Import LUTs
Free LUTs Resource for Lumafusion
Choosing the appropriate LUT pack will boost your photography and videography immediately. With our quick guide to the top free LUTs available, you can find the appropriate one for you.
1. Jaun Melara free LUTs
LUTs aren’t simply for stylizing video. They’re frequently employed as a color correction tool to ensure that your colors are shown correctly in various formats. Juan Melara has provided a free LUT set to assist you in color correcting your footage for printing on film stock. These free LUTs will provide modest stylization to your footage if you don’t want to send it to print.
Melara developed this video to demonstrate his free LUTs in action. The colors are more subdued than in the other LUTs on this list. This free LUT pack is ideal if you’re looking to produce a modern-style cinematic color grade. Melara also has a great article about using LUTs to create a lovely color grade. DaVinci PowerGrades are available for several of these LUTs. They color correct your film in the same way as LUTs do, but you’ll have more flexibility over individual PowerGrade components.

Jaun Melara free LUTs
2. Small Hd free LUTs
SmallHD, a company that makes small, full HD on-camera monitors, is giving away a free set of color grades that reproduce the appearance of seven classic movies. The company is also releasing a series of video lessons that show how to get the most out of these effects throughout production and post-production. Everything is completely free. The color grades are provided as a.zip file and are in the form of 3D LUT files created in DaVinci Resolve. If you’re unfamiliar with SmallHD, the company offers free LUTs for on-set monitoring in real-time. This free set of Movie Look LUTs is inspired by seven recent films, including Apocalypse Now’s warmth and The Matrix’s green overtones. Take use of SmallHD’s free LUT set if you want to give your footage a dramatic and cinematic vibe.

Small Hd free LUTs
3. Color Grading Central free LUTs
Color Grading Central is essential knowledge for any aspiring colorist or video editor who takes color seriously. CGC is a company that specializes in color grading. Their website has a wide range of outstanding color-related products, from grain to LUTs. They also provide their email members with a wealth of free color grading information. Free trials of some LUTs are also available, so you may try them out before you buy. They’re giving away an array of color presets, grains, and burns exclusively to their email list and the seven free color LUTs. We strongly recommend them if you want to give your footage a shot-on-film look.

Color Grading Central free LUTs
4. PremiumBeat Free LUTs
PremiumBeat has freely given countless LUT packs as well as other assets to any video editor or filmmaker over the years. Todd Blankenship has designed a fresh new set of FREE LUTs for Shutterstock, which is their latest addition. Todd chose distinct looks from films and pictures that inspire his daily work to create this bundle with attention and love. There are many options, and these looks will offer you a great place to start when it comes to grading your footage. They recently published an in-depth evaluation of Photon.io, a new color grading tool. Todd Blankenship, who ended up utilizing the tool to create these LUTs, wrote the initial review. The pack has been fine-tuned to replicate some clean, cinematic looks that you may use as a jumping-off point for your video.

PremiumBeat Free LUTs
5. Frank Glencairn free LUT
Despite having access to the most advanced filming gear, there’s something about a vintage film aesthetic that looks fantastic. Frank Glencairn has made a nice K-Tone LUT that is meant to look like vintage Kodachrome film. This film grade, which was formerly popular among photographers and filmmakers, has fallen out of favor due to the rise of digital cameras. With this free LUT, you can get the appearance of retro-looking reds, blues, and yellows.

Frank Glencairn free LUT
6. Reverse Tree Media free LUTs
Reverse Tree Media is releasing a new LUTS bundle that is absolutely free. In addition to LUTS, this LUTS collection includes utility LUTS, film grains, and a Black-Bar layer. For the color-grading procedure, this is critical. This bundle contains 56 free LUTS for various scenarios like weddings, television commercials, travel films, landscapes, Rec.709, and so on. It also has several useful LUTS and film grain overlays for 8mm, 16mm, and 35mm video, as well as a cinematic black bar PNG file with a ratio of 2.35:1 to assist you in achieving a more cinematic appearance quickly and save time. Check out the link to learn more about LUTS and to obtain their previous cinematic LUTS bundle, which is also free.

Reverse Tree
Wondershare Filmora11 Express Better
Achieve More
Grow Together
Free Download Free Download Learn More

Closing Thoughts:
LUTs are most typically used to build and store color profiles that can be utilized in other film projects. By using contrast and design, you can bring logs and flat materials to life. Everything you need to know is right here. You can now rush to your desk and fix your video.
Free Download Free Download Learn More

Closing Thoughts:
LUTs are most typically used to build and store color profiles that can be utilized in other film projects. By using contrast and design, you can bring logs and flat materials to life. Everything you need to know is right here. You can now rush to your desk and fix your video.
| How to Share YouTube Video on Zoom?
Abundant Video Effects - Wondershare Filmora
Provide abundant video effects - A creative video editor
Powerful color correction and grading
Detailed tutorials are provided by the official channel
While the internet has made all of our lives significantly easier, there are still things that can prove difficult for people who are not very tech-savvy. Not everything on the web comes with a built-in tutorial, but luckily, you can find guides across the internet.
YouTube is a free online video streaming platform that is ranked as the world’s second most viewed website, just after Google. Zoom Cloud Meetings is software designed to help users set up video and audio calls for various purposes. Are you looking to combine the two platforms?
Keep reading to learn how to share a YouTube video on Zoom easily, along with a detailed step-by-step guide with a near-to-zero learning curve.
In this article
Part 1: Potential Reasons to Share YouTube Videos in Zoom
Part 2: How to Share YouTube Videos in Zoom
Part 1: Potential Reasons to Share YouTube Videos in Zoom
Everyone’s favorite app, YouTube, provides a lot of useful services for its users. The online streaming platform contains millions of videos on almost every topic from around the world, ranging from educational content to recipes and music videos.
The Zoom streaming service has also gained tremendous popularity in recent years, particularly owing to the raging pandemic that swept the world off its feet. It is quite a convenient software program that lets you organize online meetings with up to a hundred members or more in the premium version.
Certain moments may arise when you want to share a YouTube video on Zoom. Luckily, the Zoom platform offers various methods by which users can do that easily. But why would you want to share a video from YouTube on Zoom in the first place? Let’s shine some light on that.
Let’s assume you are taking an online class via Zoom. You find a YouTube video that you believe can help explain the topic to your students. During the lecture on Zoom, just like viewing a video on a projector or a screen, you can share your chosen YouTube video with the rest of the class easily.
Now let’s say you are organizing a business meeting via Zoom. You have a YouTube video showing a compilation of different forms of marketing strategies that you wish to share with your team. With just a few simple clicks, you can easily share the YouTube video with everyone present in the meeting.
You and your friends are having a group video chat on Zoom. While laughing at something your friend said, you suddenly remember seeing a reaction video meme on YouTube that would exactly fit the situation. You quickly search it up and share it with your friends, who then applaud you for your choice.
These are just some of the scenarios where you might have to share YouTube videos on Zoom. A whole set of different reasons may arise, which can cause you to share a YouTube video with your Zoom attendees. If such an instance arises, you need to learn how to do that quickly and efficiently.
Part 2: How to Share YouTube Videos in Zoom
While each of us might have different reasons for sharing YouTube videos on Zoom, the process to do so is identical on all versions of the Zoom application. Looking for a guide on how to share YouTube videos on Zoom easily?
Below, you can find two different methods using which you can seamlessly share a YouTube video of your choice on Zoom. The methods are accompanied by a step-by-step guide and relevant images, so you don’t get lost along the way.
Method 1: Sharing Video through Screen Share
The easiest and most effective method to share a YouTube video on Zoom is using Zoom’s screen sharing option. It is designed in such a way that users can share whatever is being shown on their screens with their audiences, such as PowerPoint presentations, documents, YouTube videos, and more.
The following steps indicate how you can share your video via the screen share option in the Zoom app:
Step 1: Open Your YouTube Video
To begin with, launch the browser on your computer and go to YouTube’s website. You can now search for the video you want to share with your Zoom attendees. If you have your video saved, simply access your playlists to open the video. Click on the video and ensure that the volume is turned up, but don’t hit Play yet.
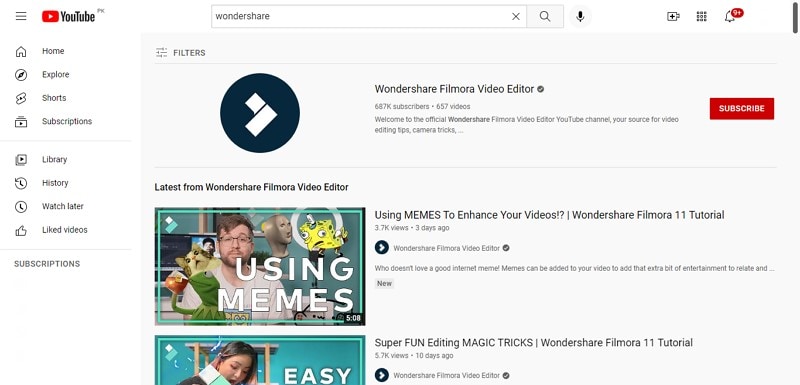
Step 2: Share Screen on Zoom
Back in your Zoom meeting’s main screen, check the bottom line for options. A green “Share Screens” option will be available in the middle. When you click on it, Zoom will open a window showing all the tabs open on your device. Click the screen with the YouTube video and check the little box next to “Share Sound” at the bottom left corner of the window. Now hit “Share.”

Step 3: Play Video
You can now go back to your browser window, open your video in the full-screen mode, and hit the “Play” button to share the YouTube video with everyone. You can press the “Stop Share” button to stop sharing your screen in the meeting.

Method 2: Using Links to Share YouTube Video
If you don’t want to play the YouTube video live in the meeting, you can still share its link so people can access it privately. Zoom offers a chat box that can help you do that. Follow the steps given below to learn how to share a YouTube video’s link on Zoom meetings.
Step 1: Copy Video Link
Open YouTube on your device and navigate to the video you wish to share in Zoom. Tap the “Share” button below the video’s title and hit “Copy” to save the link on your clipboard.
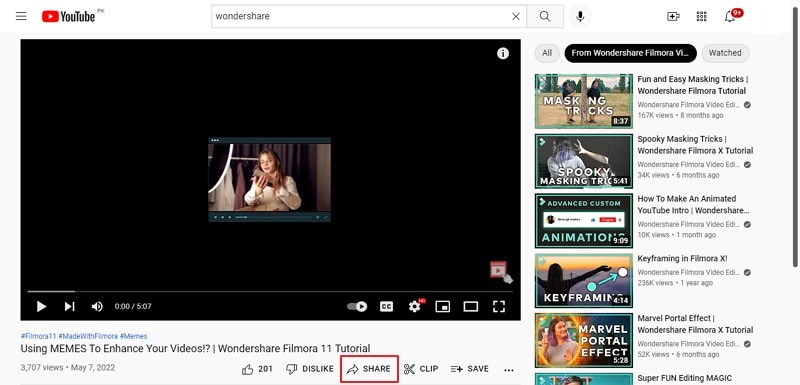
Step 2: Open Chat Box
Now go to your Zoom meeting’s interface and click on the “Chat” button at the bottom. If you are using the phone app, you might have to tap the “More” option at the bottom and find “Chat” from there.
Step 3: Share Video Link on Zoom
Now simply paste the copied video link into the chat box and hit “Enter” to share it with everyone in the meeting.
Conclusion
The wonders of technology never cease to amaze. Some of the world’s top websites and software programs offer integration and support for one another. YouTube and Zoom are the prime examples of such apps which you can use collectively, leaving behind any potential hassle.
You can now share YouTube videos on Zoom without any trouble by following the simple guide mentioned above. There are multiple options to share a YouTube video via Zoom, which include screen sharing and external links. Once done, you can show the shared video to all the participants present in a Zoom meeting.
While the internet has made all of our lives significantly easier, there are still things that can prove difficult for people who are not very tech-savvy. Not everything on the web comes with a built-in tutorial, but luckily, you can find guides across the internet.
YouTube is a free online video streaming platform that is ranked as the world’s second most viewed website, just after Google. Zoom Cloud Meetings is software designed to help users set up video and audio calls for various purposes. Are you looking to combine the two platforms?
Keep reading to learn how to share a YouTube video on Zoom easily, along with a detailed step-by-step guide with a near-to-zero learning curve.
In this article
Part 1: Potential Reasons to Share YouTube Videos in Zoom
Part 2: How to Share YouTube Videos in Zoom
Part 1: Potential Reasons to Share YouTube Videos in Zoom
Everyone’s favorite app, YouTube, provides a lot of useful services for its users. The online streaming platform contains millions of videos on almost every topic from around the world, ranging from educational content to recipes and music videos.
The Zoom streaming service has also gained tremendous popularity in recent years, particularly owing to the raging pandemic that swept the world off its feet. It is quite a convenient software program that lets you organize online meetings with up to a hundred members or more in the premium version.
Certain moments may arise when you want to share a YouTube video on Zoom. Luckily, the Zoom platform offers various methods by which users can do that easily. But why would you want to share a video from YouTube on Zoom in the first place? Let’s shine some light on that.
Let’s assume you are taking an online class via Zoom. You find a YouTube video that you believe can help explain the topic to your students. During the lecture on Zoom, just like viewing a video on a projector or a screen, you can share your chosen YouTube video with the rest of the class easily.
Now let’s say you are organizing a business meeting via Zoom. You have a YouTube video showing a compilation of different forms of marketing strategies that you wish to share with your team. With just a few simple clicks, you can easily share the YouTube video with everyone present in the meeting.
You and your friends are having a group video chat on Zoom. While laughing at something your friend said, you suddenly remember seeing a reaction video meme on YouTube that would exactly fit the situation. You quickly search it up and share it with your friends, who then applaud you for your choice.
These are just some of the scenarios where you might have to share YouTube videos on Zoom. A whole set of different reasons may arise, which can cause you to share a YouTube video with your Zoom attendees. If such an instance arises, you need to learn how to do that quickly and efficiently.
Part 2: How to Share YouTube Videos in Zoom
While each of us might have different reasons for sharing YouTube videos on Zoom, the process to do so is identical on all versions of the Zoom application. Looking for a guide on how to share YouTube videos on Zoom easily?
Below, you can find two different methods using which you can seamlessly share a YouTube video of your choice on Zoom. The methods are accompanied by a step-by-step guide and relevant images, so you don’t get lost along the way.
Method 1: Sharing Video through Screen Share
The easiest and most effective method to share a YouTube video on Zoom is using Zoom’s screen sharing option. It is designed in such a way that users can share whatever is being shown on their screens with their audiences, such as PowerPoint presentations, documents, YouTube videos, and more.
The following steps indicate how you can share your video via the screen share option in the Zoom app:
Step 1: Open Your YouTube Video
To begin with, launch the browser on your computer and go to YouTube’s website. You can now search for the video you want to share with your Zoom attendees. If you have your video saved, simply access your playlists to open the video. Click on the video and ensure that the volume is turned up, but don’t hit Play yet.

Step 2: Share Screen on Zoom
Back in your Zoom meeting’s main screen, check the bottom line for options. A green “Share Screens” option will be available in the middle. When you click on it, Zoom will open a window showing all the tabs open on your device. Click the screen with the YouTube video and check the little box next to “Share Sound” at the bottom left corner of the window. Now hit “Share.”

Step 3: Play Video
You can now go back to your browser window, open your video in the full-screen mode, and hit the “Play” button to share the YouTube video with everyone. You can press the “Stop Share” button to stop sharing your screen in the meeting.

Method 2: Using Links to Share YouTube Video
If you don’t want to play the YouTube video live in the meeting, you can still share its link so people can access it privately. Zoom offers a chat box that can help you do that. Follow the steps given below to learn how to share a YouTube video’s link on Zoom meetings.
Step 1: Copy Video Link
Open YouTube on your device and navigate to the video you wish to share in Zoom. Tap the “Share” button below the video’s title and hit “Copy” to save the link on your clipboard.

Step 2: Open Chat Box
Now go to your Zoom meeting’s interface and click on the “Chat” button at the bottom. If you are using the phone app, you might have to tap the “More” option at the bottom and find “Chat” from there.
Step 3: Share Video Link on Zoom
Now simply paste the copied video link into the chat box and hit “Enter” to share it with everyone in the meeting.

Conclusion
The wonders of technology never cease to amaze. Some of the world’s top websites and software programs offer integration and support for one another. YouTube and Zoom are the prime examples of such apps which you can use collectively, leaving behind any potential hassle.
You can now share YouTube videos on Zoom without any trouble by following the simple guide mentioned above. There are multiple options to share a YouTube video via Zoom, which include screen sharing and external links. Once done, you can show the shared video to all the participants present in a Zoom meeting.
While the internet has made all of our lives significantly easier, there are still things that can prove difficult for people who are not very tech-savvy. Not everything on the web comes with a built-in tutorial, but luckily, you can find guides across the internet.
YouTube is a free online video streaming platform that is ranked as the world’s second most viewed website, just after Google. Zoom Cloud Meetings is software designed to help users set up video and audio calls for various purposes. Are you looking to combine the two platforms?
Keep reading to learn how to share a YouTube video on Zoom easily, along with a detailed step-by-step guide with a near-to-zero learning curve.
In this article
Part 1: Potential Reasons to Share YouTube Videos in Zoom
Part 2: How to Share YouTube Videos in Zoom
Part 1: Potential Reasons to Share YouTube Videos in Zoom
Everyone’s favorite app, YouTube, provides a lot of useful services for its users. The online streaming platform contains millions of videos on almost every topic from around the world, ranging from educational content to recipes and music videos.
The Zoom streaming service has also gained tremendous popularity in recent years, particularly owing to the raging pandemic that swept the world off its feet. It is quite a convenient software program that lets you organize online meetings with up to a hundred members or more in the premium version.
Certain moments may arise when you want to share a YouTube video on Zoom. Luckily, the Zoom platform offers various methods by which users can do that easily. But why would you want to share a video from YouTube on Zoom in the first place? Let’s shine some light on that.
Let’s assume you are taking an online class via Zoom. You find a YouTube video that you believe can help explain the topic to your students. During the lecture on Zoom, just like viewing a video on a projector or a screen, you can share your chosen YouTube video with the rest of the class easily.
Now let’s say you are organizing a business meeting via Zoom. You have a YouTube video showing a compilation of different forms of marketing strategies that you wish to share with your team. With just a few simple clicks, you can easily share the YouTube video with everyone present in the meeting.
You and your friends are having a group video chat on Zoom. While laughing at something your friend said, you suddenly remember seeing a reaction video meme on YouTube that would exactly fit the situation. You quickly search it up and share it with your friends, who then applaud you for your choice.
These are just some of the scenarios where you might have to share YouTube videos on Zoom. A whole set of different reasons may arise, which can cause you to share a YouTube video with your Zoom attendees. If such an instance arises, you need to learn how to do that quickly and efficiently.
Part 2: How to Share YouTube Videos in Zoom
While each of us might have different reasons for sharing YouTube videos on Zoom, the process to do so is identical on all versions of the Zoom application. Looking for a guide on how to share YouTube videos on Zoom easily?
Below, you can find two different methods using which you can seamlessly share a YouTube video of your choice on Zoom. The methods are accompanied by a step-by-step guide and relevant images, so you don’t get lost along the way.
Method 1: Sharing Video through Screen Share
The easiest and most effective method to share a YouTube video on Zoom is using Zoom’s screen sharing option. It is designed in such a way that users can share whatever is being shown on their screens with their audiences, such as PowerPoint presentations, documents, YouTube videos, and more.
The following steps indicate how you can share your video via the screen share option in the Zoom app:
Step 1: Open Your YouTube Video
To begin with, launch the browser on your computer and go to YouTube’s website. You can now search for the video you want to share with your Zoom attendees. If you have your video saved, simply access your playlists to open the video. Click on the video and ensure that the volume is turned up, but don’t hit Play yet.

Step 2: Share Screen on Zoom
Back in your Zoom meeting’s main screen, check the bottom line for options. A green “Share Screens” option will be available in the middle. When you click on it, Zoom will open a window showing all the tabs open on your device. Click the screen with the YouTube video and check the little box next to “Share Sound” at the bottom left corner of the window. Now hit “Share.”

Step 3: Play Video
You can now go back to your browser window, open your video in the full-screen mode, and hit the “Play” button to share the YouTube video with everyone. You can press the “Stop Share” button to stop sharing your screen in the meeting.

Method 2: Using Links to Share YouTube Video
If you don’t want to play the YouTube video live in the meeting, you can still share its link so people can access it privately. Zoom offers a chat box that can help you do that. Follow the steps given below to learn how to share a YouTube video’s link on Zoom meetings.
Step 1: Copy Video Link
Open YouTube on your device and navigate to the video you wish to share in Zoom. Tap the “Share” button below the video’s title and hit “Copy” to save the link on your clipboard.

Step 2: Open Chat Box
Now go to your Zoom meeting’s interface and click on the “Chat” button at the bottom. If you are using the phone app, you might have to tap the “More” option at the bottom and find “Chat” from there.
Step 3: Share Video Link on Zoom
Now simply paste the copied video link into the chat box and hit “Enter” to share it with everyone in the meeting.

Conclusion
The wonders of technology never cease to amaze. Some of the world’s top websites and software programs offer integration and support for one another. YouTube and Zoom are the prime examples of such apps which you can use collectively, leaving behind any potential hassle.
You can now share YouTube videos on Zoom without any trouble by following the simple guide mentioned above. There are multiple options to share a YouTube video via Zoom, which include screen sharing and external links. Once done, you can show the shared video to all the participants present in a Zoom meeting.
While the internet has made all of our lives significantly easier, there are still things that can prove difficult for people who are not very tech-savvy. Not everything on the web comes with a built-in tutorial, but luckily, you can find guides across the internet.
YouTube is a free online video streaming platform that is ranked as the world’s second most viewed website, just after Google. Zoom Cloud Meetings is software designed to help users set up video and audio calls for various purposes. Are you looking to combine the two platforms?
Keep reading to learn how to share a YouTube video on Zoom easily, along with a detailed step-by-step guide with a near-to-zero learning curve.
In this article
Part 1: Potential Reasons to Share YouTube Videos in Zoom
Part 2: How to Share YouTube Videos in Zoom
Part 1: Potential Reasons to Share YouTube Videos in Zoom
Everyone’s favorite app, YouTube, provides a lot of useful services for its users. The online streaming platform contains millions of videos on almost every topic from around the world, ranging from educational content to recipes and music videos.
The Zoom streaming service has also gained tremendous popularity in recent years, particularly owing to the raging pandemic that swept the world off its feet. It is quite a convenient software program that lets you organize online meetings with up to a hundred members or more in the premium version.
Certain moments may arise when you want to share a YouTube video on Zoom. Luckily, the Zoom platform offers various methods by which users can do that easily. But why would you want to share a video from YouTube on Zoom in the first place? Let’s shine some light on that.
Let’s assume you are taking an online class via Zoom. You find a YouTube video that you believe can help explain the topic to your students. During the lecture on Zoom, just like viewing a video on a projector or a screen, you can share your chosen YouTube video with the rest of the class easily.
Now let’s say you are organizing a business meeting via Zoom. You have a YouTube video showing a compilation of different forms of marketing strategies that you wish to share with your team. With just a few simple clicks, you can easily share the YouTube video with everyone present in the meeting.
You and your friends are having a group video chat on Zoom. While laughing at something your friend said, you suddenly remember seeing a reaction video meme on YouTube that would exactly fit the situation. You quickly search it up and share it with your friends, who then applaud you for your choice.
These are just some of the scenarios where you might have to share YouTube videos on Zoom. A whole set of different reasons may arise, which can cause you to share a YouTube video with your Zoom attendees. If such an instance arises, you need to learn how to do that quickly and efficiently.
Part 2: How to Share YouTube Videos in Zoom
While each of us might have different reasons for sharing YouTube videos on Zoom, the process to do so is identical on all versions of the Zoom application. Looking for a guide on how to share YouTube videos on Zoom easily?
Below, you can find two different methods using which you can seamlessly share a YouTube video of your choice on Zoom. The methods are accompanied by a step-by-step guide and relevant images, so you don’t get lost along the way.
Method 1: Sharing Video through Screen Share
The easiest and most effective method to share a YouTube video on Zoom is using Zoom’s screen sharing option. It is designed in such a way that users can share whatever is being shown on their screens with their audiences, such as PowerPoint presentations, documents, YouTube videos, and more.
The following steps indicate how you can share your video via the screen share option in the Zoom app:
Step 1: Open Your YouTube Video
To begin with, launch the browser on your computer and go to YouTube’s website. You can now search for the video you want to share with your Zoom attendees. If you have your video saved, simply access your playlists to open the video. Click on the video and ensure that the volume is turned up, but don’t hit Play yet.

Step 2: Share Screen on Zoom
Back in your Zoom meeting’s main screen, check the bottom line for options. A green “Share Screens” option will be available in the middle. When you click on it, Zoom will open a window showing all the tabs open on your device. Click the screen with the YouTube video and check the little box next to “Share Sound” at the bottom left corner of the window. Now hit “Share.”

Step 3: Play Video
You can now go back to your browser window, open your video in the full-screen mode, and hit the “Play” button to share the YouTube video with everyone. You can press the “Stop Share” button to stop sharing your screen in the meeting.

Method 2: Using Links to Share YouTube Video
If you don’t want to play the YouTube video live in the meeting, you can still share its link so people can access it privately. Zoom offers a chat box that can help you do that. Follow the steps given below to learn how to share a YouTube video’s link on Zoom meetings.
Step 1: Copy Video Link
Open YouTube on your device and navigate to the video you wish to share in Zoom. Tap the “Share” button below the video’s title and hit “Copy” to save the link on your clipboard.

Step 2: Open Chat Box
Now go to your Zoom meeting’s interface and click on the “Chat” button at the bottom. If you are using the phone app, you might have to tap the “More” option at the bottom and find “Chat” from there.
Step 3: Share Video Link on Zoom
Now simply paste the copied video link into the chat box and hit “Enter” to share it with everyone in the meeting.

Conclusion
The wonders of technology never cease to amaze. Some of the world’s top websites and software programs offer integration and support for one another. YouTube and Zoom are the prime examples of such apps which you can use collectively, leaving behind any potential hassle.
You can now share YouTube videos on Zoom without any trouble by following the simple guide mentioned above. There are multiple options to share a YouTube video via Zoom, which include screen sharing and external links. Once done, you can show the shared video to all the participants present in a Zoom meeting.
Also read:
- Updated 2024 Approved Top 10 Transparent Image Online Tools That Give You an Advantage
- New In 2024, The Right Ways to Slow Down a Video on iPhone
- New Best Ai Generated Memes for 2024
- 2024 Approved Guide to Add Transition Effects in Premiere Pro
- Updated 2024 Approved 10 Best Meme Text to Speech Tools Windows, Mac, Android, iPhone
- New In 2024, Top 11 Best Video Editing Apps for iPhone
- Top 10 Free Spanish Text To Speech Converter Websites for 2024
- New In 2024, OBS Green Screen Guide
- 2024 Approved Finding the Best Game Recorder for PC
- In 2024, Top List of Best VHS Video Effect Makers
- Are You Looking to Finish Your YouTube Video in Style? The Following Are the Best End Screen Makers to Choose From for 2024
- 2024 Approved To Get Cinematographs of a Music Video, You Need to Understand the Basics of Camera Movement. As Well Framing and Lighting of the Setup Are Illustrated in This Article
- Do You Want to Know How to Add Captivating Audio in Simple Videos? Nothing to Be Concerned About because This Article Will Help You in This Matter for 2024
- Updated Best Free LUTs To Use in Shotcut
- Easy Way to Add Effects to Art Video for 2024
- Updated 2024 Approved A Review of Efectum App Making Slow Motion Video
- In 2024, Top 9 Lenovo ThinkPhone Monitoring Apps for Parental Controls | Dr.fone
- In 2024, Best Ways on How to Unlock/Bypass/Swipe/Remove Itel P55 5G Fingerprint Lock
- In 2024, Full Guide on Mirroring Your Lava Yuva 2 Pro to Your PC/Mac | Dr.fone
- How do i add my signature to .odt file
- 3 Smart and Simple Ways to Change Home Address on Apple iPhone X | Dr.fone
- In 2024, How Can You Cast Your Apple iPhone 15 Plus to Windows PC With Ease? | Dr.fone
- In 2024, Different Methods To Unlock Your iPhone XR
- In 2024, FRP Hijacker by Hagard Download and Bypass your Oppo Reno 10 Pro+ 5G FRP Locks
- In 2024, How to Unlock Apple ID Activation Lock From iPhone 12 Pro?
- Your Complete Guide To Reset Infinix Note 30 VIP Racing Edition | Dr.fone
- Title: How to Create Sports Intro and YouTube Endscreen?
- Author: Chloe
- Created at : 2024-05-20 03:37:22
- Updated at : 2024-05-21 03:37:22
- Link: https://ai-editing-video.techidaily.com/how-to-create-sports-intro-and-youtube-endscreen/
- License: This work is licensed under CC BY-NC-SA 4.0.


