:max_bytes(150000):strip_icc():format(webp)/cq5dam.web.1280.1280-3-5c2a5dc746e0fb0001d115f0.jpeg)
How to Create the Stranger Things Upside Down Effect for 2024

How to Create the Stranger Things Upside Down Effect
With stranger things season 4 ending, it seems like great timing to make a stranger things style transition to the Upside Down. In the Netflix series Stranger Things, there is an opposite version of our world called the Upside Down. The Upside Down is dark, creepy, and possibly filled with aliens, monsters, creatures, and other things.
Now, you can also apply the Stranger Things Upside Down Effect to your video! This effect combines camera tricks and video editing within Filmora to transition from the normal world into the Upside Down.
How-to Guide
1) Preparation
To make this effect, you will need two footage shots: one with the camera moving down and one with the camera coming back up.
When shooting for the footage, follow the steps below:
First shot
- Find any item close enough to the ground that we can block our frame with.

- Once you have your talent lined up, rotate your camera while lowering it below the foreground item at a constant speed and leaving the camera there. The key is making sure when you go behind the object, the frame is nothing but black.

For the next scene, have your actor change positions, or you can change the set around to look like the Upside Down. For instance, adding fake plants and flickering lights.
Second shot
Start bringing your camera back up at the same speed and rotate it again in the direction it was moving.

2) Steps
After you have all the footage, you can start editing it on Filmora. If you haven’t installed it yet, you can download Filmora at their official website at https://filmora.wondershare.com .
Free Download For Win 7 or later(64-bit)
Free Download For macOS 10.14 or later
Now, launch Filmora on your PC and follow the steps below:
Step1 Take your first clip in the “normal” world and drag it down to a video track on the timeline. Trim the edge of the clip, so it ends on pure black and in a downward motion.

Step2 Drag the second clip (in the Upside Down) onto the video track on the timeline after the first clip. Trim this video, so it begins in pure black and an upward motion.

Cut the clips to get the timing right since it should be a very fast transition. You can cut in the black frames so they won’t be too apparent.
If you don’t have a perfectly smooth transition, you can add a dissolve by going to Transitions > Basic > Dissolve.

Color Grading and Effects
After the transition, you can make the clip look a lot more like the Upside Down from the show with a color grade and Filmora effects. Follow the steps below:
Step1 Double-click on your second clip, then go to Color > Advanced. For a quick edit, you can try one of the presets available, such as “cool film.” It will give you the colder blue tones that Stranger Things used for the Upside Down.

Step2 You can further edit the color grading in the white balance menu. Drag the slider to the left to get a blue, cold vibe for the Upside Down.
The “cool” or “warm” color grading technically talks about color temperature. A “warmer” look will be more orange, and a “colder” look will be bluer. You can also use the tint slider to fine-tune the look.

Step3 Next, move down to the color, lower the brightness and increase contrast. It makes the scene darker and more sinister than the normal world.

Step4 Finally, go down to the vignette and drag the amount slider a tiny bit to give a Vinnette around your clip.

3) Pro Tips
You can still make your clip look even more like Upside Down with some Filmora elements.
Go to Elements > Smoke > Smokescreen 2. Drag this element on top of your Upside Down clip and trim it, so it starts at the same time the clip leaves the black frame.

You can adjust the opacity by double-clicking the smoke effect to open the setting.
Finally, go to the Transition > Basic > Dissolve to the start of the smoke and adjust it when the smoke gradually appears.

Resources from Filmostock
You can also use filmstock effects to bring our video to the next level. Go to Elements > Fire > Large Scale 12 and drag it down on top of your clip and the smoke.

Double-click the clip and change the scale of the effect to your needs. Then, go to compositing to change the blending mode to the screen to help the effect blend in more.

Now, go to color and open the white balance menu. Drag the two sliders to change the color of the particles to match your clip.

Summary
That is all you need to make a Stranger Things Upside Down effects to your video. Let us know if there are any other effects from tv shows you want to learn how to make.
Free Download For macOS 10.14 or later
Now, launch Filmora on your PC and follow the steps below:
Step1 Take your first clip in the “normal” world and drag it down to a video track on the timeline. Trim the edge of the clip, so it ends on pure black and in a downward motion.

Step2 Drag the second clip (in the Upside Down) onto the video track on the timeline after the first clip. Trim this video, so it begins in pure black and an upward motion.

Cut the clips to get the timing right since it should be a very fast transition. You can cut in the black frames so they won’t be too apparent.
If you don’t have a perfectly smooth transition, you can add a dissolve by going to Transitions > Basic > Dissolve.

Color Grading and Effects
After the transition, you can make the clip look a lot more like the Upside Down from the show with a color grade and Filmora effects. Follow the steps below:
Step1 Double-click on your second clip, then go to Color > Advanced. For a quick edit, you can try one of the presets available, such as “cool film.” It will give you the colder blue tones that Stranger Things used for the Upside Down.

Step2 You can further edit the color grading in the white balance menu. Drag the slider to the left to get a blue, cold vibe for the Upside Down.
The “cool” or “warm” color grading technically talks about color temperature. A “warmer” look will be more orange, and a “colder” look will be bluer. You can also use the tint slider to fine-tune the look.

Step3 Next, move down to the color, lower the brightness and increase contrast. It makes the scene darker and more sinister than the normal world.

Step4 Finally, go down to the vignette and drag the amount slider a tiny bit to give a Vinnette around your clip.

3) Pro Tips
You can still make your clip look even more like Upside Down with some Filmora elements.
Go to Elements > Smoke > Smokescreen 2. Drag this element on top of your Upside Down clip and trim it, so it starts at the same time the clip leaves the black frame.

You can adjust the opacity by double-clicking the smoke effect to open the setting.
Finally, go to the Transition > Basic > Dissolve to the start of the smoke and adjust it when the smoke gradually appears.

Resources from Filmostock
You can also use filmstock effects to bring our video to the next level. Go to Elements > Fire > Large Scale 12 and drag it down on top of your clip and the smoke.

Double-click the clip and change the scale of the effect to your needs. Then, go to compositing to change the blending mode to the screen to help the effect blend in more.

Now, go to color and open the white balance menu. Drag the two sliders to change the color of the particles to match your clip.

Summary
That is all you need to make a Stranger Things Upside Down effects to your video. Let us know if there are any other effects from tv shows you want to learn how to make.
Best Free Slow Motion Apps For Android and iPhone
Slow-motion videos are the recent and most popular trend of social media. Influencers are trying their best to make appealing slow-motion videos for unique content. Not everyone can afford traditional cameras to record videos in slow-mo. That’s why transforming normal video into slow-motion with free slow-motion apps is accessible to all.
For this purpose, countless apps have been developed to provide editing tools right in your palm. Regardless of the smartphone device you are using, there are solutions for everyone. Thoroughly read this article if you want to explore some free slow-mo apps for Android and iOS users.
Slow Motion Video Maker Slow your video’s speed with better control of your keyframes to create unique cinematic effects!
Make A Slow Motion Video Make A Slow Motion Video More Features

Part 1: Progressive Android Application For Creating Free Slow-Mos
Starting with Android applications, there are some great free slow-motion apps you can come across. An overview of such apps will help you find out the best option to go with in Android:
- Velomingo - Velocity Edit Maker
- Slow Motion Video Maker
- Slow Motion Video Camera
- Splice - Video Editor & Maker
- Video Speed Changer: SlowMo F
1. Velomingo - Velocity Edit Maker
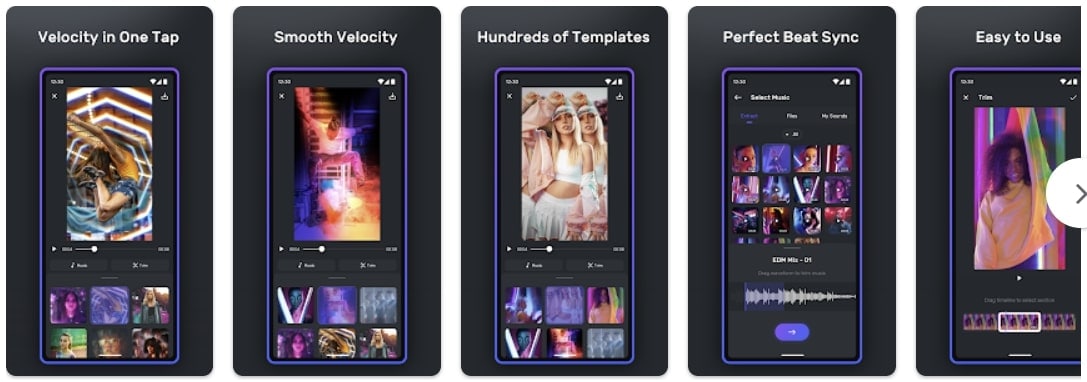
Find and transform your videos by applying multiple velocity templates using this free slow-motion app. For someone who isn’t very skilled at creating slow motions, this application can be helpful. It provides hundreds of pre-developed speed change templates for creating slow motions. After creating slo-mos, you can share them on your social handles like TikTok, Instagram, and Facebook.
Pros
- Offers high-quality export options to retain video quality while saving it.
- Offers a watermark removal option that helps in self-promotion.
Cons
- The application does not offer custom options for speed change, which limits creativity.
2. Slow Motion Video Maker
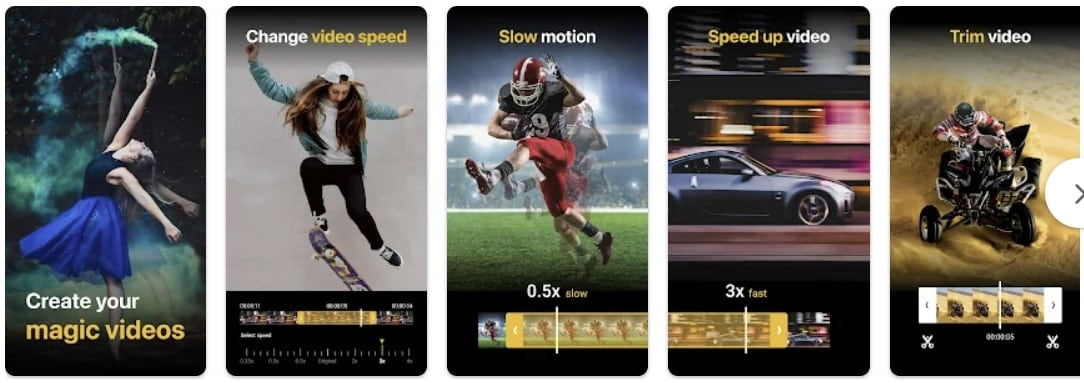
Open the doors of creativity with this free slo-mo app that is designed to modify video speed. The application slows down a video to one-fourth of its standard speed. Along with slowing down normal videos, you can bring back hyper-lapse video to normal speed. The tool offers a timeline editing panel for scene-specific editing.
Pros
- You can also increase the video speed using this application.
- Create and edit videos without worrying about their quality, as the app ensures high quality.
Cons
- Audience demand for more video playback options for fast and slow motion.
3. Slow Motion Video Camera
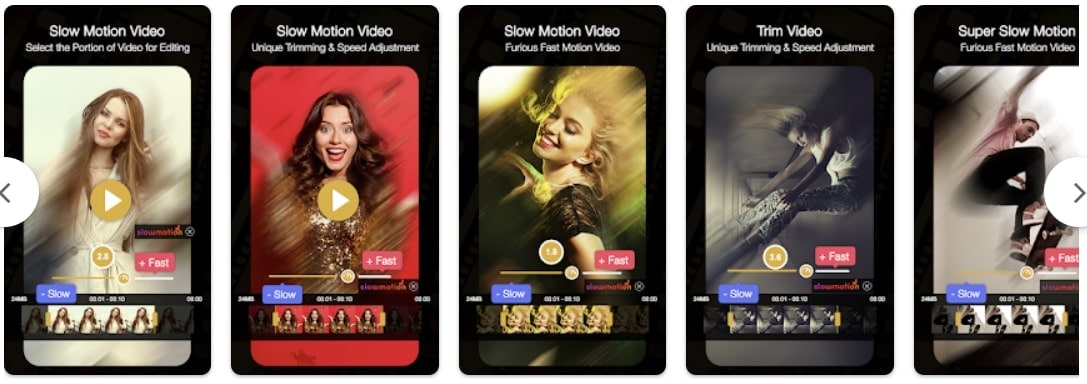
Do you want to create seamless slow motions and SloPros using a free slow-motion app? This application transforms your video into slo-mos using its playback speed options. There are five options for creating a slow motion that ranges from 1x to 5x. The application is compatible with Android version 4.3 and higher versions.
Pros
- Seamless supports all video formats to create a SloPro video.
- Offers visual and audio assets to enhance your video post-production.
Cons
- Shows a lot of Ads that annoy editors the most, especially during editing.
4. Splice - Video Editor & Maker
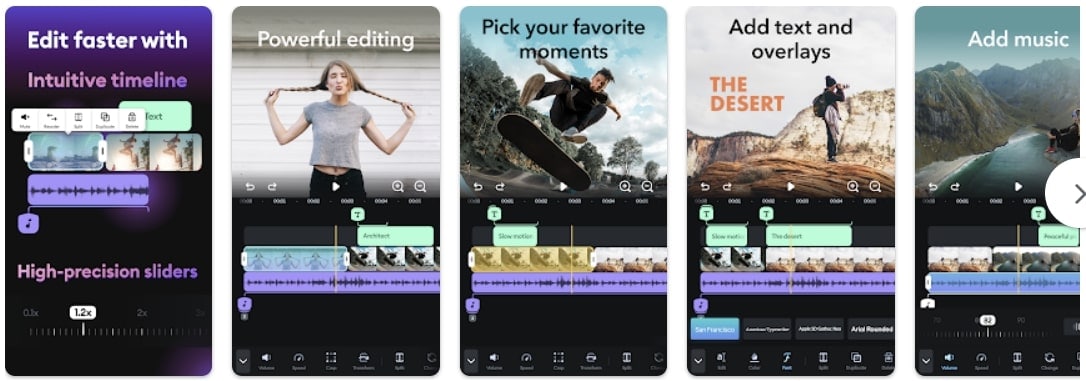
This free slow-motion app changes the speed of your video using a speed slider and timeline. The audio tracks are displayed separately on the timeline, which means you can maintain audio pitch and quality. Create slow motion for specific scenes or the whole video while providing adjustment options. There are 400+ music tracks in its audio assets library.
Pros
- A powerful interface that is an all-in-one video editor for creating compelling videos.
- Timeline editing interface to adjust text, visual, and speed effects.
Cons
- Doesn’t offer some important features like project file backup options that are on paid plans.
5. Video Speed Changer: SlowMo F
Use this free slo-mo app to create slow-motion videos in the best quality possible. The application offers distinct speed options, the slowest being 0.5x. With its timeline editing interface and trim options, you can apply an effect to specific video segments. The editor streamlines videos in any format and allows you to share them on social platforms.

Pros
- An intuitive user interface with high-quality video processing for optimized results.
- Provides regular updates in your system notifications to edit better.
Cons
- The editor comes with multiple ad displays, and there is no paid plan to avoid them.
Part 2: Directed iOS Apps For Functioning Slow Motion Video Editing
Being an iOS user, you might seek a different list of free slow-mo apps for your device. When creating a slow-motion video , it is preferred that you go by this provided list of applications. This will help you manage a good-quality of slow motion video in no time:
- SloMo Slow Motion Video Editor
- Video Editor & Maker – Vidma
- Slow Motion Video Editor
- Velomingo: Velocity Edit Maker
- InShot – Video Editor
1. SloMo Slow Motion Video Editor
Are you in search of a free slow-motion app for iPhone with an intuitive user interface? This video editor specializes in slow-motion content and assists in other speed modification tasks. Its interface reflects simplicity as it initiates editing immediately after import. Tailored to create slo-mo, the application boosts video frame rates up to 120fps and 240fps.
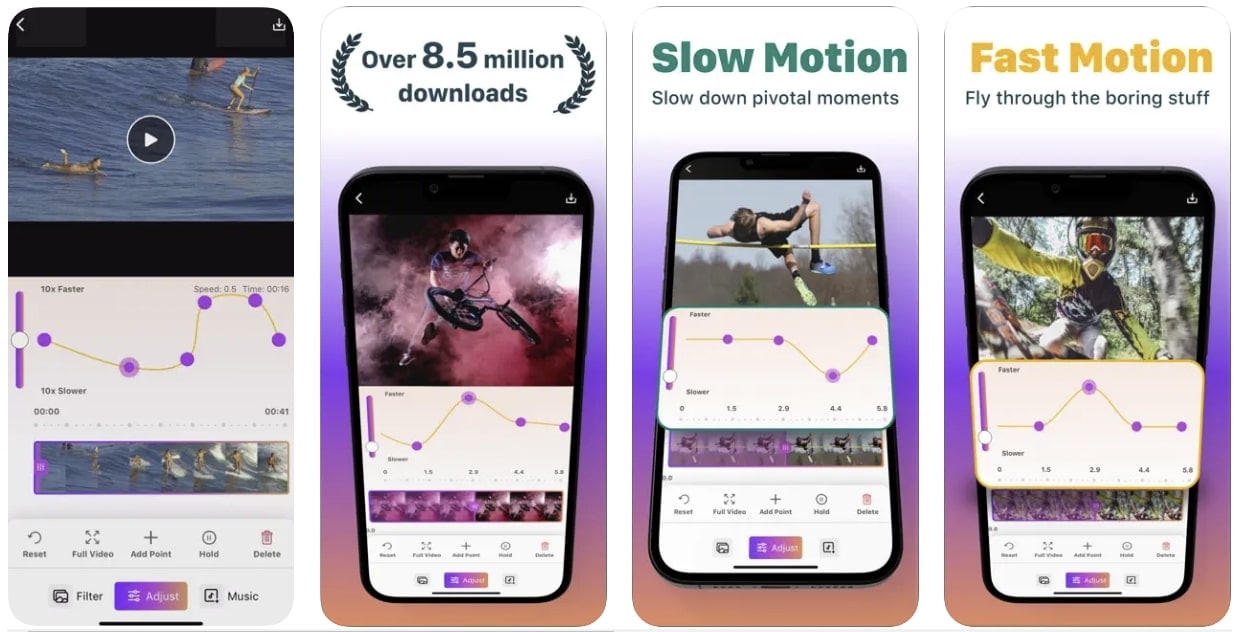
Pros
- Offers a smooth, slow motion with a still frame option to highlight a part.
- Offers 40+ visual features to enhance the graphical element in your videos.
Cons
- The application needs to fix some bugs related to its subscription plans.
2. Video Editor & Maker – Vidma
Are you in pursuit of a free slo-mo app that seamlessly produces trending slow-motion videos? Its Velocity Edit Maker tool is tailored to meet your needs. With seamless controls over playback speed and positioning on the velocity graph, you can create amazing slo-mos. The application features a beginner’s level speed change interface with a voice edit option.

Pros
- AI-backed algorithms that allow automated art generation via prompts for graphics.
- Offers keyframing that helps you to transform boring video via animations throughout.
Cons
- The free version lacks flexibility in some features, and you’ll have to avail the paid versions.
3. Slow Motion Video Editor
If you want to attain a professional-grade slow-motion effect on your iPhone, employ this free slow-motion app. The editor comes with a wide array of customizable speed settings to achieve the speed change goals. It leverages a sophisticated interface featuring a timeline bar and velocity graph. To control speed, you can employ a downward slide gesture on different timelines.

Pros
- Built-in music assets that fit both slo-mo and time-lapse videos.
- Creates slow-motion or even high-speed videos without declining their resolutions.
Cons
- It is only specified for speed change and lacks editing features; hence, users need to switch a lot.
4. Velomingo: Velocity Edit Maker
Embarking on the journey of crafting slow-motion sequences with precision using this free slow-motion app. Users are free to use the pre-installed velocity presets on their videos. These will result in captivating slow-motion and high-speed effects. While you cannot customize these presets, the application ensures slow-motion quality along with audio and visual quality maintenance.
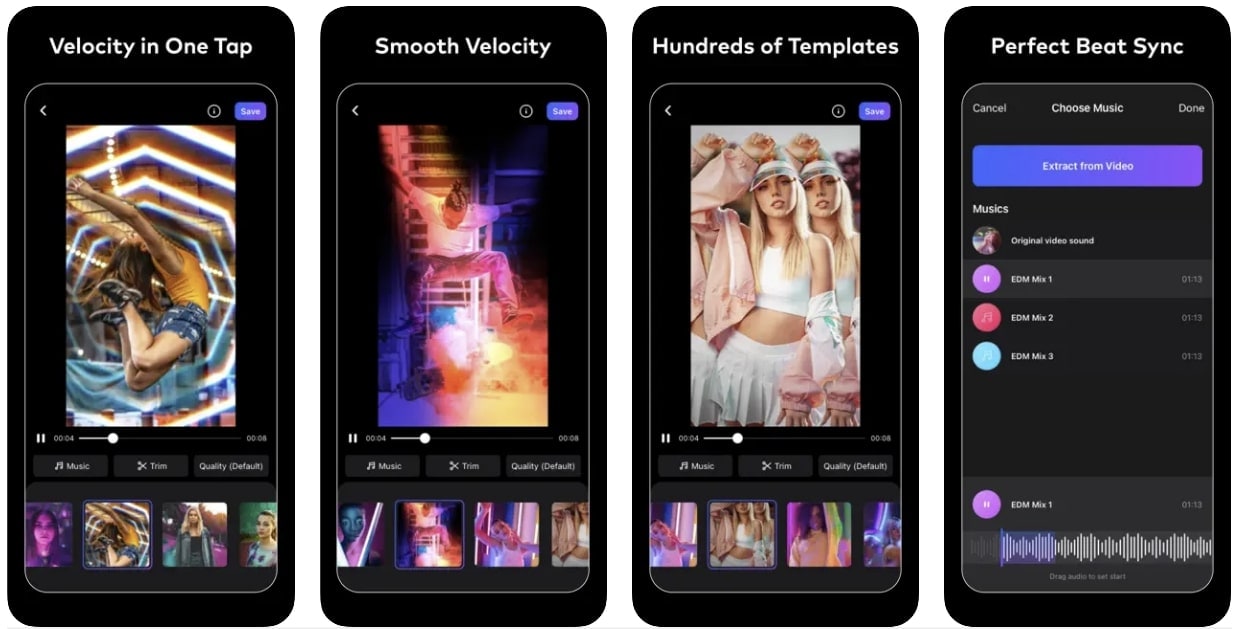
Pros
- Upon export, you can improve the video quality and remove the watermark.
- Avoid any quality loss upon export by directly publishing content to social applications.
Cons
- Lacks a custom preset option because if you have to add the same effect, you will need to do the editing all over again,
5. InShot – Video Editor
The free slow-motion app assists in the creation of effective slow motions with other features. It introduces an uncomplicated technique for decreasing video speed through a slider. With its timeline editing and selective time frame options, you can apply slow motion to specific video parts. It not only offers slow motion but also fast motion effects with an extensive interface.
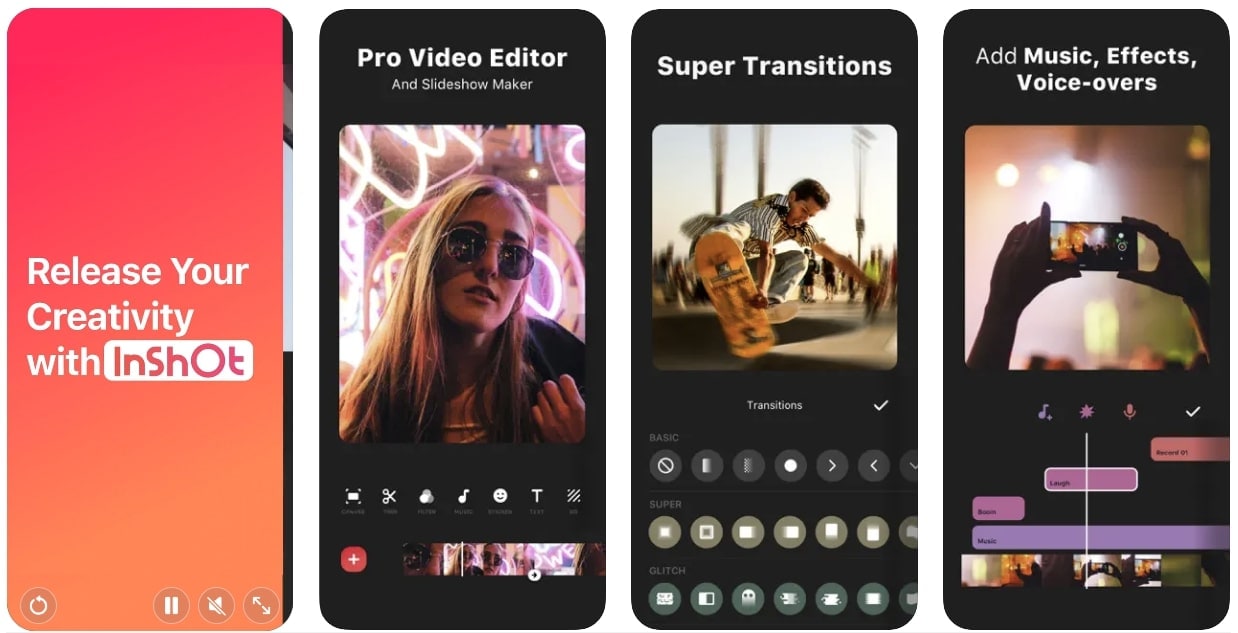
Pros
- The free version allows users to remove watermarks without any hassle.
- The Chroma key function cuts out the object and removes the background efficiently.
Cons
- Restriction of creative assets in the free version, and you’ll have to avail yourself of a subscription.
Part 3: Make Slow Motion Video Making Easy With Wondershare Filmora
There is a lot of competition for free slow-motion apps in the digital market. The platform, with an intuitive interface and more advanced options, stands at the top. Among such winning platforms include Wondershare Filmora, which is a video editor. It offers the latest features with AI integrations that keep users amazed. You can embrace creativity in your projects while saving hours of effort.
This platform can assist beginners and professionals by easing their tasks. If we come to the point, Filmora allows you to slow down your videos with customization. Besides, you can use its AI feature to get desired music and assistance through copilot editors.
Free Download For Win 7 or later(64-bit)
Free Download For macOS 10.14 or later
Integral Features of Filmora to Discover
Filmora is not just limited to cutting or merging tools; you can alter imaginations into reality. If you want to know how to read the main functionalities given.
AI Thumbnail Creator
As a content creator, you must know that thumbnail grab viewer’s attention to watch the video. That’s why creating an attractive thumbnail remains integral to video editing. Filmora offers an AI feature to ease this process with creativity. It provides thumbnail templates that you can edit and align with your videos. Besides, it can automatically detect the best shots in the video and bring it out as a thumbnail.
Speed Ramping
The literal meaning of speed ramping is a smooth change in video speed. You will not find speed ramping in the above-discussed free slow-motion apps. Filmora allows you to adjust the extent you want to slow down or speed up the video simultaneously. Besides a smooth transition in speed, it ensures the high quality of your slow-motion videos.
AI Image
If you are tired of internet surfing for copyright-free images, head to Filmora. Using the AI Image generator of Filmora, you will own the legal rights of the created image. To get the desired image, you have to describe some points that you want in the image. Optionally, you can pick one of the available image styles to get accurate results.
AI Smart Masking
Discover the endless possibilities on Filmora and use advanced skills to create transitions. It provides smart masking that recognizes objects in videos and automatically generates a mask. With AI masking, you can perform color correction on your media. Also, it can freeze frames to craft stunning still images. Users can mask objects and change video backgrounds with a single brush stroke.
AI Audio Stretch
Imagine finding a perfect song for a Vlog that is shorter in length for your video. This situation confuses you about switching to another song or cutting the video duration. Not more with Filmora, because it offers AI audio stretch that understands vocals in music. Thus, you will get re-timed audio instantly. Plus, it can remix different audio clips to produce a dynamic suite of soundtracks.
Conclusion
In short, creating slow-motion videos is necessary to maintain your social persona. Anyone can turn their videos into slow motion without putting effort into editing. This article has also shown some of the best choices in free slow-motion apps for Android and iOS. However, if you want more options than just slowing down videos, you should try Wondershare Filmora.
Make A Slow Motion Video Make A Slow Motion Video More Features

Part 1: Progressive Android Application For Creating Free Slow-Mos
Starting with Android applications, there are some great free slow-motion apps you can come across. An overview of such apps will help you find out the best option to go with in Android:
- Velomingo - Velocity Edit Maker
- Slow Motion Video Maker
- Slow Motion Video Camera
- Splice - Video Editor & Maker
- Video Speed Changer: SlowMo F
1. Velomingo - Velocity Edit Maker
Find and transform your videos by applying multiple velocity templates using this free slow-motion app. For someone who isn’t very skilled at creating slow motions, this application can be helpful. It provides hundreds of pre-developed speed change templates for creating slow motions. After creating slo-mos, you can share them on your social handles like TikTok, Instagram, and Facebook.

Pros
- Offers high-quality export options to retain video quality while saving it.
- Offers a watermark removal option that helps in self-promotion.
Cons
- The application does not offer custom options for speed change, which limits creativity.
2. Slow Motion Video Maker
Open the doors of creativity with this free slo-mo app that is designed to modify video speed. The application slows down a video to one-fourth of its standard speed. Along with slowing down normal videos, you can bring back hyper-lapse video to normal speed. The tool offers a timeline editing panel for scene-specific editing.

Pros
- You can also increase the video speed using this application.
- Create and edit videos without worrying about their quality, as the app ensures high quality.
Cons
- Audience demand for more video playback options for fast and slow motion.
3. Slow Motion Video Camera
Do you want to create seamless slow motions and SloPros using a free slow-motion app? This application transforms your video into slo-mos using its playback speed options. There are five options for creating a slow motion that ranges from 1x to 5x. The application is compatible with Android version 4.3 and higher versions.

Pros
- Seamless supports all video formats to create a SloPro video.
- Offers visual and audio assets to enhance your video post-production.
Cons
- Shows a lot of Ads that annoy editors the most, especially during editing.
4. Splice - Video Editor & Maker
This free slow-motion app changes the speed of your video using a speed slider and timeline. The audio tracks are displayed separately on the timeline, which means you can maintain audio pitch and quality. Create slow motion for specific scenes or the whole video while providing adjustment options. There are 400+ music tracks in its audio assets library.

Pros
- A powerful interface that is an all-in-one video editor for creating compelling videos.
- Timeline editing interface to adjust text, visual, and speed effects.
Cons
- Doesn’t offer some important features like project file backup options that are on paid plans.
5. Video Speed Changer: SlowMo F
Use this free slo-mo app to create slow-motion videos in the best quality possible. The application offers distinct speed options, the slowest being 0.5x. With its timeline editing interface and trim options, you can apply an effect to specific video segments. The editor streamlines videos in any format and allows you to share them on social platforms.

Pros
- An intuitive user interface with high-quality video processing for optimized results.
- Provides regular updates in your system notifications to edit better.
Cons
- The editor comes with multiple ad displays, and there is no paid plan to avoid them.
Part 2: Directed iOS Apps For Functioning Slow Motion Video Editing
Being an iOS user, you might seek a different list of free slow-mo apps for your device. When creating a slow-motion video , it is preferred that you go by this provided list of applications. This will help you manage a good-quality of slow motion video in no time:
- SloMo Slow Motion Video Editor
- Video Editor & Maker – Vidma
- Slow Motion Video Editor
- Velomingo: Velocity Edit Maker
- InShot – Video Editor
1. SloMo Slow Motion Video Editor
Are you in search of a free slow-motion app for iPhone with an intuitive user interface? This video editor specializes in slow-motion content and assists in other speed modification tasks. Its interface reflects simplicity as it initiates editing immediately after import. Tailored to create slo-mo, the application boosts video frame rates up to 120fps and 240fps.

Pros
- Offers a smooth, slow motion with a still frame option to highlight a part.
- Offers 40+ visual features to enhance the graphical element in your videos.
Cons
- The application needs to fix some bugs related to its subscription plans.
2. Video Editor & Maker – Vidma
Are you in pursuit of a free slo-mo app that seamlessly produces trending slow-motion videos? Its Velocity Edit Maker tool is tailored to meet your needs. With seamless controls over playback speed and positioning on the velocity graph, you can create amazing slo-mos. The application features a beginner’s level speed change interface with a voice edit option.

Pros
- AI-backed algorithms that allow automated art generation via prompts for graphics.
- Offers keyframing that helps you to transform boring video via animations throughout.
Cons
- The free version lacks flexibility in some features, and you’ll have to avail the paid versions.
3. Slow Motion Video Editor
If you want to attain a professional-grade slow-motion effect on your iPhone, employ this free slow-motion app. The editor comes with a wide array of customizable speed settings to achieve the speed change goals. It leverages a sophisticated interface featuring a timeline bar and velocity graph. To control speed, you can employ a downward slide gesture on different timelines.

Pros
- Built-in music assets that fit both slo-mo and time-lapse videos.
- Creates slow-motion or even high-speed videos without declining their resolutions.
Cons
- It is only specified for speed change and lacks editing features; hence, users need to switch a lot.
4. Velomingo: Velocity Edit Maker
Embarking on the journey of crafting slow-motion sequences with precision using this free slow-motion app. Users are free to use the pre-installed velocity presets on their videos. These will result in captivating slow-motion and high-speed effects. While you cannot customize these presets, the application ensures slow-motion quality along with audio and visual quality maintenance.

Pros
- Upon export, you can improve the video quality and remove the watermark.
- Avoid any quality loss upon export by directly publishing content to social applications.
Cons
- Lacks a custom preset option because if you have to add the same effect, you will need to do the editing all over again,
5. InShot – Video Editor
The free slow-motion app assists in the creation of effective slow motions with other features. It introduces an uncomplicated technique for decreasing video speed through a slider. With its timeline editing and selective time frame options, you can apply slow motion to specific video parts. It not only offers slow motion but also fast motion effects with an extensive interface.

Pros
- The free version allows users to remove watermarks without any hassle.
- The Chroma key function cuts out the object and removes the background efficiently.
Cons
- Restriction of creative assets in the free version, and you’ll have to avail yourself of a subscription.
Part 3: Make Slow Motion Video Making Easy With Wondershare Filmora
There is a lot of competition for free slow-motion apps in the digital market. The platform, with an intuitive interface and more advanced options, stands at the top. Among such winning platforms include Wondershare Filmora, which is a video editor. It offers the latest features with AI integrations that keep users amazed. You can embrace creativity in your projects while saving hours of effort.
This platform can assist beginners and professionals by easing their tasks. If we come to the point, Filmora allows you to slow down your videos with customization. Besides, you can use its AI feature to get desired music and assistance through copilot editors.
Free Download For Win 7 or later(64-bit)
Free Download For macOS 10.14 or later
Integral Features of Filmora to Discover
Filmora is not just limited to cutting or merging tools; you can alter imaginations into reality. If you want to know how to read the main functionalities given.
AI Thumbnail Creator
As a content creator, you must know that thumbnail grab viewer’s attention to watch the video. That’s why creating an attractive thumbnail remains integral to video editing. Filmora offers an AI feature to ease this process with creativity. It provides thumbnail templates that you can edit and align with your videos. Besides, it can automatically detect the best shots in the video and bring it out as a thumbnail.
Speed Ramping
The literal meaning of speed ramping is a smooth change in video speed. You will not find speed ramping in the above-discussed free slow-motion apps. Filmora allows you to adjust the extent you want to slow down or speed up the video simultaneously. Besides a smooth transition in speed, it ensures the high quality of your slow-motion videos.
AI Image
If you are tired of internet surfing for copyright-free images, head to Filmora. Using the AI Image generator of Filmora, you will own the legal rights of the created image. To get the desired image, you have to describe some points that you want in the image. Optionally, you can pick one of the available image styles to get accurate results.
AI Smart Masking
Discover the endless possibilities on Filmora and use advanced skills to create transitions. It provides smart masking that recognizes objects in videos and automatically generates a mask. With AI masking, you can perform color correction on your media. Also, it can freeze frames to craft stunning still images. Users can mask objects and change video backgrounds with a single brush stroke.
AI Audio Stretch
Imagine finding a perfect song for a Vlog that is shorter in length for your video. This situation confuses you about switching to another song or cutting the video duration. Not more with Filmora, because it offers AI audio stretch that understands vocals in music. Thus, you will get re-timed audio instantly. Plus, it can remix different audio clips to produce a dynamic suite of soundtracks.
Conclusion
In short, creating slow-motion videos is necessary to maintain your social persona. Anyone can turn their videos into slow motion without putting effort into editing. This article has also shown some of the best choices in free slow-motion apps for Android and iOS. However, if you want more options than just slowing down videos, you should try Wondershare Filmora.
Detailed Steps to Rotate Video Using KMPlayer
Are you tired of watching videos upside down and don’t know how to figure it out? Or you have shot a video in Portrait mode which would have looked better in portrait mode but you can’t shoot it again? Well you’re at the right place and we might have a solution and an alternative method for you!
Did you know that KMPlayer has the ability to rotate videos? Learn how to rotate video using KMPlayer in this article, if you do not already know how. In this section, we will discuss how to make KMPlayer rotate videos while playing them, as well as how to fix KMPlayer not working when rotating videos. Continue reading to find out more.
Using KMPlayer to Rotate Video
In this section, we’ll show you how to rotate a video using KMPlayer. The following are the steps to take in order to complete the task:
The following are the steps to rotate a video in KMPlayer:
Step 1: First and foremost, download the software to your computer. Then you should install it there.
Step 2: After that, start the software on your computer.
Step 3: Launch KMPlayer and play the video that you’ll be rotating.

Step 4: After that, press the menu button and then select the “View” tab from the drop-down menu.
Step 5: Hover your mouse cursor over the tab to reveal a list of additional options.
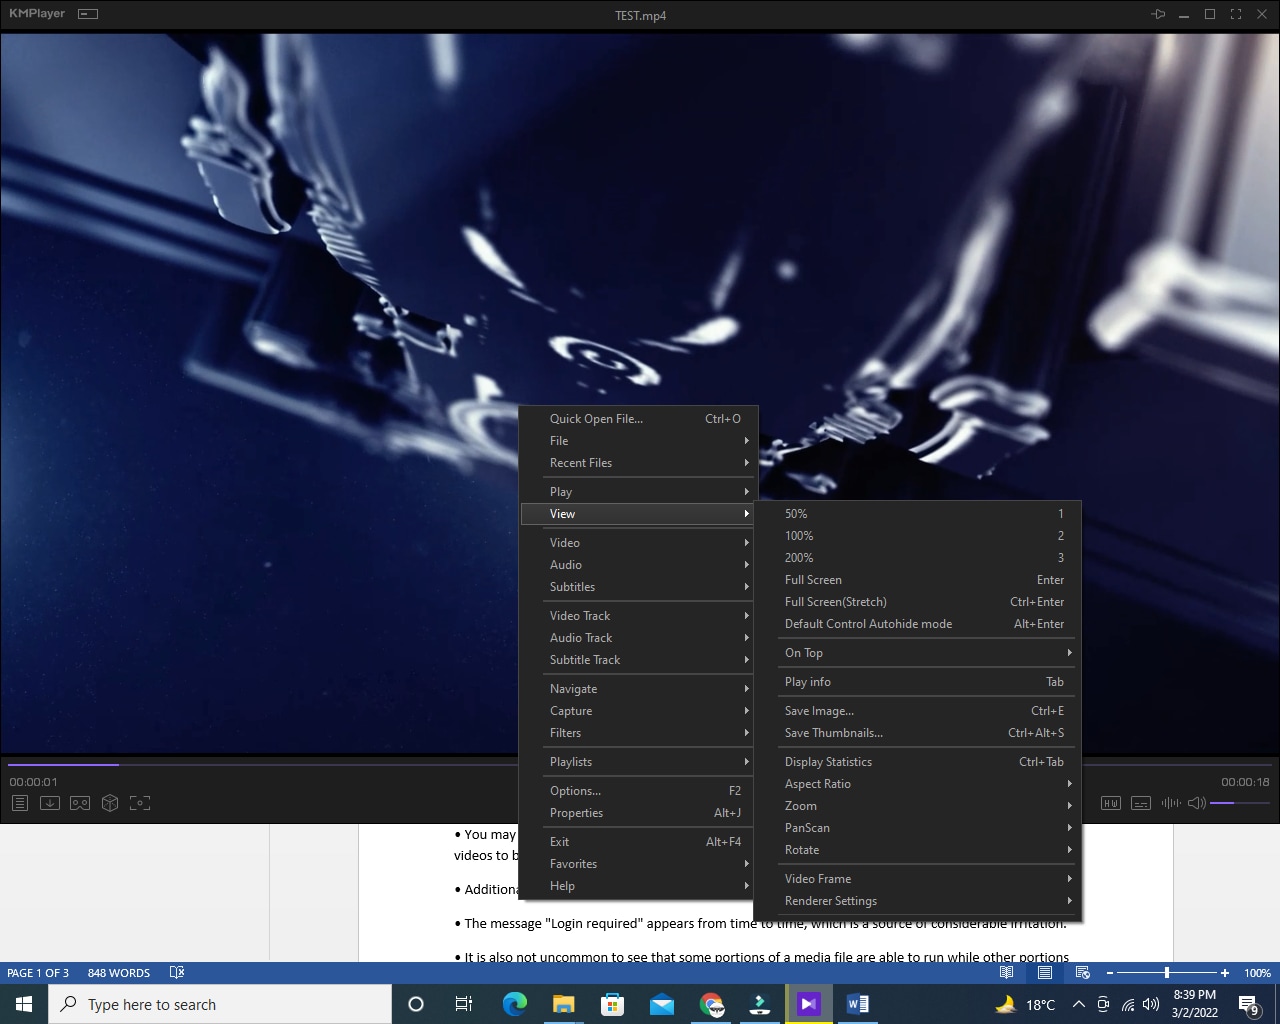
Step 6: you must select the Rotate tab from the list of available options. This will allow you to choose another option.
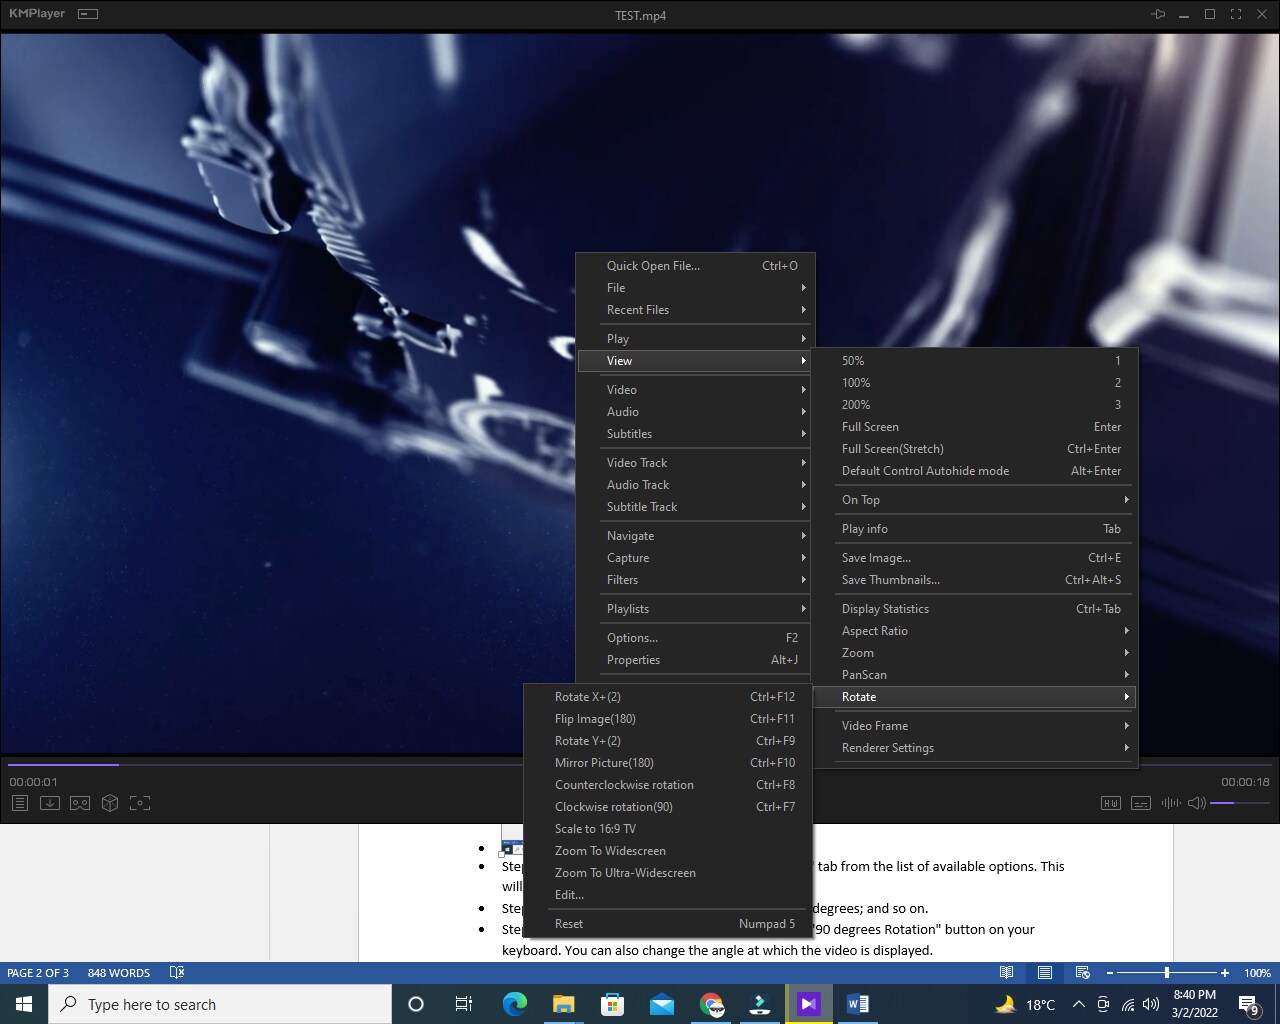
Step 07: Use Flip Image 180 degree to flip the image.
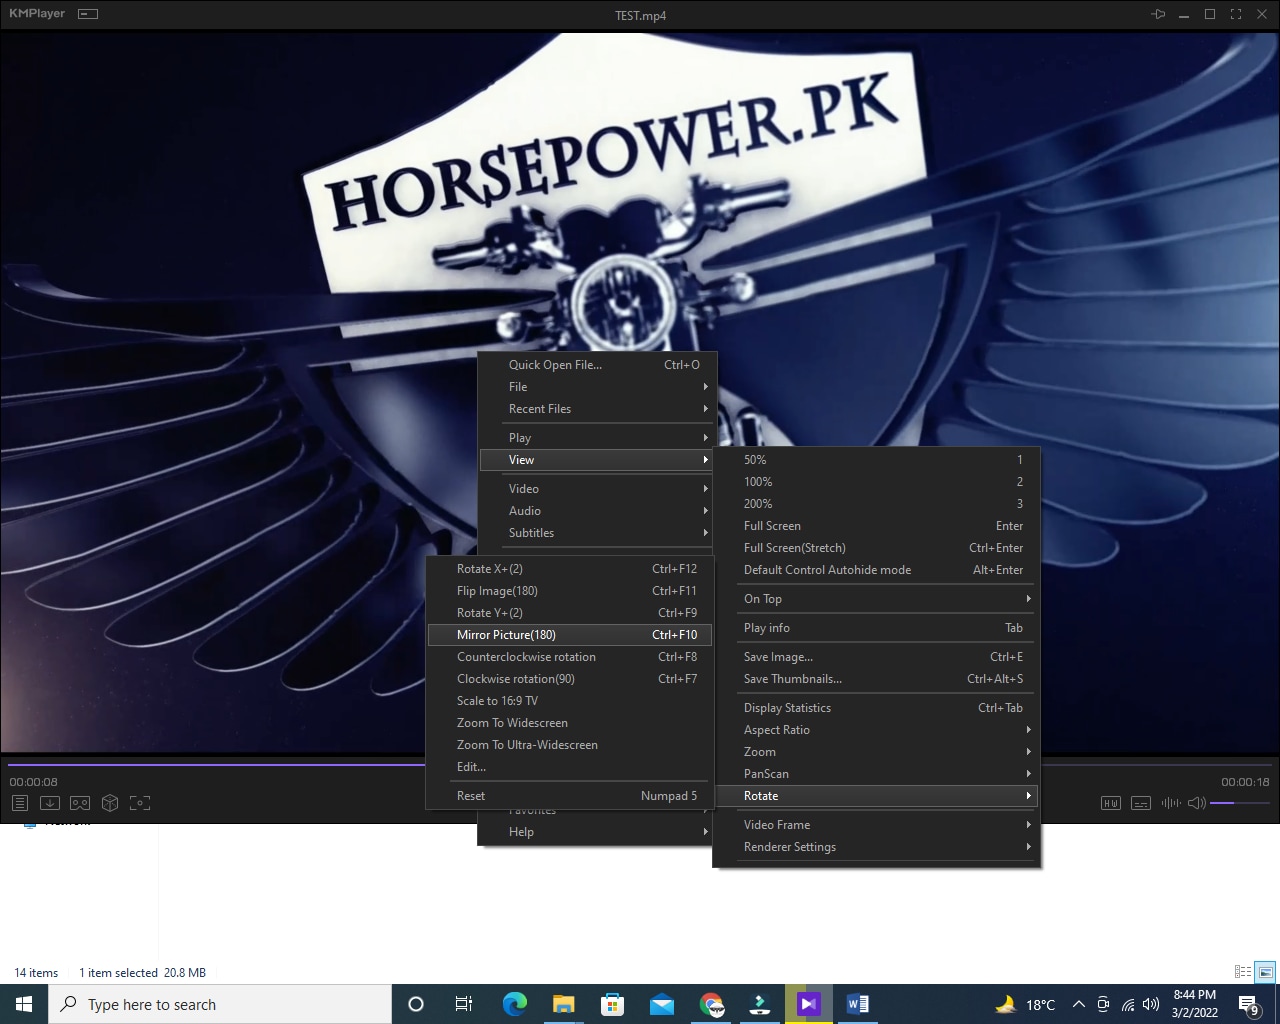
Step 8: To rotate the video in correct position, use Mirror Image (180) tab. You can also change the angle at which the video is displayed.
Your video is ready to watch peacefully.
Troubleshooting Problems with KMPlayer if Rotate Video Not Working
Despite the fact that you’ve seen that KMPlayer can rotate and edit videos, there are some disadvantages to using this particular video player. The following are some of the most frequently encountered issues when using KMPlayer to rotate video.
- After rotating a video, the video appears without a black bar, which may be irritating to some of you who are used to seeing black bars. In addition, there is no workaround for this because it is the default setting of the software.
- You may occasionally receive an error message such as “class not registered,” which will cause your videos to be closed while you are watching them.
- Additionally, the screen may turn blue.
- The message “Login required” appears from time to time, which is a source of considerable irritation.
- It is also not uncommon to see that some portions of a media file are able to run while other portions of the same media file are unable to run.
If we talk about reliable and affordable alternatives to KM Player, Wonder Share Filmora is the best alternative for rotating videos.
Despite the fact that it is one of the most user-friendly pieces of software currently available, this video spinning software achieves its goal without sacrificing image quality in the process. People with little or no experience in video creation, on the other hand, will find the Filmora video editing application to be a simple and straightforward tool that anyone can use.
Users have been experiencing difficulties while editing films on the platform, according to the company, and the most recent update to Filmora includes a new manual rotation option in the video editing interface, which the company claims will alleviate this issue.
As a result, users no longer have to be concerned about films reverting to their original position when exporting videos to other formats because they can rotate videos to any angle they desire.
An Easier Way to Rotate Video with Filmora
After learning about the problems with KMPlayer, it’s very likely that you’re looking for a great alternative that will allow you to rotate your videos flawlessly. Don’t worry, because there’s a fantastic tool called Filmora Video Editor for Windows (or Filmora Video Editor for Mac) that can go the extra mile when it comes to video editing. You’ll be astounded by the extensive selection of video editing tools available in the software.
For Win 7 or later (64-bit)
For macOS 10.14 or later
Beginners will find it easy to use because it has a simple interface to begin with.
- It allows you to edit videos in any format and from any device.
- It provides you with simple tools to rotate, trim, combine, split, and crop videos.
- It includes free effects such as titles, filters, transitions, motion elements, face-off, and more.
- It is completely free.
Steps to rotate videos in Filmora:
Simply open the wonder share filmora editing app and import your desired video to time line.
Right click on the imported video and select Rotate 90ccw until video is on your desired direction and you can simply export the video and enjoy it!
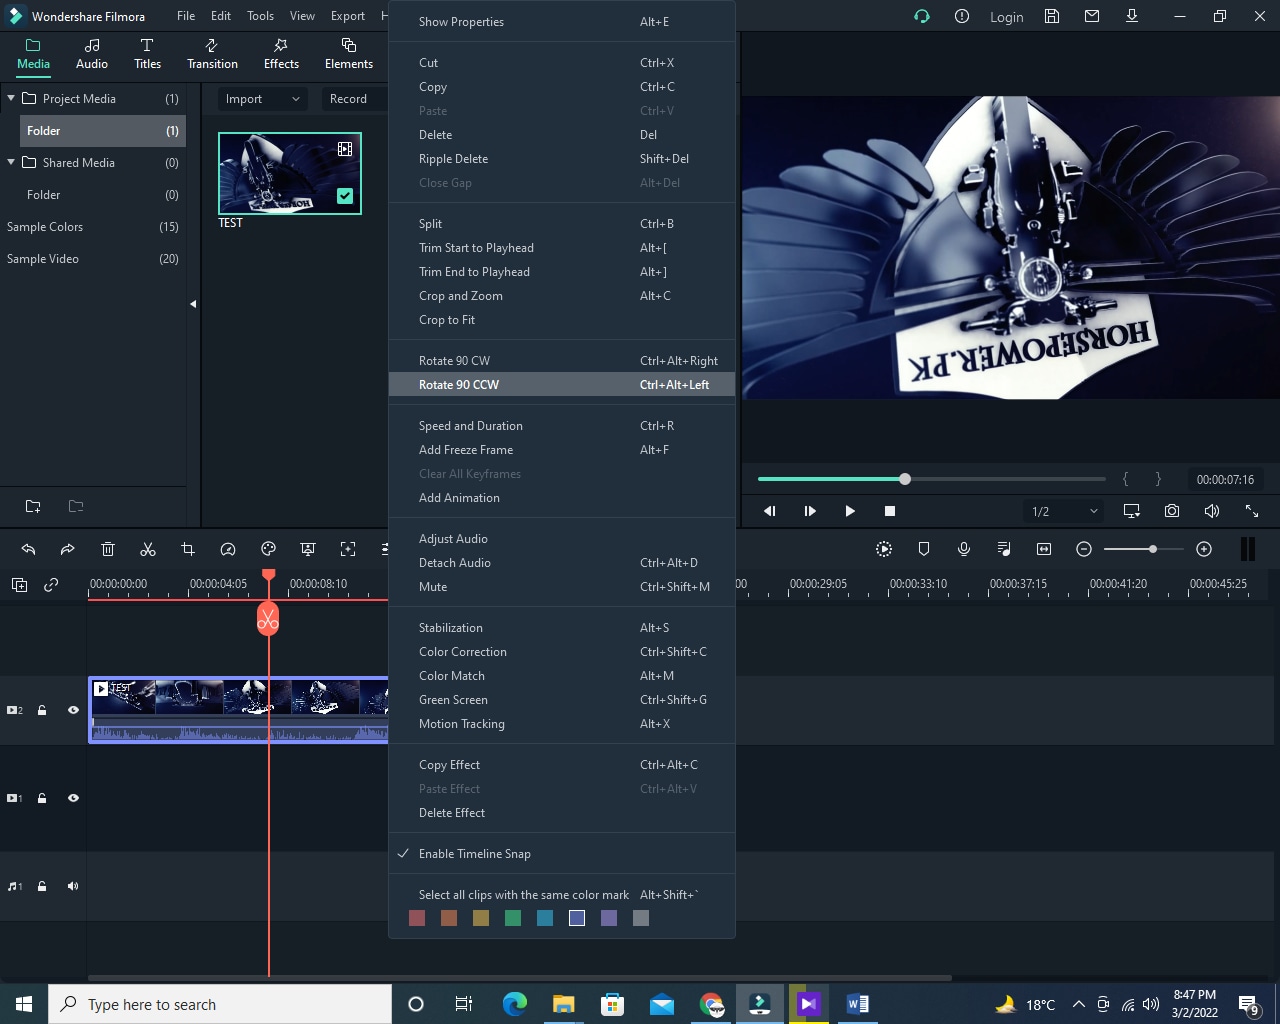
Now we have to deal with the elephant in the room: is KM Player superior, or is Wonder Share Filmora more user-friendly in terms of operation and video rotation? In general, both softwares are equally effective at rotating videos and completing tasks, but Wonder Share Filmora appears to be a significantly better and more user-friendly option. Wonder Share Filmora is powerful video editing software that allows you to learn more about video editing and take your skills to a higher level of proficiency.
Step 4: After that, press the menu button and then select the “View” tab from the drop-down menu.
Step 5: Hover your mouse cursor over the tab to reveal a list of additional options.

Step 6: you must select the Rotate tab from the list of available options. This will allow you to choose another option.

Step 07: Use Flip Image 180 degree to flip the image.

Step 8: To rotate the video in correct position, use Mirror Image (180) tab. You can also change the angle at which the video is displayed.
Your video is ready to watch peacefully.
Troubleshooting Problems with KMPlayer if Rotate Video Not Working
Despite the fact that you’ve seen that KMPlayer can rotate and edit videos, there are some disadvantages to using this particular video player. The following are some of the most frequently encountered issues when using KMPlayer to rotate video.
- After rotating a video, the video appears without a black bar, which may be irritating to some of you who are used to seeing black bars. In addition, there is no workaround for this because it is the default setting of the software.
- You may occasionally receive an error message such as “class not registered,” which will cause your videos to be closed while you are watching them.
- Additionally, the screen may turn blue.
- The message “Login required” appears from time to time, which is a source of considerable irritation.
- It is also not uncommon to see that some portions of a media file are able to run while other portions of the same media file are unable to run.
If we talk about reliable and affordable alternatives to KM Player, Wonder Share Filmora is the best alternative for rotating videos.
Despite the fact that it is one of the most user-friendly pieces of software currently available, this video spinning software achieves its goal without sacrificing image quality in the process. People with little or no experience in video creation, on the other hand, will find the Filmora video editing application to be a simple and straightforward tool that anyone can use.
Users have been experiencing difficulties while editing films on the platform, according to the company, and the most recent update to Filmora includes a new manual rotation option in the video editing interface, which the company claims will alleviate this issue.
As a result, users no longer have to be concerned about films reverting to their original position when exporting videos to other formats because they can rotate videos to any angle they desire.
An Easier Way to Rotate Video with Filmora
After learning about the problems with KMPlayer, it’s very likely that you’re looking for a great alternative that will allow you to rotate your videos flawlessly. Don’t worry, because there’s a fantastic tool called Filmora Video Editor for Windows (or Filmora Video Editor for Mac) that can go the extra mile when it comes to video editing. You’ll be astounded by the extensive selection of video editing tools available in the software.
For Win 7 or later (64-bit)
For macOS 10.14 or later
Beginners will find it easy to use because it has a simple interface to begin with.
- It allows you to edit videos in any format and from any device.
- It provides you with simple tools to rotate, trim, combine, split, and crop videos.
- It includes free effects such as titles, filters, transitions, motion elements, face-off, and more.
- It is completely free.
Steps to rotate videos in Filmora:
Simply open the wonder share filmora editing app and import your desired video to time line.
Right click on the imported video and select Rotate 90ccw until video is on your desired direction and you can simply export the video and enjoy it!

Now we have to deal with the elephant in the room: is KM Player superior, or is Wonder Share Filmora more user-friendly in terms of operation and video rotation? In general, both softwares are equally effective at rotating videos and completing tasks, but Wonder Share Filmora appears to be a significantly better and more user-friendly option. Wonder Share Filmora is powerful video editing software that allows you to learn more about video editing and take your skills to a higher level of proficiency.
Step 4: After that, press the menu button and then select the “View” tab from the drop-down menu.
Step 5: Hover your mouse cursor over the tab to reveal a list of additional options.

Step 6: you must select the Rotate tab from the list of available options. This will allow you to choose another option.

Step 07: Use Flip Image 180 degree to flip the image.

Step 8: To rotate the video in correct position, use Mirror Image (180) tab. You can also change the angle at which the video is displayed.
Your video is ready to watch peacefully.
Troubleshooting Problems with KMPlayer if Rotate Video Not Working
Despite the fact that you’ve seen that KMPlayer can rotate and edit videos, there are some disadvantages to using this particular video player. The following are some of the most frequently encountered issues when using KMPlayer to rotate video.
- After rotating a video, the video appears without a black bar, which may be irritating to some of you who are used to seeing black bars. In addition, there is no workaround for this because it is the default setting of the software.
- You may occasionally receive an error message such as “class not registered,” which will cause your videos to be closed while you are watching them.
- Additionally, the screen may turn blue.
- The message “Login required” appears from time to time, which is a source of considerable irritation.
- It is also not uncommon to see that some portions of a media file are able to run while other portions of the same media file are unable to run.
If we talk about reliable and affordable alternatives to KM Player, Wonder Share Filmora is the best alternative for rotating videos.
Despite the fact that it is one of the most user-friendly pieces of software currently available, this video spinning software achieves its goal without sacrificing image quality in the process. People with little or no experience in video creation, on the other hand, will find the Filmora video editing application to be a simple and straightforward tool that anyone can use.
Users have been experiencing difficulties while editing films on the platform, according to the company, and the most recent update to Filmora includes a new manual rotation option in the video editing interface, which the company claims will alleviate this issue.
As a result, users no longer have to be concerned about films reverting to their original position when exporting videos to other formats because they can rotate videos to any angle they desire.
An Easier Way to Rotate Video with Filmora
After learning about the problems with KMPlayer, it’s very likely that you’re looking for a great alternative that will allow you to rotate your videos flawlessly. Don’t worry, because there’s a fantastic tool called Filmora Video Editor for Windows (or Filmora Video Editor for Mac) that can go the extra mile when it comes to video editing. You’ll be astounded by the extensive selection of video editing tools available in the software.
For Win 7 or later (64-bit)
For macOS 10.14 or later
Beginners will find it easy to use because it has a simple interface to begin with.
- It allows you to edit videos in any format and from any device.
- It provides you with simple tools to rotate, trim, combine, split, and crop videos.
- It includes free effects such as titles, filters, transitions, motion elements, face-off, and more.
- It is completely free.
Steps to rotate videos in Filmora:
Simply open the wonder share filmora editing app and import your desired video to time line.
Right click on the imported video and select Rotate 90ccw until video is on your desired direction and you can simply export the video and enjoy it!

Now we have to deal with the elephant in the room: is KM Player superior, or is Wonder Share Filmora more user-friendly in terms of operation and video rotation? In general, both softwares are equally effective at rotating videos and completing tasks, but Wonder Share Filmora appears to be a significantly better and more user-friendly option. Wonder Share Filmora is powerful video editing software that allows you to learn more about video editing and take your skills to a higher level of proficiency.
Step 4: After that, press the menu button and then select the “View” tab from the drop-down menu.
Step 5: Hover your mouse cursor over the tab to reveal a list of additional options.

Step 6: you must select the Rotate tab from the list of available options. This will allow you to choose another option.

Step 07: Use Flip Image 180 degree to flip the image.

Step 8: To rotate the video in correct position, use Mirror Image (180) tab. You can also change the angle at which the video is displayed.
Your video is ready to watch peacefully.
Troubleshooting Problems with KMPlayer if Rotate Video Not Working
Despite the fact that you’ve seen that KMPlayer can rotate and edit videos, there are some disadvantages to using this particular video player. The following are some of the most frequently encountered issues when using KMPlayer to rotate video.
- After rotating a video, the video appears without a black bar, which may be irritating to some of you who are used to seeing black bars. In addition, there is no workaround for this because it is the default setting of the software.
- You may occasionally receive an error message such as “class not registered,” which will cause your videos to be closed while you are watching them.
- Additionally, the screen may turn blue.
- The message “Login required” appears from time to time, which is a source of considerable irritation.
- It is also not uncommon to see that some portions of a media file are able to run while other portions of the same media file are unable to run.
If we talk about reliable and affordable alternatives to KM Player, Wonder Share Filmora is the best alternative for rotating videos.
Despite the fact that it is one of the most user-friendly pieces of software currently available, this video spinning software achieves its goal without sacrificing image quality in the process. People with little or no experience in video creation, on the other hand, will find the Filmora video editing application to be a simple and straightforward tool that anyone can use.
Users have been experiencing difficulties while editing films on the platform, according to the company, and the most recent update to Filmora includes a new manual rotation option in the video editing interface, which the company claims will alleviate this issue.
As a result, users no longer have to be concerned about films reverting to their original position when exporting videos to other formats because they can rotate videos to any angle they desire.
An Easier Way to Rotate Video with Filmora
After learning about the problems with KMPlayer, it’s very likely that you’re looking for a great alternative that will allow you to rotate your videos flawlessly. Don’t worry, because there’s a fantastic tool called Filmora Video Editor for Windows (or Filmora Video Editor for Mac) that can go the extra mile when it comes to video editing. You’ll be astounded by the extensive selection of video editing tools available in the software.
For Win 7 or later (64-bit)
For macOS 10.14 or later
Beginners will find it easy to use because it has a simple interface to begin with.
- It allows you to edit videos in any format and from any device.
- It provides you with simple tools to rotate, trim, combine, split, and crop videos.
- It includes free effects such as titles, filters, transitions, motion elements, face-off, and more.
- It is completely free.
Steps to rotate videos in Filmora:
Simply open the wonder share filmora editing app and import your desired video to time line.
Right click on the imported video and select Rotate 90ccw until video is on your desired direction and you can simply export the video and enjoy it!

Now we have to deal with the elephant in the room: is KM Player superior, or is Wonder Share Filmora more user-friendly in terms of operation and video rotation? In general, both softwares are equally effective at rotating videos and completing tasks, but Wonder Share Filmora appears to be a significantly better and more user-friendly option. Wonder Share Filmora is powerful video editing software that allows you to learn more about video editing and take your skills to a higher level of proficiency.
How to Make Split Screen Videos in Filmora
To show the interactions and exchanges of things between the characters are widely seen in movies. It seems they are close to each other, but they aren’t.
In this article, we will go with the video editor, Wondershare Filmora, to make split-screen videos instantly. Let’s move forward to check what you need to make these videos!
Part 1. Prerequisites To Make Split Screen Video To Interact
There is no need to make complex videos. Because nowadays, only short videos get viral and are more trending. The interaction videos should be as simple as passing props or playing with someone!
Split-screen videos are widely used in movies and films because it is a visual way to describe any story. The actions will be based on real-time interactions between the characters. The essential things you are required to make these videos are described as follows:
1. Storyboard
First of all, you have to create a story with your friends and family, with whomever you want to create a video. For this, follow the below steps:
- Make a script of a story by coordination, such as writing all dialogues and actions so that there will be no difficulty during a performance on screen.
- Practice those actions again and again to get a professional look.
- The storyboard should be based on the split screen templates available on Wondershare Filmora , or you can create your customized too.

Free Download For Win 7 or later(64-bit)
Free Download For macOS 10.14 or later
2. Characters on the screen
The friends with whom you are interacting should be on the screen and have assets to record a video wherever they are. It will be one person on one split screen or two persons on one. It all depends upon your story and script.
3. Prop to interact
A prop will be any particular thing used to show interaction and should be present in the homes of both characters.
![]()
Note: The prop can be any object like a tissue roll, mobile phone, or anything seen as a passing object from one character to another.

4. A helper at home
There will be one person at home during video shooting to pretend a friend’s or family’s hand reaching to the other character from off-camera.
For example, while performing a high-five action, insert the hand of any member with whom you are living in the scene, showing as the character adjacent to you. After setting up everything in a row, it’s time to record scenes for the video.

5. Record different takes
To give a professional look to the video, you have to record different takes for each person from different angles. After recording, everyone has to send footage to only one person to edit on Filmora.
After getting things and recording, it’s time to edit it on Wondershare Filmora. For this, follow the lines below!
Part 2. Steps To Edit Split Screen Video in Filmora
Split-screen video editing is as simple as throwing a prop toward someone. Wondershare Filmora with a premium domain will get your back!
Filmora is a more creative and instant platform to edit any video or to give birth to new ideas. One of the prominent features is having ready-to-use templates for editing split-screen video. Meanwhile, you can also do a manual setup for editing. Follow the steps mentioned below to edit a video by using split-screen effects.
Split Screen Effect With Templates
Step1Import footage to Filmora
After picking up the best footage of every character, download the Wondershare Filmora (if you have not already). Then to import the clips, perform the following steps:
Free Download For Win 7 or later(64-bit)
Free Download For macOS 10.14 or later
- First, click on the “Click here to Import Media” button, as shown below.

- Then, select the clips you want to edit from your PC, and then they’ll be shown in the media section of Filmora.
Step2Add split screen effect to the timeline
Before adding the clips to the timeline, add the split screen effect to the timeline by following the below-mentioned steps:
- Click on the two-headed arrow at the upper tab.
- Then the drop-down list of two options will pop up, as shown below.

- Click on the Split Screen option, and it will show many split screen effects.

- Select the effect, whatever suits you, and download it then.
- After downloading, drag and drop the effect on the timeline section.

Step3Add clips to the effect
After adding the effect to the timeline, it’s time to implement it on the clips or footage. For this, follow the below-mentioned steps:
- Drag and drop the clips based on your storyboard in the required section.
- Then import the takes wherever and however you want, according to the storyboard.

If you don’t want any templates to be used in your video, then you can manually make a screen split layout. To do this, check the below section.
Manual Split Screen Layout
If the storyboard is organized in such a way that you can’t find out any of the templates suitable, then you can easily create a customized one for your video. In a customized split screen, you can set the duration and adjust the frame rate according to your choice.
Step1Import the clips
First, you must create a timeline to edit your split-screen video. To do this, take a look at the below steps!
- Click on the Import icon in the main preview when you open Wondershare Filmora.
- Then, import all the clips or footage you want to edit.

Step2Add all footages to the timeline
After importing all the clips of interaction videos into Filmora, our next step is to add our videos to the timeline.
- Simply click on the imported clips present in the project media section.
- Then drag it to the timeline below and drop it in the required track of videos.
Do the above-mentioned steps with all the clips present in the project media block.

Doing so will create a working timeline you can view and edit as you go along the editing process.
Step3Adjust the frame rate of all clips
It is all set that your storyboard is customized, for this you have to resize all the clips manually. To arrange clips according to the size, follow the below-mentioned steps:
- First, double-click on the clip you want to edit in the timeline.
- The Basic settings of the video will open in which you have a lot of options to edit.
- Click on the Transform option, and its setting will pop up on the top left side.
- Find out the Scale option from the settings and check out its range.

Adjust the scale rate according to your choice by sliding from its section.

![]()
Note: Repeat this process with all other clips present in the timeline to adjust them in such a way so that the hands moving from frame to frame will line up.

Step4Adjust the timing of clips
After adjusting the frame, you now have to adjust the timing of the clips. To perform this action, follow the below steps:
- Arrange and move around the clips on the timeline so that the timing of the scene lines up between each shot.
- Drag the edge of the clip to the right side if you want to increase the timing and duration.
- While dragging the edge of the clip to the left side, if you want to decrease the timing of the clip.
![]()
Note: The most important part is the first time a hand is supposed to move from one frame to another.
What to do if there is any lag in the preview?
If you’re experiencing lag during the preview, click on the “render” button on the top right of the timeline. It will help to render for a smooth preview.

Step5Splitting the clips
If the timing in your scene starts to fall out of sync, then do the following steps:
- First, try splitting all of the clips.
- Ensure to split before they start to fall out of sync.

![]()
Note: Splitting the clip before one person’s dialogue is preferred.
Step6Full-screen moment
After splitting the clips according to adjustments and storyboard, you can now make one of the characters’ videos in full screen. For this, follow the below steps:
- First, make another cut in the clips before the next hand-crossing action.
- Take one of the characters’ videos from clips in-between moment and make them full screen.

![]()
Note: You can quickly do full screen by double-clicking on the clip and unchecking the “transform“ heading in the top left window.

Final Results
You’re now free to re-adjust your clips in the next part back into sync. If you still want to make any adjustments in duration or cutting or sizing, you can do it easily. Because it’s a customizable effect. Give a pat on your Back! You did a great job and accomplish the results!

Free Download For Win 7 or later(64-bit)
Free Download For macOS 10.14 or later
Conclusion
An instant way to make split screen video and edit it is hidden in Wondershare Filmora . You can unwrap it by following the above-mentioned steps and giving a new life to your interaction videos.
Enjoy new and creative ideas with your family and friends and make your video trendy by Filmora. If you are an influencer, you can interact with other bloggers and influencers and make split-screen videos. It will be a great treat for you and your social media followers!
Free Download For macOS 10.14 or later
2. Characters on the screen
The friends with whom you are interacting should be on the screen and have assets to record a video wherever they are. It will be one person on one split screen or two persons on one. It all depends upon your story and script.
3. Prop to interact
A prop will be any particular thing used to show interaction and should be present in the homes of both characters.
![]()
Note: The prop can be any object like a tissue roll, mobile phone, or anything seen as a passing object from one character to another.

4. A helper at home
There will be one person at home during video shooting to pretend a friend’s or family’s hand reaching to the other character from off-camera.
For example, while performing a high-five action, insert the hand of any member with whom you are living in the scene, showing as the character adjacent to you. After setting up everything in a row, it’s time to record scenes for the video.

5. Record different takes
To give a professional look to the video, you have to record different takes for each person from different angles. After recording, everyone has to send footage to only one person to edit on Filmora.
After getting things and recording, it’s time to edit it on Wondershare Filmora. For this, follow the lines below!
Part 2. Steps To Edit Split Screen Video in Filmora
Split-screen video editing is as simple as throwing a prop toward someone. Wondershare Filmora with a premium domain will get your back!
Filmora is a more creative and instant platform to edit any video or to give birth to new ideas. One of the prominent features is having ready-to-use templates for editing split-screen video. Meanwhile, you can also do a manual setup for editing. Follow the steps mentioned below to edit a video by using split-screen effects.
Split Screen Effect With Templates
Step1Import footage to Filmora
After picking up the best footage of every character, download the Wondershare Filmora (if you have not already). Then to import the clips, perform the following steps:
Free Download For Win 7 or later(64-bit)
Free Download For macOS 10.14 or later
- First, click on the “Click here to Import Media” button, as shown below.

- Then, select the clips you want to edit from your PC, and then they’ll be shown in the media section of Filmora.
Step2Add split screen effect to the timeline
Before adding the clips to the timeline, add the split screen effect to the timeline by following the below-mentioned steps:
- Click on the two-headed arrow at the upper tab.
- Then the drop-down list of two options will pop up, as shown below.

- Click on the Split Screen option, and it will show many split screen effects.

- Select the effect, whatever suits you, and download it then.
- After downloading, drag and drop the effect on the timeline section.

Step3Add clips to the effect
After adding the effect to the timeline, it’s time to implement it on the clips or footage. For this, follow the below-mentioned steps:
- Drag and drop the clips based on your storyboard in the required section.
- Then import the takes wherever and however you want, according to the storyboard.

If you don’t want any templates to be used in your video, then you can manually make a screen split layout. To do this, check the below section.
Manual Split Screen Layout
If the storyboard is organized in such a way that you can’t find out any of the templates suitable, then you can easily create a customized one for your video. In a customized split screen, you can set the duration and adjust the frame rate according to your choice.
Step1Import the clips
First, you must create a timeline to edit your split-screen video. To do this, take a look at the below steps!
- Click on the Import icon in the main preview when you open Wondershare Filmora.
- Then, import all the clips or footage you want to edit.

Step2Add all footages to the timeline
After importing all the clips of interaction videos into Filmora, our next step is to add our videos to the timeline.
- Simply click on the imported clips present in the project media section.
- Then drag it to the timeline below and drop it in the required track of videos.
Do the above-mentioned steps with all the clips present in the project media block.

Doing so will create a working timeline you can view and edit as you go along the editing process.
Step3Adjust the frame rate of all clips
It is all set that your storyboard is customized, for this you have to resize all the clips manually. To arrange clips according to the size, follow the below-mentioned steps:
- First, double-click on the clip you want to edit in the timeline.
- The Basic settings of the video will open in which you have a lot of options to edit.
- Click on the Transform option, and its setting will pop up on the top left side.
- Find out the Scale option from the settings and check out its range.

Adjust the scale rate according to your choice by sliding from its section.

![]()
Note: Repeat this process with all other clips present in the timeline to adjust them in such a way so that the hands moving from frame to frame will line up.

Step4Adjust the timing of clips
After adjusting the frame, you now have to adjust the timing of the clips. To perform this action, follow the below steps:
- Arrange and move around the clips on the timeline so that the timing of the scene lines up between each shot.
- Drag the edge of the clip to the right side if you want to increase the timing and duration.
- While dragging the edge of the clip to the left side, if you want to decrease the timing of the clip.
![]()
Note: The most important part is the first time a hand is supposed to move from one frame to another.
What to do if there is any lag in the preview?
If you’re experiencing lag during the preview, click on the “render” button on the top right of the timeline. It will help to render for a smooth preview.

Step5Splitting the clips
If the timing in your scene starts to fall out of sync, then do the following steps:
- First, try splitting all of the clips.
- Ensure to split before they start to fall out of sync.

![]()
Note: Splitting the clip before one person’s dialogue is preferred.
Step6Full-screen moment
After splitting the clips according to adjustments and storyboard, you can now make one of the characters’ videos in full screen. For this, follow the below steps:
- First, make another cut in the clips before the next hand-crossing action.
- Take one of the characters’ videos from clips in-between moment and make them full screen.

![]()
Note: You can quickly do full screen by double-clicking on the clip and unchecking the “transform“ heading in the top left window.

Final Results
You’re now free to re-adjust your clips in the next part back into sync. If you still want to make any adjustments in duration or cutting or sizing, you can do it easily. Because it’s a customizable effect. Give a pat on your Back! You did a great job and accomplish the results!

Free Download For Win 7 or later(64-bit)
Free Download For macOS 10.14 or later
Conclusion
An instant way to make split screen video and edit it is hidden in Wondershare Filmora . You can unwrap it by following the above-mentioned steps and giving a new life to your interaction videos.
Enjoy new and creative ideas with your family and friends and make your video trendy by Filmora. If you are an influencer, you can interact with other bloggers and influencers and make split-screen videos. It will be a great treat for you and your social media followers!
Also read:
- Updated Merge MP4 Online? Its Easy With These 5 Tools for 2024
- Updated 2024 Approved The Ultimate Guide to Using Shotcut To Rotate Videos
- New 2024 Approved Easy Ways to Change Aspect Ratio in iMovie?
- New 2024 Approved Guide To Creating the Best Video Collages
- This Article Aims to Provide a Step-by-Step Guide to Changing a Videos Speed by Using the Speed Adjustment Panel and Duration Panel on Wondershare Filmora for 2024
- In 2024, Competitive Guide To Use Slow Motion in After Effects
- New 10 Best Camera for YouTube Beginners
- New Reversing Time Lapse Videos on iPhone Using Top Applications for 2024
- What Is AI Composite Video App and AI Composite Video Guide for 2024
- New Do You Know Adding Subtitles Can Benefit Video Content? Meanwhile, for Adding Subtitles to a Video, Wondershare Filmora Can Help You
- Updated 2024 Approved How to Brighten Video in Premiere Pro
- Updated Best GIF to Video Converters for 2024
- In This Article, You Will Learn How to Create an Attractive and Engaging Slideshow Video Using Tools Available in the Wondershare Filmora for 2024
- Updated In 2024, How to Create Cinematic Style Videos?
- 2024 Approved Learn How to Perform Velocity Edits on Your PC
- Learn How to Blur the Background in Adobe Premiere Pro with Our Quick and Simple Step-by-Step Instructions to Make Your Subject More Attention-Grabbing for 2024
- Updated 2024 Approved 2 Solutions to Cut Video in VLC on Windows
- In 2024, Are You Stuck with How to Use Discord GIF Ideally? Check that Out in This Article, as We Will Guide You on All You Need to Know About GIFs for Discord
- Updated 2024 Approved How to Apply Video Filters
- Updated 15 Best Video Editing Courses Online with Certificate Free $ Paid for 2024
- What If YouTube Zoom to Fill Not Working, In 2024
- 2024 Approved How To Add Fade In Windows Video Editor
- New Top 10 Online And PC Cartoon Video Maker 2022 For Beginner
- 2024 Approved This Guide Is to Help You Select the Ways that Meet Your Needs, and It Is Easy for You to Combine 2 or More Videos Into One Video
- How to Do Masking in After Effects Alternative Provided for 2024
- Updated 2024 Approved How to Speed up a Video on Splice
- Updated Splice Video Editor Online - Get Your Videos Splice
- How To Create The Best AI Thumbnail Using The Right Tools?
- In 2024, How to Resize FLV Videos EfficientlyWindows, Mac, Android, iPhone & Online
- New 2024 Approved The Ultimate Guide to Slideshow Maker with Music
- Updated In 2024, 10+ Best Unlimited FCPX Slideshow Templates
- Browse the List of the Best 8 Scanners or Converters for Converting the Slides to Digital Images. Also, Know the Other Important Information of Slides to Digital Conversion
- 3 Best Motion Blur Plugins for Adobe After Effects for 2024
- In 2024, 10 Best Cartoon Video Makers (Online and Desktop Solution)
- New In 2024, After Reading This Article, You Can Add a B-Roll Feature From Filmora and Captivate More Audience. Explanation Video B-Roll and Story-Telling B-Roll Are Well Illustrated
- New In 2024, 10 BEST TEXT TO SPEECH VIDEO MAKERS
- New 2024 Approved Guide To Creating The Perfect VHS Effect Look in Premiere Pro
- Updated 5 Tips for Faster Editing in Filmora Video Editor for 2024
- Updated 2024 Approved Want to Immediately Know All About Discord GIF?
- Here Are Some Reliable Ways to Get Pokemon Go Friend Codes For Realme GT 5 Pro | Dr.fone
- New What Is the Best Collage Photo Grid Maker - Experts Choice
- 3 Facts You Need to Know about Screen Mirroring Honor 90 Pro | Dr.fone
- How to Repair corrupt MP4 and MOV files of Tecno Spark 10 4G using Video Repair Utility on Windows?
- Your Account Has Been Disabled in the App Store and iTunes From iPhone XS?
- New 2024 Approved How to Make GIF Stickers for WhatsApp 100 The Easy Way
- Will Xiaomi 13T Pro play AVCHD mts files?
- Updated In 2024, Little Known Techniques of Motion Graphics in Premiere Pro
- In 2024, The Ultimate Guide to Bypassing iCloud Activation Lock on Apple iPhone 7 Plus
- How to Reset a Locked Nokia C02 Phone
- How to Hard Reset Motorola Moto G14 Without Password | Dr.fone
- Title: How to Create the Stranger Things Upside Down Effect for 2024
- Author: Chloe
- Created at : 2024-05-20 03:38:35
- Updated at : 2024-05-21 03:38:35
- Link: https://ai-editing-video.techidaily.com/how-to-create-the-stranger-things-upside-down-effect-for-2024/
- License: This work is licensed under CC BY-NC-SA 4.0.

