:max_bytes(150000):strip_icc():format(webp)/GettyImages-1135364530-dec5678c0c2c427ba18ae21452ff6326.jpg)
How to Create Your Own Subscribe Channel Graphics

How to Create Your Own Subscribe Channel Graphics
Professional video creators earn billions from YouTube, Tick Tock, and such platforms today. That strongly encourages newcomers to create their video content. But is it that easy? Of course not. To create a successful video and catch people’s attention, subscribe channel graphics are essential.
We have introduced how to create a simple custom subscribe button animation for beginners. We are here to give a more advanced and fully animated graphic that will provide your video with a professional look. Let’s start with knowing what a Subscription channel graphic is.
What Is a Subscribe Channel Graphic?
We here give a simple explanation for those new to a subscribe channel graphic. Have you ever watched videos on a platform like YouTube? If yes, you must have noticed some unique pictures encouraging viewers to subscribe to the channel. That is exactly what a subscribe channel graphic is. It looks like as below.
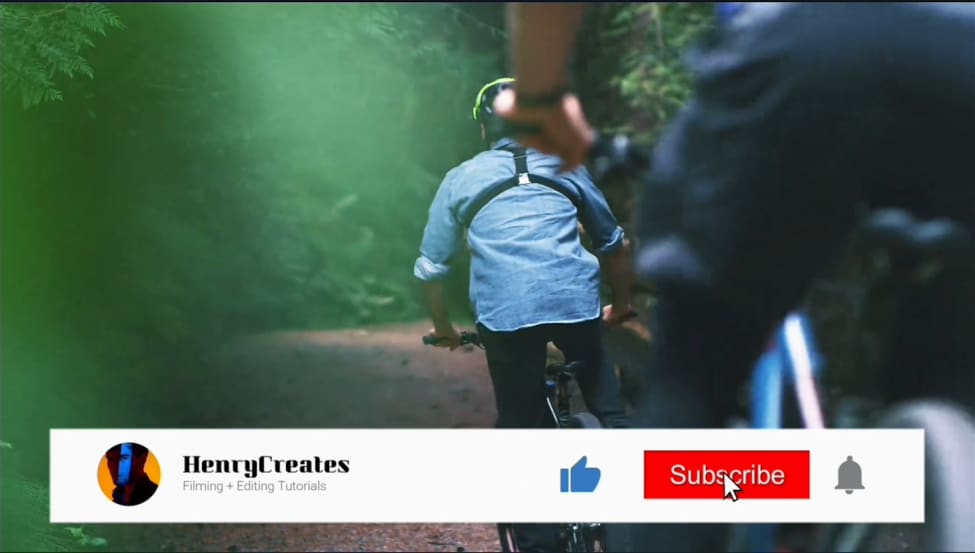
Every video crater incorporates such graphics on their videos before posting them. However, the hardest part is how to create one. We are now moving forward to see how we can make some outstanding subscribe button graphics using Wondershare Filmora.
Create Advanced Subscription Channel Graphics With Wondershare Filmora
Before we dive into our step-by-step guide, let’s first have an overview of our video editor. Wondershare Filmora is an incredible video editor with robust editing features. These features will transform your video into a stunning one within minutes. It also comes with a powerful screen recorder and a large filmstock of templates.
So using these templates, icons, and other features, here are the steps you need to follow to make an advanced subscribe channel graphic.
Free Download For Win 7 or later(64-bit)
Free Download For macOS 10.14 or later
Step1 Download and install Wondershare Filmora
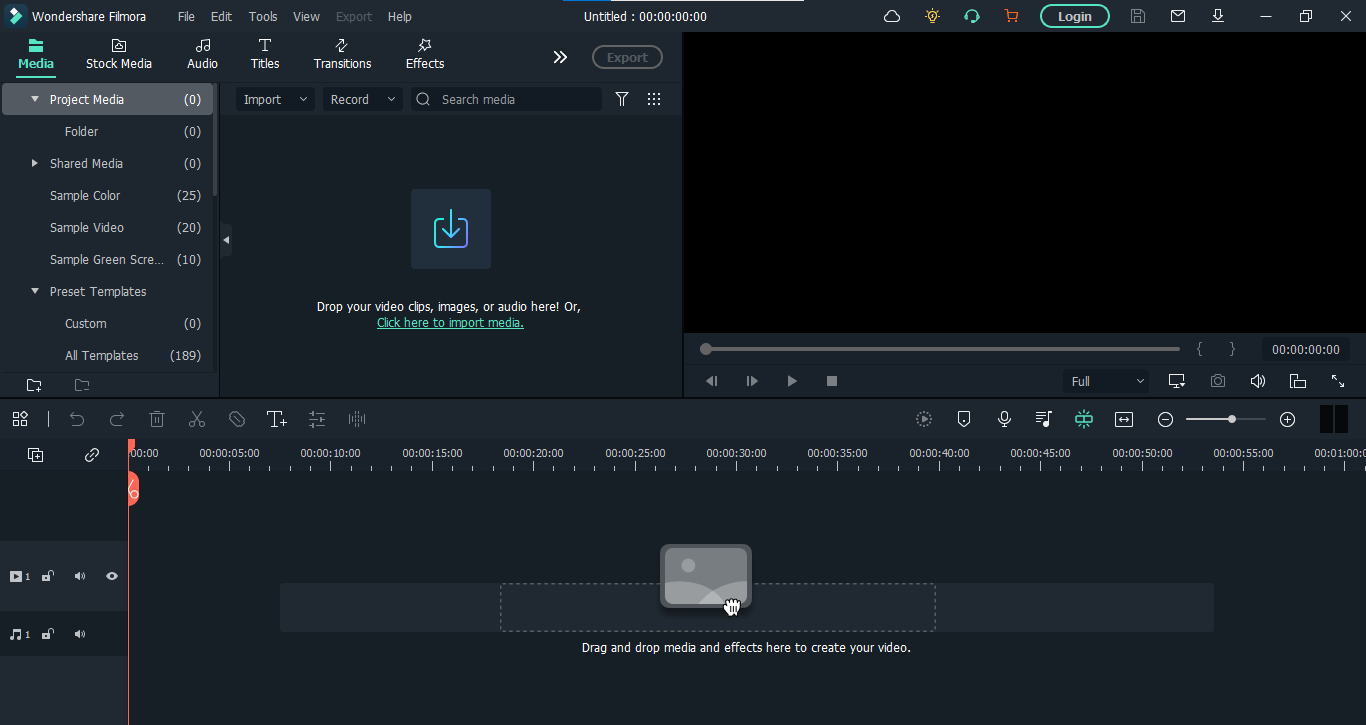
First, you need to download and install the video editor, Filmora. If you’ve already done that, then launch the software right away. But if you haven’t, then download it below. Once the download finishes, install the software on your computer.
When you launch the Filmora, click on “New Project.”
Step2 Make the structure of your graphics
For creating anything, we first need a flawless structure. Here, we can make the structure of Subscribe channel graphics using different colors, icons, texts, and channel photos. We’ll start by adding color layers.
1. Add color layers
- Go to the “Media” on the top left corner of the interface and Click on “Sample Color.” Here find the Green color and add it in the panel below as the first video layer by the drag-n-drop function.
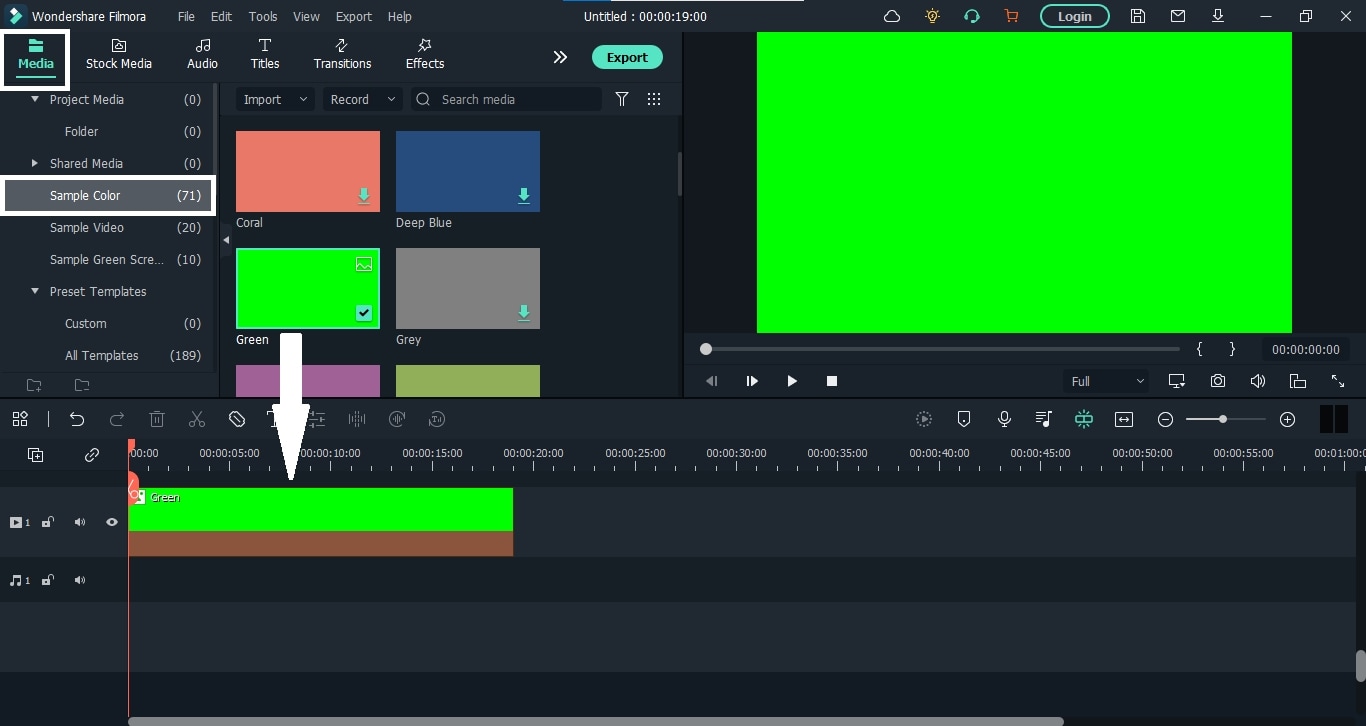
- We will key this layer at the end, so make sure not to use any other green graphics for your animation.
- Let’s lock this layer because we will no longer use it. For this, click on the “Lock” icon on the layer’s left side.
- Add white and red colors and stack them on top of the green color layer.
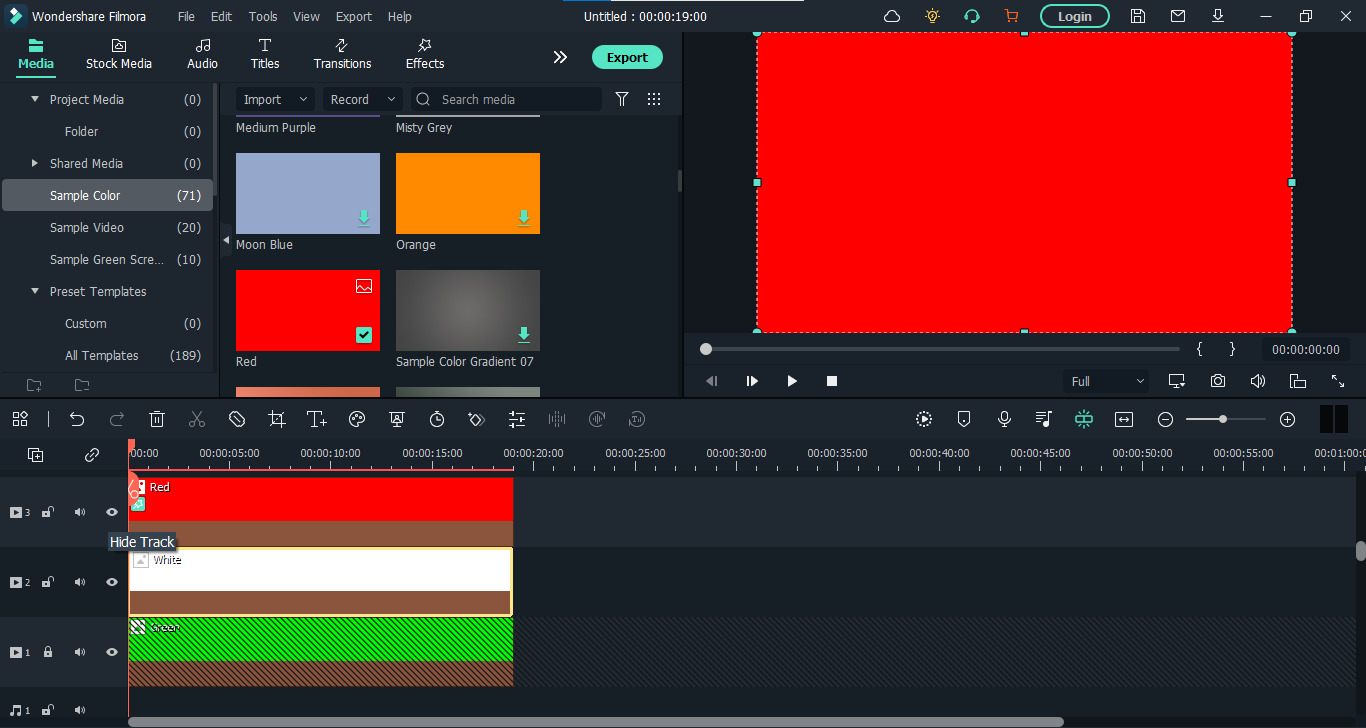
After adding all three color layers, it’s time to crop these layers to make the structure of our graphic.
Crop the Color Layers
- Go to the “Effects” tab from the top bar and search for the “Crop” effect. Then drag the effect and add it to the white and red layers on the panel.
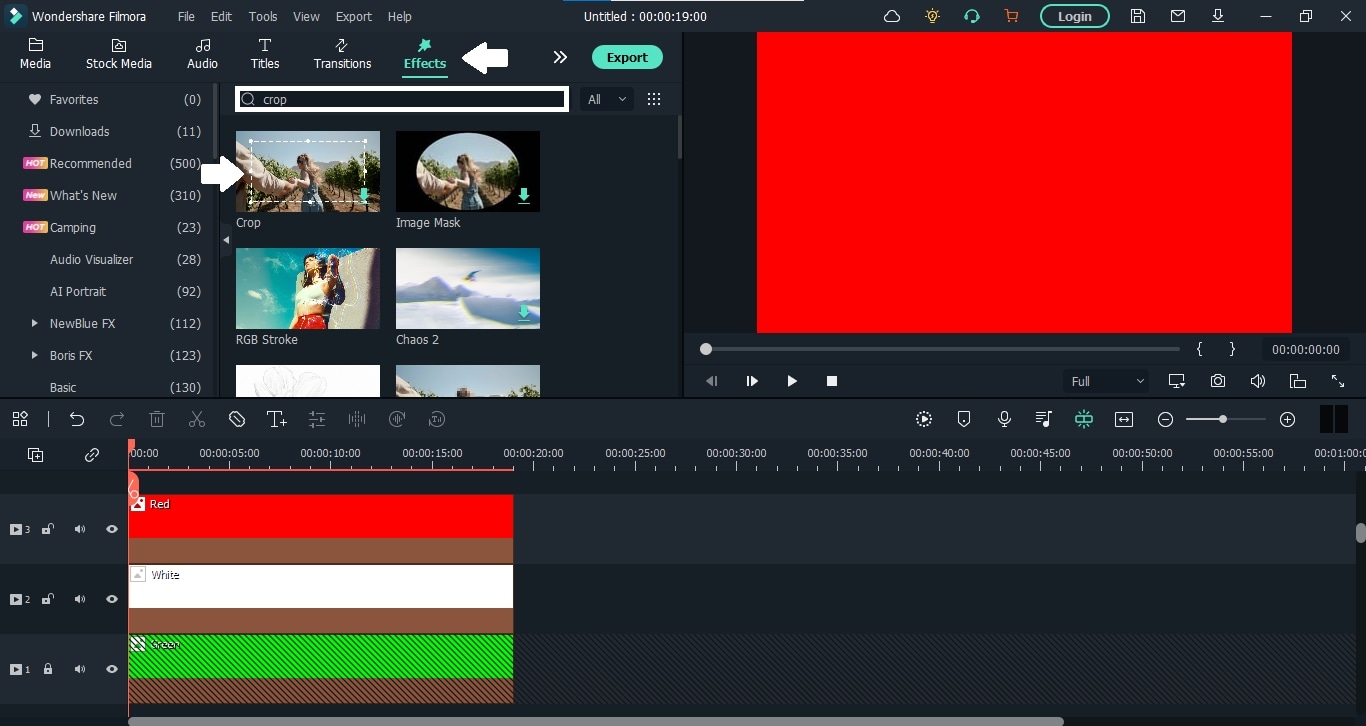
- First, click on the “Eye” icon beside the red color layer to hide it. Then double-click the white layer to see its properties. When the properties appear, select “Effects” from there.
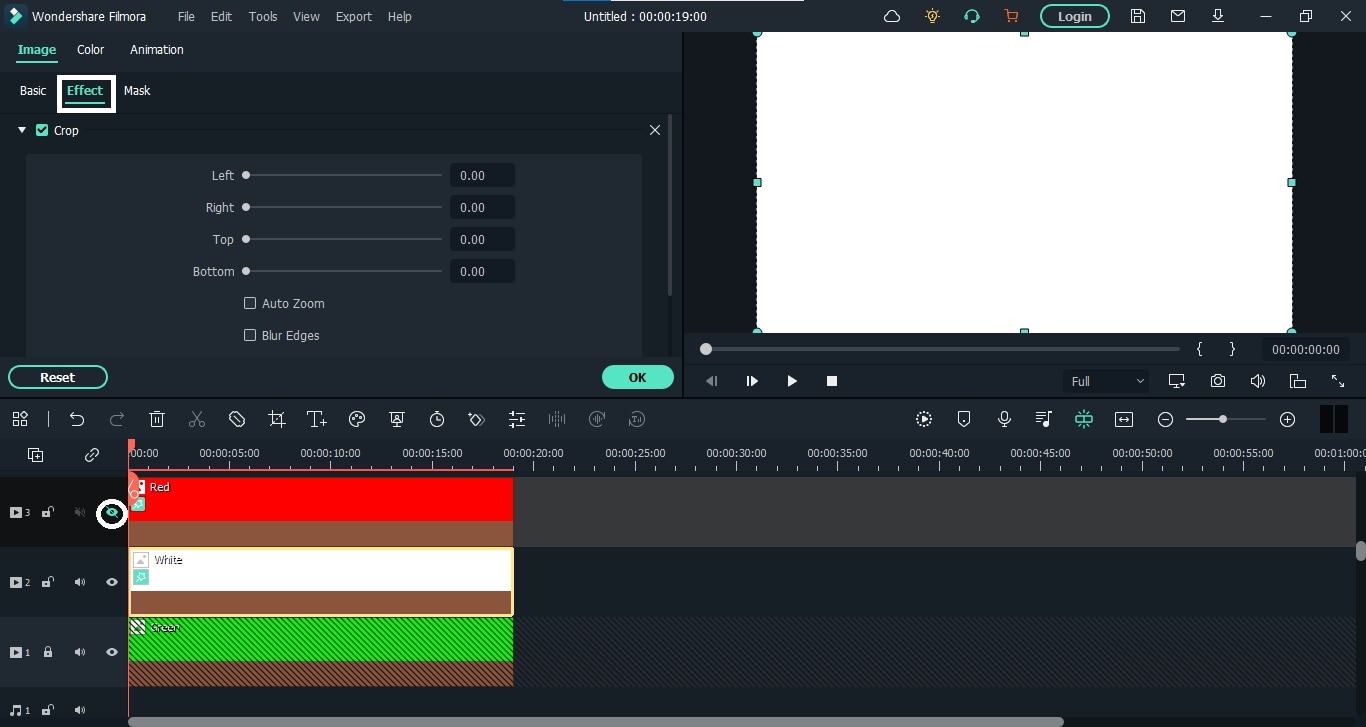
- You can also enable the safe zones from the display settings on the right side of the panel. After that, crop the white layer first, then show the red layer and crop it too. It will look like this.
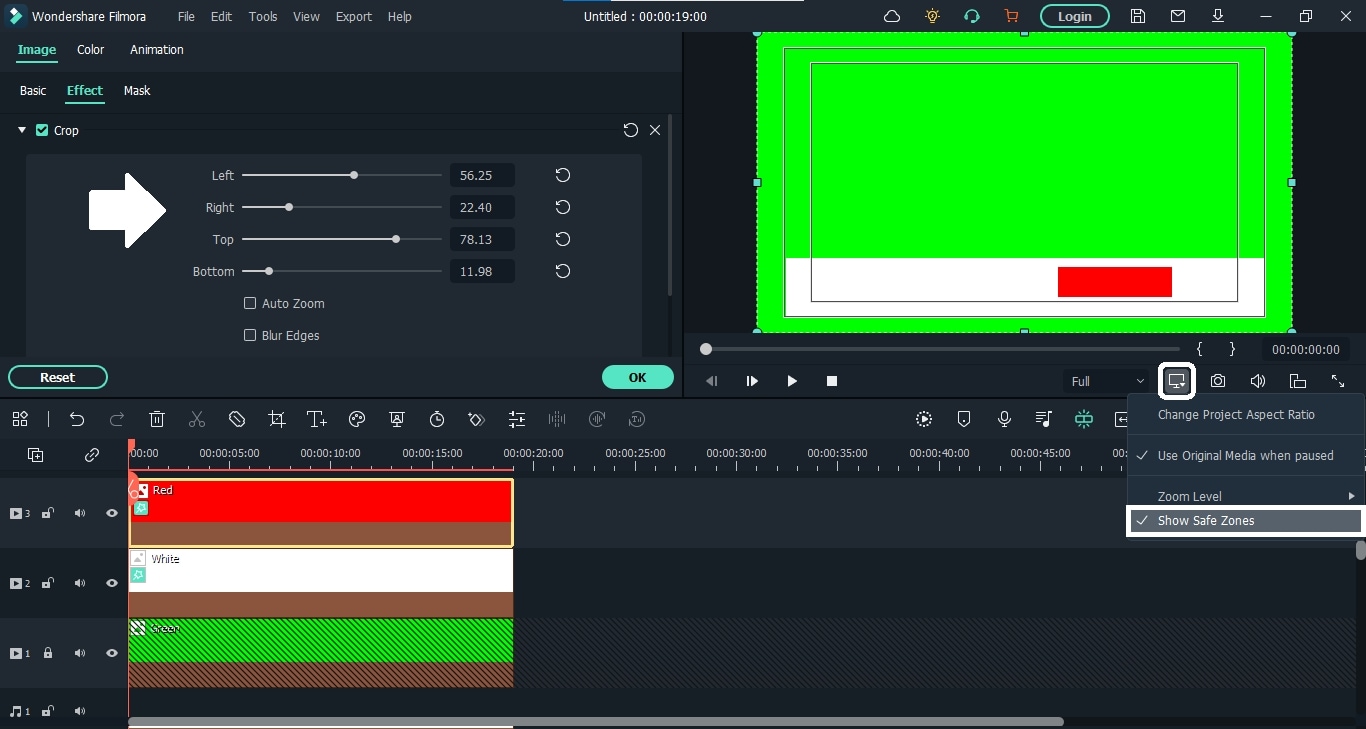
That’s it, folks. Our color backgrounds are here. Now we have to add our channel photo to this. So let’s move on to see how to do it.
2. Add a channel photo
- To add the channel photo, you can upload the image. Here we are going to use some images from the stock media. No matter the image, drop it down on the panel above the red color layer.
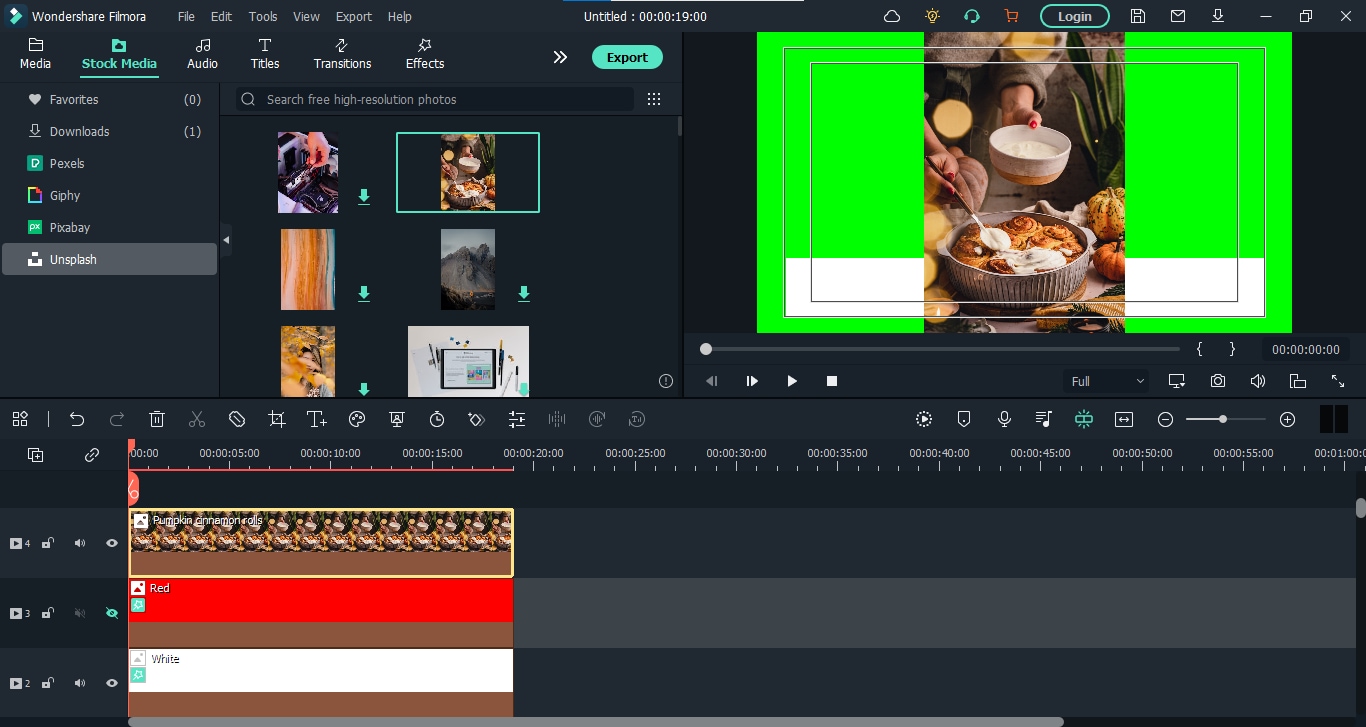
- Now double-click on the image layer, and from the properties, go to the “Mask” option and select the circle. You can also select any other shape you like.
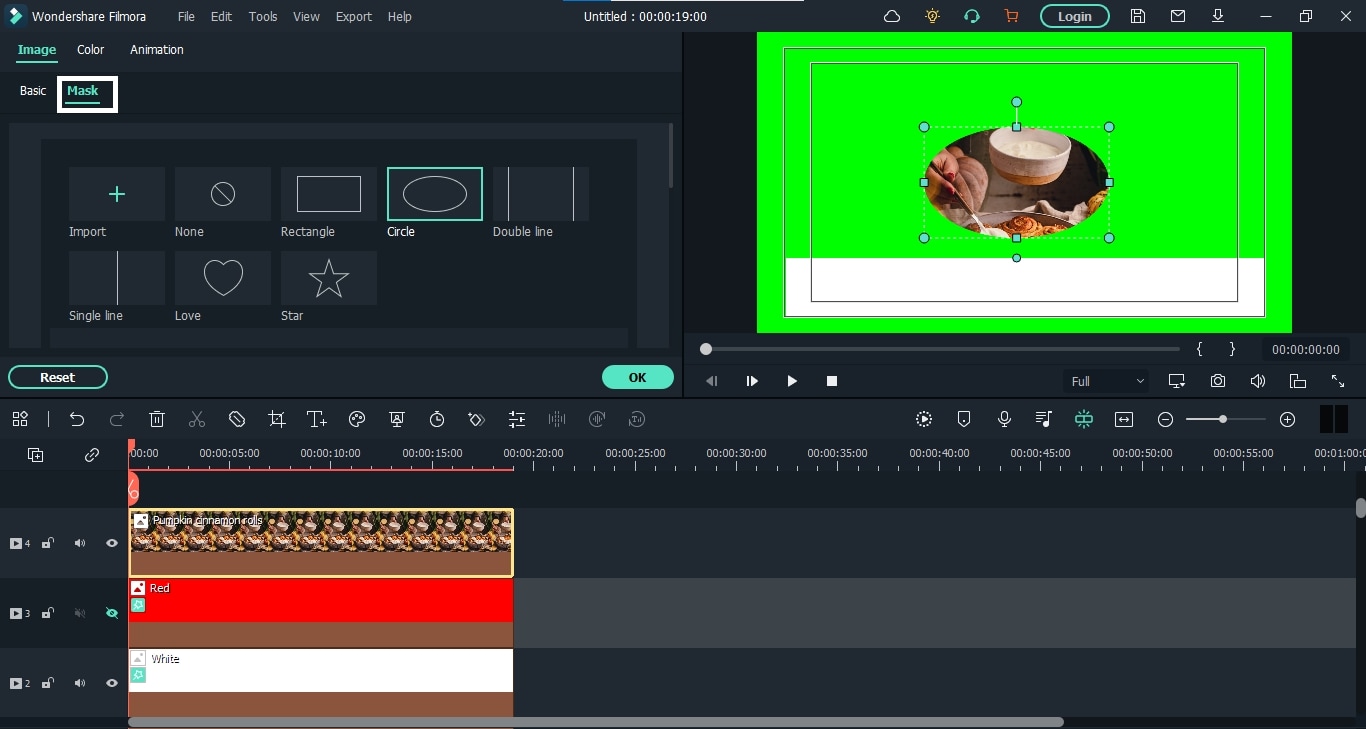
- After that, scroll down and make the circle even by matching all numbers. Then scale it down and place it on the left corner of the white layer.
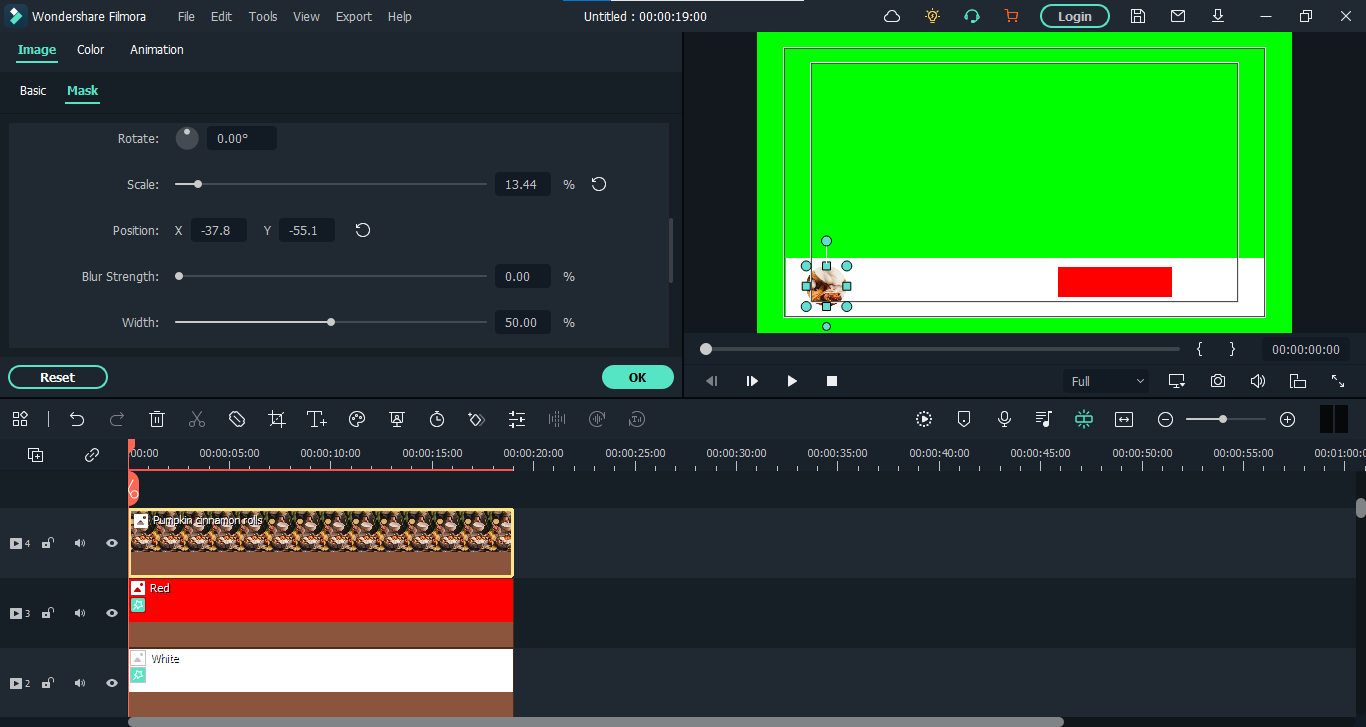
It’s done. Let’s add our channel text now.
3. Add texts
- For adding text, go to the “Titles” from the top bar and add the title you like to the panel.
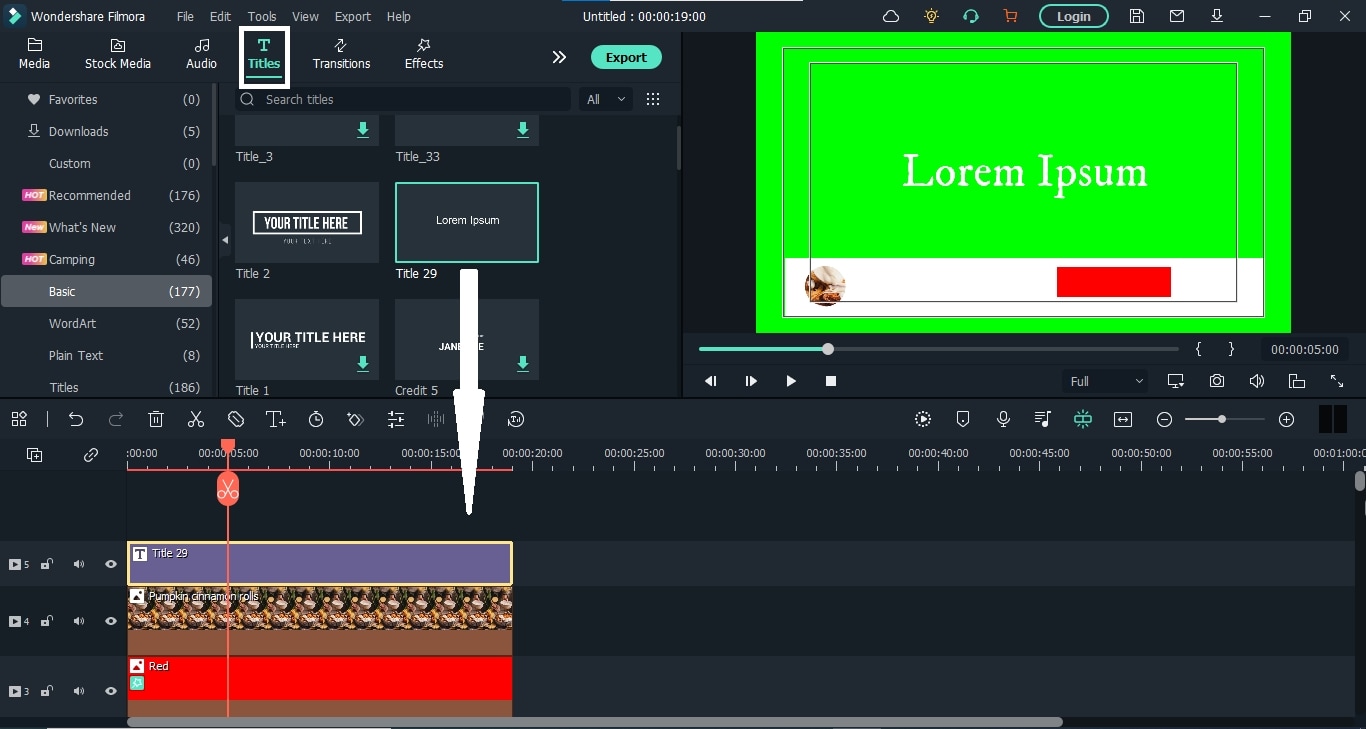
- Now double-click this layer and add the text you want. You can also change the color of the text, scale it down and place it where ever you want.
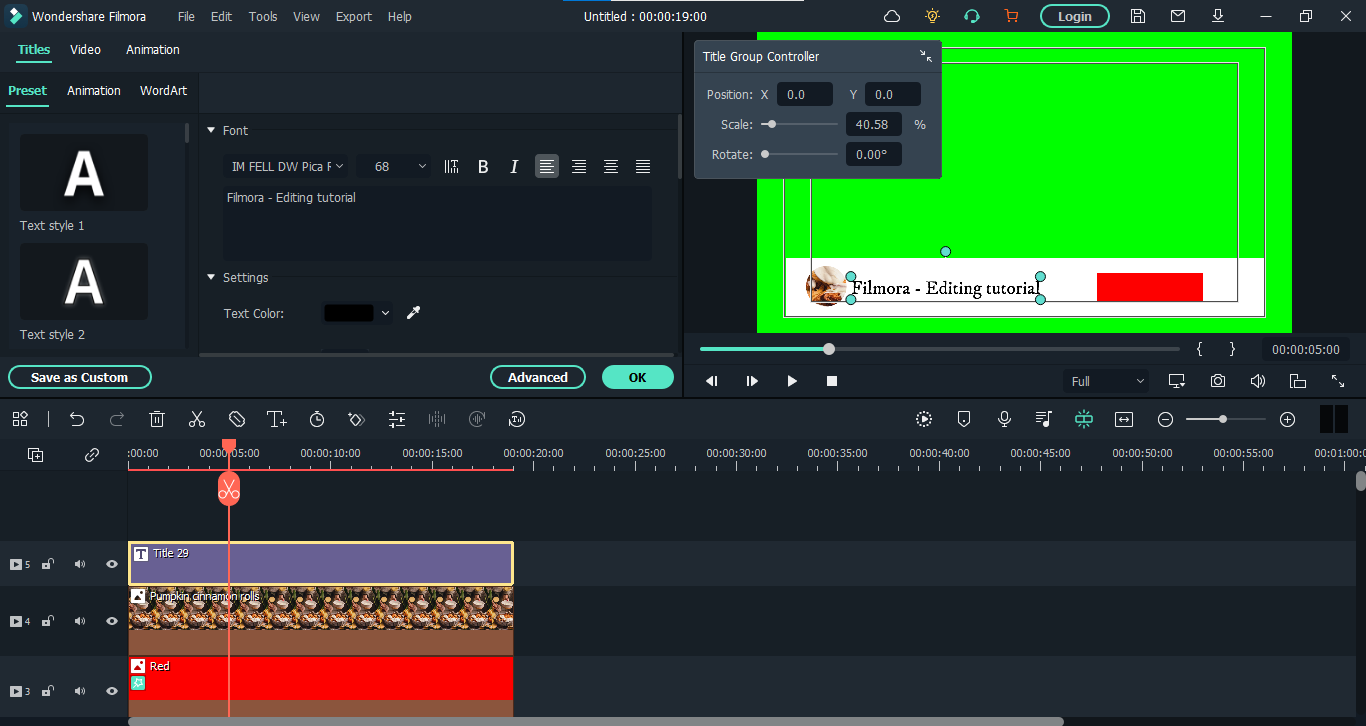
- Now, let’s add another title for the subscribe button. You have to place it on the red layer.
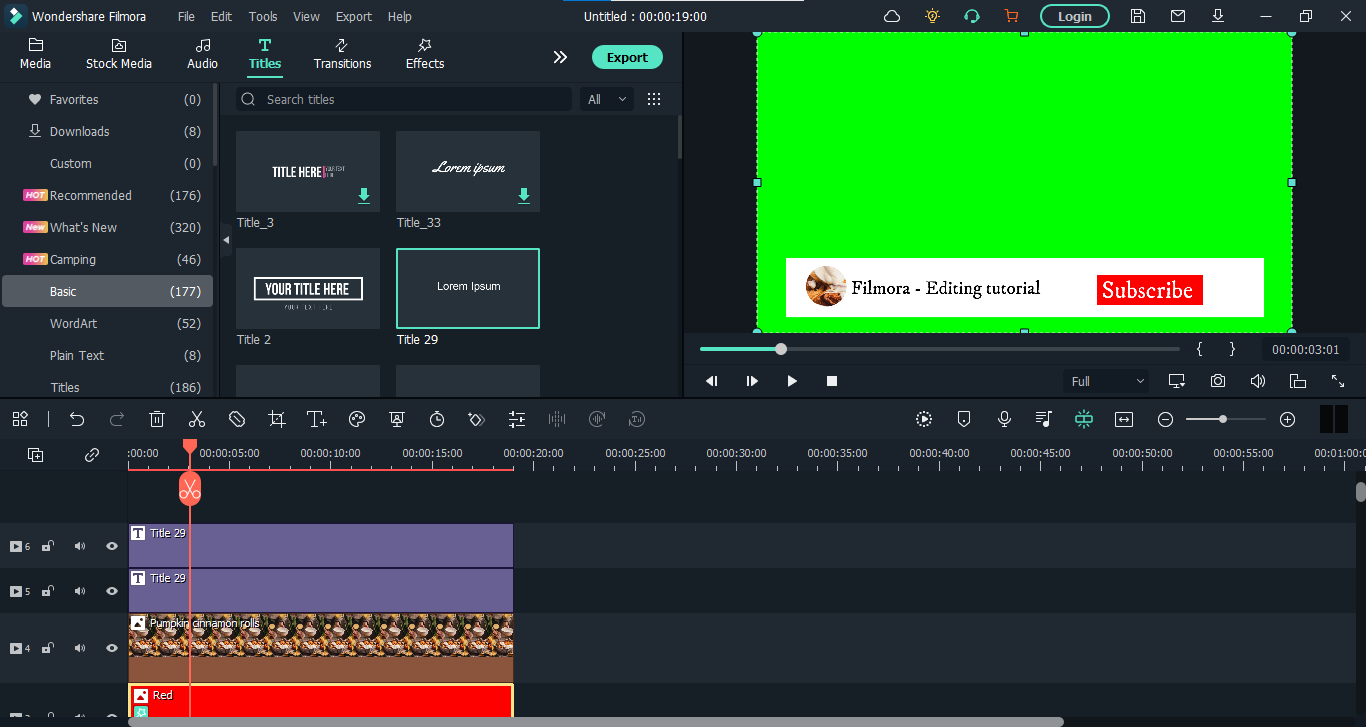
We can’t finish our structure without icons, can we? So let’s move on to them.
4. Add icons
- Hit the “Element” from the top bar and search for the “Bell” icon. You will find the short animations of the bell. Add the suitable one to the panel.
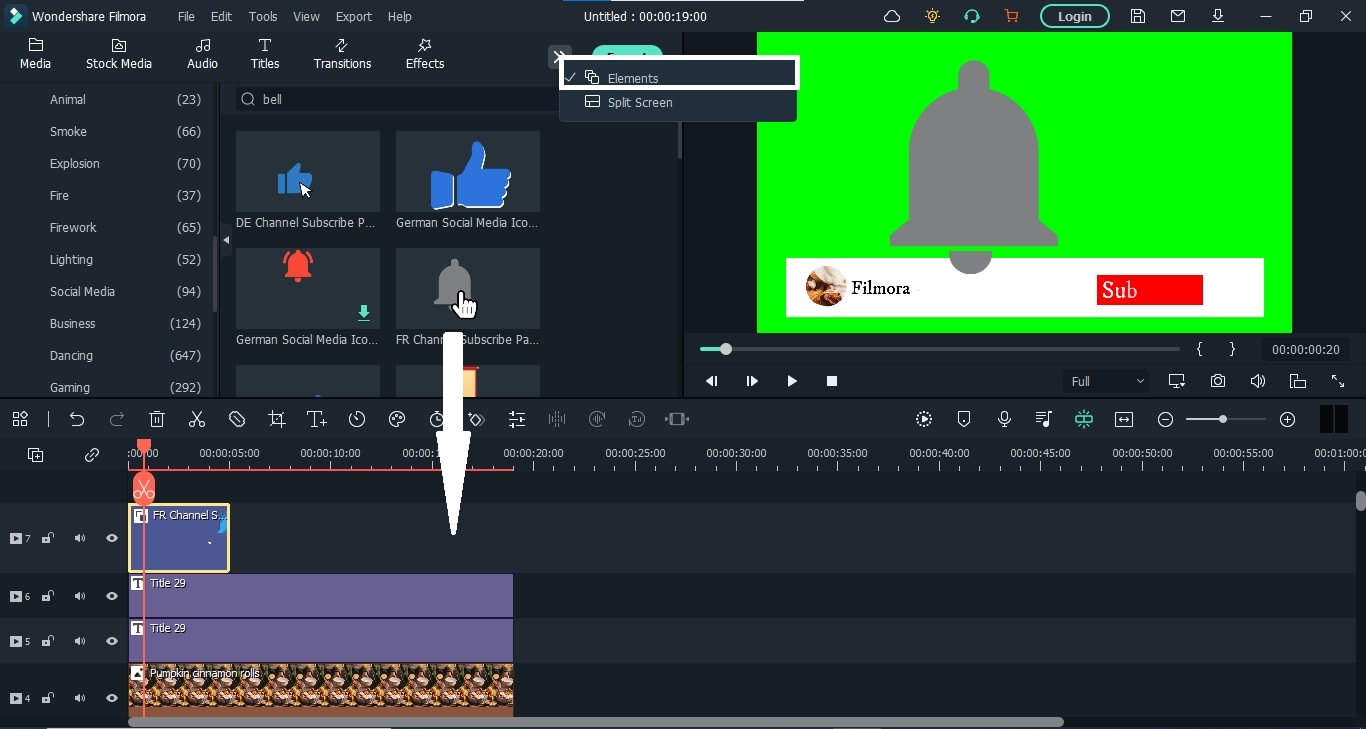
- Now find a suitable place in the animation, stop it at that point, right-click on the element layer and add a freeze frame.
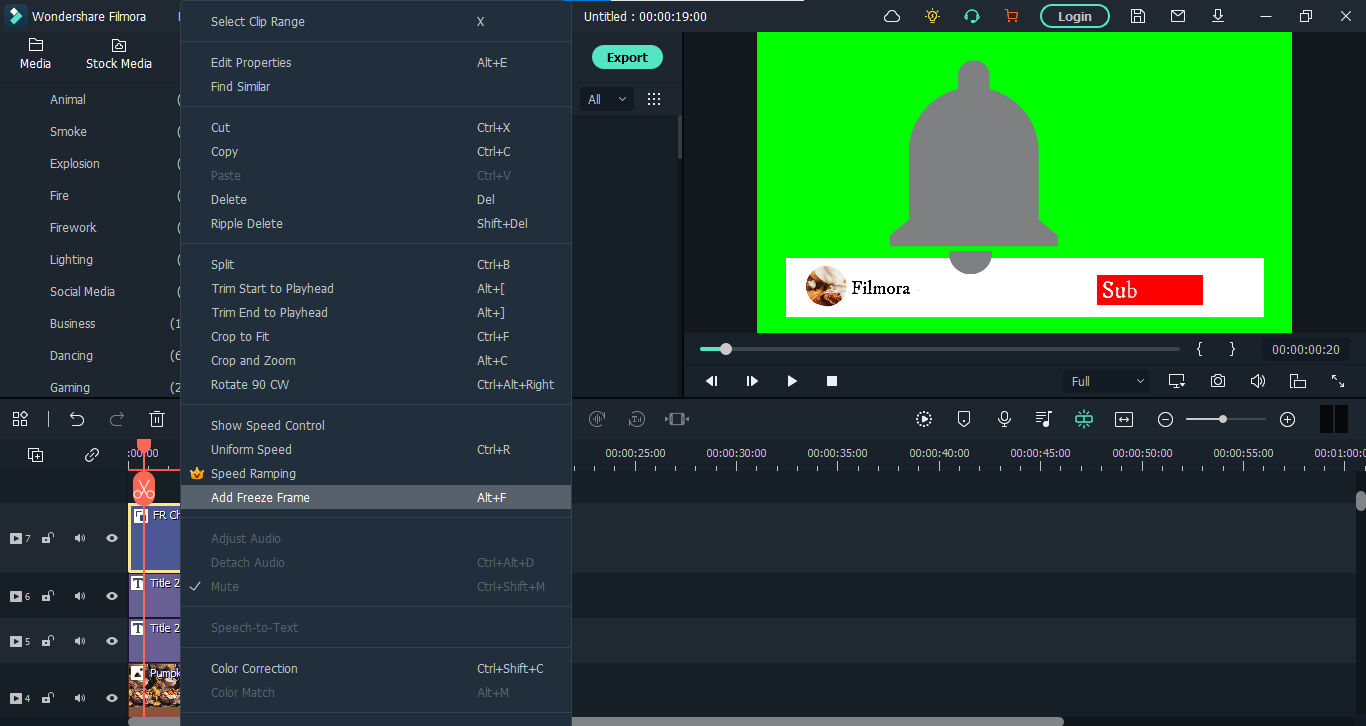
- You can also extend the freeze frame and remove the other parts. Then reduce its size and place it beside the “Subscribe” text.
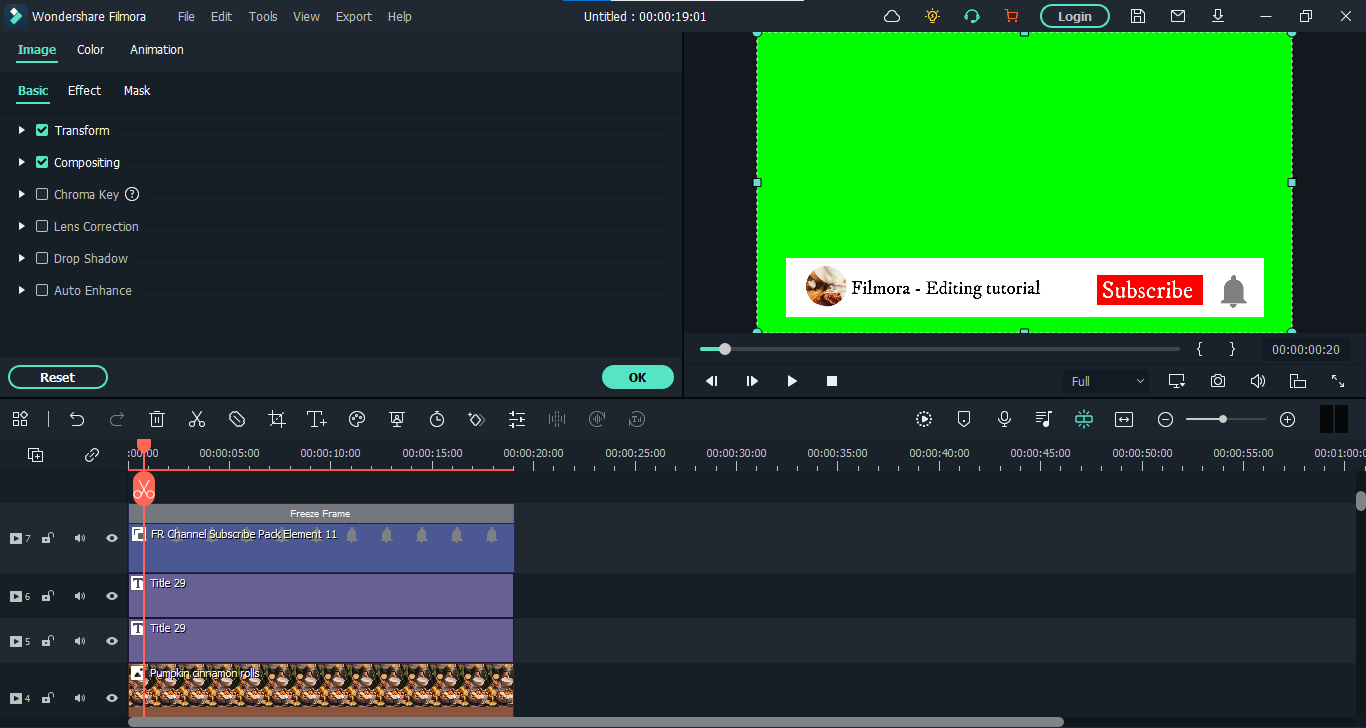
- Similarly, add “Thumbs Up” and “Mouse Cursor” icons on the panel.
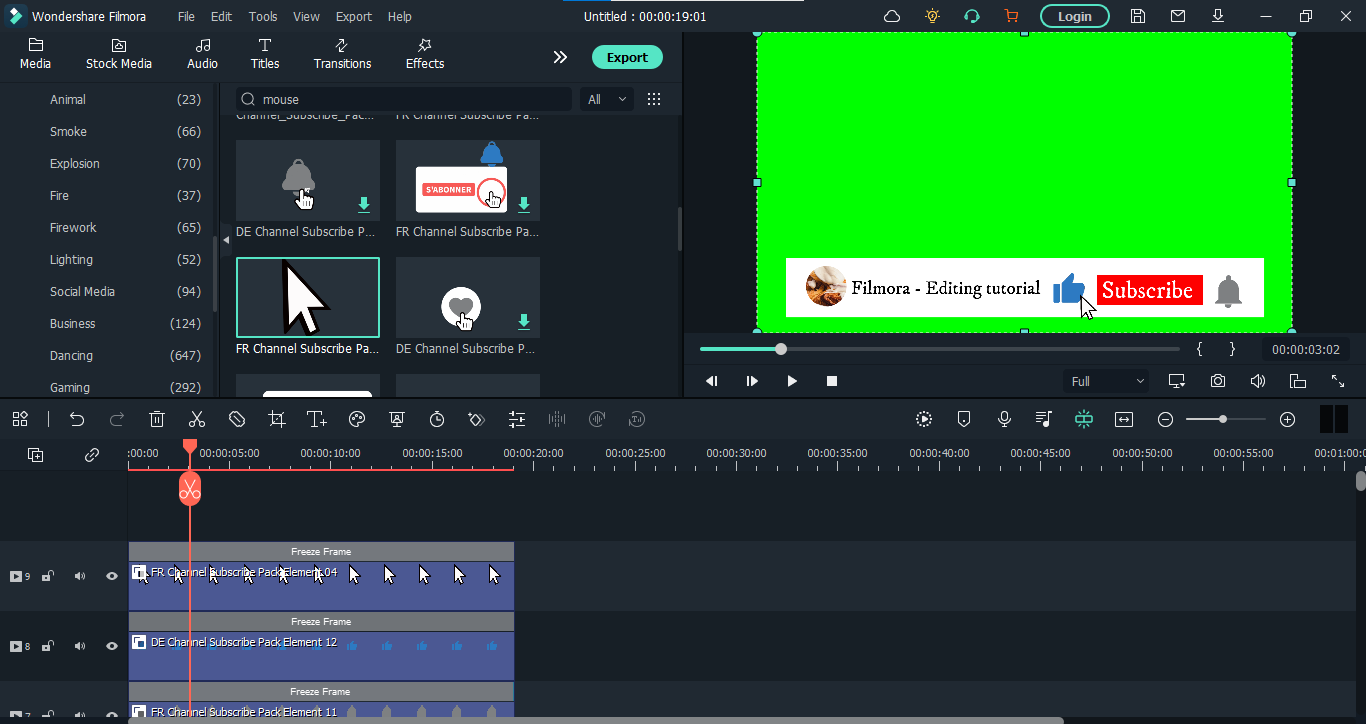
Finally, our structure is finished. Now let’s start animating.
Step3 Animate the graphics
First, we’ll make it so that all these graphics come in from below the view.
- Go to the white layer first and double-click on it. Then hit the “Animation” option and scroll down. Here add a new keyframe by clicking “Add.” Now move the playhead to the beginning and place the white color layer out of the frame.
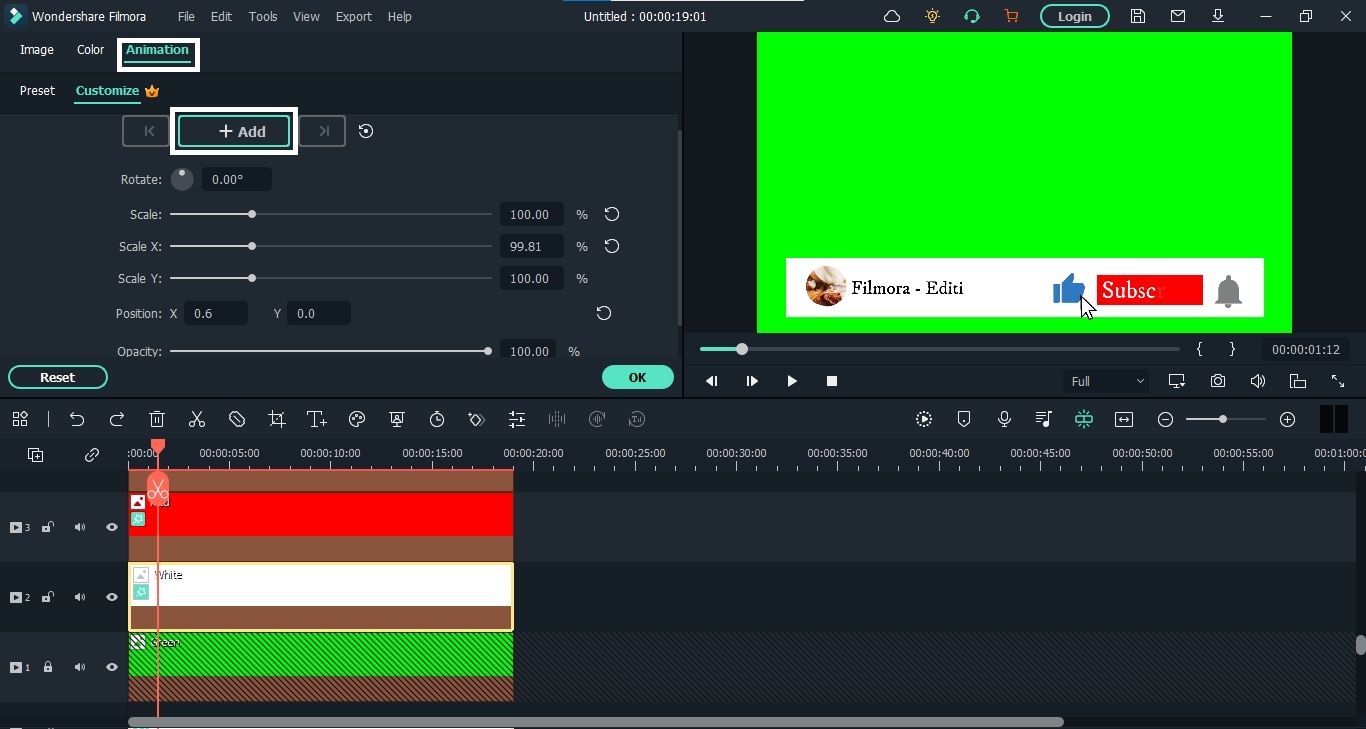
- Now, do the same for channel photos and icons. The whole animation will look like this.
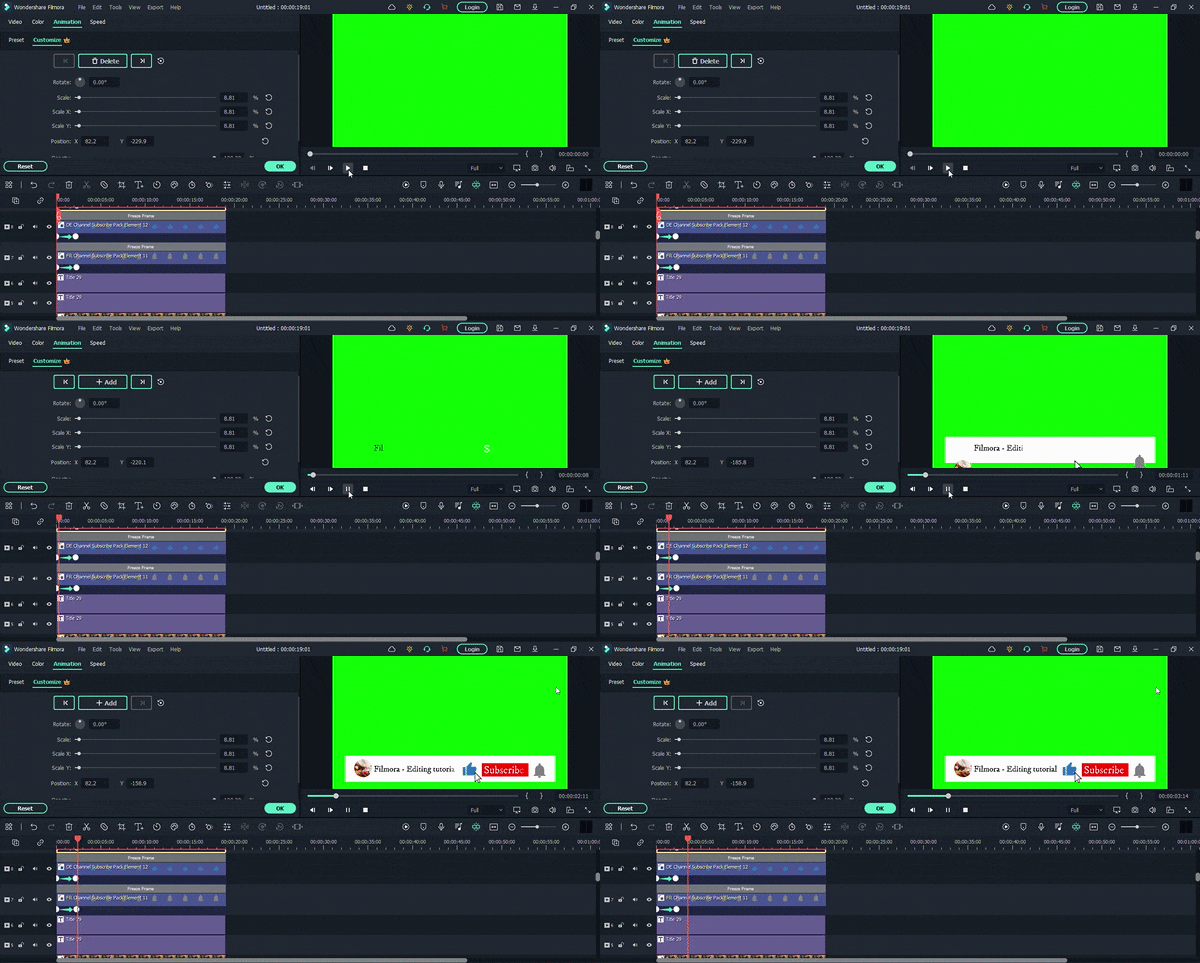
- As you can see, the text appears before the color layers. Let’s correct it. Double-click the text layer. Select the” Type Writer’ form and hit the “Advanced option.
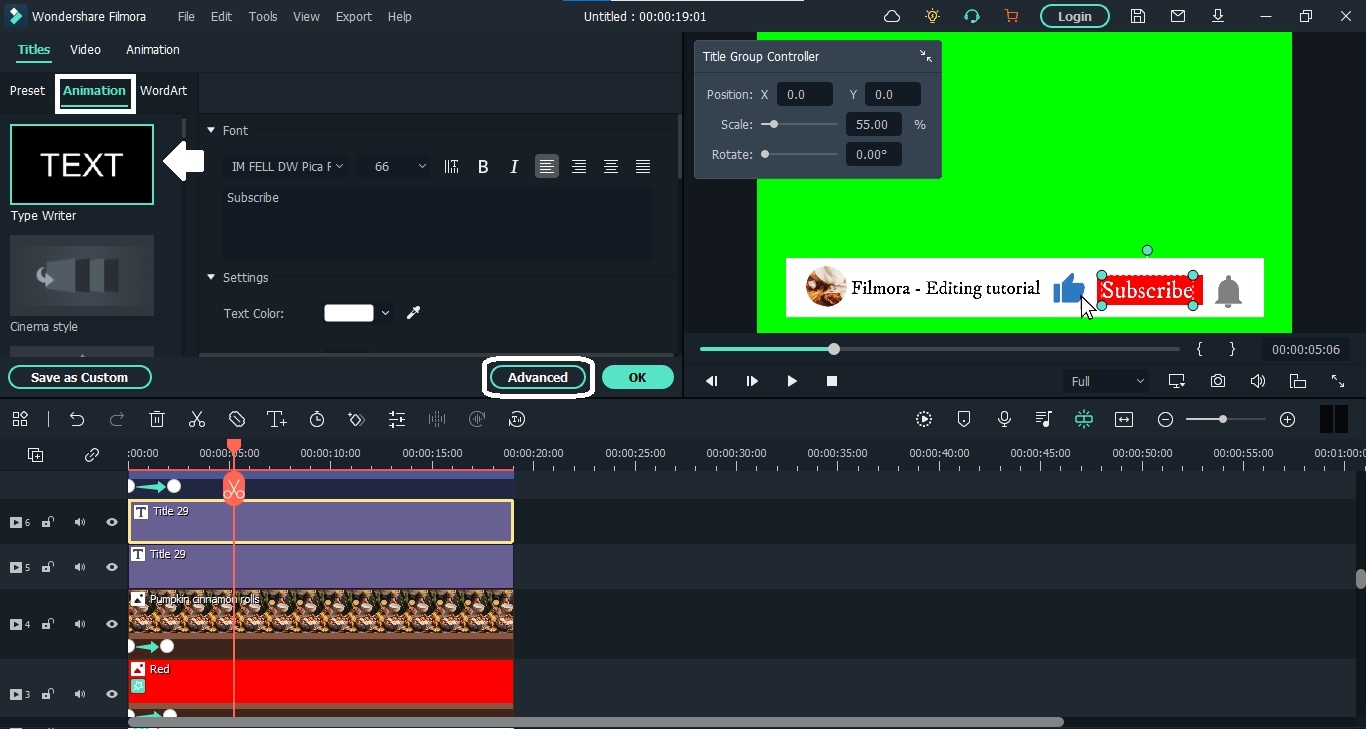
- Here, you can adjust the text with the color layers.
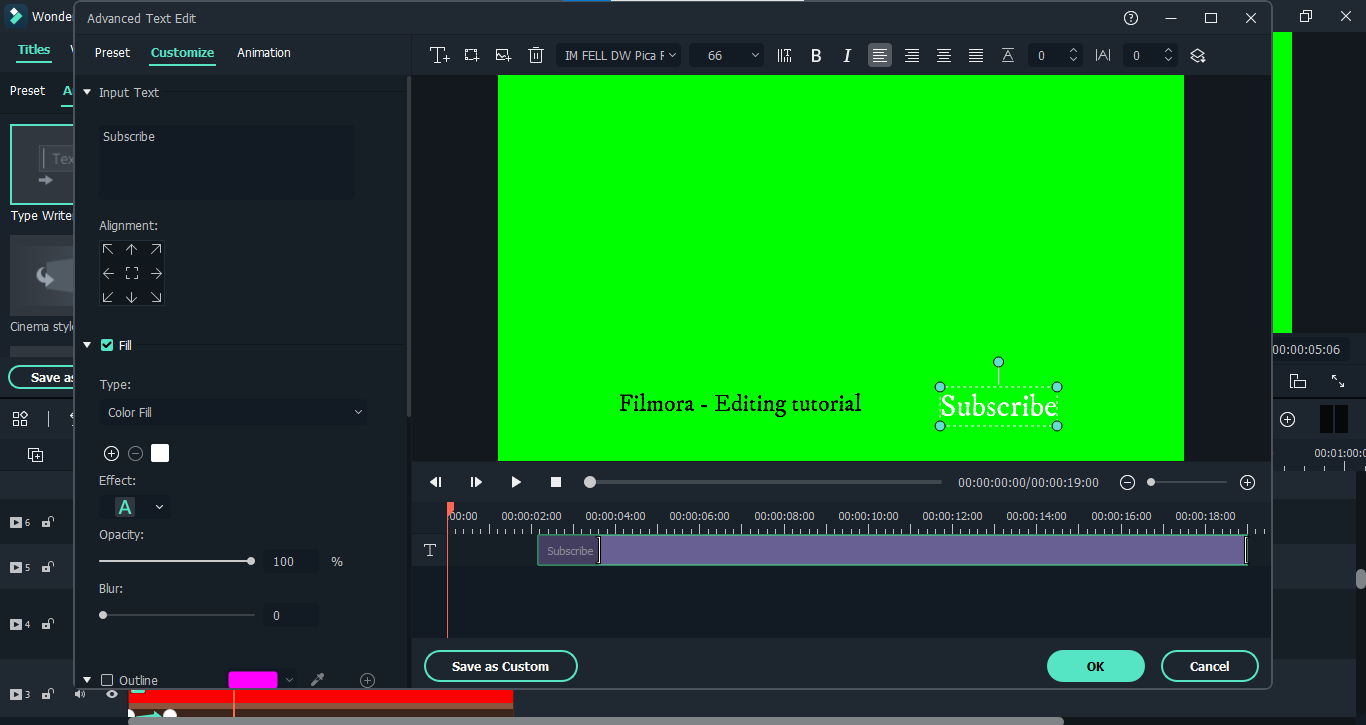
- After adjusting both the channel name and subscribe button texts, your animation will appear like this.
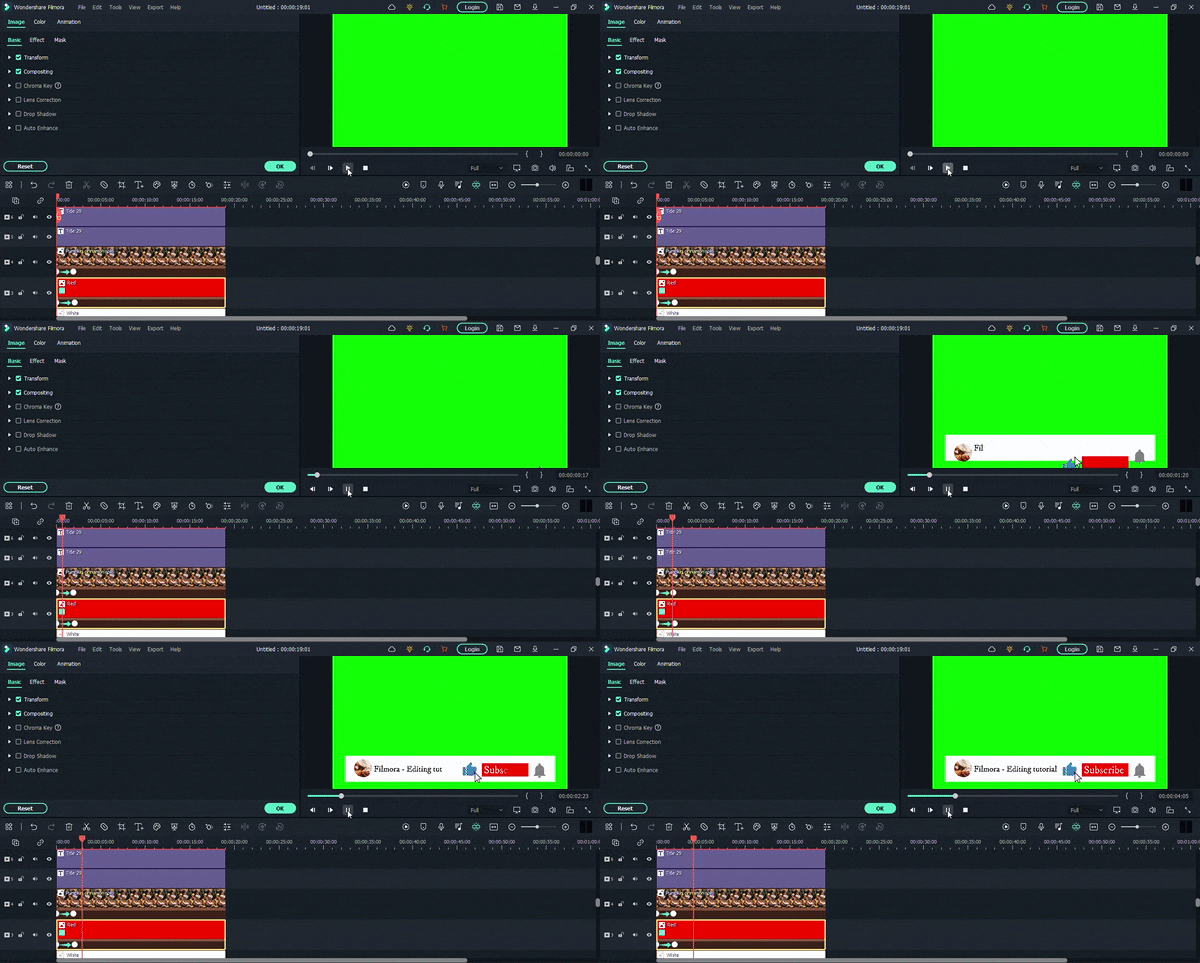
If you’ve managed so far, then that’s great. We have done most of the work. Now we need to animate the graphics of the mouse cursor so that it clicks on the bell icon, thumb icon, and our subscribe button. The process is somewhat similar because we will need to add different keyframes. But still, let’s see it in detail.
Step4 Animate the mouse cursor
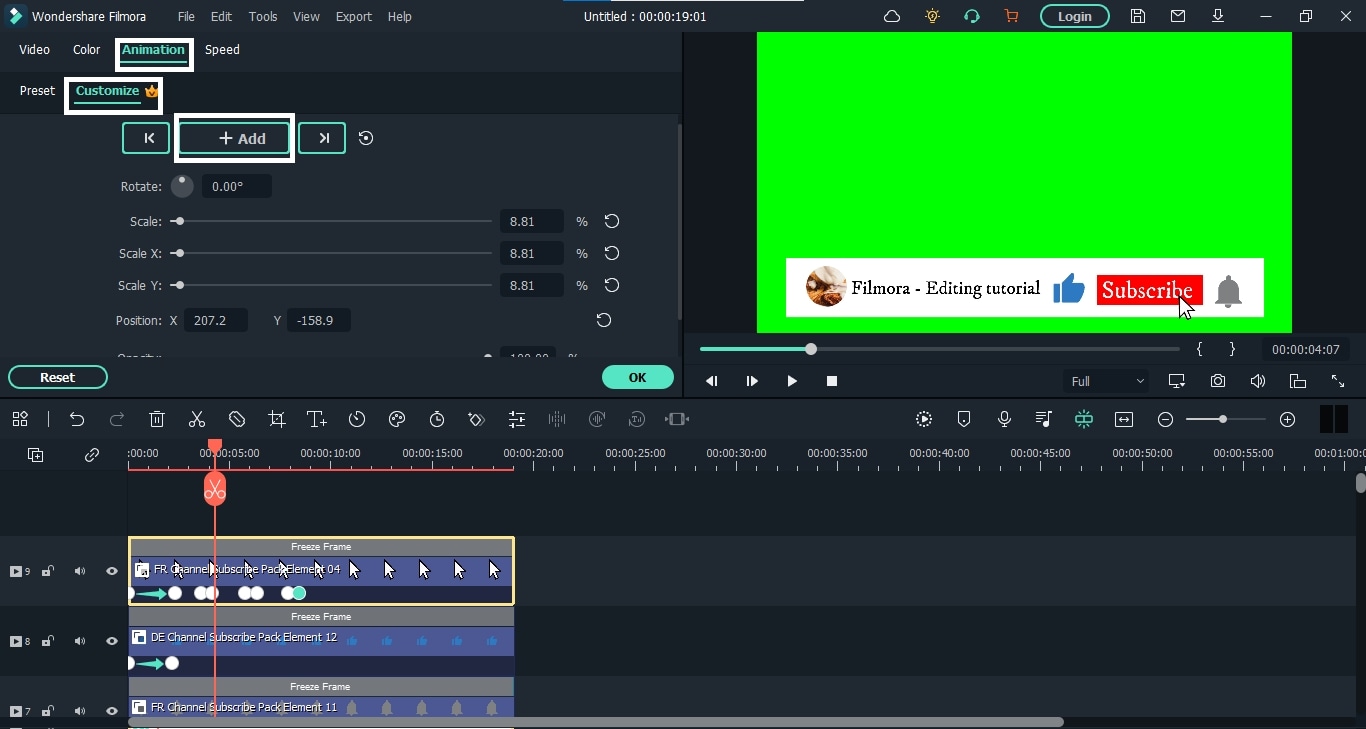
- Go to the “Mouse Cursor” icon layer and double-click on it. First, place the icon on the “Thumbs Up” so that when it animates in, it goes directly to the said icon. Then you have to add another keyframe after some time. And when you add a third one, place the “Mouse Cursor” icon on the subscribe button text.
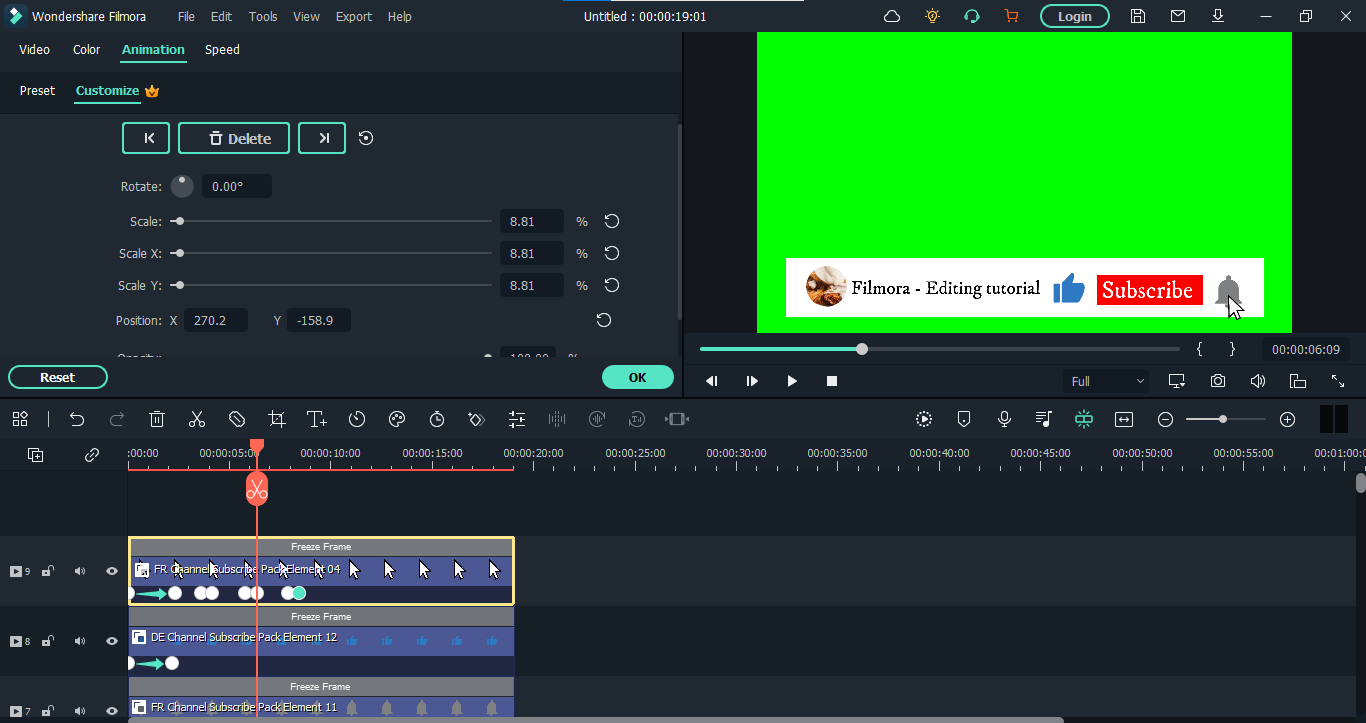
- Then add a similar pair of keyframes with some space from the last one and place the “Mouse Cursor” icon on the “Bell” icon.
- The last keyframe we have to add will place this “Mouse Cursor” icon out of our view. After that, you need to adjust these keyframes to set the speed of the moving “Mouse Cursor’ icon according to your taste.
The final product up till now will be like this.
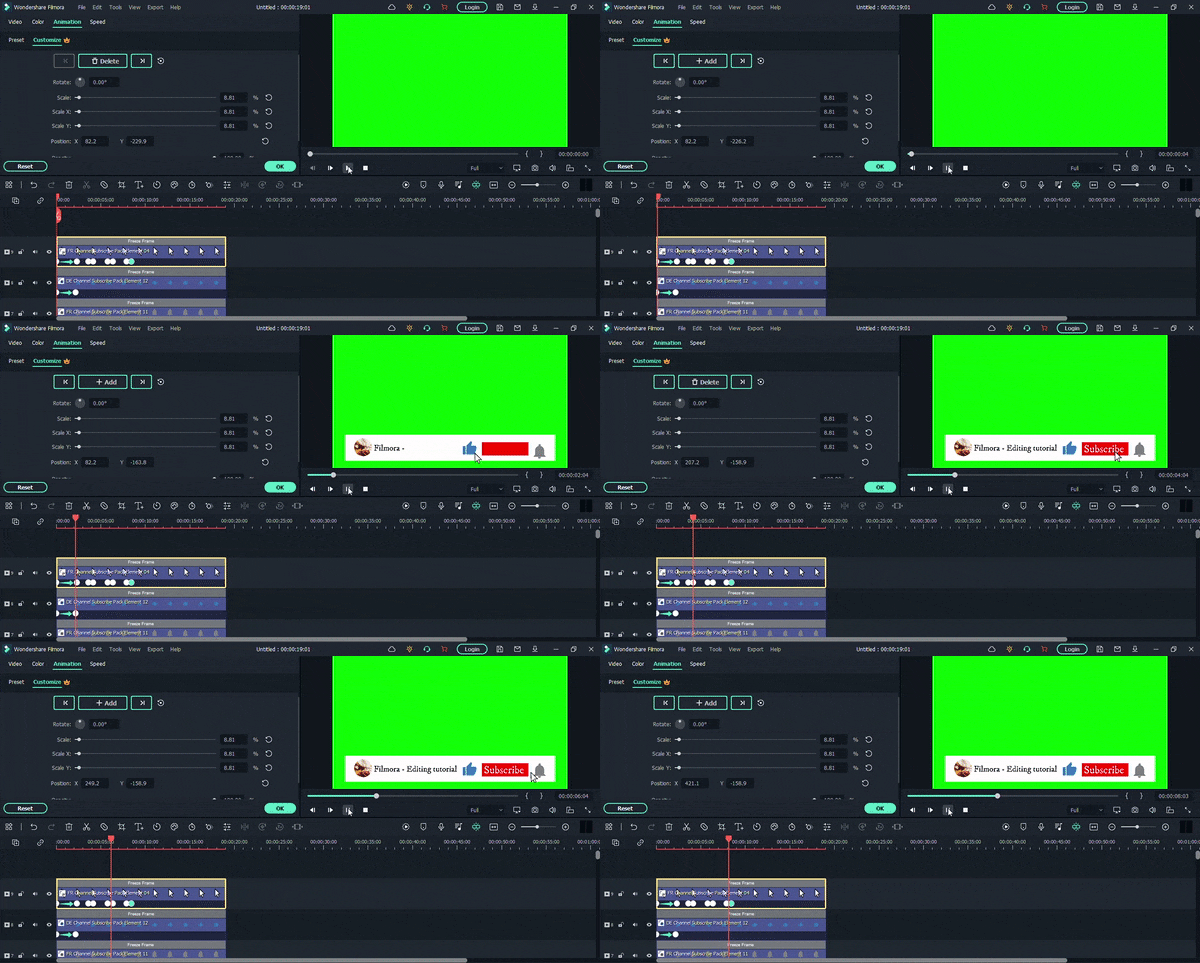
We are nearing our end, guys. Now we just need to make the graphics animate out of our view, and our work will be done. So let’s dive right into it.
Step5 Animate the graphics out
The process of animating out your graphics is like how we animated in our video. We just need to reverse those steps. So here’s how it’s done.
- Go to the white color layer and double-click on it to open its properties.
- Now, from the “Animation” option, add a new keyframe a little before the end of the video.
- After that, you have to add another keyframe at the end of your video. But in this keyframe, place the white color layer out of your view. Like this,
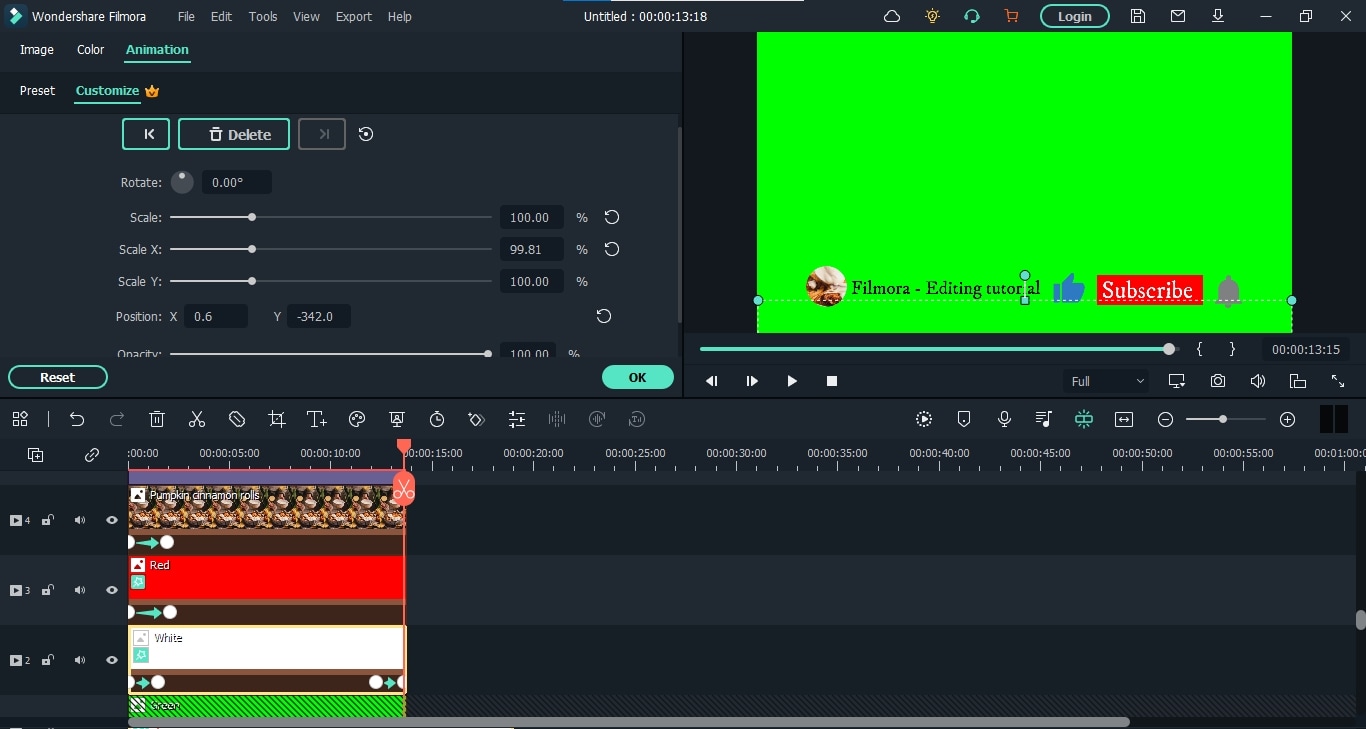
- Repeat the same steps for the red color layer, channel image layer, and icons layer.
- After it’s done, the whole graphics will look like this.
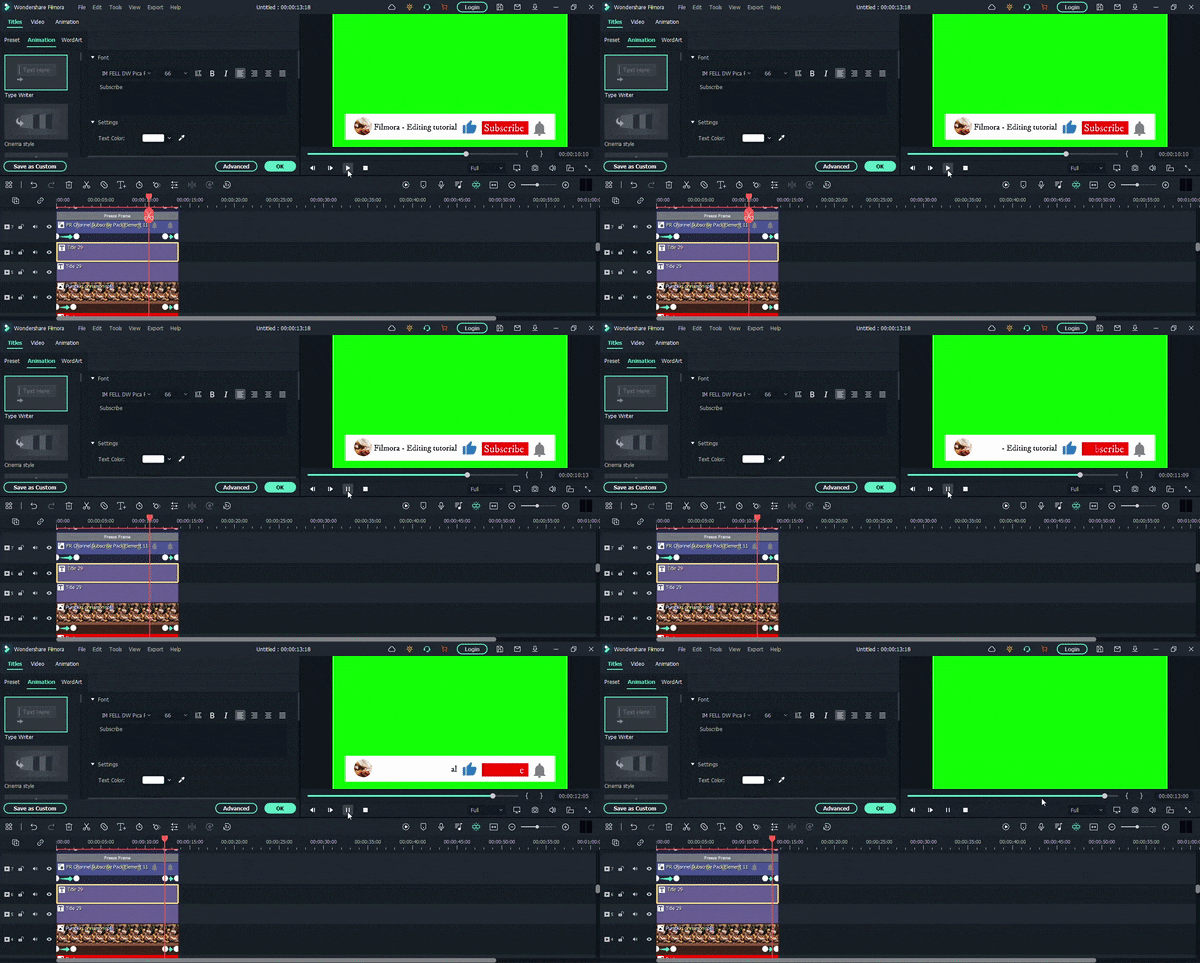
- The only thing that remains is to fix the text layers. For this, double-click on the channel text layer and go to the “Advanced” settings, just like before.
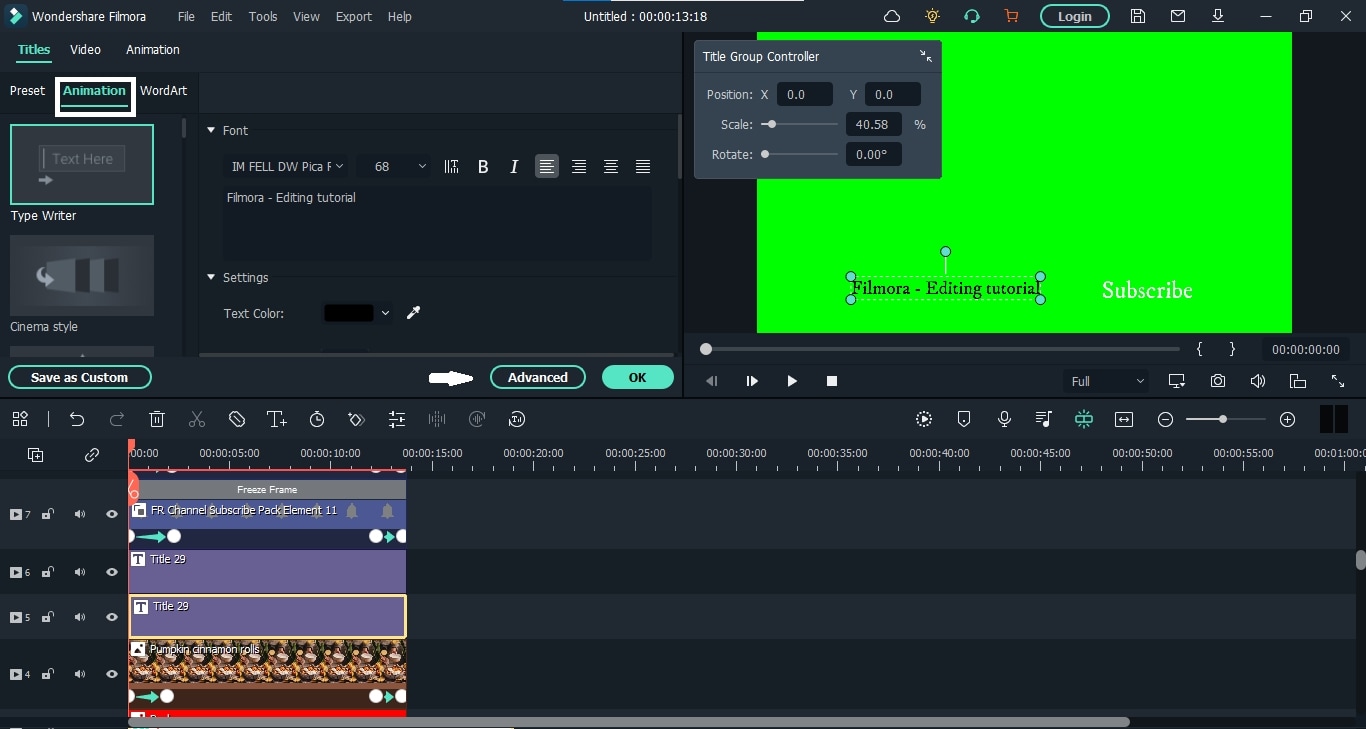
- From here, fix the text speed and end with your other graphic elements. After it’s done, we will do the same for the “Subscribe” button text.
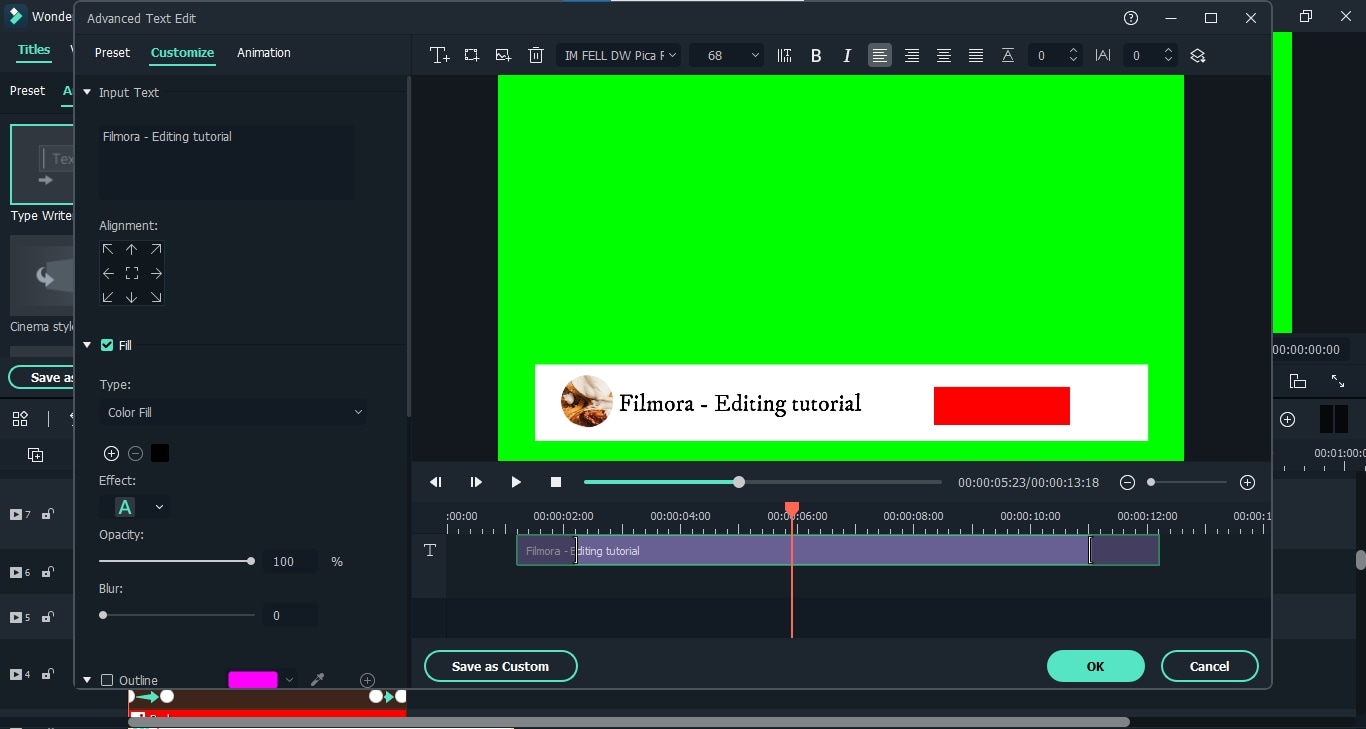
Finally, our graphic is completed. “Export” it from the software to your computer.
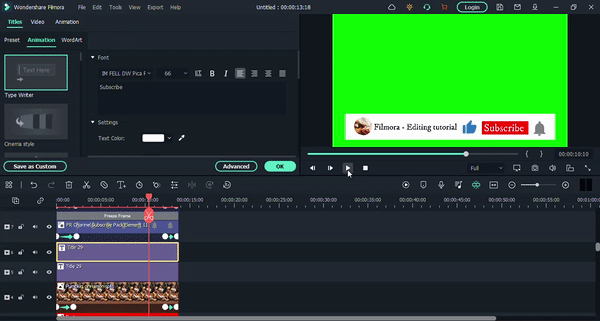
Whenever you want to use this graphic on your video, you have to import it first and enable the “Green Screen” option. It will remove the green background color. Then you can upload your video and place this graphic on it to add to the video. And that’s all.
Conclusion
Creating the Subscribe channel graphics is like picking stars from the sky for any video creator, especially if you are a beginner. However, now you don’t need to go for the professionals anymore. Wondershare Filmora has got you covered. So follow this detailed guide and create excellent subscribe channel graphics for your videos.
Free Download For macOS 10.14 or later
Step1 Download and install Wondershare Filmora
First, you need to download and install the video editor, Filmora. If you’ve already done that, then launch the software right away. But if you haven’t, then download it below. Once the download finishes, install the software on your computer.
When you launch the Filmora, click on “New Project.”

Step2 Make the structure of your graphics
For creating anything, we first need a flawless structure. Here, we can make the structure of Subscribe channel graphics using different colors, icons, texts, and channel photos. We’ll start by adding color layers.
1. Add color layers
- Go to the “Media” on the top left corner of the interface and Click on “Sample Color.” Here find the Green color and add it in the panel below as the first video layer by the drag-n-drop function.

- We will key this layer at the end, so make sure not to use any other green graphics for your animation.
- Let’s lock this layer because we will no longer use it. For this, click on the “Lock” icon on the layer’s left side.
- Add white and red colors and stack them on top of the green color layer.

After adding all three color layers, it’s time to crop these layers to make the structure of our graphic.
Crop the Color Layers
- Go to the “Effects” tab from the top bar and search for the “Crop” effect. Then drag the effect and add it to the white and red layers on the panel.

- First, click on the “Eye” icon beside the red color layer to hide it. Then double-click the white layer to see its properties. When the properties appear, select “Effects” from there.

- You can also enable the safe zones from the display settings on the right side of the panel. After that, crop the white layer first, then show the red layer and crop it too. It will look like this.

That’s it, folks. Our color backgrounds are here. Now we have to add our channel photo to this. So let’s move on to see how to do it.
2. Add a channel photo
- To add the channel photo, you can upload the image. Here we are going to use some images from the stock media. No matter the image, drop it down on the panel above the red color layer.

- Now double-click on the image layer, and from the properties, go to the “Mask” option and select the circle. You can also select any other shape you like.

- After that, scroll down and make the circle even by matching all numbers. Then scale it down and place it on the left corner of the white layer.

It’s done. Let’s add our channel text now.
3. Add texts
- For adding text, go to the “Titles” from the top bar and add the title you like to the panel.

- Now double-click this layer and add the text you want. You can also change the color of the text, scale it down and place it where ever you want.

- Now, let’s add another title for the subscribe button. You have to place it on the red layer.

We can’t finish our structure without icons, can we? So let’s move on to them.
4. Add icons
- Hit the “Element” from the top bar and search for the “Bell” icon. You will find the short animations of the bell. Add the suitable one to the panel.

- Now find a suitable place in the animation, stop it at that point, right-click on the element layer and add a freeze frame.

- You can also extend the freeze frame and remove the other parts. Then reduce its size and place it beside the “Subscribe” text.

- Similarly, add “Thumbs Up” and “Mouse Cursor” icons on the panel.

Finally, our structure is finished. Now let’s start animating.
Step3 Animate the graphics
First, we’ll make it so that all these graphics come in from below the view.
- Go to the white layer first and double-click on it. Then hit the “Animation” option and scroll down. Here add a new keyframe by clicking “Add.” Now move the playhead to the beginning and place the white color layer out of the frame.

- Now, do the same for channel photos and icons. The whole animation will look like this.

- As you can see, the text appears before the color layers. Let’s correct it. Double-click the text layer. Select the” Type Writer’ form and hit the “Advanced option.

- Here, you can adjust the text with the color layers.

- After adjusting both the channel name and subscribe button texts, your animation will appear like this.

If you’ve managed so far, then that’s great. We have done most of the work. Now we need to animate the graphics of the mouse cursor so that it clicks on the bell icon, thumb icon, and our subscribe button. The process is somewhat similar because we will need to add different keyframes. But still, let’s see it in detail.
Step4 Animate the mouse cursor
- Go to the “Mouse Cursor” icon layer and double-click on it. First, place the icon on the “Thumbs Up” so that when it animates in, it goes directly to the said icon. Then you have to add another keyframe after some time. And when you add a third one, place the “Mouse Cursor” icon on the subscribe button text.

- Then add a similar pair of keyframes with some space from the last one and place the “Mouse Cursor” icon on the “Bell” icon.

- The last keyframe we have to add will place this “Mouse Cursor” icon out of our view. After that, you need to adjust these keyframes to set the speed of the moving “Mouse Cursor’ icon according to your taste.
The final product up till now will be like this.

We are nearing our end, guys. Now we just need to make the graphics animate out of our view, and our work will be done. So let’s dive right into it.
Step5 Animate the graphics out
The process of animating out your graphics is like how we animated in our video. We just need to reverse those steps. So here’s how it’s done.
- Go to the white color layer and double-click on it to open its properties.
- Now, from the “Animation” option, add a new keyframe a little before the end of the video.
- After that, you have to add another keyframe at the end of your video. But in this keyframe, place the white color layer out of your view. Like this,

- Repeat the same steps for the red color layer, channel image layer, and icons layer.
- After it’s done, the whole graphics will look like this.

- The only thing that remains is to fix the text layers. For this, double-click on the channel text layer and go to the “Advanced” settings, just like before.

- From here, fix the text speed and end with your other graphic elements. After it’s done, we will do the same for the “Subscribe” button text.

Finally, our graphic is completed. “Export” it from the software to your computer.

Whenever you want to use this graphic on your video, you have to import it first and enable the “Green Screen” option. It will remove the green background color. Then you can upload your video and place this graphic on it to add to the video. And that’s all.
Conclusion
Creating the Subscribe channel graphics is like picking stars from the sky for any video creator, especially if you are a beginner. However, now you don’t need to go for the professionals anymore. Wondershare Filmora has got you covered. So follow this detailed guide and create excellent subscribe channel graphics for your videos.
Free 3D Intro Makers
A video intro is a great approach to express expertise and credibility in a sea of content. Developing a video intro may be as time-consuming as creating fresh material. No worries! The finest video intro producers help you generate engaging content without spending hours. This article will help you select and use the finest free video intro maker. We offer 5 alternatives for YouTube, gaming, vlog, and 3D intros. This post will break down all the specifics of the Top 5 Video Intro Makers to obtain professional outcomes.
Let’s get started on creating intros that will wow your audience!
1. What is an intro video?
A video intro is a brief introduction, typically lasting between 5 and 15 seconds, that introduces your video, YouTube channel, or brand. Video intros are becoming increasingly popular. It is often the first occasion on which a viewer will have the chance to interact with the content you produce.
Because of this, it has the power to attract attention from the very beginning and to develop trust in the company or product that you are promoting. It goes without saying that this is one of the most critical factors to consider when trying to attract and connect with your desired audience.
2. What are some good intro makers?
Here you will a list of many great intro makers you can use for free and paid.
Adobe After Effects
One of the most well-known pieces of software for creating video effects is called Adobe After Effects. It is capable of producing great motion graphics, and as a result, it should have no trouble animating and producing dynamic video intros or 3D intros for your company, brand, or YouTube channel.

After Effects is utilized by professionals working in the film business to create aesthetically spectacular work for cinema, television, video, and the online. The most significant drawback to After Effects is the fact that it requires an average beginner around eight weeks to learn the program by watching training videos and going through tutorials. In addition, the fee to join Adobe’s Creative Cloud Suite membership service is quite high.
Canva
When you use Canva, you will have instant access to a video introduction creator that is hosted on the web. You get access to a number of different themes, as well as royalty-free photographs and videos, as well as a drag-and-drop editor that you can use to create content that you can then share and post everywhere. In addition to providing, you with intro templates, it also gives you the ability to design your own logo. With a freshly designed logo in hand, now would be the ideal time to produce an introduction film using it.
Canva’s mission is to demystify graphic design and make it available to users who are not designers. They also provide a premium edition of Canva, which is ideally suited for teams to collaborate on the creation of designs with the same objective in mind. In addition, Canva Pro is equipped with additional premium features, such as a brand kit and a backdrop remover.

Canva is an easy-to-use website that provides free access to some of its features, which may be used to create great movies. However, some limitations to using Canva include the fact that it only supports a limited number of output formats and there is a possibility that you will experience connectivity troubles while attempting to save and export your video introductions.
When it came to design, I previously relied on a combination of Adobe Illustrator, Adobe Photoshop, and PicMonkey until I discovered Canva. After some time, we were able to navigate both with ease, but we found that Canva was more difficult to use than PicMonkey. Canva had a steep learning curve and lacked some of the features I was looking for in a design program.
We choose to disregard it. But I decided to give it another shot about two or three years ago, and this time I was impressed enough to switch PicMonkey out for it in my collection of editing tools. Canva had added a large number of features that made the program simpler to use and gave users the ability to accomplish more.
Promo
Promo has a wonderful look that pops. You may build quick video intros for your social media or YouTube channel by using their intro maker, and then post and share them on your social networks afterwards. Promo.com provides filmmakers and video editors with high-quality professional video clips, royalty-free music, adjustable video templates, bespoke text, and logos, and more through their monthly membership programs. You may utilize Promo to create videos in a variety of orientations and forms, including horizontal, vertical, square, and even banner films.
To summarize, Promo is a video maker that has an impressive design and allows for direct uploads to various social media platforms. The only problem is that their website occasionally becomes unresponsive and sluggish. Because of this, the process of creation can become rather laborious and drawn out.
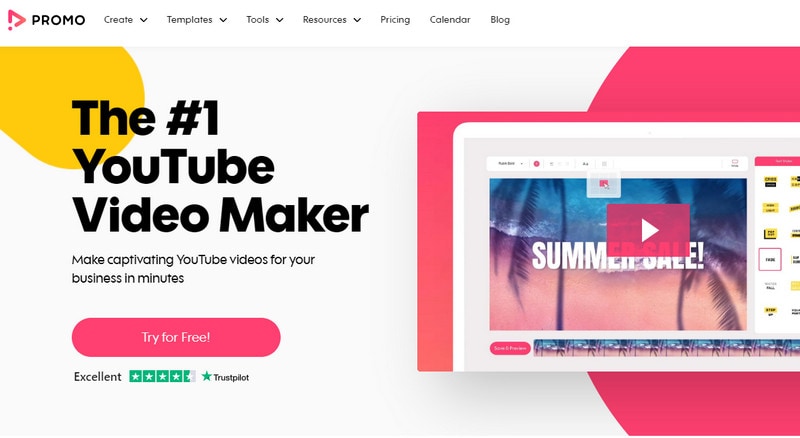
Promo.com is my one-stop-shop for all of my business promotional videos because it offers a variety of video ad templates that I can easily edit on my browser without the need for any program, and they also offer a great selection of stock footage and text overlay options to make the videos look more professional. Promo.com has a lot of awesome templates for a bunch of different categories.
Filmora
If you’re worried about how challenging and time-consuming it will be to create the ideal video introduction, Filmora will put those worries to rest. You can finish your introduction in record time thanks to iStock and Shutterstock’s vast libraries of high-quality stock films, photos, and music, as well as their ability to create fully adjustable titles and more than 5000 intro themes.

Filmora is capable of much more than simply creating video introductions. It is capable of handling anything connected to video and even more. The program is compatible with all of your Ultra HD 4K Video files and provides support for the finest quality hi-fidelity Dolby Surround Sound.
When working on other video projects, you can use masking and blending to add layers to your videos and give them the shape you want, thereby producing the most artistic scenes possible. Make use of keyframing to modify the dynamism and smoothness of your edits with the help of animated effects. The chroma key tool allows you to get rid of green screens and create amazing effects that will blow people away. And AI Motion Tracking is just what you need to make it possible for text or graphics to automatically track specific objects throughout your films.
The Bottom Line
The readers of this post have been provided with a list of many free online 3D intro creator tools, which can be used to create the ideal film for both personal and commercial usage. The availability of multiple tools accompanied by clear descriptions of the capabilities supplied by each helps to simplify the decision process. In addition to this, users have been supplied with an in-depth introduction to Wondershare UniConverter, a program that provides tools that are universally applicable.
Free Download For Win 7 or later(64-bit)
Free Download For macOS 10.14 or later
1. What is an intro video?
A video intro is a brief introduction, typically lasting between 5 and 15 seconds, that introduces your video, YouTube channel, or brand. Video intros are becoming increasingly popular. It is often the first occasion on which a viewer will have the chance to interact with the content you produce.
Because of this, it has the power to attract attention from the very beginning and to develop trust in the company or product that you are promoting. It goes without saying that this is one of the most critical factors to consider when trying to attract and connect with your desired audience.
2. What are some good intro makers?
Here you will a list of many great intro makers you can use for free and paid.
Adobe After Effects
One of the most well-known pieces of software for creating video effects is called Adobe After Effects. It is capable of producing great motion graphics, and as a result, it should have no trouble animating and producing dynamic video intros or 3D intros for your company, brand, or YouTube channel.

After Effects is utilized by professionals working in the film business to create aesthetically spectacular work for cinema, television, video, and the online. The most significant drawback to After Effects is the fact that it requires an average beginner around eight weeks to learn the program by watching training videos and going through tutorials. In addition, the fee to join Adobe’s Creative Cloud Suite membership service is quite high.
Canva
When you use Canva, you will have instant access to a video introduction creator that is hosted on the web. You get access to a number of different themes, as well as royalty-free photographs and videos, as well as a drag-and-drop editor that you can use to create content that you can then share and post everywhere. In addition to providing, you with intro templates, it also gives you the ability to design your own logo. With a freshly designed logo in hand, now would be the ideal time to produce an introduction film using it.
Canva’s mission is to demystify graphic design and make it available to users who are not designers. They also provide a premium edition of Canva, which is ideally suited for teams to collaborate on the creation of designs with the same objective in mind. In addition, Canva Pro is equipped with additional premium features, such as a brand kit and a backdrop remover.

Canva is an easy-to-use website that provides free access to some of its features, which may be used to create great movies. However, some limitations to using Canva include the fact that it only supports a limited number of output formats and there is a possibility that you will experience connectivity troubles while attempting to save and export your video introductions.
When it came to design, I previously relied on a combination of Adobe Illustrator, Adobe Photoshop, and PicMonkey until I discovered Canva. After some time, we were able to navigate both with ease, but we found that Canva was more difficult to use than PicMonkey. Canva had a steep learning curve and lacked some of the features I was looking for in a design program.
We choose to disregard it. But I decided to give it another shot about two or three years ago, and this time I was impressed enough to switch PicMonkey out for it in my collection of editing tools. Canva had added a large number of features that made the program simpler to use and gave users the ability to accomplish more.
Promo
Promo has a wonderful look that pops. You may build quick video intros for your social media or YouTube channel by using their intro maker, and then post and share them on your social networks afterwards. Promo.com provides filmmakers and video editors with high-quality professional video clips, royalty-free music, adjustable video templates, bespoke text, and logos, and more through their monthly membership programs. You may utilize Promo to create videos in a variety of orientations and forms, including horizontal, vertical, square, and even banner films.
To summarize, Promo is a video maker that has an impressive design and allows for direct uploads to various social media platforms. The only problem is that their website occasionally becomes unresponsive and sluggish. Because of this, the process of creation can become rather laborious and drawn out.

Promo.com is my one-stop-shop for all of my business promotional videos because it offers a variety of video ad templates that I can easily edit on my browser without the need for any program, and they also offer a great selection of stock footage and text overlay options to make the videos look more professional. Promo.com has a lot of awesome templates for a bunch of different categories.
Filmora
If you’re worried about how challenging and time-consuming it will be to create the ideal video introduction, Filmora will put those worries to rest. You can finish your introduction in record time thanks to iStock and Shutterstock’s vast libraries of high-quality stock films, photos, and music, as well as their ability to create fully adjustable titles and more than 5000 intro themes.

Filmora is capable of much more than simply creating video introductions. It is capable of handling anything connected to video and even more. The program is compatible with all of your Ultra HD 4K Video files and provides support for the finest quality hi-fidelity Dolby Surround Sound.
When working on other video projects, you can use masking and blending to add layers to your videos and give them the shape you want, thereby producing the most artistic scenes possible. Make use of keyframing to modify the dynamism and smoothness of your edits with the help of animated effects. The chroma key tool allows you to get rid of green screens and create amazing effects that will blow people away. And AI Motion Tracking is just what you need to make it possible for text or graphics to automatically track specific objects throughout your films.
The Bottom Line
The readers of this post have been provided with a list of many free online 3D intro creator tools, which can be used to create the ideal film for both personal and commercial usage. The availability of multiple tools accompanied by clear descriptions of the capabilities supplied by each helps to simplify the decision process. In addition to this, users have been supplied with an in-depth introduction to Wondershare UniConverter, a program that provides tools that are universally applicable.
Free Download For Win 7 or later(64-bit)
Free Download For macOS 10.14 or later
Best Guide of 8 Photo Collage Apps for PC
2024 Guide of 8 Photo Collage Apps for PC
An easy yet powerful editor
Numerous effects to choose from
Detailed tutorials provided by the official channel
There are plenty of photo collage makers for PC that you can try Some, you’ll have to download. Some, you can use directly online through a browser. We’ll be introducing several below that you might want to try out before you end up picking out one that you think will work best for the kind of projects that you have in mind.
As a bonus, we’ve also included a beginning ‘guide’ of sorts for pic collage PC apps that you can use in order to figure out what the benefits of using a pic collage for PC.
In this article
01 [What Are the Benefits of Using Collage Software?](#Part 1)
02 [The Best 8 Free Collage Makers at a Glance](#Part 2)
Part 1 What Are the Benefits of Using Collage Software?
We start this off with the short guide we promised for using a photo collage app for PC What are the benefits? Well, the main benefit is that you can get something fun and interest out of it, of course.
And, unlike with traditional collages — which are messy and require lots of prep-work and glue — you can go create pic collages with a photo collage app for PC relatively easily. All you have to do most of the time is to choose a layout that you like and then fill it with the photographs, videos, GIFs, etc. that you want. Most programs also give you the choice to add things like text (for making the collage more meaningful), stickers, frames, and so on, so that you can fully deck out your photo collages exactly how you want to.

Part 2 The Best 8 Free Collage Makers at a Glance
Now onto our recommended list for all the different photo collage makers FREE for PC that you can try. This list will include a variety of different free collage makers for PC with different benefits. So, make sure to give each one some careful consideration We’ve added not only the specifications of each photo collage for PC but also a debrief description on why you might want to buy one over the other.
01**Wondershare Filmora Video Editor **
Specifications: Windows 7 | 8.1 | 10 | 11 (64 bit OS only)
Filmora is primarily a video editor. One that is actually used by a lot of the more popular content creators on the internet (it’s especially popular with people on YouTube, as an example, but also for corporations and entrepreneurs that need a reliable way of creating high-quality videos for every occasion.)
We included it here on our list of the best photo collages for PC because it comes with something called ‘Stock Media’ where you source images, videos, music, etc. directly — for your photo collages, video projects, etc. It also comes with a lot of fun layouts, themes, filters, and so on. So, if you’re not up for creating a custom collage, you can always depend on those to make a quick and easy one
Reasons to Buy:
● Stock Media Library for direct source of images, videos, etc.
● Layouts and templates available for quick content creation
● Lots of fun Fonts, Stickers, etc. for decorating photo collages
● Advanced Video editing tools (can be used to create video collages)
For Win 7 or later (64-bit)
For macOS 10.12 or later
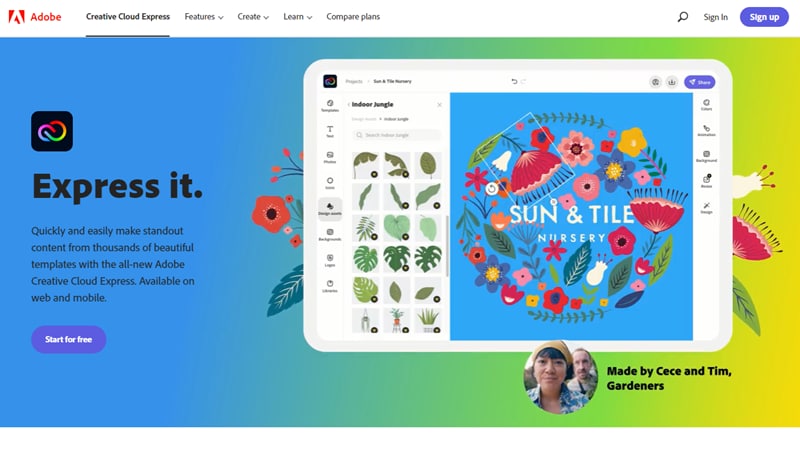
02Express It
Specifications: ONLINE
Express It is an online tool that you can use as a photo collage maker (FREE) for PC. It was made by Adobe, so from that alone, you can certain of its reliability. But, even more than this, it’s generally just incredibly useful. The tool comes with a resource library that you can tap into for your projects, and it takes ‘Free Style’ Collage making to the next level with all the different customizations that it provides
Reasons to Buy:
● Large resource library with lots of stickers, clipart, images, etc.
● Photo collage templates are available for designing quick pic collages
● ‘Free-style’ mode available for creating fully unique collage
03Fotojet
Specifications: ONLINE
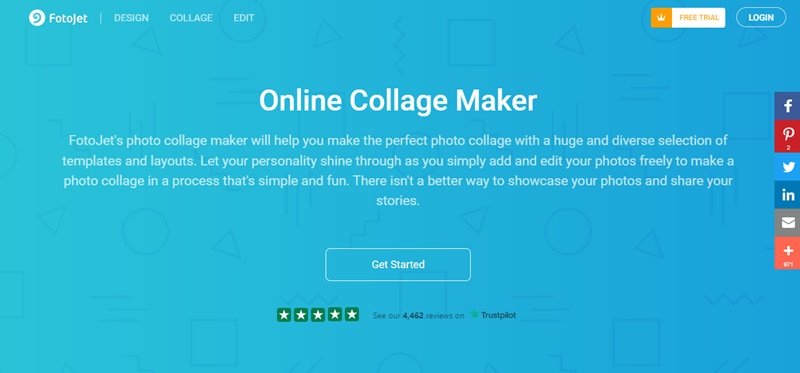
FotoJet, much like Express It, is an online photo collage tool that you use for your PC It’s primarily a photo editor, but it has ‘collage maker’ functionalities that will allow you to easily create pic collages on your laptop to be shared on social media or used for whatever projects you might have in mind.
Reasons to Buy:
● No download needed for use (FREE trial available)
● Tons of collage layouts for quick collage-making
● Photo editing functions for adding text, clipart, etc.
04Canva
Specifications: ONLINE
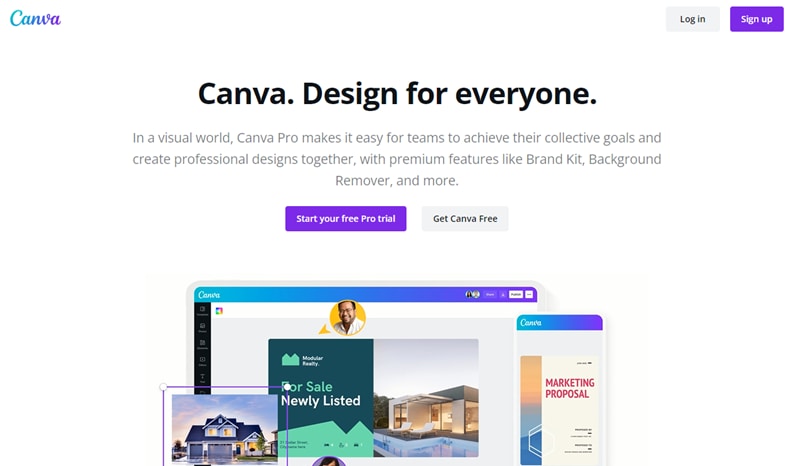
We continue our recommendations for the best tools for creating pic collage for PC with Canva Pro This online program is great because it comes with a very reliable resources library (which has just about everything that you need.) There are also tons of templates that you can use — not even just for creating collages (of which there are plenty of stylish templates, if that’s all you’re looking for), but just about everything from posters, infographics, ads, etc.
Reasons to Buy:
● Canva Pro has lots of premium resources for decorating Pic Collages
● The premium version unlocks some of the photo editing tools that are not available with the FREE version
● Templates are available for just about any project you can think of (with plenty for collages of all variety)
05Fotor
Specifications: ONLINE
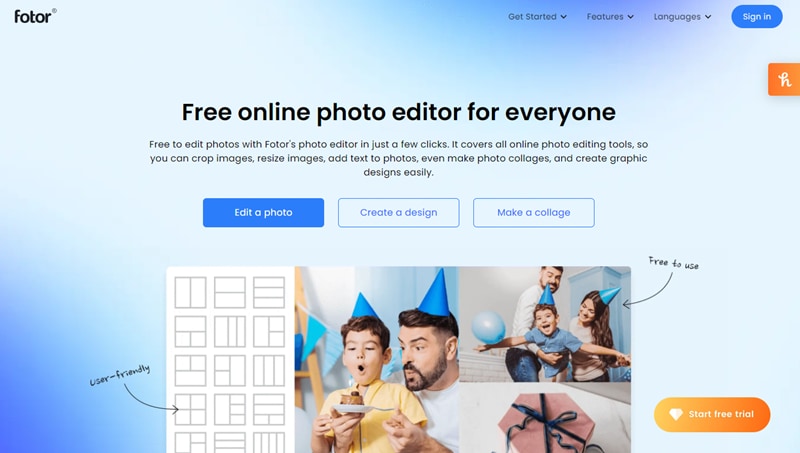
Fotor is a great online editor that comes with a lot of ‘collage-making’ tools. That includes grid layouts for creating quick photo collages This, along with the tool’s established advanced photo editing functionalities, makes it very easy to create photo collages of all kinds — whether you’re creating them for the sake of creating something to remember an event by or for some special project for work.
Reasons to Buy:
● The advanced version unlocks some of the functions unavailable in the FREE version (both layouts and photo editing tools)
● Comes with lots of easy-to-use layouts for creating collages
● No download or installation required; just a quick Sign-Up
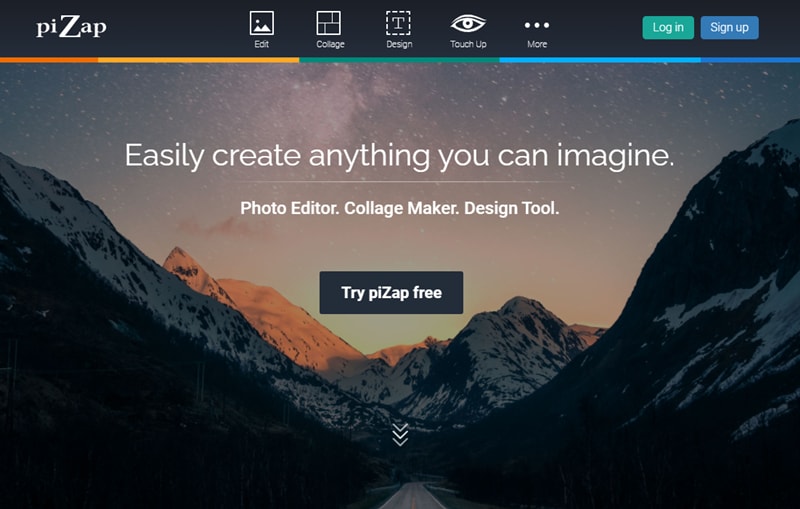
06PiZap
Specifications: ONLINE
PiZap is the last of the online photo collage apps for PC that we have on this list. It’s quite a bit more basic than some of the other online photo editors that we’ve introduced thus far, but that may be all you need It comes with the usual collage grids as well as some handy photo editing functions so that you can be sure to get the end-product to look how you want it to
Reasons to Buy:
● Lots of photo collage grits for your to try
● Easy-to-use photo editing functions
● UI is intuitive and lots of the features are set for beginners
07Phototastic Collage
Specifications: Windows 10
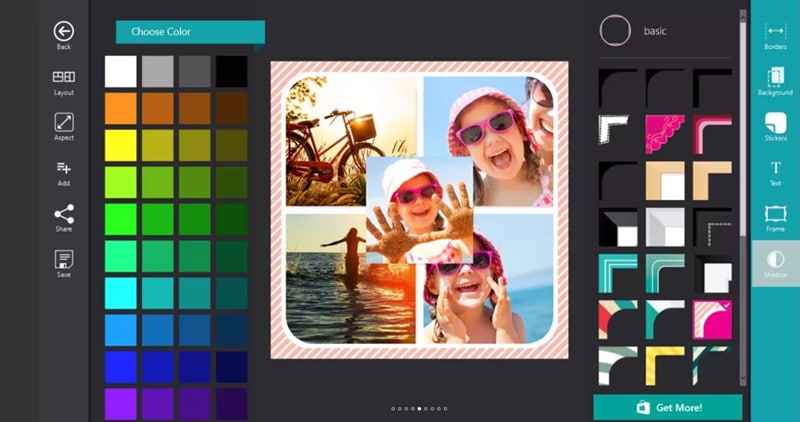
Phototastic Collage is a photo collage app for PC that you can download and used for quick collage projects. It’s quite simplistic, but it can get the job done As a collage maker, it comes with a selection of layouts that you can use from in order to create your photo collages. Adding to this, the usual customization features are also available (i.e., frames, text, etc.)
Reasons to Buy:
● Microsoft App with a very simple UI
● Lots of layouts for grid making
● Customizable layouts (i.e., adjust borders, frames, etc.)
08PhotoPad
Specifications: Windows XP|Vista|7|8|8.1|10|11
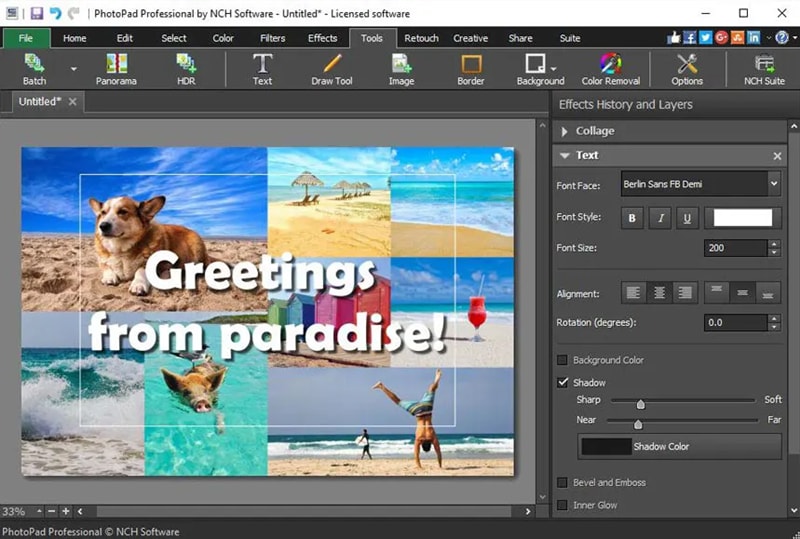
PhotoPad is an old-school photo collage editor for PC that’s been around for a while. It’s a particularly good choice for those who choose to stick to the older versions of Windows (like XP or Vista), as you don’t see a lot of the newer software supporting those anymore.
Much like many of the other software that we included in this list, this one is more of a general photo editor than one strictly made for collages. However, it does come with functionalities for that, so you shouldn’t miss out on anything
Reasons to Buy:
● Supports older Windows OS Systems
● Advanced photo editing functions
● Collage Feature for creating quick and easy collages
● Final Words: 2024 Guide of 8 Photo Collage Apps for PC →
● What’s the benefit of using a photo collage? What can it actually do for you? We answered these questions in the first section of this article
● As for the recommendations that we promised for the best photo collage apps, software, etc. for 2024, we chose to include a wide variety so that you can have plenty to choose form.
● If you want a general recommendation from the list that we included, we recommend using something like Filmora, Canva Pro, Express It, etc. that comes with a built-in resource library that you can take advantage of for filling up your future collage projects.
There are plenty of photo collage makers for PC that you can try Some, you’ll have to download. Some, you can use directly online through a browser. We’ll be introducing several below that you might want to try out before you end up picking out one that you think will work best for the kind of projects that you have in mind.
As a bonus, we’ve also included a beginning ‘guide’ of sorts for pic collage PC apps that you can use in order to figure out what the benefits of using a pic collage for PC.
In this article
01 [What Are the Benefits of Using Collage Software?](#Part 1)
02 [The Best 8 Free Collage Makers at a Glance](#Part 2)
Part 1 What Are the Benefits of Using Collage Software?
We start this off with the short guide we promised for using a photo collage app for PC What are the benefits? Well, the main benefit is that you can get something fun and interest out of it, of course.
And, unlike with traditional collages — which are messy and require lots of prep-work and glue — you can go create pic collages with a photo collage app for PC relatively easily. All you have to do most of the time is to choose a layout that you like and then fill it with the photographs, videos, GIFs, etc. that you want. Most programs also give you the choice to add things like text (for making the collage more meaningful), stickers, frames, and so on, so that you can fully deck out your photo collages exactly how you want to.

Part 2 The Best 8 Free Collage Makers at a Glance
Now onto our recommended list for all the different photo collage makers FREE for PC that you can try. This list will include a variety of different free collage makers for PC with different benefits. So, make sure to give each one some careful consideration We’ve added not only the specifications of each photo collage for PC but also a debrief description on why you might want to buy one over the other.
01**Wondershare Filmora Video Editor **
Specifications: Windows 7 | 8.1 | 10 | 11 (64 bit OS only)
Filmora is primarily a video editor. One that is actually used by a lot of the more popular content creators on the internet (it’s especially popular with people on YouTube, as an example, but also for corporations and entrepreneurs that need a reliable way of creating high-quality videos for every occasion.)
We included it here on our list of the best photo collages for PC because it comes with something called ‘Stock Media’ where you source images, videos, music, etc. directly — for your photo collages, video projects, etc. It also comes with a lot of fun layouts, themes, filters, and so on. So, if you’re not up for creating a custom collage, you can always depend on those to make a quick and easy one
Reasons to Buy:
● Stock Media Library for direct source of images, videos, etc.
● Layouts and templates available for quick content creation
● Lots of fun Fonts, Stickers, etc. for decorating photo collages
● Advanced Video editing tools (can be used to create video collages)

For Win 7 or later (64-bit)
For macOS 10.12 or later
02Express It
Specifications: ONLINE
Express It is an online tool that you can use as a photo collage maker (FREE) for PC. It was made by Adobe, so from that alone, you can certain of its reliability. But, even more than this, it’s generally just incredibly useful. The tool comes with a resource library that you can tap into for your projects, and it takes ‘Free Style’ Collage making to the next level with all the different customizations that it provides
Reasons to Buy:
● Large resource library with lots of stickers, clipart, images, etc.
● Photo collage templates are available for designing quick pic collages
● ‘Free-style’ mode available for creating fully unique collage

03Fotojet
Specifications: ONLINE
FotoJet, much like Express It, is an online photo collage tool that you use for your PC It’s primarily a photo editor, but it has ‘collage maker’ functionalities that will allow you to easily create pic collages on your laptop to be shared on social media or used for whatever projects you might have in mind.
Reasons to Buy:
● No download needed for use (FREE trial available)
● Tons of collage layouts for quick collage-making
● Photo editing functions for adding text, clipart, etc.

04Canva
Specifications: ONLINE
We continue our recommendations for the best tools for creating pic collage for PC with Canva Pro This online program is great because it comes with a very reliable resources library (which has just about everything that you need.) There are also tons of templates that you can use — not even just for creating collages (of which there are plenty of stylish templates, if that’s all you’re looking for), but just about everything from posters, infographics, ads, etc.
Reasons to Buy:
● Canva Pro has lots of premium resources for decorating Pic Collages
● The premium version unlocks some of the photo editing tools that are not available with the FREE version
● Templates are available for just about any project you can think of (with plenty for collages of all variety)

05Fotor
Specifications: ONLINE
Fotor is a great online editor that comes with a lot of ‘collage-making’ tools. That includes grid layouts for creating quick photo collages This, along with the tool’s established advanced photo editing functionalities, makes it very easy to create photo collages of all kinds — whether you’re creating them for the sake of creating something to remember an event by or for some special project for work.
Reasons to Buy:
● The advanced version unlocks some of the functions unavailable in the FREE version (both layouts and photo editing tools)
● Comes with lots of easy-to-use layouts for creating collages
● No download or installation required; just a quick Sign-Up

06PiZap
Specifications: ONLINE
PiZap is the last of the online photo collage apps for PC that we have on this list. It’s quite a bit more basic than some of the other online photo editors that we’ve introduced thus far, but that may be all you need It comes with the usual collage grids as well as some handy photo editing functions so that you can be sure to get the end-product to look how you want it to
Reasons to Buy:
● Lots of photo collage grits for your to try
● Easy-to-use photo editing functions
● UI is intuitive and lots of the features are set for beginners

07Phototastic Collage
Specifications: Windows 10
Phototastic Collage is a photo collage app for PC that you can download and used for quick collage projects. It’s quite simplistic, but it can get the job done As a collage maker, it comes with a selection of layouts that you can use from in order to create your photo collages. Adding to this, the usual customization features are also available (i.e., frames, text, etc.)
Reasons to Buy:
● Microsoft App with a very simple UI
● Lots of layouts for grid making
● Customizable layouts (i.e., adjust borders, frames, etc.)

08PhotoPad
Specifications: Windows XP|Vista|7|8|8.1|10|11
PhotoPad is an old-school photo collage editor for PC that’s been around for a while. It’s a particularly good choice for those who choose to stick to the older versions of Windows (like XP or Vista), as you don’t see a lot of the newer software supporting those anymore.
Much like many of the other software that we included in this list, this one is more of a general photo editor than one strictly made for collages. However, it does come with functionalities for that, so you shouldn’t miss out on anything
Reasons to Buy:
● Supports older Windows OS Systems
● Advanced photo editing functions
● Collage Feature for creating quick and easy collages

● Final Words: 2024 Guide of 8 Photo Collage Apps for PC →
● What’s the benefit of using a photo collage? What can it actually do for you? We answered these questions in the first section of this article
● As for the recommendations that we promised for the best photo collage apps, software, etc. for 2024, we chose to include a wide variety so that you can have plenty to choose form.
● If you want a general recommendation from the list that we included, we recommend using something like Filmora, Canva Pro, Express It, etc. that comes with a built-in resource library that you can take advantage of for filling up your future collage projects.
There are plenty of photo collage makers for PC that you can try Some, you’ll have to download. Some, you can use directly online through a browser. We’ll be introducing several below that you might want to try out before you end up picking out one that you think will work best for the kind of projects that you have in mind.
As a bonus, we’ve also included a beginning ‘guide’ of sorts for pic collage PC apps that you can use in order to figure out what the benefits of using a pic collage for PC.
In this article
01 [What Are the Benefits of Using Collage Software?](#Part 1)
02 [The Best 8 Free Collage Makers at a Glance](#Part 2)
Part 1 What Are the Benefits of Using Collage Software?
We start this off with the short guide we promised for using a photo collage app for PC What are the benefits? Well, the main benefit is that you can get something fun and interest out of it, of course.
And, unlike with traditional collages — which are messy and require lots of prep-work and glue — you can go create pic collages with a photo collage app for PC relatively easily. All you have to do most of the time is to choose a layout that you like and then fill it with the photographs, videos, GIFs, etc. that you want. Most programs also give you the choice to add things like text (for making the collage more meaningful), stickers, frames, and so on, so that you can fully deck out your photo collages exactly how you want to.

Part 2 The Best 8 Free Collage Makers at a Glance
Now onto our recommended list for all the different photo collage makers FREE for PC that you can try. This list will include a variety of different free collage makers for PC with different benefits. So, make sure to give each one some careful consideration We’ve added not only the specifications of each photo collage for PC but also a debrief description on why you might want to buy one over the other.
01**Wondershare Filmora Video Editor **
Specifications: Windows 7 | 8.1 | 10 | 11 (64 bit OS only)
Filmora is primarily a video editor. One that is actually used by a lot of the more popular content creators on the internet (it’s especially popular with people on YouTube, as an example, but also for corporations and entrepreneurs that need a reliable way of creating high-quality videos for every occasion.)
We included it here on our list of the best photo collages for PC because it comes with something called ‘Stock Media’ where you source images, videos, music, etc. directly — for your photo collages, video projects, etc. It also comes with a lot of fun layouts, themes, filters, and so on. So, if you’re not up for creating a custom collage, you can always depend on those to make a quick and easy one
Reasons to Buy:
● Stock Media Library for direct source of images, videos, etc.
● Layouts and templates available for quick content creation
● Lots of fun Fonts, Stickers, etc. for decorating photo collages
● Advanced Video editing tools (can be used to create video collages)

For Win 7 or later (64-bit)
For macOS 10.12 or later
02Express It
Specifications: ONLINE
Express It is an online tool that you can use as a photo collage maker (FREE) for PC. It was made by Adobe, so from that alone, you can certain of its reliability. But, even more than this, it’s generally just incredibly useful. The tool comes with a resource library that you can tap into for your projects, and it takes ‘Free Style’ Collage making to the next level with all the different customizations that it provides
Reasons to Buy:
● Large resource library with lots of stickers, clipart, images, etc.
● Photo collage templates are available for designing quick pic collages
● ‘Free-style’ mode available for creating fully unique collage

03Fotojet
Specifications: ONLINE
FotoJet, much like Express It, is an online photo collage tool that you use for your PC It’s primarily a photo editor, but it has ‘collage maker’ functionalities that will allow you to easily create pic collages on your laptop to be shared on social media or used for whatever projects you might have in mind.
Reasons to Buy:
● No download needed for use (FREE trial available)
● Tons of collage layouts for quick collage-making
● Photo editing functions for adding text, clipart, etc.

04Canva
Specifications: ONLINE
We continue our recommendations for the best tools for creating pic collage for PC with Canva Pro This online program is great because it comes with a very reliable resources library (which has just about everything that you need.) There are also tons of templates that you can use — not even just for creating collages (of which there are plenty of stylish templates, if that’s all you’re looking for), but just about everything from posters, infographics, ads, etc.
Reasons to Buy:
● Canva Pro has lots of premium resources for decorating Pic Collages
● The premium version unlocks some of the photo editing tools that are not available with the FREE version
● Templates are available for just about any project you can think of (with plenty for collages of all variety)

05Fotor
Specifications: ONLINE
Fotor is a great online editor that comes with a lot of ‘collage-making’ tools. That includes grid layouts for creating quick photo collages This, along with the tool’s established advanced photo editing functionalities, makes it very easy to create photo collages of all kinds — whether you’re creating them for the sake of creating something to remember an event by or for some special project for work.
Reasons to Buy:
● The advanced version unlocks some of the functions unavailable in the FREE version (both layouts and photo editing tools)
● Comes with lots of easy-to-use layouts for creating collages
● No download or installation required; just a quick Sign-Up

06PiZap
Specifications: ONLINE
PiZap is the last of the online photo collage apps for PC that we have on this list. It’s quite a bit more basic than some of the other online photo editors that we’ve introduced thus far, but that may be all you need It comes with the usual collage grids as well as some handy photo editing functions so that you can be sure to get the end-product to look how you want it to
Reasons to Buy:
● Lots of photo collage grits for your to try
● Easy-to-use photo editing functions
● UI is intuitive and lots of the features are set for beginners

07Phototastic Collage
Specifications: Windows 10
Phototastic Collage is a photo collage app for PC that you can download and used for quick collage projects. It’s quite simplistic, but it can get the job done As a collage maker, it comes with a selection of layouts that you can use from in order to create your photo collages. Adding to this, the usual customization features are also available (i.e., frames, text, etc.)
Reasons to Buy:
● Microsoft App with a very simple UI
● Lots of layouts for grid making
● Customizable layouts (i.e., adjust borders, frames, etc.)

08PhotoPad
Specifications: Windows XP|Vista|7|8|8.1|10|11
PhotoPad is an old-school photo collage editor for PC that’s been around for a while. It’s a particularly good choice for those who choose to stick to the older versions of Windows (like XP or Vista), as you don’t see a lot of the newer software supporting those anymore.
Much like many of the other software that we included in this list, this one is more of a general photo editor than one strictly made for collages. However, it does come with functionalities for that, so you shouldn’t miss out on anything
Reasons to Buy:
● Supports older Windows OS Systems
● Advanced photo editing functions
● Collage Feature for creating quick and easy collages

● Final Words: 2024 Guide of 8 Photo Collage Apps for PC →
● What’s the benefit of using a photo collage? What can it actually do for you? We answered these questions in the first section of this article
● As for the recommendations that we promised for the best photo collage apps, software, etc. for 2024, we chose to include a wide variety so that you can have plenty to choose form.
● If you want a general recommendation from the list that we included, we recommend using something like Filmora, Canva Pro, Express It, etc. that comes with a built-in resource library that you can take advantage of for filling up your future collage projects.
There are plenty of photo collage makers for PC that you can try Some, you’ll have to download. Some, you can use directly online through a browser. We’ll be introducing several below that you might want to try out before you end up picking out one that you think will work best for the kind of projects that you have in mind.
As a bonus, we’ve also included a beginning ‘guide’ of sorts for pic collage PC apps that you can use in order to figure out what the benefits of using a pic collage for PC.
In this article
01 [What Are the Benefits of Using Collage Software?](#Part 1)
02 [The Best 8 Free Collage Makers at a Glance](#Part 2)
Part 1 What Are the Benefits of Using Collage Software?
We start this off with the short guide we promised for using a photo collage app for PC What are the benefits? Well, the main benefit is that you can get something fun and interest out of it, of course.
And, unlike with traditional collages — which are messy and require lots of prep-work and glue — you can go create pic collages with a photo collage app for PC relatively easily. All you have to do most of the time is to choose a layout that you like and then fill it with the photographs, videos, GIFs, etc. that you want. Most programs also give you the choice to add things like text (for making the collage more meaningful), stickers, frames, and so on, so that you can fully deck out your photo collages exactly how you want to.

Part 2 The Best 8 Free Collage Makers at a Glance
Now onto our recommended list for all the different photo collage makers FREE for PC that you can try. This list will include a variety of different free collage makers for PC with different benefits. So, make sure to give each one some careful consideration We’ve added not only the specifications of each photo collage for PC but also a debrief description on why you might want to buy one over the other.
01**Wondershare Filmora Video Editor **
Specifications: Windows 7 | 8.1 | 10 | 11 (64 bit OS only)
Filmora is primarily a video editor. One that is actually used by a lot of the more popular content creators on the internet (it’s especially popular with people on YouTube, as an example, but also for corporations and entrepreneurs that need a reliable way of creating high-quality videos for every occasion.)
We included it here on our list of the best photo collages for PC because it comes with something called ‘Stock Media’ where you source images, videos, music, etc. directly — for your photo collages, video projects, etc. It also comes with a lot of fun layouts, themes, filters, and so on. So, if you’re not up for creating a custom collage, you can always depend on those to make a quick and easy one
Reasons to Buy:
● Stock Media Library for direct source of images, videos, etc.
● Layouts and templates available for quick content creation
● Lots of fun Fonts, Stickers, etc. for decorating photo collages
● Advanced Video editing tools (can be used to create video collages)

For Win 7 or later (64-bit)
For macOS 10.12 or later
02Express It
Specifications: ONLINE
Express It is an online tool that you can use as a photo collage maker (FREE) for PC. It was made by Adobe, so from that alone, you can certain of its reliability. But, even more than this, it’s generally just incredibly useful. The tool comes with a resource library that you can tap into for your projects, and it takes ‘Free Style’ Collage making to the next level with all the different customizations that it provides
Reasons to Buy:
● Large resource library with lots of stickers, clipart, images, etc.
● Photo collage templates are available for designing quick pic collages
● ‘Free-style’ mode available for creating fully unique collage

03Fotojet
Specifications: ONLINE
FotoJet, much like Express It, is an online photo collage tool that you use for your PC It’s primarily a photo editor, but it has ‘collage maker’ functionalities that will allow you to easily create pic collages on your laptop to be shared on social media or used for whatever projects you might have in mind.
Reasons to Buy:
● No download needed for use (FREE trial available)
● Tons of collage layouts for quick collage-making
● Photo editing functions for adding text, clipart, etc.

04Canva
Specifications: ONLINE
We continue our recommendations for the best tools for creating pic collage for PC with Canva Pro This online program is great because it comes with a very reliable resources library (which has just about everything that you need.) There are also tons of templates that you can use — not even just for creating collages (of which there are plenty of stylish templates, if that’s all you’re looking for), but just about everything from posters, infographics, ads, etc.
Reasons to Buy:
● Canva Pro has lots of premium resources for decorating Pic Collages
● The premium version unlocks some of the photo editing tools that are not available with the FREE version
● Templates are available for just about any project you can think of (with plenty for collages of all variety)

05Fotor
Specifications: ONLINE
Fotor is a great online editor that comes with a lot of ‘collage-making’ tools. That includes grid layouts for creating quick photo collages This, along with the tool’s established advanced photo editing functionalities, makes it very easy to create photo collages of all kinds — whether you’re creating them for the sake of creating something to remember an event by or for some special project for work.
Reasons to Buy:
● The advanced version unlocks some of the functions unavailable in the FREE version (both layouts and photo editing tools)
● Comes with lots of easy-to-use layouts for creating collages
● No download or installation required; just a quick Sign-Up

06PiZap
Specifications: ONLINE
PiZap is the last of the online photo collage apps for PC that we have on this list. It’s quite a bit more basic than some of the other online photo editors that we’ve introduced thus far, but that may be all you need It comes with the usual collage grids as well as some handy photo editing functions so that you can be sure to get the end-product to look how you want it to
Reasons to Buy:
● Lots of photo collage grits for your to try
● Easy-to-use photo editing functions
● UI is intuitive and lots of the features are set for beginners

07Phototastic Collage
Specifications: Windows 10
Phototastic Collage is a photo collage app for PC that you can download and used for quick collage projects. It’s quite simplistic, but it can get the job done As a collage maker, it comes with a selection of layouts that you can use from in order to create your photo collages. Adding to this, the usual customization features are also available (i.e., frames, text, etc.)
Reasons to Buy:
● Microsoft App with a very simple UI
● Lots of layouts for grid making
● Customizable layouts (i.e., adjust borders, frames, etc.)

08PhotoPad
Specifications: Windows XP|Vista|7|8|8.1|10|11
PhotoPad is an old-school photo collage editor for PC that’s been around for a while. It’s a particularly good choice for those who choose to stick to the older versions of Windows (like XP or Vista), as you don’t see a lot of the newer software supporting those anymore.
Much like many of the other software that we included in this list, this one is more of a general photo editor than one strictly made for collages. However, it does come with functionalities for that, so you shouldn’t miss out on anything
Reasons to Buy:
● Supports older Windows OS Systems
● Advanced photo editing functions
● Collage Feature for creating quick and easy collages

● Final Words: 2024 Guide of 8 Photo Collage Apps for PC →
● What’s the benefit of using a photo collage? What can it actually do for you? We answered these questions in the first section of this article
● As for the recommendations that we promised for the best photo collage apps, software, etc. for 2024, we chose to include a wide variety so that you can have plenty to choose form.
● If you want a general recommendation from the list that we included, we recommend using something like Filmora, Canva Pro, Express It, etc. that comes with a built-in resource library that you can take advantage of for filling up your future collage projects.
Have You Ever Heard Hyperlapse and Tume Lapse Videos? Do You Know the Differences Between Them? This Article Will Introduce the Concepts, Features and Differnces of Them
You’ve probably heard the terms “hyperlapse” and “timelapse” before. Whether it was in a blog post, a how-to guide, or on your preferred social media platform. Each of us has seen at least one image of one of them. However, what makes a difference? You’re about to learn in this article!
With that said, let’s begin!
Part 1. What is a timelapse, and how is it used?
Timelapses are familiar to you, whether they were used in a series to demonstrate a swift change from night today or at the beginning of your favorite influencer’s vlog. But exactly what is it? The term “timelapse” refers to a photography method in which static images are stitched together to produce a time-warping video. When the video is played, the time seems to pass more quickly, creating the illusion that time is slipping away.
Put your camera in a fixed position, stop it from moving, panning, or tilting, then record for a long time to make your own timelapse. This period of time could last for five minutes, an hour, days, or even years. Once the film is gathered, all that’s left to do is speed everything up.
The fact that time-lapses make for a pleasant visual effect is what makes them so popular in Vlogs and other media. This method enables you to describe the passage of time, the movement of individuals through space, etc. utilizes time-lapse.

Part 2. What is a hyperlapse?
On the other side, there are these things that we refer to as hyperlapses. In the subgenre of time-lapse photography known as cinematography, a hyperlapse is a filmmaking method used to generate motion shots by capturing movies rather than taking images. In order to create a hyperlapse, the camera does not remain stationary; rather, it follows the subject around and is typically held by the photographer.
The amount of time that elapses between pictures in a stop-motion video typically ranges from tenths of a second up to a few fractions of a second, although this can change significantly depending on what you want to show. However, after you have picked it, it must remain consistent in the same way that the timelapse does.
The attractive 3D look that hyperlapse produces is the primary draw for its utilization. The hyperlapse that is formed can produce a dreamy image, regardless of whether the camera is attached to a moving vehicle or is mounted on a tripod that is moving towards its target.
Additionally, you may use this approach to make stunning photographs with motion blur by employing long exposures. In most cases, the final image will be stabilized in post-production in order to eliminate some of the flaws that may have been captured in the original photo.

Part 3. What differentiates them from each other?
The movement of the camera is what differentiates these two approaches the most from one another. When capturing a time lapse, the camera is kept relatively still and in the same position throughout. In addition, when you use a hyperlapse, the camera is continuously moving, which creates a 3D appearance in the image.
You could be scratching your head right about now, wondering when you should employ one of the two methods. If your subject is moving, you should take a time-lapse photograph; if the camera is moving, you should take a hyperlapse photograph. This question has a relatively straightforward answer.
The act of recording video for a hyperlapse can cause your storage to be filled up really rapidly. Therefore, you may wish to swap between the two methods depending on the length of time that you want to shoot for. If you are going to be filming for a significant amount of time, you should consider using a timelapse.
It is simple to determine the timelapse interval if you already know these answers. Choose the video’s final frame rate. It may be 24, 25, or 30 fps. You shouldn’t select more quickly. Choose the option that best fits your audience and location. Additionally, a time-lapse calculator is available.
The shoot time should then be converted to seconds. For instance, two hours are equal to 2 x 60 x 60 seconds, or 7200 seconds. Determine how many frames are required for your chosen timelapse now. For instance, the final product should be 30 seconds of 25fps video. You’ll need to capture 750 frames in total because 30 x 25 is 750.
Divide the time (7200s in this case) by the number of frames to obtain the interval (750). You can round up the result, which is 9.6, which is pretty near to 10 seconds. Therefore, in our case, your interval should be set to 10s.
Part 4. Motion control timelapse
Now that we understand how the timelapse images that are static are created, we are able to incorporate some movement into the shots that are static. Moving the camera around during a timelapse is much more difficult than it appears to be in the video. Every movement of the camera is slowed down when using slow motion, which means that you can make even a shaky handheld movie look good when using slow motion. The situation is completely reversed while viewing a timelapse.
Because every movement of the camera is sped up, shooting with the handheld mode is nearly impossible. If you want the camera to appear to be moving slowly in the final timelapse, you will need to move it very slowly while shooting in order to achieve this effect.
For this reason, we will need to make use of motion control devices in order to accomplish our goal. Therefore, we refer to these kinds of photos as motion control timelapses. The camera can be moved very slowly and accurately along one, two, or all three axes using motors that are controlled electronically. The three-axis systems, which include a slider as well as a pan-tilt head, are by far the most popular.
Extra Info: Best Time Lapse Video Maker – Filmora
To create a time lapse video with cool effects, you can use the best video editor with rich effects – Filmora . This software offers many video speed change settings and creative effects to help make a time lapse video easily. Just download the software on your PC or Mac and then start creating a video on your own.
Conclusion
The finest results can be achieved by utilizing a variety of filmmaking approaches concurrently. Therefore, you shouldn’t be afraid to try out new things by combining time-lapse photography with slow motion and video. In addition, make sure you visit the Hyperlapse Academy so you can become familiar with all of the different approaches. Use your imagination, and don’t stop firing.
Free Download For Win 7 or later(64-bit)
Free Download For macOS 10.14 or later
Free Download For macOS 10.14 or later
Also read:
- Change Speed of a Video on iPhone
- 2024 Approved Add Green Screen Effects in Final Cut Pro
- New Everything About Adding Effects In Kinemaster for 2024
- 2024 Approved In This Article, You Will Learn Easy Ways to Edit Videos Using a Mouse in Wondershare Filmora. You Can Do Video Editing without a Keyboard After Reading This Article
- Updated Finding LUTs Made by Danny Gevirtz
- Updated Best Filmic Pro LUTs For Video Editing
- How To Export Video in Filmora for 2024
- In 2024, How to Do Datamoshing Effect in After Effects?
- Updated Guide To Make a YouTube Intro by Filmora for 2024
- Unlock the Power of Shotcut The Ultimate Guide to Rotating Videos
- New How to Animate Your Designs With Canva GIF for 2024
- Adding a Spooky Shadow Effect with Filmora for 2024
- How to Rotate Video in iMovie with Alternative for 2024
- 2024 Approved How to Be a YouTube Vlogger
- Updated How to Make a Video Slideshow in iMovie for 2024
- New How Windows Movie Maker Save MP4 File for 2024
- 2024 Approved Leading Applications to Create Fast Motion in iPhone
- In 2024, Create Eye-Catching Slow-Motion Videos to Set Your Own Trend. For This Purpose, Read This Article to Find and Learn to Use CapCuts New Slow-Motion Templates
- Adding a Spooky Shadow Effect with Filmora
- 2024 Approved Ultimate Guide on How to Plan and Storyboard a Music Video
- 2024 Approved 10 Best Free Video Player for Windows 11
- The Article Is a Guide About the Split of the Videos in VLC. There Is Also a Particular Description of Its Alternative Wondershare Filmora. It Is Suitable as Well as Reasonable for 2024
- In 2024, How to Bypass Android Lock Screen Using Emergency Call On Motorola Edge 2023?
- Forgotten The Voicemail Password Of Realme C55? Try These Fixes
- Why is iPogo not working On Nubia Red Magic 8S Pro? Fixed | Dr.fone
- How To Factory Unlock Your Telstra iPhone 12 mini
- In 2024, Trouble with Apple iPhone 14 Pro Swipe-Up? Try These 11 Solutions
- How to Stop Google Chrome from Tracking Your Location On Apple iPhone 15 Plus? | Dr.fone
- Complete guide for recovering call logs on Nubia Flip 5G
- How To Stream Anything From Realme C33 2023 to Apple TV | Dr.fone
- In 2024, How to Track a Lost Samsung Galaxy F04 for Free? | Dr.fone
- In 2024, How to Track Nokia C300 Location by Number | Dr.fone
- In 2024, How Do You Remove Restricted Mode on iPhone SE
- 3 Ways to Change Location on Facebook Marketplace for Xiaomi 14 Pro | Dr.fone
- Updated 2024 Approved All About 3D Medical Animation
- Removing Device From Apple ID For your iPhone XS
- New 2024 Approved What Is an AI Editor?
- Title: How to Create Your Own Subscribe Channel Graphics
- Author: Chloe
- Created at : 2024-05-20 03:37:28
- Updated at : 2024-05-21 03:37:28
- Link: https://ai-editing-video.techidaily.com/how-to-create-your-own-subscribe-channel-graphics/
- License: This work is licensed under CC BY-NC-SA 4.0.

