
:max_bytes(150000):strip_icc():format(webp)/samsung-un65nu7100fxza-aaa-5b3bf3f1c9e77c00370afe54.jpg)
How to DIY VHS Overlay in After Effects, In 2024
How to DIY VHS Overlay in After Effects?
The 90s generation is familiar with Video Home System video. Today, Moviemakers use VHS static overlay to give their videos an antique and vintage look.
The VHS glitch overlay has become increasingly popular as it changes the video’s theme, tone, and whole look. Let’s see how we can add DIY VHS overlay in after effects-
Part 1:Step by Step DIY VHS Overlay in After Effects?
The retro “VHS Look” has become relatively trendy in recent years. The memories associated with the popular VHS trend has helped the trend make a comeback. Creating this effect in After Effects may seem to be a complicated process if you have not tried it before. But we have made it easier for you to add VHS overlay in Adobe After Effects. Follow the steps to add it in after effects-
Before you begin, download and install VHS preset if you haven’t already. Remember that VHS preset only works with After Effects CC 2018 and up. So, make sure you have the recent version of After Effects or the one not older than the 2018 version.
Step 1: To create a VHS look on your video, drop any video of your choice into the project panel and give it a name, let’s say, “VCR static overlay”. Set the width and height to 1920 and 1080 px, respectively.

Step 2: Right-click on your video and select New Comp from Selection. Drag your video to a new composition and then go to Lumetri Color < Basic Correction. Add some contrast. You can set it to 50 or any other number of your choice. Then bring the white level down to -55.

Then open the Creative tab. Increase the faded film to 40. Set sharpening to -70. Bring vibrance to -30.
Note: Here, I changed the number to get the effect I wanted. You can change the numbers and set the values as per your requirements.
Now, click on the Curves option. Drag down the white curve and then align it with the original curve. Move the green curve up a bit and bring down the blue curve. Then comes the Vignette tab. Open it and set the number to -1.

Step 3: Now, we will give our video a subtle RGB spit appearance. For that, we need to use the Channel Blur effect twice. First, go to Effect < Blur & Sharpen < Channel Blur. Set red blurriness to 20. Turn on the repeat edge pixels. Then change the Blur Dimensions from horizontal and vertical to vertical.

Step 4: Again, go to Effect < Blur & Sharpen < Channel Blur. Set blue blurriness to 30. Repeat the process of checking the repeat edge pixels box. Change the Blue Dimensions from horizontal and vertical to horizontal.
Step 5: Next comes giving the video artificial sharpening look using Unsharp Mask. So, go to Effect < Blur & Sharpen < Unsharp Mask. Under the Unmask Mask menu, set the amount to 100 and the radius to 10.

Step 6: To add a font to your video, simply search VHS font on Google. Look for the one you want to use in your video and download it. To give your video that authentic VHS-style look, we suggest downloading free VCR OSD Mono font and installing the font on your system.
Step 7: Go to Layer < New < Solid and choose any color. We chose white. Now, under Effects & Presets, search for a number. Drag it to the white solid. Choose the font VCR OSD Mono. You can change the number to time or date. You can also add time manually. Select the text tool, go to the source text, hold alt, and click on the stopwatch. Write “timeToCurrentFormat() and time will be displayed on the video. Let us say we want to see the date on the video instead of time. So, change the time to date. Drag the date to the bottom right of the video to give it the look of an old VHS tape.
If you are a beginner and want a simple VHS effect, you can follow these easy steps and create the VHS video that will transport you back to the 90s.
BONUS TIP: How to Add VHS Overlays and Glitch Effects to Make Retro Videos in Filmora Video Editor?
Do you remember the look of the VHS and miss it? You can bring your memories back! With Wondershare Filmora, you can add this effect easily to your videos. Adding a VHS overlay transparent brings drama and creates an atmosphere of distortion. It can significantly change the appearance and feel of your video.
So, if you want to create professional-looking VHS overlay free, the only thing you need is Filmora video editing software . Filmora allows you to add three different overlay VHS effects that you can use along with other overlays to create retro videos.
For Win 7 or later (64-bit)
For macOS 10.12 or later
Do you want to add retro videos on Filmora? It is simple!
To create a VHS overlay video, you should first download the Filmora app for free if you haven’t! Let’s learn how the effect can transform your video. You will have to choose various effects and values to get the final VHS overlay video. These effects can be added to any lyric video, intro, outro, and many others.
Let’s look at the steps:
Open your draft in Filmora software and select sample colors from the Media tab on the top left.

You can drag and drop the photo on a track on the timeline. Then adjust the trim handles to change the duration to match the section of the video to be transformed.
In sequence, add these three overlays by dragging them from the Effects panel at the top to their own individual tracks on the timeline: VHS Distortion Bad (alpha = 25), VHS Distortion (alpha = 35), and VHS Rewind (alpha = 10).
You can also add effects like Strong Glitch, Chromatic Aberration, Glitch Distortion, Distort, etc., to enhance the vintage look of the video.
When finished, click export and choose the format and target folder to save the processed file with the added effects.

The smart generation has access to HD videos and high-tech devices, yet VHS is an exciting concept for them. The videos created with this effect resemble those from the 90s era. You have to customize everything when you add a VHS effect, including the title, background noise, overlay, and credits.
By choosing a video-editing software like Wondershare Filmora, users can make such videos and add retro glitch overlay professionally. You can also access Filmstock to download any video effects, stock media, templates, or sound effects for Filmora.
Conclusion
Video editing is now easy and fun. The trend of VCR overlay is now back as VHR overlay. With Wondershare Filmora, you can easily create classic videos with 90’s effects. Take your video editing to the next big level with Filmora Video Editor. We can help you make the best use of this tool to create glitch effect videos and add a VHS tape overlay.
Versatile Video Editor - Wondershare Filmora
An easy yet powerful editor
Numerous effects to choose from
Detailed tutorials provided by the official channel
For macOS 10.12 or later
Do you want to add retro videos on Filmora? It is simple!
To create a VHS overlay video, you should first download the Filmora app for free if you haven’t! Let’s learn how the effect can transform your video. You will have to choose various effects and values to get the final VHS overlay video. These effects can be added to any lyric video, intro, outro, and many others.
Let’s look at the steps:
Open your draft in Filmora software and select sample colors from the Media tab on the top left.
You can drag and drop the photo on a track on the timeline. Then adjust the trim handles to change the duration to match the section of the video to be transformed.
In sequence, add these three overlays by dragging them from the Effects panel at the top to their own individual tracks on the timeline: VHS Distortion Bad (alpha = 25), VHS Distortion (alpha = 35), and VHS Rewind (alpha = 10).
You can also add effects like Strong Glitch, Chromatic Aberration, Glitch Distortion, Distort, etc., to enhance the vintage look of the video.
When finished, click export and choose the format and target folder to save the processed file with the added effects.
The smart generation has access to HD videos and high-tech devices, yet VHS is an exciting concept for them. The videos created with this effect resemble those from the 90s era. You have to customize everything when you add a VHS effect, including the title, background noise, overlay, and credits.
By choosing a video-editing software like Wondershare Filmora, users can make such videos and add retro glitch overlay professionally. You can also access Filmstock to download any video effects, stock media, templates, or sound effects for Filmora.
Conclusion
Video editing is now easy and fun. The trend of VCR overlay is now back as VHR overlay. With Wondershare Filmora, you can easily create classic videos with 90’s effects. Take your video editing to the next big level with Filmora Video Editor. We can help you make the best use of this tool to create glitch effect videos and add a VHS tape overlay.
Versatile Video Editor - Wondershare Filmora
An easy yet powerful editor
Numerous effects to choose from
Detailed tutorials provided by the official channel
How To Edit Youtube Videos In Simple Steps
How to Edit YouTube Videos in Simple Steps
An easy yet powerful editor
Numerous effects to choose from
Detailed tutorials provided by the official channel
In this article
01 [How to Edit Your YouTube Videos for Beginners?](#Part 1)
02 [How to edit YouTube videos on phone?](#Part 2)
03 [What do Professional YouTubers Use to Edit Videos?](#Part 3)
04 [YouTube Video Editing Q&A](#Part 4)
Part 1 How to Edit Your YouTube Videos for Beginners?
There are a lot of tools for beginners from which they can edit their videos on a budget. Here some of them:
01YouTube Creator Studio
Price: Free
Great For: Quick and basic video edits
YouTube has its own web based video editor which is free of cost. YouTube creator studio is a basic editing tool which allows you to trim the clips from any part of the video. You can also blur the objects and faces if you want. There are several other features that will help you to make your video attractive and engaging.
If you have uploaded a video on YouTube then also, YouTube creator studio allows you to edit the video without losing your video ID and video URL. You can also “Add an End Screen” to your video to give your viewers an option to subscribe your channel.
Pros:
● Create (ability to edit and post your content)
● Activity Insight (you can check your performance metrics)
● Monetization Management
Cons:
There are no cons as such.

02Videorama
Price: Free
Great For: making movies from videos and photos.
If you shoot a video on an iPhone or iPad then Videorama is the best tool to edit your video. You can choose video clips and photos from your gallery and put them together. In this, you can create overlays, add music, filters, add text and can also record a voice – over. Click on the “OK, Share” after you are done with editing, choose the preferred resolution and frame rate. Now your video is ready to post on your YouTube channel.
Pros:
● Easy to use
● Great range of SFX and VFX
● Text Effects and Filters are good
Cons:
● Lack some basic editing features
● IAP’s can get expensive
● More diverse effects would be nice.

● Shotcut
Price: Free
Good For: Used for editing videos and audios for free
Shotcut is a multimedia editing tool and if you are a beginner in video or audio editing this tool is quite the deal for you. You can create or edit the videos by using its various features and can make an engaging or captivating video. It has some tutorials to help you out. For YouTube, it is the best tool to edit your videos.
There are a lot effects and some of that which are used commonly are color grading, color tint etc. When we talk about audio editing features, Shotcut is mostly used to enhance your video with adding music to it.
For editing video you can select from multiple presents or you can set the frame rate and resolution which you want by setting it on ‘Custom’.
Pros:
● Free to use
● Comes with tutorials
● It has a simple interface.
Cons:
● Doesn’t support animation
● Do not have optional plugins.
● Lacks features like multicam editing and motion tracking.

03Movavi Video Editor
Price: $ 59.95
Great For: Quick and fast video editor
Movavi is a video editor tool to edit your video and share it with everyone. You can edit your videos and make them look more alluring to people by using its Key frame animations, special effects and readymade intros.
You can also change the background in your video clips easily by applying Chroma key. It has an easy and refined interface so that you can use it easily and there is nothing to learn in it before using. You can edit your videos and download it for free. There is no need of internet connection when using it. So, it is the best to use it while on the go.
Pros:
● Easy interface
● Amazing feature and special effects
● Fast and quick editor
Cons:
● Free trial isn’t good as it has limited features
● Few templates for text templates and transitions
● You have limited control over color tuning.

04Apple iMovie
Price: Free for Mac users / $14.99 in the Apple Play Store
Great For: Making photos and videos in a beautiful production.
Apple iMovie is a video editor is for those who want to do editing on a professional level. It is for Mac users. It is easy to use and it gives you high quality of video editing with its special effects, high fidelity filters, green screen effects, etc . It allows you to add various clips and shots and arrange them in order, add text, music, effects and your engaging video is ready.
Before starting to edit your video for YouTube or for other sites, always select the standard aspect ratio that is (4:3). If you will choose any theme for your video, iMovie will add transitions effects and add title on its own.
Pros:
● User friendly interface
● It is quick and fast
● Easy sharing
Cons:
● Limited editing features
● Quite expensive
● It requires high level of HDD space

05Videoshop – video editor
Price: Free
Great For: Easy and fast video editor
Videoshop is a third party video editing app from which you can edit your videos on your android or iPhone. Videoshop has amazing features like you can trim, cut, adjust the lightning, rotate your video, add transitions, etc. You can add music and text to make your video more engaging.
There are a lot of filters and features that you can apply to your video to make it look more captivating. Once you have completed editing the video, click on the ‘Share’ icon. It makes your video ready to upload on YouTube or other sites.
Pros:
● Combine clips from various videos
● Fast and easy way to edit videos
● Add special effects, filters and sound
Cons:
● Free for limited time
● Requires subscription to access app’s features like watermark free
● Not fit for editing batch videos
06HitFilm Express
Price: Free
Great For: Gives you professional-grade video editing
HitFilm Express is a free video editing tool which is packed with amazing features to edit your videos for any platform including YouTube. It has a lot of filters and 400+ visual effects that help to give your video a professional touch. You can add voice over to your videos as well by just clicking on a button.
You can create commercials, movies, audio songs while using this as it allows you to add music, text and image etc. you can make quality videos by using HitFilm and share it with the world.
Pros:
● Clean user interface
● Easy to use
● Perfect for YouTube creators
Cons:
● Sometimes crashes and freezes
● Welcome screen is cluttered
● Steep learning curve

Part 2 How to edit YouTube videos on phone?
Editing can enhance the look of your video and making an engaging video can attract the audience to give it a watch. There are various tools to edit your YouTube video. Some of them are listed below:
01YouTube Creator Studio
This is one of the best options to edit a new video or a video that is already uploaded. This built-in editor can easily be accessed on the phone to carry out the necessary editing. You can follow the below discussed guide for the same.
Step 1: Sign in to the YouTube’s studio (channel dashboard).
Step 2: Click on the content option given at the left sidebar.
Step 3: Click on the thumbnail of the video you want to edit from uploads.

Step 4: Click on theEditor given at the left sidebar.
Step 5: You can trim the beginning or the end part of the video. You can trim the video from the Trim option which is right above the timeline.

Step 6: Add end screen to your video
Click on the end screen icon which is given at the middle of the timeline. If you want your viewers to know that you have more related videos or you want to make them subscribe your channel then you can add an end screen to your video.

02iMovie
Editing videos on iphone was never so easy. Using the iMovie app, one can easily edit the YouTube videos for free. The app can easily be downloaded from the app store. Here is a step by step guide that you can follow to edit the video.
Step 1: Import media
Open the app to My Movie section present on main screen. Now, add the video for editing by clicking on ‘Import media’. Now, you need to drag it to the bottom timeline.

Step 2: Trim or split the video
Now, you can trim or split the clip as per your requirement. You can do this by clicking on the spot in video that you want to split or trim. For this, click on modify and then select Split Clip, Trim to Clip Edge or Trim to Playhead.

Step 3: Add music and effects
You can check out the sound and music effects, background, transitions and themed titles at the top toolbar and implement them in the video. Using the icons present just above the clip, you can make color corrections, stabilize the clip, change volume, eliminate background noise, apply speed changes, etc.

Step 4: Share the video
After the editing is complete, click on the Share icon present at the top right corner. Now, click on YouTube & facebook. Now, save the video to your Mac device. When the file is saved, go to YouTube Studio And upload your video.

03Windows Photo app
To use this app, you need to have windows 10 on your system. The Windows Photo app is an effective tool to edit the videos. The editing process is very simple and can be done in a few minutes. Here is a simple guide to help you.
Step 1: Open the app
Launch the app and click on the Video Editor option. To start the editing process, click on new video project. Now, name your project to start the process.

Step 2: Import the video
Click on ‘Add’ and then ‘From this pc’ to add the video. You can then drag the clip to open it in storyboard. There are several options at the storyboard using which you can add text to the title etc. to do this, select Add title card option. You can add text, select style and duration. Finally click on Done.

Step 3: Edit the video
You can find the trim, split and other editing options at the top. Using these options, you can make the desirable changes to the video. After completing the editing work, you can click on Finish video option. Now, choose the video quality (540p, 720p, 1080p) and select Export option to save the video on your computer.

Part 3 What do Professional You Tubers Use to Edit Videos?
Professional YouTubers use the best software for editing their videos and make them engaging and of high quality. One such software that you can also give a try is Wondershare Filmora Video Editor . The easy to use and interactive interface makes this software a top notch choice of the editors. In Filmora, you can edit your videos and audios, record the PC screen, add a voiceover to your video and also add colors in an easy way. The templates are customizable and you can edit them according to you. It has a lot of animated elements, transitions, title designs etc.
For Win 7 or later (64-bit)
For macOS 10.12 or later
Why to choose Filmora for editing YouTube videos:
● Can record the PC screen
● It has Pan and Zoom movements
● Can edit your audios with audio mixers
● Have amazing Filters, Text effects and Overlays.
● Color tuning
● Upload your videos directly to YouTube, Face book or Vimeo.
● Can adjust the speed
● Video stabilization
Part 4 YouTube Video Editing Q&A
What are the tools used for editing YouTube videos?
A. There are various tools available for editing the YouTube’s video. Some of them are listed here:
● YouTube creator studio
● Apple iMovie
● Videorama
● Shotcut
● Movavi video editor
How can you edit a YouTube video on your smart phone?
A. You can easily edit a YouTube video on your smart phone. Here are the steps to follow:
● Step 1: Log in to you YouTube account and click on the three dots at top right corner.
● Step 2: Tap on the three vertical dots at the side of your video which you want to edit.
● Step 3: Edit the video as you wish. You can change its description, add effects etc.
● Step 4: Click on the save button after you are done editing.
How can you add music to your video?
A. Adding music to video is very simple and can be done using Movavi Video Editor. Here is a small guide that you can follow.
● Download the Movavi Video Editor.
● Select the audio and video in Movavi Video Editor.
● Adjust the length and volume of the audio according to your video.
● Save the file.
How can you add Transitions on a video editor?
A. You can add transition to your video in two ways. You can add transitions to one or two different video clips or the other is adding transition to one media file.
What are the steps for editing a video?
A. A simple but highly effective way to edit a video is make a plan, film the video, add the media, arrange the media, edit the video, trim the video, add transitions, add title, add effects, and merge the Audio. Now, give a final touch to your video and the project is ready.
● Ending Thoughts →
● Editing videos on a budget is now easy as there are several software like Movavi Video Editor, Videorama, Apple iMovie, Shotcut tools that help you do it with ease.
● You can also edit your YouTube videos on your smart phones as it is quite simple and also you can use these tools to edit the video professionally.
● Filmora is the best tool from which you can edit your YouTube videos and can upload them directly on YouTube.
In this article
01 [How to Edit Your YouTube Videos for Beginners?](#Part 1)
02 [How to edit YouTube videos on phone?](#Part 2)
03 [What do Professional YouTubers Use to Edit Videos?](#Part 3)
04 [YouTube Video Editing Q&A](#Part 4)
Part 1 How to Edit Your YouTube Videos for Beginners?
There are a lot of tools for beginners from which they can edit their videos on a budget. Here some of them:
01YouTube Creator Studio
Price: Free
Great For: Quick and basic video edits
YouTube has its own web based video editor which is free of cost. YouTube creator studio is a basic editing tool which allows you to trim the clips from any part of the video. You can also blur the objects and faces if you want. There are several other features that will help you to make your video attractive and engaging.
If you have uploaded a video on YouTube then also, YouTube creator studio allows you to edit the video without losing your video ID and video URL. You can also “Add an End Screen” to your video to give your viewers an option to subscribe your channel.
Pros:
● Create (ability to edit and post your content)
● Activity Insight (you can check your performance metrics)
● Monetization Management
Cons:
There are no cons as such.
02Videorama
Price: Free
Great For: making movies from videos and photos.
If you shoot a video on an iPhone or iPad then Videorama is the best tool to edit your video. You can choose video clips and photos from your gallery and put them together. In this, you can create overlays, add music, filters, add text and can also record a voice – over. Click on the “OK, Share” after you are done with editing, choose the preferred resolution and frame rate. Now your video is ready to post on your YouTube channel.
Pros:
● Easy to use
● Great range of SFX and VFX
● Text Effects and Filters are good
Cons:
● Lack some basic editing features
● IAP’s can get expensive
● More diverse effects would be nice.
● Shotcut
Price: Free
Good For: Used for editing videos and audios for free
Shotcut is a multimedia editing tool and if you are a beginner in video or audio editing this tool is quite the deal for you. You can create or edit the videos by using its various features and can make an engaging or captivating video. It has some tutorials to help you out. For YouTube, it is the best tool to edit your videos.
There are a lot effects and some of that which are used commonly are color grading, color tint etc. When we talk about audio editing features, Shotcut is mostly used to enhance your video with adding music to it.
For editing video you can select from multiple presents or you can set the frame rate and resolution which you want by setting it on ‘Custom’.
Pros:
● Free to use
● Comes with tutorials
● It has a simple interface.
Cons:
● Doesn’t support animation
● Do not have optional plugins.
● Lacks features like multicam editing and motion tracking.
03Movavi Video Editor
Price: $ 59.95
Great For: Quick and fast video editor
Movavi is a video editor tool to edit your video and share it with everyone. You can edit your videos and make them look more alluring to people by using its Key frame animations, special effects and readymade intros.
You can also change the background in your video clips easily by applying Chroma key. It has an easy and refined interface so that you can use it easily and there is nothing to learn in it before using. You can edit your videos and download it for free. There is no need of internet connection when using it. So, it is the best to use it while on the go.
Pros:
● Easy interface
● Amazing feature and special effects
● Fast and quick editor
Cons:
● Free trial isn’t good as it has limited features
● Few templates for text templates and transitions
● You have limited control over color tuning.
04Apple iMovie
Price: Free for Mac users / $14.99 in the Apple Play Store
Great For: Making photos and videos in a beautiful production.
Apple iMovie is a video editor is for those who want to do editing on a professional level. It is for Mac users. It is easy to use and it gives you high quality of video editing with its special effects, high fidelity filters, green screen effects, etc . It allows you to add various clips and shots and arrange them in order, add text, music, effects and your engaging video is ready.
Before starting to edit your video for YouTube or for other sites, always select the standard aspect ratio that is (4:3). If you will choose any theme for your video, iMovie will add transitions effects and add title on its own.
Pros:
● User friendly interface
● It is quick and fast
● Easy sharing
Cons:
● Limited editing features
● Quite expensive
● It requires high level of HDD space
05Videoshop – video editor
Price: Free
Great For: Easy and fast video editor
Videoshop is a third party video editing app from which you can edit your videos on your android or iPhone. Videoshop has amazing features like you can trim, cut, adjust the lightning, rotate your video, add transitions, etc. You can add music and text to make your video more engaging.
There are a lot of filters and features that you can apply to your video to make it look more captivating. Once you have completed editing the video, click on the ‘Share’ icon. It makes your video ready to upload on YouTube or other sites.
Pros:
● Combine clips from various videos
● Fast and easy way to edit videos
● Add special effects, filters and sound
Cons:
● Free for limited time
● Requires subscription to access app’s features like watermark free
● Not fit for editing batch videos
06HitFilm Express
Price: Free
Great For: Gives you professional-grade video editing
HitFilm Express is a free video editing tool which is packed with amazing features to edit your videos for any platform including YouTube. It has a lot of filters and 400+ visual effects that help to give your video a professional touch. You can add voice over to your videos as well by just clicking on a button.
You can create commercials, movies, audio songs while using this as it allows you to add music, text and image etc. you can make quality videos by using HitFilm and share it with the world.
Pros:
● Clean user interface
● Easy to use
● Perfect for YouTube creators
Cons:
● Sometimes crashes and freezes
● Welcome screen is cluttered
● Steep learning curve
Part 2 How to edit YouTube videos on phone?
Editing can enhance the look of your video and making an engaging video can attract the audience to give it a watch. There are various tools to edit your YouTube video. Some of them are listed below:
01YouTube Creator Studio
This is one of the best options to edit a new video or a video that is already uploaded. This built-in editor can easily be accessed on the phone to carry out the necessary editing. You can follow the below discussed guide for the same.
Step 1: Sign in to the YouTube’s studio (channel dashboard).
Step 2: Click on the content option given at the left sidebar.
Step 3: Click on the thumbnail of the video you want to edit from uploads.
Step 4: Click on theEditor given at the left sidebar.
Step 5: You can trim the beginning or the end part of the video. You can trim the video from the Trim option which is right above the timeline.
Step 6: Add end screen to your video
Click on the end screen icon which is given at the middle of the timeline. If you want your viewers to know that you have more related videos or you want to make them subscribe your channel then you can add an end screen to your video.
02iMovie
Editing videos on iphone was never so easy. Using the iMovie app, one can easily edit the YouTube videos for free. The app can easily be downloaded from the app store. Here is a step by step guide that you can follow to edit the video.
Step 1: Import media
Open the app to My Movie section present on main screen. Now, add the video for editing by clicking on ‘Import media’. Now, you need to drag it to the bottom timeline.
Step 2: Trim or split the video
Now, you can trim or split the clip as per your requirement. You can do this by clicking on the spot in video that you want to split or trim. For this, click on modify and then select Split Clip, Trim to Clip Edge or Trim to Playhead.
Step 3: Add music and effects
You can check out the sound and music effects, background, transitions and themed titles at the top toolbar and implement them in the video. Using the icons present just above the clip, you can make color corrections, stabilize the clip, change volume, eliminate background noise, apply speed changes, etc.
Step 4: Share the video
After the editing is complete, click on the Share icon present at the top right corner. Now, click on YouTube & facebook. Now, save the video to your Mac device. When the file is saved, go to YouTube Studio And upload your video.
03Windows Photo app
To use this app, you need to have windows 10 on your system. The Windows Photo app is an effective tool to edit the videos. The editing process is very simple and can be done in a few minutes. Here is a simple guide to help you.
Step 1: Open the app
Launch the app and click on the Video Editor option. To start the editing process, click on new video project. Now, name your project to start the process.
Step 2: Import the video
Click on ‘Add’ and then ‘From this pc’ to add the video. You can then drag the clip to open it in storyboard. There are several options at the storyboard using which you can add text to the title etc. to do this, select Add title card option. You can add text, select style and duration. Finally click on Done.
Step 3: Edit the video
You can find the trim, split and other editing options at the top. Using these options, you can make the desirable changes to the video. After completing the editing work, you can click on Finish video option. Now, choose the video quality (540p, 720p, 1080p) and select Export option to save the video on your computer.
Part 3 What do Professional You Tubers Use to Edit Videos?
Professional YouTubers use the best software for editing their videos and make them engaging and of high quality. One such software that you can also give a try is Wondershare Filmora Video Editor . The easy to use and interactive interface makes this software a top notch choice of the editors. In Filmora, you can edit your videos and audios, record the PC screen, add a voiceover to your video and also add colors in an easy way. The templates are customizable and you can edit them according to you. It has a lot of animated elements, transitions, title designs etc.
For Win 7 or later (64-bit)
For macOS 10.12 or later
Why to choose Filmora for editing YouTube videos:
● Can record the PC screen
● It has Pan and Zoom movements
● Can edit your audios with audio mixers
● Have amazing Filters, Text effects and Overlays.
● Color tuning
● Upload your videos directly to YouTube, Face book or Vimeo.
● Can adjust the speed
● Video stabilization
Part 4 YouTube Video Editing Q&A
What are the tools used for editing YouTube videos?
A. There are various tools available for editing the YouTube’s video. Some of them are listed here:
● YouTube creator studio
● Apple iMovie
● Videorama
● Shotcut
● Movavi video editor
How can you edit a YouTube video on your smart phone?
A. You can easily edit a YouTube video on your smart phone. Here are the steps to follow:
● Step 1: Log in to you YouTube account and click on the three dots at top right corner.
● Step 2: Tap on the three vertical dots at the side of your video which you want to edit.
● Step 3: Edit the video as you wish. You can change its description, add effects etc.
● Step 4: Click on the save button after you are done editing.
How can you add music to your video?
A. Adding music to video is very simple and can be done using Movavi Video Editor. Here is a small guide that you can follow.
● Download the Movavi Video Editor.
● Select the audio and video in Movavi Video Editor.
● Adjust the length and volume of the audio according to your video.
● Save the file.
How can you add Transitions on a video editor?
A. You can add transition to your video in two ways. You can add transitions to one or two different video clips or the other is adding transition to one media file.
What are the steps for editing a video?
A. A simple but highly effective way to edit a video is make a plan, film the video, add the media, arrange the media, edit the video, trim the video, add transitions, add title, add effects, and merge the Audio. Now, give a final touch to your video and the project is ready.
● Ending Thoughts →
● Editing videos on a budget is now easy as there are several software like Movavi Video Editor, Videorama, Apple iMovie, Shotcut tools that help you do it with ease.
● You can also edit your YouTube videos on your smart phones as it is quite simple and also you can use these tools to edit the video professionally.
● Filmora is the best tool from which you can edit your YouTube videos and can upload them directly on YouTube.
Trailer Guide for Creators and Developers
Trailers are a popular means to showcase a product you are about to release to the market. Teasers and trailers are traditionally created for movies, but have eventually evolved to include book trailers, game trailers, and app trailers. In this article, we will explain the key details of a trailer, highlight some examples, and show you how to create an effective trailer.
Part 1. What is a Trailer?
A trailer is a type of video commercial advertisement made to advertise and inform audiences about a specific program or item. To persuade customers to view or use the product, it includes a brief series of previews of the entire material. It also serves as a means of creating anticipation for a show or product that is about to hit the market.

Trailers were originally made for cinema movies. Nowadays, trailers are created for different forms of media like shows, apps, programs, video games, and book videos. A typical traditional trailer lasts between 1 to 3 minutes.
Part 2. What Are the Similarities and Differences Between a Teaser and Trailer?
Teasers and trailers can often be confused with each other. After all, they pretty much have the same objective.
Both are created for the purpose of advertising an upcoming show, product, or service. Teasers and trailers are similarly shown to audiences prior to the release of the thing they are advertising. They are meant to show a small portion of the full experience to create curiosity and excitement towards a targeted market. Both videos are typically short in length - taking up only a maximum of 3 minutes in duration.
The differences between them lie in their content, timeline, and duration. A teaser is much shorter than a trailer - the former runs for only 20-30 seconds while the latter can go between 1-3 minutes in length. This is because teasers are typically made before or during the production process of a movie or feature, whilst trailers are commonly made at the end.
For films, movies, and shows, teasers generally capture only a single part of that media. It focuses on the most intense or impactful scene. Trailers are formed from a series of clips depicting striking scenes derived from the beginning, middle, and end of the show. These scenes are normally arranged in a nonlinear structure, allowing viewers to have a general understanding of the story without revealing the entirety of the plot.
Part 3. Examples of good trailers
An excellent trailer is one who can effectively attract and maintain the audience’s attention. It satisfies its objective of showcasing striking and captivating pieces of the main product and entices viewers to experience its entirety. Here are some examples of trailers who have well fulfilled the criteria of a good trailer.
1. The Suicide Squad
The Suicide Squad is a fresh take featuring DC’s anti-heroes assemble in a single chaotic and unconventional team. James Gunn’s iteration on these characters is brought to life in the trailer with a majestic cast including John Cena, Idris Elba, Margot Robbie, and David Dastmalchian. Several key scenes are shown, highlighting its standout characters in the process while portraying the movie’s setting.
2. Raya and the Last Dragon
The trailer starts out innocently and comes with an adorable and surprising twist. The brief 2-minute trailer is packed with relevant scenes that depict the character’s quest without revealing too much. Many action-packed scenes and emotional interactions are satisfactorily squeezed into the trailer. Excitement builds further with Tamara Bubble’s “I’m That Good” playing in the background on the last minute of the video.
3. Men (2022)
Ingenious combination of sound effects and background music play a distinct role in this 2022 trailer. The female lead’s voice echoing from a tunnel, the haunting piano keys gradually building up the suspense, and the common but cleverly used horror audio effects create a chilling ensemble of haunting scenes in the movie. The sounds gradually rise up as more aggressive and energized scenes flash on the screen, and eventually end back into the sombre intro that leaves the audience with questions.
4. The Farewell
Lulu Wang’s dramatic comedy The Farewell is all about a family hiding the truth of a family member’s terminal illness from the person herself. What makes the trailer special is that it steers away from the sad, melancholic direction and veers toward a feel-good movie vibe. The conflict, struggle, and the beliefs featured in the movie are depicted in the trailer. However, the clever placement of interactions and the uplifting music tug at the audience’s heartstrings and urge them to want to see more.
5. Pokémon Go
Pokémon has become a culture to several generations. Becoming a Pokémon trainer is a secret dream that almost all of us have, even as adults. Niantic’s collaboration with the Pokémon franchise brings people closer to that reality by introducing its AR and location-powered app Pokémon Go. The trailer shows people of all ages living out their trainer dreams in the real world and interacting with Pokémon. The different features of the game are dramatized in a real-life setting, inciting more excitement, and pulling out the nostalgia from its market. The trailer keeps the actual app showcase to a minimum, instead focusing on once again selling that dream to audiences and bringing out the inner child in everyone.
Part 4. How to bring your trailer to the next level?
While it may seem intimidating to create a trailer for your upcoming product, there is no need to worry. It is now easier than ever to create a well-crafted trailer by taking advantage of a program’s tools and templates.
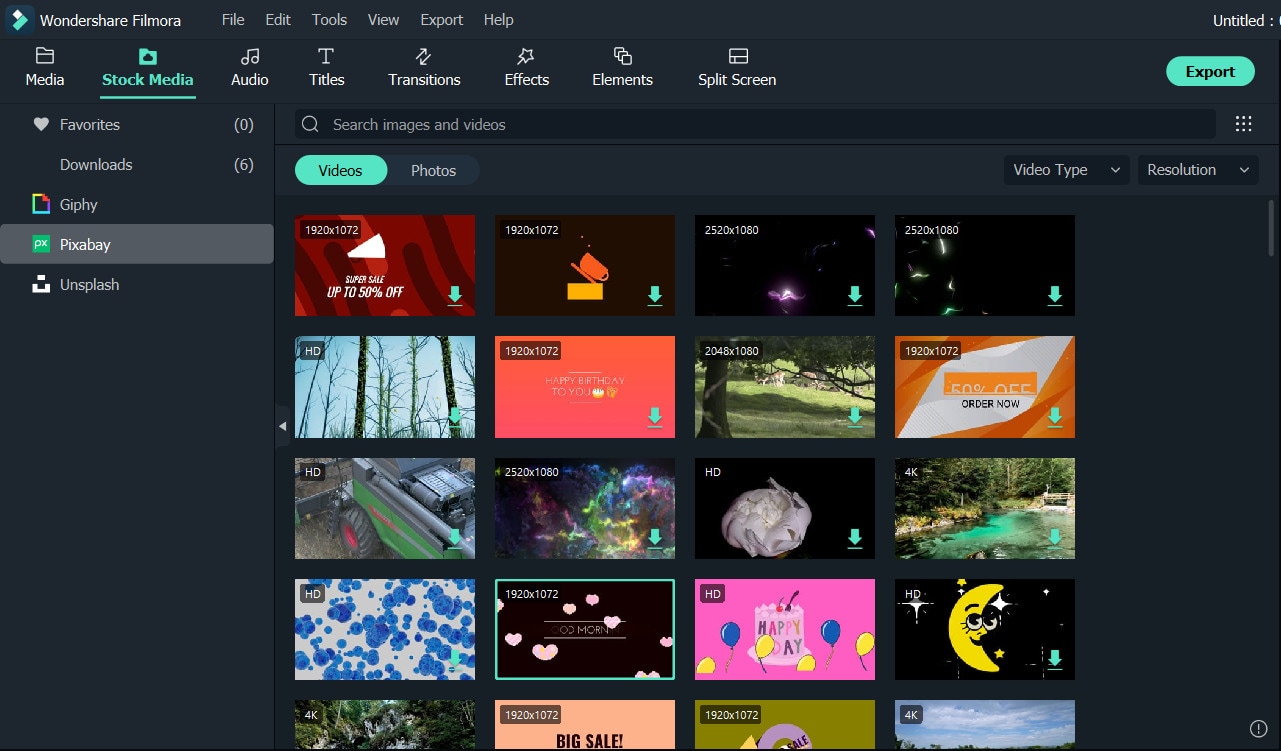
- Stock media
Filmora makes it easy to craft a trailer with only a few clicks. Make use of the program’s media library to gain access to a wealth of resources like stock photos, videos, music, and audio files.
- Keyframing
Keyframing lets you smoothly transition from one scene to another, making it an effective tool for trailers. It is particularly appealing for shows that highlight motion like sports, dancing, and action. Experiment with more than 80 preset templates and create smooth scene transitions with ease.
- Speed Ramping
Speed Ramping is a feature that works perfectly with keyframing. Increase the energy and dynamics in your trailer with 6 preset speed types. You can also customize these templates. There is also no need for concern about the audio - Filmora lets you maintain the audio pitch even when using these features.
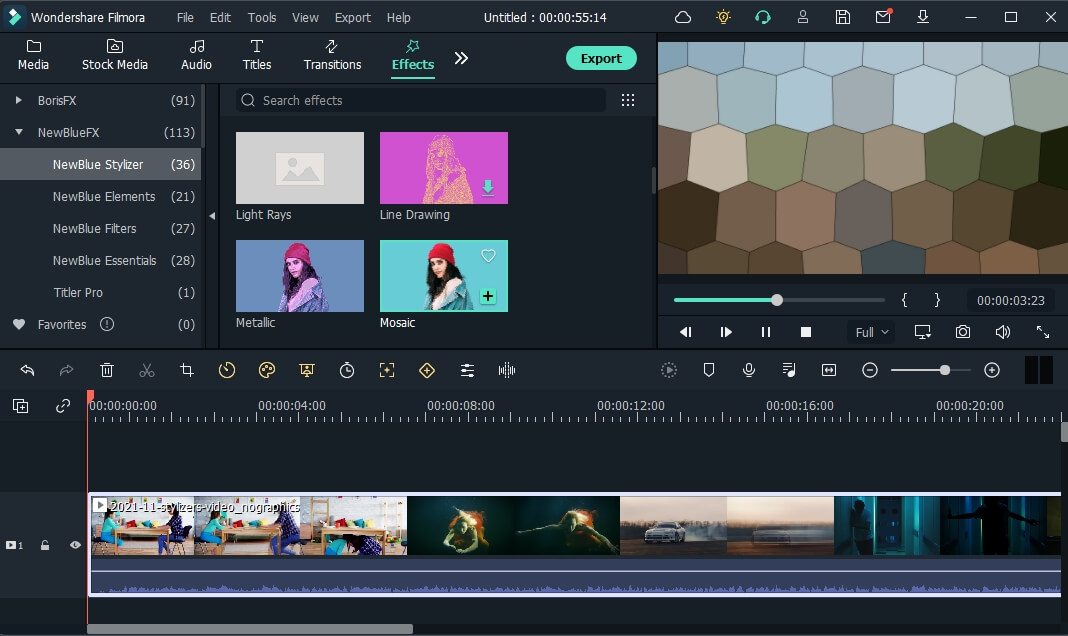
- FX Effects
The program also offers many effects and filters for an extra element in your trailer. The Borix FX is an example of that. Designed in collaboration with the award-winning developer of the same name, Boris FX and its extension Continuum features a wide array of tasteful effects for your convenience. There are over 91 customizable and adjustable presets including types like blurs, stylization, and lights. NewBlue is another option that carries choices of filters, titlers, and stylizers.
Filmora offers different features, tools, and effects to explore that can help make your trailer editing objectives easier and more convenient. Save time and resources by taking advantage of its powerful yet easy-to-use tools.
Free Download For Win 7 or later(64-bit)
Free Download For macOS 10.14 or later
2. Raya and the Last Dragon
The trailer starts out innocently and comes with an adorable and surprising twist. The brief 2-minute trailer is packed with relevant scenes that depict the character’s quest without revealing too much. Many action-packed scenes and emotional interactions are satisfactorily squeezed into the trailer. Excitement builds further with Tamara Bubble’s “I’m That Good” playing in the background on the last minute of the video.
3. Men (2022)
Ingenious combination of sound effects and background music play a distinct role in this 2022 trailer. The female lead’s voice echoing from a tunnel, the haunting piano keys gradually building up the suspense, and the common but cleverly used horror audio effects create a chilling ensemble of haunting scenes in the movie. The sounds gradually rise up as more aggressive and energized scenes flash on the screen, and eventually end back into the sombre intro that leaves the audience with questions.
4. The Farewell
Lulu Wang’s dramatic comedy The Farewell is all about a family hiding the truth of a family member’s terminal illness from the person herself. What makes the trailer special is that it steers away from the sad, melancholic direction and veers toward a feel-good movie vibe. The conflict, struggle, and the beliefs featured in the movie are depicted in the trailer. However, the clever placement of interactions and the uplifting music tug at the audience’s heartstrings and urge them to want to see more.
5. Pokémon Go
Pokémon has become a culture to several generations. Becoming a Pokémon trainer is a secret dream that almost all of us have, even as adults. Niantic’s collaboration with the Pokémon franchise brings people closer to that reality by introducing its AR and location-powered app Pokémon Go. The trailer shows people of all ages living out their trainer dreams in the real world and interacting with Pokémon. The different features of the game are dramatized in a real-life setting, inciting more excitement, and pulling out the nostalgia from its market. The trailer keeps the actual app showcase to a minimum, instead focusing on once again selling that dream to audiences and bringing out the inner child in everyone.
Part 4. How to bring your trailer to the next level?
While it may seem intimidating to create a trailer for your upcoming product, there is no need to worry. It is now easier than ever to create a well-crafted trailer by taking advantage of a program’s tools and templates.
- Stock media
Filmora makes it easy to craft a trailer with only a few clicks. Make use of the program’s media library to gain access to a wealth of resources like stock photos, videos, music, and audio files.
- Keyframing
Keyframing lets you smoothly transition from one scene to another, making it an effective tool for trailers. It is particularly appealing for shows that highlight motion like sports, dancing, and action. Experiment with more than 80 preset templates and create smooth scene transitions with ease.
- Speed Ramping
Speed Ramping is a feature that works perfectly with keyframing. Increase the energy and dynamics in your trailer with 6 preset speed types. You can also customize these templates. There is also no need for concern about the audio - Filmora lets you maintain the audio pitch even when using these features.
- FX Effects
The program also offers many effects and filters for an extra element in your trailer. The Borix FX is an example of that. Designed in collaboration with the award-winning developer of the same name, Boris FX and its extension Continuum features a wide array of tasteful effects for your convenience. There are over 91 customizable and adjustable presets including types like blurs, stylization, and lights. NewBlue is another option that carries choices of filters, titlers, and stylizers.
Filmora offers different features, tools, and effects to explore that can help make your trailer editing objectives easier and more convenient. Save time and resources by taking advantage of its powerful yet easy-to-use tools.
Free Download For Win 7 or later(64-bit)
Free Download For macOS 10.14 or later
Adding a Spooky Shadow Effect with Filmora
Wondershare Filmora’s main purpose is the empowerment of content creators. The latest updates to the program are one of the pieces of evidence.
Whether you’re a horror content creator or simply living the Halloween vibe 24/7, continue reading to know how to use its latest masking feature to create a cool shadow effect for your next mind-blowing social media video.
How to Use The Masking Effect
Wondershare Filmora’s latest Masking feature allows its users to select a specific clip that they can overlay on other parts of the video or other clips.
Free Download For Win 7 or later(64-bit)
Free Download For macOS 10.14 or later
The feature allows you to insert the mask in any shape, such as a rectangle, circle, or triangle. You can also import any shapes you like if you can’t find them in the presets library. You can also adjust the mask placement, width, height, and feather effect.
Without further ado, let’s see the detailed step-by-step guide for this effect.
a. Preparation
You will need at least three shots of the same frame to get the shadow effect to work. The first is the main video, the second is the shadow clip, and the last would be a clip portraying just a plain background.
Make sure that your camera stays at the same point and angle. You can use a tripod for assurance.
Take the first main video and don’t forget to mark the positioning of the object for the next take. Then, you can shoot the shadow clip following the marking of the object to match its position in the main clip.
Finally, shoot the final clip without the object on the frame.

b. Steps to add the shadow effect to your videos using Masking
Step 1: Place the main clip on the timeline and find the start of the segment that you want to use. Press M on the keyboard to set a marker.

Step 2: Place the shadow clip on top of the main clip on the timeline. Trim and adjust until the shadow clip ends right at the marker of the main clip.

Step 3: Move the play head to the start of the shadow clip. Trim the main clip right on that mark so both clips have the same start by clicking the scissor icon and deleting the unused part.

Step 4: Double-click the shadow clip. OpenSettings > Mask Section > Rectangle to apply the mask. Adjust the blur strength to smooth out the edge.

Step 5: Play the result to see if there’s any part you need to block out. When you find them, repeat steps 1 to 4 but with the background clip. Try to conceal all things you need to hide using the masks. Make sure that you get the timings right.

Step6 Trim the length of the masking clips to match the main clip by sliding the play head and clicking the Split button.
Adjust the audio and preview the effect before you save the result. You can also add extra features like slow motion for maximum effect.

Summary
It is so easy to use this shadow effect on your video using Wondershare Filmora. The handy masking feature also comes with additional keyframe control and easy composite adjustment.
Wondershare Filmora is also packed with other powerful new features. This includes Auto Beat Sync, Speed Ramping, Quick Split Mode, and the upgraded Denoise feature. Update today to add more quirk to your content.
Free Download For macOS 10.14 or later
The feature allows you to insert the mask in any shape, such as a rectangle, circle, or triangle. You can also import any shapes you like if you can’t find them in the presets library. You can also adjust the mask placement, width, height, and feather effect.
Without further ado, let’s see the detailed step-by-step guide for this effect.
a. Preparation
You will need at least three shots of the same frame to get the shadow effect to work. The first is the main video, the second is the shadow clip, and the last would be a clip portraying just a plain background.
Make sure that your camera stays at the same point and angle. You can use a tripod for assurance.
Take the first main video and don’t forget to mark the positioning of the object for the next take. Then, you can shoot the shadow clip following the marking of the object to match its position in the main clip.
Finally, shoot the final clip without the object on the frame.
b. Steps to add the shadow effect to your videos using Masking
Step 1: Place the main clip on the timeline and find the start of the segment that you want to use. Press M on the keyboard to set a marker.
Step 2: Place the shadow clip on top of the main clip on the timeline. Trim and adjust until the shadow clip ends right at the marker of the main clip.
Step 3: Move the play head to the start of the shadow clip. Trim the main clip right on that mark so both clips have the same start by clicking the scissor icon and deleting the unused part.
Step 4: Double-click the shadow clip. OpenSettings > Mask Section > Rectangle to apply the mask. Adjust the blur strength to smooth out the edge.
Step 5: Play the result to see if there’s any part you need to block out. When you find them, repeat steps 1 to 4 but with the background clip. Try to conceal all things you need to hide using the masks. Make sure that you get the timings right.
Step6 Trim the length of the masking clips to match the main clip by sliding the play head and clicking the Split button.
Adjust the audio and preview the effect before you save the result. You can also add extra features like slow motion for maximum effect.
Summary
It is so easy to use this shadow effect on your video using Wondershare Filmora. The handy masking feature also comes with additional keyframe control and easy composite adjustment.
Wondershare Filmora is also packed with other powerful new features. This includes Auto Beat Sync, Speed Ramping, Quick Split Mode, and the upgraded Denoise feature. Update today to add more quirk to your content.
Also read:
- In 2024, Consider a LUT to Be a Color Preset that a Filmmaker Can Use to Start Working on a Project Quickly. Sony Engineers Have Developed LUTs to Help Filmmakers Perform Specific Tasks. All of These Are Available for Free
- The Only Guide Youll Ever Need to Learn GIF Design That Get Shared Like Crazy for 2024
- New 2024 Approved Creative Ways to Add Green Screen Effects In Photoshop
- New 2024 Approved How to Add Background to Video With/Without a Green Screen
- 2024 Approved Discord Is the Future of Networking. After All, It Is Here to Stay. Have You Heard of the Discord Animated Avatar? If Yes, You Understand Its Power and if Not, Ensure You Study This Article for More Information
- Updated Want to Learn How to Trim Videos in Premiere Pro. Read on; Our Guide Will Help You Trim Videos with This Timeline-Based Video Editing Software Application to Make Them Engaging to Viewers
- Updated Are You Looking for the Best Premiere Pro Slideshow Template Online for Free? If Yes, You Can Find a Few Exciting Slideshow Templates Here. They Are Worth Using
- Updated Make Super Easy Coin Magic With Filmora for 2024
- Updated Take Your Video Editing to the Next Level with Video Scopes for 2024
- Updated 2024 Approved Blender Green Screen Effects
- 2024 Approved In This Article, You Will Learn About the Top 5 Editors for Windows, Top 5 Editors for iPhone/Android, and Top 5 Editors for Animated GIF Editing
- New The Way to Make Dynamic Video Collages, In 2024
- Updated Live Stream on YouTube Using Zoom for 2024
- New How to Splice Videos Together on iPhone
- New IMovie Review – Is It The Best Video Editor for Mac Users?
- Updated Wondering How to Replace Sky in After Effects? Learn How
- New How to Add Text to Video for 2024
- Are You Facing Trouble in Playing a TS File? We Got You! Read the Article Below to Learn the Most About TS Format, Pros and Cons, and More for 2024
- In 2024, Why Vimeo Slideshow Maker Become More and More Popular
- Using AI to Replace Skies Finding the Right Methods
- Updated Discover the Ultimate LUTs for Wondershare Filmora Uncover the Answer
- New 2024 Approved Best 8 Animated Video Makers
- Best Practical Tips to Improve Your Lighting in the Sun for 2024
- Detailed Tutorial to Merge Videos in VLC Media Player for 2024
- Updated 15 Best CapCut Templates for Slow Motion Editing
- 2024 Approved 10 Best Meme Text to Speech Tools Windows, Mac, Android, iPhone&Online
- Updated Best 8 Free Video Editing Software Reddit
- 2024 Approved The Best Way To Color Grading & Color Correction in Filmora
- Updated 2024 Approved Mastering DaVinci Resolve Scopes A Comprehensive Guide
- New 3 Different Methods to Correct Color Distortion in Videos for 2024
- New In This Article, You Will Learn Easy Ways to Edit Videos Using a Mouse in Wondershare Filmora. You Can Do Video Editing without a Keyboard After Reading This Article
- Updated 2024 Approved Add Green Screen Video on TikTok
- In 2024, Fake Android Location without Rooting For Your Tecno Phantom V Fold | Dr.fone
- In 2024, 6 Ways To Transfer Contacts From Oppo A58 4G to iPhone | Dr.fone
- How Can I Catch the Regional Pokémon without Traveling On Motorola Edge 40 Pro | Dr.fone
- In 2024, How to Cast Lava Blaze 2 Screen to PC Using WiFi | Dr.fone
- How to Cast Poco M6 Pro 5G Screen to PC Using WiFi | Dr.fone
- In 2024, How to Lock Apps on Xiaomi 13T Pro to Protect Your Individual Information
- In 2024, Proven Ways in How To Hide Location on Life360 For Oppo Reno 10 Pro 5G | Dr.fone
- Full Guide to Bypass Infinix GT 10 Pro FRP
- In 2024, How to Mirror Your Vivo V27e Screen to PC with Chromecast | Dr.fone
- In 2024, Latest Guide on iPad 2/3 and iPhone 13 iCloud Activation Lock Bypass
- Latest Guide How To Bypass Samsung Galaxy S21 FE 5G (2023) FRP Without Computer
- The Magnificent Art of Pokemon Go Streaming On Vivo S17e? | Dr.fone
- Unlock Apple ID without Phone Number From iPhone X
- How to get the dragon scale and evolution-enabled pokemon On Vivo S18e? | Dr.fone
- How to Digitally Sign .docx file online free - (Tutorial)
- How to Unlock Samsung Phone Password Without Factory Reset?
- The way to get back lost music from OnePlus
- How to Transfer Data from Oppo Find X6 Pro to Other Android Devices? | Dr.fone
- In 2024, 8 Ways to Transfer Photos from Motorola Edge 2023 to iPhone Easily | Dr.fone
- In 2024, How to Cast Asus ROG Phone 7 Ultimate to Computer for iPhone and Android? | Dr.fone
- In 2024, Top 7 Skype Hacker to Hack Any Skype Account On your Vivo V27e | Dr.fone
- How to Change your Lava Storm 5G Location on Twitter | Dr.fone
- In 2024, 3 Smart and Simple Ways to Change Home Address on Apple iPhone 6 | Dr.fone
- In 2024, Can You Unlock iPhone 12 Pro After Forgetting the Passcode? | Dr.fone
- 5 Ways to Restart Vivo T2 Pro 5G Without Power Button | Dr.fone
- Title: How to DIY VHS Overlay in After Effects, In 2024
- Author: Chloe
- Created at : 2024-05-20 03:38:08
- Updated at : 2024-05-21 03:38:08
- Link: https://ai-editing-video.techidaily.com/how-to-diy-vhs-overlay-in-after-effects-in-2024/
- License: This work is licensed under CC BY-NC-SA 4.0.
