:max_bytes(150000):strip_icc():format(webp)/Robothandholdinganapple-fbe6ff482ed641e188dd6650b9ac132e.jpg)
How to Do Motion Graphics in Filmora

How to Do Motion Graphics in Filmora
Preparation
What you need to prepare:
- A computer (Windows or macOS)
- Your video materials.
- Filmora video editor
Step 1
Visit the filmora.wondershare.com website and download Filmora . Install the program and wait for it to Run. Then, click on New Project.
Step 2
Go to File → Project Settings and set the FPS to 60. Also, ensure that the project is in Full Resolution (1920x1080). Click OK.

Step 3
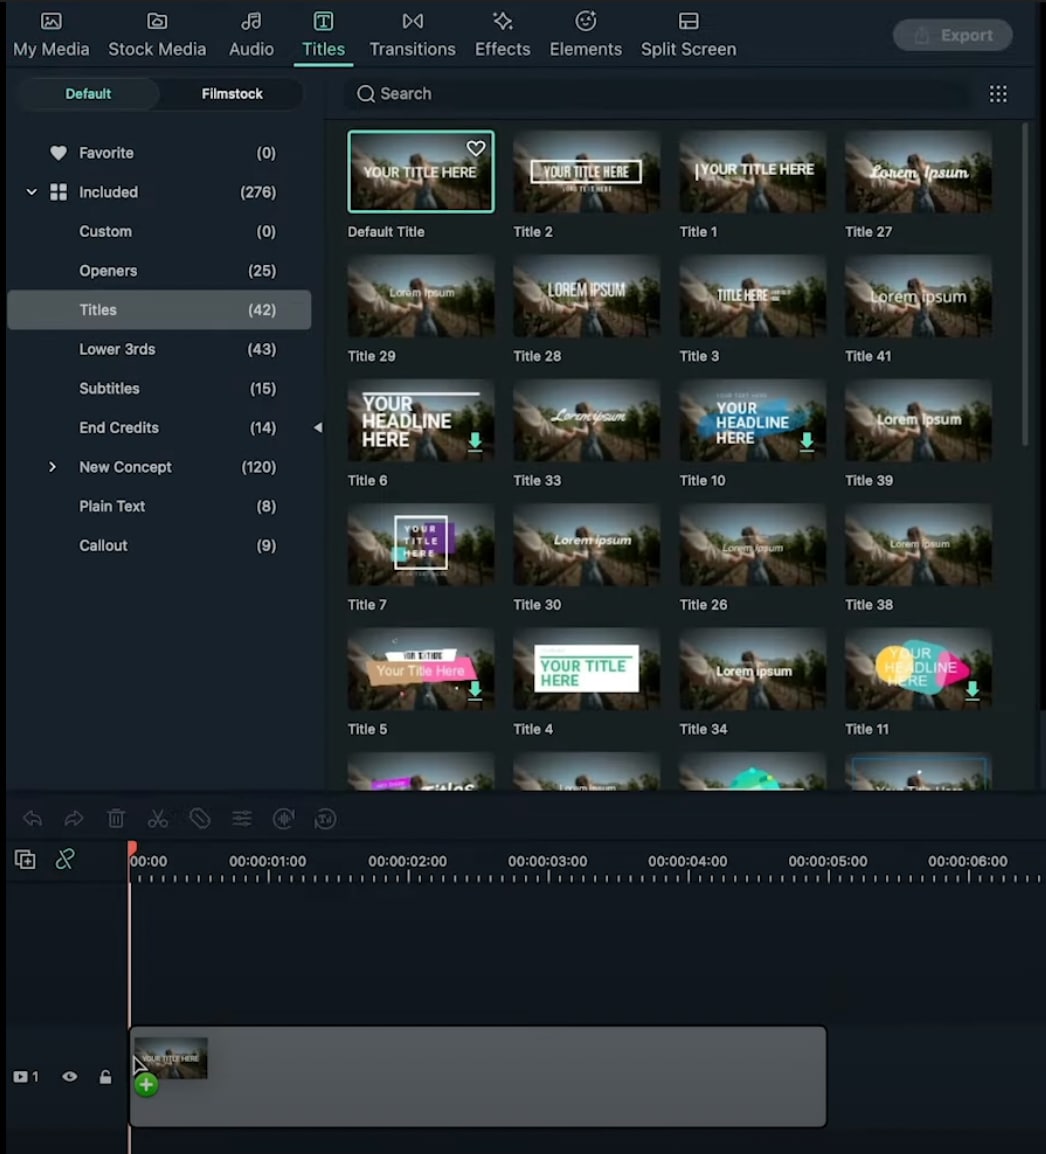
Open the Titles tab and drag the Default Title to the Timeline. Then, double-click on the Default Title and click on ADVANCED.
Step 4
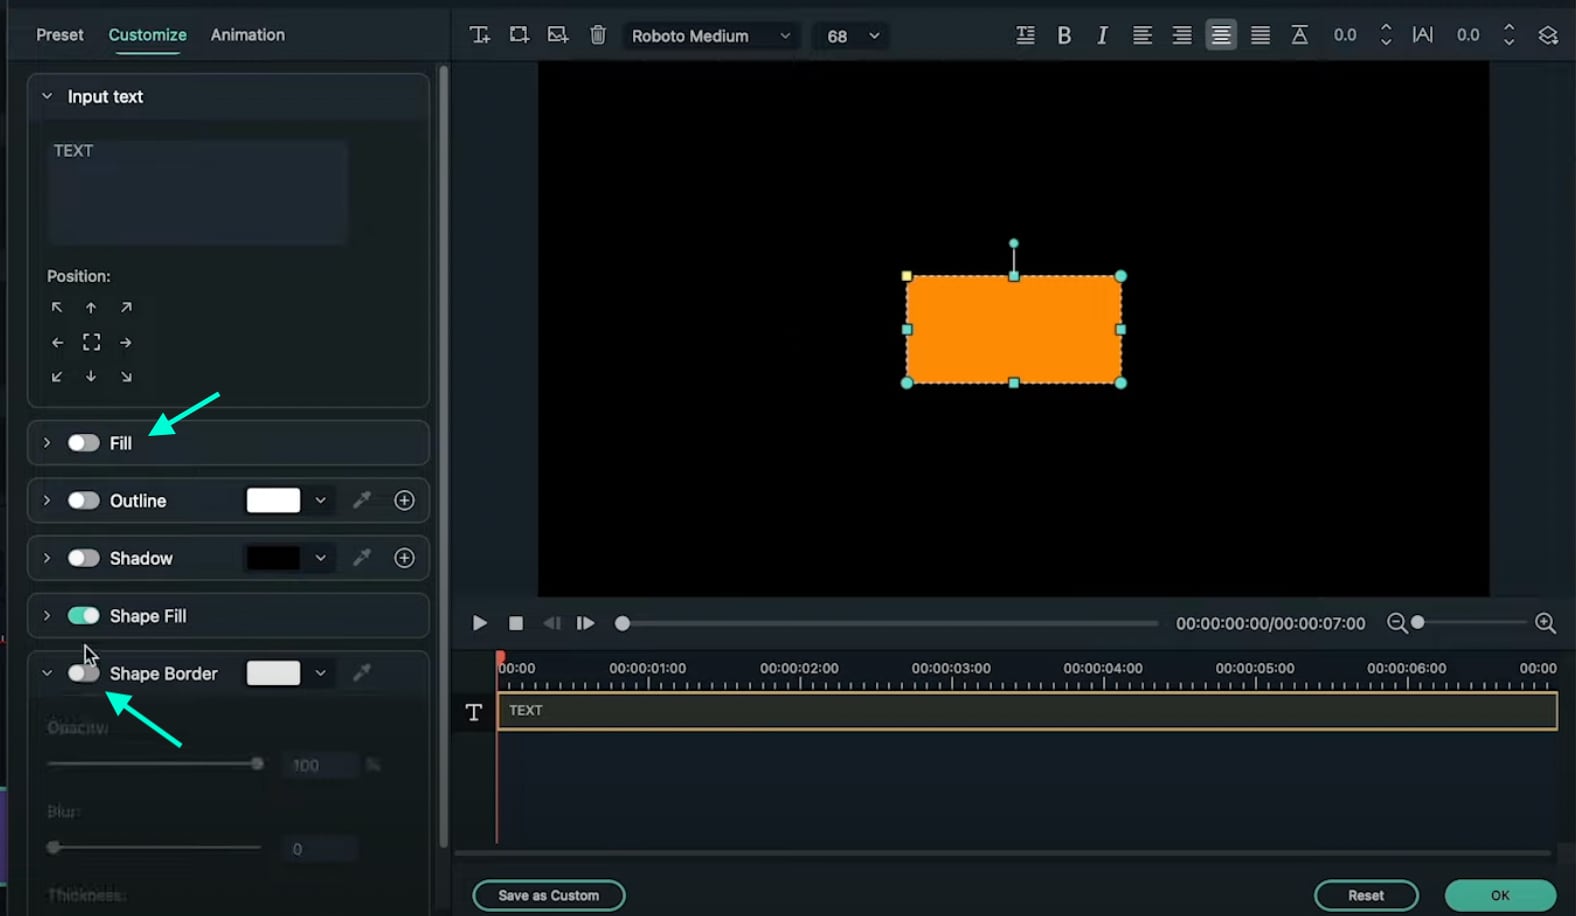
From the Advanced settings panel, delete the existing text and add a Rectangle shape.

Step 5
Disable the Text Fill and the Shape Border options from the panel on the left side.
Step 6
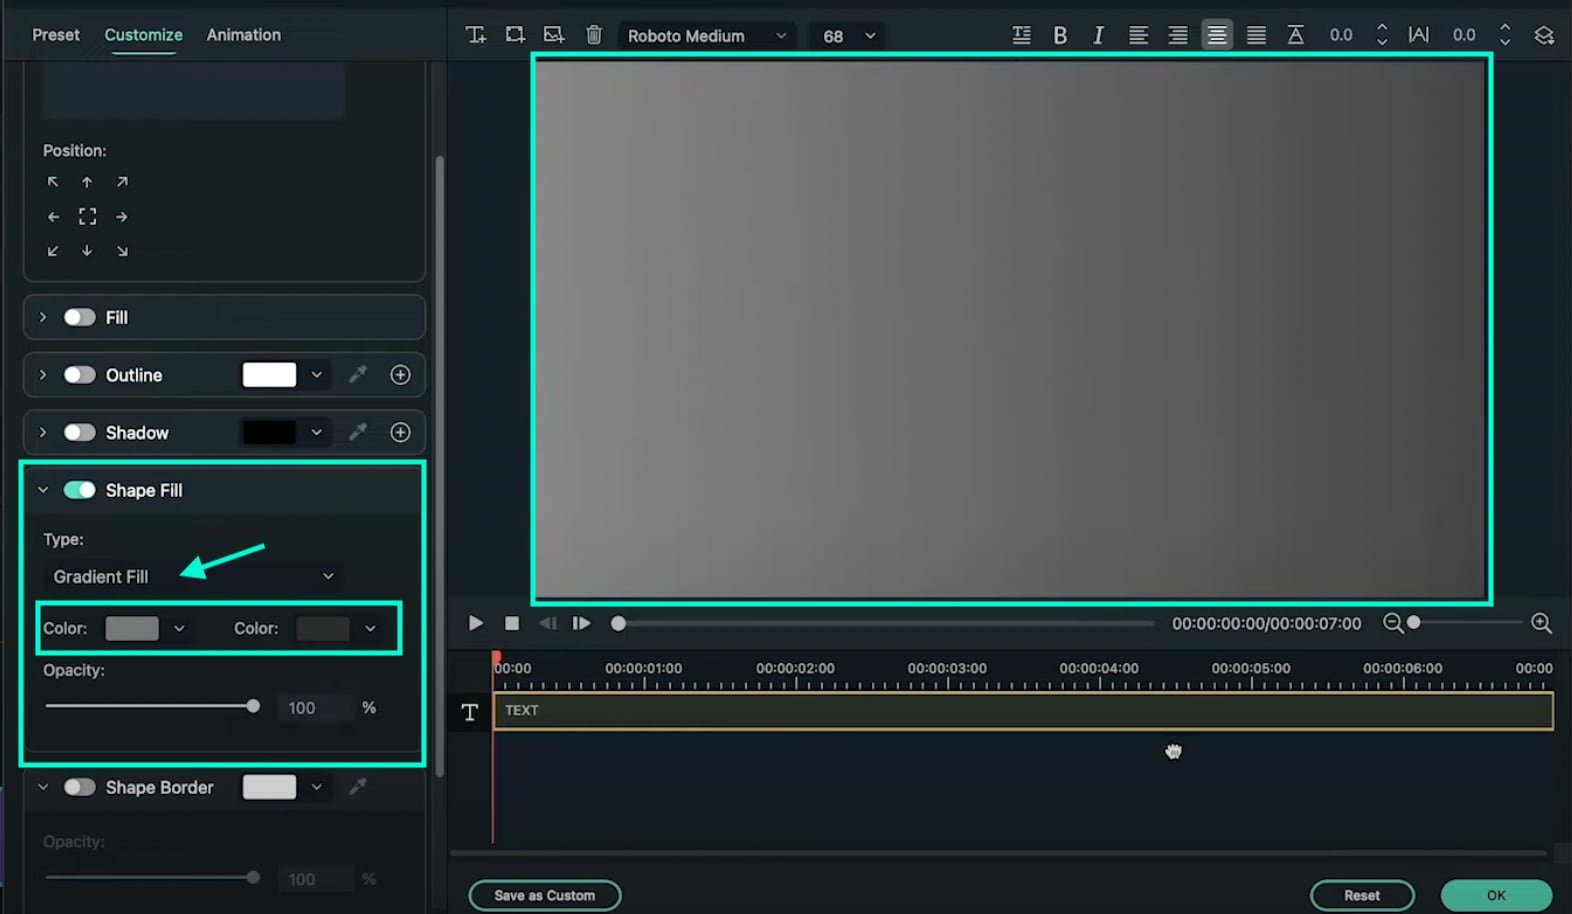
Click the drop-down arrow on the Shape Fill option and change the Type to Gradient Fill. Then, adjust the two color pallets from lighter to darker to create a gradient effect. Finally, adjust the rectangle to fit the entire screen. Click OK.
Step 7
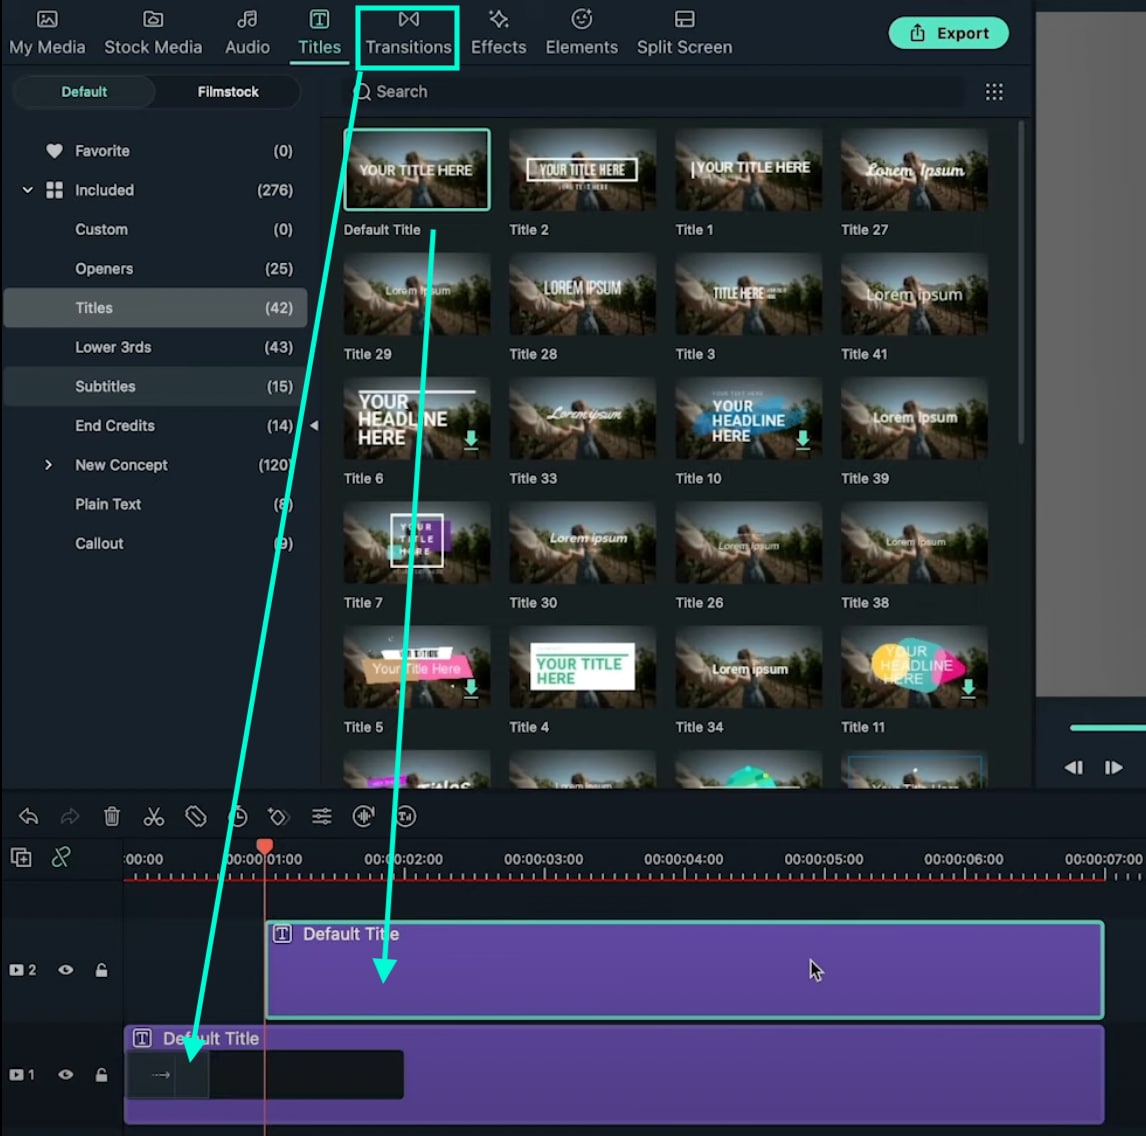
Go to the Transitions tab → search for “Push” → drag the Push transition to the Default Title in the Timeline. Then, move the Playhead to the 1-second marker and drag another Default Title to that point from the Titles tab.
Step 8
Double-click on the new Default Title → go to Advanced. Delete the default text and add a Circle shape this time instead of a Rectangle. Disable the Text Fill and Shape Fill options this time.
Step 9
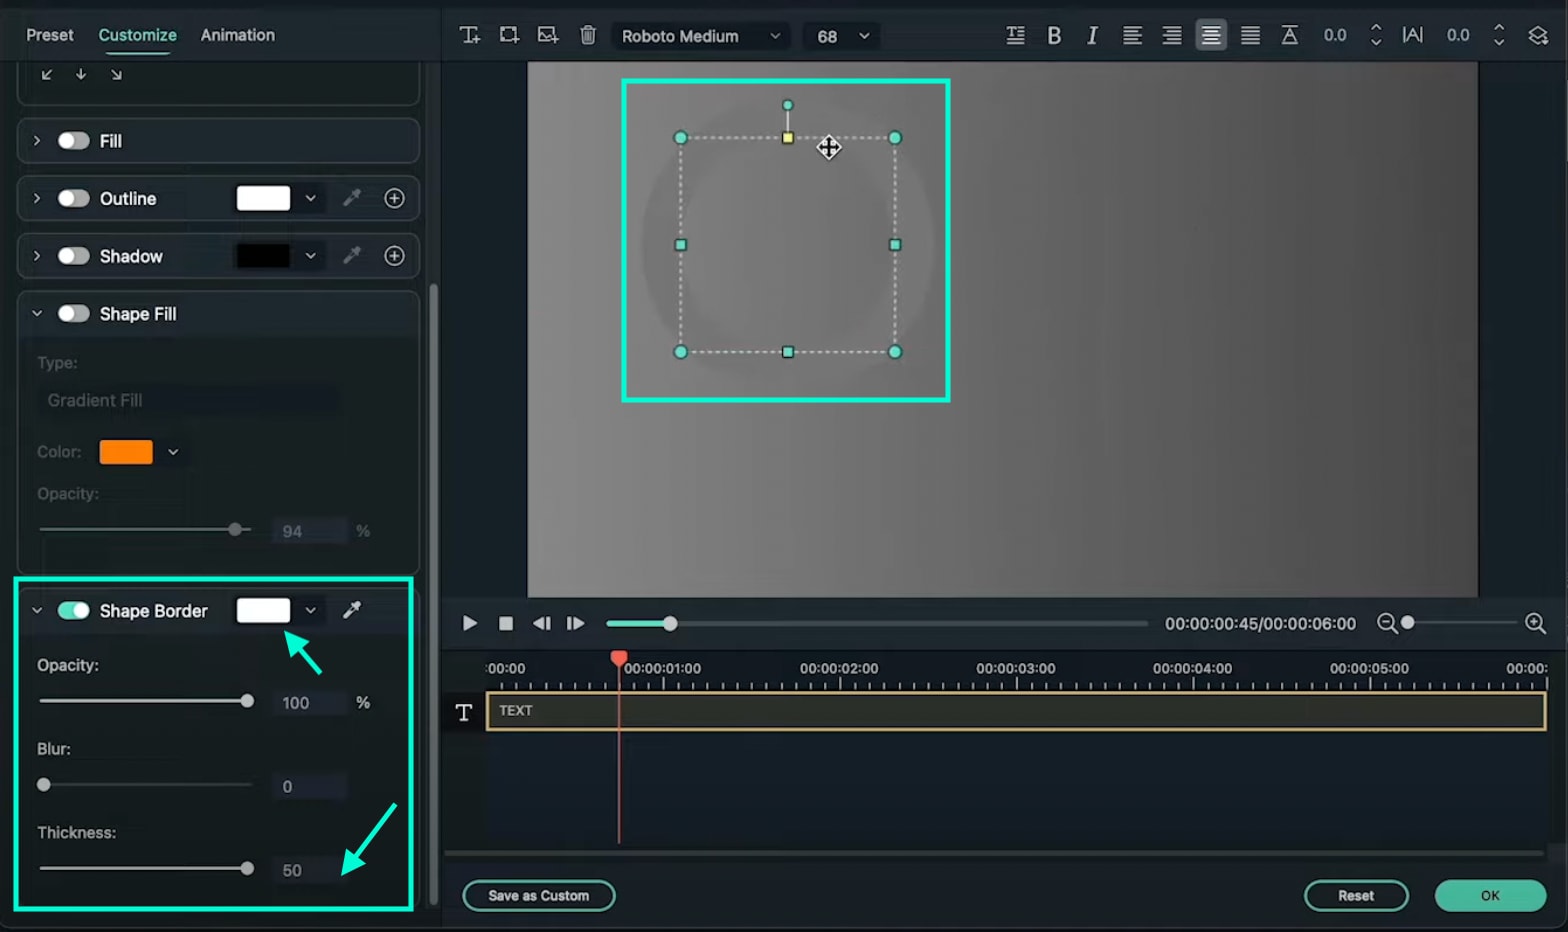
Scroll down to Shape Border and increase the Thickness bar all the way up. Then, change the circle’s color to match your background as closely as possible. Click OK.
Step 10
Copy the Title you just edited and paste it into the above layer. Then, double-click on the copied Title and go to its Advanced settings panel.

Step 11
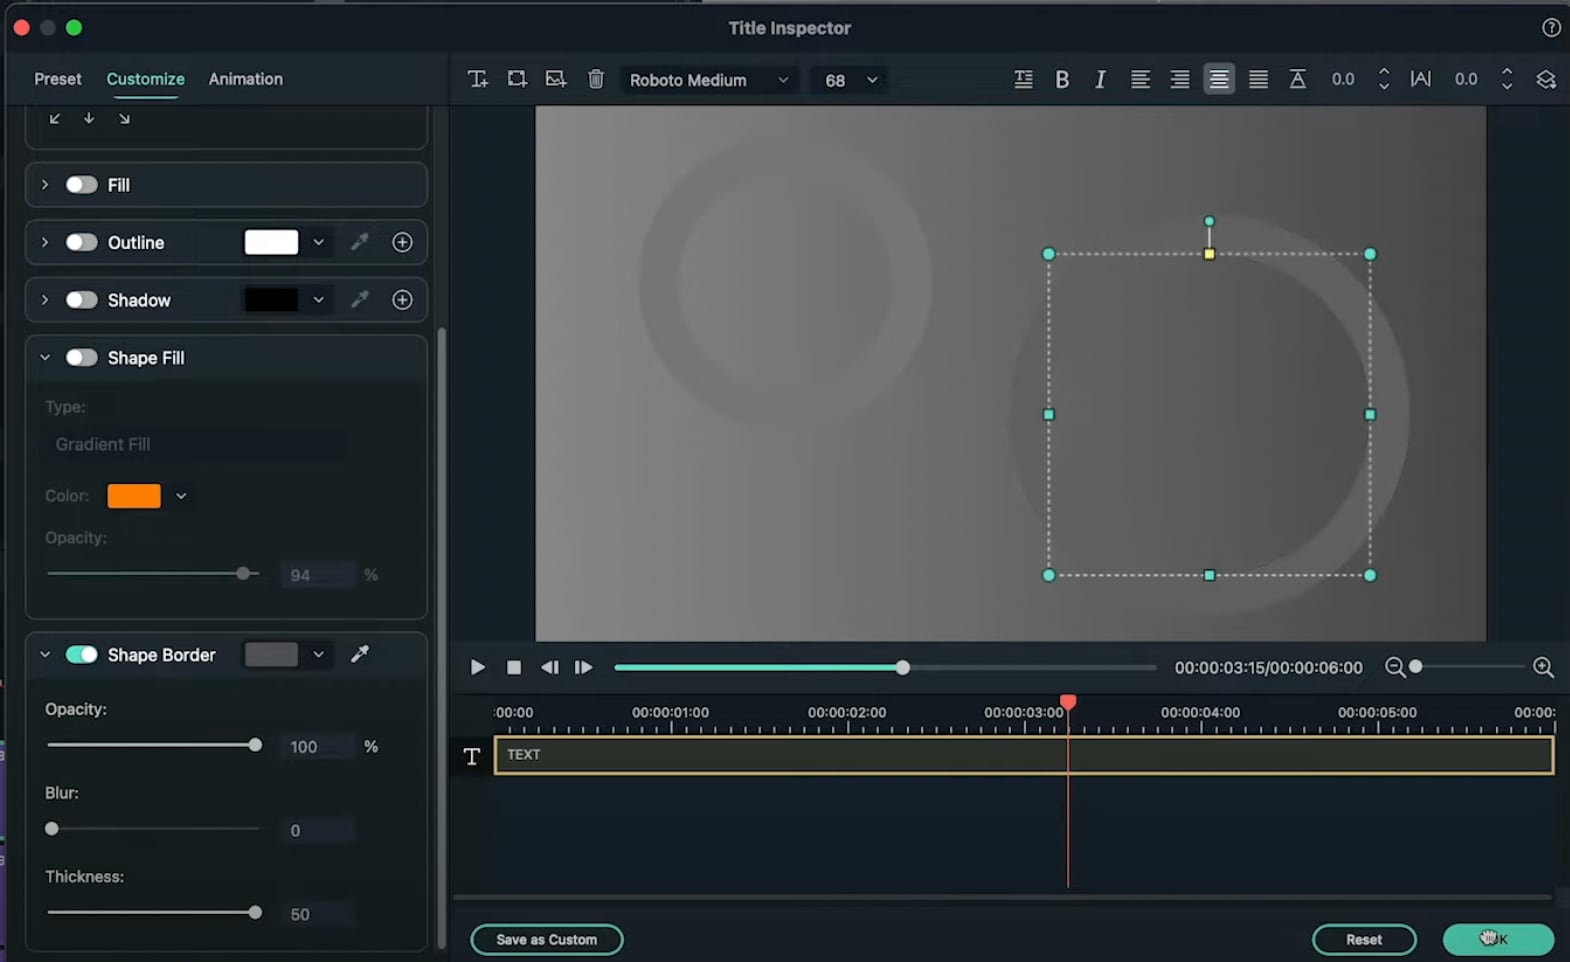
In the Advanced panel, copy the circle and paste it somewhere else on the screen. Change its size if you want, and change the shade of its color to match the background once more. You can add as many new copies of the Default Titles and copy as many circles as you want. Click OK.
Step 12
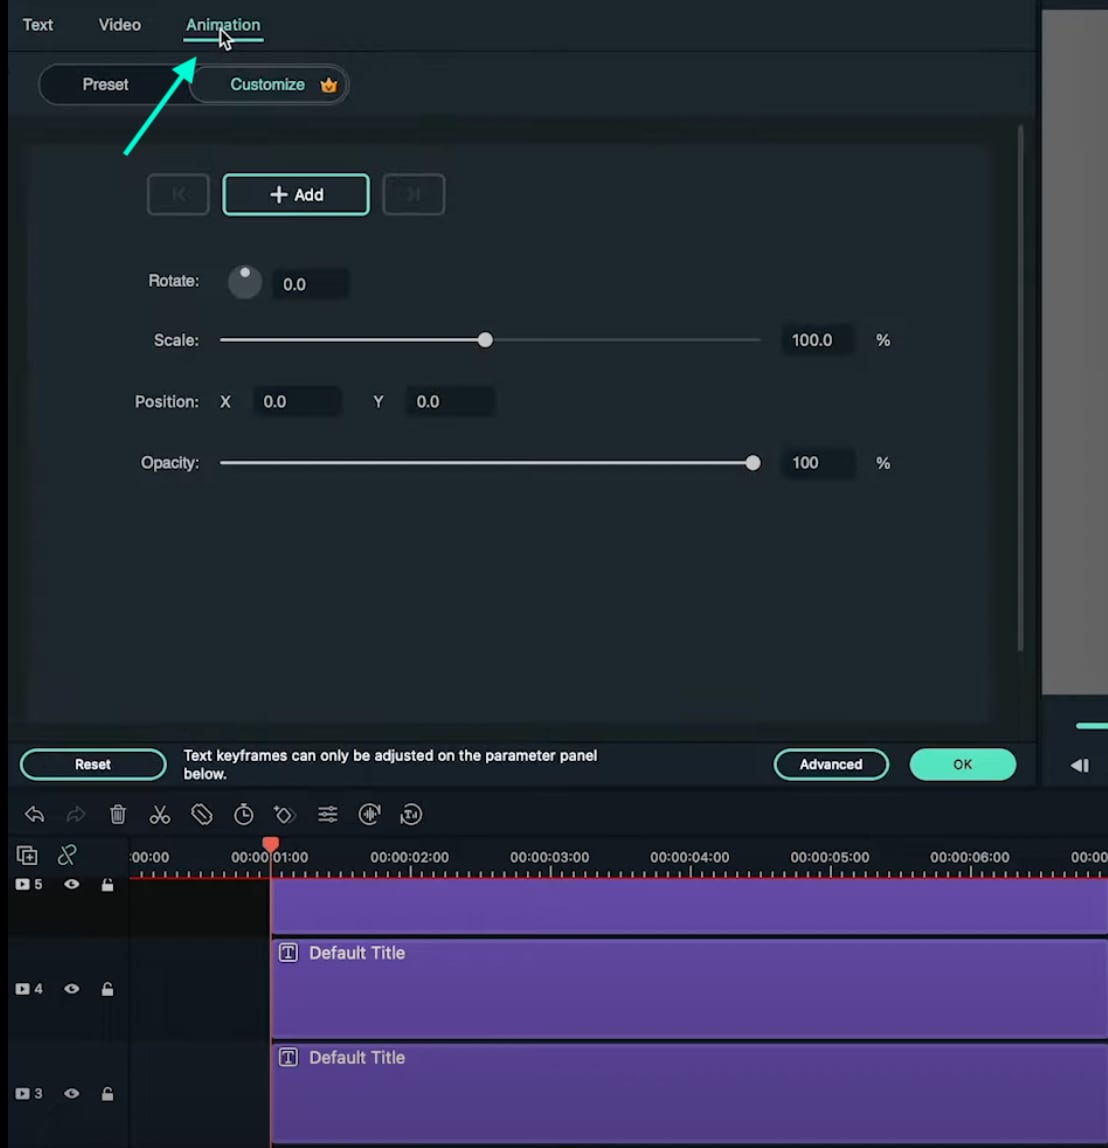
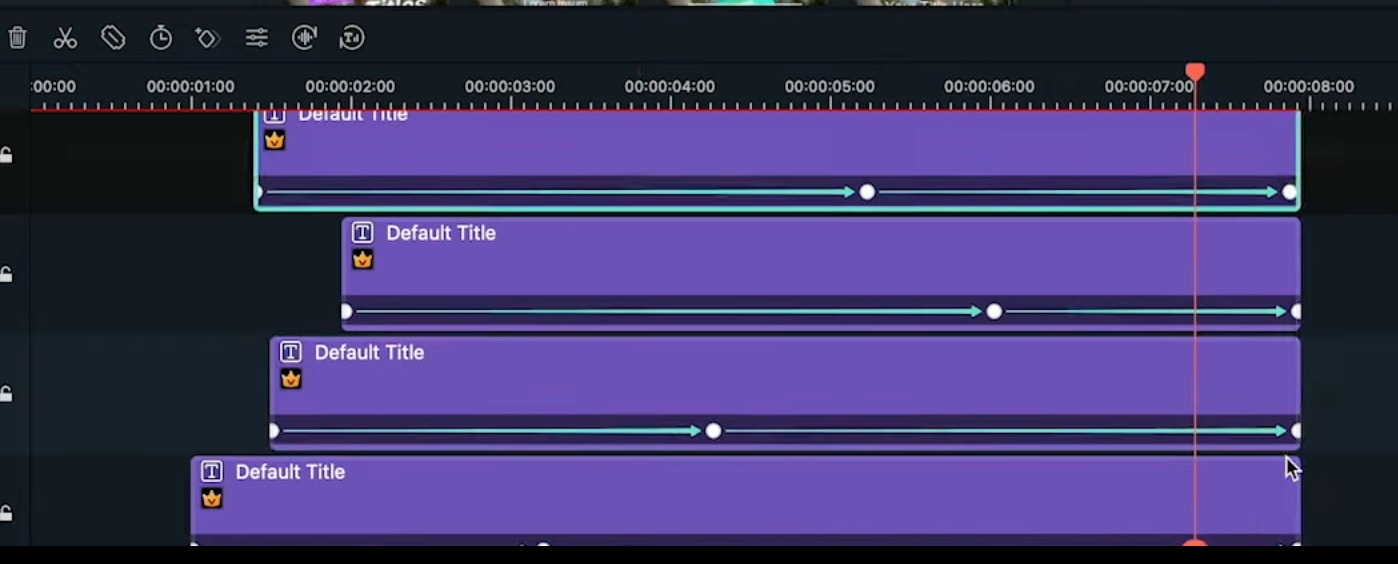
After you’re done copying and pasting more Default Titles with more Circles inside, you can start animating them. Start with the first one. Double-click on the first Default Title with the Circle inside. Make sure you place the Playhead at the beginning of that clip. Then, go to the Animation tab.
Step 13
You need to add 3 keyframes. Add the first one right now. Just click on the “**+Add” button. Then, move the Playhead somewhere in the middle and click “+Add” again. Last, move the Playhead at the end of the clip, and click “+Add**” again to add the third keyframe.

Step 14
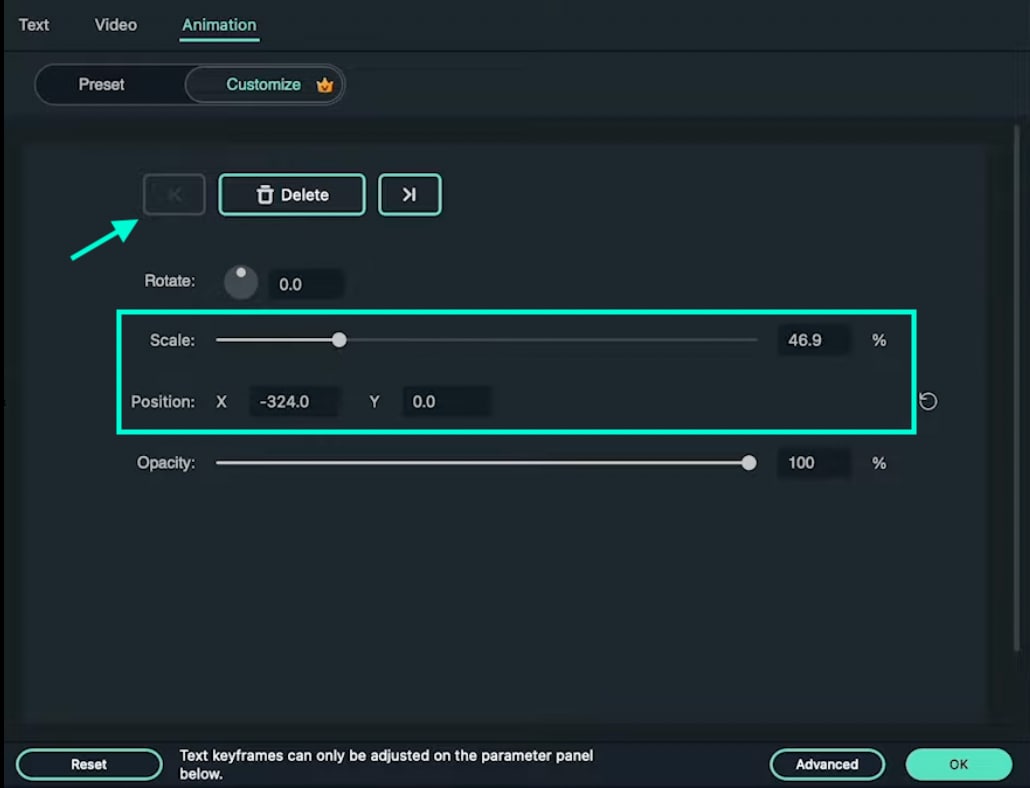
Now, go back to the first keyframe to edit its settings. Click the arrows to move between keyframes. Once you’re at the first one, start decreasing the Scale and the Position values as you move the Playhead toward the second keyframe. There are no rules here. Move each value based on how it looks best to you.
For the second keyframe, just increase the Scale and adjust the Position value based on how it looks on the screen.
Step 15
Now, apply the same method as in Step 14 to all the other circles in your video. Then, adjust the keyframe positions for all layers to create more unique movement throughout the video.
Step 16
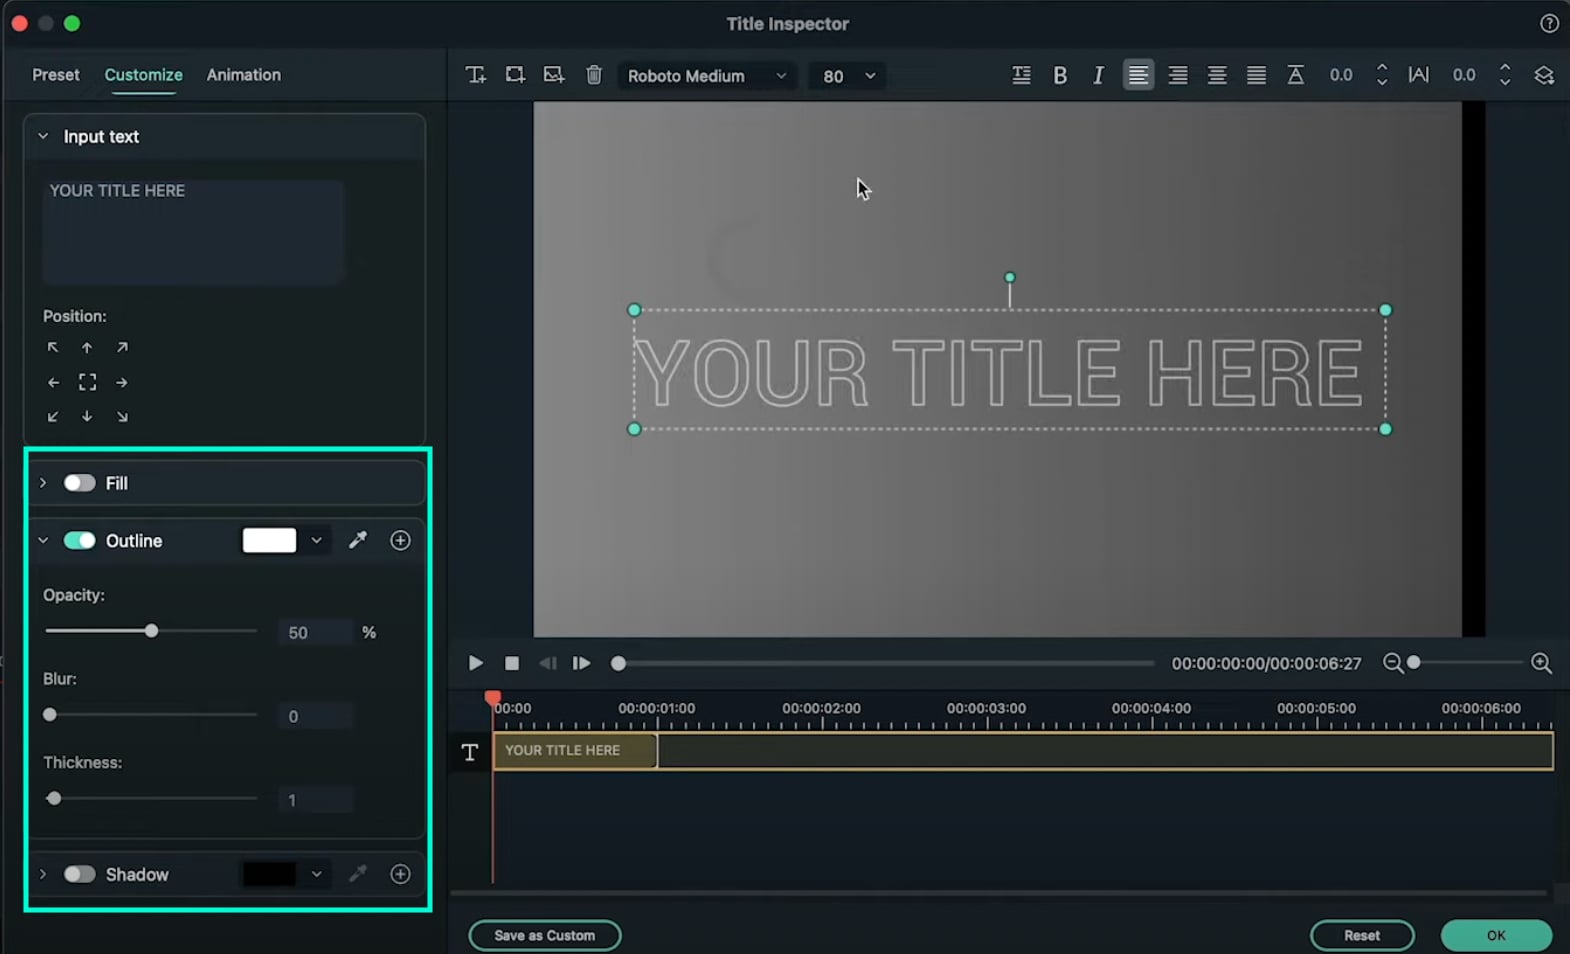
Move the Playhead to 1 second and 30 frames. Then, add a new Default Title in the Timeline and go to its Advanced settings panel. From there, Enable the Outline option and Disable the Fill option. In the Outline option, change the color to White, set Opacity to 50%, and decrease Thickness to 1.
Step 17
Next, choose your favorite font and type in your text inside the textbox. Then, change the value you see highlighted in this image to “-20”. Finally, increase the text size to almost fit the entire screen. Don’t worry about the fact that you can’t see all of it on the screen.

Step 18
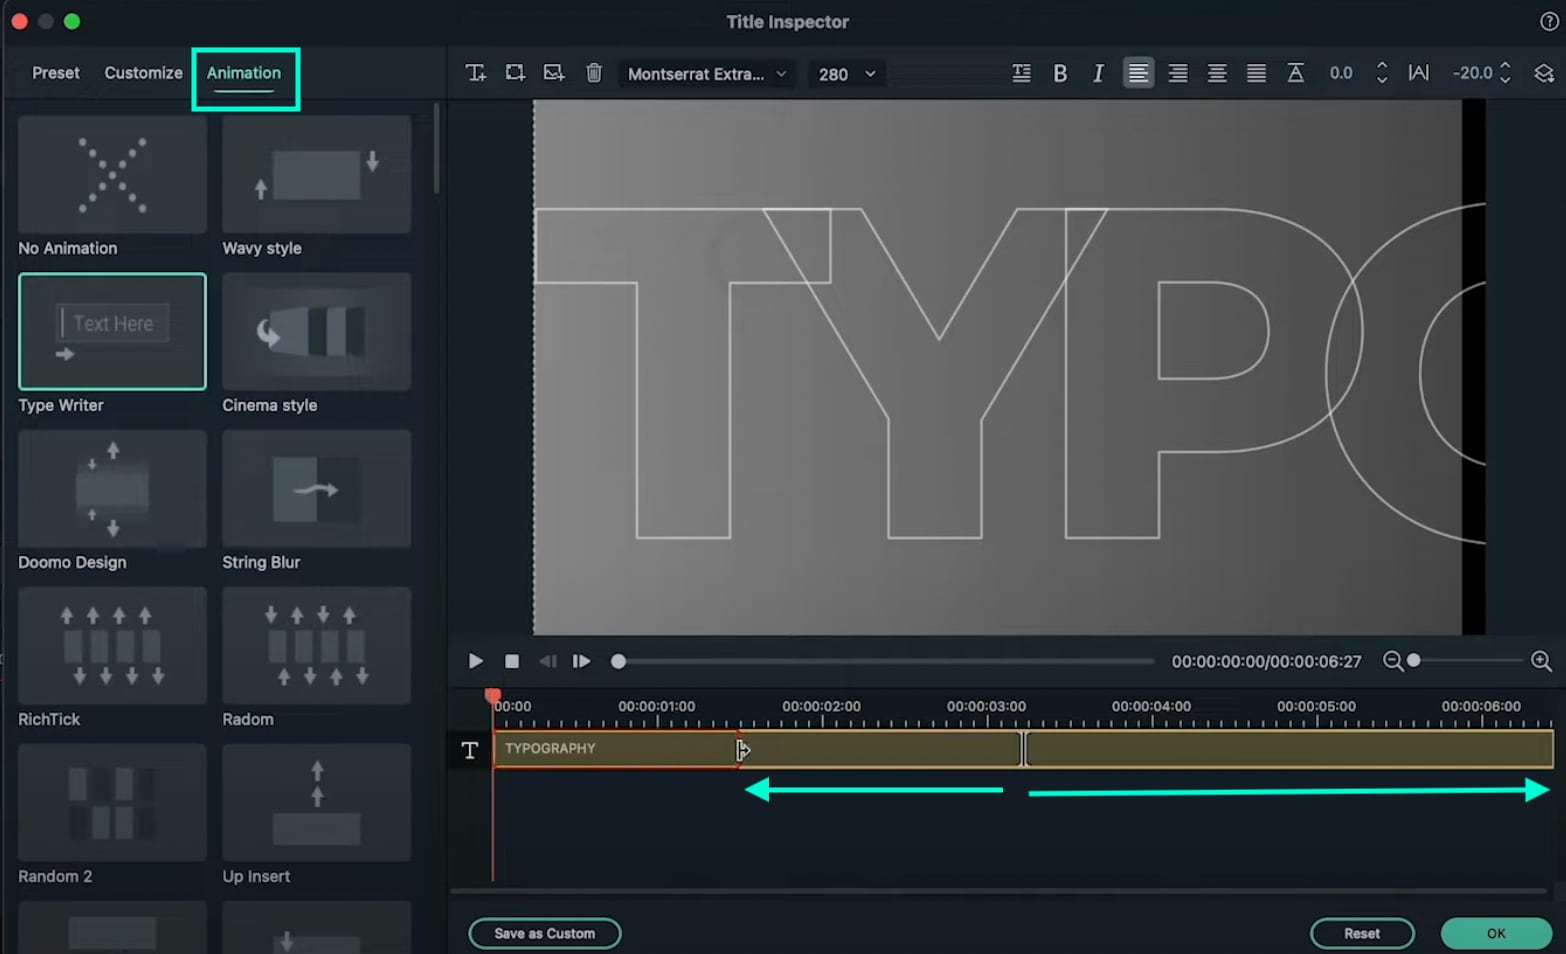
Go to the Animation tab and apply the “Type Writer” animation. Then, drag the yellow lines below just like you see in the image here. The arrows show you the length to which you need to drag these lines. Click OK.
Step 19
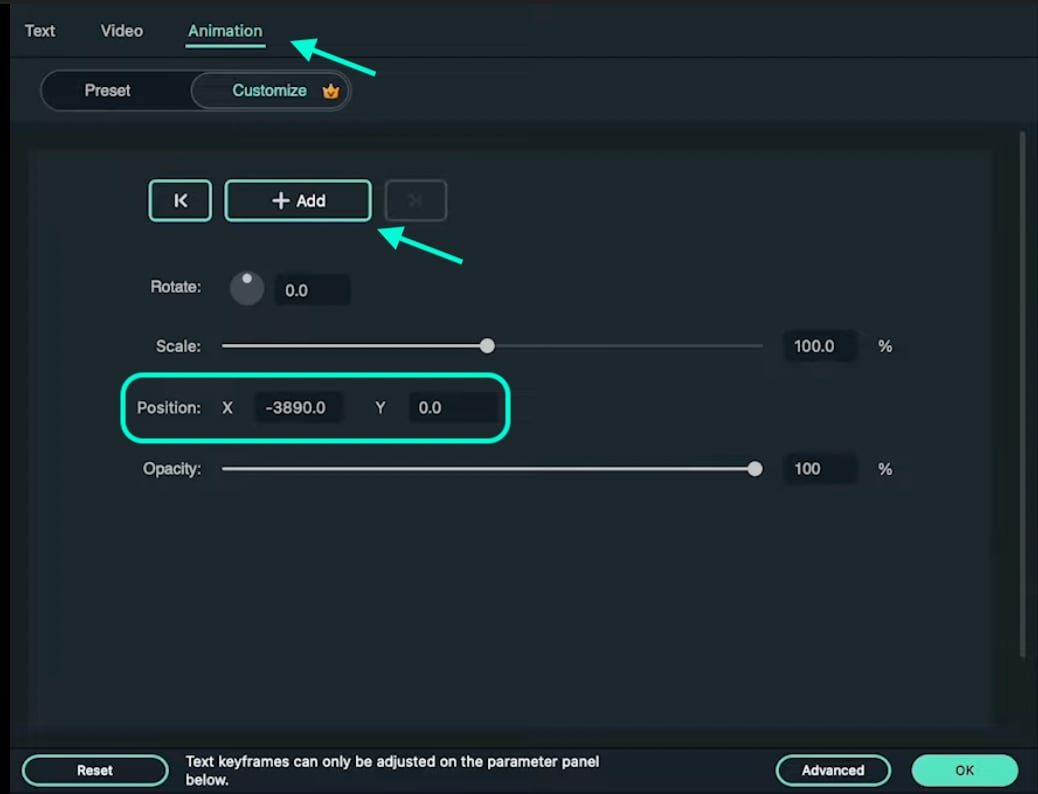
Set the Playhead to 1 second and 40 frames. Now, double-click on the last Default Title we just created and go to its Animation settings. NOTE: Don’t open its Advanced settings this time. Next, add a keyframe. Then, move the Playhead near the end of this clip in the Timeline. Now, drag the X position to the left until you see the last letter of your text appear on the screen. Click OK.
Step 20
Now, add another Default Title to the Timeline. Open its Advanced settings and type in your main text. Then, go to its Animation tab and apply the “Random 2” animation. Change its starting and end times according to your preference. Click OK.

Step 21
That’s it. You’re done! Feel free to preview the video and Render it. Congratulations on creating unique motion graphics in Filmora.
Summary
What you’ve learned:
- How to create custom motion graphics in Filmora
- How to edit and add animations to titles in Filmora
- Customize text and shapes in Filmora
What you need to prepare:
- A computer (Windows or macOS)
- Your video materials.
- Filmora video editor
Step 1
Visit the filmora.wondershare.com website and download Filmora . Install the program and wait for it to Run. Then, click on New Project.
Step 2
Go to File → Project Settings and set the FPS to 60. Also, ensure that the project is in Full Resolution (1920x1080). Click OK.

Step 3
Open the Titles tab and drag the Default Title to the Timeline. Then, double-click on the Default Title and click on ADVANCED.

Step 4
From the Advanced settings panel, delete the existing text and add a Rectangle shape.

Step 5
Disable the Text Fill and the Shape Border options from the panel on the left side.

Step 6
Click the drop-down arrow on the Shape Fill option and change the Type to Gradient Fill. Then, adjust the two color pallets from lighter to darker to create a gradient effect. Finally, adjust the rectangle to fit the entire screen. Click OK.

Step 7
Go to the Transitions tab → search for “Push” → drag the Push transition to the Default Title in the Timeline. Then, move the Playhead to the 1-second marker and drag another Default Title to that point from the Titles tab.

Step 8
Double-click on the new Default Title → go to Advanced. Delete the default text and add a Circle shape this time instead of a Rectangle. Disable the Text Fill and Shape Fill options this time.
Step 9
Scroll down to Shape Border and increase the Thickness bar all the way up. Then, change the circle’s color to match your background as closely as possible. Click OK.

Step 10
Copy the Title you just edited and paste it into the above layer. Then, double-click on the copied Title and go to its Advanced settings panel.

Step 11
In the Advanced panel, copy the circle and paste it somewhere else on the screen. Change its size if you want, and change the shade of its color to match the background once more. You can add as many new copies of the Default Titles and copy as many circles as you want. Click OK.

Step 12
After you’re done copying and pasting more Default Titles with more Circles inside, you can start animating them. Start with the first one. Double-click on the first Default Title with the Circle inside. Make sure you place the Playhead at the beginning of that clip. Then, go to the Animation tab.

Step 13
You need to add 3 keyframes. Add the first one right now. Just click on the “**+Add” button. Then, move the Playhead somewhere in the middle and click “+Add” again. Last, move the Playhead at the end of the clip, and click “+Add**” again to add the third keyframe.

Step 14
Now, go back to the first keyframe to edit its settings. Click the arrows to move between keyframes. Once you’re at the first one, start decreasing the Scale and the Position values as you move the Playhead toward the second keyframe. There are no rules here. Move each value based on how it looks best to you.
For the second keyframe, just increase the Scale and adjust the Position value based on how it looks on the screen.

Step 15
Now, apply the same method as in Step 14 to all the other circles in your video. Then, adjust the keyframe positions for all layers to create more unique movement throughout the video.

Step 16
Move the Playhead to 1 second and 30 frames. Then, add a new Default Title in the Timeline and go to its Advanced settings panel. From there, Enable the Outline option and Disable the Fill option. In the Outline option, change the color to White, set Opacity to 50%, and decrease Thickness to 1.

Step 17
Next, choose your favorite font and type in your text inside the textbox. Then, change the value you see highlighted in this image to “-20”. Finally, increase the text size to almost fit the entire screen. Don’t worry about the fact that you can’t see all of it on the screen.

Step 18
Go to the Animation tab and apply the “Type Writer” animation. Then, drag the yellow lines below just like you see in the image here. The arrows show you the length to which you need to drag these lines. Click OK.

Step 19
Set the Playhead to 1 second and 40 frames. Now, double-click on the last Default Title we just created and go to its Animation settings. NOTE: Don’t open its Advanced settings this time. Next, add a keyframe. Then, move the Playhead near the end of this clip in the Timeline. Now, drag the X position to the left until you see the last letter of your text appear on the screen. Click OK.

Step 20
Now, add another Default Title to the Timeline. Open its Advanced settings and type in your main text. Then, go to its Animation tab and apply the “Random 2” animation. Change its starting and end times according to your preference. Click OK.

Step 21
That’s it. You’re done! Feel free to preview the video and Render it. Congratulations on creating unique motion graphics in Filmora.
Summary
What you’ve learned:
- How to create custom motion graphics in Filmora
- How to edit and add animations to titles in Filmora
- Customize text and shapes in Filmora
What you need to prepare:
- A computer (Windows or macOS)
- Your video materials.
- Filmora video editor
Step 1
Visit the filmora.wondershare.com website and download Filmora . Install the program and wait for it to Run. Then, click on New Project.
Step 2
Go to File → Project Settings and set the FPS to 60. Also, ensure that the project is in Full Resolution (1920x1080). Click OK.

Step 3
Open the Titles tab and drag the Default Title to the Timeline. Then, double-click on the Default Title and click on ADVANCED.

Step 4
From the Advanced settings panel, delete the existing text and add a Rectangle shape.

Step 5
Disable the Text Fill and the Shape Border options from the panel on the left side.

Step 6
Click the drop-down arrow on the Shape Fill option and change the Type to Gradient Fill. Then, adjust the two color pallets from lighter to darker to create a gradient effect. Finally, adjust the rectangle to fit the entire screen. Click OK.

Step 7
Go to the Transitions tab → search for “Push” → drag the Push transition to the Default Title in the Timeline. Then, move the Playhead to the 1-second marker and drag another Default Title to that point from the Titles tab.

Step 8
Double-click on the new Default Title → go to Advanced. Delete the default text and add a Circle shape this time instead of a Rectangle. Disable the Text Fill and Shape Fill options this time.
Step 9
Scroll down to Shape Border and increase the Thickness bar all the way up. Then, change the circle’s color to match your background as closely as possible. Click OK.

Step 10
Copy the Title you just edited and paste it into the above layer. Then, double-click on the copied Title and go to its Advanced settings panel.

Step 11
In the Advanced panel, copy the circle and paste it somewhere else on the screen. Change its size if you want, and change the shade of its color to match the background once more. You can add as many new copies of the Default Titles and copy as many circles as you want. Click OK.

Step 12
After you’re done copying and pasting more Default Titles with more Circles inside, you can start animating them. Start with the first one. Double-click on the first Default Title with the Circle inside. Make sure you place the Playhead at the beginning of that clip. Then, go to the Animation tab.

Step 13
You need to add 3 keyframes. Add the first one right now. Just click on the “**+Add” button. Then, move the Playhead somewhere in the middle and click “+Add” again. Last, move the Playhead at the end of the clip, and click “+Add**” again to add the third keyframe.

Step 14
Now, go back to the first keyframe to edit its settings. Click the arrows to move between keyframes. Once you’re at the first one, start decreasing the Scale and the Position values as you move the Playhead toward the second keyframe. There are no rules here. Move each value based on how it looks best to you.
For the second keyframe, just increase the Scale and adjust the Position value based on how it looks on the screen.

Step 15
Now, apply the same method as in Step 14 to all the other circles in your video. Then, adjust the keyframe positions for all layers to create more unique movement throughout the video.

Step 16
Move the Playhead to 1 second and 30 frames. Then, add a new Default Title in the Timeline and go to its Advanced settings panel. From there, Enable the Outline option and Disable the Fill option. In the Outline option, change the color to White, set Opacity to 50%, and decrease Thickness to 1.

Step 17
Next, choose your favorite font and type in your text inside the textbox. Then, change the value you see highlighted in this image to “-20”. Finally, increase the text size to almost fit the entire screen. Don’t worry about the fact that you can’t see all of it on the screen.

Step 18
Go to the Animation tab and apply the “Type Writer” animation. Then, drag the yellow lines below just like you see in the image here. The arrows show you the length to which you need to drag these lines. Click OK.

Step 19
Set the Playhead to 1 second and 40 frames. Now, double-click on the last Default Title we just created and go to its Animation settings. NOTE: Don’t open its Advanced settings this time. Next, add a keyframe. Then, move the Playhead near the end of this clip in the Timeline. Now, drag the X position to the left until you see the last letter of your text appear on the screen. Click OK.

Step 20
Now, add another Default Title to the Timeline. Open its Advanced settings and type in your main text. Then, go to its Animation tab and apply the “Random 2” animation. Change its starting and end times according to your preference. Click OK.

Step 21
That’s it. You’re done! Feel free to preview the video and Render it. Congratulations on creating unique motion graphics in Filmora.
Summary
What you’ve learned:
- How to create custom motion graphics in Filmora
- How to edit and add animations to titles in Filmora
- Customize text and shapes in Filmora
What you need to prepare:
- A computer (Windows or macOS)
- Your video materials.
- Filmora video editor
Step 1
Visit the filmora.wondershare.com website and download Filmora . Install the program and wait for it to Run. Then, click on New Project.
Step 2
Go to File → Project Settings and set the FPS to 60. Also, ensure that the project is in Full Resolution (1920x1080). Click OK.

Step 3
Open the Titles tab and drag the Default Title to the Timeline. Then, double-click on the Default Title and click on ADVANCED.

Step 4
From the Advanced settings panel, delete the existing text and add a Rectangle shape.

Step 5
Disable the Text Fill and the Shape Border options from the panel on the left side.

Step 6
Click the drop-down arrow on the Shape Fill option and change the Type to Gradient Fill. Then, adjust the two color pallets from lighter to darker to create a gradient effect. Finally, adjust the rectangle to fit the entire screen. Click OK.

Step 7
Go to the Transitions tab → search for “Push” → drag the Push transition to the Default Title in the Timeline. Then, move the Playhead to the 1-second marker and drag another Default Title to that point from the Titles tab.

Step 8
Double-click on the new Default Title → go to Advanced. Delete the default text and add a Circle shape this time instead of a Rectangle. Disable the Text Fill and Shape Fill options this time.
Step 9
Scroll down to Shape Border and increase the Thickness bar all the way up. Then, change the circle’s color to match your background as closely as possible. Click OK.

Step 10
Copy the Title you just edited and paste it into the above layer. Then, double-click on the copied Title and go to its Advanced settings panel.

Step 11
In the Advanced panel, copy the circle and paste it somewhere else on the screen. Change its size if you want, and change the shade of its color to match the background once more. You can add as many new copies of the Default Titles and copy as many circles as you want. Click OK.

Step 12
After you’re done copying and pasting more Default Titles with more Circles inside, you can start animating them. Start with the first one. Double-click on the first Default Title with the Circle inside. Make sure you place the Playhead at the beginning of that clip. Then, go to the Animation tab.

Step 13
You need to add 3 keyframes. Add the first one right now. Just click on the “**+Add” button. Then, move the Playhead somewhere in the middle and click “+Add” again. Last, move the Playhead at the end of the clip, and click “+Add**” again to add the third keyframe.

Step 14
Now, go back to the first keyframe to edit its settings. Click the arrows to move between keyframes. Once you’re at the first one, start decreasing the Scale and the Position values as you move the Playhead toward the second keyframe. There are no rules here. Move each value based on how it looks best to you.
For the second keyframe, just increase the Scale and adjust the Position value based on how it looks on the screen.

Step 15
Now, apply the same method as in Step 14 to all the other circles in your video. Then, adjust the keyframe positions for all layers to create more unique movement throughout the video.

Step 16
Move the Playhead to 1 second and 30 frames. Then, add a new Default Title in the Timeline and go to its Advanced settings panel. From there, Enable the Outline option and Disable the Fill option. In the Outline option, change the color to White, set Opacity to 50%, and decrease Thickness to 1.

Step 17
Next, choose your favorite font and type in your text inside the textbox. Then, change the value you see highlighted in this image to “-20”. Finally, increase the text size to almost fit the entire screen. Don’t worry about the fact that you can’t see all of it on the screen.

Step 18
Go to the Animation tab and apply the “Type Writer” animation. Then, drag the yellow lines below just like you see in the image here. The arrows show you the length to which you need to drag these lines. Click OK.

Step 19
Set the Playhead to 1 second and 40 frames. Now, double-click on the last Default Title we just created and go to its Animation settings. NOTE: Don’t open its Advanced settings this time. Next, add a keyframe. Then, move the Playhead near the end of this clip in the Timeline. Now, drag the X position to the left until you see the last letter of your text appear on the screen. Click OK.

Step 20
Now, add another Default Title to the Timeline. Open its Advanced settings and type in your main text. Then, go to its Animation tab and apply the “Random 2” animation. Change its starting and end times according to your preference. Click OK.

Step 21
That’s it. You’re done! Feel free to preview the video and Render it. Congratulations on creating unique motion graphics in Filmora.
Summary
What you’ve learned:
- How to create custom motion graphics in Filmora
- How to edit and add animations to titles in Filmora
- Customize text and shapes in Filmora
Final Cut Pro for iPad- Is It Available?
Final Cut Pro by Apple is the most popular premium video editor among macOS users. Starting from social media videos to short films and movies, Final Cut Pro is a popular choice. Even though video editing using FCP is mostly done on Mac, there are many who prefer video editing on their powerful phones. It is quite shocking that Final Cut Pro for Android and iOS users is not yet available.
Since it is an Apple-exclusive application, you would have expected FCP mobile app for iPhone and iPad. But Apple is yet to develop a mobile app for Final Cut Pro. Naturally, we have to look for Final Cut Pro alternative mobile apps for smartphone users. The alternatives need to be as feature-rich and powerful as FCP. Here is the list of the best Final Cut Pro alternative apps for Android and iOS users.
Part 1. Final Cut Pro Alternative App for Android
There is no Final Cut Pro app available for Android users. It is not surprising because Final Cut Pro is an Apple product. When you search for Final Cut Pro on Play Store, you will come across an FCP app. But it is a fake app and not developed by Apple. Here is our recommendation of the best Final Cut Pro alternative app for Android users.
1. Filmora
Filmora is the best alternative to Final Cut Pro for Android users. The app has a super high rating on Play Store. Filmora is available for free and you can create amazing HD videos. You can add stunning effects, animations, texts, filters, backgrounds, and much more. You can obviously perform the basic video edits such as trim, cut, join, and likewise. The app allows easy sharing of edited videos on social media platforms.
You can add keyframes for personalized creativity animations. There is a wide range of music available to pick from. Besides, there are amazing stickers and emojis available to apply to your video. The user interface is super intuitive for everyone to use easily without prior experience. The free version attaches a watermark and you can remove it by upgrading to VIP membership.

Link – https://play.google.com/store/apps/details?id=com.wondershare.filmorago&hl=en\_IN&gl=US
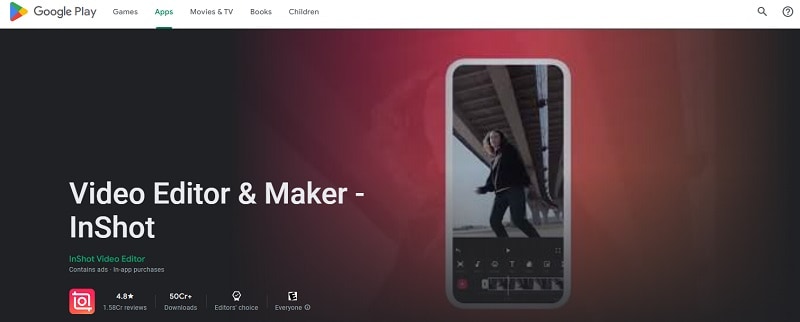
2. InShot
InShot is an extremely popular video editor app among Android users. It is featured as the Editor’s Choice on Play Store. The app has all the features and functionalities you need for basic and advanced video editing. In spite of being a powerful app, the graphical interface is user-friendly.
There are beautiful transitions, stickers, text effects, voice effects, and frames available. You can make picture-in-picture videos, slideshow videos, and slow-motion videos. You can also create stories and GIFs for social media. Besides, there is a keyframe option for texts and stickers. You can easily add voiceover, music, and voice effect to enhance the video content.
Link –https://play.google.com/store/apps/details?id=com.camerasideas.instashot&hl=en\_IN&gl=US
3. KineMaster
KineMaster is a popular video editing app among beginners. You can create your video from scratch using its video templates. KineMaster has a wide range of different categories of video templates to get started. Starting from basic adjustments to adding filters and effects, everything is available on KineMaster.
The user interface is super easy to operate. The app comes with an incredible collection of assets such as animations and clip graphics. You can remove the background from your video or photo instantly. Besides, you can save the edited video in desired video quality and share it instantly on social media platforms.

Link – https://play.google.com/store/apps/details?id=com.nexstreaming.app.kinemasterfree&hl=en\_IN&gl=US
4. Funimate
Funimate is a relatively new video editing app. But in a short time, the app has managed to become a top video editor app on Play Store. This is because it is extremely powerful and it is comparable to Final Cut Pro in terms of features. The app has a stunning collection of video and text effects that will enhance video content. You can work with multiple video layers just like Final Cut Pro.
The keyframe effect is a strong point for customized and personalized animations. You can choose from the different transitions, overlays, and backgrounds. Besides, there is a wide range of chic effects and filters to go with modern video trends. There is a dedicated 3D space available to experiment with object and text animations. You can sync music and choose AI effects and video masks.

Link – https://play.google.com/store/apps/details?id=com.avcrbt.funimate&hl=en\_IN&gl=US
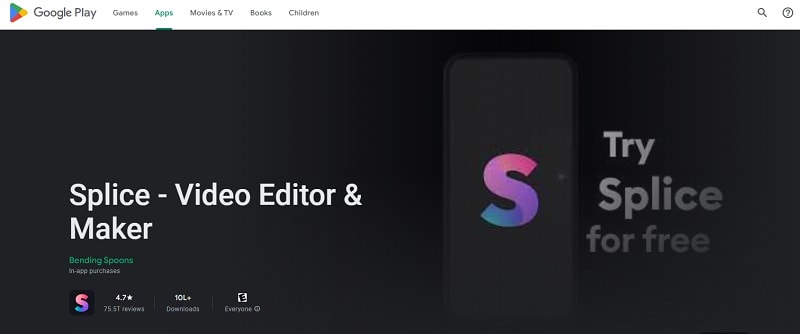
5. Splice
This is another relatively new video editor app but has a superb rating from users. The powerful video editor app makes it easy for beginners to edit videos comfortably. It has a dedicated timeline to work on your video clip and edit as per your requirements. There are beautiful text effects and overlays available.
Besides, you can add and sync music perfectly. Moreover, you can adjust the speed of your video to get the slow-motion effect. The basic video editing tools are available and you can create videos from your photos. There are amazing transitions and video effects present to apply to your photos and video clips. Overall, the video editor is suitable for beginners as well as professionals.
Link – https://play.google.com/store/apps/details?id=com.splice.video.editor&hl=en\_IN&gl=US
Part 2. Final Cut Pro Alternative App for iPhone
Since Final Cut Pro is from Apple, you would have expected an FCP app for iPhone and iPad. Unfortunately, Apple has no plan yet to launch Final Cut Pro mobile app. Here are the Final Cut Pro alternative apps for iPhone and iPad users.
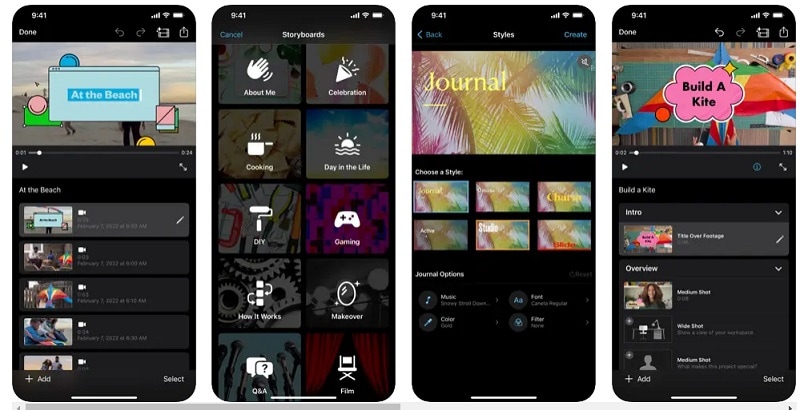
1. iMovie
iMovie by Apple is considered to be an ideal alternative to Final Cut Pro. Even though it is not as advanced as FCP, but there are powerful features for professionals as well. You can create videos from scratch and there are beautiful templates available to get started. You can also make Hollywood-style cinematic trailers to get your viewers excited.
Apart from templates of different categories, there are different text styles and textures available to pick from. You can get the popular picture-in-picture, split screen, and green screen effect options. It supports editing 4K videos at 60 fps. You can send your video projects to iPad and Mac conveniently.
Link – https://apps.apple.com/us/app/imovie/id377298193
2. Quik
Quik by GoPro is one of the most popular video editors. GoPro is the leading action camera brand. Naturally, there is huge traction for its video editor. First of all, its speed adjustment feature is the highlight of the app. You can go for super slow, regular slow, freeze, timelapse, hyper-lapse, and fast motion.
Select from a wide range of themes to get started. There is no dearth of filters, transitions, and effects. Some of the filters are super exclusive to the app. You can share your edited video on social media platforms instantly. The multi-selection timeline is suitable for advanced video editors. The app has exclusive features for GoPro owners.

Link – https://apps.apple.com/us/app/gopro-quik-video-editor/id561350520
3. Magisto
If you are into storytelling with your videos, this is the best app to edit your videos. It has all the features and options to make your video look classic and eye-catching. As a matter of fact, it is arguably the best video editor for social media video creators. You can use its artificial intelligence feature to select the best parts of your video automatically.
There are ready-made templates available to make your video look professional as well as entertaining. You can perform all the basic video editing tasks swiftly. You can work with the music part comfortably so that your video content enhances. Starting from slideshow videos to short videos for social media, the app is perfect for different genres of video making.

Link – https://apps.apple.com/us/app/magisto-video-editor-maker/id486781045
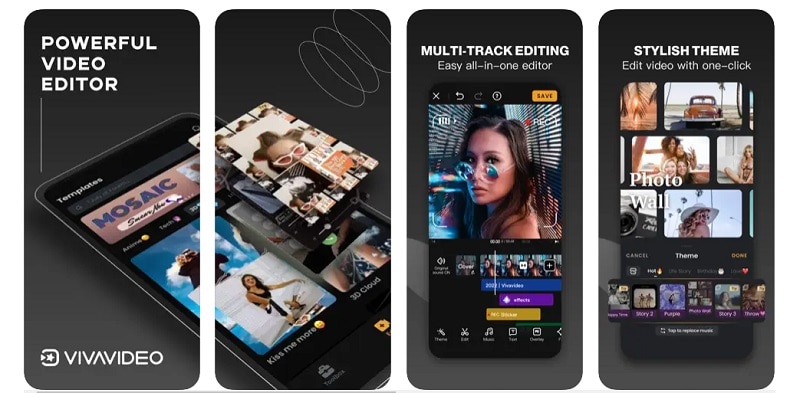
4. VivaVideo
VivaVideo is a highly rated video editing app. The app lets you change video speed, supports high-resolution output, and comes with dynamic effects. You can make short videos with your photos. You can decorate them beautifully with frames and objects available.
There are several cinematic filters available to enhance video quality. Apart from these, you get to select from a wide collection of text effects and emojis. You can work with keyframes and export video in 4k resolution. You can also create GIFs for social media platforms instantly.
Link – https://apps.apple.com/us/app/vivavideo-video-editor-maker/id738897668
5. Adobe Premiere Rush
Adobe Premiere is the biggest competitor of Final Cut Pro. But Adobe has gone one step ahead of FCP by releasing its mobile app. Adobe Premiere Rush is undoubtedly a powerful video editor. It is true that all the features of the Adobe Premiere desktop application are not available. But it is still great for a professional video creator.
There are multi-track timeline, customizable animated templates, and stunning video and text effects. The app has AI sensors for automated color balancing. The premium content library has everything you need. There are different aspect ratios available for creating videos for all devices. You can export edited videos in 4K resolution.
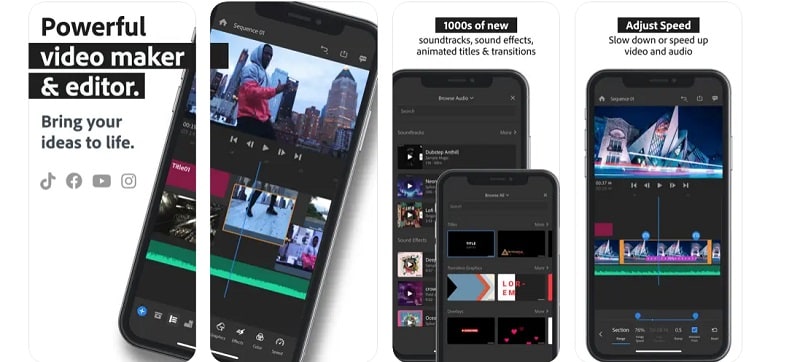
Link – https://apps.apple.com/us/app/adobe-premiere-rush-edit-video/id1188753863
Part 3. Related FAQs
1. Is Final Cut Pro a free app?
No, Final Cut Pro is not a free app. It is a paid app that costs $299.99 for lifetime access. However, you can download the free trial version of Final Cut Pro. You can use the trial version for 90 days before purchasing the product.
2. Does Final Cut Pro have a mobile app?
No, Final Cut Pro does not have any mobile app as of now. It is exclusively for iMac and MacBook users. You can use Filmora mobile app if you are looking for an FCP alternative.
3. Is Final Cut Pro Apple only?
Apple is the developer of Final Cut Pro. Therefore, it is an Apple-exclusive product. Naturally, it works only on macOS-based devices such as iMac and MacBook.
Free Download For Win 7 or later(64-bit)
Free Download For macOS 10.14 or later
Part 1. Final Cut Pro Alternative App for Android
There is no Final Cut Pro app available for Android users. It is not surprising because Final Cut Pro is an Apple product. When you search for Final Cut Pro on Play Store, you will come across an FCP app. But it is a fake app and not developed by Apple. Here is our recommendation of the best Final Cut Pro alternative app for Android users.
1. Filmora
Filmora is the best alternative to Final Cut Pro for Android users. The app has a super high rating on Play Store. Filmora is available for free and you can create amazing HD videos. You can add stunning effects, animations, texts, filters, backgrounds, and much more. You can obviously perform the basic video edits such as trim, cut, join, and likewise. The app allows easy sharing of edited videos on social media platforms.
You can add keyframes for personalized creativity animations. There is a wide range of music available to pick from. Besides, there are amazing stickers and emojis available to apply to your video. The user interface is super intuitive for everyone to use easily without prior experience. The free version attaches a watermark and you can remove it by upgrading to VIP membership.

Link – https://play.google.com/store/apps/details?id=com.wondershare.filmorago&hl=en\_IN&gl=US
2. InShot
InShot is an extremely popular video editor app among Android users. It is featured as the Editor’s Choice on Play Store. The app has all the features and functionalities you need for basic and advanced video editing. In spite of being a powerful app, the graphical interface is user-friendly.
There are beautiful transitions, stickers, text effects, voice effects, and frames available. You can make picture-in-picture videos, slideshow videos, and slow-motion videos. You can also create stories and GIFs for social media. Besides, there is a keyframe option for texts and stickers. You can easily add voiceover, music, and voice effect to enhance the video content.

Link –https://play.google.com/store/apps/details?id=com.camerasideas.instashot&hl=en\_IN&gl=US
3. KineMaster
KineMaster is a popular video editing app among beginners. You can create your video from scratch using its video templates. KineMaster has a wide range of different categories of video templates to get started. Starting from basic adjustments to adding filters and effects, everything is available on KineMaster.
The user interface is super easy to operate. The app comes with an incredible collection of assets such as animations and clip graphics. You can remove the background from your video or photo instantly. Besides, you can save the edited video in desired video quality and share it instantly on social media platforms.

Link – https://play.google.com/store/apps/details?id=com.nexstreaming.app.kinemasterfree&hl=en\_IN&gl=US
4. Funimate
Funimate is a relatively new video editing app. But in a short time, the app has managed to become a top video editor app on Play Store. This is because it is extremely powerful and it is comparable to Final Cut Pro in terms of features. The app has a stunning collection of video and text effects that will enhance video content. You can work with multiple video layers just like Final Cut Pro.
The keyframe effect is a strong point for customized and personalized animations. You can choose from the different transitions, overlays, and backgrounds. Besides, there is a wide range of chic effects and filters to go with modern video trends. There is a dedicated 3D space available to experiment with object and text animations. You can sync music and choose AI effects and video masks.

Link – https://play.google.com/store/apps/details?id=com.avcrbt.funimate&hl=en\_IN&gl=US
5. Splice
This is another relatively new video editor app but has a superb rating from users. The powerful video editor app makes it easy for beginners to edit videos comfortably. It has a dedicated timeline to work on your video clip and edit as per your requirements. There are beautiful text effects and overlays available.
Besides, you can add and sync music perfectly. Moreover, you can adjust the speed of your video to get the slow-motion effect. The basic video editing tools are available and you can create videos from your photos. There are amazing transitions and video effects present to apply to your photos and video clips. Overall, the video editor is suitable for beginners as well as professionals.

Link – https://play.google.com/store/apps/details?id=com.splice.video.editor&hl=en\_IN&gl=US
Part 2. Final Cut Pro Alternative App for iPhone
Since Final Cut Pro is from Apple, you would have expected an FCP app for iPhone and iPad. Unfortunately, Apple has no plan yet to launch Final Cut Pro mobile app. Here are the Final Cut Pro alternative apps for iPhone and iPad users.
1. iMovie
iMovie by Apple is considered to be an ideal alternative to Final Cut Pro. Even though it is not as advanced as FCP, but there are powerful features for professionals as well. You can create videos from scratch and there are beautiful templates available to get started. You can also make Hollywood-style cinematic trailers to get your viewers excited.
Apart from templates of different categories, there are different text styles and textures available to pick from. You can get the popular picture-in-picture, split screen, and green screen effect options. It supports editing 4K videos at 60 fps. You can send your video projects to iPad and Mac conveniently.

Link – https://apps.apple.com/us/app/imovie/id377298193
2. Quik
Quik by GoPro is one of the most popular video editors. GoPro is the leading action camera brand. Naturally, there is huge traction for its video editor. First of all, its speed adjustment feature is the highlight of the app. You can go for super slow, regular slow, freeze, timelapse, hyper-lapse, and fast motion.
Select from a wide range of themes to get started. There is no dearth of filters, transitions, and effects. Some of the filters are super exclusive to the app. You can share your edited video on social media platforms instantly. The multi-selection timeline is suitable for advanced video editors. The app has exclusive features for GoPro owners.

Link – https://apps.apple.com/us/app/gopro-quik-video-editor/id561350520
3. Magisto
If you are into storytelling with your videos, this is the best app to edit your videos. It has all the features and options to make your video look classic and eye-catching. As a matter of fact, it is arguably the best video editor for social media video creators. You can use its artificial intelligence feature to select the best parts of your video automatically.
There are ready-made templates available to make your video look professional as well as entertaining. You can perform all the basic video editing tasks swiftly. You can work with the music part comfortably so that your video content enhances. Starting from slideshow videos to short videos for social media, the app is perfect for different genres of video making.

Link – https://apps.apple.com/us/app/magisto-video-editor-maker/id486781045
4. VivaVideo
VivaVideo is a highly rated video editing app. The app lets you change video speed, supports high-resolution output, and comes with dynamic effects. You can make short videos with your photos. You can decorate them beautifully with frames and objects available.
There are several cinematic filters available to enhance video quality. Apart from these, you get to select from a wide collection of text effects and emojis. You can work with keyframes and export video in 4k resolution. You can also create GIFs for social media platforms instantly.

Link – https://apps.apple.com/us/app/vivavideo-video-editor-maker/id738897668
5. Adobe Premiere Rush
Adobe Premiere is the biggest competitor of Final Cut Pro. But Adobe has gone one step ahead of FCP by releasing its mobile app. Adobe Premiere Rush is undoubtedly a powerful video editor. It is true that all the features of the Adobe Premiere desktop application are not available. But it is still great for a professional video creator.
There are multi-track timeline, customizable animated templates, and stunning video and text effects. The app has AI sensors for automated color balancing. The premium content library has everything you need. There are different aspect ratios available for creating videos for all devices. You can export edited videos in 4K resolution.

Link – https://apps.apple.com/us/app/adobe-premiere-rush-edit-video/id1188753863
Part 3. Related FAQs
1. Is Final Cut Pro a free app?
No, Final Cut Pro is not a free app. It is a paid app that costs $299.99 for lifetime access. However, you can download the free trial version of Final Cut Pro. You can use the trial version for 90 days before purchasing the product.
2. Does Final Cut Pro have a mobile app?
No, Final Cut Pro does not have any mobile app as of now. It is exclusively for iMac and MacBook users. You can use Filmora mobile app if you are looking for an FCP alternative.
3. Is Final Cut Pro Apple only?
Apple is the developer of Final Cut Pro. Therefore, it is an Apple-exclusive product. Naturally, it works only on macOS-based devices such as iMac and MacBook.
Free Download For Win 7 or later(64-bit)
Free Download For macOS 10.14 or later
Explore Our Comprehensive Guide to the 10 Best Cameras . Unlock the World of Advanced Technology Perfect for Capturing Slow-Motion Footage in Various Scenarios
Camera technology is evolving at an increased pace with improved features. Each brand competes in the media industry to release cameras with diverse functionalities. When you keep updated on the latest models, you will get to know different varieties and options. It will also help you stay current with evolving technology for slow-motion videos. Choosing the best slow-motion camera involves considering specific needs like filmmaking or creating slow-motion videos.
In this article, we’ll mention the top 10 best slow mo cameras for filming slow-motion videos. The slow-motion camera is specifically built to capture the moments in perfect frame rates. Furthermore, this article will highlight an innovative way to slow down videos without any camera.
Slow Motion Video Maker Slow your video’s speed with better control of your keyframes to create unique cinematic effects!
Make A Slow Motion Video Make A Slow Motion Video More Features

Part 1: How Do Slow-Motion Cameras Help in Recording Perfect Slow-Mo Videos?
Slow-motion cameras record videos at much faster speeds than regular cameras. This feature helps create slow-motion videos by slowing down the recorded action when played at normal speed. These slow-motion cameras are popular in filmmaking, sports analysis, science, and content creation. That’s because they capture detailed moments and highlight fast-moving things.
- Higher Frame Rate: Regular videos usually record 24, 30, or 60 frames per second (fps). But slow-motion cameras can capture hundreds or thousands of frames per second. More frames mean more details and smoother slow-motion videos when played back.
- Smooth Playback: Slow-motion videos look smooth and purposeful when played at regular speeds. More frames are recorded initially to achieve this effect. Ultimately, it will preserve all details when the video is played in slow motion.
- High-Resolution Sensors: Lots of slow-motion cameras have high-quality sensors. These sensors ensure that even with more frames captured, the picture stays sharp and detailed in slow-motion videos. This helps capture fine details without losing clarity.
- Creative Control: Slow-motion cameras let filmmakers and videographers control how fast or slow some parts of a scene look. This helps tell stories better, focus on details, and make videos more interesting and attractive to watch.
- Reduced Motion Blur: More frames per second make pictures clearer and sharper. This feature works especially for fast-moving things. This is important when you need to see tiny details or when the lighting isn’t great.
- Temporal Resolution: Slow-motion cameras can record lots of details in quick movements. They’re handy in sports, science, and creative videos where catching fast and detailed actions matter a lot.
Part 2: Finding The Top Slow-Motion Cameras to Use in 2024
If you want a good slow-motion camera, start by checking out the ones with higher frame rates. Also, think about what you’ll be recording and where you’ll share your videos. Buying a new camera can be confusing and perplexing. We hope you’ll find the best slow-motion camera in the list below. We have arranged the top slow-motion cameras to use in 2024 below:
- PowerShot G7 X Mark III Black
- Sony ZV-1 Camera
- GoPro HERO11 Black
- GoPro HERO10 Black
- Panasonic Lumix GH6
- Sony α7R IV
- Fujifilm X-S20
- Canon EOS-1D X Mark III DSLR Camera
- Nikon D6 FX-Format Digital SLR Camera
- Canon DSLR Camera [EOS 90D]
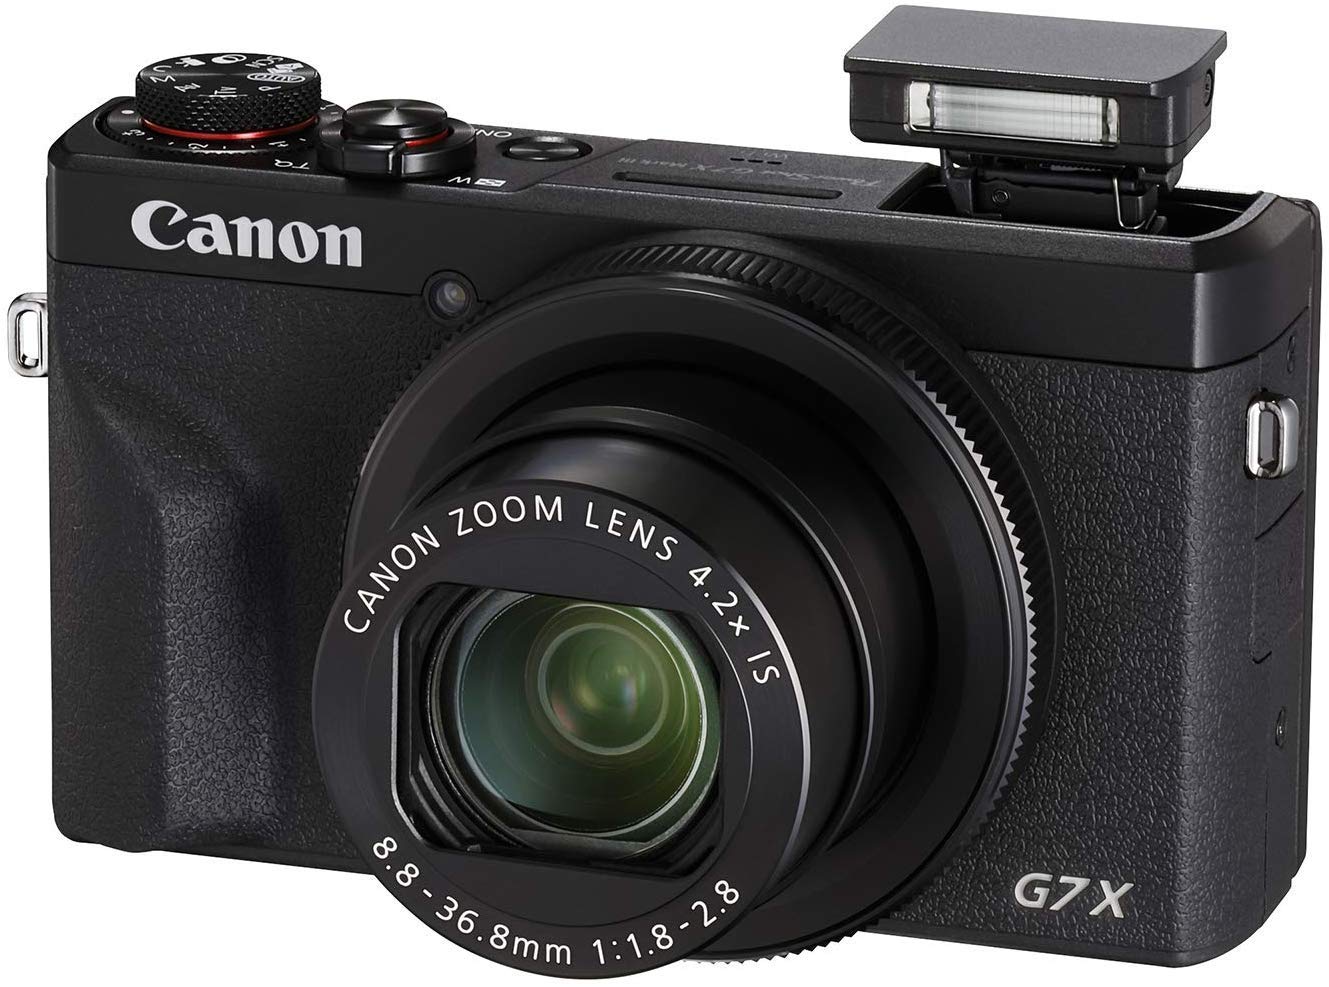
1. PowerShot G7 X Mark III Black
The PowerShot G7 X Mark III Black is a small but powerful camera for taking high-quality slow-motion videos. It has a 20.1 Megapixel camera and a DIGIC 8 Image Processor, which means it shows exceptional clarity even in different lighting. The 4.2x Optical Zoom Kens with Optical Image Stabilizer helps get close-up shots without making them blurry. For videos, it can record in 4K (at 30 frames per second) and Full HD (at 120 frames per second) for super smooth slow-motion shots.
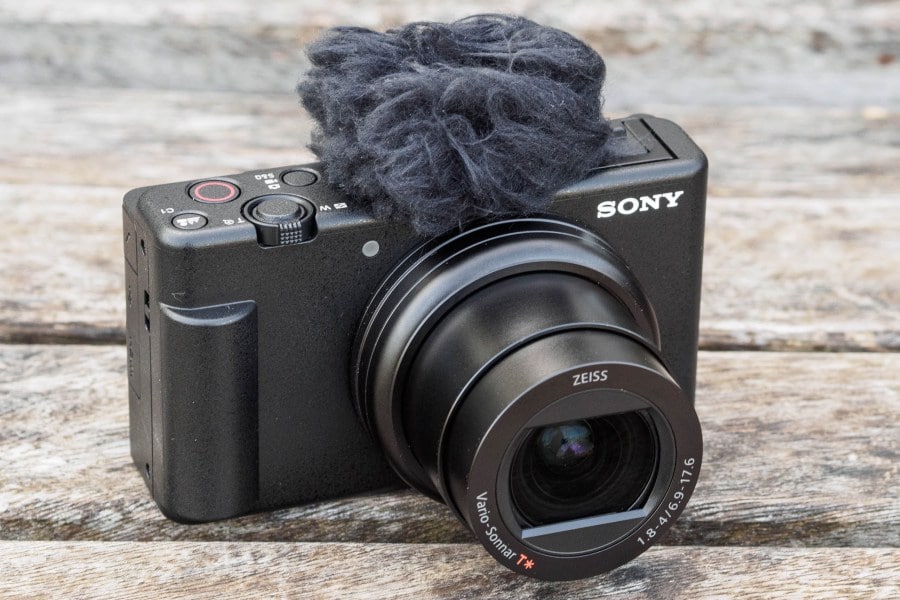
2. Sony ZV-1 Camera
The Sony ZV-1 Camera is made specifically for content creators and vloggers. Although it has a compact design, it is packed with powerful features. This slow-motion video camera has a 1-inch sensor and digital and optical image stabilization. This means your pictures and videos will be clear and steady even if things are moving fast.
The camera’s results are sharp and colorful thanks to its 20.1 MP resolution and BIONZ X Image Processor. Also, it has a Fast Hybrid AF System that quickly focuses accurately, perfect for both photos and videos.
3. GoPro HERO11 Black
The GoPro HERO11 Black is an awesome slow-motion camera perfect for all kinds of adventures. It takes clear videos up to 5.3K resolution and sharp 27MP photos. The camera has great stabilization, so your videos always look smooth. You can change how wide your shots are and switch lenses digitally while keeping things clear.
GoPro HERO11 Black has cool effects for nighttime shots, making them look artistic. The camera is tough, waterproof up to 33 feet, and has a long-lasting battery that works well even in cold weather.
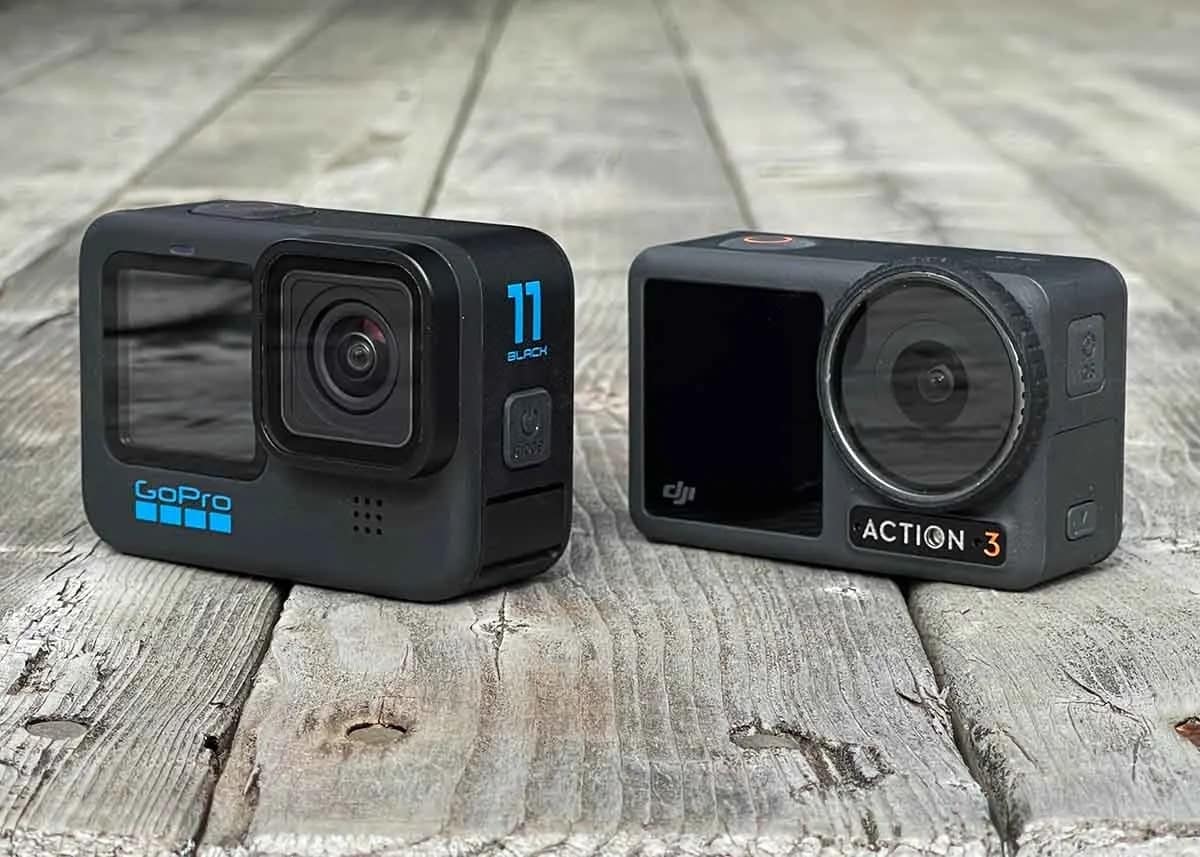
4. GoPro HERO10 Black
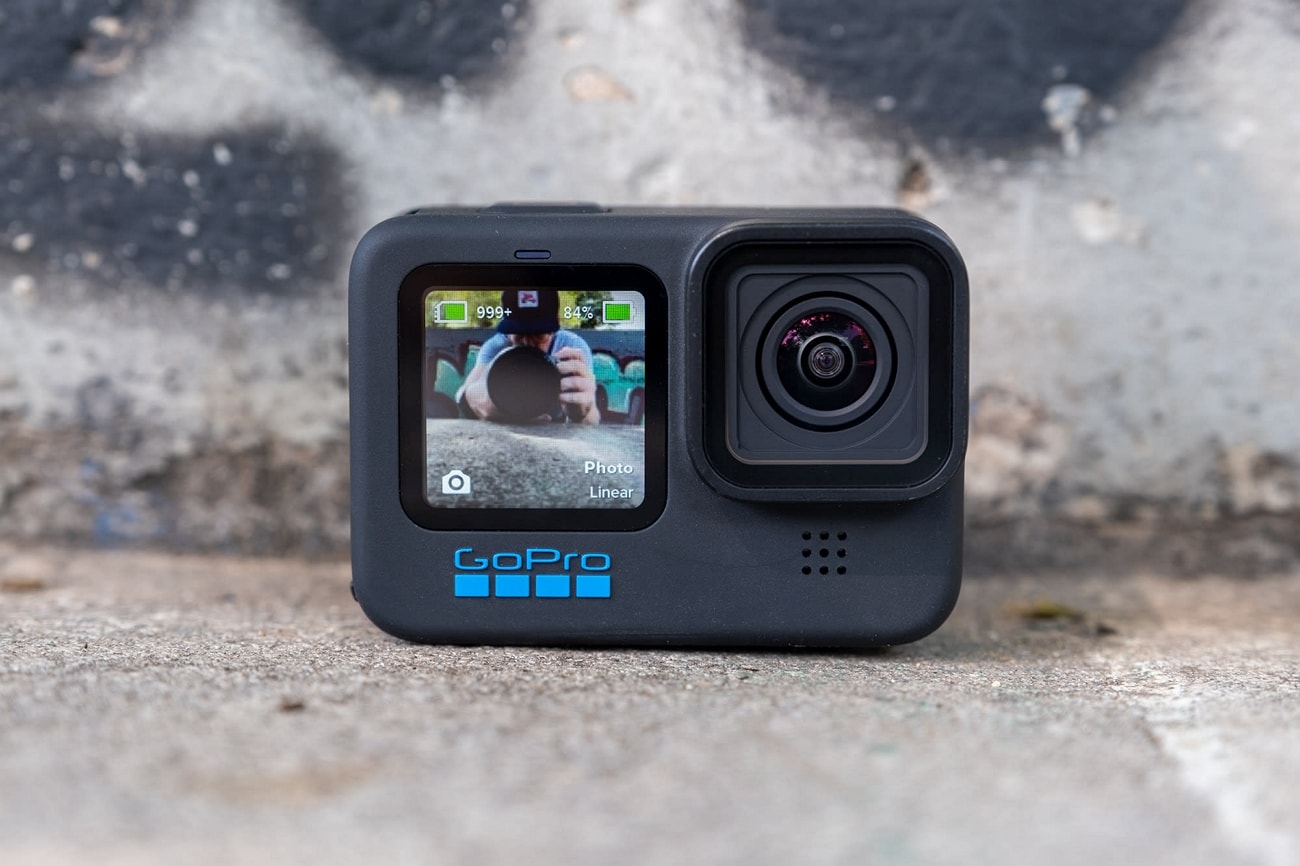
The GoPro HERO10 Black has a faster processor for smoother use and better touch controls. It can record super clear videos at higher speeds: 5.3K at 60fps and 4K at 120fps. You can also shoot camera slow-motion videos at 240fps in 2.7K resolution. The camera’s sensor is better, too, making photos sharper and allowing you to grab 15.8MP pictures from videos. It keeps footage perfectly steady with its excellent stabilization.
5. Panasonic LUMIX GH6
The LUMIX GH6 is an inspiring innovation in the LUMIX camera series, packed with amazing upgrades. It records high-quality videos internally in ProRes 422 HQ and ProRes 422, making them look great and easier to work with on computers later. This slow-mo video camera is faster due to a new engine, making pictures look better with less noise and better colors.
It’s great for professional video making, offering top-notch recording options. It also has image stabilization, a flexible rear monitor, and slots for different memory cards.

6. Sony α7R IV
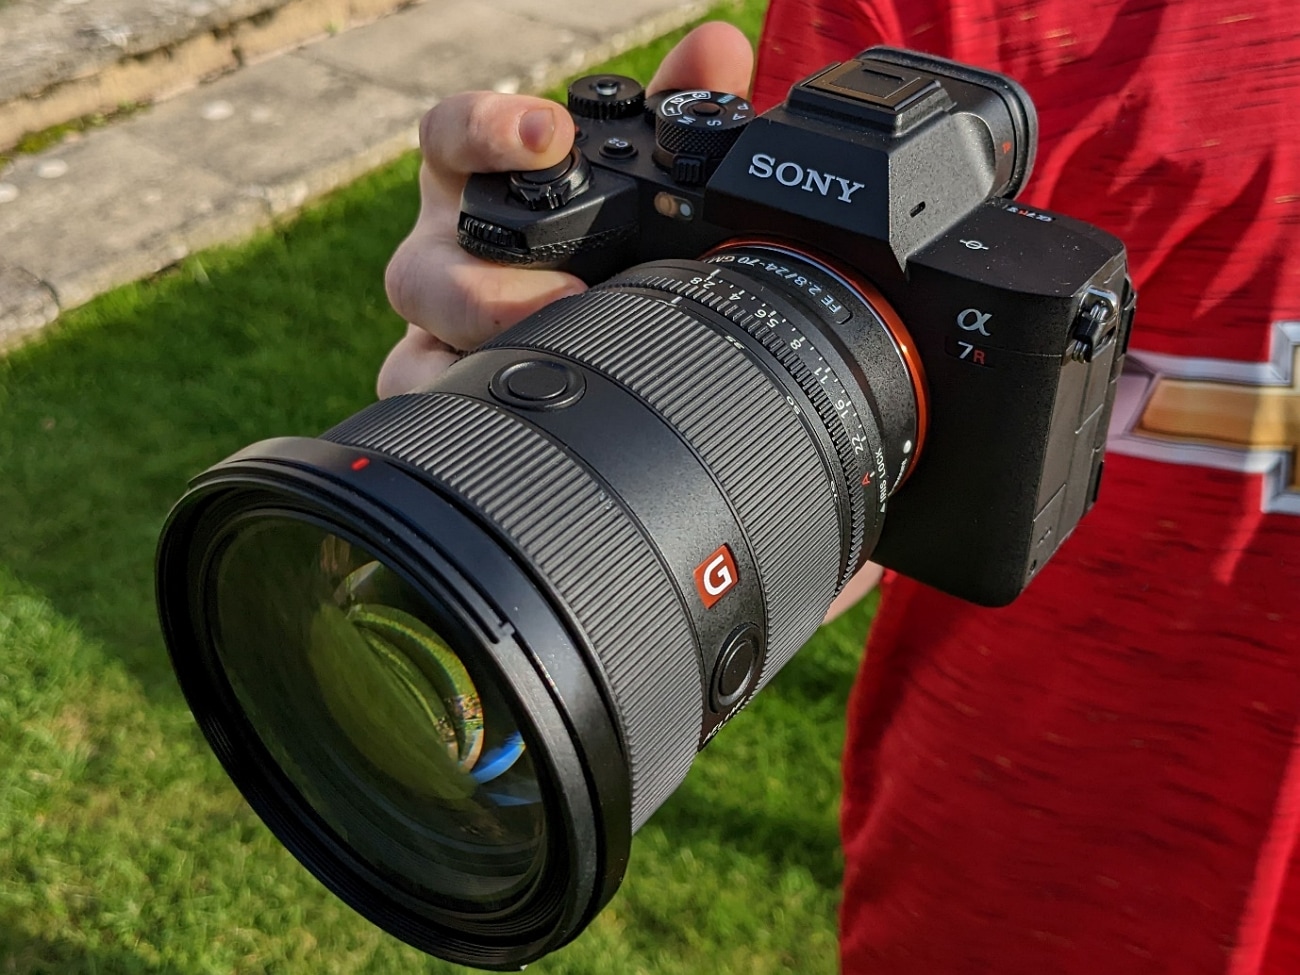
The Sony A7R IV is a top-notch mirrorless camera appreciated by videography experts. It takes super clear pictures with its 20MP full-frame sensor. Also, it has a feature that prevents shaky photos and helps videos stay steady. You can control how long the shutter stays open, which helps in different lighting.
This slow-motion video camera lets you choose different ways to measure light for better pictures. Small and adaptable, it is high-tech and has great performance in digital photography.
7. Fujifilm X-S20
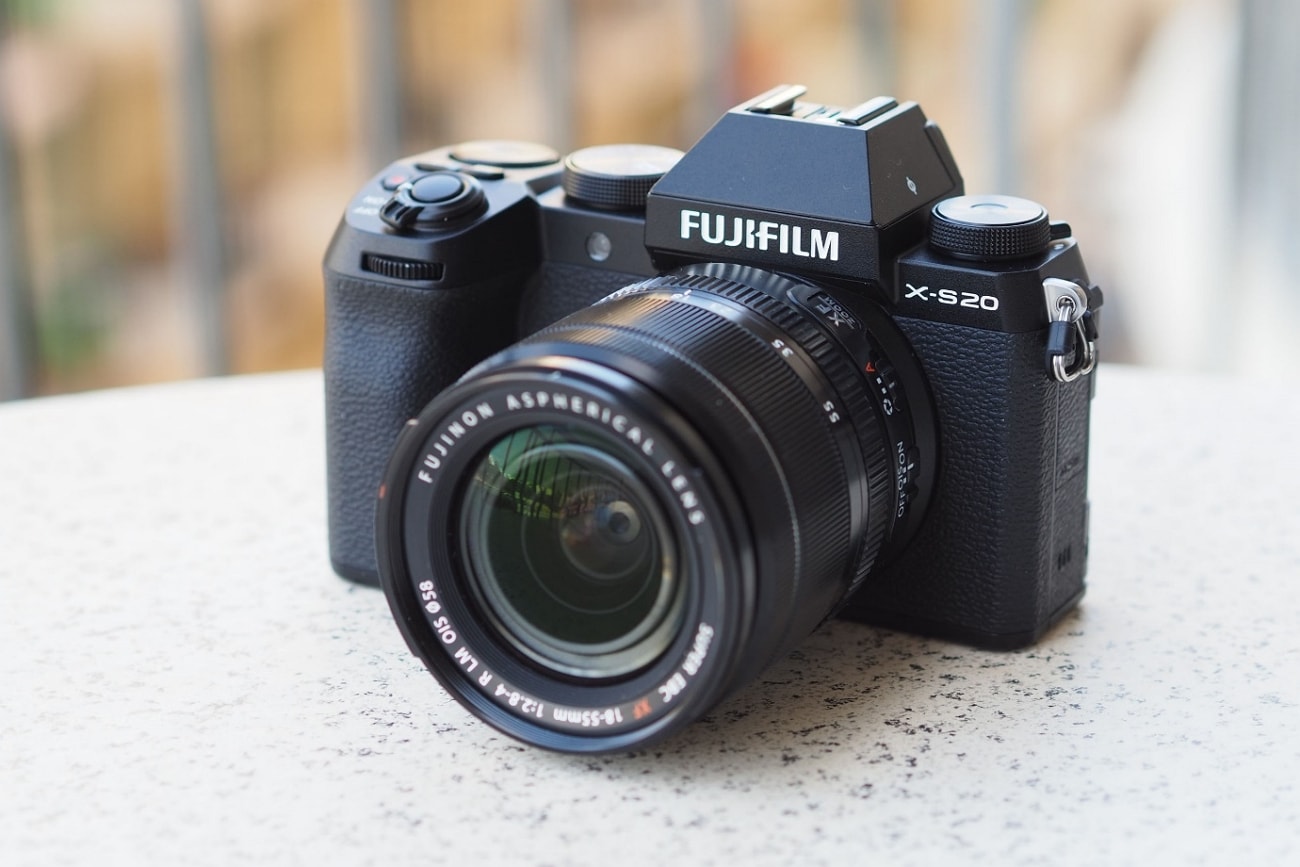
The Fujifilm X-S20 is a versatile camera that is equipped with advanced features and is easy to carry. This slow-motion camera has a 26.1MP sensor for really clear pictures. The screen is a vary-angle touchscreen of 3.0 inches and 1.84m-dot. You can connect it to Wi-Fi and Bluetooth to share and control the camera from a distance.
It’s perfect for videos, too, recording in high-quality up to 6.2K resolution. The camera is small and compact at 127.7 x 85.1 x 65.4mm and weighs only 491g.
8. Canon EOS-1D X Mark III DSLR Camera
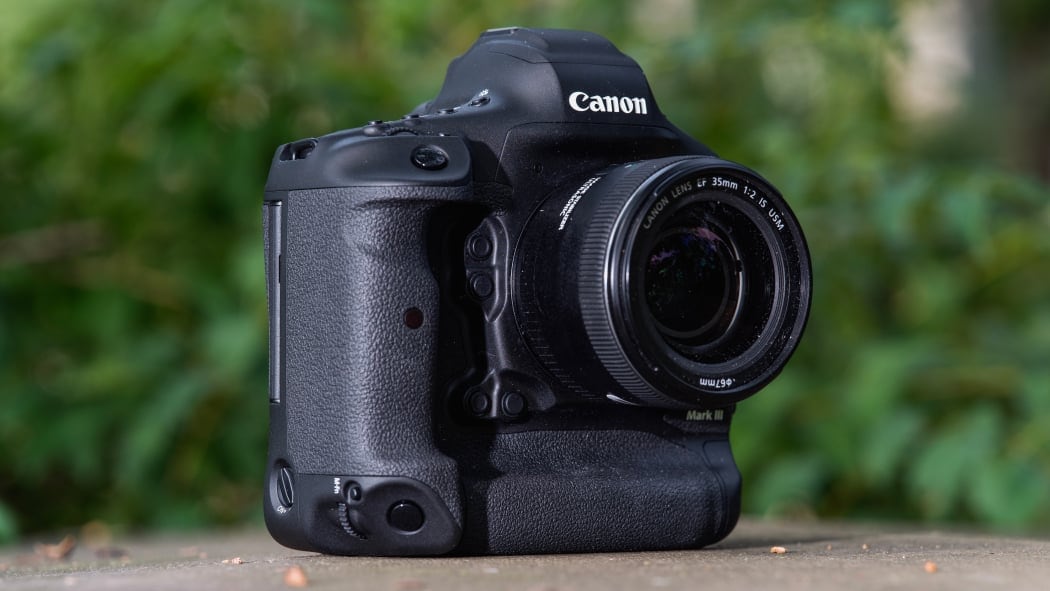
The Canon EOS-1D X Mark III is a top choice for professionals in photography and videography. It has a powerful 20.1 Megapixel Full-frame CMOS sensor that ensures high-quality images. The DIGIC X Image Processor handles low-light situations exceptionally well. Adding on, it offers a wide ISO range for great performance.
Its advanced autofocus system with deep learning technology tracks subjects accurately. This slow-mo camera supports impressive 4K UHD 2160p video recording.
9. Nikon D6 FX-Format Digital SLR Camera
The Nikon D6 FX-Format Digital SLR Camera Body is made for professionals who promise top-notch performance. It has a powerful 20.8 Megapixel Full-frame CMOS sensor for high-quality photos. Also, it can work as a webcam with a maximum resolution of 16 MP and performs well in different situations.
Using digital image stabilization, the slow-motion video camera helps prevent blur. Moreover, it has a quick shutter speed of 1/8000 seconds for precise control over exposure.
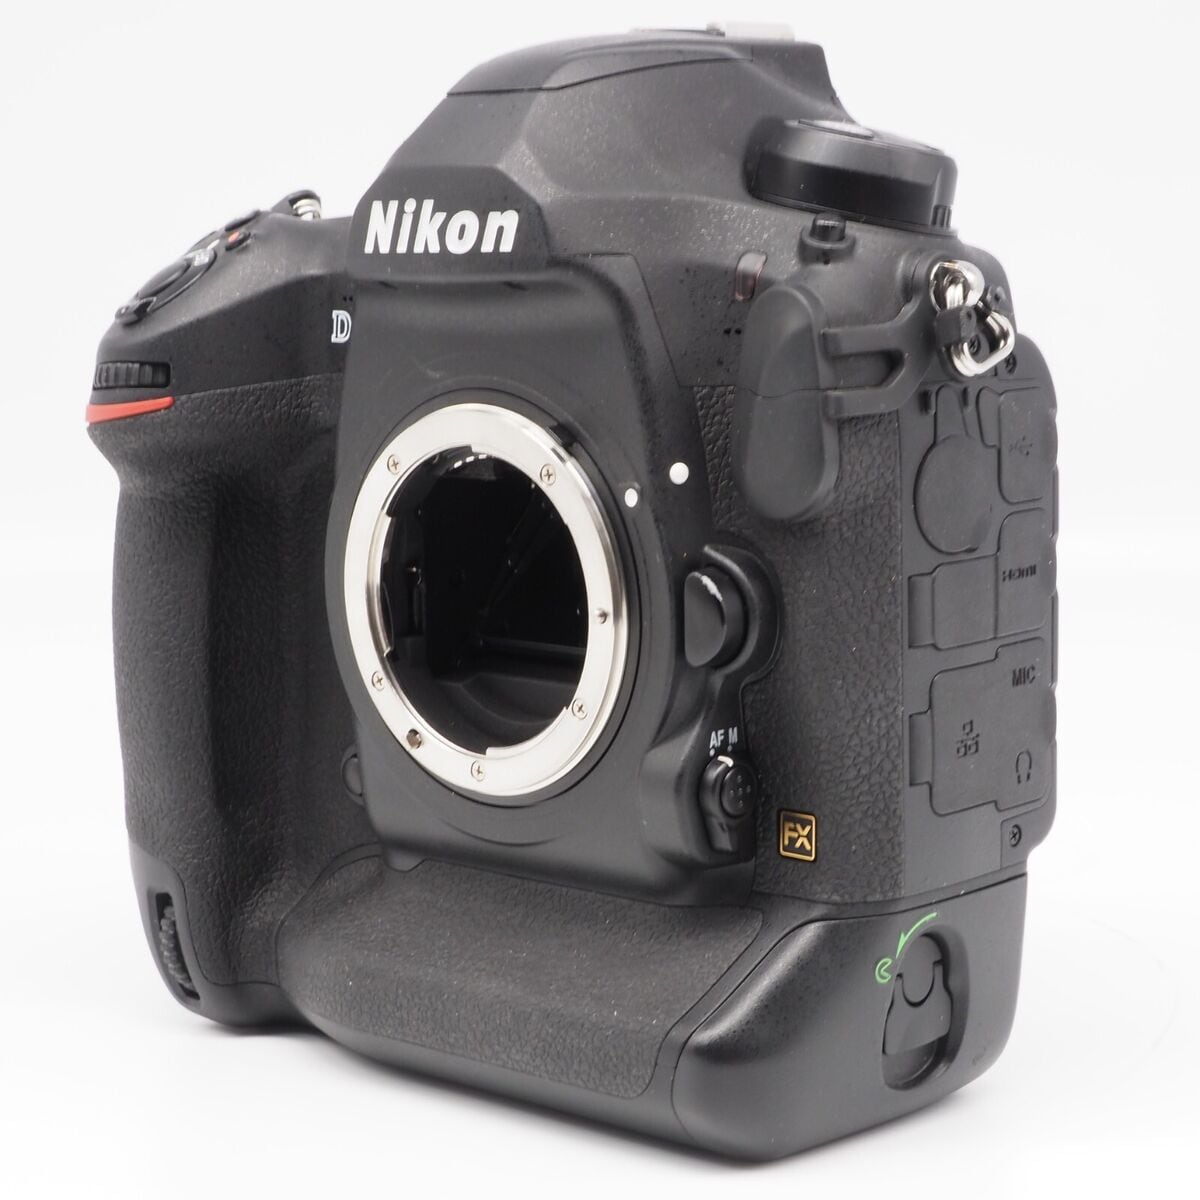
10. Canon DSLR Camera [EOS 90D]
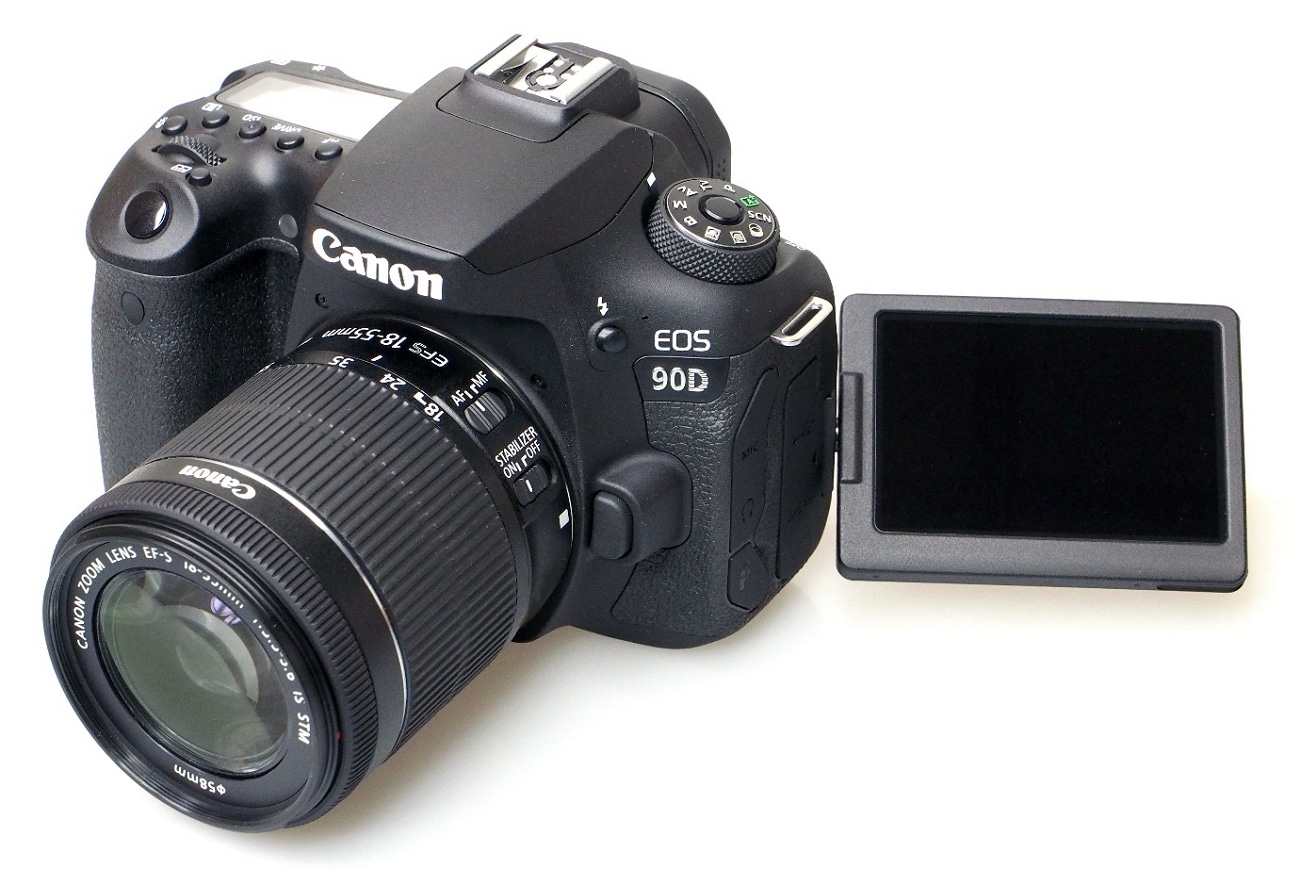
The Canon 90D Body is a slow-mo camera for both filmmakers and videographers. It has a 32.5-megapixel CMOS APS-C sensor for clear and detailed images. Furthermore, it supports recording videos in 4K UHD 30P and Full HD 120P, which helps in delivering excellent video quality. With a 45-Point All Cross-type AF System, the 90D provides precise autofocus across the entire frame.
Part 3: What To Do If You Do Not Have a Camera? Use Filmora for Slow-Mo Video Making
Sometimes, getting an affordable slow-motion camera for shooting videos can be tricky. But don’t worry! You can still create slow-motion videos without having a specific camera. Wondershare Filmora is an excellent solution to make fantastic slow-motion videos, even if you don’t own a special slow-motion camera.
You can adjust the speed of your videos easily to make certain moments slower, making your clips look cool. Filmora isn’t just about changing the speed of your videos. It’s a powerful editing software that lets you do lots of things to make your videos better.
Free Download For Win 7 or later(64-bit)
Free Download For macOS 10.14 or later
Steps Required to Slow Down Video Professionally with Speed Ramping
Filmora Speed Ramping feature allows you to control your clip’s speed. It gives the flexibility to either slow down the entire video or specific segments. Here’s a guide on executing slow-motion in the Filmora video editing interface.
Step 1Set Up Project and Import Footage
Start by launching Wondershare Filmora and creating a new project. Then, import your video by clicking the “+” icon. After that, select “Match to Media” to ensure your project settings align with your clip’s resolution.

Step 2Apply Slow-Motion Effect to Slow Down Video
In the next step, add the imported video to the timeline and access the “Speed” icon. Choose a preset, such as 0.5x from the “Slow” menu, to apply a slow-motion effect to the entire clip. Alternatively, right-click on the video, go to “Speed,” followed by “Uniform Speed,” and adjust the slider leftwards for slow motion.

Step 3Customize Speed for Specific Segments
To create slow-motion effects for specific parts or frames within your video, navigate to the “Speed Ramping” window. Then, choose “Customize” and modify the speed by dragging the points along the line.

Step 4Add Freeze Frame at Required Position
For freezing a frame, position the play head at the desired spot. Select “Add Freeze Frame,” then set the freeze duration in the “Freeze Time Field” and adjust its placement as required. Save changes by clicking “OK.”

Top Features Offered by Filmora
Wondershare Filmora offers its users a variety of advanced features to perform an edit conveniently. It enhances creativity and productivity with the help of AI-equipped in it. Described below are some of these features to know about Filmora:
1. AI Smart Masking
AI Smart Masking simplifies the process of adding high-quality transitions and effects. By contrast, it can be complex with manual editing. By activating this feature, it automatically handles the masking task. Once AI masking is enabled and the desired area is specified, it swiftly completes the process. This allows you to apply transitions and effects to the unmasked area afterward.
2. AI Copywriting
Filmora AI Copywriting is a new tool that incorporates ChatGPT API. It uses AI to create scripts, providing tons of ideas for creators to improve their video storytelling. This tool seamlessly integrates AI-generated text and narration into the editing process. With Filmora AI Copywriting, creators can quickly develop catchy YouTube titles and descriptions.
3. Audio Visualizer
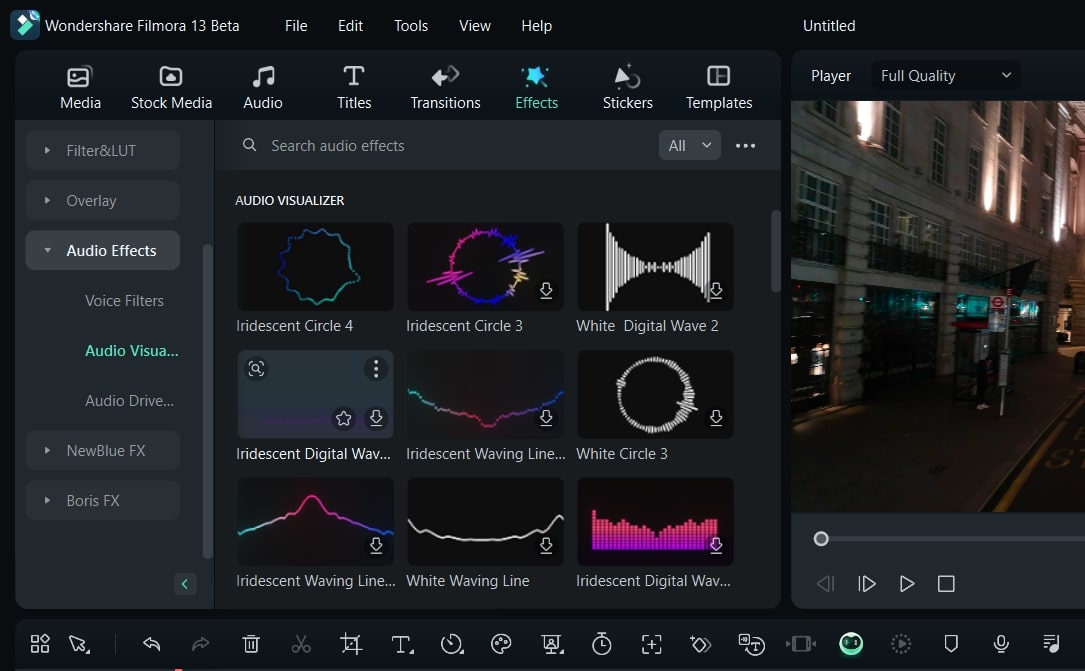
Filmora Audio Visualizer is an innovative tool for music videos on how you experience sound and visuals together. It works by matching the visuals to the sound in your video. The Audio Visualizer analyzes the audio and syncs with the music’s beats and rhythm. This creates an amazing display that makes watching and listening more enjoyable.
4. Speech-To-Text
The Filmora Speech-To-Text (STT) feature is a huge help for video editors who want to work more efficiently. With just one click, this tool changes spoken words in videos into written text. It saves a lot of time by avoiding the manual work of typing subtitles. This feature not only saves time but also ensures that subtitles match what’s being said in the video accurately.
Conclusion
In summary, slow-motion videography is an amazing way to tell stories visually. Mixing technology and your ideas helps create videos that capture people’s attention. For that reason, we have provided 10 slow-motion video cameras to help you capture slow-motion videos. Additionally, we also highlighted the perfect solution if you don’t have a camera: Wondershare Filmora. You can easily generate a slow-motion video using our simple guide with this tool.
Make A Slow Motion Video Make A Slow Motion Video More Features

Part 1: How Do Slow-Motion Cameras Help in Recording Perfect Slow-Mo Videos?
Slow-motion cameras record videos at much faster speeds than regular cameras. This feature helps create slow-motion videos by slowing down the recorded action when played at normal speed. These slow-motion cameras are popular in filmmaking, sports analysis, science, and content creation. That’s because they capture detailed moments and highlight fast-moving things.
- Higher Frame Rate: Regular videos usually record 24, 30, or 60 frames per second (fps). But slow-motion cameras can capture hundreds or thousands of frames per second. More frames mean more details and smoother slow-motion videos when played back.
- Smooth Playback: Slow-motion videos look smooth and purposeful when played at regular speeds. More frames are recorded initially to achieve this effect. Ultimately, it will preserve all details when the video is played in slow motion.
- High-Resolution Sensors: Lots of slow-motion cameras have high-quality sensors. These sensors ensure that even with more frames captured, the picture stays sharp and detailed in slow-motion videos. This helps capture fine details without losing clarity.
- Creative Control: Slow-motion cameras let filmmakers and videographers control how fast or slow some parts of a scene look. This helps tell stories better, focus on details, and make videos more interesting and attractive to watch.
- Reduced Motion Blur: More frames per second make pictures clearer and sharper. This feature works especially for fast-moving things. This is important when you need to see tiny details or when the lighting isn’t great.
- Temporal Resolution: Slow-motion cameras can record lots of details in quick movements. They’re handy in sports, science, and creative videos where catching fast and detailed actions matter a lot.
Part 2: Finding The Top Slow-Motion Cameras to Use in 2024
If you want a good slow-motion camera, start by checking out the ones with higher frame rates. Also, think about what you’ll be recording and where you’ll share your videos. Buying a new camera can be confusing and perplexing. We hope you’ll find the best slow-motion camera in the list below. We have arranged the top slow-motion cameras to use in 2024 below:
- PowerShot G7 X Mark III Black
- Sony ZV-1 Camera
- GoPro HERO11 Black
- GoPro HERO10 Black
- Panasonic Lumix GH6
- Sony α7R IV
- Fujifilm X-S20
- Canon EOS-1D X Mark III DSLR Camera
- Nikon D6 FX-Format Digital SLR Camera
- Canon DSLR Camera [EOS 90D]
1. PowerShot G7 X Mark III Black
The PowerShot G7 X Mark III Black is a small but powerful camera for taking high-quality slow-motion videos. It has a 20.1 Megapixel camera and a DIGIC 8 Image Processor, which means it shows exceptional clarity even in different lighting. The 4.2x Optical Zoom Kens with Optical Image Stabilizer helps get close-up shots without making them blurry. For videos, it can record in 4K (at 30 frames per second) and Full HD (at 120 frames per second) for super smooth slow-motion shots.

2. Sony ZV-1 Camera
The Sony ZV-1 Camera is made specifically for content creators and vloggers. Although it has a compact design, it is packed with powerful features. This slow-motion video camera has a 1-inch sensor and digital and optical image stabilization. This means your pictures and videos will be clear and steady even if things are moving fast.
The camera’s results are sharp and colorful thanks to its 20.1 MP resolution and BIONZ X Image Processor. Also, it has a Fast Hybrid AF System that quickly focuses accurately, perfect for both photos and videos.

3. GoPro HERO11 Black
The GoPro HERO11 Black is an awesome slow-motion camera perfect for all kinds of adventures. It takes clear videos up to 5.3K resolution and sharp 27MP photos. The camera has great stabilization, so your videos always look smooth. You can change how wide your shots are and switch lenses digitally while keeping things clear.
GoPro HERO11 Black has cool effects for nighttime shots, making them look artistic. The camera is tough, waterproof up to 33 feet, and has a long-lasting battery that works well even in cold weather.

4. GoPro HERO10 Black
The GoPro HERO10 Black has a faster processor for smoother use and better touch controls. It can record super clear videos at higher speeds: 5.3K at 60fps and 4K at 120fps. You can also shoot camera slow-motion videos at 240fps in 2.7K resolution. The camera’s sensor is better, too, making photos sharper and allowing you to grab 15.8MP pictures from videos. It keeps footage perfectly steady with its excellent stabilization.

5. Panasonic LUMIX GH6
The LUMIX GH6 is an inspiring innovation in the LUMIX camera series, packed with amazing upgrades. It records high-quality videos internally in ProRes 422 HQ and ProRes 422, making them look great and easier to work with on computers later. This slow-mo video camera is faster due to a new engine, making pictures look better with less noise and better colors.
It’s great for professional video making, offering top-notch recording options. It also has image stabilization, a flexible rear monitor, and slots for different memory cards.

6. Sony α7R IV
The Sony A7R IV is a top-notch mirrorless camera appreciated by videography experts. It takes super clear pictures with its 20MP full-frame sensor. Also, it has a feature that prevents shaky photos and helps videos stay steady. You can control how long the shutter stays open, which helps in different lighting.
This slow-motion video camera lets you choose different ways to measure light for better pictures. Small and adaptable, it is high-tech and has great performance in digital photography.

7. Fujifilm X-S20
The Fujifilm X-S20 is a versatile camera that is equipped with advanced features and is easy to carry. This slow-motion camera has a 26.1MP sensor for really clear pictures. The screen is a vary-angle touchscreen of 3.0 inches and 1.84m-dot. You can connect it to Wi-Fi and Bluetooth to share and control the camera from a distance.
It’s perfect for videos, too, recording in high-quality up to 6.2K resolution. The camera is small and compact at 127.7 x 85.1 x 65.4mm and weighs only 491g.

8. Canon EOS-1D X Mark III DSLR Camera
The Canon EOS-1D X Mark III is a top choice for professionals in photography and videography. It has a powerful 20.1 Megapixel Full-frame CMOS sensor that ensures high-quality images. The DIGIC X Image Processor handles low-light situations exceptionally well. Adding on, it offers a wide ISO range for great performance.
Its advanced autofocus system with deep learning technology tracks subjects accurately. This slow-mo camera supports impressive 4K UHD 2160p video recording.

9. Nikon D6 FX-Format Digital SLR Camera
The Nikon D6 FX-Format Digital SLR Camera Body is made for professionals who promise top-notch performance. It has a powerful 20.8 Megapixel Full-frame CMOS sensor for high-quality photos. Also, it can work as a webcam with a maximum resolution of 16 MP and performs well in different situations.
Using digital image stabilization, the slow-motion video camera helps prevent blur. Moreover, it has a quick shutter speed of 1/8000 seconds for precise control over exposure.

10. Canon DSLR Camera [EOS 90D]
The Canon 90D Body is a slow-mo camera for both filmmakers and videographers. It has a 32.5-megapixel CMOS APS-C sensor for clear and detailed images. Furthermore, it supports recording videos in 4K UHD 30P and Full HD 120P, which helps in delivering excellent video quality. With a 45-Point All Cross-type AF System, the 90D provides precise autofocus across the entire frame.

Part 3: What To Do If You Do Not Have a Camera? Use Filmora for Slow-Mo Video Making
Sometimes, getting an affordable slow-motion camera for shooting videos can be tricky. But don’t worry! You can still create slow-motion videos without having a specific camera. Wondershare Filmora is an excellent solution to make fantastic slow-motion videos, even if you don’t own a special slow-motion camera.
You can adjust the speed of your videos easily to make certain moments slower, making your clips look cool. Filmora isn’t just about changing the speed of your videos. It’s a powerful editing software that lets you do lots of things to make your videos better.
Free Download For Win 7 or later(64-bit)
Free Download For macOS 10.14 or later
Steps Required to Slow Down Video Professionally with Speed Ramping
Filmora Speed Ramping feature allows you to control your clip’s speed. It gives the flexibility to either slow down the entire video or specific segments. Here’s a guide on executing slow-motion in the Filmora video editing interface.
Step 1Set Up Project and Import Footage
Start by launching Wondershare Filmora and creating a new project. Then, import your video by clicking the “+” icon. After that, select “Match to Media” to ensure your project settings align with your clip’s resolution.

Step 2Apply Slow-Motion Effect to Slow Down Video
In the next step, add the imported video to the timeline and access the “Speed” icon. Choose a preset, such as 0.5x from the “Slow” menu, to apply a slow-motion effect to the entire clip. Alternatively, right-click on the video, go to “Speed,” followed by “Uniform Speed,” and adjust the slider leftwards for slow motion.

Step 3Customize Speed for Specific Segments
To create slow-motion effects for specific parts or frames within your video, navigate to the “Speed Ramping” window. Then, choose “Customize” and modify the speed by dragging the points along the line.

Step 4Add Freeze Frame at Required Position
For freezing a frame, position the play head at the desired spot. Select “Add Freeze Frame,” then set the freeze duration in the “Freeze Time Field” and adjust its placement as required. Save changes by clicking “OK.”

Top Features Offered by Filmora
Wondershare Filmora offers its users a variety of advanced features to perform an edit conveniently. It enhances creativity and productivity with the help of AI-equipped in it. Described below are some of these features to know about Filmora:
1. AI Smart Masking
AI Smart Masking simplifies the process of adding high-quality transitions and effects. By contrast, it can be complex with manual editing. By activating this feature, it automatically handles the masking task. Once AI masking is enabled and the desired area is specified, it swiftly completes the process. This allows you to apply transitions and effects to the unmasked area afterward.
2. AI Copywriting
Filmora AI Copywriting is a new tool that incorporates ChatGPT API. It uses AI to create scripts, providing tons of ideas for creators to improve their video storytelling. This tool seamlessly integrates AI-generated text and narration into the editing process. With Filmora AI Copywriting, creators can quickly develop catchy YouTube titles and descriptions.
3. Audio Visualizer
Filmora Audio Visualizer is an innovative tool for music videos on how you experience sound and visuals together. It works by matching the visuals to the sound in your video. The Audio Visualizer analyzes the audio and syncs with the music’s beats and rhythm. This creates an amazing display that makes watching and listening more enjoyable.

4. Speech-To-Text
The Filmora Speech-To-Text (STT) feature is a huge help for video editors who want to work more efficiently. With just one click, this tool changes spoken words in videos into written text. It saves a lot of time by avoiding the manual work of typing subtitles. This feature not only saves time but also ensures that subtitles match what’s being said in the video accurately.
Conclusion
In summary, slow-motion videography is an amazing way to tell stories visually. Mixing technology and your ideas helps create videos that capture people’s attention. For that reason, we have provided 10 slow-motion video cameras to help you capture slow-motion videos. Additionally, we also highlighted the perfect solution if you don’t have a camera: Wondershare Filmora. You can easily generate a slow-motion video using our simple guide with this tool.
Guide: Cropping and Combining Content in Wondershare Filmora [Latest]
Video editing is one of the most essential tasks in a video project. It plays a role in creating videos that leave a lasting impression on your audience. From the initial raw footage to the final product, a video goes through several processes. One vital aspect of video editing is trimming and merging, which holds great importance for any video project.
The editing process changes the whole narrative of a video by adding more depth and feel to it. Through editing, you can remove unwanted segments, rearrange clips, and much more. Capturing and recording video is one thing, but bringing the best out of the raw files is another. To make your raw footage somewhat stunning, you have to sit in the editing room.
Part 1: How Does Trimming or Merging Videos Help Users?
Merging and trimming videos is an editing technique that offers many benefits. Here’s how these actions can help you in so many ways. Find out how it helps the users when they merge or trim a video:
Trimming Videos
- Trimming allows users to remove unwanted portions of a video. You can eliminate mistakes, irrelevant footage, or unnecessary pauses in the video. It also helps streamline the content and improve its overall quality.
- It can help adjust the pacing of a video by removing or shortening sections that may be too slow or lengthy. This ensures a more engaging and dynamic viewing experience.
- By trimming, you can select the best moments from a longer video. You can also create highlight reels that showcase the most important or exciting parts.
- Many social media platforms have specific time limitations for videos. It allows you to meet these requirements and share their content without compromising its essence.
Merging Videos
- The merging of videos enables you to combine multiple clips or segments into a single video. This technique is useful when users want to compile footage from different sources. It also creates a uniform narrative from separate scenes.
- Merging allows you to create montages or collages that showcase various moments or perspectives. This is often used in music videos, compilations, or video presentations.
- Doing this can make seamless transitions between different shots or scenes. This further creates a visually fluid experience for the viewer.
- It also helps you create a coherent storyline by combining different clips. You can use this technique to communicate ideas, emotions, or messages effectively.
Part 2: Wondershare Filmora: An Introduction to A Great Video Editor
Wondershare Filmora is a video editing tool that is created for almost everyone. This tool has it all, from simple edit options to more complicated ones. You can apply various kinds of filters and effects to your video. Additionally, you can change the color tone of your video project by making a few adjustments. However, this is not it, as you can even do trimming and merging in your project.
Trimming or Merging Videos Editor A cross-platform for making videos anywhere for all creators, providing trimming and merging videos functions.
Free Download Free Download Learn More

Besides all this, the tool offers more than you’re expectations. It exists for professionals, enthusiasts, and even those who have started learning how to edit. Moreover, you can import and export videos up to 4K resolution using Wondershare Filmora. Choose a suitable template, import your media files, and start editing your videos with this tool.
Key Features
- Almost all tools provide effects and filters, but Wondershare Filmora offers more. The tool provides free media assets, overlays, transitions, stickers, and more.
- Filmora enables you to add keyframes to your video. This feature will allow you to make changes and add effects to the particular frame.
- Moreover, you can add a virtual green screen in Wondershare Filmora. By using this feature, you can add VFX and other motion effects to your video.
Part 3: Guide to Cropping and Trimming Videos on Wondershare Filmora
You’re in luck if you want to learn about trimming and cropping videos using Wondershare Filmora. This portion will let you know how to crop a video and trim parts of it using this tool.
Filmora Tutorial - Basic Editing in Filmora
Free Download For Win 7 or later(64-bit)
Free Download For macOS 10.14 or later
Step 1Guide to Cropping Videos
To start cropping your video, open Wondershare Filmora and select “New Project” to create a new editing project. Import your video file by dragging and dropping it into the tool. Further, locate your video file in the tool and drag it into the timeline.

Step 2Proceed To Crop and Zoom Window
In the timeline window, look for the “Crop” button and select it, which is located right next to the “Split” option. However, you can press “Alt + C” as a shortcut to access the next screen. This will help you lead into the “Crop and Zoom” window.

Step 3Adjust the Crop
Crop the video by moving the edges accordingly using your mouse. Click and drag the edges inward or outward to define the new frame of your video. If desired, you can also change the “Ratio” by entering the dimensions in the given boxes. This allows you to set specific dimensions for your cropped video.

Step 4Apply the Crop and Save
When done with the cropping adjustments, click “Apply.” This will save the changes, and your video will be cropped based on your preferences. Lastly, make sure to save your file by selecting the “Export” option.

Trimming Methods and Guide
Free Download For Win 7 or later(64-bit)
Free Download For macOS 10.14 or later
01of 05Method 1: Trim Using Video Layer Edges
Step 1: First, import your video into Wondershare Filmora. Then, drag and drop the video onto the timeline and locate the edge of your video layer.

Step 2: Slide the left or right edge to trim the video according to your requirement. Release the edge when you are satisfied with the trimmed portion. Moreover, save your file by pressing the “Export” button.

02of 05Method 2: Trim Using Playhead Slider
Step 1: After importing your media file into the timeline, place the Playhead slider on your video layer at the desired trimming point. Click the “Scissor” icon displayed on the Playhead. The video will be trimmed at the Playhead position.

Step 2: Delete the unwanted portion of the video by selecting it and pressing the “Delete” key on your keyboard. Don’t forget to save your file by exporting it to your system.

03of 05Method 3: Trim Using Option Menu
Step 1: Once your video is in the timeline, move the Playhead slider to the point where you want to trim the video. Right-click on the video layer in the timeline to open a menu.
Step 2: Select “Trim Start to Playhead” to trim the video from the start to the Playback slider.
Step 3: Alternatively, you can select “Trim End to Playhead” to trim the video from the Playhead slider to the end.

04of 05Method 4: Trim Using Shortcut Keys
Step 1: Move the Playhead slider to the desired trimming point after bringing your video into the timeline.
Step 2: Press “Alt + [“ to trim the video from the beginning to the Playhead position.
Step 3: Contrary, you can press the shortcut keys “Alt + ]“ to trim the video from the Playhead position to the end.
05of 05Method 5: Trim Using Instant Cutter Tool
Step 1: Open Wondershare Filmora and select the “Media” button. Go to the “Import” drop-down menu and choose “Import with Instant Cutter Tool.” A new window will appear.

Step 2: Select “Open File” to import your media file into the new window. Once imported, use the sliders at the edges of the video to trim it. Adjust the sliders as needed to define the trimmed portion. Lastly, press “Export” to add a trimmed video to your project.

Part 4: Manual and Automated Techniques of Merging Content on Wondershare Filmora
Wondershare Filmora is an editing platform that makes editing simple for everyone. If you’re an enthusiast looking to learn basics like merging videos and cropping YouTube videos, you’re at the right place. In the part below, you will learn two methods to merge video in Filmora.
Free Download For Win 7 or later(64-bit)
Free Download For macOS 10.14 or later
Methods to merge video in Filmora
Manual Method To Merge Video Clips in Wondershare Filmora
Step 1Launch Wondershare Filmora
To merge two or more video clips using Wondershare Filmora, start by launching the software on your computer. In the editing window of Filmora, locate the “Click here to import” option and import the video clips you want to merge. This will bring the video to the preview window.

Step 2Arrange Clips in Timeline
Proceed to drag and drop each video clip, one by one, onto the timeline. Ensure that you place each clip layer right next to each other in the desired merging order.

Step 3Adjust and Export
Adjust the timeframe of your videos, if needed, by trimming or extending them on the timeline. Once you are satisfied with the arrangement, proceed to export the project. By exporting, your multiple video clips will be merged into a single video file.

Automated Method for Merging Videos in Wondershare Filmora
Step 1Importing Videos
Start by going to the import section and clicking the “Import” drop-down menu. As this opens a menu, select the option of “Import with Instant Cutter Tool.”

Step 2Merging Videos
Within the new window, locate the “Merge” option and click on it. Select the video clips you want to merge by accessing “Open.” Filmora will now import your video clips and merge them.

Step 3Exporting the Merged File
After your video clips have been successfully merged, it’s time to export the final result. In the same window, find the “Export” option and click on it. This will export the merged file directly to the editing window of Wondershare Filmora.

Conclusion
To conclude, video editing and post-production are tasks that polish your project. Editing fine-tunes your project, and the result is always better than the raw footage. Wondershare Filmora is a tool that makes it easy to edit your raw footage into an exceptional video. This tool has everything from trimming and merging to more advanced, like an AI-powered edit option.
For those who are in search to crop YouTube videos, they can surely stop by Filmora. They will get their required results in no time in a highly professional environment.
Free Download Free Download Learn More

Besides all this, the tool offers more than you’re expectations. It exists for professionals, enthusiasts, and even those who have started learning how to edit. Moreover, you can import and export videos up to 4K resolution using Wondershare Filmora. Choose a suitable template, import your media files, and start editing your videos with this tool.
Key Features
- Almost all tools provide effects and filters, but Wondershare Filmora offers more. The tool provides free media assets, overlays, transitions, stickers, and more.
- Filmora enables you to add keyframes to your video. This feature will allow you to make changes and add effects to the particular frame.
- Moreover, you can add a virtual green screen in Wondershare Filmora. By using this feature, you can add VFX and other motion effects to your video.
Part 3: Guide to Cropping and Trimming Videos on Wondershare Filmora
You’re in luck if you want to learn about trimming and cropping videos using Wondershare Filmora. This portion will let you know how to crop a video and trim parts of it using this tool.
Filmora Tutorial - Basic Editing in Filmora
Free Download For Win 7 or later(64-bit)
Free Download For macOS 10.14 or later
Step 1Guide to Cropping Videos
To start cropping your video, open Wondershare Filmora and select “New Project” to create a new editing project. Import your video file by dragging and dropping it into the tool. Further, locate your video file in the tool and drag it into the timeline.

Step 2Proceed To Crop and Zoom Window
In the timeline window, look for the “Crop” button and select it, which is located right next to the “Split” option. However, you can press “Alt + C” as a shortcut to access the next screen. This will help you lead into the “Crop and Zoom” window.

Step 3Adjust the Crop
Crop the video by moving the edges accordingly using your mouse. Click and drag the edges inward or outward to define the new frame of your video. If desired, you can also change the “Ratio” by entering the dimensions in the given boxes. This allows you to set specific dimensions for your cropped video.

Step 4Apply the Crop and Save
When done with the cropping adjustments, click “Apply.” This will save the changes, and your video will be cropped based on your preferences. Lastly, make sure to save your file by selecting the “Export” option.

Trimming Methods and Guide
Free Download For Win 7 or later(64-bit)
Free Download For macOS 10.14 or later
01of 05Method 1: Trim Using Video Layer Edges
Step 1: First, import your video into Wondershare Filmora. Then, drag and drop the video onto the timeline and locate the edge of your video layer.

Step 2: Slide the left or right edge to trim the video according to your requirement. Release the edge when you are satisfied with the trimmed portion. Moreover, save your file by pressing the “Export” button.

02of 05Method 2: Trim Using Playhead Slider
Step 1: After importing your media file into the timeline, place the Playhead slider on your video layer at the desired trimming point. Click the “Scissor” icon displayed on the Playhead. The video will be trimmed at the Playhead position.

Step 2: Delete the unwanted portion of the video by selecting it and pressing the “Delete” key on your keyboard. Don’t forget to save your file by exporting it to your system.

03of 05Method 3: Trim Using Option Menu
Step 1: Once your video is in the timeline, move the Playhead slider to the point where you want to trim the video. Right-click on the video layer in the timeline to open a menu.
Step 2: Select “Trim Start to Playhead” to trim the video from the start to the Playback slider.
Step 3: Alternatively, you can select “Trim End to Playhead” to trim the video from the Playhead slider to the end.

04of 05Method 4: Trim Using Shortcut Keys
Step 1: Move the Playhead slider to the desired trimming point after bringing your video into the timeline.
Step 2: Press “Alt + [“ to trim the video from the beginning to the Playhead position.
Step 3: Contrary, you can press the shortcut keys “Alt + ]“ to trim the video from the Playhead position to the end.
05of 05Method 5: Trim Using Instant Cutter Tool
Step 1: Open Wondershare Filmora and select the “Media” button. Go to the “Import” drop-down menu and choose “Import with Instant Cutter Tool.” A new window will appear.

Step 2: Select “Open File” to import your media file into the new window. Once imported, use the sliders at the edges of the video to trim it. Adjust the sliders as needed to define the trimmed portion. Lastly, press “Export” to add a trimmed video to your project.

Part 4: Manual and Automated Techniques of Merging Content on Wondershare Filmora
Wondershare Filmora is an editing platform that makes editing simple for everyone. If you’re an enthusiast looking to learn basics like merging videos and cropping YouTube videos, you’re at the right place. In the part below, you will learn two methods to merge video in Filmora.
Free Download For Win 7 or later(64-bit)
Free Download For macOS 10.14 or later
Methods to merge video in Filmora
Manual Method To Merge Video Clips in Wondershare Filmora
Step 1Launch Wondershare Filmora
To merge two or more video clips using Wondershare Filmora, start by launching the software on your computer. In the editing window of Filmora, locate the “Click here to import” option and import the video clips you want to merge. This will bring the video to the preview window.

Step 2Arrange Clips in Timeline
Proceed to drag and drop each video clip, one by one, onto the timeline. Ensure that you place each clip layer right next to each other in the desired merging order.

Step 3Adjust and Export
Adjust the timeframe of your videos, if needed, by trimming or extending them on the timeline. Once you are satisfied with the arrangement, proceed to export the project. By exporting, your multiple video clips will be merged into a single video file.

Automated Method for Merging Videos in Wondershare Filmora
Step 1Importing Videos
Start by going to the import section and clicking the “Import” drop-down menu. As this opens a menu, select the option of “Import with Instant Cutter Tool.”

Step 2Merging Videos
Within the new window, locate the “Merge” option and click on it. Select the video clips you want to merge by accessing “Open.” Filmora will now import your video clips and merge them.

Step 3Exporting the Merged File
After your video clips have been successfully merged, it’s time to export the final result. In the same window, find the “Export” option and click on it. This will export the merged file directly to the editing window of Wondershare Filmora.

Conclusion
To conclude, video editing and post-production are tasks that polish your project. Editing fine-tunes your project, and the result is always better than the raw footage. Wondershare Filmora is a tool that makes it easy to edit your raw footage into an exceptional video. This tool has everything from trimming and merging to more advanced, like an AI-powered edit option.
For those who are in search to crop YouTube videos, they can surely stop by Filmora. They will get their required results in no time in a highly professional environment.
Also read:
- New Are You Tired of Spending Too Much Time on Video Editing? Learn the Most Effective Ways to Manage Your Timeline and Streamline Your Video Editing Process
- Updated In 2024, 15 Camera Shake Preset for Premiere Pro
- New 2024 Approved 10 Best Music Video Templates to Make Your Video Popular
- Updated Looking For the Best VHS Video Effect Makers? Get To Know the Top List for 2024
- Create Promotional Video
- New Want to Know the Simplest Way to Match the Colors of Your Photos in Photoshop? The Following Discussion Will Help Match Color in Photoshop, Almost Effortlessly
- Multi Object Tracking The Ultimate Guide
- New 18 Video Editors Weve Tested Heres What We Learned for 2024
- Updated Easy Way to Add Effects to Art Video
- Updated 2024 Approved How to Create Cooking Video Intro and Outro for YouTube Channel?
- In 2024, Looking Forward to Making up Your Career in Video Editing? Land in Here to Learn About the Credibility of some Popular Video Editing Courses
- 2024 Approved It Is Crucial to Introduce Your Kids to the Different Colors and Practice the Color Matching Game. So, Here Are the Various Factors Related to Color Matching for Your Child with a Tool to Help You in It Ideally
- Updated Best Ideas for Time Lapse Video for 2024
- New GIF to JPG Is as Simple as a Blink of an Eye for 2024
- New 3 Actionable Ways to Create Countdown Animation for Videos for 2024
- 2024 Approved What Should Be Considered to Choose A Nice GoPro for Vlogging?
- New In 2024, 6 Top Online MP4 Croppers
- In 2024, Learn How to Perform Velocity Edits on Your PC
- New Find Out What the Flexclip Trimmer Is, Its Key Features, and How to Use It to Trim Your Videos to Remove Unwanted Parts with Just a Few Clicks
- New How Can You Create Outstanding Educational Teaching Videos, In 2024
- 2024 Approved Transforming a Slow-Motion Video to Normal Mastering the Skill
- New Practical Way to Resize Video in Handbrake
- New In 2024, Ultimate Guide to Making Cinematography for Music Video
- Make Videos with Pictures and Music-10 Apps for 2024
- In 2024, How to Slow Down Time-Lapse Videos on iPhone
- Updated In 2024, How to Add Green Screen in OBS
- 2024 Approved Demystifying the Vectorscope A Comprehensive Guide for Premiere Pro Color Correction
- Updated 2024 Approved How to Create Glowing Edge Effect in TikTok Dancing Video
- There Are 10 Slideshow Makers Coming with Beautiful Music for Creating a Stunning Slideshow
- Updated Steps to Create Green Screen Videos in After Effects
- 2024 Approved Make A Countdown Video
- New 2024 Approved Guide to Add Transition Effects in Premiere Pro
- In 2024, Do You Want to Make Your Video Look Like Its From the 90S? Then, Make Sure to Add Vintage Overlays and VHS Sound Effects to Give It the Old Feel
- In 2024, Do You Have Any Idea About Changing the Video Speed Using the Editors? Had You Worked with the VLC Playback Speed? This Article Enlightens You with the Best Video Edits Using the Perfect Tool in the Digital Space
- Set Your Preferred Job Location on LinkedIn App of your Samsung Galaxy M54 5G | Dr.fone
- Android Screen Stuck General OnePlus Nord N30 SE Partly Screen Unresponsive | Dr.fone
- Motorola Defy 2 Bootloop Problem, How to Fix it Without Data Loss | Dr.fone
- New Before You Learn 3D Animation Some Things You Should Know
- How to Fix Vivo Y28 5G Find My Friends No Location Found? | Dr.fone
- Fix Samsung Galaxy F15 5G Android System Webview Crash 2024 Issue | Dr.fone
- In 2024, The Updated Method to Bypass Itel P55+ FRP
- How to use Pokemon Go Joystick on Poco M6 Pro 4G? | Dr.fone
- How Do You Unlock your Apple iPhone 11 Pro? Learn All 4 Methods | Dr.fone
- Fix App Not Available in Your Country Play Store Problem on Oppo Find X7 Ultra | Dr.fone
- In 2024, How I Transferred Messages from Realme 10T 5G to iPhone 12/XS (Max) in Seconds | Dr.fone
- Everything You Need to Know about Lock Screen Settings on your Vivo Y36i
- In 2024, What Does Jailbreaking iPhone SE (2022) i Do? Get Answers here
- Title: How to Do Motion Graphics in Filmora
- Author: Chloe
- Created at : 2024-05-20 03:37:28
- Updated at : 2024-05-21 03:37:28
- Link: https://ai-editing-video.techidaily.com/how-to-do-motion-graphics-in-filmora/
- License: This work is licensed under CC BY-NC-SA 4.0.

