:max_bytes(150000):strip_icc():format(webp)/001_2654847-5b99b903c9e77c005077d0d8.jpg)
How to Edit GoPro Videos on Mac

How to Edit GoPro Videos on Mac
Having a well-polished video is beyond just shooting the video. Once you shoot your GoPro videos, the next thing to do is use a video editor to make necessary corrections. These video editors’ effects and stabilizations turn your videos into a sophisticated presentation. However, there are several GoPro video editors for different video formats. So if you are thinking about how to edit GoPro videos on Mac, you’re in luck.
In this article, we’ll help you through editing your GoPro video on Mac and a list of these GoPro video editors. We will also explore paid and free GoPro video editors to help pick the right editor. So, if you are ready to impress audiences with your outstanding videos, let’s begin.
Import GoPro Videos to Mac before Editing
After filming your GoPro videos, you probably wonder how to send them to your Mac to begin editing. There are two ways you can about importing your GoPro videos to Mac before editing. The use of SD adapter and GoPro quick app. Use any of these methods to import your GoPro videos before you can begin editing. So with no further ado, let’s quickly dive into importing GoPro videos to Mac using an SD adapter and GoPro quick app.
Import GoPro Videos to Mac Before Editing – SD Adapter
This is actually one of the easiest ways to import GoPro videos to Mac. How does it work? It simply works by connecting GoPro’s SD card to the Mac. Simply remove the GoPro’s SD card and input it to Mac. By doing this, all content on the SD card will display on the Mac as external files. Let’s look at the step-by-step method of importing GoPro videos to Mac with an SD adapter.
- Step 1: First thing first, you have to power off the device
- Step 2: Next, you have to open the opening presentation just at the bottom of the GoPro camera. After successfully unlocking it, then direct access to the SD card.
- Step 3: This is where you insert the SD card into the SD card adapter or reader.
- Step 4: Now, you connect the SD card adapter or reader to your Mac
- Step 5: After a successful connection, it will display on your Mac desktop. Now, click on it to open all its content for accessibility.
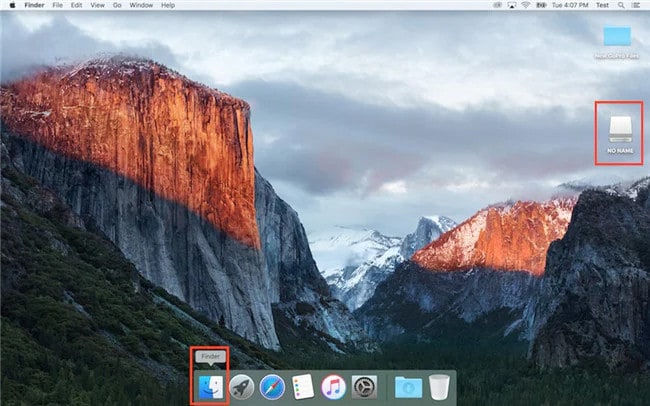
- Step 6: Once you open it, two folders will display. These folders are DCIM and MISC.
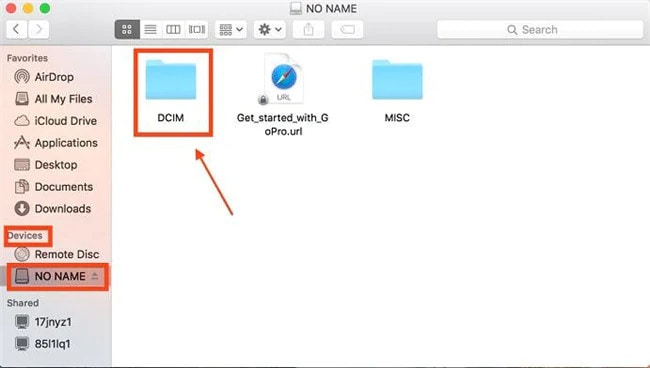
- Step 7: Click on the DCIM folder to find all videos stored on the device.
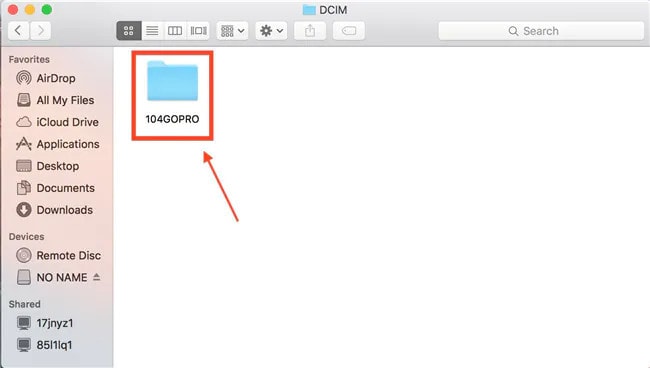
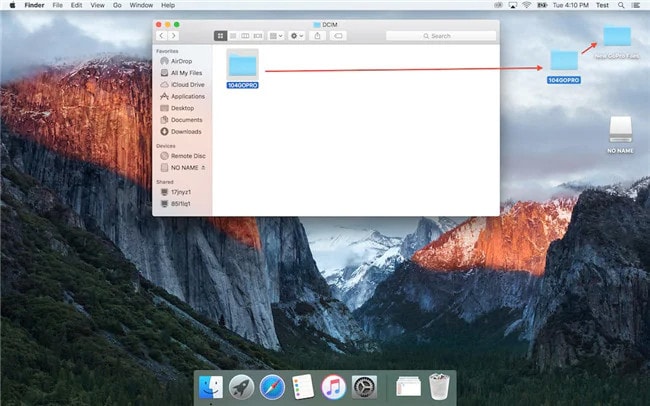
- Step 8: Finally, you can now begin uploading all your GoPro videos to Mac by simply copying and pasting.
Import GoPro Videos to Mac before editing – GoPro Quick App
Another option to import GoPro videos to Mac is the GoPro Quick app. GoPro quick app is a tool by GoPro designed to help view GoPro videos on Mac and import them. Having this app on your Mac device is relatively easy. First, you have to download its setup from the GoPro website and install it. So far, this app is one of the best tools to view and import GoPro files to your Mac device. Here are the steps to importing GoPro videos to Mac while getting set to edit.
- Step 1: First thing first, Launch the app. However, if you have not installed the app, you should quickly download and install the app.

- Step 2: Now, you can connect the GoPro camera to your Mac. You can do this by using a USB cable.
- Step 3: After launching the app, you will see an icon labeled Import Filesdisplayed at the interface.
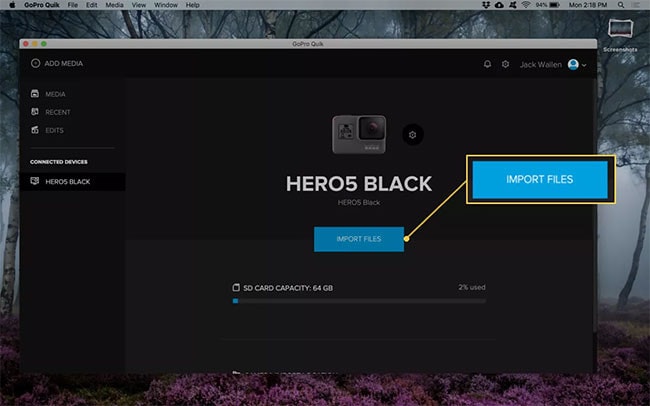
- Step 4: from here on, you will also see an icon to import the videos from your GoPro camera into your Mac device.
When the import is complete, you can now locate your GoPro videos in the folder of your choice. Now, you can close the GoPro quick app, unplug the GoPro camera and get ready to edit your videos.
Best GoPro Video Editor on Mac
A lot of people understand that GoPro is the best way to make your video look like a professional shot. After shooting the video, you’ll obviously want to make some edits to make them look more professional before sharing them. After all, no one wants to watch poor-quality videos, bad noises, and other unprofessional clips. Therefore, we have a list of the best GoPro editor for Mac in this article. Keep reading to learn about the best GoPro video editor on Mac.
Best GoPro Video Editor on Mac – Filmora Video Editor
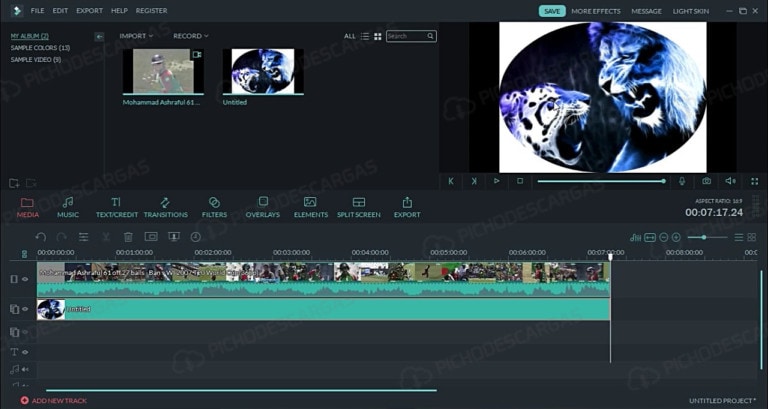
Supported System: Mac and Windows
A lot of free video editing software usually comes as either too straightforward or too challenging to understand. While other video editing software lacks vital editing features such as color correction and audio or noise editing features. However, the Filmora Video Editor for Mac bridges the gap and is undoubtedly the best GoPro Video editor on Mac.
This video editing software is an easy-to-use editing tool totally equipped with a lot of video editing functions. With Filmora, you can edit your GoPro videos on your Mac like an expert and expect a professional outcome. Filmora offers excellent performance and enhances video quality taking the user experience to a whole new level.
Additionally, Filmora is an editing tool with helpful functionality taking the user experience to a whole new level. Finally, this tool is indispensable due to its speed, intuitive user interface, and other file format support.
For Win 7 or later (64-bit)
For macOS 10.14 or later
Filmora Features
- Filmora editing tool is versatile and supports other video formats like MP4, MOV, MKV, AVCHD, etc.
- You can cut, crop, split, trim, and even combine clips with just a few clicks.
- Filmora has access to several advanced video effects such as royalty-free music, transition, animated titles, and motion elements.
- With Filmora color tuning features, your videos can look like professional Hollywood videos.
- You can also edit sounds on your video with a noise removal feature, audio equalizer, and audio keyframing tools.
- You get 500+ free special video effects to create and customize your videos yourself.
- Filmora has access to advanced video effects like PIP, audio mixer, and green screen, which you can add to your videos.
- Access to 1000+ effects downloading resources to make videos in any desired styles.
Steps to Editing Videos on Mac Using Filmora
Want to edit your GoPro videos the right way? Editing your GoPro videos on Mac with Filmora is relatively easy and will only take a few clicks. Read and follow these steps below to learn to edit GoPro videos on Mac with this easy-to-use GoPro video editor.
- Step 1: Import the GoPro video files
First, you launch the GoPro video editor and then click the “Import Media here” button. This will upload the GoPro video clips to the program. You can save these files in a suitable location for easy access before you begin editing.

- Step 2: Edit the GoPro Video clips
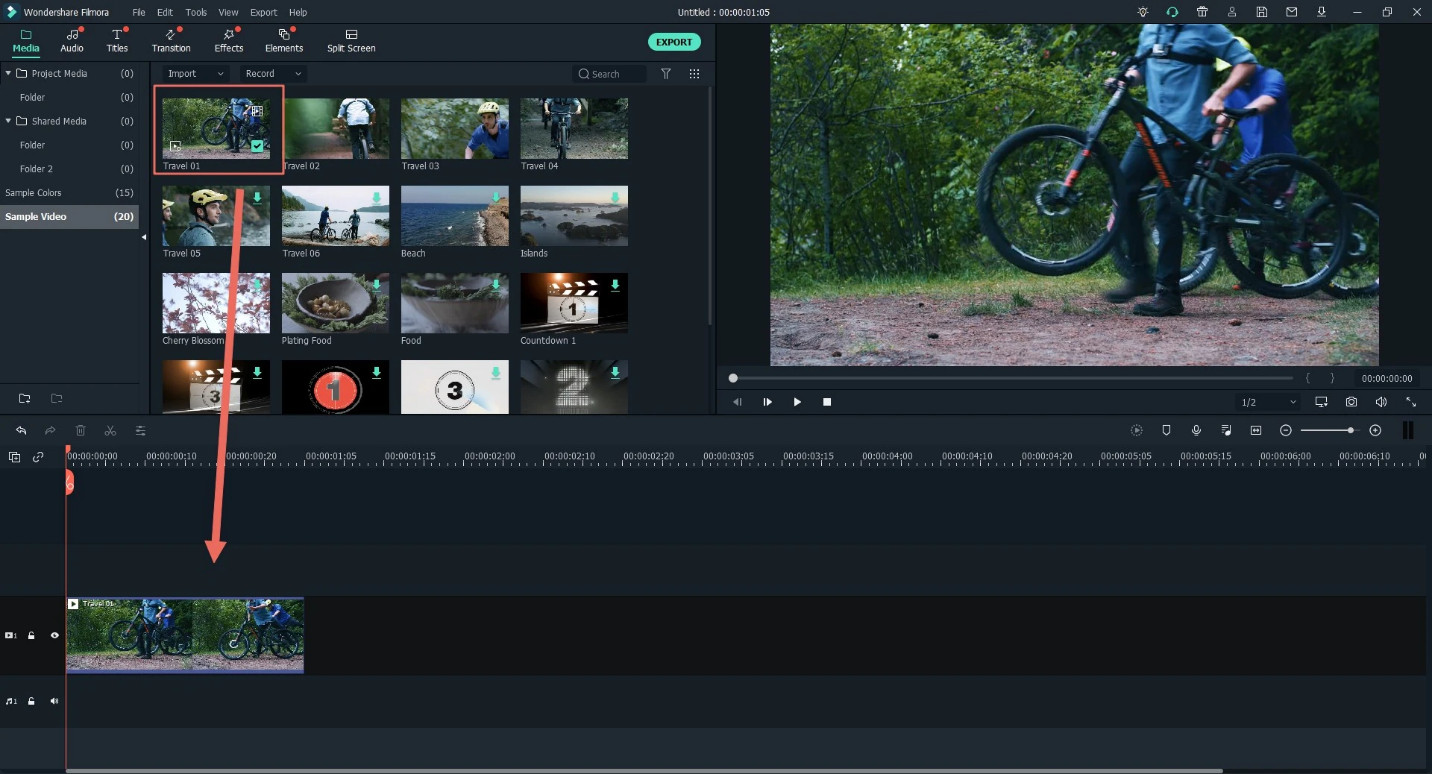
Secondly, you should drag the GoPro video clips from the folder or User’s album to the timeline and begin editing.
To trim your GoPro videos, simply mouser over the clip from the beginning to the end of the video. You should do this until the trim icon is displayed. The trim icon is labeled as “I” on the editing timeline. You can drag the trim icon forward or backward to trim the video as you desire.
Aside from the trimming option, you can also apply split footage, video stabilization, and even add transitions between two clips. You can also combine GoPro videos and rotate GoPro videos by simply tapping the icons respectively.
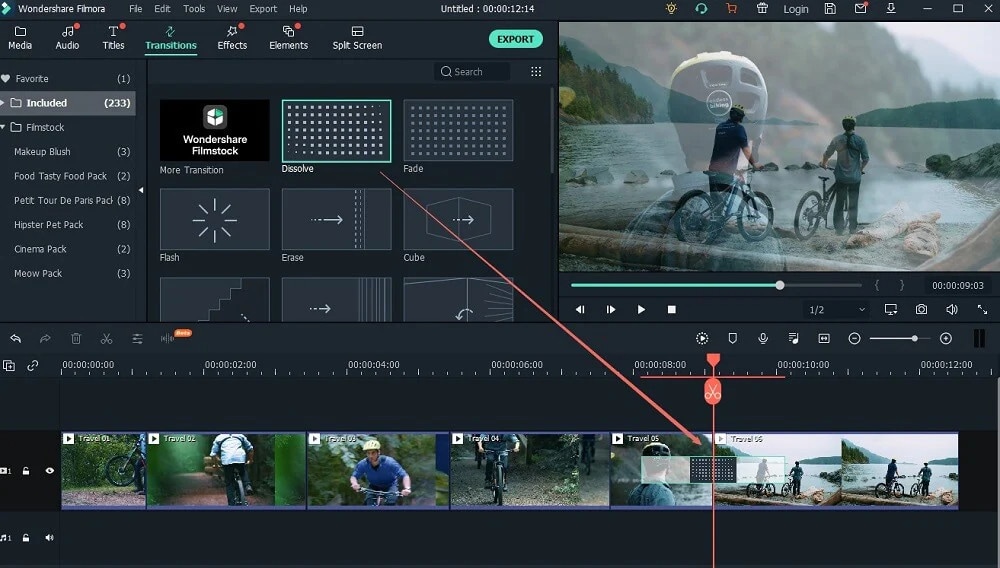
- Step 3: Export the edited GoPro video files
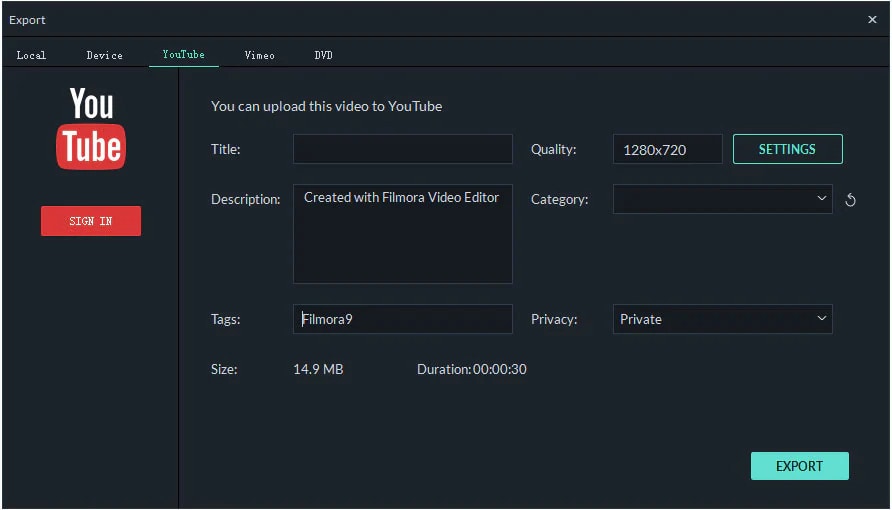
Once you finish editing, you can now navigate to the “Export” icon. Furthermore, you can also select the save path and file format from the displayed output window. After this selection, you can finally choose the “Export” icon. Once you complete this, you can find your edited video file in the same path.
More Free GoPro video editor on Mac to Edit Gopro Videos
In this section, we will list out some of the best free GoPro video editors to successfully edit your videos on Mac. These programs are, but you will have to download them to enjoy all the editing tools.
PowerDirector

Supported System: Windows and Mac
We have PowerDirector as the best overall editor on our list of best free GoPro video editors on Mac. This free GoPro video editor is compatible with Mac and has a robust video editing program. If you are looking for a free GoPro video editor with a wide range of exciting editing features, this is one of the best options. One of the benefits of using this GoPro video editor is that it comes with an Action Camera Center.
It has tons of cool effects, titles, filters, and templates to explore, especially if you want to make more action camera masterpieces. In addition, this video editor has special editing and effects tools to improve your action camera video. For example, you can stabilize your shaky video, apply cool speed effects, and correct fish-eye distortion in some minutes. You can also use the slow-motion effect, zoom, correct color problems, and freeze frame with just a few clicks.
The GoPro editor also comes with noise correction and video denoise to make your video crystal clear and remove unwanted audio noise. In addition, PowerDirector has thousands of royalty-free stock assets such as sound effects and background music. In essence, PowerDirector is a GoPro video editor that offers everything you need to produce, enhance and cut thrilling action videos. It is versatile, best for action footage editing, and supports several video formats.
Pros
- It is beginner-friendly
- It comes with easy-to-use action camera-specific editing tools
Cons
- While it is free, you need a subscription to enjoy the latest features.
Steps to Edit using PowerDirector
- Step 1: Launch the app and select ‘full mode’ to begin editing your video
- Step 2: Select’ import media folder’ to get the videos you wish to edit
- Step 3: You can now browse the folder on your Mac device and select the folder with the videos. Then Click ‘Select folder’ to move them into the editor’s media library.
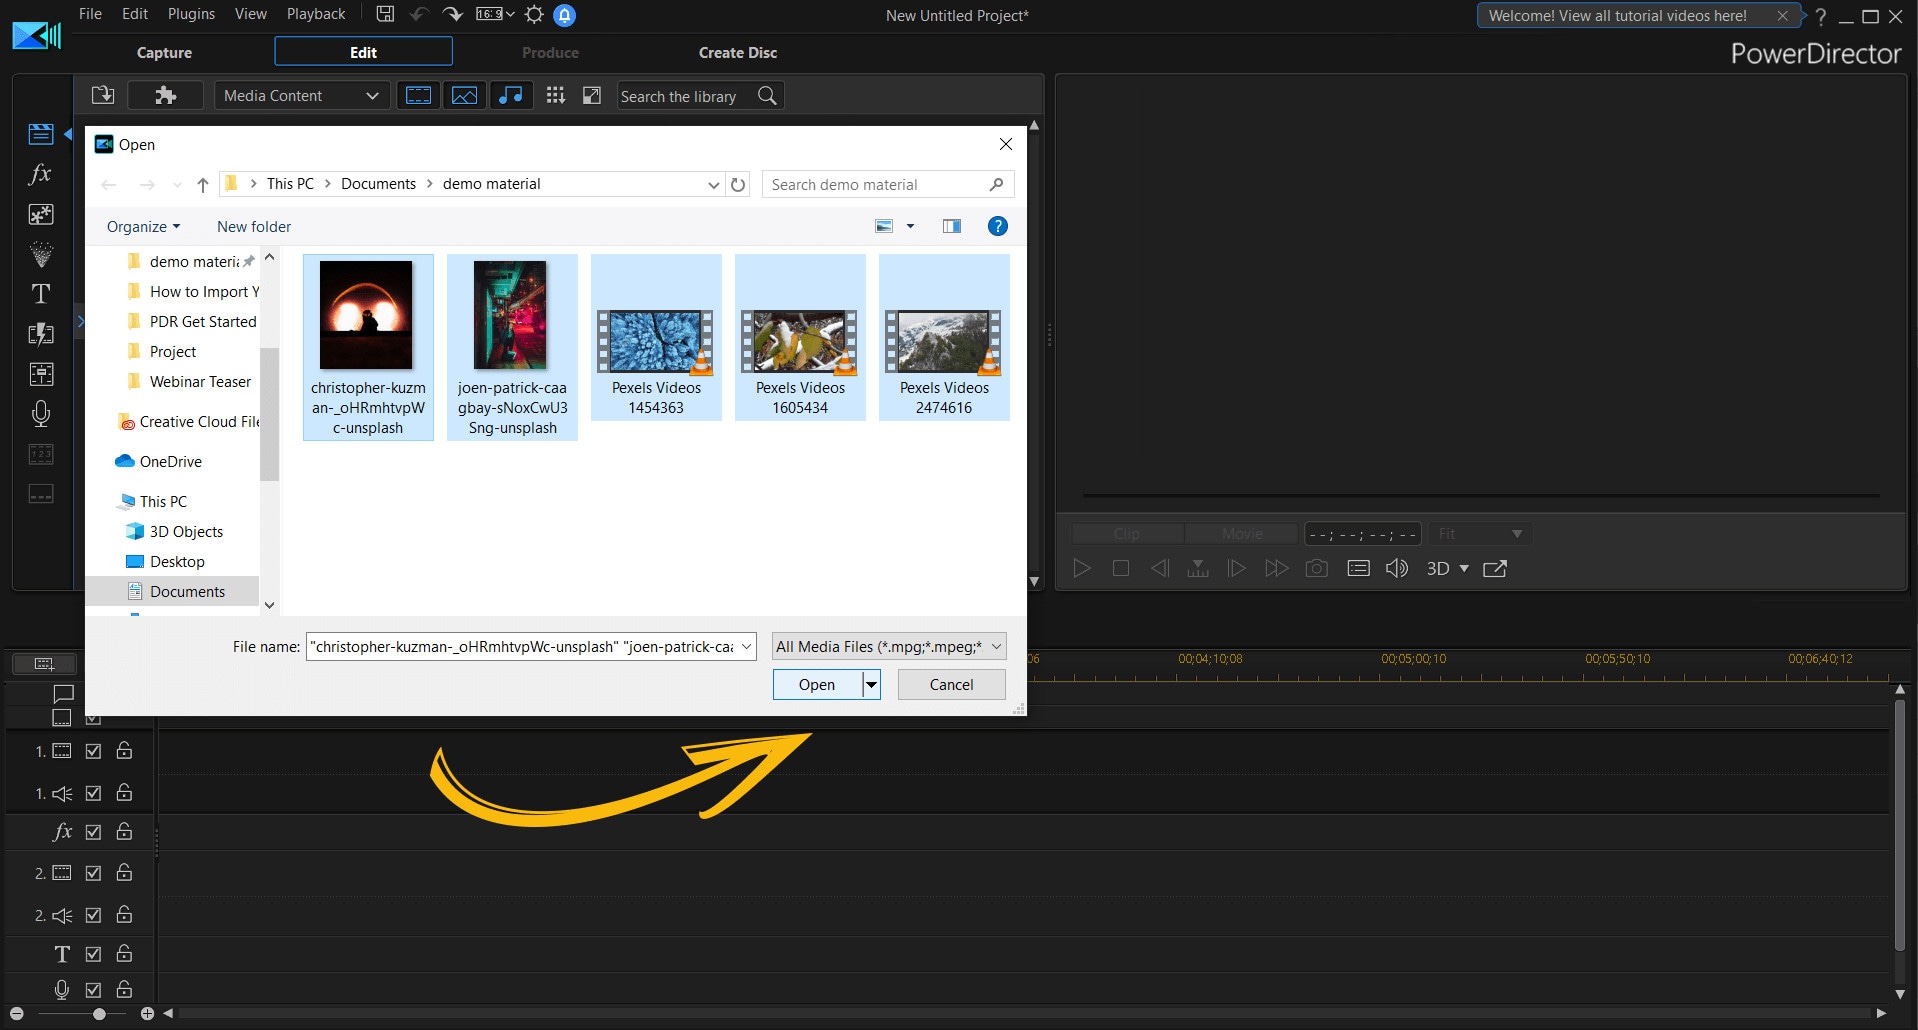
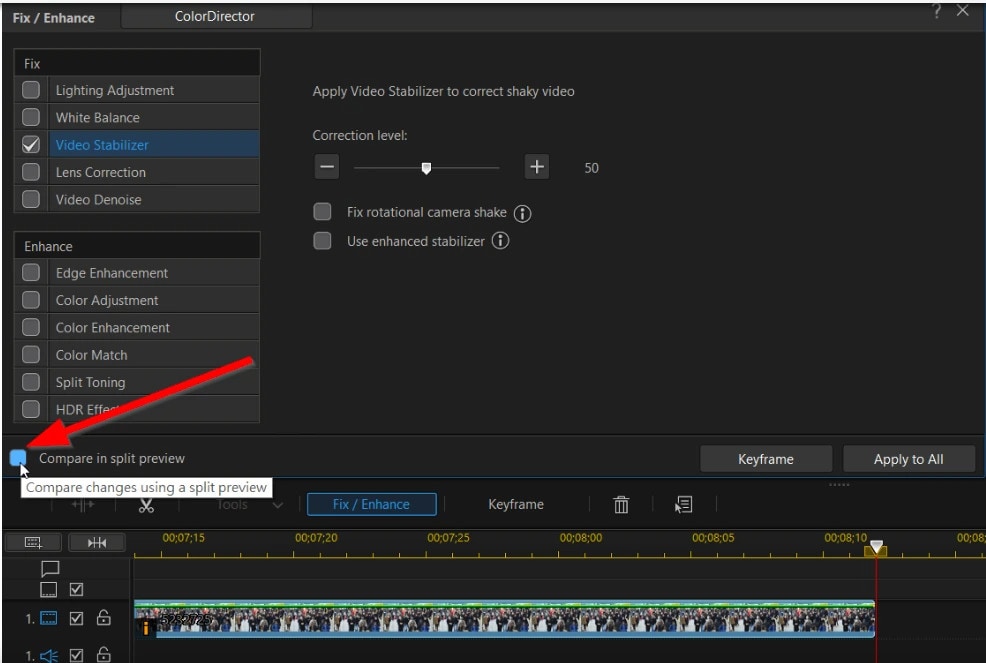
- Step 4: Now, the editing process can begin. You can stabilize and change the speed of your videos with PowerDirector.
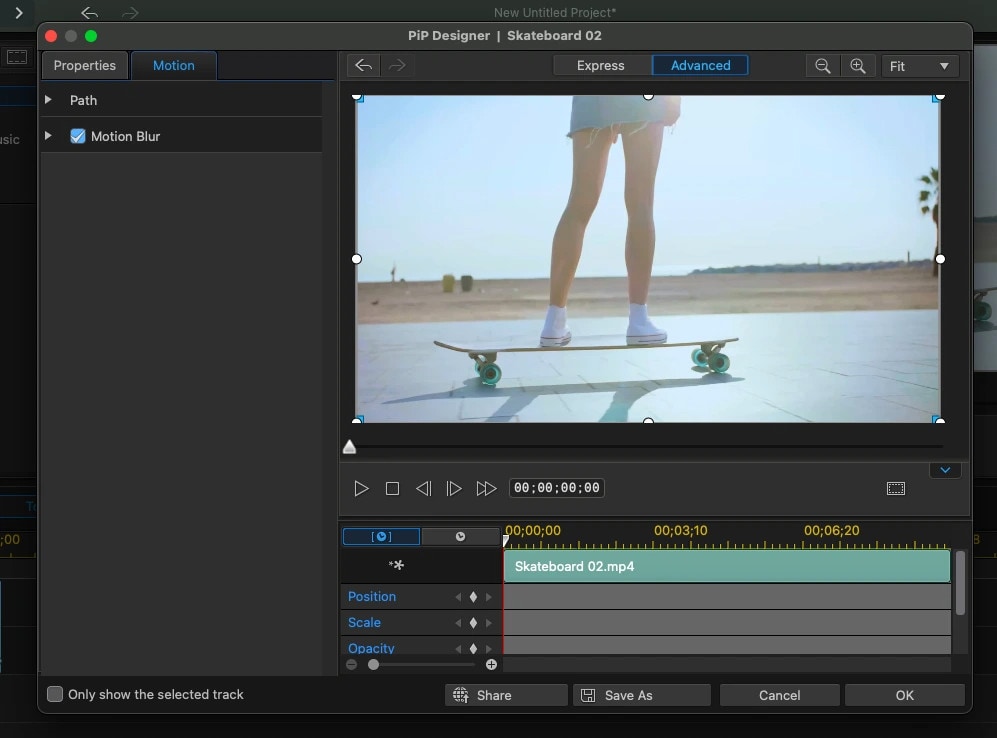
- You can add title text and motion blur to your GoPro videos if you like that.
- If you want to include transitions, you can do so by selecting the transition room.
- Step 5: Next, select the ‘produce’ button to export your video once you are sure that the editing is complete.
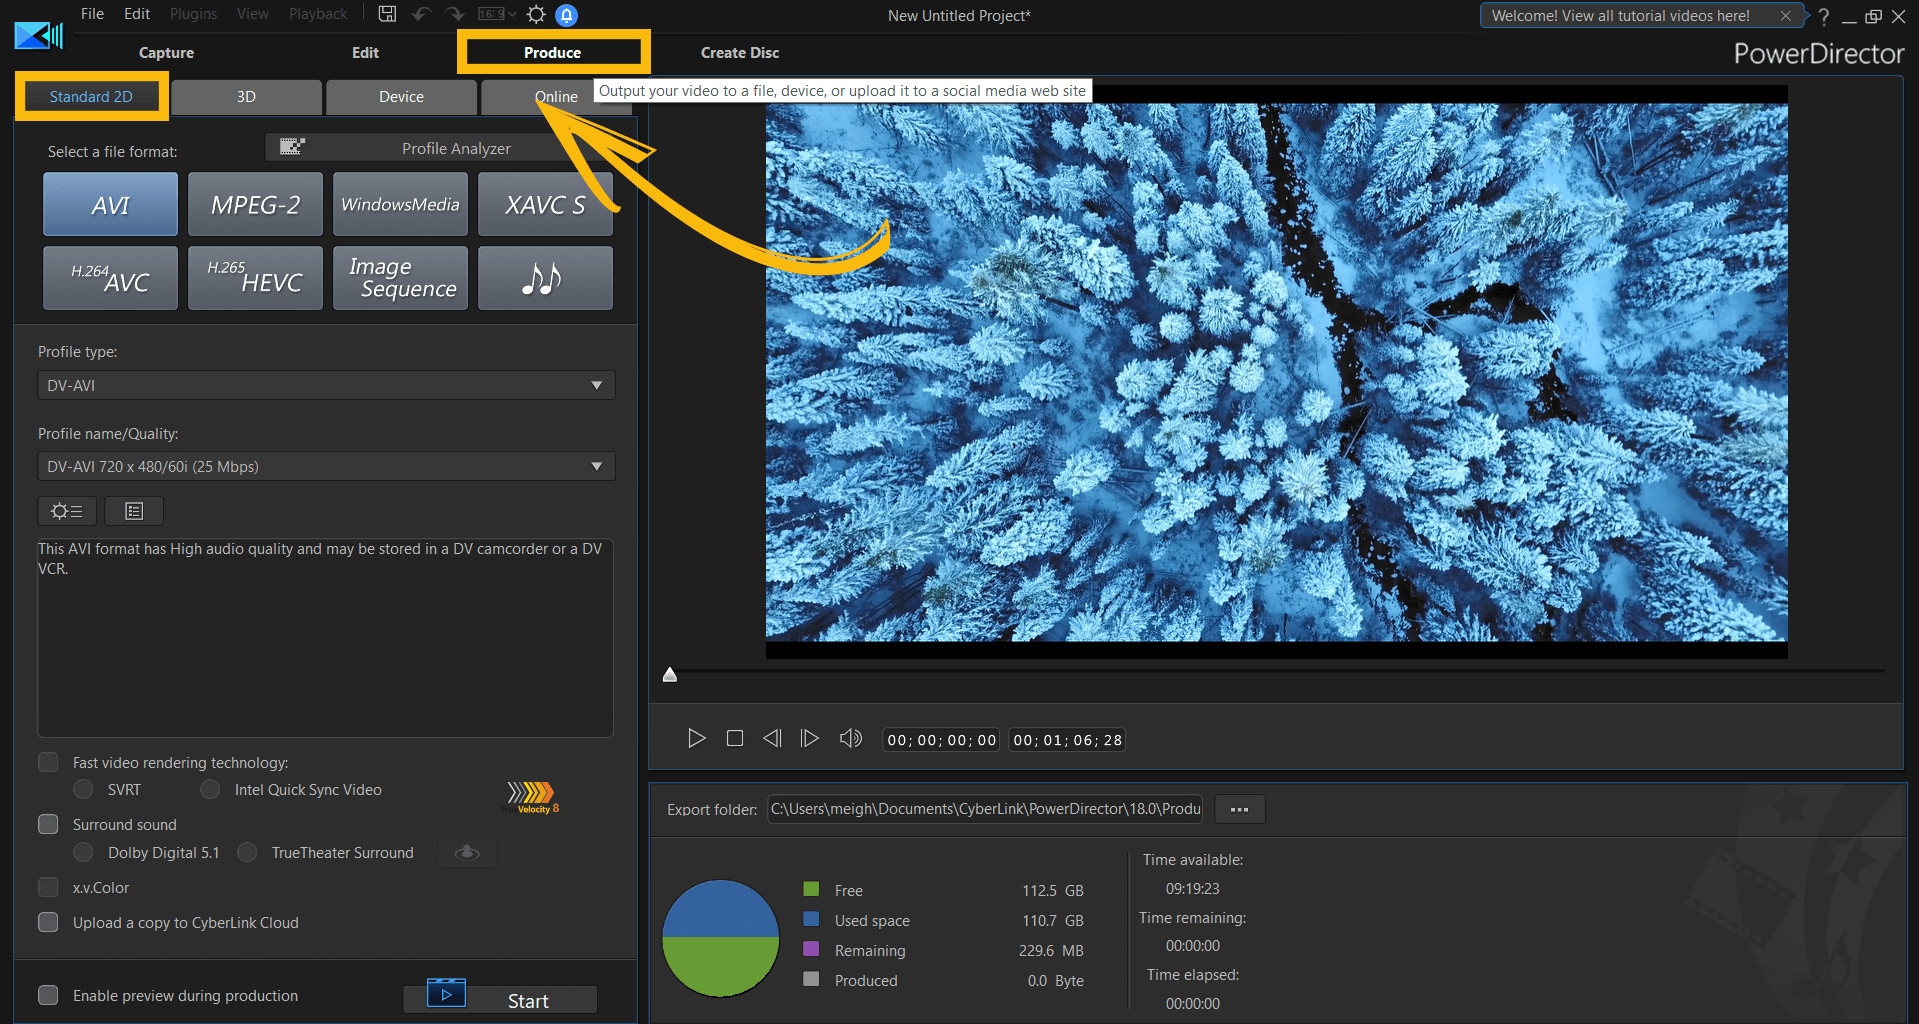
- Step 6: Change the video format before exporting.
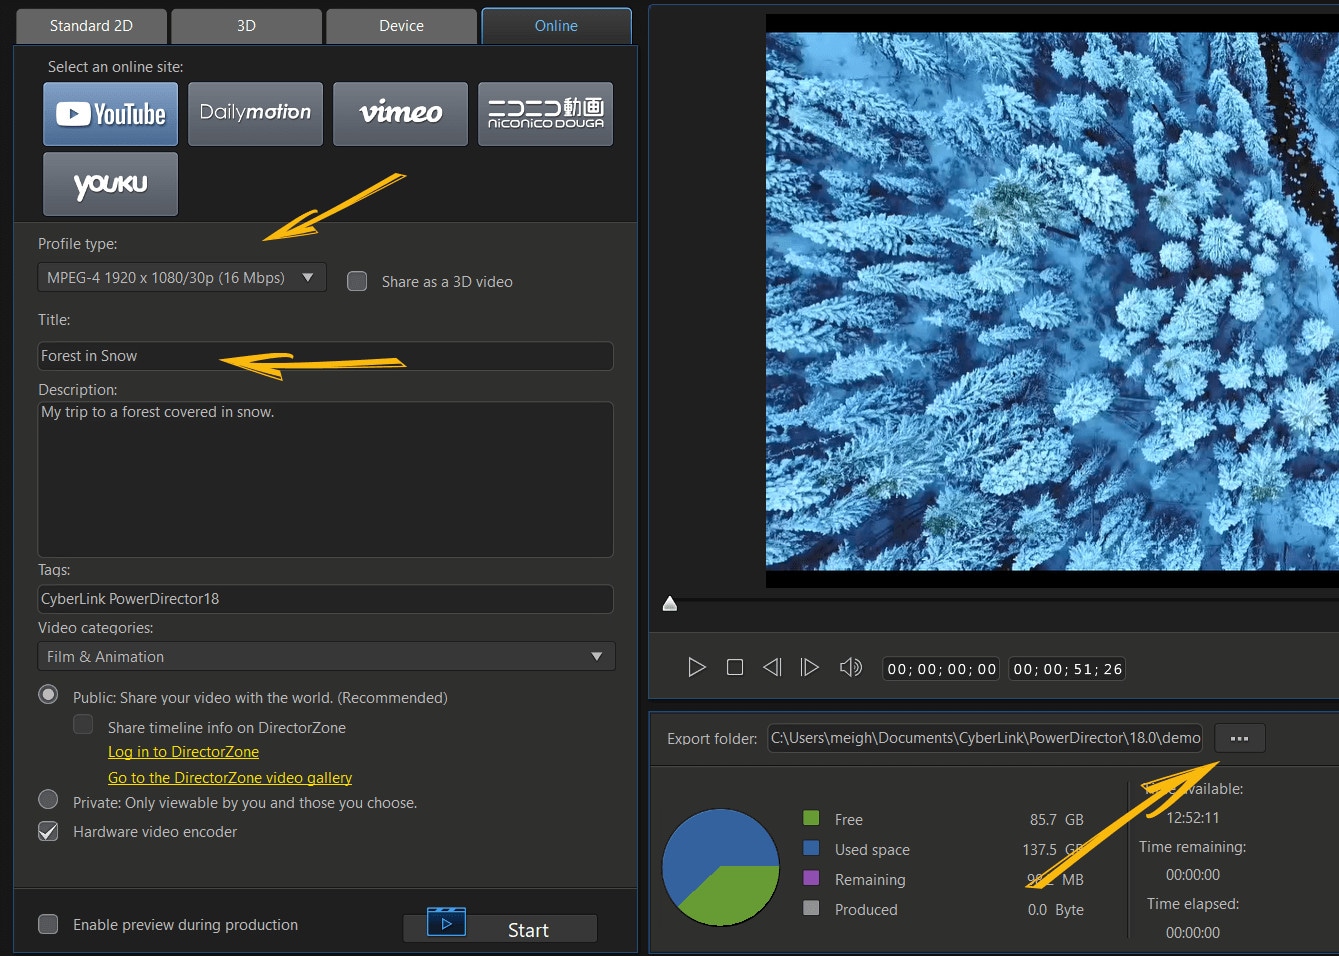
Once you select the video format you prefer, you will be able to save your GoPro video.
VideoProc Vlogger
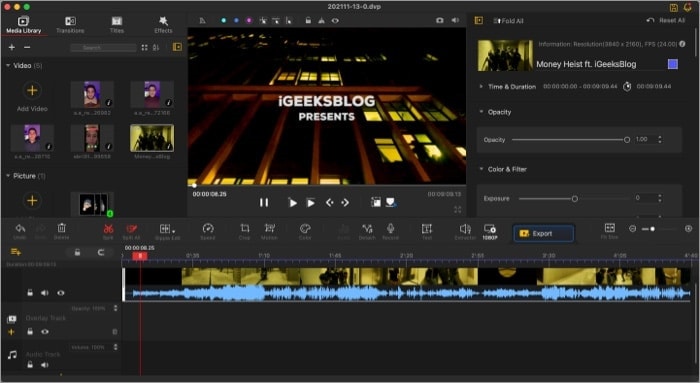
Supported System: Windows and Mac
VideoProc Vlogger is the best GoPro editor for anyone looking for speed adjustment. The video editor uses visualized speed ramping to alter the speed throughout a clip. This program contains over 20-speed features to help you quickly change the tone and tempo of your GoPro video. Furthermore, VideoProc Vlogger is beginner-friendly with a lot of advanced editing features. These features include automatic keyframes and flexible Bezier curves to slow parts of a video without splitting it.
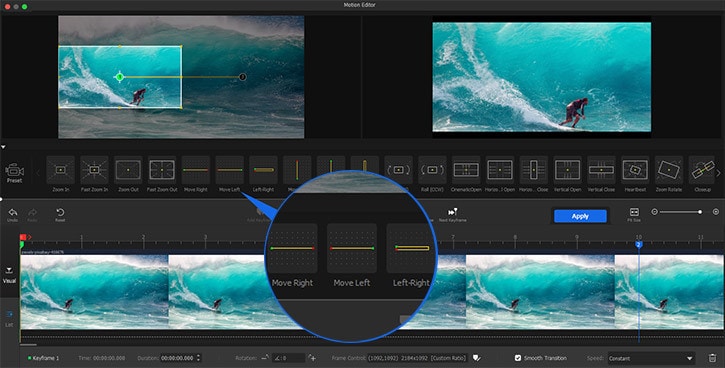
This free GoPro video editor can simulate motion roll, dolly, tilt, and even truck effects. You can also push in and out and stylize your video clips with rotation, fast zooms, and shakes. With VideoProc Vlogger, you fix grain video, remove fish-eye, extract audio and apply motion crops to your video. The video editor is best at creating new motion trails to change the action of the video.
Although VideoProc Vlogger is a free video editor, it definitely lacks some advanced editing features. For example, you can edit your videos without the annoying ads or watermarks. In addition, the video editor is designed for beginners, content creators, and hobbyists as it lacks features like video stabilization. So while the video editor is not for professionals, it’s worth trying out.
Pros
- Requires low system requirements
- It is entirely free with no ads and watermarks
Cons
- It lacks advanced editing features
- Rendering is somewhat slow
Steps to Edit using VideoProc Vlogger
- Step 1: First, import your GoPro videos from your Mac device to VideoProc Vlogger.

Simply Launch VideoProc Vlogger on your Mac, hit the plus icon in the media library, and add and import the videos.
- Step 2: Now, split and cut the GoPro Videos.
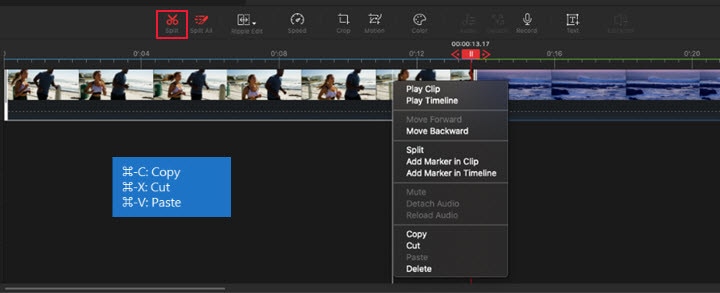
Simply drag the video clips to the timeline and begin editing. Now, put the playhead to exactly where you want to split the video and tap the split button.
- Step 3: You can also fix GoPro lens distortion.
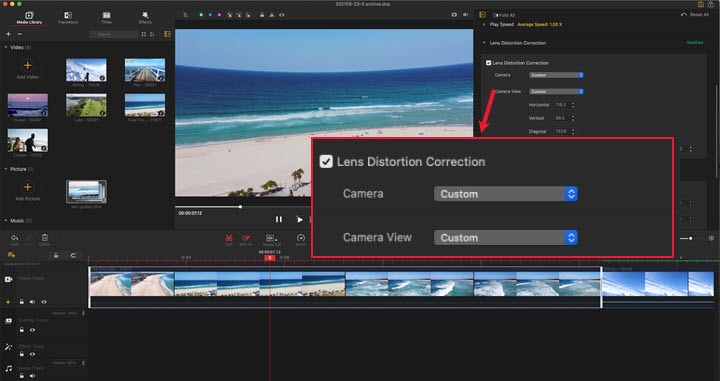
If you feel that your video looks distorted, tick the lens distortion box to resolve the issue.
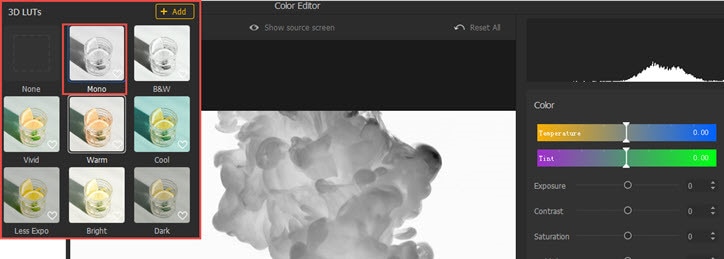
- Step 4: You can do the color correction or grading for any dark GoPro videos. Simply apply a preset aesthetic filter or simply adjust color normally.
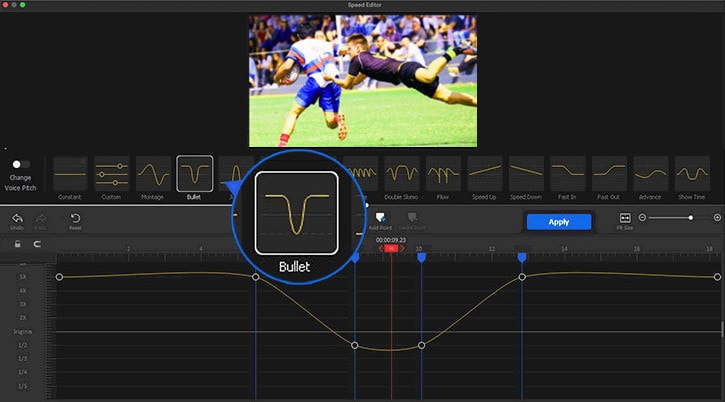
- Step 5: Adjust the speed of the GoPro video.
To adjust the speed of the video, click speed in the toolbar to open the speed editor. Then change as you desire.
- Step 6: You can also add transitions, titles, and effects by opening the panels of transitions, effects, and tiles.
- Then drag a transition to the space between two video clips, same with titles to the subtitle and effect to the effect track.
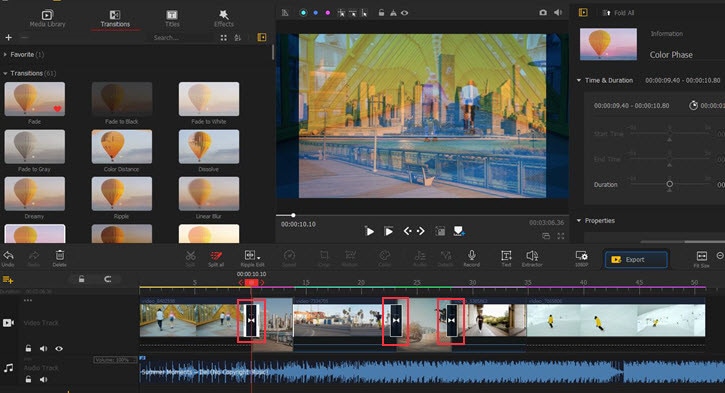
- Step 7: Next, remove noise and background music by clicking the video track and tapping “detach” to separate the audio from the video.
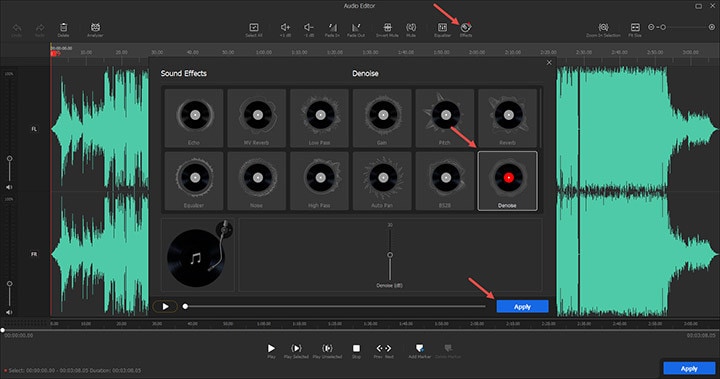
- You can also add music to replace the background noise.
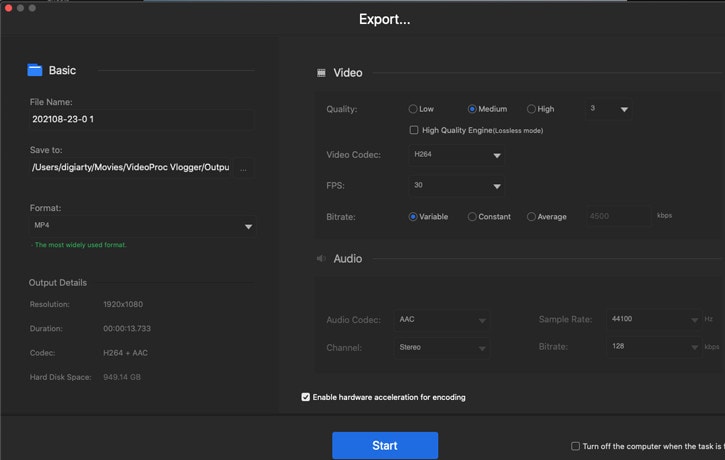
- Step 8: Finally, after the editing, you can export the GoPro video to your Mac device by setting the file name, format, file location, and video quality.
iMovie
Supported System: Mac only
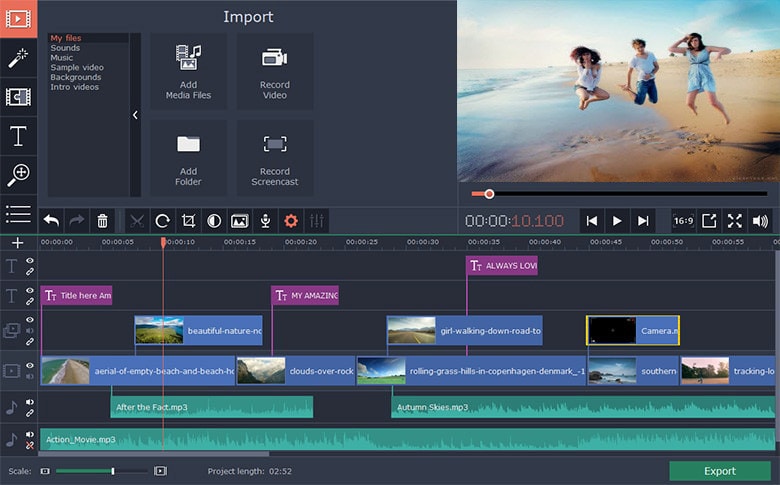
This editor is designed to ensure an excelling editing process for Mac users. Therefore, beginners, content creators, and even hobbyists can utilize this video editor to edit their videos. Although iMovie is a free GoPro video editor, it offers incredible editing features to make your video look more professional. These features include HD and 4K video support and speed adjustment tools that can slow down or speed up your video clips.
Although it comes free on all Mac devices, iMovie also has tons of themes, templates, and presets to make editing a breeze. For example, you can select the video clips that will be automatically styled and edited with titles, transitions, and music. You can make all these changes with just a few clicks. In addition, you can also rearrange, trim, split, and even delete your ready-made video clips.
Furthermore, you can always modify the shift focus and depth of field while editing your video. However, it lacks some advanced features you will need while editing, such as Multicam, motion tracking, and 360 editing. On the other hand, it has a user-friendly interface with essential editing functions.
Pros
- It has a simple and user-friendly interface
- It is definitely beginner-friendly
Cons
- It lacks essential and advanced GoPro editing features and functions
Steps to Edit using iMovie
- Step 1: first, you have to launch the iMovie and create a video project.
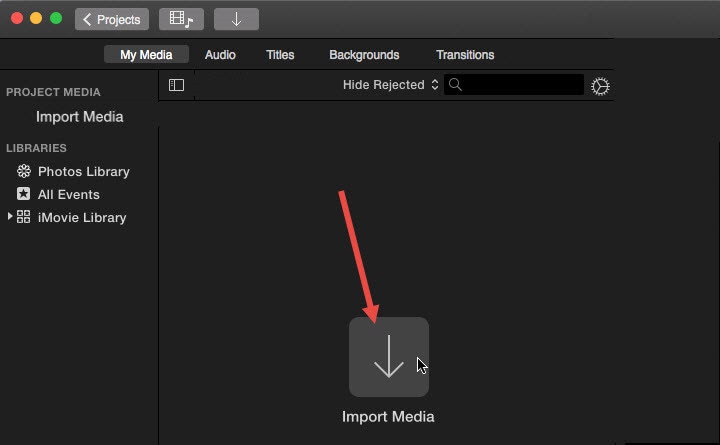
- Step 2: Now, you can click the Import button to import your GoPro video files from your Mac to it.
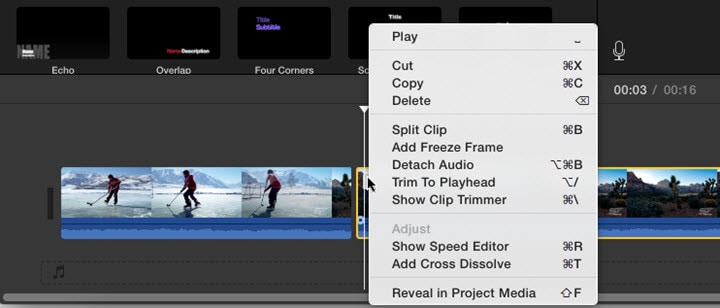
- Step 3: Drag the video files from the program media library to the timeline for editing.
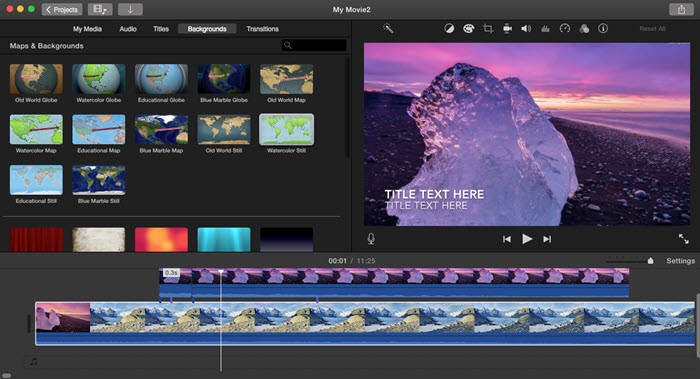
- Step 4: Load a song to the audio track if you wish to add background music to your video.
- Step 5: To split your video into smaller parts, right-click on a clip.
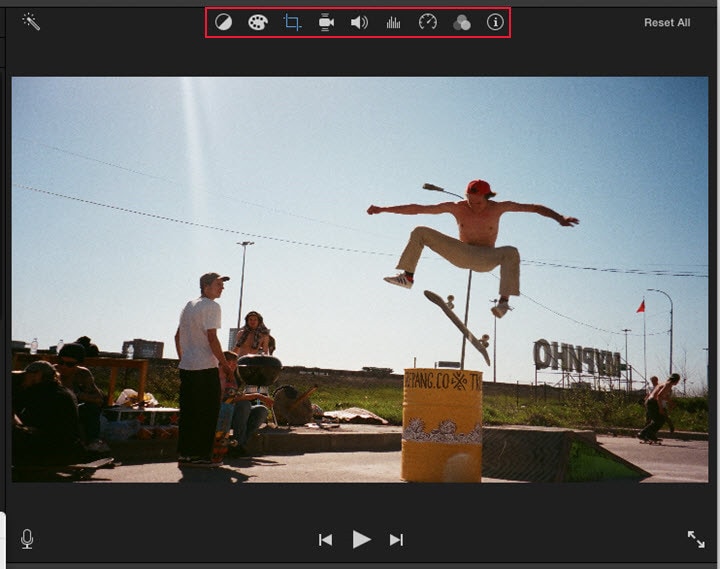
- Step 6: to edit your GoPro video with advanced tools like color correction, crop, grading, speed, and volume, simply move to the toolbar just above the timeline.
- Step 7: to add title, and transitions, you can drag a title and transition to the desired space between two clips.
- Step 8: preview and export your GoPro video from iMovie in the preferred format.
More Paid GoPro video editor on Mac to Cut MP4 Videos
If you desire GoPro video editors that offer more than just the basic editing features, you should try the paid GoPro video editors. The paid GoPro video editors offer more professional editing features for Mac users. In this section, you’ll learn about our top three paid GoPro video editors to edit your GoPro videos on Mac.
Adobe Premiere Pro
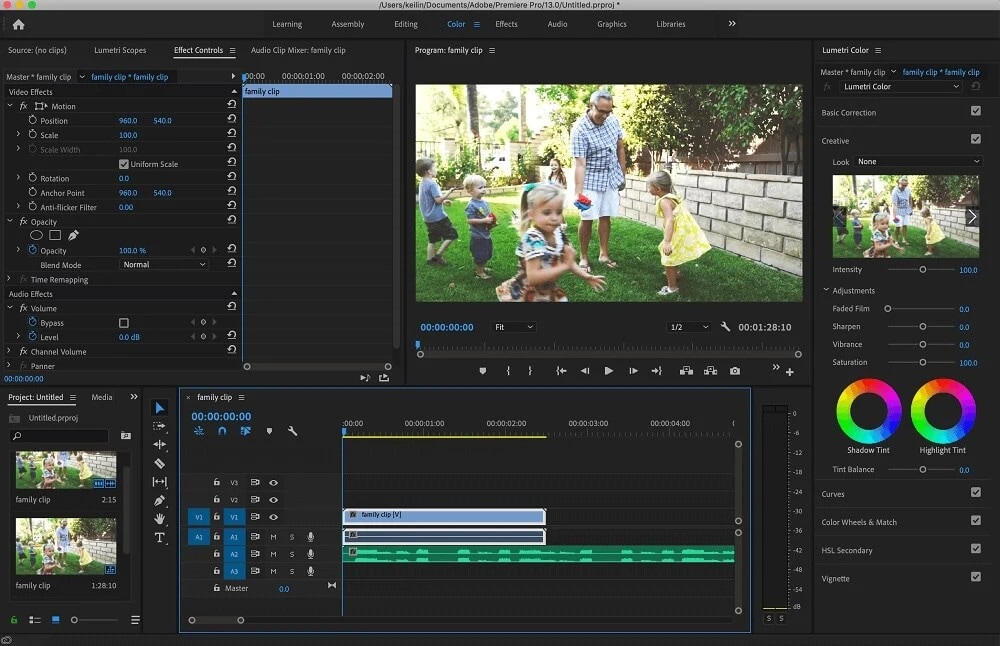
Supported System: Windows and Mac
This paid GoPro video editor is best for professionals who have experience creating video projects. This GoPro editing tool is compatible with Mac and Windows devices and also supports several video formats. Professionals use this video editor to edit top-notch videos such as Hollywood action movies and TV shows. In addition, it offers a long list of powerful features ideal for standard and action video editing.
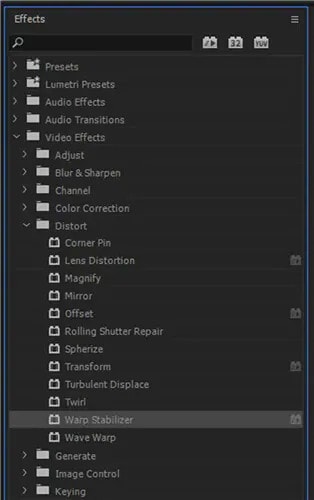
Some of these professional features include Multicam, 360-degree, VR editing, and will export in up to 8k. The GoPro video editors also have a lot of sophisticated video stabilization tools, such as the warp stabilizer effect. The video stabilizer function help reduce camera shake, especially when zooming in. Other features include unlimited video tracks, lens distortion, access to the creative cloud and will match video to music.
In addition, the GoPro video editor only offers a 7-days free trial and is relatively expensive. Although Adobe Premiere Pro video editor is professional and high-quality, it has a steep learning curve. The steep learning curve is not appropriate for beginners.
Pros
- It supports all video formats
- It supports real-time video editing
Cons
- The system requirements are resource-intensive
- Not ideal for beginners
Steps to Edit using Adobe Premiere Pro
- Step 1: Import and cut your video files on PowerDirector. You can begin by cutting out any unnecessary parts from the video. You can also add text transitions, text, and other edits.
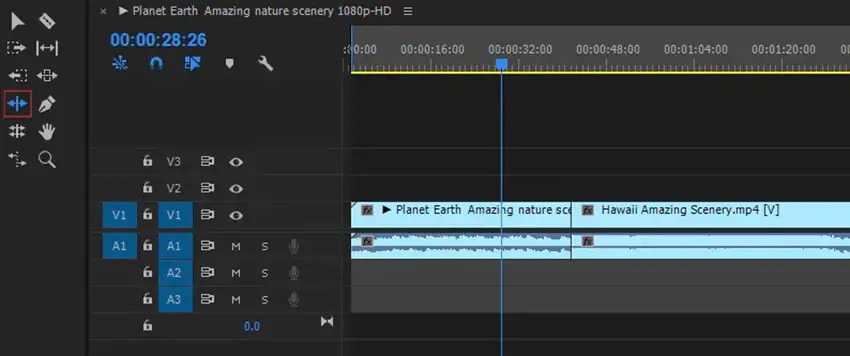
- Step 2: Next, stabilize the video using the Warp stabilizer. Double click on Warp stabilizer on the Effects menu to stabile the video.
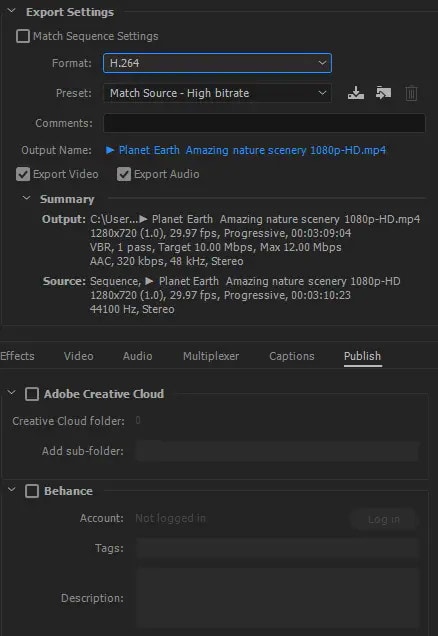
- Step 3: Finally, you can add audio and export the edited video file. Click on file, tap on export and select the format, presets, and the location to export your file.
Adobe After Effect
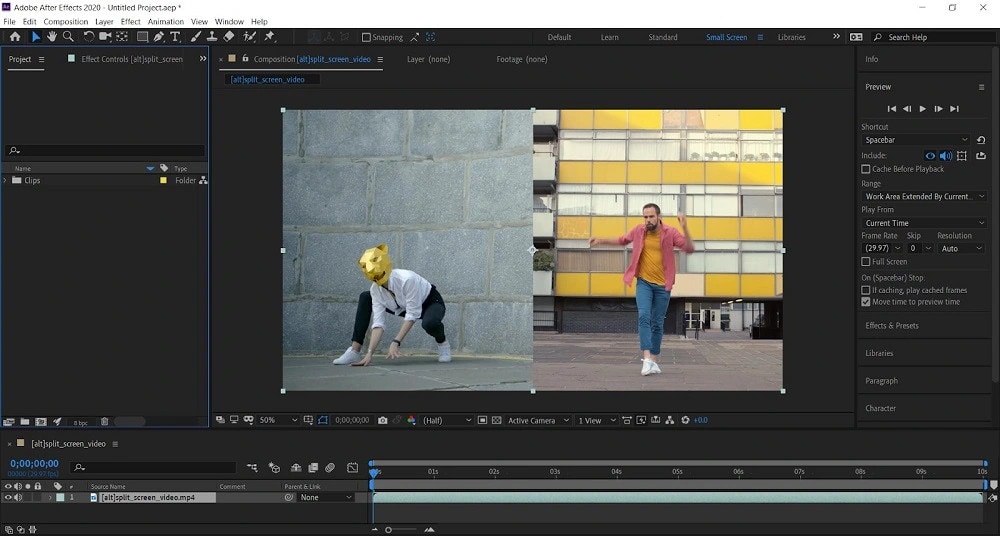
Supported System: Windows and Mac
This GoPro editor is compatible with Mac and offers many basic video editing features to ensure top-notch results. This GoPro editor is great for editors who want to add special effects like motion tracking to their videos. The after-effect function allows you to add a graphical element to a moving person, animal, car, or camera. You can also create cartoon effects, logos, stickers, or text to move seamlessly with the action onscreen.
In addition to its essential editing tools, you can also remove elements from your video with the pro-level digital rotoscoping tools. You can also use the after-effect to add elements to the missing video. Other features include 360, 3D, VR editing, transitions, lens distortions, and distortion effects for professional editing.
This GoPro video editor is an effective software and is best for adding visual effects to action camera videos. However, it lacks some essential video editing tools that you might need to make your video Hollywood standard. In addition, it also has a steep learning curve which makes it not ideal for beginners. Furthermore, as a GoPro video editor looking to do just the basic edits, then the After Effects is definitely not for you.
Pros
- It comes with realistic special effects
- It has a high-quality noise reduction
Cons
- It is not for beginners due to the steep learning curve
- It comes with only a 7-day free trial
- It is quite expensive
Steps to Edit using Adobe After Effects
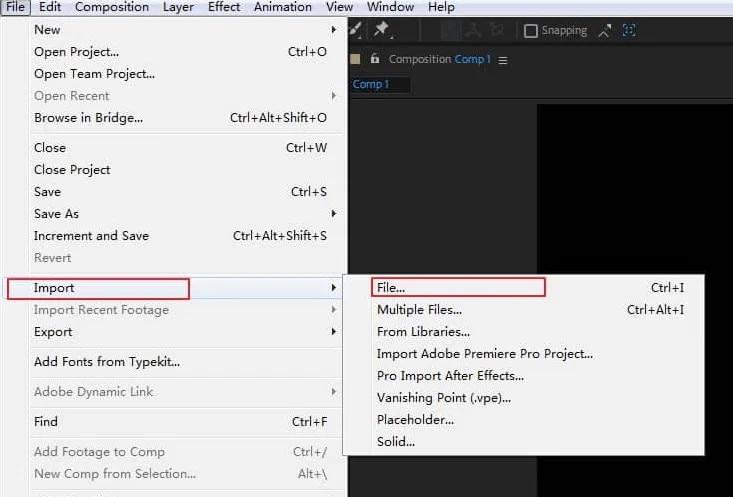
- Step 1: Import your video by going to ‘file’ on the menu and clicking ‘import’ from the dropdown menu.
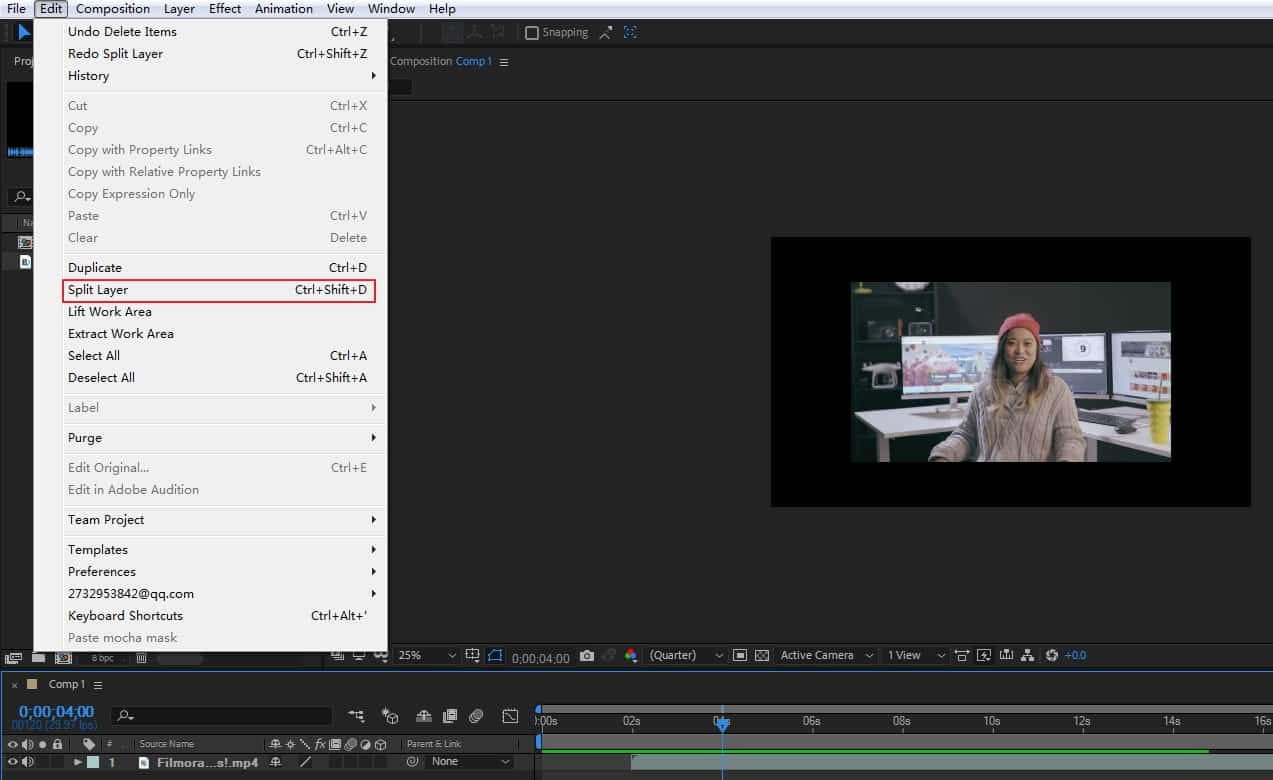
- You can begin by cutting out any unnecessary parts from the video. You can also add text transitions, text, and other edits.
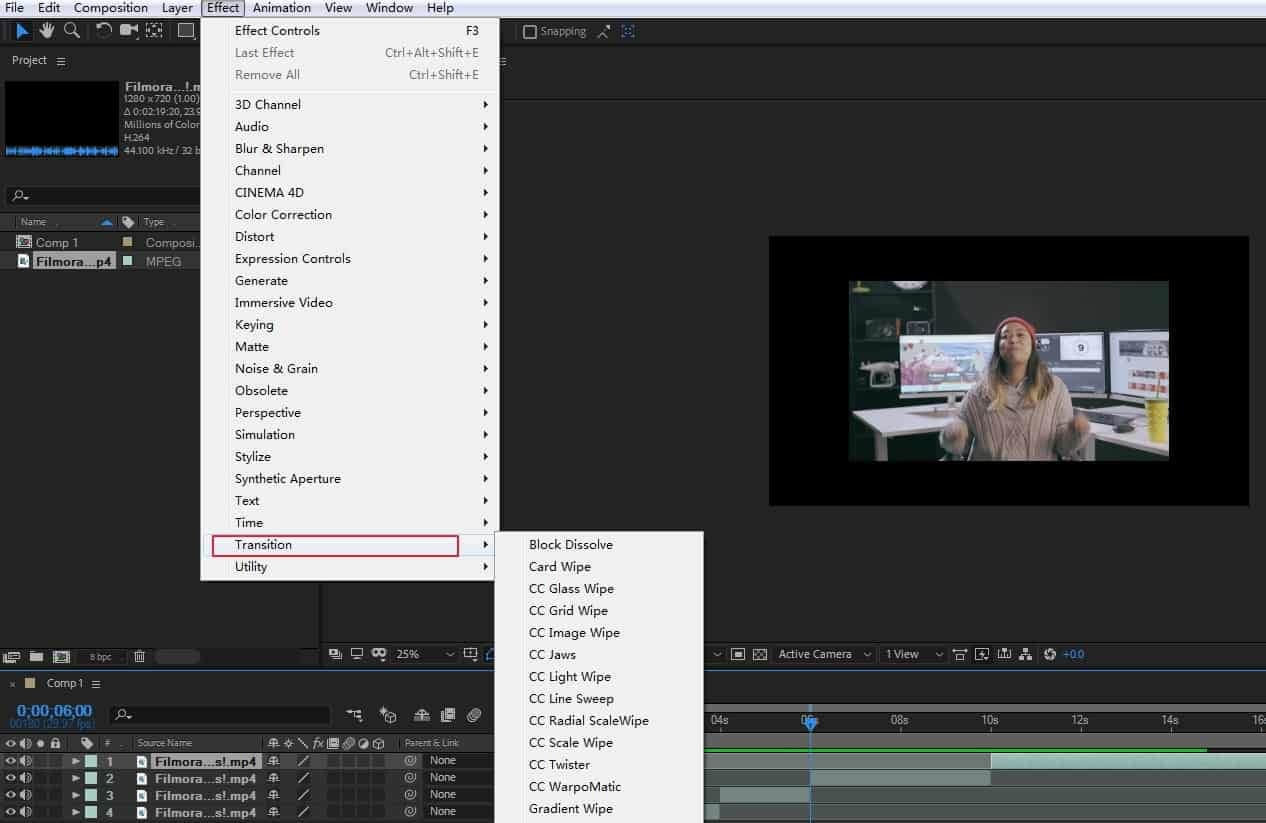
- Step 2: Next, you can apply necessary editing such as trimming, transitioning, and other edits.
- Step 3: Finally, you can add audio and export the edited video file. Click on file, tap on export and select the format, presets, and the location to export your file.

Final Cut Pro
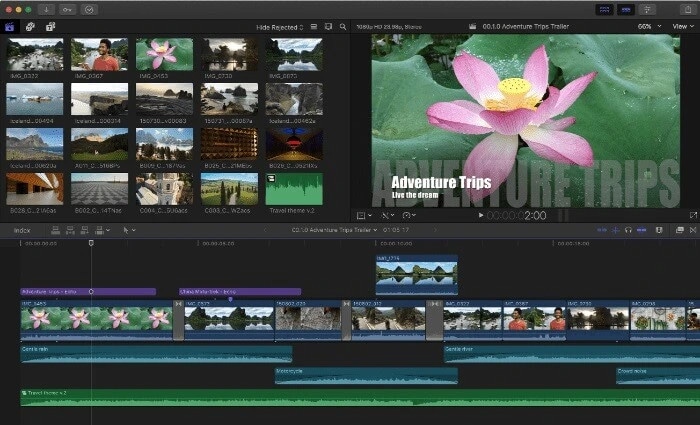
Supported System: Mac only
The Final Cut Pro is another best-paid GoPro video editor for editing GoPro videos on Mac. This video editor is ideal for editing 360 GoPro videos. This is because it offers all the editing tools you need to edit, import, and deliver both stereoscopic and monoscopic 360 videos. The GoPro video editors come with a lot of powerful features such as background noise removal, Multicam editing, color adjustment tools, and an object tracker.
You can use the GoPro video editor to visualize, remove camera rigs, change orientation, or straighten the horizon. Final Cut Pro can also easily apply graphics and effects to 360 videos and add 360 videos to regular videos with the tiny planet effect. With electronic stabilization, you can clean up your video and enhance your audience’s viewing experience. The magnetic timeline feature eliminates clip collisions and streamlines the video editing process.
Although the GoPro video editor has some notable GoPro features, it is expensive to purchase. However, it has a generous 90-day free trial to explore. It is also not beginner-friendly and requires time to learn, especially for new GoPro editors to understand. In addition, it supports several Video formats.
Pros
- It has convenient asset management functions
- Precision editing is sure with the magnetic timeline function
Cons
- It is expensive
- It is not ideal for GoPro beginners
Steps to Edit using Final Cut Pro
- Step 1: First, Launch the program
- Step 2: Import your video files to the timeline and begin editing.

- Step 3: Next, you can apply necessary editing such as trimming, transitioning, and other edits.
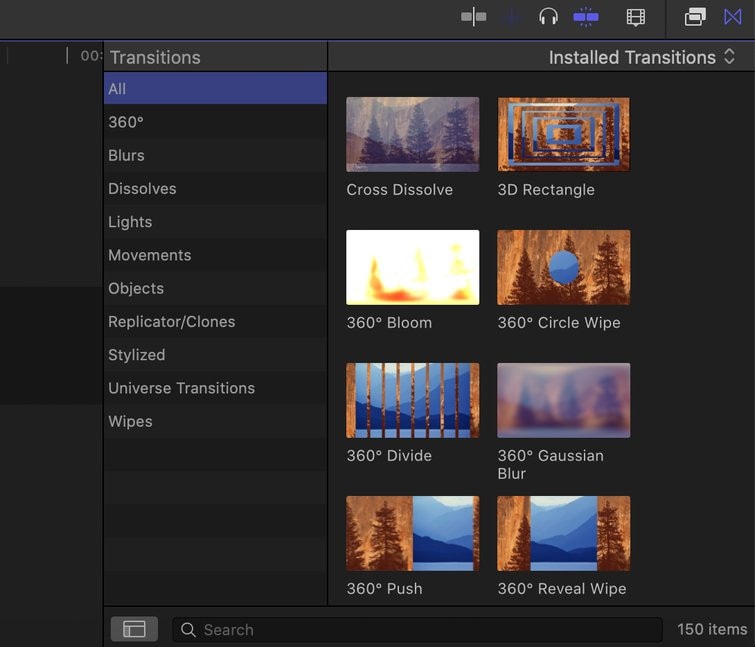
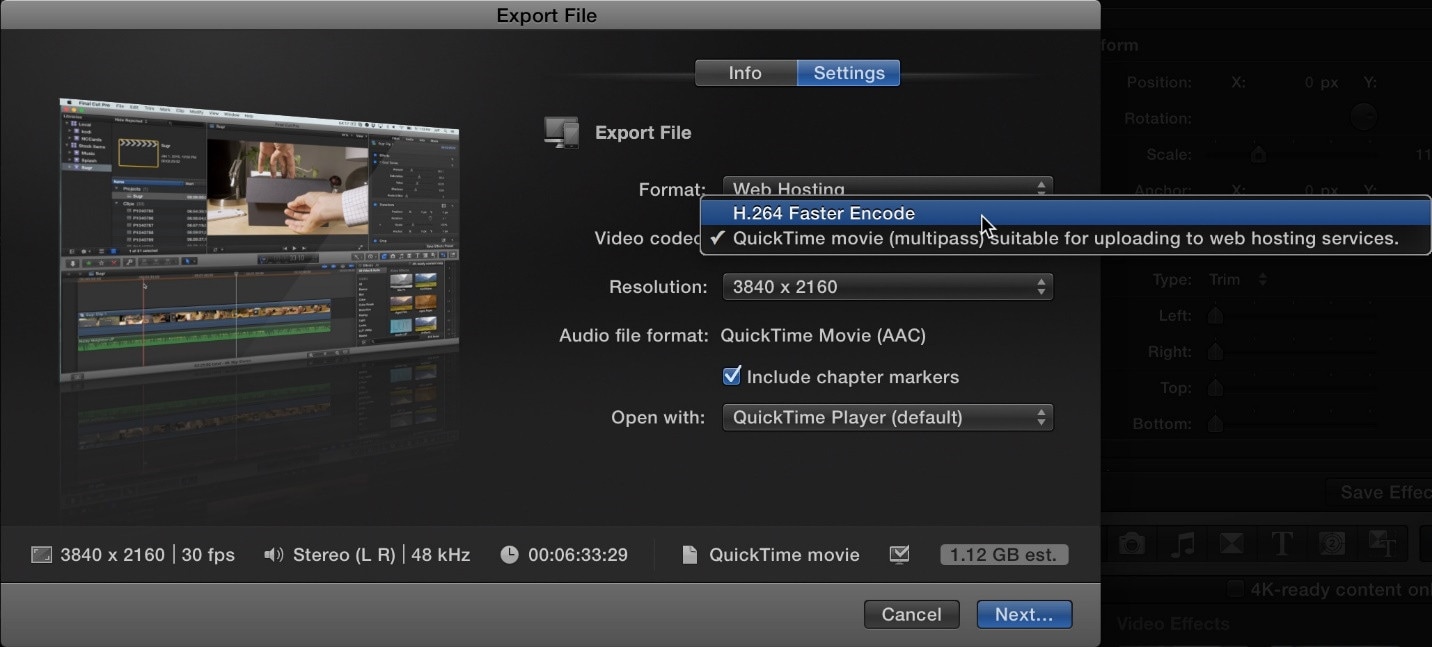
- Step 4: Finally, you can add audio and export the edited video file. Click on file, tap on export and select the format, presets, and the location to export your file.
Which should I Choose: Free or Paid GoPro Video Editor?
Many of these GoPro video editors for Mac (free and paid) are available on the internet. Therefore, it can be hard sometimes to choose the right GoPro video editor for Mac. However, you’ll need to consider factors before making your choice. Here are some of these factors.
Level of Expertise
This is a vital factor you should put into consideration before choosing a GoPro video editor. As a beginner, you wouldn’t need a GoPro editor that offers complex editing functions that you can’t use. Also, as a professional, you shouldn’t go for an editor that lacks the necessary editing tools to meet your editing needs. As an editor, you should totally be on the lookout for an editor that supports both beginners and professionals. This will remove the need to search for a new video editor at any experience level.
Interface
Another factor to consider is the user interface of your chosen video editor. When you go for a more friendly user interface, you will be saving yourself the time to get familiar with the software. Is the video editor free or paid? Regardless of the answer, check out the user interface before choosing one.
Formats
You also need to ensure that the editing software doesn’t limit you to specific video formats. You should go for a GoPro video editor that supports the common and trendy video formats. This will allow you to convert your edited videos when you need to share them.
Now, most free GoPro video editors offer just limited features to users, limiting your editing course. Furthermore, most paid GoPro video editors focus on a professional level, making it difficult for new editors to use. Therefore, you should totally opt for a GoPro video editor that succinctly supports all your editing needs.
FAQs About Editing Gopro Videos
- Can I edit GoPro videos like a Professional? Yes, you can. Learn to use advanced video editing features. The ideal thing to do is pick a GoPro video editor with a user-friendly interface to enable you to learn these professional methods.
- What is the best GoPro video editor for Mac? The best GoPro video editor for Mac devices depends on your level of expertise and what you want to achieve.
- Can I edit a GoPro video? Yes, you can. Find a GoPro editing software compatible with your Mac devices and ideal for your level of experience.
Conclusion
There are several GoPro video editors, and the editor you choose depends on your needs and your budget. It also depends on your level of experience and the equipment on the ground. However, we have a list of different GoPro video editors for you. Examine our reviews of these GoPro video editors and see which is perfect for you.

- Step 6: Once you open it, two folders will display. These folders are DCIM and MISC.

- Step 7: Click on the DCIM folder to find all videos stored on the device.

- Step 8: Finally, you can now begin uploading all your GoPro videos to Mac by simply copying and pasting.

Import GoPro Videos to Mac before editing – GoPro Quick App
Another option to import GoPro videos to Mac is the GoPro Quick app. GoPro quick app is a tool by GoPro designed to help view GoPro videos on Mac and import them. Having this app on your Mac device is relatively easy. First, you have to download its setup from the GoPro website and install it. So far, this app is one of the best tools to view and import GoPro files to your Mac device. Here are the steps to importing GoPro videos to Mac while getting set to edit.
- Step 1: First thing first, Launch the app. However, if you have not installed the app, you should quickly download and install the app.

- Step 2: Now, you can connect the GoPro camera to your Mac. You can do this by using a USB cable.
- Step 3: After launching the app, you will see an icon labeled Import Filesdisplayed at the interface.

- Step 4: from here on, you will also see an icon to import the videos from your GoPro camera into your Mac device.
When the import is complete, you can now locate your GoPro videos in the folder of your choice. Now, you can close the GoPro quick app, unplug the GoPro camera and get ready to edit your videos.
Best GoPro Video Editor on Mac
A lot of people understand that GoPro is the best way to make your video look like a professional shot. After shooting the video, you’ll obviously want to make some edits to make them look more professional before sharing them. After all, no one wants to watch poor-quality videos, bad noises, and other unprofessional clips. Therefore, we have a list of the best GoPro editor for Mac in this article. Keep reading to learn about the best GoPro video editor on Mac.
Best GoPro Video Editor on Mac – Filmora Video Editor

Supported System: Mac and Windows
A lot of free video editing software usually comes as either too straightforward or too challenging to understand. While other video editing software lacks vital editing features such as color correction and audio or noise editing features. However, the Filmora Video Editor for Mac bridges the gap and is undoubtedly the best GoPro Video editor on Mac.
This video editing software is an easy-to-use editing tool totally equipped with a lot of video editing functions. With Filmora, you can edit your GoPro videos on your Mac like an expert and expect a professional outcome. Filmora offers excellent performance and enhances video quality taking the user experience to a whole new level.
Additionally, Filmora is an editing tool with helpful functionality taking the user experience to a whole new level. Finally, this tool is indispensable due to its speed, intuitive user interface, and other file format support.
For Win 7 or later (64-bit)
For macOS 10.14 or later
Filmora Features
- Filmora editing tool is versatile and supports other video formats like MP4, MOV, MKV, AVCHD, etc.
- You can cut, crop, split, trim, and even combine clips with just a few clicks.
- Filmora has access to several advanced video effects such as royalty-free music, transition, animated titles, and motion elements.
- With Filmora color tuning features, your videos can look like professional Hollywood videos.
- You can also edit sounds on your video with a noise removal feature, audio equalizer, and audio keyframing tools.
- You get 500+ free special video effects to create and customize your videos yourself.
- Filmora has access to advanced video effects like PIP, audio mixer, and green screen, which you can add to your videos.
- Access to 1000+ effects downloading resources to make videos in any desired styles.
Steps to Editing Videos on Mac Using Filmora
Want to edit your GoPro videos the right way? Editing your GoPro videos on Mac with Filmora is relatively easy and will only take a few clicks. Read and follow these steps below to learn to edit GoPro videos on Mac with this easy-to-use GoPro video editor.
- Step 1: Import the GoPro video files
First, you launch the GoPro video editor and then click the “Import Media here” button. This will upload the GoPro video clips to the program. You can save these files in a suitable location for easy access before you begin editing.

- Step 2: Edit the GoPro Video clips

Secondly, you should drag the GoPro video clips from the folder or User’s album to the timeline and begin editing.
To trim your GoPro videos, simply mouser over the clip from the beginning to the end of the video. You should do this until the trim icon is displayed. The trim icon is labeled as “I” on the editing timeline. You can drag the trim icon forward or backward to trim the video as you desire.
Aside from the trimming option, you can also apply split footage, video stabilization, and even add transitions between two clips. You can also combine GoPro videos and rotate GoPro videos by simply tapping the icons respectively.

- Step 3: Export the edited GoPro video files

Once you finish editing, you can now navigate to the “Export” icon. Furthermore, you can also select the save path and file format from the displayed output window. After this selection, you can finally choose the “Export” icon. Once you complete this, you can find your edited video file in the same path.
More Free GoPro video editor on Mac to Edit Gopro Videos
In this section, we will list out some of the best free GoPro video editors to successfully edit your videos on Mac. These programs are, but you will have to download them to enjoy all the editing tools.
PowerDirector

Supported System: Windows and Mac
We have PowerDirector as the best overall editor on our list of best free GoPro video editors on Mac. This free GoPro video editor is compatible with Mac and has a robust video editing program. If you are looking for a free GoPro video editor with a wide range of exciting editing features, this is one of the best options. One of the benefits of using this GoPro video editor is that it comes with an Action Camera Center.
It has tons of cool effects, titles, filters, and templates to explore, especially if you want to make more action camera masterpieces. In addition, this video editor has special editing and effects tools to improve your action camera video. For example, you can stabilize your shaky video, apply cool speed effects, and correct fish-eye distortion in some minutes. You can also use the slow-motion effect, zoom, correct color problems, and freeze frame with just a few clicks.
The GoPro editor also comes with noise correction and video denoise to make your video crystal clear and remove unwanted audio noise. In addition, PowerDirector has thousands of royalty-free stock assets such as sound effects and background music. In essence, PowerDirector is a GoPro video editor that offers everything you need to produce, enhance and cut thrilling action videos. It is versatile, best for action footage editing, and supports several video formats.
Pros
- It is beginner-friendly
- It comes with easy-to-use action camera-specific editing tools
Cons
- While it is free, you need a subscription to enjoy the latest features.
Steps to Edit using PowerDirector
- Step 1: Launch the app and select ‘full mode’ to begin editing your video
- Step 2: Select’ import media folder’ to get the videos you wish to edit
- Step 3: You can now browse the folder on your Mac device and select the folder with the videos. Then Click ‘Select folder’ to move them into the editor’s media library.

- Step 4: Now, the editing process can begin. You can stabilize and change the speed of your videos with PowerDirector.

- You can add title text and motion blur to your GoPro videos if you like that.

- If you want to include transitions, you can do so by selecting the transition room.
- Step 5: Next, select the ‘produce’ button to export your video once you are sure that the editing is complete.

- Step 6: Change the video format before exporting.

Once you select the video format you prefer, you will be able to save your GoPro video.
VideoProc Vlogger

Supported System: Windows and Mac
VideoProc Vlogger is the best GoPro editor for anyone looking for speed adjustment. The video editor uses visualized speed ramping to alter the speed throughout a clip. This program contains over 20-speed features to help you quickly change the tone and tempo of your GoPro video. Furthermore, VideoProc Vlogger is beginner-friendly with a lot of advanced editing features. These features include automatic keyframes and flexible Bezier curves to slow parts of a video without splitting it.
This free GoPro video editor can simulate motion roll, dolly, tilt, and even truck effects. You can also push in and out and stylize your video clips with rotation, fast zooms, and shakes. With VideoProc Vlogger, you fix grain video, remove fish-eye, extract audio and apply motion crops to your video. The video editor is best at creating new motion trails to change the action of the video.
Although VideoProc Vlogger is a free video editor, it definitely lacks some advanced editing features. For example, you can edit your videos without the annoying ads or watermarks. In addition, the video editor is designed for beginners, content creators, and hobbyists as it lacks features like video stabilization. So while the video editor is not for professionals, it’s worth trying out.
Pros
- Requires low system requirements
- It is entirely free with no ads and watermarks
Cons
- It lacks advanced editing features
- Rendering is somewhat slow
Steps to Edit using VideoProc Vlogger
- Step 1: First, import your GoPro videos from your Mac device to VideoProc Vlogger.

Simply Launch VideoProc Vlogger on your Mac, hit the plus icon in the media library, and add and import the videos.
- Step 2: Now, split and cut the GoPro Videos.

Simply drag the video clips to the timeline and begin editing. Now, put the playhead to exactly where you want to split the video and tap the split button.
- Step 3: You can also fix GoPro lens distortion.

If you feel that your video looks distorted, tick the lens distortion box to resolve the issue.

- Step 4: You can do the color correction or grading for any dark GoPro videos. Simply apply a preset aesthetic filter or simply adjust color normally.
- Step 5: Adjust the speed of the GoPro video.

To adjust the speed of the video, click speed in the toolbar to open the speed editor. Then change as you desire.
- Step 6: You can also add transitions, titles, and effects by opening the panels of transitions, effects, and tiles.

- Then drag a transition to the space between two video clips, same with titles to the subtitle and effect to the effect track.

- Step 7: Next, remove noise and background music by clicking the video track and tapping “detach” to separate the audio from the video.

- You can also add music to replace the background noise.
- Step 8: Finally, after the editing, you can export the GoPro video to your Mac device by setting the file name, format, file location, and video quality.

iMovie

Supported System: Mac only
This editor is designed to ensure an excelling editing process for Mac users. Therefore, beginners, content creators, and even hobbyists can utilize this video editor to edit their videos. Although iMovie is a free GoPro video editor, it offers incredible editing features to make your video look more professional. These features include HD and 4K video support and speed adjustment tools that can slow down or speed up your video clips.
Although it comes free on all Mac devices, iMovie also has tons of themes, templates, and presets to make editing a breeze. For example, you can select the video clips that will be automatically styled and edited with titles, transitions, and music. You can make all these changes with just a few clicks. In addition, you can also rearrange, trim, split, and even delete your ready-made video clips.
Furthermore, you can always modify the shift focus and depth of field while editing your video. However, it lacks some advanced features you will need while editing, such as Multicam, motion tracking, and 360 editing. On the other hand, it has a user-friendly interface with essential editing functions.
Pros
- It has a simple and user-friendly interface
- It is definitely beginner-friendly
Cons
- It lacks essential and advanced GoPro editing features and functions
Steps to Edit using iMovie
- Step 1: first, you have to launch the iMovie and create a video project.

- Step 2: Now, you can click the Import button to import your GoPro video files from your Mac to it.

- Step 3: Drag the video files from the program media library to the timeline for editing.

- Step 4: Load a song to the audio track if you wish to add background music to your video.
- Step 5: To split your video into smaller parts, right-click on a clip.
- Step 6: to edit your GoPro video with advanced tools like color correction, crop, grading, speed, and volume, simply move to the toolbar just above the timeline.
- Step 7: to add title, and transitions, you can drag a title and transition to the desired space between two clips.
- Step 8: preview and export your GoPro video from iMovie in the preferred format.

More Paid GoPro video editor on Mac to Cut MP4 Videos
If you desire GoPro video editors that offer more than just the basic editing features, you should try the paid GoPro video editors. The paid GoPro video editors offer more professional editing features for Mac users. In this section, you’ll learn about our top three paid GoPro video editors to edit your GoPro videos on Mac.
Adobe Premiere Pro

Supported System: Windows and Mac
This paid GoPro video editor is best for professionals who have experience creating video projects. This GoPro editing tool is compatible with Mac and Windows devices and also supports several video formats. Professionals use this video editor to edit top-notch videos such as Hollywood action movies and TV shows. In addition, it offers a long list of powerful features ideal for standard and action video editing.
Some of these professional features include Multicam, 360-degree, VR editing, and will export in up to 8k. The GoPro video editors also have a lot of sophisticated video stabilization tools, such as the warp stabilizer effect. The video stabilizer function help reduce camera shake, especially when zooming in. Other features include unlimited video tracks, lens distortion, access to the creative cloud and will match video to music.
In addition, the GoPro video editor only offers a 7-days free trial and is relatively expensive. Although Adobe Premiere Pro video editor is professional and high-quality, it has a steep learning curve. The steep learning curve is not appropriate for beginners.
Pros
- It supports all video formats
- It supports real-time video editing
Cons
- The system requirements are resource-intensive
- Not ideal for beginners
Steps to Edit using Adobe Premiere Pro
- Step 1: Import and cut your video files on PowerDirector. You can begin by cutting out any unnecessary parts from the video. You can also add text transitions, text, and other edits.

- Step 2: Next, stabilize the video using the Warp stabilizer. Double click on Warp stabilizer on the Effects menu to stabile the video.

- Step 3: Finally, you can add audio and export the edited video file. Click on file, tap on export and select the format, presets, and the location to export your file.

Adobe After Effect

Supported System: Windows and Mac
This GoPro editor is compatible with Mac and offers many basic video editing features to ensure top-notch results. This GoPro editor is great for editors who want to add special effects like motion tracking to their videos. The after-effect function allows you to add a graphical element to a moving person, animal, car, or camera. You can also create cartoon effects, logos, stickers, or text to move seamlessly with the action onscreen.
In addition to its essential editing tools, you can also remove elements from your video with the pro-level digital rotoscoping tools. You can also use the after-effect to add elements to the missing video. Other features include 360, 3D, VR editing, transitions, lens distortions, and distortion effects for professional editing.
This GoPro video editor is an effective software and is best for adding visual effects to action camera videos. However, it lacks some essential video editing tools that you might need to make your video Hollywood standard. In addition, it also has a steep learning curve which makes it not ideal for beginners. Furthermore, as a GoPro video editor looking to do just the basic edits, then the After Effects is definitely not for you.
Pros
- It comes with realistic special effects
- It has a high-quality noise reduction
Cons
- It is not for beginners due to the steep learning curve
- It comes with only a 7-day free trial
- It is quite expensive
Steps to Edit using Adobe After Effects
- Step 1: Import your video by going to ‘file’ on the menu and clicking ‘import’ from the dropdown menu.

- You can begin by cutting out any unnecessary parts from the video. You can also add text transitions, text, and other edits.

- Step 2: Next, you can apply necessary editing such as trimming, transitioning, and other edits.

- Step 3: Finally, you can add audio and export the edited video file. Click on file, tap on export and select the format, presets, and the location to export your file.

Final Cut Pro

Supported System: Mac only
The Final Cut Pro is another best-paid GoPro video editor for editing GoPro videos on Mac. This video editor is ideal for editing 360 GoPro videos. This is because it offers all the editing tools you need to edit, import, and deliver both stereoscopic and monoscopic 360 videos. The GoPro video editors come with a lot of powerful features such as background noise removal, Multicam editing, color adjustment tools, and an object tracker.
You can use the GoPro video editor to visualize, remove camera rigs, change orientation, or straighten the horizon. Final Cut Pro can also easily apply graphics and effects to 360 videos and add 360 videos to regular videos with the tiny planet effect. With electronic stabilization, you can clean up your video and enhance your audience’s viewing experience. The magnetic timeline feature eliminates clip collisions and streamlines the video editing process.
Although the GoPro video editor has some notable GoPro features, it is expensive to purchase. However, it has a generous 90-day free trial to explore. It is also not beginner-friendly and requires time to learn, especially for new GoPro editors to understand. In addition, it supports several Video formats.
Pros
- It has convenient asset management functions
- Precision editing is sure with the magnetic timeline function
Cons
- It is expensive
- It is not ideal for GoPro beginners
Steps to Edit using Final Cut Pro
- Step 1: First, Launch the program
- Step 2: Import your video files to the timeline and begin editing.

- Step 3: Next, you can apply necessary editing such as trimming, transitioning, and other edits.

- Step 4: Finally, you can add audio and export the edited video file. Click on file, tap on export and select the format, presets, and the location to export your file.

Which should I Choose: Free or Paid GoPro Video Editor?
Many of these GoPro video editors for Mac (free and paid) are available on the internet. Therefore, it can be hard sometimes to choose the right GoPro video editor for Mac. However, you’ll need to consider factors before making your choice. Here are some of these factors.
Level of Expertise
This is a vital factor you should put into consideration before choosing a GoPro video editor. As a beginner, you wouldn’t need a GoPro editor that offers complex editing functions that you can’t use. Also, as a professional, you shouldn’t go for an editor that lacks the necessary editing tools to meet your editing needs. As an editor, you should totally be on the lookout for an editor that supports both beginners and professionals. This will remove the need to search for a new video editor at any experience level.
Interface
Another factor to consider is the user interface of your chosen video editor. When you go for a more friendly user interface, you will be saving yourself the time to get familiar with the software. Is the video editor free or paid? Regardless of the answer, check out the user interface before choosing one.
Formats
You also need to ensure that the editing software doesn’t limit you to specific video formats. You should go for a GoPro video editor that supports the common and trendy video formats. This will allow you to convert your edited videos when you need to share them.
Now, most free GoPro video editors offer just limited features to users, limiting your editing course. Furthermore, most paid GoPro video editors focus on a professional level, making it difficult for new editors to use. Therefore, you should totally opt for a GoPro video editor that succinctly supports all your editing needs.
FAQs About Editing Gopro Videos
- Can I edit GoPro videos like a Professional? Yes, you can. Learn to use advanced video editing features. The ideal thing to do is pick a GoPro video editor with a user-friendly interface to enable you to learn these professional methods.
- What is the best GoPro video editor for Mac? The best GoPro video editor for Mac devices depends on your level of expertise and what you want to achieve.
- Can I edit a GoPro video? Yes, you can. Find a GoPro editing software compatible with your Mac devices and ideal for your level of experience.
Conclusion
There are several GoPro video editors, and the editor you choose depends on your needs and your budget. It also depends on your level of experience and the equipment on the ground. However, we have a list of different GoPro video editors for you. Examine our reviews of these GoPro video editors and see which is perfect for you.

- Step 6: Once you open it, two folders will display. These folders are DCIM and MISC.

- Step 7: Click on the DCIM folder to find all videos stored on the device.

- Step 8: Finally, you can now begin uploading all your GoPro videos to Mac by simply copying and pasting.

Import GoPro Videos to Mac before editing – GoPro Quick App
Another option to import GoPro videos to Mac is the GoPro Quick app. GoPro quick app is a tool by GoPro designed to help view GoPro videos on Mac and import them. Having this app on your Mac device is relatively easy. First, you have to download its setup from the GoPro website and install it. So far, this app is one of the best tools to view and import GoPro files to your Mac device. Here are the steps to importing GoPro videos to Mac while getting set to edit.
- Step 1: First thing first, Launch the app. However, if you have not installed the app, you should quickly download and install the app.

- Step 2: Now, you can connect the GoPro camera to your Mac. You can do this by using a USB cable.
- Step 3: After launching the app, you will see an icon labeled Import Filesdisplayed at the interface.

- Step 4: from here on, you will also see an icon to import the videos from your GoPro camera into your Mac device.
When the import is complete, you can now locate your GoPro videos in the folder of your choice. Now, you can close the GoPro quick app, unplug the GoPro camera and get ready to edit your videos.
Best GoPro Video Editor on Mac
A lot of people understand that GoPro is the best way to make your video look like a professional shot. After shooting the video, you’ll obviously want to make some edits to make them look more professional before sharing them. After all, no one wants to watch poor-quality videos, bad noises, and other unprofessional clips. Therefore, we have a list of the best GoPro editor for Mac in this article. Keep reading to learn about the best GoPro video editor on Mac.
Best GoPro Video Editor on Mac – Filmora Video Editor

Supported System: Mac and Windows
A lot of free video editing software usually comes as either too straightforward or too challenging to understand. While other video editing software lacks vital editing features such as color correction and audio or noise editing features. However, the Filmora Video Editor for Mac bridges the gap and is undoubtedly the best GoPro Video editor on Mac.
This video editing software is an easy-to-use editing tool totally equipped with a lot of video editing functions. With Filmora, you can edit your GoPro videos on your Mac like an expert and expect a professional outcome. Filmora offers excellent performance and enhances video quality taking the user experience to a whole new level.
Additionally, Filmora is an editing tool with helpful functionality taking the user experience to a whole new level. Finally, this tool is indispensable due to its speed, intuitive user interface, and other file format support.
For Win 7 or later (64-bit)
For macOS 10.14 or later
Filmora Features
- Filmora editing tool is versatile and supports other video formats like MP4, MOV, MKV, AVCHD, etc.
- You can cut, crop, split, trim, and even combine clips with just a few clicks.
- Filmora has access to several advanced video effects such as royalty-free music, transition, animated titles, and motion elements.
- With Filmora color tuning features, your videos can look like professional Hollywood videos.
- You can also edit sounds on your video with a noise removal feature, audio equalizer, and audio keyframing tools.
- You get 500+ free special video effects to create and customize your videos yourself.
- Filmora has access to advanced video effects like PIP, audio mixer, and green screen, which you can add to your videos.
- Access to 1000+ effects downloading resources to make videos in any desired styles.
Steps to Editing Videos on Mac Using Filmora
Want to edit your GoPro videos the right way? Editing your GoPro videos on Mac with Filmora is relatively easy and will only take a few clicks. Read and follow these steps below to learn to edit GoPro videos on Mac with this easy-to-use GoPro video editor.
- Step 1: Import the GoPro video files
First, you launch the GoPro video editor and then click the “Import Media here” button. This will upload the GoPro video clips to the program. You can save these files in a suitable location for easy access before you begin editing.

- Step 2: Edit the GoPro Video clips

Secondly, you should drag the GoPro video clips from the folder or User’s album to the timeline and begin editing.
To trim your GoPro videos, simply mouser over the clip from the beginning to the end of the video. You should do this until the trim icon is displayed. The trim icon is labeled as “I” on the editing timeline. You can drag the trim icon forward or backward to trim the video as you desire.
Aside from the trimming option, you can also apply split footage, video stabilization, and even add transitions between two clips. You can also combine GoPro videos and rotate GoPro videos by simply tapping the icons respectively.

- Step 3: Export the edited GoPro video files

Once you finish editing, you can now navigate to the “Export” icon. Furthermore, you can also select the save path and file format from the displayed output window. After this selection, you can finally choose the “Export” icon. Once you complete this, you can find your edited video file in the same path.
More Free GoPro video editor on Mac to Edit Gopro Videos
In this section, we will list out some of the best free GoPro video editors to successfully edit your videos on Mac. These programs are, but you will have to download them to enjoy all the editing tools.
PowerDirector

Supported System: Windows and Mac
We have PowerDirector as the best overall editor on our list of best free GoPro video editors on Mac. This free GoPro video editor is compatible with Mac and has a robust video editing program. If you are looking for a free GoPro video editor with a wide range of exciting editing features, this is one of the best options. One of the benefits of using this GoPro video editor is that it comes with an Action Camera Center.
It has tons of cool effects, titles, filters, and templates to explore, especially if you want to make more action camera masterpieces. In addition, this video editor has special editing and effects tools to improve your action camera video. For example, you can stabilize your shaky video, apply cool speed effects, and correct fish-eye distortion in some minutes. You can also use the slow-motion effect, zoom, correct color problems, and freeze frame with just a few clicks.
The GoPro editor also comes with noise correction and video denoise to make your video crystal clear and remove unwanted audio noise. In addition, PowerDirector has thousands of royalty-free stock assets such as sound effects and background music. In essence, PowerDirector is a GoPro video editor that offers everything you need to produce, enhance and cut thrilling action videos. It is versatile, best for action footage editing, and supports several video formats.
Pros
- It is beginner-friendly
- It comes with easy-to-use action camera-specific editing tools
Cons
- While it is free, you need a subscription to enjoy the latest features.
Steps to Edit using PowerDirector
- Step 1: Launch the app and select ‘full mode’ to begin editing your video
- Step 2: Select’ import media folder’ to get the videos you wish to edit
- Step 3: You can now browse the folder on your Mac device and select the folder with the videos. Then Click ‘Select folder’ to move them into the editor’s media library.

- Step 4: Now, the editing process can begin. You can stabilize and change the speed of your videos with PowerDirector.

- You can add title text and motion blur to your GoPro videos if you like that.

- If you want to include transitions, you can do so by selecting the transition room.
- Step 5: Next, select the ‘produce’ button to export your video once you are sure that the editing is complete.

- Step 6: Change the video format before exporting.

Once you select the video format you prefer, you will be able to save your GoPro video.
VideoProc Vlogger

Supported System: Windows and Mac
VideoProc Vlogger is the best GoPro editor for anyone looking for speed adjustment. The video editor uses visualized speed ramping to alter the speed throughout a clip. This program contains over 20-speed features to help you quickly change the tone and tempo of your GoPro video. Furthermore, VideoProc Vlogger is beginner-friendly with a lot of advanced editing features. These features include automatic keyframes and flexible Bezier curves to slow parts of a video without splitting it.
This free GoPro video editor can simulate motion roll, dolly, tilt, and even truck effects. You can also push in and out and stylize your video clips with rotation, fast zooms, and shakes. With VideoProc Vlogger, you fix grain video, remove fish-eye, extract audio and apply motion crops to your video. The video editor is best at creating new motion trails to change the action of the video.
Although VideoProc Vlogger is a free video editor, it definitely lacks some advanced editing features. For example, you can edit your videos without the annoying ads or watermarks. In addition, the video editor is designed for beginners, content creators, and hobbyists as it lacks features like video stabilization. So while the video editor is not for professionals, it’s worth trying out.
Pros
- Requires low system requirements
- It is entirely free with no ads and watermarks
Cons
- It lacks advanced editing features
- Rendering is somewhat slow
Steps to Edit using VideoProc Vlogger
- Step 1: First, import your GoPro videos from your Mac device to VideoProc Vlogger.

Simply Launch VideoProc Vlogger on your Mac, hit the plus icon in the media library, and add and import the videos.
- Step 2: Now, split and cut the GoPro Videos.

Simply drag the video clips to the timeline and begin editing. Now, put the playhead to exactly where you want to split the video and tap the split button.
- Step 3: You can also fix GoPro lens distortion.

If you feel that your video looks distorted, tick the lens distortion box to resolve the issue.

- Step 4: You can do the color correction or grading for any dark GoPro videos. Simply apply a preset aesthetic filter or simply adjust color normally.
- Step 5: Adjust the speed of the GoPro video.

To adjust the speed of the video, click speed in the toolbar to open the speed editor. Then change as you desire.
- Step 6: You can also add transitions, titles, and effects by opening the panels of transitions, effects, and tiles.

- Then drag a transition to the space between two video clips, same with titles to the subtitle and effect to the effect track.

- Step 7: Next, remove noise and background music by clicking the video track and tapping “detach” to separate the audio from the video.

- You can also add music to replace the background noise.
- Step 8: Finally, after the editing, you can export the GoPro video to your Mac device by setting the file name, format, file location, and video quality.

iMovie

Supported System: Mac only
This editor is designed to ensure an excelling editing process for Mac users. Therefore, beginners, content creators, and even hobbyists can utilize this video editor to edit their videos. Although iMovie is a free GoPro video editor, it offers incredible editing features to make your video look more professional. These features include HD and 4K video support and speed adjustment tools that can slow down or speed up your video clips.
Although it comes free on all Mac devices, iMovie also has tons of themes, templates, and presets to make editing a breeze. For example, you can select the video clips that will be automatically styled and edited with titles, transitions, and music. You can make all these changes with just a few clicks. In addition, you can also rearrange, trim, split, and even delete your ready-made video clips.
Furthermore, you can always modify the shift focus and depth of field while editing your video. However, it lacks some advanced features you will need while editing, such as Multicam, motion tracking, and 360 editing. On the other hand, it has a user-friendly interface with essential editing functions.
Pros
- It has a simple and user-friendly interface
- It is definitely beginner-friendly
Cons
- It lacks essential and advanced GoPro editing features and functions
Steps to Edit using iMovie
- Step 1: first, you have to launch the iMovie and create a video project.

- Step 2: Now, you can click the Import button to import your GoPro video files from your Mac to it.

- Step 3: Drag the video files from the program media library to the timeline for editing.

- Step 4: Load a song to the audio track if you wish to add background music to your video.
- Step 5: To split your video into smaller parts, right-click on a clip.
- Step 6: to edit your GoPro video with advanced tools like color correction, crop, grading, speed, and volume, simply move to the toolbar just above the timeline.
- Step 7: to add title, and transitions, you can drag a title and transition to the desired space between two clips.
- Step 8: preview and export your GoPro video from iMovie in the preferred format.

More Paid GoPro video editor on Mac to Cut MP4 Videos
If you desire GoPro video editors that offer more than just the basic editing features, you should try the paid GoPro video editors. The paid GoPro video editors offer more professional editing features for Mac users. In this section, you’ll learn about our top three paid GoPro video editors to edit your GoPro videos on Mac.
Adobe Premiere Pro

Supported System: Windows and Mac
This paid GoPro video editor is best for professionals who have experience creating video projects. This GoPro editing tool is compatible with Mac and Windows devices and also supports several video formats. Professionals use this video editor to edit top-notch videos such as Hollywood action movies and TV shows. In addition, it offers a long list of powerful features ideal for standard and action video editing.
Some of these professional features include Multicam, 360-degree, VR editing, and will export in up to 8k. The GoPro video editors also have a lot of sophisticated video stabilization tools, such as the warp stabilizer effect. The video stabilizer function help reduce camera shake, especially when zooming in. Other features include unlimited video tracks, lens distortion, access to the creative cloud and will match video to music.
In addition, the GoPro video editor only offers a 7-days free trial and is relatively expensive. Although Adobe Premiere Pro video editor is professional and high-quality, it has a steep learning curve. The steep learning curve is not appropriate for beginners.
Pros
- It supports all video formats
- It supports real-time video editing
Cons
- The system requirements are resource-intensive
- Not ideal for beginners
Steps to Edit using Adobe Premiere Pro
- Step 1: Import and cut your video files on PowerDirector. You can begin by cutting out any unnecessary parts from the video. You can also add text transitions, text, and other edits.

- Step 2: Next, stabilize the video using the Warp stabilizer. Double click on Warp stabilizer on the Effects menu to stabile the video.

- Step 3: Finally, you can add audio and export the edited video file. Click on file, tap on export and select the format, presets, and the location to export your file.

Adobe After Effect

Supported System: Windows and Mac
This GoPro editor is compatible with Mac and offers many basic video editing features to ensure top-notch results. This GoPro editor is great for editors who want to add special effects like motion tracking to their videos. The after-effect function allows you to add a graphical element to a moving person, animal, car, or camera. You can also create cartoon effects, logos, stickers, or text to move seamlessly with the action onscreen.
In addition to its essential editing tools, you can also remove elements from your video with the pro-level digital rotoscoping tools. You can also use the after-effect to add elements to the missing video. Other features include 360, 3D, VR editing, transitions, lens distortions, and distortion effects for professional editing.
This GoPro video editor is an effective software and is best for adding visual effects to action camera videos. However, it lacks some essential video editing tools that you might need to make your video Hollywood standard. In addition, it also has a steep learning curve which makes it not ideal for beginners. Furthermore, as a GoPro video editor looking to do just the basic edits, then the After Effects is definitely not for you.
Pros
- It comes with realistic special effects
- It has a high-quality noise reduction
Cons
- It is not for beginners due to the steep learning curve
- It comes with only a 7-day free trial
- It is quite expensive
Steps to Edit using Adobe After Effects
- Step 1: Import your video by going to ‘file’ on the menu and clicking ‘import’ from the dropdown menu.

- You can begin by cutting out any unnecessary parts from the video. You can also add text transitions, text, and other edits.

- Step 2: Next, you can apply necessary editing such as trimming, transitioning, and other edits.

- Step 3: Finally, you can add audio and export the edited video file. Click on file, tap on export and select the format, presets, and the location to export your file.

Final Cut Pro

Supported System: Mac only
The Final Cut Pro is another best-paid GoPro video editor for editing GoPro videos on Mac. This video editor is ideal for editing 360 GoPro videos. This is because it offers all the editing tools you need to edit, import, and deliver both stereoscopic and monoscopic 360 videos. The GoPro video editors come with a lot of powerful features such as background noise removal, Multicam editing, color adjustment tools, and an object tracker.
You can use the GoPro video editor to visualize, remove camera rigs, change orientation, or straighten the horizon. Final Cut Pro can also easily apply graphics and effects to 360 videos and add 360 videos to regular videos with the tiny planet effect. With electronic stabilization, you can clean up your video and enhance your audience’s viewing experience. The magnetic timeline feature eliminates clip collisions and streamlines the video editing process.
Although the GoPro video editor has some notable GoPro features, it is expensive to purchase. However, it has a generous 90-day free trial to explore. It is also not beginner-friendly and requires time to learn, especially for new GoPro editors to understand. In addition, it supports several Video formats.
Pros
- It has convenient asset management functions
- Precision editing is sure with the magnetic timeline function
Cons
- It is expensive
- It is not ideal for GoPro beginners
Steps to Edit using Final Cut Pro
- Step 1: First, Launch the program
- Step 2: Import your video files to the timeline and begin editing.

- Step 3: Next, you can apply necessary editing such as trimming, transitioning, and other edits.

- Step 4: Finally, you can add audio and export the edited video file. Click on file, tap on export and select the format, presets, and the location to export your file.

Which should I Choose: Free or Paid GoPro Video Editor?
Many of these GoPro video editors for Mac (free and paid) are available on the internet. Therefore, it can be hard sometimes to choose the right GoPro video editor for Mac. However, you’ll need to consider factors before making your choice. Here are some of these factors.
Level of Expertise
This is a vital factor you should put into consideration before choosing a GoPro video editor. As a beginner, you wouldn’t need a GoPro editor that offers complex editing functions that you can’t use. Also, as a professional, you shouldn’t go for an editor that lacks the necessary editing tools to meet your editing needs. As an editor, you should totally be on the lookout for an editor that supports both beginners and professionals. This will remove the need to search for a new video editor at any experience level.
Interface
Another factor to consider is the user interface of your chosen video editor. When you go for a more friendly user interface, you will be saving yourself the time to get familiar with the software. Is the video editor free or paid? Regardless of the answer, check out the user interface before choosing one.
Formats
You also need to ensure that the editing software doesn’t limit you to specific video formats. You should go for a GoPro video editor that supports the common and trendy video formats. This will allow you to convert your edited videos when you need to share them.
Now, most free GoPro video editors offer just limited features to users, limiting your editing course. Furthermore, most paid GoPro video editors focus on a professional level, making it difficult for new editors to use. Therefore, you should totally opt for a GoPro video editor that succinctly supports all your editing needs.
FAQs About Editing Gopro Videos
- Can I edit GoPro videos like a Professional? Yes, you can. Learn to use advanced video editing features. The ideal thing to do is pick a GoPro video editor with a user-friendly interface to enable you to learn these professional methods.
- What is the best GoPro video editor for Mac? The best GoPro video editor for Mac devices depends on your level of expertise and what you want to achieve.
- Can I edit a GoPro video? Yes, you can. Find a GoPro editing software compatible with your Mac devices and ideal for your level of experience.
Conclusion
There are several GoPro video editors, and the editor you choose depends on your needs and your budget. It also depends on your level of experience and the equipment on the ground. However, we have a list of different GoPro video editors for you. Examine our reviews of these GoPro video editors and see which is perfect for you.

- Step 6: Once you open it, two folders will display. These folders are DCIM and MISC.

- Step 7: Click on the DCIM folder to find all videos stored on the device.

- Step 8: Finally, you can now begin uploading all your GoPro videos to Mac by simply copying and pasting.

Import GoPro Videos to Mac before editing – GoPro Quick App
Another option to import GoPro videos to Mac is the GoPro Quick app. GoPro quick app is a tool by GoPro designed to help view GoPro videos on Mac and import them. Having this app on your Mac device is relatively easy. First, you have to download its setup from the GoPro website and install it. So far, this app is one of the best tools to view and import GoPro files to your Mac device. Here are the steps to importing GoPro videos to Mac while getting set to edit.
- Step 1: First thing first, Launch the app. However, if you have not installed the app, you should quickly download and install the app.

- Step 2: Now, you can connect the GoPro camera to your Mac. You can do this by using a USB cable.
- Step 3: After launching the app, you will see an icon labeled Import Filesdisplayed at the interface.

- Step 4: from here on, you will also see an icon to import the videos from your GoPro camera into your Mac device.
When the import is complete, you can now locate your GoPro videos in the folder of your choice. Now, you can close the GoPro quick app, unplug the GoPro camera and get ready to edit your videos.
Best GoPro Video Editor on Mac
A lot of people understand that GoPro is the best way to make your video look like a professional shot. After shooting the video, you’ll obviously want to make some edits to make them look more professional before sharing them. After all, no one wants to watch poor-quality videos, bad noises, and other unprofessional clips. Therefore, we have a list of the best GoPro editor for Mac in this article. Keep reading to learn about the best GoPro video editor on Mac.
Best GoPro Video Editor on Mac – Filmora Video Editor

Supported System: Mac and Windows
A lot of free video editing software usually comes as either too straightforward or too challenging to understand. While other video editing software lacks vital editing features such as color correction and audio or noise editing features. However, the Filmora Video Editor for Mac bridges the gap and is undoubtedly the best GoPro Video editor on Mac.
This video editing software is an easy-to-use editing tool totally equipped with a lot of video editing functions. With Filmora, you can edit your GoPro videos on your Mac like an expert and expect a professional outcome. Filmora offers excellent performance and enhances video quality taking the user experience to a whole new level.
Additionally, Filmora is an editing tool with helpful functionality taking the user experience to a whole new level. Finally, this tool is indispensable due to its speed, intuitive user interface, and other file format support.
For Win 7 or later (64-bit)
For macOS 10.14 or later
Filmora Features
- Filmora editing tool is versatile and supports other video formats like MP4, MOV, MKV, AVCHD, etc.
- You can cut, crop, split, trim, and even combine clips with just a few clicks.
- Filmora has access to several advanced video effects such as royalty-free music, transition, animated titles, and motion elements.
- With Filmora color tuning features, your videos can look like professional Hollywood videos.
- You can also edit sounds on your video with a noise removal feature, audio equalizer, and audio keyframing tools.
- You get 500+ free special video effects to create and customize your videos yourself.
- Filmora has access to advanced video effects like PIP, audio mixer, and green screen, which you can add to your videos.
- Access to 1000+ effects downloading resources to make videos in any desired styles.
Steps to Editing Videos on Mac Using Filmora
Want to edit your GoPro videos the right way? Editing your GoPro videos on Mac with Filmora is relatively easy and will only take a few clicks. Read and follow these steps below to learn to edit GoPro videos on Mac with this easy-to-use GoPro video editor.
- Step 1: Import the GoPro video files
First, you launch the GoPro video editor and then click the “Import Media here” button. This will upload the GoPro video clips to the program. You can save these files in a suitable location for easy access before you begin editing.

- Step 2: Edit the GoPro Video clips

Secondly, you should drag the GoPro video clips from the folder or User’s album to the timeline and begin editing.
To trim your GoPro videos, simply mouser over the clip from the beginning to the end of the video. You should do this until the trim icon is displayed. The trim icon is labeled as “I” on the editing timeline. You can drag the trim icon forward or backward to trim the video as you desire.
Aside from the trimming option, you can also apply split footage, video stabilization, and even add transitions between two clips. You can also combine GoPro videos and rotate GoPro videos by simply tapping the icons respectively.

- Step 3: Export the edited GoPro video files

Once you finish editing, you can now navigate to the “Export” icon. Furthermore, you can also select the save path and file format from the displayed output window. After this selection, you can finally choose the “Export” icon. Once you complete this, you can find your edited video file in the same path.
More Free GoPro video editor on Mac to Edit Gopro Videos
In this section, we will list out some of the best free GoPro video editors to successfully edit your videos on Mac. These programs are, but you will have to download them to enjoy all the editing tools.
PowerDirector

Supported System: Windows and Mac
We have PowerDirector as the best overall editor on our list of best free GoPro video editors on Mac. This free GoPro video editor is compatible with Mac and has a robust video editing program. If you are looking for a free GoPro video editor with a wide range of exciting editing features, this is one of the best options. One of the benefits of using this GoPro video editor is that it comes with an Action Camera Center.
It has tons of cool effects, titles, filters, and templates to explore, especially if you want to make more action camera masterpieces. In addition, this video editor has special editing and effects tools to improve your action camera video. For example, you can stabilize your shaky video, apply cool speed effects, and correct fish-eye distortion in some minutes. You can also use the slow-motion effect, zoom, correct color problems, and freeze frame with just a few clicks.
The GoPro editor also comes with noise correction and video denoise to make your video crystal clear and remove unwanted audio noise. In addition, PowerDirector has thousands of royalty-free stock assets such as sound effects and background music. In essence, PowerDirector is a GoPro video editor that offers everything you need to produce, enhance and cut thrilling action videos. It is versatile, best for action footage editing, and supports several video formats.
Pros
- It is beginner-friendly
- It comes with easy-to-use action camera-specific editing tools
Cons
- While it is free, you need a subscription to enjoy the latest features.
Steps to Edit using PowerDirector
- Step 1: Launch the app and select ‘full mode’ to begin editing your video
- Step 2: Select’ import media folder’ to get the videos you wish to edit
- Step 3: You can now browse the folder on your Mac device and select the folder with the videos. Then Click ‘Select folder’ to move them into the editor’s media library.

- Step 4: Now, the editing process can begin. You can stabilize and change the speed of your videos with PowerDirector.

- You can add title text and motion blur to your GoPro videos if you like that.

- If you want to include transitions, you can do so by selecting the transition room.
- Step 5: Next, select the ‘produce’ button to export your video once you are sure that the editing is complete.

- Step 6: Change the video format before exporting.

Once you select the video format you prefer, you will be able to save your GoPro video.
VideoProc Vlogger

Supported System: Windows and Mac
VideoProc Vlogger is the best GoPro editor for anyone looking for speed adjustment. The video editor uses visualized speed ramping to alter the speed throughout a clip. This program contains over 20-speed features to help you quickly change the tone and tempo of your GoPro video. Furthermore, VideoProc Vlogger is beginner-friendly with a lot of advanced editing features. These features include automatic keyframes and flexible Bezier curves to slow parts of a video without splitting it.
This free GoPro video editor can simulate motion roll, dolly, tilt, and even truck effects. You can also push in and out and stylize your video clips with rotation, fast zooms, and shakes. With VideoProc Vlogger, you fix grain video, remove fish-eye, extract audio and apply motion crops to your video. The video editor is best at creating new motion trails to change the action of the video.
Although VideoProc Vlogger is a free video editor, it definitely lacks some advanced editing features. For example, you can edit your videos without the annoying ads or watermarks. In addition, the video editor is designed for beginners, content creators, and hobbyists as it lacks features like video stabilization. So while the video editor is not for professionals, it’s worth trying out.
Pros
- Requires low system requirements
- It is entirely free with no ads and watermarks
Cons
- It lacks advanced editing features
- Rendering is somewhat slow
Steps to Edit using VideoProc Vlogger
- Step 1: First, import your GoPro videos from your Mac device to VideoProc Vlogger.

Simply Launch VideoProc Vlogger on your Mac, hit the plus icon in the media library, and add and import the videos.
- Step 2: Now, split and cut the GoPro Videos.

Simply drag the video clips to the timeline and begin editing. Now, put the playhead to exactly where you want to split the video and tap the split button.
- Step 3: You can also fix GoPro lens distortion.

If you feel that your video looks distorted, tick the lens distortion box to resolve the issue.

- Step 4: You can do the color correction or grading for any dark GoPro videos. Simply apply a preset aesthetic filter or simply adjust color normally.
- Step 5: Adjust the speed of the GoPro video.

To adjust the speed of the video, click speed in the toolbar to open the speed editor. Then change as you desire.
- Step 6: You can also add transitions, titles, and effects by opening the panels of transitions, effects, and tiles.

- Then drag a transition to the space between two video clips, same with titles to the subtitle and effect to the effect track.

- Step 7: Next, remove noise and background music by clicking the video track and tapping “detach” to separate the audio from the video.

- You can also add music to replace the background noise.
- Step 8: Finally, after the editing, you can export the GoPro video to your Mac device by setting the file name, format, file location, and video quality.

iMovie

Supported System: Mac only
This editor is designed to ensure an excelling editing process for Mac users. Therefore, beginners, content creators, and even hobbyists can utilize this video editor to edit their videos. Although iMovie is a free GoPro video editor, it offers incredible editing features to make your video look more professional. These features include HD and 4K video support and speed adjustment tools that can slow down or speed up your video clips.
Although it comes free on all Mac devices, iMovie also has tons of themes, templates, and presets to make editing a breeze. For example, you can select the video clips that will be automatically styled and edited with titles, transitions, and music. You can make all these changes with just a few clicks. In addition, you can also rearrange, trim, split, and even delete your ready-made video clips.
Furthermore, you can always modify the shift focus and depth of field while editing your video. However, it lacks some advanced features you will need while editing, such as Multicam, motion tracking, and 360 editing. On the other hand, it has a user-friendly interface with essential editing functions.
Pros
- It has a simple and user-friendly interface
- It is definitely beginner-friendly
Cons
- It lacks essential and advanced GoPro editing features and functions
Steps to Edit using iMovie
- Step 1: first, you have to launch the iMovie and create a video project.

- Step 2: Now, you can click the Import button to import your GoPro video files from your Mac to it.

- Step 3: Drag the video files from the program media library to the timeline for editing.

- Step 4: Load a song to the audio track if you wish to add background music to your video.
- Step 5: To split your video into smaller parts, right-click on a clip.
- Step 6: to edit your GoPro video with advanced tools like color correction, crop, grading, speed, and volume, simply move to the toolbar just above the timeline.
- Step 7: to add title, and transitions, you can drag a title and transition to the desired space between two clips.
- Step 8: preview and export your GoPro video from iMovie in the preferred format.

More Paid GoPro video editor on Mac to Cut MP4 Videos
If you desire GoPro video editors that offer more than just the basic editing features, you should try the paid GoPro video editors. The paid GoPro video editors offer more professional editing features for Mac users. In this section, you’ll learn about our top three paid GoPro video editors to edit your GoPro videos on Mac.
Adobe Premiere Pro

Supported System: Windows and Mac
This paid GoPro video editor is best for professionals who have experience creating video projects. This GoPro editing tool is compatible with Mac and Windows devices and also supports several video formats. Professionals use this video editor to edit top-notch videos such as Hollywood action movies and TV shows. In addition, it offers a long list of powerful features ideal for standard and action video editing.
Some of these professional features include Multicam, 360-degree, VR editing, and will export in up to 8k. The GoPro video editors also have a lot of sophisticated video stabilization tools, such as the warp stabilizer effect. The video stabilizer function help reduce camera shake, especially when zooming in. Other features include unlimited video tracks, lens distortion, access to the creative cloud and will match video to music.
In addition, the GoPro video editor only offers a 7-days free trial and is relatively expensive. Although Adobe Premiere Pro video editor is professional and high-quality, it has a steep learning curve. The steep learning curve is not appropriate for beginners.
Pros
- It supports all video formats
- It supports real-time video editing
Cons
- The system requirements are resource-intensive
- Not ideal for beginners
Steps to Edit using Adobe Premiere Pro
- Step 1: Import and cut your video files on PowerDirector. You can begin by cutting out any unnecessary parts from the video. You can also add text transitions, text, and other edits.

- Step 2: Next, stabilize the video using the Warp stabilizer. Double click on Warp stabilizer on the Effects menu to stabile the video.

- Step 3: Finally, you can add audio and export the edited video file. Click on file, tap on export and select the format, presets, and the location to export your file.

Adobe After Effect

Supported System: Windows and Mac
This GoPro editor is compatible with Mac and offers many basic video editing features to ensure top-notch results. This GoPro editor is great for editors who want to add special effects like motion tracking to their videos. The after-effect function allows you to add a graphical element to a moving person, animal, car, or camera. You can also create cartoon effects, logos, stickers, or text to move seamlessly with the action onscreen.
In addition to its essential editing tools, you can also remove elements from your video with the pro-level digital rotoscoping tools. You can also use the after-effect to add elements to the missing video. Other features include 360, 3D, VR editing, transitions, lens distortions, and distortion effects for professional editing.
This GoPro video editor is an effective software and is best for adding visual effects to action camera videos. However, it lacks some essential video editing tools that you might need to make your video Hollywood standard. In addition, it also has a steep learning curve which makes it not ideal for beginners. Furthermore, as a GoPro video editor looking to do just the basic edits, then the After Effects is definitely not for you.
Pros
- It comes with realistic special effects
- It has a high-quality noise reduction
Cons
- It is not for beginners due to the steep learning curve
- It comes with only a 7-day free trial
- It is quite expensive
Steps to Edit using Adobe After Effects
- Step 1: Import your video by going to ‘file’ on the menu and clicking ‘import’ from the dropdown menu.

- You can begin by cutting out any unnecessary parts from the video. You can also add text transitions, text, and other edits.

- Step 2: Next, you can apply necessary editing such as trimming, transitioning, and other edits.

- Step 3: Finally, you can add audio and export the edited video file. Click on file, tap on export and select the format, presets, and the location to export your file.

Final Cut Pro

Supported System: Mac only
The Final Cut Pro is another best-paid GoPro video editor for editing GoPro videos on Mac. This video editor is ideal for editing 360 GoPro videos. This is because it offers all the editing tools you need to edit, import, and deliver both stereoscopic and monoscopic 360 videos. The GoPro video editors come with a lot of powerful features such as background noise removal, Multicam editing, color adjustment tools, and an object tracker.
You can use the GoPro video editor to visualize, remove camera rigs, change orientation, or straighten the horizon. Final Cut Pro can also easily apply graphics and effects to 360 videos and add 360 videos to regular videos with the tiny planet effect. With electronic stabilization, you can clean up your video and enhance your audience’s viewing experience. The magnetic timeline feature eliminates clip collisions and streamlines the video editing process.
Although the GoPro video editor has some notable GoPro features, it is expensive to purchase. However, it has a generous 90-day free trial to explore. It is also not beginner-friendly and requires time to learn, especially for new GoPro editors to understand. In addition, it supports several Video formats.
Pros
- It has convenient asset management functions
- Precision editing is sure with the magnetic timeline function
Cons
- It is expensive
- It is not ideal for GoPro beginners
Steps to Edit using Final Cut Pro
- Step 1: First, Launch the program
- Step 2: Import your video files to the timeline and begin editing.

- Step 3: Next, you can apply necessary editing such as trimming, transitioning, and other edits.

- Step 4: Finally, you can add audio and export the edited video file. Click on file, tap on export and select the format, presets, and the location to export your file.

Which should I Choose: Free or Paid GoPro Video Editor?
Many of these GoPro video editors for Mac (free and paid) are available on the internet. Therefore, it can be hard sometimes to choose the right GoPro video editor for Mac. However, you’ll need to consider factors before making your choice. Here are some of these factors.
Level of Expertise
This is a vital factor you should put into consideration before choosing a GoPro video editor. As a beginner, you wouldn’t need a GoPro editor that offers complex editing functions that you can’t use. Also, as a professional, you shouldn’t go for an editor that lacks the necessary editing tools to meet your editing needs. As an editor, you should totally be on the lookout for an editor that supports both beginners and professionals. This will remove the need to search for a new video editor at any experience level.
Interface
Another factor to consider is the user interface of your chosen video editor. When you go for a more friendly user interface, you will be saving yourself the time to get familiar with the software. Is the video editor free or paid? Regardless of the answer, check out the user interface before choosing one.
Formats
You also need to ensure that the editing software doesn’t limit you to specific video formats. You should go for a GoPro video editor that supports the common and trendy video formats. This will allow you to convert your edited videos when you need to share them.
Now, most free GoPro video editors offer just limited features to users, limiting your editing course. Furthermore, most paid GoPro video editors focus on a professional level, making it difficult for new editors to use. Therefore, you should totally opt for a GoPro video editor that succinctly supports all your editing needs.
FAQs About Editing Gopro Videos
- Can I edit GoPro videos like a Professional? Yes, you can. Learn to use advanced video editing features. The ideal thing to do is pick a GoPro video editor with a user-friendly interface to enable you to learn these professional methods.
- What is the best GoPro video editor for Mac? The best GoPro video editor for Mac devices depends on your level of expertise and what you want to achieve.
- Can I edit a GoPro video? Yes, you can. Find a GoPro editing software compatible with your Mac devices and ideal for your level of experience.
Conclusion
There are several GoPro video editors, and the editor you choose depends on your needs and your budget. It also depends on your level of experience and the equipment on the ground. However, we have a list of different GoPro video editors for you. Examine our reviews of these GoPro video editors and see which is perfect for you.
Best 7 Color Match Paint Apps
Best 7 Color Match Paint Apps
An easy yet powerful editor
Numerous effects to choose from
Detailed tutorials provided by the official channel
In today’s digital world, applications make tax more manageable, efficient, and labor-intensive. In addition, when it comes to the painting of the house or paint match, this application will allow you to do everything digitally by testing out different colors on your own to match a color in your favorite picture.

You can find paint color from photos to make your choice on matching paint color, and also, there are several ways you can match paints to your desired color. There is a famous saying that Color is Life, and the house is the place where you live in your life. So, the proper color matching will bring brightness to your life. Isn’t that? Using the appropriate paint color finder will enable you to make a wise choice to paint your house effectively.
In this article
01 [Steps for Matching a Paint Color](#Part 1)
02 [What’s the Best 7 Color Match Paint Apps](#Part 2)
Part 1 Steps for Matching a Paint Color
Become a paint match Pro by following these steps below to match paint color. Here are five steps. Paying attention to these steps shall make choosing the correct color control system much more accessible and provide a more comprehensive understanding of matching colors:

01Step 1: Identify the desired color/hue
Eyeball the color and choose a match closest to the color you want, but this method is likely to match existing paint in a noticeable area. In addition, it is a perfectly acceptable option when you want to choose a closer color.
02Step 2: Select an Application
Please make use of paint matching applications to make it easier. Oh, they work differently but provide the same solution.
● Just download the application to your smartphone,
● Take a picture of the painted surface you want to match in natural light,
● Upload it to the heart.
The app will get you the closest cousin, and more so you can preview recommended accent color and design from the comfort of your home.
Alternatively, you can take a picture with your phone in natural light without using a caller app and take the photo to your favorite paint store. They will match the color very closely with their installed spectrophotometer. Although there might be variations in color display on phone cameras, we most assuredly get a satisfactory result.
03Step 3: Paint store
When you are out of options or other options to use and need a perfect match for an already painted wall, you need to collect samples and take them to the paint store. Using a sharp utility blade, scrape a small square on a section of the painted drywall
if you want to match a pale yellow, bright blue, or stormy sky grey furniture or wall. All you need is to head to your favorite paint store and gather up a selection of paint chips close to the hue you are trying to match. After that, bring the trip home and hang them on the surface which color you want to duplicate, then observe multiple lights using lamp light and daylight, whichever chip matches most closely.
Part 2 What’s the Best 7 Color Match Paint Apps
One of the essential tips to making a design come alive is choosing the right color combination, and when you want to make your audience feel something, you can achieve this with the use of color. Whether you choose the perfect color combination for your logo or website or choose a color for a flyer, business card, and photograph, everything remains the same. Most times, it isn’t easy to match colors together. Thus, we compiled a list of the best mobile application you can use in matching colors at a go.
Here are seven (7) auto paint matching applications that we recommend when you want to tackle an exterior and interior painting Project:
01Paint My Place
The Paint My Place application is a fantastic virtual reality for Android and iPhone devices. It allows you to experience different colors on your walls without picking up a brush. You need to upload an image of your space, choose your paint brand, and swipe with your fingers.
Cost: Basic Free, advanced $2.99
Pros:
● Access to thousands of color palette
● The app is handy
● Easy to use
Cons:
● Painting around furniture or design details is difficult
● It is sometimes not accurate
● Advanced features need a subscription
02ColorView Finder
ColorView Finder is handy for iPad and iPhone users. It is used for the first house painting stage when looking for an inspirational area of color palettes. Focus your camera on an object that dries the attention, and the app will automatically generate an array of five color combinations.
Cost: Basic (Free), $1.99 (Pro)
Pros:
● Provides you with a continuous selection of color palettes to mature image inspiration
● Lots of customization feature
● It has a creative layout feature
Cons:
● The free version has a watermark
● To access the thousands of features, you will need to upgrade to the pro version
● Auto-generation sometimes avoid selecting color choices
03Paint My Wall

Paint My Wall is an effortless and easy-to-use application available for iOS devices and allows you to use images to explore color options or upload your photo to test. It will enable you to paint with your finger digitally or use the intelligent feel to feel a wall completely.
Cost: free
Pros:
● It is easy to use
● It is quick to test various color option
● The nice erase function gives a chance for modification.
Cons:
● There are a few ads that you must skip to move on
● It has limited customization features
● Edge detection does not working properly
● ColorSnap
ColorSnap is the best color palette creator that allows you to explore all of the paint colors and gives you the ability to create your color palette. Choose the color you like and see coordinating and similar colors to take it to the next level. Accessible to both Android and iOS devices.
Cost: free
Pros:
● It is easy to use
● It is the best color palette creator
● It is a good app for getting started on your painting project
Cons:
● The amount of paint options available in the application is a bit overwhelming
● It has limited customization features
● It does not give a real vision of the color as compared to digitalized look.
04Paint Tester
The Paint Tester app is available on Android and iOS devices and provides a quick way to find my paint color and purchase it right away. Choose your paint color from the two options, test the color on your surface and then select the cut button to be taken to the retailer.
Cost: $2.99
Pros:
● The app is easy to use
● It is quick to use for fast projects and to find a paint color
● Can save color combination to photo album.
Cons:
● It has limited customization features
● Ads showed up in between.
● Contain certain bugs
05Home Harmony

Home Harmony is a perfect all in 1 tool for iOS devices for designing an exterior room. The app is straightforward to use and makes switching between paint brands easier.
Cost: Free
Pros:
● The app is easy to use
● Lots of customization options
● You can try multiple color options.
Cons:
● The app is a bit slow compared to others
● Ads under Free Version.
● Sometimes crash or freeze out.
06ColorPic
ColorPic is a color hub for Amazon lovers and is available on Android and iOS devices. It gives you a view of your new paint and an easy order button straight from Amazon. A building loan calculator tells you the total number of cans you should purchase for your project.
Cost: $2.99
Pros:
● You can explore the entire color from the main menu
● The before and after images shows how pressure paints look
● Color-changing wheels give a quick option to choose from.
Cons:
● The sample images in the harp gallery are not downloadable
● No free version
● Sometimes color changing does not work well
07The New Filmora 11
Note: If you want to have a color match function from your PC, there is one ultimate solution. Yes, we are talking about the latest Wondershare launch, Filmora 11. The new Filmora 11 can do color correction, matching in a batch.
For Win 7 or later (64-bit)
For macOS 10.12 or later
● You can opt for customized color correction
● The color setting, degree adjustment
● Comparison preview function and a lot more.
● Key Takeaways from This Episode →
● The article covers how to get paint color matching
● Steps to match paint color
● Some of the prime application that assists in color matching.
● The color match in Filmora allows you to color correct the clip as a badge instead of editing it individually.
In today’s digital world, applications make tax more manageable, efficient, and labor-intensive. In addition, when it comes to the painting of the house or paint match, this application will allow you to do everything digitally by testing out different colors on your own to match a color in your favorite picture.

You can find paint color from photos to make your choice on matching paint color, and also, there are several ways you can match paints to your desired color. There is a famous saying that Color is Life, and the house is the place where you live in your life. So, the proper color matching will bring brightness to your life. Isn’t that? Using the appropriate paint color finder will enable you to make a wise choice to paint your house effectively.
In this article
01 [Steps for Matching a Paint Color](#Part 1)
02 [What’s the Best 7 Color Match Paint Apps](#Part 2)
Part 1 Steps for Matching a Paint Color
Become a paint match Pro by following these steps below to match paint color. Here are five steps. Paying attention to these steps shall make choosing the correct color control system much more accessible and provide a more comprehensive understanding of matching colors:

01Step 1: Identify the desired color/hue
Eyeball the color and choose a match closest to the color you want, but this method is likely to match existing paint in a noticeable area. In addition, it is a perfectly acceptable option when you want to choose a closer color.
02Step 2: Select an Application
Please make use of paint matching applications to make it easier. Oh, they work differently but provide the same solution.
● Just download the application to your smartphone,
● Take a picture of the painted surface you want to match in natural light,
● Upload it to the heart.
The app will get you the closest cousin, and more so you can preview recommended accent color and design from the comfort of your home.
Alternatively, you can take a picture with your phone in natural light without using a caller app and take the photo to your favorite paint store. They will match the color very closely with their installed spectrophotometer. Although there might be variations in color display on phone cameras, we most assuredly get a satisfactory result.
03Step 3: Paint store
When you are out of options or other options to use and need a perfect match for an already painted wall, you need to collect samples and take them to the paint store. Using a sharp utility blade, scrape a small square on a section of the painted drywall
if you want to match a pale yellow, bright blue, or stormy sky grey furniture or wall. All you need is to head to your favorite paint store and gather up a selection of paint chips close to the hue you are trying to match. After that, bring the trip home and hang them on the surface which color you want to duplicate, then observe multiple lights using lamp light and daylight, whichever chip matches most closely.
Part 2 What’s the Best 7 Color Match Paint Apps
One of the essential tips to making a design come alive is choosing the right color combination, and when you want to make your audience feel something, you can achieve this with the use of color. Whether you choose the perfect color combination for your logo or website or choose a color for a flyer, business card, and photograph, everything remains the same. Most times, it isn’t easy to match colors together. Thus, we compiled a list of the best mobile application you can use in matching colors at a go.
Here are seven (7) auto paint matching applications that we recommend when you want to tackle an exterior and interior painting Project:
01Paint My Place

The Paint My Place application is a fantastic virtual reality for Android and iPhone devices. It allows you to experience different colors on your walls without picking up a brush. You need to upload an image of your space, choose your paint brand, and swipe with your fingers.
Cost: Basic Free, advanced $2.99
Pros:
● Access to thousands of color palette
● The app is handy
● Easy to use
Cons:
● Painting around furniture or design details is difficult
● It is sometimes not accurate
● Advanced features need a subscription
02ColorView Finder

ColorView Finder is handy for iPad and iPhone users. It is used for the first house painting stage when looking for an inspirational area of color palettes. Focus your camera on an object that dries the attention, and the app will automatically generate an array of five color combinations.
Cost: Basic (Free), $1.99 (Pro)
Pros:
● Provides you with a continuous selection of color palettes to mature image inspiration
● Lots of customization feature
● It has a creative layout feature
Cons:
● The free version has a watermark
● To access the thousands of features, you will need to upgrade to the pro version
● Auto-generation sometimes avoid selecting color choices
03Paint My Wall

Paint My Wall is an effortless and easy-to-use application available for iOS devices and allows you to use images to explore color options or upload your photo to test. It will enable you to paint with your finger digitally or use the intelligent feel to feel a wall completely.
Cost: free
Pros:
● It is easy to use
● It is quick to test various color option
● The nice erase function gives a chance for modification.
Cons:
● There are a few ads that you must skip to move on
● It has limited customization features
● Edge detection does not working properly
● ColorSnap

ColorSnap is the best color palette creator that allows you to explore all of the paint colors and gives you the ability to create your color palette. Choose the color you like and see coordinating and similar colors to take it to the next level. Accessible to both Android and iOS devices.
Cost: free
Pros:
● It is easy to use
● It is the best color palette creator
● It is a good app for getting started on your painting project
Cons:
● The amount of paint options available in the application is a bit overwhelming
● It has limited customization features
● It does not give a real vision of the color as compared to digitalized look.
04Paint Tester

The Paint Tester app is available on Android and iOS devices and provides a quick way to find my paint color and purchase it right away. Choose your paint color from the two options, test the color on your surface and then select the cut button to be taken to the retailer.
Cost: $2.99
Pros:
● The app is easy to use
● It is quick to use for fast projects and to find a paint color
● Can save color combination to photo album.
Cons:
● It has limited customization features
● Ads showed up in between.
● Contain certain bugs
05Home Harmony

Home Harmony is a perfect all in 1 tool for iOS devices for designing an exterior room. The app is straightforward to use and makes switching between paint brands easier.
Cost: Free
Pros:
● The app is easy to use
● Lots of customization options
● You can try multiple color options.
Cons:
● The app is a bit slow compared to others
● Ads under Free Version.
● Sometimes crash or freeze out.
06ColorPic

ColorPic is a color hub for Amazon lovers and is available on Android and iOS devices. It gives you a view of your new paint and an easy order button straight from Amazon. A building loan calculator tells you the total number of cans you should purchase for your project.
Cost: $2.99
Pros:
● You can explore the entire color from the main menu
● The before and after images shows how pressure paints look
● Color-changing wheels give a quick option to choose from.
Cons:
● The sample images in the harp gallery are not downloadable
● No free version
● Sometimes color changing does not work well
07The New Filmora 11
Note: If you want to have a color match function from your PC, there is one ultimate solution. Yes, we are talking about the latest Wondershare launch, Filmora 11. The new Filmora 11 can do color correction, matching in a batch.
For Win 7 or later (64-bit)
For macOS 10.12 or later
● You can opt for customized color correction
● The color setting, degree adjustment
● Comparison preview function and a lot more.
● Key Takeaways from This Episode →
● The article covers how to get paint color matching
● Steps to match paint color
● Some of the prime application that assists in color matching.
● The color match in Filmora allows you to color correct the clip as a badge instead of editing it individually.
In today’s digital world, applications make tax more manageable, efficient, and labor-intensive. In addition, when it comes to the painting of the house or paint match, this application will allow you to do everything digitally by testing out different colors on your own to match a color in your favorite picture.

You can find paint color from photos to make your choice on matching paint color, and also, there are several ways you can match paints to your desired color. There is a famous saying that Color is Life, and the house is the place where you live in your life. So, the proper color matching will bring brightness to your life. Isn’t that? Using the appropriate paint color finder will enable you to make a wise choice to paint your house effectively.
In this article
01 [Steps for Matching a Paint Color](#Part 1)
02 [What’s the Best 7 Color Match Paint Apps](#Part 2)
Part 1 Steps for Matching a Paint Color
Become a paint match Pro by following these steps below to match paint color. Here are five steps. Paying attention to these steps shall make choosing the correct color control system much more accessible and provide a more comprehensive understanding of matching colors:

01Step 1: Identify the desired color/hue
Eyeball the color and choose a match closest to the color you want, but this method is likely to match existing paint in a noticeable area. In addition, it is a perfectly acceptable option when you want to choose a closer color.
02Step 2: Select an Application
Please make use of paint matching applications to make it easier. Oh, they work differently but provide the same solution.
● Just download the application to your smartphone,
● Take a picture of the painted surface you want to match in natural light,
● Upload it to the heart.
The app will get you the closest cousin, and more so you can preview recommended accent color and design from the comfort of your home.
Alternatively, you can take a picture with your phone in natural light without using a caller app and take the photo to your favorite paint store. They will match the color very closely with their installed spectrophotometer. Although there might be variations in color display on phone cameras, we most assuredly get a satisfactory result.
03Step 3: Paint store
When you are out of options or other options to use and need a perfect match for an already painted wall, you need to collect samples and take them to the paint store. Using a sharp utility blade, scrape a small square on a section of the painted drywall
if you want to match a pale yellow, bright blue, or stormy sky grey furniture or wall. All you need is to head to your favorite paint store and gather up a selection of paint chips close to the hue you are trying to match. After that, bring the trip home and hang them on the surface which color you want to duplicate, then observe multiple lights using lamp light and daylight, whichever chip matches most closely.
Part 2 What’s the Best 7 Color Match Paint Apps
One of the essential tips to making a design come alive is choosing the right color combination, and when you want to make your audience feel something, you can achieve this with the use of color. Whether you choose the perfect color combination for your logo or website or choose a color for a flyer, business card, and photograph, everything remains the same. Most times, it isn’t easy to match colors together. Thus, we compiled a list of the best mobile application you can use in matching colors at a go.
Here are seven (7) auto paint matching applications that we recommend when you want to tackle an exterior and interior painting Project:
01Paint My Place

The Paint My Place application is a fantastic virtual reality for Android and iPhone devices. It allows you to experience different colors on your walls without picking up a brush. You need to upload an image of your space, choose your paint brand, and swipe with your fingers.
Cost: Basic Free, advanced $2.99
Pros:
● Access to thousands of color palette
● The app is handy
● Easy to use
Cons:
● Painting around furniture or design details is difficult
● It is sometimes not accurate
● Advanced features need a subscription
02ColorView Finder

ColorView Finder is handy for iPad and iPhone users. It is used for the first house painting stage when looking for an inspirational area of color palettes. Focus your camera on an object that dries the attention, and the app will automatically generate an array of five color combinations.
Cost: Basic (Free), $1.99 (Pro)
Pros:
● Provides you with a continuous selection of color palettes to mature image inspiration
● Lots of customization feature
● It has a creative layout feature
Cons:
● The free version has a watermark
● To access the thousands of features, you will need to upgrade to the pro version
● Auto-generation sometimes avoid selecting color choices
03Paint My Wall

Paint My Wall is an effortless and easy-to-use application available for iOS devices and allows you to use images to explore color options or upload your photo to test. It will enable you to paint with your finger digitally or use the intelligent feel to feel a wall completely.
Cost: free
Pros:
● It is easy to use
● It is quick to test various color option
● The nice erase function gives a chance for modification.
Cons:
● There are a few ads that you must skip to move on
● It has limited customization features
● Edge detection does not working properly
● ColorSnap

ColorSnap is the best color palette creator that allows you to explore all of the paint colors and gives you the ability to create your color palette. Choose the color you like and see coordinating and similar colors to take it to the next level. Accessible to both Android and iOS devices.
Cost: free
Pros:
● It is easy to use
● It is the best color palette creator
● It is a good app for getting started on your painting project
Cons:
● The amount of paint options available in the application is a bit overwhelming
● It has limited customization features
● It does not give a real vision of the color as compared to digitalized look.
04Paint Tester

The Paint Tester app is available on Android and iOS devices and provides a quick way to find my paint color and purchase it right away. Choose your paint color from the two options, test the color on your surface and then select the cut button to be taken to the retailer.
Cost: $2.99
Pros:
● The app is easy to use
● It is quick to use for fast projects and to find a paint color
● Can save color combination to photo album.
Cons:
● It has limited customization features
● Ads showed up in between.
● Contain certain bugs
05Home Harmony

Home Harmony is a perfect all in 1 tool for iOS devices for designing an exterior room. The app is straightforward to use and makes switching between paint brands easier.
Cost: Free
Pros:
● The app is easy to use
● Lots of customization options
● You can try multiple color options.
Cons:
● The app is a bit slow compared to others
● Ads under Free Version.
● Sometimes crash or freeze out.
06ColorPic

ColorPic is a color hub for Amazon lovers and is available on Android and iOS devices. It gives you a view of your new paint and an easy order button straight from Amazon. A building loan calculator tells you the total number of cans you should purchase for your project.
Cost: $2.99
Pros:
● You can explore the entire color from the main menu
● The before and after images shows how pressure paints look
● Color-changing wheels give a quick option to choose from.
Cons:
● The sample images in the harp gallery are not downloadable
● No free version
● Sometimes color changing does not work well
07The New Filmora 11
Note: If you want to have a color match function from your PC, there is one ultimate solution. Yes, we are talking about the latest Wondershare launch, Filmora 11. The new Filmora 11 can do color correction, matching in a batch.
For Win 7 or later (64-bit)
For macOS 10.12 or later
● You can opt for customized color correction
● The color setting, degree adjustment
● Comparison preview function and a lot more.
● Key Takeaways from This Episode →
● The article covers how to get paint color matching
● Steps to match paint color
● Some of the prime application that assists in color matching.
● The color match in Filmora allows you to color correct the clip as a badge instead of editing it individually.
In today’s digital world, applications make tax more manageable, efficient, and labor-intensive. In addition, when it comes to the painting of the house or paint match, this application will allow you to do everything digitally by testing out different colors on your own to match a color in your favorite picture.

You can find paint color from photos to make your choice on matching paint color, and also, there are several ways you can match paints to your desired color. There is a famous saying that Color is Life, and the house is the place where you live in your life. So, the proper color matching will bring brightness to your life. Isn’t that? Using the appropriate paint color finder will enable you to make a wise choice to paint your house effectively.
In this article
01 [Steps for Matching a Paint Color](#Part 1)
02 [What’s the Best 7 Color Match Paint Apps](#Part 2)
Part 1 Steps for Matching a Paint Color
Become a paint match Pro by following these steps below to match paint color. Here are five steps. Paying attention to these steps shall make choosing the correct color control system much more accessible and provide a more comprehensive understanding of matching colors:

01Step 1: Identify the desired color/hue
Eyeball the color and choose a match closest to the color you want, but this method is likely to match existing paint in a noticeable area. In addition, it is a perfectly acceptable option when you want to choose a closer color.
02Step 2: Select an Application
Please make use of paint matching applications to make it easier. Oh, they work differently but provide the same solution.
● Just download the application to your smartphone,
● Take a picture of the painted surface you want to match in natural light,
● Upload it to the heart.
The app will get you the closest cousin, and more so you can preview recommended accent color and design from the comfort of your home.
Alternatively, you can take a picture with your phone in natural light without using a caller app and take the photo to your favorite paint store. They will match the color very closely with their installed spectrophotometer. Although there might be variations in color display on phone cameras, we most assuredly get a satisfactory result.
03Step 3: Paint store
When you are out of options or other options to use and need a perfect match for an already painted wall, you need to collect samples and take them to the paint store. Using a sharp utility blade, scrape a small square on a section of the painted drywall
if you want to match a pale yellow, bright blue, or stormy sky grey furniture or wall. All you need is to head to your favorite paint store and gather up a selection of paint chips close to the hue you are trying to match. After that, bring the trip home and hang them on the surface which color you want to duplicate, then observe multiple lights using lamp light and daylight, whichever chip matches most closely.
Part 2 What’s the Best 7 Color Match Paint Apps
One of the essential tips to making a design come alive is choosing the right color combination, and when you want to make your audience feel something, you can achieve this with the use of color. Whether you choose the perfect color combination for your logo or website or choose a color for a flyer, business card, and photograph, everything remains the same. Most times, it isn’t easy to match colors together. Thus, we compiled a list of the best mobile application you can use in matching colors at a go.
Here are seven (7) auto paint matching applications that we recommend when you want to tackle an exterior and interior painting Project:
01Paint My Place

The Paint My Place application is a fantastic virtual reality for Android and iPhone devices. It allows you to experience different colors on your walls without picking up a brush. You need to upload an image of your space, choose your paint brand, and swipe with your fingers.
Cost: Basic Free, advanced $2.99
Pros:
● Access to thousands of color palette
● The app is handy
● Easy to use
Cons:
● Painting around furniture or design details is difficult
● It is sometimes not accurate
● Advanced features need a subscription
02ColorView Finder

ColorView Finder is handy for iPad and iPhone users. It is used for the first house painting stage when looking for an inspirational area of color palettes. Focus your camera on an object that dries the attention, and the app will automatically generate an array of five color combinations.
Cost: Basic (Free), $1.99 (Pro)
Pros:
● Provides you with a continuous selection of color palettes to mature image inspiration
● Lots of customization feature
● It has a creative layout feature
Cons:
● The free version has a watermark
● To access the thousands of features, you will need to upgrade to the pro version
● Auto-generation sometimes avoid selecting color choices
03Paint My Wall

Paint My Wall is an effortless and easy-to-use application available for iOS devices and allows you to use images to explore color options or upload your photo to test. It will enable you to paint with your finger digitally or use the intelligent feel to feel a wall completely.
Cost: free
Pros:
● It is easy to use
● It is quick to test various color option
● The nice erase function gives a chance for modification.
Cons:
● There are a few ads that you must skip to move on
● It has limited customization features
● Edge detection does not working properly
● ColorSnap

ColorSnap is the best color palette creator that allows you to explore all of the paint colors and gives you the ability to create your color palette. Choose the color you like and see coordinating and similar colors to take it to the next level. Accessible to both Android and iOS devices.
Cost: free
Pros:
● It is easy to use
● It is the best color palette creator
● It is a good app for getting started on your painting project
Cons:
● The amount of paint options available in the application is a bit overwhelming
● It has limited customization features
● It does not give a real vision of the color as compared to digitalized look.
04Paint Tester

The Paint Tester app is available on Android and iOS devices and provides a quick way to find my paint color and purchase it right away. Choose your paint color from the two options, test the color on your surface and then select the cut button to be taken to the retailer.
Cost: $2.99
Pros:
● The app is easy to use
● It is quick to use for fast projects and to find a paint color
● Can save color combination to photo album.
Cons:
● It has limited customization features
● Ads showed up in between.
● Contain certain bugs
05Home Harmony

Home Harmony is a perfect all in 1 tool for iOS devices for designing an exterior room. The app is straightforward to use and makes switching between paint brands easier.
Cost: Free
Pros:
● The app is easy to use
● Lots of customization options
● You can try multiple color options.
Cons:
● The app is a bit slow compared to others
● Ads under Free Version.
● Sometimes crash or freeze out.
06ColorPic

ColorPic is a color hub for Amazon lovers and is available on Android and iOS devices. It gives you a view of your new paint and an easy order button straight from Amazon. A building loan calculator tells you the total number of cans you should purchase for your project.
Cost: $2.99
Pros:
● You can explore the entire color from the main menu
● The before and after images shows how pressure paints look
● Color-changing wheels give a quick option to choose from.
Cons:
● The sample images in the harp gallery are not downloadable
● No free version
● Sometimes color changing does not work well
07The New Filmora 11
Note: If you want to have a color match function from your PC, there is one ultimate solution. Yes, we are talking about the latest Wondershare launch, Filmora 11. The new Filmora 11 can do color correction, matching in a batch.
For Win 7 or later (64-bit)
For macOS 10.12 or later
● You can opt for customized color correction
● The color setting, degree adjustment
● Comparison preview function and a lot more.
● Key Takeaways from This Episode →
● The article covers how to get paint color matching
● Steps to match paint color
● Some of the prime application that assists in color matching.
● The color match in Filmora allows you to color correct the clip as a badge instead of editing it individually.
This Article Discusses What Is Vegas Pro, How to Download, Install and Use It, and Its Key Features. It Further Discusses Its Alternative for Editing Your Videos and More. Check Out Now
Vegas Pro is one of the best video and audio editing software for professionals. It provides one of the best editing tools with which you will be able to create professional videos. It was a product of Sony’s electronic giant, but now it is seen by Magix. It is suitable for serious amateurs and professionals who want to use it as a part of their career. However, the more recent version is a bit user-friendly, but if you are not interested in it seriously, then Vegas Pro is not your cup of tea.
One of the most significant advantages of using the high voltage Vegas Pro is that it gives you all the tools to make a professional video and multiple audio-visual effects. The software is exciting for those who already know about video and audio editing. Moreover, the price of the software is affordable and cost-effective as you get some royalty-free stock content.
How to download and install Vegas Pro?
Unshackle your creativity using Vegas Pro, one of the best professional video and audio editing software. If you have an idea for video editing, you will find the Vegas Pro video editor high on speed and editing. It will be like a new world of various professional editing tools in front of you, sure to keep you in front of the monitor without any distractions. You will be able to add images, sounds, and videos without any effort. The entire work of the software is impressive as you can make changes to your main storyboard according to your convenience.
It is an excellent way of boosting your confidence in professional video editing. Therefore, if you are serious about making professional videos, you must try your hand in Vegas Pros.
Steps to downloading and installing Vegas Pro
Vegas Pro video editor needs a good amount of space on your hard disk. Therefore, it is advisable that you either free the space or install a secondary hard disk for the Vegas Pro. Moreover, you will need Windows 7 to Windows 10 to run the Vegas Pro on your computer.

- If you are using an older version of Vegas Pro, you can upgrade it to a newer version. However, if you are downloading for the first time, you need to open the official website of Vegas Pro.
- Click on purchase.
- You will find the payment option.
- You can choose a monthly or yearly subscription.
- Once you make the payment, you will get a link for the download option.
- You can now download the Vegas Pro on your computer.
- When the process is complete, you will get an icon of Vegas Pro on your desktop.
- Click on the icon and start your exciting journey with Vegas Pro.

Key Features of Vegas Pro
Vegas Pro video editing software has some of the best features to enhance your creativity. Following are some of its key features:
**OFX Plug-ins for special effects
Vegas Pro offers OFX plug-ins that help professionals create their videos with new techniques with various special effects. You can also use different filters in your videos to give them a professional look.
**Picture-in-Picture Plug-ins
With the help of Picture-in-Picture plug-ins, users will be able to edit the pictures of their own will. You will be able to control the movement of the images and even place them accordingly.
**Editing Timeline
One of the most significant advantages of using Vegas Pro video editing software is that the timeline is much simpler and faster. Various features will help you create professional videos with the help of the timeline.
You will be able to arrange the clips in the timeline quickly and smoothly with special effects like crossfades and similar other products.
**Instant Freeze time
With the help of the Freeze option of Vegas Pro, you will be able to control the playback speed of the video. Professionals use the instant freeze time to portray a dramatic scene that requires some special effects.
It is a specific feature where you need to place the cursor on a particular frame to apply the freeze and time.
**Look-up table OFX Plug-in
The look-up table is a handy feature of Vegas Pro as you can access editing software like Adobe. It helps you to edit the images accordingly. You can also modify the clips of a particular video.
There are also various other features of the look-up table like color grading, cinematic effects, camera, and similar other attributes.
**Authoring Blu-Ray Discs and DVDs
With the help of Vegas Pro, you will be able to create exciting videos and be able to create a DVD layout with a professional look. There are various sets of effects and animations that you can choose while making the final layout of your video.
Moreover, you will be able to burn the DVDs and Blu-Ray Discs to end the final process of your video creation.
How to Edit Videos with Vegas Pro?
Video editing is an art. Hence, before creating a video, you need to have a plan. The clips must be in sequential order so that it makes a story. With the help of Vegas Pro, you can turn all your video footage into an exciting account. However, you need to have some basic skills in video editing before you lay your hands on the powerful Vegas Pro video editing software.
Following is a brief guideline that will give you an idea of how to edit videos with Vegas Pro.
**Previewing
The first step in creating a video is to have a plan of action. Before you start making the video, you must decide the clips you want to import. It is because importing all the video clips and selecting them can be a waste of time.

However, do not delete the clips permanently, as you may require them at some point in time if the need arises. Vegas Pro has some exciting editing tools where you will be able to perform color correction and also stabilize the shaky videos.
**Planning
To make an excellent sensible video, you must have a plan. Your video must have a story. Hence, you must decide beforehand how to start the video with a good beginning, the middle, and the end.
It would be best if you placed the clips in sequential order so that it creates a story. It would be best also to decide how to put the text and the transitions in your video.
**A rough cut
It is advisable to place the video clips in sequential order before you start editing, and it will give you a rough idea of the outcome of the video. You can make the changes in the initial stage in the storyboard and check the outcome before you start the editing.
**Editing
Once you are happy with the final layout of the video clips, you can start with your creativity. Vegas Pro has many exciting editing tools to give your video a professional look.
You can use transitions, trimming, fades, and other editing features to make a great video. You can also add titles, music, and other elements to your video.

**Delivery
Now that you are final with the process of creating a video, it is time to show the world your creativity and talent. You will be able to either stream it online or burn a DVD to share with your friends and loved ones.
Vegas Pro Alternative to Edit Videos
If there is one video editing platform where you want to unleash your talent and creativity, then Filmora is the one. It has all the resources you need to edit your videos and exciting editing tools. Moreover, it is easy to use as it offers many tutorials on creating videos in simple steps. With the help of Filmora, you can adjust the speed of your videos and even work on multiple screens. One of the most outstanding features of Filmora is that you use various video effects like filters and titles and even change the background of your video.
For Win 7 or later (64-bit)
For macOS 10.12 or later
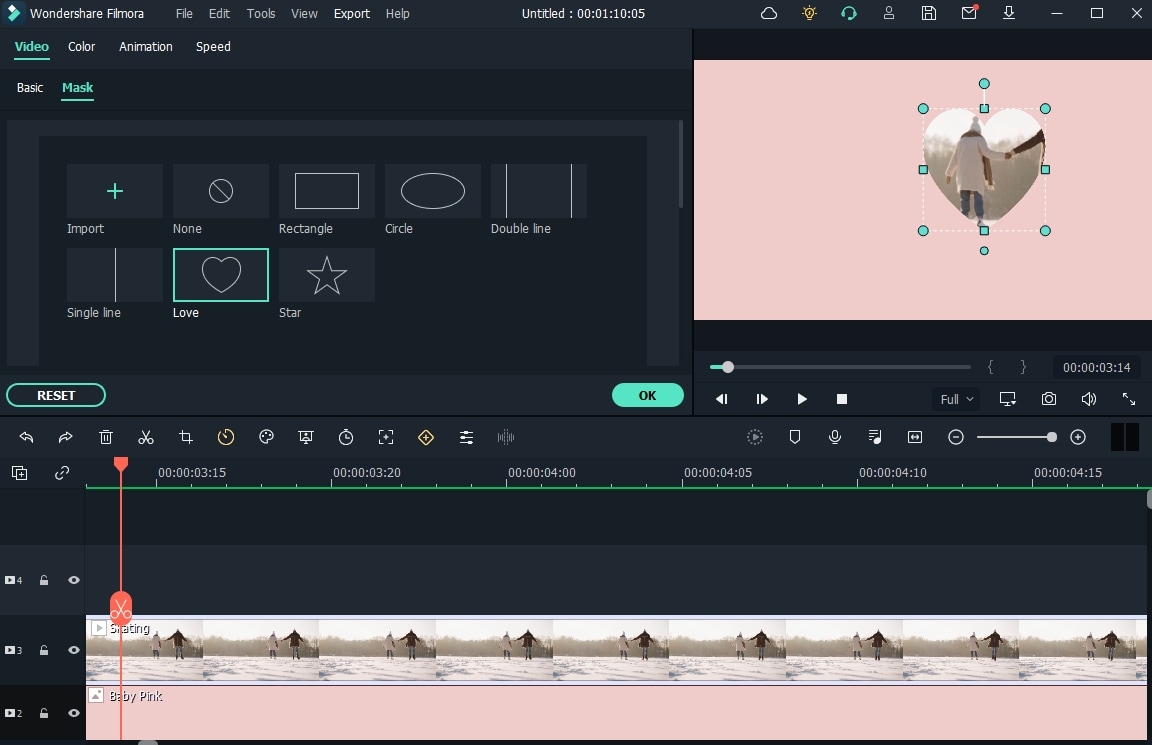
Following are the steps on how to use Filmora:
- Click on a new project from the file menu
- If you want to import media files, click on the ‘+’ icon to browse the files from your hard drive.
- Drag and drop the video clips on your timeline.
- You can now add titles, transitions, and even music.
- Arrange the video clips in sequential order.
- Once you finish the process, you will be able to export it or share it with your friends and loved ones.
FAQs about Vegas Pro
Q1. How much does Vegas Pro cost?
Ans: The cost of Vegas Pro is affordable as you can get it for $155.88 a year, and it means that you pay only about $12.99 per month. You will also get free royalty-free stock videos and 20 GB of online storage.
Q2. Is Vegas Pro a good software?
Ans: If you check the Vegas Pro review, you will understand its popularity. It is an ideal software for professionals who want to unleash their talent and creativity, and it has some high-end editing features to enhance a professional video.
Q3. Is Vegas Pro better than Premiere Pro?
Ans: Vegas Pro is better than Premiere Pro in the user interface. When you compare Vegas Pro with other video editing software, you will find that the software is much easier. Moreover, it has some great editing tools to make a great video.
Conclusion
Vegas Pro gives you all the exciting editing features to create a professional video. It is compelling and user-friendly with simple, easy to understand user interfaces. You can use the trial version to get a feel of the video editing software. Once you are ready to take full command, you can go with the Pro version of Vegas Pro. It is one of the best software where you can learn video editing in a better way. You can check the Vegas Pro review online if you want to know about its usage.

Key Features of Vegas Pro
Vegas Pro video editing software has some of the best features to enhance your creativity. Following are some of its key features:
**OFX Plug-ins for special effects
Vegas Pro offers OFX plug-ins that help professionals create their videos with new techniques with various special effects. You can also use different filters in your videos to give them a professional look.
**Picture-in-Picture Plug-ins
With the help of Picture-in-Picture plug-ins, users will be able to edit the pictures of their own will. You will be able to control the movement of the images and even place them accordingly.
**Editing Timeline
One of the most significant advantages of using Vegas Pro video editing software is that the timeline is much simpler and faster. Various features will help you create professional videos with the help of the timeline.
You will be able to arrange the clips in the timeline quickly and smoothly with special effects like crossfades and similar other products.
**Instant Freeze time
With the help of the Freeze option of Vegas Pro, you will be able to control the playback speed of the video. Professionals use the instant freeze time to portray a dramatic scene that requires some special effects.
It is a specific feature where you need to place the cursor on a particular frame to apply the freeze and time.
**Look-up table OFX Plug-in
The look-up table is a handy feature of Vegas Pro as you can access editing software like Adobe. It helps you to edit the images accordingly. You can also modify the clips of a particular video.
There are also various other features of the look-up table like color grading, cinematic effects, camera, and similar other attributes.
**Authoring Blu-Ray Discs and DVDs
With the help of Vegas Pro, you will be able to create exciting videos and be able to create a DVD layout with a professional look. There are various sets of effects and animations that you can choose while making the final layout of your video.
Moreover, you will be able to burn the DVDs and Blu-Ray Discs to end the final process of your video creation.
How to Edit Videos with Vegas Pro?
Video editing is an art. Hence, before creating a video, you need to have a plan. The clips must be in sequential order so that it makes a story. With the help of Vegas Pro, you can turn all your video footage into an exciting account. However, you need to have some basic skills in video editing before you lay your hands on the powerful Vegas Pro video editing software.
Following is a brief guideline that will give you an idea of how to edit videos with Vegas Pro.
**Previewing
The first step in creating a video is to have a plan of action. Before you start making the video, you must decide the clips you want to import. It is because importing all the video clips and selecting them can be a waste of time.

However, do not delete the clips permanently, as you may require them at some point in time if the need arises. Vegas Pro has some exciting editing tools where you will be able to perform color correction and also stabilize the shaky videos.
**Planning
To make an excellent sensible video, you must have a plan. Your video must have a story. Hence, you must decide beforehand how to start the video with a good beginning, the middle, and the end.
It would be best if you placed the clips in sequential order so that it creates a story. It would be best also to decide how to put the text and the transitions in your video.
**A rough cut
It is advisable to place the video clips in sequential order before you start editing, and it will give you a rough idea of the outcome of the video. You can make the changes in the initial stage in the storyboard and check the outcome before you start the editing.
**Editing
Once you are happy with the final layout of the video clips, you can start with your creativity. Vegas Pro has many exciting editing tools to give your video a professional look.
You can use transitions, trimming, fades, and other editing features to make a great video. You can also add titles, music, and other elements to your video.

**Delivery
Now that you are final with the process of creating a video, it is time to show the world your creativity and talent. You will be able to either stream it online or burn a DVD to share with your friends and loved ones.
Vegas Pro Alternative to Edit Videos
If there is one video editing platform where you want to unleash your talent and creativity, then Filmora is the one. It has all the resources you need to edit your videos and exciting editing tools. Moreover, it is easy to use as it offers many tutorials on creating videos in simple steps. With the help of Filmora, you can adjust the speed of your videos and even work on multiple screens. One of the most outstanding features of Filmora is that you use various video effects like filters and titles and even change the background of your video.
For Win 7 or later (64-bit)
For macOS 10.12 or later

Following are the steps on how to use Filmora:
- Click on a new project from the file menu
- If you want to import media files, click on the ‘+’ icon to browse the files from your hard drive.
- Drag and drop the video clips on your timeline.
- You can now add titles, transitions, and even music.
- Arrange the video clips in sequential order.
- Once you finish the process, you will be able to export it or share it with your friends and loved ones.
FAQs about Vegas Pro
Q1. How much does Vegas Pro cost?
Ans: The cost of Vegas Pro is affordable as you can get it for $155.88 a year, and it means that you pay only about $12.99 per month. You will also get free royalty-free stock videos and 20 GB of online storage.
Q2. Is Vegas Pro a good software?
Ans: If you check the Vegas Pro review, you will understand its popularity. It is an ideal software for professionals who want to unleash their talent and creativity, and it has some high-end editing features to enhance a professional video.
Q3. Is Vegas Pro better than Premiere Pro?
Ans: Vegas Pro is better than Premiere Pro in the user interface. When you compare Vegas Pro with other video editing software, you will find that the software is much easier. Moreover, it has some great editing tools to make a great video.
Conclusion
Vegas Pro gives you all the exciting editing features to create a professional video. It is compelling and user-friendly with simple, easy to understand user interfaces. You can use the trial version to get a feel of the video editing software. Once you are ready to take full command, you can go with the Pro version of Vegas Pro. It is one of the best software where you can learn video editing in a better way. You can check the Vegas Pro review online if you want to know about its usage.

Key Features of Vegas Pro
Vegas Pro video editing software has some of the best features to enhance your creativity. Following are some of its key features:
**OFX Plug-ins for special effects
Vegas Pro offers OFX plug-ins that help professionals create their videos with new techniques with various special effects. You can also use different filters in your videos to give them a professional look.
**Picture-in-Picture Plug-ins
With the help of Picture-in-Picture plug-ins, users will be able to edit the pictures of their own will. You will be able to control the movement of the images and even place them accordingly.
**Editing Timeline
One of the most significant advantages of using Vegas Pro video editing software is that the timeline is much simpler and faster. Various features will help you create professional videos with the help of the timeline.
You will be able to arrange the clips in the timeline quickly and smoothly with special effects like crossfades and similar other products.
**Instant Freeze time
With the help of the Freeze option of Vegas Pro, you will be able to control the playback speed of the video. Professionals use the instant freeze time to portray a dramatic scene that requires some special effects.
It is a specific feature where you need to place the cursor on a particular frame to apply the freeze and time.
**Look-up table OFX Plug-in
The look-up table is a handy feature of Vegas Pro as you can access editing software like Adobe. It helps you to edit the images accordingly. You can also modify the clips of a particular video.
There are also various other features of the look-up table like color grading, cinematic effects, camera, and similar other attributes.
**Authoring Blu-Ray Discs and DVDs
With the help of Vegas Pro, you will be able to create exciting videos and be able to create a DVD layout with a professional look. There are various sets of effects and animations that you can choose while making the final layout of your video.
Moreover, you will be able to burn the DVDs and Blu-Ray Discs to end the final process of your video creation.
How to Edit Videos with Vegas Pro?
Video editing is an art. Hence, before creating a video, you need to have a plan. The clips must be in sequential order so that it makes a story. With the help of Vegas Pro, you can turn all your video footage into an exciting account. However, you need to have some basic skills in video editing before you lay your hands on the powerful Vegas Pro video editing software.
Following is a brief guideline that will give you an idea of how to edit videos with Vegas Pro.
**Previewing
The first step in creating a video is to have a plan of action. Before you start making the video, you must decide the clips you want to import. It is because importing all the video clips and selecting them can be a waste of time.

However, do not delete the clips permanently, as you may require them at some point in time if the need arises. Vegas Pro has some exciting editing tools where you will be able to perform color correction and also stabilize the shaky videos.
**Planning
To make an excellent sensible video, you must have a plan. Your video must have a story. Hence, you must decide beforehand how to start the video with a good beginning, the middle, and the end.
It would be best if you placed the clips in sequential order so that it creates a story. It would be best also to decide how to put the text and the transitions in your video.
**A rough cut
It is advisable to place the video clips in sequential order before you start editing, and it will give you a rough idea of the outcome of the video. You can make the changes in the initial stage in the storyboard and check the outcome before you start the editing.
**Editing
Once you are happy with the final layout of the video clips, you can start with your creativity. Vegas Pro has many exciting editing tools to give your video a professional look.
You can use transitions, trimming, fades, and other editing features to make a great video. You can also add titles, music, and other elements to your video.

**Delivery
Now that you are final with the process of creating a video, it is time to show the world your creativity and talent. You will be able to either stream it online or burn a DVD to share with your friends and loved ones.
Vegas Pro Alternative to Edit Videos
If there is one video editing platform where you want to unleash your talent and creativity, then Filmora is the one. It has all the resources you need to edit your videos and exciting editing tools. Moreover, it is easy to use as it offers many tutorials on creating videos in simple steps. With the help of Filmora, you can adjust the speed of your videos and even work on multiple screens. One of the most outstanding features of Filmora is that you use various video effects like filters and titles and even change the background of your video.
For Win 7 or later (64-bit)
For macOS 10.12 or later

Following are the steps on how to use Filmora:
- Click on a new project from the file menu
- If you want to import media files, click on the ‘+’ icon to browse the files from your hard drive.
- Drag and drop the video clips on your timeline.
- You can now add titles, transitions, and even music.
- Arrange the video clips in sequential order.
- Once you finish the process, you will be able to export it or share it with your friends and loved ones.
FAQs about Vegas Pro
Q1. How much does Vegas Pro cost?
Ans: The cost of Vegas Pro is affordable as you can get it for $155.88 a year, and it means that you pay only about $12.99 per month. You will also get free royalty-free stock videos and 20 GB of online storage.
Q2. Is Vegas Pro a good software?
Ans: If you check the Vegas Pro review, you will understand its popularity. It is an ideal software for professionals who want to unleash their talent and creativity, and it has some high-end editing features to enhance a professional video.
Q3. Is Vegas Pro better than Premiere Pro?
Ans: Vegas Pro is better than Premiere Pro in the user interface. When you compare Vegas Pro with other video editing software, you will find that the software is much easier. Moreover, it has some great editing tools to make a great video.
Conclusion
Vegas Pro gives you all the exciting editing features to create a professional video. It is compelling and user-friendly with simple, easy to understand user interfaces. You can use the trial version to get a feel of the video editing software. Once you are ready to take full command, you can go with the Pro version of Vegas Pro. It is one of the best software where you can learn video editing in a better way. You can check the Vegas Pro review online if you want to know about its usage.

Key Features of Vegas Pro
Vegas Pro video editing software has some of the best features to enhance your creativity. Following are some of its key features:
**OFX Plug-ins for special effects
Vegas Pro offers OFX plug-ins that help professionals create their videos with new techniques with various special effects. You can also use different filters in your videos to give them a professional look.
**Picture-in-Picture Plug-ins
With the help of Picture-in-Picture plug-ins, users will be able to edit the pictures of their own will. You will be able to control the movement of the images and even place them accordingly.
**Editing Timeline
One of the most significant advantages of using Vegas Pro video editing software is that the timeline is much simpler and faster. Various features will help you create professional videos with the help of the timeline.
You will be able to arrange the clips in the timeline quickly and smoothly with special effects like crossfades and similar other products.
**Instant Freeze time
With the help of the Freeze option of Vegas Pro, you will be able to control the playback speed of the video. Professionals use the instant freeze time to portray a dramatic scene that requires some special effects.
It is a specific feature where you need to place the cursor on a particular frame to apply the freeze and time.
**Look-up table OFX Plug-in
The look-up table is a handy feature of Vegas Pro as you can access editing software like Adobe. It helps you to edit the images accordingly. You can also modify the clips of a particular video.
There are also various other features of the look-up table like color grading, cinematic effects, camera, and similar other attributes.
**Authoring Blu-Ray Discs and DVDs
With the help of Vegas Pro, you will be able to create exciting videos and be able to create a DVD layout with a professional look. There are various sets of effects and animations that you can choose while making the final layout of your video.
Moreover, you will be able to burn the DVDs and Blu-Ray Discs to end the final process of your video creation.
How to Edit Videos with Vegas Pro?
Video editing is an art. Hence, before creating a video, you need to have a plan. The clips must be in sequential order so that it makes a story. With the help of Vegas Pro, you can turn all your video footage into an exciting account. However, you need to have some basic skills in video editing before you lay your hands on the powerful Vegas Pro video editing software.
Following is a brief guideline that will give you an idea of how to edit videos with Vegas Pro.
**Previewing
The first step in creating a video is to have a plan of action. Before you start making the video, you must decide the clips you want to import. It is because importing all the video clips and selecting them can be a waste of time.

However, do not delete the clips permanently, as you may require them at some point in time if the need arises. Vegas Pro has some exciting editing tools where you will be able to perform color correction and also stabilize the shaky videos.
**Planning
To make an excellent sensible video, you must have a plan. Your video must have a story. Hence, you must decide beforehand how to start the video with a good beginning, the middle, and the end.
It would be best if you placed the clips in sequential order so that it creates a story. It would be best also to decide how to put the text and the transitions in your video.
**A rough cut
It is advisable to place the video clips in sequential order before you start editing, and it will give you a rough idea of the outcome of the video. You can make the changes in the initial stage in the storyboard and check the outcome before you start the editing.
**Editing
Once you are happy with the final layout of the video clips, you can start with your creativity. Vegas Pro has many exciting editing tools to give your video a professional look.
You can use transitions, trimming, fades, and other editing features to make a great video. You can also add titles, music, and other elements to your video.

**Delivery
Now that you are final with the process of creating a video, it is time to show the world your creativity and talent. You will be able to either stream it online or burn a DVD to share with your friends and loved ones.
Vegas Pro Alternative to Edit Videos
If there is one video editing platform where you want to unleash your talent and creativity, then Filmora is the one. It has all the resources you need to edit your videos and exciting editing tools. Moreover, it is easy to use as it offers many tutorials on creating videos in simple steps. With the help of Filmora, you can adjust the speed of your videos and even work on multiple screens. One of the most outstanding features of Filmora is that you use various video effects like filters and titles and even change the background of your video.
For Win 7 or later (64-bit)
For macOS 10.12 or later

Following are the steps on how to use Filmora:
- Click on a new project from the file menu
- If you want to import media files, click on the ‘+’ icon to browse the files from your hard drive.
- Drag and drop the video clips on your timeline.
- You can now add titles, transitions, and even music.
- Arrange the video clips in sequential order.
- Once you finish the process, you will be able to export it or share it with your friends and loved ones.
FAQs about Vegas Pro
Q1. How much does Vegas Pro cost?
Ans: The cost of Vegas Pro is affordable as you can get it for $155.88 a year, and it means that you pay only about $12.99 per month. You will also get free royalty-free stock videos and 20 GB of online storage.
Q2. Is Vegas Pro a good software?
Ans: If you check the Vegas Pro review, you will understand its popularity. It is an ideal software for professionals who want to unleash their talent and creativity, and it has some high-end editing features to enhance a professional video.
Q3. Is Vegas Pro better than Premiere Pro?
Ans: Vegas Pro is better than Premiere Pro in the user interface. When you compare Vegas Pro with other video editing software, you will find that the software is much easier. Moreover, it has some great editing tools to make a great video.
Conclusion
Vegas Pro gives you all the exciting editing features to create a professional video. It is compelling and user-friendly with simple, easy to understand user interfaces. You can use the trial version to get a feel of the video editing software. Once you are ready to take full command, you can go with the Pro version of Vegas Pro. It is one of the best software where you can learn video editing in a better way. You can check the Vegas Pro review online if you want to know about its usage.
How to Zoom Picture in Picture [Easy Solution]
Zoom is one of the greatest options on the market for video conferencing. It doesn’t matter whether you use it at home or in an office environment; it will quickly link the team members. One of the most popular video conferencing programs is Zoom. When in-person meetings aren’t feasible, it enables you to communicate electronically with employees, and it’s been a major popularity for social occasions as well. In case you’re not acquainted, picture-in-picture mode enables you to watch videos from one app while using your PC normally. The movie will keep playing in a tiny thumbnail window so that two applications may work simultaneously on your smartphone.
You may create virtual audio and video conferences, webinars, live chats, screen sharing, and other collaboration tools with Zoom, a cloud-based video communications solution. Zoom’s most recent iPhone apps let you dismiss a Zoom Meeting while keeping the Zoom video call open in a picture-in-picture mode. To join a Zoom conference, you don’t need an account, and because the software works with Mac, Windows, Linux, iOS, and Android devices, nearly anybody can use it. Since using Zoom’s picture-in-picture mode is the same as using it with other applications, you shouldn’t have any trouble if you often use PiP mode. Here are the top 4 methods you can refer to picture in picture in Zoom.
Method 1: Swap Shared Screen with Video
You may move the Zoom Meeting PiP window across the screen, change the thumbnail’s size, and utilize other applications while it remains open, just like any other picture-in-picture window. Before leaving the meeting if you’re not giving a presentation or speaking, you should definitely mute Zoom on your iPhone to prevent noises from your typing or other activities from entering the conversation. Additionally, keep in mind to switch off the camera if you’re engaged in something distracting, at least for the duration of your activity. To reopen the Zoom Meeting and go back to the Zoom app, touch the Picture-in-Picture mode pane. Here are some actions to keep in mind:
Steps to Swap Shared Screen for Zoom Picture in Picture
Step1Launch or enter a Zoom meeting. Keep the video on your main screen at all times, closing the chat and participant list as necessary.
Step2Tap the Home button or swipe up from the bottom of the screen.
Step3Picture-in-picture mode should be activated automatically throughout the meeting.
Method 2: Use Ecamm Live
Live streaming is a fantastic way to provide original content and stand out from the crowd. To prevent any operational difficulties, a more sophisticated virtual camera is absolutely necessary. You now have magical abilities thanks to Ecamm virtual cam, including the ability to add text, animations, observe a live stream, post viewer comments, play music, share your screen, use sound effects, and many more. It offers the Ecamm live virtual camera zoom function for video conferences so you may improve your Zoom discussions by sending output to other PC programs. You could see a quality difference between what you view in Ecamm Live and what your Zoom visitors see while utilizing virtual camera with Zoom. The quality of a Zoom video stream cannot be improved using Ecamm Live. Simply broadcast the Zoom app using Ecamm Live’s Screen Share mode to utilize Ecamm Live for picture-in-picture virtual presentations on Zoom.
Steps to Use Ecamm Live for Zoom Picture in Picture
Step1Download the Ecamm Application
Install Ecamm Live on your computer, then choose the center button in the source switcher at the top of the main window to enter Screen Share mode.

Step2Create Scenes
With the use of Ecamm Live’s Virtual Camera and Virtual Mic capabilities, you may transfer Ecamm Live’s output to almost any other Mac software, including Zoom. After setting, create the scenes in the program to quickly switch between various cameras.
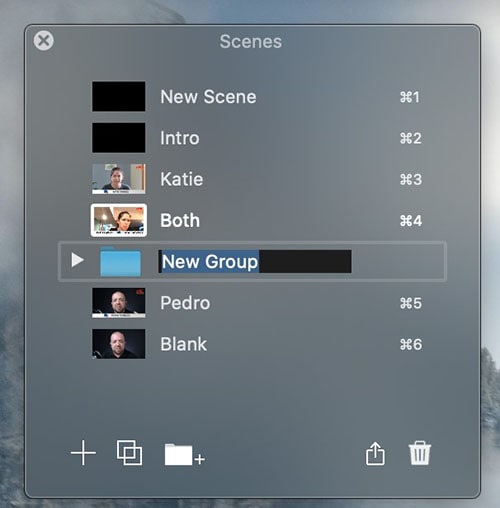
Step3Select Ecamm on Zoom
You may also utilize Ecamm Live’s Sharing Window capability to feed Ecamm Live output into Zoom. Simply activate the virtual camera, and then, as seen below, choose Ecamm Live Virtual Camera in Zoom’s video settings:
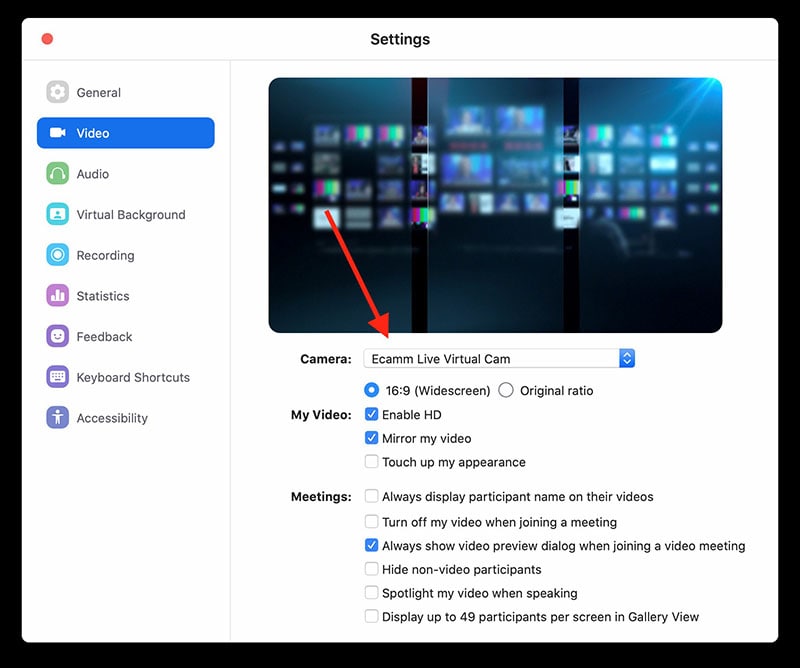
Step4Begin Your Presentation
Finally, click the PC share option to show your Zoom app to your audience. To conceal a picture-in-picture window that displays your camera image while live streaming, click the PIP button.
Method 3: Use Filmora as A Switcher
Zoom has solutions that will make your meetings simple and secure. It gives your remote staff a secure setting to interact and share crucial information. Ideal control over your film and configuration options to make them aesthetically pleasing is something Zoom lacks. To overcome the drawbacks and improve the quality of your online meetings, you may take use of the capabilities of Zoom in conjunction with Filmora. Filmora was developed with the intention of easing user burden and supporting applications. Though complicated, the program is simple to use. The perhaps most popular web information that may be saved on your computer can be easily captured by just angling your screen. For more information on how to record and save your Zoom for picture in picture, see the guide here.
To broadcast a variety of situations in a grid style, you may also combine inputs from your camera, microphone, computer screen, and web conferencing software. Wondershare -the finest desktop application for recording a Zoom Picture in Picture meeting- is Filmora. With the majority of cameras, this app’s screen recording capability is both user-friendly and feature-rich. Here, users may either choose a particular region to record or record their zoom meetings in Fullscreen mode. Additionally, you may choose the camera and input microphone that will be used while recording a video overlay. The addition of relevant comments like phrases, lines, drawings, symbols, etc. is also possible by users. The detailed procedure for recording a Zoom Picture-in-Picture meeting using a Filmora recorder is given below:
Free Download For Win 7 or later(64-bit)
Free Download For macOS 10.14 or later
Step1Download and Install Filmora Zoom Recorder
You may find both types, i.e., the most recent Windows and Mac versions, by first visiting the usual website and then using this Zoom. Install the program on your computer once you download it to get started.

Step2Initiate Filmora Recorder
After finishing the installation process for this Reside Zoom recorder, launch it from the main menus and choose “New Task” when prompted. It will take you to Filmora’s streamlined user interface where you can immediately start filming. Then, as seen in the picture below, you may adjust the screen recording using your preferred camera, microphone, and system settings:
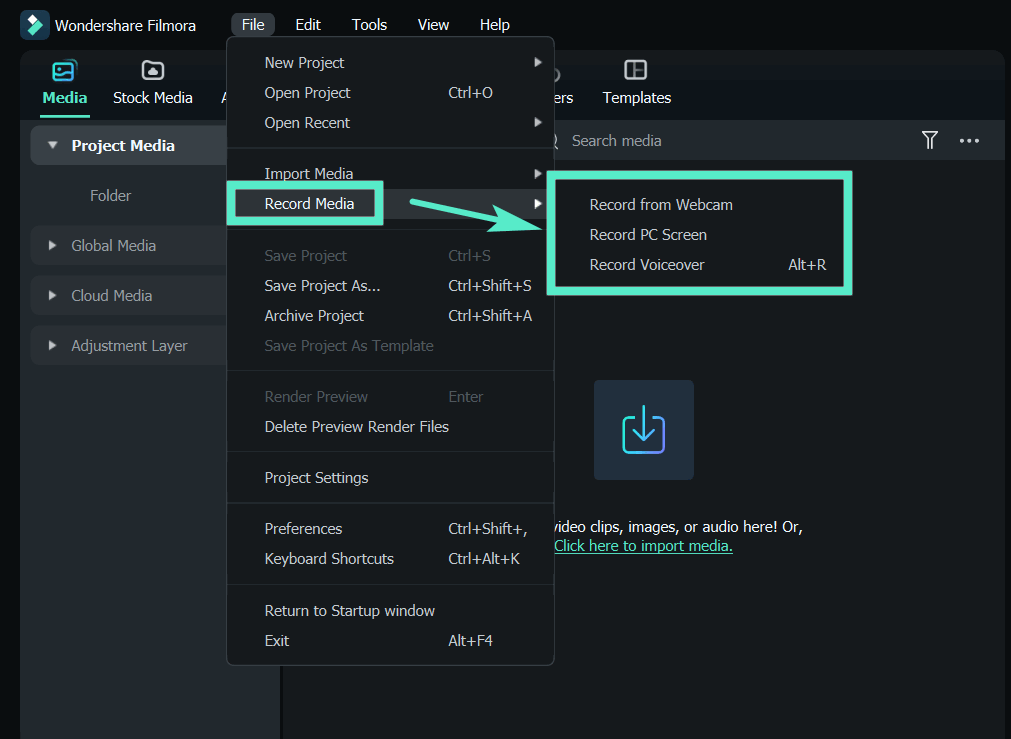
Step3Begin/End the Recording
When you are through configuring this Zoom picture in picture recorder, click the Record button, and it will immediately begin recording your customized screen. Similar to that, after you’re done recording, click Stop, which will take you inside the video editor where you may edit your recorded information.
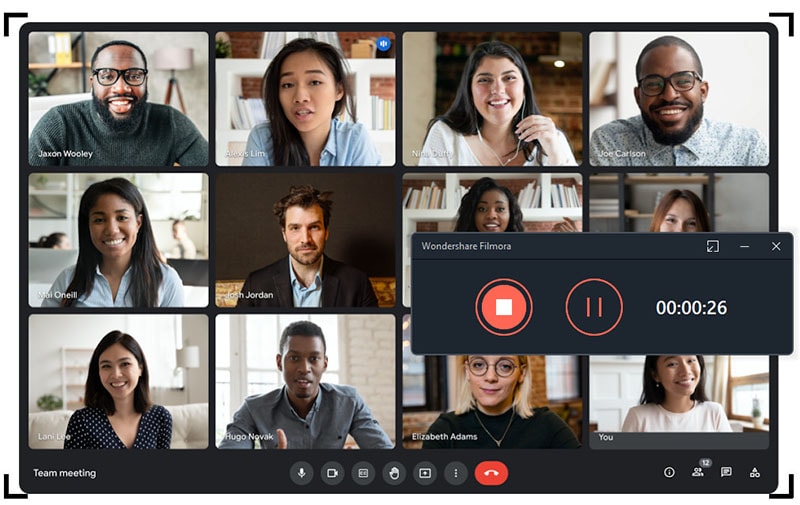
Step4Share Recordings
When you have everything ready, export your recording right away. After you’re done with the editing part, you do have a lot of options to choose from when displaying your screen capture and webcam stories. To do so, click the Export button in the item user interface’s top-right corner as shown below:
You may easily choose your preferred way to share from there if you choose to upload your work of zoom picture in picture recordings straight to the YouTube or other reputable websites right now. Simply refer to the Sharing plug-ins in the Export window to find out more.
Method 4: Use Hardware Switcher ATEM Mini Pro
Particularly on Zoom, the ATEM Mini is excellent for video conferences. The Blackmagic ATEM Mini is a USB video interface and HDMI switcher. Four HDMI inputs, or four cameras that can produce an HDMI video stream, may be switched between live. This device integrates Zoom meetings fast and makes it incredibly simple to set up your audio, a sometimes-forgotten aspect of video broadcasting. This sophisticated video switcher promises to offer broadcast-quality multi-camera footage with ease and is targeted at gamers, streamers, and online reviewers. It connects to a computer via a USB-C to USB-A connection. The video feed may then be sent to distant colleagues via a number of well-liked videos streaming services, including Zoom.
Step1The ATEM Mini Pro is a basic control switcher with pro-broadcast performance. Your ATEM Mini Pro is really simple to set up. You can connect a full setup with several cameras and microphones in around 30 minutes.
Step2You may connect several camera sources to the inputs of the ATEM Mini Pro. The 4 HDMI inputs each have a separate standards converter built in. As a result, the ATEM Mini can automatically convert inputs that are 1080p, 1080i, or 720p to the switcher’s video standard. You may make quick changes between inputs with no latency or disruption to your video output by using the ergonomic buttons.
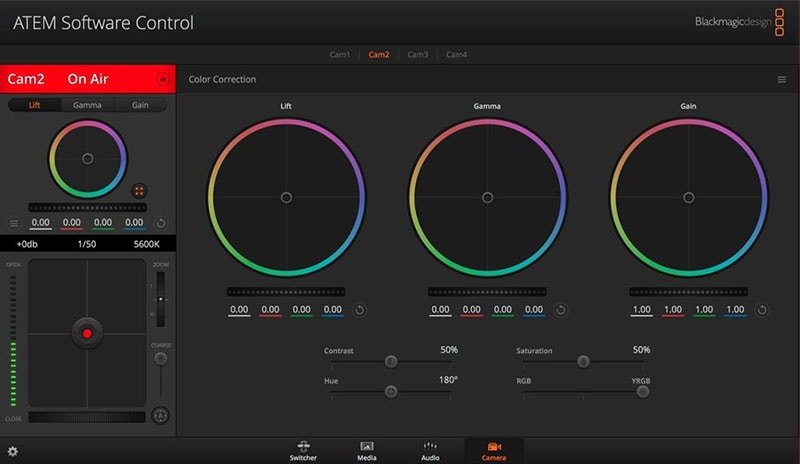
Step3As a third option, Zoom offers ATEM Mini, which enables you to switch between several inputs, add custom visuals, and adjust audio levels all from a single interface. To improve the quality of your production, you may even use smooth transitions like wipes or fades. You can even test any input stream before making it live.
Conclusion
When you are doing a Zoom Meeting and share your screen, only to discover that what the other attendees see is a split screen with your material and the other Attendee cams, it is highly annoying. You may move the Zoom Meeting PiP window across the screen, change the thumbnail’s size, and utilize other applications while it remains open, just like any other picture-in-picture window. Someone must be sharing information in the Zoom conference for the Picture in Picture, or “Split Screen” option, to be active. We’ve listed the top techniques for doing it effectively above. To do this work without difficulty, use them as your guide.
Free Download For macOS 10.14 or later
Step1Download and Install Filmora Zoom Recorder
You may find both types, i.e., the most recent Windows and Mac versions, by first visiting the usual website and then using this Zoom. Install the program on your computer once you download it to get started.

Step2Initiate Filmora Recorder
After finishing the installation process for this Reside Zoom recorder, launch it from the main menus and choose “New Task” when prompted. It will take you to Filmora’s streamlined user interface where you can immediately start filming. Then, as seen in the picture below, you may adjust the screen recording using your preferred camera, microphone, and system settings:

Step3Begin/End the Recording
When you are through configuring this Zoom picture in picture recorder, click the Record button, and it will immediately begin recording your customized screen. Similar to that, after you’re done recording, click Stop, which will take you inside the video editor where you may edit your recorded information.

Step4Share Recordings
When you have everything ready, export your recording right away. After you’re done with the editing part, you do have a lot of options to choose from when displaying your screen capture and webcam stories. To do so, click the Export button in the item user interface’s top-right corner as shown below:
You may easily choose your preferred way to share from there if you choose to upload your work of zoom picture in picture recordings straight to the YouTube or other reputable websites right now. Simply refer to the Sharing plug-ins in the Export window to find out more.
Method 4: Use Hardware Switcher ATEM Mini Pro
Particularly on Zoom, the ATEM Mini is excellent for video conferences. The Blackmagic ATEM Mini is a USB video interface and HDMI switcher. Four HDMI inputs, or four cameras that can produce an HDMI video stream, may be switched between live. This device integrates Zoom meetings fast and makes it incredibly simple to set up your audio, a sometimes-forgotten aspect of video broadcasting. This sophisticated video switcher promises to offer broadcast-quality multi-camera footage with ease and is targeted at gamers, streamers, and online reviewers. It connects to a computer via a USB-C to USB-A connection. The video feed may then be sent to distant colleagues via a number of well-liked videos streaming services, including Zoom.
Step1The ATEM Mini Pro is a basic control switcher with pro-broadcast performance. Your ATEM Mini Pro is really simple to set up. You can connect a full setup with several cameras and microphones in around 30 minutes.

Step2You may connect several camera sources to the inputs of the ATEM Mini Pro. The 4 HDMI inputs each have a separate standards converter built in. As a result, the ATEM Mini can automatically convert inputs that are 1080p, 1080i, or 720p to the switcher’s video standard. You may make quick changes between inputs with no latency or disruption to your video output by using the ergonomic buttons.

Step3As a third option, Zoom offers ATEM Mini, which enables you to switch between several inputs, add custom visuals, and adjust audio levels all from a single interface. To improve the quality of your production, you may even use smooth transitions like wipes or fades. You can even test any input stream before making it live.
Conclusion
When you are doing a Zoom Meeting and share your screen, only to discover that what the other attendees see is a split screen with your material and the other Attendee cams, it is highly annoying. You may move the Zoom Meeting PiP window across the screen, change the thumbnail’s size, and utilize other applications while it remains open, just like any other picture-in-picture window. Someone must be sharing information in the Zoom conference for the Picture in Picture, or “Split Screen” option, to be active. We’ve listed the top techniques for doing it effectively above. To do this work without difficulty, use them as your guide.
Also read:
- Updated 2024 Approved The Best 10 GIF to JPGPNG Converters
- Updated Top 5 Free Online Video Filter Editors Improve Your Videos with Filters for 2024
- New 10 Matching Color Combination That Works Together for 2024
- How to Select and Use The Best BRAW LUTs
- 2024 Approved How to Animate Text in A Video
- New 2024 Approved Best Free Video Editing Software to Boost Your Content Creation
- New Do You Wish to Learn About some Tools to Slow Down a Video? Discover How to Slow Down Time Lapse on iPhone Throughout This Article
- New Top 5 Solutions on How to Add Emojis to iPhone
- New 2024 Approved Little Known Ways of Adding Emojis to Photos on iPhone & Android 2023
- New Split Audio From a Video in Adobe Premiere Pro Step by Step
- Updated How to Put a Filter on a Video in iMovie
- 7 Best MP4 Video Editors on Mac Edit MP4 Videos Easily
- New 2024 Approved 9 Best Sparkle Effects Photo and Video Editors You Should Know
- In 2024, Premiere Pro Tutorial How To Change Video Frame Rate
- In 2024, Best Tips for Camtasia Freeze-Frame
- New 2024 Approved Before & After Editing Trick - Filmora
- 2024 Approved Tips That Show Anybody How To Make Youtube Slideshow – Guaranteed
- Updated 2024 Approved Guide of 8 Photo Collage Apps for PC
- New How to Spruce Up Your Telegram Profile
- New In 2024, How to Resize FLV Videos Efficiently Windows, Mac,Android, iPhone & Online
- New Ultimate Guide on Converting Word to SRT
- Some Effective Slow Motion Video Editors You Can Try
- What Are the Best 10 GIF Creator, In 2024
- Updated Learn Top Best Free LUTs For Premiere Pro
- 2024 Approved How to Create an Alternate Reality Effect
- In 2024, FLV Editor for Windows 11/10/8.1/8/7 Easily Edit FLV Videos on PC
- Updated In 2024, VSCO Slow Motion
- 4 Solutions to Add White Borders on Mobile and Desktop
- Split Audio From Video in Adobe Premiere Pro Step by Step
- New In 2024, How to Create a Slideshow with Movavi Slideshow Maker
- New In 2024, Video Inspiration for Birthday Slideshow
- In 2024, How D AI Video Games Act More Human Than Human?
- In 2024, Techniques You Never Heard of for Learning YouTube AI Marketing
- New 2 Methods to Cut Video in VLC on Windows
- 2024 Approved Have You Ever Heard Bokeh Effects for Videos? Do You Know that You Can Make Your Own Bokeh Video Easily with some Software. This Article Will Introduce You How to Make a Bokeh Effect Video with Steps
- 2024 Approved Unraveling How the Slow Motion Guys Have Revolutionized The Slow Motion Game
- Updated Overview About Supported iPhone Video Formats and Best iPhone Video Editor & Converter
- How to Make a Custom Slide Show in PowerPoint for 2024
- Here Is a Step-by-Step Guide to Color Correct and Color Grade a Video Professionally with Wondershare Filmora. Lets Get Going
- Updated Whatre the Best Alternatives to Pexels?
- 2024 Approved Do You Know You Can Use Mobile Apps to Apply Camera Effects to Your Videos? Many Smartphone Applications Allow You to Apply Camcorder Effects
- Updated In 2024, How to Add Filter to Video in Premiere Pro?
- How to Fix Unfortunately, Contacts Has Stopped Error on Vivo Y27 5G | Dr.fone
- In 2024, Can I Bypass a Forgotten Phone Password Of Xiaomi Mix Fold 3?
- How to Remove a Previously Synced Google Account from Your Realme Narzo 60 5G
- In 2024, Network Locked SIM Card Inserted On Your Vivo S17 Phone? Unlock It Now
- In 2024, List of Pokémon Go Joysticks On Honor X9a | Dr.fone
- 5 Hassle-Free Solutions to Fake Location on Find My Friends Of Infinix Smart 8 HD | Dr.fone
- How to Easily Hard reset my Google Pixel 7a | Dr.fone
- In 2024, What Legendaries Are In Pokemon Platinum On Apple iPhone 11 Pro Max? | Dr.fone
- How To Bypass iCloud By Checkra1n Even From iPhone 6s If Youve Tried Everything
- How to Detect and Stop mSpy from Spying on Your Motorola Razr 40 Ultra | Dr.fone
- Apple ID Locked for Security Reasons From Apple iPhone XR? Find the Best Solution Here
- How To Change Your Apple ID on iPhone 6s Plus With or Without Password | Dr.fone
- How to Transfer Data After Switching From Vivo S18 Pro to Latest Samsung | Dr.fone
- Wondering the Best Alternative to Hola On Xiaomi Redmi K70? Here Is the Answer | Dr.fone
- In 2024, 4 Feasible Ways to Fake Location on Facebook For your Oppo A1 5G | Dr.fone
- Unlock locked iPhone 7 Plus by restoring it to default settings
- How to Fix Life360 Shows Wrong Location On Samsung Galaxy F34 5G? | Dr.fone
- In 2024, How to Come up With the Best Pokemon Team On Nokia C02? | Dr.fone
- In 2024, Why does the pokemon go battle league not available On Vivo Y02T | Dr.fone
- 3 Solutions to Hard Reset Infinix Smart 8 Pro Phone Using PC | Dr.fone
- How to Make Video Slideshow with Your Travel Photos
- In 2024, How To Unlock Apple iPhone 11 Without Passcode? 4 Easy Methods | Dr.fone
- Is Rank Tracker's data accurate?
- In 2024, Preparation to Beat Giovani in Pokemon Go For Realme 11 Pro | Dr.fone
- Pokemon Go No GPS Signal? Heres Every Possible Solution On Oppo Reno 8T | Dr.fone
- Forgot iPhone Passcode Again? Unlock iPhone 12 Without Passcode Now | Dr.fone
- Solutions to Spy on Apple iPhone 8 with and without jailbreak | Dr.fone
- 8 Workable Fixes to the SIM not provisioned MM#2 Error on Samsung Galaxy S23 Ultra | Dr.fone
- How to Reset your Vivo X Flip Lock Screen Password
- In 2024, How to Transfer Apps from Motorola Moto G04 to Another | Dr.fone
- In 2024, How to Bypass FRP on Google?
- A Guide Realme 12 5G Wireless and Wired Screen Mirroring | Dr.fone
- How to Fix Error 495 While Download/Updating Android Apps On Tecno Pop 8 | Dr.fone
- How to Change Google Play Location On Honor Magic 5 Pro | Dr.fone
- How To Simulate GPS Movement With Location Spoofer On Oppo Find X7 Ultra? | Dr.fone
- In 2024, How To Change Your Apple ID Password On your iPhone 13 mini | Dr.fone
- Title: How to Edit GoPro Videos on Mac
- Author: Chloe
- Created at : 2024-05-20 03:37:22
- Updated at : 2024-05-21 03:37:22
- Link: https://ai-editing-video.techidaily.com/how-to-edit-gopro-videos-on-mac/
- License: This work is licensed under CC BY-NC-SA 4.0.

