
How to Fade in Text in Adobe Premiere Pro for 2024

How to Fade in Text in Adobe Premiere Pro
Every video is unappealing until you edit the video properly. Editing videos not only means trimming out unnecessary parts but also adding effects and animations. There are certain effects and transitions that are commonly used in most videos. Fade in effect is widely used in texts, objects, as well as clips. Fade in effect is very eye-soothing that does not distract the audience from the overall video content.
Fade in effect is available in all video editors. Among video editors, Adobe Premiere Pro is one of the best professional video editors. However, the learning curve of Premiere Pro is steep and hence, you have to know the exact steps to add fade in text Premiere Pro. We will illustrate how to apply fade in text effect Pro as well as add fade in and fade out transition effects in Premiere Pro. We will also state an alternative way to fade in texts in your videos.
Part 1. Fade in text in Premiere Pro with Opacity option
If you have added any text or any graphical object in your video on Premiere Pro, you can apply fade in effect to your text and object easily. When you add fade in effect to your text or object, they slowly appear on the screen which is very soothing to watch instead of sudden and abrupt appearance. Here are the steps on how to fade text in Premiere Pro.
Step1 You must have your video clip as well as text clip on the Timeline of Premiere Pro. Make sure that you add text from Essential Graphics panel. Select the text clip from the Timeline to proceed.
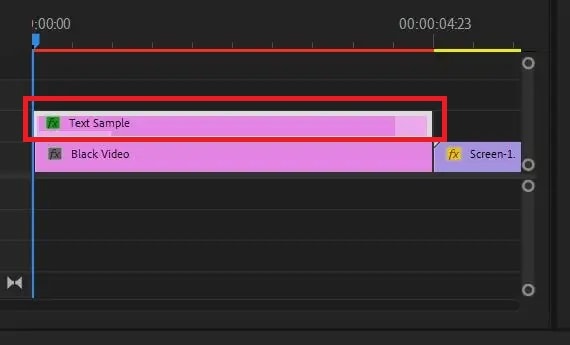
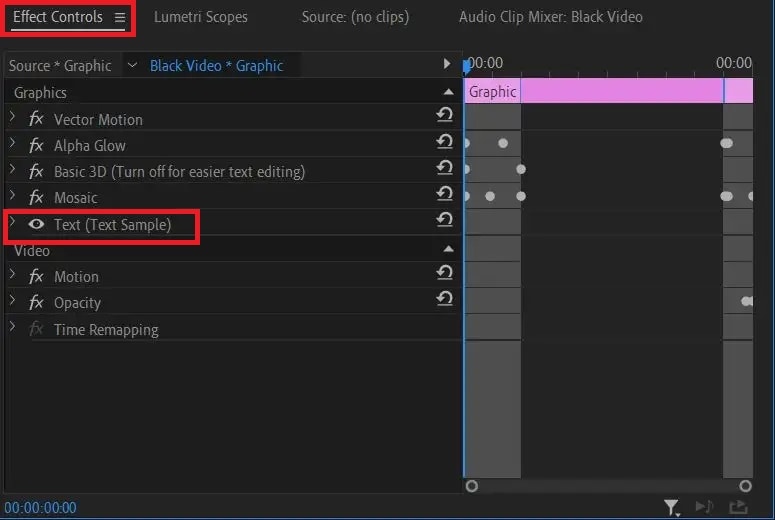
Step2 Go to Effect Controls and click on Text option to expand it. Click on Opacity option from the dropdown menu.
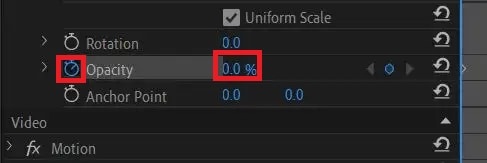
Step3 Put the timeline cursor at the beginning of the selected text clip. Thereafter, make the Opacity value to zero. Click on Stopwatch icon beside Opacity to add a keyframe.
Step4 Put the timeline cursor at that point in the clip where you want the text to appear completely. Now make the Opacity value to 100. Click on Stopwatch to add a keyframe here.

Step5 Play the video to watch the fade in effect on your selected text. You can move the keyframes to speed up or slow down fade in effect.
Part 2. Make fade in or out with transition effects
If you have multiple video clips or scenes, you should add fade in and fade out transition effects so that the transition from one clip to another or one scene to another is smooth. The fade in or fade out effect for video clips look similar to fade text Premiere Pro. In fact, you can use the steps of how to fade in text in Premiere Pro to get the job done. But there is an easier way available with Video Transitions option. Here are the steps on how to apply fade in or out effect on your video clips in Premiere Pro.
Step1 You should have multiple video clips added to Timeline. Select the video clip to which you want to apply Fade in effect.
Step2 Go to Effects panel and click on Video Transitions option.
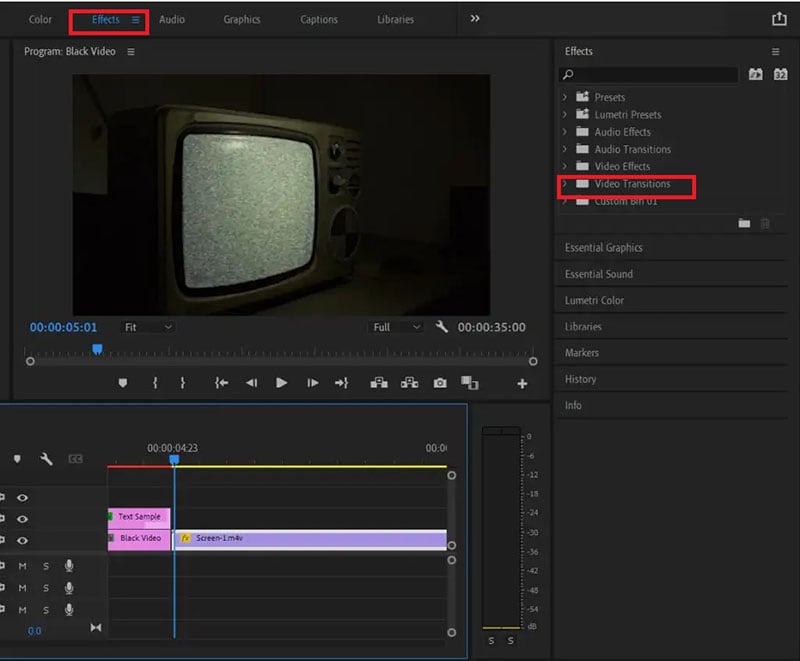
Step3 Click on Dissolve and from the dropdown list, drag and drop Film Dissolve to the beginning of the selected video clip for fade in effect.
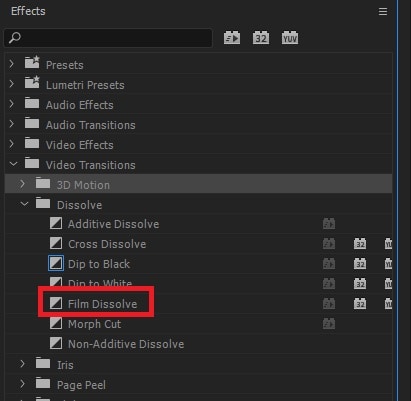
Step4 Click on the added effect on Timeline to adjust speed, duration, and alignment of the effect.

Step5 Play the video to ensure that the effect looks perfect. Therefore, go to File> Share> Export File to save the video.
You can place the transition at the end of the video for fading out effect. Instead of Film Dissolve, you can use Crossfade or Dip to Black effect for fade in and fade out effect on video clips.
Part 3. Alternative way to fade in text in videos
If you do not have Adobe Premiere Pro or you find the steps difficult to fade in text in videos using Premiere Pro, we recommend Wondershare Filmora . Filmora is a professional video editor that is available for Windows as well as Mac users. There is a wide range of video effects available in Filmora in comparison to Premiere Pro. Most importantly, Filmora is super easy and intuitive to use, and even amateur users can use it comfortably. Here are the steps to fade in text in videos using Filmora.
Free Download For Win 7 or later(64-bit)
Free Download For macOS 10.14 or later
Step1 Download and install Filmora . Launch Filmora and click on New Project option.

Step2 Import the video clip under Project Media folder. Drag and drop the video clip to Timeline.

Step3 Go to Titles located at the top and drag and drop any title style on Timeline. Double-click on the Title clip on Timeline and type in your required text in the Viewer. You can stretch the Title clip to extend its duration as per your requirement.

Step4 Double-click on Title clip again on the Timeline and go to Text> Animation tab located at the top-left corner. Scroll down to go to Fade1 option and double-click Fade1 to apply it to your text.
Step5 You can go to settings by clicking on Advanced button and adjust parameters such as speed and duration of the fade effect for better visibility.
Step6 Once you are done, play the video and thereafter, click on Export to save the video on your hard drive.
Conclusion
We have stated the steps on how to fade text in Premiere Pro. You can use the same steps to apply the effect to graphical objects. We have also illustrated how to apply fade in and fade out effects between video clips and scenes using transition effects. If you are looking for an alternative and easier way to fade in texts in your videos, we recommend Wondershare Filmora .
Free Download For macOS 10.14 or later
Step1 Download and install Filmora . Launch Filmora and click on New Project option.

Step2 Import the video clip under Project Media folder. Drag and drop the video clip to Timeline.

Step3 Go to Titles located at the top and drag and drop any title style on Timeline. Double-click on the Title clip on Timeline and type in your required text in the Viewer. You can stretch the Title clip to extend its duration as per your requirement.

Step4 Double-click on Title clip again on the Timeline and go to Text> Animation tab located at the top-left corner. Scroll down to go to Fade1 option and double-click Fade1 to apply it to your text.
Step5 You can go to settings by clicking on Advanced button and adjust parameters such as speed and duration of the fade effect for better visibility.
Step6 Once you are done, play the video and thereafter, click on Export to save the video on your hard drive.
Conclusion
We have stated the steps on how to fade text in Premiere Pro. You can use the same steps to apply the effect to graphical objects. We have also illustrated how to apply fade in and fade out effects between video clips and scenes using transition effects. If you are looking for an alternative and easier way to fade in texts in your videos, we recommend Wondershare Filmora .
Easy Steps to Add Miniature Effect to Videos
Want to add selective blur to make everything look smaller? Don’t have any idea how to focus on specific mini-things? Then don’t worry! In this article, you’ll get a step-by-step process to add miniature effects to your video. At the end of the process, you’ll have cinematic shots. Then start with us now! Scroll more to get pro tips!
What Is a Miniature Effect?

But first, let’s learn the logic of making the miniature effect. As many video editing pros present on Tiktok, the miniature effect is a fun way to brighten up your photography or video shots. For example, when taking a video or a time-lapse of a landscape, we always have a bigger depth of field, so most objects in the frame are in focus.
However, when we film a miniature model, the depth of field is shallow. So, we only see some objects in focus, and the rest is blurry. This visual trick makes our brain believe that the big landscape we’re seeing is actually a tiny model.

To create a miniature look, we can use specific effects to fake a shallow depth of field, and then the landscape view will look like a tiny model. While some keys to notice before making the miniature effect are:
- It utilizes selective blur to make things appear like small
- The miniature effect works best for footage filmed from a high angle.
- The tiny effect is usually used in drone footage, time lapses, or landscape photography.
Are you all set to add miniature effects to your video and make film-like shots? Then scroll more and get the step-by-step process.
How to Make a Miniature effect?
You are excited to add a miniature effect, and enjoy the rest! Without any further delay, follow the below instructions and get results!
Step1 Download the Wondershare Filmora
- First of all, you have to download the Wondershare Filmora .
- It’s packed with new features and effects plugins that make editing more filmy and fun!
![]()
Note: filmora has a unique “stock media” option that enables us to use all these elements and more to boost our videos!
Step2 Choose any stock footage
If you don’t have good-quality footage, but want to boost your video, here is how. You can get the miniature effect without a big format view camera or specialized lens.
- Open Filmora and select any stock footage in Wondershare Filmora.
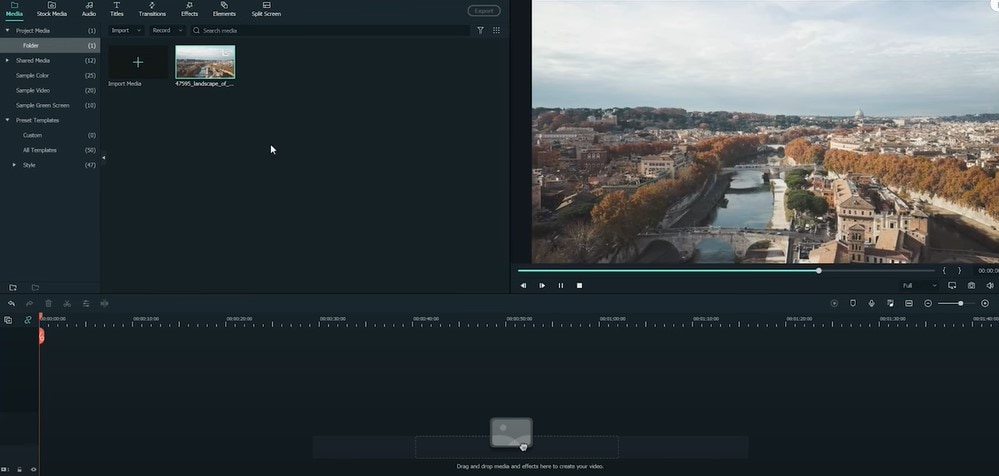
Move to the stock media folder on the above bar in the Wondershare Filmora. Or you can look towards the left window, where you will see the sample videos tab.
- Click on the sample videos tab, and a new window will appear on the library screen.
Here you will see almost more than 20 videos. So, instead of using the actual recorded footage, we’ll make do with what we have by default. After selecting and adding the stock footage of your choice. Then you have to follow the below process:
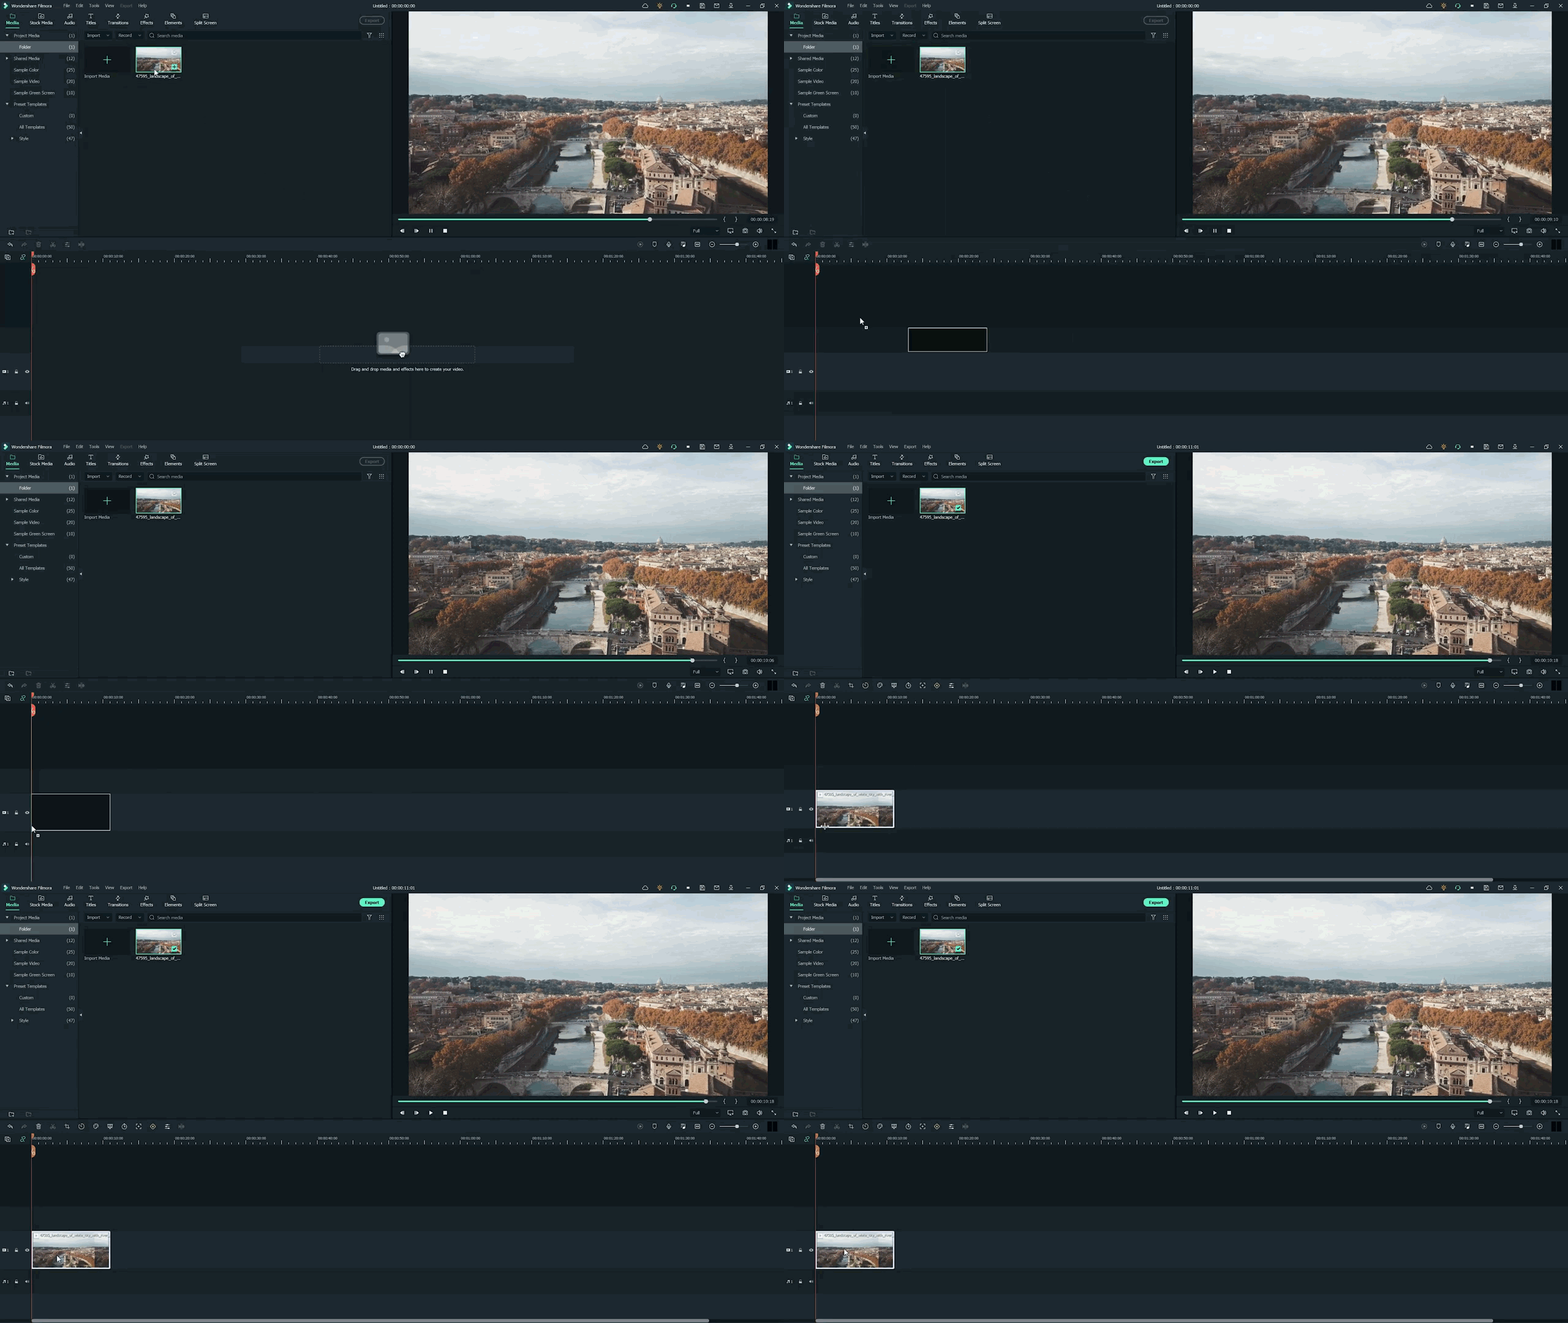
- First, hold the Stock Footage as shown in the folder section.
- Then Drag and Drop it to the timeline section for further editing.
Who will get Stock Media?
Want to get stock media? You can only have access to the stock media library if you already buy the license of Wondershare Filmora.
- The latest version has an unlimited stock library.
- After purchasing any plan, you can access Stock Media (Unsplash, Giphy, Pixabay, Pixel).
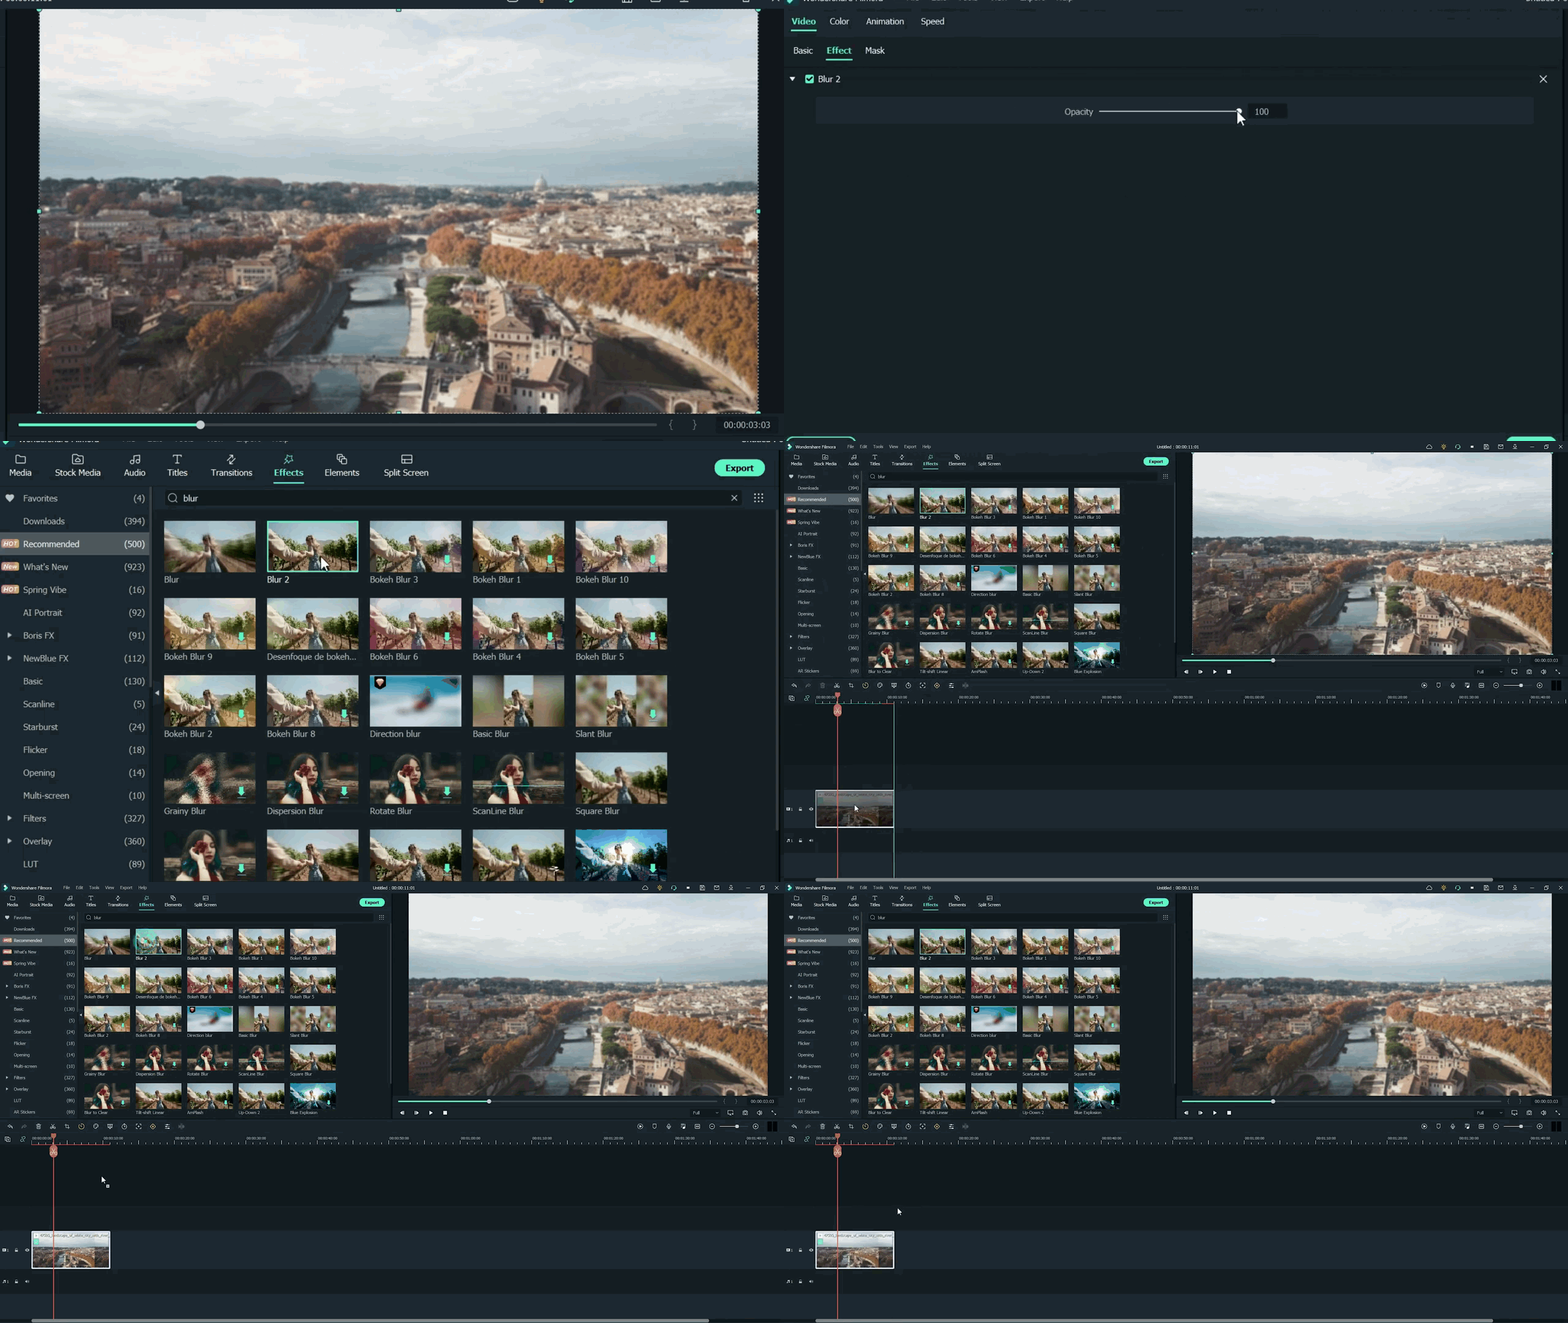
Step3 Head to the effect panel
As we are working on miniature effects, what do we need first? First, we ensure that we have a Blur effect on the video.
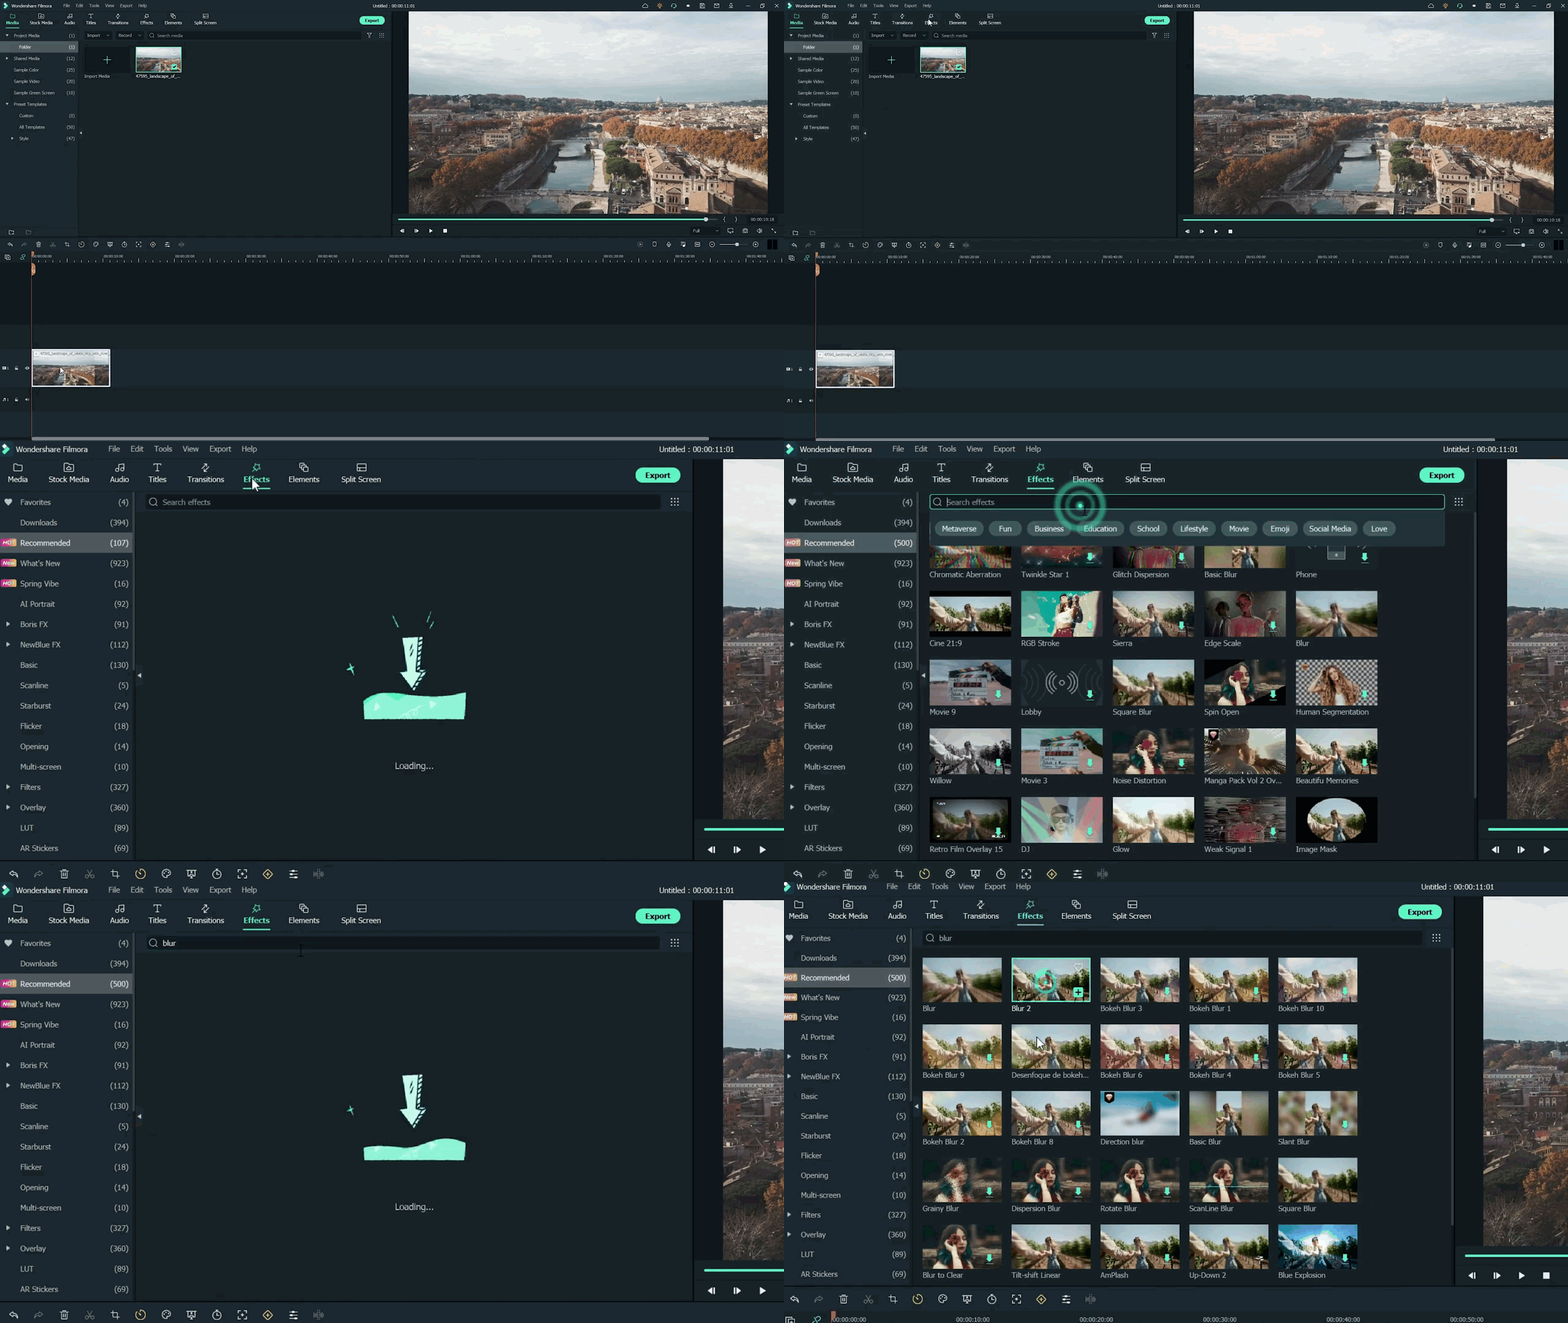
To add a blur effect from the panel, follow the below-mentioned steps:
- First of all, move toward the above tabs.
- Then click on the 5th section, which is Effect
- After selecting the effect tab, a new window will pop up.
- In this section, we have 500+ different effects.
- Then, click on the search bar.
- Search for the Blur effect.
- After that, click on the Blur 2
- Then Download this effect if you haven’t done this already.
Step4 Add the blur effect to the video
After selecting and downloading the blur effect, it’s time to add it to the video. Again, see how precise it turned out. To add effect, follow below steps:
- First, drag and Drop the effect toward the timeline.
- Then, make sure to release the effect on the video to give it a lens blur appearance.
Step5 Add the effect multiple times
Want to get an ideal blur level? If you need more blur level in your video and make it more cinematic, then follow the below steps:
- First, ensure that the opacity of the blur effect is 100%.
- Then, if you still want more blurriness, add Blur 2 effect multiple times on the video.
- Finally, add effect by just the Drag and Drop
Step6 Drop the same video clip
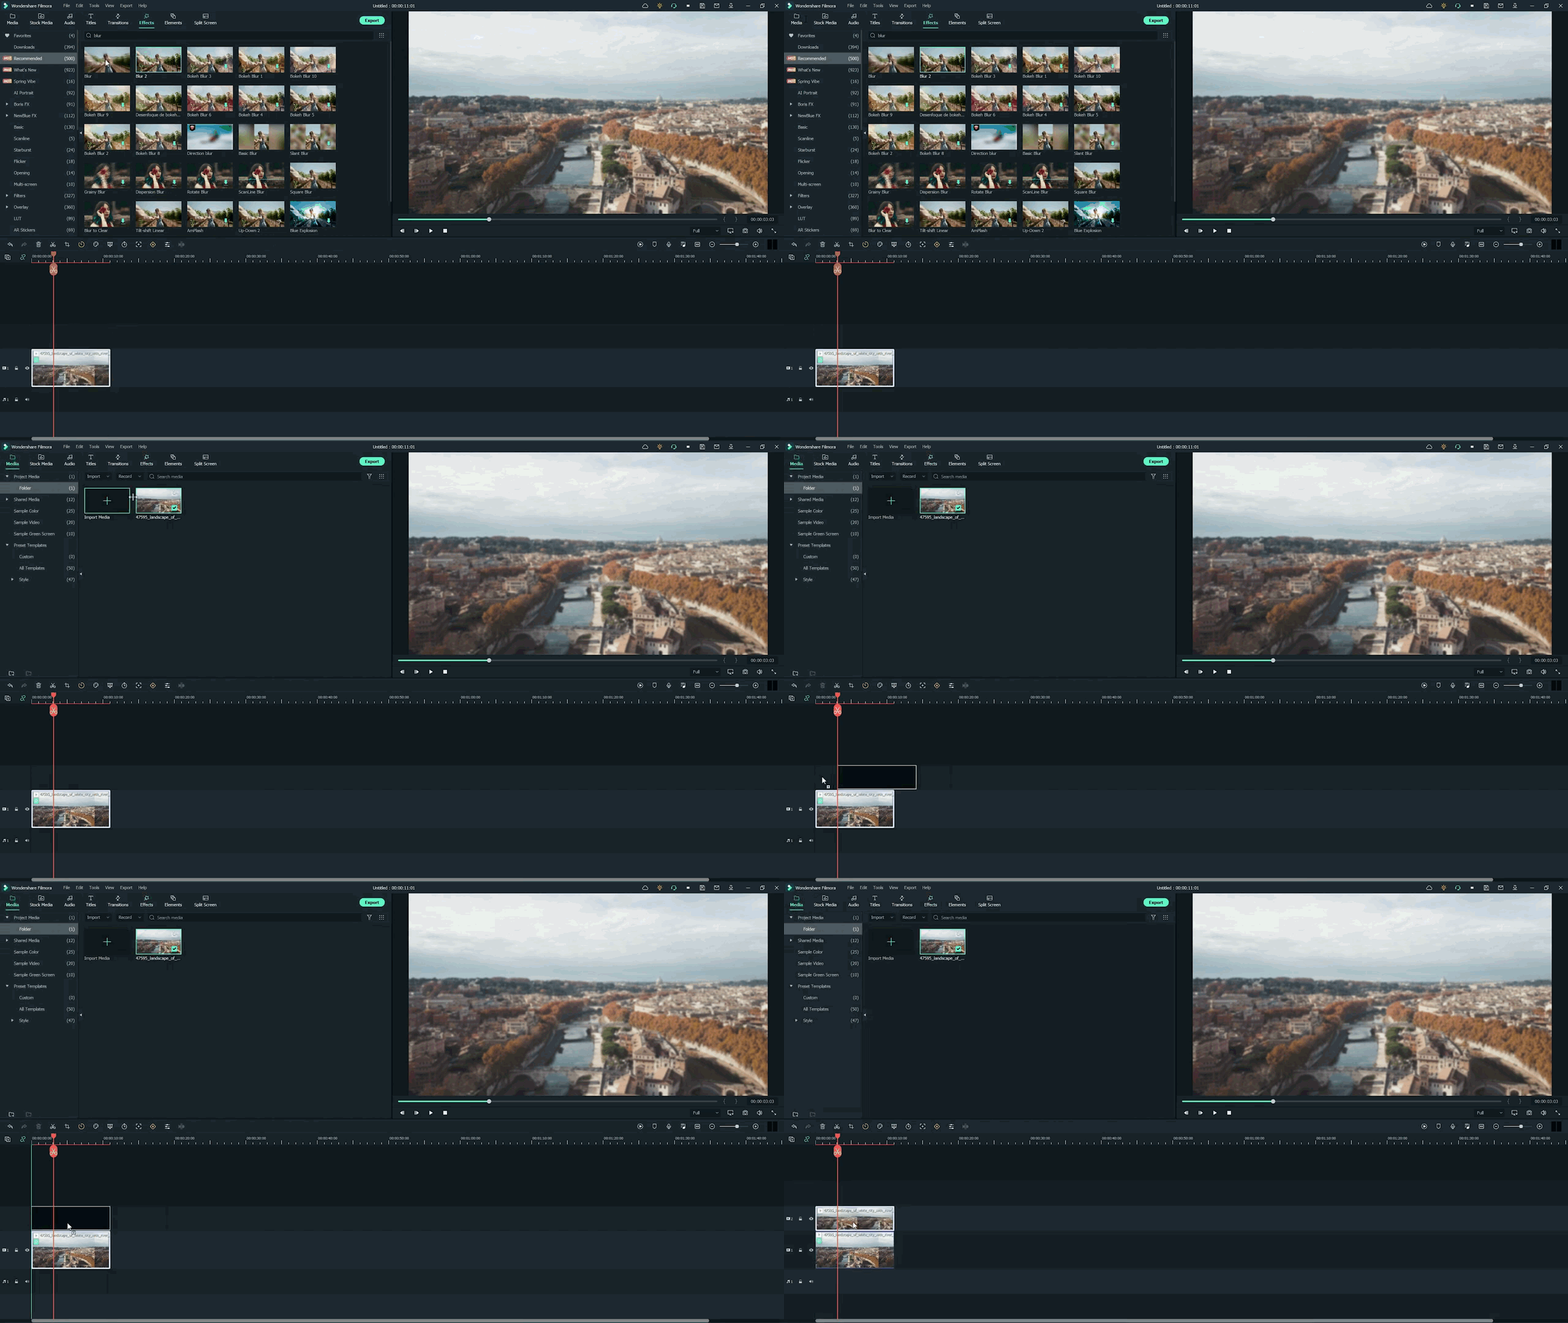
- Add the same video clip 2nd time on the timeline.
- Add it by just the Drag and Drop
- Make sure you add it to 2nd video track in the timeline above the first one.
Step7 Add masks on the Video
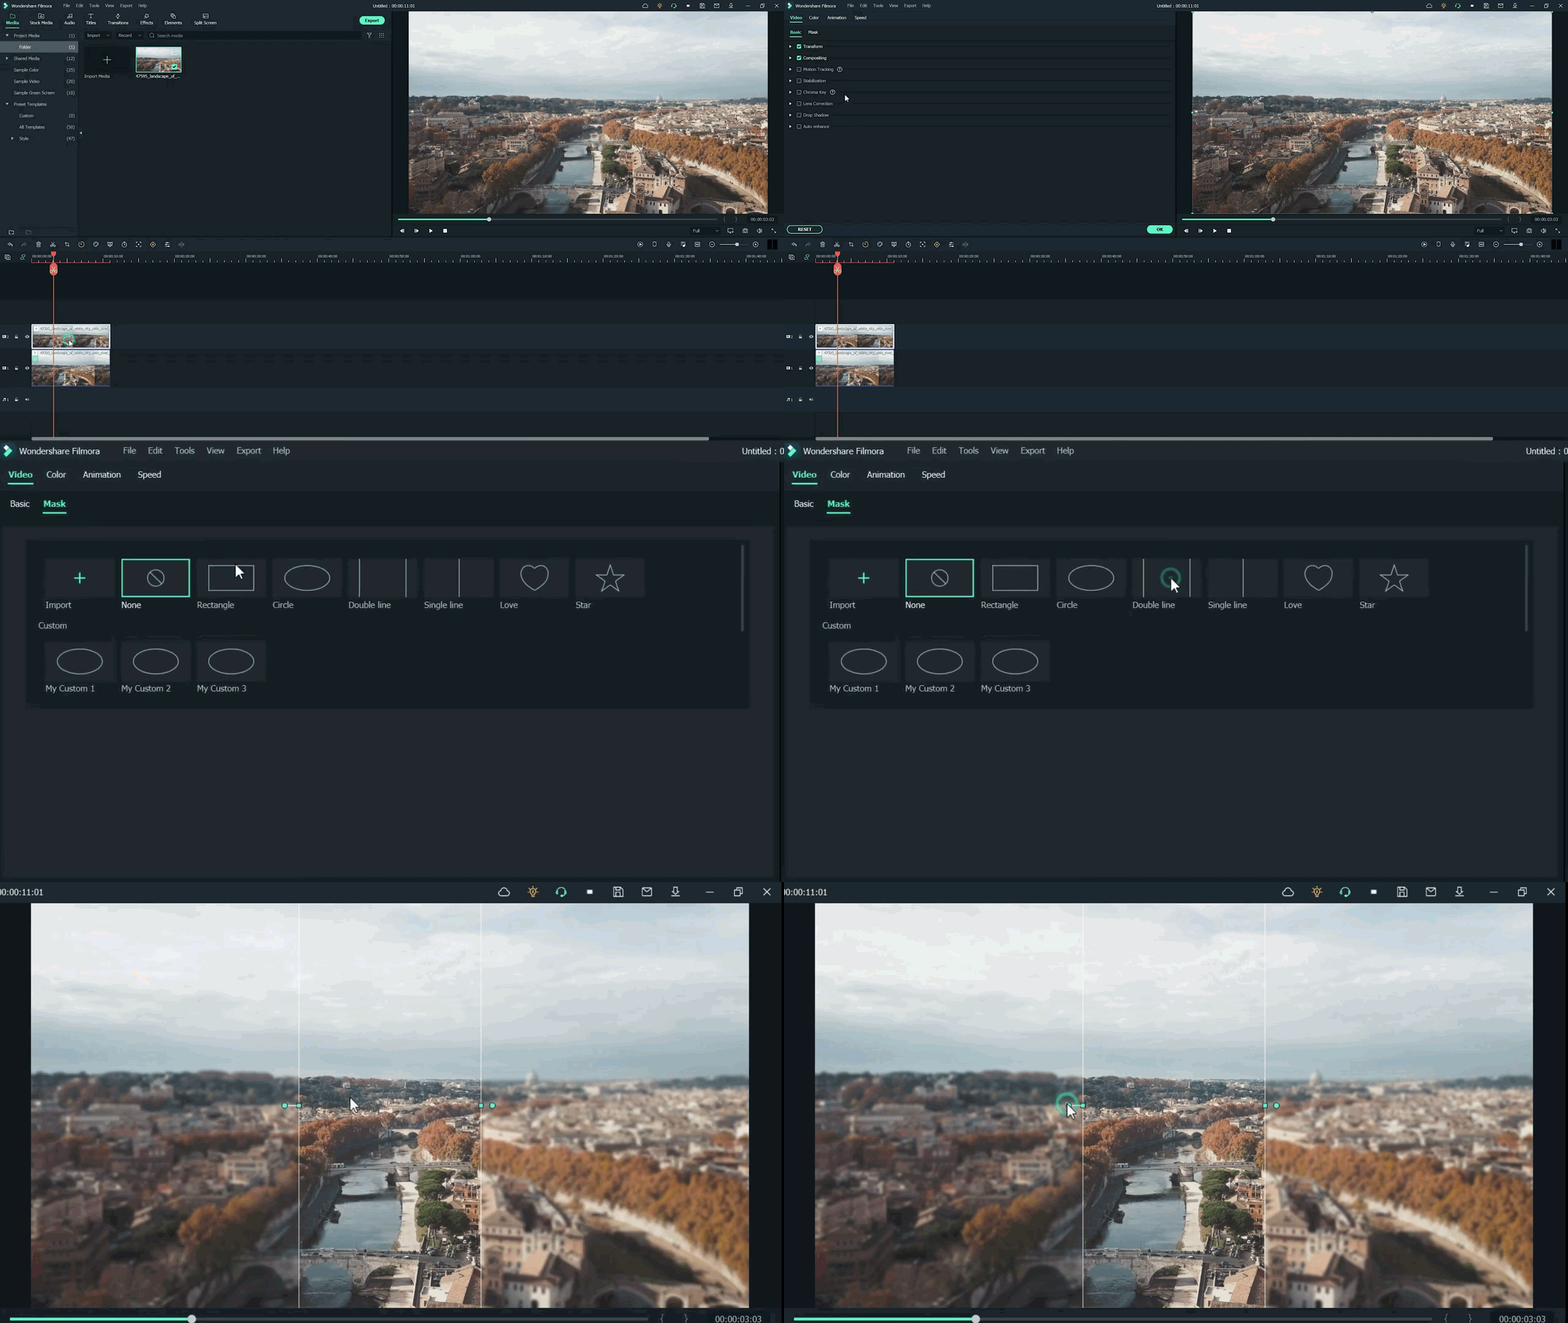
Now, it’s time to select a specific video portion and add a mask. Due to this, we will have a selective blur portion. For this, follow the below guidelines:
- Double-click on the video present in 2nd track.
- The settings tab will be open in the top left section.
- Then find the Mask section and click on it.
- After this, click on the Double-line.
- Set the mask on video according to your style and choice.
![]()
Note: you can adjust the mask size and position by rotating and changing its shape.
Watch the rotating and adjusting actions as shown below!
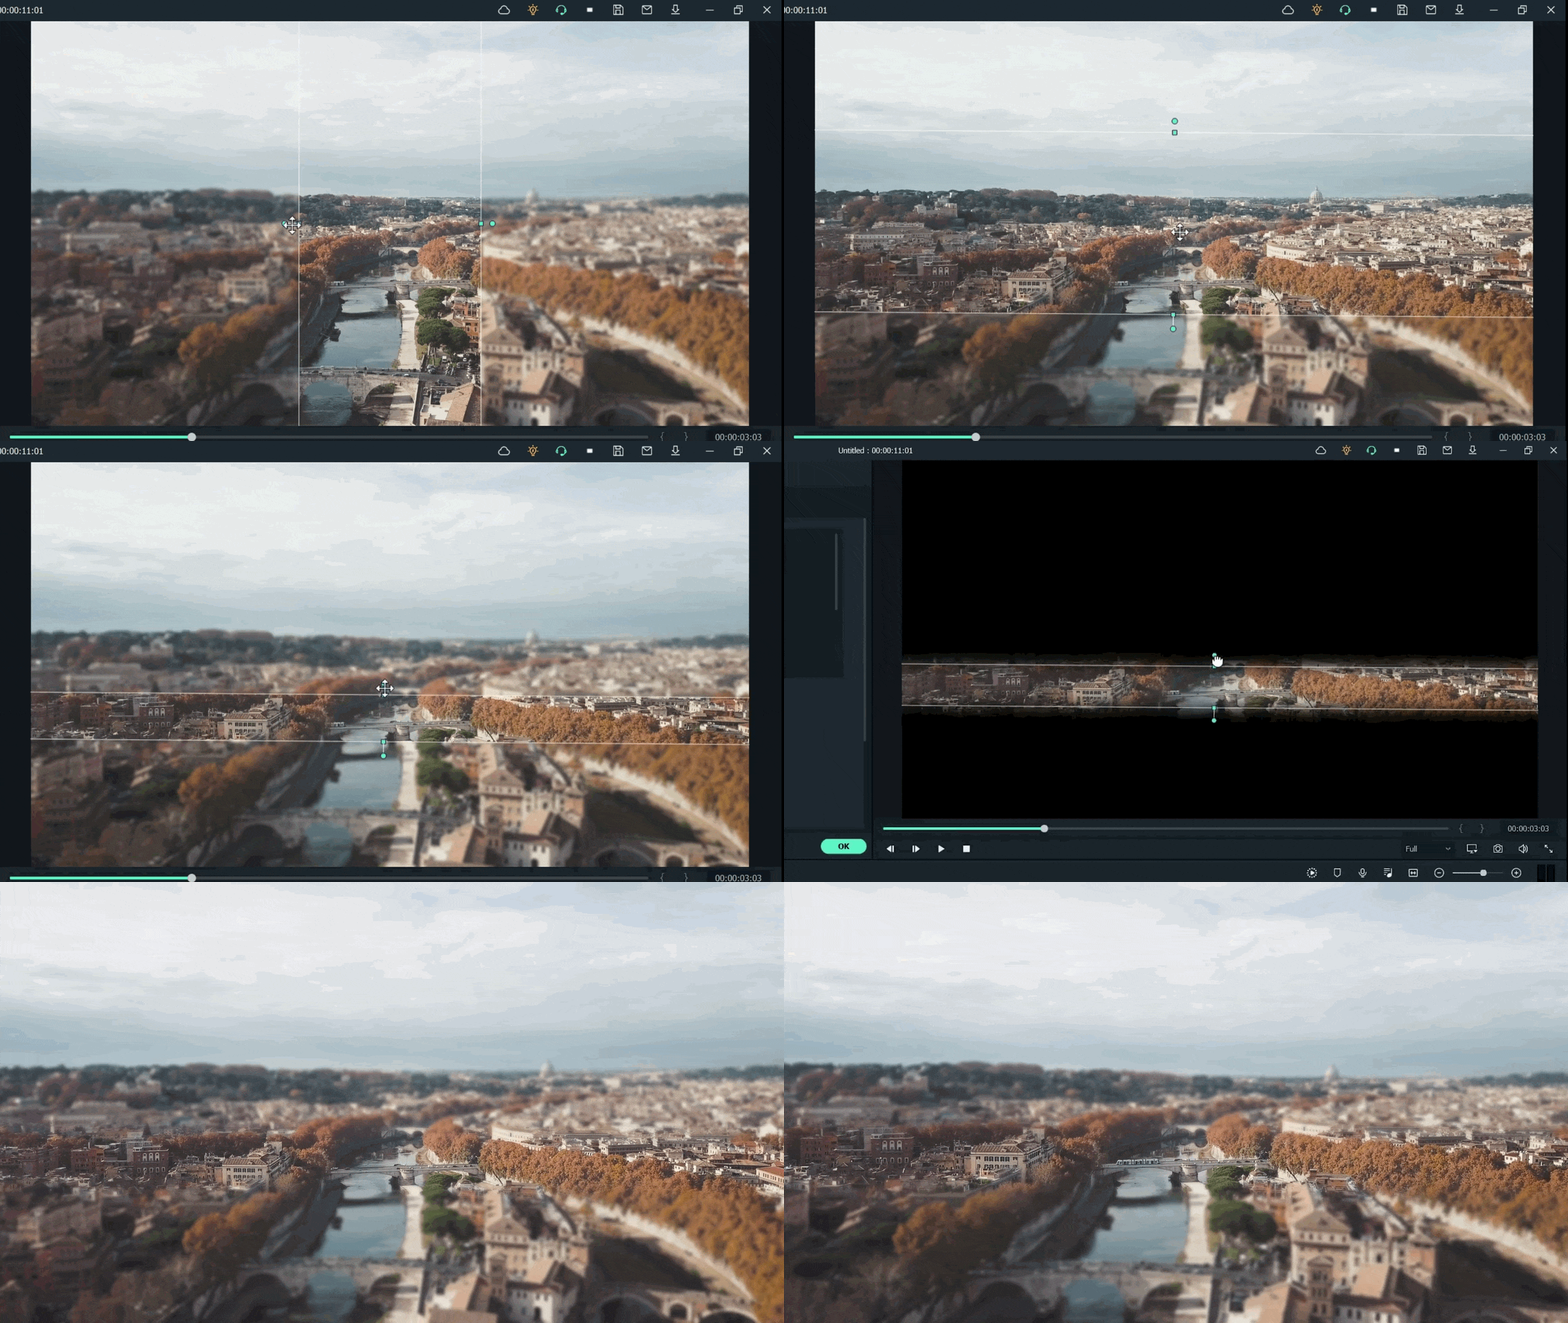
For example, when we add a mask in the below time-lapse video, follow the above mask adjustments. Unfortunately, we can’t get good results. Therefore, we will apply another way to add a mask by changing shape and position. Follow the instructions for modifications:
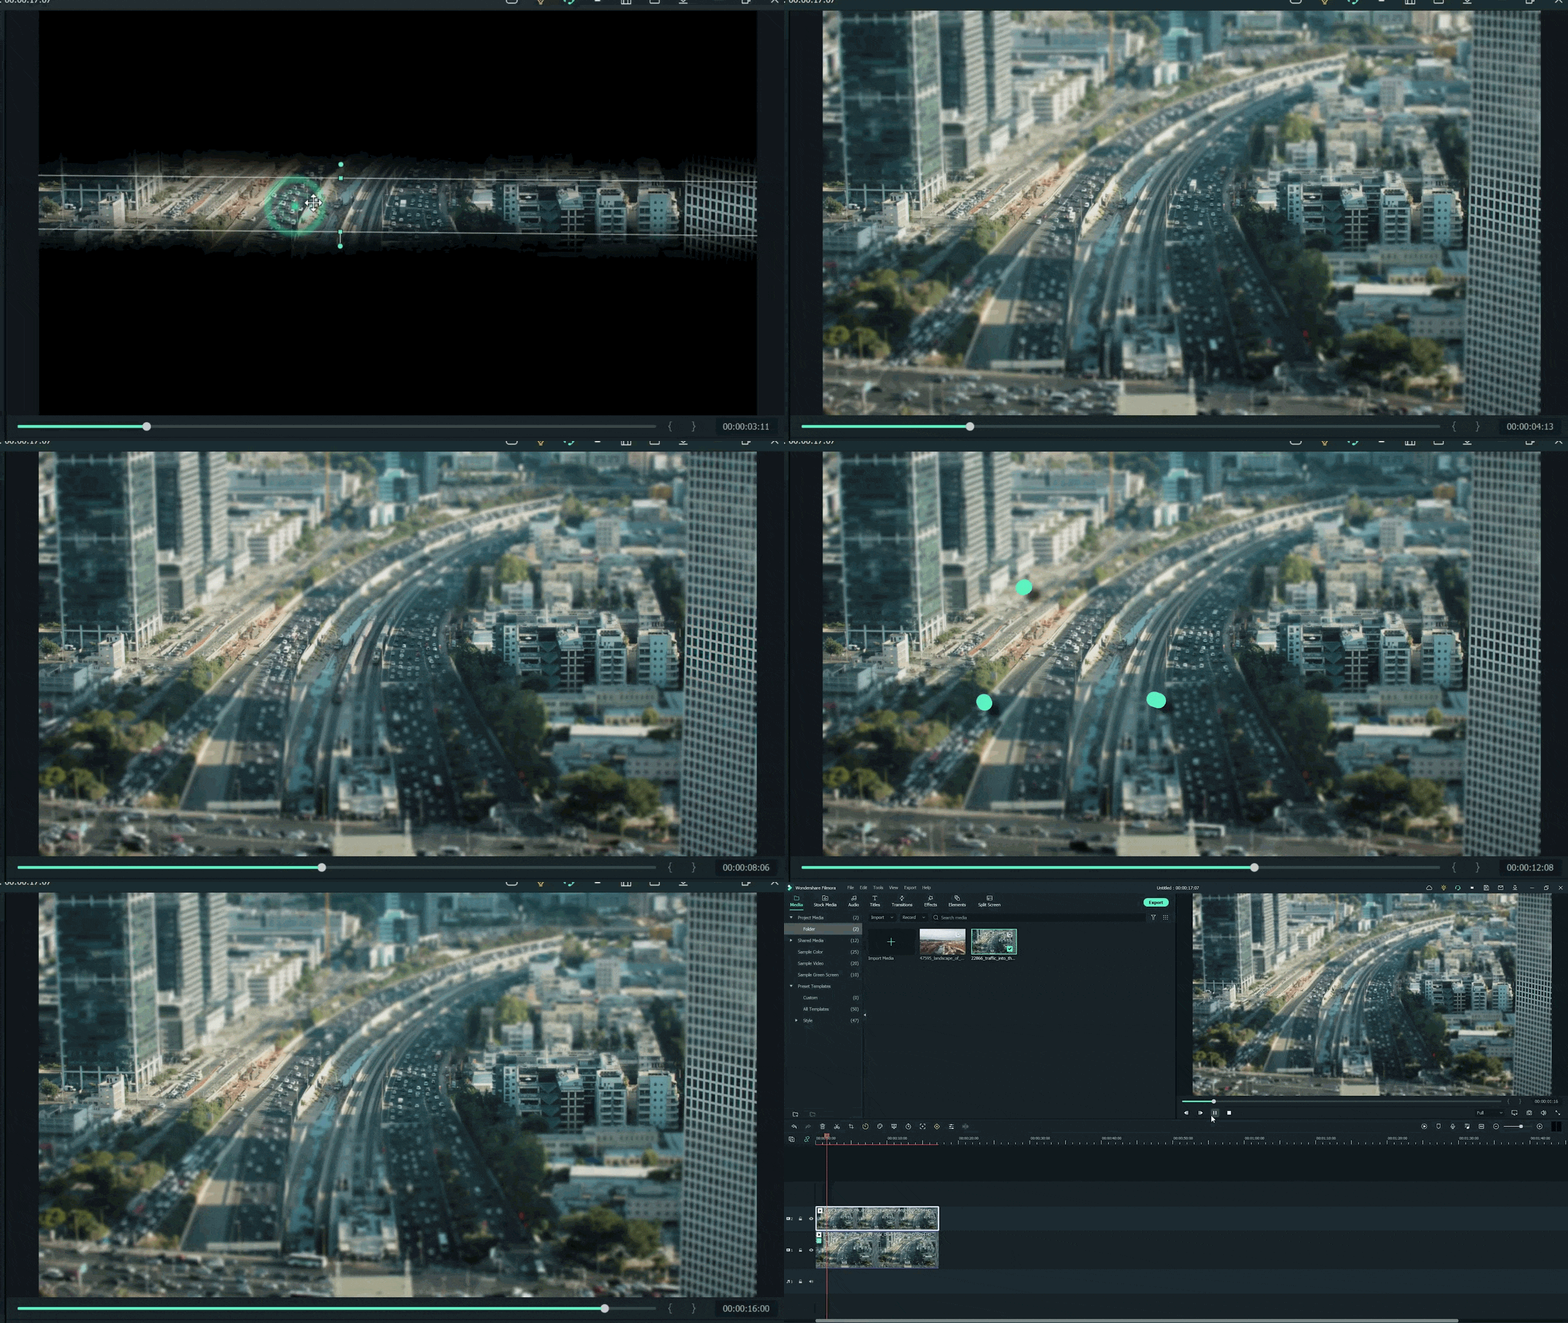
- Make a building or any object Blurry near the camera because it is not present within the depth of field.
- While the object is far from the camera, it is focused because it is in the depth of the field.
- Then adjust the mask, as per your choice.
Want to change the shape of the mask? Then follow the below steps:
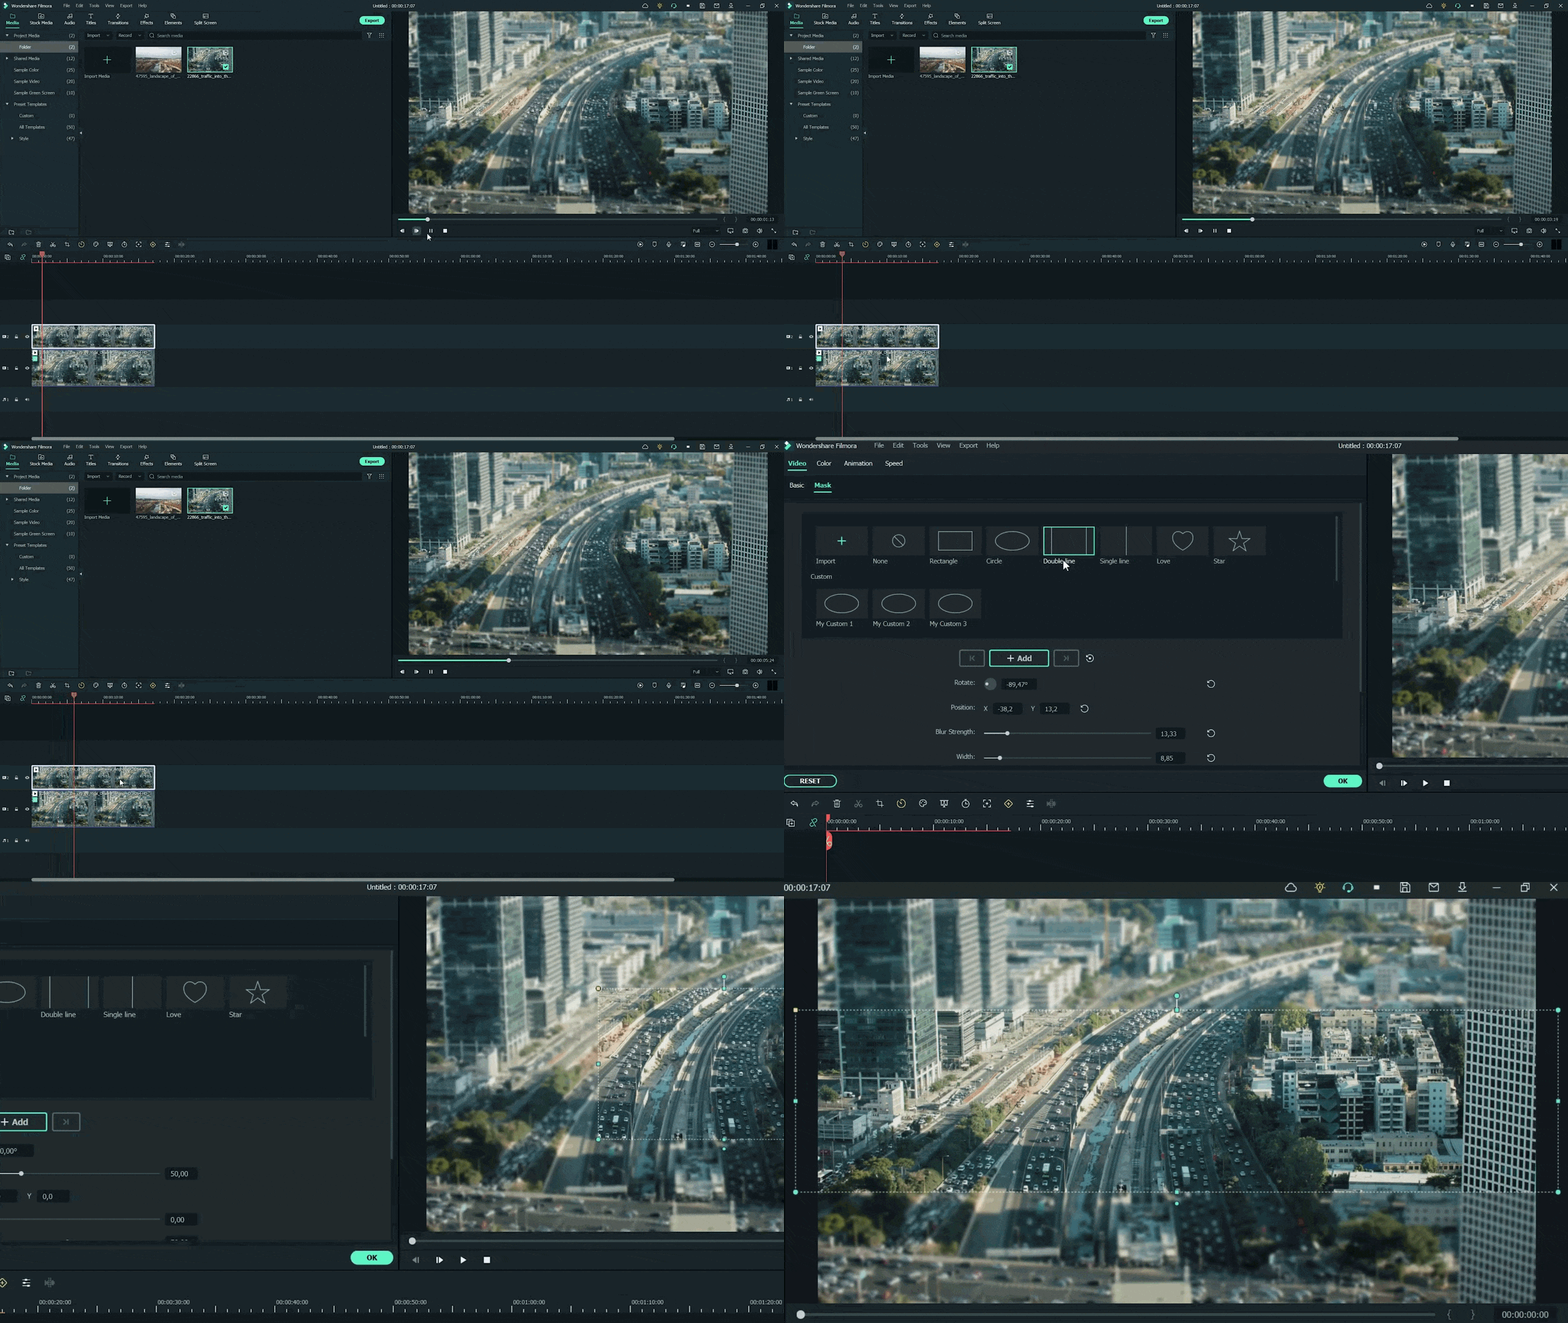
- Double-click on the video present in 2nd video track.
- Settings will activate on the top left side.
- Then click on the Mask tab to open it.
- Select the Rectangular mask from the list and apply it.
![]()
Note: make sure you are masking the same extent and excluding the object you want to be out of focus.
Now, it’s time to mask the whole object, which is far, but we want to make it in focus! For this, follow these steps:
- Add the same stock video clip a third time on the third video track of the timeline.
- Then add a mask in a Rectangle shape on the building.
- Don’t blur the edge of this mask.
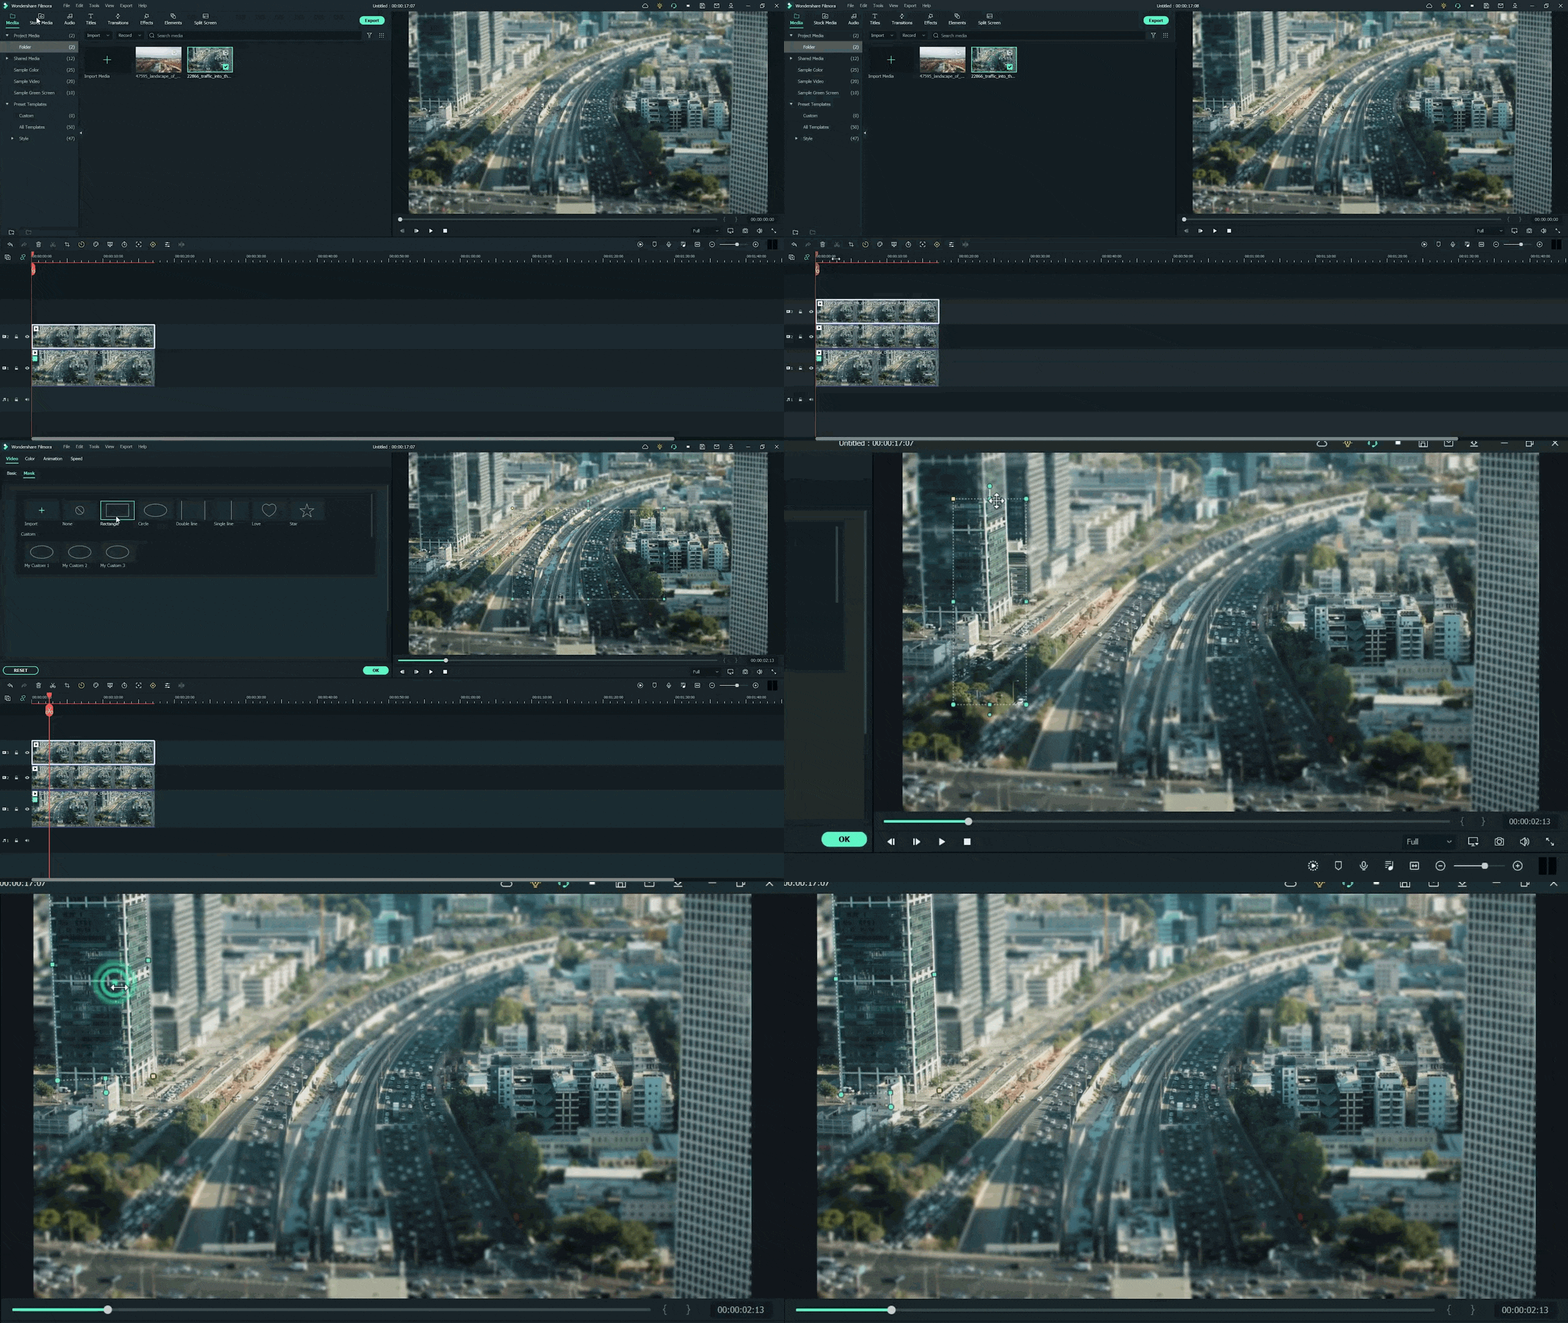
Step8 Final Look
You are excited now to see the final look of your miniature effect! Finally, it’s in front of you! Just modify it more if you want to make it more precise.
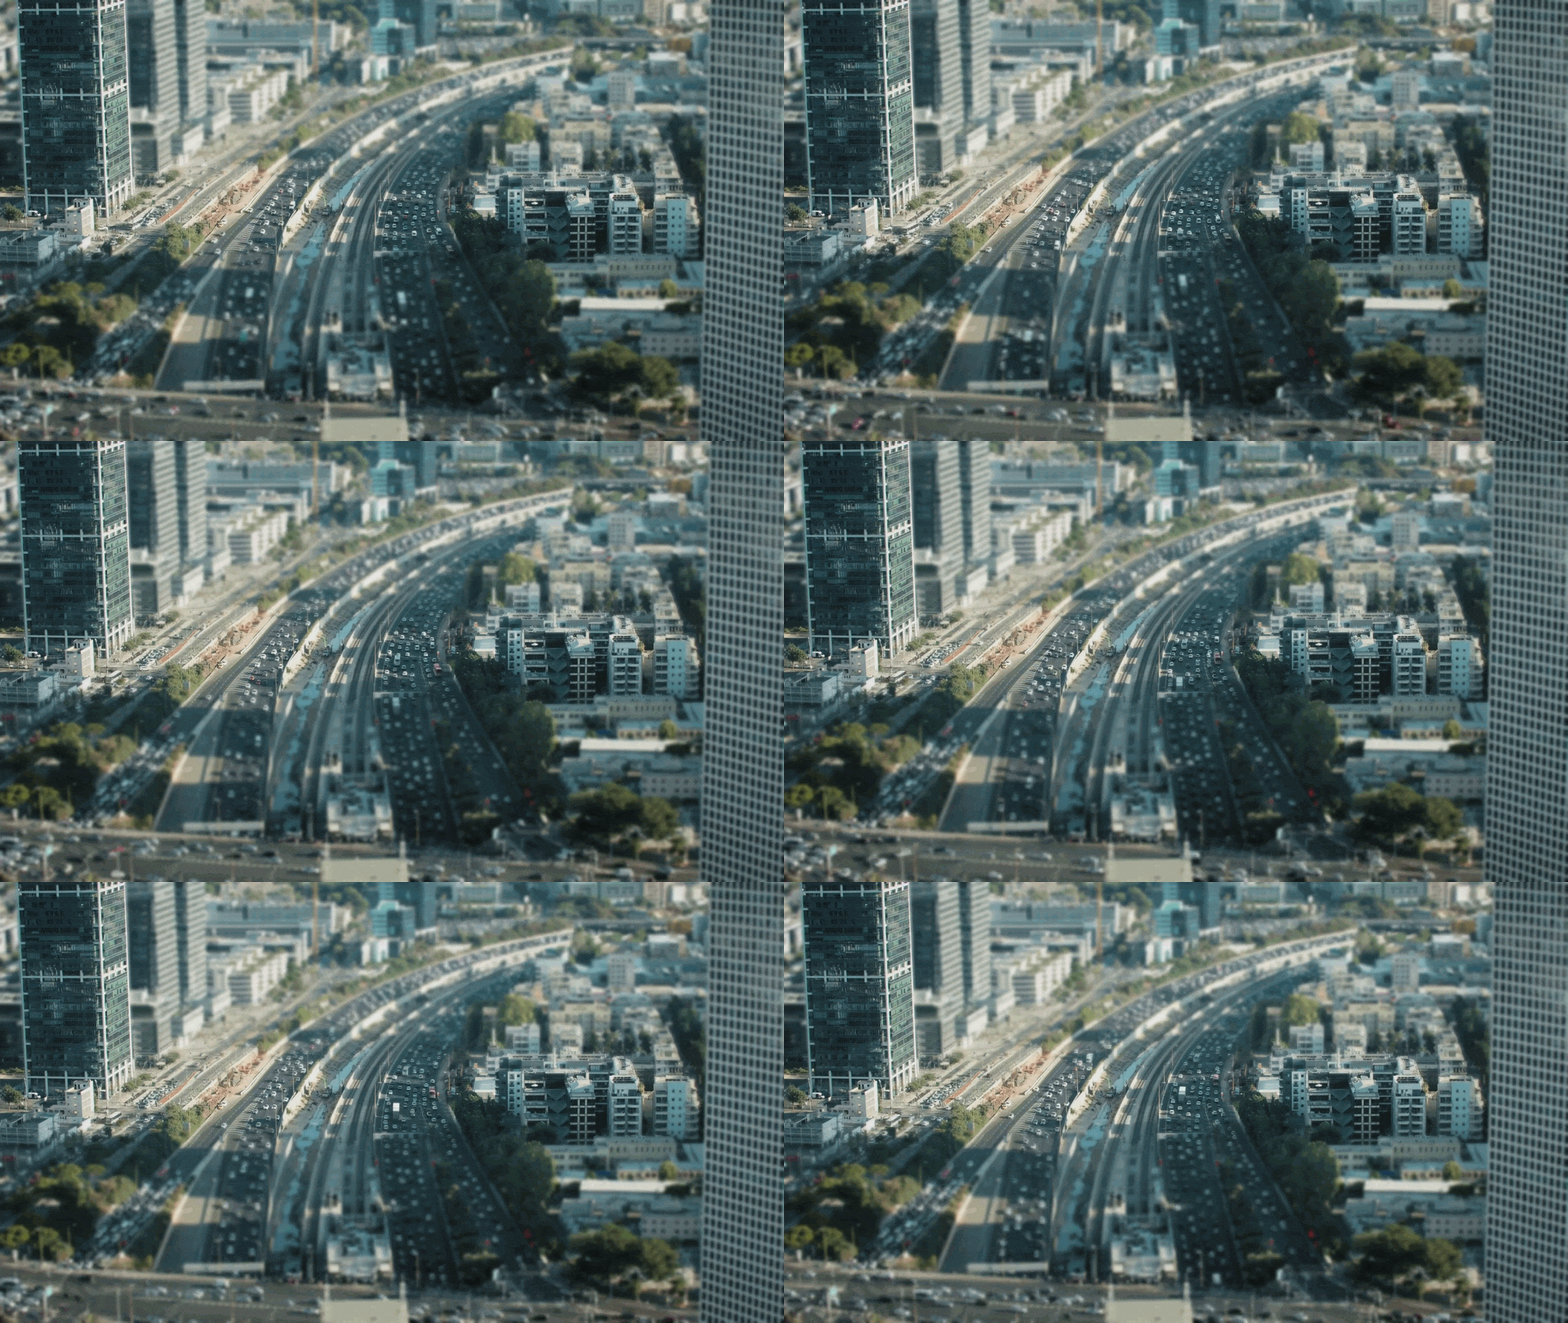
Have you tried to add a miniature effect before? If yes, then share your experience with us! Try with more mask shapes and add more blur effects. Make sure that you are using Wondershare Filmora to make more filmy shots. Feel free to try out different effects and enjoy the following results!
Free Download For Win 7 or later(64-bit)
Free Download For macOS 10.14 or later
Step2 Choose any stock footage
If you don’t have good-quality footage, but want to boost your video, here is how. You can get the miniature effect without a big format view camera or specialized lens.
- Open Filmora and select any stock footage in Wondershare Filmora.

Move to the stock media folder on the above bar in the Wondershare Filmora. Or you can look towards the left window, where you will see the sample videos tab.
- Click on the sample videos tab, and a new window will appear on the library screen.
Here you will see almost more than 20 videos. So, instead of using the actual recorded footage, we’ll make do with what we have by default. After selecting and adding the stock footage of your choice. Then you have to follow the below process:
- First, hold the Stock Footage as shown in the folder section.
- Then Drag and Drop it to the timeline section for further editing.

Who will get Stock Media?
Want to get stock media? You can only have access to the stock media library if you already buy the license of Wondershare Filmora.
- The latest version has an unlimited stock library.
- After purchasing any plan, you can access Stock Media (Unsplash, Giphy, Pixabay, Pixel).
Step3 Head to the effect panel
As we are working on miniature effects, what do we need first? First, we ensure that we have a Blur effect on the video.

To add a blur effect from the panel, follow the below-mentioned steps:
- First of all, move toward the above tabs.
- Then click on the 5th section, which is Effect
- After selecting the effect tab, a new window will pop up.
- In this section, we have 500+ different effects.
- Then, click on the search bar.
- Search for the Blur effect.
- After that, click on the Blur 2
- Then Download this effect if you haven’t done this already.
Step4 Add the blur effect to the video
After selecting and downloading the blur effect, it’s time to add it to the video. Again, see how precise it turned out. To add effect, follow below steps:
- First, drag and Drop the effect toward the timeline.
- Then, make sure to release the effect on the video to give it a lens blur appearance.

Step5 Add the effect multiple times
Want to get an ideal blur level? If you need more blur level in your video and make it more cinematic, then follow the below steps:
- First, ensure that the opacity of the blur effect is 100%.
- Then, if you still want more blurriness, add Blur 2 effect multiple times on the video.
- Finally, add effect by just the Drag and Drop

Step6 Drop the same video clip
- Add the same video clip 2nd time on the timeline.
- Add it by just the Drag and Drop
- Make sure you add it to 2nd video track in the timeline above the first one.

Step7 Add masks on the Video
Now, it’s time to select a specific video portion and add a mask. Due to this, we will have a selective blur portion. For this, follow the below guidelines:
- Double-click on the video present in 2nd track.
- The settings tab will be open in the top left section.
- Then find the Mask section and click on it.
- After this, click on the Double-line.
- Set the mask on video according to your style and choice.

![]()
Note: you can adjust the mask size and position by rotating and changing its shape.
Watch the rotating and adjusting actions as shown below!

For example, when we add a mask in the below time-lapse video, follow the above mask adjustments. Unfortunately, we can’t get good results. Therefore, we will apply another way to add a mask by changing shape and position. Follow the instructions for modifications:

- Make a building or any object Blurry near the camera because it is not present within the depth of field.
- While the object is far from the camera, it is focused because it is in the depth of the field.
- Then adjust the mask, as per your choice.
Want to change the shape of the mask? Then follow the below steps:

- Double-click on the video present in 2nd video track.
- Settings will activate on the top left side.
- Then click on the Mask tab to open it.
- Select the Rectangular mask from the list and apply it.
![]()
Note: make sure you are masking the same extent and excluding the object you want to be out of focus.
Now, it’s time to mask the whole object, which is far, but we want to make it in focus! For this, follow these steps:
- Add the same stock video clip a third time on the third video track of the timeline.
- Then add a mask in a Rectangle shape on the building.
- Don’t blur the edge of this mask.

Step8 Final Look
You are excited now to see the final look of your miniature effect! Finally, it’s in front of you! Just modify it more if you want to make it more precise.

Have you tried to add a miniature effect before? If yes, then share your experience with us! Try with more mask shapes and add more blur effects. Make sure that you are using Wondershare Filmora to make more filmy shots. Feel free to try out different effects and enjoy the following results!
Free Download For Win 7 or later(64-bit)
Free Download For macOS 10.14 or later
Best Online YouTube Video Trimmer 2024
Since the shift in interest from on-site jobs to content creators and exploring opportunities to take advantage of better and improved career growth opportunities, YouTube is one of the most popular social media platforms to get started.
But how do people face difficulties in finding an affordable and quick online YouTube video trimmer? Are you also facing issues with trimming your video before uploading it to get more views?
This is an ultimate guide on online YouTube video trimmer software and how you can trim your YouTube videos in no time.
Part 1. What is a YouTube trimmer?
Before diving into any details, it is important to introduce you to what is a YouTube trimmer and why it is important to trim your video. A YouTube trimmer is an easy and fast video editing tool that allows you to trim, crop, and share your favorite video parts online. You can also create custom links to YouTube Crops to embed on your website.
There are two popular online YouTube trimmers available; one only allows you to edit the YouTube link, which means you can only view the edited video online, while the other allows you to do related operations on the video file and download and save it as an mp4 or other file type for offline viewing.
Part 2. How to online trim YouTube videos?
1. Online YouTube trimmer (no edit and download)
Using these two websites, you can easily find the YouTube video clip you want to keep, but there is no way to download the video or add more editing to the clip. However, it works well for sharing links online or adding them to your website and using them to describe the part that best fits the topic.
The straightforward interface has just one function. Enter the start and end times in the box after entering the right YouTube link, then click “Crop!” to create a string of links.

The video’s beginning and ending times are selected in the same way as on the previous website. However, this website offers some basic code that you may copy and paste into your web pages to suit your demands in order to add YouTube videos.

Once you are done trimming your videos, you can download or export your videos in different formats, depending on your preference. It can be in mp4, mp3, or any other supported format.
2. Online YouTube trimmer (edit and download)
The websites that are listed after that combine an online YouTube downloader with a video editor, allowing you to make a variety of further edits to the selected video clip before downloading it locally.
- Veed.io :
Anyone can make powerful videos and expand their audiences thanks to the online video editing application Veed. It has some useful capabilities, such as the capacity to cut videos and filter them using different aesthetics. Users can crop, add text, make drawings, and even add photos to the movies. In addition, Veed serves as a tool for producing social media films that may be customized for each channel where they will be shared.
Additionally, they are free to play with various tools like rotate, trim, add photos, stickers, emojis, and more. Through the program, users may even create video memes online by uploading a target movie, modifying it using a variety of features, and downloading the altered video after a brief rendering.
Step1Launch veed.io on your web browser. Click on ‘Upload Your Video‘ to upload the video file you want to edit.
Step2You will notice a button to upload your media file once you are taken to the editing page.

Step3You can trim your video section by dragging the mark after you’ve uploaded the media file.

Step4Now, delete the unwanted video segment and click on ‘Export’ to save the trimmed video.
- Kapwing :
An effective, non-linear editing workflow is supported by the online video editor Kapwing. Upload your audio, video, and image files, then edit everything in one location. Since Kapwing is entirely online, content creators may access and edit their work from any computer or mobile device.
Step1Launch Kapwing.com on your web browser. If you are not directed to the trim video section, then go to the ‘Tools‘ menu and select ‘Trim Video‘. Now, click on ‘Choose a Video.’
Step2From the main page, click ‘Click to upload’ to upload the media file.

Step3After uploading the media file, Click on ‘Trim’ from the editing section on the right side of the screen.

Step4A pop-up screen will appear on your screen labeled as Trim Video. Trim the parts of the video as per your requirement and Click ‘Trim’ to finish.

Step5Once you have completed editing, click on ‘Export’ to save the video to your device.
Part 3. How to trim YouTube videos on a desktop?
Using an online video trimmer has been one of the last options that anyone would consider, but due to the expensive software, they have turned out to be a friendly and easy approach to editing videos. But the online video trimmers still rank at the bottom of the list because they’re unstable, and you can’t save the project at any time. If the online program breaks down, all your effort will be wasted. But desktop programs such as Filmora will never make you encounter such problems unless you experience a technical glitch.
With the help of a variety of strong editing tools and Wondershare Filmora , users may quickly and easily make outstanding videos. With Wondershare Filmora, anyone can learn how to be an excellent video editor, thanks to its wonderfully simple design.
You can follow these easy steps to trim your video:
Step1Click “Import” on the main windows and then select the desired video files from your computer to add video files to the Timeline for cutting. Movies can also be dropped directly into the Media Library.

Step2By moving the playhead over the unwanted section and choosing the trash can icon, you can delete it.

Step3When you’re through trimming, click “Export”, then select a location to store the edited video.
Conclusion
Depending on the comparison of how different software work, it is justifiable to conclude that Filmora is the best video editing software by all means. It offers a wide range of editing tools and ensures that progress has not been lost. If you are looking forward to trimming a video, download Filmora on your device to get started.
Free Download For Win 7 or later(64-bit)
Free Download For macOS 10.14 or later
Free Download For macOS 10.14 or later
For Artists Who Are Making Videos for Show Their Knowledge or Projects, Add some Effects for the Video Can Always Provoke Interests and Attention. This Article Will Show You How to Do that Easily
Filmora is a powerful tool and with the know-how can make your art be more than just a still image. Whether it is for a music video or a portfolio showreel, there are better ways than just inserting an image and letting it fade to the next still image. We can make use of effects and transitions to put our art to better use.
In this guide I’m going to show a couple of ways to enhance your images within Filmora for your videos.
Transitions
By inserting a transition to your image, you can add some diversity to how the viewer first see’s your image, You may want to emphasis a certain element of your art and therefore would select a transition that zooms in on that element before zooming out to the whole image or maybe you have a painting of a cyberpunk angel and wish to have the image enter in a grid formation. The point is that by experimenting with transitions and trying to select the best ones based on the element in your work you will achieve a better first impression. This is true for all aspects of video creation.
Having multiple transitions can create a unique look for your videos with minimal understanding of how to create a transition but there needs to be an understanding of how the layers work in Filmora being that a layer on top is in front of the one below, remember this when you start to add transitions as sometime you may need to duplicate your art as to keep it in the shot.
Free Download For Win 7 or later(64-bit)
Free Download For macOS 10.14 or later
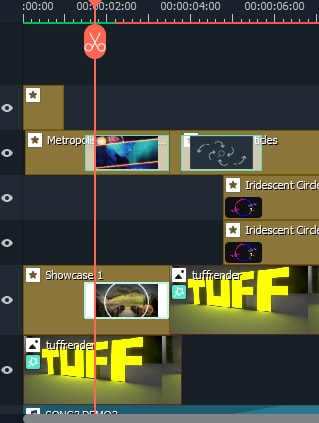
As you can see here, I have duplicated my image onto separate channels as to always keep the image in the scene.
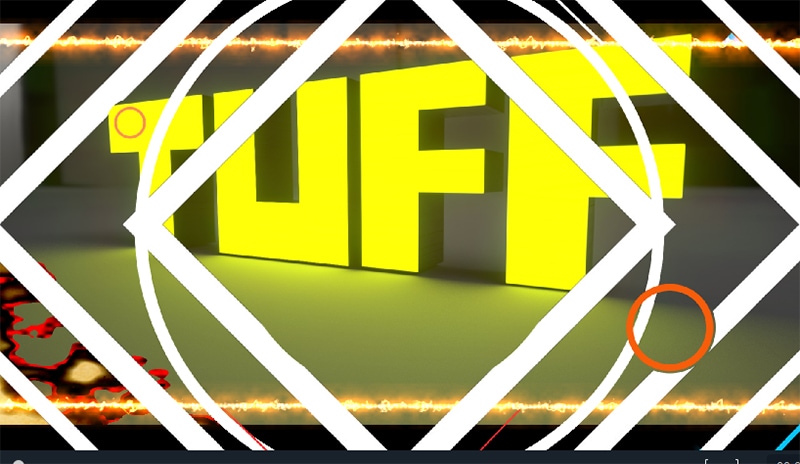
In the image above you can see how I used multiple transitions, I did this as my image is off center and I wanted to emphasize that, I picked transitions that had clear symmetry and lines so that the viewer had a reference point of where center was without me having to place that in my art. This is a very useful way of adding information to your art without telling the viewer directly. As for the color theory, I went with oranges and yellows predominantly here as they are neighboring colors on the color wheel and we know they work well together with my main color of yellow. As for the composition I have tried to keep all the eye-catching points along the top third of the image as to create a piece more pleasing to the eye even with all this information going on.
Effects
The inclusion of effect onto your art should not be discouraged depending on what the art is used for, in my example i created this as though it was album art and the musician wanted to upload a simple music video using that art, on its own it is static and can loose engagement but by applying relevant effects you can capture the viewer’s eye and make the listening experience more enjoyable. Effects can also be stacked to create unique assets for your art and help tell a story, if your art includes fire why not add a fire effect breaking the stillness of the image or maybe your art has motion, you could include a motion effect to your still image and give the viewer more information.
Even when using effects you can use fundamentals such as color theory or composition to better enhance your imagery.
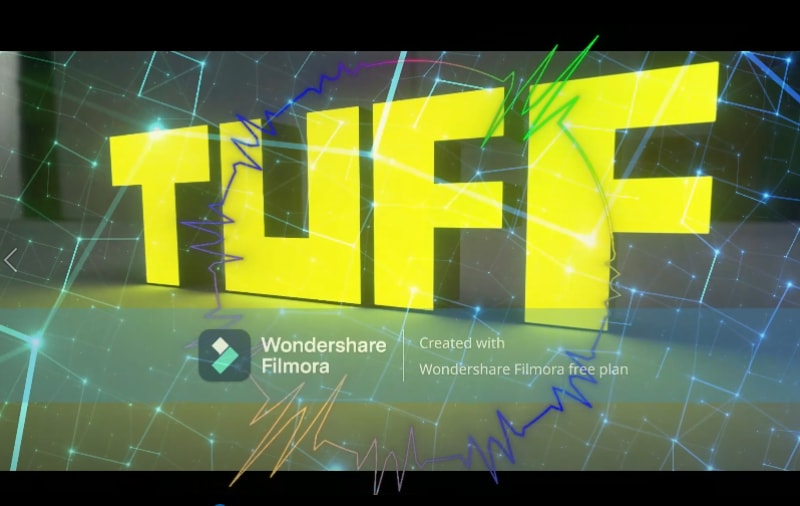
In this image you can see I have added an audio visualizer effect as well as a spectral light effect. I did this to reinforce the face of my image having a strong light source, it creates dynamic movement and the audio visualizer was added due to the nature of the video being music oriented but I felt this could have been done better. The composition of the audio visualizer was front and center and seemed boring and uninteresting. This is where the research into art fundamentals comes into play as remembering the rule of thirds and how all the main features of the image are in the top horizontal third, we can make use of the vertical thirds to gain a better composition and hopefully create more engagement.
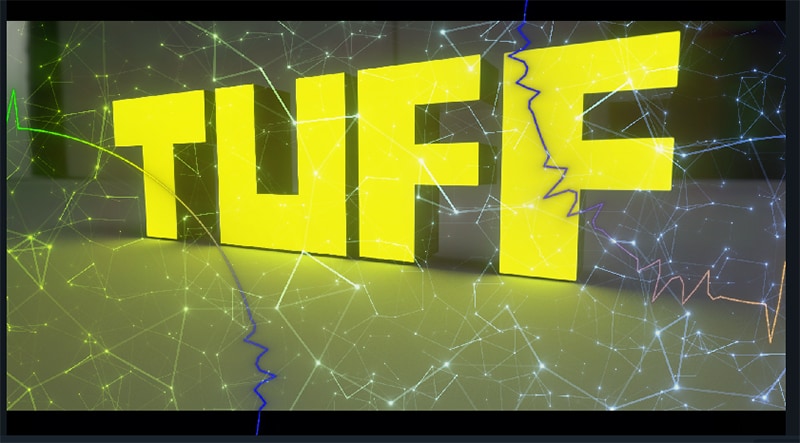
As you can see, we have duplicated the audio visualizer and made better use of the thirds nor having opposing placement within the scene, the same information is being given by the effect but we have managed to use the space more effectively and created a visually pleasing aesthetic to our video. Trick like this can make your still image feel more animated and have more purpose within the video itself.
Adding Titles and Text
Adding text is another way of adding information to your art. It’s said an image can speak a thousand words but sometimes you need words to talk for an image. When words are needed for your video, there should be some thought into how them words are presented as just selecting any text and inserting that to your video may look jarring to the viewer and result in a loss of interest towards your videos. Selecting the right transition for your text or the color or even the font can have different results and can help with affordance depending on what you’re looking to portray.

In my example I wanted to say thank you and felt sharp edges would seem formal and because of the main image it would be too similar so I went with a font that was more rounded. When inserting text onto a scene such as this one you are given a lot of information for your selections, we already have color in there to help us choose our font and background color, I went with yellow and pink due to the fact it was already in the scene and I didn’t want to take the attention away from the focus. The way the text transitions onto the screen secures just enough attention to itself that the viewer knows it’s there and can read it if they wish to. If I wanted to gain full attention i would have picked a transition that overlaps the key element and picked complementary colors on the opposite sides of the color wheel guaranteeing the viewer’s eyes would notice and engage with the motion.
Conclusion
By incorporating all the art fundamentals and skills we have learned we can use the tools provided by Filmora more effectively and create dynamic and engaging videos that are aesthetically pleasing for our audience. Upon learning the many different types and styles of transitions, effects, and titles we can enhance our artwork for use within our video. This includes artwork specifically made for use in video or even to show off your art and gain a wider audience. These are forever evolving and what you find is pleasing now may change in the future but that’s part of the fun with learning a new skill as you will find what you like and progress from there creating an identifiable style that viewers will recognize and associate you with.
Free Download For macOS 10.14 or later

As you can see here, I have duplicated my image onto separate channels as to always keep the image in the scene.

In the image above you can see how I used multiple transitions, I did this as my image is off center and I wanted to emphasize that, I picked transitions that had clear symmetry and lines so that the viewer had a reference point of where center was without me having to place that in my art. This is a very useful way of adding information to your art without telling the viewer directly. As for the color theory, I went with oranges and yellows predominantly here as they are neighboring colors on the color wheel and we know they work well together with my main color of yellow. As for the composition I have tried to keep all the eye-catching points along the top third of the image as to create a piece more pleasing to the eye even with all this information going on.
Effects
The inclusion of effect onto your art should not be discouraged depending on what the art is used for, in my example i created this as though it was album art and the musician wanted to upload a simple music video using that art, on its own it is static and can loose engagement but by applying relevant effects you can capture the viewer’s eye and make the listening experience more enjoyable. Effects can also be stacked to create unique assets for your art and help tell a story, if your art includes fire why not add a fire effect breaking the stillness of the image or maybe your art has motion, you could include a motion effect to your still image and give the viewer more information.
Even when using effects you can use fundamentals such as color theory or composition to better enhance your imagery.

In this image you can see I have added an audio visualizer effect as well as a spectral light effect. I did this to reinforce the face of my image having a strong light source, it creates dynamic movement and the audio visualizer was added due to the nature of the video being music oriented but I felt this could have been done better. The composition of the audio visualizer was front and center and seemed boring and uninteresting. This is where the research into art fundamentals comes into play as remembering the rule of thirds and how all the main features of the image are in the top horizontal third, we can make use of the vertical thirds to gain a better composition and hopefully create more engagement.

As you can see, we have duplicated the audio visualizer and made better use of the thirds nor having opposing placement within the scene, the same information is being given by the effect but we have managed to use the space more effectively and created a visually pleasing aesthetic to our video. Trick like this can make your still image feel more animated and have more purpose within the video itself.
Adding Titles and Text
Adding text is another way of adding information to your art. It’s said an image can speak a thousand words but sometimes you need words to talk for an image. When words are needed for your video, there should be some thought into how them words are presented as just selecting any text and inserting that to your video may look jarring to the viewer and result in a loss of interest towards your videos. Selecting the right transition for your text or the color or even the font can have different results and can help with affordance depending on what you’re looking to portray.

In my example I wanted to say thank you and felt sharp edges would seem formal and because of the main image it would be too similar so I went with a font that was more rounded. When inserting text onto a scene such as this one you are given a lot of information for your selections, we already have color in there to help us choose our font and background color, I went with yellow and pink due to the fact it was already in the scene and I didn’t want to take the attention away from the focus. The way the text transitions onto the screen secures just enough attention to itself that the viewer knows it’s there and can read it if they wish to. If I wanted to gain full attention i would have picked a transition that overlaps the key element and picked complementary colors on the opposite sides of the color wheel guaranteeing the viewer’s eyes would notice and engage with the motion.
Conclusion
By incorporating all the art fundamentals and skills we have learned we can use the tools provided by Filmora more effectively and create dynamic and engaging videos that are aesthetically pleasing for our audience. Upon learning the many different types and styles of transitions, effects, and titles we can enhance our artwork for use within our video. This includes artwork specifically made for use in video or even to show off your art and gain a wider audience. These are forever evolving and what you find is pleasing now may change in the future but that’s part of the fun with learning a new skill as you will find what you like and progress from there creating an identifiable style that viewers will recognize and associate you with.
Also read:
- [New] From Vision to Reality BenQ’s Masterpiece, the BL2711U Monitor Review
- [Updated] In 2024, Filmmaker's Companion Filmora for YouTube Trailers
- 2024 Approved Do You Know that You Can Apply Different LUTs and Create Your Own? There Are Many LUT Online and Offline Generators that You Can Use to Create Your LUT
- 2024 Approved Optimal Audibility Techniques to Enhance Recording Quality
- Address Serial Interface Defects
- Bilder Auf Ihrem iPhone Oder iPad Speichern - Tipps Für Die Übertragung Von Sony-Kameraaufnahmen
- Dose Life360 Notify Me When Someone Checks My Location On Itel P40? | Dr.fone
- How To Track and Blur Faces in Premiere Pro
- In 2024, 2 Methods to Cut Video in VLC on Windows
- New Beginners Guide to Video Editing Best Software Choices
- Tom's Tech Review: Comprehensive Guide on Latest Hardware
- Updated 2024 Approved How to Create the Stranger Things Upside Down Effect
- Updated In 2024, 6 Websites to Free Download Motivational Video Footage
- Updated In 2024, How To Blur Background in Adobe Premiere Pro Detailed Guide
- Updated What Are The Stages Of Film Production
- Title: How to Fade in Text in Adobe Premiere Pro for 2024
- Author: Chloe
- Created at : 2024-12-08 16:39:45
- Updated at : 2024-12-11 18:32:07
- Link: https://ai-editing-video.techidaily.com/how-to-fade-in-text-in-adobe-premiere-pro-for-2024/
- License: This work is licensed under CC BY-NC-SA 4.0.