:max_bytes(150000):strip_icc():format(webp)/how-to-increase-internet-speed-5181475-b6fd84098c634a04a6934302184c5b1b.jpg)
How to Get Motion Blur in Roblox?

How to Get Motion Blur in Roblox?
Game lovers always look for unique ways to make their gaming experience enjoyable. One of the common ways to make the gameplays look cinematic and realistic is by adding the motion blur effect. This effect can make a huge difference in your gameplay by adding a sense of speed. However, if you are a beginner, you may not be aware of how to apply the motion blur effect appropriately.
If you love playing games on Roblox and want to add a motion blur effect efficiently, you are at the right place. In this article, we will guide you on how to get motion blur in Roblox accurately. Thus, keep reading the instructions mentioned in this guide carefully to avoid any chances of mistakes.
Part 1: What is Roblox?
Roblox is an online gaming platform that enables you to play a wide range of games in a secure environment. It was launched in 2006 and acted as a virtual universe that provides various genres of games to players. These games are known as “Experiences,” having different avatars, adventures, obstacles, and goals.
In recent years, Roblox gained immense popularity as over 52 million people play games on Roblox each day. The reports have shown that teenagers, especially of the age between 12 to 16 years old, are highly engaged on this online platform. However, recent reports suggest that even adults aged from 17 to 24 years are now also becoming interested in Roblox games.
Some of the popular Roblox games are MeepCity, Royale High, Adopt Me, Blox Fruits, Murder Mystery 2, etc. As Roblox is a free gaming platform, you can easily play games free of cost. However, you can still make purchases within each game to buy accessories, upgrades, and clothing to make your gaming experience more memorable. Moreover, you can also use this platform to make connections with other people to create a global community.
Part 2: How to Get Motion Blur in Roblox?
Are you curious to know how to use motion blur in Roblox? In this section, we will address how you can apply the motion blur effect while playing Roblox games efficiently.
Step1 First, download and launch the “Reshade Me ” software on your device. Make sure to download and install the 5.5.2 version of this software. Once done, search for the Roblox Player on your PC. Right-click on it and choose “Open File Location.”
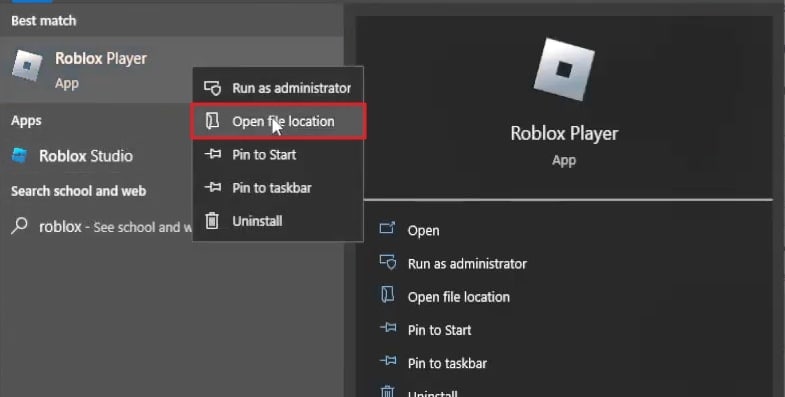
Step2 Now copy the file location of Roblox to proceed further. Once done, go back to Reshade Me and hit the “Browse” button. Afterward, paste the file location of Roblox above the “New Folder” space. Press the “Enter” button, which will display the Roblox Player.
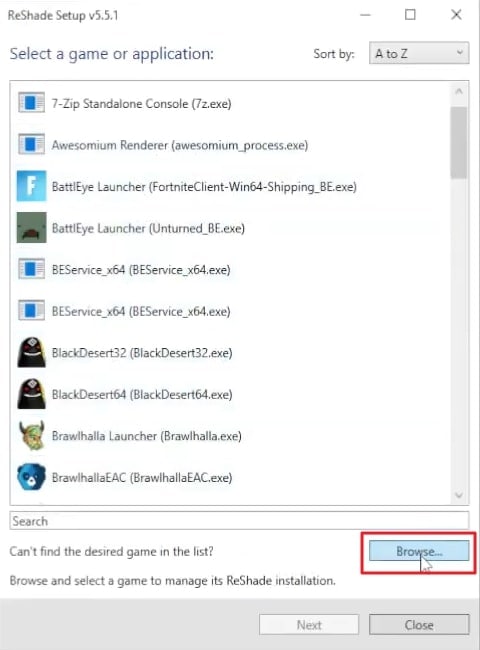
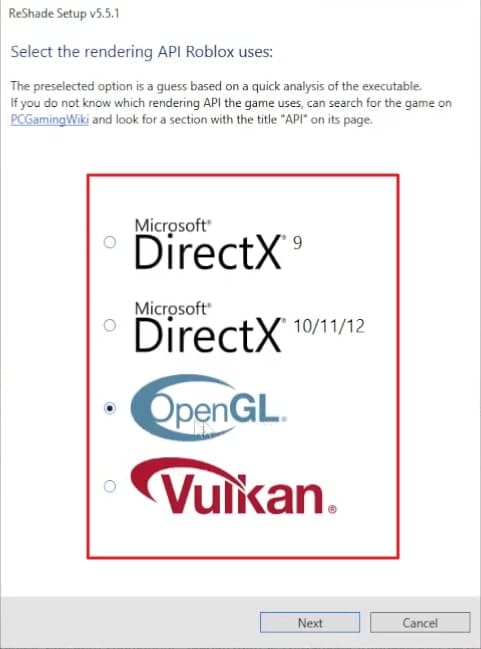
Step3 Now choose the Roblox Player and click on the “Open” button. Now click on the “Next” button that will open the “rendering API Roblox uses” window. You can select either OpenGL or DirectX. Once done, tap on the “Next” button and then on the “Modify” option.
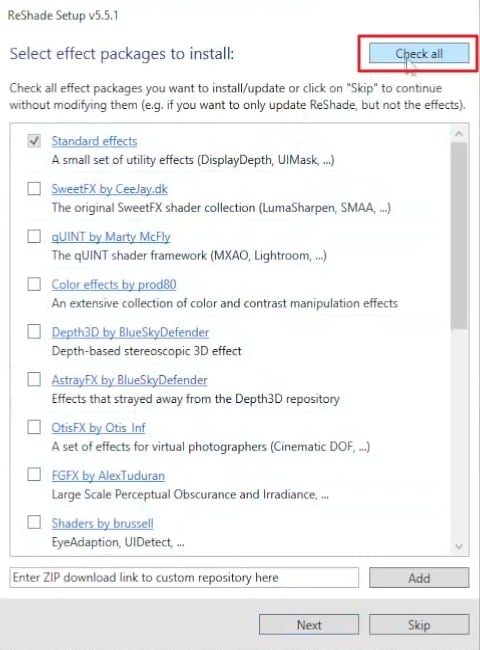
Step4 To proceed further, tap on the “Skip” button and then tap on the “Uncheck All” button. Once done, click on the “Check All” button. Once each and every option is selected, click on the “Next” button. Once you have successfully installed the Reshade Me software, open the Roblox Player.
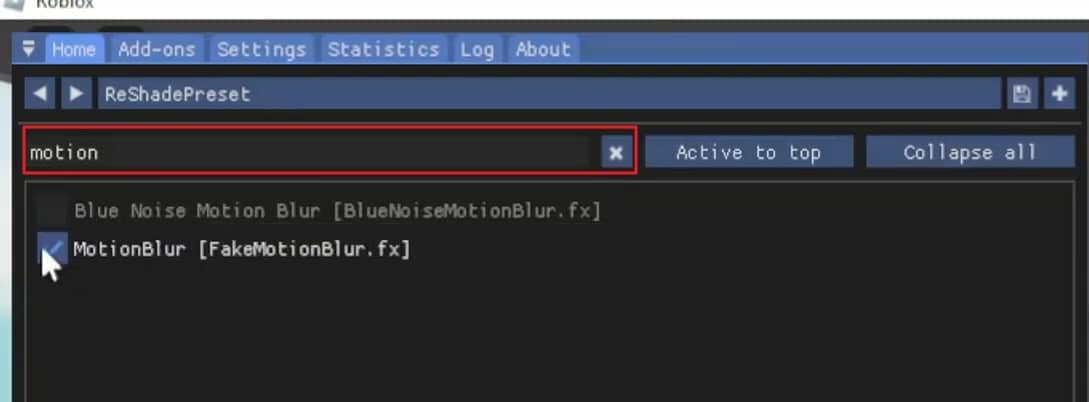
Step5 Now open any game on Roblox and press the “Home” button. On the search bar, type motion blur to find and select it. Now you can play your game while applying the motion blur effect.
Bonus Tips – How to Add Motion Blur to Your Roblox Gaming Video
If you are finding the above instructions for adding the motion blur effect difficult or lengthy, we will provide you with the best alternative. If you want to use a simpler yet more efficient tool to add a motion blur effect in your Roblox games, Wondershare Filmora is the most suitable option. It is a popular video editing software that enables you to modify your videos using its various distinct features.
Free Download For Win 7 or later(64-bit)
Free Download For macOS 10.14 or later
Apart from performing basic editing such as trimming, merging, cropping, and resizing, you can also get benefit from its advanced options. Using this professional and complete software, you can get rid of any major and minor flaws in your videos within seconds. It supports 4K and HD videos and does not harm their quality during the editing process. Furthermore, it has a friendly user interface that allows you to perform video editing without any complications.
Key Features of Filmora
- Filmora provides more than 900 diverse effects that you can apply to your videos to unleash your creativity. In its library, you can find every kind of effect that can easily match the genre of your videos.
- By using its Speed Ramping feature, you can adjust the speed of your video according to your choice. You can either speed up your videos or make a precise slow mo efficiently.
- To match your audio with your video flawlessly, you can utilize its “Auto Synchronization” feature. Thus, your embedded audio clip with your video will sound more clear to you using this feature.
- Filmora offers a screen recorder that can help you to capture your gameplays, online meetings, or product demos in high quality.
How to Add Motion Blur in Roblox Using Filmora
If you want to add motion blur in Roblox recorded gameplay videos, then follow the instructions that are described below for your ease:
Step1 Import Roblox Gameplay Video
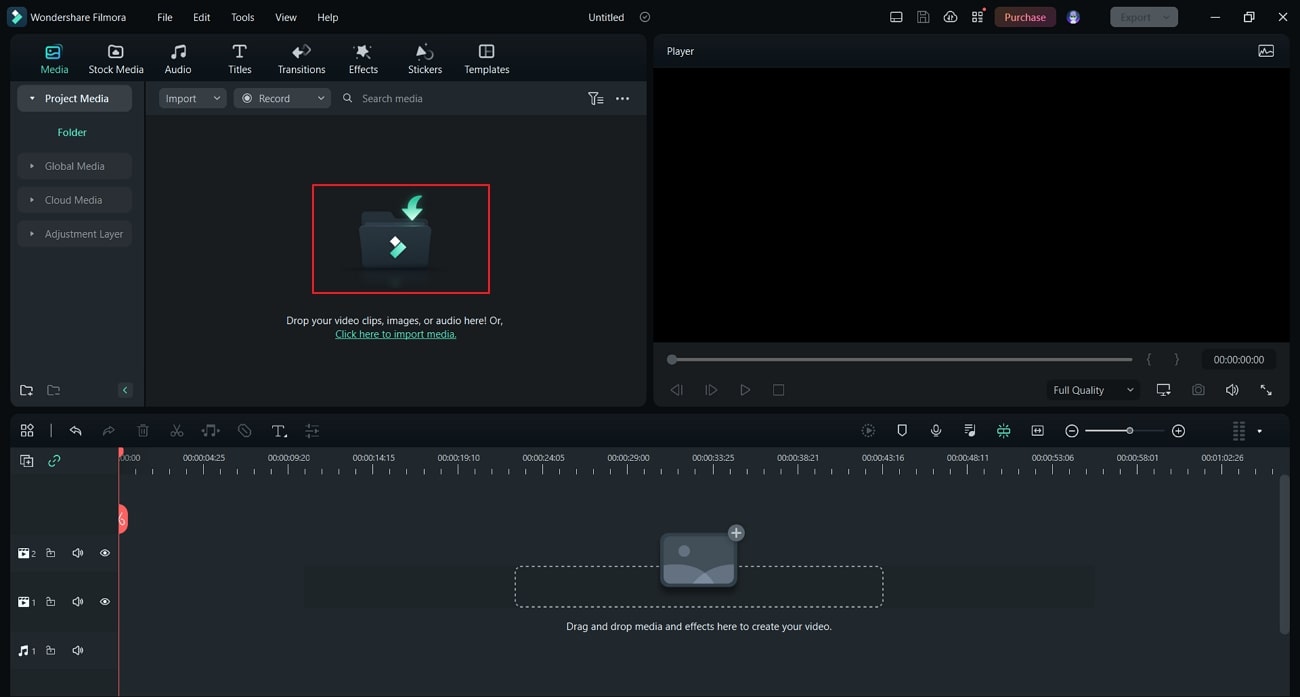
Once you have launched the Filmora software on your PC/Mac, click on the “New Project” option to proceed with the editor. To move further, hit the “Import” icon and upload your recorded Roblox game on the project media.
Step2 Split the Video on Timeline
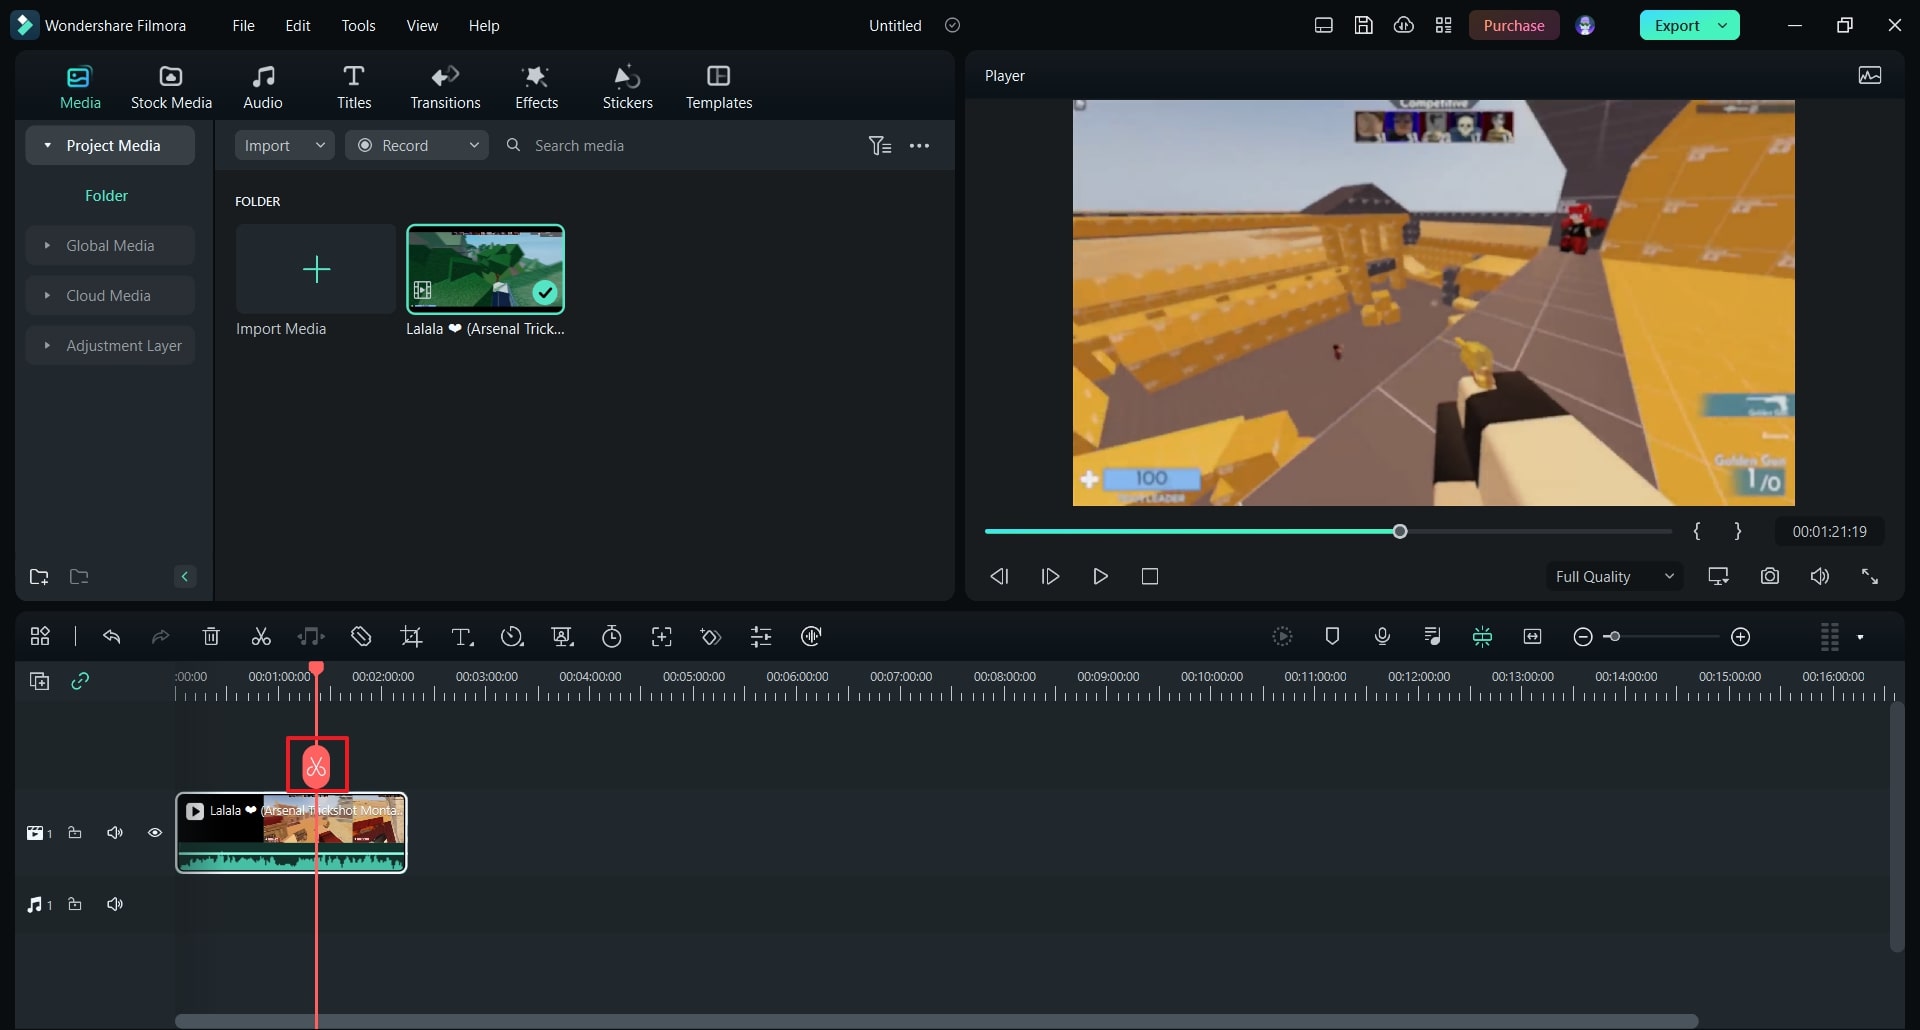
Now drag and drop the uploaded video on the timeline of this tool. Once you are done with it, move the play head to the position where you want to add the motion blur effect. Navigate to the “Scissors” icon and split the Roblox gameplay video.
Step3 Search for the Desired Blur Effect
Locate the “Effects” tab from above and click on “Video Effects” from the left side. On the search bar, type “Blur” and select the preferred blur effect from the results. Drag the chosen effect to the timeline to proceed.

Step4 Apply a Transition
To make the final output of your Roblox gameplay video look smooth and neat, go to the “Transitions” tab. From there, select the “Dissolve” transition and apply it to the timeline. Afterward, you can click on the “Export” button to save or share your customized video.

Conclusion
Roblox games are highly popular among teenagers and youngsters. If you want to make the experience of playing Roblox games more enjoyable and realistic, you can apply the motion blur effect. This article has helped you as it has listed all the necessary instructions for Roblox motion blur if you were unaware of this special effect before. Moreover, you can also try the Wondershare Filmora tool to add a motion blur effect on Roblox gameplay videos effortlessly.
Free Download For macOS 10.14 or later
Apart from performing basic editing such as trimming, merging, cropping, and resizing, you can also get benefit from its advanced options. Using this professional and complete software, you can get rid of any major and minor flaws in your videos within seconds. It supports 4K and HD videos and does not harm their quality during the editing process. Furthermore, it has a friendly user interface that allows you to perform video editing without any complications.
Key Features of Filmora
- Filmora provides more than 900 diverse effects that you can apply to your videos to unleash your creativity. In its library, you can find every kind of effect that can easily match the genre of your videos.
- By using its Speed Ramping feature, you can adjust the speed of your video according to your choice. You can either speed up your videos or make a precise slow mo efficiently.
- To match your audio with your video flawlessly, you can utilize its “Auto Synchronization” feature. Thus, your embedded audio clip with your video will sound more clear to you using this feature.
- Filmora offers a screen recorder that can help you to capture your gameplays, online meetings, or product demos in high quality.
How to Add Motion Blur in Roblox Using Filmora
If you want to add motion blur in Roblox recorded gameplay videos, then follow the instructions that are described below for your ease:
Step1 Import Roblox Gameplay Video
Once you have launched the Filmora software on your PC/Mac, click on the “New Project” option to proceed with the editor. To move further, hit the “Import” icon and upload your recorded Roblox game on the project media.

Step2 Split the Video on Timeline
Now drag and drop the uploaded video on the timeline of this tool. Once you are done with it, move the play head to the position where you want to add the motion blur effect. Navigate to the “Scissors” icon and split the Roblox gameplay video.

Step3 Search for the Desired Blur Effect
Locate the “Effects” tab from above and click on “Video Effects” from the left side. On the search bar, type “Blur” and select the preferred blur effect from the results. Drag the chosen effect to the timeline to proceed.

Step4 Apply a Transition
To make the final output of your Roblox gameplay video look smooth and neat, go to the “Transitions” tab. From there, select the “Dissolve” transition and apply it to the timeline. Afterward, you can click on the “Export” button to save or share your customized video.

Conclusion
Roblox games are highly popular among teenagers and youngsters. If you want to make the experience of playing Roblox games more enjoyable and realistic, you can apply the motion blur effect. This article has helped you as it has listed all the necessary instructions for Roblox motion blur if you were unaware of this special effect before. Moreover, you can also try the Wondershare Filmora tool to add a motion blur effect on Roblox gameplay videos effortlessly.
Best PDF to GIF Converters
Powerful Video Editor - Wondershare Filmora
Provide abundant video effects - A creative video editor
Powerful color correction and grading
Detailed tutorials are provided by the official channel
Nowadays, there are more and more people who like to create gif images. But it still requires a large amount of time to create a gif image from a pdf file. If you have already created a pdf document in the past and now want to turn it into a gif image, you probably hassle about how to do that without wasting much time. At this point, we need a practical solution!
In this article, we are going to introduce the five most effective pdf to gif converters. We also suggest trying Convertio software which is an amazing pdf to gif converter, reviewed by a number of users, with brilliant ratings. So let’s get straight into the details below.
Top 5 PDF to GIF Converters
By saving your time from searching a number of free or paid pdf to gif converters out of thousands of options available online, we have explained below the top 5 pdf to gif converters with their amazing features. All these tools are effective to use and require a little effort to make the work done. So let’s see their specifications, pros, and cons!
1. easy PDF
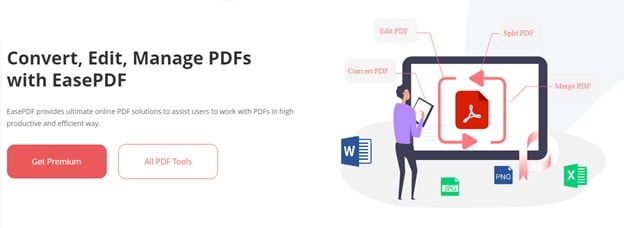
Easy PDF is a free online conversion tool that can turn difficult PDFs into Word, Excel or PowerPoint files. Who uses it? Law firms for document discovery, insurance adjusters for work loss claims, medical professionals that need to convert X-Rays, health records, medical records, hospital documents and other hard to read scanned PDF files.
Convert your files in seconds, no need to wait hours for download and without any annoying ads. Simply upload a file (PDF, Word, Excel, PowerPoint, Text Documents, Images) or use the URL of the file you wish to convert. Easy PDF will do all the modifications on your file before converting it into desired gif format, such as: filtering unsupported pages, adding page numbers and more.
Pros
Easy to use
Effective and qualified converter
Free for 2 tasks/24 Hours
Cons
Large pdfs can cause trouble
Long pdf’s colours and graphics may disturb
2. EZGIF.com
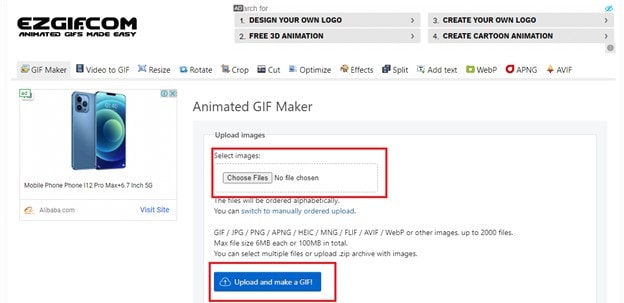
Ezgif.com claims to be “the best place to convert PDF files and other types of images into animated GIF files.”
It is a full-service online image converter including pdf to gif conversions that do not require any third-party software on your computer. You can upload PDFs and JPGs as well as other image formats. They are optimized using the latest technology and converted in just a few seconds.
Not only can you upload PDFs to their site and convert them to animated GIFs, but you can also upload JPG, PNG, BMP, TIFF, and other types of images, as well as a ZIP archive with images and have them converted automatically to GIF.
Pros
Free to use all features
Can work quickly
Professional gif maker
Presents a good range of functions
Cons
The interface is not much interacting
3. Cloudconvert
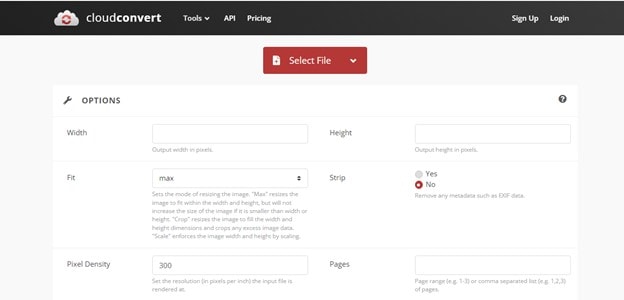
If you’re looking for a fast, easy and convenient way to convert PDF to GIF, Cloudconvert is the right choice. It enables you to create animated images in batches and customize the size and quality of your gifs.
It’s a professional document converter that helps effectively to convert pdf to gif in no time. The conversion page for users’ convenience offers a variety of document formats to choose from which format will be converted to which format. the user can also customize the gif file, such as width, pixel, height, etc.
Pros
Preset properties for the file conversion
You can set desired color mode and resolution
One-stop solution
Cons
Sometimes gives timeout error
Interface has more than required options
4. ZAMZAR
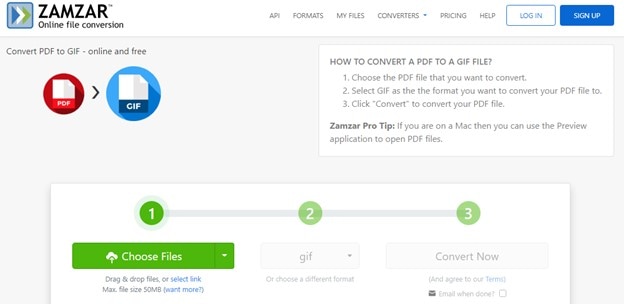
Yes, there are many PDF to GIF converters out there, but Zamzar happens to be one of the best for use in business and enterprise-level applications.
It is a free online file converter designed to convert various types of files. Using Zamzar you can create a GIF out of any PDF document with just one click, regardless of size or complexity. This feature makes it a great solution for businesses and individuals looking to condense large PDFs into smaller, more easily manageable formats.
Its friendly interface not only provides you more than one ways to upload a file but also guides you in a simple way to make the whole task done.
Pros
Has batch conversion feature
Complete tasks in simple three-step process
Work with over 1200 file forms
Cons
Restricted to 50 MB max file size on free
5. Convertio
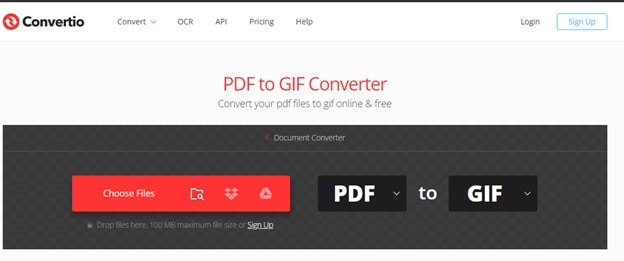
Convertio is a brand new and pretty exciting service that converts a ton of file types like PDFs, Word documents, Excel spreadsheets, PowerPoint presentations, ebooks, archives, and more. They also support web files from different formats like MP3s and more.
It is a website that converts PDF files to GIFs with the most user-friendly interface. The interface of their website is pleasing and option-rich. Their selection of supported file formats is impressive.
Pros
Incredibly effortless to convert
Work by drag & dropping
No sign-in is needed.
Up to 10 free conversions/24 hours
Cons
Restricted to 100 MB per file on free
How to Convert PDF to GIF Using Convertio?
To convert a pdf into a gif file using Convertio, here are some steps to follow and make the task done in no time!
Step 1: Upload pdf-file(s)

You have a good number of options to select a file from. Select files from Computer, Google Drive, Dropbox, URL, or by dragging it on the page. This makes this tool cloud-based and optimum to run on all devices, for all formats conversion.

You can even select more than one file per term. But make sure the overall MBs don’t exceed the free 100MBs limit. For this, you need to subscribe to its premium services.
Step 2: Choose “to gif”
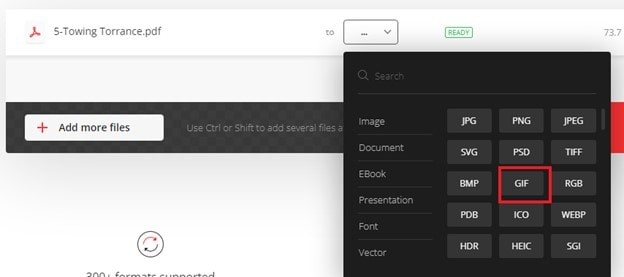
Choose gif or any other format you need as a result (more than 200 formats supported). The format selection makes it a one-stop solution because you don’t need to go to the “tools” section for finding a specific conversion tool to proceed with the work!
Step 3: Convert the file

After selecting the desired format, click on the “convert” button to convert the pdf to gif format. Within seconds, your converted document is ready.
Step 4: Download your gif

Let the file convert and you can download your gif file right afterward. Now you are ready for the next conversion!
Conclusion
You want to convert a PDF to GIF, but you’re not sure what software is best for your needs. There are many PDF to GIF converters available, but they all have different features and price points. Some are easy to use, while others have advanced options.
Some pdf to gif programs are online and free to use, while others have a free trial and then require payment to access the full version of the program. Morever, some programs are online-only, but there are also offline versions of some programs that can be used without an internet connection. Each program has its pros and cons — it depends on your specific needs as a user!
Nowadays, there are more and more people who like to create gif images. But it still requires a large amount of time to create a gif image from a pdf file. If you have already created a pdf document in the past and now want to turn it into a gif image, you probably hassle about how to do that without wasting much time. At this point, we need a practical solution!
In this article, we are going to introduce the five most effective pdf to gif converters. We also suggest trying Convertio software which is an amazing pdf to gif converter, reviewed by a number of users, with brilliant ratings. So let’s get straight into the details below.
Top 5 PDF to GIF Converters
By saving your time from searching a number of free or paid pdf to gif converters out of thousands of options available online, we have explained below the top 5 pdf to gif converters with their amazing features. All these tools are effective to use and require a little effort to make the work done. So let’s see their specifications, pros, and cons!
1. easy PDF

Easy PDF is a free online conversion tool that can turn difficult PDFs into Word, Excel or PowerPoint files. Who uses it? Law firms for document discovery, insurance adjusters for work loss claims, medical professionals that need to convert X-Rays, health records, medical records, hospital documents and other hard to read scanned PDF files.
Convert your files in seconds, no need to wait hours for download and without any annoying ads. Simply upload a file (PDF, Word, Excel, PowerPoint, Text Documents, Images) or use the URL of the file you wish to convert. Easy PDF will do all the modifications on your file before converting it into desired gif format, such as: filtering unsupported pages, adding page numbers and more.
Pros
Easy to use
Effective and qualified converter
Free for 2 tasks/24 Hours
Cons
Large pdfs can cause trouble
Long pdf’s colours and graphics may disturb
2. EZGIF.com

Ezgif.com claims to be “the best place to convert PDF files and other types of images into animated GIF files.”
It is a full-service online image converter including pdf to gif conversions that do not require any third-party software on your computer. You can upload PDFs and JPGs as well as other image formats. They are optimized using the latest technology and converted in just a few seconds.
Not only can you upload PDFs to their site and convert them to animated GIFs, but you can also upload JPG, PNG, BMP, TIFF, and other types of images, as well as a ZIP archive with images and have them converted automatically to GIF.
Pros
Free to use all features
Can work quickly
Professional gif maker
Presents a good range of functions
Cons
The interface is not much interacting
3. Cloudconvert

If you’re looking for a fast, easy and convenient way to convert PDF to GIF, Cloudconvert is the right choice. It enables you to create animated images in batches and customize the size and quality of your gifs.
It’s a professional document converter that helps effectively to convert pdf to gif in no time. The conversion page for users’ convenience offers a variety of document formats to choose from which format will be converted to which format. the user can also customize the gif file, such as width, pixel, height, etc.
Pros
Preset properties for the file conversion
You can set desired color mode and resolution
One-stop solution
Cons
Sometimes gives timeout error
Interface has more than required options
4. ZAMZAR

Yes, there are many PDF to GIF converters out there, but Zamzar happens to be one of the best for use in business and enterprise-level applications.
It is a free online file converter designed to convert various types of files. Using Zamzar you can create a GIF out of any PDF document with just one click, regardless of size or complexity. This feature makes it a great solution for businesses and individuals looking to condense large PDFs into smaller, more easily manageable formats.
Its friendly interface not only provides you more than one ways to upload a file but also guides you in a simple way to make the whole task done.
Pros
Has batch conversion feature
Complete tasks in simple three-step process
Work with over 1200 file forms
Cons
Restricted to 50 MB max file size on free
5. Convertio

Convertio is a brand new and pretty exciting service that converts a ton of file types like PDFs, Word documents, Excel spreadsheets, PowerPoint presentations, ebooks, archives, and more. They also support web files from different formats like MP3s and more.
It is a website that converts PDF files to GIFs with the most user-friendly interface. The interface of their website is pleasing and option-rich. Their selection of supported file formats is impressive.
Pros
Incredibly effortless to convert
Work by drag & dropping
No sign-in is needed.
Up to 10 free conversions/24 hours
Cons
Restricted to 100 MB per file on free
How to Convert PDF to GIF Using Convertio?
To convert a pdf into a gif file using Convertio, here are some steps to follow and make the task done in no time!
Step 1: Upload pdf-file(s)

You have a good number of options to select a file from. Select files from Computer, Google Drive, Dropbox, URL, or by dragging it on the page. This makes this tool cloud-based and optimum to run on all devices, for all formats conversion.

You can even select more than one file per term. But make sure the overall MBs don’t exceed the free 100MBs limit. For this, you need to subscribe to its premium services.
Step 2: Choose “to gif”

Choose gif or any other format you need as a result (more than 200 formats supported). The format selection makes it a one-stop solution because you don’t need to go to the “tools” section for finding a specific conversion tool to proceed with the work!
Step 3: Convert the file

After selecting the desired format, click on the “convert” button to convert the pdf to gif format. Within seconds, your converted document is ready.
Step 4: Download your gif

Let the file convert and you can download your gif file right afterward. Now you are ready for the next conversion!
Conclusion
You want to convert a PDF to GIF, but you’re not sure what software is best for your needs. There are many PDF to GIF converters available, but they all have different features and price points. Some are easy to use, while others have advanced options.
Some pdf to gif programs are online and free to use, while others have a free trial and then require payment to access the full version of the program. Morever, some programs are online-only, but there are also offline versions of some programs that can be used without an internet connection. Each program has its pros and cons — it depends on your specific needs as a user!
Nowadays, there are more and more people who like to create gif images. But it still requires a large amount of time to create a gif image from a pdf file. If you have already created a pdf document in the past and now want to turn it into a gif image, you probably hassle about how to do that without wasting much time. At this point, we need a practical solution!
In this article, we are going to introduce the five most effective pdf to gif converters. We also suggest trying Convertio software which is an amazing pdf to gif converter, reviewed by a number of users, with brilliant ratings. So let’s get straight into the details below.
Top 5 PDF to GIF Converters
By saving your time from searching a number of free or paid pdf to gif converters out of thousands of options available online, we have explained below the top 5 pdf to gif converters with their amazing features. All these tools are effective to use and require a little effort to make the work done. So let’s see their specifications, pros, and cons!
1. easy PDF

Easy PDF is a free online conversion tool that can turn difficult PDFs into Word, Excel or PowerPoint files. Who uses it? Law firms for document discovery, insurance adjusters for work loss claims, medical professionals that need to convert X-Rays, health records, medical records, hospital documents and other hard to read scanned PDF files.
Convert your files in seconds, no need to wait hours for download and without any annoying ads. Simply upload a file (PDF, Word, Excel, PowerPoint, Text Documents, Images) or use the URL of the file you wish to convert. Easy PDF will do all the modifications on your file before converting it into desired gif format, such as: filtering unsupported pages, adding page numbers and more.
Pros
Easy to use
Effective and qualified converter
Free for 2 tasks/24 Hours
Cons
Large pdfs can cause trouble
Long pdf’s colours and graphics may disturb
2. EZGIF.com

Ezgif.com claims to be “the best place to convert PDF files and other types of images into animated GIF files.”
It is a full-service online image converter including pdf to gif conversions that do not require any third-party software on your computer. You can upload PDFs and JPGs as well as other image formats. They are optimized using the latest technology and converted in just a few seconds.
Not only can you upload PDFs to their site and convert them to animated GIFs, but you can also upload JPG, PNG, BMP, TIFF, and other types of images, as well as a ZIP archive with images and have them converted automatically to GIF.
Pros
Free to use all features
Can work quickly
Professional gif maker
Presents a good range of functions
Cons
The interface is not much interacting
3. Cloudconvert

If you’re looking for a fast, easy and convenient way to convert PDF to GIF, Cloudconvert is the right choice. It enables you to create animated images in batches and customize the size and quality of your gifs.
It’s a professional document converter that helps effectively to convert pdf to gif in no time. The conversion page for users’ convenience offers a variety of document formats to choose from which format will be converted to which format. the user can also customize the gif file, such as width, pixel, height, etc.
Pros
Preset properties for the file conversion
You can set desired color mode and resolution
One-stop solution
Cons
Sometimes gives timeout error
Interface has more than required options
4. ZAMZAR

Yes, there are many PDF to GIF converters out there, but Zamzar happens to be one of the best for use in business and enterprise-level applications.
It is a free online file converter designed to convert various types of files. Using Zamzar you can create a GIF out of any PDF document with just one click, regardless of size or complexity. This feature makes it a great solution for businesses and individuals looking to condense large PDFs into smaller, more easily manageable formats.
Its friendly interface not only provides you more than one ways to upload a file but also guides you in a simple way to make the whole task done.
Pros
Has batch conversion feature
Complete tasks in simple three-step process
Work with over 1200 file forms
Cons
Restricted to 50 MB max file size on free
5. Convertio

Convertio is a brand new and pretty exciting service that converts a ton of file types like PDFs, Word documents, Excel spreadsheets, PowerPoint presentations, ebooks, archives, and more. They also support web files from different formats like MP3s and more.
It is a website that converts PDF files to GIFs with the most user-friendly interface. The interface of their website is pleasing and option-rich. Their selection of supported file formats is impressive.
Pros
Incredibly effortless to convert
Work by drag & dropping
No sign-in is needed.
Up to 10 free conversions/24 hours
Cons
Restricted to 100 MB per file on free
How to Convert PDF to GIF Using Convertio?
To convert a pdf into a gif file using Convertio, here are some steps to follow and make the task done in no time!
Step 1: Upload pdf-file(s)

You have a good number of options to select a file from. Select files from Computer, Google Drive, Dropbox, URL, or by dragging it on the page. This makes this tool cloud-based and optimum to run on all devices, for all formats conversion.

You can even select more than one file per term. But make sure the overall MBs don’t exceed the free 100MBs limit. For this, you need to subscribe to its premium services.
Step 2: Choose “to gif”

Choose gif or any other format you need as a result (more than 200 formats supported). The format selection makes it a one-stop solution because you don’t need to go to the “tools” section for finding a specific conversion tool to proceed with the work!
Step 3: Convert the file

After selecting the desired format, click on the “convert” button to convert the pdf to gif format. Within seconds, your converted document is ready.
Step 4: Download your gif

Let the file convert and you can download your gif file right afterward. Now you are ready for the next conversion!
Conclusion
You want to convert a PDF to GIF, but you’re not sure what software is best for your needs. There are many PDF to GIF converters available, but they all have different features and price points. Some are easy to use, while others have advanced options.
Some pdf to gif programs are online and free to use, while others have a free trial and then require payment to access the full version of the program. Morever, some programs are online-only, but there are also offline versions of some programs that can be used without an internet connection. Each program has its pros and cons — it depends on your specific needs as a user!
Nowadays, there are more and more people who like to create gif images. But it still requires a large amount of time to create a gif image from a pdf file. If you have already created a pdf document in the past and now want to turn it into a gif image, you probably hassle about how to do that without wasting much time. At this point, we need a practical solution!
In this article, we are going to introduce the five most effective pdf to gif converters. We also suggest trying Convertio software which is an amazing pdf to gif converter, reviewed by a number of users, with brilliant ratings. So let’s get straight into the details below.
Top 5 PDF to GIF Converters
By saving your time from searching a number of free or paid pdf to gif converters out of thousands of options available online, we have explained below the top 5 pdf to gif converters with their amazing features. All these tools are effective to use and require a little effort to make the work done. So let’s see their specifications, pros, and cons!
1. easy PDF

Easy PDF is a free online conversion tool that can turn difficult PDFs into Word, Excel or PowerPoint files. Who uses it? Law firms for document discovery, insurance adjusters for work loss claims, medical professionals that need to convert X-Rays, health records, medical records, hospital documents and other hard to read scanned PDF files.
Convert your files in seconds, no need to wait hours for download and without any annoying ads. Simply upload a file (PDF, Word, Excel, PowerPoint, Text Documents, Images) or use the URL of the file you wish to convert. Easy PDF will do all the modifications on your file before converting it into desired gif format, such as: filtering unsupported pages, adding page numbers and more.
Pros
Easy to use
Effective and qualified converter
Free for 2 tasks/24 Hours
Cons
Large pdfs can cause trouble
Long pdf’s colours and graphics may disturb
2. EZGIF.com

Ezgif.com claims to be “the best place to convert PDF files and other types of images into animated GIF files.”
It is a full-service online image converter including pdf to gif conversions that do not require any third-party software on your computer. You can upload PDFs and JPGs as well as other image formats. They are optimized using the latest technology and converted in just a few seconds.
Not only can you upload PDFs to their site and convert them to animated GIFs, but you can also upload JPG, PNG, BMP, TIFF, and other types of images, as well as a ZIP archive with images and have them converted automatically to GIF.
Pros
Free to use all features
Can work quickly
Professional gif maker
Presents a good range of functions
Cons
The interface is not much interacting
3. Cloudconvert

If you’re looking for a fast, easy and convenient way to convert PDF to GIF, Cloudconvert is the right choice. It enables you to create animated images in batches and customize the size and quality of your gifs.
It’s a professional document converter that helps effectively to convert pdf to gif in no time. The conversion page for users’ convenience offers a variety of document formats to choose from which format will be converted to which format. the user can also customize the gif file, such as width, pixel, height, etc.
Pros
Preset properties for the file conversion
You can set desired color mode and resolution
One-stop solution
Cons
Sometimes gives timeout error
Interface has more than required options
4. ZAMZAR

Yes, there are many PDF to GIF converters out there, but Zamzar happens to be one of the best for use in business and enterprise-level applications.
It is a free online file converter designed to convert various types of files. Using Zamzar you can create a GIF out of any PDF document with just one click, regardless of size or complexity. This feature makes it a great solution for businesses and individuals looking to condense large PDFs into smaller, more easily manageable formats.
Its friendly interface not only provides you more than one ways to upload a file but also guides you in a simple way to make the whole task done.
Pros
Has batch conversion feature
Complete tasks in simple three-step process
Work with over 1200 file forms
Cons
Restricted to 50 MB max file size on free
5. Convertio

Convertio is a brand new and pretty exciting service that converts a ton of file types like PDFs, Word documents, Excel spreadsheets, PowerPoint presentations, ebooks, archives, and more. They also support web files from different formats like MP3s and more.
It is a website that converts PDF files to GIFs with the most user-friendly interface. The interface of their website is pleasing and option-rich. Their selection of supported file formats is impressive.
Pros
Incredibly effortless to convert
Work by drag & dropping
No sign-in is needed.
Up to 10 free conversions/24 hours
Cons
Restricted to 100 MB per file on free
How to Convert PDF to GIF Using Convertio?
To convert a pdf into a gif file using Convertio, here are some steps to follow and make the task done in no time!
Step 1: Upload pdf-file(s)

You have a good number of options to select a file from. Select files from Computer, Google Drive, Dropbox, URL, or by dragging it on the page. This makes this tool cloud-based and optimum to run on all devices, for all formats conversion.

You can even select more than one file per term. But make sure the overall MBs don’t exceed the free 100MBs limit. For this, you need to subscribe to its premium services.
Step 2: Choose “to gif”

Choose gif or any other format you need as a result (more than 200 formats supported). The format selection makes it a one-stop solution because you don’t need to go to the “tools” section for finding a specific conversion tool to proceed with the work!
Step 3: Convert the file

After selecting the desired format, click on the “convert” button to convert the pdf to gif format. Within seconds, your converted document is ready.
Step 4: Download your gif

Let the file convert and you can download your gif file right afterward. Now you are ready for the next conversion!
Conclusion
You want to convert a PDF to GIF, but you’re not sure what software is best for your needs. There are many PDF to GIF converters available, but they all have different features and price points. Some are easy to use, while others have advanced options.
Some pdf to gif programs are online and free to use, while others have a free trial and then require payment to access the full version of the program. Morever, some programs are online-only, but there are also offline versions of some programs that can be used without an internet connection. Each program has its pros and cons — it depends on your specific needs as a user!
Ultimate Guide on How to Plan and Storyboard a Music Video
Do you want to bring your music to life on the big screen? Do you want to create something visually striking? Making a music video seems like a big task. Sometimes, the artist you’re working with might not have a clear idea for their music video. It’s your job to help guide the creative process.
But don’t worry! This guide is going to make it easy for you to plan and storyboard your music video step by step with the help of Filmora . So let’s get started and make an amazing music video together!
Plan and develop initial ideas
The first and essential step in creating a music video is planning. This is where you will lay the foundation of your music video. You need to figure out what your video is about and what you want to convey to the audience. It involves a concept or theme for the video, research, and reference material. You can also explore different ideas to make your video unique and engaging.

Step1Research and gather information
You can begin by researching and gathering information from other music videos. This will help you to know what has been done before and what is currently popular. You can also figure out how you can do it differently.
Step2Brainstorm and concept development
Once you understand the current trends and styles in the music video. It’s time to start brainstorming ideas. You can do it alone or with the help of your team. But remember that you have to think out of the box to make it creative.
Step3Consider the lyrics and message
In the planning stage, it is also important to consider the lyrics and message of the song. It would be best if you plan according to the feel and vibe of the song. It will help you to create a concept tied to the song and will help enhance its meaning.
Step4Experiment and find the right direction
Once you have a general concept, it’s time to develop it further. You can do it by creating rough sketches or storyboards. You can also film test footage to see how the concept will look on screen.
Step5Effort and attention to detail
Remember, this step is the foundation of your music video. So, take your time and don’t rush through it. By putting in effort and attention to detail, you’ll be able to create a visually stunning and closely tied to the song’s music video.
Choose a style for your music video
While creating ideas for the music video, it’s also important to consider the style of the music video. There are two main styles of music videos:

1.Performance-style music video
If you want to showcase energy and charisma in your music video, go for a performance-style music video. This video style focuses on you and your band performing live in front of an audience. You can shoot a video in a single take with minimal cuts or feature different angles and shots. The key is to capture the raw energy and emotion of the performance.
2.Narrative-style music video
A narrative-style music video tells a story or conveys a message along with the music. The story can be a visual representation of the lyrics or a multi-layered narrative. You can choose this style to convey a deeper message or story.
You can shoot this video in different locations and can include different scenes. The main motive is to create a video that emotionally connects with the audience.
Once you have an idea of what you want your music video to be about, you can put together a treatment to show the artist what your initial plan for the music video is.

If the artist approves the direction of the video, it’s time to move on to storyboarding!
Storyboard your music video
Once you are done with the style and concept of the video, the next step is storyboarding! It allows you to break down your music video visually and highlight key visual moments. It can save time and money and convey a clear idea to the team. You can do this on paper, a computer, or a tablet, whatever works best for you. Let’s see how to do it with the help of Filmora .
Free Download For Win 7 or later(64-bit)
Free Download For macOS 10.14 or later

Step1Draw your ideas
You are supposed to break your video idea into different scenes. For each scene, you should draw a picture of what the shot will look like and draw them within the rectangles.

Step2Take pictures
After doing your storyboarding on paper, take photos of each shot in a sequence and import them to your computer.

Before going to the next step, make sure to download Wondershare Filmora. It is powerful editing software that can help you easily make a storyboard. With its wide range of features, you can also customize your clips with special effects, transitions, and more.

Free Download For Win 7 or later(64-bit)
Free Download For macOS 10.14 or later
Step3Import pictures to Filmora
Now import all the scenes and music to Filmora. You can also create separate folders if you have multiple concepts for a single video.

Step4Drop your media onto the timeline
Drag and drop the song to the audio timeline. Then press shift, select all images, and drop them into the picture timeline. If you realize you are missing enough clips to complete the song, you can draw and add more shots.

Step5Adjust the frame
You can right-click on the picture’s timeline and select Crop to fit to adjust the image on the screen. You can also adjust the scenes according to the song.

Step6Add effects
You can also simulate transitions and effects in the clips. Let’s suppose you want to show a zoom-in shot. Then you would click on the picture frame and the keyframe option just above the timeline. Now keyframe the position and scale of the clip according to you.

Once you feel like your clips sync with the song, you are ready to start planning for the production of your music video.
Conclusion
We hope this blog has given you a better understanding of how planning and storyboarding can help make your music videos better. You can ensure that your vision is clearly communicated to the audience by planning and storyboarding your music videos properly. Now that you know what to do, it’s time to put that knowledge into action. Take a pencil and paper and start sketching the shots and scenes you want to create.
Free Download For macOS 10.14 or later

Step1Draw your ideas
You are supposed to break your video idea into different scenes. For each scene, you should draw a picture of what the shot will look like and draw them within the rectangles.

Step2Take pictures
After doing your storyboarding on paper, take photos of each shot in a sequence and import them to your computer.

Before going to the next step, make sure to download Wondershare Filmora. It is powerful editing software that can help you easily make a storyboard. With its wide range of features, you can also customize your clips with special effects, transitions, and more.

Free Download For Win 7 or later(64-bit)
Free Download For macOS 10.14 or later
Step3Import pictures to Filmora
Now import all the scenes and music to Filmora. You can also create separate folders if you have multiple concepts for a single video.

Step4Drop your media onto the timeline
Drag and drop the song to the audio timeline. Then press shift, select all images, and drop them into the picture timeline. If you realize you are missing enough clips to complete the song, you can draw and add more shots.

Step5Adjust the frame
You can right-click on the picture’s timeline and select Crop to fit to adjust the image on the screen. You can also adjust the scenes according to the song.

Step6Add effects
You can also simulate transitions and effects in the clips. Let’s suppose you want to show a zoom-in shot. Then you would click on the picture frame and the keyframe option just above the timeline. Now keyframe the position and scale of the clip according to you.

Once you feel like your clips sync with the song, you are ready to start planning for the production of your music video.
Conclusion
We hope this blog has given you a better understanding of how planning and storyboarding can help make your music videos better. You can ensure that your vision is clearly communicated to the audience by planning and storyboarding your music videos properly. Now that you know what to do, it’s time to put that knowledge into action. Take a pencil and paper and start sketching the shots and scenes you want to create.
Updated 8 Ways to Merge SRT with MP4
Lately, SRT has become a very crucial aspect of videos, especially in helping to increase its reach globally. So, for this reason, a lot of folks including content creators and many others are looking for ways to merge SRT with MP4. If you’re under such a category of people, then this article has the right information you need.
There are a variety of tools that allow the merging of SRT with MP4. While some are software, others are online tools. So, to help you find the best tools to Merge SRT with MP4, we have compiled a list of the best software and online tools to merge SRT with MP4 seamlessly. Keep reading to find out what these tools are and how you can employ them to Merge SRT with MP4.
Part 1: Best 4 Effective Software to Merge SRT with MP4
Firstly, let’s discuss the best software to merge SRT with MP4.
Our team of technology experts took the legwork to review different software that supports merging SRT with MP4, and we’ve compiled a list of the best 4 effective ones that any user can always rely on. The fascinating the amazing thing is you don’t need technical knowledge to employ any of these solutions. Just stick with us.
1. Wondershare Filmora (Best Choice)
Supported OS: Windows & Mac
To execute SRT with MP4 merging operation seamless, fast, and concise, you need powerful software like Wondershare Filmora .
Filmora is a popular video editing tool that boasts a wide range of functionalities for performing different types of video editing tasks. From editing SRT, including fonts, text styles, etc., to merging SRT with MP4, making, blending, speed ramping, and lots more, the tool is an absolute video editing powerhouse for any user.
Besides, Filmora comes with a very clean and intriguing user interface that makes it easy for users at all levels to navigate their way around the software without necessarily requiring any technical knowledge.
Free Download For Win 7 or later(64-bit)
Free Download For macOS 10.14 or later
See the stepwise guide on how to use Filmora video editor to merge SRT with MP4 below;
Step1Launch the Filmora software on your PC and uae the Import button to upload the SRT file from your PC or just drag-n-drop it.

Step2Move the uploaded SRT file to the timeline and right-click on it, then select “Advanced Edit” from the pop-up list.

Step3Edit the SRT subtitle ranging from its time code, text, color, fonts, etc.

Step4Once editing is completed, navigate to the timeline of the SRT file and right-click on it, then choose “Export Subtitle file” to complete the action.

Pros
- Boasts a very clean UI and its features are easy to employ.
- Very effective for both advanced and basic video editing operations.
- Compatible with both Mac and Windows and it doesn’t compromise computer functionality.
Cons
- You need to pay to be able to access advanced editing features.
2. VLC
Supported OS: Windows & Mac
We all know VLC to be a popular free open-source program for opening video files. But do you know you can also use VLC to merge SRT with MP4? Well, you can, and the process is straightforward. However, compared to Filmora, VLC lacks advanced editing options that might be required to enhance the quality of your SRT with MP4 merging.
Follow the steps illustrated below to merge SRT with MP5 using VLC
Step1Start the MP4 video via the VLC program and click on “Media” from the top bar, then click “Open File” to upload the MP4 video that you need to merge with SRT.

Step2Up next, click “Video” from the top bar and hover on the “Subtitle Track” option to select “Open File”.

Step3Find and locate the SRT file that you want to use. Then select it and click OK to complete the operation.

Pros
- It’s 100% free.
- It’s easy to operate.
- Clean and highly intuitive user interface.
- Compatible with both Mac & Windows computers.
Cons
- It doesn’t support advanced editing.
- It usually lags sometimes during SRT and MP4 merging.
3. Subtitle Edit
Supported OS: Windows, Linux
The next tool is the Subtitle Edit. This software, just like the prior mentioned ones, is very effective for SRT with MP4 merging, and it’s very easy to operate. With this software, you require no technical knowledge to merge SRT with MP4. Plus, it supports a wider range of cool features including splitting, editing, joining, and lots more that tick boxes all around.
See how to use Subtitle Edit software to merge SRT wing MP4 below.
Step1Download and install the latest version of Subtitle Edit on your PC.

Step2Start the installed program and upload the MP4 video that you want to add SRT subtitles to.

Step3Click “File” at the top-left corner and upload the SRT file that you want to add to the MP4 video.

Step4Click “Video” at the top bar, then select “Generate video with burned-in subtitle” from the pop-up list.

Step5Up next, edit the Subtitle settings in the pop-up that appears on your screen. Then click “Generate”, select where you want to save the file output, and click “Save” to start adding the SRT subtitles to ti MP4 video instantly.

Pros
- Supports a wide range of formats.
- Allows translation of SRT text from one language to another.
- The software comes with an error correction system.
Cons
- The software interface is confusing.
- It doesn’t support customization functionality.
4. Handbrake
Supported OS: Windows, Mac, & Linux
Last but not least software that can be used to merge SRT with MP4 is Handbrake. Although this software is portrayed to be a video conversion tool, it can also come in handy to merge SRT with MP4. Besides, just like VLC, it’s 100% free to use and it can be used on both Mac and Windows computers. So, you don’t have to pay any dime to utilize it or worry about it’s compatibility.
Here is how to use Handbrake to merge SRT with MP4 below;
Step1Download and install the Handbrake software on your Mac or Windows PC. Then use the “Source” button at the top left corner of the screen to upload the MP4 file that you want to add SRT to.

Step2Locate and click on “Subtitles”, then select the “Import SRT” option to upload the SRT file that you want to merge with MP4.

Step3Once you import the SRT file, tick the checkbox next to BURN IN. Then, use the “Browse” button to select a location where you want the merged file to be saved.

Step4Afterward, click “Start Encode” at the top side to start merging SRT with MP4.

Step5The SRT with MP4 merging will begin. But it’ll take some time to get completed. Then you can play the video to see the output of the process.

Pros
- it’s compatible with Mac, Windows, and Linux systems.
- It can be used to convert files from one format to another.
- it’s free software. All you just have to to is to install it on your PC.
Cons
- It is quite slow to merge SRT with MP4.
- The software usually lags during SRT with MP4 merging operation.
Part 2: Merge SRT with Videos in MP4 format by 4 Online FREE Tools
If you don’t want to use software to merge SRT with MP4, there are several online free tools that you can use to carry out the operation. However, not all online tools have all it takes to merge SRT with MP4 with high qualities. Plus, you need stable internet for online tools to work smoothly.
We’ve discussed some trustworthy online free tools for SRT with MP4 merging below.
1. Clideo
Clideo is a small but mighty free online tool that utilizes modern technology to merge SRT with MP4. The tool allows users at all levels including folks with no professional video editing experience to easily add SRT to MP4 files without hassles. All you just need is to make sure you have a stable internet connection to make it work smoothly.
The steps below explain how to merge SRT with MP4 using Clideo;
Step1Visit Clideo official website > Use the “Choose File” button to upload the MP4 file that you want to add SRT.

Step2Click on “Upload SRT” to upload the SRT file that you want to merge with your MP4 video.

Step3Once you’ve successfully added the SRT file, play your video to preview the subtitle. Then, use the “Export” button to save the file output on your PC.

Pros
- It doesn’t require the installation of software.
- You can merge as many SRT with MP4 files totally for free.
- It can be used on any device including mobile devices
Cons
- The file upload process is slow.
- You must be connected to a stable internet network to be able to merge SRT with MP4.
- You need to pay to enjoy unlimited SRT with MP4 merging.
2. Typito
Typito is another effective online tool that’s capable of merging SRT with MP4 efficiently. And all it takes is just a few clicks. Besides, it supports over 20 video formats and it can not only be used to merge SRT with MP4 but can also be used to create an SRT file for MP4 videos seamlessly.
See the steps below to learn how to use Typito to merge SRT with MP4;
Step1Visit Typito official website and click on the “Add SRT To Video” to upload the MP4 video you want to merge with SRT.

Step2Navigate to the left side of the screen and click on “Caption”. Then, select “Content” and click on “Upload File” to add the SRT file.

Step3Play the video to preview the subtitle. Then use the “Export” button at the top right corner to upload the file output to your PC storage.

Pros
- Allows editing of subtitle text like fonts, color, etc.
- You can utilize the tool to create an SRT file for different social media platforms.
- Supports different varieties of video formats.
Cons
- It won’t work if your internet network is not stable.
- The interface is quite confusing.
- You need to upgrade from the free version to be able to export the merged SRT and MP4 file or perform unlimited SRT merging.
3. Flixier
Another free online tool that allows adding of SRT to MP4 in a clean interface is Flixier. it’s a simple online tool, and it does SRT with MP4 merging operation so efficiently that it doesn’t compromise the output of the merged file. Moreover, besides merging SRT with MP4, Flixier also allows the automatic addition of SRT to subtitles, customization of SRT, and lots more SRT file editing tools that can be very helpful in different situations.
Step1Visit the “Flixier “ website > click “Import” and upload the MP4 file that you want to merge with SRT. You can either upload from your device, dropbox, google drive, etc.

Step2Click on “Text” from the left-hand side of the tool”s interface, then select “Add Subtitle” and click “Import” from the right side of the page to upload the SRT file that you want to merge with MP4.

Step3After you’ve imported the SRT file, play your video, then edit as per requirement and use the “Export” button at the top right corner to download the merged SRT and MP4 file to your PC.

Pros
- File upload is faster compared to the prior mentioned online tools.
- You don”t necessarily need to download software to be able to use the tool.
- It supports some helpful editing features for editing the video file.
Cons
- It doesn’t work with some SRT files.
- It requires a learning curve.
- You need to upgrade to this paid version to merge SRT with MP4 unlimitedly.
4. Veed.io
Veed.io is a popular online tool that offers a wide range of functionalities, and SRT with MP4 merging is one of them. Unlike the previously mentioned online tools, Veed.io supports a wide range of subtitle formats, making it easy for you not only to merge SRT with MP4 but also merge subtitles in other formats with MP4. Just follow the steps outlined below to carry out the SRT with MP4 merging using Veed.io;
Step1Open Veed.io SRT to MP4 merger on your browser > click on “Choose File” and upload the MP4 file that you want to add SRT.

Step2Once you upload the MP4 file, you”ll notice three options - that is; Auto Subtitles, Manual Subtitles, and Upload Subtitles. Just select “Upload Subtitles”.

Step3Click “Import” to upload the SRT file.

Step4Finally preview the merged SRT and MP4 file and save the file output to your PC using the “Export” button at the top right side.

Pros
- Allows automatic or manual addition of subtitles to MP4.
- Edit video with subtitles using simple editing tools.
- Translate subtitles from one language to another.
Cons
- File output has watermark.
- It cannot work if you’re not connected to the internet.
Hot FAQs on How to Merge SRT subtitles with MP4
You cannot merge more than one SRT file into an MP4 video. So, no, MP4 cannot have multiple subtitles.
To open SRT files on Windows is not a difficult task. You have to do the following:
1. Find and locate the SRT file you want to open on your Windows PC. Then right-click on it and select “Properties”.
2. Select “General” and click “Change”.
3. Click on “More Apps” from the pop-up, then select “Word” or Notepad and click OK.
4. Finally, click “Apply”, then navigate to your SRT file and double-click on it to complete the operation.
It’s easy to add SRT to MP4 with a Windows media player. All you just have to do is to:
1. Open your MP4 video with Windows Media Player.
Right-click on any part of the video screen > select Lyrics, captions, and subtitles, and click on On if available.
Final Words
Merging SRT with MP4 is not a difficult task especially when you have the right software or online tool to help you perform the task at your fingertips. In the article above, we’ve introduced all the reliable software and online free tools that support SRT with MP4 merging, their pros and cons, and how to use them to help you choose easily which tool suits your requirements to merge SRT with MP4. However, if you’re contemplating on which of them is the best, we advise you use Wondershare Filmora software as it’s safer to use and it has all you might need for not just SRT with MP4 merging but also for executing advanced video editing operations handily.
Part 1: Best 4 Effective Software to Merge SRT with MP4
Firstly, let’s discuss the best software to merge SRT with MP4.
Our team of technology experts took the legwork to review different software that supports merging SRT with MP4, and we’ve compiled a list of the best 4 effective ones that any user can always rely on. The fascinating the amazing thing is you don’t need technical knowledge to employ any of these solutions. Just stick with us.
1. Wondershare Filmora (Best Choice)
Supported OS: Windows & Mac
To execute SRT with MP4 merging operation seamless, fast, and concise, you need powerful software like Wondershare Filmora .
Filmora is a popular video editing tool that boasts a wide range of functionalities for performing different types of video editing tasks. From editing SRT, including fonts, text styles, etc., to merging SRT with MP4, making, blending, speed ramping, and lots more, the tool is an absolute video editing powerhouse for any user.
Besides, Filmora comes with a very clean and intriguing user interface that makes it easy for users at all levels to navigate their way around the software without necessarily requiring any technical knowledge.
Free Download For Win 7 or later(64-bit)
Free Download For macOS 10.14 or later
See the stepwise guide on how to use Filmora video editor to merge SRT with MP4 below;
Step1Launch the Filmora software on your PC and uae the Import button to upload the SRT file from your PC or just drag-n-drop it.

Step2Move the uploaded SRT file to the timeline and right-click on it, then select “Advanced Edit” from the pop-up list.

Step3Edit the SRT subtitle ranging from its time code, text, color, fonts, etc.

Step4Once editing is completed, navigate to the timeline of the SRT file and right-click on it, then choose “Export Subtitle file” to complete the action.

Pros
- Boasts a very clean UI and its features are easy to employ.
- Very effective for both advanced and basic video editing operations.
- Compatible with both Mac and Windows and it doesn’t compromise computer functionality.
Cons
- You need to pay to be able to access advanced editing features.
2. VLC
Supported OS: Windows & Mac
We all know VLC to be a popular free open-source program for opening video files. But do you know you can also use VLC to merge SRT with MP4? Well, you can, and the process is straightforward. However, compared to Filmora, VLC lacks advanced editing options that might be required to enhance the quality of your SRT with MP4 merging.
Follow the steps illustrated below to merge SRT with MP5 using VLC
Step1Start the MP4 video via the VLC program and click on “Media” from the top bar, then click “Open File” to upload the MP4 video that you need to merge with SRT.

Step2Up next, click “Video” from the top bar and hover on the “Subtitle Track” option to select “Open File”.

Step3Find and locate the SRT file that you want to use. Then select it and click OK to complete the operation.

Pros
- It’s 100% free.
- It’s easy to operate.
- Clean and highly intuitive user interface.
- Compatible with both Mac & Windows computers.
Cons
- It doesn’t support advanced editing.
- It usually lags sometimes during SRT and MP4 merging.
3. Subtitle Edit
Supported OS: Windows, Linux
The next tool is the Subtitle Edit. This software, just like the prior mentioned ones, is very effective for SRT with MP4 merging, and it’s very easy to operate. With this software, you require no technical knowledge to merge SRT with MP4. Plus, it supports a wider range of cool features including splitting, editing, joining, and lots more that tick boxes all around.
See how to use Subtitle Edit software to merge SRT wing MP4 below.
Step1Download and install the latest version of Subtitle Edit on your PC.

Step2Start the installed program and upload the MP4 video that you want to add SRT subtitles to.

Step3Click “File” at the top-left corner and upload the SRT file that you want to add to the MP4 video.

Step4Click “Video” at the top bar, then select “Generate video with burned-in subtitle” from the pop-up list.

Step5Up next, edit the Subtitle settings in the pop-up that appears on your screen. Then click “Generate”, select where you want to save the file output, and click “Save” to start adding the SRT subtitles to ti MP4 video instantly.

Pros
- Supports a wide range of formats.
- Allows translation of SRT text from one language to another.
- The software comes with an error correction system.
Cons
- The software interface is confusing.
- It doesn’t support customization functionality.
4. Handbrake
Supported OS: Windows, Mac, & Linux
Last but not least software that can be used to merge SRT with MP4 is Handbrake. Although this software is portrayed to be a video conversion tool, it can also come in handy to merge SRT with MP4. Besides, just like VLC, it’s 100% free to use and it can be used on both Mac and Windows computers. So, you don’t have to pay any dime to utilize it or worry about it’s compatibility.
Here is how to use Handbrake to merge SRT with MP4 below;
Step1Download and install the Handbrake software on your Mac or Windows PC. Then use the “Source” button at the top left corner of the screen to upload the MP4 file that you want to add SRT to.

Step2Locate and click on “Subtitles”, then select the “Import SRT” option to upload the SRT file that you want to merge with MP4.

Step3Once you import the SRT file, tick the checkbox next to BURN IN. Then, use the “Browse” button to select a location where you want the merged file to be saved.

Step4Afterward, click “Start Encode” at the top side to start merging SRT with MP4.

Step5The SRT with MP4 merging will begin. But it’ll take some time to get completed. Then you can play the video to see the output of the process.

Pros
- it’s compatible with Mac, Windows, and Linux systems.
- It can be used to convert files from one format to another.
- it’s free software. All you just have to to is to install it on your PC.
Cons
- It is quite slow to merge SRT with MP4.
- The software usually lags during SRT with MP4 merging operation.
Part 2: Merge SRT with Videos in MP4 format by 4 Online FREE Tools
If you don’t want to use software to merge SRT with MP4, there are several online free tools that you can use to carry out the operation. However, not all online tools have all it takes to merge SRT with MP4 with high qualities. Plus, you need stable internet for online tools to work smoothly.
We’ve discussed some trustworthy online free tools for SRT with MP4 merging below.
1. Clideo
Clideo is a small but mighty free online tool that utilizes modern technology to merge SRT with MP4. The tool allows users at all levels including folks with no professional video editing experience to easily add SRT to MP4 files without hassles. All you just need is to make sure you have a stable internet connection to make it work smoothly.
The steps below explain how to merge SRT with MP4 using Clideo;
Step1Visit Clideo official website > Use the “Choose File” button to upload the MP4 file that you want to add SRT.

Step2Click on “Upload SRT” to upload the SRT file that you want to merge with your MP4 video.

Step3Once you’ve successfully added the SRT file, play your video to preview the subtitle. Then, use the “Export” button to save the file output on your PC.

Pros
- It doesn’t require the installation of software.
- You can merge as many SRT with MP4 files totally for free.
- It can be used on any device including mobile devices
Cons
- The file upload process is slow.
- You must be connected to a stable internet network to be able to merge SRT with MP4.
- You need to pay to enjoy unlimited SRT with MP4 merging.
2. Typito
Typito is another effective online tool that’s capable of merging SRT with MP4 efficiently. And all it takes is just a few clicks. Besides, it supports over 20 video formats and it can not only be used to merge SRT with MP4 but can also be used to create an SRT file for MP4 videos seamlessly.
See the steps below to learn how to use Typito to merge SRT with MP4;
Step1Visit Typito official website and click on the “Add SRT To Video” to upload the MP4 video you want to merge with SRT.

Step2Navigate to the left side of the screen and click on “Caption”. Then, select “Content” and click on “Upload File” to add the SRT file.

Step3Play the video to preview the subtitle. Then use the “Export” button at the top right corner to upload the file output to your PC storage.

Pros
- Allows editing of subtitle text like fonts, color, etc.
- You can utilize the tool to create an SRT file for different social media platforms.
- Supports different varieties of video formats.
Cons
- It won’t work if your internet network is not stable.
- The interface is quite confusing.
- You need to upgrade from the free version to be able to export the merged SRT and MP4 file or perform unlimited SRT merging.
3. Flixier
Another free online tool that allows adding of SRT to MP4 in a clean interface is Flixier. it’s a simple online tool, and it does SRT with MP4 merging operation so efficiently that it doesn’t compromise the output of the merged file. Moreover, besides merging SRT with MP4, Flixier also allows the automatic addition of SRT to subtitles, customization of SRT, and lots more SRT file editing tools that can be very helpful in different situations.
Step1Visit the “Flixier “ website > click “Import” and upload the MP4 file that you want to merge with SRT. You can either upload from your device, dropbox, google drive, etc.

Step2Click on “Text” from the left-hand side of the tool”s interface, then select “Add Subtitle” and click “Import” from the right side of the page to upload the SRT file that you want to merge with MP4.

Step3After you’ve imported the SRT file, play your video, then edit as per requirement and use the “Export” button at the top right corner to download the merged SRT and MP4 file to your PC.

Pros
- File upload is faster compared to the prior mentioned online tools.
- You don”t necessarily need to download software to be able to use the tool.
- It supports some helpful editing features for editing the video file.
Cons
- It doesn’t work with some SRT files.
- It requires a learning curve.
- You need to upgrade to this paid version to merge SRT with MP4 unlimitedly.
4. Veed.io
Veed.io is a popular online tool that offers a wide range of functionalities, and SRT with MP4 merging is one of them. Unlike the previously mentioned online tools, Veed.io supports a wide range of subtitle formats, making it easy for you not only to merge SRT with MP4 but also merge subtitles in other formats with MP4. Just follow the steps outlined below to carry out the SRT with MP4 merging using Veed.io;
Step1Open Veed.io SRT to MP4 merger on your browser > click on “Choose File” and upload the MP4 file that you want to add SRT.

Step2Once you upload the MP4 file, you”ll notice three options - that is; Auto Subtitles, Manual Subtitles, and Upload Subtitles. Just select “Upload Subtitles”.

Step3Click “Import” to upload the SRT file.

Step4Finally preview the merged SRT and MP4 file and save the file output to your PC using the “Export” button at the top right side.

Pros
- Allows automatic or manual addition of subtitles to MP4.
- Edit video with subtitles using simple editing tools.
- Translate subtitles from one language to another.
Cons
- File output has watermark.
- It cannot work if you’re not connected to the internet.
Hot FAQs on How to Merge SRT subtitles with MP4
You cannot merge more than one SRT file into an MP4 video. So, no, MP4 cannot have multiple subtitles.
To open SRT files on Windows is not a difficult task. You have to do the following:
1. Find and locate the SRT file you want to open on your Windows PC. Then right-click on it and select “Properties”.
2. Select “General” and click “Change”.
3. Click on “More Apps” from the pop-up, then select “Word” or Notepad and click OK.
4. Finally, click “Apply”, then navigate to your SRT file and double-click on it to complete the operation.
It’s easy to add SRT to MP4 with a Windows media player. All you just have to do is to:
1. Open your MP4 video with Windows Media Player.
Right-click on any part of the video screen > select Lyrics, captions, and subtitles, and click on On if available.
Final Words
Merging SRT with MP4 is not a difficult task especially when you have the right software or online tool to help you perform the task at your fingertips. In the article above, we’ve introduced all the reliable software and online free tools that support SRT with MP4 merging, their pros and cons, and how to use them to help you choose easily which tool suits your requirements to merge SRT with MP4. However, if you’re contemplating on which of them is the best, we advise you use Wondershare Filmora software as it’s safer to use and it has all you might need for not just SRT with MP4 merging but also for executing advanced video editing operations handily.
Also read:
- 8 Best Video Editor with Useful Masking
- 2024 Approved How To Split Videos in Premier Pro
- The Article Is a Guide About the Split of the Videos in VLC. There Is Also a Particular Description of Its Alternative Wondershare Filmora. It Is Suitable as Well as Reasonable
- How to Crop Videos in Windows Media Player for 2024
- New In 2024, Control Playback Speed in Premiere Pro
- 2024 Approved To Add SRT to MP4 Is Not as Hard as You Might Think. All You Just Need Is the Right Tool to Help You Get the Job Done. Read This Article and Learn the 8 Latest Methods to Merge SRT with MP4 Effortlessly
- Updated How to Crop a Video in Davinci Resolve Step by Step for 2024
- New Splitting the Clips in Adobe After Effects Step by Step
- New In 2024, How to Apply Video Filters
- New Little Known Ways of Adding Emojis to Photos on iPhone & Android
- In 2024, Want to Make a Fun and Cinematic Video with an Introductory Text Title? Learn the Stages of Editing with Filmora for This Effect Here
- Updated How to Make a Super Easy Rotating Video Effect
- 2024 Approved If You Want to Know More About the Basics of Final Cut Pro, It Would Be Helpful to Watch a Beginner Tutorial, with the Length of only 20 Minutes, an Introduction of the Whole Program
- Updated In 2024, Text Animation Intro Tutorial in Filmora
- Step by Step to Cut a Video in Lightworks for 2024
- 2024 Approved Guide To Scaling and Setting Videos in Filmora | Tutorial
- There Are a Few Ways to Remove or Mute Audio in a Video, but How? Read This Article and Learn How to Do It Using Recommended Android Apps for 2024
- How to Rotate Video in iMovie with Alternative
- What Is the Best MP4 Cutter for YouTuber on Mac, In 2024
- Edit FLV Video Files with FLV Editor Windows, Mac,Android, iPhone
- New Ultimate Guidelines to Help You Use VLC Media Player Better
- What Is a Memoji and How to Make a Memoji? You Can Learn Top 8 Memoji Makers for PC, Android, or iOS, and the Steps to Make a Memoji
- New Brighten a Video in Windows 10 Easily When Video Clips You Recorded on Your Windows 10 Computer or Those Downloaded From YouTube Are Too Dark or Too Bright, You Can Easily Adjust the Color Levels in a Few Clicks
- 2024 Approved There Are Many Vlogging Cameras You Can Find in the Market. However, to Get a Good Start in Vlogging, some Sony Vlogging Cameras and Canon Vlog Cameras Are to Consider. This Article Introduces You to the Respective List
- Updated 2024 Approved 10 Innovative AR Teaching Examples to Tell You What Is AR in Teaching
- New Are You Looking for an Ideal Halloween Countdown Video Clip for Your Video? This Article Will Walk You Through the Best Ones You Can Use to Get the Job Done Perfectly
- DaVinci Resolve Scopes Have Undergone Significant Improvements. Find Out How to Use These Scopes and Improve Your Video Editing Skills for 2024
- New 10 Best Free Video Player for Windows 11
- New Best 10 Video Quiz Makers 2024 Add Quiz To Videos Easily
- Top 5 Websites and Software to Convert Powerpoint to Mp4 for 2024
- New Top Ever Ways Make Tiktok Slideshow Solved
- 2024 Approved Wondering About Vimeo Slideshow Maker? Know Everything About the Platform Which Is Gaining Much Popularity. Also, Browse some Tips to Create Appealing Video Slideshows
- How to Speed Up Video with Canva Online Tool?
- 2024 Approved Learn About Splice Video Online and Its Advantages. Also, Check Out the Best Online Apps for Splice Editing
- In 2024, How to Create Fantastic Glitch Effects with Filmora? Read This Guide to Find Out How to Apply Glitch Effects on Your Videos and Make Custom Glitch Effects
- Updated Guide To Using Luts Perfectly in Final Cut Pro for 2024
- How to Color-Correct an S-Log Footage for 2024
- Updated 6 Best MP4 Mergers to Join Videos Easily
- In 2024, The Most Efficient Ways to Manage Your Timeline
- 18 Video Editors Weve Tested Heres What We Learned
- New Whatre the Best Alternatives to Pexels for 2024
- New Art of Time Manipulation A Guide to After Effects Slow Motion Mastery
- Updated In 2024, | Zoom In and Zoom Out on YouTube
- New Multi Object Tracking The Ultimate Guide
- 2024 Approved How to Create a Glitch Text Effect?
- New 2024 Approved How to Add Miniature Effect in Video with Filmora
- Updated Wondering if You Can Make DIY Green Screen Video for Streaming? Learn the Easy Steps to Setup DIY Green Screen, Shoot the Video and Edit It Out to Add Green Screen Effects
- In 2024, Can I Bypass a Forgotten Phone Password Of Oppo Find N3 Flip?
- Top 5 Infinix Hot 40 Bypass FRP Tools for PC That Actually Work
- How to Track a Lost Nokia C12 Plus for Free? | Dr.fone
- In 2024, How Can We Bypass Lava Storm 5G FRP?
- How to use Device Manager to update hardware drivers in Windows 11 & 10 & 7
- How To Bypass Lava Yuva 3 FRP In 3 Different Ways
- What Does Enter PUK Code Mean And Why Did The Sim Get PUK Blocked On Lava Yuva 3 Device
- In 2024, The Top 5 Android Apps That Use Fingerprint Sensor to Lock Your Apps On Samsung Galaxy A23 5G
- What To Do When Xiaomi Redmi Note 12 Pro+ 5G Has Black Screen of Death? | Dr.fone
- How to Use Google Assistant on Your Lock Screen Of Samsung Galaxy F54 5G Phone
- Best Pokemons for PVP Matches in Pokemon Go For ZTE Blade A73 5G | Dr.fone
- In 2024, 6 Ways To Transfer Contacts From Xiaomi Redmi K70E to iPhone | Dr.fone
- How to Cast Vivo Y27 5G Screen to PC Using WiFi | Dr.fone
- 3 Ways to Track Realme Narzo 60x 5G without Them Knowing | Dr.fone
- Can I use iTools gpx file to catch the rare Pokemon On ZTE Nubia Z60 Ultra | Dr.fone
- New In 2024, Before You Learn 3D Animation Some Things You Should Know
- How to Detect and Remove Spyware on Vivo X100? | Dr.fone
- In 2024, Is Fake GPS Location Spoofer a Good Choice On Vivo V27 Pro? | Dr.fone
- Updated 2024 Approved Ways You Can Master to Find 10 Best Free Animated Text Generator
- How to Transfer Photos From Realme 11 5G to Samsung Galaxy S21 Ultra | Dr.fone
- A Step-by-Step Guide on Using ADB and Fastboot to Remove FRP Lock from your Tecno Phantom V Flip
- In 2024, How to Unlock iPhone 11 Pro, Apples New iPhone
- In 2024, What Is AI API? | Wondershare Virbo Glossary
- In 2024, Ultimate Guide on iPhone XR iCloud Activation Lock Bypass
- In 2024, 9 Best Phone Monitoring Apps for HTC U23 Pro | Dr.fone
- Is GSM Flasher ADB Legit? Full Review To Bypass Your OnePlus 11R Phone FRP Lock
- A Guide Oppo Reno 11F 5G Wireless and Wired Screen Mirroring | Dr.fone
- How To Repair iOS of Apple iPhone 14 Pro? | Dr.fone
- In 2024, Ultimate Guide from Apple iPhone 12 iCloud Activation Lock Bypass
- Why Your WhatsApp Live Location is Not Updating and How to Fix on your Realme 12 Pro+ 5G | Dr.fone
- Easy Ways to Manage Your Samsung Galaxy A25 5G Location Settings | Dr.fone
- How to Change Nokia 130 Music Location on Skout | Dr.fone
- How To Change Your SIM PIN Code on Your Motorola G54 5G Phone
- Fixing Foneazy MockGo Not Working On Vivo Y27s | Dr.fone
- How To Transfer Data From Apple iPhone 13 To Android devices? | Dr.fone
- How To Unlock a Samsung Galaxy A34 5G Easily?
- Hard Resetting an Honor X9b Device Made Easy | Dr.fone
- Easy Ways to Manage Your Oppo Find N3 Location Settings | Dr.fone
- Why Is My Motorola Edge+ (2023) Offline? Troubleshooting Guide | Dr.fone
- Looking For A Location Changer On Tecno Pop 8? Look No Further | Dr.fone
- In 2024, How To Change Your Apple ID Password On your iPhone 14 | Dr.fone
- How to Fix Android App Not Installed Error on Infinix Note 30 Pro Quickly? | Dr.fone
- In 2024, How can I get more stardust in pokemon go On Oppo Find X7? | Dr.fone
- PassFab iPhone 13 Backup Unlocker Top 4 Alternatives
- What You Need To Know To Improve Your Honor 90 Lite Hard Reset | Dr.fone
- How to recover deleted photos from Android Gallery without backup on Nokia G310
- Title: How to Get Motion Blur in Roblox?
- Author: Chloe
- Created at : 2024-05-20 03:37:28
- Updated at : 2024-05-21 03:37:28
- Link: https://ai-editing-video.techidaily.com/how-to-get-motion-blur-in-roblox/
- License: This work is licensed under CC BY-NC-SA 4.0.

