
:max_bytes(150000):strip_icc():format(webp)/iPad-Mini-Splash-ef002ffe8db643d2a2b4de772ff46790.jpg)
How to Get Zoom on TV Easy Solutions for 2024
How to Get Zoom on TV [Easy Solutions]
The modern workforce needs adaptable alternatives to the conventional room-to-room conferencing. The latest integrated online collaboration platform is called Zoom. What’s more, now you can get Zoom on TV. Being one of the most well-known conferencing programs, it offers reliable and efficient hosting of online meetings. In a same vein, you may set up conference rooms, do video seminars, and use instant messaging to receive real-time communications. Moreover, can you get zoom on your tv? Then the answer is Yes! The ideal technique to expand a small conference is to mirror it on TV using Zoom meetings. Additionally, sharing across all platforms and devices is possible. Sharing HD video, audio, and material from your desktop and mobile devices to conference rooms and phone systems is simple, dependable, and safe with Zoom Meetings.
Zoom is one of the top videos calling applications available, however, in terms of functionality, dependability, and stability. Special features include screen sharing for multi-user annotation and local and cloud recording with transcription. With just a single click, you may share any file with supported and encrypted settings for increased security and communicate across all platforms. Zoom has now come to represent meetings for those who do their business remotely. For almost all platforms, including Android, iOS, macOS, Windows, Smart TVs, etc., the Zoom app is officially accessible. For the query how to get zoom on portal tv? you may activate Zoom screen casting whether you’re using a Windows 10 or a Mac laptop with the Chrome browser. This section will be useful to you if you want to benefit from Zoom on a TV. You may thus do so. Continue reading the article to learn more about how to get zoom on tv.
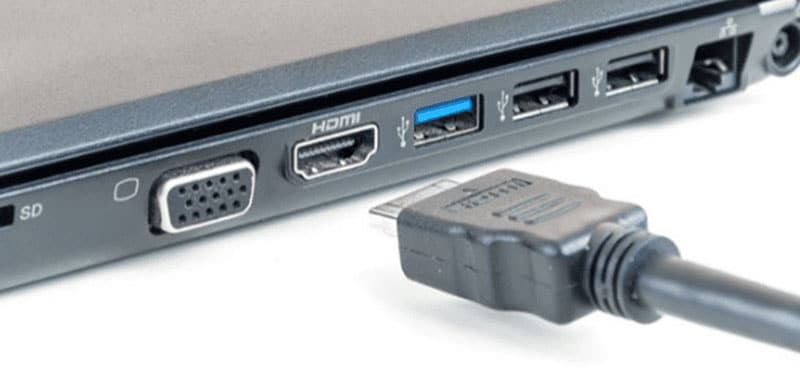
Part 1: Get Zoom on TV with HDMI Cable
Although Zoom provides companies and bigger organizations with a professional solution like Zoom Rooms, if you’re at home, you don’t need to put anything on your TV to use Zoom. You may start using Zoom right away by simply connecting your Zoom device to your TV. Connect your TV to your laptop’s HDMI port if it has one. Simple as that, however if the laptop doesn’t figure it out on its own you may need to explain what is going on with the second display. Although more reliable, connecting via cable means your source device is linked to the TV and you can’t go for a stroll. It also means you don’t have to worry about the wireless connection fading.
Steps to Get Zoom on TV with HDMI
Step1Connect the HDMI End to the TV and the Other End to Your Device
You may use this in its place if you don’t have an HDMI but do have a USB-C port. To connect to the HDMI cable coming into your TV, you’ll need a dongle, but you’ll need to make sure it’s compatible.
Step2Turn On your TV
Turn on your TV, then switch the video source to the HDMI port you just connected in your device to using the TV remote.
Step3Launch Zoom Meeting
Start or join a meeting by using the Zoom app on your smartphone (available for Android, iOS, Windows, and macOS).
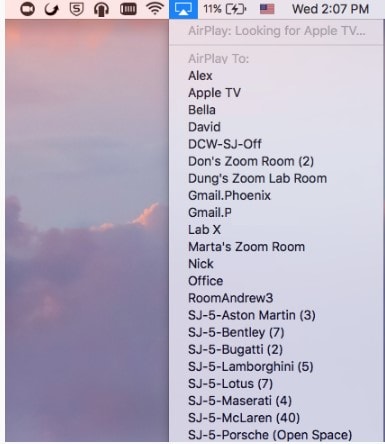
Part 2: Use AirPlay to Connect Zoom to TV
Using AirPlay mirroring, MacOS or iOS devices may share content with Zoom rooms. On MacOS and iOS, Airplay is used to communicate between the Zoom client and the Zoom room. There may be a great potential for your own business requirements if you can figure out how to utilize Airplay to Zoom mirror your screen to your Apple TV. By default, AirPlay sends audio to the Apple TV. Depending on how loud your speakers are set to play and where your input device’s microphone is located, this may cause echoing and ever-louder feedback loops. Without further ado, let’s look at some of the important strategies you may use to maximize live screen streaming on your Apple TV device.
Steps to Use AirPlay to Connect Zoom to TV
Step1Navigate to the Airplay Display in the Apple menu’s top right corner. Choose your Apple TV from the list of AirPlay Display options in the Displays preference pane. The “Show mirroring option in the menu bar when available” checkbox makes it easier to reach the AirPlay menu.

Step2Select Room Management > Zoom Rooms after logging into the Zoom online interface to manage your current Zoom Rooms. Then, modify the account settings and turn on Apple screen mirroring using the location hierarchy system.
Step3Turn on Apple Screen Mirroring by going to the Meetings tab. If this happens, you may need to activate it from the verification dialog box; otherwise, screen mirroring ought to start immediately on your device and let you see Zoom on your Apple TV. A shared password will be required of you.
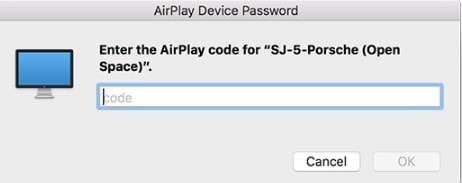
Step4Enter the passcode that is shown on the Zoom room’s screen. You may start using Airplay on your smartphone after enabling Apple screen mirroring.

Step5After that, turn off AirPlay Display by using the option in the preference pane or the system menu bar. To stop sharing, click Disconnect Airplay.
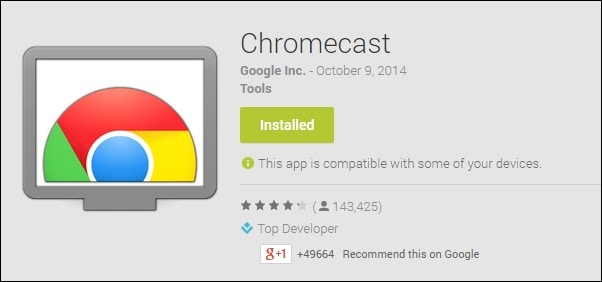
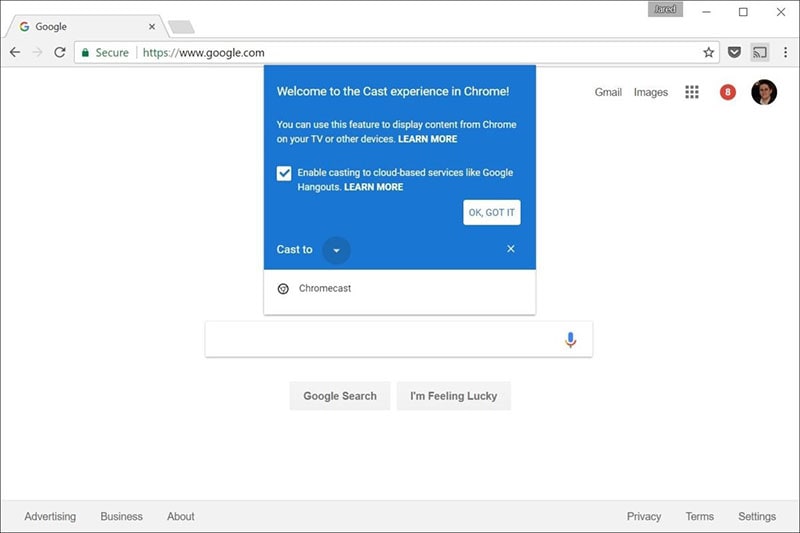
Part 3: Mirror Screen with Chromecast
The Chromecast gadgets from Google are well constructed. They should be able to cast more than just standard streaming services to your TV, logically speaking. Using a Chromecast device is one of the simplest methods to cast a Zoom conference to your TV. They are affordable, and any Google browser and the Google Home app for your Android or iOS smartphone both contain the cast capability. Between a device, such as your phone or computer, and the television, Chromecast offers the perfect connection. Chromecast makes it easy to cast Zoom meetings, particularly conferences with many of participants, since it can virtually reflect everything on your phone, tablet, or computer screen to your TV. For meetings with bigger attendance, it is advantageous to be able to cast Zoom meetings to almost any device, even a smart TV, using Chromecast.
Steps to Mirror Screen with Chromecast
Step1Install the Chromecast
Connect your Google Chromecast to the same internet source as your casting device by plugging it in.
Step2Manage Cast Settings
Locate the casting option on your device and search for recipients. Get the Zoom Cloud Meetings app for iOS or Android. You’ll also need to download the third-party software if you use an iPad or iPhone. After that, sign up for a Zoom account and log in to get started.
Step3Start Mirroring Zoom
The screen of your phone will show up on your TV when you tap your Chromecast. The best view is obtained by turning your phone into landscape after opening Zoom as usual. Once you place a call from here, the video will cast to your TV. Go to the next screen and click Start Broadcasting. You may now start casting to your Chromecast device by opening the Zoom Cloud Meeting app.
You must download the third-party app if you use an iPhone or iPad. The Chromecast Streamer software will let you cast a Zoom meeting on your Chromecast device as Zoom doesn’t provide a casting option.
Conclusion
Zoom’s popularity has skyrocketed as a result of the Pandemic. Zoom has emerged as the preferred video conferencing solution as the bulk of the global workforce shifts to a “work from home” environment. Now that more individuals than ever before work from home, video conferencing has emerged as a vital tool for marketing and corporate communication. Mirroring Zoom meetings to TV has never been this simple. In light of this, we hope that this guide has helped you come up with some of the greatest ideas and approaches for your personal zoom sharing needs. We really hope that this information has been helpful to you if you’ve been interested in learning more about screen sharing your Zoom to TV. Thanks to these methods, you can now mirror any device platform on TV.
The modern workforce needs adaptable alternatives to the conventional room-to-room conferencing. The latest integrated online collaboration platform is called Zoom. What’s more, now you can get Zoom on TV. Being one of the most well-known conferencing programs, it offers reliable and efficient hosting of online meetings. In a same vein, you may set up conference rooms, do video seminars, and use instant messaging to receive real-time communications. Moreover, can you get zoom on your tv? Then the answer is Yes! The ideal technique to expand a small conference is to mirror it on TV using Zoom meetings. Additionally, sharing across all platforms and devices is possible. Sharing HD video, audio, and material from your desktop and mobile devices to conference rooms and phone systems is simple, dependable, and safe with Zoom Meetings.
Zoom is one of the top videos calling applications available, however, in terms of functionality, dependability, and stability. Special features include screen sharing for multi-user annotation and local and cloud recording with transcription. With just a single click, you may share any file with supported and encrypted settings for increased security and communicate across all platforms. Zoom has now come to represent meetings for those who do their business remotely. For almost all platforms, including Android, iOS, macOS, Windows, Smart TVs, etc., the Zoom app is officially accessible. For the query how to get zoom on portal tv? you may activate Zoom screen casting whether you’re using a Windows 10 or a Mac laptop with the Chrome browser. This section will be useful to you if you want to benefit from Zoom on a TV. You may thus do so. Continue reading the article to learn more about how to get zoom on tv.
Part 1: Get Zoom on TV with HDMI Cable
Although Zoom provides companies and bigger organizations with a professional solution like Zoom Rooms, if you’re at home, you don’t need to put anything on your TV to use Zoom. You may start using Zoom right away by simply connecting your Zoom device to your TV. Connect your TV to your laptop’s HDMI port if it has one. Simple as that, however if the laptop doesn’t figure it out on its own you may need to explain what is going on with the second display. Although more reliable, connecting via cable means your source device is linked to the TV and you can’t go for a stroll. It also means you don’t have to worry about the wireless connection fading.
Steps to Get Zoom on TV with HDMI
Step1Connect the HDMI End to the TV and the Other End to Your Device
You may use this in its place if you don’t have an HDMI but do have a USB-C port. To connect to the HDMI cable coming into your TV, you’ll need a dongle, but you’ll need to make sure it’s compatible.
Step2Turn On your TV
Turn on your TV, then switch the video source to the HDMI port you just connected in your device to using the TV remote.
Step3Launch Zoom Meeting
Start or join a meeting by using the Zoom app on your smartphone (available for Android, iOS, Windows, and macOS).
Part 2: Use AirPlay to Connect Zoom to TV
Using AirPlay mirroring, MacOS or iOS devices may share content with Zoom rooms. On MacOS and iOS, Airplay is used to communicate between the Zoom client and the Zoom room. There may be a great potential for your own business requirements if you can figure out how to utilize Airplay to Zoom mirror your screen to your Apple TV. By default, AirPlay sends audio to the Apple TV. Depending on how loud your speakers are set to play and where your input device’s microphone is located, this may cause echoing and ever-louder feedback loops. Without further ado, let’s look at some of the important strategies you may use to maximize live screen streaming on your Apple TV device.
Steps to Use AirPlay to Connect Zoom to TV
Step1Navigate to the Airplay Display in the Apple menu’s top right corner. Choose your Apple TV from the list of AirPlay Display options in the Displays preference pane. The “Show mirroring option in the menu bar when available” checkbox makes it easier to reach the AirPlay menu.
Step2Select Room Management > Zoom Rooms after logging into the Zoom online interface to manage your current Zoom Rooms. Then, modify the account settings and turn on Apple screen mirroring using the location hierarchy system.
Step3Turn on Apple Screen Mirroring by going to the Meetings tab. If this happens, you may need to activate it from the verification dialog box; otherwise, screen mirroring ought to start immediately on your device and let you see Zoom on your Apple TV. A shared password will be required of you.
Step4Enter the passcode that is shown on the Zoom room’s screen. You may start using Airplay on your smartphone after enabling Apple screen mirroring.
Step5After that, turn off AirPlay Display by using the option in the preference pane or the system menu bar. To stop sharing, click Disconnect Airplay.
Part 3: Mirror Screen with Chromecast
The Chromecast gadgets from Google are well constructed. They should be able to cast more than just standard streaming services to your TV, logically speaking. Using a Chromecast device is one of the simplest methods to cast a Zoom conference to your TV. They are affordable, and any Google browser and the Google Home app for your Android or iOS smartphone both contain the cast capability. Between a device, such as your phone or computer, and the television, Chromecast offers the perfect connection. Chromecast makes it easy to cast Zoom meetings, particularly conferences with many of participants, since it can virtually reflect everything on your phone, tablet, or computer screen to your TV. For meetings with bigger attendance, it is advantageous to be able to cast Zoom meetings to almost any device, even a smart TV, using Chromecast.
Steps to Mirror Screen with Chromecast
Step1Install the Chromecast
Connect your Google Chromecast to the same internet source as your casting device by plugging it in.
Step2Manage Cast Settings
Locate the casting option on your device and search for recipients. Get the Zoom Cloud Meetings app for iOS or Android. You’ll also need to download the third-party software if you use an iPad or iPhone. After that, sign up for a Zoom account and log in to get started.
Step3Start Mirroring Zoom
The screen of your phone will show up on your TV when you tap your Chromecast. The best view is obtained by turning your phone into landscape after opening Zoom as usual. Once you place a call from here, the video will cast to your TV. Go to the next screen and click Start Broadcasting. You may now start casting to your Chromecast device by opening the Zoom Cloud Meeting app.
You must download the third-party app if you use an iPhone or iPad. The Chromecast Streamer software will let you cast a Zoom meeting on your Chromecast device as Zoom doesn’t provide a casting option.
Conclusion
Zoom’s popularity has skyrocketed as a result of the Pandemic. Zoom has emerged as the preferred video conferencing solution as the bulk of the global workforce shifts to a “work from home” environment. Now that more individuals than ever before work from home, video conferencing has emerged as a vital tool for marketing and corporate communication. Mirroring Zoom meetings to TV has never been this simple. In light of this, we hope that this guide has helped you come up with some of the greatest ideas and approaches for your personal zoom sharing needs. We really hope that this information has been helpful to you if you’ve been interested in learning more about screen sharing your Zoom to TV. Thanks to these methods, you can now mirror any device platform on TV.
Facts About GIF Background You Didn’t Know
Some Facts About GIF Background You Didn’t Know
An easy yet powerful editor
Numerous effects to choose from
Detailed tutorials provided by the official channel
Once you start using GIFs in your everyday conversations, there’s no going back. GIFs make the conversation more immersive and enjoyable and add a sense of emotion that is not possible with ordinary text. You probably loved some gifs more than others, or there were moments when you wanted to turn them into gifs and wished you could use them as a gif background on your device or presentation but couldn’t figure out how to do it. But, now you don’t have to bury your wish any longer. During this article, you will learn everything there is to know about all the different ways you can use gifs as your background and many more. In addition, you will learn how to use them as your background and how to create them.
In this article
01 [How to Use a GIF as Your Desktop Background on Windows](#Part 1)
02 [How to Make GIF Background on Windows/Mac/Android/iPhone](#Part 2)
03 [How to Make GIF Powerpoint Background](#Part 3)
04 [How to Make GIF Without Background - Free & Efficiently?](#Part 4)
Part 1 How to Use a GIF as Your Desktop Background on Windows?
Although Windows doesn’t have native support to keep animated gif backgrounds, you can use third-party services to keep gifs as background images.
Using Plastuer or BioniX wallpaper changer as a 3rd party software is the best way to use animated gifs for your desktop.
As a starting point, we’ll cover plastuer, which uses WebGL and chromium-browser to make gifs as your background.

The software includes selecting different screens where you want the wallpaper to appear, making it possible to apply it to different screens at once.
To select the gif you want:
● You can paste the URL of the gif you want to use.
● You can also use the “create playlist” field to add multiple gifs as your background.
● You can select a file from your device using the “select file” option.
● Or you can choose from hundreds of gifs present in the plastuer library.
● You can disable the wallpaper whenever you wish by clicking on the “disable wallpaper” option.

How to use the bioniX wallpaper changer?
BioniX comes with several options that one may need to apply to their Windows device’s background, and animated gif backgrounds are one of them.

You will need to download the software and once it is installed, launch it on your PC to apply cool gif backgrounds. To choose files from the device itself, you will have to use the shortcut command “CTRL+F”, or you can also choose to insert the URL of the gif you want to use as your background.
Once your image gets uploaded into the software, double click on it to set it as your windows wallpaper. You can also choose a launch of gifs, create a playlist, and select the timer to change wallpaper regularly.
Part 2 How to Make GIF Background on Windows/Mac/Android/iPhone?
So, how can you create moving background gifs on your different devices like Windows/Mac/Android/iPhone?
In case you thought that was hard, you were entirely mistaken. Now, you can easily create or customize cool background gifs for your computer, tablet, phone, or other devices that you own. The best part is that you don’t need any technical skills to use different tools.
You can create gifs with the help of many tools such as Giphy and share them with your family, friends, and coworkers.
01Giphy
Giphy is a one-stop destination for all of your gifs needs. You can create or choose from thousands of gifs present in their library. Furthermore, one can make personalized gifs with all the tools they provide and add custom stickers, texts or different filters. There is also a live wallpaper section present in giphy, from where you can download hundreds of cool gif backgrounds and make your old machine look fabulous again.

02Pinterest
It’s no secret that Pinterest has a lot of great images, but did you know you can also find gif backgrounds here in various genres that you like and then download them?
It’s straightforward to use, and you can also find anime gif backgrounds on Pinterest if you are an anime fan.

03Tenor
This site offers online gif backgrounds. One may choose from a wide selection of wallpapers and backgrounds available on this site. Online Library is filled up with all sorts of aesthetic gif backgrounds and other types of background that people like.
A few more tools fit the need, but most of them are not reliable, and the tools mentioned above are currently the best ones available for you to use.

Part 3 How to Make a GIF Powerpoint Background?
If you make PowerPoint presentations, you can use various tools to modify your presentation. But did you know that you can also include an aesthetic gif background as part of your presentation?
The steps to creating a gif PowerPoint background are very simple, and below you will find all the steps you need to follow:
● You’ll need to choose the PPTx file that you want to use the GIF background on to get started. Then you can choose the specific slide.
● Navigate to the “design” tab, then to the “background” section. You will see a “background styles” option where you will have to select “format background” to complete the process.
● Select “fill” in the left-hand side panel of the appeared window. Now, select “picture or texture fill” and choose the “file” button, which will lead to another window.
● In the “look in” menu, find the folder or file where the required gif is present. Go on to select the “ok” option. You can either select “close” to apply the gif to a particular slide or “apply to all” to use the gif background in the whole presentation.
Part 4 How to Make GIF Without Background - Free & Efficiently?
One may also look for transparent gif maker websites that will help them make gifs without background and use them on different devices they own.
Here are a few websites that are best for this job; they won’t only help you make transparent gifs but also edit various features like delay time, animation speed etc.
01Using EzGif
Using EzGif is probably one of the best options available in the market at the moment. You can go to their website and create a transparent gif background of high resolution.
Doing that is easy; you need to upload PNG type images that don’t have a background or combine transparent background to form a gif. You can choose up to 2000 images with a maximum file size of 100 MB for all images combined.
To create a gif, go on their site, then to the “gif maker” section to upload the images, and click on “make a gif” to make a transparent gif from the selected images. Once the gif is created, you can use it as a moving gif background and share it with friends or family.
02Use animizer.net to create a gif without background
It is effortless to use software to create transparent gifs by uploading multiple transparent PNG images and combining them to form a gif.
You can use unlimited images for your gif and animated gif background. It also lets you adjust various settings for your transparent gifs like loops, animation speed and much more.
03Use filmora for making gifs without background easily
Wondershare Filmora Video Editor is an all in one tool that will help you create all sorts of gifs, including transparent gifs. You can take advantage of their easy to use tools that are fir for people who have no technical skills at all.
You can easily upload the images and remove their background in the software itself and later use it in the gif you are willing to create.

Wondershare Filmora - Best Video Editor for Mac/Windows
5,481,435 people have downloaded it.
Build unique custom animations without breaking a sweat.
Focus on creating epic stories and leave the details to Filmora’s auto features.
Start a creative adventure with drag & drop effects and endless possibilities.
Filmora simplifies advanced features to save you time and effort.
Filmora cuts out repetition so you can move on to your next creative breakthrough.
This is probably one of the best options if you are looking for an all in one tool for all your needs.
● Ending Thoughts →
● The techniques that we have talked about in this guide may help you discover things about gif backgrounds you have not known before.
● They are incredible and can help you utilize gifs in ways you hadn’t even considered.
● Create a moving gif background and apply it to any device easily.
● Of course, a simple background won’t provide the same type of effect as a moving gif. With this guide, you’ll learn about every tool that you may use and how to apply or create a cool gif background on your own.
Once you start using GIFs in your everyday conversations, there’s no going back. GIFs make the conversation more immersive and enjoyable and add a sense of emotion that is not possible with ordinary text. You probably loved some gifs more than others, or there were moments when you wanted to turn them into gifs and wished you could use them as a gif background on your device or presentation but couldn’t figure out how to do it. But, now you don’t have to bury your wish any longer. During this article, you will learn everything there is to know about all the different ways you can use gifs as your background and many more. In addition, you will learn how to use them as your background and how to create them.
In this article
01 [How to Use a GIF as Your Desktop Background on Windows](#Part 1)
02 [How to Make GIF Background on Windows/Mac/Android/iPhone](#Part 2)
03 [How to Make GIF Powerpoint Background](#Part 3)
04 [How to Make GIF Without Background - Free & Efficiently?](#Part 4)
Part 1 How to Use a GIF as Your Desktop Background on Windows?
Although Windows doesn’t have native support to keep animated gif backgrounds, you can use third-party services to keep gifs as background images.
Using Plastuer or BioniX wallpaper changer as a 3rd party software is the best way to use animated gifs for your desktop.
As a starting point, we’ll cover plastuer, which uses WebGL and chromium-browser to make gifs as your background.
The software includes selecting different screens where you want the wallpaper to appear, making it possible to apply it to different screens at once.
To select the gif you want:
● You can paste the URL of the gif you want to use.
● You can also use the “create playlist” field to add multiple gifs as your background.
● You can select a file from your device using the “select file” option.
● Or you can choose from hundreds of gifs present in the plastuer library.
● You can disable the wallpaper whenever you wish by clicking on the “disable wallpaper” option.
How to use the bioniX wallpaper changer?
BioniX comes with several options that one may need to apply to their Windows device’s background, and animated gif backgrounds are one of them.
You will need to download the software and once it is installed, launch it on your PC to apply cool gif backgrounds. To choose files from the device itself, you will have to use the shortcut command “CTRL+F”, or you can also choose to insert the URL of the gif you want to use as your background.
Once your image gets uploaded into the software, double click on it to set it as your windows wallpaper. You can also choose a launch of gifs, create a playlist, and select the timer to change wallpaper regularly.
Part 2 How to Make GIF Background on Windows/Mac/Android/iPhone?
So, how can you create moving background gifs on your different devices like Windows/Mac/Android/iPhone?
In case you thought that was hard, you were entirely mistaken. Now, you can easily create or customize cool background gifs for your computer, tablet, phone, or other devices that you own. The best part is that you don’t need any technical skills to use different tools.
You can create gifs with the help of many tools such as Giphy and share them with your family, friends, and coworkers.
01Giphy
Giphy is a one-stop destination for all of your gifs needs. You can create or choose from thousands of gifs present in their library. Furthermore, one can make personalized gifs with all the tools they provide and add custom stickers, texts or different filters. There is also a live wallpaper section present in giphy, from where you can download hundreds of cool gif backgrounds and make your old machine look fabulous again.
02Pinterest
It’s no secret that Pinterest has a lot of great images, but did you know you can also find gif backgrounds here in various genres that you like and then download them?
It’s straightforward to use, and you can also find anime gif backgrounds on Pinterest if you are an anime fan.
03Tenor
This site offers online gif backgrounds. One may choose from a wide selection of wallpapers and backgrounds available on this site. Online Library is filled up with all sorts of aesthetic gif backgrounds and other types of background that people like.
A few more tools fit the need, but most of them are not reliable, and the tools mentioned above are currently the best ones available for you to use.
Part 3 How to Make a GIF Powerpoint Background?
If you make PowerPoint presentations, you can use various tools to modify your presentation. But did you know that you can also include an aesthetic gif background as part of your presentation?
The steps to creating a gif PowerPoint background are very simple, and below you will find all the steps you need to follow:
● You’ll need to choose the PPTx file that you want to use the GIF background on to get started. Then you can choose the specific slide.
● Navigate to the “design” tab, then to the “background” section. You will see a “background styles” option where you will have to select “format background” to complete the process.
● Select “fill” in the left-hand side panel of the appeared window. Now, select “picture or texture fill” and choose the “file” button, which will lead to another window.
● In the “look in” menu, find the folder or file where the required gif is present. Go on to select the “ok” option. You can either select “close” to apply the gif to a particular slide or “apply to all” to use the gif background in the whole presentation.
Part 4 How to Make GIF Without Background - Free & Efficiently?
One may also look for transparent gif maker websites that will help them make gifs without background and use them on different devices they own.
Here are a few websites that are best for this job; they won’t only help you make transparent gifs but also edit various features like delay time, animation speed etc.
01Using EzGif
Using EzGif is probably one of the best options available in the market at the moment. You can go to their website and create a transparent gif background of high resolution.
Doing that is easy; you need to upload PNG type images that don’t have a background or combine transparent background to form a gif. You can choose up to 2000 images with a maximum file size of 100 MB for all images combined.
To create a gif, go on their site, then to the “gif maker” section to upload the images, and click on “make a gif” to make a transparent gif from the selected images. Once the gif is created, you can use it as a moving gif background and share it with friends or family.
02Use animizer.net to create a gif without background
It is effortless to use software to create transparent gifs by uploading multiple transparent PNG images and combining them to form a gif.
You can use unlimited images for your gif and animated gif background. It also lets you adjust various settings for your transparent gifs like loops, animation speed and much more.
03Use filmora for making gifs without background easily
Wondershare Filmora Video Editor is an all in one tool that will help you create all sorts of gifs, including transparent gifs. You can take advantage of their easy to use tools that are fir for people who have no technical skills at all.
You can easily upload the images and remove their background in the software itself and later use it in the gif you are willing to create.
Wondershare Filmora - Best Video Editor for Mac/Windows
5,481,435 people have downloaded it.
Build unique custom animations without breaking a sweat.
Focus on creating epic stories and leave the details to Filmora’s auto features.
Start a creative adventure with drag & drop effects and endless possibilities.
Filmora simplifies advanced features to save you time and effort.
Filmora cuts out repetition so you can move on to your next creative breakthrough.
This is probably one of the best options if you are looking for an all in one tool for all your needs.
● Ending Thoughts →
● The techniques that we have talked about in this guide may help you discover things about gif backgrounds you have not known before.
● They are incredible and can help you utilize gifs in ways you hadn’t even considered.
● Create a moving gif background and apply it to any device easily.
● Of course, a simple background won’t provide the same type of effect as a moving gif. With this guide, you’ll learn about every tool that you may use and how to apply or create a cool gif background on your own.
Top 15 LUTS to Buy
The LUTs application improves the quality factors of the media files. It works on the color gradients and performs corrections with the existing images to bring out the best in the captures. Some details become visible only after making innovative corrections using the best LUTs program.
Using this tool, you can create filters and apply them to the photos in no time. Choose reliable applications to obtain the desired outcomes. Select the programs that carry in-built elements and a user-friendly interface for optimal tool usage. In this article, you will explore the top 15 best LUTs you can buy in 2024 to increase the overall view of the photos and videos.

Here, quickly surf the wide range of the LUTs app and its related details. Connect with the right ones that match your needs.
1. Urban Dark LUTs
The Urban dark LUTs are exclusively designed to display the city environment. You can use these LUTs to enhance your shot with urban effects. The relevant color gradients are applied to this file.
Price: $37.

Urban Dark LUTs
2. Osiris Cinematic LUT
The Osiris Cinematic LUT hails from a reputed developer Vision Color. This pack contains 3 different LUT effects with processed films to provide cinematic looks to the media content. Many filmmakers use this LUT effect frequently to reveal the realistic shots in their movies.
Price: $57

Osiris Cinematic LUT
3. Black Magic LUT
The Black magic LUT corrects the color shifts and brings out the natural flavors in the shots. This LUT effect includes the skin tone and displays the realistic colors on the captured content.
Price: $22.

Black Magic LUT
4. Filmic Tone LUT
In this LUT, you can rectify the color gradients and match the skin tone perfectly. It contains dark vibes and it is enough if you import this LUT to the editing interface without any complex installation process. The Filmic Tone LUT seems to be compatible with different video editing platforms.
Price: $28.

Filmic Tone LUT
5. Moody Bundles
Here, you can find seven types of LUT effects available in this pack. It displays the atmospheric vibes and specializes in the moods related to the landscapes, weather, fashion, and sports. Choose the LUTs as per the genre of the video clippings.
Price: $91

Moody Bundles
6. Filippo Cinotti
The film lovers use these LUT effects to adjust the shadows and highlights on the captured content. There are options to customize this LUT using the in-built color panel available with the video editing environment like Adobe Premiere, Photoshop and many more adds to the list.
Price: $29

Filippo Cinotti
7. Winter Lifestyle LUT pack
This LUTs pack is specially built to apply winter effects to the media content. It helps to include the snow, and white environment in the background to add flavor to the capture. There are more than 30 winter lifestyle LUTs effects available to include in the videos and photos effortlessly.
Price: $55

Winter Lifestyle LUT pack
8. Autumn LUTs pack
There are 20 autumn LUTs packs available in this product to edit the videos and photos with unique effects. Instead of applying similar filters to the media content, try this autumn collection LUTs to view different looks of your photos and videos.
Price: $35

Autumn LUTs pack
9. Sports LUTs
It is a pack of 20 unique sports LUTs exclusively available to insert into your videos and images. Customize the LUTs by adjusting the brightness, contrast, color grading and intensity values to add value to the captured content.
Price: $36

Sports LUTs
10. Christmas LUTs
Use these LUTs during the festival season and create an impact on the viewers. You can impress the audience by playing the videos edited using the Christmas LUTs at the time of family and friend get together. Here the effects are highly professional and no compromises with the quality factors.
Price: $36

Christmas LUTs
11. Beach LUTs
When you shoot the memorable moments on the beach, edit the content using 20 different types of beach LUTs. They are highly professional and work on the blue color with intense gradients to provide natural looks overall.
Price: $36

Beach LUTs
12. Black and White LUTs
To add the black and white color gradients to the imported videos or photos, this LUT gives you great effects. Brush the media file with black and white shades to obtain a new look at the existing content.
Price: $17

Black and White LUTs
13. Creamy LUTs
In these LUTs, you can add the skin tone effects realistically on the characters in the video content. The skin color is quickly matched by adjusting the color gradients. The creamy nature of the skin tone is retained using these LUTs.
Price: $36

Creamy LUTs
14. Retro LUTs
The retro effects are assured when you apply these LUTs in your video. Convert your latest images and videos into a retro mood by using the Retro LUTs while editing the media content on any platform. There are 20 different retro LUTs to add flavors to the videos.
Price: $36

Retro LUTs
15. Epic LUTs
When you narrate a story with the photos and videos, then insert the epic LUTs in the content to convey the tracks as a history. Resemble any epic events in your shots and use these LUTs to maintain the realistic looks overall.
Price: $36

Epic LUTs
Bonus! Use your LUTs in Filmora
Now, it is high time to study the usage of LUTs effects in Filmora and build a media file outstanding. The Filmora is a video editor tool that edits the video content beyond imagination. It allows you to perform limitless edits in your content hassle-free. You can easily upload the content from any storage space and quickly add desired effects to the videos. Apart from effects, you can insert transitions, animations, and icons to create an impact on the audience who watches the final edited video content. The Filmora video editor satisfies both the professionals and newbies giving satisfactory results.
Follow the below steps to insert the LUT effects on the imported video or photos using the Filmora editor application.
Step 1Install the LUTs app
Go to the official webpage of Filmora and download the tool according to the system OS. Install it and launch the application. Then, upload the desired video or photo that requires further edits.
Step 2Choose Effects
Now, tap the Effects option in the menu and select the LUTs option in the left panel of the screen. Next, select your favorite LUT effect displayed on the right side of the screen. Here, you can find a wide range of LUTs to include in the loaded videos or photos.

Choose Effects
Step 3Apply Now
Finally, hit the Apply button to insert the chosen LUT effect into the imported video or photo. There are options to expand the Effects library by loading LUTs from external sources. Click the Custom LUT tab and tap the drop-down menu nearby the 3D LUT label. Then, choose the Load New LUTs option to include extra LUTs in the list. You can include them in further video edits on the Filmora interface.

Load New LUTs
You can also customize the available LUT effects in the Filmora library according to the video or photo content. Use the Filmora video editor program optimally to bring the best in the content and entertain the audience for better reach. Every edit reveals the expected displays of the media content. Choose the editing features in the Filmora Video Editor app precisely for satisfactory results.
Wondershare Filmora11 Express Better
Achieve More
Grow Together
Free Download Free Download Learn More

![]()
Summarize:
Thus, you are the last lines in the discussion of the best LUTs you can purchase in 2024. Quickly rush up to the stores before the above discussed LUTs becomes out of stock. You can wait for a few days if your favorite LUTs go unavailable. Choose the LUTs professionally and use the Filmora Video Editor to insert the LUTs optimally in the video content. Connect with this article to gather exciting facts about LUTs.
Free Download Free Download Learn More
![]()
Summarize:
Thus, you are the last lines in the discussion of the best LUTs you can purchase in 2024. Quickly rush up to the stores before the above discussed LUTs becomes out of stock. You can wait for a few days if your favorite LUTs go unavailable. Choose the LUTs professionally and use the Filmora Video Editor to insert the LUTs optimally in the video content. Connect with this article to gather exciting facts about LUTs.
How to Create a Slideshow on iPhone
How to Make a Slideshow on iPhone
An easy yet powerful editor
Numerous effects to choose from
Detailed tutorials provided by the official channel
Slideshows are acceptable ways to easily sum up your amazing trip or excellent events instead of showing-off whole bunch of photos to all your surroundings. You can easily pick up beautiful moments in order to put them all together to easily create some beautiful videos.
For making a slideshow on iPhone, you can add a slice of music, effects and other ingredients to make it looks amazing. The Photo Slideshow iPhone Maker is a kind of app that can easily create beautiful music videos from you existing pictures and this also comes with amazing qualities to enhance your appearance on the go. With a rich music library and amazing effects, you can differently apply background music to your slideshow or video. With just a drag & drop facility and some tools to define your slideshow making, it is an easy process to consider.
In this article
01 [How to Make a Slideshow on iPhone](#Part 1)
02 [How to Save Slideshow on iPhone](#Part 2)
03 [How to Share Slideshow on iPhone](#Part 3)
04 [How to Send a Slideshow on iPhone](#Part 4)
05 [8 Free Slideshow Maker for iPhone](#Part 5)
Part 1 How to Make a Slideshow on iPhone
The iPhone is one of the most amazing devices that are capable of doing so many things, like making a picture slideshow or quickly adding pictures to turn up the normal pictures into life-long memories, you can do a lot of things. In case you are looking for a way to make a slideshow quickly then Photos app in iPhone can help you a lot. On the other hand, if you need something else, you can take help of other apps on the market once after downloading any one of your choice.

Here, we are talking about making slideshow on iPhone to collect tons of memories and later on sharing it with your friends of family members. Right from adding music, converting the transitions or quickly polishing any existing video, here is how you can easily make a Slideshow on iPhone with Photos app:
● Open Photos app & then select desired album that you want to use in your slideshow.
● Tap on pictures you need to start making a slideshow.
● After selecting a starting picture, tap on Share-button on the bottom left.
● Scroll down, and choose Slideshow.
● Your slideshow will automatically starts playing.
● In order to further edit the settings of your slideshow, tap on the screen & then tap pause icon at bottom centre of your screen
● Tap Options to refine your steps of how to create a slideshow on iPhone.
● Then edit Theme, Music, and choose speed of the slideshow.
● After making desirable changes, tap done and enjoy playing it.
● If you want to share the slideshow created, tap on the pause button again & then select AirPlay-icon in upper-right corner of your screen.
● Tap on the name of your device you would like to Air Play the slideshow to.
● Once you are done with playing a slideshow, tap done in upper-left corner in order to end your slideshow.
Your device can save these settings automatically if you want to your album as the slideshow. For more glory, you can add filters in a polished manner to finish the steps to create slide show on iPhone.
Part 2 How to Save Slideshow on iPhone
Once after creating the slideshow with your iPhone device, if you want to know how to save a slideshow on iPhone then you need to be little tricky because there is no way to save the slideshow created by directly using the Photos App. You can instead make use of iPhone screen recording feature to save it when your slideshow plays. You can later on trim the desired video with perfect start & end. With the photos app, you can only save your memories as a slideshow and it is just like a curated collection of pictures with ‘Year in review’.

Here is the complete assistance on how to save slideshow on iPhone:-
● Tap done on the top-left corner with your project
● Tap Share icon.
● Select the Save Video option.
● The iMovie will easily export as well as save desired slideshow in Photos app.
Part 3 How to Share Slideshow on iPhone
In order to create as well as share the desired slideshow of your photos in the Apple’s Photos app, you just need to choose shots from the device and add some special themes with the selected fonts & background music and at last share final product with your friends. The photos app of your iPhone mainly offers slightly two different kinds of slideshows with regular one allowing you to easily change theme, duration of the music added to a certain number of choices but on the other hand memory movie can allow you to modify the theme to tweak music, font, length and music at no worries.

This is how you can share a slideshow on iPhone:
If you want to know how to share slideshow on iPhone, tap share icon at the corner, and then use share screen feature to choose the desired destination like Messages, OneDrive, YouTube, Mail, Facebook, and others. The Photos application will then automatically export the desired movie to the services like: Facebook.
At last your app will preview its slideshow & then lets you easily include text, location, tag people, etc. Now, you are finished with the process to share the slideshow, tap on the share & explore your slideshow easily.
Part 4 How to Send a Slideshow on iPhone
If you are curious to know more about the process to send a slideshow on iPhone device then it is the not so difficult. With some consistency in your slideshow you can export your video to share with your loved ones in a smooth manner. Besides various transitions & effects, one can easily add stickers, text, before sending the video with share option. If you want to send the completed slideshow then quickly tap on the share icon and then choose any destination like Messages, OneDrive, YouTube, Mail, Facebook, etc. this will automatically export deliver the slideshow to your friends.

Part 5 Free Slideshow Maker for iPhone
On next we are heading towards the process to find out few amazing free slideshow makers for an iPhone. There are multiple apps are present in the market, out of which you can choose the one as per your need and comfort. So let’s begin with the discussion of each & every app, one by one:
01Vimory
The highlighted features of Vimory
● A unique Slideshow Maker
● Video-Editor
● Photo-Editor
● Giving you a feature to directly export the slideshow to Social Media
● Output at 4k
● Animated slideshow making
● Some incredible effects
● Superfast image editor
● Comes with stylish text and transitions
The Vimory offers you multiple ways to make some beautiful videos through the pictures one can easily add music track right from the app. It is the fantastic app for creating a slideshow on iPhone with significant effects, pretty amazing frames, fashionable filters and compelling music.
02PicPlayPost
The highlighted features of PicPlayPost
● Ability to Createalmost 30-minute slideshows.
● Built-in live video wallpapers.
● Record the slideshow video in HD with 1080P & 4K HD option.
● Trim, slow-down, speed up the videos
● Full featured editing capabilities
Entirely known for an ability to import the photos, add multiple texts, stickers, slide transition, &choose some amazing background music. This comes with an option to share your creations to your device gallery, Gmail, Facebook, YouTube, Messenger, Twitter, WhatsApp, Google Photos, and many more.
03Slide Lab
Highlighted features of Slidelab
● A complete Slideshow Editor
● Easy to import Option
● Music Tracks
● Comes with many video Tracks
● Audio Editing
One of the most amazing apps to turn your pictures into a realistic slideshow containing music, an extensive collection of multiple transitions to avoid sudden-jumps, in-app music library and an option to choose the in-app purchase in order to remove watermark.
04iMovie
Some of the most amazing features of iMovie:
● Ability to customize the movie studio logos, credits and cast names.
● Adjust the titles by changing the font, colour, location and size.
● Enhancing your movie by slowing-down or speeding-up desired clip.
● Easily add picture inside the picture, green-screen,& a split-screen effect.
One of the finest Photo slideshow maker through iPhone, iMovie is the fantastic slideshow maker. As compared to various other apps on the market this comes with useful features to make the slideshow simplistic yet attractive. Its frills-free interface can easily charms-up your slideshow making experience.
05Viva Video
The highlighted features of Viva Video
● Great varieties of Video Editing Tools
● Amazing Trendy Frames
● Aesthetics-Filters
● Edit any Music
● Sticker &typing option.
● Straightforward and easy to understand
● Wide range of audio tracks, effects and themes
This app is mix of free and a paid subscription and with the later one you can add some amazing effects and themes with professional editing features.
06Movavi Clips Easy Video Editor
The highlighted features of Movavi
● Edit any footage on a handy timeline
● Intuitive interface
● Movie maker without any ads
● Quick & precise
● Ability to trim and cut audios
This app is available for both iOS &Android users. If you want to know how to make a slideshow on iPhone with this app then interestingly it is very easy for you to do that.Movavi can deliver you amazing video editing experience and usually comes with some fine quality of effects and themes.
07Magisto Video Editor and Maker
The highlighted features of Magisto
● Easily create a moving photo slideshow or a video collage
● Ready-made templates
● Video Editing features like: cut, merge, trim, or reorder.
● Customization options available with editing of text, fonts, orientation, colors etc.
08MoShow Slideshow Photo & Video
● Easily Adjust Slideshow-timing
● Access few exclusive video-templates.
● Create GIFs as well as looping videos.
● Fine collection of templates
● Built-in music-options
Wondershare Filmora Video Editor can be used for making high quality videos and editing them. The styling, custom options and ease of adding effects in the video make this app popular. The application is well equipped with a wide variety of slideshow making tools.
For Win 7 or later (64-bit)
For macOS 10.12 or later
Key features
● Audio mixing feature
● Tilt shift
● Multiple video clips layer facility
● Adding and editing text feature
● Preview frame wise
● Video stabilizer
In terms of true quality of artificial intelligence technology, this app is the finest one on the list of all the apps for making an iPhone slideshow. If you are curious about the process to create slideshow on iPhone thenfinally you are getting rich collection of features in it like: stabilization, object-detection option, stylish effects, filters, and many more to outshine any average looking slideshow or a video collage.You can easily make collage or a short movie with Magisto video editor with great combination of special effects, graphics and filters.
● Ending Thoughts →
● Make use of some user friendly or light apps to create a slideshow of small sizes
● You can move further onto heavy duty apps for making long videos
● Some apps are having a possible number of features to offer you affordable options
● However, other promising apps like Filmora can give you amazing options to create some logical slideshows for any occasion and at no hidden cost. You can make use of Filmora to adding plenty of designing features to your video.
Slideshows are acceptable ways to easily sum up your amazing trip or excellent events instead of showing-off whole bunch of photos to all your surroundings. You can easily pick up beautiful moments in order to put them all together to easily create some beautiful videos.
For making a slideshow on iPhone, you can add a slice of music, effects and other ingredients to make it looks amazing. The Photo Slideshow iPhone Maker is a kind of app that can easily create beautiful music videos from you existing pictures and this also comes with amazing qualities to enhance your appearance on the go. With a rich music library and amazing effects, you can differently apply background music to your slideshow or video. With just a drag & drop facility and some tools to define your slideshow making, it is an easy process to consider.
In this article
01 [How to Make a Slideshow on iPhone](#Part 1)
02 [How to Save Slideshow on iPhone](#Part 2)
03 [How to Share Slideshow on iPhone](#Part 3)
04 [How to Send a Slideshow on iPhone](#Part 4)
05 [8 Free Slideshow Maker for iPhone](#Part 5)
Part 1 How to Make a Slideshow on iPhone
The iPhone is one of the most amazing devices that are capable of doing so many things, like making a picture slideshow or quickly adding pictures to turn up the normal pictures into life-long memories, you can do a lot of things. In case you are looking for a way to make a slideshow quickly then Photos app in iPhone can help you a lot. On the other hand, if you need something else, you can take help of other apps on the market once after downloading any one of your choice.
Here, we are talking about making slideshow on iPhone to collect tons of memories and later on sharing it with your friends of family members. Right from adding music, converting the transitions or quickly polishing any existing video, here is how you can easily make a Slideshow on iPhone with Photos app:
● Open Photos app & then select desired album that you want to use in your slideshow.
● Tap on pictures you need to start making a slideshow.
● After selecting a starting picture, tap on Share-button on the bottom left.
● Scroll down, and choose Slideshow.
● Your slideshow will automatically starts playing.
● In order to further edit the settings of your slideshow, tap on the screen & then tap pause icon at bottom centre of your screen
● Tap Options to refine your steps of how to create a slideshow on iPhone.
● Then edit Theme, Music, and choose speed of the slideshow.
● After making desirable changes, tap done and enjoy playing it.
● If you want to share the slideshow created, tap on the pause button again & then select AirPlay-icon in upper-right corner of your screen.
● Tap on the name of your device you would like to Air Play the slideshow to.
● Once you are done with playing a slideshow, tap done in upper-left corner in order to end your slideshow.
Your device can save these settings automatically if you want to your album as the slideshow. For more glory, you can add filters in a polished manner to finish the steps to create slide show on iPhone.
Part 2 How to Save Slideshow on iPhone
Once after creating the slideshow with your iPhone device, if you want to know how to save a slideshow on iPhone then you need to be little tricky because there is no way to save the slideshow created by directly using the Photos App. You can instead make use of iPhone screen recording feature to save it when your slideshow plays. You can later on trim the desired video with perfect start & end. With the photos app, you can only save your memories as a slideshow and it is just like a curated collection of pictures with ‘Year in review’.
Here is the complete assistance on how to save slideshow on iPhone:-
● Tap done on the top-left corner with your project
● Tap Share icon.
● Select the Save Video option.
● The iMovie will easily export as well as save desired slideshow in Photos app.
Part 3 How to Share Slideshow on iPhone
In order to create as well as share the desired slideshow of your photos in the Apple’s Photos app, you just need to choose shots from the device and add some special themes with the selected fonts & background music and at last share final product with your friends. The photos app of your iPhone mainly offers slightly two different kinds of slideshows with regular one allowing you to easily change theme, duration of the music added to a certain number of choices but on the other hand memory movie can allow you to modify the theme to tweak music, font, length and music at no worries.
This is how you can share a slideshow on iPhone:
If you want to know how to share slideshow on iPhone, tap share icon at the corner, and then use share screen feature to choose the desired destination like Messages, OneDrive, YouTube, Mail, Facebook, and others. The Photos application will then automatically export the desired movie to the services like: Facebook.
At last your app will preview its slideshow & then lets you easily include text, location, tag people, etc. Now, you are finished with the process to share the slideshow, tap on the share & explore your slideshow easily.
Part 4 How to Send a Slideshow on iPhone
If you are curious to know more about the process to send a slideshow on iPhone device then it is the not so difficult. With some consistency in your slideshow you can export your video to share with your loved ones in a smooth manner. Besides various transitions & effects, one can easily add stickers, text, before sending the video with share option. If you want to send the completed slideshow then quickly tap on the share icon and then choose any destination like Messages, OneDrive, YouTube, Mail, Facebook, etc. this will automatically export deliver the slideshow to your friends.
Part 5 Free Slideshow Maker for iPhone
On next we are heading towards the process to find out few amazing free slideshow makers for an iPhone. There are multiple apps are present in the market, out of which you can choose the one as per your need and comfort. So let’s begin with the discussion of each & every app, one by one:
01Vimory
The highlighted features of Vimory
● A unique Slideshow Maker
● Video-Editor
● Photo-Editor
● Giving you a feature to directly export the slideshow to Social Media
● Output at 4k
● Animated slideshow making
● Some incredible effects
● Superfast image editor
● Comes with stylish text and transitions
The Vimory offers you multiple ways to make some beautiful videos through the pictures one can easily add music track right from the app. It is the fantastic app for creating a slideshow on iPhone with significant effects, pretty amazing frames, fashionable filters and compelling music.
02PicPlayPost
The highlighted features of PicPlayPost
● Ability to Createalmost 30-minute slideshows.
● Built-in live video wallpapers.
● Record the slideshow video in HD with 1080P & 4K HD option.
● Trim, slow-down, speed up the videos
● Full featured editing capabilities
Entirely known for an ability to import the photos, add multiple texts, stickers, slide transition, &choose some amazing background music. This comes with an option to share your creations to your device gallery, Gmail, Facebook, YouTube, Messenger, Twitter, WhatsApp, Google Photos, and many more.
03Slide Lab
Highlighted features of Slidelab
● A complete Slideshow Editor
● Easy to import Option
● Music Tracks
● Comes with many video Tracks
● Audio Editing
One of the most amazing apps to turn your pictures into a realistic slideshow containing music, an extensive collection of multiple transitions to avoid sudden-jumps, in-app music library and an option to choose the in-app purchase in order to remove watermark.
04iMovie
Some of the most amazing features of iMovie:
● Ability to customize the movie studio logos, credits and cast names.
● Adjust the titles by changing the font, colour, location and size.
● Enhancing your movie by slowing-down or speeding-up desired clip.
● Easily add picture inside the picture, green-screen,& a split-screen effect.
One of the finest Photo slideshow maker through iPhone, iMovie is the fantastic slideshow maker. As compared to various other apps on the market this comes with useful features to make the slideshow simplistic yet attractive. Its frills-free interface can easily charms-up your slideshow making experience.
05Viva Video
The highlighted features of Viva Video
● Great varieties of Video Editing Tools
● Amazing Trendy Frames
● Aesthetics-Filters
● Edit any Music
● Sticker &typing option.
● Straightforward and easy to understand
● Wide range of audio tracks, effects and themes
This app is mix of free and a paid subscription and with the later one you can add some amazing effects and themes with professional editing features.
06Movavi Clips Easy Video Editor
The highlighted features of Movavi
● Edit any footage on a handy timeline
● Intuitive interface
● Movie maker without any ads
● Quick & precise
● Ability to trim and cut audios
This app is available for both iOS &Android users. If you want to know how to make a slideshow on iPhone with this app then interestingly it is very easy for you to do that.Movavi can deliver you amazing video editing experience and usually comes with some fine quality of effects and themes.
07Magisto Video Editor and Maker
The highlighted features of Magisto
● Easily create a moving photo slideshow or a video collage
● Ready-made templates
● Video Editing features like: cut, merge, trim, or reorder.
● Customization options available with editing of text, fonts, orientation, colors etc.
08MoShow Slideshow Photo & Video
● Easily Adjust Slideshow-timing
● Access few exclusive video-templates.
● Create GIFs as well as looping videos.
● Fine collection of templates
● Built-in music-options
Wondershare Filmora Video Editor can be used for making high quality videos and editing them. The styling, custom options and ease of adding effects in the video make this app popular. The application is well equipped with a wide variety of slideshow making tools.
For Win 7 or later (64-bit)
For macOS 10.12 or later
Key features
● Audio mixing feature
● Tilt shift
● Multiple video clips layer facility
● Adding and editing text feature
● Preview frame wise
● Video stabilizer
In terms of true quality of artificial intelligence technology, this app is the finest one on the list of all the apps for making an iPhone slideshow. If you are curious about the process to create slideshow on iPhone thenfinally you are getting rich collection of features in it like: stabilization, object-detection option, stylish effects, filters, and many more to outshine any average looking slideshow or a video collage.You can easily make collage or a short movie with Magisto video editor with great combination of special effects, graphics and filters.
● Ending Thoughts →
● Make use of some user friendly or light apps to create a slideshow of small sizes
● You can move further onto heavy duty apps for making long videos
● Some apps are having a possible number of features to offer you affordable options
● However, other promising apps like Filmora can give you amazing options to create some logical slideshows for any occasion and at no hidden cost. You can make use of Filmora to adding plenty of designing features to your video.
Also read:
- In 2024, Some Facts That Few People Know on How to Make Transparent Background in Canva
- Updated 4 Methods to Resize a WebM File for 2024
- New How Have Game Recording Software Improved Their Stature in the Market? An Overview for 2024
- Updated In 2024, Overview About Supported iPhone Video Formats and Best iPhone Video Editor & Converter
- New In 2024, An Ultimate Guide to Edit a Music Video Aspect Ratio and First Cut
- In 2024, How to Create a Makeup Video
- New 2024 Approved 100 Workable How to Mask Track with Adobe Premiere Pro
- 2024 Approved This Guide Will Help You to Understand Everything About the Zoho Show. Also, Know What the Zoho Show Slide Is, Why It Is Used and All Related Information
- New Top 5 Websites and Software to Convert Powerpoint to Mp4
- Updated How to Make Discord GIF Avatar in Depth Guide
- New In 2024, Shotcut Video Editor Review
- New How to Add Adjustment Layer (Clip) in DaVinci Resolve?
- Updated Do You Want to Add Voiceovers to Your Video Project? Wondershare Filmora Is an Amazing Tool that Lets You Add Audio Files, Including Voiceovers
- New WebM to GIF Converters (Online and Offline Solutions)
- In 2024, Add Emoji to Linkedin Post – 5 Tips You Would Like to Know
- In 2024, Create Dynamic Text Animation in Filmora
- What Is MOV Format and How to Edit MOV Video Better for 2024
- Create Risograph Effect In Photoshop A Beginners Guide
- Updated Guide to Create Intro Video with KineMaster
- Updated 2024 Approved 100 Working Methods to Learn How to Rotate TikTok Video
- Updated 4 Ways to Rotate Videos on Windows PC
- In 2024, The Quicktime Software with Its Latest Version Gives You an Option to Change the Speed of an Audio or Video File. It Makes It Easy to Watch the Slow-Motion Video or Fast-Forward the Audio
- Step by Step to Crop Videos Using Lightworks for 2024
- Updated Video Maker with Song for 2024
- How to Make Falling Text Effect in Filmora for 2024
- Updated VN Editor A Prominent Option for Adding Luts for Video Editing
- New How to Create Vintage Film Effect 1950S for 2024
- Hitfilm Express - A Guide to Download, Install, Key Features
- New Do You Know CapCut Has some Amazing Slow-Motion Templates You Can Utilize? Read This Article to Access the Slow-Motion CapCut Templates Link
- 2024 Approved Ways to Make Sure Your Video Editing Course Is Worthing to Watch
- Updated 15 Best Free MP4 Video Rotators Windows,Mac, Android, iPhone & Online
- New In 2024, Best Ways to Add Photos to Tik Tok Video
- New How to Trim Video in QuickTime Player on Your Mac
- How to Transfer Text Messages from Motorola G24 Power to New Phone | Dr.fone
- In 2024, Unlock Your Device iCloud DNS Bypass Explained and Tested, Plus Easy Alternatives On Apple iPhone 15 Plus
- In 2024, How to Fix Pokemon Go Route Not Working On Honor Magic V2? | Dr.fone
- How Can Poco X5Mirror Share to PC? | Dr.fone
- Full Guide to Hard Reset Your Itel P55 5G | Dr.fone
- How To Unlock Apple iPhone 6 Plus Without Passcode? 4 Easy Methods
- Full Guide to Unlock Your Itel P55T
- Top 9 Oppo K11x Monitoring Apps for Parental Controls | Dr.fone
- How to Easily Hard reset my Oppo Find X7 Ultra | Dr.fone
- In 2024, How to Fix Locked Apple ID from iPhone 12 mini
- In 2024, How to Unlock iPhone 12 Pro Max with/without SIM Card
- Title: How to Get Zoom on TV Easy Solutions for 2024
- Author: Chloe
- Created at : 2024-04-24 07:08:11
- Updated at : 2024-04-25 07:08:11
- Link: https://ai-editing-video.techidaily.com/how-to-get-zoom-on-tv-easy-solutions-for-2024/
- License: This work is licensed under CC BY-NC-SA 4.0.
