
How to Loop a Video with iMovie on Mac and iPhone
How to Loop a Video with iMovie on Mac and iPhone
If you are a video creator, there are times when you have to loop a video. This is to extend the duration of the original video. For instance, you have a stock video of a short duration. You want it to be the background in your video throughout. You have to extend the duration of the stock video by playing it in a loop.
If you are a macOS user, you can use iMovie to loop your video. iMovie comes pre-install on macOS devices. iMovie happens to be one of the most preferred video editors among beginners. In fact, iMovie comes pre-installed on iPhones and iPads. You can easily loop your video on your mobile devices as well. We will illustrate how to loop a video on iMovie on iPhone as well as on Mac.
Part 1. How to loop a video on iMovie iPhone
iMovie by Apple comes pre-installed on iPhone and iPad. Naturally, it is one of the most widely used video editors by iPhone users. iMovie app has options for basic and even advanced levels of video editing. Looping a video on iMovie involves a few simple steps that everyone can perform easily. Here are the steps on how to loop a video in the iMovie app on your iPhone.
Step1 Launch the iMovie app on your iPhone. If you have uninstalled or disabled the app, you can always go to App Store to install it again.

Step2 If you are opening the app for the first time, you will get a welcome screen. Follow the on-screen instructions to land on the home screen of the app.
Step3 Tap on New Project “+” icon and select the Movie option to get started. This will take you to the phone media gallery to select a media file to get started.

Step4 You should tap on the Video option and select the video that you want to put into a loop. After selecting a video, tap on Create Movie option.

Step5 Tap on the video on the timeline to select the video and tap on the Duplicate option. You will see that the duration of the video has doubled. You can tap on Duplicate as many times as you want to increase the video duration.

Step6 Once you are done with the iMovie loop, tap on the Done option located in the top-left corner. Thereafter, tap on the Share icon at the bottom.

Step7 You will get a pop-up where you have to tap on the Save Video option. The edited video will be saved on your iPhone. You can open the new video from the Photos app.

Part 2. Loop Videos on Mac with iMovie
Editing a video on a Mac is always more comfortable than on an iPhone because of the larger screen. iMovie from Apple comes pre-installed on Mac as well, and hence, you can get started right away. It is completely free to use, and hence, you do not need to install any third-party video editor. Here are the steps on how to loop an iMovie video in simple steps.
Step1 Open the iMovie app from the Applications folder.
Step2 Click on Create New option and then click on the Movie option.

Step3 Bring in the required video under Movie Library by dragging the file from Finder on your Mac. You can also go to File> Import Media option and select the required video. You can also select the required media file from Events or Photos under the Libraries section.

Step4 Drag and drop the video on your timeline. When you want to loop the video, drag and drop the video clip again on the timeline. Make sure there is no gap between the first clip and the second clip on the timeline. You can drag and drop the video clip multiple times on the timeline to increase its duration.


Step5 Once you are done, go to File> Share> File option. Choose the destination to save the edited video.

Part 3. iMovie Alternative to Loop Videos on Mac
If you are looking for an iMovie alternative to perform iMovie loop video action easily, we recommend Wondershare Filmora . Filmora is available for both Mac and Windows. Filmora is a better video editor than iMovie. It is a premium video editor and it has more features and functionalities.
You can loop any video as many times as you want instantly. Besides, you can edit your video clip as per your requirements before looping the edited video. The user interface is highly intuitive for everyone. Hence, it has huge popularity among Mac users. You can also save the looped video in different file formats. Here are the steps to loop a video on Filmora.
Free Download For Win 7 or later(64-bit)
Free Download For macOS 10.14 or later
Step1 Download and install Wondershare Filmora. Launch Filmora and click on New Project on the welcome screen.

Step2 Drag and drop the video file from Finder on Mac to the Project Media folder on Filmora. Thereafter, drop the video file into the timeline.

Step3 Drag and drop the video clip into the timeline again. Make sure that there is no gap between the clips. Besides, make sure that they are on the same channel for looping. You can drag and drop the video into the timeline multiple times.

Step4 You can zoom out the timeline for better viewing. Play the video to check its output on Viewer. Finally, click on the Export button and save the video in the desired file format on your Mac.
The Bottom Line
If you want to loop a video on your Mac, iMovie is the most preferred option. The same is applicable to iPhone users as well. iMovie comes pre-installed, and it is completely free to use. That is why you can loop any video instantly. Wondershare Filmora is the best alternative to iMovie to edit and loop your video.
Free Download For macOS 10.14 or later
Step1 Download and install Wondershare Filmora. Launch Filmora and click on New Project on the welcome screen.
Step2 Drag and drop the video file from Finder on Mac to the Project Media folder on Filmora. Thereafter, drop the video file into the timeline.
Step3 Drag and drop the video clip into the timeline again. Make sure that there is no gap between the clips. Besides, make sure that they are on the same channel for looping. You can drag and drop the video into the timeline multiple times.
Step4 You can zoom out the timeline for better viewing. Play the video to check its output on Viewer. Finally, click on the Export button and save the video in the desired file format on your Mac.
The Bottom Line
If you want to loop a video on your Mac, iMovie is the most preferred option. The same is applicable to iPhone users as well. iMovie comes pre-installed, and it is completely free to use. That is why you can loop any video instantly. Wondershare Filmora is the best alternative to iMovie to edit and loop your video.
How To Fade Audio With Movavi Editor
Movavi Video Editor Plus is the best option if you want to use its user-friendly Movavi fade audio feature set with plenty of functionality. There are versions of the app on Mac and Windows. For all intents and purposes, Movavi fade out music functionality is an excellent piece of this video editing software. The Movavi Video Editor Plus package comes with standard advanced features and functionality. You may also store your work and share your Movavi fade out audio exports across devices that have the software installed.
Looking for how to fade out music in Movavi? We’ve got you solutions to it. The ability to quickly and simply check that the beginning and conclusion of any audio is one of the best Movavi fade audio features. Prior to the audio, there must be a distinct period of quiet. Finding the program, like Movavi Audio fade out, that best suits your requirements is essential whether you want to fade-in, fad-out, trim, crop, clip, or combine audio files or segments of a music. Find out the details in the upcoming sections.
Part 1. How to Fade Audio with Movavi Editor
When the song’s ending is not featured in the video, fade-out is used to provide an added level of professionalism. Even if you’ve never altered a video before, using Movavi Video Editor Plus is simple. A step-by-step tutorial that walks you through all the tools you’ll need is shown to you when the software initially launches. Additionally, you may always search the Movavi official website for advice.
Steps to use Movavi Fade Audio:
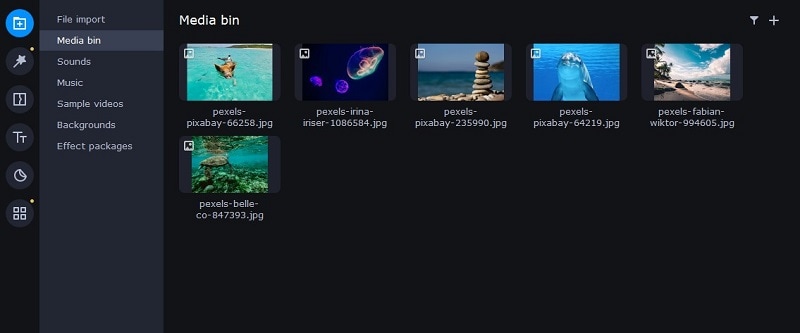
Step1The first step is to import the audio and video files you want to utilize. Drag and drop the files into the software or choose “Add Files” from the Media Bin area to do this. Drag and drop the clip into the timeline after that.
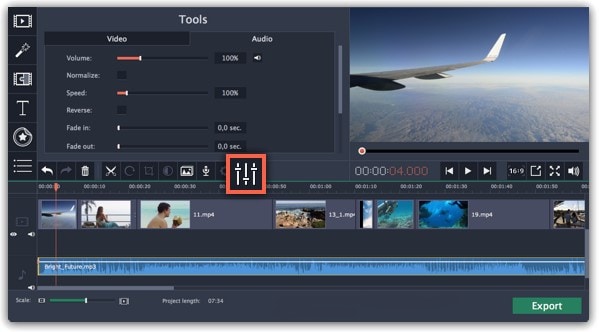
Step2Select the disconnect audio option from the edit menu. Additionally, you can see that the audio and video will no longer be connected by a little connection. Your titles’ location, color, and font may all be changed.
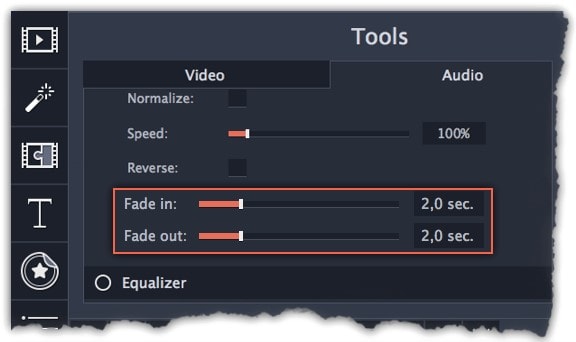
Step3Use the sliders on the Audio tab to set the fade duration by referring to the Audio Properties. Additional options may be used to increase the audio’s loudness, eliminate ambient noise, or even create an echo effect.
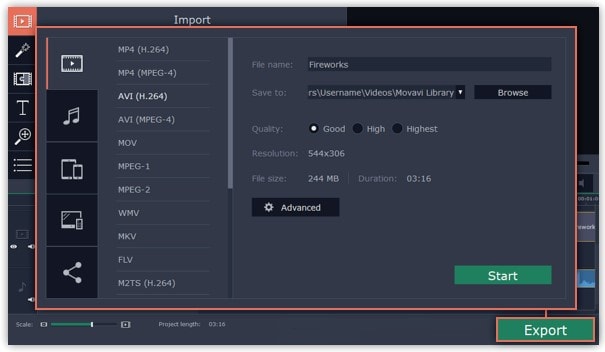
Step4Click on the export option to save this audio as an MP3. Select Audio Export. The MP3 choice is used by default. Select the Save Audio File tab after clicking the Export button. Choose the preferred format and press Start.
Part 2. Movavi Alternative to Fade Audio
Look no further than Filmora by Wondershare if you’re seeking for an effective and user-friendly Movavi audio fade out substitute. This program has all the tools you need to edit, apply special effects, and make titles for videos of a professional caliber. In contrast to Movavi, Filmora gives you the ability to create fade out music without requiring you to install a separate extension. In order to help you understand how to use this function using the Filmora video editing interface, we have enlisted the step-by-step guide for you as well.
Although there are several video editors on the market, Filmora has successfully carved out a position for itself with a variety of intriguing features. The application is appropriate for both new and more experienced users and was designed with novice users in mind. Its user interface (UI), which is rather simple when compared to professional applications. Among all the free video editing programs for beginners, Filmora also offers a far larger selection of effects, customizability, and correction tools, and its screen-splitting capability is much handier than Movavi fade audio feature.
Steps to Fade Out Audio in Filmora:
Step1Install Wondershare Filmora
The straightforward platform to start editing your audio and music files is Filmora, which is available for free. You must first download and install this application on your windows computer in order to utilize it without difficulty. Download the most current edition of this application first. It’s now time to install it on your computer when you’ve completed that. Simply install this program on your computer by following the standard setup instructions if you want to do it fast.
Step2Open Filmora Editor and Import Audio Files
In the step that follows, we’ll show you how to use this platform to fade in and out audio. Filmora may be immediately launched from your desktop or the search bar, then opened as seen below to begin going. By choosing the Video Editor option from the software’s home screen, you may now investigate the basic principles of editing. This will bring up the main interface for Filmora. To import your music and video files, just choose the Import button from the software’s main screen, as seen below:

Step3Load Built-in Audio Editor
You must drag the media files into the program’s timeline after importing them into Filmora. You may modify your media files using every tool in the timeline. To utilize the audio editor in Filmora, just right-click on the specific audio file and choose “Edit Audio” from the list, as seen below.

Step4Use Audio Fade-in/Fade-out
The initial step is to learn how to use Filmora to start fading in and, afterwards, fading out your audio recordings. The best aspect of Filmora is how simple it is to employ these techniques from the timeline. To achieve this, focus on the audio file that you want to change in the timeline; after you’ve picked it, the two icons will show up above the audio file. Drag the first one to the desired duration for the audio fade-in option, as demonstrated:

Step5Edit and Share Video/Sound
In addition to an audio editor, Filmora has a built-in toolset for video editing. You may utilize basic to sophisticated editing techniques inside the program. To choose the basic editor, just click on the video file within the timeline as seen below. There is support for all widely used video and audio formats, including MP3. Click “Export” and choose “File Format” to do this.
By pressing the Format button, choose the required configuration from the list. On a computer, the particular document will be saved to the designated directory.
The Bottom Line
Have you learned how to fade out music in Movavi? If so, then you would also find out that the Movavi fade audio alternative, Filmora , provides a selection of audio editing options in addition to video editing features. The Movavi editor is capable of spicing up your videos and audios, however; Filmora’s workflow is a little more established and well-defined than Movavi’s, which is what propels it to the top of the audio editing field. As a result, Filmora would be the better option if you intend to work as a video editor for a long time.
Free Download For Win 7 or later(64-bit)
Free Download For macOS 10.14 or later
3 Ways To Stream And Record At The Same Time
The popularity of live streaming has exploded recently. A live stream is simply a video broadcast in real-time over the internet. It’s a great way to connect with people directly, whether for a gaming session, a cooking show, or a Q&A.
Many reasons are there for which why you might want to live stream and record at the same time. For instance, keep a record of your gameplay or stream highlights for future editing or use your live stream to generate content for your YouTube channel.
Whatever your reasons, this article will show you how to do live streaming and recording at the same time using three different methods.
Way 1. Use OBS To Stream And Record Video At The Same Time
OBS, or Open Broadcaster Software, is a free and open-source tool that allows you to stream and record video at the same time, which can be useful if you want to live-stream your gameplay on Twitch or record a tutorial for YouTube.
Key Features of OBS
- Compatible with Mac OS X, Linux, and Windows operating systems.
- Requires at least 4 GB of storage space and an Intel i5 2000-series processor or higher DirectX 10 capable graphics card.
- High-performance video capturing and mixing in real-time.
- With Custom Transitions, you can set up an unlimited number of scenes you can switch between seamlessly.
- Intuitive audio mixer.
- Easy-to-use and simple configuration options.
Steps
Here’s an easy and quick guide on how to use OBS Studio to stream and record videos simultaneously:
Step1 Download OBS Studio from the official website and install it on your computer or laptop.
Step2 Launch OBS Studio and go to the Settings menu. Find the Recording section under the Output tab.
Step3 Click “Start Recording” to manually start the recording or head to the General Tab and checkmark the box before “Automatically Record When Streaming.”
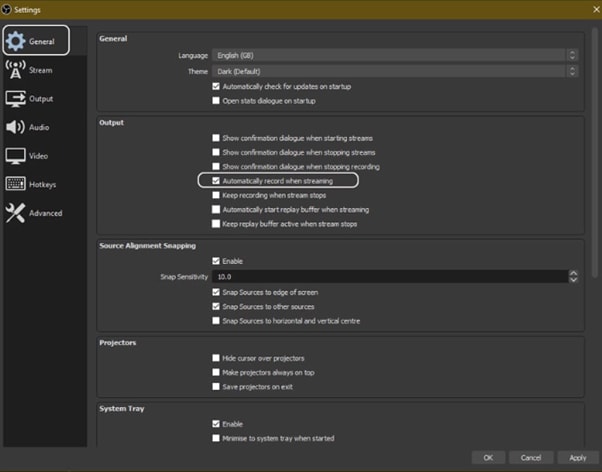
Step4 Finally, click “Apply” to save your settings. Now when you start your stream, the recording will also begin simultaneously.
Way 2. Use Twitch To Save Your Streams
Twitch is the most popular and best live streaming platform that allows gamers to broadcast their gameplay to a live audience and also gives them the ability to save their past broadcasts, or “streams.”
This feature can be useful to save your live stream for later viewing or share your stream with someone who missed it.
Features
Twitch offers a variety of features that make it a unique and powerful game streaming platform. Some of the most notable ones are:
- Live streaming: Twitch allows gamers to share their gameplay in real-time with other gamers around the world. This live aspect of the platform makes it unique and engaging.
- Social interaction: Twitch offers a variety of features that allow gamers to connect with each other, including chat rooms, forums, and user-generated content.
You can save your stream on Twitch in two ways:
- Use the “Highlights” feature, which allows you to save specific moments from your live stream.
- Download your stream’s entire VOD (video on demand) after it has ended.
Steps
Here are the quick steps to saving a stream on your PC from Twitch. But first, you need to enable Twitch VODs before starting your broadcast in the following way:
Step1 Visit Twitch and sign in to your account. Now, click the “Profile” icons and go to “Creator Dashboard.”
Step2 Head to Setting from the left-sidebar and click the “Stream” option. Scroll down and find the VOD Settings. Toggle the buttons next to “Store Past Broadcasts.”
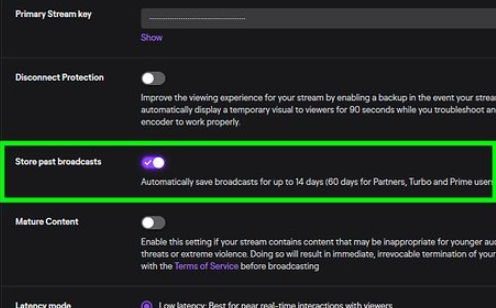
Step3 To publish your VODs instantly after broadcasting, toggle the button next to “Always Publish VODs.”
Now, to download the recordings of your broadcasts to your PC, do the following steps in sequence:
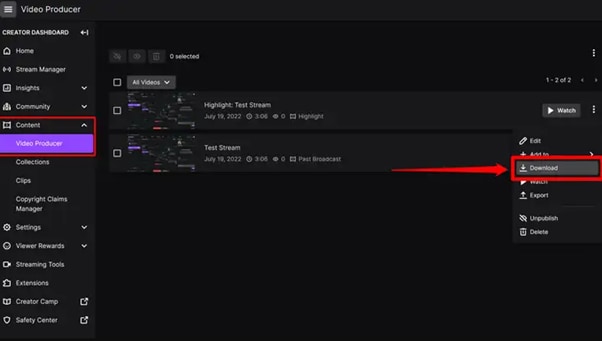
Step1 Head to the Creator Dashboard, find the “Content” section in the left sidebar, and click “Video Producer.”
Step2 Find the stream (VOD or Highlights) you want to download and on the right side, click the three dots.
Step3 Finally, click the “Download” option and let Twitch prepare your video. You will then get the stream’s recording in MP4 format.
Way 3. Use Screen Recorder To Record Your Streams
Using a screen recorder is a great way to record your live stream because it lets you capture the full screen of your PC. Although there are many different screen recorders to choose from, we recommend using Filmora.
Wondershare Filmora is a powerful editor with easy-to-use screen recording capabilities, giving you everything you need to record and stream your video at the same time. The software is free to use and has an intuitive interface.
Features of Filmora
- Support for both Mac OS X and Windows operating systems.
- Ability to record your PC screen, audio, and webcam all at once
- A variety of video editing features
- An easy-to-use interface
Steps
Here’s how to use Filmora for recording while streaming:
Step1 Head to the official Filmora website, download the software and install it on your PC.
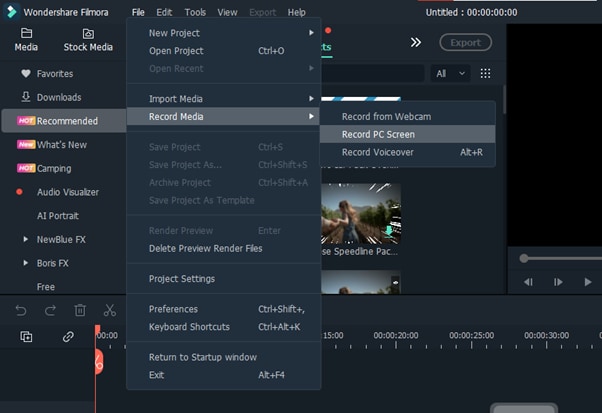
Step2 Launch Filmora 11 and click “New project” in the main interface. Click “File” from the top toolbar and scroll down to “Record media.” From the drop-down menu, select “Record PC Screen.”
Step3 A new “Wondershare Screen Recorder” window will pop up. You can set up a full screen, custom or target screen recording, speaker, and microphone settings. If you want more Settings, click the drop-down icon.
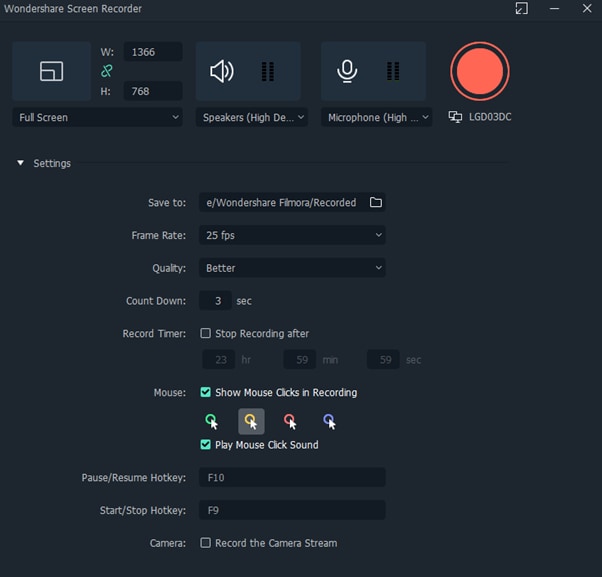
Step4 Click the Start icon to begin your recording. Afterward, click the Stop icon to stop the recording, and your stream will be saved in the selected destination.
Conclusion
In this article, we’ve discussed three step-by-step methods to help you do live streaming and recording at the same time. With these solutions at your disposal, you’ll be able to save your VODs with ease.
It is best to choose only one software to start with to avoid the time-consuming trial-and-error process. If you want to add another tool, do so later; otherwise, you will waste your precious time and resources.
Give these methods a shot, and eventually, you will find your groove—and become accustomed to just how easy it is to record and stream a video simultaneously.
Free Download For Win 7 or later(64-bit)
Free Download For macOS 10.14 or later
Free Download For macOS 10.14 or later
Want to Create a Stunning Intro Video on Your Smartphone? Legend Intro Maker Is a Popular Choice. Learn the Steps to Design Intro Video Legend Intro Maker
What makes the viewers get hooked to a video? Experts say the intro is the decider. That is why video creators focus on creating stunning intro videos. The intro of your video creates the first impression for the viewers. How do you make an intro video stand out? You need a great intro maker and your creativity skill.
Legend Intro Maker is a popular choice among Android smartphone users. You will come across loads of intro maker apps. But Legend Intro Maker clearly stands out. That is why it is highly rated on Play Stores. You can create a high-quality intro and outro video in simple steps. We will illustrate how to create intro videos with mobile legends intro maker.
Part 1. Basic Info of Legend Intro Maker
Legend Intro Maker is an Android app available on Play Stores. You can create cool intro and outro videos. There are stunning intro video templates available. You can select and customize them to create an intro video on the go. Besides, you can design amazing animated text videos. The app is useful for creating videos from your photos.
Here are the top features of Legend Intro Maker.
- Choose from intro maker animation templates.
- Over hundred text animation presets.
- Add background photos and videos.
- Amazing text font styles and effects.
- Export videos in HD and full-HD videos.
- Super intuitive user interface.
- Easy to share on social media apps.
Here are the technical specifications of Legend Intro Maker.
App Version: 1.4
Released Date: 26-09-2018
Last Updated: 28-10-2021
Download Size: 18 MB
OS Compatibility: Android 4.4 and above
Download link: https://play.google.com/store/apps/details?id=com.textonvideo.animated.animatedtext&hl=en\_US&gl=US
Part 2. How to Create Intro with Legend Intro Maker
Legend Video Maker is a versatile intro video maker app. You can create text intro videos with cool effects and animations. The app comes with loads of intro video templates. You have to choose one to get started. Thereafter, you can customize the template as per your requirements. You can also start from scratch and add background and text. Thereafter, you can animate texts and objects easily. Here are the steps to create an intro with the Legend video intro maker app.
Step1 Go for Legend gaming intro download from Play Stores. You can also download Legend intro maker mod apk file. Thereafter, you can install the apk file on your phone.

Step2 Launch the Legend app and choose an intro video template. You will see different categories of templates. You can choose any to get started.

Step3 When you choose a template, it gets downloaded immediately. Tap on the Edit Animation button to customize the template.

Step4 Tap on the Intro option located at the bottom. Select a suitable intro video template as per your video content niche.

Step5 Go to the Text option at the bottom and edit the texts and titles. You can go to the Font option to change the text font.

Step6 Finally, check the preview and tap on the Export button. Select the video resolution as per your preference. The intro video will get saved in the Phone gallery.

Part 3. Legend Intro Maker PC Alternative
If you want to create intro videos on your PC, you need a Legend Intro Maker PC alternative. We recommend Wondershare Filmora as the best alternative to mobile Legends Intro Maker. Filmora is a popular premium video editor. Filmora comes with a wide range of intro video templates. There are loads of text effects and animations present.
You can customize all the templates and presets. The video editor allows you to make creative intro videos in simple steps. Filmora happens to be the most popular intro video maker among YouTubers. You can export intro videos in 4K resolution. Filmora is available for Windows and macOS users. Here are the steps to create intro videos with Filmora.
Free Download For Win 7 or later(64-bit)
Free Download For macOS 10.14 or later
Step1 Download and install Wondershare Filmora on your computer. Launch Filmora and click on Create New Project from the welcome screen. Otherwise, go to File> New Project and select an aspect ratio to get started.

Step2 Click on the Titles option from the top bar. Go to the Openers option from the left panel. Select any intro video template as per your preference. Drag and drop it onto the timeline.

Step3 Double-click on the intro video layer. Edit the default text and type in your titles. From the left panel, select any text style as per your preference.

Step4 You can go to the Animation tab and select any animation from the left panel. Double-click on the selected animation to apply. Thereafter, you can move around the texts on the Program window to place them properly. Finally, click on Ok button.
Conclusion
If you are looking for an intro video maker app, Legend video intro maker is a superb choice. You can create stunning intro videos in simple step by step method. If you are a computer user, you cannot use Legend app. We recommend Wondershare Filmora as the best alternative to Legend video intro maker. You can create stunning intro videos with Filmora with simple steps.
Free Download For macOS 10.14 or later
Step1 Download and install Wondershare Filmora on your computer. Launch Filmora and click on Create New Project from the welcome screen. Otherwise, go to File> New Project and select an aspect ratio to get started.
Step2 Click on the Titles option from the top bar. Go to the Openers option from the left panel. Select any intro video template as per your preference. Drag and drop it onto the timeline.
Step3 Double-click on the intro video layer. Edit the default text and type in your titles. From the left panel, select any text style as per your preference.
Step4 You can go to the Animation tab and select any animation from the left panel. Double-click on the selected animation to apply. Thereafter, you can move around the texts on the Program window to place them properly. Finally, click on Ok button.
Conclusion
If you are looking for an intro video maker app, Legend video intro maker is a superb choice. You can create stunning intro videos in simple step by step method. If you are a computer user, you cannot use Legend app. We recommend Wondershare Filmora as the best alternative to Legend video intro maker. You can create stunning intro videos with Filmora with simple steps.
Also read:
- [New] 2024 Approved Reimagine Old-School VHS with Modern Computer Techniques
- [Updated] Flash Dramatization Structure
- [Updated] Skip the Struggle Tips on Avoiding Online Edgenuity Lessons
- Boosting Performance in Gaming: Updating Dell G3 Driver Software
- In 2024, Full Guide to Unlock Your Gionee F3 Pro
- Mastering Internet-Based Live Audio Capture 5 Key Strategies
- Navigating the Landscape of Generative AI
- New 2024 Approved 7 Tips to Create Teaching Videos
- New How to Download and Use Windows Movie Maker 10
- New Working Out All Important Details of Slowing Down Video in After Effects
- Unlocking Your Access: A Comprehensive Guide on How to Secure a Spotify Student Discount
- Updated In 2024, Before & After Editing Trick - Filmora
- Updated In 2024, How To Blur Background in Adobe Premiere Pro Detailed Guide
- Updated Renderforest Is a Great Online Editing Platform to Use for Many Video Creators. If You Want to Make an Intro Video for Your Channel or Daily Vlogs, You Can Follow This Article to Know More Details
- What You Need To Know To Improve Your Vivo S18e Hard Reset | Dr.fone
- Title: How to Loop a Video with iMovie on Mac and iPhone
- Author: Chloe
- Created at : 2024-09-29 02:41:56
- Updated at : 2024-10-02 22:24:46
- Link: https://ai-editing-video.techidaily.com/how-to-loop-a-video-with-imovie-on-mac-and-iphone/
- License: This work is licensed under CC BY-NC-SA 4.0.