
How to Loop a Video with iMovie on Mac and iPhone for 2024

How to Loop a Video with iMovie on Mac and iPhone
If you are a video creator, there are times when you have to loop a video. This is to extend the duration of the original video. For instance, you have a stock video of a short duration. You want it to be the background in your video throughout. You have to extend the duration of the stock video by playing it in a loop.
If you are a macOS user, you can use iMovie to loop your video. iMovie comes pre-install on macOS devices. iMovie happens to be one of the most preferred video editors among beginners. In fact, iMovie comes pre-installed on iPhones and iPads. You can easily loop your video on your mobile devices as well. We will illustrate how to loop a video on iMovie on iPhone as well as on Mac.
Part 1. How to loop a video on iMovie iPhone
iMovie by Apple comes pre-installed on iPhone and iPad. Naturally, it is one of the most widely used video editors by iPhone users. iMovie app has options for basic and even advanced levels of video editing. Looping a video on iMovie involves a few simple steps that everyone can perform easily. Here are the steps on how to loop a video in the iMovie app on your iPhone.
Step1 Launch the iMovie app on your iPhone. If you have uninstalled or disabled the app, you can always go to App Store to install it again.

Step2 If you are opening the app for the first time, you will get a welcome screen. Follow the on-screen instructions to land on the home screen of the app.
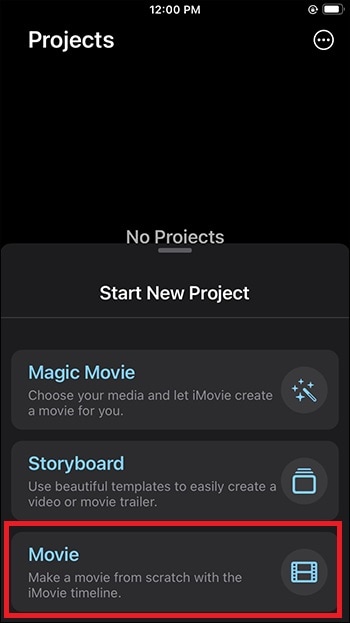
Step3 Tap on New Project “+” icon and select the Movie option to get started. This will take you to the phone media gallery to select a media file to get started.
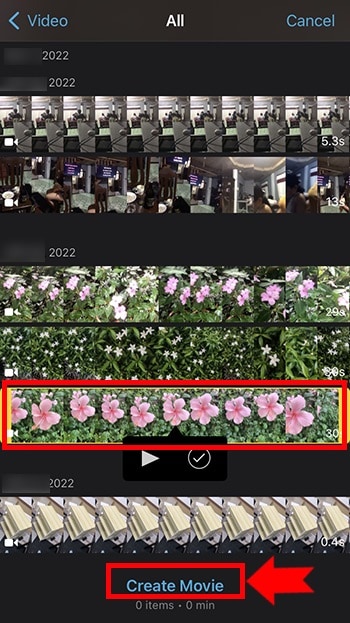
Step4 You should tap on the Video option and select the video that you want to put into a loop. After selecting a video, tap on Create Movie option.
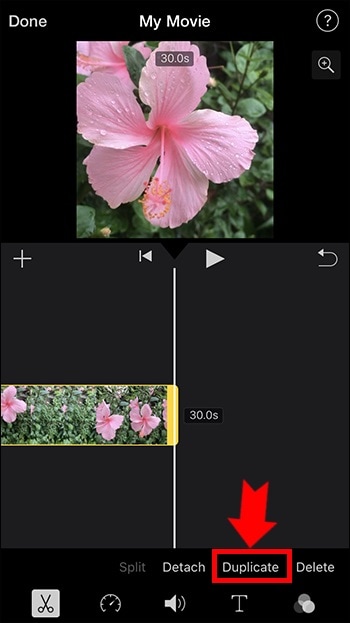
Step5 Tap on the video on the timeline to select the video and tap on the Duplicate option. You will see that the duration of the video has doubled. You can tap on Duplicate as many times as you want to increase the video duration.
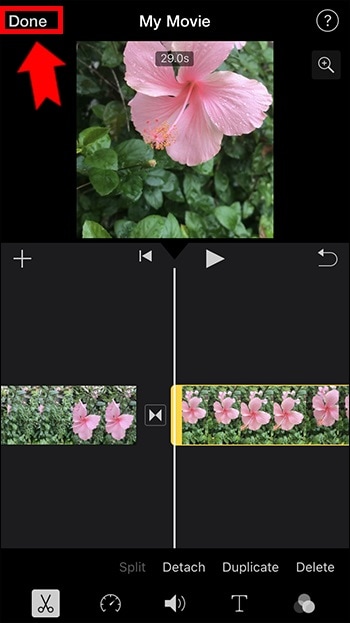
Step6 Once you are done with the iMovie loop, tap on the Done option located in the top-left corner. Thereafter, tap on the Share icon at the bottom.
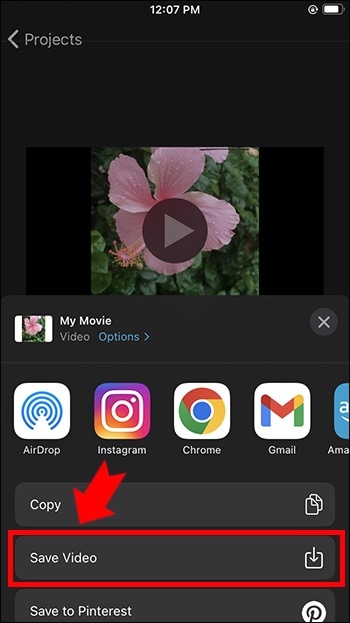
Step7 You will get a pop-up where you have to tap on the Save Video option. The edited video will be saved on your iPhone. You can open the new video from the Photos app.
Part 2. Loop Videos on Mac with iMovie
Editing a video on a Mac is always more comfortable than on an iPhone because of the larger screen. iMovie from Apple comes pre-installed on Mac as well, and hence, you can get started right away. It is completely free to use, and hence, you do not need to install any third-party video editor. Here are the steps on how to loop an iMovie video in simple steps.
Step1 Open the iMovie app from the Applications folder.
Step2 Click on Create New option and then click on the Movie option.

Step3 Bring in the required video under Movie Library by dragging the file from Finder on your Mac. You can also go to File> Import Media option and select the required video. You can also select the required media file from Events or Photos under the Libraries section.

Step4 Drag and drop the video on your timeline. When you want to loop the video, drag and drop the video clip again on the timeline. Make sure there is no gap between the first clip and the second clip on the timeline. You can drag and drop the video clip multiple times on the timeline to increase its duration.

Step5 Once you are done, go to File> Share> File option. Choose the destination to save the edited video.

Part 3. iMovie Alternative to Loop Videos on Mac
If you are looking for an iMovie alternative to perform iMovie loop video action easily, we recommend Wondershare Filmora . Filmora is available for both Mac and Windows. Filmora is a better video editor than iMovie. It is a premium video editor and it has more features and functionalities.
You can loop any video as many times as you want instantly. Besides, you can edit your video clip as per your requirements before looping the edited video. The user interface is highly intuitive for everyone. Hence, it has huge popularity among Mac users. You can also save the looped video in different file formats. Here are the steps to loop a video on Filmora.
Free Download For Win 7 or later(64-bit)
Free Download For macOS 10.14 or later
Step1 Download and install Wondershare Filmora. Launch Filmora and click on New Project on the welcome screen.

Step2 Drag and drop the video file from Finder on Mac to the Project Media folder on Filmora. Thereafter, drop the video file into the timeline.

Step3 Drag and drop the video clip into the timeline again. Make sure that there is no gap between the clips. Besides, make sure that they are on the same channel for looping. You can drag and drop the video into the timeline multiple times.
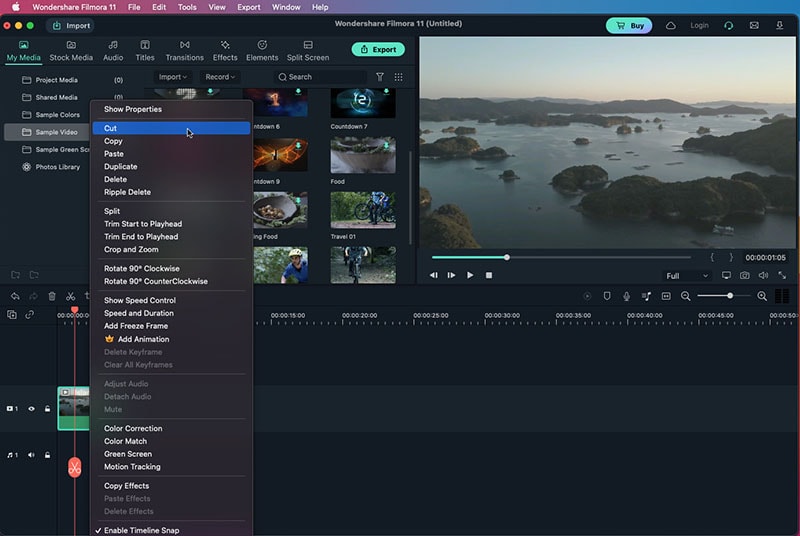
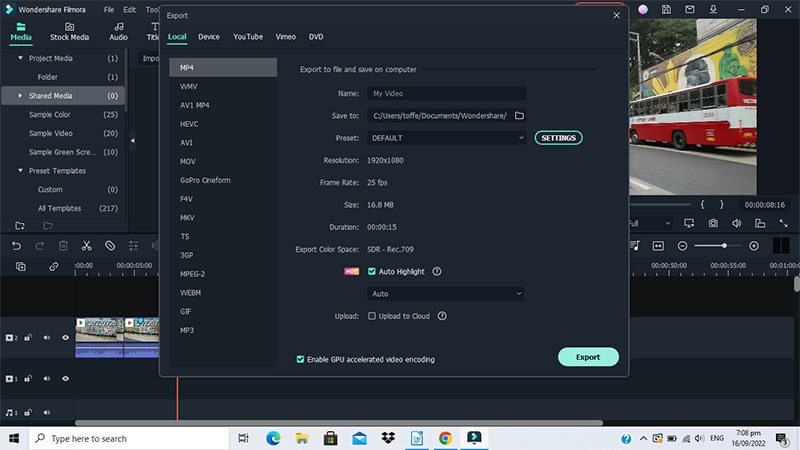
Step4 You can zoom out the timeline for better viewing. Play the video to check its output on Viewer. Finally, click on the Export button and save the video in the desired file format on your Mac.
The Bottom Line
If you want to loop a video on your Mac, iMovie is the most preferred option. The same is applicable to iPhone users as well. iMovie comes pre-installed, and it is completely free to use. That is why you can loop any video instantly. Wondershare Filmora is the best alternative to iMovie to edit and loop your video.
Free Download For macOS 10.14 or later
Step1 Download and install Wondershare Filmora. Launch Filmora and click on New Project on the welcome screen.

Step2 Drag and drop the video file from Finder on Mac to the Project Media folder on Filmora. Thereafter, drop the video file into the timeline.

Step3 Drag and drop the video clip into the timeline again. Make sure that there is no gap between the clips. Besides, make sure that they are on the same channel for looping. You can drag and drop the video into the timeline multiple times.

Step4 You can zoom out the timeline for better viewing. Play the video to check its output on Viewer. Finally, click on the Export button and save the video in the desired file format on your Mac.
The Bottom Line
If you want to loop a video on your Mac, iMovie is the most preferred option. The same is applicable to iPhone users as well. iMovie comes pre-installed, and it is completely free to use. That is why you can loop any video instantly. Wondershare Filmora is the best alternative to iMovie to edit and loop your video.
How to Use iMovie Text Effects
Text is included in every film and television program. Being a Apple device user, you may already have heard of iMovie text effects. Let’s say you want to give your video a cinematic atmosphere. If so, iMovie is a platform deserving of providing such ease. Both iOS and macOS users may access the iMovie animated texts. Additionally, there is no lag while editing 4K movies at 60 fps for iMovie text animations. Even while text is often the simplest part of a video, it often has the most effect.
Fortunately, adding text to video is simple thanks to programs like iMovie. Without taking a lot of effort to understand how to use, iMovie provides a ton of helpful tools that will advance your movie creation. You can use iMovie add text without effect as well. In addition to that, you to add words and subtitles, iMovie also lets you import sound effects, change the playing speed, and control the backdrop of the movie. The upcoming sections explains how to use iMovie on both Mac and iPhone devices to add iMovie text effects to videos. Learn to find out how.
Part 1. How to Add Text Effects in iMovie on Mac
Although the options are rather limited and the results are monotonous, the procedure with iMovie is straightforward. iMovie allows you to add many types of text templates to videos; each text template has a set location and a motion effect. Here’s how to add text to an iMovie project to make a boring movie more enjoyable.
But before that, for instance, you need to know the iMovie text effects. Basically, the Title Text is positioned in the center of the screen. Other forms include Credits Text and Third Callout. While Credit Texts are often positioned in the center of the screen, Third Callouts such as when writing a new speaker’s name are typically put at the bottom and to the left or right of the screen. iMovie is able to add text, whether it be for the opening or closing credits, a character’s name at the bottom of the screen, or anything else.
Steps to Add iMovie text effects:
The Apple website’s official store offers iMovie. The objective whenever iMovie text effect is added to a video is to provide information without detracting from the story. Before following the instructions below to learn how to add text to a video, you may download and install the program on your Mac. If you haven’t already done so, go over to the Mac app store and download the free version of iMovie.
Step1Open iMovie and start a new project
When iMovie is running, choose the Projects tab to bring up the Projects browser. Next, select Create New and Movie. If you’re a regular user, you may also access an active project as shown below:

Step2Add in your media
When your project is ready, click the Import Media option to add videos, audio, and photographs. After that, drag the imported video to the iMovie timeline (the bottom window in the interface.

Step3Add Text in Video
Here comes the main part, select Titles above the browser to launch the text window the top window in the iMovie interface. After that, you will have a wide range of choices to make. By gliding your cursor over a text style’s thumbnail, you can get a preview of that text style.
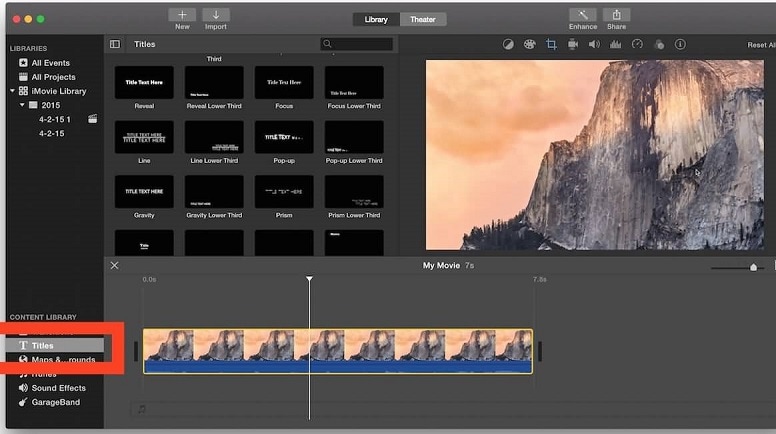
Once you’ve selected your favorite, you can drag it to the desired location in your video or double-click it to add it.
Step4Create Your Own Text
Additionally, you may create your own iMovie text effect including font style, size, color, and alignment. To make the text editable, double-click the text box and then input your words. Then, using the toolbar above the browser, you may change the font, text size, alignment, character formatting, and color until the text is the perfect size and color.
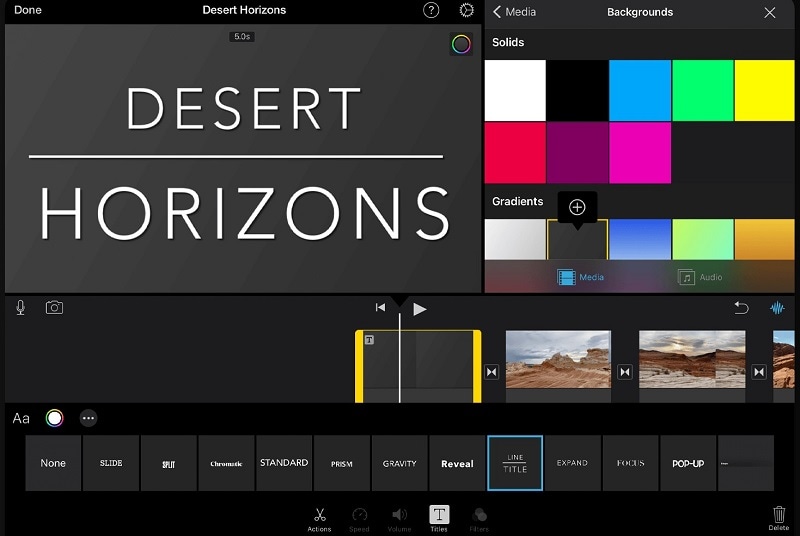
Tip: By dragging the text overlay to a different area, you may further modify your text and position it so that it appears in the proper location in your video. You may also lengthen or shorten the text overlay box in the timeline by dragging its right or left corners.
Part 2. How to Add Text Effects in iMovie on iPhone/iPad
Amazing movies may be captured on your iPhone, but what do you do with them afterward? How can you modify these films a little bit more than merely cropping them or joining a few pieces to create a single video? iMovie is useful in this situation. There is no better moment than the present to indulge in its pleasures and embrace your inner Hitchcock. We demonstrate how to use iMovie on an iPhone for the first time in this post.
Steps to Add Text Effects in iMovie on iOS Device
From the Apple App Store, download the iMovie app on the iPhone. Please follow the instructions below to learn the easiest way to add text to a video after starting the video editing program on your smartphone. It’s simple to add text with iMovie on the iPhone (or iPad). You may follow the simple instructions listed below:
Step1Launch iMovie App
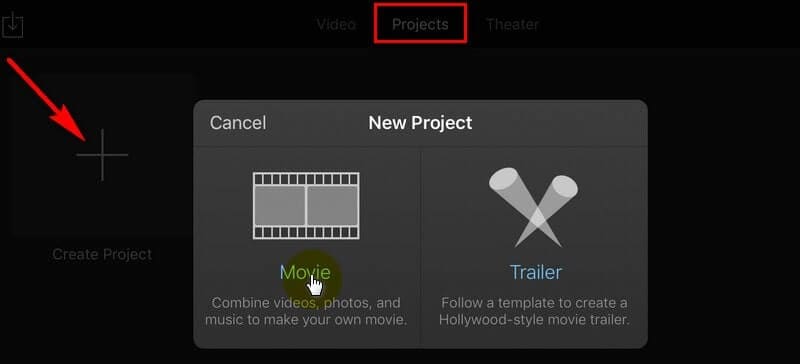
Open iMovie on your iPad or iPhone, tap the “+” symbol to upload the video clip, then choose “Movie” from the pop-up menu.
Step2Add Text
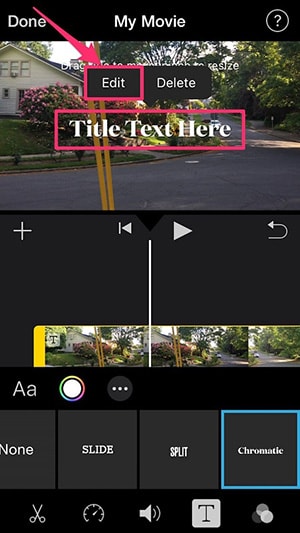
You may add text by tapping the text button denoted with a “T” at the bottom of a clip in the Timeline of your movie if you wish to do so.
Step3Animate Text
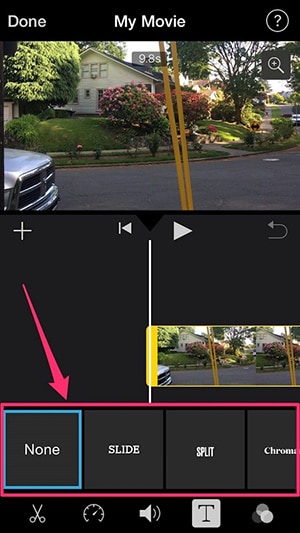
To enter the desired material, double-click on the text box after choosing the appropriate text style. You have two choices for positioning the text on the screen of your film in this instance of iMovie for iOS; choose either Center or Lower.
Step4Share or Save
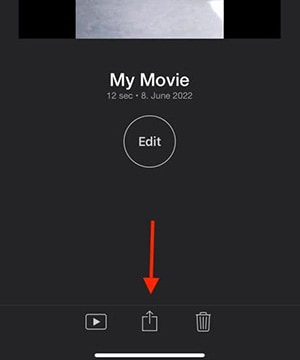
Lastly, save or share your iMovie animated text by clicking on the Share button as shown below:
Part 3. iMovie Alternative to Add Text Effects to Videos
One of the popular video editors, iMovie, allows adding text to video simple. You may easily add a title, subtitles, or captions, as well as credits, to your movie using iMovie. However, a novice user could find iMovie’s editing interface a bit confusing. Be at ease! With just a few simple steps, you can easily add text to videos using Filmora, a free and efficient video editor.
For both audio and video editing needs, Filmora comes with a ton of incredible templates that may help you achieve the majority of your editing objectives. You also receive a ton of useful features, such as split-screen, movement following, green screen, and much more. This editor’s Keyframing tool helps you insert personalized actions between segments. Additionally, you may upload your final edited movie to your preferred platform with quick rendering and 4K quality.
Free Download For Win 7 or later(64-bit)
Free Download For macOS 10.14 or later
How To Add Text Effects in Videos Using Filmora
Step1Download and open Filmora Text Editor
To take use of the simplest and most efficient text editor as iMovie alternative, you must download this on your computer using the official webpage. Afterwards, install this program, so start the downloaded file from your computer and follow the simple instructions to complete the installation.

Step2Import your Media
To import the necessary video clips or photographs, just choose the Import Media option on the Filmora editing interface. The files may also be simply dragged and dropped into the interface.
Step3Add Text Effect
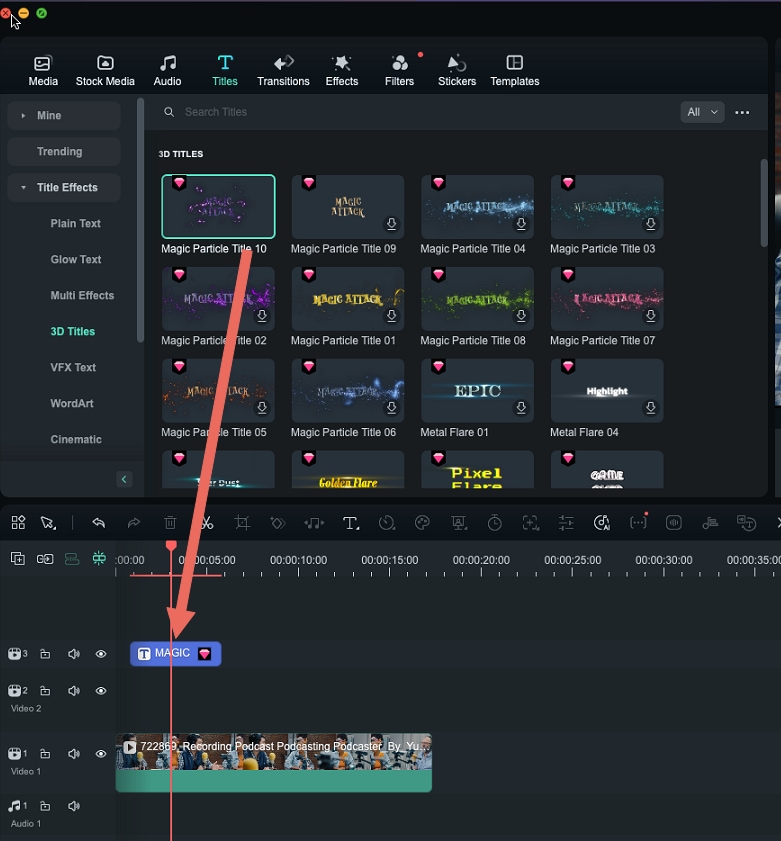
The finest feature of Filmora right now is the ease with which you can do sophisticated video editing. You may change the audio as well as add effects, transitions, elements, annotations, split screens, and more. Select the appropriate text effect after clicking the Title tab. Drop it into the timeline by dragging it there. The text should be moved to the appropriate video scene. Double-click the text on the timeline to open the window where you may change the font, color, and content of the text.

Step4Add Transitional Effects
While enabling you to add a large number of clips to its editor, Wondershare Filmora also enables you to best improve your dull and uninteresting content. Within this software’s timeline, you may apply a variety of visually appealing transitions to your video recordings. Select the Transition menu, which offers a number of effects available for you to pick from, from the menu bar on the left side of this program to access the transition effects library.
Step5Export and Publish
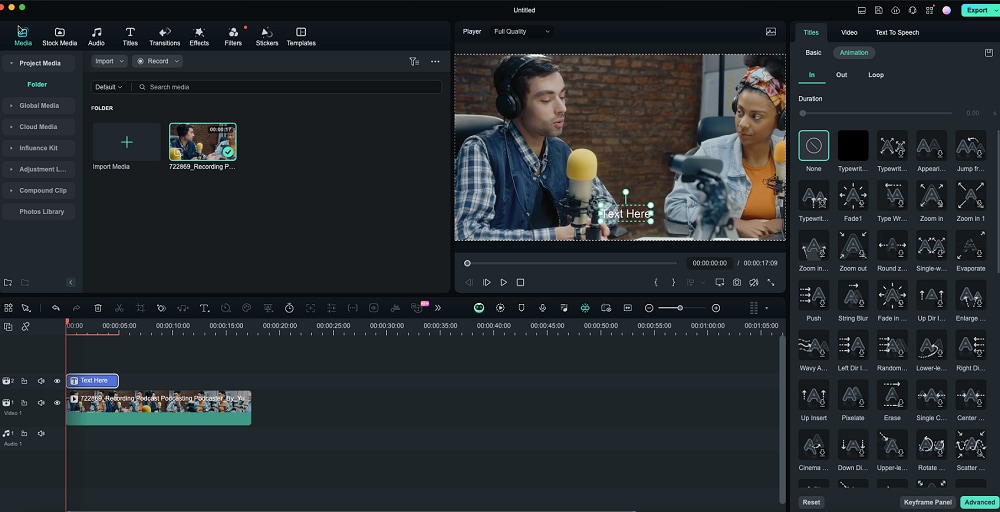
When you’re through with the editing aspect of Filmora, you have a wide range of choices to choose from when exporting your screen capture and webcam recordings. Now, just export to your computer by clicking the Export button at the top of the software’s user interface as seen in the example below.
You can now choose your preferred platform quickly by doing as follows to post your masterpiece immediately to YouTube or Vimeo or any other popular site.
The Bottom Line
Importing images, audio, and video for your movie is straightforward using iMovie. Additionally, you may add a variety of effects, sound effects, transitions, and title styles to your movie. Bring up iMovie. One of the greatest editing tools available is this entertaining and effective software. Additionally, users may quickly add subtitles to iPhone videos using iMovie. In this article, we have described text effects and shown how to apply them to iMovie on both a Mac and an iPhone.
Free Download For Win 7 or later(64-bit)
Free Download For macOS 10.14 or later
Free Download For macOS 10.14 or later
How To Add Text Effects in Videos Using Filmora
Step1Download and open Filmora Text Editor
To take use of the simplest and most efficient text editor as iMovie alternative, you must download this on your computer using the official webpage. Afterwards, install this program, so start the downloaded file from your computer and follow the simple instructions to complete the installation.

Step2Import your Media
To import the necessary video clips or photographs, just choose the Import Media option on the Filmora editing interface. The files may also be simply dragged and dropped into the interface.

Step3Add Text Effect
The finest feature of Filmora right now is the ease with which you can do sophisticated video editing. You may change the audio as well as add effects, transitions, elements, annotations, split screens, and more. Select the appropriate text effect after clicking the Title tab. Drop it into the timeline by dragging it there. The text should be moved to the appropriate video scene. Double-click the text on the timeline to open the window where you may change the font, color, and content of the text.

Step4Add Transitional Effects
While enabling you to add a large number of clips to its editor, Wondershare Filmora also enables you to best improve your dull and uninteresting content. Within this software’s timeline, you may apply a variety of visually appealing transitions to your video recordings. Select the Transition menu, which offers a number of effects available for you to pick from, from the menu bar on the left side of this program to access the transition effects library.

Step5Export and Publish
When you’re through with the editing aspect of Filmora, you have a wide range of choices to choose from when exporting your screen capture and webcam recordings. Now, just export to your computer by clicking the Export button at the top of the software’s user interface as seen in the example below.
You can now choose your preferred platform quickly by doing as follows to post your masterpiece immediately to YouTube or Vimeo or any other popular site.
The Bottom Line
Importing images, audio, and video for your movie is straightforward using iMovie. Additionally, you may add a variety of effects, sound effects, transitions, and title styles to your movie. Bring up iMovie. One of the greatest editing tools available is this entertaining and effective software. Additionally, users may quickly add subtitles to iPhone videos using iMovie. In this article, we have described text effects and shown how to apply them to iMovie on both a Mac and an iPhone.
Free Download For Win 7 or later(64-bit)
Free Download For macOS 10.14 or later
6 Free Tools To Radial Blur Photos Online
Radial blur is commonly used in photography and graphics to create a sense of movement or dynamism and help you simulate several different effects, such as a spinning wheel or a moving car. It’s also often used to create a dream-like or ethereal effect. Regardless of how you add it, radial blur can give a lot of visual interest to your otherwise static photos.
Therefore, if you’re looking for a way to add some dynamics to your photos, read on to learn about 6 free tools to create radial blur effects online!
What Is Radial Blur?
Radial blur is a blurring effect that starts from one point in an image and blurs outwards (or inwards) from (or to) that point. The word ‘radial’ means “arranged like rays that come from or go to a common center,” which is precisely how radial blur works.
Here are some common uses of the Radial motion blur effect:
- Create a sense of movement
- Add depth to a photo
- Simulate camera movement
- Create an interesting background
Best 6 Free Online Radial Blur Image Tools
If you want to create a radial blur effect on your photos but don’t have the required resources like storage space, budget, or the right software, we recommend you try using the following tools:
1.Pine Tools
Pine Tools is a terrific online program with many image editing features, such as invert color, blur, special filters, effects, crop images, and more.
Using its radial blur feature, you can quickly add depth to your images and apply the motion blur effect. To do so, visit the Pine Tools website, choose “Blur” from the left panel, and upload your image. Then, under the “Options” header, select “Radial Blur” and click “Apply.” The best thing about this online tool is that you can set different parameters before creating the effect.

Key Features:
- Numerous image editing tools
- Various parameters for creating radial blur effects, such as size, strongness, and axis (x, y)
- No editing knowledge is required to use the program
Pros
- Drag and drop interface
- Free to use
- No sign up required
Cons
- Takes time to finish the process
- UI is a bit old
2.Mass-images.pro
With Mass-images.pro tool, you can crop your images, do batch processing, or create memes in no time. Moreover, the program offers multiple image editing features to help you quickly apply basic changes to your pictures. These include Change BG, Auto Improve, Overlay image, Rotate, Swirl, Radial Blur, Text, Pixelization, and many more filters.
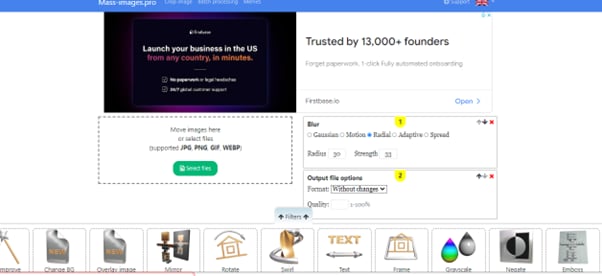
To create the radial motion blur effect on your images using the Mass-images.pro tool, you have to simply upload your file, set the radius and strength, and click “Download.” You can also configure the format and quality of your picture before downloading it.
Key features:
- Offers multiple format options for uploading and downloading your images
- Can change the radius of blur and intensity effects
- Can process multiple photos at once
Pros
- Free to use
- Many input and output formats
- Simple and straightforward to use
- Image quality option
Cons
- No advanced image editing features
3. Font Meme
Font Meme is an online resource for fonts and typography. Still, it offers other image editing features, such as 3D Rotation, Bevel Effect, Glow Effect, Invert Colors, Blend Images, and Add Background, to help you create memes instantly.
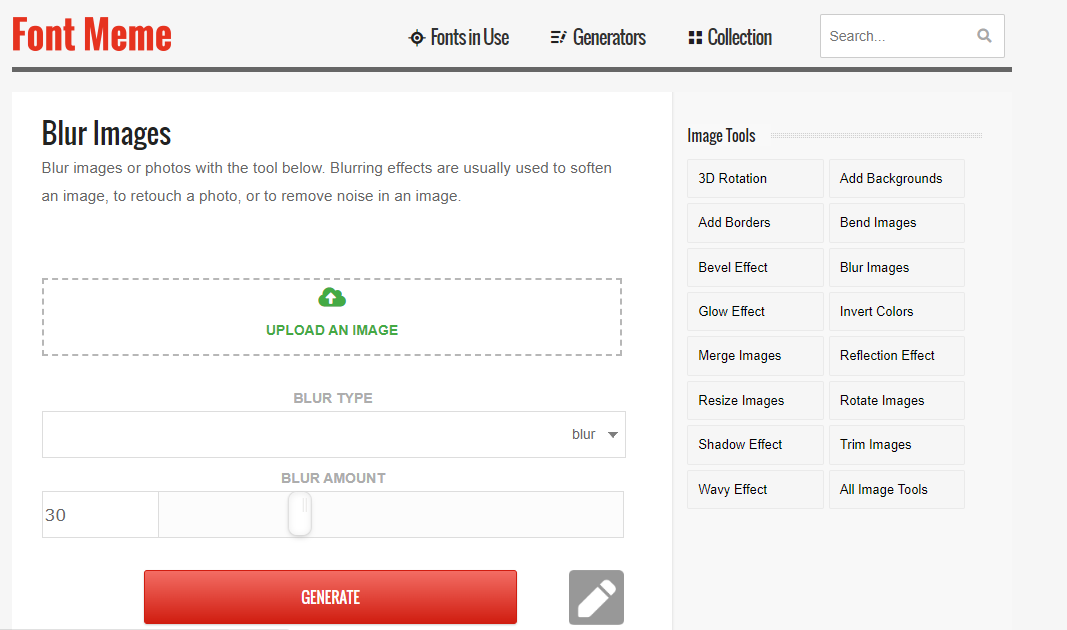
You can also use the Font Meme to create a radial blur image by uploading the image and selecting the “Blur Type” from the drop-down menu. Next, set the blur amount and click “Generate.”
Key Features:
- Instantly creates the radial blur effect on images
- Offers multiple image editing options
- A Complete resource for font and typography
Pros
- Available for free
- Quick and easy to use
- Intuitive UI
Cons
- No advanced image editing features
4.IMGonline.com.ua
IMGonline is another free online tool that offers image resizing, converting, compression, EXIF editor, effects, and other tools.
IMGonline can also help you create beautiful radial blur images in the nick of time. It’s a great and easy platform to add an extra effect to your photos. Simply upload your picture, choose the amount of blur you want, click “OK,” and download the results.
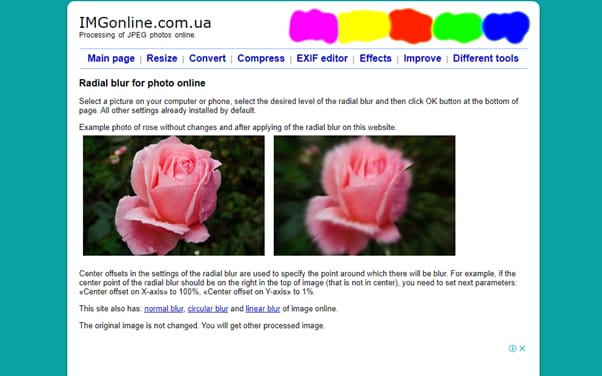
Key Features:
- Also has circular blur, usual blur, and linear blur features
- Does not change the original image during the process
- Multiple radial blur settings
- Offers JPEG and PNG as output formats
Pros
- Simple user interface
- Quick processing time
- Free
- Multiple image input formats
Cons
- Cannot process large image files
5.Pop Art Studio
Pop Art Studio is an effective online tool that allows you to create pop art images and offers numerous options for users to choose from, including different colors, fonts, and layouts. You can also upload your photos to the tool to convert them into pop art.
To use Pop Art Studio, simply upload an image to the website or paste the URL and then adjust the opacity and radius of the radial blur. Once you’re happy with the results, download the image.
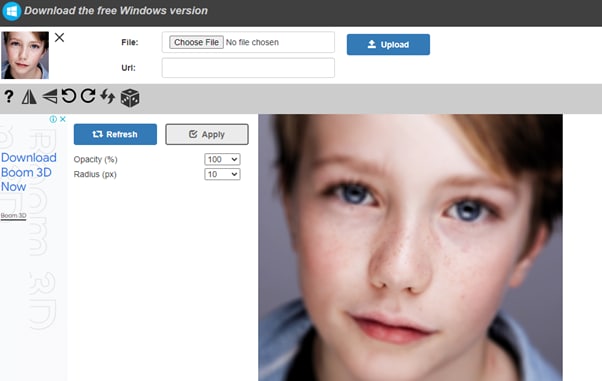
Key Features:
- Lets you paste the URL of the image
- Can configure the opacity and radius of the blur
- Instant process of the image
Pros
- Useful for creating and editing artwork
- Available for free
- Available as software
Cons
- Applies watermark to your images
6.Photokako
Photokako is a Japanese photo editor that creates radial motion blur effects in your images with just a few clicks by uploading them from your system or pulling the image from a URL.
Besides that, this tool offers several other advanced image editing features, including Transform, Illustrate, Reduce Colors, Parallel Universe, Retro, Ilusion, Frame, and Mood.

Key Features:
- Option to adjust blur smoothness and opacity
- Comes with Basic Settings to edit the image further
- Multiple output formats, including JPG, PNG-24, BMP, TIFF-24, TIFF-48, GIF, PNG-8, and PNG-32.
Pros
- Sophisticated online tool
- Multiple ways to upload a picture
- Free and easy to use
Cons
- The user interface is less intuitive
Bonus Tips – How To Add Radial Blur Effect To Images In Filmora
The programs mentioned above work only online and do not offer advanced features to add more customization options to the level of radial blurring or change its position on the images. Therefore, we recommend using the desktop software - Filmora.
Free Download For Win 7 or later(64-bit)
Free Download For macOS 10.14 or later
Filmora is a free and premium video editing software recommended by many content creators and professionals. With this software, you can create stunning radial effects on your images or memes with more customization options available.
Here’s how you can add the radial blur effect to images in Filmora by following three simple steps:
Step1 In the first step, go to the Filmora website, download the file, and install the software. Launch it and click the “Create New Project” option. Then drag & drop your file or click the “Click here to add Media file” to import it.

Step2 In the second step, go to the “Effects” tab, choose the Tilt-shift Circle for the radial blur effect, and add it to the timeline.

Step3 Finally, configure the size, X-axis, Y-axis, and intensity of the effect by double-clicking it in the timeline. You’re all set! Export your file by clicking on the “Export” button.
Last Words
In this article, we’ve provided the 6 best tools to create radial blur effects online for free and discussed their key features, pros, and cons to help you choose the right program.
In the end, we’ve provided a bonus tip to show you how to add the radial blur effect to images using the Wondershare Filmora software.
Hopefully, you’ve found this article helpful and can now quickly apply the radial motion effect to your pictures.
What Is Radial Blur?
Radial blur is a blurring effect that starts from one point in an image and blurs outwards (or inwards) from (or to) that point. The word ‘radial’ means “arranged like rays that come from or go to a common center,” which is precisely how radial blur works.
Here are some common uses of the Radial motion blur effect:
- Create a sense of movement
- Add depth to a photo
- Simulate camera movement
- Create an interesting background
Best 6 Free Online Radial Blur Image Tools
If you want to create a radial blur effect on your photos but don’t have the required resources like storage space, budget, or the right software, we recommend you try using the following tools:
1.Pine Tools
Pine Tools is a terrific online program with many image editing features, such as invert color, blur, special filters, effects, crop images, and more.
Using its radial blur feature, you can quickly add depth to your images and apply the motion blur effect. To do so, visit the Pine Tools website, choose “Blur” from the left panel, and upload your image. Then, under the “Options” header, select “Radial Blur” and click “Apply.” The best thing about this online tool is that you can set different parameters before creating the effect.

Key Features:
- Numerous image editing tools
- Various parameters for creating radial blur effects, such as size, strongness, and axis (x, y)
- No editing knowledge is required to use the program
Pros
- Drag and drop interface
- Free to use
- No sign up required
Cons
- Takes time to finish the process
- UI is a bit old
2.Mass-images.pro
With Mass-images.pro tool, you can crop your images, do batch processing, or create memes in no time. Moreover, the program offers multiple image editing features to help you quickly apply basic changes to your pictures. These include Change BG, Auto Improve, Overlay image, Rotate, Swirl, Radial Blur, Text, Pixelization, and many more filters.
To create the radial motion blur effect on your images using the Mass-images.pro tool, you have to simply upload your file, set the radius and strength, and click “Download.” You can also configure the format and quality of your picture before downloading it.

Key features:
- Offers multiple format options for uploading and downloading your images
- Can change the radius of blur and intensity effects
- Can process multiple photos at once
Pros
- Free to use
- Many input and output formats
- Simple and straightforward to use
- Image quality option
Cons
- No advanced image editing features
3. Font Meme
Font Meme is an online resource for fonts and typography. Still, it offers other image editing features, such as 3D Rotation, Bevel Effect, Glow Effect, Invert Colors, Blend Images, and Add Background, to help you create memes instantly.
You can also use the Font Meme to create a radial blur image by uploading the image and selecting the “Blur Type” from the drop-down menu. Next, set the blur amount and click “Generate.”

Key Features:
- Instantly creates the radial blur effect on images
- Offers multiple image editing options
- A Complete resource for font and typography
Pros
- Available for free
- Quick and easy to use
- Intuitive UI
Cons
- No advanced image editing features
4.IMGonline.com.ua
IMGonline is another free online tool that offers image resizing, converting, compression, EXIF editor, effects, and other tools.
IMGonline can also help you create beautiful radial blur images in the nick of time. It’s a great and easy platform to add an extra effect to your photos. Simply upload your picture, choose the amount of blur you want, click “OK,” and download the results.

Key Features:
- Also has circular blur, usual blur, and linear blur features
- Does not change the original image during the process
- Multiple radial blur settings
- Offers JPEG and PNG as output formats
Pros
- Simple user interface
- Quick processing time
- Free
- Multiple image input formats
Cons
- Cannot process large image files
5.Pop Art Studio
Pop Art Studio is an effective online tool that allows you to create pop art images and offers numerous options for users to choose from, including different colors, fonts, and layouts. You can also upload your photos to the tool to convert them into pop art.
To use Pop Art Studio, simply upload an image to the website or paste the URL and then adjust the opacity and radius of the radial blur. Once you’re happy with the results, download the image.

Key Features:
- Lets you paste the URL of the image
- Can configure the opacity and radius of the blur
- Instant process of the image
Pros
- Useful for creating and editing artwork
- Available for free
- Available as software
Cons
- Applies watermark to your images
6.Photokako
Photokako is a Japanese photo editor that creates radial motion blur effects in your images with just a few clicks by uploading them from your system or pulling the image from a URL.
Besides that, this tool offers several other advanced image editing features, including Transform, Illustrate, Reduce Colors, Parallel Universe, Retro, Ilusion, Frame, and Mood.

Key Features:
- Option to adjust blur smoothness and opacity
- Comes with Basic Settings to edit the image further
- Multiple output formats, including JPG, PNG-24, BMP, TIFF-24, TIFF-48, GIF, PNG-8, and PNG-32.
Pros
- Sophisticated online tool
- Multiple ways to upload a picture
- Free and easy to use
Cons
- The user interface is less intuitive
Bonus Tips – How To Add Radial Blur Effect To Images In Filmora
The programs mentioned above work only online and do not offer advanced features to add more customization options to the level of radial blurring or change its position on the images. Therefore, we recommend using the desktop software - Filmora.
Free Download For Win 7 or later(64-bit)
Free Download For macOS 10.14 or later
Filmora is a free and premium video editing software recommended by many content creators and professionals. With this software, you can create stunning radial effects on your images or memes with more customization options available.
Here’s how you can add the radial blur effect to images in Filmora by following three simple steps:
Step1 In the first step, go to the Filmora website, download the file, and install the software. Launch it and click the “Create New Project” option. Then drag & drop your file or click the “Click here to add Media file” to import it.

Step2 In the second step, go to the “Effects” tab, choose the Tilt-shift Circle for the radial blur effect, and add it to the timeline.

Step3 Finally, configure the size, X-axis, Y-axis, and intensity of the effect by double-clicking it in the timeline. You’re all set! Export your file by clicking on the “Export” button.
Last Words
In this article, we’ve provided the 6 best tools to create radial blur effects online for free and discussed their key features, pros, and cons to help you choose the right program.
In the end, we’ve provided a bonus tip to show you how to add the radial blur effect to images using the Wondershare Filmora software.
Hopefully, you’ve found this article helpful and can now quickly apply the radial motion effect to your pictures.
Best Ideas for Time Lapse Video
Are you thinking of stepping out of the familiar world of still photography to make a time-lapse video?
As you all know I am a fan of travel videos and time-lapse video because why not? There is no denying that time-lapse techniques are a perfect medium for travel videos.
In this article will give you some ideas to get started in time-lapse video or photography and let’s define what a time-lapse video and what makes them great.
What is Time Lapse
Time-lapse is a creative filming and video editing technique that manipulates how the frame rate is captured. Frame rate is the number of images or frames appearing in a second of video. In most videos, the frame rate and playback speed are the same. In a time-lapse video, the frame rate is stretched out far more: when played back at average speed, time appears to be sped up.
Time-lapse can also refer to a camera’s shutter speed (How long the camera’s shutter remains open to let light in). A similar effect to time-lapse is found in stop-motion videos. The subject doesn’t move but seems to be in motion because it’s manually or repeatedly moved and then photographed. The images are then strung together to create video-like motion.

How Time-lapse Works
Time-lapse photography is a technique that records a scene or objects that change at a slow speed and turns it into a video that plays back at high speed.
Most time-lapse videos are projected at a speed of 30 frames per second. The frame rate of your time-lapse video can be determined in the editing process, but you will need to account for how quickly the action is taking place in the camera or your video will be a collection if stills. Consider what FPS you want to use in your video. You need to capture that many frames per second to create a time-lapse effect. If you’re shooting a 10 second video at 30fps, you should end up with 300 images.
What equipment needed for time-lapse video?
Time-lapse photography requires only a few special pieces of equipment.
1. Camera / Smartphones
Technically any point and shoot camera or smartphone can be used for time-lapse video, the easiest ones to work are DSLR or mirrorless cameras, some even have an in camera intervalometer (often called a time-lapse feature or time-lapse mode), which means you’ll need less equipment to take great time-lapse video.
2. High-capacity Memory Card
For the best results, shoot in RAW format which takes image in the highest resolution with actual image dimensions. You’ll need to prepare for very large RAW file sizes, so bring multiple high capacity memory cards.
3.Tripod
A tripod is essential to time-lapse video or photography, because the camera needs to stay perfectly still in order to emphasize the steady movement of your subject and to avoid overlay blurry videos or photos.
How to Capture Times-lapse Video
A technique that was once found only in video editing software is now on nearly every mobile device. So what’s the best way to make an amazing time-lapse video that stands apart from the rest? That depends on how you plan to capture the footage.
Smartphones:
Most phones have a time-lapse feature in their camera app. Be advised: you will need to record for an extended period, as 30 minutes equates to about 10 seconds of footage. Like a video camera, you will need a tripod to steady your shots. On an iPhone, you can either film a time-lapse or stitch one together from your photo collection, all without a video editor.
DSLR Camera
For DSLR camera you’ll need a tripod and a device called intervalometer. The first is essential to make sure your camera is stationary and is taking photos if the exact same location without moving anywhere.
An intervalometer, or a remote control, is a device that allows you to set your camera to hit the shutter button at an interval of your choice. In other words, an intervalometer is there to let you rest aside without having a manually click the shutter button yourself.
Here are some video ideas for your time-lapse
- Ice melting
- Flower and plants
- Clouds moving
- Sunrise/sunset
- Star movement
- Traffic movement
Ice melting
Time-lapse is an ideal way to capture the mesmerizing transition between water and ice. Even something as simple as watching ice melt can be appealing.
Flower and plants
Flowers and plants can be beautiful to behold, but their transformation from seed to adult plant is often absolutely breathtaking. If you have an indoor plant that you are about to start growing you can set up a camera on a mount of a tripod at the angle with which you want to capture. As you water, groom or fertilize on a regular schedule, you can incorporate taking a photograph at the same time.
Clouds moving
The clouds can provide a whole host of phenomena that will both enlighten the observer to the complexities of the atmosphere or cosmos but will also provide a beautiful spectacle in the daytime, the movement of clouds can be quite spell binding and the rolling in of rain or a thunderstorm can be particularly interesting.
Sunrise/Sunset
Shooting a sunset is more difficult. The light changes during the selected time period.
To overcome this, use remote control camera software. This can be compensated by increasing the ISO or decreasing the shutter speed as the light dims.

Star movement
At night, if the sky is clear and you are in an area dark enough, the stars in the sky can provide a beautiful time-lapse as the stars move in relation to the observer due to earths rotations.
Traffic movement
The interconnectedness of vehicles moving along busy roads, trailing light patterns, and the general hustle and bustle of city life can be brought to you in a dynamic way via time-lapse videos.
It is the smooth impression of motion which time-lapse is able to produce that can emphasize and help to invigorate something as ordinary and everyday as the coming and going of traffic.

Edit your video with Wondershare Filmora
Wondershare Filmora has the action camera tool that allows you to fasten up your video without re-encoding. This means the quality of the video remains intact without any change after exporting. Here is how to convert a standard video to a time-lapse:
Step1 Download Wondershare Filmora from the official website
Free Download For Win 7 or later(64-bit)
Free Download For macOS 10.14 or later
Step2 Open Filmora, then click action camera tool
Step3 Click import action cam video to import your file
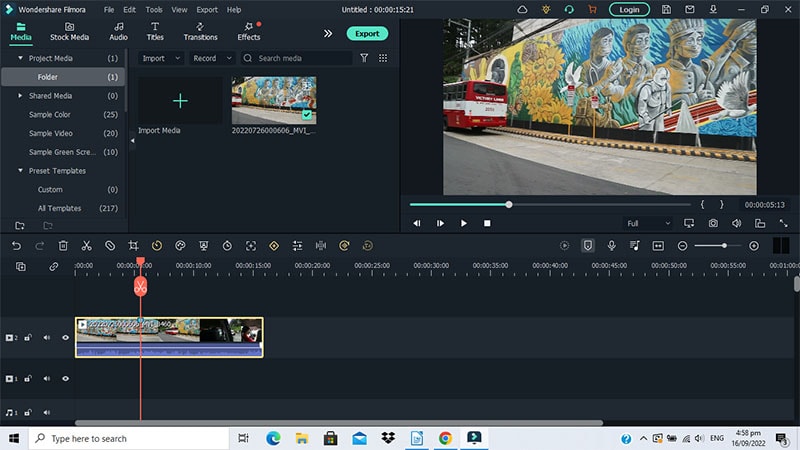
Step4 click on the speed icon add marker button. Then drag the marker all the way over the target video.
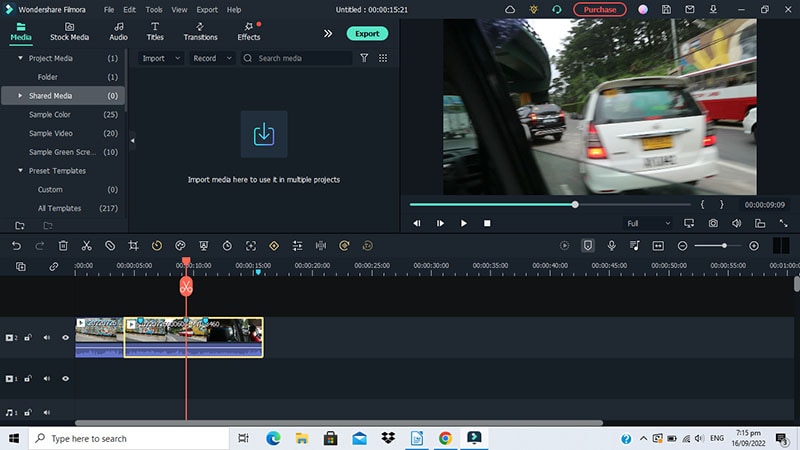
Step5 Next drag the slider under the speed tool to speed up the video according to your desire.
Step6 Lastly when done, export and save the final video.

Conclusion
Hope this article can give you an idea on how to make a good time-lapse video. It’s so fun doing it you will see how the things change that fast. Time-lapse content is typically just that, shorter, more visually interesting content, unlike most conventional video, time-lapse video can tell a story within just a few second. Start creating nice and creative time-lapse video now and make it as one content on your you tube channel.
Free Download For macOS 10.14 or later
Step2 Open Filmora, then click action camera tool
Step3 Click import action cam video to import your file

Step4 click on the speed icon add marker button. Then drag the marker all the way over the target video.

Step5 Next drag the slider under the speed tool to speed up the video according to your desire.

Step6 Lastly when done, export and save the final video.

Conclusion
Hope this article can give you an idea on how to make a good time-lapse video. It’s so fun doing it you will see how the things change that fast. Time-lapse content is typically just that, shorter, more visually interesting content, unlike most conventional video, time-lapse video can tell a story within just a few second. Start creating nice and creative time-lapse video now and make it as one content on your you tube channel.
Also read:
- [New] Innovative Nomadism How To Stand Out as A Modern Travel Videographer
- 2024 Approved Decoding Pexels Tips and Tricks for Leveraging Stock Photos
- 3 Ways To Stream And Record At The Same Time
- 4 Ways to Transfer Music from Gionee F3 Pro to iPhone | Dr.fone
- Do You Want to Create a Zoom Motion Blur Effect Using Photoshop? If You Are Unaware of How to Do This, Read This Article to Learn Simple yet Authentic Instructions
- From Page to Screen Crafting Jujutsu Kaisen Stories on TikTok
- Guide: Registering Access to the Latest ChatGPT Add-Ons
- How To Transfer Data From Apple iPhone XS To Other iPhone 14 Pro devices? | Dr.fone
- In 2024, 3 Ways To Stream And Record At The Same Time
- In 2024, A Detailed VPNa Fake GPS Location Free Review On Samsung Galaxy A24 | Dr.fone
- In 2024, Overview of Best LUTs for Vlog
- Swift Solutions for Recording Video Talks for 2024
- Updated In 2024, What You Should Know About Speech-to-Text Technology
- Want to Play a Video on Loop on Vimeo so that It Plays Again and Again? Here Are All the Different Ways to Loop a Video on Vimeo in Simple Steps for 2024
- Title: How to Loop a Video with iMovie on Mac and iPhone for 2024
- Author: Chloe
- Created at : 2025-01-18 03:31:14
- Updated at : 2025-01-24 11:29:35
- Link: https://ai-editing-video.techidaily.com/how-to-loop-a-video-with-imovie-on-mac-and-iphone-for-2024/
- License: This work is licensed under CC BY-NC-SA 4.0.