
:max_bytes(150000):strip_icc():format(webp)/TheOscarsStatue-33f6c30d7ffd4694a4dd1d1113de57f5.jpg)
How to Make A Jaw-Dropping Time Lapse Video? Full Guide for 2024
How to Make A Jaw-Dropping Time Lapse Video? [Full Guide]
Are you looking for a handy tutorial that will give you a full-fledged time lapse video? Well, here’s some two cents of what would be the ideal guide that you shall refer to! Learn more about the complete steps involved in making your time lapse video. Find out more here:
Part 1: What is Time Lapse?
1. Technical basics of Time Lapse Photography and Videography
Time-lapse is a specialized type of shot that can be achieved in-camera, through editing, or a combination of both. Time-lapse is a technique where frames are shot much slower than a normal rate (e.g., 24 frames per minute instead of per second).
Professional time-lapses are a series of raw photos even though they are sometimes perceived as videos. In a nutshell, a time-lapse is a short video that processes by revealing the evolution of a series of events, invisible to the eye.
The simplest and most useful formula is time per frame (TPF), multiplied by frames per second (FPS), multiplied by 60 seconds. Using this formula will tell you how long to record to end up with your desired time lapse length or “recording time” (RT). TPF x FPS x 60 = RT
2. What is a Time-lapse video used for?
The use of time-lapse photography and video is an excellent storytelling technique since compelling stories are essential to effective marketing. A time-lapse can also offer excellent insight into the advancement of developmental projects.
① Scientific research
- Time-lapses may be utilized to spread the word about scientific investigations to a wide audience. You can use time-lapse photography to gain money by selling the material of interesting scientific investigations to documentary makers or instructional websites.
- Scientists can visualize processes that would be challenging or sometimes even impossible to study in real life, thanks to time-lapse photography
② Individual enjoyment
Time-lapses are also utilized by filmmakers for scenes requiring extended durations of time with little significant activity occurring during the shot (such as night slowly turning into day).
③ Commercial use
- Time-lapse videos are a wonderful instrument for enhancing the perception of your brand because they are. As a result, many consumers find it interesting.
- Time-lapse videos are the epitome of the old saying that “good things come in small packages” for any brand.
3. How to Make a Time-lapse video?
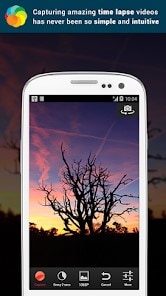
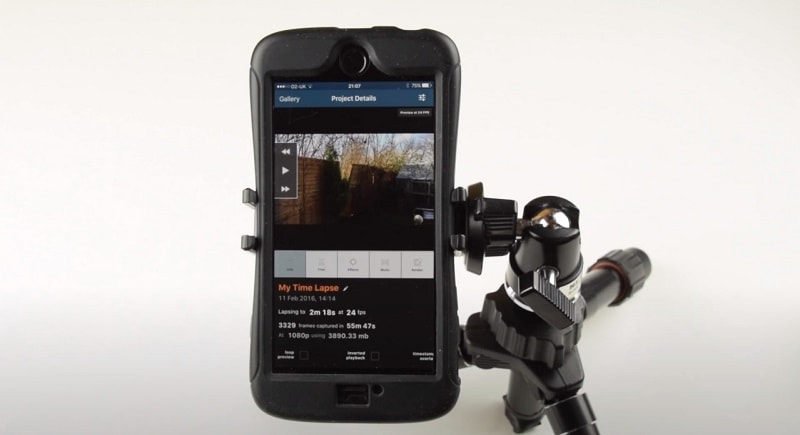
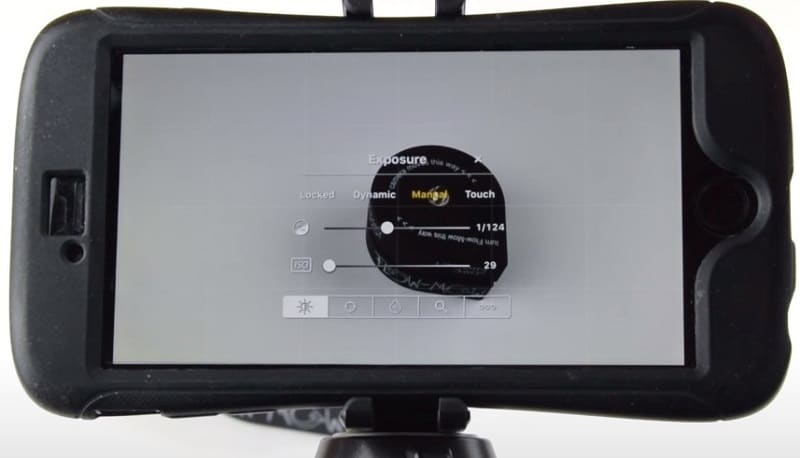
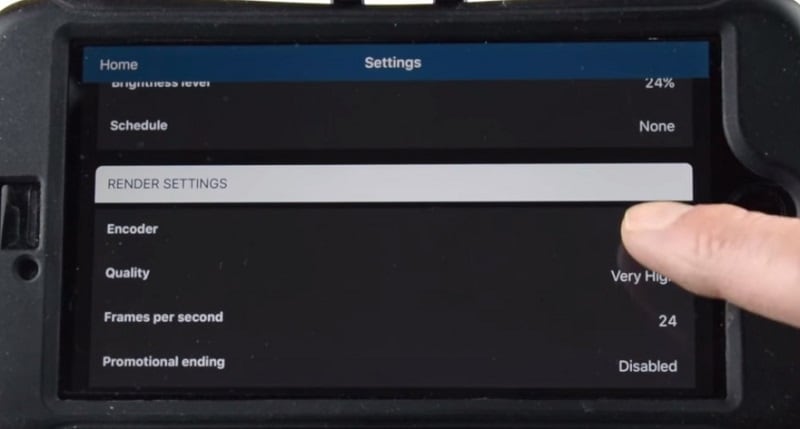
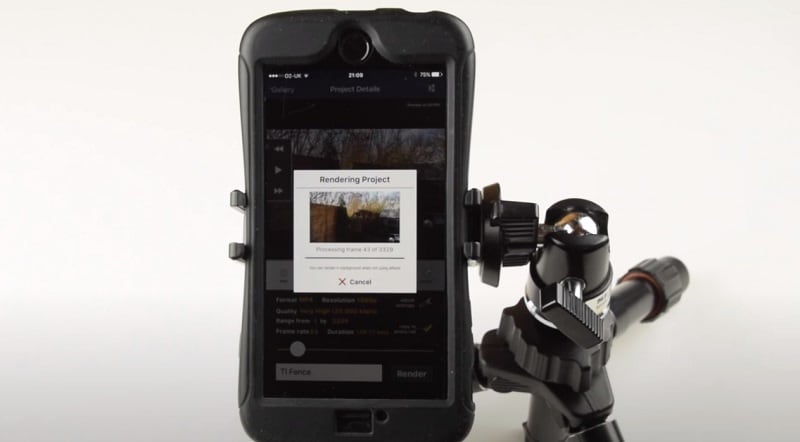
Start with a stable tripod or surface and adjust the settings on your phone camera or DSLR. Use slow shutter speed, use still mode, and don’t forget to use the timer. Find a stable surface and place your camera this way, you can get your hands on a creative time-lapse video.
Part 2: Record or Shoot Your Time-Lapse Video
1. Select Your Subject
The best way to create a time-lapse video is to pick your subject very carefully. Movement is the most crucial factor to consider while selecting a time-lapse subject. Any movement—whether it be caused by people, animals, vehicles, water, clouds, or anything else—can create an exciting and captivating time-lapse.
- Some of the iconic ideas of filming a time-lapse include:
- A stunning glimpse of the day and night cycle of life at sea.
- Construction of a building from ground till its completion
- Capturing the traffic movement
- Ice melting
- Sun setting
- A great shot of a galaxy
2. Prepare Right Equipment
Choose your equipment before heading out to capture time lapses. There are several options available for time-lapse cameras and applications, ranging from basic and affordable to sophisticated and pricy.
① Camera
You cannot make a time-lapse without owning a camera, whether it is a mobile phone, a compact, or a DSLR. The quality of the final result will be as good as the quality of the equipment you use.
- Smartphone camera apps (iPhone/Android)
All good smartphones now possess a built-in camera with good optical quality, for example: recently Apple Company launched its new iPhone 14 with a magnificent 48-megapixel camera. By using such cameras we have been able to produce really good pictures, although not in negative conditions, such as those with low-light, etc.
For apple: use IguanaLapse or TimeLapse to create your great time-lapses
For Android: use Time-Lapse – Lite
- Point-and-shoot cameras
Even though smartphone cameras have taken over in this digital era, it is still not possible to say that point-and-shoot cameras are not doing their magic. A point-and-shoot camera is really handy.
Some examples of point-and-shoot cameras which are best for creating fun time-lapse videos include Olympus Tough TG-6, Nikon Coolpix W300, Fujifilm XP140, Panasonic Lumix ZS70 / TZ90, and many others in the list.
- Action cameras
Action cameras, also known as action cams are compact, rugged, handheld, or mountable digital cameras that are designed to capture what you see when you are immersing in a movement. The action camera is usually mounted to your helmet, chest, handlebars of a bike or motorcycle, or tripod to record life.
The best action cameras for creating time-lapses include GoPro Hero11 Black, Insta360 ONE RS Twin Edition, DJI Action 2, DJI Pocket 2, and GoPro Hero9 Black.
- DSLR cameras
This is the best choice in terms of cost/benefit: it produces excellent results and high image quality. The best and top-rated DSLRs for creating terrific time-lapses include Nikon D850, Canon 80D, Canon EOS 90D, Sony A7 III, and others.
② Tripod/Gimbal/other stabilizers
Owning a solid and stable tripod is essential for the success of a time-lapse video. A good tripod will support the load without any problems and will keep the arsenal stable for the duration of the shooting session. The best way to use a tripod for filming a time-lapse is to use orient on a tripod that is quite high (at least 170cm).
Some best tripods used to record time-lapses include BONFOTO B671c, Patekfly Flexible Tripod, Sirui Easy Traveler ET-2204, and Vanguard Alta Pro 263AB 100.
A gimbal is a tool that uses motors and intelligent sensors to support and stabilize a camera. The best gimbal and other stabilizers used to film time-lapses include Moza Air 2, DJI RS 2, Zhiyun Crane-2S, Benro RedDog R1, iKan EC1 Beholder, and Feiyu AK4500.
③ Intervalometer/other camera shutter triggers
An intervalometer is a small device able to trigger the shutter of your camera every ‘n’ second, ‘n’ times (also infinite). It can be external, or as we saw earlier, integrated into the camera.
Some of the best intervalometer include Nikon Integrated Intervalometer. With a Nikon D3, you can go into Shooting Menu, and then activate” Interval Timer Shooting”.
3. List Pro Tips for Time-lapse Recording
- Make sure batteries are fully charged
- Set interval to match the movement in the scene
- Select music before shooting the time-lapse
- Use your backup camera
- Shoot in manual mode to avoid flicker
- Lock down focus
- Shoot in RAW format
- Add motion to the time-lapse
- Get comfortable, shoot longer
- Avoid bumping or moving the tripod
- Show shadow movement
- Use apps to plan your shots
- Shoot lots of images
Part 3: Edit Your Time Lapse Video
1. 3 Best Ways to Create Time Lapse from Photos
① Windows Photos App (Windows)
If you are using Windows, you probably are familiar with the general features of the Photos App. One of its distinguishing features is to import the photos and create a mind-blowing time-lapse out of those photos. To create time-lapse on your Windows Photos App, you must follow some simple steps:
- Open the Windows Photos app and import the pictures which you want to transform into a time-lapse.
- Go to Menu > Edit > Speed. For proper time-lapse, select a speed between 4x and 12x.
- Go to Save movie > save the video on your desktop or other device and you’re done with filming a great time-lapse video.
② QuickTime Player (Mac)
In your Apple devices (iPhones, iPads, and MacBook), you can create time-lapses by converting an image sequence to a movie or time-lapse video in QuickTime Player. For this, follow the simple steps and you will get a great time-lapse at the tip of your fingertips.
- Go to QuickTime App on your mac devices and open File > open image sequence.
- Select the image sequence folder and choose media.
- Adjust the quality of the movie by clicking on the options and choosing the resolution, frame rate, and video format.
- Click ‘open’ and time-lapse will be ready for access.
③ Filmora (Windows & Mac)
Through Wondershare Filmora software, it is now possible to drag your favorite image sequence into the timeline and transform it into a cool-looking time-lapse. If you’re looking for easy and efficient software to create attractive time-lapses, Filmora is your best go-to software. Using drag-and-drop, you can create time-lapse effects with Filmora’s built-in slow/fast motion effects. Filmora has over 150 free filters available for you if you wish to apply filters to your movie.
Filmora Video Editor creates a masterpiece for your video with the easiest interface for Windows & Mac users. Wondershare created the Filmora family of video editing and production software. Products on Filmora are available for a variety of users, from novice to expert. A timeline, preview window, and effects library are some of Filmora’s common features. These may all be accessed and managed using a drag-and-drop interface. Both Windows and macOS machines can use the Filmora software library.
How to Create a Time-lapse using Filmora
To create a time-lapse from photos in Filmora software, follow the mentioned steps:
Step 1: Download and install Wondershare Filmora
Go to google chrome and download the setup for Filmora. Install into your desktop.
Free Download For Win 7 or later(64-bit)
Free Download For macOS 10.14 or later
Step 2: Launch Filmora video editor
After downloading and installing, launch the Filmora timeline and import the photos to the media library.
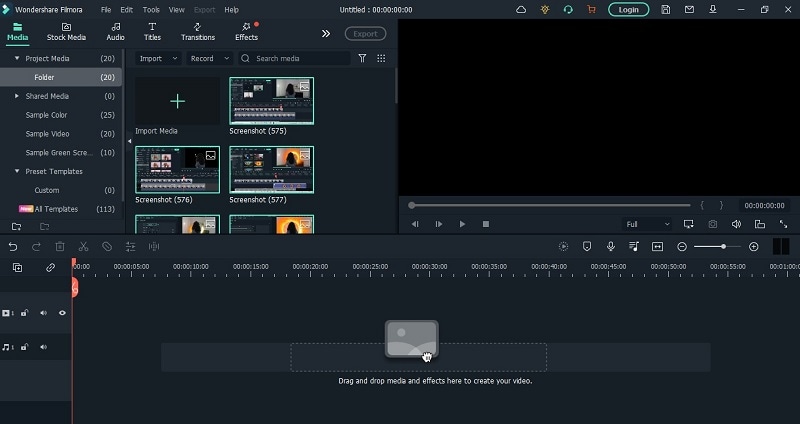
Step 3: Preview and adjust the photos.
Drag the images down to the timeline and move the pointer to reset and order the images according to your required time-lapse video. Don’t forget to resize and match the sizes of all the pictures so make a uniform time-lapse.

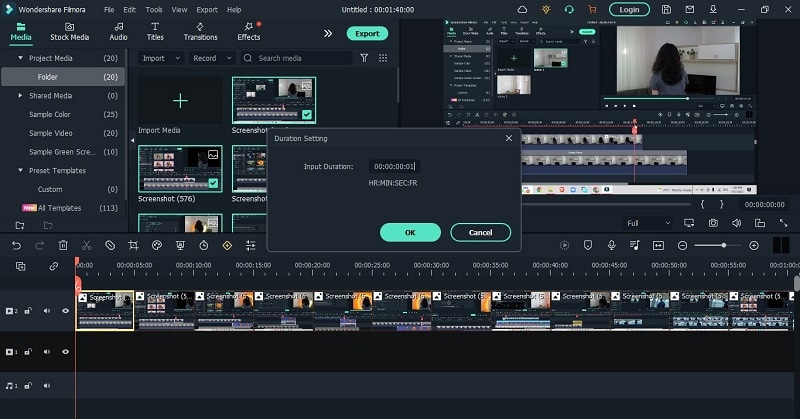
Step 4: Adjust the Speed
Select one of the photos in the timeline and right-click. Click on Speed and Duration > Custom Speed panel > Duration > change the duration of the photo to 00:00:00:01 and hit OK.
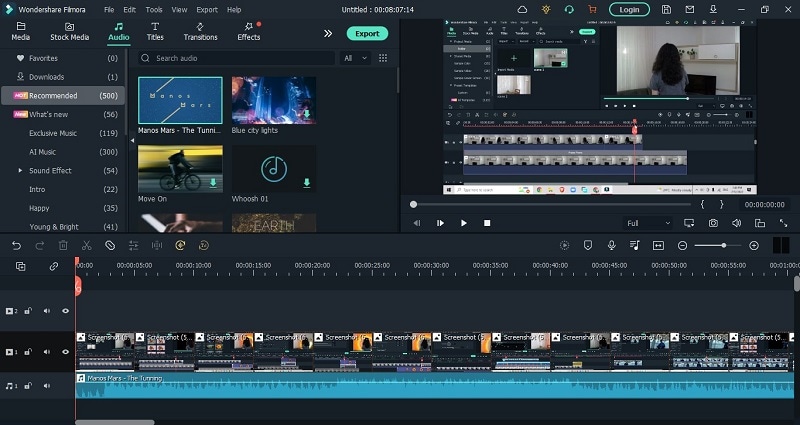
Step 5: Add effects and audio
Even though this step is optional, still it is recommended that to make your time-lapse more presentable, go to effects and choose your favorite pre-set. Go to Audio menu to choose from the music library or add your own custom audio by importing audio file into the timeline.
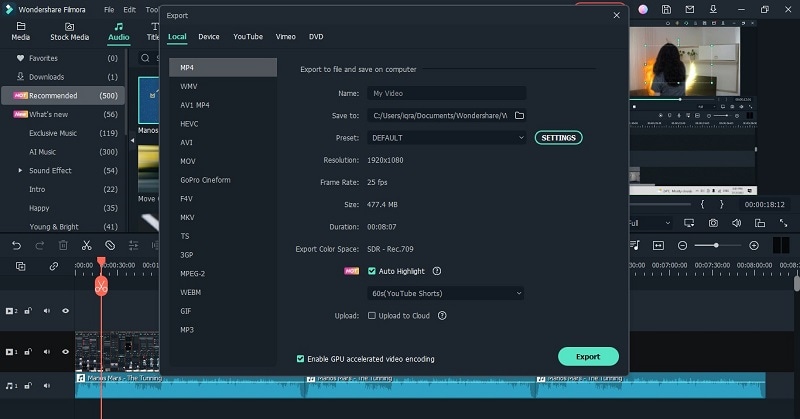
Step 6 Render and Export media
Export your file after rendering it in the full screen. Always check if there are any additional changes required before exporting the media file.

Step 7: Save into your desktop
Change the video format and video and audio parameters such as Bit Rate, Encoder, and Resolution of the video.
Other software for creating time-lapse
Besides Filmora, there are some interesting options for the users which involve:
o iMovie
o LRTimelapse
o Lightroom
o Adobe Premiere Pro
o After Effects
o Photoshop
2. 3 Best Ways to Convert Video to Time Lapse
① Filmora(Windows & Mac)
Filmora offers yet another very distinguishing feature through which it can convert video footage into an excellent time-lapse video. This feature of Filmora empowers the users and boosts their content and increases audience engagement as well.
In a few simple steps, you can get a creative time-lapse on your windows and mac devices.
- Download and install Filmora 11
- Launch Filmora timeline on your device and import the footage to the media library
- Drag your video onto the video column in the timeline. Select the loaded video and click the “Play” button. While playing the video, drag the slider bar at the start time and hit the “Split” icon to cut out the part you want to do time-lapse editing.
- Right-click on the video clip in the timeline to select Speed and Duration. Find the Speed option and drag the slider bar to the right to increase the speed.
- Click the Play button to preview the result. Filmora now supports up to 100x fast motion and 0.01x slow mo.
- Export your video
② Lapse It Pro (Android & iPhone)
One of the top apps for time-lapse photography is Lapse It Pro. A collection of further time lapses made by other people is available on Lapse It. You can post your videos and favorite those of others while using this social function, which also lets you watch other people’s videos. Through user control, the software makes the smartphone’s capacity to record time lapses as effective as possible.
The lapse It pro version is currently not free, although the Lapse its app is free and it is available on both, Android and Apple.
Steps to Use Lapse It Pro:
- Download the app on your android or apple device
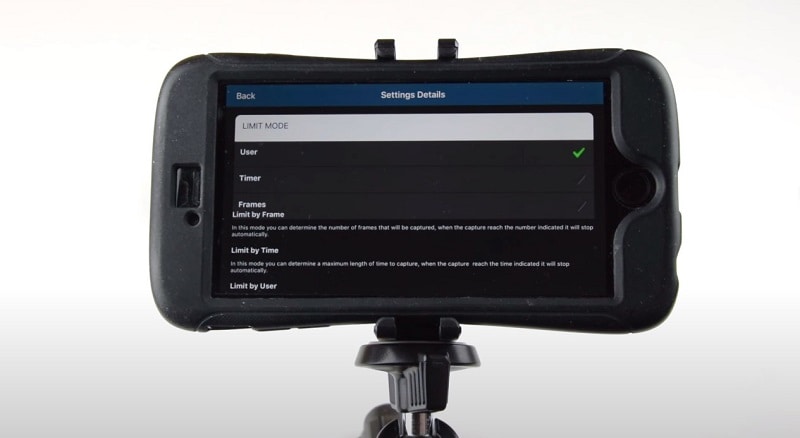
- Configure the time interval between the shots and set a time or photo-based limit while clicking pictures.
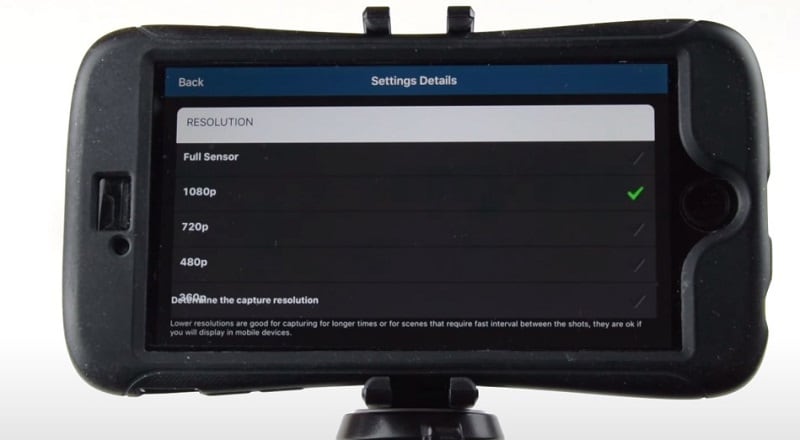
- Adjust the resolution of your camera before taking pictures.
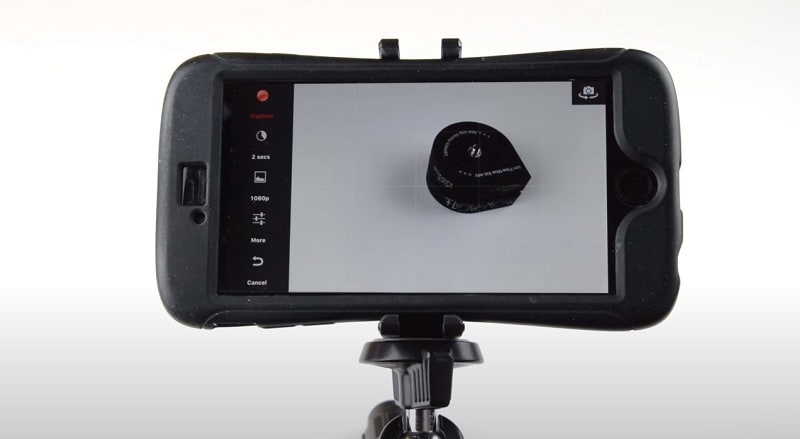
- Take a lot of pictures through the app using your device’s inbuilt camera
- Edit the order of the pictures
- Stitch the pictures together to form a time-lapse
- Add filters and adjust color settings
- Render and preview
- Export the file to your device
③ Invideo (Online)
InVideo is a do-it-yourself (DIY) video creation platform that enables users to turn their ideas into videos in real time. The platform lets users create, edit, preview, and share videos with team members. It’s a fantastic solution for combining your time-lapse footage into an amazing video project.
InVideo provides three distinct methods for creating videos:
- Text-to-Video: Upload your footage and let InVideo turn it into a series of scenes that you can customize
- Blank Templates: Start with a stripped-down template and craft an amazing video from scratch
- Premade Templates: Pick a template from an extensive library of premade templates
Steps to Use InVideo:
To create a time-lapse through InVideo, follow the mentioned steps:
Step 1. Download and install InVideo
Step 2. Sign up and sign in to your InVideo account
Step 3. Upload your footage to the ‘Add your media files here’ tab.
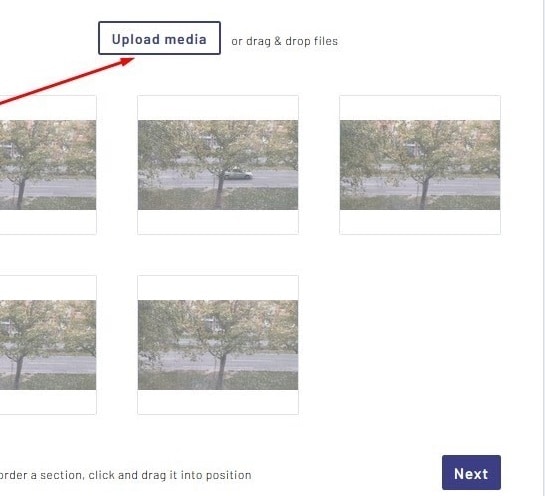
Step 4. Do not upload footage exceeding 200 MBs.
Step 5. Click ‘Next’ and you will be redirected to the Storyboard.
Step 6. Preview all your scenes in Storyboard mode. Rearrange them, add new ones in between, and delete any that you don’t want to use in your project. You can also duplicate scenes if necessary.
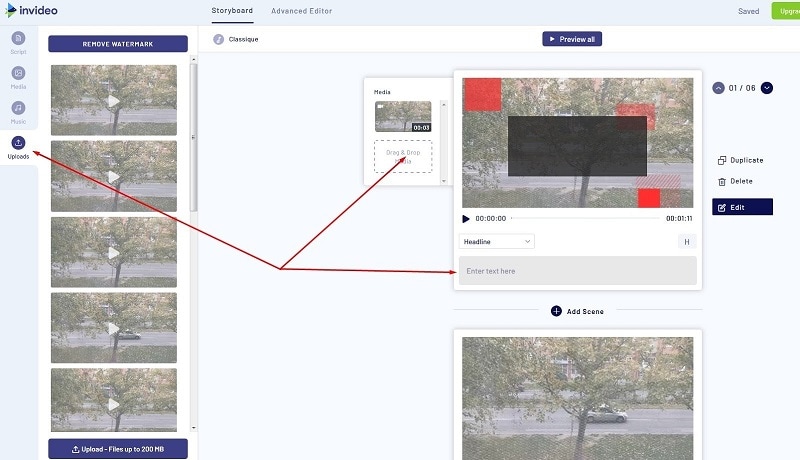
Step 7: You can also add captions to your scenes. To view all the captions you’ve created, go to the Scripts tab. You’ll be able to customize your captions further in the Advanced Editor mode.
Step 8. To add audio files to your video, go to the Music tab.
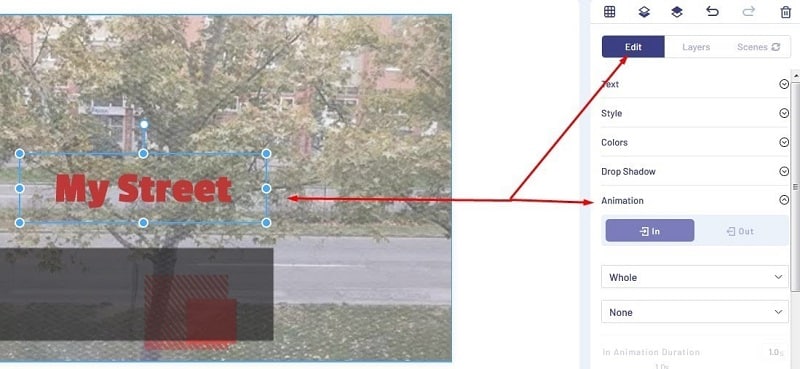
Step 9. Edit your video by clicking on Advanced Editor.

Step 10. Apply filters and review the timeline, export, save the video and you’re good to go.
3. Which Way is Right for You to Edit a Time-Lapse Video?
There are many ways to edit a time-lapse video, with varying degrees of success. Each application and software has its pros and cons. Although some best and most useful methods to create and edit time-lapse videos have been discussed earlier in this essay it is crucial to highlight that Filmora is regarded as software that possesses almost all the assets that we need while we edit our time-lapse videos.
Through Filmora, you can effortlessly make a pro-level time-lapse video either from still images or existing video. Most of the software would offer only one feature at a time so it is tremendous that Filmora lets you easily access multiple options to create a seamless time-lapse video in a spur of some minutes.
Besides multiple ways to create time-lapse, Filmora also offers basic & advanced editing features for time-lapse production. After creating a time-lapse in Filmora, you can drag through the multiple post-production editing features which include: Split Screen, Keyframing, Motion Tracking, Speed Ramping, Screen Recorder, Instant Mode, Pre-set Templates, and Auto Beat Sync. And many others.
Besides these ways of editing your time-lapses, Filmora also offers no disturbing pop-up ad experience while editing which provides a smooth editing platform for editors.
Part 4: Share & Enjoy the Best Time-Lapse Video
1. Share Your Quality Time-Lapse Video Across Social Platforms
Time-lapse & social media serve as the perfect combination in today’s times when social media publicity has become an incredibly important avenue for businesses. You can share your time lapses on different social media platforms including:
- YouTube
When people talk about today’s most popular social sharing websites, YouTube often gets left out of the conversation in favor of sites like Facebook and Twitter. But don’t be fooled: YouTube has a lot going for it.
By uploading your time-lapses on YouTube, you can create a YouTube link and share it with your friends and social circle so they can easily access your content, you can get found in search by uploading your own written transcript about the time-lapse, adding an end screen or cards to promote your time-lapse video, and add creative effects to your time-lapses with YouTube Enhancements.
- TikTok
TikTok is a social media platform for creating, sharing, and discovering short videos. The app is used by young people as an outlet to express themselves through singing, dancing, comedy, and lip-syncing, and allows users to create videos and share them across a community.
Since the duration of the time-lapse videos is mostly kept short, TikTok is the best app to approach if you want to increase your audience engagement.
The Meta app, Instagram is the most used app as per 2022 statistics. Through this app, people used to update their day-to-day routine and check-ins by uploading pictures. Now, the platform has added a ‘Reels’ section which plays the short videos to keep the audience hooked to the app, more than ever.
Upload your time-lapses on Instagram as Reels and see your content boost within hours.
2. Promote Your Time-Lapse Video on Popular Websites
Professional video editors and photographers who are looking for a paid platform to promote their business can access the most widely used and reliable websites which include the following:
- Shutterstock
With this app on your mobile phones and other devices, you can Transform Your Marketing Campaigns, Social Media, Websites, and Designs. Uploading your time-lapse content to earn good money on Shutterstock will work best in your favor.
- Pond5
Pond5 is the world’s largest marketplace for HD & 4K stock video, plus millions of music tracks, SFX, motion graphics, and images. Signing up and posting your time-lapse to promote your digital work can be a good choice if you’re looking for earning money online.
- Adobe Stock
Adobe Stock is a new service that provides designers and businesses with access to millions of high-quality, curated, royalty-free images and videos. This is also a good choice for professional photographers and videographers to post their time-lapses.
- Getty
Getty is an American visual media company and is a supplier of stock images, editorial photography, video, and music for business. By uploading your time lapses on this platform, you can be provided with exceptional opportunities to engage employees, entertain clients, and promote your brand.
3. Enjoy the Attractive Time-Lapse Video Examples
Over the internet, you will find numerous creatively designed time-lapses but a few of them still top the list. Some of the iconic time-lapses created to date include the following:
- Multiverse By Hiroshi Kondo, a mind-bending TimeLapse video of Taiwan
- Paris Day & Night by Teeter-Totter-Tam is a 5-minutes TimeLapse journey through one of the prettiest cities in the world, Paris from day to night.
- Solar Panel Installation from a Crane - David Dupuy
- Death Is the Road to Awe is a sample of TimeLapse video footage from that film shot in the American Southwest.
Part 5: FAQs – Time-Lapse Video Creation
① How to easily make a time-lapse video like a pro?
Most smartphone cameras have their time-lapse feature built in. To shoot your time-lapse video, simply open up the camera on your phone and select the “Time-Lapse” feature.
Place your phone in a secure spot where it won’t move around a lot. Then, tap the record button to start recording your time-lapse. When you’re done, tap it again. Your video will play back compressed into a shorter period for a time lapse effect.
PRO TIP: If you’re planning to make a landscape video, turn your phone so your time-lapse video is wide instead of tall
② What are the best time lapse editors or software?
The top five Best Free TimeLapse Software include:
- Wondershare Filmora- Windows and Mac
- Adobe Premiere Pro – Professional software
- Final Cut Pro – Mac software for time-lapse videos
- iMovie – User-friendly
- LRTimelapse – Sophisticated tool for more experienced users
③ Can I speed up or slow down a time-lapse video using Filmora?
Filmora also allows you to adjust the duration of the video clip to change the video speed. After importing the video clip to the timeline, right-click it and choose Speed and Duration to open the custom speed pop-up. Go to the Duration section and you will see the original duration of the video. Adjusting the duration of the video longer will add a slow-motion effect to the video. Changing the duration of the video to a shorter time will speed up the playback speed of the video. Just directly input the number in the field to speed up/slow down the video.
④ How to make my time-lapse video look better?
- Using a Slow Shutter
One solution to making your time lapses look more natural is to use a slow shutter so that each frame has a bit of motion.
- Blend in Video
Capture a time-lapse with fast movement and then mask in video with slow movement, maybe I could have the best of both worlds.
- Use filters
You can use Filters to spruce up the content with the time-lapse.
- Add Audio
Audio is an essential part if you want to leverage the content reach of your time-lapse video.
Conclusion
Time lapse videos are among the most powerful marketing tactics available in the mass media age of today. Similar to aerial photography, time-lapse videos can tell an engaging story for a low production cost, and they can be viewed fast by the audience. Filmora has helped the professionals as well as the beginners in the photography and videography to boost their content through online platforms.
This article will guide you through the most useful software and ways to promote your content and boost your audience engagement through creating mind-blowing time-lapses. Software like above mentioned ones take extremely little time and focus to comprehend the tale in a time lapse, which is a huge advantage in today’s competitive industry.
Free Download For macOS 10.14 or later
Step 2: Launch Filmora video editor
After downloading and installing, launch the Filmora timeline and import the photos to the media library.
Step 3: Preview and adjust the photos.
Drag the images down to the timeline and move the pointer to reset and order the images according to your required time-lapse video. Don’t forget to resize and match the sizes of all the pictures so make a uniform time-lapse.
Step 4: Adjust the Speed
Select one of the photos in the timeline and right-click. Click on Speed and Duration > Custom Speed panel > Duration > change the duration of the photo to 00:00:00:01 and hit OK.
Step 5: Add effects and audio
Even though this step is optional, still it is recommended that to make your time-lapse more presentable, go to effects and choose your favorite pre-set. Go to Audio menu to choose from the music library or add your own custom audio by importing audio file into the timeline.
Step 6 Render and Export media
Export your file after rendering it in the full screen. Always check if there are any additional changes required before exporting the media file.
Step 7: Save into your desktop
Change the video format and video and audio parameters such as Bit Rate, Encoder, and Resolution of the video.
Other software for creating time-lapse
Besides Filmora, there are some interesting options for the users which involve:
o iMovie
o LRTimelapse
o Lightroom
o Adobe Premiere Pro
o After Effects
o Photoshop
2. 3 Best Ways to Convert Video to Time Lapse
① Filmora(Windows & Mac)
Filmora offers yet another very distinguishing feature through which it can convert video footage into an excellent time-lapse video. This feature of Filmora empowers the users and boosts their content and increases audience engagement as well.
In a few simple steps, you can get a creative time-lapse on your windows and mac devices.
- Download and install Filmora 11
- Launch Filmora timeline on your device and import the footage to the media library
- Drag your video onto the video column in the timeline. Select the loaded video and click the “Play” button. While playing the video, drag the slider bar at the start time and hit the “Split” icon to cut out the part you want to do time-lapse editing.
- Right-click on the video clip in the timeline to select Speed and Duration. Find the Speed option and drag the slider bar to the right to increase the speed.
- Click the Play button to preview the result. Filmora now supports up to 100x fast motion and 0.01x slow mo.
- Export your video
② Lapse It Pro (Android & iPhone)
One of the top apps for time-lapse photography is Lapse It Pro. A collection of further time lapses made by other people is available on Lapse It. You can post your videos and favorite those of others while using this social function, which also lets you watch other people’s videos. Through user control, the software makes the smartphone’s capacity to record time lapses as effective as possible.
The lapse It pro version is currently not free, although the Lapse its app is free and it is available on both, Android and Apple.
Steps to Use Lapse It Pro:
- Download the app on your android or apple device
- Configure the time interval between the shots and set a time or photo-based limit while clicking pictures.
- Adjust the resolution of your camera before taking pictures.
- Take a lot of pictures through the app using your device’s inbuilt camera
- Edit the order of the pictures
- Stitch the pictures together to form a time-lapse
- Add filters and adjust color settings
- Render and preview
- Export the file to your device
③ Invideo (Online)
InVideo is a do-it-yourself (DIY) video creation platform that enables users to turn their ideas into videos in real time. The platform lets users create, edit, preview, and share videos with team members. It’s a fantastic solution for combining your time-lapse footage into an amazing video project.
InVideo provides three distinct methods for creating videos:
- Text-to-Video: Upload your footage and let InVideo turn it into a series of scenes that you can customize
- Blank Templates: Start with a stripped-down template and craft an amazing video from scratch
- Premade Templates: Pick a template from an extensive library of premade templates
Steps to Use InVideo:
To create a time-lapse through InVideo, follow the mentioned steps:
Step 1. Download and install InVideo
Step 2. Sign up and sign in to your InVideo account
Step 3. Upload your footage to the ‘Add your media files here’ tab.
Step 4. Do not upload footage exceeding 200 MBs.
Step 5. Click ‘Next’ and you will be redirected to the Storyboard.
Step 6. Preview all your scenes in Storyboard mode. Rearrange them, add new ones in between, and delete any that you don’t want to use in your project. You can also duplicate scenes if necessary.
Step 7: You can also add captions to your scenes. To view all the captions you’ve created, go to the Scripts tab. You’ll be able to customize your captions further in the Advanced Editor mode.
Step 8. To add audio files to your video, go to the Music tab.
Step 9. Edit your video by clicking on Advanced Editor.
Step 10. Apply filters and review the timeline, export, save the video and you’re good to go.
3. Which Way is Right for You to Edit a Time-Lapse Video?
There are many ways to edit a time-lapse video, with varying degrees of success. Each application and software has its pros and cons. Although some best and most useful methods to create and edit time-lapse videos have been discussed earlier in this essay it is crucial to highlight that Filmora is regarded as software that possesses almost all the assets that we need while we edit our time-lapse videos.
Through Filmora, you can effortlessly make a pro-level time-lapse video either from still images or existing video. Most of the software would offer only one feature at a time so it is tremendous that Filmora lets you easily access multiple options to create a seamless time-lapse video in a spur of some minutes.
Besides multiple ways to create time-lapse, Filmora also offers basic & advanced editing features for time-lapse production. After creating a time-lapse in Filmora, you can drag through the multiple post-production editing features which include: Split Screen, Keyframing, Motion Tracking, Speed Ramping, Screen Recorder, Instant Mode, Pre-set Templates, and Auto Beat Sync. And many others.
Besides these ways of editing your time-lapses, Filmora also offers no disturbing pop-up ad experience while editing which provides a smooth editing platform for editors.
Part 4: Share & Enjoy the Best Time-Lapse Video
1. Share Your Quality Time-Lapse Video Across Social Platforms
Time-lapse & social media serve as the perfect combination in today’s times when social media publicity has become an incredibly important avenue for businesses. You can share your time lapses on different social media platforms including:
- YouTube
When people talk about today’s most popular social sharing websites, YouTube often gets left out of the conversation in favor of sites like Facebook and Twitter. But don’t be fooled: YouTube has a lot going for it.
By uploading your time-lapses on YouTube, you can create a YouTube link and share it with your friends and social circle so they can easily access your content, you can get found in search by uploading your own written transcript about the time-lapse, adding an end screen or cards to promote your time-lapse video, and add creative effects to your time-lapses with YouTube Enhancements.
- TikTok
TikTok is a social media platform for creating, sharing, and discovering short videos. The app is used by young people as an outlet to express themselves through singing, dancing, comedy, and lip-syncing, and allows users to create videos and share them across a community.
Since the duration of the time-lapse videos is mostly kept short, TikTok is the best app to approach if you want to increase your audience engagement.
The Meta app, Instagram is the most used app as per 2022 statistics. Through this app, people used to update their day-to-day routine and check-ins by uploading pictures. Now, the platform has added a ‘Reels’ section which plays the short videos to keep the audience hooked to the app, more than ever.
Upload your time-lapses on Instagram as Reels and see your content boost within hours.
2. Promote Your Time-Lapse Video on Popular Websites
Professional video editors and photographers who are looking for a paid platform to promote their business can access the most widely used and reliable websites which include the following:
- Shutterstock
With this app on your mobile phones and other devices, you can Transform Your Marketing Campaigns, Social Media, Websites, and Designs. Uploading your time-lapse content to earn good money on Shutterstock will work best in your favor.
- Pond5
Pond5 is the world’s largest marketplace for HD & 4K stock video, plus millions of music tracks, SFX, motion graphics, and images. Signing up and posting your time-lapse to promote your digital work can be a good choice if you’re looking for earning money online.
- Adobe Stock
Adobe Stock is a new service that provides designers and businesses with access to millions of high-quality, curated, royalty-free images and videos. This is also a good choice for professional photographers and videographers to post their time-lapses.
- Getty
Getty is an American visual media company and is a supplier of stock images, editorial photography, video, and music for business. By uploading your time lapses on this platform, you can be provided with exceptional opportunities to engage employees, entertain clients, and promote your brand.
3. Enjoy the Attractive Time-Lapse Video Examples
Over the internet, you will find numerous creatively designed time-lapses but a few of them still top the list. Some of the iconic time-lapses created to date include the following:
- Multiverse By Hiroshi Kondo, a mind-bending TimeLapse video of Taiwan
- Paris Day & Night by Teeter-Totter-Tam is a 5-minutes TimeLapse journey through one of the prettiest cities in the world, Paris from day to night.
- Solar Panel Installation from a Crane - David Dupuy
- Death Is the Road to Awe is a sample of TimeLapse video footage from that film shot in the American Southwest.
Part 5: FAQs – Time-Lapse Video Creation
① How to easily make a time-lapse video like a pro?
Most smartphone cameras have their time-lapse feature built in. To shoot your time-lapse video, simply open up the camera on your phone and select the “Time-Lapse” feature.
Place your phone in a secure spot where it won’t move around a lot. Then, tap the record button to start recording your time-lapse. When you’re done, tap it again. Your video will play back compressed into a shorter period for a time lapse effect.
PRO TIP: If you’re planning to make a landscape video, turn your phone so your time-lapse video is wide instead of tall
② What are the best time lapse editors or software?
The top five Best Free TimeLapse Software include:
- Wondershare Filmora- Windows and Mac
- Adobe Premiere Pro – Professional software
- Final Cut Pro – Mac software for time-lapse videos
- iMovie – User-friendly
- LRTimelapse – Sophisticated tool for more experienced users
③ Can I speed up or slow down a time-lapse video using Filmora?
Filmora also allows you to adjust the duration of the video clip to change the video speed. After importing the video clip to the timeline, right-click it and choose Speed and Duration to open the custom speed pop-up. Go to the Duration section and you will see the original duration of the video. Adjusting the duration of the video longer will add a slow-motion effect to the video. Changing the duration of the video to a shorter time will speed up the playback speed of the video. Just directly input the number in the field to speed up/slow down the video.
④ How to make my time-lapse video look better?
- Using a Slow Shutter
One solution to making your time lapses look more natural is to use a slow shutter so that each frame has a bit of motion.
- Blend in Video
Capture a time-lapse with fast movement and then mask in video with slow movement, maybe I could have the best of both worlds.
- Use filters
You can use Filters to spruce up the content with the time-lapse.
- Add Audio
Audio is an essential part if you want to leverage the content reach of your time-lapse video.
Conclusion
Time lapse videos are among the most powerful marketing tactics available in the mass media age of today. Similar to aerial photography, time-lapse videos can tell an engaging story for a low production cost, and they can be viewed fast by the audience. Filmora has helped the professionals as well as the beginners in the photography and videography to boost their content through online platforms.
This article will guide you through the most useful software and ways to promote your content and boost your audience engagement through creating mind-blowing time-lapses. Software like above mentioned ones take extremely little time and focus to comprehend the tale in a time lapse, which is a huge advantage in today’s competitive industry.
10 Best Camera for YouTube Beginners
YouTube has made a remarkable entry into digital media with its effective interface. Numerous people adopted the structure of YouTube and produced different ideas to showcase their talent. Under such developments, the need for proper equipment was a necessity.
Camera accounts are among one of the essential requirements for anyone beginning their journey on YouTube. This article brings up a list of the best YouTube camera options that a YouTube beginner can consider.
In this article
01 10 Best Camera for YouTube Beginners
02 Best Video Editor for YouTube Beginners
Part 1: 10 Best Camera for YouTube Beginners
This part will focus on the best options in YouTube vlog camera that can be discovered in the market. Are you ready to get some of the best names you can consider when you start your channel?
Sony ZV-1
Price: $749.99
A complete package, as people say, Sony ZV-1 provides every prominent feature for YouTubers. Known for its exceptional focus, it is attached with real-time tracking and a real-time eye AF system that includes auto-focus when you are moving in the frame. The opportunities provided across Sony ZV-1 are pretty commendable, including the hotshoe.
It could clearly embed in an external mic or an LED light that could be used across different scenes. This caters to everything a YouTuber needs to make a simple video for their channel.

Canon PowerShot G7 X Mark III
Price: $714
Versatility is always welcomed in the market. If you search for a platform that can help you stream 4K videos, Canon PowerShot G7 X Mark III is the perfect option that you can come by. The lens offered across the camera is quite intuitive and flexible for managing all kinds of environments and light conditions that would be provided to the YouTuber.
The ability to take 4K video under 30fps makes this Canon camera an option in the best camera for YouTube.

Blackmagic Pocket Cinema Camera 6K
Price: $1,995
Cinema cameras can be another option you can consider for a YouTube vlog camera. Blackmagic Pocket Cinema Camera comes as the first option you should look into if you are interested in cinema cameras. This new iteration in Blackmagic cameras came with a better sensor with better compatibility options. Along with that, you can easily shoot 6K videos with this proficient camera.
Although YouTubers can use this cinema YouTube camera for making an impressive start in their digital journey, it still has some file format issues that you need to address before buying it.

Sony A6000
Price: $649.99
Are you looking for a camera with the best value-for-money? Tight on your budget for starting the YouTube channel? Sony A6000 turns out to be one of the most effective options in the market that can help YouTubers make fantastic content from the start. Although it does not offer a 4K resolution, it can still be used for Full HD quality, which is quite impressive for starters.
With some solid foundations in the focus and body features, Sony A6000 can be ideally used as a good camera for YouTube.

GoPro Hero10 Black
Price: $499.99
Are you a vlogger who has a fun side to making YouTube videos? The hefty cameras mentioned above are not the ones that could serve you perfectly in your adventures. Here comes the GoPro Hero10 Black, a YouTube camera that is extremely robust and solid that it can fall off grounds, go into lakes, or ride across a car. Where GoPro counters problems of versatility, it keeps a high-end in its internal features.
You can easily enjoy a 5.3K video resolution with 60fps using GoPro Hero10 Black, which outsmarts most in the list. However, GoPro is believed to be more expensive than the rest.

Sony ZV-E10
Price: $699.99
Does your video involve capturing them from home or in a single compact spot? Though you can find many good options for it, Sony ZV-E10 can provide exceptional services to users who have casual use in their videos.
This video camera for YouTube offers better autofocus than many cameras available in the market. However, its compact size makes it the perfect option for users who have homely uses of a camera.

Fujifilm X-T4
Price: $1,699.95
A touch of retro, with features of advanced cameras, Fujifilm can be considered as a video camera for YouTube when you are taking a start across your channel. The camera provides exceptional video specs to the people, beyond 4K resolution in 60fps. The users can also look for 10-bit internal coding and 400Mbps bit-rate across this camera model.
Although being a pricey option, it indeed accounts for among the best options that YouTubers can consider for a start.

Canon EOS 90D
Price: $1,189.95
As you go into the option of stronger cameras, you will find some DSLR cameras making a stand across the best options in a video camera for YouTube. The camera provides exceptional resolution, up to 4K in quality, and 32.5 MP stills for multimedia content. It has a heavier structure for videos; however, being strong can be a positive advantage for the user in many cases.
While weather sealed, you can easily consider using your Canon EOS 90D across harsh weather and different environments.

Panasonic G100
Price: $647.99
Looking for simpler options? We surely have the Panasonic G100 in our minds for you. A camera that is small, compact, and has a decent value; Panasonic G100 may be your perfect choice if you are not a professional in video making. This can be an ideal start in the best camera for YouTube vlogging, which, combined with the body and features, makes it one of the strongest contenders.

Panasonic Lumix GHS II
Price: $1,150.95
This camera is a whole new experience for users in the market. With exceptional features combined with proficient skills, you can make the best YouTube videos for your channel. This YouTube camera supports 4K recording under 60fps, which is not common among most cameras. Along with that, the improvements brought upon in this model from the previous offers better body stabilization.
Panasonic Lumix GHS II is the choice of your life that can help you make the most expressive YouTube videos of your channel.

Part 2: Best Video Editor for YouTube Beginners
Once you go through the cameras that would help you make a YouTube video, it is time to understand how you can get to the heights of perfection with video editing. Are you excited about this? Wondershare Filmora provides you with the perfect environment to cater to this. However, what do you actually need across this tool? Let’s find out!

For Win 7 or later (64-bit)
For macOS 10.12 or later
Crop & Zoom Video
Do you think you’ve taken a video of a bigger frame? Filmora helps you cover the frame by cropping or zooming it without compromising the quality of the video.
Reverse Playing
Are you a creative vlogger who wishes to show a sneak peek of their video in reverse? Filmora provides the option of reversing the contents of the video across the timeline.
Mosaic Blur Effect
Wish to hide something important? Wondershare Filmora contains a mosaic blur effect that can be easily induced across the video without any issue.
Changing Playback Speed
Wondershare Filmora can be easily used for slowing or speeding the videos. The playback speed is quite manageable under the given options, which enhances the quality of the video.
Chroma Key
Wish to remove the specific colors of an overlay within the video? Chroma key in Filmora is the option that removes the green out of the video if any.
Conclusion
Video content is a very delicate subject for making videos from scratch. The first option that needs to be considered in resources is YouTube cameras. This article has featured options known as the best camera for YouTube videos. You can consider any one of them for your use.
Wondershare Filmora
Get started easily with Filmora’s powerful performance, intuitive interface, and countless effects!
Try It Free Try It Free Try It Free Learn More >

02 Best Video Editor for YouTube Beginners
Part 1: 10 Best Camera for YouTube Beginners
This part will focus on the best options in YouTube vlog camera that can be discovered in the market. Are you ready to get some of the best names you can consider when you start your channel?
Sony ZV-1
Price: $749.99
A complete package, as people say, Sony ZV-1 provides every prominent feature for YouTubers. Known for its exceptional focus, it is attached with real-time tracking and a real-time eye AF system that includes auto-focus when you are moving in the frame. The opportunities provided across Sony ZV-1 are pretty commendable, including the hotshoe.
It could clearly embed in an external mic or an LED light that could be used across different scenes. This caters to everything a YouTuber needs to make a simple video for their channel.
Canon PowerShot G7 X Mark III
Price: $714
Versatility is always welcomed in the market. If you search for a platform that can help you stream 4K videos, Canon PowerShot G7 X Mark III is the perfect option that you can come by. The lens offered across the camera is quite intuitive and flexible for managing all kinds of environments and light conditions that would be provided to the YouTuber.
The ability to take 4K video under 30fps makes this Canon camera an option in the best camera for YouTube.
Blackmagic Pocket Cinema Camera 6K
Price: $1,995
Cinema cameras can be another option you can consider for a YouTube vlog camera. Blackmagic Pocket Cinema Camera comes as the first option you should look into if you are interested in cinema cameras. This new iteration in Blackmagic cameras came with a better sensor with better compatibility options. Along with that, you can easily shoot 6K videos with this proficient camera.
Although YouTubers can use this cinema YouTube camera for making an impressive start in their digital journey, it still has some file format issues that you need to address before buying it.
Sony A6000
Price: $649.99
Are you looking for a camera with the best value-for-money? Tight on your budget for starting the YouTube channel? Sony A6000 turns out to be one of the most effective options in the market that can help YouTubers make fantastic content from the start. Although it does not offer a 4K resolution, it can still be used for Full HD quality, which is quite impressive for starters.
With some solid foundations in the focus and body features, Sony A6000 can be ideally used as a good camera for YouTube.
GoPro Hero10 Black
Price: $499.99
Are you a vlogger who has a fun side to making YouTube videos? The hefty cameras mentioned above are not the ones that could serve you perfectly in your adventures. Here comes the GoPro Hero10 Black, a YouTube camera that is extremely robust and solid that it can fall off grounds, go into lakes, or ride across a car. Where GoPro counters problems of versatility, it keeps a high-end in its internal features.
You can easily enjoy a 5.3K video resolution with 60fps using GoPro Hero10 Black, which outsmarts most in the list. However, GoPro is believed to be more expensive than the rest.
Sony ZV-E10
Price: $699.99
Does your video involve capturing them from home or in a single compact spot? Though you can find many good options for it, Sony ZV-E10 can provide exceptional services to users who have casual use in their videos.
This video camera for YouTube offers better autofocus than many cameras available in the market. However, its compact size makes it the perfect option for users who have homely uses of a camera.
Fujifilm X-T4
Price: $1,699.95
A touch of retro, with features of advanced cameras, Fujifilm can be considered as a video camera for YouTube when you are taking a start across your channel. The camera provides exceptional video specs to the people, beyond 4K resolution in 60fps. The users can also look for 10-bit internal coding and 400Mbps bit-rate across this camera model.
Although being a pricey option, it indeed accounts for among the best options that YouTubers can consider for a start.
Canon EOS 90D
Price: $1,189.95
As you go into the option of stronger cameras, you will find some DSLR cameras making a stand across the best options in a video camera for YouTube. The camera provides exceptional resolution, up to 4K in quality, and 32.5 MP stills for multimedia content. It has a heavier structure for videos; however, being strong can be a positive advantage for the user in many cases.
While weather sealed, you can easily consider using your Canon EOS 90D across harsh weather and different environments.
Panasonic G100
Price: $647.99
Looking for simpler options? We surely have the Panasonic G100 in our minds for you. A camera that is small, compact, and has a decent value; Panasonic G100 may be your perfect choice if you are not a professional in video making. This can be an ideal start in the best camera for YouTube vlogging, which, combined with the body and features, makes it one of the strongest contenders.
Panasonic Lumix GHS II
Price: $1,150.95
This camera is a whole new experience for users in the market. With exceptional features combined with proficient skills, you can make the best YouTube videos for your channel. This YouTube camera supports 4K recording under 60fps, which is not common among most cameras. Along with that, the improvements brought upon in this model from the previous offers better body stabilization.
Panasonic Lumix GHS II is the choice of your life that can help you make the most expressive YouTube videos of your channel.
Part 2: Best Video Editor for YouTube Beginners
Once you go through the cameras that would help you make a YouTube video, it is time to understand how you can get to the heights of perfection with video editing. Are you excited about this? Wondershare Filmora provides you with the perfect environment to cater to this. However, what do you actually need across this tool? Let’s find out!
For Win 7 or later (64-bit)
For macOS 10.12 or later
Crop & Zoom Video
Do you think you’ve taken a video of a bigger frame? Filmora helps you cover the frame by cropping or zooming it without compromising the quality of the video.
Reverse Playing
Are you a creative vlogger who wishes to show a sneak peek of their video in reverse? Filmora provides the option of reversing the contents of the video across the timeline.
Mosaic Blur Effect
Wish to hide something important? Wondershare Filmora contains a mosaic blur effect that can be easily induced across the video without any issue.
Changing Playback Speed
Wondershare Filmora can be easily used for slowing or speeding the videos. The playback speed is quite manageable under the given options, which enhances the quality of the video.
Chroma Key
Wish to remove the specific colors of an overlay within the video? Chroma key in Filmora is the option that removes the green out of the video if any.
Conclusion
Video content is a very delicate subject for making videos from scratch. The first option that needs to be considered in resources is YouTube cameras. This article has featured options known as the best camera for YouTube videos. You can consider any one of them for your use.
Wondershare Filmora
Get started easily with Filmora’s powerful performance, intuitive interface, and countless effects!
Try It Free Try It Free Try It Free Learn More >
Create Amazing Slow-Motion Videos: 8 Affordable Slow-Motion Cameras
Budget slow-motion cameras are not just for filmmakers but are for everyone who loves making eye-catching videos and pictures. These specialized cheap slow mo cameras let us slow down time and see things in smooth frames that we normally can’t. However, not everyone can afford such fancy cameras, which are usually expensive. So, we will talk about affordable slow-motion cameras and their importance in videography.
Slow Motion Video Maker Slow your video’s speed with better control of your keyframes to create unique cinematic effects!
Make A Slow Motion Video Make A Slow Motion Video More Features

Part 1: Some Great Cheap Slow-Motion Cameras One Can Go Across
If you are looking for some cameras that are budget-friendly but still manage to capture those cool, slow-motion moments, this article will help you with it. We will enlist some of the best inexpensive slow-motion cameras you can buy for detailed videography without worrying about your money.
- DJI Pocket 2
- Insta360 One X2
- GoPro HERO11
- Sony Cyber-Shot DSC-RX100 VII
- Canon EOS R50
- Nikon Z6 II
- Canon PowerShot G5 X Mark II
- Fujifilm X-S20
1. DJI Pocket 2
Another budget-friendly camera named DJI Pocket 2 Creative Combo is a small camera perfect for videographers. It fits right in your pocket and is easy for any adventure. The camera has a special feature that keeps videos steady, even when you’re moving. Moreover, its smart tracking feature keeps your subjects in focus no matter how they move. Plus, it takes great pictures with a good sensor and shoots super clear 4K videos at 60 frames per second.
Average Price: $344

2. Insta360 One X2
Insta360 One X2 is a versatile, pocket-sized camera that is your all-in-one filming solution. With this affordable slow-motion camera, you can capture 360-degree footage. You can also use stable wide-angle shots to capture scenes from far away. With its Flow State Stabilization, your videos stay steady without the need for a gimbal. Also, with its 100MB bitrate video recording, you can experience smoother slow-mo videos.
Average Price: $300

3. GoPro HERO11
GoPro HERO11 Black allows you to shoot high-res 5.3K video at 60 fps and 4K at 120 fps. You can capture life’s action in stunning detail with its slow-motion feature. Also, thanks to Hyper Smooth 5.0 stabilization, your footage stays buttery smooth. Whether you’re a pro or a newbie, the one-button controls make it easy to use. All the features of this cheap slow-motion camera are packed into a compact and waterproof design for epic adventures.
Average Price: $299

4. Sony Cyber-Shot DSC-RX100 VII
The Sony RX100 VII is a really powerful slow-motion camera. It’s got a 20.1MP sensor that takes awesome pictures. With its Zeiss Vario-Sonar T lens, it can zoom to a great extent, allowing the capture of scenes with lots of details. Also, it focuses quickly, like in 0.02 seconds, and can shoot up to 20 frames per second without any delays. It can shoot 4K videos and has features like Interval Shooting and image stabilization, making it perfect for pro-quality videos.
Average Price: $950

5. Canon EOS R50
The Canon EOS R50 with an RF-S18-45mm STM Lens is a camera designed for filmmakers. The camera can shoot 4K videos and even super clear Full HD videos at 120 frames per second. Another handy thing is its auto-assist feature that helps with different photo settings. The focusing system is accurate and can quickly focus on different objects. And when the light isn’t great, it has a built-in flash that helps take better slow-motion videos at night.
Average Price: $699

6. Nikon Z6 II
Nikon Z6 II captures smooth slow-motion at Full HD/120p. It also provides a stunning 4K Ultra HD/60p video for a professional look. With an impressive 24.5 MP sensor, it excels in low-light conditions. You can stay powered on the go with the convenience of charging via USB-C while shooting. So, enjoy the lightweight and compact design of this affordable slow-motion camera for easy portability.
Average Price: $1500

7. Canon PowerShot G5 X Mark II
Canon PowerShot G5 X Mark II has a good 20.1-megapixel 1.0-inch Stacked CMOS Sensor that makes pictures look amazing. It also has a 5x Optical Zoom Lens with Optical Image Stabilizer, so it’s great for taking different kinds of clear and sharp photos. Plus, you can shoot awesome videos with this cheap slow-mo camera at 120 frames per second. This feature makes this camera an ideal choice for professional videography.
Average Price: $949

8. Fujifilm X-S20
The Fujifilm X-S20 is an in-expensive slow-motion camera known for its advanced features. With a 26.1MP sensor, this camera captures high-quality images and videos. The 3.0-inch vari-angle touchscreen is user-friendly to allow even beginners to shoot professional videos. Moreover, it is ideal for aesthetic video recording, as it can capture footage in an impressive 6.2K resolution.
Average Price: $1299

Part 2: Make Perfect Slow-Motion Videos with The Best Desktop Application
Let’s discuss making slow-motion videos without using any particular camera. You heard it right! It is possible to generate a slow-motion video filmed by any smartphone camera. You just have to install Wondershare Filmora on your system and import the video into it. This tool is capable of slowing down video smoothly with the help of its advanced AI features.
Wondershare Filmora also helps you to generate AI music and scripts that enhance your productivity. Moreover, it runs without any lagging, allowing you to continue the editing process seamlessly. Explore more features of Filmora below.
Steps Involved to Slow Down Video Professionally with Speed Ramping
In this section, we will learn how to edit your video to slow down using Filmora. Wondershare Filmora has a feature named Speed Ramping that allows you to slow down different parts of a video. Let’s discover how this can be achieved in a step-wise fashion.
Free Download For Win 7 or later(64-bit)
Free Download For macOS 10.14 or later
Step 1Activate Filmora and Import the Video
To begin, open Wondershare Filmora and create a new project, followed by importing your video. Subsequently, click the “+” icon on the video and choose the “Match to Media” option to ensure your project settings match the video’s resolution.

Step 2Make the Video to Slow Down
Add the video to the timeline and select the “Speed” icon. Then, pick a preset like 0.5x from the “Slow” menu to slow down the entire clip. On the other hand, you can also right-click the video, go to “Speed,” then “Uniform Speed,” and drag the slider left for slow motion.

Step 3Applying Speed Ramping on Specific Parts of Video
To create slow motion in specific parts of your video, go to the “Speed Ramping” window and choose the “Custom” option. Make adjustments to the speed by moving points below the line.

Step 4Freeze a Frame in the Video
If you want to freeze a frame, position the play head where you want to freeze it and select the “Add Freeze Frame” option. Set the freeze duration in the “Freeze Time Field” and adjust its position as needed. Click “OK” to save the changes.

Key Features of Wondershare Filmora
Filmora is a versatile video editing software that allows you to perform various tasks easily. This software is being used by professionals because of its innovative features. Some of these advanced features are listed below:
1. AI Copilot Editing
AI Copilot Editing is an innovative way to edit videos. It doesn’t just help; it also checks for mistakes and tells you if something’s wrong. This eliminates various errors and helps you edit smoothly. AI Copilot Editing changes how we edit videos, using smart tech to give helpful support for a smoother and more accurate editing experience.
2. AI Music Generator
The AI Music Generator changes how music gets made and helps create complete music tracks super-fast. You can choose different music styles and genres easily. Whether you need music for movies, for vlogs, or tunes for ads, this tool has you covered. This music can make your projects better and match exactly what you’re aiming for in your content.
3. AI Thumbnail Creator
The Automatic Thumbnail Generator makes creating video thumbnails super easy. It looks at your video and picks out three great shots for you to choose from. You can easily edit these shots to match what you want. You can also add text, titles, or cool graphics to the thumbnails. There are 58 different thumbnail styles to pick from, so you can find one that fits your video.
4. Screen Recorder
The Screen Recorder is an amazing tool that lets you record anything on your computer screen. It can also include your webcam footage while recording. You can capture both the sounds from your microphone and computer at the same time. It’s great for making videos of games, tutorials, or content for YouTube. Plus, it comes with editing tools and effects to make your recordings better before sharing them.
Conclusion
In conclusion, making awesome slow-motion videos doesn’t have to be hard if you’re on a budget. There are lots of affordable slow-mo cameras out there that can shoot great footage. Even then, you can always rely on the Filmora tool that can help create a slow-motion video. In this software, the Speed Ramping feature turns your raw videos into appealing slow-motion ones.
Whether you’ve got a cheap camera or editing tools, the most important thing is your imagination and how you see things.
Make A Slow Motion Video Make A Slow Motion Video More Features
Part 1: Some Great Cheap Slow-Motion Cameras One Can Go Across
If you are looking for some cameras that are budget-friendly but still manage to capture those cool, slow-motion moments, this article will help you with it. We will enlist some of the best inexpensive slow-motion cameras you can buy for detailed videography without worrying about your money.
- DJI Pocket 2
- Insta360 One X2
- GoPro HERO11
- Sony Cyber-Shot DSC-RX100 VII
- Canon EOS R50
- Nikon Z6 II
- Canon PowerShot G5 X Mark II
- Fujifilm X-S20
1. DJI Pocket 2
Another budget-friendly camera named DJI Pocket 2 Creative Combo is a small camera perfect for videographers. It fits right in your pocket and is easy for any adventure. The camera has a special feature that keeps videos steady, even when you’re moving. Moreover, its smart tracking feature keeps your subjects in focus no matter how they move. Plus, it takes great pictures with a good sensor and shoots super clear 4K videos at 60 frames per second.
Average Price: $344
2. Insta360 One X2
Insta360 One X2 is a versatile, pocket-sized camera that is your all-in-one filming solution. With this affordable slow-motion camera, you can capture 360-degree footage. You can also use stable wide-angle shots to capture scenes from far away. With its Flow State Stabilization, your videos stay steady without the need for a gimbal. Also, with its 100MB bitrate video recording, you can experience smoother slow-mo videos.
Average Price: $300
3. GoPro HERO11
GoPro HERO11 Black allows you to shoot high-res 5.3K video at 60 fps and 4K at 120 fps. You can capture life’s action in stunning detail with its slow-motion feature. Also, thanks to Hyper Smooth 5.0 stabilization, your footage stays buttery smooth. Whether you’re a pro or a newbie, the one-button controls make it easy to use. All the features of this cheap slow-motion camera are packed into a compact and waterproof design for epic adventures.
Average Price: $299
4. Sony Cyber-Shot DSC-RX100 VII
The Sony RX100 VII is a really powerful slow-motion camera. It’s got a 20.1MP sensor that takes awesome pictures. With its Zeiss Vario-Sonar T lens, it can zoom to a great extent, allowing the capture of scenes with lots of details. Also, it focuses quickly, like in 0.02 seconds, and can shoot up to 20 frames per second without any delays. It can shoot 4K videos and has features like Interval Shooting and image stabilization, making it perfect for pro-quality videos.
Average Price: $950
5. Canon EOS R50
The Canon EOS R50 with an RF-S18-45mm STM Lens is a camera designed for filmmakers. The camera can shoot 4K videos and even super clear Full HD videos at 120 frames per second. Another handy thing is its auto-assist feature that helps with different photo settings. The focusing system is accurate and can quickly focus on different objects. And when the light isn’t great, it has a built-in flash that helps take better slow-motion videos at night.
Average Price: $699
6. Nikon Z6 II
Nikon Z6 II captures smooth slow-motion at Full HD/120p. It also provides a stunning 4K Ultra HD/60p video for a professional look. With an impressive 24.5 MP sensor, it excels in low-light conditions. You can stay powered on the go with the convenience of charging via USB-C while shooting. So, enjoy the lightweight and compact design of this affordable slow-motion camera for easy portability.
Average Price: $1500
7. Canon PowerShot G5 X Mark II
Canon PowerShot G5 X Mark II has a good 20.1-megapixel 1.0-inch Stacked CMOS Sensor that makes pictures look amazing. It also has a 5x Optical Zoom Lens with Optical Image Stabilizer, so it’s great for taking different kinds of clear and sharp photos. Plus, you can shoot awesome videos with this cheap slow-mo camera at 120 frames per second. This feature makes this camera an ideal choice for professional videography.
Average Price: $949
8. Fujifilm X-S20
The Fujifilm X-S20 is an in-expensive slow-motion camera known for its advanced features. With a 26.1MP sensor, this camera captures high-quality images and videos. The 3.0-inch vari-angle touchscreen is user-friendly to allow even beginners to shoot professional videos. Moreover, it is ideal for aesthetic video recording, as it can capture footage in an impressive 6.2K resolution.
Average Price: $1299
Part 2: Make Perfect Slow-Motion Videos with The Best Desktop Application
Let’s discuss making slow-motion videos without using any particular camera. You heard it right! It is possible to generate a slow-motion video filmed by any smartphone camera. You just have to install Wondershare Filmora on your system and import the video into it. This tool is capable of slowing down video smoothly with the help of its advanced AI features.
Wondershare Filmora also helps you to generate AI music and scripts that enhance your productivity. Moreover, it runs without any lagging, allowing you to continue the editing process seamlessly. Explore more features of Filmora below.
Steps Involved to Slow Down Video Professionally with Speed Ramping
In this section, we will learn how to edit your video to slow down using Filmora. Wondershare Filmora has a feature named Speed Ramping that allows you to slow down different parts of a video. Let’s discover how this can be achieved in a step-wise fashion.
Free Download For Win 7 or later(64-bit)
Free Download For macOS 10.14 or later
Step 1Activate Filmora and Import the Video
To begin, open Wondershare Filmora and create a new project, followed by importing your video. Subsequently, click the “+” icon on the video and choose the “Match to Media” option to ensure your project settings match the video’s resolution.
Step 2Make the Video to Slow Down
Add the video to the timeline and select the “Speed” icon. Then, pick a preset like 0.5x from the “Slow” menu to slow down the entire clip. On the other hand, you can also right-click the video, go to “Speed,” then “Uniform Speed,” and drag the slider left for slow motion.
Step 3Applying Speed Ramping on Specific Parts of Video
To create slow motion in specific parts of your video, go to the “Speed Ramping” window and choose the “Custom” option. Make adjustments to the speed by moving points below the line.
Step 4Freeze a Frame in the Video
If you want to freeze a frame, position the play head where you want to freeze it and select the “Add Freeze Frame” option. Set the freeze duration in the “Freeze Time Field” and adjust its position as needed. Click “OK” to save the changes.
Key Features of Wondershare Filmora
Filmora is a versatile video editing software that allows you to perform various tasks easily. This software is being used by professionals because of its innovative features. Some of these advanced features are listed below:
1. AI Copilot Editing
AI Copilot Editing is an innovative way to edit videos. It doesn’t just help; it also checks for mistakes and tells you if something’s wrong. This eliminates various errors and helps you edit smoothly. AI Copilot Editing changes how we edit videos, using smart tech to give helpful support for a smoother and more accurate editing experience.
2. AI Music Generator
The AI Music Generator changes how music gets made and helps create complete music tracks super-fast. You can choose different music styles and genres easily. Whether you need music for movies, for vlogs, or tunes for ads, this tool has you covered. This music can make your projects better and match exactly what you’re aiming for in your content.
3. AI Thumbnail Creator
The Automatic Thumbnail Generator makes creating video thumbnails super easy. It looks at your video and picks out three great shots for you to choose from. You can easily edit these shots to match what you want. You can also add text, titles, or cool graphics to the thumbnails. There are 58 different thumbnail styles to pick from, so you can find one that fits your video.
4. Screen Recorder
The Screen Recorder is an amazing tool that lets you record anything on your computer screen. It can also include your webcam footage while recording. You can capture both the sounds from your microphone and computer at the same time. It’s great for making videos of games, tutorials, or content for YouTube. Plus, it comes with editing tools and effects to make your recordings better before sharing them.
Conclusion
In conclusion, making awesome slow-motion videos doesn’t have to be hard if you’re on a budget. There are lots of affordable slow-mo cameras out there that can shoot great footage. Even then, you can always rely on the Filmora tool that can help create a slow-motion video. In this software, the Speed Ramping feature turns your raw videos into appealing slow-motion ones.
Whether you’ve got a cheap camera or editing tools, the most important thing is your imagination and how you see things.
Learn How to Trim/Crop Video in Microsoft PowerPoint
Create High-Quality Video - Wondershare Filmora
An easy and powerful YouTube video editor
Numerous video and audio effects to choose from
Detailed tutorials provided by the official channel
PowerPoint allows you to trim or crop the length of your video and save it as a separate media file. Trimming/cropping video is a great way to remove distracting or unnecessary parts of your video or change its dimensions so that it fits within a certain area. Doing this will make your videos captivating, and more people will want to watch them. Keeping that in mind, we’ll explain how you can crop or trim video in PowerPoint. You will also learn some helpful tips that you can use when editing videos on this presentation program.
In this article
01 How to Trim Videos in PowerPoint
02 Bonus! Tips on Editing Videos in Powerpoint
How to Trim Videos in PowerPoint
Many people use Microsoft PowerPoint to prepare basic animated explainers and presentations, but you can learn how to trip or crop videos in this program with the tools that it provides. With that in mind, here is how to trim, reset, or edit videos in PowerPoint.
How to Trim a Video in PowerPoint
You can trip unnecessary content at the start or end of your video clip. However, you can only trim videos you have inserted from your PC, as this feature is not yet available for videos on the web. Follow the steps below to learn how to trim video in PowerPoint.
- If you are in a slide containing a media placeholder, click on Insert Video from File. A window will open; select the From a File option.
- Find the video file on your PC and select it. Then, click the arrow that’s right next to the Insert button. Choose either the Link to File or Insert option and your video will appear on the slide.
- If you are not using a slide that has a media placeholder, find the Insert tab and click Video on My PC. You will be able to locate the video file on your PC.
- You are now ready to trim video PowerPoint.
- Select your video, and the Playback tab will appear. Navigate to the Editing area of the ribbon and hit the Trim Video button.

- You’ll see a small editing window that allows you to trim video in PowerPoint.
- Enter the end and start times for the sections of the video you would like to keep. Alternatively, you can use the markers to choose the start and endpoints.

- To adjust the start and end times in smaller increments, you can use the arrows you see on the sides of those boxes. If you know the exact times, enter them into the corresponding boxes.
- You can also select the portion you would like to keep using the end and start time markers. In this case, sliding the red marker allows you to the end time while the green one lets you set the start time.

- If you want to use a combination of the tools above to pinpoint where to start and end the video, hit the Play button, then click the Pause button when you reach the time you want.

- Enter this time into the End Time or Start Time box, depending on the portion you would like to keep. Or you can move any of the markers to this spot.
- Hit the OK button once the portion of the video clip you want is all set. The video will appear on your slide update, and it will only play the section that you kept when trimming the video.
How to Reset or Edit a Trimmed Video in PowerPoint
If you trim video in PowerPoint and change your mind, you can always edit where you have trimmed it or reset the trimmed video back to its original state. Follow the steps below to learn how to edit to reset a trimmed video in PowerPoint.
- Select your video, and then find the Playback tab.

- Hit the Trim Video button, and the Trim Video Settings will be as they were when you were trimming the video. That means you can make the necessary adjustments.
- To reset a trimmed video back to its original length, slide the red end marker to the right and the green start maker to the left. The OK button allows you to play the whole video in your presentation.

How to Save a Trimmed Video
Now that you have trimmed your video in Microsoft PowerPoint, you might want to save it to use it outside this program. You can only save the video file after compressing it, then you can use the trimmed video as you want.
After compressing your trimmed video, only the trimmed section will show up on your slide. That said, follow the steps below to save your trimmed video:
- From the PowerPoint menu, select File > Info
- Next, select the Compress Media option.
- Next to Compress Media, you will see all media that are in your slideshow, including your trimmed video. If you’ve got other video files here, the compression process will apply to these files.
- Choose the suitable level of compression. A dialog box will pop up as the compression process takes place. Hit the Close button when this process completes.
- Go back to the slide that contains your trimmed video, which has now been compressed.
- Right-click the compressed video, and select the Save Media As option.

- Choose the location where you want to save your video. You can change its name if you want and click the Save button.
You have now successfully saved your trimmed video.
Bonus! Tips on Editing Videos in Powerpoint
Now that you know how to trim video PowerPoint, here are some helpful tips on editing videos on this application.
How to Crop Videos in PowerPoint
Once you have inserted your video in the slide, you have the option of cropping it. Follow these steps below to learn how to crop video PowerPoint.
- Open your presentation and then go to the slide where you have inserted your video clip.
- Double-click or select the video, and the two Video Tools tabs will appear in the ribbon: Playback and Format. Hit the Format tab option to activate it.

- Your slide may show a black rectangle after you insert your video.
- Add a Poster Frame to the video clip to get rid of the black rectangle.
- Click Crop in the Video Tools Format tab.

- On the edges of your video clip, you’ll see dark crop handles. If you use the Video Shape option, the crop handles will appear on the edge of that shape.
- Pressing the Ctrl key on your keyboard while you drag allows you to alter how you crop. Pressing Ctrl plus dragging the side cropping handles resizes two opposite sides, while Ctrl plus dragging the corner cropping handles resizes all the four sides.
- Pressing the Shift key on your keyboard while dragging will give you different results. You can also use the Shift and Ctrl keys simultaneously to combine both capabilities.
- You can reposition the crop by either moving the video itself or the crop area.
- Crop the unwanted portion by hitting the Crop button again or pressing the Enter key. You can also click on the Slide Area to apply the cropping changes.
- You can access more crop options by right-clicking the video, where a contextual menu will appear. Select the Format Video option.
- You’ll see the Format Video Task Pane; select the Crop option.

- You can crop sections of the video by specifying the Picture or Crop Position. You can also change other crop parameters, such as Top, Left, Offset Y, Offset X, Height, and Width.

How to Play Video Inside a Shape
If you want to edit your video and enhance its appearance, you can have it play inside a unique shape instead of the usual rectangle format that videos play in. In turn, you’ll draw attention to your video.
To play your video in an unusual shape, select your video and navigate to the Format tab. Then, go to the Video Shape menu, where you’ll see multiple shapes to choose from.

How to Apply Preset Video Styles
You can also liven up your video by applying one of the pre-designed styles that PowerPoints provides. These styles combine various effects, including bevels, reflections, shadows, tilts, and frames.
Applying preset video styles is a simple process. Select the video, then navigate to the Format tab. Click More under the Video Style section. You’ll see a gallery of preset styles; roll your mouse over it and hold the cursor over any style type. The program will apply a live preview of this style to your video.

Conclusion
● You can use PowerPoint to crop, trim, and add video styles to your videos to make them more attractive to your audience by following the steps above. In turn, they will get more views and attract more attention.
PowerPoint allows you to trim or crop the length of your video and save it as a separate media file. Trimming/cropping video is a great way to remove distracting or unnecessary parts of your video or change its dimensions so that it fits within a certain area. Doing this will make your videos captivating, and more people will want to watch them. Keeping that in mind, we’ll explain how you can crop or trim video in PowerPoint. You will also learn some helpful tips that you can use when editing videos on this presentation program.
In this article
01 How to Trim Videos in PowerPoint
02 Bonus! Tips on Editing Videos in Powerpoint
How to Trim Videos in PowerPoint
Many people use Microsoft PowerPoint to prepare basic animated explainers and presentations, but you can learn how to trip or crop videos in this program with the tools that it provides. With that in mind, here is how to trim, reset, or edit videos in PowerPoint.
How to Trim a Video in PowerPoint
You can trip unnecessary content at the start or end of your video clip. However, you can only trim videos you have inserted from your PC, as this feature is not yet available for videos on the web. Follow the steps below to learn how to trim video in PowerPoint.
- If you are in a slide containing a media placeholder, click on Insert Video from File. A window will open; select the From a File option.
- Find the video file on your PC and select it. Then, click the arrow that’s right next to the Insert button. Choose either the Link to File or Insert option and your video will appear on the slide.
- If you are not using a slide that has a media placeholder, find the Insert tab and click Video on My PC. You will be able to locate the video file on your PC.
- You are now ready to trim video PowerPoint.
- Select your video, and the Playback tab will appear. Navigate to the Editing area of the ribbon and hit the Trim Video button.
- You’ll see a small editing window that allows you to trim video in PowerPoint.
- Enter the end and start times for the sections of the video you would like to keep. Alternatively, you can use the markers to choose the start and endpoints.
- To adjust the start and end times in smaller increments, you can use the arrows you see on the sides of those boxes. If you know the exact times, enter them into the corresponding boxes.
- You can also select the portion you would like to keep using the end and start time markers. In this case, sliding the red marker allows you to the end time while the green one lets you set the start time.
- If you want to use a combination of the tools above to pinpoint where to start and end the video, hit the Play button, then click the Pause button when you reach the time you want.
- Enter this time into the End Time or Start Time box, depending on the portion you would like to keep. Or you can move any of the markers to this spot.
- Hit the OK button once the portion of the video clip you want is all set. The video will appear on your slide update, and it will only play the section that you kept when trimming the video.
How to Reset or Edit a Trimmed Video in PowerPoint
If you trim video in PowerPoint and change your mind, you can always edit where you have trimmed it or reset the trimmed video back to its original state. Follow the steps below to learn how to edit to reset a trimmed video in PowerPoint.
- Select your video, and then find the Playback tab.
- Hit the Trim Video button, and the Trim Video Settings will be as they were when you were trimming the video. That means you can make the necessary adjustments.
- To reset a trimmed video back to its original length, slide the red end marker to the right and the green start maker to the left. The OK button allows you to play the whole video in your presentation.
How to Save a Trimmed Video
Now that you have trimmed your video in Microsoft PowerPoint, you might want to save it to use it outside this program. You can only save the video file after compressing it, then you can use the trimmed video as you want.
After compressing your trimmed video, only the trimmed section will show up on your slide. That said, follow the steps below to save your trimmed video:
- From the PowerPoint menu, select File > Info
- Next, select the Compress Media option.
- Next to Compress Media, you will see all media that are in your slideshow, including your trimmed video. If you’ve got other video files here, the compression process will apply to these files.
- Choose the suitable level of compression. A dialog box will pop up as the compression process takes place. Hit the Close button when this process completes.
- Go back to the slide that contains your trimmed video, which has now been compressed.
- Right-click the compressed video, and select the Save Media As option.
- Choose the location where you want to save your video. You can change its name if you want and click the Save button.
You have now successfully saved your trimmed video.
Bonus! Tips on Editing Videos in Powerpoint
Now that you know how to trim video PowerPoint, here are some helpful tips on editing videos on this application.
How to Crop Videos in PowerPoint
Once you have inserted your video in the slide, you have the option of cropping it. Follow these steps below to learn how to crop video PowerPoint.
- Open your presentation and then go to the slide where you have inserted your video clip.
- Double-click or select the video, and the two Video Tools tabs will appear in the ribbon: Playback and Format. Hit the Format tab option to activate it.
- Your slide may show a black rectangle after you insert your video.
- Add a Poster Frame to the video clip to get rid of the black rectangle.
- Click Crop in the Video Tools Format tab.
- On the edges of your video clip, you’ll see dark crop handles. If you use the Video Shape option, the crop handles will appear on the edge of that shape.
- Pressing the Ctrl key on your keyboard while you drag allows you to alter how you crop. Pressing Ctrl plus dragging the side cropping handles resizes two opposite sides, while Ctrl plus dragging the corner cropping handles resizes all the four sides.
- Pressing the Shift key on your keyboard while dragging will give you different results. You can also use the Shift and Ctrl keys simultaneously to combine both capabilities.
- You can reposition the crop by either moving the video itself or the crop area.
- Crop the unwanted portion by hitting the Crop button again or pressing the Enter key. You can also click on the Slide Area to apply the cropping changes.
- You can access more crop options by right-clicking the video, where a contextual menu will appear. Select the Format Video option.
- You’ll see the Format Video Task Pane; select the Crop option.
- You can crop sections of the video by specifying the Picture or Crop Position. You can also change other crop parameters, such as Top, Left, Offset Y, Offset X, Height, and Width.
How to Play Video Inside a Shape
If you want to edit your video and enhance its appearance, you can have it play inside a unique shape instead of the usual rectangle format that videos play in. In turn, you’ll draw attention to your video.
To play your video in an unusual shape, select your video and navigate to the Format tab. Then, go to the Video Shape menu, where you’ll see multiple shapes to choose from.
How to Apply Preset Video Styles
You can also liven up your video by applying one of the pre-designed styles that PowerPoints provides. These styles combine various effects, including bevels, reflections, shadows, tilts, and frames.
Applying preset video styles is a simple process. Select the video, then navigate to the Format tab. Click More under the Video Style section. You’ll see a gallery of preset styles; roll your mouse over it and hold the cursor over any style type. The program will apply a live preview of this style to your video.
Conclusion
● You can use PowerPoint to crop, trim, and add video styles to your videos to make them more attractive to your audience by following the steps above. In turn, they will get more views and attract more attention.
Also read:
- Learn Top Best Free LUTs For Premiere Pro
- Updated This Article Aims to Provide a Step-by-Step Guide to Changing a Videos Speed by Using the Speed Adjustment Panel and Duration Panel on Wondershare Filmora
- Updated How to Animate Designs With Canva GIF
- New Attaining Slow Motion Video Trend Finding The Best CapCut Templates
- New Top 10 Best Free Video Compressors
- New Best Video Title Generators
- Updated Easily Cut Large Video Faster on Mac for 2024
- Updated The Complete Guide to Making Fortnite Montage
- New 2024 Approved 3GP Video Format What Is 3GP Format And How To Play It?
- In 2024, Step by Step Guide of Make Gimp Transparent Background PNG
- Updated Best Ways to Convert Video Frame Rate to 60FPS Software and Online Choices for 2024
- New 4 Ways to Loop a Video on Vimeo
- How to Create LUTs with LUTs Generator for 2024
- Updated In 2024, FLV Editor for Windows 11/10/8.1/8/7 Easily Edit FLV Videos on PC
- In 2024, Useful Guide to Speed Up/Down Videos in VLC
- A Detailed Guid to Remove Background From a Video in Premier Pro
- 2024 Approved Top 5 Best Video Denoisers
- Updated In 2024, Introduction to The Best Cinematic LUTs in The Market
- New In 2024, How to Create Vintage Film Effect 1990S
- In 2024, With Many Available Video Editing Solutions in the Market Today, It Is a Bit Hard to Choose the Best Video Editing Software for Your Unique Needs
- A Full Guide to Funcall Voice Changer and Its Alternatives
- Voice Changer for Discord | Use Voicemod on Discord for 2024
- Speed up Video on Splice for 2024
- New Are You Curious About the Functionality of LUTs in LumaFusion? This Article Will Satisfy Your Queries with Ease
- Add Selective Color Effect to Your Videos Using Filmora for 2024
- 6 Instant Ways to Create Windows 10 Slideshow for 2024
- Updated How To Create a Polaroid Collage for 2024
- 2024 Approved Do You Want to Slow Down Your TikTok Video and Zoom on a Specific Part? This Is No Longer a Difficult Task as This Video Comes up with the Right Set of Methods that Can Be Used to Implement the Slow Zoom Effect TikTok
- Do You Want to Make Your Photos and Videos Look Different From Others? There Are Many Lightroom LUTs Free, and They Make Your Media Content Stand Out From Others
- New How To Achieve LumaFusion Color Grading Through LUTs for 2024
- In 2024, 15 Best Vloggers That You Should Follow for Travel
- Updated 6 Best Text to Speech Generators for YouTube Videos Windows, Mac, Android, iPhone & Online for 2024
- Updated 2024 Approved How to Create and Add an Adjustment Layer in Final Cut Pro
- New Best 5 Solutions on How to Add Emojis to iPhone for 2024
- How To Use Slow Zoom Effect in Your Video for 2024
- Do You Know Adding Subtitles Can Benefit Video Content? Meanwhile, for Adding Subtitles to a Video, Wondershare Filmora Can Help You
- Updated 2024 Approved Blender - A Video Editor for Every Professional
- In 2024, How to Make a Vacation Slideshow in 5 Minutes
- Updated Detailed Guide to Crop Videos in Sony Vegas Pro
- New In 2024, How To Edit Youtube Videos In Simple Steps
- In 2024, Create a Kickass COD Warzone Thumbnail for Free
- New 2024 Approved 3 Ways to Make Time-Lapse Video on MacBook
- How to Cast Vivo Y56 5G Screen to PC Using WiFi | Dr.fone
- In 2024, Best Vivo V29 Pattern Lock Removal Tools Remove Android Pattern Lock Without Losing Data
- PassFab Apple iPhone SE (2020) Backup Unlocker Top 4 Alternatives
- Easy steps to recover deleted messages from Spark 20 Pro
- What to Do if Google Play Services Keeps Stopping on Motorola Edge+ (2023) | Dr.fone
- In 2024, How to Fix Locked Apple ID on Apple iPhone XS Max
- Why is iPogo not working On Nokia C300? Fixed | Dr.fone
- In 2024, Apple ID Unlock From Apple iPhone X? How to Fix it?
- Realme 12 Pro+ 5G Screen Unresponsive? Heres How to Fix It | Dr.fone
- How to Fix Error 495 While Download/Updating Android Apps On Sony Xperia 1 V | Dr.fone
- How To Revive Your Bricked Sony Xperia 5 V in Minutes | Dr.fone
- Step-by-Step Tutorial How To Bypass HTC U23 Pro FRP
- Top 5 Xiaomi Redmi Note 12 5G Bypass FRP Tools for PC That Actually Work
- In 2024, How can I get more stardust in pokemon go On Vivo Y78t? | Dr.fone
- Additional Tips About Sinnoh Stone For Nokia C12 | Dr.fone
- In 2024, Preparation to Beat Giovani in Pokemon Go For Samsung Galaxy A14 5G | Dr.fone
- Forgot iPhone Passcode Again? Unlock Apple iPhone 15 Without Passcode Now | Dr.fone
- In 2024, How to Change GPS Location on OnePlus Ace 2 Easily & Safely | Dr.fone
- 10 Best Fake GPS Location Spoofers for Samsung Galaxy A15 4G | Dr.fone
- In 2024, FRP Hijacker by Hagard Download and Bypass your Nokia C22 FRP Locks
- In 2024, 3 Ways to Change Location on Facebook Marketplace for Realme Narzo N53 | Dr.fone
- How to Cast Nokia 105 Classic to Computer for iPhone and Android? | Dr.fone
- What Pokémon Evolve with A Dawn Stone For Vivo Y17s? | Dr.fone
- In 2024, 8 Ways to Transfer Photos from Tecno Pova 5 Pro to iPhone Easily | Dr.fone
- In 2024, Unlock Your iPhone 6 Plus in Minutes with ICCID Code Everything You Need to Know
- How to Recover Apple iPhone 15 Data From iOS iTunes Backup? | Dr.fone
- How to recover deleted contacts from Honor 90 GT.
- In 2024, How to Screen Mirroring Motorola Edge 40 Pro to PC? | Dr.fone
- 6 Solutions to Fix Error 505 in Google Play Store on Oppo A78 | Dr.fone
- How to Change Google Play Location On Nubia Z50S Pro | Dr.fone
- 6 Methods to Mirror Apple iPhone X to your Windows PC | Dr.fone
- In 2024, Unlock Your Infinix Hot 30 5G Phone with Ease The 3 Best Lock Screen Removal Tools
- In 2024, How to Migrate Android Data From ZTE Nubia Flip 5G to New Android Phone? | Dr.fone
- Play HEVC H.265 on Motorola Edge 2023, is it possible?
- 8 Ultimate Fixes for Google Play Your ZTE Nubia Z60 Ultra Isnt Compatible | Dr.fone
- In 2024, Does Life360 Notify When You Log Out On Xiaomi Redmi Note 13 Pro+ 5G? | Dr.fone
- How to Reset a Locked Motorola G24 Power Phone
- The way to get back lost videos from Samsung
- In 2024, How To Change Honor Magic 6 Pro Lock Screen Password?
- Title: How to Make A Jaw-Dropping Time Lapse Video? Full Guide for 2024
- Author: Chloe
- Created at : 2024-04-24 07:08:12
- Updated at : 2024-04-25 07:08:12
- Link: https://ai-editing-video.techidaily.com/how-to-make-a-jaw-dropping-time-lapse-video-full-guide-for-2024/
- License: This work is licensed under CC BY-NC-SA 4.0.
