How to Make A Slideshow Video (+Filmora Techniques)

How to Make A Slideshow Video (+Filmora Techniques)
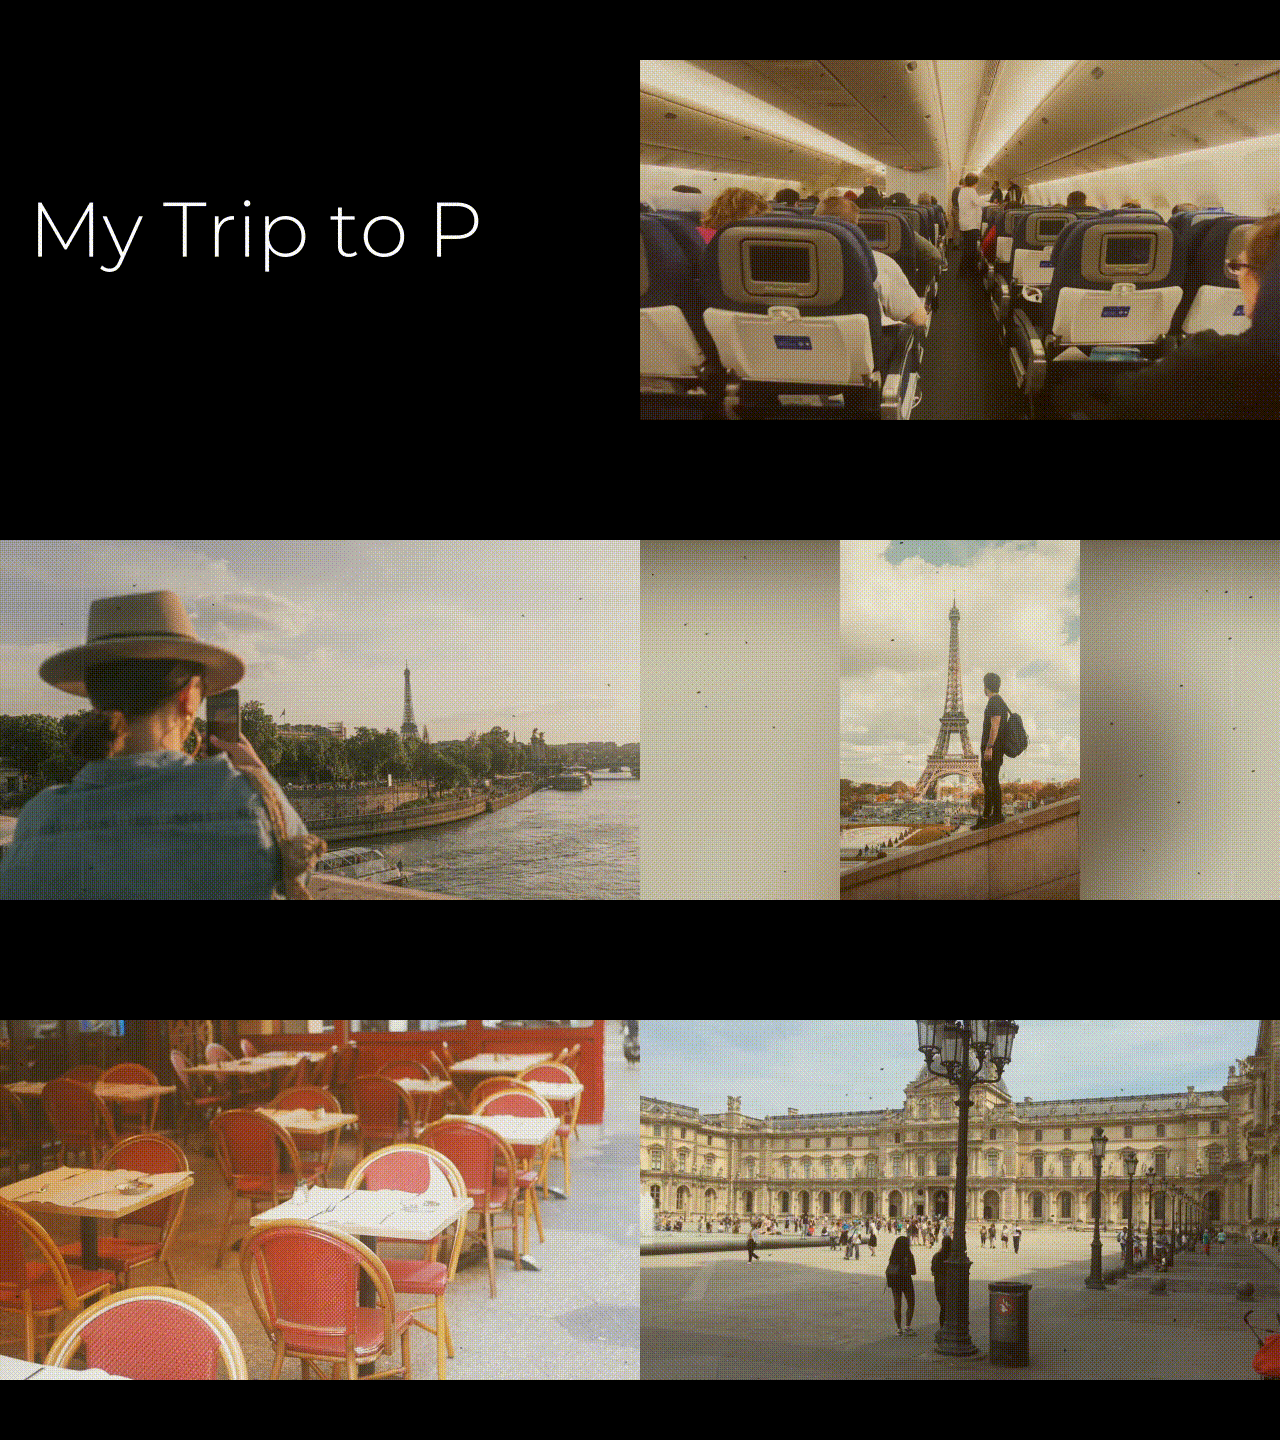
You have taken photos and videos all over your trip. Showing them to your friends and family can be a hassle if you have a lot of pictures. Viewing them all at once is possible by creating a slideshow video.
The slideshow video combines all the memories in one place. To make one on your own, we prefer just one best UI editing tools, Wondershare Filmora.
Before we create a slideshow, ensure to learn the basics of the slideshow video. Then, scroll below to get more!
Part 1. What Is a Slideshow Video?
A slideshow video is a video that combines your photos and videos to create a montage. This slideshow can be used as a collection of memories you can watch whenever you like.
You might have a photo album lying around somewhere in your house. A slideshow video can act like a modern-day photo album. But instead of photos, you can also add videos and create a monument of your precious memories.
Modern-day content creators on Youtube and other platforms can use a slideshow method to create short recap videos of their travels.
Part 2. What Are Some of the Uses of Slideshow Videos?
A slideshow video can be a great way to summarize all the moments of a marriage ceremony, graduation event, etc. And the list goes on and on.
- A wedding ceremony
- Anniversary recording
- A graduation ceremony
- A birthday party
- Your pet
- Your friends
- Your family
- A trip that you went on
Part 3. What Are the Benefits of a Slideshow?
There are many benefits to creating a slideshow video.
A long-lasting memory
Creating a slideshow video can be a digital reminiscent, allowing you to hold a precious video with your friends and family. Apart from physical portraits, a slideshow video will be a digital backup for your memories that you can watch in the future.
Easy to save and share
Since a video slideshow is a digital content, typically with an extension .mp4, .mov, etc., you can watch it whenever and wherever you want. Moreover, you can conveniently send it to the person who spent the time and shares the same memories with you.
Part 4. What Will You Need To Make a Slideshow?
To create an attractive slideshow video, you must fulfill the following requirements.
1. Good Quality Photos
To create a good slideshow, you must have good-quality photos with good resolution. Always take pictures with a good-quality camera or a mobile phone whenever you want to create a slideshow. Using filters in the editing software can disrupt the quality of your slideshow.
2. Video Clips
The slideshow is always combined with videos and photos. After taking good-quality images, remember always to record short video clips you can add between your pictures.
3. A Good Video Editor - Wondershare Filmora
To edit a slideshow video, you will need editing software. There’s no better tool to do the job than Wondershare Filmora . Wondershare Filmora enables you to make creative and appealing videos. It has a very engaging system UI that allows even novice users to get the hang of it quickly. You will learn how to make a slideshow in a few simple steps.
Free Download For Win 7 or later(64-bit)
Free Download For macOS 10.14 or later

Let’s start with the step-by-step instructions for making a slideshow video now that you know the requirements for generating a slideshow.
Part 5. Step-by-Step Guide to Creating a Slideshow Video
Utilizing filmora will reduce your workload while producing quality work. Follow the below step-by-step guide to make your slideshow video instantly!
Step1 Download Wondershare Filmora
Wondershare Filmora will provide the working platform. Follow the below steps to download it:
- First, install the Wondershare Filmora.
- Then, launch this application on your PC or Mac
Let’s proceed to edit our video after downloading the Wondershare Filmora software. Continue reading to find out how to begin the editing process.
Step2 Import your Photos and Videos
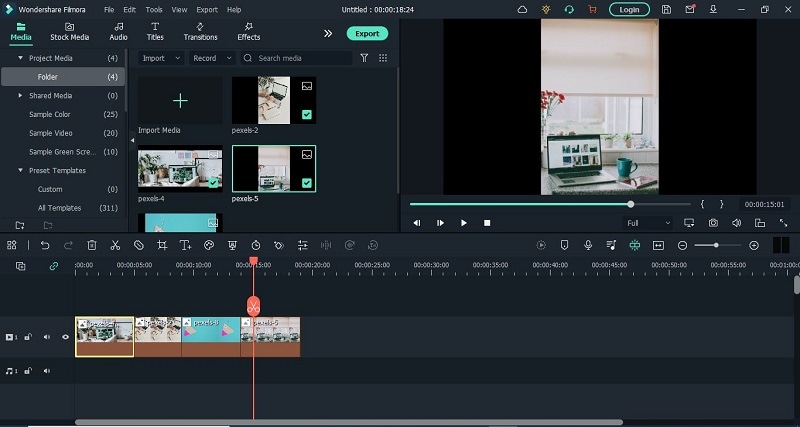
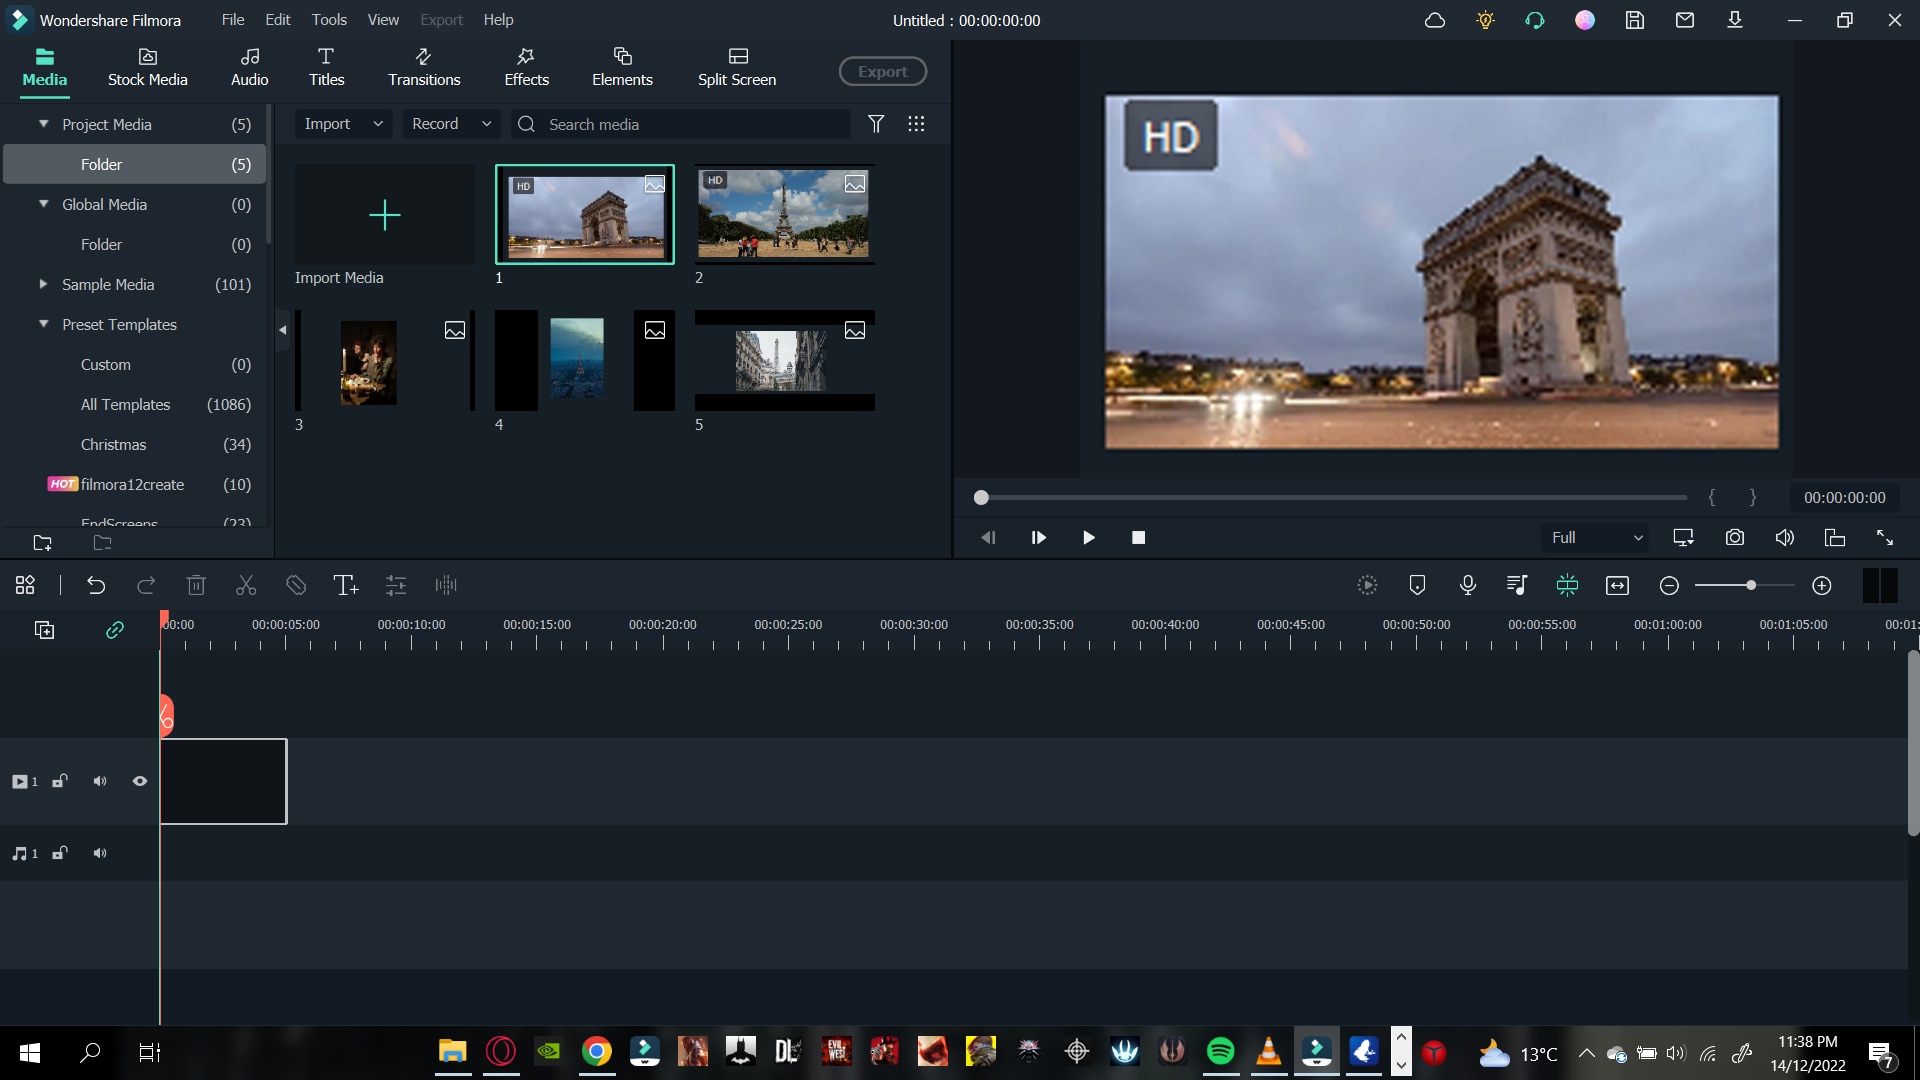
Importing your videos and pictures to Filmora’s media panel is best to have them all in one folder. Therefore, when you open Wondershare Filmora, you will notice the main import window in the top left corner.
- Click in the center of the import window upon the import icon.
- Browse from the PC library to where your target Videos and Photos are stored.
- Please select the required videos and photos and Open
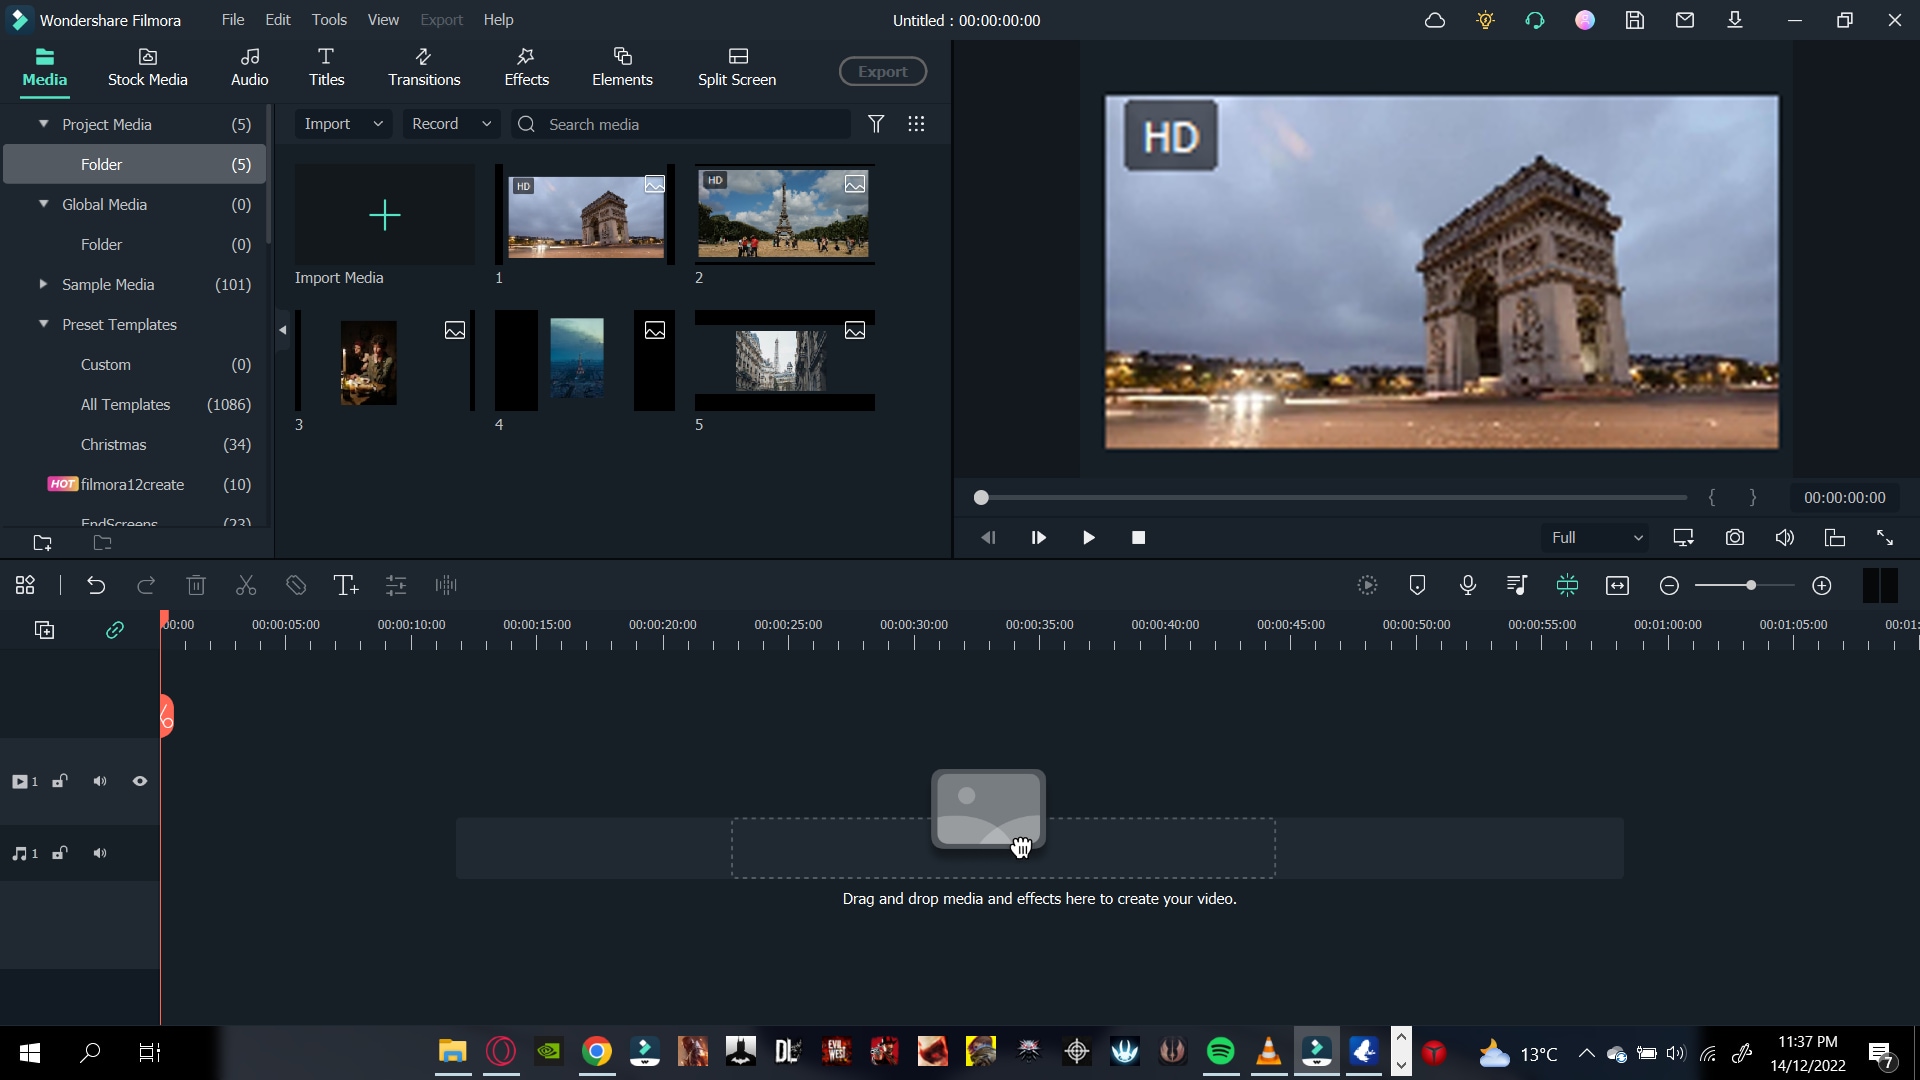
Your next step will be to add the imported videos and images to the timeline.
Step3 Add your Photos and Videos to the Timeline
When you have multiple videos and photos, you can add all of them simultaneously. Or you can also add them one by one wherever you need. Follow the steps mentioned:
- Right-click on the photo or video you want.
- Keep holding the Right-click and drag it down to the timeline.
Now that we have imported your photos and videos into the timeline, it is time to align and add text.
Step4 Add the Title
To create an attractive slideshow, you will need to add a title before the start of the video. Doing so will allow you to gain more viewers and audiences.
Add a Black Screen
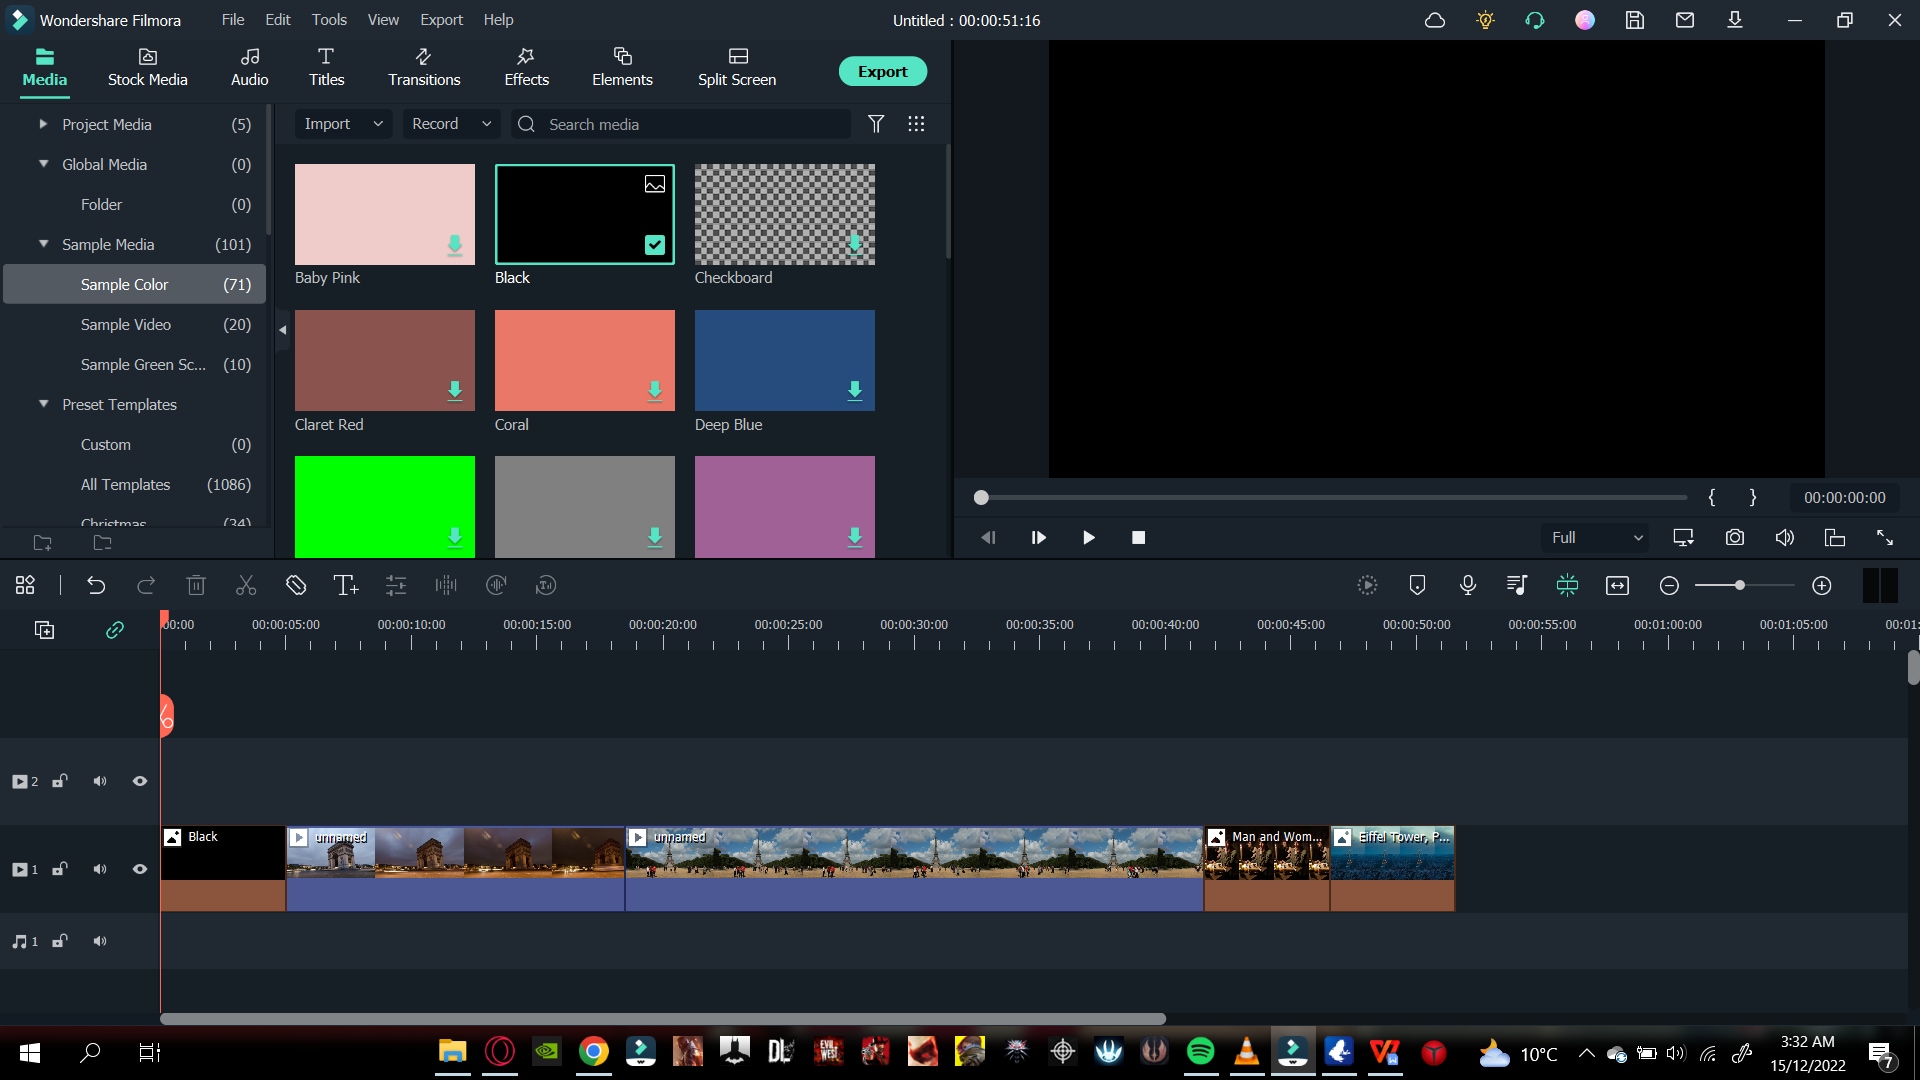
The black screen will eventually act like a canvas to give your title a good look. To add a black screen, follow the steps mentioned:
- Click on the media icon from the bar above the import window.
- You will notice many tabs on the left-hand side under a drop-down bar.
- Scroll below to find the sample media
- Download the black color if it is not downloaded already.
- Click and drag it down below to the start of your video.
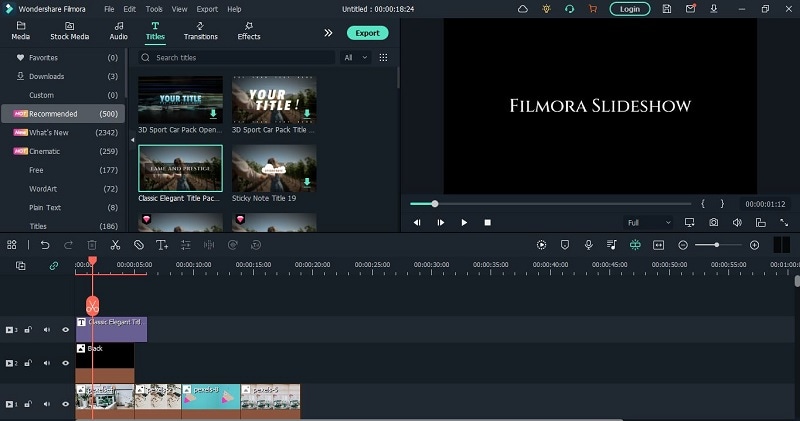
Add a Title Tile
Now that we have our canvas, we will now add the title. Above the import media library, there will be a Title icon.
- Click on the title icon, and select the title that you want for your video by browsing and scrolling down.
- For this purpose, we will use a simple title tile called “Title 29.”
![]()
Note: You can find the same title by scrolling, browsing, or searching in the search bar above the import library.
- Click and drag the title onto the black screen that we added.
- Double-click the title to open its settings.
- Here you can type in the text that you want.
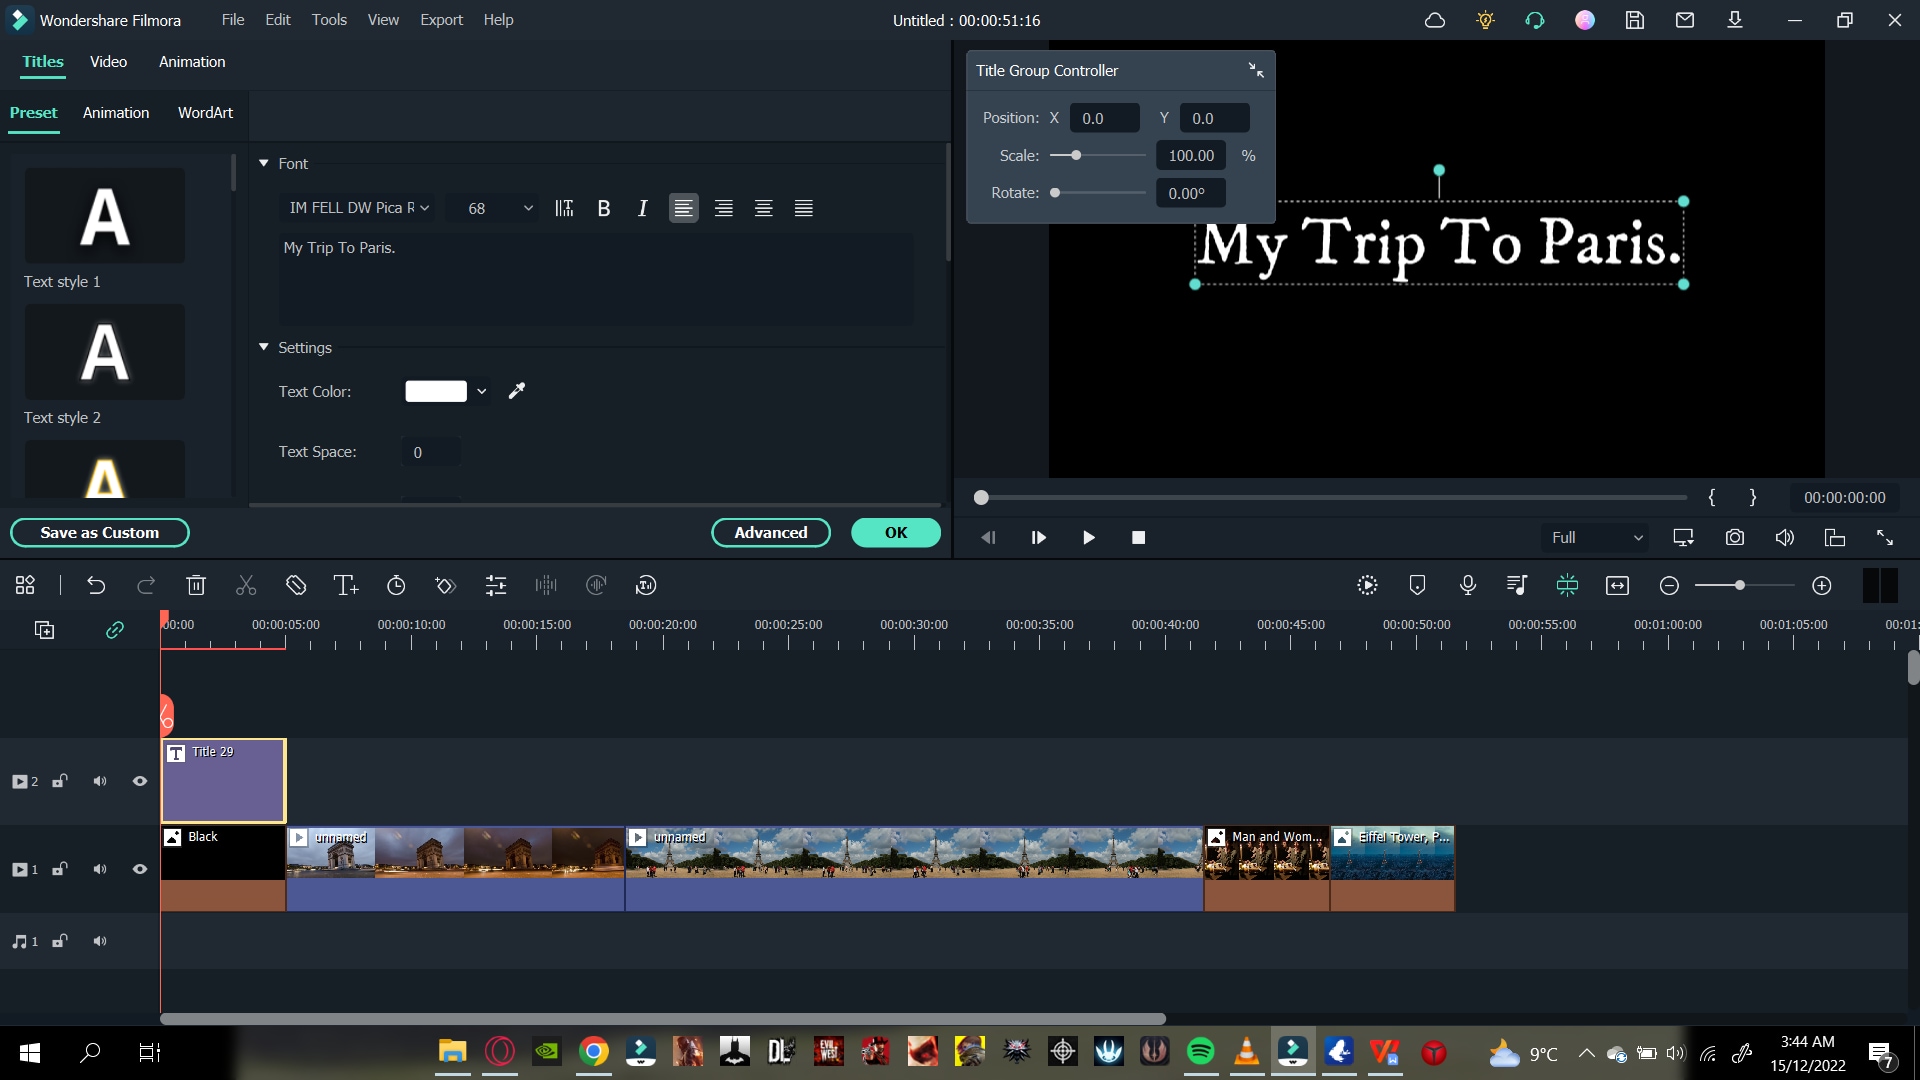
You can also change its font. When you click on the font bar, a drop-down option will pop up, and you choose whichever you like.
- Change the animation of the text title from the top left corner animation
Change The Timing of The Title
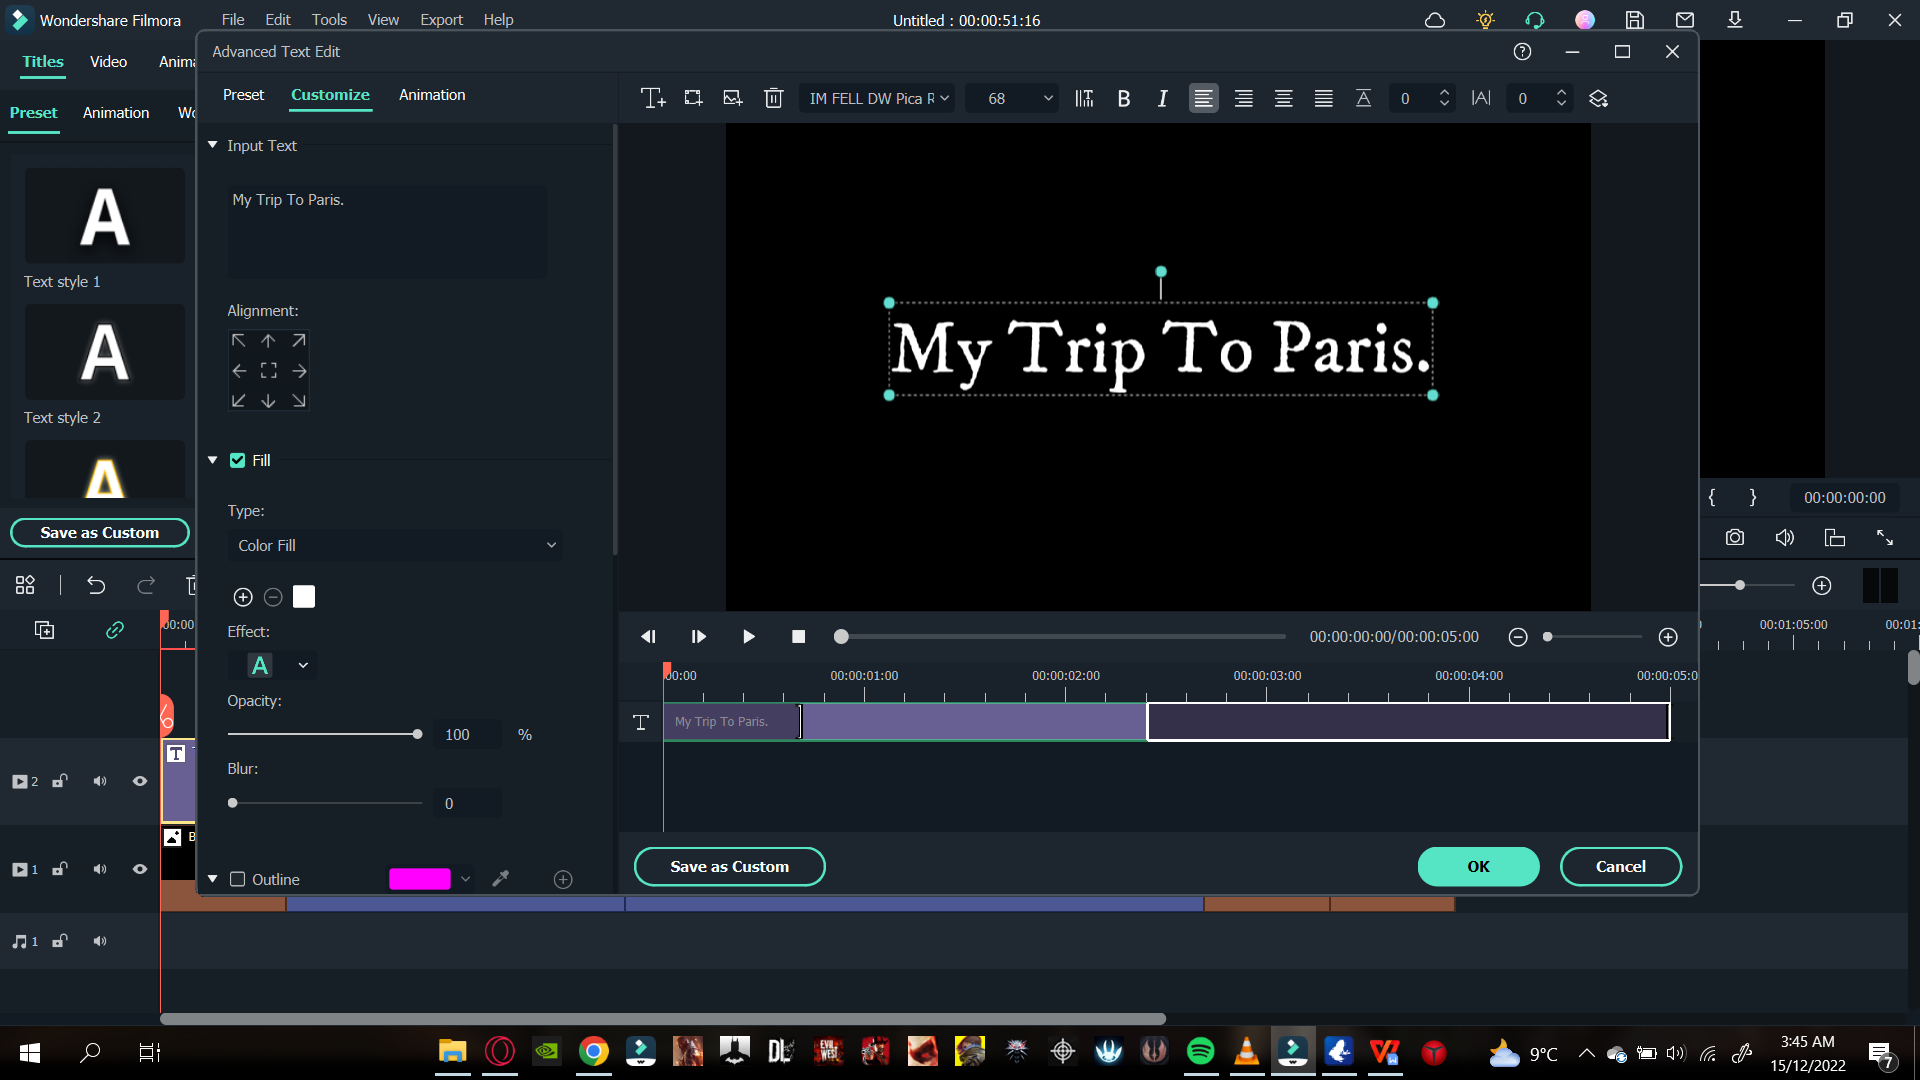
You can also adjust the timing of the title by below steps:
- Click on the advanced option in the bottom right corner, and settings will pop up.
- Find the title bar and drag it to the right side to increase the timing of the title.
After adding the title, it’s time to go with fading effect as shown below!
Step5 Add a Fade effect
You can also add a fade transition to the start of your video. It will blend the title with the first clip. Follow the steps mentioned to add the transition effects:
- Search the Fade option from the Transitions tab above the import window
![]()
Note: A fade transition will allow your title to fade into the first clip creating a visually pleasing effect.
- Download the Fade transition and drag it between the Black screen and the first clip.
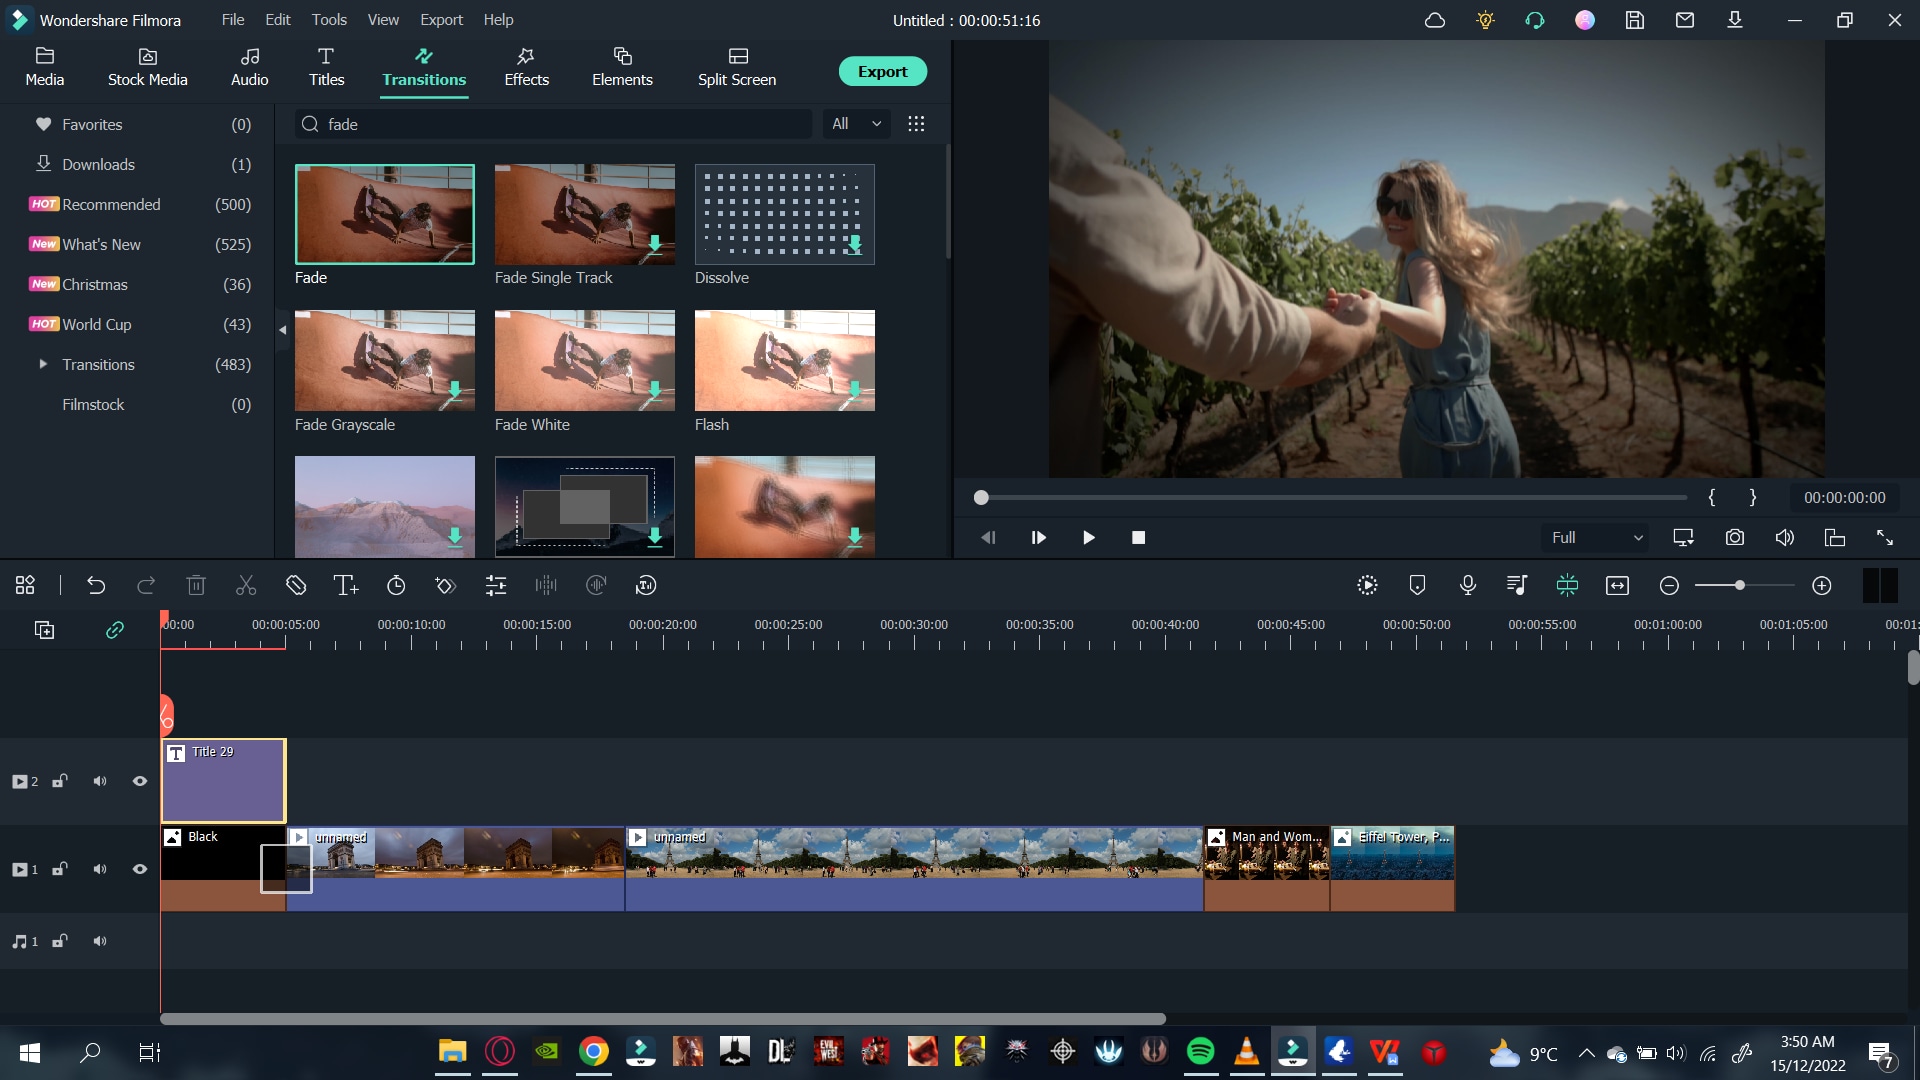
Now that we have added a transition, it is time to move on to our music!
Step6 Add The Music
You can add your music to the slideshow from your PC library, but make sure you have the music rights. It is better to use stock audio by following the steps:
- Click on the Audio icon on the bar above the import window, and the list will pop up.
- Please browse the library to find music that best suits your video and download it.
- Then add it to the timeline’s audio track.
Add Beat Detection
To match your video clips properly with the music, so it remains in sync, you can adjust it with the beat of the music. To add beat detection, follow the steps mentioned:
- Right-Click on the audio that you selected in the audio library.
- You will see a pop-up list, and in the options, you will see Beat detection.
- Click on Beat detection.
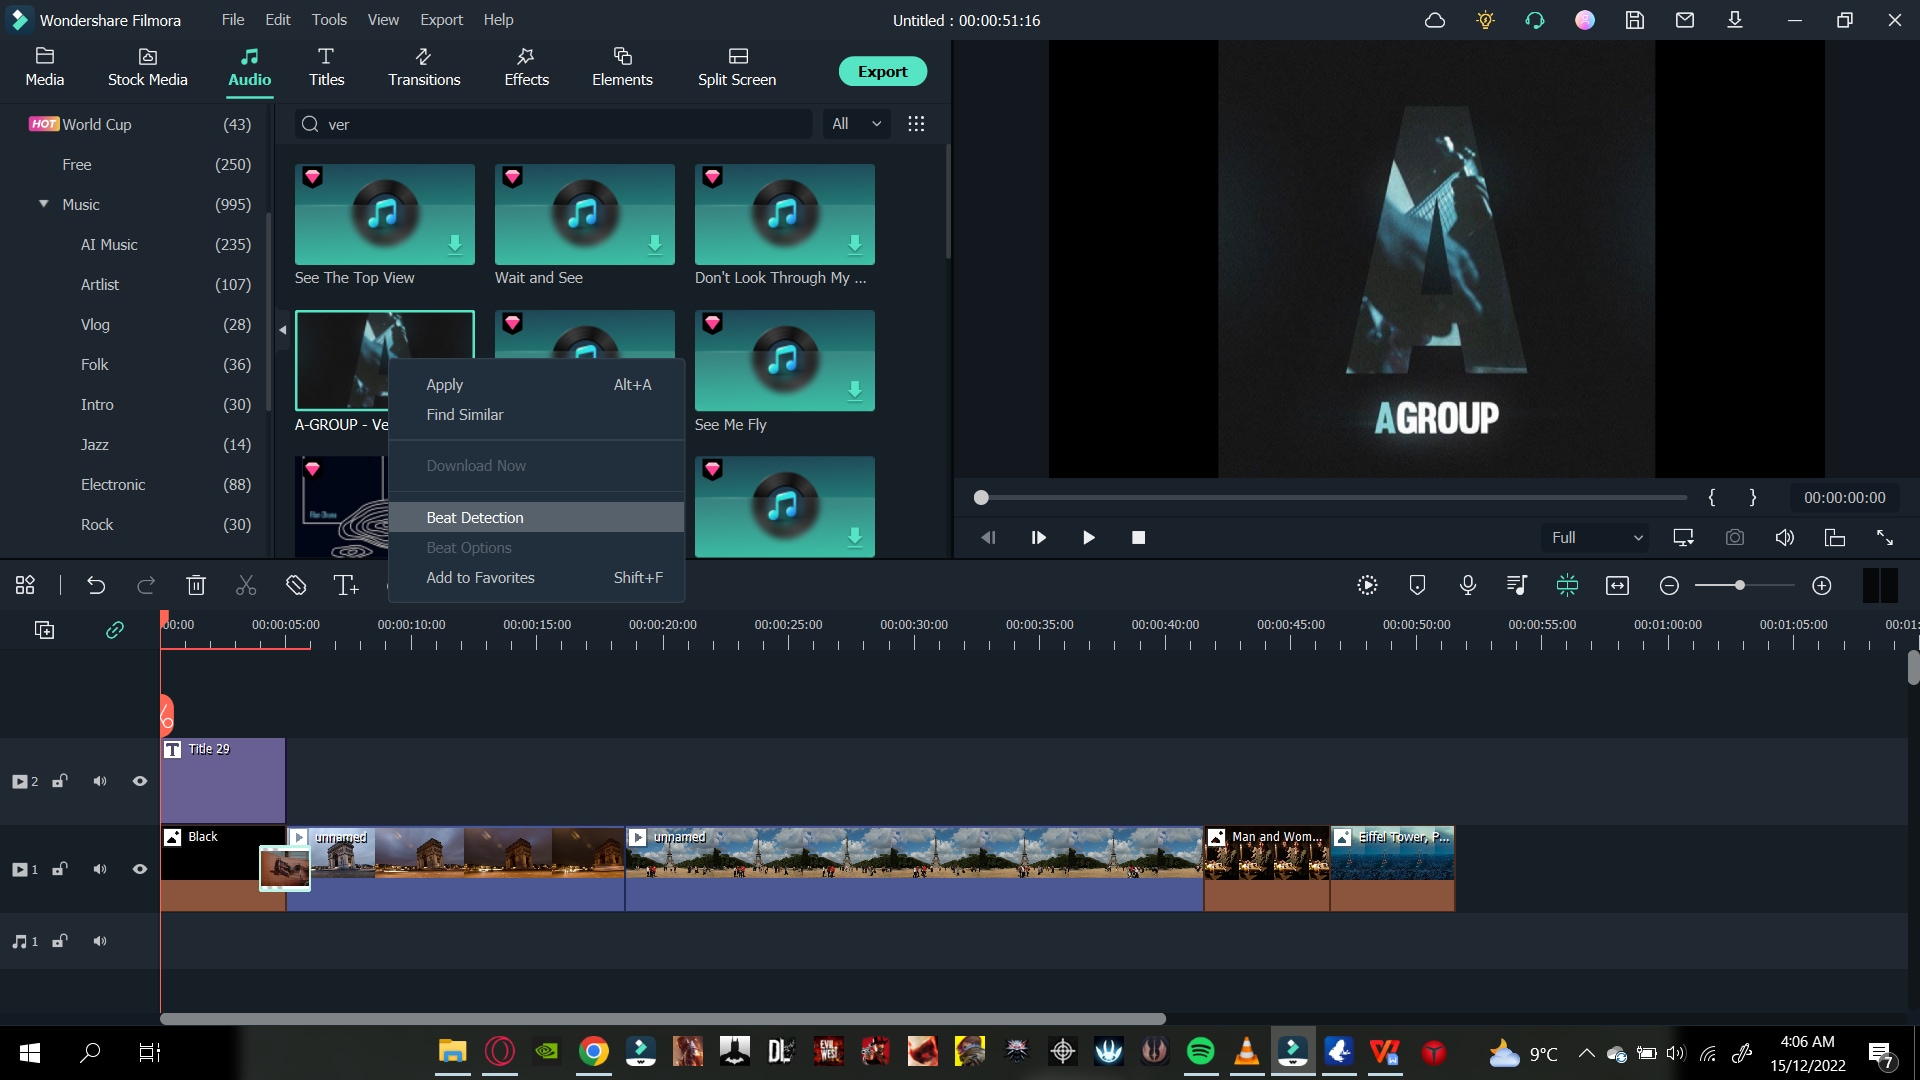
- Then click on the audio and drag it below on the timeline.
Match The Video With The Audio Markers
To have the full advantage of beat detection, you must adjust your videos and photos to the markers. Follow the steps mentioned below to do so:
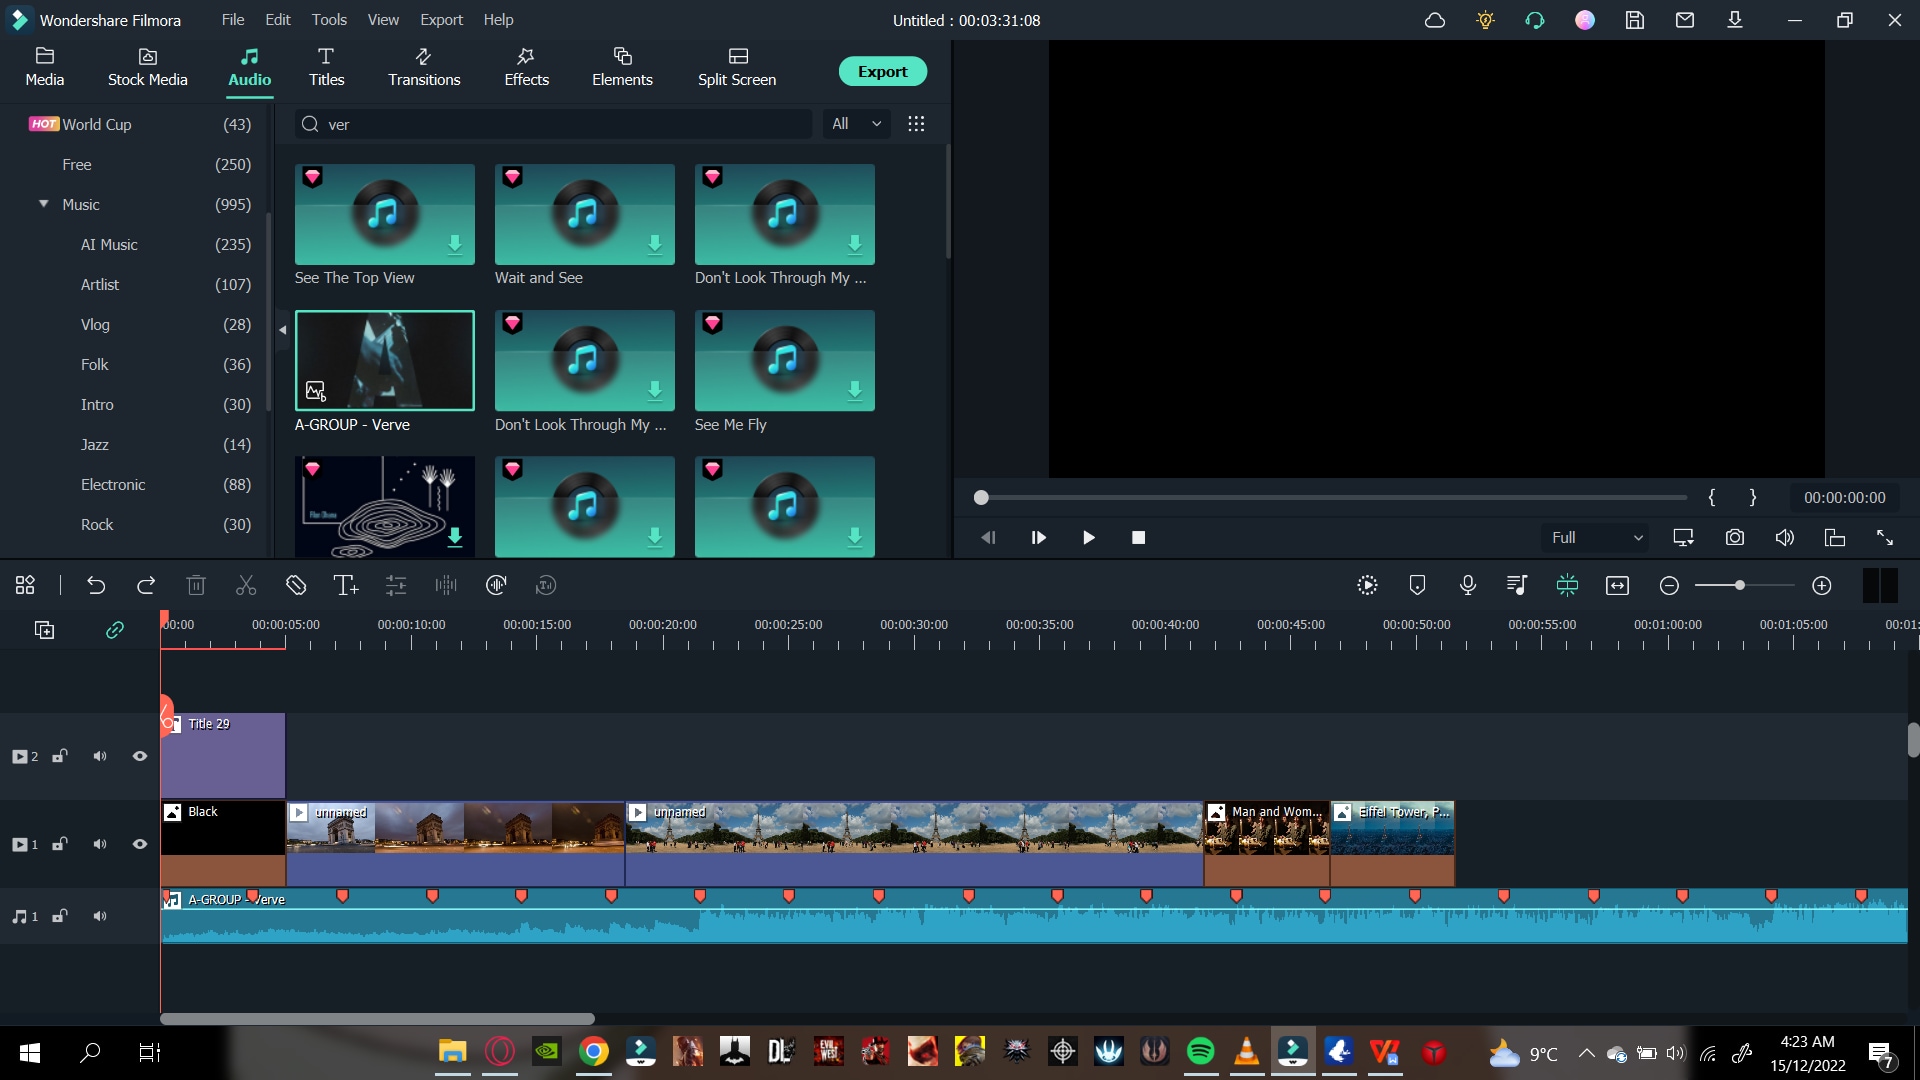
- Check that the video clips are in sync with the marker on the audio.
- For this, drag one video end to a marker or as many videos as you want.
- Ultimately, you will create a timeline in which your videos sync with the audio beat.
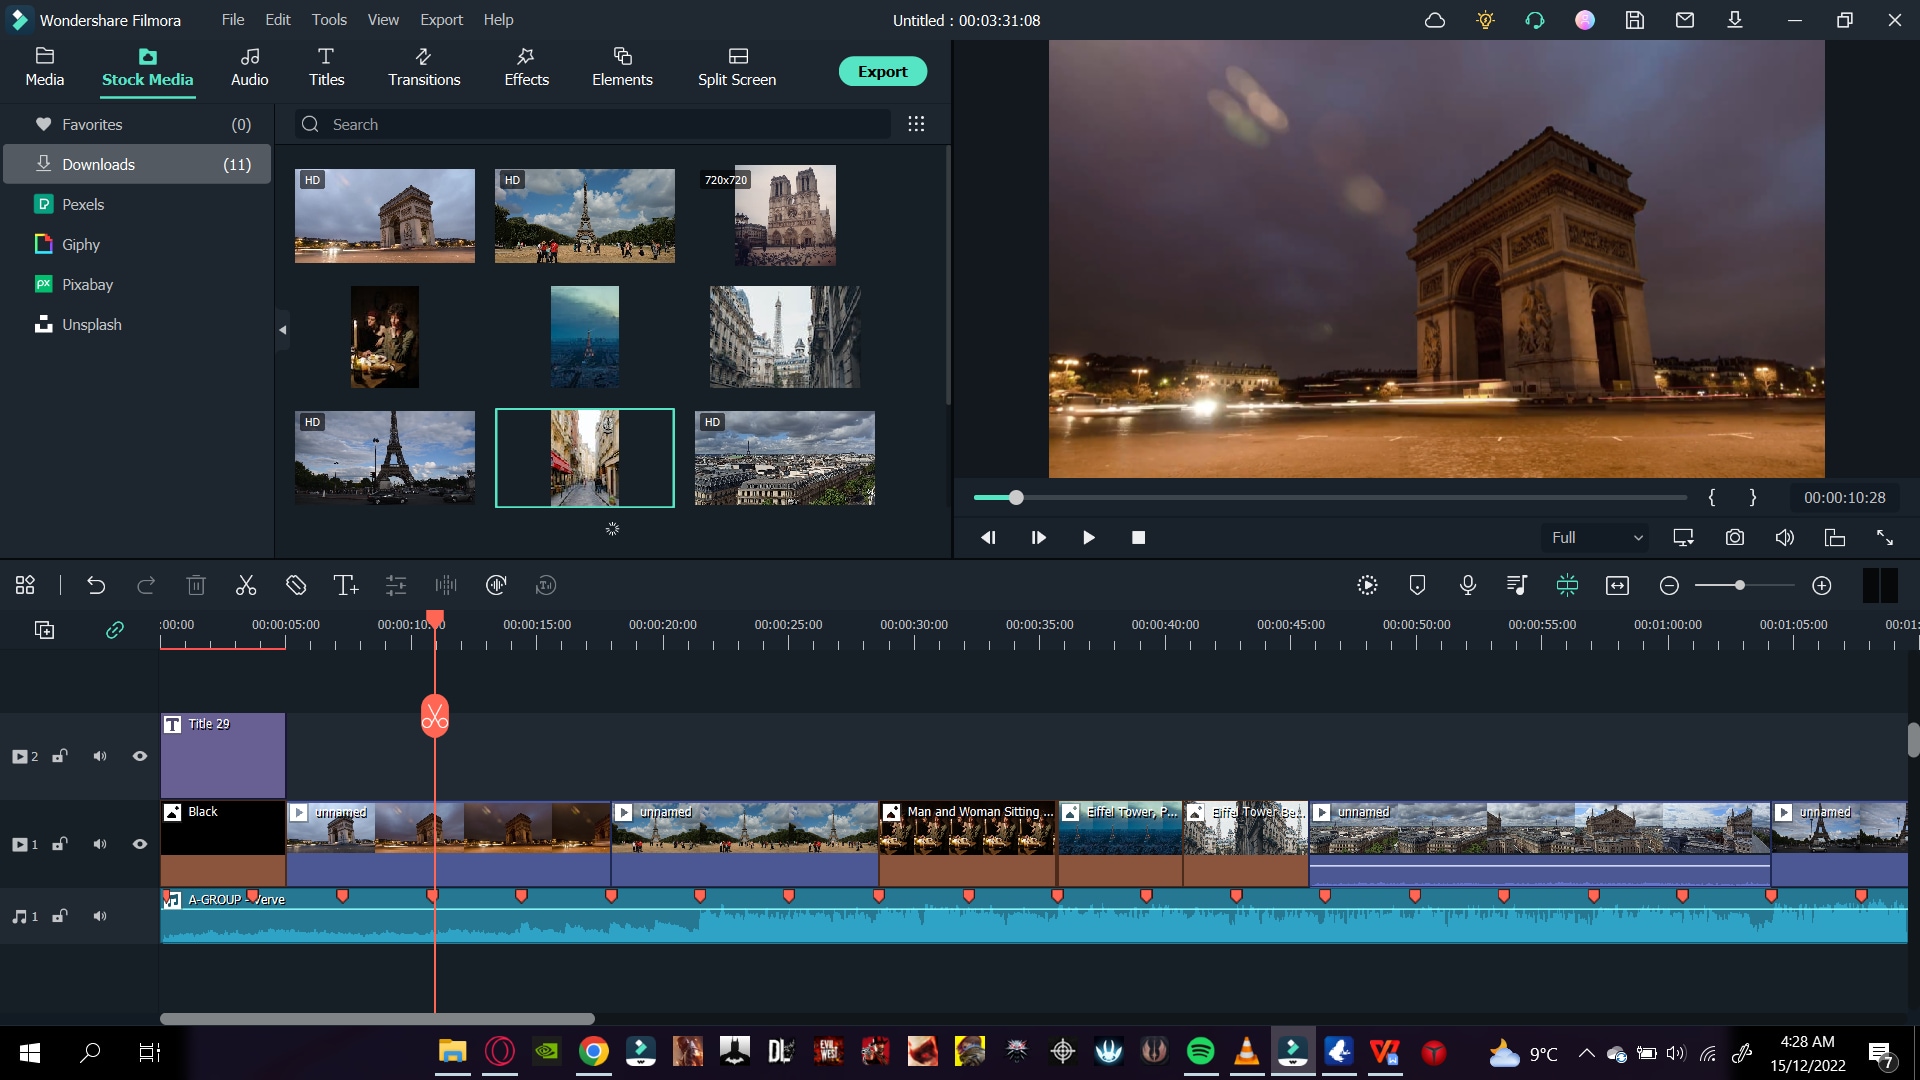
After syncing your videos and photos to the audio, it is time to move on to the scaling and background blur.
Step7 Scale and Blur The Background
Now, some of the pictures you have added must-have black borders. It usually means that your image is shorter than the aspect ratio.
If you leave the picture/photo as it is, the black borders will make it look shorter and out of proportion. As a result, it gives a generally poor look, as shown below.
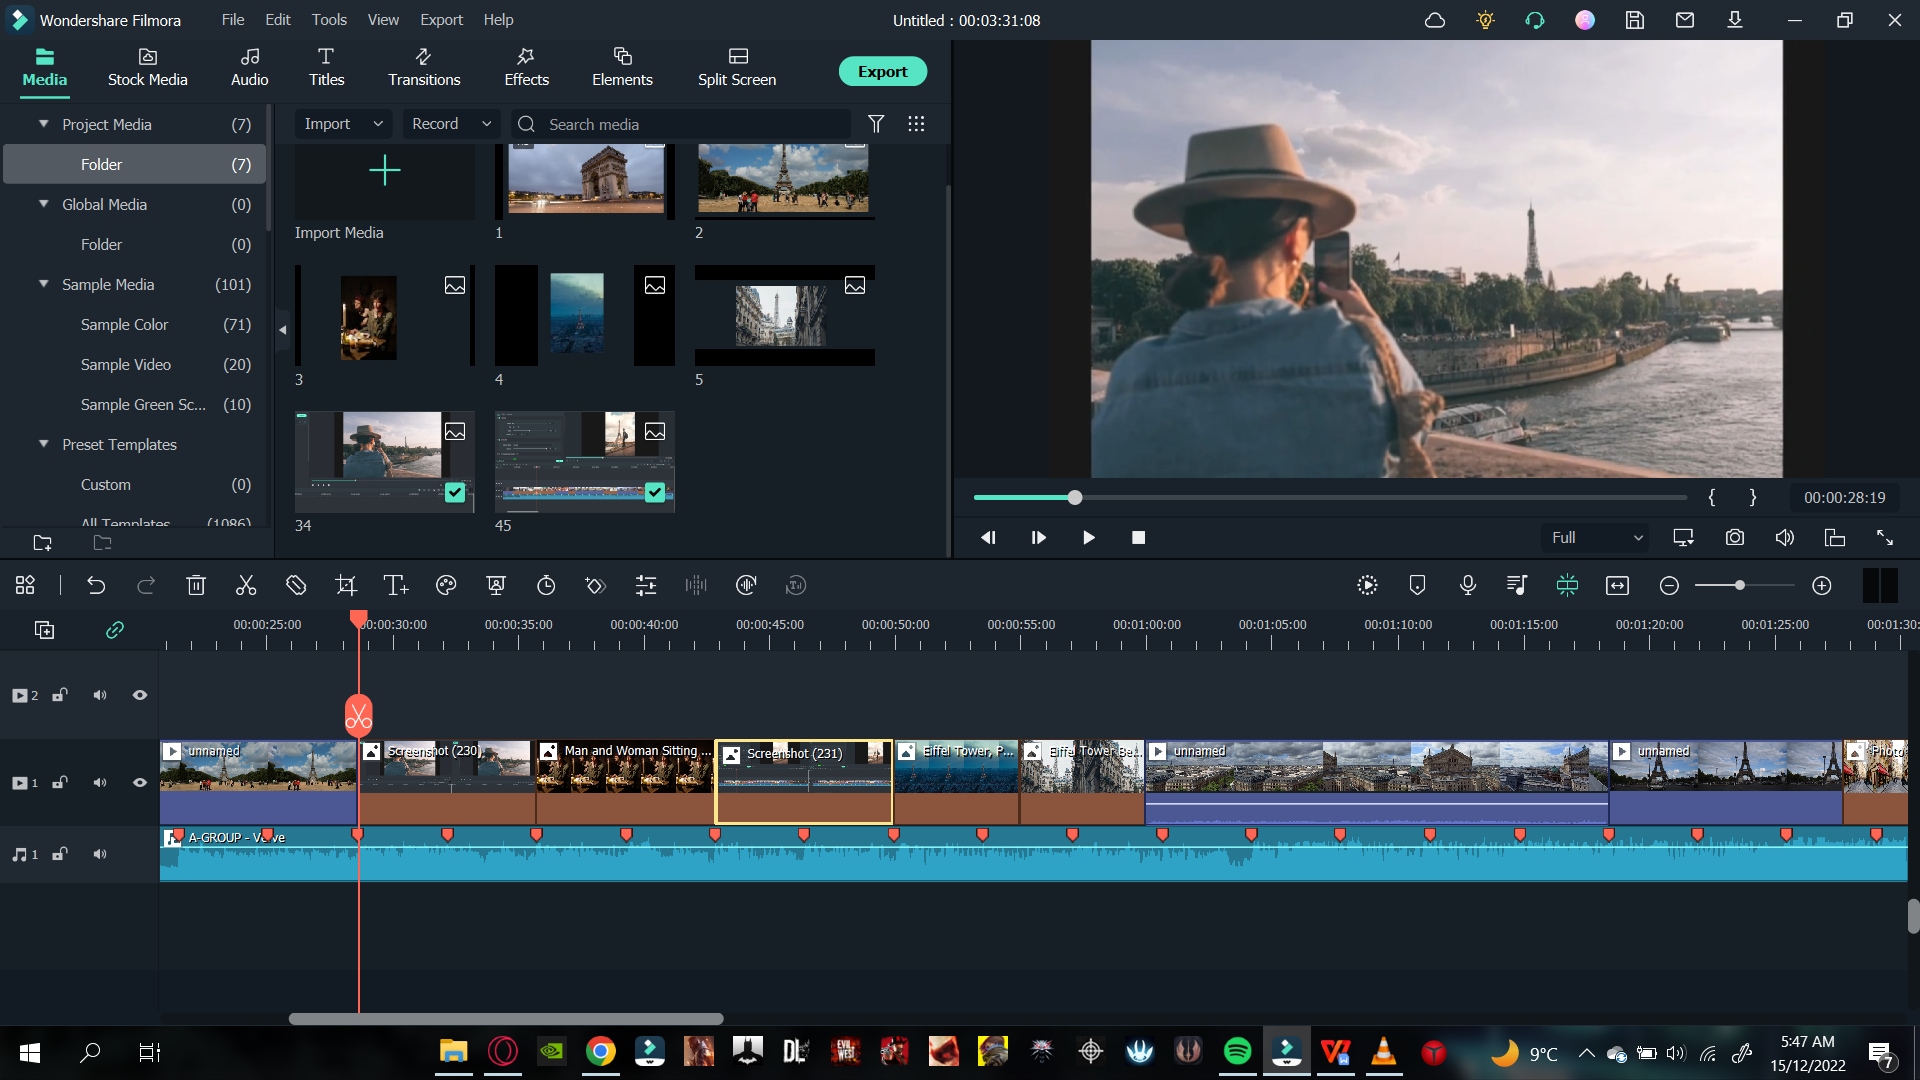
To counter this problem, follow some easy steps:
- Double-click on the picture with black borders, and it will open the settings list.
- Go into the Transform Here you can see multiple settings.
- Increase the size of your photo to match the aspect ratio.
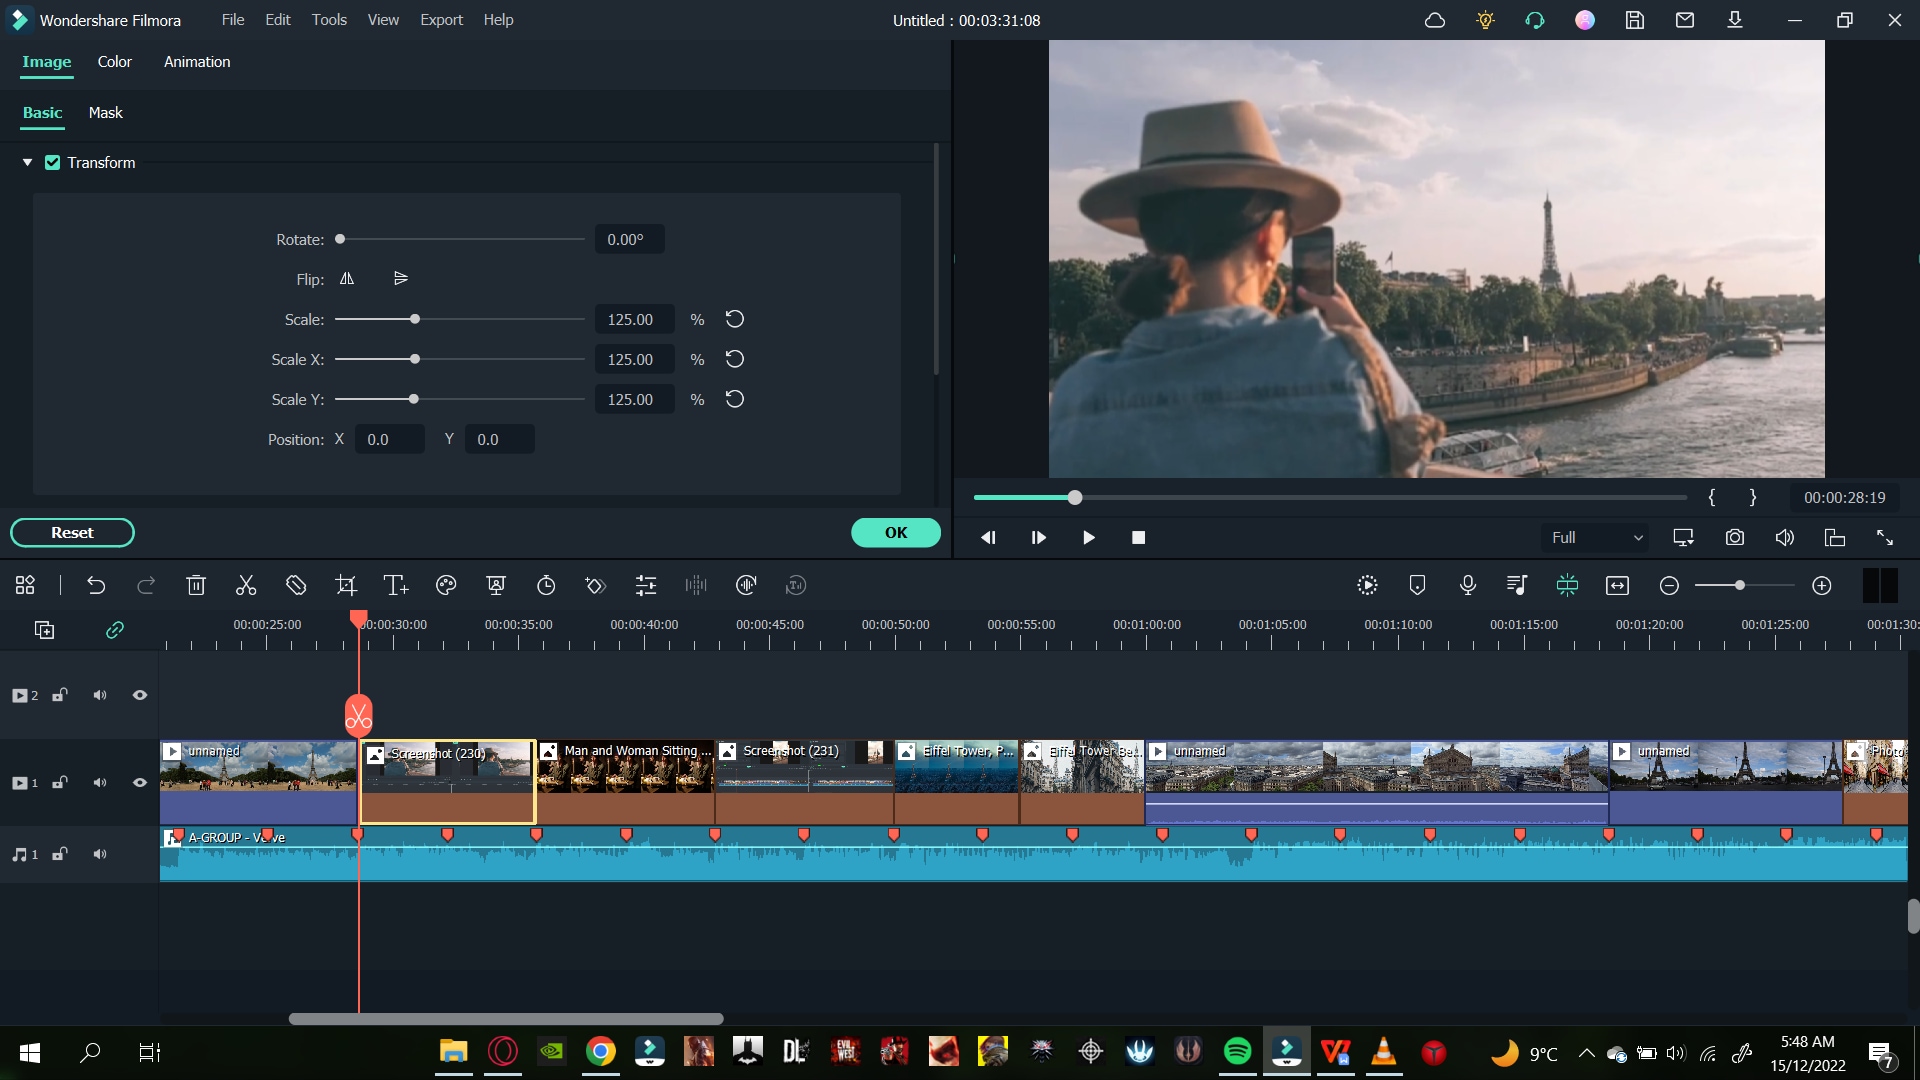
Add a Background Blur Effect
In some cases where you have taken a portrait photo where the picture is vertical, it ultimately stays out of proportion to the aspect ratio.
![]()
Note: Simply scaling the image to match the aspect ratio size is not sensible in this case. Doing so will hide the many pretty features of a portrait.
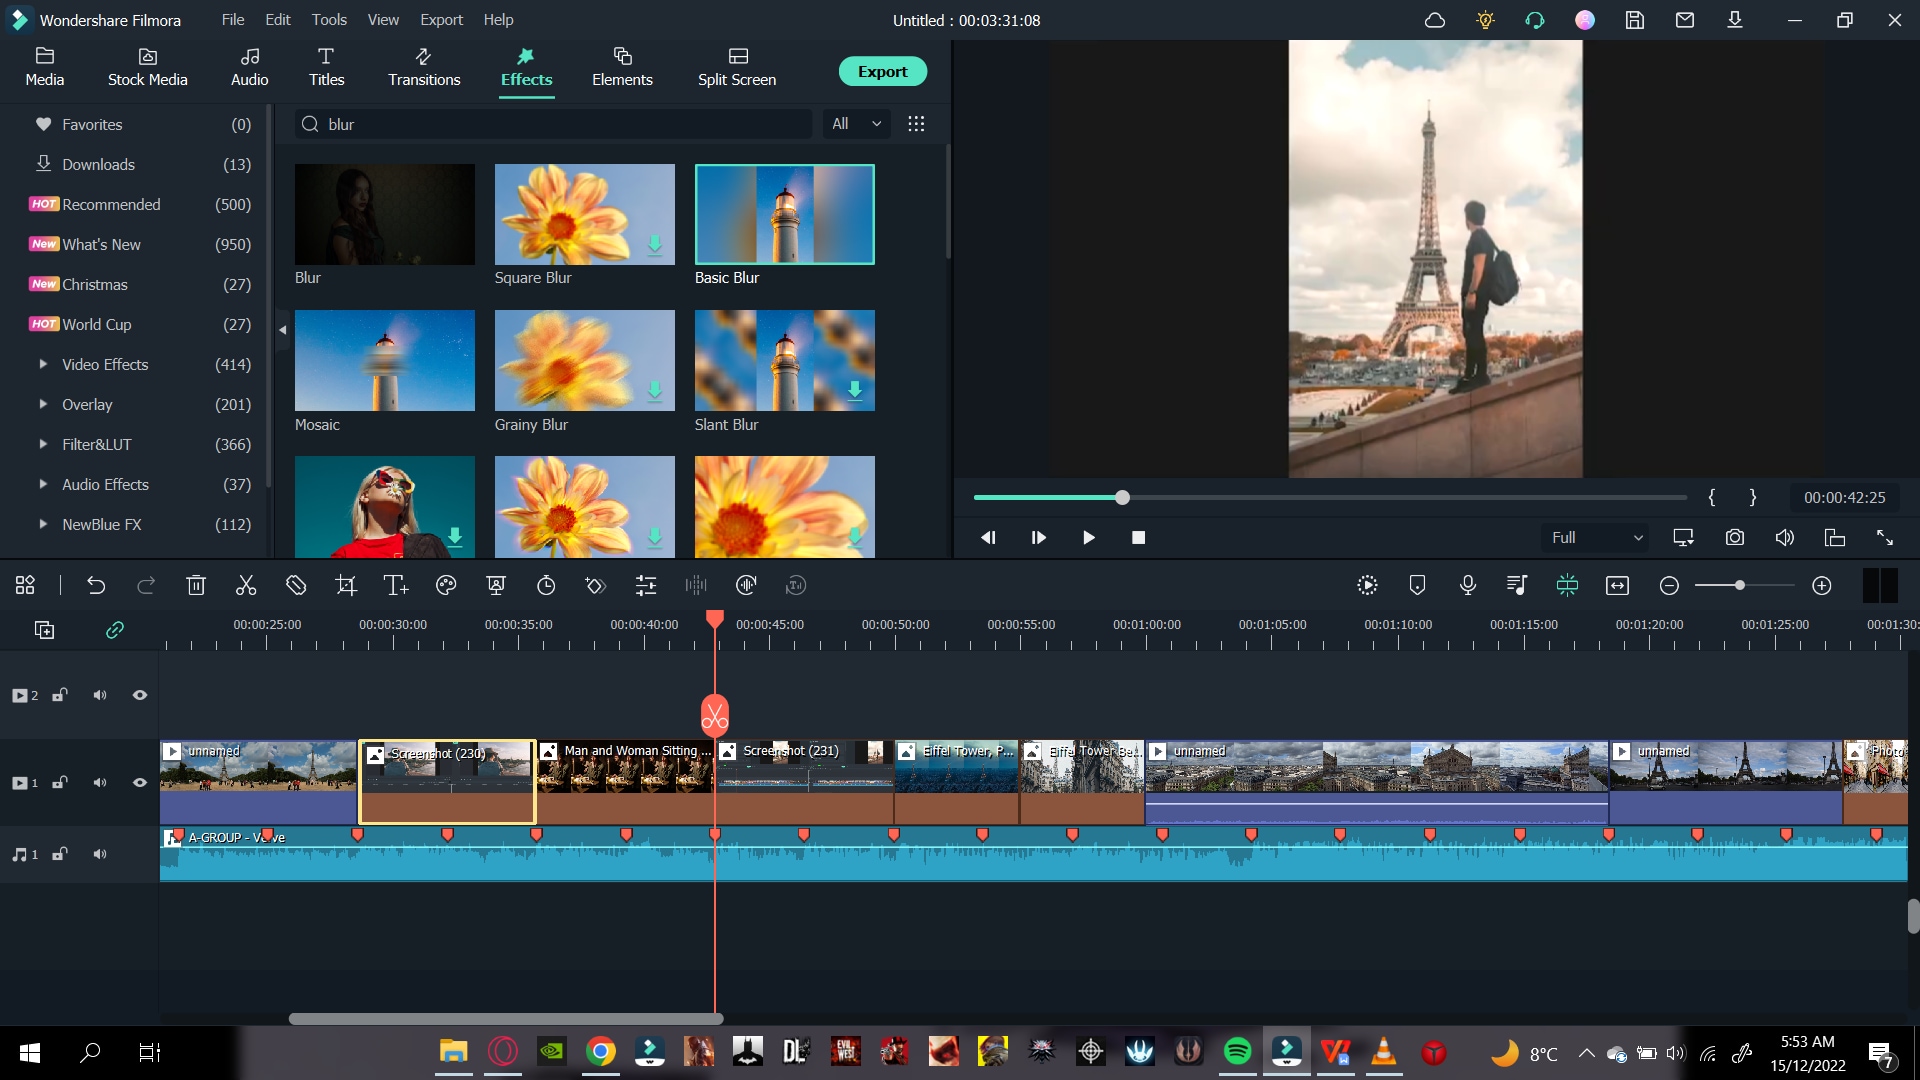
To counter this problem, you can add a blur effect. This effect will turn your background blur, matching the aspect ratio. Follow the steps mentioned below:
- Click on the Effects tab above the import window and search for Blur.
- Download the blur effect that suits you best and then drag the blur effect above your photo in the timeline.
You will notice the background turn to a blur in the main play screen.
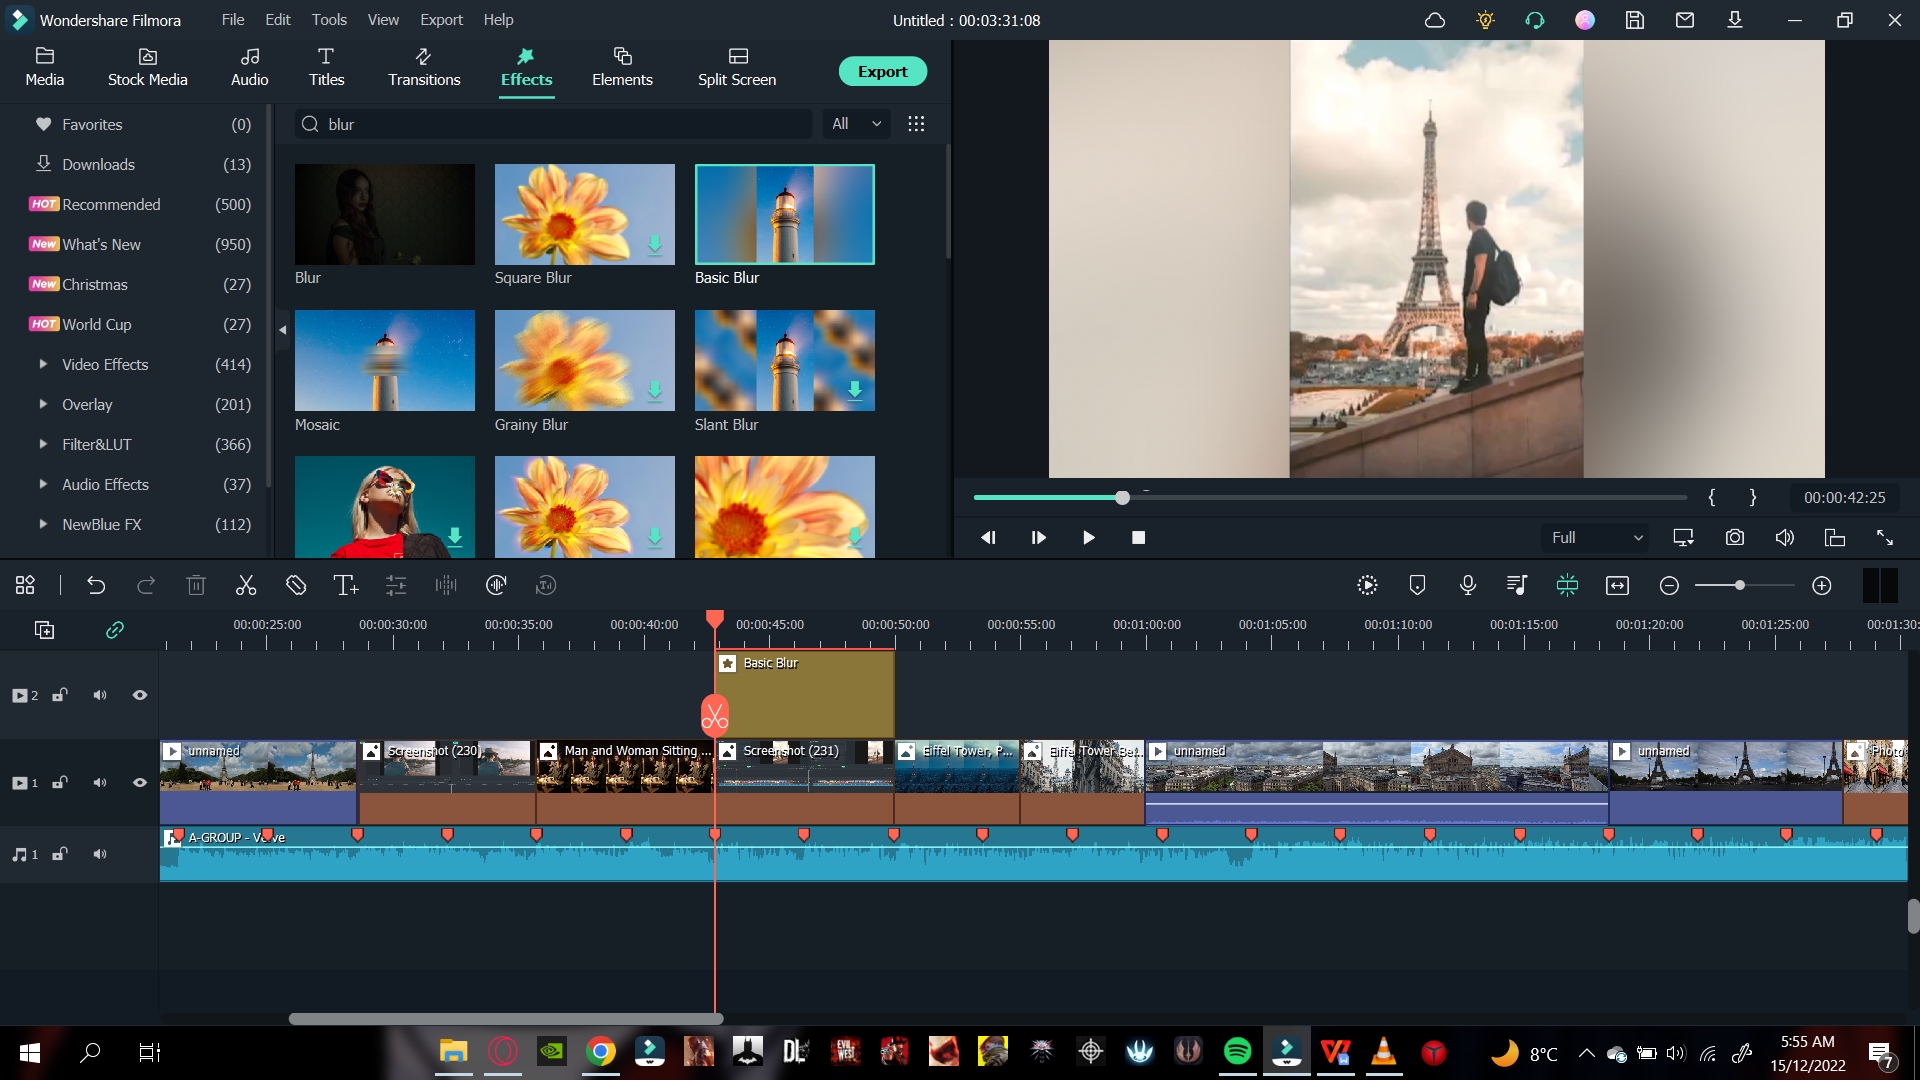
Step8 Add a Transition
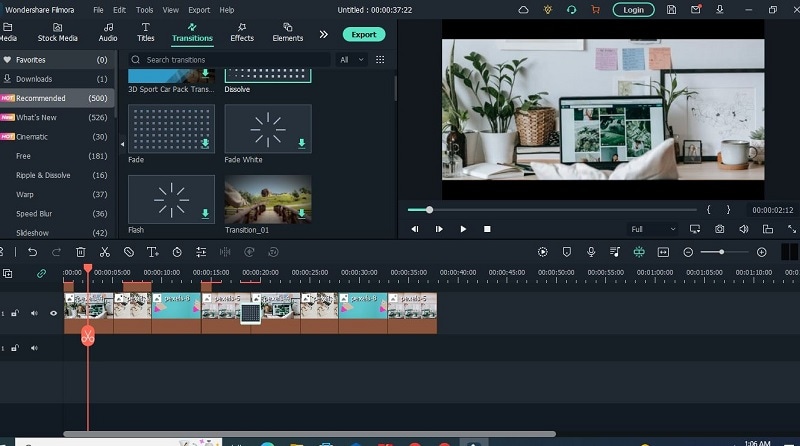
You can also add a transition effect to spice up things. It can get bland when your video or photo changes from one to another. To create a good slideshow video, you can add a transition effect by following the steps mentioned below:
- Click on the Transition icon above the import window.
- Browse the library until you find a transition you like, then download one.
- Click on the transition and drag it between the clips.

Adjust The Duration and Placement of The Transition
Now it’s time to adjust the duration and placement of the transition. For this, you can follow the steps mentioned below:
- Double-click on the transition effect, and it will open the settings list.
- You can adjust the duration by setting the timer as per your requirement.
![]()
Note: If other transitions are added to the timeline, you can adjust them by clicking Apply to all.
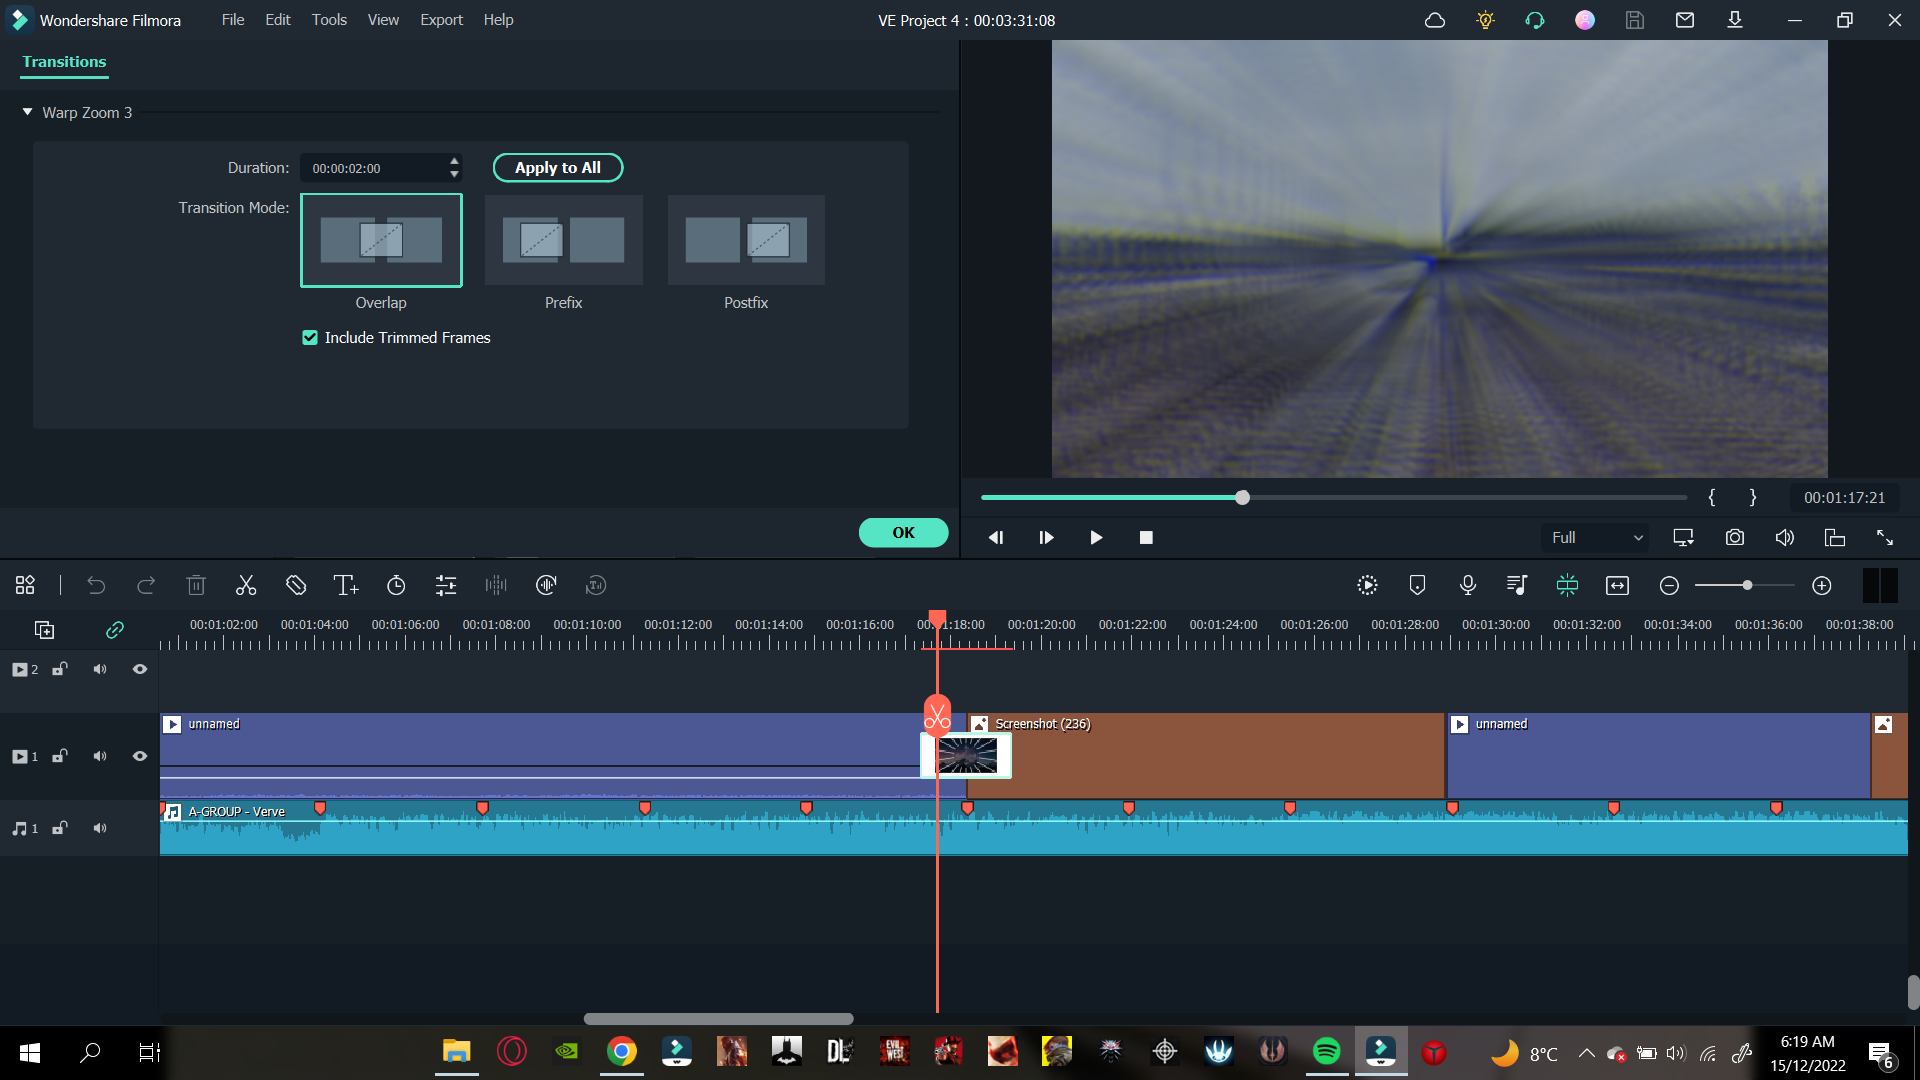
When you have adjusted the slideshow transitions, it is time to move on to the effects and filters.
Step9 Add the Effects and Filters
If you create a slideshow video of your trip to a historical place. You can add a Vintage filter to your video to give it that vintage tint. Follow the steps mentioned below:
- Head over to the Effects tab, where the effects library will open up
- Select any effect and download
- Click on the effect and drag it to drop in the timeline.
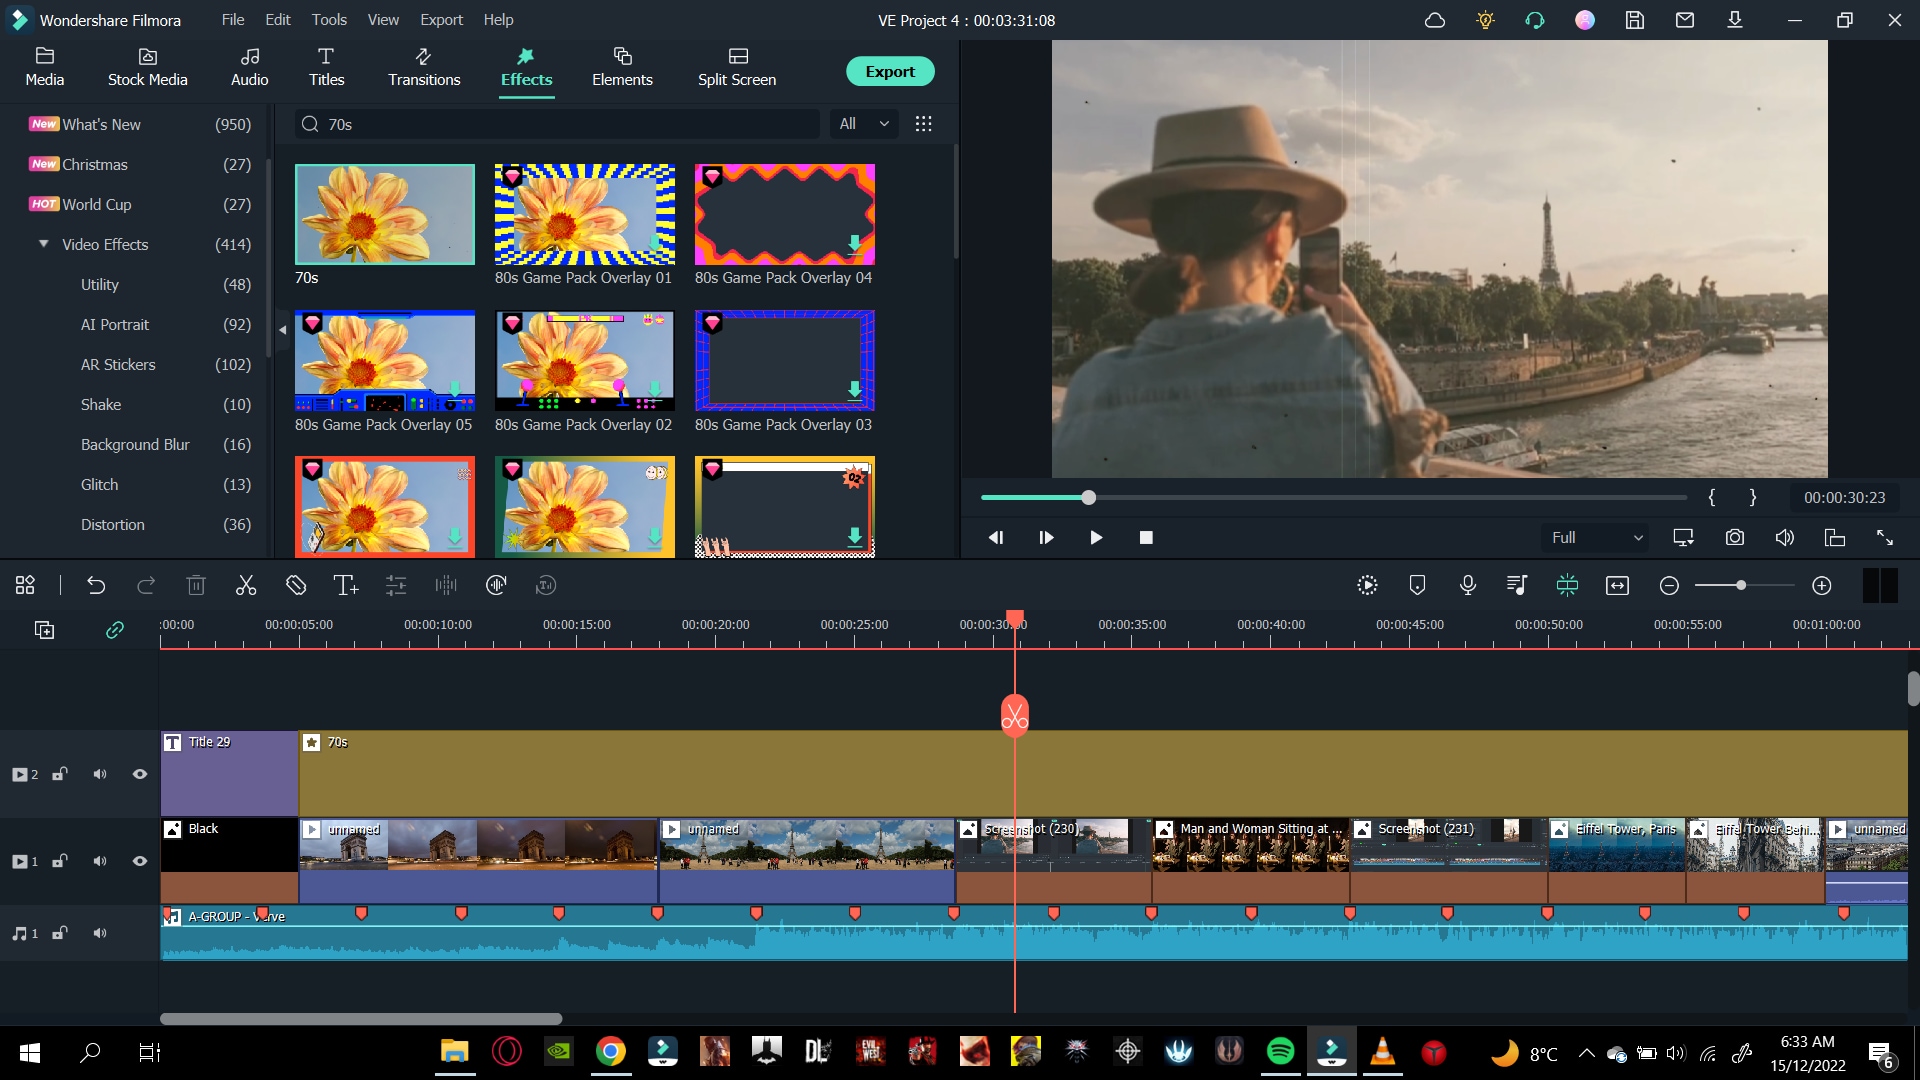
Combining a vintage effect with a dreamy glow will make your video pop up even more. To add a nostalgic glow to your video, follow the steps:
- Click on the effects and search for Glow in the search bar.
- Click and drag the glow effect above the timeline and ensure the effect is in the separate video timeline.
- Ensure the effect is applied to every photo and video.
- Double-click on the effect, and settings will open in the import window.
- Then, you can adjust the radius and opacity of the video. Adjust as you desire.
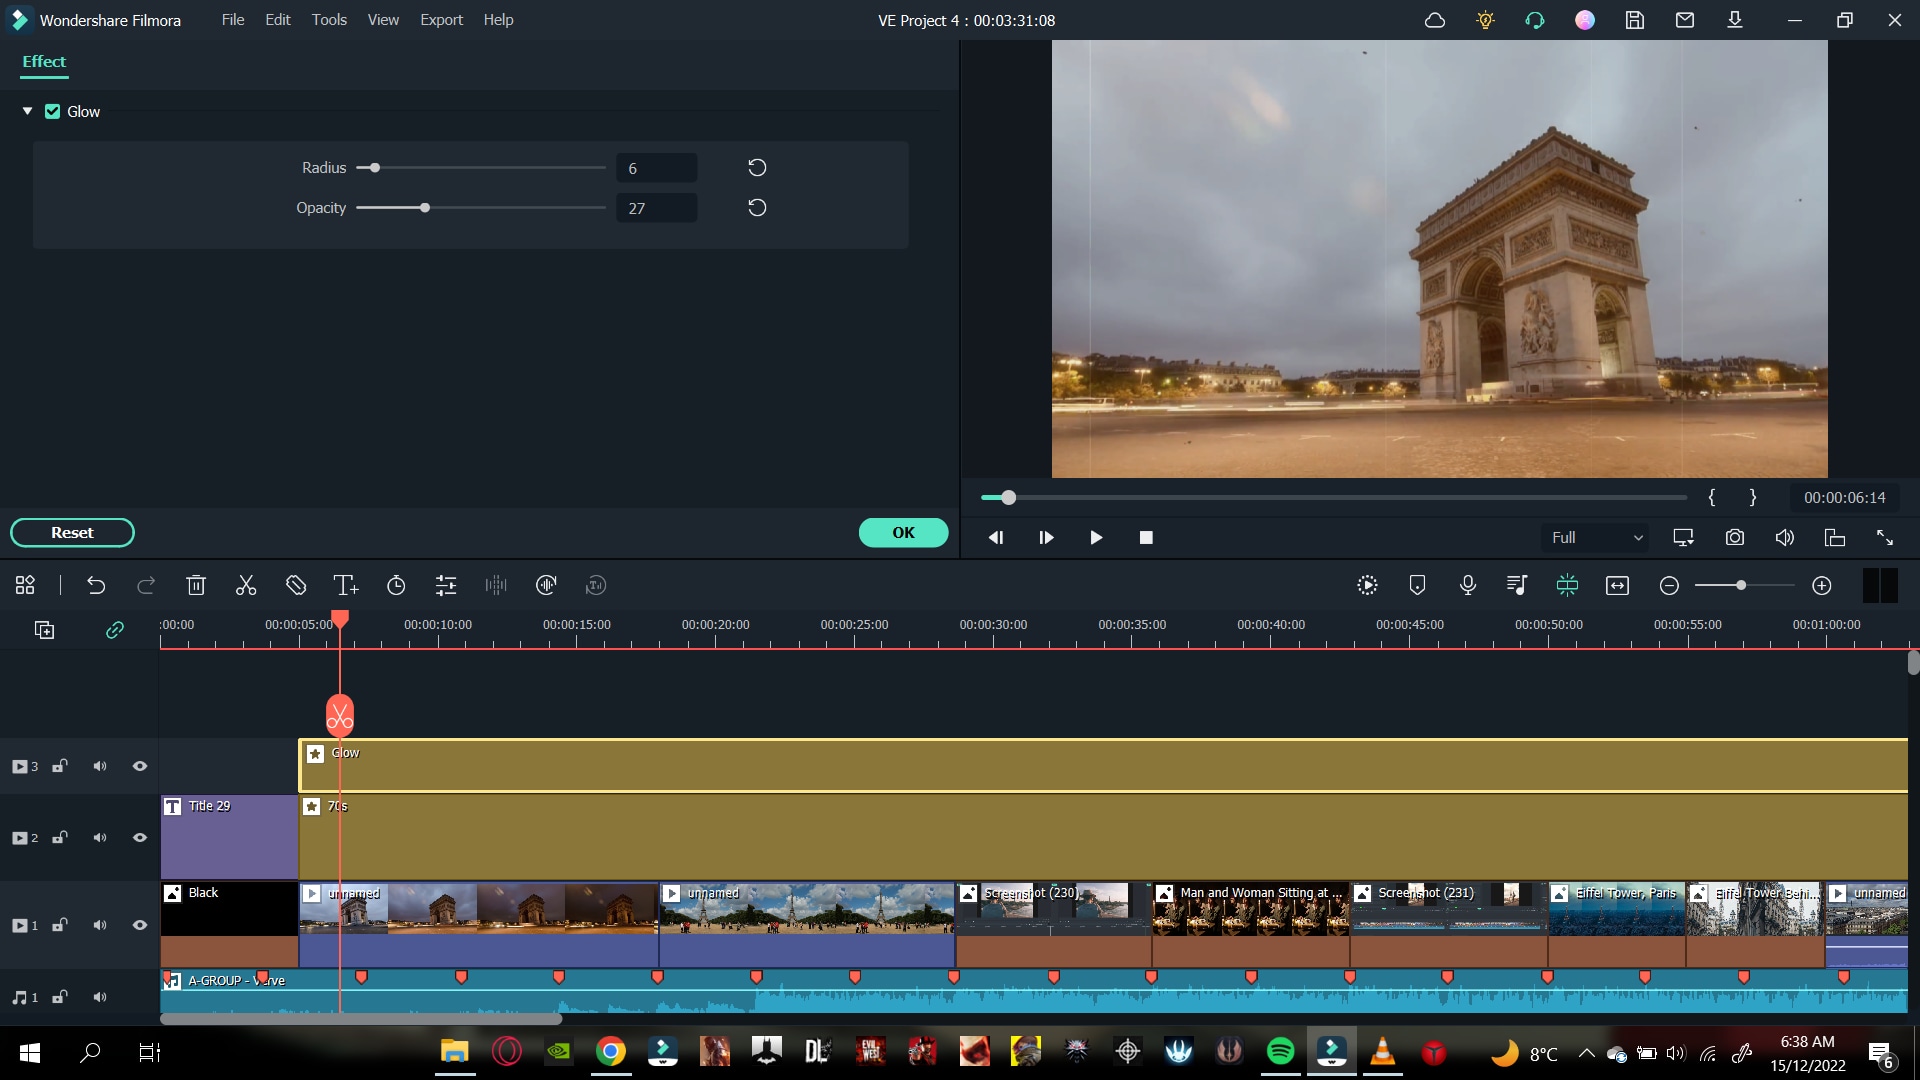
We are almost done. Let us now move toward our outro!
Step10 Create an Outro
The steps we will do will be similar to the ones we did initially. As we are creating, we will again need a canvas. Follow the steps mentioned below:
- Head to the media icon on the bar and scroll until you see the sample media tab.
- In the sample color option, drag and drop the black color at the end of your video.
Add an Outro Transition
To finalize things, add a transition effect at the end of the clip by these steps:
- In the Transition tab, search for the Fade effect.
- Drag and drop the Fade effect between your last video clip and the Black screen.
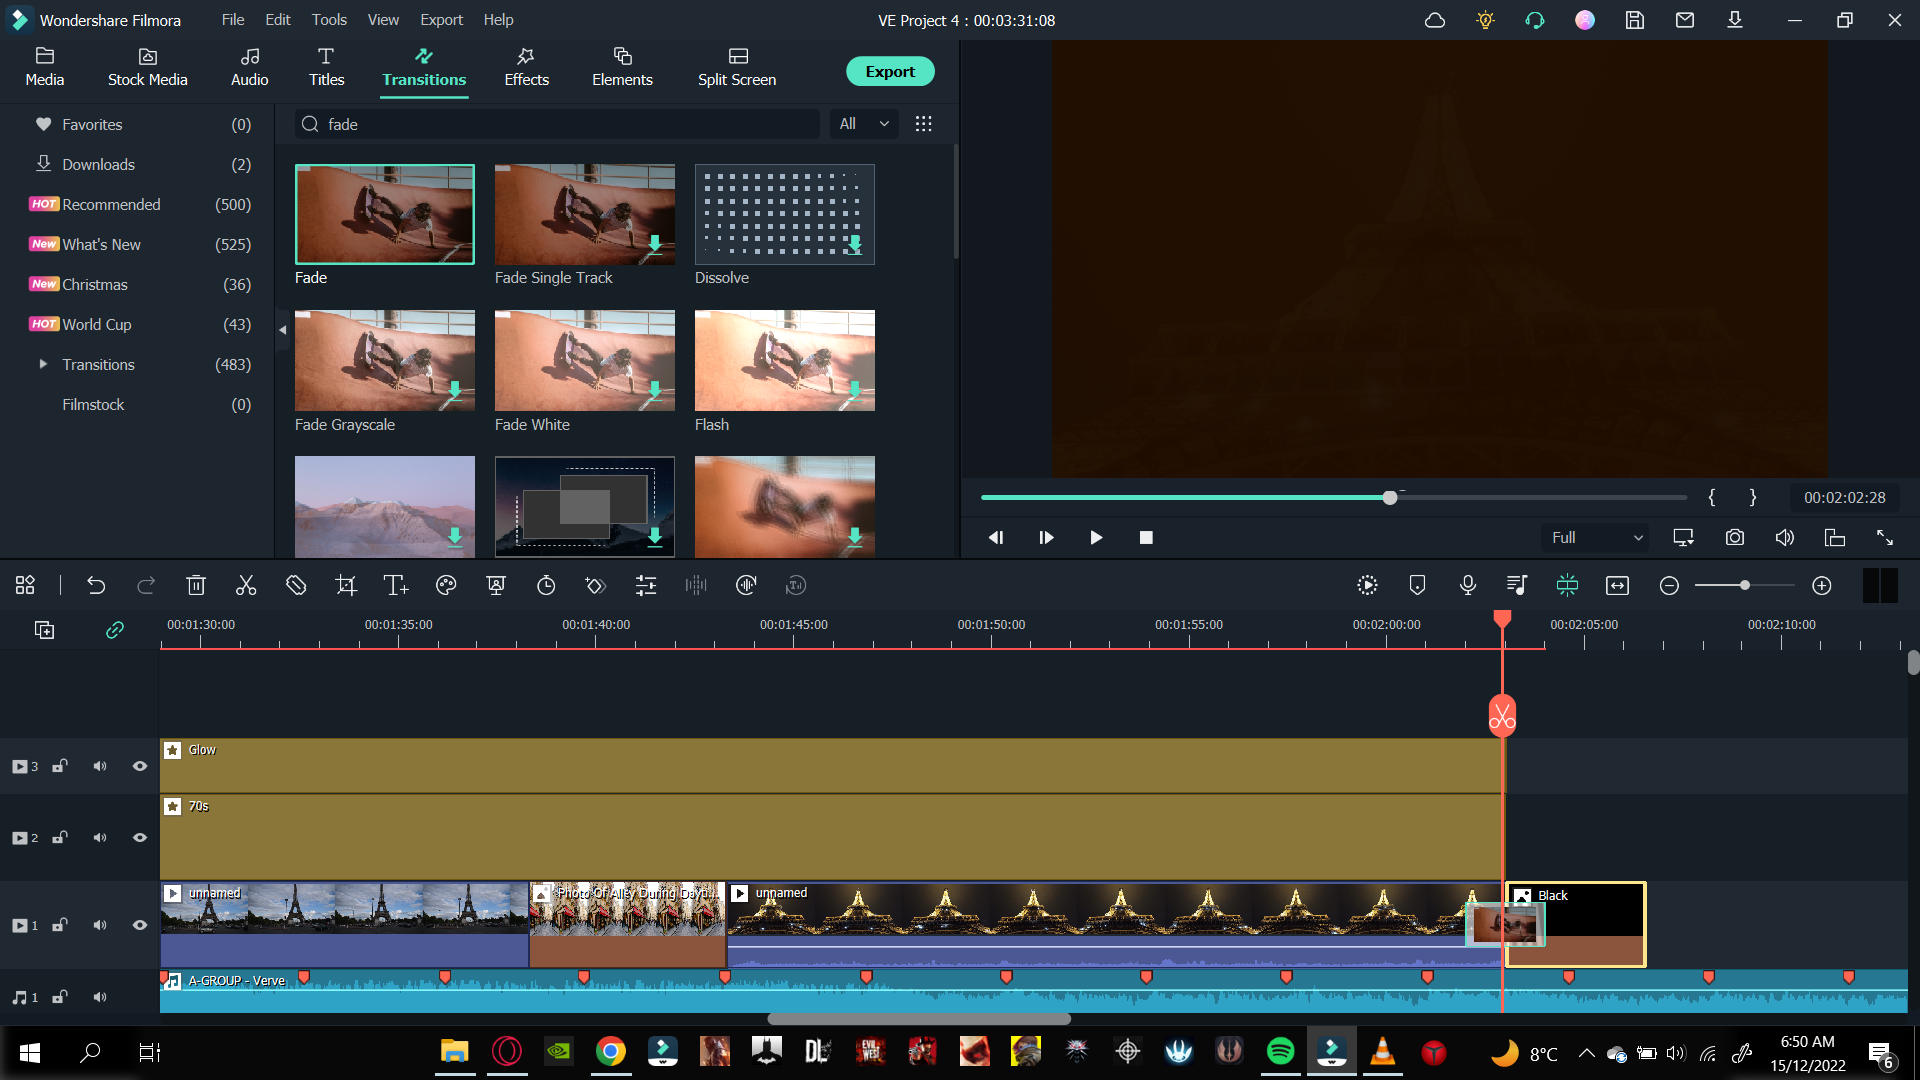
Fade out The Audio
If the audio suddenly ends at the end of your slideshow, it will create a bitter effect. Therefore, you should always fade out audio at the end of the video. To do this, follow the steps mentioned:
- Double-click on the audio in the timeline, and the settings list will pop up.
- On the top section of the import window, you will notice fade options.
- In the fade-out bar, drag it to the side to set your fade-out timer.
You can show your friends and family the slideshow or upload it to Youtube. Play the Slideshow Video from the beginning to see the changes.
Conclusion
By the steps mentioned above, you can create a slideshow video. Give every moment a chance to align everything on one side! The slideshow will also save your device space by aligning everything in one video.
Free Download For macOS 10.14 or later

Let’s start with the step-by-step instructions for making a slideshow video now that you know the requirements for generating a slideshow.
Part 5. Step-by-Step Guide to Creating a Slideshow Video
Utilizing filmora will reduce your workload while producing quality work. Follow the below step-by-step guide to make your slideshow video instantly!
Step1 Download Wondershare Filmora
Wondershare Filmora will provide the working platform. Follow the below steps to download it:
- First, install the Wondershare Filmora.
- Then, launch this application on your PC or Mac
Let’s proceed to edit our video after downloading the Wondershare Filmora software. Continue reading to find out how to begin the editing process.
Step2 Import your Photos and Videos
Importing your videos and pictures to Filmora’s media panel is best to have them all in one folder. Therefore, when you open Wondershare Filmora, you will notice the main import window in the top left corner.
- Click in the center of the import window upon the import icon.
- Browse from the PC library to where your target Videos and Photos are stored.
- Please select the required videos and photos and Open

Your next step will be to add the imported videos and images to the timeline.
Step3 Add your Photos and Videos to the Timeline
When you have multiple videos and photos, you can add all of them simultaneously. Or you can also add them one by one wherever you need. Follow the steps mentioned:
- Right-click on the photo or video you want.
- Keep holding the Right-click and drag it down to the timeline.

Now that we have imported your photos and videos into the timeline, it is time to align and add text.
Step4 Add the Title
To create an attractive slideshow, you will need to add a title before the start of the video. Doing so will allow you to gain more viewers and audiences.
Add a Black Screen
The black screen will eventually act like a canvas to give your title a good look. To add a black screen, follow the steps mentioned:
- Click on the media icon from the bar above the import window.
- You will notice many tabs on the left-hand side under a drop-down bar.
- Scroll below to find the sample media
- Download the black color if it is not downloaded already.
- Click and drag it down below to the start of your video.

Add a Title Tile
Now that we have our canvas, we will now add the title. Above the import media library, there will be a Title icon.
- Click on the title icon, and select the title that you want for your video by browsing and scrolling down.
- For this purpose, we will use a simple title tile called “Title 29.”
![]()
Note: You can find the same title by scrolling, browsing, or searching in the search bar above the import library.
- Click and drag the title onto the black screen that we added.
- Double-click the title to open its settings.
- Here you can type in the text that you want.

You can also change its font. When you click on the font bar, a drop-down option will pop up, and you choose whichever you like.
- Change the animation of the text title from the top left corner animation
Change The Timing of The Title
You can also adjust the timing of the title by below steps:
- Click on the advanced option in the bottom right corner, and settings will pop up.
- Find the title bar and drag it to the right side to increase the timing of the title.

After adding the title, it’s time to go with fading effect as shown below!
Step5 Add a Fade effect
You can also add a fade transition to the start of your video. It will blend the title with the first clip. Follow the steps mentioned to add the transition effects:
- Search the Fade option from the Transitions tab above the import window
![]()
Note: A fade transition will allow your title to fade into the first clip creating a visually pleasing effect.
- Download the Fade transition and drag it between the Black screen and the first clip.

Now that we have added a transition, it is time to move on to our music!
Step6 Add The Music
You can add your music to the slideshow from your PC library, but make sure you have the music rights. It is better to use stock audio by following the steps:
- Click on the Audio icon on the bar above the import window, and the list will pop up.
- Please browse the library to find music that best suits your video and download it.
- Then add it to the timeline’s audio track.
Add Beat Detection
To match your video clips properly with the music, so it remains in sync, you can adjust it with the beat of the music. To add beat detection, follow the steps mentioned:
- Right-Click on the audio that you selected in the audio library.
- You will see a pop-up list, and in the options, you will see Beat detection.
- Click on Beat detection.

- Then click on the audio and drag it below on the timeline.
Match The Video With The Audio Markers
To have the full advantage of beat detection, you must adjust your videos and photos to the markers. Follow the steps mentioned below to do so:

- Check that the video clips are in sync with the marker on the audio.
- For this, drag one video end to a marker or as many videos as you want.
- Ultimately, you will create a timeline in which your videos sync with the audio beat.

After syncing your videos and photos to the audio, it is time to move on to the scaling and background blur.
Step7 Scale and Blur The Background
Now, some of the pictures you have added must-have black borders. It usually means that your image is shorter than the aspect ratio.
If you leave the picture/photo as it is, the black borders will make it look shorter and out of proportion. As a result, it gives a generally poor look, as shown below.

To counter this problem, follow some easy steps:
- Double-click on the picture with black borders, and it will open the settings list.
- Go into the Transform Here you can see multiple settings.
- Increase the size of your photo to match the aspect ratio.

Add a Background Blur Effect
In some cases where you have taken a portrait photo where the picture is vertical, it ultimately stays out of proportion to the aspect ratio.
![]()
Note: Simply scaling the image to match the aspect ratio size is not sensible in this case. Doing so will hide the many pretty features of a portrait.

To counter this problem, you can add a blur effect. This effect will turn your background blur, matching the aspect ratio. Follow the steps mentioned below:
- Click on the Effects tab above the import window and search for Blur.
- Download the blur effect that suits you best and then drag the blur effect above your photo in the timeline.
You will notice the background turn to a blur in the main play screen.

Step8 Add a Transition
You can also add a transition effect to spice up things. It can get bland when your video or photo changes from one to another. To create a good slideshow video, you can add a transition effect by following the steps mentioned below:
- Click on the Transition icon above the import window.
- Browse the library until you find a transition you like, then download one.
- Click on the transition and drag it between the clips.

Adjust The Duration and Placement of The Transition
Now it’s time to adjust the duration and placement of the transition. For this, you can follow the steps mentioned below:
- Double-click on the transition effect, and it will open the settings list.
- You can adjust the duration by setting the timer as per your requirement.
![]()
Note: If other transitions are added to the timeline, you can adjust them by clicking Apply to all.

When you have adjusted the slideshow transitions, it is time to move on to the effects and filters.
Step9 Add the Effects and Filters
If you create a slideshow video of your trip to a historical place. You can add a Vintage filter to your video to give it that vintage tint. Follow the steps mentioned below:
- Head over to the Effects tab, where the effects library will open up
- Select any effect and download
- Click on the effect and drag it to drop in the timeline.

Combining a vintage effect with a dreamy glow will make your video pop up even more. To add a nostalgic glow to your video, follow the steps:
- Click on the effects and search for Glow in the search bar.
- Click and drag the glow effect above the timeline and ensure the effect is in the separate video timeline.
- Ensure the effect is applied to every photo and video.
- Double-click on the effect, and settings will open in the import window.
- Then, you can adjust the radius and opacity of the video. Adjust as you desire.

We are almost done. Let us now move toward our outro!
Step10 Create an Outro
The steps we will do will be similar to the ones we did initially. As we are creating, we will again need a canvas. Follow the steps mentioned below:
- Head to the media icon on the bar and scroll until you see the sample media tab.
- In the sample color option, drag and drop the black color at the end of your video.
Add an Outro Transition
To finalize things, add a transition effect at the end of the clip by these steps:
- In the Transition tab, search for the Fade effect.
- Drag and drop the Fade effect between your last video clip and the Black screen.

Fade out The Audio
If the audio suddenly ends at the end of your slideshow, it will create a bitter effect. Therefore, you should always fade out audio at the end of the video. To do this, follow the steps mentioned:
- Double-click on the audio in the timeline, and the settings list will pop up.
- On the top section of the import window, you will notice fade options.
- In the fade-out bar, drag it to the side to set your fade-out timer.
You can show your friends and family the slideshow or upload it to Youtube. Play the Slideshow Video from the beginning to see the changes.

Conclusion
By the steps mentioned above, you can create a slideshow video. Give every moment a chance to align everything on one side! The slideshow will also save your device space by aligning everything in one video.
Do You Want to Apply LUTs Using Open Broadcaster Software? You Can Download Free LUTs for OBS and Apply Them to Your Files. There Are Many LUTs Available
LUTs are powerful tools that can significantly enhance the visual appeal of your content. You can use this tool to change the look and feel of your images and videos. Moreover, you can use LUTs to bring out the desired mood, style, and tone to your media content. Additionally, LUTs provide endless possibilities for creativity with different color adjustments and grading.
There are many software and tools available on the market to apply LUTs. These tools let you import and apply LUTs to your images and videos. Furthermore, you can apply LUTs even using streaming software like OBS. Moreover, you can improve live streams, videos, and recordings by applying LUTs using OBS. However, many paid and free LUTs for OBS are available for usage.
Part 1: Why Do We Need to Use LUTs for Editing in OBS?
There are many free OBS LUTs available that you can download and use for your content. The real question is the utility of LUTs in OBS. Here are some of the reasons to use LUTs in this tool.
Efficiency and Consistency
LUTs provide a quick and consistent way to apply color transformations. Instead of manually adjusting individual color settings, you can use LUTs. Similarly, it allows you to instantly and precisely grade and correct colors.
Time-Saving
Using LUTs saves time because they offer pre-defined color transformations. Instead of adjusting colors for each project or image, you can use LUTs. Additionally, they allow you to match your desired look or style easily.
Artistic Control and Creative Freedom
Furthermore, it gives artists, filmmakers, and photographers more control over their work. They allow for experimentation and exploration of different looks and styles. You can be more creative by experimenting with varying tones of color to the same content.
Consistent Color Reproduction
LUTs are essential for maintaining consistent color tones. The good part is it maintains consistency across different devices, software, and platforms. They ensure that colors look the same, no matter what the viewing medium, like monitors, projectors, or mobile screens.
Film Emulation and Replication
Moreover, it can replicate classic film stocks’ characteristics and aesthetics. They allow filmmakers and photographers to recreate iconic films’ color response and tonal range. In this way, everyone can experiment with color tones inspired by famous movies.
Workflow Flexibility and Collaboration
Lookup tables offer flexibility and facilitate collaboration in post-production workflows. They can be easily shared and applied to different projects or sequences. Similarly, it ensures consistent color grading across multiple editors or teams.
Calibration and Color Management
Additionally, LUTs play an important role in color calibration and management processes. It allows you to align color spaces, correct color variations, and maintain color accuracy. Furthermore, it will maintain consistent color grading throughout the project.
Real-time Color Processing
Lastly, LUTs are valuable in applications that require real-time color processing. It can be used in live broadcasts, video streaming, or video games. You can make instant adjustments and enhancements in real time.
Empower your videos with a new mood using different LUTs. Filmora now offers 100+ top-quality 3D LUTs cover a broad range of scenarios. Transform your videos with Filmora’s powerful 3D LUTs.
Apply LUT on Videos Apply LUT on Videos Learn More

Part 2: Discussing Some Top-Notch Best LUTs for OBS?
If you are searching for the best LUTs for OBS, you’re at the right place. Here is a list of some of the best LUTs you can apply using OBS. You can choose from different styles and tones according to your preference:
1. Vintage LUTs
Take a step back in time with this pack of Vintage LUTs. This pack gives your videos and images a nostalgic, retro feel. Moreover, this pack has different classic film presets, including monochrome and b&w. It enhances warm tones, adds a vignette, and introduces a gentle fade effect. Furthermore, this pack gives your media content the perfect retro feel.

2. 13 FREE Custom LUTs for Log Footage
Using these 13 cinematic LUTs, you can unleash the power of the silver screen. With these LUTs, you can bring Hollywood magic to your videos. Additionally, this pack enhances contrast and saturation to create a dramatic and cinematic look. Moreover, it enhances your media with rich colors, deep shadows, and vibrant highlights giving them a movie-like feel.
3. Vibrant Nature LUTs for Photo & Video
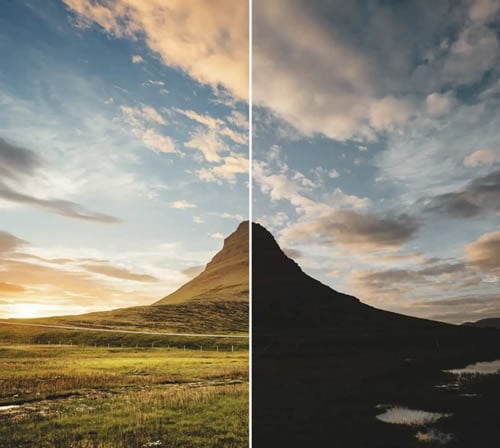
Vibrant Nature LUTs is an excellent pack that enhances the beauty of nature and the outdoors. It is a pack of five different LUTs specifically used to enhance natural landscapes and environmental shots. Furthermore, this pack highlights the earthy tones, adds depth to greens, and brings out the details of nature. Additionally, you can use this pack to improve the scenery in your pictures and videos.
4. Coastal Haze
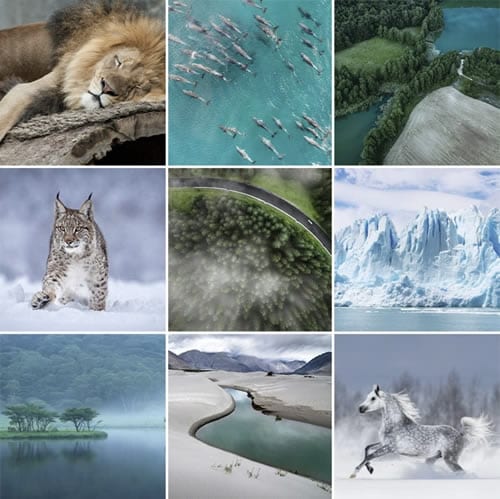
Coastal Haze is a fantastic LUT to celebrate love and romance with its color grading. It is an excellent free LUT that enhances the colors and emotions of wedding videos and romantic moments. Moreover, it adds a soft and dreamy touch by improving skin tones. Furthermore, it creates a warm and intimate atmosphere allowing you to beautify your special moments.
5. 20 Dark Moody LUTs Pack
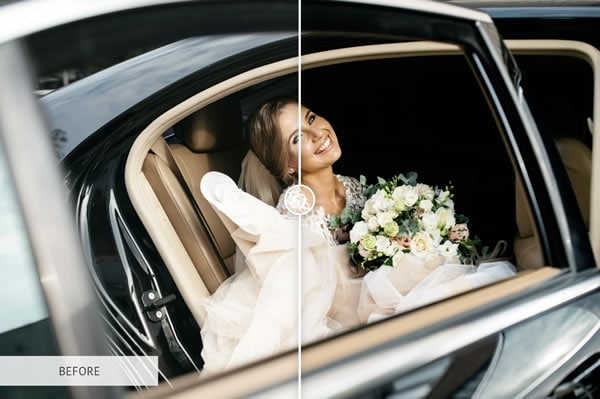
Dive into the world of moody dark colors with this 20 Dark Moody LUTs Pack. Each LUT has a different tone and feel to it. These LUTs add darkness to create a mysterious and serious ambiance. It enhances shadows, deepens blacks, and adds a subtle color grading to create an intense look. With this Moody LUT pack, you can make more professional-looking dark videos.

Part 3: How to Use LUTs in OBS Studio Properly?
If you’ve found the best free LUTs for OBS, you can apply them directly to your video feed. Here are simple steps to apply LUTs using OBS Studio. Following these steps, you can easily apply a LUT effect to your video feed or live stream in OBS.
Step 1: Open OBS and start your video feed or live stream using a webcam or capture card. Once your video stream is running, right-click the “Video Capture Device” option. After that, select “Filters” from the options that appear. In the Filters menu, locate the “Effect Filters” section and click the “+” button. Choose the “Apply LUT” option from the options that appear to add the LUT effect to your video stream.
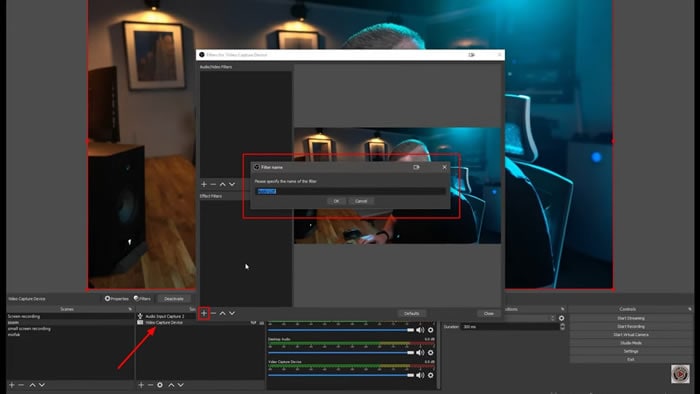
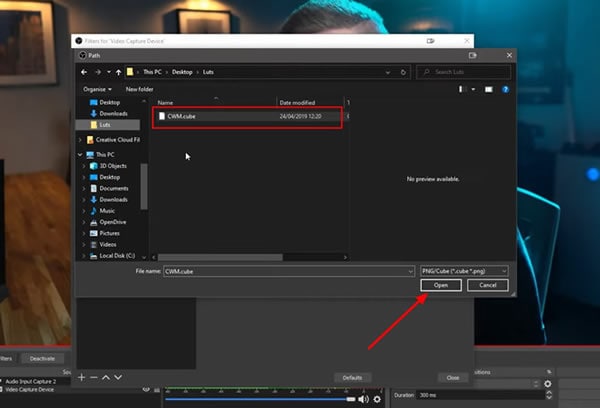
Step 2: A new window will pop up where you can specify the name of your LUT. To select your desired LUT, click the “Browse” button and navigate to its location on your device. Once you’ve found your LUT, click the “Open” button to apply it directly to your video stream. If needed, you can adjust the intensity of the LUT by making changes in the “Preview” screen.
Part 4: Wondershare Filmora: Another Efficient Platform for Adding LUTs on Videos
Wondershare Filmora is an exceptional video editing tool with the additional ability of color grading. With this powerful tool, you can color grade your videos by manually adjusting settings or applying LUTs. The latest update of Wondershare Filmora includes a library of over 200+ LUTs that you can apply to your media files. Furthermore, you can also customize the intensity of the applied LUTs.
Add LUTs on Video For Win 7 or later(64-bit)
Add LUTs on Video For macOS 10.14 or later
Besides color grading, Filmora also provides a variety of effects, filters, and overlays for your videos. These tools allow you to add artistic touches and improve the overall feel of your content. Additionally, it offers professional-grade features such as AI Cutout. This feature enables you to effortlessly select your subject in a video and change their background.

Conclusion
In conclusion, LUTs are useful tools for color-correcting live streams and video editing projects. You can apply LUTs directly to your live streams, and video feeds with OBS. Many free LUTs for OBS are available, each with a different tone and feel. Furthermore, LUTs can also be used in popular video editing tools like Wondershare Filmora. Lastly, LUTs are essential tools to make your content stand out.
Add LUTs on Video For Win 7 or later(64-bit)
Add LUTs on Video For macOS 10.14 or later
Apply LUT on Videos Apply LUT on Videos Learn More

Part 2: Discussing Some Top-Notch Best LUTs for OBS?
If you are searching for the best LUTs for OBS, you’re at the right place. Here is a list of some of the best LUTs you can apply using OBS. You can choose from different styles and tones according to your preference:
1. Vintage LUTs
Take a step back in time with this pack of Vintage LUTs. This pack gives your videos and images a nostalgic, retro feel. Moreover, this pack has different classic film presets, including monochrome and b&w. It enhances warm tones, adds a vignette, and introduces a gentle fade effect. Furthermore, this pack gives your media content the perfect retro feel.

2. 13 FREE Custom LUTs for Log Footage
Using these 13 cinematic LUTs, you can unleash the power of the silver screen. With these LUTs, you can bring Hollywood magic to your videos. Additionally, this pack enhances contrast and saturation to create a dramatic and cinematic look. Moreover, it enhances your media with rich colors, deep shadows, and vibrant highlights giving them a movie-like feel.

3. Vibrant Nature LUTs for Photo & Video
Vibrant Nature LUTs is an excellent pack that enhances the beauty of nature and the outdoors. It is a pack of five different LUTs specifically used to enhance natural landscapes and environmental shots. Furthermore, this pack highlights the earthy tones, adds depth to greens, and brings out the details of nature. Additionally, you can use this pack to improve the scenery in your pictures and videos.

4. Coastal Haze
Coastal Haze is a fantastic LUT to celebrate love and romance with its color grading. It is an excellent free LUT that enhances the colors and emotions of wedding videos and romantic moments. Moreover, it adds a soft and dreamy touch by improving skin tones. Furthermore, it creates a warm and intimate atmosphere allowing you to beautify your special moments.

5. 20 Dark Moody LUTs Pack
Dive into the world of moody dark colors with this 20 Dark Moody LUTs Pack. Each LUT has a different tone and feel to it. These LUTs add darkness to create a mysterious and serious ambiance. It enhances shadows, deepens blacks, and adds a subtle color grading to create an intense look. With this Moody LUT pack, you can make more professional-looking dark videos.

Part 3: How to Use LUTs in OBS Studio Properly?
If you’ve found the best free LUTs for OBS, you can apply them directly to your video feed. Here are simple steps to apply LUTs using OBS Studio. Following these steps, you can easily apply a LUT effect to your video feed or live stream in OBS.
Step 1: Open OBS and start your video feed or live stream using a webcam or capture card. Once your video stream is running, right-click the “Video Capture Device” option. After that, select “Filters” from the options that appear. In the Filters menu, locate the “Effect Filters” section and click the “+” button. Choose the “Apply LUT” option from the options that appear to add the LUT effect to your video stream.

Step 2: A new window will pop up where you can specify the name of your LUT. To select your desired LUT, click the “Browse” button and navigate to its location on your device. Once you’ve found your LUT, click the “Open” button to apply it directly to your video stream. If needed, you can adjust the intensity of the LUT by making changes in the “Preview” screen.

Part 4: Wondershare Filmora: Another Efficient Platform for Adding LUTs on Videos
Wondershare Filmora is an exceptional video editing tool with the additional ability of color grading. With this powerful tool, you can color grade your videos by manually adjusting settings or applying LUTs. The latest update of Wondershare Filmora includes a library of over 200+ LUTs that you can apply to your media files. Furthermore, you can also customize the intensity of the applied LUTs.
Add LUTs on Video For Win 7 or later(64-bit)
Add LUTs on Video For macOS 10.14 or later
Besides color grading, Filmora also provides a variety of effects, filters, and overlays for your videos. These tools allow you to add artistic touches and improve the overall feel of your content. Additionally, it offers professional-grade features such as AI Cutout. This feature enables you to effortlessly select your subject in a video and change their background.

Conclusion
In conclusion, LUTs are useful tools for color-correcting live streams and video editing projects. You can apply LUTs directly to your live streams, and video feeds with OBS. Many free LUTs for OBS are available, each with a different tone and feel. Furthermore, LUTs can also be used in popular video editing tools like Wondershare Filmora. Lastly, LUTs are essential tools to make your content stand out.
Add LUTs on Video For Win 7 or later(64-bit)
Add LUTs on Video For macOS 10.14 or later
Do You Know How to Create Video Loops on PowerPoint? If Not Then Read This Article to Learn More Details
Loop videos are a great way to showcase your content. They’re easy to make, and they’re also easy to edit. You can have a loop video where the slides keep repeating in the same order, or you can change it up by putting different images on each slide.
You’re probably already familiar with the concept of looping video in PowerPoint. However, there are some instances where looping videos can be a real-time saver. To do this, you need to make sure that your visuals are engaging and unique. You can achieve this by using video loops in PowerPoint presentations.
You can use it if you want to demonstrate an idea or concept by showing several parts of the same thing at once. Or you can use PowerPoint if you have a very long video that you want to show in one go. You can also use it for suggesting different angles for your audience and making their eyes move from one point to another without making them bored.
Part 1: How to Make a Slideshow Loop in PowerPoint
A power-point loop video is the most efficient way to create a slideshow for your presentation. This easy-to-use software utility provides a simple and intuitive interface that lets you add slideshows to your presentations.
This is ideal for creating multi-streaming PowerPoint presentations that can be repeatedly viewed in the same or a different sequence. Create multimedia presentations with an animated slide show, including videos, and music with just a few clicks of the mouse.
The creation of the Slideshow loop in Microsoft PowerPoint is quite easy and simple. To make a looping slideshow, you’ll first need a PowerPoint. A PowerPoint is a set of instructions that allows you to display a series of images and text in the same sequence. This gives your audience the ability to explore the information on the slides in more depth and engage with the content on a more personal level.
If you want to create a looping slideshow in PowerPoint, you can use the following steps.
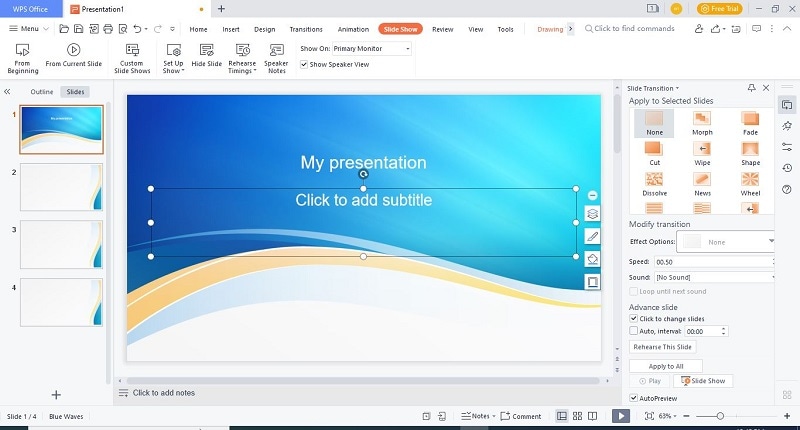
Step 1: Open Microsoft PowerPoint and select Slide show from Toolbar
The first step is to open Microsoft PowerPoint. To create a looping slideshow in PowerPoint, click on the Slide show feature on the top of the toolbar. Then different features will appear after clicking on it.
Step 2: Set up the Slide show manually
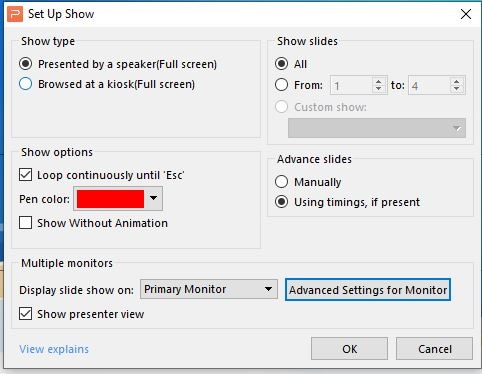
When you open the Slideshow, click on the Set Up Show from the toolbar. Some options will be shown in the drop-down (Manual, Auto, and Set Up Show). Select the option Set Up Show. A dialogue box will appear to select the following check boxes that are shown in the below picture:
Step 3: Select the slides and click on Transition
Select overall slides and click on the Transitions tab. You can see an option of Auto, interval. Uncheck the box of Auto, interval, and choose the time according to your requirements. Adding transitions can help to make your PowerPoint presentation more engaging and visually appealing. When you are adding transitions, make sure to think about how they can help to improve your overall presentation.
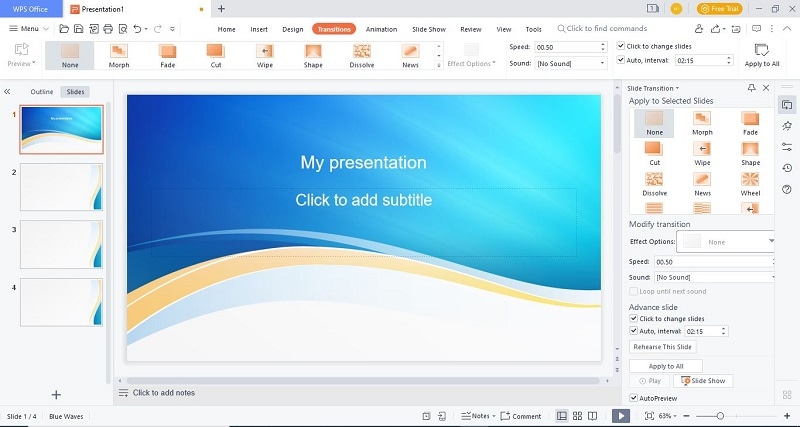
PowerPoint has the technology to create an endless loop slideshow that keeps playing without your finger. Loop slideshows are best used with information that is short, repeated, and not too repetitious. For example, if you want to play something on a loop it is better to create a looping slideshow than an extended presentation that repeats itself endlessly.
The power of loop slides is in their ability to engage users. You can have a slideshow that plays automatically or you can have it play when the user enters a specific panel. Slideshow Loops on PowerPoint allow you to play one or more slides over and over again by pressing the Play button. You can also create a time-lapse, which pauses the slideshow at a specific point.
Benefits of making a slideshow in PowerPoint
There are many benefits of using a looping slideshow in PowerPoint. There are many benefits of using loop video in PowerPoint presentations. Loop slideshow gives your audience a sense of continuity and connection, which can help them follow the story and understand the information more easily. It also helps to keep people engaged and interested in your presentation. They can be used to promote a product or service, commemorate a special event, or entertain and inform your audience.
- Slides can be played in a continuous loop, allowing the audience to stay engaged with the presentation from beginning to end.
- The looping feature makes it easy to create a presentation that is tailored to the specific needs of your audience. You can choose to have the slides repeat automatically, or you can control when each slide appears.
- It can help to save time. By using loop video, you can avoid having to constantly start and stop your presentation to show different parts of it. This can save you a lot of time and energy, which can be put into more important things.
- They can be used to commemorate a special event.
- They can be used to entertain and inform your audience.
Part 2: Alternative Way to Create Loop Slideshow Video
If you have been searching for the perfect way to create a loop slideshow video, Filmora video editor might be what you need. It is one of the most popular loop slideshow makers on the market and there is an app for all devices, including PCs and Macs to android phones and tablets. Filmora is a slideshow loop maker that allows you to produce video files quickly and easily with simple drag and drop.
Filmora provides you with seamless loop video for your website, youtube, and other channels, You can create content in various formats and image resolution to any social media like Facebook, Twitter, Instagram, and others with the help of our unique features. Filmora is a professional video editor for Windows. It’s an ideal tool for everyone, from beginners to professionals, as well as a great help for students, researchers, and teachers.
In this article, we’ll show you how to make a looping slideshow in PowerPoint. First, you’ll need to download Filmora. This software is used to create professional-looking videos that can be made at any length.
Step 1: Download Filmora and Import images and videos
Free Download For Win 7 or later(64-bit)
Free Download For macOS 10.14 or later
So first off, we need to create a new project. On the left-hand side, you’ll see your media library and on the right-hand side, there’s a green button that says “create new project”. You’ll notice there are three sections: video, audio, and images. These play a key role in creating your final video so let’s talk about each one individually.
Step 2: Add Title and background to your Slideshow video
This step is totally up to you in which you can add some titles the starting your slideshow. It is not very necessary but gives your slide show a perfect look. It also allows you to select any plain background of any color. You can use multiple transitions, music, and effects to tell your story in exactly the way you want!
Step 3: Make copies of the Slideshow and add transitions
Lastly, make copies of your media or pictures you want to add to your slideshow. Filmora allows you to set the duration of your slideshow. After copying the pictures paste them where the video ends. Then continue pasting according to your requirements. Add a transition “Dissolve” from the Transitions Tab. When you complete your editing export your video to your desktop or where you want to store it.
Benefits of looping Slideshare video in Filmora
There are many benefits of using a loop slideshow video in Filmora. First and foremost, a looping slideshow is a great way to create a presentation or video that is both engaging and professional. Additionally, looping a video makes it easy to keep audiences engaged and on foot, which is especially important for long videos or presentations.
Plus, looping can help to save on file size and memory usage, making it a great option for videos that will be shared online. Finally, looping can add an element of excitement and anticipation to a video, which can help to keep viewers engaged and coming back for more. You could also add animations between the slides that move differently than they would normally do.
Loop Slideshow Video in Filmora is a great option for you. It’s easy to use, and it has a wide range of options that allow you to customize your video output. You can even add music and sound effects to your videos! If you’re looking to make a loop slideshow video, this is the best software for it.
The Bottom Line
Slideshows are very popular, but they can sometimes seem a little boring. If you want to add something new, looping your slideshow will make all the difference. Adding music is easy in PowerPoint. A slideshow loop can be an effective way to keep viewers’ attention, making it an effective tool for presentation. You can renovate your outdated slideshows video with Filmora.
With its loop function, Filmora enables you to incorporate interesting dynamic effects into your videos. So what does it take to set up a PowerPoint loop video? You don’t need a lot of special programs or plugins to make your videos get looped on your presentations. Follow the above simple steps and you’ll have your videos getting looped in no time.
Create Promotional Video
When it comes to executing video marketing campaigns, there’s an unspoken rule that holds true no matter what your goals are. Ready for it? A great video is only as good as the brand behind it. Branding is a crucial aspect of any successful video marketing campaign because your audience needs to believe in your product or service before they will invest their time and money in you. If you want to make a real impact with your promotional videos, branding should be at the top of your mind.

What is Branding
When you think of branding, what comes to mind? Maybe it’s your favorite pair of shoes or a piece of clothing with a logo on it. Or maybe you think about big companies with catchy slogans and memorable commercials that have been around for years. But branding isn’t just about logos and slogans—it’s so much more than that.
Branding is the process of creating an identity for your product or service that differentiates itself from others in its category. This can be as simple as coming up with a name for your company, or it could mean developing an entire brand strategy that encompasses every aspect of how you present yourself to the world (and potential customers). Branding is all about finding ways to stand out from other businesses in your industry by establishing trust with consumers through consistency across all channels, including social media, websites, advertising campaigns, and more.
Why Branding is Important
Branding is vital for any business. It’s the foundation of your brand and it sets up a strong structure for your business to grow on.
Branding helps to build trust and loyalty with customers, which is crucial to gaining new customers and retaining old ones.
If you want people to remember you, then branding is important because it makes sure people will never forget about you!
With great branding comes great responsibility in terms of communicating clearly who you are as a company, what kind of products/services that you provide or sell, how those products/services will benefit consumers (or clients), etc., so make sure these things are always clear when designing promotional videos meant specifically for marketing purposes.
Branding in Video Marketing
Branding is an important part of video marketing because it helps to create a memorable video.
You should make sure you have a clear understanding of your brand before you start creating promotional videos. Your brand is the personality that people associate with your business or company, and this will help them to remember you.
For example, if you’re selling food products related to health and fitness, then having a healthy lifestyle theme throughout all aspects of the production process will be essential to getting people excited about what they see in their minds when they think about your product or service.
It can be challenging to keep track of all the aspects of your brand, but you can use Brand Guidelines to make sure that everything is aligned with your goals and values.
About Video Brand Guidelines
Video brand guidelines are a set of rules and regulations that govern how your videos should look, feel and sound. By having these in place, you can maintain a consistent style and tone across all your video content, whether that be explainer videos or social media posts.
Why do you need Video Brand Guidelines
1. Keeps your videos on-brand
The most important reason for creating video brand guidelines is to keep all your videos feeling like they come from the same place. This way, no matter what type of video it is, viewers will always know it’s from your brand.
2. Make sure everyone’s on the same page.
With so many people involved in the production of a single video, it can be hard to keep everyone on the same page. By having guidelines in place, you can make sure that everyone knows exactly what your brand’s video style is, and how to stay true to it.
3. Saves time and money.
In the long run, having video brand guidelines will save you both time and money. With a clear understanding of your brand’s video style, you can avoid costly mistakes and re-dos, and produce content faster and more efficiently.
4. Helps with planning
It can be difficult to plan video content without knowing what kind of videos you want to make. By having guidelines in place, you can map out a clear strategy for your video content, helping you to stay on track and hit your goals.
5. Improves creativity
Having video brand guidelines doesn’t mean that your videos have to be boring or formulaic. In fact, it can actually help to improve creativity, as it gives you a clear framework to work within. This way, you can experiment and try new things, safe in the knowledge that you’re still staying true to your brand.
Strong Pillars of Video Brand Guidelines
There are three strong pillars that make up a set of video brand guidelines: aesthetic (how it looks), technical (how it’s made), and messaging (what it says).
AESTHETIC
The Aesthetic Pillar is all about how your videos look, from the overall style to the specific details like color schemes and fonts. This is usually determined by your company’s branding guidelines.
TECHNICAL
The Technical Pillar covers the more practical elements of your video, such as file formats and resolution. This ensures that your videos are compatible with all kinds of devices and platforms.
MESSAGING
The Messaging Pillar deals with the actual content of your video, such as the script and narration. This is where you decide what message you want to communicate, and how you’re going to do it.
When writing your video brand standards, it’s important to keep all three pillars in mind. Each one plays a vital role in the overall impact of your video, so they should all be given equal attention.
Different Elements of Video Brand
There are several elements that make up a video that reflecting your brand. These include:
Logo
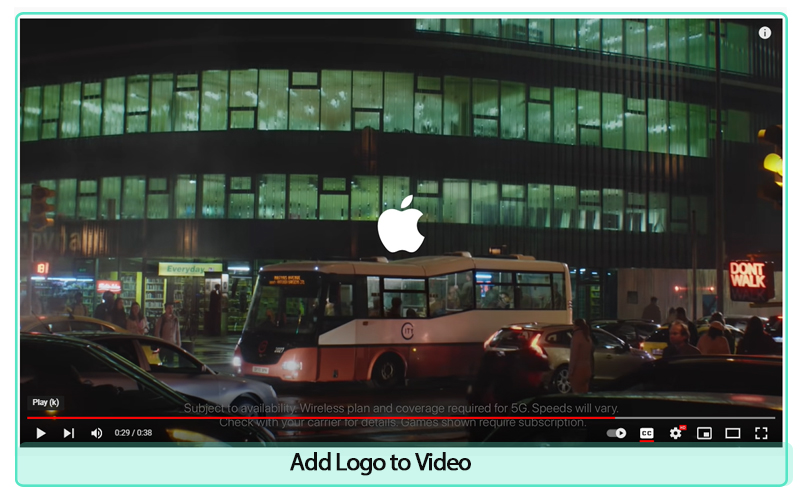
When and how should your logo be used? Should it appear at the beginning, end or throughout the video? These are just a few examples of what you might want to include in your guidelines. The important thing is to be as clear and concise as possible so that there’s no confusion about what does and doesn’t represent your brand.
Apple, for example, is a fantastic brand that uses its logo in video advertising. It may always be observed at the end of every video.
Color palette
What fonts best represent your brand and should be used in your videos?
Color has a huge impact on how people perceive your brand, so you want to choose colors that match your message and tone.

Typography choices
Typography is a key element of branding. It’s more than just picking the right typeface, though that’s important, too. Typography includes the font, size and style of your title, body copy and web copy, as well as how it’s used in your logo and all other graphics.

Imagery
If you want to use images or photos in your videos, what style should they be? And are there any specific colours that need to be used?

Voice
The way you speak to your customers is referred to as brand voice. Your brand’s communication style is what determines your brand voice. Your target audience will hear your brand voice, which can be informal or formal depending on the situation and needs of the client. It may have any tone as long as it feels genuine to your company’s principles and personality—
In terms of brand voice consistency, Apple conveys confidence, quality, and closeness. In terms of distinguishing oneself from the competition, Apple has always been the company to look up to. Many people feel welcomed and overindulged by having their own gadgets.
Graphics
If you want to use animation in your videos, you must first select a design that best represents your business. Is it going to be more cartoonish or more corporate?
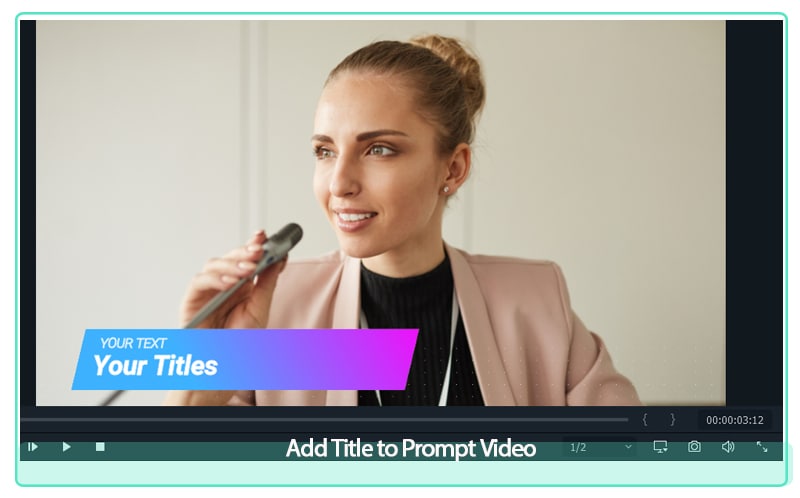
It’s also crucial to provide rules for the use of certain visual components. If you want to include the speaker’s name and job title in the lower thirds, for example, you must state how that should appear.
Transitions
Transitions between shots may boost brand recognition. Consider American sports networks that frequently use a rapid logo reveal! You should decide what your branding standard for transitions will be. Will it be a basic and traditional transition, or will you utilize it to emphasize your brand?

Music and Sounds
Music can play a significant role in how your video is received. It should be used to create the right atmosphere and reinforce the tone of voice. Your brand guidelines should include examples of the types of music that would and wouldn’t be appropriate, as well as any sound effects that could be used.

Format
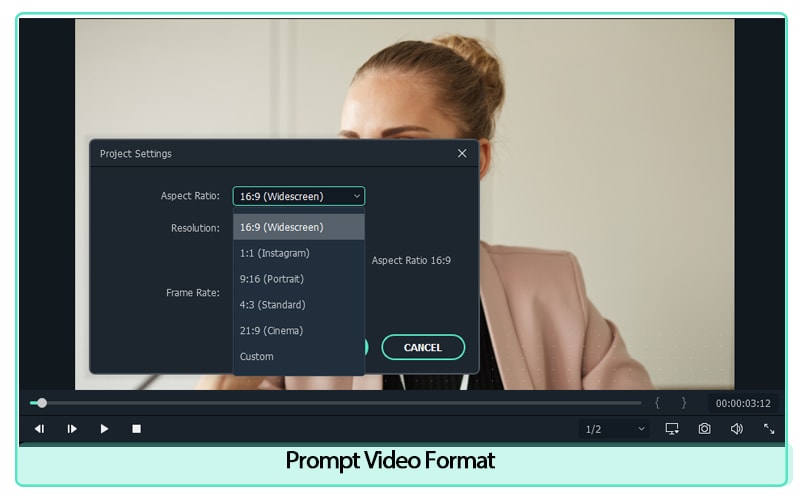
This section should detail what type of videos you want to produce. For example, do you want interview-style videos, or more dynamic explainer videos? It’s also worth including some general information about length, aspect ratio and file format.
Shooting Style
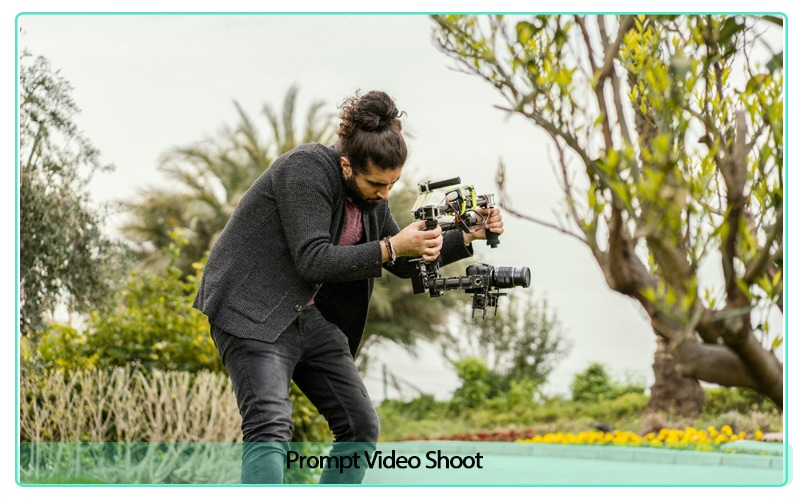
Do you want your videos to be shot in a particular way? If so, you should include information on that in your guidelines. For example, do you want close-ups or wide shots? Do you want lots of movement or static shots?
Your video brand guidelines should also consider where your videos will be shot. If you have a preferred location or style of location, such as an office or warehouse, make sure that is included.
Lighting is another important aspect of shooting style and can really affect the look and feel of a video. Consider what sort of lighting would work best with your brand - natural light, bright light, low light etc. - and include details in your guidelines.
Tagline
A tagline is a short phrase or sentence that identifies your brand. It’s often used in conjunction with a logo and other branding elements to create an overall marketing message
Nike recognized the need to appeal to a much wider audience, and transform their brand into more than simply fitness apparel. As a result of this, “Just Do It.” was created. The slogan is easy to understand and conveys the idea effectively. More significantly, it applies to everyone, not just world-class athletes
How to create Video Brand Guidelines?
Now that we’ve gone over why you need video brand guidelines, let’s take a look at how you can create them.
1. Define your brand voice
This is perhaps the most important step in creating your guidelines, as it will determine the tone and style of all your future videos. To do this, you need to think about what makes your brand unique, and how you want it to be perceived by others. Once you have a good understanding of your brand voice, you can start to put together the rest of your guidelines.
2. Choose a video style
Depending on the kind of videos you want to make, you’ll need to choose an appropriate style. This could be anything from animation to live action, so it’s important to pick something that will work well with your brand voice.
3. Decide on a look and feel
Just like with your choice of style, the look and feel of your videos should be in line with your brand identity. This means taking into account things like colour palette, typography and overall aesthetic.
4. Write a script
Once you have all the above elements in place, you can start to write a script for your video. This will act as a blueprint for the rest of the production process, so it’s important to get it right. When writing your script, be sure to keep your brand voice in mind, and make sure that the finished product stays true to your guidelines.
5. Find the right talent
To bring your script to life, you’ll need to find the right talent. This means finding voiceover artists, actors or presenters who fit with your brand identity and can help to sell your message.
6. Record and edit your video
With all the pieces in place, you’re finally ready to record and edit your video. During this process, it’s important to stick to your guidelines, so that the finished product is on-brand and consistent with your other content.
7. Publish and promote your video
Once your video is complete, it’s time to hit publish and start promoting it to your audience. Remember to use all the channels at your disposal, from social media to email marketing, to make sure that as many people as possible see your brand-new video.
Brand Guidelines Consistency
It’s important to be consistent with your brand. One of the biggest mistakes a company can make is trying to brand itself as something it isn’t. If you’re perceived as one thing and then suddenly change, it may do more harm than good for your business or organization.
The most well-known example of a company with a consistent brand is Coca Cola. It is one of the company brands with consistent brand image and a very strong reputation. This can be attributed to the company’s efforts in marketing and advertising to create a distinct brand image. The Coca Cola Company has spent millions of dollars on advertising campaigns that focus on creating a positive image for the product and reinforcing its original taste.
You need to have consistency in all aspects of your brand: logo, voice and tone (including social media), visuals (such as color scheme), and more. Your audience will immediately identify any inconsistencies between these elements - so make sure they match up well!
Wrap-up
Creating video brand guidelines may seem like a lot of work, but it’s worth it in the long run. By taking the time to put together a comprehensive guide, you can ensure that all your future videos are on-brand, efficient and effective. So what are you waiting for? Get started today! Do you have any tips for creating video brand guidelines? Let us know in the comments below
Free Download For macOS 10.14 or later
Free Download For macOS 10.14 or later
Also read:
- In 2024, ReVisionFX ReelSmart Motion Blur Plugin For Premiere Pro
- Updated 5 Tips for Faster Editing in Filmora Video Editor
- Best 10 Options Slow Down Video Online with Perfection
- In 2024, You May Want to Change the Speed of Certain Portions of Your Video. This Article Enlightens You on How to Splice and Speed up the Video in Simple Ways
- Updated A Roster of 8 Best Color Match Generators for 2024
- New There Are Many Vlogging Cameras You Can Find in the Market. However, to Get a Good Start in Vlogging, some Sony Vlogging Cameras and Canon Vlog Cameras Are to Consider. This Article Introduces You to the Respective List
- Updated Create a Movie with Windows Movie Maker for 2024
- New 10 Best Meme Text to Speech Tools Windows, Mac, Android, iPhone&Online for 2024
- Updated 2024 Approved Guide To Using Free Luts for OBS
- New In 2024, Fixing The Slow Playback Issues in DaVinci Resolve
- Updated Easy Way to Combine Several Xvid Files Into One Windows, Mac,Android for 2024
- Updated 2024 Approved Enhance Your Film Production with These 5 Silence Detection Tools
- Updated How to Convert Videos to Slow Motion? Complete Guide for 2024
- How to Speed Up Pictures on TikTok Slideshow for 2024
- New Best Video Editors to Add Text to a Video
- In 2024, Got No Luck with MP4 Video Joining Software? Try These 6 Best MP4 Mergers to Combine Videos on Your MAC and Windows
- 2024 Approved 4 Methods How To Make a Recap Video
- New How to Create a Dynamic Text Animation in Filmora — Step-By-Step
- 2024 Approved Want to Learn How to Add VHS Green Screen to Your Videos? This Guide Will Cover All the Details You Need to Know to Add This Effect to Your Videos and Make Them Stand Out
- New 2024 Approved 3 Ways to Combine 2 or 3 Videos Into 1
- 2024 Approved Do You Know About some Efficient Slow-Motion Video Editors? Read This Article to Find Out the Best Slow-Motion Video Editing Tools that You Can Try
- New Looking for the Best Websites for 3D Text PNG? Weve Covered You with Our Top 8 Picks for Your Upcoming Work
- New How to Change Video Thumbnail on Google Drive for 2024
- How To Split Screen On Tiktok
- Updated In 2024, Add some Sci-Fi Touch to Your Next Video Content Using Wondershare Filmora Editing Tools to Create an Alternate Reality Effect
- What Is TS Format and How To Play TS Files? Basic Tips
- In 2024, Are You Eager to Discover the Top-Rated and Reliable LUTs that Can Be Used in Shotcut? This Article Will Help You a Lot with This Matter
- New What You Should Know About Speech-to-Text Technology
- In 2024, 8 Apps to Custom GIF Stickers
- 2024 Approved How to Resize FLV Video EfficientlyWindows, Mac, Android, iPhone &
- New How to Add Freeze Frame to Your Video From Any Device for 2024
- Updated 2024 Approved Ideas to Make A Perfect Café Vlog
- Updated Top 5 Video Filter Software Improve Your Videos with Filters for 2024
- New LUTs Can Make Ordinary-Looking Footage Look More Attractive. Read This Guide to Learn How You Can Easily Create Your Own LUTs Using Filmora
- 2024 Approved Do You Want to Make Your Photos and Videos Look Different From Others? There Are Many Lightroom LUTs Free, and They Make Your Media Content Stand Out From Others
- Best Practical Tips to Improve Your Lighting in the Sun for 2024
- New How to Choose A Nice GoPro for Vlogging?
- How to Use a Stabilization Tool in Filmora for 2024
- Updated How to Add a Custom Transition to OBS
- Updated How to Add Photos to Tik Tok Video
- New In 2024, Camtasia vs Final Cut Pro
- New 2024 Approved Step by Step Guide on Make Gimp Transparent Background PNG
- Updated Find a Video Background Change Online that Works for You. This Article Contains Tools that Can Edit Video Backgrounds Online with Little Effort
- New Change Video Speed with FFmpeg
- Updated Live Stream on YouTube Using Zoom for 2024
- New In 2024, 10 Best Free Text to Speech Software Windows, Mac,Android, iPhone & Online
- 5 Easy Ways to Change Location on YouTube TV On Xiaomi 14 Ultra | Dr.fone
- In 2024, How to Transfer Data from Lava Yuva 3 to BlackBerry | Dr.fone
- In 2024, Lock Your ZTE Blade A73 5G Phone in Style The Top 5 Gesture Lock Screen Apps
- How To Fix OEM Unlock Missing on Oppo Reno 11F 5G?
- A Guide ZTE Blade A73 5G Wireless and Wired Screen Mirroring | Dr.fone
- New In 2024, Level Up Your AI Streaming Game A Quick Guide and Tool Recommendation
- Apple iPhone 13 mini Backup Password Never Set But Still Asking? Heres the Fix
- Full Guide on Mirroring Your Vivo Y55s 5G (2023) to Your PC/Mac | Dr.fone
- In 2024, 9 Best Phone Monitoring Apps for Vivo Y200e 5G | Dr.fone
- How To Unlink Apple ID From iPhone 7
- In 2024, How to Change your Vivo T2 5G Location on Twitter | Dr.fone
- How to Fake GPS on Android without Mock Location For your Oppo Reno 11 5G | Dr.fone
- How To Stream Anything From Realme Narzo 60x 5G to Apple TV | Dr.fone
- 9 Solutions to Fix Process System Isnt Responding Error on Itel A05s | Dr.fone
- In 2024, Reasons why Pokémon GPS does not Work On Honor 100 Pro? | Dr.fone
- Title: How to Make A Slideshow Video (+Filmora Techniques)
- Author: Chloe
- Created at : 2024-06-18 14:30:55
- Updated at : 2024-06-19 14:30:55
- Link: https://ai-editing-video.techidaily.com/how-to-make-a-slideshow-video-plusfilmora-techniques/
- License: This work is licensed under CC BY-NC-SA 4.0.


