
How To Make a Video by Mouse in Filmora?

How To Make a Video by Mouse in Filmora?
Have you ever wondered, what if somehow your keyboard just broken or disappeared? And you’re stuck in the middle of your project with just a mouse. Don’t know how to proceed remaining project with a mouse? Then no worries! We got you.
This article will guide you how to use stock videos and stock audio to create a music video. The catch, you say? We will be doing that only with a use of a mouse.
Things To Know Before Editing
Let us be honest, most shortcuts are not available without the keyboard. To counter that, our approach will need to be more general. General here means you need to know all the necessary controls and panels.

Take the challenge and find a solution together
To counter these difficulties, even if you have a keyboard, you can imagine yourself in a situation. A situation in which we have a keyboard but will not be using it.
Therefore, presenting us with a challenge, so if you someday come across a situation like this, you will be prepared. All in all, you would be learning more things by returning to the roots of your practice, which in most cases, can prove helpful.
Get Ready With the Professional Editing Tool
Before getting into the editing process handicapped from resources, you need to be familiar with the software that we will use. We will use Wondershare Filmora You can click the link below and catch it up.

Create a Music Video Without a Keyboard
Let us get started! Whether you have a real mouseless experience or want to take it as a challenge, let’s get the things clear first.
- We need to create a 20 seconds music video.
- We will only be using the footage from the stock library.
- We will be using music from the Wondershare Filmora library.
- We will have 5 minutes to review the footage and the music available.
- And most importantly, we don’t have a keyboard.
Step 1. Review your footage
Our first and most crucial step will be to use our imagination and creativity. So get those neurons firing, and let us go!

- Head to the stock media folder on the bar mentioned above, the Wondershare Filmora.
- Or you can simply look towards the left window, where you will find the sample videos tab.
- Click on the sample videos tab, and a new window will appear on the library screen.
- Here you will find almost more than 20 videos.
- So apart from using the actual recorded footage, we will work our way with what we have from default.
- For the music, we would be scrolling in the stock audio library.
- Click on the audio tab above and start scrolling.
- You will also find some categories in the left window.
- Choose the category of your choice and listen to the audio.
Do whatever suit you best. Keep in mind you only have 5 minutes.
Step 2. Pick music for your clips
Suppose you have found audio that speaks your vibe. The next step would be to find a video that tallies that audio. Let us suppose we have audio that is of the hip-hop genre. Let that creativity shine now!

If you like to add a more classical vibe, pick a classical song or audio from the audio library.
- After picking the song, move on to the sample videos tab and search for videos that match a classic vibe.
- Now random close-up shots of a piano, cinematic footage of a big orchestra, or simple landscapes with minimalistic movement while focusing on a single object, consider the example below.

Now that a scenario is constructed, our next step is to arrange these clips in the Wondershare Filmora timeline.
Step 3. Download the clips and audio
You have 15 minutes to create the music video. Start the timer! Once you have selected a sample video and audio that matches your scenario, you can download them from the bottom right icon on the thumbnail. Only if you still need to download them.
Step 4. Insert the audio into the timeline
- The first step is to drag the audio to the timeline.
- Now play the audio from the start. If you can work with the audio as a whole, then it’s perfect.
If you want your audio to start at a certain point. You have to follow the below-mentioned steps. It is as simple as that!

- Add your audio to the timeline.
- Then move the timer or the slider where you want your audio to start.
- Right-click on the audio file. Select split.
- Your audio file will split into two parts.
- Delete the prior file and drag the file ahead to the start of the timeline.
The next step is to add the videos to the timeline.
Step 5. Add the video to the timeline
When you have your audio in the timeline, your next step is adding the video. After you have trimmed or split your audio to your wish, follow the below steps.
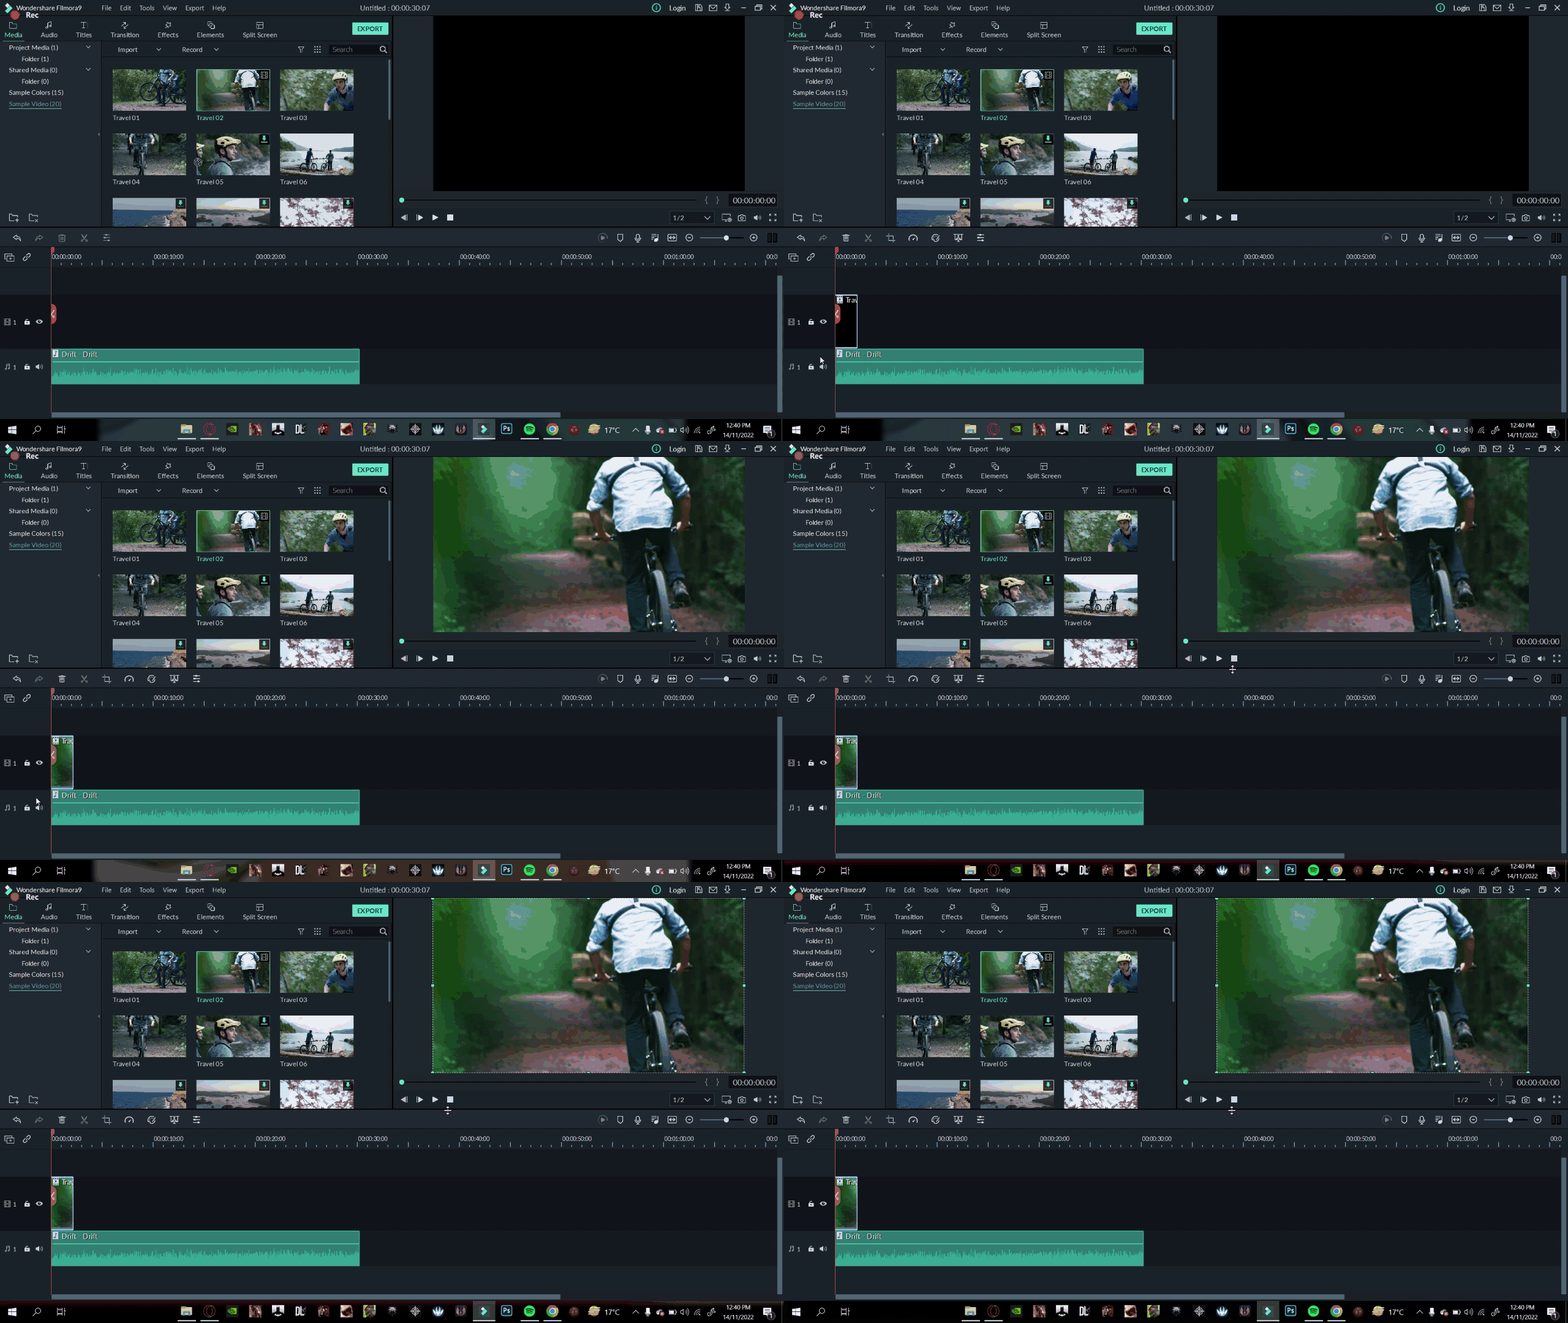
- Click and drag to drop the video clips where you want the video to start.
- Play the audio first is a good feature for where you want your video to insert.
- Then adjust the timeline slider on that point.
- Simply drag your video and drop it into the timeline.
![]()
Note: now, remember you have multiple videos to match the audio length as we create a music video. The more, the more optimistic. Now, remember you have multiple videos to match the audio length as we create a music video. The more, the more optimistic.
Download the remaining videos that you would wish to be added to the music and follow the steps mentioned above to add the clips where you desire.
Step 6. Finishing touches
You can add some transitions to give your music video a fine touch**.** To add transitions, you can follow the below steps:
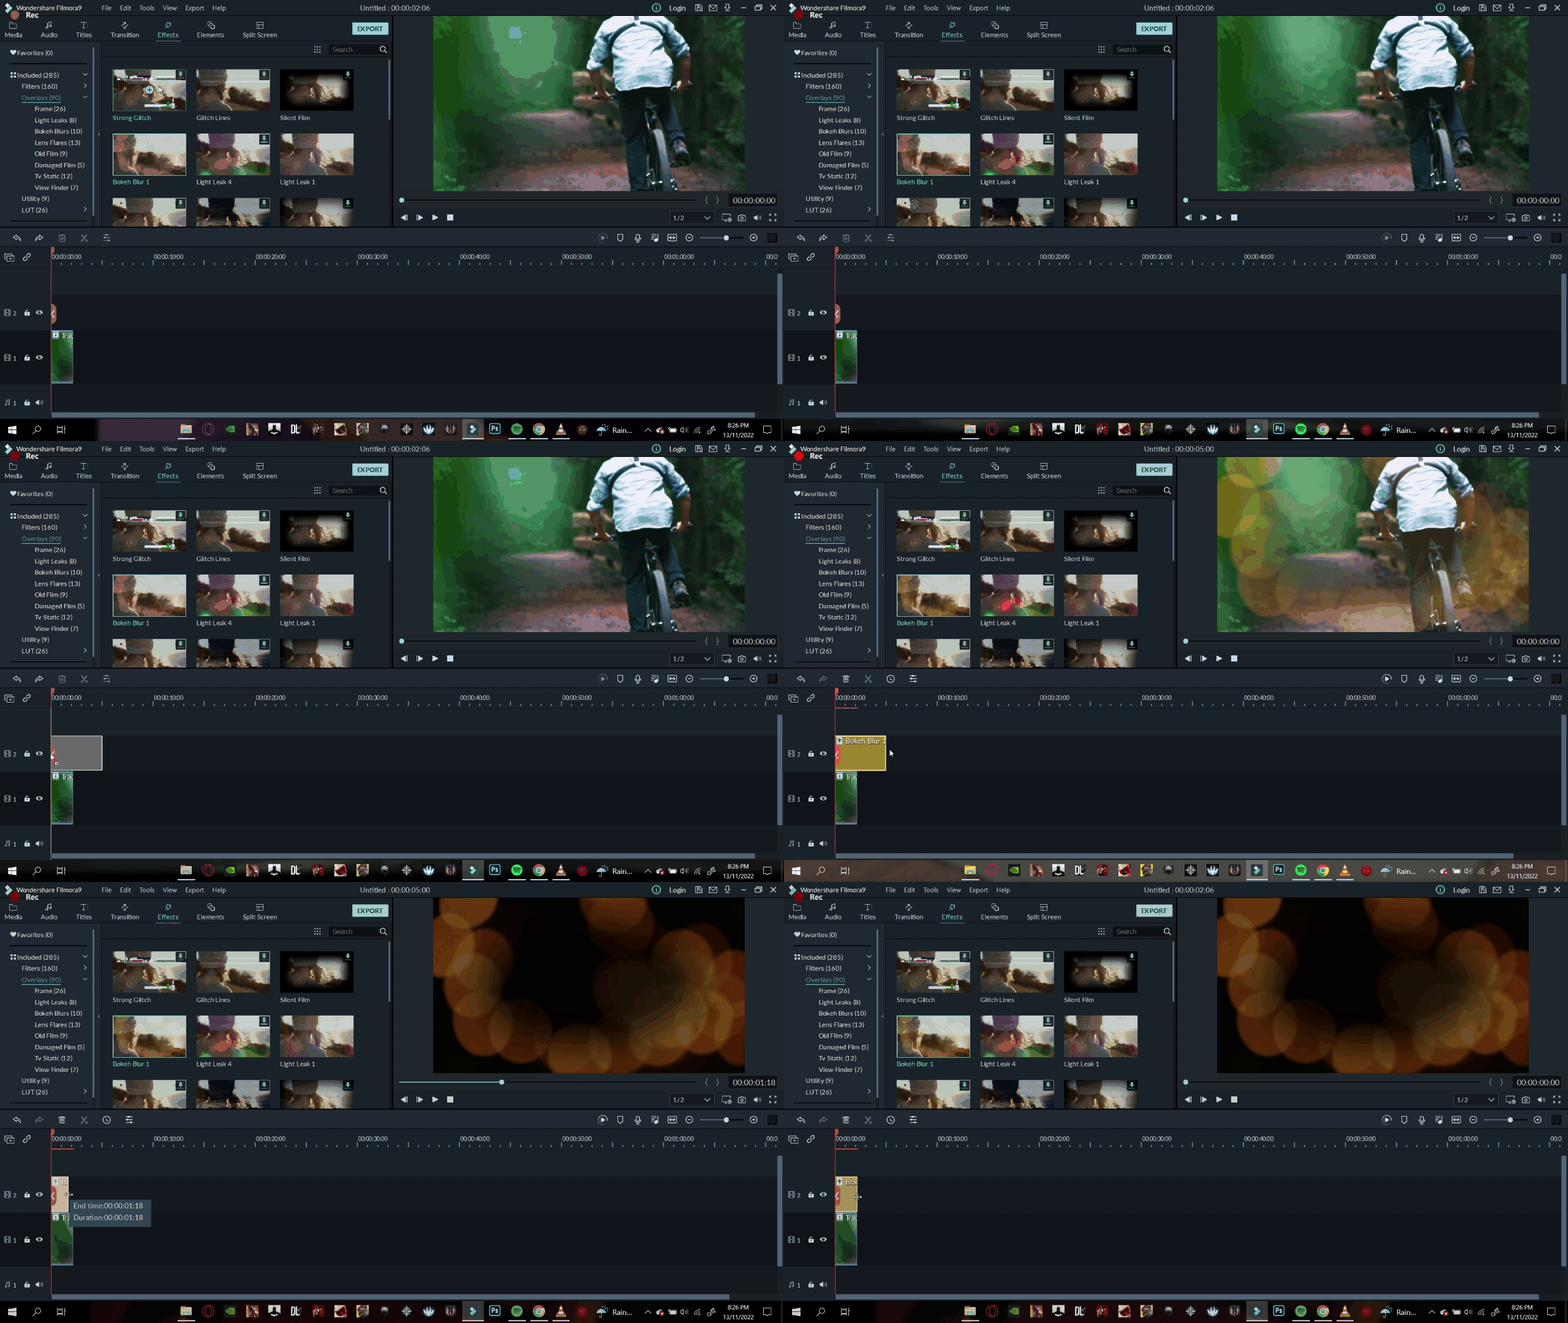
- First, click on the transition icon on the bar above. Then, browse as far as your imagination takes you.
- If the effect you want still needs to be downloaded, click on the download icon in the bottom right corner and download the effect.
- Click on the effect and drag it to drop it on your video. It will create a smooth transition while shifting from one video to the other.
Keep going you are almost there!
- Do this for all the videos in the timeline above the audio file.
If you have time, you can also add a few of the effects in the Wondershare Filmora.
- To do so, click on the effect icon on the top bar.
- A window will open to your left, indicating different available effects categories. Select any tab you want that fits your music video scenario.
- Download the effect mentioned above by clicking on the download icon in the bottom right corner of the effect thumbnail.
- Click to drag and drop it on top of your video.
![]()
Note: you can do so as many times as you want for the remaining video clips in the timeline.
It seems our 15 minutes are running out! Play the music video from the beginning and review the edits you made. Then, finalize your edits and Voila. You have successfully created a music video using a mouse on Wondershare Filmora.
So in a rare scenario when you don’t have a keyboard, you can just use your mouse to browse the Wondershare Filmora and put those creative ideas to work.
Conclusion
With just a mouse, you have created a music video! How easy is that? Try different music, audio, and video, and then enjoy the rest! Creativity has no limits if you know how to make the most of it by using the tools at your hand. Tell out more about your creative ideas! We love to hear from your side!
Free Download For Win 7 or later(64-bit)
Free Download For macOS 10.14 or later
Download the remaining videos that you would wish to be added to the music and follow the steps mentioned above to add the clips where you desire.
Step 6. Finishing touches
You can add some transitions to give your music video a fine touch**.** To add transitions, you can follow the below steps:

- First, click on the transition icon on the bar above. Then, browse as far as your imagination takes you.
- If the effect you want still needs to be downloaded, click on the download icon in the bottom right corner and download the effect.
- Click on the effect and drag it to drop it on your video. It will create a smooth transition while shifting from one video to the other.
Keep going you are almost there!
- Do this for all the videos in the timeline above the audio file.
If you have time, you can also add a few of the effects in the Wondershare Filmora.
- To do so, click on the effect icon on the top bar.
- A window will open to your left, indicating different available effects categories. Select any tab you want that fits your music video scenario.
- Download the effect mentioned above by clicking on the download icon in the bottom right corner of the effect thumbnail.
- Click to drag and drop it on top of your video.
![]()
Note: you can do so as many times as you want for the remaining video clips in the timeline.
It seems our 15 minutes are running out! Play the music video from the beginning and review the edits you made. Then, finalize your edits and Voila. You have successfully created a music video using a mouse on Wondershare Filmora.
So in a rare scenario when you don’t have a keyboard, you can just use your mouse to browse the Wondershare Filmora and put those creative ideas to work.
Conclusion
With just a mouse, you have created a music video! How easy is that? Try different music, audio, and video, and then enjoy the rest! Creativity has no limits if you know how to make the most of it by using the tools at your hand. Tell out more about your creative ideas! We love to hear from your side!
Free Download For Win 7 or later(64-bit)
Free Download For macOS 10.14 or later
Want to Learn How to Make Gaming Montage Videos? You Have Come to the Right Place. This Guide Will Teach You All You Need to Know to Create Montages of Video Games and Share Them with Other Players
The popularity of gaming montage is growing every day in today’s pop culture. There are currently more than 2.5 billion gamers, and most of them love watching gaming video content on YouTube. Whether people use a montage to parody gaming montages themselves or show off their skills, the effort and time put into them create impressive results.
We will explain how to create gaming montages and give you some tips that you might want to keep in mind to make epic videos.
How to Make a Gaming Montage
You have several options when it comes to creating gaming montages. You can include a random cut of great scenes, a mixture of the highlighted moments you found thrilling and would like to share with other gamers. In other cases, you’ll have to think of an engaging story in advance, then base your gameplay on this story.
Essentially, the workflow will be slightly different for these two scenarios. It’s much easier with the random cut type, especially when using a reliable video editor. Editing montages is as exciting as playing the game.
With that in mind, here is how to make a gaming montage.
1) Decide Your Montage Story/Type
Deciding your montage type beforehand helps clear your mind and create an epic gaming montage that will keep viewers watching. It allows you to choose the relevant video clips for your gaming montage.
Choose the topic of the video and decide the length of each clip and the sequence of the clips. Be sure to put the most epic or funny clips in the last section of your video. And this will make your viewers watch the video until the end.
2) Record Your Gameplay Footage
The methods to capture the gameplay varies depending on the platform where the game is. The most important thing you have to keep in mind is to ensure your recorder supports Replay Buffer; this will allow you to record scenes that occurred minutes or seconds ago.
That means you do not need to record the gameplay the whole time and burn your hardware. Instead, you’ll capture the moment after interesting things occur.
Game consoles like PS4 allow you to record the video natively for a maximum of one hour with the gamepad. A capture card lets you record it longer than 60 minutes.
Once you’ve all the clips you want on your PC, head over to https://filmora.wondershare.net/filmora-video-editor.html and download Filmora and install the software on your computer. This program allows you to edit your video clips and add cool effects that will make viewers keep watching.
3) Import You Videos to Media Library
You only have to import the videos to Filmora’s media library and then drag and drop them into the timeline, where you can start making the edits.
By right-clicking on the clip in your timeline, you’ll see the options to zoom, speed, change, split, or trim your videos. You can also add sound effects by going to the Audio Tab.
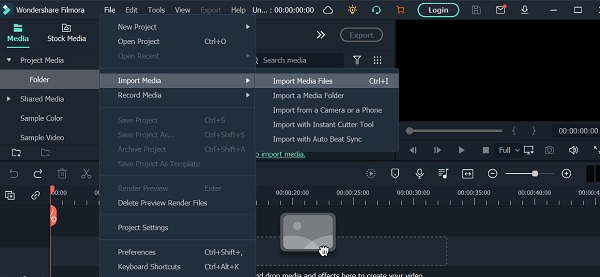
Import Videos
4) Choose Background Music for Your Montage
Music will help make your gaming montage engaging. Make sure you use a license-free track if you plan to post it on social media.
Using copyrighted music tracks and uploading the video on social media platforms can lead to video strikes. Luckily, Filmora has loads of non-copyrighted music tracks.
Navigate to Stock Media, where you’ll find non-copyrighted music on Pixabay, and choose the one you prefer.

Choose Background Music
5) Edit the Gaming Montage
With Filmora’s auto gaming montage maker, you can watch the video clip with the music you have selected. This tool will analyze beat points to change the video and effects.
Additionally, the tool can identify any bad parts in your video and delete them so that the video matches the music.
The Effects tab allows you to add multiple overlays and filters to your gaming montage video. Filmora has different categories of overlays that let you add emotions or personality to your montage. You can also use it to set the tone in your video.
Filters allow you to spice up your gaming videos. There are also different types of filters on Filmora.
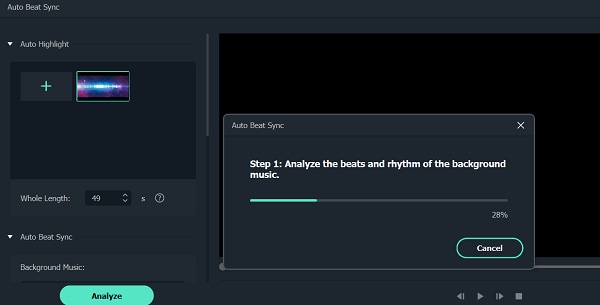
Edit Gaming Montage
6) Export Your Gaming Montage Video
Once you have finished editing your video and added music, hit the Export button. Doing this will allow you to export your edited video and save it on your computer.
You can now enter your login details and upload your gaming montage video on your YouTube channel to share it with other players.
Useful Tips for Making a Gaming Montage
Making gaming montages can help you build a large online community if you do the right thing. When making a gaming montage, there are a few tips that you should keep in mind. They include:
1. Apply Velocity Effects
Adding velocity effects to your montage will help get the attention of viewers. You can couple the transition between scenes with a speed ramping effect.
Include slow motion where there is a gunshot or other big gaming moment. You can then speed up things to quickly move into another scene. You can create these velocity effects in Filmora and make it smooth.
2. Avoid Game Loading Scenes
Do not include game loading scenes or any unnecessary clips in the gaming montage. Your audience does not have the time to wait for the scenes to load because they want to see action fast.
3. Sync Gunshot with Music Beat
Try to match gunshot sounds with beats and rhythms in shooter video games. The beats of the music and the soothing sync of gunshots will catch viewers’ attention and your video will become popular among gamers.
4. Add Creative Transitions
You can spice up your gaming montage by adding transitions, especially when you have loads of clips for the montage. But avoid overusing it, as you could confuse your audience with a range of dazzling and glaring transitions.
5. Color Grade the Video for the Mood
Use color grading to your advantage, as it can set the mood of your viewers. You can decide to make some scenes black and white to catch the viewers’ attention.
6. Add Video Vignettes for Special Occasions
You can add dark edges around the corners of your video to highlight action or create a certain mood. For gameplay based on a story, use vignetting to add a sense of nostalgia or as a flashback that shows viewers the past.
You can use Filmora to apply the vignetting effect by heading to Advanced Color Tuning, then clicking the Vignette option. You can then add the vignette effect to the video. Additionally, you can adjust the vignette’s exposure, feather, roundness, size, and highlights.
Best Gaming Montage for Studying
Here are three gaming montages that are good for studying.
1. Call of Duty: Modern Warfare
Uploaded by DemixB, the Call of Duty Game Montage uses Jacques Offenbach’s Can Can Music track. It’s a happy song that has a tempo of 81 BPM. The track has average danceable energy, and it’s somewhat danceable.
DemixB set the gunshot in the montage video to the music tune. The track builds up to the climax when the gunshot echoes with the attention-grabbing orchestral explosions.
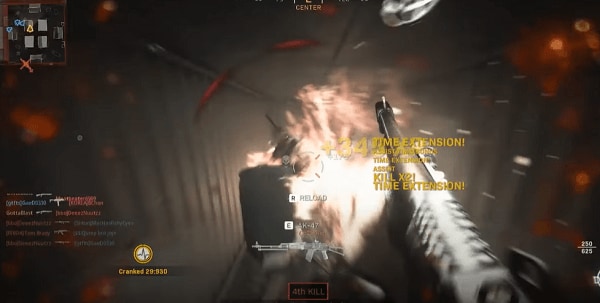
Call of Duty: Modern Warfare
2. ShutteR’s Gaming Montage
In the gaming montage uploaded by ShutteR on his YouTube channel, he used velocity effects to enhance the video. You’ll see that the transition in each scene is paired with adrenaline-pumping, speed-ramping effects.
ShutteR used a slow-motion to highlight action in each scene, then speeds up again when he wants to fast out into the next scene.; this makes the video more engaging to keep viewers glued to their screens.
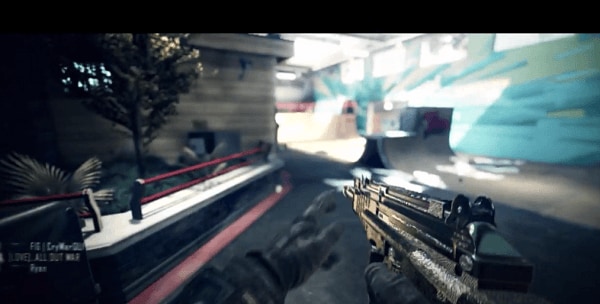
ShutteR’s Gaming Montage
3. NEVERMORE [CS: GO]
NEVERMORE [CS: GO] was uploaded by Fuze on his YouTube channel, and it has creative gameplay. The gaming montage is based on a story. He did the project with Apel, an artist who designed the Fever Dream series skins in the video.
The basic idea of this gaming montage was that the main game character is a corrupted policeman with purple glowing eyes because he’s not human.
When the edits begin, the shape of the main character will shift from CS: GO CT models and turn into his real corrupt CT shape. So that’s why his name keeps changing. You can get his real identity by pausing some of the frames and looking at the “Killfeed.”
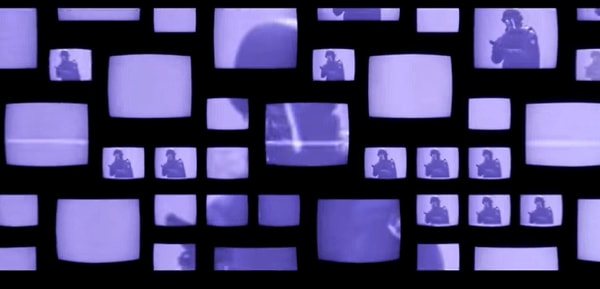
NEVERMORE [CS: GO]
Closing Thoughts:
Gaming montage involves picking and editing a range of video clips, which are brought together to create engaging video content. It consists of the best scenes from gameplay and non-copyrighted background music.
Use Filmora to edit and add effects to your video, including transitions and overlays. Your gaming montage will get more views, hence becoming popular among players.
The popularity of gaming montage is growing every day in today’s pop culture. There are currently more than 2.5 billion gamers, and most of them love watching gaming video content on YouTube. Whether people use a montage to parody gaming montages themselves or show off their skills, the effort and time put into them create impressive results.
We will explain how to create gaming montages and give you some tips that you might want to keep in mind to make epic videos.
How to Make a Gaming Montage
You have several options when it comes to creating gaming montages. You can include a random cut of great scenes, a mixture of the highlighted moments you found thrilling and would like to share with other gamers. In other cases, you’ll have to think of an engaging story in advance, then base your gameplay on this story.
Essentially, the workflow will be slightly different for these two scenarios. It’s much easier with the random cut type, especially when using a reliable video editor. Editing montages is as exciting as playing the game.
With that in mind, here is how to make a gaming montage.
1) Decide Your Montage Story/Type
Deciding your montage type beforehand helps clear your mind and create an epic gaming montage that will keep viewers watching. It allows you to choose the relevant video clips for your gaming montage.
Choose the topic of the video and decide the length of each clip and the sequence of the clips. Be sure to put the most epic or funny clips in the last section of your video. And this will make your viewers watch the video until the end.
2) Record Your Gameplay Footage
The methods to capture the gameplay varies depending on the platform where the game is. The most important thing you have to keep in mind is to ensure your recorder supports Replay Buffer; this will allow you to record scenes that occurred minutes or seconds ago.
That means you do not need to record the gameplay the whole time and burn your hardware. Instead, you’ll capture the moment after interesting things occur.
Game consoles like PS4 allow you to record the video natively for a maximum of one hour with the gamepad. A capture card lets you record it longer than 60 minutes.
Once you’ve all the clips you want on your PC, head over to https://filmora.wondershare.net/filmora-video-editor.html and download Filmora and install the software on your computer. This program allows you to edit your video clips and add cool effects that will make viewers keep watching.
3) Import You Videos to Media Library
You only have to import the videos to Filmora’s media library and then drag and drop them into the timeline, where you can start making the edits.
By right-clicking on the clip in your timeline, you’ll see the options to zoom, speed, change, split, or trim your videos. You can also add sound effects by going to the Audio Tab.

Import Videos
4) Choose Background Music for Your Montage
Music will help make your gaming montage engaging. Make sure you use a license-free track if you plan to post it on social media.
Using copyrighted music tracks and uploading the video on social media platforms can lead to video strikes. Luckily, Filmora has loads of non-copyrighted music tracks.
Navigate to Stock Media, where you’ll find non-copyrighted music on Pixabay, and choose the one you prefer.

Choose Background Music
5) Edit the Gaming Montage
With Filmora’s auto gaming montage maker, you can watch the video clip with the music you have selected. This tool will analyze beat points to change the video and effects.
Additionally, the tool can identify any bad parts in your video and delete them so that the video matches the music.
The Effects tab allows you to add multiple overlays and filters to your gaming montage video. Filmora has different categories of overlays that let you add emotions or personality to your montage. You can also use it to set the tone in your video.
Filters allow you to spice up your gaming videos. There are also different types of filters on Filmora.

Edit Gaming Montage
6) Export Your Gaming Montage Video
Once you have finished editing your video and added music, hit the Export button. Doing this will allow you to export your edited video and save it on your computer.
You can now enter your login details and upload your gaming montage video on your YouTube channel to share it with other players.
Useful Tips for Making a Gaming Montage
Making gaming montages can help you build a large online community if you do the right thing. When making a gaming montage, there are a few tips that you should keep in mind. They include:
1. Apply Velocity Effects
Adding velocity effects to your montage will help get the attention of viewers. You can couple the transition between scenes with a speed ramping effect.
Include slow motion where there is a gunshot or other big gaming moment. You can then speed up things to quickly move into another scene. You can create these velocity effects in Filmora and make it smooth.
2. Avoid Game Loading Scenes
Do not include game loading scenes or any unnecessary clips in the gaming montage. Your audience does not have the time to wait for the scenes to load because they want to see action fast.
3. Sync Gunshot with Music Beat
Try to match gunshot sounds with beats and rhythms in shooter video games. The beats of the music and the soothing sync of gunshots will catch viewers’ attention and your video will become popular among gamers.
4. Add Creative Transitions
You can spice up your gaming montage by adding transitions, especially when you have loads of clips for the montage. But avoid overusing it, as you could confuse your audience with a range of dazzling and glaring transitions.
5. Color Grade the Video for the Mood
Use color grading to your advantage, as it can set the mood of your viewers. You can decide to make some scenes black and white to catch the viewers’ attention.
6. Add Video Vignettes for Special Occasions
You can add dark edges around the corners of your video to highlight action or create a certain mood. For gameplay based on a story, use vignetting to add a sense of nostalgia or as a flashback that shows viewers the past.
You can use Filmora to apply the vignetting effect by heading to Advanced Color Tuning, then clicking the Vignette option. You can then add the vignette effect to the video. Additionally, you can adjust the vignette’s exposure, feather, roundness, size, and highlights.
Best Gaming Montage for Studying
Here are three gaming montages that are good for studying.
1. Call of Duty: Modern Warfare
Uploaded by DemixB, the Call of Duty Game Montage uses Jacques Offenbach’s Can Can Music track. It’s a happy song that has a tempo of 81 BPM. The track has average danceable energy, and it’s somewhat danceable.
DemixB set the gunshot in the montage video to the music tune. The track builds up to the climax when the gunshot echoes with the attention-grabbing orchestral explosions.

Call of Duty: Modern Warfare
2. ShutteR’s Gaming Montage
In the gaming montage uploaded by ShutteR on his YouTube channel, he used velocity effects to enhance the video. You’ll see that the transition in each scene is paired with adrenaline-pumping, speed-ramping effects.
ShutteR used a slow-motion to highlight action in each scene, then speeds up again when he wants to fast out into the next scene.; this makes the video more engaging to keep viewers glued to their screens.

ShutteR’s Gaming Montage
3. NEVERMORE [CS: GO]
NEVERMORE [CS: GO] was uploaded by Fuze on his YouTube channel, and it has creative gameplay. The gaming montage is based on a story. He did the project with Apel, an artist who designed the Fever Dream series skins in the video.
The basic idea of this gaming montage was that the main game character is a corrupted policeman with purple glowing eyes because he’s not human.
When the edits begin, the shape of the main character will shift from CS: GO CT models and turn into his real corrupt CT shape. So that’s why his name keeps changing. You can get his real identity by pausing some of the frames and looking at the “Killfeed.”

NEVERMORE [CS: GO]
Closing Thoughts:
Gaming montage involves picking and editing a range of video clips, which are brought together to create engaging video content. It consists of the best scenes from gameplay and non-copyrighted background music.
Use Filmora to edit and add effects to your video, including transitions and overlays. Your gaming montage will get more views, hence becoming popular among players.
How to Use Rules of Thirds
So you have your work flow sorted out and you’re well on your way with Filmora but you’re not quite happy with your results or something just seems off when you watch your videos back. You may be missing an important element of all visual media and that’s composition. This is where the building blocks of every frame come together to make a visually pleasing piece for the viewer and helps the eyes concentrate on the content rather than trying to figure out what they are looking at.
I’m sure you may have heard of the rule of thirds for art or photography and you may not know or understand what it is. You may even be wondering how the rule of thirds can help you with your video creation. Well, that is what I’m going to show and explain to you today.
What is the rule of thirds
At its core the rule of thirds is a guide to follow whenever you create something visual.
You break an image into thirds both horizontally and vertically, in doing this you are left with nine boxes and four gridlines, the rule states that by placing key elements in line with gridlines you will have an overall better composition.
To gain a better understanding of this here is a visual example of the gridlines and nine boxes.
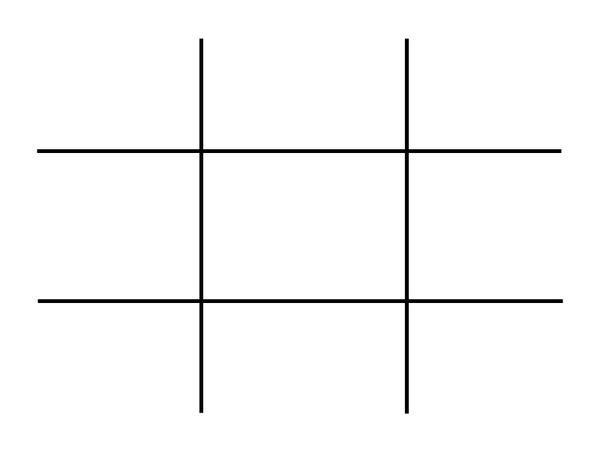
This may seem simple but is often overlooked due to time restraints and eagerness to get that video out there. By following these guidelines your overall composition will gain interesting and pleasing results that can help with viewer engagement. This is only one piece of the puzzle but as any photography professional or artist will tell you, It’s the small things that add up.
How to use the rule of thirds
To show how to use the rule of thirds I will be showing an image with and without the use of the guidelines. In doing this you will be able to see how impactful this system is and how it can help with your own creations within Filmora .
This will be our scene example, you can see buildings, boats, water and skyline. This may be typical of a backdrop or an insert for a holiday picture amongst many other things.
I will now show this picture with no compositional thought and without the use of the thirds system.

Notice how all the elements are in the scene but it just looks interesting and something just seems off when you look at it. You may find yourself searching for understanding of the image rather than taking the image in and concentrating on what the creator intended. This is seen commonly due to the need to fit every element in the scene but sometimes it is best to sacrifice something you may see as important for the sake of the whole picture.
We will now look at the example image with the rule of thirds in place and see if overall this makes a more interesting scene.

We have aligned the skyline with the first horizontal grid line and aligned the boats with the vertical grid lines. We have sacrificed the crane in the scene but overall I’m sure you can agree that this is more pleasing and makes more sense when you’re viewing this. The whole middle section of the scene now has information within it and the contrast between the middle and the rest of the scene directs your eyes to what was intended to be viewed, This is called effect use of empty space. In doing this you save yourself time from adding more information to direct the viewer.
Placing key elements directly in the center of your scene can seem static and boring but by placing elements to one side or using the first and second horizontal grid lines you create something called Dynamism , where the viewer sees an element along the grid and takes a journey through the rest of the image.
Studies have shown that this is the humans natural way of viewing imagery, we first find something interesting to look at and then journey around that. So by using this rule you are creating a more natural process for your viewer.
Tips when starting using the rule of thirds
The first tip I would say is to view other videos, YouTube is a good starting point. Watch interviews and notice where the chairs are aligned. Watch reviewers and notice where they position themselves in the scene. Lastly watch movies and pause on an interesting scene and try to deconstruct where everything is placed and why they chose that composition.
The idea with the rule is to have it become something you do naturally, by always considering the form you save yourself time in the editing process. The key things you have in your mind whenever you make a scene should be.
1. What is the key element in my scene or what am I trying to make the viewer focus on.
2. where do I intend to place these in my scene?
3. Have I created a balanced scene with enough negative space to direct the eye.
If you consider this with every video you make then in time this will become as natural as drinking water on a hot day. As a practice you could open some old projects and apply this rule to your video to see the results and you may find yourself impressed with the change.
When is it best to not use the rule of thirds?
The rule is very useful when you’re aiming to grab the attention towards a certain element but that being said, when you have a symmetrical scene you can get away with not using the rule as your eyes can make sense of symmetry very well.
Even when working with a symmetrical scene you can incorporate the rule within for elements such as people or key figures but in this situation it is down to the creator to figure what they feel is best in any given shot.
How to Use Rule of Thirds in Filmora
The tools provided within Filmora are generous and one great feature is the crop and size tool.
When inserting an image or movie file you can right click on the timeline and select crop and size bringing up a handy screen with the gridlines already there for you. It’s just a matter of aligning your shot for the best composition.
For reference I will show you what this looks like.
First right click the timeline on the image you want to reposition. Alternatively you can select the desired insert and press Alt+C this will also bring up the same editing box.
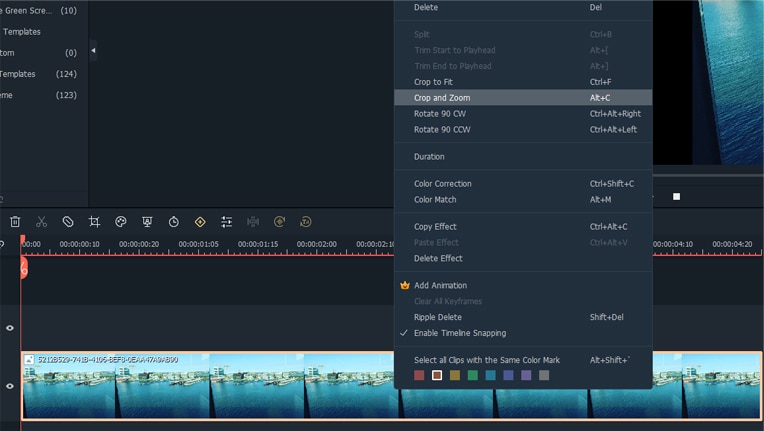
Now click on the crop and zoom option and this editor will appear.
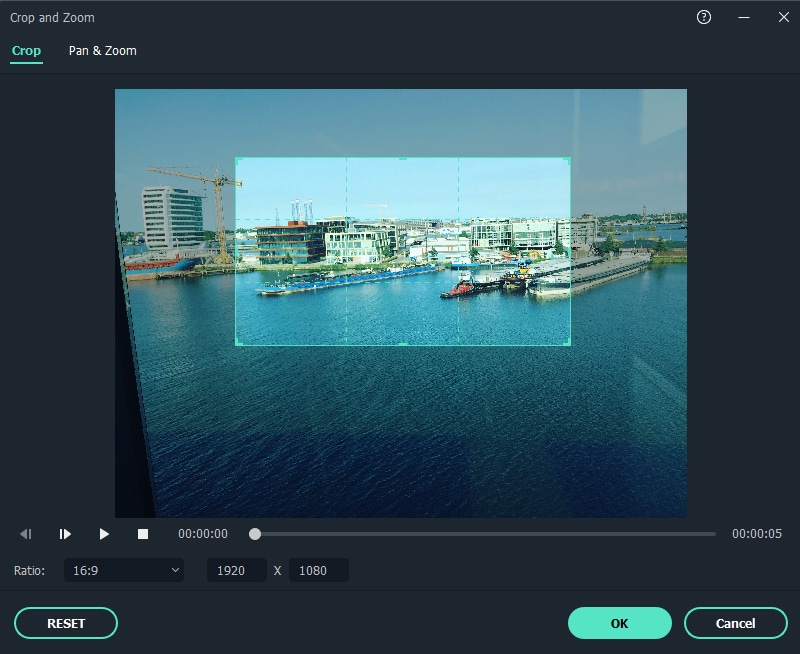
As you can see you are able to align the shot and change the aspect ratio to align with your project. For a better look at the built in grid lines see image below.

Conclusion
To conclude, the rule of thirds is very important within visual media and is tough within the fundamentals of art and photography from beginner level right up to the highest point of education, Practice thinking about your placement of key elements within your videos and how this affects your overall composition. The goal is to have this as an automatic thought when shooting your videos or still images. This is a small change you can make but has a big impact on how a viewer engages your content and in return leaves a positive opinion towards your creativity and eye for detail.
Free Download For Win 7 or later(64-bit)
Free Download For macOS 10.14 or later
Free Download For macOS 10.14 or later
MP3 Cutter Download for Computer and Mobile
MP3 cutter download is one of the most reliable tools for editing of music files in a fast and friendly way. MP3 cutter free download at the same time supports merging and cutting audio files like WAV, ACC, MP3 AC3, OPUS, OGG, among others. Cutter MP3 free download application is designed in a way to make editing of music so enjoyable, easy and fun. The application is usually free, it supports the split of large music files into shorter ones, the app can also be used to split a whole album to receive the original tracks without. MP3 cutter download is also used to support trimming by silent detection.
MP3 Cutter download is a free app for Android users available in the Audio File Players line of apps, part of Audio & Multimedia. The company that develops MP3 Cutter is called accountlab. The most current version released by the developer is 1.0. To upload MP3 Cutter on your Android operating system device, just click on the green Continue To App button to begin the installation process of this MP3 cutter application. The MP3 cutter download app has been listed on their website since 2021-10-21 and has had 1639 downloads. The app is made in such a way that it pre-checks a files safety before the download. Though for personal protection reasons, its recommended that one should scan the downloaded app using an antivirus before using the app. In some instances, there is a possibility of your antivirus detecting the MP3 cutter as malware, there is a contact page where one can connect to customer care for help.
1. MP3 Cutter Download for Windows
MP3 Cutter is a Windows desktop application that enables the user to cut and split a large MP3 or video to tiny audio pieces. While using the MP3 Cutter download for windows, you are capable of cutting and splitting a number of formats besides the MP3 like WAV, AMR, WMA, WMV, MPG4, AVI, MP4, 3GP, FLAC WMV, MOV and many more formats audio and video formats. The layout of bits generated from the audio data is called the audio coding format. A format can be compressed or depressed using an MP3 cutter for windows or any other right program. In some cases, the data can be a raw bit-stream in the audio coding format. However, it’s normally embedded in an audio data format with a specified storage layer. If you intend to cut such a file, you should do so without messing up the quality of the entire file. That’s exactly what MP3 Cutter download for windows does.
There are several reasons where someone would want to cut an MP3 file or a video file. For example, you may be having some nice audio tune or a video track that you may like to have as a ringtone, using an MP3 cutter for windows will enable you to extract the part you like most. The cut tune can be used for your morning alarm, SMS notification or ringtone. You can also use the cut a MP3 file for fixing files or broken and damaged songs. For example, you may have recorded a song from the radio then you realize there is a part that was not clearly captured or an information you don’t want, you’ll use MP3 cutter download to reorganize the music. Cutter download for MP3 allows you to manipulate your audio files without the degradation in their quality.
How to use Free MP3 Cutter Joiner
Step 1: Addition of a File
On the app’s interface, click the “Add “ button to enable you to import files. The chosen file will play automatically.
Step 2: Setting of a Start Point and End Point
By left clicking to drag the red line to quickly locate, then click on the button to set start point and end point
Tip: You can use the format hh:mm:ss.fff to directly input start point and end point in the blank edit control.
Step 3: Start Cuttting
You will simply click on the ‘CUT’ button to start cutting the file needed.
How to Join MP3 with Using Free MP3 Cutter Joiner
Step 1: Add File
You will be asked to click “Add “ button so as to enable you to import multi files.
Step 2: Click “Setting” button to set audio quality, channels, sample rate
Step 3: Start Join
Go to the button written join and click “Join” button to start the joining process.
2. MP3 Cutter Download for Android
MP3 Cutter download for Android is meant to help you to easily mix music, trim music, merge music and preciously clip out the wanted part of music and set it as a unique ringtone for every on the android device. Cutter MP3 download for android can be applied in the customization of your own alarm tone and other notifications. It also supports bitrate & volume adjustment to create the highest quality melody for you. Steps to follow while using MP3 Cutter Download for Android:
1. Make a choice of the music clip you want to cut from your phone/ SD card
2. Secondly make a selection of the length of music that you want to cut or trim
3. Edit and tag for the clip(Title, Format, Bitrate, Volume etc)
4. And lastly save as the cut music as a ringtone/Alarm/Notification or Share as desired
3. MP3 Cutter Download for iPhone
Are you looking for an app to make a ringtone on your iPhone device? MP3 cutter for iPhone is the best choice for you to make personalized ringtones, it supports aiff, m4a, mp3 and wav formats. A user can use this app to edit a recorded and it also supports trimming. Free MP3 cutter download for iPhone supports mp3, wav, aiff, m4a and other types of music formats. Mp3 download for iPhone is also referred to as music editor, ringtone cutter, alarm tone maker or notification tone creator in other instances.
MP3 download cutter for Iphone is the best application for cutting music. The cut mp3, m4a, and ringtone application will help you cut that favorite part of an audio tune or a music file. You can use the cut music as ringtone, notification tone or a music song and alarm tone. The cut pieces can be shared with friendly since the cut results are easily manageable.
Instead of buying or endlessly searching the web for a ringtone, you can rather easily make the desired ringtone yourself using the files already stored in your phone even those audios from a video. Our Online MP3 Cutter download for iPhone allows making custom ringtones from your favorite song, voice memo or video, it can then be exported in several formats. It can be used on iPhone and Android phones, Windows or Mac computers.
Below are the steps to follow while using an audio cutter for iPhone.
Step 1: Selecting a file
Open MP3 Cutter download for iPhone tool first. Then select the file you want to work with by clicking on “Choose file”. If you want to select it from Dropbox or Google Drive account where the file exists, tap on the small arrow.
If using a computer, you will just need to drag and drop the file onto the page.
Once you have selected your file, a progress bar will appear to show you the status of the upload. The speed of the upload will definitely depend on the file size or the available internet speed. It will be slower if the file is large or if the internet speed is slow.
Step 2: Editing the audio
As the representation of the audio bar appears, you can slide it to the left or to the right to choose the exact location to start cutting and where to end the ringtone clip. There is an additional feature that allows you to enter time stamps manually. The application also gives you an option of checking if you want to add a “Fade in” or “Fade out” effects.
When you are through with cropping the audio, you can decide on what file format to export. The app supports popular audio codecs such as MP3, AIFF, OGG and WAV. An Android device is capable of accepting a varied number of sound formats, but while exporting a file format, it is advisable to stick to OGG or MP3 formats.
After selecting the desired option, select “Cut” at the right bottom of the page.
Step 3: Preview and download your ringtone
The speed of processing an audio will be directly affected by the file size and the internet speed. After you shall have successfully completed the download, you can press on play button to preview or hear the audio file.
The completed file can be saved in downloads or it can alternatively be added to the Dropbox or sent to Google drive.
If you need tweaking or wants to edit a piece of audio, you’ll get back to the tool.
4. MP3 Cutter for Mac
Whether you are running a podcast or you are a musician who aspires to share audio files through Spotify, SoundCloud, YouTube, or any other platform and or a smartphone app, you need to do some editing to your MP3 files before the final product is ready. Having access to a reliable and feature-rich MP3 cutter for Mac enables you to edit the audio file in a manner that helps you in delivering the exceptional listening experience your audience expects.
It is the reason why it is important to wisely pick your MP3 cutter wisely while considering a variety of other factors. Some of these factors are reliability, cost, performance and ease of use.
Wondershare Filmora
It is feature-rich audio as well as a video editor that allows beginners to edit their audio and video files quickly and easily. It has been specially designed for audio editing amateurs with a simple and user-friendly layout that ensures there is an easy learning curve. With the help of Filmora, you can record your music and voice using a built-in feature and also use it to trim, merge, split, and cut your MP3 files.
Apart from that, you can also make necessary adjustments to volume, pitch, and speed ensuring that your audio has the clarity you need. You can use Filmora for personal use as well to create customized ringtones by cutting songs and add special sound effects to your presentation.
For Win 7 or later (64-bit)
For macOS 10.12 or later
Import audio file to Filmora. You can also import a video and then detach the MP3 file from it.
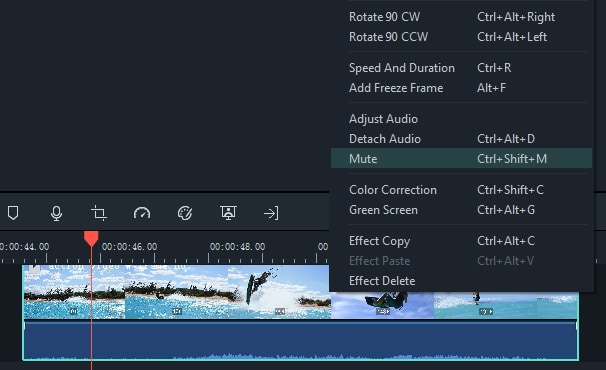
Right click on the audio and you’ll see a list out editing options, such as cut, reverse, speed change etc.
For macOS 10.12 or later
Import audio file to Filmora. You can also import a video and then detach the MP3 file from it.

Right click on the audio and you’ll see a list out editing options, such as cut, reverse, speed change etc.
For macOS 10.12 or later
Import audio file to Filmora. You can also import a video and then detach the MP3 file from it.

Right click on the audio and you’ll see a list out editing options, such as cut, reverse, speed change etc.
For macOS 10.12 or later
Import audio file to Filmora. You can also import a video and then detach the MP3 file from it.

Right click on the audio and you’ll see a list out editing options, such as cut, reverse, speed change etc.
Also read:
- [New] Boosting YI 4K Action Recording Accessory Musts
- 2024 Approved 10 Best Sony LUT for Different Purposes
- 2024 Approved Learn How to Create Inspiring Motivational Videos Using AI. Explore Tools Like Midjourney, Runway Gen2, Chat-GPT, and Filmora AI for Seamless Content Creation. Start Your Journey
- 2024 Approved Navigating the Intricacies of Networked Livestream with VLC
- 2024 Approved Top 6 Drones for Videography
- How to Convert Your M3U8 Streams to MP4: 4 Simple Methods
- How to Screen Mirroring Samsung Galaxy S23 Tactical Edition? | Dr.fone
- How to Transfer Music from Infinix Smart 8 Plus to iPod | Dr.fone
- In 2024, Premium VR Headset Picks for UAVs
- Navigating Black Screens on Startup - How To Restore Your Machine's Display
- New 2024 Approved How to Add Subtitles in Canva?
- Updated for 2024
- Updated Secret Tips & Tricks to Use in Filmora for 2024
- Title: How To Make a Video by Mouse in Filmora?
- Author: Chloe
- Created at : 2024-09-25 23:09:28
- Updated at : 2024-10-03 11:54:56
- Link: https://ai-editing-video.techidaily.com/how-to-make-a-video-by-mouse-in-filmora/
- License: This work is licensed under CC BY-NC-SA 4.0.