
:max_bytes(150000):strip_icc():format(webp)/how-to-increase-internet-speed-5181475-b6fd84098c634a04a6934302184c5b1b.jpg)
How to Make a Video with My Phone for 2024
How to Make a Video with My Phone
Never before has video recording been so simple or effortless. Everybody has a smartphone, which is a capable video camera, in their pocket. In fact, the use of smartphones for mobile creation has increased to the point that some people consider it to be the main function and equally crucial to communication.
Pocket-lint has compiled ten ideas in an effort to assist you in getting whatever it is you want in the best possible way. Even if some of the advice may seem apparent, using it all should always produce fantastic videos.

1. Get ready for filming
Make sure that you have everything you need to start recording your videos, including the necessary
equipment, props, scripts, actors, and locations, before you start the recording process. In addition, ensure that your mobile device is of high quality and that it has a sufficient amount of storage space (available memory) to save the film. High definition (HD) video files can be quite large and storing them can quickly deplete a battery’s capacity.

They add a great point; you need to think about stabilization, and they’ve included a few great options for
obtaining steady video. This video by Filmic Pro titled “5 Things to Do Before You Shoot iPhone Video” covers a lot of what we’ve discussed as well, including memory storage, battery life, audio, and resolution.
2. Use good lighting
Because smartphone cameras have smaller image sensors and lenses, proper illumination has a significant impact on their performance. As much as you can, try to film your video in well-lit environments. By doing this, you can reduce the amount of unwanted shadow and grain in your video. On the other hand, you also need to be cautious to avoid pointing the camera straight towards bright light sources because this will result in useless overexposed footage and lens flare. The lighting should be consistent and steady because most smartphone image sensors take a while to respond to abrupt changes in brightness.

If shooting your video in low light is still difficult, experiment with your phone’s or app’s backlighting and white balance settings. In case your camera is focusing on the incorrect part of your composition, most phones now provide “touch focusing.” The automatic exposure control will have an easier time making minor adjustments if the lighting condition changes once the focus has been placed on the most crucial part of the video.
3. Film horizontally, not vertically
Your natural inclination may be to hold the smartphone in a vertical position when you are using it to record video, just as you do when you are using it for the vast majority of other purposes. However, if you want to edit your video and post it online and on social media, this may place certain restrictions on your ability to do so.

4. Make sure to have good audio
We’re going to go ahead and say that sound is one of the most essential components of any video. The difficulty is in the fact that the audio quality on your smartphone is not always of the highest caliber. When it comes to audio, there is a general rule that the smartphone should be as close to the speaker as is physically possible in order to obtain the clearest sound possible from it. Even if you are only a few meters away from the person whose voice you want to record on your smartphone, you won’t be able to get a good recording of them.
This is not the fault of your smartphone; rather, smartphones are intended to be used by speaking into them at close range; hence, you should think about employing the use of an external microphone in order to improve the sound quality. However, if you are unable to do so, there is no need for concern because you can use an additional smartphone in its place.
You can record audio on your mobile device by opening the voice memo app and selecting the record button. Your audio will immediately be improved if you position the phone’s microphone such that it is facing your topic and is somewhat close to them. Clap once at the beginning of the recording to serve as a reference point for both the video and the audio, which will help you save time while editing. After that, it will be simple for you to locate the point at which the clap occurred and synchronize the high-quality audio that is on the memo with the audio that is in your film.
5. Edit your video
Now that you’ve gathered all of your film, it’s time to cut it up, add some color, and get creative with effects! Fortunately, there are numerous video editing apps available that make it easier and faster than ever to use. You can edit videos on your phone just as you would on a computer using apps like Adobe Rush and iMovie, and it’s easier than you think.

You’ve probably heard of iMovie, Apple’s free video editing software that works on both your iPhone and Mac. You can add titles, music, and additional effects to your video clips, much like in Adobe Rush. iMovie is really easy to use, especially if you’re new to editing. The main distinction between Adobe Rush and iMovie is that Adobe Rush includes more professional and technical changes, whilst iMovie has a considerably larger selection of video effects and transitions.
Adobe Rush is the most user-friendly app for editing and creating high-quality films on your smartphone. One of Adobe Rush’s best features is the ability to incorporate motion graphics, video effects, text, and mix audio. If you prefer a larger screen to edit on, Adobe Rush seamlessly transfers the files to your computer, allowing you to resume editing where you left off on your smartphone. This program is simple to use, and there are numerous guidelines and tutorials available online to help you get started.
Conclusion
You probably weren’t aware of this, but your smartphone is actually a very capable piece of equipment that can be used to record videos of a high quality. You will be able to enhance the quality of your material to a greater extent by putting into practice the strategies that are discussed in this piece. Grab your smartphone and get ready to start producing content that the people in your fanbase will always come back for.
Free Download For Win 7 or later(64-bit)
Free Download For macOS 10.14 or later
Free Download For macOS 10.14 or later
Practical Ways to Resize Video in Handbrake
Videos are a great medium to share thoughts, concepts, guides, and memories, but regardless of how far technology has come getting them online can pose an issue sometimes. These obstacles often tend to be because either a video clip is too long or the amount of data in it is so high that the service just cannot upload the file to its servers and make it available for the intended receiver.
To solve this issue, users often need to resize a video so that the data cap, which behaved as a restriction, is no longer applicable. Now, there exist multiple software that can do this, and most video editor programs include the ability to export videos in less data-hungry sizes or formats.
So, if you ever face a similar issue, here is a guide on how you can resize videos via Handbrake and Wondershare Filmora. The former is a lightweight tool perfect for batch resizing videos, while the latter is a powerful free video editing software.
How to resize video with Handbrake
Open Handbrake and follow the steps listed below.
Once open, the software will present you with options to either import a single video file for resize or a whole batch via folder selection.
Note: If you do not have Handbrake, you can download it by visiting the official website. Also, you will need Windows .NET Framework 6.0 to use Handbrake. If your system does not have the correct config Handbrake will let you know and fail to launch.
Once you have imported the video file, the software will present you with two choices.
- Option 1: Use a preset available in the application — the best choice for beginners to choose for beginners.
- Option 2: Set a custom resolution via the Dimensions Tab.
Note: To ensure the resize is perfect, find out which file format plays best with the end location of your video and convert the video clip to that version.

How your screen will look once you have imported a video file.
How to Resize Video via Option 1
Step 1: Import Video File by choosing
- Single Import, or
- Batch Import

Step 2: Choose a Preset in Handbrake.

Step 3: Click on Start Encode after choosing the desired preset.

Step 4: Wait for the Encode to finish. The application shows progress in a bar at the bottom of the screen.

Step 5: Click on Browse in the bottom right corner to enter the Save File dialogue. At this point, you can set a file name and select a new save location.


How to Resize Video via Option 2
Step 1: Import Video File by choosing
- Single Import, or
- Batch Import

Step 2: Click on the Dimensions Tab to open up a dialog box that will let you edit video resolution.


The Dimensions Dialog Box
Step 3: Modify resolution to ensure the clip you get is in the right setup.
Note: If you see 1920 x 1080 on your screen, the first number (1920) stands for the width of the video file, while the second number (1080) stands for the height.

Tip
The one thing to keep in mind while using Option 2 is to ensure that the aspect ratio of the video file is maintained; this will prevent the final video from looking like its skewed and prevent it from becoming too tall or too wide
Via Option 2 you can also add borders to the final video if desired, while resizing it to your liked resolution.
An easier way to resize video with Wondershare Filmora
While the resize feature in Handbrake is capable of working on multiple video files at once, the user interface of the application may seem daunting to some. Hence, if you’re just starting to learn, we recommend accessing more user-friendly software, say Wondershare Filmora Video Editor . You can resize videos in the video editor by following the steps we have detailed below.
For Win 7 or later (64-bit)
For macOS 10.14 or later
Just keep in mind, when using WonderShare Filmora the resize option appears at the end of the video editing process — during the export action.
Step 1: Import a video file into Wondershare Filmora.

Step 2: Drag the video file onto the timeline and then choose Export from the top bar.
Author’s Notes: Here, I recommend using the Export to Device option as having a local copy which you then manually upload to services like YouTube is a process that you can have more control over.

Step 3: Choose the video file format (marked in Red) and then choose the resolution you require (marked in Yellow).

Tip
If you press on the settings tab (marked in Yellow, in the image above) and choose custom you can modify more aspects of your video file. Including the configuration used by the audio components.

Choose Custom under the Settings Option to customise Video Details with more precision
Step 4: Click on Export once you’ve decided on the resolution.

With this you will now have a video file that has been resized to a size or converted to a format that will hopefully function well with your desired platform.
Note: You can also reset the resolution of an entire project before hand in Wondershare Filmora by choosing the right configuration from the Project Settings option, found under the File Tab.

The Bottom Line
Having read this piece, you may have noticed that software capable of resizing videos can prove quite useful. Wondershare Filmora is this, plus a lot more, its convenient and intuitive user interface is also something we believe will feel welcoming to users. Speaking of Handbrake, while effective and great for batch encoding — if you want to resize more than one video we recommend having Handbrake handy — its bare-bones interface can be intimidating. Regardless, both programs are convenient to utilize and perfectly capable of doing the task at hand with relative ease.
How your screen will look once you have imported a video file.
How to Resize Video via Option 1
Step 1: Import Video File by choosing
- Single Import, or
- Batch Import
Step 2: Choose a Preset in Handbrake.
Step 3: Click on Start Encode after choosing the desired preset.
Step 4: Wait for the Encode to finish. The application shows progress in a bar at the bottom of the screen.
Step 5: Click on Browse in the bottom right corner to enter the Save File dialogue. At this point, you can set a file name and select a new save location.
How to Resize Video via Option 2
Step 1: Import Video File by choosing
- Single Import, or
- Batch Import
Step 2: Click on the Dimensions Tab to open up a dialog box that will let you edit video resolution.
The Dimensions Dialog Box
Step 3: Modify resolution to ensure the clip you get is in the right setup.
Note: If you see 1920 x 1080 on your screen, the first number (1920) stands for the width of the video file, while the second number (1080) stands for the height.
Tip
The one thing to keep in mind while using Option 2 is to ensure that the aspect ratio of the video file is maintained; this will prevent the final video from looking like its skewed and prevent it from becoming too tall or too wide
Via Option 2 you can also add borders to the final video if desired, while resizing it to your liked resolution.
An easier way to resize video with Wondershare Filmora
While the resize feature in Handbrake is capable of working on multiple video files at once, the user interface of the application may seem daunting to some. Hence, if you’re just starting to learn, we recommend accessing more user-friendly software, say Wondershare Filmora Video Editor . You can resize videos in the video editor by following the steps we have detailed below.
For Win 7 or later (64-bit)
For macOS 10.14 or later
Just keep in mind, when using WonderShare Filmora the resize option appears at the end of the video editing process — during the export action.
Step 1: Import a video file into Wondershare Filmora.
Step 2: Drag the video file onto the timeline and then choose Export from the top bar.
Author’s Notes: Here, I recommend using the Export to Device option as having a local copy which you then manually upload to services like YouTube is a process that you can have more control over.
Step 3: Choose the video file format (marked in Red) and then choose the resolution you require (marked in Yellow).
Tip
If you press on the settings tab (marked in Yellow, in the image above) and choose custom you can modify more aspects of your video file. Including the configuration used by the audio components.
Choose Custom under the Settings Option to customise Video Details with more precision
Step 4: Click on Export once you’ve decided on the resolution.
With this you will now have a video file that has been resized to a size or converted to a format that will hopefully function well with your desired platform.
Note: You can also reset the resolution of an entire project before hand in Wondershare Filmora by choosing the right configuration from the Project Settings option, found under the File Tab.
The Bottom Line
Having read this piece, you may have noticed that software capable of resizing videos can prove quite useful. Wondershare Filmora is this, plus a lot more, its convenient and intuitive user interface is also something we believe will feel welcoming to users. Speaking of Handbrake, while effective and great for batch encoding — if you want to resize more than one video we recommend having Handbrake handy — its bare-bones interface can be intimidating. Regardless, both programs are convenient to utilize and perfectly capable of doing the task at hand with relative ease.
How to Get Zoom on TV [Easy Solutions]
The modern workforce needs adaptable alternatives to the conventional room-to-room conferencing. The latest integrated online collaboration platform is called Zoom. What’s more, now you can get Zoom on TV. Being one of the most well-known conferencing programs, it offers reliable and efficient hosting of online meetings. In a same vein, you may set up conference rooms, do video seminars, and use instant messaging to receive real-time communications. Moreover, can you get zoom on your tv? Then the answer is Yes! The ideal technique to expand a small conference is to mirror it on TV using Zoom meetings. Additionally, sharing across all platforms and devices is possible. Sharing HD video, audio, and material from your desktop and mobile devices to conference rooms and phone systems is simple, dependable, and safe with Zoom Meetings.
Zoom is one of the top videos calling applications available, however, in terms of functionality, dependability, and stability. Special features include screen sharing for multi-user annotation and local and cloud recording with transcription. With just a single click, you may share any file with supported and encrypted settings for increased security and communicate across all platforms. Zoom has now come to represent meetings for those who do their business remotely. For almost all platforms, including Android, iOS, macOS, Windows, Smart TVs, etc., the Zoom app is officially accessible. For the query how to get zoom on portal tv? you may activate Zoom screen casting whether you’re using a Windows 10 or a Mac laptop with the Chrome browser. This section will be useful to you if you want to benefit from Zoom on a TV. You may thus do so. Continue reading the article to learn more about how to get zoom on tv.
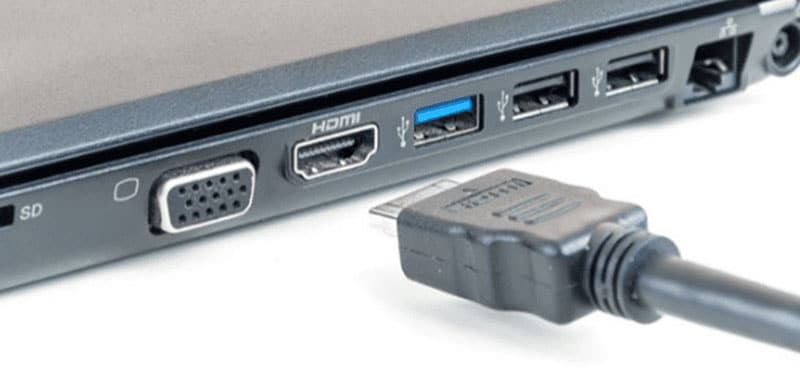
Part 1: Get Zoom on TV with HDMI Cable
Although Zoom provides companies and bigger organizations with a professional solution like Zoom Rooms, if you’re at home, you don’t need to put anything on your TV to use Zoom. You may start using Zoom right away by simply connecting your Zoom device to your TV. Connect your TV to your laptop’s HDMI port if it has one. Simple as that, however if the laptop doesn’t figure it out on its own you may need to explain what is going on with the second display. Although more reliable, connecting via cable means your source device is linked to the TV and you can’t go for a stroll. It also means you don’t have to worry about the wireless connection fading.
Steps to Get Zoom on TV with HDMI
Step1Connect the HDMI End to the TV and the Other End to Your Device
You may use this in its place if you don’t have an HDMI but do have a USB-C port. To connect to the HDMI cable coming into your TV, you’ll need a dongle, but you’ll need to make sure it’s compatible.
Step2Turn On your TV
Turn on your TV, then switch the video source to the HDMI port you just connected in your device to using the TV remote.
Step3Launch Zoom Meeting
Start or join a meeting by using the Zoom app on your smartphone (available for Android, iOS, Windows, and macOS).
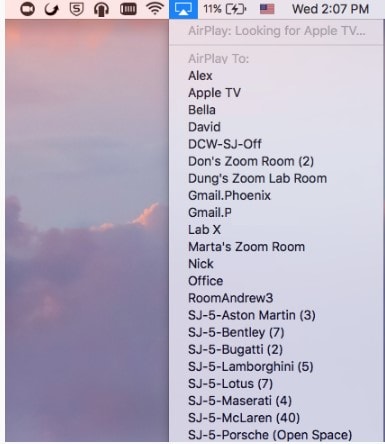
Part 2: Use AirPlay to Connect Zoom to TV
Using AirPlay mirroring, MacOS or iOS devices may share content with Zoom rooms. On MacOS and iOS, Airplay is used to communicate between the Zoom client and the Zoom room. There may be a great potential for your own business requirements if you can figure out how to utilize Airplay to Zoom mirror your screen to your Apple TV. By default, AirPlay sends audio to the Apple TV. Depending on how loud your speakers are set to play and where your input device’s microphone is located, this may cause echoing and ever-louder feedback loops. Without further ado, let’s look at some of the important strategies you may use to maximize live screen streaming on your Apple TV device.
Steps to Use AirPlay to Connect Zoom to TV
Step1Navigate to the Airplay Display in the Apple menu’s top right corner. Choose your Apple TV from the list of AirPlay Display options in the Displays preference pane. The “Show mirroring option in the menu bar when available” checkbox makes it easier to reach the AirPlay menu.

Step2Select Room Management > Zoom Rooms after logging into the Zoom online interface to manage your current Zoom Rooms. Then, modify the account settings and turn on Apple screen mirroring using the location hierarchy system.
Step3Turn on Apple Screen Mirroring by going to the Meetings tab. If this happens, you may need to activate it from the verification dialog box; otherwise, screen mirroring ought to start immediately on your device and let you see Zoom on your Apple TV. A shared password will be required of you.
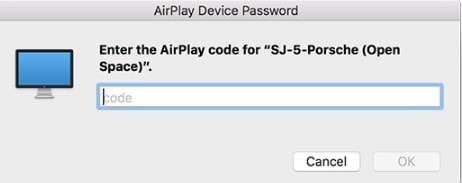
Step4Enter the passcode that is shown on the Zoom room’s screen. You may start using Airplay on your smartphone after enabling Apple screen mirroring.

Step5After that, turn off AirPlay Display by using the option in the preference pane or the system menu bar. To stop sharing, click Disconnect Airplay.
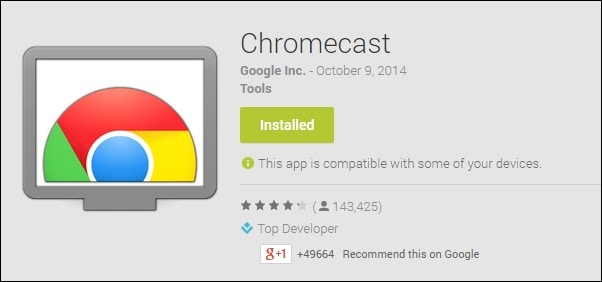
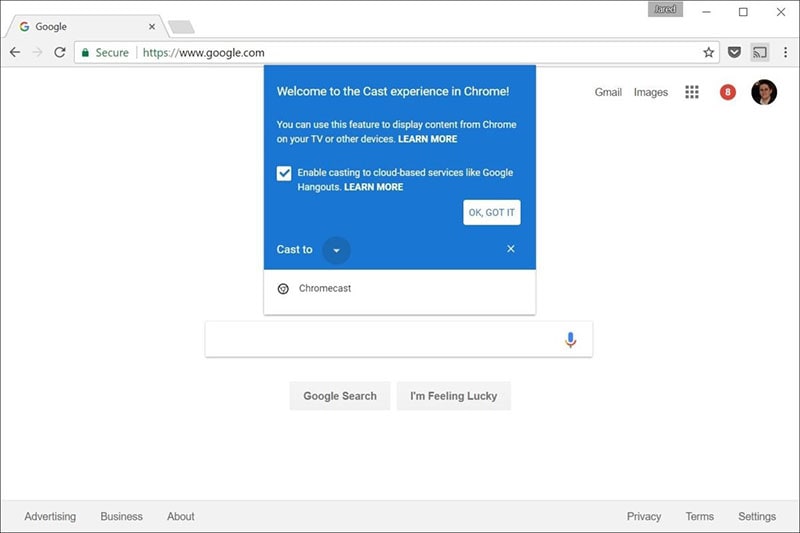
Part 3: Mirror Screen with Chromecast
The Chromecast gadgets from Google are well constructed. They should be able to cast more than just standard streaming services to your TV, logically speaking. Using a Chromecast device is one of the simplest methods to cast a Zoom conference to your TV. They are affordable, and any Google browser and the Google Home app for your Android or iOS smartphone both contain the cast capability. Between a device, such as your phone or computer, and the television, Chromecast offers the perfect connection. Chromecast makes it easy to cast Zoom meetings, particularly conferences with many of participants, since it can virtually reflect everything on your phone, tablet, or computer screen to your TV. For meetings with bigger attendance, it is advantageous to be able to cast Zoom meetings to almost any device, even a smart TV, using Chromecast.
Steps to Mirror Screen with Chromecast
Step1Install the Chromecast
Connect your Google Chromecast to the same internet source as your casting device by plugging it in.
Step2Manage Cast Settings
Locate the casting option on your device and search for recipients. Get the Zoom Cloud Meetings app for iOS or Android. You’ll also need to download the third-party software if you use an iPad or iPhone. After that, sign up for a Zoom account and log in to get started.
Step3Start Mirroring Zoom
The screen of your phone will show up on your TV when you tap your Chromecast. The best view is obtained by turning your phone into landscape after opening Zoom as usual. Once you place a call from here, the video will cast to your TV. Go to the next screen and click Start Broadcasting. You may now start casting to your Chromecast device by opening the Zoom Cloud Meeting app.
You must download the third-party app if you use an iPhone or iPad. The Chromecast Streamer software will let you cast a Zoom meeting on your Chromecast device as Zoom doesn’t provide a casting option.
Conclusion
Zoom’s popularity has skyrocketed as a result of the Pandemic. Zoom has emerged as the preferred video conferencing solution as the bulk of the global workforce shifts to a “work from home” environment. Now that more individuals than ever before work from home, video conferencing has emerged as a vital tool for marketing and corporate communication. Mirroring Zoom meetings to TV has never been this simple. In light of this, we hope that this guide has helped you come up with some of the greatest ideas and approaches for your personal zoom sharing needs. We really hope that this information has been helpful to you if you’ve been interested in learning more about screen sharing your Zoom to TV. Thanks to these methods, you can now mirror any device platform on TV.
The modern workforce needs adaptable alternatives to the conventional room-to-room conferencing. The latest integrated online collaboration platform is called Zoom. What’s more, now you can get Zoom on TV. Being one of the most well-known conferencing programs, it offers reliable and efficient hosting of online meetings. In a same vein, you may set up conference rooms, do video seminars, and use instant messaging to receive real-time communications. Moreover, can you get zoom on your tv? Then the answer is Yes! The ideal technique to expand a small conference is to mirror it on TV using Zoom meetings. Additionally, sharing across all platforms and devices is possible. Sharing HD video, audio, and material from your desktop and mobile devices to conference rooms and phone systems is simple, dependable, and safe with Zoom Meetings.
Zoom is one of the top videos calling applications available, however, in terms of functionality, dependability, and stability. Special features include screen sharing for multi-user annotation and local and cloud recording with transcription. With just a single click, you may share any file with supported and encrypted settings for increased security and communicate across all platforms. Zoom has now come to represent meetings for those who do their business remotely. For almost all platforms, including Android, iOS, macOS, Windows, Smart TVs, etc., the Zoom app is officially accessible. For the query how to get zoom on portal tv? you may activate Zoom screen casting whether you’re using a Windows 10 or a Mac laptop with the Chrome browser. This section will be useful to you if you want to benefit from Zoom on a TV. You may thus do so. Continue reading the article to learn more about how to get zoom on tv.
Part 1: Get Zoom on TV with HDMI Cable
Although Zoom provides companies and bigger organizations with a professional solution like Zoom Rooms, if you’re at home, you don’t need to put anything on your TV to use Zoom. You may start using Zoom right away by simply connecting your Zoom device to your TV. Connect your TV to your laptop’s HDMI port if it has one. Simple as that, however if the laptop doesn’t figure it out on its own you may need to explain what is going on with the second display. Although more reliable, connecting via cable means your source device is linked to the TV and you can’t go for a stroll. It also means you don’t have to worry about the wireless connection fading.
Steps to Get Zoom on TV with HDMI
Step1Connect the HDMI End to the TV and the Other End to Your Device
You may use this in its place if you don’t have an HDMI but do have a USB-C port. To connect to the HDMI cable coming into your TV, you’ll need a dongle, but you’ll need to make sure it’s compatible.
Step2Turn On your TV
Turn on your TV, then switch the video source to the HDMI port you just connected in your device to using the TV remote.
Step3Launch Zoom Meeting
Start or join a meeting by using the Zoom app on your smartphone (available for Android, iOS, Windows, and macOS).
Part 2: Use AirPlay to Connect Zoom to TV
Using AirPlay mirroring, MacOS or iOS devices may share content with Zoom rooms. On MacOS and iOS, Airplay is used to communicate between the Zoom client and the Zoom room. There may be a great potential for your own business requirements if you can figure out how to utilize Airplay to Zoom mirror your screen to your Apple TV. By default, AirPlay sends audio to the Apple TV. Depending on how loud your speakers are set to play and where your input device’s microphone is located, this may cause echoing and ever-louder feedback loops. Without further ado, let’s look at some of the important strategies you may use to maximize live screen streaming on your Apple TV device.
Steps to Use AirPlay to Connect Zoom to TV
Step1Navigate to the Airplay Display in the Apple menu’s top right corner. Choose your Apple TV from the list of AirPlay Display options in the Displays preference pane. The “Show mirroring option in the menu bar when available” checkbox makes it easier to reach the AirPlay menu.
Step2Select Room Management > Zoom Rooms after logging into the Zoom online interface to manage your current Zoom Rooms. Then, modify the account settings and turn on Apple screen mirroring using the location hierarchy system.
Step3Turn on Apple Screen Mirroring by going to the Meetings tab. If this happens, you may need to activate it from the verification dialog box; otherwise, screen mirroring ought to start immediately on your device and let you see Zoom on your Apple TV. A shared password will be required of you.
Step4Enter the passcode that is shown on the Zoom room’s screen. You may start using Airplay on your smartphone after enabling Apple screen mirroring.
Step5After that, turn off AirPlay Display by using the option in the preference pane or the system menu bar. To stop sharing, click Disconnect Airplay.
Part 3: Mirror Screen with Chromecast
The Chromecast gadgets from Google are well constructed. They should be able to cast more than just standard streaming services to your TV, logically speaking. Using a Chromecast device is one of the simplest methods to cast a Zoom conference to your TV. They are affordable, and any Google browser and the Google Home app for your Android or iOS smartphone both contain the cast capability. Between a device, such as your phone or computer, and the television, Chromecast offers the perfect connection. Chromecast makes it easy to cast Zoom meetings, particularly conferences with many of participants, since it can virtually reflect everything on your phone, tablet, or computer screen to your TV. For meetings with bigger attendance, it is advantageous to be able to cast Zoom meetings to almost any device, even a smart TV, using Chromecast.
Steps to Mirror Screen with Chromecast
Step1Install the Chromecast
Connect your Google Chromecast to the same internet source as your casting device by plugging it in.
Step2Manage Cast Settings
Locate the casting option on your device and search for recipients. Get the Zoom Cloud Meetings app for iOS or Android. You’ll also need to download the third-party software if you use an iPad or iPhone. After that, sign up for a Zoom account and log in to get started.
Step3Start Mirroring Zoom
The screen of your phone will show up on your TV when you tap your Chromecast. The best view is obtained by turning your phone into landscape after opening Zoom as usual. Once you place a call from here, the video will cast to your TV. Go to the next screen and click Start Broadcasting. You may now start casting to your Chromecast device by opening the Zoom Cloud Meeting app.
You must download the third-party app if you use an iPhone or iPad. The Chromecast Streamer software will let you cast a Zoom meeting on your Chromecast device as Zoom doesn’t provide a casting option.
Conclusion
Zoom’s popularity has skyrocketed as a result of the Pandemic. Zoom has emerged as the preferred video conferencing solution as the bulk of the global workforce shifts to a “work from home” environment. Now that more individuals than ever before work from home, video conferencing has emerged as a vital tool for marketing and corporate communication. Mirroring Zoom meetings to TV has never been this simple. In light of this, we hope that this guide has helped you come up with some of the greatest ideas and approaches for your personal zoom sharing needs. We really hope that this information has been helpful to you if you’ve been interested in learning more about screen sharing your Zoom to TV. Thanks to these methods, you can now mirror any device platform on TV.
Step by Step to Split Clips in VLC
The VLC media player is top-rated as it is freely available and operates on different platforms efficiently. Its framework helps play almost all the audios, videos, DVDs and various resources available on your systems. Even optimizing the videos and audio as the playback from your devices is possible. There is also a possibility of integrating a number of programs along with the streaming services.
You can even search the album covers. With the functionality of the playlist, you can play a number of films one after the other. This feature is helpful when you have downloaded the whole film in parts or watched different short films. The best part is to know it is not just a video player. It is an editor; yes, you heard it right. VLC is the correct choice for splitting or cutting your videos without facing any difficulties.
The article is a guide about the split of the videos in VLC. There is also a particular description of its alternative: Wondershare Filmora. It is suitable as well as reasonable.
How can you split the video clips in VLC?
VLC Media player has all the amazing tools for playing back the audios and videos regardless of the format. It is still on top of all the media players because of its simple interface. Below are the very easy steps to split the videos in the VLC media player.
Step 1: After completing the download, install the updated version of the VLC media player if it is not on your PC. Once it is installed, you need to double click on its icon for launching it.
Step 2: This step is the activation of the advanced controls in the media player. Click on “View” visible on the menu bar. Click on the “Advanced Controls” and appears the menu of four additional buttons more than the button for play or pause.

Step 3: Now, you can easily play the video simply by clicking the “Open File” option present in the media menu. The drag and drop option is available inside the VLC media player.
You should start playing the video now and recording the parts with the help of a decoder. Look for the position from where you want to begin the recording and press both Play and Pause buttons one after the other.
Even the Frame-by-Frame button is also available. It is the last one in the advance controls for navigating the actual frame from where you want to begin the recording.

Step 4:
Press the button “Record” again whenever you want the recording to stop. This is the final step for cutting the videos in VLC. The split video from the actual video saves automatically as the MP4 video file in the folder of Libraries or Videos if you are using Windows operating system.
Almost all, playing any video and audio format is possible in VLC media player. It includes AVI, MP4, FLV, WMV, RMVB and Quick time. You can even play the videos partially or preview them even before completing the downloads.

An easier way to split the video
The whole process of splitting the video into a VLC media player is extremely easy for managing and handling without any requirement of technical knowledge. But unfortunately, you can apply the frame-by-frame technique on the short videos. Monitoring is essential during the split and looking at the complete process whenever the recording is in VLC.
This causes the loss of quality. Here, the substitute that is also available is Filmora Video Editor . It is the recommendation of the graphic designers, web developers and videographers because it is freely available and lightweight software for the systems. You can apply its features to your images and videos. This includes the cutting, rotating and resizing of your videos along with the images.
For Win 7 or later (64-bit)
For macOS 10.14 or later
Features:
- There are 300+ special effects available
- Splitting of the screens and video clips
- Adding and tracking the motion graphics
- Unlimitedly sharing of the videos
- Addition of the transitional effects
- Dragging and dropping the video contents
- Customization of the effects
You can easily split and cut the large videos in Wondershare Filmora simply. There is no loss of video quality. Follow the steps below for splitting the video from Wondershare Filmora:
Step 1:
Import your videos to Filmora Video Cutter After installing the video cutter, launch it and select New Project to enter the video editing interface. Now, you need to import the video that needs to cut into several parts.

Step 2:
Drag and drop the videos in the timeline to start the splitting. Click the Split icon (scissor icon) on the toolbar or the Split button on the playhead to split the video

Apart from splitting the videos, you can even combine and merge different videos into one. Even the rotation of the videos is possible.
Therefore, Wondershare Filmora has received recognition due to its simple features. It is available for everyone, whether for individual, educational, or business purposes. It can help you in changing the look of your brand completely. Even adding the logos in the videos is also possible, along with adjusting the sizes. There is a huge range of features without any watermark, and all the upgrades are freely available.
Also, tech support is available for any assistance you need. Edit your images and videos on the social media platforms with ease, along with the adjusting tool. The perfect video editor is Wondershare Filmora, as it has compatibility with both Windows and Mac users. Correct and match the colour with the customization tools. Start using the Wondershare Filmora today without being concerned regarding the format of the video clips. You will definitely enjoy using it.
Step 3: Now, you can easily play the video simply by clicking the “Open File” option present in the media menu. The drag and drop option is available inside the VLC media player.
You should start playing the video now and recording the parts with the help of a decoder. Look for the position from where you want to begin the recording and press both Play and Pause buttons one after the other.
Even the Frame-by-Frame button is also available. It is the last one in the advance controls for navigating the actual frame from where you want to begin the recording.
Step 4:
Press the button “Record” again whenever you want the recording to stop. This is the final step for cutting the videos in VLC. The split video from the actual video saves automatically as the MP4 video file in the folder of Libraries or Videos if you are using Windows operating system.
Almost all, playing any video and audio format is possible in VLC media player. It includes AVI, MP4, FLV, WMV, RMVB and Quick time. You can even play the videos partially or preview them even before completing the downloads.
An easier way to split the video
The whole process of splitting the video into a VLC media player is extremely easy for managing and handling without any requirement of technical knowledge. But unfortunately, you can apply the frame-by-frame technique on the short videos. Monitoring is essential during the split and looking at the complete process whenever the recording is in VLC.
This causes the loss of quality. Here, the substitute that is also available is Filmora Video Editor . It is the recommendation of the graphic designers, web developers and videographers because it is freely available and lightweight software for the systems. You can apply its features to your images and videos. This includes the cutting, rotating and resizing of your videos along with the images.
For Win 7 or later (64-bit)
For macOS 10.14 or later
Features:
- There are 300+ special effects available
- Splitting of the screens and video clips
- Adding and tracking the motion graphics
- Unlimitedly sharing of the videos
- Addition of the transitional effects
- Dragging and dropping the video contents
- Customization of the effects
You can easily split and cut the large videos in Wondershare Filmora simply. There is no loss of video quality. Follow the steps below for splitting the video from Wondershare Filmora:
Step 1:
Import your videos to Filmora Video Cutter After installing the video cutter, launch it and select New Project to enter the video editing interface. Now, you need to import the video that needs to cut into several parts.
Step 2:
Drag and drop the videos in the timeline to start the splitting. Click the Split icon (scissor icon) on the toolbar or the Split button on the playhead to split the video
Apart from splitting the videos, you can even combine and merge different videos into one. Even the rotation of the videos is possible.
Therefore, Wondershare Filmora has received recognition due to its simple features. It is available for everyone, whether for individual, educational, or business purposes. It can help you in changing the look of your brand completely. Even adding the logos in the videos is also possible, along with adjusting the sizes. There is a huge range of features without any watermark, and all the upgrades are freely available.
Also, tech support is available for any assistance you need. Edit your images and videos on the social media platforms with ease, along with the adjusting tool. The perfect video editor is Wondershare Filmora, as it has compatibility with both Windows and Mac users. Correct and match the colour with the customization tools. Start using the Wondershare Filmora today without being concerned regarding the format of the video clips. You will definitely enjoy using it.
Also read:
- How to Make Stunning Glitch Effect in Photoshop? Ultimate Guide for 2024
- Updated In 2024, Best 10 Fun Discord Bots You Need
- Updated Guide Adopting Lumetri Color Presets in Effective Color Grading
- Updated In 2024, Perfecting the Art of Slowing Down Video on Instagram
- Updated 2 Methods to Crop Video in VLC
- Updated Creating Video Testimonials
- In 2024, For Converting GIF to MOV Format, You Dont Need to Search From A-Z. Here Is an Amazing Guide, that Gives You Complete Details About Both Offline and Online Gif-to-MOV Converters. Catch Them Below and Experience a Pro Editing Time
- Updated In 2024, Detailed Tutorial to Rotate a Video in Cyberlink PowerDirector
- 2024 Approved Motion Blur Photo With GIMP Step-By-Step Guide
- 2024 Approved Top 5 Apps To Add Song To Video
- New 2024 Approved Best 10 Anime Movies for All Time
- 2024 Approved Have You Ever Wondered How Those PowerPoint, Looping Slideshows You See in Conferences and Reception Areas Display and Move to the Next Slide Automatically without Clicking a Mouse? You Dont Have to Be Amazed at This
- Updated Ultimate Guide on Converting Word to SRT
- Updated How to Create the Stranger Things Upside Down Effect for 2024
- Updated Guide Adding Audio in Wondershare Filmora for 2024
- The Ultimate Guide How to Bypass Swipe Screen to Unlock on Vivo Y100A Device
- Remove Device Supervision From your Apple iPhone 15 Plus
- In 2024, How to Unlock Vivo Y36 Phone without PIN
- Easy Steps on How To Create a New Apple ID Account On iPhone 13 Pro | Dr.fone
- Top 7 Phone Number Locators To Track Realme V30T Location | Dr.fone
- In 2024, Sim Unlock Samsung Galaxy Z Fold 5 Phones without Code 2 Ways to Remove Android Sim Lock
- In 2024, Full Guide to Bypass Tecno Phantom V Flip FRP
- Updated 5 Websites with Animated Logos That Catch Your Eyes
- In 2024, What is the best Pokemon for pokemon pvp ranking On Poco F5 5G? | Dr.fone
- In 2024, Top 15 Augmented Reality Games Like Pokémon GO To Play On Vivo T2 Pro 5G | Dr.fone
- In 2024, A Comprehensive Guide to iPhone 12 Blacklist Removal Tips and Tools
- In 2024, Infinix Note 30 VIP Racing Edition ADB Format Tool for PC vs. Other Unlocking Tools Which One is the Best?
- Hassle-Free Ways to Remove FRP Lock on ZTEwith/without a PC
- AI Script | Wondershare Virbo Online
- In 2024, How Can We Bypass Huawei Nova Y71 FRP?
- Title: How to Make a Video with My Phone for 2024
- Author: Chloe
- Created at : 2024-04-24 07:08:12
- Updated at : 2024-04-25 07:08:12
- Link: https://ai-editing-video.techidaily.com/how-to-make-a-video-with-my-phone-for-2024/
- License: This work is licensed under CC BY-NC-SA 4.0.
