
How to Make Canva Collages
How to Make Canva Collages
How to Make Canva Collages
An easy yet powerful editor
Numerous effects to choose from
Detailed tutorials provided by the official channel
Collages are everywhere, be it social media sites, shopping sites, business sites, personal blogs, or anywhere else. Whenever you need to showcase multiple images at one place for the visual experience, or for any other purpose, collages work best.

There are several popular tools available that help you create a collage-like pro and Canva is one of them. So, if you too have been wanting to use Canva collage tool, this article will surely help you to learn about the tool and its use. Keep reading!!!
In this article
01 [What are a collage and its use?](#Part 1)
02 [Using Canva to create a collage](#Part 2)
03 [Get stock of media files at Wondershare Filmora](#Part 3)
Part 1 Part 1. What are a collage and its use?
In simplest terms, a collage is a collection of items that have been placed on a single frame or a page. Thus, an image collage can be termed as a collection of images placed interestingly in a single frame and for this task to be done with perfection, several collage-making tools are available.
Collages can be created for various reasons be it personal or professional. You can create a collage of your best friend’s birthday, wedding, or any special occasion. An online shopping site can create a collage for showcasing all its product under a similar niche in one place. A company can create a collage showcasing its projects, and similar others. Thus, different types of collages can be created for different purposes and requirements.
Part 2 Using Canva to create a collage
Canva is one of the most widely collage-making tools that is user-friendly and comes with a wide range of templates and editing options to let you create a customized college like a pro. It is available as a desktop tool as well as an app for Android and iOS devices. You need to free sign-up using Google, Email, or Facebook at Canva and then you are all set to the collage-making world.
The templates at Canva are available in multiple categories like fashion, travel, food, wedding, beauty, and many more. The option to design your own collage is also there.
Key features
● Simple and easy-to-use desktop and app-based collage maker.
● Comes with several pre-design templates in different categories. Templates can be customized.
● Allows designing your own design.
● Multiple editing options are supported like adding filters, background removal, adding effects, and more.
● Comes with a huge collection of stock images to meet your requirements
● Collage on Canva can be created in high-quality and can be downloaded.
● Allows resizing of the designs depending on the platform it has to be used for.
Steps to create Canva picture collage
● Step 1. On your browser window open Canva collage-maker and choose the Photo Collage option. Sign-up or log in if you already have an account.
● Step 2. At the Home window, choose the desired template from the available options. Using the search bar, you can also look for other Canva collage templates that matches your theme.

Note: Clicking on the arrow at the “Create a design” option will open the template options if not visible otherwise. Also, to get a customized size for your collage, click on the Custom dimensions button in the upper-right corner.
● Step 3. Selecting and clicking on the desired templatewill open a worktop window. Next, browse and add the images that you need to import to the collage by clicking on the Uploads tab. You can also drag and drop the images.
Images can be moved to place them in the right position.

● Step 4. Click on the image and them using one of the tools you can edit it as needed using filter effects, and another toolbar. Use the Elements tab on the left side, for adjusting more elements.
● Step 5. When all the settings are done, tap on the Download button to save the collage in one of the supported formats (JPEG, PNG, and others). You can also share or export the collage.

The steps for creating a collage using the Canva app are almost the same as that of the desktop with few changes.

Part 3 Get stock of media files at Wondershare Filmora
If you want to explore more media files for your collage, Wondershare Filmora Video Editor is excellent software. Though it is a professional video editing software, its latest version comes with a huge library of media files in an array of categories and themes. You can even search for your choice of GIFs and stickers at the tool.
Additional features of the software include creating a split-screen video that looks at a video slideshow, support to basic and advanced video editing functions, audio enhancement and editing functions, and more.
The interface of the software is simple and user-friendly making it apt for all types of users including the ones who have no prior experience of working with such tools.

● Key Takeaways from This Episode →
● Image collage is created by arranging multiple images on a single screen, frame, or page.
● Canva collage maker is one of the popular and widely used collage-maker that is available as a browser tool and phone app.
● To edit your videos professionally and also to get access to a wide range of media files Wondershare Filmora is an excellent tool.
Collages are everywhere, be it social media sites, shopping sites, business sites, personal blogs, or anywhere else. Whenever you need to showcase multiple images at one place for the visual experience, or for any other purpose, collages work best.
There are several popular tools available that help you create a collage-like pro and Canva is one of them. So, if you too have been wanting to use Canva collage tool, this article will surely help you to learn about the tool and its use. Keep reading!!!
In this article
01 [What are a collage and its use?](#Part 1)
02 [Using Canva to create a collage](#Part 2)
03 [Get stock of media files at Wondershare Filmora](#Part 3)
Part 1 Part 1. What are a collage and its use?
In simplest terms, a collage is a collection of items that have been placed on a single frame or a page. Thus, an image collage can be termed as a collection of images placed interestingly in a single frame and for this task to be done with perfection, several collage-making tools are available.
Collages can be created for various reasons be it personal or professional. You can create a collage of your best friend’s birthday, wedding, or any special occasion. An online shopping site can create a collage for showcasing all its product under a similar niche in one place. A company can create a collage showcasing its projects, and similar others. Thus, different types of collages can be created for different purposes and requirements.
Part 2 Using Canva to create a collage
Canva is one of the most widely collage-making tools that is user-friendly and comes with a wide range of templates and editing options to let you create a customized college like a pro. It is available as a desktop tool as well as an app for Android and iOS devices. You need to free sign-up using Google, Email, or Facebook at Canva and then you are all set to the collage-making world.
The templates at Canva are available in multiple categories like fashion, travel, food, wedding, beauty, and many more. The option to design your own collage is also there.
Key features
● Simple and easy-to-use desktop and app-based collage maker.
● Comes with several pre-design templates in different categories. Templates can be customized.
● Allows designing your own design.
● Multiple editing options are supported like adding filters, background removal, adding effects, and more.
● Comes with a huge collection of stock images to meet your requirements
● Collage on Canva can be created in high-quality and can be downloaded.
● Allows resizing of the designs depending on the platform it has to be used for.
Steps to create Canva picture collage
● Step 1. On your browser window open Canva collage-maker and choose the Photo Collage option. Sign-up or log in if you already have an account.
● Step 2. At the Home window, choose the desired template from the available options. Using the search bar, you can also look for other Canva collage templates that matches your theme.
Note: Clicking on the arrow at the “Create a design” option will open the template options if not visible otherwise. Also, to get a customized size for your collage, click on the Custom dimensions button in the upper-right corner.
● Step 3. Selecting and clicking on the desired templatewill open a worktop window. Next, browse and add the images that you need to import to the collage by clicking on the Uploads tab. You can also drag and drop the images.
Images can be moved to place them in the right position.
● Step 4. Click on the image and them using one of the tools you can edit it as needed using filter effects, and another toolbar. Use the Elements tab on the left side, for adjusting more elements.
● Step 5. When all the settings are done, tap on the Download button to save the collage in one of the supported formats (JPEG, PNG, and others). You can also share or export the collage.
The steps for creating a collage using the Canva app are almost the same as that of the desktop with few changes.
Part 3 Get stock of media files at Wondershare Filmora
If you want to explore more media files for your collage, Wondershare Filmora Video Editor is excellent software. Though it is a professional video editing software, its latest version comes with a huge library of media files in an array of categories and themes. You can even search for your choice of GIFs and stickers at the tool.
Additional features of the software include creating a split-screen video that looks at a video slideshow, support to basic and advanced video editing functions, audio enhancement and editing functions, and more.
The interface of the software is simple and user-friendly making it apt for all types of users including the ones who have no prior experience of working with such tools.
● Key Takeaways from This Episode →
● Image collage is created by arranging multiple images on a single screen, frame, or page.
● Canva collage maker is one of the popular and widely used collage-maker that is available as a browser tool and phone app.
● To edit your videos professionally and also to get access to a wide range of media files Wondershare Filmora is an excellent tool.
Collages are everywhere, be it social media sites, shopping sites, business sites, personal blogs, or anywhere else. Whenever you need to showcase multiple images at one place for the visual experience, or for any other purpose, collages work best.
There are several popular tools available that help you create a collage-like pro and Canva is one of them. So, if you too have been wanting to use Canva collage tool, this article will surely help you to learn about the tool and its use. Keep reading!!!
In this article
01 [What are a collage and its use?](#Part 1)
02 [Using Canva to create a collage](#Part 2)
03 [Get stock of media files at Wondershare Filmora](#Part 3)
Part 1 Part 1. What are a collage and its use?
In simplest terms, a collage is a collection of items that have been placed on a single frame or a page. Thus, an image collage can be termed as a collection of images placed interestingly in a single frame and for this task to be done with perfection, several collage-making tools are available.
Collages can be created for various reasons be it personal or professional. You can create a collage of your best friend’s birthday, wedding, or any special occasion. An online shopping site can create a collage for showcasing all its product under a similar niche in one place. A company can create a collage showcasing its projects, and similar others. Thus, different types of collages can be created for different purposes and requirements.
Part 2 Using Canva to create a collage
Canva is one of the most widely collage-making tools that is user-friendly and comes with a wide range of templates and editing options to let you create a customized college like a pro. It is available as a desktop tool as well as an app for Android and iOS devices. You need to free sign-up using Google, Email, or Facebook at Canva and then you are all set to the collage-making world.
The templates at Canva are available in multiple categories like fashion, travel, food, wedding, beauty, and many more. The option to design your own collage is also there.
Key features
● Simple and easy-to-use desktop and app-based collage maker.
● Comes with several pre-design templates in different categories. Templates can be customized.
● Allows designing your own design.
● Multiple editing options are supported like adding filters, background removal, adding effects, and more.
● Comes with a huge collection of stock images to meet your requirements
● Collage on Canva can be created in high-quality and can be downloaded.
● Allows resizing of the designs depending on the platform it has to be used for.
Steps to create Canva picture collage
● Step 1. On your browser window open Canva collage-maker and choose the Photo Collage option. Sign-up or log in if you already have an account.
● Step 2. At the Home window, choose the desired template from the available options. Using the search bar, you can also look for other Canva collage templates that matches your theme.
Note: Clicking on the arrow at the “Create a design” option will open the template options if not visible otherwise. Also, to get a customized size for your collage, click on the Custom dimensions button in the upper-right corner.
● Step 3. Selecting and clicking on the desired templatewill open a worktop window. Next, browse and add the images that you need to import to the collage by clicking on the Uploads tab. You can also drag and drop the images.
Images can be moved to place them in the right position.
● Step 4. Click on the image and them using one of the tools you can edit it as needed using filter effects, and another toolbar. Use the Elements tab on the left side, for adjusting more elements.
● Step 5. When all the settings are done, tap on the Download button to save the collage in one of the supported formats (JPEG, PNG, and others). You can also share or export the collage.
The steps for creating a collage using the Canva app are almost the same as that of the desktop with few changes.
Part 3 Get stock of media files at Wondershare Filmora
If you want to explore more media files for your collage, Wondershare Filmora Video Editor is excellent software. Though it is a professional video editing software, its latest version comes with a huge library of media files in an array of categories and themes. You can even search for your choice of GIFs and stickers at the tool.
Additional features of the software include creating a split-screen video that looks at a video slideshow, support to basic and advanced video editing functions, audio enhancement and editing functions, and more.
The interface of the software is simple and user-friendly making it apt for all types of users including the ones who have no prior experience of working with such tools.
● Key Takeaways from This Episode →
● Image collage is created by arranging multiple images on a single screen, frame, or page.
● Canva collage maker is one of the popular and widely used collage-maker that is available as a browser tool and phone app.
● To edit your videos professionally and also to get access to a wide range of media files Wondershare Filmora is an excellent tool.
How to Loop QuickTime Video
If you are a Mac user, QuickTime Player is where you play and watch videos. QuickTime by Apple comes pre-installed on every Mac. It happens to be the default video player for macOS users. Under normal circumstances, QuickTime plays a video only once. However, there are times when you want to watch a video repeatedly in a loop.
When you have a short video clip, it is usual that you want to watch it in a loop. The same is applicable to music videos. You may want to listen to the song repeatedly in the background while you work on your Mac. You may also want to show a demonstration video endlessly on the display screen. In all such scenarios, you have to play a loop video on QuickTime. We will illustrate how to play a video in a loop on QuickTime.
Part 1. Steps to Loop Video with QuickTime Player
You can play any video on your Mac via QuickTime Player. But the video player plays the video only once by default. If you want to watch the video again, you have to play it again. Instead of manually playing it over and over again, you can put the video in a loop. Here are the steps on how to loop QuickTime video.
Step 1: Play the video of your choice on QuickTime Player.
Step 2: Click on the View menu from the top menu bar.
Step 3: Click on the Loop option located at the bottom of the View menu. Alternatively, you can press the Option + Command + L shortcut keys to loop the video.

Thereafter, the video you are playing won’t stop at its end mark. It will restart again and again until your pause or close the QuickTime player.
Part 2. QuickTime Alternatives to Loop Video
QuickTime Player is where you can play videos in a loop. However, if you want to loop videos for your video project, you will need a video editor. If you are looking for QuickTime Player alternatives to loop video on your Mac, we have the following options.
1. iMovie
iMovie by Apple comes pre-installed on Mac as well. iMovie is a video editing application. You can import videos on your Mac and extend the video durations by looping. This is useful when you want to play a video clips in your video project multiple times. Here are the steps on how to loop video via iMovie similar to QuickTime loop video.
Step 1: Launch the iMovie app on your Mac. Once iMovie opens, click on Create New option. Thereafter, click on the Movie option to get started.

Step 2: Go to the File menu and click on the Import Media option. Select the desired video from your Mac. Alternatively, select any media file from All Events or Photos under the Libraries section.

Step 3: Drop the video on the timeline. You can drag and drop the video clip multiple times on the timeline. This will loop the video and extend the video duration. There should be no gap between the clips on the timeline.

Step 4: Once you have looped the desired video, go to File> Share> File option to save the video file.
2. Filmora for Mac
You already know how to loop video in QuickTime Player. But you cannot extend the video duration by looping permanently in QuickTime Player. You can do that on iMovie, but iMovie has limitations as it is a free app. If you are looking for a premium QuickTime Player alternative, Wondershare Filmora is for you.
Filmora is a premium video editor with a wide range of video editing features. It has a user-friendly interface so that everyone can operate it easily. You can trim a video and add transitions between the loops. Here are the steps on how to loop a video on Filmora for Mac.
Step 1: Download and install Wondershare Filmora. Open Filmora and click on New Project.

Free Download For Win 7 or later(64-bit)
Free Download For macOS 10.14 or later
Step 2: Drag and drop the desired video file from your device into the Project Media folder. Thereafter, drag and drop the video file into the timeline.

Step 3: Drag and drop the video clip into the timeline again. Place it by the side of the first video clip. There should not be any gap and they should be in the same channel on the timeline. Alternative, you can also copy and paste the video clip for looping.

Step 4: Play the video and watch it in a loop through the Viewer on Filmora. If you are satisfied, click on the Export button to save the video in any file format as per your preference.
Part 3. Related FAQs
How do I make my video player loop?
If you are a Mac user, the default video player is QuickTime Player. Go to View> Loop to make your Mac video player loop a video. If you are using any other video player like VLC Media Player, you can look at the View menu. Alternatively, you can look for a Loop icon to repeatedly play the video.
How to loop YouTube video on Mac?
On your Mac, open the video on YouTube that you want to put in a loop. Once you are on the watch screen of the video, right-click on the video. Choose the Loop option to play the video repeatedly.
Can QuickTime player loop audio?
Yes, you can loop any audio file on QuickTime Player. The steps are the same for looping a video. You need to play the audio and go to View> Loop option to play the audio file repeatedly. However, some have complained that looping audio may leave a gap at the beginning of the audio track.
Conclusion
Looping a video that we like to the highest degree is quite common. If you are playing any desired video on QuickTime Player, we have illustrated how to go for it. We have also provided you with a free and a premium QuickTime Player alternative. You can choose any of them as per your requirements to loop a video.
Free Download For macOS 10.14 or later
Step 2: Drag and drop the desired video file from your device into the Project Media folder. Thereafter, drag and drop the video file into the timeline.
Step 3: Drag and drop the video clip into the timeline again. Place it by the side of the first video clip. There should not be any gap and they should be in the same channel on the timeline. Alternative, you can also copy and paste the video clip for looping.
Step 4: Play the video and watch it in a loop through the Viewer on Filmora. If you are satisfied, click on the Export button to save the video in any file format as per your preference.
Part 3. Related FAQs
How do I make my video player loop?
If you are a Mac user, the default video player is QuickTime Player. Go to View> Loop to make your Mac video player loop a video. If you are using any other video player like VLC Media Player, you can look at the View menu. Alternatively, you can look for a Loop icon to repeatedly play the video.
How to loop YouTube video on Mac?
On your Mac, open the video on YouTube that you want to put in a loop. Once you are on the watch screen of the video, right-click on the video. Choose the Loop option to play the video repeatedly.
Can QuickTime player loop audio?
Yes, you can loop any audio file on QuickTime Player. The steps are the same for looping a video. You need to play the audio and go to View> Loop option to play the audio file repeatedly. However, some have complained that looping audio may leave a gap at the beginning of the audio track.
Conclusion
Looping a video that we like to the highest degree is quite common. If you are playing any desired video on QuickTime Player, we have illustrated how to go for it. We have also provided you with a free and a premium QuickTime Player alternative. You can choose any of them as per your requirements to loop a video.
How To Split Screen On Tiktok
TikTok is probably the most popular video-sharing app in the world right now. Many TikTokers have become famous for making videos that have a significant impact and encourage creativity and new ideas. One of the most popular TikTok trends is the split-screen effect. You’ve probably seen a lot of TikTok split-screen videos with cool effects that made you wonder how the user split their screen. Becoming skilled in using TikTok effects is not as difficult as it might look. It only requires a significant amount of practice. Read on as we show you how to make a TikTok split-screen video.
Using CapCut To Split Screen
CapCut is the official free TikTok Video Maker and Video Editor with Music for TikTok that is multifunctional. Its interface is quite similar and easy to use.
CapCut includes free advanced capabilities such as keyframe animation, stabilization, and Picture-in-Picture (PIP). These are in addition to its fundamental functions, such as video editing, adding stickers, text, and music.
Steps to Split Screen Video with CapCut On Android and IOS Devices
- To use the app, you need to install it first. iPhone and Android users can download CapCut. Navigate to the appropriate app store of your choice and download CapCut.
- After installation, launch the app.
- Then go ahead and grant CapCut permission to view your camera roll. Incorporating video clips into your project has never been easier. Go to the app’s main screen and select “New Project“ from the drop-down menu.
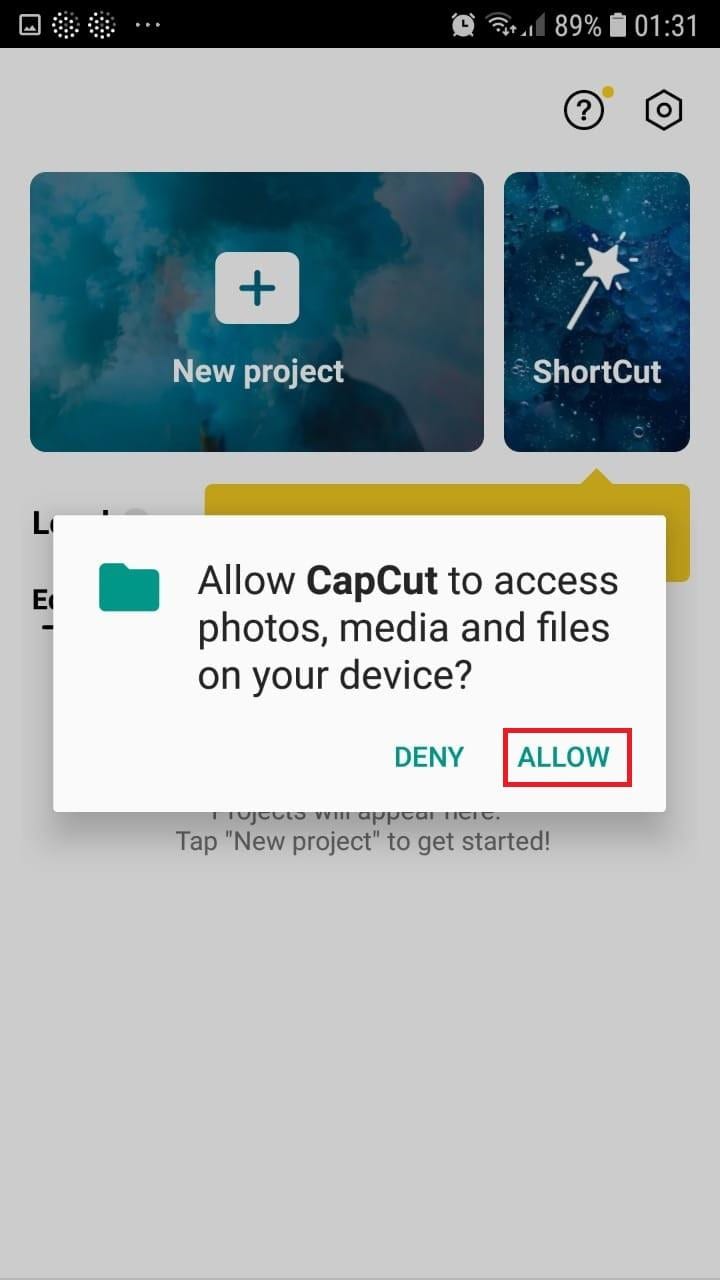
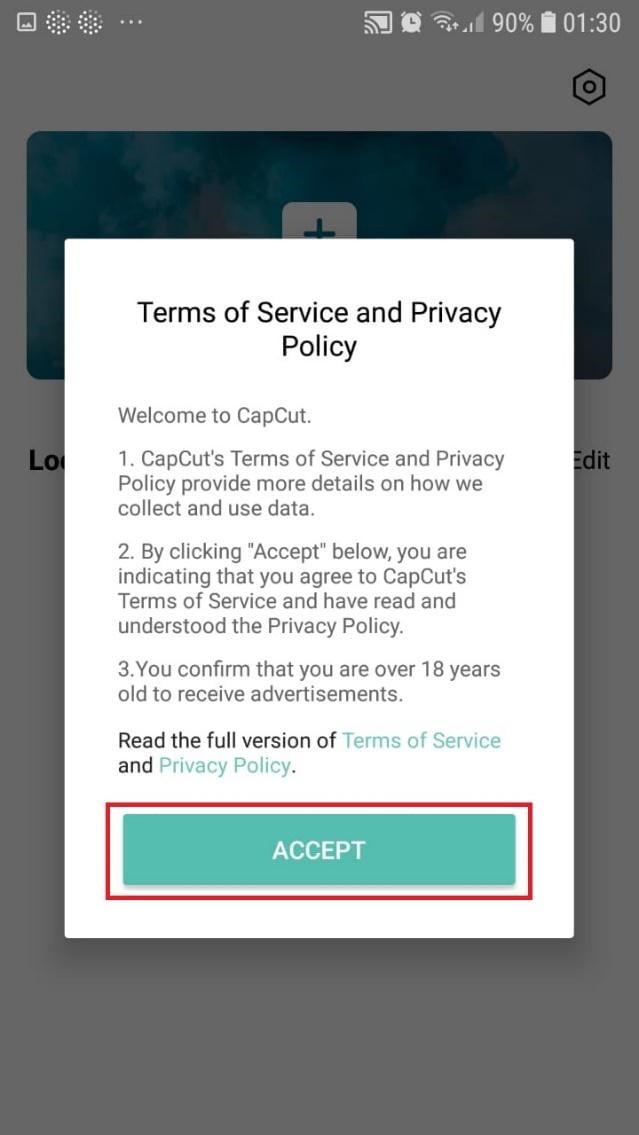
- To confirm your selection, click the green Accept This confirms that CapCut requires access to your photographs to function correctly. Tap on the button on the following pop-up window to gain access to all the photos. This is a one-time process that must be carried out the first time you launch the application.
- Begin a New Project. After opening the app, press the “New Project“ icon to bring up a new screen showing your device’s videos.

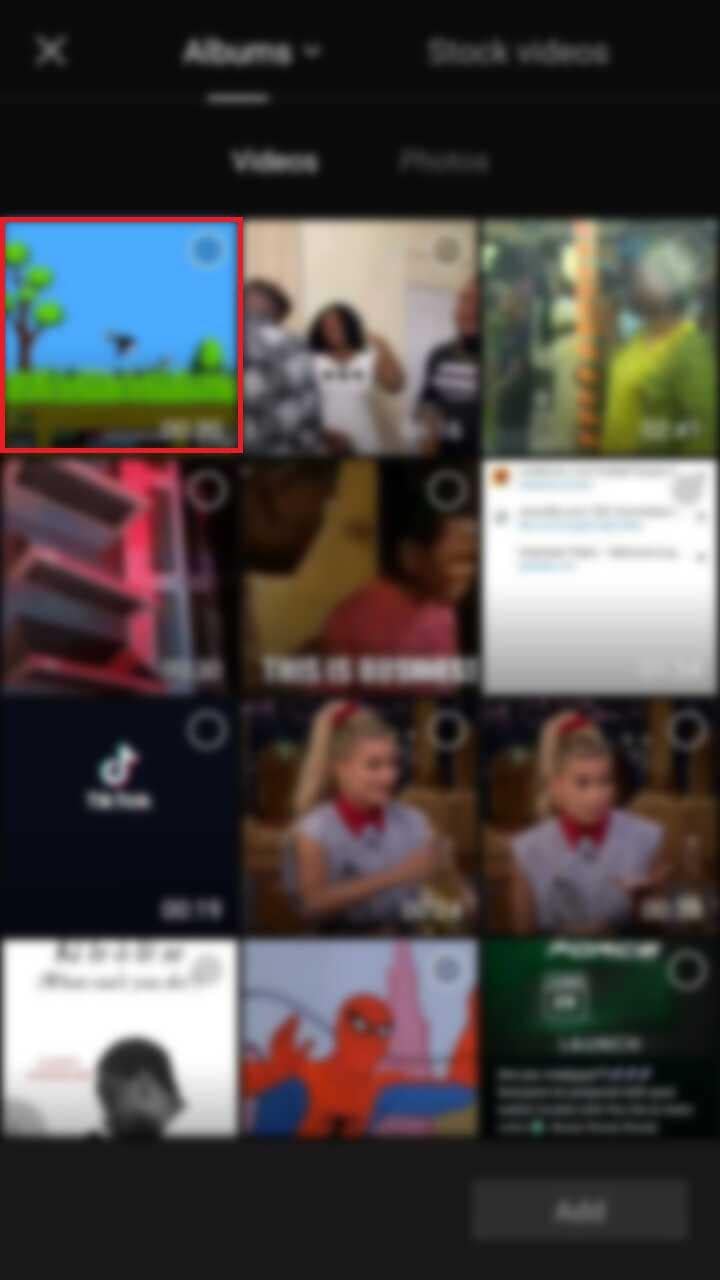
- Choose a video clip. Locate the desired video clip for your project by scrolling through the pages displaying your camera roll. Tap the video’s thumbnail and then tap the “Add“ icon in the screen’s lower part.
- Get familiar with your workspace. Upon uploading your first clip, CapCut leads you to the primary workspace. This is where you will spend most of your time within the app. The preview panel, the timeline, and the toolbar are in order from top to bottom.
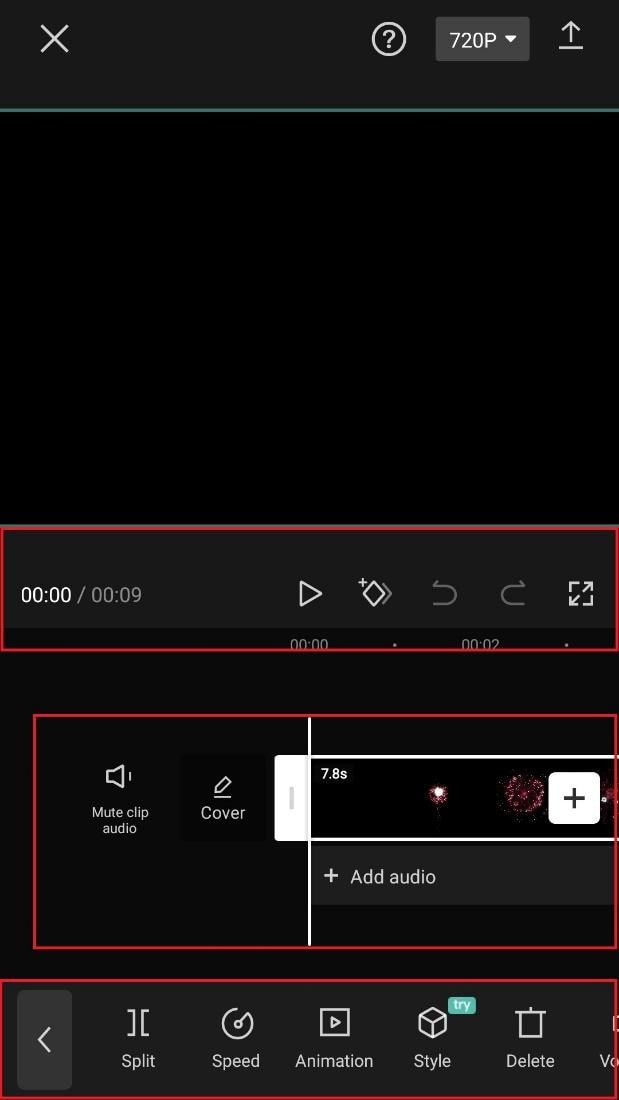
- View the toolbar and timeline. They represent your screen’s bottom half. The timeline, located below the preview panel, is where you’ll make all your adjustments. You can access all your video editing tools, including split, text, audio, effects, stickers, and more, on the toolbar at the bottom of your screen.
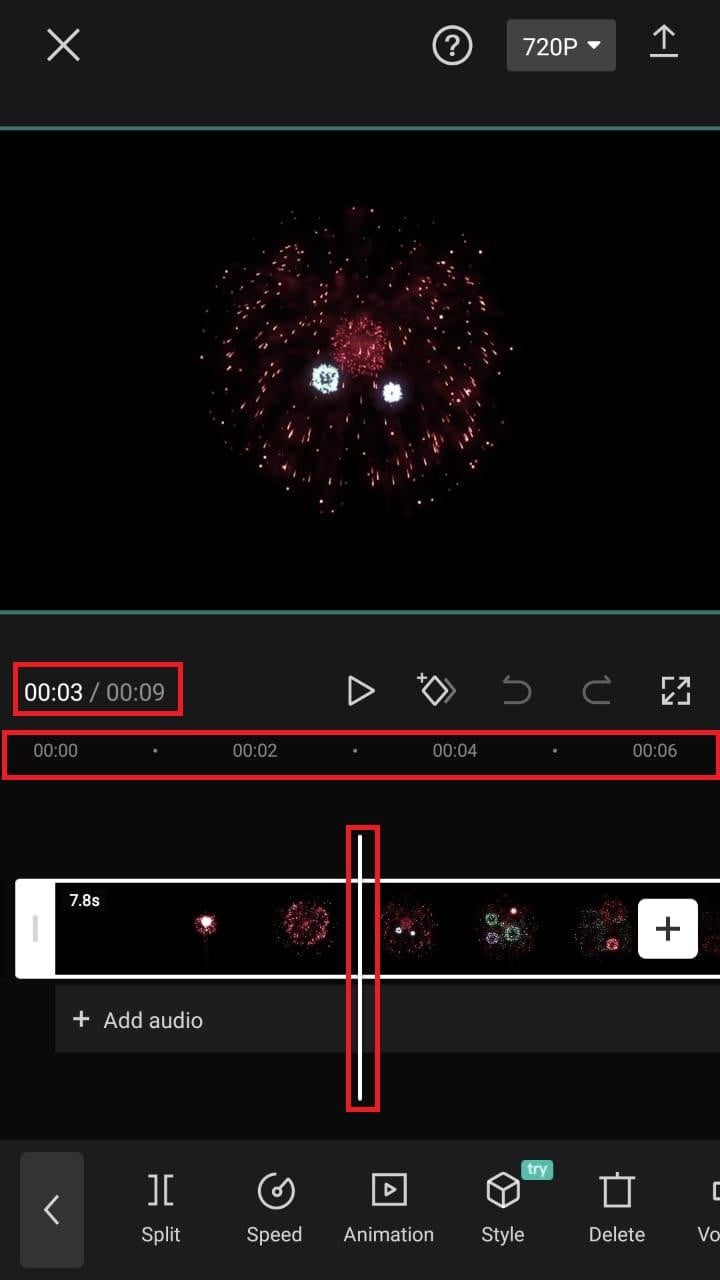
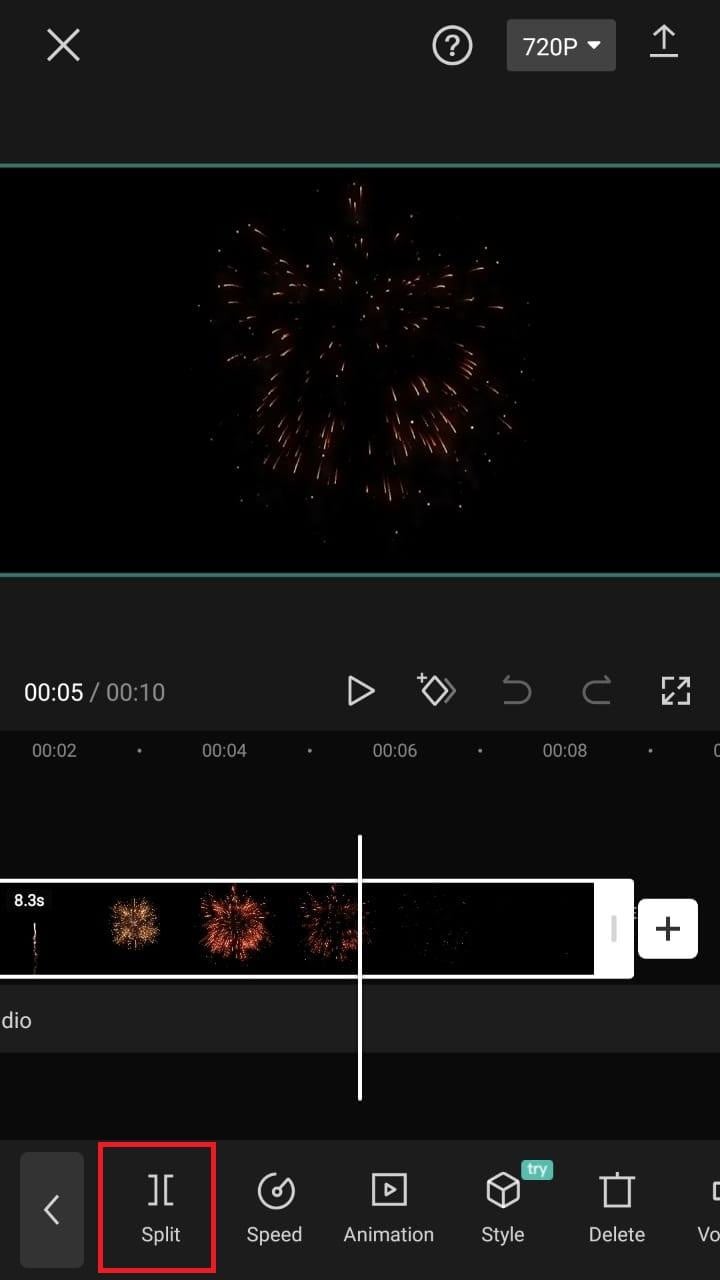
- Split video clips. To split a video clip in half, move the play head to the desired location on the timeline. Tap on your clip, then press the “Split“ toolbar icon. Your result now shows two different clips, not just one.
A Better Split-Screen Effect Video Editor
Filmora is one of the best free HD video makers and video editors with several functionalities, including text, backgrounds, filters, special effects, emoji, audio, and special effects.
Filmora is a feature-packed video editor which has a variety of tools to work with. With this video editor, producing memes, videos with images, pictures, music, stickers, and sound effects and editing videos for YouTube, Twitter, WhatsApp, Facebook, TikTok, and Instagram is simple and entertaining.
Free Download For Win 7 or later(64-bit)
Free Download For macOS 10.14 or later
Steps to Split Screen Video with Filmora
- Download Filmora from the App store
- After installation, launch it.
- Click on “Continue” to continue to use the app.

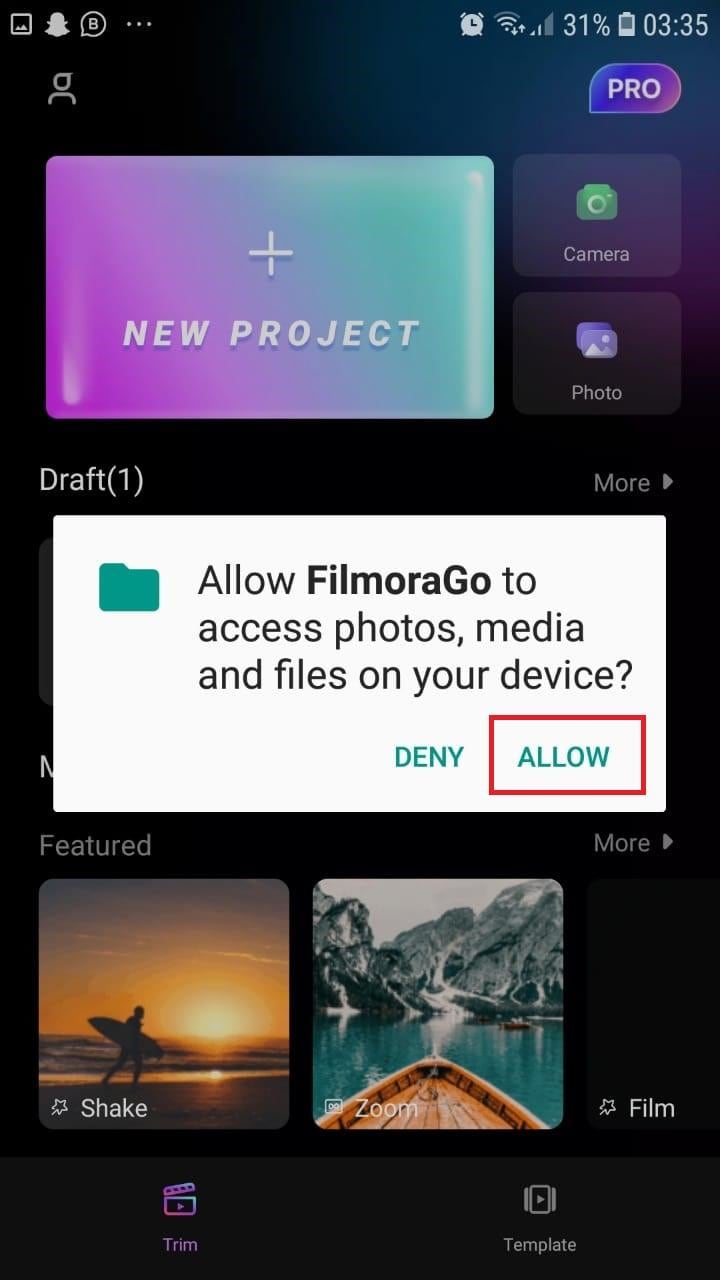
- Click on Allow to grant Filmora access to your photos and videos.
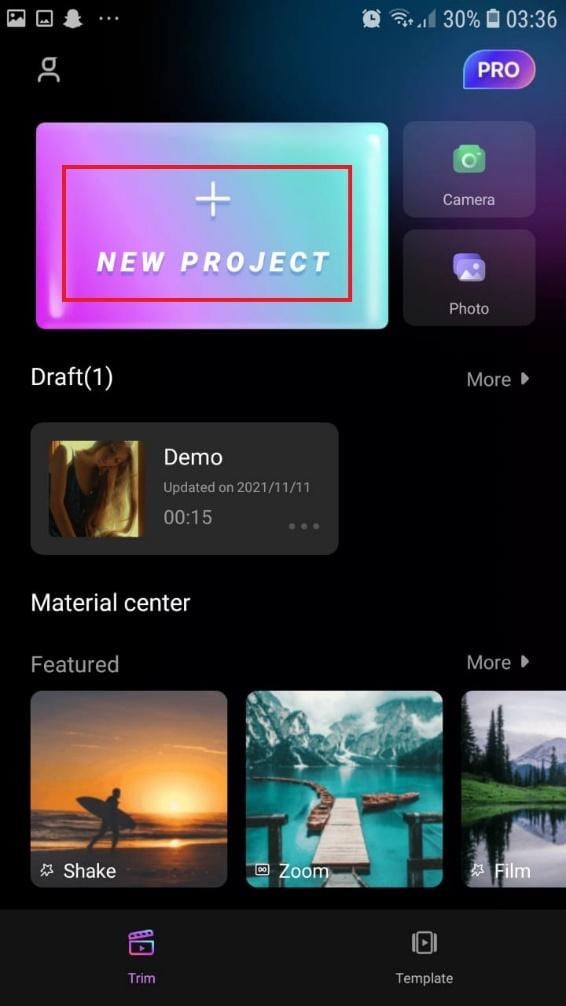
- You can now tap on “New Project” with the + Symbol.
- Select your desired video and tap on “Next” at the bottom right of your screen
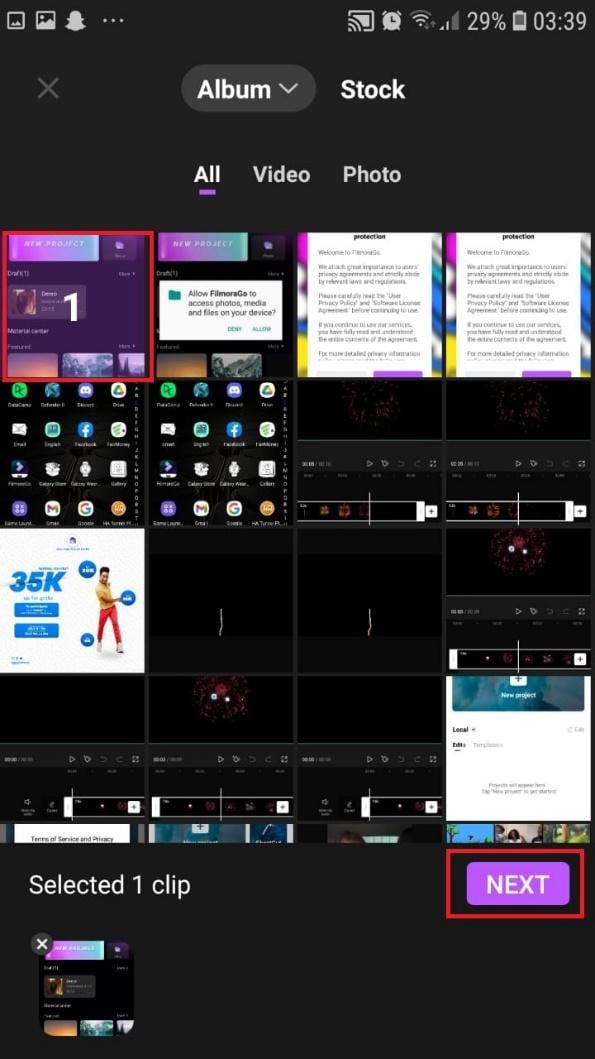
- You can select various options from the bottom of your screen to edit the selected video the way you like.

- Click on trim, and then you will see the different split-screen and collage feature options. Pick any that appeals to you.
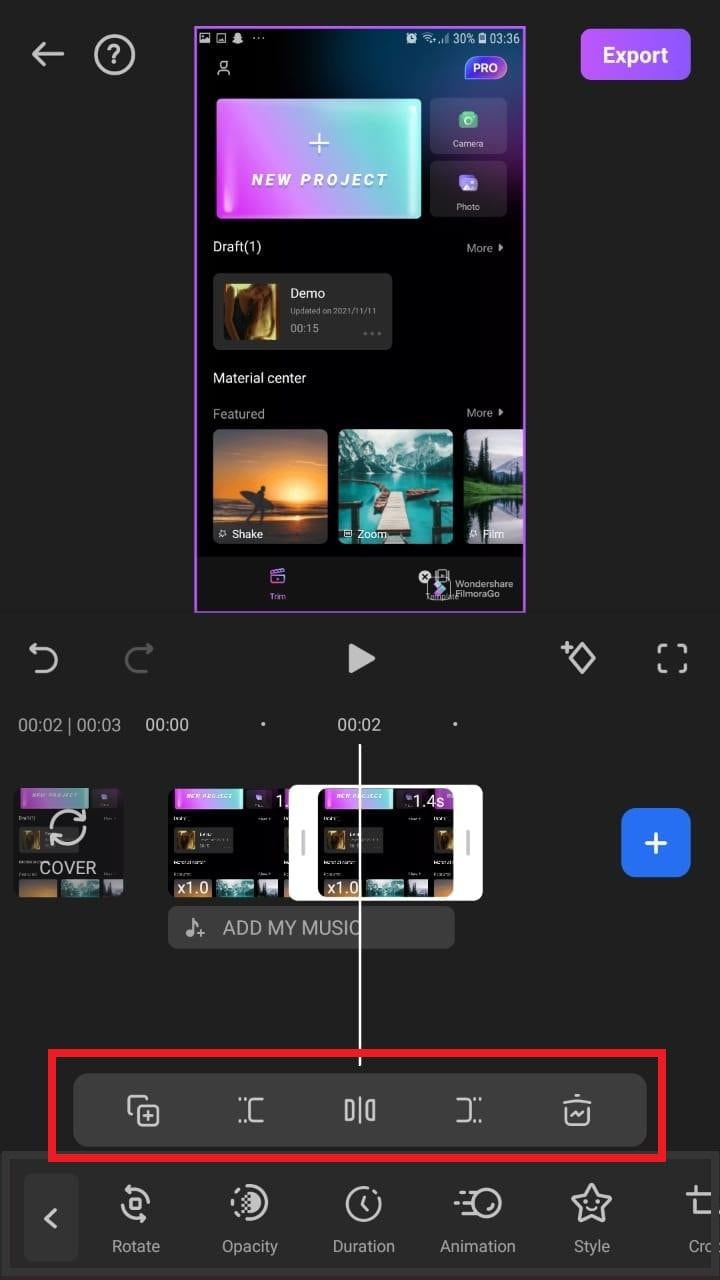
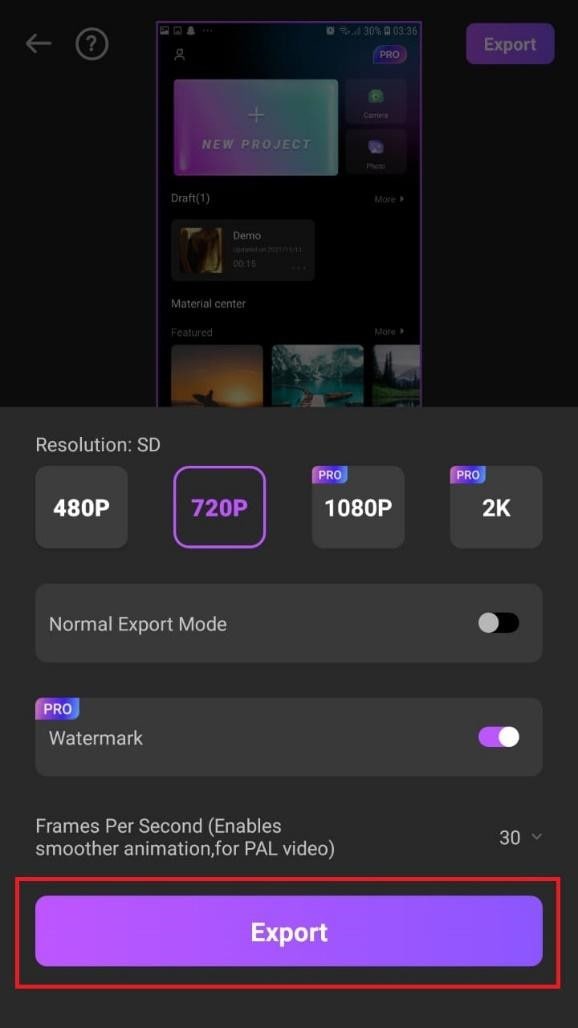
- When you are done with the editing, tap on “Export” at the top right of your screen.

- Go ahead and tap on “Export” on the next screen. Your video will be successfully exported and saved to your camera roll.
Using Filmora is very efficient in splitting your videos and making collage features for TikTok. It is a very simplified app available on both the Google Play Store and Apple Appstore.
Conclusion
TikTok is a platform that users use worldwide to create and share content. It could be pictures, videos, reels, or any other media type. Some people create videos for their audience on TikTok to educate them, while others do it to entertain them.
In any case, the goal is to build a more significant following on TikTok and garner greater attention from its users. You could even make money off the app.
One of the methods to impress your fans and explore multiple possibilities to build unique reels is to use the TikTok split-screen and collage feature effect available on TikTok. Although there are a few different ways to create a Split Screen on TikTok, the steps highlighted in this article are the most straightforward.
Free Download For macOS 10.14 or later
Steps to Split Screen Video with Filmora
- Download Filmora from the App store
- After installation, launch it.
- Click on “Continue” to continue to use the app.
- Click on Allow to grant Filmora access to your photos and videos.
- You can now tap on “New Project” with the + Symbol.
- Select your desired video and tap on “Next” at the bottom right of your screen
- You can select various options from the bottom of your screen to edit the selected video the way you like.
- Click on trim, and then you will see the different split-screen and collage feature options. Pick any that appeals to you.
- When you are done with the editing, tap on “Export” at the top right of your screen.
- Go ahead and tap on “Export” on the next screen. Your video will be successfully exported and saved to your camera roll.
Using Filmora is very efficient in splitting your videos and making collage features for TikTok. It is a very simplified app available on both the Google Play Store and Apple Appstore.
Conclusion
TikTok is a platform that users use worldwide to create and share content. It could be pictures, videos, reels, or any other media type. Some people create videos for their audience on TikTok to educate them, while others do it to entertain them.
In any case, the goal is to build a more significant following on TikTok and garner greater attention from its users. You could even make money off the app.
One of the methods to impress your fans and explore multiple possibilities to build unique reels is to use the TikTok split-screen and collage feature effect available on TikTok. Although there are a few different ways to create a Split Screen on TikTok, the steps highlighted in this article are the most straightforward.
Looking for the Best Online Video Editors to Add Filter to Your Video? Here Is the List of the Best Video Editors to Add Filter Video Online in Simple Steps
When you record a video with your phone camera, digital camera, or even webcam, the color scheme in the video can differ depending on the surrounding light. If it differs a lot from the natural color scheme, it can affect the viewing experience of the audience negatively. That is why color correction is an essential part of video editing, and that is where video filters can be handy. You do not need a dedicated video editor application to add video filters as you can you can put filter on video online.
Video filters can correct color imbalances and make the video have consistent colors. For example, if you had recorded a video when the sun was setting, you can use a high saturation video filter to make the video color more vivid. You can even set the mood of a video with video filters so that the audience can get the exact emotion you want to portray through your video. We will illustrate the different ways on how to add filter to video online instantly.
Way 1. Use Clideo Filter Editor
Clideo Filter Editor is one of the fastest video editors that you can apply filters to your videos instantly. There is a wide range of different presets to apply temporarily and compare. Therefore, you can choose the best video filter and save your modified video. The user interface is super intuitive for everyone.
The platform is completely secure for uploading and editing videos, and you can upload videos in different file formats. You can use Clideo Filter Editor on your web browser from your Mac, Windows PC as well as smartphone. Here are the steps to add video filters online using Clideo Filter Editor.
Step1Open your web browser and visit “clideo.com/filter-video”.
Step2Click on Choose File button to upload your video from your hard drive. You can also upload video from Google Drive and Dropbox.

Step3After successful uploading, you will see the video filters on the right side of your video. Apply them one and one while playing your video so that you can see the changes in video color scheme instantly.

Step4Finalize a video filter to apply to your video and click on Export to save the modified video on your hard drive on any desired file format.

Way 2. Veed.io Video Filters
If you are looking for some stunning video filters to use on your video, Veed.io Video Filters is the best online platform. You can add filter to video online free, and the platform supports several video file formats. You will find color grading filters as well as effects to apply to your video and get the desired outcome. If you are going to upload videos to social media, you should definitely use Veed.io Video Filters to make your videos feel unique. Here are the steps on how to add filter video online using Veed.io Video Filters.
Step1Open your web browser and visit “veed.io/tools/video-filters”. Click on Get Started button.

Step2On the next screen, click on Browser or drag and drop your video file for adding video filters.

Step3After the video file gets uploaded, you will see Filters on the left side of the video. There are two different tabs – Color Grading and Effects available where there are different video filters available to apply to your video.

Step4Click on the filters to see how they look on your video instantly. Once you have selected a filter for the video, click on Export button to save the edited video in desired file format.

Way 3. Clipchamp Video Filter Editor
Clipchamp video filter editor has a wide range of beautiful video filters to enhance your video instantly. You can correct any color imbalance as well as set any required tone to your video. Starting from Outdoor and Portrait to Indoors and Muted, all the popular professional video filters can do the magic to your video. You can also save the edited video in different video resolution and file format as per your requirements. Here are the steps on how to add filter video online using Clipchamp video filter editor.
Step1Open your web browser and visit “clipchamp.com/en/video-filters-editor”. Click on Create with video filters now button.

Step2You have to sign up on the next screen so that you can apply the video filters.
Step3Once the video editor opens, click on Create a Video button.

Step4Drag and drop your video on the video editor and thereafter on Timeline.

Step5Click on Filters option located at the top and you will see a drop-down containing all the filters. Place your mouse pointer on the filters one by one to see how they look on your video instantly.

Step6Finally, click on the selected filter and click on Export button to save the edited video.

Way 4. FlexClip Video Filter Editor
FlexClip has a collection of online tools to edit your video instantly without installing any video editor application. FlexClip Video Filter Editor has over 20 popular video filters to apply to your video on the go. You can change the video outlook, and the platform supports different types of video file formats. You can add filter to video online free, and there is not going to be any watermark on your edited video. Here are the steps on how you can add filter to your video using FlexClip video filter editor.
Step1Open your web browser and visit “flexclip.com/tools/filter-video”.
Step2Drag and drop your video to the free video filter editor online.

Step3After successful uploading, you will see all the video filters on the left side.

Step4Click on the video filters one to one to apply them to the video and see which one suits the best. You can adjust the intensity of the filters as per your preference.

Step5Once you have applied a filter and you can satisfy with it, click on Export button to save the edited video.

Way 5. Kapwing Filter Video Editor
Kapwing is a popular online video editor, and you can add video filters to your recorded video for free. Kapwing Filter Video Editor works on all devices, and you can access it from any popular web browser. You can upload recorded video as well as paste URL of an online video stored in Google cloud platform to apply video filters. The preset filters enhance video quality starting from colors and saturation to brightness and contrast. You can also share them on social media platforms directly from Kapwing video editor. Here are the steps how to put filter on video online using Kapwing filter video editor.
Step1Open your web browser and visit “kapwing.com/tools/filter-video”. Click on Choose a video button to get started.

Step2Once Kapwing video editor opens, drag and drop your video to upload on the platform. You can also paste video URL from Google Drive or Google Photos.

Step3Click on the video and on the right side, go to Edit tab and click on Filters under Video section.

Step4You will see a host of video filters that you can apply to your video. Click on them to check them out. You can also customize the video filter by going to Adjust tab.

Step5Select the best one and click on Apply Filters button. Finally, click on Export Project button to save the edited video.

Conclusion
If you want to apply video filters to your recorded video in order to enhance the video outlook and adjust the color balance, you can use video filter editors online. We have illustrated five different ways on how to add video filters online for free. Each one of them has different sets of video filters. If you are looking for a dedicated video editor desktop application, we recommend Wondershare Filmora .
Free Download For Win 7 or later(64-bit)
Free Download For macOS 10.14 or later
Free Download For macOS 10.14 or later
Also read:
- [Updated] Aerial Excellence with MI Drone - A High-Quality Look
- [Updated] Universal SRT to Various Subtitle Formats Handbook
- 2024 Approved Best Time-Lapse Tools & Techniques - No.5
- Clearing Up Audio in Skype Conferences for 2024
- Do You Want to Make Your Background Disappear and Replace with an Attractive Background? Here Is How to Add a Green Screen to Zoom App and Add Any Virtual Background of Your Choice
- Fire TV with Insignia NS-43DF710NA19: Alexa Voice Control & Stunning 4K Experience at Great Value.
- In 2024, 5 Best Route Generator Apps You Should Try On Xiaomi Redmi 12 5G | Dr.fone
- In 2024, Cost-Conscious Aerial Assistants Top 5 Drones
- In 2024, Do You Want to Be Aware of VHSs Meaning? There Is Nothing to Be Worried About because We Will Guide You in This Article
- In 2024, Locked Out of iPhone 14? 5 Ways to get into a Locked iPhone 14 | Dr.fone
- New 2024 Approved How to Add Subtitles to Videos With Kapwing
- New 2024 Approved How To Film a Slow Motion Video
- New VSDC Free Video Editor Review for 2024
- QuickQuip QuarterMotion Grip
- Unlocking the Power of ChatGPT with These 4 Strategies for Reading PDFs
- Updated 3 Ways to Make Time-Lapse Video on MacBook
- Updated How to Correct Lens Distortion With Filmora for 2024
- Updated In 2024, 3 Best Effects to Appear on Camera
- Updated Top 8 Sites to Download Glitch Transition for Premiere Pro
- Title: How to Make Canva Collages
- Author: Chloe
- Created at : 2024-09-30 18:57:38
- Updated at : 2024-10-03 11:31:42
- Link: https://ai-editing-video.techidaily.com/how-to-make-canva-collages/
- License: This work is licensed under CC BY-NC-SA 4.0.