:max_bytes(150000):strip_icc():format(webp)/5-things-to-consider-before-buying-a-gaming-laptop-5235493-145a8c941b9f46e99d9a90bdee387893.jpg)
How to Make Coin Magic With Filmora for 2024

How to Make Coin Magic With Filmora
Do you want to become a magician in your videos? Now, everyone can look like a magician with the magic of editing. This article will show you how to do a cool coin trick in Filmora 11 .
Part 1: What is the filmmaking technique “Cutting on action”
Cutting on action is a technique the editors use to cut in the middle of an action to another shot that matches the first shot’s action. Typically, the subject starts an action in one shot and continues the action in another, creating a smooth transition. For example, when you make the coin trick video, you need to cut on the tapping so it can trick the eyes, and the cut won’t be noticeable.
Part 2: Things You Need to Prepare for The Coin Magic Trick
- Glass and two coins

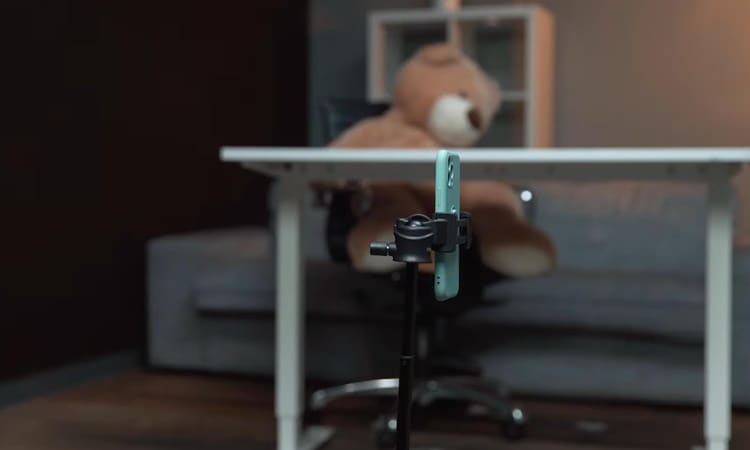
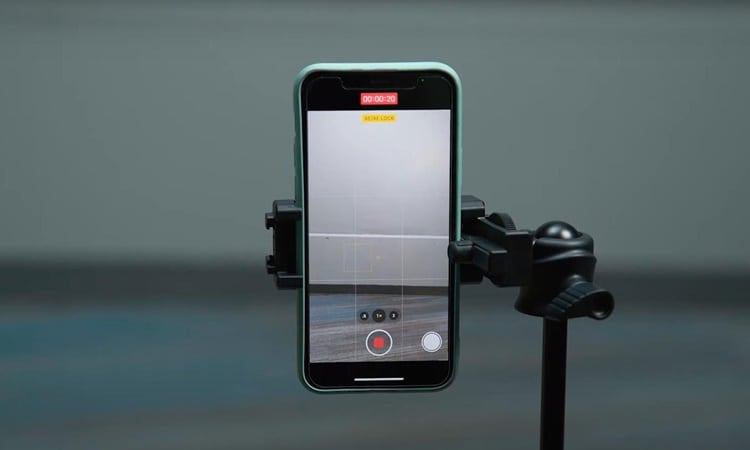
- Set the phone on a tripod. Because utilizing a tripod can significantly improve the recording’s stability.
Part 3: Start Filming
Step1 Firstly, you must show the coin and the bottom of the glass.
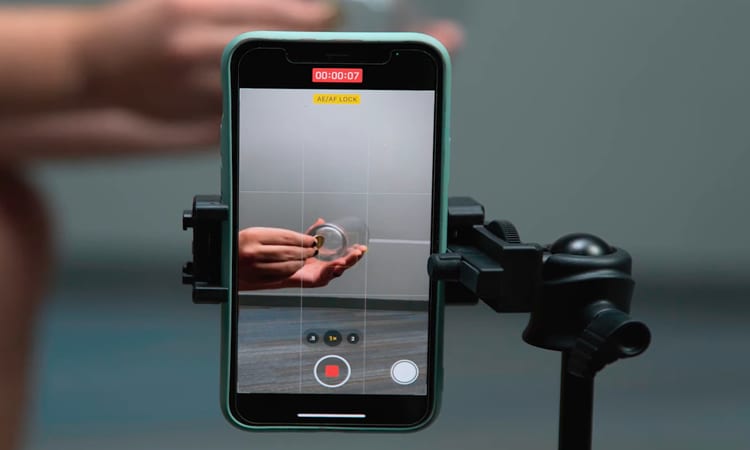
Step2 After that, you need to hold the coin with the fingers part of one hand and tap down on the coin. Make sure it looks like the coin is going through straight to the glass.
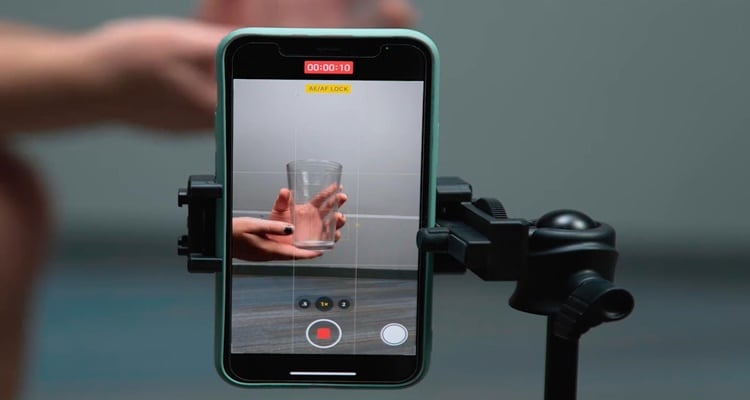
Step3 You need someone else to drop the other coin from the top. Meanwhile, you are pretending to tap a coin on the glass. You don’t need to worry about someone else hand in the frame. Since you can remove it easily with the masking feature in Filmora.
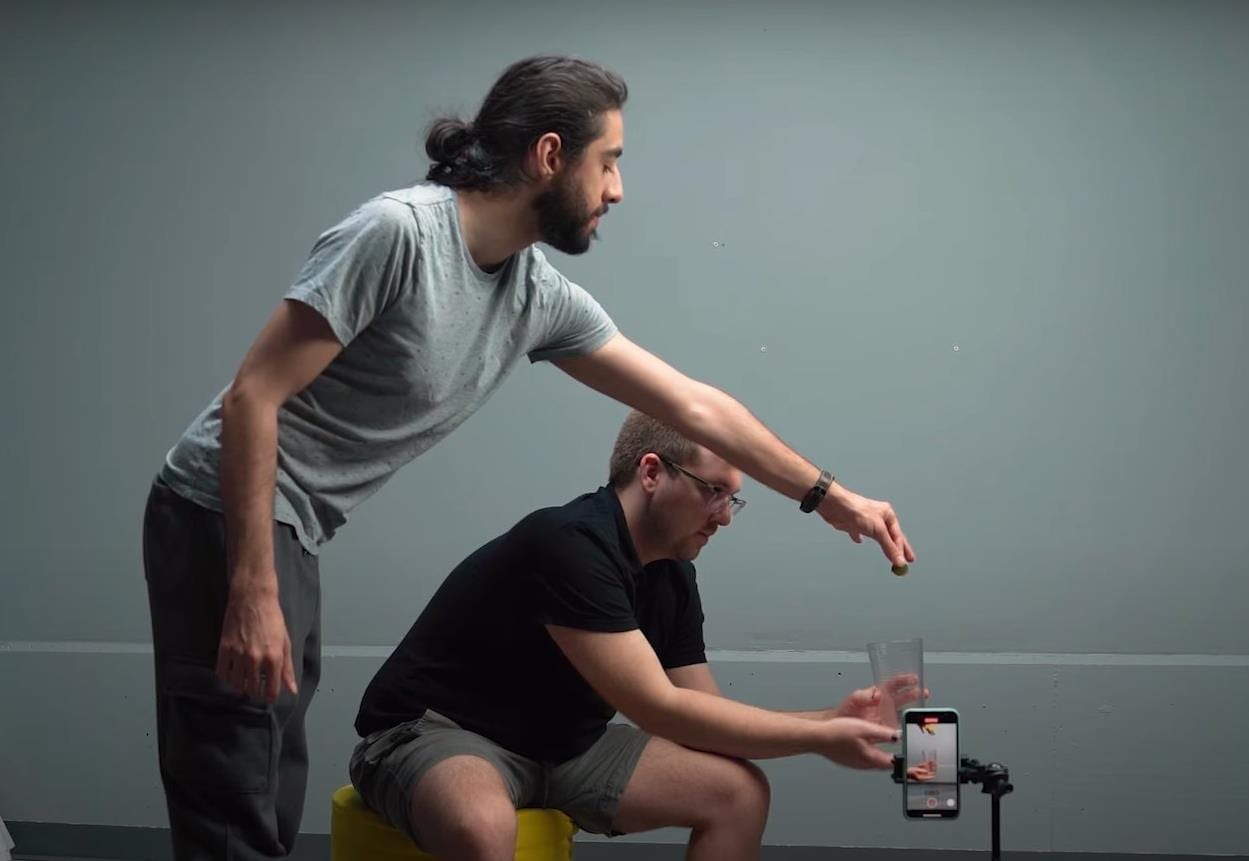
Step4 It would help if you had a second shot for a clean plate of the background. You can record background for 20 seconds.
Part 4: Bring the clips into Filmora 11
Step1 If you have not downloaded Filmora, you can visit filmora.wondershare.com to download Filmora’s new version.
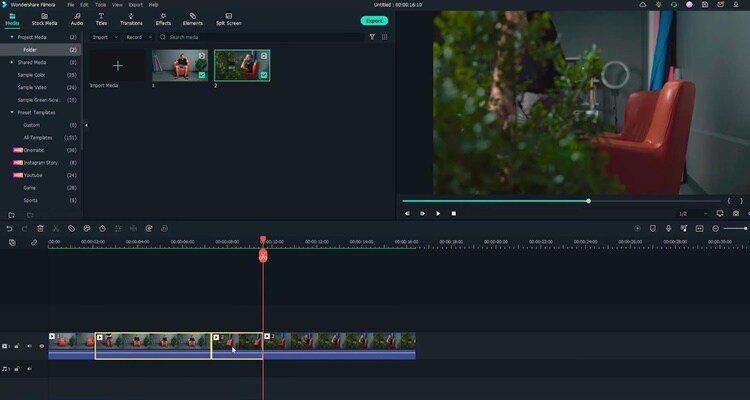
Step2 Drag and drop the clip onto the first track of the timeline.Afterward, move the playhead to the right and find the spot where you tapped the coin last time before your friend drops the other coin. Additionally, make sure it is in the middle of the tapping action and cut.
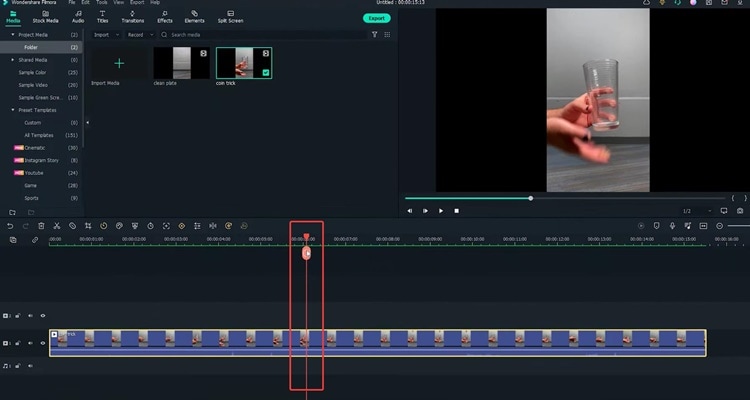
Step3 Then move the playhead to the right and find the spot where your friend drops the coin while you tap without the coin in your hand. Make sure it is in the middle of the tapping action, and the position of your hand roughly matches that in the last cut and make a cut.
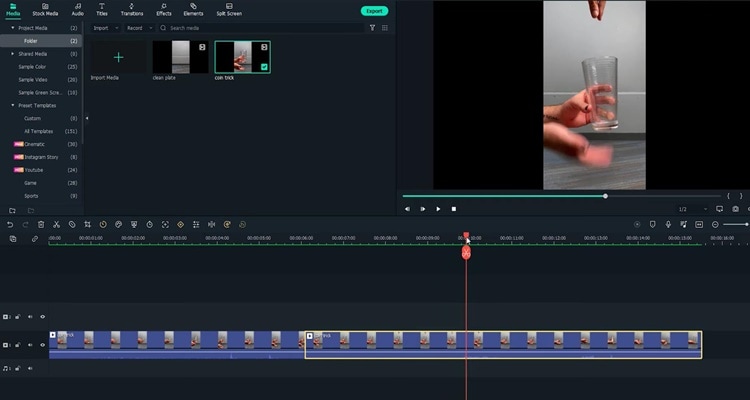
Step4 Now you need to delete the middle part and play it back. Indeed, cutting on action is the key to creating the illusion that the action is continued without editing.
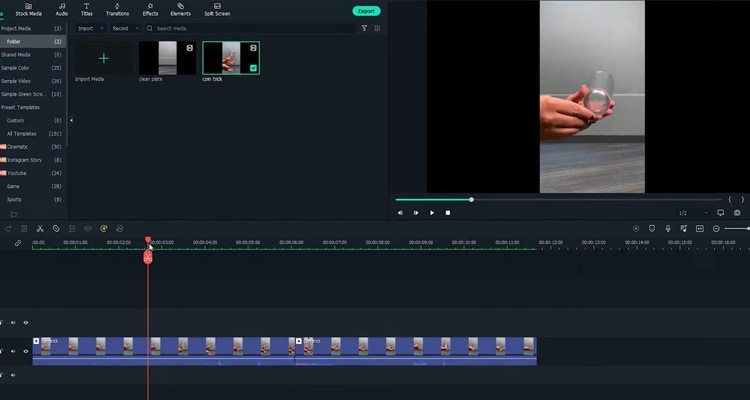
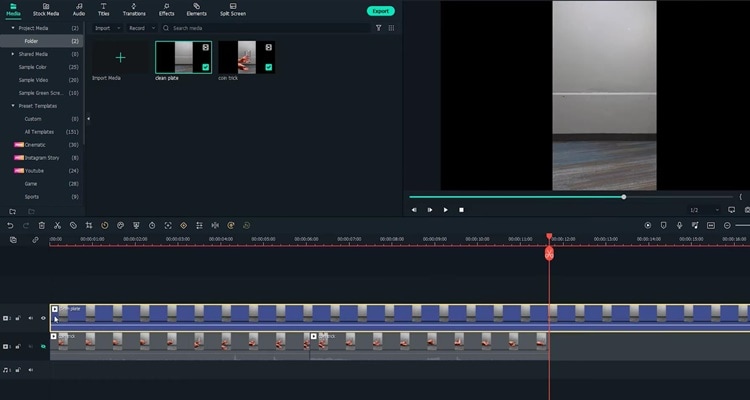
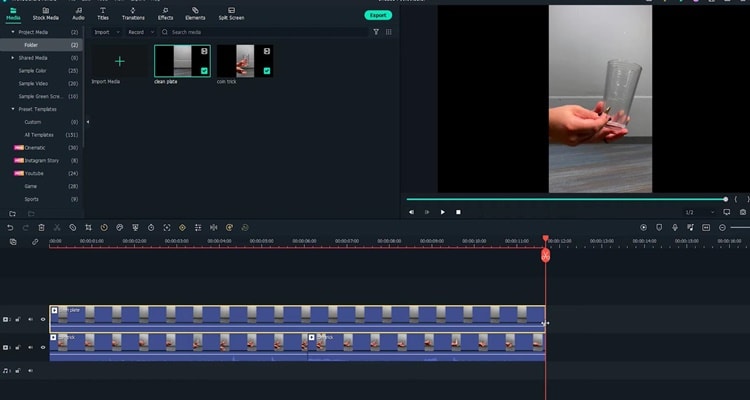
Step5 Next, you must remove your friend’s hand in the frame with the Filmora masking feature. Afterwards. drag and drop the clean plate video onto the second track of the timeline.
Step6 Next, double-click the clip to open the setting video. Find the Mask Section and select the single line.
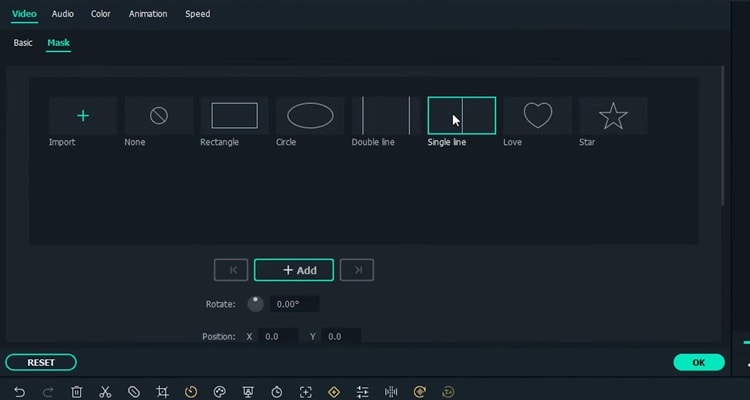
Step7 Here you can see the mask is applied.First, adjust the angle and position of the mask to only show the top part of the frame. Then you have to change the Blur Strength to add more blur to the edge of the mask.
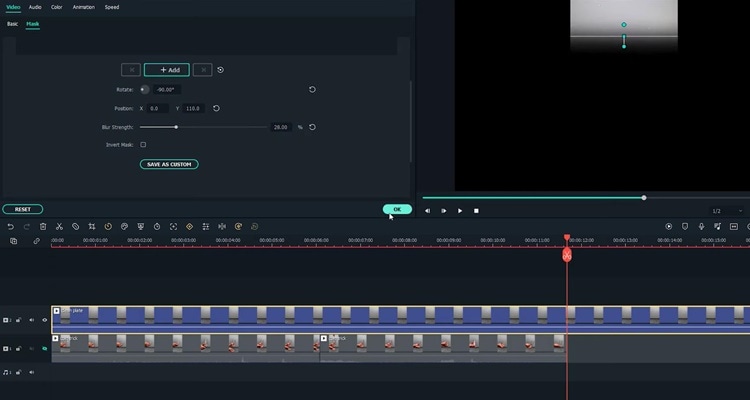
Step8 With the mask finalized, unhide the first video track and adjust the length of the clip on the timeline. Finally, playback the video and see how it looks.
Summary
That’s how to make a coin move through a glass-like MAGIC with the cutting on action editing technique. You can pay close attention to the steps above and follow each step for perfect results.
Free Download For Win 7 or later(64-bit)
Free Download For macOS 10.14 or later
Free Download For macOS 10.14 or later
Top Ever Ways Make Tiktok Slideshow [Solved]
Best Ever Ways Make Tiktok Slideshow [Solved] 2022
An easy yet powerful editor
Numerous effects to choose from
Detailed tutorials provided by the official channel
Tiktok is the most amazing and popular social media platform because it has stunning features. It is used by many people like social media influencer to common man. Tiktok helps the content creator in making them and their content viral. It is used for gaining followers and becoming popular.
In this article
01 [How to Make Tiktok Photo Slideshow Faster](#Part 1)
02 [Five Recommended Tiktok Slideshow Effects](#Part 2)
03 [How to Adjust Sound on Tiktok Slideshow](#Part 3)
04 [FAQ of Making Tiktok Slideshow](#Part 4)
Part 1 How To Make Tiktok Photo Slideshow Faster?
01How can you make fast slideshow of pictures on Tiktok 2022?
Do you want to create fast slideshow of pictures on Tiktok? Here is the step by step process to make a fast slideshow of pictures:
Step 1: Open the Tiktok app
Click on the Tiktok logo in your device to open Tiktok app.

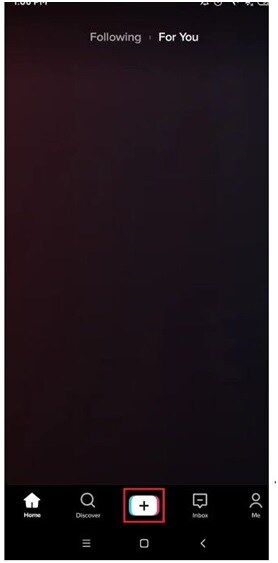
Step 2: Click on plus icon.
Now, you will start seeing the videos from “Following” or “For you” on your Home Screen.
Click on the “+” Plus icon in the bottom of the screen.
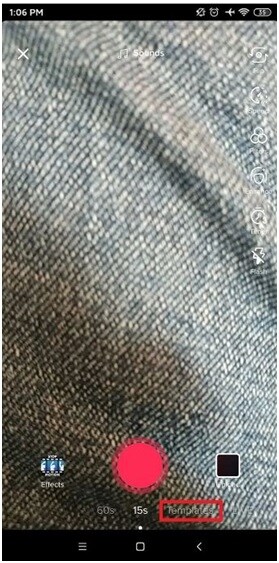
Step 3: Click on templates
On the right side of “Red Shoot Button” you will see template option, click on templates.
Step 4: Select Template
After clicking on the “Template” option, you will see photo and videos from the gallery on your device. Tap on images to select images.
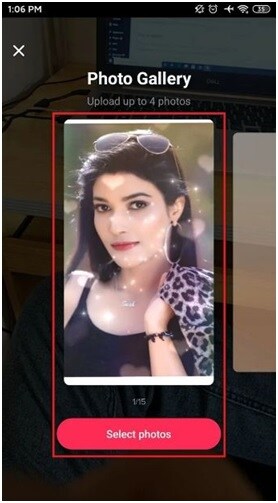
Step 5: Select Images from your gallery
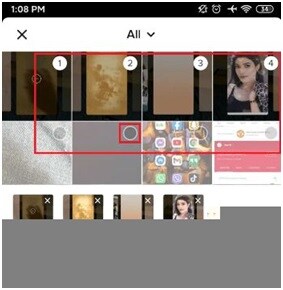
Tap on the “Radio Button” to select images, you can also choose videos if you want.
To explore all the images on your gallery, you can click on the swipe up or drop down menu.
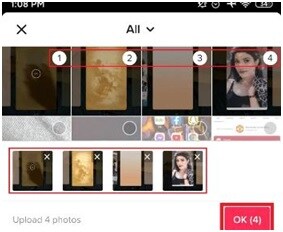
Step 6: Click on OK Button
When you are done selecting all images from the gallery, at the bottom right you see the OK button. To proceed, click on the OK button.
Step 7: Edit the Slideshow Video
Now you can see a slideshow photo video of the images which you have selected. Now, you can edit the video: you can change the sound, add different effects and add text or any stickers to your slideshow video.
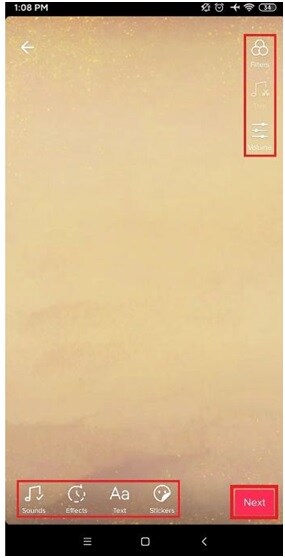
Step 8: Click on Next Button
After completing your photo video slideshow, click on the Next button.
Step 9: Click on the Post button
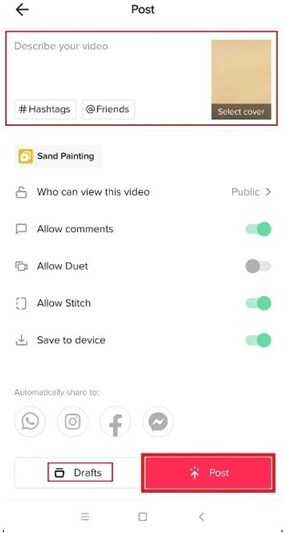
After clicking on the Next button now you will see two options, Drafts and Post button.
● Drafts: If you don’t want to post the video then add #hashtags, mention your friend name and click on the drafts button.
● Posts: If you want to post the video then add #hashtags, mention your friends and click on post button to publish.
Step 10: Done
You have successfully completed making a fast photo video slideshow.
02How can you make tiktok slideshow faster in 2022?
To faster tiktok photo slideshow follow the given steps:
● Go to Play Store or App Store.
● Search for “Video Speed” Application on your device.
● Download any app, from the search list.
● Open the app and select your Tiktok video for editing.
● Edit the video from the instructions which are given on-screen.
● Download it for free on your device.
● Add it on Tiktok to share.
So, these were the given steps from which you can make your photo slideshow faster.
Part 2 Five Recommended Tiktok Slideshow Effects
01Bling Effect on Tiktok
If you use Tiktok actively then you must have seen the Bling Effect as they look glittery and conspicuous. If you are not aware about the Bling effect on Tiktok, it is an effect which gives sparkly look. Bling Effect works better on videos which emit light. Things that emit light are jewellery, LED lights, glasses etc.
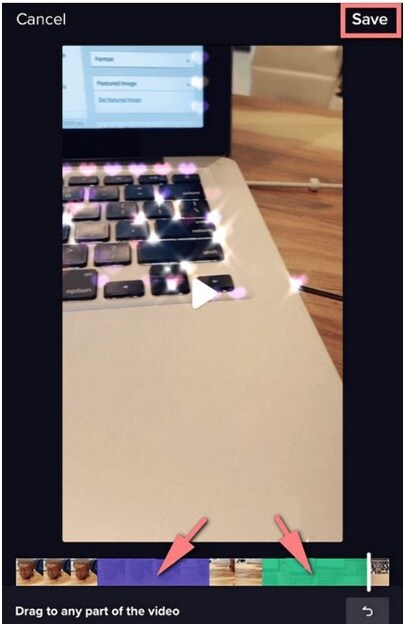
Make sure that your Tiktok is updated with the latest version to get the Bling Effect. Then follow the given steps:
● Open Tiktok on your device and click on the “+” icon to add a new video.
● Click on the “Effects” button at the bottom left side and then open the “Trending” tab of Tiktok effect.
● Keep scrolling until you do not get the Bling effect icon.
● When you get the Bling effect tap to download it, and after that it’s ready to use.
● To add an effect in your favourites, click on the white Bookmark which is given while the Bling effect is alive.
Now, you can use the Bling effect while recording your videos.
02Face Zoom Effect on Tiktok
The Face Zoom Effect is what it sounds like; it’s an effect on Tiktok which is used to automatically zoom the camera on your face. Face Zoom effect can make your videos stand out from other people videos. If you use the Face Zoom effect and hold on to the camera up to your face and pull your phone back slowly, your face will look totally different.
Here are the steps to get the Face Zoom Effect on Tiktok:
● Open the Tiktok on your device.
● Tap on the “+” button on the home screen.
● Then you will see the “Effects” section, click on it.
● In the Effects section you will see various other filters also.
● Keep searching for it and when you get it, select it.
● Now, you can make videos and publish them**.**
03Face Morph Effect on Tiktok
Face Morph Filter is which morphs 2 pictures and make transitions to the pictures at that time. When you use this filter, you can see that it make changes but still you have the same face. Your face remains the same but the transitions look very even and amazing.
Follow the given steps to use the Face Morph Effect:
● Open the Tiktok app on your device.
● Click on the “+” icon at the bottom of the screen.
● Scroll on the right side on the Templates.
● Keep scrolling until you get the Morph Effect.
● Click to select photos.
● Select at least 5 photos from your camera roll.
● Click OK at the bottom right corner
● Now edit and publish your Tiktok.
04 Beauty Effects
Beauty effects are used to beautify your face and changes you into completely different person. If you don’t want to wear makeup just to record one video, in that case you can use this effect. Basically it completely changes your overall appearance.
Steps to follow to use beauty effects:
● Open Tiktok app on your device.
● Click on the “+” button at the bottom- center of the screen.
● Click on the “Effects” section.
● Keep searching for “Beauty Effect” and after that select it.
● Now, you can record your video and publish them.
05Green Effect
Green effects allow you to change the background of any image or you can also add any video to your background of your choice. With the help of Green Screen, users have been able to film their videos wherever they want.
● Open Tiktok application.
● On the bottom center, click on the “+” icon.
● On the bottom left corner, click on “effects”.
● Click on the “Green Screen” from the Effects menu.
● Select Green Screen effect.
● Now you can film videos using Green Screen.
Part 3 How To Adjust Sound On Tiktok Slideshow
Once you have selected the sound, you may need to do some adjustments.
To edit which part of the song you are using:
● Click on the “Trim” button given at the right side of the screen.
● Drag the cursor to adjust which part of the song you want your video to begin at.
● Click on the checkmark to confirm.
To edit the volume of the sound:
● Once you have completed filming your video, in the bottom left corner click on the sounds button.
● Click the “volume” tab and use the cursor to adjust how much loud the sound is compared to the original audio.
● Click on the screen again to confirm.
These were the steps for adjusting sound, the way you want to customize it.
Part 4 FAQ’S of making Tiktok Slideshow
Q1. How can you trim the audio on a Tiktok Sideshow?
A. To trim sound on a Tiktok slideshow, first add a sound to a Tiktok slideshow, click on the ‘Trim” button at the right side of the screen. Then drag the cursor to select which part of the audio you want for your video. Listen to the sound after trimming. If you liked the trimmed song, tap to the next button to add it in your Tiktok slideshow.
Q2. How can you add text to the Tiktok slideshow?
A. Steps to add text to your Tiktok slideshow:
● Open Tiktok app.
● Click on the “+” icon.
● Click on upload.
● Select an image from your gallery.
● Click on the “Next” button.
● Now click on the “Text” to add text.
● After that type the text.
● Choose any font or color of your choice.
● Tap on the “Done “button”.
● Now your video is ready to publish.
Q3. How can we add music to slideshow videos on Tiktok?
A. Yes you can add music to your slideshow video. Before posting it you will find the edit option.
When you select images from your gallery > click next > click on the sound option > choose music from sounds and add it to your slideshow video.
Q4. How many images can you add to a Tiktok slideshow?
A. Select the images to add to the slideshow. You can also add videos to your slideshow from the videos section. Keep in mind that the images you are selecting are in perfect order as you want to see them appear in a slideshow. You can add up to 35 images and videos.
Q5. What are the best recommended slideshow effects on Tiktok?
A. There are a lot of effects on Tiktok but here are some best slideshow effects of Tiktok like Green Screen, Spilt Screen, Face Zoom effect, Bling effect, Trio effect, Beauty effect, Long Face effect, Trisection effect and Face Morph effect.
Tiktok is a great choice for making photo video slideshow but if you want to try something new you can consider using Wondershare Filmora Video Editor . As it have amazing transitions and its own music gallery, it allows you to record your own voiceover. Filmora allows you to make engaging slideshow using different features automatically or manually. It has voice removal, audio mixer, and video stabilization features that add to the output. The 4K editing feature allows you to export the video of resolution of up to 4K.
For Win 7 or later (64-bit)
For macOS 10.12 or later
● Ending Thoughts →
● Tiktok is an amazing and popular social media platform which allows you to create your own content and with the help of this platform your content can reach a wide range of people.
● You can make an attractive photo slideshow with the help of Tiktok because it has amazing features like different effects, and you can also add text and sound to it.
● Tiktok is a great choice but you can also consider an alternate option like, Filmora as you can create your slideshow with its amazing features.
Tiktok is the most amazing and popular social media platform because it has stunning features. It is used by many people like social media influencer to common man. Tiktok helps the content creator in making them and their content viral. It is used for gaining followers and becoming popular.
In this article
01 [How to Make Tiktok Photo Slideshow Faster](#Part 1)
02 [Five Recommended Tiktok Slideshow Effects](#Part 2)
03 [How to Adjust Sound on Tiktok Slideshow](#Part 3)
04 [FAQ of Making Tiktok Slideshow](#Part 4)
Part 1 How To Make Tiktok Photo Slideshow Faster?
01How can you make fast slideshow of pictures on Tiktok 2022?
Do you want to create fast slideshow of pictures on Tiktok? Here is the step by step process to make a fast slideshow of pictures:
Step 1: Open the Tiktok app
Click on the Tiktok logo in your device to open Tiktok app.

Step 2: Click on plus icon.
Now, you will start seeing the videos from “Following” or “For you” on your Home Screen.
Click on the “+” Plus icon in the bottom of the screen.

Step 3: Click on templates
On the right side of “Red Shoot Button” you will see template option, click on templates.

Step 4: Select Template
After clicking on the “Template” option, you will see photo and videos from the gallery on your device. Tap on images to select images.

Step 5: Select Images from your gallery
Tap on the “Radio Button” to select images, you can also choose videos if you want.
To explore all the images on your gallery, you can click on the swipe up or drop down menu.

Step 6: Click on OK Button
When you are done selecting all images from the gallery, at the bottom right you see the OK button. To proceed, click on the OK button.

Step 7: Edit the Slideshow Video
Now you can see a slideshow photo video of the images which you have selected. Now, you can edit the video: you can change the sound, add different effects and add text or any stickers to your slideshow video.

Step 8: Click on Next Button
After completing your photo video slideshow, click on the Next button.
Step 9: Click on the Post button
After clicking on the Next button now you will see two options, Drafts and Post button.
● Drafts: If you don’t want to post the video then add #hashtags, mention your friend name and click on the drafts button.
● Posts: If you want to post the video then add #hashtags, mention your friends and click on post button to publish.

Step 10: Done
You have successfully completed making a fast photo video slideshow.
02How can you make tiktok slideshow faster in 2022?
To faster tiktok photo slideshow follow the given steps:
● Go to Play Store or App Store.
● Search for “Video Speed” Application on your device.
● Download any app, from the search list.
● Open the app and select your Tiktok video for editing.
● Edit the video from the instructions which are given on-screen.
● Download it for free on your device.
● Add it on Tiktok to share.
So, these were the given steps from which you can make your photo slideshow faster.
Part 2 Five Recommended Tiktok Slideshow Effects
01Bling Effect on Tiktok
If you use Tiktok actively then you must have seen the Bling Effect as they look glittery and conspicuous. If you are not aware about the Bling effect on Tiktok, it is an effect which gives sparkly look. Bling Effect works better on videos which emit light. Things that emit light are jewellery, LED lights, glasses etc.

Make sure that your Tiktok is updated with the latest version to get the Bling Effect. Then follow the given steps:
● Open Tiktok on your device and click on the “+” icon to add a new video.
● Click on the “Effects” button at the bottom left side and then open the “Trending” tab of Tiktok effect.
● Keep scrolling until you do not get the Bling effect icon.
● When you get the Bling effect tap to download it, and after that it’s ready to use.
● To add an effect in your favourites, click on the white Bookmark which is given while the Bling effect is alive.
Now, you can use the Bling effect while recording your videos.
02Face Zoom Effect on Tiktok
The Face Zoom Effect is what it sounds like; it’s an effect on Tiktok which is used to automatically zoom the camera on your face. Face Zoom effect can make your videos stand out from other people videos. If you use the Face Zoom effect and hold on to the camera up to your face and pull your phone back slowly, your face will look totally different.
Here are the steps to get the Face Zoom Effect on Tiktok:
● Open the Tiktok on your device.
● Tap on the “+” button on the home screen.
● Then you will see the “Effects” section, click on it.
● In the Effects section you will see various other filters also.
● Keep searching for it and when you get it, select it.
● Now, you can make videos and publish them**.**
03Face Morph Effect on Tiktok
Face Morph Filter is which morphs 2 pictures and make transitions to the pictures at that time. When you use this filter, you can see that it make changes but still you have the same face. Your face remains the same but the transitions look very even and amazing.
Follow the given steps to use the Face Morph Effect:
● Open the Tiktok app on your device.
● Click on the “+” icon at the bottom of the screen.
● Scroll on the right side on the Templates.
● Keep scrolling until you get the Morph Effect.
● Click to select photos.
● Select at least 5 photos from your camera roll.
● Click OK at the bottom right corner
● Now edit and publish your Tiktok.
04 Beauty Effects
Beauty effects are used to beautify your face and changes you into completely different person. If you don’t want to wear makeup just to record one video, in that case you can use this effect. Basically it completely changes your overall appearance.
Steps to follow to use beauty effects:
● Open Tiktok app on your device.
● Click on the “+” button at the bottom- center of the screen.
● Click on the “Effects” section.
● Keep searching for “Beauty Effect” and after that select it.
● Now, you can record your video and publish them.
05Green Effect
Green effects allow you to change the background of any image or you can also add any video to your background of your choice. With the help of Green Screen, users have been able to film their videos wherever they want.
● Open Tiktok application.
● On the bottom center, click on the “+” icon.
● On the bottom left corner, click on “effects”.
● Click on the “Green Screen” from the Effects menu.
● Select Green Screen effect.
● Now you can film videos using Green Screen.
Part 3 How To Adjust Sound On Tiktok Slideshow
Once you have selected the sound, you may need to do some adjustments.
To edit which part of the song you are using:
● Click on the “Trim” button given at the right side of the screen.
● Drag the cursor to adjust which part of the song you want your video to begin at.
● Click on the checkmark to confirm.
To edit the volume of the sound:
● Once you have completed filming your video, in the bottom left corner click on the sounds button.
● Click the “volume” tab and use the cursor to adjust how much loud the sound is compared to the original audio.
● Click on the screen again to confirm.
These were the steps for adjusting sound, the way you want to customize it.
Part 4 FAQ’S of making Tiktok Slideshow
Q1. How can you trim the audio on a Tiktok Sideshow?
A. To trim sound on a Tiktok slideshow, first add a sound to a Tiktok slideshow, click on the ‘Trim” button at the right side of the screen. Then drag the cursor to select which part of the audio you want for your video. Listen to the sound after trimming. If you liked the trimmed song, tap to the next button to add it in your Tiktok slideshow.
Q2. How can you add text to the Tiktok slideshow?
A. Steps to add text to your Tiktok slideshow:
● Open Tiktok app.
● Click on the “+” icon.
● Click on upload.
● Select an image from your gallery.
● Click on the “Next” button.
● Now click on the “Text” to add text.
● After that type the text.
● Choose any font or color of your choice.
● Tap on the “Done “button”.
● Now your video is ready to publish.
Q3. How can we add music to slideshow videos on Tiktok?
A. Yes you can add music to your slideshow video. Before posting it you will find the edit option.
When you select images from your gallery > click next > click on the sound option > choose music from sounds and add it to your slideshow video.
Q4. How many images can you add to a Tiktok slideshow?
A. Select the images to add to the slideshow. You can also add videos to your slideshow from the videos section. Keep in mind that the images you are selecting are in perfect order as you want to see them appear in a slideshow. You can add up to 35 images and videos.
Q5. What are the best recommended slideshow effects on Tiktok?
A. There are a lot of effects on Tiktok but here are some best slideshow effects of Tiktok like Green Screen, Spilt Screen, Face Zoom effect, Bling effect, Trio effect, Beauty effect, Long Face effect, Trisection effect and Face Morph effect.
Tiktok is a great choice for making photo video slideshow but if you want to try something new you can consider using Wondershare Filmora Video Editor . As it have amazing transitions and its own music gallery, it allows you to record your own voiceover. Filmora allows you to make engaging slideshow using different features automatically or manually. It has voice removal, audio mixer, and video stabilization features that add to the output. The 4K editing feature allows you to export the video of resolution of up to 4K.
For Win 7 or later (64-bit)
For macOS 10.12 or later
● Ending Thoughts →
● Tiktok is an amazing and popular social media platform which allows you to create your own content and with the help of this platform your content can reach a wide range of people.
● You can make an attractive photo slideshow with the help of Tiktok because it has amazing features like different effects, and you can also add text and sound to it.
● Tiktok is a great choice but you can also consider an alternate option like, Filmora as you can create your slideshow with its amazing features.
Tiktok is the most amazing and popular social media platform because it has stunning features. It is used by many people like social media influencer to common man. Tiktok helps the content creator in making them and their content viral. It is used for gaining followers and becoming popular.
In this article
01 [How to Make Tiktok Photo Slideshow Faster](#Part 1)
02 [Five Recommended Tiktok Slideshow Effects](#Part 2)
03 [How to Adjust Sound on Tiktok Slideshow](#Part 3)
04 [FAQ of Making Tiktok Slideshow](#Part 4)
Part 1 How To Make Tiktok Photo Slideshow Faster?
01How can you make fast slideshow of pictures on Tiktok 2022?
Do you want to create fast slideshow of pictures on Tiktok? Here is the step by step process to make a fast slideshow of pictures:
Step 1: Open the Tiktok app
Click on the Tiktok logo in your device to open Tiktok app.

Step 2: Click on plus icon.
Now, you will start seeing the videos from “Following” or “For you” on your Home Screen.
Click on the “+” Plus icon in the bottom of the screen.

Step 3: Click on templates
On the right side of “Red Shoot Button” you will see template option, click on templates.

Step 4: Select Template
After clicking on the “Template” option, you will see photo and videos from the gallery on your device. Tap on images to select images.

Step 5: Select Images from your gallery
Tap on the “Radio Button” to select images, you can also choose videos if you want.
To explore all the images on your gallery, you can click on the swipe up or drop down menu.

Step 6: Click on OK Button
When you are done selecting all images from the gallery, at the bottom right you see the OK button. To proceed, click on the OK button.

Step 7: Edit the Slideshow Video
Now you can see a slideshow photo video of the images which you have selected. Now, you can edit the video: you can change the sound, add different effects and add text or any stickers to your slideshow video.

Step 8: Click on Next Button
After completing your photo video slideshow, click on the Next button.
Step 9: Click on the Post button
After clicking on the Next button now you will see two options, Drafts and Post button.
● Drafts: If you don’t want to post the video then add #hashtags, mention your friend name and click on the drafts button.
● Posts: If you want to post the video then add #hashtags, mention your friends and click on post button to publish.

Step 10: Done
You have successfully completed making a fast photo video slideshow.
02How can you make tiktok slideshow faster in 2022?
To faster tiktok photo slideshow follow the given steps:
● Go to Play Store or App Store.
● Search for “Video Speed” Application on your device.
● Download any app, from the search list.
● Open the app and select your Tiktok video for editing.
● Edit the video from the instructions which are given on-screen.
● Download it for free on your device.
● Add it on Tiktok to share.
So, these were the given steps from which you can make your photo slideshow faster.
Part 2 Five Recommended Tiktok Slideshow Effects
01Bling Effect on Tiktok
If you use Tiktok actively then you must have seen the Bling Effect as they look glittery and conspicuous. If you are not aware about the Bling effect on Tiktok, it is an effect which gives sparkly look. Bling Effect works better on videos which emit light. Things that emit light are jewellery, LED lights, glasses etc.

Make sure that your Tiktok is updated with the latest version to get the Bling Effect. Then follow the given steps:
● Open Tiktok on your device and click on the “+” icon to add a new video.
● Click on the “Effects” button at the bottom left side and then open the “Trending” tab of Tiktok effect.
● Keep scrolling until you do not get the Bling effect icon.
● When you get the Bling effect tap to download it, and after that it’s ready to use.
● To add an effect in your favourites, click on the white Bookmark which is given while the Bling effect is alive.
Now, you can use the Bling effect while recording your videos.
02Face Zoom Effect on Tiktok
The Face Zoom Effect is what it sounds like; it’s an effect on Tiktok which is used to automatically zoom the camera on your face. Face Zoom effect can make your videos stand out from other people videos. If you use the Face Zoom effect and hold on to the camera up to your face and pull your phone back slowly, your face will look totally different.
Here are the steps to get the Face Zoom Effect on Tiktok:
● Open the Tiktok on your device.
● Tap on the “+” button on the home screen.
● Then you will see the “Effects” section, click on it.
● In the Effects section you will see various other filters also.
● Keep searching for it and when you get it, select it.
● Now, you can make videos and publish them**.**
03Face Morph Effect on Tiktok
Face Morph Filter is which morphs 2 pictures and make transitions to the pictures at that time. When you use this filter, you can see that it make changes but still you have the same face. Your face remains the same but the transitions look very even and amazing.
Follow the given steps to use the Face Morph Effect:
● Open the Tiktok app on your device.
● Click on the “+” icon at the bottom of the screen.
● Scroll on the right side on the Templates.
● Keep scrolling until you get the Morph Effect.
● Click to select photos.
● Select at least 5 photos from your camera roll.
● Click OK at the bottom right corner
● Now edit and publish your Tiktok.
04 Beauty Effects
Beauty effects are used to beautify your face and changes you into completely different person. If you don’t want to wear makeup just to record one video, in that case you can use this effect. Basically it completely changes your overall appearance.
Steps to follow to use beauty effects:
● Open Tiktok app on your device.
● Click on the “+” button at the bottom- center of the screen.
● Click on the “Effects” section.
● Keep searching for “Beauty Effect” and after that select it.
● Now, you can record your video and publish them.
05Green Effect
Green effects allow you to change the background of any image or you can also add any video to your background of your choice. With the help of Green Screen, users have been able to film their videos wherever they want.
● Open Tiktok application.
● On the bottom center, click on the “+” icon.
● On the bottom left corner, click on “effects”.
● Click on the “Green Screen” from the Effects menu.
● Select Green Screen effect.
● Now you can film videos using Green Screen.
Part 3 How To Adjust Sound On Tiktok Slideshow
Once you have selected the sound, you may need to do some adjustments.
To edit which part of the song you are using:
● Click on the “Trim” button given at the right side of the screen.
● Drag the cursor to adjust which part of the song you want your video to begin at.
● Click on the checkmark to confirm.
To edit the volume of the sound:
● Once you have completed filming your video, in the bottom left corner click on the sounds button.
● Click the “volume” tab and use the cursor to adjust how much loud the sound is compared to the original audio.
● Click on the screen again to confirm.
These were the steps for adjusting sound, the way you want to customize it.
Part 4 FAQ’S of making Tiktok Slideshow
Q1. How can you trim the audio on a Tiktok Sideshow?
A. To trim sound on a Tiktok slideshow, first add a sound to a Tiktok slideshow, click on the ‘Trim” button at the right side of the screen. Then drag the cursor to select which part of the audio you want for your video. Listen to the sound after trimming. If you liked the trimmed song, tap to the next button to add it in your Tiktok slideshow.
Q2. How can you add text to the Tiktok slideshow?
A. Steps to add text to your Tiktok slideshow:
● Open Tiktok app.
● Click on the “+” icon.
● Click on upload.
● Select an image from your gallery.
● Click on the “Next” button.
● Now click on the “Text” to add text.
● After that type the text.
● Choose any font or color of your choice.
● Tap on the “Done “button”.
● Now your video is ready to publish.
Q3. How can we add music to slideshow videos on Tiktok?
A. Yes you can add music to your slideshow video. Before posting it you will find the edit option.
When you select images from your gallery > click next > click on the sound option > choose music from sounds and add it to your slideshow video.
Q4. How many images can you add to a Tiktok slideshow?
A. Select the images to add to the slideshow. You can also add videos to your slideshow from the videos section. Keep in mind that the images you are selecting are in perfect order as you want to see them appear in a slideshow. You can add up to 35 images and videos.
Q5. What are the best recommended slideshow effects on Tiktok?
A. There are a lot of effects on Tiktok but here are some best slideshow effects of Tiktok like Green Screen, Spilt Screen, Face Zoom effect, Bling effect, Trio effect, Beauty effect, Long Face effect, Trisection effect and Face Morph effect.
Tiktok is a great choice for making photo video slideshow but if you want to try something new you can consider using Wondershare Filmora Video Editor . As it have amazing transitions and its own music gallery, it allows you to record your own voiceover. Filmora allows you to make engaging slideshow using different features automatically or manually. It has voice removal, audio mixer, and video stabilization features that add to the output. The 4K editing feature allows you to export the video of resolution of up to 4K.
For Win 7 or later (64-bit)
For macOS 10.12 or later
● Ending Thoughts →
● Tiktok is an amazing and popular social media platform which allows you to create your own content and with the help of this platform your content can reach a wide range of people.
● You can make an attractive photo slideshow with the help of Tiktok because it has amazing features like different effects, and you can also add text and sound to it.
● Tiktok is a great choice but you can also consider an alternate option like, Filmora as you can create your slideshow with its amazing features.
Tiktok is the most amazing and popular social media platform because it has stunning features. It is used by many people like social media influencer to common man. Tiktok helps the content creator in making them and their content viral. It is used for gaining followers and becoming popular.
In this article
01 [How to Make Tiktok Photo Slideshow Faster](#Part 1)
02 [Five Recommended Tiktok Slideshow Effects](#Part 2)
03 [How to Adjust Sound on Tiktok Slideshow](#Part 3)
04 [FAQ of Making Tiktok Slideshow](#Part 4)
Part 1 How To Make Tiktok Photo Slideshow Faster?
01How can you make fast slideshow of pictures on Tiktok 2022?
Do you want to create fast slideshow of pictures on Tiktok? Here is the step by step process to make a fast slideshow of pictures:
Step 1: Open the Tiktok app
Click on the Tiktok logo in your device to open Tiktok app.

Step 2: Click on plus icon.
Now, you will start seeing the videos from “Following” or “For you” on your Home Screen.
Click on the “+” Plus icon in the bottom of the screen.

Step 3: Click on templates
On the right side of “Red Shoot Button” you will see template option, click on templates.

Step 4: Select Template
After clicking on the “Template” option, you will see photo and videos from the gallery on your device. Tap on images to select images.

Step 5: Select Images from your gallery
Tap on the “Radio Button” to select images, you can also choose videos if you want.
To explore all the images on your gallery, you can click on the swipe up or drop down menu.

Step 6: Click on OK Button
When you are done selecting all images from the gallery, at the bottom right you see the OK button. To proceed, click on the OK button.

Step 7: Edit the Slideshow Video
Now you can see a slideshow photo video of the images which you have selected. Now, you can edit the video: you can change the sound, add different effects and add text or any stickers to your slideshow video.

Step 8: Click on Next Button
After completing your photo video slideshow, click on the Next button.
Step 9: Click on the Post button
After clicking on the Next button now you will see two options, Drafts and Post button.
● Drafts: If you don’t want to post the video then add #hashtags, mention your friend name and click on the drafts button.
● Posts: If you want to post the video then add #hashtags, mention your friends and click on post button to publish.

Step 10: Done
You have successfully completed making a fast photo video slideshow.
02How can you make tiktok slideshow faster in 2022?
To faster tiktok photo slideshow follow the given steps:
● Go to Play Store or App Store.
● Search for “Video Speed” Application on your device.
● Download any app, from the search list.
● Open the app and select your Tiktok video for editing.
● Edit the video from the instructions which are given on-screen.
● Download it for free on your device.
● Add it on Tiktok to share.
So, these were the given steps from which you can make your photo slideshow faster.
Part 2 Five Recommended Tiktok Slideshow Effects
01Bling Effect on Tiktok
If you use Tiktok actively then you must have seen the Bling Effect as they look glittery and conspicuous. If you are not aware about the Bling effect on Tiktok, it is an effect which gives sparkly look. Bling Effect works better on videos which emit light. Things that emit light are jewellery, LED lights, glasses etc.

Make sure that your Tiktok is updated with the latest version to get the Bling Effect. Then follow the given steps:
● Open Tiktok on your device and click on the “+” icon to add a new video.
● Click on the “Effects” button at the bottom left side and then open the “Trending” tab of Tiktok effect.
● Keep scrolling until you do not get the Bling effect icon.
● When you get the Bling effect tap to download it, and after that it’s ready to use.
● To add an effect in your favourites, click on the white Bookmark which is given while the Bling effect is alive.
Now, you can use the Bling effect while recording your videos.
02Face Zoom Effect on Tiktok
The Face Zoom Effect is what it sounds like; it’s an effect on Tiktok which is used to automatically zoom the camera on your face. Face Zoom effect can make your videos stand out from other people videos. If you use the Face Zoom effect and hold on to the camera up to your face and pull your phone back slowly, your face will look totally different.
Here are the steps to get the Face Zoom Effect on Tiktok:
● Open the Tiktok on your device.
● Tap on the “+” button on the home screen.
● Then you will see the “Effects” section, click on it.
● In the Effects section you will see various other filters also.
● Keep searching for it and when you get it, select it.
● Now, you can make videos and publish them**.**
03Face Morph Effect on Tiktok
Face Morph Filter is which morphs 2 pictures and make transitions to the pictures at that time. When you use this filter, you can see that it make changes but still you have the same face. Your face remains the same but the transitions look very even and amazing.
Follow the given steps to use the Face Morph Effect:
● Open the Tiktok app on your device.
● Click on the “+” icon at the bottom of the screen.
● Scroll on the right side on the Templates.
● Keep scrolling until you get the Morph Effect.
● Click to select photos.
● Select at least 5 photos from your camera roll.
● Click OK at the bottom right corner
● Now edit and publish your Tiktok.
04 Beauty Effects
Beauty effects are used to beautify your face and changes you into completely different person. If you don’t want to wear makeup just to record one video, in that case you can use this effect. Basically it completely changes your overall appearance.
Steps to follow to use beauty effects:
● Open Tiktok app on your device.
● Click on the “+” button at the bottom- center of the screen.
● Click on the “Effects” section.
● Keep searching for “Beauty Effect” and after that select it.
● Now, you can record your video and publish them.
05Green Effect
Green effects allow you to change the background of any image or you can also add any video to your background of your choice. With the help of Green Screen, users have been able to film their videos wherever they want.
● Open Tiktok application.
● On the bottom center, click on the “+” icon.
● On the bottom left corner, click on “effects”.
● Click on the “Green Screen” from the Effects menu.
● Select Green Screen effect.
● Now you can film videos using Green Screen.
Part 3 How To Adjust Sound On Tiktok Slideshow
Once you have selected the sound, you may need to do some adjustments.
To edit which part of the song you are using:
● Click on the “Trim” button given at the right side of the screen.
● Drag the cursor to adjust which part of the song you want your video to begin at.
● Click on the checkmark to confirm.
To edit the volume of the sound:
● Once you have completed filming your video, in the bottom left corner click on the sounds button.
● Click the “volume” tab and use the cursor to adjust how much loud the sound is compared to the original audio.
● Click on the screen again to confirm.
These were the steps for adjusting sound, the way you want to customize it.
Part 4 FAQ’S of making Tiktok Slideshow
Q1. How can you trim the audio on a Tiktok Sideshow?
A. To trim sound on a Tiktok slideshow, first add a sound to a Tiktok slideshow, click on the ‘Trim” button at the right side of the screen. Then drag the cursor to select which part of the audio you want for your video. Listen to the sound after trimming. If you liked the trimmed song, tap to the next button to add it in your Tiktok slideshow.
Q2. How can you add text to the Tiktok slideshow?
A. Steps to add text to your Tiktok slideshow:
● Open Tiktok app.
● Click on the “+” icon.
● Click on upload.
● Select an image from your gallery.
● Click on the “Next” button.
● Now click on the “Text” to add text.
● After that type the text.
● Choose any font or color of your choice.
● Tap on the “Done “button”.
● Now your video is ready to publish.
Q3. How can we add music to slideshow videos on Tiktok?
A. Yes you can add music to your slideshow video. Before posting it you will find the edit option.
When you select images from your gallery > click next > click on the sound option > choose music from sounds and add it to your slideshow video.
Q4. How many images can you add to a Tiktok slideshow?
A. Select the images to add to the slideshow. You can also add videos to your slideshow from the videos section. Keep in mind that the images you are selecting are in perfect order as you want to see them appear in a slideshow. You can add up to 35 images and videos.
Q5. What are the best recommended slideshow effects on Tiktok?
A. There are a lot of effects on Tiktok but here are some best slideshow effects of Tiktok like Green Screen, Spilt Screen, Face Zoom effect, Bling effect, Trio effect, Beauty effect, Long Face effect, Trisection effect and Face Morph effect.
Tiktok is a great choice for making photo video slideshow but if you want to try something new you can consider using Wondershare Filmora Video Editor . As it have amazing transitions and its own music gallery, it allows you to record your own voiceover. Filmora allows you to make engaging slideshow using different features automatically or manually. It has voice removal, audio mixer, and video stabilization features that add to the output. The 4K editing feature allows you to export the video of resolution of up to 4K.
For Win 7 or later (64-bit)
For macOS 10.12 or later
● Ending Thoughts →
● Tiktok is an amazing and popular social media platform which allows you to create your own content and with the help of this platform your content can reach a wide range of people.
● You can make an attractive photo slideshow with the help of Tiktok because it has amazing features like different effects, and you can also add text and sound to it.
● Tiktok is a great choice but you can also consider an alternate option like, Filmora as you can create your slideshow with its amazing features.
How to Create a Special Animated Transition in Filmora in Just 2 Minutes. This Simple Step-by-Step Guide Will Show You the Easy Way
Preparation
What you need to prepare:
- A computer (Windows or macOS)
- Your video materials.
- Filmora video editor
Step 1
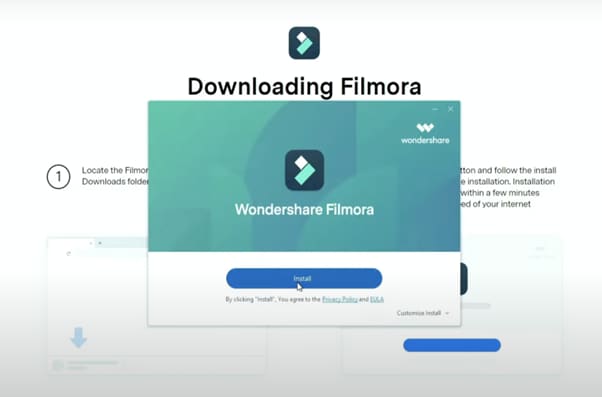
First off, download the Filmora video editor . After it downloads, click install and follow the provided steps.
Step 2
After installing, the editor will start automatically. When it does, click on the “New Project” button to finally open the editor.

Step 3
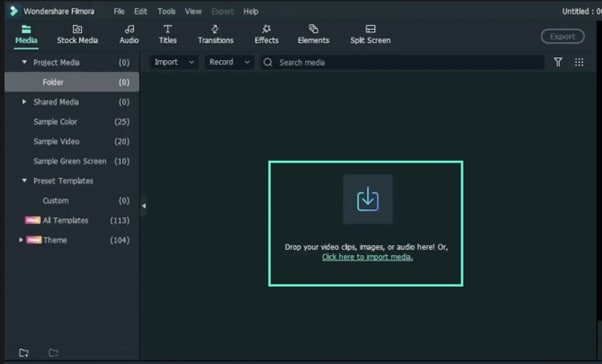
From the upper-left side of the screen, click the highlighted text to import media. This is where you insert your video files into the editor. Once the folder opens, select the videos you want to import and click “Open”.
Step 4
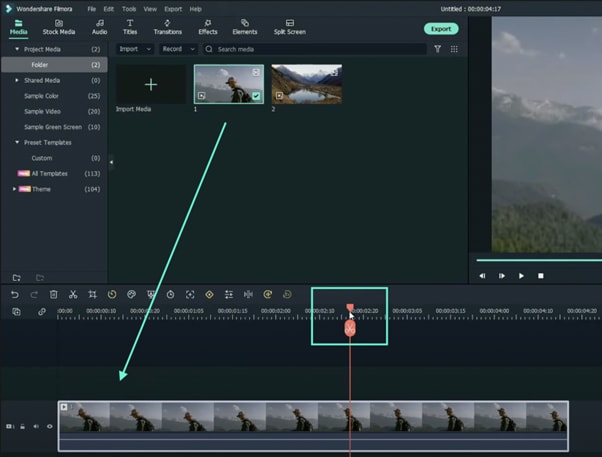
Drag your first clip to the timeline. Then, move the Playhead to where you want to start your transition.
Step 5
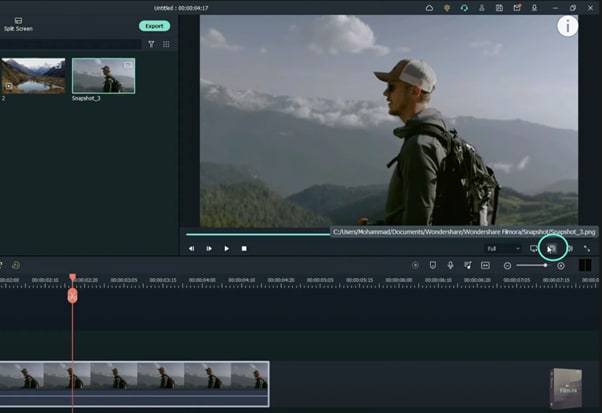
Take a snapshot of this frame.
Step 6
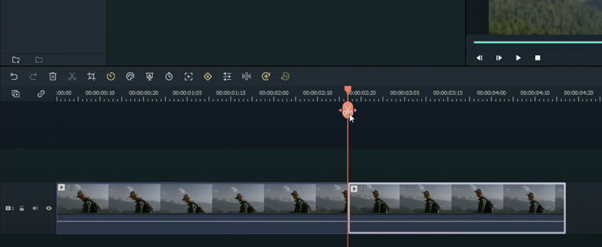
Split the footage and delete the part on the right side of the Playhead.
Step 7
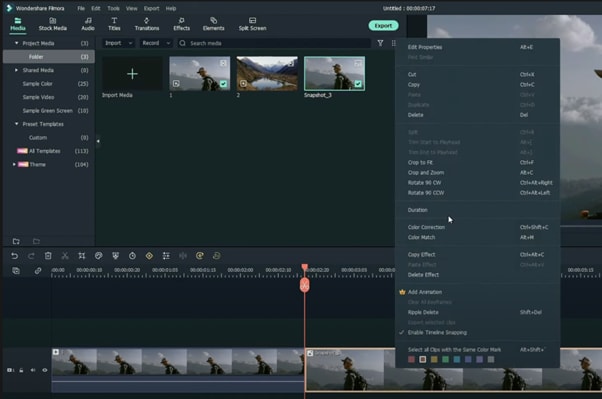
Without moving the Playhead, simply drag the snapshot you took earlier. Right-click on the snapshot in the timeline and click on “Duration”. Then, set the duration to 1 second. Finally, click “OK”.
Step 8
Open your browser and go to the Picsart photo effects editor . Upload the same snapshot we made in Filmora and apply the “Comic” preset on it. Then, download the photo and import it back into Filmora.
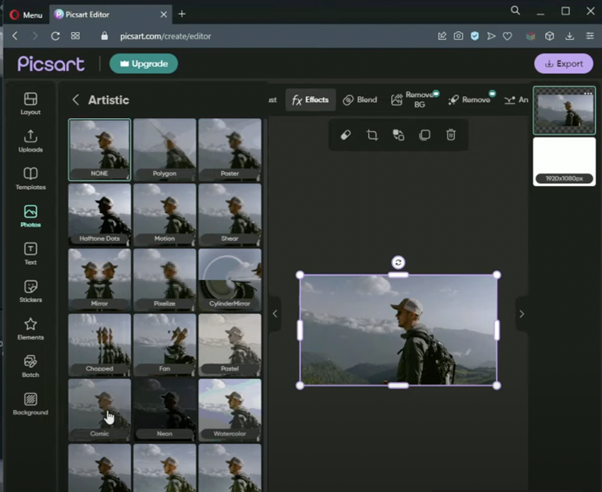
Step 9
Drag the snapshot with the Comic preset to the Timeline and set its duration to 1 second as well.
Step 10
Repeat the same process with the second clip. Take a snapshot, add the Comic effect, and import it back into Filmora. But this time, align the clips as follows: Add the snapshot with the comic preset first, then the snapshot without any effects, and then the video. It should look like this.

Step 11
Go to the Transitions tab and drag the “Color Distance” transition between the first and second snapshot on your Timeline. Then, right-click on the transition box in the timeline and select “Edit Properties”. From there, change the duration of the transition to 1 second and click “OK”.
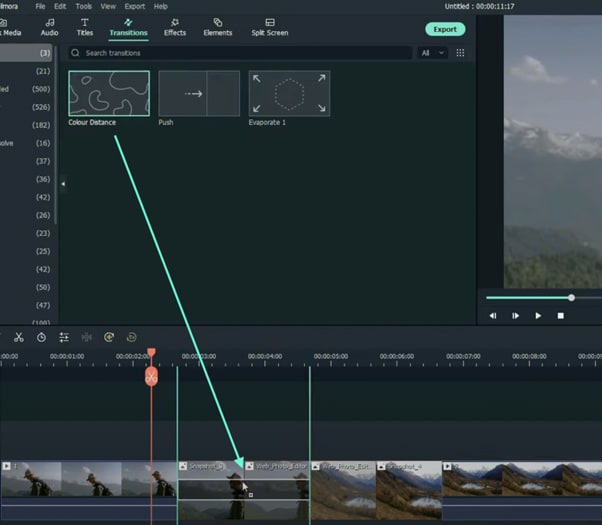
Step 12
Drag the “Push” transition between the next two snapshots. Set its duration to 1 second as well by right clicking the transition and going to “Edit Properties”.
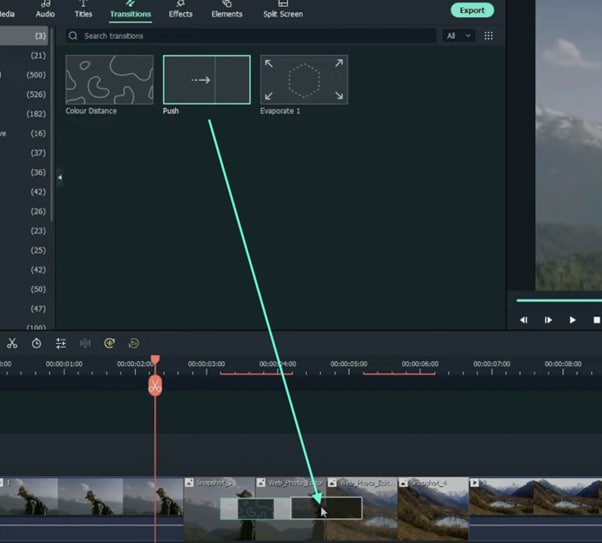
Step 13
Place the last transition between the last two snapshots in your timeline. This time, we’re going to use the “Evaporate” transition. Set its duration to 1 second as well.
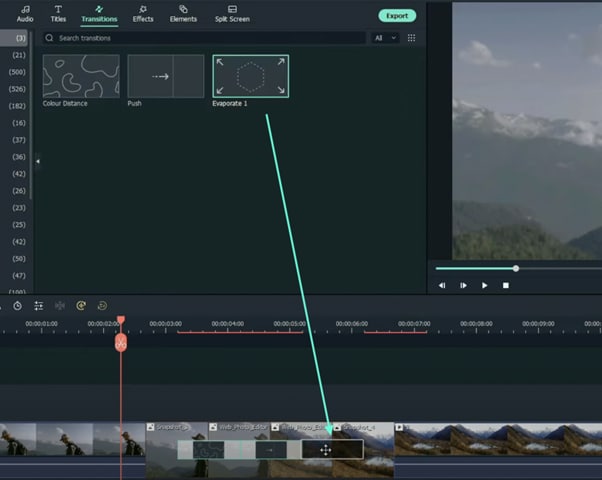
Step 14
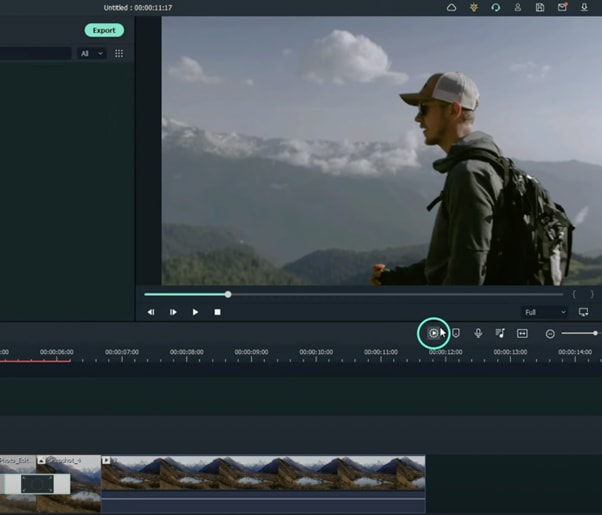
The final step is to render the video. Click this button and you will finally be done.
Summary
What you’ve learned:
- How to add any type of transition to video clips and images in Filmora
- How to take quick snapshots of any frame in Filmora
- A quick way to Render videos and watch the final preview
- Add custom effects to images
What you need to prepare:
- A computer (Windows or macOS)
- Your video materials.
- Filmora video editor
Step 1
First off, download the Filmora video editor . After it downloads, click install and follow the provided steps.

Step 2
After installing, the editor will start automatically. When it does, click on the “New Project” button to finally open the editor.

Step 3
From the upper-left side of the screen, click the highlighted text to import media. This is where you insert your video files into the editor. Once the folder opens, select the videos you want to import and click “Open”.

Step 4
Drag your first clip to the timeline. Then, move the Playhead to where you want to start your transition.

Step 5
Take a snapshot of this frame.

Step 6
Split the footage and delete the part on the right side of the Playhead.

Step 7
Without moving the Playhead, simply drag the snapshot you took earlier. Right-click on the snapshot in the timeline and click on “Duration”. Then, set the duration to 1 second. Finally, click “OK”.

Step 8
Open your browser and go to the Picsart photo effects editor . Upload the same snapshot we made in Filmora and apply the “Comic” preset on it. Then, download the photo and import it back into Filmora.

Step 9
Drag the snapshot with the Comic preset to the Timeline and set its duration to 1 second as well.
Step 10
Repeat the same process with the second clip. Take a snapshot, add the Comic effect, and import it back into Filmora. But this time, align the clips as follows: Add the snapshot with the comic preset first, then the snapshot without any effects, and then the video. It should look like this.

Step 11
Go to the Transitions tab and drag the “Color Distance” transition between the first and second snapshot on your Timeline. Then, right-click on the transition box in the timeline and select “Edit Properties”. From there, change the duration of the transition to 1 second and click “OK”.

Step 12
Drag the “Push” transition between the next two snapshots. Set its duration to 1 second as well by right clicking the transition and going to “Edit Properties”.

Step 13
Place the last transition between the last two snapshots in your timeline. This time, we’re going to use the “Evaporate” transition. Set its duration to 1 second as well.

Step 14
The final step is to render the video. Click this button and you will finally be done.

Summary
What you’ve learned:
- How to add any type of transition to video clips and images in Filmora
- How to take quick snapshots of any frame in Filmora
- A quick way to Render videos and watch the final preview
- Add custom effects to images
What you need to prepare:
- A computer (Windows or macOS)
- Your video materials.
- Filmora video editor
Step 1
First off, download the Filmora video editor . After it downloads, click install and follow the provided steps.

Step 2
After installing, the editor will start automatically. When it does, click on the “New Project” button to finally open the editor.

Step 3
From the upper-left side of the screen, click the highlighted text to import media. This is where you insert your video files into the editor. Once the folder opens, select the videos you want to import and click “Open”.

Step 4
Drag your first clip to the timeline. Then, move the Playhead to where you want to start your transition.

Step 5
Take a snapshot of this frame.

Step 6
Split the footage and delete the part on the right side of the Playhead.

Step 7
Without moving the Playhead, simply drag the snapshot you took earlier. Right-click on the snapshot in the timeline and click on “Duration”. Then, set the duration to 1 second. Finally, click “OK”.

Step 8
Open your browser and go to the Picsart photo effects editor . Upload the same snapshot we made in Filmora and apply the “Comic” preset on it. Then, download the photo and import it back into Filmora.

Step 9
Drag the snapshot with the Comic preset to the Timeline and set its duration to 1 second as well.
Step 10
Repeat the same process with the second clip. Take a snapshot, add the Comic effect, and import it back into Filmora. But this time, align the clips as follows: Add the snapshot with the comic preset first, then the snapshot without any effects, and then the video. It should look like this.

Step 11
Go to the Transitions tab and drag the “Color Distance” transition between the first and second snapshot on your Timeline. Then, right-click on the transition box in the timeline and select “Edit Properties”. From there, change the duration of the transition to 1 second and click “OK”.

Step 12
Drag the “Push” transition between the next two snapshots. Set its duration to 1 second as well by right clicking the transition and going to “Edit Properties”.

Step 13
Place the last transition between the last two snapshots in your timeline. This time, we’re going to use the “Evaporate” transition. Set its duration to 1 second as well.

Step 14
The final step is to render the video. Click this button and you will finally be done.

Summary
What you’ve learned:
- How to add any type of transition to video clips and images in Filmora
- How to take quick snapshots of any frame in Filmora
- A quick way to Render videos and watch the final preview
- Add custom effects to images
What you need to prepare:
- A computer (Windows or macOS)
- Your video materials.
- Filmora video editor
Step 1
First off, download the Filmora video editor . After it downloads, click install and follow the provided steps.

Step 2
After installing, the editor will start automatically. When it does, click on the “New Project” button to finally open the editor.

Step 3
From the upper-left side of the screen, click the highlighted text to import media. This is where you insert your video files into the editor. Once the folder opens, select the videos you want to import and click “Open”.

Step 4
Drag your first clip to the timeline. Then, move the Playhead to where you want to start your transition.

Step 5
Take a snapshot of this frame.

Step 6
Split the footage and delete the part on the right side of the Playhead.

Step 7
Without moving the Playhead, simply drag the snapshot you took earlier. Right-click on the snapshot in the timeline and click on “Duration”. Then, set the duration to 1 second. Finally, click “OK”.

Step 8
Open your browser and go to the Picsart photo effects editor . Upload the same snapshot we made in Filmora and apply the “Comic” preset on it. Then, download the photo and import it back into Filmora.

Step 9
Drag the snapshot with the Comic preset to the Timeline and set its duration to 1 second as well.
Step 10
Repeat the same process with the second clip. Take a snapshot, add the Comic effect, and import it back into Filmora. But this time, align the clips as follows: Add the snapshot with the comic preset first, then the snapshot without any effects, and then the video. It should look like this.

Step 11
Go to the Transitions tab and drag the “Color Distance” transition between the first and second snapshot on your Timeline. Then, right-click on the transition box in the timeline and select “Edit Properties”. From there, change the duration of the transition to 1 second and click “OK”.

Step 12
Drag the “Push” transition between the next two snapshots. Set its duration to 1 second as well by right clicking the transition and going to “Edit Properties”.

Step 13
Place the last transition between the last two snapshots in your timeline. This time, we’re going to use the “Evaporate” transition. Set its duration to 1 second as well.

Step 14
The final step is to render the video. Click this button and you will finally be done.

Summary
What you’ve learned:
- How to add any type of transition to video clips and images in Filmora
- How to take quick snapshots of any frame in Filmora
- A quick way to Render videos and watch the final preview
- Add custom effects to images
[Tutorial] How To Add Motion Blur in Blender?
Motion blur effect, as a terminology, holds great significance in multiple industrial uses. From filmmaking to basic photography, the motion blur effect is consumed as a reality-setting standard, which defines its significance. Many platforms are providing this effect to enhance the creativity of their users. Blender is also known among these software providing such services while designing animations.
We will target a comprehensive guide on adding motion blur in Blender using the right way. Therefore, if you seek the appropriate way of adding motion blur in Blender, the following description is for you.
Part 1: What is Blender?
As we start our discussion, we will review Blender as a free and open-source software. Following this, we will continue realizing the benefits of adding motion blur through Blender:
Introduction to Blender
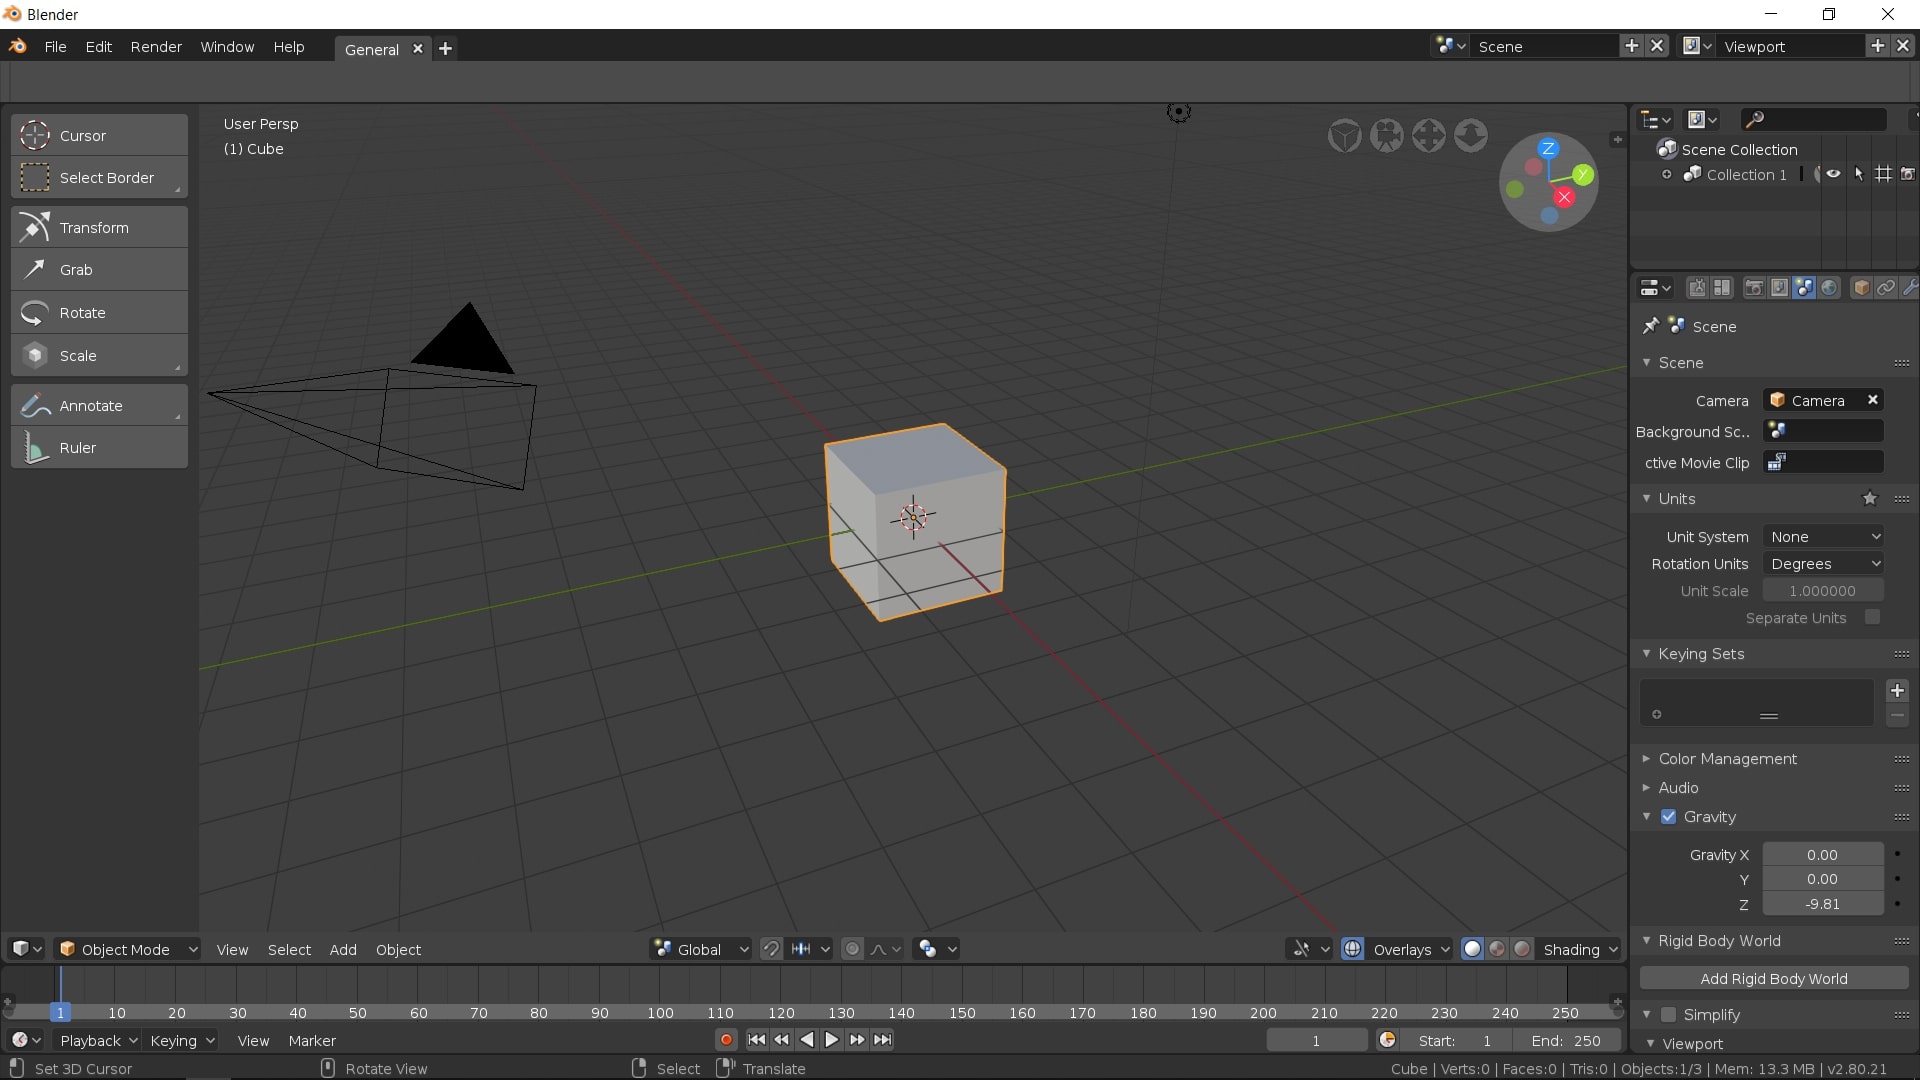
For those unaware of Blender, it is an open-source, free creativity software. You can find it as the perfect designing platform for your 3D content. This software has made itself accessible to the market with ease. This has made it quite famous among professionals, and is recommended for its high-quality, feature-rich design. From modeling to sculpting, Blender provides some great options to work with.
If you are up for editing some videos through Blender, it offers a great course of features, including motion blur. This Blender motion blur tutorial intends to bring you a similar insight into this great software. This will help you know the procedure of executing such facets to perfection.
Benefits of Using Motion Blur Effect
There are many benefits of using the motion blur effect in creative work. The following points are the highlights and benefits of adding the motion blur effect:
· Perfect For Idolizing Speed
The use of the motion blur effect is the best way to show the speed of the object. Using such effects gives the viewer an experience of the swiftness that is contained in the object.
· Resolves Flickering
Rather than trying out fast motion, you can add such effects to your 3D content to enhance the motion blur. This also helps get over problems, including strobing and flickering clips.
· Attenuates Real-Effect
One great thing about our human eye is its ability to bring motion blur in fast-moving objects. Since this is a real-life experience, the motion blur effect highlights this particular effect and brings the edited content closer to reality.
Part 2: How Do You Motion Blur An Object in Blender?
As stated before, Blender can be a great option for adding motion blur to objects. Many properties are involved in setting up the motion blur effect on an object. It includes defining the position, shutter, separation, and several other parameters. In this part, we will be looking for a guide on how to add motion blur in Blender:
Step1 With the video opened on Blender, proceed to the “Render Properties.” Look to enable “Motion Blur” from the available options. Click on the arrowhead adjacent to it to access its advanced blur options.
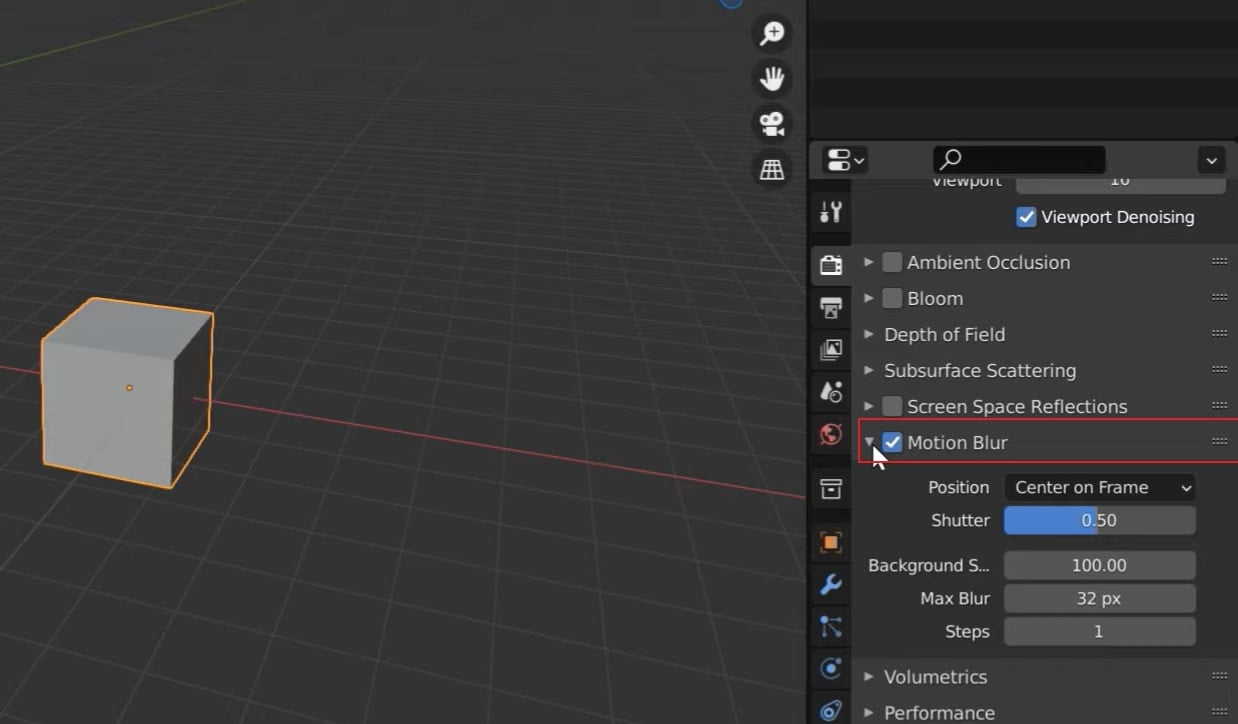
Step2 Start by setting its “Position” in the start, center, or end, according to the requirements. For those who are not sure of it, they can use “Center on Frame.” If the objects rapidly move in the video, reduce the “Shutter” value or vice versa.
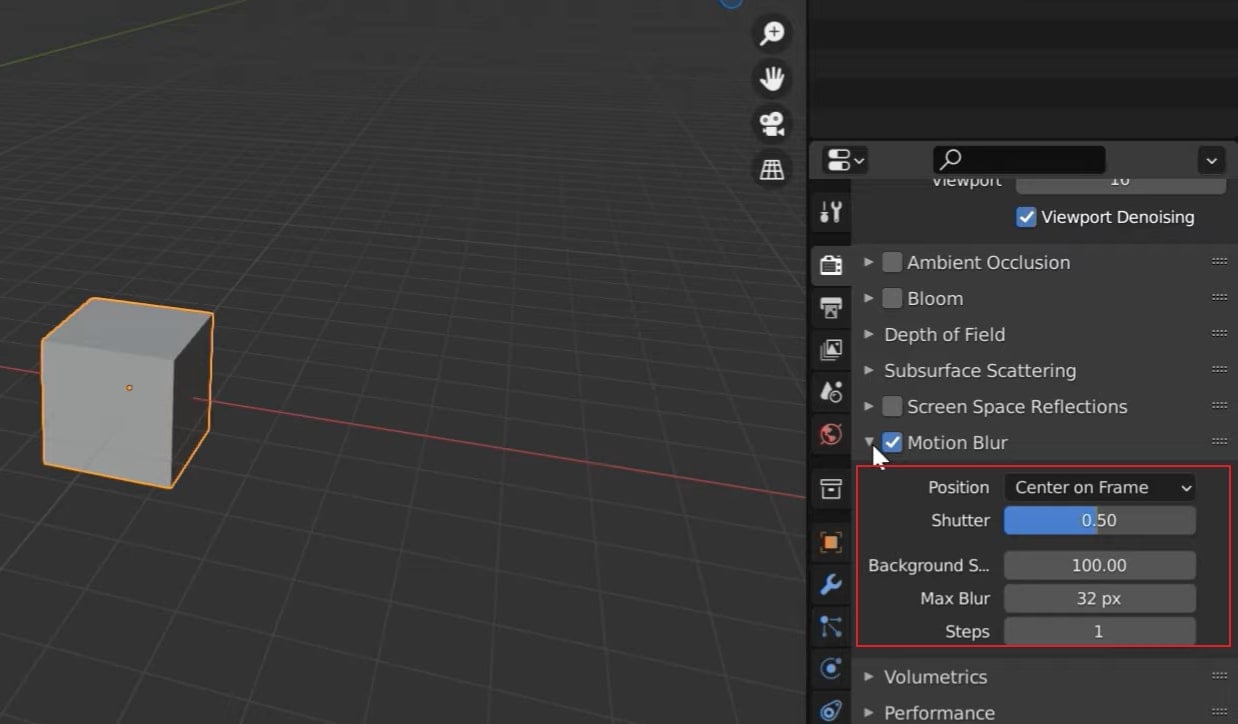
Step3 Following this, define the “Background Separation” according to how you require the foreground and background. Next, you will have to increase or decrease the “Max Blur” pixels to define the blur intensity in the video.
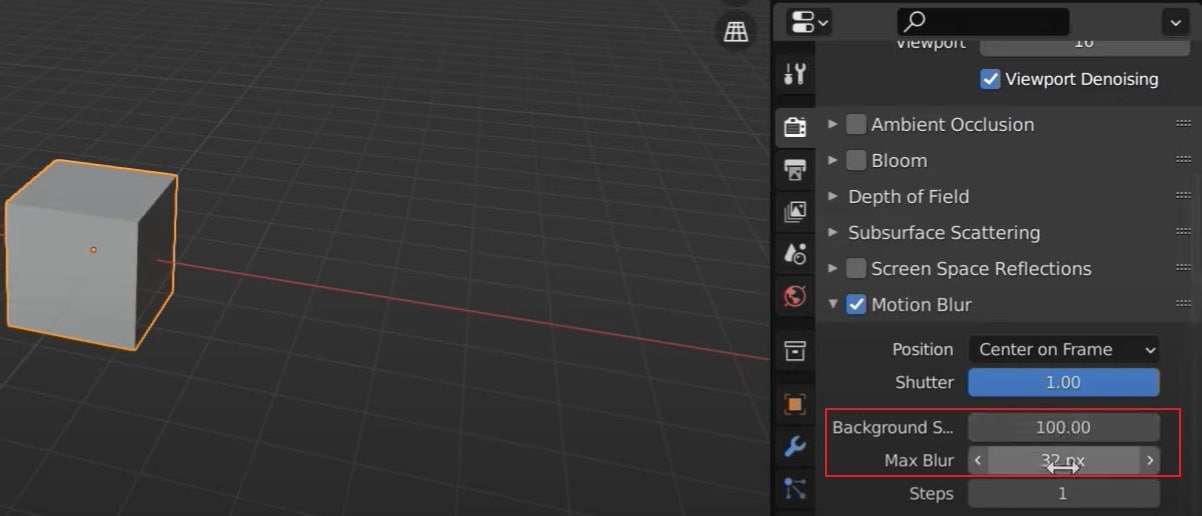
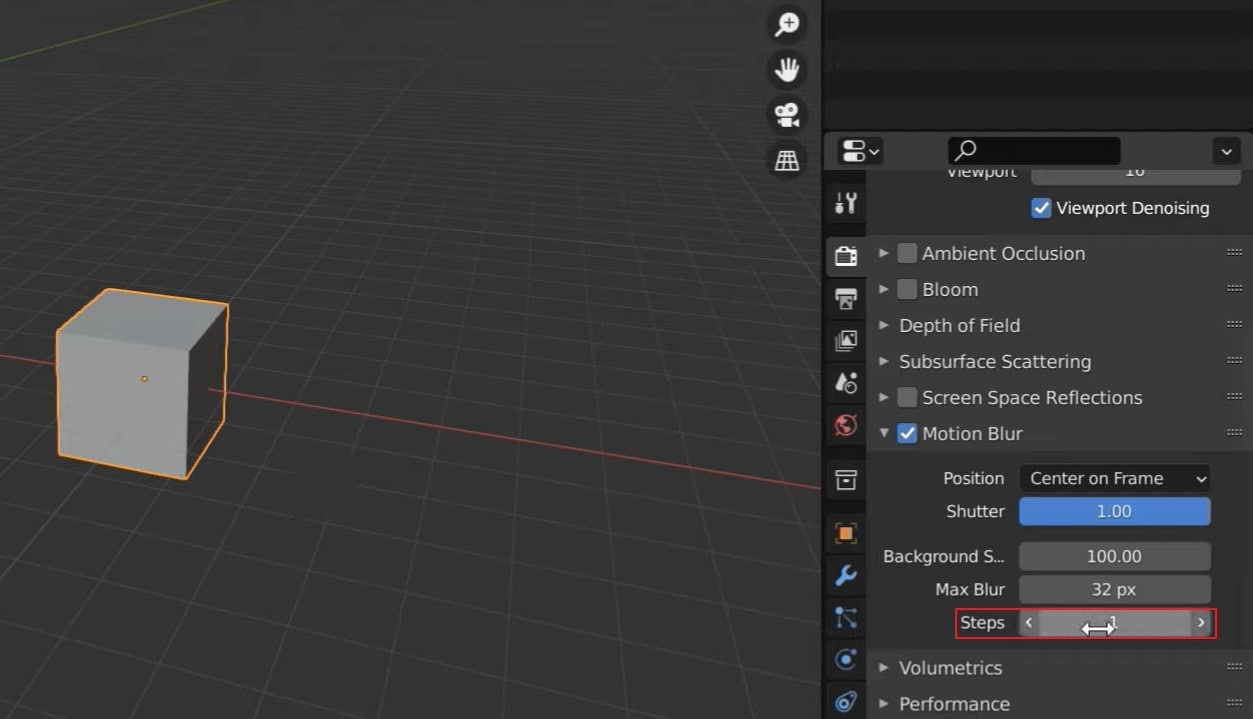
Step4 For objects with complex topology, you might have to increase the “Steps,” hence the “Shutter” time. For simple objects, the value remains unity. To apply the motion blur effect, use the F12 key for rendering the video.
Bonus Tips – Add Motion Blur to Animated Video with Filmora
Blender can become challenging to use, a no-go for basic video editors. This requires a simpler video editor that can help them add motion blurs. For applying this to a video, Wondershare Filmora is a great option. This video editor is known for its easy-going, conclusive, and diversifying features.
Free Download For Win 7 or later(64-bit)
Free Download For macOS 10.14 or later
Wondershare Filmora can be a real deal for users who are looking for high-quality video editing. A simple interface gives a perfect option to bring creativity to your work. If you wish to know more about Filmora, the following features will help you out:
- You can try out the Instant Mode offered on Filmora for creating videos in minutes.
- You can adjust the video speed to get better control of the keyframes. With the help of this feature, you can easily create cinematic effects.
- It also includes the feature of motion tracking to intensify your video creation.
- Filmora’s ability to blend in effects in the videos is one of its major highlights. There are multiple modes available in Filmora to make things interesting.
- Its AI Portrait mode helps identify humans in the video and helps them enhance their parameters.
How to Add Motion Blur to Animated Video with Wondershare Filmora
Since you are looking forward to a method explaining how to add motion blur to videos with Filmora, the following step-by-step guide is for you:
Step1 Launch Filmora and Import Animated Video
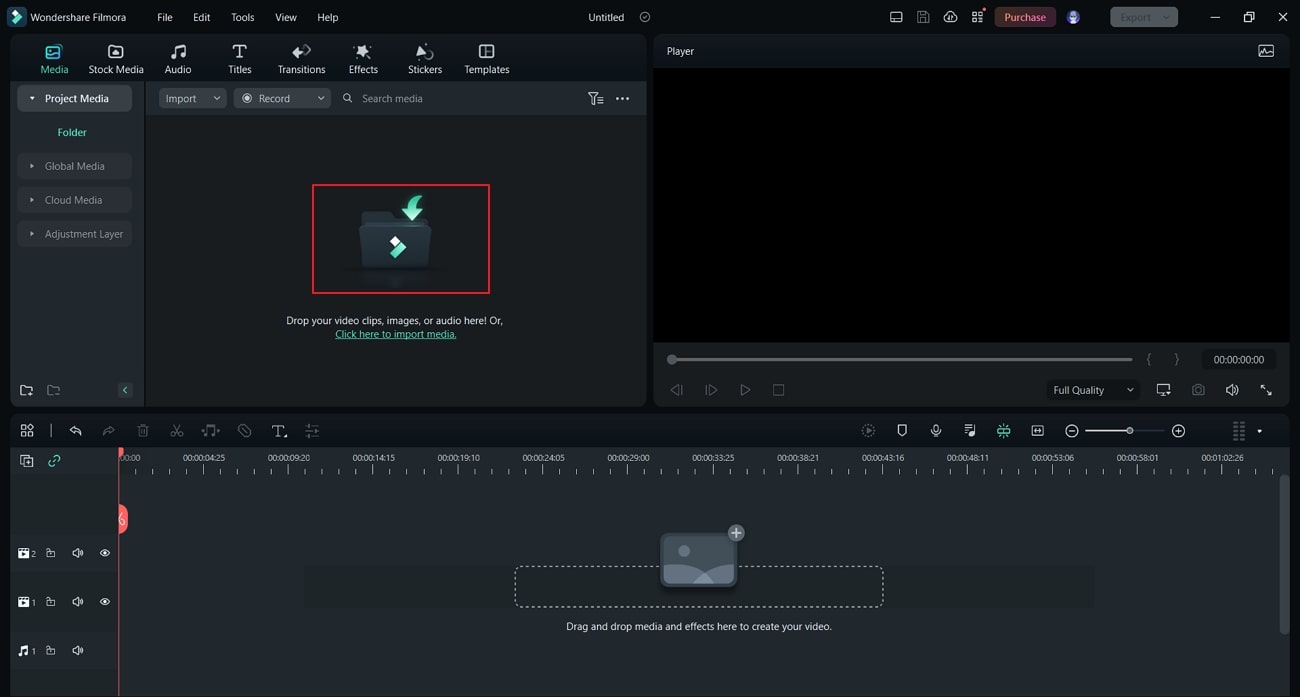
You must launch Wondershare Filmora after installing it successfully on your computer. Click the “Create New Project” button to lead to a new project screen. Here, tap on the “Folder” icon to import the animated video that is to be edited.
Step2 Split the Video to Set Platform for Adding the Effect
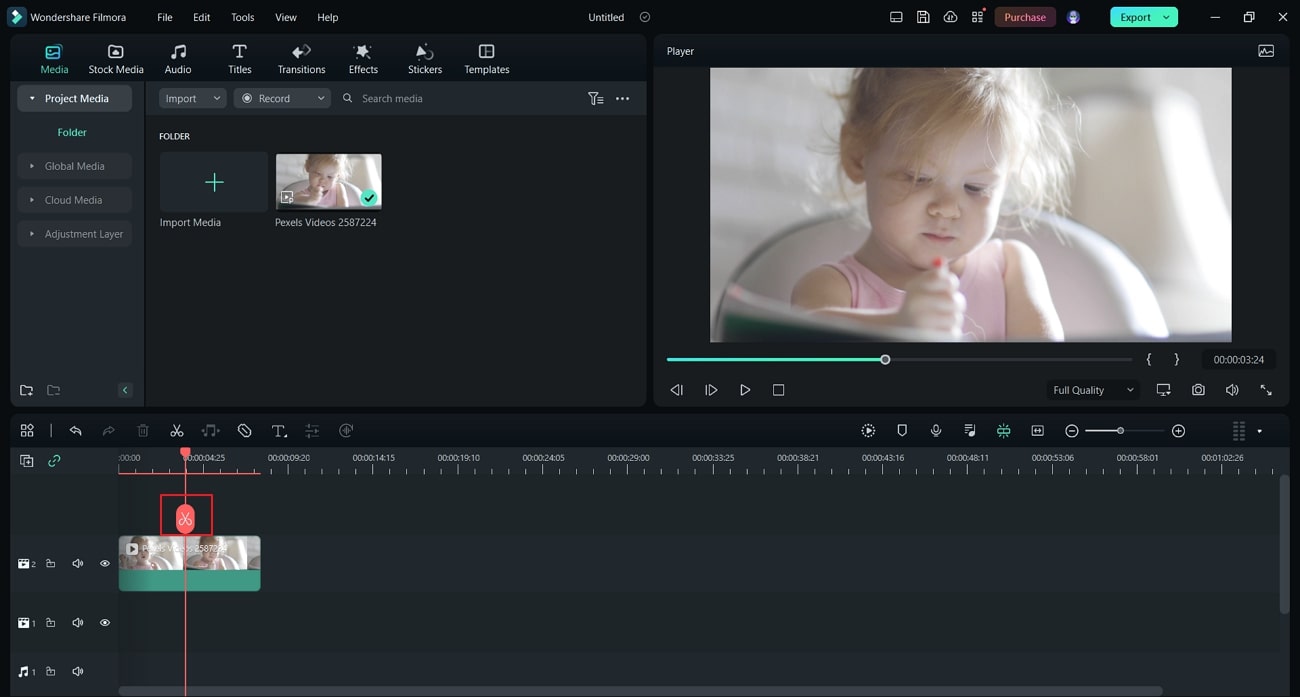
Once uploaded, drag and drop it on the timeline. Use the play head and adjust it to the point where you want to start the motion blur. Click the “Scissor” icon to split the clip from the specific point.
Step3 Look for the Blur Effect and Add
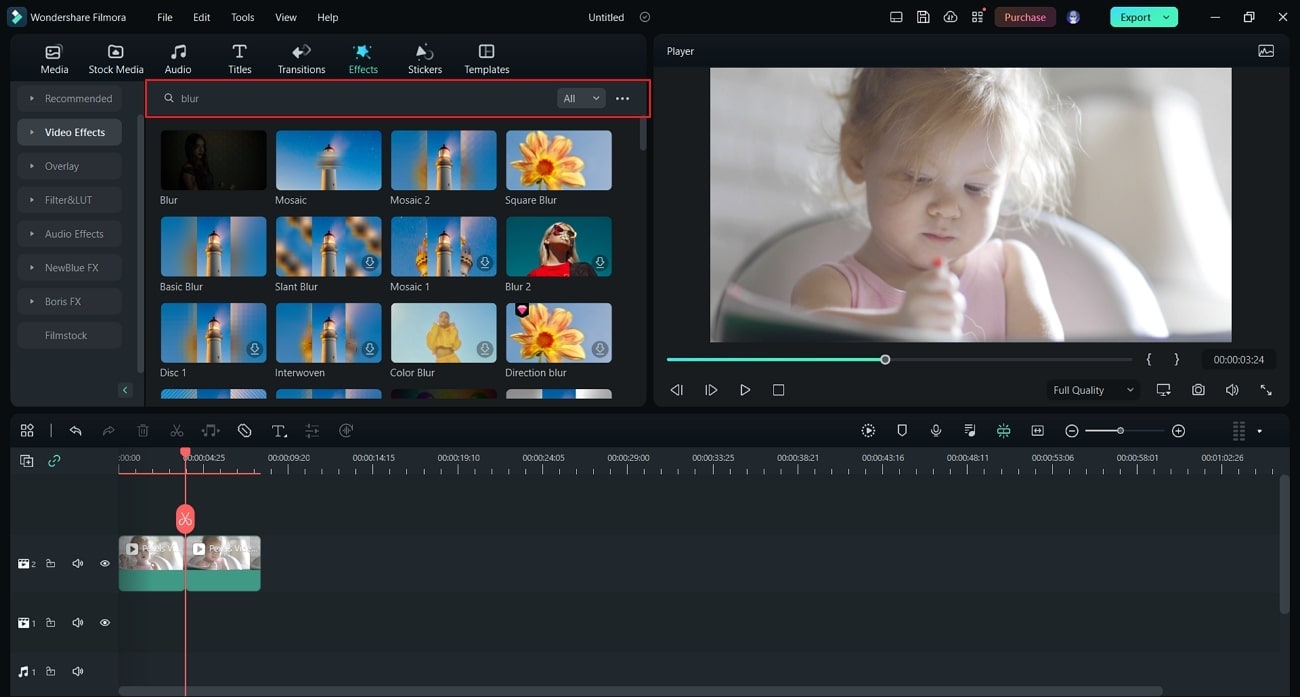
Move to the “Effects” tab from the top and look for “Video Effects” from the left section. Afterward, type “Blur” in the search bar of the effects. You will be led to a list of different blur options, which you can pick and add to the part of the video that was split.
Step4 Include Transition for Smoothness and Export Video
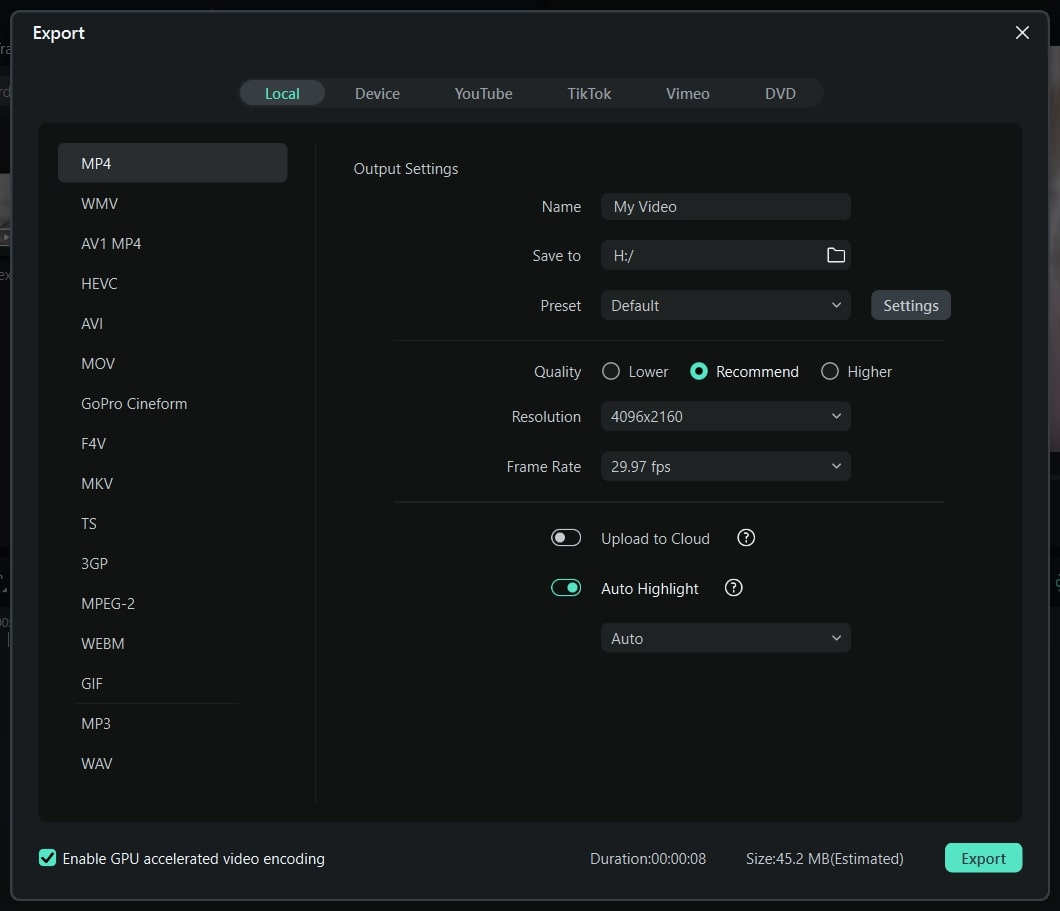
After adjusting the parameters, find the “Dissolve” transition from the “Transition” tab for smoothening the effect. Once done, you can export the edited clip by clicking the “Export” button and setting the parameters.
FAQ
What does motion blur do in Blender?
There are two different techniques adopted in the Blender motion blur effect. The first is recognized as the “Sample Motion Blur” technique, an advanced, slower, and controlled way of adding motion blur. The other technique, known as “Vector Blur,” is faster but has drawbacks, which do not look professional.
Conclusion
With that, a complete guide on how to add motion blur in Blender has been presented and explained. The provided technique will help you include the motion blur effect to perfection. For a more straightforward and quicker procedure, Wondershare Filmora gives a perfect experience of adding motion blur in animated videos. The article helps guide you toward selecting the best option in the market.
Free Download For macOS 10.14 or later
Wondershare Filmora can be a real deal for users who are looking for high-quality video editing. A simple interface gives a perfect option to bring creativity to your work. If you wish to know more about Filmora, the following features will help you out:
- You can try out the Instant Mode offered on Filmora for creating videos in minutes.
- You can adjust the video speed to get better control of the keyframes. With the help of this feature, you can easily create cinematic effects.
- It also includes the feature of motion tracking to intensify your video creation.
- Filmora’s ability to blend in effects in the videos is one of its major highlights. There are multiple modes available in Filmora to make things interesting.
- Its AI Portrait mode helps identify humans in the video and helps them enhance their parameters.
How to Add Motion Blur to Animated Video with Wondershare Filmora
Since you are looking forward to a method explaining how to add motion blur to videos with Filmora, the following step-by-step guide is for you:
Step1 Launch Filmora and Import Animated Video
You must launch Wondershare Filmora after installing it successfully on your computer. Click the “Create New Project” button to lead to a new project screen. Here, tap on the “Folder” icon to import the animated video that is to be edited.

Step2 Split the Video to Set Platform for Adding the Effect
Once uploaded, drag and drop it on the timeline. Use the play head and adjust it to the point where you want to start the motion blur. Click the “Scissor” icon to split the clip from the specific point.

Step3 Look for the Blur Effect and Add
Move to the “Effects” tab from the top and look for “Video Effects” from the left section. Afterward, type “Blur” in the search bar of the effects. You will be led to a list of different blur options, which you can pick and add to the part of the video that was split.

Step4 Include Transition for Smoothness and Export Video
After adjusting the parameters, find the “Dissolve” transition from the “Transition” tab for smoothening the effect. Once done, you can export the edited clip by clicking the “Export” button and setting the parameters.

FAQ
What does motion blur do in Blender?
There are two different techniques adopted in the Blender motion blur effect. The first is recognized as the “Sample Motion Blur” technique, an advanced, slower, and controlled way of adding motion blur. The other technique, known as “Vector Blur,” is faster but has drawbacks, which do not look professional.
Conclusion
With that, a complete guide on how to add motion blur in Blender has been presented and explained. The provided technique will help you include the motion blur effect to perfection. For a more straightforward and quicker procedure, Wondershare Filmora gives a perfect experience of adding motion blur in animated videos. The article helps guide you toward selecting the best option in the market.
Also read:
- Updated Looking for Ways to Compress Your Videos for Instagram? Keep Reading to Know About some of the Best Video Compressors for Instagram
- 2024 Approved A Guide to Speed up a Video on Splice
- New 2024 Approved Best 4 Love Video Maker with Music
- New How to Color Correct in OBS for 2024
- How to Remove Motion Blur In Photoshop for 2024
- New In 2024, Step by Step to Rotate Video in Google Photos
- New Looking for the Best Online Video Editors to Add Filter to Your Video? Here Is the List of the Best Video Editors to Add Filter Video Online in Simple Steps
- New Perfect Moody LUTs for VN Editor An Overview for 2024
- Updated How to Create One Click Video Reverse Effect in Filmora for 2024
- Updated LumaFusion Color Grading Achieving It Through LUTs for 2024
- Updated 2024 Approved Final Cut Pro - How to Download and Install It
- Updated Top 15 Slow Motion CapCut Templates to Work With
- New 11 Ways To Radial Blur To Images (iPhone/Android/Mac/Windows)
- Updated In 2024, Add Effects to Video Online
- Efficient Ways to Manage Your Timeline for 2024
- Best Cloud Storage Service for Videos for 2024
- 2024 Approved Best 5 PDF to GIF Converters You Should Know
- Updated 2024 Approved 30+ Amazing Templates for VN Video Editor
- In 2024, Everything You Need to Know About Color Grading in Photography
- 2024 Approved Do You Want to Know How to Import or Adjust Clips in Wondershare Filmora? Dont Worry because Importing or Adjusting Video Clips in This Tool Is Pretty Easy
- Updated Best iPhone LUTs App to Use for 2024
- Updated Add Stylish Text to Videos
- Updated 2024 Approved Fast Method to Match Color in Photoshop
- Updated Good Slideshow Makers Sometimes Cost High and Free Slideshow Makers Provide Slideshows with the Watermark. How to Cope with This Problem? This Article Gives Solutions
- Updated Do You Want to Know About the DaVinci Resolve Adjustment Layer? Read This Article to Learn How to Use an Adjustment Layer (Clip) in DaVinci Resolve to Edit Videos
- New Top 9 Best Solutions To Go For When Creating an AI Thumbnail for 2024
- Add Green Screen Video on TikTok
- Updated Do You Know that You Can Apply Different LUTs and Create Your Own? There Are Many LUT Online and Offline Generators that You Can Use to Create Your LUT
- Updated In 2024, Tips for Choosing Location and Scheduling Music Video
- In 2024, Learn How to Feather Shapes in After Effects and Add a Professional Touch to Your Designs. This Comprehensive Guide Covers Everything From the Basics to Advanced Techniques. Perfect for Beginners and Experts Alike
- How to Splice Videos Together on iPhone
- Updated 10+ Top Unlimited FCPX Slideshow Templates for 2024
- New In 2024, Simple Tricks Make 3D GIF Production of Inspiration Pop up Constantly
- Updated OpenCV Object Tracking The Complete Guide
- Want to Find a Good Camera for YouTube? This Article Brings You some of the Best Options of Different Varieties for Your Channel
- Updated In 2024, Guide To Cropping and Combining Content in Wondershare Filmora Latest
- New 2024 Approved How Can You Import and Adjust the Video Clips on Wondershare Filmora?
- New Want to Know the Full Process of Adding the Falling Text Effect as a Video Introduction? Detailed Guidelines on All the Steps Are Mentioned Here for Filmora Users
- New Do You Want to Know How to Convert YouTube SBV Subtitles to SRT Format? Here Is an Ultimate Guide About It
- In 2024, The Definite Guide to Craig Bot Discord
- Why Your Tecno Pova 5 Pro Screen Might be Unresponsive and How to Fix It | Dr.fone
- 5 Solutions For Oppo A2 Unlock Without Password
- AddROM Bypass An Android Tool to Unlock FRP Lock Screen For your Gionee F3 Pro
- Easy Steps to Make Excel 2013 Hyperlinks Working | Stellar
- How To Change Country on App Store for Apple iPhone 14 Plus With 7 Methods
- How to Repair Corrupted or Damaged Excel File with Ease?
- How to recover old music from your Nokia G310
- Top 11 Free Apps to Check IMEI on Vivo Y55s 5G (2023) Phones
- In 2024, Unova Stone Pokémon Go Evolution List and How Catch Them For Realme Narzo 60x 5G | Dr.fone
- In 2024, Top 5 Samsung Galaxy S23 Bypass FRP Tools for PC That Actually Work
- How to Bypass FRP on Tecno Spark 20?
- Apple iPhone 11 Pro Asking for Passcode after iOS 17/14 Update, What to Do?
- In 2024, Which Pokémon can Evolve with a Moon Stone For Realme 12 Pro 5G? | Dr.fone
- How to Motorola G24 Power Get Deleted Pictures Back with Ease and Safety?
- How to Change/Add Location Filters on Snapchat For your Oppo Find X7 | Dr.fone
- 5 Ways to Reset Vivo Y200 Without Volume Buttons | Dr.fone
- All About Factory Reset, What Is It and What It Does to Your OnePlus Nord CE 3 5G? | Dr.fone
- 10 Easy-to-Use FRP Bypass Tools for Unlocking Google Accounts On Vivo V29e
- Can Life360 Track You When Your Honor 90 GT is off? | Dr.fone
- In 2024, How to Turn Off Google Location to Stop Tracking You on Realme C67 5G | Dr.fone
- 11 Ways to Fix it When My Oppo A78 Wont Charge | Dr.fone
- How to Turn Off Find My Apple iPhone SE (2020) when Phone is Broken?
- Repair Video Tool - Repair all your damaged video files of Realme GT Neo 5 SE
- Additional Tips About Sinnoh Stone For Vivo X100 | Dr.fone
- In 2024, 9 Best Free Android Monitoring Apps to Monitor Phone Remotely For your Vivo T2x 5G | Dr.fone
- In 2024, Top-Notch Solutions for Disabled Apple ID From Apple iPhone 15 Plus Making It Possible
- In 2024, How to Send and Fake Live Location on Facebook Messenger Of your Samsung Galaxy S24 Ultra | Dr.fone
- In 2024, 8 Best Apps for Screen Mirroring Tecno Spark 10 5G PC | Dr.fone
- Possible solutions to restore deleted music from Oppo A1x 5G
- In 2024, How to Unlock Xiaomi Redmi A2 Phone without PIN
- How to Restore Deleted Lava Blaze 2 Pro Pictures An Easy Method Explained.
- 3 Things You Must Know about Fake Snapchat Location On Honor 100 Pro | Dr.fone
- Realme Narzo N55 Not Receiving Texts? 10 Hassle-Free Solutions Here | Dr.fone
- In 2024, Ultimate Guide from Infinix Hot 30i FRP Bypass
- In 2024, 8 Ways to Transfer Photos from Nokia 105 Classic to iPhone Easily | Dr.fone
- In 2024, How to Transfer Contacts from Honor Play 8T To Phone | Dr.fone
- Title: How to Make Coin Magic With Filmora for 2024
- Author: Chloe
- Created at : 2024-04-24 07:08:12
- Updated at : 2024-04-25 07:08:12
- Link: https://ai-editing-video.techidaily.com/how-to-make-coin-magic-with-filmora-for-2024/
- License: This work is licensed under CC BY-NC-SA 4.0.


