:max_bytes(150000):strip_icc():format(webp)/homeweatherstation-34f9e9a9aaf64446a8f21ff05991c079.jpg)
How to Make Double Exposure Effect in Filmora

How to Make Double Exposure Effect in Filmora
Are you an aspiring video creator, or do you enjoy editing videos that captivate your viewers’ attention? In this digital era, it is essential to edit your videos by using tools that can help you produce a masterpiece and will impress your audience. With Filmora Video Editor, it is easier to create polished and professional-looking videos that stand out from the rest.
Free Download For Win 7 or later(64-bit)
Free Download For macOS 10.14 or later
To start your creative journey, you can hone your skills by focusing on at least one technique and progressively learning new skills. One of the various video editing techniques you can employ is double exposure. This method is based on an old technique in photography in which a film is exposed twice to create a single image. This article shows you how to use the same method to combine two or more video clips and create a double exposure effect.
You can create artistic videos that tell various stories and captivate viewers by using Filmora. The following steps describe how to create a double exposure effect in Filmora.
Step1 Download the Filmora application
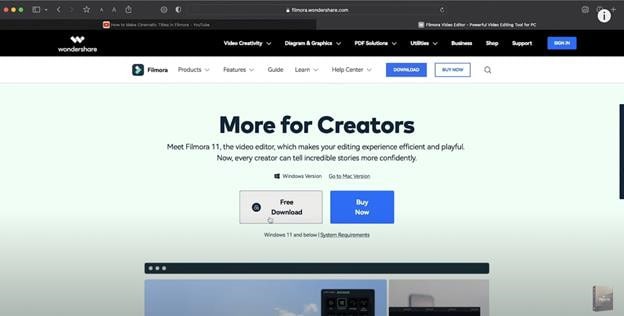
Before you start editing, click https://bit.ly/3tav2d5 to download the Filmora app. On the page that appears, click the Free Download option. Then, the Filmora installer is automatically downloaded. To start installing Filmora, double-click the installer and click Agree to agree with the terms and conditions. Then, wait for approximately 2 minutes for the installation to complete.
Step2 Start a new project in Filmora
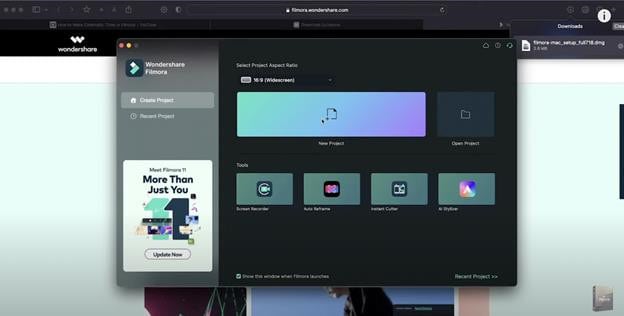
After a successful installation, the app automatically runs, and you can start editing videos. Click New Project to start a project on a clean canvas.
Before starting a new project, we recommend you plan a theme for your videos. You can incorporate different elements into your videos to convey a dramatic, light, or fun theme. This step will help you communicate the mood and message you want to convey to the audience.
Step3 Select a foreground video
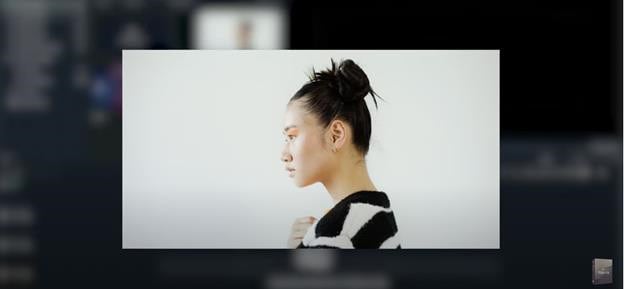
To create a trendy double exposure effect, record a video clip with a white or neutral background. Then, import the specified video to Filmora. In the second layer of the video editing pane, drag the video.
The first video is called the foreground video, which serves as the base video to achieve the desired double exposure effect. It is important to choose neutral or calm colors to make it easier for you to remove the background and highlight the main subject of your video.
Step4 Edit the foreground video
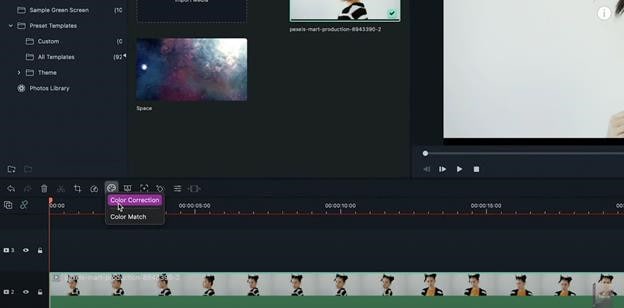
Edit the foreground video by adjusting the color settings. Click the Color Correction icon to open the color settings. In the Advanced Color Tuning box that appears, click Adjust. In this article, the value of Exposure is set to 18, and Contrast is set to 28. Then, Vibrance and Saturation are set to -100. In the Light settings, the values of Highlights and Shadows are set to -100, Whites is set to 0, and Blacks is set to -30. You can experiment and play with the settings based on the theme that you want to achieve.
Step5 Select a background video
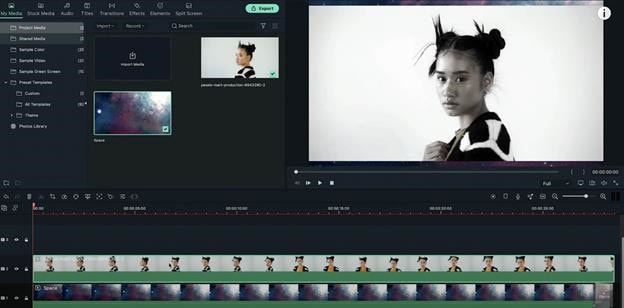
For the background video, select a video clip and import the video to Filmora. Then, drag the video in a layer below the foreground video.
When you select a background video, make sure that the video is vibrant, colorful, and has lots of texture. For example, you can select landscapes, flowers, leaves, textured patterns, city lights, sunsets, or other graphic components. The colors and lighting in the background video significantly impact the final output’s overall appearance.
Step6 Blend the foreground and background videos
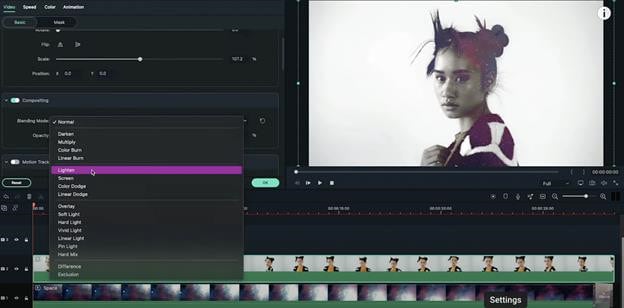
If you want to produce a perfect double-exposed video, blending layers is properly essential. To do this, double click the foreground video. Go to the Compositing option and set Blending Mode to Lighten. You can also configure Blending Mode based on your preference.
The steps that are outlined in this article can help you apply double exposure effects to your videos. You can modify your videos to your preferences by using all the resources that Filmora provides.
A simple video clip with a double-exposure effect adds a dramatic and dreamy effect to it. The creator can work with colors, exposures, and brightness to achieve a double-exposure effect. This technique provides creative results and allows the video creator to tell a story to the audience in a manner that a plain video clip cannot convey. It is useful, especially when editing personal or professional videos, such as documentaries, wedding videos, travel vlogs, and other artistic works.
Before, the double-exposure effect could only be achieved by using cameras and specialized photographic skills. These days, creators can use Filmora Video Editor to replicate the double-exposure effect in just a few simple steps. Filmora Video Editor is an easy-to-use tool that has helped over 85 million video creators from 150 countries around the world. Videos are compatible with iPhone, iPad, Samsung, Amazon, HTC, PSP, and many more. You can also watch quality videos in AVI, VOB, MP4, WMV, 3GP, MKV, AVI, and more.
To help you save time, Filmora simplifies complex features and frequently improves its services by adding new features such as speed ramping, masking, auto beat sync, and auto synchronization. The video editor also allows creators to have more creative freedom over their videos and share their outputs on different platforms such as YouTube, Facebook, and Instagram.
For more information, you can visit http://www.wondershare.com/ or visit the social media accounts of Filmora to get the most recent launches and updates.
Download Filmora Video Editor now and tell the world your creative stories.
Free Download For macOS 10.14 or later
To start your creative journey, you can hone your skills by focusing on at least one technique and progressively learning new skills. One of the various video editing techniques you can employ is double exposure. This method is based on an old technique in photography in which a film is exposed twice to create a single image. This article shows you how to use the same method to combine two or more video clips and create a double exposure effect.
You can create artistic videos that tell various stories and captivate viewers by using Filmora. The following steps describe how to create a double exposure effect in Filmora.
Step1 Download the Filmora application

Before you start editing, click https://bit.ly/3tav2d5 to download the Filmora app. On the page that appears, click the Free Download option. Then, the Filmora installer is automatically downloaded. To start installing Filmora, double-click the installer and click Agree to agree with the terms and conditions. Then, wait for approximately 2 minutes for the installation to complete.
Step2 Start a new project in Filmora

After a successful installation, the app automatically runs, and you can start editing videos. Click New Project to start a project on a clean canvas.
Before starting a new project, we recommend you plan a theme for your videos. You can incorporate different elements into your videos to convey a dramatic, light, or fun theme. This step will help you communicate the mood and message you want to convey to the audience.
Step3 Select a foreground video

To create a trendy double exposure effect, record a video clip with a white or neutral background. Then, import the specified video to Filmora. In the second layer of the video editing pane, drag the video.
The first video is called the foreground video, which serves as the base video to achieve the desired double exposure effect. It is important to choose neutral or calm colors to make it easier for you to remove the background and highlight the main subject of your video.
Step4 Edit the foreground video

Edit the foreground video by adjusting the color settings. Click the Color Correction icon to open the color settings. In the Advanced Color Tuning box that appears, click Adjust. In this article, the value of Exposure is set to 18, and Contrast is set to 28. Then, Vibrance and Saturation are set to -100. In the Light settings, the values of Highlights and Shadows are set to -100, Whites is set to 0, and Blacks is set to -30. You can experiment and play with the settings based on the theme that you want to achieve.
Step5 Select a background video

For the background video, select a video clip and import the video to Filmora. Then, drag the video in a layer below the foreground video.
When you select a background video, make sure that the video is vibrant, colorful, and has lots of texture. For example, you can select landscapes, flowers, leaves, textured patterns, city lights, sunsets, or other graphic components. The colors and lighting in the background video significantly impact the final output’s overall appearance.
Step6 Blend the foreground and background videos

If you want to produce a perfect double-exposed video, blending layers is properly essential. To do this, double click the foreground video. Go to the Compositing option and set Blending Mode to Lighten. You can also configure Blending Mode based on your preference.
The steps that are outlined in this article can help you apply double exposure effects to your videos. You can modify your videos to your preferences by using all the resources that Filmora provides.
A simple video clip with a double-exposure effect adds a dramatic and dreamy effect to it. The creator can work with colors, exposures, and brightness to achieve a double-exposure effect. This technique provides creative results and allows the video creator to tell a story to the audience in a manner that a plain video clip cannot convey. It is useful, especially when editing personal or professional videos, such as documentaries, wedding videos, travel vlogs, and other artistic works.
Before, the double-exposure effect could only be achieved by using cameras and specialized photographic skills. These days, creators can use Filmora Video Editor to replicate the double-exposure effect in just a few simple steps. Filmora Video Editor is an easy-to-use tool that has helped over 85 million video creators from 150 countries around the world. Videos are compatible with iPhone, iPad, Samsung, Amazon, HTC, PSP, and many more. You can also watch quality videos in AVI, VOB, MP4, WMV, 3GP, MKV, AVI, and more.
To help you save time, Filmora simplifies complex features and frequently improves its services by adding new features such as speed ramping, masking, auto beat sync, and auto synchronization. The video editor also allows creators to have more creative freedom over their videos and share their outputs on different platforms such as YouTube, Facebook, and Instagram.
For more information, you can visit http://www.wondershare.com/ or visit the social media accounts of Filmora to get the most recent launches and updates.
Download Filmora Video Editor now and tell the world your creative stories.
Free Download For macOS 10.14 or later
To start your creative journey, you can hone your skills by focusing on at least one technique and progressively learning new skills. One of the various video editing techniques you can employ is double exposure. This method is based on an old technique in photography in which a film is exposed twice to create a single image. This article shows you how to use the same method to combine two or more video clips and create a double exposure effect.
You can create artistic videos that tell various stories and captivate viewers by using Filmora. The following steps describe how to create a double exposure effect in Filmora.
Step1 Download the Filmora application

Before you start editing, click https://bit.ly/3tav2d5 to download the Filmora app. On the page that appears, click the Free Download option. Then, the Filmora installer is automatically downloaded. To start installing Filmora, double-click the installer and click Agree to agree with the terms and conditions. Then, wait for approximately 2 minutes for the installation to complete.
Step2 Start a new project in Filmora

After a successful installation, the app automatically runs, and you can start editing videos. Click New Project to start a project on a clean canvas.
Before starting a new project, we recommend you plan a theme for your videos. You can incorporate different elements into your videos to convey a dramatic, light, or fun theme. This step will help you communicate the mood and message you want to convey to the audience.
Step3 Select a foreground video

To create a trendy double exposure effect, record a video clip with a white or neutral background. Then, import the specified video to Filmora. In the second layer of the video editing pane, drag the video.
The first video is called the foreground video, which serves as the base video to achieve the desired double exposure effect. It is important to choose neutral or calm colors to make it easier for you to remove the background and highlight the main subject of your video.
Step4 Edit the foreground video

Edit the foreground video by adjusting the color settings. Click the Color Correction icon to open the color settings. In the Advanced Color Tuning box that appears, click Adjust. In this article, the value of Exposure is set to 18, and Contrast is set to 28. Then, Vibrance and Saturation are set to -100. In the Light settings, the values of Highlights and Shadows are set to -100, Whites is set to 0, and Blacks is set to -30. You can experiment and play with the settings based on the theme that you want to achieve.
Step5 Select a background video

For the background video, select a video clip and import the video to Filmora. Then, drag the video in a layer below the foreground video.
When you select a background video, make sure that the video is vibrant, colorful, and has lots of texture. For example, you can select landscapes, flowers, leaves, textured patterns, city lights, sunsets, or other graphic components. The colors and lighting in the background video significantly impact the final output’s overall appearance.
Step6 Blend the foreground and background videos

If you want to produce a perfect double-exposed video, blending layers is properly essential. To do this, double click the foreground video. Go to the Compositing option and set Blending Mode to Lighten. You can also configure Blending Mode based on your preference.
The steps that are outlined in this article can help you apply double exposure effects to your videos. You can modify your videos to your preferences by using all the resources that Filmora provides.
A simple video clip with a double-exposure effect adds a dramatic and dreamy effect to it. The creator can work with colors, exposures, and brightness to achieve a double-exposure effect. This technique provides creative results and allows the video creator to tell a story to the audience in a manner that a plain video clip cannot convey. It is useful, especially when editing personal or professional videos, such as documentaries, wedding videos, travel vlogs, and other artistic works.
Before, the double-exposure effect could only be achieved by using cameras and specialized photographic skills. These days, creators can use Filmora Video Editor to replicate the double-exposure effect in just a few simple steps. Filmora Video Editor is an easy-to-use tool that has helped over 85 million video creators from 150 countries around the world. Videos are compatible with iPhone, iPad, Samsung, Amazon, HTC, PSP, and many more. You can also watch quality videos in AVI, VOB, MP4, WMV, 3GP, MKV, AVI, and more.
To help you save time, Filmora simplifies complex features and frequently improves its services by adding new features such as speed ramping, masking, auto beat sync, and auto synchronization. The video editor also allows creators to have more creative freedom over their videos and share their outputs on different platforms such as YouTube, Facebook, and Instagram.
For more information, you can visit http://www.wondershare.com/ or visit the social media accounts of Filmora to get the most recent launches and updates.
Download Filmora Video Editor now and tell the world your creative stories.
Free Download For macOS 10.14 or later
To start your creative journey, you can hone your skills by focusing on at least one technique and progressively learning new skills. One of the various video editing techniques you can employ is double exposure. This method is based on an old technique in photography in which a film is exposed twice to create a single image. This article shows you how to use the same method to combine two or more video clips and create a double exposure effect.
You can create artistic videos that tell various stories and captivate viewers by using Filmora. The following steps describe how to create a double exposure effect in Filmora.
Step1 Download the Filmora application

Before you start editing, click https://bit.ly/3tav2d5 to download the Filmora app. On the page that appears, click the Free Download option. Then, the Filmora installer is automatically downloaded. To start installing Filmora, double-click the installer and click Agree to agree with the terms and conditions. Then, wait for approximately 2 minutes for the installation to complete.
Step2 Start a new project in Filmora

After a successful installation, the app automatically runs, and you can start editing videos. Click New Project to start a project on a clean canvas.
Before starting a new project, we recommend you plan a theme for your videos. You can incorporate different elements into your videos to convey a dramatic, light, or fun theme. This step will help you communicate the mood and message you want to convey to the audience.
Step3 Select a foreground video

To create a trendy double exposure effect, record a video clip with a white or neutral background. Then, import the specified video to Filmora. In the second layer of the video editing pane, drag the video.
The first video is called the foreground video, which serves as the base video to achieve the desired double exposure effect. It is important to choose neutral or calm colors to make it easier for you to remove the background and highlight the main subject of your video.
Step4 Edit the foreground video

Edit the foreground video by adjusting the color settings. Click the Color Correction icon to open the color settings. In the Advanced Color Tuning box that appears, click Adjust. In this article, the value of Exposure is set to 18, and Contrast is set to 28. Then, Vibrance and Saturation are set to -100. In the Light settings, the values of Highlights and Shadows are set to -100, Whites is set to 0, and Blacks is set to -30. You can experiment and play with the settings based on the theme that you want to achieve.
Step5 Select a background video

For the background video, select a video clip and import the video to Filmora. Then, drag the video in a layer below the foreground video.
When you select a background video, make sure that the video is vibrant, colorful, and has lots of texture. For example, you can select landscapes, flowers, leaves, textured patterns, city lights, sunsets, or other graphic components. The colors and lighting in the background video significantly impact the final output’s overall appearance.
Step6 Blend the foreground and background videos

If you want to produce a perfect double-exposed video, blending layers is properly essential. To do this, double click the foreground video. Go to the Compositing option and set Blending Mode to Lighten. You can also configure Blending Mode based on your preference.
The steps that are outlined in this article can help you apply double exposure effects to your videos. You can modify your videos to your preferences by using all the resources that Filmora provides.
A simple video clip with a double-exposure effect adds a dramatic and dreamy effect to it. The creator can work with colors, exposures, and brightness to achieve a double-exposure effect. This technique provides creative results and allows the video creator to tell a story to the audience in a manner that a plain video clip cannot convey. It is useful, especially when editing personal or professional videos, such as documentaries, wedding videos, travel vlogs, and other artistic works.
Before, the double-exposure effect could only be achieved by using cameras and specialized photographic skills. These days, creators can use Filmora Video Editor to replicate the double-exposure effect in just a few simple steps. Filmora Video Editor is an easy-to-use tool that has helped over 85 million video creators from 150 countries around the world. Videos are compatible with iPhone, iPad, Samsung, Amazon, HTC, PSP, and many more. You can also watch quality videos in AVI, VOB, MP4, WMV, 3GP, MKV, AVI, and more.
To help you save time, Filmora simplifies complex features and frequently improves its services by adding new features such as speed ramping, masking, auto beat sync, and auto synchronization. The video editor also allows creators to have more creative freedom over their videos and share their outputs on different platforms such as YouTube, Facebook, and Instagram.
For more information, you can visit http://www.wondershare.com/ or visit the social media accounts of Filmora to get the most recent launches and updates.
Download Filmora Video Editor now and tell the world your creative stories.
How To Unlink Audio and Video in DaVinci Resolve
There are various reasons why someone might want to remove audio from a video. Some of the film shots will have a lot of background noise, which might be distracting while watching the video. Some people like to include alternative audio or a soundtrack to make their films more presentable and attract people. So, whether you want to watch a silent video or one with a separate audio file, you’ll have to erase the original audio.
How To Detach Audio and Video in Da Vinci Resolve
DaVinci Resolve is a sound and video editing program for all types of files. It has numerous applications. Let’s begin with audio extraction from a video clip below:
- Launch the DaVinci Resolve and open the file from File>Open>Select video clip.
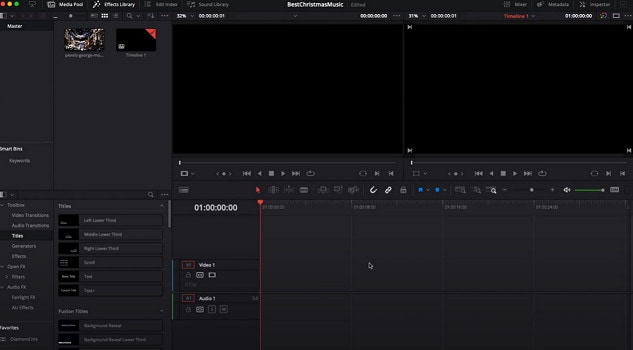
- All you have to do with DaVinci Resolve is tap on the chain link in the toolbar above to delete audio from any clip. Alternatively, you may just press down the “ctrl + shift + I” keys to connect and unlink the audio from your clip. Inspect the equalizer after that, and you’re done.
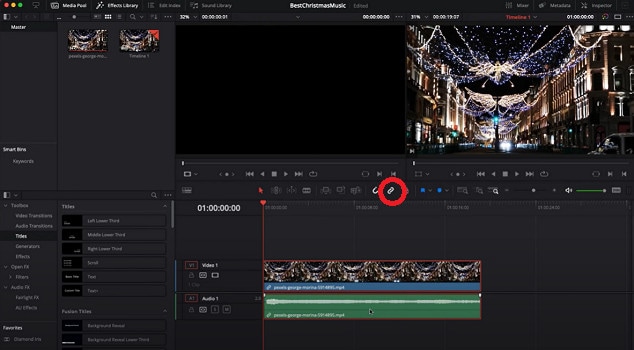
- You can now export the footage on your computer once you’ve finished editing and are pleased with the progress.
Other Alternatives
Suppose you find Da Vinci Resolve very complicated, and you get confused a lot while using it. I prepared a list of a few alternatives that you may use to detach the audio to your videos.
Besides extracting sound from video, the software listed below also has functionality for editing the audio file. Here are some of the most excellent and most popular audio separation and replacement tools:
#1: Wondershare Filmora – Overall Best
It is available on Windows and Mac.
Wondershare Filmora is a popular video editing program used all over the world. Filmora includes all the capabilities that will give you the most outstanding results, whether you’re doing easy video editing, advanced video editing, or even making movies. It also has specific editing features for social media videos.
Follow these steps below, and let’s look at how to detach audio from a video file with Filmora:
- Launch Filmora, then click on File-Import Media and load the video clip to the Media Library, wherein the sound needs to be deleted.
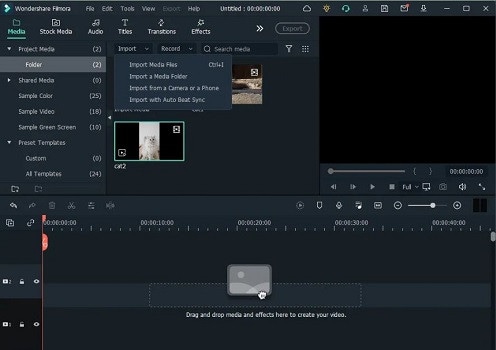
- Drag and drop using the mouse the video clips from the Media Library to the Timeline when it has been imported.
- Click Detach Audio from the context menu of the video file on the timeline.

- The audio will now show on the audio track below in a different format.
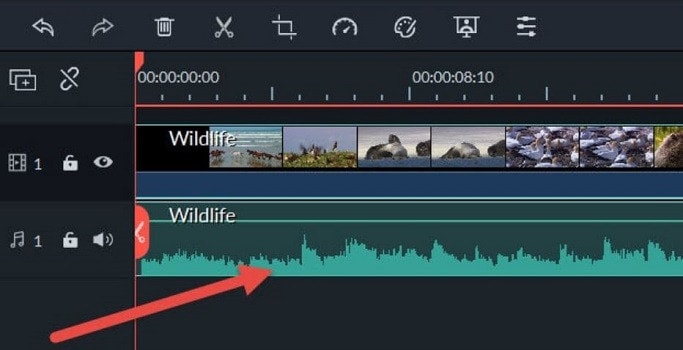
- To completely remove the audio file, press on it and simply tap the Delete icon.
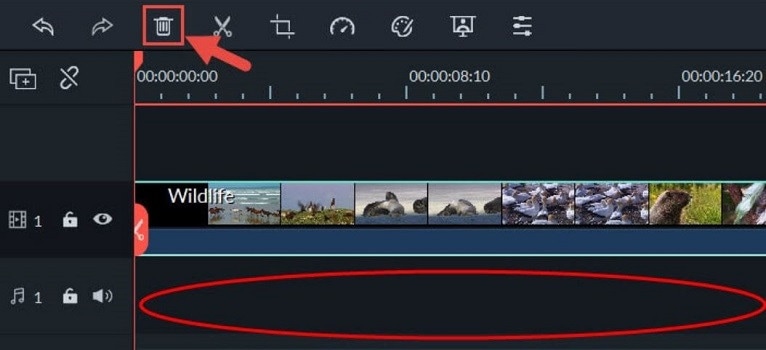
You may add a new sound to your video clip in the same manner, you did with the video (import, drag, and drop). Filmora also offers options that enable you to edit and add effects to an audio track.
#2: VSDC Video Editor
It is available on Windows and Mac.
VSDC is a popular video editing program that can handle high-resolution videos such as VR 360-degree, 4K UHD, and 3D films. It also allows users to capture speech and film from the screen and save the material in any format they want. Let’s look at how VSDC can be used to eliminate audio from video:
- Upload the clips you want to edit into VSDC.
- Pick the Properties option from the toolbar by right-clicking on the file with the cursor. A small window will drop down from the right side of the screen.

- You will find a Split to Audio and Video tab at the very bottom of the window; select it.
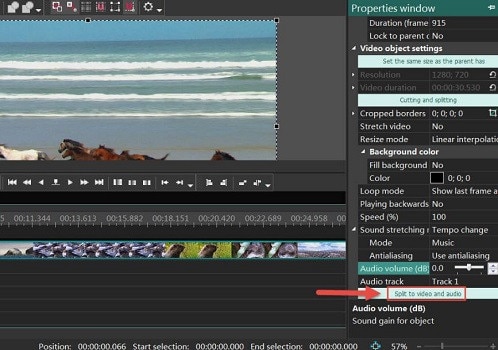
- On the timeline, the sound will now be divided from the video.
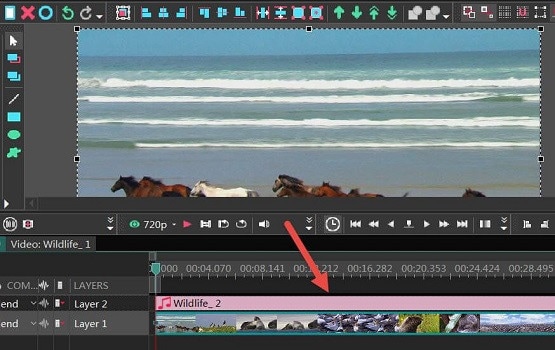
- Erase the audio file by clicking on it. Then, the video is now playable without audio.
VSDC also gives you the option of muting the audio rather than deleting it; however, deleting the audio is preferred.
#3: AudioRemover Tool
It is available on Windows, Mac, and Online.
The AudioRemover Tool is a program that allows you to eliminate audio from any video without having to re-encode it. It is an online service that can be accessed using a browser on Windows and Mac computers. The AudioRemover program can be used by those who do not want to download and install video editing software or just wish to remove audio from video files without additional editing. It can handle any video format, including MP4, MOV, and AVI.
Let’s look at how you can use this application to delete audio:
- Open the online AudioRemover.
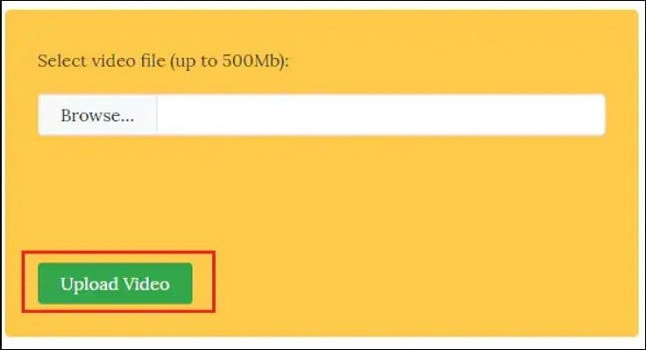
- Choose the source video using the Browse tab, then press the Upload Video icon.
- You can save the media files (without audio) once the uploading is finished by clicking the Download File button next to the Completed indication.
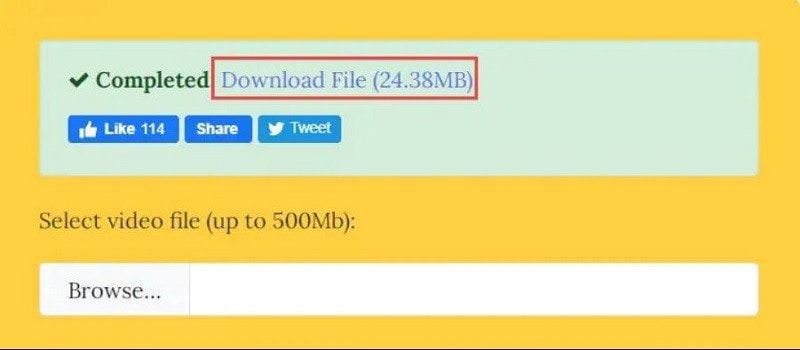
This program requires an active connection to the internet, and you cannot upload files larger than 500 MB.
#4: Windows Movie Maker
It is available on Windows.
Because it used to be included in the Windows Essentials software set, Windows Movie Maker is among the most popular accessible editing programs. Let’s have a look at how Movie Maker handles audio extraction.
- Upload the video you want to modify into Windows Movie Maker.
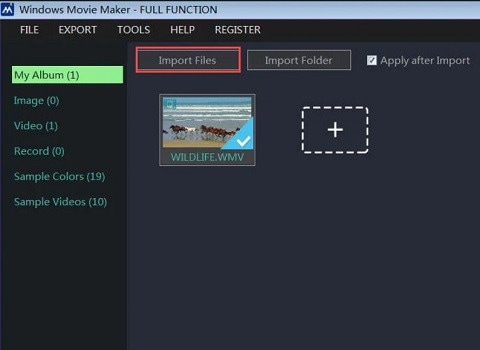
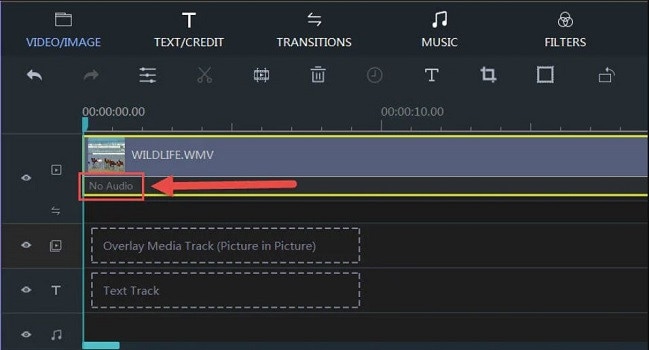
- Create a timeline for the video. Remove audio by right-clicking it (You may also click Detach Audio, and then it will detach the sound from the audio track)
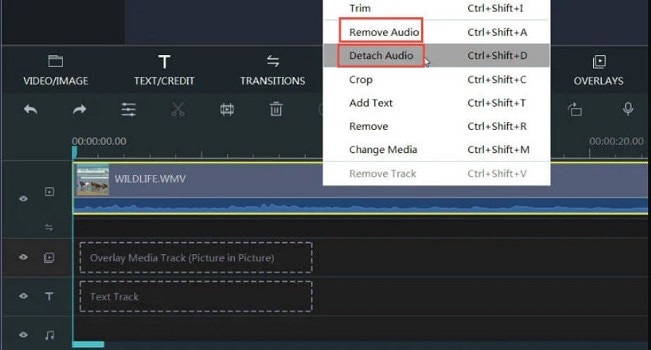
- It will immediately erase the sound, and it will not show any Audio input anymore.
Wrapping Things Up
People’s viewing experiences are greatly influenced by the audio accompanying a video. No matter how wonderful or perfect a video clip is, if the audio playing while watching it is terrible, it may be a very frustrating experience. So, we’ve gone over a few different software options for removing audio from a video file and replacing it with another audio in a couple of moments.
Frequently Asked Questions
How to Insert Audio to Video Clip in Da Vinci Resolve?
There may be times that your video may require the addition of music, background audio, or wooshing sounds.
To begin, open Resolve and import your audio clip:
- Navigate to the “Edit” page.
- Select the tab “Media Pool.”
- Right-click and choose “Import Media” or push “Ctrl + i.”
- Pick your audio clip and browse to your location.
- Select “Open.”
The audio clip is now imported into the “Media Pool.” After that, you’ll need to figure out which part of the audio track you’ll use.
Double-click the audio clip to play it. In the “Source Viewer,” it will appear.
Set the needed audio parts in (press I) and out (press O). Alternatively, if you need the entire soundtrack, there’s no need to set in and out.
Drag & drop the audio track (from the media pool) underneath the video you want to use. It will then add the sound file with the selected portion of the audio. You can now modify the audio to match the visual.
How to Link Your Audio and Video in DaVinci Resolve?
It’s best to link the soundtrack (music, sound effect, or background music) to the relevant video once you’ve adjusted the audio file.
Here’s how to connect audio and video in a timeline:
- Press “Ctrl” or “Cmd” to toggle both the video and audio.
- Right-click and choose “Link Clips.” You may also use the shortcuts “Ctrl + Alt + L” or “Option + Command + L.”
- The sound and visual are now both connected.
Thus, you can rest guaranteed that the audio will follow your movie wherever it goes. There will be no issues with out-of-sync!
How Do You Link Many Audio and Video Files Together in DaVinci Resolve?
Several video and audio segments can be linked together to form a single one. You can rearrange them anywhere in the timeline, and they will not be out of sync.
This is how you connect many clips:
- By holding down the “Ctrl” or “Cmd” key, you can choose all the video and audio clips you want.
- Right-click and choose “Link Clips.” You may also use the shortcut keys “Ctrl + Alt + L” or “Option + Command + L”.
- Now, all your video or audio files are linked together.
Is Any Music Available to Use for Editing?
Understanding copyright law can be complicated. It’s best to use free music for video editing if you don’t want to be accused of copyright violation.
Additionally, you can purchase two licenses to avoid copyright concerns. The producer controls the synchronization license, and the master license to use the song recording is managed by the publishing company.
If you don’t want to go into legal trouble, the only thing you need to remember is never to utilize any illegal video.
Is There Any Free Music in DaVinci Resolve?
DaVinci Resolve does not include any free music; however, it does include royalty-free sound effects noise. To get started, you can download and install the available sound package.
What Software Provides Free Music?
The Audio Collection in Wondershare Filmora has over 50 royalty-free audio tracks for videos, with more to come.
For video production, you can acquire free background music.
In addition, Filmora has 25 sound effects, including animal sounds, video game sounds, and beeps. With Filmora, you may use more advanced editing features like keyframing, background noise elimination, cut, trim, crop, PIP effects, green-screen effects, and more to add free-choice music to your film.
Filmora will enhance the appeal of your video by giving free background music. You may also tweak the background sound, such as speeding up and slowing down, fade-in and fade-out.

- All you have to do with DaVinci Resolve is tap on the chain link in the toolbar above to delete audio from any clip. Alternatively, you may just press down the “ctrl + shift + I” keys to connect and unlink the audio from your clip. Inspect the equalizer after that, and you’re done.

- You can now export the footage on your computer once you’ve finished editing and are pleased with the progress.
Other Alternatives
Suppose you find Da Vinci Resolve very complicated, and you get confused a lot while using it. I prepared a list of a few alternatives that you may use to detach the audio to your videos.
Besides extracting sound from video, the software listed below also has functionality for editing the audio file. Here are some of the most excellent and most popular audio separation and replacement tools:
#1: Wondershare Filmora – Overall Best
It is available on Windows and Mac.
Wondershare Filmora is a popular video editing program used all over the world. Filmora includes all the capabilities that will give you the most outstanding results, whether you’re doing easy video editing, advanced video editing, or even making movies. It also has specific editing features for social media videos.
Follow these steps below, and let’s look at how to detach audio from a video file with Filmora:
- Launch Filmora, then click on File-Import Media and load the video clip to the Media Library, wherein the sound needs to be deleted.

- Drag and drop using the mouse the video clips from the Media Library to the Timeline when it has been imported.
- Click Detach Audio from the context menu of the video file on the timeline.

- The audio will now show on the audio track below in a different format.

- To completely remove the audio file, press on it and simply tap the Delete icon.

You may add a new sound to your video clip in the same manner, you did with the video (import, drag, and drop). Filmora also offers options that enable you to edit and add effects to an audio track.
#2: VSDC Video Editor
It is available on Windows and Mac.
VSDC is a popular video editing program that can handle high-resolution videos such as VR 360-degree, 4K UHD, and 3D films. It also allows users to capture speech and film from the screen and save the material in any format they want. Let’s look at how VSDC can be used to eliminate audio from video:
- Upload the clips you want to edit into VSDC.
- Pick the Properties option from the toolbar by right-clicking on the file with the cursor. A small window will drop down from the right side of the screen.

- You will find a Split to Audio and Video tab at the very bottom of the window; select it.

- On the timeline, the sound will now be divided from the video.

- Erase the audio file by clicking on it. Then, the video is now playable without audio.
VSDC also gives you the option of muting the audio rather than deleting it; however, deleting the audio is preferred.
#3: AudioRemover Tool
It is available on Windows, Mac, and Online.
The AudioRemover Tool is a program that allows you to eliminate audio from any video without having to re-encode it. It is an online service that can be accessed using a browser on Windows and Mac computers. The AudioRemover program can be used by those who do not want to download and install video editing software or just wish to remove audio from video files without additional editing. It can handle any video format, including MP4, MOV, and AVI.
Let’s look at how you can use this application to delete audio:
- Open the online AudioRemover.
- Choose the source video using the Browse tab, then press the Upload Video icon.

- You can save the media files (without audio) once the uploading is finished by clicking the Download File button next to the Completed indication.

This program requires an active connection to the internet, and you cannot upload files larger than 500 MB.
#4: Windows Movie Maker
It is available on Windows.
Because it used to be included in the Windows Essentials software set, Windows Movie Maker is among the most popular accessible editing programs. Let’s have a look at how Movie Maker handles audio extraction.
- Upload the video you want to modify into Windows Movie Maker.

- Create a timeline for the video. Remove audio by right-clicking it (You may also click Detach Audio, and then it will detach the sound from the audio track)

- It will immediately erase the sound, and it will not show any Audio input anymore.

Wrapping Things Up
People’s viewing experiences are greatly influenced by the audio accompanying a video. No matter how wonderful or perfect a video clip is, if the audio playing while watching it is terrible, it may be a very frustrating experience. So, we’ve gone over a few different software options for removing audio from a video file and replacing it with another audio in a couple of moments.
Frequently Asked Questions
How to Insert Audio to Video Clip in Da Vinci Resolve?
There may be times that your video may require the addition of music, background audio, or wooshing sounds.
To begin, open Resolve and import your audio clip:
- Navigate to the “Edit” page.
- Select the tab “Media Pool.”
- Right-click and choose “Import Media” or push “Ctrl + i.”
- Pick your audio clip and browse to your location.
- Select “Open.”
The audio clip is now imported into the “Media Pool.” After that, you’ll need to figure out which part of the audio track you’ll use.
Double-click the audio clip to play it. In the “Source Viewer,” it will appear.
Set the needed audio parts in (press I) and out (press O). Alternatively, if you need the entire soundtrack, there’s no need to set in and out.
Drag & drop the audio track (from the media pool) underneath the video you want to use. It will then add the sound file with the selected portion of the audio. You can now modify the audio to match the visual.
How to Link Your Audio and Video in DaVinci Resolve?
It’s best to link the soundtrack (music, sound effect, or background music) to the relevant video once you’ve adjusted the audio file.
Here’s how to connect audio and video in a timeline:
- Press “Ctrl” or “Cmd” to toggle both the video and audio.
- Right-click and choose “Link Clips.” You may also use the shortcuts “Ctrl + Alt + L” or “Option + Command + L.”
- The sound and visual are now both connected.
Thus, you can rest guaranteed that the audio will follow your movie wherever it goes. There will be no issues with out-of-sync!
How Do You Link Many Audio and Video Files Together in DaVinci Resolve?
Several video and audio segments can be linked together to form a single one. You can rearrange them anywhere in the timeline, and they will not be out of sync.
This is how you connect many clips:
- By holding down the “Ctrl” or “Cmd” key, you can choose all the video and audio clips you want.
- Right-click and choose “Link Clips.” You may also use the shortcut keys “Ctrl + Alt + L” or “Option + Command + L”.
- Now, all your video or audio files are linked together.
Is Any Music Available to Use for Editing?
Understanding copyright law can be complicated. It’s best to use free music for video editing if you don’t want to be accused of copyright violation.
Additionally, you can purchase two licenses to avoid copyright concerns. The producer controls the synchronization license, and the master license to use the song recording is managed by the publishing company.
If you don’t want to go into legal trouble, the only thing you need to remember is never to utilize any illegal video.
Is There Any Free Music in DaVinci Resolve?
DaVinci Resolve does not include any free music; however, it does include royalty-free sound effects noise. To get started, you can download and install the available sound package.
What Software Provides Free Music?
The Audio Collection in Wondershare Filmora has over 50 royalty-free audio tracks for videos, with more to come.
For video production, you can acquire free background music.
In addition, Filmora has 25 sound effects, including animal sounds, video game sounds, and beeps. With Filmora, you may use more advanced editing features like keyframing, background noise elimination, cut, trim, crop, PIP effects, green-screen effects, and more to add free-choice music to your film.
Filmora will enhance the appeal of your video by giving free background music. You may also tweak the background sound, such as speeding up and slowing down, fade-in and fade-out.

- All you have to do with DaVinci Resolve is tap on the chain link in the toolbar above to delete audio from any clip. Alternatively, you may just press down the “ctrl + shift + I” keys to connect and unlink the audio from your clip. Inspect the equalizer after that, and you’re done.

- You can now export the footage on your computer once you’ve finished editing and are pleased with the progress.
Other Alternatives
Suppose you find Da Vinci Resolve very complicated, and you get confused a lot while using it. I prepared a list of a few alternatives that you may use to detach the audio to your videos.
Besides extracting sound from video, the software listed below also has functionality for editing the audio file. Here are some of the most excellent and most popular audio separation and replacement tools:
#1: Wondershare Filmora – Overall Best
It is available on Windows and Mac.
Wondershare Filmora is a popular video editing program used all over the world. Filmora includes all the capabilities that will give you the most outstanding results, whether you’re doing easy video editing, advanced video editing, or even making movies. It also has specific editing features for social media videos.
Follow these steps below, and let’s look at how to detach audio from a video file with Filmora:
- Launch Filmora, then click on File-Import Media and load the video clip to the Media Library, wherein the sound needs to be deleted.

- Drag and drop using the mouse the video clips from the Media Library to the Timeline when it has been imported.
- Click Detach Audio from the context menu of the video file on the timeline.

- The audio will now show on the audio track below in a different format.

- To completely remove the audio file, press on it and simply tap the Delete icon.

You may add a new sound to your video clip in the same manner, you did with the video (import, drag, and drop). Filmora also offers options that enable you to edit and add effects to an audio track.
#2: VSDC Video Editor
It is available on Windows and Mac.
VSDC is a popular video editing program that can handle high-resolution videos such as VR 360-degree, 4K UHD, and 3D films. It also allows users to capture speech and film from the screen and save the material in any format they want. Let’s look at how VSDC can be used to eliminate audio from video:
- Upload the clips you want to edit into VSDC.
- Pick the Properties option from the toolbar by right-clicking on the file with the cursor. A small window will drop down from the right side of the screen.

- You will find a Split to Audio and Video tab at the very bottom of the window; select it.

- On the timeline, the sound will now be divided from the video.

- Erase the audio file by clicking on it. Then, the video is now playable without audio.
VSDC also gives you the option of muting the audio rather than deleting it; however, deleting the audio is preferred.
#3: AudioRemover Tool
It is available on Windows, Mac, and Online.
The AudioRemover Tool is a program that allows you to eliminate audio from any video without having to re-encode it. It is an online service that can be accessed using a browser on Windows and Mac computers. The AudioRemover program can be used by those who do not want to download and install video editing software or just wish to remove audio from video files without additional editing. It can handle any video format, including MP4, MOV, and AVI.
Let’s look at how you can use this application to delete audio:
- Open the online AudioRemover.
- Choose the source video using the Browse tab, then press the Upload Video icon.

- You can save the media files (without audio) once the uploading is finished by clicking the Download File button next to the Completed indication.

This program requires an active connection to the internet, and you cannot upload files larger than 500 MB.
#4: Windows Movie Maker
It is available on Windows.
Because it used to be included in the Windows Essentials software set, Windows Movie Maker is among the most popular accessible editing programs. Let’s have a look at how Movie Maker handles audio extraction.
- Upload the video you want to modify into Windows Movie Maker.

- Create a timeline for the video. Remove audio by right-clicking it (You may also click Detach Audio, and then it will detach the sound from the audio track)

- It will immediately erase the sound, and it will not show any Audio input anymore.

Wrapping Things Up
People’s viewing experiences are greatly influenced by the audio accompanying a video. No matter how wonderful or perfect a video clip is, if the audio playing while watching it is terrible, it may be a very frustrating experience. So, we’ve gone over a few different software options for removing audio from a video file and replacing it with another audio in a couple of moments.
Frequently Asked Questions
How to Insert Audio to Video Clip in Da Vinci Resolve?
There may be times that your video may require the addition of music, background audio, or wooshing sounds.
To begin, open Resolve and import your audio clip:
- Navigate to the “Edit” page.
- Select the tab “Media Pool.”
- Right-click and choose “Import Media” or push “Ctrl + i.”
- Pick your audio clip and browse to your location.
- Select “Open.”
The audio clip is now imported into the “Media Pool.” After that, you’ll need to figure out which part of the audio track you’ll use.
Double-click the audio clip to play it. In the “Source Viewer,” it will appear.
Set the needed audio parts in (press I) and out (press O). Alternatively, if you need the entire soundtrack, there’s no need to set in and out.
Drag & drop the audio track (from the media pool) underneath the video you want to use. It will then add the sound file with the selected portion of the audio. You can now modify the audio to match the visual.
How to Link Your Audio and Video in DaVinci Resolve?
It’s best to link the soundtrack (music, sound effect, or background music) to the relevant video once you’ve adjusted the audio file.
Here’s how to connect audio and video in a timeline:
- Press “Ctrl” or “Cmd” to toggle both the video and audio.
- Right-click and choose “Link Clips.” You may also use the shortcuts “Ctrl + Alt + L” or “Option + Command + L.”
- The sound and visual are now both connected.
Thus, you can rest guaranteed that the audio will follow your movie wherever it goes. There will be no issues with out-of-sync!
How Do You Link Many Audio and Video Files Together in DaVinci Resolve?
Several video and audio segments can be linked together to form a single one. You can rearrange them anywhere in the timeline, and they will not be out of sync.
This is how you connect many clips:
- By holding down the “Ctrl” or “Cmd” key, you can choose all the video and audio clips you want.
- Right-click and choose “Link Clips.” You may also use the shortcut keys “Ctrl + Alt + L” or “Option + Command + L”.
- Now, all your video or audio files are linked together.
Is Any Music Available to Use for Editing?
Understanding copyright law can be complicated. It’s best to use free music for video editing if you don’t want to be accused of copyright violation.
Additionally, you can purchase two licenses to avoid copyright concerns. The producer controls the synchronization license, and the master license to use the song recording is managed by the publishing company.
If you don’t want to go into legal trouble, the only thing you need to remember is never to utilize any illegal video.
Is There Any Free Music in DaVinci Resolve?
DaVinci Resolve does not include any free music; however, it does include royalty-free sound effects noise. To get started, you can download and install the available sound package.
What Software Provides Free Music?
The Audio Collection in Wondershare Filmora has over 50 royalty-free audio tracks for videos, with more to come.
For video production, you can acquire free background music.
In addition, Filmora has 25 sound effects, including animal sounds, video game sounds, and beeps. With Filmora, you may use more advanced editing features like keyframing, background noise elimination, cut, trim, crop, PIP effects, green-screen effects, and more to add free-choice music to your film.
Filmora will enhance the appeal of your video by giving free background music. You may also tweak the background sound, such as speeding up and slowing down, fade-in and fade-out.

- All you have to do with DaVinci Resolve is tap on the chain link in the toolbar above to delete audio from any clip. Alternatively, you may just press down the “ctrl + shift + I” keys to connect and unlink the audio from your clip. Inspect the equalizer after that, and you’re done.

- You can now export the footage on your computer once you’ve finished editing and are pleased with the progress.
Other Alternatives
Suppose you find Da Vinci Resolve very complicated, and you get confused a lot while using it. I prepared a list of a few alternatives that you may use to detach the audio to your videos.
Besides extracting sound from video, the software listed below also has functionality for editing the audio file. Here are some of the most excellent and most popular audio separation and replacement tools:
#1: Wondershare Filmora – Overall Best
It is available on Windows and Mac.
Wondershare Filmora is a popular video editing program used all over the world. Filmora includes all the capabilities that will give you the most outstanding results, whether you’re doing easy video editing, advanced video editing, or even making movies. It also has specific editing features for social media videos.
Follow these steps below, and let’s look at how to detach audio from a video file with Filmora:
- Launch Filmora, then click on File-Import Media and load the video clip to the Media Library, wherein the sound needs to be deleted.

- Drag and drop using the mouse the video clips from the Media Library to the Timeline when it has been imported.
- Click Detach Audio from the context menu of the video file on the timeline.

- The audio will now show on the audio track below in a different format.

- To completely remove the audio file, press on it and simply tap the Delete icon.

You may add a new sound to your video clip in the same manner, you did with the video (import, drag, and drop). Filmora also offers options that enable you to edit and add effects to an audio track.
#2: VSDC Video Editor
It is available on Windows and Mac.
VSDC is a popular video editing program that can handle high-resolution videos such as VR 360-degree, 4K UHD, and 3D films. It also allows users to capture speech and film from the screen and save the material in any format they want. Let’s look at how VSDC can be used to eliminate audio from video:
- Upload the clips you want to edit into VSDC.
- Pick the Properties option from the toolbar by right-clicking on the file with the cursor. A small window will drop down from the right side of the screen.

- You will find a Split to Audio and Video tab at the very bottom of the window; select it.

- On the timeline, the sound will now be divided from the video.

- Erase the audio file by clicking on it. Then, the video is now playable without audio.
VSDC also gives you the option of muting the audio rather than deleting it; however, deleting the audio is preferred.
#3: AudioRemover Tool
It is available on Windows, Mac, and Online.
The AudioRemover Tool is a program that allows you to eliminate audio from any video without having to re-encode it. It is an online service that can be accessed using a browser on Windows and Mac computers. The AudioRemover program can be used by those who do not want to download and install video editing software or just wish to remove audio from video files without additional editing. It can handle any video format, including MP4, MOV, and AVI.
Let’s look at how you can use this application to delete audio:
- Open the online AudioRemover.
- Choose the source video using the Browse tab, then press the Upload Video icon.

- You can save the media files (without audio) once the uploading is finished by clicking the Download File button next to the Completed indication.

This program requires an active connection to the internet, and you cannot upload files larger than 500 MB.
#4: Windows Movie Maker
It is available on Windows.
Because it used to be included in the Windows Essentials software set, Windows Movie Maker is among the most popular accessible editing programs. Let’s have a look at how Movie Maker handles audio extraction.
- Upload the video you want to modify into Windows Movie Maker.

- Create a timeline for the video. Remove audio by right-clicking it (You may also click Detach Audio, and then it will detach the sound from the audio track)

- It will immediately erase the sound, and it will not show any Audio input anymore.

Wrapping Things Up
People’s viewing experiences are greatly influenced by the audio accompanying a video. No matter how wonderful or perfect a video clip is, if the audio playing while watching it is terrible, it may be a very frustrating experience. So, we’ve gone over a few different software options for removing audio from a video file and replacing it with another audio in a couple of moments.
Frequently Asked Questions
How to Insert Audio to Video Clip in Da Vinci Resolve?
There may be times that your video may require the addition of music, background audio, or wooshing sounds.
To begin, open Resolve and import your audio clip:
- Navigate to the “Edit” page.
- Select the tab “Media Pool.”
- Right-click and choose “Import Media” or push “Ctrl + i.”
- Pick your audio clip and browse to your location.
- Select “Open.”
The audio clip is now imported into the “Media Pool.” After that, you’ll need to figure out which part of the audio track you’ll use.
Double-click the audio clip to play it. In the “Source Viewer,” it will appear.
Set the needed audio parts in (press I) and out (press O). Alternatively, if you need the entire soundtrack, there’s no need to set in and out.
Drag & drop the audio track (from the media pool) underneath the video you want to use. It will then add the sound file with the selected portion of the audio. You can now modify the audio to match the visual.
How to Link Your Audio and Video in DaVinci Resolve?
It’s best to link the soundtrack (music, sound effect, or background music) to the relevant video once you’ve adjusted the audio file.
Here’s how to connect audio and video in a timeline:
- Press “Ctrl” or “Cmd” to toggle both the video and audio.
- Right-click and choose “Link Clips.” You may also use the shortcuts “Ctrl + Alt + L” or “Option + Command + L.”
- The sound and visual are now both connected.
Thus, you can rest guaranteed that the audio will follow your movie wherever it goes. There will be no issues with out-of-sync!
How Do You Link Many Audio and Video Files Together in DaVinci Resolve?
Several video and audio segments can be linked together to form a single one. You can rearrange them anywhere in the timeline, and they will not be out of sync.
This is how you connect many clips:
- By holding down the “Ctrl” or “Cmd” key, you can choose all the video and audio clips you want.
- Right-click and choose “Link Clips.” You may also use the shortcut keys “Ctrl + Alt + L” or “Option + Command + L”.
- Now, all your video or audio files are linked together.
Is Any Music Available to Use for Editing?
Understanding copyright law can be complicated. It’s best to use free music for video editing if you don’t want to be accused of copyright violation.
Additionally, you can purchase two licenses to avoid copyright concerns. The producer controls the synchronization license, and the master license to use the song recording is managed by the publishing company.
If you don’t want to go into legal trouble, the only thing you need to remember is never to utilize any illegal video.
Is There Any Free Music in DaVinci Resolve?
DaVinci Resolve does not include any free music; however, it does include royalty-free sound effects noise. To get started, you can download and install the available sound package.
What Software Provides Free Music?
The Audio Collection in Wondershare Filmora has over 50 royalty-free audio tracks for videos, with more to come.
For video production, you can acquire free background music.
In addition, Filmora has 25 sound effects, including animal sounds, video game sounds, and beeps. With Filmora, you may use more advanced editing features like keyframing, background noise elimination, cut, trim, crop, PIP effects, green-screen effects, and more to add free-choice music to your film.
Filmora will enhance the appeal of your video by giving free background music. You may also tweak the background sound, such as speeding up and slowing down, fade-in and fade-out.
Backup and Organize Your Footage in Minutes
Backing up your data is deemed significantly necessary among video editing communities. Files get corrupted easily. Having a backup drive can save your day and countless hours. You can back up your data any way you deem fit. However, it will do you right if you follow the advice of professionals.
The article is written explicitly after due consideration and suggestions from the professional video editor. You can follow the steps in it to make backup files. Let us start with very straightforward steps to help you understand the professional way of backing up and organizing your footage.
Part 1. Back Up Your Files
Backing up your files gives you peace of mind. If one file is lost, the whole project becomes vulnerable to failure. Therefore, every effort must be made to ensure the protection of files. The best way to protect the files from any misfortune is to back them up.
Remember, there is no specific way to back up your files. Depending on the project’s requirements, you can do that differently. The following steps will light up how you can back up your files.
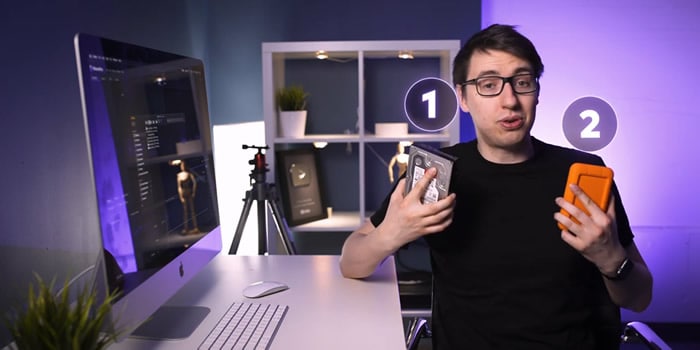
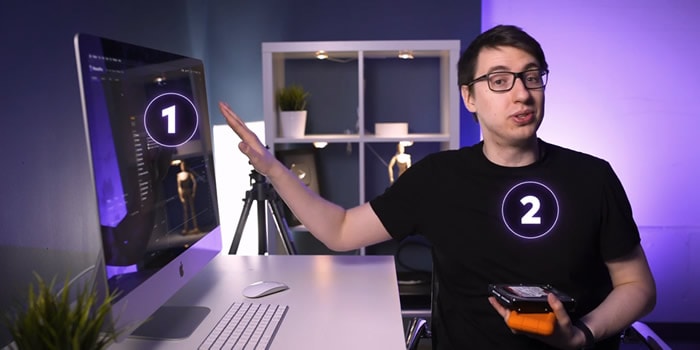
Step1Back up your files in two different places
It is crucial to do that. If one backup drive corrupts, you have the second option. It gives you an opportunity to back up files.
- You can make two different external backup hard drives.
- You can also use your internal and external devices as two backup options.
Step2Make specific folders for each purpose of the video
The next step is how you back up your files properly and safely. Make separate folders for the different formats you are importing in your drive. Always use the primary source to make a copy of your files.
Follow the steps below to understand how to back up your files in two drives.
- Create a folder in your drive.
- Name it. You can name it according to the given format. The choice is yours.
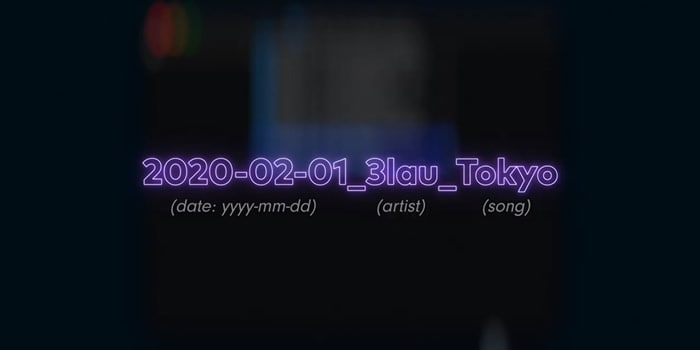
- Your backup folder is created.
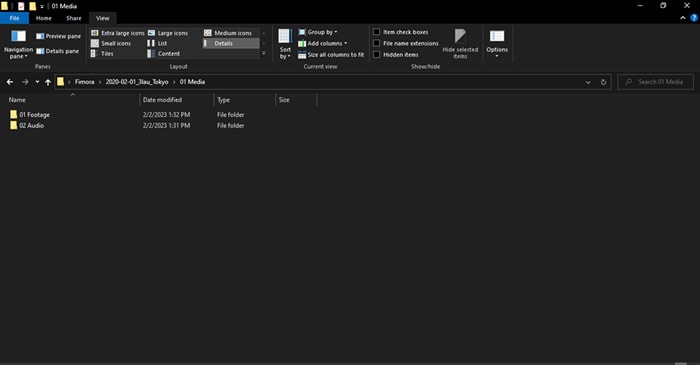
- Make new folders based on the files that are imported into the file. We are making two folders for the project, 01 Footage, and 02 Audio.
- 01 Footage is for the original footage.
- 02 Audio is for audio files provided by the music artist.
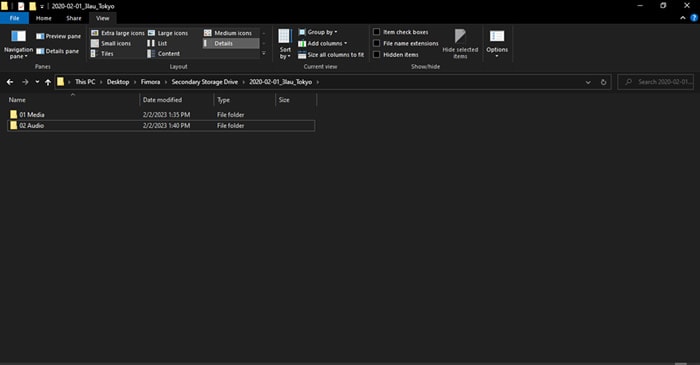
Step3Repeat the same process in your second backup drive
- Make the same folders and sub-folders in your secondary backup drive.
Step4Transfer files to your primary and secondary folders
- Transfer files to folders and sub-folders in your first backup drive.
- Transfer files to folders and sub-folders in your secondary backup drive.
![]()
Note: Most people make the mistake of making a backup drive and then using the same drive to make the second backup. The approach needs to be corrected.
We are done with backing up our files. It is time to organize the files in your drive.
Part 2. Organize Your Files in Filmora
Organizing your files is vital for any operation in video and editing. It makes everything streamlined. The risk of losing your data become negligible. Let us enlighten you on how you can organize your files.
Free Download For Win 7 or later(64-bit)
Free Download For macOS 10.14 or later
Step1Create new folders to lay the foundation for your video editing project
You can imitate the format we have chosen. However, you can choose any way you deem fit.
- Create 02 Project Files and 03 Exports.
- 02 Project contains the files that we will edit in Filmora .
- 03 Exports will have files that will be exported out of Filmora.
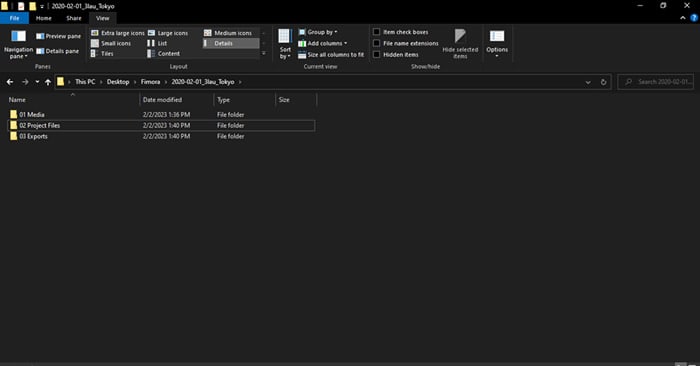
- In the 01 Media folder, create a new folder, 03 Graphics. It will contain graphics the artist will provide, such as a logo. You can also add your graphics to the folder if you want.
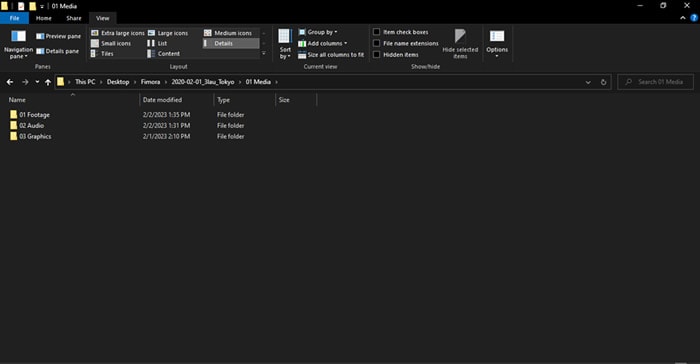
The format will help you if you move files from one device to the next case. In that case, you will only have to move one folder with the artist’s name.
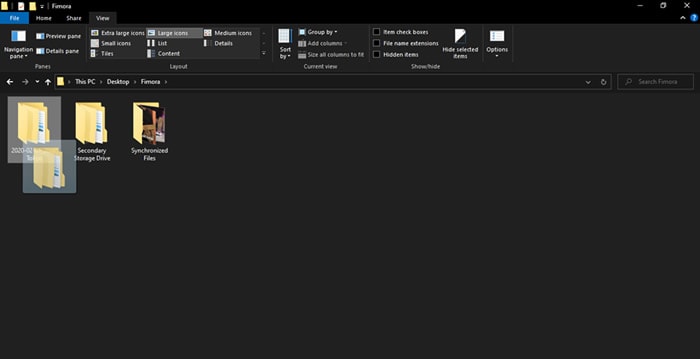
Step2Create a new project
In this step, we will organize our files in Filmora. It will help us to keep discipline and order in file organization. It makes work easy and fun.
- Create a new project when you open Filmora on your PC or Mac.
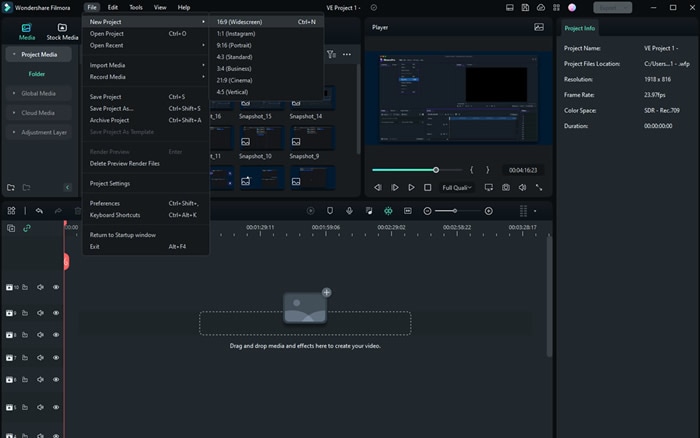
- Save the project in any name you want. We have saved the project in the format explained above.
- Save the file in 02 Project Files.
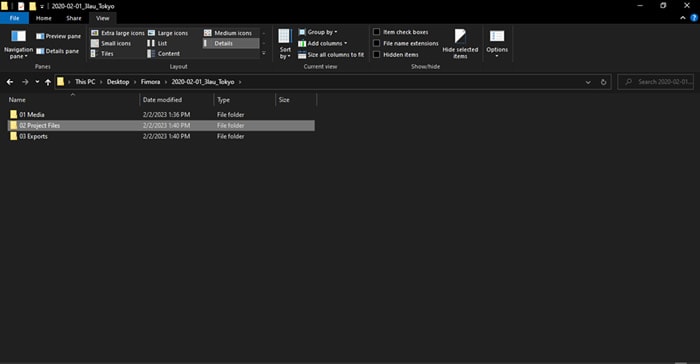
Step3Edit your workspace if you want
Users can edit the workspace in Filmora. You can customize it to your liking. Also, it is entirely optional.
- Go to layout mode. Change the layout if you want.
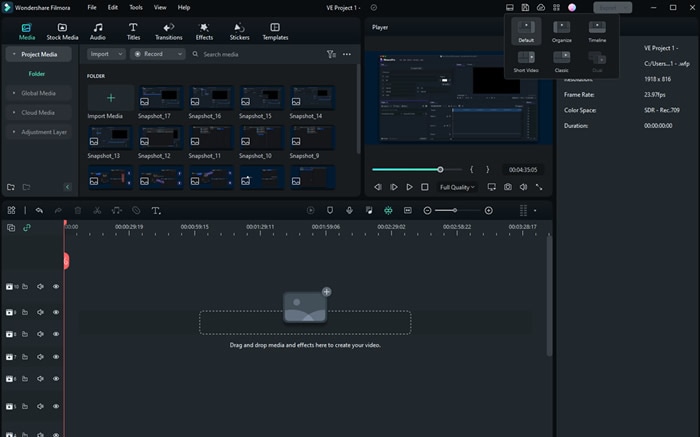
- You can manually change the panels by simply dragging them across the screen.
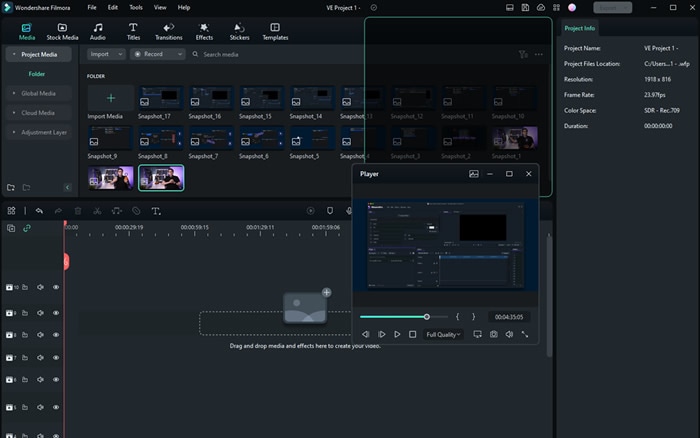
The workspace settings will be saved automatically. The next time you start Filmora, you will not need to readjust the panels.
- Save the file
Step4Recreate the file structure in your 02 project files
Now, you create folders in your project. For that, you can follow our structure, or you can follow your instincts.
- Create the folders in Filmora, as you have created them in your drive. The folders will be created in your 02 Project Files.
These new folders are the exact copies of your media files that you have got from the producer and music artist.
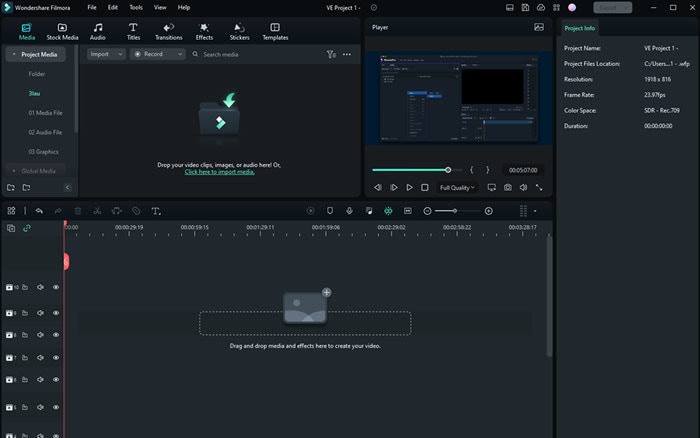
- Import the files into respective folders. Footage should include all the original videos given to your producers.
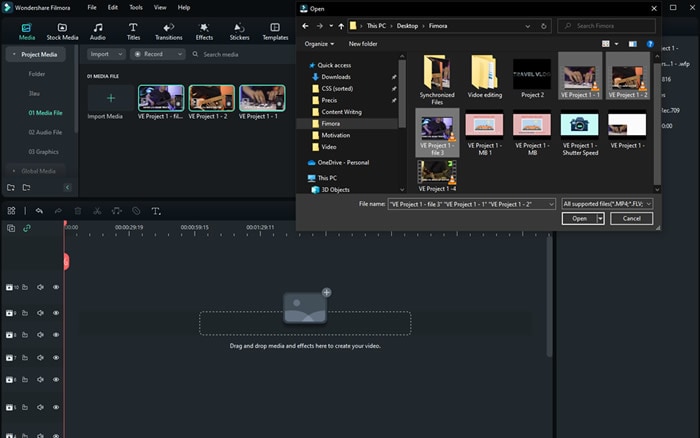
Step5Save the project
You can save the file using the button on Filmora, as shown below.
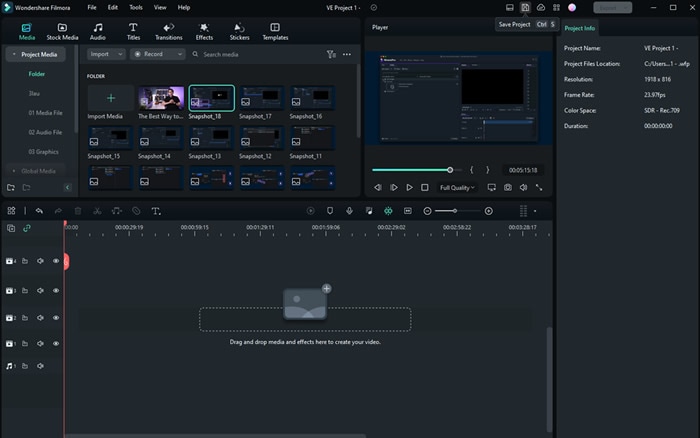
- You can save the files using short keys.

Conclusion
Making a backup file for your project is crucial. For a video editor, it is quite painful to learn that the final product has a missing file. Therefore, one must ensure that all the files are backed up before beginning the editing phase.
Apart from that, one must also keep updating the files in Filmora . You performed some editing. Make sure to save the file then and there. Any minor mistake can cause great worry for the professional editor. Thus, it is better to take proactive actions.
Free Download For Win 7 or later(64-bit)
Free Download For macOS 10.14 or later
We are done with backing up our files. It is time to organize the files in your drive.
Part 2. Organize Your Files in Filmora
Organizing your files is vital for any operation in video and editing. It makes everything streamlined. The risk of losing your data become negligible. Let us enlighten you on how you can organize your files.
Free Download For Win 7 or later(64-bit)
Free Download For macOS 10.14 or later
Step1Create new folders to lay the foundation for your video editing project
You can imitate the format we have chosen. However, you can choose any way you deem fit.
- Create 02 Project Files and 03 Exports.
- 02 Project contains the files that we will edit in Filmora .
- 03 Exports will have files that will be exported out of Filmora.

- In the 01 Media folder, create a new folder, 03 Graphics. It will contain graphics the artist will provide, such as a logo. You can also add your graphics to the folder if you want.

The format will help you if you move files from one device to the next case. In that case, you will only have to move one folder with the artist’s name.

Step2Create a new project
In this step, we will organize our files in Filmora. It will help us to keep discipline and order in file organization. It makes work easy and fun.
- Create a new project when you open Filmora on your PC or Mac.

- Save the project in any name you want. We have saved the project in the format explained above.
- Save the file in 02 Project Files.

Step3Edit your workspace if you want
Users can edit the workspace in Filmora. You can customize it to your liking. Also, it is entirely optional.
- Go to layout mode. Change the layout if you want.

- You can manually change the panels by simply dragging them across the screen.

The workspace settings will be saved automatically. The next time you start Filmora, you will not need to readjust the panels.
- Save the file
Step4Recreate the file structure in your 02 project files
Now, you create folders in your project. For that, you can follow our structure, or you can follow your instincts.
- Create the folders in Filmora, as you have created them in your drive. The folders will be created in your 02 Project Files.
These new folders are the exact copies of your media files that you have got from the producer and music artist.

- Import the files into respective folders. Footage should include all the original videos given to your producers.

Step5Save the project
You can save the file using the button on Filmora, as shown below.

- You can save the files using short keys.

Conclusion
Making a backup file for your project is crucial. For a video editor, it is quite painful to learn that the final product has a missing file. Therefore, one must ensure that all the files are backed up before beginning the editing phase.
Apart from that, one must also keep updating the files in Filmora . You performed some editing. Make sure to save the file then and there. Any minor mistake can cause great worry for the professional editor. Thus, it is better to take proactive actions.
Free Download For Win 7 or later(64-bit)
Free Download For macOS 10.14 or later
How to Make Discord GIF PFP
How to Make Discord GIF PFP? [Solved]
An easy yet powerful editor
Numerous effects to choose from
Detailed tutorials provided by the official channel
Recently, Discord has become quite popular among different communities, especially gamers. After all, it is a safe platform that delivers a convenient area to communicate with friends and family. Are you familiar with the forum? If yes, you understand some of its advantages and why many people settle for it. If not, here you will get complete information about discord gif PFP. Discord allows communication via text, video, audio, and files. It features a private chat section where you chat with your friends. Besides, it includes a free and paid version, depending on which suits you.
Despite its popularity, issues are still rising, especially on Discord GIF PFP. Besides, the idea of having a GIF as a PFP is unique and is rare among different platforms. Fortunately, this article has essential details about Discord animated PFP. Read through the content below to understand how to get an animated Discord PFP.
In this article
01 [How to Make Discord PFP a GIF? The Complete Guide](#Part 1)
02 [How to Fix GIF PFP not Working on Discord?](#Part 2)
03 [Discord GIF PFP: How to set GIF Profile Pic](#Part 3)
Part 1 How to Make Discord PFP a GIF? The Complete Guide
Let’s kick off with details on making a Discord PFP a GIF. The first thing you need to keep in mind is the requirements of a Discord PFP GIF. In other words, what are the things that Discord considers before agreeing to set up your profile? Note that the platform only allows file sizes of up-to 8Mbs. Anything above that is irrelevant. Its maximum resolution is 128 by 128 pixels. Consider these essential points to ensure that your PFP is accepted.
How do you save a GIF for Discord?
There are several ways to access Discord animated PFP. One is a Discord nitro, and the other is making one yourself. If you are a Nitro subscriber, the platform will prompt you with amazing Discord nitro PFP. However, regular users need to make the animated PFP for Discord. This section covers these individuals as we give simple steps to save a suitable GIF.
Step 1: Visit a GIF website with different options available such as Tenor and GIPHY, depending on your preference and taste
Step 2: Search for the ultimate GIF you need
Step 3: Click the animated GIF for Discord and open it on a new tab
Step 4: Right-click on the GIF and choose Save Image to name it and save it on your PC
How do you make a Discord GIF PFP?
Step 1: Visit powerful GIF websites such as the EZgif website
Step 2: Go to the editing option, Resize and upload your GIF by selecting the Upload icon
Step 3: For sizing, enter 128 as height and weight. Ensure that your Discord GIF PFP is 8Mbs and if it isn’t, go for the Gifsicle resize method.

Step 4: Select the resize option and save the necessary changes so that you can download your GIF on your PC.
After strictly following the steps above, you can easily make a Discord GIF PFP and upload it into your account. As a result, you will have an animated GIF PFP even without the Nitro subscription. Note that the Nitro option is bigger and better. After all, it has fewer requirement needs since the platform offers you the available choices. Try out Discord animated PFP today and experience powerful and eye-catching profiles.
Part 2 How to Fix GIF PFP not Working on Discord?
Discord is no secret a robust platform that makes communication among different communities more convenient for all. Are you new on Discord, or are you among the millions of users under the platform? Whatever your case is, you need the answers on dealing with an unresponsive Discord account. For instance, you can’t upload your Discord GIF PFP? GIF PFP is unresponsive in Discord? This section offers you some of the simplest ways to solve these problems.
01Ensure that you subscribe to Discord Nitro
Discord is the most sought-after platform for effective communication between different communities. It includes a free and paid option depending on your taste and preference. Of course, Discord Nitro is the paid version with many advantages that makes your experience bigger and better. Discord Nitro is the ultimate version when you wish to include GIF as your PFP since there are almost no restrictions. The platform prompts you with a conversation that assists you in setting up your PFP. Is it possible to get Discord animated GIF without Nitro? Yes. All you need is to get the GIF from other free websites. However, issues may arise, especially when meeting the requirements.
02Ensure you have a stable Internet connection
Like most networking applications, you need an internet connection to connect with your friends and family. Are you struggling with making the necessary changes for your animated Discord PFP? If yes, then ensure that you check your internet. After all, it is impossible to make the required changes without a stable network.
03Check the Discord PFP format and ensure it is GIF and not other formats such as WebM
From the information above, you can tell that Discord is quite a restrictive software when you wish to add a Discord GIF PFP without the Nitro subscription. Therefore, it is crucial to ensure that you get the correct format. Otherwise, your GIF upload will be unsuccessful. The only Discord format allowed is the GIF; hence ensure that yours meets this requirement.
04Suppose you are an IOS user, try to re-upload the GIF from your computer
Different operating systems tend to work differently. Are you an iOS user and having difficulty uploading your Discord GIF PFP from your mobile? If yes, try to re-upload it from your computer. It is a simple hack that can assist with an unresponsive Discord account.
05Reinstall or Update your Discord Application
Sometimes applications have issues because of pending updates. If you are trying to fix GIF PFP for an unresponsive Discord software, try reinstalling it or updating it. In most cases, upon making these updates, your app will automatically respond to the necessary changes.
Is your Discord having issues? Do you have a problem uploading animated GIFs for Discord? If yes, then follow the simple hacks above.
Part 3 Discord GIF PFP: How to set GIF Profile Pic?
Discord GIF PFP is a critical topic we often encounter in different online communities. After all, using GIFs as PFP is unique and makes your account gain the necessary attention. Why not when your PFP often reflects on your community. However, many questions often arise regarding animated PFP for Discord since few people are familiar with how to go about getting moving PFP discord. Luckily, several resourceful sources offer you the information you need. And this piece is one of them. This section explains the most straightforward steps to help you set a GIF Profile pic in Discord. Check it out!
You need to know that getting discord nitro is the most convenient way to get and set a GIF profile pic. Is it possible without the Nitro subscription? Yes. However, it has multiple limitations compared to Discord nitro.
Step 1: Discord Nitro
Get Discord Nitro. As mentioned above, Discord has a free and paid version. However, it is no secret that the latter version is more convenient. Discord Nitro requires you to pay a monthly fee of $4.99
Step 2: Discord GIF Picker
Use Discord GIF Picker to search for your ultimate GIF. You can access this feature from your app’s chat box right side. In this case, you need the desktop version.
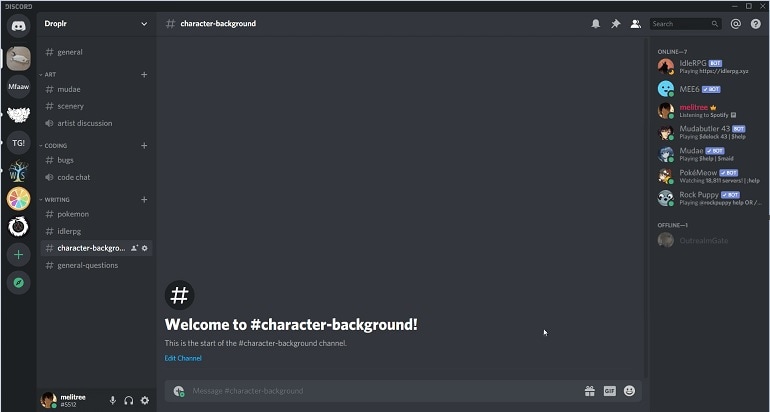
Note: If you don’t get what you are looking for, consult external websites such as Tenor, Wondershare Filmora Video Editor and save the GIF of your choice. Of course, there are many free websites available hence you can settle for any of them.

Wondershare Filmora - Best Video Editor for Mac/Windows
5,481,435 people have downloaded it.
Build unique custom animations without breaking a sweat.
Focus on creating epic stories and leave the details to Filmora’s auto features.
Start a creative adventure with drag & drop effects and endless possibilities.
Filmora simplifies advanced features to save you time and effort.
Filmora cuts out repetition so you can move on to your next creative breakthrough.
Step 3: Settings
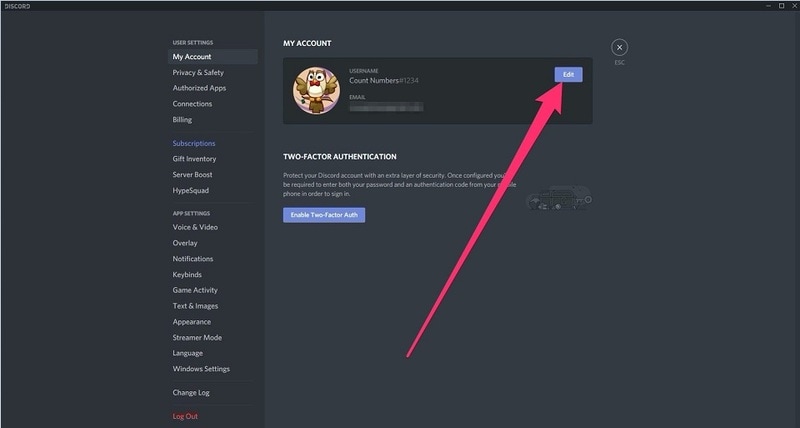
Change your PFP. For a successful process, you need to go to settings and User-Profile. Click on the available PFP and edit by selecting Change Avatar.
Step 4: Select GIF
Select your GIF from your PC and resize it to meet Discord’s requirements. Automatically, you will go to the editing page and apply the necessary changes. Select save changes and successfully change your PFP.
Step 5: Check Changes
View your Discord animated PFP to confirm the changes

Editing the animated GIF PFP is necessary, and you can use powerful editing software such as Filmora for the job. Filmora is a top editing platform that supports both video and GIF. Besides, it includes multiple features that assist in efficient editing. These features include noise removal, video stabilization, scene detection, 4k resolution support, image filters, etc. All these features blend to deliver a high-quality discord animated PFP.
● Ending Thoughts →
● Discord Nitro opens new possibilities for Discord users.
● Filmora is among the top editors you can use to get a great Discord moving PFP.
● It is possible to add GIF as PFP without Nitro. But the process is long and never delivers equally impressive results like those of Nitro.
● How to get animated Discord PFP is among the most popular topics about Discord. After all, almost everyone wants to have an exciting moving PFP Discord. Is it a straightforward process? Consider the details as above and learn more about Discord GIF PFP.
Recently, Discord has become quite popular among different communities, especially gamers. After all, it is a safe platform that delivers a convenient area to communicate with friends and family. Are you familiar with the forum? If yes, you understand some of its advantages and why many people settle for it. If not, here you will get complete information about discord gif PFP. Discord allows communication via text, video, audio, and files. It features a private chat section where you chat with your friends. Besides, it includes a free and paid version, depending on which suits you.
Despite its popularity, issues are still rising, especially on Discord GIF PFP. Besides, the idea of having a GIF as a PFP is unique and is rare among different platforms. Fortunately, this article has essential details about Discord animated PFP. Read through the content below to understand how to get an animated Discord PFP.
In this article
01 [How to Make Discord PFP a GIF? The Complete Guide](#Part 1)
02 [How to Fix GIF PFP not Working on Discord?](#Part 2)
03 [Discord GIF PFP: How to set GIF Profile Pic](#Part 3)
Part 1 How to Make Discord PFP a GIF? The Complete Guide
Let’s kick off with details on making a Discord PFP a GIF. The first thing you need to keep in mind is the requirements of a Discord PFP GIF. In other words, what are the things that Discord considers before agreeing to set up your profile? Note that the platform only allows file sizes of up-to 8Mbs. Anything above that is irrelevant. Its maximum resolution is 128 by 128 pixels. Consider these essential points to ensure that your PFP is accepted.
How do you save a GIF for Discord?
There are several ways to access Discord animated PFP. One is a Discord nitro, and the other is making one yourself. If you are a Nitro subscriber, the platform will prompt you with amazing Discord nitro PFP. However, regular users need to make the animated PFP for Discord. This section covers these individuals as we give simple steps to save a suitable GIF.
Step 1: Visit a GIF website with different options available such as Tenor and GIPHY, depending on your preference and taste
Step 2: Search for the ultimate GIF you need
Step 3: Click the animated GIF for Discord and open it on a new tab
Step 4: Right-click on the GIF and choose Save Image to name it and save it on your PC
How do you make a Discord GIF PFP?
Step 1: Visit powerful GIF websites such as the EZgif website
Step 2: Go to the editing option, Resize and upload your GIF by selecting the Upload icon
Step 3: For sizing, enter 128 as height and weight. Ensure that your Discord GIF PFP is 8Mbs and if it isn’t, go for the Gifsicle resize method.

Step 4: Select the resize option and save the necessary changes so that you can download your GIF on your PC.
After strictly following the steps above, you can easily make a Discord GIF PFP and upload it into your account. As a result, you will have an animated GIF PFP even without the Nitro subscription. Note that the Nitro option is bigger and better. After all, it has fewer requirement needs since the platform offers you the available choices. Try out Discord animated PFP today and experience powerful and eye-catching profiles.
Part 2 How to Fix GIF PFP not Working on Discord?
Discord is no secret a robust platform that makes communication among different communities more convenient for all. Are you new on Discord, or are you among the millions of users under the platform? Whatever your case is, you need the answers on dealing with an unresponsive Discord account. For instance, you can’t upload your Discord GIF PFP? GIF PFP is unresponsive in Discord? This section offers you some of the simplest ways to solve these problems.
01Ensure that you subscribe to Discord Nitro
Discord is the most sought-after platform for effective communication between different communities. It includes a free and paid option depending on your taste and preference. Of course, Discord Nitro is the paid version with many advantages that makes your experience bigger and better. Discord Nitro is the ultimate version when you wish to include GIF as your PFP since there are almost no restrictions. The platform prompts you with a conversation that assists you in setting up your PFP. Is it possible to get Discord animated GIF without Nitro? Yes. All you need is to get the GIF from other free websites. However, issues may arise, especially when meeting the requirements.
02Ensure you have a stable Internet connection
Like most networking applications, you need an internet connection to connect with your friends and family. Are you struggling with making the necessary changes for your animated Discord PFP? If yes, then ensure that you check your internet. After all, it is impossible to make the required changes without a stable network.
03Check the Discord PFP format and ensure it is GIF and not other formats such as WebM
From the information above, you can tell that Discord is quite a restrictive software when you wish to add a Discord GIF PFP without the Nitro subscription. Therefore, it is crucial to ensure that you get the correct format. Otherwise, your GIF upload will be unsuccessful. The only Discord format allowed is the GIF; hence ensure that yours meets this requirement.
04Suppose you are an IOS user, try to re-upload the GIF from your computer
Different operating systems tend to work differently. Are you an iOS user and having difficulty uploading your Discord GIF PFP from your mobile? If yes, try to re-upload it from your computer. It is a simple hack that can assist with an unresponsive Discord account.
05Reinstall or Update your Discord Application
Sometimes applications have issues because of pending updates. If you are trying to fix GIF PFP for an unresponsive Discord software, try reinstalling it or updating it. In most cases, upon making these updates, your app will automatically respond to the necessary changes.
Is your Discord having issues? Do you have a problem uploading animated GIFs for Discord? If yes, then follow the simple hacks above.
Part 3 Discord GIF PFP: How to set GIF Profile Pic?
Discord GIF PFP is a critical topic we often encounter in different online communities. After all, using GIFs as PFP is unique and makes your account gain the necessary attention. Why not when your PFP often reflects on your community. However, many questions often arise regarding animated PFP for Discord since few people are familiar with how to go about getting moving PFP discord. Luckily, several resourceful sources offer you the information you need. And this piece is one of them. This section explains the most straightforward steps to help you set a GIF Profile pic in Discord. Check it out!
You need to know that getting discord nitro is the most convenient way to get and set a GIF profile pic. Is it possible without the Nitro subscription? Yes. However, it has multiple limitations compared to Discord nitro.
Step 1: Discord Nitro
Get Discord Nitro. As mentioned above, Discord has a free and paid version. However, it is no secret that the latter version is more convenient. Discord Nitro requires you to pay a monthly fee of $4.99
Step 2: Discord GIF Picker
Use Discord GIF Picker to search for your ultimate GIF. You can access this feature from your app’s chat box right side. In this case, you need the desktop version.

Note: If you don’t get what you are looking for, consult external websites such as Tenor, Wondershare Filmora Video Editor and save the GIF of your choice. Of course, there are many free websites available hence you can settle for any of them.

Wondershare Filmora - Best Video Editor for Mac/Windows
5,481,435 people have downloaded it.
Build unique custom animations without breaking a sweat.
Focus on creating epic stories and leave the details to Filmora’s auto features.
Start a creative adventure with drag & drop effects and endless possibilities.
Filmora simplifies advanced features to save you time and effort.
Filmora cuts out repetition so you can move on to your next creative breakthrough.
Step 3: Settings
Change your PFP. For a successful process, you need to go to settings and User-Profile. Click on the available PFP and edit by selecting Change Avatar.

Step 4: Select GIF
Select your GIF from your PC and resize it to meet Discord’s requirements. Automatically, you will go to the editing page and apply the necessary changes. Select save changes and successfully change your PFP.
Step 5: Check Changes
View your Discord animated PFP to confirm the changes

Editing the animated GIF PFP is necessary, and you can use powerful editing software such as Filmora for the job. Filmora is a top editing platform that supports both video and GIF. Besides, it includes multiple features that assist in efficient editing. These features include noise removal, video stabilization, scene detection, 4k resolution support, image filters, etc. All these features blend to deliver a high-quality discord animated PFP.
● Ending Thoughts →
● Discord Nitro opens new possibilities for Discord users.
● Filmora is among the top editors you can use to get a great Discord moving PFP.
● It is possible to add GIF as PFP without Nitro. But the process is long and never delivers equally impressive results like those of Nitro.
● How to get animated Discord PFP is among the most popular topics about Discord. After all, almost everyone wants to have an exciting moving PFP Discord. Is it a straightforward process? Consider the details as above and learn more about Discord GIF PFP.
Recently, Discord has become quite popular among different communities, especially gamers. After all, it is a safe platform that delivers a convenient area to communicate with friends and family. Are you familiar with the forum? If yes, you understand some of its advantages and why many people settle for it. If not, here you will get complete information about discord gif PFP. Discord allows communication via text, video, audio, and files. It features a private chat section where you chat with your friends. Besides, it includes a free and paid version, depending on which suits you.
Despite its popularity, issues are still rising, especially on Discord GIF PFP. Besides, the idea of having a GIF as a PFP is unique and is rare among different platforms. Fortunately, this article has essential details about Discord animated PFP. Read through the content below to understand how to get an animated Discord PFP.
In this article
01 [How to Make Discord PFP a GIF? The Complete Guide](#Part 1)
02 [How to Fix GIF PFP not Working on Discord?](#Part 2)
03 [Discord GIF PFP: How to set GIF Profile Pic](#Part 3)
Part 1 How to Make Discord PFP a GIF? The Complete Guide
Let’s kick off with details on making a Discord PFP a GIF. The first thing you need to keep in mind is the requirements of a Discord PFP GIF. In other words, what are the things that Discord considers before agreeing to set up your profile? Note that the platform only allows file sizes of up-to 8Mbs. Anything above that is irrelevant. Its maximum resolution is 128 by 128 pixels. Consider these essential points to ensure that your PFP is accepted.
How do you save a GIF for Discord?
There are several ways to access Discord animated PFP. One is a Discord nitro, and the other is making one yourself. If you are a Nitro subscriber, the platform will prompt you with amazing Discord nitro PFP. However, regular users need to make the animated PFP for Discord. This section covers these individuals as we give simple steps to save a suitable GIF.
Step 1: Visit a GIF website with different options available such as Tenor and GIPHY, depending on your preference and taste
Step 2: Search for the ultimate GIF you need
Step 3: Click the animated GIF for Discord and open it on a new tab
Step 4: Right-click on the GIF and choose Save Image to name it and save it on your PC
How do you make a Discord GIF PFP?
Step 1: Visit powerful GIF websites such as the EZgif website
Step 2: Go to the editing option, Resize and upload your GIF by selecting the Upload icon
Step 3: For sizing, enter 128 as height and weight. Ensure that your Discord GIF PFP is 8Mbs and if it isn’t, go for the Gifsicle resize method.

Step 4: Select the resize option and save the necessary changes so that you can download your GIF on your PC.
After strictly following the steps above, you can easily make a Discord GIF PFP and upload it into your account. As a result, you will have an animated GIF PFP even without the Nitro subscription. Note that the Nitro option is bigger and better. After all, it has fewer requirement needs since the platform offers you the available choices. Try out Discord animated PFP today and experience powerful and eye-catching profiles.
Part 2 How to Fix GIF PFP not Working on Discord?
Discord is no secret a robust platform that makes communication among different communities more convenient for all. Are you new on Discord, or are you among the millions of users under the platform? Whatever your case is, you need the answers on dealing with an unresponsive Discord account. For instance, you can’t upload your Discord GIF PFP? GIF PFP is unresponsive in Discord? This section offers you some of the simplest ways to solve these problems.
01Ensure that you subscribe to Discord Nitro
Discord is the most sought-after platform for effective communication between different communities. It includes a free and paid option depending on your taste and preference. Of course, Discord Nitro is the paid version with many advantages that makes your experience bigger and better. Discord Nitro is the ultimate version when you wish to include GIF as your PFP since there are almost no restrictions. The platform prompts you with a conversation that assists you in setting up your PFP. Is it possible to get Discord animated GIF without Nitro? Yes. All you need is to get the GIF from other free websites. However, issues may arise, especially when meeting the requirements.
02Ensure you have a stable Internet connection
Like most networking applications, you need an internet connection to connect with your friends and family. Are you struggling with making the necessary changes for your animated Discord PFP? If yes, then ensure that you check your internet. After all, it is impossible to make the required changes without a stable network.
03Check the Discord PFP format and ensure it is GIF and not other formats such as WebM
From the information above, you can tell that Discord is quite a restrictive software when you wish to add a Discord GIF PFP without the Nitro subscription. Therefore, it is crucial to ensure that you get the correct format. Otherwise, your GIF upload will be unsuccessful. The only Discord format allowed is the GIF; hence ensure that yours meets this requirement.
04Suppose you are an IOS user, try to re-upload the GIF from your computer
Different operating systems tend to work differently. Are you an iOS user and having difficulty uploading your Discord GIF PFP from your mobile? If yes, try to re-upload it from your computer. It is a simple hack that can assist with an unresponsive Discord account.
05Reinstall or Update your Discord Application
Sometimes applications have issues because of pending updates. If you are trying to fix GIF PFP for an unresponsive Discord software, try reinstalling it or updating it. In most cases, upon making these updates, your app will automatically respond to the necessary changes.
Is your Discord having issues? Do you have a problem uploading animated GIFs for Discord? If yes, then follow the simple hacks above.
Part 3 Discord GIF PFP: How to set GIF Profile Pic?
Discord GIF PFP is a critical topic we often encounter in different online communities. After all, using GIFs as PFP is unique and makes your account gain the necessary attention. Why not when your PFP often reflects on your community. However, many questions often arise regarding animated PFP for Discord since few people are familiar with how to go about getting moving PFP discord. Luckily, several resourceful sources offer you the information you need. And this piece is one of them. This section explains the most straightforward steps to help you set a GIF Profile pic in Discord. Check it out!
You need to know that getting discord nitro is the most convenient way to get and set a GIF profile pic. Is it possible without the Nitro subscription? Yes. However, it has multiple limitations compared to Discord nitro.
Step 1: Discord Nitro
Get Discord Nitro. As mentioned above, Discord has a free and paid version. However, it is no secret that the latter version is more convenient. Discord Nitro requires you to pay a monthly fee of $4.99
Step 2: Discord GIF Picker
Use Discord GIF Picker to search for your ultimate GIF. You can access this feature from your app’s chat box right side. In this case, you need the desktop version.

Note: If you don’t get what you are looking for, consult external websites such as Tenor, Wondershare Filmora Video Editor and save the GIF of your choice. Of course, there are many free websites available hence you can settle for any of them.

Wondershare Filmora - Best Video Editor for Mac/Windows
5,481,435 people have downloaded it.
Build unique custom animations without breaking a sweat.
Focus on creating epic stories and leave the details to Filmora’s auto features.
Start a creative adventure with drag & drop effects and endless possibilities.
Filmora simplifies advanced features to save you time and effort.
Filmora cuts out repetition so you can move on to your next creative breakthrough.
Step 3: Settings
Change your PFP. For a successful process, you need to go to settings and User-Profile. Click on the available PFP and edit by selecting Change Avatar.

Step 4: Select GIF
Select your GIF from your PC and resize it to meet Discord’s requirements. Automatically, you will go to the editing page and apply the necessary changes. Select save changes and successfully change your PFP.
Step 5: Check Changes
View your Discord animated PFP to confirm the changes

Editing the animated GIF PFP is necessary, and you can use powerful editing software such as Filmora for the job. Filmora is a top editing platform that supports both video and GIF. Besides, it includes multiple features that assist in efficient editing. These features include noise removal, video stabilization, scene detection, 4k resolution support, image filters, etc. All these features blend to deliver a high-quality discord animated PFP.
● Ending Thoughts →
● Discord Nitro opens new possibilities for Discord users.
● Filmora is among the top editors you can use to get a great Discord moving PFP.
● It is possible to add GIF as PFP without Nitro. But the process is long and never delivers equally impressive results like those of Nitro.
● How to get animated Discord PFP is among the most popular topics about Discord. After all, almost everyone wants to have an exciting moving PFP Discord. Is it a straightforward process? Consider the details as above and learn more about Discord GIF PFP.
Recently, Discord has become quite popular among different communities, especially gamers. After all, it is a safe platform that delivers a convenient area to communicate with friends and family. Are you familiar with the forum? If yes, you understand some of its advantages and why many people settle for it. If not, here you will get complete information about discord gif PFP. Discord allows communication via text, video, audio, and files. It features a private chat section where you chat with your friends. Besides, it includes a free and paid version, depending on which suits you.
Despite its popularity, issues are still rising, especially on Discord GIF PFP. Besides, the idea of having a GIF as a PFP is unique and is rare among different platforms. Fortunately, this article has essential details about Discord animated PFP. Read through the content below to understand how to get an animated Discord PFP.
In this article
01 [How to Make Discord PFP a GIF? The Complete Guide](#Part 1)
02 [How to Fix GIF PFP not Working on Discord?](#Part 2)
03 [Discord GIF PFP: How to set GIF Profile Pic](#Part 3)
Part 1 How to Make Discord PFP a GIF? The Complete Guide
Let’s kick off with details on making a Discord PFP a GIF. The first thing you need to keep in mind is the requirements of a Discord PFP GIF. In other words, what are the things that Discord considers before agreeing to set up your profile? Note that the platform only allows file sizes of up-to 8Mbs. Anything above that is irrelevant. Its maximum resolution is 128 by 128 pixels. Consider these essential points to ensure that your PFP is accepted.
How do you save a GIF for Discord?
There are several ways to access Discord animated PFP. One is a Discord nitro, and the other is making one yourself. If you are a Nitro subscriber, the platform will prompt you with amazing Discord nitro PFP. However, regular users need to make the animated PFP for Discord. This section covers these individuals as we give simple steps to save a suitable GIF.
Step 1: Visit a GIF website with different options available such as Tenor and GIPHY, depending on your preference and taste
Step 2: Search for the ultimate GIF you need
Step 3: Click the animated GIF for Discord and open it on a new tab
Step 4: Right-click on the GIF and choose Save Image to name it and save it on your PC
How do you make a Discord GIF PFP?
Step 1: Visit powerful GIF websites such as the EZgif website
Step 2: Go to the editing option, Resize and upload your GIF by selecting the Upload icon
Step 3: For sizing, enter 128 as height and weight. Ensure that your Discord GIF PFP is 8Mbs and if it isn’t, go for the Gifsicle resize method.

Step 4: Select the resize option and save the necessary changes so that you can download your GIF on your PC.
After strictly following the steps above, you can easily make a Discord GIF PFP and upload it into your account. As a result, you will have an animated GIF PFP even without the Nitro subscription. Note that the Nitro option is bigger and better. After all, it has fewer requirement needs since the platform offers you the available choices. Try out Discord animated PFP today and experience powerful and eye-catching profiles.
Part 2 How to Fix GIF PFP not Working on Discord?
Discord is no secret a robust platform that makes communication among different communities more convenient for all. Are you new on Discord, or are you among the millions of users under the platform? Whatever your case is, you need the answers on dealing with an unresponsive Discord account. For instance, you can’t upload your Discord GIF PFP? GIF PFP is unresponsive in Discord? This section offers you some of the simplest ways to solve these problems.
01Ensure that you subscribe to Discord Nitro
Discord is the most sought-after platform for effective communication between different communities. It includes a free and paid option depending on your taste and preference. Of course, Discord Nitro is the paid version with many advantages that makes your experience bigger and better. Discord Nitro is the ultimate version when you wish to include GIF as your PFP since there are almost no restrictions. The platform prompts you with a conversation that assists you in setting up your PFP. Is it possible to get Discord animated GIF without Nitro? Yes. All you need is to get the GIF from other free websites. However, issues may arise, especially when meeting the requirements.
02Ensure you have a stable Internet connection
Like most networking applications, you need an internet connection to connect with your friends and family. Are you struggling with making the necessary changes for your animated Discord PFP? If yes, then ensure that you check your internet. After all, it is impossible to make the required changes without a stable network.
03Check the Discord PFP format and ensure it is GIF and not other formats such as WebM
From the information above, you can tell that Discord is quite a restrictive software when you wish to add a Discord GIF PFP without the Nitro subscription. Therefore, it is crucial to ensure that you get the correct format. Otherwise, your GIF upload will be unsuccessful. The only Discord format allowed is the GIF; hence ensure that yours meets this requirement.
04Suppose you are an IOS user, try to re-upload the GIF from your computer
Different operating systems tend to work differently. Are you an iOS user and having difficulty uploading your Discord GIF PFP from your mobile? If yes, try to re-upload it from your computer. It is a simple hack that can assist with an unresponsive Discord account.
05Reinstall or Update your Discord Application
Sometimes applications have issues because of pending updates. If you are trying to fix GIF PFP for an unresponsive Discord software, try reinstalling it or updating it. In most cases, upon making these updates, your app will automatically respond to the necessary changes.
Is your Discord having issues? Do you have a problem uploading animated GIFs for Discord? If yes, then follow the simple hacks above.
Part 3 Discord GIF PFP: How to set GIF Profile Pic?
Discord GIF PFP is a critical topic we often encounter in different online communities. After all, using GIFs as PFP is unique and makes your account gain the necessary attention. Why not when your PFP often reflects on your community. However, many questions often arise regarding animated PFP for Discord since few people are familiar with how to go about getting moving PFP discord. Luckily, several resourceful sources offer you the information you need. And this piece is one of them. This section explains the most straightforward steps to help you set a GIF Profile pic in Discord. Check it out!
You need to know that getting discord nitro is the most convenient way to get and set a GIF profile pic. Is it possible without the Nitro subscription? Yes. However, it has multiple limitations compared to Discord nitro.
Step 1: Discord Nitro
Get Discord Nitro. As mentioned above, Discord has a free and paid version. However, it is no secret that the latter version is more convenient. Discord Nitro requires you to pay a monthly fee of $4.99
Step 2: Discord GIF Picker
Use Discord GIF Picker to search for your ultimate GIF. You can access this feature from your app’s chat box right side. In this case, you need the desktop version.

Note: If you don’t get what you are looking for, consult external websites such as Tenor, Wondershare Filmora Video Editor and save the GIF of your choice. Of course, there are many free websites available hence you can settle for any of them.

Wondershare Filmora - Best Video Editor for Mac/Windows
5,481,435 people have downloaded it.
Build unique custom animations without breaking a sweat.
Focus on creating epic stories and leave the details to Filmora’s auto features.
Start a creative adventure with drag & drop effects and endless possibilities.
Filmora simplifies advanced features to save you time and effort.
Filmora cuts out repetition so you can move on to your next creative breakthrough.
Step 3: Settings
Change your PFP. For a successful process, you need to go to settings and User-Profile. Click on the available PFP and edit by selecting Change Avatar.

Step 4: Select GIF
Select your GIF from your PC and resize it to meet Discord’s requirements. Automatically, you will go to the editing page and apply the necessary changes. Select save changes and successfully change your PFP.
Step 5: Check Changes
View your Discord animated PFP to confirm the changes

Editing the animated GIF PFP is necessary, and you can use powerful editing software such as Filmora for the job. Filmora is a top editing platform that supports both video and GIF. Besides, it includes multiple features that assist in efficient editing. These features include noise removal, video stabilization, scene detection, 4k resolution support, image filters, etc. All these features blend to deliver a high-quality discord animated PFP.
● Ending Thoughts →
● Discord Nitro opens new possibilities for Discord users.
● Filmora is among the top editors you can use to get a great Discord moving PFP.
● It is possible to add GIF as PFP without Nitro. But the process is long and never delivers equally impressive results like those of Nitro.
● How to get animated Discord PFP is among the most popular topics about Discord. After all, almost everyone wants to have an exciting moving PFP Discord. Is it a straightforward process? Consider the details as above and learn more about Discord GIF PFP.
Also read:
- Getting Into The Details A Review of Kodak LUTs
- New 2024 Approved Final Cut Pro - How to Download and Install It?
- Updated 2024 Approved How to Perfect Quick and Efficient Video Editing | Keyboard Shortcuts in Filmora
- New 2024 Approved Create Promotional Video
- Updated Deleting White Background in Photoshop Is Hard?
- New Have You Ever Watched a Movie Where You Felt the Filmmakers Left You Hanging? Yea, Thats What Freeze Frame Does. Here We Will Enlighten You on What It Is, Freeze Frame Examples Where It Has Been Helpful to Drive Our Point Home
- New Top Free LUTs To Use in Shotcut An Overview for 2024
- Updated 3 Best Effects to Appear on Camera Made with Filmora
- Updated How to Create the Night-to-Day Effect Video
- How to Trim/Crop Video in Microsoft Powerpoint
- New 2024 Approved Best Audio Plug-Ins For Video Editors
- Updated The Frames per Second Can Enhance or Hamper Your Ability to Enjoy Watching a Video on YouTube. This Article Will Define Frame Rates and Help You Choose the Best FPS
- Updated 2024 Approved Add Text Animation to A Video Online
- New 2024 Approved The Ultimate Guide to GIF for Discord Profile
- New In 2024, EasyHDR Review Is This a Good Choice to Create HDR
- Updated What Is HDRI? Everything You Need to Know About HDRI
- New 20 Best Video Background Templates for 2024
- New Before & After Editing Trick - Filmora
- Updated How Much Wedding Videographer Cost for 2024
- New Do You Wish to Create High-Quality Videos and Experience Effective Videos with Editing? No Problem at All because the Keyboard Shortcuts Listed Here Will Assist You
- Want to Learn How to Trim Videos in Premiere Pro. Read on; Our Guide Will Help You Trim Videos with This Timeline-Based Video Editing Software Application to Make Them Engaging to Viewers for 2024
- In 2024, How To Create 3D Text In Video
- Updated How to Create Glowing Edge Effect in TikTok Dancing Video
- In 2024, Top 7 Best GoPro Video Editors for Mac
- Updated Find a Video Background Change Online that Works for You. This Article Contains Tools that Can Edit Video Backgrounds Online with Little Effort
- Easiest Fix Included! Top 5 Ways to Convert HDR to SDR Videos for 2024
- Updated How to Make a Slideshow with Movavi Slideshow Maker
- 2024 Approved The Complete Guide to GIF for Discord Profile
- 2024 Approved Wondering About Vimeo Slideshow Maker? Know Everything About the Platform Which Is Gaining Much Popularity. Also, Browse some Tips to Create Appealing Video Slideshows
- Updated In 2024, What Is TS Format and How To Play TS Files?
- How to Make Discord Emoji GIF for 2024
- Updated How to Make a Video Slideshow in iMovie
- Steps to Create Green Screen Videos in After Effects
- Updated Funny Content Ideas for YouTube Videos and Funny Music Background for 2024
- Updated | How to Share YouTube Video on Zoom, In 2024
- 2024 Approved FLV Editors for Windows 11/10/8.1/8/7 Easily Edit FLV Videos on PC
- In 2024, Do You Also Use Android to Create and Edit Videos? Read About the Efectum Video Effects Editor, Which Is Available in Your App Stores for Seamless Editing
- Updated Top-Search The Best Game Screen Recording Tools for PC
- Updated 2024 Approved Motion Blur Photo With GIMP Step-By-Step Guide
- New Perfecting the Art of Slowing Down Video on Instagram
- Updated KineMaster Templates 101 How to Get the Most Out of Video Templates
- In 2024, How Can I Unlock My Apple iPhone 6s After Forgetting my PIN Code?
- In 2024, 9 Best Free Android Monitoring Apps to Monitor Phone Remotely For your Honor V Purse | Dr.fone
- 2 Ways to Transfer Text Messages from Samsung Galaxy A05s to iPhone 15/14/13/12/11/X/8/ | Dr.fone
- Troubleshooting Guide How to Fix an Unresponsive Honor X7b Screen | Dr.fone
- How to Downgrade Apple iPhone 15 to the Previous iOS/iPadOS Version? | Dr.fone
- In 2024, Top 10 Best Spy Watches For your Meizu 21 | Dr.fone
- Video File Repair - How to Fix Corrupted video files of Vivo Y02T on Mac?
- How To Fix Unresponsive Phone Touchscreen Of Nubia Red Magic 8S Pro | Dr.fone
- In 2024, Step-by-Step Tutorial How To Bypass ZTE Nubia Z60 Ultra FRP
- Solved Warning Camera Failed on Tecno Spark 10 Pro | Dr.fone
- In 2024, Will Pokémon Go Ban the Account if You Use PGSharp On Samsung Galaxy M34 5G | Dr.fone
- In 2024, Why does the pokemon go battle league not available On Lava Blaze 2 Pro | Dr.fone
- In 2024, How to Change Your Nubia Z50S Pro Location on life360 Without Anyone Knowing? | Dr.fone
- In 2024, How Can You Transfer Files From Vivo S18 Pro To iPhone 15/14/13? | Dr.fone
- In 2024, A Step-by-Step Guide on Using ADB and Fastboot to Remove FRP Lock on your Xiaomi Redmi 12 5G
- In 2024, How to use Pokemon Go Joystick on Apple iPhone 11 Pro Max? | Dr.fone
- Complete guide for recovering music files on Itel A70
- Failed to play HEVC files on 14 Pro
- New How to Translate Audio/Video Content From Spanish to English and Vice Versa?
- Process of Screen Sharing Honor X50i to PC- Detailed Steps | Dr.fone
- In 2024, 10 Best Fake GPS Location Spoofers for Oppo Reno 9A | Dr.fone
- In 2024, Easy Ways to Manage Your Vivo Y28 5G Location Settings | Dr.fone
- In 2024, How To Stream Anything From Vivo Y78t to Apple TV | Dr.fone
- Title: How to Make Double Exposure Effect in Filmora
- Author: Chloe
- Created at : 2024-05-20 03:37:28
- Updated at : 2024-05-21 03:37:28
- Link: https://ai-editing-video.techidaily.com/how-to-make-double-exposure-effect-in-filmora/
- License: This work is licensed under CC BY-NC-SA 4.0.

