
How to Make Eye Zoom Transition Effect with Filmora

How to Make Eye Zoom Transition Effect with Filmora
What is an eye zoom transition effect? It’s a close-up video effect allowing viewers to transit to the next clip from the eye. This effect is commonly used by musicians and travel bloggers to give their videos a more cinematic feel. So, without wasting time, let’s learn how to create an eye zoom transition with Wondershare Filmora .
Free Download For Win 7 or later(64-bit)
Free Download For macOS 10.14 or later
Preparation:
First, you need to create a close-up eye video. Although you can do that with your digital camera, a standard smartphone should do it just fine. Just ask a friend or family member to use your phone’s rear camera to record your eye centered on the screen. Ensure that the eye is as close as possible and you don’t lose focus. The camera should be around 10cm away from your face. And lest I forget, the flash should be ON.

How to Create an Eye-zoom Transition
Step 1 Align the video clips on Filmora
After recording a close-up eye video, add it on Wondershare Filmora and duplicate it. Alternatively, you can add the video to the first and second tracks.

Step 2 Add a freeze frame to the video
Next, we want to add a freeze frame to the section where the eye opens fully. To do that, select the second video track and place the playhead where the eye is fully open. After that, right-click the video track, then choose the Add Freeze Frame option.

Now trim the first video track from where the freeze frame starts on the second video. Also, cut the second video track to leave only the freeze frame
Step 3 Add a masking effect to the eye
With the two video tracks ready, it’s time to apply a masking effect. Tap the Effect tab on the top menu bar and then find the Shape Mask under the utility section. Now drag and drop the effect to the freeze frame.

Double-click on the freeze frame clip to adjust the Shape Mask on the preview screen. Ensure the mask reveals the eye pupil only and check the Invert Mask box. Also, set the Feather number to 10.

Step 4 Add the transition video
Next, add the video you want to edit with an eye-zoom effect next to the first video track. Preview the video, and you’ll notice your new video playing inside the eye mask.
With that done, move the playhead to the start of the freeze frame video and double-click the video clip to launch the settings window. Click the Animation tab before clicking Customize to see the keyframe settings. Tap the Add button to add a keyframe. Then, add a few frames using the playhead before clicking Add. But because we’re zooming in, increase the scale to 160%. You can also add the rotation and position.

After setting the second keyframe, move the playhead to the right and add the third keyframe. This time, increase the scale number to 400%, as well as the rotation and position. Now preview the video, and you’ll notice the rotating eye-zoom effect.
Summary
There you go! That’s how to create an eye-zoom transition using Wondershare Filmora. Don’t forget to play around with this feature-rich video editor to unlock its full capabilities. Enjoy!
Free Download For macOS 10.14 or later
Preparation:
First, you need to create a close-up eye video. Although you can do that with your digital camera, a standard smartphone should do it just fine. Just ask a friend or family member to use your phone’s rear camera to record your eye centered on the screen. Ensure that the eye is as close as possible and you don’t lose focus. The camera should be around 10cm away from your face. And lest I forget, the flash should be ON.

How to Create an Eye-zoom Transition
Step 1 Align the video clips on Filmora
After recording a close-up eye video, add it on Wondershare Filmora and duplicate it. Alternatively, you can add the video to the first and second tracks.

Step 2 Add a freeze frame to the video
Next, we want to add a freeze frame to the section where the eye opens fully. To do that, select the second video track and place the playhead where the eye is fully open. After that, right-click the video track, then choose the Add Freeze Frame option.

Now trim the first video track from where the freeze frame starts on the second video. Also, cut the second video track to leave only the freeze frame
Step 3 Add a masking effect to the eye
With the two video tracks ready, it’s time to apply a masking effect. Tap the Effect tab on the top menu bar and then find the Shape Mask under the utility section. Now drag and drop the effect to the freeze frame.

Double-click on the freeze frame clip to adjust the Shape Mask on the preview screen. Ensure the mask reveals the eye pupil only and check the Invert Mask box. Also, set the Feather number to 10.

Step 4 Add the transition video
Next, add the video you want to edit with an eye-zoom effect next to the first video track. Preview the video, and you’ll notice your new video playing inside the eye mask.
With that done, move the playhead to the start of the freeze frame video and double-click the video clip to launch the settings window. Click the Animation tab before clicking Customize to see the keyframe settings. Tap the Add button to add a keyframe. Then, add a few frames using the playhead before clicking Add. But because we’re zooming in, increase the scale to 160%. You can also add the rotation and position.

After setting the second keyframe, move the playhead to the right and add the third keyframe. This time, increase the scale number to 400%, as well as the rotation and position. Now preview the video, and you’ll notice the rotating eye-zoom effect.
Summary
There you go! That’s how to create an eye-zoom transition using Wondershare Filmora. Don’t forget to play around with this feature-rich video editor to unlock its full capabilities. Enjoy!
Free Download For macOS 10.14 or later
Preparation:
First, you need to create a close-up eye video. Although you can do that with your digital camera, a standard smartphone should do it just fine. Just ask a friend or family member to use your phone’s rear camera to record your eye centered on the screen. Ensure that the eye is as close as possible and you don’t lose focus. The camera should be around 10cm away from your face. And lest I forget, the flash should be ON.

How to Create an Eye-zoom Transition
Step 1 Align the video clips on Filmora
After recording a close-up eye video, add it on Wondershare Filmora and duplicate it. Alternatively, you can add the video to the first and second tracks.

Step 2 Add a freeze frame to the video
Next, we want to add a freeze frame to the section where the eye opens fully. To do that, select the second video track and place the playhead where the eye is fully open. After that, right-click the video track, then choose the Add Freeze Frame option.

Now trim the first video track from where the freeze frame starts on the second video. Also, cut the second video track to leave only the freeze frame
Step 3 Add a masking effect to the eye
With the two video tracks ready, it’s time to apply a masking effect. Tap the Effect tab on the top menu bar and then find the Shape Mask under the utility section. Now drag and drop the effect to the freeze frame.

Double-click on the freeze frame clip to adjust the Shape Mask on the preview screen. Ensure the mask reveals the eye pupil only and check the Invert Mask box. Also, set the Feather number to 10.

Step 4 Add the transition video
Next, add the video you want to edit with an eye-zoom effect next to the first video track. Preview the video, and you’ll notice your new video playing inside the eye mask.
With that done, move the playhead to the start of the freeze frame video and double-click the video clip to launch the settings window. Click the Animation tab before clicking Customize to see the keyframe settings. Tap the Add button to add a keyframe. Then, add a few frames using the playhead before clicking Add. But because we’re zooming in, increase the scale to 160%. You can also add the rotation and position.

After setting the second keyframe, move the playhead to the right and add the third keyframe. This time, increase the scale number to 400%, as well as the rotation and position. Now preview the video, and you’ll notice the rotating eye-zoom effect.
Summary
There you go! That’s how to create an eye-zoom transition using Wondershare Filmora. Don’t forget to play around with this feature-rich video editor to unlock its full capabilities. Enjoy!
Free Download For macOS 10.14 or later
Preparation:
First, you need to create a close-up eye video. Although you can do that with your digital camera, a standard smartphone should do it just fine. Just ask a friend or family member to use your phone’s rear camera to record your eye centered on the screen. Ensure that the eye is as close as possible and you don’t lose focus. The camera should be around 10cm away from your face. And lest I forget, the flash should be ON.

How to Create an Eye-zoom Transition
Step 1 Align the video clips on Filmora
After recording a close-up eye video, add it on Wondershare Filmora and duplicate it. Alternatively, you can add the video to the first and second tracks.

Step 2 Add a freeze frame to the video
Next, we want to add a freeze frame to the section where the eye opens fully. To do that, select the second video track and place the playhead where the eye is fully open. After that, right-click the video track, then choose the Add Freeze Frame option.

Now trim the first video track from where the freeze frame starts on the second video. Also, cut the second video track to leave only the freeze frame
Step 3 Add a masking effect to the eye
With the two video tracks ready, it’s time to apply a masking effect. Tap the Effect tab on the top menu bar and then find the Shape Mask under the utility section. Now drag and drop the effect to the freeze frame.

Double-click on the freeze frame clip to adjust the Shape Mask on the preview screen. Ensure the mask reveals the eye pupil only and check the Invert Mask box. Also, set the Feather number to 10.

Step 4 Add the transition video
Next, add the video you want to edit with an eye-zoom effect next to the first video track. Preview the video, and you’ll notice your new video playing inside the eye mask.
With that done, move the playhead to the start of the freeze frame video and double-click the video clip to launch the settings window. Click the Animation tab before clicking Customize to see the keyframe settings. Tap the Add button to add a keyframe. Then, add a few frames using the playhead before clicking Add. But because we’re zooming in, increase the scale to 160%. You can also add the rotation and position.

After setting the second keyframe, move the playhead to the right and add the third keyframe. This time, increase the scale number to 400%, as well as the rotation and position. Now preview the video, and you’ll notice the rotating eye-zoom effect.
Summary
There you go! That’s how to create an eye-zoom transition using Wondershare Filmora. Don’t forget to play around with this feature-rich video editor to unlock its full capabilities. Enjoy!
The Best Peter McKinnon LUTs for Perfect Video Editing
Peter McKinnon is a highly talented video editor and YouTuber. He gained widespread recognition for his amazing video editing skills. Furthermore, his content always stands out from others for his exceptional color-grading abilities. Additionally, he has a keen eye for choosing the perfect color tones and contrasts to make his videos look impressive.
One of the secrets behind Peter’s impressive color grading is his use of LUTs. Peter McKinnon has developed his collection of LUTs. By using Peter McKinnon LUTs, you can easily apply his signature color grading style to your videos. These LUTs can enhance the colors, add depth and dimension, and give your videos that cinematic feel.
Part 1: Why Should You Use LUTs in Video Editing?
If you need Peter McKinnon LUT packs, you must know how effective LUTs are. Using Look-Up Tables in video editing has several advantages that can make your editing process easier, which are discussed as follows:
Save Time on Color Grading
LUTs offer a quick way to adjust the colors in your videos. Instead of manually tweaking each color parameter, you can apply a LUT with a few clicks. It saves time and lets you easily try different styles. Moreover, it makes the color grading process more convenient for beginners.
Maintain Consistency
Applying the same LUT to multiple clips ensures a consistent look throughout your video. It is constructive when you have different scenes or shots. Furthermore, you don’t need to edit each clip separately. Moreover, you can save time and effort by applying the same LUT to your project.
Professional and Creative Looks
LUTs are created by experts and provide a range of creative styles. They can imitate the look of different films, genres, or specific grading techniques. Additionally, using LUTs helps you achieve a particular mood or style. Furthermore, LUTs enhance your storytelling or align with your creative vision.
Match Footage from Different Sources
When working with footage from different cameras or lighting conditions, LUTs can help. They can help match the color and tone of the clips. Each camera may capture colors; lighting variations can affect the overall look. However, applying a LUT gives you a consistent result throughout.
Preview and Communicate Ideas
Another advantage is that LUTs offer real-time previews of the final look as you edit. Moreover, it helps you visualize the aesthetic and make informed creative decisions. Sharing LUTs with your team or collaborators communicates your creative ideas. Furthermore, it ensures everyone understands the desired look of the project.
Streamline Workflow
LUTs can be integrated into your editing software, allowing you to apply and modify them. They can be combined with other adjustments like exposure, contrast, and saturation. In addition to this, it streamlines your workflow, freeing up time to focus on other editing tasks.
Empower your videos with a new mood using different LUTs. Filmora now offers 100+ top-quality 3D LUTs cover a broad range of scenarios. Transform your videos with Filmora’s powerful 3D LUTs.
Apply LUT on Videos Apply LUT on Videos Learn More

Part 2: Top Peter McKinnon Influenced LUTs for Videos
Peter McKinnon is a great content creator with exceptional video editing skills. Here is a list of Peter McKinnon LUT Pack free and paid ones, which you can download. Make your videos look like Peter McKinnon’s and get the praise you deserve.
1. Cine LUTS V2
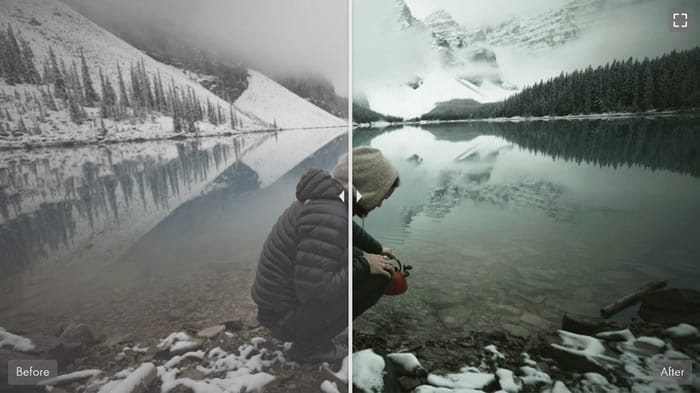
Cine LUTS V2 is a pack of 15 cinematic-style LUTs to color grade your videos. With these LUTs, you can achieve various cinematic looks, such as Dawn, Dusk, Elemental, and Ember. Moreover, the Dawn LUT adds a warm and soft color tone to your video. However, the Elemental LUT brings out vibrant colors, making your content appear bold and impactful. Furthermore, each LUT in this pack offers a unique color grading style.
2. Cine LUTS V1
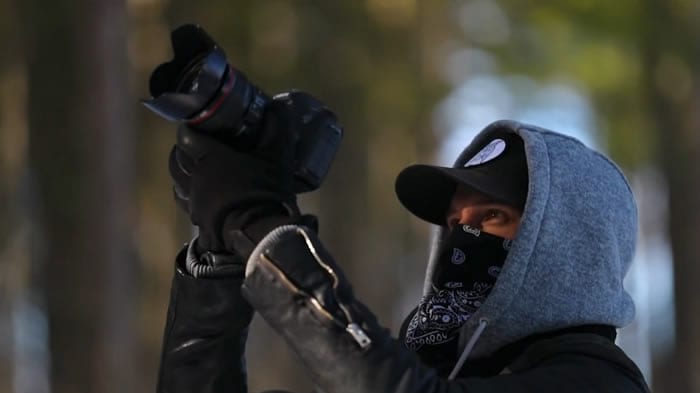
With the Cine LUTs V1 pack, you’ll have access to 7 unique LUTs. This Peter McKinnon LUT pack gives your videos a cinematic look. Furthermore, this pack has different LUTs, including Orange & Teal and Noir. The Orange & Teal LUT adds a warm orange tone to the highlights and a cool teal tone to the shadows. However, you can use the Noir LUT to add a more dramatic look to your video.
3. Arctic Shade
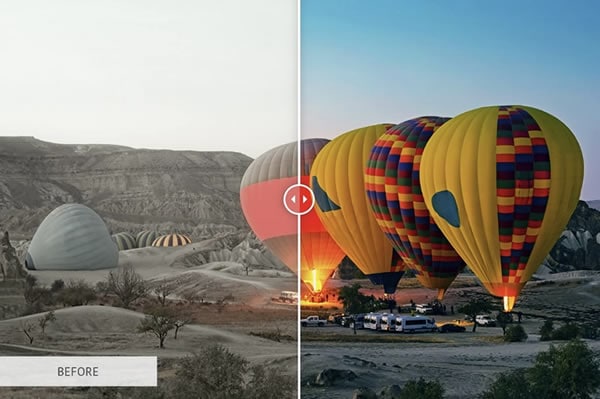
Arctic Shade LUT is a color grading tool inspired by Peter McKinnon’s technique. Applying this LUT adjusts the white balance to give your video a balanced white exposure. Furthermore, it increases saturation and enhances contrast to make your colors pop. It’s a great option to experiment with and matches the color grading style of Peter McKinnon.
4. Bleak Galaxy
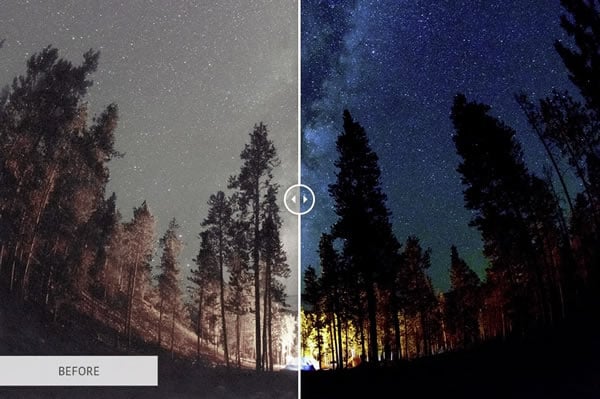
Bleak Galaxy is a fantastic LUT pack inspired by Peter McKinnon. This LUT is perfect for enhancing your night sky footage. It amplifies the blue tones, making the night sky even more beautiful. Additionally, it boosts saturation, bringing out the vibrant colors in the scene. With Bleak Galaxy, you can capture the details of the stunning night sky in all its beauty.
Part 3: Wondershare Filmora: Get Free LUTs on an Alternative Platform
Are you a fan of Peter McKinnon and want to make your content look professional and cinematic? It would be best to use professional video editing software like Wondershare Filmora . Filmora is an excellent tool that helps you in editing videos. Moreover, Filmora offers simple enhancement and adjustment tools for more advanced AI features.
Add LUTs on Video For Win 7 or later(64-bit)
Add LUTs on Video For macOS 10.14 or later
Besides video editing capabilities, you can color grade your videos like Peter McKinnon. In the same way, this tool offers paid and free LUTs that you can use. Additionally, Filmora has over 200 LUTs, each with a unique set of styles and color tones. You can download similar-looking Peter McKinnon LUTs free LUTs to apply on your digital media using Filmora.

Conclusion
In conclusion, Peter McKinnon is an impressive content creator and professional. There are many different LUTs inspired by Peter McKinnon LUT packs. Furthermore, these LUTs allow you to experiment and find the perfect color grading for your videos. Moreover, you can use these LUTs pack for a travel vlog, B-roll, or even a short film. With these LUTs, your videos will look better than ever.
Add LUTs on Video For Win 7 or later(64-bit)
Add LUTs on Video For macOS 10.14 or later
Apply LUT on Videos Apply LUT on Videos Learn More

Part 2: Top Peter McKinnon Influenced LUTs for Videos
Peter McKinnon is a great content creator with exceptional video editing skills. Here is a list of Peter McKinnon LUT Pack free and paid ones, which you can download. Make your videos look like Peter McKinnon’s and get the praise you deserve.
1. Cine LUTS V2
Cine LUTS V2 is a pack of 15 cinematic-style LUTs to color grade your videos. With these LUTs, you can achieve various cinematic looks, such as Dawn, Dusk, Elemental, and Ember. Moreover, the Dawn LUT adds a warm and soft color tone to your video. However, the Elemental LUT brings out vibrant colors, making your content appear bold and impactful. Furthermore, each LUT in this pack offers a unique color grading style.

2. Cine LUTS V1
With the Cine LUTs V1 pack, you’ll have access to 7 unique LUTs. This Peter McKinnon LUT pack gives your videos a cinematic look. Furthermore, this pack has different LUTs, including Orange & Teal and Noir. The Orange & Teal LUT adds a warm orange tone to the highlights and a cool teal tone to the shadows. However, you can use the Noir LUT to add a more dramatic look to your video.

3. Arctic Shade
Arctic Shade LUT is a color grading tool inspired by Peter McKinnon’s technique. Applying this LUT adjusts the white balance to give your video a balanced white exposure. Furthermore, it increases saturation and enhances contrast to make your colors pop. It’s a great option to experiment with and matches the color grading style of Peter McKinnon.

4. Bleak Galaxy
Bleak Galaxy is a fantastic LUT pack inspired by Peter McKinnon. This LUT is perfect for enhancing your night sky footage. It amplifies the blue tones, making the night sky even more beautiful. Additionally, it boosts saturation, bringing out the vibrant colors in the scene. With Bleak Galaxy, you can capture the details of the stunning night sky in all its beauty.

Part 3: Wondershare Filmora: Get Free LUTs on an Alternative Platform
Are you a fan of Peter McKinnon and want to make your content look professional and cinematic? It would be best to use professional video editing software like Wondershare Filmora . Filmora is an excellent tool that helps you in editing videos. Moreover, Filmora offers simple enhancement and adjustment tools for more advanced AI features.
Add LUTs on Video For Win 7 or later(64-bit)
Add LUTs on Video For macOS 10.14 or later
Besides video editing capabilities, you can color grade your videos like Peter McKinnon. In the same way, this tool offers paid and free LUTs that you can use. Additionally, Filmora has over 200 LUTs, each with a unique set of styles and color tones. You can download similar-looking Peter McKinnon LUTs free LUTs to apply on your digital media using Filmora.

Conclusion
In conclusion, Peter McKinnon is an impressive content creator and professional. There are many different LUTs inspired by Peter McKinnon LUT packs. Furthermore, these LUTs allow you to experiment and find the perfect color grading for your videos. Moreover, you can use these LUTs pack for a travel vlog, B-roll, or even a short film. With these LUTs, your videos will look better than ever.
Add LUTs on Video For Win 7 or later(64-bit)
Add LUTs on Video For macOS 10.14 or later
Offering The Best Understanding of Performing iMovie Slow Motion Video
In the past decade, social media has made slow-motion videos wildly popular. When Apple introduced the slow-motion effect in its camera, people went crazy about it. Due to the great demand, many developers introduced this effect in their applications. Slow-mo has been trendy for years, and its use is not ending soon.
This article will guide you about the iMovie slow motion effect and explain the app in detail. Users considering creating a video across their Mac should be aware of slow-mo in iMovie. If you are fascinated by finding more, read this article about slow-down video iMovie.
Slow Motion Video Maker Slow your video’s speed with better control of your keyframes to create unique cinematic effects!
Make A Slow Motion Video Make A Slow Motion Video More Features

Part 1: An Introduction to Slow Motion Videos: A Comprehensive Review
Slow-mo videos are recorded at a frame rate higher than 24 frames per second (fps). After that, they are replayed at a slower pace. This method produces an effect that can bring out special moments. Slow-motion recordings are frequently employed in sports, action, and wildlife cinematography.
What makes it so popular is how it captures fast-moving scenes in better detail. Access to the slow-motion effect was not so common, but with apps like iMovie slow-mo, the effect is accessible to everyone. You can use online video editors or desktop editing software to make slow-motion videos.
Free Download For Win 7 or later(64-bit)
Free Download For macOS 10.14 or later
Part 2: How to Set Slow Motion Settings in iMovie Video Making?
iMovie is a wonderful choice if you want to make slow-motion videos. Also, it allows users to change the speed of video clips per their needs. With slo-mo in iMovie, you can even fine-tune the speed of a single clip by splitting it into intervals, each with a different speed. You can set multiple ranges to cause a clip to speed up and down.
You can freeze a single frame in your film to create the illusion that time has stopped. The app is a fantastic option for Apple users who want to quickly add slow-motion effects to their videos. iMovie is a pretty straightforward tool that gives quick results. Follow the step-by-step guide below to slow down video in iMovie.
Step 1
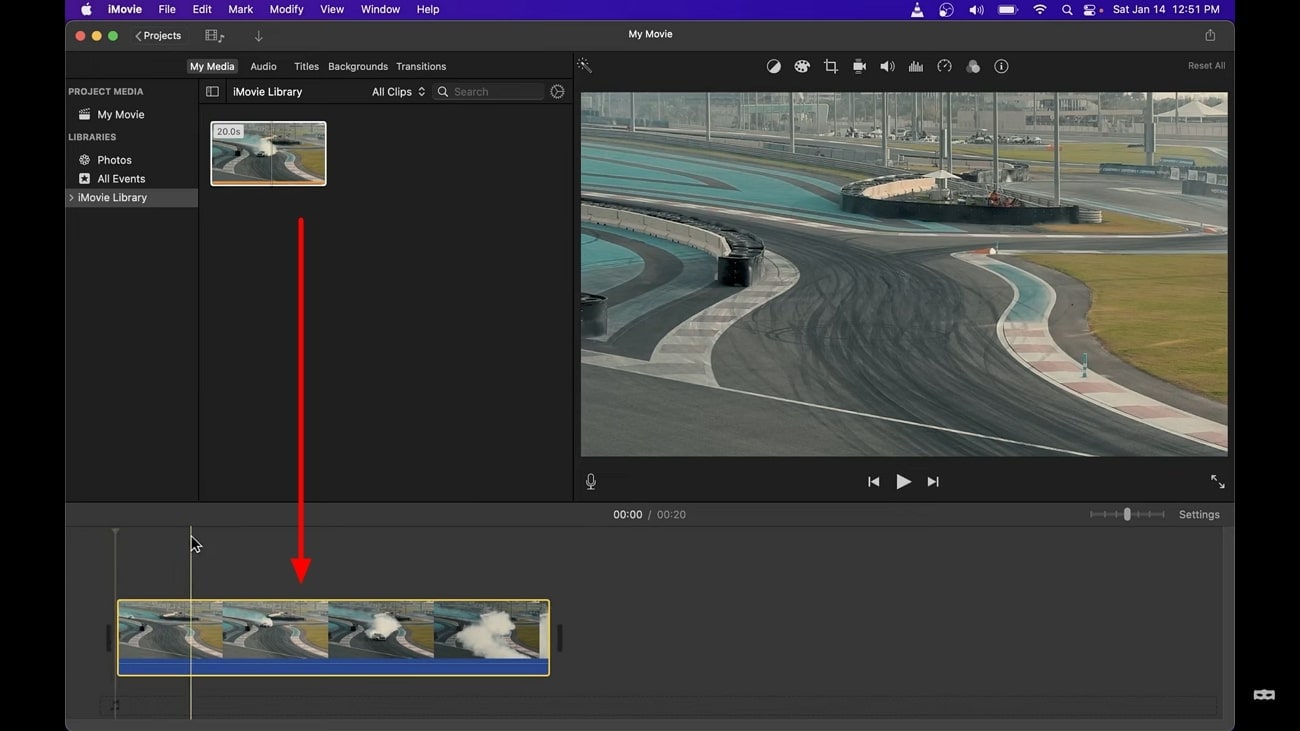
Launch iMovie in your system and click “New Project.” Go to the “Movies” option to import the video you want to edit. Drag the media in the project timeline to make changes to it.
Step 2
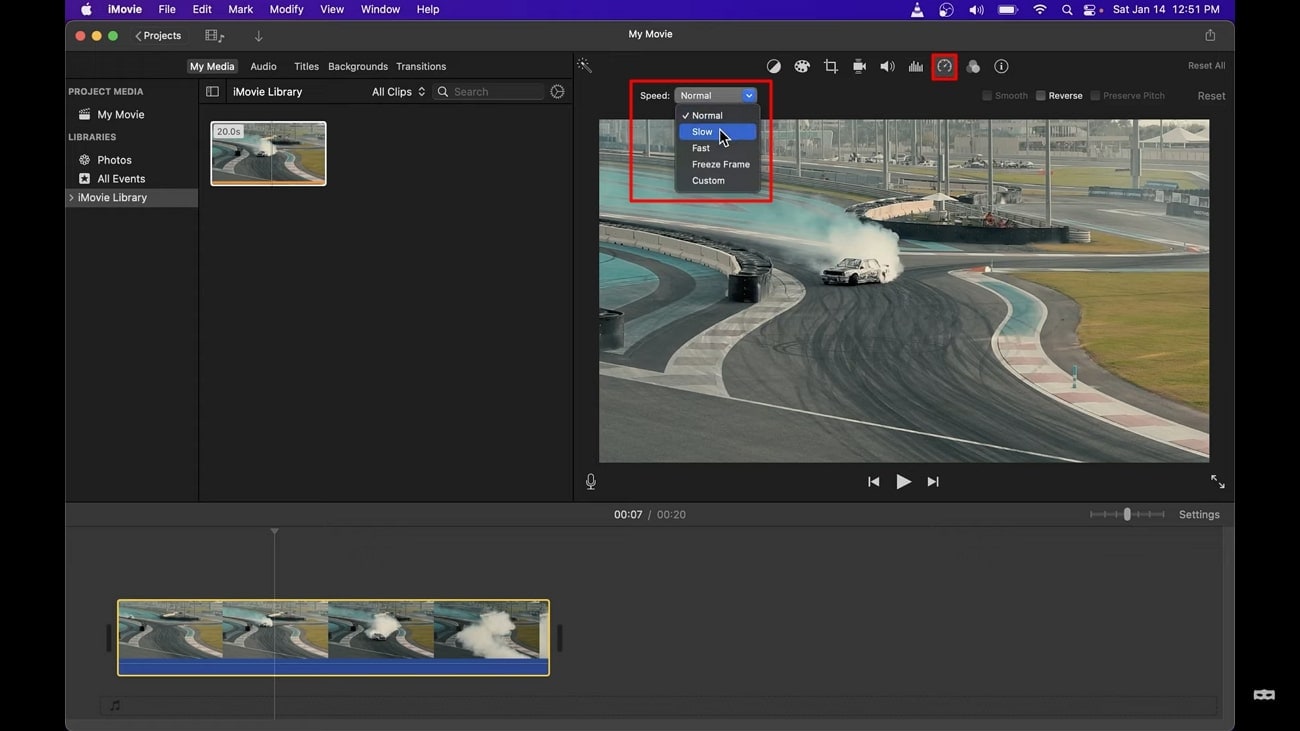
Select the video from the timeline and click the speed icon that looks like a clock. From “Speed,” select the “Slow” option and choose the percentage of slow-motion effect you want to apply in your video. To set a customized slow-mo percentage, click “Speed” again and choose “Custom.” After that, manually add the percentage of how slow you want your video to be.
Part 3: A Great Alternative to Making Slow Motion Videos: Wondershare Filmora
iMovie slow motion is undoubtedly a simple solution for creating slow-mo videos. But sometimes, you need a tool with more advanced features than iMovie. If you want to access professional features with a simple interface, Wondershare Filmora is the right platform. The tool not only provides a precise slow-motion effect, but it has many other features that will leave you amazed.
You can control your video and edit it any way you like. Wondershare Filmora gives you the freedom to be creative. For both beginners and professionals, it is an excellent choice. This software is worth checking if you want to create a cinematic masterpiece.
Step-By-Step Guide to Make Slow Motion Videos with Optical Flow
Unlike the slow-mo in iMovie, the Filmora’s effect is much more advanced and provides professional results. Look at the easy steps below and slow down your video quickly.
Free Download For Win 7 or later(64-bit)
Free Download For macOS 10.14 or later
Step 1Ensure the Latest Version of Filmora and Import Media
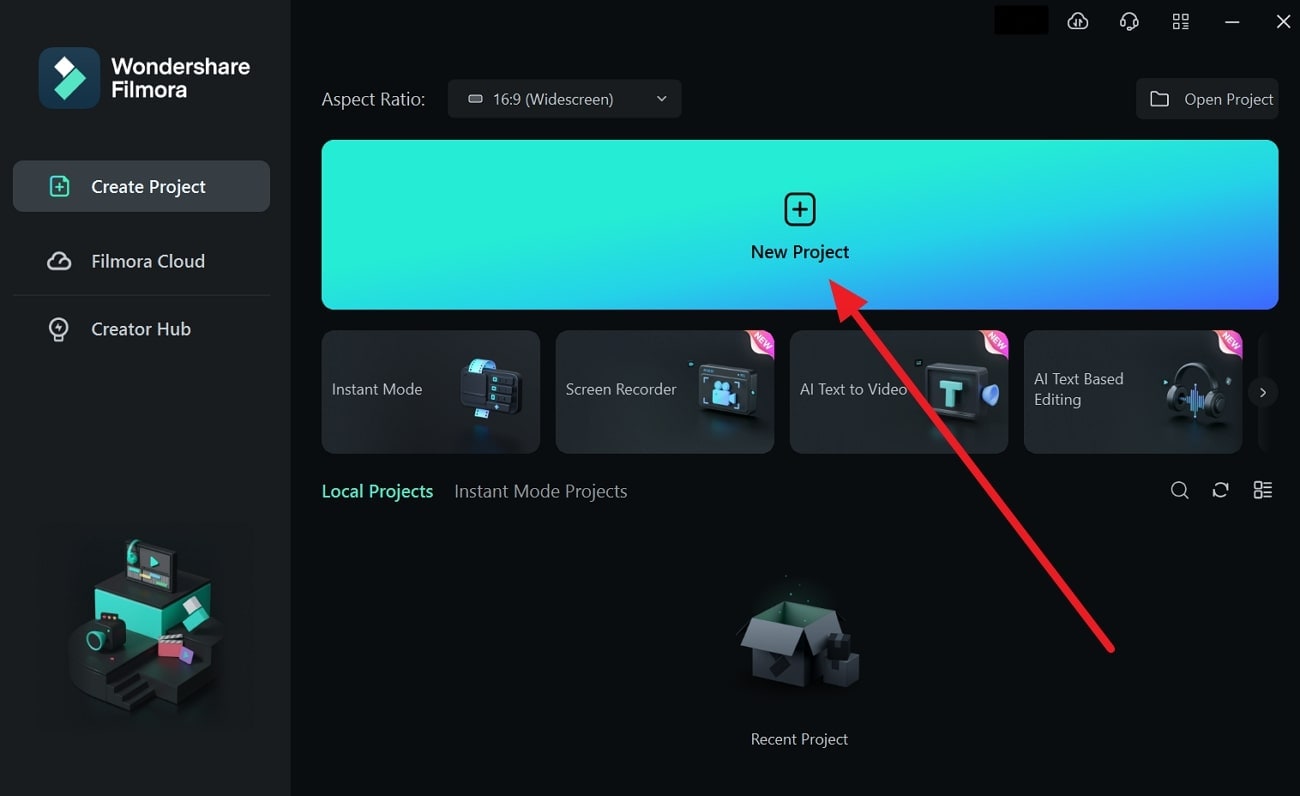
Firstly, ensure that you are using the latest version of Filmora. After launching it in your system, access its editing screen through the “New Project” option in its main interface. Drag and drop your video into the timeline section after importing it. You can simply import by pressing the “Ctrl + I” keys from your keyboard.
Step 2Apply Slow-Motion and Use Optical Flow
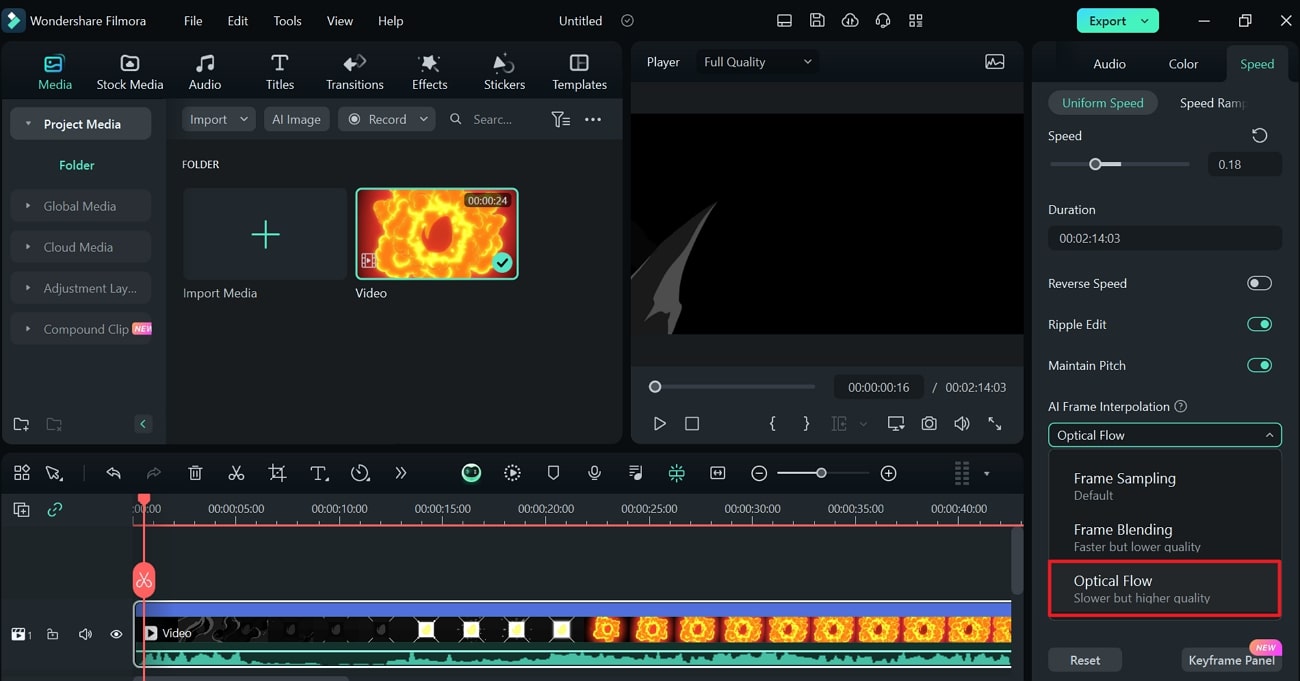
After bringing media into the timeline, right-click on it. From the displayed list, look for the “Uniform Speed” option. Tap on it and get directed toward the right-side editing screen. There, you have to use the “Speed” slider and move to the left for slow videos or to the right for fast-speed videos.
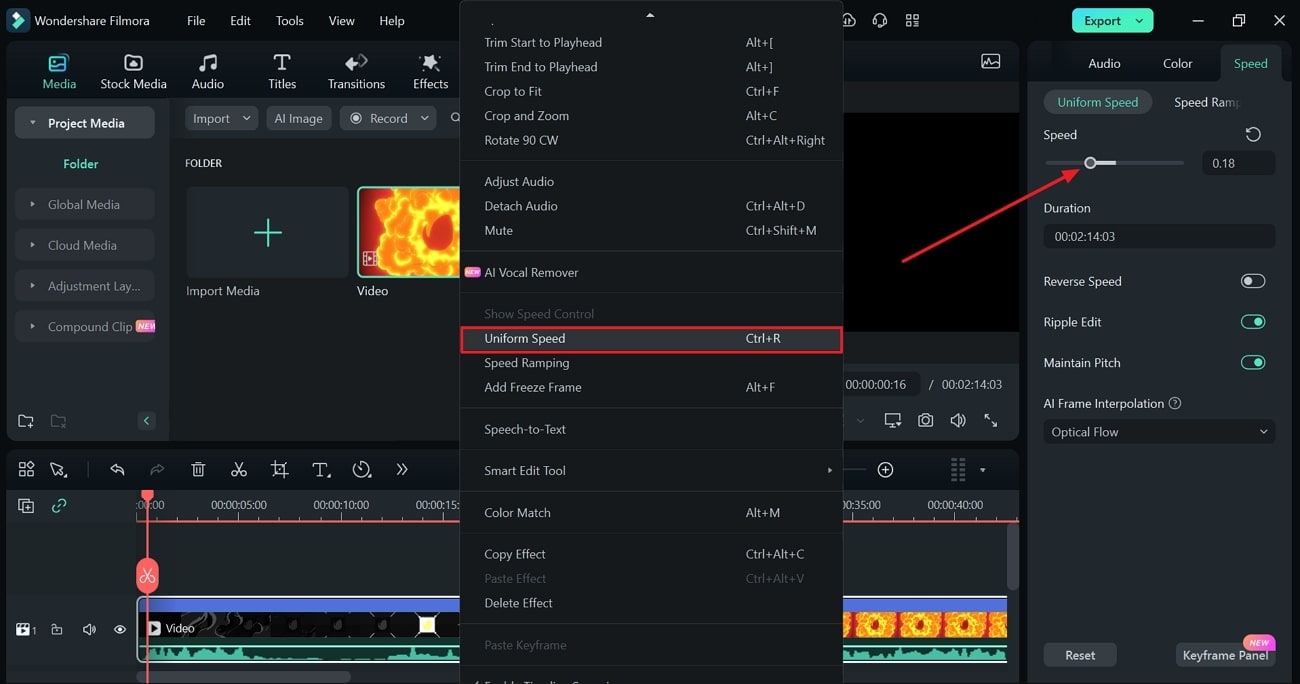
When you are done adjusting speed, head down to the “AI Frame Interpolation” option. Extend its menu and choose “Optical Flow” to reduce the speed of your video while maintaining its quality.
Step 3Analyze and Save the Video by Customizing Export Options
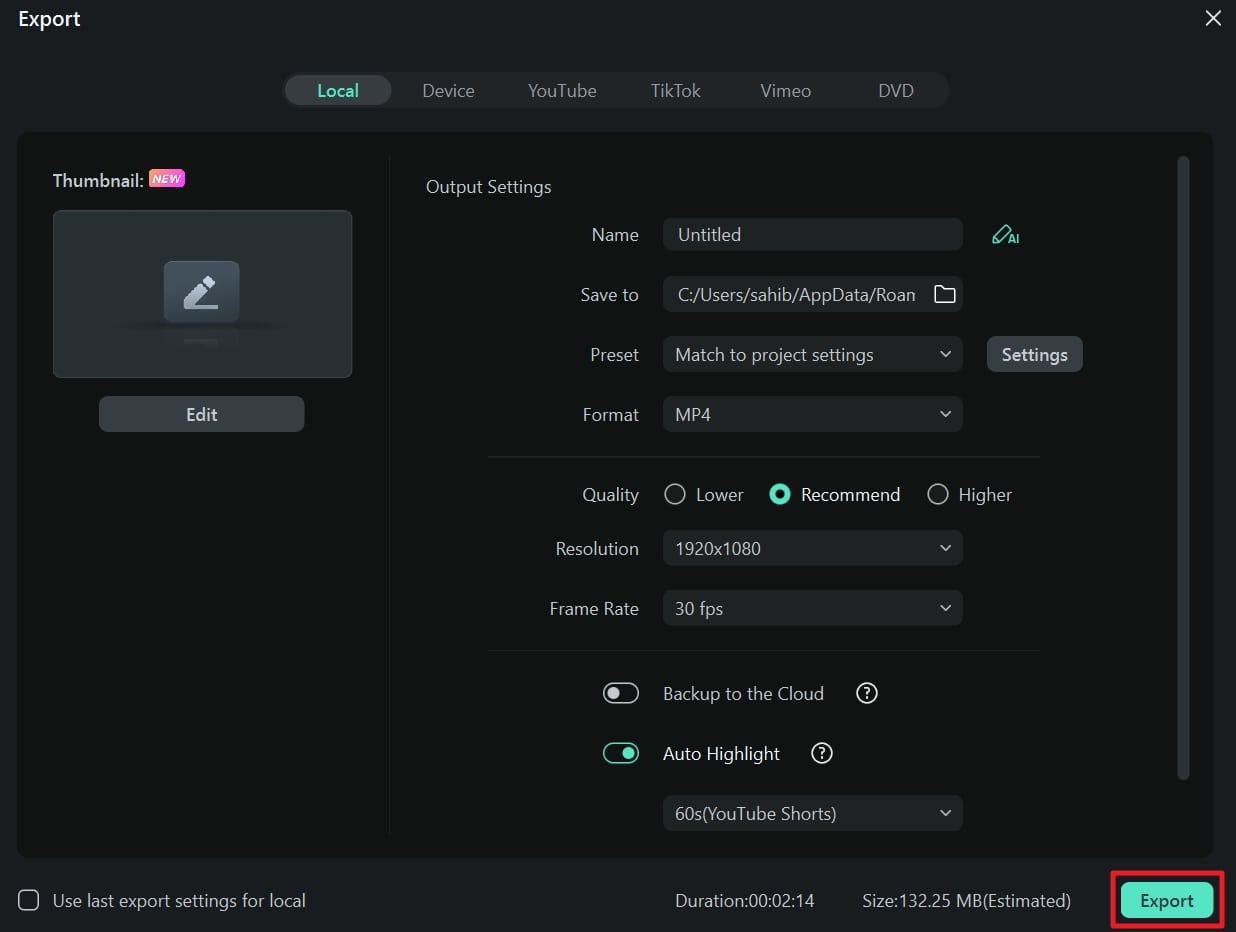
Check if the function has been applied by playing the video. Lastly, select the “Export” button located in the screen’s upper right corner. From the “Export” window, adjust video parameters to save the video your desired way.
Key Features of Wondershare Filmora
Wondershare Filmora’s impressive tools never cease to impress. Let’s discuss a few of its remarkable features in video editing:
1. Instant Mode
This feature is perfect for creating quick social media videos. You can find a variety of templates and choose the one that best suits your video’s concept. There are more than 115 templates from business, travel, and Vlog categories. Instant mode will help you to rearrange video clips with AI algorithms that cut your 3 hours of editing time.
2. AI Smart Cutout
Removing an object from a video can be challenging while maintaining a natural appearance. Not more with Filmora’s AI smart cutout that can automatically remove unwanted items. It can detect and refine the cutout frame by frame to maintain perfection and high quality. Besides, you get different preview modes to modify certain areas.
3. Auto Beat Sync
Music and film with wonderful rhythm add an entertaining aspect to the content. Utilizing the auto-beat sync feature in Filmora is the way to do it. With this tool, your music and video will automatically match the clips. Furthermore, it can inevitably identify dark sides in your footage to delete them.
4. AI Copywriting
It’s challenging to develop exciting scripts or captions for your films. In situations like this, an AI copywriting tool is invaluable. ChatGPT integration in Filmora lets you get YouTube titles and descriptions that match your needs. To generate one, you must describe the content you want using natural language.
Conclusion
In short, the slow-motion effect is one of the most popular video effects used in movies. Thus, a good video editor is necessary whether you edit videos for entertainment or business purposes. Your video will not look good and will negatively impact the viewers if it is not edited well. Here, you have learned how to slow down video iMovie. If you want an advanced tool, try the alternative Wondershare Filmora.
Make A Slow Motion Video Make A Slow Motion Video More Features

Part 1: An Introduction to Slow Motion Videos: A Comprehensive Review
Slow-mo videos are recorded at a frame rate higher than 24 frames per second (fps). After that, they are replayed at a slower pace. This method produces an effect that can bring out special moments. Slow-motion recordings are frequently employed in sports, action, and wildlife cinematography.
What makes it so popular is how it captures fast-moving scenes in better detail. Access to the slow-motion effect was not so common, but with apps like iMovie slow-mo, the effect is accessible to everyone. You can use online video editors or desktop editing software to make slow-motion videos.
Free Download For Win 7 or later(64-bit)
Free Download For macOS 10.14 or later
Part 2: How to Set Slow Motion Settings in iMovie Video Making?
iMovie is a wonderful choice if you want to make slow-motion videos. Also, it allows users to change the speed of video clips per their needs. With slo-mo in iMovie, you can even fine-tune the speed of a single clip by splitting it into intervals, each with a different speed. You can set multiple ranges to cause a clip to speed up and down.
You can freeze a single frame in your film to create the illusion that time has stopped. The app is a fantastic option for Apple users who want to quickly add slow-motion effects to their videos. iMovie is a pretty straightforward tool that gives quick results. Follow the step-by-step guide below to slow down video in iMovie.
Step 1
Launch iMovie in your system and click “New Project.” Go to the “Movies” option to import the video you want to edit. Drag the media in the project timeline to make changes to it.

Step 2
Select the video from the timeline and click the speed icon that looks like a clock. From “Speed,” select the “Slow” option and choose the percentage of slow-motion effect you want to apply in your video. To set a customized slow-mo percentage, click “Speed” again and choose “Custom.” After that, manually add the percentage of how slow you want your video to be.

Part 3: A Great Alternative to Making Slow Motion Videos: Wondershare Filmora
iMovie slow motion is undoubtedly a simple solution for creating slow-mo videos. But sometimes, you need a tool with more advanced features than iMovie. If you want to access professional features with a simple interface, Wondershare Filmora is the right platform. The tool not only provides a precise slow-motion effect, but it has many other features that will leave you amazed.
You can control your video and edit it any way you like. Wondershare Filmora gives you the freedom to be creative. For both beginners and professionals, it is an excellent choice. This software is worth checking if you want to create a cinematic masterpiece.
Step-By-Step Guide to Make Slow Motion Videos with Optical Flow
Unlike the slow-mo in iMovie, the Filmora’s effect is much more advanced and provides professional results. Look at the easy steps below and slow down your video quickly.
Free Download For Win 7 or later(64-bit)
Free Download For macOS 10.14 or later
Step 1Ensure the Latest Version of Filmora and Import Media
Firstly, ensure that you are using the latest version of Filmora. After launching it in your system, access its editing screen through the “New Project” option in its main interface. Drag and drop your video into the timeline section after importing it. You can simply import by pressing the “Ctrl + I” keys from your keyboard.

Step 2Apply Slow-Motion and Use Optical Flow
After bringing media into the timeline, right-click on it. From the displayed list, look for the “Uniform Speed” option. Tap on it and get directed toward the right-side editing screen. There, you have to use the “Speed” slider and move to the left for slow videos or to the right for fast-speed videos.

When you are done adjusting speed, head down to the “AI Frame Interpolation” option. Extend its menu and choose “Optical Flow” to reduce the speed of your video while maintaining its quality.

Step 3Analyze and Save the Video by Customizing Export Options
Check if the function has been applied by playing the video. Lastly, select the “Export” button located in the screen’s upper right corner. From the “Export” window, adjust video parameters to save the video your desired way.

Key Features of Wondershare Filmora
Wondershare Filmora’s impressive tools never cease to impress. Let’s discuss a few of its remarkable features in video editing:
1. Instant Mode
This feature is perfect for creating quick social media videos. You can find a variety of templates and choose the one that best suits your video’s concept. There are more than 115 templates from business, travel, and Vlog categories. Instant mode will help you to rearrange video clips with AI algorithms that cut your 3 hours of editing time.
2. AI Smart Cutout
Removing an object from a video can be challenging while maintaining a natural appearance. Not more with Filmora’s AI smart cutout that can automatically remove unwanted items. It can detect and refine the cutout frame by frame to maintain perfection and high quality. Besides, you get different preview modes to modify certain areas.
3. Auto Beat Sync
Music and film with wonderful rhythm add an entertaining aspect to the content. Utilizing the auto-beat sync feature in Filmora is the way to do it. With this tool, your music and video will automatically match the clips. Furthermore, it can inevitably identify dark sides in your footage to delete them.
4. AI Copywriting
It’s challenging to develop exciting scripts or captions for your films. In situations like this, an AI copywriting tool is invaluable. ChatGPT integration in Filmora lets you get YouTube titles and descriptions that match your needs. To generate one, you must describe the content you want using natural language.
Conclusion
In short, the slow-motion effect is one of the most popular video effects used in movies. Thus, a good video editor is necessary whether you edit videos for entertainment or business purposes. Your video will not look good and will negatively impact the viewers if it is not edited well. Here, you have learned how to slow down video iMovie. If you want an advanced tool, try the alternative Wondershare Filmora.
What Is First Impression Review Video
There are many types of first impression reviews, it can be for gadgets, it can also be for products like skin care, makeup or it can also be home related like appliances, home decor etc. or any products that is available in the market. It depends on the content you choose but this are all example of some products that people want to see impression reviews before buying products.
Doing a first impression review is important specially for companies, because they want to know how the public will accept their products or what else should be changed in the products. The views and opinion of content creator and also for buyer are much needed of this company.
Using this video content to market will benefits the company and products, this is because people engage more with videos than with words or static photo.In this article I will share to you the information about first impression review video and tips on how to make an effective first impression product review.
First Impression Review Video
First impression review is more likely product reviews or live review, products reviews are the videos where you are explaining, products features, pros and cons are describe while first time to see the products. It include also a little of unboxing reviews, because when doing a first impression review, it show how you accept the product looks or what can you say about the product even if it’s the first time you see it.
A review has a simple goal, to check if the products is worth buying or not. It covers how the products helps you. This can involve examining or test the products performance, cost and more.

How this kind of content will help you
Let’s say you want to create content and you have thought or chosen to create these kind of video, so below are the benefits of how it can help to grow your channel.
- Strengthening your online presence
- Engaging viewers
- Building stronger community
- Converting viewers into buyers
- Opportunity to work with Brand
- Product Sponsorship
Tips on How to Perform Product First Impression Review
Include unboxing Video
Unboxing video is recording yourself while opening item for the first time. This opportunity can benefit people who are weighing multiple products before making a purchase. Unboxing videos can recreate the feeling of getting something new and enjoying it for the first time.
Its seems that it is same as you make a first impression video and It would be better if includes this type of video the unboxing of the product in front of the viewers so they see how you react about the product. The genuine reaction upon opening the product is always the best reaction they will see.
Unboxing video make people feel that way and the people behind the camera have knack for building excitement.

Detailed explanation
Detailed explanation meaning starting from the moment you open the package to details that are into the packaging of the products like the ingredients, manufacturer, expiration etc. Introduce the product properly and talk about the where you saw it or how you found out about this. Explain also the product claims that sometime you will read on the packaging but if luck of information you also need to search in their website or pages. Just don’t forget to include everything that you think people need to know about the product.
What include in the video is a commentary explaining to the viewers the features of a particular product. The review may typically includes the strengths and weaknesses of the products.
Talk about Product features and benefits
Products features are the characteristics of the products you are making a vlog. These are the plain facts about the products like the sizes, weight, functionality and benefits because viewers or customers are more likely to know the products performance. Make a list about all the features of the product you are reviewing, explain briefly each one so that viewers can better understand. The same with the benefits they will get if they buy this products.
When you use features in this manner, you help customers who have already decided to buy the product decide which version they are going to buy.

Share personal thoughts
Of course it’s important here that you can share your personal thoughts for the first time you see or touch the product. As an influencer for your viewers to believe and trust you, you just need to give your honest review about the product. Also share them your thoughts about the appearance, what should be change or fixed in the products if any.
Don’t forget to update your viewers when you already use the products. Make another video on how the product perform on you or how the product effects. So that the viewers know immediately if they will buy or not or if it is worth to buy.
Be honest when reviewing especially many viewers only rely on the video review of the influencers.

For Effective Video Performance and Promotion
You need to make the video better so that the brand will be more happy when they see that apart from your effort to search for good things about the products, they will also see your effort when it comes to video editing.
I’m talking about video editing software, you can see many in the market that can be downloaded for free but of course make sure if it’s performance wise to use.
Wondershare Filmora is one of the effective video editing software that can be use especially if you are a beginner in this kind of work.
Filmora has many great features that you can use to enhance the video you make. Use the color enhancer to make the color of the product you show in the video even better. Also use effects to make the video more creative and nice, don’t forget to use background music so the video isn’t boring. There are viewers that beside of how effective you are in doing product review, they are also commenting about the video editing. You have to make your video creative and stand out so that you can attract more viewers to your channel.

Free Download For Win 7 or later(64-bit)
Free Download For macOS 10.14 or later
After making your video creative by editing, it is important that you always promote your videos on all your social media or pages, so that many people can see your hard work, make all effort to get your video noticed by social networks, because nowadays social network make easy for people to share information thru videos. This sharing gives your vlog the potential to reach out to the audiences exponentially. The more entertaining and helpful you make your vlogs the better the chances of sharing.
Conclusion
For Business owners, they will get great benefits when they use influencer to promote their new products because apart from the great help of online promotion, many people also listen to what influencers or vlogger say, especially when they show how effective the product is or how the product perform well. The reason why other brand owner refers to vlogger to promote their brand is because it gives a sense of transparency in communication for the consumers. Although the vlog varies slightly different depending on the vlog, the vlogger appears in the video in a tone that sounds like telling a story to the friends or acquaintance.
Also read:
- [New] Enhancing Conversion Rates with Twitter Ads for 2024
- [New] Unleash Video Power on YouTube Without Spending a Dime (Frame by Frame)
- Do You Know How You Can Trim or Merge Using Wondershare Filmora? Trimming and Merging Using This Tool Is an Easy Task; Learn How for 2024
- Easy Steps to Loop YouTube Videos on iPhone
- How to Change Google Play Location On Realme Narzo N53 | Dr.fone
- How to Fade in Text in Adobe Premiere Pro for 2024
- How to Track Samsung Galaxy M34 5G Location without Installing Software? | Dr.fone
- How To Transfer WhatsApp From iPhone 6 to other iPhone 11 Pro devices? | Dr.fone
- In 2024, Prevent Cross-Site Tracking on Tecno Phantom V Fold and Browser | Dr.fone
- In 2024, Sim Unlock Nubia Z50S Pro Phones without Code 2 Ways to Remove Android Sim Lock
- Navigating Top Video Professionals for 2024
- New 2024 Approved Easy Steps to Export Video in Filmora
- The 411 on Navigating YouTube Shorts for 2024
- Title: How to Make Eye Zoom Transition Effect with Filmora
- Author: Chloe
- Created at : 2024-10-01 01:55:47
- Updated at : 2024-10-03 10:03:41
- Link: https://ai-editing-video.techidaily.com/how-to-make-eye-zoom-transition-effect-with-filmora/
- License: This work is licensed under CC BY-NC-SA 4.0.

