:max_bytes(150000):strip_icc():format(webp)/movie-night-at-home-with-popcorn_t20_yv3PA9-5c815f7fc9e77c0001fd5b49.jpg)
How to Make Glitch Effect with Filmora

How to Make Glitch Effect with Filmora
You don’t need outdated VCRs or any other broken technology to produce glitch effects. Instead, you can use a video editing program for Mac and PCs, such as Filmora , to transform your videos into glitch-effect masterpieces. You can also use the glitch effects to provide striking shot transitions or opening titles. Keep reading this article on how to apply various glitch video effects in Filmora 11:
Part 1: What is a Glitch Effect?
A glitch effect occurs when a section of your video temporarily changes look or “glitches” for a short while. Although transient glitches are typical, they can occasionally linger for a few seconds or more.

You can use a glitch effect to temporarily change the appearance of the image in the video to give the impression that a machine is processing it. Additionally, it gives your finished piece a fantastic, dreamlike aspect.
Part 2: When Should you Apply a Glitch Effect?
A few years back, we had no choice but to watch glitchy movies on rusty VCR devices. Nowadays, retro video effects are very popular in TV movies and even games. You can use these effects in many ways, like making fake vintage footage or emulating a glitching computer.
Filmmakers frequently employ glitching in their videos to give the impression that a character has been affected by a technical abnormality, is having a flashback, or is being watched by someone else via a digital camera system. Something happens when the person or image flashes, often without their knowledge. In addition, you can apply the glitch effect to a composition to evoke a feeling of dramatic irony.
Part 3: Tutorial to Chromatic Aberration Effect
Chromatic aberration refers to how old lenses tend to split colors. This effect is very common in Old media like VHS or LaserDisc.

Here is a complete breakdown of each component of the Retro look and how you can make your glitch effects in Filmora 11:
Step1 Download Wondersshare Filmora 11 on your Pc by visiting filmora.wondershare.com.

Step2 Open Filmora and click on the Effects tab.
Step3 Search Chromatic aberration and drag the effect right onto your clip. It will give you a fantastic pre-made version of the effect.
Part 4: How to Customize Glitch Effect with Filmora
You can add final touches to your video clips by customizing Filmora’s effects to take your glitch effect to the next level. You can mix and match different effects in your video to create your custom glitch effect in Filmora 11.
Free Download For Win 7 or later(64-bit)
Free Download For macOS 10.14 or later
Step1 Once you have your clip on the timeline, select your clip and click on Edit. Now choose Duplicate to create two more copies.

Step2 Put the new copies on the layer above the others and make sure everything is lined up exactly. To create the glitch effect, separate the color channels on your Clips into the primary colors red, green, and blue.

Step3 Double-click on the top clip.

Go to Color and open the White Balance option to make this layer completely red. Next, drag both Temperature and Tint sliders to a hundred.

Step4 Now click the little eye icon on the timeline to hide the top layer and move on to the middle layer.
Step5 Double-click on your middle clip and go to Color, then select White Balance and set your Temperature to -100 and your Tint to 100.

Step6 Finally, hide this layer just like before. Repeat the same steps for the last clip but make this clip the blue layer by leaving the Temperature at zero and setting the Tint to -100.

Step7 Double-click the clip in the top layer, click the Video Tab, and open the Compositing options. Set the Blending Mode of this top layer to Soft Light.

Now click on the clip in your preview window and move the image over by pressing the left Arrow key on your keyboard a few times. Once you’re happy with the top clip, hide that layer by clicking the eye icon.

Step8 To make the middle layer visible, double-click the clip in your mid layer and set the Blending Mode of this layer to Screen.

Now click on your clip in the preview window and press the Right key as many times as you did before. Finally, make all the layers visible by clicking the eye icon.

Vignette
A vignette is a dark border that fades around the frame’s edges in Filmora. You can easily add a vignette effect to your video by using these steps:
Step1 First, click the Effects Tab and type in Vignette.
Step2 Next, drag the Vignette Radius effect to a layer above your previous three layers.
Step3 Now adjust the length to match the other clips.
VHS static effects
A VHS effect is a grainy distortion that resembles an old analog video cassette recording. To apply the VHS static effects:
Step1 Click the Effects tab.
Step2 Search for the VHS static and drag it to a new layer above everything else.
Step3 Extend one of the effects to match the length of your previous clips.
VCR Distortion
VCR Distortion effect will make your video look highly glitched. To apply this effect:
Step1 Click on the Effects tab.
Step2 Search for VCR Distortion, then drag and drop this effect over your previous layer.
Part 5: Tips to Create Awesome Glitch Effects
- One of the best ways to use the VCR Distortion effect is to cut it short and intersperse it around your video in random parts.
- The glitch Distortion effect is very intense, so we recommend cutting this effect very short and dropping it at random parts of your video.
- You can also use these effects as a sneaky way to hide Cuts in your video.
Summary
You can use glitch effects created or inspired by faulty video equipment as a powerful storytelling tool. These effects can help you change the tone of the entire video by adding a specific visual aesthetic and making the narrative simpler to convey and more approachable for the audience.
We recommend using Filmora 11 for adding built-in glitch effects. You can also use this app to create custom glitch effects within a few minutes.
Free Download For macOS 10.14 or later
Step1 Once you have your clip on the timeline, select your clip and click on Edit. Now choose Duplicate to create two more copies.

Step2 Put the new copies on the layer above the others and make sure everything is lined up exactly. To create the glitch effect, separate the color channels on your Clips into the primary colors red, green, and blue.

Step3 Double-click on the top clip.

Go to Color and open the White Balance option to make this layer completely red. Next, drag both Temperature and Tint sliders to a hundred.

Step4 Now click the little eye icon on the timeline to hide the top layer and move on to the middle layer.
Step5 Double-click on your middle clip and go to Color, then select White Balance and set your Temperature to -100 and your Tint to 100.

Step6 Finally, hide this layer just like before. Repeat the same steps for the last clip but make this clip the blue layer by leaving the Temperature at zero and setting the Tint to -100.

Step7 Double-click the clip in the top layer, click the Video Tab, and open the Compositing options. Set the Blending Mode of this top layer to Soft Light.

Now click on the clip in your preview window and move the image over by pressing the left Arrow key on your keyboard a few times. Once you’re happy with the top clip, hide that layer by clicking the eye icon.

Step8 To make the middle layer visible, double-click the clip in your mid layer and set the Blending Mode of this layer to Screen.

Now click on your clip in the preview window and press the Right key as many times as you did before. Finally, make all the layers visible by clicking the eye icon.

Vignette
A vignette is a dark border that fades around the frame’s edges in Filmora. You can easily add a vignette effect to your video by using these steps:
Step1 First, click the Effects Tab and type in Vignette.
Step2 Next, drag the Vignette Radius effect to a layer above your previous three layers.
Step3 Now adjust the length to match the other clips.
VHS static effects
A VHS effect is a grainy distortion that resembles an old analog video cassette recording. To apply the VHS static effects:
Step1 Click the Effects tab.
Step2 Search for the VHS static and drag it to a new layer above everything else.
Step3 Extend one of the effects to match the length of your previous clips.
VCR Distortion
VCR Distortion effect will make your video look highly glitched. To apply this effect:
Step1 Click on the Effects tab.
Step2 Search for VCR Distortion, then drag and drop this effect over your previous layer.
Part 5: Tips to Create Awesome Glitch Effects
- One of the best ways to use the VCR Distortion effect is to cut it short and intersperse it around your video in random parts.
- The glitch Distortion effect is very intense, so we recommend cutting this effect very short and dropping it at random parts of your video.
- You can also use these effects as a sneaky way to hide Cuts in your video.
Summary
You can use glitch effects created or inspired by faulty video equipment as a powerful storytelling tool. These effects can help you change the tone of the entire video by adding a specific visual aesthetic and making the narrative simpler to convey and more approachable for the audience.
We recommend using Filmora 11 for adding built-in glitch effects. You can also use this app to create custom glitch effects within a few minutes.
Guide to Create Intro Video with KineMaster
The intro is considered to be the most important part of a video. The intro comes first in a video and the first impression is crucial in retaining the viewers. If the intro is gripping and engaging, the viewers are likely to check the rest of the video. In order to create a stunning video, you need to have the best video editor. If you are a smartphone user, KineMaster intro maker should be your first choice.
You must have seen videos with stunning intro having KineMaster watermark on social media and video streaming platforms. Starting from beginners to professional video creators, KineMaster is an easy choice for them to make video intro. KineMaster is a powerful intro maker where you will find several templates, effects, and modes to create stunning intros for your videos. We will illustrate the steps to create intro video with KineMaster Intro Maker.
Part 1. Steps to Create Intro Video with KineMaster
KineMaster video editor is one of the most intuitive apps and that is why creating amazing intro videos is super easy. KineMaster app is available for both Android and iOS users. There are awesome assets, amazing templates, and useful blending modes available to design your desired intro video. You can create 4K intro videos at 60 FPS comfortably. Here are the steps to create intro KineMaster video.
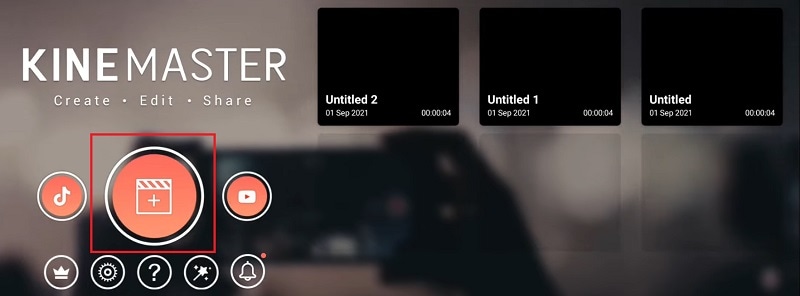
Step 1: Go for KineMaster intro download as per your smartphone OS. Launch KineMaster app and tap on Create New icon on the home screen.
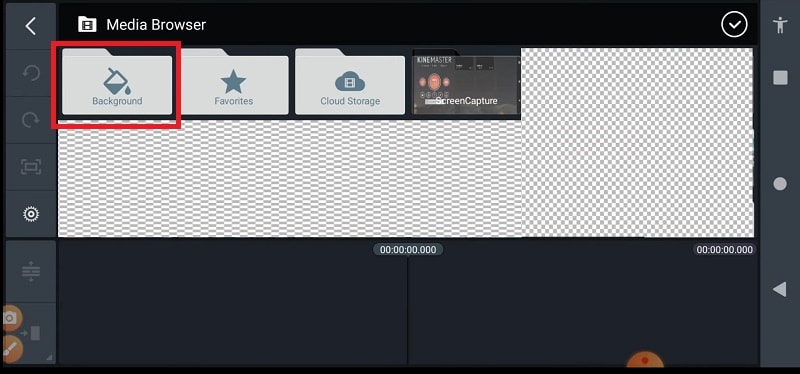
Step 2: Select an aspect ratio such as 16:9 or 9:16 or 1:1 as per your requirements. On the next screen, tap on Background and select a background as per your preference.
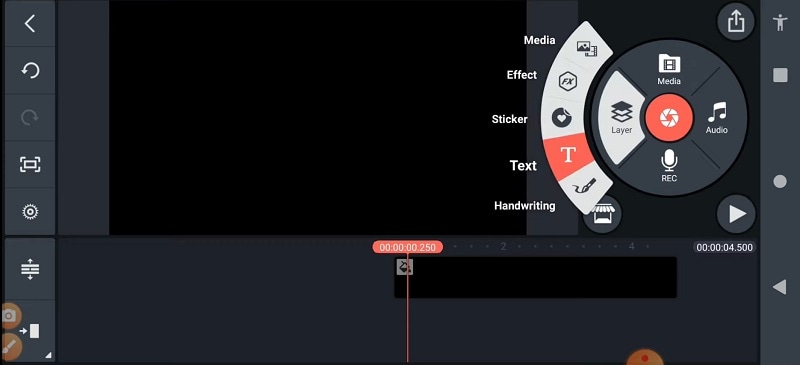
Step 3: On the layer at the bottom and select Text option. Type in your text that you want to show in the intro and tap on Ok button. You can change the font and style from the right panel.
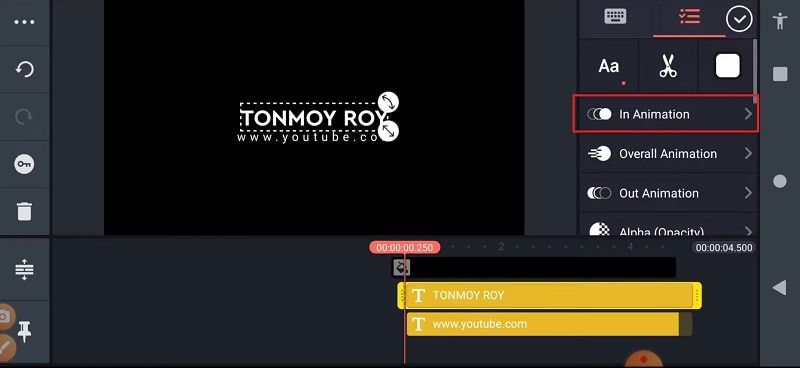
Step 4: Select the text layer and from the right panel, tap on In Animation option to animate the text. Select a desired animation template that you think is appropriate.
Step 5: Tap on the text layer again and tap on Effect option to add a text effect. Choose any desired Effect from the list. You can also tap on Get More to check out more effect templates.
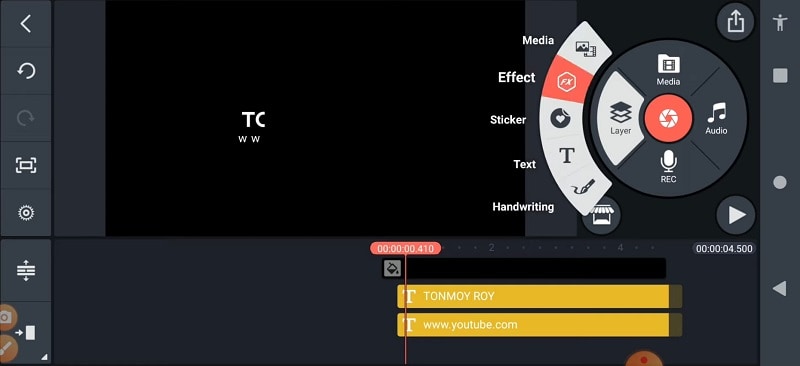
After you apply an effect, select the Effect layer from the timeline and go to Settings to make any adjustment. You can play and watch the intro video. Besides, you can add background photo or video and add graphical elements to enhance the intro animation.
Part 2. How to Create 3D Intro with KineMaster
We have illustrated how to create a text intro video and you can try out different animations and effects and come up with creative intro video. There is a viral trend in showing 3D intro to get more traction. You can use KineMaster to create amazing 3D intro videos easily that can go along with your video content. Here are the simple steps on how you can create 3D video with KineMaster.
Step 1: Install KineMaster from Play Store or App Store as per your smartphone OS. Launch KineMaster app after installation and tap on Create New icon.
Step 2: Select an aspect ratio and tap on Background option. Select a background color as per your preference. Otherwise, you can tap on Media Browser if you want to add a pre-decided photo or video as a background. We recommend a background video to amplify the 3D effect.
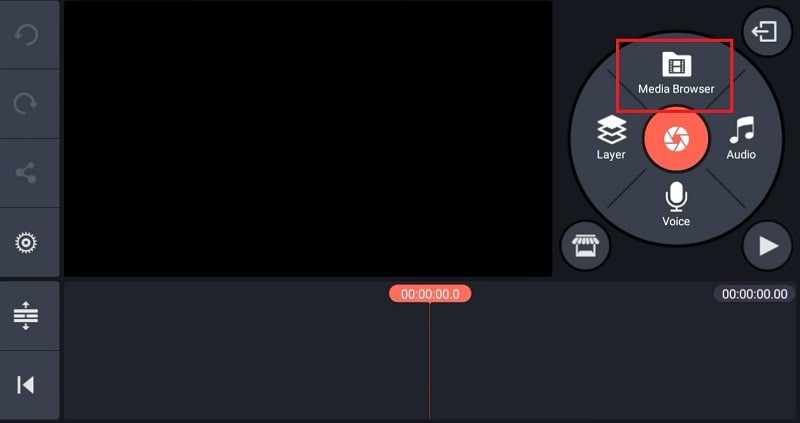
Step 3: It is time to add a 3D title. You can tap on Layer icon and Text icon to type in any title that you can turn into 3D with text effect or style. You can also tap on Media icon to select a ready-made 3D text with a transparent background. After adding the text, you can stretch it to increase the size as per your preference.
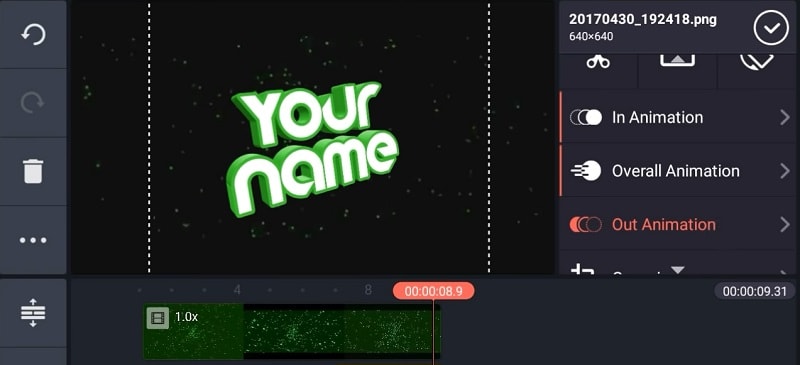
Step 4: From the right panel, tap on In Animation option and select a desired animation template. Similarly, tap on Out Animation option and select any animation whichever you think it is fit.
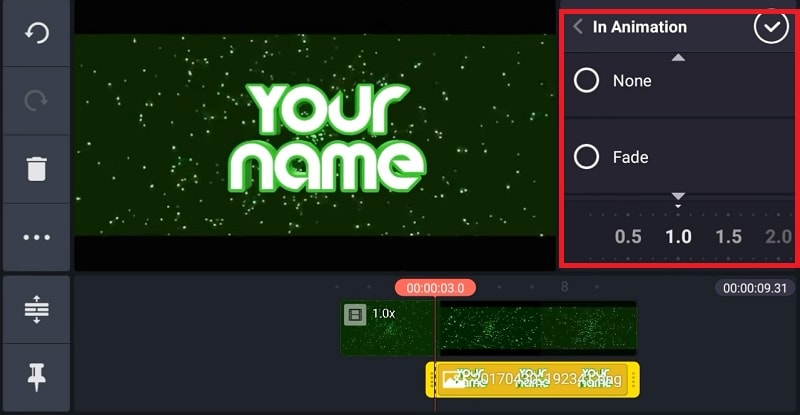
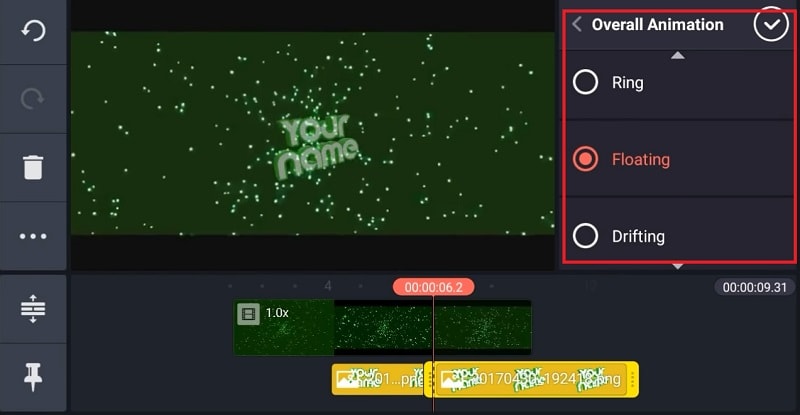
Step 5: From the right panel, tap on Overall Animation, select an animation template such as floating to enhance the 3D effect.
Part 3. Related FAQs of KineMaster Intro Video
What app most YouTubers use to make intros?
Apart from KineMaster, most YouTubers use Wondershare Filmora to make amazing videos. Filmora has a wider range of video effects, animations, and stock photos and videos. On top of that, the text animation and effect templates are tailor-made for intro videos.
Is KineMaster good for making YouTube videos?
Yes, KineMaster is good for creating engaging YouTube videos. You can create amazing intro and outro for your YouTube video on your smartphone. You can blend your photos and videos together and create amazing YouTube videos and stunning texts and titles. Besides, you can use chroma keys, transitions, reverse timing, and multi-layer features.
Can KineMaster handle 4K?
Yes, KineMaster is perfect for editing 4K video taken with high-end cameras. After editing the videos, you can export them in 4K resolution up to 60 FPS. However, you will need a high-end smartphone for KineMaster to handle 4K video editing smoothl
The intro is considered to be the most important part of a video. The intro comes first in a video and the first impression is crucial in retaining the viewers. If the intro is gripping and engaging, the viewers are likely to check the rest of the video. In order to create a stunning video, you need to have the best video editor. If you are a smartphone user, KineMaster intro maker should be your first choice.
You must have seen videos with stunning intro having KineMaster watermark on social media and video streaming platforms. Starting from beginners to professional video creators, KineMaster is an easy choice for them to make video intro. KineMaster is a powerful intro maker where you will find several templates, effects, and modes to create stunning intros for your videos. We will illustrate the steps to create intro video with KineMaster Intro Maker.
Part 1. Steps to Create Intro Video with KineMaster
KineMaster video editor is one of the most intuitive apps and that is why creating amazing intro videos is super easy. KineMaster app is available for both Android and iOS users. There are awesome assets, amazing templates, and useful blending modes available to design your desired intro video. You can create 4K intro videos at 60 FPS comfortably. Here are the steps to create intro KineMaster video.
Step 1: Go for KineMaster intro download as per your smartphone OS. Launch KineMaster app and tap on Create New icon on the home screen.

Step 2: Select an aspect ratio such as 16:9 or 9:16 or 1:1 as per your requirements. On the next screen, tap on Background and select a background as per your preference.

Step 3: On the layer at the bottom and select Text option. Type in your text that you want to show in the intro and tap on Ok button. You can change the font and style from the right panel.

Step 4: Select the text layer and from the right panel, tap on In Animation option to animate the text. Select a desired animation template that you think is appropriate.

Step 5: Tap on the text layer again and tap on Effect option to add a text effect. Choose any desired Effect from the list. You can also tap on Get More to check out more effect templates.

After you apply an effect, select the Effect layer from the timeline and go to Settings to make any adjustment. You can play and watch the intro video. Besides, you can add background photo or video and add graphical elements to enhance the intro animation.
Part 2. How to Create 3D Intro with KineMaster
We have illustrated how to create a text intro video and you can try out different animations and effects and come up with creative intro video. There is a viral trend in showing 3D intro to get more traction. You can use KineMaster to create amazing 3D intro videos easily that can go along with your video content. Here are the simple steps on how you can create 3D video with KineMaster.
Step 1: Install KineMaster from Play Store or App Store as per your smartphone OS. Launch KineMaster app after installation and tap on Create New icon.
Step 2: Select an aspect ratio and tap on Background option. Select a background color as per your preference. Otherwise, you can tap on Media Browser if you want to add a pre-decided photo or video as a background. We recommend a background video to amplify the 3D effect.

Step 3: It is time to add a 3D title. You can tap on Layer icon and Text icon to type in any title that you can turn into 3D with text effect or style. You can also tap on Media icon to select a ready-made 3D text with a transparent background. After adding the text, you can stretch it to increase the size as per your preference.

Step 4: From the right panel, tap on In Animation option and select a desired animation template. Similarly, tap on Out Animation option and select any animation whichever you think it is fit.

Step 5: From the right panel, tap on Overall Animation, select an animation template such as floating to enhance the 3D effect.

Part 3. Related FAQs of KineMaster Intro Video
What app most YouTubers use to make intros?
Apart from KineMaster, most YouTubers use Wondershare Filmora to make amazing videos. Filmora has a wider range of video effects, animations, and stock photos and videos. On top of that, the text animation and effect templates are tailor-made for intro videos.
Is KineMaster good for making YouTube videos?
Yes, KineMaster is good for creating engaging YouTube videos. You can create amazing intro and outro for your YouTube video on your smartphone. You can blend your photos and videos together and create amazing YouTube videos and stunning texts and titles. Besides, you can use chroma keys, transitions, reverse timing, and multi-layer features.
Can KineMaster handle 4K?
Yes, KineMaster is perfect for editing 4K video taken with high-end cameras. After editing the videos, you can export them in 4K resolution up to 60 FPS. However, you will need a high-end smartphone for KineMaster to handle 4K video editing smoothl
The intro is considered to be the most important part of a video. The intro comes first in a video and the first impression is crucial in retaining the viewers. If the intro is gripping and engaging, the viewers are likely to check the rest of the video. In order to create a stunning video, you need to have the best video editor. If you are a smartphone user, KineMaster intro maker should be your first choice.
You must have seen videos with stunning intro having KineMaster watermark on social media and video streaming platforms. Starting from beginners to professional video creators, KineMaster is an easy choice for them to make video intro. KineMaster is a powerful intro maker where you will find several templates, effects, and modes to create stunning intros for your videos. We will illustrate the steps to create intro video with KineMaster Intro Maker.
Part 1. Steps to Create Intro Video with KineMaster
KineMaster video editor is one of the most intuitive apps and that is why creating amazing intro videos is super easy. KineMaster app is available for both Android and iOS users. There are awesome assets, amazing templates, and useful blending modes available to design your desired intro video. You can create 4K intro videos at 60 FPS comfortably. Here are the steps to create intro KineMaster video.
Step 1: Go for KineMaster intro download as per your smartphone OS. Launch KineMaster app and tap on Create New icon on the home screen.

Step 2: Select an aspect ratio such as 16:9 or 9:16 or 1:1 as per your requirements. On the next screen, tap on Background and select a background as per your preference.

Step 3: On the layer at the bottom and select Text option. Type in your text that you want to show in the intro and tap on Ok button. You can change the font and style from the right panel.

Step 4: Select the text layer and from the right panel, tap on In Animation option to animate the text. Select a desired animation template that you think is appropriate.

Step 5: Tap on the text layer again and tap on Effect option to add a text effect. Choose any desired Effect from the list. You can also tap on Get More to check out more effect templates.

After you apply an effect, select the Effect layer from the timeline and go to Settings to make any adjustment. You can play and watch the intro video. Besides, you can add background photo or video and add graphical elements to enhance the intro animation.
Part 2. How to Create 3D Intro with KineMaster
We have illustrated how to create a text intro video and you can try out different animations and effects and come up with creative intro video. There is a viral trend in showing 3D intro to get more traction. You can use KineMaster to create amazing 3D intro videos easily that can go along with your video content. Here are the simple steps on how you can create 3D video with KineMaster.
Step 1: Install KineMaster from Play Store or App Store as per your smartphone OS. Launch KineMaster app after installation and tap on Create New icon.
Step 2: Select an aspect ratio and tap on Background option. Select a background color as per your preference. Otherwise, you can tap on Media Browser if you want to add a pre-decided photo or video as a background. We recommend a background video to amplify the 3D effect.

Step 3: It is time to add a 3D title. You can tap on Layer icon and Text icon to type in any title that you can turn into 3D with text effect or style. You can also tap on Media icon to select a ready-made 3D text with a transparent background. After adding the text, you can stretch it to increase the size as per your preference.

Step 4: From the right panel, tap on In Animation option and select a desired animation template. Similarly, tap on Out Animation option and select any animation whichever you think it is fit.

Step 5: From the right panel, tap on Overall Animation, select an animation template such as floating to enhance the 3D effect.

Part 3. Related FAQs of KineMaster Intro Video
What app most YouTubers use to make intros?
Apart from KineMaster, most YouTubers use Wondershare Filmora to make amazing videos. Filmora has a wider range of video effects, animations, and stock photos and videos. On top of that, the text animation and effect templates are tailor-made for intro videos.
Is KineMaster good for making YouTube videos?
Yes, KineMaster is good for creating engaging YouTube videos. You can create amazing intro and outro for your YouTube video on your smartphone. You can blend your photos and videos together and create amazing YouTube videos and stunning texts and titles. Besides, you can use chroma keys, transitions, reverse timing, and multi-layer features.
Can KineMaster handle 4K?
Yes, KineMaster is perfect for editing 4K video taken with high-end cameras. After editing the videos, you can export them in 4K resolution up to 60 FPS. However, you will need a high-end smartphone for KineMaster to handle 4K video editing smoothl
The intro is considered to be the most important part of a video. The intro comes first in a video and the first impression is crucial in retaining the viewers. If the intro is gripping and engaging, the viewers are likely to check the rest of the video. In order to create a stunning video, you need to have the best video editor. If you are a smartphone user, KineMaster intro maker should be your first choice.
You must have seen videos with stunning intro having KineMaster watermark on social media and video streaming platforms. Starting from beginners to professional video creators, KineMaster is an easy choice for them to make video intro. KineMaster is a powerful intro maker where you will find several templates, effects, and modes to create stunning intros for your videos. We will illustrate the steps to create intro video with KineMaster Intro Maker.
Part 1. Steps to Create Intro Video with KineMaster
KineMaster video editor is one of the most intuitive apps and that is why creating amazing intro videos is super easy. KineMaster app is available for both Android and iOS users. There are awesome assets, amazing templates, and useful blending modes available to design your desired intro video. You can create 4K intro videos at 60 FPS comfortably. Here are the steps to create intro KineMaster video.
Step 1: Go for KineMaster intro download as per your smartphone OS. Launch KineMaster app and tap on Create New icon on the home screen.

Step 2: Select an aspect ratio such as 16:9 or 9:16 or 1:1 as per your requirements. On the next screen, tap on Background and select a background as per your preference.

Step 3: On the layer at the bottom and select Text option. Type in your text that you want to show in the intro and tap on Ok button. You can change the font and style from the right panel.

Step 4: Select the text layer and from the right panel, tap on In Animation option to animate the text. Select a desired animation template that you think is appropriate.

Step 5: Tap on the text layer again and tap on Effect option to add a text effect. Choose any desired Effect from the list. You can also tap on Get More to check out more effect templates.

After you apply an effect, select the Effect layer from the timeline and go to Settings to make any adjustment. You can play and watch the intro video. Besides, you can add background photo or video and add graphical elements to enhance the intro animation.
Part 2. How to Create 3D Intro with KineMaster
We have illustrated how to create a text intro video and you can try out different animations and effects and come up with creative intro video. There is a viral trend in showing 3D intro to get more traction. You can use KineMaster to create amazing 3D intro videos easily that can go along with your video content. Here are the simple steps on how you can create 3D video with KineMaster.
Step 1: Install KineMaster from Play Store or App Store as per your smartphone OS. Launch KineMaster app after installation and tap on Create New icon.
Step 2: Select an aspect ratio and tap on Background option. Select a background color as per your preference. Otherwise, you can tap on Media Browser if you want to add a pre-decided photo or video as a background. We recommend a background video to amplify the 3D effect.

Step 3: It is time to add a 3D title. You can tap on Layer icon and Text icon to type in any title that you can turn into 3D with text effect or style. You can also tap on Media icon to select a ready-made 3D text with a transparent background. After adding the text, you can stretch it to increase the size as per your preference.

Step 4: From the right panel, tap on In Animation option and select a desired animation template. Similarly, tap on Out Animation option and select any animation whichever you think it is fit.

Step 5: From the right panel, tap on Overall Animation, select an animation template such as floating to enhance the 3D effect.

Part 3. Related FAQs of KineMaster Intro Video
What app most YouTubers use to make intros?
Apart from KineMaster, most YouTubers use Wondershare Filmora to make amazing videos. Filmora has a wider range of video effects, animations, and stock photos and videos. On top of that, the text animation and effect templates are tailor-made for intro videos.
Is KineMaster good for making YouTube videos?
Yes, KineMaster is good for creating engaging YouTube videos. You can create amazing intro and outro for your YouTube video on your smartphone. You can blend your photos and videos together and create amazing YouTube videos and stunning texts and titles. Besides, you can use chroma keys, transitions, reverse timing, and multi-layer features.
Can KineMaster handle 4K?
Yes, KineMaster is perfect for editing 4K video taken with high-end cameras. After editing the videos, you can export them in 4K resolution up to 60 FPS. However, you will need a high-end smartphone for KineMaster to handle 4K video editing smoothl
10 Mind-Blowing Video Collage Maker for PC
10 Mind-Blowing Video Collage Maker for PC
An easy yet powerful editor
Numerous effects to choose from
Detailed tutorials provided by the official channel
Video collages are a great way to play multiple short videos at the same time. These collages can be used for different purposes and platforms like social media platforms, online video sharing sites, brand promotion, announcing an event or a service, and similar others.
Whatever may be the situation, you would need a good and feature-packed tool for creating such a collage so that videos look perfect in a frame, background audio can be added, and other customizations can be done. Keep reading below to learn about the best video collage maker for PC.
In this article
01 [Top 10 Video Collage Makers for Pc](#Part 1)
02 [Alternatives to Video Collage Maker for Pc](#Part 2)
Part 1 Top 10 video collage makers for PC
Among the long list of tools available, below we have shortlisted the top 10 PC tools that can be used for creating a video collage.
01**Wondershare Filmora Video Editor **
This Windows and Mac-based software is the best choice when it comes to creating a simple video collage in an effortless manner.
Key features
● Create a video collage using the split-screen feature of the software.
● Excellent video editing tool supporting advanced features for creating professional-looking videos.
● Support customizable animation options along with precise editing functions.
● Support to multiple audio-related features like automatic audio sync, audio compression, audio transitions, and more.
● Offers of stock collection of images, and other media files.
● Windows and Mac support.
For Win 7 or later (64-bit)
For macOS 10.12 or later
04Movavi Video Editor Plus
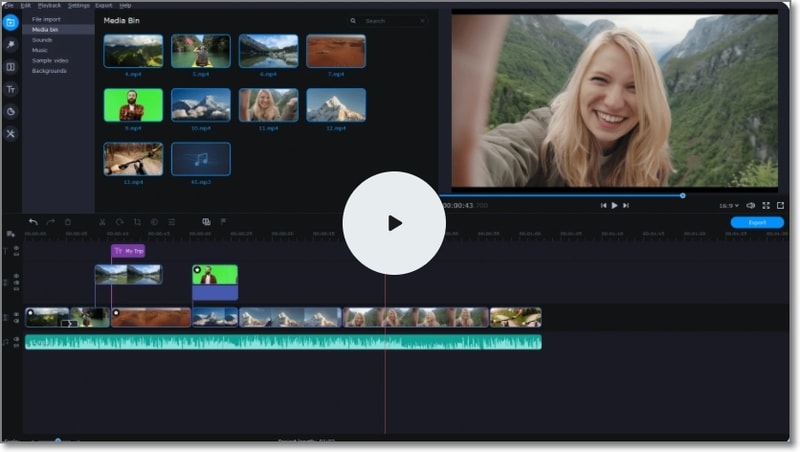
Unleash your creativity and make stunning videos including video collages using this excellent software.
Key features:
● Create stunning video collages with multiple video customization options.
● Allows adding titles, transitions, stickers, and filters.
● Option to apply chroma-key for changing the background.
● Option for creating automatic video collages.
● User-friendly interface.
● Windows and Mac support.
05Aiseesoft Video Converter Ultimate
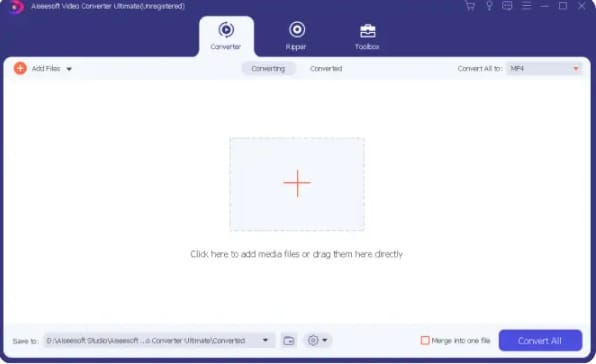
Though the name suggests the software to be a video conversion tool, it is a multi-tasking software that can perform a variety of functions including video collage making and thus can be considered as a decent video collage app for PC.
Key features
● A feature-rich program that can also be used for creating a video collage.
● Allows performing a variety of features like video conversion, editing, compression, and more.
● Option for editing the video effects and also editing ID3 info.
● Create interesting GIF animations.
● Simple and easy-to-understand layout.
● Windows and Mac support.
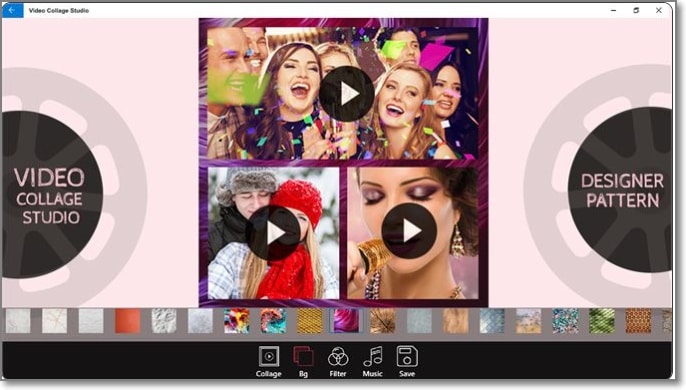
06Cidade Video Collage Studio
Using this intuitive tool, you can quickly create a video collage by combining all your favorite videos in one place.
Key features
● Create a video collage by combining multiple videos or creating a video grid.
● Intuitive and user-friendly interface.
● Multiple-grid options to choose from.
● Allows applying effects like Sepia, Lomo, and others.
● Background audio or music files can be added.
● Option to change the background color and also preview the video.
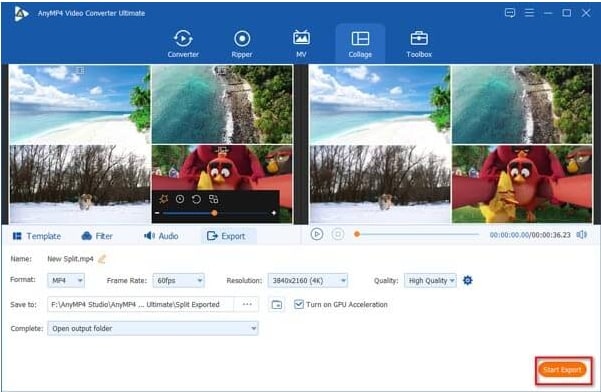
07Blu-ray Master Video Converter Ultimate
This is a video toolbox supporting multiple functions that also include creating a video collage.
Key feature
● Create a video collage using high-quality videos.
● Support customizing and editing videos using several built-in tools.
● Video conversion to over 500 formats supported.
● Multiple layouts and templates for video collage are available.
● Almost all video, image, and audio formats are supported.
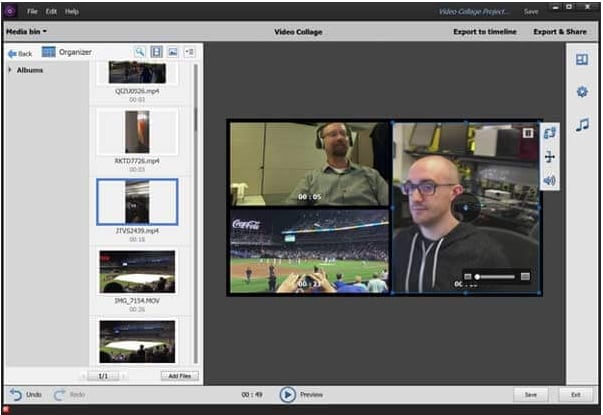
08Adobe Premiere Elements
If you are looking for an advanced and professional tool for creating a video collage and for other video editing needs, this is the right choice.
Key features:
● Create professional-looking collages using high-quality video files.
● The interface is clean with support for advanced functions.
● Option for adding multiple video effects.
● Comes with help documents and guides to help you with the software functions.
● Windows and Mac support.
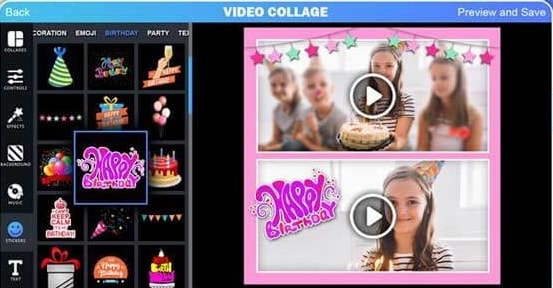
09Collage Maker
For creating a simple video collage on your Windows system this is a good tool to consider.
Key features
● Simple and basic collage-making tool.
● Comes with customizable and adjustable layout options.
● Option to add stickers ad text to the collage.
● Allows mixing videos, and images along with the music file.
1010. iMovie
For Mac users, iMovie is the default video editing tool that is pre-installed on the system. Besides editing functions, the tool can also perform other tasks like creating a video collage.
Key features:
● Allows to quickly create a video collage.
● Intuitive interface.
● Comes pre-installed with Mac systems.
● Transitions and other effects can be added.
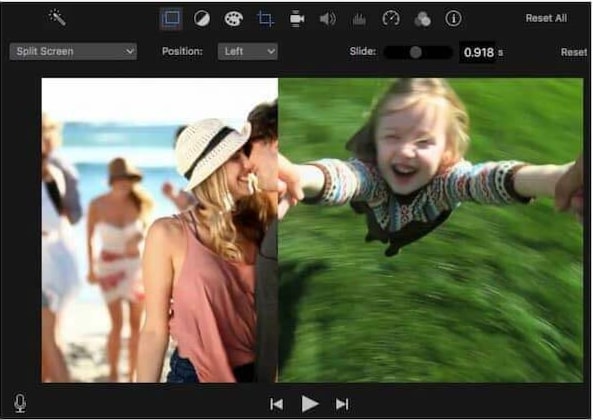
Part 2 Alternatives to video collage maker for PC
If you do not want to download any additional software on your PC for creating a video collage, there are alternatives available in form of online tools and phone-based apps. The online tools are free and simple to use supporting all basic and needed functions. Some of the popular names in the category include FastReels, Typito, Kapwing, and more.
Apps are a great option when you want to create a collage on your mobile phone. Multiple apps for the task are available on the Google play store and Apple Store. Some of the widely used ones are PicStich, PicPlayPost Movie Video Editor, Mojo, and others.
● Ending Thoughts →
● Video collages are an interesting way to combine and play short multiple videos or play them in a grid.
● There are several PC-based video collage maker tools available like Wondershare Filmora, and others.
● As alternatives, you can use online tools or phone-based apps for creating a video collage.
Video collages are a great way to play multiple short videos at the same time. These collages can be used for different purposes and platforms like social media platforms, online video sharing sites, brand promotion, announcing an event or a service, and similar others.

Whatever may be the situation, you would need a good and feature-packed tool for creating such a collage so that videos look perfect in a frame, background audio can be added, and other customizations can be done. Keep reading below to learn about the best video collage maker for PC.
In this article
01 [Top 10 Video Collage Makers for Pc](#Part 1)
02 [Alternatives to Video Collage Maker for Pc](#Part 2)
Part 1 Top 10 video collage makers for PC
Among the long list of tools available, below we have shortlisted the top 10 PC tools that can be used for creating a video collage.
01**Wondershare Filmora Video Editor **
This Windows and Mac-based software is the best choice when it comes to creating a simple video collage in an effortless manner.
Key features
● Create a video collage using the split-screen feature of the software.
● Excellent video editing tool supporting advanced features for creating professional-looking videos.
● Support customizable animation options along with precise editing functions.
● Support to multiple audio-related features like automatic audio sync, audio compression, audio transitions, and more.
● Offers of stock collection of images, and other media files.
● Windows and Mac support.
For Win 7 or later (64-bit)
For macOS 10.12 or later
04Movavi Video Editor Plus
Unleash your creativity and make stunning videos including video collages using this excellent software.
Key features:
● Create stunning video collages with multiple video customization options.
● Allows adding titles, transitions, stickers, and filters.
● Option to apply chroma-key for changing the background.
● Option for creating automatic video collages.
● User-friendly interface.
● Windows and Mac support.

05Aiseesoft Video Converter Ultimate
Though the name suggests the software to be a video conversion tool, it is a multi-tasking software that can perform a variety of functions including video collage making and thus can be considered as a decent video collage app for PC.
Key features
● A feature-rich program that can also be used for creating a video collage.
● Allows performing a variety of features like video conversion, editing, compression, and more.
● Option for editing the video effects and also editing ID3 info.
● Create interesting GIF animations.
● Simple and easy-to-understand layout.
● Windows and Mac support.

06Cidade Video Collage Studio
Using this intuitive tool, you can quickly create a video collage by combining all your favorite videos in one place.
Key features
● Create a video collage by combining multiple videos or creating a video grid.
● Intuitive and user-friendly interface.
● Multiple-grid options to choose from.
● Allows applying effects like Sepia, Lomo, and others.
● Background audio or music files can be added.
● Option to change the background color and also preview the video.

07Blu-ray Master Video Converter Ultimate
This is a video toolbox supporting multiple functions that also include creating a video collage.
Key feature
● Create a video collage using high-quality videos.
● Support customizing and editing videos using several built-in tools.
● Video conversion to over 500 formats supported.
● Multiple layouts and templates for video collage are available.
● Almost all video, image, and audio formats are supported.

08Adobe Premiere Elements
If you are looking for an advanced and professional tool for creating a video collage and for other video editing needs, this is the right choice.
Key features:
● Create professional-looking collages using high-quality video files.
● The interface is clean with support for advanced functions.
● Option for adding multiple video effects.
● Comes with help documents and guides to help you with the software functions.
● Windows and Mac support.

09Collage Maker
For creating a simple video collage on your Windows system this is a good tool to consider.
Key features
● Simple and basic collage-making tool.
● Comes with customizable and adjustable layout options.
● Option to add stickers ad text to the collage.
● Allows mixing videos, and images along with the music file.

1010. iMovie
For Mac users, iMovie is the default video editing tool that is pre-installed on the system. Besides editing functions, the tool can also perform other tasks like creating a video collage.
Key features:
● Allows to quickly create a video collage.
● Intuitive interface.
● Comes pre-installed with Mac systems.
● Transitions and other effects can be added.

Part 2 Alternatives to video collage maker for PC
If you do not want to download any additional software on your PC for creating a video collage, there are alternatives available in form of online tools and phone-based apps. The online tools are free and simple to use supporting all basic and needed functions. Some of the popular names in the category include FastReels, Typito, Kapwing, and more.
Apps are a great option when you want to create a collage on your mobile phone. Multiple apps for the task are available on the Google play store and Apple Store. Some of the widely used ones are PicStich, PicPlayPost Movie Video Editor, Mojo, and others.
● Ending Thoughts →
● Video collages are an interesting way to combine and play short multiple videos or play them in a grid.
● There are several PC-based video collage maker tools available like Wondershare Filmora, and others.
● As alternatives, you can use online tools or phone-based apps for creating a video collage.
Video collages are a great way to play multiple short videos at the same time. These collages can be used for different purposes and platforms like social media platforms, online video sharing sites, brand promotion, announcing an event or a service, and similar others.

Whatever may be the situation, you would need a good and feature-packed tool for creating such a collage so that videos look perfect in a frame, background audio can be added, and other customizations can be done. Keep reading below to learn about the best video collage maker for PC.
In this article
01 [Top 10 Video Collage Makers for Pc](#Part 1)
02 [Alternatives to Video Collage Maker for Pc](#Part 2)
Part 1 Top 10 video collage makers for PC
Among the long list of tools available, below we have shortlisted the top 10 PC tools that can be used for creating a video collage.
01**Wondershare Filmora Video Editor **
This Windows and Mac-based software is the best choice when it comes to creating a simple video collage in an effortless manner.
Key features
● Create a video collage using the split-screen feature of the software.
● Excellent video editing tool supporting advanced features for creating professional-looking videos.
● Support customizable animation options along with precise editing functions.
● Support to multiple audio-related features like automatic audio sync, audio compression, audio transitions, and more.
● Offers of stock collection of images, and other media files.
● Windows and Mac support.
For Win 7 or later (64-bit)
For macOS 10.12 or later
04Movavi Video Editor Plus
Unleash your creativity and make stunning videos including video collages using this excellent software.
Key features:
● Create stunning video collages with multiple video customization options.
● Allows adding titles, transitions, stickers, and filters.
● Option to apply chroma-key for changing the background.
● Option for creating automatic video collages.
● User-friendly interface.
● Windows and Mac support.

05Aiseesoft Video Converter Ultimate
Though the name suggests the software to be a video conversion tool, it is a multi-tasking software that can perform a variety of functions including video collage making and thus can be considered as a decent video collage app for PC.
Key features
● A feature-rich program that can also be used for creating a video collage.
● Allows performing a variety of features like video conversion, editing, compression, and more.
● Option for editing the video effects and also editing ID3 info.
● Create interesting GIF animations.
● Simple and easy-to-understand layout.
● Windows and Mac support.

06Cidade Video Collage Studio
Using this intuitive tool, you can quickly create a video collage by combining all your favorite videos in one place.
Key features
● Create a video collage by combining multiple videos or creating a video grid.
● Intuitive and user-friendly interface.
● Multiple-grid options to choose from.
● Allows applying effects like Sepia, Lomo, and others.
● Background audio or music files can be added.
● Option to change the background color and also preview the video.

07Blu-ray Master Video Converter Ultimate
This is a video toolbox supporting multiple functions that also include creating a video collage.
Key feature
● Create a video collage using high-quality videos.
● Support customizing and editing videos using several built-in tools.
● Video conversion to over 500 formats supported.
● Multiple layouts and templates for video collage are available.
● Almost all video, image, and audio formats are supported.

08Adobe Premiere Elements
If you are looking for an advanced and professional tool for creating a video collage and for other video editing needs, this is the right choice.
Key features:
● Create professional-looking collages using high-quality video files.
● The interface is clean with support for advanced functions.
● Option for adding multiple video effects.
● Comes with help documents and guides to help you with the software functions.
● Windows and Mac support.

09Collage Maker
For creating a simple video collage on your Windows system this is a good tool to consider.
Key features
● Simple and basic collage-making tool.
● Comes with customizable and adjustable layout options.
● Option to add stickers ad text to the collage.
● Allows mixing videos, and images along with the music file.

1010. iMovie
For Mac users, iMovie is the default video editing tool that is pre-installed on the system. Besides editing functions, the tool can also perform other tasks like creating a video collage.
Key features:
● Allows to quickly create a video collage.
● Intuitive interface.
● Comes pre-installed with Mac systems.
● Transitions and other effects can be added.

Part 2 Alternatives to video collage maker for PC
If you do not want to download any additional software on your PC for creating a video collage, there are alternatives available in form of online tools and phone-based apps. The online tools are free and simple to use supporting all basic and needed functions. Some of the popular names in the category include FastReels, Typito, Kapwing, and more.
Apps are a great option when you want to create a collage on your mobile phone. Multiple apps for the task are available on the Google play store and Apple Store. Some of the widely used ones are PicStich, PicPlayPost Movie Video Editor, Mojo, and others.
● Ending Thoughts →
● Video collages are an interesting way to combine and play short multiple videos or play them in a grid.
● There are several PC-based video collage maker tools available like Wondershare Filmora, and others.
● As alternatives, you can use online tools or phone-based apps for creating a video collage.
Video collages are a great way to play multiple short videos at the same time. These collages can be used for different purposes and platforms like social media platforms, online video sharing sites, brand promotion, announcing an event or a service, and similar others.

Whatever may be the situation, you would need a good and feature-packed tool for creating such a collage so that videos look perfect in a frame, background audio can be added, and other customizations can be done. Keep reading below to learn about the best video collage maker for PC.
In this article
01 [Top 10 Video Collage Makers for Pc](#Part 1)
02 [Alternatives to Video Collage Maker for Pc](#Part 2)
Part 1 Top 10 video collage makers for PC
Among the long list of tools available, below we have shortlisted the top 10 PC tools that can be used for creating a video collage.
01**Wondershare Filmora Video Editor **
This Windows and Mac-based software is the best choice when it comes to creating a simple video collage in an effortless manner.
Key features
● Create a video collage using the split-screen feature of the software.
● Excellent video editing tool supporting advanced features for creating professional-looking videos.
● Support customizable animation options along with precise editing functions.
● Support to multiple audio-related features like automatic audio sync, audio compression, audio transitions, and more.
● Offers of stock collection of images, and other media files.
● Windows and Mac support.
For Win 7 or later (64-bit)
For macOS 10.12 or later
04Movavi Video Editor Plus
Unleash your creativity and make stunning videos including video collages using this excellent software.
Key features:
● Create stunning video collages with multiple video customization options.
● Allows adding titles, transitions, stickers, and filters.
● Option to apply chroma-key for changing the background.
● Option for creating automatic video collages.
● User-friendly interface.
● Windows and Mac support.

05Aiseesoft Video Converter Ultimate
Though the name suggests the software to be a video conversion tool, it is a multi-tasking software that can perform a variety of functions including video collage making and thus can be considered as a decent video collage app for PC.
Key features
● A feature-rich program that can also be used for creating a video collage.
● Allows performing a variety of features like video conversion, editing, compression, and more.
● Option for editing the video effects and also editing ID3 info.
● Create interesting GIF animations.
● Simple and easy-to-understand layout.
● Windows and Mac support.

06Cidade Video Collage Studio
Using this intuitive tool, you can quickly create a video collage by combining all your favorite videos in one place.
Key features
● Create a video collage by combining multiple videos or creating a video grid.
● Intuitive and user-friendly interface.
● Multiple-grid options to choose from.
● Allows applying effects like Sepia, Lomo, and others.
● Background audio or music files can be added.
● Option to change the background color and also preview the video.

07Blu-ray Master Video Converter Ultimate
This is a video toolbox supporting multiple functions that also include creating a video collage.
Key feature
● Create a video collage using high-quality videos.
● Support customizing and editing videos using several built-in tools.
● Video conversion to over 500 formats supported.
● Multiple layouts and templates for video collage are available.
● Almost all video, image, and audio formats are supported.

08Adobe Premiere Elements
If you are looking for an advanced and professional tool for creating a video collage and for other video editing needs, this is the right choice.
Key features:
● Create professional-looking collages using high-quality video files.
● The interface is clean with support for advanced functions.
● Option for adding multiple video effects.
● Comes with help documents and guides to help you with the software functions.
● Windows and Mac support.

09Collage Maker
For creating a simple video collage on your Windows system this is a good tool to consider.
Key features
● Simple and basic collage-making tool.
● Comes with customizable and adjustable layout options.
● Option to add stickers ad text to the collage.
● Allows mixing videos, and images along with the music file.

1010. iMovie
For Mac users, iMovie is the default video editing tool that is pre-installed on the system. Besides editing functions, the tool can also perform other tasks like creating a video collage.
Key features:
● Allows to quickly create a video collage.
● Intuitive interface.
● Comes pre-installed with Mac systems.
● Transitions and other effects can be added.

Part 2 Alternatives to video collage maker for PC
If you do not want to download any additional software on your PC for creating a video collage, there are alternatives available in form of online tools and phone-based apps. The online tools are free and simple to use supporting all basic and needed functions. Some of the popular names in the category include FastReels, Typito, Kapwing, and more.
Apps are a great option when you want to create a collage on your mobile phone. Multiple apps for the task are available on the Google play store and Apple Store. Some of the widely used ones are PicStich, PicPlayPost Movie Video Editor, Mojo, and others.
● Ending Thoughts →
● Video collages are an interesting way to combine and play short multiple videos or play them in a grid.
● There are several PC-based video collage maker tools available like Wondershare Filmora, and others.
● As alternatives, you can use online tools or phone-based apps for creating a video collage.
Detailed Guide to Rotate Videos in Blender
Blender is a 3D animation software that can be used to create stunning 3D models and videos. It is free and open source, which means that it is available to anyone who wants to use it. Blender is also very versatile, and can be used to create anything from simple 3D models to full-blown 3D movies.
One of the biggest benefits of Blender is that it is easy to learn. The interface is intuitive and user-friendly, and there are plenty of tutorials available online that can help you get started. Blender also has a very active community, so if you ever get stuck, there is likely someone out there who can help you. It is a complex software, but there are many online tutorials like this article that can help you get started.
To download Blender, go to https://www.blender.org/download/ . Click on the link that says “Download Blender” and then select the version that you want to download. After you have downloaded Blender, install it on your computer.
Step-by-Step on how to rotate videos in Blender
The first way to rotate a video in Blender is by using the Strip option.
Step 1: To do this, open the video that you want to rotate in Blender.

Step 2: Then, click on the “Strip” menu and select “Transform.”

Step 3: In the Transform Properties window, you will see a list of different tools for the video. Scroll down until you see the “Rotation” property. This is where you can manually rotate the video.

Step 4: Click on Enter to save the rotation of the video.
The second way to rotate a video in Blender is by using the Transform Properties window. To do this…
Step 1: Open the video that you want to rotate in Blender.

Step 2: Next, go to ‘Transform’ in the Active Tool portion of the screen.
Figure 5
Step 3: Go to the ‘Transform’ option in the properties window and adjust based on the rotational angle that you want.

Step 4: Click on ‘Enter’ to apply it to the video.
In this tutorial, we have shown you two different ways to rotate a video in Blender. The first way is by using the Transform Properties window, and the second way is by using the 3D Viewport.
Which method you use is up to you. However, we recommend using the 3D Viewport method, as it is more accurate.
Rotating a video in Blender can be used for other purposes than just rotating it.
Here are some other things that you can do with a rotated video:
- Scale the video up or down
- Flip the video horizontally or vertically
- Change the position of the video in the 3D Viewport
How to rotate videos in Filmora
Meanwhile, you can also use Filmora Video Editor to rotate a video without any watermark. Filmora is a video editing software that lets you rotate videos easily. It is simple to use, and has many powerful features that let you edit your videos like a pro. It also has a built-in video converter that lets you convert your videos to different formats, so they can be played on any device. You can also export your videos in 4K resolution, so they look great no matter what device you are watching them on.
For Win 7 or later (64-bit)
For macOS 10.14 or later
There are two main ways to rotate video in Filmora: through the use of keyframes or by using the Transform Tool.
Step-by-step on how to rotate videos in Filmora
To rotate a video clip using keyframes…
Step 1: Import the video clip you want to rotate to your project.

Step 2: In the timeline, place the playhead at the beginning of the clip.

Step 3: With the playhead still at the beginning of the clip, drag the rotation handle in the preview window to rotate the video.

Step 4: Move the playhead to the end of the clip and drag the rotation handle again to rotate it further.

To rotate a video clip using the Transform Tool…
Select the “Edit” tool from the toolbar.

Go to the “Transform” selection, then select the rotate option.

Adjust the rotation angle using the tool.

Both methods are fairly straightforward and easy to use. Experiment with each to see which works best for your project.
Step 2: Then, click on the “Strip” menu and select “Transform.”

Step 3: In the Transform Properties window, you will see a list of different tools for the video. Scroll down until you see the “Rotation” property. This is where you can manually rotate the video.

Step 4: Click on Enter to save the rotation of the video.
The second way to rotate a video in Blender is by using the Transform Properties window. To do this…
Step 1: Open the video that you want to rotate in Blender.

Step 2: Next, go to ‘Transform’ in the Active Tool portion of the screen.
Figure 5
Step 3: Go to the ‘Transform’ option in the properties window and adjust based on the rotational angle that you want.

Step 4: Click on ‘Enter’ to apply it to the video.
In this tutorial, we have shown you two different ways to rotate a video in Blender. The first way is by using the Transform Properties window, and the second way is by using the 3D Viewport.
Which method you use is up to you. However, we recommend using the 3D Viewport method, as it is more accurate.
Rotating a video in Blender can be used for other purposes than just rotating it.
Here are some other things that you can do with a rotated video:
- Scale the video up or down
- Flip the video horizontally or vertically
- Change the position of the video in the 3D Viewport
How to rotate videos in Filmora
Meanwhile, you can also use Filmora Video Editor to rotate a video without any watermark. Filmora is a video editing software that lets you rotate videos easily. It is simple to use, and has many powerful features that let you edit your videos like a pro. It also has a built-in video converter that lets you convert your videos to different formats, so they can be played on any device. You can also export your videos in 4K resolution, so they look great no matter what device you are watching them on.
For Win 7 or later (64-bit)
For macOS 10.14 or later
There are two main ways to rotate video in Filmora: through the use of keyframes or by using the Transform Tool.
Step-by-step on how to rotate videos in Filmora
To rotate a video clip using keyframes…
Step 1: Import the video clip you want to rotate to your project.

Step 2: In the timeline, place the playhead at the beginning of the clip.

Step 3: With the playhead still at the beginning of the clip, drag the rotation handle in the preview window to rotate the video.

Step 4: Move the playhead to the end of the clip and drag the rotation handle again to rotate it further.

To rotate a video clip using the Transform Tool…
Select the “Edit” tool from the toolbar.

Go to the “Transform” selection, then select the rotate option.

Adjust the rotation angle using the tool.

Both methods are fairly straightforward and easy to use. Experiment with each to see which works best for your project.
Step 2: Then, click on the “Strip” menu and select “Transform.”

Step 3: In the Transform Properties window, you will see a list of different tools for the video. Scroll down until you see the “Rotation” property. This is where you can manually rotate the video.

Step 4: Click on Enter to save the rotation of the video.
The second way to rotate a video in Blender is by using the Transform Properties window. To do this…
Step 1: Open the video that you want to rotate in Blender.

Step 2: Next, go to ‘Transform’ in the Active Tool portion of the screen.
Figure 5
Step 3: Go to the ‘Transform’ option in the properties window and adjust based on the rotational angle that you want.

Step 4: Click on ‘Enter’ to apply it to the video.
In this tutorial, we have shown you two different ways to rotate a video in Blender. The first way is by using the Transform Properties window, and the second way is by using the 3D Viewport.
Which method you use is up to you. However, we recommend using the 3D Viewport method, as it is more accurate.
Rotating a video in Blender can be used for other purposes than just rotating it.
Here are some other things that you can do with a rotated video:
- Scale the video up or down
- Flip the video horizontally or vertically
- Change the position of the video in the 3D Viewport
How to rotate videos in Filmora
Meanwhile, you can also use Filmora Video Editor to rotate a video without any watermark. Filmora is a video editing software that lets you rotate videos easily. It is simple to use, and has many powerful features that let you edit your videos like a pro. It also has a built-in video converter that lets you convert your videos to different formats, so they can be played on any device. You can also export your videos in 4K resolution, so they look great no matter what device you are watching them on.
For Win 7 or later (64-bit)
For macOS 10.14 or later
There are two main ways to rotate video in Filmora: through the use of keyframes or by using the Transform Tool.
Step-by-step on how to rotate videos in Filmora
To rotate a video clip using keyframes…
Step 1: Import the video clip you want to rotate to your project.

Step 2: In the timeline, place the playhead at the beginning of the clip.

Step 3: With the playhead still at the beginning of the clip, drag the rotation handle in the preview window to rotate the video.

Step 4: Move the playhead to the end of the clip and drag the rotation handle again to rotate it further.

To rotate a video clip using the Transform Tool…
Select the “Edit” tool from the toolbar.

Go to the “Transform” selection, then select the rotate option.

Adjust the rotation angle using the tool.

Both methods are fairly straightforward and easy to use. Experiment with each to see which works best for your project.
Step 2: Then, click on the “Strip” menu and select “Transform.”

Step 3: In the Transform Properties window, you will see a list of different tools for the video. Scroll down until you see the “Rotation” property. This is where you can manually rotate the video.

Step 4: Click on Enter to save the rotation of the video.
The second way to rotate a video in Blender is by using the Transform Properties window. To do this…
Step 1: Open the video that you want to rotate in Blender.

Step 2: Next, go to ‘Transform’ in the Active Tool portion of the screen.
Figure 5
Step 3: Go to the ‘Transform’ option in the properties window and adjust based on the rotational angle that you want.

Step 4: Click on ‘Enter’ to apply it to the video.
In this tutorial, we have shown you two different ways to rotate a video in Blender. The first way is by using the Transform Properties window, and the second way is by using the 3D Viewport.
Which method you use is up to you. However, we recommend using the 3D Viewport method, as it is more accurate.
Rotating a video in Blender can be used for other purposes than just rotating it.
Here are some other things that you can do with a rotated video:
- Scale the video up or down
- Flip the video horizontally or vertically
- Change the position of the video in the 3D Viewport
How to rotate videos in Filmora
Meanwhile, you can also use Filmora Video Editor to rotate a video without any watermark. Filmora is a video editing software that lets you rotate videos easily. It is simple to use, and has many powerful features that let you edit your videos like a pro. It also has a built-in video converter that lets you convert your videos to different formats, so they can be played on any device. You can also export your videos in 4K resolution, so they look great no matter what device you are watching them on.
For Win 7 or later (64-bit)
For macOS 10.14 or later
There are two main ways to rotate video in Filmora: through the use of keyframes or by using the Transform Tool.
Step-by-step on how to rotate videos in Filmora
To rotate a video clip using keyframes…
Step 1: Import the video clip you want to rotate to your project.

Step 2: In the timeline, place the playhead at the beginning of the clip.

Step 3: With the playhead still at the beginning of the clip, drag the rotation handle in the preview window to rotate the video.

Step 4: Move the playhead to the end of the clip and drag the rotation handle again to rotate it further.

To rotate a video clip using the Transform Tool…
Select the “Edit” tool from the toolbar.

Go to the “Transform” selection, then select the rotate option.

Adjust the rotation angle using the tool.

Both methods are fairly straightforward and easy to use. Experiment with each to see which works best for your project.
Also read:
- 2024 Approved Top 12 AI Video Generators to Pick
- Updated How to Edit GoPro Videos on Mac for 2024
- Updated 7 Ways Add Subtitles to MKV Videos on All Platforms for 2024
- Updated 2024 Approved How to Resize FLV Videos EfficientlyWindows, Mac, Android, iPhone & Online
- Final Cut Pro for iPad- Is It Available, In 2024
- Updated In 2024, Top Tricks for Learning Photo Slideshow
- Best Animated Video Makers
- Updated In 2024, Best Options to Replace Sky of Any Photo Online + Offline
- Updated Mix and Match The Ultimate List of 8 Video and Photo Merging Tools
- Updated Create the Night-to-Day Effect Videos
- Updated Best 5 Solutions on How to Add Emojis to iPhone for 2024
- In 2024, Renderforest Is a Great Online Editing Platform to Use for Many Video Creators. If You Want to Make an Intro Video for Your Channel or Daily Vlogs, You Can Follow This Article to Know More Details
- New How to Add Motion Titles for 2024
- New Step by Step to Rotate Videos Using OBS
- 2024 Approved Efficient Ways to Manage Your Timeline
- Best 4 Love Video Maker with Music for 2024
- If You Have a Low Budget but Want to Create a Filmy Appearance of the Video, Then Read 6 Ways to Get Professional Filming Equipment by Using Household Objects
- New Now, You Can Also Apply the Stranger Things Upside Down Effect to Your Video! This Effect Combines Camera Tricks and Video Editing Within Filmora to Transition From the Normal World Into the Upside Down
- New How to Export Video From iMovie
- Updated In 2024, Add Motion Blur in After Effects
- How to Zoom Picture in Picture Easy Solution for 2024
- New How To Use Speed Ramping to Create an Intense Action Footage
- Updated A Guide to Create Your Own LOL Montage Video for 2024
- Updated In 2024, Best Ways to Add Meme Text to Videos
- New In 2024, Step by Step to Rotate Video in Google Photos
- New Learn to Use Montage with These Movies
- 2024 Approved Looking for a Full Guide on Removing the Background From PNG Images? Do You Want to Transform JPG to PNG Transparent? If so, Take some Time to Read This Article
- 2024 Approved Learn to Use Montage with These Movies
- Updated In 2024, How to Convert SRT to DOCX
- 4 Ways to Sync Contacts from Apple iPhone 11 Pro to iPad Easily | Dr.fone
- How to Unlock Vivo S17 Pro Phone without Google Account?
- 4 Ways to Transfer Music from Apple iPhone SE (2022) to iPod touch | Dr.fone
- In 2024, Hassle-Free Ways to Remove FRP Lock on Xiaomi Redmi Note 12 5G Phones with/without a PC
- Spoofing Life360 How to Do it on Samsung Galaxy A05s? | Dr.fone
- In 2024, iPogo will be the new iSpoofer On Samsung Galaxy A23 5G? | Dr.fone
- New 2024 Approved How to Combine Two/More GIFs Into One GIF Mergers Offered
- How to Retrieve Deleted Calendar Events iPhone 12? | Stellar
- In 2024, A Guide Xiaomi Redmi 13C 5G Wireless and Wired Screen Mirroring | Dr.fone
- In 2024, Here are Some Pro Tips for Pokemon Go PvP Battles On Samsung Galaxy A15 4G | Dr.fone
- How to Show Wi-Fi Password on Xiaomi Redmi A2
- How to Watch Hulu Outside US On Motorola Edge 40 Pro | Dr.fone
- Prevent Cross-Site Tracking on Vivo Y100 5G and Browser | Dr.fone
- Title: How to Make Glitch Effect with Filmora
- Author: Chloe
- Created at : 2024-05-20 03:37:22
- Updated at : 2024-05-21 03:37:22
- Link: https://ai-editing-video.techidaily.com/how-to-make-glitch-effect-with-filmora/
- License: This work is licensed under CC BY-NC-SA 4.0.

