:max_bytes(150000):strip_icc():format(webp)/6g-4717cafbb03b4d0eb3dae878b5ad134e.png)
How to Make Stunning Glitch Effect in Photoshop, In 2024

How to Make Stunning Glitch Effect in Photoshop?
Many of us are fascinated by glitch art. The aesthetic effect it adds to your content is unmatched. You can add color and class to your pictures with glitch picture effects. Someone who isn’t aware of the glitch effect is inspired by any technical mishap or digital error. The damage that the malfunctioning of a system causes is used as an art and an effect to beautify things.
You can add the glitch image effect to your photos easily. There are multiple cool templates available on the internet that could be used. You can also make your own stunning yet customized glitch effect Photoshop. If this has impressed you, then stay here because we will talk a lot about glitch photo editors.
In this article
01 Part 1. How Do You Do Photo Glitch Effect in Photoshop?
02 Part 2. 5 Awesome Glitch Effect Photoshop Actions.
Part 1. How Do You Do Photo Glitch Effect in Photoshop?
The jagged lines, the colorful pixels, frozen visuals, and also the distorted colors, everything perfectly blends to make a glitch effect. Usually, this is how all the glitch templates are, but if you get an opportunity to customize your image glitch effect and make your special effect, what will you do?
The best option to adopt in any such circumstances is Photoshop. With Photoshop, you can create a stunning and mind-blowing Photoshop VHS effect. If you want to learn about its steps, then continue reading.
Step 1: The process starts by importing the image to Photoshop on which you plan to add the photo glitch effect. Then you should always convert the image from colorful to black and white. This could be done quickly by going into the ‘Image’ menu from the menu bar. Next, go for the ‘Adjustments’ option and select ‘Desaturate.’

Step 2: Now duplicate the image by dragging it onto the New Layer icon in the Layers Panel. Then double click on the duplicated image. This will open a ‘Layer Style’ settings menu. Here, click on the icon for ‘R Channel’ and deselect it.

Step 3: Now, it’s time to add the first glitch element. For that, hold the ‘Shift’ key and move the image by using the left/right cursor keys on the keyboard. This will offset the image layer from the original.

Step 4: You can now select the ‘Mark’ tool from the left side. Make a rectangle anywhere on the image with the Mark tool and then switch back to the ‘Move’ tool. Then again, nudge the rectangular portion left or right to offset it. You can repeat this process multiple times on different areas of the image.

Step 5: At this point, make a New Layer and fill it with White. Now right-click on this white layer and select the option of ‘Convert to Smart Object.’

Step 6: Move to the menu bar at the top and go to the ‘Filter’ section. From there, select the option of ‘Filter Gallery.’ A new window will show up. Head to the ‘Sketch’ category, and there change the ‘Pattern Type’ to ‘Line.’ You can also play with the ‘Contrast’ and the ‘Size’ of the lines.

Step 7: Now, in the ‘Layers Panel,’ select the option of ‘Overlay’ from the dropdown menu so that the different layers can show through. You can adjust the visibility of the lines by adjusting the number on the scale.

Step 8: After setting everything for the glitch effect in your image, you can now add colors using the ‘Gradient Map.’ Or you can also import some graphic textures to Photoshop and add them to the image. Don’t forget to change the ‘Binding Mode’ to ‘Overlay.’ You can then play with the color and graphic settings.

Step 9: Once all the color adjustments have satisfied you, it’s time to add some text to your glitch image. For that, head to the ‘Text’ tool from the left menu and type in your text. Edit it as you did to your image so that you can make a cool glitch text effect Photoshop and with this, you are all done with making the most stunning glitch effect Photoshop.

Part 2. 5 Awesome Glitch Effect Photoshop Actions
With Photoshop, you can create your photo glitch effect as you prefer instead of using the available standard templates. What if you don’t have enough time to create the effect? Are you going to use the basic and standard templates?
If you are looking for some jaw-dropping glitch picture effects rather than using the basic effects, then this section of the article is perfect for you. We are going to talk about 5 fantastic glitch effects Photoshop action.
1. Distorted Glitch Photoshop Action
The first effect we will discuss is Distorted Glitch Photoshop Action. The effect is very easy to use. You can set it with just one click action. The effect allows you to do adjustment settings with very easy steps to edit it.
The effect has all the dark, distorted, and disturbance-related elements that make it an amazing effect to add glitch effect to image.

2. Geometric Glitch Photoshop Action
If glitch effect with lines is too mainstream for you, then this next effect will surely impress you. This effect is the Geometric Glitch Photoshop Action. You can edit this effect. All its colors, layers, and even elements are fully editable.
You can create a modern yet professional glitch image with this stunning effect. The effect lets you add shapes, abstract styles, and also glitch lines to make cool images.

3. Animated Glitch Photoshop Action
If you are looking for a glitch effect to add to animated content, then nothing is better than Animated Glitch Photoshop Action. The effect template is fully editable with 12 distinct color options. The animated effect has a very organized structure of layers, color coding, etc.
By using this effect, you can add a great vibe to your image. The template greatly shows the distortion, digital error, etc. You can play around with RGB to make it look crazy brilliant.

4. Futuristic Photoshop Action
The next effect in line to be discussed is Futuristic Photoshop Action. This effect has all the bright and neon colors. The effect could be added easily to your images regardless of the type of your content. Graphic designers and photographers use the Futuristic Effect to create stunning and professional glitch images.

5. Glitch Art Photoshop Action
The last effect template that we are going to shed light on is Glitch Art Photoshop Action. The effect is fully editable with 10 different abstract elements. The template has absolutely professional results. The effect delivers complete glitchy vibes.
The distortion, the abstract elements, the digital error, and everything else in effect represents all the glitchy vibes.

Final Words
This article is everything one person needs if they want to learn about glitch effect Photoshop. We have talked about creating a jaw-dropping glitch effect in Photoshop. The steps to create a stunning glitch effect have been mentioned above.
We then shared 5 incredible glitch effects that could be used in case you don’t want to create your own effect.
02 Part 2. 5 Awesome Glitch Effect Photoshop Actions.
Part 1. How Do You Do Photo Glitch Effect in Photoshop?
The jagged lines, the colorful pixels, frozen visuals, and also the distorted colors, everything perfectly blends to make a glitch effect. Usually, this is how all the glitch templates are, but if you get an opportunity to customize your image glitch effect and make your special effect, what will you do?
The best option to adopt in any such circumstances is Photoshop. With Photoshop, you can create a stunning and mind-blowing Photoshop VHS effect. If you want to learn about its steps, then continue reading.
Step 1: The process starts by importing the image to Photoshop on which you plan to add the photo glitch effect. Then you should always convert the image from colorful to black and white. This could be done quickly by going into the ‘Image’ menu from the menu bar. Next, go for the ‘Adjustments’ option and select ‘Desaturate.’

Step 2: Now duplicate the image by dragging it onto the New Layer icon in the Layers Panel. Then double click on the duplicated image. This will open a ‘Layer Style’ settings menu. Here, click on the icon for ‘R Channel’ and deselect it.

Step 3: Now, it’s time to add the first glitch element. For that, hold the ‘Shift’ key and move the image by using the left/right cursor keys on the keyboard. This will offset the image layer from the original.

Step 4: You can now select the ‘Mark’ tool from the left side. Make a rectangle anywhere on the image with the Mark tool and then switch back to the ‘Move’ tool. Then again, nudge the rectangular portion left or right to offset it. You can repeat this process multiple times on different areas of the image.

Step 5: At this point, make a New Layer and fill it with White. Now right-click on this white layer and select the option of ‘Convert to Smart Object.’

Step 6: Move to the menu bar at the top and go to the ‘Filter’ section. From there, select the option of ‘Filter Gallery.’ A new window will show up. Head to the ‘Sketch’ category, and there change the ‘Pattern Type’ to ‘Line.’ You can also play with the ‘Contrast’ and the ‘Size’ of the lines.

Step 7: Now, in the ‘Layers Panel,’ select the option of ‘Overlay’ from the dropdown menu so that the different layers can show through. You can adjust the visibility of the lines by adjusting the number on the scale.

Step 8: After setting everything for the glitch effect in your image, you can now add colors using the ‘Gradient Map.’ Or you can also import some graphic textures to Photoshop and add them to the image. Don’t forget to change the ‘Binding Mode’ to ‘Overlay.’ You can then play with the color and graphic settings.

Step 9: Once all the color adjustments have satisfied you, it’s time to add some text to your glitch image. For that, head to the ‘Text’ tool from the left menu and type in your text. Edit it as you did to your image so that you can make a cool glitch text effect Photoshop and with this, you are all done with making the most stunning glitch effect Photoshop.

Part 2. 5 Awesome Glitch Effect Photoshop Actions
With Photoshop, you can create your photo glitch effect as you prefer instead of using the available standard templates. What if you don’t have enough time to create the effect? Are you going to use the basic and standard templates?
If you are looking for some jaw-dropping glitch picture effects rather than using the basic effects, then this section of the article is perfect for you. We are going to talk about 5 fantastic glitch effects Photoshop action.
1. Distorted Glitch Photoshop Action
The first effect we will discuss is Distorted Glitch Photoshop Action. The effect is very easy to use. You can set it with just one click action. The effect allows you to do adjustment settings with very easy steps to edit it.
The effect has all the dark, distorted, and disturbance-related elements that make it an amazing effect to add glitch effect to image.

2. Geometric Glitch Photoshop Action
If glitch effect with lines is too mainstream for you, then this next effect will surely impress you. This effect is the Geometric Glitch Photoshop Action. You can edit this effect. All its colors, layers, and even elements are fully editable.
You can create a modern yet professional glitch image with this stunning effect. The effect lets you add shapes, abstract styles, and also glitch lines to make cool images.

3. Animated Glitch Photoshop Action
If you are looking for a glitch effect to add to animated content, then nothing is better than Animated Glitch Photoshop Action. The effect template is fully editable with 12 distinct color options. The animated effect has a very organized structure of layers, color coding, etc.
By using this effect, you can add a great vibe to your image. The template greatly shows the distortion, digital error, etc. You can play around with RGB to make it look crazy brilliant.

4. Futuristic Photoshop Action
The next effect in line to be discussed is Futuristic Photoshop Action. This effect has all the bright and neon colors. The effect could be added easily to your images regardless of the type of your content. Graphic designers and photographers use the Futuristic Effect to create stunning and professional glitch images.

5. Glitch Art Photoshop Action
The last effect template that we are going to shed light on is Glitch Art Photoshop Action. The effect is fully editable with 10 different abstract elements. The template has absolutely professional results. The effect delivers complete glitchy vibes.
The distortion, the abstract elements, the digital error, and everything else in effect represents all the glitchy vibes.

Final Words
This article is everything one person needs if they want to learn about glitch effect Photoshop. We have talked about creating a jaw-dropping glitch effect in Photoshop. The steps to create a stunning glitch effect have been mentioned above.
We then shared 5 incredible glitch effects that could be used in case you don’t want to create your own effect.
02 Part 2. 5 Awesome Glitch Effect Photoshop Actions.
Part 1. How Do You Do Photo Glitch Effect in Photoshop?
The jagged lines, the colorful pixels, frozen visuals, and also the distorted colors, everything perfectly blends to make a glitch effect. Usually, this is how all the glitch templates are, but if you get an opportunity to customize your image glitch effect and make your special effect, what will you do?
The best option to adopt in any such circumstances is Photoshop. With Photoshop, you can create a stunning and mind-blowing Photoshop VHS effect. If you want to learn about its steps, then continue reading.
Step 1: The process starts by importing the image to Photoshop on which you plan to add the photo glitch effect. Then you should always convert the image from colorful to black and white. This could be done quickly by going into the ‘Image’ menu from the menu bar. Next, go for the ‘Adjustments’ option and select ‘Desaturate.’

Step 2: Now duplicate the image by dragging it onto the New Layer icon in the Layers Panel. Then double click on the duplicated image. This will open a ‘Layer Style’ settings menu. Here, click on the icon for ‘R Channel’ and deselect it.

Step 3: Now, it’s time to add the first glitch element. For that, hold the ‘Shift’ key and move the image by using the left/right cursor keys on the keyboard. This will offset the image layer from the original.

Step 4: You can now select the ‘Mark’ tool from the left side. Make a rectangle anywhere on the image with the Mark tool and then switch back to the ‘Move’ tool. Then again, nudge the rectangular portion left or right to offset it. You can repeat this process multiple times on different areas of the image.

Step 5: At this point, make a New Layer and fill it with White. Now right-click on this white layer and select the option of ‘Convert to Smart Object.’

Step 6: Move to the menu bar at the top and go to the ‘Filter’ section. From there, select the option of ‘Filter Gallery.’ A new window will show up. Head to the ‘Sketch’ category, and there change the ‘Pattern Type’ to ‘Line.’ You can also play with the ‘Contrast’ and the ‘Size’ of the lines.

Step 7: Now, in the ‘Layers Panel,’ select the option of ‘Overlay’ from the dropdown menu so that the different layers can show through. You can adjust the visibility of the lines by adjusting the number on the scale.

Step 8: After setting everything for the glitch effect in your image, you can now add colors using the ‘Gradient Map.’ Or you can also import some graphic textures to Photoshop and add them to the image. Don’t forget to change the ‘Binding Mode’ to ‘Overlay.’ You can then play with the color and graphic settings.

Step 9: Once all the color adjustments have satisfied you, it’s time to add some text to your glitch image. For that, head to the ‘Text’ tool from the left menu and type in your text. Edit it as you did to your image so that you can make a cool glitch text effect Photoshop and with this, you are all done with making the most stunning glitch effect Photoshop.

Part 2. 5 Awesome Glitch Effect Photoshop Actions
With Photoshop, you can create your photo glitch effect as you prefer instead of using the available standard templates. What if you don’t have enough time to create the effect? Are you going to use the basic and standard templates?
If you are looking for some jaw-dropping glitch picture effects rather than using the basic effects, then this section of the article is perfect for you. We are going to talk about 5 fantastic glitch effects Photoshop action.
1. Distorted Glitch Photoshop Action
The first effect we will discuss is Distorted Glitch Photoshop Action. The effect is very easy to use. You can set it with just one click action. The effect allows you to do adjustment settings with very easy steps to edit it.
The effect has all the dark, distorted, and disturbance-related elements that make it an amazing effect to add glitch effect to image.

2. Geometric Glitch Photoshop Action
If glitch effect with lines is too mainstream for you, then this next effect will surely impress you. This effect is the Geometric Glitch Photoshop Action. You can edit this effect. All its colors, layers, and even elements are fully editable.
You can create a modern yet professional glitch image with this stunning effect. The effect lets you add shapes, abstract styles, and also glitch lines to make cool images.

3. Animated Glitch Photoshop Action
If you are looking for a glitch effect to add to animated content, then nothing is better than Animated Glitch Photoshop Action. The effect template is fully editable with 12 distinct color options. The animated effect has a very organized structure of layers, color coding, etc.
By using this effect, you can add a great vibe to your image. The template greatly shows the distortion, digital error, etc. You can play around with RGB to make it look crazy brilliant.

4. Futuristic Photoshop Action
The next effect in line to be discussed is Futuristic Photoshop Action. This effect has all the bright and neon colors. The effect could be added easily to your images regardless of the type of your content. Graphic designers and photographers use the Futuristic Effect to create stunning and professional glitch images.

5. Glitch Art Photoshop Action
The last effect template that we are going to shed light on is Glitch Art Photoshop Action. The effect is fully editable with 10 different abstract elements. The template has absolutely professional results. The effect delivers complete glitchy vibes.
The distortion, the abstract elements, the digital error, and everything else in effect represents all the glitchy vibes.

Final Words
This article is everything one person needs if they want to learn about glitch effect Photoshop. We have talked about creating a jaw-dropping glitch effect in Photoshop. The steps to create a stunning glitch effect have been mentioned above.
We then shared 5 incredible glitch effects that could be used in case you don’t want to create your own effect.
02 Part 2. 5 Awesome Glitch Effect Photoshop Actions.
Part 1. How Do You Do Photo Glitch Effect in Photoshop?
The jagged lines, the colorful pixels, frozen visuals, and also the distorted colors, everything perfectly blends to make a glitch effect. Usually, this is how all the glitch templates are, but if you get an opportunity to customize your image glitch effect and make your special effect, what will you do?
The best option to adopt in any such circumstances is Photoshop. With Photoshop, you can create a stunning and mind-blowing Photoshop VHS effect. If you want to learn about its steps, then continue reading.
Step 1: The process starts by importing the image to Photoshop on which you plan to add the photo glitch effect. Then you should always convert the image from colorful to black and white. This could be done quickly by going into the ‘Image’ menu from the menu bar. Next, go for the ‘Adjustments’ option and select ‘Desaturate.’

Step 2: Now duplicate the image by dragging it onto the New Layer icon in the Layers Panel. Then double click on the duplicated image. This will open a ‘Layer Style’ settings menu. Here, click on the icon for ‘R Channel’ and deselect it.

Step 3: Now, it’s time to add the first glitch element. For that, hold the ‘Shift’ key and move the image by using the left/right cursor keys on the keyboard. This will offset the image layer from the original.

Step 4: You can now select the ‘Mark’ tool from the left side. Make a rectangle anywhere on the image with the Mark tool and then switch back to the ‘Move’ tool. Then again, nudge the rectangular portion left or right to offset it. You can repeat this process multiple times on different areas of the image.

Step 5: At this point, make a New Layer and fill it with White. Now right-click on this white layer and select the option of ‘Convert to Smart Object.’

Step 6: Move to the menu bar at the top and go to the ‘Filter’ section. From there, select the option of ‘Filter Gallery.’ A new window will show up. Head to the ‘Sketch’ category, and there change the ‘Pattern Type’ to ‘Line.’ You can also play with the ‘Contrast’ and the ‘Size’ of the lines.

Step 7: Now, in the ‘Layers Panel,’ select the option of ‘Overlay’ from the dropdown menu so that the different layers can show through. You can adjust the visibility of the lines by adjusting the number on the scale.

Step 8: After setting everything for the glitch effect in your image, you can now add colors using the ‘Gradient Map.’ Or you can also import some graphic textures to Photoshop and add them to the image. Don’t forget to change the ‘Binding Mode’ to ‘Overlay.’ You can then play with the color and graphic settings.

Step 9: Once all the color adjustments have satisfied you, it’s time to add some text to your glitch image. For that, head to the ‘Text’ tool from the left menu and type in your text. Edit it as you did to your image so that you can make a cool glitch text effect Photoshop and with this, you are all done with making the most stunning glitch effect Photoshop.

Part 2. 5 Awesome Glitch Effect Photoshop Actions
With Photoshop, you can create your photo glitch effect as you prefer instead of using the available standard templates. What if you don’t have enough time to create the effect? Are you going to use the basic and standard templates?
If you are looking for some jaw-dropping glitch picture effects rather than using the basic effects, then this section of the article is perfect for you. We are going to talk about 5 fantastic glitch effects Photoshop action.
1. Distorted Glitch Photoshop Action
The first effect we will discuss is Distorted Glitch Photoshop Action. The effect is very easy to use. You can set it with just one click action. The effect allows you to do adjustment settings with very easy steps to edit it.
The effect has all the dark, distorted, and disturbance-related elements that make it an amazing effect to add glitch effect to image.

2. Geometric Glitch Photoshop Action
If glitch effect with lines is too mainstream for you, then this next effect will surely impress you. This effect is the Geometric Glitch Photoshop Action. You can edit this effect. All its colors, layers, and even elements are fully editable.
You can create a modern yet professional glitch image with this stunning effect. The effect lets you add shapes, abstract styles, and also glitch lines to make cool images.

3. Animated Glitch Photoshop Action
If you are looking for a glitch effect to add to animated content, then nothing is better than Animated Glitch Photoshop Action. The effect template is fully editable with 12 distinct color options. The animated effect has a very organized structure of layers, color coding, etc.
By using this effect, you can add a great vibe to your image. The template greatly shows the distortion, digital error, etc. You can play around with RGB to make it look crazy brilliant.

4. Futuristic Photoshop Action
The next effect in line to be discussed is Futuristic Photoshop Action. This effect has all the bright and neon colors. The effect could be added easily to your images regardless of the type of your content. Graphic designers and photographers use the Futuristic Effect to create stunning and professional glitch images.

5. Glitch Art Photoshop Action
The last effect template that we are going to shed light on is Glitch Art Photoshop Action. The effect is fully editable with 10 different abstract elements. The template has absolutely professional results. The effect delivers complete glitchy vibes.
The distortion, the abstract elements, the digital error, and everything else in effect represents all the glitchy vibes.

Final Words
This article is everything one person needs if they want to learn about glitch effect Photoshop. We have talked about creating a jaw-dropping glitch effect in Photoshop. The steps to create a stunning glitch effect have been mentioned above.
We then shared 5 incredible glitch effects that could be used in case you don’t want to create your own effect.
How to Loop YouTube Videos on iPhone
YouTube videos are a great way to get information fast. But there are times when you want to watch a video over and over again without having to go back to the YouTube app. Here is how you can loop YouTube videos on your iPhone. There are 2 ways to loop YouTube videos on iPhone. One is through the YouTube app and using third-party apps.
There are many reasons why you might want to loop a video on your iPhone. Maybe you’re trying to learn a dance routine, or you want to listen to a song on repeat. You’ve probably seen those cool looping videos on Instagram and Facebook and wondered how people make them. YouTube is a great place to find videos on any topic.
The YouTube app on the iPhone is a great way to watch videos, but it doesn’t have a repeat or loop feature. This means that if you are watching a long video, you will have to keep your phone on and continue watching the video. YouTube is the world’s most popular video-sharing platform with approx. 1.9 billion monthly active users.
Part 1: How to loop YouTube videos on iPhone
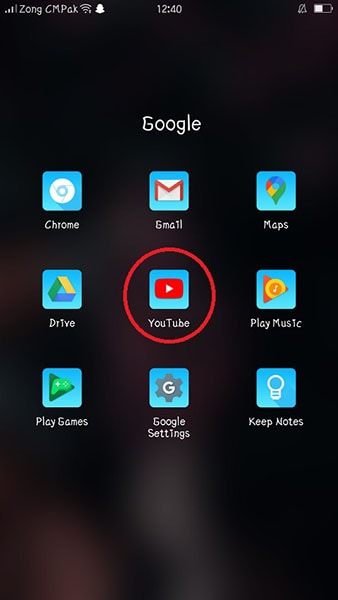
Step 1: Open the YouTube app on your iPhone
Install YouTube on your iPhone after that open it. Search your desired video on the YouTube search bar.
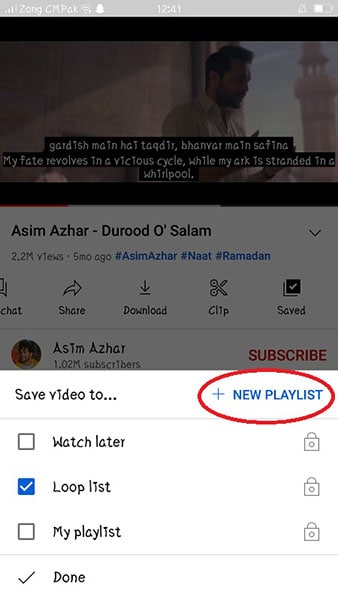
Step 2: Tap the video you want to repeat
Click on the three dots or click on the save button to create a new playlist for your video. If you want to listen to or see the existing videos you can also add your videos to your old playlist.
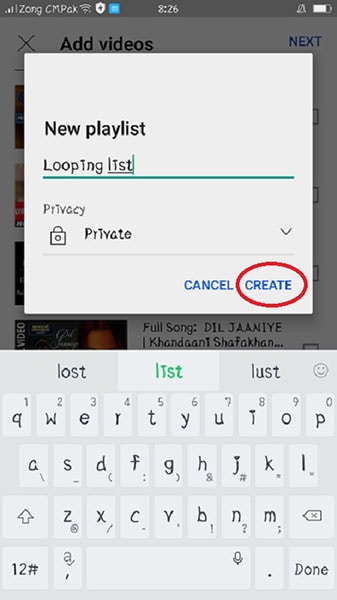
Step 3: Create a playlist and start playing it
Click on New Playlist then give any name to your playlist. Give any name to your playlist and select whether you want to make it private or public.
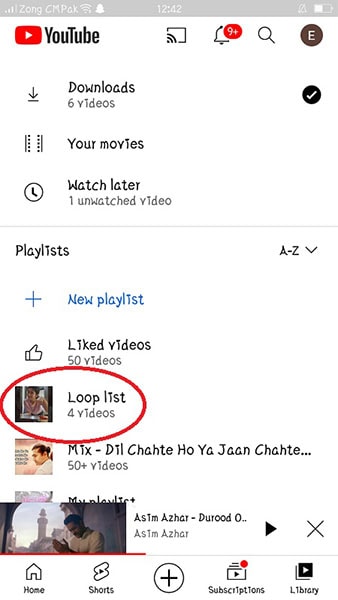
Step 4: Click on the library
After creating a playlist click on the library which is placed at the bottom. After clicking on it you can see your all playlists.
Step 5: Play the playlist on the loop
Click on your desired playlist which you want to play after that you’ll see two options on the screen Play and Shuffle. Select the Play option, your playlist will start.
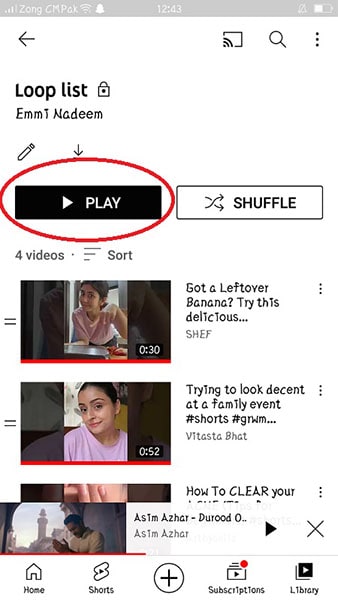
Step 6: Play your favorite video first and put the playlist on the loop
When you start playing your playlist, you can start it with your favorite video or you can also put your playlist on a loop. So that you can watch your videos on a loop.
Benefits of looping YouTube videos on iPhone
If you are a YouTube addict, then you might be pleased to know that your iPhone has a built-in feature that allows for the video to loop back to the beginning. This feature is an excellent way of saving time and maximizing your viewing pleasure. Looping videos on iPhone is a great way of saving time and maximizing your viewing pleasure.
Looping videos on your phone can be a great way to kill time. Watching the same video over and over again can be tiring, but if you do it on your phone, you don’t have to worry about that. You can change the video at any point in time, so if you find that you are getting bored with it, then just find another one.
Over a billion hours of video are watched every day. The app is available for both iOS and Android devices, which means that you can watch YouTube videos on your phone no matter where you are. This can be useful if you want to listen to music or watch a tutorial while doing something else on your phone, like checking Facebook or browsing the web.
Part 2: How to Edit Time-lapse Video on Computer
Time-lapse videos are becoming more and more popular nowadays. They are a great way to show the passage of time, but editing them on a computer is not an easy task. Editing time-lapse videos on a computer is not an easy task because it requires you to have the right software and know how to use it.
It can be quite time-consuming and tedious work, which is why we need a proper editing program that can help us through this process. It’s just about learning the basics of editing and then adding a few effects to make your video more interesting. Here are some tips on how you can edit time-lapse videos on your computer:
- The first thing you need to do is download and install a video editor for your computer.
- Import the timelapse footage into the video editing program that you have downloaded and installed, such as Adobe Premiere Pro or Sony Vegas Pro, etc.
- Now you need to trim out any unwanted footage at the beginning or end of the clip so that what remains is just what you want to show in your final video.
- The next step is to add transitions between scenes, such as fades, wipes, dissolves, or cuts between shots - this will help transition between scenes smoothly and seamlessly without any abrupt jumps in time or space between them while also adding an extra level of polish.
Time-lapse videos can help you produce stunning results, no matter what your creative goals may be. If you want to create a time-lapse video, there are many things you need to consider. Time-lapse videos are not just a series of photos strung together. And the most important thing you need to consider is the format of the video you’ll need to take.
Choosing the right editing software is also important if you’re using a camera that shoots time-lapse videos. And if you’re using a DSLR camera, there is a chance that your time-lapse videos are in MOV format. If that’s the case, then you’re in luck. Filmora can help you edit your time-lapse video with ease.
Edit Time-lapse video on Filmora software
Filmora is a video editor that lets you easily create and edit time-lapse videos. With Filmora, you can add music, filters, and effects to your videos to give them a unique look and feel. You can also trim and cut your videos, and merge them to create longer videos. Filmora is perfect for creating professional-looking time-lapse videos.
Filmora has an easy-to-use timeline that makes it easy to sequence your videos and create smooth transitions. This makes it easy to create high-quality time-lapse videos that look like they were filmed in a single take. Filmora has a built-in editor that lets you easily add music and sound effects to your videos. This means that you can create videos that look and sound like professional movies.
How to edit a video in Filmora:
Filmora’s time-lapse feature is free, which is a great start. However, you do need to do a few things to make it work. First, you need to make sure that your phone is compatible with Filmora. You’ll also need a connection to the Internet and a working camera on your phone. There are a few things that you’ll need to know to start editing videos on Filmora.
Step 1: Download Filmora and create a new project
Download Filmora on your desktop and click on the “New Project” button. This will open up a new window where you can name your project and choose a video file to start working with.

Free Download For Win 7 or later(64-bit)
Free Download For macOS 10.14 or later
Step 2: Select media and place it on the timeline
Click on the “Media” tab and select your video file. You’ll now see the video timeline on the left side of the window. Use the video timeline to drag and drop video clips into the timeline. You can also use the buttons on the timeline to change the speed, direction, and audio volume of the video clips.

Step 3: Select the speed you want the video to play at and click on the “OK” button.
You set the duration and speed of your video according to your requirements. You can edit the speed of your video individually. If you put your first video on high speed then you can slow down your second video.

Step 4: Click on the “Effects” button and select the “Special Effects” tab
You have undoubtedly seen those videos, full of special effects and transitions. These effects are the result of good video editing software, like Filmora. This software is designed to be used by anyone, from beginners to expert editors. You can add effects to your time-lapse video. Click on the Effects on the top bar of Filmora. You can also add various transitions in your time-lapse video.

Step 5: Export your time-lapse video
As a user of Filmora, you can export a time-lapse video onto your computer. This feature is one of the best features Filmora has to offer. You can export your edited time-lapse video on Filmora. When you are done with your time-lapse editing export the video on your desktop, drive, or anywhere you want

The Bottom Line
Since most people own an iPhone, it’s very useful to know some tricks to be more productive. As you have seen, the utility of looping a video is not something to be scoffed at. If you need to keep watching a video over and over again, on iPhone looping a video is one of the best ways to do so.
We hope the content above has been useful to you, and that you can see how looping YouTube videos on your iPhone could improve your iPhone experience. On the other hand, you can use Filmora software for your video or photo editing. Filmora is user-friendly software and you can easily install it from a browser. You just need a piece of basic knowledge to use Filmora.
Free Download For macOS 10.14 or later
Step 2: Select media and place it on the timeline
Click on the “Media” tab and select your video file. You’ll now see the video timeline on the left side of the window. Use the video timeline to drag and drop video clips into the timeline. You can also use the buttons on the timeline to change the speed, direction, and audio volume of the video clips.

Step 3: Select the speed you want the video to play at and click on the “OK” button.
You set the duration and speed of your video according to your requirements. You can edit the speed of your video individually. If you put your first video on high speed then you can slow down your second video.

Step 4: Click on the “Effects” button and select the “Special Effects” tab
You have undoubtedly seen those videos, full of special effects and transitions. These effects are the result of good video editing software, like Filmora. This software is designed to be used by anyone, from beginners to expert editors. You can add effects to your time-lapse video. Click on the Effects on the top bar of Filmora. You can also add various transitions in your time-lapse video.

Step 5: Export your time-lapse video
As a user of Filmora, you can export a time-lapse video onto your computer. This feature is one of the best features Filmora has to offer. You can export your edited time-lapse video on Filmora. When you are done with your time-lapse editing export the video on your desktop, drive, or anywhere you want

The Bottom Line
Since most people own an iPhone, it’s very useful to know some tricks to be more productive. As you have seen, the utility of looping a video is not something to be scoffed at. If you need to keep watching a video over and over again, on iPhone looping a video is one of the best ways to do so.
We hope the content above has been useful to you, and that you can see how looping YouTube videos on your iPhone could improve your iPhone experience. On the other hand, you can use Filmora software for your video or photo editing. Filmora is user-friendly software and you can easily install it from a browser. You just need a piece of basic knowledge to use Filmora.
Free Download For macOS 10.14 or later
Step 2: Select media and place it on the timeline
Click on the “Media” tab and select your video file. You’ll now see the video timeline on the left side of the window. Use the video timeline to drag and drop video clips into the timeline. You can also use the buttons on the timeline to change the speed, direction, and audio volume of the video clips.

Step 3: Select the speed you want the video to play at and click on the “OK” button.
You set the duration and speed of your video according to your requirements. You can edit the speed of your video individually. If you put your first video on high speed then you can slow down your second video.

Step 4: Click on the “Effects” button and select the “Special Effects” tab
You have undoubtedly seen those videos, full of special effects and transitions. These effects are the result of good video editing software, like Filmora. This software is designed to be used by anyone, from beginners to expert editors. You can add effects to your time-lapse video. Click on the Effects on the top bar of Filmora. You can also add various transitions in your time-lapse video.

Step 5: Export your time-lapse video
As a user of Filmora, you can export a time-lapse video onto your computer. This feature is one of the best features Filmora has to offer. You can export your edited time-lapse video on Filmora. When you are done with your time-lapse editing export the video on your desktop, drive, or anywhere you want

The Bottom Line
Since most people own an iPhone, it’s very useful to know some tricks to be more productive. As you have seen, the utility of looping a video is not something to be scoffed at. If you need to keep watching a video over and over again, on iPhone looping a video is one of the best ways to do so.
We hope the content above has been useful to you, and that you can see how looping YouTube videos on your iPhone could improve your iPhone experience. On the other hand, you can use Filmora software for your video or photo editing. Filmora is user-friendly software and you can easily install it from a browser. You just need a piece of basic knowledge to use Filmora.
Free Download For macOS 10.14 or later
Step 2: Select media and place it on the timeline
Click on the “Media” tab and select your video file. You’ll now see the video timeline on the left side of the window. Use the video timeline to drag and drop video clips into the timeline. You can also use the buttons on the timeline to change the speed, direction, and audio volume of the video clips.

Step 3: Select the speed you want the video to play at and click on the “OK” button.
You set the duration and speed of your video according to your requirements. You can edit the speed of your video individually. If you put your first video on high speed then you can slow down your second video.

Step 4: Click on the “Effects” button and select the “Special Effects” tab
You have undoubtedly seen those videos, full of special effects and transitions. These effects are the result of good video editing software, like Filmora. This software is designed to be used by anyone, from beginners to expert editors. You can add effects to your time-lapse video. Click on the Effects on the top bar of Filmora. You can also add various transitions in your time-lapse video.

Step 5: Export your time-lapse video
As a user of Filmora, you can export a time-lapse video onto your computer. This feature is one of the best features Filmora has to offer. You can export your edited time-lapse video on Filmora. When you are done with your time-lapse editing export the video on your desktop, drive, or anywhere you want

The Bottom Line
Since most people own an iPhone, it’s very useful to know some tricks to be more productive. As you have seen, the utility of looping a video is not something to be scoffed at. If you need to keep watching a video over and over again, on iPhone looping a video is one of the best ways to do so.
We hope the content above has been useful to you, and that you can see how looping YouTube videos on your iPhone could improve your iPhone experience. On the other hand, you can use Filmora software for your video or photo editing. Filmora is user-friendly software and you can easily install it from a browser. You just need a piece of basic knowledge to use Filmora.
Some Effective Slow Motion Video Editors You Can Try
Slow-motion videos help in sports analysis to gain insights into the performance. Slow motion is beneficial for observing precise movements in instructional videos. Moreover, such videos are crucial for product showcasing in advertising and marketing. Due to the various uses of slow-motion videos, you may need to create one with an edit video slow motion online free.
Thus, this article will focus on some top-notch slow-motion video editors online for free. With these tools, you can produce slow-motion videos at the desired pace. Moreover, we will introduce a desktop tool that leaves behind all online video editors slow motion free.
Slow Motion Video Maker Slow your video’s speed with better control of your keyframes to create unique cinematic effects!
Make A Slow Motion Video Make A Slow Motion Video More Features

Part 1: [Top List] Best Slow Motion Video Editors To Work Within 2024
Have you ever worked with slow-motion video editors? In this section, we will shed light on some of the best online video editors that are slow-motion free. By using them, you can produce professional quality slow-motion videos with ease:
1. VEED.io
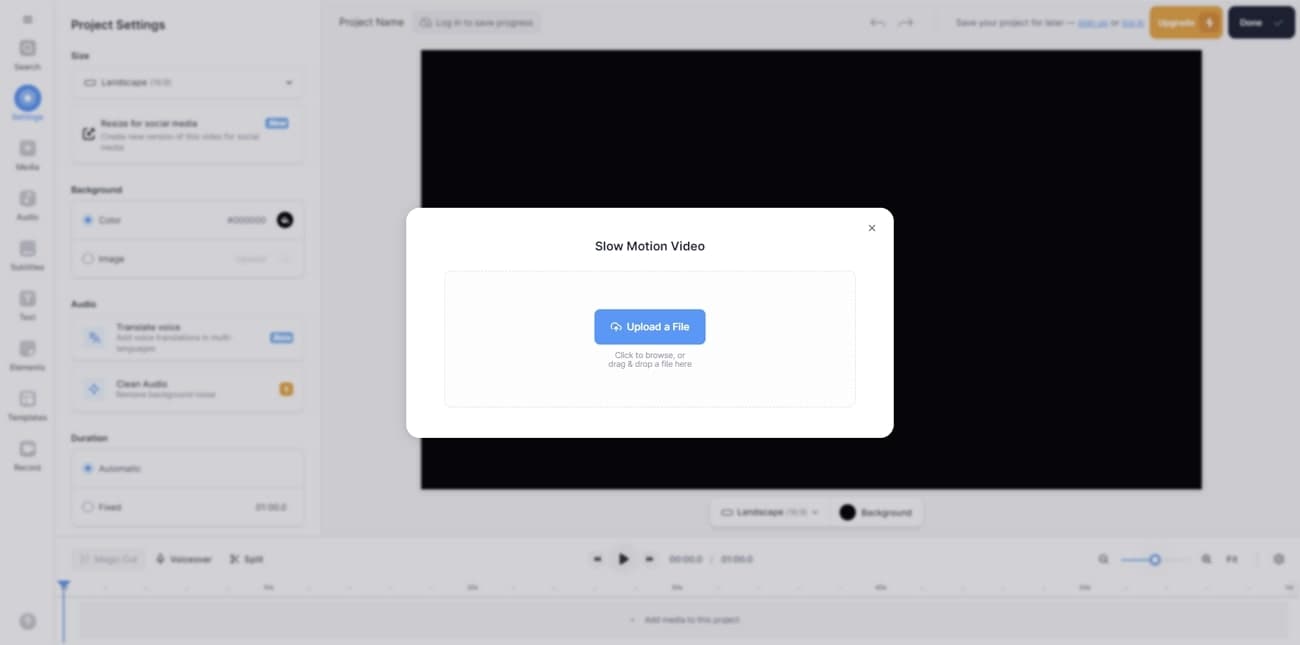
VEED.io is a prominent tool that you can access through a web browser. Along with its many features, this tool lets you slow down a video with proficiency. It lets you change the video speed to up to 0.5x. Moreover, you can enter the custom speed for more modification. For precision, you can slow down certain parts by splitting the clips. Hence, this tool gives you complete control for making slow-motion videos.
Pros
- This tool shows compatibility with many file formats. For example, you can import videos in MOV, MP3, AVI, and other formats.
- After slowing down a video, this tool lets you perform basic video editing. You can cut, crop, trim, and annotate the slow-motion video.
Cons
- This tool freezes and lacks fast processing speed.
2. Canva
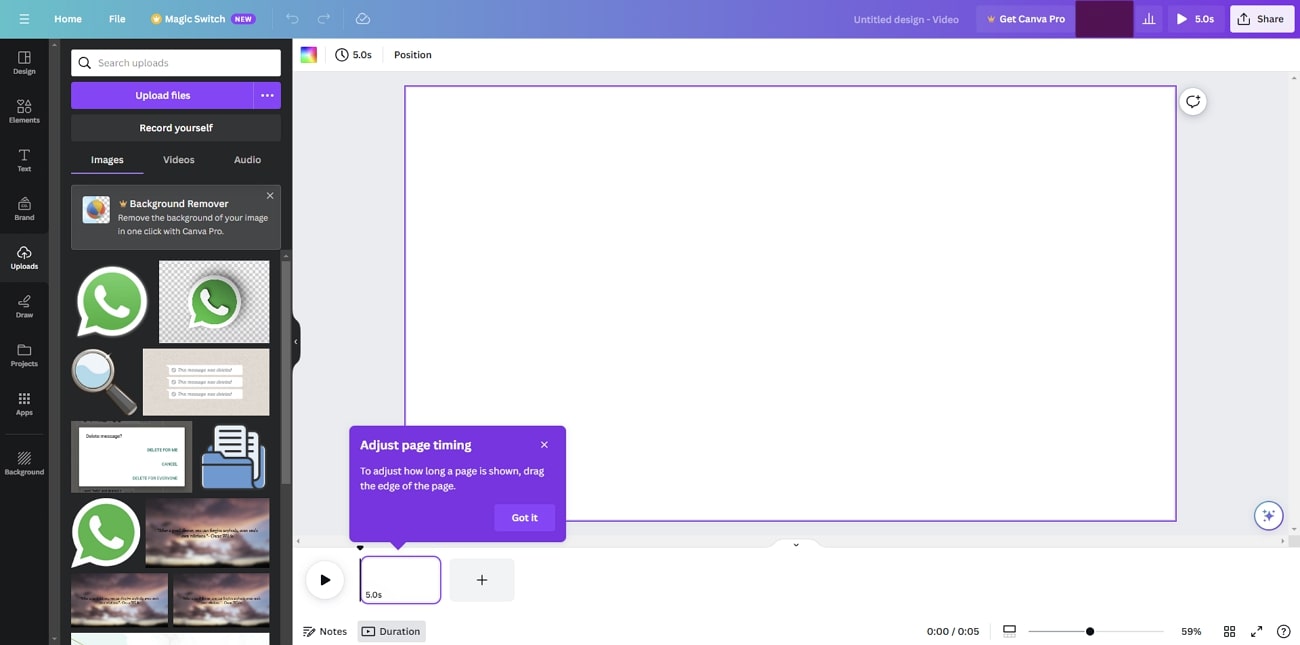
Have you ever edited a video through Canva? This famous edit video slow motion online free tool offers many tools to execute basic and advanced editing. Among them, it contains the feature to add a slow-motion effect to a video. After uploading the video, you can reduce the speed to 0.1x. While adding a slow-motion effect, you can add comments to the video for more modification.
Pros
- This tool provides many options for uploading a video. For instance, you can upload videos from Facebook, Google Drive, Google Photos, or Dropbox.
- It includes a collaboration link to help your teammates access the video. You can also enter groups, people, and tags for collaboration.
Cons
- The options for template designs and export are limited.
3. Typito
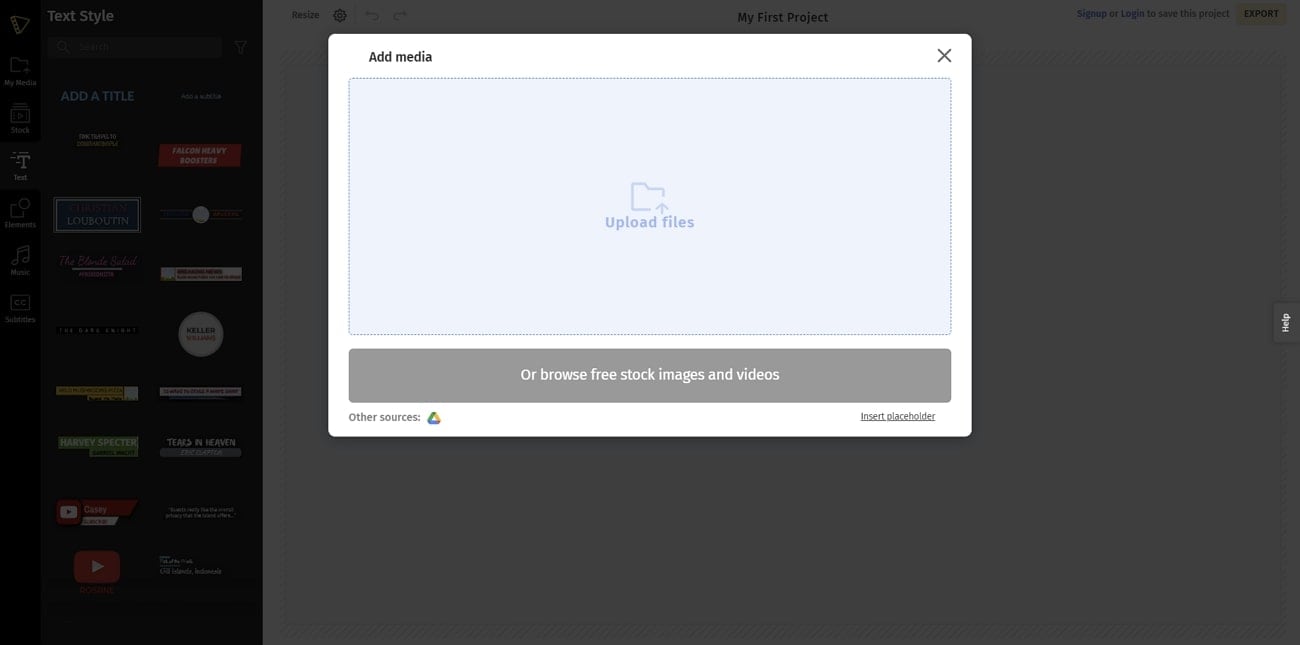
Typito is a reliable tool that supports over 20 video file formats. With its video speed modifier, you can speed up or slow down a video file without hassle. Furthermore, it supports many aspect ratios, like a square letterbox, vertical, etc. Moreover, it contains a stock media library containing royalty-free videos and images. Thus, it’s a competent online tool featuring a reliable option to make slow-motion videos.
Pros
- You can display your own brand video with this tool. It allows you to upload your brand colors, designs, and fonts for brand marketing.
- It offers a real-time video preview to analyze the final result. By doing so, you can download satisfactory slow-motion videos.
Cons
- Sometimes, the tool encounters glitches, which can disrupt its overall performance.
4. Media.io
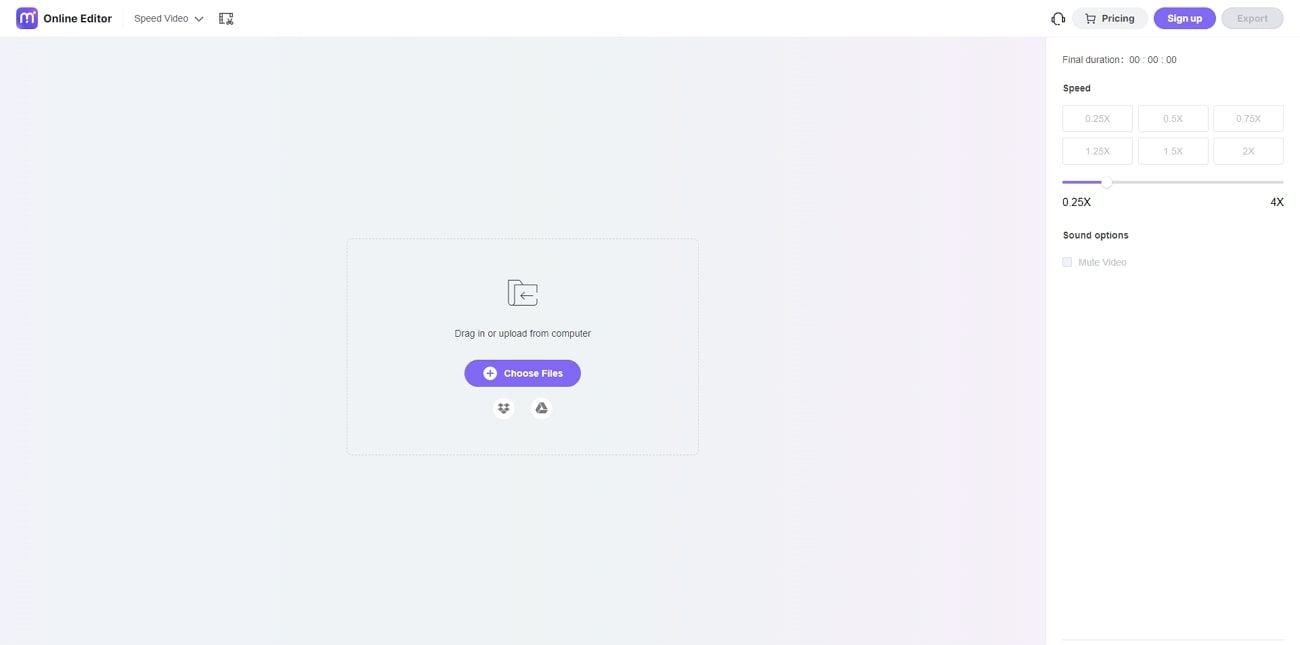
Media.io is a capable online tool famous for its flawless results. After importing the video, you can reduce it to the lowest speed, which is 0.25x. Meanwhile, you can also increase the video speed to 4x efficiently. One of the best things about this tool is that it can edit the motion effect to YouTube URLs directly. Hence, this slow down video online free can benefit you in making slow-motion videos.
Pros
- This tool contains many free additional features. For instance, it contains a video converter, letting you convert the file format into another one.
- To remove unwanted audio from a video, you can mute the video. Thus, with a single click, you can mute the video instantly.
Cons
- You cannot upload large file sizes on this tool. Thus, you can face file size restrictions on Media.io.
5. Flixier
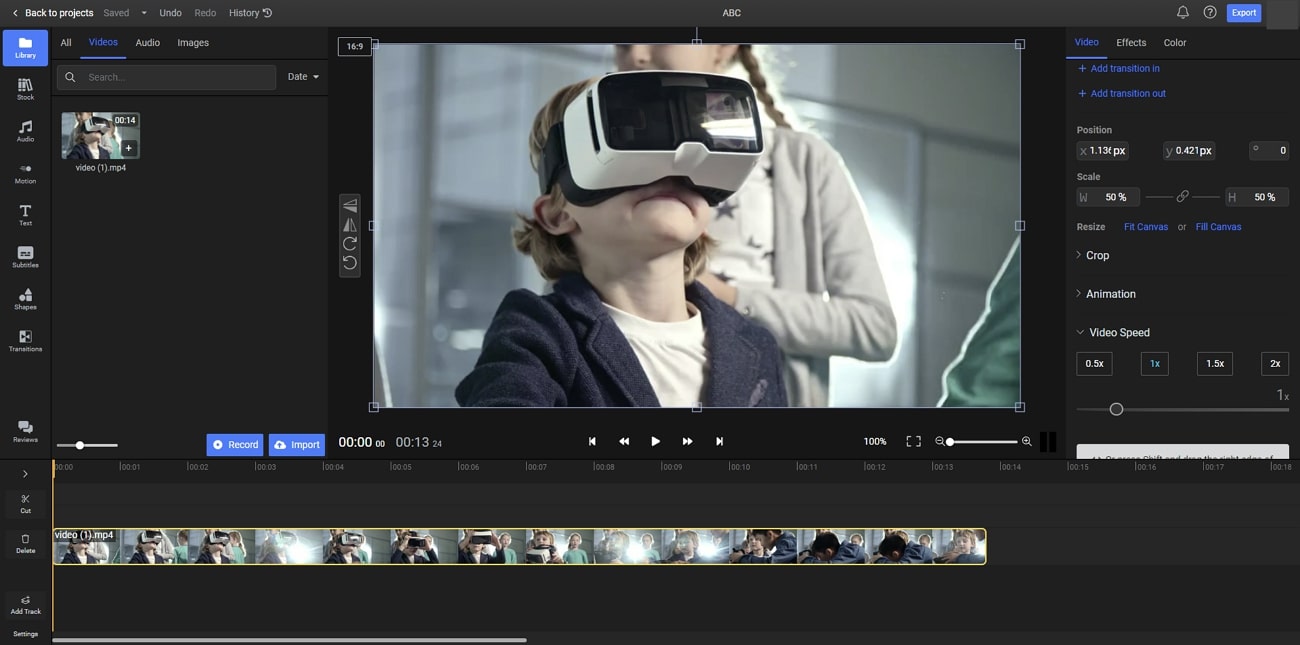
This online video editor slow motion free tool has an easy-to-use interface that you can operate without watching tutorials. It can slow down a video at any frame rate without decreasing its quality. To reduce the video speed, you can drag the slider with great ease. Moreover, you can add powerful effects to enhance the slowed-down video. Hence, it’s an advanced tool for creating slow-motion videos.
Pros
- It contains an AI subtitle generator through which you can transcribe your videos. It supports all common languages for the generation of video subtitles.
- To make your video pleasing in a visual way, you can add many filters. This tool consists of many filters which can improve your facial appearance.
Cons
- Flixier takes extra time to process video files. Thus, making slow-motion videos with this tool is time-consuming.
6. Kapwing
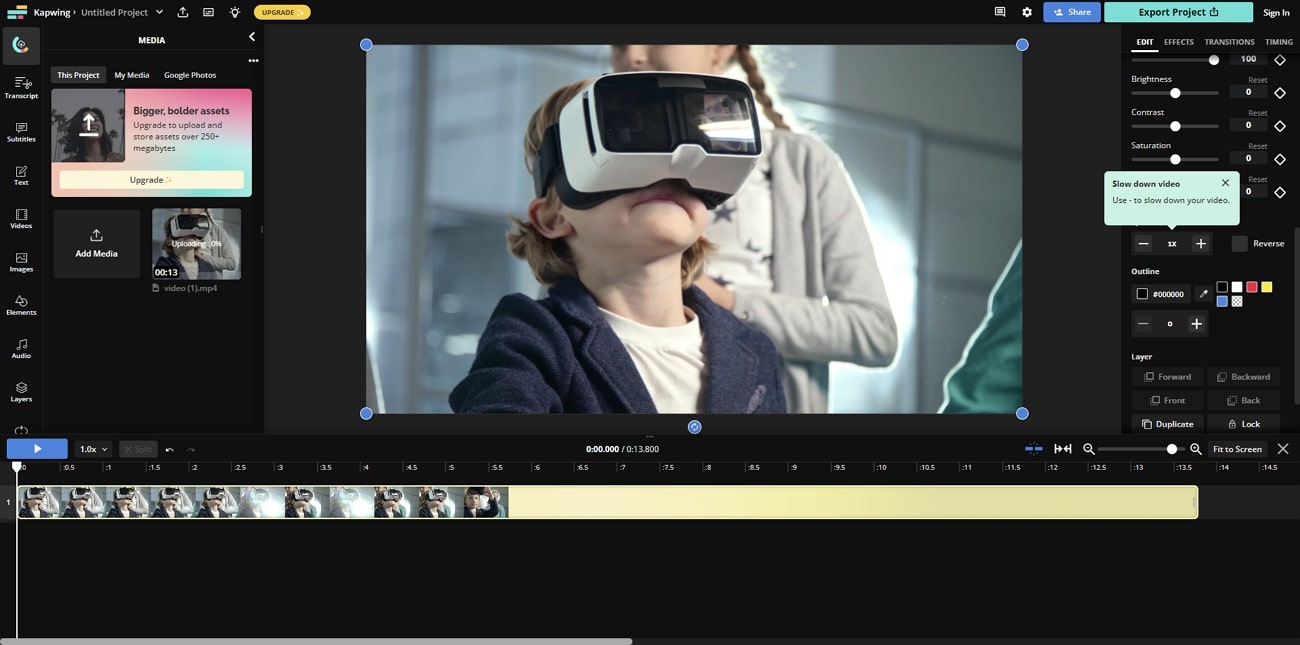
This online tool uses advanced technology to slow down a video without losing quality. Whether your video is 4K or 1080p, the tool maintains the original resolution of the video. You can import the video from your device within a few seconds. It also allows you to paste the URL of the video quickly. Afterward, you can adjust the speed slider to manage the video speed in a preferred way.
Pros
- Kapwing is an all-round video editor offering many features. Using this video editor, users can combine and split video tracks.
- The AI audio enhancer of this tool can improve the sound quality of your audio. You can improve the quality of your voice recording and background music with this feature.
Cons
- To use its premium features, you must buy its subscription plans. However, its subscription plans can be expensive for some users.
7. Clideo
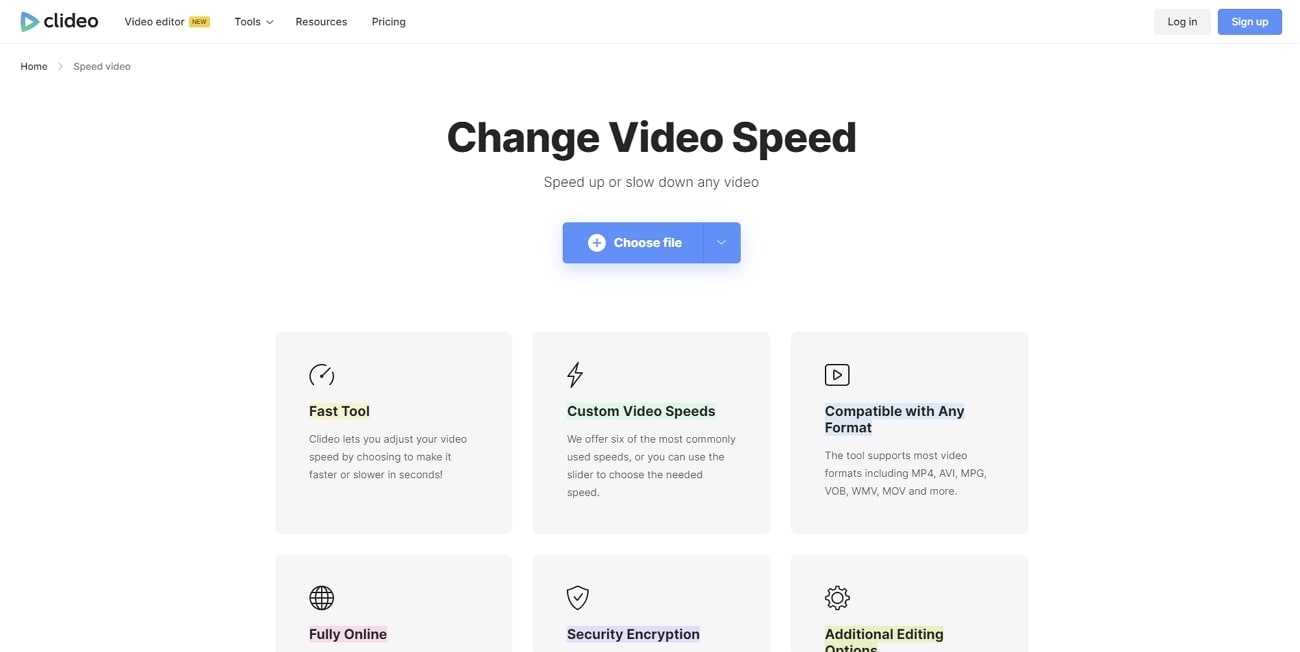
Do you want a basic tool for slowing down videos? Clideo is one of the simple tools that has intuitive controls to modify a video. It has a fast processing speed to offer users instant results. It provides six commonly used speeds for video clips. In addition, you can use the speed slider to adjust the speed in a personalized way. Meanwhile, the tool ensures complete security to protect your valuable video files.
Pros
- This slow down video online free can function as a great video compressor. It decreases the video file size without compromising its resolution.
- It acts as a video maker, allowing you to create videos from images. Moreover, you can produce videos with GIFs of desired quality.
Cons
- It adds a watermark to the videos in its free version.
8. Online Video Cutter
This comprehensive slow motion video online without watermark tool offers a great user experience in making slow-motion videos. Without adding a watermark, it can create slow-mo videos as best as possible. Along with various video speeds, it provides many file formats. Moreover, you can slow down videos without creating an account. Within a few taps, you can make slow-motion videos in high resolution.
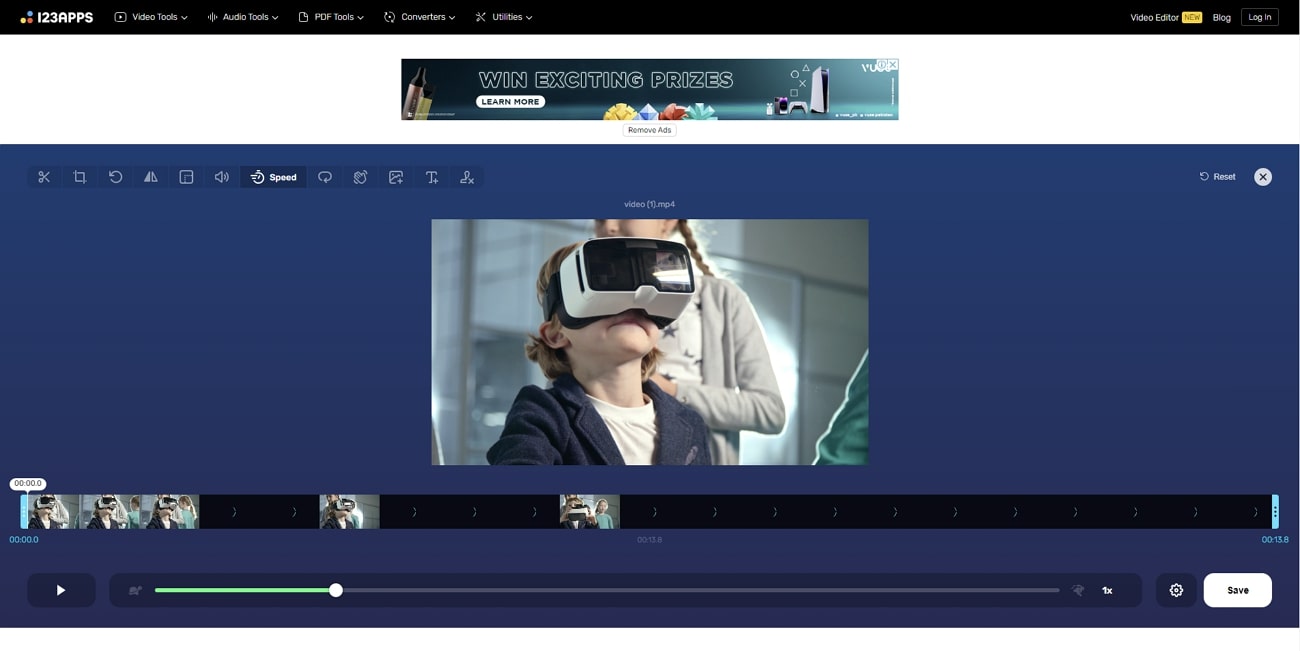
Pros
- To describe your video clips, add text to them using this tool. It lets you select the desired text font, style, size, and color.
- It contains a screen recorder to capture the current activities of your desktop. After recording, you can edit and export the video flawlessly.
Cons
- The interface of this tool contains many pop-up ads, which can be annoying.
Part 2: Alternative For Better Results: Wondershare Filmora
After knowing the drawbacks of online tools, you must want an alternative. Wondershare Filmora is a skillful tool comprising good qualities as a video editor. It targets every need of a professional video editor with its robust features. With its friendly user interface, you can perform video editing without hurdles. It lets you apply effects, transitions, animations, and other modifications with ease.
Moreover, it allows users to control the speed of the videos. After dragging the video to the timeline, you can adjust its speed accordingly. It retains the frame rate of the video with high-end rendering. Also, it contains tons of AI options to improvise the video clip. Hence, Filmora is a must-have offline tool catering to all the needs of video editors.
Free Download For Win 7 or later(64-bit)
Free Download For macOS 10.14 or later
Directions to Make Slow-Motion Video
In this section, we will enlist the simple steps to create slow-motion videos. Thus, check the following instructions to generate slow-motion videos in a flawless way.
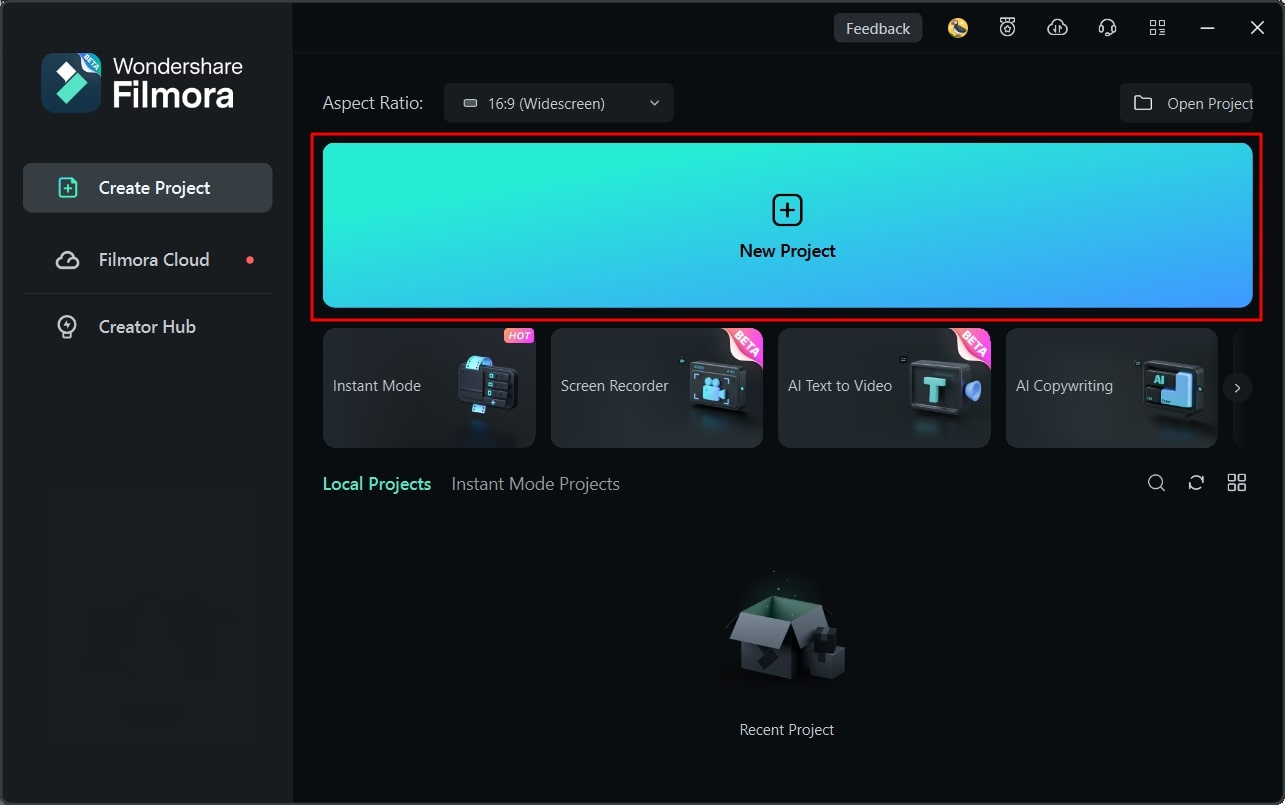
Step 1Sign Into Filmora
Start by launching Filmora on your PC. Once done, head to the top bar and select “Profile”. From there, sign into the account and select the “New Project” button.
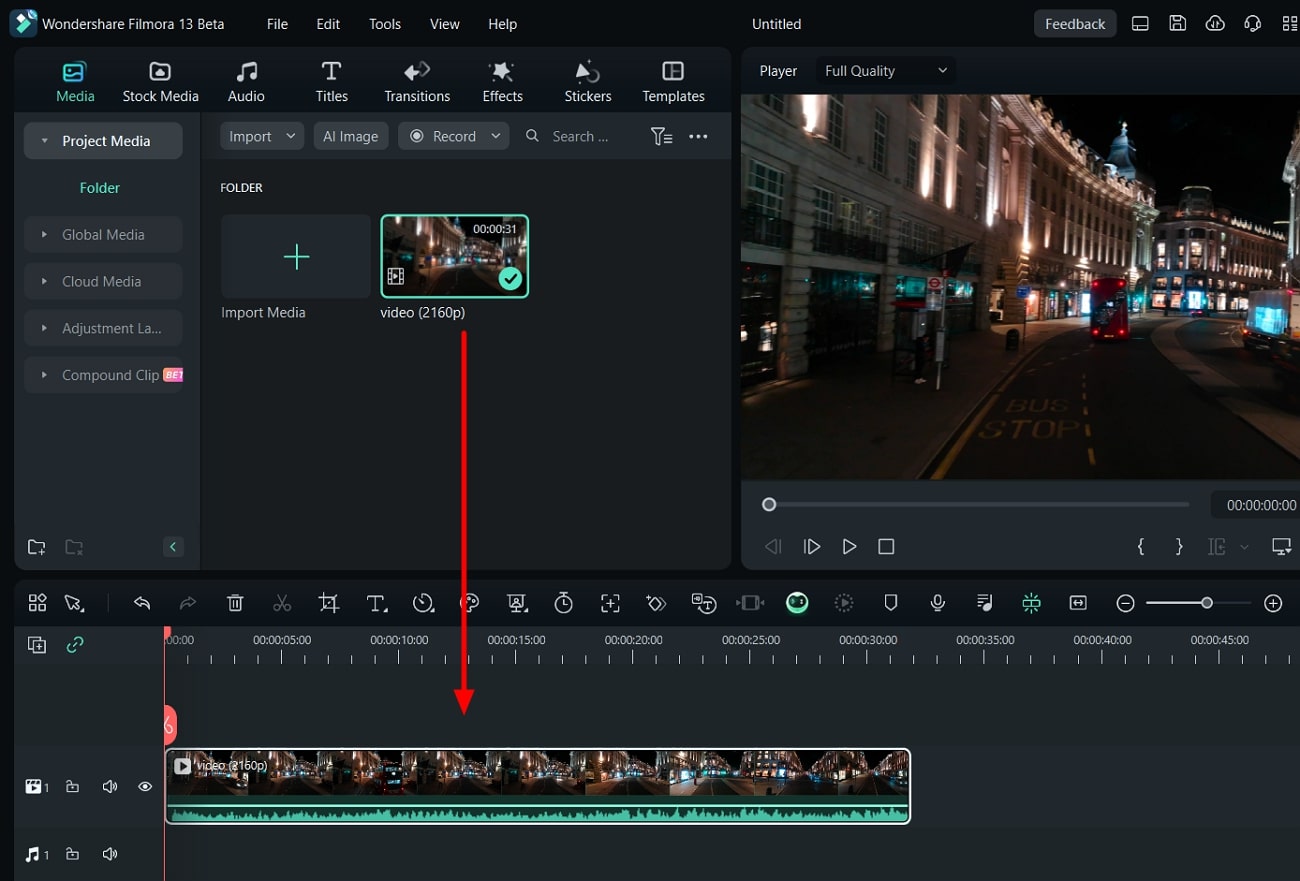
Step 2Add Video on Timeline
Now, on the main interface of Filmora, press “Ctrl + I”. In this manner, you can import the video clips from your computer. Once done, drag and drop the video file to the timeline for editing.
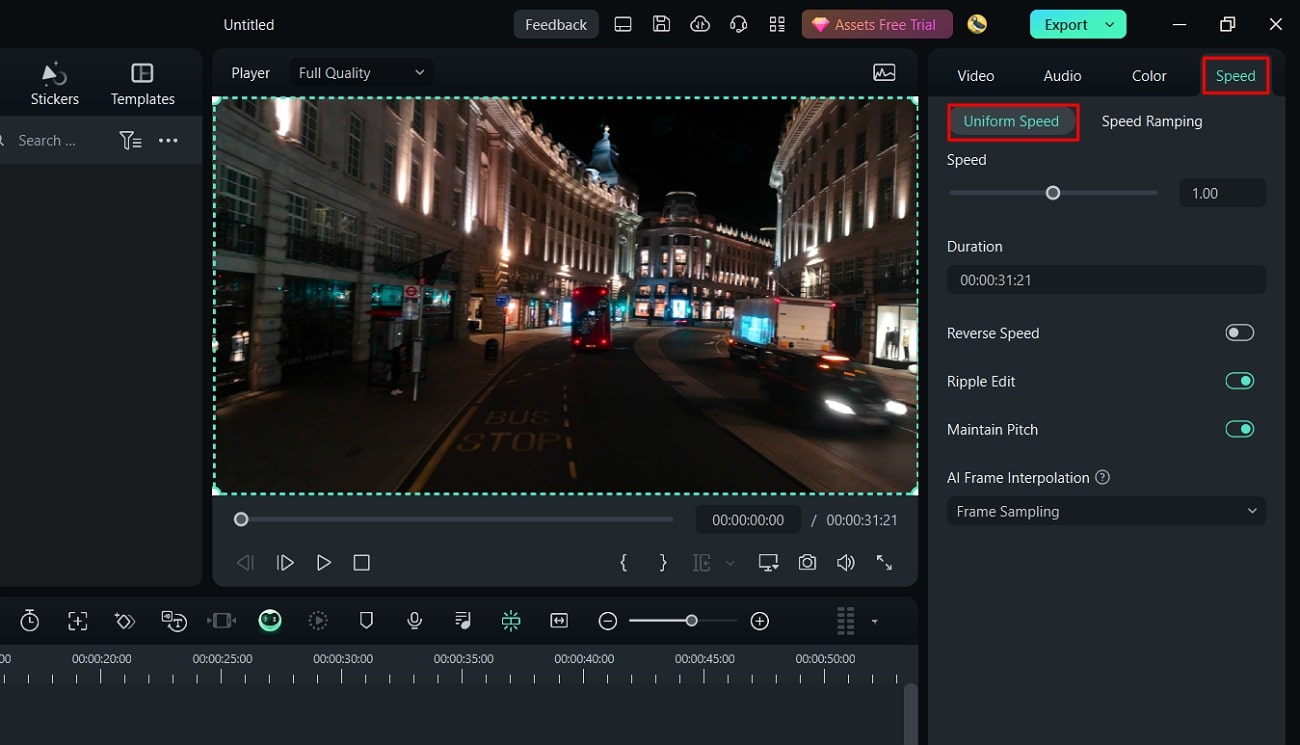
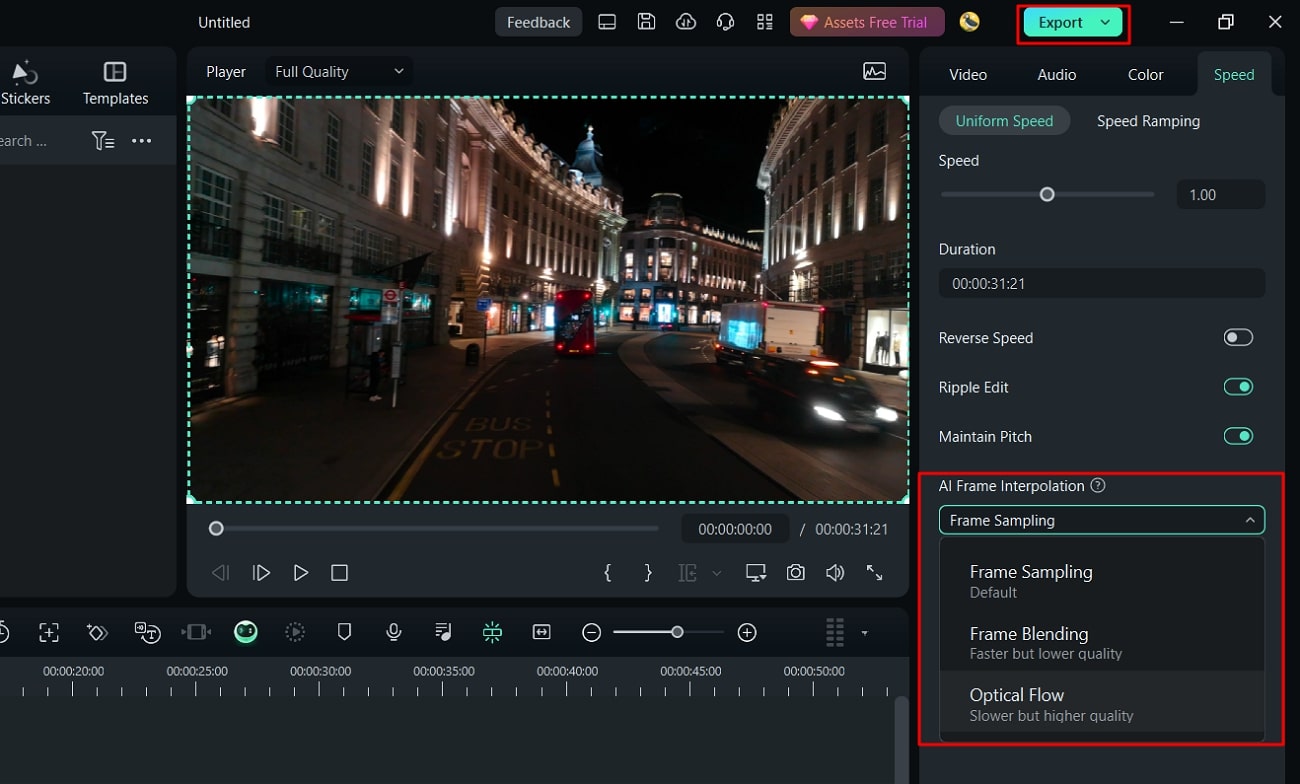
Step 3Go to the Speed Tab
Select the video on the timeline and go to the right panel. Through this panel, click on the “Speed” tab and tap “Uniform Speed”.
Step 4Choose Optical Flow
Expand “AI Frame Interpolation” and tap “Optical Flow”. Now, stay on the timeline and select “Render Preview” from the top toolbar. By doing so, you can export the video in the selected file format.
Key Features Highlighting Filmora
AI Vocal Remover: This AI feature isolates the music from any song. It preserves the high resolution of the video while removing vocals. Also, it extracts other unwanted elements from audio. Hence, it automatically removes vocals from an audio file.
AI Copywriting: This feature is integrated with ChatGPT to produce AI-generated scripts. Content creators can generate YouTube descriptions and titles from this smart feature. To do so, you can enter the question in the given box. After some seconds, the AI tool will answer your queries.
AI Image: By using this feature, you can convert your text to images in an automated way. You can describe the image in the text in the given box. Afterward, the tool will create an AI image in three resolutions.
Part 3: What Are Some Major Drawbacks to Using Online Slow Motion Video Editors Compared to Offline Editors?
There are some disadvantages to using online slow-motion video editors as compared to offline tools. Here are some of the common drawbacks of slow motion video editor online free that you should consider:
Network Dependency
Online slow-motion video editors need credible and fast internet connections. You can’t access their website with a poor internet connection. If there is a poor network connection, the tool will take extra time to upload and process videos.
Limitations of Features
Unlike offline slow-motion video editors, online free tools have limited features. They don’t offer advanced options to make professional enhancements. Moreover, advanced tools need high-end computing sources. This may not be present on web-based slow-motion video editors.
Privacy Concerns
Desktop tools use enhanced encryption methods for data privacy. However, online sites may contain hidden malicious files which can harm your data. Hence, online users may face privacy threats when making slow-motion videos.
User Interface and Subscription Packages
It’s common that online slow-motion video editors lack intuitive controls. The interface of online tools is difficult to operate for beginners. Moreover, the subscription packages can be expensive for some users. In contrast, desktop tools have better user interface experience with affordable plans.
Conclusion
Slow-motion videos are useful for deep analysis. It helps in highlighting the minor details of a product. There are many online video editors slow motion free to create slow-motion effects. However, desktop tools like Filmora are a better alternative to such online tools. This tool uses high-end computing algorithms to make slow-motion videos with precision.
Make A Slow Motion Video Make A Slow Motion Video More Features

Part 1: [Top List] Best Slow Motion Video Editors To Work Within 2024
Have you ever worked with slow-motion video editors? In this section, we will shed light on some of the best online video editors that are slow-motion free. By using them, you can produce professional quality slow-motion videos with ease:
1. VEED.io
VEED.io is a prominent tool that you can access through a web browser. Along with its many features, this tool lets you slow down a video with proficiency. It lets you change the video speed to up to 0.5x. Moreover, you can enter the custom speed for more modification. For precision, you can slow down certain parts by splitting the clips. Hence, this tool gives you complete control for making slow-motion videos.

Pros
- This tool shows compatibility with many file formats. For example, you can import videos in MOV, MP3, AVI, and other formats.
- After slowing down a video, this tool lets you perform basic video editing. You can cut, crop, trim, and annotate the slow-motion video.
Cons
- This tool freezes and lacks fast processing speed.
2. Canva
Have you ever edited a video through Canva? This famous edit video slow motion online free tool offers many tools to execute basic and advanced editing. Among them, it contains the feature to add a slow-motion effect to a video. After uploading the video, you can reduce the speed to 0.1x. While adding a slow-motion effect, you can add comments to the video for more modification.

Pros
- This tool provides many options for uploading a video. For instance, you can upload videos from Facebook, Google Drive, Google Photos, or Dropbox.
- It includes a collaboration link to help your teammates access the video. You can also enter groups, people, and tags for collaboration.
Cons
- The options for template designs and export are limited.
3. Typito
Typito is a reliable tool that supports over 20 video file formats. With its video speed modifier, you can speed up or slow down a video file without hassle. Furthermore, it supports many aspect ratios, like a square letterbox, vertical, etc. Moreover, it contains a stock media library containing royalty-free videos and images. Thus, it’s a competent online tool featuring a reliable option to make slow-motion videos.

Pros
- You can display your own brand video with this tool. It allows you to upload your brand colors, designs, and fonts for brand marketing.
- It offers a real-time video preview to analyze the final result. By doing so, you can download satisfactory slow-motion videos.
Cons
- Sometimes, the tool encounters glitches, which can disrupt its overall performance.
4. Media.io
Media.io is a capable online tool famous for its flawless results. After importing the video, you can reduce it to the lowest speed, which is 0.25x. Meanwhile, you can also increase the video speed to 4x efficiently. One of the best things about this tool is that it can edit the motion effect to YouTube URLs directly. Hence, this slow down video online free can benefit you in making slow-motion videos.

Pros
- This tool contains many free additional features. For instance, it contains a video converter, letting you convert the file format into another one.
- To remove unwanted audio from a video, you can mute the video. Thus, with a single click, you can mute the video instantly.
Cons
- You cannot upload large file sizes on this tool. Thus, you can face file size restrictions on Media.io.
5. Flixier
This online video editor slow motion free tool has an easy-to-use interface that you can operate without watching tutorials. It can slow down a video at any frame rate without decreasing its quality. To reduce the video speed, you can drag the slider with great ease. Moreover, you can add powerful effects to enhance the slowed-down video. Hence, it’s an advanced tool for creating slow-motion videos.

Pros
- It contains an AI subtitle generator through which you can transcribe your videos. It supports all common languages for the generation of video subtitles.
- To make your video pleasing in a visual way, you can add many filters. This tool consists of many filters which can improve your facial appearance.
Cons
- Flixier takes extra time to process video files. Thus, making slow-motion videos with this tool is time-consuming.
6. Kapwing
This online tool uses advanced technology to slow down a video without losing quality. Whether your video is 4K or 1080p, the tool maintains the original resolution of the video. You can import the video from your device within a few seconds. It also allows you to paste the URL of the video quickly. Afterward, you can adjust the speed slider to manage the video speed in a preferred way.

Pros
- Kapwing is an all-round video editor offering many features. Using this video editor, users can combine and split video tracks.
- The AI audio enhancer of this tool can improve the sound quality of your audio. You can improve the quality of your voice recording and background music with this feature.
Cons
- To use its premium features, you must buy its subscription plans. However, its subscription plans can be expensive for some users.
7. Clideo
Do you want a basic tool for slowing down videos? Clideo is one of the simple tools that has intuitive controls to modify a video. It has a fast processing speed to offer users instant results. It provides six commonly used speeds for video clips. In addition, you can use the speed slider to adjust the speed in a personalized way. Meanwhile, the tool ensures complete security to protect your valuable video files.

Pros
- This slow down video online free can function as a great video compressor. It decreases the video file size without compromising its resolution.
- It acts as a video maker, allowing you to create videos from images. Moreover, you can produce videos with GIFs of desired quality.
Cons
- It adds a watermark to the videos in its free version.
8. Online Video Cutter
This comprehensive slow motion video online without watermark tool offers a great user experience in making slow-motion videos. Without adding a watermark, it can create slow-mo videos as best as possible. Along with various video speeds, it provides many file formats. Moreover, you can slow down videos without creating an account. Within a few taps, you can make slow-motion videos in high resolution.

Pros
- To describe your video clips, add text to them using this tool. It lets you select the desired text font, style, size, and color.
- It contains a screen recorder to capture the current activities of your desktop. After recording, you can edit and export the video flawlessly.
Cons
- The interface of this tool contains many pop-up ads, which can be annoying.
Part 2: Alternative For Better Results: Wondershare Filmora
After knowing the drawbacks of online tools, you must want an alternative. Wondershare Filmora is a skillful tool comprising good qualities as a video editor. It targets every need of a professional video editor with its robust features. With its friendly user interface, you can perform video editing without hurdles. It lets you apply effects, transitions, animations, and other modifications with ease.
Moreover, it allows users to control the speed of the videos. After dragging the video to the timeline, you can adjust its speed accordingly. It retains the frame rate of the video with high-end rendering. Also, it contains tons of AI options to improvise the video clip. Hence, Filmora is a must-have offline tool catering to all the needs of video editors.
Free Download For Win 7 or later(64-bit)
Free Download For macOS 10.14 or later
Directions to Make Slow-Motion Video
In this section, we will enlist the simple steps to create slow-motion videos. Thus, check the following instructions to generate slow-motion videos in a flawless way.
Step 1Sign Into Filmora
Start by launching Filmora on your PC. Once done, head to the top bar and select “Profile”. From there, sign into the account and select the “New Project” button.

Step 2Add Video on Timeline
Now, on the main interface of Filmora, press “Ctrl + I”. In this manner, you can import the video clips from your computer. Once done, drag and drop the video file to the timeline for editing.

Step 3Go to the Speed Tab
Select the video on the timeline and go to the right panel. Through this panel, click on the “Speed” tab and tap “Uniform Speed”.

Step 4Choose Optical Flow
Expand “AI Frame Interpolation” and tap “Optical Flow”. Now, stay on the timeline and select “Render Preview” from the top toolbar. By doing so, you can export the video in the selected file format.

Key Features Highlighting Filmora
AI Vocal Remover: This AI feature isolates the music from any song. It preserves the high resolution of the video while removing vocals. Also, it extracts other unwanted elements from audio. Hence, it automatically removes vocals from an audio file.
AI Copywriting: This feature is integrated with ChatGPT to produce AI-generated scripts. Content creators can generate YouTube descriptions and titles from this smart feature. To do so, you can enter the question in the given box. After some seconds, the AI tool will answer your queries.
AI Image: By using this feature, you can convert your text to images in an automated way. You can describe the image in the text in the given box. Afterward, the tool will create an AI image in three resolutions.
Part 3: What Are Some Major Drawbacks to Using Online Slow Motion Video Editors Compared to Offline Editors?
There are some disadvantages to using online slow-motion video editors as compared to offline tools. Here are some of the common drawbacks of slow motion video editor online free that you should consider:
Network Dependency
Online slow-motion video editors need credible and fast internet connections. You can’t access their website with a poor internet connection. If there is a poor network connection, the tool will take extra time to upload and process videos.
Limitations of Features
Unlike offline slow-motion video editors, online free tools have limited features. They don’t offer advanced options to make professional enhancements. Moreover, advanced tools need high-end computing sources. This may not be present on web-based slow-motion video editors.
Privacy Concerns
Desktop tools use enhanced encryption methods for data privacy. However, online sites may contain hidden malicious files which can harm your data. Hence, online users may face privacy threats when making slow-motion videos.
User Interface and Subscription Packages
It’s common that online slow-motion video editors lack intuitive controls. The interface of online tools is difficult to operate for beginners. Moreover, the subscription packages can be expensive for some users. In contrast, desktop tools have better user interface experience with affordable plans.
Conclusion
Slow-motion videos are useful for deep analysis. It helps in highlighting the minor details of a product. There are many online video editors slow motion free to create slow-motion effects. However, desktop tools like Filmora are a better alternative to such online tools. This tool uses high-end computing algorithms to make slow-motion videos with precision.
Using Montage In Movies | Learn to Use Montage With Movies
As with many new things in life, Montage isn’t your best friend right off the bat. So, if you want to learn to use montages with movies, they need to be the right ones. If you don’t know what Montage is, it is a way of compressing an action or series of actions into a short amount of time. We look at movies because they are a common type of entertainment everyone has seen before, which makes them easier to understand as a concept.
Using Montage is a great way to create engaging video content. There are many people interested in the topic of Montage, so if you get that video out there, you can easily find an audience. When used in conjunction with YouTube advertising, creating videos about Montage could be an excellent business idea for you.
Learning how to use Montage properly can be challenging. The process isn’t intuitive, and using it can feel like hiding random pieces around your page. But, when you watch the right movies, they can help you understand how to use this tool effectively. So, take some time, check out these movies, and learn how to get the most out of Montage!
What Is A Montage?
The definition of a montage is a “series of short scenes or episodes forming a unified whole.” That definition can lead to different interpretations of a montage and can be applied to any art medium. A “montage” isn’t just for movies. Music artists use montages to tell stories that often describe their emotions and experiences; writers create poetry and prose contained in such an artistic form, and painters often use this art form. However, many people are most familiar with the term associated with movies: a montage is essentially a collection of images or scenes that populate a movie with music.
If you’ve seen any blockbuster Hollywood films in the last ten years, you’ve probably seen some Montage. The Montage is a sequence that takes place over a set period and shows us how the lead character goes from being an ordinary person to an extraordinary one. The difference between these two states is dramatic, so we see so many montages in movies. They are meant to grab your attention and excitingly introduce a character.
Purpose of Montage
Montage movies are made up of a compilation of short yet powerful scenes put together to make one movie or project. Even though these types of movies have become a common genre, there’s a list of reasons why this is popular in movies today.
- Montage has several uses in movies. Of course, Montage can be used to show events such as battles or dancing. It can also describe emotions, including sadness, happiness, and sarcasm. These different uses of Montage do come with their styles, but they all share a few common traits.
- They’re often used to condense periods of storytime into much smaller but more entertaining segments. The word montage is French for “to construct from many parts .”Montages can now be seen everywhere in film and television, from silent films to blockbuster action movies.
- This is frequently used in narratives when the story needs to advance quickly. The characters are going somewhere or doing something else not within the context of the moment in time that represents them. A great example of a montage was used in Rocky when Rocky was training for his fight with Apollo Creed.
- A montage allows filmmakers to explore a theme using several sequential shots that can’t be covered in a single shot.
Learn To Use Montage With These Movies
1. Rocky (1976)
The training montage is popular in cinema. A montage like this helps us follow how the protagonist prepares himself for a life-threatening fight and claims honor in society. Sylvester Stallone plays Robert “Rocky” Balboa, going through the rigorous preparations for his fight. A song by Bill Conti called “Gonna Fly Now” is playing in the background, contributing to the scene’s energy.
Rocky (1976)
2. Scarface (1983)
A fictional Cuban Tony (Al Pacino) becomes a gangster in Brian De Palma’s 1983 film Scarface against the backdrop of the cocaine boom of the 1980s. He is portrayed as a criminal rising to the echelons of the underworld and slowly falling. In this montage sequence, Tony becomes the biggest drug lord in Miami and controls nearly all the cocaine that comes through the city.
Scarface (1983)
3. Goodfellas (1990)
Martin Scorsese’s Goodfellas is a gangster film set in 1950s New York City, one of the best. In it, Irish-Italian Henry Hill (Ray Liotta) is portrayed as he rises through the ranks of the crime branch of his Brooklyn neighborhood. As we watch this Montage, we see Henry and his gang members viciously murdering anyone who stands in their path. This edit is beautifully complemented by Eric Clapton’s “Layla.” voice-over.
Goodfellas (1990)
4. Trainspotting (1996)
Ewan McGregor stars in Danny Boyle’s black comedy, which tells the tale of drug addict Mark Renton (Danny Boyle). Mark tries to get clean and get back on his feet. Despite this, drug enticements and friend influence are major deterrents. Through this introductory Montage, we are introduced to the protagonist’s lifestyle. In addition, the film explores the themes of drug abuse, addiction, and nihilism.
Trainspotting (1996)
5. Run Lola Run (1998)
In his movie Run Lola Run (1998), Tom Tykwer tells the story of Lola (Franka Potente) and Mani (Moritz Bleibtreu) as they face the different possibilities that arise from a single event in their lives. This Montage shows Lola bumping into various people as she begins to sprint. Her encounter has a profound impact on their lives. Through Montage, the film is given a sense of exhilarating pace and multi-layered visual design.
Run Lola Run (1998)
6. Requiem for a Dream (2000)
Hubert Selby Jr.’s titular novel is the source material for Darren Aronofsky’s psychological drama. Four people trapped by their addictions are the focus of the narrative. By watching this Montage, a viewer can get a better sense of the world or the film’s characters. As a result of their drug addictions, four ambitious people will eventually have their dreams dashed. As a result, we gain insight into how addiction takes hold of the characters’ minds and bodies.
Requiem for a Dream (2000)
7. Swades (2004)
Songs have played an integral role in bringing the story of the film to life in the hands of some of India’s most thoughtful filmmakers. Among them is Ashutosh Gowariker. Montage techniques are used to create the title song sequence of his film Swades. The fictional Indian village of Charanpur, where the protagonist Mohan Bhargava (Shahrukh Khan) has lived, is a source of great trauma for the protagonist. As he ends up returning to India, the song signifies his development psychologically.
Swades (2004)
8. Whiplash (2014)
Miles Teller plays Andrew Neiman, a promising young drummer who enrolls in a tough music conservatory. Damien Chazelle directs the film. Terence Fletcher (J. K. Simmons) mentors him, and he is determined to see his students’ dreams come true. Neiman pushes himself to his limits in this Montage, suffering a breakdown as a result. Edited shots and tempo match the visual images to accentuate the protagonist’s mental state.
Whiplash (2014)
9. Gone Girl (2014)
Gillian Flynn’s eponymous novel is the basis for David Fincher’s psychological crime drama. On their fifth wedding anniversary, Amy Elliott Dunne (Rosamund Pike) disappears, and Nicholas Dunne (Ben Affleck) becomes the prime suspect. Amy carefully crafts her new identity in this Montage as we learn she is alive. The Montage ends as Amy sets up her cabin and begins purchasing supplies. After hitting herself with a hammer, the sequence ends.
Whiplash (2014)
10. Parasite (2019)
In Bong Joon-ho’s Oscar-winning dark comedy thriller, the Kim family lives on the edge of poverty. They are suddenly thrown into a world of affluence when a family member gets a job at an affluent family. Moon-Gwang (Lee Jung-Eun) is a long-time housekeeper for the Kim family. The family comes up with a cunning plan to exploit her allergy to peaches. In the closing montage, they convince Mrs. Park (Cho Yeo-Jeong) that Moon-Gwang has tuberculosis.
Whiplash (2014)
Wondershare Filmora11 Express Better
Achieve More
Grow Together
Free Download Free Download Learn More

Summarize:
If you’re thinking about using Montage, check out movies and trailers in the Action and Comedy genres. Keep in mind that finding material that works well with montages is no accident. They are filled with some of the best soundtracks, action scenes, and comedy routines that can help guide your project through its rough spots. Montage can do amazing things for any movie, so it’s important to learn when and where it should be used.
Rocky (1976)
2. Scarface (1983)
A fictional Cuban Tony (Al Pacino) becomes a gangster in Brian De Palma’s 1983 film Scarface against the backdrop of the cocaine boom of the 1980s. He is portrayed as a criminal rising to the echelons of the underworld and slowly falling. In this montage sequence, Tony becomes the biggest drug lord in Miami and controls nearly all the cocaine that comes through the city.
Scarface (1983)
3. Goodfellas (1990)
Martin Scorsese’s Goodfellas is a gangster film set in 1950s New York City, one of the best. In it, Irish-Italian Henry Hill (Ray Liotta) is portrayed as he rises through the ranks of the crime branch of his Brooklyn neighborhood. As we watch this Montage, we see Henry and his gang members viciously murdering anyone who stands in their path. This edit is beautifully complemented by Eric Clapton’s “Layla.” voice-over.
Goodfellas (1990)
4. Trainspotting (1996)
Ewan McGregor stars in Danny Boyle’s black comedy, which tells the tale of drug addict Mark Renton (Danny Boyle). Mark tries to get clean and get back on his feet. Despite this, drug enticements and friend influence are major deterrents. Through this introductory Montage, we are introduced to the protagonist’s lifestyle. In addition, the film explores the themes of drug abuse, addiction, and nihilism.
Trainspotting (1996)
5. Run Lola Run (1998)
In his movie Run Lola Run (1998), Tom Tykwer tells the story of Lola (Franka Potente) and Mani (Moritz Bleibtreu) as they face the different possibilities that arise from a single event in their lives. This Montage shows Lola bumping into various people as she begins to sprint. Her encounter has a profound impact on their lives. Through Montage, the film is given a sense of exhilarating pace and multi-layered visual design.
Run Lola Run (1998)
6. Requiem for a Dream (2000)
Hubert Selby Jr.’s titular novel is the source material for Darren Aronofsky’s psychological drama. Four people trapped by their addictions are the focus of the narrative. By watching this Montage, a viewer can get a better sense of the world or the film’s characters. As a result of their drug addictions, four ambitious people will eventually have their dreams dashed. As a result, we gain insight into how addiction takes hold of the characters’ minds and bodies.
Requiem for a Dream (2000)
7. Swades (2004)
Songs have played an integral role in bringing the story of the film to life in the hands of some of India’s most thoughtful filmmakers. Among them is Ashutosh Gowariker. Montage techniques are used to create the title song sequence of his film Swades. The fictional Indian village of Charanpur, where the protagonist Mohan Bhargava (Shahrukh Khan) has lived, is a source of great trauma for the protagonist. As he ends up returning to India, the song signifies his development psychologically.
Swades (2004)
8. Whiplash (2014)
Miles Teller plays Andrew Neiman, a promising young drummer who enrolls in a tough music conservatory. Damien Chazelle directs the film. Terence Fletcher (J. K. Simmons) mentors him, and he is determined to see his students’ dreams come true. Neiman pushes himself to his limits in this Montage, suffering a breakdown as a result. Edited shots and tempo match the visual images to accentuate the protagonist’s mental state.
Whiplash (2014)
9. Gone Girl (2014)
Gillian Flynn’s eponymous novel is the basis for David Fincher’s psychological crime drama. On their fifth wedding anniversary, Amy Elliott Dunne (Rosamund Pike) disappears, and Nicholas Dunne (Ben Affleck) becomes the prime suspect. Amy carefully crafts her new identity in this Montage as we learn she is alive. The Montage ends as Amy sets up her cabin and begins purchasing supplies. After hitting herself with a hammer, the sequence ends.
Whiplash (2014)
10. Parasite (2019)
In Bong Joon-ho’s Oscar-winning dark comedy thriller, the Kim family lives on the edge of poverty. They are suddenly thrown into a world of affluence when a family member gets a job at an affluent family. Moon-Gwang (Lee Jung-Eun) is a long-time housekeeper for the Kim family. The family comes up with a cunning plan to exploit her allergy to peaches. In the closing montage, they convince Mrs. Park (Cho Yeo-Jeong) that Moon-Gwang has tuberculosis.
Whiplash (2014)
Wondershare Filmora11 Express Better
Achieve More
Grow Together
Free Download Free Download Learn More

Summarize:
If you’re thinking about using Montage, check out movies and trailers in the Action and Comedy genres. Keep in mind that finding material that works well with montages is no accident. They are filled with some of the best soundtracks, action scenes, and comedy routines that can help guide your project through its rough spots. Montage can do amazing things for any movie, so it’s important to learn when and where it should be used.
Also read:
- New 2024 Approved Convert MP4 to 60 FPS GIF A Step-by-Step Guide
- If You Are Looking Forward to Make Attractive and Customized Slideshows, Lightroom Is One of the Best Options that You Can Consider for 2024
- New In 2024, 5 Ways to Make a Fake Facetime Call Video
- Updated Some Leading AI Tools to Replace Sky Backgrounds for 2024
- A Complete Guide to the Best Brand Story Videos |2023|
- New 2024 Approved How To Add Motion Blur On CapCut? (IPhone & Android)
- The Right Ways to Slow Down a Video on iPhone for 2024
- Updated M31 LUT (Teal and Orange LUT) Free Download
- New 12 Best Marketing Slideshow Templates for 2024
- New In 2024, How to Make Video Fade to Black in Movie Maker Easily
- Updated How to Add Green Screen in OBS for 2024
- New How to Put Emoji on Mac That Take Less Than 10 Mins for 2024
- Updated 2024 Approved The Most Efficient Ways to Manage Your Timeline
- New 10 Best Music Video Templates to Make Your Video Popular for 2024
- If the Phenomenon of Augmented Reality Fascinates You, Consider Entering Into the Gaming World with the Best AR Games You Will Ever Come Across
- Techniques You Never Heard of for Learning AI Marketing YouTube
- New How to Create Discord Emoji GIF for 2024
- Updated Step by Step to Cut Video in Adobe Premiere Pro for 2024
- A Guide to Use Distortion Effect in Premeiere Pro
- New 2024 Approved 2 Practical Ways to Combine Videos on TikTok
- Updated In 2024, Camtasia vs Final Cut Pro
- 2024 Approved Embrace Creativity in Your Media by Replacing Backgrounds. Learn to Replace the Sky in Lightroom Through the Steps and Details Discussed in This Article
- New Are You Looking for a Video Format Converter Free? We Will Introduce the 5 Best Online Converters and Also the 5 Best Video Format Converters for PC
- Updated 2024 Approved Reversing Time Lapse Videos on iPhone Using Top Applications
- New EasyHDR Review Is This a Good Choice to Create HDR
- Updated How to Use Filmora Slideshow Maker for Making Slideshow? What Is Slideshow Filmora? Know the Steps to Make Filmora Slideshow. What Are Steps to Make Filmora Slideshow Template?
- Updated Hard to Remove Black Background in After Effects, In 2024
- New 2024 Approved Finest Approach to Slow Down a Video CapCut All-in-One Video Editor
- In 2024, Top 15 Augmented Reality Games Like Pokémon GO To Play On Sony Xperia 10 V | Dr.fone
- How to Unlock Itel P55 PIN Code/Pattern Lock/Password
- 6 Solutions to Fix Error 505 in Google Play Store on Nokia XR21 | Dr.fone
- Unova Stone Pokémon Go Evolution List and How Catch Them For Nubia Red Magic 9 Pro+ | Dr.fone
- In 2024, Recommended Best Applications for Mirroring Your Nokia C300 Screen | Dr.fone
- 8 Solutions to Fix Find My Friends Location Not Available On Samsung Galaxy S21 FE 5G (2023) | Dr.fone
- Updated In 2024, Translate Videos with Subtitle Cat Your Essential Guide
- In 2024, The Ultimate Guide to Unlocking Your Apple iPhone 7 Plus on MetroPCS
- How To Pause Life360 Location Sharing For HTC U23 | Dr.fone
- Data Retrieval tool – restore lost data from Redmi K70E
- In 2024, 3 Effective Ways to Bypass Activation Lock from Apple iPhone SE (2022)
- In 2024, Can I use iTools gpx file to catch the rare Pokemon On Samsung Galaxy A24 | Dr.fone
- Updated New Essential Details of Making Perfect Talking Face
- How To Repair iOS System Issues of Apple iPhone SE? | Dr.fone
- Updated RTMP Streaming on Instagram A Comprehensive Tutorial for 2024
- The Ultimate Guide to Vivo S17e Pattern Lock Screen Everything You Need to Know
- Full Solutions to Fix Error Code 920 In Google Play on Oppo A79 5G | Dr.fone
- How to Spy on Text Messages from Computer & OnePlus Ace 2 | Dr.fone
- In 2024, How and Where to Find a Shiny Stone Pokémon For Samsung Galaxy S24? | Dr.fone
- How to Remove Apple iPhone 13 Activation Lock
- In 2024, Different Methods To Unlock Your Apple iPhone 6 Plus | Dr.fone
- In 2024, How to Use Google Assistant on Your Lock Screen Of Nokia C02 Phone
- Simple and Effective Ways to Change Your Country on YouTube App Of your Apple iPhone XR | Dr.fone
- In 2024, How to Unlock iCloud lock on your iPhone 14 Pro and iPad?
- In 2024, How to Bypass Activation Lock from iPhone 15 Pro or iPad?
- Unlocking an iCloud Locked iPad and Apple iPhone 14
- How to recover old music from your Nubia
- A Complete Guide To OEM Unlocking on Realme GT Neo 5
- Title: How to Make Stunning Glitch Effect in Photoshop, In 2024
- Author: Chloe
- Created at : 2024-04-24 07:08:12
- Updated at : 2024-04-25 07:08:12
- Link: https://ai-editing-video.techidaily.com/how-to-make-stunning-glitch-effect-in-photoshop-in-2024/
- License: This work is licensed under CC BY-NC-SA 4.0.


