:max_bytes(150000):strip_icc():format(webp)/GettyImages-917461864-7141ebd3ec944ce6a431b8d485cc9cdb.jpg)
How to Make Stunning Glitch Effect in Photoshop? Ultimate Guide for 2024

How to Make Stunning Glitch Effect in Photoshop? [Ultimate Guide]
Many of us are fascinated by glitch art. The aesthetic effect it adds to your content is unmatched. You can add color and class to your pictures with glitch picture effects. Someone who isn’t aware of the glitch effect is inspired by any technical mishap or digital error. The damage that the malfunctioning of a system causes is used as an art and an effect to beautify things.
You can add the glitch image effect to your photos easily. There are multiple cool templates available on the internet that could be used. You can also make your own stunning yet customized glitch effect Photoshop. If this has impressed you, then stay here because we will talk a lot about glitch photo editors.
In this article
01 Part 1. How Do You Do Photo Glitch Effect in Photoshop?
02 Part 2. 5 Awesome Glitch Effect Photoshop Actions.
Part 1. How Do You Do Photo Glitch Effect in Photoshop?
The jagged lines, the colorful pixels, frozen visuals, and also the distorted colors, everything perfectly blends to make a glitch effect. Usually, this is how all the glitch templates are, but if you get an opportunity to customize your image glitch effect and make your special effect, what will you do?
The best option to adopt in any such circumstances is Photoshop. With Photoshop, you can create a stunning and mind-blowing Photoshop VHS effect. If you want to learn about its steps, then continue reading.
Step 1: The process starts by importing the image to Photoshop on which you plan to add the photo glitch effect. Then you should always convert the image from colorful to black and white. This could be done quickly by going into the ‘Image’ menu from the menu bar. Next, go for the ‘Adjustments’ option and select ‘Desaturate.’

Step 2: Now duplicate the image by dragging it onto the New Layer icon in the Layers Panel. Then double click on the duplicated image. This will open a ‘Layer Style’ settings menu. Here, click on the icon for ‘R Channel’ and deselect it.

Step 3: Now, it’s time to add the first glitch element. For that, hold the ‘Shift’ key and move the image by using the left/right cursor keys on the keyboard. This will offset the image layer from the original.

Step 4: You can now select the ‘Mark’ tool from the left side. Make a rectangle anywhere on the image with the Mark tool and then switch back to the ‘Move’ tool. Then again, nudge the rectangular portion left or right to offset it. You can repeat this process multiple times on different areas of the image.

Step 5: At this point, make a New Layer and fill it with White. Now right-click on this white layer and select the option of ‘Convert to Smart Object.’

Step 6: Move to the menu bar at the top and go to the ‘Filter’ section. From there, select the option of ‘Filter Gallery.’ A new window will show up. Head to the ‘Sketch’ category, and there change the ‘Pattern Type’ to ‘Line.’ You can also play with the ‘Contrast’ and the ‘Size’ of the lines.

Step 7: Now, in the ‘Layers Panel,’ select the option of ‘Overlay’ from the dropdown menu so that the different layers can show through. You can adjust the visibility of the lines by adjusting the number on the scale.

Step 8: After setting everything for the glitch effect in your image, you can now add colors using the ‘Gradient Map.’ Or you can also import some graphic textures to Photoshop and add them to the image. Don’t forget to change the ‘Binding Mode’ to ‘Overlay.’ You can then play with the color and graphic settings.

Step 9: Once all the color adjustments have satisfied you, it’s time to add some text to your glitch image. For that, head to the ‘Text’ tool from the left menu and type in your text. Edit it as you did to your image so that you can make a cool glitch text effect Photoshop and with this, you are all done with making the most stunning glitch effect Photoshop.

Part 2. 5 Awesome Glitch Effect Photoshop Actions
With Photoshop, you can create your photo glitch effect as you prefer instead of using the available standard templates. What if you don’t have enough time to create the effect? Are you going to use the basic and standard templates?
If you are looking for some jaw-dropping glitch picture effects rather than using the basic effects, then this section of the article is perfect for you. We are going to talk about 5 fantastic glitch effects Photoshop action.
1. Distorted Glitch Photoshop Action
The first effect we will discuss is Distorted Glitch Photoshop Action. The effect is very easy to use. You can set it with just one click action. The effect allows you to do adjustment settings with very easy steps to edit it.
The effect has all the dark, distorted, and disturbance-related elements that make it an amazing effect to add glitch effect to image.

2. Geometric Glitch Photoshop Action
If glitch effect with lines is too mainstream for you, then this next effect will surely impress you. This effect is the Geometric Glitch Photoshop Action. You can edit this effect. All its colors, layers, and even elements are fully editable.
You can create a modern yet professional glitch image with this stunning effect. The effect lets you add shapes, abstract styles, and also glitch lines to make cool images.

3. Animated Glitch Photoshop Action
If you are looking for a glitch effect to add to animated content, then nothing is better than Animated Glitch Photoshop Action. The effect template is fully editable with 12 distinct color options. The animated effect has a very organized structure of layers, color coding, etc.
By using this effect, you can add a great vibe to your image. The template greatly shows the distortion, digital error, etc. You can play around with RGB to make it look crazy brilliant.

4. Futuristic Photoshop Action
The next effect in line to be discussed is Futuristic Photoshop Action. This effect has all the bright and neon colors. The effect could be added easily to your images regardless of the type of your content. Graphic designers and photographers use the Futuristic Effect to create stunning and professional glitch images.

5. Glitch Art Photoshop Action
The last effect template that we are going to shed light on is Glitch Art Photoshop Action. The effect is fully editable with 10 different abstract elements. The template has absolutely professional results. The effect delivers complete glitchy vibes.
The distortion, the abstract elements, the digital error, and everything else in effect represents all the glitchy vibes.

Final Words
This article is everything one person needs if they want to learn about glitch effect Photoshop. We have talked about creating a jaw-dropping glitch effect in Photoshop. The steps to create a stunning glitch effect have been mentioned above.
We then shared 5 incredible glitch effects that could be used in case you don’t want to create your own effect.
02 Part 2. 5 Awesome Glitch Effect Photoshop Actions.
Part 1. How Do You Do Photo Glitch Effect in Photoshop?
The jagged lines, the colorful pixels, frozen visuals, and also the distorted colors, everything perfectly blends to make a glitch effect. Usually, this is how all the glitch templates are, but if you get an opportunity to customize your image glitch effect and make your special effect, what will you do?
The best option to adopt in any such circumstances is Photoshop. With Photoshop, you can create a stunning and mind-blowing Photoshop VHS effect. If you want to learn about its steps, then continue reading.
Step 1: The process starts by importing the image to Photoshop on which you plan to add the photo glitch effect. Then you should always convert the image from colorful to black and white. This could be done quickly by going into the ‘Image’ menu from the menu bar. Next, go for the ‘Adjustments’ option and select ‘Desaturate.’

Step 2: Now duplicate the image by dragging it onto the New Layer icon in the Layers Panel. Then double click on the duplicated image. This will open a ‘Layer Style’ settings menu. Here, click on the icon for ‘R Channel’ and deselect it.

Step 3: Now, it’s time to add the first glitch element. For that, hold the ‘Shift’ key and move the image by using the left/right cursor keys on the keyboard. This will offset the image layer from the original.

Step 4: You can now select the ‘Mark’ tool from the left side. Make a rectangle anywhere on the image with the Mark tool and then switch back to the ‘Move’ tool. Then again, nudge the rectangular portion left or right to offset it. You can repeat this process multiple times on different areas of the image.

Step 5: At this point, make a New Layer and fill it with White. Now right-click on this white layer and select the option of ‘Convert to Smart Object.’

Step 6: Move to the menu bar at the top and go to the ‘Filter’ section. From there, select the option of ‘Filter Gallery.’ A new window will show up. Head to the ‘Sketch’ category, and there change the ‘Pattern Type’ to ‘Line.’ You can also play with the ‘Contrast’ and the ‘Size’ of the lines.

Step 7: Now, in the ‘Layers Panel,’ select the option of ‘Overlay’ from the dropdown menu so that the different layers can show through. You can adjust the visibility of the lines by adjusting the number on the scale.

Step 8: After setting everything for the glitch effect in your image, you can now add colors using the ‘Gradient Map.’ Or you can also import some graphic textures to Photoshop and add them to the image. Don’t forget to change the ‘Binding Mode’ to ‘Overlay.’ You can then play with the color and graphic settings.

Step 9: Once all the color adjustments have satisfied you, it’s time to add some text to your glitch image. For that, head to the ‘Text’ tool from the left menu and type in your text. Edit it as you did to your image so that you can make a cool glitch text effect Photoshop and with this, you are all done with making the most stunning glitch effect Photoshop.

Part 2. 5 Awesome Glitch Effect Photoshop Actions
With Photoshop, you can create your photo glitch effect as you prefer instead of using the available standard templates. What if you don’t have enough time to create the effect? Are you going to use the basic and standard templates?
If you are looking for some jaw-dropping glitch picture effects rather than using the basic effects, then this section of the article is perfect for you. We are going to talk about 5 fantastic glitch effects Photoshop action.
1. Distorted Glitch Photoshop Action
The first effect we will discuss is Distorted Glitch Photoshop Action. The effect is very easy to use. You can set it with just one click action. The effect allows you to do adjustment settings with very easy steps to edit it.
The effect has all the dark, distorted, and disturbance-related elements that make it an amazing effect to add glitch effect to image.

2. Geometric Glitch Photoshop Action
If glitch effect with lines is too mainstream for you, then this next effect will surely impress you. This effect is the Geometric Glitch Photoshop Action. You can edit this effect. All its colors, layers, and even elements are fully editable.
You can create a modern yet professional glitch image with this stunning effect. The effect lets you add shapes, abstract styles, and also glitch lines to make cool images.

3. Animated Glitch Photoshop Action
If you are looking for a glitch effect to add to animated content, then nothing is better than Animated Glitch Photoshop Action. The effect template is fully editable with 12 distinct color options. The animated effect has a very organized structure of layers, color coding, etc.
By using this effect, you can add a great vibe to your image. The template greatly shows the distortion, digital error, etc. You can play around with RGB to make it look crazy brilliant.

4. Futuristic Photoshop Action
The next effect in line to be discussed is Futuristic Photoshop Action. This effect has all the bright and neon colors. The effect could be added easily to your images regardless of the type of your content. Graphic designers and photographers use the Futuristic Effect to create stunning and professional glitch images.

5. Glitch Art Photoshop Action
The last effect template that we are going to shed light on is Glitch Art Photoshop Action. The effect is fully editable with 10 different abstract elements. The template has absolutely professional results. The effect delivers complete glitchy vibes.
The distortion, the abstract elements, the digital error, and everything else in effect represents all the glitchy vibes.

Final Words
This article is everything one person needs if they want to learn about glitch effect Photoshop. We have talked about creating a jaw-dropping glitch effect in Photoshop. The steps to create a stunning glitch effect have been mentioned above.
We then shared 5 incredible glitch effects that could be used in case you don’t want to create your own effect.
02 Part 2. 5 Awesome Glitch Effect Photoshop Actions.
Part 1. How Do You Do Photo Glitch Effect in Photoshop?
The jagged lines, the colorful pixels, frozen visuals, and also the distorted colors, everything perfectly blends to make a glitch effect. Usually, this is how all the glitch templates are, but if you get an opportunity to customize your image glitch effect and make your special effect, what will you do?
The best option to adopt in any such circumstances is Photoshop. With Photoshop, you can create a stunning and mind-blowing Photoshop VHS effect. If you want to learn about its steps, then continue reading.
Step 1: The process starts by importing the image to Photoshop on which you plan to add the photo glitch effect. Then you should always convert the image from colorful to black and white. This could be done quickly by going into the ‘Image’ menu from the menu bar. Next, go for the ‘Adjustments’ option and select ‘Desaturate.’

Step 2: Now duplicate the image by dragging it onto the New Layer icon in the Layers Panel. Then double click on the duplicated image. This will open a ‘Layer Style’ settings menu. Here, click on the icon for ‘R Channel’ and deselect it.

Step 3: Now, it’s time to add the first glitch element. For that, hold the ‘Shift’ key and move the image by using the left/right cursor keys on the keyboard. This will offset the image layer from the original.

Step 4: You can now select the ‘Mark’ tool from the left side. Make a rectangle anywhere on the image with the Mark tool and then switch back to the ‘Move’ tool. Then again, nudge the rectangular portion left or right to offset it. You can repeat this process multiple times on different areas of the image.

Step 5: At this point, make a New Layer and fill it with White. Now right-click on this white layer and select the option of ‘Convert to Smart Object.’

Step 6: Move to the menu bar at the top and go to the ‘Filter’ section. From there, select the option of ‘Filter Gallery.’ A new window will show up. Head to the ‘Sketch’ category, and there change the ‘Pattern Type’ to ‘Line.’ You can also play with the ‘Contrast’ and the ‘Size’ of the lines.

Step 7: Now, in the ‘Layers Panel,’ select the option of ‘Overlay’ from the dropdown menu so that the different layers can show through. You can adjust the visibility of the lines by adjusting the number on the scale.

Step 8: After setting everything for the glitch effect in your image, you can now add colors using the ‘Gradient Map.’ Or you can also import some graphic textures to Photoshop and add them to the image. Don’t forget to change the ‘Binding Mode’ to ‘Overlay.’ You can then play with the color and graphic settings.

Step 9: Once all the color adjustments have satisfied you, it’s time to add some text to your glitch image. For that, head to the ‘Text’ tool from the left menu and type in your text. Edit it as you did to your image so that you can make a cool glitch text effect Photoshop and with this, you are all done with making the most stunning glitch effect Photoshop.

Part 2. 5 Awesome Glitch Effect Photoshop Actions
With Photoshop, you can create your photo glitch effect as you prefer instead of using the available standard templates. What if you don’t have enough time to create the effect? Are you going to use the basic and standard templates?
If you are looking for some jaw-dropping glitch picture effects rather than using the basic effects, then this section of the article is perfect for you. We are going to talk about 5 fantastic glitch effects Photoshop action.
1. Distorted Glitch Photoshop Action
The first effect we will discuss is Distorted Glitch Photoshop Action. The effect is very easy to use. You can set it with just one click action. The effect allows you to do adjustment settings with very easy steps to edit it.
The effect has all the dark, distorted, and disturbance-related elements that make it an amazing effect to add glitch effect to image.

2. Geometric Glitch Photoshop Action
If glitch effect with lines is too mainstream for you, then this next effect will surely impress you. This effect is the Geometric Glitch Photoshop Action. You can edit this effect. All its colors, layers, and even elements are fully editable.
You can create a modern yet professional glitch image with this stunning effect. The effect lets you add shapes, abstract styles, and also glitch lines to make cool images.

3. Animated Glitch Photoshop Action
If you are looking for a glitch effect to add to animated content, then nothing is better than Animated Glitch Photoshop Action. The effect template is fully editable with 12 distinct color options. The animated effect has a very organized structure of layers, color coding, etc.
By using this effect, you can add a great vibe to your image. The template greatly shows the distortion, digital error, etc. You can play around with RGB to make it look crazy brilliant.

4. Futuristic Photoshop Action
The next effect in line to be discussed is Futuristic Photoshop Action. This effect has all the bright and neon colors. The effect could be added easily to your images regardless of the type of your content. Graphic designers and photographers use the Futuristic Effect to create stunning and professional glitch images.

5. Glitch Art Photoshop Action
The last effect template that we are going to shed light on is Glitch Art Photoshop Action. The effect is fully editable with 10 different abstract elements. The template has absolutely professional results. The effect delivers complete glitchy vibes.
The distortion, the abstract elements, the digital error, and everything else in effect represents all the glitchy vibes.

Final Words
This article is everything one person needs if they want to learn about glitch effect Photoshop. We have talked about creating a jaw-dropping glitch effect in Photoshop. The steps to create a stunning glitch effect have been mentioned above.
We then shared 5 incredible glitch effects that could be used in case you don’t want to create your own effect.
02 Part 2. 5 Awesome Glitch Effect Photoshop Actions.
Part 1. How Do You Do Photo Glitch Effect in Photoshop?
The jagged lines, the colorful pixels, frozen visuals, and also the distorted colors, everything perfectly blends to make a glitch effect. Usually, this is how all the glitch templates are, but if you get an opportunity to customize your image glitch effect and make your special effect, what will you do?
The best option to adopt in any such circumstances is Photoshop. With Photoshop, you can create a stunning and mind-blowing Photoshop VHS effect. If you want to learn about its steps, then continue reading.
Step 1: The process starts by importing the image to Photoshop on which you plan to add the photo glitch effect. Then you should always convert the image from colorful to black and white. This could be done quickly by going into the ‘Image’ menu from the menu bar. Next, go for the ‘Adjustments’ option and select ‘Desaturate.’

Step 2: Now duplicate the image by dragging it onto the New Layer icon in the Layers Panel. Then double click on the duplicated image. This will open a ‘Layer Style’ settings menu. Here, click on the icon for ‘R Channel’ and deselect it.

Step 3: Now, it’s time to add the first glitch element. For that, hold the ‘Shift’ key and move the image by using the left/right cursor keys on the keyboard. This will offset the image layer from the original.

Step 4: You can now select the ‘Mark’ tool from the left side. Make a rectangle anywhere on the image with the Mark tool and then switch back to the ‘Move’ tool. Then again, nudge the rectangular portion left or right to offset it. You can repeat this process multiple times on different areas of the image.

Step 5: At this point, make a New Layer and fill it with White. Now right-click on this white layer and select the option of ‘Convert to Smart Object.’

Step 6: Move to the menu bar at the top and go to the ‘Filter’ section. From there, select the option of ‘Filter Gallery.’ A new window will show up. Head to the ‘Sketch’ category, and there change the ‘Pattern Type’ to ‘Line.’ You can also play with the ‘Contrast’ and the ‘Size’ of the lines.

Step 7: Now, in the ‘Layers Panel,’ select the option of ‘Overlay’ from the dropdown menu so that the different layers can show through. You can adjust the visibility of the lines by adjusting the number on the scale.

Step 8: After setting everything for the glitch effect in your image, you can now add colors using the ‘Gradient Map.’ Or you can also import some graphic textures to Photoshop and add them to the image. Don’t forget to change the ‘Binding Mode’ to ‘Overlay.’ You can then play with the color and graphic settings.

Step 9: Once all the color adjustments have satisfied you, it’s time to add some text to your glitch image. For that, head to the ‘Text’ tool from the left menu and type in your text. Edit it as you did to your image so that you can make a cool glitch text effect Photoshop and with this, you are all done with making the most stunning glitch effect Photoshop.

Part 2. 5 Awesome Glitch Effect Photoshop Actions
With Photoshop, you can create your photo glitch effect as you prefer instead of using the available standard templates. What if you don’t have enough time to create the effect? Are you going to use the basic and standard templates?
If you are looking for some jaw-dropping glitch picture effects rather than using the basic effects, then this section of the article is perfect for you. We are going to talk about 5 fantastic glitch effects Photoshop action.
1. Distorted Glitch Photoshop Action
The first effect we will discuss is Distorted Glitch Photoshop Action. The effect is very easy to use. You can set it with just one click action. The effect allows you to do adjustment settings with very easy steps to edit it.
The effect has all the dark, distorted, and disturbance-related elements that make it an amazing effect to add glitch effect to image.

2. Geometric Glitch Photoshop Action
If glitch effect with lines is too mainstream for you, then this next effect will surely impress you. This effect is the Geometric Glitch Photoshop Action. You can edit this effect. All its colors, layers, and even elements are fully editable.
You can create a modern yet professional glitch image with this stunning effect. The effect lets you add shapes, abstract styles, and also glitch lines to make cool images.

3. Animated Glitch Photoshop Action
If you are looking for a glitch effect to add to animated content, then nothing is better than Animated Glitch Photoshop Action. The effect template is fully editable with 12 distinct color options. The animated effect has a very organized structure of layers, color coding, etc.
By using this effect, you can add a great vibe to your image. The template greatly shows the distortion, digital error, etc. You can play around with RGB to make it look crazy brilliant.

4. Futuristic Photoshop Action
The next effect in line to be discussed is Futuristic Photoshop Action. This effect has all the bright and neon colors. The effect could be added easily to your images regardless of the type of your content. Graphic designers and photographers use the Futuristic Effect to create stunning and professional glitch images.

5. Glitch Art Photoshop Action
The last effect template that we are going to shed light on is Glitch Art Photoshop Action. The effect is fully editable with 10 different abstract elements. The template has absolutely professional results. The effect delivers complete glitchy vibes.
The distortion, the abstract elements, the digital error, and everything else in effect represents all the glitchy vibes.

Final Words
This article is everything one person needs if they want to learn about glitch effect Photoshop. We have talked about creating a jaw-dropping glitch effect in Photoshop. The steps to create a stunning glitch effect have been mentioned above.
We then shared 5 incredible glitch effects that could be used in case you don’t want to create your own effect.
The Quick and Simple Way to Mirror Video in Premiere Pro
Video editing is a crucial part of filmmaking, and it can make or break the outcome of a project. Adobe Premiere Pro is a widely used video editing software that provides a vast range of tools for professional video editing. One of the features that Premiere Pro offers is the ability to mirror video clips, which can add an interesting visual element to your footage.
In this article, we will look at how to mirror a video clip in Premiere Pro in a few simple steps. Whether you’re a seasoned video editor or just starting, this guide will help you achieve the desired effect in your videos. From basic mirroring to advanced techniques, we will cover everything you need to know to create a symmetrical and visually appealing look in your projects.
What Is To “Mirror” a Video?
Mirroring a video in Adobe Premiere Pro refers to reflecting the footage along either the horizontal or vertical axis. This results in the composition being flipped and reversed, creating a reflection-like effect. Flipping a video is distinct from rotating it, as the orientation of the elements is changed, but their position remains the same.
Flipping can serve both creative and practical purposes. On the one hand, it can add a unique and visually interesting element to a project, creating a form of self-reflection or self-analysis. On the other hand, flipping can also be used to correct videos accidentally captured upside down. For example, flipping a video recorded with a selfie camera along the horizontal axis will correctly display the right side up.
It is important to note the distinction between flipping and rotating a video. A flipped video will look like a mirror image, whereas a video rotated 180 degrees will not. By understanding the differences between these techniques, you can effectively use mirroring to achieve the desired result in your projects.
How To Mirror a Video in Adobe Premiere Pro
Mirroring a video in Adobe Premiere Pro is a quick and simple process that can add a unique and visually appealing touch to your projects. Whether you want to create a symmetrical look or experiment with a new visual style, this guide will mirror a video clip in Premiere Pro. From basic to advanced techniques, you’ll be able to create stunning and reflective videos in no time. So, let’s get started!
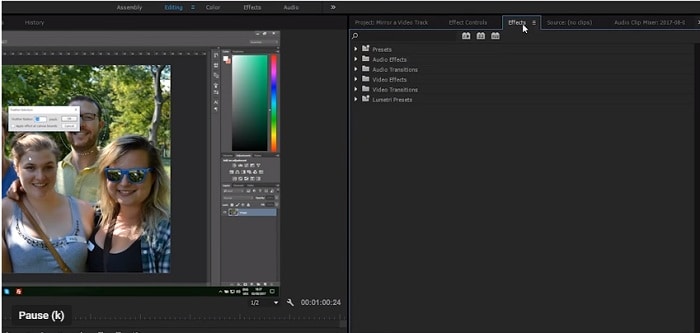
Step1 Choose the “Effects“ option from the menu.
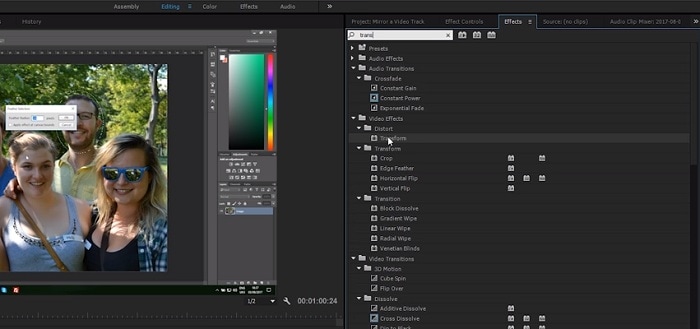
Step2 Look for the “Transform“ tab.
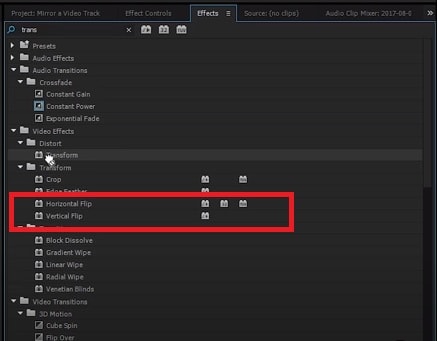
Step3 Pick the “Horizontal Flip“ or “Vertical Flip“ from the drop-down list.
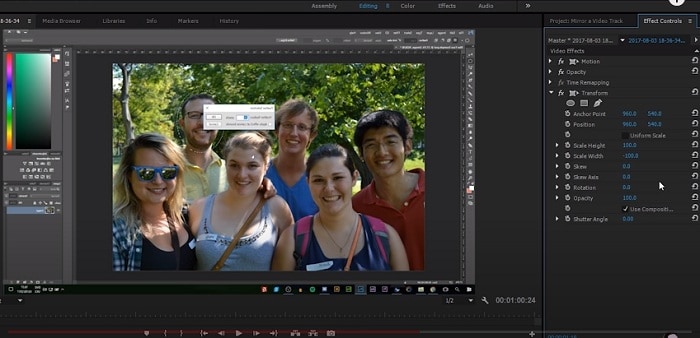
Step4 Drag the desired flip onto the selected clip, which will immediately reverse the image displayed on the Program Monitor.
How To Create Mirror Video Effect in Premiere Pro
Creating a mirror video effect in Adobe Premiere Pro opens up a world of artistic possibilities for your projects. With the right techniques, you can create visually appealing and symmetrical videos that stand out from the crowd. This guide will show you how to master the art of mirror video effects in Premiere Pro, from the basics to more advanced techniques. Get ready to explore the creative side of video editing and elevate your projects to the next level.
Step1 Access the “Effects“ menu and select “Video Effects.”
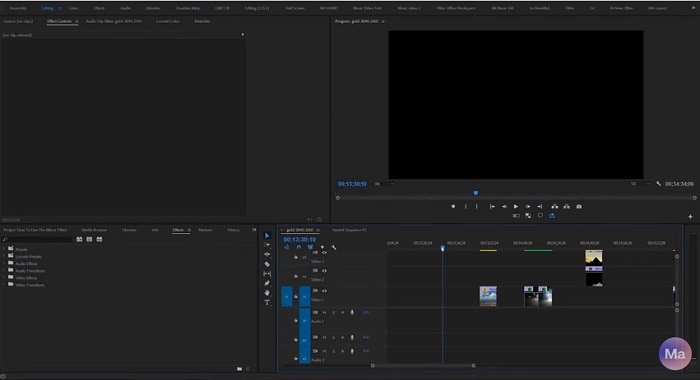
Step2 Pick “Distort“, then the “Mirror“.
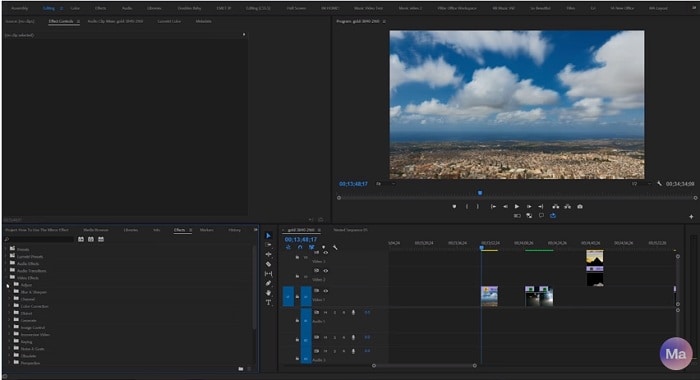
Step3 Apply the Mirror effect to your clip.
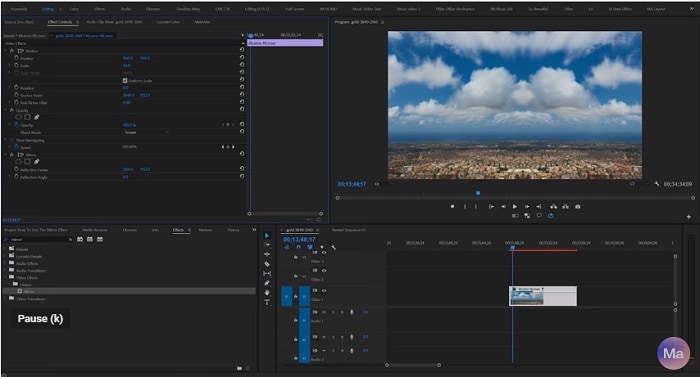
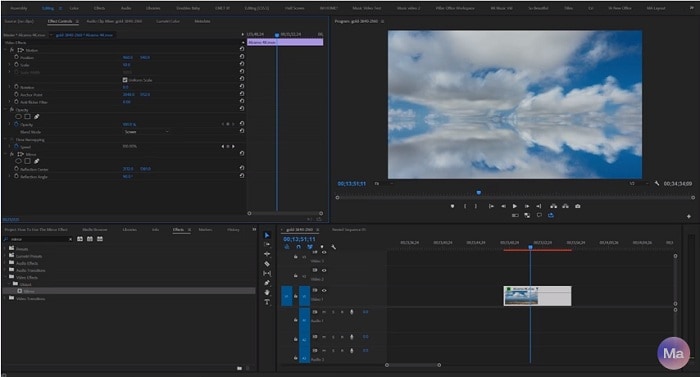
Step4 Adjust “Reflection Center“ for side-by-side effect or “Reflection Angle“ for up-and-down effect in the Effect Controls panel.
[Bonus] Wondershare Filmora – A Great Alternative to Premiere Pro Mirror Tool
Wondershare Filmora is a great alternative to Adobe Premiere Pro for video editing. Not only does it offer an intuitive interface for both beginners and professionals, but it also offers a range of video editing tools and features. One of those features is its ability to easily mirror a video. With Filmora, you can flip your videos vertically or horizontally with just a few clicks.
Free Download For Win 7 or later(64-bit)
Free Download For macOS 10.14 or later

Filmora also offers a variety of creative video effects and templates, making it easy to add a unique touch to your projects. In addition, its built-in audio editing tools allow you to create professional-sounding soundtracks for your videos. Filmora’s easy-to-use keyframe animation feature gives you precise control over the animation of your elements, allowing you to add movement and bring your videos to life.
Furthermore, Filmora’s advanced color correction tools help you achieve the perfect color balance in your videos. Whether you’re a beginner or a professional, Wondershare Filmora is a great option for anyone looking for a powerful and easy-to-use video editor.
How To Mirror a Video Clip With Wondershare Filmora
Mirroring a video clip is a simple process with Wondershare Filmora. This video editing software provides an intuitive and user-friendly interface, making it easy to achieve the desired result.
To mirror your video in Filmora, you can follow a few straightforward steps. Whether you want to flip your video horizontally or vertically, Filmora’s mirroring tool will help you achieve the perfect reflection with just a few clicks. So, if you’re looking for an alternative to Adobe Premiere Pro, Wondershare Filmora is a great option to consider for your video editing needs.
Step1 Within the “Flip“ section, there are four options available. To flip the clip from left to right, select the “Flip Horizontal“ icon, or if you want to turn the clip upside down, choose the “Flip “ option.
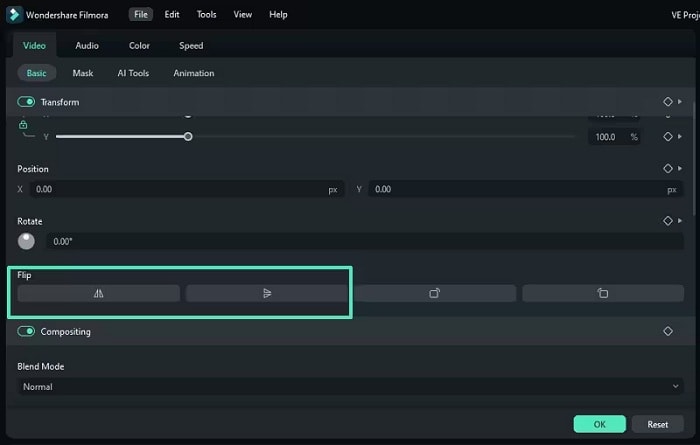
Step2 You can rotate the clip by clicking either the “Clockwise“ or “Counterclockwise“ icons under the Rotate section.

Step3 If you want to specify the rotation angle, you can either enter a value in the box under the Rotate tab or manipulate the dot in the circle to achieve the desired angle.

How To Create Mirror Video Effect in Wondershare Filmora
Wondershare Filmora is an excellent video editing software that offers a simple solution for creating a mirror video effect. Its intuitive interface and powerful features make it possible for amateur and professional video editors to achieve stunning results. Filmora provides users with an array of tools to create a mirror effect on their video clip effortlessly.
Whether you want to create a reversed image, flip the orientation vertically, or rotate the clip in a specific direction, Filmora has got you covered. Let’s see how to create a mirror video effect with Wondershare Filmora.
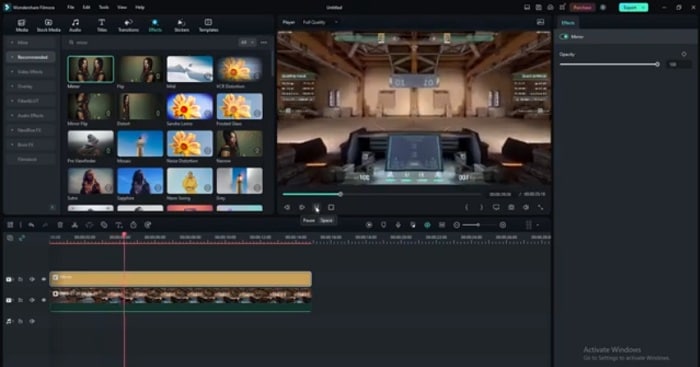
Step1 Add the video clip to a video track on the timeline
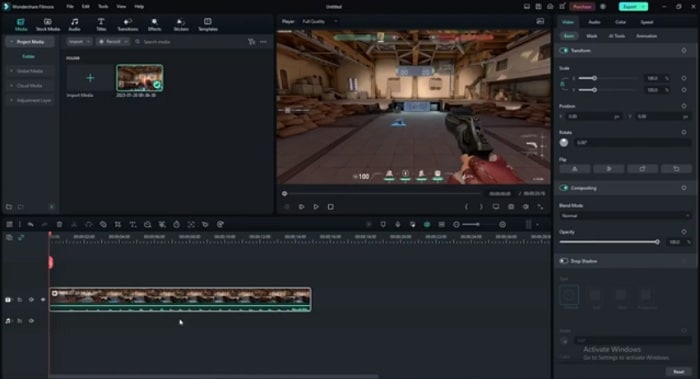
Step2 Click the “Filters“ icon and choose the “Distortion“ category
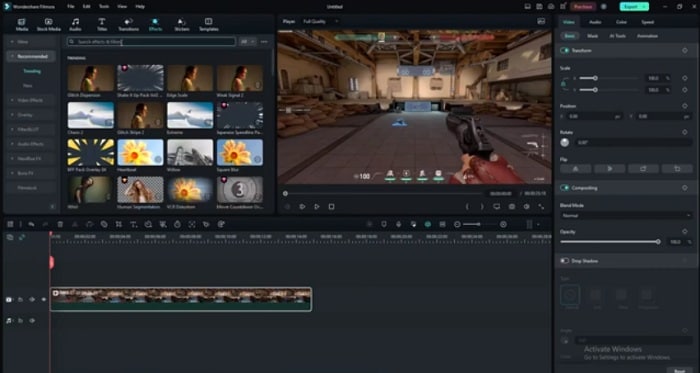
Step3 Locate the “Mirror“ effect, drag and drop it to the filter track, and adjust its duration to match the video clip
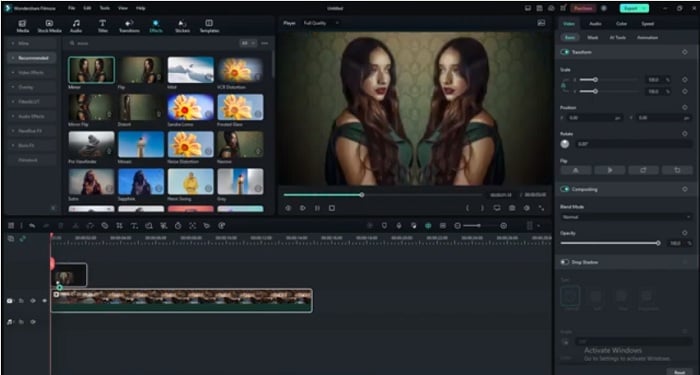
Step4 Preview the results in the Preview Window before exporting the video from Filmora.
Conclusion
Mirroring a video can add an interesting and unique visual effect to your videos. Adobe Premiere Pro and Wondershare Filmora provide easy-to-use tools to achieve this effect. While Premiere Pro offers more advanced features and customization options, Filmora provides a simpler and more user-friendly interface for those who want to achieve the same results without the hassle. Whichever option you choose, you can create stunning mirror videos in no time.
Free Download For macOS 10.14 or later

Filmora also offers a variety of creative video effects and templates, making it easy to add a unique touch to your projects. In addition, its built-in audio editing tools allow you to create professional-sounding soundtracks for your videos. Filmora’s easy-to-use keyframe animation feature gives you precise control over the animation of your elements, allowing you to add movement and bring your videos to life.
Furthermore, Filmora’s advanced color correction tools help you achieve the perfect color balance in your videos. Whether you’re a beginner or a professional, Wondershare Filmora is a great option for anyone looking for a powerful and easy-to-use video editor.
How To Mirror a Video Clip With Wondershare Filmora
Mirroring a video clip is a simple process with Wondershare Filmora. This video editing software provides an intuitive and user-friendly interface, making it easy to achieve the desired result.
To mirror your video in Filmora, you can follow a few straightforward steps. Whether you want to flip your video horizontally or vertically, Filmora’s mirroring tool will help you achieve the perfect reflection with just a few clicks. So, if you’re looking for an alternative to Adobe Premiere Pro, Wondershare Filmora is a great option to consider for your video editing needs.
Step1 Within the “Flip“ section, there are four options available. To flip the clip from left to right, select the “Flip Horizontal“ icon, or if you want to turn the clip upside down, choose the “Flip “ option.

Step2 You can rotate the clip by clicking either the “Clockwise“ or “Counterclockwise“ icons under the Rotate section.

Step3 If you want to specify the rotation angle, you can either enter a value in the box under the Rotate tab or manipulate the dot in the circle to achieve the desired angle.

How To Create Mirror Video Effect in Wondershare Filmora
Wondershare Filmora is an excellent video editing software that offers a simple solution for creating a mirror video effect. Its intuitive interface and powerful features make it possible for amateur and professional video editors to achieve stunning results. Filmora provides users with an array of tools to create a mirror effect on their video clip effortlessly.
Whether you want to create a reversed image, flip the orientation vertically, or rotate the clip in a specific direction, Filmora has got you covered. Let’s see how to create a mirror video effect with Wondershare Filmora.
Step1 Add the video clip to a video track on the timeline

Step2 Click the “Filters“ icon and choose the “Distortion“ category

Step3 Locate the “Mirror“ effect, drag and drop it to the filter track, and adjust its duration to match the video clip

Step4 Preview the results in the Preview Window before exporting the video from Filmora.

Conclusion
Mirroring a video can add an interesting and unique visual effect to your videos. Adobe Premiere Pro and Wondershare Filmora provide easy-to-use tools to achieve this effect. While Premiere Pro offers more advanced features and customization options, Filmora provides a simpler and more user-friendly interface for those who want to achieve the same results without the hassle. Whichever option you choose, you can create stunning mirror videos in no time.
Top Tips for Camtasia Freeze-Frame
Best Tips of Camtasia Freeze Frame
An easy yet powerful editor
Numerous effects to choose from
Detailed tutorials provided by the official channel
A freeze-frame is a technique whereby editors can suddenly halt motion in a film to make it look like a photograph. Then the still shot in the movie is usually used to create suspense or add emphasis to a scene. When freeze-frame gets added at the film’s end, it leaves the viewer guessing what will happen next.

Freezing or extending a frame will allow users to pace their video better. More importantly, freeze-frame applies on a per track basis, which helps buy users more time for a voiceover or an annotation. This article will teach you how to freeze-frame in Camtasia perfectly.
In this article
01 [How to Do Freeze-frame or Extended Frame in Camtasia?](#Part 1)
02 [What’s the Best Freeze-frame Video Editing Effect in Camtasia?](#Part 2)
03 [Best 5 Alternatives to Freeze-frame](#Part 3)
Part 1 How to Do Freeze-frame or Extended Frame in Camtasia?
If you are looking to bring in more creativity to your video clips by doing freeze-frame in Camtasia or extend frame, here is a step-by-step guide:
Step 1: Select the Video Part and Enter Duration
You have to move the Playhead to the frame if you want to extend. Then right-click on the track you wish to extend to choose the Extend Frame option or press shift+E.
For the keyboard shortcut to work, select the track first.
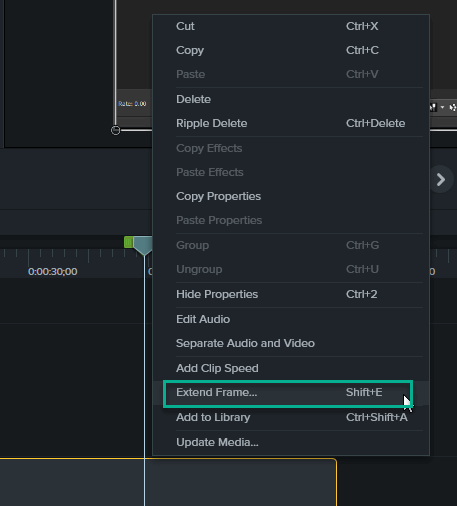
Now, enter the desired duration in seconds.
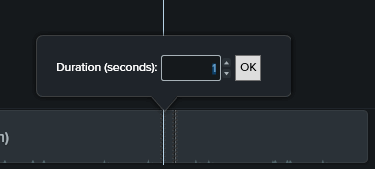
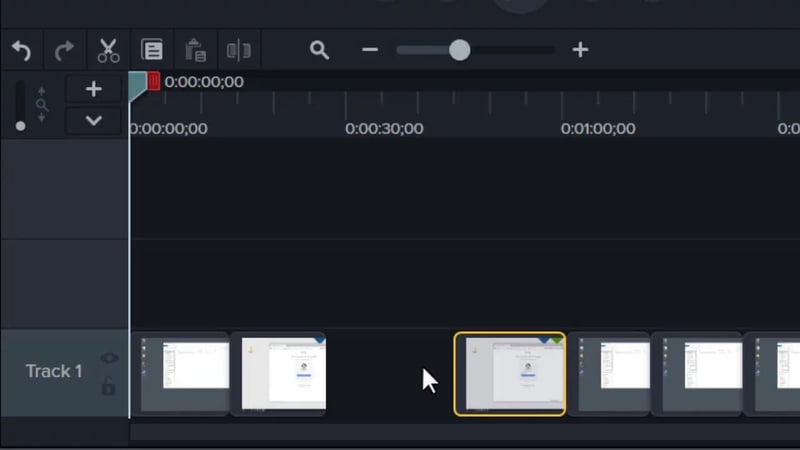
This will, in turn, create a stitched clip, provided that the auto-stitch in preferences hasn’t been disabled.
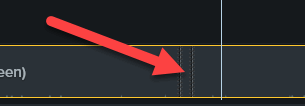
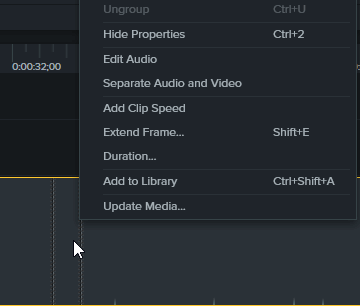
In addition, if the auto-stitch has been disabled, the clip will be split into three, as shown below, with the middle clip containing the extended frame.

Step 2: Change the Duration
To change the freeze duration in Camtasia freeze frame, right-click on the still portion of the clip and choose the Duration option. However, this will work with both split segments and stitched segments.
Part 2 What’s the Best Freeze-frame Video Editing Effect in Camtasia?
The freeze-frame effect in Camtasia is an excellent feature with a unique, elegant glitch and warp design. This well-organized and straightforward template is perfect for any event and features a full HD version and different freeze time effects. It is easy to use and customize, render your new awesome video, and drop media.
Here is the best Camtasia freeze-frame video editing effect of 2021, which is how to extend the frame and customize the amount of time in Camtasia Studio:
Step 1: Upload the Video
Download the Camtasia software, install and open it on your PC. Then drag and drop the video that must be freeze-frame on the timeline.
Step 2: Select Video Portion and Duration
Play the click on the timeline and when it gets to the position, you want to freeze-frame, pause the video and left-click on the Playhead to select extend the frame.
Now, select the desired duration you want to extend the freeze-frame
Step 3: Extend Frame
Next is to go back to the timeline and left-click on the Playhead to select extend frame, then, click on split tool. After that, drag the extended frame to the upper new layer.
Step 4: Add Clip Speed
Right-click on the extended frame and apply “add clip speed” to select the amount of time required.
Step 5: Export and Save
Finally, reposition it back to the main track and play your video. Then, when you feel satisfied with the result, export and save it on your device.
For a more detailed, interactive explanation and understanding, watch the video
https://m.youtube.com/watch?v=j4zHxtflMsM
Part 3 Best 5 Alternatives to Freeze-frame
Here are the top five (5) alternatives to Camtasia freeze frames. We have mentioned their pros and cons for better understanding.
01**Wondershare Filmora Video Editor **
For Win 7 or later (64-bit)
For macOS 10.12 or later
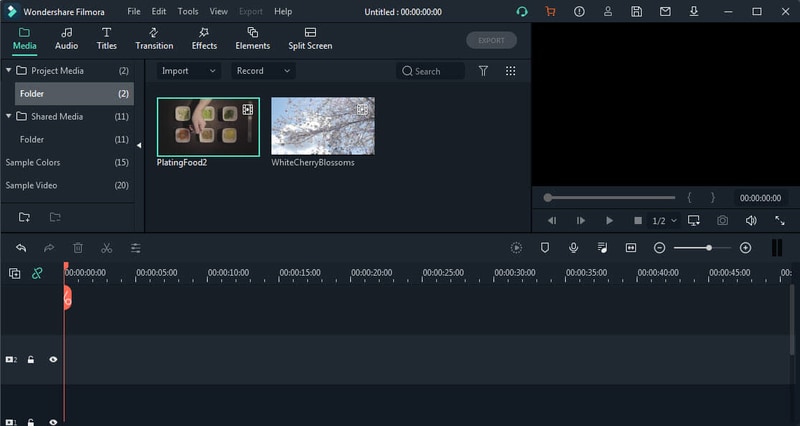
Filmora is our first alternative for freeze frames in Camtasia. It is an easy-to-use video editing software with excellent tools and an outline of creative video effects. Being the best Mac video editor, it is safe to say you can directly make your freeze-frame effect from scratch.
Filmora is free to download, supports Mac and Windows devices, and has a practical freeze-frame effect function.
Pros:
● Ease of use
● No payment until required
● The full-featured video editing tool
● Tons of effects are available
Cons:
● Some effects are not free.
02Kinemaster
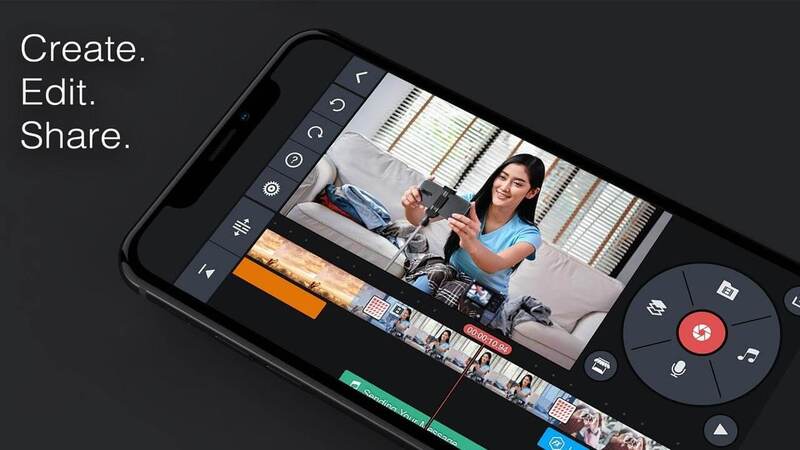
This is a free video editing application that edits your smartphone with much more fun and accessibility. It is equipped with top-notch editing tools and features and supports iOS and Android devices. Kinemaster is also a powerful application you can get creative with and makes it the top 5 alternatives to Camtasia freeze frame.
Pros:
● Easy-to-use editing tools.
● User-friendly interface.
Cons:
● There is a watermark at the end of the video
● Limited video format support.
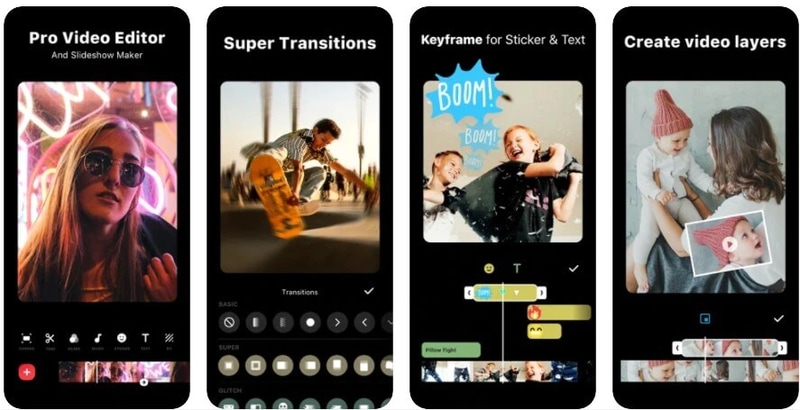
03InShot
This is a free iOS and Android video editing application and a multi-featured application that assits you to get creative and edit videos with limitless features and the freeze-frame effect inclusive of its element.
Pros:
● Easy to use
● A wide range of quick, accessible features and editing tools to use.
Cons:
● Purchase needed to access the top features.
● Hardly intuitive.
04Videoshop video editor.
This is an effortless video editing application that is specifically for iOS devices. In addition, it comes furnished with remarkable video editing tools and stunning features to transform your video. This freeze-frame Camtasia alternative app is easy to use and gives your videos a creative shine.
Pros
● It is straightforward to use
● It has a detailed UI design
Cons:
● It has some glitches
● It has limited resolution support.
● The CIT can support a large amount of content.

05iMovie
iMovie application is popularly known to create and edit videos into a movie-like shine. However, the application is accessible for iOS video editing software equipped with the freeze-frame effect. iMovie is stocked with a bonus of powerful features to make your pop and stand out amongst others.
Pros:
● it has a user-friendly interface
● Allow users to share videos directly after editing
● It is straightforward and intuitive to use without guidelines
Cons:
● It supports a limited video format
● Video edits take up lots of phone storage.
● It crashes if video content is significant.

● Ending Thoughts →
● This article guided using the Camtasia freeze-frame and explained extending the freeze-frame features.
● The report also included the top 5 alternatives to freeze-frame Camtasia and rated Filmora as the number one due to its many latest effects in the upgraded version.
A freeze-frame is a technique whereby editors can suddenly halt motion in a film to make it look like a photograph. Then the still shot in the movie is usually used to create suspense or add emphasis to a scene. When freeze-frame gets added at the film’s end, it leaves the viewer guessing what will happen next.

Freezing or extending a frame will allow users to pace their video better. More importantly, freeze-frame applies on a per track basis, which helps buy users more time for a voiceover or an annotation. This article will teach you how to freeze-frame in Camtasia perfectly.
In this article
01 [How to Do Freeze-frame or Extended Frame in Camtasia?](#Part 1)
02 [What’s the Best Freeze-frame Video Editing Effect in Camtasia?](#Part 2)
03 [Best 5 Alternatives to Freeze-frame](#Part 3)
Part 1 How to Do Freeze-frame or Extended Frame in Camtasia?
If you are looking to bring in more creativity to your video clips by doing freeze-frame in Camtasia or extend frame, here is a step-by-step guide:
Step 1: Select the Video Part and Enter Duration
You have to move the Playhead to the frame if you want to extend. Then right-click on the track you wish to extend to choose the Extend Frame option or press shift+E.
For the keyboard shortcut to work, select the track first.

Now, enter the desired duration in seconds.

This will, in turn, create a stitched clip, provided that the auto-stitch in preferences hasn’t been disabled.

In addition, if the auto-stitch has been disabled, the clip will be split into three, as shown below, with the middle clip containing the extended frame.

Step 2: Change the Duration
To change the freeze duration in Camtasia freeze frame, right-click on the still portion of the clip and choose the Duration option. However, this will work with both split segments and stitched segments.

Part 2 What’s the Best Freeze-frame Video Editing Effect in Camtasia?
The freeze-frame effect in Camtasia is an excellent feature with a unique, elegant glitch and warp design. This well-organized and straightforward template is perfect for any event and features a full HD version and different freeze time effects. It is easy to use and customize, render your new awesome video, and drop media.
Here is the best Camtasia freeze-frame video editing effect of 2021, which is how to extend the frame and customize the amount of time in Camtasia Studio:

Step 1: Upload the Video
Download the Camtasia software, install and open it on your PC. Then drag and drop the video that must be freeze-frame on the timeline.
Step 2: Select Video Portion and Duration
Play the click on the timeline and when it gets to the position, you want to freeze-frame, pause the video and left-click on the Playhead to select extend the frame.
Now, select the desired duration you want to extend the freeze-frame
Step 3: Extend Frame
Next is to go back to the timeline and left-click on the Playhead to select extend frame, then, click on split tool. After that, drag the extended frame to the upper new layer.
Step 4: Add Clip Speed
Right-click on the extended frame and apply “add clip speed” to select the amount of time required.
Step 5: Export and Save
Finally, reposition it back to the main track and play your video. Then, when you feel satisfied with the result, export and save it on your device.
For a more detailed, interactive explanation and understanding, watch the video
https://m.youtube.com/watch?v=j4zHxtflMsM
Part 3 Best 5 Alternatives to Freeze-frame
Here are the top five (5) alternatives to Camtasia freeze frames. We have mentioned their pros and cons for better understanding.
01**Wondershare Filmora Video Editor **
For Win 7 or later (64-bit)
For macOS 10.12 or later
Filmora is our first alternative for freeze frames in Camtasia. It is an easy-to-use video editing software with excellent tools and an outline of creative video effects. Being the best Mac video editor, it is safe to say you can directly make your freeze-frame effect from scratch.
Filmora is free to download, supports Mac and Windows devices, and has a practical freeze-frame effect function.
Pros:
● Ease of use
● No payment until required
● The full-featured video editing tool
● Tons of effects are available
Cons:
● Some effects are not free.

02Kinemaster
This is a free video editing application that edits your smartphone with much more fun and accessibility. It is equipped with top-notch editing tools and features and supports iOS and Android devices. Kinemaster is also a powerful application you can get creative with and makes it the top 5 alternatives to Camtasia freeze frame.
Pros:
● Easy-to-use editing tools.
● User-friendly interface.
Cons:
● There is a watermark at the end of the video
● Limited video format support.

03InShot
This is a free iOS and Android video editing application and a multi-featured application that assits you to get creative and edit videos with limitless features and the freeze-frame effect inclusive of its element.
Pros:
● Easy to use
● A wide range of quick, accessible features and editing tools to use.
Cons:
● Purchase needed to access the top features.
● Hardly intuitive.

04Videoshop video editor.
This is an effortless video editing application that is specifically for iOS devices. In addition, it comes furnished with remarkable video editing tools and stunning features to transform your video. This freeze-frame Camtasia alternative app is easy to use and gives your videos a creative shine.
Pros
● It is straightforward to use
● It has a detailed UI design
Cons:
● It has some glitches
● It has limited resolution support.
● The CIT can support a large amount of content.

05iMovie
iMovie application is popularly known to create and edit videos into a movie-like shine. However, the application is accessible for iOS video editing software equipped with the freeze-frame effect. iMovie is stocked with a bonus of powerful features to make your pop and stand out amongst others.
Pros:
● it has a user-friendly interface
● Allow users to share videos directly after editing
● It is straightforward and intuitive to use without guidelines
Cons:
● It supports a limited video format
● Video edits take up lots of phone storage.
● It crashes if video content is significant.

● Ending Thoughts →
● This article guided using the Camtasia freeze-frame and explained extending the freeze-frame features.
● The report also included the top 5 alternatives to freeze-frame Camtasia and rated Filmora as the number one due to its many latest effects in the upgraded version.
A freeze-frame is a technique whereby editors can suddenly halt motion in a film to make it look like a photograph. Then the still shot in the movie is usually used to create suspense or add emphasis to a scene. When freeze-frame gets added at the film’s end, it leaves the viewer guessing what will happen next.

Freezing or extending a frame will allow users to pace their video better. More importantly, freeze-frame applies on a per track basis, which helps buy users more time for a voiceover or an annotation. This article will teach you how to freeze-frame in Camtasia perfectly.
In this article
01 [How to Do Freeze-frame or Extended Frame in Camtasia?](#Part 1)
02 [What’s the Best Freeze-frame Video Editing Effect in Camtasia?](#Part 2)
03 [Best 5 Alternatives to Freeze-frame](#Part 3)
Part 1 How to Do Freeze-frame or Extended Frame in Camtasia?
If you are looking to bring in more creativity to your video clips by doing freeze-frame in Camtasia or extend frame, here is a step-by-step guide:
Step 1: Select the Video Part and Enter Duration
You have to move the Playhead to the frame if you want to extend. Then right-click on the track you wish to extend to choose the Extend Frame option or press shift+E.
For the keyboard shortcut to work, select the track first.

Now, enter the desired duration in seconds.

This will, in turn, create a stitched clip, provided that the auto-stitch in preferences hasn’t been disabled.

In addition, if the auto-stitch has been disabled, the clip will be split into three, as shown below, with the middle clip containing the extended frame.

Step 2: Change the Duration
To change the freeze duration in Camtasia freeze frame, right-click on the still portion of the clip and choose the Duration option. However, this will work with both split segments and stitched segments.

Part 2 What’s the Best Freeze-frame Video Editing Effect in Camtasia?
The freeze-frame effect in Camtasia is an excellent feature with a unique, elegant glitch and warp design. This well-organized and straightforward template is perfect for any event and features a full HD version and different freeze time effects. It is easy to use and customize, render your new awesome video, and drop media.
Here is the best Camtasia freeze-frame video editing effect of 2021, which is how to extend the frame and customize the amount of time in Camtasia Studio:

Step 1: Upload the Video
Download the Camtasia software, install and open it on your PC. Then drag and drop the video that must be freeze-frame on the timeline.
Step 2: Select Video Portion and Duration
Play the click on the timeline and when it gets to the position, you want to freeze-frame, pause the video and left-click on the Playhead to select extend the frame.
Now, select the desired duration you want to extend the freeze-frame
Step 3: Extend Frame
Next is to go back to the timeline and left-click on the Playhead to select extend frame, then, click on split tool. After that, drag the extended frame to the upper new layer.
Step 4: Add Clip Speed
Right-click on the extended frame and apply “add clip speed” to select the amount of time required.
Step 5: Export and Save
Finally, reposition it back to the main track and play your video. Then, when you feel satisfied with the result, export and save it on your device.
For a more detailed, interactive explanation and understanding, watch the video
https://m.youtube.com/watch?v=j4zHxtflMsM
Part 3 Best 5 Alternatives to Freeze-frame
Here are the top five (5) alternatives to Camtasia freeze frames. We have mentioned their pros and cons for better understanding.
01**Wondershare Filmora Video Editor **
For Win 7 or later (64-bit)
For macOS 10.12 or later
Filmora is our first alternative for freeze frames in Camtasia. It is an easy-to-use video editing software with excellent tools and an outline of creative video effects. Being the best Mac video editor, it is safe to say you can directly make your freeze-frame effect from scratch.
Filmora is free to download, supports Mac and Windows devices, and has a practical freeze-frame effect function.
Pros:
● Ease of use
● No payment until required
● The full-featured video editing tool
● Tons of effects are available
Cons:
● Some effects are not free.

02Kinemaster
This is a free video editing application that edits your smartphone with much more fun and accessibility. It is equipped with top-notch editing tools and features and supports iOS and Android devices. Kinemaster is also a powerful application you can get creative with and makes it the top 5 alternatives to Camtasia freeze frame.
Pros:
● Easy-to-use editing tools.
● User-friendly interface.
Cons:
● There is a watermark at the end of the video
● Limited video format support.

03InShot
This is a free iOS and Android video editing application and a multi-featured application that assits you to get creative and edit videos with limitless features and the freeze-frame effect inclusive of its element.
Pros:
● Easy to use
● A wide range of quick, accessible features and editing tools to use.
Cons:
● Purchase needed to access the top features.
● Hardly intuitive.

04Videoshop video editor.
This is an effortless video editing application that is specifically for iOS devices. In addition, it comes furnished with remarkable video editing tools and stunning features to transform your video. This freeze-frame Camtasia alternative app is easy to use and gives your videos a creative shine.
Pros
● It is straightforward to use
● It has a detailed UI design
Cons:
● It has some glitches
● It has limited resolution support.
● The CIT can support a large amount of content.

05iMovie
iMovie application is popularly known to create and edit videos into a movie-like shine. However, the application is accessible for iOS video editing software equipped with the freeze-frame effect. iMovie is stocked with a bonus of powerful features to make your pop and stand out amongst others.
Pros:
● it has a user-friendly interface
● Allow users to share videos directly after editing
● It is straightforward and intuitive to use without guidelines
Cons:
● It supports a limited video format
● Video edits take up lots of phone storage.
● It crashes if video content is significant.

● Ending Thoughts →
● This article guided using the Camtasia freeze-frame and explained extending the freeze-frame features.
● The report also included the top 5 alternatives to freeze-frame Camtasia and rated Filmora as the number one due to its many latest effects in the upgraded version.
A freeze-frame is a technique whereby editors can suddenly halt motion in a film to make it look like a photograph. Then the still shot in the movie is usually used to create suspense or add emphasis to a scene. When freeze-frame gets added at the film’s end, it leaves the viewer guessing what will happen next.

Freezing or extending a frame will allow users to pace their video better. More importantly, freeze-frame applies on a per track basis, which helps buy users more time for a voiceover or an annotation. This article will teach you how to freeze-frame in Camtasia perfectly.
In this article
01 [How to Do Freeze-frame or Extended Frame in Camtasia?](#Part 1)
02 [What’s the Best Freeze-frame Video Editing Effect in Camtasia?](#Part 2)
03 [Best 5 Alternatives to Freeze-frame](#Part 3)
Part 1 How to Do Freeze-frame or Extended Frame in Camtasia?
If you are looking to bring in more creativity to your video clips by doing freeze-frame in Camtasia or extend frame, here is a step-by-step guide:
Step 1: Select the Video Part and Enter Duration
You have to move the Playhead to the frame if you want to extend. Then right-click on the track you wish to extend to choose the Extend Frame option or press shift+E.
For the keyboard shortcut to work, select the track first.

Now, enter the desired duration in seconds.

This will, in turn, create a stitched clip, provided that the auto-stitch in preferences hasn’t been disabled.

In addition, if the auto-stitch has been disabled, the clip will be split into three, as shown below, with the middle clip containing the extended frame.

Step 2: Change the Duration
To change the freeze duration in Camtasia freeze frame, right-click on the still portion of the clip and choose the Duration option. However, this will work with both split segments and stitched segments.

Part 2 What’s the Best Freeze-frame Video Editing Effect in Camtasia?
The freeze-frame effect in Camtasia is an excellent feature with a unique, elegant glitch and warp design. This well-organized and straightforward template is perfect for any event and features a full HD version and different freeze time effects. It is easy to use and customize, render your new awesome video, and drop media.
Here is the best Camtasia freeze-frame video editing effect of 2021, which is how to extend the frame and customize the amount of time in Camtasia Studio:

Step 1: Upload the Video
Download the Camtasia software, install and open it on your PC. Then drag and drop the video that must be freeze-frame on the timeline.
Step 2: Select Video Portion and Duration
Play the click on the timeline and when it gets to the position, you want to freeze-frame, pause the video and left-click on the Playhead to select extend the frame.
Now, select the desired duration you want to extend the freeze-frame
Step 3: Extend Frame
Next is to go back to the timeline and left-click on the Playhead to select extend frame, then, click on split tool. After that, drag the extended frame to the upper new layer.
Step 4: Add Clip Speed
Right-click on the extended frame and apply “add clip speed” to select the amount of time required.
Step 5: Export and Save
Finally, reposition it back to the main track and play your video. Then, when you feel satisfied with the result, export and save it on your device.
For a more detailed, interactive explanation and understanding, watch the video
https://m.youtube.com/watch?v=j4zHxtflMsM
Part 3 Best 5 Alternatives to Freeze-frame
Here are the top five (5) alternatives to Camtasia freeze frames. We have mentioned their pros and cons for better understanding.
01**Wondershare Filmora Video Editor **
For Win 7 or later (64-bit)
For macOS 10.12 or later
Filmora is our first alternative for freeze frames in Camtasia. It is an easy-to-use video editing software with excellent tools and an outline of creative video effects. Being the best Mac video editor, it is safe to say you can directly make your freeze-frame effect from scratch.
Filmora is free to download, supports Mac and Windows devices, and has a practical freeze-frame effect function.
Pros:
● Ease of use
● No payment until required
● The full-featured video editing tool
● Tons of effects are available
Cons:
● Some effects are not free.

02Kinemaster
This is a free video editing application that edits your smartphone with much more fun and accessibility. It is equipped with top-notch editing tools and features and supports iOS and Android devices. Kinemaster is also a powerful application you can get creative with and makes it the top 5 alternatives to Camtasia freeze frame.
Pros:
● Easy-to-use editing tools.
● User-friendly interface.
Cons:
● There is a watermark at the end of the video
● Limited video format support.

03InShot
This is a free iOS and Android video editing application and a multi-featured application that assits you to get creative and edit videos with limitless features and the freeze-frame effect inclusive of its element.
Pros:
● Easy to use
● A wide range of quick, accessible features and editing tools to use.
Cons:
● Purchase needed to access the top features.
● Hardly intuitive.

04Videoshop video editor.
This is an effortless video editing application that is specifically for iOS devices. In addition, it comes furnished with remarkable video editing tools and stunning features to transform your video. This freeze-frame Camtasia alternative app is easy to use and gives your videos a creative shine.
Pros
● It is straightforward to use
● It has a detailed UI design
Cons:
● It has some glitches
● It has limited resolution support.
● The CIT can support a large amount of content.

05iMovie
iMovie application is popularly known to create and edit videos into a movie-like shine. However, the application is accessible for iOS video editing software equipped with the freeze-frame effect. iMovie is stocked with a bonus of powerful features to make your pop and stand out amongst others.
Pros:
● it has a user-friendly interface
● Allow users to share videos directly after editing
● It is straightforward and intuitive to use without guidelines
Cons:
● It supports a limited video format
● Video edits take up lots of phone storage.
● It crashes if video content is significant.

● Ending Thoughts →
● This article guided using the Camtasia freeze-frame and explained extending the freeze-frame features.
● The report also included the top 5 alternatives to freeze-frame Camtasia and rated Filmora as the number one due to its many latest effects in the upgraded version.
How to Remove Audio From Video Without Watermark?
Remove audio from video without watermark is easy if you use the right tool. Nonetheless, many tools to remove audio are bad, since they have a hard user interface. Therefore, some beginners will take time to remove audio from the video. Moreover, many tools also have a slow problem, which is time-consuming. Fortunately, this article provides you with some tools to remove audio from video online free without watermark and open-source tools. It will also be complete with a tutorial on how to do it in each tool.
Part1: Method 1: Use online free tools to remove audio without watermark (800 words)
1. AudioRemover
As the name suggests, AudioRemover is an online service that lets you take out audio from videos without re-encoding. This site also has a simple user interface that makes it easy for anyone to use. Moreover, AudioRemover allows you to remove audio from video without watermark.
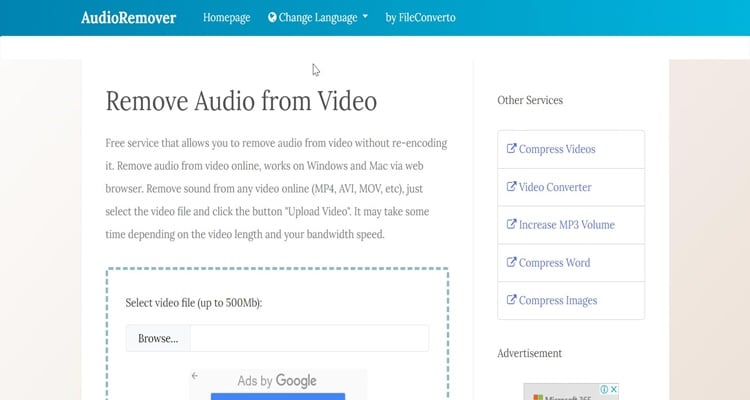
How to remove audio from video with AudioRemover
Step1 First, open any browser on your computer and go to the AudioRemover site. After that, click “Browse” and add your video to AudioRemover. After choosing your video, click the “Upload Video” to upload your video into AudioRemover.
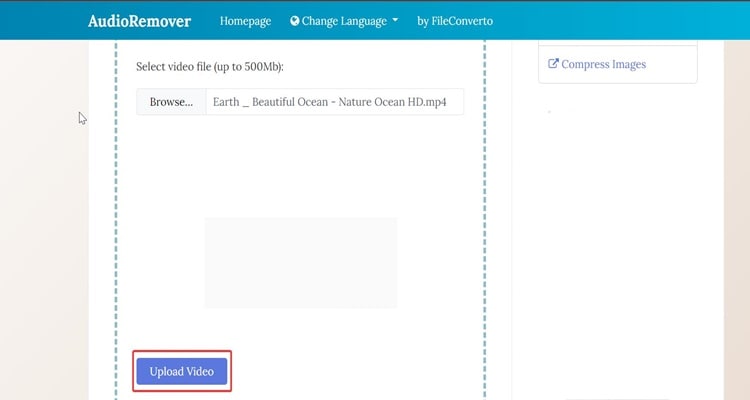
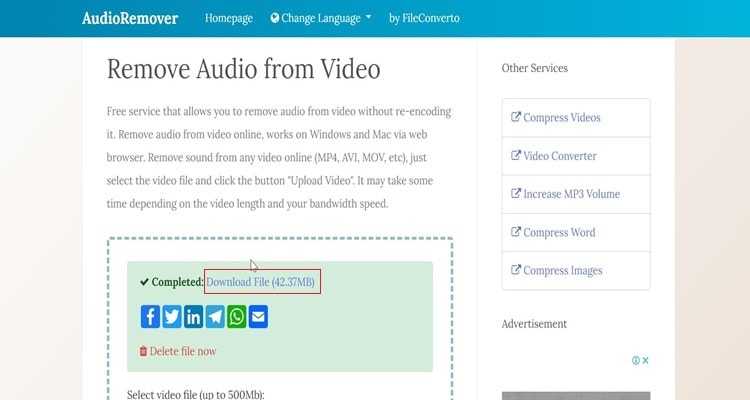
Step2 Wait until the uploading video is done. Once it is done, you just need to click “Download file.” The video that you download when it is played will no longer have sound in the video
2. Veed.io
If you are seeking for a tool for mute video online free no watermark, then you should try VEED. VEED is an exceptional online video editing tool that allows you to take out audio from video in just a few clicks. Since VEED is an online video editor, there is no installation. Instead, you do it straight from your favorite browser.

How to mute video online without watermark with VEED.io
Step1 Firstly, open any browser on your computer and search for “remove a voice from video with VEED.” After that, go click “Choose video” to import your video to VEED

Step2 In the next window, simply click “Upload a file” to browse the video file you want to remove the audio on your computer.
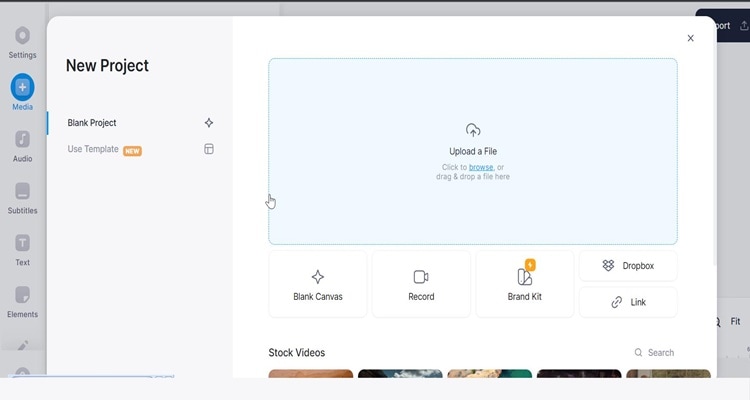
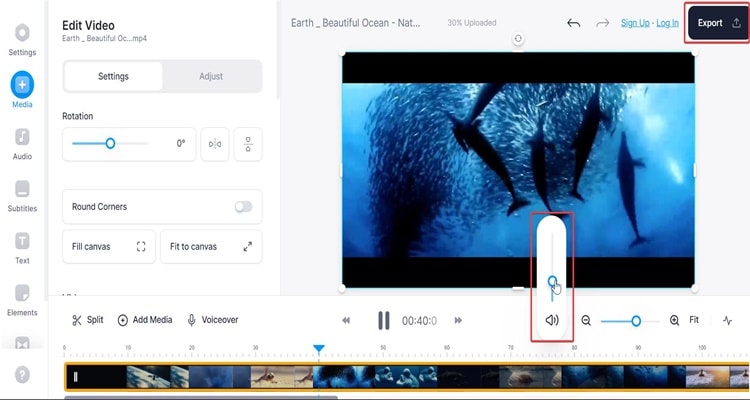
Step3 Once you import your video to the editing page, go to the sound icon and swipe down the bar to remove the audio. Next, click “Export” in the most top right on your screen.
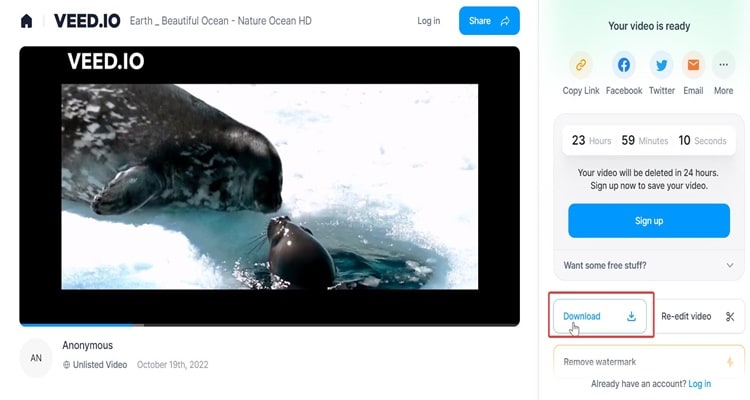
Step4 If you want to save the video to your computer after the exporting process is complete, click “download.”
3. Canva
Canva is not only for creating image designs, templates, and post designs for social media, but Canva is also a very good tool for removing audio from videos. Indeed, you can easily remove audio from video online without watermark. Follow all the steps below to know how to remove audio from video with Canva.

Step1 First, you can visit Canva to remove audio from video , then click “Remove audio from the video.”

Step2 Drag your video to the black space.
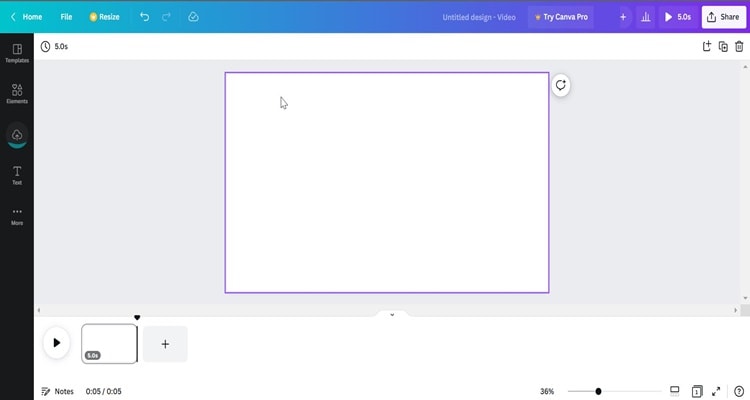
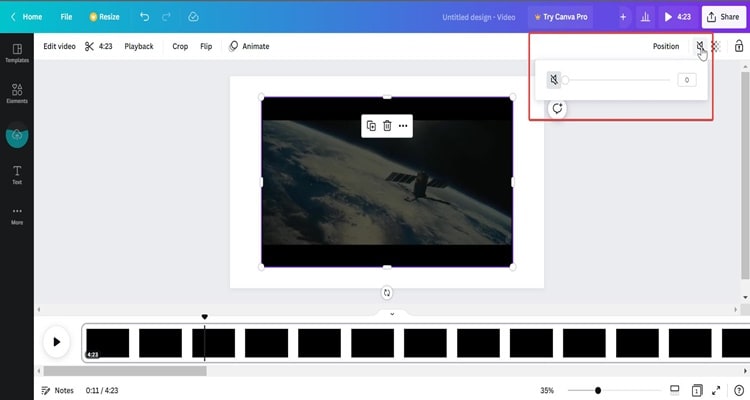
Step3 After you import your video to the black space, you click on the “Sound” icon at the top of your screen. Then, drag the bar to the left to remove the audio.
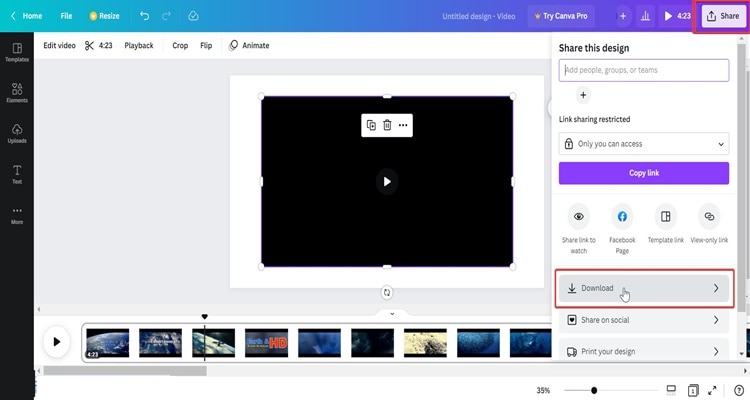
Step4 Once you have removed the sound from your video, you can click “Share” in the top right corner of your screen. Then, click “Download” to save the file on your computer.
Part2: Method 2: Use free and open source video editors (800 words)
1. VideoLAN Client (VLC)
VLC is a widely known media player that works on Windows and Mac. In fact, VLC is a free, open-source, cross-platform multimedia player and framework that can perform many multimedia files and several streaming protocols. Even though VLC is mostly a media player and not a video editor, you can remove a video’s audio using the built-in converter.

Follow the simple steps below to discover how to use VLC to remove audio from a video.
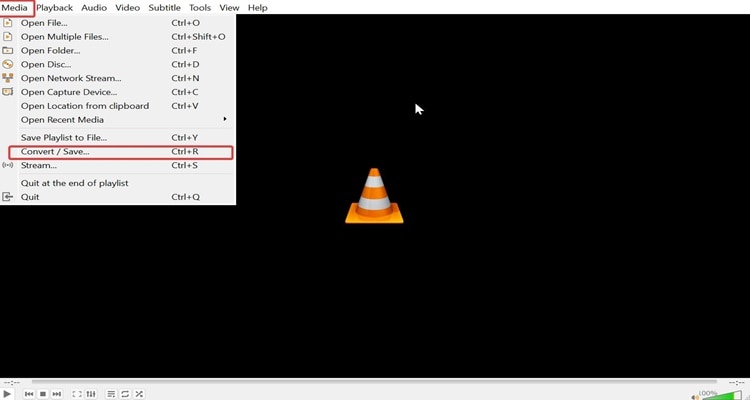
Step1 First, you must download and launch VLC on your computer. After that, navigate to “Media” and “Convert/save.”
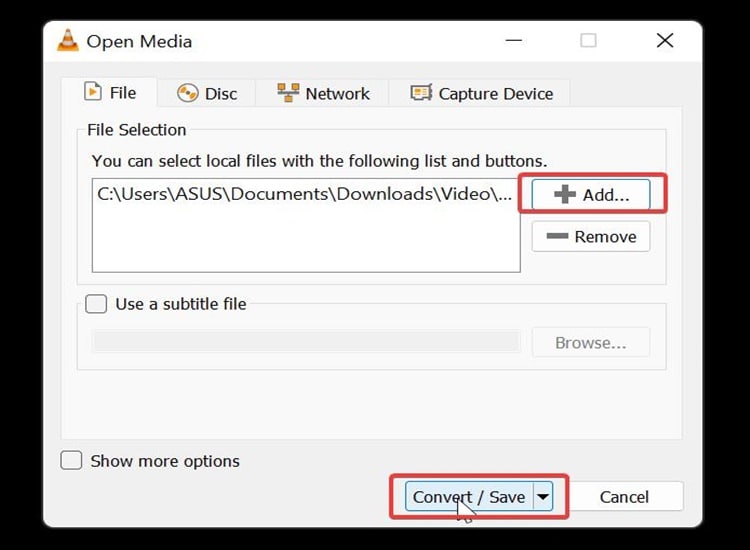
Step2 Select the video you wish to mute by clicking the “Add” button in the Open Media window. Afterward, click the” Convert/Save” in the lower right corner of the same window.
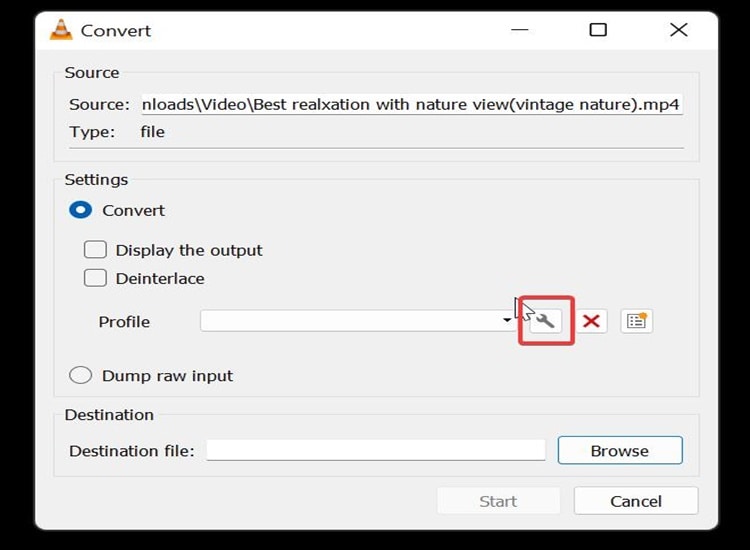
Step3 Click the “wrench” icon in the Convert window, as seen in the picture below.
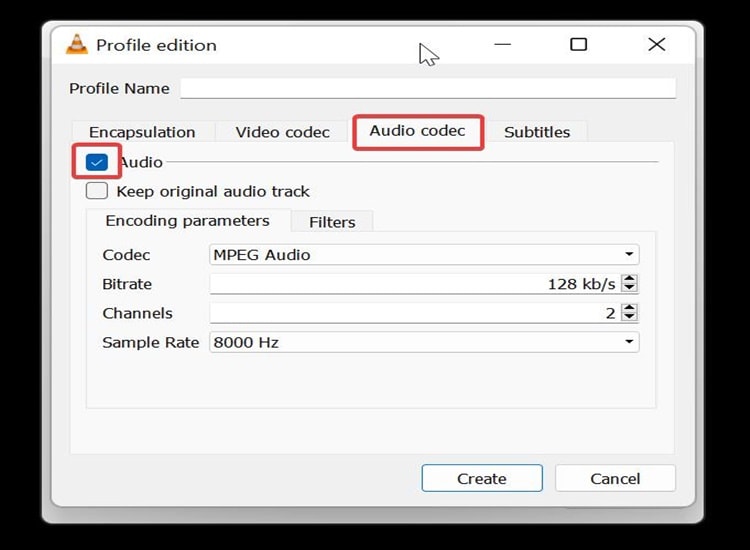
Step4 lick on “Media codec” in the next window. After that, untick the Audio checkbox. Next, click the Create button in the bottom right corner of the same window. You’ll now come back to the Convert window.
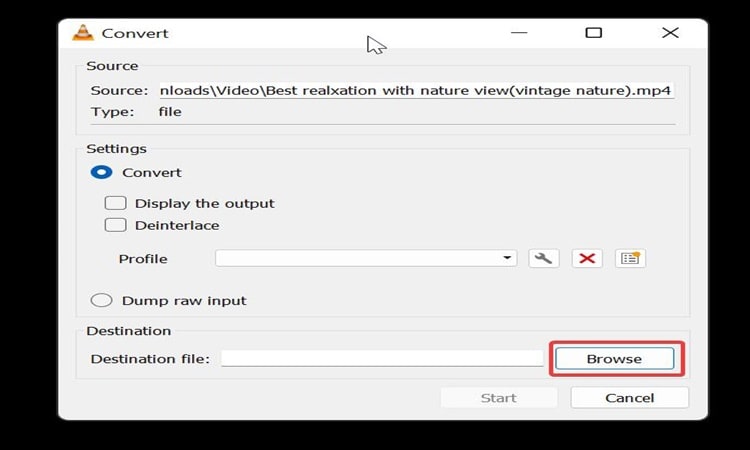
Step5 Click “Browser” to choose the location of your video to save. Lastly, click “Start” to save the video.
2. Shotcut
The Shotcut Video Editor is a cross-platform (Windows, macOS, Linux, and Chrome OS) free and open-source video editor. If you are looking for an open-source editor to remove audio from video without watermark you should try Shotcut.

Follow easy steps below to remove audio from video with Shotcut
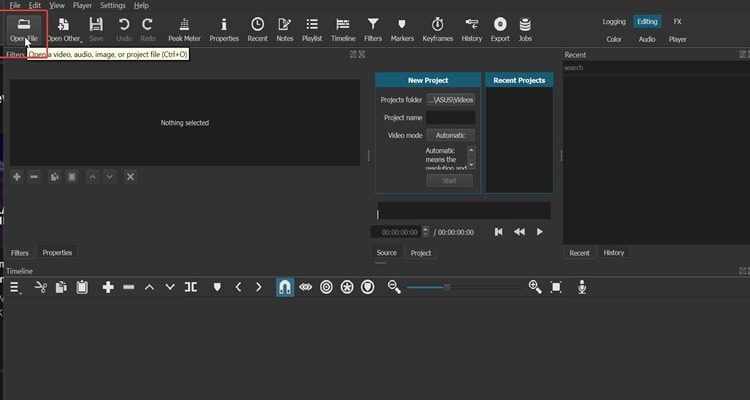
Step1 Download and launch the Shotcut on your computer. When the Shotcut is open, click “Open file” to import the file.
Step2 After importing the video file into Shotcut, you must drag it to the timeline.
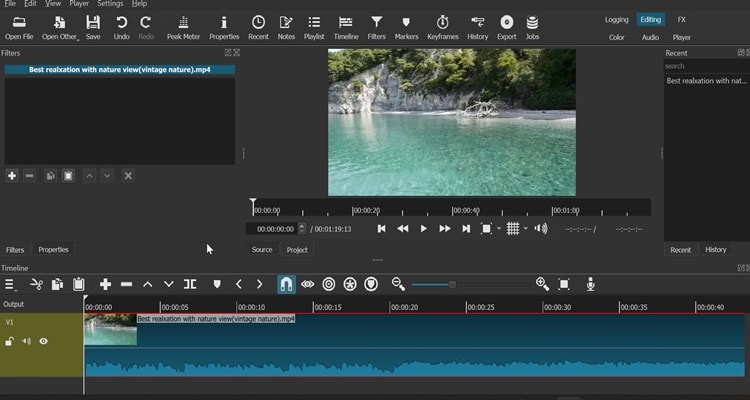
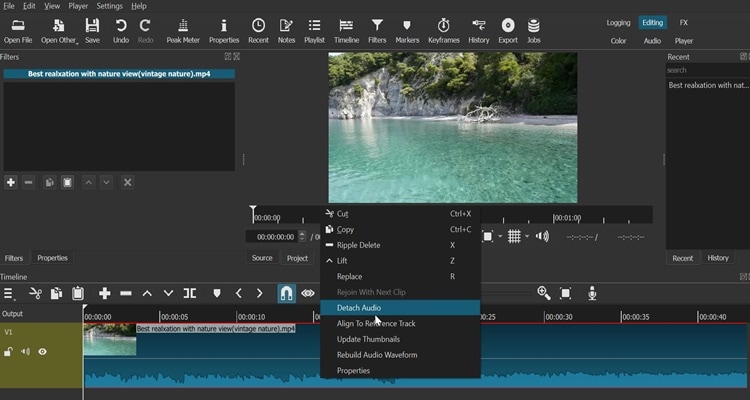
Step3 Next, right click in audio track of the video, then click “Detach audio.”
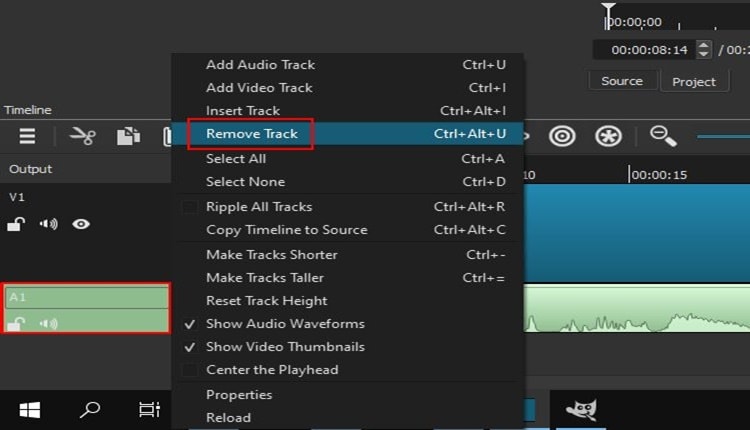
Step4 Right-click on the audio track in the Output section on the left and then click on “Remove Track.”
Step5 After you remove the audio, then click “Export.”
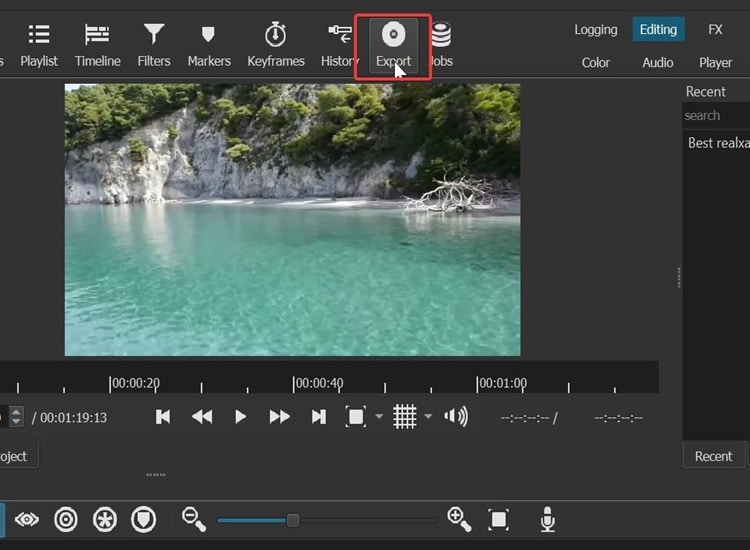
Step6 Finally, click “Export file” to save your mute video on your computer.
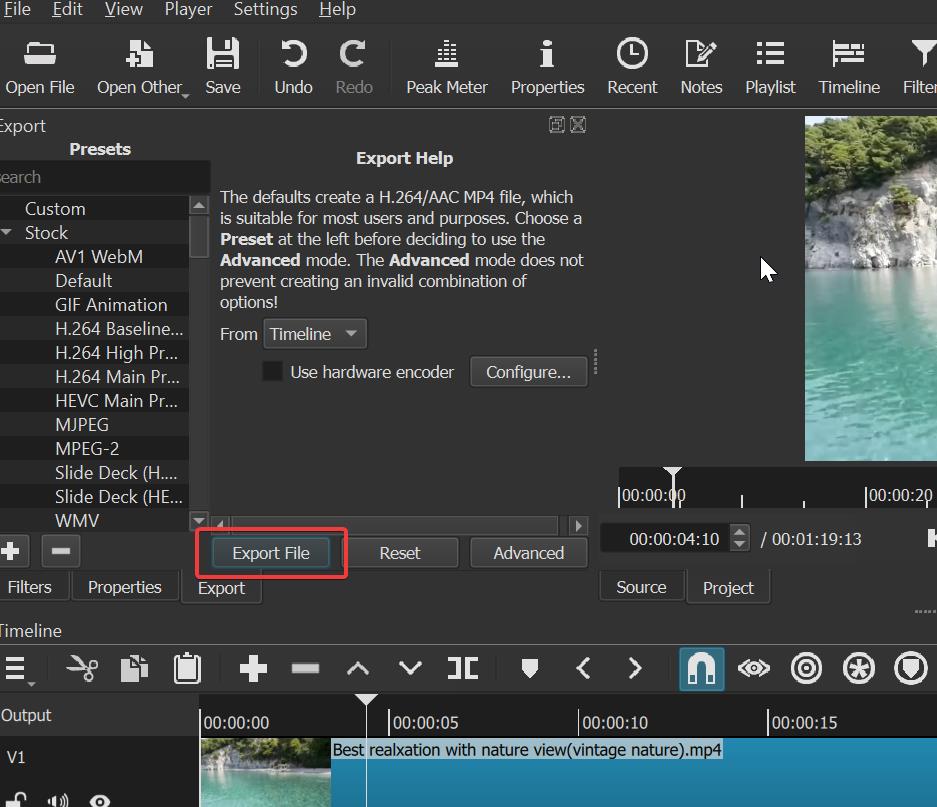
3. OpenShot
The OpenShot Video Editor is a cross-platform (Linux, Mac, Windows) free and open-source video editor. OpenShot is a video editor that aims to be intuitive, simple to use, yet unexpectedly potent. The video or film can be easily sliced, cut, and edited.

Step1 You must download and launch the Openshot on your computer.
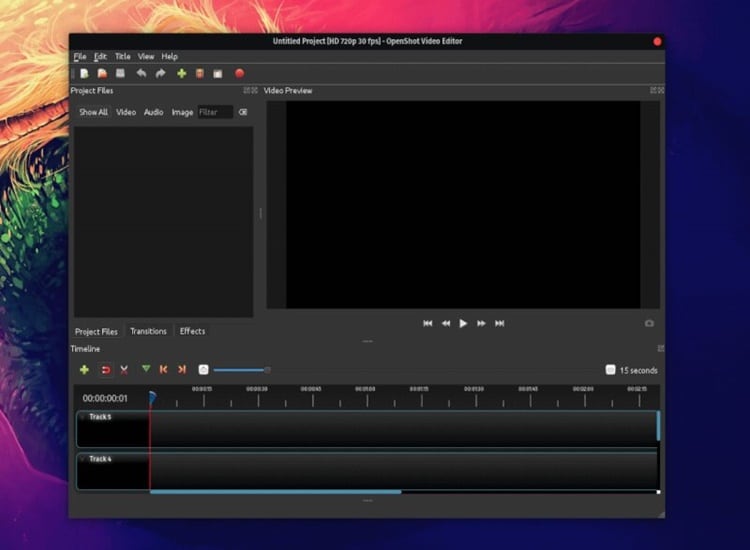
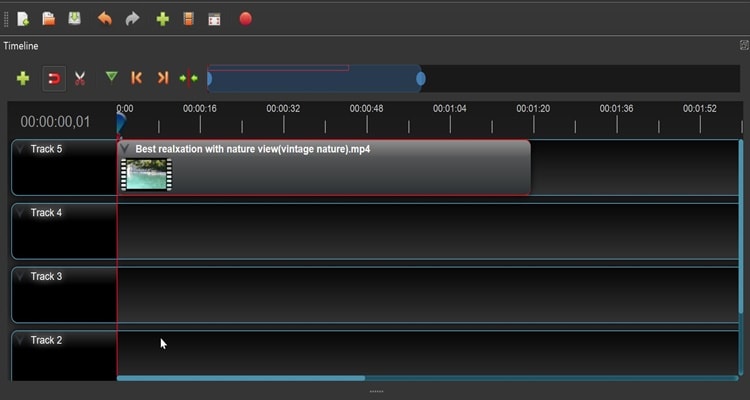
Step2 Drag your video you want to mute in the time line.
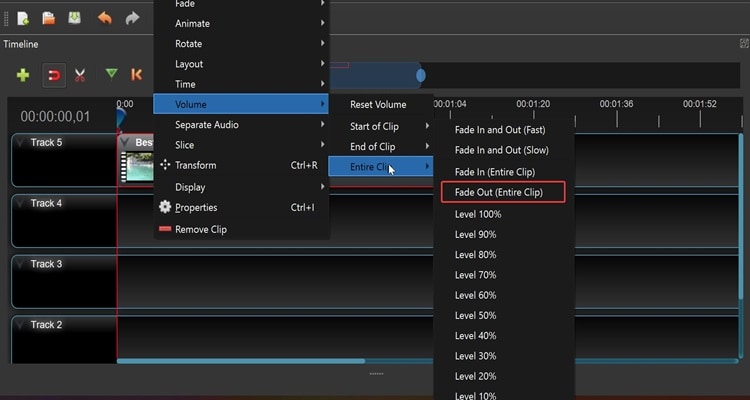
Step3 Right-click on the clip, then navigate “Volume,” “Entire clip,” and “Fade out (entire clip).
Step4 Once you done removing the audio from the video, click “Save project” to save your video.
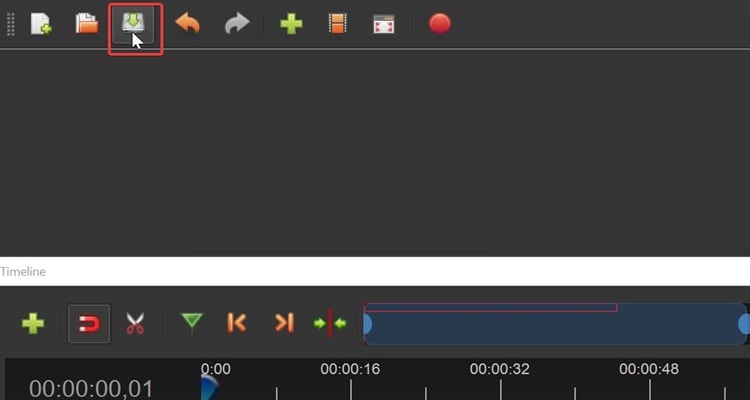
Part3: Method 3: Get a video editor that can do everything for you (500 words)
1. Filmora
Step1 Download Filmora and launch it on your computer before starting. At this point, you can start a “new project” by selecting that option.
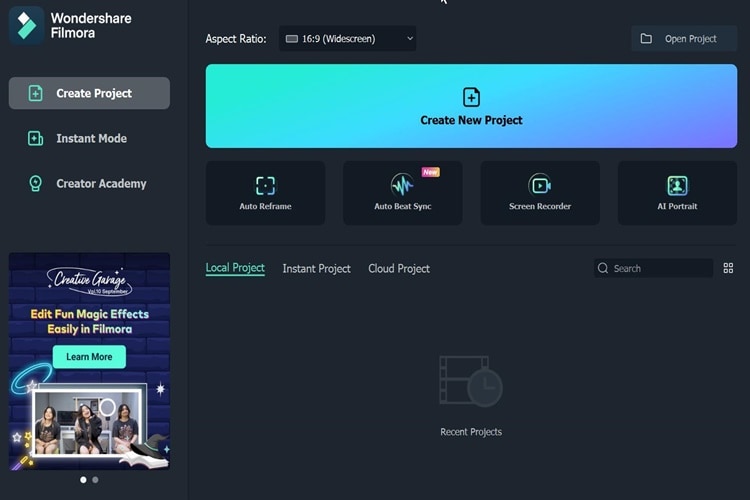
Step2 Here, you’ll find the video on your hard drive and upload it into Filmora. Upload the clip to Filmora’s timeline after that.
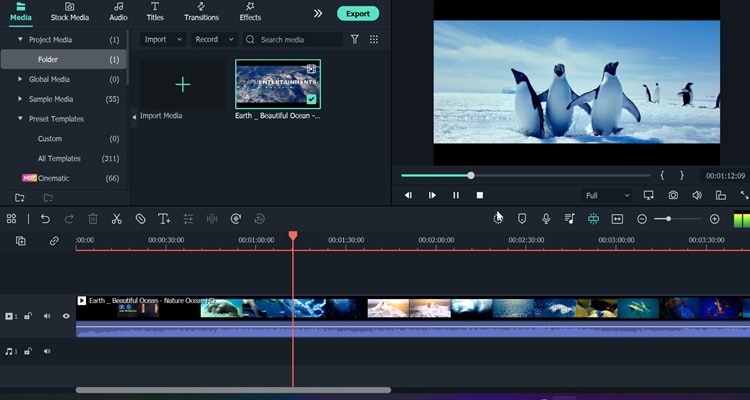
Step3 The next thing you need to do after dragging the video onto the Filmora timeline is to right-click on the Filmora timeline. After that, click “Detach audio” option.
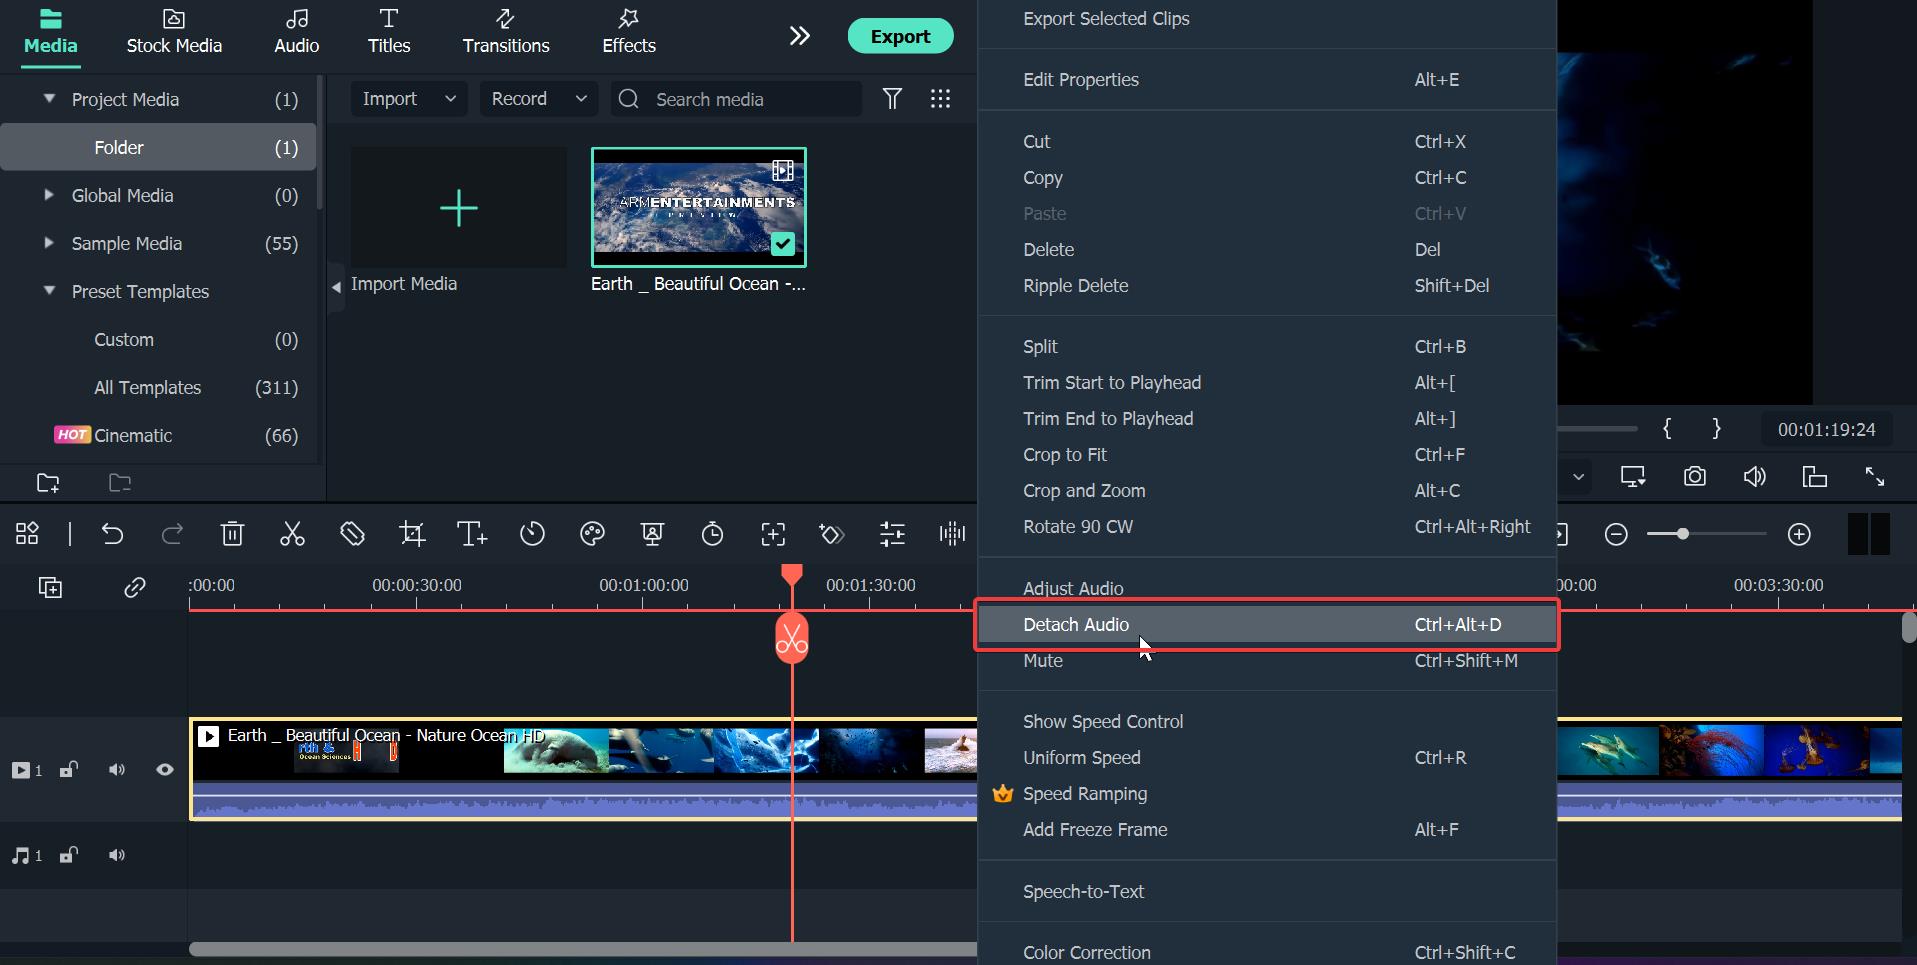
Step4 The audio track will appear underneath the video track. To delete an audio track, you need only to click on it and then click the “trash” icon. At long last, you have successfully silenced the audio track in your video.
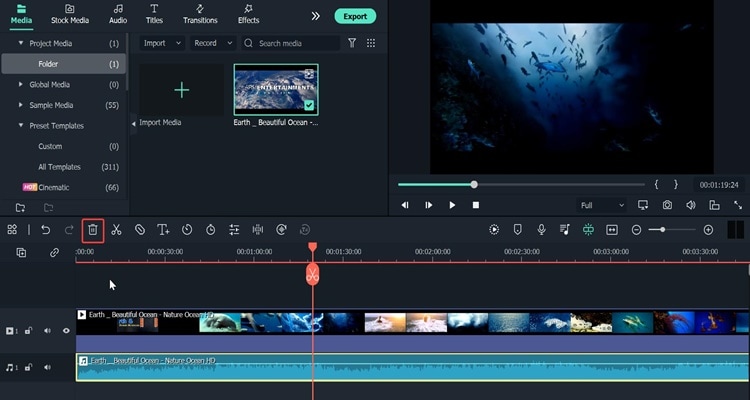
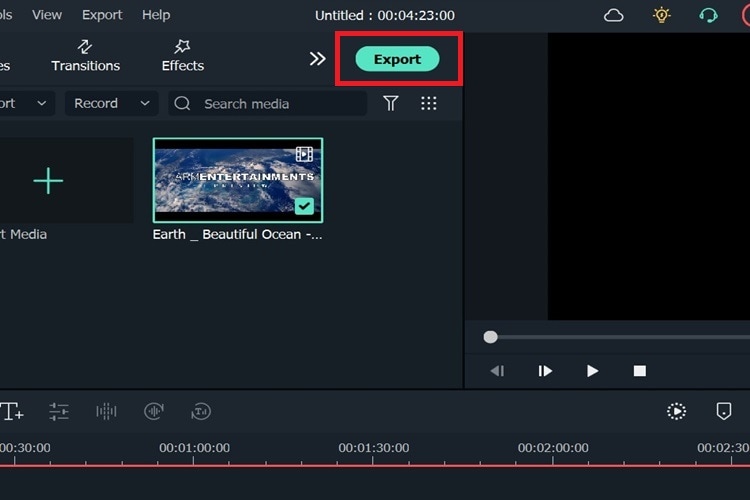
Step5 Simply click “Export” after you’re finished to save your video to your computer..
Filmora doesn’t just let you remove audio from videos; it also has a lot of other tools for editing audio that you can use to improve your videos. Some of Filmora’s audio editing features will be talked about below.
Free Download For Win 7 or later(64-bit)
Free Download For macOS 10.14 or later
#1. Silence Detection
Filmora has some great audio features, and silence detection is one of them. Silence detection simply recognizes instances of silence and removes them from your video instantly. Silence can make people confused or disappointed. Indeed, Filmora can instantly find the part of no sound and cut it out.
#2. Audio Ducking
Moreover, there is audio ducking, another great audio feature from Filmora. When recording voiceovers, narrations, translations, podcasts, etc., you can automatically lower the volume of one track to make another track clearer by using a Filmora audio feature called “audio ducking.”
#3. Auto Synchronization
Meanwhile, you can record videos and additional audio to improve the video’s audio quality. Filmora’s audio synchronization feature will help the video’s sound by perfectly matching the two simultaneously. With audio sync, it’ll be easier to match the sound to the video, making it sound clearer.
#4. Speech to Text (STT)
With Filmora’s Speech to Text (STT) feature, you can quickly turn your voice into subtitles. Furthermore, using speech-to-text will save you a lot of time on subtitling and speed up the editing process. When you hover on the Speech to Text button, Filmora will instantly detect the speech in your video and turn it into text.
#5. Text to Speech (TTS)
With Filmora’s Text to Speech (TTS) feature, adding voice to your video is straightforward. When you click on the button, Filmora could well turn your text files into speech instantly.
#6. Audio Visualizer
Last but not least, Audio Visualizer is an exceptional audio feature that Filmore offer. The Filmora Audio Visualizer will bring your music video to life. The effect will dynamically sync with the sound in your video.
Conclusion
Remove audio from video without watermark is fairly easy. You can choose a tool that has been recommended and read a complete tutorial on how to do it. However, if you are looking for a good online editing maker, we recommend Filmora, considering that Filmora is rich in features.
Also read:
- Updated Do You Want to Remove the Unnecessary Scene From Your TikTok Video? This Article Will Help You to Adjust the Length of TikTok Clip by Providing Easy Methods
- Updated In 2024, | Top GIF to MP4 Converters
- Updated 2024 Approved Best Phantom Slow-Mo Camera For Recording Slow Motion Videos
- 2024 Approved Find Out How to Create Your Own Custom Motion Graphics in Filmora. Add Unique Objects, Manipulate Text, and Animate Anything You Want
- Updated 5 Methods to Make a Fake Facetime Call Video
- New 2024 Approved 2 Practical Ways to Combine Videos on TikTok
- The Best Tools for Converting Slides to Digital - 2024 Review
- New In 2024, Vintage Film Effect 1990S - How to Make
- New In 2024, Best Voice Changers for WhatsApp Free Included
- New In 2024, Best Image (JPG/PNG) to GIF Converters
- 2024 Approved This Article Is a Guide on How to Download and Install Final Cut Pro, Its Key Features, and More. It Also Discusses an Alternative Option to It so the Creators or Editors Can Opt for Editing Videos Accordingly
- New 2024 Approved Voice Changer for Discord | Use Voicemod on Discord
- Use Mobile Phones to Shoot a Video Is Very Convenient Compare with Professional Cameras. In This Article, Well List You some Tips to Help Capture a High-Quality Video on Your Phone for 2024
- Updated Create Kinetice Typography Text Effect in Filmora for 2024
- New Detailed Steps to Cut a Video in QuickTime
- Updated Best Video Format Converter for PC and Online for 2024
- Updated What If YouTube Zoom to Fill Not Working, In 2024
- Updated How to Create an Adobe Slideshow the Easy Way
- Updated 2024 Approved Add some Sci-Fi Touch to Your Next Video Content Using Wondershare Filmora Editing Tools to Create an Alternate Reality Effect
- Steps To Fade Audio In Premier Pro
- Updated 2024 Approved Hitfilm Express Video Editor Review
- Updated Stunning Glitch Effect and Its Creation Steps for Premiere Pro
- 2024 Approved Are You Seeking an Answer for What Is a LUT in the Video? In This Article, We Will Provide You with Detailed Information About LUTs and Their Utility
- Updated In This Article, Youll Find Four Solutions for Rotating Your Go-Pro Videos. The Following Tools Will Be Used for This Purpose
- New Wondering How to Rotate a Video in Windows at Any Desired Angle and Save It Permanently? Find Out All the Different Ways to Rotate Videos Temporarily as Well as Permanently
- Using This Article as a Reference, the Users Would Create a Café Meal Intro and YouTube End Screen While Knowing Multiple Ways to Download Cooking Background Music for 2024
- In 2024, Green Screen Is a Widely Used Effect in After Effects. Many Professional Photographers Use It to Make Creative Video Effects. This Guide Will Show You How to Use Green Screen to Videos in After Effects
- New How to Splice Videos Together on iPhone for 2024
- Updated 2024 Approved The Best 10 GIF to JPGPNG Converters
- Step by Step to Rotate Videos Using Handbrake
- Deleting White Background in Photoshop Is Hard?
- How To Fake GPS On Honor X7b For Mobile Legends? | Dr.fone
- In 2024, How to Share/Fake Location on WhatsApp for Vivo Y78 5G | Dr.fone
- Where Is the Best Place to Catch Dratini On Oppo A59 5G | Dr.fone
- Why Your Oppo Find X6 Screen Might be Unresponsive and How to Fix It | Dr.fone
- New Best Photo Slideshow Maker How to Make a Photo Slideshow 2023 Update
- In 2024, Protecting Your Privacy How To Remove Apple ID From Apple iPhone 14
- In 2024, How to fix iCloud lock on your Apple iPhone SE and iPad
- How to Unlock Apple iPhone 14 Passcode without Computer?
- A Working Guide For Pachirisu Pokemon Go Map On Xiaomi 13 Ultra | Dr.fone
- How to use Pokemon Go Joystick on Oppo A56s 5G? | Dr.fone
- In 2024, 10 Best Fake GPS Location Spoofers for Samsung Galaxy F15 5G | Dr.fone
- In 2024, Unlock Apple ID without Phone Number From Apple iPhone 14 Pro Max
- Tips and Tricks for Apple ID Locked Issue From iPhone 15
- A Step-by-Step Guide on Using ADB and Fastboot to Remove FRP Lock from your Samsung Galaxy M34
- Title: How to Make Stunning Glitch Effect in Photoshop? Ultimate Guide for 2024
- Author: Chloe
- Created at : 2024-05-20 03:38:11
- Updated at : 2024-05-21 03:38:11
- Link: https://ai-editing-video.techidaily.com/how-to-make-stunning-glitch-effect-in-photoshop-ultimate-guide-for-2024/
- License: This work is licensed under CC BY-NC-SA 4.0.


