:max_bytes(150000):strip_icc():format(webp)/MorningShow-aed160f9cfd448cc8034b23bb3073314.jpg)
How to Make Tutorial Video with Filmora

How to Make Tutorial Video with Filmora
You may want to create your video tutorial and share your knowledge with others. Fortunately, you can easily create a professionally edited tutorial video with Filmora . Keep reading this article since we will show you how to do it.
Part 1. Recording your footage
The first step of any video is to record your footage for some tutorials like arts and cooking. You can use a camera to get the footage you need. However, sometimes you’ll need to record your computer screen, and you can do that easily in Filmora.
Free Download For Win 7 or later(64-bit)
Free Download For macOS 10.14 or later
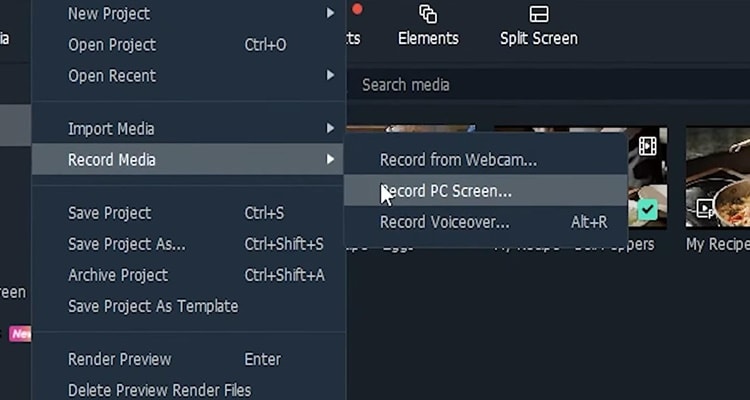
Step1 Firstly, open Filmora on your computer. If you haven’t already downloaded it you can get it at filmora.wondershare.com. Once you open Filmora, click “File” and “Record screen.” Here you can adjust various options like recording your computer’s audio or including your webcam.
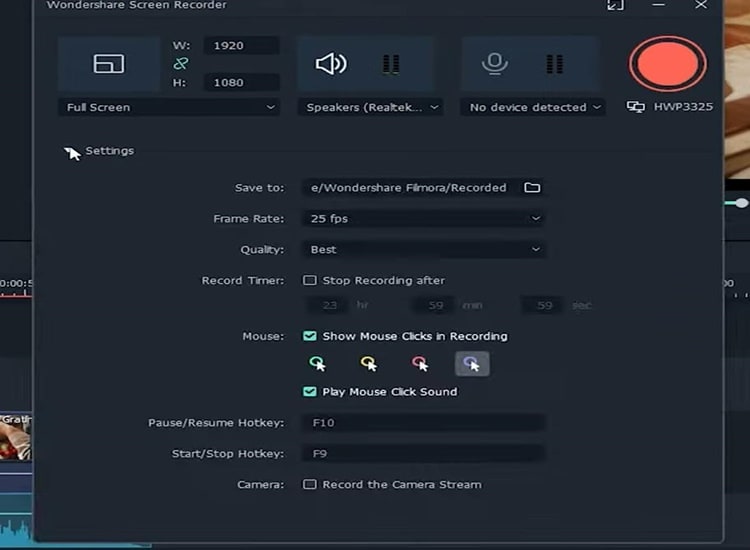
Step2 Click settings to unlock even more options. Recording at the highest quality setting is recommended in case you need to zoom in later. Also, make sure to enable the show mouse if you want your viewer to follow along with your cursor.
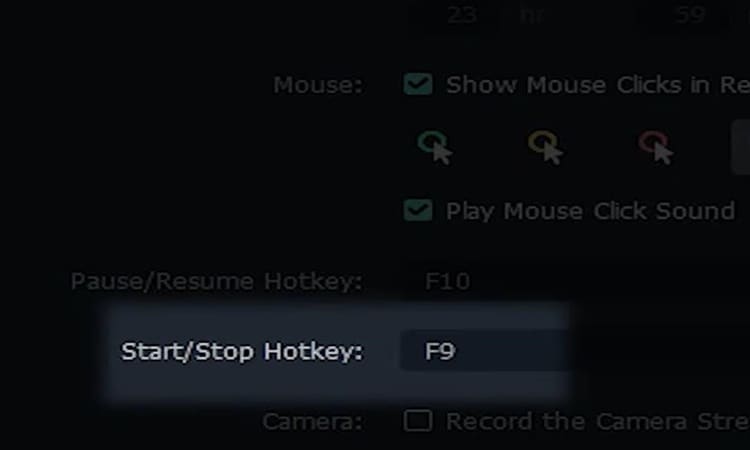
Step3 When you’re ready press these buttons to begin recording your tutorial and hit them again to finish your recording.
Part 2. Keep your intro short
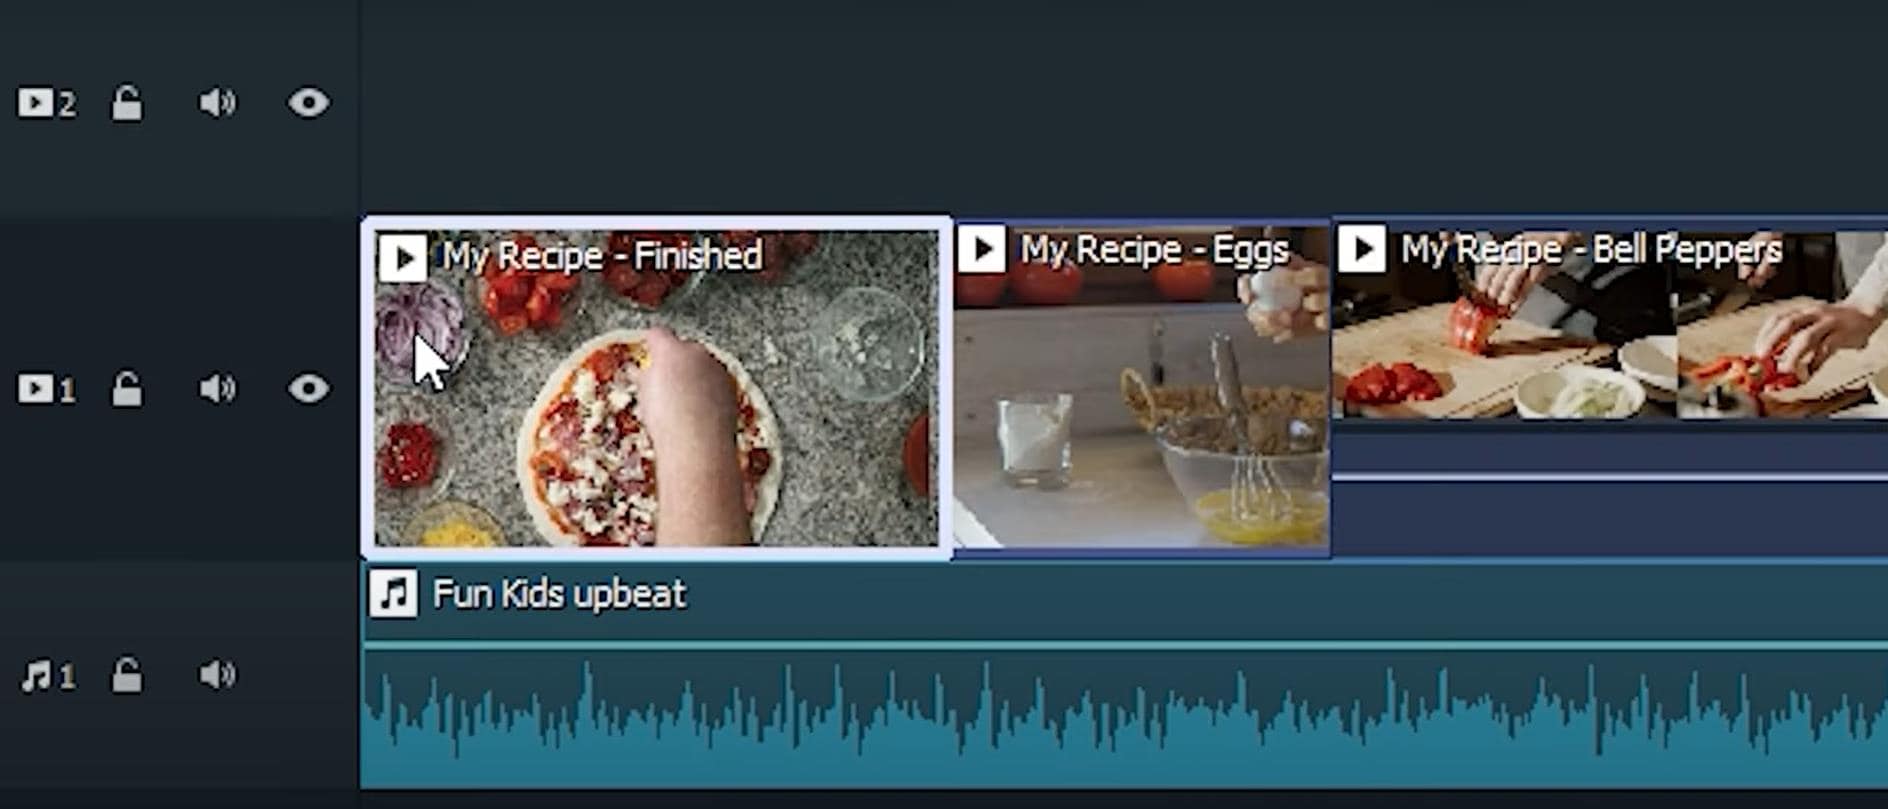
Avoid adding any long intro monologues or skits to your tutorial. First, your goal is to be informative and entertaining. Second, it’s always best to lead with a peek at what the final result of your tutorial will look like whether it’s a video effect arts and crafts or a recipe video.
Part 3. Break down your tutorial into steps
No matter what your tutorial is about, breaking down your process into steps makes your tutorial a lot easier to understand with Filmora. You can do this in just a few minutes.
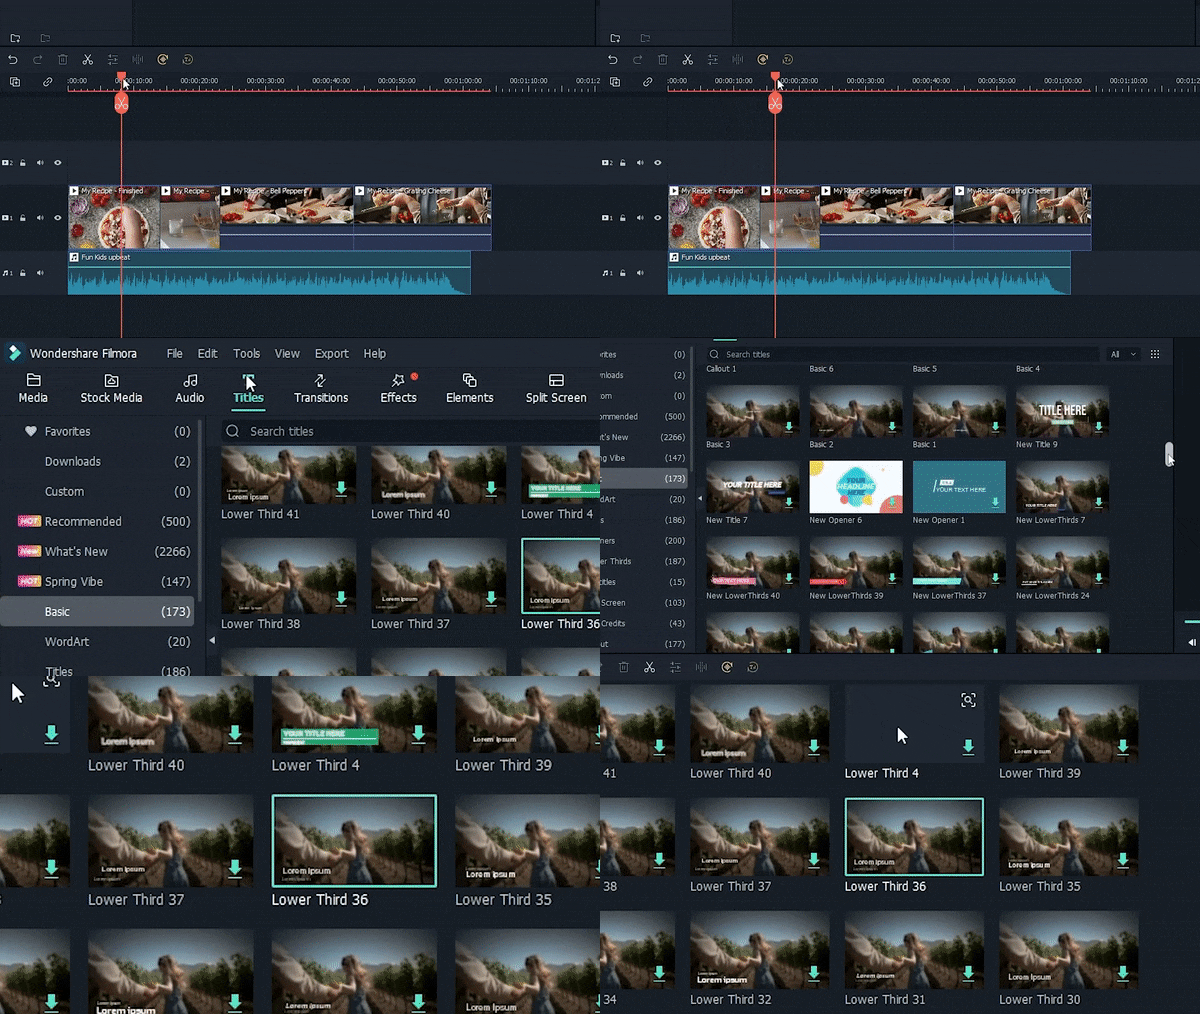
Step1 Move the playhead to where you want your first section to begin. Next, click the “Tittles” and pick a style that appeals to you.
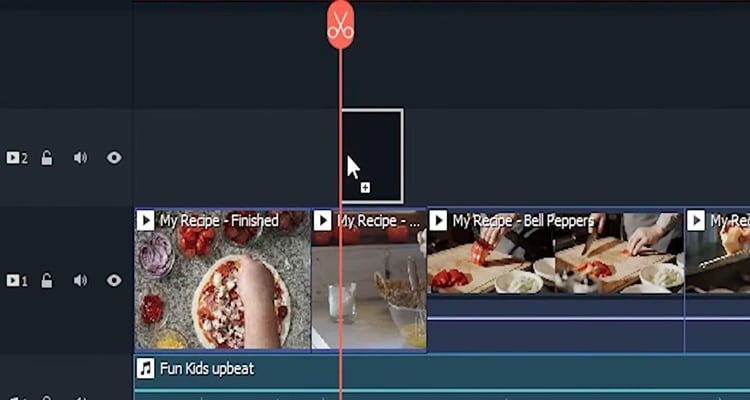
Step2 Click and drag your title on a track above your footage.
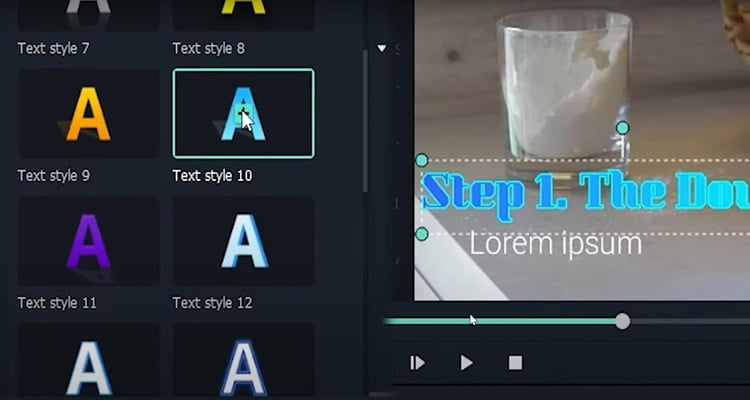
Step3 Double-click your new title and type in your section title. You can even adjust the style of the text to your liking. Repeat the process for as many steps as you’d like for your tutorial
Part 4. Narrate your video
Narration is a crucial part of making an effective tutorial video. Indeed, with Filmora adding narration to your video couldn’t be easier.
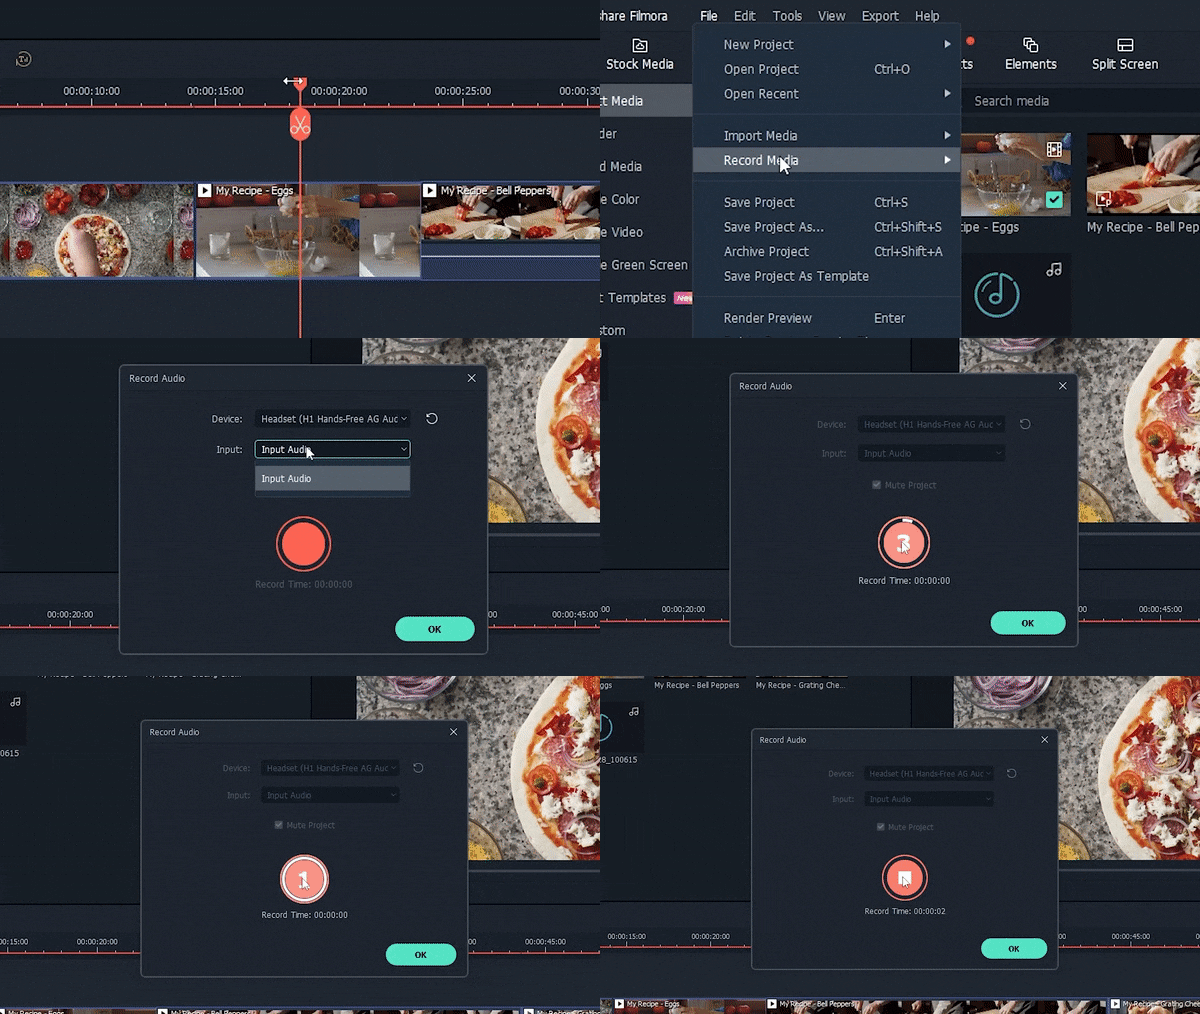
Step1 Moving your playhead to the beginning of your video. Then go to file record media and record voiceover and select your microphone. The drop-down menu and click the red button, then simply narrate your video as it plays out. Your voice will automatically be recorded and placed into the project. Additionally, make sure to speak, reduce background noise, and use simple language
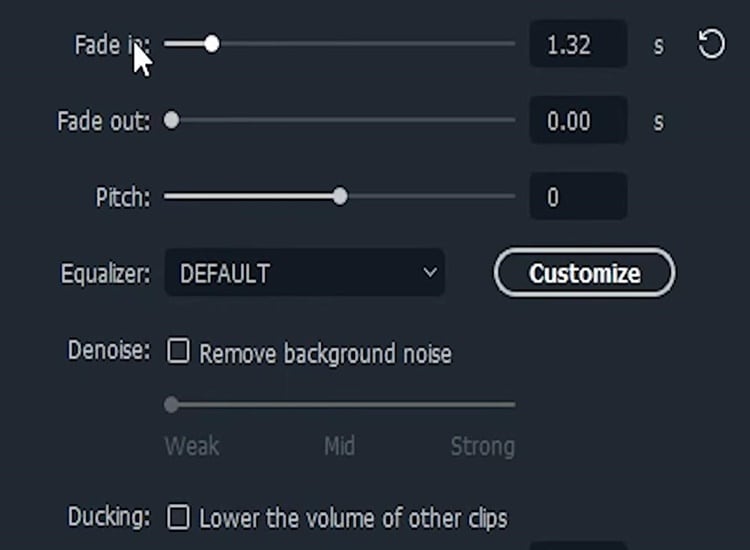
Step2 Once you’re done recording, you can adjust the volume and further edit the voiceover by double-clicking the new audio file on your timeline.
Part 5. Emphasize important steps
Since you are working in a visual medium, emphasizing critical steps visually is very important. Here are some of the easiest and most effective ways to do that in Filmora
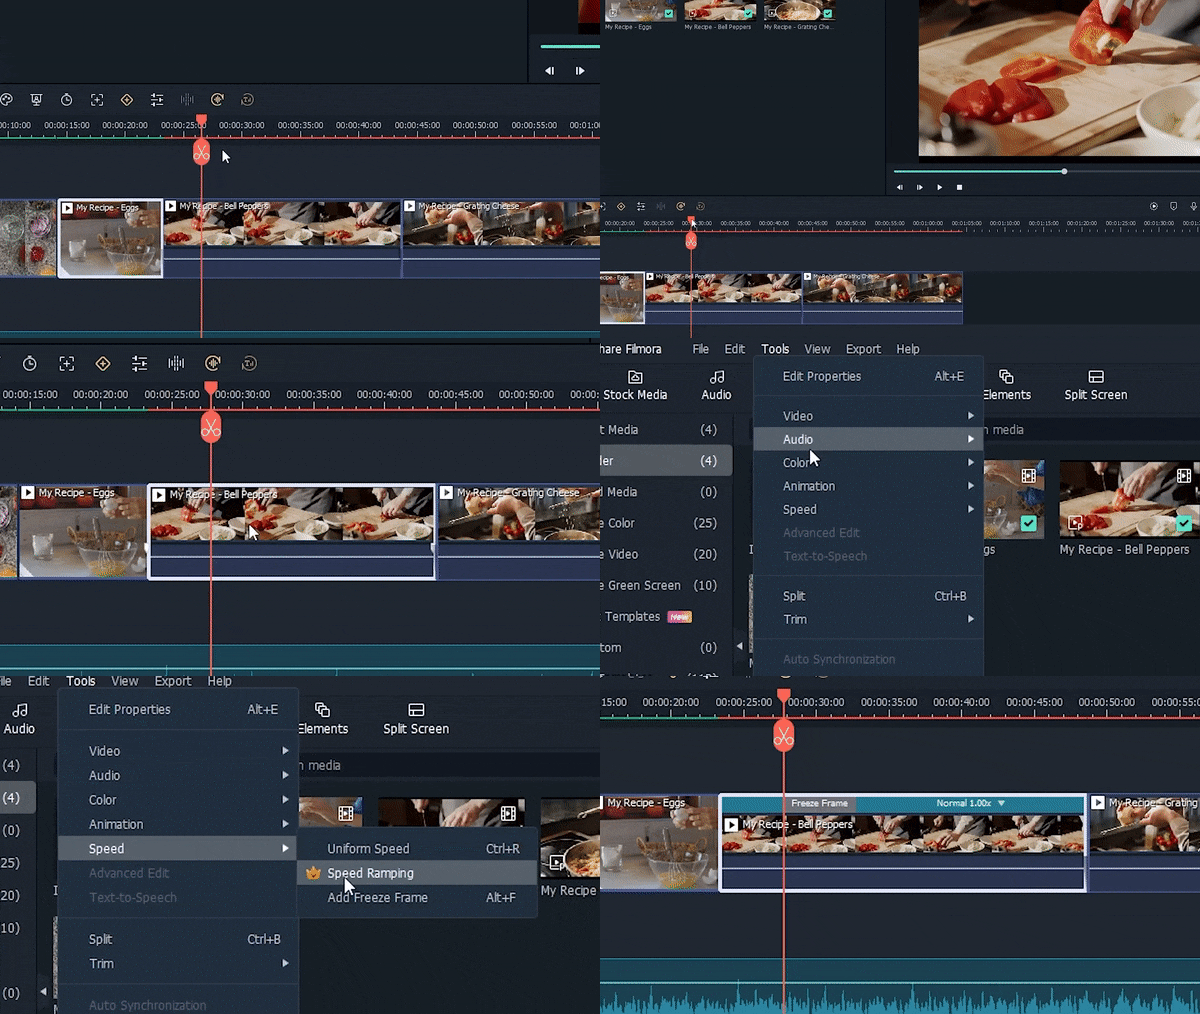
Step1 firstly, the freeze frame. Move your playhead to the frame you want to freeze, select your clip, go to tools speed, and click add freeze frame.
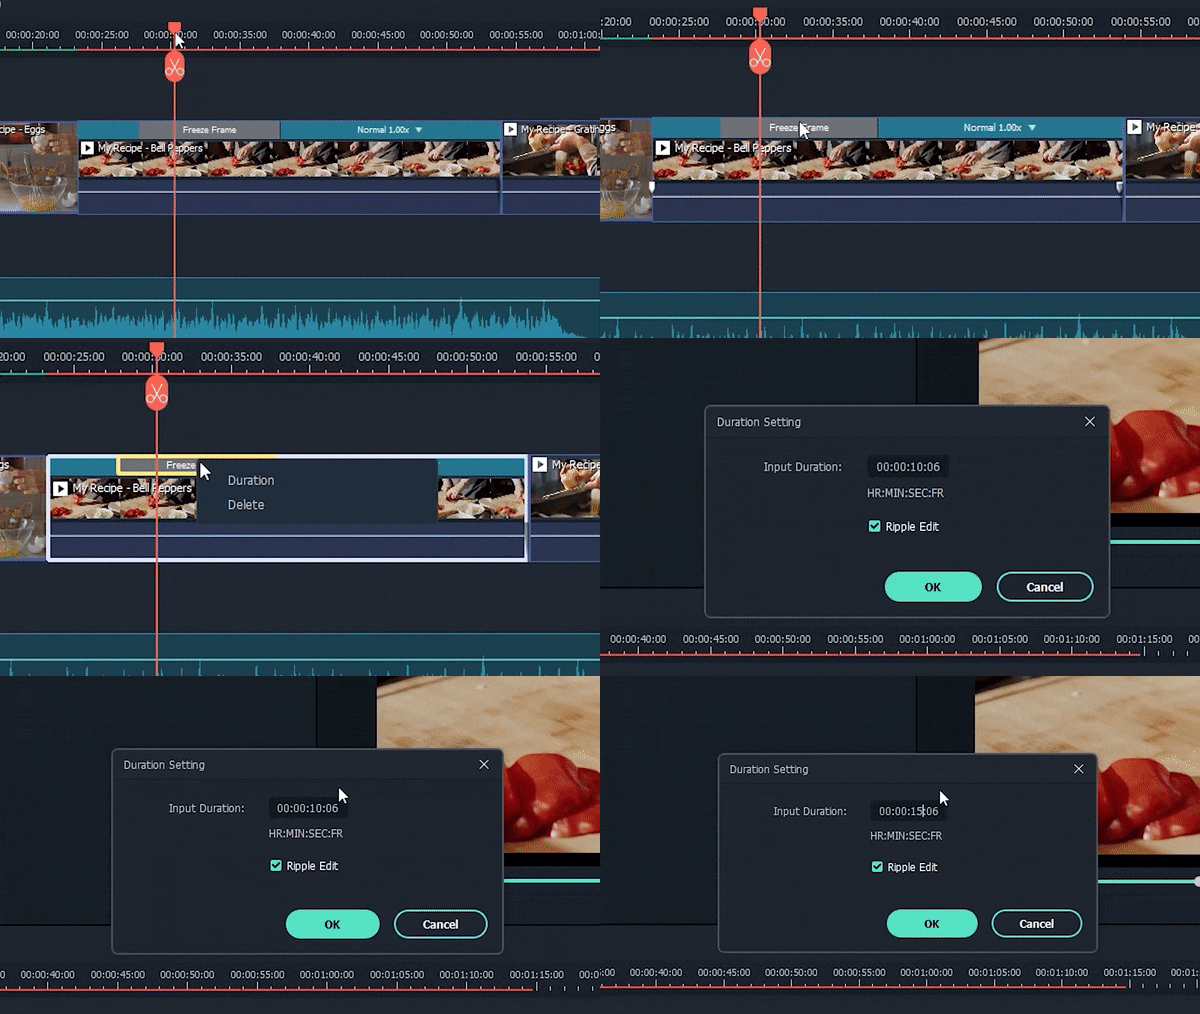
Step2 To adjust the length of your freeze, click “freeze frame.” and enter any duration you want.
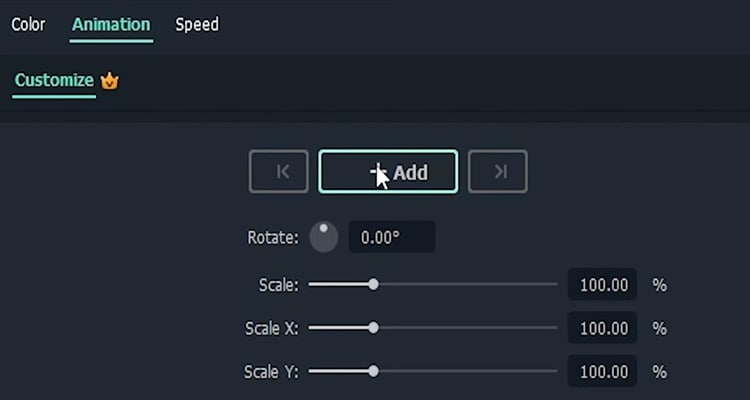
Step3 Next is about to zoom the video. Double-click your clip and click on “Animation” and then “customize.”
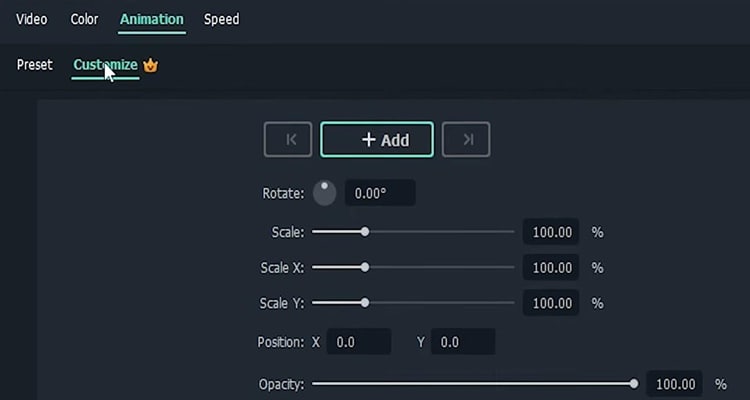
Step4 Move your playhead to where you want the zoom to begin and click “Add” to add a keyframe. Then move your playhead where you want your zoom to finish and click “Add” again.
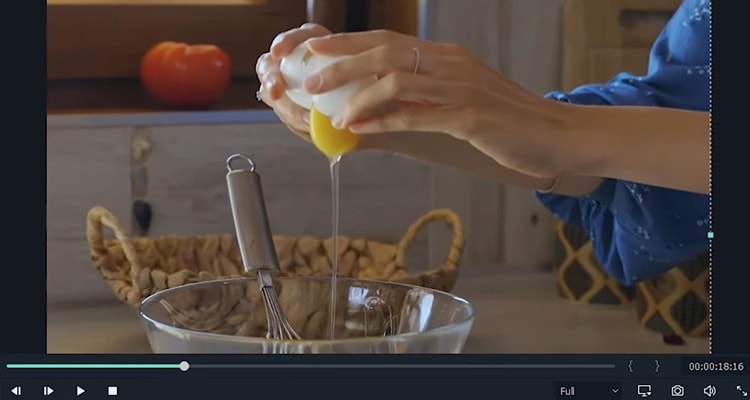
Step5 Now, you have to double-click the clip in the preview window and move and resize it to your liking.
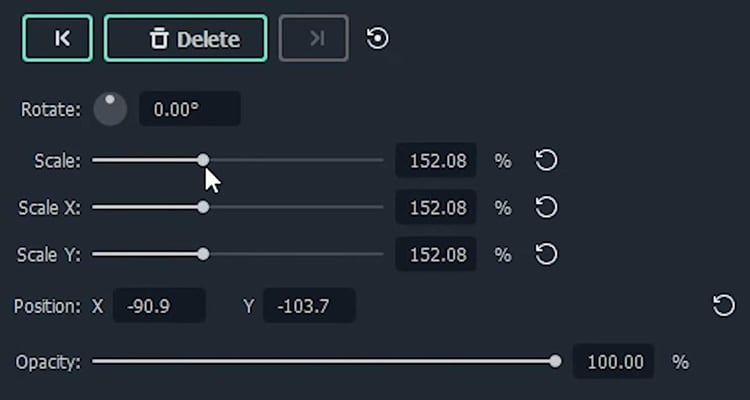
Step6 You can also use the sliders in the animation tab to do this if you want.
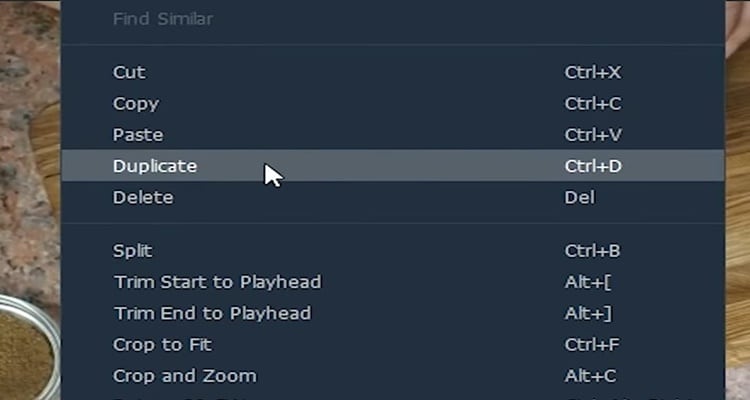
Step7 Lastly, the mask highlight. To achieve this effect, you need to duplicate your desired clip by right-clicking and clicking “Duplicate.”
Step8 Drag the new clip to any layer above the original and make sure they’re lined up.
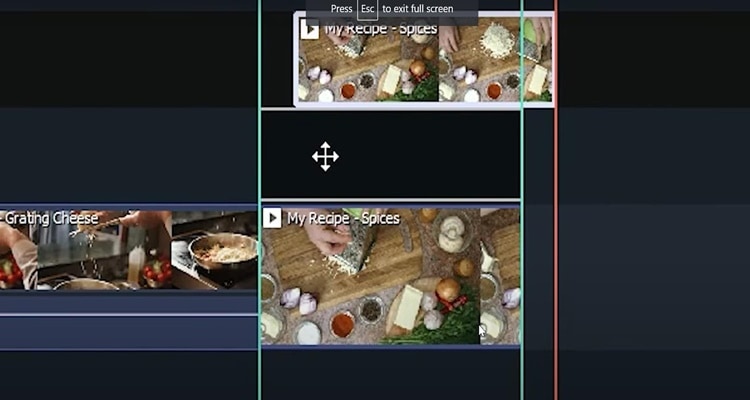
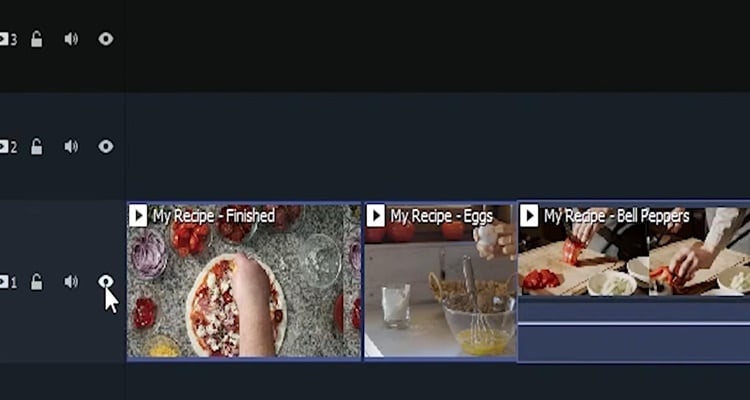
Step9 To make things easier, turn off the bottom track by clicking the eye icon.
Step10 Double-click the clip on top and go to “Video > “Mask” and .click the button to turn it on. In this tutorial, we’re going to use a “Rectangle” mask but the choice is yours.
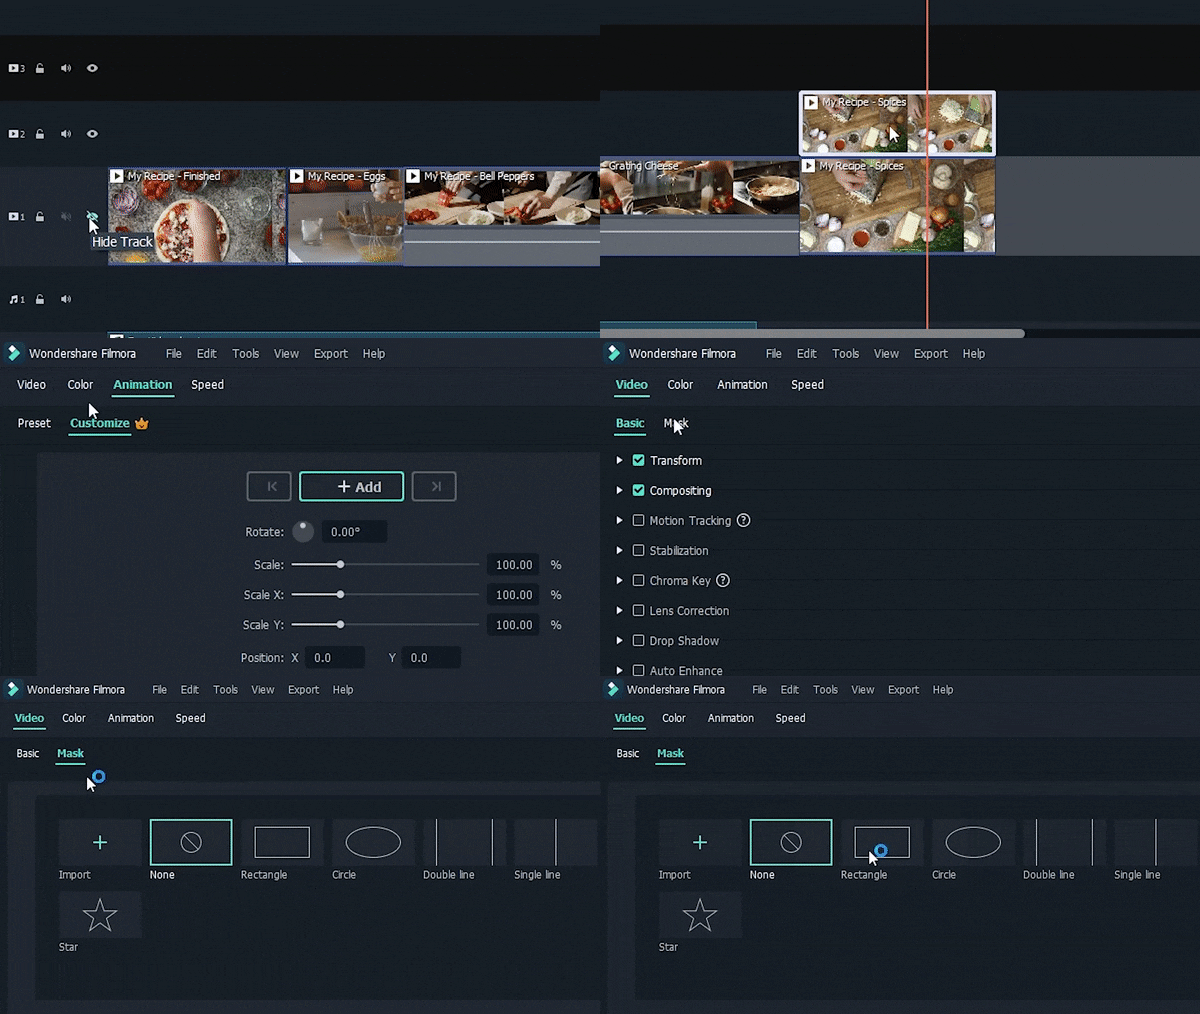
Step11 Adjust the mask size and position in the preview window to the area you want to highlight.

Step12 Once you’re happy with the mask’s position with the top clip, turn the bottom trackback on by clicking the eye icon.
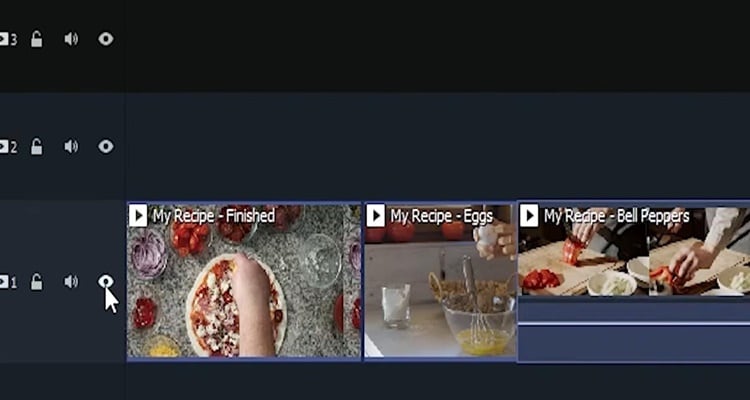
Step13 here’s where it all comes together. Double-click the bottom clip, click on “Anmation,” and “Customize.”
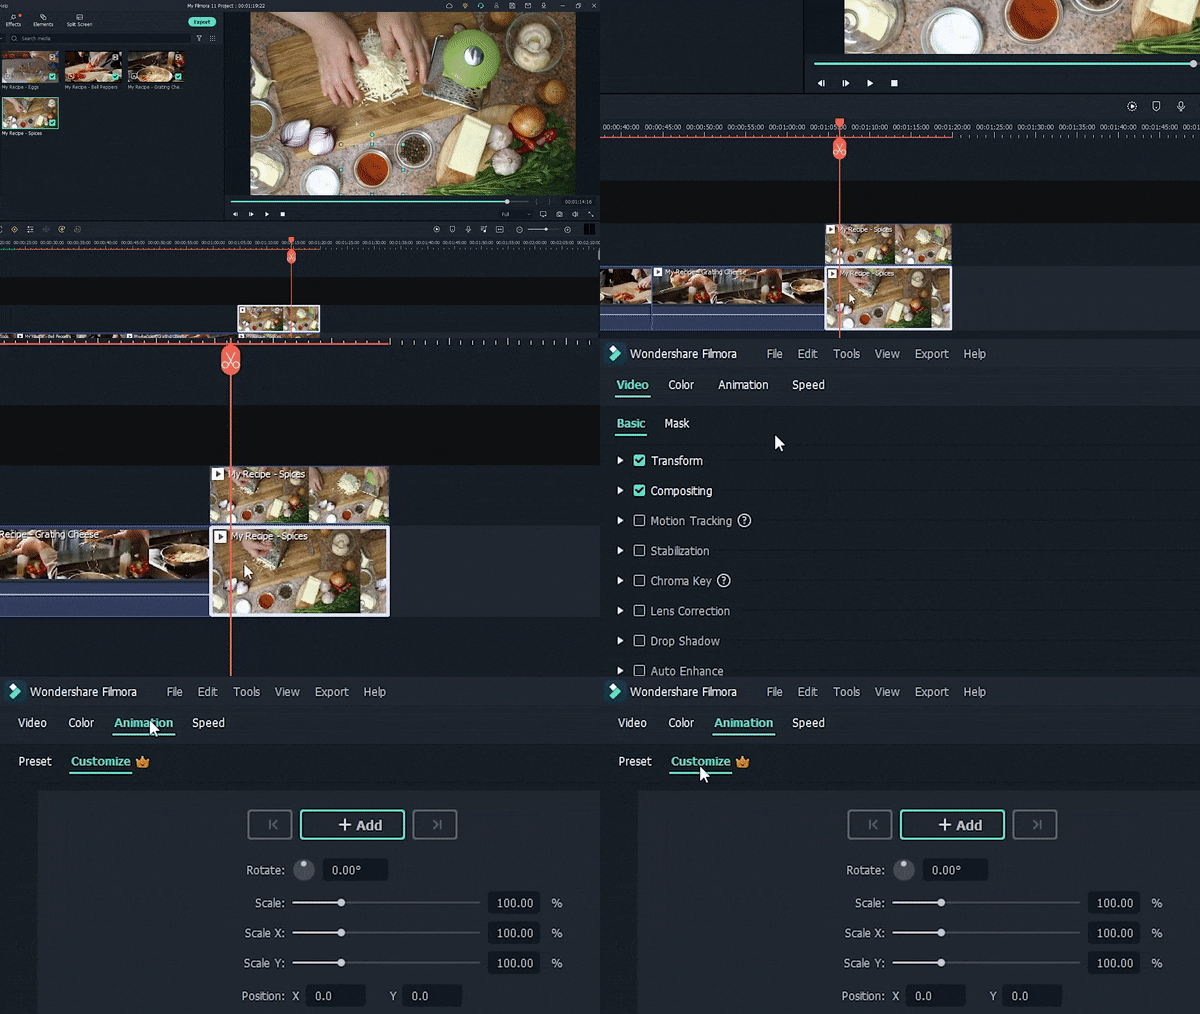
Step14 Drag the opacity slider until you’re happy with the contrast. Finally, you have a nifty mask highlight for your tutorial.
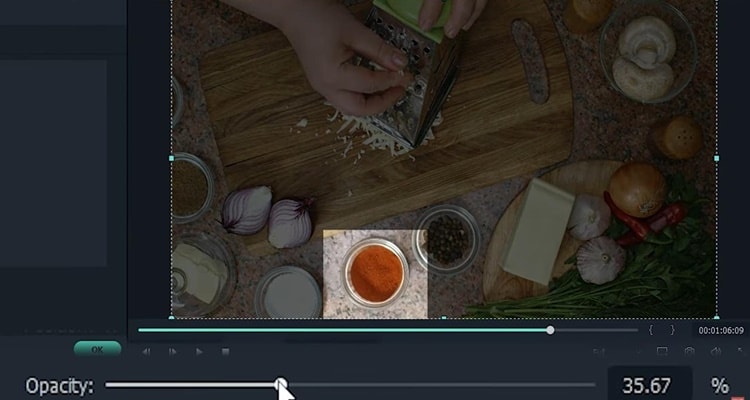
Summary
That’s how you create a tutorial video with Wondershare Filmora. Ensure you follow all the steps below to get perfect results.
Free Download For Win 7 or later(64-bit)
Free Download For macOS 10.14 or later
Free Download For macOS 10.14 or later
Step1 Firstly, open Filmora on your computer. If you haven’t already downloaded it you can get it at filmora.wondershare.com. Once you open Filmora, click “File” and “Record screen.” Here you can adjust various options like recording your computer’s audio or including your webcam.

Step2 Click settings to unlock even more options. Recording at the highest quality setting is recommended in case you need to zoom in later. Also, make sure to enable the show mouse if you want your viewer to follow along with your cursor.

Step3 When you’re ready press these buttons to begin recording your tutorial and hit them again to finish your recording.

Part 2. Keep your intro short
Avoid adding any long intro monologues or skits to your tutorial. First, your goal is to be informative and entertaining. Second, it’s always best to lead with a peek at what the final result of your tutorial will look like whether it’s a video effect arts and crafts or a recipe video.

Part 3. Break down your tutorial into steps
No matter what your tutorial is about, breaking down your process into steps makes your tutorial a lot easier to understand with Filmora. You can do this in just a few minutes.
Step1 Move the playhead to where you want your first section to begin. Next, click the “Tittles” and pick a style that appeals to you.

Step2 Click and drag your title on a track above your footage.

Step3 Double-click your new title and type in your section title. You can even adjust the style of the text to your liking. Repeat the process for as many steps as you’d like for your tutorial

Part 4. Narrate your video
Narration is a crucial part of making an effective tutorial video. Indeed, with Filmora adding narration to your video couldn’t be easier.
Step1 Moving your playhead to the beginning of your video. Then go to file record media and record voiceover and select your microphone. The drop-down menu and click the red button, then simply narrate your video as it plays out. Your voice will automatically be recorded and placed into the project. Additionally, make sure to speak, reduce background noise, and use simple language

Step2 Once you’re done recording, you can adjust the volume and further edit the voiceover by double-clicking the new audio file on your timeline.

Part 5. Emphasize important steps
Since you are working in a visual medium, emphasizing critical steps visually is very important. Here are some of the easiest and most effective ways to do that in Filmora
Step1 firstly, the freeze frame. Move your playhead to the frame you want to freeze, select your clip, go to tools speed, and click add freeze frame.

Step2 To adjust the length of your freeze, click “freeze frame.” and enter any duration you want.

Step3 Next is about to zoom the video. Double-click your clip and click on “Animation” and then “customize.”

Step4 Move your playhead to where you want the zoom to begin and click “Add” to add a keyframe. Then move your playhead where you want your zoom to finish and click “Add” again.

Step5 Now, you have to double-click the clip in the preview window and move and resize it to your liking.

Step6 You can also use the sliders in the animation tab to do this if you want.

Step7 Lastly, the mask highlight. To achieve this effect, you need to duplicate your desired clip by right-clicking and clicking “Duplicate.”

Step8 Drag the new clip to any layer above the original and make sure they’re lined up.

Step9 To make things easier, turn off the bottom track by clicking the eye icon.

Step10 Double-click the clip on top and go to “Video > “Mask” and .click the button to turn it on. In this tutorial, we’re going to use a “Rectangle” mask but the choice is yours.

Step11 Adjust the mask size and position in the preview window to the area you want to highlight.

Step12 Once you’re happy with the mask’s position with the top clip, turn the bottom trackback on by clicking the eye icon.

Step13 here’s where it all comes together. Double-click the bottom clip, click on “Anmation,” and “Customize.”

Step14 Drag the opacity slider until you’re happy with the contrast. Finally, you have a nifty mask highlight for your tutorial.

Summary
That’s how you create a tutorial video with Wondershare Filmora. Ensure you follow all the steps below to get perfect results.
Free Download For Win 7 or later(64-bit)
Free Download For macOS 10.14 or later
Separating Audio From Video in DaVinci Resolve [Step by Step]
The DaVinci Resolve is an excellent software for editing videos; that’s why it attracts users. They also enjoy using it due to its simplicity and availability of features. One of them is separating the audio from the video that most people are looking for. It is easy to extract from this software. But, to avail of this feature, you need to follow proper steps, and this article is all about it. There are also details regarding the Wondershare Filmora as the most appropriate alternative and simpler solution provider.
How can you separate audio from the video clips in DaVinci resolve?
The DaVinci resolve is the complete package to solve your different issues. It is a solution provider regarding the editing of the videos, extraction of audio from videos, matching, correction of the colours and many more. It also includes modification of the lens that helps analyse and correct the distortion. Even the lens analysis is also available to deliver high-quality results.
Step 1: Launch the DaVinci Resolve in your system after its installation. Import the media file from the library in your timeline from which you have to separate the audio.

Step 2: Select the Edit tab in the timeline of your project if it isn’t selected by default. You need to choose the video clip by pointing the cursor or dragging the mouse towards it.

Step 3: After its selection, untick all the clips, and this step is for separating the audio from the video just from one file. Click the video file for deselection.

Step 4: Now it is easy to select the video and click on it. Select the audio and video clips separately. Simply edit, delete or move your audio whenever you want it to.
An easier way to separate the audio from the video
However, the DaVinci Resolve is the software of advanced level and the best choice for professionals. But its pricing that is $299, is quite disturbing for most of the users. So, they are always searching for a suitable approach and reasonable as well. And that is the first and foremost Filmora Video Editor . You can split the audio and listen to your favourite track on any media player.
All the tools are readily available, and they are used without facing any issue. After editing and applying all the effects, it is easy to upload on social network platforms. it is very simple to create fast or slow-motion videos with speed controls. This software is highly supportive of editing videos of any kind. There is no need to look for the reasons to choose Wondershare Filmora; instead, it is not to choose it for editing tasks.
For Win 7 or later (64-bit)
For macOS 10.14 or later
Features:
- Extracting the audio from videos
- Controls available for videos and audios
- Number of ways to split the clips and screens
- All the functions are performed by just drag and drop
- Sharing of the videos unlimitedly on Vimeo, YouTube and others
- mixing the audio and removing the noise
To extract the audio from the video clip in Wondershare Filmora, go through the following easy steps and get your task done.
Step 1: After completing the installation of Wondershare Filmora, selection of the ratio is required whether it is 4:3 or 16:9. It is your choice and dependent on the requirements of your project. Import the video from the folder of your computer when you will click “Import”. As the default, all the files are all together in one place with no gap.

Step 2: This step separates the audio from the video in a single click. You need to right-click on the video from which you have to split the audio and select “Detach Audio”. Instantly, an audio file will appear on the screen on the audio track. Yes, you have received the original audio final from the source file.
Successfully the audio is separate from the video. Wondershare Filmora also offers to replace the audio file you want to add to the video. It can provide a few instructions, some narrations or personal, funny tunes for sharing with family and friends.
Step 3: After step2, it is simple to delete the audio clips or video that isn’t needed anymore and add your own choice. Click on “Export” to save the audio file into the new MP3 file and select “iPod” presenting to play. Even, you can save it as your project file on your system. After the completion of exporting the audio track, load the project file again with the video frame and export it as the new file of your video.

Wondershare Filmora is the most user-friendly editing software for all. Whether you want to make complex or straightforward videos, all is done in just a few steps. The best part of this software is that all the features are easily accessible to all types of users. It is very simple to start and show your creative skills and share easily if you are unfamiliar with video editing.
There is a massive range of tools in Wondershare Filmora that you are looking for in any video editor. 800+ video effects are built-in, such as effects for the text, transitions, filters, stickers, motion graphics, and overlays.
In Wondershare Filmora, there are templates for the spilt screens as well. It is best for you to handle your YouTube channels or your Instagram account. It doesn’t record screen only but as well voice-over. Even capturing the videos from frame to frame is also possible. So, what are you waiting for? Download Wondershare Filmora today and start your editing done in just a few clicks.
Step 2: Select the Edit tab in the timeline of your project if it isn’t selected by default. You need to choose the video clip by pointing the cursor or dragging the mouse towards it.

Step 3: After its selection, untick all the clips, and this step is for separating the audio from the video just from one file. Click the video file for deselection.

Step 4: Now it is easy to select the video and click on it. Select the audio and video clips separately. Simply edit, delete or move your audio whenever you want it to.
An easier way to separate the audio from the video
However, the DaVinci Resolve is the software of advanced level and the best choice for professionals. But its pricing that is $299, is quite disturbing for most of the users. So, they are always searching for a suitable approach and reasonable as well. And that is the first and foremost Filmora Video Editor . You can split the audio and listen to your favourite track on any media player.
All the tools are readily available, and they are used without facing any issue. After editing and applying all the effects, it is easy to upload on social network platforms. it is very simple to create fast or slow-motion videos with speed controls. This software is highly supportive of editing videos of any kind. There is no need to look for the reasons to choose Wondershare Filmora; instead, it is not to choose it for editing tasks.
For Win 7 or later (64-bit)
For macOS 10.14 or later
Features:
- Extracting the audio from videos
- Controls available for videos and audios
- Number of ways to split the clips and screens
- All the functions are performed by just drag and drop
- Sharing of the videos unlimitedly on Vimeo, YouTube and others
- mixing the audio and removing the noise
To extract the audio from the video clip in Wondershare Filmora, go through the following easy steps and get your task done.
Step 1: After completing the installation of Wondershare Filmora, selection of the ratio is required whether it is 4:3 or 16:9. It is your choice and dependent on the requirements of your project. Import the video from the folder of your computer when you will click “Import”. As the default, all the files are all together in one place with no gap.

Step 2: This step separates the audio from the video in a single click. You need to right-click on the video from which you have to split the audio and select “Detach Audio”. Instantly, an audio file will appear on the screen on the audio track. Yes, you have received the original audio final from the source file.
Successfully the audio is separate from the video. Wondershare Filmora also offers to replace the audio file you want to add to the video. It can provide a few instructions, some narrations or personal, funny tunes for sharing with family and friends.
Step 3: After step2, it is simple to delete the audio clips or video that isn’t needed anymore and add your own choice. Click on “Export” to save the audio file into the new MP3 file and select “iPod” presenting to play. Even, you can save it as your project file on your system. After the completion of exporting the audio track, load the project file again with the video frame and export it as the new file of your video.

Wondershare Filmora is the most user-friendly editing software for all. Whether you want to make complex or straightforward videos, all is done in just a few steps. The best part of this software is that all the features are easily accessible to all types of users. It is very simple to start and show your creative skills and share easily if you are unfamiliar with video editing.
There is a massive range of tools in Wondershare Filmora that you are looking for in any video editor. 800+ video effects are built-in, such as effects for the text, transitions, filters, stickers, motion graphics, and overlays.
In Wondershare Filmora, there are templates for the spilt screens as well. It is best for you to handle your YouTube channels or your Instagram account. It doesn’t record screen only but as well voice-over. Even capturing the videos from frame to frame is also possible. So, what are you waiting for? Download Wondershare Filmora today and start your editing done in just a few clicks.
Step 2: Select the Edit tab in the timeline of your project if it isn’t selected by default. You need to choose the video clip by pointing the cursor or dragging the mouse towards it.

Step 3: After its selection, untick all the clips, and this step is for separating the audio from the video just from one file. Click the video file for deselection.

Step 4: Now it is easy to select the video and click on it. Select the audio and video clips separately. Simply edit, delete or move your audio whenever you want it to.
An easier way to separate the audio from the video
However, the DaVinci Resolve is the software of advanced level and the best choice for professionals. But its pricing that is $299, is quite disturbing for most of the users. So, they are always searching for a suitable approach and reasonable as well. And that is the first and foremost Filmora Video Editor . You can split the audio and listen to your favourite track on any media player.
All the tools are readily available, and they are used without facing any issue. After editing and applying all the effects, it is easy to upload on social network platforms. it is very simple to create fast or slow-motion videos with speed controls. This software is highly supportive of editing videos of any kind. There is no need to look for the reasons to choose Wondershare Filmora; instead, it is not to choose it for editing tasks.
For Win 7 or later (64-bit)
For macOS 10.14 or later
Features:
- Extracting the audio from videos
- Controls available for videos and audios
- Number of ways to split the clips and screens
- All the functions are performed by just drag and drop
- Sharing of the videos unlimitedly on Vimeo, YouTube and others
- mixing the audio and removing the noise
To extract the audio from the video clip in Wondershare Filmora, go through the following easy steps and get your task done.
Step 1: After completing the installation of Wondershare Filmora, selection of the ratio is required whether it is 4:3 or 16:9. It is your choice and dependent on the requirements of your project. Import the video from the folder of your computer when you will click “Import”. As the default, all the files are all together in one place with no gap.

Step 2: This step separates the audio from the video in a single click. You need to right-click on the video from which you have to split the audio and select “Detach Audio”. Instantly, an audio file will appear on the screen on the audio track. Yes, you have received the original audio final from the source file.
Successfully the audio is separate from the video. Wondershare Filmora also offers to replace the audio file you want to add to the video. It can provide a few instructions, some narrations or personal, funny tunes for sharing with family and friends.
Step 3: After step2, it is simple to delete the audio clips or video that isn’t needed anymore and add your own choice. Click on “Export” to save the audio file into the new MP3 file and select “iPod” presenting to play. Even, you can save it as your project file on your system. After the completion of exporting the audio track, load the project file again with the video frame and export it as the new file of your video.

Wondershare Filmora is the most user-friendly editing software for all. Whether you want to make complex or straightforward videos, all is done in just a few steps. The best part of this software is that all the features are easily accessible to all types of users. It is very simple to start and show your creative skills and share easily if you are unfamiliar with video editing.
There is a massive range of tools in Wondershare Filmora that you are looking for in any video editor. 800+ video effects are built-in, such as effects for the text, transitions, filters, stickers, motion graphics, and overlays.
In Wondershare Filmora, there are templates for the spilt screens as well. It is best for you to handle your YouTube channels or your Instagram account. It doesn’t record screen only but as well voice-over. Even capturing the videos from frame to frame is also possible. So, what are you waiting for? Download Wondershare Filmora today and start your editing done in just a few clicks.
Step 2: Select the Edit tab in the timeline of your project if it isn’t selected by default. You need to choose the video clip by pointing the cursor or dragging the mouse towards it.

Step 3: After its selection, untick all the clips, and this step is for separating the audio from the video just from one file. Click the video file for deselection.

Step 4: Now it is easy to select the video and click on it. Select the audio and video clips separately. Simply edit, delete or move your audio whenever you want it to.
An easier way to separate the audio from the video
However, the DaVinci Resolve is the software of advanced level and the best choice for professionals. But its pricing that is $299, is quite disturbing for most of the users. So, they are always searching for a suitable approach and reasonable as well. And that is the first and foremost Filmora Video Editor . You can split the audio and listen to your favourite track on any media player.
All the tools are readily available, and they are used without facing any issue. After editing and applying all the effects, it is easy to upload on social network platforms. it is very simple to create fast or slow-motion videos with speed controls. This software is highly supportive of editing videos of any kind. There is no need to look for the reasons to choose Wondershare Filmora; instead, it is not to choose it for editing tasks.
For Win 7 or later (64-bit)
For macOS 10.14 or later
Features:
- Extracting the audio from videos
- Controls available for videos and audios
- Number of ways to split the clips and screens
- All the functions are performed by just drag and drop
- Sharing of the videos unlimitedly on Vimeo, YouTube and others
- mixing the audio and removing the noise
To extract the audio from the video clip in Wondershare Filmora, go through the following easy steps and get your task done.
Step 1: After completing the installation of Wondershare Filmora, selection of the ratio is required whether it is 4:3 or 16:9. It is your choice and dependent on the requirements of your project. Import the video from the folder of your computer when you will click “Import”. As the default, all the files are all together in one place with no gap.

Step 2: This step separates the audio from the video in a single click. You need to right-click on the video from which you have to split the audio and select “Detach Audio”. Instantly, an audio file will appear on the screen on the audio track. Yes, you have received the original audio final from the source file.
Successfully the audio is separate from the video. Wondershare Filmora also offers to replace the audio file you want to add to the video. It can provide a few instructions, some narrations or personal, funny tunes for sharing with family and friends.
Step 3: After step2, it is simple to delete the audio clips or video that isn’t needed anymore and add your own choice. Click on “Export” to save the audio file into the new MP3 file and select “iPod” presenting to play. Even, you can save it as your project file on your system. After the completion of exporting the audio track, load the project file again with the video frame and export it as the new file of your video.

Wondershare Filmora is the most user-friendly editing software for all. Whether you want to make complex or straightforward videos, all is done in just a few steps. The best part of this software is that all the features are easily accessible to all types of users. It is very simple to start and show your creative skills and share easily if you are unfamiliar with video editing.
There is a massive range of tools in Wondershare Filmora that you are looking for in any video editor. 800+ video effects are built-in, such as effects for the text, transitions, filters, stickers, motion graphics, and overlays.
In Wondershare Filmora, there are templates for the spilt screens as well. It is best for you to handle your YouTube channels or your Instagram account. It doesn’t record screen only but as well voice-over. Even capturing the videos from frame to frame is also possible. So, what are you waiting for? Download Wondershare Filmora today and start your editing done in just a few clicks.
A Guide to Create Your Own LOL Montage Video
Mostly, the lol montage videos help to excite the League of Legend players by displaying powerful attacks in the game. These videos help to entertain the viewers. In this article, you will study the importance of making these videos and the related steps in creating such content like a profession. There are many video editing tools available in the digital space to build videos according to your needs. Through efficient edits, you can make the best out of the captured content. The below content helps you to choose the right tool to carry out your video edits optimally. Connect with this article and find out the best ways to make the montage videos efficiently.

LOL Montage
Why we need to make LOL Montage Video
You can create lol montage videos for various reasons. Here are some of them are listed below.
Reason 1: Enlighten the viewers on how to play the game
As the game comprises two teams each five players fight one another using their powers. There are different ways to earn points, rewards and extra features for their characters while playing the game. Using the lol montage videos, you can teach the newbie users about the tips and tricks in this game.
Reason 2: Enhanced visuals
When creating montage videos, you can bring out the real effects of the content. There are options to edit the video effects and convincingly display them. The lol montage video grabs the attention of the viewers in no time and you can convey your message easily to the audience.
Reason 3: Increase the players
After streaming the LOL montage videos, you can expect many viewers will become players trying the tips highlighted in your content. It excites the audience and helps them to succeed in the game flawlessly.
How to create your own LOL Montage video
It is simple to create a lol montage video. Creativity with innovative edits is sufficient to develop outstanding montage content for your needs.

How to Create LOL Montage
1. Prepare your LOL video clips
Initially, prepare lol video clips as separate pieces. You can also pick the older images or videos if you have any in your gallery that is recorded when you had played the game. Capture fresh copies if possible but ensure it lasts for a short duration. Avoid recording longer content because it reduces the excitement in the audience.
2. How to pick the right video editing software
Next, after collecting the number of League of legends play recordings, pick the ones that are important in creating the montage video. Then, select the best video editor to perform the desired edits on the collected content. Here is a few recommended video editing tool to enhance the overall edits on the recorded content.
• Wondershare Filmora
The Filmora video editor is a simple tool with an excellent user interface. You can perform any edits effortlessly using this program. All the controls are explicitly available for quick access. Using Filmora video editor, you can add visual effects, transitions, and animations to the content like a pro. This app serves the needs of both professionals and newbies. You can also insert advanced features like audio ducking, freeze frames, keyframes, split the screens and stream desired music tracks with the content. You can explore more if you make a quick download of this application.
You can work on many factors in the videos to enhance their overall performance. Edit the background using the Chroma key and green screen effect and adjust the visuals by modifying the attributes like color gradients, hue, saturation, and brightness. You can insert motion elements, filters, and titles to add flavors to the content. Improve the audio quality in the content by removing the noise factors and adjusting the audio equalizers to sound precise.
• OpenShot Video editor
It is an exclusive video editor compatible with multi-platforms like Linux, Mac, and Windows, and you can use this app to trim and slice the videos into desired pieces. There are options to animate and keyframe the content hassle-free. This app enables you to work with multiple tracks without any watermark issues. Insert slow-motion effects and playback speed variations to add flavors to the edited content. It supports more than 70 languages and displays a simple interface.
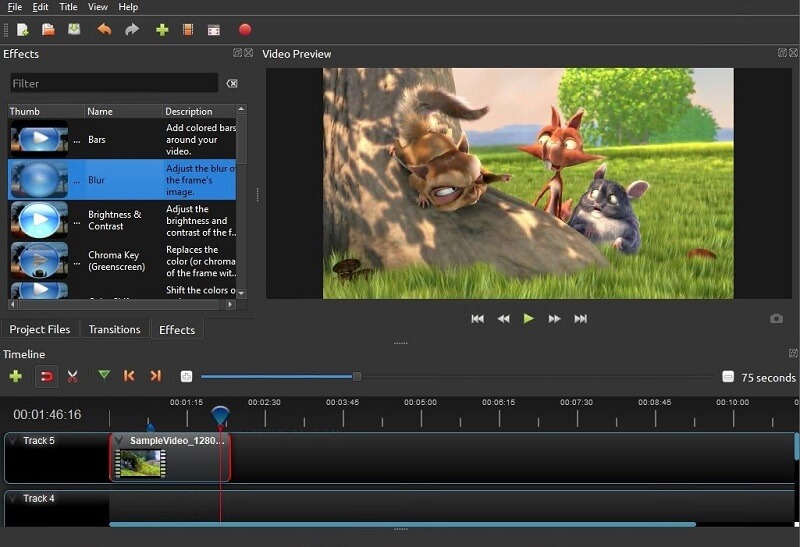
Openshot Video Editor
• AVS video editor
Here comes another efficient video editor that works on the HD content like a pro. It is compatible with all file formats and processes the videos using its in-built features. This app allows adding texts, annotating, and splitting the recordings according to your requirement. Get a professional look at the content by working on its color gradients. Remove the shaking effects on the footage using the video stabilization features and change the background by triggering the Chroma Key effects.
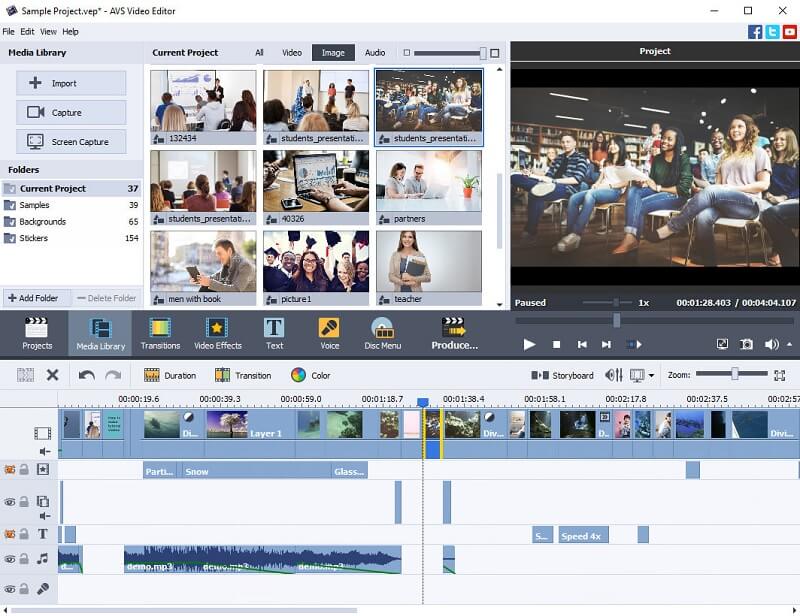
AVS video editor
The above-discussed video editors are reliable, and you can go for them without hesitation. It brings impressive effects to the recordings and helps you create lol montage video content.
How to edit your LOL Montage video
Consider the Filmora video editor after recording the content to edit the file in the Filmora video editor by following the below instructions.
Step1Install the app
Go to the official webpage of Filmora and download the correct version of the tool based on the system OS. Then, install and launch the program. Next, upload the recorded file into the working space of Filmora using the Import Files option.
Wondershare Filmora11 Express Better
Achieve More
Grow Together
Free Download Free Download Learn More

Step2Add Visual effects
Now, select the Effects option in the Menu and witness the list of visual effects available as a built-in asset in the Filmora library. Then, choose the favorite effect option and right-click to select the Apply pop-up message. This activity applies the effect to the uploaded content in no time. You can use the Preview option to view the video effect on the recordings before making the final download of the edited content.
Step3Add Transitions and Effects to make it better
If you want to increase the effects on the recordings, then try some transitions and animations.
Select the Transitions option in the Menu and choose the desired transition effect listed on the screen. Choose your favorite one and right-click to hit the Apply pop-up option. This action applies the video effect to the uploaded file. You can witness the changes in the Preview button by playing the edited video.
Likewise, you can also add animations to the content. Use the in-built resource of Filmora by using the above method. Access the asset library of Filmora to add extra flavors to the content.
image / video 16:9
Conclusion:
Thus, this article has given valuable insights into the LOL montage video making. You can use the instructions wisely and build a montage video according to your needs. Increase the overall appearance of the content using reliable video editors like Filmora. Apply the basic and advanced edits on the video content and enhance the recordings for better outcomes. Stay connected with this article to learn more about the video edits and the reliable video editors that bring miraculous changes in the video content.
Free Download Free Download Learn More

Step2Add Visual effects
Now, select the Effects option in the Menu and witness the list of visual effects available as a built-in asset in the Filmora library. Then, choose the favorite effect option and right-click to select the Apply pop-up message. This activity applies the effect to the uploaded content in no time. You can use the Preview option to view the video effect on the recordings before making the final download of the edited content.
Step3Add Transitions and Effects to make it better
If you want to increase the effects on the recordings, then try some transitions and animations.
Select the Transitions option in the Menu and choose the desired transition effect listed on the screen. Choose your favorite one and right-click to hit the Apply pop-up option. This action applies the video effect to the uploaded file. You can witness the changes in the Preview button by playing the edited video.
Likewise, you can also add animations to the content. Use the in-built resource of Filmora by using the above method. Access the asset library of Filmora to add extra flavors to the content.
image / video 16:9
Conclusion:
Thus, this article has given valuable insights into the LOL montage video making. You can use the instructions wisely and build a montage video according to your needs. Increase the overall appearance of the content using reliable video editors like Filmora. Apply the basic and advanced edits on the video content and enhance the recordings for better outcomes. Stay connected with this article to learn more about the video edits and the reliable video editors that bring miraculous changes in the video content.
Recommended Video Background Changers
Popular Trends in the creative space engendered the creation of several tools that have reduced the difficulties involved in content creation. A few years ago, executing simple post-production tricks was a huge task. Simple edits like changing video backgrounds needed an expensive light setup and a proper green/blue screen background. In simpler words, it was expensive.
Today, we can utilize a video background changer online without an expensive setup. It has brought out the hidden creativity in thousands of content creators worldwide. Check out TikTok, Instagram, and other social media platforms to verify this claim.
This article covers a list of tools that can edit video backgrounds online. Content creators and anyone who wants to explore creativity can use these tools. Before we jump into the substance of this article, you might be wondering;
What is a Video Background Changer?
A video background changer is a tool that can swap the background of any video. These tools usually work in three simple steps.
- Analyze the footage.
- Separate the subject or “subjects” from the background
- Switch backgrounds.
The process starts when a user uploads a video clip. The tool analyzes the footage and separates the subjects from the background. The user can select other available pre-made backgrounds or upload a preferred one to the platform. After this process, users can share the finished video or save it to their devices. Other kinds of background changers only merge a transparent clip with a background.
How to Remove Background without Green Screen
Free Download For Win 7 or later(64-bit)
Free Download For macOS 10.14 or later
3 Video Background Changers Online
Veed.io

Veed is an online feature-packed video editing platform. It comes with an interface that is suitable for newbies and professionals alike. Like many other competitors, it offers a free and premium version that unlocks more tools for you to play around with.
This tool allows you to edit video background online, transcribe audio, add subtitles, etc. Since this tool is web-based, there is no need to download any storage-intensive application. You can quickly edit your content online and share your videos.
Features
- Recorder feature for recording tutorials and online meetings
- Edit feature for creating catchy videos
- Transcriptions and subtitle module
- Color grading feature
- Online video hosting and storage
BeeCut

BeeCut is a video editing software specifically created and designed for simplicity. Quick trims and edits for short videos are the primary focus of the BeeCut online application. A compilation of over 60+ reviews quickly exposes BeeCut as a beginner-friendly editing software. You can acquaint yourself with this platform in less than 24 hours.
You can change your background online for free using the BeeCut online editor. It allows you to Import a background and merge it with the clip that contains your subject. BeeCut has a familiar user interface that feels like it came from mobile editors. This simplicity makes it easy to understand.
Features
- Trim and cut your footage
- Add custom video intros and overlays
- Speech recognition for transcription and subtitling
- Online and offline versions for different functions
- Large community of over 1 million users
Unscreen

If you’re searching for one of the fastest background removers, you’re in luck. Unscreen is the “sit tight and relax” version of background changers. You can change the video background online without clicking any buttons or learning how to use the software. You also don’t need to select pixels or use a color picker from an “ultra key” function. You only upload a video, and the platform does the rest.
In simple steps, you can quickly acquaint yourself with Unscreen. It also promises a risk-free money-back guarantee that lasts for 14 days only.
Features
- Other platforms can integrate it as a tool
- No watermarks
- Full HD video upload and download
- Affordable and more realistic payment structure
- Specialized background remover
3 Video Background Changers on Desktop
Final Cut Pro

The video editors’ community refers to Final Cut Pro as one of the most professional applications for Mac users. It is a standard editing software that competes with DaVinci Resolve, Premiere Pro, and the rest. It uses the standard ground-to-top layering system to organize a timeline and is easy to learn.
Though it cannot edit background videos online, users can download it and use its chroma key effect. Like Premiere’s ultra-key effect, the chroma key function can select and remove a specific color. This is not the only way to remove backgrounds, but it is the most effective. If done correctly, no bleeding or distorted subject traces will be found.
Features
- Simple object motion tracking
- Color grading and cinematic color LUTs
- Supports 4k - 8k footage editing, rendering, and exporting
- Text animations
- Apple’s Neural Engine for speed edits
Adobe Premiere Pro

Adobe Premiere Pro is one of the best-selling products from the Adobe franchise, apart from Acrobat Reader and Photoshop. Professionals worldwide trust Premiere Pro as their go-to editor. With features like cut & trim, animations (using keyframing), an in-built graphics panel, and a lumetri color grading panel. Most beginners start their creative video editing careers using Premiere Pro.
Online change video background features don’t come with this application. To change a video background, you have to use its “Ultra Key” effect, or mask out your subject frame-by-frame. The easiest way to achieve this is to use the color picker from the ultra key effect in your effects control panel. Premier Pro has a wide range of free tutorials on YouTube from various content creators. This makes the learning process a breeze.
Features
- AI-assisted transcription and subtitling
- Customizable workspaces
- Audio effects and dedicated audio editing interface
- Work seamlessly between After Effects (for complex motion graphics and effects) and Audition (for dedicated audio effects and editing)
- Large community support base
Filmora

If you’re searching for easy-to-use video editing software for beginners and professionals, Filmora might be your best choice. With AI-assisted creative features, you can easily add effects and style to your video. Its AI Text-based editing feature makes adding effects enjoyable.
As a perfect alternative to getting a video background changer online, Filmora can save you hours in editing time. With AI assistance, you can separate your subject from your background without needing to do the work. You can add creative texts and colors to your background with a few clicks.
Features
- AI-assisted editing
- Hundreds of templates
- Countless effect templates.
Free Online Background Changer Fantastic tool for effortlessly transforming and enhancing your videos.
Try Filmora’s Background Changer Try Filmora’s Background Changer Explore Background Changer with Filmora

Conclusion
In finding the right Video background changer online, knowing the description and the features offered is key. We’ve saved you the stress of having to try them all out. With this article, you should be able to pick what works best for you.
Out of these mentioned tools, no one stands out as a better money’s worth like Filmora. With AI assistance, you can save hours in editing time, and get better results. Users worldwide have reviewed this app, and recommend it for easy use, quality exports, and seamless AI-assisted editing.
Free Download For Win 7 or later(64-bit)
Free Download For macOS 10.14 or later
3 Video Background Changers Online
Veed.io

Veed is an online feature-packed video editing platform. It comes with an interface that is suitable for newbies and professionals alike. Like many other competitors, it offers a free and premium version that unlocks more tools for you to play around with.
This tool allows you to edit video background online, transcribe audio, add subtitles, etc. Since this tool is web-based, there is no need to download any storage-intensive application. You can quickly edit your content online and share your videos.
Features
- Recorder feature for recording tutorials and online meetings
- Edit feature for creating catchy videos
- Transcriptions and subtitle module
- Color grading feature
- Online video hosting and storage
BeeCut

BeeCut is a video editing software specifically created and designed for simplicity. Quick trims and edits for short videos are the primary focus of the BeeCut online application. A compilation of over 60+ reviews quickly exposes BeeCut as a beginner-friendly editing software. You can acquaint yourself with this platform in less than 24 hours.
You can change your background online for free using the BeeCut online editor. It allows you to Import a background and merge it with the clip that contains your subject. BeeCut has a familiar user interface that feels like it came from mobile editors. This simplicity makes it easy to understand.
Features
- Trim and cut your footage
- Add custom video intros and overlays
- Speech recognition for transcription and subtitling
- Online and offline versions for different functions
- Large community of over 1 million users
Unscreen

If you’re searching for one of the fastest background removers, you’re in luck. Unscreen is the “sit tight and relax” version of background changers. You can change the video background online without clicking any buttons or learning how to use the software. You also don’t need to select pixels or use a color picker from an “ultra key” function. You only upload a video, and the platform does the rest.
In simple steps, you can quickly acquaint yourself with Unscreen. It also promises a risk-free money-back guarantee that lasts for 14 days only.
Features
- Other platforms can integrate it as a tool
- No watermarks
- Full HD video upload and download
- Affordable and more realistic payment structure
- Specialized background remover
3 Video Background Changers on Desktop
Final Cut Pro

The video editors’ community refers to Final Cut Pro as one of the most professional applications for Mac users. It is a standard editing software that competes with DaVinci Resolve, Premiere Pro, and the rest. It uses the standard ground-to-top layering system to organize a timeline and is easy to learn.
Though it cannot edit background videos online, users can download it and use its chroma key effect. Like Premiere’s ultra-key effect, the chroma key function can select and remove a specific color. This is not the only way to remove backgrounds, but it is the most effective. If done correctly, no bleeding or distorted subject traces will be found.
Features
- Simple object motion tracking
- Color grading and cinematic color LUTs
- Supports 4k - 8k footage editing, rendering, and exporting
- Text animations
- Apple’s Neural Engine for speed edits
Adobe Premiere Pro

Adobe Premiere Pro is one of the best-selling products from the Adobe franchise, apart from Acrobat Reader and Photoshop. Professionals worldwide trust Premiere Pro as their go-to editor. With features like cut & trim, animations (using keyframing), an in-built graphics panel, and a lumetri color grading panel. Most beginners start their creative video editing careers using Premiere Pro.
Online change video background features don’t come with this application. To change a video background, you have to use its “Ultra Key” effect, or mask out your subject frame-by-frame. The easiest way to achieve this is to use the color picker from the ultra key effect in your effects control panel. Premier Pro has a wide range of free tutorials on YouTube from various content creators. This makes the learning process a breeze.
Features
- AI-assisted transcription and subtitling
- Customizable workspaces
- Audio effects and dedicated audio editing interface
- Work seamlessly between After Effects (for complex motion graphics and effects) and Audition (for dedicated audio effects and editing)
- Large community support base
Filmora

If you’re searching for easy-to-use video editing software for beginners and professionals, Filmora might be your best choice. With AI-assisted creative features, you can easily add effects and style to your video. Its AI Text-based editing feature makes adding effects enjoyable.
As a perfect alternative to getting a video background changer online, Filmora can save you hours in editing time. With AI assistance, you can separate your subject from your background without needing to do the work. You can add creative texts and colors to your background with a few clicks.
Features
- AI-assisted editing
- Hundreds of templates
- Countless effect templates.
Free Online Background Changer Fantastic tool for effortlessly transforming and enhancing your videos.
Try Filmora’s Background Changer Try Filmora’s Background Changer Explore Background Changer with Filmora

Conclusion
In finding the right Video background changer online, knowing the description and the features offered is key. We’ve saved you the stress of having to try them all out. With this article, you should be able to pick what works best for you.
Out of these mentioned tools, no one stands out as a better money’s worth like Filmora. With AI assistance, you can save hours in editing time, and get better results. Users worldwide have reviewed this app, and recommend it for easy use, quality exports, and seamless AI-assisted editing.
Free Download For Win 7 or later(64-bit)
Free Download For macOS 10.14 or later
3 Video Background Changers Online
Veed.io

Veed is an online feature-packed video editing platform. It comes with an interface that is suitable for newbies and professionals alike. Like many other competitors, it offers a free and premium version that unlocks more tools for you to play around with.
This tool allows you to edit video background online, transcribe audio, add subtitles, etc. Since this tool is web-based, there is no need to download any storage-intensive application. You can quickly edit your content online and share your videos.
Features
- Recorder feature for recording tutorials and online meetings
- Edit feature for creating catchy videos
- Transcriptions and subtitle module
- Color grading feature
- Online video hosting and storage
BeeCut

BeeCut is a video editing software specifically created and designed for simplicity. Quick trims and edits for short videos are the primary focus of the BeeCut online application. A compilation of over 60+ reviews quickly exposes BeeCut as a beginner-friendly editing software. You can acquaint yourself with this platform in less than 24 hours.
You can change your background online for free using the BeeCut online editor. It allows you to Import a background and merge it with the clip that contains your subject. BeeCut has a familiar user interface that feels like it came from mobile editors. This simplicity makes it easy to understand.
Features
- Trim and cut your footage
- Add custom video intros and overlays
- Speech recognition for transcription and subtitling
- Online and offline versions for different functions
- Large community of over 1 million users
Unscreen

If you’re searching for one of the fastest background removers, you’re in luck. Unscreen is the “sit tight and relax” version of background changers. You can change the video background online without clicking any buttons or learning how to use the software. You also don’t need to select pixels or use a color picker from an “ultra key” function. You only upload a video, and the platform does the rest.
In simple steps, you can quickly acquaint yourself with Unscreen. It also promises a risk-free money-back guarantee that lasts for 14 days only.
Features
- Other platforms can integrate it as a tool
- No watermarks
- Full HD video upload and download
- Affordable and more realistic payment structure
- Specialized background remover
3 Video Background Changers on Desktop
Final Cut Pro

The video editors’ community refers to Final Cut Pro as one of the most professional applications for Mac users. It is a standard editing software that competes with DaVinci Resolve, Premiere Pro, and the rest. It uses the standard ground-to-top layering system to organize a timeline and is easy to learn.
Though it cannot edit background videos online, users can download it and use its chroma key effect. Like Premiere’s ultra-key effect, the chroma key function can select and remove a specific color. This is not the only way to remove backgrounds, but it is the most effective. If done correctly, no bleeding or distorted subject traces will be found.
Features
- Simple object motion tracking
- Color grading and cinematic color LUTs
- Supports 4k - 8k footage editing, rendering, and exporting
- Text animations
- Apple’s Neural Engine for speed edits
Adobe Premiere Pro

Adobe Premiere Pro is one of the best-selling products from the Adobe franchise, apart from Acrobat Reader and Photoshop. Professionals worldwide trust Premiere Pro as their go-to editor. With features like cut & trim, animations (using keyframing), an in-built graphics panel, and a lumetri color grading panel. Most beginners start their creative video editing careers using Premiere Pro.
Online change video background features don’t come with this application. To change a video background, you have to use its “Ultra Key” effect, or mask out your subject frame-by-frame. The easiest way to achieve this is to use the color picker from the ultra key effect in your effects control panel. Premier Pro has a wide range of free tutorials on YouTube from various content creators. This makes the learning process a breeze.
Features
- AI-assisted transcription and subtitling
- Customizable workspaces
- Audio effects and dedicated audio editing interface
- Work seamlessly between After Effects (for complex motion graphics and effects) and Audition (for dedicated audio effects and editing)
- Large community support base
Filmora

If you’re searching for easy-to-use video editing software for beginners and professionals, Filmora might be your best choice. With AI-assisted creative features, you can easily add effects and style to your video. Its AI Text-based editing feature makes adding effects enjoyable.
As a perfect alternative to getting a video background changer online, Filmora can save you hours in editing time. With AI assistance, you can separate your subject from your background without needing to do the work. You can add creative texts and colors to your background with a few clicks.
Features
- AI-assisted editing
- Hundreds of templates
- Countless effect templates.
Free Online Background Changer Fantastic tool for effortlessly transforming and enhancing your videos.
Try Filmora’s Background Changer Try Filmora’s Background Changer Explore Background Changer with Filmora

Conclusion
In finding the right Video background changer online, knowing the description and the features offered is key. We’ve saved you the stress of having to try them all out. With this article, you should be able to pick what works best for you.
Out of these mentioned tools, no one stands out as a better money’s worth like Filmora. With AI assistance, you can save hours in editing time, and get better results. Users worldwide have reviewed this app, and recommend it for easy use, quality exports, and seamless AI-assisted editing.
Free Download For Win 7 or later(64-bit)
Free Download For macOS 10.14 or later
3 Video Background Changers Online
Veed.io

Veed is an online feature-packed video editing platform. It comes with an interface that is suitable for newbies and professionals alike. Like many other competitors, it offers a free and premium version that unlocks more tools for you to play around with.
This tool allows you to edit video background online, transcribe audio, add subtitles, etc. Since this tool is web-based, there is no need to download any storage-intensive application. You can quickly edit your content online and share your videos.
Features
- Recorder feature for recording tutorials and online meetings
- Edit feature for creating catchy videos
- Transcriptions and subtitle module
- Color grading feature
- Online video hosting and storage
BeeCut

BeeCut is a video editing software specifically created and designed for simplicity. Quick trims and edits for short videos are the primary focus of the BeeCut online application. A compilation of over 60+ reviews quickly exposes BeeCut as a beginner-friendly editing software. You can acquaint yourself with this platform in less than 24 hours.
You can change your background online for free using the BeeCut online editor. It allows you to Import a background and merge it with the clip that contains your subject. BeeCut has a familiar user interface that feels like it came from mobile editors. This simplicity makes it easy to understand.
Features
- Trim and cut your footage
- Add custom video intros and overlays
- Speech recognition for transcription and subtitling
- Online and offline versions for different functions
- Large community of over 1 million users
Unscreen

If you’re searching for one of the fastest background removers, you’re in luck. Unscreen is the “sit tight and relax” version of background changers. You can change the video background online without clicking any buttons or learning how to use the software. You also don’t need to select pixels or use a color picker from an “ultra key” function. You only upload a video, and the platform does the rest.
In simple steps, you can quickly acquaint yourself with Unscreen. It also promises a risk-free money-back guarantee that lasts for 14 days only.
Features
- Other platforms can integrate it as a tool
- No watermarks
- Full HD video upload and download
- Affordable and more realistic payment structure
- Specialized background remover
3 Video Background Changers on Desktop
Final Cut Pro

The video editors’ community refers to Final Cut Pro as one of the most professional applications for Mac users. It is a standard editing software that competes with DaVinci Resolve, Premiere Pro, and the rest. It uses the standard ground-to-top layering system to organize a timeline and is easy to learn.
Though it cannot edit background videos online, users can download it and use its chroma key effect. Like Premiere’s ultra-key effect, the chroma key function can select and remove a specific color. This is not the only way to remove backgrounds, but it is the most effective. If done correctly, no bleeding or distorted subject traces will be found.
Features
- Simple object motion tracking
- Color grading and cinematic color LUTs
- Supports 4k - 8k footage editing, rendering, and exporting
- Text animations
- Apple’s Neural Engine for speed edits
Adobe Premiere Pro

Adobe Premiere Pro is one of the best-selling products from the Adobe franchise, apart from Acrobat Reader and Photoshop. Professionals worldwide trust Premiere Pro as their go-to editor. With features like cut & trim, animations (using keyframing), an in-built graphics panel, and a lumetri color grading panel. Most beginners start their creative video editing careers using Premiere Pro.
Online change video background features don’t come with this application. To change a video background, you have to use its “Ultra Key” effect, or mask out your subject frame-by-frame. The easiest way to achieve this is to use the color picker from the ultra key effect in your effects control panel. Premier Pro has a wide range of free tutorials on YouTube from various content creators. This makes the learning process a breeze.
Features
- AI-assisted transcription and subtitling
- Customizable workspaces
- Audio effects and dedicated audio editing interface
- Work seamlessly between After Effects (for complex motion graphics and effects) and Audition (for dedicated audio effects and editing)
- Large community support base
Filmora

If you’re searching for easy-to-use video editing software for beginners and professionals, Filmora might be your best choice. With AI-assisted creative features, you can easily add effects and style to your video. Its AI Text-based editing feature makes adding effects enjoyable.
As a perfect alternative to getting a video background changer online, Filmora can save you hours in editing time. With AI assistance, you can separate your subject from your background without needing to do the work. You can add creative texts and colors to your background with a few clicks.
Features
- AI-assisted editing
- Hundreds of templates
- Countless effect templates.
Free Online Background Changer Fantastic tool for effortlessly transforming and enhancing your videos.
Try Filmora’s Background Changer Try Filmora’s Background Changer Explore Background Changer with Filmora

Conclusion
In finding the right Video background changer online, knowing the description and the features offered is key. We’ve saved you the stress of having to try them all out. With this article, you should be able to pick what works best for you.
Out of these mentioned tools, no one stands out as a better money’s worth like Filmora. With AI assistance, you can save hours in editing time, and get better results. Users worldwide have reviewed this app, and recommend it for easy use, quality exports, and seamless AI-assisted editing.
Also read:
- 2024 Approved Recording Video in Slow Motion Some Considerable Points
- How to Animate Designs With Canva GIF for 2024
- Updated How to Time-Lapse a Video on iMovie
- New 4 Solutions to Add White Border to Video on Mobile and Desktop
- New 2024 Approved Detailed Review of Kodak LUTs
- New 2024 Approved How to Add a Slideshow in PowerPoint
- Updated In 2024, Want Make a Slide Show Video? Heres How
- Try These 10 Music Video Templates To Make Your Work Easy for 2024
- Updated Change Background Color in After Effects
- 2024 Approved With Everything Centered Around Videos on the Digital Platform, the Use and the Need for AI-Based Editing Tools Have Also Increased Manifold. We Have Curated a List of the Top Programs that Can Help You with AI Video Editing
- In 2024, How to Remove Audio From Videos with FFmpeg?
- New Using Slow Motion in Adobe After Effects A Step-by-Step Procession
- New A Detailed Guide to Do Color Correction in OBS for 2024
- In 2024, Speed Control Is Frequently Used in Video Editing. By Speed up or Slow Down the Video Speed, You Can Achieve Different Visual Results. This Article Will Show You How to Control the Speed of a Video
- Looking Forward to Making up Your Career in Video Editing? Land in Here to Learn About the Credibility of some Popular Video Editing Courses for 2024
- New Offering The Best Understanding of Performing iMovie Slow Motion Video
- 2024 Approved Looking for the Ways by Which Subtitles Can Be Extracted From Your MKV Files without Affecting the File Quality? Look No Further as We Are Here to Help You Know the Best Tools that Can Easily Extract SRT From MKV
- How to Add a Custom Transition to OBS for 2024
- New Splice App for Android - Guide to Download & Use
- Updated In 2024, Top 5 Video Filter Software Improve Your Videos with Filters
- New How to Make OBS Slideshow
- New Difference Between Time Lapse and Hyperlapse for 2024
- New 20 Must-Have Graduation Songs for 2024
- New How to Loop Video in Canva for 2024
- Can You Make an Fcpx Slideshow? Undoubtedly Yes, with the Unlimited Best Fcpx Slideshow Templates Available. To Know How to, Follow the Discussion Below
- AVI Video Format Is Known and Famous for Its Features. Many of You Must Have Heard About It but Do You Know some Details About AVI? Lets Increase Your Knowledge and Talk About It
- Updated 3 Methods to Combine 2 or 3 Videos Into 1 for 2024
- New How to Zoom Video in VLC Media Player
- Steps to Denoise in Final Cut Pro – Reduce Video and Audio Noise
- Updated 2024 Approved How to Animate Designs With Canva GIF
- New In 2024, How to Make Your CSGO Montage Impressive
- New Find Out The Best Dark Moody LUTs During Editing
- Updated In 2024, What Is the Best Filmora Slideshow Templates? Experts Choice
- Top 15 Slow Motion CapCut Templates to Work With for 2024
- Get 15 Absolutely-Free LUTs From This Article as Well as Get an Insight on How Cinematic LUTs Affect Your Film
- Updated How to Make a Gaming Montage - Guide & Tips
- 8 Best Video Editor with Useful Masking
- In 2024, How to Change Location on TikTok to See More Content On your Apple iPhone XS Max | Dr.fone
- What You Want To Know About Two-Factor Authentication for iCloud From your Apple iPhone SE (2020)
- Easy steps to recover deleted photos from Galaxy A14 5G.
- How to Fix Life360 Shows Wrong Location On Vivo Y36? | Dr.fone
- New Ultimate Guide How to Live Stream on Facebook for 2024
- In 2024, AddROM Bypass An Android Tool to Unlock FRP Lock Screen For your Tecno Pova 5
- In 2024, 3 Effective Methods to Fake GPS location on Android For your Infinix Smart 7 | Dr.fone
- MKV playback issues on Xiaomi Redmi Note 13 5G
- How to Transfer Data from Tecno Spark 20 to Samsung Phone | Dr.fone
- 5 Easy Ways to Change Location on YouTube TV On Honor X9b | Dr.fone
- In 2024, 3 Solutions to Find Your Lava Agni 2 5G Current Location of a Mobile Number | Dr.fone
- 10 Best Fake GPS Location Spoofers for Huawei Nova Y91 | Dr.fone
- Reasons for Samsung Galaxy A23 5G Stuck on Startup Screen and Ways To Fix Them | Dr.fone
- In 2024, How to Change Lock Screen Wallpaper on Vivo Y78+
- 4 Ways to Transfer Contacts from Apple iPhone 12 Pro Max to iPhone Quickly | Dr.fone
- In 2024, 10 Fake GPS Location Apps on Android Of your Oppo F25 Pro 5G | Dr.fone
- A Working Guide For Pachirisu Pokemon Go Map On Honor Magic 5 Pro | Dr.fone
- In 2024, Pokemon Go No GPS Signal? Heres Every Possible Solution On Honor 100 | Dr.fone
- In 2024, How To Unlock Apple iPhone 15 Without Passcode? 4 Easy Methods
- 10 Fake GPS Location Apps on Android Of your Nokia C12 | Dr.fone
- Title: How to Make Tutorial Video with Filmora
- Author: Chloe
- Created at : 2024-05-20 03:37:28
- Updated at : 2024-05-21 03:37:28
- Link: https://ai-editing-video.techidaily.com/how-to-make-tutorial-video-with-filmora/
- License: This work is licensed under CC BY-NC-SA 4.0.


