:max_bytes(150000):strip_icc():format(webp)/patch-tuesday-2625783-d6bcf232b3c64fc5958037ad31299bd9.png)
How to Make Video Slow Motion? Complete Guide

How to Make Video Slow Motion? [Complete Guide]
Slow-motion videos are in trend now, especially when shooting for Instagram Reels , TikTok videos, or YouTube Shorts . While many users record the entire video in slow motion, there are others who need only a particular section of a clip to play at a reduced speed. Nevertheless, slowing down footage is no longer rocket science, thanks to the advancements in technology, and the availability and ease of access to relevant apps.
That said, here you will learn what is needed to record a video in slow motion, and how to get the job done in a simple way. In addition, you will also learn how to reduce the playback speed of an already existing video if it was recorded at a normal pace.
In this article
01 How to Make Slow Motion Videos via Recording?
02 How to Apply the Smooth Slow-Motion Effect in Post-Production?
Part 1: How to Make Slow Motion Videos via Recording?
The fact is, the playback speed of a video is inversely proportional to the frames per second (FPS) it has been recorded in. Usually, to have a video play at normal speed, it is recorded at 24 FPS or 30 FPS. On the other hand, if you increase the frame rate (FPS) to 120 or 240, the playback speed slows down. You can easily check this if you have access to a DSLR camera or an iPhone. These devices allow you to adjust the FPS so the videos can be recorded in slow motion.
For your convenience and learning, the step-by-step procedure on how to record a video in slow motion using an iPhone is explained below:
Step 1: Get to the SLO-MO Mode
Launch the Camera app on your iPhone (iPhone 13 Pro Max is used here for illustrations), and swipe the screen to the left to get to the SLO-MO mode.

Step 2: Adjust Recording Preferences
Tap the number at the top-right corner to switch between 120 FPS and 240 FPS as needed. Tap 1x from the lower-middle section of the screen, and use the rotator to adjust your preferred zoom level.

Step 3: Start and Stop Recording
Tap the Record button from the bottom-center of the screen to begin recording the video in slow motion. Tap Stop when you are done. You can access the recorded video from the Videos container of the Photos app in your iPhone.
If you are using Android phone, you can check this article to find out more details about How to Record Super Slow Motion Videos on Your Phone.
You may also like: Best Slo-mo Camera Apps for Android And iPhone
Part 2: How to Apply the Smooth Slow-Motion Effect in Post-Production?
If you don’t have access to a camera that can record videos in slow motion, or in case you want to capture the footage at normal playback speed and then slow it down later, you need a dedicated tool to get the job done. Even though several post-production applications are available in the market, the one that is most versatile, has an intuitive interface, and is quite easy to use is Filmora video editor from Wondershare .
The latest version of the app, i.e., Wondershare Filmora 11 has a new feature called Speed Ramping that enables you to graphically manage the speed of the clips. While using the feature, you can either slow down the entire video or certain parts of it according to your requirements. For your learning, both the methods are explained below:
Method 1: Add Slow Motion Effect to the Whole Clip
For Win 7 or later (64-bit)
For macOS 10.12 or later
Step 1: Import the Source Video and Add to Timeline
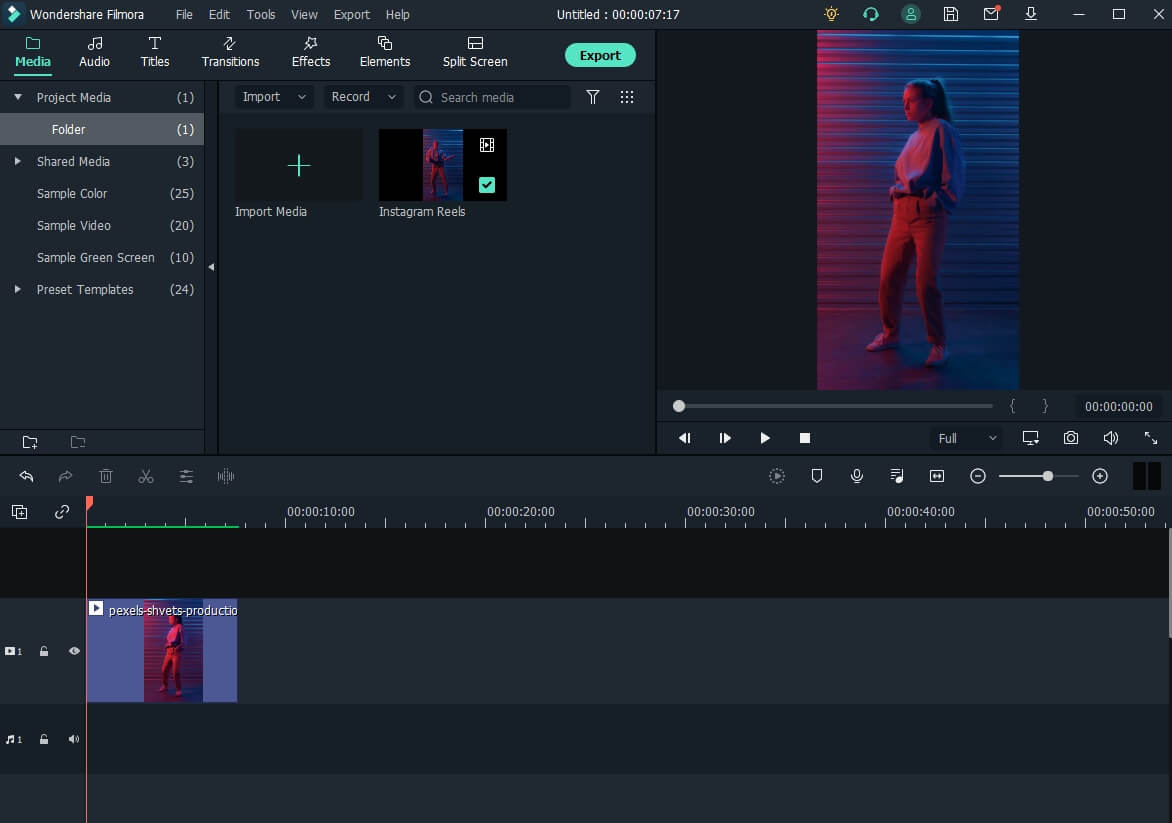
Launch Wondershare Filmora on your Windows or Mac computer (a Windows 11 PC is used here for illustrations), click New Project from the first screen that appears. Make sure that the Media tool is selected from the standard tool bar at the top, click anywhere inside the Media window, and select and import the source clip to the program.

Next, hover the mouse over the thumbnail of the imported video in the Media window, and click the + icon present at its bottom-right corner. When the confirmation box comes up, click the Match to Media or Keep Project Settings button to change the project settings to match the resolution of the video, or change the footage to meet the project settings respectively.
Step 2: Add Slow Motion Effect to the Whole Clip
Once the media is added to the timeline, click on it and then click the Speed icon on the toolbar. Scroll down to the Slow menu and then you will see 0.5x, 0.25x, 0.1x, 0.05x and 0.01x presets. Select one to add slo-mo effects to the whole select clip. and click Speed Ramping from the menu that drops down.
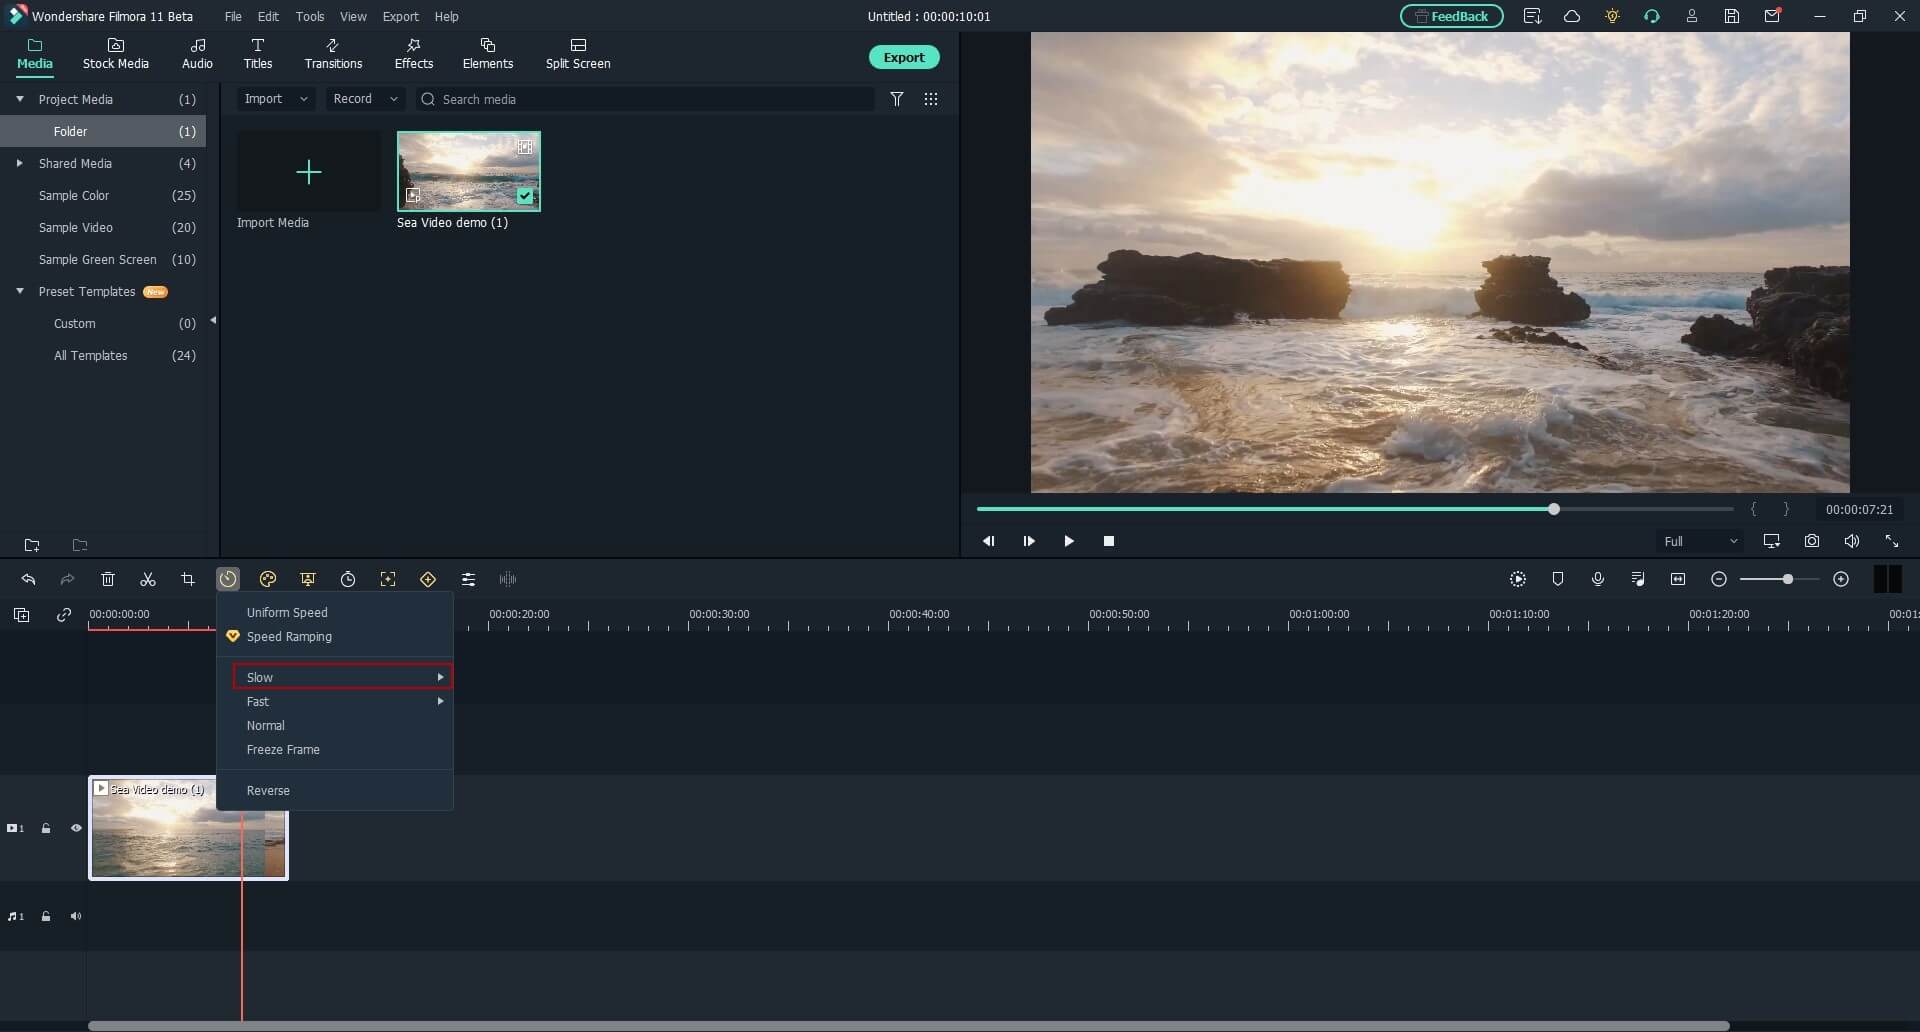
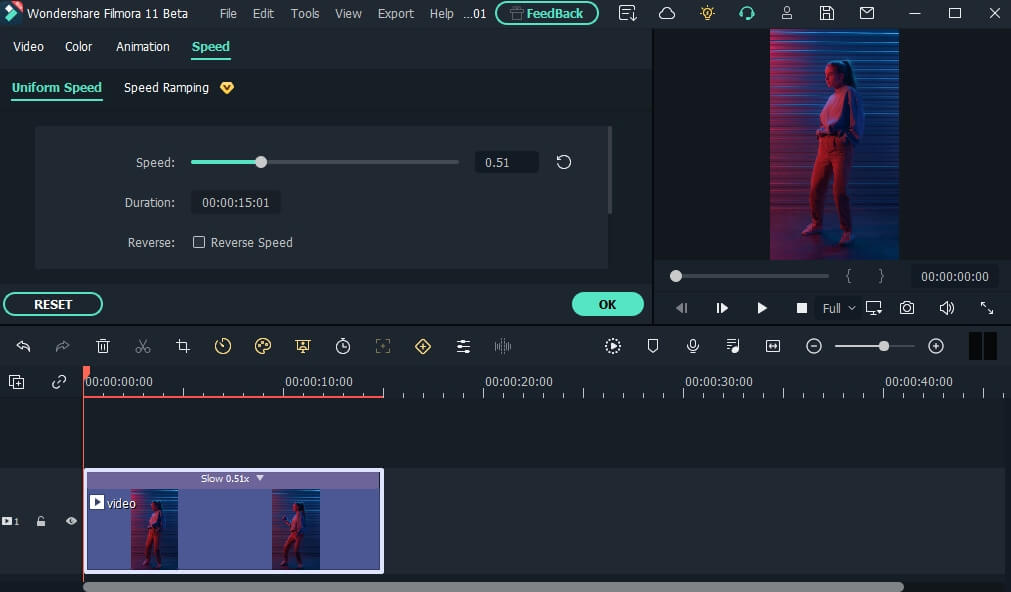
You can also right click the video in the timeline, and hover over to Speed option to select Uniform Speed to adjust the speed of the video to make a slo-mo effect video. Drag the speed slider to the left to slow down the video and you will see how many times it slowed down in the next field.
Method 2: Use Speed Ramping to Add Slow Motion Effect
For Win 7 or later (64-bit)
For macOS 10.12 or later
Speed Ramping enables you to add the slow-motion effect at different parts of a video and even freeze the screen for the duration that you specify. The processes to get these done are given below in detail:
Step 1: Add Source Video to Timeline and Get to the Speed Ramping Window
Use the process given in the previous method to import a source video to Wondershare Filmora 11 and add it to the Timeline. Then use the process given in the second step of the previous method to get to the Speed Ramping window.
Step 2: Add Slow Motion Effect to Different Parts of the Clip
Go to the Speed Ramping tab if it is not already selected, click Custom from the available options, and drag the adjustment points below the center line to reduce the playback speed for that particular section of the clip. Optionally, you can click any of the available presets to automatically add the slow-motion effect to the video.
Note: You can also drag the adjustment points above the line to increase the playback speed.
To add an adjustment point on the frame where it is not already present, place the playhead (skimmer) at the correct position, and click Add Adjust Point from the left of the Speed Ramping window itself. Once added, you can drag it downward to reduce the playback speed of that part of the clip.

Step 3: Freeze the Video
Place the skimmer on the frame where you want to freeze the video for a while, and click Add Freeze Frame from the left of the Speed Ramping window. When the time box appears, in the Freeze Time field, enter the duration in seconds you want to freeze the screen for, and click OK.
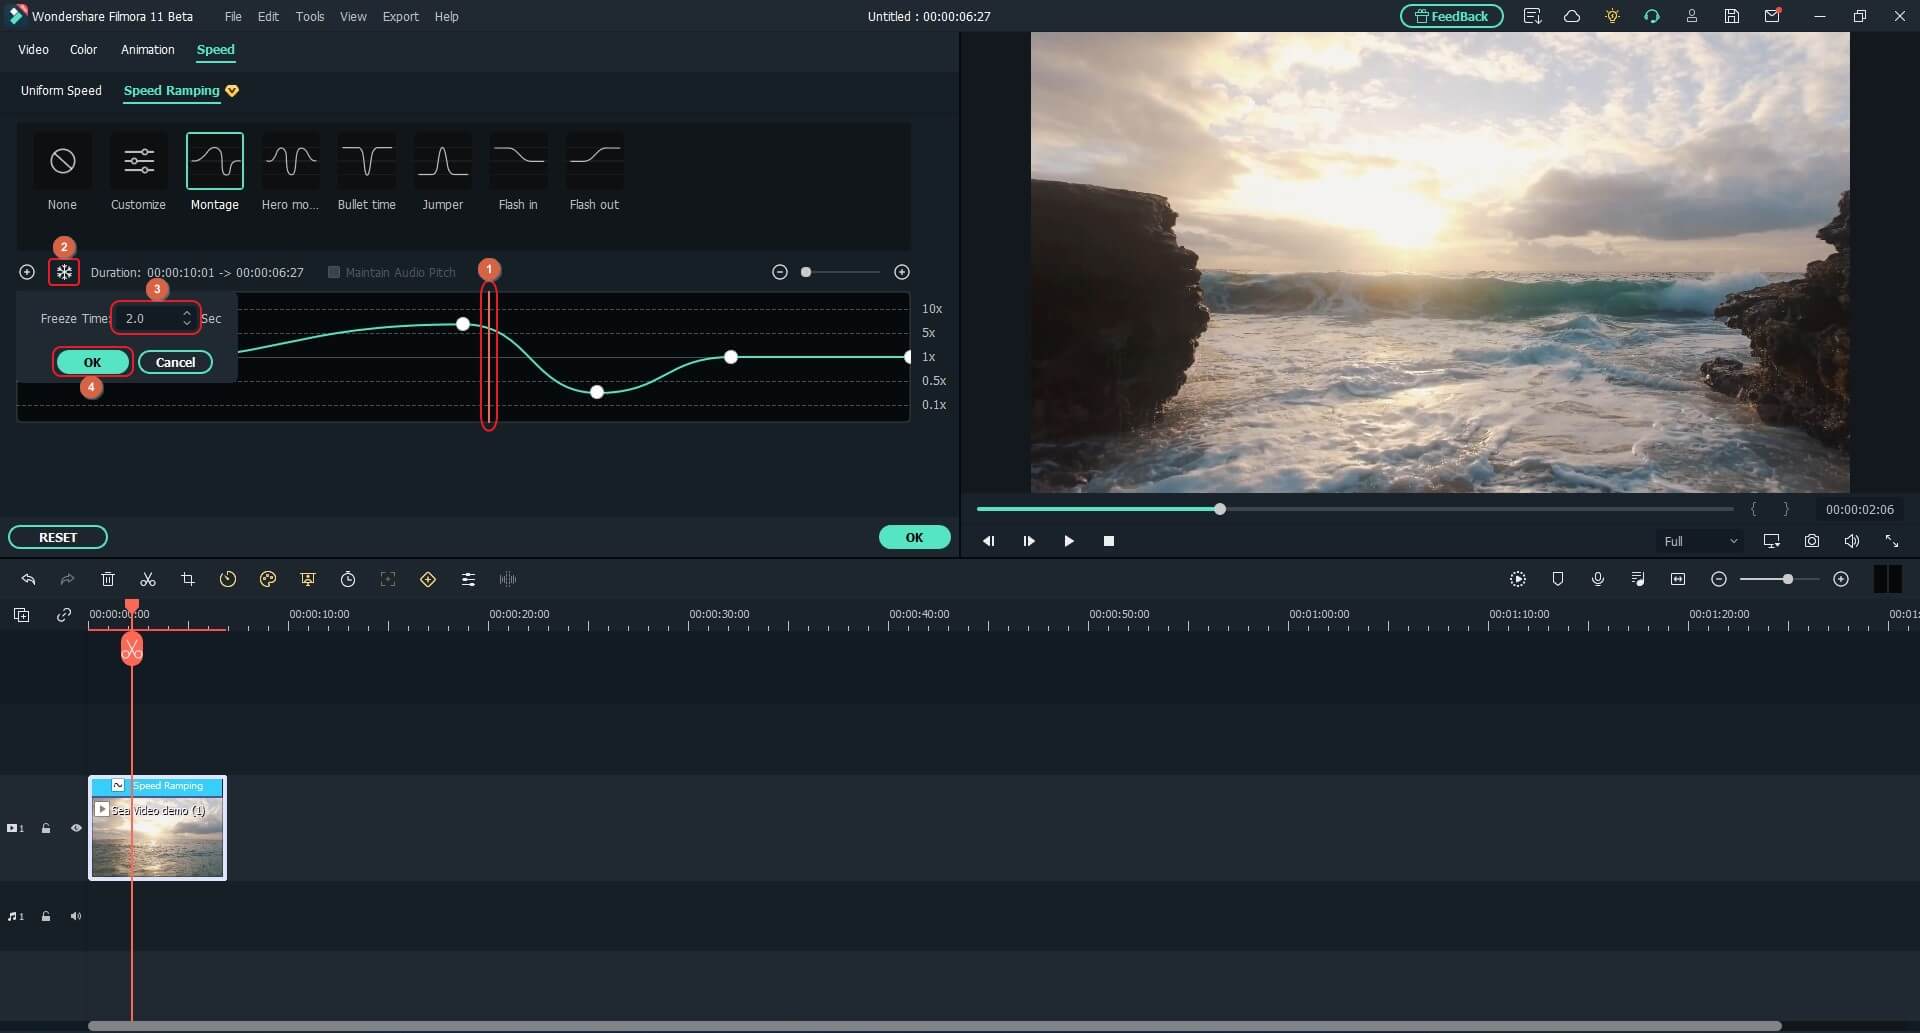
After adding a freeze point, optionally, you can drag and reposition it in the Speed Ramping timeline as needed. Finally, click OK from the bottom-right area to save the changes.
Part 3: When to Use Slow Motion?
There could be many instances when you want to add a slow-motion effect to your videos. Some of the most common ones include:
- Add Focus
If there is a particular scene in a clip that you want the audience to focus on, it would be a good idea to add the slow-motion effect right before that action appears on the screen, and bring the speed back to normal when the section is over.
- Skill or Style Demonstration
When a clip is playing at a normal speed, many times, the audience isn’t able to see the skills that you want to display. This is where you may want to add the slow-motion effect so that every detail can be noticed clearly and in detail.
- Replays
Mostly used for tournaments and matches where the actual action is to replayed so the audience, umpires, and other viewers can see the movements in detail before making the right decision.
- Observation
Some natural phenomena such as a deer running in the woods, a balloon full of water bursting, etc. occur quite quickly. If you want to witness such things clearly and in detail, it would be good to record them, and then reduce the playback speed for better viewing.
- Add Suspense
When you add the slow-motion effect to a scene, the impulse of the audience is automatically increased, and they take that particular section more seriously and with a thrill.
Conclusion
The slow-motion effect is inversely proportional to the framerate, i.e., frames per second or FPS. Almost all DSLR cameras that are available nowadays allow you to switch between different FPS values (typically 120 and 240) before recording. Also, if you have access to an iPhone, its Camera app has a built-in SLO-MO mode that can capture the footage in slow motion.
In addition, if you already have a video that has been recorded at a normal speed, you can use an efficient post-production software like Wondershare Filmora 11, and exploit its Speed Ramping feature to add the slow-motion effect at different scenes of a clip.
02 How to Apply the Smooth Slow-Motion Effect in Post-Production?
Part 1: How to Make Slow Motion Videos via Recording?
The fact is, the playback speed of a video is inversely proportional to the frames per second (FPS) it has been recorded in. Usually, to have a video play at normal speed, it is recorded at 24 FPS or 30 FPS. On the other hand, if you increase the frame rate (FPS) to 120 or 240, the playback speed slows down. You can easily check this if you have access to a DSLR camera or an iPhone. These devices allow you to adjust the FPS so the videos can be recorded in slow motion.
For your convenience and learning, the step-by-step procedure on how to record a video in slow motion using an iPhone is explained below:
Step 1: Get to the SLO-MO Mode
Launch the Camera app on your iPhone (iPhone 13 Pro Max is used here for illustrations), and swipe the screen to the left to get to the SLO-MO mode.

Step 2: Adjust Recording Preferences
Tap the number at the top-right corner to switch between 120 FPS and 240 FPS as needed. Tap 1x from the lower-middle section of the screen, and use the rotator to adjust your preferred zoom level.

Step 3: Start and Stop Recording
Tap the Record button from the bottom-center of the screen to begin recording the video in slow motion. Tap Stop when you are done. You can access the recorded video from the Videos container of the Photos app in your iPhone.
If you are using Android phone, you can check this article to find out more details about How to Record Super Slow Motion Videos on Your Phone.
You may also like: Best Slo-mo Camera Apps for Android And iPhone
Part 2: How to Apply the Smooth Slow-Motion Effect in Post-Production?
If you don’t have access to a camera that can record videos in slow motion, or in case you want to capture the footage at normal playback speed and then slow it down later, you need a dedicated tool to get the job done. Even though several post-production applications are available in the market, the one that is most versatile, has an intuitive interface, and is quite easy to use is Filmora video editor from Wondershare .
The latest version of the app, i.e., Wondershare Filmora 11 has a new feature called Speed Ramping that enables you to graphically manage the speed of the clips. While using the feature, you can either slow down the entire video or certain parts of it according to your requirements. For your learning, both the methods are explained below:
Method 1: Add Slow Motion Effect to the Whole Clip
For Win 7 or later (64-bit)
For macOS 10.12 or later
Step 1: Import the Source Video and Add to Timeline
Launch Wondershare Filmora on your Windows or Mac computer (a Windows 11 PC is used here for illustrations), click New Project from the first screen that appears. Make sure that the Media tool is selected from the standard tool bar at the top, click anywhere inside the Media window, and select and import the source clip to the program.

Next, hover the mouse over the thumbnail of the imported video in the Media window, and click the + icon present at its bottom-right corner. When the confirmation box comes up, click the Match to Media or Keep Project Settings button to change the project settings to match the resolution of the video, or change the footage to meet the project settings respectively.

Step 2: Add Slow Motion Effect to the Whole Clip
Once the media is added to the timeline, click on it and then click the Speed icon on the toolbar. Scroll down to the Slow menu and then you will see 0.5x, 0.25x, 0.1x, 0.05x and 0.01x presets. Select one to add slo-mo effects to the whole select clip. and click Speed Ramping from the menu that drops down.

You can also right click the video in the timeline, and hover over to Speed option to select Uniform Speed to adjust the speed of the video to make a slo-mo effect video. Drag the speed slider to the left to slow down the video and you will see how many times it slowed down in the next field.

Method 2: Use Speed Ramping to Add Slow Motion Effect
For Win 7 or later (64-bit)
For macOS 10.12 or later
Speed Ramping enables you to add the slow-motion effect at different parts of a video and even freeze the screen for the duration that you specify. The processes to get these done are given below in detail:
Step 1: Add Source Video to Timeline and Get to the Speed Ramping Window
Use the process given in the previous method to import a source video to Wondershare Filmora 11 and add it to the Timeline. Then use the process given in the second step of the previous method to get to the Speed Ramping window.
Step 2: Add Slow Motion Effect to Different Parts of the Clip
Go to the Speed Ramping tab if it is not already selected, click Custom from the available options, and drag the adjustment points below the center line to reduce the playback speed for that particular section of the clip. Optionally, you can click any of the available presets to automatically add the slow-motion effect to the video.
Note: You can also drag the adjustment points above the line to increase the playback speed.
To add an adjustment point on the frame where it is not already present, place the playhead (skimmer) at the correct position, and click Add Adjust Point from the left of the Speed Ramping window itself. Once added, you can drag it downward to reduce the playback speed of that part of the clip.

Step 3: Freeze the Video
Place the skimmer on the frame where you want to freeze the video for a while, and click Add Freeze Frame from the left of the Speed Ramping window. When the time box appears, in the Freeze Time field, enter the duration in seconds you want to freeze the screen for, and click OK.

After adding a freeze point, optionally, you can drag and reposition it in the Speed Ramping timeline as needed. Finally, click OK from the bottom-right area to save the changes.
Part 3: When to Use Slow Motion?
There could be many instances when you want to add a slow-motion effect to your videos. Some of the most common ones include:
- Add Focus
If there is a particular scene in a clip that you want the audience to focus on, it would be a good idea to add the slow-motion effect right before that action appears on the screen, and bring the speed back to normal when the section is over.
- Skill or Style Demonstration
When a clip is playing at a normal speed, many times, the audience isn’t able to see the skills that you want to display. This is where you may want to add the slow-motion effect so that every detail can be noticed clearly and in detail.
- Replays
Mostly used for tournaments and matches where the actual action is to replayed so the audience, umpires, and other viewers can see the movements in detail before making the right decision.
- Observation
Some natural phenomena such as a deer running in the woods, a balloon full of water bursting, etc. occur quite quickly. If you want to witness such things clearly and in detail, it would be good to record them, and then reduce the playback speed for better viewing.
- Add Suspense
When you add the slow-motion effect to a scene, the impulse of the audience is automatically increased, and they take that particular section more seriously and with a thrill.
Conclusion
The slow-motion effect is inversely proportional to the framerate, i.e., frames per second or FPS. Almost all DSLR cameras that are available nowadays allow you to switch between different FPS values (typically 120 and 240) before recording. Also, if you have access to an iPhone, its Camera app has a built-in SLO-MO mode that can capture the footage in slow motion.
In addition, if you already have a video that has been recorded at a normal speed, you can use an efficient post-production software like Wondershare Filmora 11, and exploit its Speed Ramping feature to add the slow-motion effect at different scenes of a clip.
02 How to Apply the Smooth Slow-Motion Effect in Post-Production?
Part 1: How to Make Slow Motion Videos via Recording?
The fact is, the playback speed of a video is inversely proportional to the frames per second (FPS) it has been recorded in. Usually, to have a video play at normal speed, it is recorded at 24 FPS or 30 FPS. On the other hand, if you increase the frame rate (FPS) to 120 or 240, the playback speed slows down. You can easily check this if you have access to a DSLR camera or an iPhone. These devices allow you to adjust the FPS so the videos can be recorded in slow motion.
For your convenience and learning, the step-by-step procedure on how to record a video in slow motion using an iPhone is explained below:
Step 1: Get to the SLO-MO Mode
Launch the Camera app on your iPhone (iPhone 13 Pro Max is used here for illustrations), and swipe the screen to the left to get to the SLO-MO mode.

Step 2: Adjust Recording Preferences
Tap the number at the top-right corner to switch between 120 FPS and 240 FPS as needed. Tap 1x from the lower-middle section of the screen, and use the rotator to adjust your preferred zoom level.

Step 3: Start and Stop Recording
Tap the Record button from the bottom-center of the screen to begin recording the video in slow motion. Tap Stop when you are done. You can access the recorded video from the Videos container of the Photos app in your iPhone.
If you are using Android phone, you can check this article to find out more details about How to Record Super Slow Motion Videos on Your Phone.
You may also like: Best Slo-mo Camera Apps for Android And iPhone
Part 2: How to Apply the Smooth Slow-Motion Effect in Post-Production?
If you don’t have access to a camera that can record videos in slow motion, or in case you want to capture the footage at normal playback speed and then slow it down later, you need a dedicated tool to get the job done. Even though several post-production applications are available in the market, the one that is most versatile, has an intuitive interface, and is quite easy to use is Filmora video editor from Wondershare .
The latest version of the app, i.e., Wondershare Filmora 11 has a new feature called Speed Ramping that enables you to graphically manage the speed of the clips. While using the feature, you can either slow down the entire video or certain parts of it according to your requirements. For your learning, both the methods are explained below:
Method 1: Add Slow Motion Effect to the Whole Clip
For Win 7 or later (64-bit)
For macOS 10.12 or later
Step 1: Import the Source Video and Add to Timeline
Launch Wondershare Filmora on your Windows or Mac computer (a Windows 11 PC is used here for illustrations), click New Project from the first screen that appears. Make sure that the Media tool is selected from the standard tool bar at the top, click anywhere inside the Media window, and select and import the source clip to the program.

Next, hover the mouse over the thumbnail of the imported video in the Media window, and click the + icon present at its bottom-right corner. When the confirmation box comes up, click the Match to Media or Keep Project Settings button to change the project settings to match the resolution of the video, or change the footage to meet the project settings respectively.

Step 2: Add Slow Motion Effect to the Whole Clip
Once the media is added to the timeline, click on it and then click the Speed icon on the toolbar. Scroll down to the Slow menu and then you will see 0.5x, 0.25x, 0.1x, 0.05x and 0.01x presets. Select one to add slo-mo effects to the whole select clip. and click Speed Ramping from the menu that drops down.

You can also right click the video in the timeline, and hover over to Speed option to select Uniform Speed to adjust the speed of the video to make a slo-mo effect video. Drag the speed slider to the left to slow down the video and you will see how many times it slowed down in the next field.

Method 2: Use Speed Ramping to Add Slow Motion Effect
For Win 7 or later (64-bit)
For macOS 10.12 or later
Speed Ramping enables you to add the slow-motion effect at different parts of a video and even freeze the screen for the duration that you specify. The processes to get these done are given below in detail:
Step 1: Add Source Video to Timeline and Get to the Speed Ramping Window
Use the process given in the previous method to import a source video to Wondershare Filmora 11 and add it to the Timeline. Then use the process given in the second step of the previous method to get to the Speed Ramping window.
Step 2: Add Slow Motion Effect to Different Parts of the Clip
Go to the Speed Ramping tab if it is not already selected, click Custom from the available options, and drag the adjustment points below the center line to reduce the playback speed for that particular section of the clip. Optionally, you can click any of the available presets to automatically add the slow-motion effect to the video.
Note: You can also drag the adjustment points above the line to increase the playback speed.
To add an adjustment point on the frame where it is not already present, place the playhead (skimmer) at the correct position, and click Add Adjust Point from the left of the Speed Ramping window itself. Once added, you can drag it downward to reduce the playback speed of that part of the clip.

Step 3: Freeze the Video
Place the skimmer on the frame where you want to freeze the video for a while, and click Add Freeze Frame from the left of the Speed Ramping window. When the time box appears, in the Freeze Time field, enter the duration in seconds you want to freeze the screen for, and click OK.

After adding a freeze point, optionally, you can drag and reposition it in the Speed Ramping timeline as needed. Finally, click OK from the bottom-right area to save the changes.
Part 3: When to Use Slow Motion?
There could be many instances when you want to add a slow-motion effect to your videos. Some of the most common ones include:
- Add Focus
If there is a particular scene in a clip that you want the audience to focus on, it would be a good idea to add the slow-motion effect right before that action appears on the screen, and bring the speed back to normal when the section is over.
- Skill or Style Demonstration
When a clip is playing at a normal speed, many times, the audience isn’t able to see the skills that you want to display. This is where you may want to add the slow-motion effect so that every detail can be noticed clearly and in detail.
- Replays
Mostly used for tournaments and matches where the actual action is to replayed so the audience, umpires, and other viewers can see the movements in detail before making the right decision.
- Observation
Some natural phenomena such as a deer running in the woods, a balloon full of water bursting, etc. occur quite quickly. If you want to witness such things clearly and in detail, it would be good to record them, and then reduce the playback speed for better viewing.
- Add Suspense
When you add the slow-motion effect to a scene, the impulse of the audience is automatically increased, and they take that particular section more seriously and with a thrill.
Conclusion
The slow-motion effect is inversely proportional to the framerate, i.e., frames per second or FPS. Almost all DSLR cameras that are available nowadays allow you to switch between different FPS values (typically 120 and 240) before recording. Also, if you have access to an iPhone, its Camera app has a built-in SLO-MO mode that can capture the footage in slow motion.
In addition, if you already have a video that has been recorded at a normal speed, you can use an efficient post-production software like Wondershare Filmora 11, and exploit its Speed Ramping feature to add the slow-motion effect at different scenes of a clip.
02 How to Apply the Smooth Slow-Motion Effect in Post-Production?
Part 1: How to Make Slow Motion Videos via Recording?
The fact is, the playback speed of a video is inversely proportional to the frames per second (FPS) it has been recorded in. Usually, to have a video play at normal speed, it is recorded at 24 FPS or 30 FPS. On the other hand, if you increase the frame rate (FPS) to 120 or 240, the playback speed slows down. You can easily check this if you have access to a DSLR camera or an iPhone. These devices allow you to adjust the FPS so the videos can be recorded in slow motion.
For your convenience and learning, the step-by-step procedure on how to record a video in slow motion using an iPhone is explained below:
Step 1: Get to the SLO-MO Mode
Launch the Camera app on your iPhone (iPhone 13 Pro Max is used here for illustrations), and swipe the screen to the left to get to the SLO-MO mode.

Step 2: Adjust Recording Preferences
Tap the number at the top-right corner to switch between 120 FPS and 240 FPS as needed. Tap 1x from the lower-middle section of the screen, and use the rotator to adjust your preferred zoom level.

Step 3: Start and Stop Recording
Tap the Record button from the bottom-center of the screen to begin recording the video in slow motion. Tap Stop when you are done. You can access the recorded video from the Videos container of the Photos app in your iPhone.
If you are using Android phone, you can check this article to find out more details about How to Record Super Slow Motion Videos on Your Phone.
You may also like: Best Slo-mo Camera Apps for Android And iPhone
Part 2: How to Apply the Smooth Slow-Motion Effect in Post-Production?
If you don’t have access to a camera that can record videos in slow motion, or in case you want to capture the footage at normal playback speed and then slow it down later, you need a dedicated tool to get the job done. Even though several post-production applications are available in the market, the one that is most versatile, has an intuitive interface, and is quite easy to use is Filmora video editor from Wondershare .
The latest version of the app, i.e., Wondershare Filmora 11 has a new feature called Speed Ramping that enables you to graphically manage the speed of the clips. While using the feature, you can either slow down the entire video or certain parts of it according to your requirements. For your learning, both the methods are explained below:
Method 1: Add Slow Motion Effect to the Whole Clip
For Win 7 or later (64-bit)
For macOS 10.12 or later
Step 1: Import the Source Video and Add to Timeline
Launch Wondershare Filmora on your Windows or Mac computer (a Windows 11 PC is used here for illustrations), click New Project from the first screen that appears. Make sure that the Media tool is selected from the standard tool bar at the top, click anywhere inside the Media window, and select and import the source clip to the program.

Next, hover the mouse over the thumbnail of the imported video in the Media window, and click the + icon present at its bottom-right corner. When the confirmation box comes up, click the Match to Media or Keep Project Settings button to change the project settings to match the resolution of the video, or change the footage to meet the project settings respectively.

Step 2: Add Slow Motion Effect to the Whole Clip
Once the media is added to the timeline, click on it and then click the Speed icon on the toolbar. Scroll down to the Slow menu and then you will see 0.5x, 0.25x, 0.1x, 0.05x and 0.01x presets. Select one to add slo-mo effects to the whole select clip. and click Speed Ramping from the menu that drops down.

You can also right click the video in the timeline, and hover over to Speed option to select Uniform Speed to adjust the speed of the video to make a slo-mo effect video. Drag the speed slider to the left to slow down the video and you will see how many times it slowed down in the next field.

Method 2: Use Speed Ramping to Add Slow Motion Effect
For Win 7 or later (64-bit)
For macOS 10.12 or later
Speed Ramping enables you to add the slow-motion effect at different parts of a video and even freeze the screen for the duration that you specify. The processes to get these done are given below in detail:
Step 1: Add Source Video to Timeline and Get to the Speed Ramping Window
Use the process given in the previous method to import a source video to Wondershare Filmora 11 and add it to the Timeline. Then use the process given in the second step of the previous method to get to the Speed Ramping window.
Step 2: Add Slow Motion Effect to Different Parts of the Clip
Go to the Speed Ramping tab if it is not already selected, click Custom from the available options, and drag the adjustment points below the center line to reduce the playback speed for that particular section of the clip. Optionally, you can click any of the available presets to automatically add the slow-motion effect to the video.
Note: You can also drag the adjustment points above the line to increase the playback speed.
To add an adjustment point on the frame where it is not already present, place the playhead (skimmer) at the correct position, and click Add Adjust Point from the left of the Speed Ramping window itself. Once added, you can drag it downward to reduce the playback speed of that part of the clip.

Step 3: Freeze the Video
Place the skimmer on the frame where you want to freeze the video for a while, and click Add Freeze Frame from the left of the Speed Ramping window. When the time box appears, in the Freeze Time field, enter the duration in seconds you want to freeze the screen for, and click OK.

After adding a freeze point, optionally, you can drag and reposition it in the Speed Ramping timeline as needed. Finally, click OK from the bottom-right area to save the changes.
Part 3: When to Use Slow Motion?
There could be many instances when you want to add a slow-motion effect to your videos. Some of the most common ones include:
- Add Focus
If there is a particular scene in a clip that you want the audience to focus on, it would be a good idea to add the slow-motion effect right before that action appears on the screen, and bring the speed back to normal when the section is over.
- Skill or Style Demonstration
When a clip is playing at a normal speed, many times, the audience isn’t able to see the skills that you want to display. This is where you may want to add the slow-motion effect so that every detail can be noticed clearly and in detail.
- Replays
Mostly used for tournaments and matches where the actual action is to replayed so the audience, umpires, and other viewers can see the movements in detail before making the right decision.
- Observation
Some natural phenomena such as a deer running in the woods, a balloon full of water bursting, etc. occur quite quickly. If you want to witness such things clearly and in detail, it would be good to record them, and then reduce the playback speed for better viewing.
- Add Suspense
When you add the slow-motion effect to a scene, the impulse of the audience is automatically increased, and they take that particular section more seriously and with a thrill.
Conclusion
The slow-motion effect is inversely proportional to the framerate, i.e., frames per second or FPS. Almost all DSLR cameras that are available nowadays allow you to switch between different FPS values (typically 120 and 240) before recording. Also, if you have access to an iPhone, its Camera app has a built-in SLO-MO mode that can capture the footage in slow motion.
In addition, if you already have a video that has been recorded at a normal speed, you can use an efficient post-production software like Wondershare Filmora 11, and exploit its Speed Ramping feature to add the slow-motion effect at different scenes of a clip.
Best Cinematic LUTs For Premiere Pro You Can Come Across
LUTs stand for Look-Up Tables and are compatible with a wide array of editing software. This element in video editing can be used during production or before and after production. Using the LUTs, you can color grade your media content to make it more visually appealing. The LUTs can create consistency in your videos and photos and also leads to accurate results.
This article is designed to provide all the information about cinematic LUTs for Premiere Pro. You will not only find the best LUTs present for Premiere Pro, but we will also discuss the compatibility of LUTs with other editing software. Above all, the bonus tip will also provide a great alternative to Premiere Pro for cinematic LUTs.
Part 1: Which File Formats Are LUTs Available In?
You must be wondering if there are any specific file formats for cinematic LUTs Premiere Pro. Yes, some formats define the availability of LUTs. Some of them are:
- 3DL: 3DL is the 3D lattice of RGB output colors. You can find this in DaVinci Resolve, Adobe After Effects, and Photoshop.
- CUBE: It is one of the most popular file formats for video editing. If you want to work with CUBE, you can access it on Final Cut Pro, Adobe Premiere Pro, and other editing software.
- DAT: If you are an animation maker or work with 3D modeling, this file format is for you. In case you want to use it, go to Autodesk Maya.
- CSP: This stands for Clip Studio Paint. As the name suggests, you can use it for making high-class digital art.
- ICC: The International Color Consortium is a file format specifically used for color calibrations along with color management.
- MGA: Are you irritated by low-quality graphics? No worries because MGA can help you in improving the graphics in versatile gaming software.
- Look: With this file format; you can work with Sony Camera’s postproduction work. It leads to high-quality results, so you can use it without issues.
Empower your videos with a new mood using different LUTs. Filmora now offers 100+ top-quality 3D LUTs cover a broad range of scenarios. Transform your videos with Filmora’s powerful 3D LUTs.
Apply LUT on Videos Apply LUT on Videos Learn More

Part 2: Are LUTs Compatible With All Media Editing Software?
Predominantly, LUTs are compatible with a considerable number of media editing software. Yet, the specificity of the compatibility is somehow dependent on the file formats for the LUTs you want to use. Moreover, some software does not have the ability to import or apply the LUTs to a satisfactory quality. Many video editing software supports 3DL and CUBE as they are the most commonly used software.
In addition, popular platforms such as Final Cut Pro, Adobe Acrobat, DaVinci Resolve, and many other software can provide you with LUTs. However, you need to make sure that you are using their latest version because versions of software can affect the compatibility of LUTs. In case you want to use the less commonly used LUTs formats, you need to find a reliable source to import or apply it.
Part 3: What Are The Best Cinematic LUTs For Premiere Pro?
Now that you know considerable information about LUTs, you must be wondering where to find them. In this section, you will discover the cinematic LUTs for Premiere Pro, one of the most known platforms for providing LUTs. Thus, look below to find the LUTs of Premiere Pro:
1. Fast Film LUTs
With this cinematic LUTs Premiere Pro, you can add aesthetic emulation to your film project. It can even add a filmy touch to simple photographs. This can also save the low light issues in the footage to show clear scenes to your audience. Above all, it also reduces the noise and helps improve your film’s outlook.

2. Emulation LUTs
Using this LUT preset, you can optimize your film’s dynamic range and emulation metrics. It can escalate every little detail of your footage and help engage more viewers. In addition to this, you can apply these LUTs to multiple shots to add consistency to your video. These Premiere Pro cinematic LUTs can also

3. Pro Color Grading LUTs
A video or photo without colors can never attract the target audience. Yet, you can cater to these issues using the intuitive LUT named Pro Color Grading LUTs. It can not only fix the color grading problems of your media but can also add aesthetics to it. Moreover, you can also customize it as per your need.

4. Filmy Tone LUTs
If you wish to evoke a sense of nostalgia in your viewers, there is no better way than the Filmy Tone LUTs. It enhances the visibility of videos and photos and aims to show different periods. This can be the perfect choice for those who want to create films and photos dedicated to the past.

5. City Skyline LUTs
For creating and adding the city-lighted environment to media, you can take assistance from this LUT. It is widely used in travel and commercial videos. Moreover, you can also emphasize the features of the cityscape by using it. This also helps to add vibrant colors and styling, just as in city shots.

6. LUTs Summer Film
Creating summer videos with precise summer lights can be a tricky procedure. However, the LUTs Summer Film can help you with this as it can add summer vibes to any videos and photos. You can even use it to give summer looks to the videos shot in the winter season.

7. Exhale LUTs
To add the soft highlight along with a moody environment, you can use the Exhale LUTs. These cinematic filters Premiere Pro are widely used in music and fashion videos. You can also use it in art videos to create a sense of immersion and connection for the viewers.

8. DELUTS
The Digital Film Emulation Look-Up Tables are useful for creating a classic filmy look for simple videos and photos. It can enhance the texture and depth of everything in the video, making it more studio friendly. You can use this LUT for weddings or corporate videos.

9. Free Reign Sample LUTs
With the help of this LUT, you can experience full control over the color metrics of videos and photos. Even if the video’s color gets compromised during shooting, you can fix them with this. This type of LUTs can be used for experiments, independent or travel videos.

10. Vintage LUTs for Premiere Pro
As the name suggests, you can use these LUTs to add a more vintage look to the photos and videos. This can improve the warmth and clarify the theme of the video. You can make your videos and photos stand out in a crowd with the help of this type of LUTs.

11. Airy Bright LUTs
Many users love to make their videos airier and fuller in brightness. This LUT is perfect for users of these types of liking. You can access these LUTs to add soothing brightness and airer effects in videos and photos. It is widely used for fixing the photos of bad videos captured at night.

12. Canon Cinestyle to Rec.709 LUT
This LUT can help the videographers to add a more cinematic look to the videos captured by Cannon DSLR. You can also create a color space of Rec.709 in your videos with this LUT. No matter if you want to work on wedding shots or short films, this LUT can help you with all.

13. Urban Fashion Premiere Pro LUTs
By applying this LUT, you can convert simple fashion videos into professional ones. It can create VOUGE-standard videos for you; thus, you can also use this for startup brands. Moreover, if you are an Instagram or TikTok model, you should get familiar with it because it can make any footage premiere level in a few taps.

14. Osiris Cinematic LUTs
For making travel or advertisement videos more high quality, you can use this Premiere Pro cinematic presets. It can make all types of videos more visually appealing and can add cinematic looks to it. Moreover, this LUT allows you to upscale all the visuals and characters in the video.

15. Finishing LUTs
To add eye-catching finishing effects to the videos, you can use the Finishing LUTs. This can enhance the end-of-color grading procedure for you. It can also add a more contrast and color-friendly look to the ends. You can use it for TV series, films, music, and other videos.

Bonus Part: Wondershare Filmora – A Great Alternative To Discover Cinematic LUTs
Undoubtedly, you can use the cinematic LUTs for Premiere Pro, yet sometimes it can be a tricky platform. Thus, you need to know the best alternative to Premiere Pro so you can apply LUTs to your videos in an optimized manner. The best tool that can help you with this is Wondershare Filmora . You can experience professional-level video editing with this.
Add LUTs on Video For Win 7 or later(64-bit)
Add LUTs on Video For macOS 10.14 or later
Moreover, you can apply LUTs to the videos and can also adjust their intensity as per your need. Above all, it can help you to apply LUTs to several types of videos, such as landscapers or short videos. It also supports the LUTs hover, which lets you preview the LUTs effects .

Prominent Features of Wondershare Filmora
- With its Color Wheel, you can adjust every color metric of video. It can include mid-tones, shadows, hue, and more.
- Along with color customization, you can also sharpen the blur videos to improve the quality of your video.
- You can also control the speed ramping of your video with Filmora. It can also do motion tracking for you.
- By using the batch edit feature, you can edit multiple videos at once without compromising the quality.
Conclusion
Considering everything, you can use the cinematic LUTs for Premiere Pro to upgrade the functionality of your video. The LUTs are available in several file formats, which are mentioned above. Moreover, several editing software can help you to import and apply LUTs on photos and videos. One of the popular ones is Premiere Pro.
Other than this, the best Premiere Pro cinematic LUTs are also discussed above for your ease. Yet, if you find the Premiere Pro difficult, you can use its best alternative named Wondershare Filmora. To find out more about Filmora, go to the previous part.
Add LUTs on Video For Win 7 or later(64-bit)
Add LUTs on Video For macOS 10.14 or later
Apply LUT on Videos Apply LUT on Videos Learn More

Part 2: Are LUTs Compatible With All Media Editing Software?
Predominantly, LUTs are compatible with a considerable number of media editing software. Yet, the specificity of the compatibility is somehow dependent on the file formats for the LUTs you want to use. Moreover, some software does not have the ability to import or apply the LUTs to a satisfactory quality. Many video editing software supports 3DL and CUBE as they are the most commonly used software.
In addition, popular platforms such as Final Cut Pro, Adobe Acrobat, DaVinci Resolve, and many other software can provide you with LUTs. However, you need to make sure that you are using their latest version because versions of software can affect the compatibility of LUTs. In case you want to use the less commonly used LUTs formats, you need to find a reliable source to import or apply it.
Part 3: What Are The Best Cinematic LUTs For Premiere Pro?
Now that you know considerable information about LUTs, you must be wondering where to find them. In this section, you will discover the cinematic LUTs for Premiere Pro, one of the most known platforms for providing LUTs. Thus, look below to find the LUTs of Premiere Pro:
1. Fast Film LUTs
With this cinematic LUTs Premiere Pro, you can add aesthetic emulation to your film project. It can even add a filmy touch to simple photographs. This can also save the low light issues in the footage to show clear scenes to your audience. Above all, it also reduces the noise and helps improve your film’s outlook.

2. Emulation LUTs
Using this LUT preset, you can optimize your film’s dynamic range and emulation metrics. It can escalate every little detail of your footage and help engage more viewers. In addition to this, you can apply these LUTs to multiple shots to add consistency to your video. These Premiere Pro cinematic LUTs can also

3. Pro Color Grading LUTs
A video or photo without colors can never attract the target audience. Yet, you can cater to these issues using the intuitive LUT named Pro Color Grading LUTs. It can not only fix the color grading problems of your media but can also add aesthetics to it. Moreover, you can also customize it as per your need.

4. Filmy Tone LUTs
If you wish to evoke a sense of nostalgia in your viewers, there is no better way than the Filmy Tone LUTs. It enhances the visibility of videos and photos and aims to show different periods. This can be the perfect choice for those who want to create films and photos dedicated to the past.

5. City Skyline LUTs
For creating and adding the city-lighted environment to media, you can take assistance from this LUT. It is widely used in travel and commercial videos. Moreover, you can also emphasize the features of the cityscape by using it. This also helps to add vibrant colors and styling, just as in city shots.

6. LUTs Summer Film
Creating summer videos with precise summer lights can be a tricky procedure. However, the LUTs Summer Film can help you with this as it can add summer vibes to any videos and photos. You can even use it to give summer looks to the videos shot in the winter season.

7. Exhale LUTs
To add the soft highlight along with a moody environment, you can use the Exhale LUTs. These cinematic filters Premiere Pro are widely used in music and fashion videos. You can also use it in art videos to create a sense of immersion and connection for the viewers.

8. DELUTS
The Digital Film Emulation Look-Up Tables are useful for creating a classic filmy look for simple videos and photos. It can enhance the texture and depth of everything in the video, making it more studio friendly. You can use this LUT for weddings or corporate videos.

9. Free Reign Sample LUTs
With the help of this LUT, you can experience full control over the color metrics of videos and photos. Even if the video’s color gets compromised during shooting, you can fix them with this. This type of LUTs can be used for experiments, independent or travel videos.

10. Vintage LUTs for Premiere Pro
As the name suggests, you can use these LUTs to add a more vintage look to the photos and videos. This can improve the warmth and clarify the theme of the video. You can make your videos and photos stand out in a crowd with the help of this type of LUTs.

11. Airy Bright LUTs
Many users love to make their videos airier and fuller in brightness. This LUT is perfect for users of these types of liking. You can access these LUTs to add soothing brightness and airer effects in videos and photos. It is widely used for fixing the photos of bad videos captured at night.

12. Canon Cinestyle to Rec.709 LUT
This LUT can help the videographers to add a more cinematic look to the videos captured by Cannon DSLR. You can also create a color space of Rec.709 in your videos with this LUT. No matter if you want to work on wedding shots or short films, this LUT can help you with all.

13. Urban Fashion Premiere Pro LUTs
By applying this LUT, you can convert simple fashion videos into professional ones. It can create VOUGE-standard videos for you; thus, you can also use this for startup brands. Moreover, if you are an Instagram or TikTok model, you should get familiar with it because it can make any footage premiere level in a few taps.

14. Osiris Cinematic LUTs
For making travel or advertisement videos more high quality, you can use this Premiere Pro cinematic presets. It can make all types of videos more visually appealing and can add cinematic looks to it. Moreover, this LUT allows you to upscale all the visuals and characters in the video.

15. Finishing LUTs
To add eye-catching finishing effects to the videos, you can use the Finishing LUTs. This can enhance the end-of-color grading procedure for you. It can also add a more contrast and color-friendly look to the ends. You can use it for TV series, films, music, and other videos.

Bonus Part: Wondershare Filmora – A Great Alternative To Discover Cinematic LUTs
Undoubtedly, you can use the cinematic LUTs for Premiere Pro, yet sometimes it can be a tricky platform. Thus, you need to know the best alternative to Premiere Pro so you can apply LUTs to your videos in an optimized manner. The best tool that can help you with this is Wondershare Filmora . You can experience professional-level video editing with this.
Add LUTs on Video For Win 7 or later(64-bit)
Add LUTs on Video For macOS 10.14 or later
Moreover, you can apply LUTs to the videos and can also adjust their intensity as per your need. Above all, it can help you to apply LUTs to several types of videos, such as landscapers or short videos. It also supports the LUTs hover, which lets you preview the LUTs effects .

Prominent Features of Wondershare Filmora
- With its Color Wheel, you can adjust every color metric of video. It can include mid-tones, shadows, hue, and more.
- Along with color customization, you can also sharpen the blur videos to improve the quality of your video.
- You can also control the speed ramping of your video with Filmora. It can also do motion tracking for you.
- By using the batch edit feature, you can edit multiple videos at once without compromising the quality.
Conclusion
Considering everything, you can use the cinematic LUTs for Premiere Pro to upgrade the functionality of your video. The LUTs are available in several file formats, which are mentioned above. Moreover, several editing software can help you to import and apply LUTs on photos and videos. One of the popular ones is Premiere Pro.
Other than this, the best Premiere Pro cinematic LUTs are also discussed above for your ease. Yet, if you find the Premiere Pro difficult, you can use its best alternative named Wondershare Filmora. To find out more about Filmora, go to the previous part.
Add LUTs on Video For Win 7 or later(64-bit)
Add LUTs on Video For macOS 10.14 or later
How to Create Glowing Edge Effect in TikTok Dancing Video
Preparation
What you need to prepare:
- A computer (Windows or macOS)
- Your video materials.
- Filmora video editor
Step 1
Download Filmora and run the program. Once it starts, click on “New Project”.
Step 2
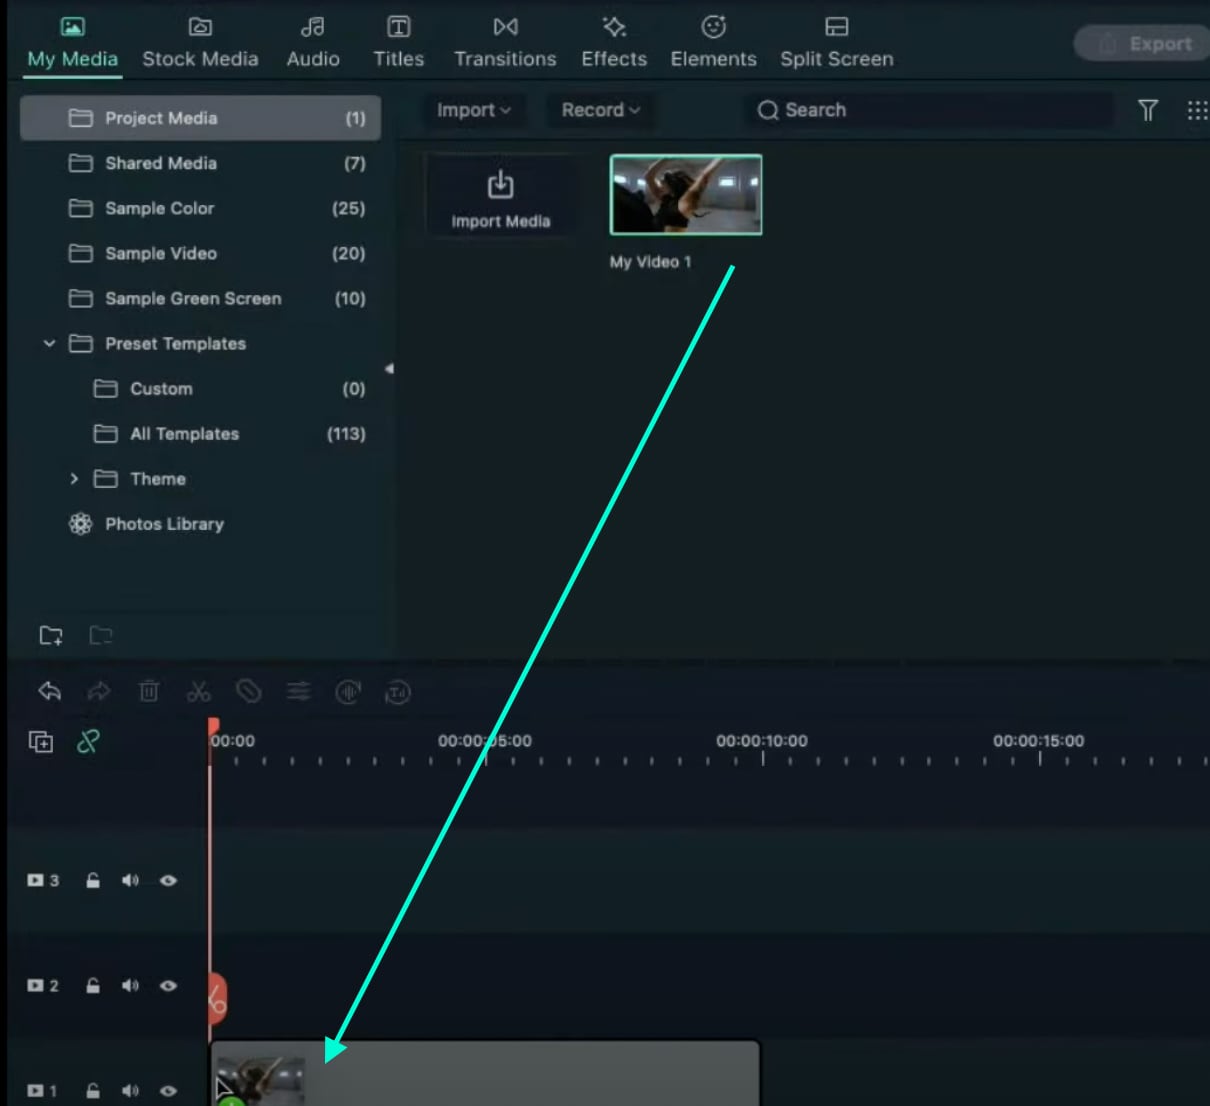
Go to My Media and Import any video you want to add a glowing edge effect to. Then, drag the video to Track 1 on the Timeline.
Step 3
Copy the Clip from Track 1 and paste it on Track 2.
Step 4
Go to the Effects tab and apply the “Pixelated Edges” effect to the clip on Track 1. Then, hide Track 2 by clicking the “eye” button.

Step 5
Double-click on the Clip in Track 1. Go to Video → Effects. Here, change the color to anything you want. This will determine what color your glowing edge effect will be. When you’re done choosing a color, click OK.

Step 6
Next, Unhide the Track 2. Double-click on the clip in Track 2 and go to Video → Basic. Scroll down and change the Blending Mode to “Difference”. Click OK and Export the clip at a higher rate. Click on the blue Export button at the top center.

Step 7
Delete the clip on Track 1. Then, move the clip from Track 2 to Track 1. Now, Import the clip that you just Exported and drag it to Track 2.

Step 8
Go to Effects and find the Blur effect. Drag the Blur effect to the clip on Track 2.

Step 9
Double-click on the clip in Track 2. Go to Video → Effects. Change the Zoom Rate to 1. Click OK. Now, find the Glow effect in the Effects tab and apply it two times to the clip on Track 2. Copy the Track 2 clip and paste it on Track 3.
Step 10
Search for the Wash effect in the Effects tab and apply it twice to the Track 2 clip again. Just drag it two times on top of the clip.
Step 11
Double-click on the clip in Track 2 and change its Blending Mode to “Screen”. Do the same thing for the clip in Track 3.
Step 12
You’re done. The glow effect will now be applied to your video. You have successfully created a glowing edge effect in any dancing video you want. Congratulations!

Summary
What you’ve learned:
- How to add a glowing edge effect on any video you want
- How to add other effects to clips in Filmora
- Edit the settings and features of these effects and make them more unique
What you need to prepare:
- A computer (Windows or macOS)
- Your video materials.
- Filmora video editor
Step 1
Download Filmora and run the program. Once it starts, click on “New Project”.
Step 2
Go to My Media and Import any video you want to add a glowing edge effect to. Then, drag the video to Track 1 on the Timeline.

Step 3
Copy the Clip from Track 1 and paste it on Track 2.
Step 4
Go to the Effects tab and apply the “Pixelated Edges” effect to the clip on Track 1. Then, hide Track 2 by clicking the “eye” button.

Step 5
Double-click on the Clip in Track 1. Go to Video → Effects. Here, change the color to anything you want. This will determine what color your glowing edge effect will be. When you’re done choosing a color, click OK.

Step 6
Next, Unhide the Track 2. Double-click on the clip in Track 2 and go to Video → Basic. Scroll down and change the Blending Mode to “Difference”. Click OK and Export the clip at a higher rate. Click on the blue Export button at the top center.

Step 7
Delete the clip on Track 1. Then, move the clip from Track 2 to Track 1. Now, Import the clip that you just Exported and drag it to Track 2.

Step 8
Go to Effects and find the Blur effect. Drag the Blur effect to the clip on Track 2.

Step 9
Double-click on the clip in Track 2. Go to Video → Effects. Change the Zoom Rate to 1. Click OK. Now, find the Glow effect in the Effects tab and apply it two times to the clip on Track 2. Copy the Track 2 clip and paste it on Track 3.
Step 10
Search for the Wash effect in the Effects tab and apply it twice to the Track 2 clip again. Just drag it two times on top of the clip.
Step 11
Double-click on the clip in Track 2 and change its Blending Mode to “Screen”. Do the same thing for the clip in Track 3.
Step 12
You’re done. The glow effect will now be applied to your video. You have successfully created a glowing edge effect in any dancing video you want. Congratulations!

Summary
What you’ve learned:
- How to add a glowing edge effect on any video you want
- How to add other effects to clips in Filmora
- Edit the settings and features of these effects and make them more unique
What you need to prepare:
- A computer (Windows or macOS)
- Your video materials.
- Filmora video editor
Step 1
Download Filmora and run the program. Once it starts, click on “New Project”.
Step 2
Go to My Media and Import any video you want to add a glowing edge effect to. Then, drag the video to Track 1 on the Timeline.

Step 3
Copy the Clip from Track 1 and paste it on Track 2.
Step 4
Go to the Effects tab and apply the “Pixelated Edges” effect to the clip on Track 1. Then, hide Track 2 by clicking the “eye” button.

Step 5
Double-click on the Clip in Track 1. Go to Video → Effects. Here, change the color to anything you want. This will determine what color your glowing edge effect will be. When you’re done choosing a color, click OK.

Step 6
Next, Unhide the Track 2. Double-click on the clip in Track 2 and go to Video → Basic. Scroll down and change the Blending Mode to “Difference”. Click OK and Export the clip at a higher rate. Click on the blue Export button at the top center.

Step 7
Delete the clip on Track 1. Then, move the clip from Track 2 to Track 1. Now, Import the clip that you just Exported and drag it to Track 2.

Step 8
Go to Effects and find the Blur effect. Drag the Blur effect to the clip on Track 2.

Step 9
Double-click on the clip in Track 2. Go to Video → Effects. Change the Zoom Rate to 1. Click OK. Now, find the Glow effect in the Effects tab and apply it two times to the clip on Track 2. Copy the Track 2 clip and paste it on Track 3.
Step 10
Search for the Wash effect in the Effects tab and apply it twice to the Track 2 clip again. Just drag it two times on top of the clip.
Step 11
Double-click on the clip in Track 2 and change its Blending Mode to “Screen”. Do the same thing for the clip in Track 3.
Step 12
You’re done. The glow effect will now be applied to your video. You have successfully created a glowing edge effect in any dancing video you want. Congratulations!

Summary
What you’ve learned:
- How to add a glowing edge effect on any video you want
- How to add other effects to clips in Filmora
- Edit the settings and features of these effects and make them more unique
What you need to prepare:
- A computer (Windows or macOS)
- Your video materials.
- Filmora video editor
Step 1
Download Filmora and run the program. Once it starts, click on “New Project”.
Step 2
Go to My Media and Import any video you want to add a glowing edge effect to. Then, drag the video to Track 1 on the Timeline.

Step 3
Copy the Clip from Track 1 and paste it on Track 2.
Step 4
Go to the Effects tab and apply the “Pixelated Edges” effect to the clip on Track 1. Then, hide Track 2 by clicking the “eye” button.

Step 5
Double-click on the Clip in Track 1. Go to Video → Effects. Here, change the color to anything you want. This will determine what color your glowing edge effect will be. When you’re done choosing a color, click OK.

Step 6
Next, Unhide the Track 2. Double-click on the clip in Track 2 and go to Video → Basic. Scroll down and change the Blending Mode to “Difference”. Click OK and Export the clip at a higher rate. Click on the blue Export button at the top center.

Step 7
Delete the clip on Track 1. Then, move the clip from Track 2 to Track 1. Now, Import the clip that you just Exported and drag it to Track 2.

Step 8
Go to Effects and find the Blur effect. Drag the Blur effect to the clip on Track 2.

Step 9
Double-click on the clip in Track 2. Go to Video → Effects. Change the Zoom Rate to 1. Click OK. Now, find the Glow effect in the Effects tab and apply it two times to the clip on Track 2. Copy the Track 2 clip and paste it on Track 3.
Step 10
Search for the Wash effect in the Effects tab and apply it twice to the Track 2 clip again. Just drag it two times on top of the clip.
Step 11
Double-click on the clip in Track 2 and change its Blending Mode to “Screen”. Do the same thing for the clip in Track 3.
Step 12
You’re done. The glow effect will now be applied to your video. You have successfully created a glowing edge effect in any dancing video you want. Congratulations!

Summary
What you’ve learned:
- How to add a glowing edge effect on any video you want
- How to add other effects to clips in Filmora
- Edit the settings and features of these effects and make them more unique
Quick Answer: What Is a GIF File?
Quick Answer: What Is a GIF File?
An easy yet powerful editor
Numerous effects to choose from
Detailed tutorials provided by the official channel
Stay tuned to get an insight into what and how of GIFs with utmost ease! Here’s all about the origin, credibility, creation and content repositories of GIFs!
In this article
01 [What Is a GIF File?](#Part 1)
02 [Are GIF Files Subject to Copyright?](#Part 2)
03 [How to Convert a GIF File](#Part 3)
04 [6 Places to Find the Best Gifs](#Part 4)
Part 1 What Is a GIF File?
GIF is an acronym for Graphics Interchange Format. Talking of the explicit GIF meaning, this one is a short motion snippet created from a set of serially arranged still images in a looping motion. Talking of the origin of GIFs, these were first introduced in 1987 by Steve Wilhite from the US based online service provider CompuServe, precisely on June 15.
GIFs serve as portable image formats for still and animated images, and are primarily small sized files. However, these are very well compatible with large content files too. In today’s times, GIFs are a trending means of entertainment based content sharing and intensified message delivery to target audience. Additionally, you can conveniently use motion images in the GIF format as effective tools of improvising and upgrading your marketing straggles for an enhanced brand promotion.
Considering the immense content varieties of GIFs, these are an eminent part of blogs, social media posts and product websites. You can even use them to objectify your emotions and feelings when conversing with peers through the latest instant messaging applications. The bottom line is, GIFs are an integral part of today’s modern and dynamic communication patterns and needs.
Part 2 Are GIF File Subject to Copyright?
The straight and simple answer to this query is a ‘Yes’. CIFs are indeed subject to copyright, just like its creative counterparts. These essentially constitute an original copyrighted creation, or may even originate from an existing copyright protected work. However, you may encounter potential glitches when choosing to work with GIF images while sticking with legal constraints.
Talking of the potential issues with the legality of GIF usage, there are two major concerns; the first being the sharing of unlicensed copyrighted GIF content, while the absence of legalized methods for licensed commercial use of these short motion clips being the second. Talking of possible reasons, there is again a duel. At present, there no copyright exercise from the end of original creators of GIF content, along with the absence of exact copyright claim constraints that can be imposed by content owners.
This scenario poses a potential need to look for suitable mitigation methods to curb copyright claims and disputes resulting from illegal use of GIFs. As a matter of fact, the development of a proper legal framework for undisputed GIF usage is a time consuming process. However, you can stay cautious by adhering to the following measures in the meantime:
● Refrain from using GIFs in a manner that would appear unsolicited to you, had you been the content owner.
● Take a note to credit the original creators in case3 you are using the GIF content from a known copyright source.
● Avoid drawing content from doubtful sources, instead search for trusted alternatives, or creating a GIF of your own would be an even better and safe choice.
Part 3 How to Convert a GIF File
GIFs are an exciting means of creating a buzz about the information being conveyed. You can ensure an effective reach and impact of your brand if you include these catchy, short animation loops in your promotion strategy. Counting upon the credibility of GIFs, it is equally exciting to create these on your own. Try hands at experimenting with your creative skills to make and share interesting content through GIFs.
When looking for an excellent GIF creator tool, you don’t need to have second thoughts on picking up the Wondershare Filmora GIF Creator. This software has everything to make you fall in love with creating and editing GIFs! You can choose to create looping animations from static images and video files in a variety of formats when creating GIFs in Wondershare Filmora Video Editor .

Wondershare Filmora - Best Video Editor for Mac/Windows
5,481,435 people have downloaded it.
Build unique custom animations without breaking a sweat.
Focus on creating epic stories and leave the details to Filmora’s auto features.
Start a creative adventure with drag & drop effects and endless possibilities.
Filmora simplifies advanced features to save you time and effort.
Filmora cuts out repetition so you can move on to your next creative breakthrough.
Creating GIFs in Filmora
As already stated, making GIFs in Filmora is super easy. You just need to follow the steps mentioned below:
Step 1: Download and Launch Filmora
From the link given above, download the Filmora GIF creator software for free and install the same in your preferred device. When you finish, launch the software to reach its timeline.
Step 2: Media Upload
Select a set of locally saved still images or any desired video file to upload to the software’s timeline. Filmora supports over 150 different file formats, granting you the liberty to choose your suitable one without a glitch.
Step 3: Timeline Placement
Drag the uploaded media files to the Filmora editor timeline to customize your artwork with suitable effects and filters, while exploring your editing creativity. You can try non adding overlays; background effects, audio and music, or making size, frame and play speed adjustments and even add suitable tests to make your content impressive.
Step 4: Save and Export
When you are happy with your work, save it locally using the .gif extension. This will cause a GIF file download in your device’s memory. Your artwork is now ready to be exported to your media sharing handles.
Part 4 Places to Find the Best Gifs
Creating GIFs of your own is an absolute fun, but considering the fact that you may require to look for excellent pre made GIF content at some instances, the web is flooded with appealing GIF libraries that are enriched with top quality, amazing GIF content. Some of the best GIF websites include the following:
01GIFHY
This is probably the first name that comes in mind when the talk is about quality with variety in GIF content. The site is an extensive library of stunning GIFs, with tons of different and relatable content categories that are packed with all the latest and trending GIFs. Ann additional advantage of using this site to hunt for the perfect GIF is, the site has a direct export feature. This means that you can directly share your selected GIF on the site to your instant massaging conversations and social media handles.
02Tenor
This one is another heap of amazing GIFs available online. Having a vast and distributed content inventory, Tenor lands among the most potential competitors of GIPHY. In spite of being on the same page in terms of website interface and content categorization, these two libraries offer potentially diverse search results for the sane keyword. It is interesting to know that Tenor takes the credit of introducing the GIF Keyboard.
03Gfycat
If you are interested to experiment with GIF hosting, this website is your one stop access for adhering to all related concerns. Though you may be a little disappointed with the site’s content search filter, its GIF category bank is quite impressive. Additionally, you will be pleased with the high-definition image quality of the GIFs available on this site. You can visibly count on this as a dependable means to access and host premade GIFs.
04GIFbin
GIFs are known to be the trendsetters in content sharing, but if you are among the ones who like to stay out of the crowd, you can visit this site for state of the art nostalgic GIF content. Browsing through the retro inspired content categories of the website, you will experience getting back to those Limewire and MSN Messenger days almost two decades back. The site comes with a simple interface and has a massive library to access content in the GIF file format.
05Imgflip
You can take this site as a bridge connecting the GIF sharing and meme creation spectrums. Though the site excels as a quality meme creation platform, it is simultaneously a hub of stunning GIF content in diverse categories, particularly in the comic genre. The GIFs on the site have an embedded watermark, which you may prefer removing before downloading or sharing the contents, if not, it is equally fine to keep the watermark.
06Tumblr
This site is visibly a time travel into the GIF world. Covering an extensive range of GIFs from the retro panorama to the latest ongoing trends, this website is an eminent store house of futuristic GIF content too. you can either browse through selected content categories or pick up a specific keyword search in the Tumblr search field. Consider visiting this site to take a nostalgia tour to the domain of quality content sharing.
Premade GIFs are a content of class in the world of information sharing. These are intuitively power packed tools of data promotion, but may require additional customization in some cases. Whether aiming to intensify your message or just for a creative fun, if you want to explore your editing skills to personalize your GIFs, you can choose the Filmora GIF Maker software to serve your purpose.
Key Features
The software is loaded with exciting features to let you enjoy the GIF creation experience. Some are them are outlined below:
● The software is free to use and comes with a clean and organized user interface.
● This is quick and easy GIF maker software that helps you create amazing GIF content in a spic and span process.
● The Filmora editor library is a huge storehouse of professional quality effects and filters, like, overlays, audio-visual effects, image size and frame adjustment tools, etc., that are ready to give an outstanding professional touch to your creation.
● This software is conveniently compatible with your Windows and MacOS supported devices.
● It supports almost all common image and video file formats.
● Key Takeaways from This Episode →
● GIFs are an extensive content sharing alternative that are known to add volume and substance to still captures and thereby assure a precise and impactful message delivery.
● You can create stunning GIFs from static images as well as convert different file formats into GIFs.
● When looking for quality premade GIF content, you can visit a range of GIF website to pick exactly what you like. However, if you want to take up further customization, consider using the Filmora GIF Creator software to either edit premade GIFs, or create exciting ones of your own!
Stay tuned to get an insight into what and how of GIFs with utmost ease! Here’s all about the origin, credibility, creation and content repositories of GIFs!
In this article
01 [What Is a GIF File?](#Part 1)
02 [Are GIF Files Subject to Copyright?](#Part 2)
03 [How to Convert a GIF File](#Part 3)
04 [6 Places to Find the Best Gifs](#Part 4)
Part 1 What Is a GIF File?
GIF is an acronym for Graphics Interchange Format. Talking of the explicit GIF meaning, this one is a short motion snippet created from a set of serially arranged still images in a looping motion. Talking of the origin of GIFs, these were first introduced in 1987 by Steve Wilhite from the US based online service provider CompuServe, precisely on June 15.
GIFs serve as portable image formats for still and animated images, and are primarily small sized files. However, these are very well compatible with large content files too. In today’s times, GIFs are a trending means of entertainment based content sharing and intensified message delivery to target audience. Additionally, you can conveniently use motion images in the GIF format as effective tools of improvising and upgrading your marketing straggles for an enhanced brand promotion.
Considering the immense content varieties of GIFs, these are an eminent part of blogs, social media posts and product websites. You can even use them to objectify your emotions and feelings when conversing with peers through the latest instant messaging applications. The bottom line is, GIFs are an integral part of today’s modern and dynamic communication patterns and needs.
Part 2 Are GIF File Subject to Copyright?
The straight and simple answer to this query is a ‘Yes’. CIFs are indeed subject to copyright, just like its creative counterparts. These essentially constitute an original copyrighted creation, or may even originate from an existing copyright protected work. However, you may encounter potential glitches when choosing to work with GIF images while sticking with legal constraints.
Talking of the potential issues with the legality of GIF usage, there are two major concerns; the first being the sharing of unlicensed copyrighted GIF content, while the absence of legalized methods for licensed commercial use of these short motion clips being the second. Talking of possible reasons, there is again a duel. At present, there no copyright exercise from the end of original creators of GIF content, along with the absence of exact copyright claim constraints that can be imposed by content owners.
This scenario poses a potential need to look for suitable mitigation methods to curb copyright claims and disputes resulting from illegal use of GIFs. As a matter of fact, the development of a proper legal framework for undisputed GIF usage is a time consuming process. However, you can stay cautious by adhering to the following measures in the meantime:
● Refrain from using GIFs in a manner that would appear unsolicited to you, had you been the content owner.
● Take a note to credit the original creators in case3 you are using the GIF content from a known copyright source.
● Avoid drawing content from doubtful sources, instead search for trusted alternatives, or creating a GIF of your own would be an even better and safe choice.
Part 3 How to Convert a GIF File
GIFs are an exciting means of creating a buzz about the information being conveyed. You can ensure an effective reach and impact of your brand if you include these catchy, short animation loops in your promotion strategy. Counting upon the credibility of GIFs, it is equally exciting to create these on your own. Try hands at experimenting with your creative skills to make and share interesting content through GIFs.
When looking for an excellent GIF creator tool, you don’t need to have second thoughts on picking up the Wondershare Filmora GIF Creator. This software has everything to make you fall in love with creating and editing GIFs! You can choose to create looping animations from static images and video files in a variety of formats when creating GIFs in Wondershare Filmora Video Editor .

Wondershare Filmora - Best Video Editor for Mac/Windows
5,481,435 people have downloaded it.
Build unique custom animations without breaking a sweat.
Focus on creating epic stories and leave the details to Filmora’s auto features.
Start a creative adventure with drag & drop effects and endless possibilities.
Filmora simplifies advanced features to save you time and effort.
Filmora cuts out repetition so you can move on to your next creative breakthrough.
Creating GIFs in Filmora
As already stated, making GIFs in Filmora is super easy. You just need to follow the steps mentioned below:
Step 1: Download and Launch Filmora
From the link given above, download the Filmora GIF creator software for free and install the same in your preferred device. When you finish, launch the software to reach its timeline.
Step 2: Media Upload
Select a set of locally saved still images or any desired video file to upload to the software’s timeline. Filmora supports over 150 different file formats, granting you the liberty to choose your suitable one without a glitch.
Step 3: Timeline Placement
Drag the uploaded media files to the Filmora editor timeline to customize your artwork with suitable effects and filters, while exploring your editing creativity. You can try non adding overlays; background effects, audio and music, or making size, frame and play speed adjustments and even add suitable tests to make your content impressive.
Step 4: Save and Export
When you are happy with your work, save it locally using the .gif extension. This will cause a GIF file download in your device’s memory. Your artwork is now ready to be exported to your media sharing handles.
Part 4 Places to Find the Best Gifs
Creating GIFs of your own is an absolute fun, but considering the fact that you may require to look for excellent pre made GIF content at some instances, the web is flooded with appealing GIF libraries that are enriched with top quality, amazing GIF content. Some of the best GIF websites include the following:
01GIFHY
This is probably the first name that comes in mind when the talk is about quality with variety in GIF content. The site is an extensive library of stunning GIFs, with tons of different and relatable content categories that are packed with all the latest and trending GIFs. Ann additional advantage of using this site to hunt for the perfect GIF is, the site has a direct export feature. This means that you can directly share your selected GIF on the site to your instant massaging conversations and social media handles.
02Tenor
This one is another heap of amazing GIFs available online. Having a vast and distributed content inventory, Tenor lands among the most potential competitors of GIPHY. In spite of being on the same page in terms of website interface and content categorization, these two libraries offer potentially diverse search results for the sane keyword. It is interesting to know that Tenor takes the credit of introducing the GIF Keyboard.
03Gfycat
If you are interested to experiment with GIF hosting, this website is your one stop access for adhering to all related concerns. Though you may be a little disappointed with the site’s content search filter, its GIF category bank is quite impressive. Additionally, you will be pleased with the high-definition image quality of the GIFs available on this site. You can visibly count on this as a dependable means to access and host premade GIFs.
04GIFbin
GIFs are known to be the trendsetters in content sharing, but if you are among the ones who like to stay out of the crowd, you can visit this site for state of the art nostalgic GIF content. Browsing through the retro inspired content categories of the website, you will experience getting back to those Limewire and MSN Messenger days almost two decades back. The site comes with a simple interface and has a massive library to access content in the GIF file format.
05Imgflip
You can take this site as a bridge connecting the GIF sharing and meme creation spectrums. Though the site excels as a quality meme creation platform, it is simultaneously a hub of stunning GIF content in diverse categories, particularly in the comic genre. The GIFs on the site have an embedded watermark, which you may prefer removing before downloading or sharing the contents, if not, it is equally fine to keep the watermark.
06Tumblr
This site is visibly a time travel into the GIF world. Covering an extensive range of GIFs from the retro panorama to the latest ongoing trends, this website is an eminent store house of futuristic GIF content too. you can either browse through selected content categories or pick up a specific keyword search in the Tumblr search field. Consider visiting this site to take a nostalgia tour to the domain of quality content sharing.
Premade GIFs are a content of class in the world of information sharing. These are intuitively power packed tools of data promotion, but may require additional customization in some cases. Whether aiming to intensify your message or just for a creative fun, if you want to explore your editing skills to personalize your GIFs, you can choose the Filmora GIF Maker software to serve your purpose.
Key Features
The software is loaded with exciting features to let you enjoy the GIF creation experience. Some are them are outlined below:
● The software is free to use and comes with a clean and organized user interface.
● This is quick and easy GIF maker software that helps you create amazing GIF content in a spic and span process.
● The Filmora editor library is a huge storehouse of professional quality effects and filters, like, overlays, audio-visual effects, image size and frame adjustment tools, etc., that are ready to give an outstanding professional touch to your creation.
● This software is conveniently compatible with your Windows and MacOS supported devices.
● It supports almost all common image and video file formats.
● Key Takeaways from This Episode →
● GIFs are an extensive content sharing alternative that are known to add volume and substance to still captures and thereby assure a precise and impactful message delivery.
● You can create stunning GIFs from static images as well as convert different file formats into GIFs.
● When looking for quality premade GIF content, you can visit a range of GIF website to pick exactly what you like. However, if you want to take up further customization, consider using the Filmora GIF Creator software to either edit premade GIFs, or create exciting ones of your own!
Stay tuned to get an insight into what and how of GIFs with utmost ease! Here’s all about the origin, credibility, creation and content repositories of GIFs!
In this article
01 [What Is a GIF File?](#Part 1)
02 [Are GIF Files Subject to Copyright?](#Part 2)
03 [How to Convert a GIF File](#Part 3)
04 [6 Places to Find the Best Gifs](#Part 4)
Part 1 What Is a GIF File?
GIF is an acronym for Graphics Interchange Format. Talking of the explicit GIF meaning, this one is a short motion snippet created from a set of serially arranged still images in a looping motion. Talking of the origin of GIFs, these were first introduced in 1987 by Steve Wilhite from the US based online service provider CompuServe, precisely on June 15.
GIFs serve as portable image formats for still and animated images, and are primarily small sized files. However, these are very well compatible with large content files too. In today’s times, GIFs are a trending means of entertainment based content sharing and intensified message delivery to target audience. Additionally, you can conveniently use motion images in the GIF format as effective tools of improvising and upgrading your marketing straggles for an enhanced brand promotion.
Considering the immense content varieties of GIFs, these are an eminent part of blogs, social media posts and product websites. You can even use them to objectify your emotions and feelings when conversing with peers through the latest instant messaging applications. The bottom line is, GIFs are an integral part of today’s modern and dynamic communication patterns and needs.
Part 2 Are GIF File Subject to Copyright?
The straight and simple answer to this query is a ‘Yes’. CIFs are indeed subject to copyright, just like its creative counterparts. These essentially constitute an original copyrighted creation, or may even originate from an existing copyright protected work. However, you may encounter potential glitches when choosing to work with GIF images while sticking with legal constraints.
Talking of the potential issues with the legality of GIF usage, there are two major concerns; the first being the sharing of unlicensed copyrighted GIF content, while the absence of legalized methods for licensed commercial use of these short motion clips being the second. Talking of possible reasons, there is again a duel. At present, there no copyright exercise from the end of original creators of GIF content, along with the absence of exact copyright claim constraints that can be imposed by content owners.
This scenario poses a potential need to look for suitable mitigation methods to curb copyright claims and disputes resulting from illegal use of GIFs. As a matter of fact, the development of a proper legal framework for undisputed GIF usage is a time consuming process. However, you can stay cautious by adhering to the following measures in the meantime:
● Refrain from using GIFs in a manner that would appear unsolicited to you, had you been the content owner.
● Take a note to credit the original creators in case3 you are using the GIF content from a known copyright source.
● Avoid drawing content from doubtful sources, instead search for trusted alternatives, or creating a GIF of your own would be an even better and safe choice.
Part 3 How to Convert a GIF File
GIFs are an exciting means of creating a buzz about the information being conveyed. You can ensure an effective reach and impact of your brand if you include these catchy, short animation loops in your promotion strategy. Counting upon the credibility of GIFs, it is equally exciting to create these on your own. Try hands at experimenting with your creative skills to make and share interesting content through GIFs.
When looking for an excellent GIF creator tool, you don’t need to have second thoughts on picking up the Wondershare Filmora GIF Creator. This software has everything to make you fall in love with creating and editing GIFs! You can choose to create looping animations from static images and video files in a variety of formats when creating GIFs in Wondershare Filmora Video Editor .

Wondershare Filmora - Best Video Editor for Mac/Windows
5,481,435 people have downloaded it.
Build unique custom animations without breaking a sweat.
Focus on creating epic stories and leave the details to Filmora’s auto features.
Start a creative adventure with drag & drop effects and endless possibilities.
Filmora simplifies advanced features to save you time and effort.
Filmora cuts out repetition so you can move on to your next creative breakthrough.
Creating GIFs in Filmora
As already stated, making GIFs in Filmora is super easy. You just need to follow the steps mentioned below:
Step 1: Download and Launch Filmora
From the link given above, download the Filmora GIF creator software for free and install the same in your preferred device. When you finish, launch the software to reach its timeline.
Step 2: Media Upload
Select a set of locally saved still images or any desired video file to upload to the software’s timeline. Filmora supports over 150 different file formats, granting you the liberty to choose your suitable one without a glitch.
Step 3: Timeline Placement
Drag the uploaded media files to the Filmora editor timeline to customize your artwork with suitable effects and filters, while exploring your editing creativity. You can try non adding overlays; background effects, audio and music, or making size, frame and play speed adjustments and even add suitable tests to make your content impressive.
Step 4: Save and Export
When you are happy with your work, save it locally using the .gif extension. This will cause a GIF file download in your device’s memory. Your artwork is now ready to be exported to your media sharing handles.
Part 4 Places to Find the Best Gifs
Creating GIFs of your own is an absolute fun, but considering the fact that you may require to look for excellent pre made GIF content at some instances, the web is flooded with appealing GIF libraries that are enriched with top quality, amazing GIF content. Some of the best GIF websites include the following:
01GIFHY
This is probably the first name that comes in mind when the talk is about quality with variety in GIF content. The site is an extensive library of stunning GIFs, with tons of different and relatable content categories that are packed with all the latest and trending GIFs. Ann additional advantage of using this site to hunt for the perfect GIF is, the site has a direct export feature. This means that you can directly share your selected GIF on the site to your instant massaging conversations and social media handles.
02Tenor
This one is another heap of amazing GIFs available online. Having a vast and distributed content inventory, Tenor lands among the most potential competitors of GIPHY. In spite of being on the same page in terms of website interface and content categorization, these two libraries offer potentially diverse search results for the sane keyword. It is interesting to know that Tenor takes the credit of introducing the GIF Keyboard.
03Gfycat
If you are interested to experiment with GIF hosting, this website is your one stop access for adhering to all related concerns. Though you may be a little disappointed with the site’s content search filter, its GIF category bank is quite impressive. Additionally, you will be pleased with the high-definition image quality of the GIFs available on this site. You can visibly count on this as a dependable means to access and host premade GIFs.
04GIFbin
GIFs are known to be the trendsetters in content sharing, but if you are among the ones who like to stay out of the crowd, you can visit this site for state of the art nostalgic GIF content. Browsing through the retro inspired content categories of the website, you will experience getting back to those Limewire and MSN Messenger days almost two decades back. The site comes with a simple interface and has a massive library to access content in the GIF file format.
05Imgflip
You can take this site as a bridge connecting the GIF sharing and meme creation spectrums. Though the site excels as a quality meme creation platform, it is simultaneously a hub of stunning GIF content in diverse categories, particularly in the comic genre. The GIFs on the site have an embedded watermark, which you may prefer removing before downloading or sharing the contents, if not, it is equally fine to keep the watermark.
06Tumblr
This site is visibly a time travel into the GIF world. Covering an extensive range of GIFs from the retro panorama to the latest ongoing trends, this website is an eminent store house of futuristic GIF content too. you can either browse through selected content categories or pick up a specific keyword search in the Tumblr search field. Consider visiting this site to take a nostalgia tour to the domain of quality content sharing.
Premade GIFs are a content of class in the world of information sharing. These are intuitively power packed tools of data promotion, but may require additional customization in some cases. Whether aiming to intensify your message or just for a creative fun, if you want to explore your editing skills to personalize your GIFs, you can choose the Filmora GIF Maker software to serve your purpose.
Key Features
The software is loaded with exciting features to let you enjoy the GIF creation experience. Some are them are outlined below:
● The software is free to use and comes with a clean and organized user interface.
● This is quick and easy GIF maker software that helps you create amazing GIF content in a spic and span process.
● The Filmora editor library is a huge storehouse of professional quality effects and filters, like, overlays, audio-visual effects, image size and frame adjustment tools, etc., that are ready to give an outstanding professional touch to your creation.
● This software is conveniently compatible with your Windows and MacOS supported devices.
● It supports almost all common image and video file formats.
● Key Takeaways from This Episode →
● GIFs are an extensive content sharing alternative that are known to add volume and substance to still captures and thereby assure a precise and impactful message delivery.
● You can create stunning GIFs from static images as well as convert different file formats into GIFs.
● When looking for quality premade GIF content, you can visit a range of GIF website to pick exactly what you like. However, if you want to take up further customization, consider using the Filmora GIF Creator software to either edit premade GIFs, or create exciting ones of your own!
Stay tuned to get an insight into what and how of GIFs with utmost ease! Here’s all about the origin, credibility, creation and content repositories of GIFs!
In this article
01 [What Is a GIF File?](#Part 1)
02 [Are GIF Files Subject to Copyright?](#Part 2)
03 [How to Convert a GIF File](#Part 3)
04 [6 Places to Find the Best Gifs](#Part 4)
Part 1 What Is a GIF File?
GIF is an acronym for Graphics Interchange Format. Talking of the explicit GIF meaning, this one is a short motion snippet created from a set of serially arranged still images in a looping motion. Talking of the origin of GIFs, these were first introduced in 1987 by Steve Wilhite from the US based online service provider CompuServe, precisely on June 15.
GIFs serve as portable image formats for still and animated images, and are primarily small sized files. However, these are very well compatible with large content files too. In today’s times, GIFs are a trending means of entertainment based content sharing and intensified message delivery to target audience. Additionally, you can conveniently use motion images in the GIF format as effective tools of improvising and upgrading your marketing straggles for an enhanced brand promotion.
Considering the immense content varieties of GIFs, these are an eminent part of blogs, social media posts and product websites. You can even use them to objectify your emotions and feelings when conversing with peers through the latest instant messaging applications. The bottom line is, GIFs are an integral part of today’s modern and dynamic communication patterns and needs.
Part 2 Are GIF File Subject to Copyright?
The straight and simple answer to this query is a ‘Yes’. CIFs are indeed subject to copyright, just like its creative counterparts. These essentially constitute an original copyrighted creation, or may even originate from an existing copyright protected work. However, you may encounter potential glitches when choosing to work with GIF images while sticking with legal constraints.
Talking of the potential issues with the legality of GIF usage, there are two major concerns; the first being the sharing of unlicensed copyrighted GIF content, while the absence of legalized methods for licensed commercial use of these short motion clips being the second. Talking of possible reasons, there is again a duel. At present, there no copyright exercise from the end of original creators of GIF content, along with the absence of exact copyright claim constraints that can be imposed by content owners.
This scenario poses a potential need to look for suitable mitigation methods to curb copyright claims and disputes resulting from illegal use of GIFs. As a matter of fact, the development of a proper legal framework for undisputed GIF usage is a time consuming process. However, you can stay cautious by adhering to the following measures in the meantime:
● Refrain from using GIFs in a manner that would appear unsolicited to you, had you been the content owner.
● Take a note to credit the original creators in case3 you are using the GIF content from a known copyright source.
● Avoid drawing content from doubtful sources, instead search for trusted alternatives, or creating a GIF of your own would be an even better and safe choice.
Part 3 How to Convert a GIF File
GIFs are an exciting means of creating a buzz about the information being conveyed. You can ensure an effective reach and impact of your brand if you include these catchy, short animation loops in your promotion strategy. Counting upon the credibility of GIFs, it is equally exciting to create these on your own. Try hands at experimenting with your creative skills to make and share interesting content through GIFs.
When looking for an excellent GIF creator tool, you don’t need to have second thoughts on picking up the Wondershare Filmora GIF Creator. This software has everything to make you fall in love with creating and editing GIFs! You can choose to create looping animations from static images and video files in a variety of formats when creating GIFs in Wondershare Filmora Video Editor .

Wondershare Filmora - Best Video Editor for Mac/Windows
5,481,435 people have downloaded it.
Build unique custom animations without breaking a sweat.
Focus on creating epic stories and leave the details to Filmora’s auto features.
Start a creative adventure with drag & drop effects and endless possibilities.
Filmora simplifies advanced features to save you time and effort.
Filmora cuts out repetition so you can move on to your next creative breakthrough.
Creating GIFs in Filmora
As already stated, making GIFs in Filmora is super easy. You just need to follow the steps mentioned below:
Step 1: Download and Launch Filmora
From the link given above, download the Filmora GIF creator software for free and install the same in your preferred device. When you finish, launch the software to reach its timeline.
Step 2: Media Upload
Select a set of locally saved still images or any desired video file to upload to the software’s timeline. Filmora supports over 150 different file formats, granting you the liberty to choose your suitable one without a glitch.
Step 3: Timeline Placement
Drag the uploaded media files to the Filmora editor timeline to customize your artwork with suitable effects and filters, while exploring your editing creativity. You can try non adding overlays; background effects, audio and music, or making size, frame and play speed adjustments and even add suitable tests to make your content impressive.
Step 4: Save and Export
When you are happy with your work, save it locally using the .gif extension. This will cause a GIF file download in your device’s memory. Your artwork is now ready to be exported to your media sharing handles.
Part 4 Places to Find the Best Gifs
Creating GIFs of your own is an absolute fun, but considering the fact that you may require to look for excellent pre made GIF content at some instances, the web is flooded with appealing GIF libraries that are enriched with top quality, amazing GIF content. Some of the best GIF websites include the following:
01GIFHY
This is probably the first name that comes in mind when the talk is about quality with variety in GIF content. The site is an extensive library of stunning GIFs, with tons of different and relatable content categories that are packed with all the latest and trending GIFs. Ann additional advantage of using this site to hunt for the perfect GIF is, the site has a direct export feature. This means that you can directly share your selected GIF on the site to your instant massaging conversations and social media handles.
02Tenor
This one is another heap of amazing GIFs available online. Having a vast and distributed content inventory, Tenor lands among the most potential competitors of GIPHY. In spite of being on the same page in terms of website interface and content categorization, these two libraries offer potentially diverse search results for the sane keyword. It is interesting to know that Tenor takes the credit of introducing the GIF Keyboard.
03Gfycat
If you are interested to experiment with GIF hosting, this website is your one stop access for adhering to all related concerns. Though you may be a little disappointed with the site’s content search filter, its GIF category bank is quite impressive. Additionally, you will be pleased with the high-definition image quality of the GIFs available on this site. You can visibly count on this as a dependable means to access and host premade GIFs.
04GIFbin
GIFs are known to be the trendsetters in content sharing, but if you are among the ones who like to stay out of the crowd, you can visit this site for state of the art nostalgic GIF content. Browsing through the retro inspired content categories of the website, you will experience getting back to those Limewire and MSN Messenger days almost two decades back. The site comes with a simple interface and has a massive library to access content in the GIF file format.
05Imgflip
You can take this site as a bridge connecting the GIF sharing and meme creation spectrums. Though the site excels as a quality meme creation platform, it is simultaneously a hub of stunning GIF content in diverse categories, particularly in the comic genre. The GIFs on the site have an embedded watermark, which you may prefer removing before downloading or sharing the contents, if not, it is equally fine to keep the watermark.
06Tumblr
This site is visibly a time travel into the GIF world. Covering an extensive range of GIFs from the retro panorama to the latest ongoing trends, this website is an eminent store house of futuristic GIF content too. you can either browse through selected content categories or pick up a specific keyword search in the Tumblr search field. Consider visiting this site to take a nostalgia tour to the domain of quality content sharing.
Premade GIFs are a content of class in the world of information sharing. These are intuitively power packed tools of data promotion, but may require additional customization in some cases. Whether aiming to intensify your message or just for a creative fun, if you want to explore your editing skills to personalize your GIFs, you can choose the Filmora GIF Maker software to serve your purpose.
Key Features
The software is loaded with exciting features to let you enjoy the GIF creation experience. Some are them are outlined below:
● The software is free to use and comes with a clean and organized user interface.
● This is quick and easy GIF maker software that helps you create amazing GIF content in a spic and span process.
● The Filmora editor library is a huge storehouse of professional quality effects and filters, like, overlays, audio-visual effects, image size and frame adjustment tools, etc., that are ready to give an outstanding professional touch to your creation.
● This software is conveniently compatible with your Windows and MacOS supported devices.
● It supports almost all common image and video file formats.
● Key Takeaways from This Episode →
● GIFs are an extensive content sharing alternative that are known to add volume and substance to still captures and thereby assure a precise and impactful message delivery.
● You can create stunning GIFs from static images as well as convert different file formats into GIFs.
● When looking for quality premade GIF content, you can visit a range of GIF website to pick exactly what you like. However, if you want to take up further customization, consider using the Filmora GIF Creator software to either edit premade GIFs, or create exciting ones of your own!
Also read:
- Updated 2024 Approved How to Achieve GoPro Slow Motion With Quality
- New Do You Want a LUT that You Can Use for Your High-Definition Content? You Can Use Rec 709 LUT Premiere Pro for Your HD Digital Media to Give the Perfect Result
- 2024 Approved In This Article, We Talk About How to Add Old Film Overlays and Other Effects to Turn the Videos or Photos More Vintage and with an Older Aspect. We Take a Look at Filmora in This Guide and Give Tips on How to Create Great Retro Videos
- Updated How to Add Text in Adobe Rush for 2024
- Updated Camtasia Vs. Final Cut Pro for 2024
- How to Make Vintage Film Effect 1980S
- Updated 4 Ways for Rotating Your GoPro Videos Professionally
- New If the Phenomenon of Augmented Reality Fascinates You, Consider Entering Into the Gaming World with the Best AR Games You Will Ever Come Across
- Updated Did You Know Cameras Have a Built-In Feature to Shoot Slow-Motion Clips? This Article Is About Using Sony S&Q to Capture Slow-Motion Scenes
- New Converting VTT to SRT, or in Other Words, Converting a Document File Format Web to Subtitles File with the SRT Format Can Be a Cumbersome Process for Many. It Becomes Difficult when You Are New to This and Dont Have Prior Guidance
- New How to Change Quicktime Player Speed on Mac?
- New 2024 Approved 6 Instant Mp4 to GIF Online Tools
- If You Have a Low Budget but Want to Create a Filmy Appearance of the Video, Then Read 6 Ways to Get Professional Filming Equipment by Using Household Objects
- Are You Looking to Freeze-Frame in FCP? If Yes, Read One, as Here Is a Guide About How to Freeze-Frame in Final Cut Pro (FCP) with Ease for 2024
- New Do You Know You Can Use Mobile Apps to Apply Camera Effects to Your Videos? Many Smartphone Applications Allow You to Apply Camcorder Effects
- 2024 Approved Wondering How to Make a Perfect Love Video to Express Your Love for Your Special One and Share with the World? Here Are the Best Love Video Makers with Music
- New Have You Ever Wondered How Those PowerPoint, Looping Slideshows You See in Conferences and Reception Areas Display and Move to the Next Slide Automatically without Clicking a Mouse? You Dont Have to Be Amazed at This
- In 2024, Top 6 End Screen Makers
- New Create Glitch Text Effect
- Updated In 2024, Adobe Premiere Pro Guide to Slow-Down Video
- Updated Looking for Simple Steps to Apply Fade in Effect to Your Text in Premiere Pro? Here Are Two Different Methods Along with an Alternative Way to Fade Text in Videos
- Updated We Can Say that the Horror Movies of the 90S Laid the Foundation for Current Horror Movies. So, without Wasting Time, Lets Create a 1990S Horror Movie Similar to The Blair Witch Project
- New Making Creative and Engaging Youtube Videos Is Now Easy with Several Tools. Now, YouTube Also Offers You Its Own Built-In Video Editor Through Which You Can Edit and Enhance the Video Quality
- Updated In 2024, A Review of 3D LUT Mobile App - A Composite Application for Editing Media
- Difference Between Time Lapse and Hyperlapse for 2024
- 2024 Approved How to Create Chroma Key Written Text Effects in Filmora
- 2024 Approved How to Add Subtitles to Videos With Kapwing
- New Steps to Make a Neon Dance Effect With Filmora
- Is Augmented Reality Conferencing the Future of Workplace Collaboration, In 2024
- Updated How To Slow Down GIF Building an Understanding for 2024
- Updated Color Lut Is an Easy and Powerful Tool to Make Your Video Stands Out From the Crowd. Check This Article to Learn the Details About Color Lut
- Updated Zoom In and Out on Discord for 2024
- Updated In 2024, 8 Unexpected Ways to Add Emoji to Photo Online
- New Looking Into How Slow Mo Guys Have Changed the Dynamics of Slow-Motion
- In 2024, Online Calculate and Change Video Aspect Ratio
- Updated Do You Want Your Photos and Videos to Give an Old and Vintage Feel? Here Are some Vintage LUTs Premiere Pro Free and Paid Options Available to Download
- 2024 Approved Do You Want to Know How to Import or Adjust Clips in Wondershare Filmora? Dont Worry because Importing or Adjusting Video Clips in This Tool Is Pretty Easy
- New In 2024, How To Create Quiz Videos Detailed Guide
- You Can Create a Photo Video Slideshow on YouTube. In Slideshow on YouTube You Can Add Photos and Videos, Effects and Transitions and Make a Quality Slideshow
- New In 2024, Create the Stranger Things Upside Down Effect Video
- Updated Are You Eager to Discover the Top-Rated and Reliable LUTs that Can Be Used in Shotcut? This Article Will Help You a Lot with This Matter
- As a Designer, Color Is the Most Powerful and the Most Diverse Tool at Your Disposal. Here Are Ten Matching Color Combinations to Get You Started on Your Next Project
- In 2024, How to Create and Use Adjustment Layers in After Effects
- New What Are the 10 Best GIF Creator?
- In 2024, How to Remove Echo with Premiere Pro? Full Guide Here
- Updated How To Track and Blur Faces in Premiere Pro
- In 2024, How to Screen Mirroring Itel S23 to PC? | Dr.fone
- In 2024, Easy Ways to Manage Your Poco C65 Location Settings | Dr.fone
- How to Factory Reset Xiaomi 13T Pro without Losing Data | Dr.fone
- Full Guide to Catch 100 IV Pokémon Using a Map On Vivo Y55s 5G (2023) | Dr.fone
- Bypassing Google Account With vnROM Bypass For Realme Narzo 60x 5G
- In 2024, How to Turn Off Google Location to Stop Tracking You on OnePlus Nord N30 5G | Dr.fone
- Does Airplane Mode Turn off GPS Location On Apple iPhone XS? | Dr.fone
- In 2024, 3 Ways of How to Get Someones Apple ID Off iPhone 15 without Password
- Bypass iCloud Activation Lock with IMEI Code On iPhone XS Max
- How to Fix iPad or iPhone XR Stuck On Activation Lock?
- In 2024, What Is a SIM Network Unlock PIN? Get Your OnePlus Nord 3 5G Phone Network-Ready
- Gmail Not Working on Xiaomi Redmi 13C 5G 7 Common Problems & Fixes | Dr.fone
- How to retrieve erased videos from Xiaomi 14 Ultra
- How To Pause Life360 Location Sharing For Poco X6 Pro | Dr.fone
- Full Guide to Catch 100 IV Pokémon Using a Map On Honor X50 GT | Dr.fone
- How to Cast Oppo Find X6 Pro Screen to PC Using WiFi | Dr.fone
- In 2024, How to Unlock Vivo V27 Pro Bootloader Easily
- Thinking About Changing Your Netflix Region Without a VPN On Xiaomi Redmi K70 Pro? | Dr.fone
- Updated 5 Foolproof Amazing Anime Text to Speech Tips
- In 2024, How to Transfer Contacts from Infinix GT 10 Pro to Other Android Devices Devices? | Dr.fone
- In 2024, 4 solution to get rid of pokemon fail to detect location On Vivo Y36i | Dr.fone
- Title: How to Make Video Slow Motion? Complete Guide
- Author: Chloe
- Created at : 2024-05-20 03:37:28
- Updated at : 2024-05-21 03:37:28
- Link: https://ai-editing-video.techidaily.com/how-to-make-video-slow-motion-complete-guide/
- License: This work is licensed under CC BY-NC-SA 4.0.


