:max_bytes(150000):strip_icc():format(webp)/GettyImages-585151372-a659baf0c7b441b9b7e7896716b12784.jpg)
How to Make Video Slow Motion, In 2024

How to Make Video Slow Motion?
Slow-motion videos are in trend now, especially when shooting for Instagram Reels , TikTok videos, or YouTube Shorts . While many users record the entire video in slow motion, there are others who need only a particular section of a clip to play at a reduced speed. Nevertheless, slowing down footage is no longer rocket science, thanks to the advancements in technology, and the availability and ease of access to relevant apps.
That said, here you will learn what is needed to record a video in slow motion, and how to get the job done in a simple way. In addition, you will also learn how to reduce the playback speed of an already existing video if it was recorded at a normal pace.
In this article
01 How to Make Slow Motion Videos via Recording?
02 How to Apply the Smooth Slow-Motion Effect in Post-Production?
Part 1: How to Make Slow Motion Videos via Recording?
The fact is, the playback speed of a video is inversely proportional to the frames per second (FPS) it has been recorded in. Usually, to have a video play at normal speed, it is recorded at 24 FPS or 30 FPS. On the other hand, if you increase the frame rate (FPS) to 120 or 240, the playback speed slows down. You can easily check this if you have access to a DSLR camera or an iPhone. These devices allow you to adjust the FPS so the videos can be recorded in slow motion.
For your convenience and learning, the step-by-step procedure on how to record a video in slow motion using an iPhone is explained below:
Step 1: Get to the SLO-MO Mode
Launch the Camera app on your iPhone (iPhone 13 Pro Max is used here for illustrations), and swipe the screen to the left to get to the SLO-MO mode.

Step 2: Adjust Recording Preferences
Tap the number at the top-right corner to switch between 120 FPS and 240 FPS as needed. Tap 1x from the lower-middle section of the screen, and use the rotator to adjust your preferred zoom level.

Step 3: Start and Stop Recording
Tap the Record button from the bottom-center of the screen to begin recording the video in slow motion. Tap Stop when you are done. You can access the recorded video from the Videos container of the Photos app in your iPhone.
If you are using Android phone, you can check this article to find out more details about How to Record Super Slow Motion Videos on Your Phone.
You may also like: Best Slo-mo Camera Apps for Android And iPhone
Part 2: How to Apply the Smooth Slow-Motion Effect in Post-Production?
If you don’t have access to a camera that can record videos in slow motion, or in case you want to capture the footage at normal playback speed and then slow it down later, you need a dedicated tool to get the job done. Even though several post-production applications are available in the market, the one that is most versatile, has an intuitive interface, and is quite easy to use is Filmora video editor from Wondershare .
The latest version of the app, i.e., Wondershare Filmora 11 has a new feature called Speed Ramping that enables you to graphically manage the speed of the clips. While using the feature, you can either slow down the entire video or certain parts of it according to your requirements. For your learning, both the methods are explained below:
Method 1: Add Slow Motion Effect to the Whole Clip
For Win 7 or later (64-bit)
For macOS 10.12 or later
Step 1: Import the Source Video and Add to Timeline
Launch Wondershare Filmora on your Windows or Mac computer (a Windows 11 PC is used here for illustrations), click New Project from the first screen that appears. Make sure that the Media tool is selected from the standard tool bar at the top, click anywhere inside the Media window, and select and import the source clip to the program.
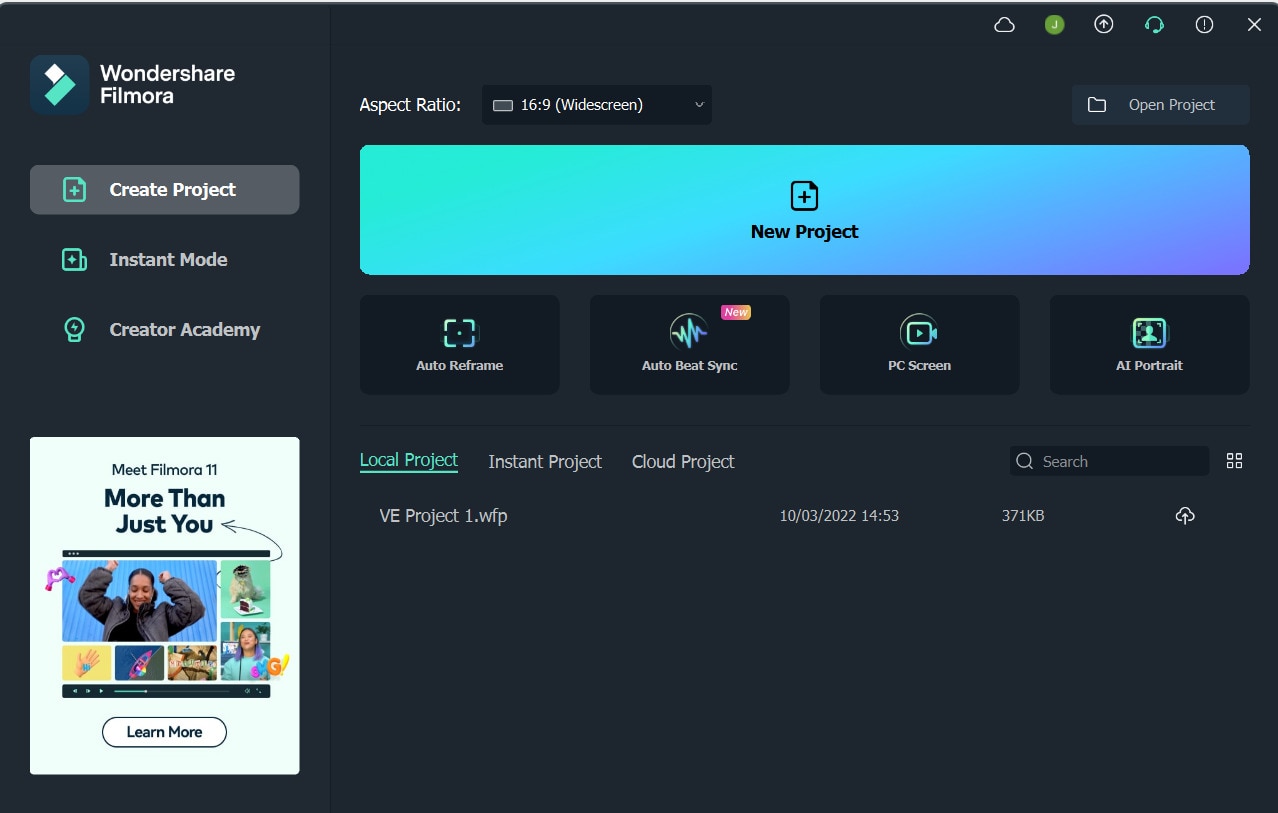
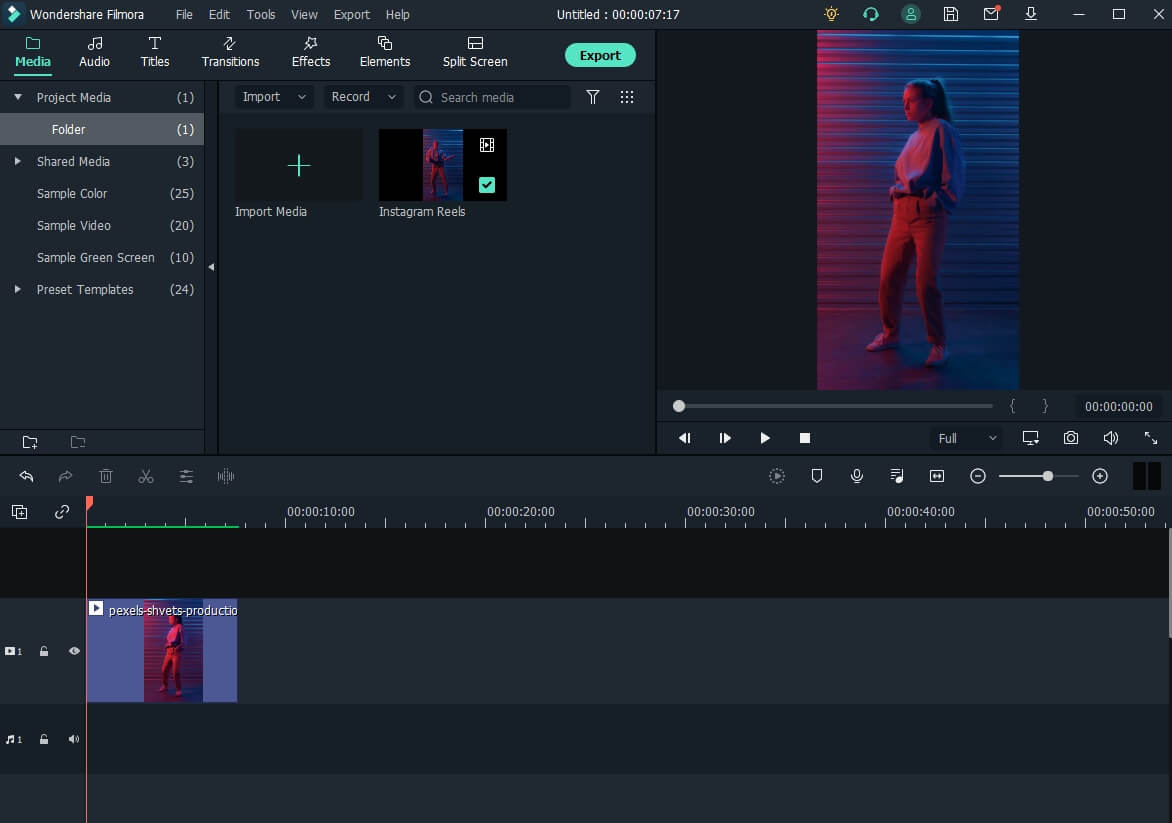
Next, hover the mouse over the thumbnail of the imported video in the Media window, and click the + icon present at its bottom-right corner. When the confirmation box comes up, click the Match to Media or Keep Project Settings button to change the project settings to match the resolution of the video, or change the footage to meet the project settings respectively.
Step 2: Add Slow Motion Effect to the Whole Clip
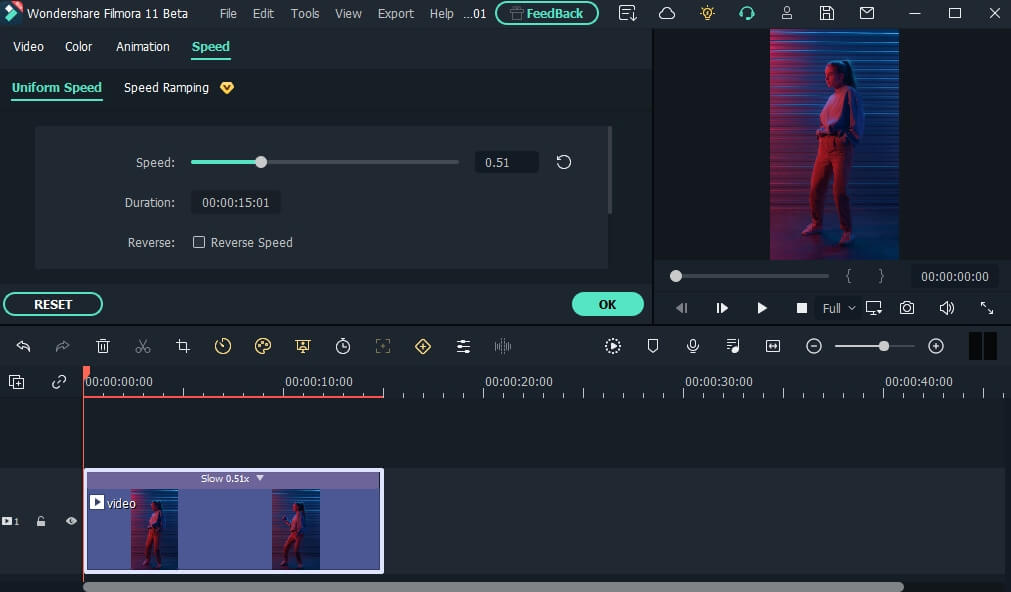
Once the media is added to the timeline, click on it and then click the Speed icon on the toolbar. Scroll down to the Slow menu and then you will see 0.5x, 0.25x, 0.1x, 0.05x and 0.01x presets. Select one to add slo-mo effects to the whole select clip. and click Speed Ramping from the menu that drops down.
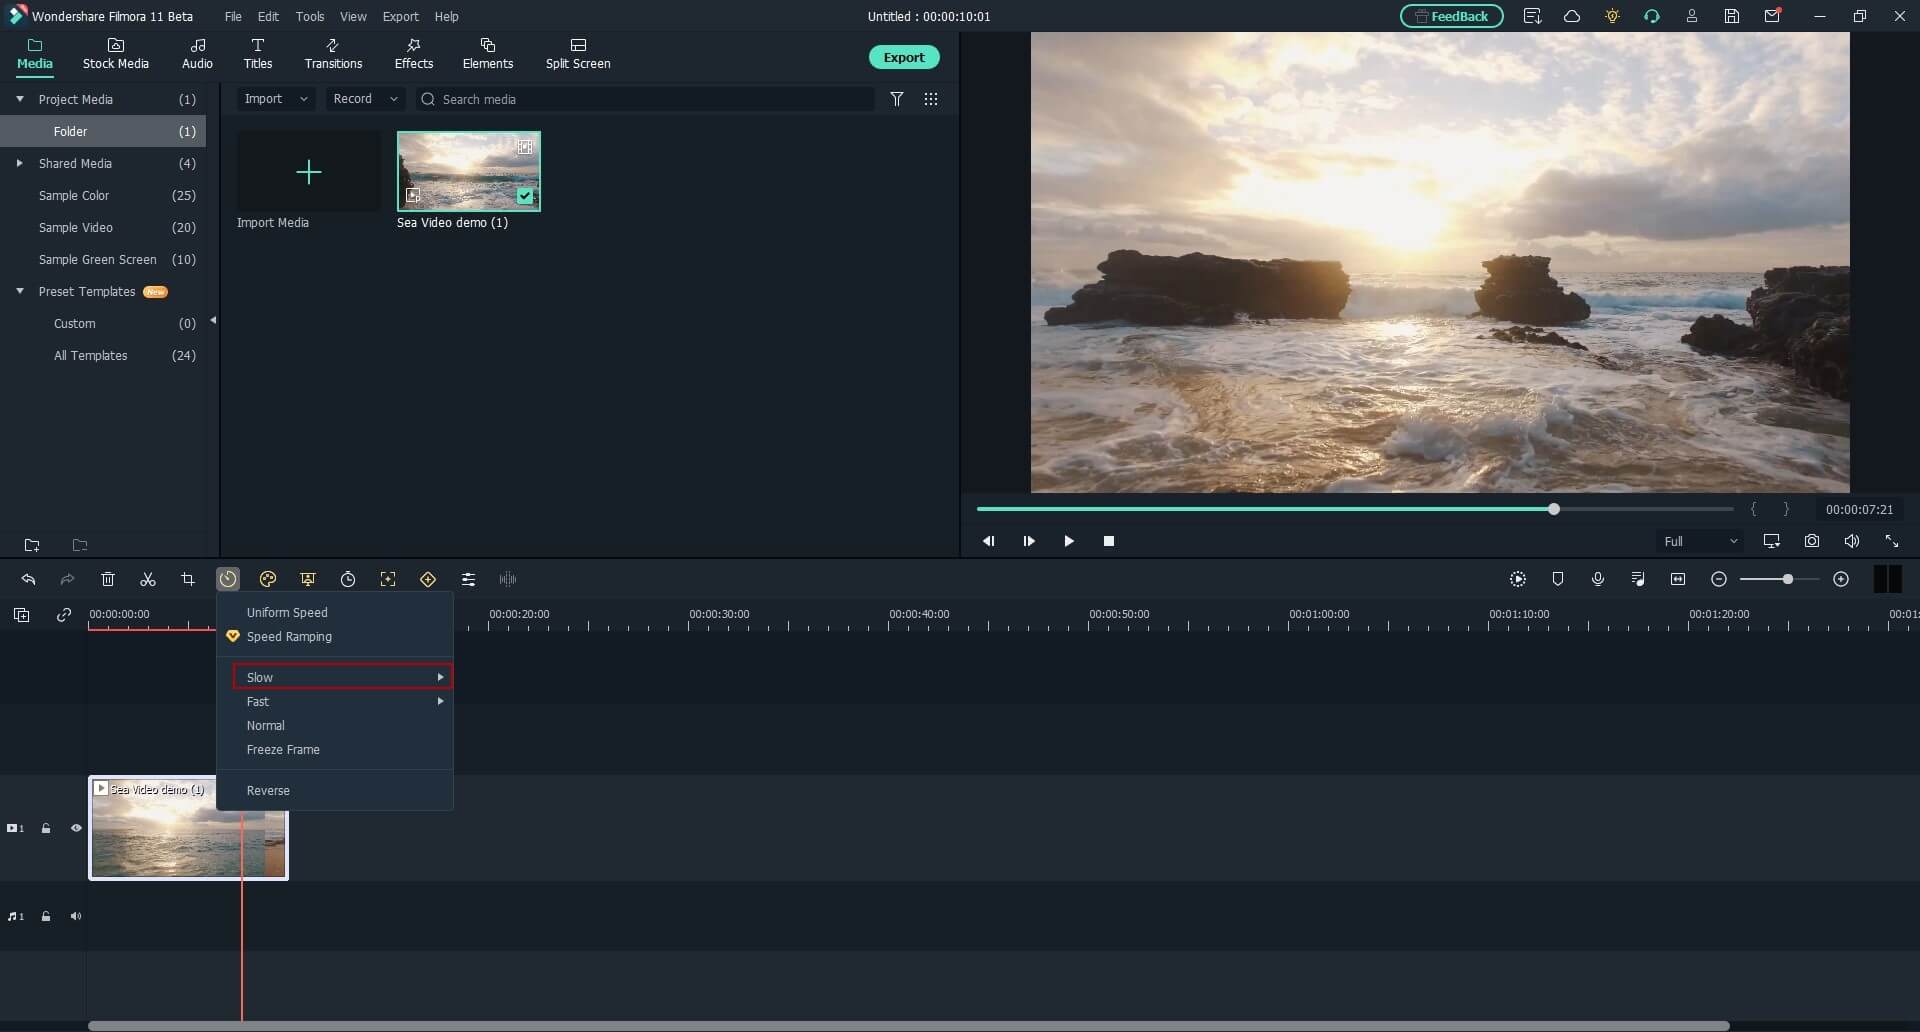
You can also right click the video in the timeline, and hover over to Speed option to select Uniform Speed to adjust the speed of the video to make a slo-mo effect video. Drag the speed slider to the left to slow down the video and you will see how many times it slowed down in the next field.
Method 2: Use Speed Ramping to Add Slow Motion Effect
For Win 7 or later (64-bit)
For macOS 10.12 or later
Speed Ramping enables you to add the slow-motion effect at different parts of a video and even freeze the screen for the duration that you specify. The processes to get these done are given below in detail:
Step 1: Add Source Video to Timeline and Get to the Speed Ramping Window
Use the process given in the previous method to import a source video to Wondershare Filmora 11 and add it to the Timeline. Then use the process given in the second step of the previous method to get to the Speed Ramping window.
Step 2: Add Slow Motion Effect to Different Parts of the Clip
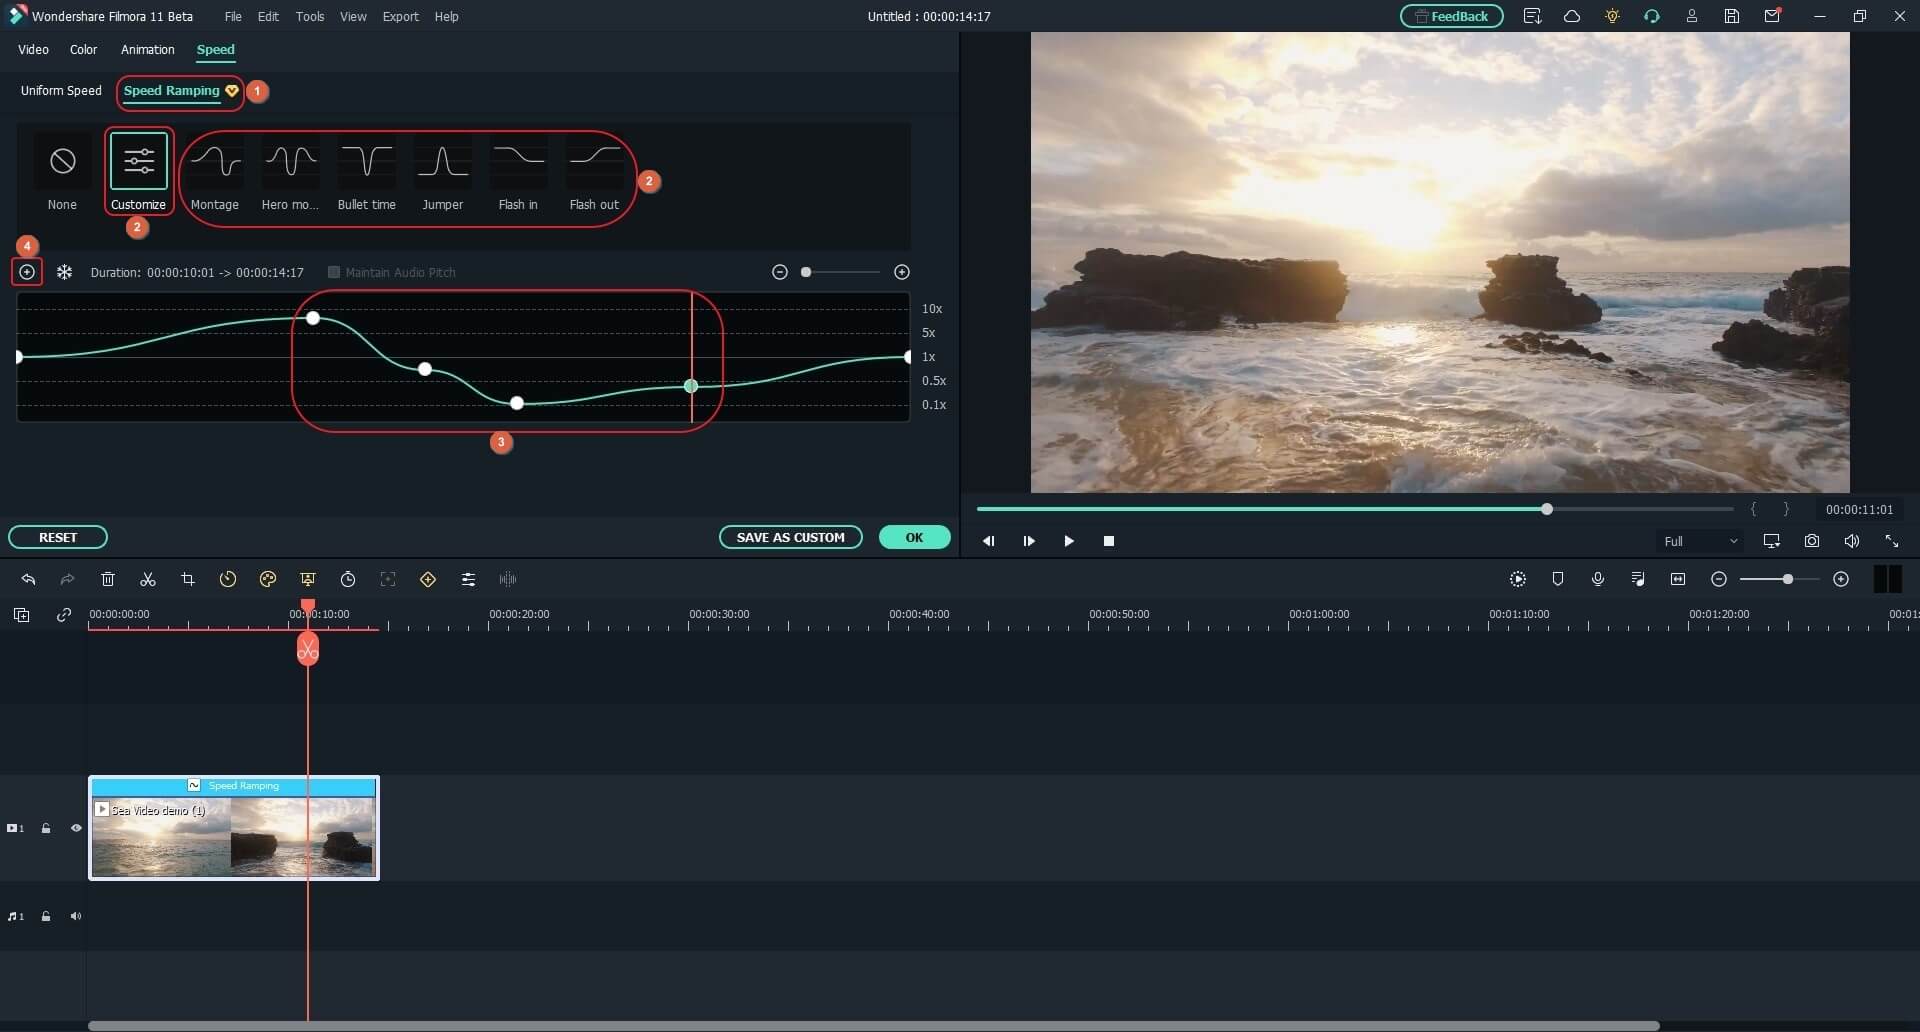
Go to the Speed Ramping tab if it is not already selected, click Custom from the available options, and drag the adjustment points below the center line to reduce the playback speed for that particular section of the clip. Optionally, you can click any of the available presets to automatically add the slow-motion effect to the video.
Note: You can also drag the adjustment points above the line to increase the playback speed.
To add an adjustment point on the frame where it is not already present, place the playhead (skimmer) at the correct position, and click Add Adjust Point from the left of the Speed Ramping window itself. Once added, you can drag it downward to reduce the playback speed of that part of the clip.
Step 3: Freeze the Video
Place the skimmer on the frame where you want to freeze the video for a while, and click Add Freeze Frame from the left of the Speed Ramping window. When the time box appears, in the Freeze Time field, enter the duration in seconds you want to freeze the screen for, and click OK.
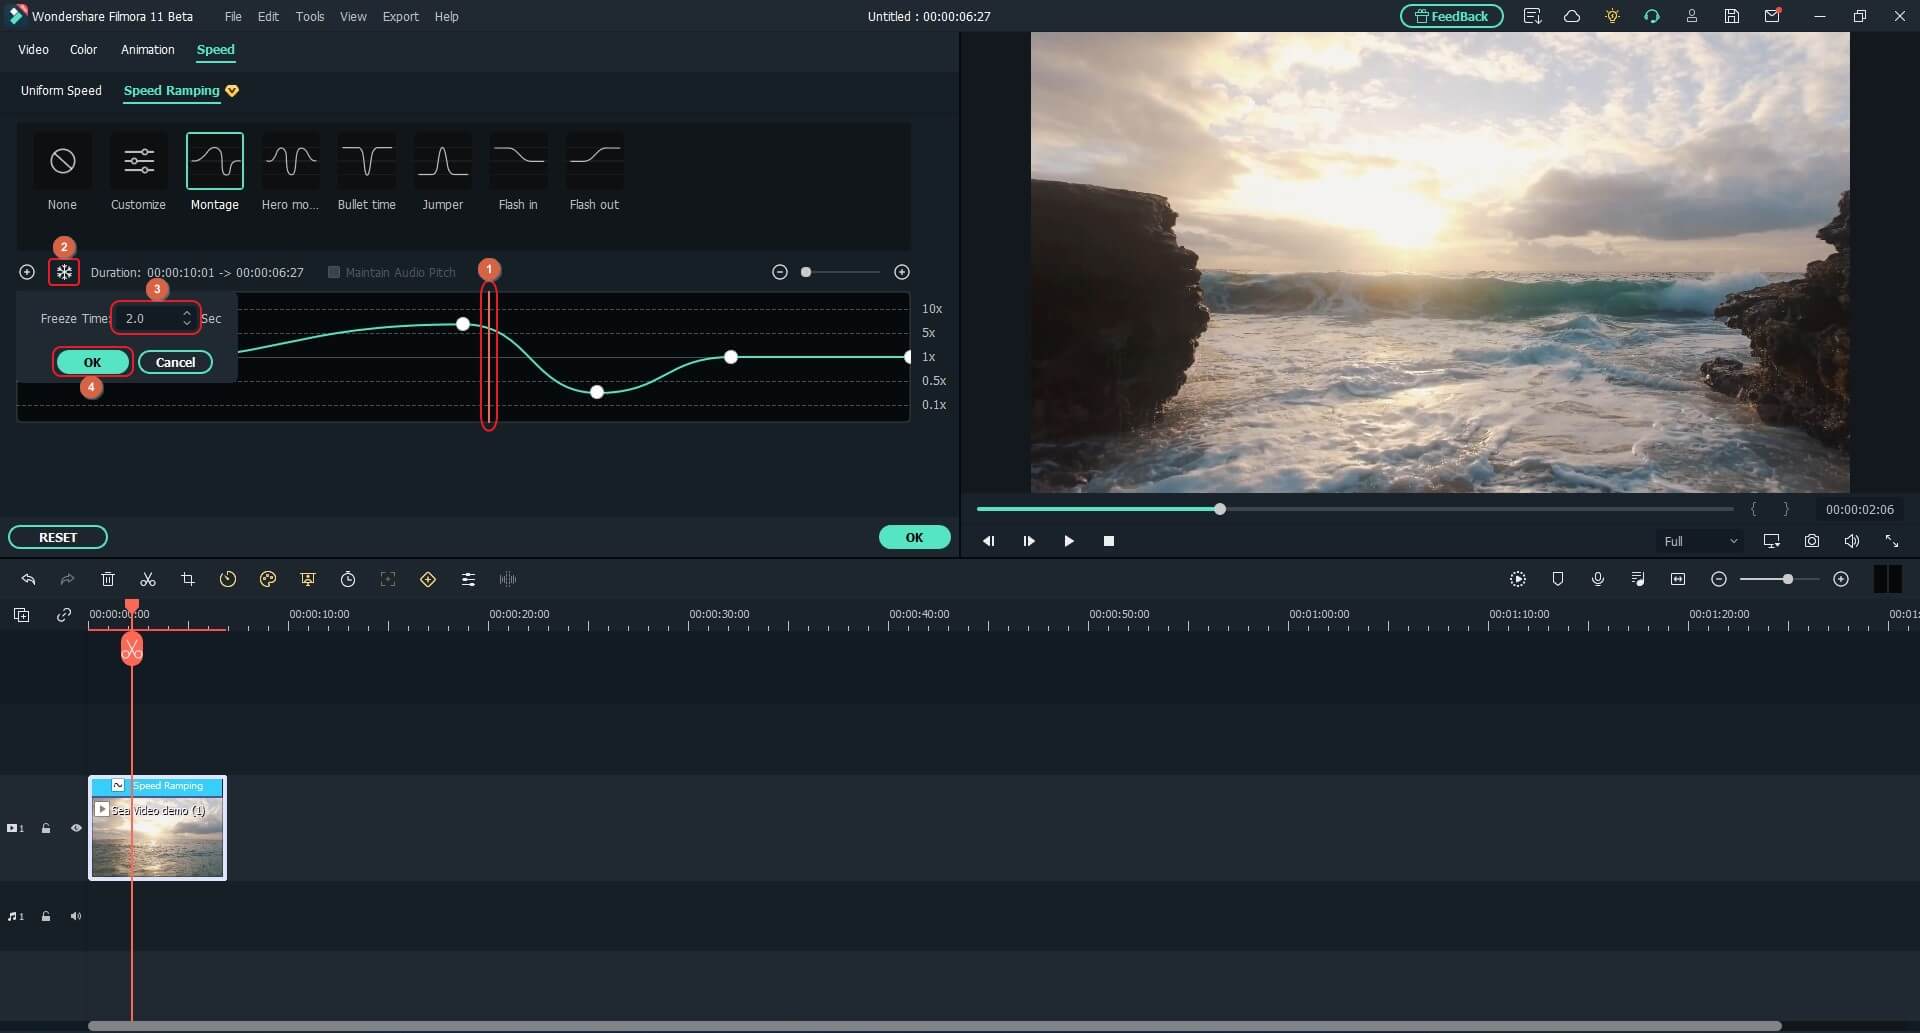
After adding a freeze point, optionally, you can drag and reposition it in the Speed Ramping timeline as needed. Finally, click OK from the bottom-right area to save the changes.
Part 3: When to Use Slow Motion?
There could be many instances when you want to add a slow-motion effect to your videos. Some of the most common ones include:
- Add Focus
If there is a particular scene in a clip that you want the audience to focus on, it would be a good idea to add the slow-motion effect right before that action appears on the screen, and bring the speed back to normal when the section is over.
- Skill or Style Demonstration
When a clip is playing at a normal speed, many times, the audience isn’t able to see the skills that you want to display. This is where you may want to add the slow-motion effect so that every detail can be noticed clearly and in detail.
- Replays
Mostly used for tournaments and matches where the actual action is to replayed so the audience, umpires, and other viewers can see the movements in detail before making the right decision.
- Observation
Some natural phenomena such as a deer running in the woods, a balloon full of water bursting, etc. occur quite quickly. If you want to witness such things clearly and in detail, it would be good to record them, and then reduce the playback speed for better viewing.
- Add Suspense
When you add the slow-motion effect to a scene, the impulse of the audience is automatically increased, and they take that particular section more seriously and with a thrill.
Conclusion
The slow-motion effect is inversely proportional to the framerate, i.e., frames per second or FPS. Almost all DSLR cameras that are available nowadays allow you to switch between different FPS values (typically 120 and 240) before recording. Also, if you have access to an iPhone, its Camera app has a built-in SLO-MO mode that can capture the footage in slow motion.
In addition, if you already have a video that has been recorded at a normal speed, you can use an efficient post-production software like Wondershare Filmora 11, and exploit its Speed Ramping feature to add the slow-motion effect at different scenes of a clip.
02 How to Apply the Smooth Slow-Motion Effect in Post-Production?
Part 1: How to Make Slow Motion Videos via Recording?
The fact is, the playback speed of a video is inversely proportional to the frames per second (FPS) it has been recorded in. Usually, to have a video play at normal speed, it is recorded at 24 FPS or 30 FPS. On the other hand, if you increase the frame rate (FPS) to 120 or 240, the playback speed slows down. You can easily check this if you have access to a DSLR camera or an iPhone. These devices allow you to adjust the FPS so the videos can be recorded in slow motion.
For your convenience and learning, the step-by-step procedure on how to record a video in slow motion using an iPhone is explained below:
Step 1: Get to the SLO-MO Mode
Launch the Camera app on your iPhone (iPhone 13 Pro Max is used here for illustrations), and swipe the screen to the left to get to the SLO-MO mode.

Step 2: Adjust Recording Preferences
Tap the number at the top-right corner to switch between 120 FPS and 240 FPS as needed. Tap 1x from the lower-middle section of the screen, and use the rotator to adjust your preferred zoom level.

Step 3: Start and Stop Recording
Tap the Record button from the bottom-center of the screen to begin recording the video in slow motion. Tap Stop when you are done. You can access the recorded video from the Videos container of the Photos app in your iPhone.
If you are using Android phone, you can check this article to find out more details about How to Record Super Slow Motion Videos on Your Phone.
You may also like: Best Slo-mo Camera Apps for Android And iPhone
Part 2: How to Apply the Smooth Slow-Motion Effect in Post-Production?
If you don’t have access to a camera that can record videos in slow motion, or in case you want to capture the footage at normal playback speed and then slow it down later, you need a dedicated tool to get the job done. Even though several post-production applications are available in the market, the one that is most versatile, has an intuitive interface, and is quite easy to use is Filmora video editor from Wondershare .
The latest version of the app, i.e., Wondershare Filmora 11 has a new feature called Speed Ramping that enables you to graphically manage the speed of the clips. While using the feature, you can either slow down the entire video or certain parts of it according to your requirements. For your learning, both the methods are explained below:
Method 1: Add Slow Motion Effect to the Whole Clip
For Win 7 or later (64-bit)
For macOS 10.12 or later
Step 1: Import the Source Video and Add to Timeline
Launch Wondershare Filmora on your Windows or Mac computer (a Windows 11 PC is used here for illustrations), click New Project from the first screen that appears. Make sure that the Media tool is selected from the standard tool bar at the top, click anywhere inside the Media window, and select and import the source clip to the program.

Next, hover the mouse over the thumbnail of the imported video in the Media window, and click the + icon present at its bottom-right corner. When the confirmation box comes up, click the Match to Media or Keep Project Settings button to change the project settings to match the resolution of the video, or change the footage to meet the project settings respectively.

Step 2: Add Slow Motion Effect to the Whole Clip
Once the media is added to the timeline, click on it and then click the Speed icon on the toolbar. Scroll down to the Slow menu and then you will see 0.5x, 0.25x, 0.1x, 0.05x and 0.01x presets. Select one to add slo-mo effects to the whole select clip. and click Speed Ramping from the menu that drops down.

You can also right click the video in the timeline, and hover over to Speed option to select Uniform Speed to adjust the speed of the video to make a slo-mo effect video. Drag the speed slider to the left to slow down the video and you will see how many times it slowed down in the next field.

Method 2: Use Speed Ramping to Add Slow Motion Effect
For Win 7 or later (64-bit)
For macOS 10.12 or later
Speed Ramping enables you to add the slow-motion effect at different parts of a video and even freeze the screen for the duration that you specify. The processes to get these done are given below in detail:
Step 1: Add Source Video to Timeline and Get to the Speed Ramping Window
Use the process given in the previous method to import a source video to Wondershare Filmora 11 and add it to the Timeline. Then use the process given in the second step of the previous method to get to the Speed Ramping window.
Step 2: Add Slow Motion Effect to Different Parts of the Clip
Go to the Speed Ramping tab if it is not already selected, click Custom from the available options, and drag the adjustment points below the center line to reduce the playback speed for that particular section of the clip. Optionally, you can click any of the available presets to automatically add the slow-motion effect to the video.
Note: You can also drag the adjustment points above the line to increase the playback speed.
To add an adjustment point on the frame where it is not already present, place the playhead (skimmer) at the correct position, and click Add Adjust Point from the left of the Speed Ramping window itself. Once added, you can drag it downward to reduce the playback speed of that part of the clip.

Step 3: Freeze the Video
Place the skimmer on the frame where you want to freeze the video for a while, and click Add Freeze Frame from the left of the Speed Ramping window. When the time box appears, in the Freeze Time field, enter the duration in seconds you want to freeze the screen for, and click OK.

After adding a freeze point, optionally, you can drag and reposition it in the Speed Ramping timeline as needed. Finally, click OK from the bottom-right area to save the changes.
Part 3: When to Use Slow Motion?
There could be many instances when you want to add a slow-motion effect to your videos. Some of the most common ones include:
- Add Focus
If there is a particular scene in a clip that you want the audience to focus on, it would be a good idea to add the slow-motion effect right before that action appears on the screen, and bring the speed back to normal when the section is over.
- Skill or Style Demonstration
When a clip is playing at a normal speed, many times, the audience isn’t able to see the skills that you want to display. This is where you may want to add the slow-motion effect so that every detail can be noticed clearly and in detail.
- Replays
Mostly used for tournaments and matches where the actual action is to replayed so the audience, umpires, and other viewers can see the movements in detail before making the right decision.
- Observation
Some natural phenomena such as a deer running in the woods, a balloon full of water bursting, etc. occur quite quickly. If you want to witness such things clearly and in detail, it would be good to record them, and then reduce the playback speed for better viewing.
- Add Suspense
When you add the slow-motion effect to a scene, the impulse of the audience is automatically increased, and they take that particular section more seriously and with a thrill.
Conclusion
The slow-motion effect is inversely proportional to the framerate, i.e., frames per second or FPS. Almost all DSLR cameras that are available nowadays allow you to switch between different FPS values (typically 120 and 240) before recording. Also, if you have access to an iPhone, its Camera app has a built-in SLO-MO mode that can capture the footage in slow motion.
In addition, if you already have a video that has been recorded at a normal speed, you can use an efficient post-production software like Wondershare Filmora 11, and exploit its Speed Ramping feature to add the slow-motion effect at different scenes of a clip.
02 How to Apply the Smooth Slow-Motion Effect in Post-Production?
Part 1: How to Make Slow Motion Videos via Recording?
The fact is, the playback speed of a video is inversely proportional to the frames per second (FPS) it has been recorded in. Usually, to have a video play at normal speed, it is recorded at 24 FPS or 30 FPS. On the other hand, if you increase the frame rate (FPS) to 120 or 240, the playback speed slows down. You can easily check this if you have access to a DSLR camera or an iPhone. These devices allow you to adjust the FPS so the videos can be recorded in slow motion.
For your convenience and learning, the step-by-step procedure on how to record a video in slow motion using an iPhone is explained below:
Step 1: Get to the SLO-MO Mode
Launch the Camera app on your iPhone (iPhone 13 Pro Max is used here for illustrations), and swipe the screen to the left to get to the SLO-MO mode.

Step 2: Adjust Recording Preferences
Tap the number at the top-right corner to switch between 120 FPS and 240 FPS as needed. Tap 1x from the lower-middle section of the screen, and use the rotator to adjust your preferred zoom level.

Step 3: Start and Stop Recording
Tap the Record button from the bottom-center of the screen to begin recording the video in slow motion. Tap Stop when you are done. You can access the recorded video from the Videos container of the Photos app in your iPhone.
If you are using Android phone, you can check this article to find out more details about How to Record Super Slow Motion Videos on Your Phone.
You may also like: Best Slo-mo Camera Apps for Android And iPhone
Part 2: How to Apply the Smooth Slow-Motion Effect in Post-Production?
If you don’t have access to a camera that can record videos in slow motion, or in case you want to capture the footage at normal playback speed and then slow it down later, you need a dedicated tool to get the job done. Even though several post-production applications are available in the market, the one that is most versatile, has an intuitive interface, and is quite easy to use is Filmora video editor from Wondershare .
The latest version of the app, i.e., Wondershare Filmora 11 has a new feature called Speed Ramping that enables you to graphically manage the speed of the clips. While using the feature, you can either slow down the entire video or certain parts of it according to your requirements. For your learning, both the methods are explained below:
Method 1: Add Slow Motion Effect to the Whole Clip
For Win 7 or later (64-bit)
For macOS 10.12 or later
Step 1: Import the Source Video and Add to Timeline
Launch Wondershare Filmora on your Windows or Mac computer (a Windows 11 PC is used here for illustrations), click New Project from the first screen that appears. Make sure that the Media tool is selected from the standard tool bar at the top, click anywhere inside the Media window, and select and import the source clip to the program.

Next, hover the mouse over the thumbnail of the imported video in the Media window, and click the + icon present at its bottom-right corner. When the confirmation box comes up, click the Match to Media or Keep Project Settings button to change the project settings to match the resolution of the video, or change the footage to meet the project settings respectively.

Step 2: Add Slow Motion Effect to the Whole Clip
Once the media is added to the timeline, click on it and then click the Speed icon on the toolbar. Scroll down to the Slow menu and then you will see 0.5x, 0.25x, 0.1x, 0.05x and 0.01x presets. Select one to add slo-mo effects to the whole select clip. and click Speed Ramping from the menu that drops down.

You can also right click the video in the timeline, and hover over to Speed option to select Uniform Speed to adjust the speed of the video to make a slo-mo effect video. Drag the speed slider to the left to slow down the video and you will see how many times it slowed down in the next field.

Method 2: Use Speed Ramping to Add Slow Motion Effect
For Win 7 or later (64-bit)
For macOS 10.12 or later
Speed Ramping enables you to add the slow-motion effect at different parts of a video and even freeze the screen for the duration that you specify. The processes to get these done are given below in detail:
Step 1: Add Source Video to Timeline and Get to the Speed Ramping Window
Use the process given in the previous method to import a source video to Wondershare Filmora 11 and add it to the Timeline. Then use the process given in the second step of the previous method to get to the Speed Ramping window.
Step 2: Add Slow Motion Effect to Different Parts of the Clip
Go to the Speed Ramping tab if it is not already selected, click Custom from the available options, and drag the adjustment points below the center line to reduce the playback speed for that particular section of the clip. Optionally, you can click any of the available presets to automatically add the slow-motion effect to the video.
Note: You can also drag the adjustment points above the line to increase the playback speed.
To add an adjustment point on the frame where it is not already present, place the playhead (skimmer) at the correct position, and click Add Adjust Point from the left of the Speed Ramping window itself. Once added, you can drag it downward to reduce the playback speed of that part of the clip.

Step 3: Freeze the Video
Place the skimmer on the frame where you want to freeze the video for a while, and click Add Freeze Frame from the left of the Speed Ramping window. When the time box appears, in the Freeze Time field, enter the duration in seconds you want to freeze the screen for, and click OK.

After adding a freeze point, optionally, you can drag and reposition it in the Speed Ramping timeline as needed. Finally, click OK from the bottom-right area to save the changes.
Part 3: When to Use Slow Motion?
There could be many instances when you want to add a slow-motion effect to your videos. Some of the most common ones include:
- Add Focus
If there is a particular scene in a clip that you want the audience to focus on, it would be a good idea to add the slow-motion effect right before that action appears on the screen, and bring the speed back to normal when the section is over.
- Skill or Style Demonstration
When a clip is playing at a normal speed, many times, the audience isn’t able to see the skills that you want to display. This is where you may want to add the slow-motion effect so that every detail can be noticed clearly and in detail.
- Replays
Mostly used for tournaments and matches where the actual action is to replayed so the audience, umpires, and other viewers can see the movements in detail before making the right decision.
- Observation
Some natural phenomena such as a deer running in the woods, a balloon full of water bursting, etc. occur quite quickly. If you want to witness such things clearly and in detail, it would be good to record them, and then reduce the playback speed for better viewing.
- Add Suspense
When you add the slow-motion effect to a scene, the impulse of the audience is automatically increased, and they take that particular section more seriously and with a thrill.
Conclusion
The slow-motion effect is inversely proportional to the framerate, i.e., frames per second or FPS. Almost all DSLR cameras that are available nowadays allow you to switch between different FPS values (typically 120 and 240) before recording. Also, if you have access to an iPhone, its Camera app has a built-in SLO-MO mode that can capture the footage in slow motion.
In addition, if you already have a video that has been recorded at a normal speed, you can use an efficient post-production software like Wondershare Filmora 11, and exploit its Speed Ramping feature to add the slow-motion effect at different scenes of a clip.
02 How to Apply the Smooth Slow-Motion Effect in Post-Production?
Part 1: How to Make Slow Motion Videos via Recording?
The fact is, the playback speed of a video is inversely proportional to the frames per second (FPS) it has been recorded in. Usually, to have a video play at normal speed, it is recorded at 24 FPS or 30 FPS. On the other hand, if you increase the frame rate (FPS) to 120 or 240, the playback speed slows down. You can easily check this if you have access to a DSLR camera or an iPhone. These devices allow you to adjust the FPS so the videos can be recorded in slow motion.
For your convenience and learning, the step-by-step procedure on how to record a video in slow motion using an iPhone is explained below:
Step 1: Get to the SLO-MO Mode
Launch the Camera app on your iPhone (iPhone 13 Pro Max is used here for illustrations), and swipe the screen to the left to get to the SLO-MO mode.

Step 2: Adjust Recording Preferences
Tap the number at the top-right corner to switch between 120 FPS and 240 FPS as needed. Tap 1x from the lower-middle section of the screen, and use the rotator to adjust your preferred zoom level.

Step 3: Start and Stop Recording
Tap the Record button from the bottom-center of the screen to begin recording the video in slow motion. Tap Stop when you are done. You can access the recorded video from the Videos container of the Photos app in your iPhone.
If you are using Android phone, you can check this article to find out more details about How to Record Super Slow Motion Videos on Your Phone.
You may also like: Best Slo-mo Camera Apps for Android And iPhone
Part 2: How to Apply the Smooth Slow-Motion Effect in Post-Production?
If you don’t have access to a camera that can record videos in slow motion, or in case you want to capture the footage at normal playback speed and then slow it down later, you need a dedicated tool to get the job done. Even though several post-production applications are available in the market, the one that is most versatile, has an intuitive interface, and is quite easy to use is Filmora video editor from Wondershare .
The latest version of the app, i.e., Wondershare Filmora 11 has a new feature called Speed Ramping that enables you to graphically manage the speed of the clips. While using the feature, you can either slow down the entire video or certain parts of it according to your requirements. For your learning, both the methods are explained below:
Method 1: Add Slow Motion Effect to the Whole Clip
For Win 7 or later (64-bit)
For macOS 10.12 or later
Step 1: Import the Source Video and Add to Timeline
Launch Wondershare Filmora on your Windows or Mac computer (a Windows 11 PC is used here for illustrations), click New Project from the first screen that appears. Make sure that the Media tool is selected from the standard tool bar at the top, click anywhere inside the Media window, and select and import the source clip to the program.

Next, hover the mouse over the thumbnail of the imported video in the Media window, and click the + icon present at its bottom-right corner. When the confirmation box comes up, click the Match to Media or Keep Project Settings button to change the project settings to match the resolution of the video, or change the footage to meet the project settings respectively.

Step 2: Add Slow Motion Effect to the Whole Clip
Once the media is added to the timeline, click on it and then click the Speed icon on the toolbar. Scroll down to the Slow menu and then you will see 0.5x, 0.25x, 0.1x, 0.05x and 0.01x presets. Select one to add slo-mo effects to the whole select clip. and click Speed Ramping from the menu that drops down.

You can also right click the video in the timeline, and hover over to Speed option to select Uniform Speed to adjust the speed of the video to make a slo-mo effect video. Drag the speed slider to the left to slow down the video and you will see how many times it slowed down in the next field.

Method 2: Use Speed Ramping to Add Slow Motion Effect
For Win 7 or later (64-bit)
For macOS 10.12 or later
Speed Ramping enables you to add the slow-motion effect at different parts of a video and even freeze the screen for the duration that you specify. The processes to get these done are given below in detail:
Step 1: Add Source Video to Timeline and Get to the Speed Ramping Window
Use the process given in the previous method to import a source video to Wondershare Filmora 11 and add it to the Timeline. Then use the process given in the second step of the previous method to get to the Speed Ramping window.
Step 2: Add Slow Motion Effect to Different Parts of the Clip
Go to the Speed Ramping tab if it is not already selected, click Custom from the available options, and drag the adjustment points below the center line to reduce the playback speed for that particular section of the clip. Optionally, you can click any of the available presets to automatically add the slow-motion effect to the video.
Note: You can also drag the adjustment points above the line to increase the playback speed.
To add an adjustment point on the frame where it is not already present, place the playhead (skimmer) at the correct position, and click Add Adjust Point from the left of the Speed Ramping window itself. Once added, you can drag it downward to reduce the playback speed of that part of the clip.

Step 3: Freeze the Video
Place the skimmer on the frame where you want to freeze the video for a while, and click Add Freeze Frame from the left of the Speed Ramping window. When the time box appears, in the Freeze Time field, enter the duration in seconds you want to freeze the screen for, and click OK.

After adding a freeze point, optionally, you can drag and reposition it in the Speed Ramping timeline as needed. Finally, click OK from the bottom-right area to save the changes.
Part 3: When to Use Slow Motion?
There could be many instances when you want to add a slow-motion effect to your videos. Some of the most common ones include:
- Add Focus
If there is a particular scene in a clip that you want the audience to focus on, it would be a good idea to add the slow-motion effect right before that action appears on the screen, and bring the speed back to normal when the section is over.
- Skill or Style Demonstration
When a clip is playing at a normal speed, many times, the audience isn’t able to see the skills that you want to display. This is where you may want to add the slow-motion effect so that every detail can be noticed clearly and in detail.
- Replays
Mostly used for tournaments and matches where the actual action is to replayed so the audience, umpires, and other viewers can see the movements in detail before making the right decision.
- Observation
Some natural phenomena such as a deer running in the woods, a balloon full of water bursting, etc. occur quite quickly. If you want to witness such things clearly and in detail, it would be good to record them, and then reduce the playback speed for better viewing.
- Add Suspense
When you add the slow-motion effect to a scene, the impulse of the audience is automatically increased, and they take that particular section more seriously and with a thrill.
Conclusion
The slow-motion effect is inversely proportional to the framerate, i.e., frames per second or FPS. Almost all DSLR cameras that are available nowadays allow you to switch between different FPS values (typically 120 and 240) before recording. Also, if you have access to an iPhone, its Camera app has a built-in SLO-MO mode that can capture the footage in slow motion.
In addition, if you already have a video that has been recorded at a normal speed, you can use an efficient post-production software like Wondershare Filmora 11, and exploit its Speed Ramping feature to add the slow-motion effect at different scenes of a clip.
Blender Tips - How to Make Blender Render Transparent Background
Blender Tips - How to Make Blender Render Transparent Background
An easy yet powerful editor
Numerous effects to choose from
Detailed tutorials provided by the official channel
Want to explore open source 2D/3D content creation through Blender? Stay here to embark your graphic creations with over the top dimensional detailing!
In this article
01 [What’s Blender and What’s Its Advantages?](#Part 1)
02 [How to Make a Material Transparent in Blender](#Part 2)
03 [How to Make a Background Transparent in Blender](#Part 3)
Part 1 What’s Blender and What’s Its Advantages?
When landing into the world of 3D graphic design, the Blender software suite is a one stop access to everything you would possibly think of exploring with. Right from modeling, animation, rendering and compositing to rigging, motion tracking and simulation; the software is a complete video editor and game developer kit.
Some high rated professional applications of the software include, API based Python and allied tool scripting to customize different applications, most of which are a part of the suite’s later releases. The software further supports a common graphic pipeline; compatible to studio based professional as well as individual usage and undergoes continuous upgrade to ascertain maximum graphic productivity.
Talking of the software’s platform compatibility, you are free to use Blender on any of your Windows, Mac and Linux supported devices with utmost ease. The suite works on the OpenGL platform for the most responsive user experience and quick output response.
You can further, conveniently regard the software as your personal 3D graphic designer, owing to the fact that the software’s General Public License grants the liberty of minor and major code alterations to its users, which often results in making the suite additively responsive, with the inclusion of improved features, receptive bug fixes and interactive usage.
Potential Advantages
Choosing the Blender 3D design suite for dimensional and motion graphic editing, you are entitled to benefit from the following advantages:
01A Free Graphic Suite
Almost every software user has the obvious habit of prioritizing financial equity before all other program credibility. However, you should be relieved to realize that the Blender 3D Suite is available to you without a price tag. Loyal users of the software claim the product to outshine its priced counterparts in terms of features and responsive flexibility.
If you are at the shore of graphic design and 3D modeling, there’s absolutely no better software to jump with, in the creation pool. Talking of the concerns of long term free usage and hidden feature blocking pay walls, there’s no cause to worry.
The software earns most of it financial credits through sales merchandise, donations and Cloud Service, which is a reasonably priced and optional graphic design assistant and application resource.
02Open Source Software
Essentially programmed and developed by an expert and skilled core team, the software is liberal enough to entertain open source modifications. Public users of the suite are permitted to make functionality alterations with Python coding. This flexibility of the Blender software is the underlying reason to a community driven increment to the existing top class suite functionalities.
While the public user creativity is responsible for adding a heap of free and paid software functionalities, the suite offers a sale of the specific feature scripts at marketplaces like, Blendermarket.com as a developer support initiative to promote the creation of highly productive graphic tools.
03Extensive Pipeline Support
As already stated, the software supports a plethora of creative utilities ranging from still and motion image graphics, movie developments, dimensional modeling, gaming, studio VFX and lots more. What’s best is, you are entitled to all this without having to spend a single penny from your pocket.
While most creators take up Blender graphic designing as a full time earning source, the bottom line is, if you are wondering, whether or not Blender supports a particular design task, most of the times it possibly can!
04Rendering Flexibility
You can work with two rendering options, viz., Eevee and Cycles within Blender. Using the Eevee render option, users can render their design models in physical, real time outputs in a quick time span. T5her biggest advantage of this rendering engine happens to be its working speed. While it does not require you wait for tedious rendering durations, you can additionally escape individual frame renders.
The Cycles is a physical, path tracing render engine, using light rays to interpret design looks. Compatible to GPU and CPU rendering, this one is a bit slow, but delivers a much precise image than Eevee.
Part 2 How to Make a Material Transparent in Blender
Blender is a top class graphic modulation tool; you can use to play with your editing creativity to your heart’s content, catering to a variety of design requirements, while adhering to a distinguished professional outlook. If you are pondering over the perfect task choice to start your editing journey with Blender, you can begin with making a material transparent in the software.
When beginning to create transparent artworks in Blender, you need to be familiar with the Transparent BSDF node. Here’s a quick explanation:
Transparent BSDF Node
When working with Blender, you get to access a variety of graphic nodes that cater to specific design purposes. Likewise, the transparent BSDF, as the name suggests, is an exclusive transparency creation graphic node that is essential to make materials transparent in Blender. Talking of the specific node function, it is there to facilitate the control of different transparency modes, in cohesion with specific user requirements.
Browse through the following section for a guided tutorial to make a material transparent using Blender:
Step 1:
Prepare a suitable BSDF material by selecting any image from your device and applying it to the object in the Blender’s viewport.
Step 2:
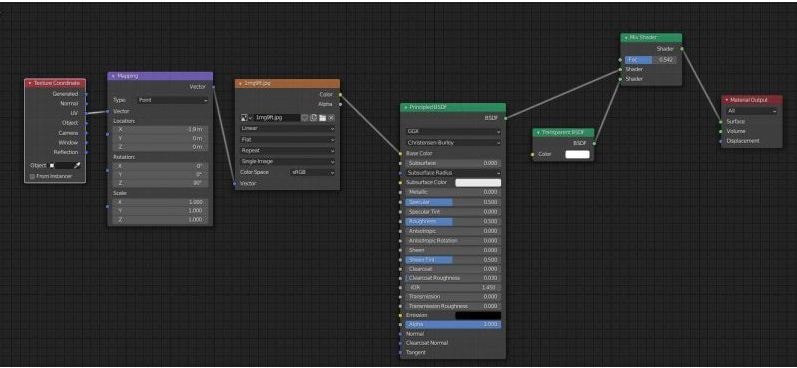
To start working with the Transparent BSDF node, you first need to insert the same into the node tree amongst the Principle BSDF and the Mix Shader nodes. To do this, you need to select ‘Add’ or press ‘Ctrl + A’, followed by locating the same in the ‘Shader’ submenu. Do not forget to add the ‘Mix Shader’ node, which is again, present in the ‘Shader’ submenu, to the node tree.
Step 3:
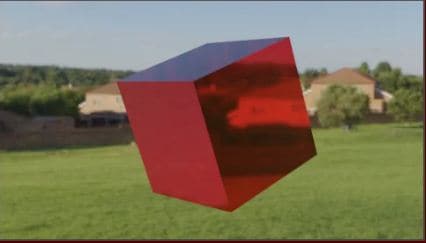
Plug in the Transparent BSDF output into the top Shader input of the Mix Shader, while dragging the latter into the connecting link between the Material Output and Principle BSDF nodes. This enables the Mix Shader node to pass through the two output generating nodes. The resultant ‘Transparency Effect’ can be seen on the viewpoint object within a few seconds.
Step 4:
Make an additional connection of two fresh nodes into the node tree as follows:
● Transparent BSDF output to the Mix Shader input
● Principal BSDF output to the Mix Shader input
● Mix Shader output to the Surface input
This will finally fetch a transparent material output for the selected image object.
Part 3 How to Make a Background Transparent in Blender
Having experimented with object material transparency in Blender, you can try hands at taking your creativity to the next level by creating Blender render transparent backgrounds in the software. Here’s what you need to do to take up the creation process:
Step 1:
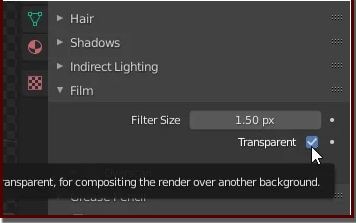
Begin with choosing a suitable image to create a transparent background in either of the Eevee or Cycles render engines, followed by navigating to the ‘Render Properties’ tab in the software’s main interface. Click on the same to get a related drop down menu for activating selected image effects.
Step 2:
From the dropdown that appears, reach to the ‘Film’ option and click on the ‘Transparency’ checkbox to activate it.
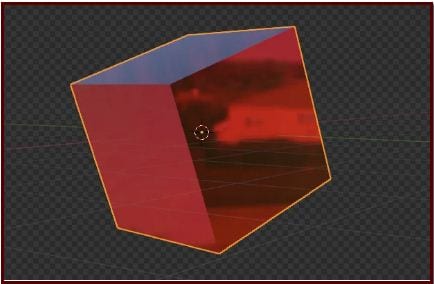
You will now observe the image background in the Blender object viewport to disappear.
Step 3:
Press F12 to receive the render output. You can now save the transparent background image in your device. Take note use a transparency compatible image format, preferably PNG.
Blender is undoubtedly a viable graphic editing software to create transparent background images, but if you are in search of a different editor alternative, the Filmora Image Creator and Editor software to take up the aforesaid task with utmost ease.
Wondershare Filmora Video Editor
Essentially a Wondershare software utility, Filmora is conveniently regarded as one among the finest and top curated image editor software. Adhering to the particular interest of transparent background creation, Filmora’s exclusive ‘Green Screen’ attribute is a viable solution to create masterpieces of professional quality, transparent background images. The huge effects library of the software is there to infuse the additional tint of class to your creative excellence.
Making Transparent Background Images in Filmora
Follow the stepwise guided tutorial given below to create images with excellent quality transparent background in Filmora:
Step 1: Software Download and Installation
Log in to your favorite web browser in a Mac or Windows device to download Filmora from its official site and proceed with the software installation process.
For Win 7 or later (64-bit)
For macOS 10.12 or later
Step 2: Import Image File
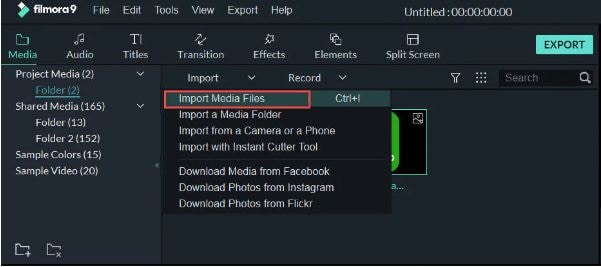
When you are done with the installation, launch the software and navigate to the ’Import’ tab in its welcome interface. Click and tap ‘Import Media File’ from the dropdown that appears to import the desired image to Filmora’s media library.
Step 3: Drag to Timeline
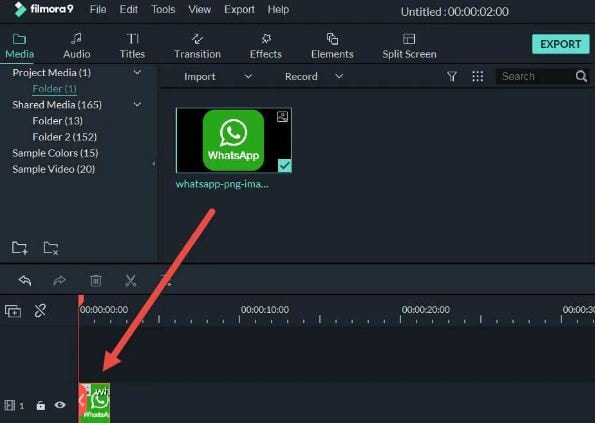
The next step is to drag your image selection from the software’s media library to its editor timeline. Either right click the image and select ‘Insert’ option from the submenu that appears, or use the conventional ‘Drag and Drop’ method to accomplish this task.
Step 4: Transparency Adjustments
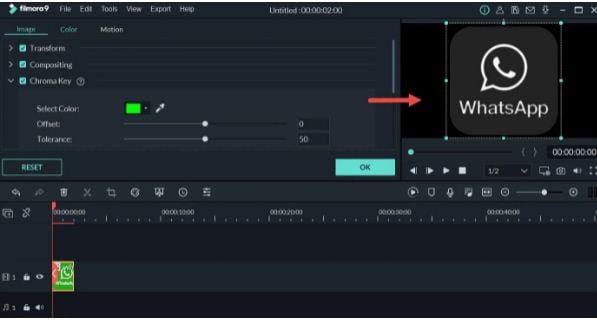
Once the image reaches the timeline, tap the same to see the ‘Settings’ tab get opened. Navigate through the tab options until you find ‘Chroma Key Settings’. Enable the ‘Chroma Key’ with a right side toggle to see your selected image get transparent with a ‘Green’ color in the background.
An alternative to the above method is to hit the ‘Color Picker’ option to the right of the ‘Select Color’ tab and navigate to a desired section of the image to make it transparent with a single click.
If you observe partial transparency in the resultant image background, consider making additional adjustments in ’Chroma Key’ setting parameters like, offset, edge thickness, tolerance, edge feather, etc., to ensure that the image background is totally transparent. When the final artwork makes you happy, tap ‘OK’.
**Step 4: Time to Export!**Your creation is now all set for a media export to your favorite social media handles. Just click on the ‘Export’ tab in the top right of the software timeline and that’s it!
● Ending Thoughts →
● Exploring your creative abilities with different graphic design tools and editing variations is an absolute fun. Among the various design alternatives, playing with dimensional graphic creativity is a remarkable craft that can be mastered with convenient market based software like Blender.
● However, if you are keen on trying other alternatives, you can prefer the Filmora Image Editor software for top class, professional quality image and video creation.
Full Guide to Discord Boost
Full Guide To Discord Boost in 2024
An easy yet powerful editor
Numerous effects to choose from
Detailed tutorials provided by the official channel
Thanks to increased uptake by the coronavirus epidemic, Discord has become more prevalent than ever in recent years. However, while many individuals have become more familiar with Discord, not everyone is aware of all its features. Discord server boost can help you unlock Discord’s full potential by adding new features to the server you run.
A server boost might provide various benefits. These increases, however, are not free, which is why it’s necessary to debate if they’re worthwhile.
Finally, we will investigate all the possible Discord server boost levels, benefits, and expenses. Keep in mind that while this article will cover everything there is to know about server enhancements, it is ultimately up to you to decide whether they are worthwhile. Let’s get into it!
In this article
01 [What is a Discord Server Boost and is It Worth It?](#Part 1)
02 [How Much is a Boost Discord?](#Part 2)
03 [How to Boost a Discord Server - Full Tutorial](#Part 3)
04 [Discord Boost Q&A](#Part 4)
Part 1 What is a Discord Server Boost and is It Worth It?
Discord Nitro Boost is a monthly membership costing $10 and linked to a user’s account. The advantages are likewise limited to a single user.
Server boosts are one of Discord’s main revenue streams, and they function similarly to Nitro. There are, nevertheless, significant distinctions. Server boosts are benefits tied to a particular server and used by any member.
A server must acquire two boosts to unlock level 1 boosts, seven boosts to reach level 2 perks and fourteen boosts for level 3.
With all of this in mind, can you say, Discord server boosts are worthwhile? They most certainly are. The added features can improve everyone’s server experience and are inexpensive, significantly if boosting as a group.
Whether or not server boosting is worthwhile is mainly subjective. If you’re not an active server member and only use Discord to play games with a small group of pals, you might want to save your money. if you’re a member of a clan or online community dedicated to a server, boosting can be a terrific way to contribute to ‘the greater good.’ Aside from the cosmetic bonuses that come with each level, the better audio quality, streaming quality, and upload limit are valuable features.
If you plan to buy two or more server boosts, we offer Discord Nitro, which includes two server enhancements for the same price as buying them separately, plus a 30% discount on any additional server boosts purchased.
Part 2 How Much is a Boost Discord?
Any member of the Discord Server can provide a boost for $4.99 per month. If you’re a Discord Nitro subscriber, all Discord Server Boost purchases are discounted by 30%.
Discord just implemented reduced upgrade thresholds for Discord Server Levels. Previously, Level 2 required 15 server boosts, while Level 3 required 30 server boosts. However, Level 2 requires only seven server boosts with a recent upgrade, and Level 3 requires 14 boosts.
Level 2 would cost $34.93, and Level 3 would cost $69.86. Nitro subscribers will pay $24.45 for Level 2 and $48.90 for Level 3.
Part 3 How to Boost a Discord Server - Full Tutorial
If you’re ready to give your Discord server a boost, follow the steps below:
Step 1: Open the Discord server
Log into your Discord server
Step 2: Choose the server you want to boost.
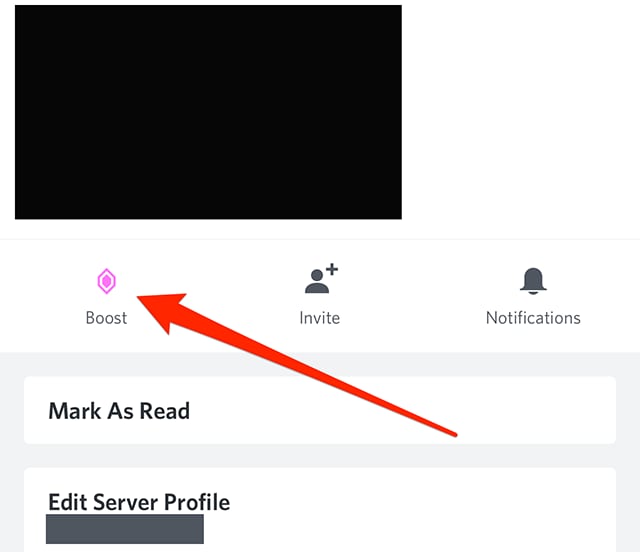
First, choose the server you wish to boost. Go to the Server Settings drop-down menu and select the Server Boost option once you’re on that server.
Step 3: Verify Benefits and Boost
A new screen will appear after you select the Boost button. This shows the current perks and the number of Server Boosts applied to this server.
If everything appears to be in order, click the Boost This Server button to confirm it.
Remember that you can also “Gift Nitro” to someone else from this screen. You can give more if you’re feeling generous.
Step 4: Confirmation Page
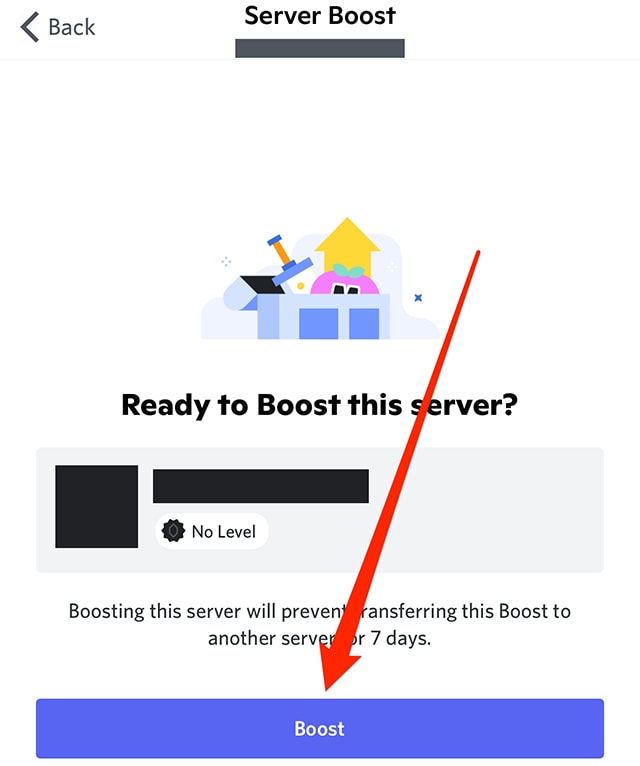
Discord wants to make sure you understand what you’re signing up for, so you’ll be asked to reconfirm.
They’ll ask you again when you hit the confirmation button. If you have second thoughts, this is your time to back out.
Note: Discord is aware that you’re serious about enhancing a server’s performance. They want to make sure you’re boosting the correct one. If everything looks good, push the Boost button one more time.
However, you should be aware that if you boost this Server, you will be unable to transfer this Boost to another server for seven days.
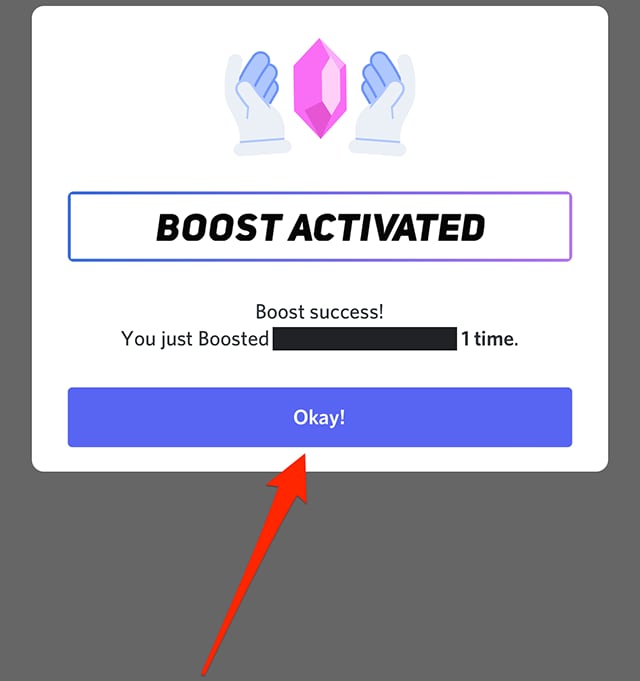
Step 5: Choose a Boost Number
Do you require several boosts?
This action can be after the confirmation screen.
Choose how many boosts you want for this Server in Discord. But don’t be concerned! Before you pay for anything, you can see the subtotal.
Select the plus or minus symbol in the window to modify the number of server boosts.
Step 5: Payment Information
You’re almost there, but there are a few things you need to take care of first, especially your billing information.
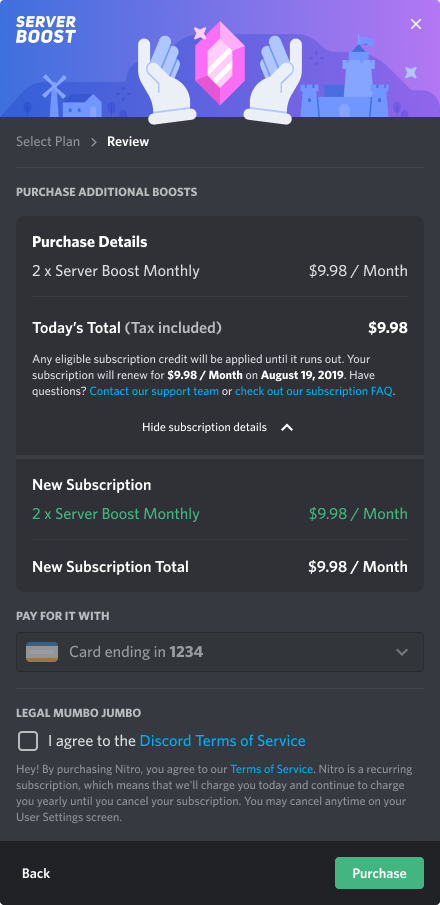
So, there are no surprises. Discord shows you a detailed overview of your current cost and the Boost purchase. But it’s a condensed version. If you require additional information, click the Details option.
This convenient window also allows you to validate your credit card information to complete the transaction. The data is pre-filled for Discord users.
You’ll also receive the legal documentation for the Discord Terms of Service agreement. Read it carefully before clicking the “I agree” button.
To complete your Boost, click the Purchase button once you’ve reviewed everything on the checkout page.
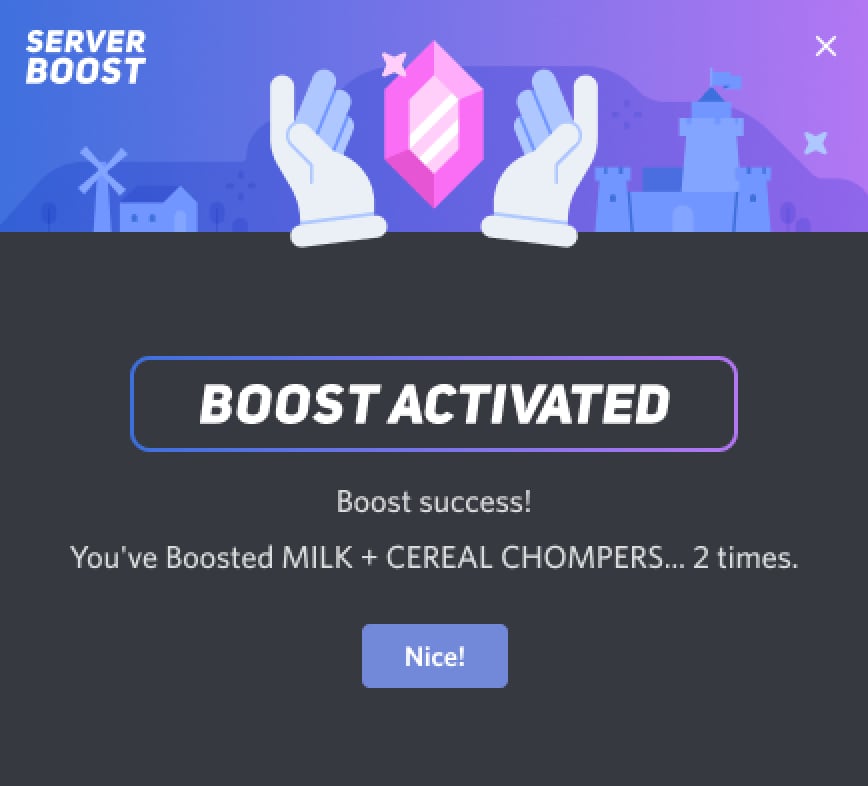
If everything works well, you’ll get a screen congratulating you on your new Server Boost.
Part 4 Discord Boost Q&A
What Does It Mean to Boost Discord Server?
Boosting a Discord server enhances audio and screen sharing quality, expands the file upload limit, and offers more emoji slots, among other things. Server banners, custom role icons, private forums, and custom invite links are available at higher levels.
How Long Does a Discord Server Boost Last?
On Discord, a server boost lasts for one month. Discord server boosts briefly increase the number of features available on the server. The server loses the associated prizes when the Boost expires. If you wish to keep all the elements with the boost plan, you and other users must boost the server monthly.
Is There a Way to Make a Discord Server Boost Permanent?
On Discord, there is no method to make a server boost permanent. Monthly subscriptions are a must for server boosts. However, you can automatically use auto-renewal to increase your favourite Discord servers. It will immediately charge your credit card or use any available free server boosters.
How Do I Modify My Current Server Boosts?
Following the User Settings Guide below, you’ll be able to move the Server Boost to a new server!
Note: You must wait seven days before boosting your first server before boosting another!
● Step-by-Step Instructions Summary
Navigate to the User Settings > Server Boost tab!
Press the three-dot icon to select the Boost you’d like to transfer, then select Transfer Boost!
Choose the server to which you want to transfer the boost. 4. Double-check and confirm your transfer!
Your transfer has finished.
Can I Cancel My Server Boost?
You can cancel your Server Boosts any time if you change your mind about them and decide you’re no longer a cereal fan!
● Summary of the Step-by-Step Guide
Navigate to the User Settings > Server Boost tab!
Press the three-dot icon to select the Boost you want to cancel, then select Cancel Boost Subscription!
Go over your cancellation and confirm it!
You have finished your cancellation!
Wondershare Filmora Video Editor is a simple and stylish video editing program for beginners. Anyone can learn how to use this application. The end effects are always beautiful, but your footage will have a watermark in the free version. According to the makers, this photo filmmaker is a competitor to Apple iMovie and Windows Movie Maker.
For Win 7 or later (64-bit)
For macOS 10.12 or later
Many essential capabilities of Wondershare video editor include adding overlays, animations, and elements such as GIF images, music, and text to videos. It also has features that allow users to crop film, change the size of clips, and adapt them all to a specified playback time. You may also utilize the tilt-shift feature to blur specific areas of the video, remove noise from your video and audio, etc. However, if you use Filmora’s free edition, the functionality is somewhat limited.
Pros
● Simple user interface
● Ongoing updates
● Integrated step-by-step instructions
● Import files from connected cameras.
● HD and Full HD video editing with high quality
● Many audio formats are supported.
Cons
● A Filmora watermark in the free version.
● The complete version contains more features.
● Ending Thoughts →
● Now that you have a complete guide on boosting server discord, you can quickly grow your serverto enjoy the extra benefits.
● You can also make do with the answers provided for FAQs to clarify some related issues. With the excellent Filmora program, you can easily edit videos as desired. Besides, boost your discord server and get to use Filmora to create customized GIF images.
Thanks to increased uptake by the coronavirus epidemic, Discord has become more prevalent than ever in recent years. However, while many individuals have become more familiar with Discord, not everyone is aware of all its features. Discord server boost can help you unlock Discord’s full potential by adding new features to the server you run.
A server boost might provide various benefits. These increases, however, are not free, which is why it’s necessary to debate if they’re worthwhile.
Finally, we will investigate all the possible Discord server boost levels, benefits, and expenses. Keep in mind that while this article will cover everything there is to know about server enhancements, it is ultimately up to you to decide whether they are worthwhile. Let’s get into it!
In this article
01 [What is a Discord Server Boost and is It Worth It?](#Part 1)
02 [How Much is a Boost Discord?](#Part 2)
03 [How to Boost a Discord Server - Full Tutorial](#Part 3)
04 [Discord Boost Q&A](#Part 4)
Part 1 What is a Discord Server Boost and is It Worth It?
Discord Nitro Boost is a monthly membership costing $10 and linked to a user’s account. The advantages are likewise limited to a single user.
Server boosts are one of Discord’s main revenue streams, and they function similarly to Nitro. There are, nevertheless, significant distinctions. Server boosts are benefits tied to a particular server and used by any member.
A server must acquire two boosts to unlock level 1 boosts, seven boosts to reach level 2 perks and fourteen boosts for level 3.
With all of this in mind, can you say, Discord server boosts are worthwhile? They most certainly are. The added features can improve everyone’s server experience and are inexpensive, significantly if boosting as a group.
Whether or not server boosting is worthwhile is mainly subjective. If you’re not an active server member and only use Discord to play games with a small group of pals, you might want to save your money. if you’re a member of a clan or online community dedicated to a server, boosting can be a terrific way to contribute to ‘the greater good.’ Aside from the cosmetic bonuses that come with each level, the better audio quality, streaming quality, and upload limit are valuable features.
If you plan to buy two or more server boosts, we offer Discord Nitro, which includes two server enhancements for the same price as buying them separately, plus a 30% discount on any additional server boosts purchased.
Part 2 How Much is a Boost Discord?
Any member of the Discord Server can provide a boost for $4.99 per month. If you’re a Discord Nitro subscriber, all Discord Server Boost purchases are discounted by 30%.
Discord just implemented reduced upgrade thresholds for Discord Server Levels. Previously, Level 2 required 15 server boosts, while Level 3 required 30 server boosts. However, Level 2 requires only seven server boosts with a recent upgrade, and Level 3 requires 14 boosts.
Level 2 would cost $34.93, and Level 3 would cost $69.86. Nitro subscribers will pay $24.45 for Level 2 and $48.90 for Level 3.
Part 3 How to Boost a Discord Server - Full Tutorial
If you’re ready to give your Discord server a boost, follow the steps below:
Step 1: Open the Discord server
Log into your Discord server
Step 2: Choose the server you want to boost.
First, choose the server you wish to boost. Go to the Server Settings drop-down menu and select the Server Boost option once you’re on that server.

Step 3: Verify Benefits and Boost
A new screen will appear after you select the Boost button. This shows the current perks and the number of Server Boosts applied to this server.
If everything appears to be in order, click the Boost This Server button to confirm it.
Remember that you can also “Gift Nitro” to someone else from this screen. You can give more if you’re feeling generous.

Step 4: Confirmation Page
Discord wants to make sure you understand what you’re signing up for, so you’ll be asked to reconfirm.
They’ll ask you again when you hit the confirmation button. If you have second thoughts, this is your time to back out.
Note: Discord is aware that you’re serious about enhancing a server’s performance. They want to make sure you’re boosting the correct one. If everything looks good, push the Boost button one more time.
However, you should be aware that if you boost this Server, you will be unable to transfer this Boost to another server for seven days.

Step 5: Choose a Boost Number
Do you require several boosts?
This action can be after the confirmation screen.
Choose how many boosts you want for this Server in Discord. But don’t be concerned! Before you pay for anything, you can see the subtotal.
Select the plus or minus symbol in the window to modify the number of server boosts.
Step 5: Payment Information
You’re almost there, but there are a few things you need to take care of first, especially your billing information.

So, there are no surprises. Discord shows you a detailed overview of your current cost and the Boost purchase. But it’s a condensed version. If you require additional information, click the Details option.
This convenient window also allows you to validate your credit card information to complete the transaction. The data is pre-filled for Discord users.
You’ll also receive the legal documentation for the Discord Terms of Service agreement. Read it carefully before clicking the “I agree” button.
To complete your Boost, click the Purchase button once you’ve reviewed everything on the checkout page.
If everything works well, you’ll get a screen congratulating you on your new Server Boost.

Part 4 Discord Boost Q&A
What Does It Mean to Boost Discord Server?
Boosting a Discord server enhances audio and screen sharing quality, expands the file upload limit, and offers more emoji slots, among other things. Server banners, custom role icons, private forums, and custom invite links are available at higher levels.
How Long Does a Discord Server Boost Last?
On Discord, a server boost lasts for one month. Discord server boosts briefly increase the number of features available on the server. The server loses the associated prizes when the Boost expires. If you wish to keep all the elements with the boost plan, you and other users must boost the server monthly.
Is There a Way to Make a Discord Server Boost Permanent?
On Discord, there is no method to make a server boost permanent. Monthly subscriptions are a must for server boosts. However, you can automatically use auto-renewal to increase your favourite Discord servers. It will immediately charge your credit card or use any available free server boosters.
How Do I Modify My Current Server Boosts?
Following the User Settings Guide below, you’ll be able to move the Server Boost to a new server!
Note: You must wait seven days before boosting your first server before boosting another!
● Step-by-Step Instructions Summary
Navigate to the User Settings > Server Boost tab!
Press the three-dot icon to select the Boost you’d like to transfer, then select Transfer Boost!
Choose the server to which you want to transfer the boost. 4. Double-check and confirm your transfer!
Your transfer has finished.
Can I Cancel My Server Boost?
You can cancel your Server Boosts any time if you change your mind about them and decide you’re no longer a cereal fan!
● Summary of the Step-by-Step Guide
Navigate to the User Settings > Server Boost tab!
Press the three-dot icon to select the Boost you want to cancel, then select Cancel Boost Subscription!
Go over your cancellation and confirm it!
You have finished your cancellation!
Wondershare Filmora Video Editor is a simple and stylish video editing program for beginners. Anyone can learn how to use this application. The end effects are always beautiful, but your footage will have a watermark in the free version. According to the makers, this photo filmmaker is a competitor to Apple iMovie and Windows Movie Maker.
For Win 7 or later (64-bit)
For macOS 10.12 or later
Many essential capabilities of Wondershare video editor include adding overlays, animations, and elements such as GIF images, music, and text to videos. It also has features that allow users to crop film, change the size of clips, and adapt them all to a specified playback time. You may also utilize the tilt-shift feature to blur specific areas of the video, remove noise from your video and audio, etc. However, if you use Filmora’s free edition, the functionality is somewhat limited.
Pros
● Simple user interface
● Ongoing updates
● Integrated step-by-step instructions
● Import files from connected cameras.
● HD and Full HD video editing with high quality
● Many audio formats are supported.
Cons
● A Filmora watermark in the free version.
● The complete version contains more features.
● Ending Thoughts →
● Now that you have a complete guide on boosting server discord, you can quickly grow your serverto enjoy the extra benefits.
● You can also make do with the answers provided for FAQs to clarify some related issues. With the excellent Filmora program, you can easily edit videos as desired. Besides, boost your discord server and get to use Filmora to create customized GIF images.
Thanks to increased uptake by the coronavirus epidemic, Discord has become more prevalent than ever in recent years. However, while many individuals have become more familiar with Discord, not everyone is aware of all its features. Discord server boost can help you unlock Discord’s full potential by adding new features to the server you run.
A server boost might provide various benefits. These increases, however, are not free, which is why it’s necessary to debate if they’re worthwhile.
Finally, we will investigate all the possible Discord server boost levels, benefits, and expenses. Keep in mind that while this article will cover everything there is to know about server enhancements, it is ultimately up to you to decide whether they are worthwhile. Let’s get into it!
In this article
01 [What is a Discord Server Boost and is It Worth It?](#Part 1)
02 [How Much is a Boost Discord?](#Part 2)
03 [How to Boost a Discord Server - Full Tutorial](#Part 3)
04 [Discord Boost Q&A](#Part 4)
Part 1 What is a Discord Server Boost and is It Worth It?
Discord Nitro Boost is a monthly membership costing $10 and linked to a user’s account. The advantages are likewise limited to a single user.
Server boosts are one of Discord’s main revenue streams, and they function similarly to Nitro. There are, nevertheless, significant distinctions. Server boosts are benefits tied to a particular server and used by any member.
A server must acquire two boosts to unlock level 1 boosts, seven boosts to reach level 2 perks and fourteen boosts for level 3.
With all of this in mind, can you say, Discord server boosts are worthwhile? They most certainly are. The added features can improve everyone’s server experience and are inexpensive, significantly if boosting as a group.
Whether or not server boosting is worthwhile is mainly subjective. If you’re not an active server member and only use Discord to play games with a small group of pals, you might want to save your money. if you’re a member of a clan or online community dedicated to a server, boosting can be a terrific way to contribute to ‘the greater good.’ Aside from the cosmetic bonuses that come with each level, the better audio quality, streaming quality, and upload limit are valuable features.
If you plan to buy two or more server boosts, we offer Discord Nitro, which includes two server enhancements for the same price as buying them separately, plus a 30% discount on any additional server boosts purchased.
Part 2 How Much is a Boost Discord?
Any member of the Discord Server can provide a boost for $4.99 per month. If you’re a Discord Nitro subscriber, all Discord Server Boost purchases are discounted by 30%.
Discord just implemented reduced upgrade thresholds for Discord Server Levels. Previously, Level 2 required 15 server boosts, while Level 3 required 30 server boosts. However, Level 2 requires only seven server boosts with a recent upgrade, and Level 3 requires 14 boosts.
Level 2 would cost $34.93, and Level 3 would cost $69.86. Nitro subscribers will pay $24.45 for Level 2 and $48.90 for Level 3.
Part 3 How to Boost a Discord Server - Full Tutorial
If you’re ready to give your Discord server a boost, follow the steps below:
Step 1: Open the Discord server
Log into your Discord server
Step 2: Choose the server you want to boost.
First, choose the server you wish to boost. Go to the Server Settings drop-down menu and select the Server Boost option once you’re on that server.

Step 3: Verify Benefits and Boost
A new screen will appear after you select the Boost button. This shows the current perks and the number of Server Boosts applied to this server.
If everything appears to be in order, click the Boost This Server button to confirm it.
Remember that you can also “Gift Nitro” to someone else from this screen. You can give more if you’re feeling generous.

Step 4: Confirmation Page
Discord wants to make sure you understand what you’re signing up for, so you’ll be asked to reconfirm.
They’ll ask you again when you hit the confirmation button. If you have second thoughts, this is your time to back out.
Note: Discord is aware that you’re serious about enhancing a server’s performance. They want to make sure you’re boosting the correct one. If everything looks good, push the Boost button one more time.
However, you should be aware that if you boost this Server, you will be unable to transfer this Boost to another server for seven days.

Step 5: Choose a Boost Number
Do you require several boosts?
This action can be after the confirmation screen.
Choose how many boosts you want for this Server in Discord. But don’t be concerned! Before you pay for anything, you can see the subtotal.
Select the plus or minus symbol in the window to modify the number of server boosts.
Step 5: Payment Information
You’re almost there, but there are a few things you need to take care of first, especially your billing information.

So, there are no surprises. Discord shows you a detailed overview of your current cost and the Boost purchase. But it’s a condensed version. If you require additional information, click the Details option.
This convenient window also allows you to validate your credit card information to complete the transaction. The data is pre-filled for Discord users.
You’ll also receive the legal documentation for the Discord Terms of Service agreement. Read it carefully before clicking the “I agree” button.
To complete your Boost, click the Purchase button once you’ve reviewed everything on the checkout page.
If everything works well, you’ll get a screen congratulating you on your new Server Boost.

Part 4 Discord Boost Q&A
What Does It Mean to Boost Discord Server?
Boosting a Discord server enhances audio and screen sharing quality, expands the file upload limit, and offers more emoji slots, among other things. Server banners, custom role icons, private forums, and custom invite links are available at higher levels.
How Long Does a Discord Server Boost Last?
On Discord, a server boost lasts for one month. Discord server boosts briefly increase the number of features available on the server. The server loses the associated prizes when the Boost expires. If you wish to keep all the elements with the boost plan, you and other users must boost the server monthly.
Is There a Way to Make a Discord Server Boost Permanent?
On Discord, there is no method to make a server boost permanent. Monthly subscriptions are a must for server boosts. However, you can automatically use auto-renewal to increase your favourite Discord servers. It will immediately charge your credit card or use any available free server boosters.
How Do I Modify My Current Server Boosts?
Following the User Settings Guide below, you’ll be able to move the Server Boost to a new server!
Note: You must wait seven days before boosting your first server before boosting another!
● Step-by-Step Instructions Summary
Navigate to the User Settings > Server Boost tab!
Press the three-dot icon to select the Boost you’d like to transfer, then select Transfer Boost!
Choose the server to which you want to transfer the boost. 4. Double-check and confirm your transfer!
Your transfer has finished.
Can I Cancel My Server Boost?
You can cancel your Server Boosts any time if you change your mind about them and decide you’re no longer a cereal fan!
● Summary of the Step-by-Step Guide
Navigate to the User Settings > Server Boost tab!
Press the three-dot icon to select the Boost you want to cancel, then select Cancel Boost Subscription!
Go over your cancellation and confirm it!
You have finished your cancellation!
Wondershare Filmora Video Editor is a simple and stylish video editing program for beginners. Anyone can learn how to use this application. The end effects are always beautiful, but your footage will have a watermark in the free version. According to the makers, this photo filmmaker is a competitor to Apple iMovie and Windows Movie Maker.
For Win 7 or later (64-bit)
For macOS 10.12 or later
Many essential capabilities of Wondershare video editor include adding overlays, animations, and elements such as GIF images, music, and text to videos. It also has features that allow users to crop film, change the size of clips, and adapt them all to a specified playback time. You may also utilize the tilt-shift feature to blur specific areas of the video, remove noise from your video and audio, etc. However, if you use Filmora’s free edition, the functionality is somewhat limited.
Pros
● Simple user interface
● Ongoing updates
● Integrated step-by-step instructions
● Import files from connected cameras.
● HD and Full HD video editing with high quality
● Many audio formats are supported.
Cons
● A Filmora watermark in the free version.
● The complete version contains more features.
● Ending Thoughts →
● Now that you have a complete guide on boosting server discord, you can quickly grow your serverto enjoy the extra benefits.
● You can also make do with the answers provided for FAQs to clarify some related issues. With the excellent Filmora program, you can easily edit videos as desired. Besides, boost your discord server and get to use Filmora to create customized GIF images.
Thanks to increased uptake by the coronavirus epidemic, Discord has become more prevalent than ever in recent years. However, while many individuals have become more familiar with Discord, not everyone is aware of all its features. Discord server boost can help you unlock Discord’s full potential by adding new features to the server you run.
A server boost might provide various benefits. These increases, however, are not free, which is why it’s necessary to debate if they’re worthwhile.
Finally, we will investigate all the possible Discord server boost levels, benefits, and expenses. Keep in mind that while this article will cover everything there is to know about server enhancements, it is ultimately up to you to decide whether they are worthwhile. Let’s get into it!
In this article
01 [What is a Discord Server Boost and is It Worth It?](#Part 1)
02 [How Much is a Boost Discord?](#Part 2)
03 [How to Boost a Discord Server - Full Tutorial](#Part 3)
04 [Discord Boost Q&A](#Part 4)
Part 1 What is a Discord Server Boost and is It Worth It?
Discord Nitro Boost is a monthly membership costing $10 and linked to a user’s account. The advantages are likewise limited to a single user.
Server boosts are one of Discord’s main revenue streams, and they function similarly to Nitro. There are, nevertheless, significant distinctions. Server boosts are benefits tied to a particular server and used by any member.
A server must acquire two boosts to unlock level 1 boosts, seven boosts to reach level 2 perks and fourteen boosts for level 3.
With all of this in mind, can you say, Discord server boosts are worthwhile? They most certainly are. The added features can improve everyone’s server experience and are inexpensive, significantly if boosting as a group.
Whether or not server boosting is worthwhile is mainly subjective. If you’re not an active server member and only use Discord to play games with a small group of pals, you might want to save your money. if you’re a member of a clan or online community dedicated to a server, boosting can be a terrific way to contribute to ‘the greater good.’ Aside from the cosmetic bonuses that come with each level, the better audio quality, streaming quality, and upload limit are valuable features.
If you plan to buy two or more server boosts, we offer Discord Nitro, which includes two server enhancements for the same price as buying them separately, plus a 30% discount on any additional server boosts purchased.
Part 2 How Much is a Boost Discord?
Any member of the Discord Server can provide a boost for $4.99 per month. If you’re a Discord Nitro subscriber, all Discord Server Boost purchases are discounted by 30%.
Discord just implemented reduced upgrade thresholds for Discord Server Levels. Previously, Level 2 required 15 server boosts, while Level 3 required 30 server boosts. However, Level 2 requires only seven server boosts with a recent upgrade, and Level 3 requires 14 boosts.
Level 2 would cost $34.93, and Level 3 would cost $69.86. Nitro subscribers will pay $24.45 for Level 2 and $48.90 for Level 3.
Part 3 How to Boost a Discord Server - Full Tutorial
If you’re ready to give your Discord server a boost, follow the steps below:
Step 1: Open the Discord server
Log into your Discord server
Step 2: Choose the server you want to boost.
First, choose the server you wish to boost. Go to the Server Settings drop-down menu and select the Server Boost option once you’re on that server.

Step 3: Verify Benefits and Boost
A new screen will appear after you select the Boost button. This shows the current perks and the number of Server Boosts applied to this server.
If everything appears to be in order, click the Boost This Server button to confirm it.
Remember that you can also “Gift Nitro” to someone else from this screen. You can give more if you’re feeling generous.

Step 4: Confirmation Page
Discord wants to make sure you understand what you’re signing up for, so you’ll be asked to reconfirm.
They’ll ask you again when you hit the confirmation button. If you have second thoughts, this is your time to back out.
Note: Discord is aware that you’re serious about enhancing a server’s performance. They want to make sure you’re boosting the correct one. If everything looks good, push the Boost button one more time.
However, you should be aware that if you boost this Server, you will be unable to transfer this Boost to another server for seven days.

Step 5: Choose a Boost Number
Do you require several boosts?
This action can be after the confirmation screen.
Choose how many boosts you want for this Server in Discord. But don’t be concerned! Before you pay for anything, you can see the subtotal.
Select the plus or minus symbol in the window to modify the number of server boosts.
Step 5: Payment Information
You’re almost there, but there are a few things you need to take care of first, especially your billing information.

So, there are no surprises. Discord shows you a detailed overview of your current cost and the Boost purchase. But it’s a condensed version. If you require additional information, click the Details option.
This convenient window also allows you to validate your credit card information to complete the transaction. The data is pre-filled for Discord users.
You’ll also receive the legal documentation for the Discord Terms of Service agreement. Read it carefully before clicking the “I agree” button.
To complete your Boost, click the Purchase button once you’ve reviewed everything on the checkout page.
If everything works well, you’ll get a screen congratulating you on your new Server Boost.

Part 4 Discord Boost Q&A
What Does It Mean to Boost Discord Server?
Boosting a Discord server enhances audio and screen sharing quality, expands the file upload limit, and offers more emoji slots, among other things. Server banners, custom role icons, private forums, and custom invite links are available at higher levels.
How Long Does a Discord Server Boost Last?
On Discord, a server boost lasts for one month. Discord server boosts briefly increase the number of features available on the server. The server loses the associated prizes when the Boost expires. If you wish to keep all the elements with the boost plan, you and other users must boost the server monthly.
Is There a Way to Make a Discord Server Boost Permanent?
On Discord, there is no method to make a server boost permanent. Monthly subscriptions are a must for server boosts. However, you can automatically use auto-renewal to increase your favourite Discord servers. It will immediately charge your credit card or use any available free server boosters.
How Do I Modify My Current Server Boosts?
Following the User Settings Guide below, you’ll be able to move the Server Boost to a new server!
Note: You must wait seven days before boosting your first server before boosting another!
● Step-by-Step Instructions Summary
Navigate to the User Settings > Server Boost tab!
Press the three-dot icon to select the Boost you’d like to transfer, then select Transfer Boost!
Choose the server to which you want to transfer the boost. 4. Double-check and confirm your transfer!
Your transfer has finished.
Can I Cancel My Server Boost?
You can cancel your Server Boosts any time if you change your mind about them and decide you’re no longer a cereal fan!
● Summary of the Step-by-Step Guide
Navigate to the User Settings > Server Boost tab!
Press the three-dot icon to select the Boost you want to cancel, then select Cancel Boost Subscription!
Go over your cancellation and confirm it!
You have finished your cancellation!
Wondershare Filmora Video Editor is a simple and stylish video editing program for beginners. Anyone can learn how to use this application. The end effects are always beautiful, but your footage will have a watermark in the free version. According to the makers, this photo filmmaker is a competitor to Apple iMovie and Windows Movie Maker.
For Win 7 or later (64-bit)
For macOS 10.12 or later
Many essential capabilities of Wondershare video editor include adding overlays, animations, and elements such as GIF images, music, and text to videos. It also has features that allow users to crop film, change the size of clips, and adapt them all to a specified playback time. You may also utilize the tilt-shift feature to blur specific areas of the video, remove noise from your video and audio, etc. However, if you use Filmora’s free edition, the functionality is somewhat limited.
Pros
● Simple user interface
● Ongoing updates
● Integrated step-by-step instructions
● Import files from connected cameras.
● HD and Full HD video editing with high quality
● Many audio formats are supported.
Cons
● A Filmora watermark in the free version.
● The complete version contains more features.
● Ending Thoughts →
● Now that you have a complete guide on boosting server discord, you can quickly grow your serverto enjoy the extra benefits.
● You can also make do with the answers provided for FAQs to clarify some related issues. With the excellent Filmora program, you can easily edit videos as desired. Besides, boost your discord server and get to use Filmora to create customized GIF images.
Spooky Halloween with the Best 15+ Halloween Countdown Video Clips
Halloween is fast approaching, and as a content creator, you’re looking to take advantage of the season and give your viewers unique Halloween vibes in your videos, but you don’t know how to go about it. Don’t panic, we got just the right idea for you. Some might ask; What idea? Well, it’s none other than a Halloween countdown video clip.
Adding a Halloween countdown clip to your video is a great way to spice it up. However, it can be quite difficult to find a perfect clip that will suit the theme of your video. To help you out, we’ve curated a list of the best 15 Halloween countdown video clips that you can use in your videos to make them fancier.
- Fog Stones Halloween Dead
- Scary Sadako ghost
- Transferring Halloween Cupcakes From The Tray To The Table Moments
- Skeleton breaking screen
- Dark Monster Halloween Horror
- Face Portrait Halloween Clown
- A Family Wearing Handmade Halloween Mask At Home
- Halloween Buckets Stacked Together
- Carving Of Pumpkin For Halloween
- Dough Halloween Cookies Bakery Products
- Woman Decorating for Halloween [TikTok]
- Girl Blonde Portrait Halloween
- An Outdoor Table With Halloween Theme Settings
- A Kid In A Mummy Costume Holding A Halloween Bucket
- Stop Motion Of Halloween Candy
Halloween Countdown Clips Editor The best editor helps you add a Halloween countdown clip to your video.
Free Download Free Download Learn More

Part 1: Top 10 Halloween-Themed Footage for Halloween Countdown Clock Video
Here we provide footage exclusively for horizontal videos, so that you can use them for your videos for YouTube, Vimeo, Twitch, etc. If you just want some clips for TikTok, Ins story, or anything else, go ahead Halloween footage for vertical videos.
1. Fog Stones Halloween Dead
Spooky graveyard with scary tombstones is another good way to go about it when you are looking for vacation countdown clock videos. The mixture of the turbulent and serene environment is enough to set the Halloween mood and even scare some folks.
Remember the scene from the movie “The Fog” and its famous dialogues: When the fog rolls in the terror begin! If you do not, take a look at a scene and judge for yourself if scary enough or not.
2. Scary Sadako ghost
What’s better than the Sadako ghost 7-day video call threat on Halloween? Well, nothing! So, why not create a prank video for your friends and family, especially those afraid of Sadako? Plus, Sadako creates a perfect backdrop for the countdown. Look at this Philippines creator who went to great lengths to scare his friends via a Sadako video call.
But you do not have to go through all that costume and scenery setup. Instead, you can use the video footage on any premium video and apply Sadako ghost via Green Screen.

3. Transferring Halloween Cupcakes From The Tray To The Table Moments
Halloween is adored for its trick-or-treat, but what about the party? What will you serve? Cupcakes sound like a good idea. But how will you entice your guest with your Halloween cupcakes? Well, you can include the cupcakes in the invitation video. While you can find many Halloween creative and savory cupcake recipes on YouTube, you can use stock footage to have them in the video.
4. Skeleton breaking screen
The broken screen is the classic prank suitable for any event and day. But simply using apps or replacing the wallpaper on your friend’s or spouse’s mobile doesn’t cut in this age and day. With new technology coming in, you have to get creative. Plus, it’s for Halloween, meaning dead skulls are a must.
5. Dark Monster Halloween Horror
Halloween house horror is another great backdrop for scaring your friends after a vacation countdown clock. You will find tons of videos on Halloween Horror houses on the internet. Look at how Jackie from Super Enthused (YouTube channel) gets scared while touring the 10 Halloween horror houses at the theme park. That was really scary, and this Halloween countdown effect can also help you do the same to your viewers.
6. Face Portrait Halloween Clown
Scary clowns against a kid’s window have been the long norm of scaring the small ones. No doubt, such pranks can scare anyone, not just kids. If you do not believe me, look at the reaction video from Infinite featuring scaring clowns’ pranks.
But how about dropping such a scary face bomb in a vacation countdown clock video? You can easily get your hands on creepy clowns’ portraits for videos via premium stock libraries like Filmora’s Filmstock.
7. A Family Wearing Handmade Halloween Mask At Home
Another not-so-fancy, subtle, and understated appeal for the Halloween vacation countdown clock video is a family together with Halloween masks. Given everyone will be in their costumes, you can also consider distributing self-made masks for everyone. You can take ideas from any of the numerous videos about Halloween mask design ideas.
8. Halloween Buckets Stacked Together
What’s the simplest and most fitting footage for the Halloween vacation countdown clock? Well, it is the scary pumpkins. Carving out Jack-o’-lantern has long been the Halloween “tradition,” and featuring it in your countdown timer at the party is the most classic way to go about it. The vibe from simple Halloween buckets stacked together is on the next level; if you do not believe me, look at Angie Bellemare’s Halloween Bucket ideas and creativity:
9. Carving Of Pumpkin For Halloween
Another Jack-o’-lantern idea for the vacation countdown clock video is the DIY Pumpin projects in the video. It doesn’t sound like much, but it really is enough to give the best feeling about Halloween without really indulging in the scary stuff. Take a look at how Jenn designs her Pumpkin Stack Fall Planter:
10. Dough Halloween Cookies Bakery Products
If Halloween is more about spending time with friends and family, a bunch of laughter, fun, and creating memories, then it cannot get better than focusing on the sweet stuff, like the dough used to cook the Halloween cookies. When you imagine the scenario of dough mixing for the Halloween countdown timer video, it does not sound like much! But they are cool-looking and set the perfect backdrop for a countdown timer video:
You can use such clips individually or mix them with other stock video footage mentioned here to create a perfect Halloween vacation countdown clock video clip.

Halloween Footage for Vertical Videos [TikTok/Instagram Story]:
The above list discusses the panoramic footage suitable for big screens. If your screen is rather a vertical one, then you might be looking for vertical stock footage for the Halloween vacation countdown clock clip. Here are some vertical footage ideas and links to stock footage to create the perfect vertical vacation countdown clock video for Halloween:
1. Woman Decorating for Halloween [TikTok]
Another simple backdrop for the Halloween countdown timer video is the decorations process to transform your indoors or outdoors for Halloween. And while you can use your own footage of decorating the house, chances are you may have missed filming yourself while decorating the house, given not everyone films themselves decorating the house and use it for their TikTok video. Here’s a video from Spooky Bones featuring the indoor decoration process for Halloween.
2. Girl Blonde Portrait Halloween
Another simple idea for a vertical countdown timer for Halloween is a scary face. In fact, if you are looking for the users to focus on the timer instead of footage is to use a slo-mo video, like this one from Tay. Tay tells a story about a real haunted house in her neighborhood while wearing scary Halloween makeup.
Of course, you can replace the story; and instead, use a clock with a girl wearing Halloween makeup.

3. An Outdoor Table With Halloween Theme Settings
If you are looking to feature the vacation countdown clock outdoors in a vertical setup, then a table with a Halloween theme might create the perfect setting. After all, Halloween is all about setting the perfect theme, and featuring a non-relevant indoor or scary video outdoors spoils the theme. Take a look at how Stephanie Cunningham on TikTok showcases her outdoor table decoration setup for Halloween.

4. A Kid In A Mummy Costume Holding A Halloween Bucket
If you are going for the classic mummy theme on Halloween, then how can you include any other footage than an actual mummy in the vertical countdown timer video? There are many ways to go about when looking to feature a mummy in the countdown clock; one idea is to show you made the mummy costumes, like Vina’s getup video on TikTok.

5. Stop Motion Of Halloween Candy
Hosting a Halloween party for kids and in search of the perfect vertical footage for a Halloween vacation countdown clock video? It cannot get better than simply featuring a bunch of candy to lure the kids toward the countdown clock. When you look at this video and imagine using a clock for the countdown clock.
Part 2: How to Apply a Halloween Countdown Clock to Your Video?
To make a unique Halloween Countdown Clock that ticks boxes around, you need software like Wondershare Filmora to implement the right element seamlessly.
Filmora library is filled with numerous such videos that will create the perfect backdrop for Halloween vacation countdown clock clips.
Coming to using the footage in your videos and making the Halloween countdown clock; well, you can do that easily using the Filmora Video editor (the video editor includes the Filmstock plug-in for easy navigation).
- Aside from Halloween-themed video footage, Filmora’s Filmstock also includes numerous audio, image, and other such elements.
- Filmora, primarily, is a video editor. You can combine all the elements like the stock footage videos discussed above and scary soundtracks and create a clock-down timer video easily.
- From trimming to splitting, to cool effects, there are several editing tools in Filmora.
- Transitions**, filters, text animations, and other editing features** are all supported.
Here’s how to use Filmora to Create a Halloween Countdown Clock Video
Free Download For Win 7 or later(64-bit)
Free Download For macOS 10.14 or later
Step1 Download and install Filmora on your Mac or PC.
Step2 Start the installed software and click Import from the main interface to upload the Halloween countdown clip. Alternatively, you can just drag-n-drop the video.
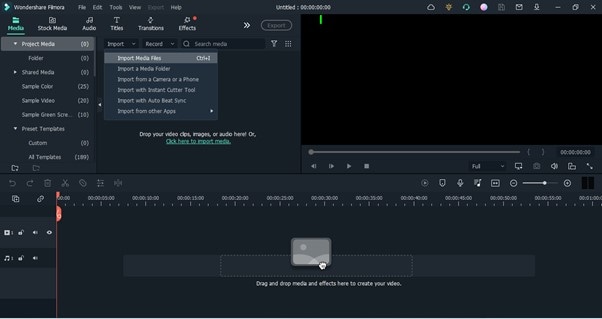
Step3 Drag-n-drop the uploaded video to the timeline.
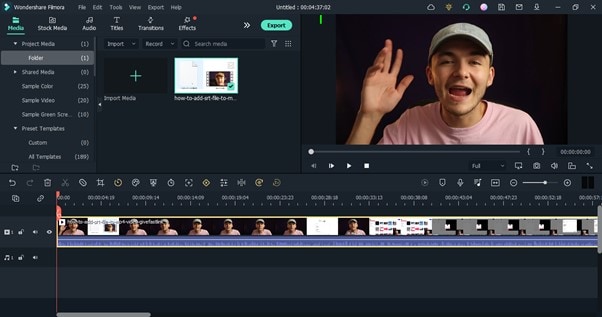
Step4 Next, click on Stock Media and select the countdown effect that you want to use in the Halloween video. Then, drag-n-drop it to the timeline.
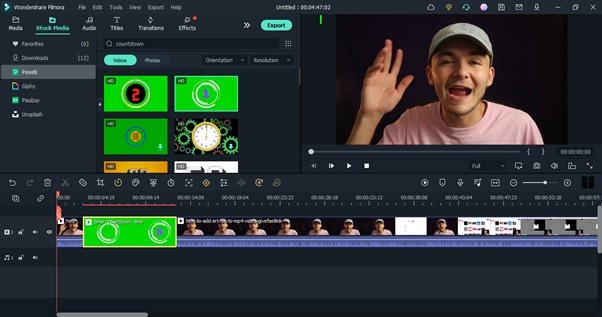
Step5 double click on the countdown effect and adjust it according to your requirement. You can adjust the time length too.
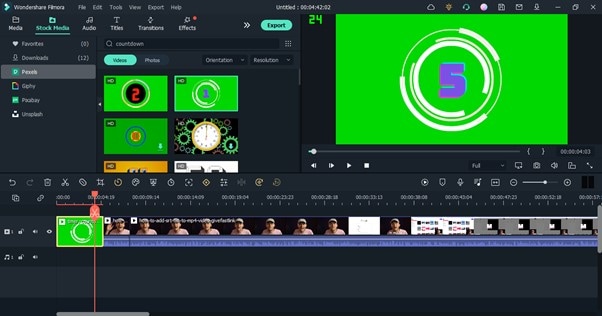
After that, play the video to preview it.
Step6 If you’re satisfied with the editing, scroll to the top of the screen and click Export, then, select ‘Burn DVD’.
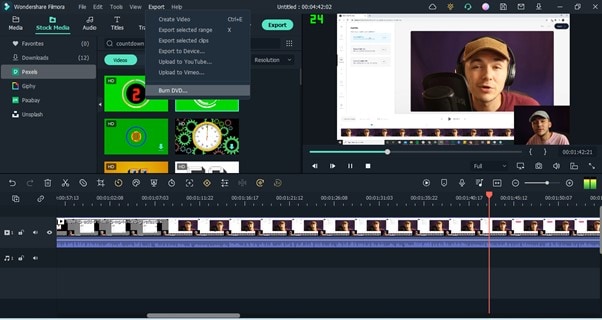
Step7 Enter a name for your file in the Label box of the pop-up that appears on your screen, then in the Folder Path, choose the location where you want the file to be saved. Click the ‘Export’ button to finish.
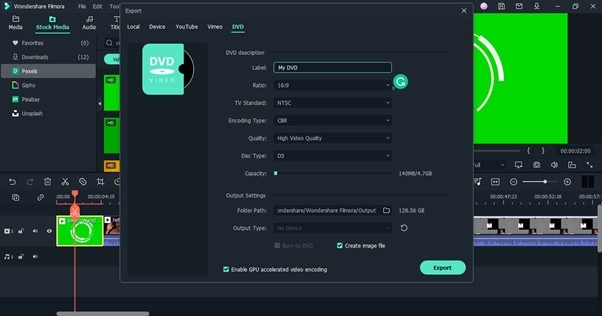
Conclusion
There you have it - the top 15 Halloween countdown videos that can be used to spice up videos. Not to mention, you can find the stock footage on this page via Filmstock’s vast library containing tons of such videos. Also, is better to use subtle and not-so-horrifying clips if you want everything to be serene in the Halloween vacation countdown clock video.
Free Download For Win 7 or later(64-bit)
Free Download For macOS 10.14 or later
Halloween Countdown Clips Editor The best editor helps you add a Halloween countdown clip to your video.
Free Download Free Download Learn More

Part 1: Top 10 Halloween-Themed Footage for Halloween Countdown Clock Video
Here we provide footage exclusively for horizontal videos, so that you can use them for your videos for YouTube, Vimeo, Twitch, etc. If you just want some clips for TikTok, Ins story, or anything else, go ahead Halloween footage for vertical videos.
1. Fog Stones Halloween Dead
Spooky graveyard with scary tombstones is another good way to go about it when you are looking for vacation countdown clock videos. The mixture of the turbulent and serene environment is enough to set the Halloween mood and even scare some folks.
Remember the scene from the movie “The Fog” and its famous dialogues: When the fog rolls in the terror begin! If you do not, take a look at a scene and judge for yourself if scary enough or not.

2. Scary Sadako ghost
What’s better than the Sadako ghost 7-day video call threat on Halloween? Well, nothing! So, why not create a prank video for your friends and family, especially those afraid of Sadako? Plus, Sadako creates a perfect backdrop for the countdown. Look at this Philippines creator who went to great lengths to scare his friends via a Sadako video call.
But you do not have to go through all that costume and scenery setup. Instead, you can use the video footage on any premium video and apply Sadako ghost via Green Screen.

3. Transferring Halloween Cupcakes From The Tray To The Table Moments
Halloween is adored for its trick-or-treat, but what about the party? What will you serve? Cupcakes sound like a good idea. But how will you entice your guest with your Halloween cupcakes? Well, you can include the cupcakes in the invitation video. While you can find many Halloween creative and savory cupcake recipes on YouTube, you can use stock footage to have them in the video.

4. Skeleton breaking screen
The broken screen is the classic prank suitable for any event and day. But simply using apps or replacing the wallpaper on your friend’s or spouse’s mobile doesn’t cut in this age and day. With new technology coming in, you have to get creative. Plus, it’s for Halloween, meaning dead skulls are a must.

5. Dark Monster Halloween Horror
Halloween house horror is another great backdrop for scaring your friends after a vacation countdown clock. You will find tons of videos on Halloween Horror houses on the internet. Look at how Jackie from Super Enthused (YouTube channel) gets scared while touring the 10 Halloween horror houses at the theme park. That was really scary, and this Halloween countdown effect can also help you do the same to your viewers.

6. Face Portrait Halloween Clown
Scary clowns against a kid’s window have been the long norm of scaring the small ones. No doubt, such pranks can scare anyone, not just kids. If you do not believe me, look at the reaction video from Infinite featuring scaring clowns’ pranks.
But how about dropping such a scary face bomb in a vacation countdown clock video? You can easily get your hands on creepy clowns’ portraits for videos via premium stock libraries like Filmora’s Filmstock.

7. A Family Wearing Handmade Halloween Mask At Home
Another not-so-fancy, subtle, and understated appeal for the Halloween vacation countdown clock video is a family together with Halloween masks. Given everyone will be in their costumes, you can also consider distributing self-made masks for everyone. You can take ideas from any of the numerous videos about Halloween mask design ideas.

8. Halloween Buckets Stacked Together
What’s the simplest and most fitting footage for the Halloween vacation countdown clock? Well, it is the scary pumpkins. Carving out Jack-o’-lantern has long been the Halloween “tradition,” and featuring it in your countdown timer at the party is the most classic way to go about it. The vibe from simple Halloween buckets stacked together is on the next level; if you do not believe me, look at Angie Bellemare’s Halloween Bucket ideas and creativity:

9. Carving Of Pumpkin For Halloween
Another Jack-o’-lantern idea for the vacation countdown clock video is the DIY Pumpin projects in the video. It doesn’t sound like much, but it really is enough to give the best feeling about Halloween without really indulging in the scary stuff. Take a look at how Jenn designs her Pumpkin Stack Fall Planter:

10. Dough Halloween Cookies Bakery Products
If Halloween is more about spending time with friends and family, a bunch of laughter, fun, and creating memories, then it cannot get better than focusing on the sweet stuff, like the dough used to cook the Halloween cookies. When you imagine the scenario of dough mixing for the Halloween countdown timer video, it does not sound like much! But they are cool-looking and set the perfect backdrop for a countdown timer video:
You can use such clips individually or mix them with other stock video footage mentioned here to create a perfect Halloween vacation countdown clock video clip.

Halloween Footage for Vertical Videos [TikTok/Instagram Story]:
The above list discusses the panoramic footage suitable for big screens. If your screen is rather a vertical one, then you might be looking for vertical stock footage for the Halloween vacation countdown clock clip. Here are some vertical footage ideas and links to stock footage to create the perfect vertical vacation countdown clock video for Halloween:
1. Woman Decorating for Halloween [TikTok]
Another simple backdrop for the Halloween countdown timer video is the decorations process to transform your indoors or outdoors for Halloween. And while you can use your own footage of decorating the house, chances are you may have missed filming yourself while decorating the house, given not everyone films themselves decorating the house and use it for their TikTok video. Here’s a video from Spooky Bones featuring the indoor decoration process for Halloween.

2. Girl Blonde Portrait Halloween
Another simple idea for a vertical countdown timer for Halloween is a scary face. In fact, if you are looking for the users to focus on the timer instead of footage is to use a slo-mo video, like this one from Tay. Tay tells a story about a real haunted house in her neighborhood while wearing scary Halloween makeup.
Of course, you can replace the story; and instead, use a clock with a girl wearing Halloween makeup.

3. An Outdoor Table With Halloween Theme Settings
If you are looking to feature the vacation countdown clock outdoors in a vertical setup, then a table with a Halloween theme might create the perfect setting. After all, Halloween is all about setting the perfect theme, and featuring a non-relevant indoor or scary video outdoors spoils the theme. Take a look at how Stephanie Cunningham on TikTok showcases her outdoor table decoration setup for Halloween.

4. A Kid In A Mummy Costume Holding A Halloween Bucket
If you are going for the classic mummy theme on Halloween, then how can you include any other footage than an actual mummy in the vertical countdown timer video? There are many ways to go about when looking to feature a mummy in the countdown clock; one idea is to show you made the mummy costumes, like Vina’s getup video on TikTok.

5. Stop Motion Of Halloween Candy
Hosting a Halloween party for kids and in search of the perfect vertical footage for a Halloween vacation countdown clock video? It cannot get better than simply featuring a bunch of candy to lure the kids toward the countdown clock. When you look at this video and imagine using a clock for the countdown clock.

Part 2: How to Apply a Halloween Countdown Clock to Your Video?
To make a unique Halloween Countdown Clock that ticks boxes around, you need software like Wondershare Filmora to implement the right element seamlessly.
Filmora library is filled with numerous such videos that will create the perfect backdrop for Halloween vacation countdown clock clips.
Coming to using the footage in your videos and making the Halloween countdown clock; well, you can do that easily using the Filmora Video editor (the video editor includes the Filmstock plug-in for easy navigation).
- Aside from Halloween-themed video footage, Filmora’s Filmstock also includes numerous audio, image, and other such elements.
- Filmora, primarily, is a video editor. You can combine all the elements like the stock footage videos discussed above and scary soundtracks and create a clock-down timer video easily.
- From trimming to splitting, to cool effects, there are several editing tools in Filmora.
- Transitions**, filters, text animations, and other editing features** are all supported.
Here’s how to use Filmora to Create a Halloween Countdown Clock Video
Free Download For Win 7 or later(64-bit)
Free Download For macOS 10.14 or later
Step1 Download and install Filmora on your Mac or PC.
Step2 Start the installed software and click Import from the main interface to upload the Halloween countdown clip. Alternatively, you can just drag-n-drop the video.

Step3 Drag-n-drop the uploaded video to the timeline.

Step4 Next, click on Stock Media and select the countdown effect that you want to use in the Halloween video. Then, drag-n-drop it to the timeline.

Step5 double click on the countdown effect and adjust it according to your requirement. You can adjust the time length too.

After that, play the video to preview it.
Step6 If you’re satisfied with the editing, scroll to the top of the screen and click Export, then, select ‘Burn DVD’.

Step7 Enter a name for your file in the Label box of the pop-up that appears on your screen, then in the Folder Path, choose the location where you want the file to be saved. Click the ‘Export’ button to finish.

Conclusion
There you have it - the top 15 Halloween countdown videos that can be used to spice up videos. Not to mention, you can find the stock footage on this page via Filmstock’s vast library containing tons of such videos. Also, is better to use subtle and not-so-horrifying clips if you want everything to be serene in the Halloween vacation countdown clock video.
Free Download For Win 7 or later(64-bit)
Free Download For macOS 10.14 or later
Also read:
- New Change Background Color in After Effects for 2024
- New 10 Innovative AR Teaching Examples to Tell You What Is AR in Teaching
- New In 2024, Best Options to Replace Sky of Any Photo Online + Offline
- Updated How to Create a Text Effect Video with Filmora for 2024
- New Create Slide Masking Effect Intro【Filmora】
- New Top 18 Video Editors for PC and Mac for 2024
- New How To Remove Audio From Video
- How To Use Voicemod On Discord Desktop+Mobile for 2024
- In 2024, 100 Workable How to Mask Track with Adobe Premiere Pro
- 2024 Approved In This Article, You Will Learn Easy Ways to Edit Videos Using a Mouse in Wondershare Filmora. You Can Do Video Editing without a Keyboard After Reading This Article
- In 2024, How To Mirror a Video Clip in Premiere Pro
- Updated Different Ways To Trim Video In Premiere Pro for 2024
- Updated 2024 Approved Best CapCut Templates for Slow Motion Video Trend
- 2024 Approved Add Zoom Blur Effect In Photoshop Step by Step
- Updated Speed Control Is Frequently Used in Video Editing. By Speed up or Slow Down the Video Speed, You Can Achieve Different Visual Results. This Article Will Show You How to Control the Speed of a Video
- New 10 BEST TEXT TO SPEECH VIDEO MAKERS
- New 2024 Approved How to Make a GIF With Transparent Background?
- 2024 Approved Have You Ever Watched a Movie Where You Felt the Filmmakers Left You Hanging? Yea, Thats What Freeze Frame Does. Here We Will Enlighten You on What It Is, Freeze Frame Examples Where It Has Been Helpful to Drive Our Point Home
- New LumaFusion Offers Various Look Up Table Presets, or LUTs, Such as FiLMiC deLog and FiLMiC DeFlat, and Several Stylistic LUTs for Use with Neutral Use Video. You Can Also Manually Add the LUTs
- New Have You Ever Watched a Movie Where You Felt the Filmmakers Left You Hanging? Yea, Thats What Freeze Frame Does. Here We Will Enlighten You on What It Is, Freeze Frame Examples Where It Has Been Helpful to Drive Our Point Home
- New In 2024, Clone Yourself in Videos with Filmora
- Updated Best 10 iPad Slideshow Apps to Create a Slideshow
- Updated In 2024, How to Make a Movie with Windows Movie Maker?
- New In 2024, A Full Guide to Funcall Voice Changer and Its Alternatives
- Updated Best 5 Solutions on How to Add Emojis to iPhone for 2024
- How to Easily Create a Free Eye-Catching Intro Videos with Invideo
- Updated So, without Wasting Time, Let Me Show You How to Mask a Video in Wondershare Filmora. Lets Get Started
- Learn About some of the Best Photo Collage with Music Tools
- New Easy Ways to Remove Motion Blur In Photoshop
- 2024 Approved 10 Best Innovative AR Video Effects to Check Out
- New Add Selective Color Effect to Your Videos Using Filmora for 2024
- 2024 Approved Quick Solved How to Add Subtitles to a Video on iPhones
- New 2024 Approved Everything About Adding Effects In Kinemaster
- 2024 Approved Here, You Will Learn How to Add a Realistic Fire Effect Using Wondershare Filmora. That Will Help to Boost Your Channel and Decorate Your YouTube Channel with Creative and Unique Effects
- In 2024, Being an After Effects Editor, You Often Find Yourself the Need to Add Motion Blur After Effects. This Guide Has Got You Covered. Follow to Find Out How to Add Motion Blur in After Effects
- Updated Why Your Transparent GIF Is Hard to Remove
- Updated 2024 Approved How to Animate Your Designs With Canva GIF
- Create Slow Motion Videos Using Final Cut Pro with Ease
- 2024 Approved Want to Learn How to Make Gaming Montage Videos? You Have Come to the Right Place. This Guide Will Teach You All You Need to Know to Create Montages of Video Games and Share Them with Other Players
- 2024 Approved Ultimate Guide on Making A Slideshow Video
- 2024 Approved Guide on VHS Technology and Its Influence on Video Editing
- In 2024, How Do You Create In-Camera Transitions in Your Videos? A Complete Guide for Beginners to Create These Transitions Using Their Camera at Home
- 2024 Approved Learn How to Perform Velocity Edits on Your PC
- New How to Create a Special Animated Transition in Filmora in Just 2 Minutes. This Simple Step-by-Step Guide Will Show You the Easy Way
- In 2024, How to See Someones Location on Apple iPhone X | Dr.fone
- Trouble with Apple iPhone 8 Plus Swipe-Up? Try These 11 Solutions
- Repair Video Tool - Repair all your damaged video files of Itel P40+ on Windows
- Reliable User Guide to Fix Asus ROG Phone 8 Pro Running Slow and Freezing | Dr.fone
- In 2024, Easy Guide How To Bypass Samsung Galaxy M14 4G FRP Android 10/11/12/13
- What are Location Permissions Life360 On Samsung Galaxy M14 4G? | Dr.fone
- In 2024, Fixing Foneazy MockGo Not Working On Vivo V27 Pro | Dr.fone
- A Guide Xiaomi 14 Ultra Wireless and Wired Screen Mirroring | Dr.fone
- In 2024, Pokémon Go Cooldown Chart On OnePlus Nord N30 SE | Dr.fone
- How to Fix & Retrieve Pictures/Videos From a Water Damaged iPhone 14 Plus That Wont Turn on | Stellar
- Samsung Galaxy S23 Tactical Edition won’t play MKV movies
- 10 Free Location Spoofers to Fake GPS Location on your Honor Play 40C | Dr.fone
- In 2024, 4 Feasible Ways to Fake Location on Facebook For your Samsung Galaxy M34 | Dr.fone
- In 2024, Easy Guide to Xiaomi Redmi Note 12 Pro 5G FRP Bypass With Best Methods
- App Wont Open on Your Infinix Zero 5G 2023 Turbo? Here Are All Fixes | Dr.fone
- In 2024, Unlocking iPhone SE Lock Screen 3 Foolproof Methods that Actually Work
- In 2024, Ultimate Guide, How to Transfer Music From Apple iPhone 13 Pro to iPhone | Dr.fone
- How to Show Wi-Fi Password on Vivo Y27 4G
- Best 3 Vivo Y78+ Emulator for Mac to Run Your Wanted Android Apps | Dr.fone
- In 2024, Hassle-Free Ways to Remove FRP Lock on Nokiawith/without a PC
- In 2024, Your Account Has Been Disabled in the App Store and iTunes From iPhone XR?
- How to Reset iPhone 6s without Losing Data? | Stellar
- Full Tutorial to Bypass Your ZTE Nubia Z60 Ultra Face Lock?
- 5 Hassle-Free Solutions to Fake Location on Find My Friends Of Infinix Note 30 5G | Dr.fone
- How to Restore Deleted 11 Pro+ Pictures An Easy Method Explained.
- How to Fix iPhone 11 Passcode not Working? | Dr.fone
- In 2024, Apple ID Locked for Security Reasons From Apple iPhone 6s Plus? Find the Best Solution Here
- Best Android Data Recovery - Retrieve Lost Pictures from X6.
- Restore Missing App Icon on Vivo Y36 Step-by-Step Solutions | Dr.fone
- Read This Guide to Find a Reliable Alternative to Fake GPS On Oppo Find X7 | Dr.fone
- In 2024, Top 9 Motorola Moto G13 Monitoring Apps for Parental Controls | Dr.fone
- New In 2024, The Boxing Streaming Websites You Cant Afford To Miss
- All You Need To Know About Mega Greninja For Nokia C02 | Dr.fone
- 5 Easy Ways to Change Location on YouTube TV On Honor Magic 5 Lite | Dr.fone
- 9 Quick Fixes to Unfortunately TouchWiz has stopped Of Samsung Galaxy S23 FE | Dr.fone
- A Quick Guide to Xiaomi Redmi Note 13 5G FRP Bypass Instantly
- 4 Ways to Mirror Apple iPhone 7 to Laptop via USB or Wi-Fi | Dr.fone
- In 2024, 10 Easy-to-Use FRP Bypass Tools for Unlocking Google Accounts On Realme 11X 5G
- Remove the Lock Screen Fingerprint Of Your Samsung Galaxy M34
- In 2024, Apple ID Unlock From Apple iPhone 12 mini? How to Fix it?
- In 2024, Getting the Pokemon Go GPS Signal Not Found 11 Error in Tecno Spark 10 Pro | Dr.fone
- In 2024, The Ultimate Guide to Get the Rare Candy on Pokemon Go Fire Red On HTC U23 Pro | Dr.fone
- 8 Solutions to Solve YouTube App Crashing on OnePlus 12 | Dr.fone
- Recommended Best Applications for Mirroring Your Vivo T2 5G Screen | Dr.fone
- Title: How to Make Video Slow Motion, In 2024
- Author: Chloe
- Created at : 2024-05-20 03:37:55
- Updated at : 2024-05-21 03:37:55
- Link: https://ai-editing-video.techidaily.com/how-to-make-video-slow-motion-in-2024/
- License: This work is licensed under CC BY-NC-SA 4.0.

