How to Make Vintage Film Effect 1950S for 2024

How to Make Vintage Film Effect 1950S
So, what’s the difference between a vintage film shot in the 1920s and 1950s? It’s simple; in the 1950s, video-making technologies were slightly advanced, although films were more about rock and roll and poodle skirts. So, without further dilly-dallying, let’s learn how to create a retro 1950-style video with this simple Filmora tutorial.
Preparation 
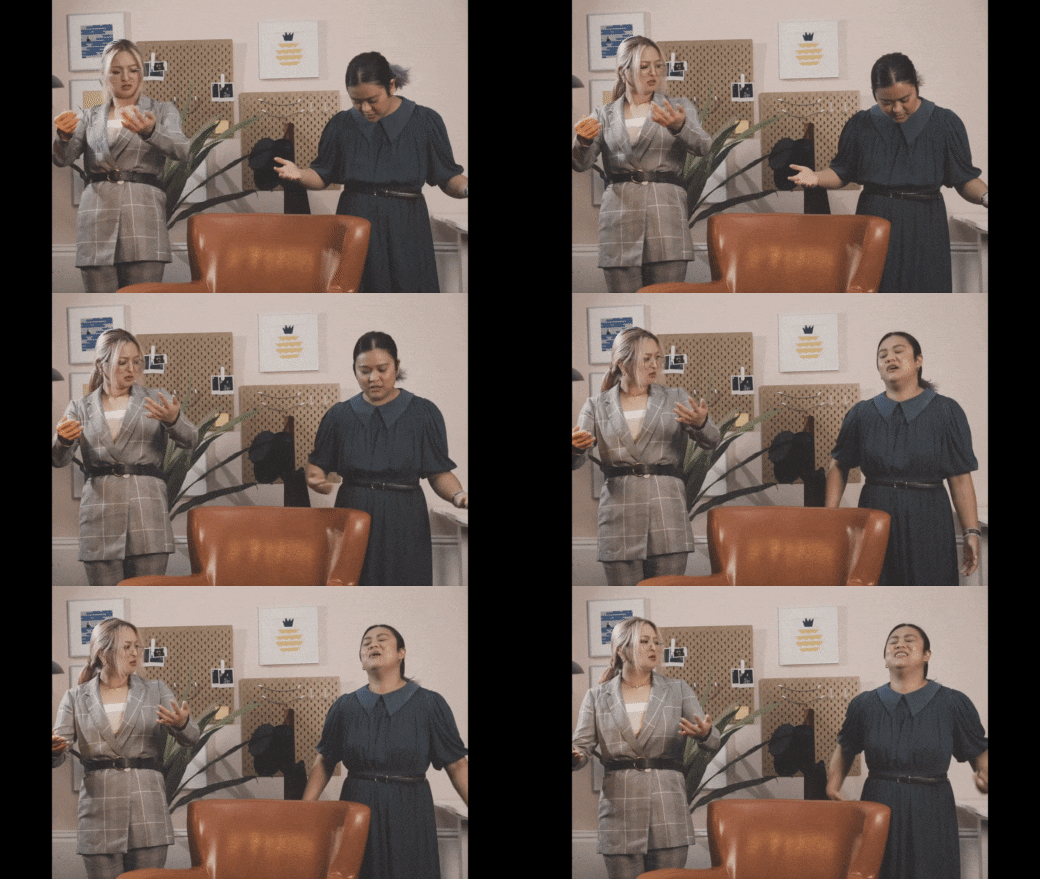
Shooting a video to teleport yourself to the 1950s doesn’t need to be complicated. You simply need to look the part in the video. For example, you can wear velvet-collar jackets, stovepipe trousers, carefully combed back hair, and other trendy styles in the 50s. It’s even better if you can find those vintage chairs in your grandparent’s collection.
How to create a 1950s vintage film:
Step 1 Add your video on Filmora
Free Download For Win 7 or later(64-bit)
Free Download For macOS 10.14 or later 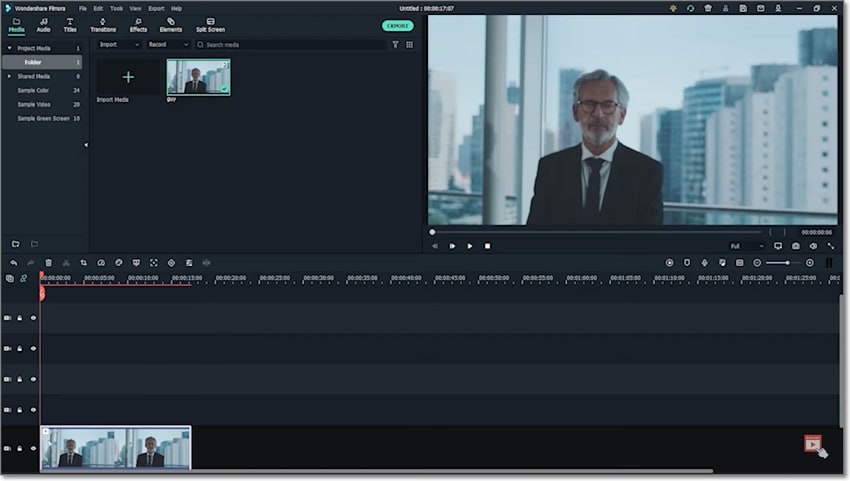
First, fire up Filmora and load the video you want to send back to the 1950s. Then, drag your footage onto the editing timeline.
Step 2 Apply a cropping effect to the video 
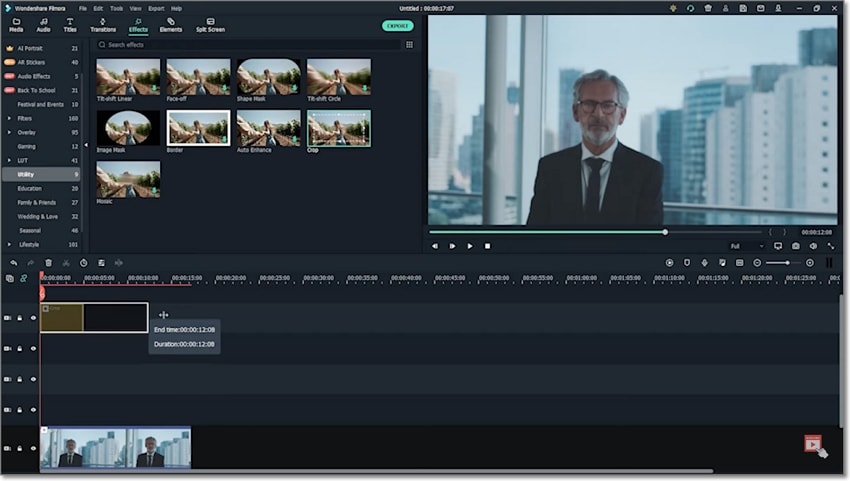
Once the video is successfully added to Filmora, click the Effect tab on the top menu bar and choose the Crop effect under the Utility folder. Make sure you add the Crop effect two or three tracks above the original video track.
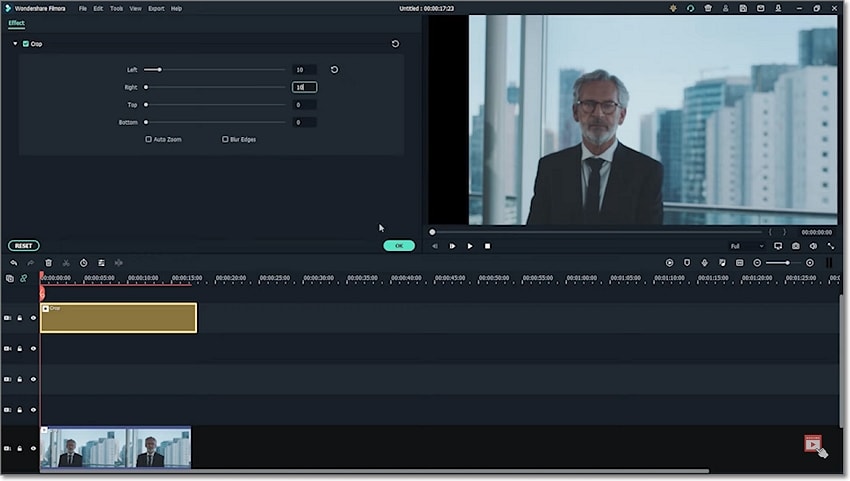
Double-click the Crop effect, then change the Left and Right values to make the video look like it was shot in the 50s. You can set the values as 10.
Step 3 Add a Warm Film color effect 
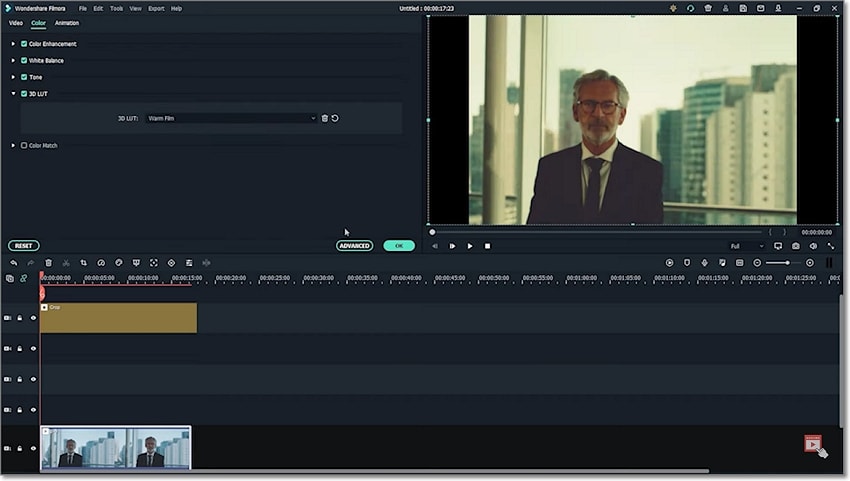
Up to here, you’ll realize that your video doesn’t still look like a 1950s film per se. Double-click your video clip and choose the 3D LUT option under the Color category. Then, open the drop-down menu and choose Warm Film. This will make your video look like it was shot using an old camera.
Step 4 Apply more graininess to the film 
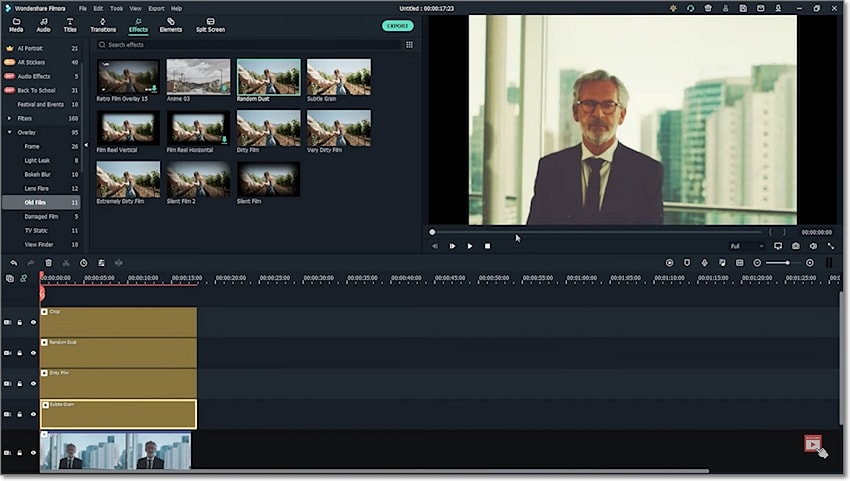
Please don’t stop there; we want to make the footage slightly grainy. In other words, you need to make the footage have a lot of grain and low light. To do that, tap the Overlay menu under the Effects tab, then click Old Film. After that, choose the Random Dust, Dirty Film, and Subtle Grain effects and add them to the tracks above your video clip. Remember to use as much grain as possible to give your footage that vintage look of the 1950s.
Summary
And that’s all there is today! With these steps, you can create an engaging 1950s film without breaking a sweat on Filmora. Remember to visit our other vintage tutorials to learn how to create a film recorded in the 20s, 80s, and 90s. Happy editing, everyone 

First, fire up Filmora and load the video you want to send back to the 1950s. Then, drag your footage onto the editing timeline.
Step 2 Apply a cropping effect to the video 
Once the video is successfully added to Filmora, click the Effect tab on the top menu bar and choose the Crop effect under the Utility folder. Make sure you add the Crop effect two or three tracks above the original video track.

Double-click the Crop effect, then change the Left and Right values to make the video look like it was shot in the 50s. You can set the values as 10.
Step 3 Add a Warm Film color effect 
Up to here, you’ll realize that your video doesn’t still look like a 1950s film per se. Double-click your video clip and choose the 3D LUT option under the Color category. Then, open the drop-down menu and choose Warm Film. This will make your video look like it was shot using an old camera.
Step 4 Apply more graininess to the film 
Please don’t stop there; we want to make the footage slightly grainy. In other words, you need to make the footage have a lot of grain and low light. To do that, tap the Overlay menu under the Effects tab, then click Old Film. After that, choose the Random Dust, Dirty Film, and Subtle Grain effects and add them to the tracks above your video clip. Remember to use as much grain as possible to give your footage that vintage look of the 1950s.
Summary
And that’s all there is today! With these steps, you can create an engaging 1950s film without breaking a sweat on Filmora. Remember to visit our other vintage tutorials to learn how to create a film recorded in the 20s, 80s, and 90s. Happy editing, everyone 

First, fire up Filmora and load the video you want to send back to the 1950s. Then, drag your footage onto the editing timeline.
Step 2 Apply a cropping effect to the video 
Once the video is successfully added to Filmora, click the Effect tab on the top menu bar and choose the Crop effect under the Utility folder. Make sure you add the Crop effect two or three tracks above the original video track.

Double-click the Crop effect, then change the Left and Right values to make the video look like it was shot in the 50s. You can set the values as 10.
Step 3 Add a Warm Film color effect 
Up to here, you’ll realize that your video doesn’t still look like a 1950s film per se. Double-click your video clip and choose the 3D LUT option under the Color category. Then, open the drop-down menu and choose Warm Film. This will make your video look like it was shot using an old camera.
Step 4 Apply more graininess to the film 
Please don’t stop there; we want to make the footage slightly grainy. In other words, you need to make the footage have a lot of grain and low light. To do that, tap the Overlay menu under the Effects tab, then click Old Film. After that, choose the Random Dust, Dirty Film, and Subtle Grain effects and add them to the tracks above your video clip. Remember to use as much grain as possible to give your footage that vintage look of the 1950s.
Summary
And that’s all there is today! With these steps, you can create an engaging 1950s film without breaking a sweat on Filmora. Remember to visit our other vintage tutorials to learn how to create a film recorded in the 20s, 80s, and 90s. Happy editing, everyone 

First, fire up Filmora and load the video you want to send back to the 1950s. Then, drag your footage onto the editing timeline.
Step 2 Apply a cropping effect to the video 
Once the video is successfully added to Filmora, click the Effect tab on the top menu bar and choose the Crop effect under the Utility folder. Make sure you add the Crop effect two or three tracks above the original video track.

Double-click the Crop effect, then change the Left and Right values to make the video look like it was shot in the 50s. You can set the values as 10.
Step 3 Add a Warm Film color effect 
Up to here, you’ll realize that your video doesn’t still look like a 1950s film per se. Double-click your video clip and choose the 3D LUT option under the Color category. Then, open the drop-down menu and choose Warm Film. This will make your video look like it was shot using an old camera.
Step 4 Apply more graininess to the film 
Please don’t stop there; we want to make the footage slightly grainy. In other words, you need to make the footage have a lot of grain and low light. To do that, tap the Overlay menu under the Effects tab, then click Old Film. After that, choose the Random Dust, Dirty Film, and Subtle Grain effects and add them to the tracks above your video clip. Remember to use as much grain as possible to give your footage that vintage look of the 1950s.
Summary
And that’s all there is today! With these steps, you can create an engaging 1950s film without breaking a sweat on Filmora. Remember to visit our other vintage tutorials to learn how to create a film recorded in the 20s, 80s, and 90s. Happy editing, everyone!
Want to Speed up Your Video to Create Short-Duration Instagram Reels? Here Is How You Can Change the Speed of Pre-Recorded and Live Videos on Instagram Reels
Undoubtedly, every social media video creator loves to make use of Instagram Reels for their widespread popularity. If you want to grab your audience’s attention and keep them engaged with your videos, then Instagram Reels should be your destination. On this platform, you can only make short videos maxing out the 90-second time limit. But what if your video content is lengthy? Don’t fret. One simple trick is to speed up the pace of your videos.

There are two scenarios regarding how to increase the speed of the video in Reels. You can speed up the video when recording directly on the Instagram app, or use a third-party editing tool if it is a pre-recorded video. We will illustrate below how to speed up video on Instagram Reels for both scenarios.
Part I. Basic Understanding of Instagram Reels
- What are Instagram Reels?
Instagram Reels are short-duration, vertically-oriented videos that are displayed in the dedicated reels tab on the Instagram app. You can compare Instagram Reels with TikTok videos. The maximum duration of Instagram Reels can be of 90 seconds.
Instagram displays the popular Reels on Explore tab so that the Instagram Reels creators get more exposure. Since short-duration videos and apps are in trend, Instagram Reels has become the most popular section on the Instagram app.
Reels can be entertaining videos with popular songs in the background. They can be funny videos as well as gripping slow-motion videos. Brands promote their products and services through Reels. You can add stunning AR effects and change the speed of the video while recording Reels through the Instagram app.
- Why Should You Make Instagram Reels?
Instagram Reels have been a game-changer in the social media world. From regular video creators and social media influencers to brands and businesses, Instagram Reels has become everyone’s real deal. Here are the reasons why you should make Instagram Reels:
Reach - The primary reason for making Instagram Reels is to reach out to the target audiences and get more followers. If your videos become popular, your Instagram Reels can get featured in the Explore tab. Once it does happen, there will be an exponential rise in views and followers. Besides, Instagram Reels have better reach to your followers than regular Instagram posts.
Engagement - The world has moved on from photos to videos. People love to check out short videos rather than still images. So naturally, when you start making Instagram reels, your followers’ engagement will increase dramatically. With more engagement, your Reels will get more exposure as people will love to share them with their friends. Of course, the content has to be top-notch so that people start to pay attention to your Reels.

Showcase Personality - Instagram Reels are the best way to showcase your personality on social media. Personality is the magical key that attracts followers on social media platforms. You can create different genres of videos and showcase your talent and personality to get noticed.
Brand Promotion - Brands and businesses use Instagram Reels to promote their products and services. They come up with creative Reels that audiences cannot ignore. Even social media influencers promote brands through Instagram Reels these days. It is a great way to make the target audiences aware of the products and services and build a strong brand image.
You can go through this informative article for more information about Instagram Reels.
Part II. Speed Up Video on Instagram Reels
If you prefer to film videos directly on Instagram Reels, you will find a dedicated option to change video speed on the Instagram app. When you use the option, you get to set the speed of the video even before you start recording.
However, if you are already recorded a video for Instagram Reels, you can jump to the next part to find out the best way to speed up existing videos for Reels. Here, you will illustrate how to speed up video on Instagram Reels directly on the Instagram app without needing any third-party app.
Step-by-step Guide to Speed Up Reels Video
Here are the simple steps to speed up the video in Reels on the Instagram app.
Step1 Open the Instagram app. Tap on the Camera icon at the bottom to film a video.
Step2 Swipe at the bottom to select the Reels option.
Step3 You will find the Speed option on the left panel. Tap on the Speed option.
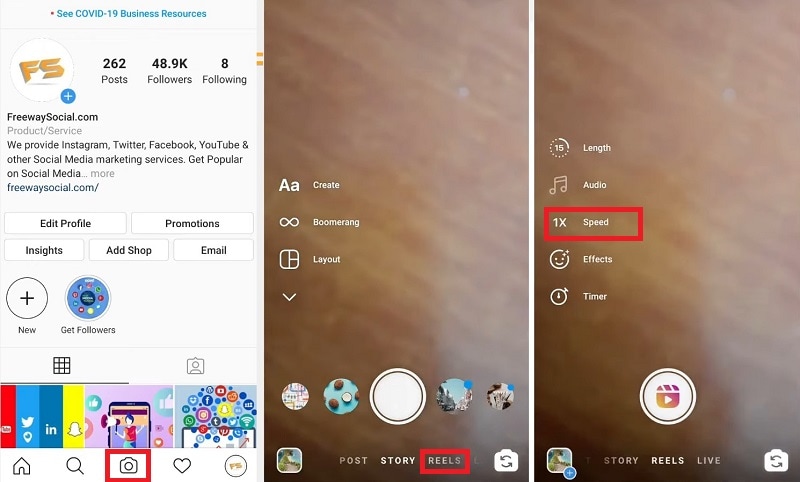
Step4 If you want to speed up your video, select a speed preset above 1X. For example, if you want double the speed than usual, you will tap on the 2X preset.
Step5 Tap the Record icon at the bottom to record the Reels video.
Step6 Once you are done recording, tap on the Stop icon.
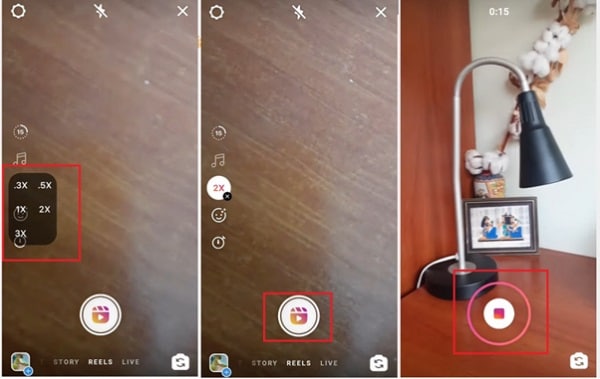
Step7 Tap the Preview option to check how the recorded video looks. After that, tap the Next option.
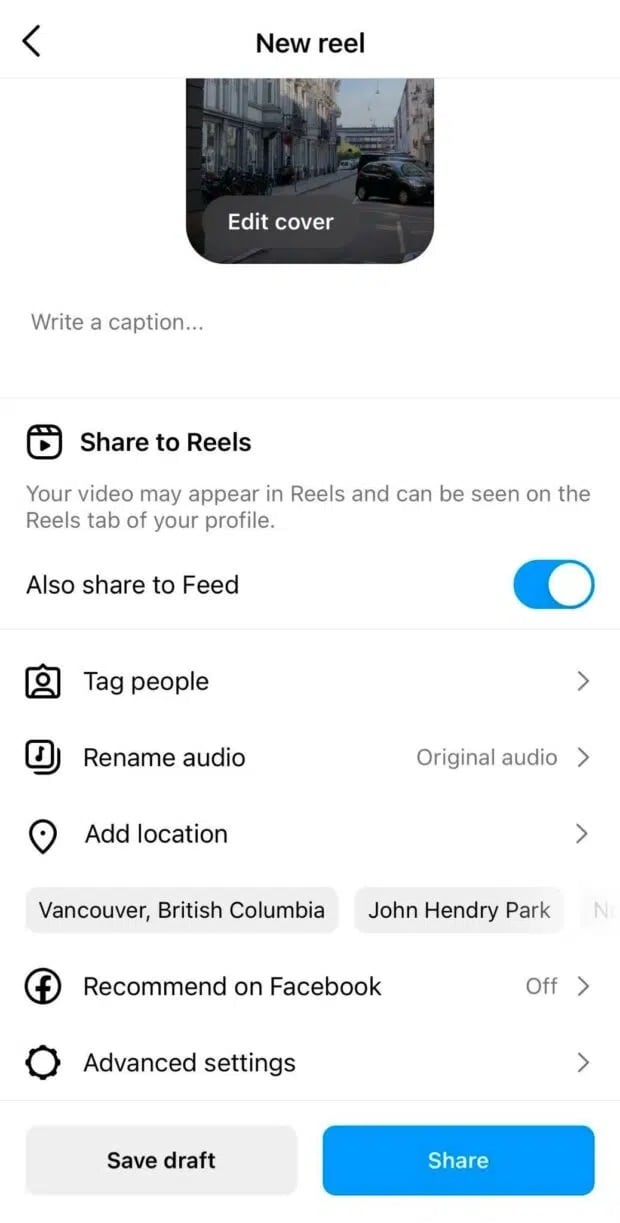
Step8 You can write a caption, add a cover, add a location, and even tag people. Finally, tap on the Share button to post the video under the Reels section.
Part III. Speed Up Existing Videos for Reels
When you have already recorded the video for Reels, you need to use a third-party tool to change the video speed. Depending on the device you are going to use to edit the speed of your video, you have to select an appropriate video editing application. We have handpicked the best applications to change Instagram Reels video speed for computers, smartphones as well as online users.
- Speed Up Video for Instagram Reels on PC
A professional video creator always prefers a computer to edit videos minutely. This is because a computer’s dedicated video editor has far more editing options than a video editor app or even an online video editor. If you have filmed and transferred the video to your computer, you can change its speed easily. Wondershare Filmora is the best video editor to alter video speed precisely as you need.
Free Download For Win 7 or later(64-bit)
Free Download For macOS 10.14 or later
There are various options available to change the speed of a video. You can choose from the speed presets for instant change. You can customize the speed through the Uniform Speed option. Besides, you can use Speed Ramping to vary the speed of the video differently for different sections. Most importantly, Filmora is super easy to use despite being a professional video editing software.
A Step-by-step Guide to speed up a video on Filmora
Instead of choosing from the speed presets, using the Uniform Speed option is always handy to speed up your video. This is because speed presets are limited and may not be suitable for your video. That is why Uniform Speed is effective, as you can set any desired speed up to 100X.
Here are the steps to speed up a Reels video (already recorded) using Filmora
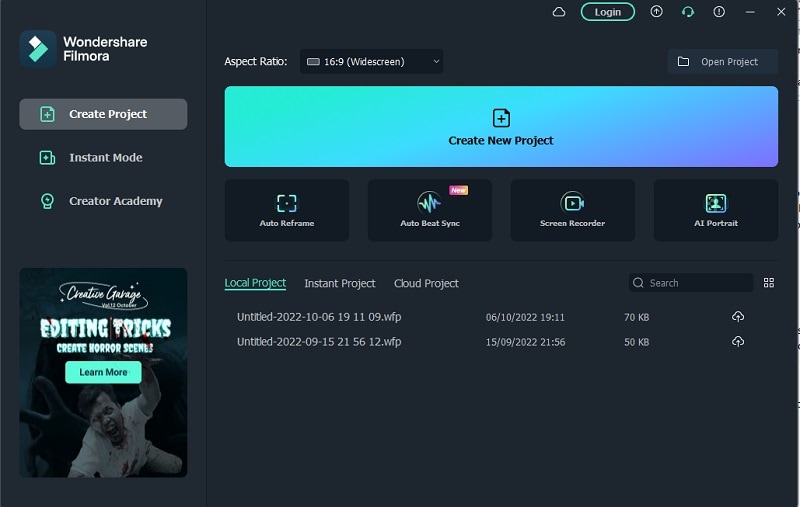
Step1 Download Wondershare Filmora on your computer based on your operating system. Filmora is available for macOS as well as Windows. After successful installation, open Filmora and click on Create New Project button.
Step2 Go to the File menu and the Import Media option. Select Import Media Files and browse your computer to import the target video file into the Project Media folder. Now, drop that file into the timeline. Press the Speed (timer) icon that you will find at the top of the timeline.
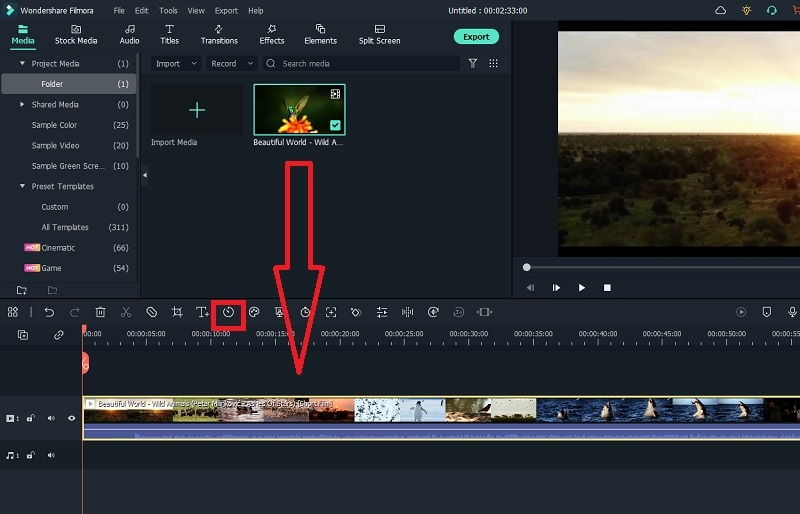
Step3 Press the Uniform Speed option from the displayed menu. This will open the Uniform Speed tab.
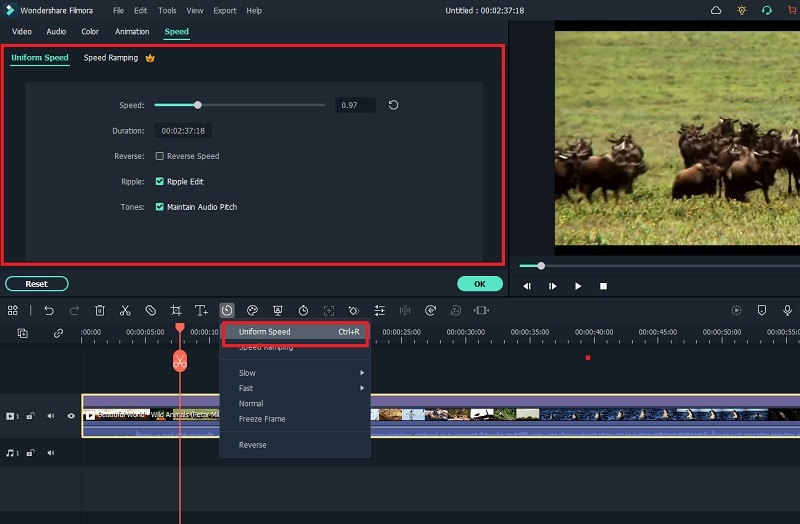
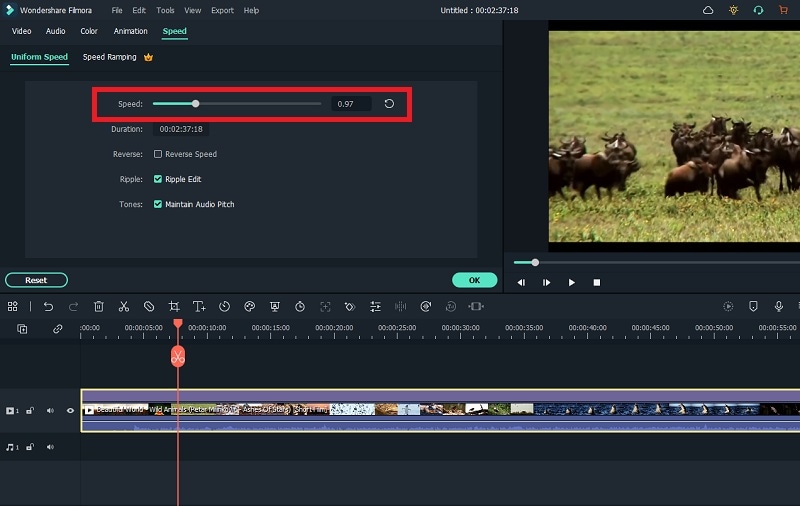
Step4 Move the speed slider to the right to speed up the video. Once you have set the desired speed, press the Ok button. Finally, tap Export to save the edited file. Thereafter, you can upload the video file as Instagram Reels.
For more details, you can check out this video where changing video speed in Filmora is fully illustrated.
![]()
Note: We have already mentioned that you can also use the Speed Ramping option to customize speed for different sections of your video. You will customize the visualization graph to set the speed unevenly with smooth transitions for the entire video. You can watch this tutorial video to find out how to change speed with Speed Ramping option in Filmora.
- Speed Up Video for Reels Online
If you do not want dedicated video editing software, you can still speed up your recorded video using an online video editor. There are several online video editors available where you can speed up your video for Reels. But Clideo is the most straightforward online video editor where you can speed up videos instantly. All you need is an internet connection and a supporting web browser on your device.
A Step-by-step Guide to speed up a video on Clideo
Step1 Open the web browser on your device. Visit the official website of Clideo.
Step2 Click on the Choose File option. Select the target video from your device storage.
Step3 Once the video gets uploaded on the platform, you will see different speed presets on the right side of the screen.
Step4 You can select from the speed presets. Otherwise, you can use the slider to alter the video’s speed as needed.
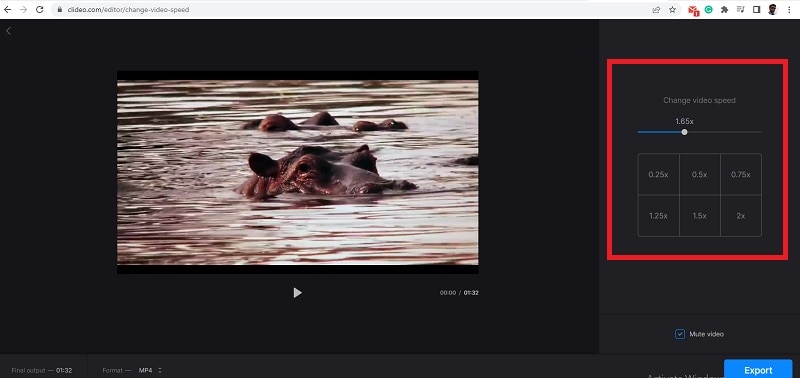
Step5 Play the video and if everything is perfect, click on the Export button to save the video on your device storage.
- Speed up Video for Instagram Reels on iPhone
If you have already recorded a video on your iPhone for Reels Instagram, you can use the VN Video app (VlogNow) to alter its speed before uploading it. Previously, Instagram used to provide Hyperlapse to change video speed. But Instagram has pulled down the app from App Store. VN Video is a complete video editing app where you can instantly change the video speed. It is an extremely popular video editor with a high average rating, proving its usefulness.
A Step-by-step Guide to speed up a video on VN Video
Step1 Install the VN Video app from App Store on your iPhone. Launch the app after installation.
Step2 Tap on the Plus icon located at the bottom. Tap on New Project to get started.
Step3 Select the pre-recorded video from the device storage and tap on the Next arrow icon at the bottom of the screen.
Step4 Tap on the Speed icon at the bottom and select the regular tab at the top.

Step5 Adjust the speed slider as per your need to change the video speed. Once done, tap on the Tick icon at the bottom.

Step6 Finally, tap on the Export icon to save the video file on the device storage.
- Speed up Video for Instagram on Android
Filmora happens to be the easiest video editing app to change the speed of your video for Instagram Reels. Filmora by Wondershare is a complete video editor that is extremely popular among social media video creators. There are trending video effects and stickers available to make short videos engaging. You can speed up as well as slow down videos. Besides, you get the basic as well as some advanced video editing options for Reels.
A Step-by-step Guide to speed up a video on Filmora
Step1 Install the Filmora app on your Android phone from Play Store. Launch the Filmora app and tap on the New Project option. Select the pre-recorded video from your device gallery.
Step2 After the video appears on Filmora, tap on the Trim tab at the bottom of the screen.
Step3 Tap on the Speed option from the bottom. Adjust the speed slider and move it to the right to speed up your video.
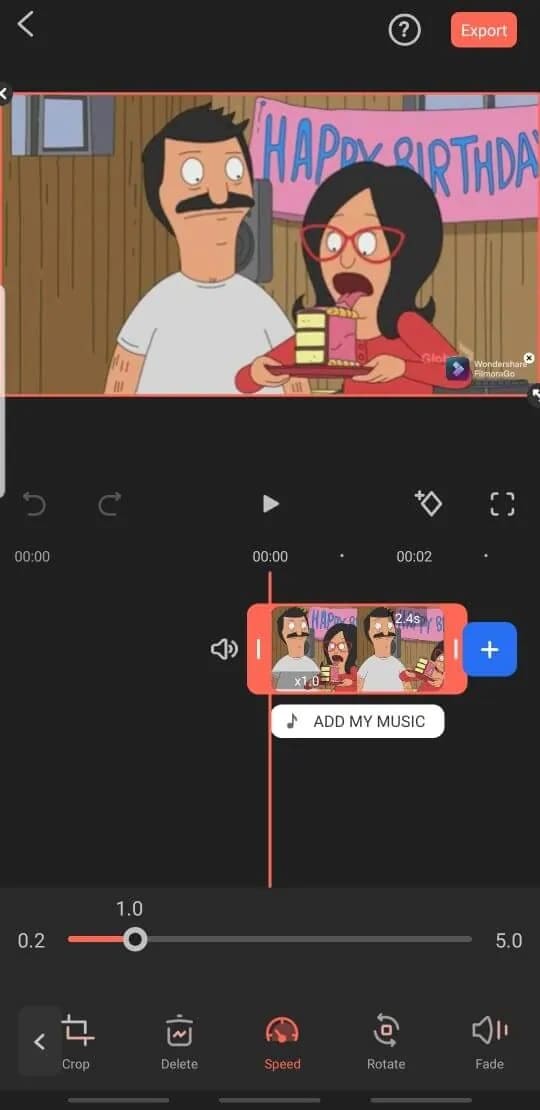
Step4 Tap on the Export button at the top-right corner to save the video on your phone.
FAQs
- Why are my Instagram videos slow?
Multiple reasons can explain why is my Instagram slow. First of all, the videos could be in slow-motion. Secondly, your internet speed may not be up to the mark. Thirdly, Instagram cache and storage could be full when your device runs out of free space. Besides, your device RAM could be fully occupied due to several apps running in the background. Moreover, if you have an older Instagram app version, your Instagram videos can be slow.
- What’s the difference between Instagram Reels and Instagram Stories?
There are several differences between Reels and Stories. Reels stay forever, while Stories get deleted after 24 hours. You can upload a 15-second video for Instagram Story. You can upload a 90-second video for Instagram Reel. Instagram Reels focus on content and entertainment, while Stories focus on real-time events. You can change the video speed of Reels directly from Instagram while no such option is available for Stories. Stories cannot be saved but you can save Reels.
Conclusion
We have answered your question, “Can you speed up a pre-recorded video on reels?” You can definitely speed up your video through different methods as applicable in your case. If you are going to film the footage through Instagram Reels, you can set the speed beforehand directly on the Instagram app. If you want to change the speed of a pre-recorded video, you can use VN editor on your iPhone and Filmora app on your Android smartphone. If you want to customize the video speed on PC, Wondershare Filmora will be your best video editor.
Free Download For macOS 10.14 or later
There are various options available to change the speed of a video. You can choose from the speed presets for instant change. You can customize the speed through the Uniform Speed option. Besides, you can use Speed Ramping to vary the speed of the video differently for different sections. Most importantly, Filmora is super easy to use despite being a professional video editing software.
A Step-by-step Guide to speed up a video on Filmora
Instead of choosing from the speed presets, using the Uniform Speed option is always handy to speed up your video. This is because speed presets are limited and may not be suitable for your video. That is why Uniform Speed is effective, as you can set any desired speed up to 100X.
Here are the steps to speed up a Reels video (already recorded) using Filmora
Step1 Download Wondershare Filmora on your computer based on your operating system. Filmora is available for macOS as well as Windows. After successful installation, open Filmora and click on Create New Project button.

Step2 Go to the File menu and the Import Media option. Select Import Media Files and browse your computer to import the target video file into the Project Media folder. Now, drop that file into the timeline. Press the Speed (timer) icon that you will find at the top of the timeline.

Step3 Press the Uniform Speed option from the displayed menu. This will open the Uniform Speed tab.

Step4 Move the speed slider to the right to speed up the video. Once you have set the desired speed, press the Ok button. Finally, tap Export to save the edited file. Thereafter, you can upload the video file as Instagram Reels.

For more details, you can check out this video where changing video speed in Filmora is fully illustrated.
![]()
Note: We have already mentioned that you can also use the Speed Ramping option to customize speed for different sections of your video. You will customize the visualization graph to set the speed unevenly with smooth transitions for the entire video. You can watch this tutorial video to find out how to change speed with Speed Ramping option in Filmora.
- Speed Up Video for Reels Online
If you do not want dedicated video editing software, you can still speed up your recorded video using an online video editor. There are several online video editors available where you can speed up your video for Reels. But Clideo is the most straightforward online video editor where you can speed up videos instantly. All you need is an internet connection and a supporting web browser on your device.
A Step-by-step Guide to speed up a video on Clideo
Step1 Open the web browser on your device. Visit the official website of Clideo.
Step2 Click on the Choose File option. Select the target video from your device storage.
Step3 Once the video gets uploaded on the platform, you will see different speed presets on the right side of the screen.
Step4 You can select from the speed presets. Otherwise, you can use the slider to alter the video’s speed as needed.

Step5 Play the video and if everything is perfect, click on the Export button to save the video on your device storage.
- Speed up Video for Instagram Reels on iPhone
If you have already recorded a video on your iPhone for Reels Instagram, you can use the VN Video app (VlogNow) to alter its speed before uploading it. Previously, Instagram used to provide Hyperlapse to change video speed. But Instagram has pulled down the app from App Store. VN Video is a complete video editing app where you can instantly change the video speed. It is an extremely popular video editor with a high average rating, proving its usefulness.
A Step-by-step Guide to speed up a video on VN Video
Step1 Install the VN Video app from App Store on your iPhone. Launch the app after installation.
Step2 Tap on the Plus icon located at the bottom. Tap on New Project to get started.
Step3 Select the pre-recorded video from the device storage and tap on the Next arrow icon at the bottom of the screen.
Step4 Tap on the Speed icon at the bottom and select the regular tab at the top.

Step5 Adjust the speed slider as per your need to change the video speed. Once done, tap on the Tick icon at the bottom.

Step6 Finally, tap on the Export icon to save the video file on the device storage.
- Speed up Video for Instagram on Android
Filmora happens to be the easiest video editing app to change the speed of your video for Instagram Reels. Filmora by Wondershare is a complete video editor that is extremely popular among social media video creators. There are trending video effects and stickers available to make short videos engaging. You can speed up as well as slow down videos. Besides, you get the basic as well as some advanced video editing options for Reels.
A Step-by-step Guide to speed up a video on Filmora
Step1 Install the Filmora app on your Android phone from Play Store. Launch the Filmora app and tap on the New Project option. Select the pre-recorded video from your device gallery.
Step2 After the video appears on Filmora, tap on the Trim tab at the bottom of the screen.
Step3 Tap on the Speed option from the bottom. Adjust the speed slider and move it to the right to speed up your video.

Step4 Tap on the Export button at the top-right corner to save the video on your phone.
FAQs
- Why are my Instagram videos slow?
Multiple reasons can explain why is my Instagram slow. First of all, the videos could be in slow-motion. Secondly, your internet speed may not be up to the mark. Thirdly, Instagram cache and storage could be full when your device runs out of free space. Besides, your device RAM could be fully occupied due to several apps running in the background. Moreover, if you have an older Instagram app version, your Instagram videos can be slow.
- What’s the difference between Instagram Reels and Instagram Stories?
There are several differences between Reels and Stories. Reels stay forever, while Stories get deleted after 24 hours. You can upload a 15-second video for Instagram Story. You can upload a 90-second video for Instagram Reel. Instagram Reels focus on content and entertainment, while Stories focus on real-time events. You can change the video speed of Reels directly from Instagram while no such option is available for Stories. Stories cannot be saved but you can save Reels.
Conclusion
We have answered your question, “Can you speed up a pre-recorded video on reels?” You can definitely speed up your video through different methods as applicable in your case. If you are going to film the footage through Instagram Reels, you can set the speed beforehand directly on the Instagram app. If you want to change the speed of a pre-recorded video, you can use VN editor on your iPhone and Filmora app on your Android smartphone. If you want to customize the video speed on PC, Wondershare Filmora will be your best video editor.
How to Create Intro with Legend Intro Maker
What makes the viewers get hooked to a video? Experts say the intro is the decider. That is why video creators focus on creating stunning intro videos. The intro of your video creates the first impression for the viewers. How do you make an intro video stand out? You need a great intro maker and your creativity skill.
Legend Intro Maker is a popular choice among Android smartphone users. You will come across loads of intro maker apps. But Legend Intro Maker clearly stands out. That is why it is highly rated on Play Stores. You can create a high-quality intro and outro video in simple steps. We will illustrate how to create intro videos with mobile legends intro maker.
Part 1. Basic Info of Legend Intro Maker
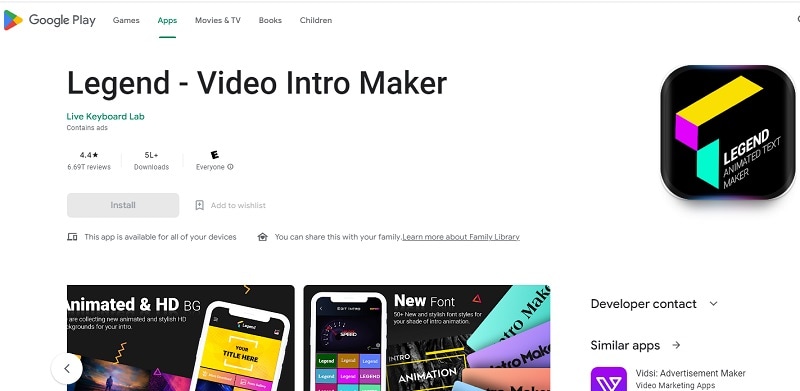
Legend Intro Maker is an Android app available on Play Stores. You can create cool intro and outro videos. There are stunning intro video templates available. You can select and customize them to create an intro video on the go. Besides, you can design amazing animated text videos. The app is useful for creating videos from your photos.
Here are the top features of Legend Intro Maker.
- Choose from intro maker animation templates.
- Over hundred text animation presets.
- Add background photos and videos.
- Amazing text font styles and effects.
- Export videos in HD and full-HD videos.
- Super intuitive user interface.
- Easy to share on social media apps.
Here are the technical specifications of Legend Intro Maker.
App Version: 1.4
Released Date: 26-09-2018
Last Updated: 28-10-2021
Download Size: 18 MB
OS Compatibility: Android 4.4 and above
Download link: https://play.google.com/store/apps/details?id=com.textonvideo.animated.animatedtext&hl=en\_US&gl=US
Part 2. How to Create Intro with Legend Intro Maker
Legend Video Maker is a versatile intro video maker app. You can create text intro videos with cool effects and animations. The app comes with loads of intro video templates. You have to choose one to get started. Thereafter, you can customize the template as per your requirements. You can also start from scratch and add background and text. Thereafter, you can animate texts and objects easily. Here are the steps to create an intro with the Legend video intro maker app.
Step1 Go for Legend gaming intro download from Play Stores. You can also download Legend intro maker mod apk file. Thereafter, you can install the apk file on your phone.
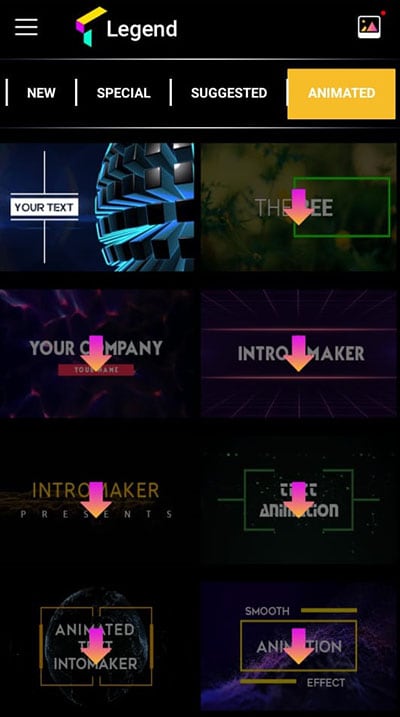
Step2 Launch the Legend app and choose an intro video template. You will see different categories of templates. You can choose any to get started.
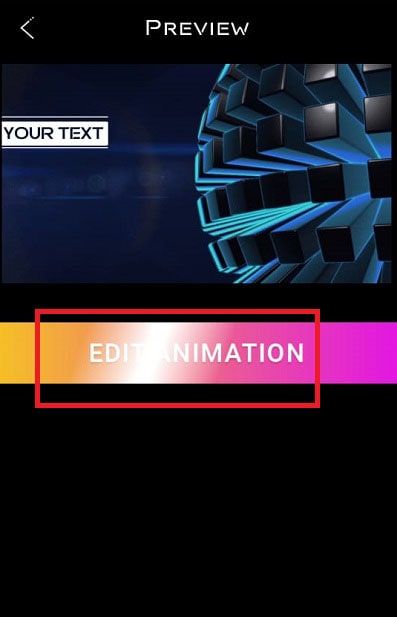
Step3 When you choose a template, it gets downloaded immediately. Tap on the Edit Animation button to customize the template.
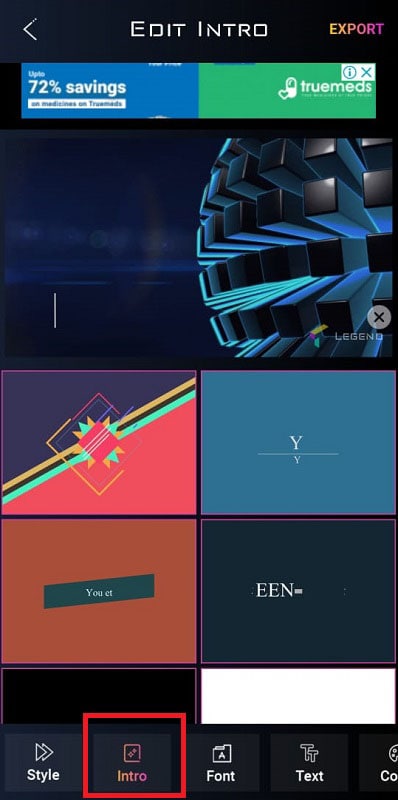
Step4 Tap on the Intro option located at the bottom. Select a suitable intro video template as per your video content niche.
Step5 Go to the Text option at the bottom and edit the texts and titles. You can go to the Font option to change the text font.
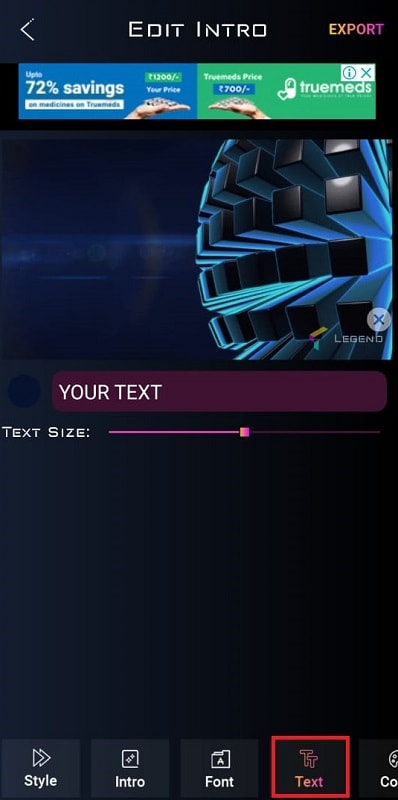
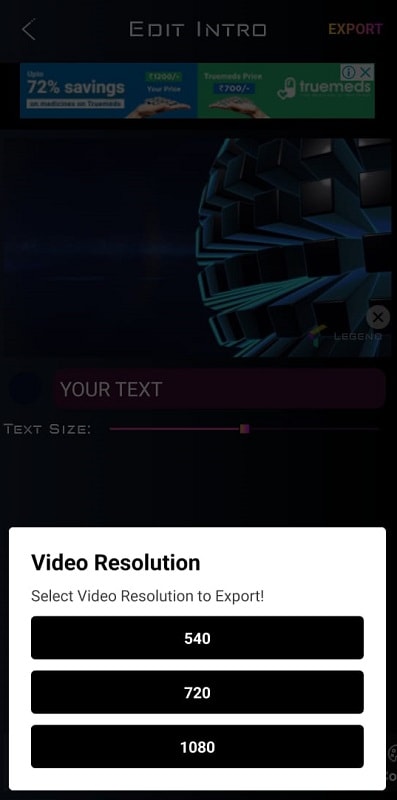
Step6 Finally, check the preview and tap on the Export button. Select the video resolution as per your preference. The intro video will get saved in the Phone gallery.
Part 3. Legend Intro Maker PC Alternative
If you want to create intro videos on your PC, you need a Legend Intro Maker PC alternative. We recommend Wondershare Filmora as the best alternative to mobile Legends Intro Maker. Filmora is a popular premium video editor. Filmora comes with a wide range of intro video templates. There are loads of text effects and animations present.
You can customize all the templates and presets. The video editor allows you to make creative intro videos in simple steps. Filmora happens to be the most popular intro video maker among YouTubers. You can export intro videos in 4K resolution. Filmora is available for Windows and macOS users. Here are the steps to create intro videos with Filmora.
Free Download For Win 7 or later(64-bit)
Free Download For macOS 10.14 or later
Step1 Download and install Wondershare Filmora on your computer. Launch Filmora and click on Create New Project from the welcome screen. Otherwise, go to File> New Project and select an aspect ratio to get started.

Step2 Click on the Titles option from the top bar. Go to the Openers option from the left panel. Select any intro video template as per your preference. Drag and drop it onto the timeline.

Step3 Double-click on the intro video layer. Edit the default text and type in your titles. From the left panel, select any text style as per your preference.

Step4 You can go to the Animation tab and select any animation from the left panel. Double-click on the selected animation to apply. Thereafter, you can move around the texts on the Program window to place them properly. Finally, click on Ok button.
Conclusion
If you are looking for an intro video maker app, Legend video intro maker is a superb choice. You can create stunning intro videos in simple step by step method. If you are a computer user, you cannot use Legend app. We recommend Wondershare Filmora as the best alternative to Legend video intro maker. You can create stunning intro videos with Filmora with simple steps.
Free Download For macOS 10.14 or later
Step1 Download and install Wondershare Filmora on your computer. Launch Filmora and click on Create New Project from the welcome screen. Otherwise, go to File> New Project and select an aspect ratio to get started.

Step2 Click on the Titles option from the top bar. Go to the Openers option from the left panel. Select any intro video template as per your preference. Drag and drop it onto the timeline.

Step3 Double-click on the intro video layer. Edit the default text and type in your titles. From the left panel, select any text style as per your preference.

Step4 You can go to the Animation tab and select any animation from the left panel. Double-click on the selected animation to apply. Thereafter, you can move around the texts on the Program window to place them properly. Finally, click on Ok button.
Conclusion
If you are looking for an intro video maker app, Legend video intro maker is a superb choice. You can create stunning intro videos in simple step by step method. If you are a computer user, you cannot use Legend app. We recommend Wondershare Filmora as the best alternative to Legend video intro maker. You can create stunning intro videos with Filmora with simple steps.
How to Change Frame Rate in Premiere Pro
The video’s frame rate is an important aspect of it. Too high of a frame rate makes the video seem unnatural. On the other hand, too low can make some videos choppy. You can fix that by changing the frame rate using a video editor. And we are here to help you learn how to do that. Here’s how to change the frame rate in Premiere Pro.
The frame rate sometimes makes or breaks the video. So it is important to get this setting right. Suppose you made a mistake and recorded your video in the wrong setting. You can follow this guide to solve your problem.
How To Check Video Frame Rate in Premiere Pro
Before we teach you how to change a video’s frame rate in Premiere Pro, let’s first make sure you know how to check. Maybe you don’t need to modify the video because it is already in the correct setting.
So how do you do that in Premiere Pro?
- Import the video to Adobe Premiere Pro.
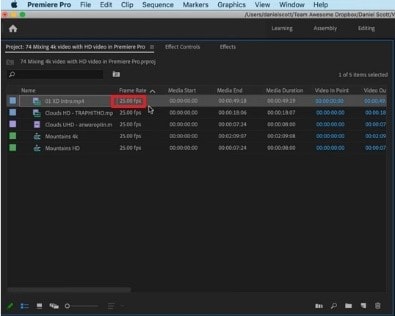
- Check the “Media” window. Next to the video file name is its frame rate. It is written in the format x.00 fps. FPS stands for “frames per second,” which is used interchangeably with the term frame rate.
Reasons for Changing Frame Rate
Suppose you have an action-packed video. It would not look great at 30 fps - it will look too choppy. That will give your audience a rotten viewing experience. By increasing the frames, you can make the motion more fluid and smoother.
Increasing the frames per second also results in better slow-motion videos. A 30 fps one would not look good with this effect because it does not show smooth motion. Thus, we recommend making the video at least 60 fps.
However, a higher frame rate does not always mean better videos. It can result in what they call the “soap opera effect.” It means the video shows too many details. That makes the videos seem “unnatural” or less cinematic.
High frame rates make videos look more realistic since there is less stuttering and motion blur between frames. That’s great. But for older audiences - the ones used to watching videos at 24 fps, it can be off-putting. So it’s also important to consider your target audience when deciding the right frame rate for your video.
With these reasons in mind, you may want to change your video’s frame rate.
How To Change FPS in Premiere Pro
Let’s dilly-dally no more. Here’s a quick guide on how to change fps in Adobe Premiere Pro. This program gives you two different ways to change fps. One is changing the frame rate of a sequence; the other is changing the frame rate of the video clip. We will teach you how to do both.
l Change the Frame Rate of a Sequence
Suppose you want to keep the frame rate of most of the video the same. Only some parts need adjusting. You can change the frame rate of the sequences that need changing instead. Here are the steps to follow to achieve this:
- Open your project in Adobe Premiere Pro.
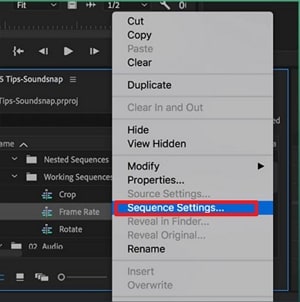
- In the Project panel, select the sequence whose frame rate you want to change. Right-click on that sequence.
- Choose “Sequence Settings” from the menu that appears.
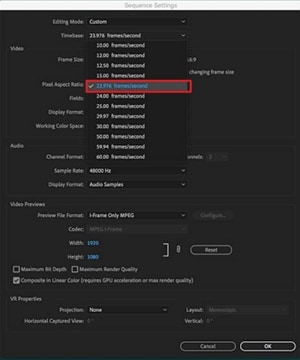
- Click the drop-down menu for “Timebase.”
- Select the frame rate you want the sequence to be in.
- Click “OK.”
l Change the Frame Rate of a Video Clip
Here are the steps you should follow if you want to change the frame rate of an entire video clip.
- Import your video clip to Premiere Pro and drag it to the timeline.
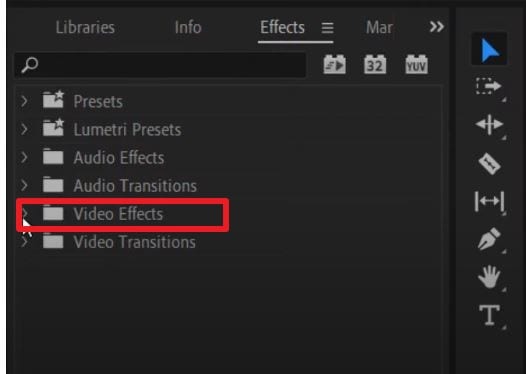
- Go to the “Effects” tab. It’s in the options at the bottom left of the screen.
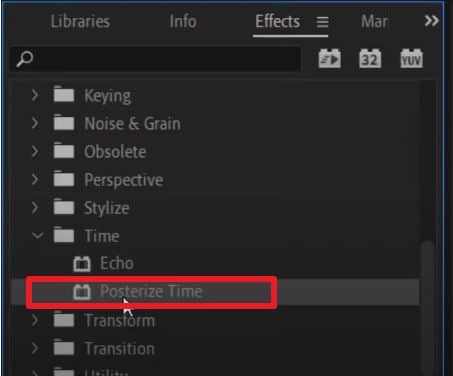
- Select “Video Effects” > “Time” > “Posterize Time.”
- Drag and drop the Posterize Time effect to the clip whose frame rate you want to change.
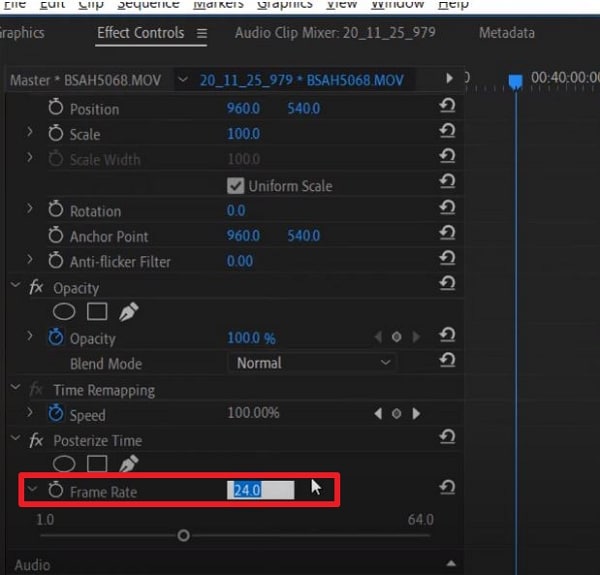
- Click “Effect Controls” at the top left of the screen.
- Select the small “arrow” button next to the “Frame Rate” text under “Posterize Time.”
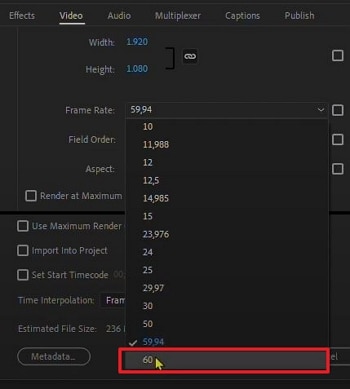
- Change the frame rate to your preferred setting. For example, type “60” to make the video 60 fps.
- Click “Sequence” > “Render Selection.”
And that’s it! That is how you change a video clip’s frame rate in Adobe Premiere Pro.
How To Make 120 FPS Videos With Premiere Pro
Videos that are 120 fps are very popular now. If you are a gaming content creator on YouTube, you probably record videos at this frame rate. You’d want to edit that footage and export it at the same frame rate.
Adobe Premiere Pro allows you to do that. But it’s a little bit of a hidden feature. When creating a sequence, you may notice that the highest the frame rate can go is 60 frames per second. That’s obviously not the number that we want. Don’t worry. There is a workaround. The best thing is that it’s super easy.
Follow these steps to change your video to 120 fps:
- Import your 120 fps video to Adobe Premiere Pro.
- Select your footage. Drag it to your timeline or the tab where the text says, “Drop media here to create sequence.”
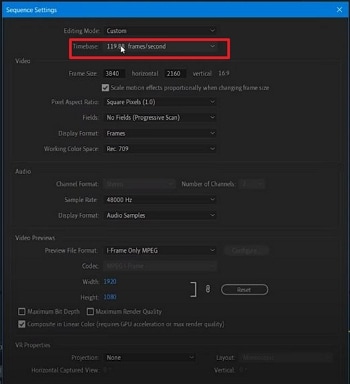
- Select the timeline panel. Click “Sequence” > “Sequence Settings.”
- Check the “Timebase” section. It should say “119.88 frames/second,” 120 fps when rounded off.
- Edit the video as needed and render it. The output should stay at 120 fps.
How To Change Video From 30 FPS to 60 FPS in Premiere Pro
Do you have a video recorded at 30 frames per second, and do you want it at 60? Here’s a simple solution to that. Follow these steps in Adobe Premiere Pro to double the video’s frame rate.
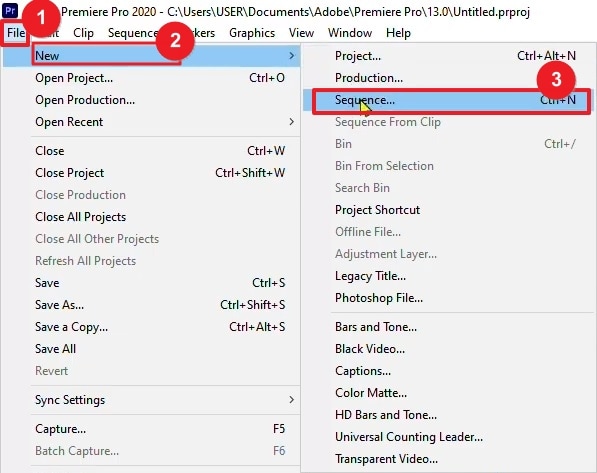
- Open Adobe Premiere Pro. Click “File” > “New” > “Sequence.”
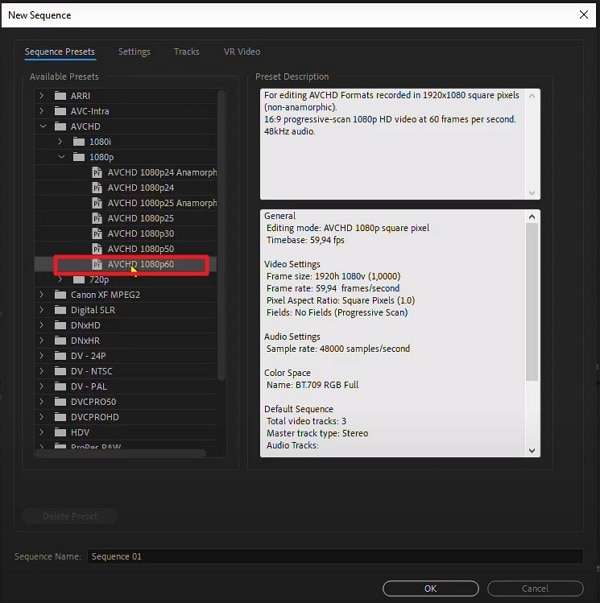
- Click “AVCHD” > “1080p” > “AVCHD 1080p60” > “OK.”
- Import your 30 fps video into Adobe Premiere Pro.
- Drag the video into the timeline.
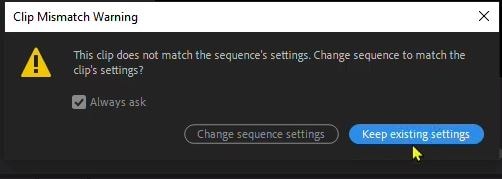
- Click “Keep existing settings.”
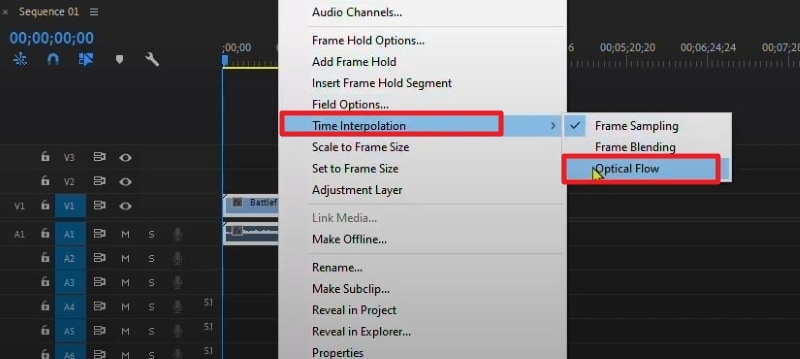
- Right-click the video in the timeline. Select “Time interpolation” > “Optical Flow.”
- Press the “Enter” key. Wait for the processing to finish. This can take hours.
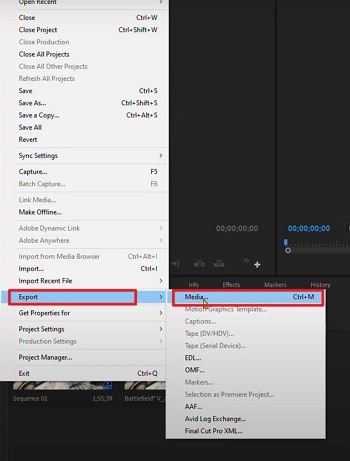
- Click “File” > “Export” > “Media.”
- Select a preset.
- Scroll down to the “Effects” section to check if the frame rate is at 60 fps. If not, change it to 60 fps.
- Click “Export.”
\ Bonus] [Wondershare Filmora
Free Download For Win 7 or later(64-bit)
Free Download For macOS 10.14 or later
What if you don’t have Adobe Premiere Pro or don’t like this tool? What’s a good alternative? That would be Wondershare Filmora.

Why use Filmora as a substitute for Premiere Pro? This video editor offers lots of great features, basic or advanced. With these at your fingertips, you can bring your videos to the next level and wow your audiences.
Among Filmora’s handy features is the ability to quickly change a video’s frame rate. You don’t even need to be a video editing expert to do it with this software! That’s how straightforward the process is.
How To Change the Frame Rate in Wondershare Filmora
Changing a video’s frame rate in Wondershare Filmora is super easy. Even a child can do it due to how simple the steps are. Here, read this 5-step guide to change a video’s frame rate using this amazing video editor.
- Launch Wondershare Filmora and create a new project.

- Import the video whose frame rate you want to change.
- Drag the video into the timeline.
![]()
- Click “Export.”
- Select the format you want the output file to be in. Find the “Frame Rate” in the options, click the drop-down menu, and select the frame rate that you want. Click “Export.”

Conclusion
Getting the frame rate of a video right is important, so you should not neglect it. It greatly affects your audience’s viewing experience. Thankfully, if you make mistakes, you can correct them with video editors like Premiere Pro. If it’s not to your liking, you can use Wondershare Filmora instead - it’s the best alternative.
Filmora lets you change a video’s frame rate very easily. Also, it gives you a bunch of other features you might enjoy using. And here’s some good news: this software app is affordable! You can also download the free trial to give it a shot.
Free Download For macOS 10.14 or later
What if you don’t have Adobe Premiere Pro or don’t like this tool? What’s a good alternative? That would be Wondershare Filmora.

Why use Filmora as a substitute for Premiere Pro? This video editor offers lots of great features, basic or advanced. With these at your fingertips, you can bring your videos to the next level and wow your audiences.
Among Filmora’s handy features is the ability to quickly change a video’s frame rate. You don’t even need to be a video editing expert to do it with this software! That’s how straightforward the process is.
How To Change the Frame Rate in Wondershare Filmora
Changing a video’s frame rate in Wondershare Filmora is super easy. Even a child can do it due to how simple the steps are. Here, read this 5-step guide to change a video’s frame rate using this amazing video editor.
- Launch Wondershare Filmora and create a new project.

- Import the video whose frame rate you want to change.
- Drag the video into the timeline.
![]()
- Click “Export.”
- Select the format you want the output file to be in. Find the “Frame Rate” in the options, click the drop-down menu, and select the frame rate that you want. Click “Export.”

Conclusion
Getting the frame rate of a video right is important, so you should not neglect it. It greatly affects your audience’s viewing experience. Thankfully, if you make mistakes, you can correct them with video editors like Premiere Pro. If it’s not to your liking, you can use Wondershare Filmora instead - it’s the best alternative.
Filmora lets you change a video’s frame rate very easily. Also, it gives you a bunch of other features you might enjoy using. And here’s some good news: this software app is affordable! You can also download the free trial to give it a shot.
Also read:
- [New] 2024 Approved Bridging Devices Move Images & Videos From PC
- 2024 Approved Transform Meetings with Easy-to-Follow Zoom Sharing Tips
- Clear Up Zoom Audio Troubleshoot Distortion Immediately for 2024
- Comprehensive Test of the Asus RT-AC68U: Powerful 5G Connectivity Unveiled
- Effortless Solutions to Your Apex Legends Startup Woes!
- Expert Tips on Repairing Malfunctioning Computer Audio Systems
- Explore with AKASO's EK7000: High-Quality, Economical Adventure Tool
- Fix Your CoD: Modern Warfare Voice Chat - A Comprehensive Solution
- How can I get more stardust in pokemon go On Oppo A78 5G? | Dr.fone
- Mark Zuckerberg Reveals He Has a Goat Named Bitcoin
- Perfected Meme Design Suite
- Restoring Sounds in Skyrim: Fixes for Muted Gameplay Experience
- Unpacking the Mini-Powerhouse: In-Depth Analysis of the 3Rd Gen Amazon Echo Dot's Alexa Capabilities
- What Went Wrong? Insights Into Windows 10'S Problematic Version 1ˈ607 Update
- Title: How to Make Vintage Film Effect 1950S for 2024
- Author: Chloe
- Created at : 2024-12-10 23:18:05
- Updated at : 2024-12-12 10:45:08
- Link: https://ai-editing-video.techidaily.com/how-to-make-vintage-film-effect-1950s-for-2024/
- License: This work is licensed under CC BY-NC-SA 4.0.
