:max_bytes(150000):strip_icc():format(webp)/GettyImages-93420821-0ce0b19097fb47d78dec8dbc039c1260.jpg)
How to Put a Filter on a Video in iMovie

How to Put a Filter on a Video in iMovie
There are times when you record a video and find out that the light and color in the video have been up to the mark. The light could be too bright or too dark while there could be some color overlays in certain portion as well as the entire frame of the video. Thanks to the video editing apps, you can correct any lighting and coloration issues with different filters available to apply to your video.
If you are using iPhone or Mac, you can use Apple’s iMovie app easily. Therefore, you should know how to add filters on iMovie to get the desired output. iMovie app is available for both iPhone and iPad users as well as Mac users. You do not need prior experience in video editing to add filter to your videos to enhance and improve them. We will illustrate the steps on how to add filters in iMovie as well as suggest a better iMovie alternative.
Part 1. How to add filters on iMovie iPhone
If you have an iPhone, you are more likely to record a video with your iPhone. This is because the camera quality of iPhones is extremely good and there are various modes available for capturing different types of videos like slow-motion and time-lapse. Once you capture a video with your iPhone, you can edit the video and add filters to enhance the video quality using iMovie app available for iPhone.
You have to install iMovie app from App Store as it does not come pre-install. If you already have it installed, make sure you update it to the latest version to get all the filters. Here are the steps how to put a filter on a video in iMovie app.
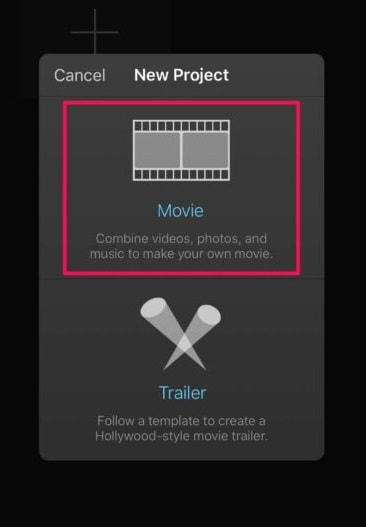
Step1 Open iMovie app on your iPhone. Tap on Create Project option and tap on Movie on the next screen.
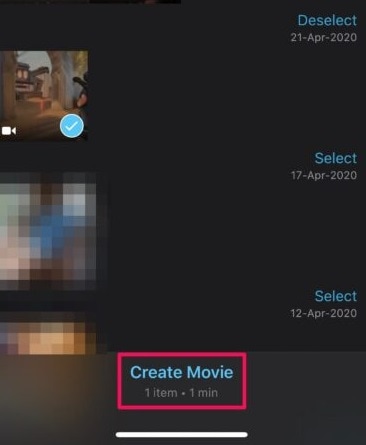
Step2 Select the video from your iPhone that you want to edit and add filters. After your selection, tap on Create Movie option located at the bottom.
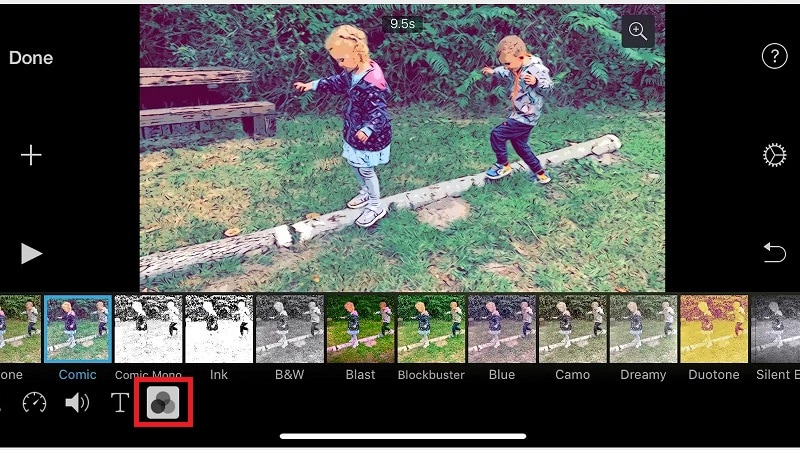
Step3 Your selected video will now be available on the Timeline where you can edit your video. Tap on Filters icon located at the bottom-right corner.
Step4 You will see all the different filters available on iMovie app. You can also find a slider above each selected filter. You can adjust the filter to increase or decrease the filter intensity.
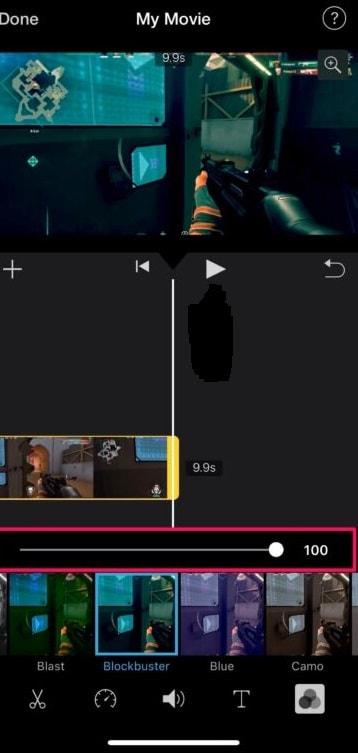
Step5 Tap on Play icon to check how the filter is looking on your video. Once you are satisfied, tap on Done option located at the top-left corner.
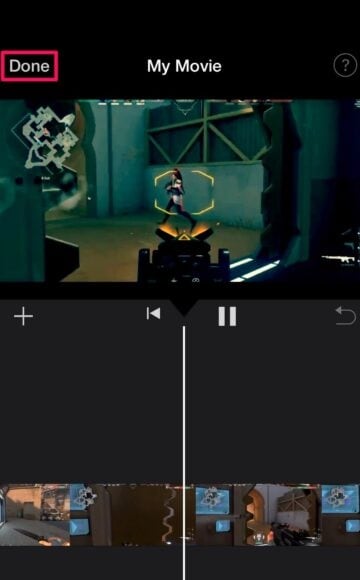
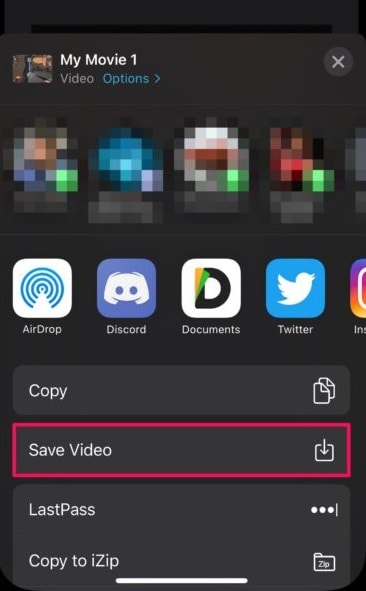
Step6 Tap on Share icon at the bottom and then tap on Save Video option to save the modified video on your iPhone.
Part 2. How to add filters on Mac iMovie
If you are someone who regularly makes videos for social media account or video streaming channel, you are more likely to record your video using a video camera and transfer the recorded video to you Mac for editing purposes. iMovie comes pre-installed on Mac, and therefore, once you have transferred the video, you can get started with editing and adding filters immediately. Here are the steps on how to add filters to iMovie on your Mac.
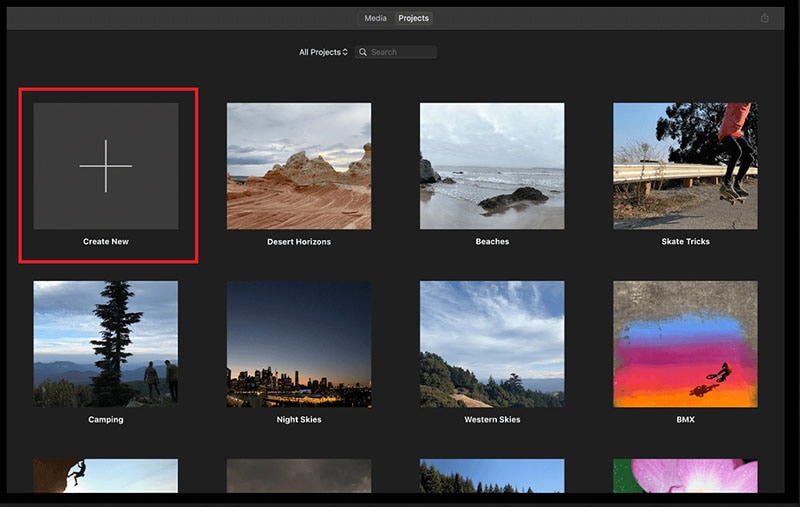
Step1 Launch iMovie from Applications folder. Click on Create New option to start a new Project.
Step2 Drag and drop the target video from Photos app to Desktop. Thereafter, drag and drop the video file from Desktop to the Timeline of iMovie project.
Step3 Click on the video clip on the Timeline and click on Crop Filter and Audio Effects icon above the Viewer.
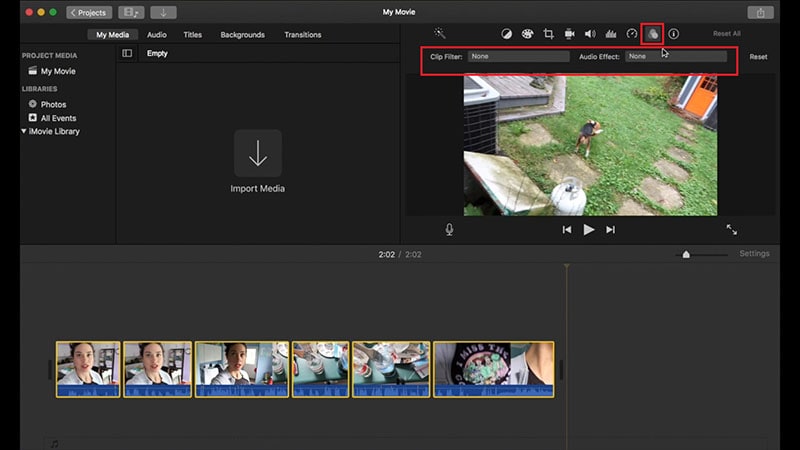
Step4 Click on Clip Filter option and you will see different filters in a window to the left. Place the mouse pointer over the filters, and you will see the filter in the Viewer.
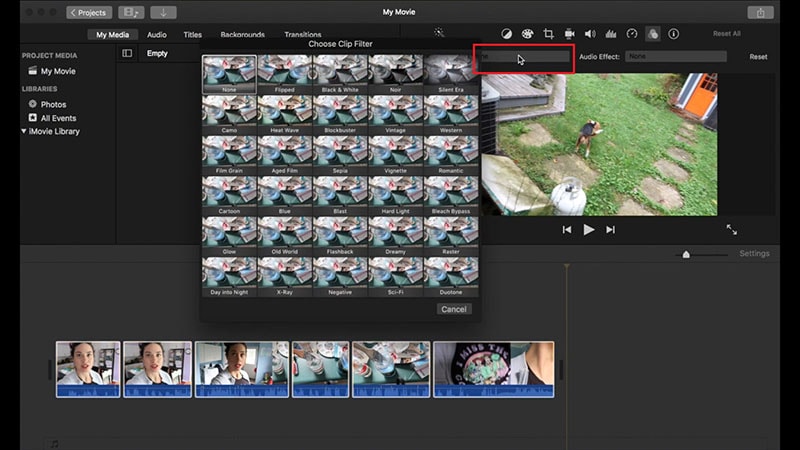
Step5 Once you are satisfied with a filter, click on that filter to apply it to the video clip.
Part 3. iMovie Alternative to add filters on Computer
There are several reasons iMovie filters may not always serve your purpose. For example, there is no way on how to add face filters on iMovie. The collection of filters is rather limited. If you are not satisfied with the filters available on iMovie, there are several iMovie alternatives available. We recommend Wondershare Filmora due to its vast collection of filters of all categories to enhance your video to the next level. Here are steps on how to add filters to your video using Filmora on your computer.
Free Download For Win 7 or later(64-bit)
Free Download For macOS 10.14 or later
Step1 Download and install Wondershare Filmora and it is available for Mac as well as Windows users. Open Filmora and click New Project.
Step2 Drag and drop video clips under Project Media folder. Thereafter, drag and drop video clips to Timeline.

Step3 Go to Effects from the top panel and click on Filters from the left panel. You will see all the different categories of filters.

Step4 Select any filter and drag and drop it on Timeline. You can stretch the duration of the filter as per your requirements.
You can also check Overlay> Utility option from the left panel to add face filters to your video in the same manner. If you want to save the modified video, click on Export button.
Conclusion
If you are an iPhone user or a Mac user, you can add filters to your video using iMovie app. You have to install iMovie app on your iPhone, but iMovie comes pre-installed on Mac. But there are limited filters available on iMovie and there is a lack of face filters which are trending in today’s viral videos. That is why we recommend Wondershare Filmora where there is a wide range of filters available to apply to your video conveniently as per your requirements.
Free Download For macOS 10.14 or later
Step1 Download and install Wondershare Filmora and it is available for Mac as well as Windows users. Open Filmora and click New Project.
Step2 Drag and drop video clips under Project Media folder. Thereafter, drag and drop video clips to Timeline.

Step3 Go to Effects from the top panel and click on Filters from the left panel. You will see all the different categories of filters.

Step4 Select any filter and drag and drop it on Timeline. You can stretch the duration of the filter as per your requirements.
You can also check Overlay> Utility option from the left panel to add face filters to your video in the same manner. If you want to save the modified video, click on Export button.
Conclusion
If you are an iPhone user or a Mac user, you can add filters to your video using iMovie app. You have to install iMovie app on your iPhone, but iMovie comes pre-installed on Mac. But there are limited filters available on iMovie and there is a lack of face filters which are trending in today’s viral videos. That is why we recommend Wondershare Filmora where there is a wide range of filters available to apply to your video conveniently as per your requirements.
Easy Way to Apply Green Screen to YouTube Videos
This is a large green backdrop that is placed in the background of a shot to allow for digital effects later on. A majority of popular YouTube vloggers use green to enhance interesting background views to their videos. Screen replaces the background and adds depth and visually interesting patterns that ends up keeping the viewer captivated.
Why use Green Screen
1. Creativity
There are several effects that can be applied to green screen video editing in the editing process, it gives one a chance to explore their imagination. A good editor can really customize the video to make the production really stand out from those of the competitors.
2. Flexibility
There are portable green screens that can be taken to any location of choice for video shooting. Location allows one endless possibilities without having to spend time and resources doing assembling of different sets and backgrounds. The desired feel to the video can be simply achieved by an image.
3. Budget
Filming YouTube using green screen is a cost effective way of producing professional video content on a small budget. This is a great idea for upcoming YouTube vloggers as expenses catering for travel and location are eliminated.
4. Consistency
At some point in YouTube green screen use, you may be affected by the weather and worse pf all, natural lighting may end up being problematic while you are on location doing your video shots. However, with YouTube Video green screen technology, ambient lighting is blocked out and the screen can be lit the same way every time. This brings consistency over a number of videos the user applies green screen on.
5. Clarity
Youtube video green screen allows for an additional visual ellements and diagrams such as graphics, this can be added on to the video to illustrate what the speaker is saying. This green screen effect helps the viewer to gain a better understanding of any concepts or complex illustrations mentioned by the presenter.
6. Branding
YouTube green screen logo and branding colors can be easily added into the video, this can easily make the viewers to identify the video with your business. Apart from standing out from other competitors, you will also have a professional, high quality and reliable video to use anytime you please.
Best Places to find Green Screen Effects
Filmstock
Filmstock features a massive library full of royalty-free stock video, video effects, sound effects, video templates, and so much more. There are resources on the platform for all kinds of creators, including video editors, content creators, social media influencers, and marketers. You get unlimited access to all these resources for a single price when you subscribe to Filmstock. While there are other marketplaces that offer similar options, Filmstock does things differently.
Green Screen Effects
1. Balance Beam
Ever wanted to walk across a small beam way high up in the air? Me neither, but you can make a cool effect that looks like you did. Throwing a green screen on the ground and then building a balance beam over top of it you can start recording the main shot. Strap a GoPro to your head and look down while walking across the beam.
2. Shrink Effect
Okay this one is really easy. Take some footage of a person walking in front of a green screen, ideally looking at something to be featured in the main shot to sell the effect. Then take a close up of a small object. Key out the green behind the person, take the footage and drop it over your close up, and then scale it to match. Duplicate it, mirror it horizontally to act as a reflection and then drop the opacity and add some blur to make it look more realistic. It’s a fun little trick.
3. Floating Object
This is a simple one, making an object appear to be floating. This is another two clip shot. First, take a shot with the object hanging in front of a blue screen. Then on the same location, take another shot but while pretending to levitate the hammer. Masking around the hammer will get rid of the string for hanging, key out the blue, and then dropping it on top of the other clip is all you need.
Best Green Screen Video Editor for YouTube
Filmora
If you’re just starting out with video editing, or just want a simple program that works, Wondershare Filmora might be what you’re looking for. It has the essential tools, and anyone can learn to use it easily.
Wondershare Filmora is the one of best video editing software with cool features that compares to other competing video editing Softwares. Many video editing programs claim to offer professional results; Filmora is one of a few consumer-level tools that actually delivers.
For Win 7 or later (64-bit)
For macOS 10.12 or later
Installation Steps
- Click the icon in the center of the Media Library to add files directly.
- Go File > Import Media > Import Media Files.
- Drag and drop to the Media Library directly.
While importing a media file, Wondershar Filmora may ask you if you wish to create a proxy file to accelerate the editing process. Select “Yes” to have a fast video editing experience.
You can also import video clips using your Touch Bar controls if your computer has Touch Bar.
Record a media file
Apart from the videos shot by your digital devices, you can also directly import media files by recording video from your webcam, capturing the computer screen, or recording a voice-over.
Find green screen effects: Now you can select the different types of green screen effects.

Apply green screen: drag the effects to the timeline to apply it to your videos.

Save and Export: Then you can save or export the video.
A green screen is a green surface used as a background when filming so that any image can replace the screen behind the actor or presenter. Shooting with a green screen involves filming a person or adding visual effects in front of a solid color. Then, by digitally removing or “keying out” that color, you can drop that scene onto the background of your choice in post-production. Removing the colored background is also referred to as “chroma keying.”
Steps with Images
The first step is to record footage in front of a green screen so that you can import it into WeVideo as a media file. To capture footage that is optimal for the Green Screen effect, please ensure the following:
- There is ample lighting distributed evenly around you with no shadows.
- You are in front of a solid background with no creases. Green or blue is the recommended color for your background.
- The quality of your camera is high enough so that the footage is not pixelated or grainy. 720p HD footage or above is recommended.
Step 2) Add media to the Timeline
Once you’ve captured the footage you want to use for the Green Screen effect, import that media file and add it to the Timeline. Remember to place the green screen footage in the Video 2 track and the clip you would like to use as the background in the Video 1 track.
If you are using more than two video tracks, place the green screen footage in the track above whichever track holds the background footage to ensure proper layering techniques are used.
Step 3) Open the clip editor
Double click on the green screen clip in the Timeline to open the clip editor. In the clip editor, navigate to the Color Keying tab.
Step 4) Use the color picker tool
Select the color picker tool and then click anywhere on the green screen footage to apply the effect.
Step 5) _(optional) Adjust the color settings
The Green Screen effect should automatically apply without the need to adjust the color settings. However, if you would like to make these additional modifications, you can use the scroll bars to make the following adjustments:
- **Show- You can select Mask to reveal a black and white representation of the mask you are applying using the color keying tool. Notice that the black area represents transparent sections of your video, while the white area represents opaque sections.
- **Color Balance- This adjusts how selective the effect is. The further right you scroll, the wider the range of tints and shades are removed.
- **Color Sensitivity- This smooths out any pixelation and rough edges of color that remain.
- **Defringe- This helps reduce color bleeding at the edges of your mask. The left and right sliders control the level of white and black respectively to help match the edges of the mask with your new background color.
For macOS 10.12 or later
Installation Steps
- Click the icon in the center of the Media Library to add files directly.
- Go File > Import Media > Import Media Files.
- Drag and drop to the Media Library directly.
While importing a media file, Wondershar Filmora may ask you if you wish to create a proxy file to accelerate the editing process. Select “Yes” to have a fast video editing experience.
You can also import video clips using your Touch Bar controls if your computer has Touch Bar.
Record a media file
Apart from the videos shot by your digital devices, you can also directly import media files by recording video from your webcam, capturing the computer screen, or recording a voice-over.
Find green screen effects: Now you can select the different types of green screen effects.

Apply green screen: drag the effects to the timeline to apply it to your videos.

Save and Export: Then you can save or export the video.
A green screen is a green surface used as a background when filming so that any image can replace the screen behind the actor or presenter. Shooting with a green screen involves filming a person or adding visual effects in front of a solid color. Then, by digitally removing or “keying out” that color, you can drop that scene onto the background of your choice in post-production. Removing the colored background is also referred to as “chroma keying.”
Steps with Images
The first step is to record footage in front of a green screen so that you can import it into WeVideo as a media file. To capture footage that is optimal for the Green Screen effect, please ensure the following:
- There is ample lighting distributed evenly around you with no shadows.
- You are in front of a solid background with no creases. Green or blue is the recommended color for your background.
- The quality of your camera is high enough so that the footage is not pixelated or grainy. 720p HD footage or above is recommended.
Step 2) Add media to the Timeline
Once you’ve captured the footage you want to use for the Green Screen effect, import that media file and add it to the Timeline. Remember to place the green screen footage in the Video 2 track and the clip you would like to use as the background in the Video 1 track.
If you are using more than two video tracks, place the green screen footage in the track above whichever track holds the background footage to ensure proper layering techniques are used.
Step 3) Open the clip editor
Double click on the green screen clip in the Timeline to open the clip editor. In the clip editor, navigate to the Color Keying tab.
Step 4) Use the color picker tool
Select the color picker tool and then click anywhere on the green screen footage to apply the effect.
Step 5) _(optional) Adjust the color settings
The Green Screen effect should automatically apply without the need to adjust the color settings. However, if you would like to make these additional modifications, you can use the scroll bars to make the following adjustments:
- **Show- You can select Mask to reveal a black and white representation of the mask you are applying using the color keying tool. Notice that the black area represents transparent sections of your video, while the white area represents opaque sections.
- **Color Balance- This adjusts how selective the effect is. The further right you scroll, the wider the range of tints and shades are removed.
- **Color Sensitivity- This smooths out any pixelation and rough edges of color that remain.
- **Defringe- This helps reduce color bleeding at the edges of your mask. The left and right sliders control the level of white and black respectively to help match the edges of the mask with your new background color.
For macOS 10.12 or later
Installation Steps
- Click the icon in the center of the Media Library to add files directly.
- Go File > Import Media > Import Media Files.
- Drag and drop to the Media Library directly.
While importing a media file, Wondershar Filmora may ask you if you wish to create a proxy file to accelerate the editing process. Select “Yes” to have a fast video editing experience.
You can also import video clips using your Touch Bar controls if your computer has Touch Bar.
Record a media file
Apart from the videos shot by your digital devices, you can also directly import media files by recording video from your webcam, capturing the computer screen, or recording a voice-over.
Find green screen effects: Now you can select the different types of green screen effects.

Apply green screen: drag the effects to the timeline to apply it to your videos.

Save and Export: Then you can save or export the video.
A green screen is a green surface used as a background when filming so that any image can replace the screen behind the actor or presenter. Shooting with a green screen involves filming a person or adding visual effects in front of a solid color. Then, by digitally removing or “keying out” that color, you can drop that scene onto the background of your choice in post-production. Removing the colored background is also referred to as “chroma keying.”
Steps with Images
The first step is to record footage in front of a green screen so that you can import it into WeVideo as a media file. To capture footage that is optimal for the Green Screen effect, please ensure the following:
- There is ample lighting distributed evenly around you with no shadows.
- You are in front of a solid background with no creases. Green or blue is the recommended color for your background.
- The quality of your camera is high enough so that the footage is not pixelated or grainy. 720p HD footage or above is recommended.
Step 2) Add media to the Timeline
Once you’ve captured the footage you want to use for the Green Screen effect, import that media file and add it to the Timeline. Remember to place the green screen footage in the Video 2 track and the clip you would like to use as the background in the Video 1 track.
If you are using more than two video tracks, place the green screen footage in the track above whichever track holds the background footage to ensure proper layering techniques are used.
Step 3) Open the clip editor
Double click on the green screen clip in the Timeline to open the clip editor. In the clip editor, navigate to the Color Keying tab.
Step 4) Use the color picker tool
Select the color picker tool and then click anywhere on the green screen footage to apply the effect.
Step 5) _(optional) Adjust the color settings
The Green Screen effect should automatically apply without the need to adjust the color settings. However, if you would like to make these additional modifications, you can use the scroll bars to make the following adjustments:
- **Show- You can select Mask to reveal a black and white representation of the mask you are applying using the color keying tool. Notice that the black area represents transparent sections of your video, while the white area represents opaque sections.
- **Color Balance- This adjusts how selective the effect is. The further right you scroll, the wider the range of tints and shades are removed.
- **Color Sensitivity- This smooths out any pixelation and rough edges of color that remain.
- **Defringe- This helps reduce color bleeding at the edges of your mask. The left and right sliders control the level of white and black respectively to help match the edges of the mask with your new background color.
For macOS 10.12 or later
Installation Steps
- Click the icon in the center of the Media Library to add files directly.
- Go File > Import Media > Import Media Files.
- Drag and drop to the Media Library directly.
While importing a media file, Wondershar Filmora may ask you if you wish to create a proxy file to accelerate the editing process. Select “Yes” to have a fast video editing experience.
You can also import video clips using your Touch Bar controls if your computer has Touch Bar.
Record a media file
Apart from the videos shot by your digital devices, you can also directly import media files by recording video from your webcam, capturing the computer screen, or recording a voice-over.
Find green screen effects: Now you can select the different types of green screen effects.

Apply green screen: drag the effects to the timeline to apply it to your videos.

Save and Export: Then you can save or export the video.
A green screen is a green surface used as a background when filming so that any image can replace the screen behind the actor or presenter. Shooting with a green screen involves filming a person or adding visual effects in front of a solid color. Then, by digitally removing or “keying out” that color, you can drop that scene onto the background of your choice in post-production. Removing the colored background is also referred to as “chroma keying.”
Steps with Images
The first step is to record footage in front of a green screen so that you can import it into WeVideo as a media file. To capture footage that is optimal for the Green Screen effect, please ensure the following:
- There is ample lighting distributed evenly around you with no shadows.
- You are in front of a solid background with no creases. Green or blue is the recommended color for your background.
- The quality of your camera is high enough so that the footage is not pixelated or grainy. 720p HD footage or above is recommended.
Step 2) Add media to the Timeline
Once you’ve captured the footage you want to use for the Green Screen effect, import that media file and add it to the Timeline. Remember to place the green screen footage in the Video 2 track and the clip you would like to use as the background in the Video 1 track.
If you are using more than two video tracks, place the green screen footage in the track above whichever track holds the background footage to ensure proper layering techniques are used.
Step 3) Open the clip editor
Double click on the green screen clip in the Timeline to open the clip editor. In the clip editor, navigate to the Color Keying tab.
Step 4) Use the color picker tool
Select the color picker tool and then click anywhere on the green screen footage to apply the effect.
Step 5) _(optional) Adjust the color settings
The Green Screen effect should automatically apply without the need to adjust the color settings. However, if you would like to make these additional modifications, you can use the scroll bars to make the following adjustments:
- **Show- You can select Mask to reveal a black and white representation of the mask you are applying using the color keying tool. Notice that the black area represents transparent sections of your video, while the white area represents opaque sections.
- **Color Balance- This adjusts how selective the effect is. The further right you scroll, the wider the range of tints and shades are removed.
- **Color Sensitivity- This smooths out any pixelation and rough edges of color that remain.
- **Defringe- This helps reduce color bleeding at the edges of your mask. The left and right sliders control the level of white and black respectively to help match the edges of the mask with your new background color.
Best 15 Subtitle Apps
Every content creator wants professional subtitle generator apps to create subtitles flawlessly. There are tons of subtitle editors that you can find in the market, but not every tool produces quality results. It can be confusing and difficult to choose the best subtitle editor app among tons of options. By reading this article, you will come to know about professional subtitle apps for PC and all platforms.
- Jubler Subtitle Editor - The Best Free Subtitle Editor for Windows
- Wondershare Filmora - All-in-One Subtitle Solution
- Movavi Video Editor - Best for Adding Subtitles Manually
- VideoProc - Best Video Converter for macOS Devices
- Wondershare UniConverter - Complete Video Toolbox for Mac Users
- Adobe Premiere Pro - Video Editor for Professionals
- CapCut - Best App for TikTok Users
- MixCaptions - Specially Built for Adding Captions
- VLLO - Advanced Video and Subtitle Editor for Android Users
- iMovie - Free Video Editor for iOS Users
- Add Subtitles - Auto Captions - Enhanced Subtitle Creator for Apple Users
- InShot - Video Editor - Complete Subtitle and Video Editor
- Veed.io - Online Auto Subtitle Generator
- Happy Scribe - Subtitle Generator with Enhanced Features
- FlexClip - Manual Online Subtitle Editor
Part 1: Best 3 Subtitle Apps on Windows
Do you want to know about some reliable video subtitle apps for Windows? This section will shed light on the top 3 subtitle apps on Windows, along with their advantages and drawbacks.
| Name | Price | Support System | Supported Subtitle Files | Auto Caption | Video Editing |
|---|---|---|---|---|---|
| Jubler Subtitle Editor | Free | Linux, Windows, and Mac | ASS, SRT, SUB, Text, etc. | No | No |
| Wondershare Filmora | Month Plan: $19.99Annual Plan: $49.99Perpetual Plan: $79.99 | Windows, Mac, and iOS | SRT and Text | Yes | Yes |
| Movavi Video Editor | $69.95 | Windows and Mac | Text | No | Yes |
1. Jubler Subtitle Editor - The Best Free Subtitle Editor for Windows
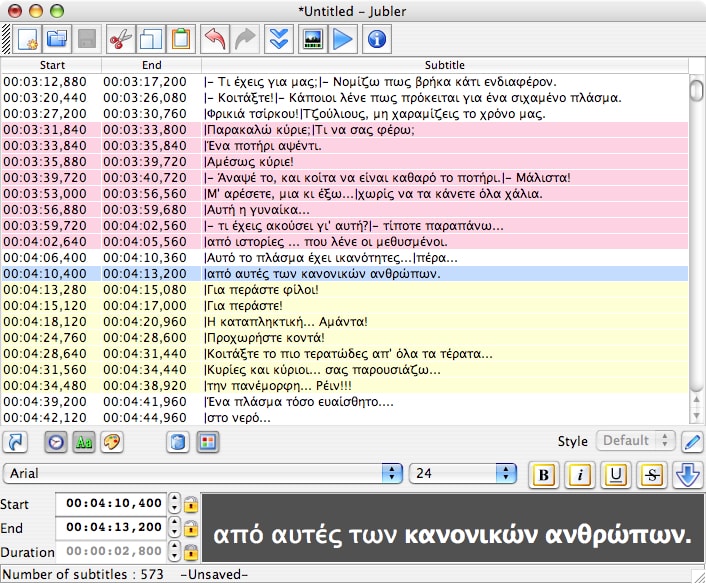
Jubler is a classic example of a subtitle editor through which you can efficiently create and edit subtitles for your videos. You can also use this tool to convert, modify, transform, or correct the existing subtitles on a video file. The supported file formats are SubViewer, SubRip, SubStation, etc. Hence, it’s a compatible subtitle app for Windows users comprising all the necessary features for subtitle creation and editing.
Key Features
- This tool allows you to mark your subtitles with different colors while editing or playing the video file in real-time.
- This app can graphically display your subtitles and allows you to resize or move them.
- It provides the Undo and the Redo options to edit your subtitles without any complications.
Pros
- This tool offers a feature for spell-checking along with dictionary selection to prevent the chances of mistakes.
- You can check the current frame and waveform preview to graphically preview the subtitles using the FFMPEG library.
Cons
- You have to install a video player with this tool to preview your video to check the results.
2. Wondershare Filmora - All-in-One Subtitle Solution
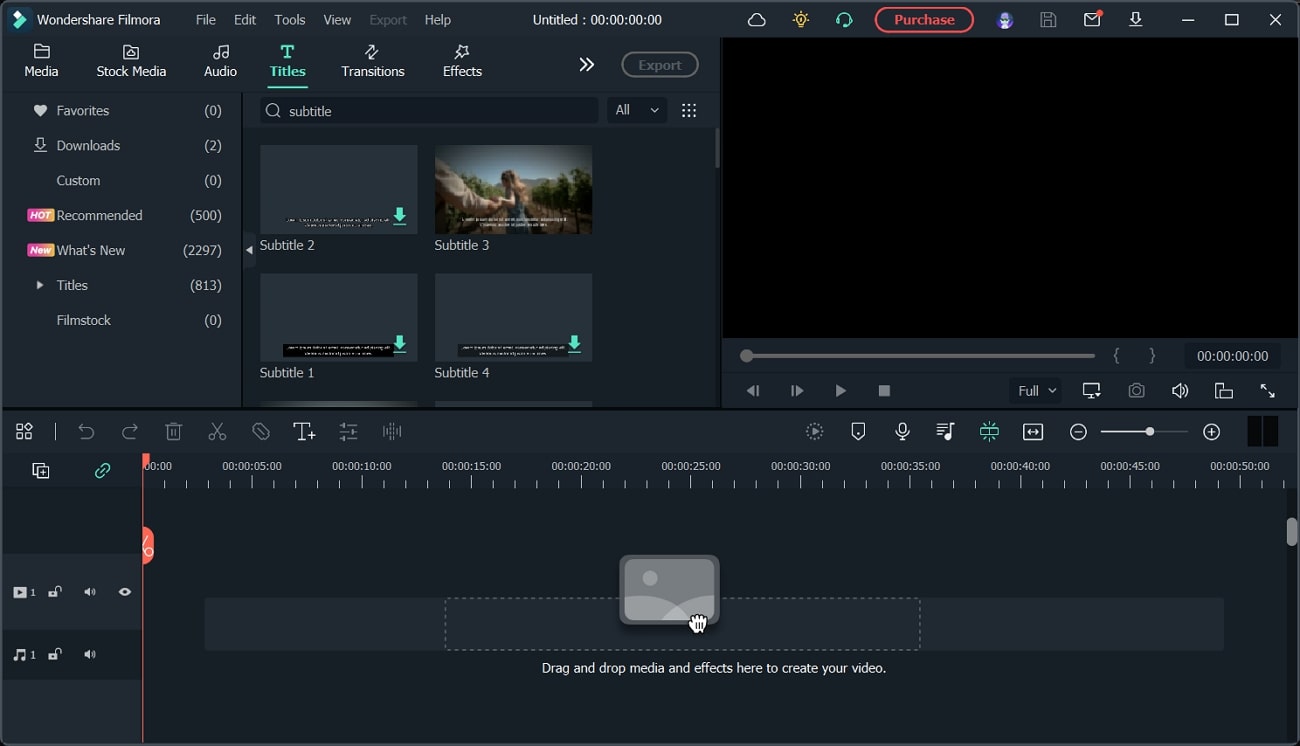
Have you ever experienced using Wondershare Filmora? Filmora is a famous tool through which people can enhance and edit their video files using advanced features. You can utilize this platform with a famous video editor to create subtitles from scratch efficiently. It contains a Speech-to-Text option that can help you to generate subtitles without requiring your efforts. With a single click, this feature can automatically create subtitles by transcribing your voice with high accuracy.
Key Features
- Filmora offers more than 80 animation presets and styles that you can instantly apply to your created subtitles.
- The speech-to-text feature shows compatibility with up to 16 different languages. Thus, you can auto-create subtitles in popular languages.
- This tool contains stock footage in its library that you can easily add to your videos.
Pros
- This platform offers an AI Portrait feature that can remove the background from your videos. Moreover, it contains more than 70 AI portrait effects and stickers for further enhancement.
- This tool can act as a high-quality screen recorder to capture gameplays, online meetings, tutorials, and other screen activities.
Cons
- Filmora adds a watermark to your video in the free trial.
3. Movavi Video Editor - Best for Adding Subtitles Manually
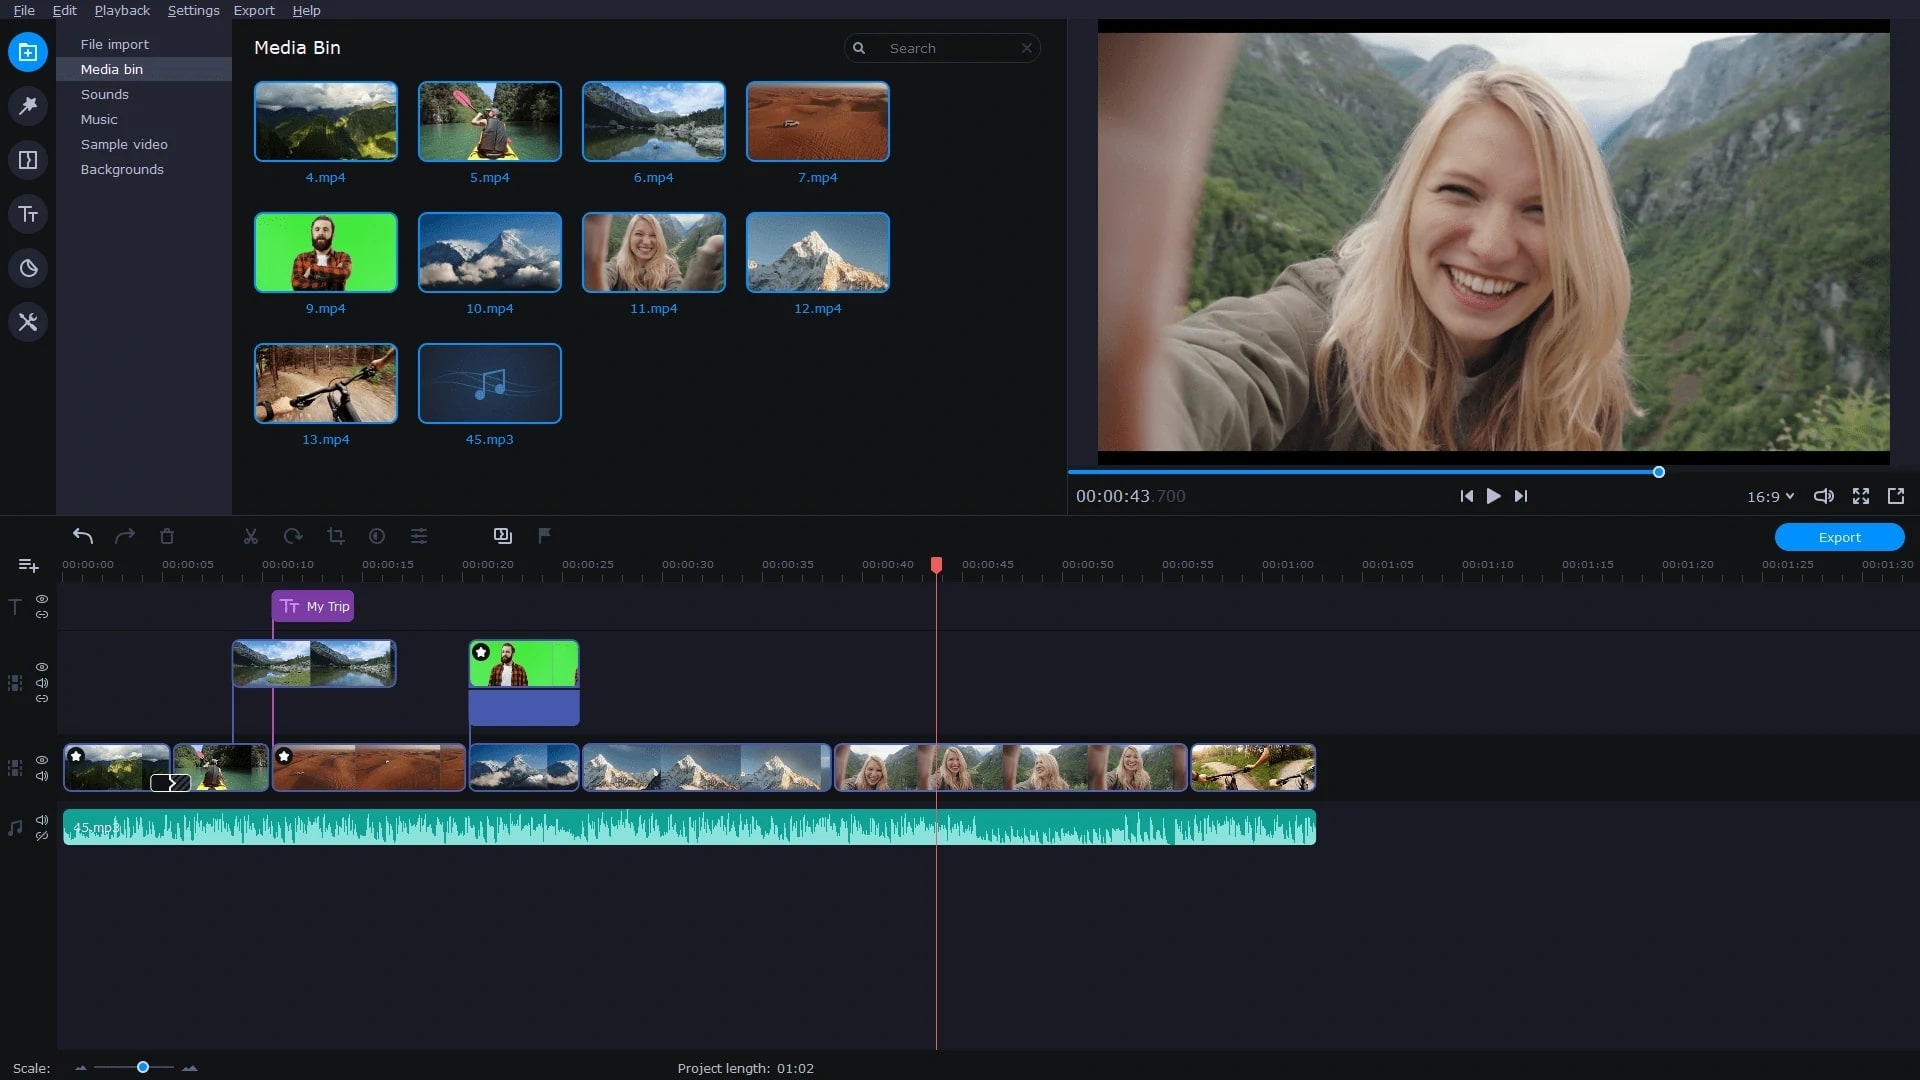
Movavi is a popular tool that many professionals use to create and edit their videos in high quality. It contains various transition effects that you can apply to make your video look smooth and attractive. By using this tool, you can also create Softsubs and Hardsubs according to your desire. Afterward, you can select the font, color, and size of your added subtitles using this platform.
Key Features
- It contains a synchronization box that enables you to delay or advance the subtitles according to the specific time. This will make your subtitles synchronized effectively.
- You can also change the position of your subtitles with accuracy and precision using this tool.
- To make your video look customized, you can add a watermark to your video files according to your desire.
Pros
- If your video contains unnecessary noise, Movavi offers an AI Noise removal feature that allows you to eradicate the noise.
- If you have captured a shaky video, you can use its stabilization option to get rid of flaws.
Cons
- The video rendering process in this tool is slow and sluggish.
Part 2: 3 Subtitle Apps for Mac Worth Trying
Are you looking for special subtitle apps for your MacBook? In this section, we will shed light on the top 3 subtitle generator apps that can be ideal for MacBook users.
| Name | Price | Support System | Supported Subtitle Files | Auto Caption | Video Editing |
|---|---|---|---|---|---|
| VideoProc Converter | Lifetime License: $39.95 | Windows and Mac | ASS, SSA, SRT, Text | No | No |
| Wondershare UniConverter | Quarterly Plan: $29.99Annual Plan: $39.99Perpetual Plan: $55.99 | Windows and Mac | SRT. ASS, SSA, Text | Yes | Yes |
| Adobe Premier Pro | $20.99/Month | Windows and Mac | SCC, MCC, XML, STL, SRTDFXMP, Text | Yes | Yes |
1. VideoProc - Best Video Converter for macOS Devices
This app has a simple interface that enables you to manage subtitle files easily. Through this compatible tool, you can embed your subtitles into your videos without any hassle. It’s a lightweight tool as it won’t take up excessive storage space on your MacBook. Moreover, you can also use this tool to tackle video issues like noise, poor color, camera shake, etc.

Key Features
- This software can convert 4K and HD videos while maintaining their original quality.
- It offers batch conversion so that you can convert multiple video files at the same time easily.
- You can batch-download the video files in various formats and preferred resolutions. It also supports more than 1000 websites for media download.
Pros
- It offers two recording modes: Chroma key and Picture-in-picture. By utilizing these modes, you can capture live stream sessions and gameplays in high resolution.
- Using this tool instantly, you can rotate and flip your videos clockwise or counter-clockwise.
Cons
- The free trial of this tool is limited to 5 minutes video only.
2. Wondershare UniConverter - Complete Video Toolbox for Mac Users
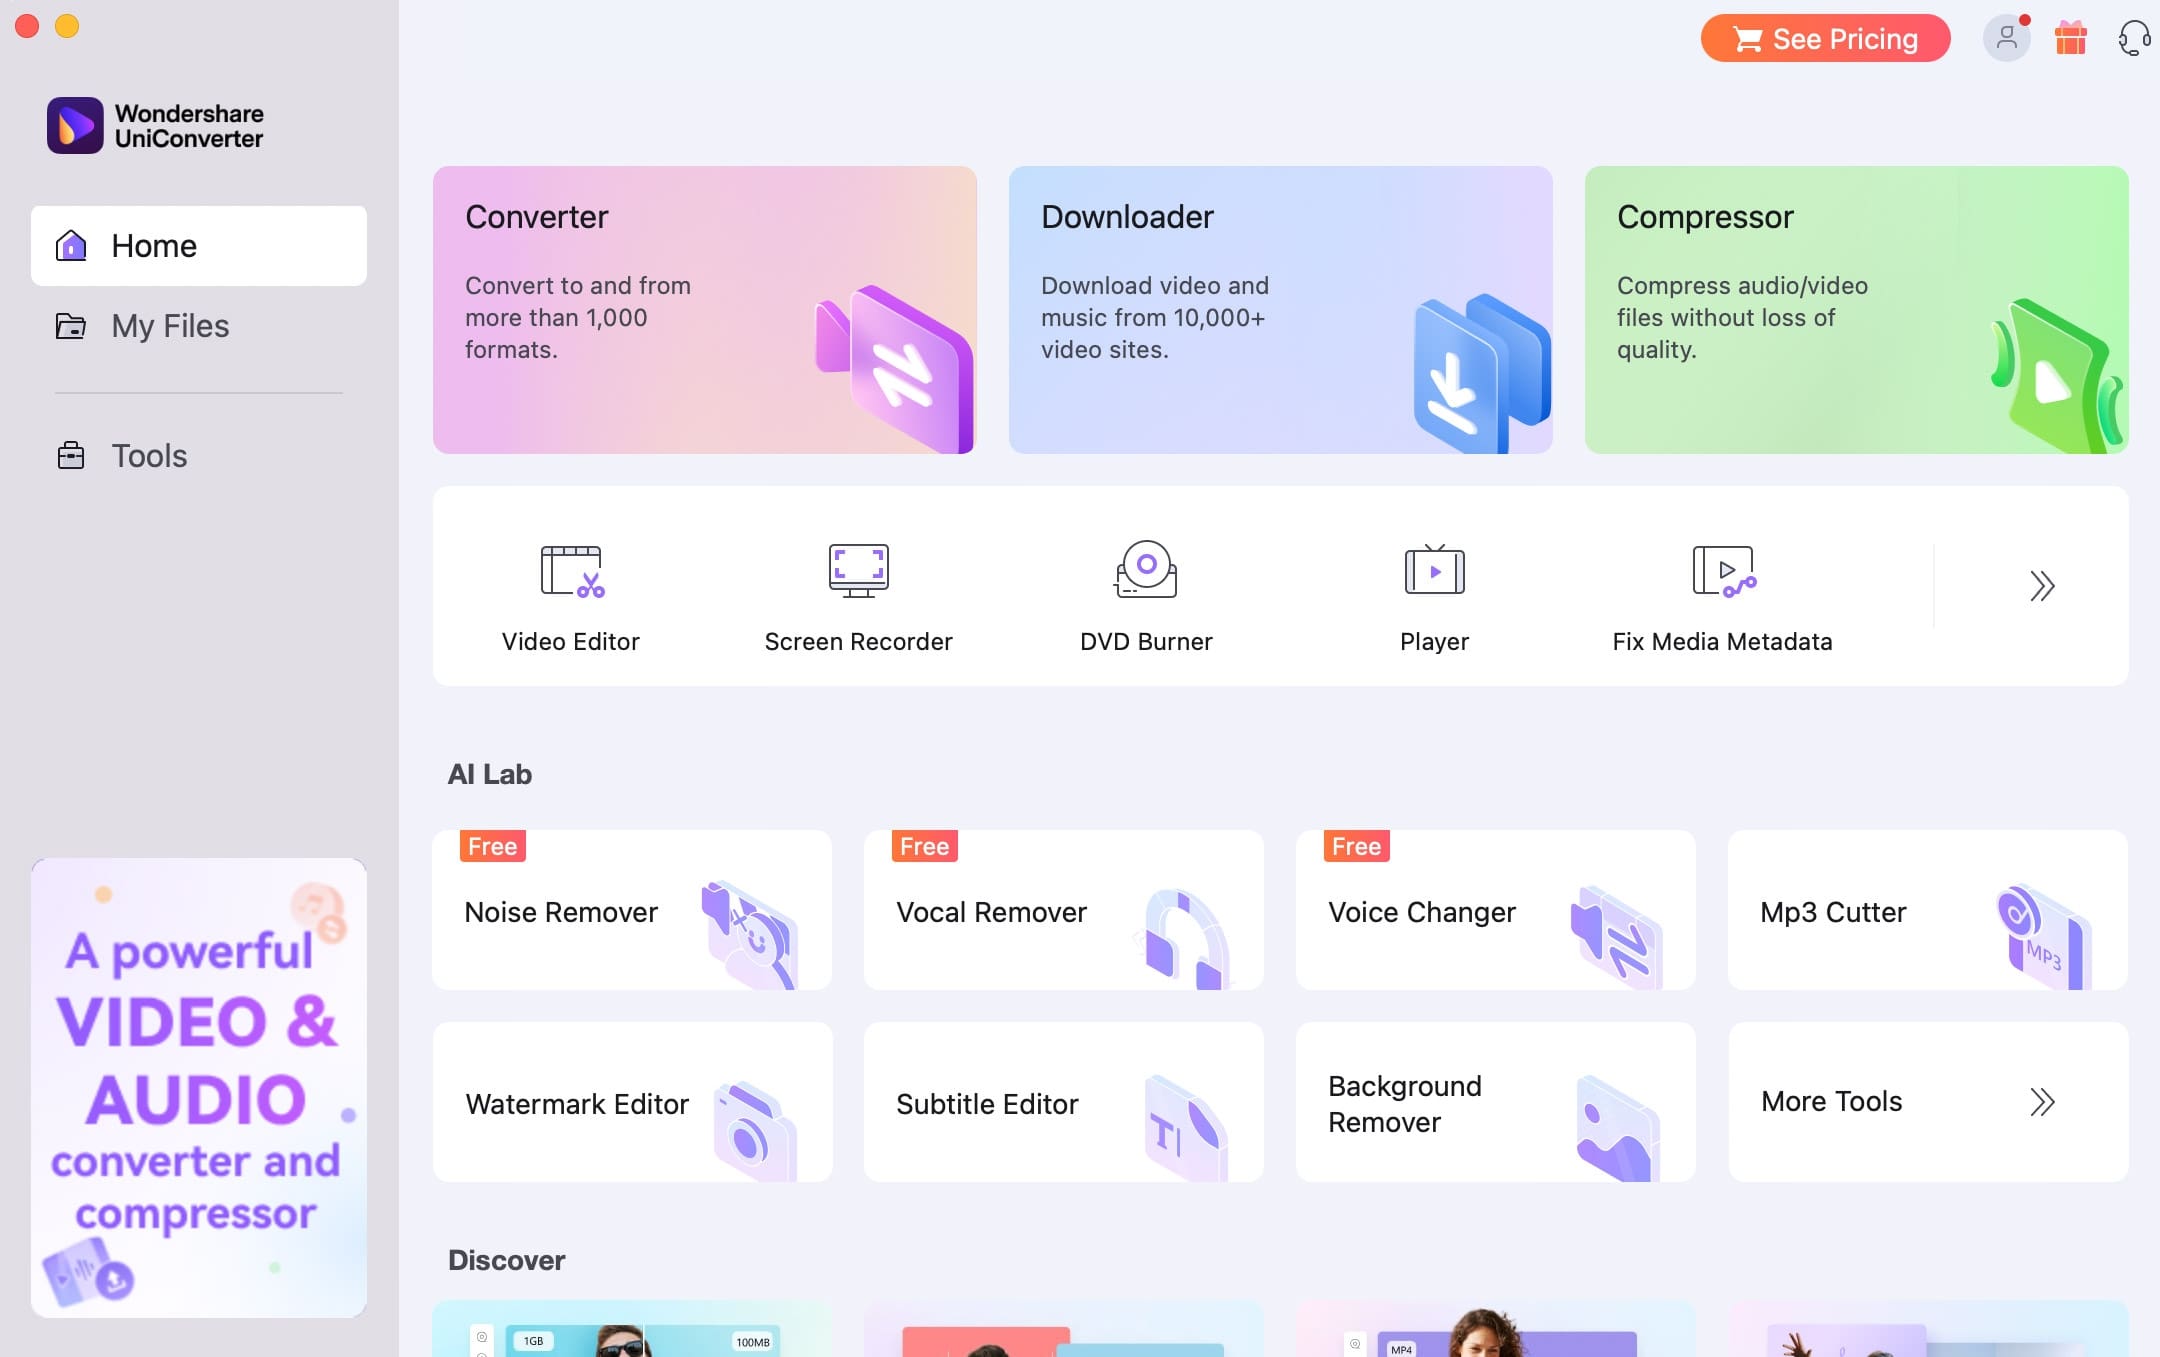
UniConverter is one of the well-trusted platforms through which you can modify your videos by using advanced key features. It contains tons of options, such as a watermark editor, screen recorder, compressor, converter, etc. Furthermore, it provides a subtitle editor through which you can add subtitles to your videos in multiple ways. Thus, using this tool, you can add subtitles to your videos at a fast-processing speed.
Key Features
- This tool supports more than 1000 video file formats batch conversion. Thus, you can convert your multiple video files to other formats.
- You can use this tool as a downloader to download online videos of high quality.
- It contains an Auto Crop feature through which you can resize your videos according to social media channels.
Pros
- By using its AI Portrait feature, you can automatically separate the portrait and background from your video.
- To eradicate the unwanted parts from your video, you can use the trim feature of UniConverter effectively.
Cons
- It lacks advanced video editing features that are necessary for professional editing.
3. Adobe Premiere Pro - Video Editor for Professionals
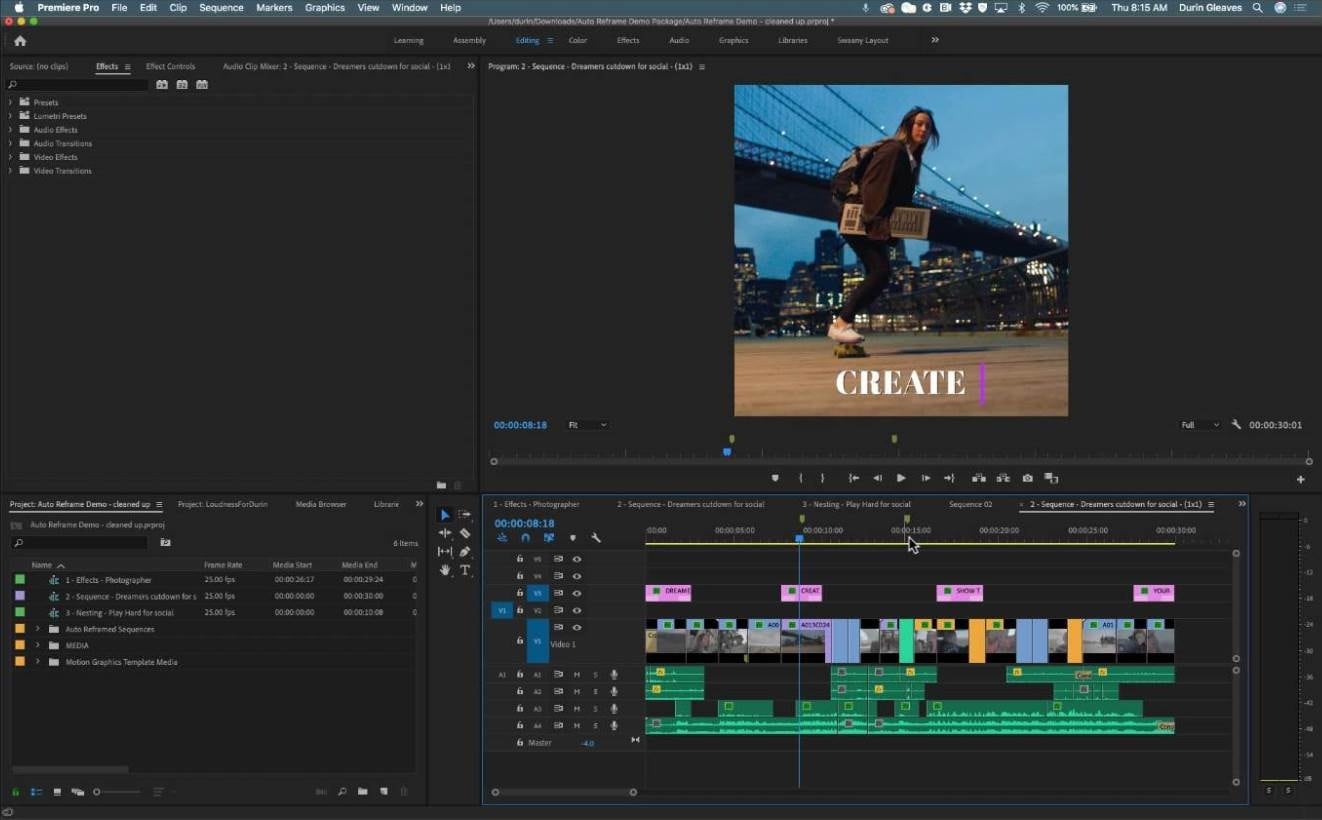
Have you ever used Adobe Premiere Pro for video editing? Adobe Premiere Pro is undoubtedly the most famous software for MacBook users through which you can execute professional editing. It functions as a complete video toolbox and ensures great output results. Besides being a professional video editing software, you can also use this tool as a subtitle generator app. You can use its Speech-to-Text feature to produce subtitles automatically and with precision.
Key Features
- To increase the visual appeal of your video, you can use this tool for color grading and correction.
- You can create captivating intros and outros for your videos by using graphic templates and other elements.
- You can add different audio effects to transform the sound in your video professionally.
Pros
- Using this tool, you can convert your video to GIF within seconds.
- You can enhance or decrease the speed of your video accordingly from this professional tool.
Cons
- The interface of Adobe Premiere Pro can be intimidating for beginners.
Part 3: The Best 3 Subtitle Apps for Android
Being an Android user, you may feel to use auto caption apps to create subtitles for your videos without any hassle. By reading this section, you can come across some of the best subtitle generator apps for your Android devices.
1. CapCut - Best App for TikTok Users
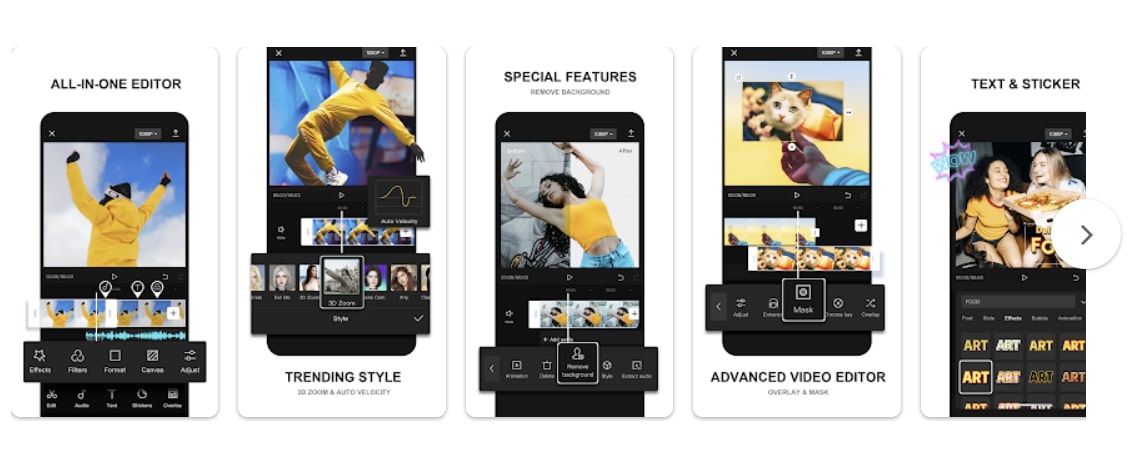
CapCut is an easy-to-use Android and iOS app to add subtitles to videos professionally. It comprises different functions that can assist you in making your video look appealing and engaging. You can make adjustments such as changing the brightness, saturation, exposure, contrast, etc. To add subtitles, you can create auto captions through CapCut without manually adding them. Thus, it’s a complete tool for creating subtitles and editing videos effortlessly.
Price
- $0.99 - $74.99 Per Item
Key Features
- CapCut contains various trending text templates that you can apply while creating subtitles. It contains multiple text templates such as Titles, Outro, Spark, Chapter, Message, Tag, etc.
- You can extract audio from a video file using this app in its original quality with a single click.
- To enhance your visual appearance in a video, CapCut provides different filters such as Metal, Green Milk, Taro, Red Tea, and many more.
Pros
- You can retouch the facial features of your face by using different options such as White Teeth, Dark Circles, Smile Lines, etc.
- For more enhancements, you can modify the opacity of your video using this app.
Cons
- It does not offer impressive color grading options.
2. MixCaptions - Specially Built for Adding Captions
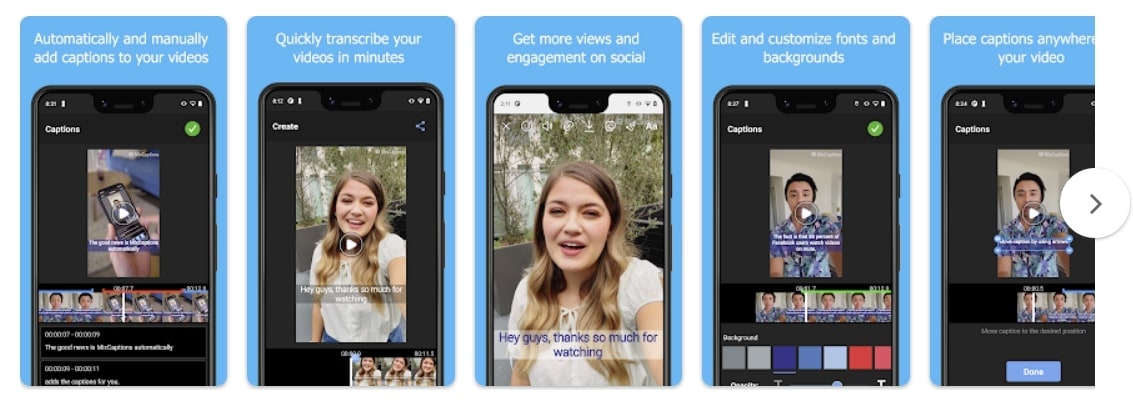
MixCaptions can be used as a video editor and subtitle editor app effectively. Apart from creating subtitles manually, you can utilize your SRT files to create subtitles. You can also use this app to create SRT files instantly. Moreover, you can also decide where to display your subtitles on your video. You can display your subtitles at the top, bottom, or middle using this tool.
Price
- $0.49 - $24.99 Per Item
Key Features
- Using MixCaptions, you can transcribe your voice in up to 23 languages, such as Turkish, English, French, German, Spanish, Chinese, etc.
- This tool supports common video aspect ratios that can be suitable for IGTV, TikTok, Twitter, Facebook, and Instagram posts.
- Once you have transcribed your voice to create subtitles, you can edit them by selecting the desired font, color, text style, etc.
Pros
- This tool does not add a watermark to your video files after you have bought its subscription plan.
- Using this tool, you can manually add subtitles to your videos according to the time frame.
Cons
- In a free trial, you can only transcribe the video for up to 3 minutes.
3. VLLO - Advanced Video and Subtitle Editor for Android Users
Have you ever used VLLO before? This video subtitle app offers an intuitive user interface through which you can perform different operations on your video files. You can trim, split, reverse, rotate, and crop your video quickly using this app. Moreover, you can add subtitles to your videos through this tool easily. The offered subtitle text styles are present in vector format so that you won’t lose the quality of your video.
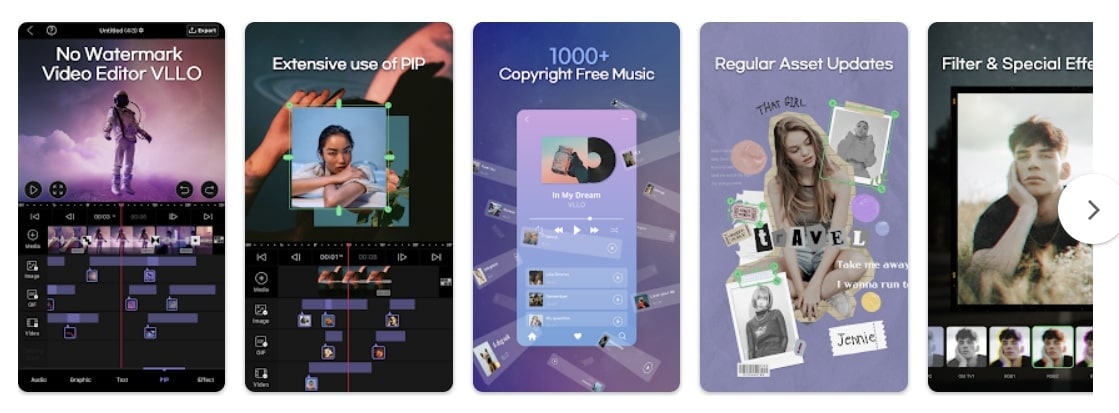
Price
- $0.99 - $25.99 Per Item
Key Features
- VLLO provides more than 200 royalty-free background music tracks that can easily be added to your video files.
- You can also add a voice-over to your videos in high audio quality while editing in real-time.
- On this platform, you can craft your own customized text style by utilizing animation effects, shadows, and outline properties.
Pros
- To check the editing of your video, this tool provides a full-screen preview window. It also offers a grid so that you can analyze the ratio of your video easily.
- You can save all the edited videos in this app under the “My Project” folder.
Cons
- Many stickers, filters, text styles, and effects are only available for premium users.
Part 4: 3 Apps to Add Captions to Videos on iPhone
Are you ready to know about the best subtitle creators for iOS devices? Here are some of the top subtitle generators which you can use to add captions to videos on your iPhone.
1. iMovie - Free Video Editor for iOS Users
iMovie is an excellent app for iOS users through which they can try their creative editing skills easily. You can apply different styles and transitions to change the dimensions of your video clips completely. Moreover, you can also add text and subtitles to your videos using this tool. It offers various font styles and options that you can apply to create customized subtitles.
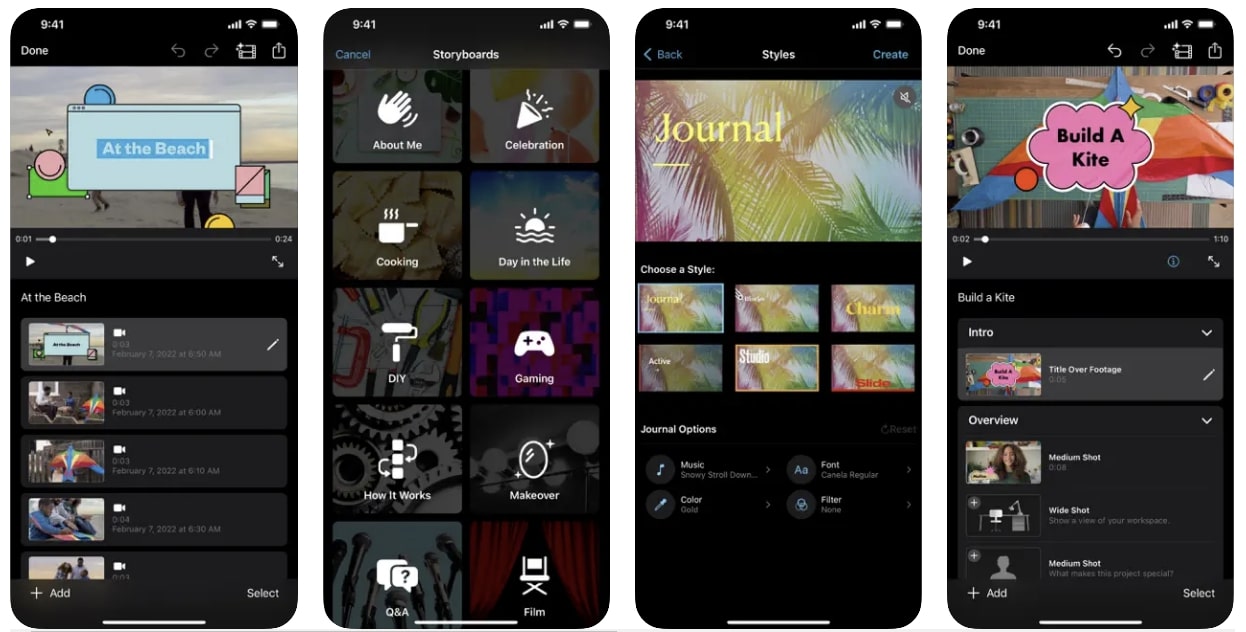
Price
- Free
Download: iOS
Key Features
- It offers 20 storyboards related to different categories that you can use to begin creating your videos effectively.
- In its timeline, you can easily rearrange and remove video clips.
- This tool offers up to 14 trailer templates through which you can produce your movie trailers.
Pros
- iMovie contains 8 distinct themes with added transitions, music tracks, and titles. You can apply these themes to create impressive videos effortlessly.
- You can share your projects created in iMovie between your iPhone and iPad using iCloud Drive.
Cons
- This tool does not include Multicam and motion tracking options.
2. Add Subtitles - Auto Captions - Enhanced Subtitle Creator for Apple Users
This video subtitle app is commonly used to add auto-captions on videos without any restrictions. The speech recognition feature in this tool works 3 times faster along with high precision. It does not restrict a user to a particular video length. Moreover, you would also receive text alternatives so that you can edit auto-generated subtitles.
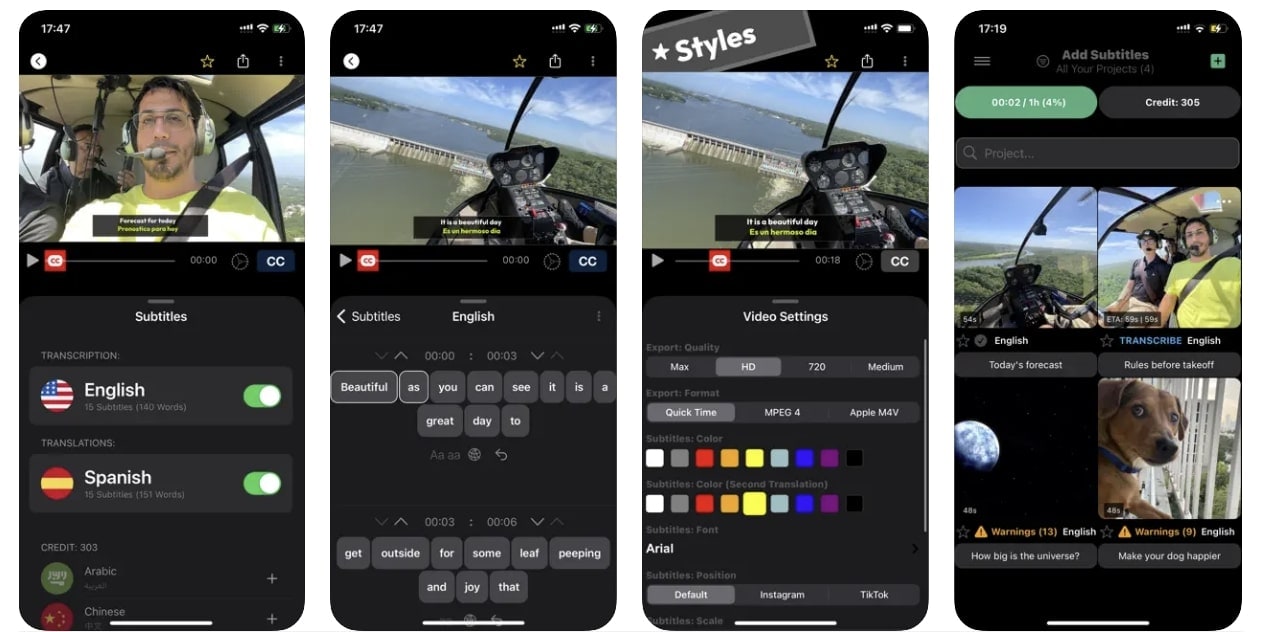
Price
- Beginner: $3.99
- Expert: $9.99
- Business: $29.99
- Personal Use: $8.49
- Small Translations Pack: $2.99
- Big Translations Pack: $5.99
Download: iOS
Key Features
- The translation feature of this tool supports more than 100 languages. Moreover, you can translate up to 2 languages in one video file.
- It provides various export options such as M4V, MPEG4, 4K, HD, and QuickTime.
- You can create projects on this tool through your camera, photo library, and iCloud.
Pros
- You can filter videos to search for your project without any hassle.
- Using this tool, you can change the file name and thumbnail with a single tap.
Cons
- On this platform, you cannot edit or modify your video files.
3. InShot - Video Editor - Complete Subtitle and Video Editor
Have you ever used InShot before? InShot is a famous app that enables you to trim, cut, and merge video files instantly. Along with basic editing, you can also add music tracks, voice-overs, and effects. You can also add subtitles to your videos efficiently without any restrictions. Moreover, you can sync the added text to your videos on the timeline proficiently with a few clicks.
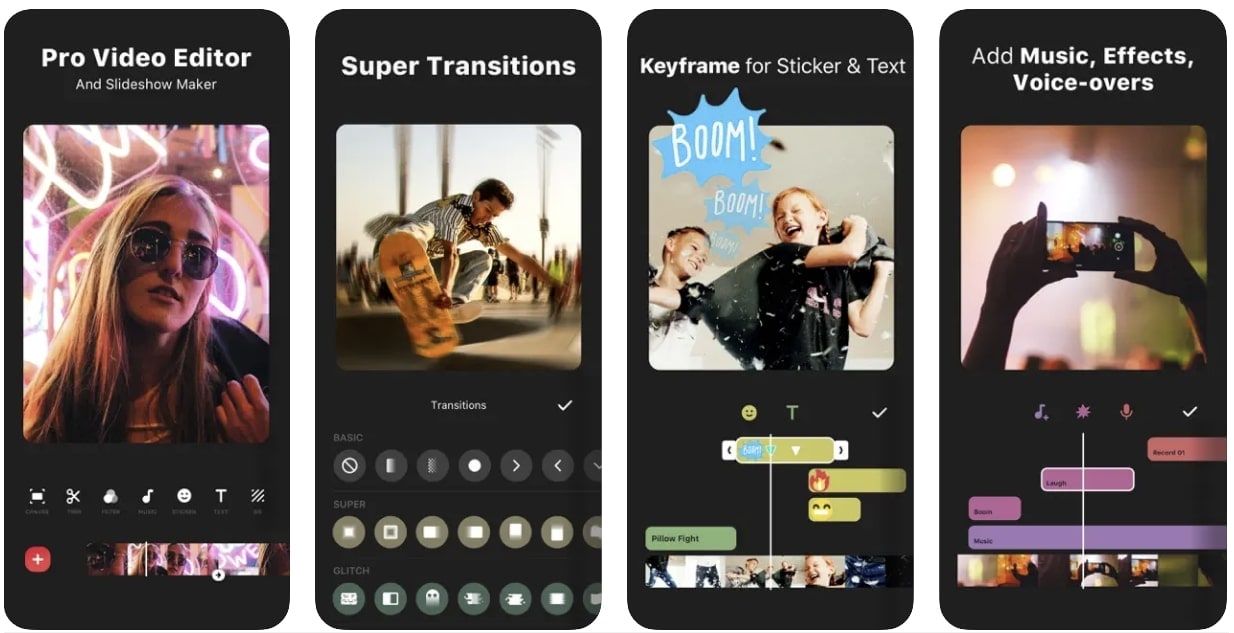
Price
- InShot Pro (1 Month): $3.99
- InShot Pro (1 Year): $14.99
- Remove Ads: $3.99
- InShot Pro (Permanently): $34.99
- Transition Pack - Power: $3.99
- Video Effect - FORM Pack: $1.99
- Filter Pack - CINEMA: $1.99
- Transition Pack - Glitch: $3.99
- Filter Pack - SKIN: $1.99
- Filter Pack - CREATE: $1.99
Key Features
- You can make blur borders on your video using this tool to upload them on social media platforms.
- This video subtitle app supports high video output resolution and allows you to save a video in 4K and 60FPS.
- This tool provides a wide variety of cinematic filters which you can add to make your videos more compelling.
Pros
- You can add music tracks to your video files to make your content more engaging.
- On this tool, you can add video and photo layers to display your creativity in a unique manner.
Cons
- This tool does not offer advanced features to create subtitles for video files automatically.
Part 5: 3 Online Tools to Add Subtitles to Videos
Many people don’t prefer to download apps or software on their devices. For such users, there are various online subtitle generator apps that can be accessed from any web browser. For your convenience, this part of the article will discuss the top 3 online auto caption apps.
1. Veed.io - Online Auto Subtitle Generator
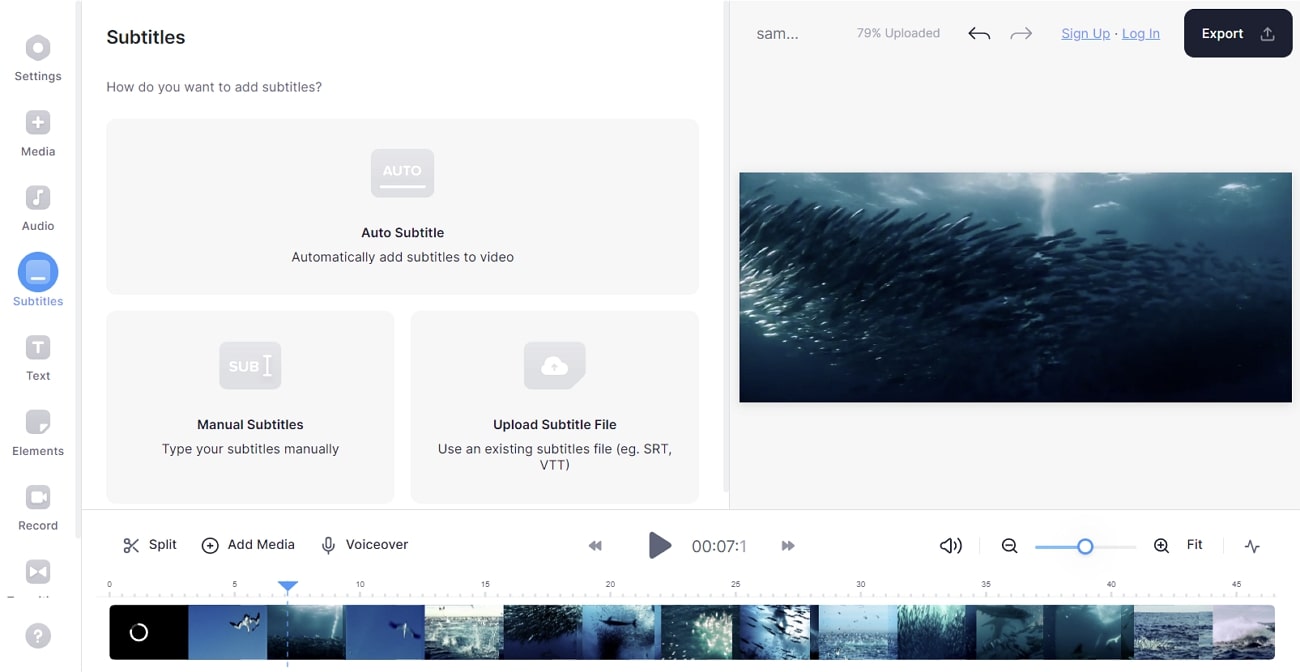
When it comes to online subtitle generator apps, Veed.io is one of the most suitable choices. Through this app, you can add subtitles in three ways. To add subtitles briefly, you can use the manual option on this tool. Or, if you already have a subtitle file, you can upload it directly to this tool easily. To increase your work efficiency and productivity, you can use the auto transcription services to produce subtitles with 95% accuracy.
Pricing
- Basic: $12/Month
- Pro: $24/Month
Key Features
- To decrease the file size of your videos, this tool contains a video compressor to compress videos while preserving the original video quality.
- If you want to make your videos interesting and funny, Veed.io allows you to add emojis and stickers to video files instantly.
- It has a Subtitle Translator through which you can translate your subtitles into different languages.
Pros
- This tool can act as a video player that allows you to play videos of various file formats.
- io can function as a multi-streaming platform through which you can broadcast your live streams to multiple platforms like Twitter, YouTube, Facebook, etc.
Cons
- The video export length of the Veed.io free package is extremely low, which is 10 minutes.
2. Happy Scribe - Subtitle Generator with Enhanced Features
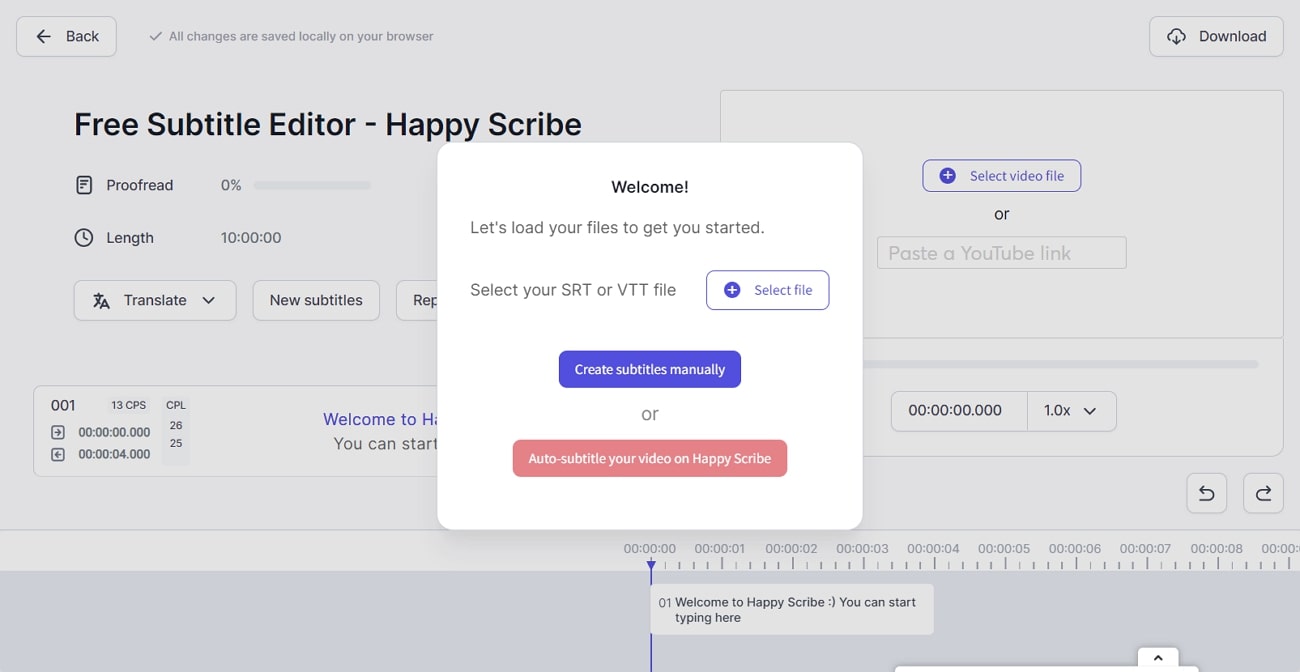
Happy Scribe is a famous online platform for adding subtitles to video apps impressively. It contains multiple export formats such as SRT, Word, PDF, Text, AVID, STL, VVT, etc. Without any limitations, such as creating a user account or uploading a particular file size, you can create subtitles for your videos. Furthermore, this app preserves the confidentiality and security of your files to keep personal data safe while editing it online.
Pricing
- Automatic: €0.20/minute
- Hand-made: €2.00/Minute
- Human Translation: €20.85/Minute
Key Features
- This app supports real-time collaboration so that you can modify and enhance your video files along with your friends and team members.
- In its transcription services, you can select either automatic transcription software or human-made transcription for more accurate results.
- You can customize your added subtitles with the help of CPL and CPS management.
Pros
- You can preview your subtitles in real-time and analyze their position with a soundwave.
- You can also share your subtitles by enabling the options like view-only and edit mode.
Cons
- Happy Scribe does not offer video editing features like other subtitle creators.
3. FlexClip - Manual Online Subtitle Editor
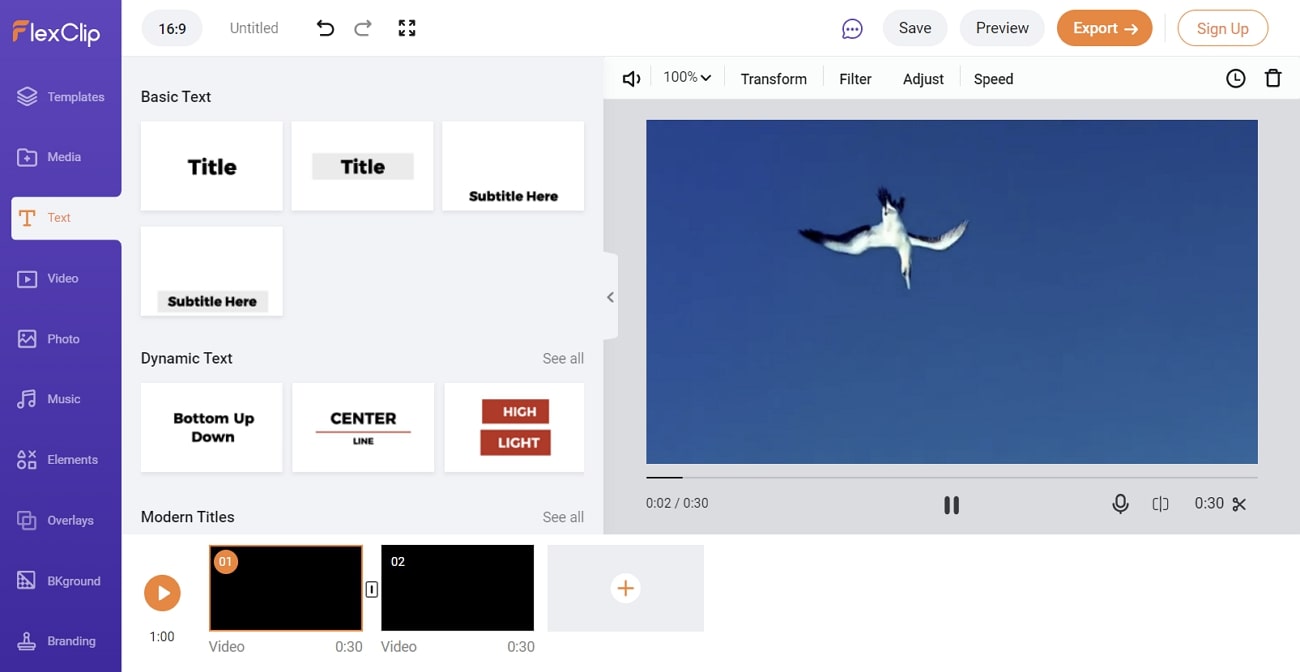
FlexClip is a classic and basic subtitle generator app through which you can produce subtitles in three simple steps. It supports popular video file formats such as MOV, MP4, M4V, etc. Without downloading any software or extension, you can quickly insert subtitles to your videos easily. This tool also provides more than 100 built-in text fonts for your ease. Hence, this online tool provides flexible subtitle editing in its clean and delightful user interface.
Pricing
- Basic: $9.99/Month
- Plus: $19.99/Month
- Business: $29.99/Month
Key Features
- To make your video look more appealing, you can enhance the video brightness through this online tool.
- You can also add text boxes to your videos to demonstrate or explain the content in an organized manner.
- To endorse your product or brand, you can easily add customized logos to your videos.
Pros
- You can use its merger feature to combine several video clips smoothly and effortlessly.
- This online tool does not charge any subscription fees from the users. Thus, you can create subtitles for your videos using this online platform free of cost.
Cons
- Using this tool, you cannot export videos in 4K and 8K.
Part 6: Three Top Picks
Do you want to know the top three picks of subtitle editors? Read this section to learn the best choices for video subtitle apps:
1. Best Easy-to-Use Subtitle Editor: Veed.io
Veed.io is an online tool that has the best clean and delightful user interface. As a beginner, you can easily navigate its interface and create subtitles without interruption or ads.
2. Most Advanced Subtitle Creator: Filmora
If you are looking for an advanced subtitle creator, Wondershare Filmora is the best choice. Its Speech-To-Text feature uses advanced algorithms through which you can auto-create subtitles for your videos.
Free Download For Win 7 or later(64-bit)
Free Download For macOS 10.14 or later
3. Most Cost-Effective Subtitle Generator: UniConverter
UniConverter is one of the most reliable and cost-effective software for subtitle editing. It provides multiple subscription plans within affordable ranges to assist students, beginners, and other individuals.
People May Also Ask
1. How can I merge subtitles and video permanently?
You can use Wondershare Filmora to edit your video files flawlessly. Once you are done editing your video, you can add subtitles to it by using your preferred option. Afterward, the tool will automatically merge subtitles and video once you have exported the video file.
2. How do I add subtitles to an already recorded or downloaded video?
Upload your video file to the interface of Filmora and head to its “Title” option. From there, select the option of “Subtitle” and choose your preferred subtitle style to add your subtitles. Using this tool, you can also choose its font style, color, size, and opacity.
Last Words
This article has shed light on the top 15 subtitle generator apps along with their descriptions, advantages, features, and drawbacks. For your help, we have provided a detailed list of subtitle apps for all platforms. However, if you want to choose the best video subtitle app, you can try Wondershare Filmora. This tool offers a Speech-to-Text feature that enables you to produce subtitles automatically and with high accuracy.
- VideoProc - Best Video Converter for macOS Devices
- Wondershare UniConverter - Complete Video Toolbox for Mac Users
- Adobe Premiere Pro - Video Editor for Professionals
- The Best 3 Subtitle Apps for Android
- CapCut - Best App for TikTok Users
- MixCaptions - Specially Built for Adding Captions
- VLLO - Advanced Video and Subtitle Editor for Android Users
- iMovie - Free Video Editor for iOS Users
- Add Subtitles - Auto Captions - Enhanced Subtitle Creator for Apple Users
- InShot - Video Editor - Complete Subtitle and Video Editor
- Veed.io - Online Auto Subtitle Generator
- Happy Scribe - Subtitle Generator with Enhanced Features
- FlexClip - Manual Online Subtitle Editor
Part 1: Best 3 Subtitle Apps on Windows
Do you want to know about some reliable video subtitle apps for Windows? This section will shed light on the top 3 subtitle apps on Windows, along with their advantages and drawbacks.
| Name | Price | Support System | Supported Subtitle Files | Auto Caption | Video Editing |
|---|---|---|---|---|---|
| Jubler Subtitle Editor | Free | Linux, Windows, and Mac | ASS, SRT, SUB, Text, etc. | No | No |
| Wondershare Filmora | Month Plan: $19.99Annual Plan: $49.99Perpetual Plan: $79.99 | Windows, Mac, and iOS | SRT and Text | Yes | Yes |
| Movavi Video Editor | $69.95 | Windows and Mac | Text | No | Yes |
1. Jubler Subtitle Editor - The Best Free Subtitle Editor for Windows
Jubler is a classic example of a subtitle editor through which you can efficiently create and edit subtitles for your videos. You can also use this tool to convert, modify, transform, or correct the existing subtitles on a video file. The supported file formats are SubViewer, SubRip, SubStation, etc. Hence, it’s a compatible subtitle app for Windows users comprising all the necessary features for subtitle creation and editing.

Key Features
- This tool allows you to mark your subtitles with different colors while editing or playing the video file in real-time.
- This app can graphically display your subtitles and allows you to resize or move them.
- It provides the Undo and the Redo options to edit your subtitles without any complications.
Pros
- This tool offers a feature for spell-checking along with dictionary selection to prevent the chances of mistakes.
- You can check the current frame and waveform preview to graphically preview the subtitles using the FFMPEG library.
Cons
- You have to install a video player with this tool to preview your video to check the results.
2. Wondershare Filmora - All-in-One Subtitle Solution
Have you ever experienced using Wondershare Filmora? Filmora is a famous tool through which people can enhance and edit their video files using advanced features. You can utilize this platform with a famous video editor to create subtitles from scratch efficiently. It contains a Speech-to-Text option that can help you to generate subtitles without requiring your efforts. With a single click, this feature can automatically create subtitles by transcribing your voice with high accuracy.

Key Features
- Filmora offers more than 80 animation presets and styles that you can instantly apply to your created subtitles.
- The speech-to-text feature shows compatibility with up to 16 different languages. Thus, you can auto-create subtitles in popular languages.
- This tool contains stock footage in its library that you can easily add to your videos.
Pros
- This platform offers an AI Portrait feature that can remove the background from your videos. Moreover, it contains more than 70 AI portrait effects and stickers for further enhancement.
- This tool can act as a high-quality screen recorder to capture gameplays, online meetings, tutorials, and other screen activities.
Cons
- Filmora adds a watermark to your video in the free trial.
3. Movavi Video Editor - Best for Adding Subtitles Manually
Movavi is a popular tool that many professionals use to create and edit their videos in high quality. It contains various transition effects that you can apply to make your video look smooth and attractive. By using this tool, you can also create Softsubs and Hardsubs according to your desire. Afterward, you can select the font, color, and size of your added subtitles using this platform.

Key Features
- It contains a synchronization box that enables you to delay or advance the subtitles according to the specific time. This will make your subtitles synchronized effectively.
- You can also change the position of your subtitles with accuracy and precision using this tool.
- To make your video look customized, you can add a watermark to your video files according to your desire.
Pros
- If your video contains unnecessary noise, Movavi offers an AI Noise removal feature that allows you to eradicate the noise.
- If you have captured a shaky video, you can use its stabilization option to get rid of flaws.
Cons
- The video rendering process in this tool is slow and sluggish.
Part 2: 3 Subtitle Apps for Mac Worth Trying
Are you looking for special subtitle apps for your MacBook? In this section, we will shed light on the top 3 subtitle generator apps that can be ideal for MacBook users.
| Name | Price | Support System | Supported Subtitle Files | Auto Caption | Video Editing |
|---|---|---|---|---|---|
| VideoProc Converter | Lifetime License: $39.95 | Windows and Mac | ASS, SSA, SRT, Text | No | No |
| Wondershare UniConverter | Quarterly Plan: $29.99Annual Plan: $39.99Perpetual Plan: $55.99 | Windows and Mac | SRT. ASS, SSA, Text | Yes | Yes |
| Adobe Premier Pro | $20.99/Month | Windows and Mac | SCC, MCC, XML, STL, SRTDFXMP, Text | Yes | Yes |
1. VideoProc - Best Video Converter for macOS Devices
This app has a simple interface that enables you to manage subtitle files easily. Through this compatible tool, you can embed your subtitles into your videos without any hassle. It’s a lightweight tool as it won’t take up excessive storage space on your MacBook. Moreover, you can also use this tool to tackle video issues like noise, poor color, camera shake, etc.

Key Features
- This software can convert 4K and HD videos while maintaining their original quality.
- It offers batch conversion so that you can convert multiple video files at the same time easily.
- You can batch-download the video files in various formats and preferred resolutions. It also supports more than 1000 websites for media download.
Pros
- It offers two recording modes: Chroma key and Picture-in-picture. By utilizing these modes, you can capture live stream sessions and gameplays in high resolution.
- Using this tool instantly, you can rotate and flip your videos clockwise or counter-clockwise.
Cons
- The free trial of this tool is limited to 5 minutes video only.
2. Wondershare UniConverter - Complete Video Toolbox for Mac Users
UniConverter is one of the well-trusted platforms through which you can modify your videos by using advanced key features. It contains tons of options, such as a watermark editor, screen recorder, compressor, converter, etc. Furthermore, it provides a subtitle editor through which you can add subtitles to your videos in multiple ways. Thus, using this tool, you can add subtitles to your videos at a fast-processing speed.

Key Features
- This tool supports more than 1000 video file formats batch conversion. Thus, you can convert your multiple video files to other formats.
- You can use this tool as a downloader to download online videos of high quality.
- It contains an Auto Crop feature through which you can resize your videos according to social media channels.
Pros
- By using its AI Portrait feature, you can automatically separate the portrait and background from your video.
- To eradicate the unwanted parts from your video, you can use the trim feature of UniConverter effectively.
Cons
- It lacks advanced video editing features that are necessary for professional editing.
3. Adobe Premiere Pro - Video Editor for Professionals
Have you ever used Adobe Premiere Pro for video editing? Adobe Premiere Pro is undoubtedly the most famous software for MacBook users through which you can execute professional editing. It functions as a complete video toolbox and ensures great output results. Besides being a professional video editing software, you can also use this tool as a subtitle generator app. You can use its Speech-to-Text feature to produce subtitles automatically and with precision.

Key Features
- To increase the visual appeal of your video, you can use this tool for color grading and correction.
- You can create captivating intros and outros for your videos by using graphic templates and other elements.
- You can add different audio effects to transform the sound in your video professionally.
Pros
- Using this tool, you can convert your video to GIF within seconds.
- You can enhance or decrease the speed of your video accordingly from this professional tool.
Cons
- The interface of Adobe Premiere Pro can be intimidating for beginners.
Part 3: The Best 3 Subtitle Apps for Android
Being an Android user, you may feel to use auto caption apps to create subtitles for your videos without any hassle. By reading this section, you can come across some of the best subtitle generator apps for your Android devices.
1. CapCut - Best App for TikTok Users
CapCut is an easy-to-use Android and iOS app to add subtitles to videos professionally. It comprises different functions that can assist you in making your video look appealing and engaging. You can make adjustments such as changing the brightness, saturation, exposure, contrast, etc. To add subtitles, you can create auto captions through CapCut without manually adding them. Thus, it’s a complete tool for creating subtitles and editing videos effortlessly.

Price
- $0.99 - $74.99 Per Item
Key Features
- CapCut contains various trending text templates that you can apply while creating subtitles. It contains multiple text templates such as Titles, Outro, Spark, Chapter, Message, Tag, etc.
- You can extract audio from a video file using this app in its original quality with a single click.
- To enhance your visual appearance in a video, CapCut provides different filters such as Metal, Green Milk, Taro, Red Tea, and many more.
Pros
- You can retouch the facial features of your face by using different options such as White Teeth, Dark Circles, Smile Lines, etc.
- For more enhancements, you can modify the opacity of your video using this app.
Cons
- It does not offer impressive color grading options.
2. MixCaptions - Specially Built for Adding Captions
MixCaptions can be used as a video editor and subtitle editor app effectively. Apart from creating subtitles manually, you can utilize your SRT files to create subtitles. You can also use this app to create SRT files instantly. Moreover, you can also decide where to display your subtitles on your video. You can display your subtitles at the top, bottom, or middle using this tool.

Price
- $0.49 - $24.99 Per Item
Key Features
- Using MixCaptions, you can transcribe your voice in up to 23 languages, such as Turkish, English, French, German, Spanish, Chinese, etc.
- This tool supports common video aspect ratios that can be suitable for IGTV, TikTok, Twitter, Facebook, and Instagram posts.
- Once you have transcribed your voice to create subtitles, you can edit them by selecting the desired font, color, text style, etc.
Pros
- This tool does not add a watermark to your video files after you have bought its subscription plan.
- Using this tool, you can manually add subtitles to your videos according to the time frame.
Cons
- In a free trial, you can only transcribe the video for up to 3 minutes.
3. VLLO - Advanced Video and Subtitle Editor for Android Users
Have you ever used VLLO before? This video subtitle app offers an intuitive user interface through which you can perform different operations on your video files. You can trim, split, reverse, rotate, and crop your video quickly using this app. Moreover, you can add subtitles to your videos through this tool easily. The offered subtitle text styles are present in vector format so that you won’t lose the quality of your video.

Price
- $0.99 - $25.99 Per Item
Key Features
- VLLO provides more than 200 royalty-free background music tracks that can easily be added to your video files.
- You can also add a voice-over to your videos in high audio quality while editing in real-time.
- On this platform, you can craft your own customized text style by utilizing animation effects, shadows, and outline properties.
Pros
- To check the editing of your video, this tool provides a full-screen preview window. It also offers a grid so that you can analyze the ratio of your video easily.
- You can save all the edited videos in this app under the “My Project” folder.
Cons
- Many stickers, filters, text styles, and effects are only available for premium users.
Part 4: 3 Apps to Add Captions to Videos on iPhone
Are you ready to know about the best subtitle creators for iOS devices? Here are some of the top subtitle generators which you can use to add captions to videos on your iPhone.
1. iMovie - Free Video Editor for iOS Users
iMovie is an excellent app for iOS users through which they can try their creative editing skills easily. You can apply different styles and transitions to change the dimensions of your video clips completely. Moreover, you can also add text and subtitles to your videos using this tool. It offers various font styles and options that you can apply to create customized subtitles.

Price
- Free
Download: iOS
Key Features
- It offers 20 storyboards related to different categories that you can use to begin creating your videos effectively.
- In its timeline, you can easily rearrange and remove video clips.
- This tool offers up to 14 trailer templates through which you can produce your movie trailers.
Pros
- iMovie contains 8 distinct themes with added transitions, music tracks, and titles. You can apply these themes to create impressive videos effortlessly.
- You can share your projects created in iMovie between your iPhone and iPad using iCloud Drive.
Cons
- This tool does not include Multicam and motion tracking options.
2. Add Subtitles - Auto Captions - Enhanced Subtitle Creator for Apple Users
This video subtitle app is commonly used to add auto-captions on videos without any restrictions. The speech recognition feature in this tool works 3 times faster along with high precision. It does not restrict a user to a particular video length. Moreover, you would also receive text alternatives so that you can edit auto-generated subtitles.

Price
- Beginner: $3.99
- Expert: $9.99
- Business: $29.99
- Personal Use: $8.49
- Small Translations Pack: $2.99
- Big Translations Pack: $5.99
Download: iOS
Key Features
- The translation feature of this tool supports more than 100 languages. Moreover, you can translate up to 2 languages in one video file.
- It provides various export options such as M4V, MPEG4, 4K, HD, and QuickTime.
- You can create projects on this tool through your camera, photo library, and iCloud.
Pros
- You can filter videos to search for your project without any hassle.
- Using this tool, you can change the file name and thumbnail with a single tap.
Cons
- On this platform, you cannot edit or modify your video files.
3. InShot - Video Editor - Complete Subtitle and Video Editor
Have you ever used InShot before? InShot is a famous app that enables you to trim, cut, and merge video files instantly. Along with basic editing, you can also add music tracks, voice-overs, and effects. You can also add subtitles to your videos efficiently without any restrictions. Moreover, you can sync the added text to your videos on the timeline proficiently with a few clicks.

Price
- InShot Pro (1 Month): $3.99
- InShot Pro (1 Year): $14.99
- Remove Ads: $3.99
- InShot Pro (Permanently): $34.99
- Transition Pack - Power: $3.99
- Video Effect - FORM Pack: $1.99
- Filter Pack - CINEMA: $1.99
- Transition Pack - Glitch: $3.99
- Filter Pack - SKIN: $1.99
- Filter Pack - CREATE: $1.99
Key Features
- You can make blur borders on your video using this tool to upload them on social media platforms.
- This video subtitle app supports high video output resolution and allows you to save a video in 4K and 60FPS.
- This tool provides a wide variety of cinematic filters which you can add to make your videos more compelling.
Pros
- You can add music tracks to your video files to make your content more engaging.
- On this tool, you can add video and photo layers to display your creativity in a unique manner.
Cons
- This tool does not offer advanced features to create subtitles for video files automatically.
Part 5: 3 Online Tools to Add Subtitles to Videos
Many people don’t prefer to download apps or software on their devices. For such users, there are various online subtitle generator apps that can be accessed from any web browser. For your convenience, this part of the article will discuss the top 3 online auto caption apps.
1. Veed.io - Online Auto Subtitle Generator
When it comes to online subtitle generator apps, Veed.io is one of the most suitable choices. Through this app, you can add subtitles in three ways. To add subtitles briefly, you can use the manual option on this tool. Or, if you already have a subtitle file, you can upload it directly to this tool easily. To increase your work efficiency and productivity, you can use the auto transcription services to produce subtitles with 95% accuracy.

Pricing
- Basic: $12/Month
- Pro: $24/Month
Key Features
- To decrease the file size of your videos, this tool contains a video compressor to compress videos while preserving the original video quality.
- If you want to make your videos interesting and funny, Veed.io allows you to add emojis and stickers to video files instantly.
- It has a Subtitle Translator through which you can translate your subtitles into different languages.
Pros
- This tool can act as a video player that allows you to play videos of various file formats.
- io can function as a multi-streaming platform through which you can broadcast your live streams to multiple platforms like Twitter, YouTube, Facebook, etc.
Cons
- The video export length of the Veed.io free package is extremely low, which is 10 minutes.
2. Happy Scribe - Subtitle Generator with Enhanced Features
Happy Scribe is a famous online platform for adding subtitles to video apps impressively. It contains multiple export formats such as SRT, Word, PDF, Text, AVID, STL, VVT, etc. Without any limitations, such as creating a user account or uploading a particular file size, you can create subtitles for your videos. Furthermore, this app preserves the confidentiality and security of your files to keep personal data safe while editing it online.

Pricing
- Automatic: €0.20/minute
- Hand-made: €2.00/Minute
- Human Translation: €20.85/Minute
Key Features
- This app supports real-time collaboration so that you can modify and enhance your video files along with your friends and team members.
- In its transcription services, you can select either automatic transcription software or human-made transcription for more accurate results.
- You can customize your added subtitles with the help of CPL and CPS management.
Pros
- You can preview your subtitles in real-time and analyze their position with a soundwave.
- You can also share your subtitles by enabling the options like view-only and edit mode.
Cons
- Happy Scribe does not offer video editing features like other subtitle creators.
3. FlexClip - Manual Online Subtitle Editor
FlexClip is a classic and basic subtitle generator app through which you can produce subtitles in three simple steps. It supports popular video file formats such as MOV, MP4, M4V, etc. Without downloading any software or extension, you can quickly insert subtitles to your videos easily. This tool also provides more than 100 built-in text fonts for your ease. Hence, this online tool provides flexible subtitle editing in its clean and delightful user interface.

Pricing
- Basic: $9.99/Month
- Plus: $19.99/Month
- Business: $29.99/Month
Key Features
- To make your video look more appealing, you can enhance the video brightness through this online tool.
- You can also add text boxes to your videos to demonstrate or explain the content in an organized manner.
- To endorse your product or brand, you can easily add customized logos to your videos.
Pros
- You can use its merger feature to combine several video clips smoothly and effortlessly.
- This online tool does not charge any subscription fees from the users. Thus, you can create subtitles for your videos using this online platform free of cost.
Cons
- Using this tool, you cannot export videos in 4K and 8K.
Part 6: Three Top Picks
Do you want to know the top three picks of subtitle editors? Read this section to learn the best choices for video subtitle apps:
1. Best Easy-to-Use Subtitle Editor: Veed.io
Veed.io is an online tool that has the best clean and delightful user interface. As a beginner, you can easily navigate its interface and create subtitles without interruption or ads.
2. Most Advanced Subtitle Creator: Filmora
If you are looking for an advanced subtitle creator, Wondershare Filmora is the best choice. Its Speech-To-Text feature uses advanced algorithms through which you can auto-create subtitles for your videos.
Free Download For Win 7 or later(64-bit)
Free Download For macOS 10.14 or later
3. Most Cost-Effective Subtitle Generator: UniConverter
UniConverter is one of the most reliable and cost-effective software for subtitle editing. It provides multiple subscription plans within affordable ranges to assist students, beginners, and other individuals.
People May Also Ask
1. How can I merge subtitles and video permanently?
You can use Wondershare Filmora to edit your video files flawlessly. Once you are done editing your video, you can add subtitles to it by using your preferred option. Afterward, the tool will automatically merge subtitles and video once you have exported the video file.
2. How do I add subtitles to an already recorded or downloaded video?
Upload your video file to the interface of Filmora and head to its “Title” option. From there, select the option of “Subtitle” and choose your preferred subtitle style to add your subtitles. Using this tool, you can also choose its font style, color, size, and opacity.
Last Words
This article has shed light on the top 15 subtitle generator apps along with their descriptions, advantages, features, and drawbacks. For your help, we have provided a detailed list of subtitle apps for all platforms. However, if you want to choose the best video subtitle app, you can try Wondershare Filmora. This tool offers a Speech-to-Text feature that enables you to produce subtitles automatically and with high accuracy.
Mastering OpenCV Object Tracking: A Comprehensive Guide for Beginners and Experts
OpenCV Tracking is a popular method used for tracking objects in a video in real-time. OpenCV is a powerful library used for image processing and computer vision applications.
From real-time video analysis to Augmented Reality, OpenCV Tracking has a wide range of uses and can help both private and public sectors to detect and track the desired object in an image or video.
In this comprehensive guide, we’ll explore OpenCV Tracking and its pre-built trackers**.** We will use the OpenCV library and Python to implement this Object Tracking application.
- What Is OpenCV
- The Pre-Built Algorithms OpenCV Offers For Object Tracking
- Implementation In Python And OpenCV
Part 1. What Is Object Tracking?
Object Tracking determines the location of an object in a video and can be used for a variety of purposes, including surveillance, security, traffic control, digital forensics, anomaly detection, gesture recognition, visual surveillance, human-computer interaction, augmented reality, and robot vision.
Even though it may seem easy for an average person, object tracking is quite complex for computers because they have to analyze a set of frames and estimate the object’s trajectory based on numbers instead of images.
Because of how complicated it is, Object Tracking is considered one of the most difficult tasks in computer vision. Even though it’s a challenge, it’s not impossible to accomplish.
And there are two levels of Object Tracking that you should learn about:
1. SOT & MOT
- Single Object Tracking (SOT): SOT is a tracking algorithm that creates advanced appearance models and/or motion models to manage difficult issues like out-of-plane rotations, illumination variations, or scale changes.
- Multiple Object Tracking (MOT): MOT tracks every part of a video and is mainly concerned with mid-level tasks and serves as a foundation for high-level tasks.
2. The Difference Between Tracking And Detection
After knowing what Object Tracking is, there is another concept you should also be aware of - Object Detection.
The Object Tracking and Object Detection are two important methods in computer vision. Object Tracking tracks the position of a given object in an image in real-time, while Object Detection identifies and localizes objects in an image or video. That is the difference.
Part 2. Types Of Object Tracking
Image Tracking
Image tracking allows users to interact with digital content more naturally and helps users move and interact with digital objects in the same manner as they will with real-world physical objects.
Image tracking can be used in various augmented reality (AR) applications, such as AR gaming, shopping, and navigation. Moreover, you can also use it for educational purposes, such as teaching anatomy or providing instructions for a difficult task.
Video Tracking
Video tracking is the process of tracking objects in a video sequence and can be used for various applications, such as detecting and counting objects in a scene, understanding their motions, and recognizing activities.
Part 3. What Are The Difficulties Of Object Tracking?
As what has been mentioned above, the use of object tracking is versatile. However, there are some challenges associated with Object Tracking, such as:
Background Clutter: The background can impact extracting an object’s features. If the background is more densely populated, detecting or tracking the object of interest can be more difficult.
Occlusion: This is a phenomenon where the object being tracked is affected by the background or foreground. This causes the tracking algorithm to get confused due to multiple objects coming close together, hence, losing track of the object.
Varying spatial scales: Varying spatial scales refer to the target object being of a different size or shape, which can confuse the algorithm, leading to errors.
Training and Tracking Speed: If the object is moving too fast or is too small, it can be difficult to track. Therefore, the tracking module has to be designed to track, identify, and localize objects in a matter of seconds.
Part 4. Stages Of The Object Tracking Process
After the introduction of object tracking technically, let’s learn about its mechanism of it from two sides: periods of the working process and the way it tracks.
1. Stages Of The Object Tracking Process
Following are the stages of the Object Tracking process:
Target Initialization
Target initialization is the first step in Object Tracking and involves defining the targets or objects of interest and drawing a bounding box around them in the initial frame. After that, the tracker has to detect the position of the object in the frame while drawing the bounding box.
Appearance Modeling
Appearance modeling is important for understanding how an object will look under different circumstances. If the object being tracked changes appearance due to different lighting, angle, or speed, the tracking algorithm may lose its information and the object itself. Therefore, it has to be conducted to let the algorithm detect the changes and distortion.
Motion Estimation
Motion estimation entails the capacity of the model to anticipate an object’s future position with precision.
Target Positioning
Motion estimation is a process of approximating the most likely region where an object could be present. After the object’s location is approximated, a visual model can be used to determine the target’s location more accurately.
2. Methods Of Object Tracking
Here’re some methods of Object Tracking:
OpenCV-Based Object Tracking
OpenCV Object Tracking method is widely used because it offers several built-in functions designed specifically for this purpose, such as GOTURN, MIL, MediandFlow, and CSRT. The tracker type you select will depend on your specific application design. Each tracker has its pros and cons, so there is not a single type of tracker ideal for all applications.
MDNet
Multi-Domain Convolutional Neural Network Tracker is a convolutional neural-based visual tracker and has won the VOT2015 challenge. Moreover, it is composed of domain-specific layers, branches, and multiple shared layers.
The MDNetT tracker is a deep neural network that is trained on numerous Object Tracking datasets. The tracker is designed to work in multiple domains, including video, text, and images.
DeepSort
DeepSort algorithm can track objects in real-time and uses YOLO v3 to compute the bounding boxes around the objects in a frame.
DeepSort uses Kalman filter from Simple Online and Realtime Tracking algorithm and an identification model, ReID to interlink bounding boxes and object tracks.
ROLO
ROLO is a novel Object Tracking method that uses recurrent neural networks (RNNs) to learn object-specific Spatio-temporal representations. This method works with YOLO, an object detection algorithm, and an LTSM for determining the trajectory of an object.
Part 5. The powerful backup: OpenCV
We have demonstrated how powerful OpenCV Tracking is and how it works. However, do you wonder what OpenCV is? How it supports the tracking goals being achieved? In this part, we will focus on OpenCV and help you better understand the the underlying mechanisms.
1. What Is OpenCV?
OpenCV is a powerful library that allows you to perform image processing, deep learning, machine learning, and computer vision tasks on live video feeds. Moreover, it can be used to detect objects, track their movements, and recognize faces.
It can help process the data that have videos and images and has been used in various applications, such as object recognition and detection, autonomous cars, robots, medical image analysis, automated surveillance, and anomaly detection.
2. The Pre-Built Algorithms OpenCV Offers For Object Tracking
There are 8 pre-built algorithms that OpenCV offers for Objects Tracking. All of them have their uniquility and here we will present their pros and cons for your better understadning.
| Tracker | Pros | Cons |
|---|---|---|
| BOOSTING Tracker | Track objects accurately. | Relatively slow. Unable to stop when an object is lost. |
| MIL Tracker | Strong resistance to noise. Gives accurate results. | Low speed. Unable to stop tracking once the object is lost. |
| KCF Tracker | High speed and accuracy. Stops tracking when the object is lost. | Inability to continue tracking objects once lost. |
| TLD Tracker | Resistance to overlapping and object scaling. | Unstable in object detection and tracking. Constantly loses object. |
| MEDIANFLOW Tracker | High accuracy and speed. Accurate in determining the object’s loss. | Loses object quickly due to high speed. |
| GOTURN Tracker | Shows resistance to obstructions and noise. | If the speed of an object is high, it shifts to another object. |
| MOSSE Tracker | Able to continue tracking after the object is lost. High speed. | Loses object easily if very high speed. |
| CSRT Tracker | Good resistance to overlapping. High accuracy. | Low speed. Unstable when an object is lost. |
3. Implementation In Python And OpenCV
Now, after theoretical explanation of OpenCV and OpenCV Tracking, let’s learn Object Tracking OpenCV Python with coding and our simple and step-by-step instructions:
Install The Dependencies
Install the pycharm app on your PC, and launch it. Create a new project and go to Terminal. Install the opencv-contrib-python package by pasting the following command into the Terminal.
Set Up the Trackers
Now, create a Jupyter-notebook and set up the trackers with this code:
Tasks:
- cv2. version returns the OpenCV library version number.
- Save the name of the eight trackers.
- Check the list for the version you are working on and create a tracker object based on the number.
Capture The Video Input
For capturing the video input, write the following lines of code:
Tasks:
- Use the VideoCapture class to capture a video via the webcam or get a saved one from your PC.
- In VideoCapture - line 2, give the path to your video.
- Comment on the second line to use the webcam for tracking and uncomment the third one.
Creating The Bounding Box And Initializing The Tracker
Define an initial random bounding box or select the choices for the object you want to track with the following code:
Start The Tracker And Check The Output
Finally, write the below code lines to start the tracker:
Tasks
- Read each video frame.
- Start the timer and, through the tracker, determine the trajectory of the object.
- Use the trajectory to draw the bounding box.
- The program will start tracking. Afterward, press the space bar to stop tracking.
Video – Object Tracking with Opencv and Python
Conclusion
In this article, we’ve discussed Object Tracking in detail and how it compares with Object Detection. Furthermore, we explored the methods used for tracking objects and provided complete guidance on the OpenCV Tracking method and its built-in functionalities.
Hopefully, you find this guide helpful, and you can now track objects in real-time without any issues.
Free Download For Win 7 or later(64-bit)
Free Download For macOS 10.14 or later
- Image Tracking
- Video Tracking
- What Are The Difficulties Of Object Tracking
- Stages Of The Object Tracking Process
- What Is OpenCV
- The Pre-Built Algorithms OpenCV Offers For Object Tracking
- Implementation In Python And OpenCV
Part 1. What Is Object Tracking?
Object Tracking determines the location of an object in a video and can be used for a variety of purposes, including surveillance, security, traffic control, digital forensics, anomaly detection, gesture recognition, visual surveillance, human-computer interaction, augmented reality, and robot vision.
Even though it may seem easy for an average person, object tracking is quite complex for computers because they have to analyze a set of frames and estimate the object’s trajectory based on numbers instead of images.
Because of how complicated it is, Object Tracking is considered one of the most difficult tasks in computer vision. Even though it’s a challenge, it’s not impossible to accomplish.
And there are two levels of Object Tracking that you should learn about:
1. SOT & MOT
- Single Object Tracking (SOT): SOT is a tracking algorithm that creates advanced appearance models and/or motion models to manage difficult issues like out-of-plane rotations, illumination variations, or scale changes.
- Multiple Object Tracking (MOT): MOT tracks every part of a video and is mainly concerned with mid-level tasks and serves as a foundation for high-level tasks.
2. The Difference Between Tracking And Detection
After knowing what Object Tracking is, there is another concept you should also be aware of - Object Detection.
The Object Tracking and Object Detection are two important methods in computer vision. Object Tracking tracks the position of a given object in an image in real-time, while Object Detection identifies and localizes objects in an image or video. That is the difference.
Part 2. Types Of Object Tracking
Image Tracking
Image tracking allows users to interact with digital content more naturally and helps users move and interact with digital objects in the same manner as they will with real-world physical objects.
Image tracking can be used in various augmented reality (AR) applications, such as AR gaming, shopping, and navigation. Moreover, you can also use it for educational purposes, such as teaching anatomy or providing instructions for a difficult task.
Video Tracking
Video tracking is the process of tracking objects in a video sequence and can be used for various applications, such as detecting and counting objects in a scene, understanding their motions, and recognizing activities.
Part 3. What Are The Difficulties Of Object Tracking?
As what has been mentioned above, the use of object tracking is versatile. However, there are some challenges associated with Object Tracking, such as:
Background Clutter: The background can impact extracting an object’s features. If the background is more densely populated, detecting or tracking the object of interest can be more difficult.
Occlusion: This is a phenomenon where the object being tracked is affected by the background or foreground. This causes the tracking algorithm to get confused due to multiple objects coming close together, hence, losing track of the object.
Varying spatial scales: Varying spatial scales refer to the target object being of a different size or shape, which can confuse the algorithm, leading to errors.
Training and Tracking Speed: If the object is moving too fast or is too small, it can be difficult to track. Therefore, the tracking module has to be designed to track, identify, and localize objects in a matter of seconds.
Part 4. Stages Of The Object Tracking Process
After the introduction of object tracking technically, let’s learn about its mechanism of it from two sides: periods of the working process and the way it tracks.
1. Stages Of The Object Tracking Process
Following are the stages of the Object Tracking process:
Target Initialization
Target initialization is the first step in Object Tracking and involves defining the targets or objects of interest and drawing a bounding box around them in the initial frame. After that, the tracker has to detect the position of the object in the frame while drawing the bounding box.
Appearance Modeling
Appearance modeling is important for understanding how an object will look under different circumstances. If the object being tracked changes appearance due to different lighting, angle, or speed, the tracking algorithm may lose its information and the object itself. Therefore, it has to be conducted to let the algorithm detect the changes and distortion.
Motion Estimation
Motion estimation entails the capacity of the model to anticipate an object’s future position with precision.
Target Positioning
Motion estimation is a process of approximating the most likely region where an object could be present. After the object’s location is approximated, a visual model can be used to determine the target’s location more accurately.
2. Methods Of Object Tracking
Here’re some methods of Object Tracking:
OpenCV-Based Object Tracking
OpenCV Object Tracking method is widely used because it offers several built-in functions designed specifically for this purpose, such as GOTURN, MIL, MediandFlow, and CSRT. The tracker type you select will depend on your specific application design. Each tracker has its pros and cons, so there is not a single type of tracker ideal for all applications.
MDNet
Multi-Domain Convolutional Neural Network Tracker is a convolutional neural-based visual tracker and has won the VOT2015 challenge. Moreover, it is composed of domain-specific layers, branches, and multiple shared layers.
The MDNetT tracker is a deep neural network that is trained on numerous Object Tracking datasets. The tracker is designed to work in multiple domains, including video, text, and images.
DeepSort
DeepSort algorithm can track objects in real-time and uses YOLO v3 to compute the bounding boxes around the objects in a frame.
DeepSort uses Kalman filter from Simple Online and Realtime Tracking algorithm and an identification model, ReID to interlink bounding boxes and object tracks.
ROLO
ROLO is a novel Object Tracking method that uses recurrent neural networks (RNNs) to learn object-specific Spatio-temporal representations. This method works with YOLO, an object detection algorithm, and an LTSM for determining the trajectory of an object.
Part 5. The powerful backup: OpenCV
We have demonstrated how powerful OpenCV Tracking is and how it works. However, do you wonder what OpenCV is? How it supports the tracking goals being achieved? In this part, we will focus on OpenCV and help you better understand the the underlying mechanisms.
1. What Is OpenCV?
OpenCV is a powerful library that allows you to perform image processing, deep learning, machine learning, and computer vision tasks on live video feeds. Moreover, it can be used to detect objects, track their movements, and recognize faces.
It can help process the data that have videos and images and has been used in various applications, such as object recognition and detection, autonomous cars, robots, medical image analysis, automated surveillance, and anomaly detection.
2. The Pre-Built Algorithms OpenCV Offers For Object Tracking
There are 8 pre-built algorithms that OpenCV offers for Objects Tracking. All of them have their uniquility and here we will present their pros and cons for your better understadning.
| Tracker | Pros | Cons |
|---|---|---|
| BOOSTING Tracker | Track objects accurately. | Relatively slow. Unable to stop when an object is lost. |
| MIL Tracker | Strong resistance to noise. Gives accurate results. | Low speed. Unable to stop tracking once the object is lost. |
| KCF Tracker | High speed and accuracy. Stops tracking when the object is lost. | Inability to continue tracking objects once lost. |
| TLD Tracker | Resistance to overlapping and object scaling. | Unstable in object detection and tracking. Constantly loses object. |
| MEDIANFLOW Tracker | High accuracy and speed. Accurate in determining the object’s loss. | Loses object quickly due to high speed. |
| GOTURN Tracker | Shows resistance to obstructions and noise. | If the speed of an object is high, it shifts to another object. |
| MOSSE Tracker | Able to continue tracking after the object is lost. High speed. | Loses object easily if very high speed. |
| CSRT Tracker | Good resistance to overlapping. High accuracy. | Low speed. Unstable when an object is lost. |
3. Implementation In Python And OpenCV
Now, after theoretical explanation of OpenCV and OpenCV Tracking, let’s learn Object Tracking OpenCV Python with coding and our simple and step-by-step instructions:
Install The Dependencies
Install the pycharm app on your PC, and launch it. Create a new project and go to Terminal. Install the opencv-contrib-python package by pasting the following command into the Terminal.
Set Up the Trackers
Now, create a Jupyter-notebook and set up the trackers with this code:
Tasks:
- cv2. version returns the OpenCV library version number.
- Save the name of the eight trackers.
- Check the list for the version you are working on and create a tracker object based on the number.
Capture The Video Input
For capturing the video input, write the following lines of code:
Tasks:
- Use the VideoCapture class to capture a video via the webcam or get a saved one from your PC.
- In VideoCapture - line 2, give the path to your video.
- Comment on the second line to use the webcam for tracking and uncomment the third one.
Creating The Bounding Box And Initializing The Tracker
Define an initial random bounding box or select the choices for the object you want to track with the following code:
Start The Tracker And Check The Output
Finally, write the below code lines to start the tracker:
Tasks
- Read each video frame.
- Start the timer and, through the tracker, determine the trajectory of the object.
- Use the trajectory to draw the bounding box.
- The program will start tracking. Afterward, press the space bar to stop tracking.
Video – Object Tracking with Opencv and Python
Conclusion
In this article, we’ve discussed Object Tracking in detail and how it compares with Object Detection. Furthermore, we explored the methods used for tracking objects and provided complete guidance on the OpenCV Tracking method and its built-in functionalities.
Hopefully, you find this guide helpful, and you can now track objects in real-time without any issues.
Free Download For Win 7 or later(64-bit)
Free Download For macOS 10.14 or later
Also read:
- 2024 Approved How to Create a Custom Sequence Preset in Premiere Pro
- In 2024, How to Record Super Slow Motion Videos on Your Huawei/Samsung/iPhone?
- Are You Looking for a Video Format Converter Free? We Will Introduce the 5 Best Online Converters and Also the 5 Best Video Format Converters for PC for 2024
- How to Add a Custom Transition to OBS for 2024
- Do You Want to Make TikTok Videos More Elemental by Using Countdown but Dont Know How to Do This? Here We Will Thoroughly Guide You About This
- Updated Top 9 AMV Makers for Computer
- New Learn How to Use Face Tracking in After Effects to Quickly Mask Out Faces, Animate Objects on Faces, and More
- 2024 Approved Experience Time Differently with The Top Slow-Motion Applications
- New 2024 Approved Best 6 WebM to GIF Converters
- Google Meet Green Screen
- 2024 Approved A Guide to Create Your Own LOL Montage Video
- New Learn How to Make Interactive and Fun Video Collages Using Kapwing Collage Maker, an Easy-to-Use Tool for All Your Collage-Making Needs
- Updated This Article Presents a Guide to Using the Keyframe Feature for Creating Competent Films with Detailed Instructions and Filmoras Grow and Win Program Contest
- New In 2024, Add Some Shake to Videos with Alight Motion
- Updated In 2024, Green Screen YouTube Videos
- 2024 Approved How To Achieve LumaFusion Color Grading Through LUTs
- New A Detailed Guid to Remove Background From a Video in Premier Pro for 2024
- 2024 Approved Add Fade in Windows Video Editor
- 2024 Approved Step by Step to Crop Videos Using Lightworks
- 2024 Approved Use Your Social Media App and Make Slow-Motion Videos by Reading This Guide. Besides Learning Slow-Motion Snapchat, Get Useful Apps Serving the Same Purposes
- Updated Ultimate Guide on How to Plan and Storyboard a Music Video
- Updated In 2024, Quick Solved How to Add Subtitles to a Video on iPhones
- Updated Best Ways to Merge FLV Files Windows, Mac,Android, iPhone & Online for 2024
- New How to Make a Smooth Speed Ramping in Premiere Pro, In 2024
- Updated In 2024, Little Tricks to Create Canva Slideshow No One Is Telling You
- This Article Will Explore in Detail How You Can Use the Features Available in Wondershare Filmora to Export the Video by Changing the Resolution of the Footage for 2024
- The Frames per Second Can Enhance or Hamper Your Ability to Enjoy Watching a Video on YouTube. This Article Will Define Frame Rates and Help You Choose the Best FPS
- 2024 Approved Add Some Shake to Videos with Alight Motion
- Top 10 Audio Visualizers Windows, Mac, Android, iPhone & Online
- In 2024, Event Videography Is Popular in Weddings, Graduation, Family Reunion and Other Great Moments. Here Im Going to Share some of the Tips to Make a Better Event Videography
- Updated Easy Steps to Add Miniature Effect to Videos for 2024
- New In 2024, Create an Awesome Logo Reveal with Logo Intro Templates
- You Can Use It to Fix Videos that Are Not Aligned Properly or that Have Been Filmed Upside Down. A Handbrake Is a Popular Tool because It Is Easy to Use and It Has a Variety of Features
- New 2024 Approved How to Add a Custom Transition to OBS
- Guide Adopting Lumetri Color Presets in Effective Color Grading for 2024
- How to Split a Video Into Parts on All Platforms for 2024
- In 2024, Learn How to Effortlessly Mirror Video Clips in Adobe Premiere Pro with This Step-by-Step Guide. Perfect for Creating a Symmetrical Look in Your Videos
- New Deleting White Background in Photoshop Is Hard? No for 2024
- New 2024 Approved How To Make A Video Longer
- New How to Create an URL for Your Video?
- How to Animate Designs With Canva GIF
- Updated Top Applications That Can Help Apply The Best VHS Camera Effect for 2024
- 2024 Approved Easy Ways to Create Procreate GIFs
- Edit FLV Video Files with FLV Editor Windows, Mac,Android, iPhone
- How to Use LUTs in Adobe Premiere Pro for 2024
- Updated Best Jump Cut Editing Tricks for 2024
- New In 2024, How to Trim Video in Quicktime Player on Mac
- How to Fix corrupt video files of A60s using Video Repair Utility on Windows?
- In 2024, 10 Best Fake GPS Location Spoofers for Realme 12+ 5G | Dr.fone
- In 2024, 5 Ways to Transfer Music from Realme 12 Pro 5G to Other Android Devices Easily | Dr.fone
- In 2024, How Can Tecno Spark 20 Pro+Mirror Share to PC? | Dr.fone
- Methods to Change GPS Location On Itel P55T | Dr.fone
- In 2024, How to Track a Lost Vivo T2 5G for Free? | Dr.fone
- In 2024, Downloading SamFw FRP Tool 3.0 for ZTE Axon 40 Lite
- New Adobe Animate Text Effects Skills You Need to Know
- How To Change Your SIM PIN Code on Your Nubia Red Magic 9 Pro+ Phone
- Reasons why Pokémon GPS does not Work On Nubia Red Magic 8S Pro+? | Dr.fone
- 3 Ways to Track Xiaomi Redmi Note 12 4G without Them Knowing | Dr.fone
- Best 10 Mock Location Apps Worth Trying On Vivo Y55s 5G (2023) | Dr.fone
- What Does Enter PUK Code Mean And Why Did The Sim Get PUK Blocked On Motorola Defy 2 Device
- Why Your Vivo G2 Screen Might be Unresponsive and How to Fix It | Dr.fone
- 5 Ways to Restart ZTE Nubia Z60 Ultra Without Power Button | Dr.fone
- How To Restore Missing Photos Files from Oppo Reno 11F 5G.
- How to Change Your Poco C55 Location on life360 Without Anyone Knowing? | Dr.fone
- The Complete Guide to Oppo A1x 5G FRP Bypass Everything You Need to Know
- How To Revive Your Bricked Infinix Note 30 Pro in Minutes | Dr.fone
- 8 Best Apps for Screen Mirroring Xiaomi 13T Pro PC | Dr.fone
- Easy Guide to Xiaomi 13 Ultra FRP Bypass With Best Methods
- In 2024, How to Unlock Infinix Note 30 Pro Phone without PIN
- Methods to Change GPS Location On Poco X6 Pro | Dr.fone
- In 2024, The Complete Guide to Google FRP Bypass Everything You Need to Know
- In 2024, Top 15 Augmented Reality Games Like Pokémon GO To Play On Lava Blaze 2 Pro | Dr.fone
- 6 Proven Ways to Unlock Tecno Spark 20 Pro+ Phone When You Forget the Password
- Top 4 Android System Repair Software for Vivo X90S Bricked Devices | Dr.fone
- In 2024, How to Fake Snapchat Location without Jailbreak On Samsung Galaxy S23 | Dr.fone
- In 2024, How to Transfer Contacts from Infinix Smart 8 Pro to iPhone XS/11 | Dr.fone
- In 2024, Android to Apple How To Transfer Photos From Itel A60 to iPad Easily | Dr.fone
- How to Change Spotify Location After Moving to Another Country On Huawei P60 | Dr.fone
- In 2024, How to Send and Fake Live Location on Facebook Messenger Of your Realme 12 Pro 5G | Dr.fone
- Tips and Tricks for Apple ID Locked Issue On Apple iPhone 15 Plus
- Latest way to get Shiny Meltan Box in Pokémon Go Mystery Box On Xiaomi Redmi Note 12 Pro 4G | Dr.fone
- How to Stop My Spouse from Spying on My OnePlus Ace 2 Pro | Dr.fone
- Tutorial to Change Vivo G2 IMEI without Root A Comprehensive Guide
- How to Remove a Previously Synced Google Account from Your Samsung Galaxy S23 FE
- How to Fix Life360 Shows Wrong Location On Tecno Pova 6 Pro 5G? | Dr.fone
- How to Fix Vivo S17t Find My Friends No Location Found? | Dr.fone
- Easy steps to recover deleted call history from Itel P40+
- 10 Easy-to-Use FRP Bypass Tools for Unlocking Google Accounts On Infinix Note 30 Pro
- The way to recover deleted photos on Realme 11 Pro+ without backup.
- In 2024, How I Transferred Messages from Infinix Note 30i to iPhone 12/XS (Max) in Seconds | Dr.fone
- How to Unlock Apple iPhone 12 with IMEI Code?
- Title: How to Put a Filter on a Video in iMovie
- Author: Chloe
- Created at : 2024-05-20 03:37:28
- Updated at : 2024-05-21 03:37:28
- Link: https://ai-editing-video.techidaily.com/how-to-put-a-filter-on-a-video-in-imovie/
- License: This work is licensed under CC BY-NC-SA 4.0.

