
How To Quickly Create A Screen Print Effect In Photoshop Detailed Guide for 2024

How To Quickly Create A Screen Print Effect In Photoshop: Detailed Guide
Screen printing is a unique method that uses a mesh to transfer ink onto a surface and is commonly used to print designs onto t-shirts or other garments, such as hoodies, tote bags, and even sneakers.
Nowadays, digital means such as Photoshop or Illustrator are used to create the screen print effect, which is achieved by using a layer mask to cut out a portion of the image and filling it with the color or pattern of your choice. The design is then printed onto fabric using water-based CMYK (cyan, magenta, yellow, black) inks with inkjet printers.
Suppose you’ve ever wanted to create the screen print effect in Photoshop to give that artistic look to your pictures and embed them in your clothes or other accessories but don’t know where to start or are not familiar with the process. In that case, this guide can surely help you figure this out quickly!
So without any delay, let’s get on with it!
How To Use Photoshop To Create The Print Effect
Below we’ve provided a detailed guide using Adobe Photoshop to create the print effect with easy step-by-step instructions.
What Are The Requirements For Creating the Print Effect In PhotoShop?
Before we discuss the complete process of creating the print effect while using Photoshop, here are the resources you have to arrange.
- Picture of the object: We will cut out the object from the original image using the Lasso tool and unsaturate it. However, you have to ensure that the object is clear and easily detectable within the picture.
- A background image: You will need a background image to add the object to. For this, you can use a solid background, capture scenery, etc.
- Fonts: You can also add fonts to the final image to add your ideas or thoughts, making your final project more eye-catching and engaging.
- Photoshop latest version: For this tutorial, we will use the Photoshop CC 2021 version, so make sure to download and install it to your computer immediately!
What Are The Steps To Create Print Effect in PhotoShop?
Now that you know the necessary resources, the following are the steps to create the print effect in Photoshop:
Step1 Launch thePhotoshop program on your laptop/desktop and click “Create New” on the software dashboard. Next, select the page size, such as “letter,” and click “Open.”

Now, click the “File” option in the top toolbar, and from the drop-down menu, select “Open.” Next, choose the image you want to apply the screen print effect by browsing to its location on your computer.

Step2 Next, click the “Lasso” tool from the left-side menu to create the selection around the object in the image.

Press the CMD/Ctrl + C on your computer’s keyboard to copy the selection. Next, click the “Layer“ option in the top toolbar, select “New,” and click “Layer via Copy.”

Step3 Now, hide the background layer in the “Layers” panel on the right-hand side, and you will get your object without any BG. Click the “Image” option in the top toolbar and select “Adjustments.”
Click “Threshold…” from the drop-down menu, and set the “Threshold level.” Alternatively, you can click “Cmd/ctrl+Shift+U” on the keyboard to desaturate the image.

Step4 Next, select the “Magic Eraser Tool” from the left-side menu and remove the white parts to smooth down the background. Afterward, choose the “Move Tool” from the menu and drag your object to a new layer.
To add the background image, click “File” and select “Open.” Next, select the file and again click “Open.”
Step5 Select the object using the “Move Tool” and drag it to the background image layer. If the thing is too large and you want to resize it, select the object using the “CMD/Ctrl” key and click “Edit” from the top toolbar. From the drop-down menu, choose “Transform” and click “Scale.”

Next, drag the handles to adjust the size of the object on the Background image.
Step6 Click the “T” icon from the left-hand side menu and set the font style, color, and size. You can also click the “3D” option to convert your text to a three-dimensional form.

Try removing the left-out white patches on the object using the “Magic Eraser Tool” to give a polished look to the print screen effect. Once you are satisfied, click the “File” option from the top toolbar panel and select “Save As.”
Type in the file name and select the file type from the drop-down menu next to “Save As Type.” Choose the storage location, click “Save” to export your final project, and you’re done!
Conclusion
In this article, we’ve explored what the screen print effect is and how it is used in digital art. We’ve also discussed the requirements and resources you need to use and then demonstrated a step-by-step process of how to create the screen print effect in Photoshop with simple and easy-to-follow instructions.
To make things easy for you, we also added original screenshots while creating a sample project on the software.
Hopefully, this article helped resolve your queries, and you can now give a vintage or retro look to your images using the screen print effect in Photoshop.
Free Download For Win 7 or later(64-bit)
Free Download For macOS 10.14 or later
Free Download For macOS 10.14 or later
Easy Steps to Slow Down a Video on iPhone and Android
How to edit a video to slow motion on iPhone and Android? Slow motion is an important part of video editing. You would be enhancing your feature-length films or simply preparing cool stuff for posting on social media. By slowing down some or all the scenes of your video, you make it appear cool and more interesting. The slo mo allows viewers to notice specific details of your videos or focus on what you want them to. To show you how to make slow motion video in Android and iPhone, we are going to introduce a versatile video editing app that works well on both platforms. This article will provide the step-by-step process on how to edit video to slow motion on iPhone and Android using Wondershare Filmora.
Slow Motion Maker Slow your video’s speed with better control of your keyframes to create unique cinematic effects!
Free Download Free Download Learn More

Part 1. How to Make Slow Motion Videos on iPhone With Filmora : 2 Ways
Creating slo mo videos is a staple in video editing, which helps make videos more cinematic and engaging. Understanding how to edit iPhone slow motion video will help you to create quality videos on the go. It also gives you more freedom in how you tell your visual story or keeping the attention of your viewers throughout the video.
Free Download For Win 7 or later(64-bit)
Free Download For macOS 10.14 or later
When you slow motion a video, you make it easier for your viewers to observe details in every minute. This is also an effective way to add emotional weight or a dramatic flair to your videos. Let’s explore how to edit a video slow motion on iPhone with Wondershare Filmora.
Step 1: Download Wondershare Filmora
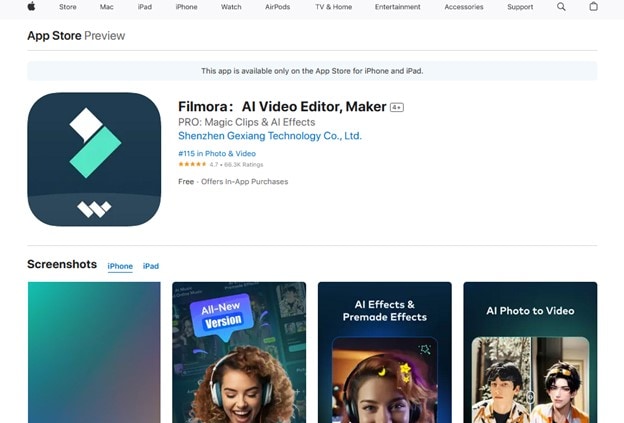
Open the App Store on your phone. Search for Wondershare Filmora, download and launch the app on your phone. Follow the instructions on the screen to create a Filmora account or log in to an existing one to start using the app.
Step 2: Import Video to Filmora
Once you open the Filmora app, tap the + button and import the video you want to edit from your photo library.

Step 3: Slow Down the Video
Once you have imported the video, slow it down to your desired speed. You have two ways to achieve this with Filmora for iPhone:
Method 1Use the Uniform Speed Slider
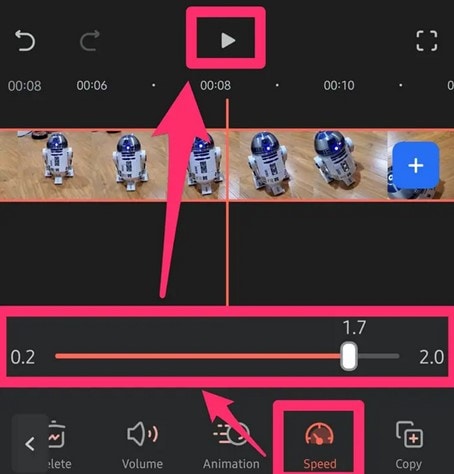
Tap on the video clip, and at the bottom of the screen, select the speed slider. Adjust the slider to the right or left to adjust the speed of your video. Then tap Done, and save your video.
Method 2Use the Speed Ramping Feature
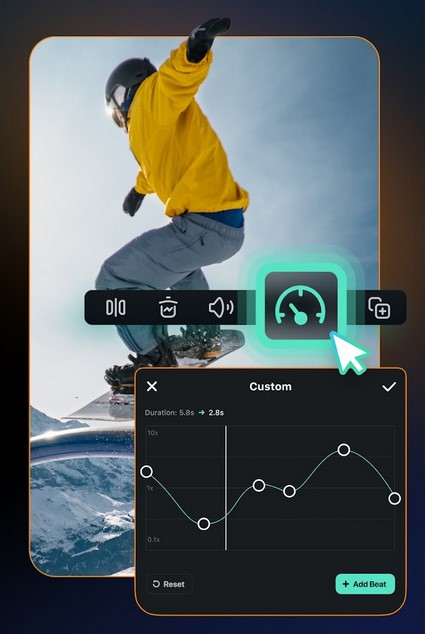
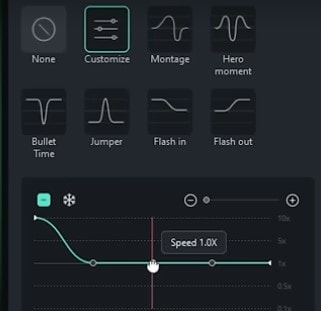
The speed ramping feature will gradually change the speed of your video. When done right, speed ramps in a video add a cinematic feel and look. Tap on the video clip. Then tap on the Speed Ramping feature at the bottom of the screen. Use the graph that appears to set the speed ramp for your video. You may choose the presets already available or customize the speed based on your own desired setting. Tap Done when you are satisfied and save the video.
Part 2. How to Make Slow Motion Videos on Android with Filmora : 2 Ways
The Android operating systems does allow you to slow down or speed up video. However, third-party apps like Wondershare Filmors provide more versatile and better outcomes. The app helps you quickly change the playback speed of a video. It is a great choice for anyone wondering how to make slow motion video in Android.
You can opt for speeding up or slowing down the video based on what you specifically want to achieve. There is also the option to use the Speed Ramp feature which allows you to customize different speed rates for the same clip. In some circumstances, combining the two features can produce exceptional results in your video editing projects. Let’s have a look at how you can use this app on your Android phone.
Free Download For Win 7 or later(64-bit)
Free Download For macOS 10.14 or later
Step 1: Download and Install Filmora
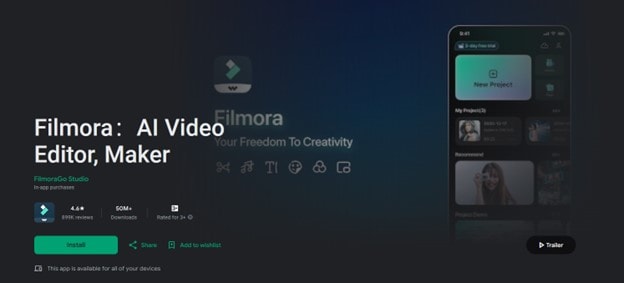
Search for Wondershare Filmora in the Google Play Store. The app is available for Android devices running Android 7.0 or higher, making it compatible with a wide range of devices. Download and install the Filmora: AI Video Editor and Maker app on your Android phone. Start the app and follow the instructions to create a new or sign into an existing account.
Step 2: Import Your Video into Filmora
Once you start the Filmora app on your Android device, tap the + button and select the video you want to import. This will add the video files in Filmora to start editing its specific components, including speed.

Step 3: Adjust the Speed with Filmora
Filmora for Android offers two methods to edit the speed of your video. You can use the speed slider for direct editing or the Speed Ramping feature for a more creative approach.
Method 1Use the Uniform Speed Slider
Tap the video that you have imported. Then, select the speed slider at the bottom of the screen. Adjust the speed of the video by dragging the speed slider to the left or right. Once satisfied, tap the Check button and save your video.

Method 2Use the Speed Ramping Feature
With the Speed Ramping feature, adjust the speed of your Android video gradually in a more creative manner. You may slow it down at the beginning or the end while accelerating the middle. This makes the video fun and more engaging to your audience.
To use this feature on Filmora for Android, tap on the video clip and select the Speed Ramping icon at the bottom of the screen. Use the graph that appears to adjust how you want the video to slow down or speed up when playing it back. Tap on the Check button once done and save your video.
Conclusion
Creating slow-motion videos is a vital skill in video editing. It improves visual storytelling and keeps your audience more engaging by focusing on the most important aspects of your videos. Wondering how to edit slo mo video on iPhone and Android devices, Wondershare Filmora offers an intuitive feature to do this. The user-friendly tool is effective in slowing down videos on both iPhone and Android phones. Download the app App Store for iPhone and Play Store for Android to enhance your slow-motion videos and unleash the creativity of mobile phone video editing.
Free Download Free Download Learn More

Part 1. How to Make Slow Motion Videos on iPhone With Filmora : 2 Ways
Creating slo mo videos is a staple in video editing, which helps make videos more cinematic and engaging. Understanding how to edit iPhone slow motion video will help you to create quality videos on the go. It also gives you more freedom in how you tell your visual story or keeping the attention of your viewers throughout the video.
Free Download For Win 7 or later(64-bit)
Free Download For macOS 10.14 or later
When you slow motion a video, you make it easier for your viewers to observe details in every minute. This is also an effective way to add emotional weight or a dramatic flair to your videos. Let’s explore how to edit a video slow motion on iPhone with Wondershare Filmora.
Step 1: Download Wondershare Filmora
Open the App Store on your phone. Search for Wondershare Filmora, download and launch the app on your phone. Follow the instructions on the screen to create a Filmora account or log in to an existing one to start using the app.

Step 2: Import Video to Filmora
Once you open the Filmora app, tap the + button and import the video you want to edit from your photo library.

Step 3: Slow Down the Video
Once you have imported the video, slow it down to your desired speed. You have two ways to achieve this with Filmora for iPhone:
Method 1Use the Uniform Speed Slider
Tap on the video clip, and at the bottom of the screen, select the speed slider. Adjust the slider to the right or left to adjust the speed of your video. Then tap Done, and save your video.

Method 2Use the Speed Ramping Feature
The speed ramping feature will gradually change the speed of your video. When done right, speed ramps in a video add a cinematic feel and look. Tap on the video clip. Then tap on the Speed Ramping feature at the bottom of the screen. Use the graph that appears to set the speed ramp for your video. You may choose the presets already available or customize the speed based on your own desired setting. Tap Done when you are satisfied and save the video.

Part 2. How to Make Slow Motion Videos on Android with Filmora : 2 Ways
The Android operating systems does allow you to slow down or speed up video. However, third-party apps like Wondershare Filmors provide more versatile and better outcomes. The app helps you quickly change the playback speed of a video. It is a great choice for anyone wondering how to make slow motion video in Android.
You can opt for speeding up or slowing down the video based on what you specifically want to achieve. There is also the option to use the Speed Ramp feature which allows you to customize different speed rates for the same clip. In some circumstances, combining the two features can produce exceptional results in your video editing projects. Let’s have a look at how you can use this app on your Android phone.
Free Download For Win 7 or later(64-bit)
Free Download For macOS 10.14 or later
Step 1: Download and Install Filmora
Search for Wondershare Filmora in the Google Play Store. The app is available for Android devices running Android 7.0 or higher, making it compatible with a wide range of devices. Download and install the Filmora: AI Video Editor and Maker app on your Android phone. Start the app and follow the instructions to create a new or sign into an existing account.

Step 2: Import Your Video into Filmora
Once you start the Filmora app on your Android device, tap the + button and select the video you want to import. This will add the video files in Filmora to start editing its specific components, including speed.

Step 3: Adjust the Speed with Filmora
Filmora for Android offers two methods to edit the speed of your video. You can use the speed slider for direct editing or the Speed Ramping feature for a more creative approach.
Method 1Use the Uniform Speed Slider
Tap the video that you have imported. Then, select the speed slider at the bottom of the screen. Adjust the speed of the video by dragging the speed slider to the left or right. Once satisfied, tap the Check button and save your video.

Method 2Use the Speed Ramping Feature
With the Speed Ramping feature, adjust the speed of your Android video gradually in a more creative manner. You may slow it down at the beginning or the end while accelerating the middle. This makes the video fun and more engaging to your audience.
To use this feature on Filmora for Android, tap on the video clip and select the Speed Ramping icon at the bottom of the screen. Use the graph that appears to adjust how you want the video to slow down or speed up when playing it back. Tap on the Check button once done and save your video.

Conclusion
Creating slow-motion videos is a vital skill in video editing. It improves visual storytelling and keeps your audience more engaging by focusing on the most important aspects of your videos. Wondering how to edit slo mo video on iPhone and Android devices, Wondershare Filmora offers an intuitive feature to do this. The user-friendly tool is effective in slowing down videos on both iPhone and Android phones. Download the app App Store for iPhone and Play Store for Android to enhance your slow-motion videos and unleash the creativity of mobile phone video editing.
How to Loop Videos with iMovie
If you are a video creator, there are times when you have to loop a video. This is to extend the duration of the original video. For instance, you have a stock video of a short duration. You want it to be the background in your video throughout. You have to extend the duration of the stock video by playing it in a loop.
If you are a macOS user, you can use iMovie to loop your video. iMovie comes pre-install on macOS devices. iMovie happens to be one of the most preferred video editors among beginners. In fact, iMovie comes pre-installed on iPhones and iPads. You can easily loop your video on your mobile devices as well. We will illustrate how to loop a video on iMovie on iPhone as well as on Mac.
Part 1. How to loop a video on iMovie iPhone
iMovie by Apple comes pre-installed on iPhone and iPad. Naturally, it is one of the most widely used video editors by iPhone users. iMovie app has options for basic and even advanced levels of video editing. Looping a video on iMovie involves a few simple steps that everyone can perform easily. Here are the steps on how to loop a video in the iMovie app on your iPhone.
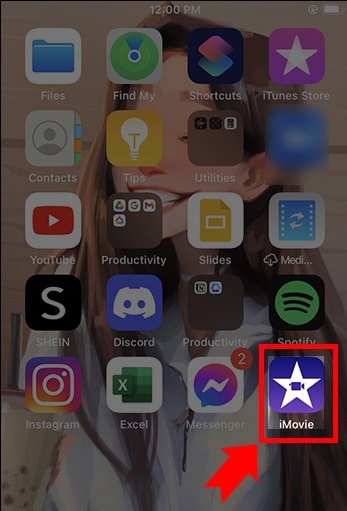
Step1 Launch the iMovie app on your iPhone. If you have uninstalled or disabled the app, you can always go to App Store to install it again.
Step2 If you are opening the app for the first time, you will get a welcome screen. Follow the on-screen instructions to land on the home screen of the app.
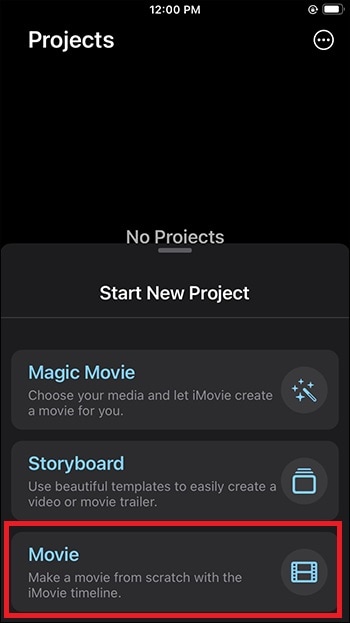
Step3 Tap on New Project “+” icon and select the Movie option to get started. This will take you to the phone media gallery to select a media file to get started.
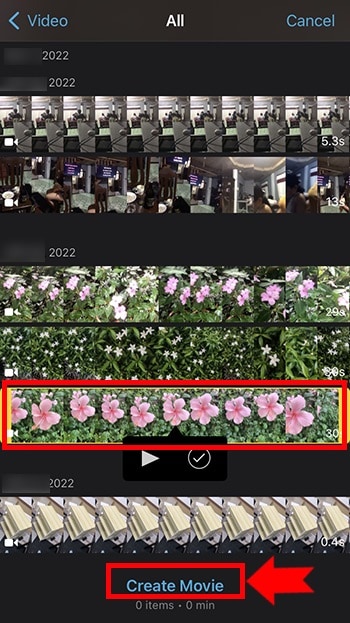
Step4 You should tap on the Video option and select the video that you want to put into a loop. After selecting a video, tap on Create Movie option.
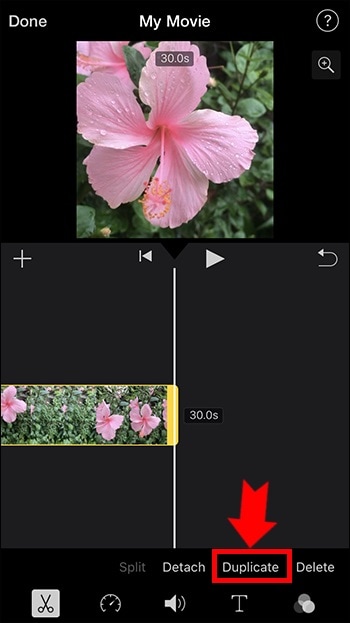
Step5 Tap on the video on the timeline to select the video and tap on the Duplicate option. You will see that the duration of the video has doubled. You can tap on Duplicate as many times as you want to increase the video duration.
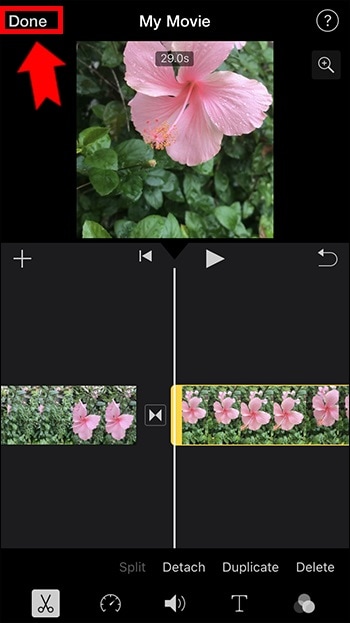
Step6 Once you are done with the iMovie loop, tap on the Done option located in the top-left corner. Thereafter, tap on the Share icon at the bottom.
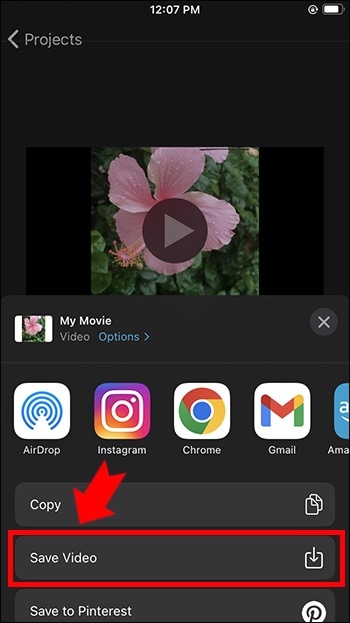
Step7 You will get a pop-up where you have to tap on the Save Video option. The edited video will be saved on your iPhone. You can open the new video from the Photos app.
Part 2. Loop Videos on Mac with iMovie
Editing a video on a Mac is always more comfortable than on an iPhone because of the larger screen. iMovie from Apple comes pre-installed on Mac as well, and hence, you can get started right away. It is completely free to use, and hence, you do not need to install any third-party video editor. Here are the steps on how to loop an iMovie video in simple steps.
Step1 Open the iMovie app from the Applications folder.
Step2 Click on Create New option and then click on the Movie option.

Step3 Bring in the required video under Movie Library by dragging the file from Finder on your Mac. You can also go to File> Import Media option and select the required video. You can also select the required media file from Events or Photos under the Libraries section.

Step4 Drag and drop the video on your timeline. When you want to loop the video, drag and drop the video clip again on the timeline. Make sure there is no gap between the first clip and the second clip on the timeline. You can drag and drop the video clip multiple times on the timeline to increase its duration.

Step5 Once you are done, go to File> Share> File option. Choose the destination to save the edited video.

Part 3. iMovie Alternative to Loop Videos on Mac
If you are looking for an iMovie alternative to perform iMovie loop video action easily, we recommend Wondershare Filmora . Filmora is available for both Mac and Windows. Filmora is a better video editor than iMovie. It is a premium video editor and it has more features and functionalities.
You can loop any video as many times as you want instantly. Besides, you can edit your video clip as per your requirements before looping the edited video. The user interface is highly intuitive for everyone. Hence, it has huge popularity among Mac users. You can also save the looped video in different file formats. Here are the steps to loop a video on Filmora.
Free Download For Win 7 or later(64-bit)
Free Download For macOS 10.14 or later
Step1 Download and install Wondershare Filmora. Launch Filmora and click on New Project on the welcome screen.

Step2 Drag and drop the video file from Finder on Mac to the Project Media folder on Filmora. Thereafter, drop the video file into the timeline.

Step3 Drag and drop the video clip into the timeline again. Make sure that there is no gap between the clips. Besides, make sure that they are on the same channel for looping. You can drag and drop the video into the timeline multiple times.
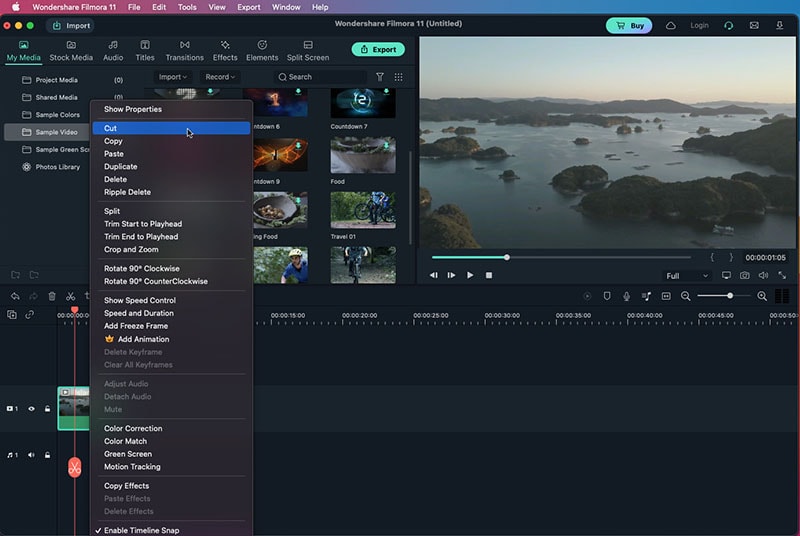
Step4 You can zoom out the timeline for better viewing. Play the video to check its output on Viewer. Finally, click on the Export button and save the video in the desired file format on your Mac.
The Bottom Line
If you want to loop a video on your Mac, iMovie is the most preferred option. The same is applicable to iPhone users as well. iMovie comes pre-installed, and it is completely free to use. That is why you can loop any video instantly. Wondershare Filmora is the best alternative to iMovie to edit and loop your video.
Free Download For macOS 10.14 or later
Step1 Download and install Wondershare Filmora. Launch Filmora and click on New Project on the welcome screen.

Step2 Drag and drop the video file from Finder on Mac to the Project Media folder on Filmora. Thereafter, drop the video file into the timeline.

Step3 Drag and drop the video clip into the timeline again. Make sure that there is no gap between the clips. Besides, make sure that they are on the same channel for looping. You can drag and drop the video into the timeline multiple times.

Step4 You can zoom out the timeline for better viewing. Play the video to check its output on Viewer. Finally, click on the Export button and save the video in the desired file format on your Mac.
The Bottom Line
If you want to loop a video on your Mac, iMovie is the most preferred option. The same is applicable to iPhone users as well. iMovie comes pre-installed, and it is completely free to use. That is why you can loop any video instantly. Wondershare Filmora is the best alternative to iMovie to edit and loop your video.
Detailed Review of Kodak LUTs
If you’re from the 20th century, you might have used Kodak cameras. Those cameras had a distinct look and feel, creating a nostalgic look. However, as technology has advanced, we now have access to more advanced cameras. Moreover, these new cameras can capture high-quality images with accurate details. However, you can still achieve that classic Kodak look with the help of LUTs.
To add up, these LUTs can mimic the characteristics of specific films or looks, including Kodak films. There are various LUTs available to download, offering different film looks and styles. In contrast, you can get the classic Kodak film look with your modern cameras. There are different options for Kodak 2383 LUTs free download on the internet. You can download these LUTs to apply on your digital media.
Part 1: An Overview of Some Famous Kodak LUTs and Powergrade Print Films
There are many different presets available that give you Kodak films-like color grading. Here are some of the Kodak film presets that you can use.
Kodak 2383
Kodak 2383 is a color film known for its unique qualities. When used, it enhances the richness of black shades, adding depth and intensity to your images. Additionally, it brings out neutral highlights, creating a distinctive Kodak film look. Moreover, this color film is suitable for both traditional camera films and digital prints. Additionally, you can expect your images to have a timeless quality and a distinct character.
Moreover, you can give your photos a dramatic touch with black shades and neutral highlights. These color films are a unique way to give your content a classic Kodak film look. You can experience the richness and clarity it brings to your images using this film. You can get the Kodak 2383 LUT download link online.
Kodak 2393
Kodak 2393 is a Powergrade film preset that you can use. This editable LUT can improve your media files by adding richer colors, especially in the shadows. When you apply this LUT, it brings out the natural beauty of your video with the right amount of saturation. Furthermore, you can make your videos a more natural and lifelike appearance with this Powergrade.
Moreover, it works particularly well in adding depth and richness to darker areas of your footage. Similarly, it ensures that every detail is visible in a natural way. Furthermore, this LUT can achieve a more natural and realistic look. Additionally, it is a great choice if you’re looking to add vibrance and naturalness to your media files.
Kodak 2302
Kodak 2302 is a high-resolution black-and-white color print film. Furthermore, this film is specifically designed for blue-sensitive printing. It allows for the precise reproduction of details and tones in black-and-white imagery. Moreover, this Kodak 2302 film offers exceptional image quality. Additionally, it uses electron beam recorders to create positive and negative titles.
In addition to this, it also creates RGB separations using beam recorders. Similarly, this technology creates accurate color reproduction and improves the final print’s quality. Kodak 2302 is coated with an ESTAR base to enhance its performance further. This special coating improves the film’s physical properties, making it more durable and resistant.
Empower your videos with a new mood using different LUTs. Filmora now offers 100+ top-quality 3D LUTs cover a broad range of scenarios. Transform your videos with Filmora’s powerful 3D LUTs.
Apply LUT on Videos Apply LUT on Videos Learn More

Part 2: The Best Kodak LUTs Free Available in the Market
You might find many Kodak 2393 LUT free download links, but some of them are not authentic. Here is a list of authentic Kodak-inspired LUTs that you can download and use.
1. Kinetic
Kinetic LUT is a great preset inspired by the iconic Kodak 2383 and 2393 films. With Kinetic, you can bring a vibrant and dynamic color palette to your digital media. This LUT enhances shades such as deep blues and rich reds, adding depth and intensity to your visuals. Moreover, it creates dynamic shadows to bring a sense of richness and dimension to your content. It is a pack of 5 Kodak-inspired LUTs.

2. Kodak Film 2383 - Vlog
The Kodak Film 2383 - Vlog LUT is a perfect choice for adding a Kodak-inspired look to your vlogs. This LUT brings an authentic touch to your content. Moreover, this LUT enhances the color grading of your content with yellowish and bluish tones. Furthermore, it aims to recreate the look and feel of shooting with Kodak film stock. Experiment, explore, and find the perfect balance that brings out the best in your vlogs.

3. Kodak 2383 Print Film LUT
The Kodak 2383 Print Film LUT allows you to create a modern cinematic look. You can use digital videos and transform them into old-style Kodak films look. Moreover, this LUT replicates the color grading of the Kodak 2383 print film. Additionally, it captures the essence of the original film stock, providing an authentic feel. It is a great LUT to make your video content look more natural.

4. Free LUTs Kodak Color
It is a collection of LUTs inspired by the iconic Kodak film look. LUTs Kodak Color is created to enhance your media with vibrant colors and a cinematic look. It is a Kodak LUT free pack that you can download from the internet. Moreover, it adds vibrancy to your media, making the colors pop and come to life. Additionally, these LUTs decrease the white balance, giving your media a warmer tone.

5. KODAK Film Emulation LUT
The KODAK Film Emulation LUT is a collection of 16 cinematic LUTs. These LUTs are inspired by the iconic Kodak 2383 film. Furthermore, these LUTs allow you to achieve the timeless and distinctive look of Kodak film. Moreover, to increase the authenticity of Kodak films, this LUT highlights rich red and blue tones. This LUT replicates Kodak film stock to improve the character of your digital media files.

6. Kodak Film LUTs and Presets
The Kodak Film LUTs and Presets pack features 17 LUTs inspired by the iconic Kodak film look. These LUTs are created to give your digital files a timeless aesthetic. Moreover, it fades certain colors and adds vibrant tones to your media files. Furthermore, replicating Kodak films adds richness and depth to your content with color grading. Additionally, it maintains a perfect balance between classic and modern looks.

7. CL-Kodak
CL-Kodak is a collection of 28 Kodak-style LUTs. Each LUT is designed to elevate your color grading game. Furthermore, you can color grade your media with the iconic reddish tones of Kodak films. Additionally, these LUTs add a grainy texture to your media. These LUTs support Kodak cameras up to 8K resolution. Using these LUTs, you can give your digital files the authentic nostalgic feel of Kodak films.

Part 3: Wondershare Filmora: Reviewing LUTs in Video Editor
There are many great video editing software that exist in the market. Wondershare Filmora , being among the best, offers features to enhance your videos, including color grading and adjustment capabilities. With Filmora, you can modify the colors and tones of your videos to get the desired look and feel. Furthermore, you can apply LUTs using Wondershare Filmora. You can import different LUTs in the tool and apply them directly to your files.
Add LUTs on Video For Win 7 or later(64-bit)
Add LUTs on Video For macOS 10.14 or later
In its newest update, Filmora has introduced over 200+ LUTs you can download and use. Filmora has expanded your creative color grading and adjustment options with this feature. These LUTs cover many styles, from bold and modern to retro and vintage looks. With such a vast selection, you can easily find the perfect LUT to match the mood and tone of your video project.

Key Features of Wondershare Filmora
- Filmora offers complete video editing features to help you edit your videos. You can trim and merge clips and apply transitions. Moreover, you can add text and titles, import music and sound effects, and much more.
- Furthermore, Wondershare Filmora provides advanced tools for precise control over your videos. You can adjust the brightness and contrast. Furthermore, you can control saturation and other parameters.
- You can create dynamic animations and apply effects at any frame with keyframing. Moreover, using this feature, you can add effects to specific sections of your video.
Conclusion
To conclude, using LUTs is a simple and effective way to transform your media files. Moreover, you can also add a nostalgic or cinematic feel to your videos. You can experiment with different film looks by exploring different LUTs. Furthermore, you can even get Kodak 2393 Powergrade free download options online. These Kodak-film-inspired LUTs can take you back to the 20th century.
Apply LUT on Videos Apply LUT on Videos Learn More

Part 2: The Best Kodak LUTs Free Available in the Market
You might find many Kodak 2393 LUT free download links, but some of them are not authentic. Here is a list of authentic Kodak-inspired LUTs that you can download and use.
1. Kinetic
Kinetic LUT is a great preset inspired by the iconic Kodak 2383 and 2393 films. With Kinetic, you can bring a vibrant and dynamic color palette to your digital media. This LUT enhances shades such as deep blues and rich reds, adding depth and intensity to your visuals. Moreover, it creates dynamic shadows to bring a sense of richness and dimension to your content. It is a pack of 5 Kodak-inspired LUTs.

2. Kodak Film 2383 - Vlog
The Kodak Film 2383 - Vlog LUT is a perfect choice for adding a Kodak-inspired look to your vlogs. This LUT brings an authentic touch to your content. Moreover, this LUT enhances the color grading of your content with yellowish and bluish tones. Furthermore, it aims to recreate the look and feel of shooting with Kodak film stock. Experiment, explore, and find the perfect balance that brings out the best in your vlogs.

3. Kodak 2383 Print Film LUT
The Kodak 2383 Print Film LUT allows you to create a modern cinematic look. You can use digital videos and transform them into old-style Kodak films look. Moreover, this LUT replicates the color grading of the Kodak 2383 print film. Additionally, it captures the essence of the original film stock, providing an authentic feel. It is a great LUT to make your video content look more natural.

4. Free LUTs Kodak Color
It is a collection of LUTs inspired by the iconic Kodak film look. LUTs Kodak Color is created to enhance your media with vibrant colors and a cinematic look. It is a Kodak LUT free pack that you can download from the internet. Moreover, it adds vibrancy to your media, making the colors pop and come to life. Additionally, these LUTs decrease the white balance, giving your media a warmer tone.

5. KODAK Film Emulation LUT
The KODAK Film Emulation LUT is a collection of 16 cinematic LUTs. These LUTs are inspired by the iconic Kodak 2383 film. Furthermore, these LUTs allow you to achieve the timeless and distinctive look of Kodak film. Moreover, to increase the authenticity of Kodak films, this LUT highlights rich red and blue tones. This LUT replicates Kodak film stock to improve the character of your digital media files.

6. Kodak Film LUTs and Presets
The Kodak Film LUTs and Presets pack features 17 LUTs inspired by the iconic Kodak film look. These LUTs are created to give your digital files a timeless aesthetic. Moreover, it fades certain colors and adds vibrant tones to your media files. Furthermore, replicating Kodak films adds richness and depth to your content with color grading. Additionally, it maintains a perfect balance between classic and modern looks.

7. CL-Kodak
CL-Kodak is a collection of 28 Kodak-style LUTs. Each LUT is designed to elevate your color grading game. Furthermore, you can color grade your media with the iconic reddish tones of Kodak films. Additionally, these LUTs add a grainy texture to your media. These LUTs support Kodak cameras up to 8K resolution. Using these LUTs, you can give your digital files the authentic nostalgic feel of Kodak films.

Part 3: Wondershare Filmora: Reviewing LUTs in Video Editor
There are many great video editing software that exist in the market. Wondershare Filmora , being among the best, offers features to enhance your videos, including color grading and adjustment capabilities. With Filmora, you can modify the colors and tones of your videos to get the desired look and feel. Furthermore, you can apply LUTs using Wondershare Filmora. You can import different LUTs in the tool and apply them directly to your files.
Add LUTs on Video For Win 7 or later(64-bit)
Add LUTs on Video For macOS 10.14 or later
In its newest update, Filmora has introduced over 200+ LUTs you can download and use. Filmora has expanded your creative color grading and adjustment options with this feature. These LUTs cover many styles, from bold and modern to retro and vintage looks. With such a vast selection, you can easily find the perfect LUT to match the mood and tone of your video project.

Key Features of Wondershare Filmora
- Filmora offers complete video editing features to help you edit your videos. You can trim and merge clips and apply transitions. Moreover, you can add text and titles, import music and sound effects, and much more.
- Furthermore, Wondershare Filmora provides advanced tools for precise control over your videos. You can adjust the brightness and contrast. Furthermore, you can control saturation and other parameters.
- You can create dynamic animations and apply effects at any frame with keyframing. Moreover, using this feature, you can add effects to specific sections of your video.
Conclusion
To conclude, using LUTs is a simple and effective way to transform your media files. Moreover, you can also add a nostalgic or cinematic feel to your videos. You can experiment with different film looks by exploring different LUTs. Furthermore, you can even get Kodak 2393 Powergrade free download options online. These Kodak-film-inspired LUTs can take you back to the 20th century.
Also read:
- [New] Pushing Boundaries with Dell's Revolutionary P2715Q Monitor Review for 2024
- [New] Soundscape Shifting Made Easy Unveiling the Best Free Vocal Transformers for 2024
- [Updated] 2024 Approved Uncomplicated Process How to Swiftly Eliminate YouTube Comments
- [Updated] Elevate Your Online Presence Secrets of Youtube Live with WireCast for 2024
- [Updated] Making Text Dance 2 Creative Animation Strategies
- [Updated] Premier 5 Digital Camera Background Swap Tools IPhone Photos for 2024
- Exploring Flexus 200: A Revolutionary Audio Experience
- Fixing Performance Lags & Stutter in Modern Warfare 2 on Windows Systems
- Holiday DJing Essentials: Prepping with PCDJ for Epic Festive Gigs
- In 2024, Unlocking the Magic Advanced Techniques for TikTok Videos
- Solution to Stuttering Glitch in Mass Effect Legendary Anthology Released
- Troubleshooting Guide for Common Minecraft World Connection Errors
- Unlock More Fun on Your NES Classic with Essential Game Installation Techniques
- Vyncs Link Analysis: Unrivaled Monitoring Capabilities Overshadowed by Puzzling Pricing Structures
- Title: How To Quickly Create A Screen Print Effect In Photoshop Detailed Guide for 2024
- Author: Chloe
- Created at : 2024-12-09 02:11:06
- Updated at : 2024-12-12 03:52:07
- Link: https://ai-editing-video.techidaily.com/how-to-quickly-create-a-screen-print-effect-in-photoshop-detailed-guide-for-2024/
- License: This work is licensed under CC BY-NC-SA 4.0.

