:max_bytes(150000):strip_icc():format(webp)/CODA-d4dd2a9b6c3d4a008a05c9718c9bce1e.jpg)
How to Remove Background From a Video in Premier Pro

How to Remove Background From a Video in Premier Pro
Adobe Premiere Pro is one of the leading video editing software. You can use to create or remove a video’s background. Advanced Chroma Key features such as Color Key and Ultra Key make it possible to produce background-free content quickly.
Although both Keys work similarly, many users prefer to use the Ultra key for a better result in the video. This article will explain how to remove video background in Premiere Pro if you are a newbie.
Let’s get right to it and start the tutorial!
How to Use Premiere Pro to Remove Video Background?
Adobe Premiere Pro can remove video backgrounds quickly using the Ultra Key feature with the following steps:
Step1 In the first step, launch a browser, and download the appropriate Adobe Premiere Pro version for your Windows PC or Mac . Next, install the software on your system and launch it from your Desktop or Dock.
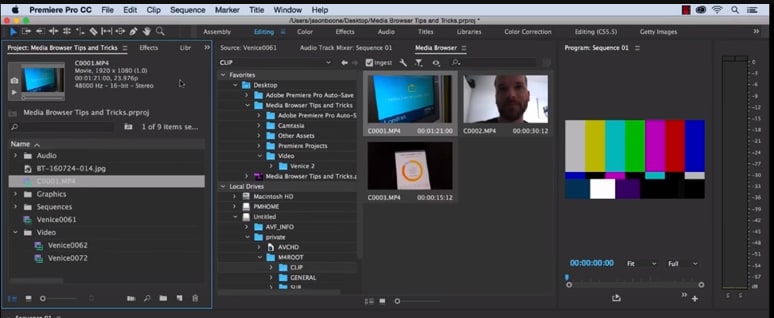
Step2 Now, use the Media Browser panel in the software to browse the video clips you want to import into the software. Next, right-click on your selected video file in which you want to remove the background and choose the “Import” option.
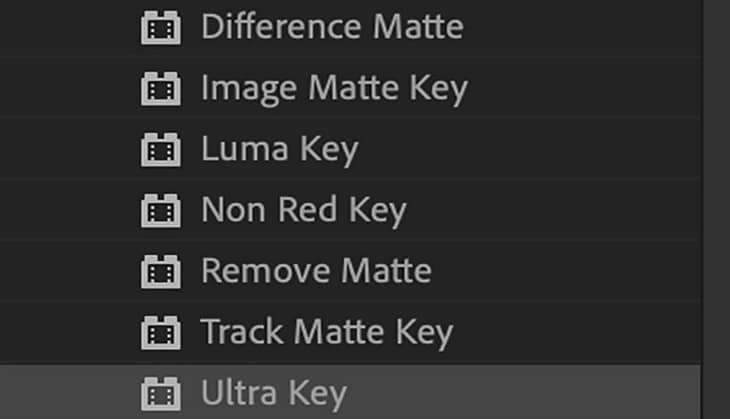
Step3 Click the “Effects” tab in the software panel and select Video Effects. Here, you will see the “Keying” option; select the Ultra Key, press and hold it to grab the key, and place it on your video clip.
![]()
Note: You can also search for the Ultra Key in the Adobe Premiere Pro search bar. Drag it to the video clip containing a background you want to remove.
Step4 As soon as you drop the Ultra Key to your footage, an Effects Control panel will pop up. Next, use the eyedropper tool in the Effects Control panel. Finally, select the background color on your video that you want to remove.
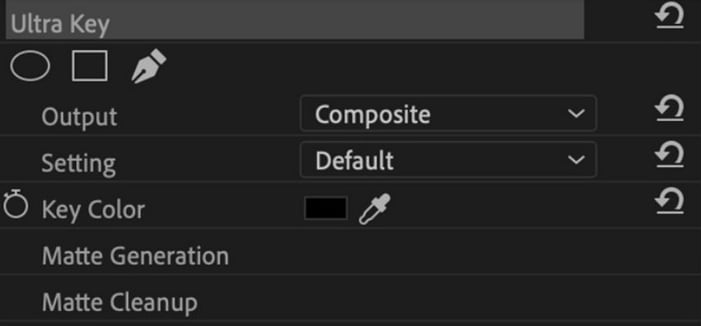
Step5 In the next step, click the drop-down menu next to the “Output” option, and select “Alpha Channel” from the list. This will reveal the details of your video and the edits. Also, click the “Setting” drop-down menu and select the Relaxed, Aggressive, or Custom option for the video effect.

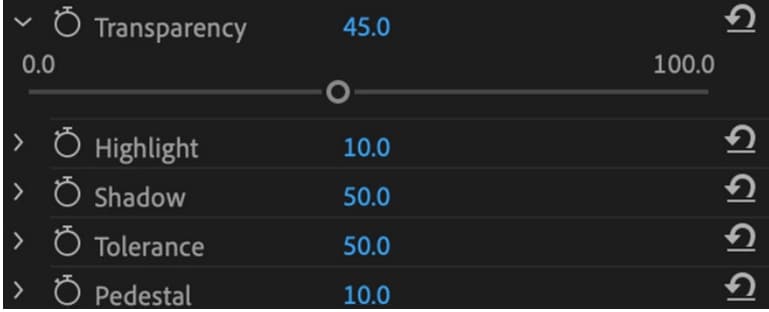
Step6 Select the “Matte Generation“ below Key Color. Try different levels for Highlight, Shadow, Tolerance, Transparency, Pedestal, and other settings to further clean the matte for a premium effect.
Step7 In this step,choose the “Matte Cleanup” option to expand its settings and clean up the edges of your clip. You will see various options here, but the most important one is “Choke.” It will shrink the object’s borders and “Soften” to add fuzz.
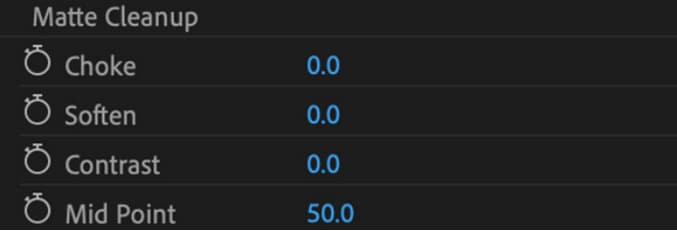
If you see a background color spill on your video after playing with the above settings, click “Spill Suppression” beneath Matte Cleanup to expand its options and choose the desired settings to resolve this issue.
That’s about it! You have successfully removed the video background in Premiere Pro.
Step8 In the last step, you need to save, render, and export your video with the removed background. To do this, click the “File” option on the Premiere Pro Media Browser, and choose “Export” to explore the “Media” menu.
Choose the format in the Export Settings, as it is compatible with most devices. Next, choose a valid Preset and resolution, and click “Export” to begin the rendering process. Finally, save your edited background video again, and export the video to the desired destination.
Is There Any Best Alternative to Remove Video’s Background?
Although Adobe Premiere Pro is an excellent choice, the software can be a little overzealous for beginners. But don’t fret; there is an alternative for newbie to remove the video background.
Many video content creators recommended Wondershare Filmora as a user-friendly video editing software. This software loads with customization options and compact feature, including the Human Segmentation effect. With it, you can isolate objects from the background of a video without a green screen.
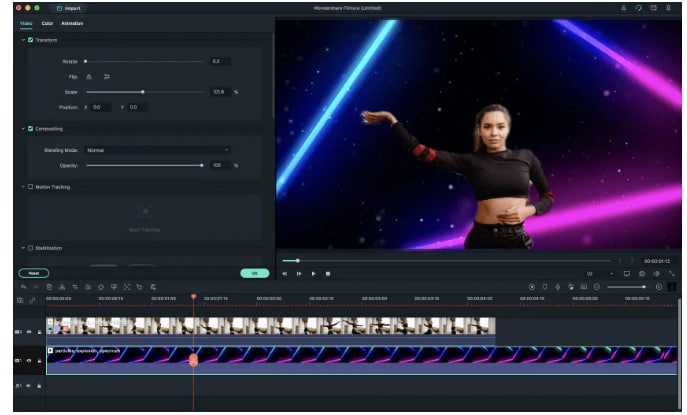
Let’s take a quick look at Filmora video editing marvel features:
- Comes with a free trial and is priced to meet most video designers’ production needs.
- Remove the video background with four quick steps.
- View the foreground of your video in real-time after background removal.
- Numerous customization options to add a different background or an image to the original content.
- Add the removed background as an overlay on top of another clip.
- Drag and drop a video clip to another track in the timeline for cutting, trimming, and elimination purposes.
- Using the “Human Segregation effect” in the AI Portrait on any imported video is simple.
- See objects isolated from the background in the Preview mode, which allows you to adjust the edges, feathers, and thickness accordingly.
- Easy export options supporting various compatible formats.
Additionally, we have provided you with a video tutorial about How to Remove and Change Video Background Without Green Screen with Filmora:
Free Download For Win 7 or later(64-bit)
Free Download For macOS 10.14 or later
Conclusion
This comprehensive guide explains how to remove the video background in Premier Pro using the Ultra key instead of the Color Key.
We have also discussed an excellent alternative to Premier Pro that can eliminate any background in your video content within minutes.
This article helped solve your queries. As a result, you can now create quality video content for your audience without paying thousands of dollars to professional video editors to do the background removal for you.
Step4 As soon as you drop the Ultra Key to your footage, an Effects Control panel will pop up. Next, use the eyedropper tool in the Effects Control panel. Finally, select the background color on your video that you want to remove.

Step5 In the next step, click the drop-down menu next to the “Output” option, and select “Alpha Channel” from the list. This will reveal the details of your video and the edits. Also, click the “Setting” drop-down menu and select the Relaxed, Aggressive, or Custom option for the video effect.

Step6 Select the “Matte Generation“ below Key Color. Try different levels for Highlight, Shadow, Tolerance, Transparency, Pedestal, and other settings to further clean the matte for a premium effect.

Step7 In this step,choose the “Matte Cleanup” option to expand its settings and clean up the edges of your clip. You will see various options here, but the most important one is “Choke.” It will shrink the object’s borders and “Soften” to add fuzz.

If you see a background color spill on your video after playing with the above settings, click “Spill Suppression” beneath Matte Cleanup to expand its options and choose the desired settings to resolve this issue.
That’s about it! You have successfully removed the video background in Premiere Pro.
Step8 In the last step, you need to save, render, and export your video with the removed background. To do this, click the “File” option on the Premiere Pro Media Browser, and choose “Export” to explore the “Media” menu.
Choose the format in the Export Settings, as it is compatible with most devices. Next, choose a valid Preset and resolution, and click “Export” to begin the rendering process. Finally, save your edited background video again, and export the video to the desired destination.
Is There Any Best Alternative to Remove Video’s Background?
Although Adobe Premiere Pro is an excellent choice, the software can be a little overzealous for beginners. But don’t fret; there is an alternative for newbie to remove the video background.
Many video content creators recommended Wondershare Filmora as a user-friendly video editing software. This software loads with customization options and compact feature, including the Human Segmentation effect. With it, you can isolate objects from the background of a video without a green screen.

Let’s take a quick look at Filmora video editing marvel features:
- Comes with a free trial and is priced to meet most video designers’ production needs.
- Remove the video background with four quick steps.
- View the foreground of your video in real-time after background removal.
- Numerous customization options to add a different background or an image to the original content.
- Add the removed background as an overlay on top of another clip.
- Drag and drop a video clip to another track in the timeline for cutting, trimming, and elimination purposes.
- Using the “Human Segregation effect” in the AI Portrait on any imported video is simple.
- See objects isolated from the background in the Preview mode, which allows you to adjust the edges, feathers, and thickness accordingly.
- Easy export options supporting various compatible formats.
Additionally, we have provided you with a video tutorial about How to Remove and Change Video Background Without Green Screen with Filmora:
Free Download For Win 7 or later(64-bit)
Free Download For macOS 10.14 or later
Conclusion
This comprehensive guide explains how to remove the video background in Premier Pro using the Ultra key instead of the Color Key.
We have also discussed an excellent alternative to Premier Pro that can eliminate any background in your video content within minutes.
This article helped solve your queries. As a result, you can now create quality video content for your audience without paying thousands of dollars to professional video editors to do the background removal for you.
The Complete Guide to Make a Text Collage
The Ultimate Guide to Make a Text Collage
An easy yet powerful editor
Numerous effects to choose from
Detailed tutorials provided by the official channel
Collages are everywhere, be it online sites, social media platforms, magazines, birthday wishes, newspapers, and much tools, more. Organizing your images in some random or specific shapes to offer a visually enhanced experience is the major purpose of the collage. Besides adding images, there are several other elements and factors that combine to make up an eye-catchy collage and a key one is the “text”.

So, if you too are considering to create a photo collage with text, just stick to us and keep reading.
In this article
01 [Why Create a Text Collage?](#Part 1)
02 [When to Use Text Collage?](#Part 2)
03 [Factors to Be Considered While Creating a Text Collage](#Part 3)
04 [Top 5 Tools to Create a Text Collage](#Part 4)
05 [Use Stock Images to Pep Up Your Text Collage](#Part 5)
Part 1 Why Create a Text Collage?
Adding a text to your collage is beneficial in ways more than one. The text brings versatility to your collage, and also helps in conveying the message along with the theme. Moreover, a little interesting text line along with animations added to your collage enhances its overall visual communication and looks.
Part 2 When to Use Text Collage?
Though text can be added to all types of collages there are some specific occasions when the purpose of adding the text becomes more meaningful. For instance, adding text while creating a birthday collage, mood board collage, anniversary collage, scrapbook collage, holiday collage, or other similar ones helps in expressing the feelings, theme, and emotions in a better manner.
Part 3 Factors to Be Considered While Creating a Text Collage
There are several text-adding ways and methods by which you can make your collage look interesting. Considering a few important ones will let you create an impressive collage in no time. Check out some useful tips and tricks to use text within the photo collage.
● Identify if you wish to add the text as the focal point or not. If you are using the text as the first striking thing in the collage then ensure that it is eye-catchy and interesting.
● Keep a good balance between the text and the images so that it does not look weird.
● The color and the font of the text are among the most important factors to be considered. Make sure that both the text color as well as the font match and blend well with the theme and the images in the collage.
● Keeping the background of the text simple, less detailed, and also clutter-free is important so that the text content comes out nicely.
● Make sure only to add a few words or lines in your collage to make it look sophisticated. It’s majorly a photo collage with a dash of the text so keep it that way only and not vice-versa.
Part 4 Top 5 Tools to Create a Text Collage
There are several desktop, online, and app based text collage maker tools available. Some of the popular ones are enlisted below.
01Adobe Creative Cloud Express
Adobe is known for its advanced image editing options and its online version called creative cloud is no less. Using this browser-based tool you can create some amazing collage and also add text easily. The site offers an array of templates to choose the design as per your theme and the interface is also user-friendly. You need to free sign-up to use the program.

02Befunky
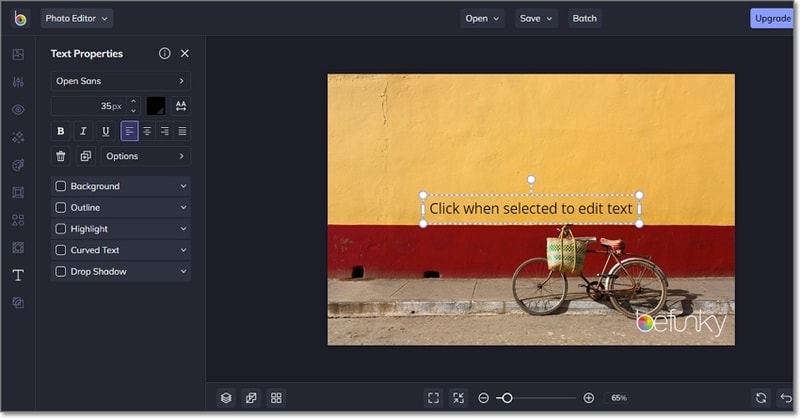
This is another interesting online tool that can be used to add text to your collages, photo projects, and designs. Free to use, the tool has multiple options for text customization like selecting the body text, headline, outline, shadow drop options, and more. Pre-set designs for adding the text to your collages are also available here.
03Fotor
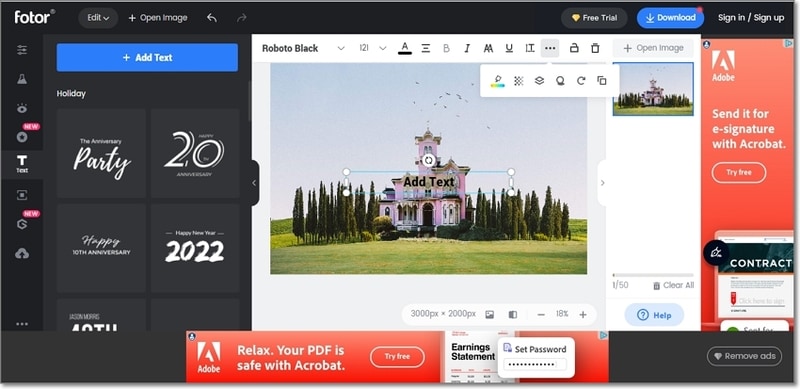
When it comes to creating collages and customizing them, Fotor is one of the most widely used tools. This free online program will let you add text to your created collages for enhancing their overall looks. Several text-based templates are also available to choose from and you can even customize the text parameters like font, size, spacing, highlight color, shadow, and more.
04Canva
Canva is a popular image editing online tool that supports several other functions as well including collage creation. Using this versatile program, you can add texts to your photos as well as collages easily. Several templates in an array of categories for collage creation are available and you can even personalize the text by changing its font, color, background, and other parameters.

05PhotoCollage
This is a simple to use online collage maker with text tool that helps you create a decent collage with a text in no time. You can either use the blank space to add images and set them in the desired format for a collage or choose from the pre-set templates. Using the tool you can change the position of the text, flip it, rotate it, select the font, color, size, shadow, stroke and customize it in several other ways.
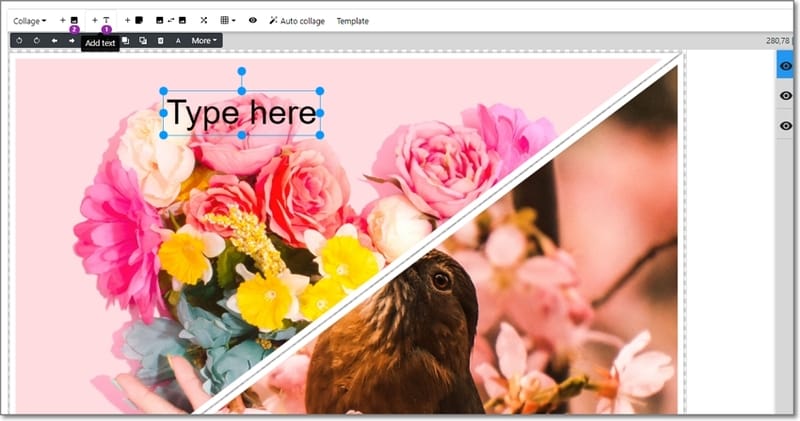
Part 5 Use stock images to pep up your text collage
The text is the additional elements of the collage to make them look more interesting while the images and photos remain as the main content. So, no matter how interesting your text and its design are, if the images in the collages are not interesting, the collage will be of no good.
So, if you do not have interesting pictures matching your theme in high quality, no need to worry as there are several tools that can help you use their stock images for creating a collage or other purposes. One such superb tool we suggest here is Wondershare Filmora Video Editor which is a complete video editing tool that also has an impressive collection of pictures and other stick media in high quality.
Search for the pictures from several categories matching your theme at Filmora and use them without any worries. Moreover, you can even create a video collage using the software’s split-screen feature.
For Win 7 or later (64-bit)
For macOS 10.12 or later
● Ending Thoughts →
● Text collage are the ones where text is added to the photo collage to convey a message or make it look more interesting.
● While creating a text collage there are several factors to be considered like the text color, font, background, and more.
● A number of text collage maker online, desktop, and app-based tools available.
● To get stock images in high quality for your collages, Wondershare Filmora is an excellent tool.
Collages are everywhere, be it online sites, social media platforms, magazines, birthday wishes, newspapers, and much tools, more. Organizing your images in some random or specific shapes to offer a visually enhanced experience is the major purpose of the collage. Besides adding images, there are several other elements and factors that combine to make up an eye-catchy collage and a key one is the “text”.

So, if you too are considering to create a photo collage with text, just stick to us and keep reading.
In this article
01 [Why Create a Text Collage?](#Part 1)
02 [When to Use Text Collage?](#Part 2)
03 [Factors to Be Considered While Creating a Text Collage](#Part 3)
04 [Top 5 Tools to Create a Text Collage](#Part 4)
05 [Use Stock Images to Pep Up Your Text Collage](#Part 5)
Part 1 Why Create a Text Collage?
Adding a text to your collage is beneficial in ways more than one. The text brings versatility to your collage, and also helps in conveying the message along with the theme. Moreover, a little interesting text line along with animations added to your collage enhances its overall visual communication and looks.
Part 2 When to Use Text Collage?
Though text can be added to all types of collages there are some specific occasions when the purpose of adding the text becomes more meaningful. For instance, adding text while creating a birthday collage, mood board collage, anniversary collage, scrapbook collage, holiday collage, or other similar ones helps in expressing the feelings, theme, and emotions in a better manner.
Part 3 Factors to Be Considered While Creating a Text Collage
There are several text-adding ways and methods by which you can make your collage look interesting. Considering a few important ones will let you create an impressive collage in no time. Check out some useful tips and tricks to use text within the photo collage.
● Identify if you wish to add the text as the focal point or not. If you are using the text as the first striking thing in the collage then ensure that it is eye-catchy and interesting.
● Keep a good balance between the text and the images so that it does not look weird.
● The color and the font of the text are among the most important factors to be considered. Make sure that both the text color as well as the font match and blend well with the theme and the images in the collage.
● Keeping the background of the text simple, less detailed, and also clutter-free is important so that the text content comes out nicely.
● Make sure only to add a few words or lines in your collage to make it look sophisticated. It’s majorly a photo collage with a dash of the text so keep it that way only and not vice-versa.
Part 4 Top 5 Tools to Create a Text Collage
There are several desktop, online, and app based text collage maker tools available. Some of the popular ones are enlisted below.
01Adobe Creative Cloud Express
Adobe is known for its advanced image editing options and its online version called creative cloud is no less. Using this browser-based tool you can create some amazing collage and also add text easily. The site offers an array of templates to choose the design as per your theme and the interface is also user-friendly. You need to free sign-up to use the program.

02Befunky
This is another interesting online tool that can be used to add text to your collages, photo projects, and designs. Free to use, the tool has multiple options for text customization like selecting the body text, headline, outline, shadow drop options, and more. Pre-set designs for adding the text to your collages are also available here.

03Fotor
When it comes to creating collages and customizing them, Fotor is one of the most widely used tools. This free online program will let you add text to your created collages for enhancing their overall looks. Several text-based templates are also available to choose from and you can even customize the text parameters like font, size, spacing, highlight color, shadow, and more.

04Canva
Canva is a popular image editing online tool that supports several other functions as well including collage creation. Using this versatile program, you can add texts to your photos as well as collages easily. Several templates in an array of categories for collage creation are available and you can even personalize the text by changing its font, color, background, and other parameters.

05PhotoCollage
This is a simple to use online collage maker with text tool that helps you create a decent collage with a text in no time. You can either use the blank space to add images and set them in the desired format for a collage or choose from the pre-set templates. Using the tool you can change the position of the text, flip it, rotate it, select the font, color, size, shadow, stroke and customize it in several other ways.

Part 5 Use stock images to pep up your text collage
The text is the additional elements of the collage to make them look more interesting while the images and photos remain as the main content. So, no matter how interesting your text and its design are, if the images in the collages are not interesting, the collage will be of no good.
So, if you do not have interesting pictures matching your theme in high quality, no need to worry as there are several tools that can help you use their stock images for creating a collage or other purposes. One such superb tool we suggest here is Wondershare Filmora Video Editor which is a complete video editing tool that also has an impressive collection of pictures and other stick media in high quality.
Search for the pictures from several categories matching your theme at Filmora and use them without any worries. Moreover, you can even create a video collage using the software’s split-screen feature.
For Win 7 or later (64-bit)
For macOS 10.12 or later
● Ending Thoughts →
● Text collage are the ones where text is added to the photo collage to convey a message or make it look more interesting.
● While creating a text collage there are several factors to be considered like the text color, font, background, and more.
● A number of text collage maker online, desktop, and app-based tools available.
● To get stock images in high quality for your collages, Wondershare Filmora is an excellent tool.
Collages are everywhere, be it online sites, social media platforms, magazines, birthday wishes, newspapers, and much tools, more. Organizing your images in some random or specific shapes to offer a visually enhanced experience is the major purpose of the collage. Besides adding images, there are several other elements and factors that combine to make up an eye-catchy collage and a key one is the “text”.

So, if you too are considering to create a photo collage with text, just stick to us and keep reading.
In this article
01 [Why Create a Text Collage?](#Part 1)
02 [When to Use Text Collage?](#Part 2)
03 [Factors to Be Considered While Creating a Text Collage](#Part 3)
04 [Top 5 Tools to Create a Text Collage](#Part 4)
05 [Use Stock Images to Pep Up Your Text Collage](#Part 5)
Part 1 Why Create a Text Collage?
Adding a text to your collage is beneficial in ways more than one. The text brings versatility to your collage, and also helps in conveying the message along with the theme. Moreover, a little interesting text line along with animations added to your collage enhances its overall visual communication and looks.
Part 2 When to Use Text Collage?
Though text can be added to all types of collages there are some specific occasions when the purpose of adding the text becomes more meaningful. For instance, adding text while creating a birthday collage, mood board collage, anniversary collage, scrapbook collage, holiday collage, or other similar ones helps in expressing the feelings, theme, and emotions in a better manner.
Part 3 Factors to Be Considered While Creating a Text Collage
There are several text-adding ways and methods by which you can make your collage look interesting. Considering a few important ones will let you create an impressive collage in no time. Check out some useful tips and tricks to use text within the photo collage.
● Identify if you wish to add the text as the focal point or not. If you are using the text as the first striking thing in the collage then ensure that it is eye-catchy and interesting.
● Keep a good balance between the text and the images so that it does not look weird.
● The color and the font of the text are among the most important factors to be considered. Make sure that both the text color as well as the font match and blend well with the theme and the images in the collage.
● Keeping the background of the text simple, less detailed, and also clutter-free is important so that the text content comes out nicely.
● Make sure only to add a few words or lines in your collage to make it look sophisticated. It’s majorly a photo collage with a dash of the text so keep it that way only and not vice-versa.
Part 4 Top 5 Tools to Create a Text Collage
There are several desktop, online, and app based text collage maker tools available. Some of the popular ones are enlisted below.
01Adobe Creative Cloud Express
Adobe is known for its advanced image editing options and its online version called creative cloud is no less. Using this browser-based tool you can create some amazing collage and also add text easily. The site offers an array of templates to choose the design as per your theme and the interface is also user-friendly. You need to free sign-up to use the program.

02Befunky
This is another interesting online tool that can be used to add text to your collages, photo projects, and designs. Free to use, the tool has multiple options for text customization like selecting the body text, headline, outline, shadow drop options, and more. Pre-set designs for adding the text to your collages are also available here.

03Fotor
When it comes to creating collages and customizing them, Fotor is one of the most widely used tools. This free online program will let you add text to your created collages for enhancing their overall looks. Several text-based templates are also available to choose from and you can even customize the text parameters like font, size, spacing, highlight color, shadow, and more.

04Canva
Canva is a popular image editing online tool that supports several other functions as well including collage creation. Using this versatile program, you can add texts to your photos as well as collages easily. Several templates in an array of categories for collage creation are available and you can even personalize the text by changing its font, color, background, and other parameters.

05PhotoCollage
This is a simple to use online collage maker with text tool that helps you create a decent collage with a text in no time. You can either use the blank space to add images and set them in the desired format for a collage or choose from the pre-set templates. Using the tool you can change the position of the text, flip it, rotate it, select the font, color, size, shadow, stroke and customize it in several other ways.

Part 5 Use stock images to pep up your text collage
The text is the additional elements of the collage to make them look more interesting while the images and photos remain as the main content. So, no matter how interesting your text and its design are, if the images in the collages are not interesting, the collage will be of no good.
So, if you do not have interesting pictures matching your theme in high quality, no need to worry as there are several tools that can help you use their stock images for creating a collage or other purposes. One such superb tool we suggest here is Wondershare Filmora Video Editor which is a complete video editing tool that also has an impressive collection of pictures and other stick media in high quality.
Search for the pictures from several categories matching your theme at Filmora and use them without any worries. Moreover, you can even create a video collage using the software’s split-screen feature.
For Win 7 or later (64-bit)
For macOS 10.12 or later
● Ending Thoughts →
● Text collage are the ones where text is added to the photo collage to convey a message or make it look more interesting.
● While creating a text collage there are several factors to be considered like the text color, font, background, and more.
● A number of text collage maker online, desktop, and app-based tools available.
● To get stock images in high quality for your collages, Wondershare Filmora is an excellent tool.
Collages are everywhere, be it online sites, social media platforms, magazines, birthday wishes, newspapers, and much tools, more. Organizing your images in some random or specific shapes to offer a visually enhanced experience is the major purpose of the collage. Besides adding images, there are several other elements and factors that combine to make up an eye-catchy collage and a key one is the “text”.

So, if you too are considering to create a photo collage with text, just stick to us and keep reading.
In this article
01 [Why Create a Text Collage?](#Part 1)
02 [When to Use Text Collage?](#Part 2)
03 [Factors to Be Considered While Creating a Text Collage](#Part 3)
04 [Top 5 Tools to Create a Text Collage](#Part 4)
05 [Use Stock Images to Pep Up Your Text Collage](#Part 5)
Part 1 Why Create a Text Collage?
Adding a text to your collage is beneficial in ways more than one. The text brings versatility to your collage, and also helps in conveying the message along with the theme. Moreover, a little interesting text line along with animations added to your collage enhances its overall visual communication and looks.
Part 2 When to Use Text Collage?
Though text can be added to all types of collages there are some specific occasions when the purpose of adding the text becomes more meaningful. For instance, adding text while creating a birthday collage, mood board collage, anniversary collage, scrapbook collage, holiday collage, or other similar ones helps in expressing the feelings, theme, and emotions in a better manner.
Part 3 Factors to Be Considered While Creating a Text Collage
There are several text-adding ways and methods by which you can make your collage look interesting. Considering a few important ones will let you create an impressive collage in no time. Check out some useful tips and tricks to use text within the photo collage.
● Identify if you wish to add the text as the focal point or not. If you are using the text as the first striking thing in the collage then ensure that it is eye-catchy and interesting.
● Keep a good balance between the text and the images so that it does not look weird.
● The color and the font of the text are among the most important factors to be considered. Make sure that both the text color as well as the font match and blend well with the theme and the images in the collage.
● Keeping the background of the text simple, less detailed, and also clutter-free is important so that the text content comes out nicely.
● Make sure only to add a few words or lines in your collage to make it look sophisticated. It’s majorly a photo collage with a dash of the text so keep it that way only and not vice-versa.
Part 4 Top 5 Tools to Create a Text Collage
There are several desktop, online, and app based text collage maker tools available. Some of the popular ones are enlisted below.
01Adobe Creative Cloud Express
Adobe is known for its advanced image editing options and its online version called creative cloud is no less. Using this browser-based tool you can create some amazing collage and also add text easily. The site offers an array of templates to choose the design as per your theme and the interface is also user-friendly. You need to free sign-up to use the program.

02Befunky
This is another interesting online tool that can be used to add text to your collages, photo projects, and designs. Free to use, the tool has multiple options for text customization like selecting the body text, headline, outline, shadow drop options, and more. Pre-set designs for adding the text to your collages are also available here.

03Fotor
When it comes to creating collages and customizing them, Fotor is one of the most widely used tools. This free online program will let you add text to your created collages for enhancing their overall looks. Several text-based templates are also available to choose from and you can even customize the text parameters like font, size, spacing, highlight color, shadow, and more.

04Canva
Canva is a popular image editing online tool that supports several other functions as well including collage creation. Using this versatile program, you can add texts to your photos as well as collages easily. Several templates in an array of categories for collage creation are available and you can even personalize the text by changing its font, color, background, and other parameters.

05PhotoCollage
This is a simple to use online collage maker with text tool that helps you create a decent collage with a text in no time. You can either use the blank space to add images and set them in the desired format for a collage or choose from the pre-set templates. Using the tool you can change the position of the text, flip it, rotate it, select the font, color, size, shadow, stroke and customize it in several other ways.

Part 5 Use stock images to pep up your text collage
The text is the additional elements of the collage to make them look more interesting while the images and photos remain as the main content. So, no matter how interesting your text and its design are, if the images in the collages are not interesting, the collage will be of no good.
So, if you do not have interesting pictures matching your theme in high quality, no need to worry as there are several tools that can help you use their stock images for creating a collage or other purposes. One such superb tool we suggest here is Wondershare Filmora Video Editor which is a complete video editing tool that also has an impressive collection of pictures and other stick media in high quality.
Search for the pictures from several categories matching your theme at Filmora and use them without any worries. Moreover, you can even create a video collage using the software’s split-screen feature.
For Win 7 or later (64-bit)
For macOS 10.12 or later
● Ending Thoughts →
● Text collage are the ones where text is added to the photo collage to convey a message or make it look more interesting.
● While creating a text collage there are several factors to be considered like the text color, font, background, and more.
● A number of text collage maker online, desktop, and app-based tools available.
● To get stock images in high quality for your collages, Wondershare Filmora is an excellent tool.
How to Do Datamoshing Effect in After Effects?
Experimenting with new effects and filters has become part and parcel of life, especially for creative professionals. Datamoshing is a similar effect that displays errors and flaws in the video clips to leave an impression on the audience. In most terms, the datamoshing effect shares similarities with the glitch effect.
Henceforth, the write-up shall focus on the introduction of this effect along with its workability. The procedure to create datamosh After Effects would also be covered. So, let us begin!
In this article
01 What is the Datamoshing Effect?
02 How Does Datamoshing Effect Work?
03 Step by Step to Create Datamoshing Effect in After Effects (Without Plugin)
04 How to Do Datamoshing Effect with Datamosh Plugin in After Effects
Part 1: What is the Datamoshing Effect?
Before going into the depths of workability and operation of the datamoshing effect in After Effects, let us understand the effect in detail. The datamoshing effect plays with the video compression to corrupt the pixels of the footage.
In this effect, the pixels glitch and appear to melt, duplicate, and create a projection organically. Also known as databending, it is a complicated technique in which movement of one layer is introduced to another layer of the video clip.
Lossy compression and removed frames help develop a psychedelic result effortlessly. Presently, datamosh After Effects has gained popularity as it helps bring change to the video and engages the audience.
Part 2: How Does Datamoshing Effect Work?
The sub-section informs the content creators and creative professionals regarding the workability of the datamoshing effect in video clips. Hence, let us commence this.
Datamoshing eliminates the new picture frame and keeps those frames that control the movement of the pixels. It leads to the picture pixels going into different directions instead of the usual one, thus, creating a glitch effect. These glitch effects are used in unique mediums to create a classy yet ancient vibe.
The datamoshing effect can be noticed between the cuts and motion. It is the process of corrupting the imagery in which the I-frames are replaced and P-frames are applied in the wrong picture. Let us dive right into two types of datamoshing.
The first type of datamoshing is created when the I-frame of the video is removed. In this scenario, the pixels from the previous scene are projected into the next scene smoothly. It gives the impression that the pixels have been tracked into the next shot.
The second kind of datamoshing, known to humankind, is when the d-frame of the video is duplicated. It leads the footage to show images and colors being bloomed together as the pixels are equivalent, coming through the same motion path.
Part 3: Step by Step to Create Datamoshing Effect in After Effects (Without Plugin)
Understanding the datamosh After Effects is one thing, and incorporating it in your footage is another. The section shall walk you through the step-by-step guide to create the After Effects’ datamoshing effect without a plugin. So, let’s go, shall we?
Step 1: Preliminary Process
The first step is easy. Open After Effects from your system. Import the targeted video that needs the datamosh effect. After that, head to the “Content-Aware Fill” to begin the process.

Step 2: Creating the Reference Frame
Use the playhead where you wish to create the effect, and then click on “Create Reference Frame.” The picture frame opens in Photoshop, and the user is expected to save it. Now, go back to the After Effects.

Step 3: Smearing Process
Now, hide the top layer so that the smearing can occur. Turn the Masks to “None” so that you can perform the masking. Split the second layer to duplicate the layer as we make changes to it. Set the “Masks” to “Subtract and then add a refine soft matte.

Step 4: Pre-composing the Clip
It is important to pre-compose the clip, so right-click on the timeline and hit “Pre-compose” to the menu list that appears. Tick mark “Move all attributes into the new composition” and rename the clip afterward. Hit “OK.”

Step 5: Rendering Queue
Double-click on the timeline, hold shift and drag it until the clip snaps. Press “B” on your keyboard and “N” on the other side to snap the work area. Navigate to “File” and “Export” and then click on “Render Queue.”

Step 6: Generating Fill Layer
Import the file when it is done rendering and drag it to the timeline. Trim the work area again using B and N buttons from the keyboard. Ensure that the fill method is “Surface,” and the range is “Work Area.” Click on “Generate Fill Layer” to start the analyzing process.

Step 7: Creating the Transition
The user is expected to create a transition between the two shots. Use the track matte to make solid and fractal noise. In the “Noise and Grain” section, click on “Fractal noise” and then switch the fractal type to “Basic.” Now, keyframe the “Brightness” and simultaneously turn its level to black and white to create a transition.

Step 8: Achieving a Glitchy Effect
To give the glitchy effect, head to the “Effects and Presets” and hit “Posterize,” and reduce its level to a couple of integers. Pull the transition down to the fill layer and set it to “Luma Matte.” It will showcase the halo sign that we masked around the image.

Step 9: Have a Finer Imprint
To eliminate it, use the “Set Matte” channel and alter its layer to the one we pre-composed. Now, invert the matte. Moving on, navigate to the “Simple Choker” and reduce it to one pixel. For perfection, duplicate it and get a finer imprint.

Step 10: Final Process
Duplicate the grey solid and then extend the second clip to our fill. In the last step, change the layer of the second clip to “Luma Matte” and save the video. You are done with the process.

Part 4: How to Do Datamoshing Effect with Datamosh Plugin in After Effects
With its plugin, this sub-section revolves around creating the datamosh effect in After Effects. So, let us begin!
Step 1: Rendering the Work Area
Open After Effects and click on the (+) sign to set the in and out points. Click on the “Datamosh” to render the work area. The timeline will showcase the clip. Click on “Remove Frames” from the left panel and add a new mosh marker by pressing the (+) button beside “Remove Frames.”

Step 2: I-Frame Removal
The new remove frame marker will be on the timeline. Drag it to the new scene and then hit “Datamosh.” The I-frame removal effect can be shown on the screen. Again, click on (+) to add a new mosh module. Press “Multiply” and then “Average” from the menus that appear. Hit “Average previous 3” afterward.

Step 3: Using the Hold Frames Function
Set the in and out points of this mosh marker and again hit “Datamosh.” The work area will be rendered. Now, open the mosh module and toggle on the “Hold Frames” feature. Also, toggle on the previous render. Press the “Datamosh” again.

Step 4: Injecting the Frames
Toggle the “Inject Frames” on and press use previous render. Hit “Datamosh” afterward. In this way, the clip will hold the frames and inject them into the transition. Enhance the intensity of the moshing algorithm and eliminate “Remove Frames” and “Inject Frames.” Use the previous render and again hit “Datamosh.”

Step 5: Playing with the Acceleration
Increase the acceleration and bring the intensity back to what it was. Again, use the previous render and click “Datamosh.” Now, improve the intensity and set the acceleration back to 0. Alter the “Blend” as much you need to mix the original and present motion of the transition. Press the “Datamosh.”

Step 6: Changing the Threshold
Moving on to the threshold feature, this function is a gatekeeper and decides if a pixel will be moshed. Inverse the intensity of the clip, change the blend to be 0, and set the threshold to be a small integer to find out the impact first. It can be enhanced later on. Uncheck the previous render if you are using the new clip for threshold. Hit “Datamosh” again. Now, export the video, and you are done with the datamoshing.

Conclusion
YouTubers and content creators use the Datamoshing effect to offer magic to the workplace. The article offered an extensive guide to effortlessly adding this effect in After Effects. The foundation and workability of the datamosh effect were also the cruces of the article. It is recommended that the user properly know the software before getting into the process.
02 How Does Datamoshing Effect Work?
03 Step by Step to Create Datamoshing Effect in After Effects (Without Plugin)
04 How to Do Datamoshing Effect with Datamosh Plugin in After Effects
Part 1: What is the Datamoshing Effect?
Before going into the depths of workability and operation of the datamoshing effect in After Effects, let us understand the effect in detail. The datamoshing effect plays with the video compression to corrupt the pixels of the footage.
In this effect, the pixels glitch and appear to melt, duplicate, and create a projection organically. Also known as databending, it is a complicated technique in which movement of one layer is introduced to another layer of the video clip.
Lossy compression and removed frames help develop a psychedelic result effortlessly. Presently, datamosh After Effects has gained popularity as it helps bring change to the video and engages the audience.
Part 2: How Does Datamoshing Effect Work?
The sub-section informs the content creators and creative professionals regarding the workability of the datamoshing effect in video clips. Hence, let us commence this.
Datamoshing eliminates the new picture frame and keeps those frames that control the movement of the pixels. It leads to the picture pixels going into different directions instead of the usual one, thus, creating a glitch effect. These glitch effects are used in unique mediums to create a classy yet ancient vibe.
The datamoshing effect can be noticed between the cuts and motion. It is the process of corrupting the imagery in which the I-frames are replaced and P-frames are applied in the wrong picture. Let us dive right into two types of datamoshing.
The first type of datamoshing is created when the I-frame of the video is removed. In this scenario, the pixels from the previous scene are projected into the next scene smoothly. It gives the impression that the pixels have been tracked into the next shot.
The second kind of datamoshing, known to humankind, is when the d-frame of the video is duplicated. It leads the footage to show images and colors being bloomed together as the pixels are equivalent, coming through the same motion path.
Part 3: Step by Step to Create Datamoshing Effect in After Effects (Without Plugin)
Understanding the datamosh After Effects is one thing, and incorporating it in your footage is another. The section shall walk you through the step-by-step guide to create the After Effects’ datamoshing effect without a plugin. So, let’s go, shall we?
Step 1: Preliminary Process
The first step is easy. Open After Effects from your system. Import the targeted video that needs the datamosh effect. After that, head to the “Content-Aware Fill” to begin the process.

Step 2: Creating the Reference Frame
Use the playhead where you wish to create the effect, and then click on “Create Reference Frame.” The picture frame opens in Photoshop, and the user is expected to save it. Now, go back to the After Effects.

Step 3: Smearing Process
Now, hide the top layer so that the smearing can occur. Turn the Masks to “None” so that you can perform the masking. Split the second layer to duplicate the layer as we make changes to it. Set the “Masks” to “Subtract and then add a refine soft matte.

Step 4: Pre-composing the Clip
It is important to pre-compose the clip, so right-click on the timeline and hit “Pre-compose” to the menu list that appears. Tick mark “Move all attributes into the new composition” and rename the clip afterward. Hit “OK.”

Step 5: Rendering Queue
Double-click on the timeline, hold shift and drag it until the clip snaps. Press “B” on your keyboard and “N” on the other side to snap the work area. Navigate to “File” and “Export” and then click on “Render Queue.”

Step 6: Generating Fill Layer
Import the file when it is done rendering and drag it to the timeline. Trim the work area again using B and N buttons from the keyboard. Ensure that the fill method is “Surface,” and the range is “Work Area.” Click on “Generate Fill Layer” to start the analyzing process.

Step 7: Creating the Transition
The user is expected to create a transition between the two shots. Use the track matte to make solid and fractal noise. In the “Noise and Grain” section, click on “Fractal noise” and then switch the fractal type to “Basic.” Now, keyframe the “Brightness” and simultaneously turn its level to black and white to create a transition.

Step 8: Achieving a Glitchy Effect
To give the glitchy effect, head to the “Effects and Presets” and hit “Posterize,” and reduce its level to a couple of integers. Pull the transition down to the fill layer and set it to “Luma Matte.” It will showcase the halo sign that we masked around the image.

Step 9: Have a Finer Imprint
To eliminate it, use the “Set Matte” channel and alter its layer to the one we pre-composed. Now, invert the matte. Moving on, navigate to the “Simple Choker” and reduce it to one pixel. For perfection, duplicate it and get a finer imprint.

Step 10: Final Process
Duplicate the grey solid and then extend the second clip to our fill. In the last step, change the layer of the second clip to “Luma Matte” and save the video. You are done with the process.

Part 4: How to Do Datamoshing Effect with Datamosh Plugin in After Effects
With its plugin, this sub-section revolves around creating the datamosh effect in After Effects. So, let us begin!
Step 1: Rendering the Work Area
Open After Effects and click on the (+) sign to set the in and out points. Click on the “Datamosh” to render the work area. The timeline will showcase the clip. Click on “Remove Frames” from the left panel and add a new mosh marker by pressing the (+) button beside “Remove Frames.”

Step 2: I-Frame Removal
The new remove frame marker will be on the timeline. Drag it to the new scene and then hit “Datamosh.” The I-frame removal effect can be shown on the screen. Again, click on (+) to add a new mosh module. Press “Multiply” and then “Average” from the menus that appear. Hit “Average previous 3” afterward.

Step 3: Using the Hold Frames Function
Set the in and out points of this mosh marker and again hit “Datamosh.” The work area will be rendered. Now, open the mosh module and toggle on the “Hold Frames” feature. Also, toggle on the previous render. Press the “Datamosh” again.

Step 4: Injecting the Frames
Toggle the “Inject Frames” on and press use previous render. Hit “Datamosh” afterward. In this way, the clip will hold the frames and inject them into the transition. Enhance the intensity of the moshing algorithm and eliminate “Remove Frames” and “Inject Frames.” Use the previous render and again hit “Datamosh.”

Step 5: Playing with the Acceleration
Increase the acceleration and bring the intensity back to what it was. Again, use the previous render and click “Datamosh.” Now, improve the intensity and set the acceleration back to 0. Alter the “Blend” as much you need to mix the original and present motion of the transition. Press the “Datamosh.”

Step 6: Changing the Threshold
Moving on to the threshold feature, this function is a gatekeeper and decides if a pixel will be moshed. Inverse the intensity of the clip, change the blend to be 0, and set the threshold to be a small integer to find out the impact first. It can be enhanced later on. Uncheck the previous render if you are using the new clip for threshold. Hit “Datamosh” again. Now, export the video, and you are done with the datamoshing.

Conclusion
YouTubers and content creators use the Datamoshing effect to offer magic to the workplace. The article offered an extensive guide to effortlessly adding this effect in After Effects. The foundation and workability of the datamosh effect were also the cruces of the article. It is recommended that the user properly know the software before getting into the process.
02 How Does Datamoshing Effect Work?
03 Step by Step to Create Datamoshing Effect in After Effects (Without Plugin)
04 How to Do Datamoshing Effect with Datamosh Plugin in After Effects
Part 1: What is the Datamoshing Effect?
Before going into the depths of workability and operation of the datamoshing effect in After Effects, let us understand the effect in detail. The datamoshing effect plays with the video compression to corrupt the pixels of the footage.
In this effect, the pixels glitch and appear to melt, duplicate, and create a projection organically. Also known as databending, it is a complicated technique in which movement of one layer is introduced to another layer of the video clip.
Lossy compression and removed frames help develop a psychedelic result effortlessly. Presently, datamosh After Effects has gained popularity as it helps bring change to the video and engages the audience.
Part 2: How Does Datamoshing Effect Work?
The sub-section informs the content creators and creative professionals regarding the workability of the datamoshing effect in video clips. Hence, let us commence this.
Datamoshing eliminates the new picture frame and keeps those frames that control the movement of the pixels. It leads to the picture pixels going into different directions instead of the usual one, thus, creating a glitch effect. These glitch effects are used in unique mediums to create a classy yet ancient vibe.
The datamoshing effect can be noticed between the cuts and motion. It is the process of corrupting the imagery in which the I-frames are replaced and P-frames are applied in the wrong picture. Let us dive right into two types of datamoshing.
The first type of datamoshing is created when the I-frame of the video is removed. In this scenario, the pixels from the previous scene are projected into the next scene smoothly. It gives the impression that the pixels have been tracked into the next shot.
The second kind of datamoshing, known to humankind, is when the d-frame of the video is duplicated. It leads the footage to show images and colors being bloomed together as the pixels are equivalent, coming through the same motion path.
Part 3: Step by Step to Create Datamoshing Effect in After Effects (Without Plugin)
Understanding the datamosh After Effects is one thing, and incorporating it in your footage is another. The section shall walk you through the step-by-step guide to create the After Effects’ datamoshing effect without a plugin. So, let’s go, shall we?
Step 1: Preliminary Process
The first step is easy. Open After Effects from your system. Import the targeted video that needs the datamosh effect. After that, head to the “Content-Aware Fill” to begin the process.

Step 2: Creating the Reference Frame
Use the playhead where you wish to create the effect, and then click on “Create Reference Frame.” The picture frame opens in Photoshop, and the user is expected to save it. Now, go back to the After Effects.

Step 3: Smearing Process
Now, hide the top layer so that the smearing can occur. Turn the Masks to “None” so that you can perform the masking. Split the second layer to duplicate the layer as we make changes to it. Set the “Masks” to “Subtract and then add a refine soft matte.

Step 4: Pre-composing the Clip
It is important to pre-compose the clip, so right-click on the timeline and hit “Pre-compose” to the menu list that appears. Tick mark “Move all attributes into the new composition” and rename the clip afterward. Hit “OK.”

Step 5: Rendering Queue
Double-click on the timeline, hold shift and drag it until the clip snaps. Press “B” on your keyboard and “N” on the other side to snap the work area. Navigate to “File” and “Export” and then click on “Render Queue.”

Step 6: Generating Fill Layer
Import the file when it is done rendering and drag it to the timeline. Trim the work area again using B and N buttons from the keyboard. Ensure that the fill method is “Surface,” and the range is “Work Area.” Click on “Generate Fill Layer” to start the analyzing process.

Step 7: Creating the Transition
The user is expected to create a transition between the two shots. Use the track matte to make solid and fractal noise. In the “Noise and Grain” section, click on “Fractal noise” and then switch the fractal type to “Basic.” Now, keyframe the “Brightness” and simultaneously turn its level to black and white to create a transition.

Step 8: Achieving a Glitchy Effect
To give the glitchy effect, head to the “Effects and Presets” and hit “Posterize,” and reduce its level to a couple of integers. Pull the transition down to the fill layer and set it to “Luma Matte.” It will showcase the halo sign that we masked around the image.

Step 9: Have a Finer Imprint
To eliminate it, use the “Set Matte” channel and alter its layer to the one we pre-composed. Now, invert the matte. Moving on, navigate to the “Simple Choker” and reduce it to one pixel. For perfection, duplicate it and get a finer imprint.

Step 10: Final Process
Duplicate the grey solid and then extend the second clip to our fill. In the last step, change the layer of the second clip to “Luma Matte” and save the video. You are done with the process.

Part 4: How to Do Datamoshing Effect with Datamosh Plugin in After Effects
With its plugin, this sub-section revolves around creating the datamosh effect in After Effects. So, let us begin!
Step 1: Rendering the Work Area
Open After Effects and click on the (+) sign to set the in and out points. Click on the “Datamosh” to render the work area. The timeline will showcase the clip. Click on “Remove Frames” from the left panel and add a new mosh marker by pressing the (+) button beside “Remove Frames.”

Step 2: I-Frame Removal
The new remove frame marker will be on the timeline. Drag it to the new scene and then hit “Datamosh.” The I-frame removal effect can be shown on the screen. Again, click on (+) to add a new mosh module. Press “Multiply” and then “Average” from the menus that appear. Hit “Average previous 3” afterward.

Step 3: Using the Hold Frames Function
Set the in and out points of this mosh marker and again hit “Datamosh.” The work area will be rendered. Now, open the mosh module and toggle on the “Hold Frames” feature. Also, toggle on the previous render. Press the “Datamosh” again.

Step 4: Injecting the Frames
Toggle the “Inject Frames” on and press use previous render. Hit “Datamosh” afterward. In this way, the clip will hold the frames and inject them into the transition. Enhance the intensity of the moshing algorithm and eliminate “Remove Frames” and “Inject Frames.” Use the previous render and again hit “Datamosh.”

Step 5: Playing with the Acceleration
Increase the acceleration and bring the intensity back to what it was. Again, use the previous render and click “Datamosh.” Now, improve the intensity and set the acceleration back to 0. Alter the “Blend” as much you need to mix the original and present motion of the transition. Press the “Datamosh.”

Step 6: Changing the Threshold
Moving on to the threshold feature, this function is a gatekeeper and decides if a pixel will be moshed. Inverse the intensity of the clip, change the blend to be 0, and set the threshold to be a small integer to find out the impact first. It can be enhanced later on. Uncheck the previous render if you are using the new clip for threshold. Hit “Datamosh” again. Now, export the video, and you are done with the datamoshing.

Conclusion
YouTubers and content creators use the Datamoshing effect to offer magic to the workplace. The article offered an extensive guide to effortlessly adding this effect in After Effects. The foundation and workability of the datamosh effect were also the cruces of the article. It is recommended that the user properly know the software before getting into the process.
02 How Does Datamoshing Effect Work?
03 Step by Step to Create Datamoshing Effect in After Effects (Without Plugin)
04 How to Do Datamoshing Effect with Datamosh Plugin in After Effects
Part 1: What is the Datamoshing Effect?
Before going into the depths of workability and operation of the datamoshing effect in After Effects, let us understand the effect in detail. The datamoshing effect plays with the video compression to corrupt the pixels of the footage.
In this effect, the pixels glitch and appear to melt, duplicate, and create a projection organically. Also known as databending, it is a complicated technique in which movement of one layer is introduced to another layer of the video clip.
Lossy compression and removed frames help develop a psychedelic result effortlessly. Presently, datamosh After Effects has gained popularity as it helps bring change to the video and engages the audience.
Part 2: How Does Datamoshing Effect Work?
The sub-section informs the content creators and creative professionals regarding the workability of the datamoshing effect in video clips. Hence, let us commence this.
Datamoshing eliminates the new picture frame and keeps those frames that control the movement of the pixels. It leads to the picture pixels going into different directions instead of the usual one, thus, creating a glitch effect. These glitch effects are used in unique mediums to create a classy yet ancient vibe.
The datamoshing effect can be noticed between the cuts and motion. It is the process of corrupting the imagery in which the I-frames are replaced and P-frames are applied in the wrong picture. Let us dive right into two types of datamoshing.
The first type of datamoshing is created when the I-frame of the video is removed. In this scenario, the pixels from the previous scene are projected into the next scene smoothly. It gives the impression that the pixels have been tracked into the next shot.
The second kind of datamoshing, known to humankind, is when the d-frame of the video is duplicated. It leads the footage to show images and colors being bloomed together as the pixels are equivalent, coming through the same motion path.
Part 3: Step by Step to Create Datamoshing Effect in After Effects (Without Plugin)
Understanding the datamosh After Effects is one thing, and incorporating it in your footage is another. The section shall walk you through the step-by-step guide to create the After Effects’ datamoshing effect without a plugin. So, let’s go, shall we?
Step 1: Preliminary Process
The first step is easy. Open After Effects from your system. Import the targeted video that needs the datamosh effect. After that, head to the “Content-Aware Fill” to begin the process.

Step 2: Creating the Reference Frame
Use the playhead where you wish to create the effect, and then click on “Create Reference Frame.” The picture frame opens in Photoshop, and the user is expected to save it. Now, go back to the After Effects.

Step 3: Smearing Process
Now, hide the top layer so that the smearing can occur. Turn the Masks to “None” so that you can perform the masking. Split the second layer to duplicate the layer as we make changes to it. Set the “Masks” to “Subtract and then add a refine soft matte.

Step 4: Pre-composing the Clip
It is important to pre-compose the clip, so right-click on the timeline and hit “Pre-compose” to the menu list that appears. Tick mark “Move all attributes into the new composition” and rename the clip afterward. Hit “OK.”

Step 5: Rendering Queue
Double-click on the timeline, hold shift and drag it until the clip snaps. Press “B” on your keyboard and “N” on the other side to snap the work area. Navigate to “File” and “Export” and then click on “Render Queue.”

Step 6: Generating Fill Layer
Import the file when it is done rendering and drag it to the timeline. Trim the work area again using B and N buttons from the keyboard. Ensure that the fill method is “Surface,” and the range is “Work Area.” Click on “Generate Fill Layer” to start the analyzing process.

Step 7: Creating the Transition
The user is expected to create a transition between the two shots. Use the track matte to make solid and fractal noise. In the “Noise and Grain” section, click on “Fractal noise” and then switch the fractal type to “Basic.” Now, keyframe the “Brightness” and simultaneously turn its level to black and white to create a transition.

Step 8: Achieving a Glitchy Effect
To give the glitchy effect, head to the “Effects and Presets” and hit “Posterize,” and reduce its level to a couple of integers. Pull the transition down to the fill layer and set it to “Luma Matte.” It will showcase the halo sign that we masked around the image.

Step 9: Have a Finer Imprint
To eliminate it, use the “Set Matte” channel and alter its layer to the one we pre-composed. Now, invert the matte. Moving on, navigate to the “Simple Choker” and reduce it to one pixel. For perfection, duplicate it and get a finer imprint.

Step 10: Final Process
Duplicate the grey solid and then extend the second clip to our fill. In the last step, change the layer of the second clip to “Luma Matte” and save the video. You are done with the process.

Part 4: How to Do Datamoshing Effect with Datamosh Plugin in After Effects
With its plugin, this sub-section revolves around creating the datamosh effect in After Effects. So, let us begin!
Step 1: Rendering the Work Area
Open After Effects and click on the (+) sign to set the in and out points. Click on the “Datamosh” to render the work area. The timeline will showcase the clip. Click on “Remove Frames” from the left panel and add a new mosh marker by pressing the (+) button beside “Remove Frames.”

Step 2: I-Frame Removal
The new remove frame marker will be on the timeline. Drag it to the new scene and then hit “Datamosh.” The I-frame removal effect can be shown on the screen. Again, click on (+) to add a new mosh module. Press “Multiply” and then “Average” from the menus that appear. Hit “Average previous 3” afterward.

Step 3: Using the Hold Frames Function
Set the in and out points of this mosh marker and again hit “Datamosh.” The work area will be rendered. Now, open the mosh module and toggle on the “Hold Frames” feature. Also, toggle on the previous render. Press the “Datamosh” again.

Step 4: Injecting the Frames
Toggle the “Inject Frames” on and press use previous render. Hit “Datamosh” afterward. In this way, the clip will hold the frames and inject them into the transition. Enhance the intensity of the moshing algorithm and eliminate “Remove Frames” and “Inject Frames.” Use the previous render and again hit “Datamosh.”

Step 5: Playing with the Acceleration
Increase the acceleration and bring the intensity back to what it was. Again, use the previous render and click “Datamosh.” Now, improve the intensity and set the acceleration back to 0. Alter the “Blend” as much you need to mix the original and present motion of the transition. Press the “Datamosh.”

Step 6: Changing the Threshold
Moving on to the threshold feature, this function is a gatekeeper and decides if a pixel will be moshed. Inverse the intensity of the clip, change the blend to be 0, and set the threshold to be a small integer to find out the impact first. It can be enhanced later on. Uncheck the previous render if you are using the new clip for threshold. Hit “Datamosh” again. Now, export the video, and you are done with the datamoshing.

Conclusion
YouTubers and content creators use the Datamoshing effect to offer magic to the workplace. The article offered an extensive guide to effortlessly adding this effect in After Effects. The foundation and workability of the datamosh effect were also the cruces of the article. It is recommended that the user properly know the software before getting into the process.
Split Videos in the Lightworks [Step by Step]
Lightworks is among the best programs for editing the videos available for the Windows and Mac operating systems with no watermark. Through the accessible version of Lightworks, it is easy to export the videos into the MP4 format along with the resolution of 720p. There are different tools available in Lightworks so you can make videos for your YouTube channels, Vimeo, film making projects and different social media platforms.
Lightworks has become famous because it has been used for editing the popular movies of Hollywood. Along with the videos, it is straightforward to enhance the images by blending the colours. This article has a detailed description of how you can split the videos in Lightworks including the the discussion of splitting the Wondershare Filmora as an alternative. It is also a suitable choice.
How can you split the video clips in Lightworks?
Lightworks is software based on the cloud that consists of particular functionalities. It only includes editing and trimming, cutting, and splitting your video clips according to your requirements. Following are the easy-to-follow steps for splitting the clips in Lightworks:
Part1 - Splitting of one clip:
Step 1: The first step is importing the video into the timeline. It is simply through dragging the file on which you have to work.

Step 2: When the uploading is complete, you can cut and split the clips depending on your needs. Now, keep moving the play head in the specific direction from where you have to cut the clips—Press “C” on your keyboard.

Step 3: After getting the split clip, you can delete the remaining part that is not in use. For this, selecting the particular part is necessary and selecting the option of “Delete”. Even, you can press the “delete” key on your keyboard.

Step 4: When your video is ready, simply export the video by clicking right on the option of “All”. On the left lower side of the timeline, it is now clicked on “Export”.


Part 2- trimming of the clips in Lightworks
To trim the video clips in Lightworks, you require to hover the mouse towards the last of the video clip. Keep moving until and unless that part of the clip gets highlighted. After this step, start dragging till the previous where you want it.


An easier way to split the video clip
Even though Lightworks is a wonderful software for editing videos and images, its interface is easy to handle. But it is not supportive of different formats and 4K videos. For a few features, you might need the paid version of Lightworks. The most acquired solution to resolve this issue is Filmora Video Editor . It is freely available, and use all the tools according to your needs. That’s why it is gaining popularity, and users are increasing day by day. The latest versions of the Wondershare Filmora are available to enhance user experiences. You can export the outcome with ease from the tools.
For Win 7 or later (64-bit)
For macOS 10.14 or later
Features:
- Availability of drag and drag feature
- Can preview the functionalities you apply
- Easy to customize the images and videos
- Involvement of the animation
- Huge library available for the effects of visual and audio
- Splitting and merging the clips
Wondershare Filmora always offers to split the clips from the creative techniques. This tool is extremely useful, particularly when creating commentaries, tutorials, or interviews. The exact footage has to be on the timeline. All the options are on the main panel. Add anything you like, such as animation, text, images, or other media, to make an outstanding outcome. These are very easy to understand, so go through the following steps for splitting the video clips. Two ways are trimming and splitting the clips in Wondershare Filmora.
First method: splitting on the timeline
Step 1. Selection of the clip in the timeline that you want to split. Your play head should be precisely at this particular place from where you need the splitting.

Step 2. When your play head is on the correct point of the timeline, right-click on the clip for opening the menu. Select the option of “Split” or click on the scissor icon in red colour.

There is also a possibility of hiding the red icon of the scissor present. You can do it by tapping on the options of Wondershare Filmora. Then go to Preferencesàediting. Now uncheck the button of Split.

Second method: detection of the scene
If there are different shots in your clips or separation in the scenes, you can use the tool of “scene detection” in the Wondershare Filmora.
Step 1. Select your video clip from the media library that you want to split. After right-clicking on it, select the option of “Scene detection” from the menu.

Step 2. The new window of the scene detection appears and then click on “Detect”. Depending on the transitions of the video clips, it is divided into different parts.

There are hundreds of editing software present in the marketplace, but Wondershare Filmora’s success rate is the highest. It is just because of its simplicity and advanced tools that fulfil the users’ needs. The whole interface is hassle-free and clean no matter which operating system you use. It is also helpful in saving your time in terms of applying the settings of colour correction on more than one clip at all at once.
Exploration of the transition effects with the filters allows motion elements in your images and videos. Even you can split the screens to present your videos in a different style. Must discover the Wondershare Filmora whether you are using it casually or professionally. Keep going with the flow and go through the available guidelines. You will definitely consider Wondershare Filmora the best software for your managing and editing tasks.
Step 2: When the uploading is complete, you can cut and split the clips depending on your needs. Now, keep moving the play head in the specific direction from where you have to cut the clips—Press “C” on your keyboard.

Step 3: After getting the split clip, you can delete the remaining part that is not in use. For this, selecting the particular part is necessary and selecting the option of “Delete”. Even, you can press the “delete” key on your keyboard.

Step 4: When your video is ready, simply export the video by clicking right on the option of “All”. On the left lower side of the timeline, it is now clicked on “Export”.


Part 2- trimming of the clips in Lightworks
To trim the video clips in Lightworks, you require to hover the mouse towards the last of the video clip. Keep moving until and unless that part of the clip gets highlighted. After this step, start dragging till the previous where you want it.


An easier way to split the video clip
Even though Lightworks is a wonderful software for editing videos and images, its interface is easy to handle. But it is not supportive of different formats and 4K videos. For a few features, you might need the paid version of Lightworks. The most acquired solution to resolve this issue is Filmora Video Editor . It is freely available, and use all the tools according to your needs. That’s why it is gaining popularity, and users are increasing day by day. The latest versions of the Wondershare Filmora are available to enhance user experiences. You can export the outcome with ease from the tools.
For Win 7 or later (64-bit)
For macOS 10.14 or later
Features:
- Availability of drag and drag feature
- Can preview the functionalities you apply
- Easy to customize the images and videos
- Involvement of the animation
- Huge library available for the effects of visual and audio
- Splitting and merging the clips
Wondershare Filmora always offers to split the clips from the creative techniques. This tool is extremely useful, particularly when creating commentaries, tutorials, or interviews. The exact footage has to be on the timeline. All the options are on the main panel. Add anything you like, such as animation, text, images, or other media, to make an outstanding outcome. These are very easy to understand, so go through the following steps for splitting the video clips. Two ways are trimming and splitting the clips in Wondershare Filmora.
First method: splitting on the timeline
Step 1. Selection of the clip in the timeline that you want to split. Your play head should be precisely at this particular place from where you need the splitting.

Step 2. When your play head is on the correct point of the timeline, right-click on the clip for opening the menu. Select the option of “Split” or click on the scissor icon in red colour.

There is also a possibility of hiding the red icon of the scissor present. You can do it by tapping on the options of Wondershare Filmora. Then go to Preferencesàediting. Now uncheck the button of Split.

Second method: detection of the scene
If there are different shots in your clips or separation in the scenes, you can use the tool of “scene detection” in the Wondershare Filmora.
Step 1. Select your video clip from the media library that you want to split. After right-clicking on it, select the option of “Scene detection” from the menu.

Step 2. The new window of the scene detection appears and then click on “Detect”. Depending on the transitions of the video clips, it is divided into different parts.

There are hundreds of editing software present in the marketplace, but Wondershare Filmora’s success rate is the highest. It is just because of its simplicity and advanced tools that fulfil the users’ needs. The whole interface is hassle-free and clean no matter which operating system you use. It is also helpful in saving your time in terms of applying the settings of colour correction on more than one clip at all at once.
Exploration of the transition effects with the filters allows motion elements in your images and videos. Even you can split the screens to present your videos in a different style. Must discover the Wondershare Filmora whether you are using it casually or professionally. Keep going with the flow and go through the available guidelines. You will definitely consider Wondershare Filmora the best software for your managing and editing tasks.
Step 2: When the uploading is complete, you can cut and split the clips depending on your needs. Now, keep moving the play head in the specific direction from where you have to cut the clips—Press “C” on your keyboard.

Step 3: After getting the split clip, you can delete the remaining part that is not in use. For this, selecting the particular part is necessary and selecting the option of “Delete”. Even, you can press the “delete” key on your keyboard.

Step 4: When your video is ready, simply export the video by clicking right on the option of “All”. On the left lower side of the timeline, it is now clicked on “Export”.


Part 2- trimming of the clips in Lightworks
To trim the video clips in Lightworks, you require to hover the mouse towards the last of the video clip. Keep moving until and unless that part of the clip gets highlighted. After this step, start dragging till the previous where you want it.


An easier way to split the video clip
Even though Lightworks is a wonderful software for editing videos and images, its interface is easy to handle. But it is not supportive of different formats and 4K videos. For a few features, you might need the paid version of Lightworks. The most acquired solution to resolve this issue is Filmora Video Editor . It is freely available, and use all the tools according to your needs. That’s why it is gaining popularity, and users are increasing day by day. The latest versions of the Wondershare Filmora are available to enhance user experiences. You can export the outcome with ease from the tools.
For Win 7 or later (64-bit)
For macOS 10.14 or later
Features:
- Availability of drag and drag feature
- Can preview the functionalities you apply
- Easy to customize the images and videos
- Involvement of the animation
- Huge library available for the effects of visual and audio
- Splitting and merging the clips
Wondershare Filmora always offers to split the clips from the creative techniques. This tool is extremely useful, particularly when creating commentaries, tutorials, or interviews. The exact footage has to be on the timeline. All the options are on the main panel. Add anything you like, such as animation, text, images, or other media, to make an outstanding outcome. These are very easy to understand, so go through the following steps for splitting the video clips. Two ways are trimming and splitting the clips in Wondershare Filmora.
First method: splitting on the timeline
Step 1. Selection of the clip in the timeline that you want to split. Your play head should be precisely at this particular place from where you need the splitting.

Step 2. When your play head is on the correct point of the timeline, right-click on the clip for opening the menu. Select the option of “Split” or click on the scissor icon in red colour.

There is also a possibility of hiding the red icon of the scissor present. You can do it by tapping on the options of Wondershare Filmora. Then go to Preferencesàediting. Now uncheck the button of Split.

Second method: detection of the scene
If there are different shots in your clips or separation in the scenes, you can use the tool of “scene detection” in the Wondershare Filmora.
Step 1. Select your video clip from the media library that you want to split. After right-clicking on it, select the option of “Scene detection” from the menu.

Step 2. The new window of the scene detection appears and then click on “Detect”. Depending on the transitions of the video clips, it is divided into different parts.

There are hundreds of editing software present in the marketplace, but Wondershare Filmora’s success rate is the highest. It is just because of its simplicity and advanced tools that fulfil the users’ needs. The whole interface is hassle-free and clean no matter which operating system you use. It is also helpful in saving your time in terms of applying the settings of colour correction on more than one clip at all at once.
Exploration of the transition effects with the filters allows motion elements in your images and videos. Even you can split the screens to present your videos in a different style. Must discover the Wondershare Filmora whether you are using it casually or professionally. Keep going with the flow and go through the available guidelines. You will definitely consider Wondershare Filmora the best software for your managing and editing tasks.
Step 2: When the uploading is complete, you can cut and split the clips depending on your needs. Now, keep moving the play head in the specific direction from where you have to cut the clips—Press “C” on your keyboard.

Step 3: After getting the split clip, you can delete the remaining part that is not in use. For this, selecting the particular part is necessary and selecting the option of “Delete”. Even, you can press the “delete” key on your keyboard.

Step 4: When your video is ready, simply export the video by clicking right on the option of “All”. On the left lower side of the timeline, it is now clicked on “Export”.


Part 2- trimming of the clips in Lightworks
To trim the video clips in Lightworks, you require to hover the mouse towards the last of the video clip. Keep moving until and unless that part of the clip gets highlighted. After this step, start dragging till the previous where you want it.


An easier way to split the video clip
Even though Lightworks is a wonderful software for editing videos and images, its interface is easy to handle. But it is not supportive of different formats and 4K videos. For a few features, you might need the paid version of Lightworks. The most acquired solution to resolve this issue is Filmora Video Editor . It is freely available, and use all the tools according to your needs. That’s why it is gaining popularity, and users are increasing day by day. The latest versions of the Wondershare Filmora are available to enhance user experiences. You can export the outcome with ease from the tools.
For Win 7 or later (64-bit)
For macOS 10.14 or later
Features:
- Availability of drag and drag feature
- Can preview the functionalities you apply
- Easy to customize the images and videos
- Involvement of the animation
- Huge library available for the effects of visual and audio
- Splitting and merging the clips
Wondershare Filmora always offers to split the clips from the creative techniques. This tool is extremely useful, particularly when creating commentaries, tutorials, or interviews. The exact footage has to be on the timeline. All the options are on the main panel. Add anything you like, such as animation, text, images, or other media, to make an outstanding outcome. These are very easy to understand, so go through the following steps for splitting the video clips. Two ways are trimming and splitting the clips in Wondershare Filmora.
First method: splitting on the timeline
Step 1. Selection of the clip in the timeline that you want to split. Your play head should be precisely at this particular place from where you need the splitting.

Step 2. When your play head is on the correct point of the timeline, right-click on the clip for opening the menu. Select the option of “Split” or click on the scissor icon in red colour.

There is also a possibility of hiding the red icon of the scissor present. You can do it by tapping on the options of Wondershare Filmora. Then go to Preferencesàediting. Now uncheck the button of Split.

Second method: detection of the scene
If there are different shots in your clips or separation in the scenes, you can use the tool of “scene detection” in the Wondershare Filmora.
Step 1. Select your video clip from the media library that you want to split. After right-clicking on it, select the option of “Scene detection” from the menu.

Step 2. The new window of the scene detection appears and then click on “Detect”. Depending on the transitions of the video clips, it is divided into different parts.

There are hundreds of editing software present in the marketplace, but Wondershare Filmora’s success rate is the highest. It is just because of its simplicity and advanced tools that fulfil the users’ needs. The whole interface is hassle-free and clean no matter which operating system you use. It is also helpful in saving your time in terms of applying the settings of colour correction on more than one clip at all at once.
Exploration of the transition effects with the filters allows motion elements in your images and videos. Even you can split the screens to present your videos in a different style. Must discover the Wondershare Filmora whether you are using it casually or professionally. Keep going with the flow and go through the available guidelines. You will definitely consider Wondershare Filmora the best software for your managing and editing tasks.
Also read:
- Updated Top 9 AMV Makers for Computer
- How to Make Cool COD Warzone Thumbnail
- New 2024 Approved 2 Actionable Ways to Extract Subtitles From MKV Videos without Quality Loss
- If You Are Looking for an Open-Source, Cross-Platform Video Editor, Shotcut Is a Great Choice? But Is It Truly the Best Video Editor or Is There a Better Alternative Available?
- 2024 Approved How to Create a Bokeh Effect
- Updated Have You Ever Wondered How Those PowerPoint, Looping Slideshows You See in Conferences and Reception Areas Display and Move to the Next Slide Automatically without Clicking a Mouse? You Dont Have to Be Amazed at This
- New Free
- Updated 7 Ways to Make GIF From Videos on Mac
- Updated You Are Planning to Convert an AVI to GIF Online but You Are Not Sure How? If You Are Looking for an Idea on How to Do It, You Have Come to the Right Place
- New How to Rotate Video in iMovie with Alternative for 2024
- New Step by Step to Resize Video in Davinci Resolve
- 2024 Approved Whatever the Reason You Want to Convert an Mp4 to GIF Online, There Are a Number of Ways to Do It. Use This Guide to Learn the Best Methods. Read More Here
- In 2024, Top 5 Tools to Help You Know More Freeze-Frame Video Editing Skills
- How to Create a Text Effect Video with Filmora for 2024
- New Minecraft Pixel Art A Complete Guide for Die-Hard Fans
- How to Make Transparent Background in Canva for 2024
- In 2024, How to Record Super Slow Motion Videos on Your Phone?
- New In 2024, Create the Stranger Things Upside Down Effect Video
- In 2024, Every Compositor Should Know The Tips of Color Match in After Effects
- Updated 2024 Approved Detailed Guide to Resize Your Video in VLC
- Enhance Your Film Production with These 5 Silence Detection Tools for 2024
- How to Add a Lower Third to Your Video for 2024
- Updated Ultimate Guide to Making Cinematography for Music Video for 2024
- Updated A Comprehensive Guide on Converting Slo-Mo Videos to Normal Speed Videos On iPhone
- Updated In 2024, How to Make Discord Logo GIF
- 8 Tips to Apply Cinematic Color Grading to Your Video for 2024
- 2024 Approved How to DIY VHS Overlay in After Effects?
- How to Make Fortnite Thumbnail with Motion Blur?
- Updated HOW to Add Fade to Black on Premiere Pro
- New Customize PowerPoint Slideshow Icon in Simple Ways for 2024
- Updated Are You Looking to Remove Echo in Premiere Pro? Please Look at Our Guide for Advice and Suggestions on Getting the Best Possible Outcomes
- New Top 5 Free Online Video Filter Editors Improve Your Videos with Filters for 2024
- Linkedin Posts Can Be Made Engaging by Using the Emojis. This Article Will Tell You Its Importance and Different Ways to Add Them
- In 2024, How to Use Twixtor Effect to Create Super Slow-Motion Video?
- In 2024, How To Use Virtual Green Screen to Shoot Video
- Finding The Best LUTs for Wondershare Filmora for 2024
- In 2024, Best Ideas for Time Lapse Video
- Movavi Video Editor Plus Review
- Updated How to Add a Slideshow in PowerPoint for 2024
- New How to Turn On/Off Motion Blur in Minecraft?
- 2024 Approved This Is a Recommendation About Bandicut. If You Are Confused, Please Check It Out
- Discover the Art of Masking in After Effects A Comprehensive Guide for 2024
- How to Remove Apple ID from iPhone 14 Pro without Password?
- In 2024, Why is iPogo not working On Honor X7b? Fixed | Dr.fone
- CatchEmAll Celebrate National Pokémon Day with Virtual Location On Honor 90 Pro | Dr.fone
- 2024 Approved Mastering Facebook Live Your Complete Guide to Successful Streaming
- In 2024, Bypassing Google Account With vnROM Bypass For Motorola Moto G34 5G
- 4 Ways to Mirror Apple iPhone 8 Plus to Laptop via USB or Wi-Fi | Dr.fone
- In 2024, How to Transfer Data from Apple iPhone 12 Pro to ZTE Phones | Dr.fone
- Authentication Error Occurred on Vivo T2 5G? Here Are 10 Proven Fixes | Dr.fone
- In 2024, How to Migrate Android Data From OnePlus Ace 2 Pro to New Android Phone? | Dr.fone
- 4 Ways to Fix Android Blue Screen of Death On Samsung Galaxy S23 | Dr.fone
- In 2024, Can I Remove the Apple Watch Activation Lock By iPhone 11 Pro Max without the Previous Owner?
- How to Rescue Lost Photos from Samsung Galaxy F54 5G?
- How to use Pokemon Go Joystick on Realme C67 5G? | Dr.fone
- In 2024, How To Activate and Use Life360 Ghost Mode On Vivo X90S | Dr.fone
- How to Transfer Contacts from ZTE Nubia Flip 5G to Outlook | Dr.fone
- In 2024, 5 Ways to Track Vivo Y78+ without App | Dr.fone
- How to use Pokemon Go Joystick on Nokia 130 Music? | Dr.fone
- In 2024, How I Transferred Messages from Tecno Pova 6 Pro 5G to iPhone 12/XS (Max) in Seconds | Dr.fone
- How to Stop Life360 from Tracking You On Honor 90 GT? | Dr.fone
- How To Repair iOS of iPhone 15 Pro Max? | Dr.fone
- In 2024, 5 Ways to Track Apple iPhone 15 without App | Dr.fone
- Best 10 Mock Location Apps Worth Trying On Realme 11X 5G | Dr.fone
- Can Life360 Track You When Your OnePlus Ace 2 Pro is off? | Dr.fone
- The Best 8 VPN Hardware Devices Reviewed On Oppo Find N3 | Dr.fone
- Top 15 Apps To Hack WiFi Password On Vivo Y78 5G
- Title: How to Remove Background From a Video in Premier Pro
- Author: Chloe
- Created at : 2024-05-20 03:37:22
- Updated at : 2024-05-21 03:37:22
- Link: https://ai-editing-video.techidaily.com/how-to-remove-background-from-a-video-in-premier-pro/
- License: This work is licensed under CC BY-NC-SA 4.0.

