:max_bytes(150000):strip_icc():format(webp)/snork-fa65ca350e2243e1a2deaf6bb7b209b1.jpg)
How to Remove Echo with Premiere Pro? Full Guide Here

How to Remove Echo with Premiere Pro? Full Guide Here
Do you want to reduce echo in Premiere Pro? How often have you been in situations where you encountered conditions where there was annoying background noise on your video? There is no need to overthink, given that everyone has to deal with this problem. Your video may become intolerable if background noise, such as the sound of a fan or the wind blowing through a window, is present. Because of this, you need to take immediate action to remove echo in Premiere Pro to accomplish the task of uploading a video to YouTube or any other social media site.
Spending a lot of time on a recording, only to have the completed work have a terrible echo, is one of the most frustrating experiences. You will be relieved that there are methods by which you may take your audio clips and modify the audio on your clips to decrease the echo. The following explains how to remove echo from audio in Premiere Pro.
Part 1: How to Reduce Echo Noise with Premiere Pro
Reducing echo in Premiere Pro is straightforward with the application’s built-in tools. It requires no additional plugins from other developers.
Step1 Deverb
The first step is to look for an effect called “DeReverb” in the Effects box of the Effects workspace. Once you find it, you can easily add it to the clip in question by dragging and dropping it there. After that, it will show in the top-left corner of the effect controls inside your audio clip.
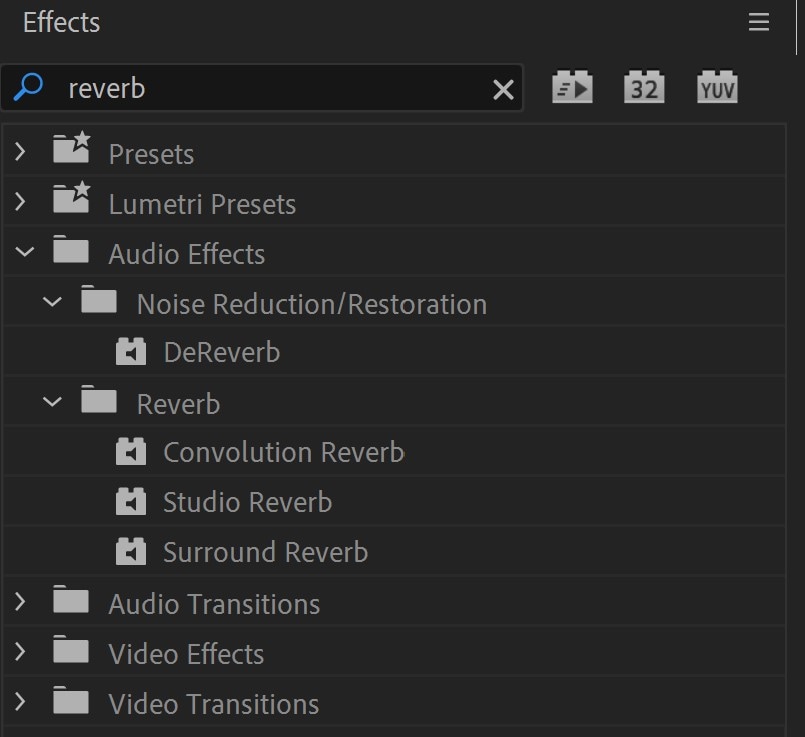
Step2 Edit
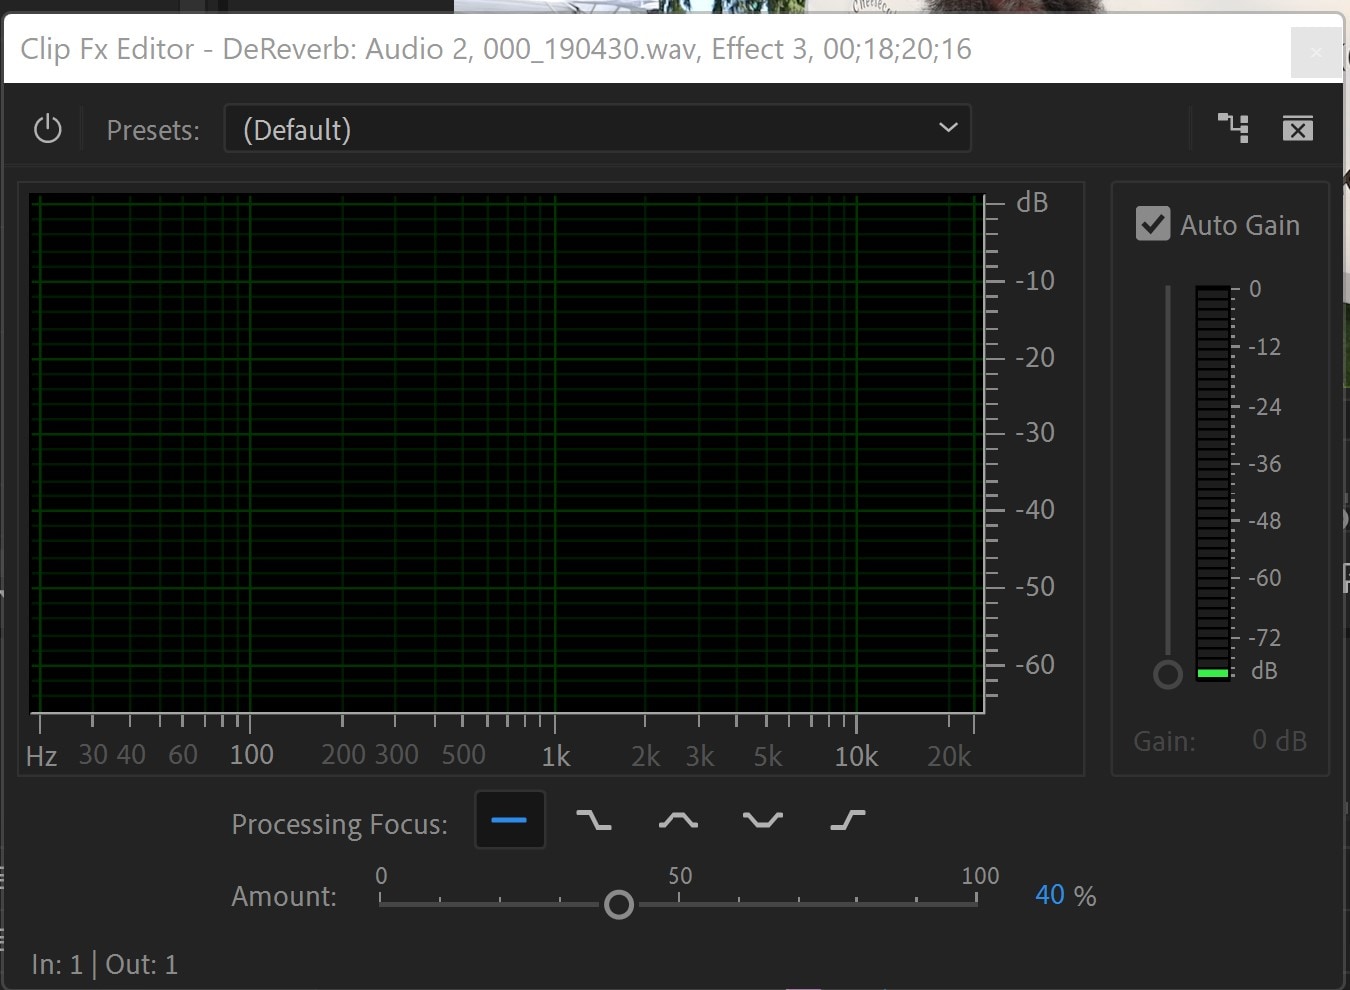
Next, choose ‘Edit’ from the drop-down menu, and then set the level of DeReverb by dragging the simple slider below your clip anywhere from 0% to 100%. As you move the slider closer to 100 percent, the echo should begin to vanish almost as soon as you do!
The processing emphasis should be around the flat line unless you know the frequencies you are working with. Additionally, ensure you activate the effect by clicking the button in the upper left corner of the effect window.
It is vital to bear in mind that less is more when it comes to this effect since it does have a somewhat negative impact on the quality of the audio you have captured.
Further Dialing in Your Settings
After you have reached a level of DeReverb that you are satisfied with, you may apply other modifications to the audio, such as compression and EQ. Still, it should already sound more distinct and more apparent at this point.
When you use the DeReverb effect to remove echo in Premiere Pro, there is one more cool thing about it. If you tick the box labeled “Auto Gain,” the volume level does not decrease as it usually would when you remove echo using this effect. Instead, the volume level maintains the same level as you go from 0 percent to 100 percent of the effect.
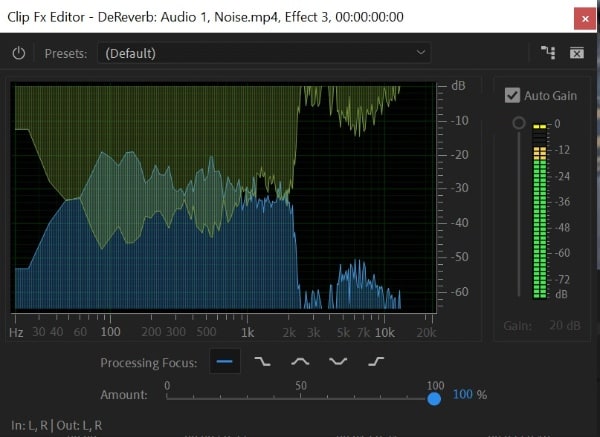
The conclusion is as follows: When you are out and about or in an ample space with many echoes, here is a super easy method to manage the echo levels!
The ‘Amount’ option in DeReverb allows users to specify the percentage of echo they wish to remove. However, use caution while adjusting this parameter since setting it too high can decrease the quality of your audio.
Also, applying the DeReverb effect may decrease the audio level; but if you mark the Auto Gain check box, Premiere Pro will compensate for the decrease in volume. Hence, it is advisable to keep the box checked since this is the default configuration. You also can tinker with the Processing Focus settings, which let you zero in on a specific frequency or frequency.
Part 2: How to Denoise the Free and Easy Way?
Unparalleled videos are shared in clear voices by vloggers and filmmakers. But how do they manage to make such superb, noise-free videos? Your video would still pick up some background sounds even if you had the ideal acoustic conditions, had a high-end recorder and set the recorder and everything else up perfectly. Noise reduction is a crucial step in producing a high-quality video and is required for yours. After all, good audio is essential for video. Aside from removing echo from audio in Premiere Pro, here are other free and accessible ways.
1. Use Wondershare AILab [Free and online]
Wondershare AILab is an excellent alternative to removing echo in Premiere Pro with its various free online tools. You don’t need to specify any settings since the AI will automatically identify and eliminate noise. So you can avoid an unwelcome sound in a crowd or a harsh breeze. AILab can help you create images, sounds, and clips that are simpler and more enjoyable.
Step1 To begin, use Add audio or drag it to upload.

Step2 As shown in the image below, the AI will automatically process the file and remove the static sound.

Step3 That’s it. Now, download the updated audio file at this point.
2. Use kapwing [Free and online with a watermark]
Another alternative to reduce echo in Premiere Pro is Kapwing. This noise-canceling program removes the audio in your movies by separating speech patterns, decreasing background noise, and eliminating background hums. It does this by removing background noise, reducing background noise, and removing background noise—no need to become proficient in high-powered and complicated audio editors such as Adobe Audition or iMovie. Suppose you host your podcast or live stream and utilize mics like the Blue Snowball. In that case, you can quickly and easily eliminate annoying background noise from every video you record with just one click.
Step1 Upload your video while it still has the background noise you want to remove by either uploading the video file straight from the device into your workplace or copying the URL link of the movie into your workspace.
Step2 Reach the “Edit” tab and pick the “Clean Audio” option from the drop-down menu. Kapwing will automatically clean up your video’s audio by removing any unwanted background noise. If necessary, you should make any essential extra adjustments to your video, such as adding subtitles, transitions, or sound effects.
Step3 When you have reduced the background noise from your movie, go to the “File” option and choose “Export Project.” After a few moments, the improved version of your video will be available for you to download and share.

3. Use Wondershare Filmora to denoise
The Filmora Video Editor is easy to use and delivers various features superior to those provided by other video editors. Thus, it is one of the best audio/video editors for denoising backgrounds. The process we will follow is broken down into parts for easier understanding.
Free Download For Win 7 or later(64-bit)
Free Download For macOS 10.14 or later
You can call this the best alternative to removing echo from audio in Premiere Pro.
Step1 Upload File and Preview
Start by importing your video into the interface of Wondershare Filmora. To get a video preview, trim the portions, and remove what don’t want to keep.
Step2 Start Editing
You will need to enter “Smart Denoise” into the search bar in the Effects panel. After that, choose Edit Properties from the context menu that appears after right-clicking on the video.

Here, you can alter the clip’s opacity, the threshold, and the radius.

Step3 Make Changes and Save
In this step, you can keep adjusting the Opacity slider until you get the perfect effect to satisfy your need. Afterward, reach the box beside the Smart Denoise to compare the scene before and after removing the noise and grain.
Finally, save the edited video and share it.
Part 3: FAQs
1. How can an echo be reduced in the sound of an audio recording?
For example, you might use anything that absorbs sound, like a foam pad or acoustic panels. You could alternatively record in a smaller space and use a microphone with a narrower pick-up pattern, or you could use a microphone that already has a filter built into it.
2. How can I get rid of the reverb that is on the video?
You can use either the DeReverb or the Parametric Equalizer tool to eliminate reverb or remove echo from audio in Premiere Pro.
3. Why does my recording have such a reverberant sound?
You may be in a room with hard surfaces reflecting sound waves, or your microphone is picking up an excessive amount of background noise. Try to remedy the issue by recording in a new place, using a different microphone, or modifying the settings in your recording program. All of these options are available to you.
Conclusion
This article presents how to remove echo from audio Premiere Pro and lists some of its alternatives. Have you ever wondered why so many professional content creators use Filmora? They opt to edit their content in Filmora because this tool provides complete support and reliable services.
However, all the above alternatives and Adobe will help you become better content creators by practice. So, choose the best software that is affordable and full of professional features to create flawless and eye-catching videos. Although, in my experience, Filmora is the best alternative to remove echo from audio Premiere Pro.
Free Download For macOS 10.14 or later
You can call this the best alternative to removing echo from audio in Premiere Pro.
Step1 Upload File and Preview
Start by importing your video into the interface of Wondershare Filmora. To get a video preview, trim the portions, and remove what don’t want to keep.
Step2 Start Editing
You will need to enter “Smart Denoise” into the search bar in the Effects panel. After that, choose Edit Properties from the context menu that appears after right-clicking on the video.

Here, you can alter the clip’s opacity, the threshold, and the radius.

Step3 Make Changes and Save
In this step, you can keep adjusting the Opacity slider until you get the perfect effect to satisfy your need. Afterward, reach the box beside the Smart Denoise to compare the scene before and after removing the noise and grain.
Finally, save the edited video and share it.
Part 3: FAQs
1. How can an echo be reduced in the sound of an audio recording?
For example, you might use anything that absorbs sound, like a foam pad or acoustic panels. You could alternatively record in a smaller space and use a microphone with a narrower pick-up pattern, or you could use a microphone that already has a filter built into it.
2. How can I get rid of the reverb that is on the video?
You can use either the DeReverb or the Parametric Equalizer tool to eliminate reverb or remove echo from audio in Premiere Pro.
3. Why does my recording have such a reverberant sound?
You may be in a room with hard surfaces reflecting sound waves, or your microphone is picking up an excessive amount of background noise. Try to remedy the issue by recording in a new place, using a different microphone, or modifying the settings in your recording program. All of these options are available to you.
Conclusion
This article presents how to remove echo from audio Premiere Pro and lists some of its alternatives. Have you ever wondered why so many professional content creators use Filmora? They opt to edit their content in Filmora because this tool provides complete support and reliable services.
However, all the above alternatives and Adobe will help you become better content creators by practice. So, choose the best software that is affordable and full of professional features to create flawless and eye-catching videos. Although, in my experience, Filmora is the best alternative to remove echo from audio Premiere Pro.
Easy Ways to Make Procreate GIFs
Easy Ways to Make Procreate GIFs
An easy yet powerful editor
Numerous effects to choose from
Detailed tutorials provided by the official channel
Stay tuned for a complete know-how into making Procreate GIFs.
In this article
01 [How Animation Works in Procreate](#Part 1)
02 [How to Make Animated Gifs in Procreate](#Part 2)
Part 1 How Animation Works in Procreate
GIFs are known to be the top ranked and most intuitive trendsetters in the world of infotainment and media service tools. Be it for fun or a targeted market influence, you can depend on GIFs for a variety of information solutions. Moving to the creative aspect, the experimentation belt with creating GIFs is huge. From making simple static and animated GIFs to creating professionally sound market promotion tools; you can play with your editing skills to extract just anything from these quick snippets.
Having said that, let’s take a dive into creating animated Procreate GIFs. Being a relatively new dimension of GIF editing, a merge of the two produces matchless and classic results. Read through the further article to get a complete guide for working on GIF creation and editing with Procreate.
● Underlying Concept
Before you begin creating a Procreate GIF, let’s get a bit familiar with the concept behind this GIF creation utility. This one is an excellent and advanced means of exploring your skills in digital drawing and animations. It is one of the easiest GIF maker software that helps you to become a pro in animation creativity even if you are beginner and for the ones already into the skill, Procreate is simply heaven.
Procreate allows you to work with animation in its ‘Animation Assist’ tool, where you get a generous workspace with the perfect editing canvas to experiment with a plethora of tools, effects and filters to create exciting GIFs with basic and complex animation craft.
The software allows frame-by-frame animation that refers to working with different frames of a particular illustration, while making minimal changes in each frame. Once you finish, your final creation gets played in a motion loop.
Part 1 How to Make Animated Gifs in Procreate
As is already stated, Procreate is among the most affordable GIF creator and editing software. Creating GIFs here is a few minute stuff within a span of counted steps. Let’s have a broader see through of the creation process. Take the following quick steps and get started to make your exclusive Procreate GIF:
● Step 1: Select an Artwork
Launch the software in your device to reach the Procreate welcome screen, where you need to select an existing static GIF to work on from your device. You can also create a fresh one if you like. Having done that, make a right swipe on the ‘Canvas’ icon and select ‘Duplicate’. This creates a copy of your artwork, preserving all of its layers, so that you are free to make changes or stick to the original one according to your preference.
If you want to use a specific section of your image to animate, you can use the crop tool to remove unwanted portions. Next, you need to put together the specific layers you wish to animate and also remove any unwanted layers you don’t want to use.
● Step 2: Enable Animation Assist Tool
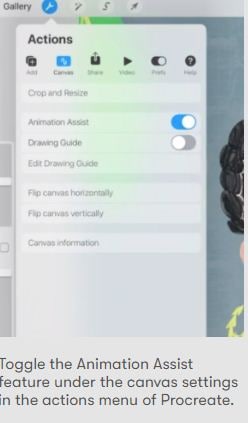
From the Procreate tool gallery at the top, click on the ‘Wrench’ icon and select ‘Canvas’ from the ’Actions’ menu that drops down. In the interface that appears, enable the ‘Animation Assist’ tool with a right toggle. This will cause the ‘Animation Toolbar’ to appear at the bottom of the interface.
● Step 3: Add Frames and Make Image Adjustments
At this instant, you need to make additional adjustments in your selected image and create a copy of the image frames. To get this done, navigate to the ‘Animation Assist Toolbar’ and long press the ‘Add Frame’ button. A duplicate frame will now appear on the screen. Within this frame, you need to move the image elements that you wish to animate. To do this, select an element and drag it to a convenient spot of your choice.
While you go through with object movement, the software simultaneously shows you a semi-transparent preview of your creation through its unique ‘Onion-skin’ feature. You can enjoy playing your animation at this very stage, or continue to create something more exciting.
● Step 4: Enjoying? Let’s Continue.
Repeat Step 3 to create long and smooth GIFs with additional frames. Take caution to create a copy of your latest frame (not the original one), in case you need to make any adjustments later on. Consider playing your GIF to see if you need to add extra frames or implement further changes.
Step 5: Almost There.
You may notice a jerky movement of your final image frames. This is on account of the ‘Default Play’ feature of the Procreate software that initiates a run of your creation from the beginning to end and loops on the same fashion.
To set this right, navigate to the ‘Settings’ tool of the ‘Animation Assist Toolbar’ and tap ‘Ping-Pong’ on the opening interface. Your animated Gif will now play in a forward to backward loop, resulting in a smooth frame movement.
● Step 6: Time to Share.
Once you are happy with your artwork, you can share it across different media platforms. To export your creation, navigate to the Procreate tool gallery and tap the ‘Wrench’ icon and select ‘Share’. In the ‘Sharing Options’ menu, you will be asked to make a format selection. You can share your creation in either of the GIF, PNG or MP4 formats.
You may even require a size modification in the created file with respect to specific sharing platforms. You can either select a web compatible resolution to shrink your file, or create a copy of the file to resize the same.
Once you get familiar with Procreate and its GIF creation basics, you have the liberty to explore the huge effects library offered by the software to give your animated GIFs the classy, professional touch. So why wait? Just get the software and start a never ending spree of Procreating GIFs.
Procreate is undoubtedly an excellent tool for creating animated GIFs, but if you are looking for alternatives, another software to rely on is Wondershare Filmora Video Editor GIF creator.

Wondershare Filmora - Best Video Editor for Mac/Windows
5,481,435 people have downloaded it.
Build unique custom animations without breaking a sweat.
Focus on creating epic stories and leave the details to Filmora’s auto features.
Start a creative adventure with drag & drop effects and endless possibilities.
Filmora simplifies advanced features to save you time and effort.
Filmora cuts out repetition so you can move on to your next creative breakthrough.
● Filmora GIF Maker
Launched by Wondershare, this one is something you can blindly count upon for creating stunning animated GIFs from image and video files. Packed with tons of amazing features, Filmora is an inventory of audio-visual effects and filters that never runs out of fresh and appealing choices. Available to you as free and clean GIF generator software, this is easily compatible to almost any smart device. Working with Filmora will certainly make you admit that creating GIFs was never easier.
To start creating GIFs with this awesome tool, here’s what you need to do:
● Step 1: Import Necessary Media Files
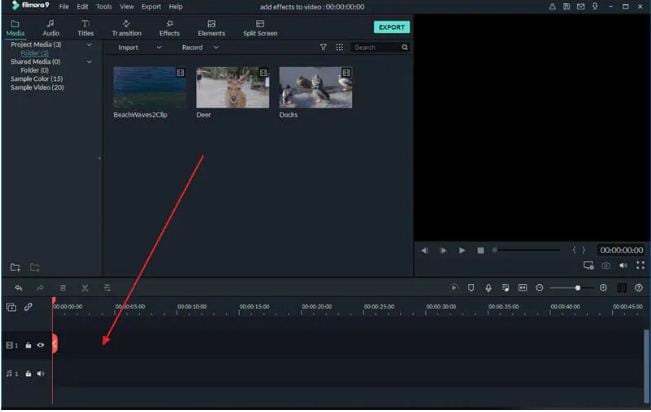
Either a funny video or a group of stunning still images, you can choose any suitable media to make GIFs in Filmora. All you need to do is import the desired files from your PC or smartphone to the software’s timeline.
● Step 2: Timeline Dragging
Once you are done with importing the required files, you need to drag and drop the same to the ‘Editor Timeline’ of the GIF maker tool, where can improvise them to your heart’s content.
● Step 3: Time to Edit.
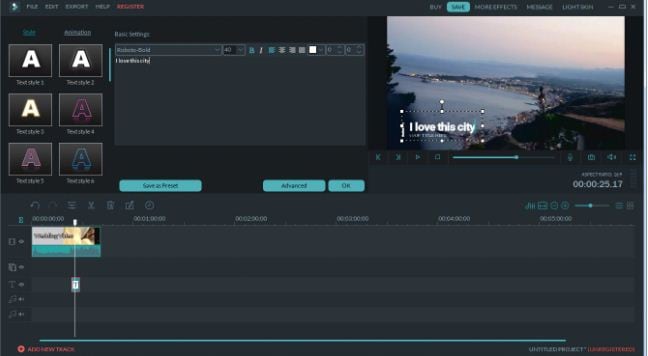
The Filmora effects library is simply heaven for the ones with creative instincts. Getting a liberty to browse and apply a glut of effects and filters, you are at the perfect place to create professionally sound and next level animated GIFs. Try hands on creating classy backgrounds with overlays, crop and trim clips to the perfect shot, make frame and time adjustments, add text to intensify your message, or pick up just anything you like, to create magic with your creativity.
● Step 4: Show it to the World.
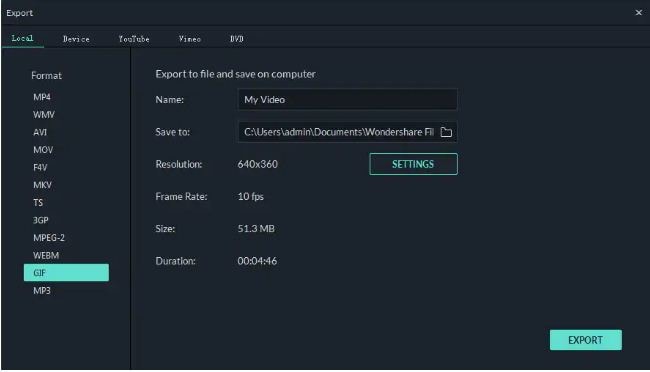
When finally satisfied, save your artwork file to your device using the .gif extension and receive compliments from friends and peers by sharing it on your Instagram or other social media handles.
● Key Takeaways from This Episode →
● Animated GIFs are among the latest social media frenzy. These short, moving clips are nothing less than a complete entertainment roll-on. When it comes to creating animated GIFs, you can certainly take the Procreate software as a worthy choice.
● This one is a super easy and exciting means of working on animation GIFs that are by default, captivating for every onlooker. Talking of competing alternatives, you can trust on Wondershare Filmora, a handy, quick and clean solution to animated GIF creation.
Stay tuned for a complete know-how into making Procreate GIFs.
In this article
01 [How Animation Works in Procreate](#Part 1)
02 [How to Make Animated Gifs in Procreate](#Part 2)
Part 1 How Animation Works in Procreate
GIFs are known to be the top ranked and most intuitive trendsetters in the world of infotainment and media service tools. Be it for fun or a targeted market influence, you can depend on GIFs for a variety of information solutions. Moving to the creative aspect, the experimentation belt with creating GIFs is huge. From making simple static and animated GIFs to creating professionally sound market promotion tools; you can play with your editing skills to extract just anything from these quick snippets.
Having said that, let’s take a dive into creating animated Procreate GIFs. Being a relatively new dimension of GIF editing, a merge of the two produces matchless and classic results. Read through the further article to get a complete guide for working on GIF creation and editing with Procreate.
● Underlying Concept
Before you begin creating a Procreate GIF, let’s get a bit familiar with the concept behind this GIF creation utility. This one is an excellent and advanced means of exploring your skills in digital drawing and animations. It is one of the easiest GIF maker software that helps you to become a pro in animation creativity even if you are beginner and for the ones already into the skill, Procreate is simply heaven.
Procreate allows you to work with animation in its ‘Animation Assist’ tool, where you get a generous workspace with the perfect editing canvas to experiment with a plethora of tools, effects and filters to create exciting GIFs with basic and complex animation craft.
The software allows frame-by-frame animation that refers to working with different frames of a particular illustration, while making minimal changes in each frame. Once you finish, your final creation gets played in a motion loop.
Part 1 How to Make Animated Gifs in Procreate
As is already stated, Procreate is among the most affordable GIF creator and editing software. Creating GIFs here is a few minute stuff within a span of counted steps. Let’s have a broader see through of the creation process. Take the following quick steps and get started to make your exclusive Procreate GIF:
● Step 1: Select an Artwork
Launch the software in your device to reach the Procreate welcome screen, where you need to select an existing static GIF to work on from your device. You can also create a fresh one if you like. Having done that, make a right swipe on the ‘Canvas’ icon and select ‘Duplicate’. This creates a copy of your artwork, preserving all of its layers, so that you are free to make changes or stick to the original one according to your preference.
If you want to use a specific section of your image to animate, you can use the crop tool to remove unwanted portions. Next, you need to put together the specific layers you wish to animate and also remove any unwanted layers you don’t want to use.
● Step 2: Enable Animation Assist Tool
From the Procreate tool gallery at the top, click on the ‘Wrench’ icon and select ‘Canvas’ from the ’Actions’ menu that drops down. In the interface that appears, enable the ‘Animation Assist’ tool with a right toggle. This will cause the ‘Animation Toolbar’ to appear at the bottom of the interface.
● Step 3: Add Frames and Make Image Adjustments
At this instant, you need to make additional adjustments in your selected image and create a copy of the image frames. To get this done, navigate to the ‘Animation Assist Toolbar’ and long press the ‘Add Frame’ button. A duplicate frame will now appear on the screen. Within this frame, you need to move the image elements that you wish to animate. To do this, select an element and drag it to a convenient spot of your choice.
While you go through with object movement, the software simultaneously shows you a semi-transparent preview of your creation through its unique ‘Onion-skin’ feature. You can enjoy playing your animation at this very stage, or continue to create something more exciting.
● Step 4: Enjoying? Let’s Continue.
Repeat Step 3 to create long and smooth GIFs with additional frames. Take caution to create a copy of your latest frame (not the original one), in case you need to make any adjustments later on. Consider playing your GIF to see if you need to add extra frames or implement further changes.
Step 5: Almost There.
You may notice a jerky movement of your final image frames. This is on account of the ‘Default Play’ feature of the Procreate software that initiates a run of your creation from the beginning to end and loops on the same fashion.
To set this right, navigate to the ‘Settings’ tool of the ‘Animation Assist Toolbar’ and tap ‘Ping-Pong’ on the opening interface. Your animated Gif will now play in a forward to backward loop, resulting in a smooth frame movement.
● Step 6: Time to Share.
Once you are happy with your artwork, you can share it across different media platforms. To export your creation, navigate to the Procreate tool gallery and tap the ‘Wrench’ icon and select ‘Share’. In the ‘Sharing Options’ menu, you will be asked to make a format selection. You can share your creation in either of the GIF, PNG or MP4 formats.
You may even require a size modification in the created file with respect to specific sharing platforms. You can either select a web compatible resolution to shrink your file, or create a copy of the file to resize the same.
Once you get familiar with Procreate and its GIF creation basics, you have the liberty to explore the huge effects library offered by the software to give your animated GIFs the classy, professional touch. So why wait? Just get the software and start a never ending spree of Procreating GIFs.
Procreate is undoubtedly an excellent tool for creating animated GIFs, but if you are looking for alternatives, another software to rely on is Wondershare Filmora Video Editor GIF creator.

Wondershare Filmora - Best Video Editor for Mac/Windows
5,481,435 people have downloaded it.
Build unique custom animations without breaking a sweat.
Focus on creating epic stories and leave the details to Filmora’s auto features.
Start a creative adventure with drag & drop effects and endless possibilities.
Filmora simplifies advanced features to save you time and effort.
Filmora cuts out repetition so you can move on to your next creative breakthrough.
● Filmora GIF Maker
Launched by Wondershare, this one is something you can blindly count upon for creating stunning animated GIFs from image and video files. Packed with tons of amazing features, Filmora is an inventory of audio-visual effects and filters that never runs out of fresh and appealing choices. Available to you as free and clean GIF generator software, this is easily compatible to almost any smart device. Working with Filmora will certainly make you admit that creating GIFs was never easier.
To start creating GIFs with this awesome tool, here’s what you need to do:
● Step 1: Import Necessary Media Files
Either a funny video or a group of stunning still images, you can choose any suitable media to make GIFs in Filmora. All you need to do is import the desired files from your PC or smartphone to the software’s timeline.
● Step 2: Timeline Dragging
Once you are done with importing the required files, you need to drag and drop the same to the ‘Editor Timeline’ of the GIF maker tool, where can improvise them to your heart’s content.
● Step 3: Time to Edit.
The Filmora effects library is simply heaven for the ones with creative instincts. Getting a liberty to browse and apply a glut of effects and filters, you are at the perfect place to create professionally sound and next level animated GIFs. Try hands on creating classy backgrounds with overlays, crop and trim clips to the perfect shot, make frame and time adjustments, add text to intensify your message, or pick up just anything you like, to create magic with your creativity.
● Step 4: Show it to the World.
When finally satisfied, save your artwork file to your device using the .gif extension and receive compliments from friends and peers by sharing it on your Instagram or other social media handles.
● Key Takeaways from This Episode →
● Animated GIFs are among the latest social media frenzy. These short, moving clips are nothing less than a complete entertainment roll-on. When it comes to creating animated GIFs, you can certainly take the Procreate software as a worthy choice.
● This one is a super easy and exciting means of working on animation GIFs that are by default, captivating for every onlooker. Talking of competing alternatives, you can trust on Wondershare Filmora, a handy, quick and clean solution to animated GIF creation.
Stay tuned for a complete know-how into making Procreate GIFs.
In this article
01 [How Animation Works in Procreate](#Part 1)
02 [How to Make Animated Gifs in Procreate](#Part 2)
Part 1 How Animation Works in Procreate
GIFs are known to be the top ranked and most intuitive trendsetters in the world of infotainment and media service tools. Be it for fun or a targeted market influence, you can depend on GIFs for a variety of information solutions. Moving to the creative aspect, the experimentation belt with creating GIFs is huge. From making simple static and animated GIFs to creating professionally sound market promotion tools; you can play with your editing skills to extract just anything from these quick snippets.
Having said that, let’s take a dive into creating animated Procreate GIFs. Being a relatively new dimension of GIF editing, a merge of the two produces matchless and classic results. Read through the further article to get a complete guide for working on GIF creation and editing with Procreate.
● Underlying Concept
Before you begin creating a Procreate GIF, let’s get a bit familiar with the concept behind this GIF creation utility. This one is an excellent and advanced means of exploring your skills in digital drawing and animations. It is one of the easiest GIF maker software that helps you to become a pro in animation creativity even if you are beginner and for the ones already into the skill, Procreate is simply heaven.
Procreate allows you to work with animation in its ‘Animation Assist’ tool, where you get a generous workspace with the perfect editing canvas to experiment with a plethora of tools, effects and filters to create exciting GIFs with basic and complex animation craft.
The software allows frame-by-frame animation that refers to working with different frames of a particular illustration, while making minimal changes in each frame. Once you finish, your final creation gets played in a motion loop.
Part 1 How to Make Animated Gifs in Procreate
As is already stated, Procreate is among the most affordable GIF creator and editing software. Creating GIFs here is a few minute stuff within a span of counted steps. Let’s have a broader see through of the creation process. Take the following quick steps and get started to make your exclusive Procreate GIF:
● Step 1: Select an Artwork
Launch the software in your device to reach the Procreate welcome screen, where you need to select an existing static GIF to work on from your device. You can also create a fresh one if you like. Having done that, make a right swipe on the ‘Canvas’ icon and select ‘Duplicate’. This creates a copy of your artwork, preserving all of its layers, so that you are free to make changes or stick to the original one according to your preference.
If you want to use a specific section of your image to animate, you can use the crop tool to remove unwanted portions. Next, you need to put together the specific layers you wish to animate and also remove any unwanted layers you don’t want to use.
● Step 2: Enable Animation Assist Tool
From the Procreate tool gallery at the top, click on the ‘Wrench’ icon and select ‘Canvas’ from the ’Actions’ menu that drops down. In the interface that appears, enable the ‘Animation Assist’ tool with a right toggle. This will cause the ‘Animation Toolbar’ to appear at the bottom of the interface.
● Step 3: Add Frames and Make Image Adjustments
At this instant, you need to make additional adjustments in your selected image and create a copy of the image frames. To get this done, navigate to the ‘Animation Assist Toolbar’ and long press the ‘Add Frame’ button. A duplicate frame will now appear on the screen. Within this frame, you need to move the image elements that you wish to animate. To do this, select an element and drag it to a convenient spot of your choice.
While you go through with object movement, the software simultaneously shows you a semi-transparent preview of your creation through its unique ‘Onion-skin’ feature. You can enjoy playing your animation at this very stage, or continue to create something more exciting.
● Step 4: Enjoying? Let’s Continue.
Repeat Step 3 to create long and smooth GIFs with additional frames. Take caution to create a copy of your latest frame (not the original one), in case you need to make any adjustments later on. Consider playing your GIF to see if you need to add extra frames or implement further changes.
Step 5: Almost There.
You may notice a jerky movement of your final image frames. This is on account of the ‘Default Play’ feature of the Procreate software that initiates a run of your creation from the beginning to end and loops on the same fashion.
To set this right, navigate to the ‘Settings’ tool of the ‘Animation Assist Toolbar’ and tap ‘Ping-Pong’ on the opening interface. Your animated Gif will now play in a forward to backward loop, resulting in a smooth frame movement.
● Step 6: Time to Share.
Once you are happy with your artwork, you can share it across different media platforms. To export your creation, navigate to the Procreate tool gallery and tap the ‘Wrench’ icon and select ‘Share’. In the ‘Sharing Options’ menu, you will be asked to make a format selection. You can share your creation in either of the GIF, PNG or MP4 formats.
You may even require a size modification in the created file with respect to specific sharing platforms. You can either select a web compatible resolution to shrink your file, or create a copy of the file to resize the same.
Once you get familiar with Procreate and its GIF creation basics, you have the liberty to explore the huge effects library offered by the software to give your animated GIFs the classy, professional touch. So why wait? Just get the software and start a never ending spree of Procreating GIFs.
Procreate is undoubtedly an excellent tool for creating animated GIFs, but if you are looking for alternatives, another software to rely on is Wondershare Filmora Video Editor GIF creator.

Wondershare Filmora - Best Video Editor for Mac/Windows
5,481,435 people have downloaded it.
Build unique custom animations without breaking a sweat.
Focus on creating epic stories and leave the details to Filmora’s auto features.
Start a creative adventure with drag & drop effects and endless possibilities.
Filmora simplifies advanced features to save you time and effort.
Filmora cuts out repetition so you can move on to your next creative breakthrough.
● Filmora GIF Maker
Launched by Wondershare, this one is something you can blindly count upon for creating stunning animated GIFs from image and video files. Packed with tons of amazing features, Filmora is an inventory of audio-visual effects and filters that never runs out of fresh and appealing choices. Available to you as free and clean GIF generator software, this is easily compatible to almost any smart device. Working with Filmora will certainly make you admit that creating GIFs was never easier.
To start creating GIFs with this awesome tool, here’s what you need to do:
● Step 1: Import Necessary Media Files
Either a funny video or a group of stunning still images, you can choose any suitable media to make GIFs in Filmora. All you need to do is import the desired files from your PC or smartphone to the software’s timeline.
● Step 2: Timeline Dragging
Once you are done with importing the required files, you need to drag and drop the same to the ‘Editor Timeline’ of the GIF maker tool, where can improvise them to your heart’s content.
● Step 3: Time to Edit.
The Filmora effects library is simply heaven for the ones with creative instincts. Getting a liberty to browse and apply a glut of effects and filters, you are at the perfect place to create professionally sound and next level animated GIFs. Try hands on creating classy backgrounds with overlays, crop and trim clips to the perfect shot, make frame and time adjustments, add text to intensify your message, or pick up just anything you like, to create magic with your creativity.
● Step 4: Show it to the World.
When finally satisfied, save your artwork file to your device using the .gif extension and receive compliments from friends and peers by sharing it on your Instagram or other social media handles.
● Key Takeaways from This Episode →
● Animated GIFs are among the latest social media frenzy. These short, moving clips are nothing less than a complete entertainment roll-on. When it comes to creating animated GIFs, you can certainly take the Procreate software as a worthy choice.
● This one is a super easy and exciting means of working on animation GIFs that are by default, captivating for every onlooker. Talking of competing alternatives, you can trust on Wondershare Filmora, a handy, quick and clean solution to animated GIF creation.
Stay tuned for a complete know-how into making Procreate GIFs.
In this article
01 [How Animation Works in Procreate](#Part 1)
02 [How to Make Animated Gifs in Procreate](#Part 2)
Part 1 How Animation Works in Procreate
GIFs are known to be the top ranked and most intuitive trendsetters in the world of infotainment and media service tools. Be it for fun or a targeted market influence, you can depend on GIFs for a variety of information solutions. Moving to the creative aspect, the experimentation belt with creating GIFs is huge. From making simple static and animated GIFs to creating professionally sound market promotion tools; you can play with your editing skills to extract just anything from these quick snippets.
Having said that, let’s take a dive into creating animated Procreate GIFs. Being a relatively new dimension of GIF editing, a merge of the two produces matchless and classic results. Read through the further article to get a complete guide for working on GIF creation and editing with Procreate.
● Underlying Concept
Before you begin creating a Procreate GIF, let’s get a bit familiar with the concept behind this GIF creation utility. This one is an excellent and advanced means of exploring your skills in digital drawing and animations. It is one of the easiest GIF maker software that helps you to become a pro in animation creativity even if you are beginner and for the ones already into the skill, Procreate is simply heaven.
Procreate allows you to work with animation in its ‘Animation Assist’ tool, where you get a generous workspace with the perfect editing canvas to experiment with a plethora of tools, effects and filters to create exciting GIFs with basic and complex animation craft.
The software allows frame-by-frame animation that refers to working with different frames of a particular illustration, while making minimal changes in each frame. Once you finish, your final creation gets played in a motion loop.
Part 1 How to Make Animated Gifs in Procreate
As is already stated, Procreate is among the most affordable GIF creator and editing software. Creating GIFs here is a few minute stuff within a span of counted steps. Let’s have a broader see through of the creation process. Take the following quick steps and get started to make your exclusive Procreate GIF:
● Step 1: Select an Artwork
Launch the software in your device to reach the Procreate welcome screen, where you need to select an existing static GIF to work on from your device. You can also create a fresh one if you like. Having done that, make a right swipe on the ‘Canvas’ icon and select ‘Duplicate’. This creates a copy of your artwork, preserving all of its layers, so that you are free to make changes or stick to the original one according to your preference.
If you want to use a specific section of your image to animate, you can use the crop tool to remove unwanted portions. Next, you need to put together the specific layers you wish to animate and also remove any unwanted layers you don’t want to use.
● Step 2: Enable Animation Assist Tool
From the Procreate tool gallery at the top, click on the ‘Wrench’ icon and select ‘Canvas’ from the ’Actions’ menu that drops down. In the interface that appears, enable the ‘Animation Assist’ tool with a right toggle. This will cause the ‘Animation Toolbar’ to appear at the bottom of the interface.
● Step 3: Add Frames and Make Image Adjustments
At this instant, you need to make additional adjustments in your selected image and create a copy of the image frames. To get this done, navigate to the ‘Animation Assist Toolbar’ and long press the ‘Add Frame’ button. A duplicate frame will now appear on the screen. Within this frame, you need to move the image elements that you wish to animate. To do this, select an element and drag it to a convenient spot of your choice.
While you go through with object movement, the software simultaneously shows you a semi-transparent preview of your creation through its unique ‘Onion-skin’ feature. You can enjoy playing your animation at this very stage, or continue to create something more exciting.
● Step 4: Enjoying? Let’s Continue.
Repeat Step 3 to create long and smooth GIFs with additional frames. Take caution to create a copy of your latest frame (not the original one), in case you need to make any adjustments later on. Consider playing your GIF to see if you need to add extra frames or implement further changes.
Step 5: Almost There.
You may notice a jerky movement of your final image frames. This is on account of the ‘Default Play’ feature of the Procreate software that initiates a run of your creation from the beginning to end and loops on the same fashion.
To set this right, navigate to the ‘Settings’ tool of the ‘Animation Assist Toolbar’ and tap ‘Ping-Pong’ on the opening interface. Your animated Gif will now play in a forward to backward loop, resulting in a smooth frame movement.
● Step 6: Time to Share.
Once you are happy with your artwork, you can share it across different media platforms. To export your creation, navigate to the Procreate tool gallery and tap the ‘Wrench’ icon and select ‘Share’. In the ‘Sharing Options’ menu, you will be asked to make a format selection. You can share your creation in either of the GIF, PNG or MP4 formats.
You may even require a size modification in the created file with respect to specific sharing platforms. You can either select a web compatible resolution to shrink your file, or create a copy of the file to resize the same.
Once you get familiar with Procreate and its GIF creation basics, you have the liberty to explore the huge effects library offered by the software to give your animated GIFs the classy, professional touch. So why wait? Just get the software and start a never ending spree of Procreating GIFs.
Procreate is undoubtedly an excellent tool for creating animated GIFs, but if you are looking for alternatives, another software to rely on is Wondershare Filmora Video Editor GIF creator.

Wondershare Filmora - Best Video Editor for Mac/Windows
5,481,435 people have downloaded it.
Build unique custom animations without breaking a sweat.
Focus on creating epic stories and leave the details to Filmora’s auto features.
Start a creative adventure with drag & drop effects and endless possibilities.
Filmora simplifies advanced features to save you time and effort.
Filmora cuts out repetition so you can move on to your next creative breakthrough.
● Filmora GIF Maker
Launched by Wondershare, this one is something you can blindly count upon for creating stunning animated GIFs from image and video files. Packed with tons of amazing features, Filmora is an inventory of audio-visual effects and filters that never runs out of fresh and appealing choices. Available to you as free and clean GIF generator software, this is easily compatible to almost any smart device. Working with Filmora will certainly make you admit that creating GIFs was never easier.
To start creating GIFs with this awesome tool, here’s what you need to do:
● Step 1: Import Necessary Media Files
Either a funny video or a group of stunning still images, you can choose any suitable media to make GIFs in Filmora. All you need to do is import the desired files from your PC or smartphone to the software’s timeline.
● Step 2: Timeline Dragging
Once you are done with importing the required files, you need to drag and drop the same to the ‘Editor Timeline’ of the GIF maker tool, where can improvise them to your heart’s content.
● Step 3: Time to Edit.
The Filmora effects library is simply heaven for the ones with creative instincts. Getting a liberty to browse and apply a glut of effects and filters, you are at the perfect place to create professionally sound and next level animated GIFs. Try hands on creating classy backgrounds with overlays, crop and trim clips to the perfect shot, make frame and time adjustments, add text to intensify your message, or pick up just anything you like, to create magic with your creativity.
● Step 4: Show it to the World.
When finally satisfied, save your artwork file to your device using the .gif extension and receive compliments from friends and peers by sharing it on your Instagram or other social media handles.
● Key Takeaways from This Episode →
● Animated GIFs are among the latest social media frenzy. These short, moving clips are nothing less than a complete entertainment roll-on. When it comes to creating animated GIFs, you can certainly take the Procreate software as a worthy choice.
● This one is a super easy and exciting means of working on animation GIFs that are by default, captivating for every onlooker. Talking of competing alternatives, you can trust on Wondershare Filmora, a handy, quick and clean solution to animated GIF creation.
Detailed Tutorial to Rotate a Video in Cyberlink PowerDirector
Video Editing is a craft that is highly dependent on various characteristics of your video. But the way one presents it or goes about filming clips also has a profound effect on the end product. And as you may know, not every aspect of a video production activity always goes without hiccups. But editing can come in clutch as it can easily solve minor problems like skewed footage that was shot at the wrong angle or is upside down (an issue that can happen while using mobile phones).
Thus, with this article, we will be looking at steps to rotate a video in Cyberlink PowerDirector to help you when required. We have also mentioned the steps you will need to follow in Wondershare Filmora.
Note: We documented the steps in this guide with PowerDirector 365 and WonderShare Filmora X.
Steps to Rotate Videos with CyberLink PowerDirector
Put yourself in a situation where you’ve just finished filming a project with your smartphone but end up realizing that the footage isn’t in the right orientation by default. While the error has an easy fix on most smartphones, you can also perform this action with video editing tools.
Also, while this form of rotating might be the most basic implementation of the feature, you can often use the feature to add a dynamic nature to your video with Keyframes.
Definition: Keyframes in Video Editing is a software feature that allows an editor to set start and endpoints (denoted by In and Out Markers), presenting the opportunity to custom clip properties between the two positions. The set changes occur gradually as the playhead continues moving through the clip. Properties that can undergo modification with this method are zoom, rotation, colors, positions, etc.
The process of rotating clips is fairly straightforward; once you have PowerDirector 365 open, follow the steps listed below.
If you do not have CyberLink PowerDirector 365, download the software by visiting Cyberlink’s official website.
Step 1: Create a new video project in Cyberlink PowerDirector 365 and choose Full Mode.
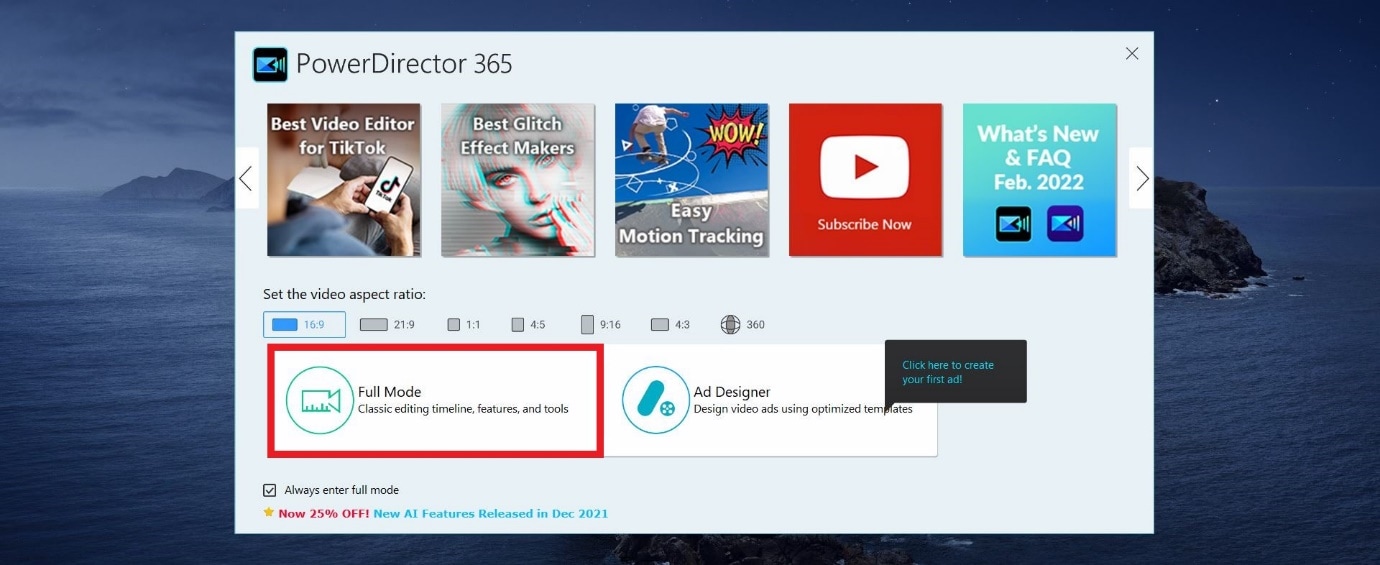
Note: Full Mode in Cyberlink PowerDirector 365 will provide users access to a full-featured video editing tool similar in function to Wondershare Filmora. The other option available is Ad Designer.
Step 2: Now, import media onto the Timeline from the Media Library.
For this guide, we used the pre-existing stock footage in Cyberlink PowerDirector.
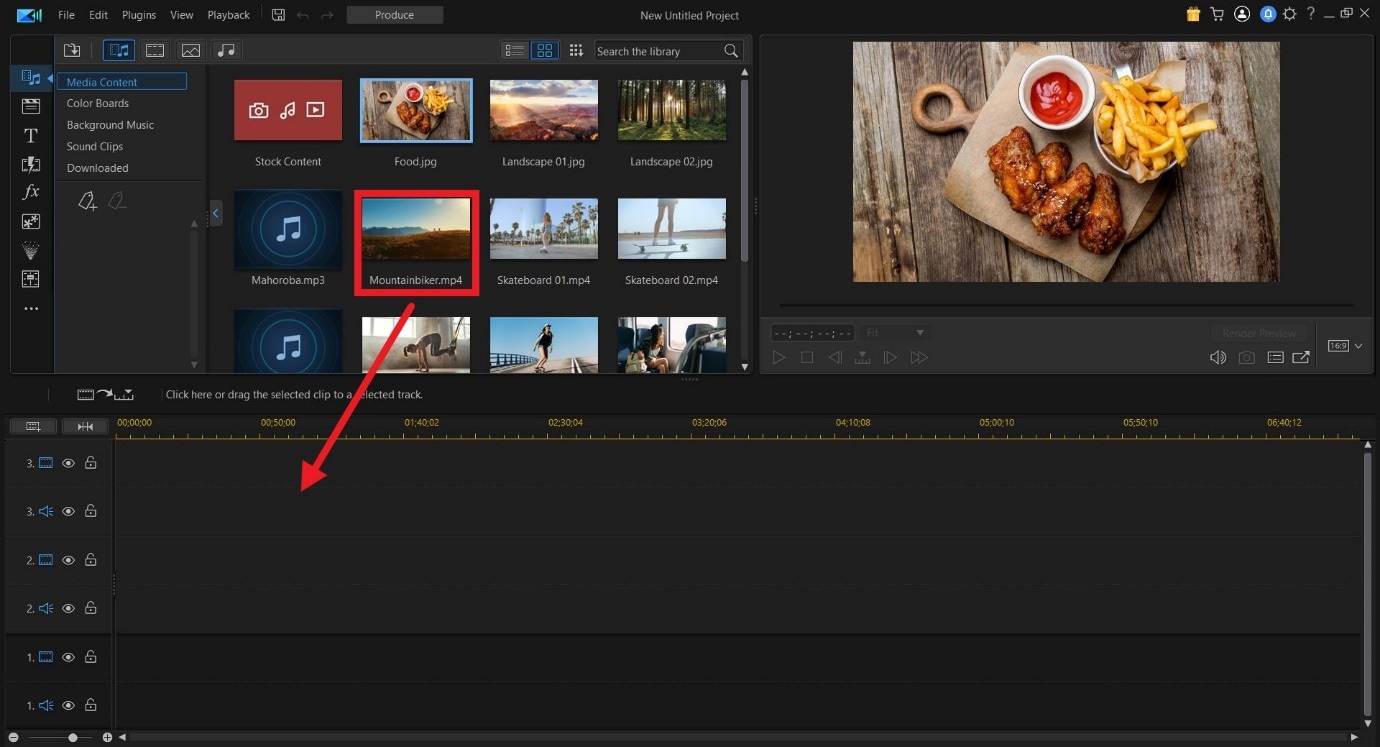
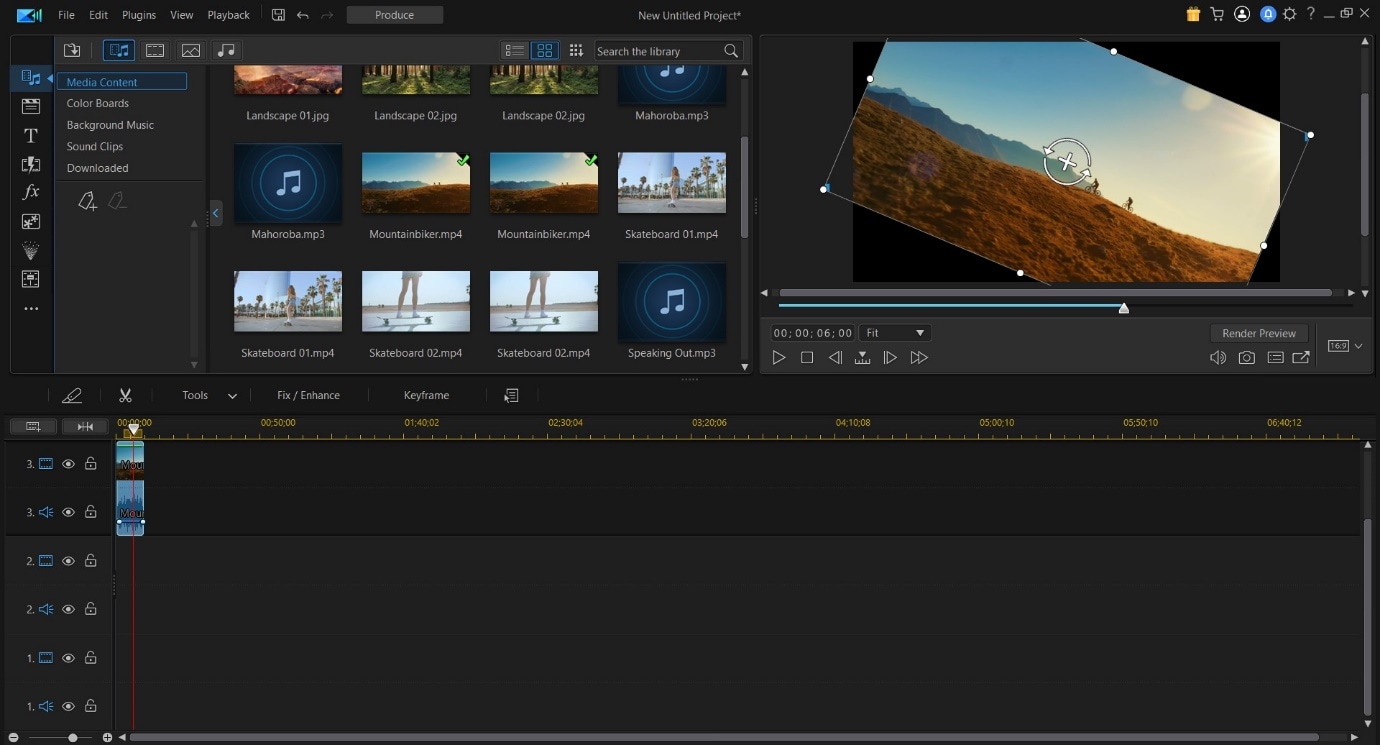
Step 3: Now, click on the video file on the Timeline; this will activate the video in the Preview Window. And it will provide you with access to the rotation circle, allowing you to change the orientation of the source file.
EXTRA
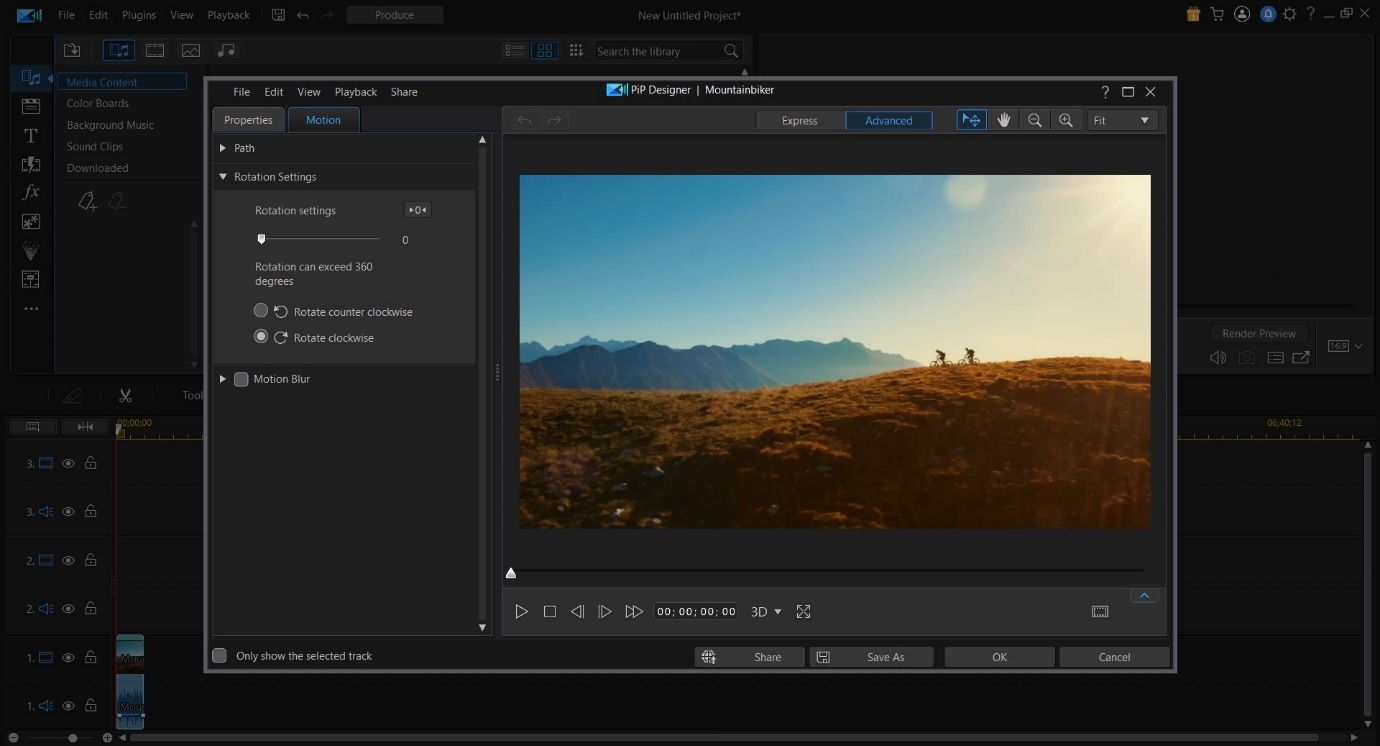
Rotation added in the PiP Designer will function as a keyframe-based rotation action. Right-click on the video in the preview window, choose Edit and then Modify to access this menu.
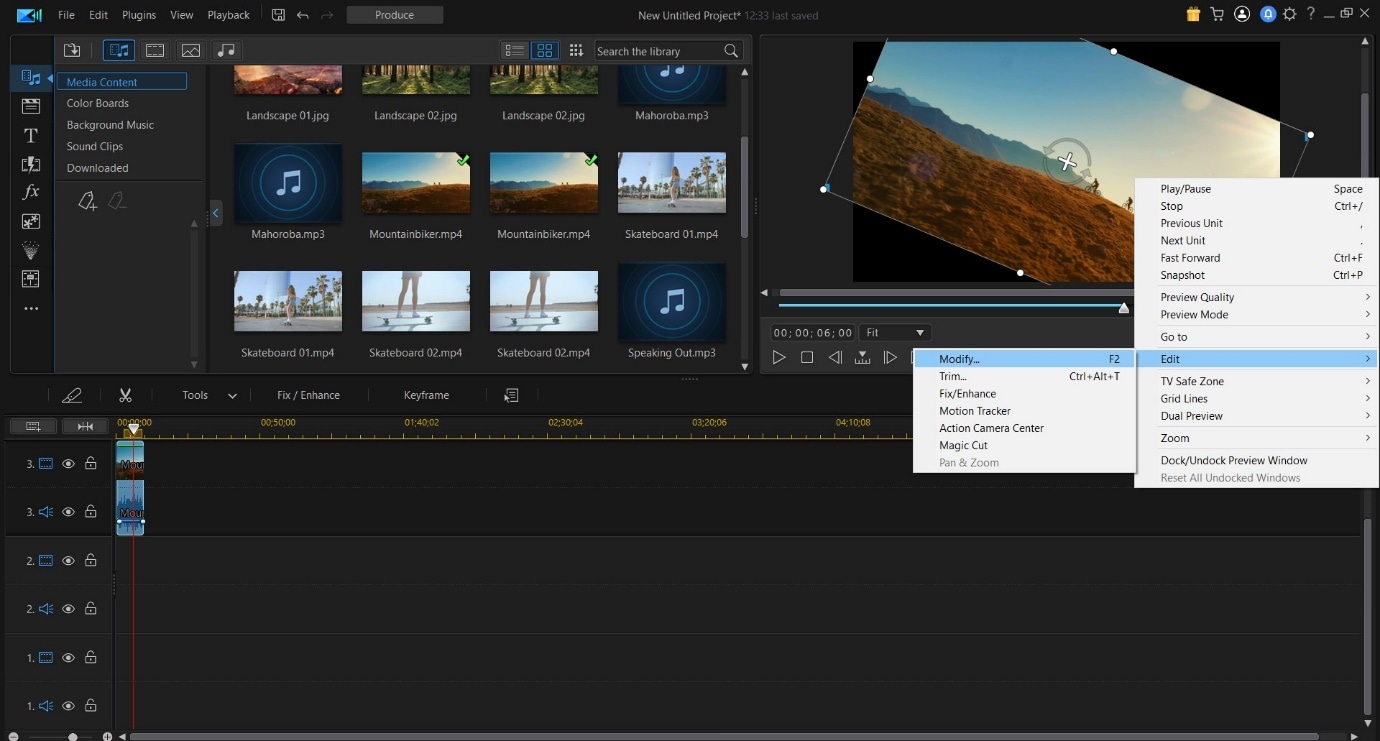
Following this, you can click on the Motion Tab, go into Rotation Settings, and modify the angle with greater precision. In the Preview Window, you will now be able to see the rotating video.
An Easier Way to Crop Video with Wondershare Filmora
Though Cyberlink PowerDirector 365 is a powerful video editing tool, we felt its menus were not as simple to navigate. Accessing the rotate function while available in the forefront, the use of PiP Designer didn’t feel intuitive.
In Wondershare Filmora Video Editor , rotating footage only happens via the Edit Option, and this straightforward approach felt simple. As for those who want to use Keyframes, the integration of this feature right above the Timeline is an appreciated convenience.
This emphasis on quick accessibility is present with almost every function in Filmora, and we believe this to be a significant advantage. The use of modern and unique iconography also increases familiarity, an aspect that will always be welcoming to new and budding creators.
If you do not already have Wondershare Filmora, you can download the software by visiting the official website.
To help you learn how to use the rotate function and show you an example of the easy accessibility in Filmora, here is how you can use the feature to get the output you desire.
For Win 7 or later (64-bit)
For macOS 10.14 or later
Once you have a new project open in Filmora, follow the steps listed below.
Step 1: Import a Media File to edit into your Video Project.
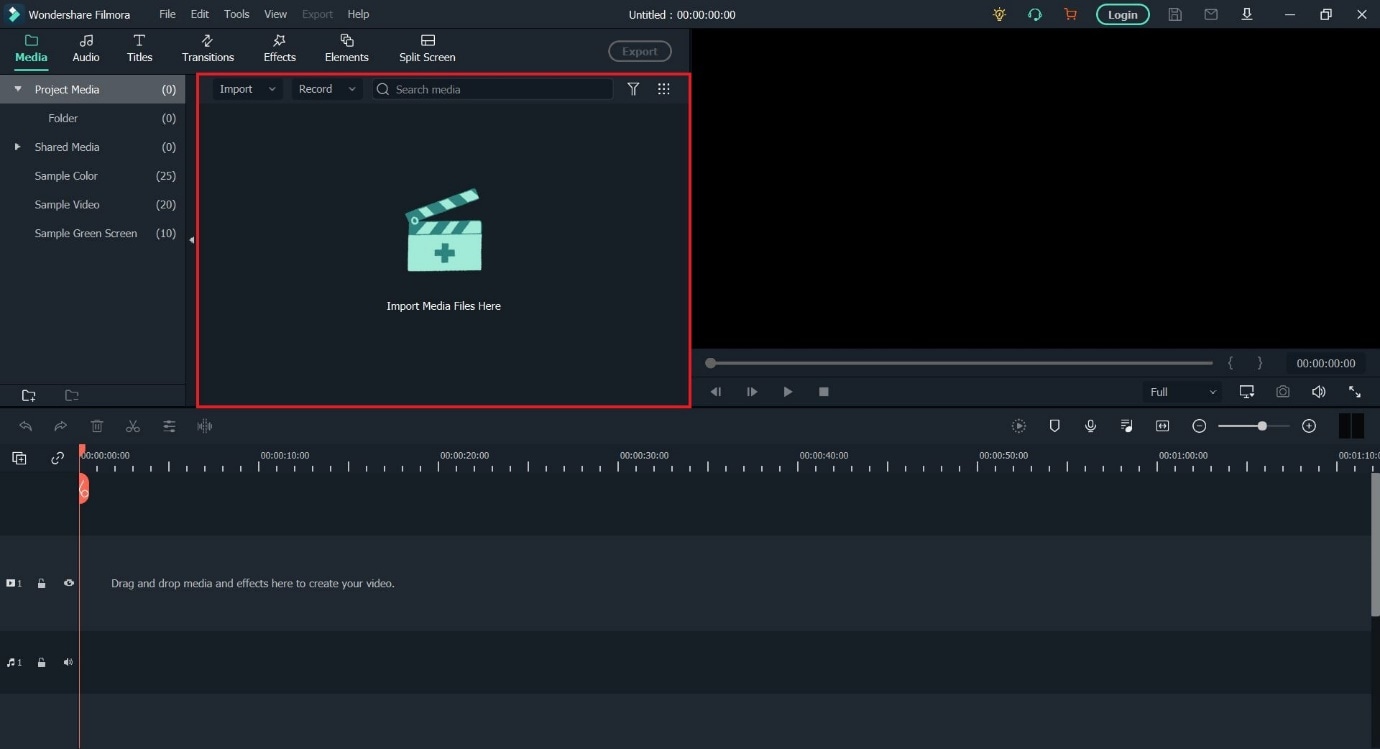
Step 2: Drag the video clip onto the Timeline and then select it with a mouse click to activate further interactions.

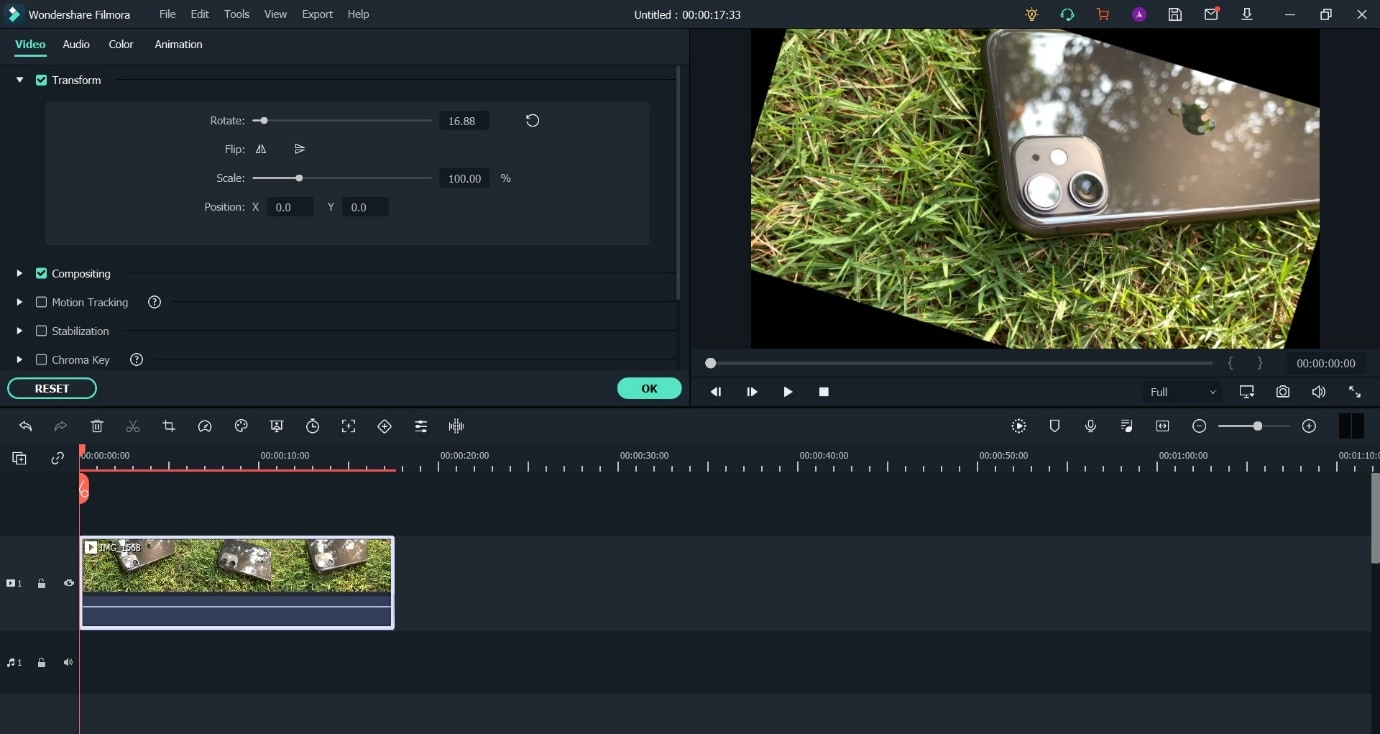
Step 3: Choose the Edit Option (marked in Red).
This will bring up the Edit Window in the left-top corner of your screen.

Step 4: Click on the Transform Menu and use the Rotation Slider to edit the orientation.
Having read this stretch of the guide, we believe you may have noticed how Filmora is more user-friendly and accessible due to its menu layout.
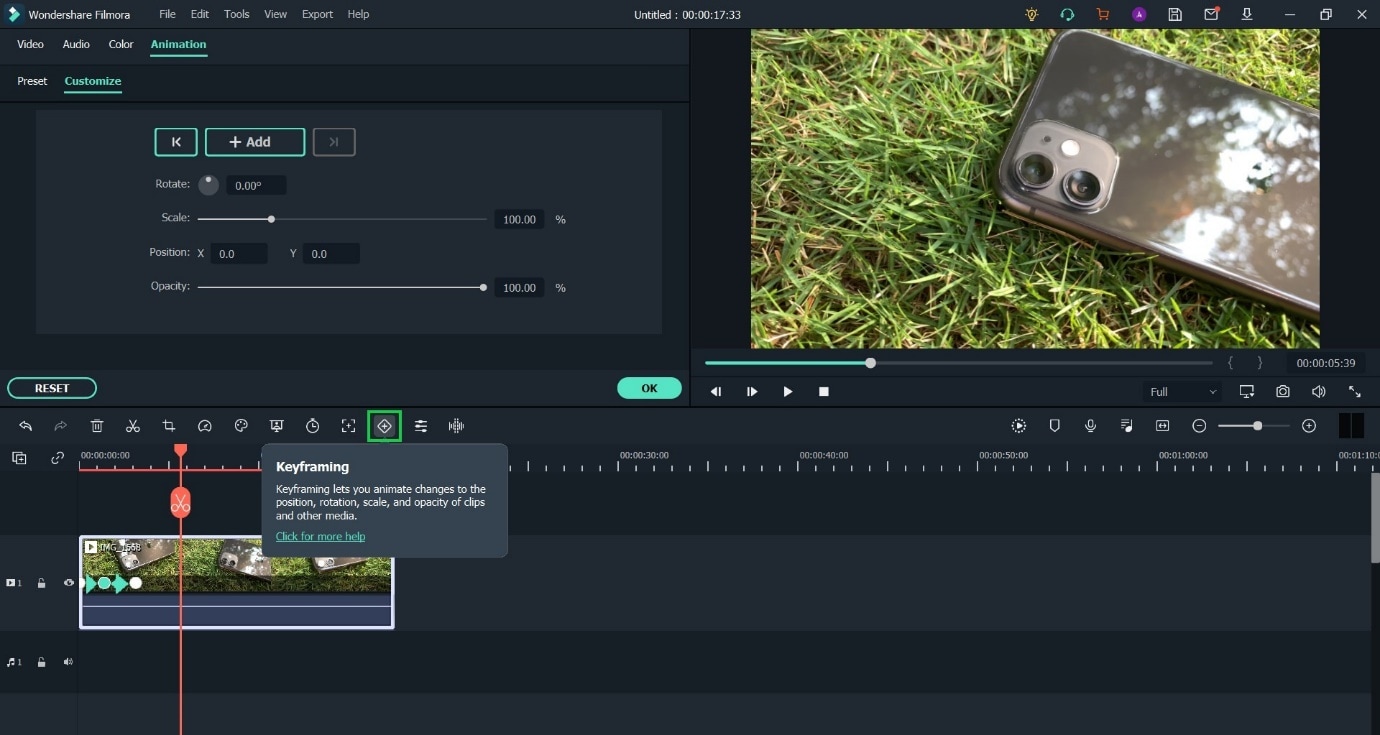
BONUS
Click on the Keyframe Button (marked in Green) to access the Keyframe Menu that allows you to set points between which a decided amount of rotation can happen.
The Bottom Line
This marks the end of our guide on how to rotate video in PowerDirector 365 and Wondershare Filmora X. Now, while both software are high-capable tools, we feel the keyframe-based working on rotation in Filmora is a lot more intuitive and easy to use. The ability to only have number-based rotation within the edit menu is also a positive, as rotating with a swivel like in PowerDirector isn’t always the most accurate.
And lastly, the modern iconography-based design of Wondershare Filmora is a factor to keep in mind, as this increases usability manifolds.
Note: Full Mode in Cyberlink PowerDirector 365 will provide users access to a full-featured video editing tool similar in function to Wondershare Filmora. The other option available is Ad Designer.
Step 2: Now, import media onto the Timeline from the Media Library.
For this guide, we used the pre-existing stock footage in Cyberlink PowerDirector.

Step 3: Now, click on the video file on the Timeline; this will activate the video in the Preview Window. And it will provide you with access to the rotation circle, allowing you to change the orientation of the source file.

EXTRA
Rotation added in the PiP Designer will function as a keyframe-based rotation action. Right-click on the video in the preview window, choose Edit and then Modify to access this menu.

Following this, you can click on the Motion Tab, go into Rotation Settings, and modify the angle with greater precision. In the Preview Window, you will now be able to see the rotating video.

An Easier Way to Crop Video with Wondershare Filmora
Though Cyberlink PowerDirector 365 is a powerful video editing tool, we felt its menus were not as simple to navigate. Accessing the rotate function while available in the forefront, the use of PiP Designer didn’t feel intuitive.
In Wondershare Filmora Video Editor , rotating footage only happens via the Edit Option, and this straightforward approach felt simple. As for those who want to use Keyframes, the integration of this feature right above the Timeline is an appreciated convenience.
This emphasis on quick accessibility is present with almost every function in Filmora, and we believe this to be a significant advantage. The use of modern and unique iconography also increases familiarity, an aspect that will always be welcoming to new and budding creators.
If you do not already have Wondershare Filmora, you can download the software by visiting the official website.
To help you learn how to use the rotate function and show you an example of the easy accessibility in Filmora, here is how you can use the feature to get the output you desire.
For Win 7 or later (64-bit)
For macOS 10.14 or later
Once you have a new project open in Filmora, follow the steps listed below.
Step 1: Import a Media File to edit into your Video Project.

Step 2: Drag the video clip onto the Timeline and then select it with a mouse click to activate further interactions.

Step 3: Choose the Edit Option (marked in Red).
This will bring up the Edit Window in the left-top corner of your screen.

Step 4: Click on the Transform Menu and use the Rotation Slider to edit the orientation.

Having read this stretch of the guide, we believe you may have noticed how Filmora is more user-friendly and accessible due to its menu layout.
BONUS
Click on the Keyframe Button (marked in Green) to access the Keyframe Menu that allows you to set points between which a decided amount of rotation can happen.

The Bottom Line
This marks the end of our guide on how to rotate video in PowerDirector 365 and Wondershare Filmora X. Now, while both software are high-capable tools, we feel the keyframe-based working on rotation in Filmora is a lot more intuitive and easy to use. The ability to only have number-based rotation within the edit menu is also a positive, as rotating with a swivel like in PowerDirector isn’t always the most accurate.
And lastly, the modern iconography-based design of Wondershare Filmora is a factor to keep in mind, as this increases usability manifolds.
Note: Full Mode in Cyberlink PowerDirector 365 will provide users access to a full-featured video editing tool similar in function to Wondershare Filmora. The other option available is Ad Designer.
Step 2: Now, import media onto the Timeline from the Media Library.
For this guide, we used the pre-existing stock footage in Cyberlink PowerDirector.

Step 3: Now, click on the video file on the Timeline; this will activate the video in the Preview Window. And it will provide you with access to the rotation circle, allowing you to change the orientation of the source file.

EXTRA
Rotation added in the PiP Designer will function as a keyframe-based rotation action. Right-click on the video in the preview window, choose Edit and then Modify to access this menu.

Following this, you can click on the Motion Tab, go into Rotation Settings, and modify the angle with greater precision. In the Preview Window, you will now be able to see the rotating video.

An Easier Way to Crop Video with Wondershare Filmora
Though Cyberlink PowerDirector 365 is a powerful video editing tool, we felt its menus were not as simple to navigate. Accessing the rotate function while available in the forefront, the use of PiP Designer didn’t feel intuitive.
In Wondershare Filmora Video Editor , rotating footage only happens via the Edit Option, and this straightforward approach felt simple. As for those who want to use Keyframes, the integration of this feature right above the Timeline is an appreciated convenience.
This emphasis on quick accessibility is present with almost every function in Filmora, and we believe this to be a significant advantage. The use of modern and unique iconography also increases familiarity, an aspect that will always be welcoming to new and budding creators.
If you do not already have Wondershare Filmora, you can download the software by visiting the official website.
To help you learn how to use the rotate function and show you an example of the easy accessibility in Filmora, here is how you can use the feature to get the output you desire.
For Win 7 or later (64-bit)
For macOS 10.14 or later
Once you have a new project open in Filmora, follow the steps listed below.
Step 1: Import a Media File to edit into your Video Project.

Step 2: Drag the video clip onto the Timeline and then select it with a mouse click to activate further interactions.

Step 3: Choose the Edit Option (marked in Red).
This will bring up the Edit Window in the left-top corner of your screen.

Step 4: Click on the Transform Menu and use the Rotation Slider to edit the orientation.

Having read this stretch of the guide, we believe you may have noticed how Filmora is more user-friendly and accessible due to its menu layout.
BONUS
Click on the Keyframe Button (marked in Green) to access the Keyframe Menu that allows you to set points between which a decided amount of rotation can happen.

The Bottom Line
This marks the end of our guide on how to rotate video in PowerDirector 365 and Wondershare Filmora X. Now, while both software are high-capable tools, we feel the keyframe-based working on rotation in Filmora is a lot more intuitive and easy to use. The ability to only have number-based rotation within the edit menu is also a positive, as rotating with a swivel like in PowerDirector isn’t always the most accurate.
And lastly, the modern iconography-based design of Wondershare Filmora is a factor to keep in mind, as this increases usability manifolds.
Note: Full Mode in Cyberlink PowerDirector 365 will provide users access to a full-featured video editing tool similar in function to Wondershare Filmora. The other option available is Ad Designer.
Step 2: Now, import media onto the Timeline from the Media Library.
For this guide, we used the pre-existing stock footage in Cyberlink PowerDirector.

Step 3: Now, click on the video file on the Timeline; this will activate the video in the Preview Window. And it will provide you with access to the rotation circle, allowing you to change the orientation of the source file.

EXTRA
Rotation added in the PiP Designer will function as a keyframe-based rotation action. Right-click on the video in the preview window, choose Edit and then Modify to access this menu.

Following this, you can click on the Motion Tab, go into Rotation Settings, and modify the angle with greater precision. In the Preview Window, you will now be able to see the rotating video.

An Easier Way to Crop Video with Wondershare Filmora
Though Cyberlink PowerDirector 365 is a powerful video editing tool, we felt its menus were not as simple to navigate. Accessing the rotate function while available in the forefront, the use of PiP Designer didn’t feel intuitive.
In Wondershare Filmora Video Editor , rotating footage only happens via the Edit Option, and this straightforward approach felt simple. As for those who want to use Keyframes, the integration of this feature right above the Timeline is an appreciated convenience.
This emphasis on quick accessibility is present with almost every function in Filmora, and we believe this to be a significant advantage. The use of modern and unique iconography also increases familiarity, an aspect that will always be welcoming to new and budding creators.
If you do not already have Wondershare Filmora, you can download the software by visiting the official website.
To help you learn how to use the rotate function and show you an example of the easy accessibility in Filmora, here is how you can use the feature to get the output you desire.
For Win 7 or later (64-bit)
For macOS 10.14 or later
Once you have a new project open in Filmora, follow the steps listed below.
Step 1: Import a Media File to edit into your Video Project.

Step 2: Drag the video clip onto the Timeline and then select it with a mouse click to activate further interactions.

Step 3: Choose the Edit Option (marked in Red).
This will bring up the Edit Window in the left-top corner of your screen.

Step 4: Click on the Transform Menu and use the Rotation Slider to edit the orientation.

Having read this stretch of the guide, we believe you may have noticed how Filmora is more user-friendly and accessible due to its menu layout.
BONUS
Click on the Keyframe Button (marked in Green) to access the Keyframe Menu that allows you to set points between which a decided amount of rotation can happen.

The Bottom Line
This marks the end of our guide on how to rotate video in PowerDirector 365 and Wondershare Filmora X. Now, while both software are high-capable tools, we feel the keyframe-based working on rotation in Filmora is a lot more intuitive and easy to use. The ability to only have number-based rotation within the edit menu is also a positive, as rotating with a swivel like in PowerDirector isn’t always the most accurate.
And lastly, the modern iconography-based design of Wondershare Filmora is a factor to keep in mind, as this increases usability manifolds.
Making Slow Motion Videos in Premiere Pro: A Review on The Best Method
Slow-motion videos can give your videos more depth, drama, and emotion. Your viewers will find your films more interesting if you use slow-motion effects. It can bring attention to a shot, produce an artistic effect, or relive a memorable scene. Slow-motion video has been used for decades to add dramatic effects to films and videos.
If you’re interested in how to do slow-mo in Premiere Pro, this article is your ultimate solution. Read the article and add artistic to dramatic slow-mo to your videos. You will eventually come to know how to do slow mo on Premiere Pro with ease.
Slow Motion Video Maker Slow your video’s speed with better control of your keyframes to create unique cinematic effects!
Make A Slow Motion Video Make A Slow Motion Video More Features

Part 1: What Are Some Potential Real-Life Use Cases of Having Slow Motion Videos?
Slow-motion movies can be utilized to record and examine events in greater depth. Before delving into how to make a slow-motion video in Premiere Pro, learn its use cases. Thus, below are a few applications of the slow motion in real life:
- Medical Research and Imaging: Slow-motion videos are used in medical research and education. They thoroughly examine surgical methods and practices. This promotes medical practice improvement and student’s better comprehension of concepts.
- Cinematography and Filmmaking: Filmmakers use slow motion to add dramatic and creative effects. It can arouse feelings, highlight particular movements, or produce a dreamlike mood. In commercials, these videos create sequences of the message you want to convey.
- Wildlife Observation: Slow-motion recordings can be very useful in animal research. They can be used to watch and record animal activity more closely. It gives researchers a better knowledge of the animal’s habits.
- Sports analysis: Slow-motion effect can analyze an athlete’s movement mechanics and give reviews. Coaches and athletes pinpoint areas where their technique needs to be improved.
- Product Testing and Quality Control: Video effects also prove useful in industries. It allows engineers to inspect high-speed operations and identify any flaws or malfunctions.
- **Crash Test Analysis:**Analyzing slow-motion video is essential for examining vehicle crash tests. It aids in improving car designs and evaluating the performance of safety systems.
Part 2: Performing Slow Mo in Adobe Premiere Pro: Using A Good Option
Adobe Premiere Pro’s editing interface makes its reputation high in the market. It is known as the industry standard tool because of its unparalleled features. Content developers and filmmakers can arrange and edit video files on it. It can also improve audio and image quality with its extensive editing toolkit.
Premier Pro offers many more functions than basic video editing. It offers some features that can change your content creation journey. Following are some of its basic features that you should know before learning Premiere Pro how to slow motion:
- Auto Reframe: This feature keeps the object of the image in the frame no matter which frame you choose. You can easily auto-frame a single clip or go for the entire video.
- Text-Based Editing: Text-based editing can give you more control over the transcript. It can deal with multi-channel audio recordings and remove gaps with a single click.
- Color Settings: Color settings allow you to adjust colors quickly and easily. It can check the result by combining multiple color selections into a single tab.
- Audio Auto-Tagging: This feature classifies audio files as either dialogue, music, or ambiance. It then provides access to the most useful tools for producing high-quality audio.
This guide will tell you how to make a slow-motion video on Premiere Pro. Follow the steps below to decrease the speed of your video across Adobe Premiere Pro:
Step 1
Import your video into the timeline and right-click on the icon you see with the video file on the timeline. From here, go to “Time-Remapping” and click on “Speed.” You will know the function has been activated when you see the white line on your timeline.

Step 2
Expand the timeline to see the ramping line. Now click on the ramping line by using the “Ctrl + click” command. You can also add keyframes by going to the toolkit on the left side of the screen and selecting the “Add Keyframe” button. Another option is the time remapping speed settings from the top and activating the keyframe.

Step 3
Move the timeline cursor to the right side and add another keyframe there. Now, double-click on the first keyframe and drag it to the right side just a bit. After that, drag the speed ramping line downwards to create a ramp. To change the length of keyframes more precisely, go to “Effects Control” from the top and manage its length.

Part 3: Quick Alternative: Wondershare Filmora and Slow-Motion Clips
You might have gotten the answer to “how to make slow-motion video in Premiere Pro” until now. But another question comes into mind: “How to make slow-mo videos easily ?” Using Adobe Premiere Pro can be tricky for starters, so they look for alternative tools. Filmora is a great option if you struggle with using Adobe Premier Pro.
The tool is easy to use and can process heavy videos, keeping its quality intact. With its AI features, the edits that used to take hours can now be done within minutes. The tool has amazing options for all kinds of media editing.
Step-by-Step Guide to Perform Slow Motion in Filmora Using Different Methods
Remarkable features of Filmora do not end here. If you want to know more about Filmora, you should download it, but first, learn how to add slow motion in reels. In this read, follow the guide below:
Free Download For Win 7 or later(64-bit)
Free Download For macOS 10.14 or later
Method 1: Using Uniform Speed
Using this method, you can slow down your video smartly with the help of AI. Some options in uniform speed will help you to automate the process while ensuring the quality of the content. Look at the steps below to add slo-mo to your video like a pro:
Step 1Import Media to the Timeline and Explore Uniform Speed
Install Filmora 13 on your device and open it to access “New Project” from the main interface. When you enter the editing window, import your file into the media panel.

Step 2Adjust the Speed and Other Use Advanced Options
Later, drag that file to the timeline and right-click on it to get a list. Select the “Uniform Speed” option from that list and head to the editing panel opened to the right. Under the “Speed,” there will be a slider. You have to move it to the left for slow-motion video. While adjusting speed with that slider, track video duration from the “Duration” section. Below that option, you can toggle the “Reverse Speed” option if required.

Otherwise, check the “Ripple Edit” and “Maintain Pitch” option for good. Now, extend the “AI Interpolation” menu and choose “Optical Flow.” It will let AI automatically adjust the video speed in slow motion with high quality.

Method 2: Using Speed Ramping
If you want to bring a professional look to Slow-motion videos, use Speed Ramping. It will ensure a smooth change in video speed when it increases or decreases. To add this refined touch to videos, look at the given steps:
Step 1Access the Speed Ramping Option in 2 Ways
Tap the “Speed Ramping” next to the “Uniform Speed” in the right-side panel. Optionally, you can right-click on your videos in the timeline. There, you will find the “Speed Ramping” option below the “Uniform Speed” option in the list.

Step 2Speed Ramping Your Videos and Get Render Preview
In the Speed Ramping Section, you will get 6 templates. Pick one or hit the “Customize” to design your own speed ramping in videos. Later, move to the toolbar of the timeline section and choose “Render Preview” next to the “Copilot” icon. It will bring a smooth playback of your speed ramping in videos.

Matchless Features of Wondershare Filmora
Wondershare Filmora offers a creative editing experience. It has a number of important features, some of which are discussed below:
AI Copilot: You can speed up your video editing process with the AI Copilot Editing function. It offers AI assistance anytime you need it and gives a quick response. This feature directs you towards the required feature with a button. To get assistance, users just have to prompt questions in natural language.
AI Text-Based Editing: You can edit your video content with the AI Text-Based Editing tool. This feature can transcribe your spoken words into editable text. Afterward, you can edit the text based on your preferences, and the changes in the video will be added. Moreover, Filmora allows you to save the generated text to reuse it in articles and blogs later.
AI Copywriting: If you are stuck creating a unique script, get help from AI copywriting in Filmora. It gives several video ideas to generate YouTube video titles and descriptions. This creative personal assistant will bring content aligning with your video goals. The generated script can be used to make videos from Filmora’s text-to-video feature.
Conclusion
Regular videos do not always generate the same level of response from viewers. Slow-mo videos can make a video more entertaining and improve the film’s narrative. It’s good to use when you want to draw attention to the most significant shot in a video. This article shows how to make slow motion in Premiere Pro and offers an amazing alternative. Thus, try to use Filmora and improve your editing experiences with ease.
Make A Slow Motion Video Make A Slow Motion Video More Features

Part 1: What Are Some Potential Real-Life Use Cases of Having Slow Motion Videos?
Slow-motion movies can be utilized to record and examine events in greater depth. Before delving into how to make a slow-motion video in Premiere Pro, learn its use cases. Thus, below are a few applications of the slow motion in real life:
- Medical Research and Imaging: Slow-motion videos are used in medical research and education. They thoroughly examine surgical methods and practices. This promotes medical practice improvement and student’s better comprehension of concepts.
- Cinematography and Filmmaking: Filmmakers use slow motion to add dramatic and creative effects. It can arouse feelings, highlight particular movements, or produce a dreamlike mood. In commercials, these videos create sequences of the message you want to convey.
- Wildlife Observation: Slow-motion recordings can be very useful in animal research. They can be used to watch and record animal activity more closely. It gives researchers a better knowledge of the animal’s habits.
- Sports analysis: Slow-motion effect can analyze an athlete’s movement mechanics and give reviews. Coaches and athletes pinpoint areas where their technique needs to be improved.
- Product Testing and Quality Control: Video effects also prove useful in industries. It allows engineers to inspect high-speed operations and identify any flaws or malfunctions.
- **Crash Test Analysis:**Analyzing slow-motion video is essential for examining vehicle crash tests. It aids in improving car designs and evaluating the performance of safety systems.
Part 2: Performing Slow Mo in Adobe Premiere Pro: Using A Good Option
Adobe Premiere Pro’s editing interface makes its reputation high in the market. It is known as the industry standard tool because of its unparalleled features. Content developers and filmmakers can arrange and edit video files on it. It can also improve audio and image quality with its extensive editing toolkit.
Premier Pro offers many more functions than basic video editing. It offers some features that can change your content creation journey. Following are some of its basic features that you should know before learning Premiere Pro how to slow motion:
- Auto Reframe: This feature keeps the object of the image in the frame no matter which frame you choose. You can easily auto-frame a single clip or go for the entire video.
- Text-Based Editing: Text-based editing can give you more control over the transcript. It can deal with multi-channel audio recordings and remove gaps with a single click.
- Color Settings: Color settings allow you to adjust colors quickly and easily. It can check the result by combining multiple color selections into a single tab.
- Audio Auto-Tagging: This feature classifies audio files as either dialogue, music, or ambiance. It then provides access to the most useful tools for producing high-quality audio.
This guide will tell you how to make a slow-motion video on Premiere Pro. Follow the steps below to decrease the speed of your video across Adobe Premiere Pro:
Step 1
Import your video into the timeline and right-click on the icon you see with the video file on the timeline. From here, go to “Time-Remapping” and click on “Speed.” You will know the function has been activated when you see the white line on your timeline.

Step 2
Expand the timeline to see the ramping line. Now click on the ramping line by using the “Ctrl + click” command. You can also add keyframes by going to the toolkit on the left side of the screen and selecting the “Add Keyframe” button. Another option is the time remapping speed settings from the top and activating the keyframe.

Step 3
Move the timeline cursor to the right side and add another keyframe there. Now, double-click on the first keyframe and drag it to the right side just a bit. After that, drag the speed ramping line downwards to create a ramp. To change the length of keyframes more precisely, go to “Effects Control” from the top and manage its length.

Part 3: Quick Alternative: Wondershare Filmora and Slow-Motion Clips
You might have gotten the answer to “how to make slow-motion video in Premiere Pro” until now. But another question comes into mind: “How to make slow-mo videos easily ?” Using Adobe Premiere Pro can be tricky for starters, so they look for alternative tools. Filmora is a great option if you struggle with using Adobe Premier Pro.
The tool is easy to use and can process heavy videos, keeping its quality intact. With its AI features, the edits that used to take hours can now be done within minutes. The tool has amazing options for all kinds of media editing.
Step-by-Step Guide to Perform Slow Motion in Filmora Using Different Methods
Remarkable features of Filmora do not end here. If you want to know more about Filmora, you should download it, but first, learn how to add slow motion in reels. In this read, follow the guide below:
Free Download For Win 7 or later(64-bit)
Free Download For macOS 10.14 or later
Method 1: Using Uniform Speed
Using this method, you can slow down your video smartly with the help of AI. Some options in uniform speed will help you to automate the process while ensuring the quality of the content. Look at the steps below to add slo-mo to your video like a pro:
Step 1Import Media to the Timeline and Explore Uniform Speed
Install Filmora 13 on your device and open it to access “New Project” from the main interface. When you enter the editing window, import your file into the media panel.

Step 2Adjust the Speed and Other Use Advanced Options
Later, drag that file to the timeline and right-click on it to get a list. Select the “Uniform Speed” option from that list and head to the editing panel opened to the right. Under the “Speed,” there will be a slider. You have to move it to the left for slow-motion video. While adjusting speed with that slider, track video duration from the “Duration” section. Below that option, you can toggle the “Reverse Speed” option if required.

Otherwise, check the “Ripple Edit” and “Maintain Pitch” option for good. Now, extend the “AI Interpolation” menu and choose “Optical Flow.” It will let AI automatically adjust the video speed in slow motion with high quality.

Method 2: Using Speed Ramping
If you want to bring a professional look to Slow-motion videos, use Speed Ramping. It will ensure a smooth change in video speed when it increases or decreases. To add this refined touch to videos, look at the given steps:
Step 1Access the Speed Ramping Option in 2 Ways
Tap the “Speed Ramping” next to the “Uniform Speed” in the right-side panel. Optionally, you can right-click on your videos in the timeline. There, you will find the “Speed Ramping” option below the “Uniform Speed” option in the list.

Step 2Speed Ramping Your Videos and Get Render Preview
In the Speed Ramping Section, you will get 6 templates. Pick one or hit the “Customize” to design your own speed ramping in videos. Later, move to the toolbar of the timeline section and choose “Render Preview” next to the “Copilot” icon. It will bring a smooth playback of your speed ramping in videos.

Matchless Features of Wondershare Filmora
Wondershare Filmora offers a creative editing experience. It has a number of important features, some of which are discussed below:
AI Copilot: You can speed up your video editing process with the AI Copilot Editing function. It offers AI assistance anytime you need it and gives a quick response. This feature directs you towards the required feature with a button. To get assistance, users just have to prompt questions in natural language.
AI Text-Based Editing: You can edit your video content with the AI Text-Based Editing tool. This feature can transcribe your spoken words into editable text. Afterward, you can edit the text based on your preferences, and the changes in the video will be added. Moreover, Filmora allows you to save the generated text to reuse it in articles and blogs later.
AI Copywriting: If you are stuck creating a unique script, get help from AI copywriting in Filmora. It gives several video ideas to generate YouTube video titles and descriptions. This creative personal assistant will bring content aligning with your video goals. The generated script can be used to make videos from Filmora’s text-to-video feature.
Conclusion
Regular videos do not always generate the same level of response from viewers. Slow-mo videos can make a video more entertaining and improve the film’s narrative. It’s good to use when you want to draw attention to the most significant shot in a video. This article shows how to make slow motion in Premiere Pro and offers an amazing alternative. Thus, try to use Filmora and improve your editing experiences with ease.
Also read:
- New Make A Tattoo Disappear Like A Magic
- Why You Should Master Slideshows In Lightroom?
- How to Create an URL for Your Video?
- Find Out What Track Mattes Are in After Effects and Learn How to Find and Use It with Simple and Easy-to-Follow Instructions for 2024
- In 2024, 8 Apps to Custom GIF Stickers
- The Ultimate Guide to Use LUTS to Color Grade on iPhone for 2024
- Updated In 2024, What Is First Impression Review Video
- Updated In 2024, Top List Best VHS Sound Effect That You Can Use in Video Making
- New Logo Intro Videos Are the Hottest Trend in Town and Are Gaining Popularity Quickly. Keep Reading This Article to Learn Their Importance and How to Design One
- Updated In 2024, What Are the Best Video Background Changers Online?
- In 2024, The Best Laptops For Video Editing
- Browse the List of the Best 8 Scanners or Converters for Converting the Slides to Digital Images. Also, Know the Other Important Information of Slides to Digital Conversion
- Updated Ll About GIF Keyboard That You Want to Know for 2024
- 2024 Approved How to Make Video Fade to Black in Movie Maker Easily
- 2024 Approved How to Delete White Background in Photoshop. How to Create a Transparent Background in Photoshop? Steps to Get Rid of White Background in Photoshop
- Updated Do You Wish to Convert GIF to Animated PNG? Then, You Need to Know About Using a GIF to APNG Converter to Help You Carry This Process Out in No Time. Read On
- Updated 2024 Approved Top 10 Transparent Image Online Tools That Give You an Advantage
- Updated 2024 Approved Bandicut Video Editor Download and Review
- New In 2024, 4 Methods to Crop a Video on Android Easily
- How to Add Motion Titles for 2024
- Updated How to Add Font Effect for 2024
- New How to Save As MP4 File on Windows Movie Maker?
- Updated You Can Make Attractive Videos by Adding Text Behind Objects. This Article Will Explain How to Use Wondershare Filmora to Create These Videos
- New Add Motion Blur in After Effects for 2024
- Updated This Article Aims to Provide a Step-by-Step Guide to Changing a Videos Speed by Using the Speed Adjustment Panel and Duration Panel on Wondershare Filmora
- Start Making Procreate GIFs and Take Your Editing Creativity to the Next Level
- Top 10 Sound Extractors to Extract Sound From Video 2023
- How to Animate Designs With Canva GIF
- How to Create Realistic Fire Effects
- 2024 Approved How To Make a Polaroid Collage
- New 2024 Approved All About GIF Keyboard That You May Want to Know
- Updated 20 Must-Have Graduation Songs for 2024
- 2024 Approved Steps to Rotate Videos Using Handbrake
- New How to Make Vintage Film Effect 1950S
- New In 2024, How To Add Motion Blur On CapCut? (IPhone & Android)
- New 2024 Approved The Ultimate Guide to GIF for Discord Profile
- 2024 Approved Are You a Gaming YouTuber or Content Creator Whose Main Game Is COD Warzone? How Kickass Are Your Warzone Thumbnails? Heres a Guide on How to Make One for Free
- New 2024 Approved Best iPhone LUTs App to Use
- 2024 Approved How to Add Expression in After Effects
- 2024 Approved How to Edit FLV Video Files with FLV Editor Windows, Mac,Android, iPhone & Online
- 2024 Approved Are You Looking to Remove Echo in Premiere Pro? Please Look at Our Guide for Advice and Suggestions on Getting the Best Possible Outcomes
- In 2024, The Ultimate Guide to Unlocking Your iPhone 13 Pro Max on MetroPCS
- How to Bypass Google FRP Lock from Vivo Y02T Devices
- In 2024, How To Use Allshare Cast To Turn On Screen Mirroring On Honor 90 GT | Dr.fone
- Top 6 Apps/Services to Trace Any Oppo A79 5G Location By Mobile Number | Dr.fone
- Simple and Effective Ways to Change Your Country on YouTube App Of your Oppo Find X7 Ultra | Dr.fone
- In 2024, How To Unlock iPhone 12 Pro Max Without Swiping Up? 6 Ways
- In 2024, How Many Attempts To Unlock Apple iPhone 15 Plus | Dr.fone
- How to Remove and Reset Face ID on Apple iPhone 11 Pro
- Will the iPogo Get You Banned and How to Solve It On Vivo T2 Pro 5G | Dr.fone
- 10 Fake GPS Location Apps on Android Of your Realme Narzo 60x 5G | Dr.fone
- How To Restore Missing Photos Files from C12 Pro.
- In 2024, Unlock Your Boost Mobile Apple iPhone 11 Before the Plan Expires
- In 2024, Dose Life360 Notify Me When Someone Checks My Location On Xiaomi Redmi Note 12 5G? | Dr.fone
- PassFab Apple iPhone 11 Pro Max Backup Unlocker Top 4 Alternatives | Dr.fone
- Xiaomi Redmi K70 Camera Not Working Unexpected Error? Fix It Now | Dr.fone
- Full guide to Apple iPhone 13 Pro Max iCloud Bypass
- Life360 Learn How Everything Works On Xiaomi Redmi Note 12 Pro+ 5G | Dr.fone
- Best Ways to Bypass iCloud Activation Lock from iPhone 12/iPad/iPod
- In 2024, Unlock Xiaomi 14 Pro Phone Password Without Factory Reset Full Guide Here
- The Ultimate Guide to Get the Rare Candy on Pokemon Go Fire Red On Lava Blaze 2 5G | Dr.fone
- 10 Free Location Spoofers to Fake GPS Location on your Infinix GT 10 Pro | Dr.fone
- Top Apps and Online Tools To Track Infinix Hot 30 5G Phone With/Without IMEI Number
- Title: How to Remove Echo with Premiere Pro? Full Guide Here
- Author: Chloe
- Created at : 2024-05-20 03:37:29
- Updated at : 2024-05-21 03:37:29
- Link: https://ai-editing-video.techidaily.com/how-to-remove-echo-with-premiere-pro-full-guide-here/
- License: This work is licensed under CC BY-NC-SA 4.0.


