:max_bytes(150000):strip_icc():format(webp)/sb10069770n-003-56a104403df78cafdaa7dd48-ba41d70c51114343aaa38409d9cdfc3f.jpg)
How to Remove or Mute Audio in Video with Android Phones for 2024

How to Remove or Mute Audio in Video with Android Phones?
There are many situations where you need to remove or mute audio in the video. For example, you don’t want the audio in your video to be included, or you want to change it to another sound.
Whatever the reasons, you don’t always have to edit to remove them on PC. There are many adequate android apps that can remove audio from your video. Read on, and this article will show you how!
Method 1: Use Google Photos to mute a video
If you’re looking for a free way to edit a video, you can use the editing tools in Google Photos. Google Photos is the best free app that you can use to store, manage, and edit your photos and videos. It’s also compatible with many android devices.
The basic editing features that Google Photos offers include removing audio from videos on android devices, making videos shorter, or adding text to videos. You can also use it to improve the quality of your videos by editing the contrast, brightness, and saturation.

So, if you want to know how to mute audio in a video android using Google Photos, follow the steps below:
Step1 Launch Google Photos and select the video you want to edit
Step2 Open the video editing setting
After the video is shown, pause the video and tap the Edit button to see the setting.
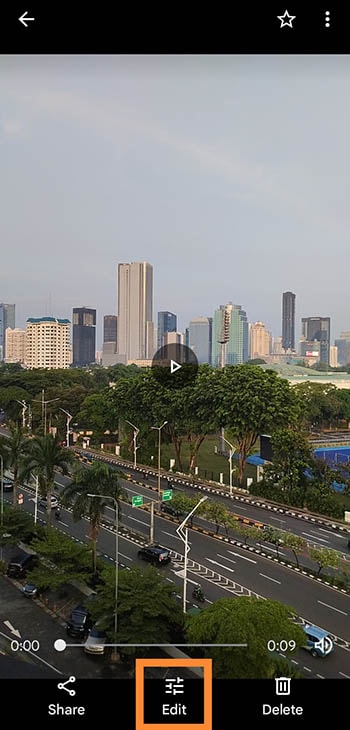
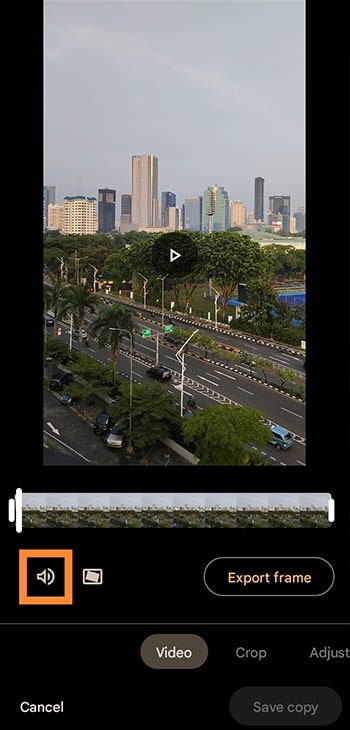
Step3 Mute the audio
Now, you can click the speaker icon to mute the video audio, as seen in the picture.
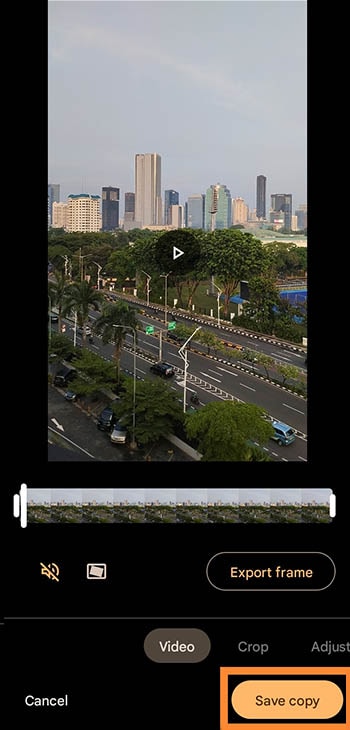
Step4 Save the edited video
Once you’re finished making changes, tap the “Save copy” button to save your changes.
Method 2: Use Filmora to remove audio from a video
Although Google Photos is excellent enough for basic video editing, there are a variety of phones that have no access to Google Services. But worry not. There are still plenty of other tool options that can remove sound from video in android.
The Filmora video editor is another fantastic tool for mobile videographers. It’s very convenient and has a wide range of features, making it a superb choice for anyone looking to edit videos on their mobile device.
Free Download For Win 7 or later(64-bit)
Free Download For macOS 10.14 or later
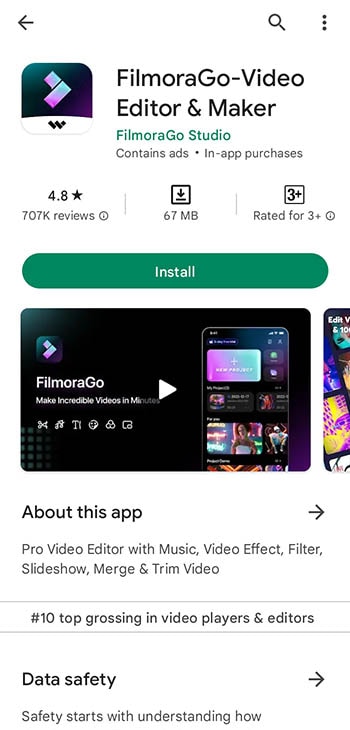
App size: 67 MB
Rating: 4.8/5 (Google Playstore)

If you’re new to video editing, Filmora is a great place to start. The interface is easy to understand, with a reasonable learning curve and a built-in tutorial that will help you get up to speed quickly.
Once you’re familiar with the basics, you can start exploring more app features, like adding effects and transitions, trimming and splitting clips, and more.
Take a look at some of Filmora’s best features:
- Equipped with over 1000 templates and featured music
- Allows you to do keyframe on a phone
- Professional adjustments, such as voice enhancement and audio speed, or setting video brightness and contrast
- Export quickly in HD quality and custom resolution
Moreover, Filmora is in the top 10 ranking for video players and editors at Google Playstore. Whether you’re a seasoned pro or just getting started, Filmora is an excellent option for mobile video editing. You can edit your videos whenever and wherever you can.
Let’s start removing the audio from your videos by following the steps below:
Step1 Install Filmora on your device
You can find and download Filmora Go through Google Playstore. Just search for “Filmora-Video Editor & Maker) and click the Install button.
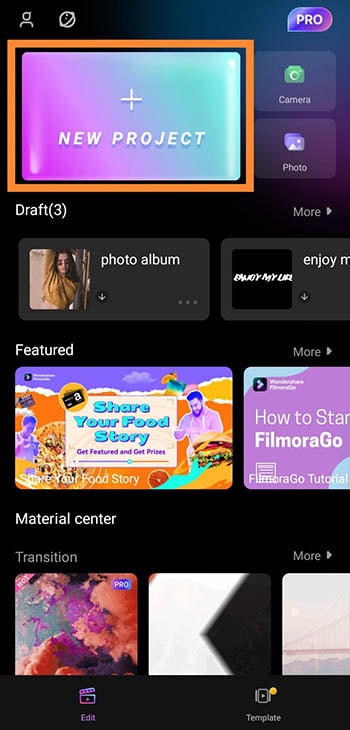
Step2 Open Filmora Go and click New Project
After running Filmora Go, you can click the New Project button and upload the video you want to edit from your gallery.
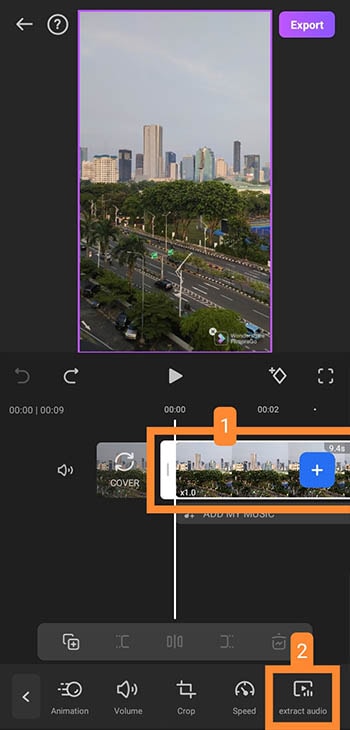
Step3 Extract audio from the video
Once the video has been uploaded, click the clip in the timeline and choose “extract audio.”
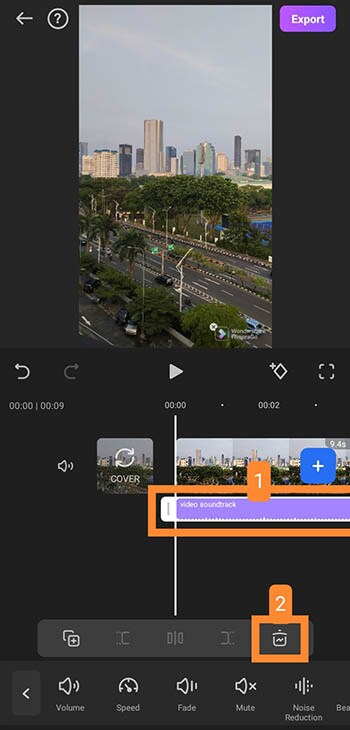
Step4 Remove audio from the video
Now that you have extracted the audio from your video, you can click the video soundtrack on the timeline, then click the delete button as seen in the picture below. By then, your audio will be removed.
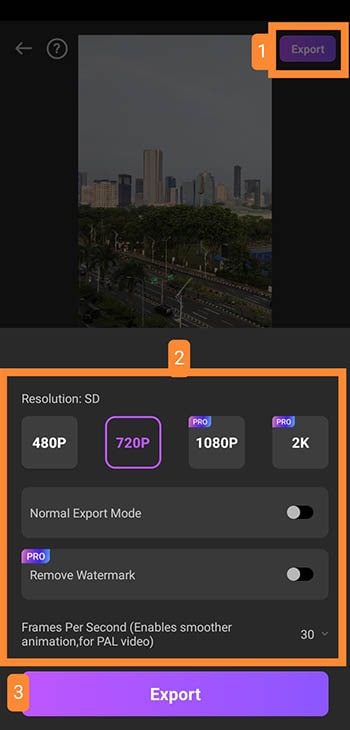
Step5 Export the edited file
After you have deleted the audio and felt satisfied, it’s time to export the edited video. Click “Export” at the top right to see the export setting. Choose the resolution and frame rates output you want, then click the Export button.
Voila! The edited video without sound will be saved to your phone, and you can also share it immediately on your social media.
Method 3: Use InShot to remove sound from video android
There are many ways to remove sound from a video on android. In this part, we’ll show you another alternative tool that you can use to mute your videos, namely InShot Video Editor.
InShot is a video editing app for mobile phones with professional features. This app is a great tool for creating short and fancy video clips to share on social media or with friends and family. But to be aware, although you can use Inshot for free, but the app will display some ads.
App size: 168 MB
Rating: 4.9/5 (Google Playstore)

InShot is widely used by android users with more than 500M downloads on Google Playstore, making it one of the most popular video editors for mobile.
InShot offers a variety of features for its users, such as:
- Adding transition effects for videos
- Making a smooth slow motion
- Adding music and voice-overs
The method is a bit more tricky than the other tools mentioned above, but it should work for most people. Now, follow these steps carefully to remove the audio from your video:
Step1 Install InShot Video Editor on your phone
The app can take up your phone’s storage, so ensure you have enough space before downloading it. You can find and install the app from Google Playstore by searching “Video Editor & Maker - InShot.”
Step2 Open the InShot app and create a new video project

Step3 Extract audio from the video
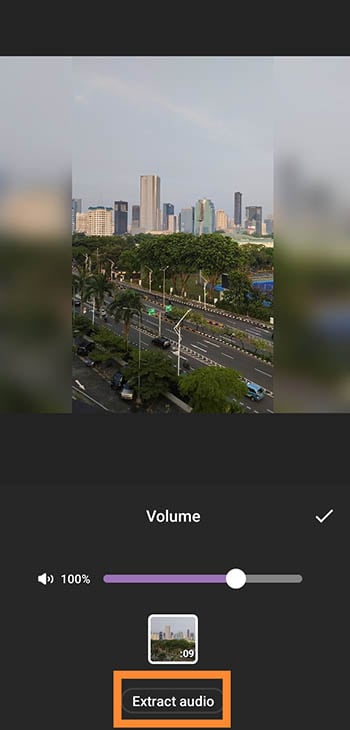
After the video has been added, you should find and click the Volume setting.

Then, click the “Extract audio” button to separate the audio from the video. Tip: if you only want to mute it, you can slide the volume to zero for this step.
Step4 Remove the audio
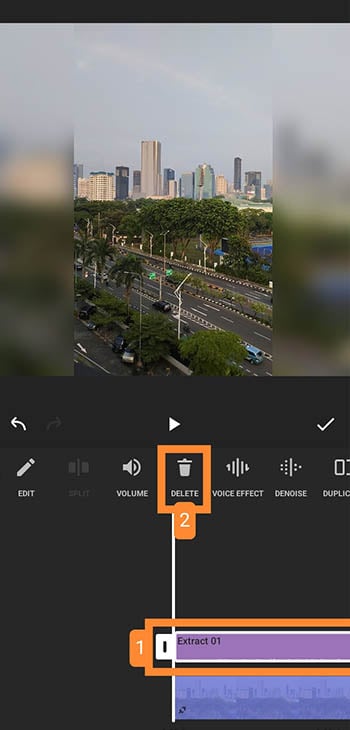
Once you have extracted the audio, select the audio bar and click the delete button to remove it.
Step5 Save the changes
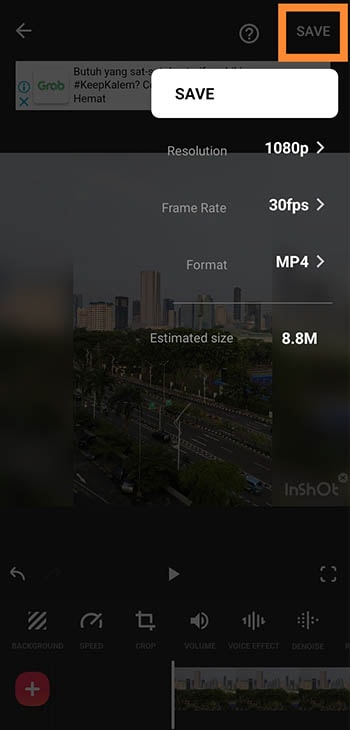
Now, you can save the edited video and choose the resolution you need, as well as the frame rate and output format. InShot will also show you the estimated size of the edited file before saving it.
Once done, click “Save,” and the video will be downloaded to your phone.
Conclusion
For video editing or audio removal, you don’t always have to do it on a PC. You can use android apps to remove sound from your video in any case. Among android video editors, some apps let you simply mute the audio, while others remove the audio track entirely.
The above-recommended apps are the best-chosen ones, including Google Photos, Filmora, and InShot. While not every android device supports Google service, you might want to consider Filmora, as it’s a sufficient alternative with a rather smaller size. Hence, it helps you edit your video with ease and smoothly.
Free Download For macOS 10.14 or later
App size: 67 MB
Rating: 4.8/5 (Google Playstore)

If you’re new to video editing, Filmora is a great place to start. The interface is easy to understand, with a reasonable learning curve and a built-in tutorial that will help you get up to speed quickly.
Once you’re familiar with the basics, you can start exploring more app features, like adding effects and transitions, trimming and splitting clips, and more.
Take a look at some of Filmora’s best features:
- Equipped with over 1000 templates and featured music
- Allows you to do keyframe on a phone
- Professional adjustments, such as voice enhancement and audio speed, or setting video brightness and contrast
- Export quickly in HD quality and custom resolution
Moreover, Filmora is in the top 10 ranking for video players and editors at Google Playstore. Whether you’re a seasoned pro or just getting started, Filmora is an excellent option for mobile video editing. You can edit your videos whenever and wherever you can.
Let’s start removing the audio from your videos by following the steps below:
Step1 Install Filmora on your device
You can find and download Filmora Go through Google Playstore. Just search for “Filmora-Video Editor & Maker) and click the Install button.

Step2 Open Filmora Go and click New Project
After running Filmora Go, you can click the New Project button and upload the video you want to edit from your gallery.

Step3 Extract audio from the video
Once the video has been uploaded, click the clip in the timeline and choose “extract audio.”

Step4 Remove audio from the video
Now that you have extracted the audio from your video, you can click the video soundtrack on the timeline, then click the delete button as seen in the picture below. By then, your audio will be removed.

Step5 Export the edited file
After you have deleted the audio and felt satisfied, it’s time to export the edited video. Click “Export” at the top right to see the export setting. Choose the resolution and frame rates output you want, then click the Export button.

Voila! The edited video without sound will be saved to your phone, and you can also share it immediately on your social media.
Method 3: Use InShot to remove sound from video android
There are many ways to remove sound from a video on android. In this part, we’ll show you another alternative tool that you can use to mute your videos, namely InShot Video Editor.
InShot is a video editing app for mobile phones with professional features. This app is a great tool for creating short and fancy video clips to share on social media or with friends and family. But to be aware, although you can use Inshot for free, but the app will display some ads.
App size: 168 MB
Rating: 4.9/5 (Google Playstore)

InShot is widely used by android users with more than 500M downloads on Google Playstore, making it one of the most popular video editors for mobile.
InShot offers a variety of features for its users, such as:
- Adding transition effects for videos
- Making a smooth slow motion
- Adding music and voice-overs
The method is a bit more tricky than the other tools mentioned above, but it should work for most people. Now, follow these steps carefully to remove the audio from your video:
Step1 Install InShot Video Editor on your phone
The app can take up your phone’s storage, so ensure you have enough space before downloading it. You can find and install the app from Google Playstore by searching “Video Editor & Maker - InShot.”
Step2 Open the InShot app and create a new video project

Step3 Extract audio from the video
After the video has been added, you should find and click the Volume setting.

Then, click the “Extract audio” button to separate the audio from the video. Tip: if you only want to mute it, you can slide the volume to zero for this step.

Step4 Remove the audio
Once you have extracted the audio, select the audio bar and click the delete button to remove it.

Step5 Save the changes
Now, you can save the edited video and choose the resolution you need, as well as the frame rate and output format. InShot will also show you the estimated size of the edited file before saving it.
Once done, click “Save,” and the video will be downloaded to your phone.

Conclusion
For video editing or audio removal, you don’t always have to do it on a PC. You can use android apps to remove sound from your video in any case. Among android video editors, some apps let you simply mute the audio, while others remove the audio track entirely.
The above-recommended apps are the best-chosen ones, including Google Photos, Filmora, and InShot. While not every android device supports Google service, you might want to consider Filmora, as it’s a sufficient alternative with a rather smaller size. Hence, it helps you edit your video with ease and smoothly.
We All Know Very Well that a 1-Second-Video Has Several Images in a Single Row. Even with iMovie Time-Lapse, You Can Create This! So, without Any Further Ado, Let’s Learn How to Make a Timelapse in iMovie
Are you in search of how to time-lapse a video on iMovie? You very well would have known that the method in which the film frames are often taken is mainly due to the timelapse. The way the time-lapse film is played is quite similar to how faster-paced videos are presented. The time-lapse aspect of a video may be created simply by speeding up the footage. It is always wonderful to see a time-lapse movie being captured.
Making time-lapse images and films may be done in a variety of methods, such as by fusing many images or utilizing pre-existing video. Time-lapse films may be made using a variety of software. When we watched a film at regular speed, it seemed like time was slipping away and moving. A fascinating perspective is created by the motion and the ability to witness hours of film condensed into a few seconds.
Part 1. How to Make Timelapse Video with iMovie iPhone
All iOS devices come with the iMovie software, which may speed up videos. iMovie makes it simple to turn a movie into a time-lapse. To transform a movie into a time-lapse, just launch iMovie. If you want a simpler solution, we advise using Slow fast Slow, a tool that speeds up playback. You must correctly configure your phone to capture time-lapse films. The camera app is aware of everything it does.
Steps to Make Timelapse Video with iMovie iPhone:
Step1 Record the Footage
In the first step, open our camera app to select the Time-lapse from the slider. You need to tap the video in the timeline and then click the icon button on the bottom-left of the corner until you find the time-lapse option. and then select it and press the record button. When you made a video and it’s done, just click on the record button again.

Step2 Launch iMovie on iPhone
Open the iMovie app on your iPhone, swipe up right then select a camera and click the “Projects” tab on top and start to “Create Project” to load the video clip whatever you want to make an iMovie lapse.

Step3 Customize the Recorded Footage
The titles, text, and even music is uploaded based on your liking or choice from the built-in royalty-free library, which offers hundreds of songs. The total length of the source video segments may vary depending on how long you want the time-lapse movie to be. The impression of increased movement or the speeding up of time is the most important component of a time-lapse.

Step4 Create Time-lapse and Save
To create the ideal iMovie time-lapse, adjust the speed and examine the movie. To save and distribute the iMovie time-lapse, click the “Done” button!

Part 2. Make Timelapse Video with iMovie on Mac
The idea behind an iMovie time-lapse is to capture anything that is moving slightly and then speed it up so you can notice the movement. A time-lapse movie only captures 1 to 2 frames per second, while video typically captures numerous. Learn how to utilize the app’s time-lapse mode and use iMovie to transform standard iPhone footage into a time-lapse movie. Here are the fundamental instructions for utilizing images and video clips in Apple iMovie:
Steps to Make a Timelapse Video with iMovie on Mac:
Step1 Download iMovie
iMovie is a free app. It comes with a new apple series computer and mobile. You can use that app to create real-time-lapse videos, with a small workaround. On your Mac, launch iMovie and import the video clip from the ‘Library’ that you want to use for your time-lapse. In the timeline, drag the video.

Step2 Select the Timelapse
Decide the clip you wish to modify the speed of. On the preview window’s upper right, tap the clock symbol. Next, you need to pick Speed > Fast, where you may set a frame rate such as “8x” or “20x.” You may watch the time-lapse video till you’re good to go.

Step3 Apply Editing
The time-lapse options in iMovie allow you to add video effects, trim, edit, and combine video clips, although doing so may degrade the quality of the final product. If you are using iMovie 9, creating a time-lapse film is a little challenging. To change the “Speed” option in the preview windows, double-click on the video clip in the timeline.

Step4 Save the Video
Due to the amount of space, it will take up on your Mac, this is the quickest method to produce time-lapses with iMovie for Mac. When you click the “Share” button straight above, you can decide whether to preserve or immediately share the iMovie time-lapse.

Part 3. iMovie Alternative to Create Timelapse video on Mac
When you record the time-lapse video, the video movements are much more noticeable and they become the focus of it. With the wide range of its features interface and wizard, the best alternative to make the iMovie time-lapse is by Filmora . It has Advanced editing features that help you create slow-motion in addition to time-lapse videos. Also, you can enhance the video too much extent.
Time-lapse is now a very popular feature for editing videos where you can speed up as you want for a clip up to X times. Filmora makes it even more compelling. As with this toolkit, all kinds of time-lapse videos can be made by Filmora’s time-lapse techniques. What’s more, the software lets you finish the video with a color grading edit. The feasibility of making a time-lapse video is at full-scale with software like Filmora.
Free Download For Win 7 or later(64-bit)
Free Download For macOS 10.14 or later
How to Make a Timelapse Video on Mac with Filmora
Step1 Install and Launch Filmora
Visit the official website to get the most recent version of Filmora on your PC as the first step. The installation procedure may then be started by launching the installer. You will then be sent to the Filmora launcher as seen below:

Step2 Add video to the Timeline
Please make sure the software has been launched and is in “Full Features Mode” before beginning. Use the “Import” option to add the desired movie or photographs to the media library. Drag it to the Timeline after that.

Step3 Divide and Edit Your Video
To produce the timelapse effect, move the slider bar to the desired location. Then, click the “Split” button to split the video into two halves. To split the video into numerous segments, repeat this step.

Step4 Make the Time-lapse
A window will appear when you double-click on the video clip you want to speed up. To speed up the movie, choose the “Speed” option and move the slider to the right. Up to 100x rapid motion and 0.01x slow motion are supported by this software.

Step5 Render and Export the Timelapse Movie
Right after the editing, render by hitting the icon in the timeline, and then you can get a stunning, high-quality movie on Filmora that is up to 4K. After completing the aforementioned parameters, click “Export” to choose an output format for exporting and storing the freshly made time-lapse movie on Mac.

Part 4: Related FAQs of Timelapse Video
1. How Do You Speed-up videos on iMovie?
The speed of the video can be changed until you get a perfect iMovie time-lapse. The speed of your time-lapse video is to use the slider to change. Drag the slider right to make it faster, or left to make it slow down. Select and click the “Done” button to save and you can share the iMovie time-lapse with the others.
2. How Do You Create a time-lapse video?
Select then tap the video in the timeline and then click the icon button on the bottom-left of the corner until you find the time-lapse option. and then select it and press the record button. When you made a video and it’s done, just click on the record button again.
3. How Long Can a Time-Lapse video on iPhone be?
There is no limit to how long time-lapse videos you can shoot. the only limitation with the iPhone. Time-lapse videos depending on the length of the original videos that you make on your iPhone can last up to 20 to 40 seconds, whether you shoot for 30 minutes or 30 hours. How long did you record the video, it won’t go over 40 seconds.
Conclusion
The iMovie time-lapse will consume very little time to create your videos and movie. When this technique is used in photography to make time-lapse videos in iMovie, time seems to be fast-moving. Time-lapse on your iPhone has never been simpler, thanks to the features of the camera app. Also, if you’re looking for easy and efficient software to create attractive time-lapses, Filmora is your best go-to software.
Free Download For macOS 10.14 or later
How to Make a Timelapse Video on Mac with Filmora
Step1 Install and Launch Filmora
Visit the official website to get the most recent version of Filmora on your PC as the first step. The installation procedure may then be started by launching the installer. You will then be sent to the Filmora launcher as seen below:

Step2 Add video to the Timeline
Please make sure the software has been launched and is in “Full Features Mode” before beginning. Use the “Import” option to add the desired movie or photographs to the media library. Drag it to the Timeline after that.

Step3 Divide and Edit Your Video
To produce the timelapse effect, move the slider bar to the desired location. Then, click the “Split” button to split the video into two halves. To split the video into numerous segments, repeat this step.

Step4 Make the Time-lapse
A window will appear when you double-click on the video clip you want to speed up. To speed up the movie, choose the “Speed” option and move the slider to the right. Up to 100x rapid motion and 0.01x slow motion are supported by this software.

Step5 Render and Export the Timelapse Movie
Right after the editing, render by hitting the icon in the timeline, and then you can get a stunning, high-quality movie on Filmora that is up to 4K. After completing the aforementioned parameters, click “Export” to choose an output format for exporting and storing the freshly made time-lapse movie on Mac.

Part 4: Related FAQs of Timelapse Video
1. How Do You Speed-up videos on iMovie?
The speed of the video can be changed until you get a perfect iMovie time-lapse. The speed of your time-lapse video is to use the slider to change. Drag the slider right to make it faster, or left to make it slow down. Select and click the “Done” button to save and you can share the iMovie time-lapse with the others.
2. How Do You Create a time-lapse video?
Select then tap the video in the timeline and then click the icon button on the bottom-left of the corner until you find the time-lapse option. and then select it and press the record button. When you made a video and it’s done, just click on the record button again.
3. How Long Can a Time-Lapse video on iPhone be?
There is no limit to how long time-lapse videos you can shoot. the only limitation with the iPhone. Time-lapse videos depending on the length of the original videos that you make on your iPhone can last up to 20 to 40 seconds, whether you shoot for 30 minutes or 30 hours. How long did you record the video, it won’t go over 40 seconds.
Conclusion
The iMovie time-lapse will consume very little time to create your videos and movie. When this technique is used in photography to make time-lapse videos in iMovie, time seems to be fast-moving. Time-lapse on your iPhone has never been simpler, thanks to the features of the camera app. Also, if you’re looking for easy and efficient software to create attractive time-lapses, Filmora is your best go-to software.
How to Use 3D Camera Tracking Effects in After Effects
Adobe After Effects is an ever-growing product, with new features introduced almost every year. One of these features is the 3D Camera Tracking, which allows you to take your motion graphic effects to the next level.
Camera Tracking is extracting the camera movement from a recorded video sequence. This process allows filmmakers to add computer-generated elements to a live action shot, track objects throughout a shot for compositing, and estimate camera movements for virtual reality applications.
In this article, we will explore what Camera Tracking is and Motion Tracking in After Effect. We’ll also show you how to use 3D Camera Tracking in After Effects on a Windows PC.
Part 1. What Is Camera Tracking
Camera Tracking is a process that determines the movement of a video clip. This information can be used to add certain effects to the video, such as objects that seem to follow the camera or text that appears to be stationary in the frame.
Camera Tracking is a relatively simple process, but it can be time-consuming. However, the results are often worth the effort, as it can add a whole new level of realism to your footage clips.
For example, you have taken a video clip of a zoo and want to add an object to it while making sure it gives a realistic look. This is where the Camera Tracking feature can help you make a smooth transition and add the element as if it was there.
Part 2. Why Use Camera Tracking?
Now that you know what Camera Tracking is, let’s have a look at some benefits of using it:
- Add a 3D object or element to a 2D video clip.
- Embed objects, texts, etc., to a video.
- Stabilize a shaky camera/video clip.
- Create special effects.
- Apply color grading.
- Replace a TV or PC screen with some information.
Thus, if you need some basic compositions or advanced ones, the Camera Tracking feature will help you track your videos, embed anything you want, or create special effects to make your clip different.
Part 3. Motion Tracking In After Effects
The Motion Tracking capability is Adobe After Effects’ feature that allows you to track the movement of the camera/an object in a video clip and use the data to add effects to objects.
Motion tracking can be used for various effects, like creating realistic text animations or adding special effects to objects in a video.
There are four main types of Motion Tracking in After Effects, each with its own advantages and disadvantages:
Single Point Tracking
Single Point tracking tracks a single position in a video clip. You can use it for composing a video clip with a single point of focus, and it is suitable for following the movement of an object with right-left or up-down motion.
Advantage: Single Point Tracking is perfect for tracking a single position or motion of a single object.
Disadvantage: No scale or rotation properties and needs a clear contrast point for effective results.
Two Point Tracking
Two Point Tracking is a feature that allows you to track two points in a footage clip and can be used for scale, motion, and rotation tracking.
Advantage: Two Point Tracking can track scale and rotation along with the motion.
Disadvantage: It doesn’t give effective results with a shaky video clip.
Four Point Tracking
The Four Point Tracking feature lets you track four different points (corners) in your footage and apply the tracking data to a layer in your composition.
The four points can be placed at the screen’s corners in your shot, and new footage is applied to cover the screen.
Advantage: Directly pins the data to each corner of the image.
Disadvantage: Cannot be used to create a 3D object.
3D Camera Tracking
With 3D camera tracking, you can track the movement of a camera in a video and place 3D elements in the scene that match the camera’s movement. This is a great way to add realism to your graphics and make them look like they’re part of the scene.
Advantage: 3D Camera Tracking can help you add shapes, texts, or 3D objects to 2D footage.
Disadvantage: A bit tricky and needs an expert grip on the tool to use effectively.
Part 4. How To Use 3D Camera Tracking In After Effects Of Windows
Here’s a simple and quick rundown of how to use 3D camera tracking in After Effects:
Step1Import Your Video Footage
Launch Adobe After Effects, create a new composition, and import your footage. Once your clip is uploaded, click the Window Menu. Scroll down and choose “Tracker.”
![]()
Here you will see four tracking options:
- Track Camera
- Warp Stabilizer
- Track Motion
- Stabilize Motion
![]()
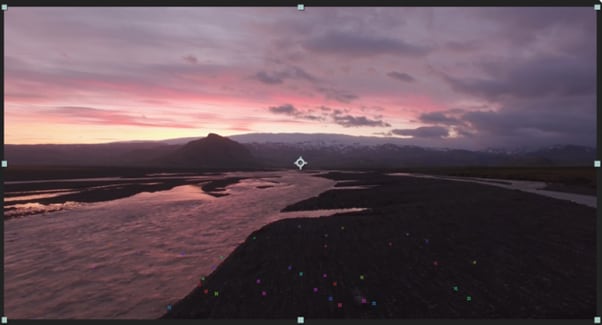
Click “Track Camera” to add the 3D Camera Tracker effect to your selected layer. After Effects will start analyzing the layer, show the percentage, and count the total frames of clips tracked.
![]()
Note: The dots that appear on your video clips cannot be rendered out, as they are strictly referential.
Step2Establish The Tracking Points
You have to select the tracking points and a plane to which it must be tracked. To do this, hover over the tracking point references in the After Effect compositions window. Between the three tracking points, a triangle will form, and a red “target” will appear to help you better visualize the plane.
Now, you have to find a tracking point that lays the red “target” parallel to your selected plane. Next, select the triangle that lines up best for your surface. Move the arrow away to disable the picker and stop the red “target.”
![]()
Step3Add The Text To Your Video Clip
Once you define the plane, it’s time to add text to your video clip. To do this, right-click on the triangle you have set previously, and a window will appear, allowing you to create new layers.
Click “Create Text” to place the text on your tracked video clip. A new text layer will be added using the tracking data.
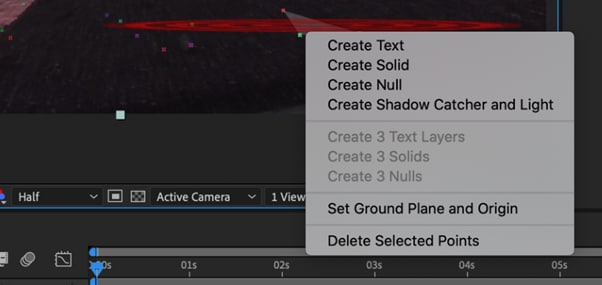
Step4Align Text On Tracked Footage
Now you have to align your text. In the timeline, locate the tracked text layer and click the arrow to the left to unveil all the editable properties for the layer.
Click the “Transform” option to use the transform options and use the layer lines to adjust the X, Y, and Scale values afterward.
![]()
Note: You can select your layer and press the S, P, R, or T keys to adjust the scale, position, rotation, and opacity, respectively.
Your text will now be added to your video footage. The method is similar to adding solid or null to your clips. However, the exact steps might differ a little.
Video - Learn 3D Camera Tracking In After Effects
Conclusion
In this article, we’ve discussed what Camera Tracking is and why to use it. We also provided information regarding Motion Tracking, its four types, and their advantages and disadvantages.
Furthermore, we walked you through the step-by-step process of using 3D Camera Tracking in Adobe After Effects for Windows.
We hope this guide helps you to add text to your video footage without much effort, and you now have complete knowledge of the Camera Tracking feature.
Free Download For Win 7 or later(64-bit)
Free Download For macOS 10.14 or later

Step2Establish The Tracking Points
You have to select the tracking points and a plane to which it must be tracked. To do this, hover over the tracking point references in the After Effect compositions window. Between the three tracking points, a triangle will form, and a red “target” will appear to help you better visualize the plane.
Now, you have to find a tracking point that lays the red “target” parallel to your selected plane. Next, select the triangle that lines up best for your surface. Move the arrow away to disable the picker and stop the red “target.”
![]()
Step3Add The Text To Your Video Clip
Once you define the plane, it’s time to add text to your video clip. To do this, right-click on the triangle you have set previously, and a window will appear, allowing you to create new layers.
Click “Create Text” to place the text on your tracked video clip. A new text layer will be added using the tracking data.

Step4Align Text On Tracked Footage
Now you have to align your text. In the timeline, locate the tracked text layer and click the arrow to the left to unveil all the editable properties for the layer.
Click the “Transform” option to use the transform options and use the layer lines to adjust the X, Y, and Scale values afterward.
![]()
Note: You can select your layer and press the S, P, R, or T keys to adjust the scale, position, rotation, and opacity, respectively.
Your text will now be added to your video footage. The method is similar to adding solid or null to your clips. However, the exact steps might differ a little.
Video - Learn 3D Camera Tracking In After Effects
Conclusion
In this article, we’ve discussed what Camera Tracking is and why to use it. We also provided information regarding Motion Tracking, its four types, and their advantages and disadvantages.
Furthermore, we walked you through the step-by-step process of using 3D Camera Tracking in Adobe After Effects for Windows.
We hope this guide helps you to add text to your video footage without much effort, and you now have complete knowledge of the Camera Tracking feature.
Free Download For Win 7 or later(64-bit)
Free Download For macOS 10.14 or later
What Are the Best Video Background Changers Online?
Popular Trends in the creative space engendered the creation of several tools that have reduced the difficulties involved in content creation. A few years ago, executing simple post-production tricks was a huge task. Simple edits like changing video backgrounds needed an expensive light setup and a proper green/blue screen background. In simpler words, it was expensive.
Today, we can utilize a video background changer online without an expensive setup. It has brought out the hidden creativity in thousands of content creators worldwide. Check out TikTok, Instagram, and other social media platforms to verify this claim.
This article covers a list of tools that can edit video backgrounds online. Content creators and anyone who wants to explore creativity can use these tools. Before we jump into the substance of this article, you might be wondering;
What is a Video Background Changer?
A video background changer is a tool that can swap the background of any video. These tools usually work in three simple steps.
- Analyze the footage.
- Separate the subject or “subjects” from the background
- Switch backgrounds.
The process starts when a user uploads a video clip. The tool analyzes the footage and separates the subjects from the background. The user can select other available pre-made backgrounds or upload a preferred one to the platform. After this process, users can share the finished video or save it to their devices. Other kinds of background changers only merge a transparent clip with a background.
How to Remove Background without Green Screen
Free Download For Win 7 or later(64-bit)
Free Download For macOS 10.14 or later
3 Video Background Changers Online
Veed.io

Veed is an online feature-packed video editing platform. It comes with an interface that is suitable for newbies and professionals alike. Like many other competitors, it offers a free and premium version that unlocks more tools for you to play around with.
This tool allows you to edit video background online, transcribe audio, add subtitles, etc. Since this tool is web-based, there is no need to download any storage-intensive application. You can quickly edit your content online and share your videos.
Features
- Recorder feature for recording tutorials and online meetings
- Edit feature for creating catchy videos
- Transcriptions and subtitle module
- Color grading feature
- Online video hosting and storage
BeeCut

BeeCut is a video editing software specifically created and designed for simplicity. Quick trims and edits for short videos are the primary focus of the BeeCut online application. A compilation of over 60+ reviews quickly exposes BeeCut as a beginner-friendly editing software. You can acquaint yourself with this platform in less than 24 hours.
You can change your background online for free using the BeeCut online editor. It allows you to Import a background and merge it with the clip that contains your subject. BeeCut has a familiar user interface that feels like it came from mobile editors. This simplicity makes it easy to understand.
Features
- Trim and cut your footage
- Add custom video intros and overlays
- Speech recognition for transcription and subtitling
- Online and offline versions for different functions
- Large community of over 1 million users
Unscreen

If you’re searching for one of the fastest background removers, you’re in luck. Unscreen is the “sit tight and relax” version of background changers. You can change the video background online without clicking any buttons or learning how to use the software. You also don’t need to select pixels or use a color picker from an “ultra key” function. You only upload a video, and the platform does the rest.
In simple steps, you can quickly acquaint yourself with Unscreen. It also promises a risk-free money-back guarantee that lasts for 14 days only.
Features
- Other platforms can integrate it as a tool
- No watermarks
- Full HD video upload and download
- Affordable and more realistic payment structure
- Specialized background remover
3 Video Background Changers on Desktop
Final Cut Pro

The video editors’ community refers to Final Cut Pro as one of the most professional applications for Mac users. It is a standard editing software that competes with DaVinci Resolve, Premiere Pro, and the rest. It uses the standard ground-to-top layering system to organize a timeline and is easy to learn.
Though it cannot edit background videos online, users can download it and use its chroma key effect. Like Premiere’s ultra-key effect, the chroma key function can select and remove a specific color. This is not the only way to remove backgrounds, but it is the most effective. If done correctly, no bleeding or distorted subject traces will be found.
Features
- Simple object motion tracking
- Color grading and cinematic color LUTs
- Supports 4k - 8k footage editing, rendering, and exporting
- Text animations
- Apple’s Neural Engine for speed edits
Adobe Premiere Pro

Adobe Premiere Pro is one of the best-selling products from the Adobe franchise, apart from Acrobat Reader and Photoshop. Professionals worldwide trust Premiere Pro as their go-to editor. With features like cut & trim, animations (using keyframing), an in-built graphics panel, and a lumetri color grading panel. Most beginners start their creative video editing careers using Premiere Pro.
Online change video background features don’t come with this application. To change a video background, you have to use its “Ultra Key” effect, or mask out your subject frame-by-frame. The easiest way to achieve this is to use the color picker from the ultra key effect in your effects control panel. Premier Pro has a wide range of free tutorials on YouTube from various content creators. This makes the learning process a breeze.
Features
- AI-assisted transcription and subtitling
- Customizable workspaces
- Audio effects and dedicated audio editing interface
- Work seamlessly between After Effects (for complex motion graphics and effects) and Audition (for dedicated audio effects and editing)
- Large community support base
Filmora

If you’re searching for easy-to-use video editing software for beginners and professionals, Filmora might be your best choice. With AI-assisted creative features, you can easily add effects and style to your video. Its AI Text-based editing feature makes adding effects enjoyable.
As a perfect alternative to getting a video background changer online, Filmora can save you hours in editing time. With AI assistance, you can separate your subject from your background without needing to do the work. You can add creative texts and colors to your background with a few clicks.
Features
- AI-assisted editing
- Hundreds of templates
- Countless effect templates.
Free Online Background Changer Fantastic tool for effortlessly transforming and enhancing your videos.
Try Filmora’s Background Changer Try Filmora’s Background Changer Explore Background Changer with Filmora

Conclusion
In finding the right Video background changer online, knowing the description and the features offered is key. We’ve saved you the stress of having to try them all out. With this article, you should be able to pick what works best for you.
Out of these mentioned tools, no one stands out as a better money’s worth like Filmora. With AI assistance, you can save hours in editing time, and get better results. Users worldwide have reviewed this app, and recommend it for easy use, quality exports, and seamless AI-assisted editing.
Free Download For Win 7 or later(64-bit)
Free Download For macOS 10.14 or later
3 Video Background Changers Online
Veed.io

Veed is an online feature-packed video editing platform. It comes with an interface that is suitable for newbies and professionals alike. Like many other competitors, it offers a free and premium version that unlocks more tools for you to play around with.
This tool allows you to edit video background online, transcribe audio, add subtitles, etc. Since this tool is web-based, there is no need to download any storage-intensive application. You can quickly edit your content online and share your videos.
Features
- Recorder feature for recording tutorials and online meetings
- Edit feature for creating catchy videos
- Transcriptions and subtitle module
- Color grading feature
- Online video hosting and storage
BeeCut

BeeCut is a video editing software specifically created and designed for simplicity. Quick trims and edits for short videos are the primary focus of the BeeCut online application. A compilation of over 60+ reviews quickly exposes BeeCut as a beginner-friendly editing software. You can acquaint yourself with this platform in less than 24 hours.
You can change your background online for free using the BeeCut online editor. It allows you to Import a background and merge it with the clip that contains your subject. BeeCut has a familiar user interface that feels like it came from mobile editors. This simplicity makes it easy to understand.
Features
- Trim and cut your footage
- Add custom video intros and overlays
- Speech recognition for transcription and subtitling
- Online and offline versions for different functions
- Large community of over 1 million users
Unscreen

If you’re searching for one of the fastest background removers, you’re in luck. Unscreen is the “sit tight and relax” version of background changers. You can change the video background online without clicking any buttons or learning how to use the software. You also don’t need to select pixels or use a color picker from an “ultra key” function. You only upload a video, and the platform does the rest.
In simple steps, you can quickly acquaint yourself with Unscreen. It also promises a risk-free money-back guarantee that lasts for 14 days only.
Features
- Other platforms can integrate it as a tool
- No watermarks
- Full HD video upload and download
- Affordable and more realistic payment structure
- Specialized background remover
3 Video Background Changers on Desktop
Final Cut Pro

The video editors’ community refers to Final Cut Pro as one of the most professional applications for Mac users. It is a standard editing software that competes with DaVinci Resolve, Premiere Pro, and the rest. It uses the standard ground-to-top layering system to organize a timeline and is easy to learn.
Though it cannot edit background videos online, users can download it and use its chroma key effect. Like Premiere’s ultra-key effect, the chroma key function can select and remove a specific color. This is not the only way to remove backgrounds, but it is the most effective. If done correctly, no bleeding or distorted subject traces will be found.
Features
- Simple object motion tracking
- Color grading and cinematic color LUTs
- Supports 4k - 8k footage editing, rendering, and exporting
- Text animations
- Apple’s Neural Engine for speed edits
Adobe Premiere Pro

Adobe Premiere Pro is one of the best-selling products from the Adobe franchise, apart from Acrobat Reader and Photoshop. Professionals worldwide trust Premiere Pro as their go-to editor. With features like cut & trim, animations (using keyframing), an in-built graphics panel, and a lumetri color grading panel. Most beginners start their creative video editing careers using Premiere Pro.
Online change video background features don’t come with this application. To change a video background, you have to use its “Ultra Key” effect, or mask out your subject frame-by-frame. The easiest way to achieve this is to use the color picker from the ultra key effect in your effects control panel. Premier Pro has a wide range of free tutorials on YouTube from various content creators. This makes the learning process a breeze.
Features
- AI-assisted transcription and subtitling
- Customizable workspaces
- Audio effects and dedicated audio editing interface
- Work seamlessly between After Effects (for complex motion graphics and effects) and Audition (for dedicated audio effects and editing)
- Large community support base
Filmora

If you’re searching for easy-to-use video editing software for beginners and professionals, Filmora might be your best choice. With AI-assisted creative features, you can easily add effects and style to your video. Its AI Text-based editing feature makes adding effects enjoyable.
As a perfect alternative to getting a video background changer online, Filmora can save you hours in editing time. With AI assistance, you can separate your subject from your background without needing to do the work. You can add creative texts and colors to your background with a few clicks.
Features
- AI-assisted editing
- Hundreds of templates
- Countless effect templates.
Free Online Background Changer Fantastic tool for effortlessly transforming and enhancing your videos.
Try Filmora’s Background Changer Try Filmora’s Background Changer Explore Background Changer with Filmora

Conclusion
In finding the right Video background changer online, knowing the description and the features offered is key. We’ve saved you the stress of having to try them all out. With this article, you should be able to pick what works best for you.
Out of these mentioned tools, no one stands out as a better money’s worth like Filmora. With AI assistance, you can save hours in editing time, and get better results. Users worldwide have reviewed this app, and recommend it for easy use, quality exports, and seamless AI-assisted editing.
Free Download For Win 7 or later(64-bit)
Free Download For macOS 10.14 or later
3 Video Background Changers Online
Veed.io

Veed is an online feature-packed video editing platform. It comes with an interface that is suitable for newbies and professionals alike. Like many other competitors, it offers a free and premium version that unlocks more tools for you to play around with.
This tool allows you to edit video background online, transcribe audio, add subtitles, etc. Since this tool is web-based, there is no need to download any storage-intensive application. You can quickly edit your content online and share your videos.
Features
- Recorder feature for recording tutorials and online meetings
- Edit feature for creating catchy videos
- Transcriptions and subtitle module
- Color grading feature
- Online video hosting and storage
BeeCut

BeeCut is a video editing software specifically created and designed for simplicity. Quick trims and edits for short videos are the primary focus of the BeeCut online application. A compilation of over 60+ reviews quickly exposes BeeCut as a beginner-friendly editing software. You can acquaint yourself with this platform in less than 24 hours.
You can change your background online for free using the BeeCut online editor. It allows you to Import a background and merge it with the clip that contains your subject. BeeCut has a familiar user interface that feels like it came from mobile editors. This simplicity makes it easy to understand.
Features
- Trim and cut your footage
- Add custom video intros and overlays
- Speech recognition for transcription and subtitling
- Online and offline versions for different functions
- Large community of over 1 million users
Unscreen

If you’re searching for one of the fastest background removers, you’re in luck. Unscreen is the “sit tight and relax” version of background changers. You can change the video background online without clicking any buttons or learning how to use the software. You also don’t need to select pixels or use a color picker from an “ultra key” function. You only upload a video, and the platform does the rest.
In simple steps, you can quickly acquaint yourself with Unscreen. It also promises a risk-free money-back guarantee that lasts for 14 days only.
Features
- Other platforms can integrate it as a tool
- No watermarks
- Full HD video upload and download
- Affordable and more realistic payment structure
- Specialized background remover
3 Video Background Changers on Desktop
Final Cut Pro

The video editors’ community refers to Final Cut Pro as one of the most professional applications for Mac users. It is a standard editing software that competes with DaVinci Resolve, Premiere Pro, and the rest. It uses the standard ground-to-top layering system to organize a timeline and is easy to learn.
Though it cannot edit background videos online, users can download it and use its chroma key effect. Like Premiere’s ultra-key effect, the chroma key function can select and remove a specific color. This is not the only way to remove backgrounds, but it is the most effective. If done correctly, no bleeding or distorted subject traces will be found.
Features
- Simple object motion tracking
- Color grading and cinematic color LUTs
- Supports 4k - 8k footage editing, rendering, and exporting
- Text animations
- Apple’s Neural Engine for speed edits
Adobe Premiere Pro

Adobe Premiere Pro is one of the best-selling products from the Adobe franchise, apart from Acrobat Reader and Photoshop. Professionals worldwide trust Premiere Pro as their go-to editor. With features like cut & trim, animations (using keyframing), an in-built graphics panel, and a lumetri color grading panel. Most beginners start their creative video editing careers using Premiere Pro.
Online change video background features don’t come with this application. To change a video background, you have to use its “Ultra Key” effect, or mask out your subject frame-by-frame. The easiest way to achieve this is to use the color picker from the ultra key effect in your effects control panel. Premier Pro has a wide range of free tutorials on YouTube from various content creators. This makes the learning process a breeze.
Features
- AI-assisted transcription and subtitling
- Customizable workspaces
- Audio effects and dedicated audio editing interface
- Work seamlessly between After Effects (for complex motion graphics and effects) and Audition (for dedicated audio effects and editing)
- Large community support base
Filmora

If you’re searching for easy-to-use video editing software for beginners and professionals, Filmora might be your best choice. With AI-assisted creative features, you can easily add effects and style to your video. Its AI Text-based editing feature makes adding effects enjoyable.
As a perfect alternative to getting a video background changer online, Filmora can save you hours in editing time. With AI assistance, you can separate your subject from your background without needing to do the work. You can add creative texts and colors to your background with a few clicks.
Features
- AI-assisted editing
- Hundreds of templates
- Countless effect templates.
Free Online Background Changer Fantastic tool for effortlessly transforming and enhancing your videos.
Try Filmora’s Background Changer Try Filmora’s Background Changer Explore Background Changer with Filmora

Conclusion
In finding the right Video background changer online, knowing the description and the features offered is key. We’ve saved you the stress of having to try them all out. With this article, you should be able to pick what works best for you.
Out of these mentioned tools, no one stands out as a better money’s worth like Filmora. With AI assistance, you can save hours in editing time, and get better results. Users worldwide have reviewed this app, and recommend it for easy use, quality exports, and seamless AI-assisted editing.
Free Download For Win 7 or later(64-bit)
Free Download For macOS 10.14 or later
3 Video Background Changers Online
Veed.io

Veed is an online feature-packed video editing platform. It comes with an interface that is suitable for newbies and professionals alike. Like many other competitors, it offers a free and premium version that unlocks more tools for you to play around with.
This tool allows you to edit video background online, transcribe audio, add subtitles, etc. Since this tool is web-based, there is no need to download any storage-intensive application. You can quickly edit your content online and share your videos.
Features
- Recorder feature for recording tutorials and online meetings
- Edit feature for creating catchy videos
- Transcriptions and subtitle module
- Color grading feature
- Online video hosting and storage
BeeCut

BeeCut is a video editing software specifically created and designed for simplicity. Quick trims and edits for short videos are the primary focus of the BeeCut online application. A compilation of over 60+ reviews quickly exposes BeeCut as a beginner-friendly editing software. You can acquaint yourself with this platform in less than 24 hours.
You can change your background online for free using the BeeCut online editor. It allows you to Import a background and merge it with the clip that contains your subject. BeeCut has a familiar user interface that feels like it came from mobile editors. This simplicity makes it easy to understand.
Features
- Trim and cut your footage
- Add custom video intros and overlays
- Speech recognition for transcription and subtitling
- Online and offline versions for different functions
- Large community of over 1 million users
Unscreen

If you’re searching for one of the fastest background removers, you’re in luck. Unscreen is the “sit tight and relax” version of background changers. You can change the video background online without clicking any buttons or learning how to use the software. You also don’t need to select pixels or use a color picker from an “ultra key” function. You only upload a video, and the platform does the rest.
In simple steps, you can quickly acquaint yourself with Unscreen. It also promises a risk-free money-back guarantee that lasts for 14 days only.
Features
- Other platforms can integrate it as a tool
- No watermarks
- Full HD video upload and download
- Affordable and more realistic payment structure
- Specialized background remover
3 Video Background Changers on Desktop
Final Cut Pro

The video editors’ community refers to Final Cut Pro as one of the most professional applications for Mac users. It is a standard editing software that competes with DaVinci Resolve, Premiere Pro, and the rest. It uses the standard ground-to-top layering system to organize a timeline and is easy to learn.
Though it cannot edit background videos online, users can download it and use its chroma key effect. Like Premiere’s ultra-key effect, the chroma key function can select and remove a specific color. This is not the only way to remove backgrounds, but it is the most effective. If done correctly, no bleeding or distorted subject traces will be found.
Features
- Simple object motion tracking
- Color grading and cinematic color LUTs
- Supports 4k - 8k footage editing, rendering, and exporting
- Text animations
- Apple’s Neural Engine for speed edits
Adobe Premiere Pro

Adobe Premiere Pro is one of the best-selling products from the Adobe franchise, apart from Acrobat Reader and Photoshop. Professionals worldwide trust Premiere Pro as their go-to editor. With features like cut & trim, animations (using keyframing), an in-built graphics panel, and a lumetri color grading panel. Most beginners start their creative video editing careers using Premiere Pro.
Online change video background features don’t come with this application. To change a video background, you have to use its “Ultra Key” effect, or mask out your subject frame-by-frame. The easiest way to achieve this is to use the color picker from the ultra key effect in your effects control panel. Premier Pro has a wide range of free tutorials on YouTube from various content creators. This makes the learning process a breeze.
Features
- AI-assisted transcription and subtitling
- Customizable workspaces
- Audio effects and dedicated audio editing interface
- Work seamlessly between After Effects (for complex motion graphics and effects) and Audition (for dedicated audio effects and editing)
- Large community support base
Filmora

If you’re searching for easy-to-use video editing software for beginners and professionals, Filmora might be your best choice. With AI-assisted creative features, you can easily add effects and style to your video. Its AI Text-based editing feature makes adding effects enjoyable.
As a perfect alternative to getting a video background changer online, Filmora can save you hours in editing time. With AI assistance, you can separate your subject from your background without needing to do the work. You can add creative texts and colors to your background with a few clicks.
Features
- AI-assisted editing
- Hundreds of templates
- Countless effect templates.
Free Online Background Changer Fantastic tool for effortlessly transforming and enhancing your videos.
Try Filmora’s Background Changer Try Filmora’s Background Changer Explore Background Changer with Filmora

Conclusion
In finding the right Video background changer online, knowing the description and the features offered is key. We’ve saved you the stress of having to try them all out. With this article, you should be able to pick what works best for you.
Out of these mentioned tools, no one stands out as a better money’s worth like Filmora. With AI assistance, you can save hours in editing time, and get better results. Users worldwide have reviewed this app, and recommend it for easy use, quality exports, and seamless AI-assisted editing.
Also read:
- New In 2024, Effective 10 Ways to Convert YouTube to MOV at Ease PC & Online
- New In 2024, How to Add Subtitles in QuickTime Player?
- 2024 Approved Ways to Make Sure Your Video Editing Course Is Worthing to Watch
- In 2024, How to Create and Use Adjustment Layers in After Effects
- Steps to Add Subtitles in Canva
- Updated In 2024, How to Add Text Animation Online
- Updated Detailed Guide to Merge Videos in VLC Media Player
- New How to Create Liquid Water Reveal Intro, In 2024
- How To Fade Audio With Movavi Editor for 2024
- 2024 Approved 8 Excellent Video and Photo Mergers on Desktop/Mobile/Online
- Good Ways to Make Sure Your Video Editing Course Is Worthing to Watch
- In 2024, Learn Topaz Video Enhance AI Review
- In 2024, How to Create Photoshop GIF The 100 Easy Way
- Embrace Creativity in Your Media by Replacing Backgrounds. Learn to Replace the Sky in Lightroom Through the Steps and Details Discussed in This Article for 2024
- New Cropping Videos in VLC Step by Step
- Updated Easy Ways to Change Aspect Ratio in iMovie for 2024
- 2024 Approved 8 Ways To Live Stream Pre-Recorded Video
- In 2024, Have You Ever Used the Path Blur Effect in Your Photos? This Article Will Address How to Use Path Blur in Photoshop to Generate Appealing Results Accurately
- In 2024, Top 5 Tools to Help You Know More Freeze-Frame Video Editing Skills
- In 2024, Top 7 Best GoPro Video Editors for Mac
- New How to Clone Yourself in Videos with Filmora, In 2024
- Top 5 Best Video to PPT Converters
- New In 2024, Detailed Guide to Rotate Videos in Blender
- Updated 2024 Approved Learn to Merge Clips in DaVinci Resolve with Simple Steps
- Updated In 2024, Five Thoughts on Discord Create Accounts How-To Questions
- In 2024, 15 Best CapCut Templates for Slow Motion Editing
- Updated Best 6 WebM to GIF Converters
- New 2024 Approved Create Realistic Fire Effects by Filmora
- New How to Add Text Animation Online for 2024
- Updated How to Apply Gaussian Blur Effect to Videos In Premiere Pro for 2024
- In 2024, How to Change Aspect Ratio of Video?
- Updated 2024 Approved How to Make Your CSGO Montage Impressive
- Updated Top 7 Color Match Paint Apps
- Making Slow Motion Videos in Premiere Pro A Review on The Best Methods
- Updated How To Fade Audio In Kinemaster
- New How to Set Up Twitch Green Screen for 2024
- New 2024 Approved Some Facts That Few People Know on How to Make Transparent Background in Canva
- New 6 Top Online MP4 Croppers for 2024
- 2024 Approved Are You Searching for the Best Cinematic LUTs for Premiere Pro? You Are in the Right Place because This Article Is Dedicated to LUTs
- Updated In 2024, Best Online MPEG to GIF Converters
- Have the Desire to Create a Stylish Glitch Effect to a Text on Your Video? Use Filmora for the Editing, Following the Given Steps Explained in Detail for 2024
- How to Easily Create a Free Eye-Catching Intro Videos with Invideo for 2024
- 2024 Approved 10 Apps to Make Videos with Pictures and Music
- 2024 Approved With the Datamoshing Effect, the User Can Damage the Video Clips to Offer a Glitch Effect. The Article Introduces Datamosh After Effects Its Workability in the Industry
- Updated 2024 Approved Best Jump Cut Editing Tricks
- Updated Frame Rates, Speed, and Wondershare Filmora
- Want to Speed up Your Video to Create Short-Duration Instagram Reels? Here Is How You Can Change the Speed of Pre-Recorded and Live Videos on Instagram Reels
- In 2024, How Nokia 150 (2023) Mirror Screen to PC? | Dr.fone
- New How to Make a Triggered Meme?
- How to Fix It Vivo T2 Pro 5G Wont Turn On | Dr.fone
- Unlock Your Samsung Galaxy S23 Tactical Edition Phone with Ease The 3 Best Lock Screen Removal Tools
- Updated Best 10 Free AI Voice Generators to Use in Daily Life
- Easy Ways to Manage Your Vivo X Flip Location Settings | Dr.fone
- Did Your iPhone 14 Pro Passcode Change Itself? Unlock It Now | Dr.fone
- In 2024, How to Delete iCloud Account with or without Password from your iPhone XR/Windows/Mac
- How To Update or Downgrade Apple iPhone 8? | Dr.fone
- In 2024, How To Unlock a Motorola Moto G24 Easily?
- In 2024, How To Unlock Stolen Apple iPhone 15 Pro In Different Conditionsin
- The way to recover deleted photos on Samsung Galaxy XCover 6 Pro Tactical Edition without backup.
- Calls on Infinix Note 30 Go Straight to Voicemail? 12 Fixes | Dr.fone
- In 2024, 4 Things You Must Know About Apple iPhone 14 Pro Max Activation Lock
- In 2024, 8 Ways to Transfer Photos from Motorola Moto G24 to iPhone Easily | Dr.fone
- 2 Ways to Transfer Text Messages from Vivo V29 Pro to iPhone 15/14/13/12/11/X/8/ | Dr.fone
- Full Guide to Hard Reset Your Vivo Y78+ | Dr.fone
- In 2024, 5 Quick Methods to Bypass Vivo Y100 FRP
- New Techniques on How to Make After Effects 2D Animation
- Title: How to Remove or Mute Audio in Video with Android Phones for 2024
- Author: Chloe
- Created at : 2024-04-24 07:08:12
- Updated at : 2024-04-25 07:08:12
- Link: https://ai-editing-video.techidaily.com/how-to-remove-or-mute-audio-in-video-with-android-phones-for-2024/
- License: This work is licensed under CC BY-NC-SA 4.0.

