:max_bytes(150000):strip_icc():format(webp)/DTS-Virtual-X-logo-w-illustration-xxbb-59403d7b3df78c537b1ef6b2.jpg)
How to Rotate AVI in Vertical/Portrait Orientation Windows, Mac,Android, iPhone & Online

How to Rotate AVI in Vertical/Portrait Orientation [Windows, Mac,Android, iPhone & Online]

Video editing is the process of cutting and rearranging multiple clips or segments of video to create a new and more improved video. This involves adding titles, animations, sound effects, music and more. Video editing has not ceased to follow the trend of technology as it keeps thriving tirelessly through the ages. With advancement springing forth from many sides, video editing followed every pace to ensure it’s not left behind. This largely involves gadgets, computers and smartphones.
Before the advent of smartphones, computers have been the only video editing tools, and that culture is preserved even till date as its use has spread round the world. It is therefore evident that film making cannot bypass this process. Improvements have been made over the years on video editing softwares for computers to stay up to date as regards features and usability. There are other video editors which were introduced, and are still being updated such as Adobe Premiere Pro, Final Cut, Filmora and so on. As the case is today, smartphones have proven to be relevant in the process; they have also come up with video editing applications such as Power Video Director, InShot, Filmora for Android, Kinemaster and many more for Android, iPhone and iPads.
This article aims at giving guides and steps on how to rotate AVI videos using different softwares on different PCs (Windows and Mac) and smartphones (Android and iPhone). This does not leave online video editing softwares behind also.
WHAT IS AVI?

AVI means Audio Video Interleave. It’s a multimedia container format introduced by Microsoft in November 1992 as part of its video for Windows technology. AVI files can contain both audio and video data in a file container that allows synchronous audio-with-video playback.
KDENLIVE – FREE FOR WINDOWS

Introduced in 2002, Kdenlive has a good quality and design. The design is straightforward, user-friendly which makes you know what you are getting into, as well as the actual quality of the effects that you might want to apply to your video while editing. Overall, it looks really professional, neat and organized.
HOW TO ROTATE AVI VIDEO IN KDENLIVE
- STEP 1 - Launch Kdenlive on your Windows and import the video from where you have saved it locally. Drag and drop video on timeline
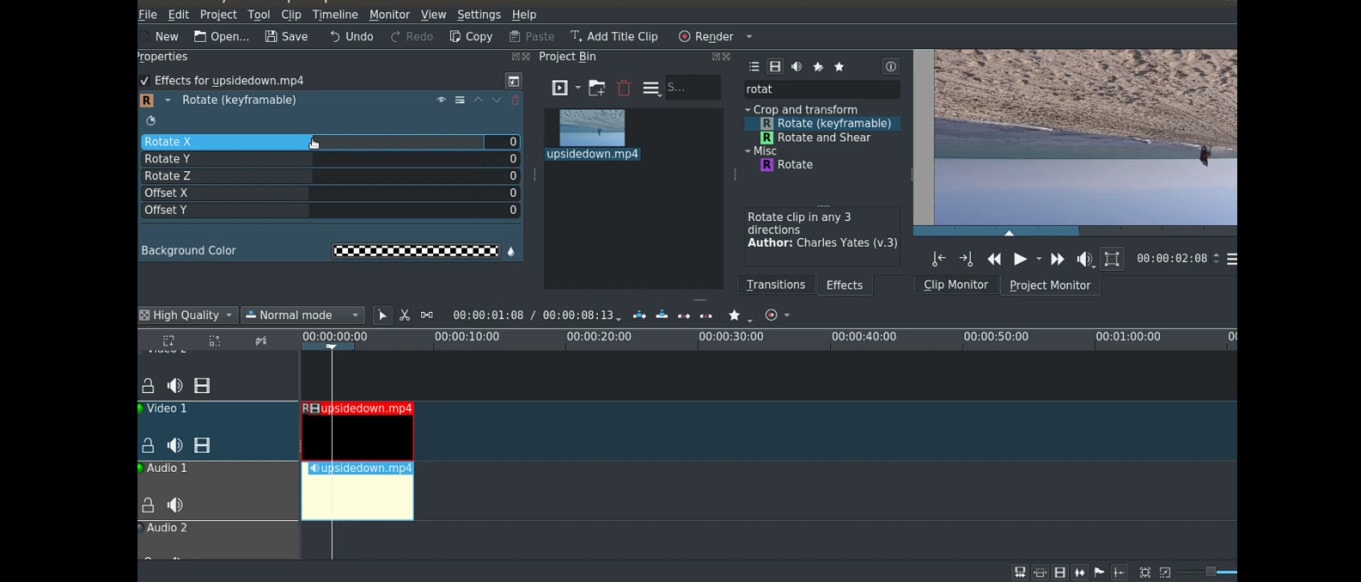
- STEP 2 - Select video effects and in the search box, type ‘rotate’ and click on it. Click on effects, then select video effects
- STEP 3 - Drag the video to the timeline and go to effects, then drag and drop the ‘rotate’ effect on the clip.
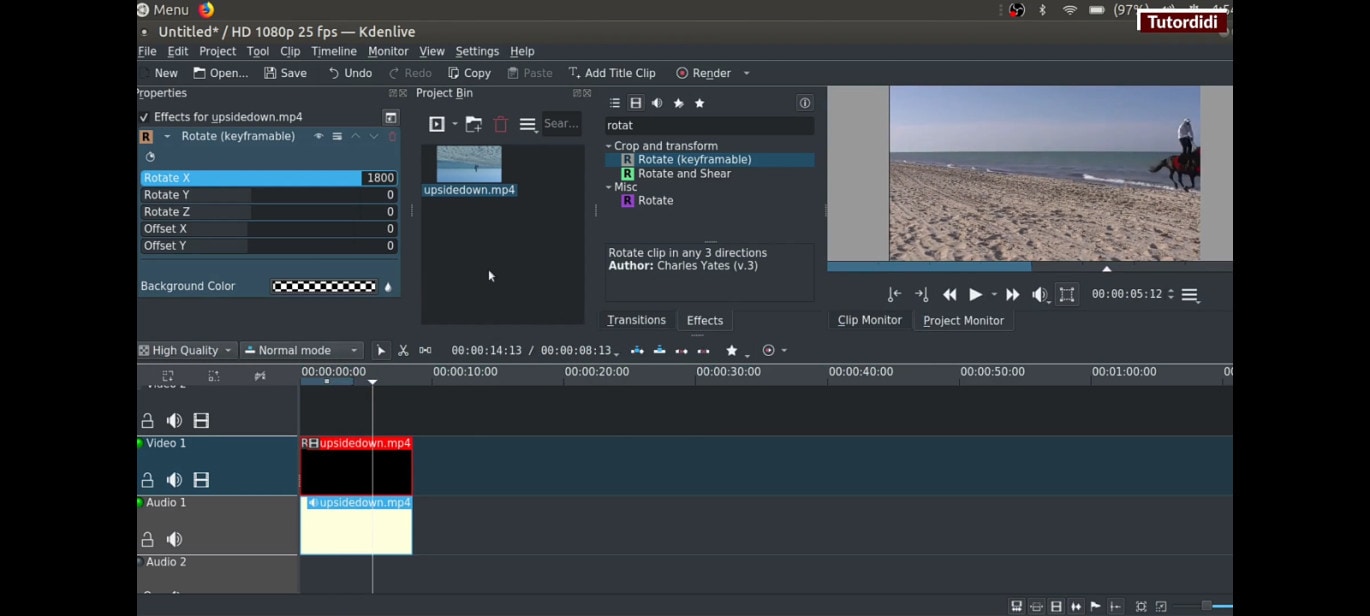
ALTERNATIVE WAY TO ROTATE AVI VIDEO ON KDENLIVE
- STEP 1 - Create a vertical project: create profile, select size, 1080 x 1920 and select aspect ratio: 9:16. Afterwards, there will be a vertical outline on your program window. Import your video to the project bin and drag it to the timeline
- STEP 2 - Go to effects, then click on ‘transform’ and double-click on it
- STEP 3 - Go to the down-right part of your screen and click on ‘rotation’ and highlight to change the number to whichever is ideal for your screen; you can change it to 270. This will make it rotate but will not fill the screen yet. Highlight the size and change it to 180 an hit the ‘enter’ key.
OPENSHOT – FREE FOR WINDOWS
OpenShot Video Editor is a free and open-source video editor for Windows, macOS, Linux, and Chrome OS. The project started in August 2008 by Jonathan Thomas, with the objective of providing a stable, free, and friendly to use video editor.

HOW TO ROTATE AVI VIDEO ON OPENSHOT
- STEP 1 - Launch OpenShot on your Windows and import your clip form where you’ve saved it locally
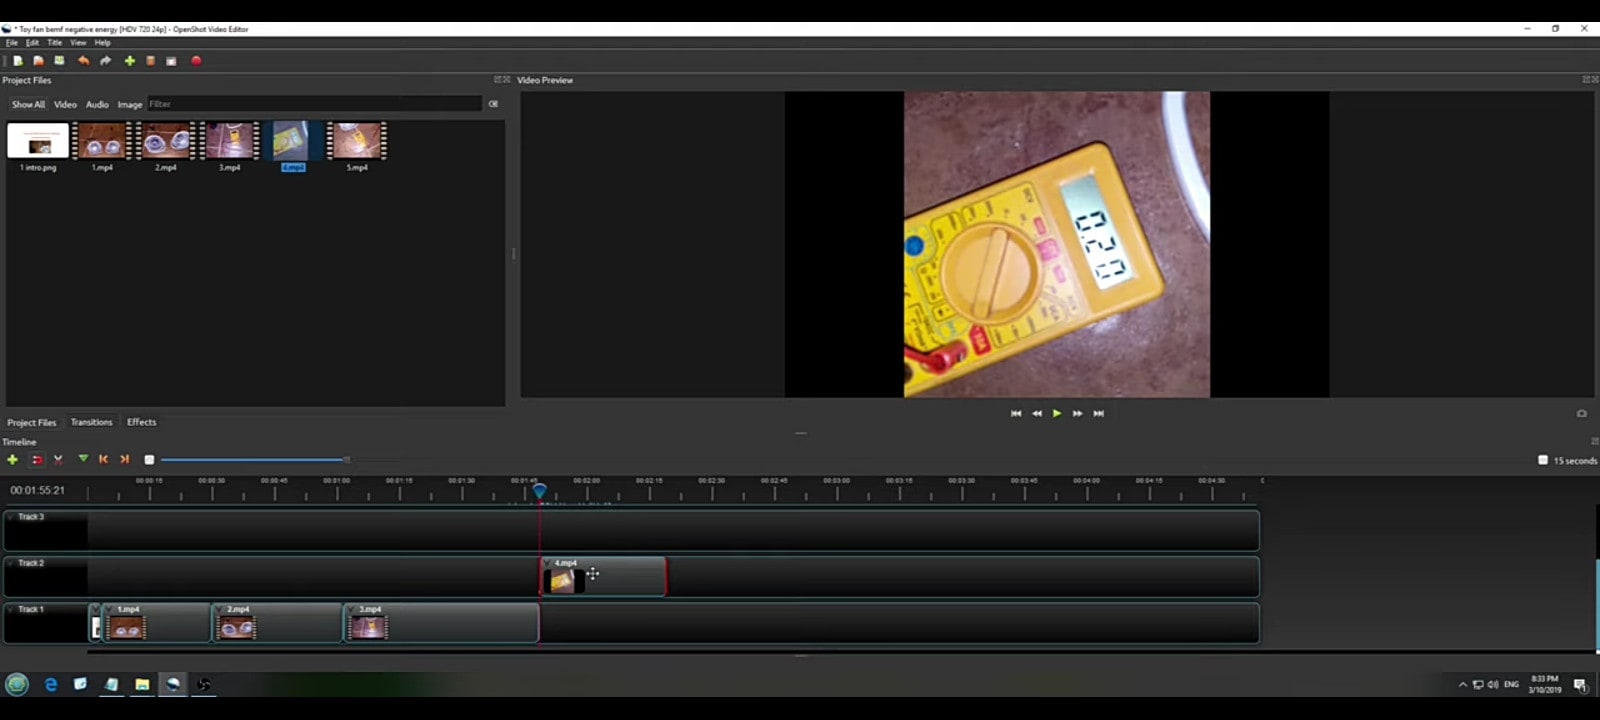
- STEP 2 - Drag and drop footage on your timeline and click on the ‘play’ button to check your footage. Right click on the footage and an option box will appear
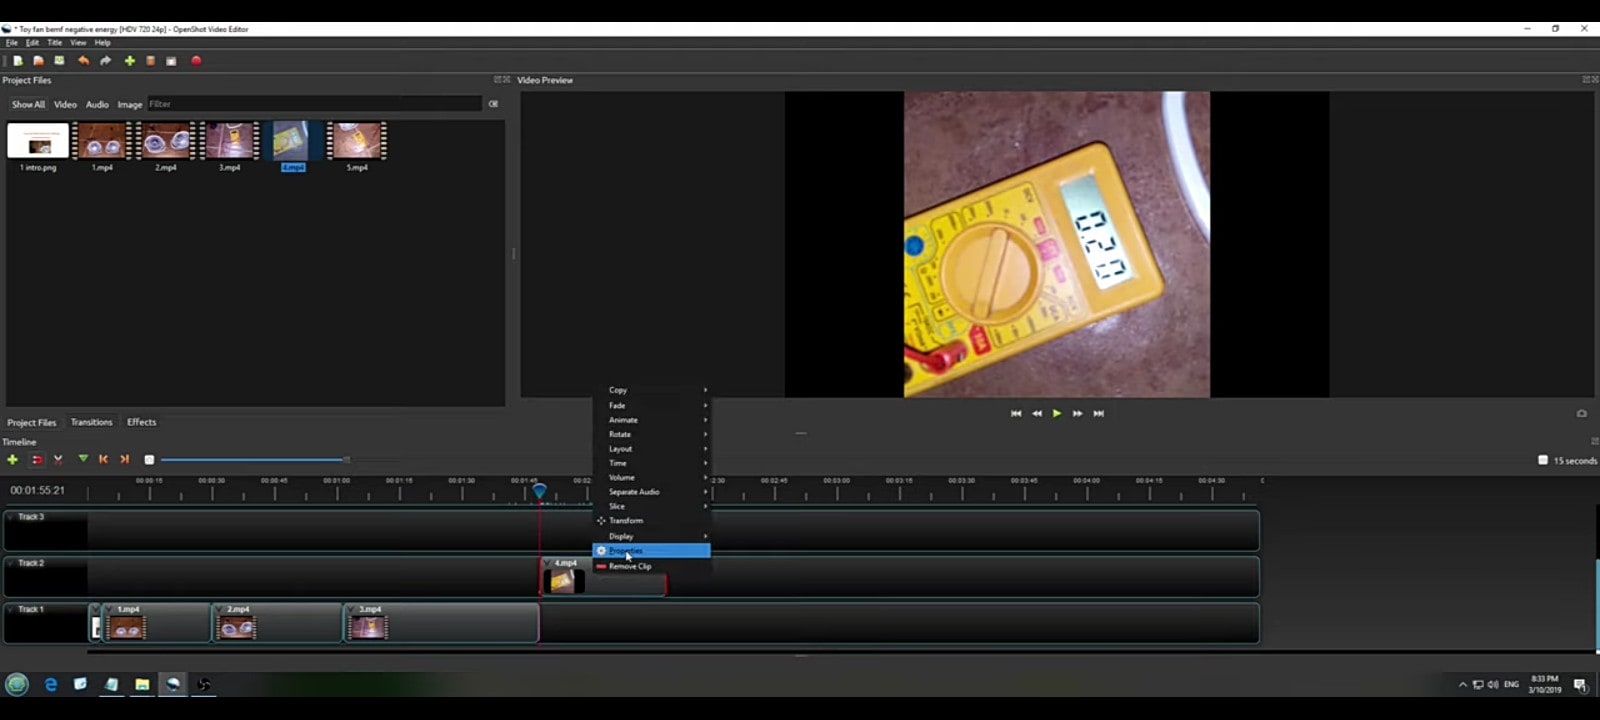
- STEP 3 - Click on rotate; you can choose to rotate either left or right. Rotate till it ideally fits the screen
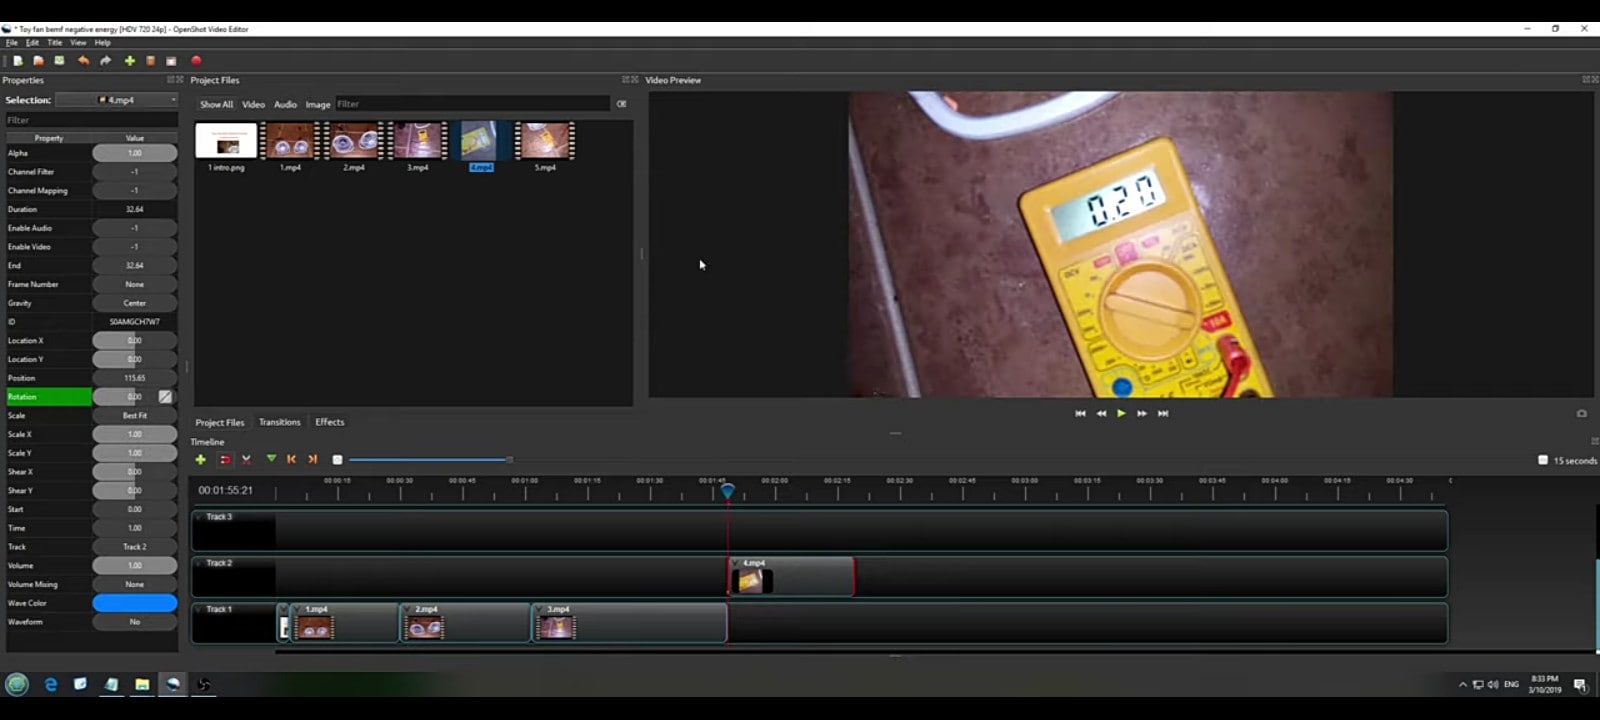
ALTERNATIVE WAY TO ROTATE AVI VIDEO ON OPEN SHOT
- STEP 1 - Launch OpenShot on your Windows and drag your footage to the timeline.
- STEP 2 - Right click on your video and select properties.
- STEP 3 - Go to rotation and change the value, and your video will rotate
ADOBE PREMIERE PRO – PAID FOR WINDOWS
Introduced in 2003, Adobe Premiere Pro is known to be a video editing software. It has a lot of features that can be used in the process of editing. It’s capable of editing feature movies such as Hollywood and the likes.
HOW TO ROTATE AVI VIDEO ON ADOBE PREMIERE PRO – FIXING A LANDSCAPE SHOT
- STEP 1 - Go to sequence and click on sequence settings
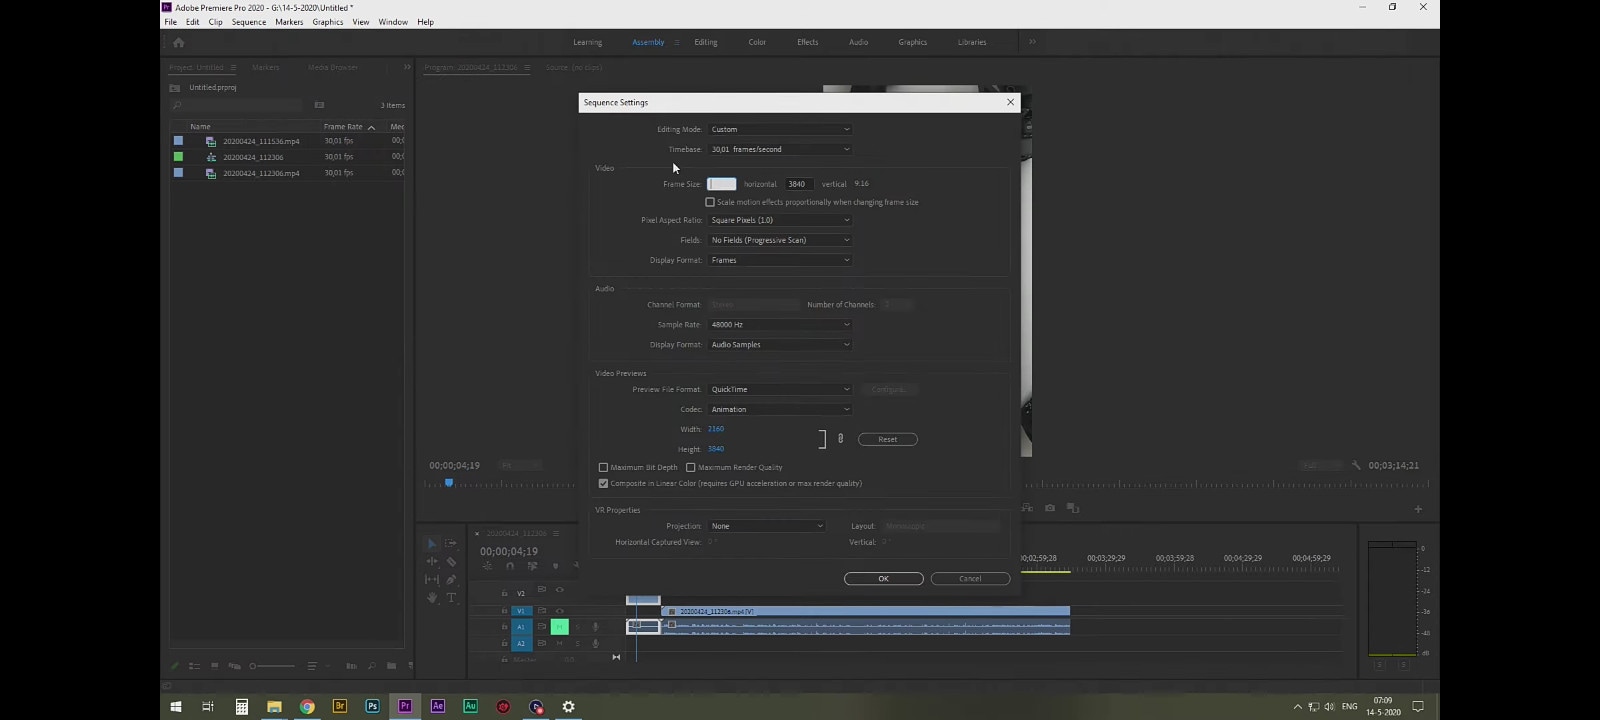
- STEP 2 - Click on frame size and type in 3840; for the horizontal, type in 2160 and then proceed to click ok
FIXING A PORTRAIT SHOT
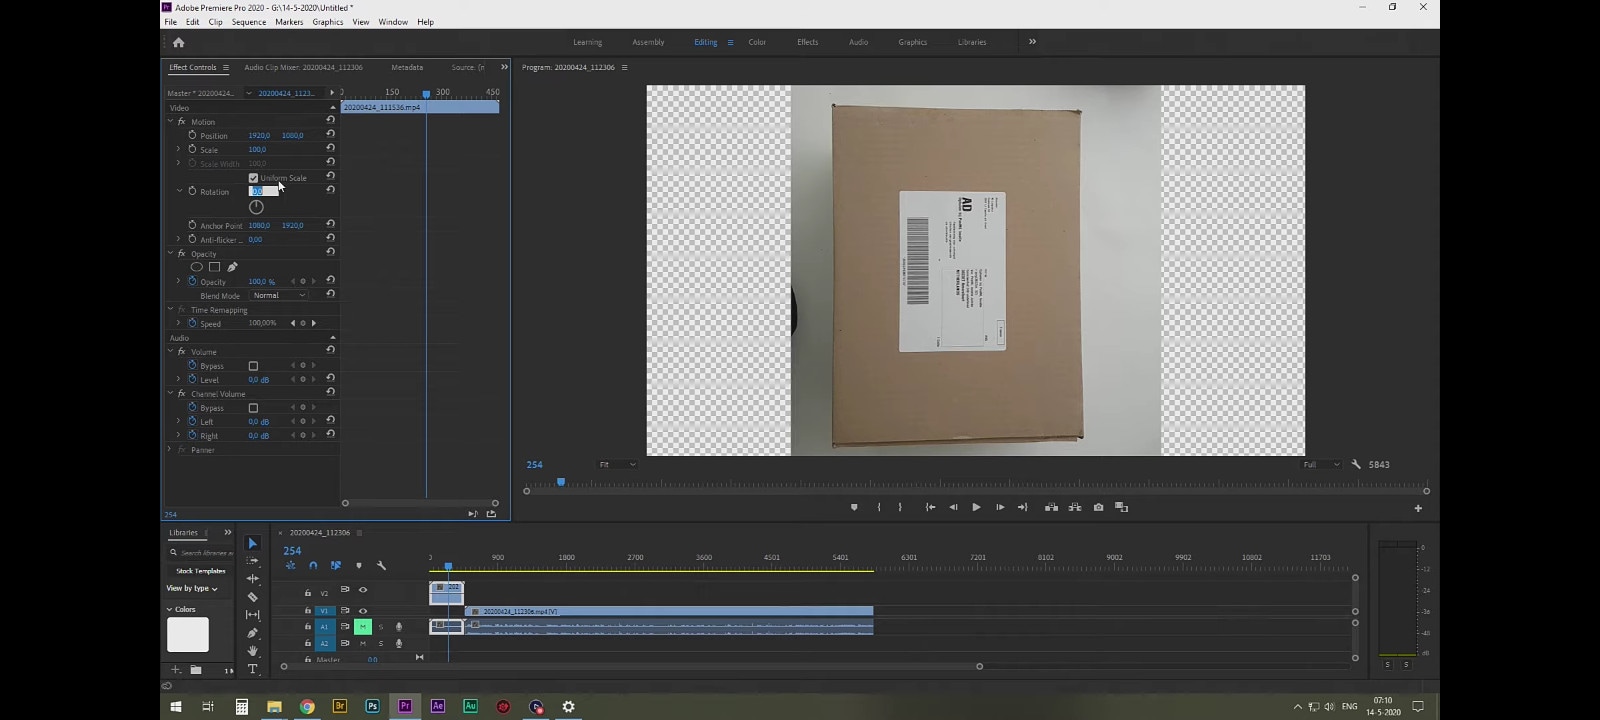
- Put your play-head (the thin line that moves over the clips on your timeline) on the clip on the timeline
- Go to the top and click on ‘Editing’, then you go to effects control
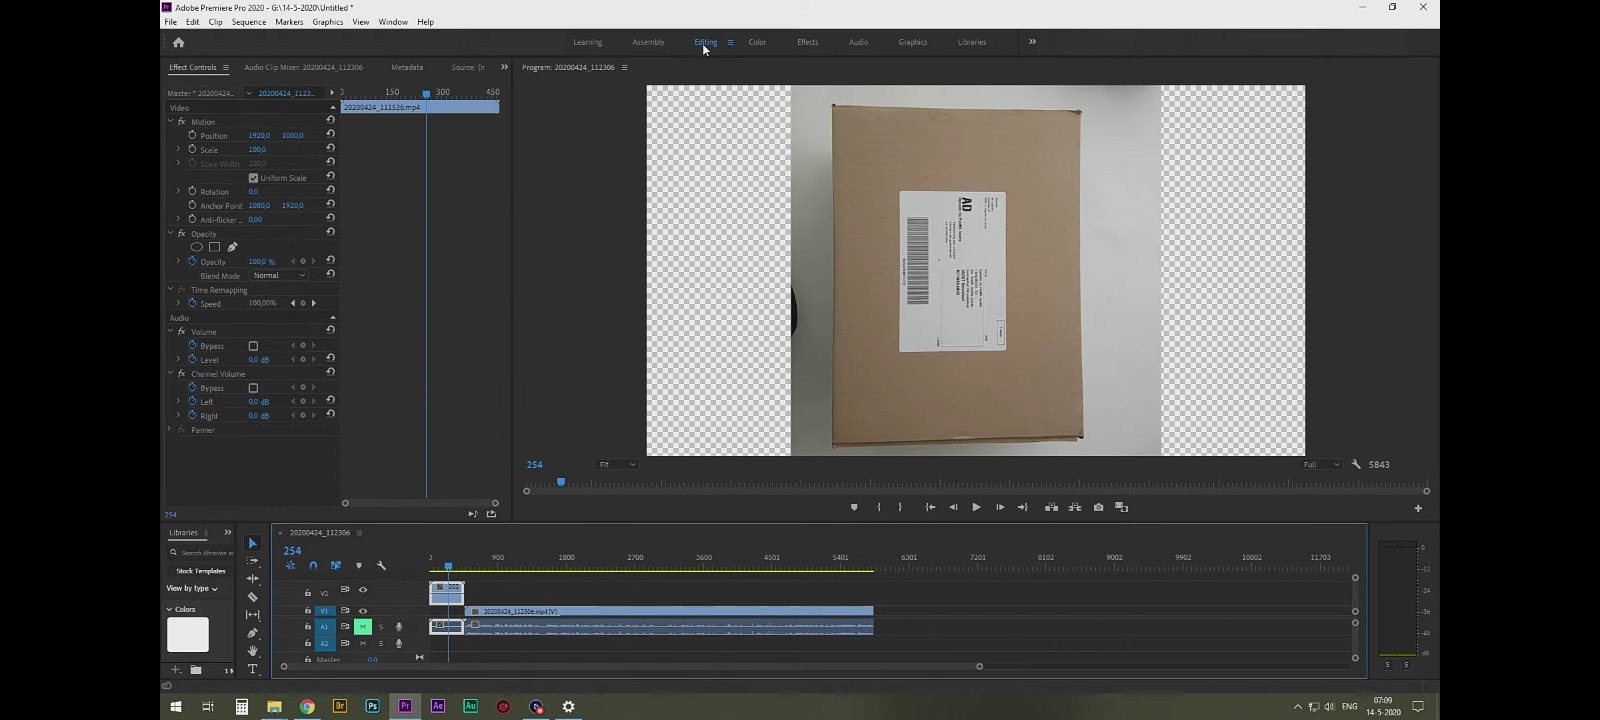
- Go to ‘scale’, and type in the number according to the degree you desire to effect
your rotation. However, your video will be just perfect if you type in -90
ALTERNATIVE WAY TO ROTATE AVI VIDEO ON ADOBE PREMIERE PRO
- STEP 1 - Go to the effects window and search for ‘flip’
- STEP 2 - Click on ‘Transform’. You can then decide to do a horizontal flip or a vertical flip
- STEP 3 - All you need to do is click and drag it on to your clip and it will flip, whether horizontal or vertical
- STEP 4 - It is easy to remedy when you click and drag the other to place on your footage, whether horizontal or vertical.
TO ROTATE YOUR CLIP
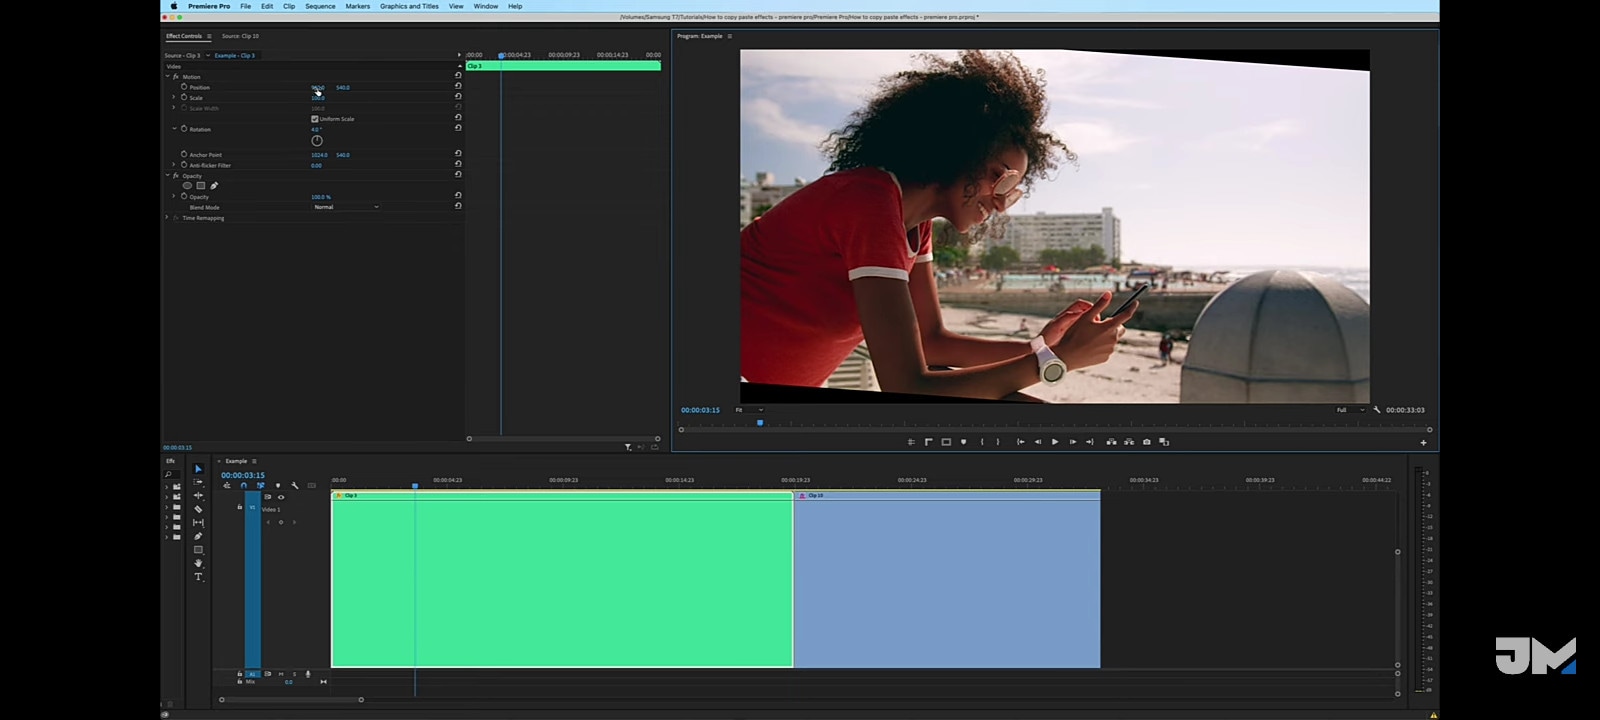
- STEP 1 - Highlight your footage on the timeline and go to your effects controls window. Underneath ‘motion’, there is the perimeter of rotation. If you click and drag the mouse on the number, it will rotate either clockwise or counter-clockwise. Also, you can type in whatever rotation amount you want
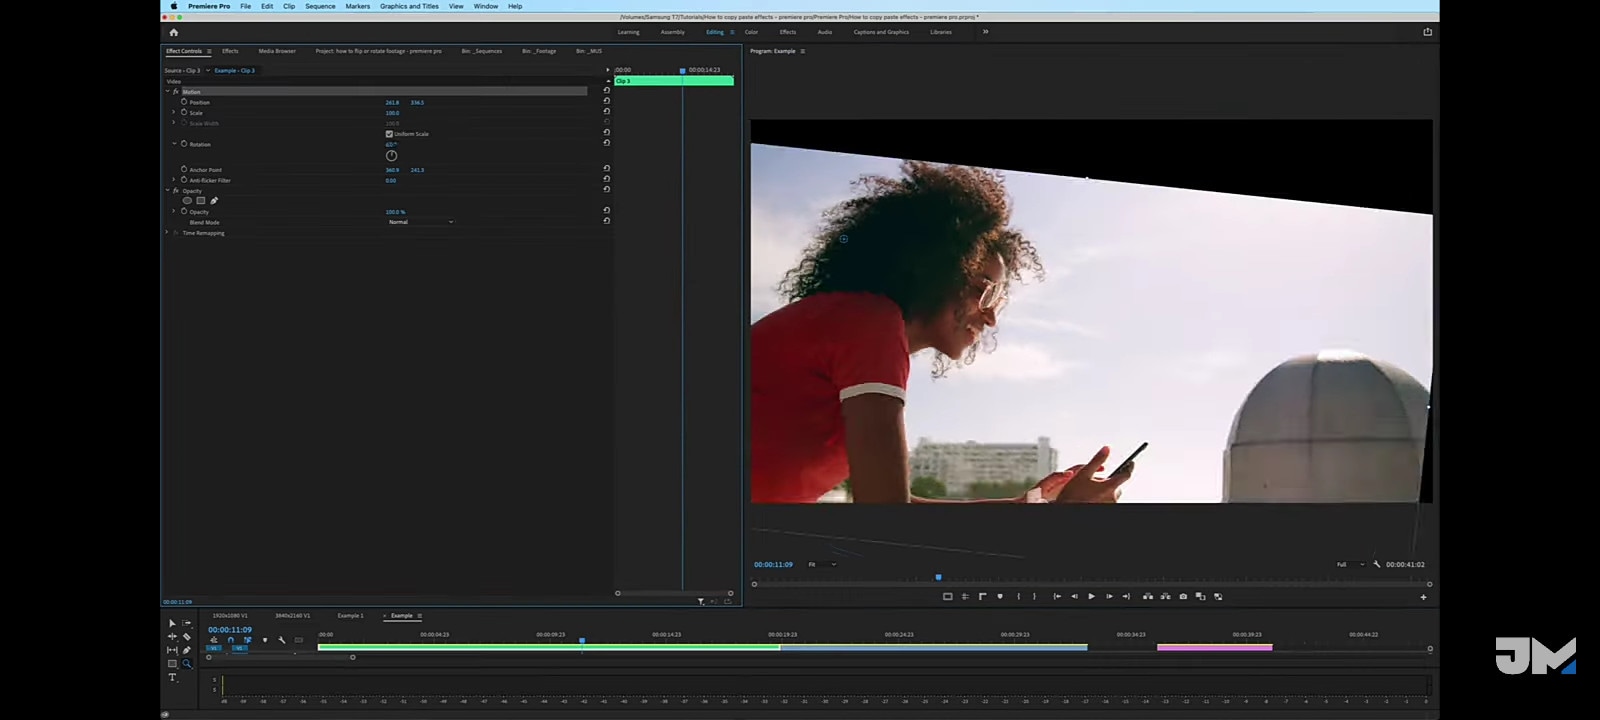
- STEP 2 - It’s also worth mentioning that when you rotate a clip, you’re always rotating around the inker point (the little blue cross in a circle). You can click and drag this through the program monitor to any point on the clip and start rotating it around the inker point. In fact, it doesn’t have to be on the clip; you can make the inker point up further and rotate, and will still rotate around the inker point. If you don’t see this on your program monitor, that’s because you haven’t highlighted the motion.

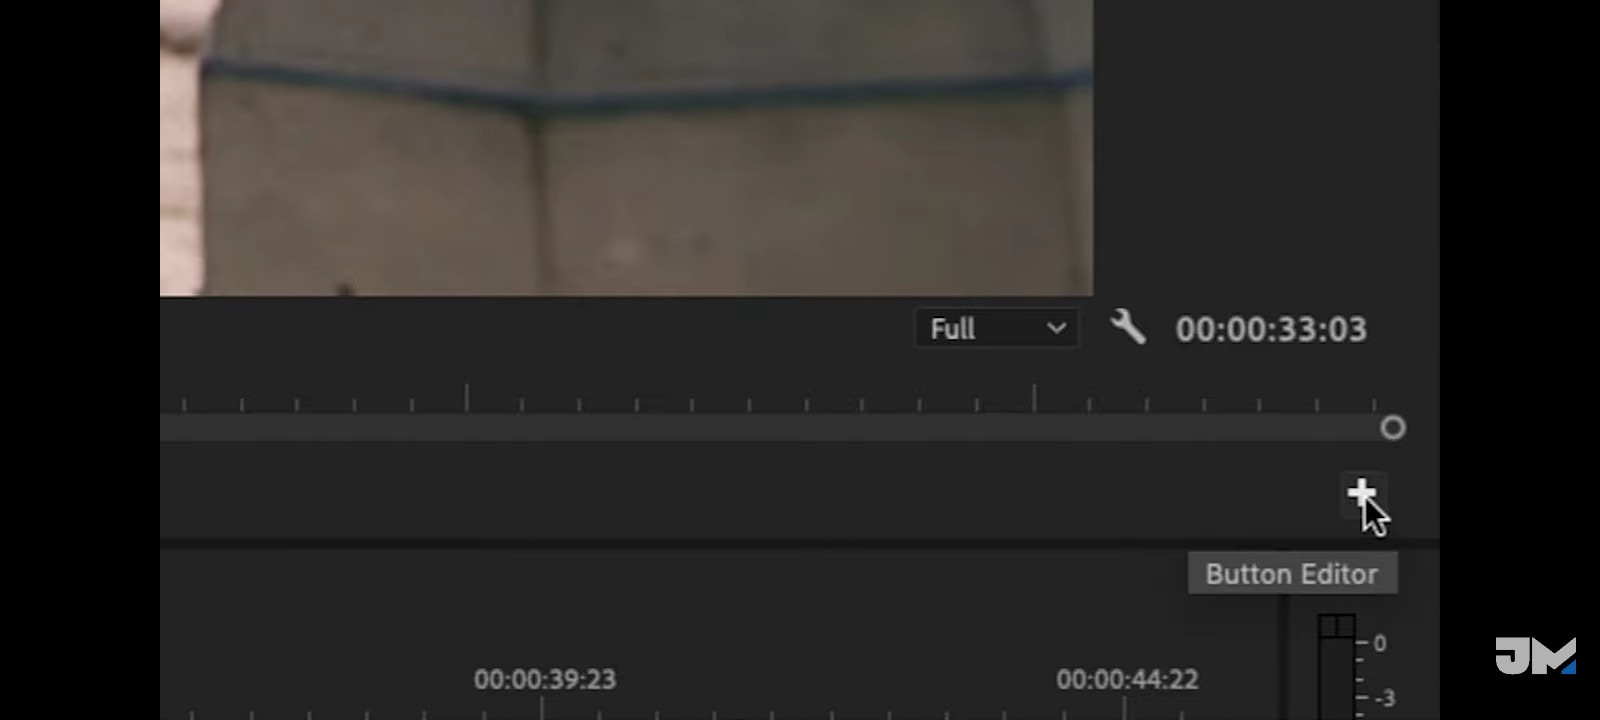
- STEP 3 - A good tip is using guides to help you level and horizontal or whether you are working with on-screen. To get a slant perfectly leveled, there’s an easy way to reference a straight line on your program monitor. On the bottom right of your program monitor is the button [a plus (+) button] editor. Click on it and a box full of tools will pop up which you can work with. Click ‘add show rulers’, ‘show guides’ and ‘safe margins’
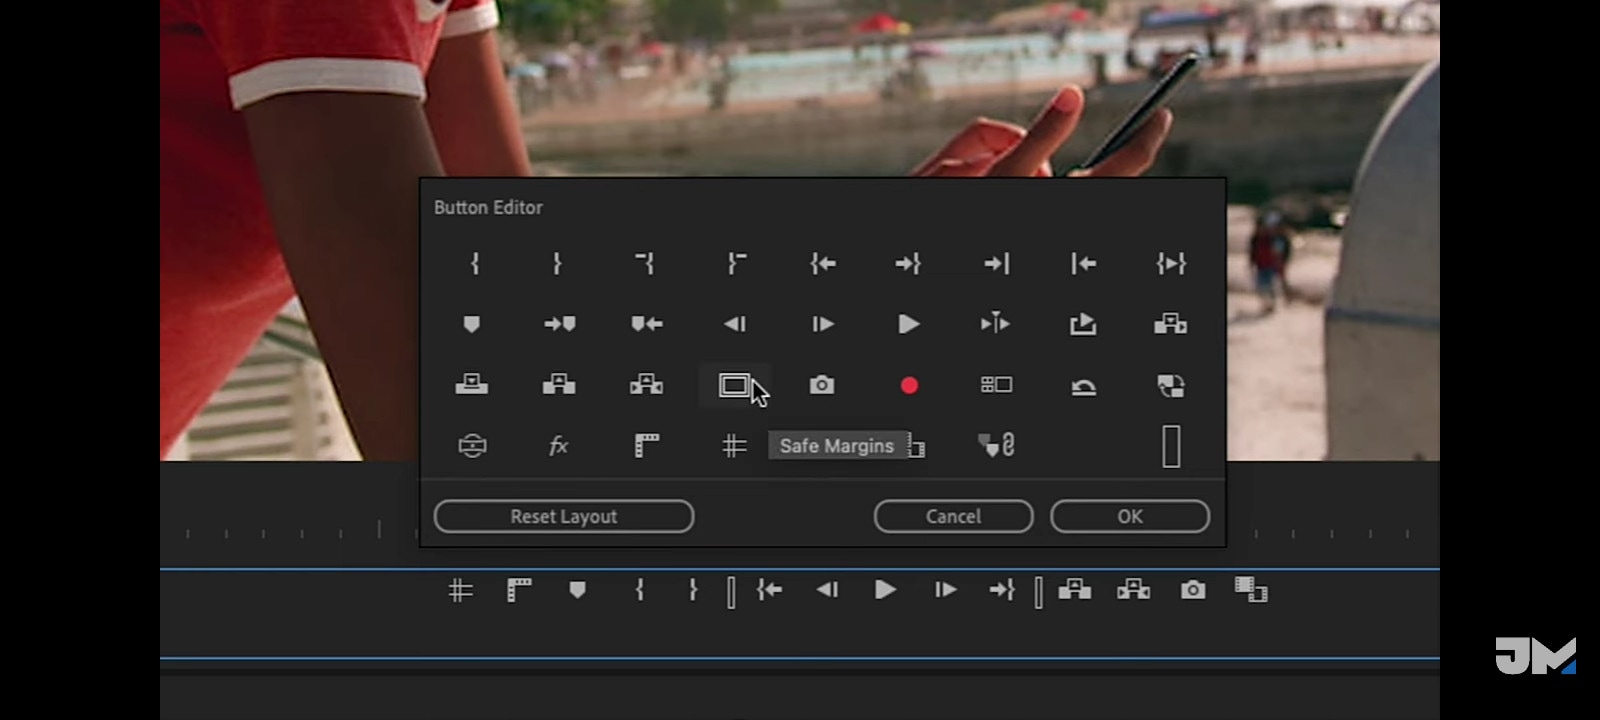
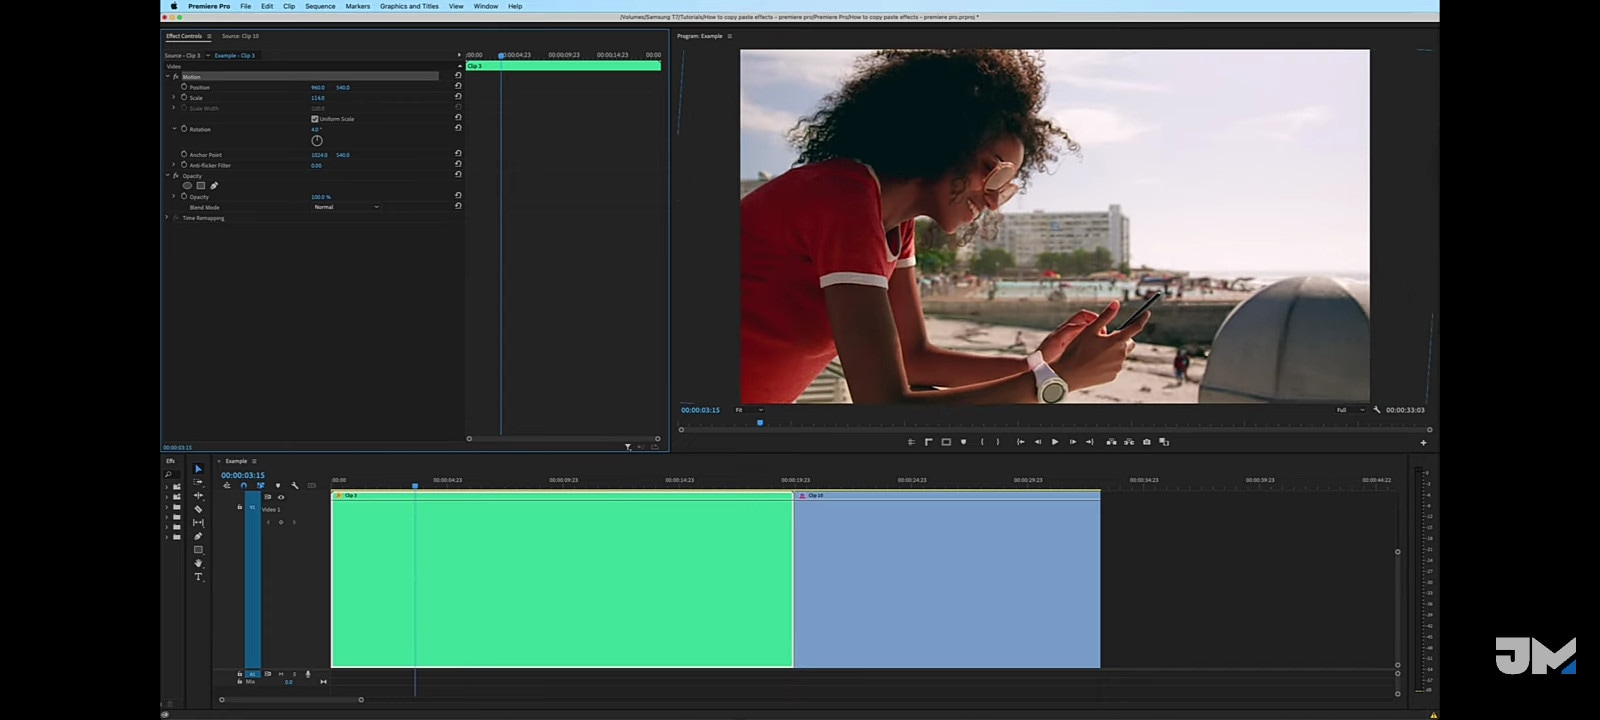
- STEP 4 - In the ruler section, take your mouse, click and drag it down to the little crosses of your safe margins. The same goes for the vertical ruler; click and drag over. That will create a new guide. For your footage, what you might need to do is get your horizontal guide down to your horizon view. You can go to your rotation and rotate your footage to get straight with your guide. If you are left with black bars at the corners, take off your safe margin rulers and guides and then zoom in on your footage and take off the black bars. To do this, go back to your effect controls
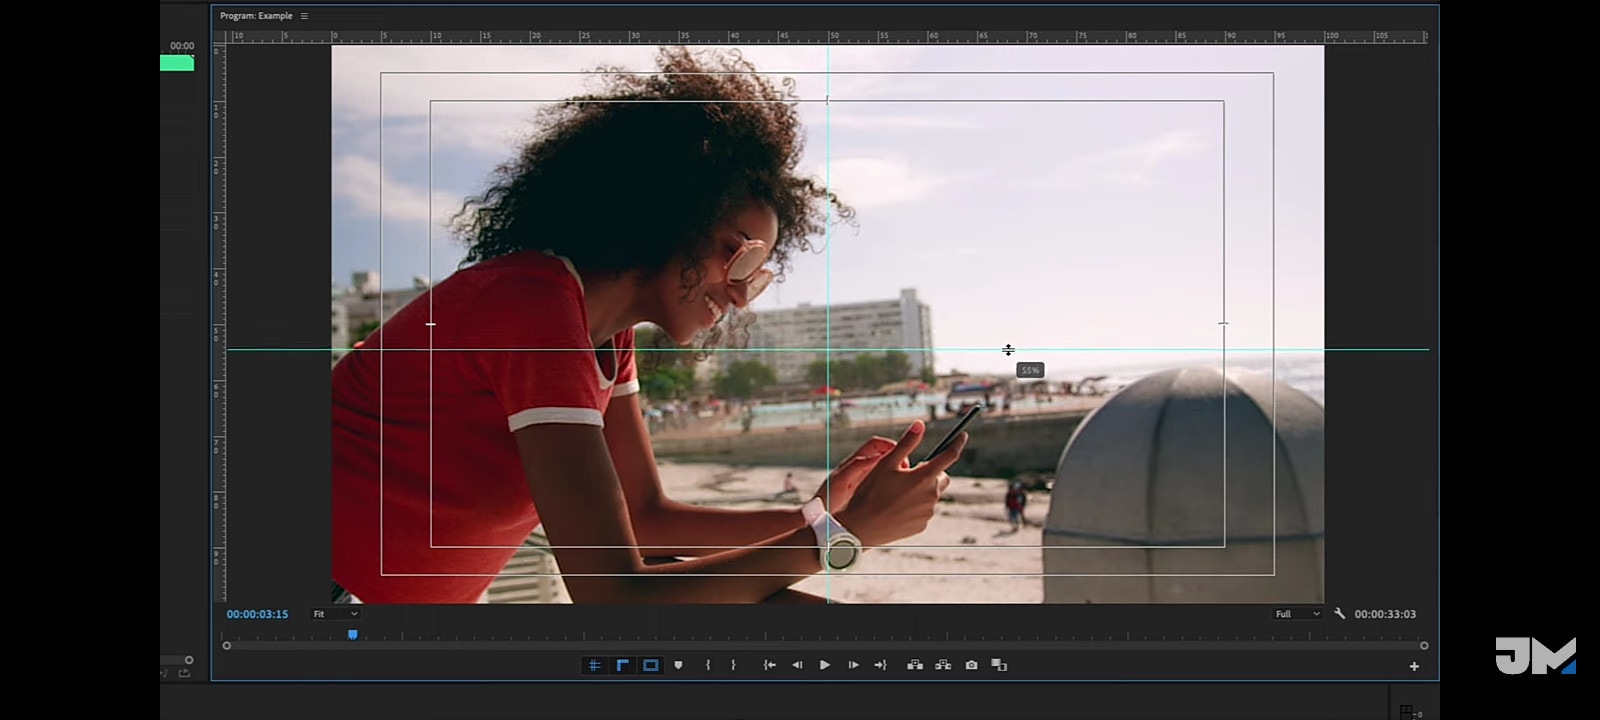
- STEP 5 - Instead of doing rotation, you scale by clicking and sliding the mouse on the number to the right
iMOVIE – FREE FOR MAC

iMovie is a preinstalled video editing application developed by Apple Inc. for macOS, Ios, and iPadOS devices. It was originally released in 1999 as a Mac OS 8 application bundle with the first FireWire-enabled consumer Mac model, the iMac DV. With iMovie, you can create professional-looking videos without an editing degree.
HOW TO ROTATE AVI VIDEO IN iMOVIE
- STEP 1 - Run iMovie on your PC and create a new project by clicking ‘create new’ and selecting ‘movie’. Import your footage: Click on the arrow pointing downwards just below your menu bar, and select the video from wherever it is saved locally.
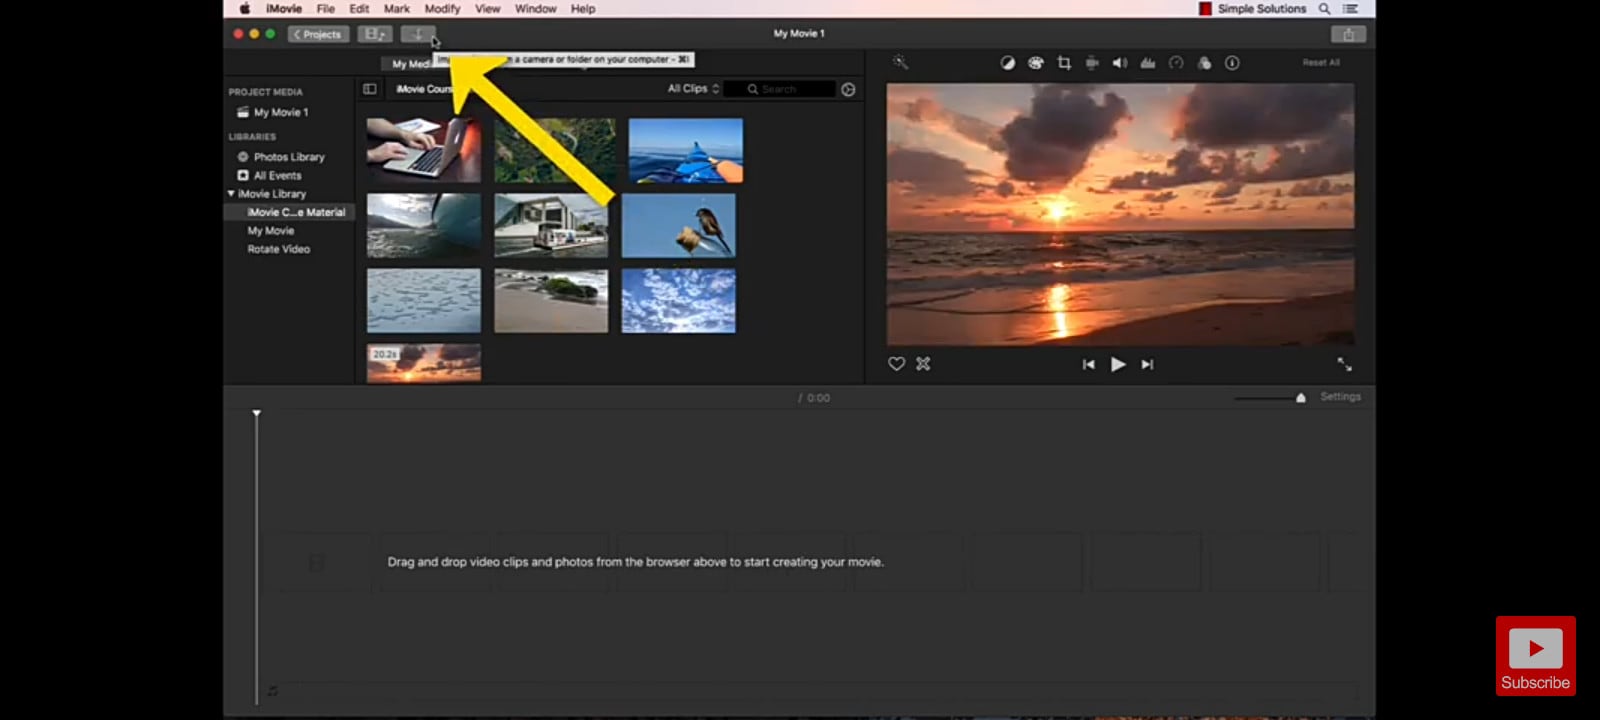
- STEP 2 - Click on the video once it’s imported; make sure it has the yellow boundary on it. Click and drag it onto the timeline
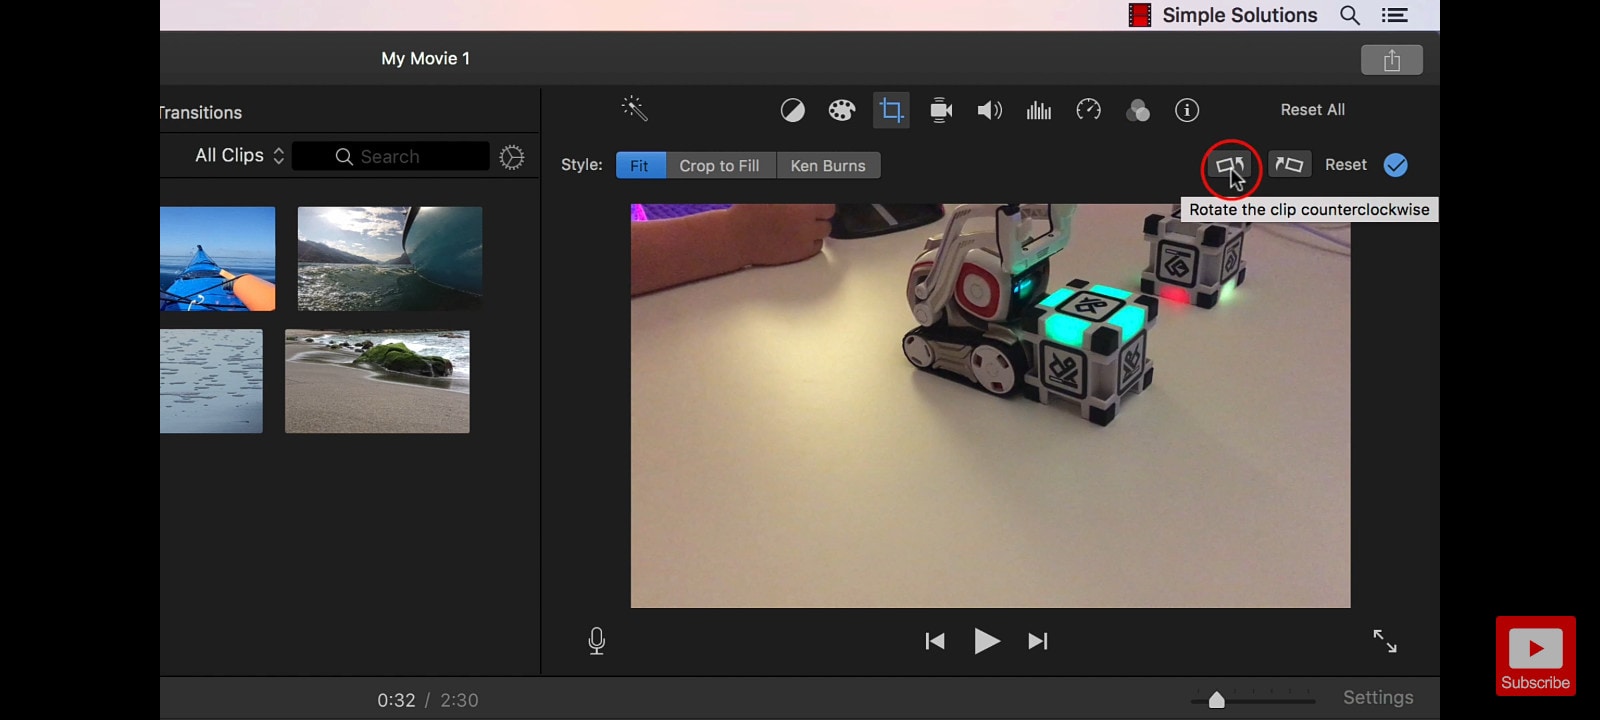
- STEP 3 - Leave your play-head on the footage and go just above your program window and click on the crop icon, the third from the left. Afterwards, a rotate ion will show just by the right above the program monitor. There are actually two buttons to rotate in either direction. You can save time by clicking the correct direction for whichever way your videos need to be rotated
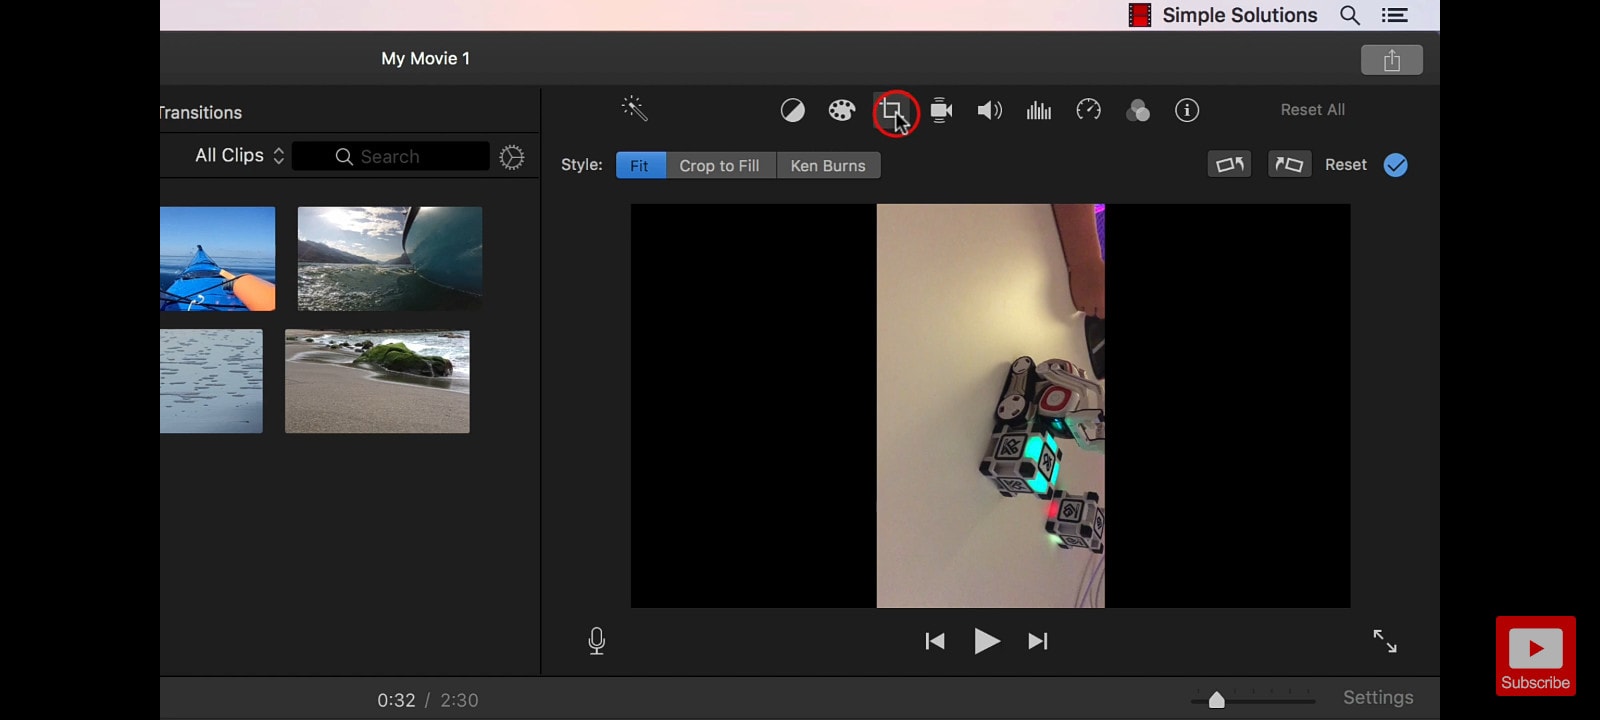
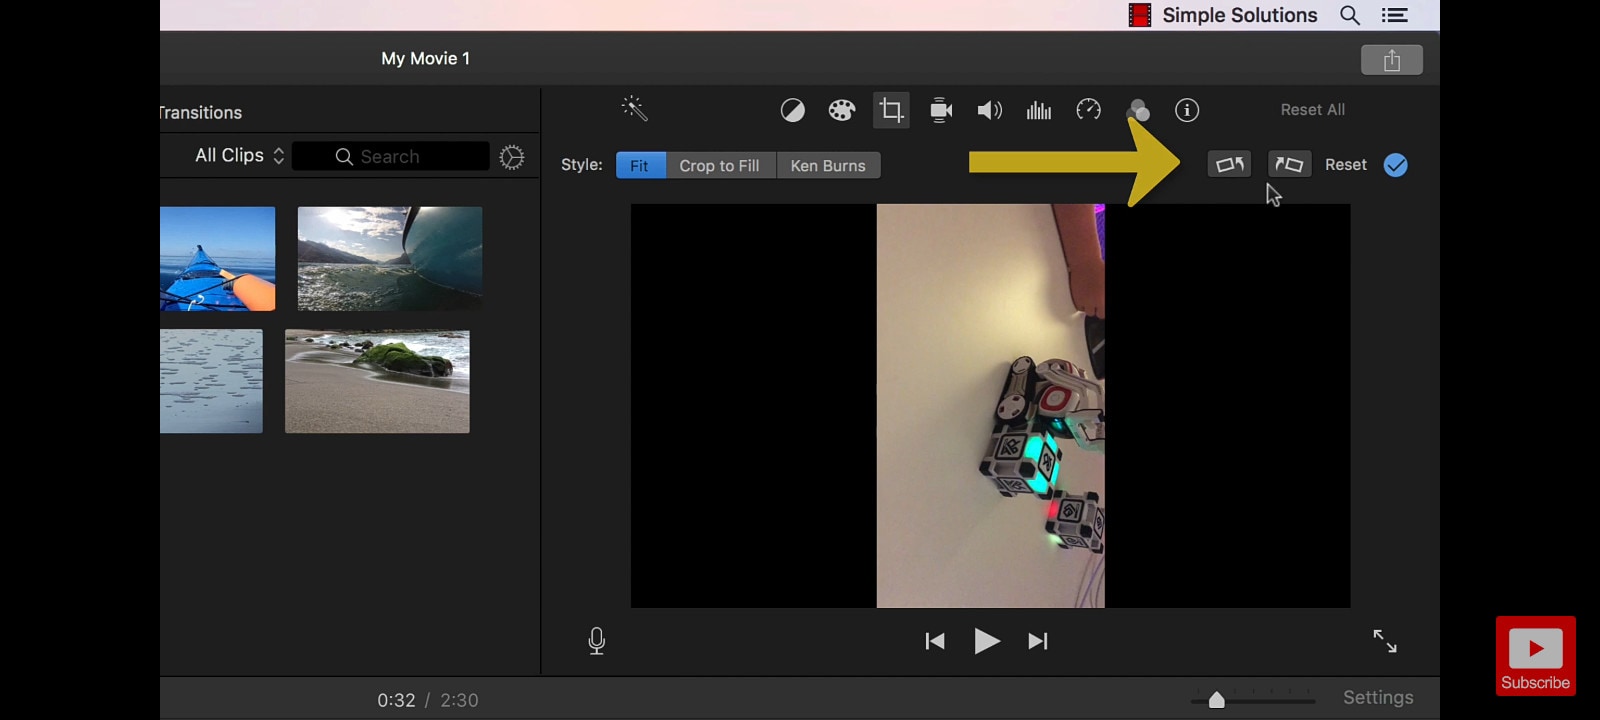
- STEP 4 - Your videos is rotated; you can go ahead and save
FILMORA – PAID FOR MAC

Formerly known as Wondershare Video Editor as at when it first launched in 2015, Filmora Video Editor is a video editing software that helps businesses create and distribute white-labeled marketing videos. Filmora is an easy-to-use video editing software for a beginner. It supports 50 above formats, 4k editing, Filmstock effects store, all basic and advanced editing tools in the most easily accessible and used manner.
For Win 7 or later (64-bit)
For macOS 10.14 or later
HOW TO ROTATE AVI VIDEO IN FILMORA
- STEP 1 - Run Filmora on your PC, import your video from where it has been locally saved and drag to the timeline
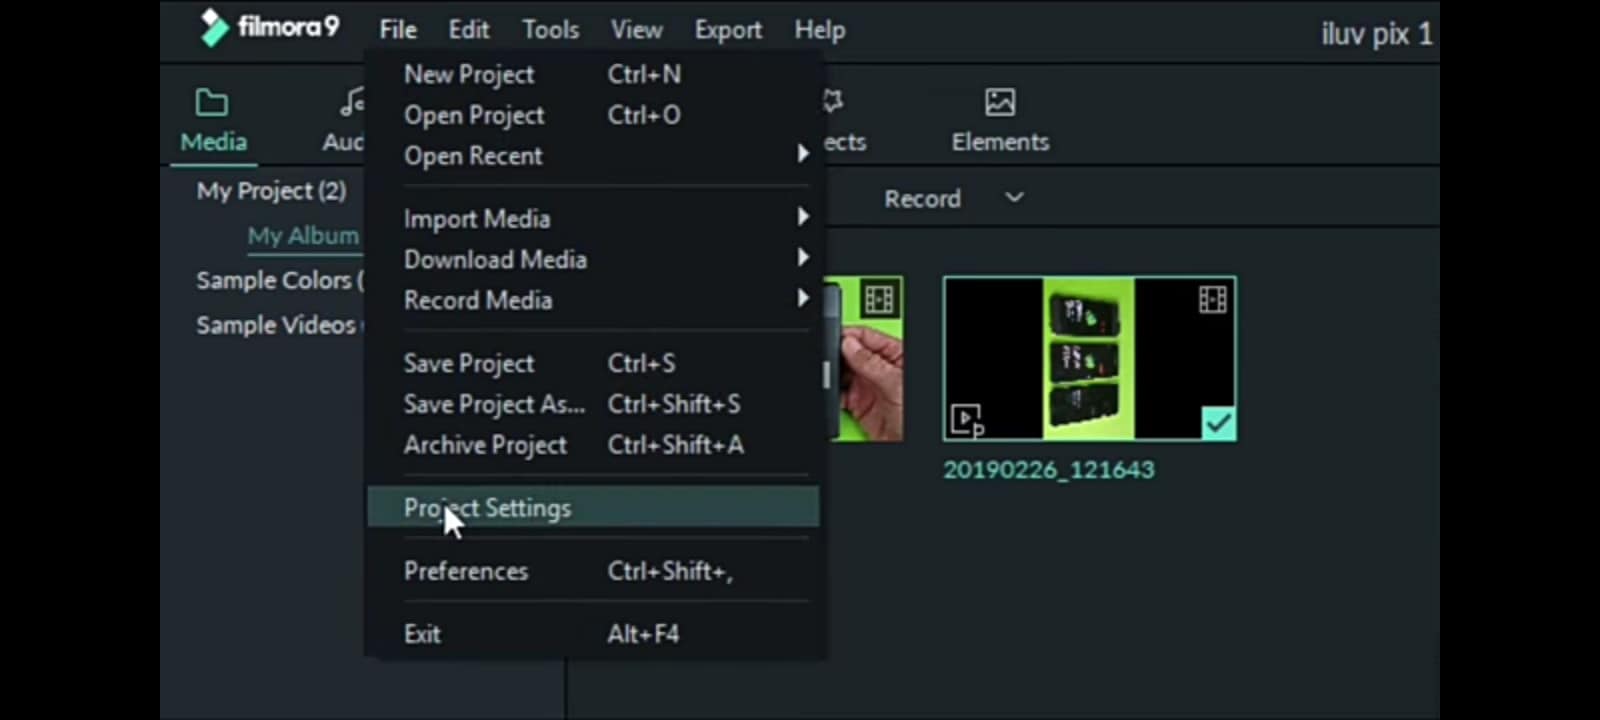
- STEP 2 - Go to file, and select ‘project settings’. By default, the video is recorded on portrait – 9:11, so change the aspect ratio to 16:9
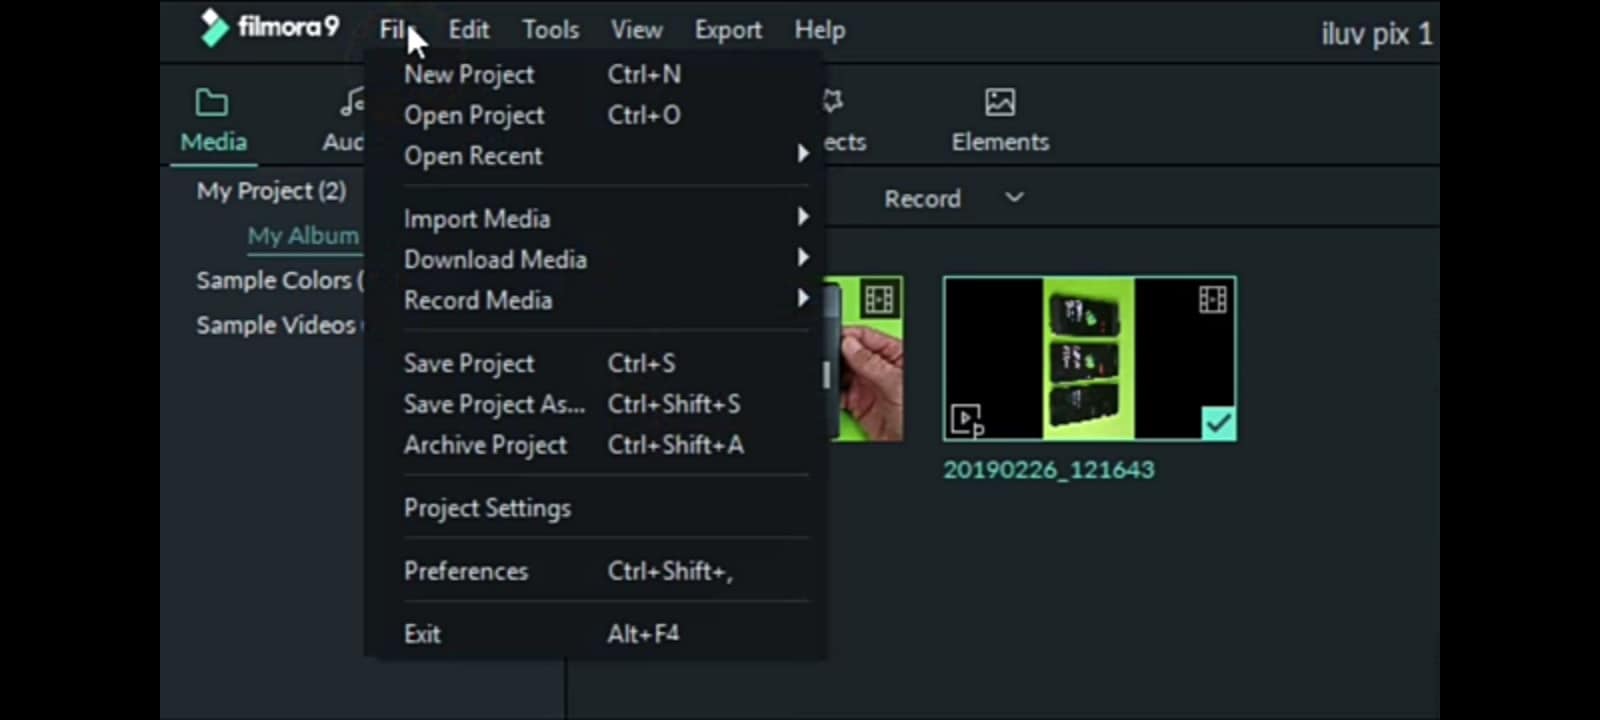
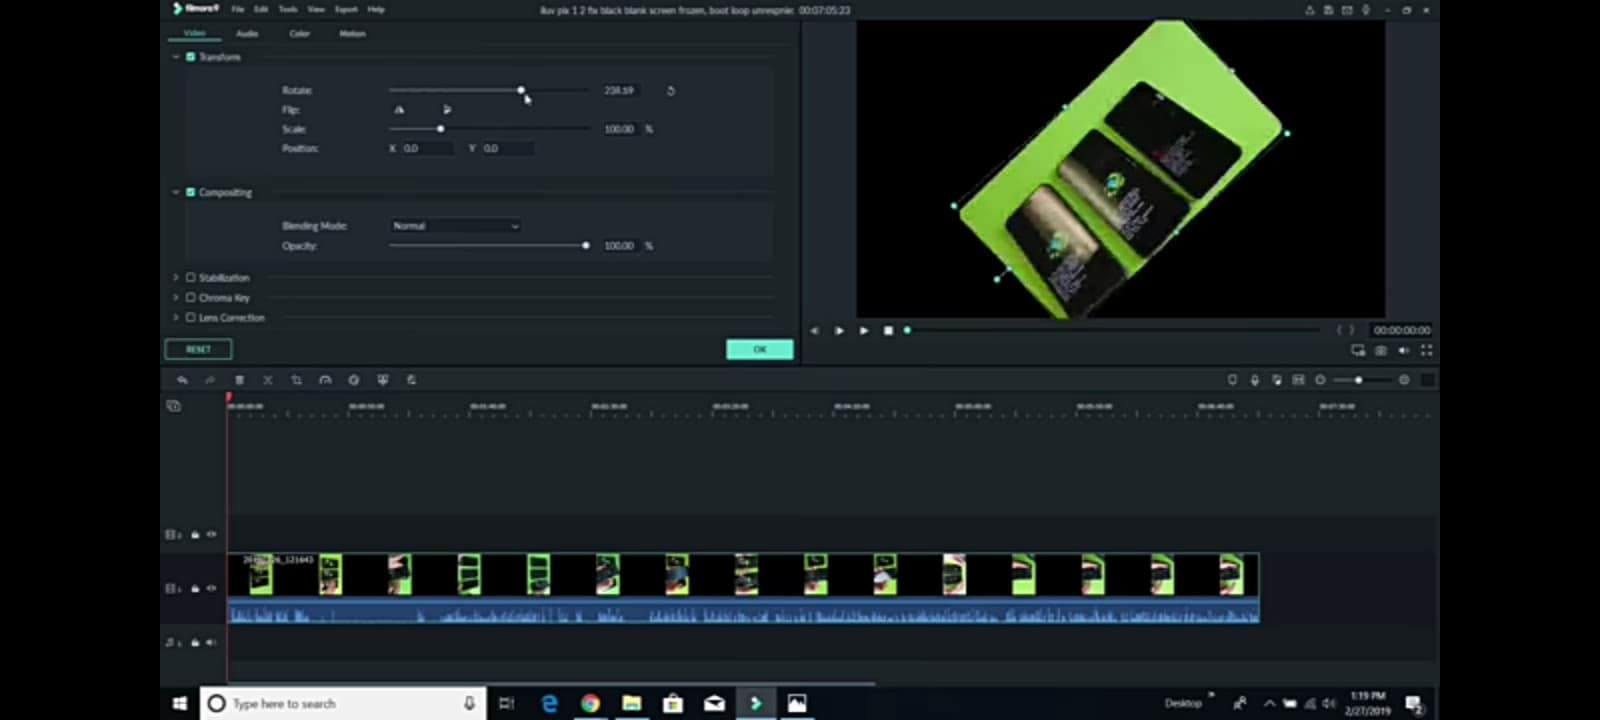
- STEP 3 - Go to your timeline and double-click your footage. A box of options will pop up beside the program monitor. Simply go to rotate and click and slide to rotate. It may be difficult to line it up even and straight. Just go to the program monitor and click on the little line and drag; it makes it easier to align
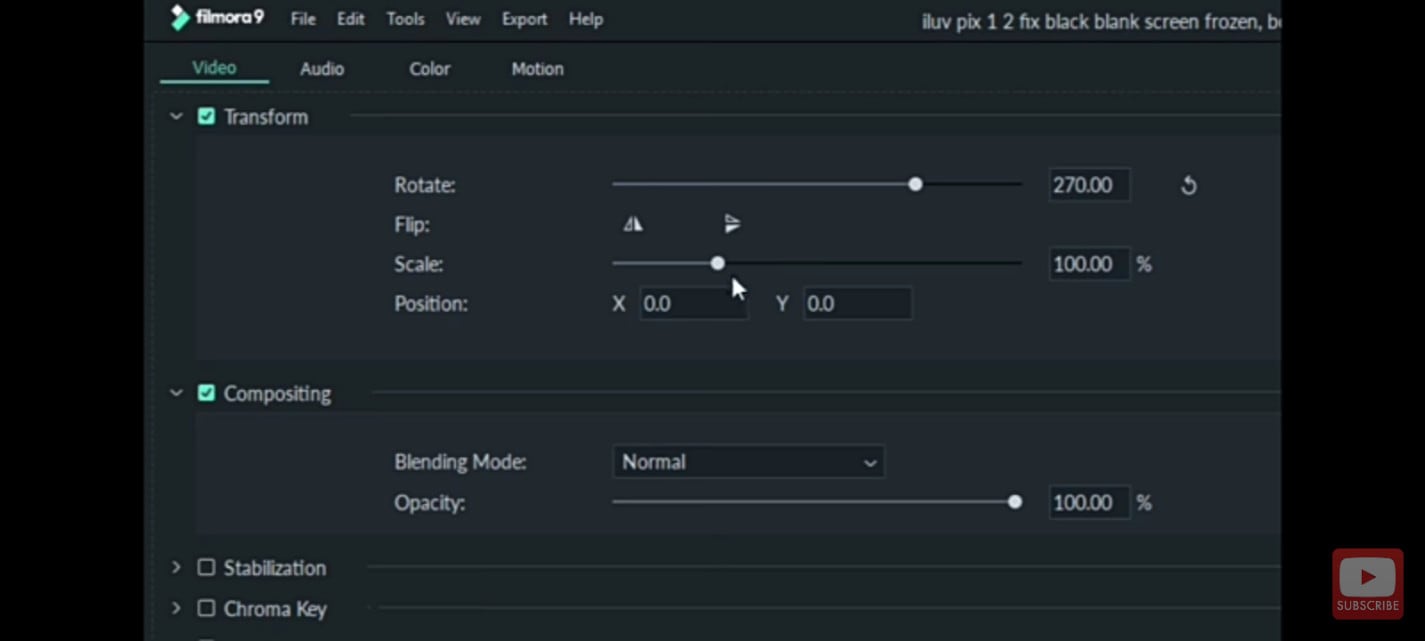
- STEP 4 - Go to ‘scale’ and slide it to the right to make it fill the screen. Your video is rotated and ready to be previewed
VIDEOLEAP – PAID FOR ANDROID AND iPHONE

Videoleap includes the usual basic cutting and pasting tools, plus greenscreen aspect ratios, slow-mo and fast motion, audio editing, and unlimited undo and redo actions. Access to the app and premium features is available with a subscription for $7.99/month, or with additional discounts if bought as a one-time purchase or multiple month bundles.
HOW TO ROTATE AVI VIDEO IN VIDEOLEAP
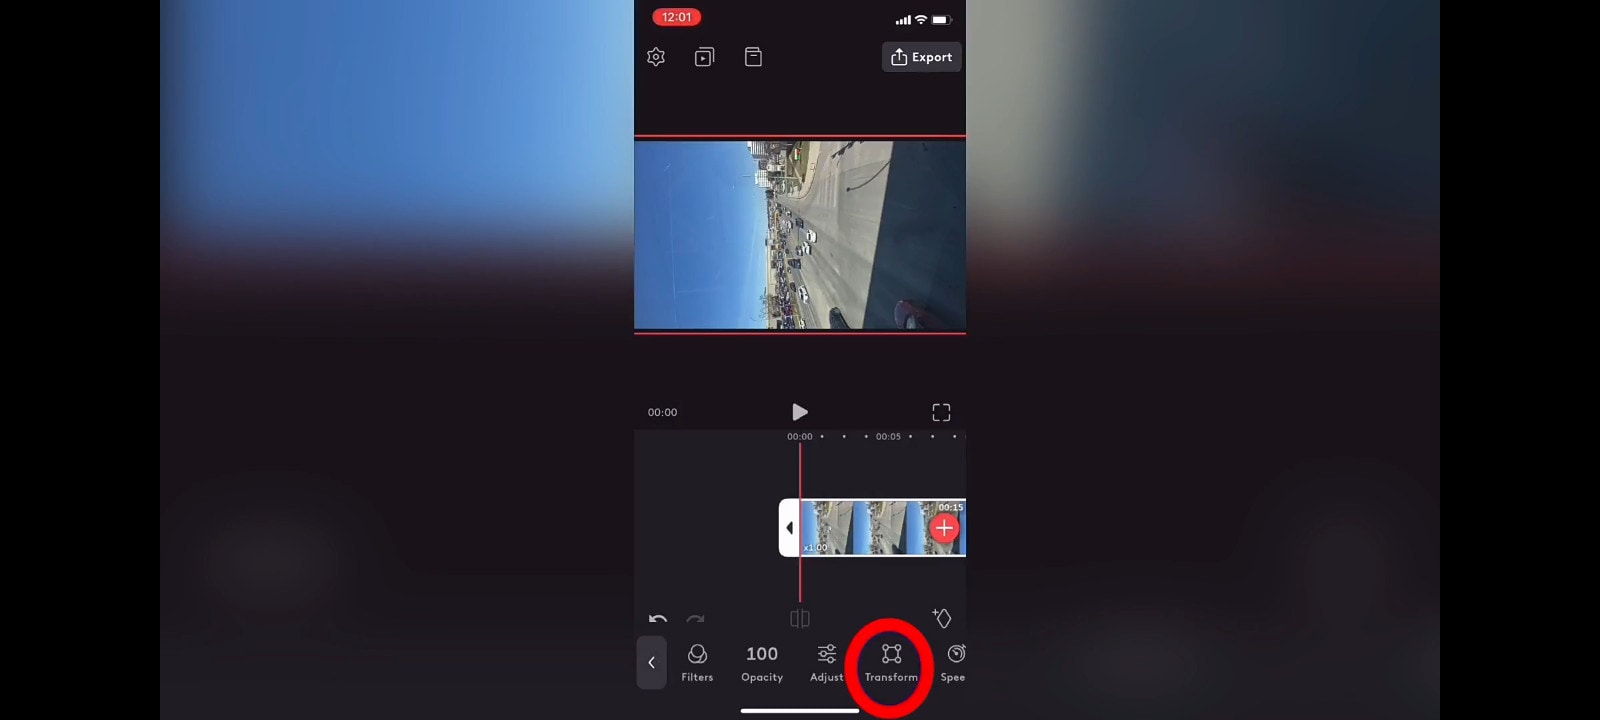
- STEP 1 - Launch Videoleap on your android and Import your footage from where you have saved it locally. Tap on ‘transform’, and then tap on rotate, then tap on rotate as many times as it takes so that it can be ideally fit
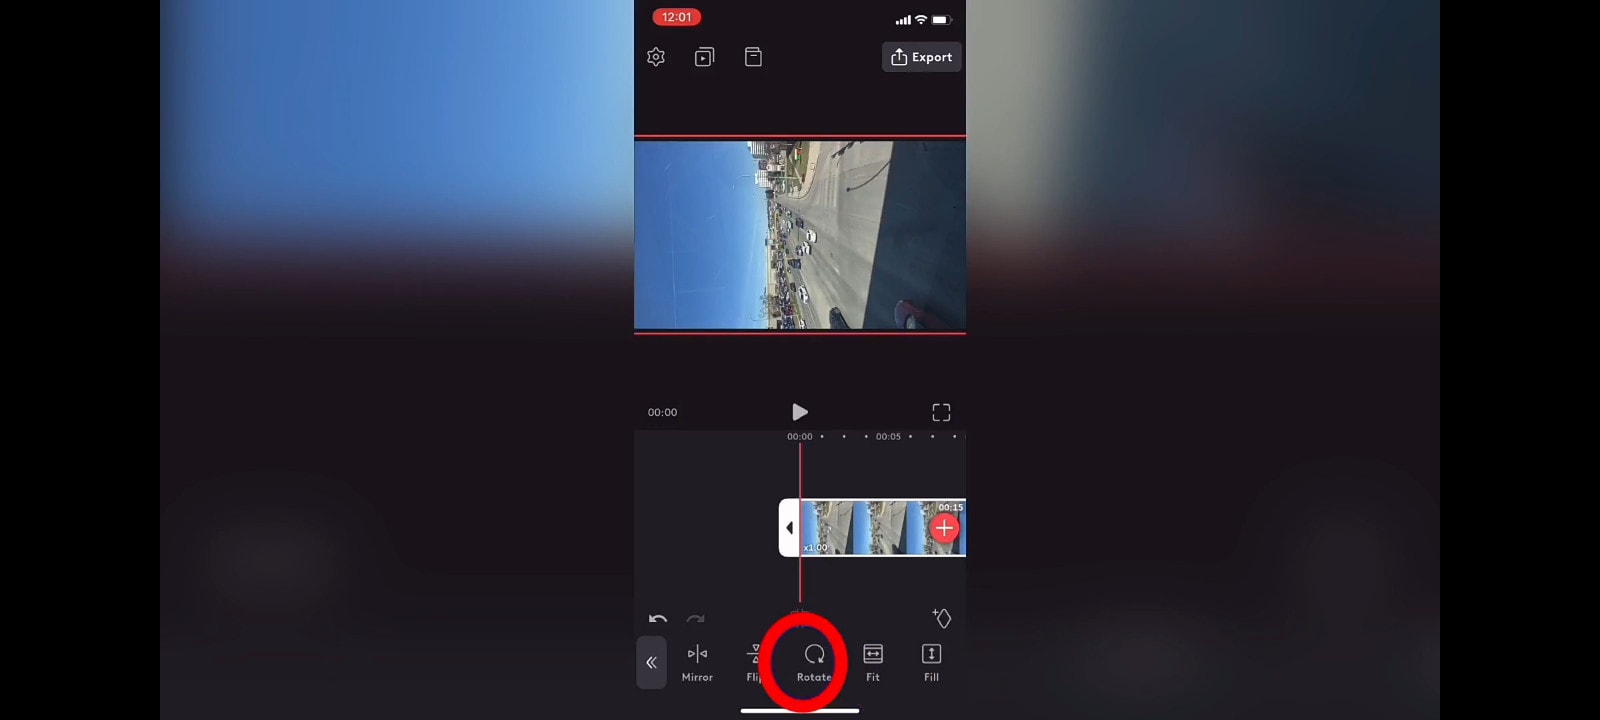

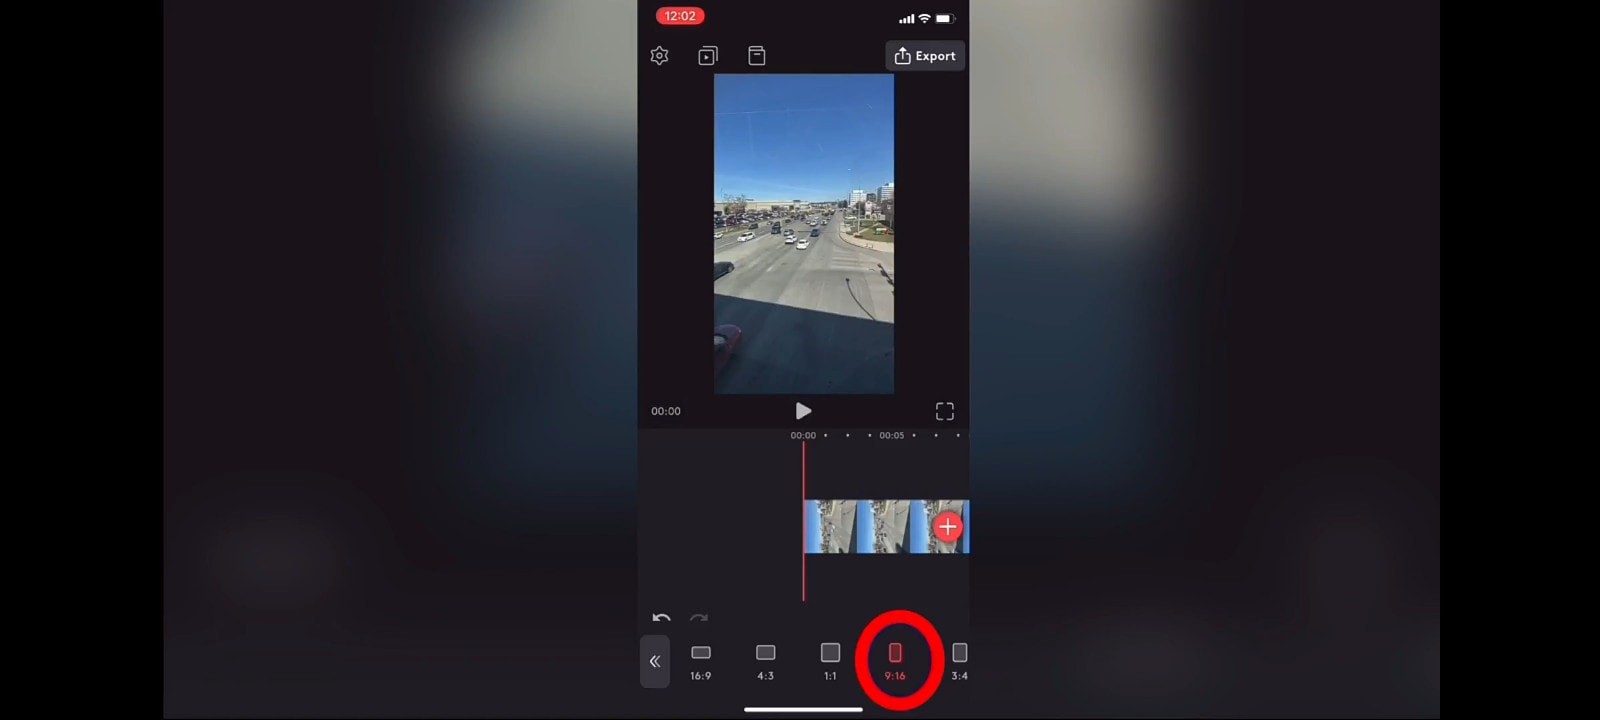
- STEP 2 - Change the format from 16:9 (YouTube format) to 9:16 (for TikTok). To do that, deselect the clip, tap on canvas, and then choose 9:16. Play the clip to preview and save.
INSHOT – FREE FOR ANDROID

InShot app is an all-in-one visual content editing app. It allows you to create videos, edit photos, and create image collages. The app has plenty of features too. You can trim clips, change the speed of your footage, and add filters, music and text. InShot is a free mobile application that you can download on your Windows to create or edit videos and photos.
HOW TO ROTATE AVI VIDEO ON INSHOT
- STEP 1 - Import your video from where you have locally saved it
- STEP 2 - Tap on the clip, and swipe the toolbar to the left to find the ‘rotate’ icon. When you tap on ‘rotate’, it will rotate your video to your left; you can keep rotating till it’s ideally fit


QUICKTIME VIDEO EDITOR – FREE FOR MAC

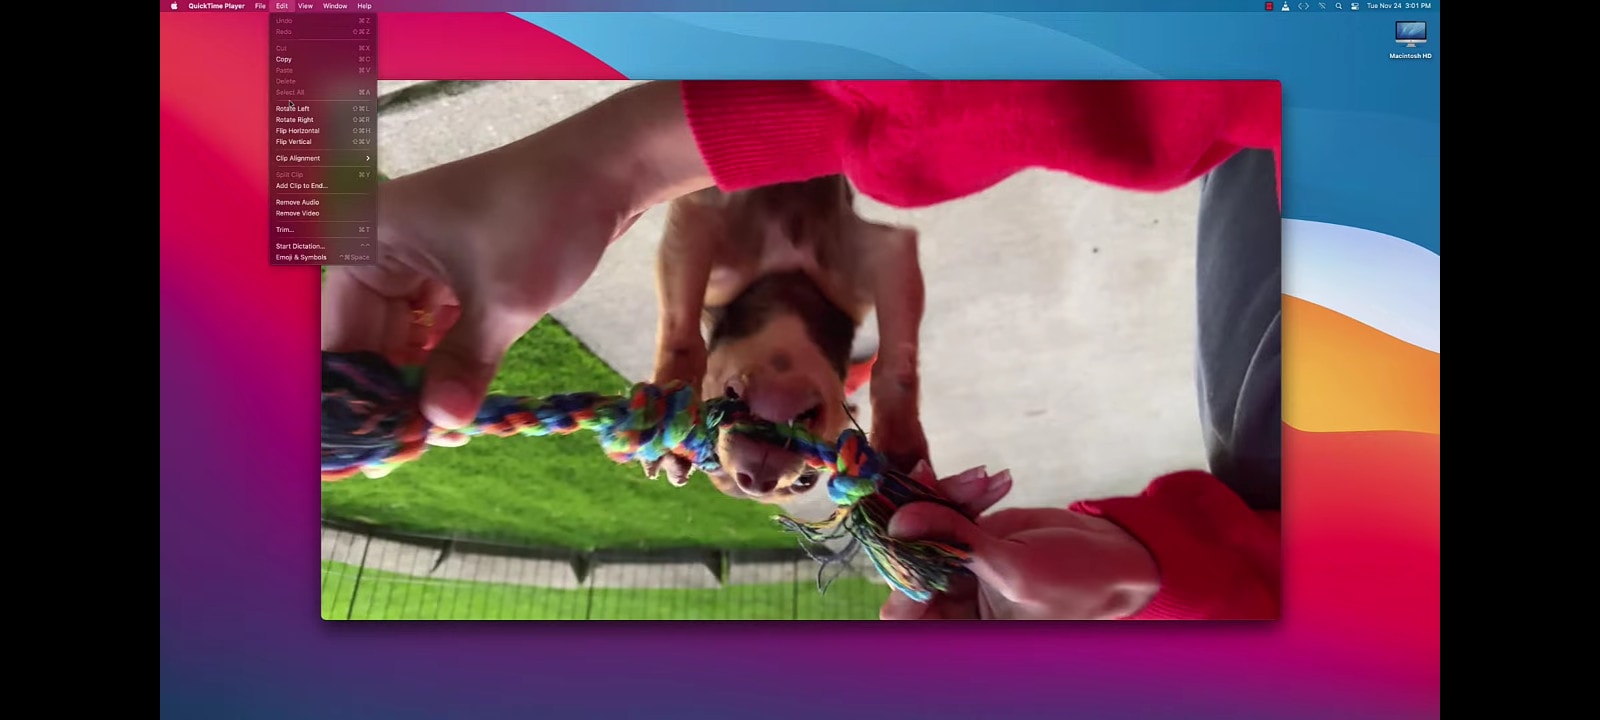
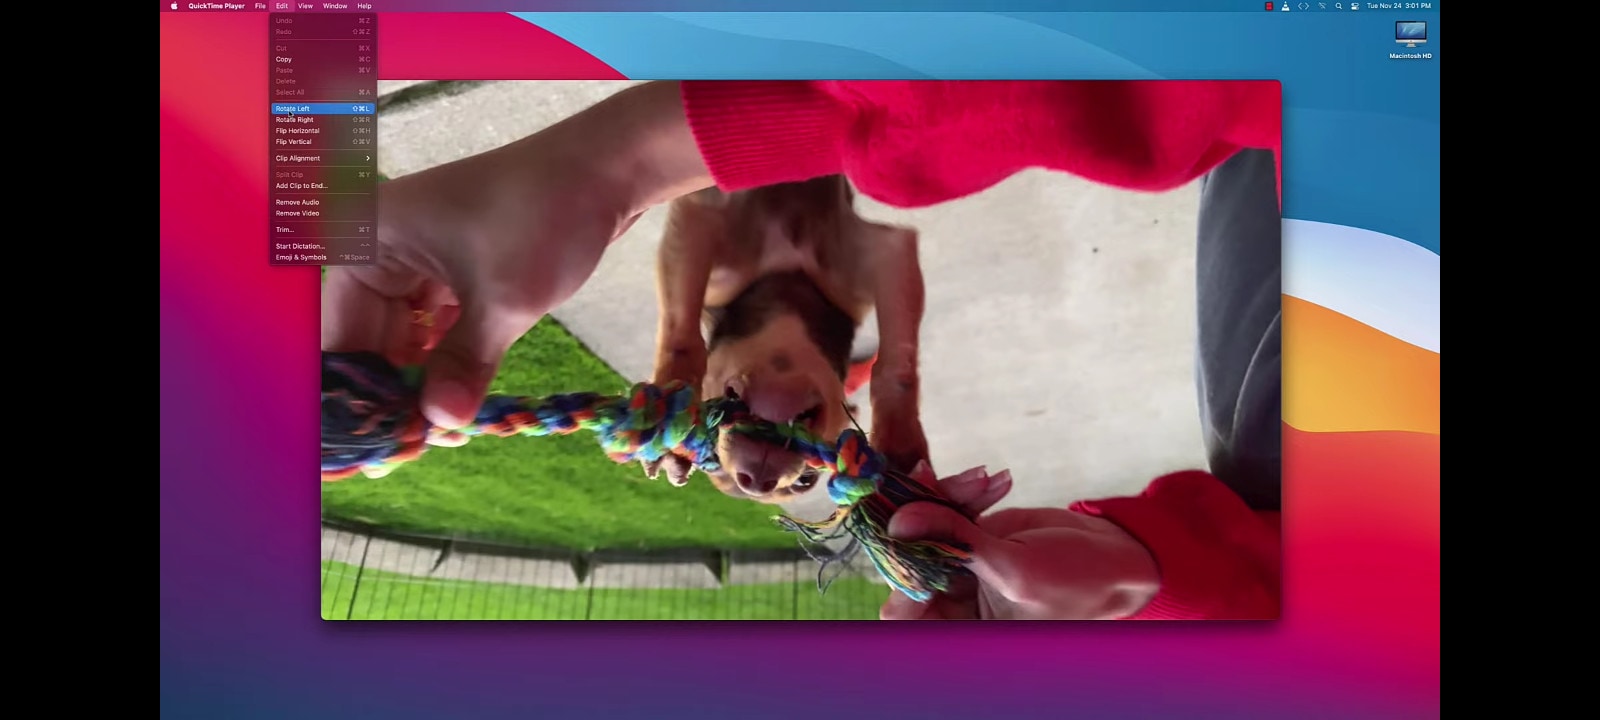
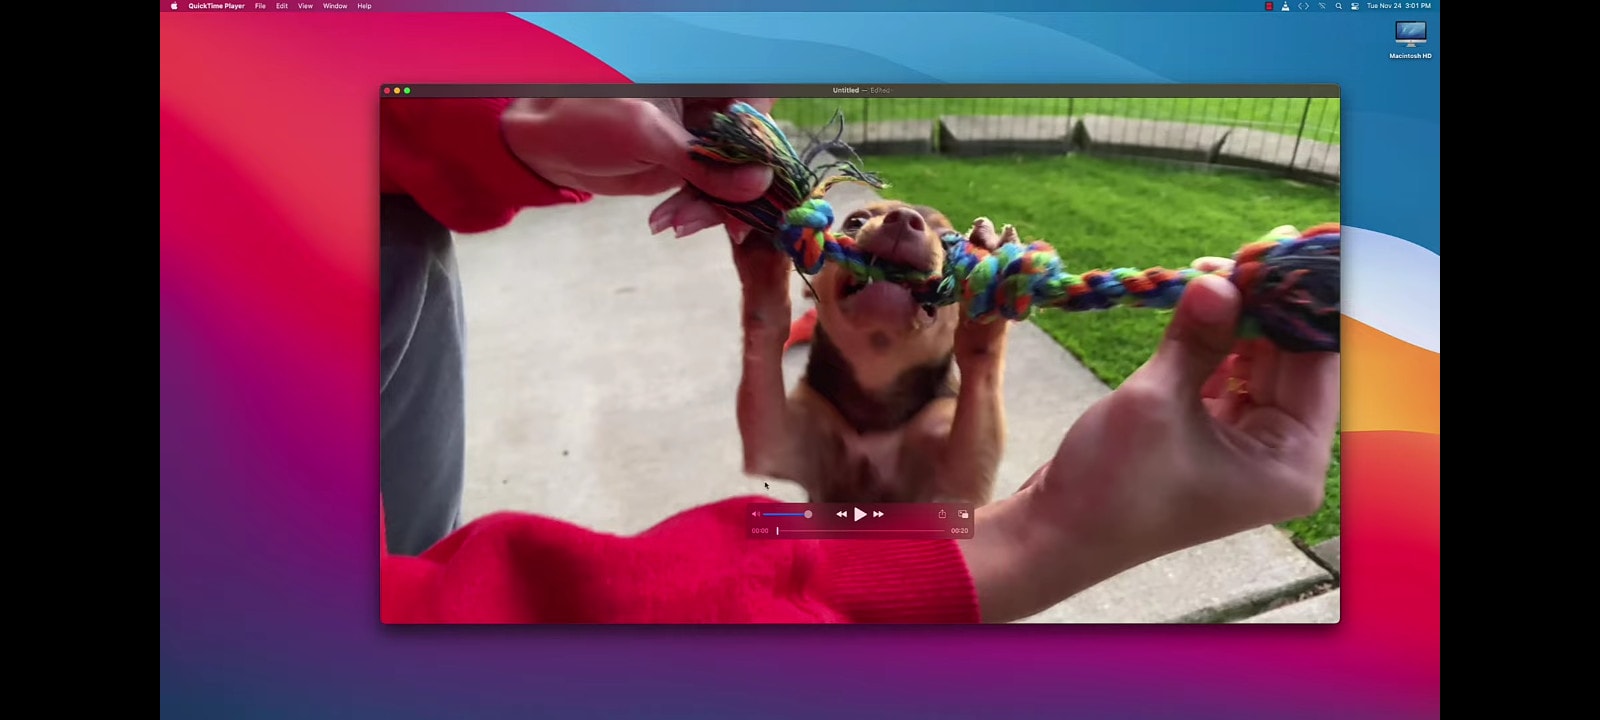
- Open your video on your PC using the Quicktime program. Go to ‘edit’ and click on ‘rotate left’; keep clicking until your video ideally fits the screen. Your video is rotated successfully. Preview, save and export your video.
VLLO – PAID FOR ANDROID

VLLO is a super easy video editor. Beginner and casual users will enjoy editing video with its intuitive but precise control abled split, txt, BGM and transition. For the pro editors, premium paid features are also ready with Chroma-Key, PIP, mosaic and keyframe animations.
HOW TO ROTATE AVI VIDEO IN VLLO – LANDSCAPE TO PORTRAIT
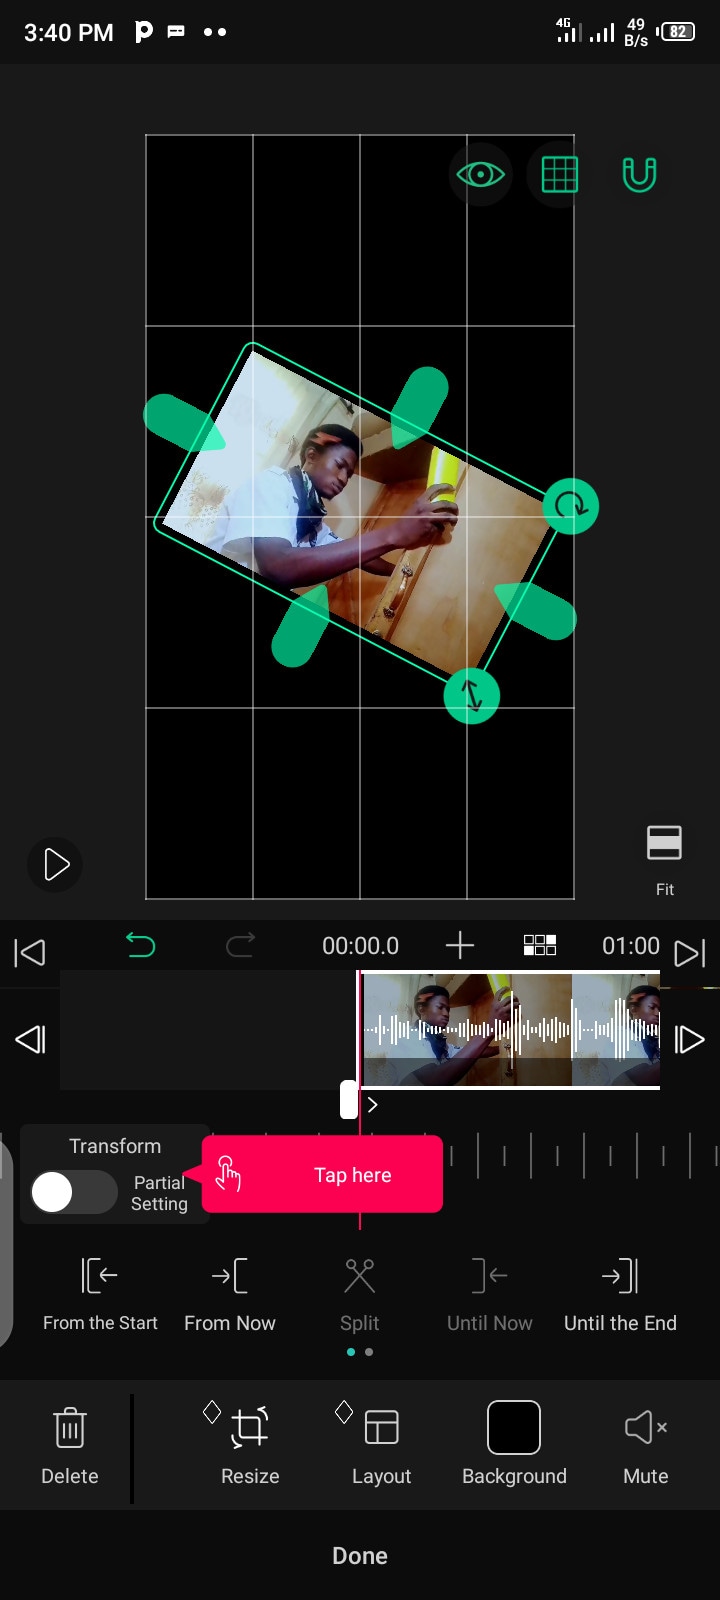
- STEP 1 - Import your footage from where you have saved it locally and change aspect ratio to 16:9 and select the ‘fill’ icon.

- STEP 2 - On your timeline, click on the footage and select the curved arrow icon to rotate as you click and drag. You can choose to rotate either ways, and your video is rotated, and ready to be previewed and saved
VEED – ONLINE/CLOUD-BASED VIDEO EDITOR

VEED.IO is an online video editing platform that makes creating videos easy and accessible to everyone. Millions of creators around the world use our products to tell stories, create content, grow their audience and more.
HOW TO ROTATE AVI VIDEO ONLINE USING VEED – PORTRAIT TO LANDSCAPE
- STEP 1 - Create an account online on Veed – Visit <www.veed.io>
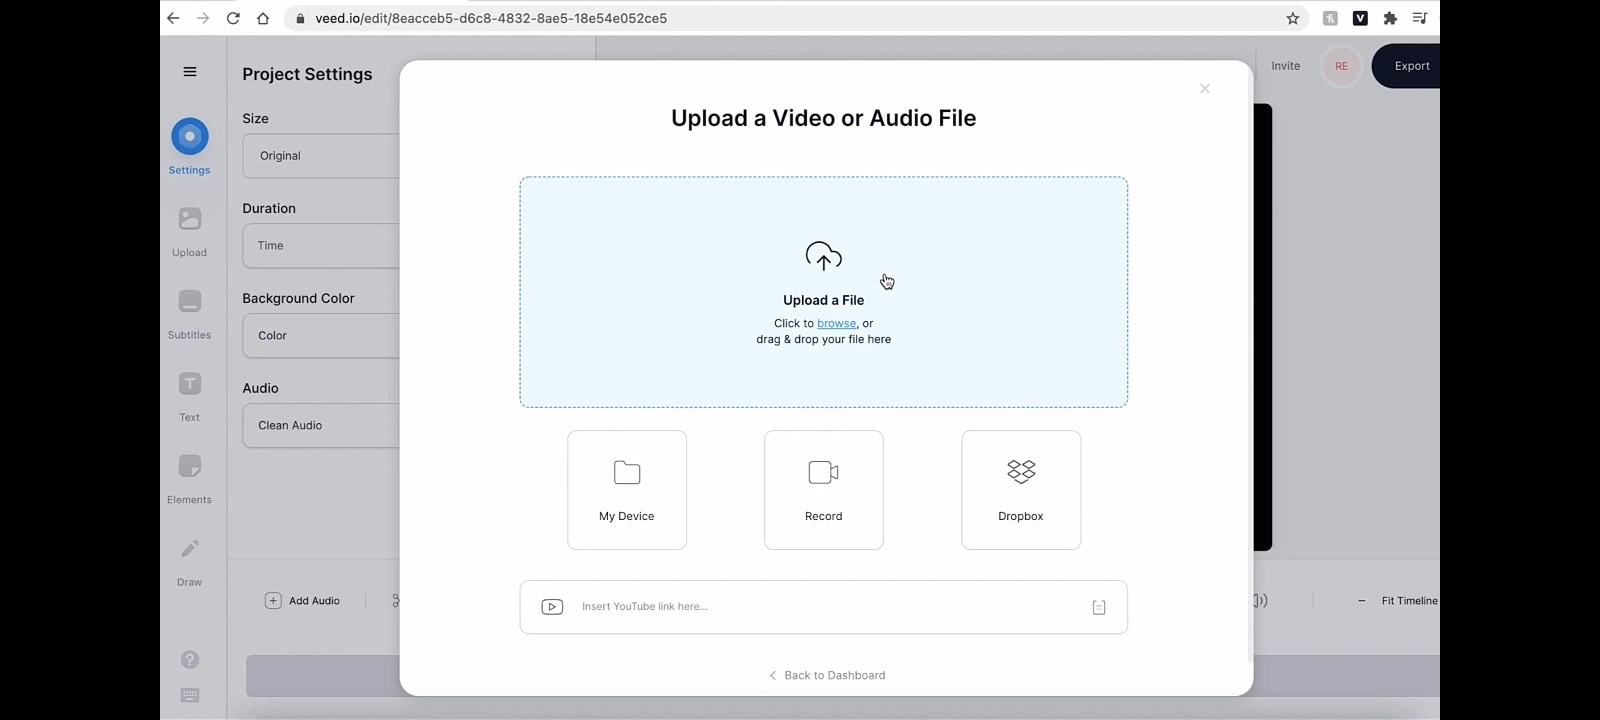
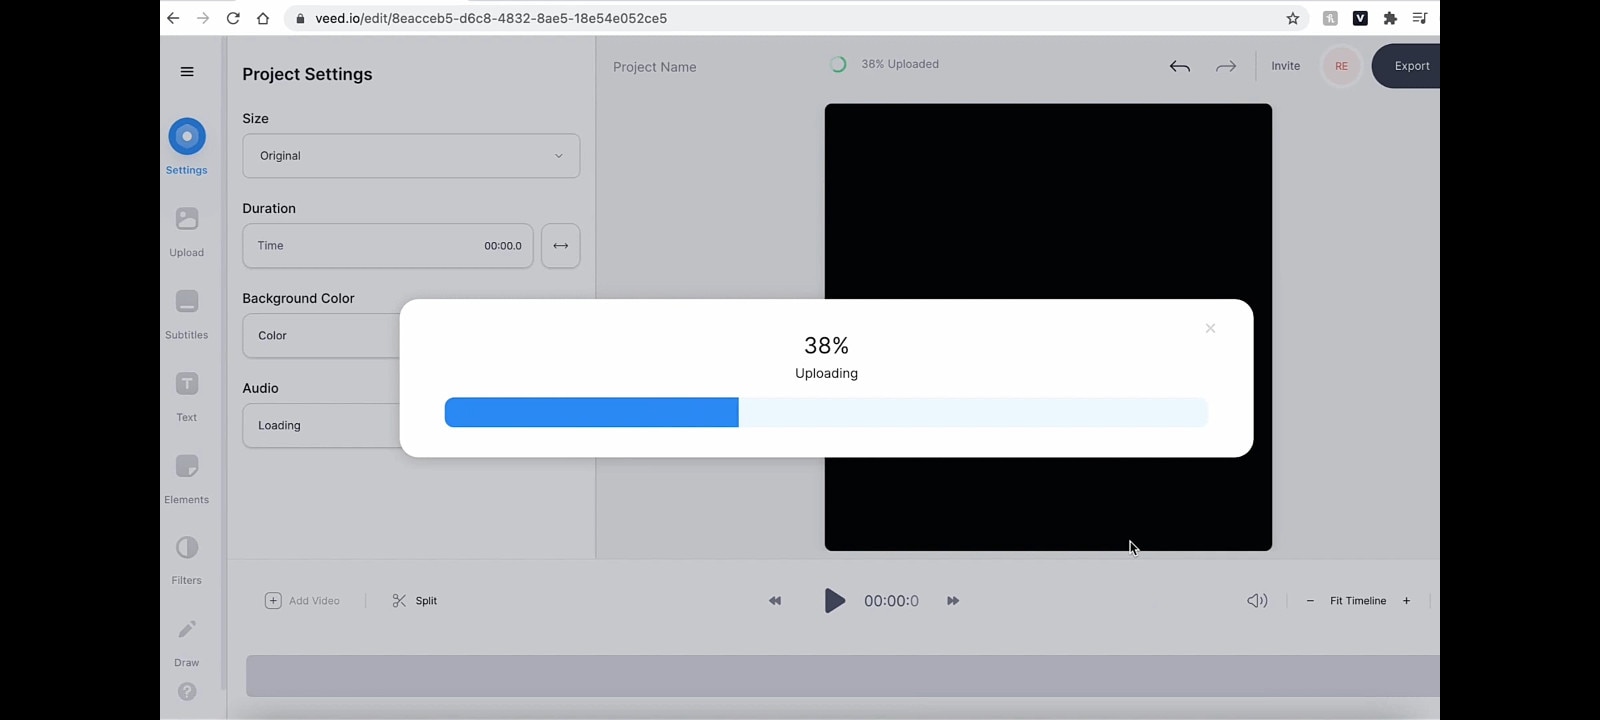
- STEP 2 - Click the ‘view project’ button and import/upload footage form where it has been saved locally
- STEP 3 - Go to ‘edit video’ and select ‘adjust’. Go to rotation and click and drag to the right and to the left for your video to fit ideally
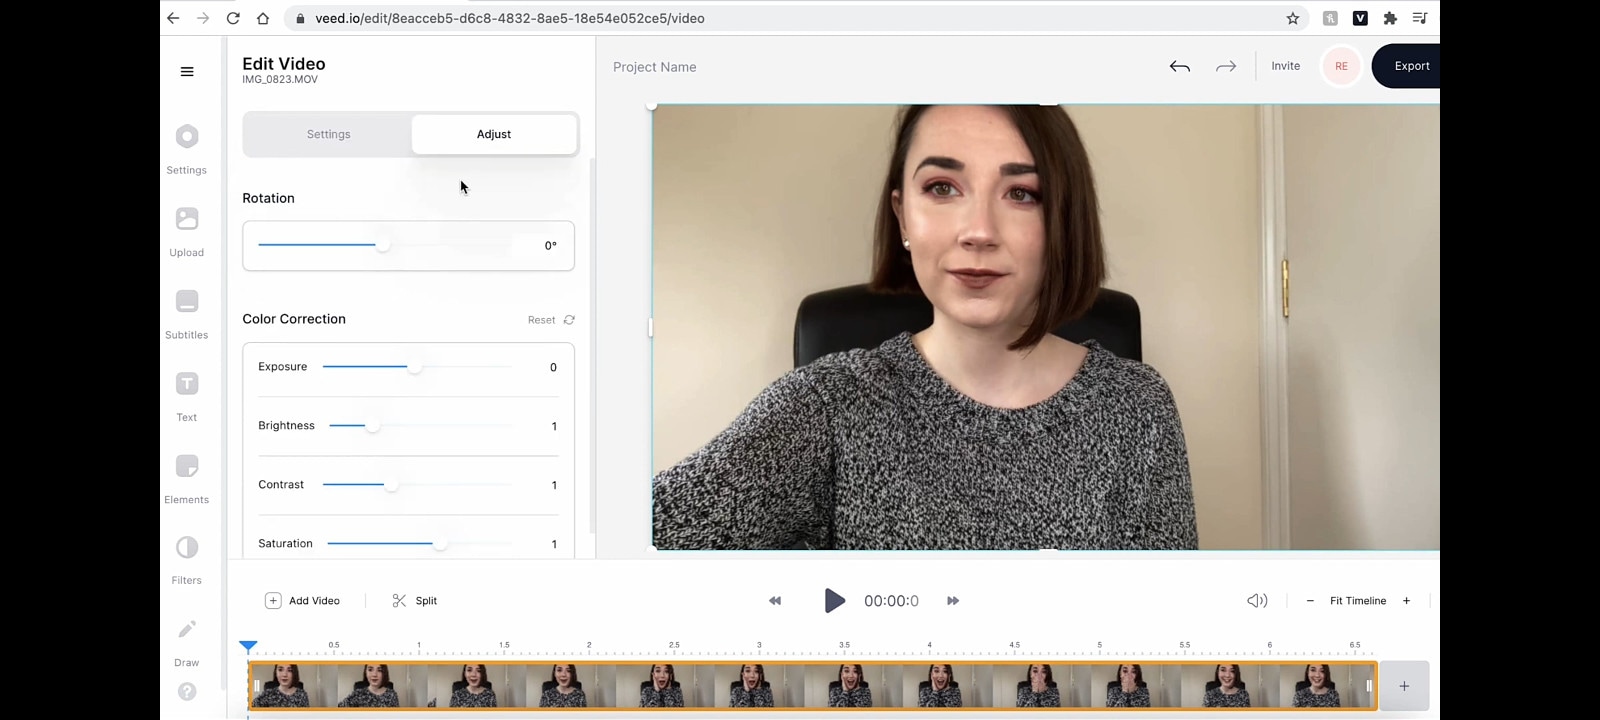
- STEP 4 - You can export your video once it is rotated
ALTRNATIVE WAY TO ROTATE AVI VIDEO ONLINE USING VEED
- STEP 1 - Import your footage and drag it to the timeline
- STEP 2 - Click on ‘try sample’ or ‘upload video’
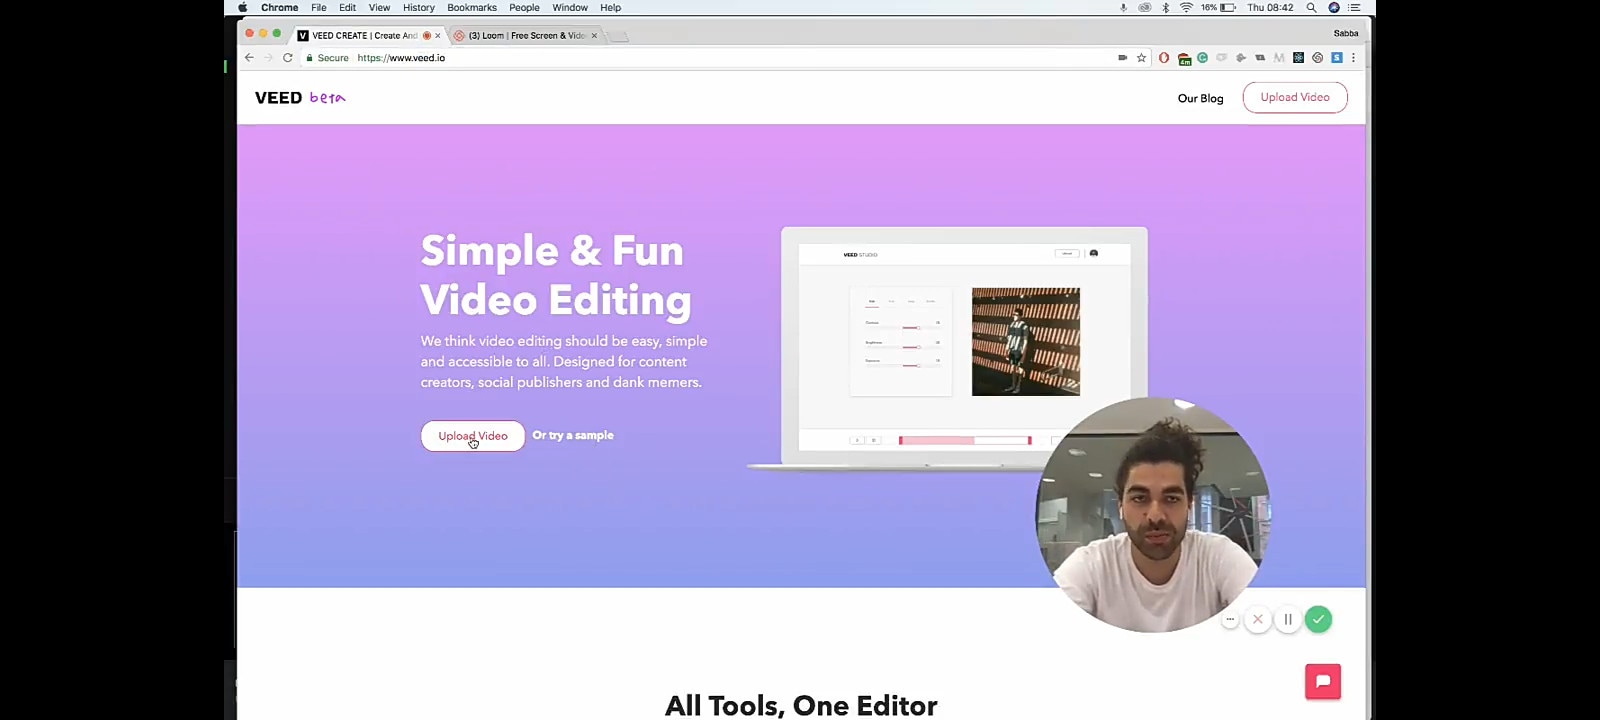
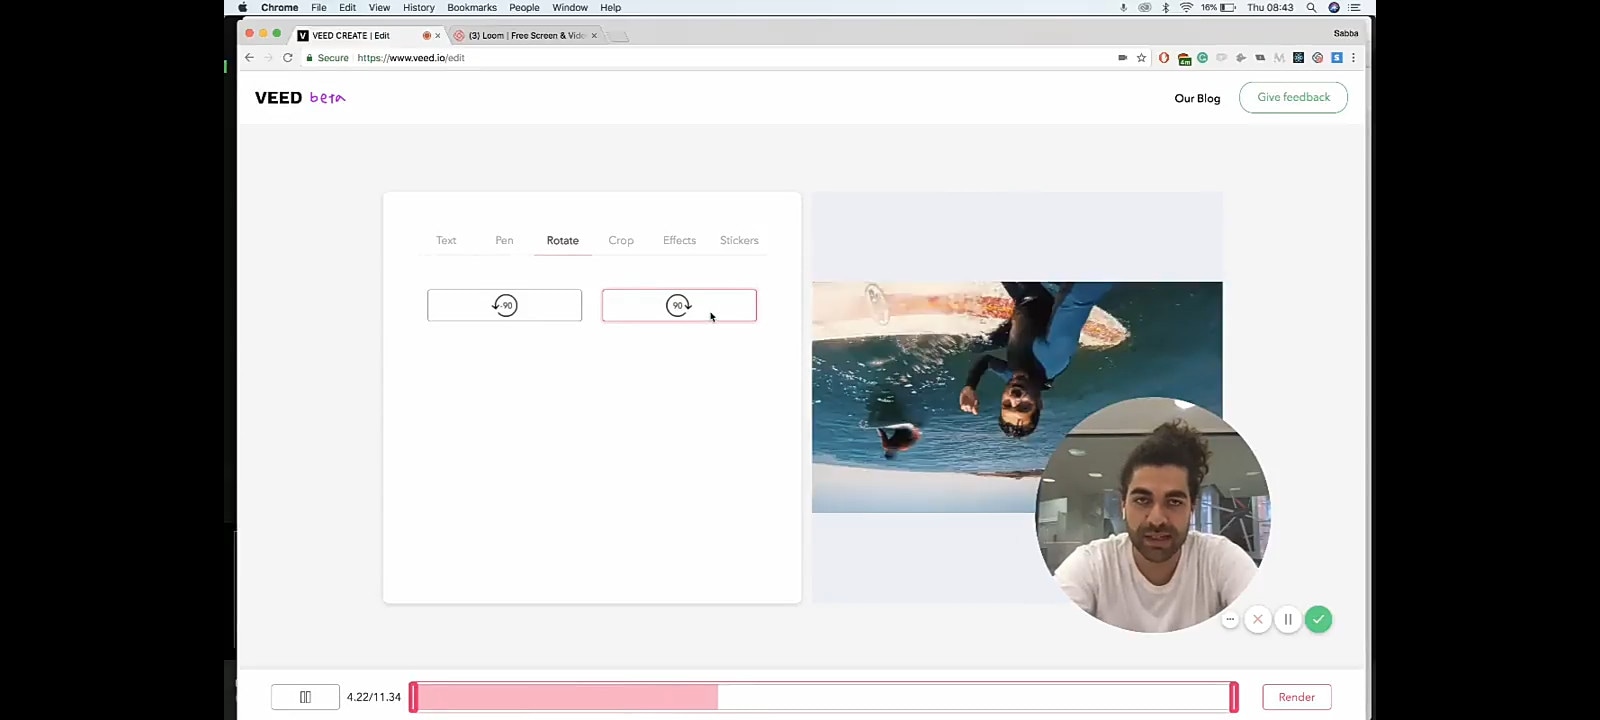
- STEP 3 - Click on ‘rotate’. Click to rotate either ways, 90 degrees
- STEP 4 - Go to crop and choose whether ‘vertical’ or ‘landscape’ to get rid of the bars
WEVIDEO – ONLINE/CLOUD-BASED VIDEO EDITOR
WeVideo is an online, cloud-based video editing platform that works in web browsers and on mobile devices. The company was originally founded in 2011 in Europe. Their main headquarters is in Mountain View, California with a team based in Romania.
HOW TO ROTATE AVI VIDEO ON WEVIDEO ONLINE
- STEP 1 - Import your footage and drag it to the timeline
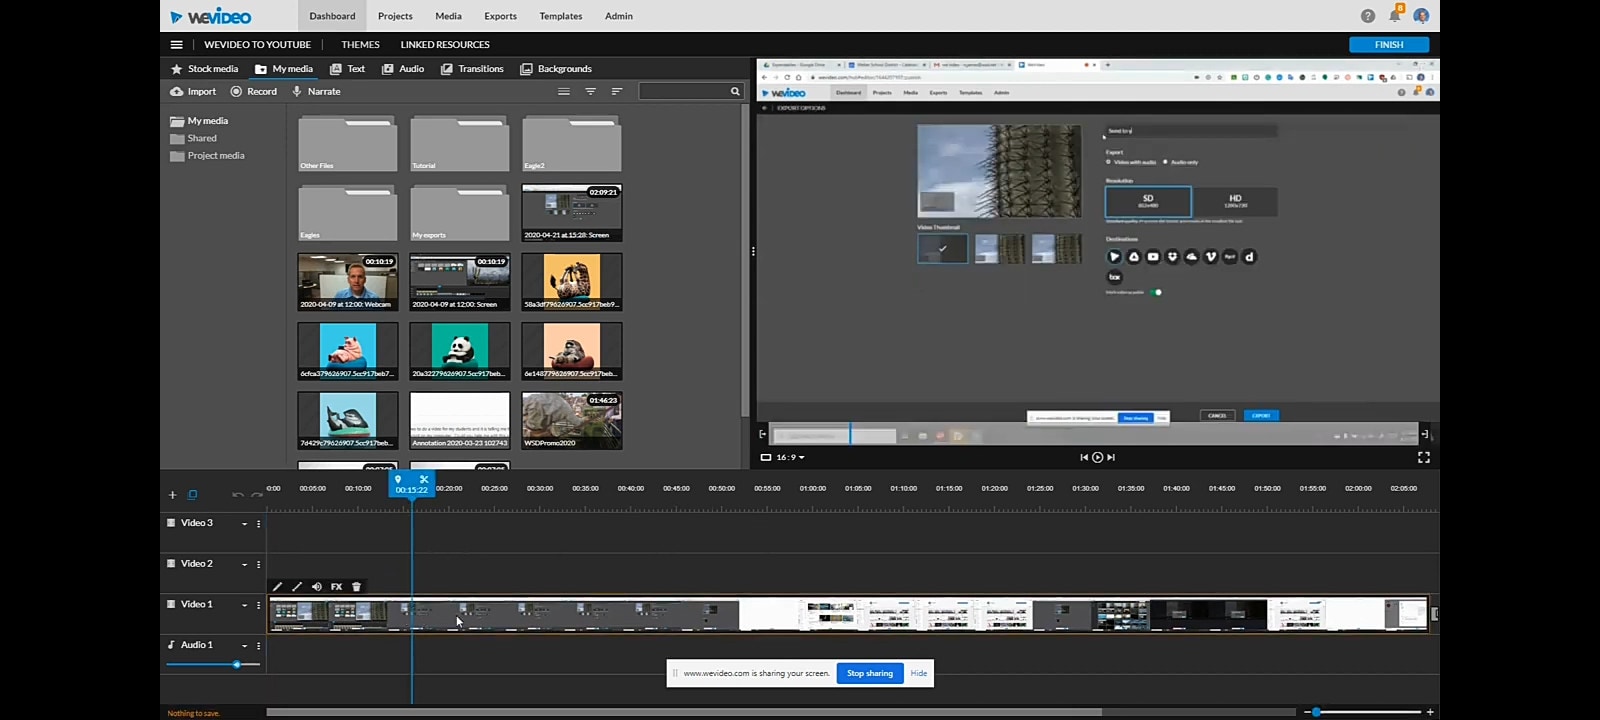
- STEP 2 - Click on the little pencil icon right above the timeline
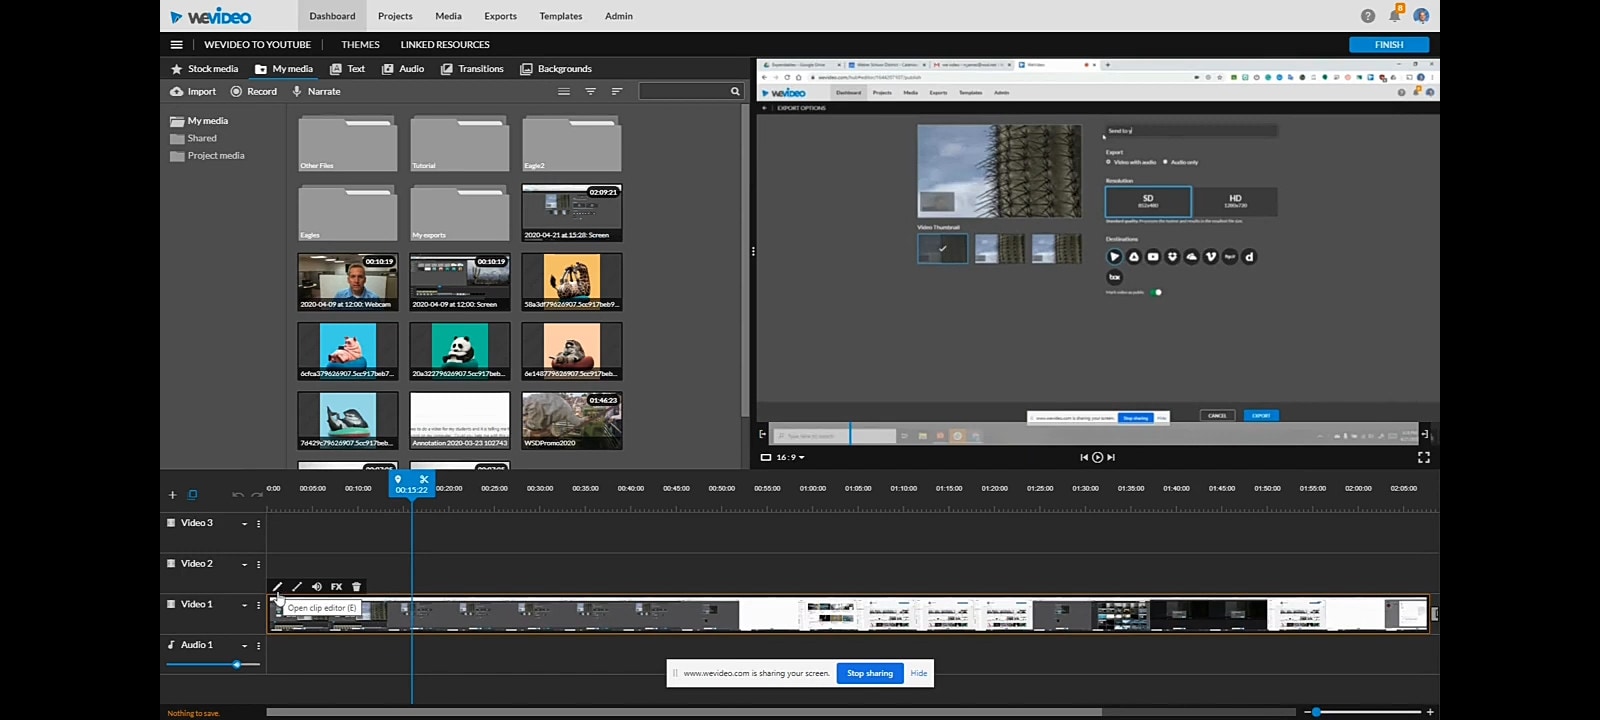
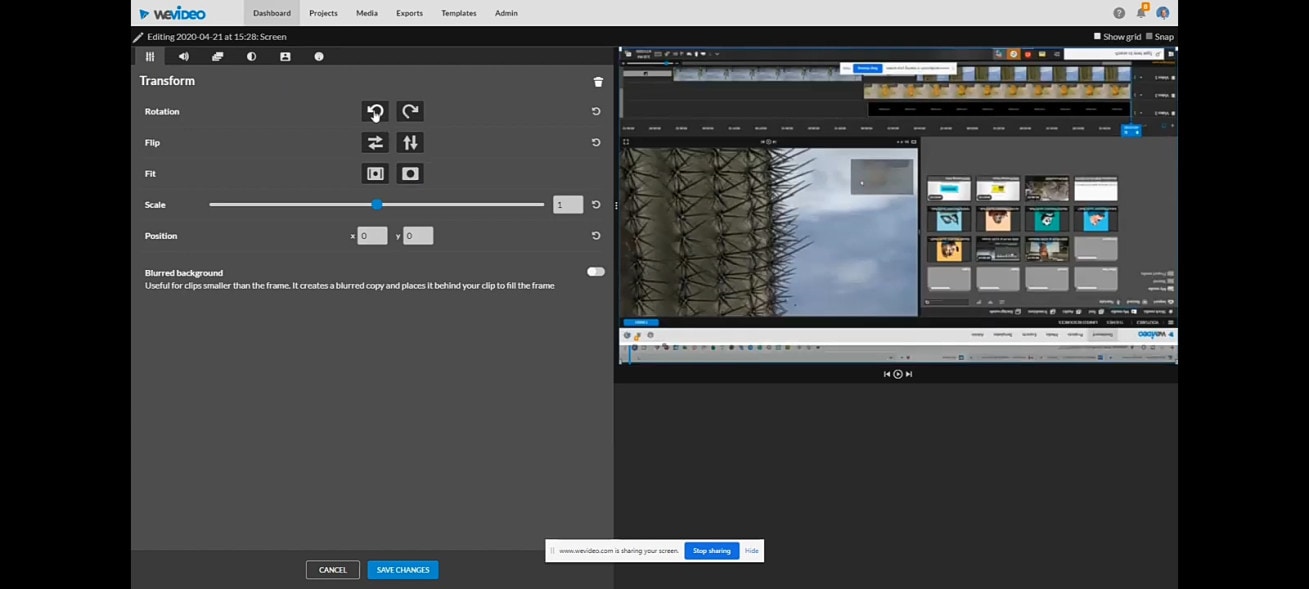
- STEP 3 - That will open up your editor, popping up a box full of option. Select the ‘transform’ tab, then two arrows right in front of ‘rotation’ till it fits: two clicks for 180, and one click for 90. Adjust it as needed, and save changes to preview.
Video editing is the process of cutting and rearranging multiple clips or segments of video to create a new and more improved video. This involves adding titles, animations, sound effects, music and more. Video editing has not ceased to follow the trend of technology as it keeps thriving tirelessly through the ages. With advancement springing forth from many sides, video editing followed every pace to ensure it’s not left behind. This largely involves gadgets, computers and smartphones.
Before the advent of smartphones, computers have been the only video editing tools, and that culture is preserved even till date as its use has spread round the world. It is therefore evident that film making cannot bypass this process. Improvements have been made over the years on video editing softwares for computers to stay up to date as regards features and usability. There are other video editors which were introduced, and are still being updated such as Adobe Premiere Pro, Final Cut, Filmora and so on. As the case is today, smartphones have proven to be relevant in the process; they have also come up with video editing applications such as Power Video Director, InShot, Filmora for Android, Kinemaster and many more for Android, iPhone and iPads.
This article aims at giving guides and steps on how to rotate AVI videos using different softwares on different PCs (Windows and Mac) and smartphones (Android and iPhone). This does not leave online video editing softwares behind also.
WHAT IS AVI?

AVI means Audio Video Interleave. It’s a multimedia container format introduced by Microsoft in November 1992 as part of its video for Windows technology. AVI files can contain both audio and video data in a file container that allows synchronous audio-with-video playback.
KDENLIVE – FREE FOR WINDOWS

Introduced in 2002, Kdenlive has a good quality and design. The design is straightforward, user-friendly which makes you know what you are getting into, as well as the actual quality of the effects that you might want to apply to your video while editing. Overall, it looks really professional, neat and organized.
HOW TO ROTATE AVI VIDEO IN KDENLIVE
- STEP 1 - Launch Kdenlive on your Windows and import the video from where you have saved it locally. Drag and drop video on timeline

- STEP 2 - Select video effects and in the search box, type ‘rotate’ and click on it. Click on effects, then select video effects
- STEP 3 - Drag the video to the timeline and go to effects, then drag and drop the ‘rotate’ effect on the clip.

ALTERNATIVE WAY TO ROTATE AVI VIDEO ON KDENLIVE
- STEP 1 - Create a vertical project: create profile, select size, 1080 x 1920 and select aspect ratio: 9:16. Afterwards, there will be a vertical outline on your program window. Import your video to the project bin and drag it to the timeline
- STEP 2 - Go to effects, then click on ‘transform’ and double-click on it
- STEP 3 - Go to the down-right part of your screen and click on ‘rotation’ and highlight to change the number to whichever is ideal for your screen; you can change it to 270. This will make it rotate but will not fill the screen yet. Highlight the size and change it to 180 an hit the ‘enter’ key.
OPENSHOT – FREE FOR WINDOWS
OpenShot Video Editor is a free and open-source video editor for Windows, macOS, Linux, and Chrome OS. The project started in August 2008 by Jonathan Thomas, with the objective of providing a stable, free, and friendly to use video editor.

HOW TO ROTATE AVI VIDEO ON OPENSHOT
- STEP 1 - Launch OpenShot on your Windows and import your clip form where you’ve saved it locally

- STEP 2 - Drag and drop footage on your timeline and click on the ‘play’ button to check your footage. Right click on the footage and an option box will appear

- STEP 3 - Click on rotate; you can choose to rotate either left or right. Rotate till it ideally fits the screen

ALTERNATIVE WAY TO ROTATE AVI VIDEO ON OPEN SHOT
- STEP 1 - Launch OpenShot on your Windows and drag your footage to the timeline.
- STEP 2 - Right click on your video and select properties.
- STEP 3 - Go to rotation and change the value, and your video will rotate
ADOBE PREMIERE PRO – PAID FOR WINDOWS

Introduced in 2003, Adobe Premiere Pro is known to be a video editing software. It has a lot of features that can be used in the process of editing. It’s capable of editing feature movies such as Hollywood and the likes.
HOW TO ROTATE AVI VIDEO ON ADOBE PREMIERE PRO – FIXING A LANDSCAPE SHOT
- STEP 1 - Go to sequence and click on sequence settings

- STEP 2 - Click on frame size and type in 3840; for the horizontal, type in 2160 and then proceed to click ok
FIXING A PORTRAIT SHOT
- Put your play-head (the thin line that moves over the clips on your timeline) on the clip on the timeline
- Go to the top and click on ‘Editing’, then you go to effects control

- Go to ‘scale’, and type in the number according to the degree you desire to effect
your rotation. However, your video will be just perfect if you type in -90

ALTERNATIVE WAY TO ROTATE AVI VIDEO ON ADOBE PREMIERE PRO
- STEP 1 - Go to the effects window and search for ‘flip’
- STEP 2 - Click on ‘Transform’. You can then decide to do a horizontal flip or a vertical flip
- STEP 3 - All you need to do is click and drag it on to your clip and it will flip, whether horizontal or vertical
- STEP 4 - It is easy to remedy when you click and drag the other to place on your footage, whether horizontal or vertical.
TO ROTATE YOUR CLIP
- STEP 1 - Highlight your footage on the timeline and go to your effects controls window. Underneath ‘motion’, there is the perimeter of rotation. If you click and drag the mouse on the number, it will rotate either clockwise or counter-clockwise. Also, you can type in whatever rotation amount you want

- STEP 2 - It’s also worth mentioning that when you rotate a clip, you’re always rotating around the inker point (the little blue cross in a circle). You can click and drag this through the program monitor to any point on the clip and start rotating it around the inker point. In fact, it doesn’t have to be on the clip; you can make the inker point up further and rotate, and will still rotate around the inker point. If you don’t see this on your program monitor, that’s because you haven’t highlighted the motion.

- STEP 3 - A good tip is using guides to help you level and horizontal or whether you are working with on-screen. To get a slant perfectly leveled, there’s an easy way to reference a straight line on your program monitor. On the bottom right of your program monitor is the button [a plus (+) button] editor. Click on it and a box full of tools will pop up which you can work with. Click ‘add show rulers’, ‘show guides’ and ‘safe margins’


- STEP 4 - In the ruler section, take your mouse, click and drag it down to the little crosses of your safe margins. The same goes for the vertical ruler; click and drag over. That will create a new guide. For your footage, what you might need to do is get your horizontal guide down to your horizon view. You can go to your rotation and rotate your footage to get straight with your guide. If you are left with black bars at the corners, take off your safe margin rulers and guides and then zoom in on your footage and take off the black bars. To do this, go back to your effect controls

- STEP 5 - Instead of doing rotation, you scale by clicking and sliding the mouse on the number to the right


iMOVIE – FREE FOR MAC

iMovie is a preinstalled video editing application developed by Apple Inc. for macOS, Ios, and iPadOS devices. It was originally released in 1999 as a Mac OS 8 application bundle with the first FireWire-enabled consumer Mac model, the iMac DV. With iMovie, you can create professional-looking videos without an editing degree.
HOW TO ROTATE AVI VIDEO IN iMOVIE
- STEP 1 - Run iMovie on your PC and create a new project by clicking ‘create new’ and selecting ‘movie’. Import your footage: Click on the arrow pointing downwards just below your menu bar, and select the video from wherever it is saved locally.

- STEP 2 - Click on the video once it’s imported; make sure it has the yellow boundary on it. Click and drag it onto the timeline
- STEP 3 - Leave your play-head on the footage and go just above your program window and click on the crop icon, the third from the left. Afterwards, a rotate ion will show just by the right above the program monitor. There are actually two buttons to rotate in either direction. You can save time by clicking the correct direction for whichever way your videos need to be rotated


- STEP 4 - Your videos is rotated; you can go ahead and save

FILMORA – PAID FOR MAC

Formerly known as Wondershare Video Editor as at when it first launched in 2015, Filmora Video Editor is a video editing software that helps businesses create and distribute white-labeled marketing videos. Filmora is an easy-to-use video editing software for a beginner. It supports 50 above formats, 4k editing, Filmstock effects store, all basic and advanced editing tools in the most easily accessible and used manner.
For Win 7 or later (64-bit)
For macOS 10.14 or later
HOW TO ROTATE AVI VIDEO IN FILMORA
- STEP 1 - Run Filmora on your PC, import your video from where it has been locally saved and drag to the timeline
- STEP 2 - Go to file, and select ‘project settings’. By default, the video is recorded on portrait – 9:11, so change the aspect ratio to 16:9


- STEP 3 - Go to your timeline and double-click your footage. A box of options will pop up beside the program monitor. Simply go to rotate and click and slide to rotate. It may be difficult to line it up even and straight. Just go to the program monitor and click on the little line and drag; it makes it easier to align


- STEP 4 - Go to ‘scale’ and slide it to the right to make it fill the screen. Your video is rotated and ready to be previewed
VIDEOLEAP – PAID FOR ANDROID AND iPHONE

Videoleap includes the usual basic cutting and pasting tools, plus greenscreen aspect ratios, slow-mo and fast motion, audio editing, and unlimited undo and redo actions. Access to the app and premium features is available with a subscription for $7.99/month, or with additional discounts if bought as a one-time purchase or multiple month bundles.
HOW TO ROTATE AVI VIDEO IN VIDEOLEAP
- STEP 1 - Launch Videoleap on your android and Import your footage from where you have saved it locally. Tap on ‘transform’, and then tap on rotate, then tap on rotate as many times as it takes so that it can be ideally fit


- STEP 2 - Change the format from 16:9 (YouTube format) to 9:16 (for TikTok). To do that, deselect the clip, tap on canvas, and then choose 9:16. Play the clip to preview and save.

INSHOT – FREE FOR ANDROID

InShot app is an all-in-one visual content editing app. It allows you to create videos, edit photos, and create image collages. The app has plenty of features too. You can trim clips, change the speed of your footage, and add filters, music and text. InShot is a free mobile application that you can download on your Windows to create or edit videos and photos.
HOW TO ROTATE AVI VIDEO ON INSHOT
- STEP 1 - Import your video from where you have locally saved it
- STEP 2 - Tap on the clip, and swipe the toolbar to the left to find the ‘rotate’ icon. When you tap on ‘rotate’, it will rotate your video to your left; you can keep rotating till it’s ideally fit


QUICKTIME VIDEO EDITOR – FREE FOR MAC

- Open your video on your PC using the Quicktime program. Go to ‘edit’ and click on ‘rotate left’; keep clicking until your video ideally fits the screen. Your video is rotated successfully. Preview, save and export your video.


VLLO – PAID FOR ANDROID

VLLO is a super easy video editor. Beginner and casual users will enjoy editing video with its intuitive but precise control abled split, txt, BGM and transition. For the pro editors, premium paid features are also ready with Chroma-Key, PIP, mosaic and keyframe animations.
HOW TO ROTATE AVI VIDEO IN VLLO – LANDSCAPE TO PORTRAIT
- STEP 1 - Import your footage from where you have saved it locally and change aspect ratio to 16:9 and select the ‘fill’ icon.

- STEP 2 - On your timeline, click on the footage and select the curved arrow icon to rotate as you click and drag. You can choose to rotate either ways, and your video is rotated, and ready to be previewed and saved

VEED – ONLINE/CLOUD-BASED VIDEO EDITOR

VEED.IO is an online video editing platform that makes creating videos easy and accessible to everyone. Millions of creators around the world use our products to tell stories, create content, grow their audience and more.
HOW TO ROTATE AVI VIDEO ONLINE USING VEED – PORTRAIT TO LANDSCAPE
- STEP 1 - Create an account online on Veed – Visit <www.veed.io>

- STEP 2 - Click the ‘view project’ button and import/upload footage form where it has been saved locally

- STEP 3 - Go to ‘edit video’ and select ‘adjust’. Go to rotation and click and drag to the right and to the left for your video to fit ideally

- STEP 4 - You can export your video once it is rotated
ALTRNATIVE WAY TO ROTATE AVI VIDEO ONLINE USING VEED
- STEP 1 - Import your footage and drag it to the timeline
- STEP 2 - Click on ‘try sample’ or ‘upload video’

- STEP 3 - Click on ‘rotate’. Click to rotate either ways, 90 degrees
- STEP 4 - Go to crop and choose whether ‘vertical’ or ‘landscape’ to get rid of the bars

WEVIDEO – ONLINE/CLOUD-BASED VIDEO EDITOR
WeVideo is an online, cloud-based video editing platform that works in web browsers and on mobile devices. The company was originally founded in 2011 in Europe. Their main headquarters is in Mountain View, California with a team based in Romania.
HOW TO ROTATE AVI VIDEO ON WEVIDEO ONLINE
- STEP 1 - Import your footage and drag it to the timeline

- STEP 2 - Click on the little pencil icon right above the timeline

- STEP 3 - That will open up your editor, popping up a box full of option. Select the ‘transform’ tab, then two arrows right in front of ‘rotation’ till it fits: two clicks for 180, and one click for 90. Adjust it as needed, and save changes to preview.

Video editing is the process of cutting and rearranging multiple clips or segments of video to create a new and more improved video. This involves adding titles, animations, sound effects, music and more. Video editing has not ceased to follow the trend of technology as it keeps thriving tirelessly through the ages. With advancement springing forth from many sides, video editing followed every pace to ensure it’s not left behind. This largely involves gadgets, computers and smartphones.
Before the advent of smartphones, computers have been the only video editing tools, and that culture is preserved even till date as its use has spread round the world. It is therefore evident that film making cannot bypass this process. Improvements have been made over the years on video editing softwares for computers to stay up to date as regards features and usability. There are other video editors which were introduced, and are still being updated such as Adobe Premiere Pro, Final Cut, Filmora and so on. As the case is today, smartphones have proven to be relevant in the process; they have also come up with video editing applications such as Power Video Director, InShot, Filmora for Android, Kinemaster and many more for Android, iPhone and iPads.
This article aims at giving guides and steps on how to rotate AVI videos using different softwares on different PCs (Windows and Mac) and smartphones (Android and iPhone). This does not leave online video editing softwares behind also.
WHAT IS AVI?

AVI means Audio Video Interleave. It’s a multimedia container format introduced by Microsoft in November 1992 as part of its video for Windows technology. AVI files can contain both audio and video data in a file container that allows synchronous audio-with-video playback.
KDENLIVE – FREE FOR WINDOWS

Introduced in 2002, Kdenlive has a good quality and design. The design is straightforward, user-friendly which makes you know what you are getting into, as well as the actual quality of the effects that you might want to apply to your video while editing. Overall, it looks really professional, neat and organized.
HOW TO ROTATE AVI VIDEO IN KDENLIVE
- STEP 1 - Launch Kdenlive on your Windows and import the video from where you have saved it locally. Drag and drop video on timeline

- STEP 2 - Select video effects and in the search box, type ‘rotate’ and click on it. Click on effects, then select video effects
- STEP 3 - Drag the video to the timeline and go to effects, then drag and drop the ‘rotate’ effect on the clip.

ALTERNATIVE WAY TO ROTATE AVI VIDEO ON KDENLIVE
- STEP 1 - Create a vertical project: create profile, select size, 1080 x 1920 and select aspect ratio: 9:16. Afterwards, there will be a vertical outline on your program window. Import your video to the project bin and drag it to the timeline
- STEP 2 - Go to effects, then click on ‘transform’ and double-click on it
- STEP 3 - Go to the down-right part of your screen and click on ‘rotation’ and highlight to change the number to whichever is ideal for your screen; you can change it to 270. This will make it rotate but will not fill the screen yet. Highlight the size and change it to 180 an hit the ‘enter’ key.
OPENSHOT – FREE FOR WINDOWS
OpenShot Video Editor is a free and open-source video editor for Windows, macOS, Linux, and Chrome OS. The project started in August 2008 by Jonathan Thomas, with the objective of providing a stable, free, and friendly to use video editor.

HOW TO ROTATE AVI VIDEO ON OPENSHOT
- STEP 1 - Launch OpenShot on your Windows and import your clip form where you’ve saved it locally

- STEP 2 - Drag and drop footage on your timeline and click on the ‘play’ button to check your footage. Right click on the footage and an option box will appear

- STEP 3 - Click on rotate; you can choose to rotate either left or right. Rotate till it ideally fits the screen

ALTERNATIVE WAY TO ROTATE AVI VIDEO ON OPEN SHOT
- STEP 1 - Launch OpenShot on your Windows and drag your footage to the timeline.
- STEP 2 - Right click on your video and select properties.
- STEP 3 - Go to rotation and change the value, and your video will rotate
ADOBE PREMIERE PRO – PAID FOR WINDOWS

Introduced in 2003, Adobe Premiere Pro is known to be a video editing software. It has a lot of features that can be used in the process of editing. It’s capable of editing feature movies such as Hollywood and the likes.
HOW TO ROTATE AVI VIDEO ON ADOBE PREMIERE PRO – FIXING A LANDSCAPE SHOT
- STEP 1 - Go to sequence and click on sequence settings

- STEP 2 - Click on frame size and type in 3840; for the horizontal, type in 2160 and then proceed to click ok
FIXING A PORTRAIT SHOT
- Put your play-head (the thin line that moves over the clips on your timeline) on the clip on the timeline
- Go to the top and click on ‘Editing’, then you go to effects control

- Go to ‘scale’, and type in the number according to the degree you desire to effect
your rotation. However, your video will be just perfect if you type in -90

ALTERNATIVE WAY TO ROTATE AVI VIDEO ON ADOBE PREMIERE PRO
- STEP 1 - Go to the effects window and search for ‘flip’
- STEP 2 - Click on ‘Transform’. You can then decide to do a horizontal flip or a vertical flip
- STEP 3 - All you need to do is click and drag it on to your clip and it will flip, whether horizontal or vertical
- STEP 4 - It is easy to remedy when you click and drag the other to place on your footage, whether horizontal or vertical.
TO ROTATE YOUR CLIP
- STEP 1 - Highlight your footage on the timeline and go to your effects controls window. Underneath ‘motion’, there is the perimeter of rotation. If you click and drag the mouse on the number, it will rotate either clockwise or counter-clockwise. Also, you can type in whatever rotation amount you want

- STEP 2 - It’s also worth mentioning that when you rotate a clip, you’re always rotating around the inker point (the little blue cross in a circle). You can click and drag this through the program monitor to any point on the clip and start rotating it around the inker point. In fact, it doesn’t have to be on the clip; you can make the inker point up further and rotate, and will still rotate around the inker point. If you don’t see this on your program monitor, that’s because you haven’t highlighted the motion.

- STEP 3 - A good tip is using guides to help you level and horizontal or whether you are working with on-screen. To get a slant perfectly leveled, there’s an easy way to reference a straight line on your program monitor. On the bottom right of your program monitor is the button [a plus (+) button] editor. Click on it and a box full of tools will pop up which you can work with. Click ‘add show rulers’, ‘show guides’ and ‘safe margins’


- STEP 4 - In the ruler section, take your mouse, click and drag it down to the little crosses of your safe margins. The same goes for the vertical ruler; click and drag over. That will create a new guide. For your footage, what you might need to do is get your horizontal guide down to your horizon view. You can go to your rotation and rotate your footage to get straight with your guide. If you are left with black bars at the corners, take off your safe margin rulers and guides and then zoom in on your footage and take off the black bars. To do this, go back to your effect controls

- STEP 5 - Instead of doing rotation, you scale by clicking and sliding the mouse on the number to the right


iMOVIE – FREE FOR MAC

iMovie is a preinstalled video editing application developed by Apple Inc. for macOS, Ios, and iPadOS devices. It was originally released in 1999 as a Mac OS 8 application bundle with the first FireWire-enabled consumer Mac model, the iMac DV. With iMovie, you can create professional-looking videos without an editing degree.
HOW TO ROTATE AVI VIDEO IN iMOVIE
- STEP 1 - Run iMovie on your PC and create a new project by clicking ‘create new’ and selecting ‘movie’. Import your footage: Click on the arrow pointing downwards just below your menu bar, and select the video from wherever it is saved locally.

- STEP 2 - Click on the video once it’s imported; make sure it has the yellow boundary on it. Click and drag it onto the timeline
- STEP 3 - Leave your play-head on the footage and go just above your program window and click on the crop icon, the third from the left. Afterwards, a rotate ion will show just by the right above the program monitor. There are actually two buttons to rotate in either direction. You can save time by clicking the correct direction for whichever way your videos need to be rotated


- STEP 4 - Your videos is rotated; you can go ahead and save

FILMORA – PAID FOR MAC

Formerly known as Wondershare Video Editor as at when it first launched in 2015, Filmora Video Editor is a video editing software that helps businesses create and distribute white-labeled marketing videos. Filmora is an easy-to-use video editing software for a beginner. It supports 50 above formats, 4k editing, Filmstock effects store, all basic and advanced editing tools in the most easily accessible and used manner.
For Win 7 or later (64-bit)
For macOS 10.14 or later
HOW TO ROTATE AVI VIDEO IN FILMORA
- STEP 1 - Run Filmora on your PC, import your video from where it has been locally saved and drag to the timeline
- STEP 2 - Go to file, and select ‘project settings’. By default, the video is recorded on portrait – 9:11, so change the aspect ratio to 16:9


- STEP 3 - Go to your timeline and double-click your footage. A box of options will pop up beside the program monitor. Simply go to rotate and click and slide to rotate. It may be difficult to line it up even and straight. Just go to the program monitor and click on the little line and drag; it makes it easier to align


- STEP 4 - Go to ‘scale’ and slide it to the right to make it fill the screen. Your video is rotated and ready to be previewed
VIDEOLEAP – PAID FOR ANDROID AND iPHONE

Videoleap includes the usual basic cutting and pasting tools, plus greenscreen aspect ratios, slow-mo and fast motion, audio editing, and unlimited undo and redo actions. Access to the app and premium features is available with a subscription for $7.99/month, or with additional discounts if bought as a one-time purchase or multiple month bundles.
HOW TO ROTATE AVI VIDEO IN VIDEOLEAP
- STEP 1 - Launch Videoleap on your android and Import your footage from where you have saved it locally. Tap on ‘transform’, and then tap on rotate, then tap on rotate as many times as it takes so that it can be ideally fit


- STEP 2 - Change the format from 16:9 (YouTube format) to 9:16 (for TikTok). To do that, deselect the clip, tap on canvas, and then choose 9:16. Play the clip to preview and save.

INSHOT – FREE FOR ANDROID

InShot app is an all-in-one visual content editing app. It allows you to create videos, edit photos, and create image collages. The app has plenty of features too. You can trim clips, change the speed of your footage, and add filters, music and text. InShot is a free mobile application that you can download on your Windows to create or edit videos and photos.
HOW TO ROTATE AVI VIDEO ON INSHOT
- STEP 1 - Import your video from where you have locally saved it
- STEP 2 - Tap on the clip, and swipe the toolbar to the left to find the ‘rotate’ icon. When you tap on ‘rotate’, it will rotate your video to your left; you can keep rotating till it’s ideally fit


QUICKTIME VIDEO EDITOR – FREE FOR MAC

- Open your video on your PC using the Quicktime program. Go to ‘edit’ and click on ‘rotate left’; keep clicking until your video ideally fits the screen. Your video is rotated successfully. Preview, save and export your video.


VLLO – PAID FOR ANDROID

VLLO is a super easy video editor. Beginner and casual users will enjoy editing video with its intuitive but precise control abled split, txt, BGM and transition. For the pro editors, premium paid features are also ready with Chroma-Key, PIP, mosaic and keyframe animations.
HOW TO ROTATE AVI VIDEO IN VLLO – LANDSCAPE TO PORTRAIT
- STEP 1 - Import your footage from where you have saved it locally and change aspect ratio to 16:9 and select the ‘fill’ icon.

- STEP 2 - On your timeline, click on the footage and select the curved arrow icon to rotate as you click and drag. You can choose to rotate either ways, and your video is rotated, and ready to be previewed and saved

VEED – ONLINE/CLOUD-BASED VIDEO EDITOR

VEED.IO is an online video editing platform that makes creating videos easy and accessible to everyone. Millions of creators around the world use our products to tell stories, create content, grow their audience and more.
HOW TO ROTATE AVI VIDEO ONLINE USING VEED – PORTRAIT TO LANDSCAPE
- STEP 1 - Create an account online on Veed – Visit <www.veed.io>

- STEP 2 - Click the ‘view project’ button and import/upload footage form where it has been saved locally

- STEP 3 - Go to ‘edit video’ and select ‘adjust’. Go to rotation and click and drag to the right and to the left for your video to fit ideally

- STEP 4 - You can export your video once it is rotated
ALTRNATIVE WAY TO ROTATE AVI VIDEO ONLINE USING VEED
- STEP 1 - Import your footage and drag it to the timeline
- STEP 2 - Click on ‘try sample’ or ‘upload video’

- STEP 3 - Click on ‘rotate’. Click to rotate either ways, 90 degrees
- STEP 4 - Go to crop and choose whether ‘vertical’ or ‘landscape’ to get rid of the bars

WEVIDEO – ONLINE/CLOUD-BASED VIDEO EDITOR
WeVideo is an online, cloud-based video editing platform that works in web browsers and on mobile devices. The company was originally founded in 2011 in Europe. Their main headquarters is in Mountain View, California with a team based in Romania.
HOW TO ROTATE AVI VIDEO ON WEVIDEO ONLINE
- STEP 1 - Import your footage and drag it to the timeline

- STEP 2 - Click on the little pencil icon right above the timeline

- STEP 3 - That will open up your editor, popping up a box full of option. Select the ‘transform’ tab, then two arrows right in front of ‘rotation’ till it fits: two clicks for 180, and one click for 90. Adjust it as needed, and save changes to preview.

Video editing is the process of cutting and rearranging multiple clips or segments of video to create a new and more improved video. This involves adding titles, animations, sound effects, music and more. Video editing has not ceased to follow the trend of technology as it keeps thriving tirelessly through the ages. With advancement springing forth from many sides, video editing followed every pace to ensure it’s not left behind. This largely involves gadgets, computers and smartphones.
Before the advent of smartphones, computers have been the only video editing tools, and that culture is preserved even till date as its use has spread round the world. It is therefore evident that film making cannot bypass this process. Improvements have been made over the years on video editing softwares for computers to stay up to date as regards features and usability. There are other video editors which were introduced, and are still being updated such as Adobe Premiere Pro, Final Cut, Filmora and so on. As the case is today, smartphones have proven to be relevant in the process; they have also come up with video editing applications such as Power Video Director, InShot, Filmora for Android, Kinemaster and many more for Android, iPhone and iPads.
This article aims at giving guides and steps on how to rotate AVI videos using different softwares on different PCs (Windows and Mac) and smartphones (Android and iPhone). This does not leave online video editing softwares behind also.
WHAT IS AVI?

AVI means Audio Video Interleave. It’s a multimedia container format introduced by Microsoft in November 1992 as part of its video for Windows technology. AVI files can contain both audio and video data in a file container that allows synchronous audio-with-video playback.
KDENLIVE – FREE FOR WINDOWS

Introduced in 2002, Kdenlive has a good quality and design. The design is straightforward, user-friendly which makes you know what you are getting into, as well as the actual quality of the effects that you might want to apply to your video while editing. Overall, it looks really professional, neat and organized.
HOW TO ROTATE AVI VIDEO IN KDENLIVE
- STEP 1 - Launch Kdenlive on your Windows and import the video from where you have saved it locally. Drag and drop video on timeline

- STEP 2 - Select video effects and in the search box, type ‘rotate’ and click on it. Click on effects, then select video effects
- STEP 3 - Drag the video to the timeline and go to effects, then drag and drop the ‘rotate’ effect on the clip.

ALTERNATIVE WAY TO ROTATE AVI VIDEO ON KDENLIVE
- STEP 1 - Create a vertical project: create profile, select size, 1080 x 1920 and select aspect ratio: 9:16. Afterwards, there will be a vertical outline on your program window. Import your video to the project bin and drag it to the timeline
- STEP 2 - Go to effects, then click on ‘transform’ and double-click on it
- STEP 3 - Go to the down-right part of your screen and click on ‘rotation’ and highlight to change the number to whichever is ideal for your screen; you can change it to 270. This will make it rotate but will not fill the screen yet. Highlight the size and change it to 180 an hit the ‘enter’ key.
OPENSHOT – FREE FOR WINDOWS
OpenShot Video Editor is a free and open-source video editor for Windows, macOS, Linux, and Chrome OS. The project started in August 2008 by Jonathan Thomas, with the objective of providing a stable, free, and friendly to use video editor.

HOW TO ROTATE AVI VIDEO ON OPENSHOT
- STEP 1 - Launch OpenShot on your Windows and import your clip form where you’ve saved it locally

- STEP 2 - Drag and drop footage on your timeline and click on the ‘play’ button to check your footage. Right click on the footage and an option box will appear

- STEP 3 - Click on rotate; you can choose to rotate either left or right. Rotate till it ideally fits the screen

ALTERNATIVE WAY TO ROTATE AVI VIDEO ON OPEN SHOT
- STEP 1 - Launch OpenShot on your Windows and drag your footage to the timeline.
- STEP 2 - Right click on your video and select properties.
- STEP 3 - Go to rotation and change the value, and your video will rotate
ADOBE PREMIERE PRO – PAID FOR WINDOWS

Introduced in 2003, Adobe Premiere Pro is known to be a video editing software. It has a lot of features that can be used in the process of editing. It’s capable of editing feature movies such as Hollywood and the likes.
HOW TO ROTATE AVI VIDEO ON ADOBE PREMIERE PRO – FIXING A LANDSCAPE SHOT
- STEP 1 - Go to sequence and click on sequence settings

- STEP 2 - Click on frame size and type in 3840; for the horizontal, type in 2160 and then proceed to click ok
FIXING A PORTRAIT SHOT
- Put your play-head (the thin line that moves over the clips on your timeline) on the clip on the timeline
- Go to the top and click on ‘Editing’, then you go to effects control

- Go to ‘scale’, and type in the number according to the degree you desire to effect
your rotation. However, your video will be just perfect if you type in -90

ALTERNATIVE WAY TO ROTATE AVI VIDEO ON ADOBE PREMIERE PRO
- STEP 1 - Go to the effects window and search for ‘flip’
- STEP 2 - Click on ‘Transform’. You can then decide to do a horizontal flip or a vertical flip
- STEP 3 - All you need to do is click and drag it on to your clip and it will flip, whether horizontal or vertical
- STEP 4 - It is easy to remedy when you click and drag the other to place on your footage, whether horizontal or vertical.
TO ROTATE YOUR CLIP
- STEP 1 - Highlight your footage on the timeline and go to your effects controls window. Underneath ‘motion’, there is the perimeter of rotation. If you click and drag the mouse on the number, it will rotate either clockwise or counter-clockwise. Also, you can type in whatever rotation amount you want

- STEP 2 - It’s also worth mentioning that when you rotate a clip, you’re always rotating around the inker point (the little blue cross in a circle). You can click and drag this through the program monitor to any point on the clip and start rotating it around the inker point. In fact, it doesn’t have to be on the clip; you can make the inker point up further and rotate, and will still rotate around the inker point. If you don’t see this on your program monitor, that’s because you haven’t highlighted the motion.

- STEP 3 - A good tip is using guides to help you level and horizontal or whether you are working with on-screen. To get a slant perfectly leveled, there’s an easy way to reference a straight line on your program monitor. On the bottom right of your program monitor is the button [a plus (+) button] editor. Click on it and a box full of tools will pop up which you can work with. Click ‘add show rulers’, ‘show guides’ and ‘safe margins’


- STEP 4 - In the ruler section, take your mouse, click and drag it down to the little crosses of your safe margins. The same goes for the vertical ruler; click and drag over. That will create a new guide. For your footage, what you might need to do is get your horizontal guide down to your horizon view. You can go to your rotation and rotate your footage to get straight with your guide. If you are left with black bars at the corners, take off your safe margin rulers and guides and then zoom in on your footage and take off the black bars. To do this, go back to your effect controls

- STEP 5 - Instead of doing rotation, you scale by clicking and sliding the mouse on the number to the right


iMOVIE – FREE FOR MAC

iMovie is a preinstalled video editing application developed by Apple Inc. for macOS, Ios, and iPadOS devices. It was originally released in 1999 as a Mac OS 8 application bundle with the first FireWire-enabled consumer Mac model, the iMac DV. With iMovie, you can create professional-looking videos without an editing degree.
HOW TO ROTATE AVI VIDEO IN iMOVIE
- STEP 1 - Run iMovie on your PC and create a new project by clicking ‘create new’ and selecting ‘movie’. Import your footage: Click on the arrow pointing downwards just below your menu bar, and select the video from wherever it is saved locally.

- STEP 2 - Click on the video once it’s imported; make sure it has the yellow boundary on it. Click and drag it onto the timeline
- STEP 3 - Leave your play-head on the footage and go just above your program window and click on the crop icon, the third from the left. Afterwards, a rotate ion will show just by the right above the program monitor. There are actually two buttons to rotate in either direction. You can save time by clicking the correct direction for whichever way your videos need to be rotated


- STEP 4 - Your videos is rotated; you can go ahead and save

FILMORA – PAID FOR MAC

Formerly known as Wondershare Video Editor as at when it first launched in 2015, Filmora Video Editor is a video editing software that helps businesses create and distribute white-labeled marketing videos. Filmora is an easy-to-use video editing software for a beginner. It supports 50 above formats, 4k editing, Filmstock effects store, all basic and advanced editing tools in the most easily accessible and used manner.
For Win 7 or later (64-bit)
For macOS 10.14 or later
HOW TO ROTATE AVI VIDEO IN FILMORA
- STEP 1 - Run Filmora on your PC, import your video from where it has been locally saved and drag to the timeline
- STEP 2 - Go to file, and select ‘project settings’. By default, the video is recorded on portrait – 9:11, so change the aspect ratio to 16:9


- STEP 3 - Go to your timeline and double-click your footage. A box of options will pop up beside the program monitor. Simply go to rotate and click and slide to rotate. It may be difficult to line it up even and straight. Just go to the program monitor and click on the little line and drag; it makes it easier to align


- STEP 4 - Go to ‘scale’ and slide it to the right to make it fill the screen. Your video is rotated and ready to be previewed
VIDEOLEAP – PAID FOR ANDROID AND iPHONE

Videoleap includes the usual basic cutting and pasting tools, plus greenscreen aspect ratios, slow-mo and fast motion, audio editing, and unlimited undo and redo actions. Access to the app and premium features is available with a subscription for $7.99/month, or with additional discounts if bought as a one-time purchase or multiple month bundles.
HOW TO ROTATE AVI VIDEO IN VIDEOLEAP
- STEP 1 - Launch Videoleap on your android and Import your footage from where you have saved it locally. Tap on ‘transform’, and then tap on rotate, then tap on rotate as many times as it takes so that it can be ideally fit


- STEP 2 - Change the format from 16:9 (YouTube format) to 9:16 (for TikTok). To do that, deselect the clip, tap on canvas, and then choose 9:16. Play the clip to preview and save.

INSHOT – FREE FOR ANDROID

InShot app is an all-in-one visual content editing app. It allows you to create videos, edit photos, and create image collages. The app has plenty of features too. You can trim clips, change the speed of your footage, and add filters, music and text. InShot is a free mobile application that you can download on your Windows to create or edit videos and photos.
HOW TO ROTATE AVI VIDEO ON INSHOT
- STEP 1 - Import your video from where you have locally saved it
- STEP 2 - Tap on the clip, and swipe the toolbar to the left to find the ‘rotate’ icon. When you tap on ‘rotate’, it will rotate your video to your left; you can keep rotating till it’s ideally fit


QUICKTIME VIDEO EDITOR – FREE FOR MAC

- Open your video on your PC using the Quicktime program. Go to ‘edit’ and click on ‘rotate left’; keep clicking until your video ideally fits the screen. Your video is rotated successfully. Preview, save and export your video.


VLLO – PAID FOR ANDROID

VLLO is a super easy video editor. Beginner and casual users will enjoy editing video with its intuitive but precise control abled split, txt, BGM and transition. For the pro editors, premium paid features are also ready with Chroma-Key, PIP, mosaic and keyframe animations.
HOW TO ROTATE AVI VIDEO IN VLLO – LANDSCAPE TO PORTRAIT
- STEP 1 - Import your footage from where you have saved it locally and change aspect ratio to 16:9 and select the ‘fill’ icon.

- STEP 2 - On your timeline, click on the footage and select the curved arrow icon to rotate as you click and drag. You can choose to rotate either ways, and your video is rotated, and ready to be previewed and saved

VEED – ONLINE/CLOUD-BASED VIDEO EDITOR

VEED.IO is an online video editing platform that makes creating videos easy and accessible to everyone. Millions of creators around the world use our products to tell stories, create content, grow their audience and more.
HOW TO ROTATE AVI VIDEO ONLINE USING VEED – PORTRAIT TO LANDSCAPE
- STEP 1 - Create an account online on Veed – Visit <www.veed.io>

- STEP 2 - Click the ‘view project’ button and import/upload footage form where it has been saved locally

- STEP 3 - Go to ‘edit video’ and select ‘adjust’. Go to rotation and click and drag to the right and to the left for your video to fit ideally

- STEP 4 - You can export your video once it is rotated
ALTRNATIVE WAY TO ROTATE AVI VIDEO ONLINE USING VEED
- STEP 1 - Import your footage and drag it to the timeline
- STEP 2 - Click on ‘try sample’ or ‘upload video’

- STEP 3 - Click on ‘rotate’. Click to rotate either ways, 90 degrees
- STEP 4 - Go to crop and choose whether ‘vertical’ or ‘landscape’ to get rid of the bars

WEVIDEO – ONLINE/CLOUD-BASED VIDEO EDITOR
WeVideo is an online, cloud-based video editing platform that works in web browsers and on mobile devices. The company was originally founded in 2011 in Europe. Their main headquarters is in Mountain View, California with a team based in Romania.
HOW TO ROTATE AVI VIDEO ON WEVIDEO ONLINE
- STEP 1 - Import your footage and drag it to the timeline

- STEP 2 - Click on the little pencil icon right above the timeline

- STEP 3 - That will open up your editor, popping up a box full of option. Select the ‘transform’ tab, then two arrows right in front of ‘rotation’ till it fits: two clicks for 180, and one click for 90. Adjust it as needed, and save changes to preview.

Ways to Find Free Online Slideshow Maker with No Watermark
How to Find Free Online Slideshow Maker with No Watermark
An easy yet powerful editor
Numerous effects to choose from
Detailed tutorials provided by the official channel
Finding the best free online slideshow maker no watermar becomes challenging, especially if you are dealing with this matter for the first time. If you want to create instant slideshow without any watermark, check this page out.

There is no lack of good, reliable and easy to use slide show makers in the internet that offer you the chance of creating slide show or presentations for free. Moreover, they don’t leave any watermark in the final work.
In this article
01 [What is the Best Free Slideshow Maker?](#Part 1)
02 [Step-by-step Guide to Make Slideshow](#Part 2)
Part 1 What is the Best Free Slideshow Maker?
Check out the list of following recommendable slideshow maker online free no watermark for easy job –
01PhotoStage

Small, simple and flexible; yes, this is how we can define Photo Stage slideshow maker. The developer NCH software wanted the clients to have something that can give them instant slideshow without so many obstacles. PhtoStage is the result.
How to use – Add photos in the slideshow template and adjust the duration for slides. Reorder, add and remove the slides if required. Add audio and text, caption etc. and save the video.
Pros
● Compatible with Mac and Windows
● Video can be saved in different formats
● User friendly interface
Cons
● Video duration can’t be changed as per choice
● Thumbnail edges can’t be dragged.
02LightMV

Being one of the free slideshow makers no watermark, LightMV has its special place in the world of slideshow makers. There are several creative and trendy themes in this app to allow you make interesting videos. The operation is simple but the result is powerful.
Pros
● One click share of the final result.
● Variety of Beautiful themes
● Can be launched directly without installation
Cons
● Filters, texts and other custom options are not available
● Text can be added only at the first and the last picture
How to use – Select template and add photos for slide show making. Use the vast media library
and theme for making your video attractive.
03IceCream

Another lovable free slideshow maker without watermark online is IceCream which allows user to save their work without watermark. You can create memorable slideshows of your holidays or make good presentations for business meeting.
How to use – Install, run and explore the application. Upload the photos for making slideshow and use the effect you want. You can adjust the slides by zooming them in and out. Give final touch to the video with filters and transitions and download it.
Pros
● Supports 45 languages and 4K quality videos
● Variety of effects and zoom function
● Facility of adding background music
● Direct share to social media and
● Feature of burning the prepared video directly into CD/DVD
Cons
● Incompatible to Mac
04Slideful

We cannot forget slideful while discussing the list of online slideshow maker no watermark. The application is perfect to be used by educators who want to create simple but funny slide shows. The created video can be accessed directly online too.
How to Use – Upload images of your choice in the app and start making slides. You can create animated slides with this application.
Pros
● User friendly program
● Beautiful and coloured slide can be created
● Educational slides can be created
Cons
● Offline mode is not available
● Only 25 photos can be added
● Big files upload slowly
05Adobe Spark

Another excellent slideshow maker without watermark is Adobe Spark. It is a professional tool that gives you premium results when it comes to slideshow presentations using videos, pictures, and other multimedia items.
How to use – The user friendly application allows you to select the pictures of your choice and convert them into slideshow. Music, text, filters, effects, transitions and stickers can be used as per demand.
Pros
● Supportive to third party plug ins
● Forty available templates with creative theme
● Spark video component for creating attractive slideshows with effects and music.
Cons
● Limited templates
● No freedom to design your post
06Wondershare Filmora
For Win 7 or later (64-bit)
For macOS 10.12 or later
Who doesn’t know about Wondershare Filmora Video Editor ? But do you know that Filmora comes with a feature of removing watermark from your video. The vast library of attractive themes, transitions and option of adding text makes the application special.
Pros
● Supportive to Mac and windows
● Advance video editor with easy to use interface
Cons
● It can be confusing to pick effects and templates due to vast library.
● Advance features are available in premium version.
How to use – After making the slideshow in Filmora, you may not get the chance for removing watermark but you can use free watermark remover to delete watermark.
07InVideo

Invideo is the best free slideshow maker without watermark with drag and drop user interface. The vast collection of templates and copyright free music library makes it outstanding. You need nothing but to choose an attractive template and uploading the file of choice. Add transitions and effects to make your video beautiful.
How to Use – Go to ‘blank canvas’ in the application and pick the size of the template. Then
continue making slideshow simply like mentioned for other slideshow makers.
Pros
● Multi-layer and advance editing features
● Variety of captions and overlays
● Templates are customizable
Cons
● Free version is limited
● Technical glitch
08Wondershare Vidair

Want to create impressive videos for any platform? If yes, wondershare Vidair is the best free online slideshow maker with easy to use interface. Watermark can be deleted or customized as per your choice. You can do so many playful things here such as adding music sharing in social media and adding text to the video etc.
How to use – as mentioned, the user-friendly interface of the product will help you to create the
slideshow easily. Make it simple and short to save time.
Pros
● High quality video export system
● Templates with attractive themes
● Rich music library and interesting captions
Cons
● No advance features for video editing
09Aiseesoft

It’s not possible to ignore Aiseesoft while discussing online slideshow maker without watermark. When you want a free video editor for creating slideshow with stylish theme, this lovable slideshow creator comes in limelight.
How to use - You need nothing but to choose a theme, upload the media and customize the
Video. Save it for your use and that’s it.
Pros
● More than 30 font styles with custom texts
● Customizable theme and templates
● Trendy filters, stickers and animations
Cons
● Limited editing features in free version
Part 2 Part-2 Step-by-step Guide to Make Slideshow
Making a slideshow online is not a big deal and you can easily learn to create presentation like a pro. The all you need to understand is the basic procedure of video making in slideshow maker online free no watermark. The process of slideshow making is almost same in every slideshow maker and you need to utilize the features and designs available in them. If you are using a particular slideshow creator, it will be better to learn about it first online and know the advance features in the program that can be used for making your slideshow more attractive.

More or less, the process of making slideshow is same in all slideshow makers. Basic steps are as follows –
Install the application
First of all, you need to install the slideshow maker no watermark that you want. Pick a slideshow maker of your choice as per the features you need to work with. After choosing the slideshow maker, install it from internet and allow your device to run the application.
Pick a template
After installing the slideshow maker, explore it. See the features available, template and media library and themes you can use. After going through the templates and themes, pick a template with them you want to make your slideshow on and go to the next step.
Upload your files
Upload your photos and arrange them in the order you want. In most of the slideshow makers, you will get the option of sliding pictures and rearranging them. You can also insert text on pictures after this step.
Apply effects, filters and transitions
Your basic slideshow is ready. Now apply effects, filters and transitions to make your slideshow beautiful. The theme itself comes with the effects sometimes; for example; if you choose holiday theme, romance or party, the theme will come with effects and filters accordingly. But you can customize it as per your choice and apply filters and effects according to your preference. Then check transition library and apply the one that attract you. You can also use different transitions for different set of pictures.

Insert music
Now it’s time to make your work musical and insert music. There are online tracks available with almost every slideshow maker but they come with the option of customizing or inserting your own soundtracks if you want. So, you can customize the slideshow accordingly.
Remove watermark
The most important step is removing the watermark of the product. The procedure of removing watermark can vary product to product. For instance, some comes without watermark while some offers watching free promotional video of a few second to remove watermark. In some products watermark can be removed by cracking the product while in others, watermark can be removed with the help of online watermark remover. The procedure of removing watermark depends totally upon the slideshow maker you choose.
Export and save video
After removing the watermark, you need nothing but to export the video and saving it into your device.
Share with friends
Your slideshow is completely ready to be shared with your friends.
● Ending Thoughts →
● Prefer basics if you are a beginner.
● Pick a slideshow maker with advance features and apply them all to present your work like a pro.
● Make slideshow of your memorable trips and occasions to avoid hassles of saving all the pictures from the same trip.
Finding the best free online slideshow maker no watermar becomes challenging, especially if you are dealing with this matter for the first time. If you want to create instant slideshow without any watermark, check this page out.

There is no lack of good, reliable and easy to use slide show makers in the internet that offer you the chance of creating slide show or presentations for free. Moreover, they don’t leave any watermark in the final work.
In this article
01 [What is the Best Free Slideshow Maker?](#Part 1)
02 [Step-by-step Guide to Make Slideshow](#Part 2)
Part 1 What is the Best Free Slideshow Maker?
Check out the list of following recommendable slideshow maker online free no watermark for easy job –
01PhotoStage

Small, simple and flexible; yes, this is how we can define Photo Stage slideshow maker. The developer NCH software wanted the clients to have something that can give them instant slideshow without so many obstacles. PhtoStage is the result.
How to use – Add photos in the slideshow template and adjust the duration for slides. Reorder, add and remove the slides if required. Add audio and text, caption etc. and save the video.
Pros
● Compatible with Mac and Windows
● Video can be saved in different formats
● User friendly interface
Cons
● Video duration can’t be changed as per choice
● Thumbnail edges can’t be dragged.
02LightMV

Being one of the free slideshow makers no watermark, LightMV has its special place in the world of slideshow makers. There are several creative and trendy themes in this app to allow you make interesting videos. The operation is simple but the result is powerful.
Pros
● One click share of the final result.
● Variety of Beautiful themes
● Can be launched directly without installation
Cons
● Filters, texts and other custom options are not available
● Text can be added only at the first and the last picture
How to use – Select template and add photos for slide show making. Use the vast media library
and theme for making your video attractive.
03IceCream

Another lovable free slideshow maker without watermark online is IceCream which allows user to save their work without watermark. You can create memorable slideshows of your holidays or make good presentations for business meeting.
How to use – Install, run and explore the application. Upload the photos for making slideshow and use the effect you want. You can adjust the slides by zooming them in and out. Give final touch to the video with filters and transitions and download it.
Pros
● Supports 45 languages and 4K quality videos
● Variety of effects and zoom function
● Facility of adding background music
● Direct share to social media and
● Feature of burning the prepared video directly into CD/DVD
Cons
● Incompatible to Mac
04Slideful

We cannot forget slideful while discussing the list of online slideshow maker no watermark. The application is perfect to be used by educators who want to create simple but funny slide shows. The created video can be accessed directly online too.
How to Use – Upload images of your choice in the app and start making slides. You can create animated slides with this application.
Pros
● User friendly program
● Beautiful and coloured slide can be created
● Educational slides can be created
Cons
● Offline mode is not available
● Only 25 photos can be added
● Big files upload slowly
05Adobe Spark

Another excellent slideshow maker without watermark is Adobe Spark. It is a professional tool that gives you premium results when it comes to slideshow presentations using videos, pictures, and other multimedia items.
How to use – The user friendly application allows you to select the pictures of your choice and convert them into slideshow. Music, text, filters, effects, transitions and stickers can be used as per demand.
Pros
● Supportive to third party plug ins
● Forty available templates with creative theme
● Spark video component for creating attractive slideshows with effects and music.
Cons
● Limited templates
● No freedom to design your post
06Wondershare Filmora
For Win 7 or later (64-bit)
For macOS 10.12 or later
Who doesn’t know about Wondershare Filmora Video Editor ? But do you know that Filmora comes with a feature of removing watermark from your video. The vast library of attractive themes, transitions and option of adding text makes the application special.
Pros
● Supportive to Mac and windows
● Advance video editor with easy to use interface
Cons
● It can be confusing to pick effects and templates due to vast library.
● Advance features are available in premium version.
How to use – After making the slideshow in Filmora, you may not get the chance for removing watermark but you can use free watermark remover to delete watermark.
07InVideo

Invideo is the best free slideshow maker without watermark with drag and drop user interface. The vast collection of templates and copyright free music library makes it outstanding. You need nothing but to choose an attractive template and uploading the file of choice. Add transitions and effects to make your video beautiful.
How to Use – Go to ‘blank canvas’ in the application and pick the size of the template. Then
continue making slideshow simply like mentioned for other slideshow makers.
Pros
● Multi-layer and advance editing features
● Variety of captions and overlays
● Templates are customizable
Cons
● Free version is limited
● Technical glitch
08Wondershare Vidair

Want to create impressive videos for any platform? If yes, wondershare Vidair is the best free online slideshow maker with easy to use interface. Watermark can be deleted or customized as per your choice. You can do so many playful things here such as adding music sharing in social media and adding text to the video etc.
How to use – as mentioned, the user-friendly interface of the product will help you to create the
slideshow easily. Make it simple and short to save time.
Pros
● High quality video export system
● Templates with attractive themes
● Rich music library and interesting captions
Cons
● No advance features for video editing
09Aiseesoft

It’s not possible to ignore Aiseesoft while discussing online slideshow maker without watermark. When you want a free video editor for creating slideshow with stylish theme, this lovable slideshow creator comes in limelight.
How to use - You need nothing but to choose a theme, upload the media and customize the
Video. Save it for your use and that’s it.
Pros
● More than 30 font styles with custom texts
● Customizable theme and templates
● Trendy filters, stickers and animations
Cons
● Limited editing features in free version
Part 2 Part-2 Step-by-step Guide to Make Slideshow
Making a slideshow online is not a big deal and you can easily learn to create presentation like a pro. The all you need to understand is the basic procedure of video making in slideshow maker online free no watermark. The process of slideshow making is almost same in every slideshow maker and you need to utilize the features and designs available in them. If you are using a particular slideshow creator, it will be better to learn about it first online and know the advance features in the program that can be used for making your slideshow more attractive.

More or less, the process of making slideshow is same in all slideshow makers. Basic steps are as follows –
Install the application
First of all, you need to install the slideshow maker no watermark that you want. Pick a slideshow maker of your choice as per the features you need to work with. After choosing the slideshow maker, install it from internet and allow your device to run the application.
Pick a template
After installing the slideshow maker, explore it. See the features available, template and media library and themes you can use. After going through the templates and themes, pick a template with them you want to make your slideshow on and go to the next step.
Upload your files
Upload your photos and arrange them in the order you want. In most of the slideshow makers, you will get the option of sliding pictures and rearranging them. You can also insert text on pictures after this step.
Apply effects, filters and transitions
Your basic slideshow is ready. Now apply effects, filters and transitions to make your slideshow beautiful. The theme itself comes with the effects sometimes; for example; if you choose holiday theme, romance or party, the theme will come with effects and filters accordingly. But you can customize it as per your choice and apply filters and effects according to your preference. Then check transition library and apply the one that attract you. You can also use different transitions for different set of pictures.

Insert music
Now it’s time to make your work musical and insert music. There are online tracks available with almost every slideshow maker but they come with the option of customizing or inserting your own soundtracks if you want. So, you can customize the slideshow accordingly.
Remove watermark
The most important step is removing the watermark of the product. The procedure of removing watermark can vary product to product. For instance, some comes without watermark while some offers watching free promotional video of a few second to remove watermark. In some products watermark can be removed by cracking the product while in others, watermark can be removed with the help of online watermark remover. The procedure of removing watermark depends totally upon the slideshow maker you choose.
Export and save video
After removing the watermark, you need nothing but to export the video and saving it into your device.
Share with friends
Your slideshow is completely ready to be shared with your friends.
● Ending Thoughts →
● Prefer basics if you are a beginner.
● Pick a slideshow maker with advance features and apply them all to present your work like a pro.
● Make slideshow of your memorable trips and occasions to avoid hassles of saving all the pictures from the same trip.
Finding the best free online slideshow maker no watermar becomes challenging, especially if you are dealing with this matter for the first time. If you want to create instant slideshow without any watermark, check this page out.

There is no lack of good, reliable and easy to use slide show makers in the internet that offer you the chance of creating slide show or presentations for free. Moreover, they don’t leave any watermark in the final work.
In this article
01 [What is the Best Free Slideshow Maker?](#Part 1)
02 [Step-by-step Guide to Make Slideshow](#Part 2)
Part 1 What is the Best Free Slideshow Maker?
Check out the list of following recommendable slideshow maker online free no watermark for easy job –
01PhotoStage

Small, simple and flexible; yes, this is how we can define Photo Stage slideshow maker. The developer NCH software wanted the clients to have something that can give them instant slideshow without so many obstacles. PhtoStage is the result.
How to use – Add photos in the slideshow template and adjust the duration for slides. Reorder, add and remove the slides if required. Add audio and text, caption etc. and save the video.
Pros
● Compatible with Mac and Windows
● Video can be saved in different formats
● User friendly interface
Cons
● Video duration can’t be changed as per choice
● Thumbnail edges can’t be dragged.
02LightMV

Being one of the free slideshow makers no watermark, LightMV has its special place in the world of slideshow makers. There are several creative and trendy themes in this app to allow you make interesting videos. The operation is simple but the result is powerful.
Pros
● One click share of the final result.
● Variety of Beautiful themes
● Can be launched directly without installation
Cons
● Filters, texts and other custom options are not available
● Text can be added only at the first and the last picture
How to use – Select template and add photos for slide show making. Use the vast media library
and theme for making your video attractive.
03IceCream

Another lovable free slideshow maker without watermark online is IceCream which allows user to save their work without watermark. You can create memorable slideshows of your holidays or make good presentations for business meeting.
How to use – Install, run and explore the application. Upload the photos for making slideshow and use the effect you want. You can adjust the slides by zooming them in and out. Give final touch to the video with filters and transitions and download it.
Pros
● Supports 45 languages and 4K quality videos
● Variety of effects and zoom function
● Facility of adding background music
● Direct share to social media and
● Feature of burning the prepared video directly into CD/DVD
Cons
● Incompatible to Mac
04Slideful

We cannot forget slideful while discussing the list of online slideshow maker no watermark. The application is perfect to be used by educators who want to create simple but funny slide shows. The created video can be accessed directly online too.
How to Use – Upload images of your choice in the app and start making slides. You can create animated slides with this application.
Pros
● User friendly program
● Beautiful and coloured slide can be created
● Educational slides can be created
Cons
● Offline mode is not available
● Only 25 photos can be added
● Big files upload slowly
05Adobe Spark

Another excellent slideshow maker without watermark is Adobe Spark. It is a professional tool that gives you premium results when it comes to slideshow presentations using videos, pictures, and other multimedia items.
How to use – The user friendly application allows you to select the pictures of your choice and convert them into slideshow. Music, text, filters, effects, transitions and stickers can be used as per demand.
Pros
● Supportive to third party plug ins
● Forty available templates with creative theme
● Spark video component for creating attractive slideshows with effects and music.
Cons
● Limited templates
● No freedom to design your post
06Wondershare Filmora
For Win 7 or later (64-bit)
For macOS 10.12 or later
Who doesn’t know about Wondershare Filmora Video Editor ? But do you know that Filmora comes with a feature of removing watermark from your video. The vast library of attractive themes, transitions and option of adding text makes the application special.
Pros
● Supportive to Mac and windows
● Advance video editor with easy to use interface
Cons
● It can be confusing to pick effects and templates due to vast library.
● Advance features are available in premium version.
How to use – After making the slideshow in Filmora, you may not get the chance for removing watermark but you can use free watermark remover to delete watermark.
07InVideo

Invideo is the best free slideshow maker without watermark with drag and drop user interface. The vast collection of templates and copyright free music library makes it outstanding. You need nothing but to choose an attractive template and uploading the file of choice. Add transitions and effects to make your video beautiful.
How to Use – Go to ‘blank canvas’ in the application and pick the size of the template. Then
continue making slideshow simply like mentioned for other slideshow makers.
Pros
● Multi-layer and advance editing features
● Variety of captions and overlays
● Templates are customizable
Cons
● Free version is limited
● Technical glitch
08Wondershare Vidair

Want to create impressive videos for any platform? If yes, wondershare Vidair is the best free online slideshow maker with easy to use interface. Watermark can be deleted or customized as per your choice. You can do so many playful things here such as adding music sharing in social media and adding text to the video etc.
How to use – as mentioned, the user-friendly interface of the product will help you to create the
slideshow easily. Make it simple and short to save time.
Pros
● High quality video export system
● Templates with attractive themes
● Rich music library and interesting captions
Cons
● No advance features for video editing
09Aiseesoft

It’s not possible to ignore Aiseesoft while discussing online slideshow maker without watermark. When you want a free video editor for creating slideshow with stylish theme, this lovable slideshow creator comes in limelight.
How to use - You need nothing but to choose a theme, upload the media and customize the
Video. Save it for your use and that’s it.
Pros
● More than 30 font styles with custom texts
● Customizable theme and templates
● Trendy filters, stickers and animations
Cons
● Limited editing features in free version
Part 2 Part-2 Step-by-step Guide to Make Slideshow
Making a slideshow online is not a big deal and you can easily learn to create presentation like a pro. The all you need to understand is the basic procedure of video making in slideshow maker online free no watermark. The process of slideshow making is almost same in every slideshow maker and you need to utilize the features and designs available in them. If you are using a particular slideshow creator, it will be better to learn about it first online and know the advance features in the program that can be used for making your slideshow more attractive.

More or less, the process of making slideshow is same in all slideshow makers. Basic steps are as follows –
Install the application
First of all, you need to install the slideshow maker no watermark that you want. Pick a slideshow maker of your choice as per the features you need to work with. After choosing the slideshow maker, install it from internet and allow your device to run the application.
Pick a template
After installing the slideshow maker, explore it. See the features available, template and media library and themes you can use. After going through the templates and themes, pick a template with them you want to make your slideshow on and go to the next step.
Upload your files
Upload your photos and arrange them in the order you want. In most of the slideshow makers, you will get the option of sliding pictures and rearranging them. You can also insert text on pictures after this step.
Apply effects, filters and transitions
Your basic slideshow is ready. Now apply effects, filters and transitions to make your slideshow beautiful. The theme itself comes with the effects sometimes; for example; if you choose holiday theme, romance or party, the theme will come with effects and filters accordingly. But you can customize it as per your choice and apply filters and effects according to your preference. Then check transition library and apply the one that attract you. You can also use different transitions for different set of pictures.

Insert music
Now it’s time to make your work musical and insert music. There are online tracks available with almost every slideshow maker but they come with the option of customizing or inserting your own soundtracks if you want. So, you can customize the slideshow accordingly.
Remove watermark
The most important step is removing the watermark of the product. The procedure of removing watermark can vary product to product. For instance, some comes without watermark while some offers watching free promotional video of a few second to remove watermark. In some products watermark can be removed by cracking the product while in others, watermark can be removed with the help of online watermark remover. The procedure of removing watermark depends totally upon the slideshow maker you choose.
Export and save video
After removing the watermark, you need nothing but to export the video and saving it into your device.
Share with friends
Your slideshow is completely ready to be shared with your friends.
● Ending Thoughts →
● Prefer basics if you are a beginner.
● Pick a slideshow maker with advance features and apply them all to present your work like a pro.
● Make slideshow of your memorable trips and occasions to avoid hassles of saving all the pictures from the same trip.
Finding the best free online slideshow maker no watermar becomes challenging, especially if you are dealing with this matter for the first time. If you want to create instant slideshow without any watermark, check this page out.

There is no lack of good, reliable and easy to use slide show makers in the internet that offer you the chance of creating slide show or presentations for free. Moreover, they don’t leave any watermark in the final work.
In this article
01 [What is the Best Free Slideshow Maker?](#Part 1)
02 [Step-by-step Guide to Make Slideshow](#Part 2)
Part 1 What is the Best Free Slideshow Maker?
Check out the list of following recommendable slideshow maker online free no watermark for easy job –
01PhotoStage

Small, simple and flexible; yes, this is how we can define Photo Stage slideshow maker. The developer NCH software wanted the clients to have something that can give them instant slideshow without so many obstacles. PhtoStage is the result.
How to use – Add photos in the slideshow template and adjust the duration for slides. Reorder, add and remove the slides if required. Add audio and text, caption etc. and save the video.
Pros
● Compatible with Mac and Windows
● Video can be saved in different formats
● User friendly interface
Cons
● Video duration can’t be changed as per choice
● Thumbnail edges can’t be dragged.
02LightMV

Being one of the free slideshow makers no watermark, LightMV has its special place in the world of slideshow makers. There are several creative and trendy themes in this app to allow you make interesting videos. The operation is simple but the result is powerful.
Pros
● One click share of the final result.
● Variety of Beautiful themes
● Can be launched directly without installation
Cons
● Filters, texts and other custom options are not available
● Text can be added only at the first and the last picture
How to use – Select template and add photos for slide show making. Use the vast media library
and theme for making your video attractive.
03IceCream

Another lovable free slideshow maker without watermark online is IceCream which allows user to save their work without watermark. You can create memorable slideshows of your holidays or make good presentations for business meeting.
How to use – Install, run and explore the application. Upload the photos for making slideshow and use the effect you want. You can adjust the slides by zooming them in and out. Give final touch to the video with filters and transitions and download it.
Pros
● Supports 45 languages and 4K quality videos
● Variety of effects and zoom function
● Facility of adding background music
● Direct share to social media and
● Feature of burning the prepared video directly into CD/DVD
Cons
● Incompatible to Mac
04Slideful

We cannot forget slideful while discussing the list of online slideshow maker no watermark. The application is perfect to be used by educators who want to create simple but funny slide shows. The created video can be accessed directly online too.
How to Use – Upload images of your choice in the app and start making slides. You can create animated slides with this application.
Pros
● User friendly program
● Beautiful and coloured slide can be created
● Educational slides can be created
Cons
● Offline mode is not available
● Only 25 photos can be added
● Big files upload slowly
05Adobe Spark

Another excellent slideshow maker without watermark is Adobe Spark. It is a professional tool that gives you premium results when it comes to slideshow presentations using videos, pictures, and other multimedia items.
How to use – The user friendly application allows you to select the pictures of your choice and convert them into slideshow. Music, text, filters, effects, transitions and stickers can be used as per demand.
Pros
● Supportive to third party plug ins
● Forty available templates with creative theme
● Spark video component for creating attractive slideshows with effects and music.
Cons
● Limited templates
● No freedom to design your post
06Wondershare Filmora
For Win 7 or later (64-bit)
For macOS 10.12 or later
Who doesn’t know about Wondershare Filmora Video Editor ? But do you know that Filmora comes with a feature of removing watermark from your video. The vast library of attractive themes, transitions and option of adding text makes the application special.
Pros
● Supportive to Mac and windows
● Advance video editor with easy to use interface
Cons
● It can be confusing to pick effects and templates due to vast library.
● Advance features are available in premium version.
How to use – After making the slideshow in Filmora, you may not get the chance for removing watermark but you can use free watermark remover to delete watermark.
07InVideo

Invideo is the best free slideshow maker without watermark with drag and drop user interface. The vast collection of templates and copyright free music library makes it outstanding. You need nothing but to choose an attractive template and uploading the file of choice. Add transitions and effects to make your video beautiful.
How to Use – Go to ‘blank canvas’ in the application and pick the size of the template. Then
continue making slideshow simply like mentioned for other slideshow makers.
Pros
● Multi-layer and advance editing features
● Variety of captions and overlays
● Templates are customizable
Cons
● Free version is limited
● Technical glitch
08Wondershare Vidair

Want to create impressive videos for any platform? If yes, wondershare Vidair is the best free online slideshow maker with easy to use interface. Watermark can be deleted or customized as per your choice. You can do so many playful things here such as adding music sharing in social media and adding text to the video etc.
How to use – as mentioned, the user-friendly interface of the product will help you to create the
slideshow easily. Make it simple and short to save time.
Pros
● High quality video export system
● Templates with attractive themes
● Rich music library and interesting captions
Cons
● No advance features for video editing
09Aiseesoft

It’s not possible to ignore Aiseesoft while discussing online slideshow maker without watermark. When you want a free video editor for creating slideshow with stylish theme, this lovable slideshow creator comes in limelight.
How to use - You need nothing but to choose a theme, upload the media and customize the
Video. Save it for your use and that’s it.
Pros
● More than 30 font styles with custom texts
● Customizable theme and templates
● Trendy filters, stickers and animations
Cons
● Limited editing features in free version
Part 2 Part-2 Step-by-step Guide to Make Slideshow
Making a slideshow online is not a big deal and you can easily learn to create presentation like a pro. The all you need to understand is the basic procedure of video making in slideshow maker online free no watermark. The process of slideshow making is almost same in every slideshow maker and you need to utilize the features and designs available in them. If you are using a particular slideshow creator, it will be better to learn about it first online and know the advance features in the program that can be used for making your slideshow more attractive.

More or less, the process of making slideshow is same in all slideshow makers. Basic steps are as follows –
Install the application
First of all, you need to install the slideshow maker no watermark that you want. Pick a slideshow maker of your choice as per the features you need to work with. After choosing the slideshow maker, install it from internet and allow your device to run the application.
Pick a template
After installing the slideshow maker, explore it. See the features available, template and media library and themes you can use. After going through the templates and themes, pick a template with them you want to make your slideshow on and go to the next step.
Upload your files
Upload your photos and arrange them in the order you want. In most of the slideshow makers, you will get the option of sliding pictures and rearranging them. You can also insert text on pictures after this step.
Apply effects, filters and transitions
Your basic slideshow is ready. Now apply effects, filters and transitions to make your slideshow beautiful. The theme itself comes with the effects sometimes; for example; if you choose holiday theme, romance or party, the theme will come with effects and filters accordingly. But you can customize it as per your choice and apply filters and effects according to your preference. Then check transition library and apply the one that attract you. You can also use different transitions for different set of pictures.

Insert music
Now it’s time to make your work musical and insert music. There are online tracks available with almost every slideshow maker but they come with the option of customizing or inserting your own soundtracks if you want. So, you can customize the slideshow accordingly.
Remove watermark
The most important step is removing the watermark of the product. The procedure of removing watermark can vary product to product. For instance, some comes without watermark while some offers watching free promotional video of a few second to remove watermark. In some products watermark can be removed by cracking the product while in others, watermark can be removed with the help of online watermark remover. The procedure of removing watermark depends totally upon the slideshow maker you choose.
Export and save video
After removing the watermark, you need nothing but to export the video and saving it into your device.
Share with friends
Your slideshow is completely ready to be shared with your friends.
● Ending Thoughts →
● Prefer basics if you are a beginner.
● Pick a slideshow maker with advance features and apply them all to present your work like a pro.
● Make slideshow of your memorable trips and occasions to avoid hassles of saving all the pictures from the same trip.
Explore Our Comprehensive Guide to the 10 Best Cameras . Unlock the World of Advanced Technology Perfect for Capturing Slow-Motion Footage in Various Scenarios
Camera technology is evolving at an increased pace with improved features. Each brand competes in the media industry to release cameras with diverse functionalities. When you keep updated on the latest models, you will get to know different varieties and options. It will also help you stay current with evolving technology for slow-motion videos. Choosing the best slow-motion camera involves considering specific needs like filmmaking or creating slow-motion videos.
In this article, we’ll mention the top 10 best slow mo cameras for filming slow-motion videos. The slow-motion camera is specifically built to capture the moments in perfect frame rates. Furthermore, this article will highlight an innovative way to slow down videos without any camera.
Slow Motion Video Maker Slow your video’s speed with better control of your keyframes to create unique cinematic effects!
Make A Slow Motion Video Make A Slow Motion Video More Features

Part 1: How Do Slow-Motion Cameras Help in Recording Perfect Slow-Mo Videos?
Slow-motion cameras record videos at much faster speeds than regular cameras. This feature helps create slow-motion videos by slowing down the recorded action when played at normal speed. These slow-motion cameras are popular in filmmaking, sports analysis, science, and content creation. That’s because they capture detailed moments and highlight fast-moving things.
- Higher Frame Rate: Regular videos usually record 24, 30, or 60 frames per second (fps). But slow-motion cameras can capture hundreds or thousands of frames per second. More frames mean more details and smoother slow-motion videos when played back.
- Smooth Playback: Slow-motion videos look smooth and purposeful when played at regular speeds. More frames are recorded initially to achieve this effect. Ultimately, it will preserve all details when the video is played in slow motion.
- High-Resolution Sensors: Lots of slow-motion cameras have high-quality sensors. These sensors ensure that even with more frames captured, the picture stays sharp and detailed in slow-motion videos. This helps capture fine details without losing clarity.
- Creative Control: Slow-motion cameras let filmmakers and videographers control how fast or slow some parts of a scene look. This helps tell stories better, focus on details, and make videos more interesting and attractive to watch.
- Reduced Motion Blur: More frames per second make pictures clearer and sharper. This feature works especially for fast-moving things. This is important when you need to see tiny details or when the lighting isn’t great.
- Temporal Resolution: Slow-motion cameras can record lots of details in quick movements. They’re handy in sports, science, and creative videos where catching fast and detailed actions matter a lot.
Part 2: Finding The Top Slow-Motion Cameras to Use in 2024
If you want a good slow-motion camera, start by checking out the ones with higher frame rates. Also, think about what you’ll be recording and where you’ll share your videos. Buying a new camera can be confusing and perplexing. We hope you’ll find the best slow-motion camera in the list below. We have arranged the top slow-motion cameras to use in 2024 below:
- PowerShot G7 X Mark III Black
- Sony ZV-1 Camera
- GoPro HERO11 Black
- GoPro HERO10 Black
- Panasonic Lumix GH6
- Sony α7R IV
- Fujifilm X-S20
- Canon EOS-1D X Mark III DSLR Camera
- Nikon D6 FX-Format Digital SLR Camera
- Canon DSLR Camera [EOS 90D]
1. PowerShot G7 X Mark III Black
The PowerShot G7 X Mark III Black is a small but powerful camera for taking high-quality slow-motion videos. It has a 20.1 Megapixel camera and a DIGIC 8 Image Processor, which means it shows exceptional clarity even in different lighting. The 4.2x Optical Zoom Kens with Optical Image Stabilizer helps get close-up shots without making them blurry. For videos, it can record in 4K (at 30 frames per second) and Full HD (at 120 frames per second) for super smooth slow-motion shots.

2. Sony ZV-1 Camera
The Sony ZV-1 Camera is made specifically for content creators and vloggers. Although it has a compact design, it is packed with powerful features. This slow-motion video camera has a 1-inch sensor and digital and optical image stabilization. This means your pictures and videos will be clear and steady even if things are moving fast.
The camera’s results are sharp and colorful thanks to its 20.1 MP resolution and BIONZ X Image Processor. Also, it has a Fast Hybrid AF System that quickly focuses accurately, perfect for both photos and videos.

3. GoPro HERO11 Black
The GoPro HERO11 Black is an awesome slow-motion camera perfect for all kinds of adventures. It takes clear videos up to 5.3K resolution and sharp 27MP photos. The camera has great stabilization, so your videos always look smooth. You can change how wide your shots are and switch lenses digitally while keeping things clear.
GoPro HERO11 Black has cool effects for nighttime shots, making them look artistic. The camera is tough, waterproof up to 33 feet, and has a long-lasting battery that works well even in cold weather.
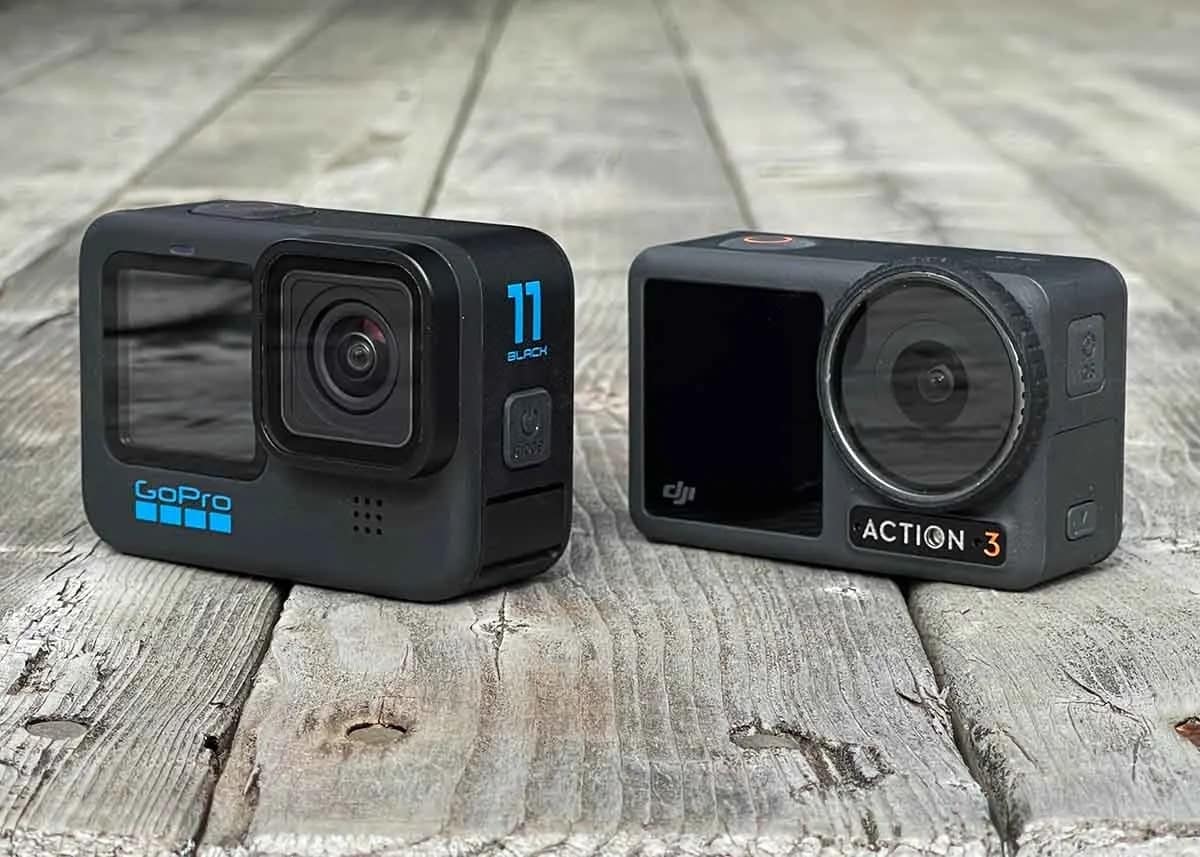
4. GoPro HERO10 Black
The GoPro HERO10 Black has a faster processor for smoother use and better touch controls. It can record super clear videos at higher speeds: 5.3K at 60fps and 4K at 120fps. You can also shoot camera slow-motion videos at 240fps in 2.7K resolution. The camera’s sensor is better, too, making photos sharper and allowing you to grab 15.8MP pictures from videos. It keeps footage perfectly steady with its excellent stabilization.
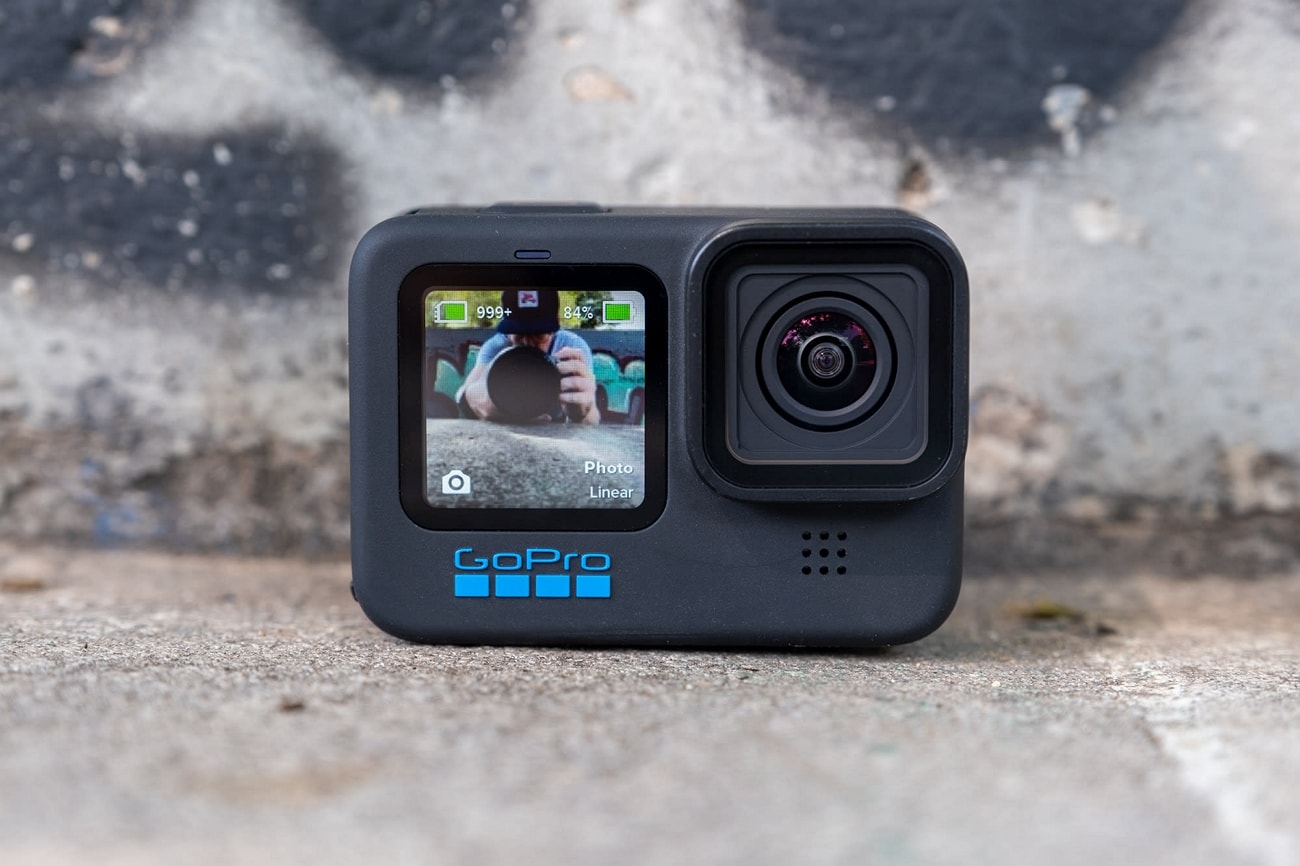
5. Panasonic LUMIX GH6
The LUMIX GH6 is an inspiring innovation in the LUMIX camera series, packed with amazing upgrades. It records high-quality videos internally in ProRes 422 HQ and ProRes 422, making them look great and easier to work with on computers later. This slow-mo video camera is faster due to a new engine, making pictures look better with less noise and better colors.
It’s great for professional video making, offering top-notch recording options. It also has image stabilization, a flexible rear monitor, and slots for different memory cards.

6. Sony α7R IV
The Sony A7R IV is a top-notch mirrorless camera appreciated by videography experts. It takes super clear pictures with its 20MP full-frame sensor. Also, it has a feature that prevents shaky photos and helps videos stay steady. You can control how long the shutter stays open, which helps in different lighting.
This slow-motion video camera lets you choose different ways to measure light for better pictures. Small and adaptable, it is high-tech and has great performance in digital photography.
7. Fujifilm X-S20
The Fujifilm X-S20 is a versatile camera that is equipped with advanced features and is easy to carry. This slow-motion camera has a 26.1MP sensor for really clear pictures. The screen is a vary-angle touchscreen of 3.0 inches and 1.84m-dot. You can connect it to Wi-Fi and Bluetooth to share and control the camera from a distance.
It’s perfect for videos, too, recording in high-quality up to 6.2K resolution. The camera is small and compact at 127.7 x 85.1 x 65.4mm and weighs only 491g.

8. Canon EOS-1D X Mark III DSLR Camera
The Canon EOS-1D X Mark III is a top choice for professionals in photography and videography. It has a powerful 20.1 Megapixel Full-frame CMOS sensor that ensures high-quality images. The DIGIC X Image Processor handles low-light situations exceptionally well. Adding on, it offers a wide ISO range for great performance.
Its advanced autofocus system with deep learning technology tracks subjects accurately. This slow-mo camera supports impressive 4K UHD 2160p video recording.
9. Nikon D6 FX-Format Digital SLR Camera
The Nikon D6 FX-Format Digital SLR Camera Body is made for professionals who promise top-notch performance. It has a powerful 20.8 Megapixel Full-frame CMOS sensor for high-quality photos. Also, it can work as a webcam with a maximum resolution of 16 MP and performs well in different situations.
Using digital image stabilization, the slow-motion video camera helps prevent blur. Moreover, it has a quick shutter speed of 1/8000 seconds for precise control over exposure.

10. Canon DSLR Camera [EOS 90D]
The Canon 90D Body is a slow-mo camera for both filmmakers and videographers. It has a 32.5-megapixel CMOS APS-C sensor for clear and detailed images. Furthermore, it supports recording videos in 4K UHD 30P and Full HD 120P, which helps in delivering excellent video quality. With a 45-Point All Cross-type AF System, the 90D provides precise autofocus across the entire frame.
Part 3: What To Do If You Do Not Have a Camera? Use Filmora for Slow-Mo Video Making
Sometimes, getting an affordable slow-motion camera for shooting videos can be tricky. But don’t worry! You can still create slow-motion videos without having a specific camera. Wondershare Filmora is an excellent solution to make fantastic slow-motion videos, even if you don’t own a special slow-motion camera.
You can adjust the speed of your videos easily to make certain moments slower, making your clips look cool. Filmora isn’t just about changing the speed of your videos. It’s a powerful editing software that lets you do lots of things to make your videos better.
Free Download For Win 7 or later(64-bit)
Free Download For macOS 10.14 or later
Steps Required to Slow Down Video Professionally with Speed Ramping
Filmora Speed Ramping feature allows you to control your clip’s speed. It gives the flexibility to either slow down the entire video or specific segments. Here’s a guide on executing slow-motion in the Filmora video editing interface.
Step 1Set Up Project and Import Footage
Start by launching Wondershare Filmora and creating a new project. Then, import your video by clicking the “+” icon. After that, select “Match to Media” to ensure your project settings align with your clip’s resolution.
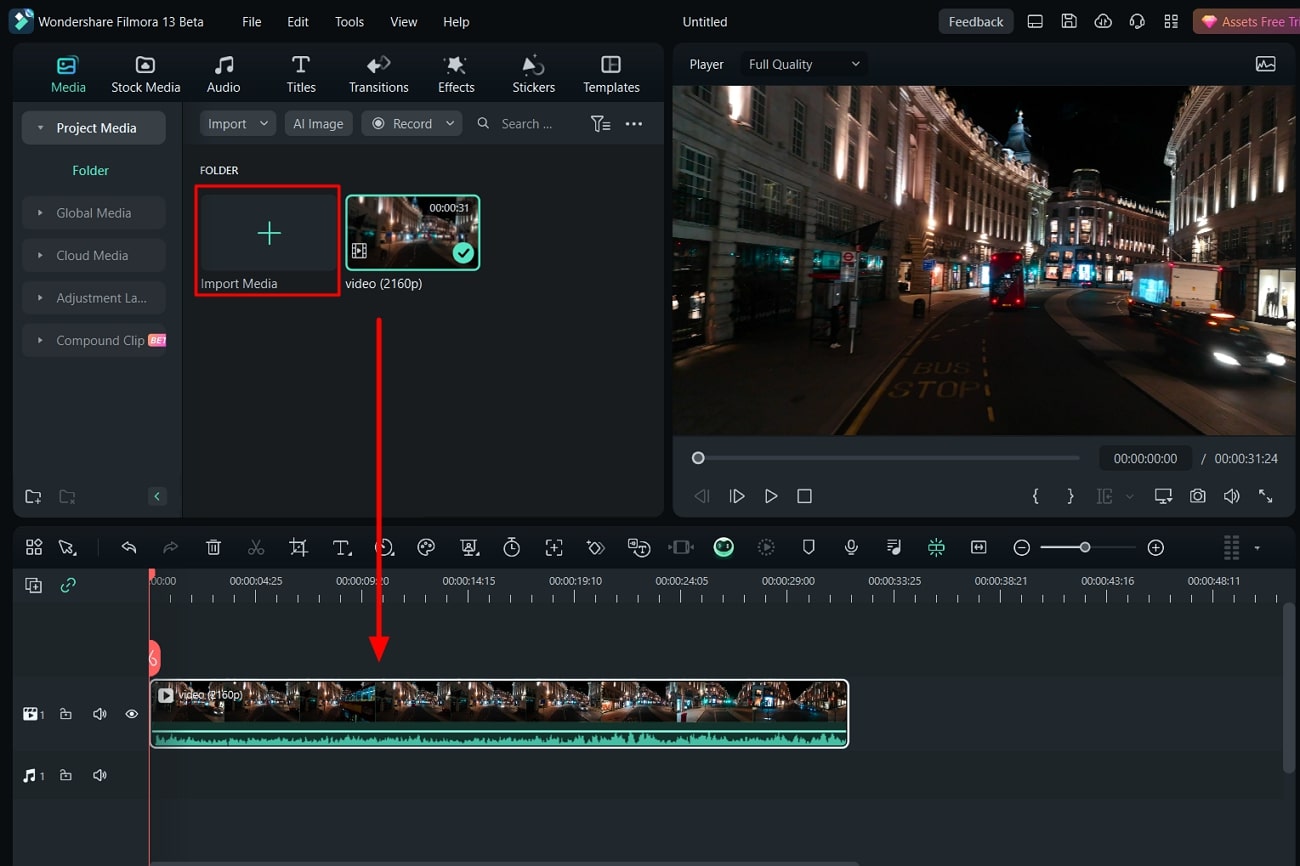
Step 2Apply Slow-Motion Effect to Slow Down Video
In the next step, add the imported video to the timeline and access the “Speed” icon. Choose a preset, such as 0.5x from the “Slow” menu, to apply a slow-motion effect to the entire clip. Alternatively, right-click on the video, go to “Speed,” followed by “Uniform Speed,” and adjust the slider leftwards for slow motion.
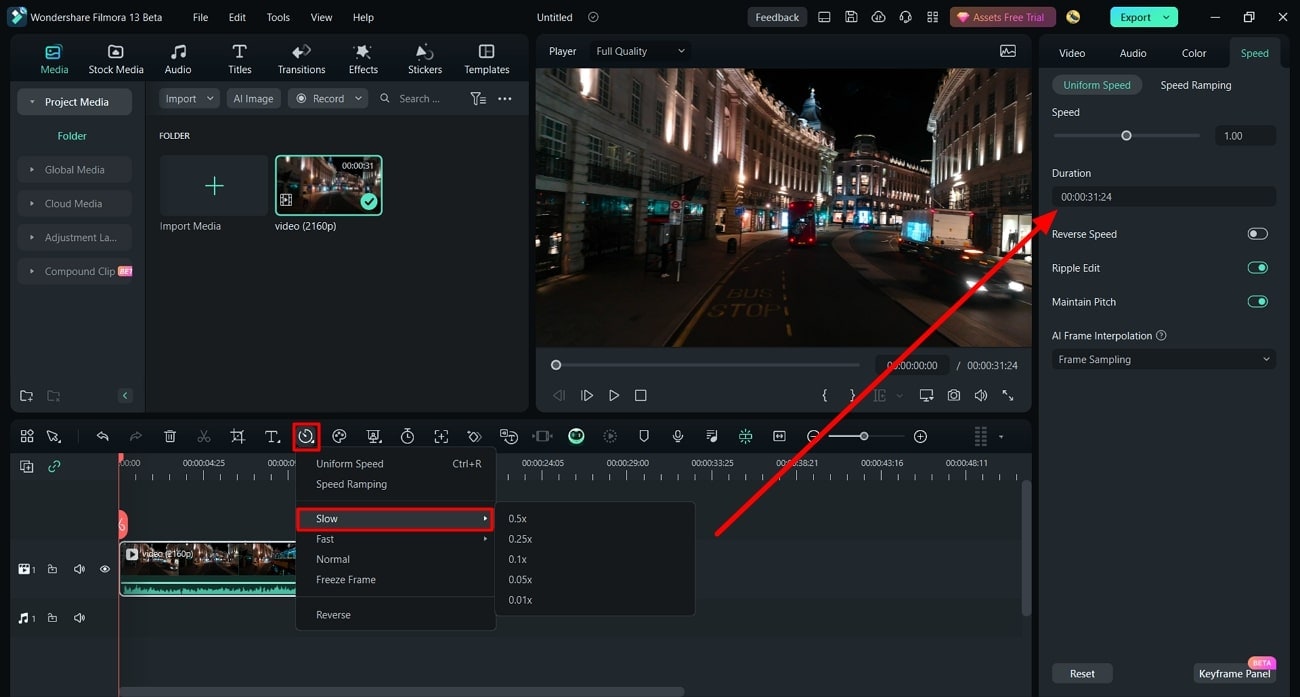
Step 3Customize Speed for Specific Segments
To create slow-motion effects for specific parts or frames within your video, navigate to the “Speed Ramping” window. Then, choose “Customize” and modify the speed by dragging the points along the line.
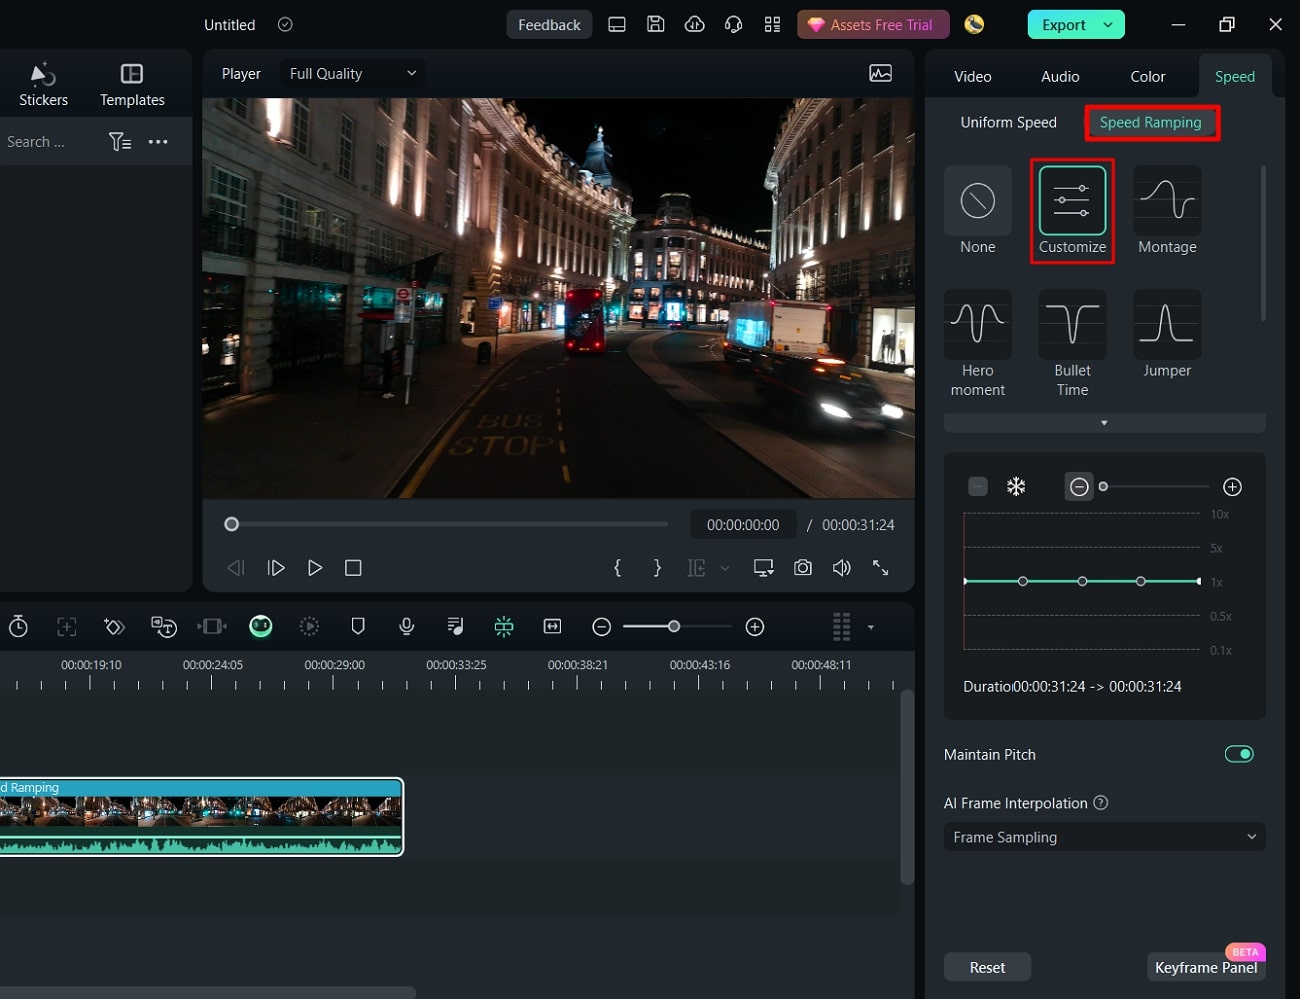
Step 4Add Freeze Frame at Required Position
For freezing a frame, position the play head at the desired spot. Select “Add Freeze Frame,” then set the freeze duration in the “Freeze Time Field” and adjust its placement as required. Save changes by clicking “OK.”

Top Features Offered by Filmora
Wondershare Filmora offers its users a variety of advanced features to perform an edit conveniently. It enhances creativity and productivity with the help of AI-equipped in it. Described below are some of these features to know about Filmora:
1. AI Smart Masking
AI Smart Masking simplifies the process of adding high-quality transitions and effects. By contrast, it can be complex with manual editing. By activating this feature, it automatically handles the masking task. Once AI masking is enabled and the desired area is specified, it swiftly completes the process. This allows you to apply transitions and effects to the unmasked area afterward.
2. AI Copywriting
Filmora AI Copywriting is a new tool that incorporates ChatGPT API. It uses AI to create scripts, providing tons of ideas for creators to improve their video storytelling. This tool seamlessly integrates AI-generated text and narration into the editing process. With Filmora AI Copywriting, creators can quickly develop catchy YouTube titles and descriptions.
3. Audio Visualizer
Filmora Audio Visualizer is an innovative tool for music videos on how you experience sound and visuals together. It works by matching the visuals to the sound in your video. The Audio Visualizer analyzes the audio and syncs with the music’s beats and rhythm. This creates an amazing display that makes watching and listening more enjoyable.
4. Speech-To-Text
The Filmora Speech-To-Text (STT) feature is a huge help for video editors who want to work more efficiently. With just one click, this tool changes spoken words in videos into written text. It saves a lot of time by avoiding the manual work of typing subtitles. This feature not only saves time but also ensures that subtitles match what’s being said in the video accurately.
Conclusion
In summary, slow-motion videography is an amazing way to tell stories visually. Mixing technology and your ideas helps create videos that capture people’s attention. For that reason, we have provided 10 slow-motion video cameras to help you capture slow-motion videos. Additionally, we also highlighted the perfect solution if you don’t have a camera: Wondershare Filmora. You can easily generate a slow-motion video using our simple guide with this tool.
Make A Slow Motion Video Make A Slow Motion Video More Features

Part 1: How Do Slow-Motion Cameras Help in Recording Perfect Slow-Mo Videos?
Slow-motion cameras record videos at much faster speeds than regular cameras. This feature helps create slow-motion videos by slowing down the recorded action when played at normal speed. These slow-motion cameras are popular in filmmaking, sports analysis, science, and content creation. That’s because they capture detailed moments and highlight fast-moving things.
- Higher Frame Rate: Regular videos usually record 24, 30, or 60 frames per second (fps). But slow-motion cameras can capture hundreds or thousands of frames per second. More frames mean more details and smoother slow-motion videos when played back.
- Smooth Playback: Slow-motion videos look smooth and purposeful when played at regular speeds. More frames are recorded initially to achieve this effect. Ultimately, it will preserve all details when the video is played in slow motion.
- High-Resolution Sensors: Lots of slow-motion cameras have high-quality sensors. These sensors ensure that even with more frames captured, the picture stays sharp and detailed in slow-motion videos. This helps capture fine details without losing clarity.
- Creative Control: Slow-motion cameras let filmmakers and videographers control how fast or slow some parts of a scene look. This helps tell stories better, focus on details, and make videos more interesting and attractive to watch.
- Reduced Motion Blur: More frames per second make pictures clearer and sharper. This feature works especially for fast-moving things. This is important when you need to see tiny details or when the lighting isn’t great.
- Temporal Resolution: Slow-motion cameras can record lots of details in quick movements. They’re handy in sports, science, and creative videos where catching fast and detailed actions matter a lot.
Part 2: Finding The Top Slow-Motion Cameras to Use in 2024
If you want a good slow-motion camera, start by checking out the ones with higher frame rates. Also, think about what you’ll be recording and where you’ll share your videos. Buying a new camera can be confusing and perplexing. We hope you’ll find the best slow-motion camera in the list below. We have arranged the top slow-motion cameras to use in 2024 below:
- PowerShot G7 X Mark III Black
- Sony ZV-1 Camera
- GoPro HERO11 Black
- GoPro HERO10 Black
- Panasonic Lumix GH6
- Sony α7R IV
- Fujifilm X-S20
- Canon EOS-1D X Mark III DSLR Camera
- Nikon D6 FX-Format Digital SLR Camera
- Canon DSLR Camera [EOS 90D]
1. PowerShot G7 X Mark III Black
The PowerShot G7 X Mark III Black is a small but powerful camera for taking high-quality slow-motion videos. It has a 20.1 Megapixel camera and a DIGIC 8 Image Processor, which means it shows exceptional clarity even in different lighting. The 4.2x Optical Zoom Kens with Optical Image Stabilizer helps get close-up shots without making them blurry. For videos, it can record in 4K (at 30 frames per second) and Full HD (at 120 frames per second) for super smooth slow-motion shots.

2. Sony ZV-1 Camera
The Sony ZV-1 Camera is made specifically for content creators and vloggers. Although it has a compact design, it is packed with powerful features. This slow-motion video camera has a 1-inch sensor and digital and optical image stabilization. This means your pictures and videos will be clear and steady even if things are moving fast.
The camera’s results are sharp and colorful thanks to its 20.1 MP resolution and BIONZ X Image Processor. Also, it has a Fast Hybrid AF System that quickly focuses accurately, perfect for both photos and videos.

3. GoPro HERO11 Black
The GoPro HERO11 Black is an awesome slow-motion camera perfect for all kinds of adventures. It takes clear videos up to 5.3K resolution and sharp 27MP photos. The camera has great stabilization, so your videos always look smooth. You can change how wide your shots are and switch lenses digitally while keeping things clear.
GoPro HERO11 Black has cool effects for nighttime shots, making them look artistic. The camera is tough, waterproof up to 33 feet, and has a long-lasting battery that works well even in cold weather.

4. GoPro HERO10 Black
The GoPro HERO10 Black has a faster processor for smoother use and better touch controls. It can record super clear videos at higher speeds: 5.3K at 60fps and 4K at 120fps. You can also shoot camera slow-motion videos at 240fps in 2.7K resolution. The camera’s sensor is better, too, making photos sharper and allowing you to grab 15.8MP pictures from videos. It keeps footage perfectly steady with its excellent stabilization.

5. Panasonic LUMIX GH6
The LUMIX GH6 is an inspiring innovation in the LUMIX camera series, packed with amazing upgrades. It records high-quality videos internally in ProRes 422 HQ and ProRes 422, making them look great and easier to work with on computers later. This slow-mo video camera is faster due to a new engine, making pictures look better with less noise and better colors.
It’s great for professional video making, offering top-notch recording options. It also has image stabilization, a flexible rear monitor, and slots for different memory cards.

6. Sony α7R IV
The Sony A7R IV is a top-notch mirrorless camera appreciated by videography experts. It takes super clear pictures with its 20MP full-frame sensor. Also, it has a feature that prevents shaky photos and helps videos stay steady. You can control how long the shutter stays open, which helps in different lighting.
This slow-motion video camera lets you choose different ways to measure light for better pictures. Small and adaptable, it is high-tech and has great performance in digital photography.

7. Fujifilm X-S20
The Fujifilm X-S20 is a versatile camera that is equipped with advanced features and is easy to carry. This slow-motion camera has a 26.1MP sensor for really clear pictures. The screen is a vary-angle touchscreen of 3.0 inches and 1.84m-dot. You can connect it to Wi-Fi and Bluetooth to share and control the camera from a distance.
It’s perfect for videos, too, recording in high-quality up to 6.2K resolution. The camera is small and compact at 127.7 x 85.1 x 65.4mm and weighs only 491g.

8. Canon EOS-1D X Mark III DSLR Camera
The Canon EOS-1D X Mark III is a top choice for professionals in photography and videography. It has a powerful 20.1 Megapixel Full-frame CMOS sensor that ensures high-quality images. The DIGIC X Image Processor handles low-light situations exceptionally well. Adding on, it offers a wide ISO range for great performance.
Its advanced autofocus system with deep learning technology tracks subjects accurately. This slow-mo camera supports impressive 4K UHD 2160p video recording.

9. Nikon D6 FX-Format Digital SLR Camera
The Nikon D6 FX-Format Digital SLR Camera Body is made for professionals who promise top-notch performance. It has a powerful 20.8 Megapixel Full-frame CMOS sensor for high-quality photos. Also, it can work as a webcam with a maximum resolution of 16 MP and performs well in different situations.
Using digital image stabilization, the slow-motion video camera helps prevent blur. Moreover, it has a quick shutter speed of 1/8000 seconds for precise control over exposure.

10. Canon DSLR Camera [EOS 90D]
The Canon 90D Body is a slow-mo camera for both filmmakers and videographers. It has a 32.5-megapixel CMOS APS-C sensor for clear and detailed images. Furthermore, it supports recording videos in 4K UHD 30P and Full HD 120P, which helps in delivering excellent video quality. With a 45-Point All Cross-type AF System, the 90D provides precise autofocus across the entire frame.

Part 3: What To Do If You Do Not Have a Camera? Use Filmora for Slow-Mo Video Making
Sometimes, getting an affordable slow-motion camera for shooting videos can be tricky. But don’t worry! You can still create slow-motion videos without having a specific camera. Wondershare Filmora is an excellent solution to make fantastic slow-motion videos, even if you don’t own a special slow-motion camera.
You can adjust the speed of your videos easily to make certain moments slower, making your clips look cool. Filmora isn’t just about changing the speed of your videos. It’s a powerful editing software that lets you do lots of things to make your videos better.
Free Download For Win 7 or later(64-bit)
Free Download For macOS 10.14 or later
Steps Required to Slow Down Video Professionally with Speed Ramping
Filmora Speed Ramping feature allows you to control your clip’s speed. It gives the flexibility to either slow down the entire video or specific segments. Here’s a guide on executing slow-motion in the Filmora video editing interface.
Step 1Set Up Project and Import Footage
Start by launching Wondershare Filmora and creating a new project. Then, import your video by clicking the “+” icon. After that, select “Match to Media” to ensure your project settings align with your clip’s resolution.

Step 2Apply Slow-Motion Effect to Slow Down Video
In the next step, add the imported video to the timeline and access the “Speed” icon. Choose a preset, such as 0.5x from the “Slow” menu, to apply a slow-motion effect to the entire clip. Alternatively, right-click on the video, go to “Speed,” followed by “Uniform Speed,” and adjust the slider leftwards for slow motion.

Step 3Customize Speed for Specific Segments
To create slow-motion effects for specific parts or frames within your video, navigate to the “Speed Ramping” window. Then, choose “Customize” and modify the speed by dragging the points along the line.

Step 4Add Freeze Frame at Required Position
For freezing a frame, position the play head at the desired spot. Select “Add Freeze Frame,” then set the freeze duration in the “Freeze Time Field” and adjust its placement as required. Save changes by clicking “OK.”

Top Features Offered by Filmora
Wondershare Filmora offers its users a variety of advanced features to perform an edit conveniently. It enhances creativity and productivity with the help of AI-equipped in it. Described below are some of these features to know about Filmora:
1. AI Smart Masking
AI Smart Masking simplifies the process of adding high-quality transitions and effects. By contrast, it can be complex with manual editing. By activating this feature, it automatically handles the masking task. Once AI masking is enabled and the desired area is specified, it swiftly completes the process. This allows you to apply transitions and effects to the unmasked area afterward.
2. AI Copywriting
Filmora AI Copywriting is a new tool that incorporates ChatGPT API. It uses AI to create scripts, providing tons of ideas for creators to improve their video storytelling. This tool seamlessly integrates AI-generated text and narration into the editing process. With Filmora AI Copywriting, creators can quickly develop catchy YouTube titles and descriptions.
3. Audio Visualizer
Filmora Audio Visualizer is an innovative tool for music videos on how you experience sound and visuals together. It works by matching the visuals to the sound in your video. The Audio Visualizer analyzes the audio and syncs with the music’s beats and rhythm. This creates an amazing display that makes watching and listening more enjoyable.

4. Speech-To-Text
The Filmora Speech-To-Text (STT) feature is a huge help for video editors who want to work more efficiently. With just one click, this tool changes spoken words in videos into written text. It saves a lot of time by avoiding the manual work of typing subtitles. This feature not only saves time but also ensures that subtitles match what’s being said in the video accurately.
Conclusion
In summary, slow-motion videography is an amazing way to tell stories visually. Mixing technology and your ideas helps create videos that capture people’s attention. For that reason, we have provided 10 slow-motion video cameras to help you capture slow-motion videos. Additionally, we also highlighted the perfect solution if you don’t have a camera: Wondershare Filmora. You can easily generate a slow-motion video using our simple guide with this tool.
In This Article I Will Share to You My Tips and Experiences on How to Become a YouTube Vlogger and Things You Need to Consider Being a Vlogger
Being a vlogger is a lot of fun specially making videos but is not also very easy, there are times you feel giving up specially when no one in the family supports you, there are also times when you get tired because you think no one is interested in your videos, but very fulfilling at the same time being able to do what you love. As you all know making video on YouTube is making also money that is through google AdSense, but if you are into money without the passion of being a vlogger, you will definitely get tired immediately, because being a vlogger requires more effort, patience, love of work, creativity and most specially passion.
![]()
Note: You don’t need to study a career to become a vlogger, but it’s not easy as simply pressing the publishing button. You’ll need a purpose, a message, a platform, an audience and more.
In this article I will share to you my tips and experiences on How to become a YouTube Vlogger and things you need to consider being a Vlogger.
1. What is Vlog?
A Vlog is a piece of video that document a person’s life or expertise, with an average length of around five minutes. The word vlog is “video” and “blog”. Vlog are created to connect with an audience through shared ideas and experiences in the form of video.
2. Tips on How to Become a YouTube Vlogger
- Create a Channel
- Content
- Equipment
- Skills
- Collaborate
3. Create a YouTube Channel
Your channel name is the official name for your channel on YouTube. Your channel name is a big part of how people will define and understand what your channel is about. So, it’s important that your name accurately represents your brand. It’s important that your name stands out from another channel on YouTube or should be unique.
![]()
Note: So before deciding on a name, pop your potential name into YouTube and see what comes up, if you can’t find any similar sounding channels, you’re good to go.
For example, my channel name is Mayang Dyosa, Mayang is what my family and friend called me and Dyosa means Goddess. I find it unique and cute because that’s my dream to be a Goddess.
❶ Content
One of the challenging parts being a YouTuber is finding a right content for your channel.
You can use YouTube’s trending page this is the easiest way to find trending topic for you to have an idea of what topic or content you like. You can always use or share experiences to be your topic content whether it is beauty, make-up tutorial, DIY’s, Skin care ideas, etc. As long as you can share honestly and correctly.
Do whatever you love, do something that you like, expertise, make a relatable videos or timely videos and searchable videos. Create a content that people need or are often searched for online, content that can provide information to people. I suggest you go with “how to” videos, because people always searched for this kind of content.

Vlog Content
❷ Equipment
Gear is essential for making a YouTube video obviously a camera is the most important piece of equipment, you can use anything that can record at least 1080p resolution of video. You can use your mobile phone or a digital camera. Whatever your equipment you have now, you can start your first vlog as long as you can record a video at you have a clear audio you are good to go.
Many of the successful YouTube creators started with very simple equipment so don’t let equipment get in your way. Start your vlog now!
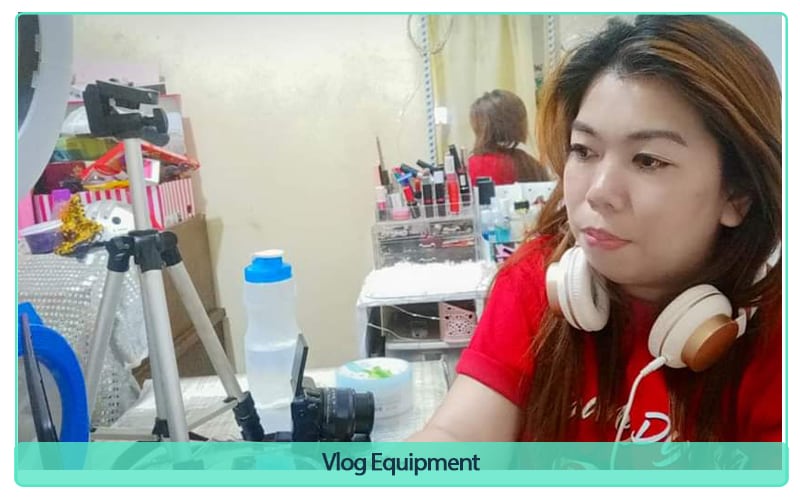
Vlog Equipment
❸ Skills
Vlog Editing Skills
Speaking with confident in the front of camera is always a skill of being a vlogger, you must be talkative in order for you to share more information to you viewers but make sure that your ideas are related to your chosen content.
You should be entertaining in front of the camera so that the viewers don’t get bored, because sometimes it’s not just the information that excite them to watch a vlogger, but also on how you entertain the viewers.

Entertain in Front of the Camera
❹ Editing Skils
In Editing skills, there are two ways you can edit your vlog, first on your phones, second on your pc or laptops.
You don’t have to be good at editing but this is one of the things you need to study to make your videos better.
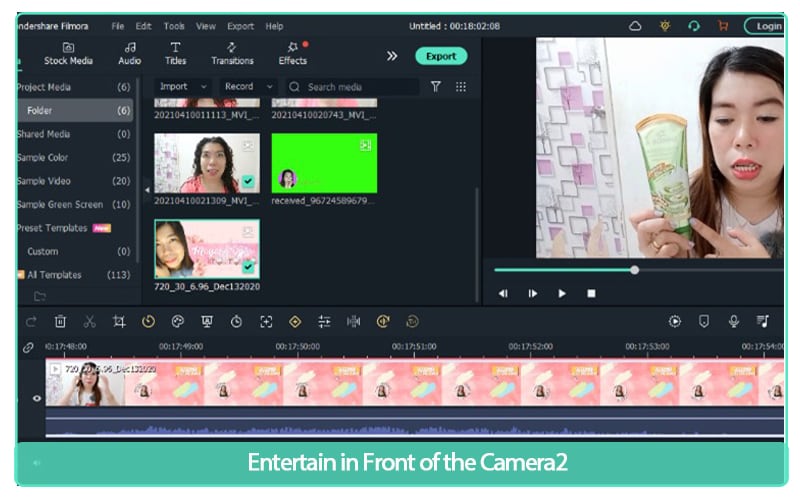
Entertain in Front of the Camera2
Wondershare Filmora Video Editor is one of my personally used editing software, this is considered to be the best option for YouTubers because there is how-to video guide that allows anyone to quickly pick up the pace and start producing or creating an eye-catching video.
Wondershare Filmora 11 The Best video editor that makes your editing experience efficient and playful.
Try It Free Try It Free Learn More

I am using this software for almost 5 years and always satisfied by its performance. It is easy to use software with a lot of tools needed to edit a video in a fast way and it even has animation/affects you can add to your video to look more creative and catchier.
Filmora allows you to export your videos in multiple video formats with lot of customization settings.
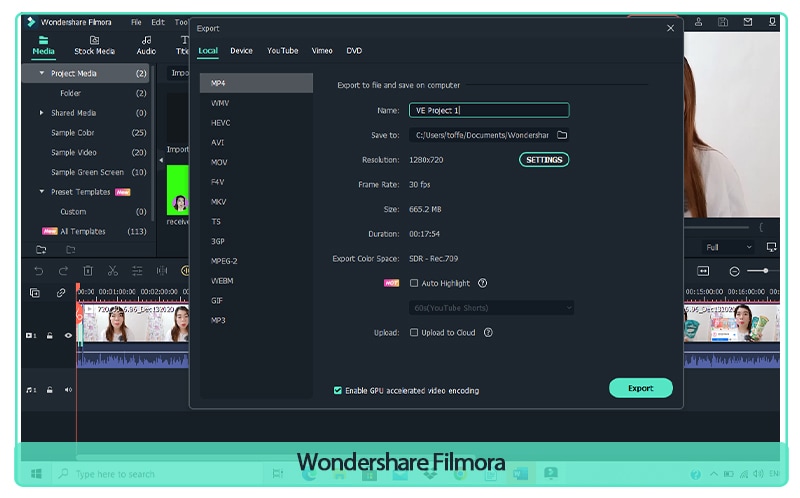
Wondershare Filmora
It also allows you to export your videos directly to your social media platforms like YouTube, Facebook, Vimeo. The speed of exporting videos is also quite fast so not time consuming.
❺ Collaborate
It really helps your channel to grow if you collaborate with someone that is same passion as you, you can share ideas of content and help one another channel grow. Also, this will help others to know that you also have a YouTube channel and this is another way to promote your channel by the help of other content creator. In this way you can gain a friend and someone that you can seek for advice as you are starting for your career.

Wondershare Filmora
Wrap Up
- You must also remember when starting to be a vlogger you should be emotionally and mentally ready because this is not easy as you expected.
- You can earn money by doing a vlog but don’t make the money to be your motivation to be a Vlogger, ask yourself first if this is really you like or is this really your passion? because being a Vlogger comes with great responsibility and it comes with great effort.
- If you are ready to become a vlogger because of the tips I gave, you can start now but you should not expect more subscriber and views immediately because you still need a lot effort and a lot of work to get people get to know your channel. So just keep working and work hard on the content, one day you will be famous and recognized by many.
In this article I will share to you my tips and experiences on How to become a YouTube Vlogger and things you need to consider being a Vlogger.
1. What is Vlog?
A Vlog is a piece of video that document a person’s life or expertise, with an average length of around five minutes. The word vlog is “video” and “blog”. Vlog are created to connect with an audience through shared ideas and experiences in the form of video.
2. Tips on How to Become a YouTube Vlogger
- Create a Channel
- Content
- Equipment
- Skills
- Collaborate
3. Create a YouTube Channel
Your channel name is the official name for your channel on YouTube. Your channel name is a big part of how people will define and understand what your channel is about. So, it’s important that your name accurately represents your brand. It’s important that your name stands out from another channel on YouTube or should be unique.
![]()
Note: So before deciding on a name, pop your potential name into YouTube and see what comes up, if you can’t find any similar sounding channels, you’re good to go.
For example, my channel name is Mayang Dyosa, Mayang is what my family and friend called me and Dyosa means Goddess. I find it unique and cute because that’s my dream to be a Goddess.
❶ Content
One of the challenging parts being a YouTuber is finding a right content for your channel.
You can use YouTube’s trending page this is the easiest way to find trending topic for you to have an idea of what topic or content you like. You can always use or share experiences to be your topic content whether it is beauty, make-up tutorial, DIY’s, Skin care ideas, etc. As long as you can share honestly and correctly.
Do whatever you love, do something that you like, expertise, make a relatable videos or timely videos and searchable videos. Create a content that people need or are often searched for online, content that can provide information to people. I suggest you go with “how to” videos, because people always searched for this kind of content.

Vlog Content
❷ Equipment
Gear is essential for making a YouTube video obviously a camera is the most important piece of equipment, you can use anything that can record at least 1080p resolution of video. You can use your mobile phone or a digital camera. Whatever your equipment you have now, you can start your first vlog as long as you can record a video at you have a clear audio you are good to go.
Many of the successful YouTube creators started with very simple equipment so don’t let equipment get in your way. Start your vlog now!

Vlog Equipment
❸ Skills

Vlog Editing Skills
Speaking with confident in the front of camera is always a skill of being a vlogger, you must be talkative in order for you to share more information to you viewers but make sure that your ideas are related to your chosen content.
You should be entertaining in front of the camera so that the viewers don’t get bored, because sometimes it’s not just the information that excite them to watch a vlogger, but also on how you entertain the viewers.

Entertain in Front of the Camera
❹ Editing Skils
In Editing skills, there are two ways you can edit your vlog, first on your phones, second on your pc or laptops.
You don’t have to be good at editing but this is one of the things you need to study to make your videos better.

Entertain in Front of the Camera2
Wondershare Filmora Video Editor is one of my personally used editing software, this is considered to be the best option for YouTubers because there is how-to video guide that allows anyone to quickly pick up the pace and start producing or creating an eye-catching video.
Wondershare Filmora 11 The Best video editor that makes your editing experience efficient and playful.
Try It Free Try It Free Learn More

I am using this software for almost 5 years and always satisfied by its performance. It is easy to use software with a lot of tools needed to edit a video in a fast way and it even has animation/affects you can add to your video to look more creative and catchier.
Filmora allows you to export your videos in multiple video formats with lot of customization settings.

Wondershare Filmora
It also allows you to export your videos directly to your social media platforms like YouTube, Facebook, Vimeo. The speed of exporting videos is also quite fast so not time consuming.
❺ Collaborate
It really helps your channel to grow if you collaborate with someone that is same passion as you, you can share ideas of content and help one another channel grow. Also, this will help others to know that you also have a YouTube channel and this is another way to promote your channel by the help of other content creator. In this way you can gain a friend and someone that you can seek for advice as you are starting for your career.

Wondershare Filmora
Wrap Up
- You must also remember when starting to be a vlogger you should be emotionally and mentally ready because this is not easy as you expected.
- You can earn money by doing a vlog but don’t make the money to be your motivation to be a Vlogger, ask yourself first if this is really you like or is this really your passion? because being a Vlogger comes with great responsibility and it comes with great effort.
- If you are ready to become a vlogger because of the tips I gave, you can start now but you should not expect more subscriber and views immediately because you still need a lot effort and a lot of work to get people get to know your channel. So just keep working and work hard on the content, one day you will be famous and recognized by many.
Also read:
- New In 2024, Dubbing Videos With Voiceovers | Using Wondershare Filmora
- In 2024, 4 Methods for Rotating Your GoPro Videos Professionally
- New In 2024, VSCO Slow Motion
- Wondering if You Can Make DIY Green Screen Video for Streaming? Learn the Easy Steps to Setup DIY Green Screen, Shoot the Video and Edit It Out to Add Green Screen Effects for 2024
- Updated In 2024, Top 10 Picks for Flawless Slow Motion Video Generation
- How to Make Falling Text Effect in Filmora for 2024
- New How Can You Import and Adjust the Video Clips on Wondershare Filmora, In 2024
- New 2024 Approved Best 12 AI Video Generators to Pick
- What Is MOV Format and How to Edit MOV Video Better, In 2024
- Updated How to Make a Slideshow with Icecream Slideshow Maker for 2024
- How to Make A Funny Vlog for TikTok, In 2024
- New Do You Wish to Make Your Discord PFP an Attention-Seeker? If Yes, Try the Animated Discord PFP. Lets Go over Essential Facts on the Topic, Including How to Get an Animated Discord PFP
- Updated 2024 Approved Full Guide to Funcall Voice Changer and Its Alternatives
- New Elevate Your TikTok Game with Catchy Captions! Explore the Trendiest 2024 TikTok Captions for Every Occasion and Style. Up Your TikTok Content with Style
- In Todays Article, We Are Going to Show You How Adding a Simple Lower Third to Your Video Can Add a Degree of Professionalism and Polish to Your Videos While Giving It a Higher Perceived Value
- Best Ways to Blur Zoom Background for Free for 2024
- Updated In This Article, Youll Find Four Solutions for Rotating Your Go-Pro Videos. The Following Tools Will Be Used for This Purpose
- Finding Best GIF Websites Is Easy as Pie — Heres What You Should Know
- 2024 Approved Where To Find The Best Free Canon LUTs? Learn More
- New Free Drone LUTs For Perfect Drone Footage
- Possible solutions to restore deleted photos from Huawei .
- Can Life360 Track You When Your Realme GT 5 Pro is off? | Dr.fone
- Xiaomi Redmi Note 12 5G Not Receiving Texts? 10 Hassle-Free Solutions Here | Dr.fone
- Possible solutions to restore deleted music from HTC U23
- In 2024, How To Check if Your Vivo Y200 Is Unlocked
- Best 3 Vivo G2 Emulator for Mac to Run Your Wanted Android Apps | Dr.fone
- In 2024, How to Reset Apple ID and Apple Password On Apple iPhone 12 mini
- Play HEVC H.265 on Galaxy A15 5G, is it possible?
- How to Fix Android.Process.Media Has Stopped on Infinix Note 30 Pro | Dr.fone
- 2 Ways to Monitor Samsung Galaxy S24 Activity | Dr.fone
- How to Stop Life360 from Tracking You On Samsung Galaxy S24? | Dr.fone
- How to Fix Locked Apple ID on Apple iPhone 7 Plus
- 2024 Approved Want to Make a Meme GIF?
- How to Unlock Infinix Zero 5G 2023 Turbo Phone without PIN
- Play Store Stuck on Downloading Of Samsung Galaxy A25 5G? 7 Ways to Resolve | Dr.fone
- Title: How to Rotate AVI in Vertical/Portrait Orientation Windows, Mac,Android, iPhone & Online
- Author: Chloe
- Created at : 2024-05-20 03:37:22
- Updated at : 2024-05-21 03:37:22
- Link: https://ai-editing-video.techidaily.com/how-to-rotate-avi-in-verticalportrait-orientation-windows-macandroid-iphone-and-online/
- License: This work is licensed under CC BY-NC-SA 4.0.

