
How To Track and Blur Faces in Premiere Pro

How To Track and Blur Faces in Premiere Pro
Many times, while making videos, you may capture strangers’ faces in the background. This can divert the attention of viewers or may ruin the overall impression. To solve this issue, you can use professional video editing tools to blur the faces in the video. By reading this article, you can learn how to blur the face in Premiere Pro efficiently. Moreover, we will also provide an alternative to Premiere Pro for your further assistance.
Part 1: Why Do You Need to Blur Faces in Videos?
Do you know what the actual reasons for blurring faces in videos are? Read this part of the article to find out the main causes of blurring faces in the videos:
1. Keeping Privacy
Invasion of privacy is both morally and ethically wrong. If you are making a video in some public place, you should ensure the complete privacy of strangers. For this reason, you should blur the faces in your video’s background to protect the privacy of others.
2. For Commercial Ads
If you are creating a commercial advertisement to sell your product, it may be possible that the video may contain some unwanted people in the background. To make your commercial advertisement look professional, you must hide the unnecessary people from your video.
3. To Create Social Media Posts
While running social media campaigns to raise awareness of any social issue, you must ensure to hide the individual’s face. The reason is that showing someone’s face on your social media post without their consent can be legally or morally wrong.
4. Hiding the Minor’s Faces
Many parents don’t like to expose their children’s identity over the internet. If you have created a video including a minor, you should blur his face to display a sense of responsibility. Thus, you must know how to blur the face of people efficiently.
Part 2: How to Track and Blur Faces in Videos with Premiere Pro?
Do you have any experience using Adobe Premiere Pro ? This tool is one of the industry-leading platforms through which professionals can edit their videos effectively. Using this tool, you can edit your videos according to your preferences to express your emotions in a compelling manner. You can add music tracks to your videos to add more engagement for your viewers.
Besides being a great video editing tool, you can use this tool to add various modifications. For instance, you can add vibrant backgrounds and other elements to your videos. Moreover, you can also use Adobe Premiere to blur faces efficiently.
Steps to Blur Faces Using Adobe Premiere Pro
Are you ready to learn how to blur faces in Premiere Pro? Read this part of the article to learn how to track and blur the selected faces in the videos effortlessly:
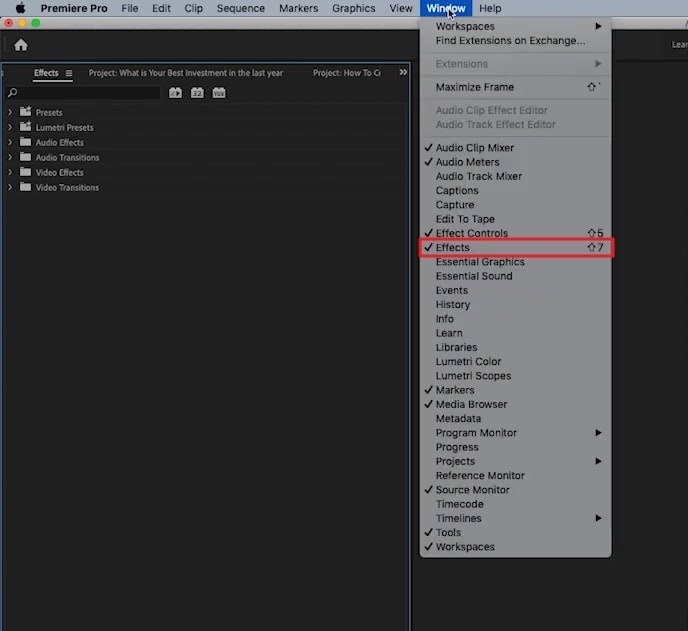
Step1 Navigate to Adobe Premiere Pro and upload the desired video. Now head to the “Effects” option by selecting the “Windows” tab.
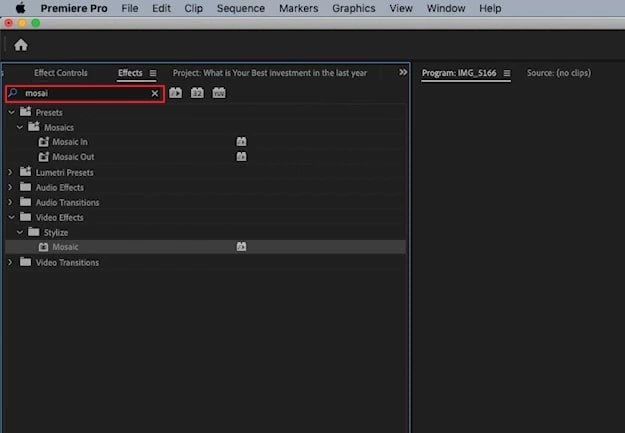
Step2 Afterward, type the word “Mosaic” in the search box and select this option in the results. Now drag and drop this effect on the timeline. It will add a blur effect to your complete video.
Step3 Now go back to the Windows section and select “Effects Controls“. From its menu, turn off the applied Mosaic effect. From the same menu, select the “Circle” shape and apply it to the face that you want to blur. Afterward, you can turn on the toggle of the added blur effect.
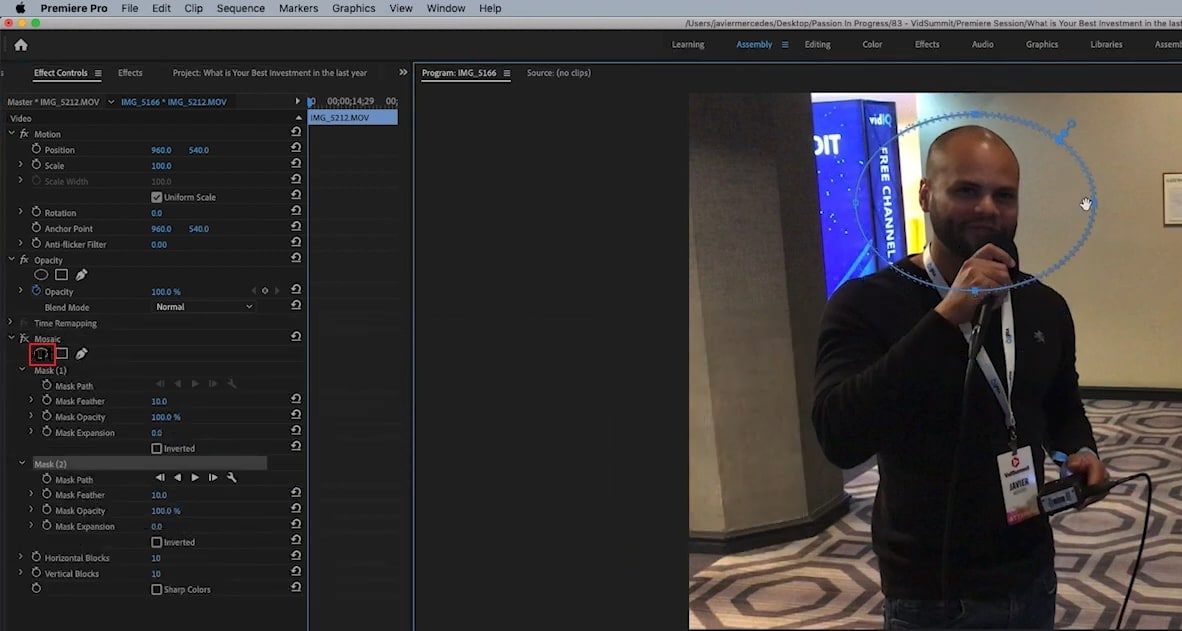
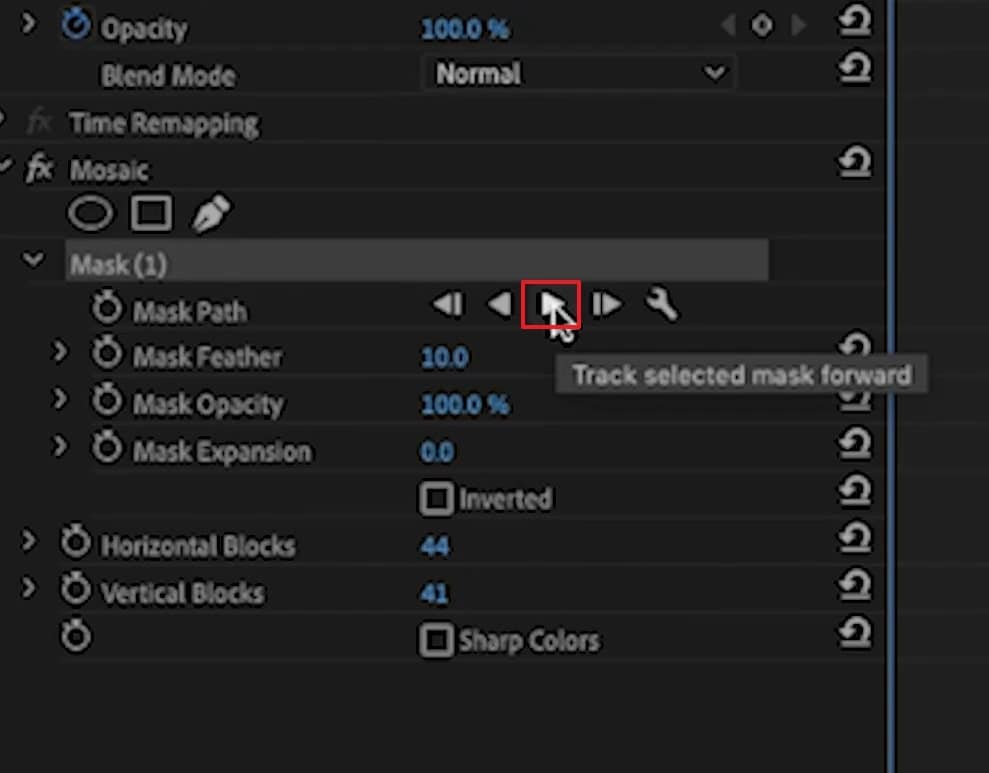
Step4 To adjust the blur strength, you can modify the Horizontal and Vertical blocks. To track the blurred face, you can go to the “Mask Path” option displayed in the left section. Just hit the “Play” button to track the selected mask forward. After some time, you can see the end results on the preview window. You can also adjust the keyframes to blur the selected mask efficiently.
Bonus Tip – The Alternative to Photoshop to Blur Face in Videos
Do you want a simpler solution to blur the faces in your videos? No need to worry, as Wondershare Filmora brings an intuitive and easy-to-use interface that allows you to blur the faces with few clicks. It’s one of the most reliable platforms that you can come across to edit and modify your videos. It also offers preset templates and an Instant Mode that can help you to create a video from scratch efficiently. Also, it provides fast rendering speed so that you can see your final results instantly.
Free Download For Win 7 or later(64-bit)
Free Download For macOS 10.14 or later
Step-by-Step Guide to Blur Faces in Filmora Video Editor
Are you wandering how to easily blur faces in a video? Follow the steps mentioned below to blur faces using the Filmora video editor:
Step1 Select Motion Tracking Tool
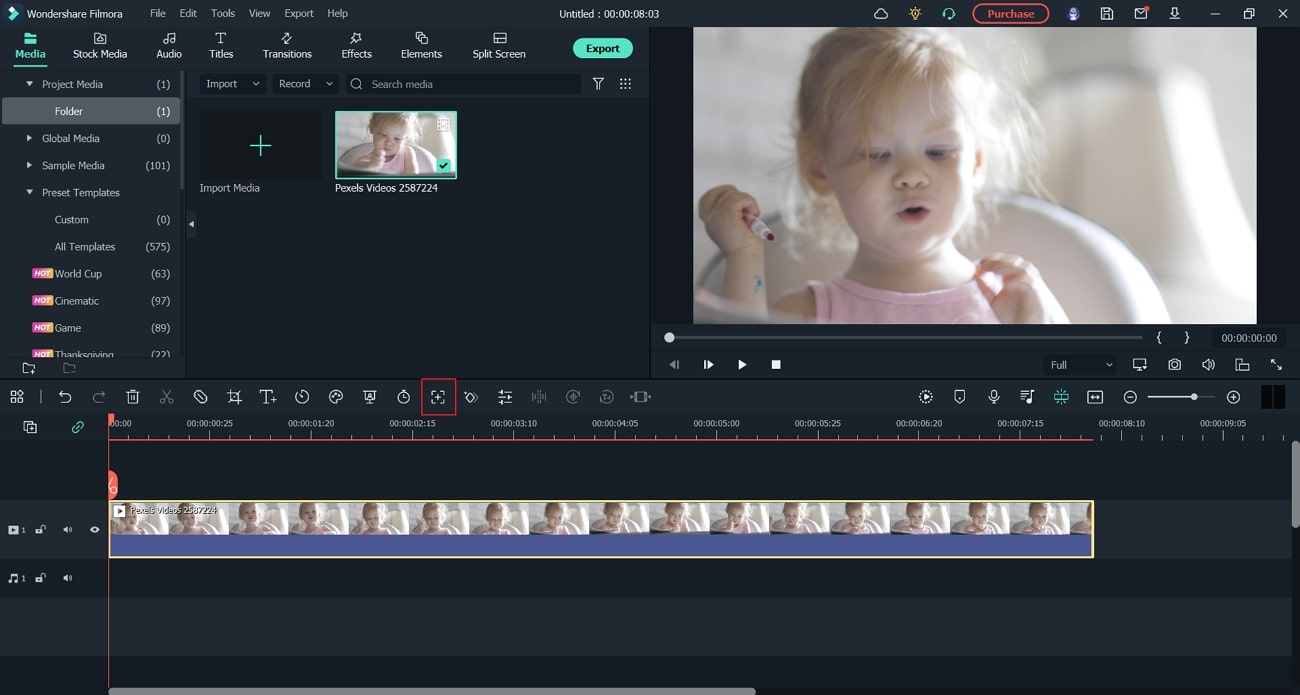
Once you are done launching Filmora, select “Create New Project.” Afterward, import and drop the video into the timeline. Now place the play head at the start and proceed with the “Motion Tracking” tool.
Step2 Start Motion Tracking Process
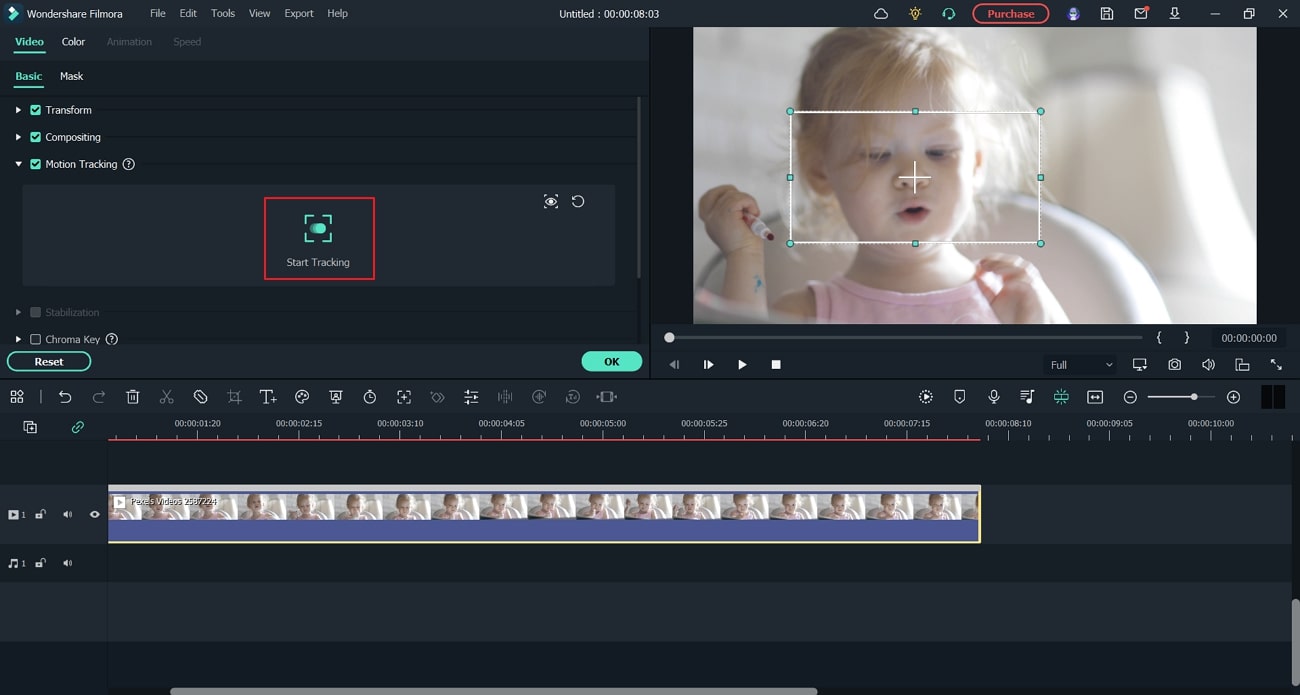
Now adjust the motion tracking space from your preview window. Once done, hit the “Start Tracking” button. Within a few minutes, you will be able to finish this process. Click the “OK” button to proceed.
Step3 Choose the Mosaic Effect
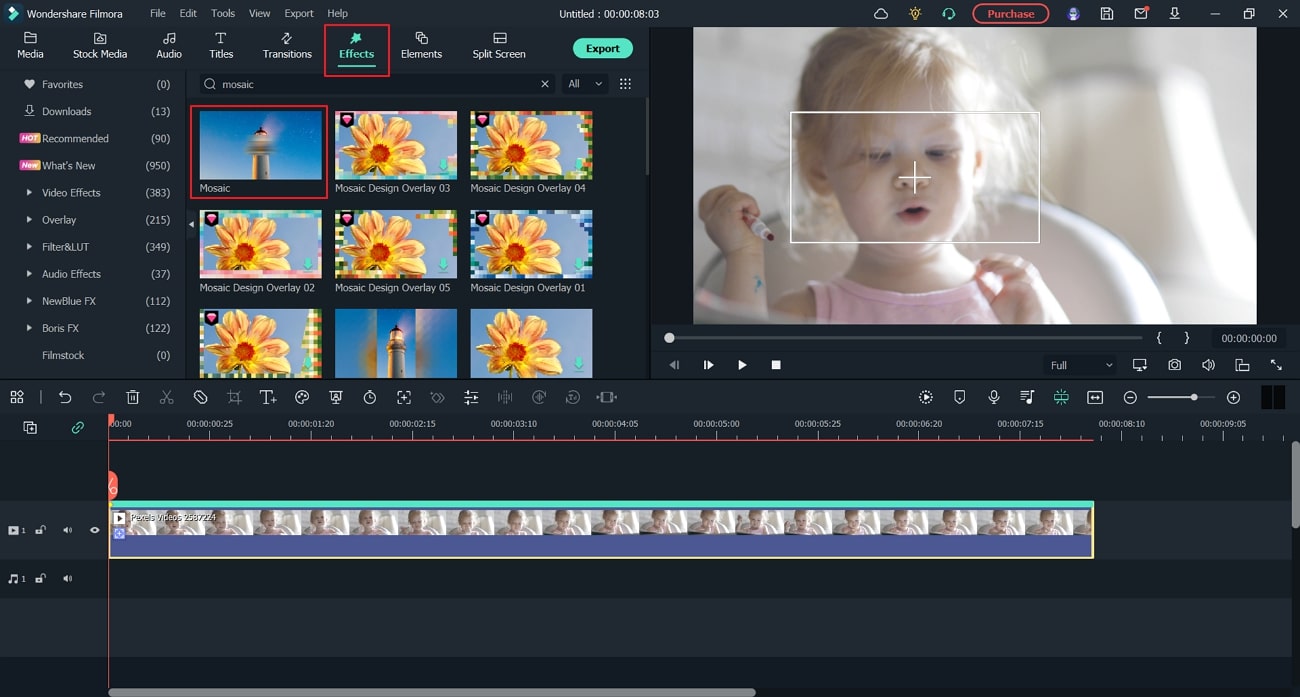
To proceed, head to the “Effects” section and locate the “Video Effects” section. From there, search for the effect called “Mosaic.” From the results, drag and drop the effect to the timeline and extend it according to your clip.
Step4 Adjust the Blur Settings
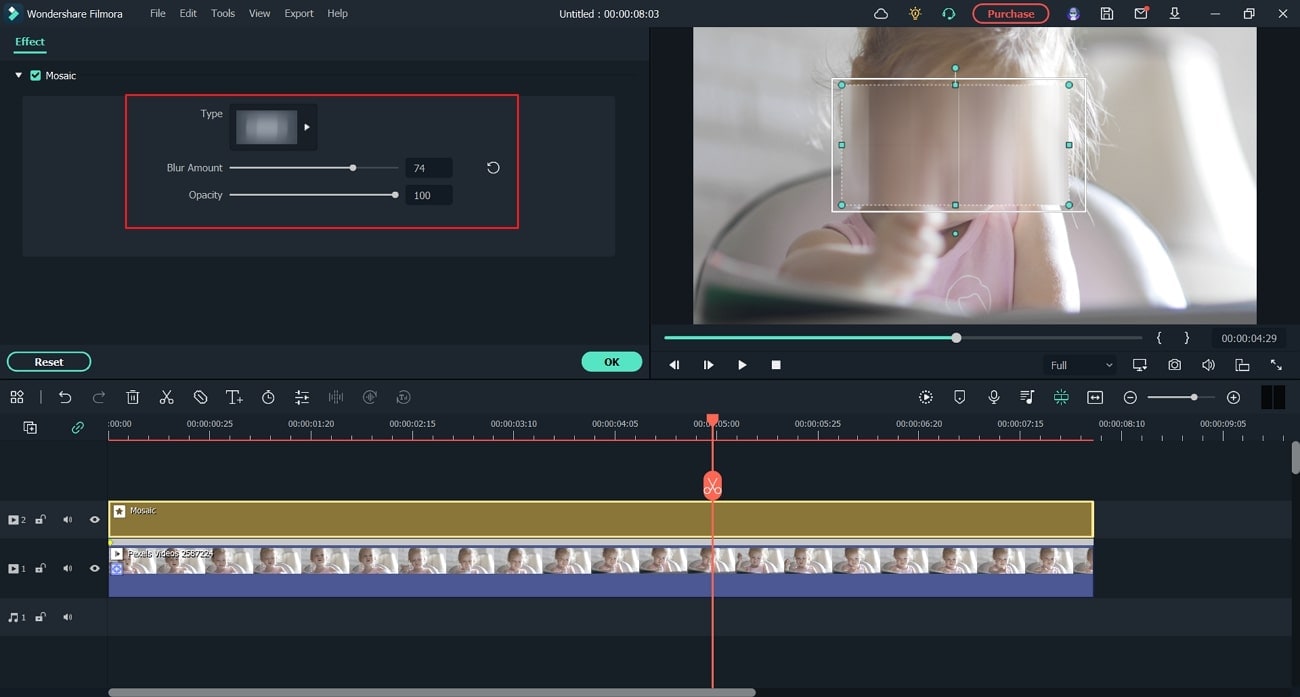
Now, double-click on the effect to open settings. You can choose your desired “Blur Type” for your Mosaic effect from the settings. Also, you can change the opacity and blur strength. Afterward, adjust the blurred space on your preview window. Press “OK” to continue.
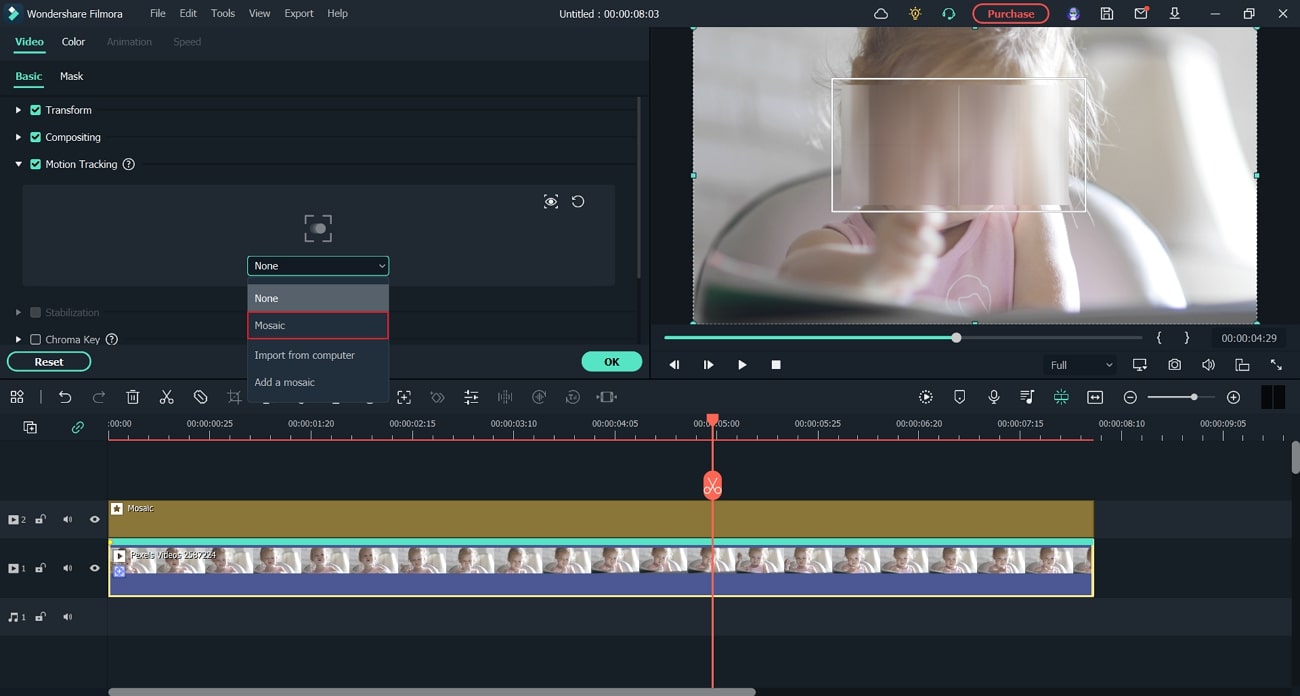
Step5 Choose Mosaic in Motion Tracking
Double-click on the video clip on your timeline and select “Motion Tracking.” On the drop-down menu, select “Mosaic.” Afterward, press “OK,” and you can see the final results in the preview window.
Conclusion
Have you accidentally captured the strangers’ faces in your video? No need to worry, as this article can help you to blur the faces in the video with professional tools. By reading this article, you can learn how to blur the face in Premiere Pro instantly. You can also try our recommended alternative to Premiere Pro, known as Filmora, to get fast and high-end results effortlessly.
Free Download For macOS 10.14 or later
Step-by-Step Guide to Blur Faces in Filmora Video Editor
Are you wandering how to easily blur faces in a video? Follow the steps mentioned below to blur faces using the Filmora video editor:
Step1 Select Motion Tracking Tool
Once you are done launching Filmora, select “Create New Project.” Afterward, import and drop the video into the timeline. Now place the play head at the start and proceed with the “Motion Tracking” tool.

Step2 Start Motion Tracking Process
Now adjust the motion tracking space from your preview window. Once done, hit the “Start Tracking” button. Within a few minutes, you will be able to finish this process. Click the “OK” button to proceed.

Step3 Choose the Mosaic Effect
To proceed, head to the “Effects” section and locate the “Video Effects” section. From there, search for the effect called “Mosaic.” From the results, drag and drop the effect to the timeline and extend it according to your clip.

Step4 Adjust the Blur Settings
Now, double-click on the effect to open settings. You can choose your desired “Blur Type” for your Mosaic effect from the settings. Also, you can change the opacity and blur strength. Afterward, adjust the blurred space on your preview window. Press “OK” to continue.

Step5 Choose Mosaic in Motion Tracking
Double-click on the video clip on your timeline and select “Motion Tracking.” On the drop-down menu, select “Mosaic.” Afterward, press “OK,” and you can see the final results in the preview window.

Conclusion
Have you accidentally captured the strangers’ faces in your video? No need to worry, as this article can help you to blur the faces in the video with professional tools. By reading this article, you can learn how to blur the face in Premiere Pro instantly. You can also try our recommended alternative to Premiere Pro, known as Filmora, to get fast and high-end results effortlessly.
Easy Steps to Make Glitch Effect with Filmora
You don’t need outdated VCRs or any other broken technology to produce glitch effects. Instead, you can use a video editing program for Mac and PCs, such as Filmora , to transform your videos into glitch-effect masterpieces. You can also use the glitch effects to provide striking shot transitions or opening titles. Keep reading this article on how to apply various glitch video effects in Filmora 11:
Part 1: What is a Glitch Effect?
A glitch effect occurs when a section of your video temporarily changes look or “glitches” for a short while. Although transient glitches are typical, they can occasionally linger for a few seconds or more.

You can use a glitch effect to temporarily change the appearance of the image in the video to give the impression that a machine is processing it. Additionally, it gives your finished piece a fantastic, dreamlike aspect.
Part 2: When Should you Apply a Glitch Effect?
A few years back, we had no choice but to watch glitchy movies on rusty VCR devices. Nowadays, retro video effects are very popular in TV movies and even games. You can use these effects in many ways, like making fake vintage footage or emulating a glitching computer.
Filmmakers frequently employ glitching in their videos to give the impression that a character has been affected by a technical abnormality, is having a flashback, or is being watched by someone else via a digital camera system. Something happens when the person or image flashes, often without their knowledge. In addition, you can apply the glitch effect to a composition to evoke a feeling of dramatic irony.
Part 3: Tutorial to Chromatic Aberration Effect
Chromatic aberration refers to how old lenses tend to split colors. This effect is very common in Old media like VHS or LaserDisc.

Here is a complete breakdown of each component of the Retro look and how you can make your glitch effects in Filmora 11:
Step1 Download Wondersshare Filmora 11 on your Pc by visiting filmora.wondershare.com.

Step2 Open Filmora and click on the Effects tab.
Step3 Search Chromatic aberration and drag the effect right onto your clip. It will give you a fantastic pre-made version of the effect.
Part 4: How to Customize Glitch Effect with Filmora
You can add final touches to your video clips by customizing Filmora’s effects to take your glitch effect to the next level. You can mix and match different effects in your video to create your custom glitch effect in Filmora 11.
Free Download For Win 7 or later(64-bit)
Free Download For macOS 10.14 or later
Step1 Once you have your clip on the timeline, select your clip and click on Edit. Now choose Duplicate to create two more copies.

Step2 Put the new copies on the layer above the others and make sure everything is lined up exactly. To create the glitch effect, separate the color channels on your Clips into the primary colors red, green, and blue.

Step3 Double-click on the top clip.

Go to Color and open the White Balance option to make this layer completely red. Next, drag both Temperature and Tint sliders to a hundred.

Step4 Now click the little eye icon on the timeline to hide the top layer and move on to the middle layer.
Step5 Double-click on your middle clip and go to Color, then select White Balance and set your Temperature to -100 and your Tint to 100.

Step6 Finally, hide this layer just like before. Repeat the same steps for the last clip but make this clip the blue layer by leaving the Temperature at zero and setting the Tint to -100.

Step7 Double-click the clip in the top layer, click the Video Tab, and open the Compositing options. Set the Blending Mode of this top layer to Soft Light.

Now click on the clip in your preview window and move the image over by pressing the left Arrow key on your keyboard a few times. Once you’re happy with the top clip, hide that layer by clicking the eye icon.

Step8 To make the middle layer visible, double-click the clip in your mid layer and set the Blending Mode of this layer to Screen.

Now click on your clip in the preview window and press the Right key as many times as you did before. Finally, make all the layers visible by clicking the eye icon.

Vignette
A vignette is a dark border that fades around the frame’s edges in Filmora. You can easily add a vignette effect to your video by using these steps:
Step1 First, click the Effects Tab and type in Vignette.
Step2 Next, drag the Vignette Radius effect to a layer above your previous three layers.
Step3 Now adjust the length to match the other clips.
VHS static effects
A VHS effect is a grainy distortion that resembles an old analog video cassette recording. To apply the VHS static effects:
Step1 Click the Effects tab.
Step2 Search for the VHS static and drag it to a new layer above everything else.
Step3 Extend one of the effects to match the length of your previous clips.
VCR Distortion
VCR Distortion effect will make your video look highly glitched. To apply this effect:
Step1 Click on the Effects tab.
Step2 Search for VCR Distortion, then drag and drop this effect over your previous layer.
Part 5: Tips to Create Awesome Glitch Effects
- One of the best ways to use the VCR Distortion effect is to cut it short and intersperse it around your video in random parts.
- The glitch Distortion effect is very intense, so we recommend cutting this effect very short and dropping it at random parts of your video.
- You can also use these effects as a sneaky way to hide Cuts in your video.
Summary
You can use glitch effects created or inspired by faulty video equipment as a powerful storytelling tool. These effects can help you change the tone of the entire video by adding a specific visual aesthetic and making the narrative simpler to convey and more approachable for the audience.
We recommend using Filmora 11 for adding built-in glitch effects. You can also use this app to create custom glitch effects within a few minutes.
Free Download For macOS 10.14 or later
Step1 Once you have your clip on the timeline, select your clip and click on Edit. Now choose Duplicate to create two more copies.

Step2 Put the new copies on the layer above the others and make sure everything is lined up exactly. To create the glitch effect, separate the color channels on your Clips into the primary colors red, green, and blue.

Step3 Double-click on the top clip.

Go to Color and open the White Balance option to make this layer completely red. Next, drag both Temperature and Tint sliders to a hundred.

Step4 Now click the little eye icon on the timeline to hide the top layer and move on to the middle layer.
Step5 Double-click on your middle clip and go to Color, then select White Balance and set your Temperature to -100 and your Tint to 100.

Step6 Finally, hide this layer just like before. Repeat the same steps for the last clip but make this clip the blue layer by leaving the Temperature at zero and setting the Tint to -100.

Step7 Double-click the clip in the top layer, click the Video Tab, and open the Compositing options. Set the Blending Mode of this top layer to Soft Light.

Now click on the clip in your preview window and move the image over by pressing the left Arrow key on your keyboard a few times. Once you’re happy with the top clip, hide that layer by clicking the eye icon.

Step8 To make the middle layer visible, double-click the clip in your mid layer and set the Blending Mode of this layer to Screen.

Now click on your clip in the preview window and press the Right key as many times as you did before. Finally, make all the layers visible by clicking the eye icon.

Vignette
A vignette is a dark border that fades around the frame’s edges in Filmora. You can easily add a vignette effect to your video by using these steps:
Step1 First, click the Effects Tab and type in Vignette.
Step2 Next, drag the Vignette Radius effect to a layer above your previous three layers.
Step3 Now adjust the length to match the other clips.
VHS static effects
A VHS effect is a grainy distortion that resembles an old analog video cassette recording. To apply the VHS static effects:
Step1 Click the Effects tab.
Step2 Search for the VHS static and drag it to a new layer above everything else.
Step3 Extend one of the effects to match the length of your previous clips.
VCR Distortion
VCR Distortion effect will make your video look highly glitched. To apply this effect:
Step1 Click on the Effects tab.
Step2 Search for VCR Distortion, then drag and drop this effect over your previous layer.
Part 5: Tips to Create Awesome Glitch Effects
- One of the best ways to use the VCR Distortion effect is to cut it short and intersperse it around your video in random parts.
- The glitch Distortion effect is very intense, so we recommend cutting this effect very short and dropping it at random parts of your video.
- You can also use these effects as a sneaky way to hide Cuts in your video.
Summary
You can use glitch effects created or inspired by faulty video equipment as a powerful storytelling tool. These effects can help you change the tone of the entire video by adding a specific visual aesthetic and making the narrative simpler to convey and more approachable for the audience.
We recommend using Filmora 11 for adding built-in glitch effects. You can also use this app to create custom glitch effects within a few minutes.
[100% Workable] How to Mask Track with Adobe Premiere Pro
Mask tracking Premiere Pro is a technique that lets you apply effects to a precise frame area. In video editing, mask tracking is crucial because it lets you apply effects to areas of your footage rather than the full frame. This can assist you in producing videos that look more professional by emphasizing crucial details, obscuring delicate content, and using imaginative effects.
This article guides Premiere Pro mask tracking using the right tools and effects. Give it a read if you are interested in tracking mask Premiere.
AI Smart Masking Spice up your video content with the endless possibilities of AI masking functions!
Free Download Free Download Learn More

Part 1. What Do You Know About Mask Tracking in Videos?
Automatic tracking and following a certain object or area during a video clip is known as mask tracking. Usually, the “mask” depicts a designated zone of interest, such as a person’s face, an item, or any other area. Mask tracking is achieved using various methods and algorithms, including computer vision techniques such as optical flow, feature tracking, or machine learning.
The objective of the effect is to track the targeted item consistently over all video frames. Mask tracking Premiere Pro is a common special effect in video editing. It can add visual components, apply filters, or change the color and lighting inside the tracked region.
Part 2. How To Perform Mask Tracking with Adobe Premiere Pro
One of the most widely used industry standard programs for video editing is Adobe Premiere Pro . With the help of this tool, users can alter various aspects of photographs and films. It can tweak effects in nearly every frame according to user preferences using Premiere mask tracking. You will undoubtedly get remarkable outcomes from it in a short amount of time.
The tool is a video editing expert, so many professional video editors rely on it. It offers a huge range of editing features that get together to create an impactful and eye-catching video.
Marked Key Features of Adobe Premiere Pro
- Video Editing: You can combine audio and apply effects and transitions to your video content. The platform also helps you work with color or add animated titles to your videos.
- Text-Based Editing: Text-based editing creates a transcript and automatically highlights text to add clips to your timeline. It can edit and rearrange clips like a text document.
- Color Correction: With the help of AI, you can automatically balance your colors or modify the frame using expert color wheels and curve controls. It also assists in viewing your work using integrated video scopes.
- Audio Editing: With Adobe Premiere Pro, you can explore audio tracks, license them, and utilize AI to adapt them to your clips automatically.
Step-by-Step Guide to Perform Mask Tracking with Premiere Pro
Adobe Premiere mask tracking is one of the many remarkable features of the app. If you want to employ mask tracking in your videos using Adobe Premiere, look at the steps below:
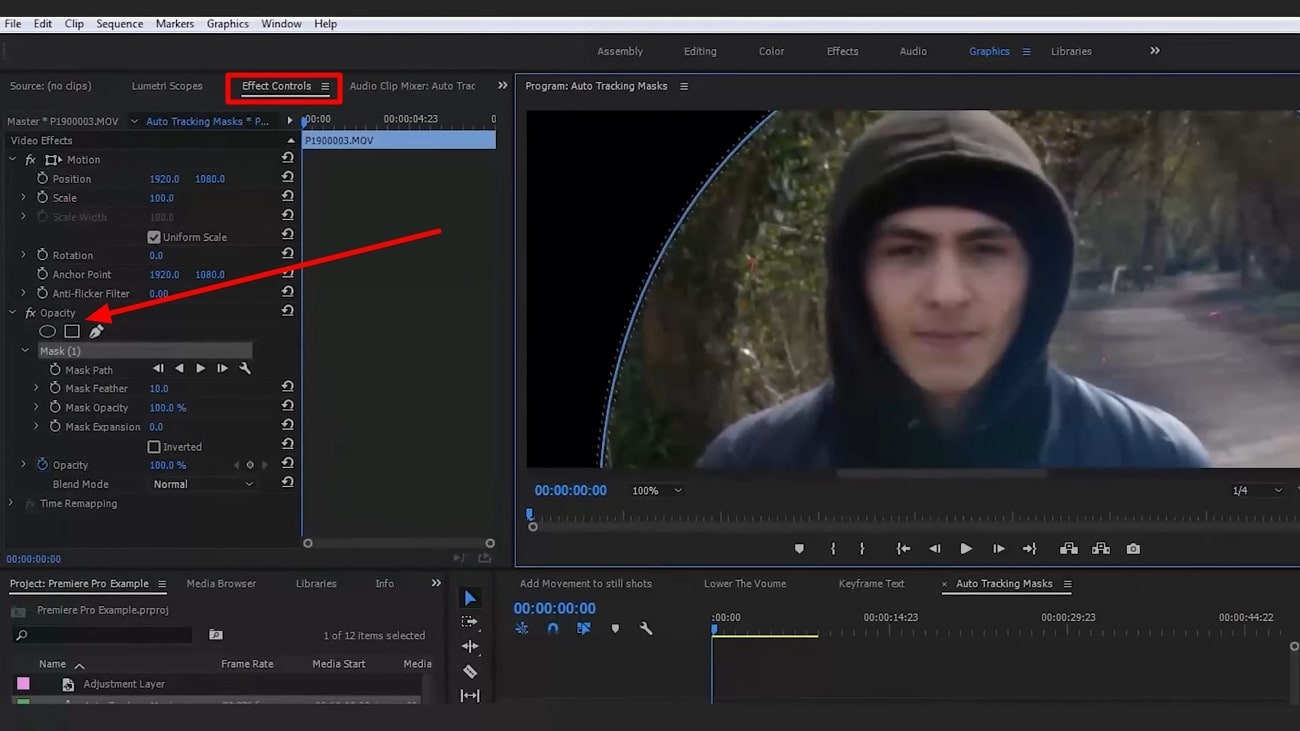
Step 1: To start off with the process, import the video onto the timeline that needs to be edited. Navigate to the top of the screen and select “Effect Controls” to proceed further. Select any specific shape present below the “Opacity” option on the left to add a mask to your clip.
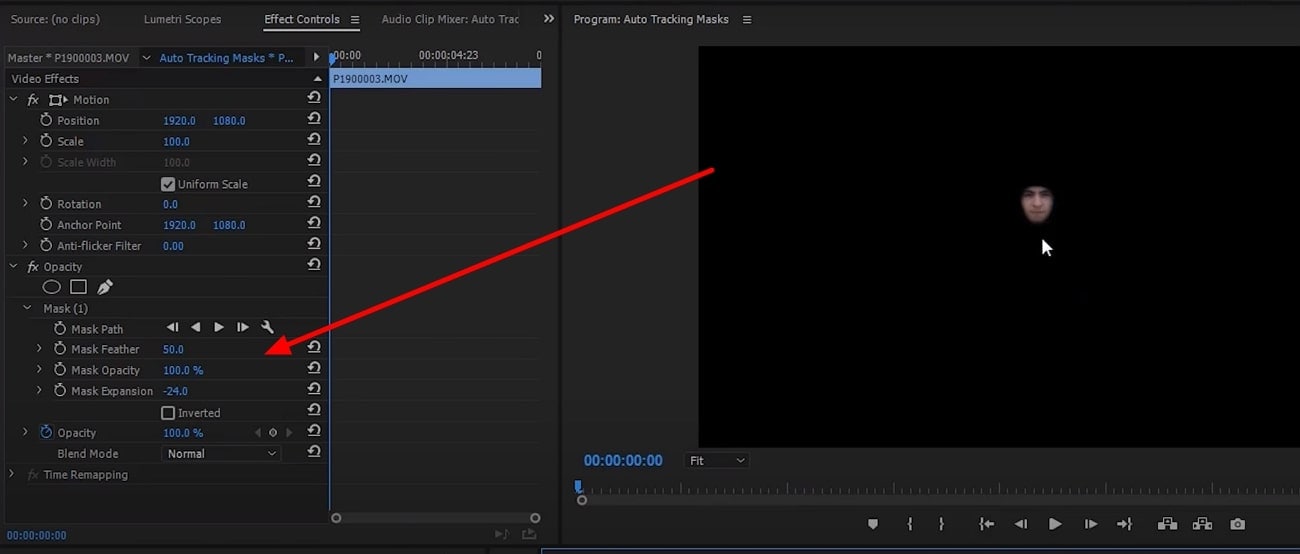
Step 2: Set the shape according to the person or object you will track by masking. Now, under the “Mask” option, you will see the “Mask Feather” option. Click on “Mask Feather” and adjust it so it won’t look too harsh on the edges.
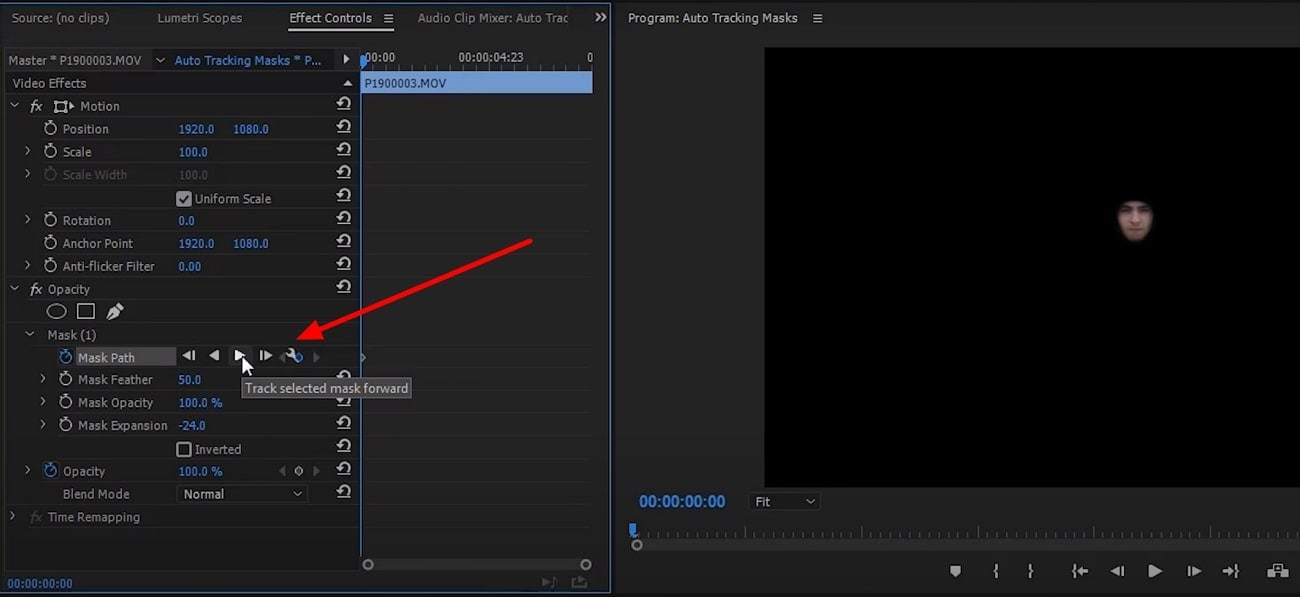
Step 4: Go to the beginning of the video you are editing, return to the editing section, and look for the “Mask Path” option. Now hit the “Track Selected Masked Forward” button and wait for the system to complete the Premiere Pro tracking mask process and save the video.
Part 3. Making Masking Easy with Wondershare Filmora: Reviewing the Details
Adobe Premiere Pro is an incredible tool, without a doubt. However, many users say that it needs to be simpler to use. You cannot generate a good video even after watching tutorials because it’s hard for an amateur to use Adobe Premiere Pro. Because of this, many users look for alternative options to add a premiere tracking mask and make other changes to their videos.
This part is all about the amazing alternative that you’re looking for. Wondershare Filmora is a video editing tool that provides professional quality content editing. The tool is so easy to use that you can start immediately with basic instructions. Its smart editing features, combined with a fast and intelligent system, make it a great choice for everyone.
Free Download For Win 7 or later(64-bit)
Free Download For macOS 10.14 or later
Key Features of Wondershare Filmora
- Compound Clip: This feature will arrange all your clips, combine them, and edit them as a single clip. This strong and intuitive feature improves and edits your video.

- AI Text-to-Video: You can convert text into engaging visual narratives and instantly turn text inputs into interesting videos. The feature makes ideas into stunning videos with ease.

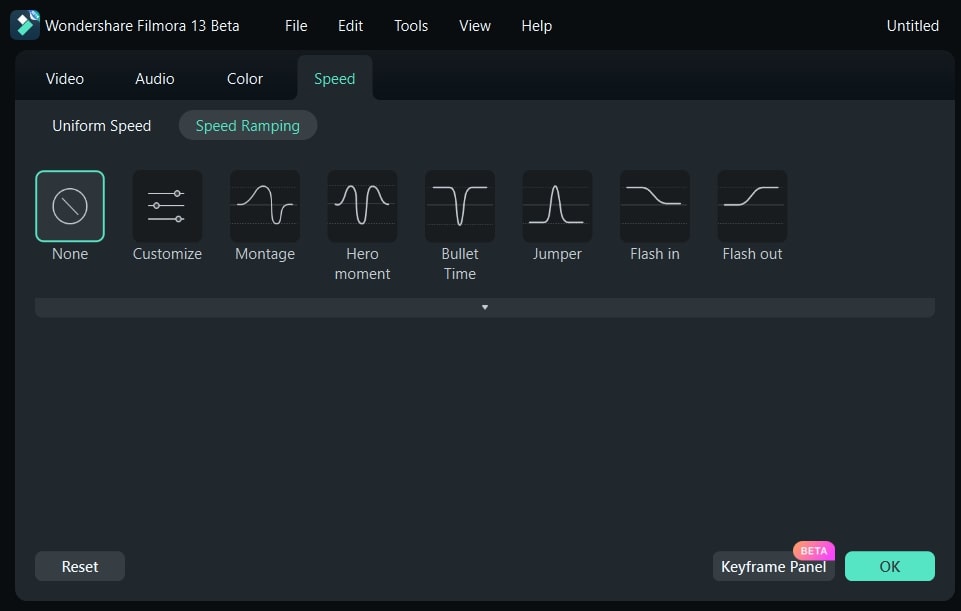
- Speed Ramping: This feature produces distinctive cinematic effects by managing your keyframes and altering the speed of your film.
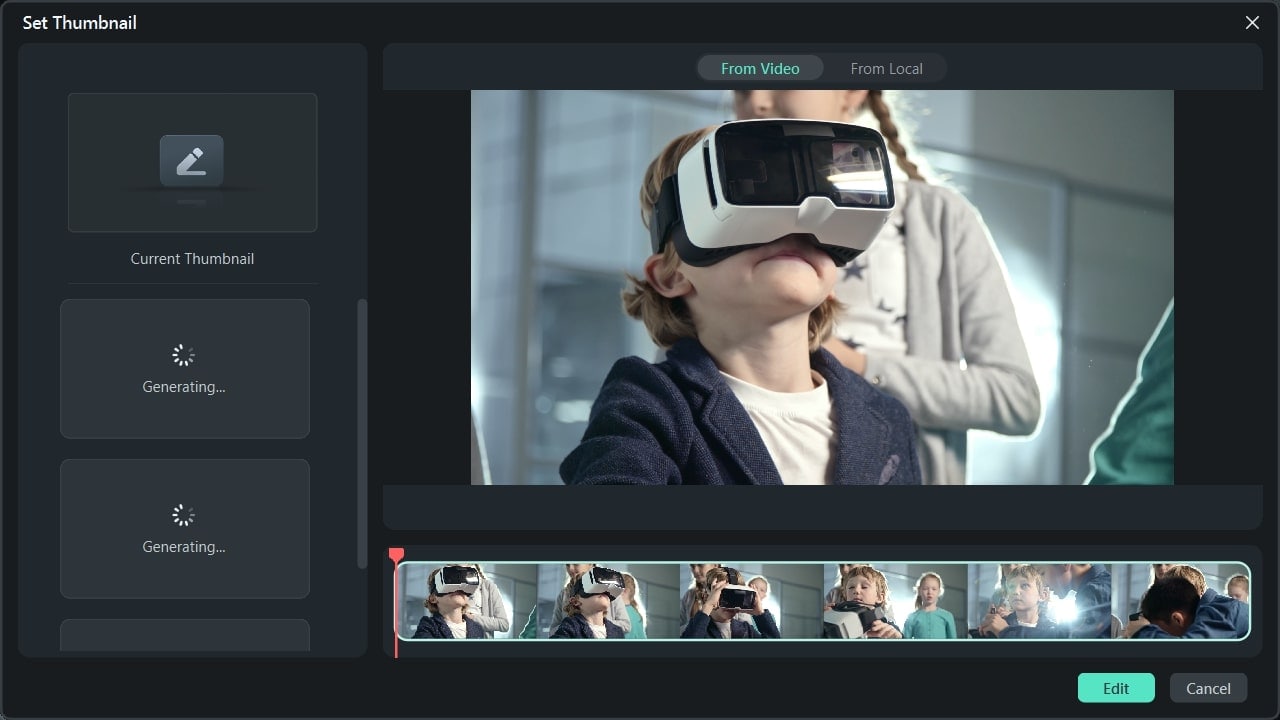
- AI Thumbnail Creator: The tool uses AI to create attractive, engaging thumbnails that get the viewers’ attention. You can use different presets to beautify your thumbnail.
Step-by-Step Guide on How to Perform AI Masking on Filmora
Wondershare Filmora Premiere Pro mask tracking is way easier and provides the same high-end results. Follow the steps below to do mask tracking using Filmora’s unique functions and procedures:
Step 1Add Video Content to Timeline in Filmora
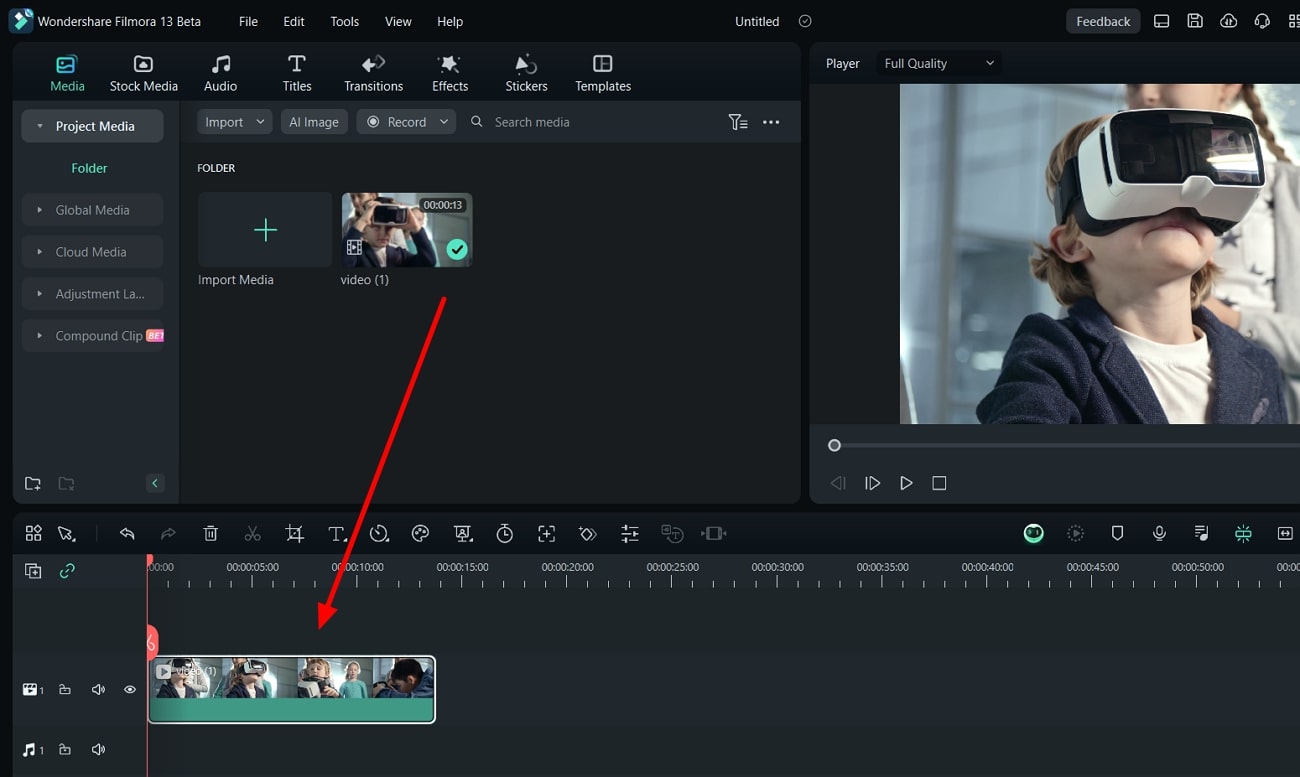
Launch Wondershare Filmora on your computer and proceed by creating a “New Project.” As a new window opens, import your required video clips to the timeline. Double-click and proceed to their respective video settings.
Step 2Use AI Masking Feature on Video
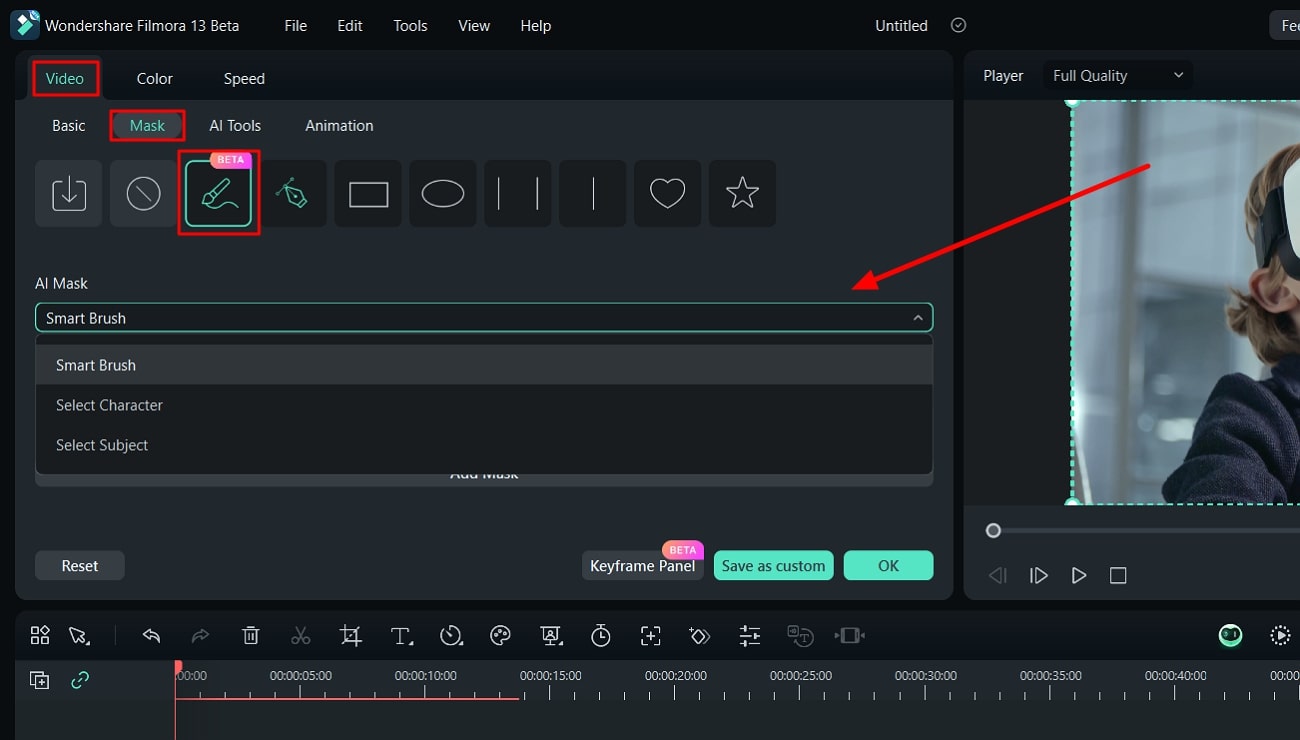
On double-clicking the video, proceed to the “Video” tab from the top and continue into the “Mask” section. Select the “AI Mask” option in the provided list to open further settings. Select any appropriate mode of AI Mask from the bottom options and set the respective parameters accordingly. You can either select “Smart Brush” or go for “Smart Character” or “Smart Subject.”
Step 3Save Final Video
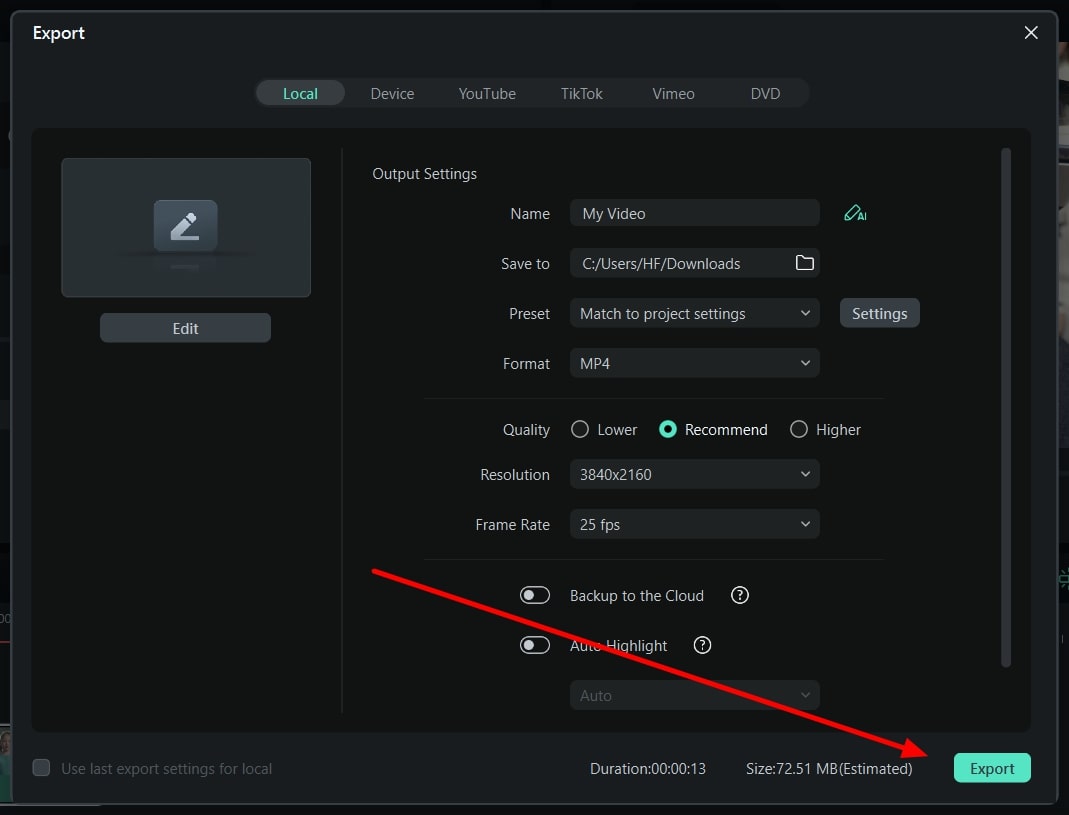
On clicking “OK,” all changes are applied to the video. Continue to the “Export” button to save your edited video clip on your computer.
Free Download For Win 7 or later(64-bit)
Free Download For macOS 10.14 or later
Conclusion
Mask tracking is handy for adding effects to a moving object in your video. By tracking the movement, you can ensure the effect persists even as the object moves around the frame. Many professionals use it in their videos to edit and enhance a specific area in their clip. Check out this article if you also seek an app for Premiere mask tracking.
Free Download Free Download Learn More

Part 1. What Do You Know About Mask Tracking in Videos?
Automatic tracking and following a certain object or area during a video clip is known as mask tracking. Usually, the “mask” depicts a designated zone of interest, such as a person’s face, an item, or any other area. Mask tracking is achieved using various methods and algorithms, including computer vision techniques such as optical flow, feature tracking, or machine learning.
The objective of the effect is to track the targeted item consistently over all video frames. Mask tracking Premiere Pro is a common special effect in video editing. It can add visual components, apply filters, or change the color and lighting inside the tracked region.
Part 2. How To Perform Mask Tracking with Adobe Premiere Pro
One of the most widely used industry standard programs for video editing is Adobe Premiere Pro . With the help of this tool, users can alter various aspects of photographs and films. It can tweak effects in nearly every frame according to user preferences using Premiere mask tracking. You will undoubtedly get remarkable outcomes from it in a short amount of time.
The tool is a video editing expert, so many professional video editors rely on it. It offers a huge range of editing features that get together to create an impactful and eye-catching video.
Marked Key Features of Adobe Premiere Pro
- Video Editing: You can combine audio and apply effects and transitions to your video content. The platform also helps you work with color or add animated titles to your videos.
- Text-Based Editing: Text-based editing creates a transcript and automatically highlights text to add clips to your timeline. It can edit and rearrange clips like a text document.
- Color Correction: With the help of AI, you can automatically balance your colors or modify the frame using expert color wheels and curve controls. It also assists in viewing your work using integrated video scopes.
- Audio Editing: With Adobe Premiere Pro, you can explore audio tracks, license them, and utilize AI to adapt them to your clips automatically.
Step-by-Step Guide to Perform Mask Tracking with Premiere Pro
Adobe Premiere mask tracking is one of the many remarkable features of the app. If you want to employ mask tracking in your videos using Adobe Premiere, look at the steps below:
Step 1: To start off with the process, import the video onto the timeline that needs to be edited. Navigate to the top of the screen and select “Effect Controls” to proceed further. Select any specific shape present below the “Opacity” option on the left to add a mask to your clip.

Step 2: Set the shape according to the person or object you will track by masking. Now, under the “Mask” option, you will see the “Mask Feather” option. Click on “Mask Feather” and adjust it so it won’t look too harsh on the edges.

Step 4: Go to the beginning of the video you are editing, return to the editing section, and look for the “Mask Path” option. Now hit the “Track Selected Masked Forward” button and wait for the system to complete the Premiere Pro tracking mask process and save the video.

Part 3. Making Masking Easy with Wondershare Filmora: Reviewing the Details
Adobe Premiere Pro is an incredible tool, without a doubt. However, many users say that it needs to be simpler to use. You cannot generate a good video even after watching tutorials because it’s hard for an amateur to use Adobe Premiere Pro. Because of this, many users look for alternative options to add a premiere tracking mask and make other changes to their videos.
This part is all about the amazing alternative that you’re looking for. Wondershare Filmora is a video editing tool that provides professional quality content editing. The tool is so easy to use that you can start immediately with basic instructions. Its smart editing features, combined with a fast and intelligent system, make it a great choice for everyone.
Free Download For Win 7 or later(64-bit)
Free Download For macOS 10.14 or later
Key Features of Wondershare Filmora
- Compound Clip: This feature will arrange all your clips, combine them, and edit them as a single clip. This strong and intuitive feature improves and edits your video.

- AI Text-to-Video: You can convert text into engaging visual narratives and instantly turn text inputs into interesting videos. The feature makes ideas into stunning videos with ease.

- Speed Ramping: This feature produces distinctive cinematic effects by managing your keyframes and altering the speed of your film.

- AI Thumbnail Creator: The tool uses AI to create attractive, engaging thumbnails that get the viewers’ attention. You can use different presets to beautify your thumbnail.

Step-by-Step Guide on How to Perform AI Masking on Filmora
Wondershare Filmora Premiere Pro mask tracking is way easier and provides the same high-end results. Follow the steps below to do mask tracking using Filmora’s unique functions and procedures:
Step 1Add Video Content to Timeline in Filmora
Launch Wondershare Filmora on your computer and proceed by creating a “New Project.” As a new window opens, import your required video clips to the timeline. Double-click and proceed to their respective video settings.

Step 2Use AI Masking Feature on Video
On double-clicking the video, proceed to the “Video” tab from the top and continue into the “Mask” section. Select the “AI Mask” option in the provided list to open further settings. Select any appropriate mode of AI Mask from the bottom options and set the respective parameters accordingly. You can either select “Smart Brush” or go for “Smart Character” or “Smart Subject.”

Step 3Save Final Video
On clicking “OK,” all changes are applied to the video. Continue to the “Export” button to save your edited video clip on your computer.

Free Download For Win 7 or later(64-bit)
Free Download For macOS 10.14 or later
Conclusion
Mask tracking is handy for adding effects to a moving object in your video. By tracking the movement, you can ensure the effect persists even as the object moves around the frame. Many professionals use it in their videos to edit and enhance a specific area in their clip. Check out this article if you also seek an app for Premiere mask tracking.
How to Add Zoom Blur Effect In Photoshop
People add blurry effects to their photos to add a sense of focus effortlessly. It helps to grasp the viewers’ attention as blurry effects add a depth of field. There are various kinds of blurry effects, such as motion blur, zoom blur, etc.
One of the commonly used blurry effects is zoom blur which helps to highlight a specific area of the image. This article will help you to add zoom blur Photoshop through simple means.
Part 1: What is Zoom Blur?
Zoom blur is a creative effect that adds a new dimension to your captured photos. It creates an illusion where the captured shot appears to blur from the center direction. It gives an abstract feel and adds a certain movement to the picture. You can quickly draw attention to your subject by adding a zoom motion blur.
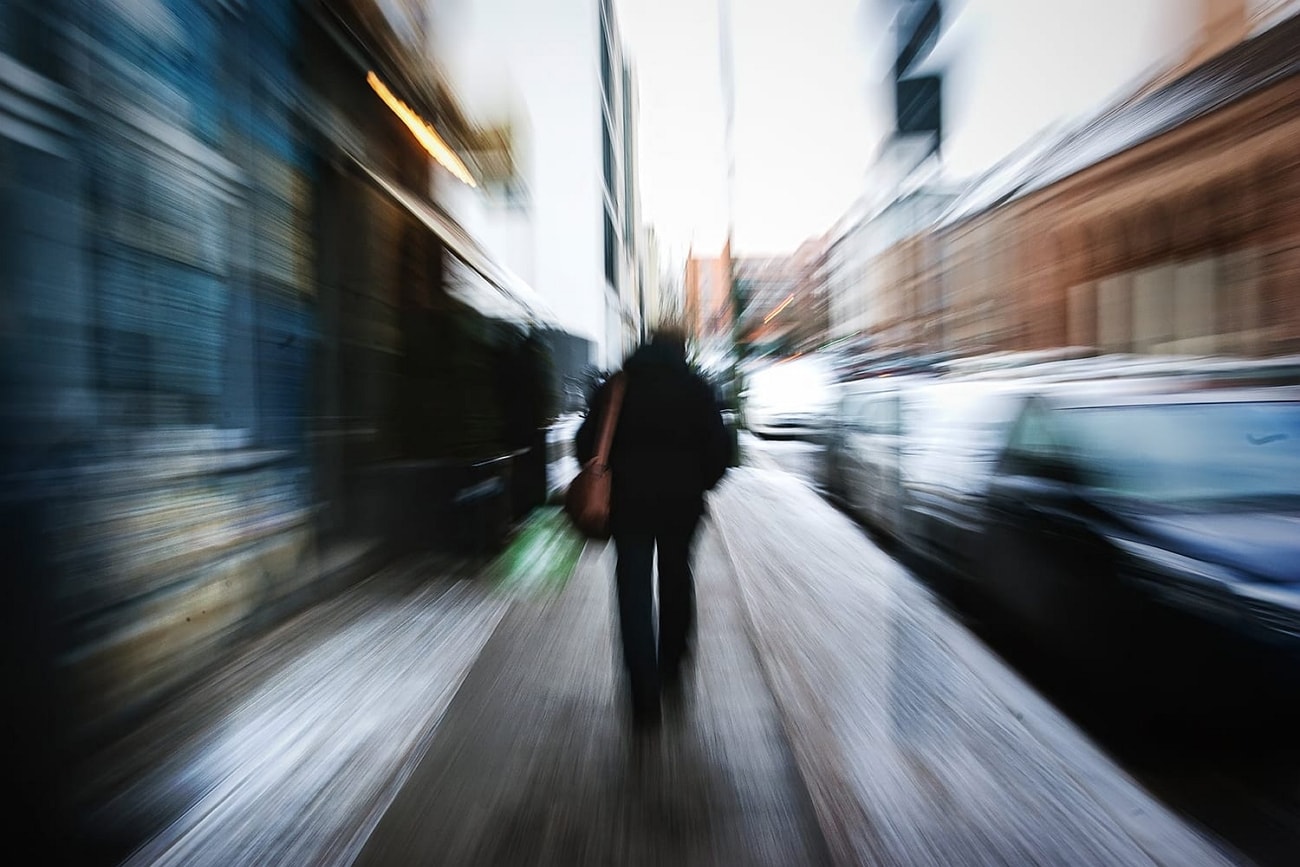
To create a zoom blur effect while capturing the photo, you should consider some conditions. For example, you can successfully create this effect by taking a picture in low-light conditions. Moreover, you should use a tripod to acquire the best results.
Part 2: How to Add Zoom Blur Effect to Photos in Photoshop?
Photoshop is widely used to alter images with distinct features. It can easily handle diverse file types with great efficiency. It gives complete control to the user as it comprises a friendly user interface. Moreover, you can utilize its color grading tools to adjust the saturation, hue, contrast, and brightness of the photo.
You can also discover AI-supported neural filters that can be a game-changer for you. It also provides a sky replacement tool that you can use to replace the sky in your captured photos effortlessly. For zoom blur Photoshop, you can manually create this effect with a few clicks. For this purpose, you can take help from the following guidelines:
Step1 Navigate to your Photoshop tool and import your desired photo. Go to the “Layers” section on your screen and press “Ctrl + J” to duplicate the first layer. If you are a MacBook user, you can press “Command + J.”

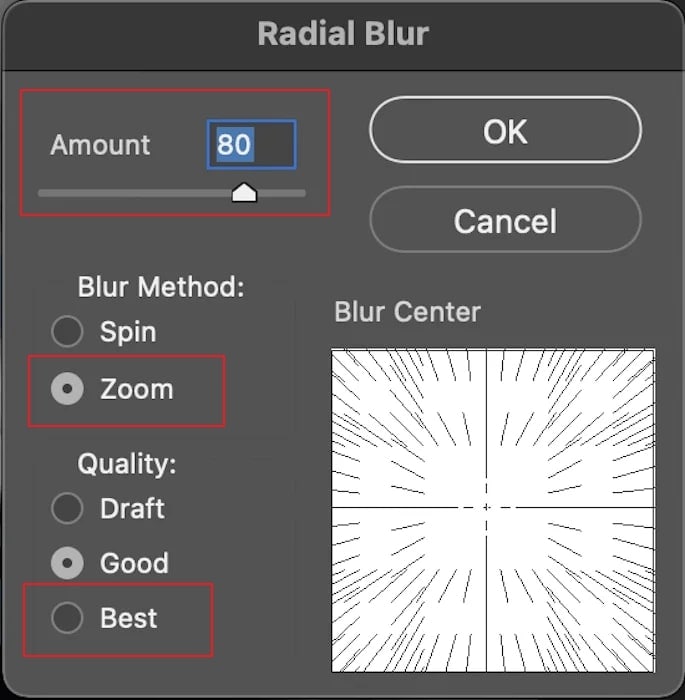
Step2 To proceed, go to the “Filter” option given above and select the “Blur” option. From its drop-down menu, select “Radial Blur .”Now you would be able to see a new window of Radial Blur on your screen. Here, change the amount to 10, and under the “Blur Method” section, select “Zoom .”Also, choose “Best” in the “Quality” section.
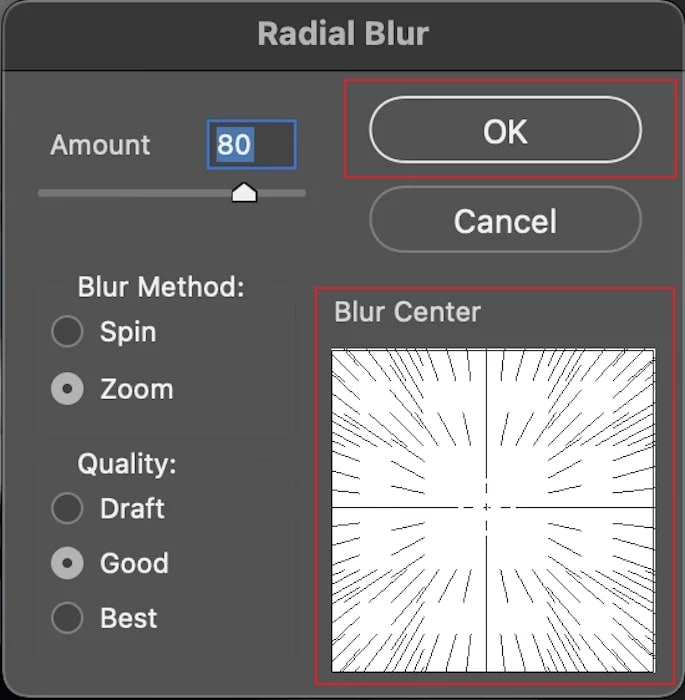
Step3 By staying on the Radial Blur window, adjust the “Blur Center” according to your desire. It will add focus to the central point while blurring the surroundings of your image. Once done, hit the “OK” button. To add further modifications, you can open the Radial Blur window again and modify the “Blur Center” easily.
Part 3: Add the Motion Blur with an Alternative to Photoshop
Are you searching the alternatives to Photoshop? It may be possible that you don’t get desired final results using zoom blur Photoshop. For this, you can check the following tools to achieve the best results.
1. GIFGIT.com
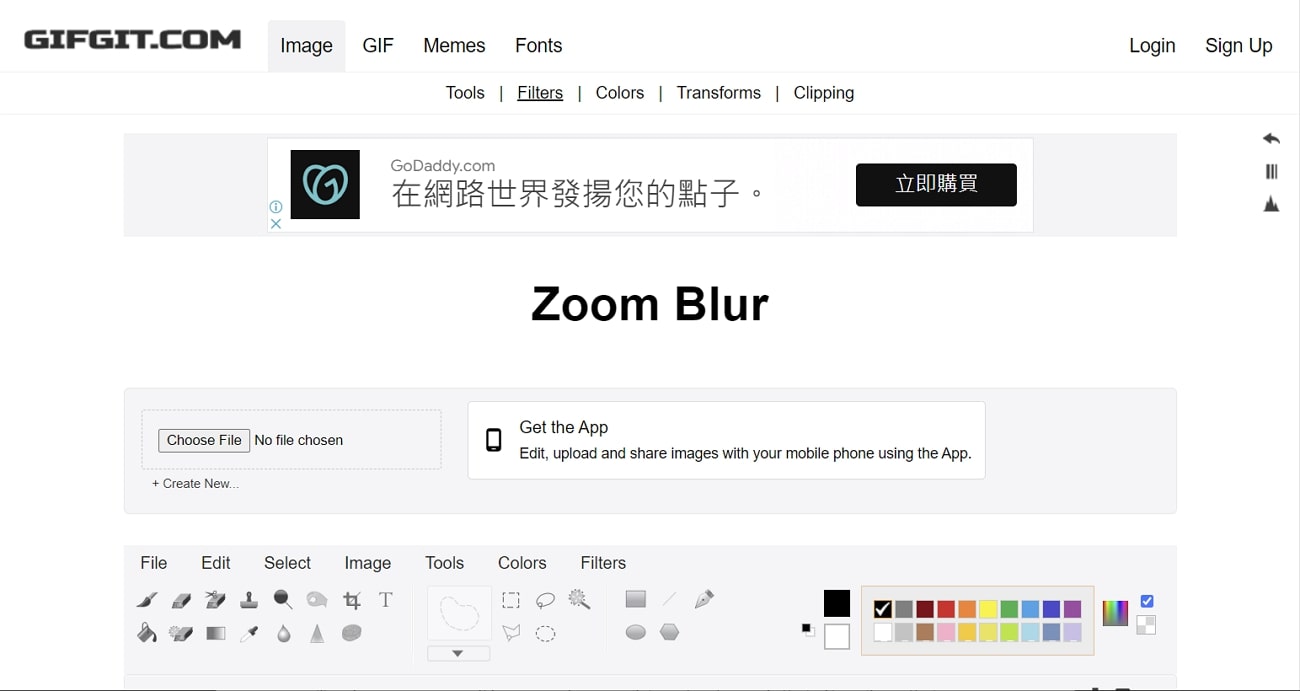
This online tool is an easy-to-use platform through which you can edit your images without any complications. It contains different tools through which you can add modifications instantly. For instance, you can utilize its advanced features such as Color Picker, Background Eraser, Gradient Tool, Magic Eraser, etc. Through its Blur Tool, you can defocus an image precisely in the desired manner.
To use this tool, navigate to the website of GIFGIT through your web browser. From its various tools, select the “Blur” tool. Afterward, click the “Choose File” button and upload your image. From the above editing toolbar, access the “Zoom Blur” slider to use the blur option. Adjust the ratio of the blur by increasing or decreasing the value through the slider or by entering the number inside the box.
2. Luxa.org
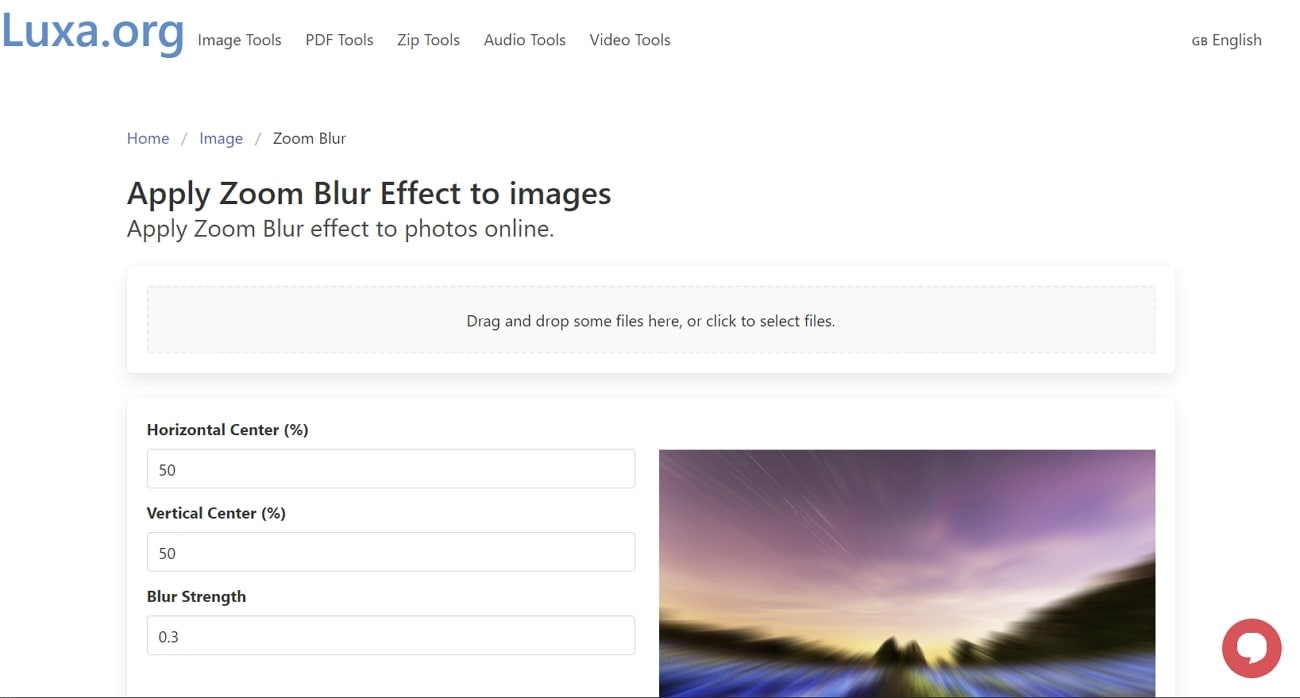
Do you want a professional tool to add a zoom blur effect? Luxa.org has a friendly user interface that comprises different options, such as PDF tools and image tools. For the image tools, you can find various options to execute the editing. For instance, you can add colored borders to your images and text in the desired font. You can also modify the brightness level of your pictures through this tool.
To add a zoom motion blur effect, this tool provides a special online blur tool. To utilize it, access the website of Luxa.org and go to its image tools. From there, navigate to the zoom blur feature. Now upload your image on this tool and set the horizontal and vertical strengths. Also, adjust the blur strength accordingly. Once the zoom blur effect gets added to your photo, click on the “Download” button.
3. Wondershare Filmora
Have you ever tried Wondershare Filmora before? Filmora is a complete toolbox through which you can execute basic and advanced image editing without complications. It contains different kinds of built-in presets that can help you express your creativity. Moreover, it provides stock images that you use without any restrictions.
Free Download For Win 7 or later(64-bit)
Free Download For macOS 10.14 or later
To enhance your images, Filmora provides you with tons of professional effects. Using these effects, you can also add a zoom blur effect to your photos along with modification options. Furthermore, you can also export the edited image in the desired file format and resolution on this platform. To use this platform for adding a zoom blur effect, check the following instructions:
Step1 Import the Particular Image
After launching Filmora, select the “Create New Project” option to begin. Afterward, import the image from your computer to which you want to add the zoom blur effect. Once done, drag and drop the picture into the timeline.

Step2 Add the Zoom Blur Effect
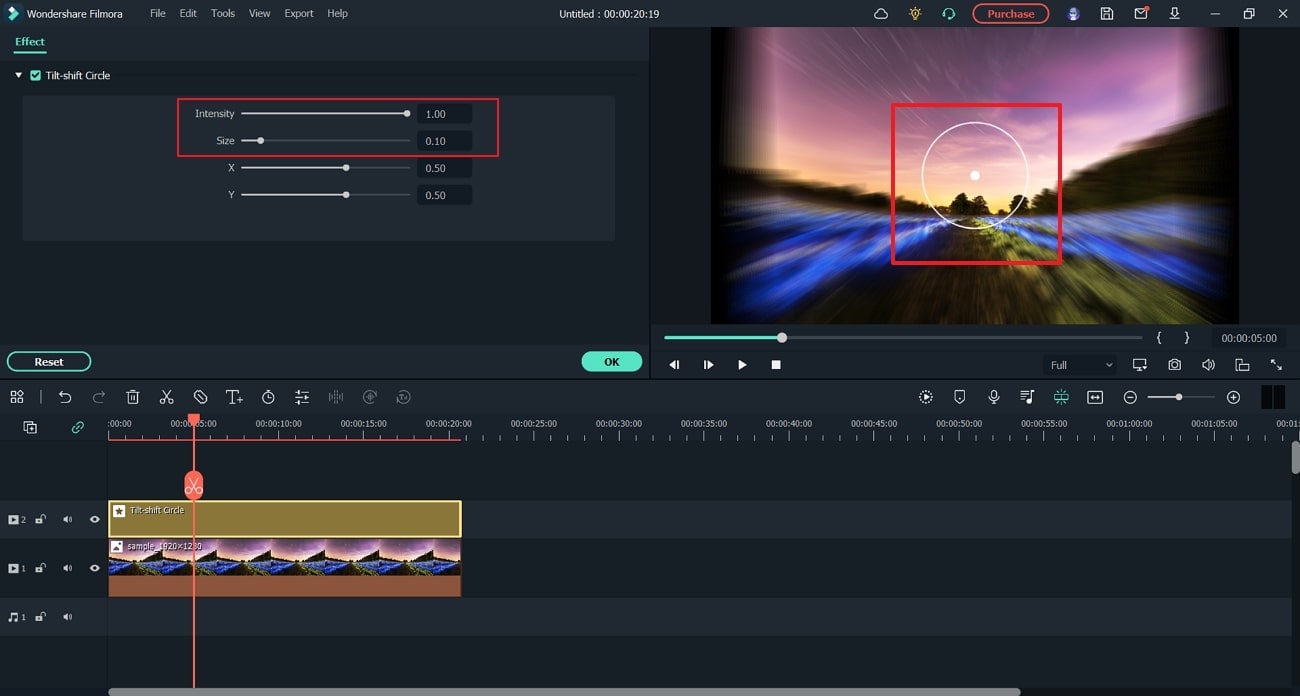
Go to the Effect section and select “Utility” under the “Video Effects” section. From there, search “Tilt-Shift Circle” effect. Select and drop this effect to the timeline to proceed. Also, make sure to adjust the duration of the added effect according to your clip.

Step3 Adjust the Blur Settings
Now, double-click the added effect to adjust the intensity of the effect. Through the circle, you can apply the zoom blur effect to the photo precisely. You can adjust the intensity and size of the zoom motion blur effect.
Last Words
The zoom blur effect can instantly add focus to the subject in a dramatic manner. It can also highlight a specific point of the image effortlessly. In this article, we have addressed how to add zoom motion blur using Photoshop. To use the best alternative to Photoshop, we highly recommend using Wondershare Filmora. This tool has an easy-to-use interface and enables you to add a zoom blur effect easily.
Part 1: What is Zoom Blur?
Zoom blur is a creative effect that adds a new dimension to your captured photos. It creates an illusion where the captured shot appears to blur from the center direction. It gives an abstract feel and adds a certain movement to the picture. You can quickly draw attention to your subject by adding a zoom motion blur.

To create a zoom blur effect while capturing the photo, you should consider some conditions. For example, you can successfully create this effect by taking a picture in low-light conditions. Moreover, you should use a tripod to acquire the best results.
Part 2: How to Add Zoom Blur Effect to Photos in Photoshop?
Photoshop is widely used to alter images with distinct features. It can easily handle diverse file types with great efficiency. It gives complete control to the user as it comprises a friendly user interface. Moreover, you can utilize its color grading tools to adjust the saturation, hue, contrast, and brightness of the photo.
You can also discover AI-supported neural filters that can be a game-changer for you. It also provides a sky replacement tool that you can use to replace the sky in your captured photos effortlessly. For zoom blur Photoshop, you can manually create this effect with a few clicks. For this purpose, you can take help from the following guidelines:
Step1 Navigate to your Photoshop tool and import your desired photo. Go to the “Layers” section on your screen and press “Ctrl + J” to duplicate the first layer. If you are a MacBook user, you can press “Command + J.”

Step2 To proceed, go to the “Filter” option given above and select the “Blur” option. From its drop-down menu, select “Radial Blur .”Now you would be able to see a new window of Radial Blur on your screen. Here, change the amount to 10, and under the “Blur Method” section, select “Zoom .”Also, choose “Best” in the “Quality” section.

Step3 By staying on the Radial Blur window, adjust the “Blur Center” according to your desire. It will add focus to the central point while blurring the surroundings of your image. Once done, hit the “OK” button. To add further modifications, you can open the Radial Blur window again and modify the “Blur Center” easily.

Part 3: Add the Motion Blur with an Alternative to Photoshop
Are you searching the alternatives to Photoshop? It may be possible that you don’t get desired final results using zoom blur Photoshop. For this, you can check the following tools to achieve the best results.
1. GIFGIT.com
This online tool is an easy-to-use platform through which you can edit your images without any complications. It contains different tools through which you can add modifications instantly. For instance, you can utilize its advanced features such as Color Picker, Background Eraser, Gradient Tool, Magic Eraser, etc. Through its Blur Tool, you can defocus an image precisely in the desired manner.
To use this tool, navigate to the website of GIFGIT through your web browser. From its various tools, select the “Blur” tool. Afterward, click the “Choose File” button and upload your image. From the above editing toolbar, access the “Zoom Blur” slider to use the blur option. Adjust the ratio of the blur by increasing or decreasing the value through the slider or by entering the number inside the box.

2. Luxa.org
Do you want a professional tool to add a zoom blur effect? Luxa.org has a friendly user interface that comprises different options, such as PDF tools and image tools. For the image tools, you can find various options to execute the editing. For instance, you can add colored borders to your images and text in the desired font. You can also modify the brightness level of your pictures through this tool.
To add a zoom motion blur effect, this tool provides a special online blur tool. To utilize it, access the website of Luxa.org and go to its image tools. From there, navigate to the zoom blur feature. Now upload your image on this tool and set the horizontal and vertical strengths. Also, adjust the blur strength accordingly. Once the zoom blur effect gets added to your photo, click on the “Download” button.

3. Wondershare Filmora
Have you ever tried Wondershare Filmora before? Filmora is a complete toolbox through which you can execute basic and advanced image editing without complications. It contains different kinds of built-in presets that can help you express your creativity. Moreover, it provides stock images that you use without any restrictions.
Free Download For Win 7 or later(64-bit)
Free Download For macOS 10.14 or later
To enhance your images, Filmora provides you with tons of professional effects. Using these effects, you can also add a zoom blur effect to your photos along with modification options. Furthermore, you can also export the edited image in the desired file format and resolution on this platform. To use this platform for adding a zoom blur effect, check the following instructions:
Step1 Import the Particular Image
After launching Filmora, select the “Create New Project” option to begin. Afterward, import the image from your computer to which you want to add the zoom blur effect. Once done, drag and drop the picture into the timeline.

Step2 Add the Zoom Blur Effect
Go to the Effect section and select “Utility” under the “Video Effects” section. From there, search “Tilt-Shift Circle” effect. Select and drop this effect to the timeline to proceed. Also, make sure to adjust the duration of the added effect according to your clip.

Step3 Adjust the Blur Settings
Now, double-click the added effect to adjust the intensity of the effect. Through the circle, you can apply the zoom blur effect to the photo precisely. You can adjust the intensity and size of the zoom motion blur effect.

Last Words
The zoom blur effect can instantly add focus to the subject in a dramatic manner. It can also highlight a specific point of the image effortlessly. In this article, we have addressed how to add zoom motion blur using Photoshop. To use the best alternative to Photoshop, we highly recommend using Wondershare Filmora. This tool has an easy-to-use interface and enables you to add a zoom blur effect easily.
Also read:
- [New] Yoga Enthusiasts' Go-To Guide on YouTube
- 5 Tools to Create a Time-Lapse Video Online
- Complete guide for recovering video files on OnePlus
- Discover a Quick Guide to Add Personalized Video Filters in VN App. Learn How to Use Built-In Filters and Import External Ones for Creative Video Editing for 2024
- Do You Have the Habit to Create Subtitle for Your Video? You Can Always Add Open and Close Subtitles to Your Video to Make It Perfect. Follow This Article to Learn More About It
- Driving Design Excellence: Mass-Creating with Canva & GPT Insights
- Finding Purpose in Film Our Selection of Top Motivational Titles for 2024
- GTX 950 'Error 43' Fix Guide: A Comprehensive Solution for Windows 11 Users
- How to Effectively Empty Your Cache on Leading Internet Browsers
- How To Pause Life360 Location Sharing For Oppo A78 | Dr.fone
- In 2024, Detailed Guide to Rotate Videos in Blender
- In 2024, Overview of FPS for YouTube Videos
- The Essential Guide to LG 360 Camera Features Update 2023
- Unveiling the Power of Photo Editing Techniques to Add Text in Windows/MacOS
- Want to Save Your Edited Video File in MP4 Format in Windows Movie Maker? Here Are the Simple Steps Along with a Better Alternative
- Title: How To Track and Blur Faces in Premiere Pro
- Author: Chloe
- Created at : 2024-09-29 12:58:01
- Updated at : 2024-10-02 23:53:21
- Link: https://ai-editing-video.techidaily.com/how-to-track-and-blur-faces-in-premiere-pro/
- License: This work is licensed under CC BY-NC-SA 4.0.