
How to Upload Videos to Twitch? Heres a Guide for Beginner

How to Upload Videos to Twitch? Here’s a Guide for Beginner
Recently, Twitch announced that its users can now upload video to Twitch, and there is no need to broadcast or live stream on Twitch anymore. Uploading videos to Twitch can be an excellent way to share your videos with your audience.

Besides this, you don’t need to upload videos on other video-sharing sites. But if you are using this platform for the first time, then you must be wondering how to upload video to Twitch. Don’t worry, as we have got your back. Keep reading to explore the process, and it is quite easy.
Part 1: How to Upload Videos to Twitch?
- First of all, you need to open Twitch in any browser. Just type twitch.tv in the browser’s address bar and click on Enter. Then you need to log into your account.
- Once done, you can see your account with your profile picture in the screen’s top-right corner. You can find it next to the Get Bits option. Click on it to access the drop-down menu.
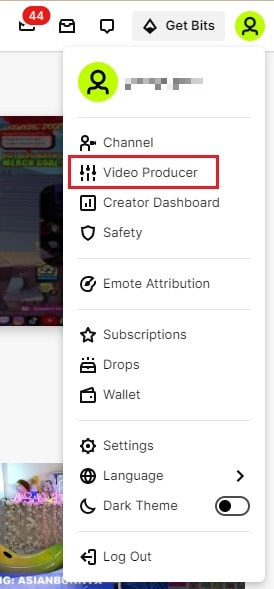
- Then you need to choose the Video Producer option available in the drop-down menu. A new page will open, and you can see the Creator Dashboard from where you can begin uploading your video or hosting a channel on twitch. If this option is unavailable, then you can’t upload your videos.
- Now, you need to click on the upload option. If you have not uploaded any video, you will find this area blank. You can just drag and drop your desired video to upload video to twitch.

- Choose the video that you want to upload and click on the Open option.
- Now, the upload process will begin. Wait for a few seconds to finish the process. Once done, click on the video, and the details window will come up.
- Here you need to edit your video’s metadata information. You can set a title, the category and a description for your video. Besides you can also edit the language and thumbnail here.
- After that, you can click on the Save Changes option that you can find in the upper right corner.
- Now you need to click on the Publish button to post your video on your channel. You can follow the process while hosting a channel on twitch to upload the videos.
Part 2: Why can’t you upload videos to twitch?
Well, it may be noted that not all Twitch users can upload video to twitch. For now, this feature is only available for Twitch partners and affiliates. So, first, you need to become an affiliate or partner, and then you can easily upload your videos. Besides, you should also keep the video upload guidelines in mind to avoid any issues.
- You can only upload video formats like 1080P videos, videos with up to 190mbps bit rate. The platform supports FLV, MOV, AVI and MP4 file formats.
- Besides, using one account, you can upload only 5 videos simultaneously. And within 24 hours, you can do a maximum of 100 uploads.
Now you know that only Twitch partners or affiliates can upload video to twitch, it is crucial for you to know how to become a Twitch affiliate or partner. Have a look at the below-given section for your answer.
Part 3: How to be a twitch affiliate or partner?
In general, streamers on Twitch can’t earn money from their content, and they can only make money from donations. However, if you have more followers, consistent viewers and hosting a channel on twitch regularly, then you can try to become a Twitch affiliate or partner. Some benefits that you can enjoy with this are:
- You will be able to sell your games
- You can get subscriptions.
- You will enjoy chargeback protection.
- It will be easier for you to get Twitch Bits.
- You can now earn revenue through advertisements.
To become an affiliate on Twitch, first of all, you need to monetize your content, i.e., stream. Now, let’s have a look at some requirements to become an affiliate.
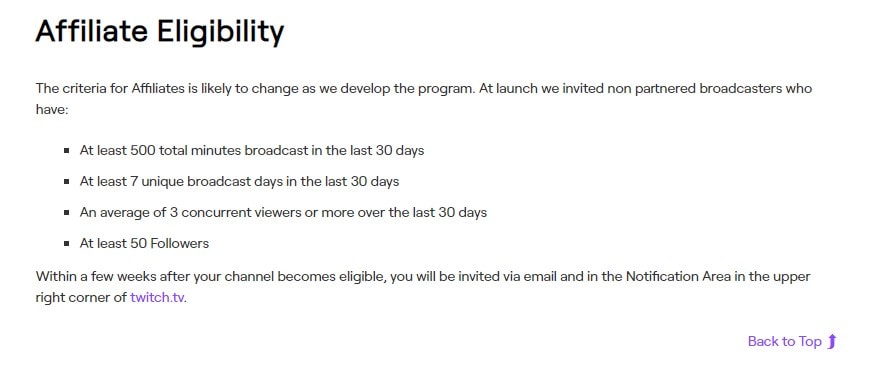
- You must have at least 50 followers.
- Make sure you have completed a minimum of 500 total minutes broadcast within one month or in the last 30 days.
- In the last 30 days, you should have at least seven unique broadcast days.
- At least 3 viewers per stream in the last 30 days.
Steps to Become an Affiliate
- Visit the Twitch website and log into your account.
- Find the Notifications icon and click on it.
- There you can see the Get Started option. Click on it.
- Sign the affiliate agreement and then give your tax information.
- Then choose your payment location to complete the procedure.
Requirements For Becoming a Partner
Once you receive your affiliate status, you can become a partner. But there are some requirements that you need to keep in your mind.
- You must have 75 average unique viewers per day in the last 30 days.
- Have streamed or hosting a channel on twitch for 12 days in the last 30 days.
- You need to stream for 25 hours in 30 days.
Steps to Follow
- Visit Twitch and log into your account.
- Now click on your Profile icon and then click on the Creator Dashboard option.
- Click on the arrow mark located near Insights and then click on Achievements.
- Click on the Apply option located under the Patch to Partner tab.
Once applied, Twitch will reply to your application within 7 business days. Well, if you face rejection, then you need to build a stronger audience and apply for it again later.
What Do You Mean Stay Active?
Chat is an important part of Twitch, and it lets you interact with your fellow members of the community as well as streamers. By keeping your chat active, you can let others know that you are ready to interact with them. This, in turn, can help you to increase your followers.
Part 4: What’s The Alternative to Twitch for Creators?
1. YouTube Gaming
Well, even though YouTube Gaming lacks in-game overlays, it offers other features. The platform offers live gaming broadcasts, channels, chat rooms and more. Here the viewers don’t need to subscribe to watch the content.
2. Smashcast
If you are a gaming fan, you must have heard about Hitbox and Azubu. They came together to form Smashcast. This provides the users with perfect JavaScript and HTML integration. If you are a gaming partner, esports team, viewer, organizer or streamer, then this platform will be an excellent option for you. Compared to Twitch, Smashcast offers better quality esports streams.
3. Facebook Gaming

Facebook also has introduced its own gaming and streaming platform. Facebook Gaming comes with an easy-to-navigate interface. It has a chat room and also allows you to watch videos from different social media platforms, like Twitter, Instagram, and YouTube. Besides, it offers some amazing features, such as different monetization options, interactive live-streaming, simple streaming setup, stream analytics and more.
4. DLive
While YouTube and Twitch have some high bars for monetization, they don’t offer sufficient profit to the creators. DLive is here to solve that issue. This platform rewards content creators as well as viewers. It charges a flat fee and takes around 20 percent of total revenue. On the other hand, viewers also get rewards for their engagement.
5. Ustream
This platform offers more than just gaming video streams, such as sports news, live streams, talk shows, podcasts and more. Some reviews say Ustream provides users with a better and faster streaming service. Besides, it is available for different platforms, such as PS4, Mac, Windows, iOS, and Android.
6. Vimeo

Vimeo has all the features, such as a live chat system and other features that a streaming platform must have. You can easily access its analytic dashboard to know your audience in a better way. It also has many integrations such as Figma, Meta, WordPress, Shopify and more. So, uploading videos directly from your website to Vimeo will not be a challenging task.
FAQs
How Long Do My Videos Stay on Twitch?
The answer is that it depends. If you are a Twitch Prime user, Turbo user or a Twitch partner, then once you upload video to twitch, it will stay for 60 days. For regular broadcasters, their videos will remain active for 14 days. Just follow the above-mentioned steps to successfully upload your videos.
Can I Upload Videos to Twitch?
You can upload your video to twitch if you become a Twitch affiliate or Partner. Regular streamers don’t have this feature for now. Just meet the criteria required for this and apply for an affiliate. This can be a great way to promote your brand as you can leverage this amazing form of influenced marketing.
Free Download For Win 7 or later(64-bit)
Free Download For macOS 10.14 or later
Free Download For macOS 10.14 or later
Perfect Guide for Beginners to Make a TikTok with Multiple Clips
A “day-in-life” short vlog is insanely increasing on TikTok. People love to create small clips throughout the day and then merge it together as a short vlog. With the right tools and methods, you can also create a perfect TikTok with many clips. Moreover, if you don’t know how to film a TikTok with multiple clips, this article is for you.
Here, we will discuss recording multiple clips on TikTok and editing it. If you do not like the editing with TikTok, consider using a third-party video editor. A tool named Wondershare Filmora can help you a lot with this process.

Part 1: How to Make a TikTok Video with Multiple Clips
With more than 1 billion downloads on Play Store and No.1 in the entertainment charts on App Store, TikTok is loved by many users. The community present worldwide has accepted the addition of TikTok to social media. Generally, TikTok is discovered as a source of small videos.
It is widely used for creating and posting entertaining and interactive videos. Making TikTok videos with multiple clips is not as complicated as it sounds. You don’t have to master any videography skills to complete this task.
Moreover, you don’t have to be concerned about private videos as it allows you to make your TikTok account private or public. Managing followers and the following list is also very easy with TikTok. By using the simplified and easy-to-implement methods, you can record multiple TikTok clips with ease:
Method 1: How to Record Multiple Clips on One TikTok Video
The built-in camera recorder of TikTok holds very astonishing metrics. With it, you can switch the flash on and off and swipe the camera from front and back. Moreover, you can also add filters to make videos more complimentary. Enabling beautify feature will help you in looking more beautiful in the videos. By following the steps listed below, you can record multiple TikTok clips:
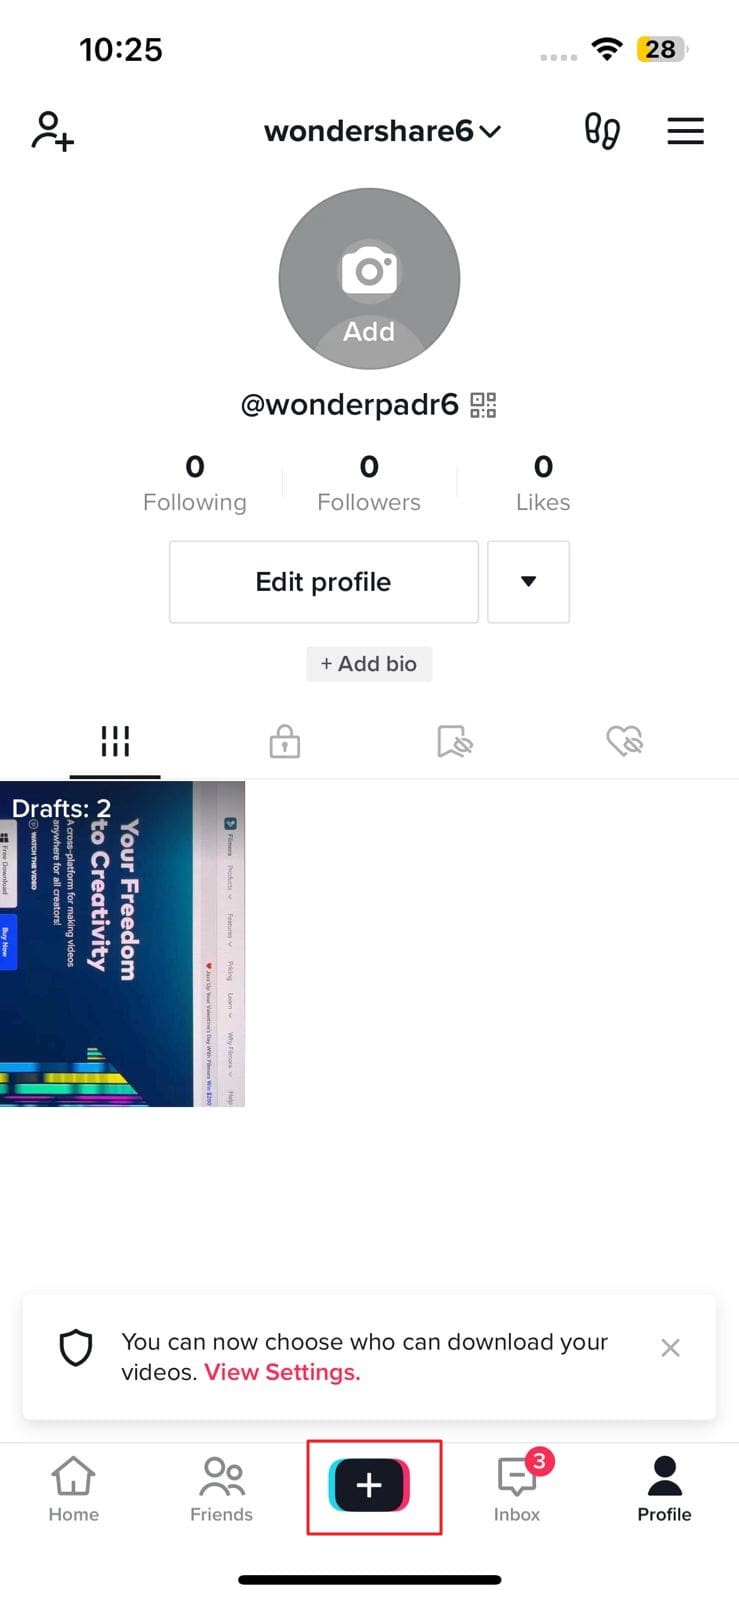
Step 1: To start the process, locate TikTok on your device and launch it. From the app’s interface, tap the “+” icon from the bottom center of the screen.
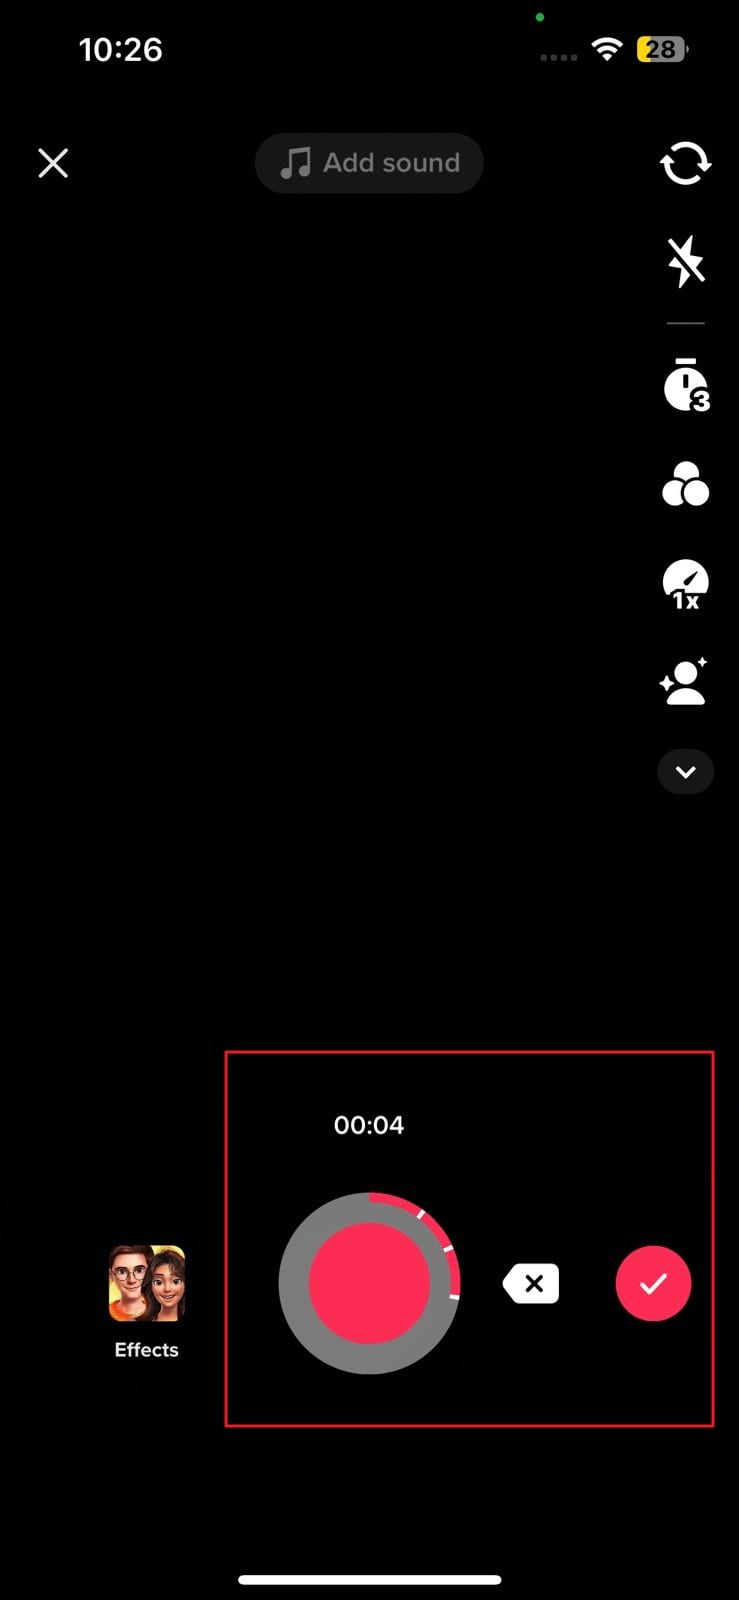
Step 2: From the recording interface, select the time limit from the options of “15s”, “60s,” “3m,” and “10m.” Then, hold onto the “Record” button and capture the scenes you want. You can resume and pause the recording to shoot multiple clips. In case you’ve recorded anything unwanted, select “Back Arrow.” Afterward, select the “Tick” icon from the left side of the record button.
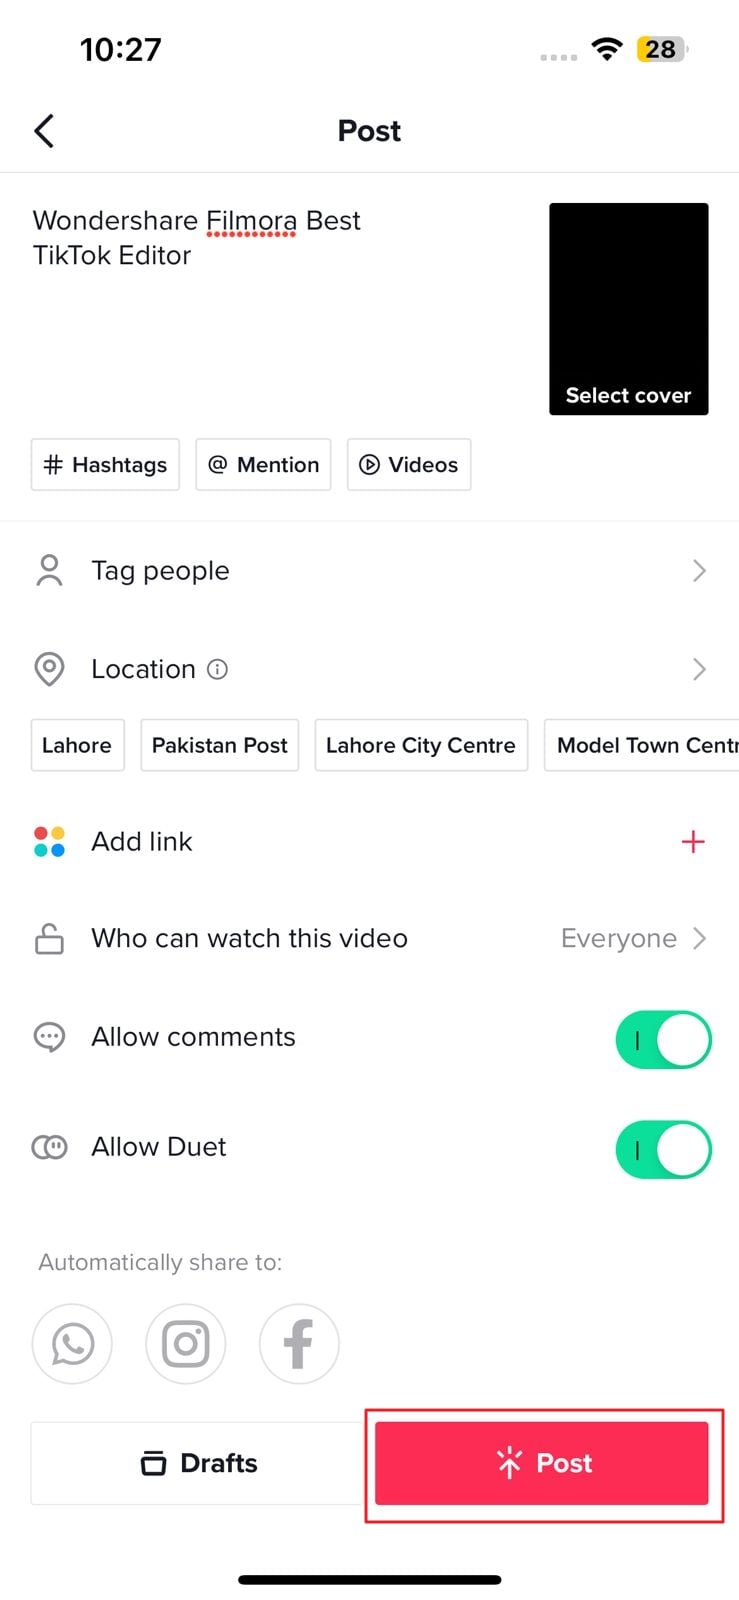
Step 3: Following this, you can customize your videos with the options of editing, text, stickers, effects, filters, and more. Once done with editing the video, tap “Next” and add captions and hashtags of your liking. Then hit “Post,” and you upload a TikTok with multiple clips.
Method 2: Uploading Multiple Videos on Create Page
TikTok is a widely used feature-rich application that gives users a full hand to edit videos. You can not only record multiple clips with TikTok but can also add clips in it from the camera roll. Furthermore, TikTok allows you to edit videos by personalizing their speed and length. Adding and deleting clips is also a very smooth process with this app.
You can also use TikTok’s built-in stickers, effects, and filters to give a video a more creative look. They are the perfect elements to enhance the quality of a video. The steps below help you in editing TikTok with more than one clip:
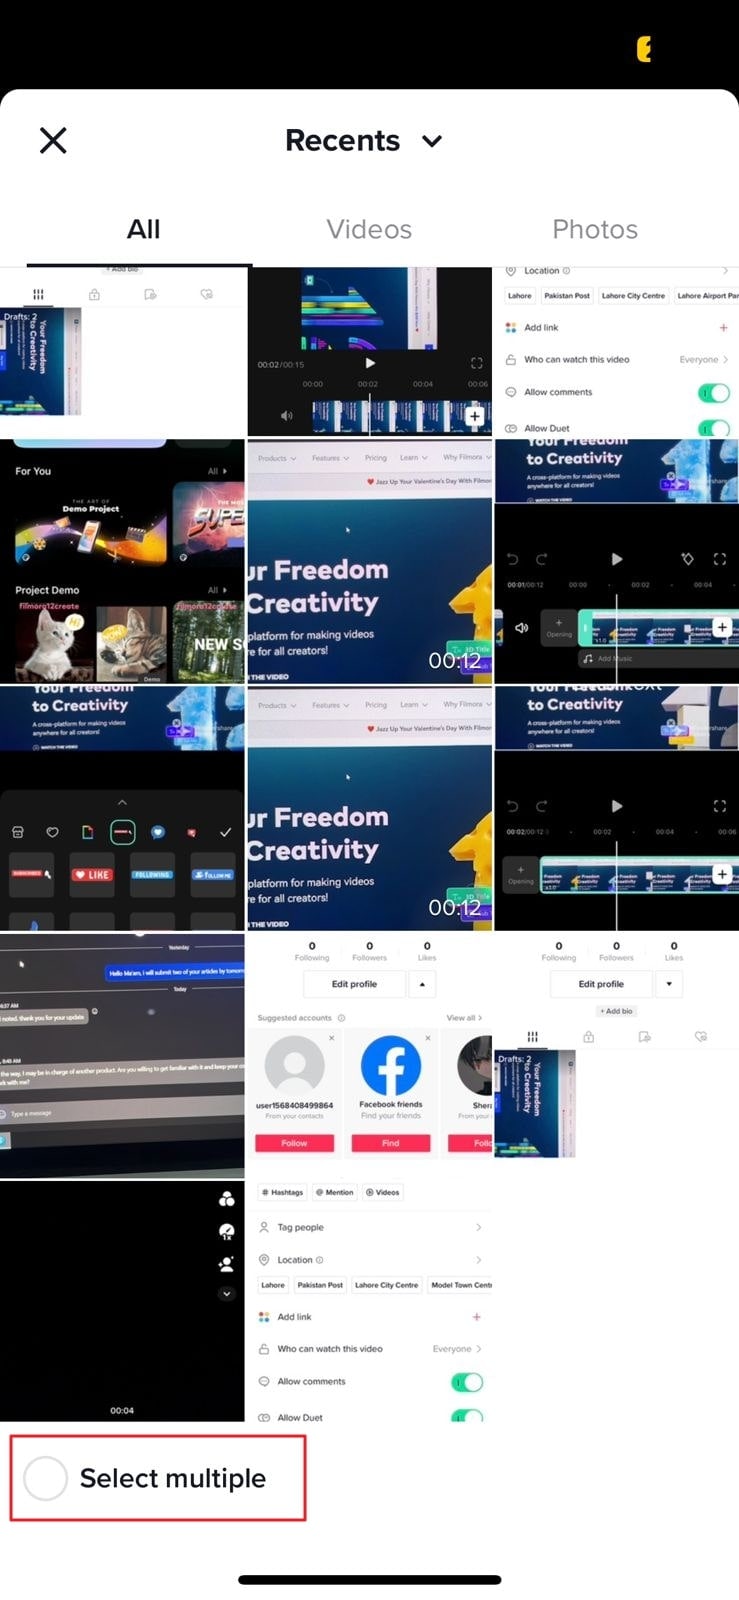
Step 1: To upload several videos on create page, launch TikTok on your device and tap the “Plus” button. Following this, select “Upload” from the bottom right and hit “Select Multiple.” Keep in mind that you cannot select more than 35 clips. After selecting the clips, choose the “Next” button.
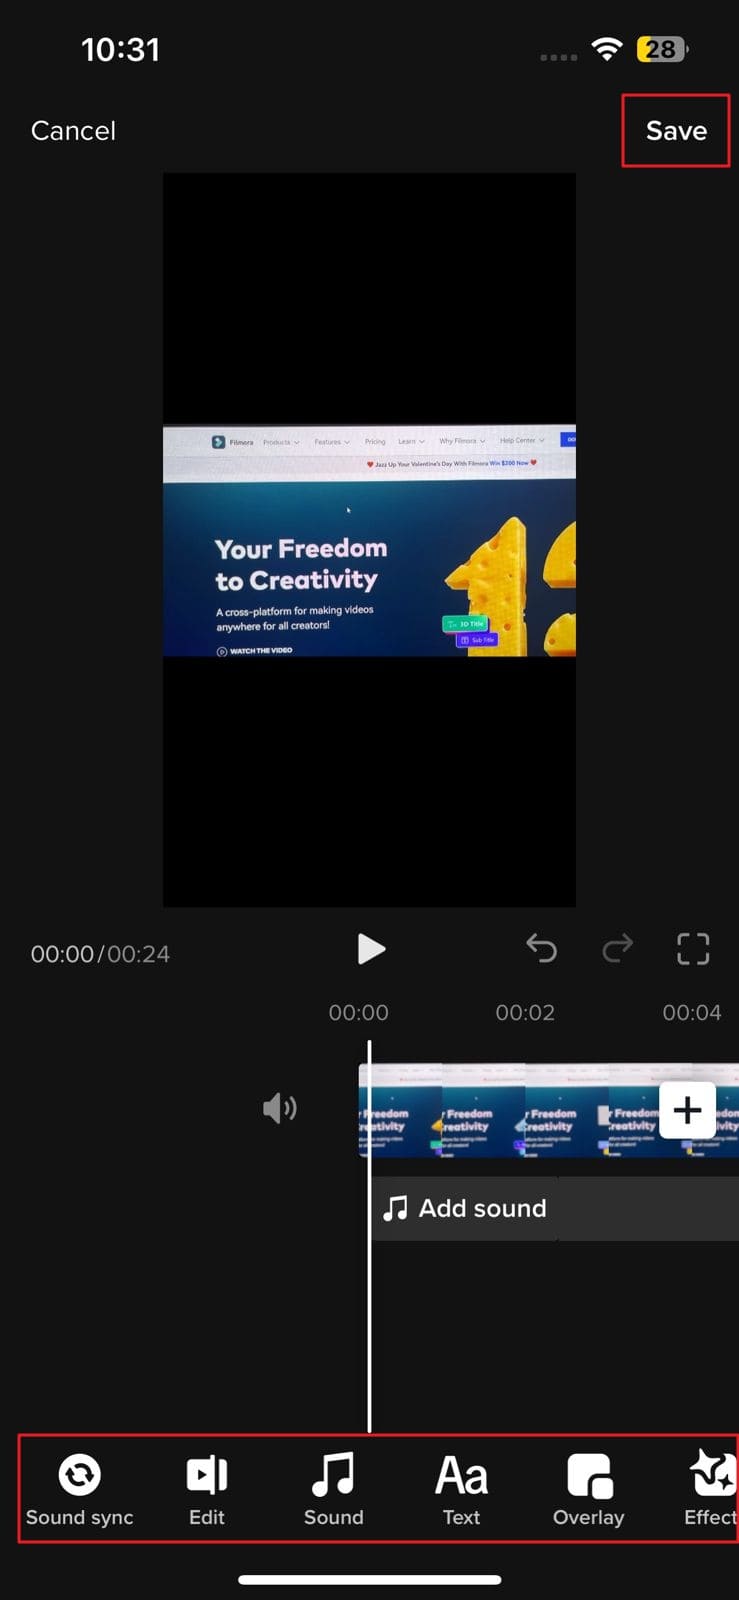
Step 2: Once the clips are uploaded as one video, you can enhance them by accessing the TikTok editor. For sound synchronization, select the “Sound Sync” icon from the bottom screen. Edit, text, overlays, and effects can also be customized here.
Once the video is edited, tap on “Save” and select “Next.” Following this add captions of your choice on the next screen and tap “Post.”
Method 3: How to Add Multiple Clips to a TikTok Video Using a Video Editor App
Although TikTok has diversified editing parameters, some users cannot be satisfied with it. That is why they need to take assistance from a third-party video editor. If you are a person who wants to edit TikTok with multiple clips with a third-party tool, the recommendation lies in Wondershare Filmora . Both Android and iPhone users can use this video editor to make prolific TikTok videos.
Filmora has a smooth and sleek interface, making it the best video editing app. It generally provides a variety of editing features to manage videos. Other than this, the processing speed of this tool is ultra-fast, so you can edit TikTok videos in the least time.
download filmora app for ios ](https://app.adjust.com/b0k9hf2%5F4bsu85t ) download filmora app for android ](https://app.adjust.com/b0k9hf2%5F4bsu85t )
Outstanding Key Features of Wondershare Filmora
- Powerful Video Editing Tools: In this app, you can find all the powerful and innovative video editing tools. It can help you with splitting screens, speed ramping, title editing, and more.
- Magnificent Effects: All the video effects in Wondershare Filmora are beyond expectations. It supports all the latest and exclusive video effects. The use of video effects can make your videos eye-catching. AI Portrait and HumanClone are also some special effects in it.
- Edit Videos with Green Screen: Everyone has their own preferences for video editing. If you are working with a green screen and want to change the video’s background, Filmora can help you. It also helps in trimming and adding subtitles and logos in a video.
- Customize Colors: If your video has no illustrative colors, viewers will not like it. That is why Filmora allows you to add a colorful background without complications. You can also blur your background or add an image as your video background.
Steps to Make TikTok Video with Multiple Clips by Using Filmora
To create and enhance the TikTok video with multiple clips in an appealing way, follow the instructions guided below:
Step 1: Launch Filmora and Import Clips
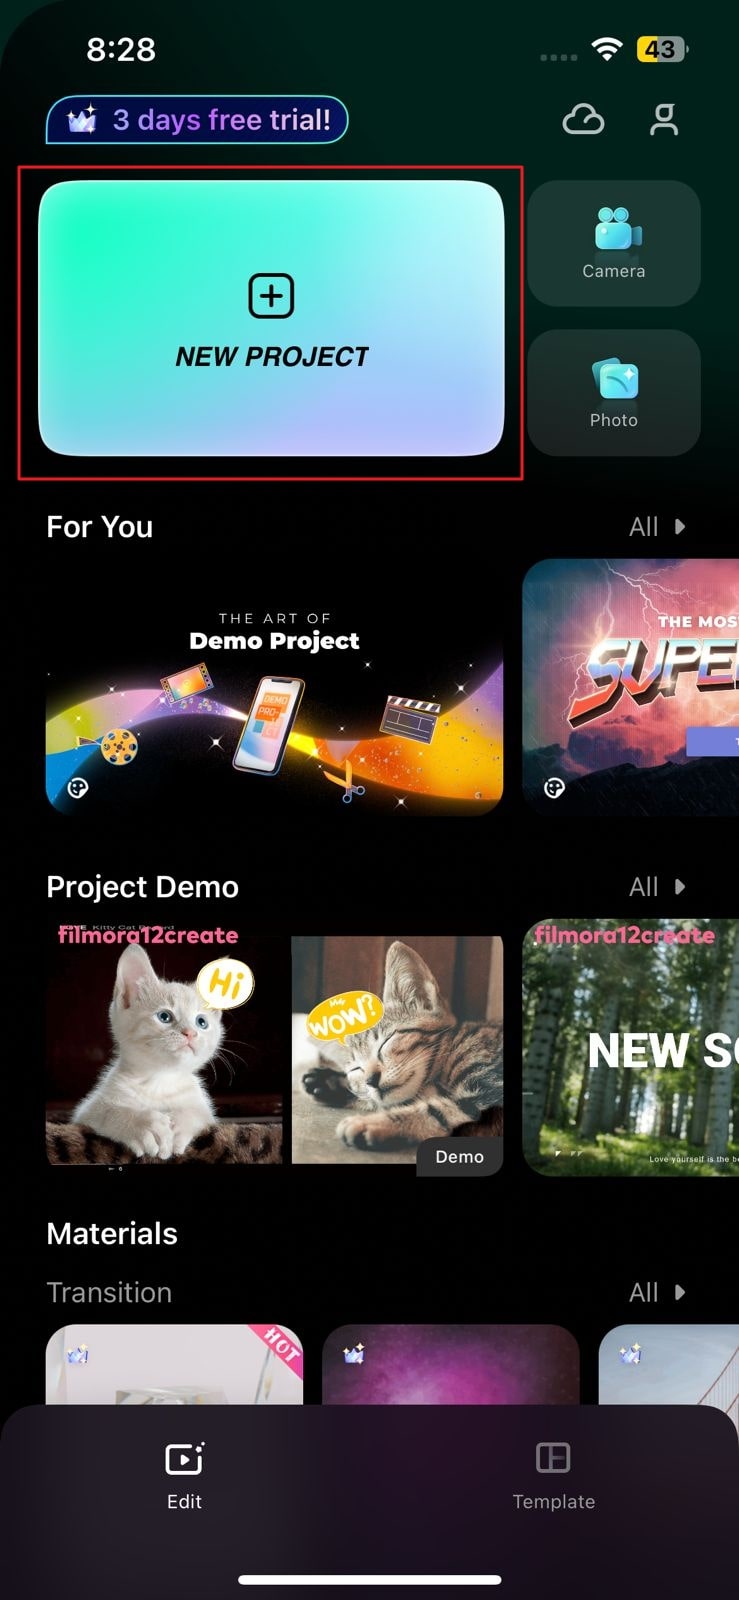
Access Wondershare Filmora on your mobile and launch it. From the main interface, tap “New Project” and select the clips of your choice. Tap the “Import” button and wait a few seconds.
Step 2: Edit the Video with Multiple Clips
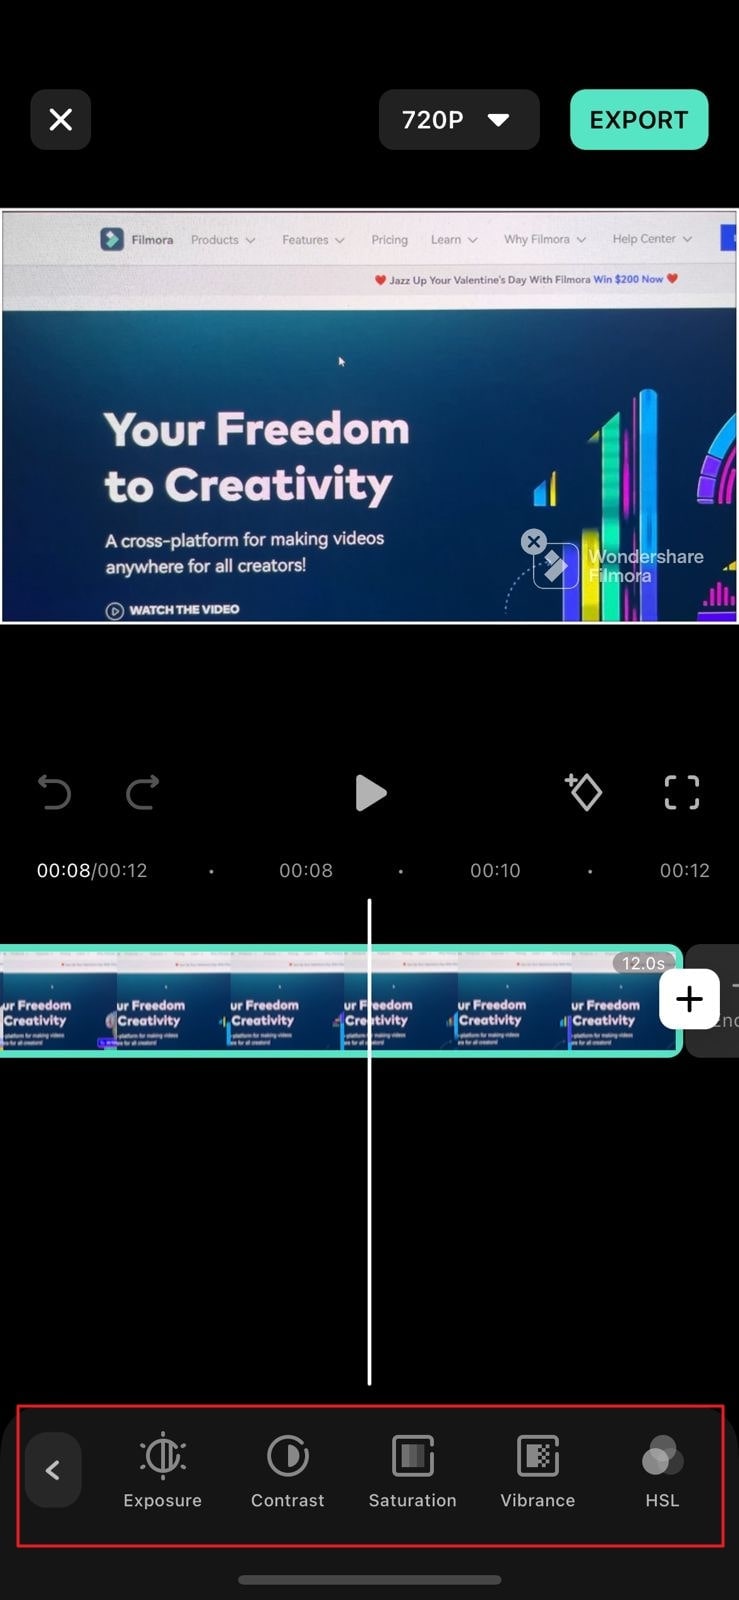
Once the clips are imported to Filmora, you will see that they are in the form of one video. From here, you can edit the video by using several editing tools like trim, music, text stickers, and more. You can also tap “Adjust” to customize metrics like exposure and contrast.
Step 3: Export TikTok Video with Multiple Clips
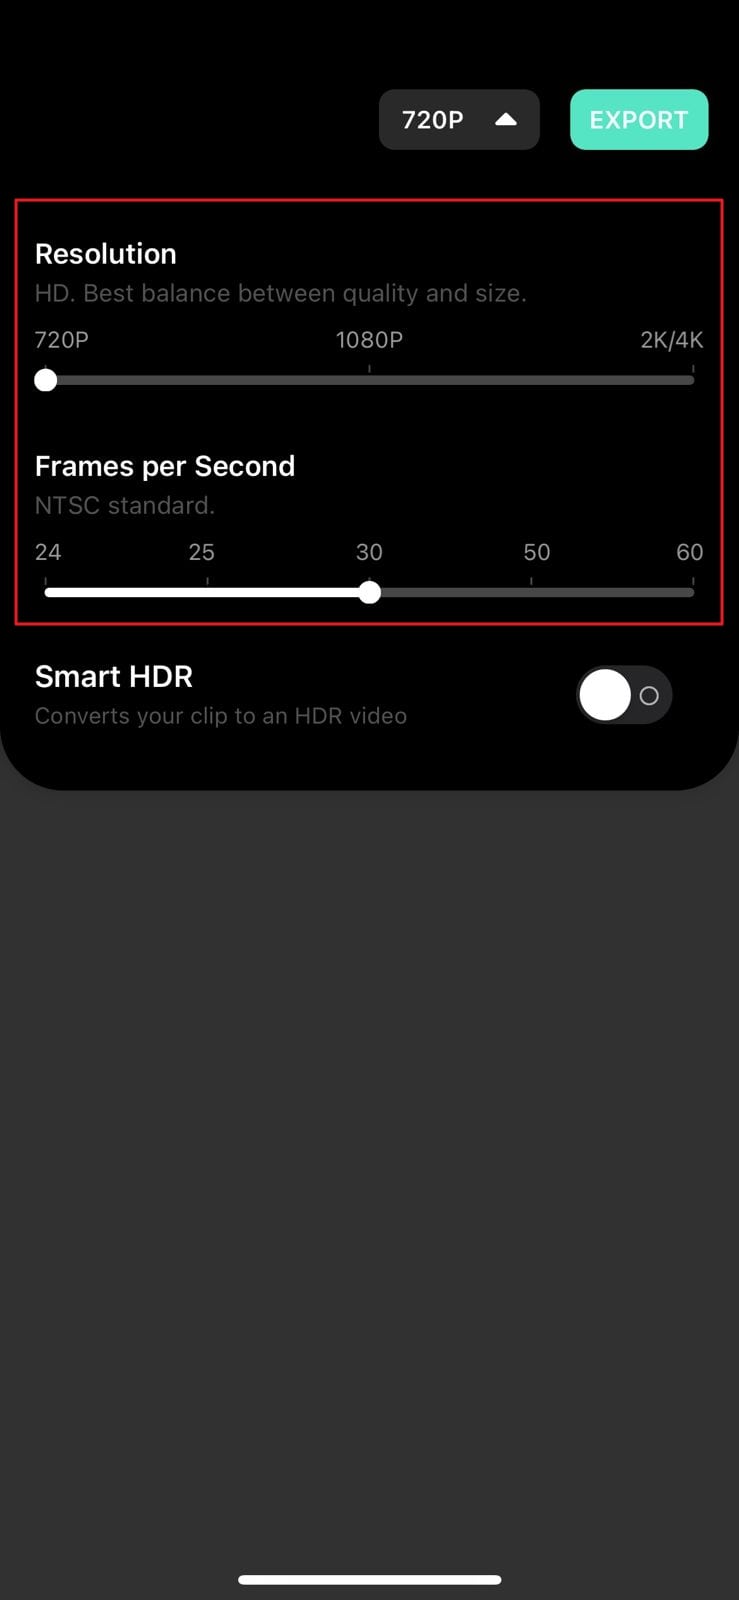
After editing the video to its full extent, tap the “Resolution” dropdown menu from the above panel. From the given options, select the resolution and frames per second for your video. Select the “Export” button to save the edited TikTok video with various clips.
Conclusion
TikTok is an innovative platform for creating and uploading videos. This article has taught you how to film a TikTok with multiple clips with ease. It also offers numerous editing options to its users for creating effective videos. If you don’t like them, you can use a third-party video editor.
A video editor by which you can create and edit TikTok videos with two or more clips is Wondershare Filmora. It never fails to amaze its users with its intuitive and modern tools.
Outstanding Key Features of Wondershare Filmora
- Powerful Video Editing Tools: In this app, you can find all the powerful and innovative video editing tools. It can help you with splitting screens, speed ramping, title editing, and more.
- Magnificent Effects: All the video effects in Wondershare Filmora are beyond expectations. It supports all the latest and exclusive video effects. The use of video effects can make your videos eye-catching. AI Portrait and HumanClone are also some special effects in it.
- Edit Videos with Green Screen: Everyone has their own preferences for video editing. If you are working with a green screen and want to change the video’s background, Filmora can help you. It also helps in trimming and adding subtitles and logos in a video.
- Customize Colors: If your video has no illustrative colors, viewers will not like it. That is why Filmora allows you to add a colorful background without complications. You can also blur your background or add an image as your video background.
Steps to Make TikTok Video with Multiple Clips by Using Filmora
To create and enhance the TikTok video with multiple clips in an appealing way, follow the instructions guided below:
Step 1: Launch Filmora and Import Clips
Access Wondershare Filmora on your mobile and launch it. From the main interface, tap “New Project” and select the clips of your choice. Tap the “Import” button and wait a few seconds.

Step 2: Edit the Video with Multiple Clips
Once the clips are imported to Filmora, you will see that they are in the form of one video. From here, you can edit the video by using several editing tools like trim, music, text stickers, and more. You can also tap “Adjust” to customize metrics like exposure and contrast.

Step 3: Export TikTok Video with Multiple Clips
After editing the video to its full extent, tap the “Resolution” dropdown menu from the above panel. From the given options, select the resolution and frames per second for your video. Select the “Export” button to save the edited TikTok video with various clips.

Conclusion
TikTok is an innovative platform for creating and uploading videos. This article has taught you how to film a TikTok with multiple clips with ease. It also offers numerous editing options to its users for creating effective videos. If you don’t like them, you can use a third-party video editor.
A video editor by which you can create and edit TikTok videos with two or more clips is Wondershare Filmora. It never fails to amaze its users with its intuitive and modern tools.
Looking for a Free and Open Source Video Editor with Cross-Platform Support? Kdenlive Video Editor Is Great but Is It the Best? Find Out From Our Complete Kdenlive Review
When you look for an open source video editor online, you will come across several popular video editors. One of them has to be Kdenlive video editor that is available free and compatible across all desktop operating systems. The video editor claims to be suitable for beginners as well as for professional video editors.
Starting from multi-track video editing and support for different file formats to loads to effects and flexible interface, Kdenlive video editor seems to be truly powerful. But is it comparable to premium video editors and is it suitable for standard and advanced video editing? Read our Kdenlive tutorial and review for everything you need to know.
Part 1. Key Features of Kdenlive
If you need to edit videos occasionally, a free video editor is what you will be looking for. Unfortunately, most free videos have very basic video editing tools and they are suitable for editing personal videos only. On the contrary, Kdenlive comes with all the standard as well as some advanced video editing features. Here are all the key features of Kdenlive video editor that you should be aware of.
Multi-track editing – Kdenlive comes with a versatile timeline where you can have multiple tracks consisting of video clips, audio files and different effects and objects. You can lock the tracks as well as mute them so that you can experiment as you edit your video.
Effects and Transitions – Even though limited, there are eye-catching effects and transitions available. You can also go for color correction as well as minor adjustments in your audio. Besides, the titler lets you create amazing 2D texts and titles.
Proxy Editing – Kdenlive uses proxy editing technique to lower the resolution of high-resolution videos while you edit them. This takes away the pressure on the CPU resources, but when it renders, the original resolution gets restored back. That is why Kdenlive has been effective in low-end computers as well.
Flexible User Interface – Kdenlive comes with a customizable user interface. This means you can arrange the layouts of your workflow as per your requirements. Besides, there are configurable keyboard shortcuts. There are also different themes available for the user interface.
Keyframing – One of the advanced features of Kdenlive is that you can keyframe any effect. This means you can change the parameters of the effects with time using curves. Besides, the software supports green screen effect.
Miscellaneous – The software supports almost all types of audio and video file formats. There is an option for automatic backup which is highly useful in any video editing software. The software also supports online resources and add-ons.
Part 2. Basic Editing with Kdenlive
Kdenlive is available for free and you should definitely try it out. Thereafter, you decide whether it is perfect for you or not. After Kdenlive download, here are all the steps for basic video editing with Kdenlive.
Import a clip:
Step 1: Launch Kdenlive on your computer and make sure you have the video clip ready on your hard drive.
Step 2: Go to Project menu option. Click on “Add Clip or Folder” option. You can include all the video clips on any folder.

Step 3: The imported clips will then have to be dragged and dropped on the timeline from Project Bin.
Trim and Export:
Step 1: Import the video clip on Kdenlive and drag and drop the clip on the timeline.
Step 2: Put the timeline cursor over the point on the video clip from where you want to trim it.

Step 3: Click on Scissor icon to start trimming. Thereafter, move the red timeline cursor to the point where you want the trimming to end.
![]()
Add multiple tracks:
There is enough number of tracks already available on Kdenlive timeline. However, when you are editing a large video project, you may need more tracks that already present.
Step 1: Go to Timeline menu option.
Step 2: Go to Tracks> Inset Track option.

Step 3: Enter a name for the track and select the type of track and click on Ok button.

Adjust brightness and contrast:
Step 1: Go to Effects> Color and Image Correction.

Step 2: Drag and drop Brightness or Contrast directly on the video clip.
Step 3: Click on Brightness that you just placed on the video clip and adjust the parameter from its slider.

Speed up or slow down:
Step 1: Right-click on the video clip that is on the timeline and click on Change Speed option.

Step 2: Adjust the slider to increase or decrease video clip speed and click on Ok button.

Part 3. Advanced Editing with Kdenlive
Now that we have discussed the basic editing Kdenlive tutorial, let us focus on a couple of useful advanced editing features of Kdenlive.
Use green screen effects:
You must have the video clip with green screen background on the timeline. Below the green screen clip should be the background image with which you want to replace the green screen background.
Step 1: Go to Effect> Alpha, Mask and Keying option.
Step 2: Drag and drop “Chroma Key : Advanced” on the video clip where there is a green screen.

Step 3: Click on video clip and adjust the parameters to soften the edges and make it as natural as possible.

**Add audio:
Adding audio files and music files to the video is as easy as adding video clips. You should have your audio file ready on your hard drive.
Step 1: Go to Project menu option. Click on “Add Clip or Folder” option. Select the audio file or folder from your hard drive.

Step 2: The imported audio files will have to be dragged and dropped on the timeline from Project Bin.

Part 4. Best Kdenlive Alternative to Edit Videos
Kdenlive has several drawbacks that prevent it from becoming the best video editor. Even though the features are sufficient for beginners, it is not suitable for professional editing. There is a lack of advanced options such as motion tracking or faster video production. Besides, the effects are very limited in number and so are the text and audio effects. That is why we recommend Wondershare Filmora as the best alternative to Kdenlive Mac and Windows.
Filmora is a premium video editor with video capturing feature. You can record your screen and webcam video. There is no dearth of effects, filters, elements and royalty-free media files. The user interface is cleaner and hence, it is suitable for both beginners and professionals. Here are the key features of Filmora.

For Win 7 or later (64-bit)
For macOS 10.12 or later
- 4K video editing and exporting without lag.
- Noise removal, color tuning, and video stabilization.
- Standard editing like trim, crop, split, join, rotate etc.
- Advanced text styles, audio mixing options, and audio equalizers.
- Wide range of stock media files. Supports different file formats.
- Capture screen and webcam video with internal and external audio.
Frequently Asked Questions
**Is Kdenlive a good editor?
Kdenlive is a good editor if you are getting started in video editing or you are editing your video for personal usage. However, for professional and even social media videos, a premium video editor will be better. We recommend Filmora over Kdenlive because Kdenlive lacks advanced video editing options.
**Does Kdenlive cost money?
Kdenlive Windows, Mac, and Linux are available free of cost as it belongs to the open-source software category. There is also no premium version available, and hence, all the features are unlocked in the free version.
**What can you do with Kdenlive?
You can trim your video, add music, add effects, adjust speed, correct colors, and add green screen effect. Besides, you can add multiple video clips and audio files to the timeline. There are options for keyframable effects as well.
Turn Your Text Into a Podcast Made Possible (+ EASY Editing Tips)
Being a content creator, either writing or generating videos, requires podcast text-to-speech knowledge. The impact of content depends on how many people see it. It means finding new ways to get it into real and virtual places where customers and users might be.
Depending on the context, podcasting can be a perfect alternative for sharing content.
This article will address your questions about the easiest way to turn a blog into a podcast. Let’s begin with the reasons why you should do a podcast.
Part 1. Why You Should Podcast
Podcasts are one of the simplest and most cost-effective ways. It helps to advertise yourself and your products to a highly targeted audience. Podcasts are also excellent for engaging with potential clients interested in your content. In your field, you can achieve fame and expertise.

Repurposing of Content
Podcasters can maximize their potential for successful episodes and repurposing their podcast into multiple content pieces.
This podcasting strategy can help you reach more people by putting your podcasts on more channels and engaging more people who might be interested.
More Fulfilling than Articles
Unlike music, news, TV, and social media, podcast listeners don’t have to watch the screen like they do with YouTube videos or TV shows. This means they can listen while walking or driving home from work.
Podcasts are the best way to get people to pay attention and make fundamental societal changes. They can keep people interested for a long time, so you can go into detail and get personal without turning off your audience.
Minimal Start-Up Costs
To start a podcast, you can spend a little money. Even some of the most famous podcasts use a microphone, a computer, and software for recording. But it’s common to spend more money on advertising and better hosting.
Starting a podcast doesn’t cost much, as you can get everything you need for about $145.
Expansion of Search Potential
In the past few years, many big brands and small to medium-sized businesses have started using podcasts as a marketing strategy. This is because podcasts are becoming more and more popular and can help raise your company’s profile.
Podcasting is another way to disseminate your study to a broader audience, whether that audience consists of policymakers or interested citizens.
Potential to Monetize
Using an affiliate program podcast, you can earn money. Businesses can increase their income by offering paid advertising sponsorships to monetize podcasts. Suppose you accept an affiliate offer to sell ads. In that case, you become the company’s voice and put recorded ads in your podcast episodes.
The most common way to make money from a podcast is through sponsorship. It’s also the easiest way to make money because you don’t have to make or sell anything. You just have to make a deal with a sponsor.
Part 2. Why Are Writers Hesitant to Start a Podcast?
Even after knowing all these benefits, writers are still hesitant to start a podcast. One of the main reasons a writer may be reluctant to launch a podcast is the cost of the necessary equipment. You will need at least $80 to $500 for this unpromissing business.
However, let me tell you a secret that many podcastors didn’t buy any audio equipment for the launch of their podcast channel on Spotify.
Moreover, many writers don’t want to show their voice through recordings. This is because they couldn’t just make a recording and hand it off to a sound specialist. Besides, finding their voice through the stories they write is the routine.
But we all need to get the truth that many podcastors don’t record a single word of the podcast with their own voice. Due to a solution: text-to-speech, technology like this has been around for a while and continues to improve.
The two important issues have been solved, so what are you waiting for? Platform building has always relied heavily on content marketing. With blog posts and social media, additional support was provided, and now podcasts are becoming more commonplace.
Part 3. How to Turn a Text Into a Podcast?
Text To Speech
To turn your text into audible content, Text-to-speech (TTS) is an assistive technology. With a single click, TTS reads your written text aloud. Many people also use it for writing and editing to maintain audience concentration.
Text-to-speech technology is compatible with all digital devices, including computers, tablets, and smartphones. Increasing numbers of websites and products now have developed this function. For example, you can find it within the trusted video editing software like Filmora. With Filmora’s Text to Speech (TTS) feature , you may add extra aspects to your video by turning your text files into voiceovers.
Why we regard text to speech as a good
For writers, imagination is the only tool to construct their stories. To bring our stories to life, all we need is a laptop. The same holds for text-to-speech technologies, which can significantly assist writing and editing by allowing the author to hear their words without using their voice.
- Text-to-speech applications can assist you in repurposing your material.
Your written work can be converted into spoken language or a podcast. A podcast can be converted into a YouTube video with a few alterations. All of these factors can help you reach new audiences.
Repurposing material permits your audience to consume it in a variety of ways. The audience can read, listen to, or view your content.
- Text-to-speech systems enable authors to create information that is accessible.
As per World Health Organization, there are almost 285 million visually impaired persons and 39 million blind people. We writers can create a more inclusive world by constantly keeping accessibility in mind.
The limitations of text to speech
Text-to-speech software is becoming increasingly lifelike thanks to technological advancements. However, it cannot still express genuine human emotions. However, this should allow you to utilize these tools. The positives significantly exceed the disadvantages, and technology is continually improving.
Easiest Fix: Turn Texts Into Podcasts With TTS in Filmora
So how can you use text-to-speech? Andhow you can turn your texts into audio podcasts in a daily routine? Filmora , a all-in-one video editor, gets you the solution.
Free Download For Win 7 or later(64-bit)
Free Download For macOS 10.14 or later
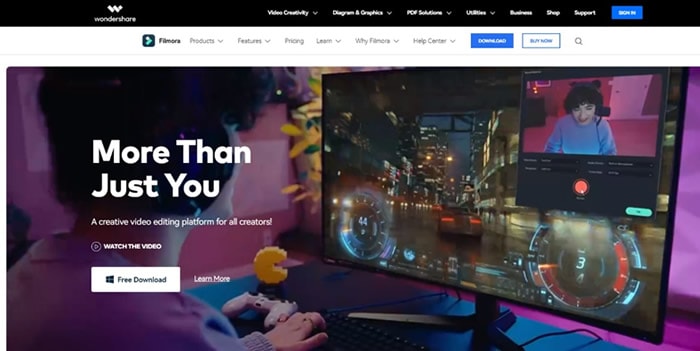
Step1 Download and install Filmora on your PC or Mac.
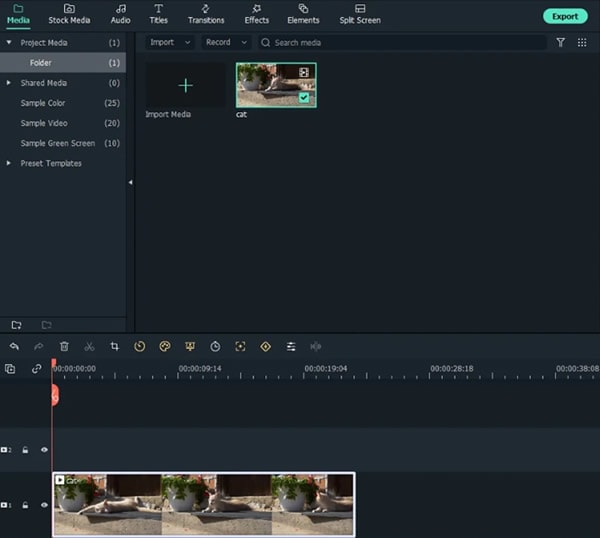
Step2 Open Filmora and select the video on which you wish to add audio.
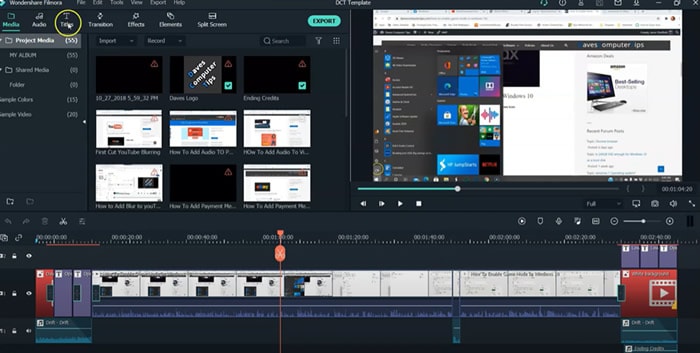
Step3 After adding your selected video, select the option “Titles” to add text to your video.
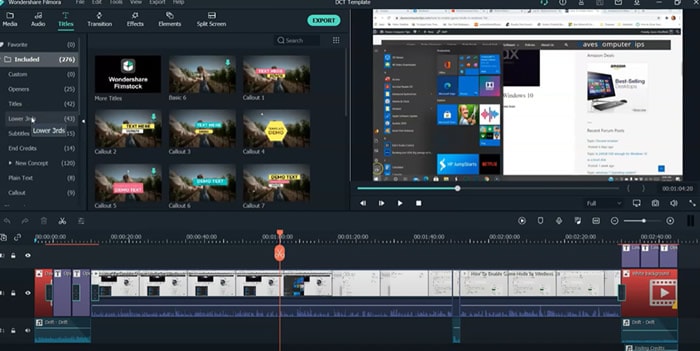
Step4 Select your favorite position for text in the video, like “lower third,” which is used the most in video titles.
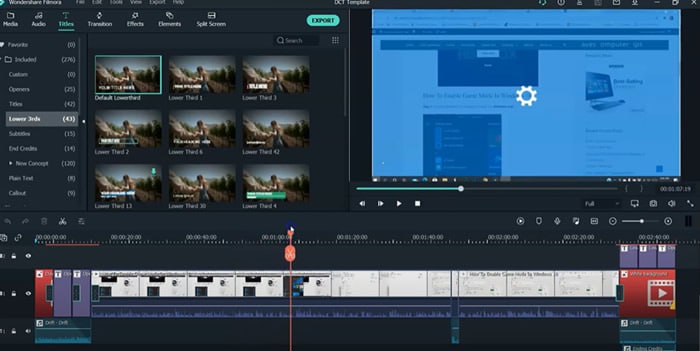
Step5 Add text to the timeline and click “Ok.” You can move the red timeline marker if you want your text in a certain spot.
Click the “+” button marked in the picture below to add text.
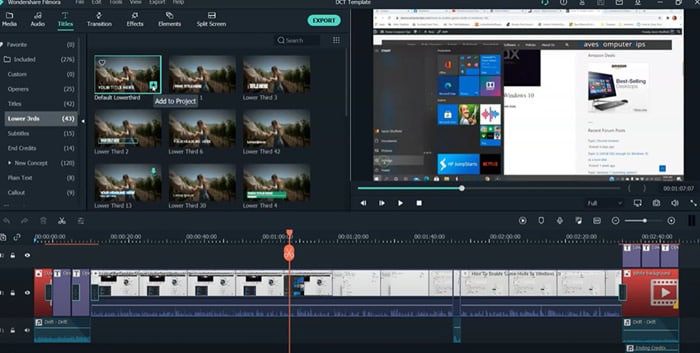
You can also edit the text by changing its style, color, and font or by animating it.
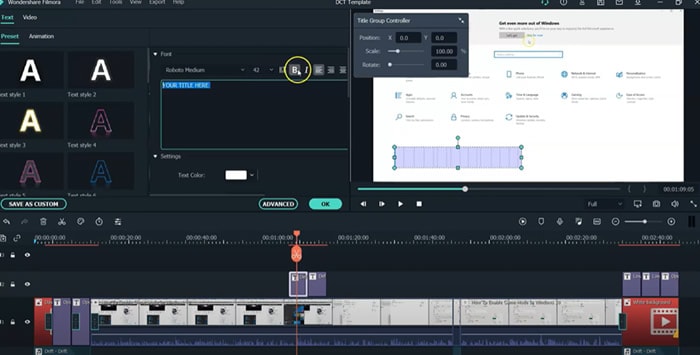
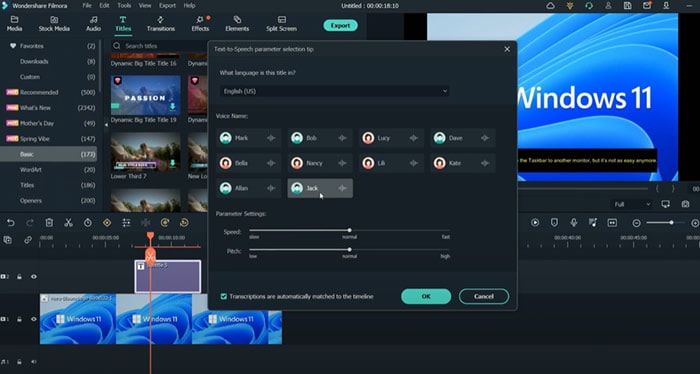
Step6 Press the “Text-to-Speech” button in the lower right side and choose your preferred voice. For example, Lilly’s voice resembles Siri.
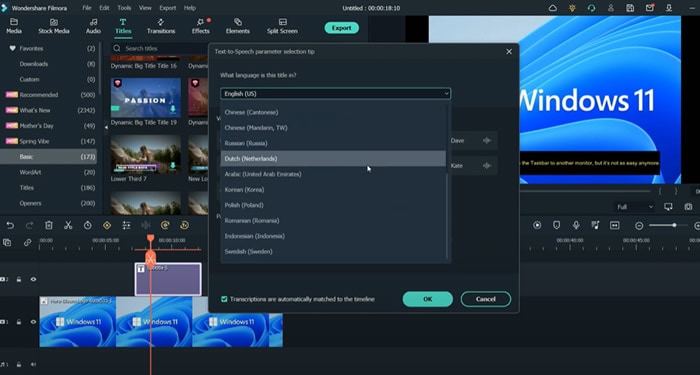
You can also choose another language other than English.
Click “Ok” once you’ve selected everything according to your requirements.
Step7 Once the transcription is completed, go ahead and test the video and audio to see if it’s synching.
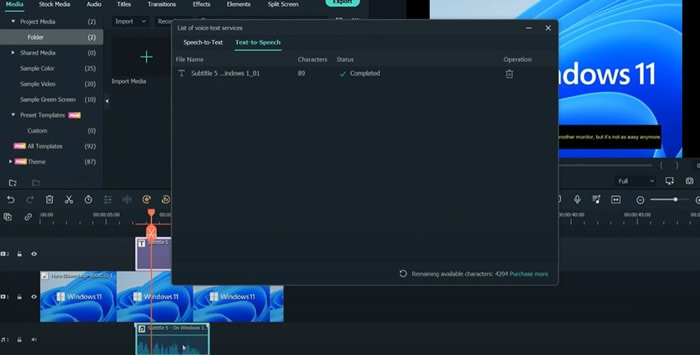
And that’s done. This is how easy it is to turn your texts into speech using Filmora.
Part 4. Hot FAQs on Podcast Text to Speech
How do I convert podcasts to text?
With the help of the smartphone app Google Recorder you can easily convert podcasts to texts for free.
- Open the app on your phone, start recording to it, and start recording your podcast simultaneously.
- The words will be automatically recorded and entered into the application as you talk into your phone’s microphone.
- After you click stop on the app, you can store and share the files once you finish your recording.
You have an option of sharing the text, the audio, or both. Alternatively, you can save them to your Google Drive if you don’t want to share them.
How to turn my podcast into a sound?
To convert your video podcasts into audio through Filmora. Follow these steps:
- Drag the imported video from the media library into the video timeline.
- To extract the audio from the video, right-click the video clip and select “Audio Detach.”
- After a while, audio and video will be seen on separate tracks.
Can I save the sound after converting text to speech?
Once the text has been converted to speech, you can save the sound. Select your preferred format after clicking the “export” option in Filmora.
Conclusion
Many of us wish to launch a podcast and blog. A productive podcast’s essence is turning writing into audio using various podcasting techniques. AI-powered text-to-speech softwares can quickly convert articles into podcasts. Or, you can invite significant people to your podcast to personalize it. Podcasting can give outdated content a new life.
Free Download For macOS 10.14 or later
Step1 Download and install Filmora on your PC or Mac.

Step2 Open Filmora and select the video on which you wish to add audio.

Step3 After adding your selected video, select the option “Titles” to add text to your video.

Step4 Select your favorite position for text in the video, like “lower third,” which is used the most in video titles.

Step5 Add text to the timeline and click “Ok.” You can move the red timeline marker if you want your text in a certain spot.

Click the “+” button marked in the picture below to add text.

You can also edit the text by changing its style, color, and font or by animating it.

Step6 Press the “Text-to-Speech” button in the lower right side and choose your preferred voice. For example, Lilly’s voice resembles Siri.

You can also choose another language other than English.

Click “Ok” once you’ve selected everything according to your requirements.
Step7 Once the transcription is completed, go ahead and test the video and audio to see if it’s synching.

And that’s done. This is how easy it is to turn your texts into speech using Filmora.
Part 4. Hot FAQs on Podcast Text to Speech
How do I convert podcasts to text?
With the help of the smartphone app Google Recorder you can easily convert podcasts to texts for free.
- Open the app on your phone, start recording to it, and start recording your podcast simultaneously.
- The words will be automatically recorded and entered into the application as you talk into your phone’s microphone.
- After you click stop on the app, you can store and share the files once you finish your recording.
You have an option of sharing the text, the audio, or both. Alternatively, you can save them to your Google Drive if you don’t want to share them.
How to turn my podcast into a sound?
To convert your video podcasts into audio through Filmora. Follow these steps:
- Drag the imported video from the media library into the video timeline.
- To extract the audio from the video, right-click the video clip and select “Audio Detach.”
- After a while, audio and video will be seen on separate tracks.
Can I save the sound after converting text to speech?
Once the text has been converted to speech, you can save the sound. Select your preferred format after clicking the “export” option in Filmora.
Conclusion
Many of us wish to launch a podcast and blog. A productive podcast’s essence is turning writing into audio using various podcasting techniques. AI-powered text-to-speech softwares can quickly convert articles into podcasts. Or, you can invite significant people to your podcast to personalize it. Podcasting can give outdated content a new life.
Also read:
- [New] In 2024, Enhancing Your Feed with New Instagram Filters
- [Optimal] 4 Strategies to Fix Faded iPhone HDR in Editing for 2024
- [Updated] A Convenient Approach to Changing the Main Image of Your FB Page for 2024
- [Updated] Transform Spaceships Into Trees – Youtube’s Green Secrets Revealed
- 2024 Approved How to Color Grading in Final Cut Pro
- 2024 Approved This Article Talks in Detail About How to Export iMovie Video From iPhone, Mac, Etc. It Also Covers the Process of Using iMovie Alternative to Edit Videos on Mac. Check Out Now
- DrTuber Video Downloader: Step-by-Step Guide on Securely Retrieving Content
- Learn How to Resurrect the Non-Functional Win + P Feature in Windows
- New How to Easily Create a Free Eye-Catching Intro Videos with Invideo
- New In 2024, HDR Photography How to Use HDR Mode on Your Android Devices
- New In 2024, How To Change Speed of Video in Final Cut Pro?
- Top 6 Advantages of Using ChatGPT on iOS Over the Web Version
- Updated Looking For the Best VHS Video Effect Makers? Get To Know the Top List for 2024
- Title: How to Upload Videos to Twitch? Heres a Guide for Beginner
- Author: Chloe
- Created at : 2024-09-30 03:17:31
- Updated at : 2024-10-02 17:47:32
- Link: https://ai-editing-video.techidaily.com/how-to-upload-videos-to-twitch-heres-a-guide-for-beginner/
- License: This work is licensed under CC BY-NC-SA 4.0.