:max_bytes(150000):strip_icc():format(webp)/how-to-add-tiktok-filters-and-effects-f3c195b2fe1449cb8b2906eea3305b22.jpg)
How to Use a Stabilization Tool in Filmora

How to Use a Stabilization Tool in Filmora
Does your video shake so much? Shaking movement on your camera is often inevitable, especially if you don’t use a camera stabilizer or a camera with no built-in image stabilization. As a result, it can make your video look distracting and difficult to watch.
But you don’t need to worry. You can use a stabilization tool in Filmora . A stabilization tool is a feature that can help to correct for camera shake and other types of movement. If you are a handheld shooter, you will find this tool extremely helpful.
Part 1: When do you need to stabilize your video?
Now, let’s talk about when you should stabilize your video. If you’re shooting something that is moving, like people or animals, you will definitely want to stabilize your video. This will help ensure that the video is smooth and steady.
Another time you may want to stabilize your video is if you’re shooting in a low-light situation. It will help to ensure that your video is not too shaky.
Finally, if you’re shooting a video that’s going to be displayed on a large screen, you may want to stabilize your video. Stabilizing your video will help ensure the output is crisp and clear.
Part 2: How to stabilize your video with Filmora
Filmora has a stabilization feature that can help to smooth your video and make it look more professional. If you haven’t installed Filmora yet, you can download it for free.
Free Download For Win 7 or later(64-bit)
Free Download For macOS 10.14 or later
So, should you have a wobble movement in your video, follow these steps to make it smoother in no time:
Step1 Launch Filmora 11 and create a new project.
Step2 Import your video to Filmora.
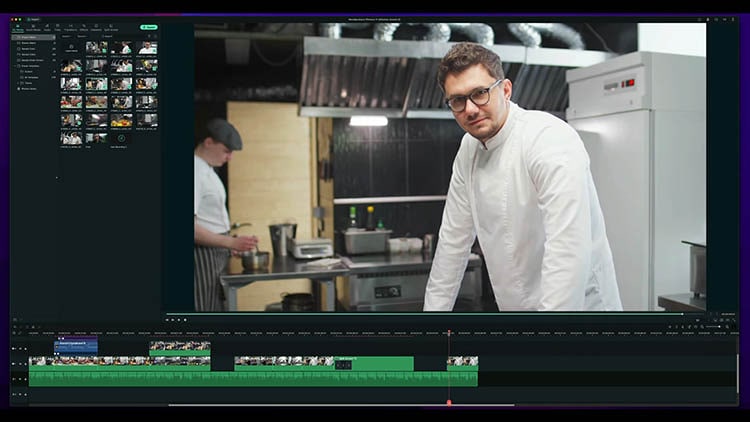
Step3 After you import your video to Filmora, the Stabilization must have been off. So, switch the Stabilization toggle on, then a loading bar will start going up to analyze the clip.
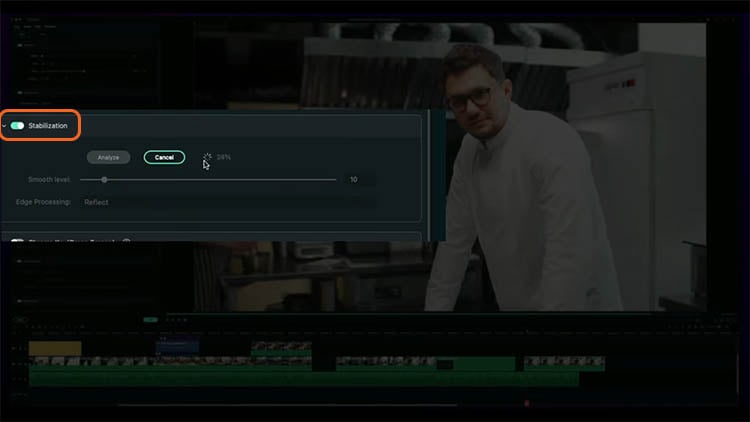
Step4 Once it finishes analyzing, the smooth level will default to 10. See the preview whether you like how it turns out.
Before
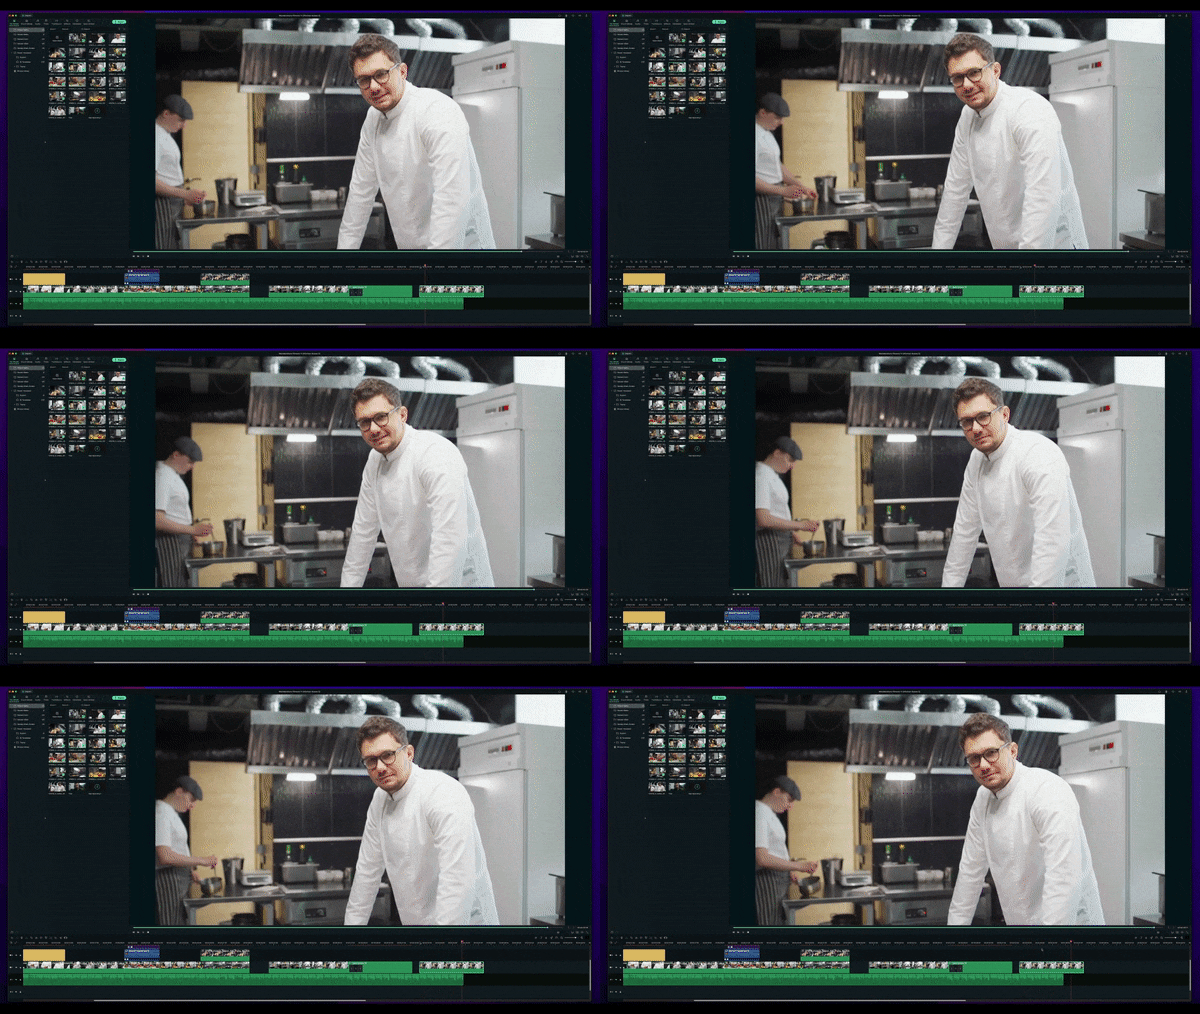
After
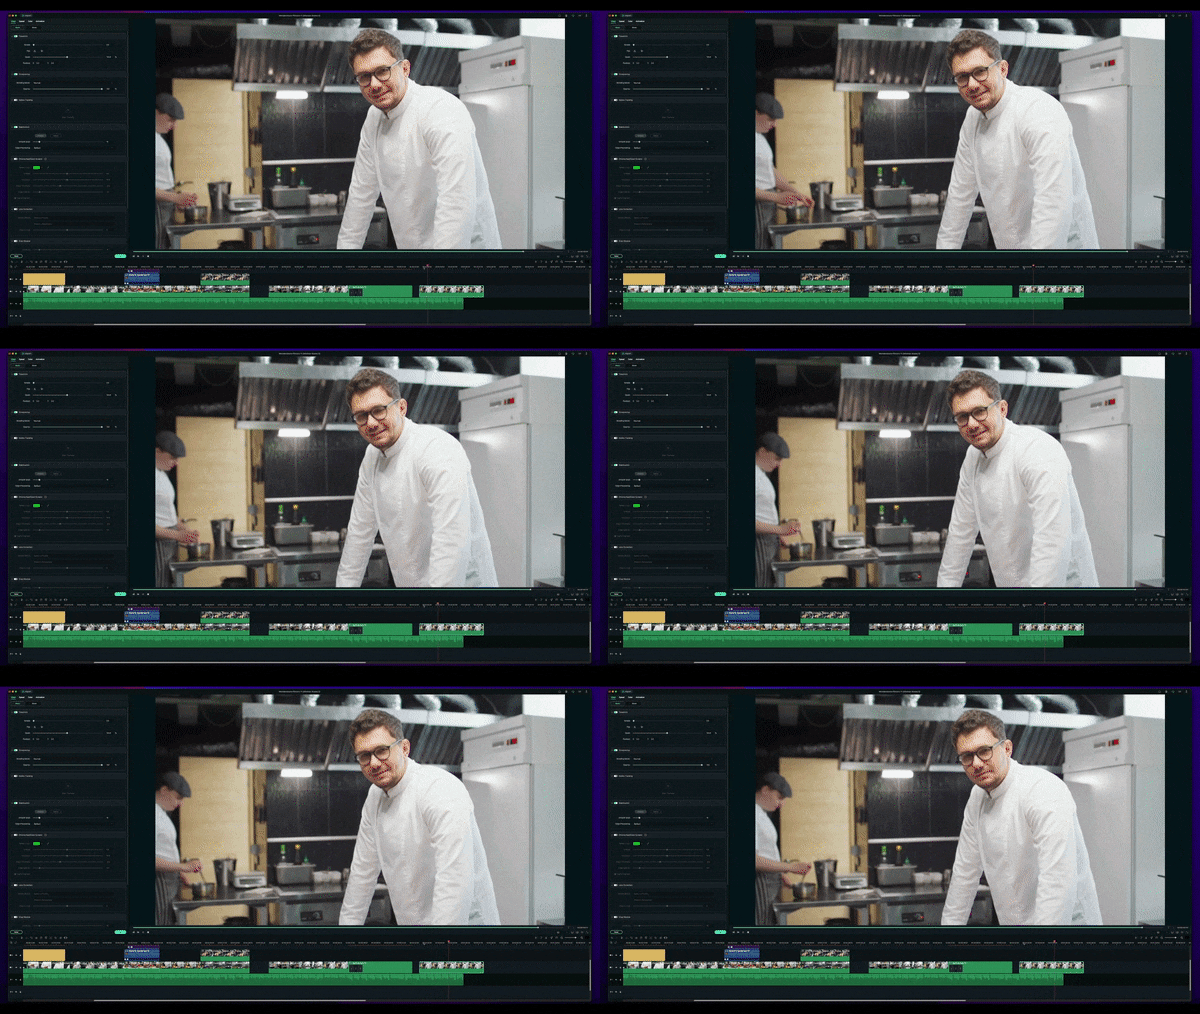
Please note that the center point of your image will always be the most stable. The more shaky a clip is, the more it will crop into that image.
If you are unsatisfied with the default setting, increasing the Smoothness Level will result in more cropping to the image. On the contrary, if you put the Smoothness Level down to zero, you are no longer cropping into the image, but the result won’t be as smooth.
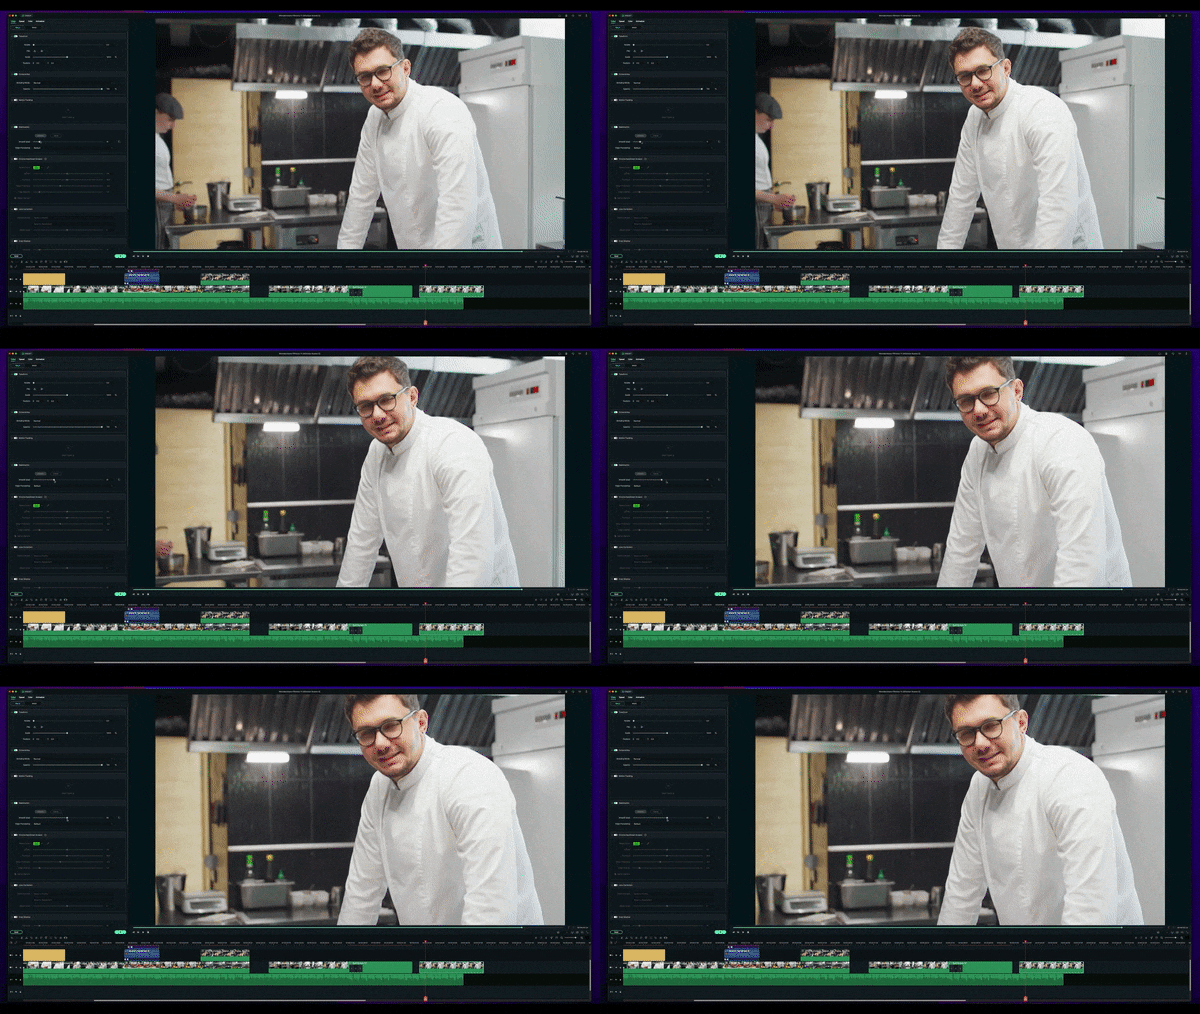
Should the cropping bother you, such as it crops the subject’s hair out of the frame, you can adjust it with Edge Processing.
If you change it to None, you will see the black bars that simulate how it stabilizes the clip. Try to hit play on the preview screen, and then you can see more clearly how the tool keeps the center of the frame to make it stable and less shaky.
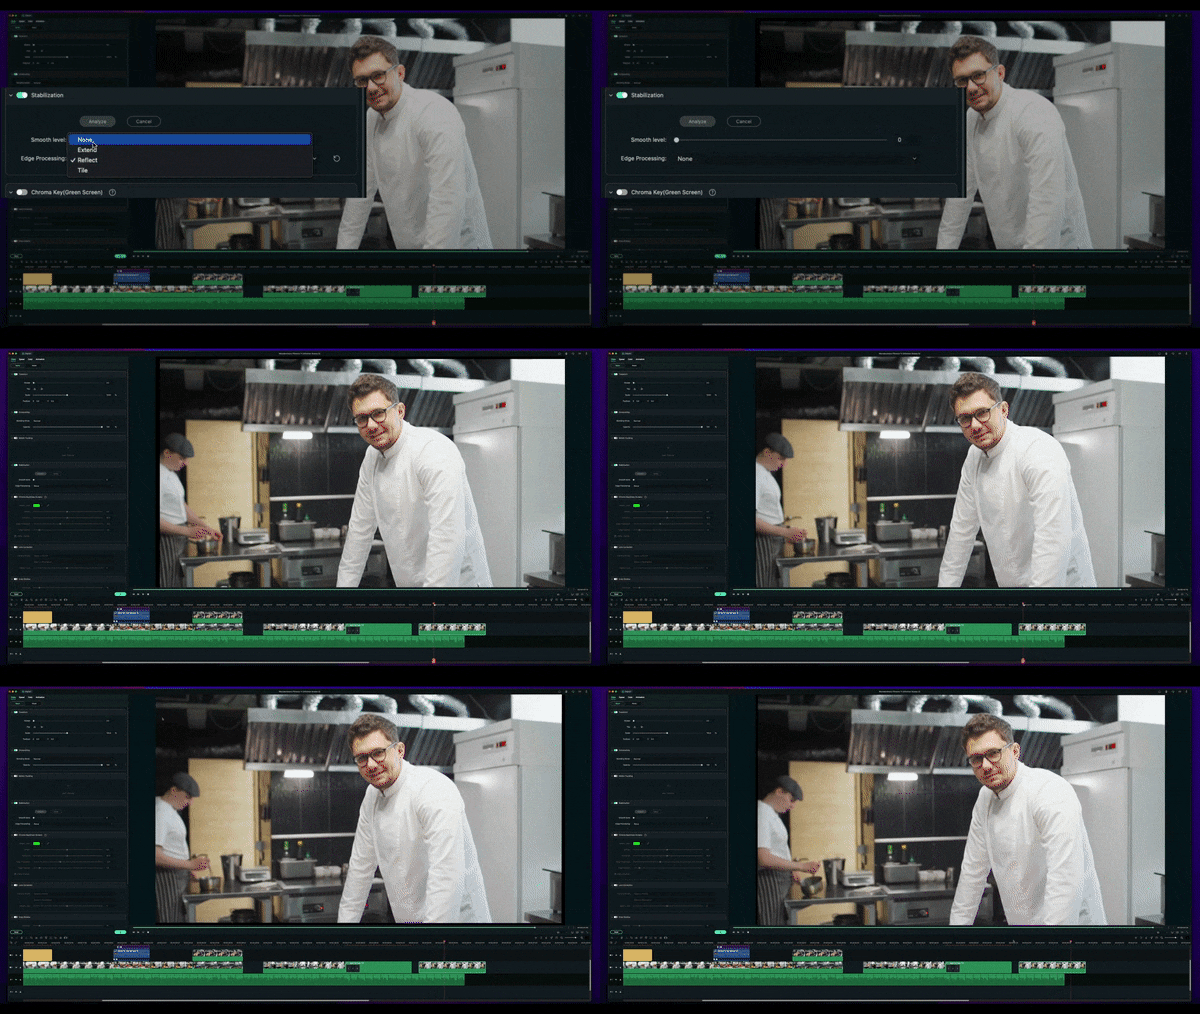
As Reflect is the default, the Extend uses artificial intelligence to extend the pixels, as you are often aware in Photoshop.
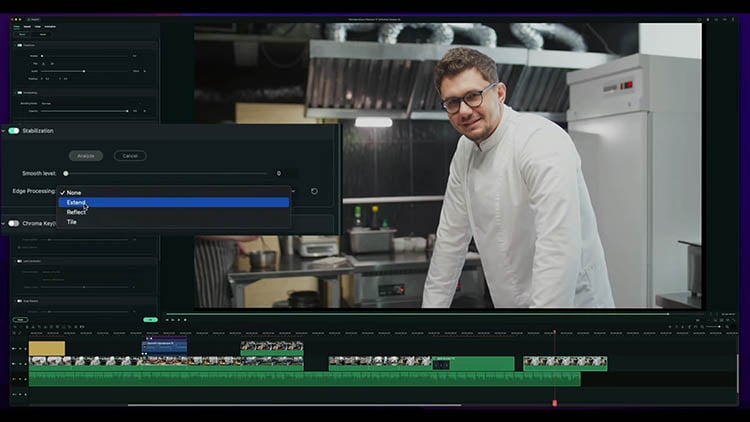
Besides the three, there is also the Tile option. Each of them would give a different result. You can try and use the one that works best for you.
Summary
When you’re shooting a video, you must have wanted it to be as smooth and stable as possible. By stabilizing your video, you can help ensure it’s smooth and easy to watch.
Filmora offers a Stabilization feature that allows you to easily improve your video’s quality. Simply select the video clip you want to stabilize and click the stabilization button. Filmora will do the rest, giving you a smooth and stable video.
Free Download For macOS 10.14 or later
So, should you have a wobble movement in your video, follow these steps to make it smoother in no time:
Step1 Launch Filmora 11 and create a new project.
Step2 Import your video to Filmora.

Step3 After you import your video to Filmora, the Stabilization must have been off. So, switch the Stabilization toggle on, then a loading bar will start going up to analyze the clip.

Step4 Once it finishes analyzing, the smooth level will default to 10. See the preview whether you like how it turns out.
Before

After

Please note that the center point of your image will always be the most stable. The more shaky a clip is, the more it will crop into that image.
If you are unsatisfied with the default setting, increasing the Smoothness Level will result in more cropping to the image. On the contrary, if you put the Smoothness Level down to zero, you are no longer cropping into the image, but the result won’t be as smooth.

Should the cropping bother you, such as it crops the subject’s hair out of the frame, you can adjust it with Edge Processing.
If you change it to None, you will see the black bars that simulate how it stabilizes the clip. Try to hit play on the preview screen, and then you can see more clearly how the tool keeps the center of the frame to make it stable and less shaky.

As Reflect is the default, the Extend uses artificial intelligence to extend the pixels, as you are often aware in Photoshop.

Besides the three, there is also the Tile option. Each of them would give a different result. You can try and use the one that works best for you.
Summary
When you’re shooting a video, you must have wanted it to be as smooth and stable as possible. By stabilizing your video, you can help ensure it’s smooth and easy to watch.
Filmora offers a Stabilization feature that allows you to easily improve your video’s quality. Simply select the video clip you want to stabilize and click the stabilization button. Filmora will do the rest, giving you a smooth and stable video.
Step by Step to Rotate Videos Using Handbrake
Handbrake is a video editing tool that allows you to rotate videos. It is a free and open source software that is available on Windows, Mac, and Linux. It is used to convert video files from one format to another. You can use it to compress videos, add subtitles, or create chapters. It also allows you to rotate videos in different directions. You can use it to fix videos that are not aligned properly or that have been filmed upside down. A handbrake is a popular tool because it is easy to use and it has a variety of features.
Step-by-step on how to rotate videos using Handbrake
When you import a video into the Handbrake software, it will by default be in a “landscape” orientation, with the long edge of the video oriented horizontally. If you want to rotate the video 90 degrees counterclockwise so that it appears “vertical,” or if you want to rotate it 180 degrees so that it is upside down, you can do so by following these two steps:
Step 1: Open the Handbrake software and import your video.
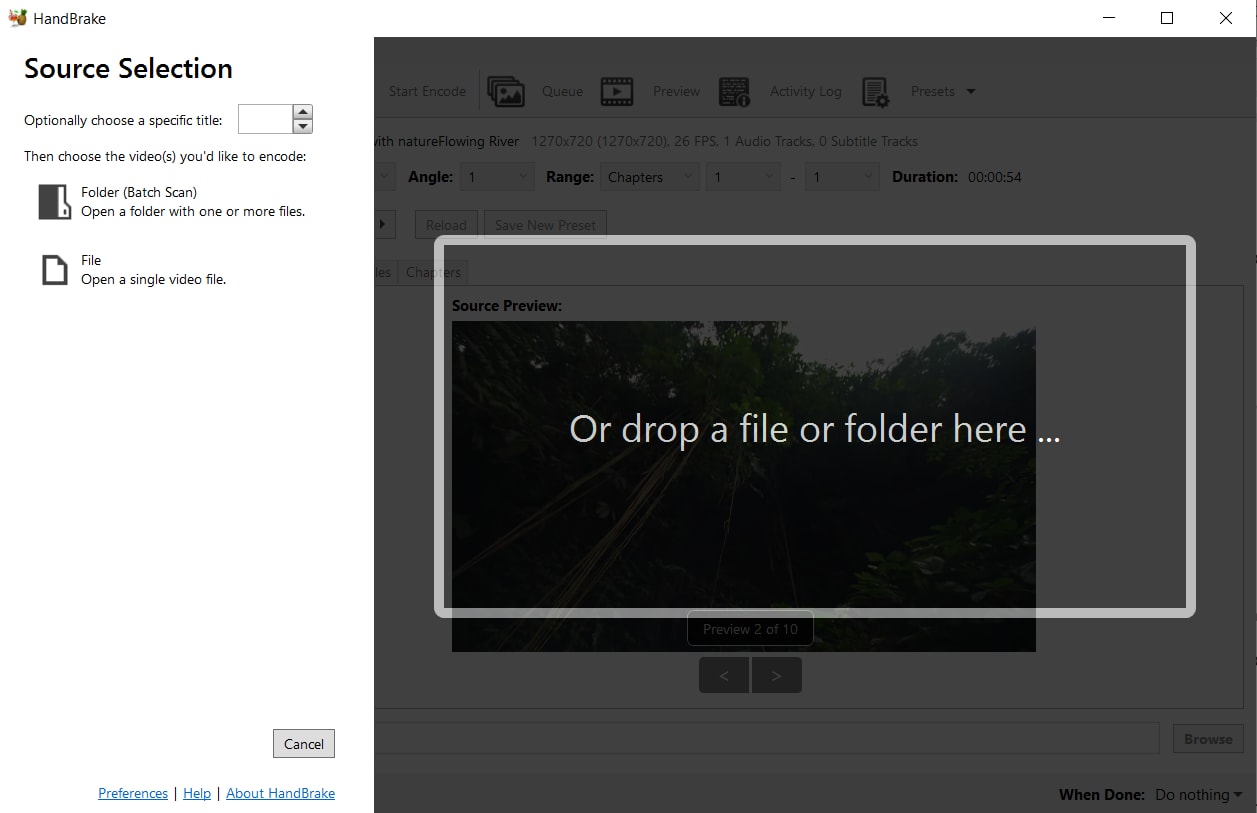
Step 2: Click on the “Dimensions” tab at the top of the Handbrake window.

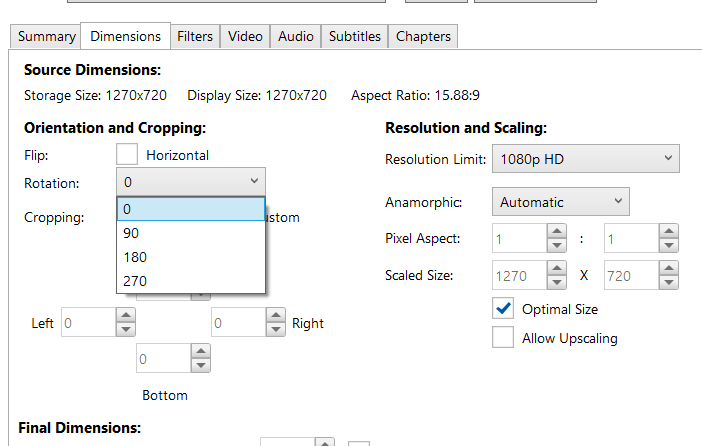
Step 3: Under the “Orientation and Cropping” section, click on one of the options in the “Rotate” menu.
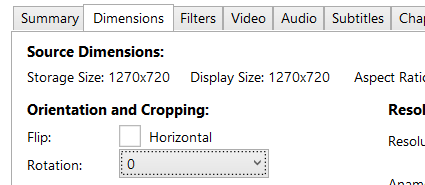
Step 4: If you want to rotate a video 90 degrees counterclockwise, select “90 Degrees CW (Counter-Clockwise).” If you want to rotate the video 180 degrees so that it is upside down, select “180 Degrees.”
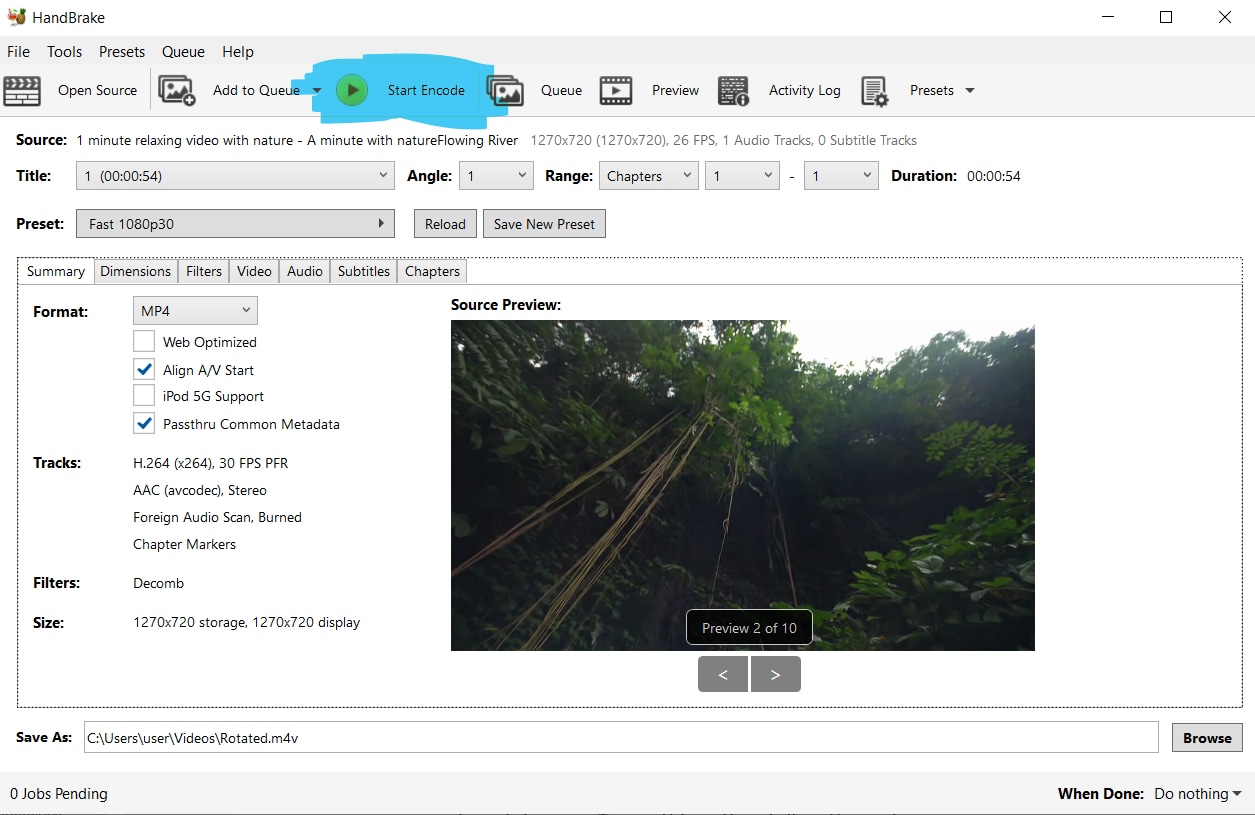
Step 5: Click on the “Preview” button at the bottom of the Handbrake window to see a preview of how your rotated video will look. When you are satisfied with the rotation, click on the “Start Encode” button to begin the encoding process.
The Handbrake software also offers a “Flip” option which you can do after rotating it, which allows you to slip the video after rotating it. To use this option, follow these steps:
Under the “Orientation and Cropping” section, Go to Rotation and choose the degrees that best is best for your rotation requirements.
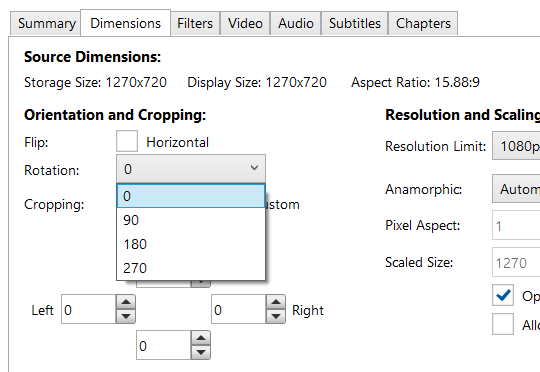
Click on “Flip” to flip your video horizontally.
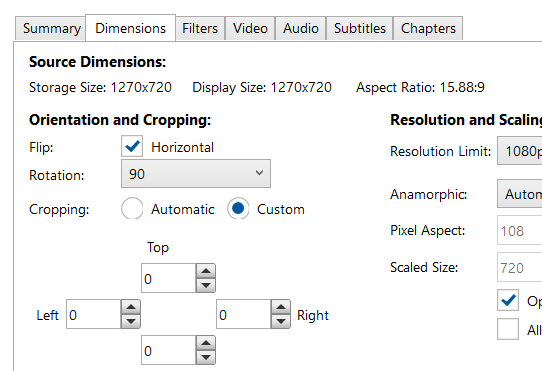
Click on the “Preview” button at the bottom of the Handbrake window to see a preview of how your rotated video will look. When you are satisfied with the rotation, click on the “Start Encode” button to begin the encoding process.
Both of these methods for rotating videos are easy to use and produce good results. Experiment with them to see which method works best for you.
An Easy Way to Rotate Videos Using Filmora
Moreover, instead of using Handbrake, you can use Filmora Video Editor instead. Filmora is a video editor that is very easy to use. It has a variety of features, including the ability to rotate videos. You can download Filmora from the Filmora website. The website has links to the download page for each of the supported platforms.
For Win 7 or later (64-bit)
For macOS 10.14 or later
Step-by-Step on how to rotate videos in Filmora
In order for you to rotate videos in Filmora, follow these simple steps:
Step 1: Import the video that you want to rotate into Filmora.

Step 2: Click on the “Edit” tab at the top of the video timeline.
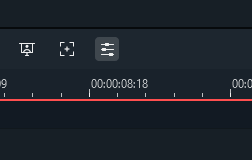
Step 3: Click on the “Rotate” button in the “Transform” section of the toolbar.

Step 4: Select the rotation angle that you want to rotate the video in the “Rotate” menu.

Step 5: Click on the “Preview” button at the bottom of the Filmora window to see a preview of how your rotated video will look. When you are satisfied with the rotation, click on the “OK” button to apply the rotation.

As you can see, rotating videos is a very easy process in both Handbrake and Filmora. Both Handbrake and Filmora offer simple methods for rotating videos. In Handbrake, you can rotate the video 90 degrees counterclockwise or 180 degrees.
In Filmora, you can rotate the video by any number of degrees in either direction. Experiment with these methods to see which one works best for you. Additionally, Filmora offers a number of other features, such as the ability to add text and transitions, that you may find useful.
Step 2: Click on the “Dimensions” tab at the top of the Handbrake window.

Step 3: Under the “Orientation and Cropping” section, click on one of the options in the “Rotate” menu.

Step 4: If you want to rotate a video 90 degrees counterclockwise, select “90 Degrees CW (Counter-Clockwise).” If you want to rotate the video 180 degrees so that it is upside down, select “180 Degrees.”

Step 5: Click on the “Preview” button at the bottom of the Handbrake window to see a preview of how your rotated video will look. When you are satisfied with the rotation, click on the “Start Encode” button to begin the encoding process.

The Handbrake software also offers a “Flip” option which you can do after rotating it, which allows you to slip the video after rotating it. To use this option, follow these steps:
Under the “Orientation and Cropping” section, Go to Rotation and choose the degrees that best is best for your rotation requirements.

Click on “Flip” to flip your video horizontally.

Click on the “Preview” button at the bottom of the Handbrake window to see a preview of how your rotated video will look. When you are satisfied with the rotation, click on the “Start Encode” button to begin the encoding process.
Both of these methods for rotating videos are easy to use and produce good results. Experiment with them to see which method works best for you.
An Easy Way to Rotate Videos Using Filmora
Moreover, instead of using Handbrake, you can use Filmora Video Editor instead. Filmora is a video editor that is very easy to use. It has a variety of features, including the ability to rotate videos. You can download Filmora from the Filmora website. The website has links to the download page for each of the supported platforms.
For Win 7 or later (64-bit)
For macOS 10.14 or later
Step-by-Step on how to rotate videos in Filmora
In order for you to rotate videos in Filmora, follow these simple steps:
Step 1: Import the video that you want to rotate into Filmora.

Step 2: Click on the “Edit” tab at the top of the video timeline.

Step 3: Click on the “Rotate” button in the “Transform” section of the toolbar.

Step 4: Select the rotation angle that you want to rotate the video in the “Rotate” menu.

Step 5: Click on the “Preview” button at the bottom of the Filmora window to see a preview of how your rotated video will look. When you are satisfied with the rotation, click on the “OK” button to apply the rotation.

As you can see, rotating videos is a very easy process in both Handbrake and Filmora. Both Handbrake and Filmora offer simple methods for rotating videos. In Handbrake, you can rotate the video 90 degrees counterclockwise or 180 degrees.
In Filmora, you can rotate the video by any number of degrees in either direction. Experiment with these methods to see which one works best for you. Additionally, Filmora offers a number of other features, such as the ability to add text and transitions, that you may find useful.
Step 2: Click on the “Dimensions” tab at the top of the Handbrake window.

Step 3: Under the “Orientation and Cropping” section, click on one of the options in the “Rotate” menu.

Step 4: If you want to rotate a video 90 degrees counterclockwise, select “90 Degrees CW (Counter-Clockwise).” If you want to rotate the video 180 degrees so that it is upside down, select “180 Degrees.”

Step 5: Click on the “Preview” button at the bottom of the Handbrake window to see a preview of how your rotated video will look. When you are satisfied with the rotation, click on the “Start Encode” button to begin the encoding process.

The Handbrake software also offers a “Flip” option which you can do after rotating it, which allows you to slip the video after rotating it. To use this option, follow these steps:
Under the “Orientation and Cropping” section, Go to Rotation and choose the degrees that best is best for your rotation requirements.

Click on “Flip” to flip your video horizontally.

Click on the “Preview” button at the bottom of the Handbrake window to see a preview of how your rotated video will look. When you are satisfied with the rotation, click on the “Start Encode” button to begin the encoding process.
Both of these methods for rotating videos are easy to use and produce good results. Experiment with them to see which method works best for you.
An Easy Way to Rotate Videos Using Filmora
Moreover, instead of using Handbrake, you can use Filmora Video Editor instead. Filmora is a video editor that is very easy to use. It has a variety of features, including the ability to rotate videos. You can download Filmora from the Filmora website. The website has links to the download page for each of the supported platforms.
For Win 7 or later (64-bit)
For macOS 10.14 or later
Step-by-Step on how to rotate videos in Filmora
In order for you to rotate videos in Filmora, follow these simple steps:
Step 1: Import the video that you want to rotate into Filmora.

Step 2: Click on the “Edit” tab at the top of the video timeline.

Step 3: Click on the “Rotate” button in the “Transform” section of the toolbar.

Step 4: Select the rotation angle that you want to rotate the video in the “Rotate” menu.

Step 5: Click on the “Preview” button at the bottom of the Filmora window to see a preview of how your rotated video will look. When you are satisfied with the rotation, click on the “OK” button to apply the rotation.

As you can see, rotating videos is a very easy process in both Handbrake and Filmora. Both Handbrake and Filmora offer simple methods for rotating videos. In Handbrake, you can rotate the video 90 degrees counterclockwise or 180 degrees.
In Filmora, you can rotate the video by any number of degrees in either direction. Experiment with these methods to see which one works best for you. Additionally, Filmora offers a number of other features, such as the ability to add text and transitions, that you may find useful.
Step 2: Click on the “Dimensions” tab at the top of the Handbrake window.

Step 3: Under the “Orientation and Cropping” section, click on one of the options in the “Rotate” menu.

Step 4: If you want to rotate a video 90 degrees counterclockwise, select “90 Degrees CW (Counter-Clockwise).” If you want to rotate the video 180 degrees so that it is upside down, select “180 Degrees.”

Step 5: Click on the “Preview” button at the bottom of the Handbrake window to see a preview of how your rotated video will look. When you are satisfied with the rotation, click on the “Start Encode” button to begin the encoding process.

The Handbrake software also offers a “Flip” option which you can do after rotating it, which allows you to slip the video after rotating it. To use this option, follow these steps:
Under the “Orientation and Cropping” section, Go to Rotation and choose the degrees that best is best for your rotation requirements.

Click on “Flip” to flip your video horizontally.

Click on the “Preview” button at the bottom of the Handbrake window to see a preview of how your rotated video will look. When you are satisfied with the rotation, click on the “Start Encode” button to begin the encoding process.
Both of these methods for rotating videos are easy to use and produce good results. Experiment with them to see which method works best for you.
An Easy Way to Rotate Videos Using Filmora
Moreover, instead of using Handbrake, you can use Filmora Video Editor instead. Filmora is a video editor that is very easy to use. It has a variety of features, including the ability to rotate videos. You can download Filmora from the Filmora website. The website has links to the download page for each of the supported platforms.
For Win 7 or later (64-bit)
For macOS 10.14 or later
Step-by-Step on how to rotate videos in Filmora
In order for you to rotate videos in Filmora, follow these simple steps:
Step 1: Import the video that you want to rotate into Filmora.

Step 2: Click on the “Edit” tab at the top of the video timeline.

Step 3: Click on the “Rotate” button in the “Transform” section of the toolbar.

Step 4: Select the rotation angle that you want to rotate the video in the “Rotate” menu.

Step 5: Click on the “Preview” button at the bottom of the Filmora window to see a preview of how your rotated video will look. When you are satisfied with the rotation, click on the “OK” button to apply the rotation.

As you can see, rotating videos is a very easy process in both Handbrake and Filmora. Both Handbrake and Filmora offer simple methods for rotating videos. In Handbrake, you can rotate the video 90 degrees counterclockwise or 180 degrees.
In Filmora, you can rotate the video by any number of degrees in either direction. Experiment with these methods to see which one works best for you. Additionally, Filmora offers a number of other features, such as the ability to add text and transitions, that you may find useful.
Best Phantom Slow-Mo Camera For Recording Slow Motion Videos
In the media industry, you can find many professional and high-end cameras. Such cameras use advanced mechanisms to create slow-motion videos. Moreover, they capture natural colors and shades in the video with precision. Phantom slow-mo cameras are one of the prominent examples of the industry’s leading camera brand. To learn more about this camera brand, this article will consist of all the details.
With a Phantom slow-motion camera, you can get high-resolution results. Through this guide, you can discover a detailed analysis of the Phantom slo-mo camera. Also, we will suggest an affordable alternative that can make slow-motion videos efficiently.
Slow Motion Video Maker Slow your video’s speed with better control of your keyframes to create unique cinematic effects!
Make A Slow Motion Video Make A Slow Motion Video More Features

Part 1: What Do You Know About Phantom Camera Company?
Vision Research manufactures a Phantom camera that can be used in many professional fields. This company first came into being in 1950 by the name of “Photographic Analysis Company .”During the initial years, the company produced many cameras that could tackle the need for high-speed photography. However, in 1992, the company decided to create a separate entity to create high-speed cameras that wouldn’t depend on photographic film for imaging.
The US Patent Office acknowledged the use of innovative technology in the Phantom high-speed cameras. The main aim of this company is to produce robust cameras that can capture faster frame rates in high-speed photography. Many industries like defense, academia, and science research use Phantom slow-motion cameras. They are used in microfluidics, transparent flows, imaging, etc.
Part 2: Best Phantom Slow Motion Camera To Try
Phantom offers many slow-motion cameras with different features. This section will list down some of the best Phantom slow-motion cameras with pricing:
- TMX 7510
- T – Series T4040
- Machine Vision S200
- VEO 710
- Micro C and N C321
- 4K and Media Production Flex4K
1. TMX 7510
The TMX 7510 is built to produce high-end videos with different speed combinations. It uses a side-illuminated camera sensor to capture high-definition images. It can deliver 75,000 FPS with 1280 x 800 resolution. It offers up to 512GB RAM to help in making high-speed images. You can use its built-in Binning Mode with flexible options. It also supports many file formats like Cine RAW, TIFF, JPEG, etc.

2. T – Series T4040
The T-Series of Phantom includes many features to capture images with precision. The T4040 camera supports 9,350 fps with 2560 x 1664 resolution. It offers a peak Quantum Efficiency rating of 90% that can produce images in low-light conditions. Moreover, this Phantom slow-motion camera uses flow visualization techniques to capture minute details with high precision. It also offers EDR that balances exposure in the saturated areas of the image.
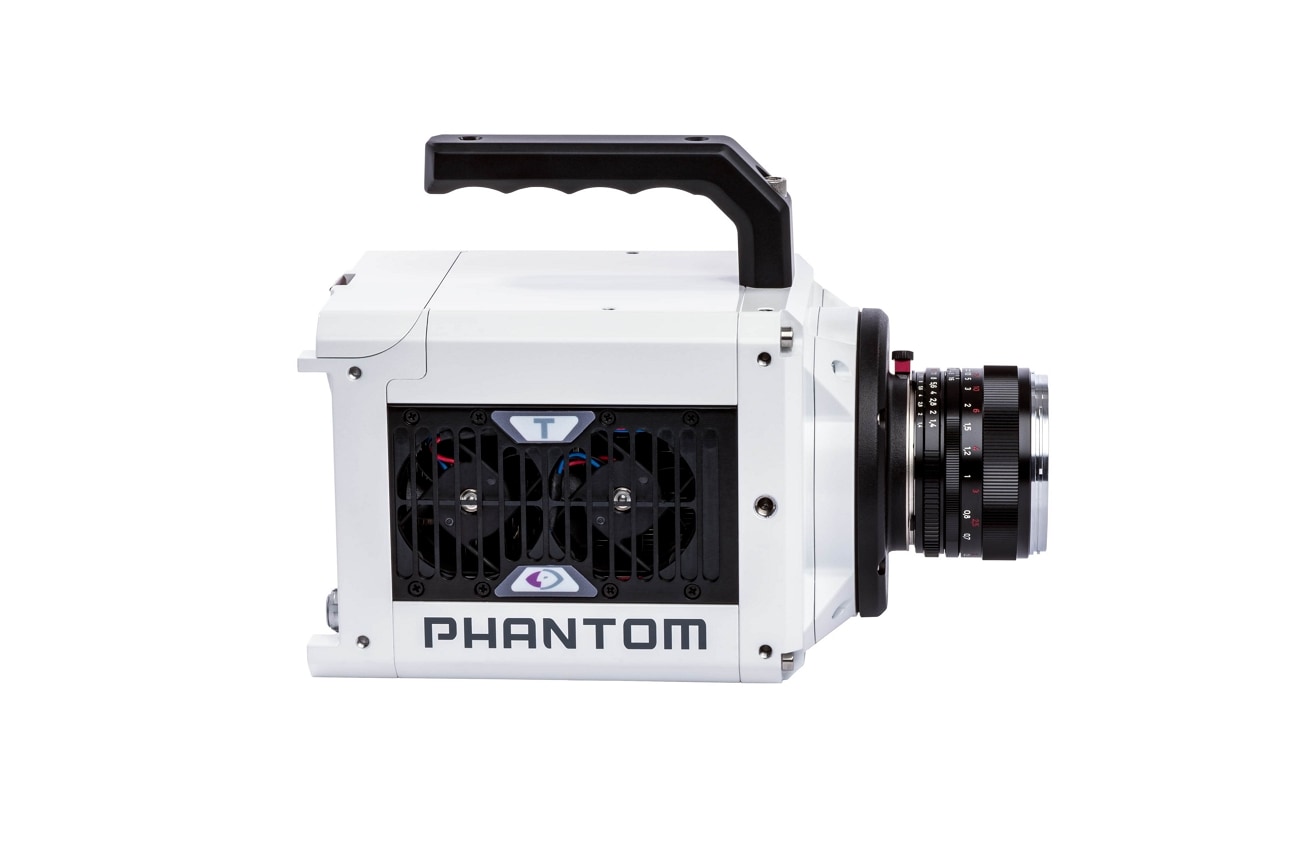
3. Machine Vision S200
This machine vision camera applies CXP technology to capture long-duration high-speed photos. It includes GPIO for events and ready signals. It’s economical and available in a compact size. Users can also use the time stamp on the frame to check the time code. Moreover, it can reach up to 6,950 fps with full resolution. You can trigger the recording with the given software or the GPIO trigger signal.
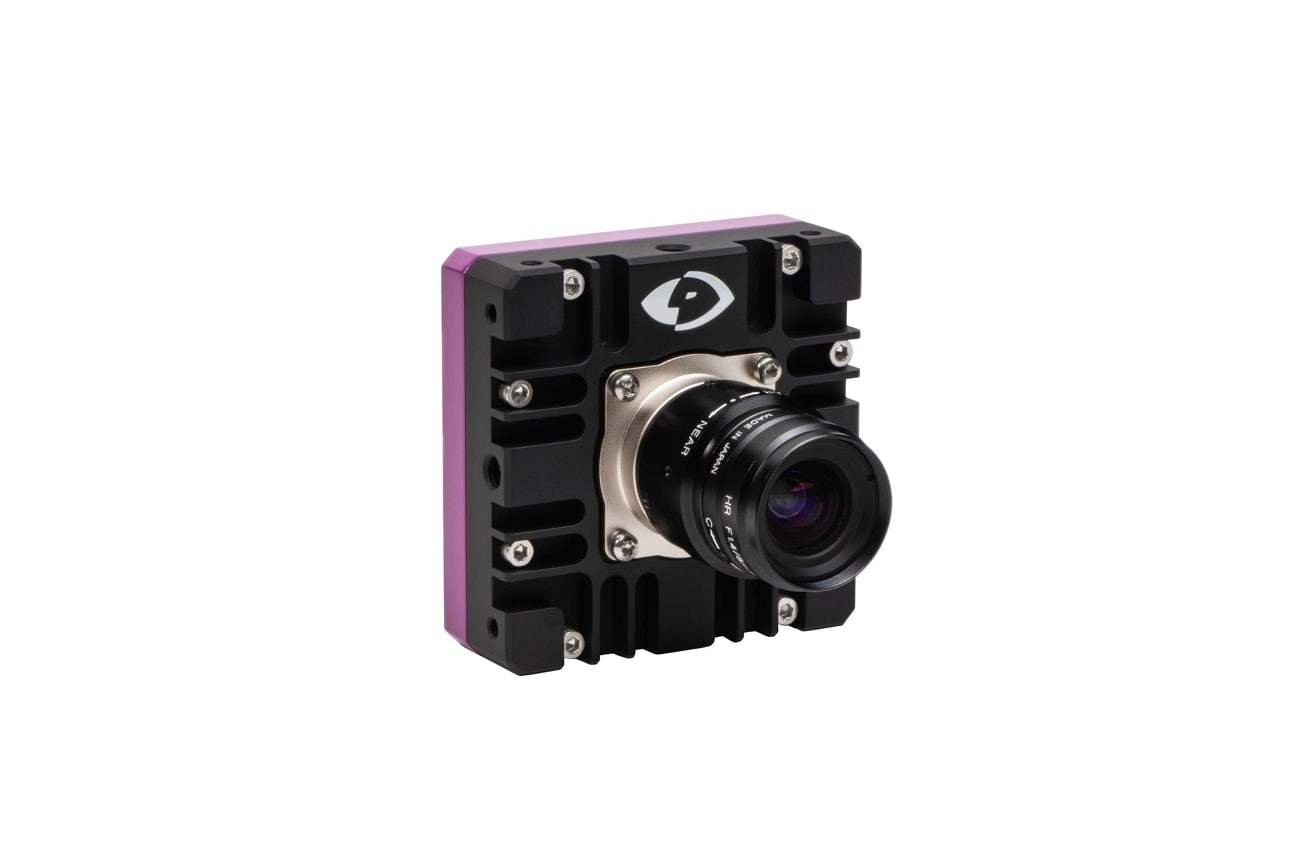
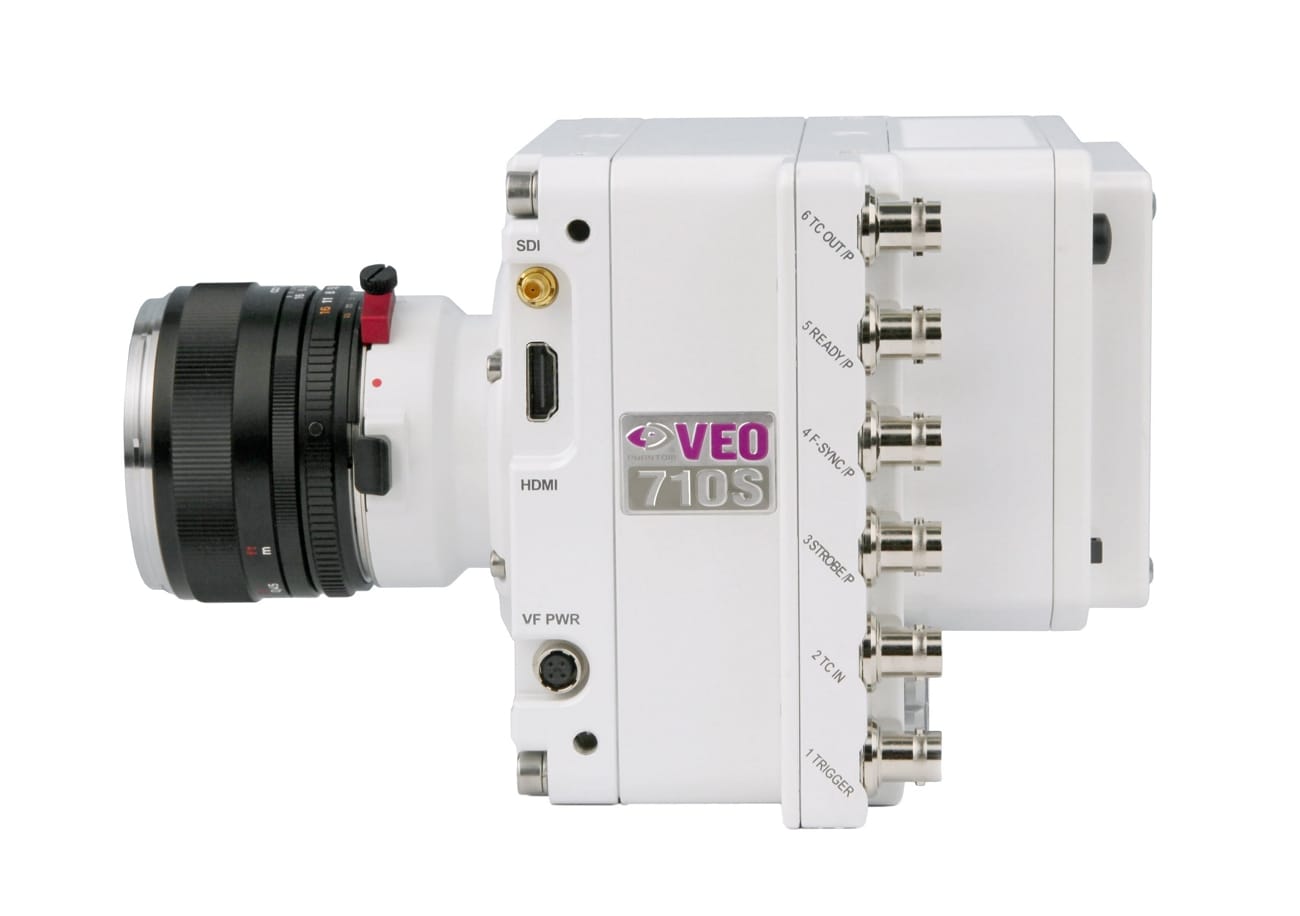
4. VEO 710
VEO series are specifically designed for film production and science laboratories. It has 7,400fps with a 1-Mpx 35mm sensor. The sensor format used in this camera is ideal for high-quality camera lenses. There are two options for the VEO body: S (full) and L (light). By purchasing the S model, you can experience many on-camera controls. Moreover, the body of this camera is made with aluminum to increase its reliability in tougher situations.
5. Micro C and N C321
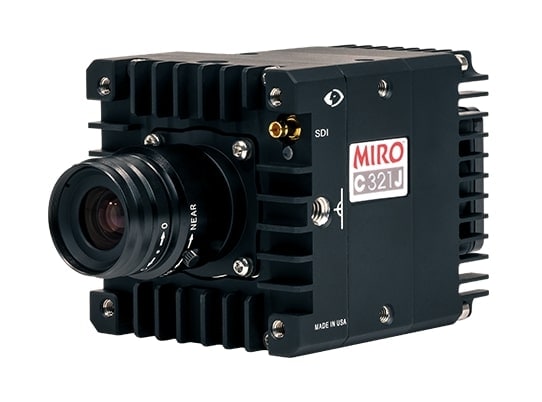
The Micro C and N series are built to meet the challenges of using a standard camera. The lightweight body and on-board protection make this camera ideal. It supports a maximum fps of 1480 with full resolution. With high sensitivity, it can capture low-noise images with vibrant colors. The advanced features of this camera can provide high-end images while preserving the natural colors.
6. 4K and Media Production Flex4K
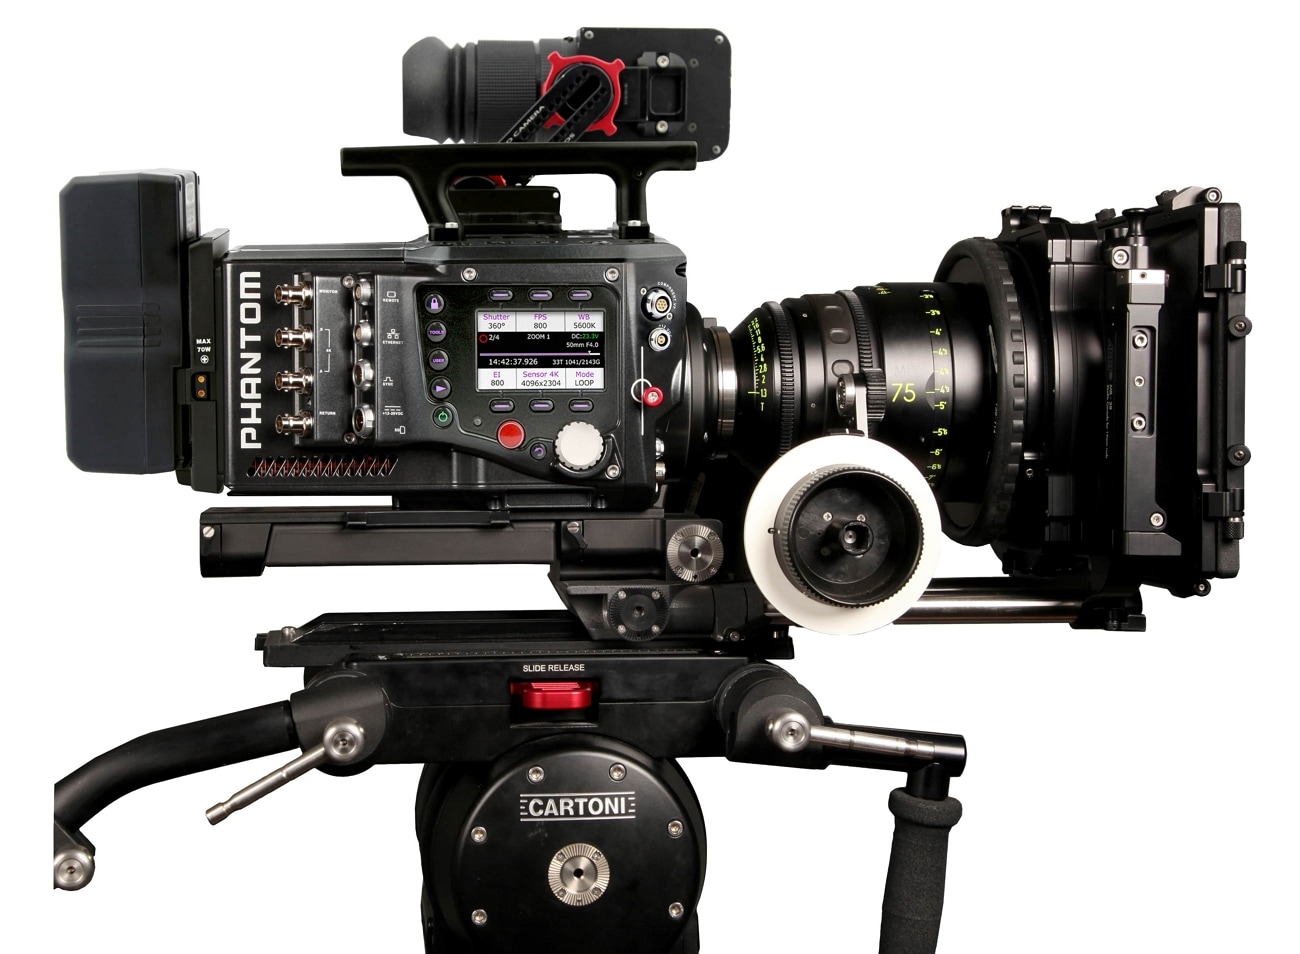
For professional cinema, Phantom has developed the Flex4k camera. This Phantom slo-mo camera supports 4K imaging with up to 1,000 fps. It provides three battery mounts with an on-camera menu system. The produced images are compatible with many color grading and video editing tools. Furthermore, it offers many remote-control options to ease your workflow. All the images that are produced will be delivered in the Cine RAW file format.
Part 3: No Phantom Camera? Still, Create a Slow Motion Video
Are you unable to buy a Phantom slow-mo camera? No worries, as Filmora can help you generate slow-motion videos with a normal camera. After recording a video from any standard device, you can add slow-motion effects with this tool. It provides a speed ramping feature that allows you to manage the speed of your video. It contains 6 speed ramping templates that you can try for professional purposes. Moreover, it provides a drag-and-drop interface to provide you with robust controls.
Filmora can make any ordinary video look cinematic. You can incorporate special backgrounds in your video without using a green screen. Furthermore, it can remove all the production flaws from your video within a few taps.
Free Download For Win 7 or later(64-bit)
Free Download For macOS 10.14 or later
Instructions to Produce Slow Motion Video With Speed Ramping
This part of the guide will include all the basic steps to make slow-motion videos . Thus, follow the steps mentioned below:
Step 1Import the Video File
Start by launching Filmora on your desktop. Select “New Project” to open its interface. Once done, press “Ctrl + I” to import the preferred video file.

Step 2Select Speed Ramping
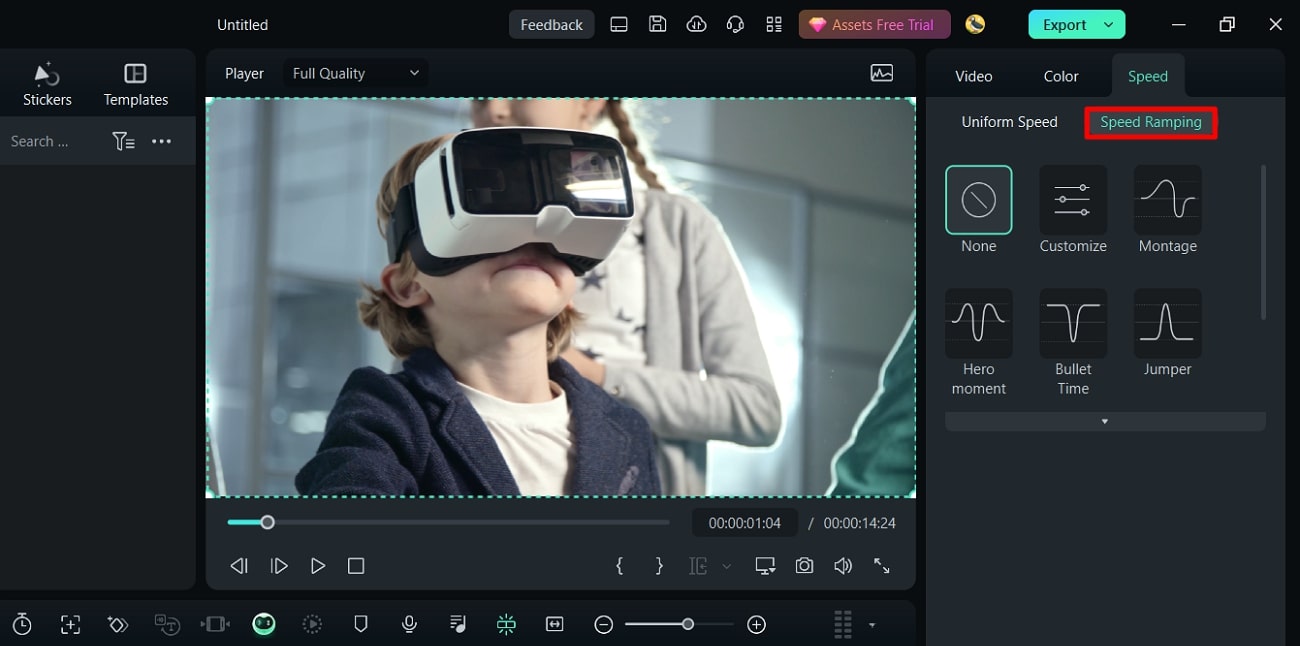
Once done by dragging it to the timeline, right-click on it to open a pop-up menu. Select “Speed” and then choose “Speed Ramping”. From the right panel, you can manage the speed ramping settings.
Step 3Adjust the Speed Settings
Select “Customize” for the preset and scroll a little bit. Here, you can adjust the pointers by using the cursor for speed modification. By dragging the point downwards, you will decrease the speed. In contrast, moving the points upwards will increase the speed.

Step 4Generate Final Results
Navigate into the “AI Frame Interpolation” section to smoothen the effect. From there, select “Optical Flow” to create a slow-motion effect of the best quality. To see the results, choose the “Render Preview” option given on the toolbar of the timeline. After modifying the video, save and export the results.

Key Features of Wondershare Filmora
Auto Reframe: This feature adjusts the aspect ratio of a video in an automated manner. You can make your video vertical for TikTok and YouTube Shorts. In a similar way, it can make videos horizontal to fit to Instagram.
AI Audio Denoise: The AI audio denoise feature is designed to remove specific voices from your video. You can try its AI voice enhancement option to make the vocals prominent. Moreover, it can remove reverb and hiss sounds from the audio in a natural way.
AI Smart Cutout: To remove unnecessary objects from the video, try its AI Smart Cutout feature. After selecting the area, it offers four preview modes. By using these modes, you can make adjustments according to the background.
Color Correction: Filmora provides more than 40 presets for color schemes. You can access the color correction settings to make manual changes. Moreover, you can apply advanced color tuning to adjust the colors of the video deeply.
Conclusion
Phantom slow-motion cameras offer great high-speed image details. The cameras of this brand produce high-definition results with advanced features. However, it cannot be affordable or accessible for many users. Therefore, Filmora is the best choice for students and beginners. With this software, you can make slow-motion videos in a cost-effective manner.
Make A Slow Motion Video Make A Slow Motion Video More Features

Part 1: What Do You Know About Phantom Camera Company?
Vision Research manufactures a Phantom camera that can be used in many professional fields. This company first came into being in 1950 by the name of “Photographic Analysis Company .”During the initial years, the company produced many cameras that could tackle the need for high-speed photography. However, in 1992, the company decided to create a separate entity to create high-speed cameras that wouldn’t depend on photographic film for imaging.
The US Patent Office acknowledged the use of innovative technology in the Phantom high-speed cameras. The main aim of this company is to produce robust cameras that can capture faster frame rates in high-speed photography. Many industries like defense, academia, and science research use Phantom slow-motion cameras. They are used in microfluidics, transparent flows, imaging, etc.
Part 2: Best Phantom Slow Motion Camera To Try
Phantom offers many slow-motion cameras with different features. This section will list down some of the best Phantom slow-motion cameras with pricing:
- TMX 7510
- T – Series T4040
- Machine Vision S200
- VEO 710
- Micro C and N C321
- 4K and Media Production Flex4K
1. TMX 7510
The TMX 7510 is built to produce high-end videos with different speed combinations. It uses a side-illuminated camera sensor to capture high-definition images. It can deliver 75,000 FPS with 1280 x 800 resolution. It offers up to 512GB RAM to help in making high-speed images. You can use its built-in Binning Mode with flexible options. It also supports many file formats like Cine RAW, TIFF, JPEG, etc.

2. T – Series T4040
The T-Series of Phantom includes many features to capture images with precision. The T4040 camera supports 9,350 fps with 2560 x 1664 resolution. It offers a peak Quantum Efficiency rating of 90% that can produce images in low-light conditions. Moreover, this Phantom slow-motion camera uses flow visualization techniques to capture minute details with high precision. It also offers EDR that balances exposure in the saturated areas of the image.

3. Machine Vision S200
This machine vision camera applies CXP technology to capture long-duration high-speed photos. It includes GPIO for events and ready signals. It’s economical and available in a compact size. Users can also use the time stamp on the frame to check the time code. Moreover, it can reach up to 6,950 fps with full resolution. You can trigger the recording with the given software or the GPIO trigger signal.

4. VEO 710
VEO series are specifically designed for film production and science laboratories. It has 7,400fps with a 1-Mpx 35mm sensor. The sensor format used in this camera is ideal for high-quality camera lenses. There are two options for the VEO body: S (full) and L (light). By purchasing the S model, you can experience many on-camera controls. Moreover, the body of this camera is made with aluminum to increase its reliability in tougher situations.

5. Micro C and N C321
The Micro C and N series are built to meet the challenges of using a standard camera. The lightweight body and on-board protection make this camera ideal. It supports a maximum fps of 1480 with full resolution. With high sensitivity, it can capture low-noise images with vibrant colors. The advanced features of this camera can provide high-end images while preserving the natural colors.

6. 4K and Media Production Flex4K
For professional cinema, Phantom has developed the Flex4k camera. This Phantom slo-mo camera supports 4K imaging with up to 1,000 fps. It provides three battery mounts with an on-camera menu system. The produced images are compatible with many color grading and video editing tools. Furthermore, it offers many remote-control options to ease your workflow. All the images that are produced will be delivered in the Cine RAW file format.

Part 3: No Phantom Camera? Still, Create a Slow Motion Video
Are you unable to buy a Phantom slow-mo camera? No worries, as Filmora can help you generate slow-motion videos with a normal camera. After recording a video from any standard device, you can add slow-motion effects with this tool. It provides a speed ramping feature that allows you to manage the speed of your video. It contains 6 speed ramping templates that you can try for professional purposes. Moreover, it provides a drag-and-drop interface to provide you with robust controls.
Filmora can make any ordinary video look cinematic. You can incorporate special backgrounds in your video without using a green screen. Furthermore, it can remove all the production flaws from your video within a few taps.
Free Download For Win 7 or later(64-bit)
Free Download For macOS 10.14 or later
Instructions to Produce Slow Motion Video With Speed Ramping
This part of the guide will include all the basic steps to make slow-motion videos . Thus, follow the steps mentioned below:
Step 1Import the Video File
Start by launching Filmora on your desktop. Select “New Project” to open its interface. Once done, press “Ctrl + I” to import the preferred video file.

Step 2Select Speed Ramping
Once done by dragging it to the timeline, right-click on it to open a pop-up menu. Select “Speed” and then choose “Speed Ramping”. From the right panel, you can manage the speed ramping settings.

Step 3Adjust the Speed Settings
Select “Customize” for the preset and scroll a little bit. Here, you can adjust the pointers by using the cursor for speed modification. By dragging the point downwards, you will decrease the speed. In contrast, moving the points upwards will increase the speed.

Step 4Generate Final Results
Navigate into the “AI Frame Interpolation” section to smoothen the effect. From there, select “Optical Flow” to create a slow-motion effect of the best quality. To see the results, choose the “Render Preview” option given on the toolbar of the timeline. After modifying the video, save and export the results.

Key Features of Wondershare Filmora
Auto Reframe: This feature adjusts the aspect ratio of a video in an automated manner. You can make your video vertical for TikTok and YouTube Shorts. In a similar way, it can make videos horizontal to fit to Instagram.
AI Audio Denoise: The AI audio denoise feature is designed to remove specific voices from your video. You can try its AI voice enhancement option to make the vocals prominent. Moreover, it can remove reverb and hiss sounds from the audio in a natural way.
AI Smart Cutout: To remove unnecessary objects from the video, try its AI Smart Cutout feature. After selecting the area, it offers four preview modes. By using these modes, you can make adjustments according to the background.
Color Correction: Filmora provides more than 40 presets for color schemes. You can access the color correction settings to make manual changes. Moreover, you can apply advanced color tuning to adjust the colors of the video deeply.
Conclusion
Phantom slow-motion cameras offer great high-speed image details. The cameras of this brand produce high-definition results with advanced features. However, it cannot be affordable or accessible for many users. Therefore, Filmora is the best choice for students and beginners. With this software, you can make slow-motion videos in a cost-effective manner.
When It Comes to Video Editing, There Are Countless Software Options Available on the Market. However, Not All of Them Come with Useful Masking Tools. In This Article, We Will Be Discussing the Top 8 Video Editor with Useful Masking Tools
Create High-Quality Video - Wondershare Filmora
An easy and powerful YouTube video editor
Numerous video and audio effects to choose from
Detailed tutorials are provided by the official channel
Masking video editing is the process of hiding or obscuring certain elements in a video clip. This can be done for aesthetic purposes and is often used to remove unwanted objects or blemishes from the footage. Masking can be accomplished using a variety of methods, including rotoscoping, chroma-keying, and motion tracking.
In this article
02 Top 8 Video Editor with Useful Masking
What is Masking?
Masks are a feature of editing software that allows you to choose a particular portion of the video or utilize video overlays to hide, duplicate, reveal, or change your footage. The mask is the portion of the video you’ve chosen to pick, either with a template or a custom frame. The mask then becomes isolated, and you may modify it as desired to produce your intended effect.
Masks may be used to do some fantastic things with your videos. You can clone people or objects, overlay several pictures, create glitch effects, blur faces out, etc. Masks add a lot of excitement and color to videos, making them more dynamic, enjoyable to watch, and professional. It can draw attention - and keep it!
Different types of masking
There are three primary types of masking: rotoscoping, chroma-keying, and motion tracking.
Rotoscoping: Rotoscoping is the process of manually tracing an object in a video frame by frame to create a mask. This can be a time-consuming process, but it allows for very precise control over the masked area.
Chroma-keying: Chroma-keying is a type of masking that makes use of color to isolate a particular area of the frame. For example, this is often used to remove a green or blue screen from the footage, but can also be used to isolate other colors.
Motion tracking: Motion tracking is a masking technique that allows you to track the movement of an object in a video clip. This is often used to add special effects, such as explosions, to a video.

Top 8 Video Editor with Useful Masking

Here is the list of Top 8 Video Editors with useful masking Features
1. Adobe Premiere Pro
Adobe Premiere Pro is a professional video editing software with a wide range of features and precise masking controls. It allows you to create custom masks or use the built-in rotoscope tool to isolate objects in your footage quickly.

How to Create a Mask in Premiere Pro
Do you understand how to construct a mask in Adobe Premiere? Shape tools and pen tools may be used to make the Adobe premiere mask.
By Using Shape Tools:
Select the shape tool you’d like to utilize from the Tools panel.
Then, create a mask by drawing a shape on the video clip in the Timeline.
By Using Pen Tools:
Click the pen tool icon in the Tools panel.
Click and drag to draw a path around the object you wish to isolate.
After drawing your path, click the “Mask” button in the Tools panel.
2. Final Cut Pro X
Final Cut Pro X is a proficient video editing software with powerful masking tools. It allows you to create custom masks or isolate objects in your footage.

How to Create a Mask in Final Cut Pro X
With little effort, the Shape Mask tool allows you to make a mask in any shape on the continuum, ranging from an ellipse to a rectangle.
The Shape Mask is a simple mask that may be changed to editable control points in order to create complex bespoke masks (converting it into a Draw Mask).
- Open the Final Cut Pro project and select the clip you wish to mask.
Note: You can’t composite a clip over another one while using isolated clips. Final Cut Pro has this option, which you may find in the Comping window. - To make a clip transparent, select it in the timeline and place the play head at a point within the video clip that shows the portion you wish to make transparent.
- Click the Effects button in the top-right corner of the timeline (or press Command-5) to display the Effects browser.
- Select the Shape Mask effect in the Effects Browser.
Tip: Type “shape” in the Effects browser search bar to quickly locate the Shape Mask effect.
To apply the masking effect to the clip in the timeline, choose one of the following options:
- Drag the effect to the timeline clip.
- Double-click the effect thumbnail in the Effects browser to apply it.
- Use the on-screen controls to modify the shape mask if necessary.
The controls for the Shape Mask appear in the viewer, overlaid on top of the video image. In addition, the Effects area of the Video inspector displays the Shape Mask options. By default, the Shape Mask is set to a partially feathered ellipse shape in the center of the frame.
3. Wondershare Filmora
Filmora 11 is an easy to use video editor with useful masking features. It provides various of masking presets to make masking easy for you. If you are looking for Green Screen, Filmora also covers you. Its Chroma Key allows you to remove the background of almost any color.
Masking in Filmora 11
Filmora 11 has been modified to allow for the masking of keyframes. First, double-click the clip on your timeline to open a settings window in the library. Then, in the videos area, select the “Mask” option. Multiple forms may be selected here.
We picked the ‘Star’ form for this project. After selecting it, you may drag the shape to your clip in the preview area.
Scrolling down in the Windows category will take you to more options where you can change the scale, position, width, height, and radius of your chosen shape. You may also lessen the strength of the form and rotate it to make it blend in better with the other elements you’re trying to hide in your window.
To add the keyframe, simply hit the “Add” button after completing it. You may then modify the mask’s form to match the added frame.
For Win 7 or later (64-bit)
For macOS 10.12 or later
4. Avid Media Composer
Avid Media Composer has a comprehensive masking feature for video editors of different levels. You can either use the built-in masking tools or make your own one.

Masking in Avid Media Composer
In the Masking Effect window, you can choose to either create a new mask or use an existing one. First, select the “Create Mask” option and then click on the “Draw Mask” button to create a new mask.
This will open up the Draw Mask window, where you can draw your mask using the various tools provided. To apply the mask, simply click the “Apply” button.
If you want to use an existing mask, select the “Use Mask” option and then choose the mask you want to use from the drop-down menu.
5. Sony Vegas Pro
Sony Vegas Pro is a professional video editing software with robust masking tools. The interface of the editor may looks complicated for beginners, yet once you get familiar with it, you will be amazed by what you can achieve with the Vegas Pro.

Masking in Sony Vegas Pro
Step 1: Drag the clip from the Explorer or Project Media windows and drop it on the timeline. Then, look for another video that is quite distinct from the first.
Step 2: Drag it to the timeline below the first video event. A new track will be created. Place the original event directly beneath the video occurrence.
The Video Preview window does not display the second video because it is covered by the first video, which resembles one photo sitting on top of another in a stack. So to view the lower clip, we’ll need to add a mask.
6. Magix Movie Edit Pro
Magix Movie Edit Pro is another video editor that is great for adding masks to your video. It is famous for its ease-of-learn and stable rendering. When it comes to masking, it is also quite powerful.

Masking in Magix Movie Edit Pro
They let you apply special effects to only certain parts of a video. You may dramatically improve the aspect of your movies with this Magix Movie Edit Pro Plus feature.
When you apply color effects to the software’s template, it appears that you can only use color effects.
To add additional effects to specific portions of the shot, simply import an image and apply the Alpha Mask property from the Chroma Key menu. Then you must duplicate the video section and place it on a lower track, while keeping the alpha mask picture in between the two videos (click the graphic above for a visual guide).
7. Studio
Studio is a pro-level video editing software. It is preloaded with pro-caliber tool and premium effects to help you create the videos you want. We will show you how to apply masking in Studio in the following paragraphs.

Masking in Studio
Select the clip you want to overlay your media on, then click the ‘Mask’ button on the editing toolbar. After that, open the mask creation window by clicking ‘Create Mask.
First, click “Create Panel” to create a video mask panel.
To make a panel, use the panel of tools on the left side of the preview window. They’ll only be shown in your video when you add assets later if they’re inside this panel. Keep in mind that you may modify the size and placement of your asset within the panel and the panel itself; therefore, you might need to.
To access the media selection possibilities, click on the ‘Asset’ tab of the mask creation window. To discover the picture or video you want to include in your panel, go through your imported files by selecting ‘Select media.’ After that, select the media to be included in your panel video mask and hit ‘Apply.’
Use the left-hand slider or the resizing box in the preview window on the right to change the size and placement of your media in your panel video mask.
To adjust the 3D position of your panel video mask, go to the ‘3D’ tab of the mask creation window.
8. CyberLink PowerDirector
CyberLink PowerDirector has recently enhanced its mask & blend feature to help you create artistic scenes. If you are interested in the feature, you can try it out.

Masking in CyberLink PowerDirector
Drag and drop a photo from the media room into track 2 of your timeline, then drag the background image into track 1.
Then, go to the Quick Settings menu (press the Menu button at the bottom of your screen), select Cloud Print from the drop-down menu, and then select your photo. Then open up the design interface by selecting Mask Designer from the drop-down menu.
You may select from a variety of templates in the Mask Designer. If you want to make your own mask shape, the Mask Designer has three alternatives for you to create new mask types.
Create an image mask: You may use any picture or video, and it will be resized to fit the shape.
Create a text mask: Enter the text you’d like to appear in your photo. Then, go to the left side of the panel under Font/Paragraph on the left side for font style, size, and other options. To alter the text mask itself, go to the preview window and resize it on the left panel.
Conclusion
● Maybe you want to add a picture-in-picture effect, or maybe you want to replace the background with a new image. Whatever the reason, it’s easy to do with most video editing software. We’ve shown you how to mask videos in eight different editors in this article. So now you can get started creating your own custom videos!
Masking video editing is the process of hiding or obscuring certain elements in a video clip. This can be done for aesthetic purposes and is often used to remove unwanted objects or blemishes from the footage. Masking can be accomplished using a variety of methods, including rotoscoping, chroma-keying, and motion tracking.
In this article
02 Top 8 Video Editor with Useful Masking
What is Masking?
Masks are a feature of editing software that allows you to choose a particular portion of the video or utilize video overlays to hide, duplicate, reveal, or change your footage. The mask is the portion of the video you’ve chosen to pick, either with a template or a custom frame. The mask then becomes isolated, and you may modify it as desired to produce your intended effect.
Masks may be used to do some fantastic things with your videos. You can clone people or objects, overlay several pictures, create glitch effects, blur faces out, etc. Masks add a lot of excitement and color to videos, making them more dynamic, enjoyable to watch, and professional. It can draw attention - and keep it!
Different types of masking
There are three primary types of masking: rotoscoping, chroma-keying, and motion tracking.
Rotoscoping: Rotoscoping is the process of manually tracing an object in a video frame by frame to create a mask. This can be a time-consuming process, but it allows for very precise control over the masked area.
Chroma-keying: Chroma-keying is a type of masking that makes use of color to isolate a particular area of the frame. For example, this is often used to remove a green or blue screen from the footage, but can also be used to isolate other colors.
Motion tracking: Motion tracking is a masking technique that allows you to track the movement of an object in a video clip. This is often used to add special effects, such as explosions, to a video.

Top 8 Video Editor with Useful Masking

Here is the list of Top 8 Video Editors with useful masking Features
1. Adobe Premiere Pro
Adobe Premiere Pro is a professional video editing software with a wide range of features and precise masking controls. It allows you to create custom masks or use the built-in rotoscope tool to isolate objects in your footage quickly.

How to Create a Mask in Premiere Pro
Do you understand how to construct a mask in Adobe Premiere? Shape tools and pen tools may be used to make the Adobe premiere mask.
By Using Shape Tools:
Select the shape tool you’d like to utilize from the Tools panel.
Then, create a mask by drawing a shape on the video clip in the Timeline.
By Using Pen Tools:
Click the pen tool icon in the Tools panel.
Click and drag to draw a path around the object you wish to isolate.
After drawing your path, click the “Mask” button in the Tools panel.
2. Final Cut Pro X
Final Cut Pro X is a proficient video editing software with powerful masking tools. It allows you to create custom masks or isolate objects in your footage.

How to Create a Mask in Final Cut Pro X
With little effort, the Shape Mask tool allows you to make a mask in any shape on the continuum, ranging from an ellipse to a rectangle.
The Shape Mask is a simple mask that may be changed to editable control points in order to create complex bespoke masks (converting it into a Draw Mask).
- Open the Final Cut Pro project and select the clip you wish to mask.
Note: You can’t composite a clip over another one while using isolated clips. Final Cut Pro has this option, which you may find in the Comping window. - To make a clip transparent, select it in the timeline and place the play head at a point within the video clip that shows the portion you wish to make transparent.
- Click the Effects button in the top-right corner of the timeline (or press Command-5) to display the Effects browser.
- Select the Shape Mask effect in the Effects Browser.
Tip: Type “shape” in the Effects browser search bar to quickly locate the Shape Mask effect.
To apply the masking effect to the clip in the timeline, choose one of the following options:
- Drag the effect to the timeline clip.
- Double-click the effect thumbnail in the Effects browser to apply it.
- Use the on-screen controls to modify the shape mask if necessary.
The controls for the Shape Mask appear in the viewer, overlaid on top of the video image. In addition, the Effects area of the Video inspector displays the Shape Mask options. By default, the Shape Mask is set to a partially feathered ellipse shape in the center of the frame.
3. Wondershare Filmora
Filmora 11 is an easy to use video editor with useful masking features. It provides various of masking presets to make masking easy for you. If you are looking for Green Screen, Filmora also covers you. Its Chroma Key allows you to remove the background of almost any color.
Masking in Filmora 11
Filmora 11 has been modified to allow for the masking of keyframes. First, double-click the clip on your timeline to open a settings window in the library. Then, in the videos area, select the “Mask” option. Multiple forms may be selected here.
We picked the ‘Star’ form for this project. After selecting it, you may drag the shape to your clip in the preview area.
Scrolling down in the Windows category will take you to more options where you can change the scale, position, width, height, and radius of your chosen shape. You may also lessen the strength of the form and rotate it to make it blend in better with the other elements you’re trying to hide in your window.
To add the keyframe, simply hit the “Add” button after completing it. You may then modify the mask’s form to match the added frame.
For Win 7 or later (64-bit)
For macOS 10.12 or later
4. Avid Media Composer
Avid Media Composer has a comprehensive masking feature for video editors of different levels. You can either use the built-in masking tools or make your own one.

Masking in Avid Media Composer
In the Masking Effect window, you can choose to either create a new mask or use an existing one. First, select the “Create Mask” option and then click on the “Draw Mask” button to create a new mask.
This will open up the Draw Mask window, where you can draw your mask using the various tools provided. To apply the mask, simply click the “Apply” button.
If you want to use an existing mask, select the “Use Mask” option and then choose the mask you want to use from the drop-down menu.
5. Sony Vegas Pro
Sony Vegas Pro is a professional video editing software with robust masking tools. The interface of the editor may looks complicated for beginners, yet once you get familiar with it, you will be amazed by what you can achieve with the Vegas Pro.

Masking in Sony Vegas Pro
Step 1: Drag the clip from the Explorer or Project Media windows and drop it on the timeline. Then, look for another video that is quite distinct from the first.
Step 2: Drag it to the timeline below the first video event. A new track will be created. Place the original event directly beneath the video occurrence.
The Video Preview window does not display the second video because it is covered by the first video, which resembles one photo sitting on top of another in a stack. So to view the lower clip, we’ll need to add a mask.
6. Magix Movie Edit Pro
Magix Movie Edit Pro is another video editor that is great for adding masks to your video. It is famous for its ease-of-learn and stable rendering. When it comes to masking, it is also quite powerful.

Masking in Magix Movie Edit Pro
They let you apply special effects to only certain parts of a video. You may dramatically improve the aspect of your movies with this Magix Movie Edit Pro Plus feature.
When you apply color effects to the software’s template, it appears that you can only use color effects.
To add additional effects to specific portions of the shot, simply import an image and apply the Alpha Mask property from the Chroma Key menu. Then you must duplicate the video section and place it on a lower track, while keeping the alpha mask picture in between the two videos (click the graphic above for a visual guide).
7. Studio
Studio is a pro-level video editing software. It is preloaded with pro-caliber tool and premium effects to help you create the videos you want. We will show you how to apply masking in Studio in the following paragraphs.

Masking in Studio
Select the clip you want to overlay your media on, then click the ‘Mask’ button on the editing toolbar. After that, open the mask creation window by clicking ‘Create Mask.
First, click “Create Panel” to create a video mask panel.
To make a panel, use the panel of tools on the left side of the preview window. They’ll only be shown in your video when you add assets later if they’re inside this panel. Keep in mind that you may modify the size and placement of your asset within the panel and the panel itself; therefore, you might need to.
To access the media selection possibilities, click on the ‘Asset’ tab of the mask creation window. To discover the picture or video you want to include in your panel, go through your imported files by selecting ‘Select media.’ After that, select the media to be included in your panel video mask and hit ‘Apply.’
Use the left-hand slider or the resizing box in the preview window on the right to change the size and placement of your media in your panel video mask.
To adjust the 3D position of your panel video mask, go to the ‘3D’ tab of the mask creation window.
8. CyberLink PowerDirector
CyberLink PowerDirector has recently enhanced its mask & blend feature to help you create artistic scenes. If you are interested in the feature, you can try it out.

Masking in CyberLink PowerDirector
Drag and drop a photo from the media room into track 2 of your timeline, then drag the background image into track 1.
Then, go to the Quick Settings menu (press the Menu button at the bottom of your screen), select Cloud Print from the drop-down menu, and then select your photo. Then open up the design interface by selecting Mask Designer from the drop-down menu.
You may select from a variety of templates in the Mask Designer. If you want to make your own mask shape, the Mask Designer has three alternatives for you to create new mask types.
Create an image mask: You may use any picture or video, and it will be resized to fit the shape.
Create a text mask: Enter the text you’d like to appear in your photo. Then, go to the left side of the panel under Font/Paragraph on the left side for font style, size, and other options. To alter the text mask itself, go to the preview window and resize it on the left panel.
Conclusion
● Maybe you want to add a picture-in-picture effect, or maybe you want to replace the background with a new image. Whatever the reason, it’s easy to do with most video editing software. We’ve shown you how to mask videos in eight different editors in this article. So now you can get started creating your own custom videos!
Masking video editing is the process of hiding or obscuring certain elements in a video clip. This can be done for aesthetic purposes and is often used to remove unwanted objects or blemishes from the footage. Masking can be accomplished using a variety of methods, including rotoscoping, chroma-keying, and motion tracking.
In this article
02 Top 8 Video Editor with Useful Masking
What is Masking?
Masks are a feature of editing software that allows you to choose a particular portion of the video or utilize video overlays to hide, duplicate, reveal, or change your footage. The mask is the portion of the video you’ve chosen to pick, either with a template or a custom frame. The mask then becomes isolated, and you may modify it as desired to produce your intended effect.
Masks may be used to do some fantastic things with your videos. You can clone people or objects, overlay several pictures, create glitch effects, blur faces out, etc. Masks add a lot of excitement and color to videos, making them more dynamic, enjoyable to watch, and professional. It can draw attention - and keep it!
Different types of masking
There are three primary types of masking: rotoscoping, chroma-keying, and motion tracking.
Rotoscoping: Rotoscoping is the process of manually tracing an object in a video frame by frame to create a mask. This can be a time-consuming process, but it allows for very precise control over the masked area.
Chroma-keying: Chroma-keying is a type of masking that makes use of color to isolate a particular area of the frame. For example, this is often used to remove a green or blue screen from the footage, but can also be used to isolate other colors.
Motion tracking: Motion tracking is a masking technique that allows you to track the movement of an object in a video clip. This is often used to add special effects, such as explosions, to a video.

Top 8 Video Editor with Useful Masking

Here is the list of Top 8 Video Editors with useful masking Features
1. Adobe Premiere Pro
Adobe Premiere Pro is a professional video editing software with a wide range of features and precise masking controls. It allows you to create custom masks or use the built-in rotoscope tool to isolate objects in your footage quickly.

How to Create a Mask in Premiere Pro
Do you understand how to construct a mask in Adobe Premiere? Shape tools and pen tools may be used to make the Adobe premiere mask.
By Using Shape Tools:
Select the shape tool you’d like to utilize from the Tools panel.
Then, create a mask by drawing a shape on the video clip in the Timeline.
By Using Pen Tools:
Click the pen tool icon in the Tools panel.
Click and drag to draw a path around the object you wish to isolate.
After drawing your path, click the “Mask” button in the Tools panel.
2. Final Cut Pro X
Final Cut Pro X is a proficient video editing software with powerful masking tools. It allows you to create custom masks or isolate objects in your footage.

How to Create a Mask in Final Cut Pro X
With little effort, the Shape Mask tool allows you to make a mask in any shape on the continuum, ranging from an ellipse to a rectangle.
The Shape Mask is a simple mask that may be changed to editable control points in order to create complex bespoke masks (converting it into a Draw Mask).
- Open the Final Cut Pro project and select the clip you wish to mask.
Note: You can’t composite a clip over another one while using isolated clips. Final Cut Pro has this option, which you may find in the Comping window. - To make a clip transparent, select it in the timeline and place the play head at a point within the video clip that shows the portion you wish to make transparent.
- Click the Effects button in the top-right corner of the timeline (or press Command-5) to display the Effects browser.
- Select the Shape Mask effect in the Effects Browser.
Tip: Type “shape” in the Effects browser search bar to quickly locate the Shape Mask effect.
To apply the masking effect to the clip in the timeline, choose one of the following options:
- Drag the effect to the timeline clip.
- Double-click the effect thumbnail in the Effects browser to apply it.
- Use the on-screen controls to modify the shape mask if necessary.
The controls for the Shape Mask appear in the viewer, overlaid on top of the video image. In addition, the Effects area of the Video inspector displays the Shape Mask options. By default, the Shape Mask is set to a partially feathered ellipse shape in the center of the frame.
3. Wondershare Filmora
Filmora 11 is an easy to use video editor with useful masking features. It provides various of masking presets to make masking easy for you. If you are looking for Green Screen, Filmora also covers you. Its Chroma Key allows you to remove the background of almost any color.
Masking in Filmora 11
Filmora 11 has been modified to allow for the masking of keyframes. First, double-click the clip on your timeline to open a settings window in the library. Then, in the videos area, select the “Mask” option. Multiple forms may be selected here.
We picked the ‘Star’ form for this project. After selecting it, you may drag the shape to your clip in the preview area.
Scrolling down in the Windows category will take you to more options where you can change the scale, position, width, height, and radius of your chosen shape. You may also lessen the strength of the form and rotate it to make it blend in better with the other elements you’re trying to hide in your window.
To add the keyframe, simply hit the “Add” button after completing it. You may then modify the mask’s form to match the added frame.
For Win 7 or later (64-bit)
For macOS 10.12 or later
4. Avid Media Composer
Avid Media Composer has a comprehensive masking feature for video editors of different levels. You can either use the built-in masking tools or make your own one.

Masking in Avid Media Composer
In the Masking Effect window, you can choose to either create a new mask or use an existing one. First, select the “Create Mask” option and then click on the “Draw Mask” button to create a new mask.
This will open up the Draw Mask window, where you can draw your mask using the various tools provided. To apply the mask, simply click the “Apply” button.
If you want to use an existing mask, select the “Use Mask” option and then choose the mask you want to use from the drop-down menu.
5. Sony Vegas Pro
Sony Vegas Pro is a professional video editing software with robust masking tools. The interface of the editor may looks complicated for beginners, yet once you get familiar with it, you will be amazed by what you can achieve with the Vegas Pro.

Masking in Sony Vegas Pro
Step 1: Drag the clip from the Explorer or Project Media windows and drop it on the timeline. Then, look for another video that is quite distinct from the first.
Step 2: Drag it to the timeline below the first video event. A new track will be created. Place the original event directly beneath the video occurrence.
The Video Preview window does not display the second video because it is covered by the first video, which resembles one photo sitting on top of another in a stack. So to view the lower clip, we’ll need to add a mask.
6. Magix Movie Edit Pro
Magix Movie Edit Pro is another video editor that is great for adding masks to your video. It is famous for its ease-of-learn and stable rendering. When it comes to masking, it is also quite powerful.

Masking in Magix Movie Edit Pro
They let you apply special effects to only certain parts of a video. You may dramatically improve the aspect of your movies with this Magix Movie Edit Pro Plus feature.
When you apply color effects to the software’s template, it appears that you can only use color effects.
To add additional effects to specific portions of the shot, simply import an image and apply the Alpha Mask property from the Chroma Key menu. Then you must duplicate the video section and place it on a lower track, while keeping the alpha mask picture in between the two videos (click the graphic above for a visual guide).
7. Studio
Studio is a pro-level video editing software. It is preloaded with pro-caliber tool and premium effects to help you create the videos you want. We will show you how to apply masking in Studio in the following paragraphs.

Masking in Studio
Select the clip you want to overlay your media on, then click the ‘Mask’ button on the editing toolbar. After that, open the mask creation window by clicking ‘Create Mask.
First, click “Create Panel” to create a video mask panel.
To make a panel, use the panel of tools on the left side of the preview window. They’ll only be shown in your video when you add assets later if they’re inside this panel. Keep in mind that you may modify the size and placement of your asset within the panel and the panel itself; therefore, you might need to.
To access the media selection possibilities, click on the ‘Asset’ tab of the mask creation window. To discover the picture or video you want to include in your panel, go through your imported files by selecting ‘Select media.’ After that, select the media to be included in your panel video mask and hit ‘Apply.’
Use the left-hand slider or the resizing box in the preview window on the right to change the size and placement of your media in your panel video mask.
To adjust the 3D position of your panel video mask, go to the ‘3D’ tab of the mask creation window.
8. CyberLink PowerDirector
CyberLink PowerDirector has recently enhanced its mask & blend feature to help you create artistic scenes. If you are interested in the feature, you can try it out.

Masking in CyberLink PowerDirector
Drag and drop a photo from the media room into track 2 of your timeline, then drag the background image into track 1.
Then, go to the Quick Settings menu (press the Menu button at the bottom of your screen), select Cloud Print from the drop-down menu, and then select your photo. Then open up the design interface by selecting Mask Designer from the drop-down menu.
You may select from a variety of templates in the Mask Designer. If you want to make your own mask shape, the Mask Designer has three alternatives for you to create new mask types.
Create an image mask: You may use any picture or video, and it will be resized to fit the shape.
Create a text mask: Enter the text you’d like to appear in your photo. Then, go to the left side of the panel under Font/Paragraph on the left side for font style, size, and other options. To alter the text mask itself, go to the preview window and resize it on the left panel.
Conclusion
● Maybe you want to add a picture-in-picture effect, or maybe you want to replace the background with a new image. Whatever the reason, it’s easy to do with most video editing software. We’ve shown you how to mask videos in eight different editors in this article. So now you can get started creating your own custom videos!
Masking video editing is the process of hiding or obscuring certain elements in a video clip. This can be done for aesthetic purposes and is often used to remove unwanted objects or blemishes from the footage. Masking can be accomplished using a variety of methods, including rotoscoping, chroma-keying, and motion tracking.
In this article
02 Top 8 Video Editor with Useful Masking
What is Masking?
Masks are a feature of editing software that allows you to choose a particular portion of the video or utilize video overlays to hide, duplicate, reveal, or change your footage. The mask is the portion of the video you’ve chosen to pick, either with a template or a custom frame. The mask then becomes isolated, and you may modify it as desired to produce your intended effect.
Masks may be used to do some fantastic things with your videos. You can clone people or objects, overlay several pictures, create glitch effects, blur faces out, etc. Masks add a lot of excitement and color to videos, making them more dynamic, enjoyable to watch, and professional. It can draw attention - and keep it!
Different types of masking
There are three primary types of masking: rotoscoping, chroma-keying, and motion tracking.
Rotoscoping: Rotoscoping is the process of manually tracing an object in a video frame by frame to create a mask. This can be a time-consuming process, but it allows for very precise control over the masked area.
Chroma-keying: Chroma-keying is a type of masking that makes use of color to isolate a particular area of the frame. For example, this is often used to remove a green or blue screen from the footage, but can also be used to isolate other colors.
Motion tracking: Motion tracking is a masking technique that allows you to track the movement of an object in a video clip. This is often used to add special effects, such as explosions, to a video.

Top 8 Video Editor with Useful Masking

Here is the list of Top 8 Video Editors with useful masking Features
1. Adobe Premiere Pro
Adobe Premiere Pro is a professional video editing software with a wide range of features and precise masking controls. It allows you to create custom masks or use the built-in rotoscope tool to isolate objects in your footage quickly.

How to Create a Mask in Premiere Pro
Do you understand how to construct a mask in Adobe Premiere? Shape tools and pen tools may be used to make the Adobe premiere mask.
By Using Shape Tools:
Select the shape tool you’d like to utilize from the Tools panel.
Then, create a mask by drawing a shape on the video clip in the Timeline.
By Using Pen Tools:
Click the pen tool icon in the Tools panel.
Click and drag to draw a path around the object you wish to isolate.
After drawing your path, click the “Mask” button in the Tools panel.
2. Final Cut Pro X
Final Cut Pro X is a proficient video editing software with powerful masking tools. It allows you to create custom masks or isolate objects in your footage.

How to Create a Mask in Final Cut Pro X
With little effort, the Shape Mask tool allows you to make a mask in any shape on the continuum, ranging from an ellipse to a rectangle.
The Shape Mask is a simple mask that may be changed to editable control points in order to create complex bespoke masks (converting it into a Draw Mask).
- Open the Final Cut Pro project and select the clip you wish to mask.
Note: You can’t composite a clip over another one while using isolated clips. Final Cut Pro has this option, which you may find in the Comping window. - To make a clip transparent, select it in the timeline and place the play head at a point within the video clip that shows the portion you wish to make transparent.
- Click the Effects button in the top-right corner of the timeline (or press Command-5) to display the Effects browser.
- Select the Shape Mask effect in the Effects Browser.
Tip: Type “shape” in the Effects browser search bar to quickly locate the Shape Mask effect.
To apply the masking effect to the clip in the timeline, choose one of the following options:
- Drag the effect to the timeline clip.
- Double-click the effect thumbnail in the Effects browser to apply it.
- Use the on-screen controls to modify the shape mask if necessary.
The controls for the Shape Mask appear in the viewer, overlaid on top of the video image. In addition, the Effects area of the Video inspector displays the Shape Mask options. By default, the Shape Mask is set to a partially feathered ellipse shape in the center of the frame.
3. Wondershare Filmora
Filmora 11 is an easy to use video editor with useful masking features. It provides various of masking presets to make masking easy for you. If you are looking for Green Screen, Filmora also covers you. Its Chroma Key allows you to remove the background of almost any color.
Masking in Filmora 11
Filmora 11 has been modified to allow for the masking of keyframes. First, double-click the clip on your timeline to open a settings window in the library. Then, in the videos area, select the “Mask” option. Multiple forms may be selected here.
We picked the ‘Star’ form for this project. After selecting it, you may drag the shape to your clip in the preview area.
Scrolling down in the Windows category will take you to more options where you can change the scale, position, width, height, and radius of your chosen shape. You may also lessen the strength of the form and rotate it to make it blend in better with the other elements you’re trying to hide in your window.
To add the keyframe, simply hit the “Add” button after completing it. You may then modify the mask’s form to match the added frame.
For Win 7 or later (64-bit)
For macOS 10.12 or later
4. Avid Media Composer
Avid Media Composer has a comprehensive masking feature for video editors of different levels. You can either use the built-in masking tools or make your own one.

Masking in Avid Media Composer
In the Masking Effect window, you can choose to either create a new mask or use an existing one. First, select the “Create Mask” option and then click on the “Draw Mask” button to create a new mask.
This will open up the Draw Mask window, where you can draw your mask using the various tools provided. To apply the mask, simply click the “Apply” button.
If you want to use an existing mask, select the “Use Mask” option and then choose the mask you want to use from the drop-down menu.
5. Sony Vegas Pro
Sony Vegas Pro is a professional video editing software with robust masking tools. The interface of the editor may looks complicated for beginners, yet once you get familiar with it, you will be amazed by what you can achieve with the Vegas Pro.

Masking in Sony Vegas Pro
Step 1: Drag the clip from the Explorer or Project Media windows and drop it on the timeline. Then, look for another video that is quite distinct from the first.
Step 2: Drag it to the timeline below the first video event. A new track will be created. Place the original event directly beneath the video occurrence.
The Video Preview window does not display the second video because it is covered by the first video, which resembles one photo sitting on top of another in a stack. So to view the lower clip, we’ll need to add a mask.
6. Magix Movie Edit Pro
Magix Movie Edit Pro is another video editor that is great for adding masks to your video. It is famous for its ease-of-learn and stable rendering. When it comes to masking, it is also quite powerful.

Masking in Magix Movie Edit Pro
They let you apply special effects to only certain parts of a video. You may dramatically improve the aspect of your movies with this Magix Movie Edit Pro Plus feature.
When you apply color effects to the software’s template, it appears that you can only use color effects.
To add additional effects to specific portions of the shot, simply import an image and apply the Alpha Mask property from the Chroma Key menu. Then you must duplicate the video section and place it on a lower track, while keeping the alpha mask picture in between the two videos (click the graphic above for a visual guide).
7. Studio
Studio is a pro-level video editing software. It is preloaded with pro-caliber tool and premium effects to help you create the videos you want. We will show you how to apply masking in Studio in the following paragraphs.

Masking in Studio
Select the clip you want to overlay your media on, then click the ‘Mask’ button on the editing toolbar. After that, open the mask creation window by clicking ‘Create Mask.
First, click “Create Panel” to create a video mask panel.
To make a panel, use the panel of tools on the left side of the preview window. They’ll only be shown in your video when you add assets later if they’re inside this panel. Keep in mind that you may modify the size and placement of your asset within the panel and the panel itself; therefore, you might need to.
To access the media selection possibilities, click on the ‘Asset’ tab of the mask creation window. To discover the picture or video you want to include in your panel, go through your imported files by selecting ‘Select media.’ After that, select the media to be included in your panel video mask and hit ‘Apply.’
Use the left-hand slider or the resizing box in the preview window on the right to change the size and placement of your media in your panel video mask.
To adjust the 3D position of your panel video mask, go to the ‘3D’ tab of the mask creation window.
8. CyberLink PowerDirector
CyberLink PowerDirector has recently enhanced its mask & blend feature to help you create artistic scenes. If you are interested in the feature, you can try it out.

Masking in CyberLink PowerDirector
Drag and drop a photo from the media room into track 2 of your timeline, then drag the background image into track 1.
Then, go to the Quick Settings menu (press the Menu button at the bottom of your screen), select Cloud Print from the drop-down menu, and then select your photo. Then open up the design interface by selecting Mask Designer from the drop-down menu.
You may select from a variety of templates in the Mask Designer. If you want to make your own mask shape, the Mask Designer has three alternatives for you to create new mask types.
Create an image mask: You may use any picture or video, and it will be resized to fit the shape.
Create a text mask: Enter the text you’d like to appear in your photo. Then, go to the left side of the panel under Font/Paragraph on the left side for font style, size, and other options. To alter the text mask itself, go to the preview window and resize it on the left panel.
Conclusion
● Maybe you want to add a picture-in-picture effect, or maybe you want to replace the background with a new image. Whatever the reason, it’s easy to do with most video editing software. We’ve shown you how to mask videos in eight different editors in this article. So now you can get started creating your own custom videos!
Also read:
- New Shotcut Review – Is It The Best Free Video Editor?
- Updated 2024 Approved Tips for Choosing Location and Scheduling Music Video
- In 2024, Many People Choose Video Editing or Post-Editing as Their Career in These Days. Is This a Good Choice? How to Start a Video Editing Career? This Article Will Tell You the Complete Details
- Updated In 2024, How to Add Subtitles in VLC Media Play
- In 2024, Get 15 Absolutely-Free LUTs From This Article as Well as Get an Insight on How Cinematic LUTs Affect Your Film
- Updated Add Some Shake to Videos with Alight Motion
- Updated 2024 Approved Color Match Game Tips for You
- Updated Guide to Making Cinematography for Music Video for 2024
- New In 2024, Google Meet Green Screen
- Updated Tutorial | How to Make a Smooth Speed Ramping in Premiere Pro?
- New Reversing Time Lapse Videos on iPhone Using Top Applications
- In 2024, When It Comes to Video Editing, There Are Countless Software Options Available on the Market. However, Not All of Them Come with Useful Masking Tools. In This Article, We Will Be Discussing the Top 8 Video Editor with Useful Masking Tools
- Updated 2024 Approved Cropping a Video in Final Cut Pro Step by Step
- Top Fixes to Resolve Issues with Premiere Pro Slow Playback
- New 2024 Approved A Roster of 8 Top Color Match Generators
- Updated Change Video Speed with FFmpeg for 2024
- Updated In 2024, Complete Tutorial on After Effects Countdown Timer Adding
- Updated 2024 Approved A Guide to Adding Audio in Wondershare Filmora
- In 2024, How to Make Discord GIF PFP
- Updated Full Guide to Discord Boost for 2024
- New In 2024, Best Frame Rate for 4K Video
- An Intro Video Describing You and Your Content Is the First and the Foremost Thing Which a Viewer Sees. Thinking of How to Make an Interesting Intro Video, This Blog Is Surely a Supportive Guide for You. Learn More Here
- New 2024 Approved 7 Best Green Screen Software for Beginners on Mac
- Updated In 2024, A Review On 3D LUT Creator
- Updated | How to Share YouTube Video on Zoom, In 2024
- 2024 Approved Best Free Video Editing Software to Boost Your Content Creation
- Updated Learn How to Create Inspiring Motivational Videos Using AI. Explore Tools Like Midjourney, Runway Gen2, Chat-GPT, and Filmora AI for Seamless Content Creation. Start Your Journey
- Updated 2024 Approved How to Make Text Reveal Effect Easily
- Updated In 2024, How to Convert Images Into Video - Kapwing Tutorial
- New Best 8 AI Video Denoise Software for 2024
- 2024 Approved 3 Best Effects to Appear on Camera
- Do You Want to Know All About Video Frame Rates and Speed? Wondershare Filmora Will Help You to Get More Information on This Matter
- How Can I Catch the Regional Pokémon without Traveling On Realme GT 5 | Dr.fone
- The Ultimate Guide to Get the Rare Candy on Pokemon Go Fire Red On Oppo A38 | Dr.fone
- In 2024, Network Locked SIM Card Inserted On Your Samsung Galaxy F14 5G Phone? Unlock It Now
- Updated 2024 Approved Best 10 Free AI Video Generators with Innovative/Advanced Algorithms
- In 2024, PassFab Apple iPhone 13 mini Backup Unlocker Top 4 Alternatives
- Set Your Preferred Job Location on LinkedIn App of your Samsung Galaxy F14 5G | Dr.fone
- In 2024, Hassle-Free Ways to Remove FRP Lock on Vivo Y02T Phones with/without a PC
- Updated 2024 Approved Top 6 Mickey Mouse Voice Generators Providing Efficient Results
- New 2024 Approved How to Stream on Twitch The Ultimate Guide
- In 2024, How Can I Unlock My iPhone 11 Pro Max After Forgetting my PIN Code?
- In 2024, Easy Ways to Manage Your Oppo A56s 5G Location Settings | Dr.fone
- In 2024, How To Remove or Bypass Knox Enrollment Service On Vivo Y78 5G
- In 2024, Nokia C12 Pro ADB Format Tool for PC vs. Other Unlocking Tools Which One is the Best?
- Full Guide to Hard Reset Your Nokia C22 | Dr.fone
- In 2024, 15 Best Strongest Pokémon To Use in Pokémon GO PvP Leagues For Nokia C32 | Dr.fone
- How to Watch Hulu Outside US On Realme GT Neo 5 | Dr.fone
- How to Simulate GPS Movement in AR games On Vivo Y78+ (T1) Edition? | Dr.fone
- Title: How to Use a Stabilization Tool in Filmora
- Author: Chloe
- Created at : 2024-05-20 03:37:23
- Updated at : 2024-05-21 03:37:23
- Link: https://ai-editing-video.techidaily.com/how-to-use-a-stabilization-tool-in-filmora/
- License: This work is licensed under CC BY-NC-SA 4.0.

