
:max_bytes(150000):strip_icc():format(webp)/nintendo-switch-vs-nintendo-switch-lite-01-61592395e9e44fc78403c7e99105de84.jpg)
How to Use Kahoot! On Zoom
How to Use Kahoot! On Zoom
In the educational game Kahoot! participants respond to multiple-choice questions based on trivia. Each participant uses their own controller to answer questions in the online game. There are several question kinds to pick from, allowing for complete customization of the test. Each player needs their own controller for Kahoot! The game questions will be shown in the Zoom/Google Meet window, but the answers must be entered using the controller. With the Kahoot!! app for Zoom, presenters may use play and friendly rivalry to increase participant engagement. Users may organize knowledge- and feedback-gathering pulse checks with staff members, encourage original thought with word clouds, and empower participants’ voices with surveys, open-ended questions, and other tools. Utilizing the brainstorm tool, organizations may crowdsource ideas and advance teamwork.
Engagement has emerged as a crucial component of successful learning, collaboration, and connection as the globe has increased the use of video communications in social and professional situations. Users may access, host, and play Kahoot!! games and educational information with other meeting participants using the Kahoot!! app for Zoom without ever leaving the Zoom Meeting or requiring a second device. Corporate executives may motivate their staff via speeches, meetings, and online activities. Meeting hosts will have immediate access to data and statistics from their Kahoot!! experience, allowing them to respond in real time to audience engagement with the material. Additionally, hosts may email the Kahoot!! games to all participants so they can practice and improve their scores, which will increase participant engagement and learning retention. Hosts can also distribute the Kahoot!! games as self-paced challenges with individuals who couldn’t attend in person.
Part 1: Key Features of Kahoot
What more is there to discuss, Kahoot!? Every pupil adores it. Many instructors and educators use it all around the world to make learning simple, enjoyable, and interesting. Everyone may use it since it is free and extremely simple to use. These are some of its attributes:
- Quizzes may be made in a matter of minutes.
- Develop games based on the abilities of the kids. Playing at home or in the Zoom is simple for them.
- Various templates are offered. You can choose one of them with confidence.
- Kahoot! has the ability to be organized into many folders according to topics or subjects.
- Additionally, multiple choice questions may be included by quiz makers.
- Teachers using Kahoot! may combine different questions into one format, such as quizzes, polls, riddles, and slides.
- Use Apple Schoolwork, Google Zooms, and Microsoft Teams to share student-centered tasks.
Part 2: How to Host a Kahoot! Session within a Zoom Meeting
With the Zoom app, Kahoot! may be viewed, hosted, and used. It’s amazing that Kahoot!!, one of the most well-known brands in quiz-based learning, still provides a free-to-use platform, making it very accessible to both instructors and students. It’s also a useful resource for a hybrid class that combines online and classroom instruction. Most devices will be able to use the cloud-based service using a web browser. This implies that students using computers, tablets, and cellphones in class or at home may access this. Participants in Zoom Meetings may play games and learn without having to leave the Zoom meeting or bring a second device.
Step1Sign up for Zoom ahead of time and get ready. On the other hand, launch the Kahoot! test in your web browser, then be ready to share your screen in Zoom.
Step2As the participants come, allow them in and check to see whether you and they can both hear each other. To access the Kahoot! quiz, make sure they have a device or another browser tab open.
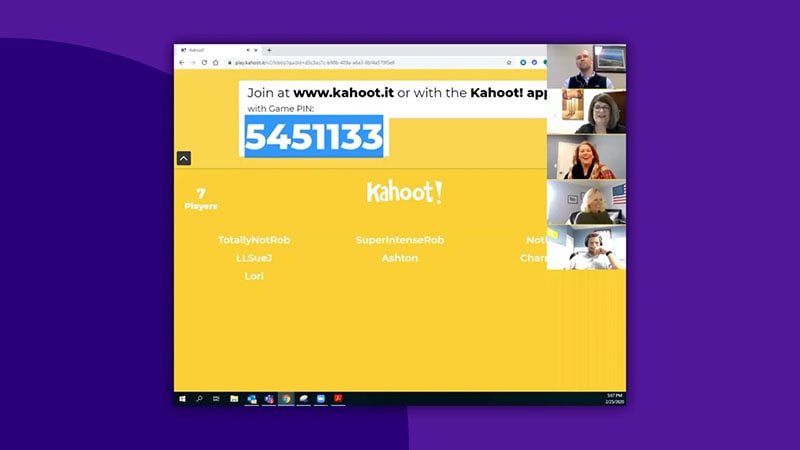
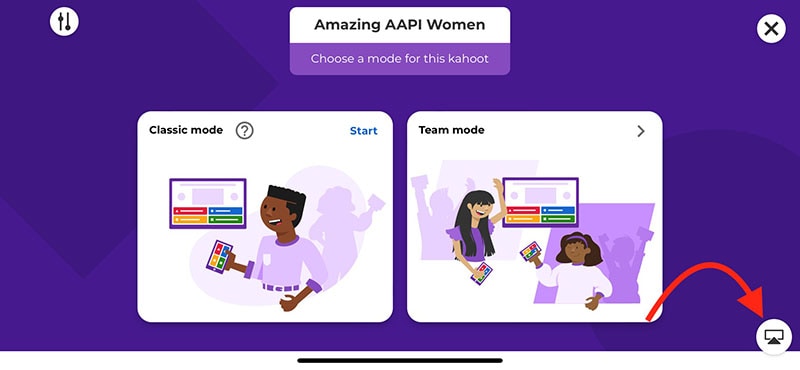
Step3Open the Kahoot! test and share it using Zoom’s “Share Screen” feature. While your screen is shared, continue to host the Kahoot! as normal. To view participants next to your shared screen, we advise selecting Side-by-Side Mode.
Part 3: How to Participate in Kahoot! Sessions within a Zoom Meeting
With more than 40 million ready-made games available on Kahoot!!, getting started is fast and simple. When time and resources are limited, hybrid or distant learning is ideal. After linking the Kahoot! to your Zoom account, you may utilize it. Use this app and start a meeting. Go to Apps on the toolbar and choose the program you wish to use. Select Who is Hosting to locate their host or to join a Kahoot! session being hosted by a friend or another player. Players may post a question to a shared screen on the Kahoot! platform. Kahoot!! just needs an account to be made in order to use it since it is free. Most devices may be used by students to access Kahoot!! from wherever there is an internet connection. This is how:
Step1Take the time to check that Zoom, Skype, Cisco Webex, or Google Hangout are operating and that your camera, microphone, and speaker are all operational.
Step2In the right-side panel, add the Kahoot!! app to your list of apps and click Join.
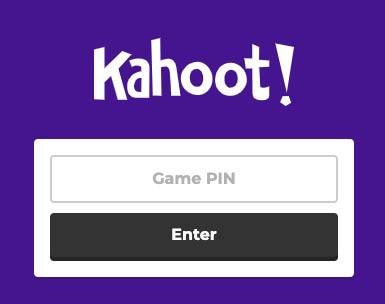
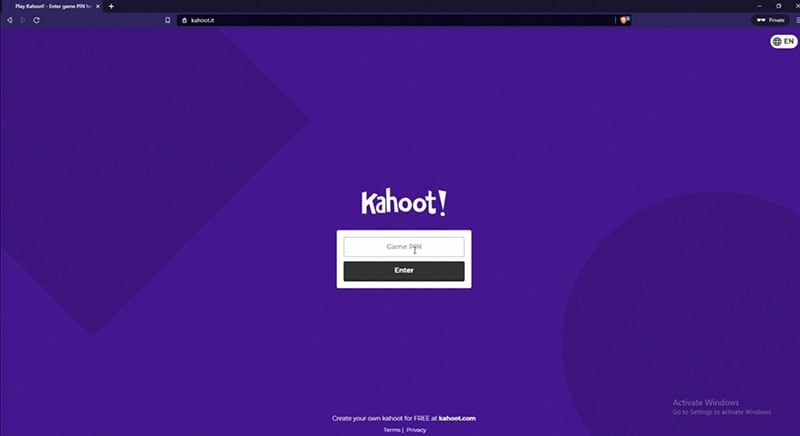
Step3The lobby will reveal your game PIN when you click the Play button, allowing the computer to show you a Kahoot! You may enter the game PIN and press Enter to join the Kahoot! session once the host shows their screen with you. To participate in a Kahoot! session, you don’t need a Kahoot! account.
Part 4: How to Record Zoom Meetings
Zoom is a conference tool that enables real-time, high-quality, low-latency communication. Filmora is an excellent video recorder for that reason, enabling users to capture on-screen activity such Zoom audio tracks and video conversations. Wondershare One of the most versatile and portable Zoom voice recorders is the Filmora. Even novices may easily utilize it due to its user-friendly UI. All you have to do is click the record button after choosing the proper audio source in the settings. The all-in-one video editing program Filmora allows you to record your screen with audio, a facecam, and a green screen effect. You can record the entire screen or just a portion of it, and you can perform a number of quick edits on your video using tools like trimming, cropping, changing the audio track’s volume, and so on.
How to Use Filmora to Record Zoom Lectures
Having said that, Filmora is a great Zoom recorder that can capture games, audio, and video conversations. This video recorder may be used to make video clip lessons in addition to recording movies, video games, and webcam footage. In addition to Zoom, it can also capture internet streaming audio. Here is information on how to record Zoom meetings using this software:
Step1Download and Install Filmora on your PC
To use this program for a number of tasks, including screen recording and recording editing, you must first download and install it on your computer. To achieve this, download the recording program by clicking the link below. Launch the program as soon as the download is finished to start the installation process, and then adhere to the on-screen directions to install and make this software available for usage.
Step2Choose the Record’s Ideal Position in the Zoom
Use it on your PC at this point. As soon as you start the program, a window interface with two choices for screen recording, editing already recorded videos, and generating videos will display. Choose the Recording option from the menu. When you click the record button, the program will direct you to the recording interface, where you can easily adjust the settings for your camera and audio. To add the microphone or Zoom sound in that particular field, use the necessary buttons as described below:
Step3Press the Record Button
It goes without saying that you must test your recording tools to ensure they are functional and capturing the highest quality audio. But once you’re ready, click the record button, which will allow you 3-5 seconds before starting to record the personalized screen of your PC as seen below:
Step4Export and Save Your Zoom Recording
You may now save the Zoom video for sharing on social media after making and modifying it. The following file types may be used to save the document: MP4, WMV, AVI, MOV, GIF, and MP3. The finest feature of Wondershare Filmora is the direct export and sharing of Zoom video recordings to YouTube; the only need is that you must be signed in to your YouTube account inside the application:
Because the MOV format is only available for online movies, you may also export your Zoom recordings to MP4 if you want to publish them to your YouTube channel. You are free to choose the format that best suits your needs. You may choose the encoder from a drop-down menu in the export options.
Conclusion
With the aid of several interesting tools and programs made accessible in this virtual environment, learning has now become enjoyable. Of them is Kahoot! In Zoom. It is an application that acts as a learning tool by providing fun games, tests, and a variety of other chances. In only a few minutes, quizzes may be made and distributed. Games and quizzes may be planned using this platform quite easily. The Kahoot! with Zoom will make it simpler than ever for corporate leaders to engage and encourage their team members with Kahoot!! engaging game-based learning experiences at a time when many organizations are staying virtual or planning for a hybrid model. Head towards recording Kahoot with Filmora to experience a smooth Kahoot! usage on Zoom. Plus, you can also share the gameplay afterwards.
In the educational game Kahoot! participants respond to multiple-choice questions based on trivia. Each participant uses their own controller to answer questions in the online game. There are several question kinds to pick from, allowing for complete customization of the test. Each player needs their own controller for Kahoot! The game questions will be shown in the Zoom/Google Meet window, but the answers must be entered using the controller. With the Kahoot!! app for Zoom, presenters may use play and friendly rivalry to increase participant engagement. Users may organize knowledge- and feedback-gathering pulse checks with staff members, encourage original thought with word clouds, and empower participants’ voices with surveys, open-ended questions, and other tools. Utilizing the brainstorm tool, organizations may crowdsource ideas and advance teamwork.
Engagement has emerged as a crucial component of successful learning, collaboration, and connection as the globe has increased the use of video communications in social and professional situations. Users may access, host, and play Kahoot!! games and educational information with other meeting participants using the Kahoot!! app for Zoom without ever leaving the Zoom Meeting or requiring a second device. Corporate executives may motivate their staff via speeches, meetings, and online activities. Meeting hosts will have immediate access to data and statistics from their Kahoot!! experience, allowing them to respond in real time to audience engagement with the material. Additionally, hosts may email the Kahoot!! games to all participants so they can practice and improve their scores, which will increase participant engagement and learning retention. Hosts can also distribute the Kahoot!! games as self-paced challenges with individuals who couldn’t attend in person.
Part 1: Key Features of Kahoot
What more is there to discuss, Kahoot!? Every pupil adores it. Many instructors and educators use it all around the world to make learning simple, enjoyable, and interesting. Everyone may use it since it is free and extremely simple to use. These are some of its attributes:
- Quizzes may be made in a matter of minutes.
- Develop games based on the abilities of the kids. Playing at home or in the Zoom is simple for them.
- Various templates are offered. You can choose one of them with confidence.
- Kahoot! has the ability to be organized into many folders according to topics or subjects.
- Additionally, multiple choice questions may be included by quiz makers.
- Teachers using Kahoot! may combine different questions into one format, such as quizzes, polls, riddles, and slides.
- Use Apple Schoolwork, Google Zooms, and Microsoft Teams to share student-centered tasks.
Part 2: How to Host a Kahoot! Session within a Zoom Meeting
With the Zoom app, Kahoot! may be viewed, hosted, and used. It’s amazing that Kahoot!!, one of the most well-known brands in quiz-based learning, still provides a free-to-use platform, making it very accessible to both instructors and students. It’s also a useful resource for a hybrid class that combines online and classroom instruction. Most devices will be able to use the cloud-based service using a web browser. This implies that students using computers, tablets, and cellphones in class or at home may access this. Participants in Zoom Meetings may play games and learn without having to leave the Zoom meeting or bring a second device.
Step1Sign up for Zoom ahead of time and get ready. On the other hand, launch the Kahoot! test in your web browser, then be ready to share your screen in Zoom.
Step2As the participants come, allow them in and check to see whether you and they can both hear each other. To access the Kahoot! quiz, make sure they have a device or another browser tab open.
Step3Open the Kahoot! test and share it using Zoom’s “Share Screen” feature. While your screen is shared, continue to host the Kahoot! as normal. To view participants next to your shared screen, we advise selecting Side-by-Side Mode.
Part 3: How to Participate in Kahoot! Sessions within a Zoom Meeting
With more than 40 million ready-made games available on Kahoot!!, getting started is fast and simple. When time and resources are limited, hybrid or distant learning is ideal. After linking the Kahoot! to your Zoom account, you may utilize it. Use this app and start a meeting. Go to Apps on the toolbar and choose the program you wish to use. Select Who is Hosting to locate their host or to join a Kahoot! session being hosted by a friend or another player. Players may post a question to a shared screen on the Kahoot! platform. Kahoot!! just needs an account to be made in order to use it since it is free. Most devices may be used by students to access Kahoot!! from wherever there is an internet connection. This is how:
Step1Take the time to check that Zoom, Skype, Cisco Webex, or Google Hangout are operating and that your camera, microphone, and speaker are all operational.
Step2In the right-side panel, add the Kahoot!! app to your list of apps and click Join.
Step3The lobby will reveal your game PIN when you click the Play button, allowing the computer to show you a Kahoot! You may enter the game PIN and press Enter to join the Kahoot! session once the host shows their screen with you. To participate in a Kahoot! session, you don’t need a Kahoot! account.
Part 4: How to Record Zoom Meetings
Zoom is a conference tool that enables real-time, high-quality, low-latency communication. Filmora is an excellent video recorder for that reason, enabling users to capture on-screen activity such Zoom audio tracks and video conversations. Wondershare One of the most versatile and portable Zoom voice recorders is the Filmora. Even novices may easily utilize it due to its user-friendly UI. All you have to do is click the record button after choosing the proper audio source in the settings. The all-in-one video editing program Filmora allows you to record your screen with audio, a facecam, and a green screen effect. You can record the entire screen or just a portion of it, and you can perform a number of quick edits on your video using tools like trimming, cropping, changing the audio track’s volume, and so on.
How to Use Filmora to Record Zoom Lectures
Having said that, Filmora is a great Zoom recorder that can capture games, audio, and video conversations. This video recorder may be used to make video clip lessons in addition to recording movies, video games, and webcam footage. In addition to Zoom, it can also capture internet streaming audio. Here is information on how to record Zoom meetings using this software:
Step1Download and Install Filmora on your PC
To use this program for a number of tasks, including screen recording and recording editing, you must first download and install it on your computer. To achieve this, download the recording program by clicking the link below. Launch the program as soon as the download is finished to start the installation process, and then adhere to the on-screen directions to install and make this software available for usage.
Step2Choose the Record’s Ideal Position in the Zoom
Use it on your PC at this point. As soon as you start the program, a window interface with two choices for screen recording, editing already recorded videos, and generating videos will display. Choose the Recording option from the menu. When you click the record button, the program will direct you to the recording interface, where you can easily adjust the settings for your camera and audio. To add the microphone or Zoom sound in that particular field, use the necessary buttons as described below:
Step3Press the Record Button
It goes without saying that you must test your recording tools to ensure they are functional and capturing the highest quality audio. But once you’re ready, click the record button, which will allow you 3-5 seconds before starting to record the personalized screen of your PC as seen below:
Step4Export and Save Your Zoom Recording
You may now save the Zoom video for sharing on social media after making and modifying it. The following file types may be used to save the document: MP4, WMV, AVI, MOV, GIF, and MP3. The finest feature of Wondershare Filmora is the direct export and sharing of Zoom video recordings to YouTube; the only need is that you must be signed in to your YouTube account inside the application:
Because the MOV format is only available for online movies, you may also export your Zoom recordings to MP4 if you want to publish them to your YouTube channel. You are free to choose the format that best suits your needs. You may choose the encoder from a drop-down menu in the export options.
Conclusion
With the aid of several interesting tools and programs made accessible in this virtual environment, learning has now become enjoyable. Of them is Kahoot! In Zoom. It is an application that acts as a learning tool by providing fun games, tests, and a variety of other chances. In only a few minutes, quizzes may be made and distributed. Games and quizzes may be planned using this platform quite easily. The Kahoot! with Zoom will make it simpler than ever for corporate leaders to engage and encourage their team members with Kahoot!! engaging game-based learning experiences at a time when many organizations are staying virtual or planning for a hybrid model. Head towards recording Kahoot with Filmora to experience a smooth Kahoot! usage on Zoom. Plus, you can also share the gameplay afterwards.
How to Create Photoshop GIF The Easy Way
How to Create Photoshop GIF The 100% Easy Way
An easy yet powerful editor
Numerous effects to choose from
Detailed tutorials provided by the official channel
Having trouble creating Photoshop GIFs? Stay tuned to set everything straight.
In this article
01 [Easy Ways to Create an Animated GIF in Photoshop](#Part 1)
02 [6 Ways To Make An Animated GIF Without Photoshop](#Part 2)
Part 1 Easy Ways to Create an Animated GIF in Photoshop
Animated GIFs are a naturally captivating means of information exchange and entertainment. When the talk is about creating these, you can visibly see a flood of creation tools and software solutions. However, standing out in the crowd, are those catchy Photoshop snippets that certainly have the potential to leave you jaw dropped.
A Photoshop GIF is bound to capture attention, owing to its high quality imaging and top rated professional editing outlook. If you possess the editing flare, do try creating one for an amazing editing experience.
Creating Animated Photoshop GIFs: Easiest Solutions
Let’s take a look into some easy and interesting ways of creating a GIF in Photoshop, to leave you with handy solutions, just in case you feel motivated to take up the creation idea.
Before you begin, make sure to install and launch a suitable version the Photoshop application in your device and keep a set of selected images at hand that you will require for GIF creation.
● Step 1: Load Image Files
Photoshop requires you to load your selected files into its creation stack. There is no limit on the image count, but make sure you choose images in a natural series so that the GIF doesn’t give an out of the box feel.

Reach the ‘File’ tab at the top and load your image files into the Photoshop stack using the following path:
File -> Scripts -> Load Files into Stack

● Step 2: Image Selection
In the next pop-up window, click ‘Browse’ and choose the image file you wish to load into the Photoshop stack. In case the selected images seem tom lack proper alignment, click on the ‘Attempt to Automatically Align Source Images’ checkbox to set this straight and make your GIF frame stable.

Click on ‘OK’ when you are happy with your selections.

At this instant, Photoshop starts creating layers for the uploaded images, which you can see in the ‘Layers’ panel at the bottom-right. You are allowed to rearrange the image layers by selecting and dragging them or click on layer names to rename them.

If you notice distortion in Photoshop’s automatic alignment of your images, just crop the images frames to sort this out. Here’s how you can get this done:
● Tap the ‘Crop’ symbol.
● Adjust the crop frame to select the desired portion.
● Click on ‘Enter’ to confirm the action.
If you didn’t permit auto alignment previously, no worries, you can move ahead.
● Step 3: Make a Timeline Setup
Navigate to the ‘Window’ tab in the top menu and click the ’Timeline’ checkbox. You will see the ‘Timeline Window’ pop up below the Photoshop workspace, where you need to select the ‘Create Frame Animation’ tab. This will cause the options for frame animation to pop-up.

Select you topmost image layer, followed by clicking on the ‘Duplicate’ icon to generate a copy of the image frame.

● Step 4: Decide Time Frames
Select your topmost image frame to see a play duration of ‘0 sec’ below its thumbnail. Click to open the drop-down menu beside it and choose suitable time duration for the frame to run. Allot time durations to all successive frames in a similar manner.

● Step 5: Conceal Top Layers
You will see am combination of the first and second image layers in the image thumbnail. To set this right, navigate to ‘Layers’ to hide the top layer.

Continue to hide previous layers in successive frames so that each layer appears in its respective frame at the end of the process.

● Step 6: Preview Your Creation
Tap the ‘Play’ button to see your GIF preview. Ensure a smooth run with correct appearance order of images and precise frame durations.

● Step 7: Time to Share.
When you are satisfied, navigate to the ‘File’ tab and select ‘Save As’. From the menu that drops down, choose the GIF file format and click on ‘Save’.

In the ’GIF Save Options’ that follows, adjust file settings suited to your preference and tap ‘OK’.

As an alternative you can take the following path to open the ‘GIF Preview Window’:
File -> Export -> Save for Web

In the top-right comer, choose the GIF file format from the drop-down menu. There is also an option to resize your image at the bottom-right. It is advisable to keep the image size within 500 pixels for a convenient export across various media sharing platforms. When you finish, click on ‘Save’. Your creation is now ready for a media export.

Part 2 6 Ways to Make an Animated GIF Without Photoshop
The idea to create GIF in Photoshop is fun and exciting, no doubt on that, but you may often want to switch to a different platform. No issues with that, the web is there to sort out everything for you. All you need to do is open your favorite browser to land across a heap of welcoming solutions to create GIFs without Photoshop. Let’s have a look through the best ones:
01**Wondershare Filmora Video Editor **
Filmora by Wondershare is probably the best GIF maker tool you can rely on. This is packed with a diverse inventory of exciting design features that are ready to provide a creative boost to your editing skills. Loaded with a ton of classic audio visual effects, this software is certainly comprises of everything you need to create static and animated GIFs like a pro.

Wondershare Filmora - Best Video Editor for Mac/Windows
5,481,435 people have downloaded it.
Build unique custom animations without breaking a sweat.
Focus on creating epic stories and leave the details to Filmora’s auto features.
Start a creative adventure with drag & drop effects and endless possibilities.
Filmora simplifies advanced features to save you time and effort.
Filmora cuts out repetition so you can move on to your next creative breakthrough.
Key Features
● This is free software with possibly the most convenient interface.
● You get the freedom to play with hundreds of audio-visual effects to your heart’s content.
● You can create GIFs with static images and videos that are simply awesome to say the least.
● You need not worry about specific file formats. The software is compatible with almost all commonly known ones.
● Filmora allows you to expand and explore your editing talent to the fullest. You can play with tools like, cut, trim or combine image frames and make color and speed adjustments to get the perfect results for your artwork.
02Photoscape
This is another GIF maker tool you can choose to create catchy and interesting GIFs. Photoscape is a simple graphic editor that makes GIF creation exciting and fun. Available to you for free, this software allows you to design and edit animated GIFs with a series of image enhancements, like, resizing, color selection, image prints, etc. Photoscape is compatible with your Windows, Linux and Mac supported devices and has a clean interface. However, the program may sometimes take up a slow run.

Key Features
● You can improvise you GIF with image editing tools, like, color and size adjustments, clip arts, effects, overlays, etc.
● It has a unique ‘Photo Batch’ tool that you can use to process and rename multiple images simultaneously.
● Photoscape allows you to create interesting collages by merging a series of images into a single one.
● You can create captivating animated GIFs with multiple still images.
● The software is loaded with a bunch of utilities like, photo splitter, page merger, color picker, image viewer and others to give that perfect professional outlook to your creations.
03Gifted Motion
This is also among the commonly preferred GIF creator software. The best this about the tool is that it is platform independent and compatible with almost any Operating System. Another choice appeal of the software is its direct workability that is, you don’t require any program installations to create GIFs using this tool.

Key Features
● This is a simple graphic editor that runs on JAVA and is quite convenient to use.
● You can use this software to edit and create GIFs with images saved locally in your device.
● File formats supported by the software include PNG, JPEG, BMP and GIF.
● You don’t need to worry about licensing costs or in-app purchases; this tool is absolutely free to use.
● Loading big image files on this software may however, cost you some extra time.
01SSuite GIF Animator
This one is Windows compatible software that works well with both, 32 and 64-bit Operating System configurations. It lies among those ’Green Software Programs’ that cut down on your net energy cost. Apart from high quality animated GIFs, y6ou can also create movies and slides shows with this software.

Key Features
● This is a free of cost, clean and user-friendly graphic editor software.
● You don’t require Windows registration to use this software
● You can conveniently save the software into any USB or memory device; it is easily portable.
● It facilitates a speedy GIF creation and editing.
● You can explore a variety of editing features and add separate time frames to each image using this software.
● Picasion
This is a free, online GIF maker tool that gives you the liberty to import images and videos from different app galleries, like, Picasa, Flickr and others to create and edit motion GIFs. The tool, though having a simple interface and feature packed, is quite ad-stricken, but you can skip that by sticking to the right webpage.

Key Features
● The tool crosses language borders and is available to you in English, Spanish, Portuguese and Russian.
● You can make size adjustments to the GIF images, or add a completely new avatar of your own.
● The tool offers you a variety of editing effects and filters to enhance and improvise your created GIFs.
● You need not limit yourself to specific file formats with this tool; all common ones are conveniently supported.
● It is a quick and clean tool that rescues you from the glitch of a messy interface.
05GifPal
This one is also a free, online GIF creator with amazing editing features and tools. It comes with a diverse library of 20 frames and 30 effects to choose from, for creating normal and animated GIFs. It further has a variety of drawing and text editing tools you can use to add messages to your GIFs to make more impactful.

Key Features
● The tool is packed with a vast set of quality image editing tools that can create attractive motion and animated GIFs.
● The tool allows you to adjust and change the speed of image frames to give a natural flow to your GIF.
● An exclusive feature of the tool is that it allows you to edit frames in its timeline.
● Your creations with the tools are deprived of any default watermarks. You can either add one of your choice, or even create GIFs without a watermark.
● The tool site is free of unwanted and irrelevant ads.
● Key Takeaways from This Episode →
● Making a GIF in Photoshop is a great idea to design animation snippets, both for fun and a target purpose. Using the Photoshop GIF maker ensures quality and class in complete professional styles.
● However, if you are keen on browsing through other GIF creator alternatives, you can safely pick the Filmora GIF Maher software for creating excellent, next level animated GIFs.
Having trouble creating Photoshop GIFs? Stay tuned to set everything straight.
In this article
01 [Easy Ways to Create an Animated GIF in Photoshop](#Part 1)
02 [6 Ways To Make An Animated GIF Without Photoshop](#Part 2)
Part 1 Easy Ways to Create an Animated GIF in Photoshop
Animated GIFs are a naturally captivating means of information exchange and entertainment. When the talk is about creating these, you can visibly see a flood of creation tools and software solutions. However, standing out in the crowd, are those catchy Photoshop snippets that certainly have the potential to leave you jaw dropped.
A Photoshop GIF is bound to capture attention, owing to its high quality imaging and top rated professional editing outlook. If you possess the editing flare, do try creating one for an amazing editing experience.
Creating Animated Photoshop GIFs: Easiest Solutions
Let’s take a look into some easy and interesting ways of creating a GIF in Photoshop, to leave you with handy solutions, just in case you feel motivated to take up the creation idea.
Before you begin, make sure to install and launch a suitable version the Photoshop application in your device and keep a set of selected images at hand that you will require for GIF creation.
● Step 1: Load Image Files
Photoshop requires you to load your selected files into its creation stack. There is no limit on the image count, but make sure you choose images in a natural series so that the GIF doesn’t give an out of the box feel.
Reach the ‘File’ tab at the top and load your image files into the Photoshop stack using the following path:
File -> Scripts -> Load Files into Stack
● Step 2: Image Selection
In the next pop-up window, click ‘Browse’ and choose the image file you wish to load into the Photoshop stack. In case the selected images seem tom lack proper alignment, click on the ‘Attempt to Automatically Align Source Images’ checkbox to set this straight and make your GIF frame stable.
Click on ‘OK’ when you are happy with your selections.
At this instant, Photoshop starts creating layers for the uploaded images, which you can see in the ‘Layers’ panel at the bottom-right. You are allowed to rearrange the image layers by selecting and dragging them or click on layer names to rename them.
If you notice distortion in Photoshop’s automatic alignment of your images, just crop the images frames to sort this out. Here’s how you can get this done:
● Tap the ‘Crop’ symbol.
● Adjust the crop frame to select the desired portion.
● Click on ‘Enter’ to confirm the action.
If you didn’t permit auto alignment previously, no worries, you can move ahead.
● Step 3: Make a Timeline Setup
Navigate to the ‘Window’ tab in the top menu and click the ’Timeline’ checkbox. You will see the ‘Timeline Window’ pop up below the Photoshop workspace, where you need to select the ‘Create Frame Animation’ tab. This will cause the options for frame animation to pop-up.
Select you topmost image layer, followed by clicking on the ‘Duplicate’ icon to generate a copy of the image frame.
● Step 4: Decide Time Frames
Select your topmost image frame to see a play duration of ‘0 sec’ below its thumbnail. Click to open the drop-down menu beside it and choose suitable time duration for the frame to run. Allot time durations to all successive frames in a similar manner.
● Step 5: Conceal Top Layers
You will see am combination of the first and second image layers in the image thumbnail. To set this right, navigate to ‘Layers’ to hide the top layer.
Continue to hide previous layers in successive frames so that each layer appears in its respective frame at the end of the process.
● Step 6: Preview Your Creation
Tap the ‘Play’ button to see your GIF preview. Ensure a smooth run with correct appearance order of images and precise frame durations.
● Step 7: Time to Share.
When you are satisfied, navigate to the ‘File’ tab and select ‘Save As’. From the menu that drops down, choose the GIF file format and click on ‘Save’.
In the ’GIF Save Options’ that follows, adjust file settings suited to your preference and tap ‘OK’.
As an alternative you can take the following path to open the ‘GIF Preview Window’:
File -> Export -> Save for Web
In the top-right comer, choose the GIF file format from the drop-down menu. There is also an option to resize your image at the bottom-right. It is advisable to keep the image size within 500 pixels for a convenient export across various media sharing platforms. When you finish, click on ‘Save’. Your creation is now ready for a media export.
Part 2 6 Ways to Make an Animated GIF Without Photoshop
The idea to create GIF in Photoshop is fun and exciting, no doubt on that, but you may often want to switch to a different platform. No issues with that, the web is there to sort out everything for you. All you need to do is open your favorite browser to land across a heap of welcoming solutions to create GIFs without Photoshop. Let’s have a look through the best ones:
01**Wondershare Filmora Video Editor **
Filmora by Wondershare is probably the best GIF maker tool you can rely on. This is packed with a diverse inventory of exciting design features that are ready to provide a creative boost to your editing skills. Loaded with a ton of classic audio visual effects, this software is certainly comprises of everything you need to create static and animated GIFs like a pro.
Wondershare Filmora - Best Video Editor for Mac/Windows
5,481,435 people have downloaded it.
Build unique custom animations without breaking a sweat.
Focus on creating epic stories and leave the details to Filmora’s auto features.
Start a creative adventure with drag & drop effects and endless possibilities.
Filmora simplifies advanced features to save you time and effort.
Filmora cuts out repetition so you can move on to your next creative breakthrough.
Key Features
● This is free software with possibly the most convenient interface.
● You get the freedom to play with hundreds of audio-visual effects to your heart’s content.
● You can create GIFs with static images and videos that are simply awesome to say the least.
● You need not worry about specific file formats. The software is compatible with almost all commonly known ones.
● Filmora allows you to expand and explore your editing talent to the fullest. You can play with tools like, cut, trim or combine image frames and make color and speed adjustments to get the perfect results for your artwork.
02Photoscape
This is another GIF maker tool you can choose to create catchy and interesting GIFs. Photoscape is a simple graphic editor that makes GIF creation exciting and fun. Available to you for free, this software allows you to design and edit animated GIFs with a series of image enhancements, like, resizing, color selection, image prints, etc. Photoscape is compatible with your Windows, Linux and Mac supported devices and has a clean interface. However, the program may sometimes take up a slow run.
Key Features
● You can improvise you GIF with image editing tools, like, color and size adjustments, clip arts, effects, overlays, etc.
● It has a unique ‘Photo Batch’ tool that you can use to process and rename multiple images simultaneously.
● Photoscape allows you to create interesting collages by merging a series of images into a single one.
● You can create captivating animated GIFs with multiple still images.
● The software is loaded with a bunch of utilities like, photo splitter, page merger, color picker, image viewer and others to give that perfect professional outlook to your creations.
03Gifted Motion
This is also among the commonly preferred GIF creator software. The best this about the tool is that it is platform independent and compatible with almost any Operating System. Another choice appeal of the software is its direct workability that is, you don’t require any program installations to create GIFs using this tool.
Key Features
● This is a simple graphic editor that runs on JAVA and is quite convenient to use.
● You can use this software to edit and create GIFs with images saved locally in your device.
● File formats supported by the software include PNG, JPEG, BMP and GIF.
● You don’t need to worry about licensing costs or in-app purchases; this tool is absolutely free to use.
● Loading big image files on this software may however, cost you some extra time.
01SSuite GIF Animator
This one is Windows compatible software that works well with both, 32 and 64-bit Operating System configurations. It lies among those ’Green Software Programs’ that cut down on your net energy cost. Apart from high quality animated GIFs, y6ou can also create movies and slides shows with this software.
Key Features
● This is a free of cost, clean and user-friendly graphic editor software.
● You don’t require Windows registration to use this software
● You can conveniently save the software into any USB or memory device; it is easily portable.
● It facilitates a speedy GIF creation and editing.
● You can explore a variety of editing features and add separate time frames to each image using this software.
● Picasion
This is a free, online GIF maker tool that gives you the liberty to import images and videos from different app galleries, like, Picasa, Flickr and others to create and edit motion GIFs. The tool, though having a simple interface and feature packed, is quite ad-stricken, but you can skip that by sticking to the right webpage.
Key Features
● The tool crosses language borders and is available to you in English, Spanish, Portuguese and Russian.
● You can make size adjustments to the GIF images, or add a completely new avatar of your own.
● The tool offers you a variety of editing effects and filters to enhance and improvise your created GIFs.
● You need not limit yourself to specific file formats with this tool; all common ones are conveniently supported.
● It is a quick and clean tool that rescues you from the glitch of a messy interface.
05GifPal
This one is also a free, online GIF creator with amazing editing features and tools. It comes with a diverse library of 20 frames and 30 effects to choose from, for creating normal and animated GIFs. It further has a variety of drawing and text editing tools you can use to add messages to your GIFs to make more impactful.
Key Features
● The tool is packed with a vast set of quality image editing tools that can create attractive motion and animated GIFs.
● The tool allows you to adjust and change the speed of image frames to give a natural flow to your GIF.
● An exclusive feature of the tool is that it allows you to edit frames in its timeline.
● Your creations with the tools are deprived of any default watermarks. You can either add one of your choice, or even create GIFs without a watermark.
● The tool site is free of unwanted and irrelevant ads.
● Key Takeaways from This Episode →
● Making a GIF in Photoshop is a great idea to design animation snippets, both for fun and a target purpose. Using the Photoshop GIF maker ensures quality and class in complete professional styles.
● However, if you are keen on browsing through other GIF creator alternatives, you can safely pick the Filmora GIF Maher software for creating excellent, next level animated GIFs.
Best Video Title Generators
The ranking of videos in search results depends on the quality of their titles; making video title maker an essentiality. Similar to metadata, titles provide important information about your video, like its genre, subject, etc., to YouTube, Google, and TikTok viewers. The likelihood that the audience will locate and watch your film will rise if you provide the appropriate titles. To assist you in choosing which option will work best for you, we have included video title makers online in this post.
The process of making video titles may be laborious and time-consuming. However, not with the video title maker online free. You can utilize one of the title video makers online for free and your social media videos might rank higher and get more views altogether. But even when you know where to start, there are so many different factors that it may be perplexing. Fortunately, the fantastic video title generator provided in this post will make the process fast and simple.
Part 1. Tools to Generate Video Titles
1. TubeRanker Title Generator
A collection of YouTube SEO tools called TubeRanker may be used to optimize videos on Facebook, YouTube, and TikTok. Creators may utilize the short bursts of video title suggestions provided by the TubeRanker Title Generator in the names of their YouTube videos. Creators of videos may arrange and produce flawless, SEO-optimized video descriptions with the aid of the TubeRanker Video Description Generator. With the help of its title generator tool, TubeRanker can extract and display the meta tags connected to any public movie.
Steps to Use TubeRanker:
Step1 Visit the Website
In the first step, refer to the TubeRanker official website and you will be shown to the following UI. As a result, it’s a good idea to start with some keyword research instructions; you can read the TubeRanker title generator instructions to do so.

Step2 Launch the Title Generator
Your video’s ranking on search engine results pages in TubeRanker depends heavily on your keywords, which also assist viewers determine if the post is relevant to them. From the webpage, refer to the title generator as shown here:

Step3 Generate Video Title
Simply enter your keyword into the title generator and press the red button to complete this phase. You’ll see many titles as soon as you do that and begin reading the headlines. Write down the ones that make sense as you go down. Make a few minor edits to ensure that they are grammatically sound. Run a search using the niche and after that the automatically created titles are getting in the way as shown here:

Step4 Copy the Title (s)
After that, you’ll have a lot of options from which to choose. Some individuals push for names that are SEO-friendly, while others try for titles that are distinctive to stand out from the throng. maintain a careful balance. Both include a powerful keyword and making your title stand out should be your goals.

2. TunePocket Title Generator
For background music for your video and YouTube video SEO, TunePocket might be a top-notch tool. Additionally, the fact that it is free to use and that no account creation is necessary is beneficial. A stock music library, TunePocket provides a variety of music services. Additionally, we have discovered some incredible YouTube tools, such as YouTube tag generators. The fact that you can use this tag generator on YouTube without creating an account is what made us appreciate it even more.
Steps to Use TunePocket:
Step1 Visit the Website
The title generating procedure for your films may be started by first visiting the official TunePocket website, as illustrated here:
image name: visit-tunepocket.jpg
Step2 Launch the Title Generator
While on the webpage, you can refer to the YouTube title generator section. This will let you enter the topic of your video in the referred box as shown here:

Step3 Generate Video Title
You may save a lot of time by using TunePocket title generator to create creative titles. Simply type in your target term, choose your desired region, and language, then click “Get Titles.” There will be a list of useful keywords returned by TunePocket. You can run again the generator in order to get the desired results. For that, click on the Run again button down the line as shown here:

Step4 Copy the Title to Clipboard
A title generator may be processed in a matter of seconds and a few clicks. You don’t need to spend hours and hours coming up with numerous titles; you can copy more than one in a matter of minutes. Simply hit the Copy to Clipboard and get done with the title:

Part 2. Tips to Create Video Titles
Whether you’ve been video marketing for years or are just starting out, coming up with catchy video titles might be the most difficult aspect of the process. The title of a video has a significant role in whether or not viewers choose to click the play button, making it more than simply a minor feature. Poor titles make it difficult to attract views and expand your following, regardless of how fantastic your videos are. Here are the best scrutinized tips for creating best ranking titles for your videos:
1. Optimize the title using keywords for improved SEO
It might be difficult to come up with a title that is original, concise, and descriptive. However, a strong video title stays something original. Keywords are crucial for more than simply your website. They are important for video titles, too. If you want people to see your videos when they search for certain phrases, those keywords should be in the title because Google and YouTube can’t watch videos and grasp the content (yet).
2. Perfectly Match the Content
A excellent video title explains to viewers what to anticipate from the video. It’s unambiguous, straightforward, and sincere. Additionally, if you are familiar with your target demographic, you will be able to generate a lot more hits to your videos. Using a vague or confusing title is problematic as people are busy and need a reason to watch your movie. Similar to false content, misleading headlines deceive viewers and damage your reputation.
3. Attempt to pique interest
Keep in mind that compelling video titles are an art form that appeals to viewers’ emotions rather than being a precise SEO science. Try answering the questions on your own to get a catchy video title. People are more inclined to watch a video if you make reference to a secret or exceptional knowledge that you will disclose in it. Keep in mind that your goal is not to deceive viewers into viewing your video.
4. Increase the Click Through Rate
The finest titles are those that best expose the vulnerabilities of the reader. Consider it a little preview for your video. If you are creating a how-to or instructive video that answers a question or gives information, you may want to consider include the question in the title. It also makes it simple to think up video concept.
5. Attempt to utilize cue (triggering) words
Your title and description should both include your target keyword. You’ll probably start to generate some ideas for a real video title after you begin your keyword research. To determine how persuasive these concepts are, use a trigger analyzer. You’ll need to do study in order to accomplish this. As for the knowledge gap, consider how your target audience would respond.
The Bottom Line
In this article, we’ve compiled a list of the best tag generators for videos, including everything from video names and descriptions to titles, thumbnail design elements, and video ideas. You may get some useful tips as well for creating the greatest video titles by using this guide to the video title generator to obtain the ideal title for your social media videos. Find out the best suitable video title maker online free in the post above and tweak your video titles for social platforms rankings.
Free Download For Win 7 or later(64-bit)
Free Download For macOS 10.14 or later
1. TubeRanker Title GeneratorA collection of YouTube SEO tools called TubeRanker may be used to optimize videos on Facebook, YouTube, and TikTok. Creators may utilize the short bursts of video title suggestions provided by the TubeRanker Title Generator in the names of their YouTube videos. Creators of videos may arrange and produce flawless, SEO-optimized video descriptions with the aid of the TubeRanker Video Description Generator. With the help of its title generator tool, TubeRanker can extract and display the meta tags connected to any public movie.
Steps to Use TubeRanker:
Step1 Visit the Website
In the first step, refer to the TubeRanker official website and you will be shown to the following UI. As a result, it’s a good idea to start with some keyword research instructions; you can read the TubeRanker title generator instructions to do so.
Step2 Launch the Title Generator
Your video’s ranking on search engine results pages in TubeRanker depends heavily on your keywords, which also assist viewers determine if the post is relevant to them. From the webpage, refer to the title generator as shown here:
Step3 Generate Video Title
Simply enter your keyword into the title generator and press the red button to complete this phase. You’ll see many titles as soon as you do that and begin reading the headlines. Write down the ones that make sense as you go down. Make a few minor edits to ensure that they are grammatically sound. Run a search using the niche and after that the automatically created titles are getting in the way as shown here:
Step4 Copy the Title (s)
After that, you’ll have a lot of options from which to choose. Some individuals push for names that are SEO-friendly, while others try for titles that are distinctive to stand out from the throng. maintain a careful balance. Both include a powerful keyword and making your title stand out should be your goals.
2. TunePocket Title Generator
For background music for your video and YouTube video SEO, TunePocket might be a top-notch tool. Additionally, the fact that it is free to use and that no account creation is necessary is beneficial. A stock music library, TunePocket provides a variety of music services. Additionally, we have discovered some incredible YouTube tools, such as YouTube tag generators. The fact that you can use this tag generator on YouTube without creating an account is what made us appreciate it even more.
Steps to Use TunePocket:
Step1 Visit the Website
The title generating procedure for your films may be started by first visiting the official TunePocket website, as illustrated here:
image name: visit-tunepocket.jpg
Step2 Launch the Title Generator
While on the webpage, you can refer to the YouTube title generator section. This will let you enter the topic of your video in the referred box as shown here:
Step3 Generate Video Title
You may save a lot of time by using TunePocket title generator to create creative titles. Simply type in your target term, choose your desired region, and language, then click “Get Titles.” There will be a list of useful keywords returned by TunePocket. You can run again the generator in order to get the desired results. For that, click on the Run again button down the line as shown here:
Step4 Copy the Title to Clipboard
A title generator may be processed in a matter of seconds and a few clicks. You don’t need to spend hours and hours coming up with numerous titles; you can copy more than one in a matter of minutes. Simply hit the Copy to Clipboard and get done with the title:
Part 2. Tips to Create Video Titles
Whether you’ve been video marketing for years or are just starting out, coming up with catchy video titles might be the most difficult aspect of the process. The title of a video has a significant role in whether or not viewers choose to click the play button, making it more than simply a minor feature. Poor titles make it difficult to attract views and expand your following, regardless of how fantastic your videos are. Here are the best scrutinized tips for creating best ranking titles for your videos:
1. Optimize the title using keywords for improved SEO
It might be difficult to come up with a title that is original, concise, and descriptive. However, a strong video title stays something original. Keywords are crucial for more than simply your website. They are important for video titles, too. If you want people to see your videos when they search for certain phrases, those keywords should be in the title because Google and YouTube can’t watch videos and grasp the content (yet).
2. Perfectly Match the Content
A excellent video title explains to viewers what to anticipate from the video. It’s unambiguous, straightforward, and sincere. Additionally, if you are familiar with your target demographic, you will be able to generate a lot more hits to your videos. Using a vague or confusing title is problematic as people are busy and need a reason to watch your movie. Similar to false content, misleading headlines deceive viewers and damage your reputation.
3. Attempt to pique interest
Keep in mind that compelling video titles are an art form that appeals to viewers’ emotions rather than being a precise SEO science. Try answering the questions on your own to get a catchy video title. People are more inclined to watch a video if you make reference to a secret or exceptional knowledge that you will disclose in it. Keep in mind that your goal is not to deceive viewers into viewing your video.
4. Increase the Click Through Rate
The finest titles are those that best expose the vulnerabilities of the reader. Consider it a little preview for your video. If you are creating a how-to or instructive video that answers a question or gives information, you may want to consider include the question in the title. It also makes it simple to think up video concept.
5. Attempt to utilize cue (triggering) words
Your title and description should both include your target keyword. You’ll probably start to generate some ideas for a real video title after you begin your keyword research. To determine how persuasive these concepts are, use a trigger analyzer. You’ll need to do study in order to accomplish this. As for the knowledge gap, consider how your target audience would respond.
The Bottom Line
In this article, we’ve compiled a list of the best tag generators for videos, including everything from video names and descriptions to titles, thumbnail design elements, and video ideas. You may get some useful tips as well for creating the greatest video titles by using this guide to the video title generator to obtain the ideal title for your social media videos. Find out the best suitable video title maker online free in the post above and tweak your video titles for social platforms rankings.
Free Download For Win 7 or later(64-bit)
Free Download For macOS 10.14 or later
How to Add Green Screen in OBS
OBS Studio is a free and open-source app for screen-casting and live streaming. Written in C/C++ and built with Qt, OBS Studio provides real-time capture, scene composition, recording, encoding, and broadcasting via the Real Time Messaging Protocol (RTMP).It can stream Videos to any RTMP supporting destination including YouTube, Twitch, Instagram and Facebook.
You only need one green screen software – OBS. The reason why OBS is the most recommended for streaming is because once you have set it up properly, you can do literally anything you can think of with the software (either with or without added plug-ins).
Chroma Key Settings in OBS
Chroma keying has become incredibly popular nowadays. People use it not just for gaming, but also in Zoom conferences, live interviews, talk shows, etc. Although it may feel complicated at first glance, setting up Chroma Key in OBS Studio is actually incredibly easy.
Have a look at the simple steps you need to take to set up a green screen in OBS:
- Make sure you have the following equipment prepared: a solid green background, webcam or video camera, lighting, and OBS Studio.
- Download the latest stable version of OBS Studio from the official website and install the software. Open OBS and let the Auto-Configuration Wizard optimize the software’s settings based on your hardware.
- Now you can add a video source.
- Right-click on the video source you’ve created and select Filter.
- Click the + button under the Effects Filters section and select Chroma Key.
- Type in a name for this effect layer.
- After you add a chroma key, OBS will automatically create and adjust the baseline settings for the filter. You can experiment with the sliders and settle when you are satisfied with the result.
- Make sure you aren’t wearing any green or reflective material. You can double-check the performance on the preview screen.
- If things are working smoothly, you are all set to start streaming with the green screen on.
Pro tip:
You can follow the instructions above and live stream to multiple platforms at once with Restream. Multistreaming to platforms like YouTube, Facebook, Twitter, Twitch, and LinkedIn allows you to drastically increase the audience reach and grow your followers.
How to make OBS green screen settings better
Using green screens for filmmaking isn’t the most complicated or difficult thing in the world but it certainly has its pitfalls. If you ask any experienced filmmaker what to look out for when using a green screen, chances are they’re going to mention lighting about a billion times and that’s for good reason.
Tips on How to make OBS green screen settings better
- Evenly light your green screen so you can get a good key.
- Watch out for light flares. Use some a matte box or your trusty paw to block out any unwanted light.
- When lighting, try to create as much separation between your subject and the green screen as you can.
- Shutter speed: Minimize motion blur by raising your shutter speed to 1/80 or 1/100
- Aperture: Setting your aperture to f4 or f5.6 will give you slightly more depth of field, which will blur and smooth out your green screen.
- Format: Set your camera to the best recording format it has.
- ISO: Try to avoid high ISOs.
Filmora
If you’re just starting out with video editing, or just want a simple program that works, Wondershare Filmora might be what you’re looking for. It has the essential tools, and anyone can learn to use it easily.
Wondershare Filmora is the one of best video editing software with cool features that compares to other competing video editing Softwares. Many video editing programs claim to offer professional results; Filmora is one of a few consumer-level tools that actually delivers.
For Win 7 or later (64-bit)
For macOS 10.12 or later
Installation Steps
- Click the icon in the center of the Media Library to add files directly.
- Go File > Import Media > Import Media Files.
- Drag and drop to the Media Library directly.
While importing a media file, Wondershar Filmora may ask you if you wish to create a proxy file to accelerate the editing process. Select “Yes” to have a fast video editing experience.
You can also import video clips using your Touch Bar controls if your computer has Touch Bar.

Record a media file
Apart from the videos shot by your digital devices, you can also directly import media files by recording video from your webcam, capturing the computer screen, or recording a voice-over.
Record computer screen:
Click the “Record” option, and choose “Record PC Screen” to get the built-in Wondershare Screen Recorder. Hit the red button to get started. If you want to stop the recording, you can hit F9.
Record videos from webcam:
Also, click the “Record” option, and choose “Record from Webcam”. In the pop-up Video Recording window, click the red button to start recording and click it again to stop recording. Then click OK to save the recorded video file.
Record voice-over:
Choose “Record a voiceover” under the Record menu. It would be better to connect a microphone to your Mac for a better result. Hit the Record button, and it leaves you 3 seconds to get ready.
All the recorded media files will be saved into Media Library automatically and you can drag them to the Timeline for editing.
Pro tip:
You can follow the instructions above and live stream to multiple platforms at once with Restream. Multistreaming to platforms like YouTube, Facebook, Twitter, Twitch, and LinkedIn allows you to drastically increase the audience reach and grow your followers.
How to make OBS green screen settings better
Using green screens for filmmaking isn’t the most complicated or difficult thing in the world but it certainly has its pitfalls. If you ask any experienced filmmaker what to look out for when using a green screen, chances are they’re going to mention lighting about a billion times and that’s for good reason.
Tips on How to make OBS green screen settings better
- Evenly light your green screen so you can get a good key.
- Watch out for light flares. Use some a matte box or your trusty paw to block out any unwanted light.
- When lighting, try to create as much separation between your subject and the green screen as you can.
- Shutter speed: Minimize motion blur by raising your shutter speed to 1/80 or 1/100
- Aperture: Setting your aperture to f4 or f5.6 will give you slightly more depth of field, which will blur and smooth out your green screen.
- Format: Set your camera to the best recording format it has.
- ISO: Try to avoid high ISOs.
Filmora
If you’re just starting out with video editing, or just want a simple program that works, Wondershare Filmora might be what you’re looking for. It has the essential tools, and anyone can learn to use it easily.
Wondershare Filmora is the one of best video editing software with cool features that compares to other competing video editing Softwares. Many video editing programs claim to offer professional results; Filmora is one of a few consumer-level tools that actually delivers.
For Win 7 or later (64-bit)
For macOS 10.12 or later
Installation Steps
- Click the icon in the center of the Media Library to add files directly.
- Go File > Import Media > Import Media Files.
- Drag and drop to the Media Library directly.
While importing a media file, Wondershar Filmora may ask you if you wish to create a proxy file to accelerate the editing process. Select “Yes” to have a fast video editing experience.
You can also import video clips using your Touch Bar controls if your computer has Touch Bar.
Record a media file
Apart from the videos shot by your digital devices, you can also directly import media files by recording video from your webcam, capturing the computer screen, or recording a voice-over.
Record computer screen:
Click the “Record” option, and choose “Record PC Screen” to get the built-in Wondershare Screen Recorder. Hit the red button to get started. If you want to stop the recording, you can hit F9.
Record videos from webcam:
Also, click the “Record” option, and choose “Record from Webcam”. In the pop-up Video Recording window, click the red button to start recording and click it again to stop recording. Then click OK to save the recorded video file.
Record voice-over:
Choose “Record a voiceover” under the Record menu. It would be better to connect a microphone to your Mac for a better result. Hit the Record button, and it leaves you 3 seconds to get ready.
All the recorded media files will be saved into Media Library automatically and you can drag them to the Timeline for editing.
Also read:
- New In 2024, How to Get VHS Filter and Glitch Filter to Your Images or Videos?
- 2024 Approved What Are the Top 15 Slideshow Presentation Examples Your Audience Will
- New How to Make A Funny Vlog for TikTok?
- How to Easily Add VHS Green Screen to Your Video
- New 2024 Approved How to Create an Aesthetic Slideshow Presentation
- 2024 Approved How to Use Rule of Thirds in Video
- Updated In 2024, How to Make a Vacation Slideshow in 5 Minutes
- Updated In 2024, Best Tips on How to Design Travel Slideshow
- New 2024 Approved AI Features of Wondershare Filmora - Silence Detection in Videos
- Create Glitch Text Effect
- Updated 2024 Approved How to Add Green Screen Effects In Phhotoshop
- Updated How to Blur Faces in Your Video on iPhone for 2024
- Updated How to Find a High-Quality Video Marketing Agency?
- 2024 Approved Some of the Top Sites to Replace a Sky Background in Videos
- New In 2024, What Is MOV Format and How to Edit MOV Video Better?
- Steps to Denoise in Final Cut Pro – Reduce Video and Audio Noise for 2024
- 2024 Approved Techniques You Never Heard of for Learning AI Marketing YouTube
- Updated In 2024, How to Add a Green Screen to Zoom
- New 2024 Approved How to Add Subtitles in QuickTime Player?
- Updated Try This Simple Trick to Make Instant 3D GIF that Pops Out of Your Screen. Here Are a Few Memorable Examples of the Most Popular 3D GIFs
- 2024 Approved How to Zoom Desktop Screen
- Updated 2024 Approved Detailed Steps to Add Border to Video Using Premiere Pro
- Updated TOP 6 Online Video Speed Controller for Chrome, Safari, Firefox
- Updated 2024 Approved 5 Excellent Tools To Convert Video to 60 FPS
- In 2024, Learn to Use Montage with These Movies
- How to Turn On/Off Motion Blur in Fortnite, In 2024 Is It Good for Fortnite?
- Updated How to Create a DIY Green Screen Video Effect, In 2024
- Updated Are You Also a Fan of the Slow Mo Guys? Well! Who Isnt? Learn How You Can Create Compelling Slow-Mo Videos Like the Slow Mo Guys Here
- New This Article Will Explore in Detail How You Can Use the Features Available in Wondershare Filmora to Export the Video by Changing the Resolution of the Footage
- New Do You Know CapCut Has some Amazing Slow-Motion Templates You Can Utilize? Read This Article to Access the Slow-Motion CapCut Templates Link
- Updated The Easiest Way to Make Time-Lapse Videos. Yes, You Can Make a Time-Lapse Video with Your Phone. It Powers a Very Simple and Easy Way to Make Time-Lapse Videos
- Updated Before & After Editing Trick | Wondershare Filmora Tutorial for 2024
- New How to Loop a Video on Vimeo for 2024
- Updated Being an After Effects Editor, You Often Find Yourself the Need to Add Motion Blur After Effects. This Guide Has Got You Covered. Follow to Find Out How to Add Motion Blur in After Effects
- 2024 Approved How to Brighten Video in Premiere Pro
- Updated Planning and Storyboarding Is the Most Important Part of Creating a Music Video. Here Are some Easy Tips for Planning and Storyboarding a Music Video in Filmora
- Color Lut in Video - Color Grade Your Video for 2024
- New Are You a Gaming YouTuber or Content Creator Whose Main Game Is COD Warzone? How Kickass Are Your Warzone Thumbnails? Heres a Guide on How to Make One for Free
- New Facts About GIF Background You Didnt Know
- How to Access Your Apple iPhone X When You Forget the Passcode?
- In 2024, Dose Life360 Notify Me When Someone Checks My Location On Apple iPhone 12? | Dr.fone
- How To Fix Apple ID Verification Code Not Working From Apple iPhone 6
- Best 10 Mock Location Apps Worth Trying On Honor Play 7T | Dr.fone
- In 2024, How to Share/Fake Location on WhatsApp for Oppo Reno 8T 5G | Dr.fone
- Life360 Circle Everything You Need to Know On Honor Magic 5 | Dr.fone
- Hard Resetting an Oppo Find X7 Device Made Easy | Dr.fone
- How To Remove Screen Lock PIN On Infinix Smart 7 HD Like A Pro 5 Easy Ways
- In 2024, Effective Guide to Cast Apple iPhone 12 Pro Max to MacBook without Hindrance | Dr.fone
- In 2024, How to Transfer Contacts from Motorola Moto G84 5G to Other Android Devices Devices? | Dr.fone
- In 2024, How to Remove iPhone 13 mini Activation Lock
- How to use Pokemon Go Joystick on Motorola Edge+ (2023)? | Dr.fone
- How to Unlock iCloud Activation Lock and iCloud Account On iPhone 14 Plus?
- How do I reset my Poco F5 5G Phone without technical knowledge? | Dr.fone
- In 2024, Locked Out of Apple iPhone XR? 5 Ways to get into a Locked Apple iPhone XR
- In 2024, Forgot iPhone Passcode Again? Unlock iPhone 6 Without Passcode Now
- Itel A05s Unlock Tool - Remove android phone password, PIN, Pattern and fingerprint
- In 2024, Preparation to Beat Giovani in Pokemon Go For Apple iPhone XR | Dr.fone
- How To Simulate GPS Movement With Location Spoofer On Oppo A58 4G? | Dr.fone
- Title: How to Use Kahoot! On Zoom
- Author: Chloe
- Created at : 2024-05-20 03:37:29
- Updated at : 2024-05-21 03:37:29
- Link: https://ai-editing-video.techidaily.com/how-to-use-kahoot-on-zoom/
- License: This work is licensed under CC BY-NC-SA 4.0.
