
:max_bytes(150000):strip_icc():format(webp)/watch-free-movies-online-1356647-32f79b8cc3ed484ca1f9f898f503e416.png)
How to Use Visual Effect for Zoom for 2024
How to Use Visual Effect for Zoom
Zoom, a video calling software, has been quite popular over the last several months and is still one of the most used videos calling applications by millions of people worldwide. The site is a favorite among working professionals, but it is also utilized by individuals to connect with their friends and loved ones. Additionally, despite the app’s abundance of practical built-in tools and functions, it lacks the fun filters and special effects that the majority of users are used to when using a camera. Zoom has ingrained itself in our vocabulary during the last year. It seemed almost inevitable given that everything, from meetings to parties, has moved online.
You don’t need to seek farther than Zoom visual effects to inject a little jazz into the routine Zoom meetings during these hard times. By making adjustments to your Video configuration either before or during a video call, you may add visual effects in Zoom. Zoom meetings may be tedious to conduct over extended periods of time. Additionally, it would be helpful if you recorded the condition of your room before any Zoom meetings. You wouldn’t want to reveal your disorganized space while in a meeting. In these situations, adding visual effects will keep your private area private while also making your Zoom meetings entertaining and exciting. It will also prevent others from seeing your filthy room. This tutorial will walk you through the process of adding visual effects to Zoom step-by-step. In addition, you will get acquainted with the numerous camera functions and visual effects that you may employ during a Zoom video conversation.
- 1. What apps can add visual effect on Zoom?
- 2. How do I add visual effects to Zoom in Mobile?
- 3. How do you download Zoom effects?
Part 1: Popular Visual Effects you can add to Zoom
You may apply one of four main graphic effects to your Zoom meetings. The visual effects that you may use in your next Zoom video chat are briefly summarized below.
1. Visual Backgrounds
Virtual backdrops may transform any plain wall into an artistic setting. Zoom provides you the choice to add photographs to your backdrop in addition to offering you a few pre-made backdrops. Zoom lets you add a movie to your backdrop in addition to simply photographs. With the help of this imaginative feature, gather your pals and enjoy your favorite meme or video. A presentation’s collection of photos, a video, or a single image may all serve as virtual backdrops. A green screen would often be used as your real backdrop and consistent lighting would be required.
To avoid having to reveal your real surroundings while in a conference, you may add any picture or video as a virtual backdrop in Zoom. You have the option of adding own photos and movies or selecting from the pre-existing backdrop films and images. The file type for video backgrounds should be MP4 or MOV, and the resolution should range from 360p to a maximum of 1080p. Ensure that the mirroring of your video is deselected in the Zoom’s Video settings if your backdrop picture has text that may be read. By using virtual backdrops, you may alter the background of your video as it appears to the audience member with whom you are speaking. During the video conference you’re in, the other participants will be able to view your face and body overlaid on the backdrop of your choice.
2. Filters
With these filters, you can have fun in all of your Zoom meetings! Filters are a fun way to spend time with loved ones who are far away, particularly at a period when maintaining social distance is crucial. Filters are the modifications you make to yourself during Zoom meetings (such as a mustache, beard, etc.). They enliven the proceedings and contribute to the fun and memorability of your Zoom meetings.
Your films’ colors may be changed, and video filters can also add new aspects. By selecting a filter appropriate for each event, like team meetings or game nights, you may create the right atmosphere. You may embellish your face in the video with flowers or animal traits by using Zoom’s various filters. Alternately, you might just convert your video’s color to black and white. The video filters from a different program, however, allow you to apply more vibrant filters and place a greater emphasis on special effects.
3. Lighting and Touch-ups
The Lighting function enhances lighting effects and makes adjustments for low light situations to make you seem more professional during a Zoom conference. Similar to this, Touch-up enhances your facial characteristics by making your skin shine, erasing wrinkles, and giving your face a radiant appearance.
On your Zoom videos, changing your lighting and applying touch-ups may improve how you seem. By adjusting your lighting, you can make even dim illumination look bright. By doing touch-ups, you may get a smoother skin texture and get rid of any obvious imperfections.
4. Studio Effects
Zoom has been developing on a new feature called Studio Effects that would give customers the option of using virtual cosmetics in their movies. They are still checking it out before formally releasing it since it is still in beta. However, it is still available to users under the Backgrounds & Filters area. You may adjust the opacity as you like. You have the option to choose a new color or one of the predefined colors. Additionally, you may decide to employ the face effects in all of your next meetings, albeit doing so might be problematic if you use Zoom for business. Don’t worry if you’re running late. Zoom can give your face a natural-looking cosmetic makeover in only one minute!
This function is intended for less formal settings, such as gatherings of friends or family. Anyone who wants to seem more professional during meetings has access to Studio Effects, which offers the choice of various eyebrow colors, beards, and lipsticks. These are a few recently added features. You may add mustaches, beards, and brows in a variety of designs, hues, and intensities. Additionally, you have the option of coloring your lips.
Part 2: How to Add Visual Effects to Zoom
Along with facilitating online meetings, the Zoom program also lets you play with its visual effects. You just need to make a few adjustments to the video settings or utilize another third-party program to be ready to go.
Step1Start a Zoom meeting
You can download Zoom, install it on your computer, and log into your account if you don’t already have it if you don’t already have it.
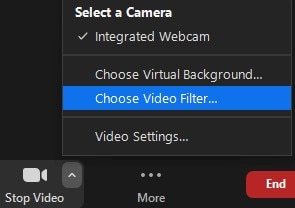
Step2Tap Background and Filters
After logging in to Zoom, use these settings. - Options > Camera > Video

Step3Faucet Filters
Here, you may play with a variety of visual effects and customize them to suit your tastes. Pick one of the numerous filters that are offered. To activate the filter, tap it.
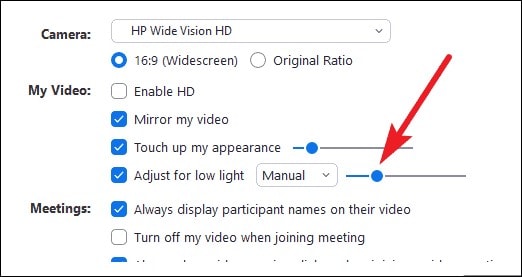
Step4Set Lighting Effects to on
Select “Adjust for low light” in the video options. For your lighting, you may choose between Auto and Manual effects. Zoom will automatically detect and adapt for the lighting in your room if you choose Auto.
Use Zoom’s noise reduction option to keep your conversation focused during your video conference in addition to adding visual elements. To do this, go to “Audio Settings” and choose “High” under “Suppress background noise.” Once you start speaking during the video conference, this essentially cancels out any background noise.
Part 3: Related FAQs
1. What apps can add visual effect on Zoom?
Following is the list of top three apps that you can use to utilize visual effects Zoom application:
Snap Camera is regarded as the most user-friendly. It is a software that you can download for Windows or Mac that works with live broadcasts and video chats. Because it was created by the people who founded Snapchat, it shares a broad variety of filters with that platform.
Link: Snap Camera
The Mac is the only platform on which CamTwist may be used. You may also use it to give your movies additional filters and unique effects. This program lets you pick from a variety of pre-made effects while also allowing you to create your own.
Link: CamTwist
Another desktop application that lets you change and even blur your backdrop is ManyCam. It enables you to apply digital effects, filters, and 3-D masks to your face. Using this tool, you can also build layers and presets.
Link: ManyCam
2. How do I add visual effects to Zoom in Mobile?
Zoom includes a function that might be useful if you don’t want to tidy up or want to add some entertainment to your calls. You may utilize Zoom virtual backdrops to alter your surroundings and take you to a more pleasant location on both the desktop and mobile apps. After joining one on a mobile device, pick Virtual backdrop by tapping the More icon in the bottom right corner. Choose a photo from the list of choices, or click the plus sign (+) to add a photo or video from your gallery.
3. How do you download Zoom effects?
Pressing the Studio Effects button after installing Zoom for the first time will prompt a pop-up asking you to download the Studio Effects package. Several filters, suited for both business meetings and conversations with friends, let you customize the video and audio during your video calls. To start downloading the Effects bundle, click the Download button. The “Studio Effects” window will appear on the right-hand side of the Background & Filter page after the download is finished. All the face components and choices are available in this Studio Effects window.
Conclusion
The most popular video meeting tool worldwide is Zoom. Family, friends, coworkers, and any two people who want to video chat utilize it. Zoom visual effects are the ideal tool for injecting some humor into otherwise dull Zoom sessions and meetings. A few simple steps will get you a striking backdrop, a humorous filter, and some interesting effects. Since the majority of formal work is now completed from home, Zoom has taken over as the standard video conferencing program. Try out as many of the effects as you like, and use this page as a companion and a map to help you along the way.
- 1. What apps can add visual effect on Zoom?
- 2. How do I add visual effects to Zoom in Mobile?
- 3. How do you download Zoom effects?
Part 1: Popular Visual Effects you can add to Zoom
You may apply one of four main graphic effects to your Zoom meetings. The visual effects that you may use in your next Zoom video chat are briefly summarized below.
1. Visual Backgrounds
Virtual backdrops may transform any plain wall into an artistic setting. Zoom provides you the choice to add photographs to your backdrop in addition to offering you a few pre-made backdrops. Zoom lets you add a movie to your backdrop in addition to simply photographs. With the help of this imaginative feature, gather your pals and enjoy your favorite meme or video. A presentation’s collection of photos, a video, or a single image may all serve as virtual backdrops. A green screen would often be used as your real backdrop and consistent lighting would be required.
To avoid having to reveal your real surroundings while in a conference, you may add any picture or video as a virtual backdrop in Zoom. You have the option of adding own photos and movies or selecting from the pre-existing backdrop films and images. The file type for video backgrounds should be MP4 or MOV, and the resolution should range from 360p to a maximum of 1080p. Ensure that the mirroring of your video is deselected in the Zoom’s Video settings if your backdrop picture has text that may be read. By using virtual backdrops, you may alter the background of your video as it appears to the audience member with whom you are speaking. During the video conference you’re in, the other participants will be able to view your face and body overlaid on the backdrop of your choice.
2. Filters
With these filters, you can have fun in all of your Zoom meetings! Filters are a fun way to spend time with loved ones who are far away, particularly at a period when maintaining social distance is crucial. Filters are the modifications you make to yourself during Zoom meetings (such as a mustache, beard, etc.). They enliven the proceedings and contribute to the fun and memorability of your Zoom meetings.
Your films’ colors may be changed, and video filters can also add new aspects. By selecting a filter appropriate for each event, like team meetings or game nights, you may create the right atmosphere. You may embellish your face in the video with flowers or animal traits by using Zoom’s various filters. Alternately, you might just convert your video’s color to black and white. The video filters from a different program, however, allow you to apply more vibrant filters and place a greater emphasis on special effects.
3. Lighting and Touch-ups
The Lighting function enhances lighting effects and makes adjustments for low light situations to make you seem more professional during a Zoom conference. Similar to this, Touch-up enhances your facial characteristics by making your skin shine, erasing wrinkles, and giving your face a radiant appearance.
On your Zoom videos, changing your lighting and applying touch-ups may improve how you seem. By adjusting your lighting, you can make even dim illumination look bright. By doing touch-ups, you may get a smoother skin texture and get rid of any obvious imperfections.
4. Studio Effects
Zoom has been developing on a new feature called Studio Effects that would give customers the option of using virtual cosmetics in their movies. They are still checking it out before formally releasing it since it is still in beta. However, it is still available to users under the Backgrounds & Filters area. You may adjust the opacity as you like. You have the option to choose a new color or one of the predefined colors. Additionally, you may decide to employ the face effects in all of your next meetings, albeit doing so might be problematic if you use Zoom for business. Don’t worry if you’re running late. Zoom can give your face a natural-looking cosmetic makeover in only one minute!
This function is intended for less formal settings, such as gatherings of friends or family. Anyone who wants to seem more professional during meetings has access to Studio Effects, which offers the choice of various eyebrow colors, beards, and lipsticks. These are a few recently added features. You may add mustaches, beards, and brows in a variety of designs, hues, and intensities. Additionally, you have the option of coloring your lips.
Part 2: How to Add Visual Effects to Zoom
Along with facilitating online meetings, the Zoom program also lets you play with its visual effects. You just need to make a few adjustments to the video settings or utilize another third-party program to be ready to go.
Step1Start a Zoom meeting
You can download Zoom, install it on your computer, and log into your account if you don’t already have it if you don’t already have it.
Step2Tap Background and Filters
After logging in to Zoom, use these settings. - Options > Camera > Video
Step3Faucet Filters
Here, you may play with a variety of visual effects and customize them to suit your tastes. Pick one of the numerous filters that are offered. To activate the filter, tap it.
Step4Set Lighting Effects to on
Select “Adjust for low light” in the video options. For your lighting, you may choose between Auto and Manual effects. Zoom will automatically detect and adapt for the lighting in your room if you choose Auto.
Use Zoom’s noise reduction option to keep your conversation focused during your video conference in addition to adding visual elements. To do this, go to “Audio Settings” and choose “High” under “Suppress background noise.” Once you start speaking during the video conference, this essentially cancels out any background noise.
Part 3: Related FAQs
1. What apps can add visual effect on Zoom?
Following is the list of top three apps that you can use to utilize visual effects Zoom application:
Snap Camera is regarded as the most user-friendly. It is a software that you can download for Windows or Mac that works with live broadcasts and video chats. Because it was created by the people who founded Snapchat, it shares a broad variety of filters with that platform.
Link: Snap Camera
The Mac is the only platform on which CamTwist may be used. You may also use it to give your movies additional filters and unique effects. This program lets you pick from a variety of pre-made effects while also allowing you to create your own.
Link: CamTwist
Another desktop application that lets you change and even blur your backdrop is ManyCam. It enables you to apply digital effects, filters, and 3-D masks to your face. Using this tool, you can also build layers and presets.
Link: ManyCam
2. How do I add visual effects to Zoom in Mobile?
Zoom includes a function that might be useful if you don’t want to tidy up or want to add some entertainment to your calls. You may utilize Zoom virtual backdrops to alter your surroundings and take you to a more pleasant location on both the desktop and mobile apps. After joining one on a mobile device, pick Virtual backdrop by tapping the More icon in the bottom right corner. Choose a photo from the list of choices, or click the plus sign (+) to add a photo or video from your gallery.
3. How do you download Zoom effects?
Pressing the Studio Effects button after installing Zoom for the first time will prompt a pop-up asking you to download the Studio Effects package. Several filters, suited for both business meetings and conversations with friends, let you customize the video and audio during your video calls. To start downloading the Effects bundle, click the Download button. The “Studio Effects” window will appear on the right-hand side of the Background & Filter page after the download is finished. All the face components and choices are available in this Studio Effects window.
Conclusion
The most popular video meeting tool worldwide is Zoom. Family, friends, coworkers, and any two people who want to video chat utilize it. Zoom visual effects are the ideal tool for injecting some humor into otherwise dull Zoom sessions and meetings. A few simple steps will get you a striking backdrop, a humorous filter, and some interesting effects. Since the majority of formal work is now completed from home, Zoom has taken over as the standard video conferencing program. Try out as many of the effects as you like, and use this page as a companion and a map to help you along the way.
Slow-motion videos help in sports analysis to gain insights into the performance. Slow motion is beneficial for observing precise movements in instructional videos. Moreover, such videos are crucial for product showcasing in advertising and marketing. Due to the various uses of slow-motion videos, you may need to create one with an edit video slow motion online free.
Thus, this article will focus on some top-notch slow-motion video editors online for free. With these tools, you can produce slow-motion videos at the desired pace. Moreover, we will introduce a desktop tool that leaves behind all online video editors slow motion free.
Slow Motion Video Maker Slow your video’s speed with better control of your keyframes to create unique cinematic effects!
Make A Slow Motion Video Make A Slow Motion Video More Features

Part 1: [Top List] Best Slow Motion Video Editors To Work Within 2024
Have you ever worked with slow-motion video editors? In this section, we will shed light on some of the best online video editors that are slow-motion free. By using them, you can produce professional quality slow-motion videos with ease:
1. VEED.io
VEED.io is a prominent tool that you can access through a web browser. Along with its many features, this tool lets you slow down a video with proficiency. It lets you change the video speed to up to 0.5x. Moreover, you can enter the custom speed for more modification. For precision, you can slow down certain parts by splitting the clips. Hence, this tool gives you complete control for making slow-motion videos.

Pros
- This tool shows compatibility with many file formats. For example, you can import videos in MOV, MP3, AVI, and other formats.
- After slowing down a video, this tool lets you perform basic video editing. You can cut, crop, trim, and annotate the slow-motion video.
Cons
- This tool freezes and lacks fast processing speed.
2. Canva
Have you ever edited a video through Canva? This famous edit video slow motion online free tool offers many tools to execute basic and advanced editing. Among them, it contains the feature to add a slow-motion effect to a video. After uploading the video, you can reduce the speed to 0.1x. While adding a slow-motion effect, you can add comments to the video for more modification.

Pros
- This tool provides many options for uploading a video. For instance, you can upload videos from Facebook, Google Drive, Google Photos, or Dropbox.
- It includes a collaboration link to help your teammates access the video. You can also enter groups, people, and tags for collaboration.
Cons
- The options for template designs and export are limited.
3. Typito
Typito is a reliable tool that supports over 20 video file formats. With its video speed modifier, you can speed up or slow down a video file without hassle. Furthermore, it supports many aspect ratios, like a square letterbox, vertical, etc. Moreover, it contains a stock media library containing royalty-free videos and images. Thus, it’s a competent online tool featuring a reliable option to make slow-motion videos.

Pros
- You can display your own brand video with this tool. It allows you to upload your brand colors, designs, and fonts for brand marketing.
- It offers a real-time video preview to analyze the final result. By doing so, you can download satisfactory slow-motion videos.
Cons
- Sometimes, the tool encounters glitches, which can disrupt its overall performance.
4. Media.io
Media.io is a capable online tool famous for its flawless results. After importing the video, you can reduce it to the lowest speed, which is 0.25x. Meanwhile, you can also increase the video speed to 4x efficiently. One of the best things about this tool is that it can edit the motion effect to YouTube URLs directly. Hence, this slow down video online free can benefit you in making slow-motion videos.

Pros
- This tool contains many free additional features. For instance, it contains a video converter, letting you convert the file format into another one.
- To remove unwanted audio from a video, you can mute the video. Thus, with a single click, you can mute the video instantly.
Cons
- You cannot upload large file sizes on this tool. Thus, you can face file size restrictions on Media.io.
5. Flixier
This online video editor slow motion free tool has an easy-to-use interface that you can operate without watching tutorials. It can slow down a video at any frame rate without decreasing its quality. To reduce the video speed, you can drag the slider with great ease. Moreover, you can add powerful effects to enhance the slowed-down video. Hence, it’s an advanced tool for creating slow-motion videos.

Pros
- It contains an AI subtitle generator through which you can transcribe your videos. It supports all common languages for the generation of video subtitles.
- To make your video pleasing in a visual way, you can add many filters. This tool consists of many filters which can improve your facial appearance.
Cons
- Flixier takes extra time to process video files. Thus, making slow-motion videos with this tool is time-consuming.
6. Kapwing
This online tool uses advanced technology to slow down a video without losing quality. Whether your video is 4K or 1080p, the tool maintains the original resolution of the video. You can import the video from your device within a few seconds. It also allows you to paste the URL of the video quickly. Afterward, you can adjust the speed slider to manage the video speed in a preferred way.

Pros
- Kapwing is an all-round video editor offering many features. Using this video editor, users can combine and split video tracks.
- The AI audio enhancer of this tool can improve the sound quality of your audio. You can improve the quality of your voice recording and background music with this feature.
Cons
- To use its premium features, you must buy its subscription plans. However, its subscription plans can be expensive for some users.
7. Clideo
Do you want a basic tool for slowing down videos? Clideo is one of the simple tools that has intuitive controls to modify a video. It has a fast processing speed to offer users instant results. It provides six commonly used speeds for video clips. In addition, you can use the speed slider to adjust the speed in a personalized way. Meanwhile, the tool ensures complete security to protect your valuable video files.

Pros
- This slow down video online free can function as a great video compressor. It decreases the video file size without compromising its resolution.
- It acts as a video maker, allowing you to create videos from images. Moreover, you can produce videos with GIFs of desired quality.
Cons
- It adds a watermark to the videos in its free version.
8. Online Video Cutter
This comprehensive slow motion video online without watermark tool offers a great user experience in making slow-motion videos. Without adding a watermark, it can create slow-mo videos as best as possible. Along with various video speeds, it provides many file formats. Moreover, you can slow down videos without creating an account. Within a few taps, you can make slow-motion videos in high resolution.

Pros
- To describe your video clips, add text to them using this tool. It lets you select the desired text font, style, size, and color.
- It contains a screen recorder to capture the current activities of your desktop. After recording, you can edit and export the video flawlessly.
Cons
- The interface of this tool contains many pop-up ads, which can be annoying.
Part 2: Alternative For Better Results: Wondershare Filmora
After knowing the drawbacks of online tools, you must want an alternative. Wondershare Filmora is a skillful tool comprising good qualities as a video editor. It targets every need of a professional video editor with its robust features. With its friendly user interface, you can perform video editing without hurdles. It lets you apply effects, transitions, animations, and other modifications with ease.
Moreover, it allows users to control the speed of the videos. After dragging the video to the timeline, you can adjust its speed accordingly. It retains the frame rate of the video with high-end rendering. Also, it contains tons of AI options to improvise the video clip. Hence, Filmora is a must-have offline tool catering to all the needs of video editors.
Free Download For Win 7 or later(64-bit)
Free Download For macOS 10.14 or later
Directions to Make Slow-Motion Video
In this section, we will enlist the simple steps to create slow-motion videos. Thus, check the following instructions to generate slow-motion videos in a flawless way.
Step 1Sign Into Filmora
Start by launching Filmora on your PC. Once done, head to the top bar and select “Profile”. From there, sign into the account and select the “New Project” button.

Step 2Add Video on Timeline
Now, on the main interface of Filmora, press “Ctrl + I”. In this manner, you can import the video clips from your computer. Once done, drag and drop the video file to the timeline for editing.

Step 3Go to the Speed Tab
Select the video on the timeline and go to the right panel. Through this panel, click on the “Speed” tab and tap “Uniform Speed”.

Step 4Choose Optical Flow
Expand “AI Frame Interpolation” and tap “Optical Flow”. Now, stay on the timeline and select “Render Preview” from the top toolbar. By doing so, you can export the video in the selected file format.

Key Features Highlighting Filmora
AI Vocal Remover: This AI feature isolates the music from any song. It preserves the high resolution of the video while removing vocals. Also, it extracts other unwanted elements from audio. Hence, it automatically removes vocals from an audio file.
AI Copywriting: This feature is integrated with ChatGPT to produce AI-generated scripts. Content creators can generate YouTube descriptions and titles from this smart feature. To do so, you can enter the question in the given box. After some seconds, the AI tool will answer your queries.
AI Image: By using this feature, you can convert your text to images in an automated way. You can describe the image in the text in the given box. Afterward, the tool will create an AI image in three resolutions.
Part 3: What Are Some Major Drawbacks to Using Online Slow Motion Video Editors Compared to Offline Editors?
There are some disadvantages to using online slow-motion video editors as compared to offline tools. Here are some of the common drawbacks of slow motion video editor online free that you should consider:
Network Dependency
Online slow-motion video editors need credible and fast internet connections. You can’t access their website with a poor internet connection. If there is a poor network connection, the tool will take extra time to upload and process videos.
Limitations of Features
Unlike offline slow-motion video editors, online free tools have limited features. They don’t offer advanced options to make professional enhancements. Moreover, advanced tools need high-end computing sources. This may not be present on web-based slow-motion video editors.
Privacy Concerns
Desktop tools use enhanced encryption methods for data privacy. However, online sites may contain hidden malicious files which can harm your data. Hence, online users may face privacy threats when making slow-motion videos.
User Interface and Subscription Packages
It’s common that online slow-motion video editors lack intuitive controls. The interface of online tools is difficult to operate for beginners. Moreover, the subscription packages can be expensive for some users. In contrast, desktop tools have better user interface experience with affordable plans.
Conclusion
Slow-motion videos are useful for deep analysis. It helps in highlighting the minor details of a product. There are many online video editors slow motion free to create slow-motion effects. However, desktop tools like Filmora are a better alternative to such online tools. This tool uses high-end computing algorithms to make slow-motion videos with precision.
Make A Slow Motion Video Make A Slow Motion Video More Features
Part 1: [Top List] Best Slow Motion Video Editors To Work Within 2024
Have you ever worked with slow-motion video editors? In this section, we will shed light on some of the best online video editors that are slow-motion free. By using them, you can produce professional quality slow-motion videos with ease:
1. VEED.io
VEED.io is a prominent tool that you can access through a web browser. Along with its many features, this tool lets you slow down a video with proficiency. It lets you change the video speed to up to 0.5x. Moreover, you can enter the custom speed for more modification. For precision, you can slow down certain parts by splitting the clips. Hence, this tool gives you complete control for making slow-motion videos.
Pros
- This tool shows compatibility with many file formats. For example, you can import videos in MOV, MP3, AVI, and other formats.
- After slowing down a video, this tool lets you perform basic video editing. You can cut, crop, trim, and annotate the slow-motion video.
Cons
- This tool freezes and lacks fast processing speed.
2. Canva
Have you ever edited a video through Canva? This famous edit video slow motion online free tool offers many tools to execute basic and advanced editing. Among them, it contains the feature to add a slow-motion effect to a video. After uploading the video, you can reduce the speed to 0.1x. While adding a slow-motion effect, you can add comments to the video for more modification.
Pros
- This tool provides many options for uploading a video. For instance, you can upload videos from Facebook, Google Drive, Google Photos, or Dropbox.
- It includes a collaboration link to help your teammates access the video. You can also enter groups, people, and tags for collaboration.
Cons
- The options for template designs and export are limited.
3. Typito
Typito is a reliable tool that supports over 20 video file formats. With its video speed modifier, you can speed up or slow down a video file without hassle. Furthermore, it supports many aspect ratios, like a square letterbox, vertical, etc. Moreover, it contains a stock media library containing royalty-free videos and images. Thus, it’s a competent online tool featuring a reliable option to make slow-motion videos.
Pros
- You can display your own brand video with this tool. It allows you to upload your brand colors, designs, and fonts for brand marketing.
- It offers a real-time video preview to analyze the final result. By doing so, you can download satisfactory slow-motion videos.
Cons
- Sometimes, the tool encounters glitches, which can disrupt its overall performance.
4. Media.io
Media.io is a capable online tool famous for its flawless results. After importing the video, you can reduce it to the lowest speed, which is 0.25x. Meanwhile, you can also increase the video speed to 4x efficiently. One of the best things about this tool is that it can edit the motion effect to YouTube URLs directly. Hence, this slow down video online free can benefit you in making slow-motion videos.
Pros
- This tool contains many free additional features. For instance, it contains a video converter, letting you convert the file format into another one.
- To remove unwanted audio from a video, you can mute the video. Thus, with a single click, you can mute the video instantly.
Cons
- You cannot upload large file sizes on this tool. Thus, you can face file size restrictions on Media.io.
5. Flixier
This online video editor slow motion free tool has an easy-to-use interface that you can operate without watching tutorials. It can slow down a video at any frame rate without decreasing its quality. To reduce the video speed, you can drag the slider with great ease. Moreover, you can add powerful effects to enhance the slowed-down video. Hence, it’s an advanced tool for creating slow-motion videos.
Pros
- It contains an AI subtitle generator through which you can transcribe your videos. It supports all common languages for the generation of video subtitles.
- To make your video pleasing in a visual way, you can add many filters. This tool consists of many filters which can improve your facial appearance.
Cons
- Flixier takes extra time to process video files. Thus, making slow-motion videos with this tool is time-consuming.
6. Kapwing
This online tool uses advanced technology to slow down a video without losing quality. Whether your video is 4K or 1080p, the tool maintains the original resolution of the video. You can import the video from your device within a few seconds. It also allows you to paste the URL of the video quickly. Afterward, you can adjust the speed slider to manage the video speed in a preferred way.
Pros
- Kapwing is an all-round video editor offering many features. Using this video editor, users can combine and split video tracks.
- The AI audio enhancer of this tool can improve the sound quality of your audio. You can improve the quality of your voice recording and background music with this feature.
Cons
- To use its premium features, you must buy its subscription plans. However, its subscription plans can be expensive for some users.
7. Clideo
Do you want a basic tool for slowing down videos? Clideo is one of the simple tools that has intuitive controls to modify a video. It has a fast processing speed to offer users instant results. It provides six commonly used speeds for video clips. In addition, you can use the speed slider to adjust the speed in a personalized way. Meanwhile, the tool ensures complete security to protect your valuable video files.
Pros
- This slow down video online free can function as a great video compressor. It decreases the video file size without compromising its resolution.
- It acts as a video maker, allowing you to create videos from images. Moreover, you can produce videos with GIFs of desired quality.
Cons
- It adds a watermark to the videos in its free version.
8. Online Video Cutter
This comprehensive slow motion video online without watermark tool offers a great user experience in making slow-motion videos. Without adding a watermark, it can create slow-mo videos as best as possible. Along with various video speeds, it provides many file formats. Moreover, you can slow down videos without creating an account. Within a few taps, you can make slow-motion videos in high resolution.
Pros
- To describe your video clips, add text to them using this tool. It lets you select the desired text font, style, size, and color.
- It contains a screen recorder to capture the current activities of your desktop. After recording, you can edit and export the video flawlessly.
Cons
- The interface of this tool contains many pop-up ads, which can be annoying.
Part 2: Alternative For Better Results: Wondershare Filmora
After knowing the drawbacks of online tools, you must want an alternative. Wondershare Filmora is a skillful tool comprising good qualities as a video editor. It targets every need of a professional video editor with its robust features. With its friendly user interface, you can perform video editing without hurdles. It lets you apply effects, transitions, animations, and other modifications with ease.
Moreover, it allows users to control the speed of the videos. After dragging the video to the timeline, you can adjust its speed accordingly. It retains the frame rate of the video with high-end rendering. Also, it contains tons of AI options to improvise the video clip. Hence, Filmora is a must-have offline tool catering to all the needs of video editors.
Free Download For Win 7 or later(64-bit)
Free Download For macOS 10.14 or later
Directions to Make Slow-Motion Video
In this section, we will enlist the simple steps to create slow-motion videos. Thus, check the following instructions to generate slow-motion videos in a flawless way.
Step 1Sign Into Filmora
Start by launching Filmora on your PC. Once done, head to the top bar and select “Profile”. From there, sign into the account and select the “New Project” button.
Step 2Add Video on Timeline
Now, on the main interface of Filmora, press “Ctrl + I”. In this manner, you can import the video clips from your computer. Once done, drag and drop the video file to the timeline for editing.
Step 3Go to the Speed Tab
Select the video on the timeline and go to the right panel. Through this panel, click on the “Speed” tab and tap “Uniform Speed”.
Step 4Choose Optical Flow
Expand “AI Frame Interpolation” and tap “Optical Flow”. Now, stay on the timeline and select “Render Preview” from the top toolbar. By doing so, you can export the video in the selected file format.
Key Features Highlighting Filmora
AI Vocal Remover: This AI feature isolates the music from any song. It preserves the high resolution of the video while removing vocals. Also, it extracts other unwanted elements from audio. Hence, it automatically removes vocals from an audio file.
AI Copywriting: This feature is integrated with ChatGPT to produce AI-generated scripts. Content creators can generate YouTube descriptions and titles from this smart feature. To do so, you can enter the question in the given box. After some seconds, the AI tool will answer your queries.
AI Image: By using this feature, you can convert your text to images in an automated way. You can describe the image in the text in the given box. Afterward, the tool will create an AI image in three resolutions.
Part 3: What Are Some Major Drawbacks to Using Online Slow Motion Video Editors Compared to Offline Editors?
There are some disadvantages to using online slow-motion video editors as compared to offline tools. Here are some of the common drawbacks of slow motion video editor online free that you should consider:
Network Dependency
Online slow-motion video editors need credible and fast internet connections. You can’t access their website with a poor internet connection. If there is a poor network connection, the tool will take extra time to upload and process videos.
Limitations of Features
Unlike offline slow-motion video editors, online free tools have limited features. They don’t offer advanced options to make professional enhancements. Moreover, advanced tools need high-end computing sources. This may not be present on web-based slow-motion video editors.
Privacy Concerns
Desktop tools use enhanced encryption methods for data privacy. However, online sites may contain hidden malicious files which can harm your data. Hence, online users may face privacy threats when making slow-motion videos.
User Interface and Subscription Packages
It’s common that online slow-motion video editors lack intuitive controls. The interface of online tools is difficult to operate for beginners. Moreover, the subscription packages can be expensive for some users. In contrast, desktop tools have better user interface experience with affordable plans.
Conclusion
Slow-motion videos are useful for deep analysis. It helps in highlighting the minor details of a product. There are many online video editors slow motion free to create slow-motion effects. However, desktop tools like Filmora are a better alternative to such online tools. This tool uses high-end computing algorithms to make slow-motion videos with precision.
Find Out The Best Dark Moody LUTs During Editing
Look-up tables (LUTs) are visual editing tools used as color presets. By using LUTs, you can enhance color grading within photos and videos. This way, your visual content looks more aesthetic, engaging, and appealing. Meanwhile, within LUTs, there are several color presets to use. The most popular one is dark moody LUT. In this article, you’ll find useful information on dark moody LUTs with the best recommendations.
Part 1: What Do Dark Moody LUTs Represent?
Like another color preset, dark moody LUTs provide special and unique color grading. So, you’ll experience darkened shadows, desaturated tones, blue tints, green hues, and others. The dark preset filters offer moody looks with pitch-dark effects to your visual content. Hence, these types of LUTs add a foreboding atmosphere.
Dark and moody LUTs are used in horror films or thriller cinematography. After all, they provide dedicated dark contrast with gloomy looks to the visual content. Hence, a special dark horror effect is blended, which adds mystery, tension, and fear. For adding dark moody LUTs, several tools are available for enhancing colors.
Empower your videos with a new mood using different LUTs. Filmora now offers 100+ top-quality 3D LUTs cover a broad range of scenarios. Transform your videos with Filmora’s powerful 3D LUTs.
Apply LUT on Videos Apply LUT on Videos Learn More


Part 2: Best Dark Moody LUTs You Can Find
LUTs are perfect for enhancing color gradients with minimal effort. This means you don’t need to spend long hours on video editing. With dark moody LUTs, there is an option to make your video more cinematic. Let’s find some of the best dark moody LUTs to make things easier:
1. Dark Moody LUTS Fashion
Elevate your photos and videos with these cinematic dark moody LUTs filters. There are 4 LUT presets that could be utilized to blend dark contrast. Hence, you can provide muted looks to your visual content with a mystery tone. The LUTs are ideal for fashion use because of dark shadows. For social media content, these LUTs are ideal.

2. Dark and Moody Cinematic 3D LUTs
Videography and photography are incomplete without color enhancement through editing. Saving time, these dark and moody cinematic 3D LUTs pack is a perfect solution. If you want desaturated contrast with muted colors, there are 8 different LUTs to assist. Apply all the LUT preset filters easily without hassles. With 4 separate files, the LUTs will suit almost every editing tool.

3. Dark Moody Lightroom Presets
Improvise your closest visual media with dark moody Lightroom presets. You will get 20 different dark LUTs Premiere Pro free in this pack. All available LUT filter presets are unique, with different dark contrasts and tones. Thus, you can add a moody touch with desaturated color gradients. This way, your photos, and videos will enlighten with a murk appearance.

4. Film Noir LUTs and Presets Pack
Adding film-like dark cinematic looks is possible with this LUTs preset pack. The availability of 50 preset filters allows adding dark moods to your visual media. The content becomes visually appealing with crushed black hues and darker and gloomy textures. The filters are instantly applied and can be edited with desired intensity and contrast.

5. Dark & Moody Aesthetic Filters
This dark and moody LUTs filter pack has everything to beautify your photos and videos. With 5 different filter presets, transform color gradients with cool hues and less vibrant colors. This will provide dark aesthetic looks to your visual content with desaturated tone. This exceptional grading with moody filters allows upscaling colors for social media content.

6. MOODY NORDIC LUTS
The Nordic region is known for its attractive landscapes with dark weather. Adding such LUTs to your videos enhances color hues with gloomy and dark gradients. This will provide cinematic looks to your videos in an engaging way. The available LUTs are in 5 color presets, and each one is unique. Thus, your travel videos can become more pleasing using Nordic effects.

Part 3: Wondershare Filmora: A Great Platform For Using Dark Moody LUTs
For video upgradation, editing is essential to overcome underlying visual hindrances. Meanwhile, a good video editor is necessary for this purpose. Meet Wondershare Filmora that is a creative video editing platform for content creators. Using this tool, you can use 100+ LUTs, including dark moody LUTs. You can also utilize elements, stickers, transitions, and other effects.
Add LUTs on Video For Win 7 or later(64-bit)
Add LUTs on Video For macOS 10.14 or later
Filmora is the industry-leading tool for enhancing video quality with suitable color gradients. The filters are fully creative with adjustable contrast and saturation. Meanwhile, Filmora has added 100+ LUTs in its new updates. This means there are more than 200 LUTs in Filmora. When it comes to usability, Filmora offers best-in-class tools with amazing functionalities.

Key Features Of Wondershare Filmora
Filmora is an easy-to-use platform that delivers video editing with optimized solutions. Let’s find more of its features that make it an exceptional tool:
- Audio Support: With Filmora, users can add songs, voiceovers, and music to their videos. This can make their videos more enchanting. Meanwhile, there is also an option to merge, split, crop, or customize audio speed. Using an audio visualizer is also a possibility by adjusting audio bass, treble, and frequencies.
- Color Grading: There is a color wheel by which you can set desired color palette. This way, you can transform your video into desired color contrast with necessary gradients. The color intensity could also be adjusted from 0 – 100% range. With available LUT preset filters, different color effects could be applied.
- Split Screen: The availability of a split screen function allows for playing different videos at one time. Thus, combining or comparing different videos will be easier to process. This will save you time and simplify your video editing procedure.
- Text-to-Speech: Filmora’s text-to-speech allows you to create voiceovers from text files. This will enrich your video and give useful content with more elements. The transcription process is quick and fast with more accuracy. This feature is available in up to 16 types of languages.
Conclusion
Using LUTs, you can enhance and optimize the color grading of your video. Meanwhile, if your video is horror or suspense relevant, use dark LUTs Premiere Pro free. This adds dark shades to your video with desaturated contrasts and crushed black hues. So, if you want the best dark moody LUTs free download, Filmora is the right solution. This tool provides unique and special LUTs in different categories.
Add LUTs on Video For Win 7 or later(64-bit)
Add LUTs on Video For macOS 10.14 or later
Apply LUT on Videos Apply LUT on Videos Learn More
Part 2: Best Dark Moody LUTs You Can Find
LUTs are perfect for enhancing color gradients with minimal effort. This means you don’t need to spend long hours on video editing. With dark moody LUTs, there is an option to make your video more cinematic. Let’s find some of the best dark moody LUTs to make things easier:
1. Dark Moody LUTS Fashion
Elevate your photos and videos with these cinematic dark moody LUTs filters. There are 4 LUT presets that could be utilized to blend dark contrast. Hence, you can provide muted looks to your visual content with a mystery tone. The LUTs are ideal for fashion use because of dark shadows. For social media content, these LUTs are ideal.
2. Dark and Moody Cinematic 3D LUTs
Videography and photography are incomplete without color enhancement through editing. Saving time, these dark and moody cinematic 3D LUTs pack is a perfect solution. If you want desaturated contrast with muted colors, there are 8 different LUTs to assist. Apply all the LUT preset filters easily without hassles. With 4 separate files, the LUTs will suit almost every editing tool.
3. Dark Moody Lightroom Presets
Improvise your closest visual media with dark moody Lightroom presets. You will get 20 different dark LUTs Premiere Pro free in this pack. All available LUT filter presets are unique, with different dark contrasts and tones. Thus, you can add a moody touch with desaturated color gradients. This way, your photos, and videos will enlighten with a murk appearance.
4. Film Noir LUTs and Presets Pack
Adding film-like dark cinematic looks is possible with this LUTs preset pack. The availability of 50 preset filters allows adding dark moods to your visual media. The content becomes visually appealing with crushed black hues and darker and gloomy textures. The filters are instantly applied and can be edited with desired intensity and contrast.
5. Dark & Moody Aesthetic Filters
This dark and moody LUTs filter pack has everything to beautify your photos and videos. With 5 different filter presets, transform color gradients with cool hues and less vibrant colors. This will provide dark aesthetic looks to your visual content with desaturated tone. This exceptional grading with moody filters allows upscaling colors for social media content.
6. MOODY NORDIC LUTS
The Nordic region is known for its attractive landscapes with dark weather. Adding such LUTs to your videos enhances color hues with gloomy and dark gradients. This will provide cinematic looks to your videos in an engaging way. The available LUTs are in 5 color presets, and each one is unique. Thus, your travel videos can become more pleasing using Nordic effects.
Part 3: Wondershare Filmora: A Great Platform For Using Dark Moody LUTs
For video upgradation, editing is essential to overcome underlying visual hindrances. Meanwhile, a good video editor is necessary for this purpose. Meet Wondershare Filmora that is a creative video editing platform for content creators. Using this tool, you can use 100+ LUTs, including dark moody LUTs. You can also utilize elements, stickers, transitions, and other effects.
Add LUTs on Video For Win 7 or later(64-bit)
Add LUTs on Video For macOS 10.14 or later
Filmora is the industry-leading tool for enhancing video quality with suitable color gradients. The filters are fully creative with adjustable contrast and saturation. Meanwhile, Filmora has added 100+ LUTs in its new updates. This means there are more than 200 LUTs in Filmora. When it comes to usability, Filmora offers best-in-class tools with amazing functionalities.
Key Features Of Wondershare Filmora
Filmora is an easy-to-use platform that delivers video editing with optimized solutions. Let’s find more of its features that make it an exceptional tool:
- Audio Support: With Filmora, users can add songs, voiceovers, and music to their videos. This can make their videos more enchanting. Meanwhile, there is also an option to merge, split, crop, or customize audio speed. Using an audio visualizer is also a possibility by adjusting audio bass, treble, and frequencies.
- Color Grading: There is a color wheel by which you can set desired color palette. This way, you can transform your video into desired color contrast with necessary gradients. The color intensity could also be adjusted from 0 – 100% range. With available LUT preset filters, different color effects could be applied.
- Split Screen: The availability of a split screen function allows for playing different videos at one time. Thus, combining or comparing different videos will be easier to process. This will save you time and simplify your video editing procedure.
- Text-to-Speech: Filmora’s text-to-speech allows you to create voiceovers from text files. This will enrich your video and give useful content with more elements. The transcription process is quick and fast with more accuracy. This feature is available in up to 16 types of languages.
Conclusion
Using LUTs, you can enhance and optimize the color grading of your video. Meanwhile, if your video is horror or suspense relevant, use dark LUTs Premiere Pro free. This adds dark shades to your video with desaturated contrasts and crushed black hues. So, if you want the best dark moody LUTs free download, Filmora is the right solution. This tool provides unique and special LUTs in different categories.
Add LUTs on Video For Win 7 or later(64-bit)
Add LUTs on Video For macOS 10.14 or later
FLV Editors for Windows 11/10/8.1/8/7: Easily Edit FLV Videos on PC
If you are a streamer or a content creator then you undoubtedly may have come across files having .flv format. FLV stands for “Flash Video”. It is a container file format like .mp4 and .mov. But it isn’t used quite frequently nowadays. They are mainly used for streaming videos. Because it provides compressed video while maintaining the quality and takes less space. It supports codec which is compatible with most of the devices but you may need a flash player to play these files. If you have recently started working with .flv files or need more info about it then read till the end. We have gathered all the necessary information for you in this article.
Being a content creator, you can’t just record videos and publish them directly. Sometimes it requires finishing touches or an entirely new look, for this purpose you need a good editor. And if you are working with .flv files then selecting a good editing software that supports .flv files is important. So, here we have mentioned a list of FLV video editors. You can select one depending on your needs and budget.
Best FLV Editor to Edit FlV Video on Windows and Mac:
- Wondershare – Filmora:
It is available for both Windows and Mac.
Filmora Video Editor is the most common and versatile editing software in this list that almost every content creator may have used or heard about. It has a lot of professional features used by content creators. It is one of the best video editors for .flv format, if u work with .flv files then you must get your hands on filmora.
Its UI is quite similar to premiere pro which makes it quite easy for people who are looking for premiere pro alternatives. It has hundreds of classy transitions/effects and dozens of unique and useful features but many of them are available on paid version only.
The free version also packs a punch but it is almost useless for most users as it leaves a watermark on the final product. It is good for learning video editing and once you master enough to move forward then you can purchase the pro version or you can start directly on the paid version.
For Win 7 or later (64-bit)
For macOS 10.14 or later
Features:
- Support a wide range of formats including .flv.
- Have advanced color grading options.
- Have standard Motion Tracking feature.
- Masking and Chroma key.
- Keyframing and Smooth animation. (Paid version)
- Speed ramping and Auto Synchronization. (Paid Version)
- Support industry-standard plugins (like Boris fx).
- Have a vast stock library.
Cons:
- Leaves a watermark on export. (free version)
- Have playback issues while using 4k videos.
- Lacks some standard editing features.
*Almost every software has some pros and cons. Remember these are inspected from my point of view. And it can differ from your experience.
Steps:
Import: Open filmora, a popup will appear, Select desired aspect ratio then click “New Project” to start editing or click “Open Project” to continue your old project.
On the center of the screen, you will see the import window, click it to import .flv file or any other video you want to edit.

Edit: Drag the clips on the timeline to start editing. Drag the clips from the corner to trim them. Click the top left icon of the timeline (not the whole screen) to add layers. In the toolbar above the timeline, you will find a bunch of tools, like split, crop, speed ramping, animation e.t.c. Click the red scissors icon on the pointer to split the clip at the desired timestamp.

Effects: Click the “edit” icon, then you will see a bunch of icons appear on the top left corner of the screen, These are as follow.
Select the “Video” icon to transform the clip or to do motion tracking, stabilization, chroma-key, Masking, e.t.c. To do Motion tracking, on the playback screen, lock the box on the item you want to track then click “Start Tracking”.
Select the “Audio” icon to apply effects and enhance your audio.
Select the “Color” icon to do fine-tuning and color grading, Select the “3D LUT” option to import a new customized lut. You can find a number of cool luts online.
Select the “Animation” icon to add preset animations or make custom animations by using keyframes.
Select the “Speed” icon to adjust the speed of the clip or to do speed ramping.
Click the “OK” button below to go back to previous tabs.
From there you can add Audio, Titles, Transitions, Effects, Elements, and Stock Media. Simply drag and drop the effects and transition on the clip to apply it. And to use titles and stock media, click and drag them on the timeline to use them.
Export: Click the blue “Export” button. Then choose Desired format and Resolution to export your final product.
More Free FLV Editor for Windows to Edit FLV Videos:
If you are looking for a .flv video editor to perform some editing tasks without spending any money then read till the end because here we have mentioned some free FLV editors for you.
- VSDC video editors :
It is available only on Windows.
Despite being free software, it is packed with lots of features. It is a good choice for non-professionals and it can even run on low-end PCs. It supports a wide range of video/audio formats including .flv file. It has dozens of cool effects and tools that can give your videos a new look. It is a non-linear program that makes using layers much easier means you can add layers at any specific time frame and can add layers into layers for complex editing. It also supports 360 and 3D video which can easily be converted into 2D. It has a number of video and audio effects. It is an old yet powerful software which can even run in 19s Pc. Its features are mentioned below.
Features:
- Free Software with no watermark.
- Can support 4K footages on the latest versions.
- Can import/export a wide range of formats.
- Have built-in video and screen capture feature.
- Has a Non-linear interface that supports multi-layer editing.
- Have professional features like chroma key and masking.
- Can convert layers into a sprite (Grouped Sequence) for handling multiple layers easily.
Cons:
- Being a free software it has some limitations too.
- It’s hard to learn for beginners.
- It still lacks features for a professional creator.
- Doesn’t support Hardware acceleration.
Steps:
Import: Open VSDC video editor, from the “Start Project Now” tab click “Blank Project” to start a new project or click “Import Content” to browse video or image files. Then select “Project settings”.

Edit: You can add more files by clicking the “Add Object” button on the top left corner. Then drag the file from Object explorer to anywhere on the timeline even on layers. On top of the “Editor Tab”, you can find the necessary tools to split, crop, and rotate the video. Click “Spacebar” to play/pause the timeline.

Effects: Click a video on the timeline then select the Effect buttons on top of the “Editor” tab to apply effects to your clip. Then Click the effect on “Object Explorer” to open its properties menu. On the left side of the player, you will find buttons to add text, shapes, e.t.c to the project. On the right side of the screen, you will find the “Basic effects window” where you can do color correction and grading.
Select Multiple Clips then right-click the mouse button and then the “Convert to sprite” button to make a grouped clip (clips within a clip).
Export: Click the “Export Project” button on the top of the screen. Then choose “Media device”, “output video format” and select output destination and quality setup then click “Export Project” to export the video. If you are using the free version of the software, a popup will appear saying “export without premium features”, just click Continue. Now your file is ready to be viewed.

- Shotcut:
It is available on Windows, Mac, and Linux.
It is a free and open-source video editor which is simple and easy to use, which makes it ideal for beginners. It doesn’t have any pro version. It is an ideal software to deal with .flv files as it supports a large number of import/export formats. However, it takes some time to understand its UI. After that, it is quite easy to use. It has cool effects and transitions. It has a clean and simple timeline which is not versatile for professionals although it has some complex options to customize your timeline. It has some refined color grading options. Being a free software it has some 360 effects and 3D text which makes it comparatively good as compared to some other free softwares. It can support 4K videos also but lags or crashes sometimes when using 4K clips. All the effects and tools are combined in one tab “Filter” which is a plus point for some users. It also has some good quality audio effects. Some of its features are mentioned below.
Features:
- It is completely free software with no watermark.
- It has one of the largest file format compatibility.
- It can support 4K video resolution.
- It has 3 wheel grading tool and some other color filters.
- It has standard animation and keyframing features.
- It has some effects to support 360 videos.
Cons:
- It isn’t suitable for professionals as it lacks some useful features.
- Have issues with playback of 4K videos and sometimes crashes.
- Doesn’t have a separate text column and lacks some basic text and title effects.
- Its UI is different from other common video editors and is a bit hard to understand.
Steps:
Import: Click the “Open file” icon on the top left corner of the window to import files.

Edit: Drag and drop clips on an empty timeline panel to add tracks. Right-click on the left side of the timeline to add a video or an audio track. To trim from ends, drag the clip from corners to trim. Click the Scissors icon on the top timeline to split the clip in between.
Click the “Properties” tab above the timeline panel to change the aspect ratio and playback speed of the clip.

Effects: Click the “Filters” tab above the timeline panel to open the filter menu, Click “+” above it to add filters. Double click a filter to add it to the selected clip, then click the filter to change its properties.
Click the “Keyframes” icon on top of the window to open the Keyframes window. Then click the “Timeline” icon to go back to the previous window.
Export: Click the “Export” button on the top of the screen. Select a preset or click the “Advanced” button to change export settings then click “Export File”.

- OpenShot:
It is available on Windows, Mac, and Linux.
OpenShot is another choice for you if you are looking for a free FLV editor. It is simple and easy to use. Its User Interface is clean and beginner-friendly. It has hundreds of transitions and effects. It has an animated titles option also, which is powered by Blender.
Features:
- Is simple and easy to use.
- Its UI is Beginner friendly.
- Can support 4K videos.
- Support a wide range of formats.
- Have smooth keyframe animation.
- Is free and has no watermark.
Cons:
- Video Playback is a bit laggy.
- Animated titles are only supported when you have Blender (3d software) installed on your PC.
- Doesn’t have enough tools for professionals.
Steps:
Import: Start “OpenShot” then drag and drop files in the project files tab from your file system (or press CTRL + F). Drag and drop files to add them to the timeline.
Edit: To trim from ends, drag the clip from corners to trim. There are some basic tools above the tracks in the timeline window. Click “+” to add a new track. Click the scissors icon to split the clip at the desired length. Click the magnet icon to on snapping mode. Click the green marker icon to add markers at desired points during editing.

Effects: Above the timeline window you will see a bar containing 4 buttons: Project Files, Transitions, Effects, and Emojis. Drag these elements to add them to the timeline. Effects appear as a small icon on the clip. Right-click the icon then select “Remove Effect” to remove it.

Right-click the clip to access more features like keyframe animation, playback speed, e.t.c.
Export: Click the red dot button on the top of the screen to export your video (or press CTRL + E). Select the desired Profile, Format, Quality, and Destination folder then click “Export Video” to export your file.

More Paid FLV Editor for Windows to Edit FLV Videos:
If you are looking for a good flv editor and you are ready to spend some cash on it then we have selected some paid softwares worthy of your investment.
- Power director 365 (import only):
It is available on both, Windows and Mac.
If you are looking for software to do more than just trimming and cropping the video then Cyberlink Power Director can be the right choice for you. It is packed with dozens of features that professional content creators look for. It has some professional-level plugins also. It is suitable for both beginners and advanced users.
It allows users to import .flv file and edit it like usual but you can’t export it in the same format as it exports videos in few formats only. FLV file is then converted into any of the other supported formats.
Pricing:
Its annual subscription is 69$ which is available at 30% off at 48.99$/year. This offer is valid till 4th May 2022.
Features:
- Can support 4K videos and can import a wide range of file formats.
- Have Auto Chapter and Subtitle settings.
- Multi-cam editing.
- Have hundreds of transitions, effects, and access to thousands of stock footage.
- Can Group clips for easy editing.
- Can import presets and color LUTS.
Cons:
- It lags sometimes, this issue can be resolved to an extent if you have a powerful PC.
- Some features are complicated to use.
- Export settings have fewer file formats as compared to the import file range.
Steps:
Import: Open Power Director then select the aspect ratio and click “Full Mode” to start the program. Import media files to the media room. Click the “Import Media” icon below the files tab to add more clips.

Edit: Drag and drop files to add them to the timeline. Drop files above or below to add them in layers. Click the icon on the top left corner of the timeline to add a new layer. You can find basic editing tools above the timeline.

Effects: All the effects and overlay elements are situated at the top left corner of the screen in a vertical bar. Here you will find the Project library, titles, effects, transitions, overlays, e.t.c. Simply just drag and drop on the timeline to use them. Here you can also do audio mixing and add subtitles and chapters.
Double click a clip or an overlay element to open the designer window. Here you can customize the clips and overlays to enhance your project.

Export: Click the “Produce” button on top of the screen then select the desired mode and file format and add a destination then click “Start”.
- AVS video editor:
If you are looking for a good .flv video editor and are ready to spend some bucks then the AVS video editor is a good choice for you. It is a low-budget software that is simple and easy to use and has some great features. It was my first video editor which I used about 5-6 years ago when I started making videos. It is simple and easy to use. It has some fine features that can fulfill your basic video editing tasks. Has a unique animation trajectory feature, where you can create paths for overlays.
Pricing:
It has two different plans, the first is an annual one which is at 69$ per year and the second one is a lifetime offer for 199$. In a lifetime plan, you can own the software forever. Right now, the software is at a 70% discount(till 30th April 2022) which decreases the price of the annual subscription to 39$ and the purchase price is 59$ this offer makes the software valuable enough to invest in.
Features:
- Its UI is beginner-friendly and easy to learn.
- Can Support 4K videos.
- Has cool features like video stabilization and a chroma key.
- Has 300+ effects, transitions, and overlays.
- Has a storyboard-type editing style also, which is a great feature for some users.
- Has keyframing and animation trajectory option for overlays.
Cons:
- Lacks some commonly used features.
- It is a decade-old software and needs some new updates to compete with other editing softwares.
- It isn’t suitable for professionals as you can’t do many customizations.
- It has only one layer for every element like text, effects, overlays, e.t.c.
- If hard disk crashes you have to purchase the license again.
Steps:
Import: Click “Import Media Files” to import clips or click “Open Existing Project” to load previously saved projects. Drag and drop files to add them to the timeline.
Edit: To trim from ends, drag the clip from corners to trim. On top of the timeline, you will find a few basic tools like change speed, apply transitions, do color correction, or do video stabilization.

Effects: Click the “Transition” button above the timeline to apply transitions. Drag and drop transitions between two clips to apply it. Right-click on the transition to change its duration.
Click the “Video Effects” button on top of the timeline, then drag and drop the desired effect on the effects layer and trim it according to your need.
Similarly from the “Text” tab Drag and drop the desired text to the text layer in the timeline. Then select “Edit text” to change the text.

Export: Click the “Produce” button on top of the timeline to open the export window. Select the desired file format and quality then click “next” and then click the “Create” button to export your file.

Veed.io: (Online):
If you want to edit FLV videos quickly and don’t want to install any software then Veed.io can be a good choice for you. It is an online FLV video editor that can run on any browser and is compatible with Windows, Mac, Linux, and even mobile phones. It is a quick and simple method to fulfill your basic video editing needs. It has some amazing and uniques features as compared to other basic video editors. It is a great platform to edit videos anywhere. You can start editing video on your PC and can continue it on your phone if you have to leave your workplace. But these features come at a price as its basic plan has the majority of the features but it leaves a watermark on the final video.
Pricing:
It has 3 different plans depending on your needs. The first one is the “Free Plan” which is almost useless for most users as it creates a watermark. The second one is the “Basic Plan” at 18$/month. While third is the “Pro Plan” at 30$/month which has some more features than the basic plan. You can purchase an annual plan to save up to 33%.

Features:
- It is an online platform that makes it easily accessible from any device.
- It is multi user friendly and is a good choice for team projects.
- It has a simple and clean interface which is ideal for beginners.
- It has an Auto subtitle generator + subtitle translator and editor.
- It has audio to text and video to text features that aren’t found in many other editors.
- It is compatible with many video and audio formats.
Cons:
- It is quite slow as compared to other video editing software.
- Downloading 4K videos is only available in Pro Plan.
- It is an online platform, so its data can be breached or leaked, so avoid editing your personal videos on this platform. It can rarely happen but precaution is better than cure.
Steps:
Import: Click choose FLV File on the home screen then a popup will appear, click “Browse” to upload a file or use a template.

Edit: To trim from ends, drag the clip from corners to trim. Click the “Split” button above the timeline to split the clip in between.

Effects: All the effects tabs like Text, Elements, Transitions lie on the left side of the screen (on windows). Click an element and it will be added to the timeline, then adjust the settings according to your will.
Export: Click the “Export” button on the top right side of the screen. Select a preset or change export settings then click “Export Video”. Soon you will get your final product.
Which Should I choose Free or Paid FLV Editor :
Are you confused to choose the FLV editor for you? Then look for the one that suits your other needs. Like if you want an editor only to crop or trim videos then save your money and go for a free video editor. But if you want some extra features to enhance your workflow or have some cash then go for paid software. For professionals, Power Director 365 or Filmora pro can be a good choice to invest your money in.
~ Some FAQs about FLV Videos:
why is .flv format used?
FLV is basically used to publish or distribute videos on the Internet. Many social platforms and web pages (such as youtube, Hulu, e.t.c.) use .flv files as it provide high-quality synchronized audio and video in compact file size. It was mostly used for embedded videos on these platforms. It is compatible with most browsers and devices even with older phones and computers.
How to play .FLV files?
To play .flv files a flash player is required. Which is pre-installed in almost most of the computers and browsers, if that’s not the case. Then you need a good video player which supports .flv format. Therefore VLC media prayer is a good choice. It is quite easy to use and has some useful features like Speed, Adding subtitles, Audio sync, e.t.c.
Is .flv file easy to edit?
FLV is just a format, It can be edited like any other format. Steps may differ from software to software. But don’t worry as I have mentioned the steps of some popular FLV video editors above.
Can the .flv file be converted?
If you don’t want to stick with the .flv format for long enough and want to switch over to a more convenient format then you can try these converters.
VLC Media Player: Yes, apart from being a video player it can convert video formats. It’s quite easy to use.
Simply Open VLC Media Player >> Click Media tab >> Click “Convert/Save” >> On pop up menu Select “Add” to add file (can add multiple files also) >> Click “Convert/Save” >> Add Destination folder and File Format (to convert in) then click “Start”.
Hand Brake: It is another popular video converter that can convert a .flv file into almost any file format.
Open HandBrake-“Drop a file” screen will appear >> Select the specific file you one to convert >> Select Destination filder >> Click “Start encoding”.
Flv vs Mp4 which is better?
FLV format was quite popular back in 2010 as it provides high-quality compressed video for the internet. It takes less space which makes it easy to download and transfer quickly. Nowadays MP4 format is used more as it is versatile and is compatible with almost all devices like Mobile, PC, TV, e.t.c. FLV uses H.263 codec while MP4 uses codec which provides better quality after compression. Still .flv file is a better choice for streaming platforms as one of the most common software used for streaming is OBS studio and it produces .flv files.
It is available for both Windows and Mac.
Filmora Video Editor is the most common and versatile editing software in this list that almost every content creator may have used or heard about. It has a lot of professional features used by content creators. It is one of the best video editors for .flv format, if u work with .flv files then you must get your hands on filmora.
Its UI is quite similar to premiere pro which makes it quite easy for people who are looking for premiere pro alternatives. It has hundreds of classy transitions/effects and dozens of unique and useful features but many of them are available on paid version only.
The free version also packs a punch but it is almost useless for most users as it leaves a watermark on the final product. It is good for learning video editing and once you master enough to move forward then you can purchase the pro version or you can start directly on the paid version.
For Win 7 or later (64-bit)
For macOS 10.14 or later
Features:
- Support a wide range of formats including .flv.
- Have advanced color grading options.
- Have standard Motion Tracking feature.
- Masking and Chroma key.
- Keyframing and Smooth animation. (Paid version)
- Speed ramping and Auto Synchronization. (Paid Version)
- Support industry-standard plugins (like Boris fx).
- Have a vast stock library.
Cons:
- Leaves a watermark on export. (free version)
- Have playback issues while using 4k videos.
- Lacks some standard editing features.
*Almost every software has some pros and cons. Remember these are inspected from my point of view. And it can differ from your experience.
Steps:
Import: Open filmora, a popup will appear, Select desired aspect ratio then click “New Project” to start editing or click “Open Project” to continue your old project.
On the center of the screen, you will see the import window, click it to import .flv file or any other video you want to edit.
Edit: Drag the clips on the timeline to start editing. Drag the clips from the corner to trim them. Click the top left icon of the timeline (not the whole screen) to add layers. In the toolbar above the timeline, you will find a bunch of tools, like split, crop, speed ramping, animation e.t.c. Click the red scissors icon on the pointer to split the clip at the desired timestamp.
Effects: Click the “edit” icon, then you will see a bunch of icons appear on the top left corner of the screen, These are as follow.
Select the “Video” icon to transform the clip or to do motion tracking, stabilization, chroma-key, Masking, e.t.c. To do Motion tracking, on the playback screen, lock the box on the item you want to track then click “Start Tracking”.
Select the “Audio” icon to apply effects and enhance your audio.
Select the “Color” icon to do fine-tuning and color grading, Select the “3D LUT” option to import a new customized lut. You can find a number of cool luts online.
Select the “Animation” icon to add preset animations or make custom animations by using keyframes.
Select the “Speed” icon to adjust the speed of the clip or to do speed ramping.
Click the “OK” button below to go back to previous tabs.
From there you can add Audio, Titles, Transitions, Effects, Elements, and Stock Media. Simply drag and drop the effects and transition on the clip to apply it. And to use titles and stock media, click and drag them on the timeline to use them.
Export: Click the blue “Export” button. Then choose Desired format and Resolution to export your final product.
More Free FLV Editor for Windows to Edit FLV Videos:
If you are looking for a .flv video editor to perform some editing tasks without spending any money then read till the end because here we have mentioned some free FLV editors for you.
- VSDC video editors :
It is available only on Windows.
Despite being free software, it is packed with lots of features. It is a good choice for non-professionals and it can even run on low-end PCs. It supports a wide range of video/audio formats including .flv file. It has dozens of cool effects and tools that can give your videos a new look. It is a non-linear program that makes using layers much easier means you can add layers at any specific time frame and can add layers into layers for complex editing. It also supports 360 and 3D video which can easily be converted into 2D. It has a number of video and audio effects. It is an old yet powerful software which can even run in 19s Pc. Its features are mentioned below.
Features:
- Free Software with no watermark.
- Can support 4K footages on the latest versions.
- Can import/export a wide range of formats.
- Have built-in video and screen capture feature.
- Has a Non-linear interface that supports multi-layer editing.
- Have professional features like chroma key and masking.
- Can convert layers into a sprite (Grouped Sequence) for handling multiple layers easily.
Cons:
- Being a free software it has some limitations too.
- It’s hard to learn for beginners.
- It still lacks features for a professional creator.
- Doesn’t support Hardware acceleration.
Steps:
Import: Open VSDC video editor, from the “Start Project Now” tab click “Blank Project” to start a new project or click “Import Content” to browse video or image files. Then select “Project settings”.
Edit: You can add more files by clicking the “Add Object” button on the top left corner. Then drag the file from Object explorer to anywhere on the timeline even on layers. On top of the “Editor Tab”, you can find the necessary tools to split, crop, and rotate the video. Click “Spacebar” to play/pause the timeline.
Effects: Click a video on the timeline then select the Effect buttons on top of the “Editor” tab to apply effects to your clip. Then Click the effect on “Object Explorer” to open its properties menu. On the left side of the player, you will find buttons to add text, shapes, e.t.c to the project. On the right side of the screen, you will find the “Basic effects window” where you can do color correction and grading.
Select Multiple Clips then right-click the mouse button and then the “Convert to sprite” button to make a grouped clip (clips within a clip).
Export: Click the “Export Project” button on the top of the screen. Then choose “Media device”, “output video format” and select output destination and quality setup then click “Export Project” to export the video. If you are using the free version of the software, a popup will appear saying “export without premium features”, just click Continue. Now your file is ready to be viewed.
- Shotcut:
It is available on Windows, Mac, and Linux.
It is a free and open-source video editor which is simple and easy to use, which makes it ideal for beginners. It doesn’t have any pro version. It is an ideal software to deal with .flv files as it supports a large number of import/export formats. However, it takes some time to understand its UI. After that, it is quite easy to use. It has cool effects and transitions. It has a clean and simple timeline which is not versatile for professionals although it has some complex options to customize your timeline. It has some refined color grading options. Being a free software it has some 360 effects and 3D text which makes it comparatively good as compared to some other free softwares. It can support 4K videos also but lags or crashes sometimes when using 4K clips. All the effects and tools are combined in one tab “Filter” which is a plus point for some users. It also has some good quality audio effects. Some of its features are mentioned below.
Features:
- It is completely free software with no watermark.
- It has one of the largest file format compatibility.
- It can support 4K video resolution.
- It has 3 wheel grading tool and some other color filters.
- It has standard animation and keyframing features.
- It has some effects to support 360 videos.
Cons:
- It isn’t suitable for professionals as it lacks some useful features.
- Have issues with playback of 4K videos and sometimes crashes.
- Doesn’t have a separate text column and lacks some basic text and title effects.
- Its UI is different from other common video editors and is a bit hard to understand.
Steps:
Import: Click the “Open file” icon on the top left corner of the window to import files.
Edit: Drag and drop clips on an empty timeline panel to add tracks. Right-click on the left side of the timeline to add a video or an audio track. To trim from ends, drag the clip from corners to trim. Click the Scissors icon on the top timeline to split the clip in between.
Click the “Properties” tab above the timeline panel to change the aspect ratio and playback speed of the clip.
Effects: Click the “Filters” tab above the timeline panel to open the filter menu, Click “+” above it to add filters. Double click a filter to add it to the selected clip, then click the filter to change its properties.
Click the “Keyframes” icon on top of the window to open the Keyframes window. Then click the “Timeline” icon to go back to the previous window.
Export: Click the “Export” button on the top of the screen. Select a preset or click the “Advanced” button to change export settings then click “Export File”.
- OpenShot:
It is available on Windows, Mac, and Linux.
OpenShot is another choice for you if you are looking for a free FLV editor. It is simple and easy to use. Its User Interface is clean and beginner-friendly. It has hundreds of transitions and effects. It has an animated titles option also, which is powered by Blender.
Features:
- Is simple and easy to use.
- Its UI is Beginner friendly.
- Can support 4K videos.
- Support a wide range of formats.
- Have smooth keyframe animation.
- Is free and has no watermark.
Cons:
- Video Playback is a bit laggy.
- Animated titles are only supported when you have Blender (3d software) installed on your PC.
- Doesn’t have enough tools for professionals.
Steps:
Import: Start “OpenShot” then drag and drop files in the project files tab from your file system (or press CTRL + F). Drag and drop files to add them to the timeline.
Edit: To trim from ends, drag the clip from corners to trim. There are some basic tools above the tracks in the timeline window. Click “+” to add a new track. Click the scissors icon to split the clip at the desired length. Click the magnet icon to on snapping mode. Click the green marker icon to add markers at desired points during editing.
Effects: Above the timeline window you will see a bar containing 4 buttons: Project Files, Transitions, Effects, and Emojis. Drag these elements to add them to the timeline. Effects appear as a small icon on the clip. Right-click the icon then select “Remove Effect” to remove it.
Right-click the clip to access more features like keyframe animation, playback speed, e.t.c.
Export: Click the red dot button on the top of the screen to export your video (or press CTRL + E). Select the desired Profile, Format, Quality, and Destination folder then click “Export Video” to export your file.
More Paid FLV Editor for Windows to Edit FLV Videos:
If you are looking for a good flv editor and you are ready to spend some cash on it then we have selected some paid softwares worthy of your investment.
- Power director 365 (import only):
It is available on both, Windows and Mac.
If you are looking for software to do more than just trimming and cropping the video then Cyberlink Power Director can be the right choice for you. It is packed with dozens of features that professional content creators look for. It has some professional-level plugins also. It is suitable for both beginners and advanced users.
It allows users to import .flv file and edit it like usual but you can’t export it in the same format as it exports videos in few formats only. FLV file is then converted into any of the other supported formats.
Pricing:
Its annual subscription is 69$ which is available at 30% off at 48.99$/year. This offer is valid till 4th May 2022.
Features:
- Can support 4K videos and can import a wide range of file formats.
- Have Auto Chapter and Subtitle settings.
- Multi-cam editing.
- Have hundreds of transitions, effects, and access to thousands of stock footage.
- Can Group clips for easy editing.
- Can import presets and color LUTS.
Cons:
- It lags sometimes, this issue can be resolved to an extent if you have a powerful PC.
- Some features are complicated to use.
- Export settings have fewer file formats as compared to the import file range.
Steps:
Import: Open Power Director then select the aspect ratio and click “Full Mode” to start the program. Import media files to the media room. Click the “Import Media” icon below the files tab to add more clips.
Edit: Drag and drop files to add them to the timeline. Drop files above or below to add them in layers. Click the icon on the top left corner of the timeline to add a new layer. You can find basic editing tools above the timeline.
Effects: All the effects and overlay elements are situated at the top left corner of the screen in a vertical bar. Here you will find the Project library, titles, effects, transitions, overlays, e.t.c. Simply just drag and drop on the timeline to use them. Here you can also do audio mixing and add subtitles and chapters.
Double click a clip or an overlay element to open the designer window. Here you can customize the clips and overlays to enhance your project.
Export: Click the “Produce” button on top of the screen then select the desired mode and file format and add a destination then click “Start”.
- AVS video editor:
If you are looking for a good .flv video editor and are ready to spend some bucks then the AVS video editor is a good choice for you. It is a low-budget software that is simple and easy to use and has some great features. It was my first video editor which I used about 5-6 years ago when I started making videos. It is simple and easy to use. It has some fine features that can fulfill your basic video editing tasks. Has a unique animation trajectory feature, where you can create paths for overlays.
Pricing:
It has two different plans, the first is an annual one which is at 69$ per year and the second one is a lifetime offer for 199$. In a lifetime plan, you can own the software forever. Right now, the software is at a 70% discount(till 30th April 2022) which decreases the price of the annual subscription to 39$ and the purchase price is 59$ this offer makes the software valuable enough to invest in.
Features:
- Its UI is beginner-friendly and easy to learn.
- Can Support 4K videos.
- Has cool features like video stabilization and a chroma key.
- Has 300+ effects, transitions, and overlays.
- Has a storyboard-type editing style also, which is a great feature for some users.
- Has keyframing and animation trajectory option for overlays.
Cons:
- Lacks some commonly used features.
- It is a decade-old software and needs some new updates to compete with other editing softwares.
- It isn’t suitable for professionals as you can’t do many customizations.
- It has only one layer for every element like text, effects, overlays, e.t.c.
- If hard disk crashes you have to purchase the license again.
Steps:
Import: Click “Import Media Files” to import clips or click “Open Existing Project” to load previously saved projects. Drag and drop files to add them to the timeline.
Edit: To trim from ends, drag the clip from corners to trim. On top of the timeline, you will find a few basic tools like change speed, apply transitions, do color correction, or do video stabilization.
Effects: Click the “Transition” button above the timeline to apply transitions. Drag and drop transitions between two clips to apply it. Right-click on the transition to change its duration.
Click the “Video Effects” button on top of the timeline, then drag and drop the desired effect on the effects layer and trim it according to your need.
Similarly from the “Text” tab Drag and drop the desired text to the text layer in the timeline. Then select “Edit text” to change the text.
Export: Click the “Produce” button on top of the timeline to open the export window. Select the desired file format and quality then click “next” and then click the “Create” button to export your file.
Veed.io: (Online):
If you want to edit FLV videos quickly and don’t want to install any software then Veed.io can be a good choice for you. It is an online FLV video editor that can run on any browser and is compatible with Windows, Mac, Linux, and even mobile phones. It is a quick and simple method to fulfill your basic video editing needs. It has some amazing and uniques features as compared to other basic video editors. It is a great platform to edit videos anywhere. You can start editing video on your PC and can continue it on your phone if you have to leave your workplace. But these features come at a price as its basic plan has the majority of the features but it leaves a watermark on the final video.
Pricing:
It has 3 different plans depending on your needs. The first one is the “Free Plan” which is almost useless for most users as it creates a watermark. The second one is the “Basic Plan” at 18$/month. While third is the “Pro Plan” at 30$/month which has some more features than the basic plan. You can purchase an annual plan to save up to 33%.
Features:
- It is an online platform that makes it easily accessible from any device.
- It is multi user friendly and is a good choice for team projects.
- It has a simple and clean interface which is ideal for beginners.
- It has an Auto subtitle generator + subtitle translator and editor.
- It has audio to text and video to text features that aren’t found in many other editors.
- It is compatible with many video and audio formats.
Cons:
- It is quite slow as compared to other video editing software.
- Downloading 4K videos is only available in Pro Plan.
- It is an online platform, so its data can be breached or leaked, so avoid editing your personal videos on this platform. It can rarely happen but precaution is better than cure.
Steps:
Import: Click choose FLV File on the home screen then a popup will appear, click “Browse” to upload a file or use a template.
Edit: To trim from ends, drag the clip from corners to trim. Click the “Split” button above the timeline to split the clip in between.
Effects: All the effects tabs like Text, Elements, Transitions lie on the left side of the screen (on windows). Click an element and it will be added to the timeline, then adjust the settings according to your will.
Export: Click the “Export” button on the top right side of the screen. Select a preset or change export settings then click “Export Video”. Soon you will get your final product.
Which Should I choose Free or Paid FLV Editor :
Are you confused to choose the FLV editor for you? Then look for the one that suits your other needs. Like if you want an editor only to crop or trim videos then save your money and go for a free video editor. But if you want some extra features to enhance your workflow or have some cash then go for paid software. For professionals, Power Director 365 or Filmora pro can be a good choice to invest your money in.
~ Some FAQs about FLV Videos:
why is .flv format used?
FLV is basically used to publish or distribute videos on the Internet. Many social platforms and web pages (such as youtube, Hulu, e.t.c.) use .flv files as it provide high-quality synchronized audio and video in compact file size. It was mostly used for embedded videos on these platforms. It is compatible with most browsers and devices even with older phones and computers.
How to play .FLV files?
To play .flv files a flash player is required. Which is pre-installed in almost most of the computers and browsers, if that’s not the case. Then you need a good video player which supports .flv format. Therefore VLC media prayer is a good choice. It is quite easy to use and has some useful features like Speed, Adding subtitles, Audio sync, e.t.c.
Is .flv file easy to edit?
FLV is just a format, It can be edited like any other format. Steps may differ from software to software. But don’t worry as I have mentioned the steps of some popular FLV video editors above.
Can the .flv file be converted?
If you don’t want to stick with the .flv format for long enough and want to switch over to a more convenient format then you can try these converters.
VLC Media Player: Yes, apart from being a video player it can convert video formats. It’s quite easy to use.
Simply Open VLC Media Player >> Click Media tab >> Click “Convert/Save” >> On pop up menu Select “Add” to add file (can add multiple files also) >> Click “Convert/Save” >> Add Destination folder and File Format (to convert in) then click “Start”.
Hand Brake: It is another popular video converter that can convert a .flv file into almost any file format.
Open HandBrake-“Drop a file” screen will appear >> Select the specific file you one to convert >> Select Destination filder >> Click “Start encoding”.
Flv vs Mp4 which is better?
FLV format was quite popular back in 2010 as it provides high-quality compressed video for the internet. It takes less space which makes it easy to download and transfer quickly. Nowadays MP4 format is used more as it is versatile and is compatible with almost all devices like Mobile, PC, TV, e.t.c. FLV uses H.263 codec while MP4 uses codec which provides better quality after compression. Still .flv file is a better choice for streaming platforms as one of the most common software used for streaming is OBS studio and it produces .flv files.
Also read:
- In 2024, How to Color Grade Your Picture in LightRoom
- New 2024 Approved Focusing On The Best Ways To Convert Slow-Motion Video to Normal
- Updated 2024 Approved Top Applications That Can Help Apply The Best VHS Camera Effect
- New An Ultimate Guide to Edit a Music Video Aspect Ratio and First Cut
- In 2024, How To Create A YouTube Intro
- Want to Find some Creative, Entertaining Ways to Preserve Precious Memories& Pass Them On-To Upcoming Generations? Well, Surely You Can Do It
- Make A Tattoo Disappear Like A Magic for 2024
- Updated Best iPhone LUTs App to Use for 2024
- Updated Top 5 Tips to Freeze-Frame in After Effects for 2024
- Create Motion Effect with Path Blur In Photoshop for 2024
- Updated Best 8 Educational Video Websites for Teachers for 2024
- In 2024, 2 Methods to Crop a Video in VLC
- Free LUTs for OBS How to Use Them for 2024
- Updated 2024 Approved Add Text Animation to A Video Online
- New Learn About Splice Video Online and Its Advantages. Also, Check Out the Best Online Apps for Splice Editing
- Updated Create Motion Effect with Path Blur In Photoshop
- Updated 2024 Approved A Guide To Adopting Lumetri Color Presets in Effective Color Grading
- 2024 Approved Do You Want to Know All About Video Frame Rates and Speed? Wondershare Filmora Will Help You to Get More Information on This Matter
- Confused About Which GoPro Should You Use? This Article Introduces and Provides a Detailed Overview of the Best GoPro for YouTubers You Can Find in the Market for Vlogging
- New 12 Impressive AI Video Ideas for Creating Engaging Video Content for 2024
- Updated 2024 Approved Guide of 8 Photo Collage Apps for PC
- How to Create The Best Video Collages for 2024
- New Discover the Best Game Recording Software for Your PC in This Developing Industry. Record Your Gameplay in Real Time and Enjoy the Benefits that Come with It
- 2024 Approved Different Ways to Crop TikTok Video in High-Quality
- 2024 Approved Step-by-Step Guide | How to Edit A Time Lapse Video on iPhone
- New Things You Need to Know About Transparent PNG Remove and Convert for 2024
- Updated How to Create a Dynamic Text Animation in Filmora — Step-By-Step for 2024
- Updated Discover the Various Techniques of Video Framing, Which Involve Capturing the Essence of a Subject While Eliminating Distractions in the Background, Andlearn How to Apply Them Skillfully to Achieve Desired Results
- New TikTok Velocity Dance Tutorial| Filmora
- Updated 3 Actionable Ways to Create Countdown Animation for Videos for 2024
- Top 16 Motion Blur Apps for Videos & Photos for 2024
- Updated Looking for Simple Steps to Customize the Speed of Your Video in DaVinci Resolve? Find Out How You Can Do that and Discover an Easier Alternative to DaVinci Resolve
- Updated In 2024, The Most Complete Guide to Make Fortnite Montage
- In 2024, Do You Know How You Can Trim or Merge Using Wondershare Filmora? Trimming and Merging Using This Tool Is an Easy Task; Learn How
- Do You Want to Remove Unnecessary Sound From Your Video? We Are Providing You the List of the Best Software to Remove Audio From Video for Mac and Apple for 2024
- In 2024, Learn How To Lock Stolen Your iPhone 7 Plus Properly | Dr.fone
- How To Leave a Life360 Group On Realme C55 Without Anyone Knowing? | Dr.fone
- Oppo A1 5G Stuck on Screen – Finding Solutions For Stuck on Boot | Dr.fone
- Change Location on Yik Yak For your Xiaomi Redmi 13C to Enjoy More Fun | Dr.fone
- 3 Facts You Need to Know about Screen Mirroring Lenovo ThinkPhone | Dr.fone
- In 2024, Is Fake GPS Location Spoofer a Good Choice On Lava Blaze Curve 5G? | Dr.fone
- In 2024, Mastering Lock Screen Settings How to Enable and Disable on Vivo T2x 5G
- How to Unlock iPhone 13 Pro Max Passcode Screen? | Dr.fone
- In 2024, Easy Guide How To Bypass Motorola Moto G84 5G FRP Android 10/11/12/13
- Guide How To Unbrick a Bricked Lava Blaze Curve 5G Phone | Dr.fone
- How To Bypass Xiaomi Redmi Note 12 Pro 5G FRP In 3 Different Ways
- In 2024, Ways To Find Unlocking Codes For Oppo F25 Pro 5G Phones
- Solutions to restore deleted files from Zero 30 5G
- In 2024, How to Bypass Android Lock Screen Using Emergency Call On Realme 12 5G?
- 6 Fixes to Unfortunately WhatsApp has stopped Error Popups On Xiaomi 13 Ultra | Dr.fone
- Updated 2024 Approved Google Translate Video A Complete Guide To Translate Video With Google
- How to Detect and Remove Spyware on OnePlus Nord CE 3 5G? | Dr.fone
- A Step-by-Step Guide on Using ADB and Fastboot to Remove FRP Lock on your Motorola
- How To Repair iOS System Issues of iPhone 11? | Dr.fone
- Repair damaged, unplayable video files of Oppo F23 5G on Windows
- How to Reset Xiaomi Redmi Note 12T Pro Without the Home Button | Dr.fone
- Title: How to Use Visual Effect for Zoom for 2024
- Author: Chloe
- Created at : 2024-04-24 07:08:13
- Updated at : 2024-04-25 07:08:13
- Link: https://ai-editing-video.techidaily.com/how-to-use-visual-effect-for-zoom-for-2024/
- License: This work is licensed under CC BY-NC-SA 4.0.
