
:max_bytes(150000):strip_icc():format(webp)/preaknessstakes-5c804f1b46e0fb00019b8ee0.jpg)
How to Zoom Webcam on PC for 2024
How to Zoom Webcam on PC
Making certain our digital presence is the best it can be pays dividends as more and more of what we do online; similar is the case with how to zoom out webcam windows 10. The majority of experts advise against using the built-in camera that comes with your laptop or computer and instead advocate getting a webcam or an HD camera. These, however, may be hard to come by and pricy if you locate a nice one. If the built-in camera on your laptop doesn’t perform effectively during Zoom meetings, you may want to consider about investing in a separate, better webcam. Webcams offer automatic settings that are intended to function with the largest variety of lighting situations possible. This suggests that they average out a great number of responses to the content of the frame. Because of this, we have incorporated basic PC webcam zooming settings. These answers may be found in the portions that follow.
It’s vital to know how to zoom in on a webcam before visiting there. The camera wasn’t always as vital as it is today, and only very large corporations could afford to employ it as a convenience. But today, nearly everyone, from huge organizations to little firms, acknowledges its value. Everybody needs a webcam that works properly. The camera control software you are using determines the zoom function. The resolution of your picture window and the capabilities of the application dictate how far you can zoom in on the webcam’s video image. You can zoom in and out on camera photos using tools like YouCam and Windows Live Messenger. The most critical camera capabilities for the ideal video conferencing experience are zoom in and zoom out, which at first look may appear trivial. Here, we’ll walk you through each step, in detail. Continue reading, and we’ll check your understanding of webcam zoom in and zoom out skills!
Way 1: Zoom with Windows Live Messenger
When utilizing a camera for video conferencing, you may zoom in on a user’s face to get rid of the background. Webcam settings are not accessible by default in Microsoft Windows. However, camera zoom settings may be changed in instant chat systems. Through an instant messaging tool, such as Windows Live Messenger, you may simply access these options. This application provides private offline chat, video messaging, image and video sharing, and video chatting.
Step1Start Windows Live Messenger on your PC or laptop first. Enter your login name and password by clicking the “Sign In” button.

Step2On the top menu bar, pick “Tools.” And then select the “Audio and Video Setup”. Drag the slider next to “Speaker” to modify the speaker volume. Drag the slider next to “Microphone” to modify the microphone sensitivity. Press “Next.”

Step3From the drop-down list, pick the webcam. The “Camera Control” option is situated on the top; pick “Webcam Settings” after that.
Step4Now, to alter the zoom settings, drag the “Zoom” slider. To zoom in or out, drag the slider to the left or right. Press “OK.”
Way 2: Use Windows 10 Camera App
Wondering how to zoom your camera in the Windows 10 Camera app? The Camera app enables you to zoom in or out on your webcam in both image and video modes. To accomplish so, click or push the Magnification button, and then use the slider to modify the webcam’s zoom level. To operate the zoom feature manually, pick “Manual Zoom.” In the preview window, a square appears when you pick this option. To zoom in on a specific region of the capture window, drag the square there. To expand the image that was acquired by the webcam, slide the slider bar. In simply, The Camera app enables you zoom in or out of photographs and movies shot with your webcam. To do this, click on the “Zoom” button and drag the slider to the left or right as appropriate on your Windows 10 camera. the following steps:
Step1To open the “Start Menu,” make a right-click on “Start.” Now, to access the Camera app, type “Camera App” into the start menu’s search box.

Step2Tap the Camera Control icon when you start or join a meeting. To zoom and pan the camera to the appropriate spot, utilize the icons on the Camera Control panel.
![]()
Step3To exit the Camera Control window and return to the Meeting Controls, touch outside of it.
Way 3: Zoom with YouCam
Unfortunately, the default cameras or webcams bundled with the majority of Windows laptops and desktops don’t have an automatic zoom option. In fact, the only method to adjust their crop is to switch from “Standard” to “Widescreen,” which does slightly zoom in on you but not in the manner we’d want. This makes it inescapable that the only method to manually alter a webcam’s magnification is to acquire one separately and apply its software settings. , like YouCam. YouCam provides video calling, streaming, and broadcasting. includes an integrated app. To employ Zoom with YouCam, refer to the methods given below:
Step1Launch the YouCam camera program and activate the webcam.

Step2In the camera preview window, pick Settings. Then, select “Enable Video Zoom” from the menu.
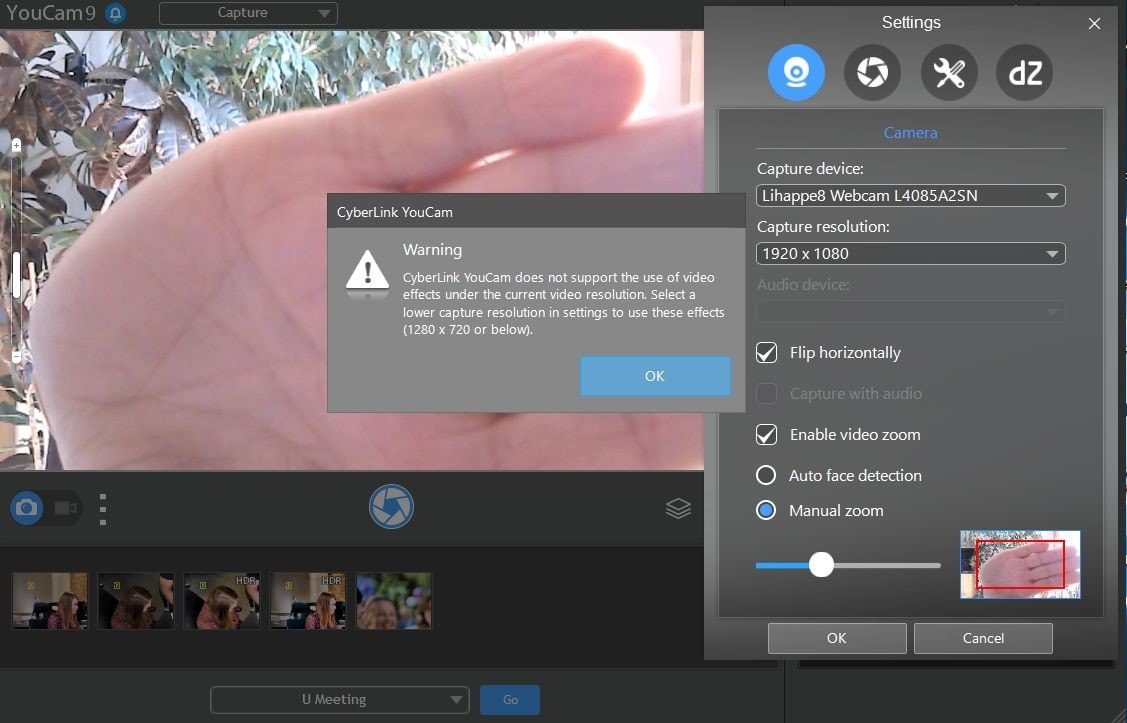
Step3Select “Automatic Face Detection” from the menu. As you wander about in the capture window, the camera watches your face and automatically zooms in on your photo as shown above.
Step4To handle the zoom feature manually, pick “Manual Zoom.” In the preview window, a square appears when you pick this option. To zoom in on a specific region of the capture window, drag the square there. To expand the image that was acquired by the webcam, slide the slider bar.

Way 4: Use iGlasses on Mac
For the perfect webcam look on a MAC, install the Chrome plugin iGlasses for video effects and style tweaks. Your videos will appear better on Zoom as a consequence. You may instantly enhance the appearance of your video interactions by utilizing the digital zoom on your iGlasses. Digital pan, tilt, and zoom are all possible with easy controls. For Macs that support it, an Apple Remote may be used to operate. iGlasses will become an option in Zoom’s video settings when it has been installed. You may improve your camera by altering the settings in iGlasses. You may experiment with a range of amusing effects, like 3-D distortions, using the virtual camera. Let’s learn how to utilize iGlasses on a Mac:
Step1Installing Ecamm’s iGlasses on a MacBook in the first step.
Step2To activate the camera, go to your video settings and pick iGlasses.
Step3Choose the Zoom window and execute the appropriate operations using the Zoom and Flip options. You may now zoom in and out using the camera on your MacBook as you like.

Conclusion
In conclusion, so many people currently take part in online conferences and virtual meetings. You want to create a lasting impression, don’t you? Not or whether you are the host of an online meeting or event, you must now maintain a professional image to prevent turning off attendees. You have discovered how to utilize the tools at your disposal to boost the zoom in and out quality of your camera in this post. However, as will be explained in the sections ahead, you may do it without the third-party plugins. With just one quick plugin, you can significantly transform how you look on a camera. Hence, try out the easy method from the above enlisted ones to get hold on your PC webcam to zoom in or out purposes.
Making certain our digital presence is the best it can be pays dividends as more and more of what we do online; similar is the case with how to zoom out webcam windows 10. The majority of experts advise against using the built-in camera that comes with your laptop or computer and instead advocate getting a webcam or an HD camera. These, however, may be hard to come by and pricy if you locate a nice one. If the built-in camera on your laptop doesn’t perform effectively during Zoom meetings, you may want to consider about investing in a separate, better webcam. Webcams offer automatic settings that are intended to function with the largest variety of lighting situations possible. This suggests that they average out a great number of responses to the content of the frame. Because of this, we have incorporated basic PC webcam zooming settings. These answers may be found in the portions that follow.
It’s vital to know how to zoom in on a webcam before visiting there. The camera wasn’t always as vital as it is today, and only very large corporations could afford to employ it as a convenience. But today, nearly everyone, from huge organizations to little firms, acknowledges its value. Everybody needs a webcam that works properly. The camera control software you are using determines the zoom function. The resolution of your picture window and the capabilities of the application dictate how far you can zoom in on the webcam’s video image. You can zoom in and out on camera photos using tools like YouCam and Windows Live Messenger. The most critical camera capabilities for the ideal video conferencing experience are zoom in and zoom out, which at first look may appear trivial. Here, we’ll walk you through each step, in detail. Continue reading, and we’ll check your understanding of webcam zoom in and zoom out skills!
Way 1: Zoom with Windows Live Messenger
When utilizing a camera for video conferencing, you may zoom in on a user’s face to get rid of the background. Webcam settings are not accessible by default in Microsoft Windows. However, camera zoom settings may be changed in instant chat systems. Through an instant messaging tool, such as Windows Live Messenger, you may simply access these options. This application provides private offline chat, video messaging, image and video sharing, and video chatting.
Step1Start Windows Live Messenger on your PC or laptop first. Enter your login name and password by clicking the “Sign In” button.
Step2On the top menu bar, pick “Tools.” And then select the “Audio and Video Setup”. Drag the slider next to “Speaker” to modify the speaker volume. Drag the slider next to “Microphone” to modify the microphone sensitivity. Press “Next.”
Step3From the drop-down list, pick the webcam. The “Camera Control” option is situated on the top; pick “Webcam Settings” after that.
Step4Now, to alter the zoom settings, drag the “Zoom” slider. To zoom in or out, drag the slider to the left or right. Press “OK.”
Way 2: Use Windows 10 Camera App
Wondering how to zoom your camera in the Windows 10 Camera app? The Camera app enables you to zoom in or out on your webcam in both image and video modes. To accomplish so, click or push the Magnification button, and then use the slider to modify the webcam’s zoom level. To operate the zoom feature manually, pick “Manual Zoom.” In the preview window, a square appears when you pick this option. To zoom in on a specific region of the capture window, drag the square there. To expand the image that was acquired by the webcam, slide the slider bar. In simply, The Camera app enables you zoom in or out of photographs and movies shot with your webcam. To do this, click on the “Zoom” button and drag the slider to the left or right as appropriate on your Windows 10 camera. the following steps:
Step1To open the “Start Menu,” make a right-click on “Start.” Now, to access the Camera app, type “Camera App” into the start menu’s search box.
Step2Tap the Camera Control icon when you start or join a meeting. To zoom and pan the camera to the appropriate spot, utilize the icons on the Camera Control panel.
![]()
Step3To exit the Camera Control window and return to the Meeting Controls, touch outside of it.
Way 3: Zoom with YouCam
Unfortunately, the default cameras or webcams bundled with the majority of Windows laptops and desktops don’t have an automatic zoom option. In fact, the only method to adjust their crop is to switch from “Standard” to “Widescreen,” which does slightly zoom in on you but not in the manner we’d want. This makes it inescapable that the only method to manually alter a webcam’s magnification is to acquire one separately and apply its software settings. , like YouCam. YouCam provides video calling, streaming, and broadcasting. includes an integrated app. To employ Zoom with YouCam, refer to the methods given below:
Step1Launch the YouCam camera program and activate the webcam.
Step2In the camera preview window, pick Settings. Then, select “Enable Video Zoom” from the menu.
Step3Select “Automatic Face Detection” from the menu. As you wander about in the capture window, the camera watches your face and automatically zooms in on your photo as shown above.
Step4To handle the zoom feature manually, pick “Manual Zoom.” In the preview window, a square appears when you pick this option. To zoom in on a specific region of the capture window, drag the square there. To expand the image that was acquired by the webcam, slide the slider bar.
Way 4: Use iGlasses on Mac
For the perfect webcam look on a MAC, install the Chrome plugin iGlasses for video effects and style tweaks. Your videos will appear better on Zoom as a consequence. You may instantly enhance the appearance of your video interactions by utilizing the digital zoom on your iGlasses. Digital pan, tilt, and zoom are all possible with easy controls. For Macs that support it, an Apple Remote may be used to operate. iGlasses will become an option in Zoom’s video settings when it has been installed. You may improve your camera by altering the settings in iGlasses. You may experiment with a range of amusing effects, like 3-D distortions, using the virtual camera. Let’s learn how to utilize iGlasses on a Mac:
Step1Installing Ecamm’s iGlasses on a MacBook in the first step.
Step2To activate the camera, go to your video settings and pick iGlasses.
Step3Choose the Zoom window and execute the appropriate operations using the Zoom and Flip options. You may now zoom in and out using the camera on your MacBook as you like.
Conclusion
In conclusion, so many people currently take part in online conferences and virtual meetings. You want to create a lasting impression, don’t you? Not or whether you are the host of an online meeting or event, you must now maintain a professional image to prevent turning off attendees. You have discovered how to utilize the tools at your disposal to boost the zoom in and out quality of your camera in this post. However, as will be explained in the sections ahead, you may do it without the third-party plugins. With just one quick plugin, you can significantly transform how you look on a camera. Hence, try out the easy method from the above enlisted ones to get hold on your PC webcam to zoom in or out purposes.
Denoise a Video in Adobe Premiere Pro – Audio and Video Noise Removal
What’s the key to our success? And what’s the process that it takes us? How can we attract audiences and guarantee the viewers’ transition to loyalty? – these are the questions that people in the professions connected to the technology should ask. There is no recipe, but at least, we know what NOT to do – DO NOT create bad content! You will never have a desired amount of listeners for your podcasts if the voice of the actor or noise of the whole track is annoying, you will struggle to have success on Youtube if your shots are unpleasant to watch, and the list goes on – there are just too many things you should not do!
But sometimes bad quality just happens. It happens when you know you have a problem and it happens when you think everything is going well in producing. You might come back from the production and find out that every shot you took had bad lightning, or there was an almost naked guy running on the background, or there is a noise on the background that just makes the whole experience of watching and listening not worthwhile! This might be something that sinks your heart…
But the mistakes we make don’t ensure that there has been a verdict cast for our failure. Nowadays, the will is everything – if you are really willing to make something work, you will just have to find the right tools, and learn a little about them, and, Voila! – Maybe you can turn bad into something good? Unacceptable into something acceptable? Annoying into interesting, and unpleasant into enjoyable?
This is called EDITING. And Editing covers different, almost endless days – too many computer programs, too many tools, too many opportunities to modify almost anything you want to make look and sound better - All of this feels like magic!
Among many instruments and techniques, there is one thing called denoising, with two different meaning. You might find noise in two areas – video and audio. Audio denoising means to remove or reduce the background noise, such as air conditioner hum, someone screaming from far away, birds chirping, the waves, etc. the noise in photo and video terms means that the scene we are looking at is grainy and makes watching the scene a little more difficult, with a less clear picture. And whenever these kind of things appear, mostly out of the blue, – because no one wants to take a bad video or record a bad voice-over, - our magical tools and abilities come to play…
One of those is called Adobe Premiere Pro, using for video editing, viewed as the most sophisticated video editor software. So, in this article, we will learn how to handle bot noise-s – in video as well as audio terms, and how to create a better viewer/listener experience in this very program. Lastly, we’ll touch upon an alternative for background noise removal, so, there’s nothing left but tuning in!
Video denoising in Adobe Premiere Pro
Reducing the noise in the video in this software can be achieved through using effect which is called Median. Before discovering it, without any doubt, we need to add our footage into the Timeline in Premiere Pro. Then, we can proceed to finding the Effects Panel, where our wanted Median can be found – just drag and drop the effect to your clip.

In order to make sure that the Median touches the grainiest parts of the whole clip, we need to use something called masks. In the Effects Control panel, we can select the mask shape for our clip –either choose rectangle, circle, or pen tool. Pen tool is something with which we move the Mask around the screen and resize it to include the desired area and cover it.

Changing Feather setting to 100 will make sure that the effect loses a visible edge and there is some smoothness added to those edges.

There might be the need to repeat this process and create several masks, if that means to have covered all of the grainy area of the scene.
Lastly, tom reduce the noise, adjusting the effect settings is needed.

Technically, what the Median effect does is just blurring the graininess, not exactly “taking it away”. And if we play with the Radius settings there, we can find our desired look!
How to remove background noise in Adobe Premiere Pro
Removing background noise in Adobe Premiere Pro can be a pretty simple process and lead to much better results. First of all, of course, import the desired material into your software so you can see the video and audio in the sequence visually. After having the project set up, you will need to find the Efffects Panel, which might be hidden a little, but it must be on the left and bottom of the program layout; or, you can find it on the top, in the navbar.

After having located the Effects panel, go for the search bar and type: denoise, and you’ll see that DeNoise effect is under Audio Effects.

You hold onto the effect, drag and drop it on the audio track in the timeline itself! Then, you just click on the audio in the sequence and on the top right Effect Controls will appear, which we need to concentrate on. You will scroll down a little there and below Audio notice: fx DeNoise, where you hit on the Edit button. This will open the Clip Fx Editor for the Audio denoising.

Basically, it only has one, Amount scale, and if you drag the slider of it to the right at 100%, it will remove the whole noise, but setting it on 0% will not remove any noise at all. So, you need to choose your preferred percentage! Just listen what is acceptable for you, but the general suggestion here would be that you can choose as high percent as you want, but if the effect starts taking out the voice and actually wanted parts, then you will have to stop and keep it that way. So, that’s actually it!
Bonus tip: how to remove audio noise in video with Wondershare Filmora
What we have promised in the beginning in the video, we like to offer now – the alternative to reduce or remove audio noise in the video is called Wondershare Filmora, which functions in a very simple way. So, we can start using these guides:
Drag and drop your video into the timeline. Right-clicking on the video and hitting Detach Audio will enable us to separate audio and video from one another, getting us a chance to work on them individually.

Double-click on the audio track shows the editing panel, where we see Remove background noise – choosing this option removes the noise!

Though, there is another way to do this too. If you don’t want to detach the audio, then first, double-click on the video clip in the timeline and when the editing panel opens, switch to Audio. If you check the box next to Remove background noise, you will see that there are three levels – weak, mid, and strong, which determine the strength of how toe noise is going to be reduced. Choosing one of them is up to you!
In case you find that the voice sounds a little robotics, you’ll need to make it sound more natural, of course. For it, you will need to click Customize, which will take you into the Customize Equalizer department.

The low tunes are on the left, while the highs are on the right. Background noises are often the low ones, so we better lower them even more, but we would raise the middle ones to achieve a natural sound.

And, that’s it – you are done with audio background noise removal!
So, in this article, we learned how to remove the video noise and grain and audio background noise using the software Adobe Premire Pro, while we also discussed how to do the latter using Wondershare Filmora – hope you can start using your new knowledge and tools very soon and create the content you never thought you could have created!
In order to make sure that the Median touches the grainiest parts of the whole clip, we need to use something called masks. In the Effects Control panel, we can select the mask shape for our clip –either choose rectangle, circle, or pen tool. Pen tool is something with which we move the Mask around the screen and resize it to include the desired area and cover it.
Changing Feather setting to 100 will make sure that the effect loses a visible edge and there is some smoothness added to those edges.
There might be the need to repeat this process and create several masks, if that means to have covered all of the grainy area of the scene.
Lastly, tom reduce the noise, adjusting the effect settings is needed.
Technically, what the Median effect does is just blurring the graininess, not exactly “taking it away”. And if we play with the Radius settings there, we can find our desired look!
How to remove background noise in Adobe Premiere Pro
Removing background noise in Adobe Premiere Pro can be a pretty simple process and lead to much better results. First of all, of course, import the desired material into your software so you can see the video and audio in the sequence visually. After having the project set up, you will need to find the Efffects Panel, which might be hidden a little, but it must be on the left and bottom of the program layout; or, you can find it on the top, in the navbar.
After having located the Effects panel, go for the search bar and type: denoise, and you’ll see that DeNoise effect is under Audio Effects.
You hold onto the effect, drag and drop it on the audio track in the timeline itself! Then, you just click on the audio in the sequence and on the top right Effect Controls will appear, which we need to concentrate on. You will scroll down a little there and below Audio notice: fx DeNoise, where you hit on the Edit button. This will open the Clip Fx Editor for the Audio denoising.
Basically, it only has one, Amount scale, and if you drag the slider of it to the right at 100%, it will remove the whole noise, but setting it on 0% will not remove any noise at all. So, you need to choose your preferred percentage! Just listen what is acceptable for you, but the general suggestion here would be that you can choose as high percent as you want, but if the effect starts taking out the voice and actually wanted parts, then you will have to stop and keep it that way. So, that’s actually it!
Bonus tip: how to remove audio noise in video with Wondershare Filmora
What we have promised in the beginning in the video, we like to offer now – the alternative to reduce or remove audio noise in the video is called Wondershare Filmora, which functions in a very simple way. So, we can start using these guides:
Drag and drop your video into the timeline. Right-clicking on the video and hitting Detach Audio will enable us to separate audio and video from one another, getting us a chance to work on them individually.
Double-click on the audio track shows the editing panel, where we see Remove background noise – choosing this option removes the noise!
Though, there is another way to do this too. If you don’t want to detach the audio, then first, double-click on the video clip in the timeline and when the editing panel opens, switch to Audio. If you check the box next to Remove background noise, you will see that there are three levels – weak, mid, and strong, which determine the strength of how toe noise is going to be reduced. Choosing one of them is up to you!
In case you find that the voice sounds a little robotics, you’ll need to make it sound more natural, of course. For it, you will need to click Customize, which will take you into the Customize Equalizer department.
The low tunes are on the left, while the highs are on the right. Background noises are often the low ones, so we better lower them even more, but we would raise the middle ones to achieve a natural sound.
And, that’s it – you are done with audio background noise removal!
So, in this article, we learned how to remove the video noise and grain and audio background noise using the software Adobe Premire Pro, while we also discussed how to do the latter using Wondershare Filmora – hope you can start using your new knowledge and tools very soon and create the content you never thought you could have created!
Best 8 Online MPEG to GIF Converters
Powerful Video Editor - Wondershare Filmora
Provide abundant video effects - A creative video editor
Powerful color correction and grading
Detailed tutorials provided by the official channel
GIFs are known to be quite effective in displaying a video portrayal. Many people save special moments across GIFs to make sharing easy and simple. However, when you own different forms of video formats and are looking to convert them to a GIF, you may need a proper tool for its execution. In this article, we shall be working on converting MPEG to GIF without any difficulty.
To make sure that you successfully convert a MPEG to GIF, this article will introduce a set of offline and online converters for effective execution.
In this article
Part 1: Best 3 MPEG to GIF Converter Software
Part 2: Top Online 5 MPEG to GIF Converters
Part 3: How to Convert MPEG to GIF Using Wondershare Filmora?
Part 1: Best 3 MPEG to GIF Converter Software
This part will focus on the offline software that can be considered for converting MPEG to GIF. Follow through these tools to understand more details about them:
1. Wondershare Filmora
| Compatibility | Pricing |
|---|---|
| Windows/Mac | $28.98/Monthly $68.98/Annual $98.98/Perpetual |
This offline software stands among the premium software of the market that provides efficient services in video management. From basic video editing to diverse features such as adding effects and transitions across it, Wondershare Filmora provides enthusiast-level features to its users. The advanced and modern features, combined with simple interfaces, bring a competitive environment for users.
As you create a video across Wondershare Filmora, multiple advanced tools can be consumed easily. You can find examples like motion tracking and overlays across the tool. However, if you consider converting a MPEG video to a GIF, Filmora is definitely a great option in the market.

Advantages
- Provides a wide variety of effects and overlays.
- Quick rendering of video while converting or editing.
- A cost-effective tool with a vast set of elements.
- Offers intuitive guidelines and custom animation tools.
Disadvantage
- Adds watermark across the exported video in the free version.
2. Adobe Premiere Pro
| Compatibility | Pricing |
|---|---|
| Windows/Mac | $20.99/Monthly |
Adobe has developed industry-standard tools in this developing age of digital software. Adobe Premiere Pro is an efficient example of good video editing and management software. The ecosystem of tools offered across Premiere Pro is extensive and prolific; however, the user needs to have a basic knowledge of video editing before coming across it.
The conversion opportunities across this MPEG to GIF converter software are extensive. Its execution, alongside the wide variety of conversion options, is responsive. This makes it a great choice for your organization that is in search of a perfect tool for this purpose.

Pros
The interface is quite clear and flexible for video editors.
The stabilization tool of Filmora is commendable for users.
Collaborate with other editors on different projects through Creative Cloud.
Can perform color correction and audio tweaking on videos before having them exported.
Cons
This tool is not designed for beginners and people who do not understand video editing.
3. VLC
| Compatibility | Windows/Mac/Linux |
|---|---|
| Windows/Mac | Free |
VLC is a free and open-source media player that provides an inspiring variety of tools across its platform. Unlike other free tools, VLC does not work across simple features and characteristics. It offers options for converting, streaming, video editing, and enhancing. This makes it an exceptional offer for users looking to convert their MPEG to GIF.
The tool is highly customizable and is supported with extensive file format support. Looking across the different features required in the process, you can add different plugins to expand your work across VLC.

Benefits
- Offers easy conversion of video files without loss in quality.
- Encode outbound streams without any issues.
- Works perfectly for Linux, Windows, and Mac devices. Also available across Android and iPhone devices.
- It can be expanded through plugins for better functionality.
Drawback
- You cannot edit the video using the VLC Media Player.
Part 2: Top Online 5 MPEG to GIF Converters
For this part, we shall work across a few impressive online converters that can be essentially used for converting a MPEG to GIF. Go through the functions of these tools to understand how you can convert your required video with ease.
1. Aconvert
The first option among the premium online converters for MPEG to GIF is Aconvert. This tool can be quite charismatic in providing you with a proper platform to work on your video conversion. While being a simple tool, you can make changes in the video in the best possible manner. Not only does this tool provide the conversion of the specific format, but it also covers an immense amount of conversion options.

Benefits
- Set the duration of the GIF as per your desire.
- Change the video settings, such as bitrate, frame rate, and size.
- A simple and effective user interface.
- Contains a proper description of the file formats for the user’s knowledge.
Con
- Does not keep up with the quality of the video while converting.
2. EZGIF.com
As the name suggests, this online converter is a very simple and effective tool to try. As it converts a MPEG video into a GIF with ease, you can surely look for this tool for quick results. With the option of multiple tools to work with, you can add this tool to your daily life for quick functions. EZGIF.com returns you with an animated GIF, which is quite effective compared to other online platforms.

Advantages
You can paste a URL of a video directly for conversion.
Provides a variety of file formats to its users.
Covers videos of variating frame rates, which makes it diverse.
Get an accurate start and end of the GIF with proper setting tools.
Bad
Users can only upload file sizes of 100MB.
3. CloudConvert
You may find this online platform to be the most effective for converting your MPEG files. While offering various options for converting videos, you can easily manage more than 200+ formats across the tool. Along with that, Cloudconvert ensures the security of all shared data across the platform. It does not allow anyone else to access your data.

Goods
You can ensure high-quality conversion with the online converter tool.
It offers you the option of setting the resolution of the video that you wish to convert.
Helps in changing the aspect ratio of the tool with ease.
You can also change the frame rate of the video that is to be converted.
Bad
Allows converting 25 videos in a day.
4. OnlineConvertFree
Another great website that you can consider to convert your MPEG to GIF is OnlineConvertFree. With a wide variety of conversion options available across the format, you can make quality GIFs. Along with that, the platform allows its users to upload videos through the computer and Dropbox or Google Drive. Its fast conversion makes it a premium option among users.

Pros
It is a completely free tool to use.
Provides users with support across more than 250 file formats.
Do not keep any data across the website for security reasons.
You can also save your converted data across the cloud.
Cons
The website contains a lot of ads throughout.
5. Convertio
This platform is another exceptional option in file conversion that can be considered in the online software. Convertio supports more than 25600 different file conversion options, which shows that the file format support is extremely elaborate in the platform. The process of conversion is the simplest you can find in the market. Along with that, the tool ensures that the shared files are kept secure from unauthorized access.

Pros
Provides exceptional features for free.
The interface is quite straightforward.
Allows batch conversion of multiple MPEG files into GIFs.
Ensures the quality of the converted file.
Cons
Users are bound to buy a plan for Convertio to use its full features without any file size limits.
Part 3: How to Convert MPEG to GIF Using Wondershare Filmora?
Filmora can be a great option to convert MPEG to GIF without any problems. You need to go through the steps to figure out the complete procedure with ease.
Step 1: Launch Filmora and Open Project
Download and install the latest version of Wondershare Filmora on your computer. Once done, launch the tool and click on “New Project” to open a new window.

Step 2: Import MPEG Video File
Once a new window opens up, you need to click on the “Import” icon displayed in the “Media” section. Add the MPEG video that is to be converted to a GIF. Once added, drag it across the timeline.

Step 3: Export as GIF
Click on the “Export” icon to open the export options. You need to select the option of “GIF” displayed on the left-hand column of the screen. Once done, set up a name and location for the video. Along with that, you can also change the resolution, frame rate, and size by clicking on “Settings.” Once done, click on the “Export” button to conclude the process.

Conclusion
Have you learned about the variety of software that is available to convert MPEG to GIF? You can consider any tools for making quick changes across your video. Along with that, for perfect execution with quality, you can definitely consider using Wondershare Filmora to convert your video files. Go through the article to make the perfect selection for your tasks.
GIFs are known to be quite effective in displaying a video portrayal. Many people save special moments across GIFs to make sharing easy and simple. However, when you own different forms of video formats and are looking to convert them to a GIF, you may need a proper tool for its execution. In this article, we shall be working on converting MPEG to GIF without any difficulty.
To make sure that you successfully convert a MPEG to GIF, this article will introduce a set of offline and online converters for effective execution.
In this article
Part 1: Best 3 MPEG to GIF Converter Software
Part 2: Top Online 5 MPEG to GIF Converters
Part 3: How to Convert MPEG to GIF Using Wondershare Filmora?
Part 1: Best 3 MPEG to GIF Converter Software
This part will focus on the offline software that can be considered for converting MPEG to GIF. Follow through these tools to understand more details about them:
1. Wondershare Filmora
| Compatibility | Pricing |
|---|---|
| Windows/Mac | $28.98/Monthly $68.98/Annual $98.98/Perpetual |
This offline software stands among the premium software of the market that provides efficient services in video management. From basic video editing to diverse features such as adding effects and transitions across it, Wondershare Filmora provides enthusiast-level features to its users. The advanced and modern features, combined with simple interfaces, bring a competitive environment for users.
As you create a video across Wondershare Filmora, multiple advanced tools can be consumed easily. You can find examples like motion tracking and overlays across the tool. However, if you consider converting a MPEG video to a GIF, Filmora is definitely a great option in the market.
Advantages
- Provides a wide variety of effects and overlays.
- Quick rendering of video while converting or editing.
- A cost-effective tool with a vast set of elements.
- Offers intuitive guidelines and custom animation tools.
Disadvantage
- Adds watermark across the exported video in the free version.
2. Adobe Premiere Pro
| Compatibility | Pricing |
|---|---|
| Windows/Mac | $20.99/Monthly |
Adobe has developed industry-standard tools in this developing age of digital software. Adobe Premiere Pro is an efficient example of good video editing and management software. The ecosystem of tools offered across Premiere Pro is extensive and prolific; however, the user needs to have a basic knowledge of video editing before coming across it.
The conversion opportunities across this MPEG to GIF converter software are extensive. Its execution, alongside the wide variety of conversion options, is responsive. This makes it a great choice for your organization that is in search of a perfect tool for this purpose.
Pros
The interface is quite clear and flexible for video editors.
The stabilization tool of Filmora is commendable for users.
Collaborate with other editors on different projects through Creative Cloud.
Can perform color correction and audio tweaking on videos before having them exported.
Cons
This tool is not designed for beginners and people who do not understand video editing.
3. VLC
| Compatibility | Windows/Mac/Linux |
|---|---|
| Windows/Mac | Free |
VLC is a free and open-source media player that provides an inspiring variety of tools across its platform. Unlike other free tools, VLC does not work across simple features and characteristics. It offers options for converting, streaming, video editing, and enhancing. This makes it an exceptional offer for users looking to convert their MPEG to GIF.
The tool is highly customizable and is supported with extensive file format support. Looking across the different features required in the process, you can add different plugins to expand your work across VLC.
Benefits
- Offers easy conversion of video files without loss in quality.
- Encode outbound streams without any issues.
- Works perfectly for Linux, Windows, and Mac devices. Also available across Android and iPhone devices.
- It can be expanded through plugins for better functionality.
Drawback
- You cannot edit the video using the VLC Media Player.
Part 2: Top Online 5 MPEG to GIF Converters
For this part, we shall work across a few impressive online converters that can be essentially used for converting a MPEG to GIF. Go through the functions of these tools to understand how you can convert your required video with ease.
1. Aconvert
The first option among the premium online converters for MPEG to GIF is Aconvert. This tool can be quite charismatic in providing you with a proper platform to work on your video conversion. While being a simple tool, you can make changes in the video in the best possible manner. Not only does this tool provide the conversion of the specific format, but it also covers an immense amount of conversion options.
Benefits
- Set the duration of the GIF as per your desire.
- Change the video settings, such as bitrate, frame rate, and size.
- A simple and effective user interface.
- Contains a proper description of the file formats for the user’s knowledge.
Con
- Does not keep up with the quality of the video while converting.
2. EZGIF.com
As the name suggests, this online converter is a very simple and effective tool to try. As it converts a MPEG video into a GIF with ease, you can surely look for this tool for quick results. With the option of multiple tools to work with, you can add this tool to your daily life for quick functions. EZGIF.com returns you with an animated GIF, which is quite effective compared to other online platforms.
Advantages
You can paste a URL of a video directly for conversion.
Provides a variety of file formats to its users.
Covers videos of variating frame rates, which makes it diverse.
Get an accurate start and end of the GIF with proper setting tools.
Bad
Users can only upload file sizes of 100MB.
3. CloudConvert
You may find this online platform to be the most effective for converting your MPEG files. While offering various options for converting videos, you can easily manage more than 200+ formats across the tool. Along with that, Cloudconvert ensures the security of all shared data across the platform. It does not allow anyone else to access your data.
Goods
You can ensure high-quality conversion with the online converter tool.
It offers you the option of setting the resolution of the video that you wish to convert.
Helps in changing the aspect ratio of the tool with ease.
You can also change the frame rate of the video that is to be converted.
Bad
Allows converting 25 videos in a day.
4. OnlineConvertFree
Another great website that you can consider to convert your MPEG to GIF is OnlineConvertFree. With a wide variety of conversion options available across the format, you can make quality GIFs. Along with that, the platform allows its users to upload videos through the computer and Dropbox or Google Drive. Its fast conversion makes it a premium option among users.
Pros
It is a completely free tool to use.
Provides users with support across more than 250 file formats.
Do not keep any data across the website for security reasons.
You can also save your converted data across the cloud.
Cons
The website contains a lot of ads throughout.
5. Convertio
This platform is another exceptional option in file conversion that can be considered in the online software. Convertio supports more than 25600 different file conversion options, which shows that the file format support is extremely elaborate in the platform. The process of conversion is the simplest you can find in the market. Along with that, the tool ensures that the shared files are kept secure from unauthorized access.
Pros
Provides exceptional features for free.
The interface is quite straightforward.
Allows batch conversion of multiple MPEG files into GIFs.
Ensures the quality of the converted file.
Cons
Users are bound to buy a plan for Convertio to use its full features without any file size limits.
Part 3: How to Convert MPEG to GIF Using Wondershare Filmora?
Filmora can be a great option to convert MPEG to GIF without any problems. You need to go through the steps to figure out the complete procedure with ease.
Step 1: Launch Filmora and Open Project
Download and install the latest version of Wondershare Filmora on your computer. Once done, launch the tool and click on “New Project” to open a new window.
Step 2: Import MPEG Video File
Once a new window opens up, you need to click on the “Import” icon displayed in the “Media” section. Add the MPEG video that is to be converted to a GIF. Once added, drag it across the timeline.
Step 3: Export as GIF
Click on the “Export” icon to open the export options. You need to select the option of “GIF” displayed on the left-hand column of the screen. Once done, set up a name and location for the video. Along with that, you can also change the resolution, frame rate, and size by clicking on “Settings.” Once done, click on the “Export” button to conclude the process.
Conclusion
Have you learned about the variety of software that is available to convert MPEG to GIF? You can consider any tools for making quick changes across your video. Along with that, for perfect execution with quality, you can definitely consider using Wondershare Filmora to convert your video files. Go through the article to make the perfect selection for your tasks.
9 Best Sparkle Effects Photo and Video Editors You Should Know
Versatile Video Editor - Wondershare Filmora
An easy yet powerful editor
Numerous effects to choose from
Detailed tutorials provided by the official channel
Has your project been looking sparkly lately?
With New Year’s Eve and other holiday celebrations just behind us, you may have noticed some excessive glitter everywhere. You might have found yourself wondering if everyone had spent the holidays mastering some clever techniques of photography with fancy new equipment they got for holiday celebrations. Well, they might have, but the chances are they have just improved their projects with some admirable effects, and we are about to show you how you can do the same.
There are loads of free (or very cheap) apps or video editors you can use to easily beautify the creativity and mood of your images - using just the smartphone camera in your pocket! Sparkling decorations, twinkling lights, and dramatic lens flares can all compile into your photo during or after you shoot your project.
So, let’s move on to considering the best and effective ways of using sparkle video effects as follows.
In this article
01 What are the Advantages of Sparkle Effects?
02 Top 8 Sparkle Effects Apps/Editors in 2021
Part 1: What are the Advantages of Sparkle Effects?
By now, you’re all familiar with the basics of sparkle video effects editing: You push a button and push your button. But if you plan to preserve those prosperous memories, then you’ll want your snaps to look their best.
Glitter filters or sparkle video effects are beauty-enhancing effects that any photo or video editing users enjoy applying to their projects. Even Twitter and Instagram are pretty considerable that incredible amounts of sparkle or glitter effects are available within.
There are tons of filters and similar effects to choose from among them, and they all add specks of silver glitter that glisten as you shoot your video. At the same time, they also often smooth the skin of the subject. So, you must also note them as their advantages.
However, others aren’t too keen on the glitters filters, claiming they transform appearance too much and are usually pretty annoying and fake.
Depending on the purpose of your image, you may want to add filters, text, and frames. For instance, you can include your signature to avoid copying your image without receiving credit if shared online.
Part 2: Top 8 Sparkle Effects Apps/Editors in 2021
Find the right photo enhancement tools to edit your pictures.
3 Best Sparkle Effect Apps
1. kirakira+

With this app, you can apply a cross filter to combine with the camera lens. The reflective objects and light-emitting materials will shine even more. It has sparkle video effects of jewelry, glass, illumination, etc. Its primary function is that you can shoot the photo and video with an impressive Glitter effect.
Price: $0.99 || Devices: Android, iPhone, iPad ||
2. Sparkle Effects - Glitter FX

Let’s have fun adding beautiful glitter and sparkle video effects to your photos and videos. Here, you can upload pictures and videos directly from your gallery. Just hover the camera at anything shiny and let the app take over. These effects can be helpful on jewelry, cars, landscape, motorcycles, or anything else you’d like!
Price: Free || Devices: Android, iPhone, iPad ||
3. PicsArt iOS | Android

Use the Lens Flare tool to apply a dynamic effect directly to your videos and images. Alternatively, you Search for lens flare or sunray stickers and similar sparkle video effects and then apply them to your photo using the different blend modes. You can adjust using a layer mask or customize the opacity to suit.
2 Excellent Sparkle Video Effects Editor
1. Wondershare Filmora
Wondershare Filmora
Get started easily with Filmora’s powerful performance, intuitive interface, and countless effects!
Try It Free Try It Free Try It Free Learn More >

Video effects, also known as visual effects or filters, create crazy graphics with clicks. It’s simple, and the results are great when you use dedicated software such as Wondershare Filmora. This is why people love sparkle video effects.
This platform is quite different from other video editing software in the market with minimal video effects. Wondershare Filmora offers 300+ free effects: Picture in Pageant, Transitional effects, Intro/Credits, Sound, Jump Cut, Titles, Mosaic, and more.

Or, you can download the Sparkle effects pack from Filmstock .

2. After Effects
It’s an excellent background for Christmas plays, holiday pageants, or any other video you wish to add a little twinkle! You can add a twinkling star quite easily in Adobe After Effects.
Are you looking for the perfect sparkle video effect for your next After Effects project? Here are some great picks!
After Effects has Particle Presets Kit, Glitter Particles Logo, Elegant Particle Logo, Glitter Fantasy, Particle Glitter, Magic Graphics, Golden, and more in Sparkle effects filters.

Top 3 Online Sparkle Effects Editor
1. Videezy
Footage from Videezy is royalty-free for personal and commercial use, but users need to credit ‘Videezy.com’ in their projects.
The freest stock videos are in HD resolution, but there’s also a good collection of 4K clips – mostly abstract clips and landscape scenes rendered using Adobe After Effects.
The quality is mixed but generally high. All videos are in MP4 format, and you can see the resolution below the preview on the download page.

2. Pngtree
Pngtree is a PNG stock images market, but also you can look for a lot of unique backgrounds and templates. Their staff or customer care are also lovely and reply in time. Furthermore, its graphics are good enough, and you can find almost anything you are looking for.

3. Glitterboo
It is a much more complete tool that also allows video editing. Before you edit your images, we advise you to test this site yourself to get satisfactory results. Essentially, the procedure to apply the glitter effect is very similar to those described above, so in this case, it is not strictly necessary to show you all the steps, as it is all quite intuitive.

Part 3: FAQs about Sparkle Effects
1 – What is the sparkle effect on Instagram?
Glitter filters are a type of beauty-enhancing filter that Instagram users enjoy applying to their selfies and videos. There is plenty of different ones to choose from on Instagram, and they all add specks of silver glitter that glisten as you film your video.
2 – What is the sparkle effect on TikTok?
To get the sparkly ‘bling’ effect, you further need to consider a few straightforward steps. All you are required to do beforehand is to check that your TikTok app is up to date!
3 – How can I improve my photos?
You can use filters and effects to improve photos to a great extent. For this purpose, you can go with using the sparkle effects as aforementioned.
Conclusion
The perfect sparkle video effect can add majesty, magic, and wonder to your next project. Furthermore, you can add a slight shimmer and shine and take the viewing experience to a whole new stage with one of these tremendous effects.
More thanks we should add to the video editing software present in the market, every kins of user can easily apply effects to our videos. Don’t like the complicated software like Final Cut Pro or Adobe Premiere or any other tools listed above? Wondershare Filmora video editor now makes it easy to apply all the special effects, including sparkle video effects mentioned above. This simple video editing tool provides the most comprehensive and practical editing elements and workflow around.
And, if you’re not satisfied with Filmora’s inbuilt effects, Filmstock is a one-stop shop for royalty-free video effects, music and sound effects, stock video footage, and more stock media.
Has your project been looking sparkly lately?
With New Year’s Eve and other holiday celebrations just behind us, you may have noticed some excessive glitter everywhere. You might have found yourself wondering if everyone had spent the holidays mastering some clever techniques of photography with fancy new equipment they got for holiday celebrations. Well, they might have, but the chances are they have just improved their projects with some admirable effects, and we are about to show you how you can do the same.
There are loads of free (or very cheap) apps or video editors you can use to easily beautify the creativity and mood of your images - using just the smartphone camera in your pocket! Sparkling decorations, twinkling lights, and dramatic lens flares can all compile into your photo during or after you shoot your project.
So, let’s move on to considering the best and effective ways of using sparkle video effects as follows.
In this article
01 What are the Advantages of Sparkle Effects?
02 Top 8 Sparkle Effects Apps/Editors in 2021
Part 1: What are the Advantages of Sparkle Effects?
By now, you’re all familiar with the basics of sparkle video effects editing: You push a button and push your button. But if you plan to preserve those prosperous memories, then you’ll want your snaps to look their best.
Glitter filters or sparkle video effects are beauty-enhancing effects that any photo or video editing users enjoy applying to their projects. Even Twitter and Instagram are pretty considerable that incredible amounts of sparkle or glitter effects are available within.
There are tons of filters and similar effects to choose from among them, and they all add specks of silver glitter that glisten as you shoot your video. At the same time, they also often smooth the skin of the subject. So, you must also note them as their advantages.
However, others aren’t too keen on the glitters filters, claiming they transform appearance too much and are usually pretty annoying and fake.
Depending on the purpose of your image, you may want to add filters, text, and frames. For instance, you can include your signature to avoid copying your image without receiving credit if shared online.
Part 2: Top 8 Sparkle Effects Apps/Editors in 2021
Find the right photo enhancement tools to edit your pictures.
3 Best Sparkle Effect Apps
1. kirakira+
With this app, you can apply a cross filter to combine with the camera lens. The reflective objects and light-emitting materials will shine even more. It has sparkle video effects of jewelry, glass, illumination, etc. Its primary function is that you can shoot the photo and video with an impressive Glitter effect.
Price: $0.99 || Devices: Android, iPhone, iPad ||
2. Sparkle Effects - Glitter FX
Let’s have fun adding beautiful glitter and sparkle video effects to your photos and videos. Here, you can upload pictures and videos directly from your gallery. Just hover the camera at anything shiny and let the app take over. These effects can be helpful on jewelry, cars, landscape, motorcycles, or anything else you’d like!
Price: Free || Devices: Android, iPhone, iPad ||
3. PicsArt iOS | Android
Use the Lens Flare tool to apply a dynamic effect directly to your videos and images. Alternatively, you Search for lens flare or sunray stickers and similar sparkle video effects and then apply them to your photo using the different blend modes. You can adjust using a layer mask or customize the opacity to suit.
2 Excellent Sparkle Video Effects Editor
1. Wondershare Filmora
Wondershare Filmora
Get started easily with Filmora’s powerful performance, intuitive interface, and countless effects!
Try It Free Try It Free Try It Free Learn More >
Video effects, also known as visual effects or filters, create crazy graphics with clicks. It’s simple, and the results are great when you use dedicated software such as Wondershare Filmora. This is why people love sparkle video effects.
This platform is quite different from other video editing software in the market with minimal video effects. Wondershare Filmora offers 300+ free effects: Picture in Pageant, Transitional effects, Intro/Credits, Sound, Jump Cut, Titles, Mosaic, and more.
Or, you can download the Sparkle effects pack from Filmstock .
2. After Effects
It’s an excellent background for Christmas plays, holiday pageants, or any other video you wish to add a little twinkle! You can add a twinkling star quite easily in Adobe After Effects.
Are you looking for the perfect sparkle video effect for your next After Effects project? Here are some great picks!
After Effects has Particle Presets Kit, Glitter Particles Logo, Elegant Particle Logo, Glitter Fantasy, Particle Glitter, Magic Graphics, Golden, and more in Sparkle effects filters.
Top 3 Online Sparkle Effects Editor
1. Videezy
Footage from Videezy is royalty-free for personal and commercial use, but users need to credit ‘Videezy.com’ in their projects.
The freest stock videos are in HD resolution, but there’s also a good collection of 4K clips – mostly abstract clips and landscape scenes rendered using Adobe After Effects.
The quality is mixed but generally high. All videos are in MP4 format, and you can see the resolution below the preview on the download page.
2. Pngtree
Pngtree is a PNG stock images market, but also you can look for a lot of unique backgrounds and templates. Their staff or customer care are also lovely and reply in time. Furthermore, its graphics are good enough, and you can find almost anything you are looking for.
3. Glitterboo
It is a much more complete tool that also allows video editing. Before you edit your images, we advise you to test this site yourself to get satisfactory results. Essentially, the procedure to apply the glitter effect is very similar to those described above, so in this case, it is not strictly necessary to show you all the steps, as it is all quite intuitive.
Part 3: FAQs about Sparkle Effects
1 – What is the sparkle effect on Instagram?
Glitter filters are a type of beauty-enhancing filter that Instagram users enjoy applying to their selfies and videos. There is plenty of different ones to choose from on Instagram, and they all add specks of silver glitter that glisten as you film your video.
2 – What is the sparkle effect on TikTok?
To get the sparkly ‘bling’ effect, you further need to consider a few straightforward steps. All you are required to do beforehand is to check that your TikTok app is up to date!
3 – How can I improve my photos?
You can use filters and effects to improve photos to a great extent. For this purpose, you can go with using the sparkle effects as aforementioned.
Conclusion
The perfect sparkle video effect can add majesty, magic, and wonder to your next project. Furthermore, you can add a slight shimmer and shine and take the viewing experience to a whole new stage with one of these tremendous effects.
More thanks we should add to the video editing software present in the market, every kins of user can easily apply effects to our videos. Don’t like the complicated software like Final Cut Pro or Adobe Premiere or any other tools listed above? Wondershare Filmora video editor now makes it easy to apply all the special effects, including sparkle video effects mentioned above. This simple video editing tool provides the most comprehensive and practical editing elements and workflow around.
And, if you’re not satisfied with Filmora’s inbuilt effects, Filmstock is a one-stop shop for royalty-free video effects, music and sound effects, stock video footage, and more stock media.
Also read:
- In 2024, Do You Want to Create a Zoom Motion Blur Effect Using Photoshop? If You Are Unaware of How to Do This, Read This Article to Learn Simple yet Authentic Instructions
- In 2024, This Article Has a Detailed Description of How You Can Split the Videos in Lightworks Including the the Discussion of Splitting the Wondershare Filmora as an Alternative. It Is Also a Suitable Choice
- New Top Animated Title Makers
- Updated In 2024, A Comprehensive Guide on Converting Slo-Mo Videos to Normal Speed Videos On iPhone
- New Step by Step to Rotate Videos Using OBS for 2024
- New 2024 Approved How to Create OBS Slideshow
- Updated In 2024, Stunning Glitch Effect and Its Creation Steps for Premiere Pro
- Updated How to Use Twixtor Effect to Add Slow-Motion Effect to Video?
- New Enhance Your Film Production with These 5 Silence Detection Tools for 2024
- In 2024, 15 Stunning GIF Splitter Examples You Need to Bookmark
- How to Google Meet Green Screen for 2024
- Easy Steps to Make Glitch Effect with Filmora
- Updated In 2024, Best 15 Subtitle Apps
- 2024 Approved In This Article, We Will Discuss What Lens Distortion Is, How It May Be Fixed, and the Factors You Need to Pay Attention to Avoid Lens Distortion when Taking or Recording Videos
- 2024 Approved How to Combine Multiple Videos Into One on Instagram
- 2024 Approved Converting an SRT (SRT/Sorted Reader) Into a DOCX File Is a Process. Here We Will Discuss Converting a Set File to a Docx File and More Details About This
- New You Can Easily Film Rotating Video Illusions From Your Smartphone and Edit Them on Wondershare Filmora in Just a Few Clicks
- Top Fixes to Resolve Issues with Premiere Pro Slow Playback
- Updated How to Change Aspect Ratio of Video?
- Updated The Actual Discussion Is Regarding the Splitting of the Video by Using the VSDC. Also, Recommendation of Using Wondershare Filmora as the Better Substitute in Place of VSDC
- Updated 15 Best Video Editing Courses Online with Certificate Free $ Paid
- Updated Best 8 Augmented Reality Video Games for 2024
- New Best 10 3D Slideshow Software Review for 2024
- Updated 2024 Approved How to Edit Facebook Video Ads for E-Commerce Business
- New How to Make a Vacation Slideshow in 5 Minutes
- In 2024, Best Video Title Generators
- How to Create After Effects Gifs
- New Do You Still Waste Time Making Transparent Background in Paint
- 2024 Approved Complete Guide to Make an Intro Video
- New SRT Not Displaying How to Open and Use SRT File in VLC?
- New In 2024, Best PDF to GIF Converters
- New Looking For a Cheap Camera to Make Slow Motion Video? Get It Now
- New Wondering How to Add Custom Transitions in OBS Studio? Here Are the Steps to Add Stinger Transitions to OBS. Get a Better OBS Alternative to Add Transitions
- REVIEW Whats Top 10 Software to Make AI Upscaling Video for 2024
- Updated How to Speed Up and Slow Down a Video for 2024
- In 2024, The Best Way to Remove Audio From Your Videos
- Updated In 2024, How to Zoom Video in VLC Media Player
- New Mastering Video Marketing An Expert Playbook
- Updated How To Polish Your Music Video Edits Using Filmora
- Updated 4 Solutions to Add White Borders on Mobile and Desktop
- Updated Quick Solved How to Add Subtitles to a Video on iPhones for 2024
- In 2024, The Ultimate Guide to Get the Rare Candy on Pokemon Go Fire Red On Meizu 21 | Dr.fone
- In 2024, How to Unlock Poco M6 Pro 4G PIN Code/Pattern Lock/Password
- Android Safe Mode - How to Turn off Safe Mode on Infinix Hot 40i? | Dr.fone
- How to Unlock T-Mobile Apple iPhone 7 Plus online without SIM Card?
- How to Change GPS Location on Oppo A59 5G Easily & Safely | Dr.fone
- Edit and Send Fake Location on Telegram For your Oppo A79 5G in 3 Ways | Dr.fone
- Can I use iTools gpx file to catch the rare Pokemon On Itel P55+ | Dr.fone
- How To Repair Apple iPhone 12 iOS System? | Dr.fone
- How to Unlock Infinix Note 30i Phone without Any Data Loss
- Updated Best Voice Generators & Changers with The Most Anime Voices Supported
- Getting the Pokemon Go GPS Signal Not Found 11 Error in Samsung Galaxy F14 5G | Dr.fone
- How to Unlock Apple iPhone 8 Plus with/without SIM Card
- 7 Solutions to Fix Chrome Crashes or Wont Open on Motorola Edge+ (2023) | Dr.fone
- In 2024, How to use Snapchat Location Spoofer to Protect Your Privacy On Motorola Moto G14? | Dr.fone
- How To Transfer Data From Apple iPhone 6s Plus To Other iPhone devices? | Dr.fone
- How To Do Itel P55 Screen Sharing | Dr.fone
- Top 4 Ways to Trace Motorola Moto G73 5G Location | Dr.fone
- Reset iTunes Backup Password Of iPhone 8 Prevention & Solution | Dr.fone
- How to Rescue Lost Messages from Vivo Y77t
- How To Fix Part of the Touch Screen Not Working on Lava Yuva 2 | Dr.fone
- How To Fix Apple iPhone 8 Unavailable Issue With Ease
- How to Transfer Data from Motorola Edge 40 Pro to Samsung Phone | Dr.fone
- In 2024, The Best Android SIM Unlock Code Generators Unlock Your Oppo Reno 8T 5G Phone Hassle-Free
- In 2024, How to Unlock Nubia Phone without PIN
- In 2024, Why does the pokemon go battle league not available On Samsung Galaxy M34 | Dr.fone
- Complete Tutorial to Use GPS Joystick to Fake GPS Location On Oppo K11 5G | Dr.fone
- In 2024, What Is a SIM Network Unlock PIN? Get Your OnePlus Ace 2 Phone Network-Ready
- Reasons for Huawei Nova Y71 Stuck on Boot Screen and Ways To Fix Them | Dr.fone
- Rootjunky APK To Bypass Google FRP Lock For Vivo Y78t
- Title: How to Zoom Webcam on PC for 2024
- Author: Chloe
- Created at : 2024-04-24 07:08:13
- Updated at : 2024-04-25 07:08:13
- Link: https://ai-editing-video.techidaily.com/how-to-zoom-webcam-on-pc-for-2024/
- License: This work is licensed under CC BY-NC-SA 4.0.
