
:max_bytes(150000):strip_icc():format(webp)/GettyImages-165567842-58e5bd253df78c51625e84ab.jpg)
If You Are Wondering How to Play a Slideshow in PowerPoint Automatically, This Article Is for You. Here We Will Be Looking at How to Add a Slideshow in PowerPoint and Other Relevant Headings that Would Help You Quickly Work on a PowerPoint
If You Are Wondering How to Play a Slideshow in PowerPoint Automatically, This Article Is for You. Here We Will Be Looking at How to Add a Slideshow in PowerPoint and Other Relevant Headings that Would Help You Quickly Work on a PowerPoint
How to Add a Slideshow in PowerPoint
An easy yet powerful editor
Numerous effects to choose from
Detailed tutorials provided by the official channel
A slideshow view fills the entire computer screen, much like a real slide show. The presentation is exhibited in full-screen mode, as the audience will see it. Graphics, timings, videos, animated elements, and transition effects get displayed in the same way they appear on stage. PowerPoint is an excellent tool for preparing presentations on the fly, whether for a seminar, classroom, lecture hall, conference, or even a contract pitch. With PowerPoint software, you can never go wrong. We’ll show you how to do a slideshow presentation in this post, even if you’re a complete novice who has never used it before.
In this article
01 How to Add Slideshow in PowerPoint
02 [How to Prepare a slideshow in PowerPoint](#Part 2)
03 [How to Play Slideshow in PowerPoint Automatically](#Part 3)
04 [How to Add Sound to a PowerPoint Slideshow](#Part 4)
05 [How to View Slideshow PowerPoint](#Part 5)
05 [How to Add Audio to the Slideshow](#Part 5)
Part 1 How to Add Slideshow in PowerPoint
Below are the steps on how to prepare a slideshow in PowerPoint
Step 1: Open New
Click on open new presentation in Microsoft PowerPoint.

Step 2: Add Photo
Add a new photo album to your presentation.

Step 3: Add Transition
Customize your presentation by adding transitions and effects to your slideshow.

Step 4: Advanced Settings
Set the slides to advance automatically.

Step 5: Set Slideshow Loop
To make the slideshow loop continuously, go to the “ set up” group on the “slide show” tap and check the box next to “Loop continuously until Esc .”Then click OK. The slide will start from the beginning after displaying the last slide.

Now, your slideshow has been created and is ready for viewing.
Part 2 How to Prepare Slideshows in PowerPoint
Learning how to do a slideshow in PowerPoint is a relatively simple process that anyone can accomplish.
Ready to make aslideshow? Let us get you started.
Step 1: Create New Presentation
To do so:
● Go to your browser and click on the PowerPoint icon.
● When PowerPoint opens, go to the upper left-hand corner and choose “File,” then “New,” listed under “File.”
● Choose “New Presentation” from the drop-down menu, which will create a new slide show for you to begin uploading photos to.

Step 2: Save PowerPoint
Go to the top right-hand side of the presentation screen and click on the flash drive icon. After that, you’ll be able to name your presentation and pick where to save it.
Remember to save your presentation after something that will remind you of the images in the File. This act will make it easier for you to find them later.

Step 3: Name the Page
Consider a title and type it in the box. Your title page can include a name, date, or image.
Choose an image-friendly arrangement, such as a slide with a title box and an image box, a slide with only an image box, or even a blank slide.

Step 4: Add Slides
You can choose from a variety of slide layouts and visuals. You can select “New Slide” from either “Home” or “Insert.” You may also right-click any slide in the left-hand panel and select “New Slide.” [1]

Step 5: Import Images
You have the option add one or multiple pictures to each slide. It’s all up to you. Double-click inside the picture box (or select Insert > Picture > From File from the Insert menu) and click OK.

Step 6: Rearrange the Photo
You will find it easier to decide the optimum order for the slides if you use the slide sorter.
Bear the bottom of the image pane, and look for the “Slide Sorter” button. Then, using your mouse, drag the slides to their preferred locations.

Step 7: Add Transitions
Transitions are essential for tying the presentation together and allowing it to flow smoothly from one image to the next. Go to the “Transitions” tab at the top of the bar and experiment with the various possibilities.

Step 8: Add a Background.
If the white space around the edges of your photographs bothers you, right-click on any slide, choose “Format Background,” and then adjust the background fill. You may change the hue, direction, and transparency of a solid fill, a gradient fill, etc. To make your slides look more professional,

Step 9: Save your PowerPoint
Before exiting, save your show once you’ve finished adding photos and graphics. If you named and saved your presentation at the start, all you have to do now is click the flash drive icon in the upper left corner.

Now your Powerpoint is ready to be displayed, and you can also view your slideshow automatically. Read the next part for details.
Part 3 How to Play Slideshow in PowerPoint Automatically
Before you can play a slideshow automatically**,** you have to make sure to save the presentation.
This is how to play a slideshow automatically in PowerPoint. Follow these simple steps, and your slideshow will auto-play when you double-click it.
Step 1: Save File and Visit More Option
After creating your slideshow, select file,” save as,” or “save as a copy.” Click on More options.
Step 2: Save in Desired Folder
Reach the folder where you want to save your presentation.
Step 3: Name your Presentation
Type a name for your presentation in the file name box
Step 4: Select Format
Select PowerPoint slideshow under the Save as type. This indicates what format you want to save your presentation as.
Save the File as a .ppsx file. After saving, double click the File, and it will open up as a slideshow.

Now, you can automatically play your slideshow on PowerPoint.
Part 4 How to Add Sound to a PowerPoint Slideshow
Sounds make your PowerPoint presentation more lively. Sound helps to widen your audience’s attention span. If you want your presentation to have sound:
Open your presentation and click the slide to which you want to add a sound. Then, visit the Insert tab, click on the Media group, and select the arrow under Audio.
Now, from the list displayed, click Audio from File. Locate the Audio you want to use and then select the audio clip you want.
Finally, click Insert.
Your audio icon and controls will appear on the slide.

Part 5 How to View Slide Show in PowerPoint
Viewing an already created slideshow in PowerPoint is easy. Following these steps below, you will be able to do it without stress.
Step 1: Open your PowerPoint presentation.
Open and go to the bottom of the PowerPoint window and click on the view slideshow command.
Step 2: Visit the More Options Tab
Navigate to the slideshow tab on the ribbon to access even more options.
Step 3: Start your Presentation
You can start the presentation from here and view the current slide.

Thus, that is how you can video slideshow in Microsoft PowerPoint
Now, we will move on to adding sound to your Slideshow to make it more attractive.
Part 6 How to Add Audio to a Slideshow
You can add audio, music, narration, and soundbites to your PowerPoint presentation. But to record and hear any audio, the computer you are using must have a sound card, microphone, and speakers.
To add audio from your computer:
Step 1: Select insert
Select audio on your computer.

Step 2: Select Desired Audio
An insert audio dialog box will pop up. Select the desired audio file and click insert.

To record audio
Step 1: Select Record Audio
Select insert>Audio> record audio

Step 2: Name Audio
Type in the name you want your audio file to be saved as.

Step 3: Start Recording
Select the record and start speaking.

Step 4: Review Recordings
Select a stop and then play to listen to and review your recording.

If you arent satisfied, you can select a record to re-record your audio or click OK if you are satisfied.
To place the audio at your desired location in the slide, select and drag the audio icon to where you want it. If you’re going to use numerous audio per slide, it is better to put the voice icon in the same place on the slide to be easily discoverable.
Note that you must enable a microphone on your device to start recording audio.
● Bonus Tip with Wondershare Filmora Video Editor

If you are looking to present your message to a large audience using slideshows, Filmora software has covered you. Whether you’re a professional at making slideshows or a beginner who wants to try it out for the first time, it has an easy-to-use interface.
For Win 7 or later (64-bit)
For macOS 10.12 or later
● Filmora software also creates photo and video slideshows and can add music, texts, filters, different transition effects, and even animation to your slideshow.
● Many tools can help you create these kinds of videos, and Filmora is one of the best in them with its latest upgrade.
● Its ready-to-use templates and unique features, like split-screen, freeze-frame, etc., make it one of the best slideshow makers.
● The Filmora software has the flexibility to suit whatever kind of slideshow you want to make, whether it is a photo slideshow or video slideshow.
● Ending Thoughts →
● Many people use PowerPoint cause of its simplicity, flexible function, easy sharing and conversion, reliability, and vast template library. So, after going through this, you would know how to add slides in PowerPoint and many more.
● Thus, we believe creating a slideshow in PowerPoint is now a bit easier with this guide to walk you through it.
A slideshow view fills the entire computer screen, much like a real slide show. The presentation is exhibited in full-screen mode, as the audience will see it. Graphics, timings, videos, animated elements, and transition effects get displayed in the same way they appear on stage. PowerPoint is an excellent tool for preparing presentations on the fly, whether for a seminar, classroom, lecture hall, conference, or even a contract pitch. With PowerPoint software, you can never go wrong. We’ll show you how to do a slideshow presentation in this post, even if you’re a complete novice who has never used it before.
In this article
01 How to Add Slideshow in PowerPoint
02 [How to Prepare a slideshow in PowerPoint](#Part 2)
03 [How to Play Slideshow in PowerPoint Automatically](#Part 3)
04 [How to Add Sound to a PowerPoint Slideshow](#Part 4)
05 [How to View Slideshow PowerPoint](#Part 5)
05 [How to Add Audio to the Slideshow](#Part 5)
Part 1 How to Add Slideshow in PowerPoint
Below are the steps on how to prepare a slideshow in PowerPoint
Step 1: Open New
Click on open new presentation in Microsoft PowerPoint.
Step 2: Add Photo
Add a new photo album to your presentation.
Step 3: Add Transition
Customize your presentation by adding transitions and effects to your slideshow.
Step 4: Advanced Settings
Set the slides to advance automatically.
Step 5: Set Slideshow Loop
To make the slideshow loop continuously, go to the “ set up” group on the “slide show” tap and check the box next to “Loop continuously until Esc .”Then click OK. The slide will start from the beginning after displaying the last slide.
Now, your slideshow has been created and is ready for viewing.
Part 2 How to Prepare Slideshows in PowerPoint
Learning how to do a slideshow in PowerPoint is a relatively simple process that anyone can accomplish.
Ready to make aslideshow? Let us get you started.
Step 1: Create New Presentation
To do so:
● Go to your browser and click on the PowerPoint icon.
● When PowerPoint opens, go to the upper left-hand corner and choose “File,” then “New,” listed under “File.”
● Choose “New Presentation” from the drop-down menu, which will create a new slide show for you to begin uploading photos to.
Step 2: Save PowerPoint
Go to the top right-hand side of the presentation screen and click on the flash drive icon. After that, you’ll be able to name your presentation and pick where to save it.
Remember to save your presentation after something that will remind you of the images in the File. This act will make it easier for you to find them later.
Step 3: Name the Page
Consider a title and type it in the box. Your title page can include a name, date, or image.
Choose an image-friendly arrangement, such as a slide with a title box and an image box, a slide with only an image box, or even a blank slide.
Step 4: Add Slides
You can choose from a variety of slide layouts and visuals. You can select “New Slide” from either “Home” or “Insert.” You may also right-click any slide in the left-hand panel and select “New Slide.” [1]
Step 5: Import Images
You have the option add one or multiple pictures to each slide. It’s all up to you. Double-click inside the picture box (or select Insert > Picture > From File from the Insert menu) and click OK.
Step 6: Rearrange the Photo
You will find it easier to decide the optimum order for the slides if you use the slide sorter.
Bear the bottom of the image pane, and look for the “Slide Sorter” button. Then, using your mouse, drag the slides to their preferred locations.
Step 7: Add Transitions
Transitions are essential for tying the presentation together and allowing it to flow smoothly from one image to the next. Go to the “Transitions” tab at the top of the bar and experiment with the various possibilities.
Step 8: Add a Background.
If the white space around the edges of your photographs bothers you, right-click on any slide, choose “Format Background,” and then adjust the background fill. You may change the hue, direction, and transparency of a solid fill, a gradient fill, etc. To make your slides look more professional,
Step 9: Save your PowerPoint
Before exiting, save your show once you’ve finished adding photos and graphics. If you named and saved your presentation at the start, all you have to do now is click the flash drive icon in the upper left corner.
Now your Powerpoint is ready to be displayed, and you can also view your slideshow automatically. Read the next part for details.
Part 3 How to Play Slideshow in PowerPoint Automatically
Before you can play a slideshow automatically**,** you have to make sure to save the presentation.
This is how to play a slideshow automatically in PowerPoint. Follow these simple steps, and your slideshow will auto-play when you double-click it.
Step 1: Save File and Visit More Option
After creating your slideshow, select file,” save as,” or “save as a copy.” Click on More options.
Step 2: Save in Desired Folder
Reach the folder where you want to save your presentation.
Step 3: Name your Presentation
Type a name for your presentation in the file name box
Step 4: Select Format
Select PowerPoint slideshow under the Save as type. This indicates what format you want to save your presentation as.
Save the File as a .ppsx file. After saving, double click the File, and it will open up as a slideshow.
Now, you can automatically play your slideshow on PowerPoint.
Part 4 How to Add Sound to a PowerPoint Slideshow
Sounds make your PowerPoint presentation more lively. Sound helps to widen your audience’s attention span. If you want your presentation to have sound:
Open your presentation and click the slide to which you want to add a sound. Then, visit the Insert tab, click on the Media group, and select the arrow under Audio.
Now, from the list displayed, click Audio from File. Locate the Audio you want to use and then select the audio clip you want.
Finally, click Insert.
Your audio icon and controls will appear on the slide.
Part 5 How to View Slide Show in PowerPoint
Viewing an already created slideshow in PowerPoint is easy. Following these steps below, you will be able to do it without stress.
Step 1: Open your PowerPoint presentation.
Open and go to the bottom of the PowerPoint window and click on the view slideshow command.
Step 2: Visit the More Options Tab
Navigate to the slideshow tab on the ribbon to access even more options.
Step 3: Start your Presentation
You can start the presentation from here and view the current slide.
Thus, that is how you can video slideshow in Microsoft PowerPoint
Now, we will move on to adding sound to your Slideshow to make it more attractive.
Part 6 How to Add Audio to a Slideshow
You can add audio, music, narration, and soundbites to your PowerPoint presentation. But to record and hear any audio, the computer you are using must have a sound card, microphone, and speakers.
To add audio from your computer:
Step 1: Select insert
Select audio on your computer.
Step 2: Select Desired Audio
An insert audio dialog box will pop up. Select the desired audio file and click insert.
To record audio
Step 1: Select Record Audio
Select insert>Audio> record audio
Step 2: Name Audio
Type in the name you want your audio file to be saved as.
Step 3: Start Recording
Select the record and start speaking.
Step 4: Review Recordings
Select a stop and then play to listen to and review your recording.
If you arent satisfied, you can select a record to re-record your audio or click OK if you are satisfied.
To place the audio at your desired location in the slide, select and drag the audio icon to where you want it. If you’re going to use numerous audio per slide, it is better to put the voice icon in the same place on the slide to be easily discoverable.
Note that you must enable a microphone on your device to start recording audio.
● Bonus Tip with Wondershare Filmora Video Editor
If you are looking to present your message to a large audience using slideshows, Filmora software has covered you. Whether you’re a professional at making slideshows or a beginner who wants to try it out for the first time, it has an easy-to-use interface.
For Win 7 or later (64-bit)
For macOS 10.12 or later
● Filmora software also creates photo and video slideshows and can add music, texts, filters, different transition effects, and even animation to your slideshow.
● Many tools can help you create these kinds of videos, and Filmora is one of the best in them with its latest upgrade.
● Its ready-to-use templates and unique features, like split-screen, freeze-frame, etc., make it one of the best slideshow makers.
● The Filmora software has the flexibility to suit whatever kind of slideshow you want to make, whether it is a photo slideshow or video slideshow.
● Ending Thoughts →
● Many people use PowerPoint cause of its simplicity, flexible function, easy sharing and conversion, reliability, and vast template library. So, after going through this, you would know how to add slides in PowerPoint and many more.
● Thus, we believe creating a slideshow in PowerPoint is now a bit easier with this guide to walk you through it.
6 Best Methods to Make a Video Longer
These days when you head on to social media, you can easily find 4-5 seconds video clips on the internet. However, many social media platforms like YouTube, Instagram, and other videos sharing platforms require you to make your video longer to meet the site’s minimum length requirements. So, for example, although Instagram’s minimum length is 3 seconds, you might want to find ways to engage your audience longer.
This article will describe the best ways to make a video longer. We’ll also offer a bonus tip on how you can edit your video to make it look better and attract more audience. On that note, let’s take a look.
6 Best Methods to Make a Video Longer
There are many methods out there to make your video longer. This section will touch on the six best methods to make a video longer.
Loop the Video

One of the best ways to make your video longer for most social media platforms is to loop the video. When you replay the video several times in a single row, it helps to multiply its length. An example is taking a 2-second video and looping it 4x. This automatically makes it into an 8-second video clip. With looping, you can simply replay the action of the clip rather than altering it in any way.
Many video editing software today allows you to loop your video for free. You have to upload the video and choose how many times you would like to loop it, and the software will get to work.
Slow Down the Video Speed

We would all agree that slow-motion makes everything seem longer automatically. You can utilize the same technique when you want to make a video longer. When you slow down a video clip, every second lasts longer. Using the slow-motion effect on a 3-second video will make the video 6 or even 9 seconds longer.
Add an Intro and Outro

Intro and outro are scenes you add before and after the video; these scenes are popular in YouTube videos. More generally, an intro is like a trailer. It shows the audience what the video is about, and the outro scene is usually used to show more information about the video maker. Adding an intro and outro to your video can add 2-4 seconds to your video clips.
It’s quite easy to add an intro and outro to any video. You can create them separately and then merge them with your video. The intro must be something relevant to the video clip; an example is adding a fast photo slideshow to the beginning of your video or a black frame. Relevant intro and outro scenes will make your video longer and maybe more engaging.
Add Images to the Video
This is another trick that most bloggers use to make their videos longer. It is an old trick in the book and makes your video significantly longer, depending on the number of videos you’re adding. A single picture can add a second or two to your video. You can simply use a video editor to merge the video clip and pictures into one seamless file.
Boomerang Your Video

If you have plans to upload your media to Instagram, then a top feature you can use to make your video longer is the boomerang feature. Instagram introduced the Boomerang feature to play short video clips forward and then repeat their reverse. So by using the Boomerang feature, you don’t only add a memory effect to your video, but you also make your video longer.
Alternatively, you can manually append your video clip to a reversed version; this option allows you to make a boomerang from an existing clip. Apart from Instagram, you can utilize many other editing tools to create a boomerang from an existing video.
Add More Content to Your Video Clip

Another step you can take is to add more materials to your video. This doesn’t necessarily mean you have to get your camera out and start shooting more scenes to add to your video. Instead, you can simply access online media libraries and get amazing materials from there that are relevant to your video clip.
Today, most professional video editors offer you access to royalty-free photos and music material. You can simply browse through their collections and pick materials relevant to your video. For example, you could add a soundtrack and videos or GIFs that make your videos engaging. Adding extra content to your video clip can make it longer by 10 seconds.
Bonus Tips: How to Edit Video Easily on a Computer
Social media platforms offer you basic video editing features that you can use to optimize your video. However, these features are limited in what they can provide you with. If you want to have more control over the editing of your video clip and make it look even more professional, you should try Wondershare Filmora. This video editing tool is powerful and provides you with more editing features to ensure you get the result you want.
Filmora offers users over 300 effects like motion elements, overlays, titles, music sounds, and many more features to make your video more engaging and attractive. Using this app is relatively easy as well, and it offers users the option of changing the file format of their video if the social media platform does not support the original format.
If you would like to edit your video to give it a more engaging and professional look, follow the simple steps below.
Step 1: Import Video to Wondershare Filmora
First, you need to download the app on your device. After that, you can download it from the official website. Luckily, Wondershare Filmora supports Windows and Mac OS. Once you download the file, install and launch the app to get started.
On the menu, click on create a new project to begin. Next, click on the import button, and from the dropdown menu, choose ‘import media file.’ Alternatively, you can simply drag the video directly to the media library of this video editor. In addition, Filmora allows you to preview your video as you add different features to optimize the video.

If your video is shaky, you can use the stabilization feature to make it more stable. Simply right-click on the video in the preview window and select the option. Once you are sure, the video is ok, drag and drop it into the timeline to start editing your video.
Step 2: Cut, Slip, Rotate, or Color-Tune Your Video

You can use many features to shape your video quickly on Wondershare Filmora. For example, you can use the scissors tool to cut or split your video. You can also use the transform tool to rotate and flip your video if you would prefer. In addition, Filmora allows you to add some advanced color tuning to your video with the color feature. This automatically makes your video even more beautiful.
Step 3: Add Filters and Effects to Your Video

Additionally, Wondershare Filmora allows you to choose different transitions, graphics, tiles, texts, sound effects, titles, filters, overlays, and elements for your videos. With this video editing tool, you can get the exact look and sound you’re looking to achieve. In addition, there are different effect tabs above the timeline that directs you to the right feature you would like to include in your video.
You can just drag these effects and drop them on the timeline to apply to your video. Filmora has over 100 in-built filters and royalty-free music you can implement on your video. If you’re not sure which feature you’re looking for. Simply experiment and undo the effect till you find exactly what you’re looking for.
Step 4: Save and Share Edited Video

Once you’re satisfied with your video clip, you can now proceed to save it. You can choose to save the video to your local folder or a storage device you’d prefer. Wondershare Filmora allows you to save in the original format or change the format to your preferred option. Filmora also allows you to change your video’s resolution and bit rate to your preference. Alternatively, you can upload your video to video-sharing platforms like Instagram, Vimeo, YouTube, etc. You can also burn the video into a DVD collection if that’s what you’re looking for.
Final Thoughts
Social media platforms are great for gaining recognition and promoting your brand. However, there are times when you don’t meet the right video length, and you would like to make your video longer. With the six methods explained above, you can make your video as long as you want and also make your video more engaging. Additionally, you can use Wondershare Filmora to make your video more professional-looking. It offers you hundreds of effects and filters you can use to optimize your video.
Meta Description: If your video is short and you need to make it longer, this article gives you six methods to make a video longer and optimize them.
One of the best ways to make your video longer for most social media platforms is to loop the video. When you replay the video several times in a single row, it helps to multiply its length. An example is taking a 2-second video and looping it 4x. This automatically makes it into an 8-second video clip. With looping, you can simply replay the action of the clip rather than altering it in any way.
Many video editing software today allows you to loop your video for free. You have to upload the video and choose how many times you would like to loop it, and the software will get to work.
Slow Down the Video Speed
We would all agree that slow-motion makes everything seem longer automatically. You can utilize the same technique when you want to make a video longer. When you slow down a video clip, every second lasts longer. Using the slow-motion effect on a 3-second video will make the video 6 or even 9 seconds longer.
Add an Intro and Outro
Intro and outro are scenes you add before and after the video; these scenes are popular in YouTube videos. More generally, an intro is like a trailer. It shows the audience what the video is about, and the outro scene is usually used to show more information about the video maker. Adding an intro and outro to your video can add 2-4 seconds to your video clips.
It’s quite easy to add an intro and outro to any video. You can create them separately and then merge them with your video. The intro must be something relevant to the video clip; an example is adding a fast photo slideshow to the beginning of your video or a black frame. Relevant intro and outro scenes will make your video longer and maybe more engaging.
Add Images to the Video
This is another trick that most bloggers use to make their videos longer. It is an old trick in the book and makes your video significantly longer, depending on the number of videos you’re adding. A single picture can add a second or two to your video. You can simply use a video editor to merge the video clip and pictures into one seamless file.
Boomerang Your Video
If you have plans to upload your media to Instagram, then a top feature you can use to make your video longer is the boomerang feature. Instagram introduced the Boomerang feature to play short video clips forward and then repeat their reverse. So by using the Boomerang feature, you don’t only add a memory effect to your video, but you also make your video longer.
Alternatively, you can manually append your video clip to a reversed version; this option allows you to make a boomerang from an existing clip. Apart from Instagram, you can utilize many other editing tools to create a boomerang from an existing video.
Add More Content to Your Video Clip
Another step you can take is to add more materials to your video. This doesn’t necessarily mean you have to get your camera out and start shooting more scenes to add to your video. Instead, you can simply access online media libraries and get amazing materials from there that are relevant to your video clip.
Today, most professional video editors offer you access to royalty-free photos and music material. You can simply browse through their collections and pick materials relevant to your video. For example, you could add a soundtrack and videos or GIFs that make your videos engaging. Adding extra content to your video clip can make it longer by 10 seconds.
Bonus Tips: How to Edit Video Easily on a Computer
Social media platforms offer you basic video editing features that you can use to optimize your video. However, these features are limited in what they can provide you with. If you want to have more control over the editing of your video clip and make it look even more professional, you should try Wondershare Filmora. This video editing tool is powerful and provides you with more editing features to ensure you get the result you want.
Filmora offers users over 300 effects like motion elements, overlays, titles, music sounds, and many more features to make your video more engaging and attractive. Using this app is relatively easy as well, and it offers users the option of changing the file format of their video if the social media platform does not support the original format.
If you would like to edit your video to give it a more engaging and professional look, follow the simple steps below.
Step 1: Import Video to Wondershare Filmora
First, you need to download the app on your device. After that, you can download it from the official website. Luckily, Wondershare Filmora supports Windows and Mac OS. Once you download the file, install and launch the app to get started.
On the menu, click on create a new project to begin. Next, click on the import button, and from the dropdown menu, choose ‘import media file.’ Alternatively, you can simply drag the video directly to the media library of this video editor. In addition, Filmora allows you to preview your video as you add different features to optimize the video.
If your video is shaky, you can use the stabilization feature to make it more stable. Simply right-click on the video in the preview window and select the option. Once you are sure, the video is ok, drag and drop it into the timeline to start editing your video.
Step 2: Cut, Slip, Rotate, or Color-Tune Your Video
You can use many features to shape your video quickly on Wondershare Filmora. For example, you can use the scissors tool to cut or split your video. You can also use the transform tool to rotate and flip your video if you would prefer. In addition, Filmora allows you to add some advanced color tuning to your video with the color feature. This automatically makes your video even more beautiful.
Step 3: Add Filters and Effects to Your Video
Additionally, Wondershare Filmora allows you to choose different transitions, graphics, tiles, texts, sound effects, titles, filters, overlays, and elements for your videos. With this video editing tool, you can get the exact look and sound you’re looking to achieve. In addition, there are different effect tabs above the timeline that directs you to the right feature you would like to include in your video.
You can just drag these effects and drop them on the timeline to apply to your video. Filmora has over 100 in-built filters and royalty-free music you can implement on your video. If you’re not sure which feature you’re looking for. Simply experiment and undo the effect till you find exactly what you’re looking for.
Step 4: Save and Share Edited Video
Once you’re satisfied with your video clip, you can now proceed to save it. You can choose to save the video to your local folder or a storage device you’d prefer. Wondershare Filmora allows you to save in the original format or change the format to your preferred option. Filmora also allows you to change your video’s resolution and bit rate to your preference. Alternatively, you can upload your video to video-sharing platforms like Instagram, Vimeo, YouTube, etc. You can also burn the video into a DVD collection if that’s what you’re looking for.
Final Thoughts
Social media platforms are great for gaining recognition and promoting your brand. However, there are times when you don’t meet the right video length, and you would like to make your video longer. With the six methods explained above, you can make your video as long as you want and also make your video more engaging. Additionally, you can use Wondershare Filmora to make your video more professional-looking. It offers you hundreds of effects and filters you can use to optimize your video.
Meta Description: If your video is short and you need to make it longer, this article gives you six methods to make a video longer and optimize them.
How to Zoom Picture in Picture [Easy Solution]
Zoom is one of the greatest options on the market for video conferencing. It doesn’t matter whether you use it at home or in an office environment; it will quickly link the team members. One of the most popular video conferencing programs is Zoom. When in-person meetings aren’t feasible, it enables you to communicate electronically with employees, and it’s been a major popularity for social occasions as well. In case you’re not acquainted, picture-in-picture mode enables you to watch videos from one app while using your PC normally. The movie will keep playing in a tiny thumbnail window so that two applications may work simultaneously on your smartphone.
You may create virtual audio and video conferences, webinars, live chats, screen sharing, and other collaboration tools with Zoom, a cloud-based video communications solution. Zoom’s most recent iPhone apps let you dismiss a Zoom Meeting while keeping the Zoom video call open in a picture-in-picture mode. To join a Zoom conference, you don’t need an account, and because the software works with Mac, Windows, Linux, iOS, and Android devices, nearly anybody can use it. Since using Zoom’s picture-in-picture mode is the same as using it with other applications, you shouldn’t have any trouble if you often use PiP mode. Here are the top 4 methods you can refer to picture in picture in Zoom.
Method 1: Swap Shared Screen with Video
You may move the Zoom Meeting PiP window across the screen, change the thumbnail’s size, and utilize other applications while it remains open, just like any other picture-in-picture window. Before leaving the meeting if you’re not giving a presentation or speaking, you should definitely mute Zoom on your iPhone to prevent noises from your typing or other activities from entering the conversation. Additionally, keep in mind to switch off the camera if you’re engaged in something distracting, at least for the duration of your activity. To reopen the Zoom Meeting and go back to the Zoom app, touch the Picture-in-Picture mode pane. Here are some actions to keep in mind:
Steps to Swap Shared Screen for Zoom Picture in Picture
Step1Launch or enter a Zoom meeting. Keep the video on your main screen at all times, closing the chat and participant list as necessary.
Step2Tap the Home button or swipe up from the bottom of the screen.
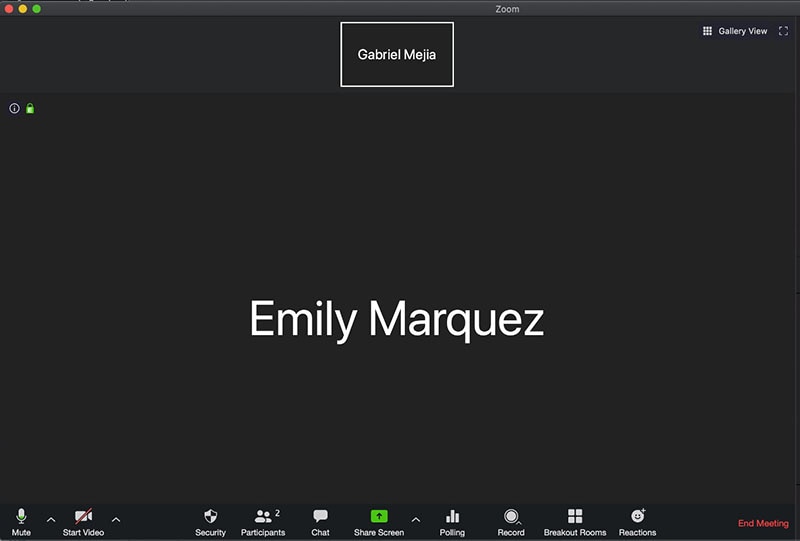
Step3Picture-in-picture mode should be activated automatically throughout the meeting.
Method 2: Use Ecamm Live
Live streaming is a fantastic way to provide original content and stand out from the crowd. To prevent any operational difficulties, a more sophisticated virtual camera is absolutely necessary. You now have magical abilities thanks to Ecamm virtual cam, including the ability to add text, animations, observe a live stream, post viewer comments, play music, share your screen, use sound effects, and many more. It offers the Ecamm live virtual camera zoom function for video conferences so you may improve your Zoom discussions by sending output to other PC programs. You could see a quality difference between what you view in Ecamm Live and what your Zoom visitors see while utilizing virtual camera with Zoom. The quality of a Zoom video stream cannot be improved using Ecamm Live. Simply broadcast the Zoom app using Ecamm Live’s Screen Share mode to utilize Ecamm Live for picture-in-picture virtual presentations on Zoom.
Steps to Use Ecamm Live for Zoom Picture in Picture
Step1Download the Ecamm Application
Install Ecamm Live on your computer, then choose the center button in the source switcher at the top of the main window to enter Screen Share mode.
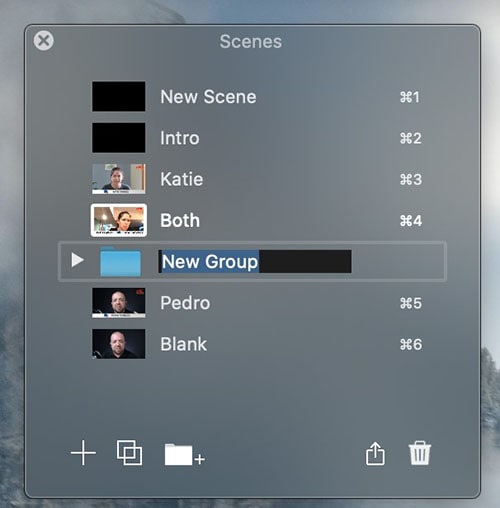
Step2Create Scenes
With the use of Ecamm Live’s Virtual Camera and Virtual Mic capabilities, you may transfer Ecamm Live’s output to almost any other Mac software, including Zoom. After setting, create the scenes in the program to quickly switch between various cameras.
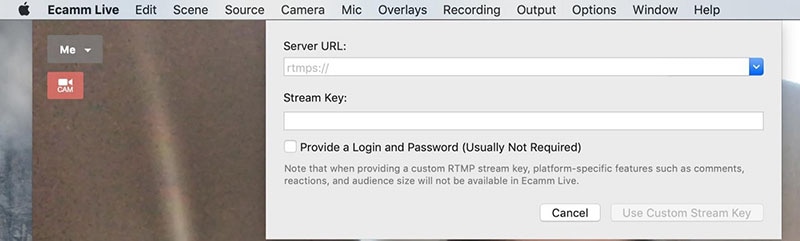
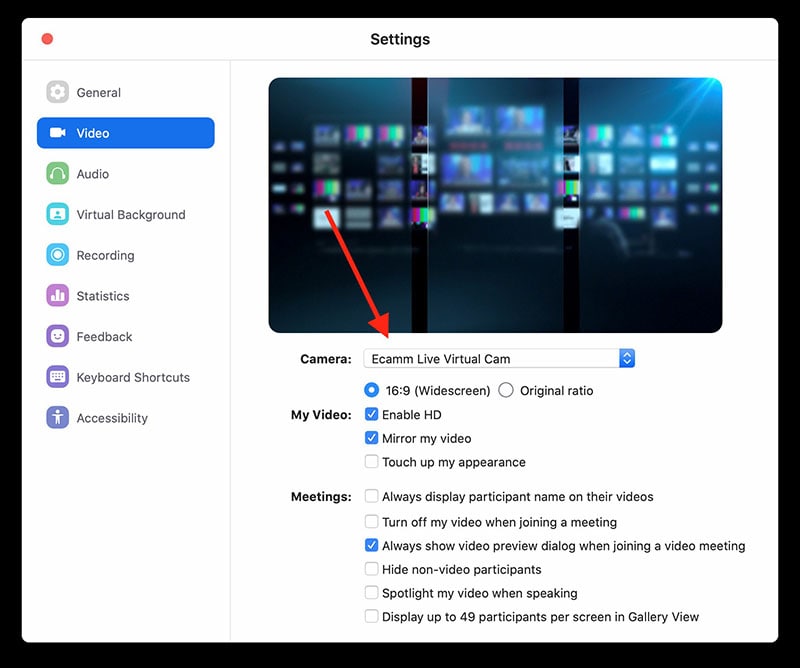
Step3Select Ecamm on Zoom
You may also utilize Ecamm Live’s Sharing Window capability to feed Ecamm Live output into Zoom. Simply activate the virtual camera, and then, as seen below, choose Ecamm Live Virtual Camera in Zoom’s video settings:
Step4Begin Your Presentation
Finally, click the PC share option to show your Zoom app to your audience. To conceal a picture-in-picture window that displays your camera image while live streaming, click the PIP button.
Method 3: Use Filmora as A Switcher
Zoom has solutions that will make your meetings simple and secure. It gives your remote staff a secure setting to interact and share crucial information. Ideal control over your film and configuration options to make them aesthetically pleasing is something Zoom lacks. To overcome the drawbacks and improve the quality of your online meetings, you may take use of the capabilities of Zoom in conjunction with Filmora. Filmora was developed with the intention of easing user burden and supporting applications. Though complicated, the program is simple to use. The perhaps most popular web information that may be saved on your computer can be easily captured by just angling your screen. For more information on how to record and save your Zoom for picture in picture, see the guide here.
To broadcast a variety of situations in a grid style, you may also combine inputs from your camera, microphone, computer screen, and web conferencing software. Wondershare -the finest desktop application for recording a Zoom Picture in Picture meeting- is Filmora. With the majority of cameras, this app’s screen recording capability is both user-friendly and feature-rich. Here, users may either choose a particular region to record or record their zoom meetings in Fullscreen mode. Additionally, you may choose the camera and input microphone that will be used while recording a video overlay. The addition of relevant comments like phrases, lines, drawings, symbols, etc. is also possible by users. The detailed procedure for recording a Zoom Picture-in-Picture meeting using a Filmora recorder is given below:
Free Download For Win 7 or later(64-bit)
Free Download For macOS 10.14 or later
Step1Download and Install Filmora Zoom Recorder
You may find both types, i.e., the most recent Windows and Mac versions, by first visiting the usual website and then using this Zoom. Install the program on your computer once you download it to get started.

Step2Initiate Filmora Recorder
After finishing the installation process for this Reside Zoom recorder, launch it from the main menus and choose “New Task” when prompted. It will take you to Filmora’s streamlined user interface where you can immediately start filming. Then, as seen in the picture below, you may adjust the screen recording using your preferred camera, microphone, and system settings:

Step3Begin/End the Recording
When you are through configuring this Zoom picture in picture recorder, click the Record button, and it will immediately begin recording your customized screen. Similar to that, after you’re done recording, click Stop, which will take you inside the video editor where you may edit your recorded information.

Step4Share Recordings
When you have everything ready, export your recording right away. After you’re done with the editing part, you do have a lot of options to choose from when displaying your screen capture and webcam stories. To do so, click the Export button in the item user interface’s top-right corner as shown below:
You may easily choose your preferred way to share from there if you choose to upload your work of zoom picture in picture recordings straight to the YouTube or other reputable websites right now. Simply refer to the Sharing plug-ins in the Export window to find out more.
Method 4: Use Hardware Switcher ATEM Mini Pro
Particularly on Zoom, the ATEM Mini is excellent for video conferences. The Blackmagic ATEM Mini is a USB video interface and HDMI switcher. Four HDMI inputs, or four cameras that can produce an HDMI video stream, may be switched between live. This device integrates Zoom meetings fast and makes it incredibly simple to set up your audio, a sometimes-forgotten aspect of video broadcasting. This sophisticated video switcher promises to offer broadcast-quality multi-camera footage with ease and is targeted at gamers, streamers, and online reviewers. It connects to a computer via a USB-C to USB-A connection. The video feed may then be sent to distant colleagues via a number of well-liked videos streaming services, including Zoom.
Step1The ATEM Mini Pro is a basic control switcher with pro-broadcast performance. Your ATEM Mini Pro is really simple to set up. You can connect a full setup with several cameras and microphones in around 30 minutes.
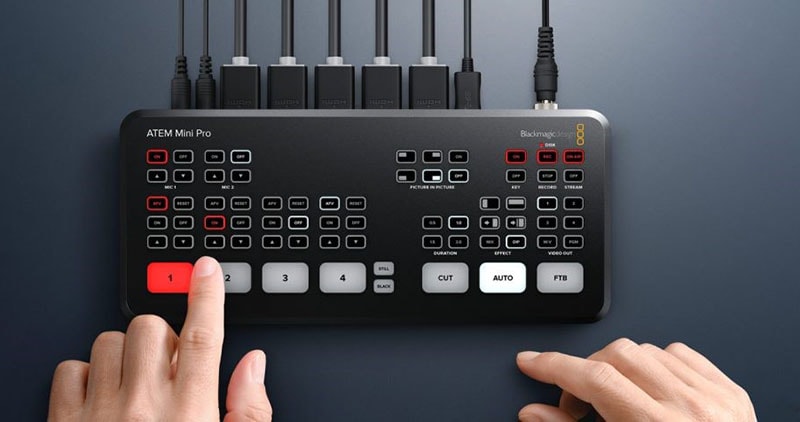
Step2You may connect several camera sources to the inputs of the ATEM Mini Pro. The 4 HDMI inputs each have a separate standards converter built in. As a result, the ATEM Mini can automatically convert inputs that are 1080p, 1080i, or 720p to the switcher’s video standard. You may make quick changes between inputs with no latency or disruption to your video output by using the ergonomic buttons.
Step3As a third option, Zoom offers ATEM Mini, which enables you to switch between several inputs, add custom visuals, and adjust audio levels all from a single interface. To improve the quality of your production, you may even use smooth transitions like wipes or fades. You can even test any input stream before making it live.
Conclusion
When you are doing a Zoom Meeting and share your screen, only to discover that what the other attendees see is a split screen with your material and the other Attendee cams, it is highly annoying. You may move the Zoom Meeting PiP window across the screen, change the thumbnail’s size, and utilize other applications while it remains open, just like any other picture-in-picture window. Someone must be sharing information in the Zoom conference for the Picture in Picture, or “Split Screen” option, to be active. We’ve listed the top techniques for doing it effectively above. To do this work without difficulty, use them as your guide.
Free Download For macOS 10.14 or later
Step1Download and Install Filmora Zoom Recorder
You may find both types, i.e., the most recent Windows and Mac versions, by first visiting the usual website and then using this Zoom. Install the program on your computer once you download it to get started.
Step2Initiate Filmora Recorder
After finishing the installation process for this Reside Zoom recorder, launch it from the main menus and choose “New Task” when prompted. It will take you to Filmora’s streamlined user interface where you can immediately start filming. Then, as seen in the picture below, you may adjust the screen recording using your preferred camera, microphone, and system settings:
Step3Begin/End the Recording
When you are through configuring this Zoom picture in picture recorder, click the Record button, and it will immediately begin recording your customized screen. Similar to that, after you’re done recording, click Stop, which will take you inside the video editor where you may edit your recorded information.
Step4Share Recordings
When you have everything ready, export your recording right away. After you’re done with the editing part, you do have a lot of options to choose from when displaying your screen capture and webcam stories. To do so, click the Export button in the item user interface’s top-right corner as shown below:
You may easily choose your preferred way to share from there if you choose to upload your work of zoom picture in picture recordings straight to the YouTube or other reputable websites right now. Simply refer to the Sharing plug-ins in the Export window to find out more.
Method 4: Use Hardware Switcher ATEM Mini Pro
Particularly on Zoom, the ATEM Mini is excellent for video conferences. The Blackmagic ATEM Mini is a USB video interface and HDMI switcher. Four HDMI inputs, or four cameras that can produce an HDMI video stream, may be switched between live. This device integrates Zoom meetings fast and makes it incredibly simple to set up your audio, a sometimes-forgotten aspect of video broadcasting. This sophisticated video switcher promises to offer broadcast-quality multi-camera footage with ease and is targeted at gamers, streamers, and online reviewers. It connects to a computer via a USB-C to USB-A connection. The video feed may then be sent to distant colleagues via a number of well-liked videos streaming services, including Zoom.
Step1The ATEM Mini Pro is a basic control switcher with pro-broadcast performance. Your ATEM Mini Pro is really simple to set up. You can connect a full setup with several cameras and microphones in around 30 minutes.
Step2You may connect several camera sources to the inputs of the ATEM Mini Pro. The 4 HDMI inputs each have a separate standards converter built in. As a result, the ATEM Mini can automatically convert inputs that are 1080p, 1080i, or 720p to the switcher’s video standard. You may make quick changes between inputs with no latency or disruption to your video output by using the ergonomic buttons.
Step3As a third option, Zoom offers ATEM Mini, which enables you to switch between several inputs, add custom visuals, and adjust audio levels all from a single interface. To improve the quality of your production, you may even use smooth transitions like wipes or fades. You can even test any input stream before making it live.
Conclusion
When you are doing a Zoom Meeting and share your screen, only to discover that what the other attendees see is a split screen with your material and the other Attendee cams, it is highly annoying. You may move the Zoom Meeting PiP window across the screen, change the thumbnail’s size, and utilize other applications while it remains open, just like any other picture-in-picture window. Someone must be sharing information in the Zoom conference for the Picture in Picture, or “Split Screen” option, to be active. We’ve listed the top techniques for doing it effectively above. To do this work without difficulty, use them as your guide.
Track Mattes: The Ultimate Guide For After Effects
Are you wondering what Track Mattes is? In After Effects, this tool adds an invisible layer that is used to mask or reveal parts of a layer, including video, graphics, text, shapes, and images. This feature is in the arsenal of any visual effects artist or motion graphic designer.
For After Effects editors, Track Mattes can be an incredibly helpful tool for managing multiple layers and creating complex animations.
In this article, we’ll explore everything you need to know about Track Mattes. We’ll cover topics like the difference between a mask and Track Matte, finding this tool in After Effects, and its four options: Alpha Matter, Alpha Inverted Matte, Luma Matte, and Luma Inverted Matte.
- Alpha Matte
- Alpha Inverted Matte
- Luma Matte
- Luma Inverted Matte
- Differences Between Alpha Channel and Luma Channel
Part 1. What Are Track Mattes In After Effects?
A Track Matte is an element used in video editing to control the opacity of a layer. Essentially, it lets you create a “hole” in a layer so that underlying layers can show through. This tool can be used with video and audio layers, which is essential for creating complex composites in After Effects.
You can use Track Mattes to generate shapes, reveal part of a layer, or keying outs. Interestingly, it remains independent of all layers in your projects, which means you can get visual effects and animations more efficiently than with the masks tool.
Moreover, Track Mattes uses Alpha or Luma channels as a layer mask to determine what parts of the layer to reveal. For instance, you can make a top layer that provides an Alpha or Luminous effect and a bottom layer consisting of the image that will be revealed or shown.
Thus, if you want to use an image to hide your video until you want to unveil it or add a picture in your text, Track Mattes will help you to shape the appearance of a layer above it.
Part 2. Differences Between A Mask And A Track Matte
In Adobe After Effects, there are two types of masking tools: Masks and Track Mattes. Both are used to hide or reveal a portion of a layer.
Here’re some key differences between a Mask and a Track Matte:
- A mask is dependent on a specific layer, while the Track Matter is independent of any layer.
- A mask is applied directly to a layer having an image or a video and transforms with the layers. On the other hand, Track Matte is a stationary mask applied to the composition rather than a layer.
Part 3. Finding The Track Matte Tool In After Effects
Track Matte is located by default in the Timeline Window of the After Effects interface, but if it is unavailable there for some reason, toggle the Transfer Control Pane button on the bottom-left of the timeline.

If you are still unable to find the Track Matte option, press the F1 key or do the following steps in sequence:
- Right-click on the area above your layers and select “Columns.”
- Scroll down and click the “Modes” option to enable it.

- Track Matte mode, Preserve Underlying Transparency, and Blending Modes will be available now.
Under Track Matte’s drop-down menu, you can find four further options, two with Alpha and two with Luma. We’ll discuss these options in detail in the next section.
Part 4. All Four Track Matte Options In After Effects
After Effects provides four types of Track Matte options: Alpha Matte, Alpha Inverted Matte, Luma Matte, and Luma Inverted Matte, each has its own specific use case. But first, you need to understand what Alpha and Luma are:
Alpha: This Track Matte type uses the layer’s Alpha channel to determine the layer’s opacity.
Luma: This Track Matte type uses the top layer’s brightness to mask the bottom layer.

Let’s find out the functions of each option one by one:
Alpha Matte
Alpha Matte is an important option under the Track Matte menu, as it allows you to create a mask based on the transparency of the layer you are using it on. Like the mask, it will use any pixel above 0% opacity and can be useful for various purposes, such as creating a vignette or isolating a certain area of the frame.
Alpha Inverted Matte
The Alpha Inverted Matte option is quite the opposite of the Alpha Matte, and around the Alpha channel, it uses negative space from the above layer and will therefore use pixels with 0% opacity as it had 100% opacity.
Luma Matte
Instead of using the Alpha channel, Luma Mattes uses the brightness level or Luma channel of the upper layer to create a mask for the bottom layer.
Luma Inverted Matte
Opposite of the Luma Matte, the Luma Inverted Matte uses dark or low luminance areas of the upper layer to create a mask for the lower layer.
Differences Between Alpha Channel and Luma Channel
When altering the opacity of a layer, it may look like the brightness settings are changed. This might confuse some users, as both Alpha and Luma channels carry the same information. However, they differ in how they are used.
Alpha channel is a type of Track Matte that stores transparency information. This information determines how opaque or transparent a layer will be when superimposed over another layer.

On the other hand, a Luma channel is a video track that stores brightness information. This information is used to determine how bright or dark an image will be and is further divided into three channels, i.e., Red, Green, and Blue (RGB). Their value ranges from 0 to 255, where 0 represents the darkest value while 255 represents the brightest value.

Video – How to use Track Mattes in Adobe After Effects - Tutorial
Conclusion
In this article, we’ve discussed what Track Matte is in After Effects and how it differs from the mask tool. We also explored where to find the Track Matter option and its four options, i.e., Alpha Matte, Alpha Inverted Matte, Luma Matte, and Luma Inverted Matte. In the end, we discussed the difference between the Alpha and Luma channels to provide a clear view of the two.
Hopefully, this guide resolves your queries, and you now have a better understanding of the Track Matte tool in After Effects.
Free Download For Win 7 or later(64-bit)
Free Download For macOS 10.14 or later
Part 1. What Are Track Mattes In After Effects?
A Track Matte is an element used in video editing to control the opacity of a layer. Essentially, it lets you create a “hole” in a layer so that underlying layers can show through. This tool can be used with video and audio layers, which is essential for creating complex composites in After Effects.
You can use Track Mattes to generate shapes, reveal part of a layer, or keying outs. Interestingly, it remains independent of all layers in your projects, which means you can get visual effects and animations more efficiently than with the masks tool.
Moreover, Track Mattes uses Alpha or Luma channels as a layer mask to determine what parts of the layer to reveal. For instance, you can make a top layer that provides an Alpha or Luminous effect and a bottom layer consisting of the image that will be revealed or shown.
Thus, if you want to use an image to hide your video until you want to unveil it or add a picture in your text, Track Mattes will help you to shape the appearance of a layer above it.
Part 2. Differences Between A Mask And A Track Matte
In Adobe After Effects, there are two types of masking tools: Masks and Track Mattes. Both are used to hide or reveal a portion of a layer.
Here’re some key differences between a Mask and a Track Matte:
- A mask is dependent on a specific layer, while the Track Matter is independent of any layer.
- A mask is applied directly to a layer having an image or a video and transforms with the layers. On the other hand, Track Matte is a stationary mask applied to the composition rather than a layer.
Part 3. Finding The Track Matte Tool In After Effects
Track Matte is located by default in the Timeline Window of the After Effects interface, but if it is unavailable there for some reason, toggle the Transfer Control Pane button on the bottom-left of the timeline.
If you are still unable to find the Track Matte option, press the F1 key or do the following steps in sequence:
- Right-click on the area above your layers and select “Columns.”
- Scroll down and click the “Modes” option to enable it.
- Track Matte mode, Preserve Underlying Transparency, and Blending Modes will be available now.
Under Track Matte’s drop-down menu, you can find four further options, two with Alpha and two with Luma. We’ll discuss these options in detail in the next section.
Part 4. All Four Track Matte Options In After Effects
After Effects provides four types of Track Matte options: Alpha Matte, Alpha Inverted Matte, Luma Matte, and Luma Inverted Matte, each has its own specific use case. But first, you need to understand what Alpha and Luma are:
Alpha: This Track Matte type uses the layer’s Alpha channel to determine the layer’s opacity.
Luma: This Track Matte type uses the top layer’s brightness to mask the bottom layer.
Let’s find out the functions of each option one by one:
Alpha Matte
Alpha Matte is an important option under the Track Matte menu, as it allows you to create a mask based on the transparency of the layer you are using it on. Like the mask, it will use any pixel above 0% opacity and can be useful for various purposes, such as creating a vignette or isolating a certain area of the frame.
Alpha Inverted Matte
The Alpha Inverted Matte option is quite the opposite of the Alpha Matte, and around the Alpha channel, it uses negative space from the above layer and will therefore use pixels with 0% opacity as it had 100% opacity.
Luma Matte
Instead of using the Alpha channel, Luma Mattes uses the brightness level or Luma channel of the upper layer to create a mask for the bottom layer.
Luma Inverted Matte
Opposite of the Luma Matte, the Luma Inverted Matte uses dark or low luminance areas of the upper layer to create a mask for the lower layer.
Differences Between Alpha Channel and Luma Channel
When altering the opacity of a layer, it may look like the brightness settings are changed. This might confuse some users, as both Alpha and Luma channels carry the same information. However, they differ in how they are used.
Alpha channel is a type of Track Matte that stores transparency information. This information determines how opaque or transparent a layer will be when superimposed over another layer.
On the other hand, a Luma channel is a video track that stores brightness information. This information is used to determine how bright or dark an image will be and is further divided into three channels, i.e., Red, Green, and Blue (RGB). Their value ranges from 0 to 255, where 0 represents the darkest value while 255 represents the brightest value.
Video – How to use Track Mattes in Adobe After Effects - Tutorial
Conclusion
In this article, we’ve discussed what Track Matte is in After Effects and how it differs from the mask tool. We also explored where to find the Track Matter option and its four options, i.e., Alpha Matte, Alpha Inverted Matte, Luma Matte, and Luma Inverted Matte. In the end, we discussed the difference between the Alpha and Luma channels to provide a clear view of the two.
Hopefully, this guide resolves your queries, and you now have a better understanding of the Track Matte tool in After Effects.
Free Download For Win 7 or later(64-bit)
Free Download For macOS 10.14 or later
Also read:
- Updated How to Add VHS Green Screen to Your Video
- Applications and Software Take up Your Devices Storage to Create Slow-Mo. Explore This Piece to Learn About some Slow-Motion Video Online Makers
- Brightening a Video Doesnt Need to Be Complicated. This Article Will Discuss How to Brighten up Your Videos Easily Using Premiere Pro for 2024
- Updated HOW to Add Fade to Black on Premiere Pro
- Updated Some of the Top Sites to Replace a Sky Background in Videos for 2024
- New In 2024, How to Make Video Slow Motion?
- Updated 2024 Approved AVI Editors for Windows 11/10/8.1/8/7 Easily Edit AVI Files on PC
- Updated 2024 Approved Top 15 Best Free MP4 Video Rotators Windows, Mac, Android, iPhone & Online
- New How to Create a Custom Slide Show in PowerPoint
- Create Amazing Slow-Motion Videos 8 Affordable Slow-Motion Cameras
- In 2024, Any Video May Be Enhanced Using Adobe Premiere Transitions. If You Are Looking to Learn How to Add Fade to Black in Premiere Pro? Then, Check Out This Fade to Black Transition Premiere Pro Guide to Learn the Trick
- Updated Wondering How to Replace Sky in After Effects? Learn How
- New Wondering About How to Easily Create a Slideshow on Your iPhone? Well, Take Note of some of the Finest Apps to Turn Your Vision Into Reality
- Finding Best GIF Websites Is Easy as Pie — Heres What You Should Know for 2024
- 2024 Approved Quickly Turn Any Video Into a Paper Rip Effect
- New 2024 Approved How to Concatenate Videos Using FFmpeg
- New Want to Make a Single Video From Different Clips? Follow These Ways to Learn About How to Merge Clips in DaVinci Resolve
- Do You Want to Remove the Unnecessary Scene From Your TikTok Video? This Article Will Help You to Adjust the Length of TikTok Clip by Providing Easy Methods for 2024
- New How To Combine Videos On TikTok for 2024
- Updated If You Are a Teacher or People Who Want to Share Their Ideas via Vides, You Can Always Make It on Your Own. This Article Will Share You 7 Tips to Create an Educational Video Easily
- New 2024 Approved What You Should Know About Speech-to-Text Technology
- Updated In 2024, Best 5 Apps To Add Song To Video
- A Detailed Guide to Do Color Correction in OBS
- New Ideas for Time-Lapse Video for 2024
- New This Article Discusses What Is Adobe Premiere Pro, How to Download, Install and Use It, and Its Key Features. It Further Discusses Its Alternative for Editing Your Videos and More. Check Out Now
- Updated In This Article You Will Learn How to Crop a Video Through Windows Media Player and with Filmora Wondershare. Here Are Ways to Crop Your Video Clip
- How to Make a Video by Mouse with Filmora for 2024
- 2024 Approved Learn How to Easily Concatenate Videos Using FFmpeg in This Step-by-Step Guide. From Installation to Execution, We Cover It All to Streamline Your Video Editing Process
- New Top 8 AI Video Denoise Software
- In 2024, Ways to stop parent tracking your Motorola G54 5G | Dr.fone
- In 2024, Remove Device Supervision From your Apple iPhone 7 | Dr.fone
- How to use Pokemon Go Joystick on Honor Magic 5 Lite? | Dr.fone
- In 2024, How To Unlock ZTE Phone Without Password?
- In 2024, How to Unlock iPhone SE (2022) Passcode without Computer? | Dr.fone
- In 2024, 3 Methods to Mirror Honor Play 7T to Roku | Dr.fone
- 2024 Approved Authors Recommended The Best Text Voice Generators for All Platforms
- 3uTools Virtual Location Not Working On Infinix Smart 8 Plus? Fix Now | Dr.fone
- Pixel Fold Messages Recovery - Recover Deleted Messages from Pixel Fold
- Can I recover permanently deleted photos from Infinix Hot 30i
- In 2024, How To Get the Apple ID Verification Code From Apple iPhone 6s in the Best Ways
- Where Is the Best Place to Catch Dratini On Poco X5 | Dr.fone
- In 2024, Still Using Pattern Locks with Xiaomi Redmi 12? Tips, Tricks and Helpful Advice
- Title: If You Are Wondering How to Play a Slideshow in PowerPoint Automatically, This Article Is for You. Here We Will Be Looking at How to Add a Slideshow in PowerPoint and Other Relevant Headings that Would Help You Quickly Work on a PowerPoint
- Author: Chloe
- Created at : 2024-05-20 03:37:35
- Updated at : 2024-05-21 03:37:35
- Link: https://ai-editing-video.techidaily.com/if-you-are-wondering-how-to-play-a-slideshow-in-powerpoint-automatically-this-article-is-for-you-here-we-will-be-looking-at-how-to-add-a-slideshow-in-powerp/
- License: This work is licensed under CC BY-NC-SA 4.0.
