
:max_bytes(150000):strip_icc():format(webp)/ArtificalIntelligenceChatbotConcept-c0e491e36fae46ef84b670334af5095f.jpg)
In 2024, 11 Tips to Make Product Ad Videos
11 Tips to Make Product Ad Videos
In the list of various video types, let’s check out product ad videos. This type of video gives more details about a product and it is normally used by businesses in promoting their products both new and old to the public. Product ad videos are videos that help to enlighten the public about products and also show them what they will gain in going for such products. These videos are best used for unveiling new products. Product ad videos have been in existence for a very long time.

Some people regard them as business ad videos, advertisement videos or even marketing videos. Not only do product ad videos help your products to stand out among the very many, but it also brings about numerous engagements from your audience by making your products to be found online by both far and near viewers. Product ad video answers every question in the heart of the audience and makes the audience build trust in the products. There are a lot of things to put into consideration while going for product ads videos and they include:
1. Good Quality Video and Picture Coverage
Now, among several things to consider in creating product ad video, is good and quality video or picture coverage which can only be possible when there is correct lighting that can help to get a very clear video or image of those products. This helps attract the attention of the customers. This also makes your products stand out among several products on sale. It also will help in creating quality videos because the quality of the pictures and the videos are not compressed.
2. Concise Videos
Another thing to put into consideration is the concise nature of your video. It must be brief and comprehensive. There should not be a lot of bulky information in the video so as not to make the customers tired and burdened.
3. Correct Colour Combination
This is something that must not be neglected in making product ad videos. The colour combination must be correct and matches very well with both the products and the things written on the products. It is better to work at most with just three colours that complement one another. This will not only attract the customers but will make the customer see how professional you are and will pay anything to get the products.
4. Short Videos
Videos are best with at most one minute depending on the platforms you want to advertise them on. This will make the customers not wait for a long time to understand the video and it will help the client to make the decision quickly without wasting a lot of time. It will help him make the decision quickly. Studies and statistics have it that attention span is only 8.5 seconds so you must try to make proper use of the first few seconds of your video.
5. Product Prize
The goals of a product ads video are to either make the announcement of a new product on sale or to also advertise particular products to sell to make great sales. Therefore, if the product needs to be sold, then the prize should be written down boldly in such a way that the buyer can see the price. The real prize and the promo size can also be written to entice the customers more to buy.
6. Text, The Font Styles, The Font Size And The Font Color
This is another important area that must not be neglected. This is another area in product ads that catches the eyes of the customers. So, the font, the font styles, and font color must go in line with the products, the text on the products and the background color of the products.
7. Aspect Ratio
This is another important thing to consider while making the video for product ads. Each social media platform has its unique aspect ratio. Aspect ratio talks about the ratio of the length and width of a video. Therefore before creating any video for any platform, first look for the aspect ratio of the platform. Facebook has its aspect ratio as also Instagram, TikTok, Facebook story and reels. This will make your video fit into the platform and make the video come out professionally and grandly.
8. Product Ads Software/Applications
Aside from knowing all that has been discussed, it is important to look out for the best software for the job. There is a lot of software that will be of help in creating product ads videos, go for the ones that you can understand and can help you create product ads video. Software like:
- Kinemaster.
- Imovie.
- Quik.
- Adobe Premiere Pro.
- Wondershare Filmora.
- Video ads Maker.
- Video Guru.
- Videolicious.
- AndroVid
- FiLMiC Pro.
- movie.
- Doodly.
- WeVideo.
- Vimeo Create.
- Power Director.
- Canva etc.
9. Good Reviews
Another important thing that makes product ad videos convert and confidence in the heart of the audience is the reviews from customers who have used such products. Therefore, try always to get reviews on the products from buyers. Now, it can come as a note, audio or video of the buyers reviewing the product. Adding these reviews from various buyers will not only draw the attention of viewers but also make them trust the authenticity of the products. So, try to add such reviews to your product ads video.
10. Graphics And Music
This is important also in creating product ad videos. You need nice and eye-catching graphics and music that goes in line with the products. Your music must be good and 100% natural.
11. Call To Action
This is a very important thing that must not be exempted in your product ads videos. Your video must have the ability to call the audience to action. Now after all has been done and the question in the heart of the audience will be, ’How can I get this product?’.The ‘call to action answers this question. So, it must be included. The call to action can be at the beginning of the video, middle of the video and end of the video but it is best placed in the middle and at end of the video.
The above and more are what should be considered and applied if you want a product ads video that can convert very well and yield massive sales.
Conclusion
Product ads video is the order of the day and it is very important as a businessman to leverage the conversions being generated by it to make a profit and to build up engagement for your business, websites etc.
Free Download For Win 7 or later(64-bit)
Free Download For macOS 10.14 or later
Free Download For macOS 10.14 or later
How to Get Zoom on TV [Easy Solutions]
The modern workforce needs adaptable alternatives to the conventional room-to-room conferencing. The latest integrated online collaboration platform is called Zoom. What’s more, now you can get Zoom on TV. Being one of the most well-known conferencing programs, it offers reliable and efficient hosting of online meetings. In a same vein, you may set up conference rooms, do video seminars, and use instant messaging to receive real-time communications. Moreover, can you get zoom on your tv? Then the answer is Yes! The ideal technique to expand a small conference is to mirror it on TV using Zoom meetings. Additionally, sharing across all platforms and devices is possible. Sharing HD video, audio, and material from your desktop and mobile devices to conference rooms and phone systems is simple, dependable, and safe with Zoom Meetings.
Zoom is one of the top videos calling applications available, however, in terms of functionality, dependability, and stability. Special features include screen sharing for multi-user annotation and local and cloud recording with transcription. With just a single click, you may share any file with supported and encrypted settings for increased security and communicate across all platforms. Zoom has now come to represent meetings for those who do their business remotely. For almost all platforms, including Android, iOS, macOS, Windows, Smart TVs, etc., the Zoom app is officially accessible. For the query how to get zoom on portal tv? you may activate Zoom screen casting whether you’re using a Windows 10 or a Mac laptop with the Chrome browser. This section will be useful to you if you want to benefit from Zoom on a TV. You may thus do so. Continue reading the article to learn more about how to get zoom on tv.
Part 1: Get Zoom on TV with HDMI Cable
Although Zoom provides companies and bigger organizations with a professional solution like Zoom Rooms, if you’re at home, you don’t need to put anything on your TV to use Zoom. You may start using Zoom right away by simply connecting your Zoom device to your TV. Connect your TV to your laptop’s HDMI port if it has one. Simple as that, however if the laptop doesn’t figure it out on its own you may need to explain what is going on with the second display. Although more reliable, connecting via cable means your source device is linked to the TV and you can’t go for a stroll. It also means you don’t have to worry about the wireless connection fading.
Steps to Get Zoom on TV with HDMI
Step1Connect the HDMI End to the TV and the Other End to Your Device
You may use this in its place if you don’t have an HDMI but do have a USB-C port. To connect to the HDMI cable coming into your TV, you’ll need a dongle, but you’ll need to make sure it’s compatible.
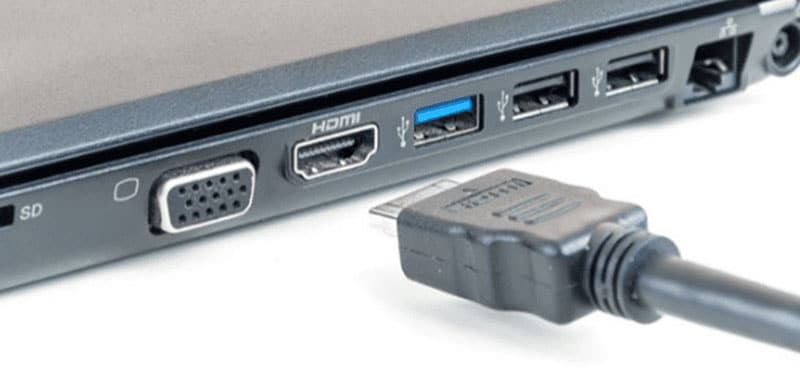
Step2Turn On your TV
Turn on your TV, then switch the video source to the HDMI port you just connected in your device to using the TV remote.
Step3Launch Zoom Meeting
Start or join a meeting by using the Zoom app on your smartphone (available for Android, iOS, Windows, and macOS).
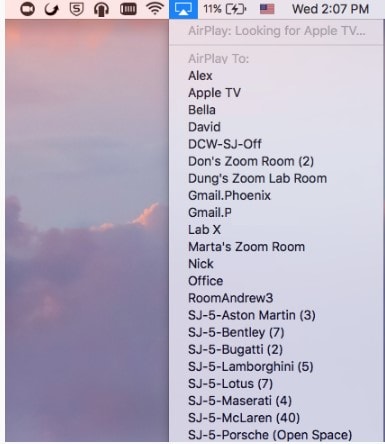
Part 2: Use AirPlay to Connect Zoom to TV
Using AirPlay mirroring, MacOS or iOS devices may share content with Zoom rooms. On MacOS and iOS, Airplay is used to communicate between the Zoom client and the Zoom room. There may be a great potential for your own business requirements if you can figure out how to utilize Airplay to Zoom mirror your screen to your Apple TV. By default, AirPlay sends audio to the Apple TV. Depending on how loud your speakers are set to play and where your input device’s microphone is located, this may cause echoing and ever-louder feedback loops. Without further ado, let’s look at some of the important strategies you may use to maximize live screen streaming on your Apple TV device.
Steps to Use AirPlay to Connect Zoom to TV
Step1Navigate to the Airplay Display in the Apple menu’s top right corner. Choose your Apple TV from the list of AirPlay Display options in the Displays preference pane. The “Show mirroring option in the menu bar when available” checkbox makes it easier to reach the AirPlay menu.

Step2Select Room Management > Zoom Rooms after logging into the Zoom online interface to manage your current Zoom Rooms. Then, modify the account settings and turn on Apple screen mirroring using the location hierarchy system.
Step3Turn on Apple Screen Mirroring by going to the Meetings tab. If this happens, you may need to activate it from the verification dialog box; otherwise, screen mirroring ought to start immediately on your device and let you see Zoom on your Apple TV. A shared password will be required of you.
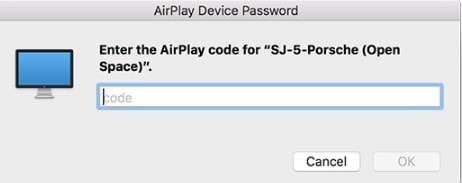
Step4Enter the passcode that is shown on the Zoom room’s screen. You may start using Airplay on your smartphone after enabling Apple screen mirroring.

Step5After that, turn off AirPlay Display by using the option in the preference pane or the system menu bar. To stop sharing, click Disconnect Airplay.
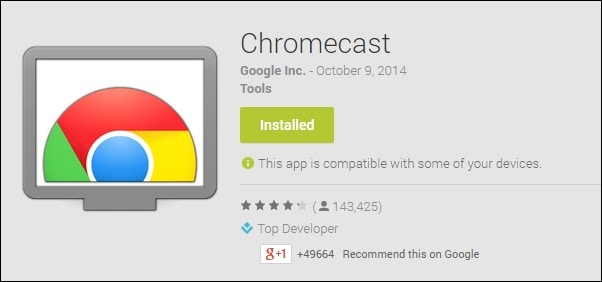
Part 3: Mirror Screen with Chromecast
The Chromecast gadgets from Google are well constructed. They should be able to cast more than just standard streaming services to your TV, logically speaking. Using a Chromecast device is one of the simplest methods to cast a Zoom conference to your TV. They are affordable, and any Google browser and the Google Home app for your Android or iOS smartphone both contain the cast capability. Between a device, such as your phone or computer, and the television, Chromecast offers the perfect connection. Chromecast makes it easy to cast Zoom meetings, particularly conferences with many of participants, since it can virtually reflect everything on your phone, tablet, or computer screen to your TV. For meetings with bigger attendance, it is advantageous to be able to cast Zoom meetings to almost any device, even a smart TV, using Chromecast.
Steps to Mirror Screen with Chromecast
Step1Install the Chromecast
Connect your Google Chromecast to the same internet source as your casting device by plugging it in.
Step2Manage Cast Settings
Locate the casting option on your device and search for recipients. Get the Zoom Cloud Meetings app for iOS or Android. You’ll also need to download the third-party software if you use an iPad or iPhone. After that, sign up for a Zoom account and log in to get started.
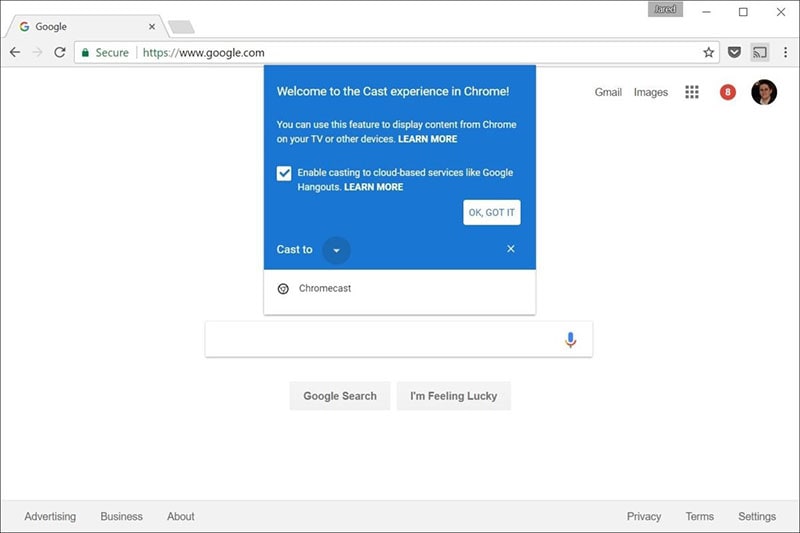
Step3Start Mirroring Zoom
The screen of your phone will show up on your TV when you tap your Chromecast. The best view is obtained by turning your phone into landscape after opening Zoom as usual. Once you place a call from here, the video will cast to your TV. Go to the next screen and click Start Broadcasting. You may now start casting to your Chromecast device by opening the Zoom Cloud Meeting app.

You must download the third-party app if you use an iPhone or iPad. The Chromecast Streamer software will let you cast a Zoom meeting on your Chromecast device as Zoom doesn’t provide a casting option.
Conclusion
Zoom’s popularity has skyrocketed as a result of the Pandemic. Zoom has emerged as the preferred video conferencing solution as the bulk of the global workforce shifts to a “work from home” environment. Now that more individuals than ever before work from home, video conferencing has emerged as a vital tool for marketing and corporate communication. Mirroring Zoom meetings to TV has never been this simple. In light of this, we hope that this guide has helped you come up with some of the greatest ideas and approaches for your personal zoom sharing needs. We really hope that this information has been helpful to you if you’ve been interested in learning more about screen sharing your Zoom to TV. Thanks to these methods, you can now mirror any device platform on TV.
The modern workforce needs adaptable alternatives to the conventional room-to-room conferencing. The latest integrated online collaboration platform is called Zoom. What’s more, now you can get Zoom on TV. Being one of the most well-known conferencing programs, it offers reliable and efficient hosting of online meetings. In a same vein, you may set up conference rooms, do video seminars, and use instant messaging to receive real-time communications. Moreover, can you get zoom on your tv? Then the answer is Yes! The ideal technique to expand a small conference is to mirror it on TV using Zoom meetings. Additionally, sharing across all platforms and devices is possible. Sharing HD video, audio, and material from your desktop and mobile devices to conference rooms and phone systems is simple, dependable, and safe with Zoom Meetings.
Zoom is one of the top videos calling applications available, however, in terms of functionality, dependability, and stability. Special features include screen sharing for multi-user annotation and local and cloud recording with transcription. With just a single click, you may share any file with supported and encrypted settings for increased security and communicate across all platforms. Zoom has now come to represent meetings for those who do their business remotely. For almost all platforms, including Android, iOS, macOS, Windows, Smart TVs, etc., the Zoom app is officially accessible. For the query how to get zoom on portal tv? you may activate Zoom screen casting whether you’re using a Windows 10 or a Mac laptop with the Chrome browser. This section will be useful to you if you want to benefit from Zoom on a TV. You may thus do so. Continue reading the article to learn more about how to get zoom on tv.
Part 1: Get Zoom on TV with HDMI Cable
Although Zoom provides companies and bigger organizations with a professional solution like Zoom Rooms, if you’re at home, you don’t need to put anything on your TV to use Zoom. You may start using Zoom right away by simply connecting your Zoom device to your TV. Connect your TV to your laptop’s HDMI port if it has one. Simple as that, however if the laptop doesn’t figure it out on its own you may need to explain what is going on with the second display. Although more reliable, connecting via cable means your source device is linked to the TV and you can’t go for a stroll. It also means you don’t have to worry about the wireless connection fading.
Steps to Get Zoom on TV with HDMI
Step1Connect the HDMI End to the TV and the Other End to Your Device
You may use this in its place if you don’t have an HDMI but do have a USB-C port. To connect to the HDMI cable coming into your TV, you’ll need a dongle, but you’ll need to make sure it’s compatible.
Step2Turn On your TV
Turn on your TV, then switch the video source to the HDMI port you just connected in your device to using the TV remote.
Step3Launch Zoom Meeting
Start or join a meeting by using the Zoom app on your smartphone (available for Android, iOS, Windows, and macOS).
Part 2: Use AirPlay to Connect Zoom to TV
Using AirPlay mirroring, MacOS or iOS devices may share content with Zoom rooms. On MacOS and iOS, Airplay is used to communicate between the Zoom client and the Zoom room. There may be a great potential for your own business requirements if you can figure out how to utilize Airplay to Zoom mirror your screen to your Apple TV. By default, AirPlay sends audio to the Apple TV. Depending on how loud your speakers are set to play and where your input device’s microphone is located, this may cause echoing and ever-louder feedback loops. Without further ado, let’s look at some of the important strategies you may use to maximize live screen streaming on your Apple TV device.
Steps to Use AirPlay to Connect Zoom to TV
Step1Navigate to the Airplay Display in the Apple menu’s top right corner. Choose your Apple TV from the list of AirPlay Display options in the Displays preference pane. The “Show mirroring option in the menu bar when available” checkbox makes it easier to reach the AirPlay menu.
Step2Select Room Management > Zoom Rooms after logging into the Zoom online interface to manage your current Zoom Rooms. Then, modify the account settings and turn on Apple screen mirroring using the location hierarchy system.
Step3Turn on Apple Screen Mirroring by going to the Meetings tab. If this happens, you may need to activate it from the verification dialog box; otherwise, screen mirroring ought to start immediately on your device and let you see Zoom on your Apple TV. A shared password will be required of you.
Step4Enter the passcode that is shown on the Zoom room’s screen. You may start using Airplay on your smartphone after enabling Apple screen mirroring.
Step5After that, turn off AirPlay Display by using the option in the preference pane or the system menu bar. To stop sharing, click Disconnect Airplay.
Part 3: Mirror Screen with Chromecast
The Chromecast gadgets from Google are well constructed. They should be able to cast more than just standard streaming services to your TV, logically speaking. Using a Chromecast device is one of the simplest methods to cast a Zoom conference to your TV. They are affordable, and any Google browser and the Google Home app for your Android or iOS smartphone both contain the cast capability. Between a device, such as your phone or computer, and the television, Chromecast offers the perfect connection. Chromecast makes it easy to cast Zoom meetings, particularly conferences with many of participants, since it can virtually reflect everything on your phone, tablet, or computer screen to your TV. For meetings with bigger attendance, it is advantageous to be able to cast Zoom meetings to almost any device, even a smart TV, using Chromecast.
Steps to Mirror Screen with Chromecast
Step1Install the Chromecast
Connect your Google Chromecast to the same internet source as your casting device by plugging it in.
Step2Manage Cast Settings
Locate the casting option on your device and search for recipients. Get the Zoom Cloud Meetings app for iOS or Android. You’ll also need to download the third-party software if you use an iPad or iPhone. After that, sign up for a Zoom account and log in to get started.
Step3Start Mirroring Zoom
The screen of your phone will show up on your TV when you tap your Chromecast. The best view is obtained by turning your phone into landscape after opening Zoom as usual. Once you place a call from here, the video will cast to your TV. Go to the next screen and click Start Broadcasting. You may now start casting to your Chromecast device by opening the Zoom Cloud Meeting app.
You must download the third-party app if you use an iPhone or iPad. The Chromecast Streamer software will let you cast a Zoom meeting on your Chromecast device as Zoom doesn’t provide a casting option.
Conclusion
Zoom’s popularity has skyrocketed as a result of the Pandemic. Zoom has emerged as the preferred video conferencing solution as the bulk of the global workforce shifts to a “work from home” environment. Now that more individuals than ever before work from home, video conferencing has emerged as a vital tool for marketing and corporate communication. Mirroring Zoom meetings to TV has never been this simple. In light of this, we hope that this guide has helped you come up with some of the greatest ideas and approaches for your personal zoom sharing needs. We really hope that this information has been helpful to you if you’ve been interested in learning more about screen sharing your Zoom to TV. Thanks to these methods, you can now mirror any device platform on TV.
With the Datamoshing Effect, the User Can Damage the Video Clips to Offer a Glitch Effect. The Article Introduces Datamosh After Effects Its Workability in the Industry
Experimenting with new effects and filters has become part and parcel of life, especially for creative professionals. Datamoshing is a similar effect that displays errors and flaws in the video clips to leave an impression on the audience. In most terms, the datamoshing effect shares similarities with the glitch effect.
Henceforth, the write-up shall focus on the introduction of this effect along with its workability. The procedure to create datamosh After Effects would also be covered. So, let us begin!
In this article
01 What is the Datamoshing Effect?
02 How Does Datamoshing Effect Work?
03 Step by Step to Create Datamoshing Effect in After Effects (Without Plugin)
04 How to Do Datamoshing Effect with Datamosh Plugin in After Effects
Part 1: What is the Datamoshing Effect?
Before going into the depths of workability and operation of the datamoshing effect in After Effects, let us understand the effect in detail. The datamoshing effect plays with the video compression to corrupt the pixels of the footage.
In this effect, the pixels glitch and appear to melt, duplicate, and create a projection organically. Also known as databending, it is a complicated technique in which movement of one layer is introduced to another layer of the video clip.
Lossy compression and removed frames help develop a psychedelic result effortlessly. Presently, datamosh After Effects has gained popularity as it helps bring change to the video and engages the audience.
Part 2: How Does Datamoshing Effect Work?
The sub-section informs the content creators and creative professionals regarding the workability of the datamoshing effect in video clips. Hence, let us commence this.
Datamoshing eliminates the new picture frame and keeps those frames that control the movement of the pixels. It leads to the picture pixels going into different directions instead of the usual one, thus, creating a glitch effect. These glitch effects are used in unique mediums to create a classy yet ancient vibe.
The datamoshing effect can be noticed between the cuts and motion. It is the process of corrupting the imagery in which the I-frames are replaced and P-frames are applied in the wrong picture. Let us dive right into two types of datamoshing.
The first type of datamoshing is created when the I-frame of the video is removed. In this scenario, the pixels from the previous scene are projected into the next scene smoothly. It gives the impression that the pixels have been tracked into the next shot.
The second kind of datamoshing, known to humankind, is when the d-frame of the video is duplicated. It leads the footage to show images and colors being bloomed together as the pixels are equivalent, coming through the same motion path.
Part 3: Step by Step to Create Datamoshing Effect in After Effects (Without Plugin)
Understanding the datamosh After Effects is one thing, and incorporating it in your footage is another. The section shall walk you through the step-by-step guide to create the After Effects’ datamoshing effect without a plugin. So, let’s go, shall we?
Step 1: Preliminary Process
The first step is easy. Open After Effects from your system. Import the targeted video that needs the datamosh effect. After that, head to the “Content-Aware Fill” to begin the process.

Step 2: Creating the Reference Frame
Use the playhead where you wish to create the effect, and then click on “Create Reference Frame.” The picture frame opens in Photoshop, and the user is expected to save it. Now, go back to the After Effects.

Step 3: Smearing Process
Now, hide the top layer so that the smearing can occur. Turn the Masks to “None” so that you can perform the masking. Split the second layer to duplicate the layer as we make changes to it. Set the “Masks” to “Subtract and then add a refine soft matte.

Step 4: Pre-composing the Clip
It is important to pre-compose the clip, so right-click on the timeline and hit “Pre-compose” to the menu list that appears. Tick mark “Move all attributes into the new composition” and rename the clip afterward. Hit “OK.”

Step 5: Rendering Queue
Double-click on the timeline, hold shift and drag it until the clip snaps. Press “B” on your keyboard and “N” on the other side to snap the work area. Navigate to “File” and “Export” and then click on “Render Queue.”

Step 6: Generating Fill Layer
Import the file when it is done rendering and drag it to the timeline. Trim the work area again using B and N buttons from the keyboard. Ensure that the fill method is “Surface,” and the range is “Work Area.” Click on “Generate Fill Layer” to start the analyzing process.

Step 7: Creating the Transition
The user is expected to create a transition between the two shots. Use the track matte to make solid and fractal noise. In the “Noise and Grain” section, click on “Fractal noise” and then switch the fractal type to “Basic.” Now, keyframe the “Brightness” and simultaneously turn its level to black and white to create a transition.

Step 8: Achieving a Glitchy Effect
To give the glitchy effect, head to the “Effects and Presets” and hit “Posterize,” and reduce its level to a couple of integers. Pull the transition down to the fill layer and set it to “Luma Matte.” It will showcase the halo sign that we masked around the image.

Step 9: Have a Finer Imprint
To eliminate it, use the “Set Matte” channel and alter its layer to the one we pre-composed. Now, invert the matte. Moving on, navigate to the “Simple Choker” and reduce it to one pixel. For perfection, duplicate it and get a finer imprint.

Step 10: Final Process
Duplicate the grey solid and then extend the second clip to our fill. In the last step, change the layer of the second clip to “Luma Matte” and save the video. You are done with the process.

Part 4: How to Do Datamoshing Effect with Datamosh Plugin in After Effects
With its plugin, this sub-section revolves around creating the datamosh effect in After Effects. So, let us begin!
Step 1: Rendering the Work Area
Open After Effects and click on the (+) sign to set the in and out points. Click on the “Datamosh” to render the work area. The timeline will showcase the clip. Click on “Remove Frames” from the left panel and add a new mosh marker by pressing the (+) button beside “Remove Frames.”

Step 2: I-Frame Removal
The new remove frame marker will be on the timeline. Drag it to the new scene and then hit “Datamosh.” The I-frame removal effect can be shown on the screen. Again, click on (+) to add a new mosh module. Press “Multiply” and then “Average” from the menus that appear. Hit “Average previous 3” afterward.

Step 3: Using the Hold Frames Function
Set the in and out points of this mosh marker and again hit “Datamosh.” The work area will be rendered. Now, open the mosh module and toggle on the “Hold Frames” feature. Also, toggle on the previous render. Press the “Datamosh” again.

Step 4: Injecting the Frames
Toggle the “Inject Frames” on and press use previous render. Hit “Datamosh” afterward. In this way, the clip will hold the frames and inject them into the transition. Enhance the intensity of the moshing algorithm and eliminate “Remove Frames” and “Inject Frames.” Use the previous render and again hit “Datamosh.”

Step 5: Playing with the Acceleration
Increase the acceleration and bring the intensity back to what it was. Again, use the previous render and click “Datamosh.” Now, improve the intensity and set the acceleration back to 0. Alter the “Blend” as much you need to mix the original and present motion of the transition. Press the “Datamosh.”

Step 6: Changing the Threshold
Moving on to the threshold feature, this function is a gatekeeper and decides if a pixel will be moshed. Inverse the intensity of the clip, change the blend to be 0, and set the threshold to be a small integer to find out the impact first. It can be enhanced later on. Uncheck the previous render if you are using the new clip for threshold. Hit “Datamosh” again. Now, export the video, and you are done with the datamoshing.

Conclusion
YouTubers and content creators use the Datamoshing effect to offer magic to the workplace. The article offered an extensive guide to effortlessly adding this effect in After Effects. The foundation and workability of the datamosh effect were also the cruces of the article. It is recommended that the user properly know the software before getting into the process.
02 How Does Datamoshing Effect Work?
03 Step by Step to Create Datamoshing Effect in After Effects (Without Plugin)
04 How to Do Datamoshing Effect with Datamosh Plugin in After Effects
Part 1: What is the Datamoshing Effect?
Before going into the depths of workability and operation of the datamoshing effect in After Effects, let us understand the effect in detail. The datamoshing effect plays with the video compression to corrupt the pixels of the footage.
In this effect, the pixels glitch and appear to melt, duplicate, and create a projection organically. Also known as databending, it is a complicated technique in which movement of one layer is introduced to another layer of the video clip.
Lossy compression and removed frames help develop a psychedelic result effortlessly. Presently, datamosh After Effects has gained popularity as it helps bring change to the video and engages the audience.
Part 2: How Does Datamoshing Effect Work?
The sub-section informs the content creators and creative professionals regarding the workability of the datamoshing effect in video clips. Hence, let us commence this.
Datamoshing eliminates the new picture frame and keeps those frames that control the movement of the pixels. It leads to the picture pixels going into different directions instead of the usual one, thus, creating a glitch effect. These glitch effects are used in unique mediums to create a classy yet ancient vibe.
The datamoshing effect can be noticed between the cuts and motion. It is the process of corrupting the imagery in which the I-frames are replaced and P-frames are applied in the wrong picture. Let us dive right into two types of datamoshing.
The first type of datamoshing is created when the I-frame of the video is removed. In this scenario, the pixels from the previous scene are projected into the next scene smoothly. It gives the impression that the pixels have been tracked into the next shot.
The second kind of datamoshing, known to humankind, is when the d-frame of the video is duplicated. It leads the footage to show images and colors being bloomed together as the pixels are equivalent, coming through the same motion path.
Part 3: Step by Step to Create Datamoshing Effect in After Effects (Without Plugin)
Understanding the datamosh After Effects is one thing, and incorporating it in your footage is another. The section shall walk you through the step-by-step guide to create the After Effects’ datamoshing effect without a plugin. So, let’s go, shall we?
Step 1: Preliminary Process
The first step is easy. Open After Effects from your system. Import the targeted video that needs the datamosh effect. After that, head to the “Content-Aware Fill” to begin the process.
Step 2: Creating the Reference Frame
Use the playhead where you wish to create the effect, and then click on “Create Reference Frame.” The picture frame opens in Photoshop, and the user is expected to save it. Now, go back to the After Effects.
Step 3: Smearing Process
Now, hide the top layer so that the smearing can occur. Turn the Masks to “None” so that you can perform the masking. Split the second layer to duplicate the layer as we make changes to it. Set the “Masks” to “Subtract and then add a refine soft matte.
Step 4: Pre-composing the Clip
It is important to pre-compose the clip, so right-click on the timeline and hit “Pre-compose” to the menu list that appears. Tick mark “Move all attributes into the new composition” and rename the clip afterward. Hit “OK.”
Step 5: Rendering Queue
Double-click on the timeline, hold shift and drag it until the clip snaps. Press “B” on your keyboard and “N” on the other side to snap the work area. Navigate to “File” and “Export” and then click on “Render Queue.”
Step 6: Generating Fill Layer
Import the file when it is done rendering and drag it to the timeline. Trim the work area again using B and N buttons from the keyboard. Ensure that the fill method is “Surface,” and the range is “Work Area.” Click on “Generate Fill Layer” to start the analyzing process.
Step 7: Creating the Transition
The user is expected to create a transition between the two shots. Use the track matte to make solid and fractal noise. In the “Noise and Grain” section, click on “Fractal noise” and then switch the fractal type to “Basic.” Now, keyframe the “Brightness” and simultaneously turn its level to black and white to create a transition.
Step 8: Achieving a Glitchy Effect
To give the glitchy effect, head to the “Effects and Presets” and hit “Posterize,” and reduce its level to a couple of integers. Pull the transition down to the fill layer and set it to “Luma Matte.” It will showcase the halo sign that we masked around the image.
Step 9: Have a Finer Imprint
To eliminate it, use the “Set Matte” channel and alter its layer to the one we pre-composed. Now, invert the matte. Moving on, navigate to the “Simple Choker” and reduce it to one pixel. For perfection, duplicate it and get a finer imprint.
Step 10: Final Process
Duplicate the grey solid and then extend the second clip to our fill. In the last step, change the layer of the second clip to “Luma Matte” and save the video. You are done with the process.
Part 4: How to Do Datamoshing Effect with Datamosh Plugin in After Effects
With its plugin, this sub-section revolves around creating the datamosh effect in After Effects. So, let us begin!
Step 1: Rendering the Work Area
Open After Effects and click on the (+) sign to set the in and out points. Click on the “Datamosh” to render the work area. The timeline will showcase the clip. Click on “Remove Frames” from the left panel and add a new mosh marker by pressing the (+) button beside “Remove Frames.”
Step 2: I-Frame Removal
The new remove frame marker will be on the timeline. Drag it to the new scene and then hit “Datamosh.” The I-frame removal effect can be shown on the screen. Again, click on (+) to add a new mosh module. Press “Multiply” and then “Average” from the menus that appear. Hit “Average previous 3” afterward.
Step 3: Using the Hold Frames Function
Set the in and out points of this mosh marker and again hit “Datamosh.” The work area will be rendered. Now, open the mosh module and toggle on the “Hold Frames” feature. Also, toggle on the previous render. Press the “Datamosh” again.
Step 4: Injecting the Frames
Toggle the “Inject Frames” on and press use previous render. Hit “Datamosh” afterward. In this way, the clip will hold the frames and inject them into the transition. Enhance the intensity of the moshing algorithm and eliminate “Remove Frames” and “Inject Frames.” Use the previous render and again hit “Datamosh.”
Step 5: Playing with the Acceleration
Increase the acceleration and bring the intensity back to what it was. Again, use the previous render and click “Datamosh.” Now, improve the intensity and set the acceleration back to 0. Alter the “Blend” as much you need to mix the original and present motion of the transition. Press the “Datamosh.”
Step 6: Changing the Threshold
Moving on to the threshold feature, this function is a gatekeeper and decides if a pixel will be moshed. Inverse the intensity of the clip, change the blend to be 0, and set the threshold to be a small integer to find out the impact first. It can be enhanced later on. Uncheck the previous render if you are using the new clip for threshold. Hit “Datamosh” again. Now, export the video, and you are done with the datamoshing.
Conclusion
YouTubers and content creators use the Datamoshing effect to offer magic to the workplace. The article offered an extensive guide to effortlessly adding this effect in After Effects. The foundation and workability of the datamosh effect were also the cruces of the article. It is recommended that the user properly know the software before getting into the process.
Detailed Tutorial to Crop Videos Using Openshot?
OPENSHOT is a free and open source video editing software that can be used to create or edit videos for various purposes. It provides the users with some special features like easy trimming, splitting and merging of clips, etc. By using Openshot, you can easily crop your short video (a clip) and also resize it.
OpenShot is freely available for Windows, Mac, and Linux platforms. You can download the software from Openshot official web page given below.
To install the program follow the steps mentioned below:
OpenShot can be downloaded from the website <www.openshot.org>. After opening your browser, you have to select your operating system (Windows, Mac, or Linux).
Now you have to choose the correct download link for your computer. You can find 32 bit and 64-bit Openshot software there.
Once you have downloaded this software, then open it using a double click on its icon.
then a dialog box will open up on your screen, asking you to choose the language. You can select any of them based on your requirements.
Now another dialog box will appear on your screen asking you to give the location where you want to install this software. To install it in the default location, simply click on the “Next” button.
Now Openshot is successfully installed on your computer.
Openshot provides some special features like easy trimming, splitting and merging of clips, etc. You can easily cut or crop a part of your video by using its editing tools such as Crop (To remove unwanted black borders), Trim (To remove the unwanted front and end parts of your video clip).
Step-by-step on how to crop videos using Openshot?
To crop your short video (a clip) and also resize it, follow the steps given below:
Step 1: Open OpenShot Video Editor. Go to Applications> Education> OpenShot Video Editor.
Step 2: Import your video in Openshot. Under the “Project files” tab, you can either right click on your mouse and an Import Files command will show up, click it and choose the video that you want to import.

Step 3: Then, go to the “Effects” tab.

Step 4: From the list of options, you have to choose “Crop” option and drag it to the clip that you want to crop.

Step 5: After dragging it, you will see a letter ‘C’ on the clip which means crop. Right click on it and you will see few selections. Select ‘Properties’.

Step 6: Under ‘Properties’, you will see a ‘Selection’ drop down. Choose ‘Crop’. You can utilize it to adjust to your preferred video size, a video preview will show on the right side of the screen.

Step 7: You can also use the crop frame that will appear on your screen with some handles around it. You can drag these handles from four corners to resize the frame according to the content you want to crop.

Step 8: Once you have cropped your video, then go to the “File” tab in the uppermost part of the editor and select the “Save as” option and save your file.

In conclusion, follow the steps given above to crop your video, resize it and save your work.
There is a better way to do it which using Filmora. It is an online video editing software that allows its users to create videos for various purposes. It provides the users with some special features like easy trimming, splitting and merging of clips, etc. By using Filmora, you can easily crop your short video (a clip) and also resize it.
An easier way to crop video using Filmora
Wondershare Filmora Video Editor is a software created for use on Windows, designed to edit videos. It has many of the features of Adobe Premiere, but it is free.
It supports the following formats: AVI, MP4, WMV, MKV, MOV, FLV and 3GP.
Wondershare Filmora is different than most video editors in that it does not use timelines. Instead, the user edits clips in a storyboard and adds effects and titles to them. It also has an Audio Visualization feature that plays back music in your collection and shows what you’re listening to in real time. There is no voice-over tool and it is not possible to add an audio track.
Wondershare Filmora has a very large number of effects, all editable via keyframes. These include simple motion graphics such as fades and dissolves, but it also includes advanced options like motion blur and chroma-key. There are free downloadable effects, which are created by users.
Wondershare Filmora supports text editing and there is a large library of free fonts available for download on its website. It does not support green-screening/chroma-keying. This can be done in post production via Adobe Premiere or other software.
It also has the ability to add a number of different titles, which can be stacked and moved around in 3D space.
Wondershare Filmora allows you to import photos for use in slideshows and effects. Every clip or image can have its own effect applied to it if desired.
After editing, the project is rendered in real time with no waiting. You can also choose to render only part of the video by selecting the time range.
One final bonus is Wondershare Filmora’s media library, which allows users to add files from their computer and sort them by category. This makes finding your desired video a much easier task.
This software has a very simple interface that is easy to navigate, even for beginners. The design of the program makes it intuitive enough that you can start editing videos right away without having to go through tutorials. It is easy to create the desired effects and titles that you need for your video with just a few clicks. Its editing tools are powerful enough for professional use while still being easy to learn.
The one downside is that Wondershare Filmora does not support 4K resolution—the maximum output size is 1080p.
For Win 7 or later (64-bit)
For macOS 10.14 or later
Step-by-step on how to crop videos using Filmora?
To crop your short video (a clip) and also resize it, follow the steps given below:
Step 1: Open Filmora video editor. Go to the ‘Home’ menu and click on ‘Open Project’ or go to File > Open Project. Now, select your *.AVI or *.MP4 file.

Step 2: Click Alt + C in your keyboard. A small pop-out will show, it is for the command Crop and Zoom.

Step 3: Drag the corners of the frame to resize the size of your video or adjust position by dragging the handles. You can crop off anything outside this frame and hit “OK”.

Step 4: Adjust the crop and zoom as you like and finally, click on ‘Save Project As’ to export your video.

You can download Filmora free video editor from the official website easily. Just visit the behind-the-link and click on ‘Download’ to get the installer file. Once you have downloaded it, you need to install Filmora software on your computer to start using it.
Step 3: Then, go to the “Effects” tab.
Step 4: From the list of options, you have to choose “Crop” option and drag it to the clip that you want to crop.
Step 5: After dragging it, you will see a letter ‘C’ on the clip which means crop. Right click on it and you will see few selections. Select ‘Properties’.
Step 6: Under ‘Properties’, you will see a ‘Selection’ drop down. Choose ‘Crop’. You can utilize it to adjust to your preferred video size, a video preview will show on the right side of the screen.
Step 7: You can also use the crop frame that will appear on your screen with some handles around it. You can drag these handles from four corners to resize the frame according to the content you want to crop.
Step 8: Once you have cropped your video, then go to the “File” tab in the uppermost part of the editor and select the “Save as” option and save your file.
In conclusion, follow the steps given above to crop your video, resize it and save your work.
There is a better way to do it which using Filmora. It is an online video editing software that allows its users to create videos for various purposes. It provides the users with some special features like easy trimming, splitting and merging of clips, etc. By using Filmora, you can easily crop your short video (a clip) and also resize it.
An easier way to crop video using Filmora
Wondershare Filmora Video Editor is a software created for use on Windows, designed to edit videos. It has many of the features of Adobe Premiere, but it is free.
It supports the following formats: AVI, MP4, WMV, MKV, MOV, FLV and 3GP.
Wondershare Filmora is different than most video editors in that it does not use timelines. Instead, the user edits clips in a storyboard and adds effects and titles to them. It also has an Audio Visualization feature that plays back music in your collection and shows what you’re listening to in real time. There is no voice-over tool and it is not possible to add an audio track.
Wondershare Filmora has a very large number of effects, all editable via keyframes. These include simple motion graphics such as fades and dissolves, but it also includes advanced options like motion blur and chroma-key. There are free downloadable effects, which are created by users.
Wondershare Filmora supports text editing and there is a large library of free fonts available for download on its website. It does not support green-screening/chroma-keying. This can be done in post production via Adobe Premiere or other software.
It also has the ability to add a number of different titles, which can be stacked and moved around in 3D space.
Wondershare Filmora allows you to import photos for use in slideshows and effects. Every clip or image can have its own effect applied to it if desired.
After editing, the project is rendered in real time with no waiting. You can also choose to render only part of the video by selecting the time range.
One final bonus is Wondershare Filmora’s media library, which allows users to add files from their computer and sort them by category. This makes finding your desired video a much easier task.
This software has a very simple interface that is easy to navigate, even for beginners. The design of the program makes it intuitive enough that you can start editing videos right away without having to go through tutorials. It is easy to create the desired effects and titles that you need for your video with just a few clicks. Its editing tools are powerful enough for professional use while still being easy to learn.
The one downside is that Wondershare Filmora does not support 4K resolution—the maximum output size is 1080p.
For Win 7 or later (64-bit)
For macOS 10.14 or later
Step-by-step on how to crop videos using Filmora?
To crop your short video (a clip) and also resize it, follow the steps given below:
Step 1: Open Filmora video editor. Go to the ‘Home’ menu and click on ‘Open Project’ or go to File > Open Project. Now, select your *.AVI or *.MP4 file.
Step 2: Click Alt + C in your keyboard. A small pop-out will show, it is for the command Crop and Zoom.
Step 3: Drag the corners of the frame to resize the size of your video or adjust position by dragging the handles. You can crop off anything outside this frame and hit “OK”.
Step 4: Adjust the crop and zoom as you like and finally, click on ‘Save Project As’ to export your video.
You can download Filmora free video editor from the official website easily. Just visit the behind-the-link and click on ‘Download’ to get the installer file. Once you have downloaded it, you need to install Filmora software on your computer to start using it.
Also read:
- Finding The Best LUTs for Wondershare Filmora for 2024
- 2024 Approved How to Select and Use The Best BRAW LUTs
- New 2024 Approved How to Brighten a Video in Windows 10 Easily
- New In 2024, 10 Best Old Film Overlays to Make Your Videos Look Vintage
- Are You Searching for the Best Canon LUT Download? This Article Provides the Best Recommendations for Creating the Best Professional Videos for 2024
- Updated Do You Want to Stream and Record at the Same Time but Cant Find an Easy Solution? This Guide Will Help You Get This Done Using Three Easy-to-Follow Methods
- Updated To Know How to Add Effects in Premiere Pro, You Need to Follow This Guide as It Has All You Need to Know to Add Effects in Premiere Pro. Learn More Here
- New Detailed Guide to Resize Your Video in VLC for 2024
- In 2024, Creating Testimonial Videos For Health And Wellness Business Industry
- Updated 10+ Royalty-Free 5 Second Countdown Footage HD & 4K Clips Included
- Kdenlive Review – Is It The Best Video Editor, In 2024
- New Top 5 Apps To Add Song To Video
- Updated In 2024, 6 Tips for Your First Facebook Ads
- In 2024, Top 7 Easy Ways to Convert a Video to a GIF Online
- Updated Explore a Variety of Inexpensive Camera Models Suitable for Making Slow-Motion Footage without Compromising Quality
- New How to Make Flying Objects in Wondershare Filmora
- In 2024, Best AR Video App - Top 10 Picks
- New 2024 Approved Tactics to Make Transparent Image in Minimal Steps
- How to Add a Custom Transition to OBS for 2024
- In 2024, How to Make Coin Magic With Filmora
- How to Remove Echo with Premiere Pro? Full Guide Here for 2024
- Do You Want to Make TikTok Videos More Elemental by Using Countdown but Dont Know How to Do This? Here We Will Thoroughly Guide You About This for 2024
- New Best Audio Plug-Ins For Video Editors
- New Creating Testimonial Videos For Health And Wellness Business Industry
- 2024 Approved How to Remove Background Noise From Video Sony Vegas
- Updated The Audio You Produce Will Inevitably Be Flawed Throughout the Production Process. So, Learn How Adobe Audition Removes Echo to Sound Better Instead of Throwing It Away
- New 2024 Approved How To Trim Video In Premiere Pro in Different Ways
- Updated In 2024, How to Create Video Contents That Convert Sales
- 2024 Approved Having Trouble with Black Backgrounds in After Effects? Land in Here to Know How You Can Quickly Escape This Glitch in the Simplest Ever Way Possible
- Updated Detailed Steps to Rotate Videos in Windows Media Player for 2024
- Updated A Guide to Adding Audio in Wondershare Filmora for 2024
- New In 2024, How to Create Discord Emoji GIF
- Updated 2024 Approved Every Compositor Should Know The Trick of Color Match in After Effects
- Updated Why Did Filmora AI Portrait Attract People?
- New Want to Make Use of a Lovely Background for Your Image by Removing the Background or Making It Transparent? Here Is Something You Need to Cover
- Updated How to Create Custom Lower Thirds in Filmora
- The Complete Guide to Slideshow Maker with Music
- 2024 Approved Best Free LUTs to Use
- New 2024 Approved Best 9 Amv Makers for Computer
- Updated 2024 Approved How to Record Super Slow Motion Videos on Your Phone?
- Guide To Make a YouTube Intro by Filmora
- In 2024, Having Trouble with Black Backgrounds in After Effects? Land in Here to Know How You Can Quickly Escape This Glitch in the Simplest Ever Way Possible
- How to Make a Custom Slide Show in PowerPoint for 2024
- Updated Best Ways to Convert Video Frame Rate to 60FPS Software and Online Choices
- Complete Tutorial on After Effects Countdown Timer Adding
- In 2024, Are You Excited to Learn About a File Format that Helps in Easy Transfer? We Are Talking About the 3GP Format. Stay with Us and Get to Know More About It
- In 2024, The Best iSpoofer Alternative to Try On Samsung Galaxy Z Flip 5 | Dr.fone
- In 2024, A Step-by-Step Guide on Using ADB and Fastboot to Remove FRP Lock on your Motorola Moto G84 5G
- New What Is an AI Tool for 2024
- In 2024, Unova Stone Pokémon Go Evolution List and How Catch Them For OnePlus Ace 2 | Dr.fone
- In 2024, How to Transfer Data from Poco C55 to Any iOS Devices | Dr.fone
- In 2024, Best 3 Software to Transfer Files to/from Your HTC U23 via a USB Cable | Dr.fone
- In 2024, The Most Useful Tips for Pokemon Go Ultra League On Vivo Y78+ | Dr.fone
- Forgotten The Voicemail Password Of Samsung Galaxy XCover 6 Pro Tactical Edition? Try These Fixes
- In 2024, 4 Most-Known Ways to Find Someone on Tinder For Apple iPhone 15 by Name | Dr.fone
- In 2024, How Motorola Moto G34 5G Mirror Screen to PC? | Dr.fone
- How to Vivo Y77t Get Deleted Pictures Back with Ease and Safety?
- In 2024, Best Vivo S18 Pro Pattern Lock Removal Tools Remove Android Pattern Lock Without Losing Data
- In 2024, Full Guide on Mirroring Your Vivo Y200 to Your PC/Mac | Dr.fone
- In 2024, 5 Ways to Transfer Music from Asus ROG Phone 8 to Other Android Devices Easily | Dr.fone
- In 2024, 9 Best Phone Monitoring Apps for OnePlus 12 | Dr.fone
- In 2024, Easy Fixes How To Recover Forgotten iCloud Password On your iPhone 13
- Top 4 Android System Repair Software for Infinix Smart 8 Bricked Devices | Dr.fone
- How to add a digital signature field to a Word 2019
- 3 Easy Solutions to Hard Reset Vivo Y28 5G | Dr.fone
- In 2024, Top 12 Prominent Infinix Zero 30 5G Fingerprint Not Working Solutions
- In 2024, Easy Ways to Manage Your OnePlus Nord CE 3 Lite 5G Location Settings | Dr.fone
- How to Transfer Photos from Honor X50i+ to Laptop Without USB | Dr.fone
- Android Call History Recovery - recover deleted call logs from Honor 90 Pro
- In 2024, 5 Ways to Track OnePlus Nord N30 SE without App | Dr.fone
- How To Reset the Security Questions of Your Apple ID From Your Apple iPhone 12
- Things You Dont Know About Vivo V30 Lite 5G Reset Code | Dr.fone
- 7 Top Ways To Resolve Apple ID Not Active Issue For iPhone 7 | Dr.fone
- Three methods to recover lost data on Itel A60s
- In 2024, How to Use Pokémon Emerald Master Ball Cheat On Oppo A18 | Dr.fone
- 8 Workable Fixes to the SIM not provisioned MM#2 Error on Vivo S17 | Dr.fone
- How to recover deleted photos from Android Gallery after format on Moto G13
- How to rescue lost call logs from Lava Yuva 2
- The way to get back lost videos from 10T 5G
- In 2024, Top 15 Augmented Reality Games Like Pokémon GO To Play On Samsung Galaxy XCover 6 Pro Tactical Edition | Dr.fone
- In 2024, Your Account Has Been Disabled in the App Store and iTunes From iPhone XR?
- 3 Methods to Mirror Xiaomi 14 Pro to Roku | Dr.fone
- 6 Fixes to Unfortunately WhatsApp has stopped Error Popups On Samsung Galaxy M54 5G | Dr.fone
- The 6 Best SIM Unlock Services That Actually Work On Your Xiaomi Redmi Note 12 5G Device
- Play Store Not Working On Infinix Smart 8? 8 Solutions Inside | Dr.fone
- In 2024, The Best Android SIM Unlock Code Generators Unlock Your Motorola Edge 40 Pro Phone Hassle-Free
- In 2024, 5 Ways to Transfer Music from Nokia 130 Music to Other Android Devices Easily | Dr.fone
- In 2024, How to Unlock Xiaomi Civi 3 Phone with Broken Screen
- Spoofing Life360 How to Do it on Vivo Y55s 5G (2023)? | Dr.fone
- Title: In 2024, 11 Tips to Make Product Ad Videos
- Author: Chloe
- Created at : 2024-05-20 03:37:39
- Updated at : 2024-05-21 03:37:39
- Link: https://ai-editing-video.techidaily.com/in-2024-11-tips-to-make-product-ad-videos/
- License: This work is licensed under CC BY-NC-SA 4.0.
