
:max_bytes(150000):strip_icc():format(webp)/Robothandholdinganapple-fbe6ff482ed641e188dd6650b9ac132e.jpg)
In 2024, 2 Effective Ways to Add Text Behind Objects
2 Effective Ways to Add Text Behind Objects
Adding text behind objects in your videos can be a great way to start your videos. For example, you can do so to create an attractive intro or startup a video. So, if you hope to make a video like a pro, let’s learn how to add text behind objects in your videos by Filmora.

Part 1. What Are The Benefits of Adding Text Behind Objects in Videos?
Your videos must maintain quality to create content worthy of a huge audience. You may have a YouTube channel or be starting down the road. Then you must give this a try because
Give a cool look
Adding text behind an object in a video looks cool! Now, your object could be a silhouette of a person or a huge skyscraper. You can add a text tile behind the object, creating the illusion. Due to this, the text will be flying in real-time.
Show creativity
Blasting your channel with innovative and creative content is the key to building a big audience. But, of course, you can always opt for many ways to create a video showing your creativity. One of those ways is to add text behind your object.
You can create an attractive intro by adding text behind objects that captivate the viewer. It ensures that your subscribers stay tuned to your channel and your content.
Build up a solid audience
Every day can be a real struggle if you are a daily content creator on YouTube. The audience demands good content. But your daily videos can get boring if you do not use new methods to edit your videos.
You can add text behind videos to spice up your intros and hook your daily audience even more. That will show the audience that you are genuinely putting in the effort.
Part 2. What Will You Need To Add Text Behind Videos?
Now there are a few things that you will need to add text behind videos. First, take a look at the basic priorities to perform this feature.
1. A Static Object Video
Adding text behind an object can be tricky if the object isn’t static. For example, the effect will be ruined if an object moves around a lot in a video.
Our goal is to create a smooth text behind the video effect. And this can only be achieved if the target object remains static in the video and does not move about its position.
2. A Video Editing Software - Wondershare Filmora
Once you select a video source, you aim to add it to a video editor. For this purpose, Wondershare Filmora would be your best choice. Wondershare Filmora allows you to create innovative and attractive videos.
Free Download For Win 7 or later(64-bit)
Free Download For macOS 10.14 or later
It has a very engaging system UI, allowing even beginner users to get their hands on it instantly. You will learn how to add text behind your videos with a few simple steps.

Now that you know the requirements for the video, let’s move on to the step-by-step guide to add text to your video.
Part 3. Step-by-Step Guide To Add Text Behind Videos
We look at two examples of how to add text behind videos in Wondershare Filmora.
- A static video with an object that can be easily masked out.
- A video with high contrast and a clean background.
Add Text behind a Static Video
First, we will go with adding text behind a static object. For this, scroll more to get the step-by-step process.
Step1 Download Wondershare Filmora
If you are a beginner just starting in the video editing business, Wondershare Filmora is the best choice. Follow the steps below to download the free version of Wondershare Filmora:
- First, download the Wondershare Filmora on your PC or Mac.
- Open the setup and install the Wondershare Filmora.
After downloading the Wondershare Filmora software, let’s edit the video. Scroll below to learn how to start the editing process!
Step2 Add the Video to the Timeline
We will first look at the static video example. For this, follow the below instructions:
- You have to start by importing your video in the import library.
- From the import library, you can click on the video and drag it down below to the timeline.

![]()
Note: Adding video to the timelines will allow you to create a workspace to edit your video.
Now let’s move on to how we will add the text tile to our video.
Step3 Add the Text Tile
It is time to add the text tile you will animate behind the object. To do that, follow the steps mentioned as such.:
- Go to the Titles icon on the bar above the import library.
- A drop-down option will be available on the left side.
- Scroll down to the Plain text.
- Here, you can see many text tiles to add to your video.
- You can choose anyone you like.
- The most commonly used tile is the Basic 6.
- When you add the text tile to the timeline, you must ensure that the text is of equal length to the video.
- To do that, drag the right corner of the text tile and drag it to the right to match the length of the video.

Step4 Edit the Text Tile
After you have added the text tile you desire, you need to type in the text. For this article, we will keep it simple. We will be typing a simple statement such as “Hello, World.“
- Double-click the Text tile to open the settings menu.
- After the settings menu is opened, type in the text box on the import window.
You will notice changes on the main window that your text has changed.

- After the text appears, you can make the font look as desired.
- Look above the text window, and you will see the type of text font selected.
- Click on the drop-down option and choose whatever you like.
Let’s move on to animate the text tile.
Step5 Animate the text tile
After adding text, it is time to animate it. This animation will decide how your text will appear behind the target object.
- First, you must open the text settings by double-clicking on the text tile in the timeline.
- In the settings opened in the import window, you will have to click on the animation tab in the upper left corner, aside from the Preset
- Now scroll down to where you will see the Right Roll
- Click on Right Roll and then click on the OK in the bottom right corner of the import window.

![]()
Note: You may notice now that the text appears in front of our object. Don’t worry now! We are getting there. With a few simple steps, we will see the results.
Now let us move on to the more significant part of the editing, masking the object. Again, look ahead to see how you can mask the object!
Step6 Mask the Object
To mask our object, we will need to be technical. We will begin by adding the same footage of the static object on our timeline. Follow the steps mentioned below:
- Drag and drop the static object footage above the timeline text. Make sure the text stays in the middle of the sandwich.

- We will hide the video in the first track to simplify things. In addition, this will make our editing easier.
- We will have to look in the effects library to insert the masking effect.
- You can see the Effects icon on the bar at the top.
- Click on the Effects.
- You will see the search bar at the top of the import window.
- In the search bar, type in Image mask.
- Drag the Image mask effect on the video above the text tile.
Now the masking effect has been added. But we would have to adjust so that it stays upon our object.
- Double-click on the video and the settings option will open up.
- Go into the Effects
![]()
Note: You must select your target object’s mask shape exactly as its shape.
- We have to mask out a building, so that we will need a vertical rectangle.

- After you have selected the shape of your object, we will need to convert it to the object’s size so that it only masks the building.
- To do that, scroll down below the import window to the settings.
- Here you can see the X, Y, and width settings.
- First, move the width bar so that it matches the width of the building.

- Now drag the X bar until the mask is confined to the building. You would have created the mask only limited to the building.

- Once you complete this step, click OK in the bottom right corner.
- Now un-hide the original video that you imported in the beginning.
Finally, play the video in the main play window from the beginning.

You have successfully created a text behind the object effect. Now that you know how to add text behind static objects let us move to learn how to add text to a video that has high contrast and a clean background.
Add text behind a high contrast and clean background
Besides the text can be added behind a static object, it can also be added to a clean background with high contrast. But how is it? Let’s dive into it.
Step1 Import the video into the timeline
- Import the video from the location in your PC media.
- When imported, drag and drop it onto the timeline.

Step2 Add the text tile
To add the text to your video, follow the steps mentioned below.
- Click on the titles icon on the bar above the import window.
- On the left drop-down option, scroll down to the titles.
- Select the Plain text option.
- You will notice that multiple options will pop up in the import window.
- Select the text title that suits you best.
- After you have selected the text style, drag and drop it down above your video in the timeline.

- Our next step would be to add the text.
- Double-click on the text tile. Doing so will open the settings menu in the import window.
- Type in the text that you want. For reference, we will keep it simple such as, “Hello world.”
- You can also adjust the font of your text.
- Above the type box, a drop-down option will show you the range of fonts available.
- Select the font you desire.

Now that you have added the text, it is time to animate it.
Step3 Take a snapshot
After typing in the text, you will notice in the main play window that your text still appears in front of your object. Therefore, we want to take it behind the object. To do so, first, you will need to take a snapshot.
Follow the steps mentioned to take a snapshot:
- Hide the main video. You can see the Eye icon aside from your main video in the edit column on the left side of the timeline.
- Click on the Eye icon to hide the main video.
- In the main play window, you will notice that the screen turns black, which leaves only the text on the screen.

- In the main play screen, you can notice a small camera icon.
- This camera icon is used to take snapshots of your screen.
- Click on the camera icon to take a snapshot of your screen.
- Your snapshot will now be saved in the main import window.

Now that we have taken a snapshot, we will need to import it into the timeline. Scroll below for more.
Step4 Add the snapshot
After taking it, your goal is to import it into the timeline. To perform this action, perform the following steps:
- Before adding the snapshot to the timeline, we must delete the main text tile.
- Then drag and drop the snapshot from the import library into the timeline above the video.
- Make sure that the snapshot is aligned well with the length of the video.
- If it is longer than the video, drag it from the right to match the length of the video.
- If its length is smaller than the video, drag it to the right to increase its length.

After adding the snapshot, we will have to change its blending mode.
Step5 Change the blending of the snapshot
To create the effect of your text behind the video, you must alter the main text’s blending mode. In this case, it will be the snapshot we took.
![]()
Note: Changing the blending mode of the snapshot will allow it to blend with the transparent background and will create the effect of the text behind the object in the video.
Follow the steps mentioned below to change the blending of the snapshot:
- Double-click the snapshot.
- If you select the compositing tab, the blending options will pop up.
- From default, it would be set to Normal. Click on the Normal
- It will show a drop-down option.
- Scroll down below until you can see an option labeled Then click on Overlay.

- And press OK in the bottom right corner to confirm your changes.
The text can be blended with the background.
- Click on the Eye icon to un-hide the video from the timeline.
- Now play the video from the start from the main play screen to see the final changes.

Congratulations! The above steps allow you to add text behind objects in your videos.
Conclusion
Modern media is full of creative content. And if you are a content creator that wants to make it through the world of YouTube and video creating, you need to be the best. You can only be the best at what you do if you keep pushing the boundaries of your creativity.
Adding text behind objects could be the first step in making your intros shine with creativity and innovation. It allows you to maintain and build your viewing audience. The more the audience, the more your content gets watched!
Free Download For macOS 10.14 or later
It has a very engaging system UI, allowing even beginner users to get their hands on it instantly. You will learn how to add text behind your videos with a few simple steps.
Now that you know the requirements for the video, let’s move on to the step-by-step guide to add text to your video.
Part 3. Step-by-Step Guide To Add Text Behind Videos
We look at two examples of how to add text behind videos in Wondershare Filmora.
- A static video with an object that can be easily masked out.
- A video with high contrast and a clean background.
Add Text behind a Static Video
First, we will go with adding text behind a static object. For this, scroll more to get the step-by-step process.
Step1 Download Wondershare Filmora
If you are a beginner just starting in the video editing business, Wondershare Filmora is the best choice. Follow the steps below to download the free version of Wondershare Filmora:
- First, download the Wondershare Filmora on your PC or Mac.
- Open the setup and install the Wondershare Filmora.
After downloading the Wondershare Filmora software, let’s edit the video. Scroll below to learn how to start the editing process!
Step2 Add the Video to the Timeline
We will first look at the static video example. For this, follow the below instructions:
- You have to start by importing your video in the import library.
- From the import library, you can click on the video and drag it down below to the timeline.
![]()
Note: Adding video to the timelines will allow you to create a workspace to edit your video.
Now let’s move on to how we will add the text tile to our video.
Step3 Add the Text Tile
It is time to add the text tile you will animate behind the object. To do that, follow the steps mentioned as such.:
- Go to the Titles icon on the bar above the import library.
- A drop-down option will be available on the left side.
- Scroll down to the Plain text.
- Here, you can see many text tiles to add to your video.
- You can choose anyone you like.
- The most commonly used tile is the Basic 6.
- When you add the text tile to the timeline, you must ensure that the text is of equal length to the video.
- To do that, drag the right corner of the text tile and drag it to the right to match the length of the video.
Step4 Edit the Text Tile
After you have added the text tile you desire, you need to type in the text. For this article, we will keep it simple. We will be typing a simple statement such as “Hello, World.“
- Double-click the Text tile to open the settings menu.
- After the settings menu is opened, type in the text box on the import window.
You will notice changes on the main window that your text has changed.
- After the text appears, you can make the font look as desired.
- Look above the text window, and you will see the type of text font selected.
- Click on the drop-down option and choose whatever you like.
Let’s move on to animate the text tile.
Step5 Animate the text tile
After adding text, it is time to animate it. This animation will decide how your text will appear behind the target object.
- First, you must open the text settings by double-clicking on the text tile in the timeline.
- In the settings opened in the import window, you will have to click on the animation tab in the upper left corner, aside from the Preset
- Now scroll down to where you will see the Right Roll
- Click on Right Roll and then click on the OK in the bottom right corner of the import window.
![]()
Note: You may notice now that the text appears in front of our object. Don’t worry now! We are getting there. With a few simple steps, we will see the results.
Now let us move on to the more significant part of the editing, masking the object. Again, look ahead to see how you can mask the object!
Step6 Mask the Object
To mask our object, we will need to be technical. We will begin by adding the same footage of the static object on our timeline. Follow the steps mentioned below:
- Drag and drop the static object footage above the timeline text. Make sure the text stays in the middle of the sandwich.
- We will hide the video in the first track to simplify things. In addition, this will make our editing easier.
- We will have to look in the effects library to insert the masking effect.
- You can see the Effects icon on the bar at the top.
- Click on the Effects.
- You will see the search bar at the top of the import window.
- In the search bar, type in Image mask.
- Drag the Image mask effect on the video above the text tile.
Now the masking effect has been added. But we would have to adjust so that it stays upon our object.
- Double-click on the video and the settings option will open up.
- Go into the Effects
![]()
Note: You must select your target object’s mask shape exactly as its shape.
- We have to mask out a building, so that we will need a vertical rectangle.
- After you have selected the shape of your object, we will need to convert it to the object’s size so that it only masks the building.
- To do that, scroll down below the import window to the settings.
- Here you can see the X, Y, and width settings.
- First, move the width bar so that it matches the width of the building.
- Now drag the X bar until the mask is confined to the building. You would have created the mask only limited to the building.
- Once you complete this step, click OK in the bottom right corner.
- Now un-hide the original video that you imported in the beginning.
Finally, play the video in the main play window from the beginning.
You have successfully created a text behind the object effect. Now that you know how to add text behind static objects let us move to learn how to add text to a video that has high contrast and a clean background.
Add text behind a high contrast and clean background
Besides the text can be added behind a static object, it can also be added to a clean background with high contrast. But how is it? Let’s dive into it.
Step1 Import the video into the timeline
- Import the video from the location in your PC media.
- When imported, drag and drop it onto the timeline.
Step2 Add the text tile
To add the text to your video, follow the steps mentioned below.
- Click on the titles icon on the bar above the import window.
- On the left drop-down option, scroll down to the titles.
- Select the Plain text option.
- You will notice that multiple options will pop up in the import window.
- Select the text title that suits you best.
- After you have selected the text style, drag and drop it down above your video in the timeline.
- Our next step would be to add the text.
- Double-click on the text tile. Doing so will open the settings menu in the import window.
- Type in the text that you want. For reference, we will keep it simple such as, “Hello world.”
- You can also adjust the font of your text.
- Above the type box, a drop-down option will show you the range of fonts available.
- Select the font you desire.
Now that you have added the text, it is time to animate it.
Step3 Take a snapshot
After typing in the text, you will notice in the main play window that your text still appears in front of your object. Therefore, we want to take it behind the object. To do so, first, you will need to take a snapshot.
Follow the steps mentioned to take a snapshot:
- Hide the main video. You can see the Eye icon aside from your main video in the edit column on the left side of the timeline.
- Click on the Eye icon to hide the main video.
- In the main play window, you will notice that the screen turns black, which leaves only the text on the screen.
- In the main play screen, you can notice a small camera icon.
- This camera icon is used to take snapshots of your screen.
- Click on the camera icon to take a snapshot of your screen.
- Your snapshot will now be saved in the main import window.
Now that we have taken a snapshot, we will need to import it into the timeline. Scroll below for more.
Step4 Add the snapshot
After taking it, your goal is to import it into the timeline. To perform this action, perform the following steps:
- Before adding the snapshot to the timeline, we must delete the main text tile.
- Then drag and drop the snapshot from the import library into the timeline above the video.
- Make sure that the snapshot is aligned well with the length of the video.
- If it is longer than the video, drag it from the right to match the length of the video.
- If its length is smaller than the video, drag it to the right to increase its length.
After adding the snapshot, we will have to change its blending mode.
Step5 Change the blending of the snapshot
To create the effect of your text behind the video, you must alter the main text’s blending mode. In this case, it will be the snapshot we took.
![]()
Note: Changing the blending mode of the snapshot will allow it to blend with the transparent background and will create the effect of the text behind the object in the video.
Follow the steps mentioned below to change the blending of the snapshot:
- Double-click the snapshot.
- If you select the compositing tab, the blending options will pop up.
- From default, it would be set to Normal. Click on the Normal
- It will show a drop-down option.
- Scroll down below until you can see an option labeled Then click on Overlay.
- And press OK in the bottom right corner to confirm your changes.
The text can be blended with the background.
- Click on the Eye icon to un-hide the video from the timeline.
- Now play the video from the start from the main play screen to see the final changes.
Congratulations! The above steps allow you to add text behind objects in your videos.
Conclusion
Modern media is full of creative content. And if you are a content creator that wants to make it through the world of YouTube and video creating, you need to be the best. You can only be the best at what you do if you keep pushing the boundaries of your creativity.
Adding text behind objects could be the first step in making your intros shine with creativity and innovation. It allows you to maintain and build your viewing audience. The more the audience, the more your content gets watched!
Best 5 Tips to Freeze-Frame in After Effects
Top 5 Tips to Freeze Frame in After Effects
An easy yet powerful editor
Numerous effects to choose from
Detailed tutorials provided by the official channel
After Effects (AE) does not require any introduction as it is one of the most preferred video editing tools for commercial and professional purposes. However, this editing software is a bit complex for beginners. A freeze-frame is basically for holding the video on a single frame for an extended period. When it comes to clip editing, Adobe After Effects is a tool that no one can miss as it has plenty of editing tools and features that other tools do not have. In addition, AE offers a layer-based editing tool that provides the most professional way to edit videos, whereby users can add transition, multiple layers, effects, audio, etc., at the same instant.

Among many other features, one of the essential features of AE that we will talk about is a freeze-frame. Now the question is, what is freeze-frame? The freeze-frame stops or freezes stop the specific frame that users should focus on or feature. Simply, select or pick the frame required to be frozen and follow the steps to freeze the frame of their choice. This article will explain how you can frame hold in After Effects by following a few simple steps.
In this article
01 [How to Freeze-frame in After Effects](#Part 1)
02 [FAQs on Freeze Effect on After Effects](#Part 2)
03 [Compared with Filmora, What Are the Advantages of Freeze-frame After Effects?](#Part 3)
Part 1 How to Freeze-frame in After Effects
This part explains how to hold a frame in After Effects and the working of the freeze-frame button. After Effects requires ample resources, and the layers need to be solo for the editing process to speed up. However, sometimes you may need to see other objects in the scene, and that is where the freeze-frame button will be helpful. This freeze-frame Effect temporarily freezes the selected layers while you continue editing the video and does not overload the After Effects editor. In addition, you can press the button again to remove the freeze. Here is a step-by-step guide on how to use Adobe After Effects to freeze-frame:
Step 1: Add Video Clip to Adobe After Effects
First, make sure you have the AE composition open, and the video clip added. Next is to find the point where you want the video to “pause” or freeze by moving the time position indicator on the timeline.
Step 2: Choose Layer for Freezing Frame
Next, select the layer and then right-click on the layer to find Time in the menu that appears, and under Time find Freeze-frame and click it. Once done, the entire layer will get stuck on that frame.

Step 3: Add Multiple Layers for Effects
Start the same way before and repeat it several times by splitting the layer, which means that After Effects will take the layer at the time position indicator and cut it into two layers. To achieve this, use the keyboard shortcut Command+Shift+D if you are using a Mac or Control+Shift+D if you are using a Windows operating system.
Step 4: Zoom in
Next, hit the plus (+) sign a few times to zoom into the timeline, move forward one frame, select the new layer, the one on top, and split the layer again using the keyboard shortcut, and now have three layers.

Finally, export and save it on your device when you are satisfied with the result.
Thus, you successfully used the After Effects Freeze Frame to bring cinematic effects to your video.
Part 2 FAQs on Freeze Effect on After Effects
Now, let us view some common FAQs that may come across while using After Effects frame hold.
● What does freeze do in After Effects?
With After Effects holding the last frame (freeze-frame), you can instantly add multiple layers, effects, transitions, audio, and other media. In addition, the freeze-frame in After Effect pauses or stops the specific frame that you want to feature or focus.
● Why can’t I freeze-frame in After Effects?
The reason you cannot freeze-frame in After Effect could be a result of the greyed-out features. With this grey-out feature, a freeze-frame cannot be created or added from a sequence, as you will be required to go back to the original clip to create a freeze-frame or any other type of Effect.
● How do you Freeze the current frame for the duration of the layer in After Effects 2020?
● First, in the Composition or the Timeline panel, pick the layer.
● Place the current-time indicator on the frame that you want to freeze.
● Choose Layer > Time > Freeze-frame.
Part 3 Compared with Filmora, What Are the Advantages of Freeze-frame After Effects?
A freeze-frame can be any frame from a video clip you would like to turn into an After Effects still frame or still image. Another perfect way to explain a freeze-frame called a still image is that it is like pressing the pause button on remote control, making a statue, or taking a photo.
Other Advantages of Freeze-frame in Adobe After Effect is that:
● The images can be worked upon quickly without discussion or rehearsed and planned.
● They are instrumental as an immediate way of communicating ideas or telling a story.
● They can be valuable to represent people or objects and even abstract concepts like emotions or atmospheres.
● As there are no lines to learn, frame hold in After Effects can help shyer performers to gain confidence.
More so, with the Filmora Video Editor, you can freeze a frame of your video clip, and it also allows users to set the duration of the freeze automatically.
Other Advantages of Freeze-frame in Filmora are that:
● Freeze Frame in Filmora has made the editing tasks more flexible and accessible.
● It makes the video more appealing and exciting.
● It helps extend the duration of any point in the video and makes it more focused.
▲Comparison Table of Adobe After Effect and Wondershare Filmora Video Editor
For Win 7 or later (64-bit)
For macOS 10.12 or later
| DIMENSIONS | ADOBE AFTER EFFECT (AE) | FILMORA |
|---|---|---|
| Smartscore | 9.0 | 9.5 |
| User Satisfaction | 82% | 96% |
| Price | $29.99 | $7.99 |
| Price Model | Monthly PaymentAnnual SubscriptionQuote Based | Monthly PaymentAnnual SubscriptionQuote BasedOne-time Payment |
| List of Features | Immersive Virtual Reality EffectsData-Driven AnimationExpression Access to Shape, Mask, And Brush Stroke Path PointsCreate Virtual Reality EffectsVR ConverterVR Comp EditorVR Rotate SphereCreate Nulls from Path PanelGPU Accelerated Effects | 4K editing supportGIF supportNoise removalColor tuningAdvanced text editorAudio mixerVideo stabilizationScene detectionAudio equalizer |
| Integration | Video collaboration tool3D graphic programProject management solution | YouTubeFacebookTwitterInstagramVimeo |
| Language Supported | EnglishDutchPolishTurkishSwedish | EnglishSwedishPortugueseDutchItalianRussianFrenchSpanishJapaneseHindiGermanChinese |
| Available Device | WindowsMacAndroidWeb-basediPhone/iPadLinux | WindowsMac |
In short, Adobe After Effects is a much better instrument for professionals due to its extensive range of features. However, it can seem complex for newbies. Thus, if you are new to video editing and freeze frames on After Effects, we suggest you go for Filmora first to get yourself acquainted.
● Ending Thoughts →
● Thus, this report recommends Filmora as an essential alternative to After Effect in using freeze-frame as Filmora allows work with ease.
● We added a list of FAQs on the After Effects freeze-frame.
After Effects (AE) does not require any introduction as it is one of the most preferred video editing tools for commercial and professional purposes. However, this editing software is a bit complex for beginners. A freeze-frame is basically for holding the video on a single frame for an extended period. When it comes to clip editing, Adobe After Effects is a tool that no one can miss as it has plenty of editing tools and features that other tools do not have. In addition, AE offers a layer-based editing tool that provides the most professional way to edit videos, whereby users can add transition, multiple layers, effects, audio, etc., at the same instant.
Among many other features, one of the essential features of AE that we will talk about is a freeze-frame. Now the question is, what is freeze-frame? The freeze-frame stops or freezes stop the specific frame that users should focus on or feature. Simply, select or pick the frame required to be frozen and follow the steps to freeze the frame of their choice. This article will explain how you can frame hold in After Effects by following a few simple steps.
In this article
01 [How to Freeze-frame in After Effects](#Part 1)
02 [FAQs on Freeze Effect on After Effects](#Part 2)
03 [Compared with Filmora, What Are the Advantages of Freeze-frame After Effects?](#Part 3)
Part 1 How to Freeze-frame in After Effects
This part explains how to hold a frame in After Effects and the working of the freeze-frame button. After Effects requires ample resources, and the layers need to be solo for the editing process to speed up. However, sometimes you may need to see other objects in the scene, and that is where the freeze-frame button will be helpful. This freeze-frame Effect temporarily freezes the selected layers while you continue editing the video and does not overload the After Effects editor. In addition, you can press the button again to remove the freeze. Here is a step-by-step guide on how to use Adobe After Effects to freeze-frame:
Step 1: Add Video Clip to Adobe After Effects
First, make sure you have the AE composition open, and the video clip added. Next is to find the point where you want the video to “pause” or freeze by moving the time position indicator on the timeline.
Step 2: Choose Layer for Freezing Frame
Next, select the layer and then right-click on the layer to find Time in the menu that appears, and under Time find Freeze-frame and click it. Once done, the entire layer will get stuck on that frame.
Step 3: Add Multiple Layers for Effects
Start the same way before and repeat it several times by splitting the layer, which means that After Effects will take the layer at the time position indicator and cut it into two layers. To achieve this, use the keyboard shortcut Command+Shift+D if you are using a Mac or Control+Shift+D if you are using a Windows operating system.
Step 4: Zoom in
Next, hit the plus (+) sign a few times to zoom into the timeline, move forward one frame, select the new layer, the one on top, and split the layer again using the keyboard shortcut, and now have three layers.
Finally, export and save it on your device when you are satisfied with the result.
Thus, you successfully used the After Effects Freeze Frame to bring cinematic effects to your video.
Part 2 FAQs on Freeze Effect on After Effects
Now, let us view some common FAQs that may come across while using After Effects frame hold.
● What does freeze do in After Effects?
With After Effects holding the last frame (freeze-frame), you can instantly add multiple layers, effects, transitions, audio, and other media. In addition, the freeze-frame in After Effect pauses or stops the specific frame that you want to feature or focus.
● Why can’t I freeze-frame in After Effects?
The reason you cannot freeze-frame in After Effect could be a result of the greyed-out features. With this grey-out feature, a freeze-frame cannot be created or added from a sequence, as you will be required to go back to the original clip to create a freeze-frame or any other type of Effect.
● How do you Freeze the current frame for the duration of the layer in After Effects 2020?
● First, in the Composition or the Timeline panel, pick the layer.
● Place the current-time indicator on the frame that you want to freeze.
● Choose Layer > Time > Freeze-frame.
Part 3 Compared with Filmora, What Are the Advantages of Freeze-frame After Effects?
A freeze-frame can be any frame from a video clip you would like to turn into an After Effects still frame or still image. Another perfect way to explain a freeze-frame called a still image is that it is like pressing the pause button on remote control, making a statue, or taking a photo.
Other Advantages of Freeze-frame in Adobe After Effect is that:
● The images can be worked upon quickly without discussion or rehearsed and planned.
● They are instrumental as an immediate way of communicating ideas or telling a story.
● They can be valuable to represent people or objects and even abstract concepts like emotions or atmospheres.
● As there are no lines to learn, frame hold in After Effects can help shyer performers to gain confidence.
More so, with the Filmora Video Editor, you can freeze a frame of your video clip, and it also allows users to set the duration of the freeze automatically.
Other Advantages of Freeze-frame in Filmora are that:
● Freeze Frame in Filmora has made the editing tasks more flexible and accessible.
● It makes the video more appealing and exciting.
● It helps extend the duration of any point in the video and makes it more focused.
▲Comparison Table of Adobe After Effect and Wondershare Filmora Video Editor
For Win 7 or later (64-bit)
For macOS 10.12 or later
| DIMENSIONS | ADOBE AFTER EFFECT (AE) | FILMORA |
|---|---|---|
| Smartscore | 9.0 | 9.5 |
| User Satisfaction | 82% | 96% |
| Price | $29.99 | $7.99 |
| Price Model | Monthly PaymentAnnual SubscriptionQuote Based | Monthly PaymentAnnual SubscriptionQuote BasedOne-time Payment |
| List of Features | Immersive Virtual Reality EffectsData-Driven AnimationExpression Access to Shape, Mask, And Brush Stroke Path PointsCreate Virtual Reality EffectsVR ConverterVR Comp EditorVR Rotate SphereCreate Nulls from Path PanelGPU Accelerated Effects | 4K editing supportGIF supportNoise removalColor tuningAdvanced text editorAudio mixerVideo stabilizationScene detectionAudio equalizer |
| Integration | Video collaboration tool3D graphic programProject management solution | YouTubeFacebookTwitterInstagramVimeo |
| Language Supported | EnglishDutchPolishTurkishSwedish | EnglishSwedishPortugueseDutchItalianRussianFrenchSpanishJapaneseHindiGermanChinese |
| Available Device | WindowsMacAndroidWeb-basediPhone/iPadLinux | WindowsMac |
In short, Adobe After Effects is a much better instrument for professionals due to its extensive range of features. However, it can seem complex for newbies. Thus, if you are new to video editing and freeze frames on After Effects, we suggest you go for Filmora first to get yourself acquainted.
● Ending Thoughts →
● Thus, this report recommends Filmora as an essential alternative to After Effect in using freeze-frame as Filmora allows work with ease.
● We added a list of FAQs on the After Effects freeze-frame.
Vintage Film Effect 1980S - How to Create
The 1980s is widely regarded as the golden era of music and film-making. If you play a video recorded in the 80s, you’ll notice graininess, blurriness, and light exposure, giving the footage a dreamy vintage touch. So, in this short tutorial, we’ll learn how to create a vintage 1980-style video with a retro effect that will leave your audience yearning for more.
Preparation

In this tutorial, you’ll need at least two video clips. First, take clear footage of a hoop dancer playing to music and a disco ball footage that you’ll add to the background. You can also add another footage to give your dancing video the perfect transition.
How to create a retro-style music video shot in the 80s:
Step1 Import the video clips on Filmora
Free Download For Win 7 or later(64-bit)
Free Download For macOS 10.14 or later

First, run Wondershare Filmora and add the video with the hoop dancer on the first track. Then, move the disco ball footage right above the first video track.
Step2 Add an animation keyframe

With the two videos imported on Filmora, move the playhead to the point where the hoop dancer begins to dance and double-click the disco ball footage.

Now find the Animation tab, then click the Customize tab. Next, click Add to apply a keyframe to this point of the video. Don’t stop there. Move the playhead to the right and add another keyframe to the footage before changing the opacity to 50%.

Meanwhile, we’ll add a keyframe to the third video with a lady removing her sunglasses. To do that, add the footage to the third track, then double-click the video track. After that, place the playhead at the start of the video and apply an animation keyframe before changing the opacity to 0%. Move the playhead a few keyframes forward and add another animation keyframe.
Step3 Add retro filters and effects to the video

Go to the Effect tab and choose Overlay. Once that is done, select the TV Static option before choosing the VHS Distortion effect. This effect will give your video the retro feeling of the 1980s. Don’t be afraid to try out the TV Static effects to find what works best in your video.
Summary
Creating a retro-style 1980s film is as easy as pie with Wondershare Filmora. You can also check out more 80s-inspired video effects on Wondershare’s Filmstock library. Ready to go back to the 80s? Hope so!
Free Download For macOS 10.14 or later
First, run Wondershare Filmora and add the video with the hoop dancer on the first track. Then, move the disco ball footage right above the first video track.
Step2 Add an animation keyframe
With the two videos imported on Filmora, move the playhead to the point where the hoop dancer begins to dance and double-click the disco ball footage.
Now find the Animation tab, then click the Customize tab. Next, click Add to apply a keyframe to this point of the video. Don’t stop there. Move the playhead to the right and add another keyframe to the footage before changing the opacity to 50%.
Meanwhile, we’ll add a keyframe to the third video with a lady removing her sunglasses. To do that, add the footage to the third track, then double-click the video track. After that, place the playhead at the start of the video and apply an animation keyframe before changing the opacity to 0%. Move the playhead a few keyframes forward and add another animation keyframe.
Step3 Add retro filters and effects to the video
Go to the Effect tab and choose Overlay. Once that is done, select the TV Static option before choosing the VHS Distortion effect. This effect will give your video the retro feeling of the 1980s. Don’t be afraid to try out the TV Static effects to find what works best in your video.
Summary
Creating a retro-style 1980s film is as easy as pie with Wondershare Filmora. You can also check out more 80s-inspired video effects on Wondershare’s Filmstock library. Ready to go back to the 80s? Hope so!
What Are the Best 10 GIF Creator?
What are the 10 Best GIF Creator?
An easy yet powerful editor
Numerous effects to choose from
Detailed tutorials provided by the official channel
Stay tuned to find the most affordable GIF creator solutions.
In this article
01 [Why Gifs Are Essential for Every Marketer?](#Part 1)
02 [How to Make Your Own GIF?](#Part 2)
03 [What Are 10 Best GIF Creator to Find Brilliant Pre-made Gifs?](#Part 3)
Part 1 Why Gifs Are Essential for Every Marketer?
Everyone around you today is accustomed with the fact that GIFs are an interesting and impactful means of content sharing. These 3-5 second snippets are highly preferred and convenient ways to deliver information that is precise, clear and to the point. When it comes to time frames, short and quick GIFs are obvious choices over lengthy videos. Additionally, GIFs are eye-catchy and keep you captivated to see though the entire content within seconds, contradictory to those monotonous and often dull videos that sound more like a long, boring lecture.
These are an effective media tool that is not limited to sharing information that is chiefly entertainment based or fun centered. You can use them to deliver important content that addresses a specific purpose or audience. Owing to this, GIFs have become an essential marketing utility, here’s why:
● Improve Product Branding:
GIFs can serve as impressive branding tools for your products in the market. Markets today are considerably impacted by the ‘What You See is What You Buy’ concept, which puts forward the need to lay added stress on effective branding.
GIFs are ready to sort this out with their exciting range of features. From video editing choices to sound and color customization, GIFs are loaded with everything you need to improvise your product branding. All you have to do is explore your creativity to make the most of the GIF branding choices.
● Explain it Better
On a preference poll, most of us would shift to ‘watch’ over ‘read’ for a comprehensive understanding. An attractive motion visual is an even better treat. GIFs are pivotal in making viewers relate to the concept and message behind your product in a more enhanced manner.
Additionally, these are a continent means to introduce emotional mobility among your target audience with depictive emojis. You can use GIFs to develop effective content approaches to make the audience connect with your product viability, both practically band emotionally.
● Increase Visitor Attraction
Today’s changing times have brought about a rapid outlook towards everything. All of us are bounded by time constraints and when browsing the web, the prime need is to look for quick and accurate solutions to everything concerned.
Short and exact information delivery of GIFs is something that would keep visitors glued to your site because they will be assured of getting exactly what they search for and that too in an interesting and entertaining way.
Part 2 How to Make Your Own GIF?
Now that you are familiar with the creative marketing credibility of GIFs, you might naturally feel motivated towards creating a GIF of your own. In case you are, see through the following section of this article to find out interesting ways of creating interesting and catchy GIFs, either for impressive product marketing or just to make your social media posts leave your community peers in awe!
Looking for the best GIF creator solutions on the web, you can rely on GIPHY, one of the most preferred and convenient databases to create GIFs quickly. This is a smartphone compatible tool and works well with almost any device. Follow the steps given below to make GIFs with this tool:
Step 1:
Download and install the GIPHY app in your device.
Step 2:
Click on ‘Create’ in the app’s welcome screen. This will change (+) icon at the top-right corner to the ‘Camera’ symbol. You can also navigate to the ‘Profile’ at the bottom-right and tap the (+) or ‘Camera’ icon in the app’s account page.
Step 3:
Click on ‘Allow Camera Access’. You will receive two successive prompt messages from the app. Click on ‘Allow’ to grant access permissions to your device media. When you are done, click on ‘I Agree’.
Step 4:
GIFHY uses your device’s front camera for GIF creation. However, if you need to go for a camera switch, click on the ‘Camera’ sign at the bottom-right.
Step 5:
Choose a desired filter and effect for your GIF with a left or right swipe on the live feed toolbar. The app has 11 amazing and realistic effects, including VHS Static, 3D Glasses, etc.
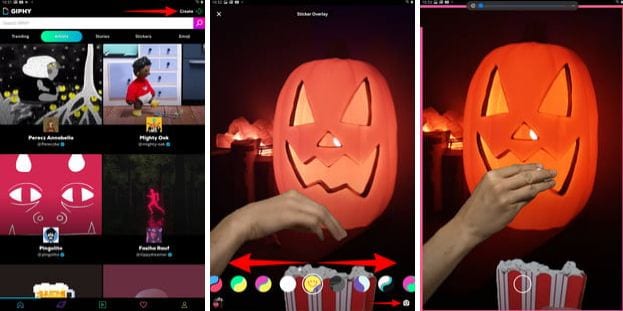
Step 6:
You can take up either of the following:
Press either of the ‘Filter’ or ‘Effect’ buttons to take static shots to create GIF from images, or press and hold the same to create animated GIF. For simply using effects, tap the white button.
In case you choose to create a motion GIF, the app forms a ‘visual timer’ around the editor screen. The motion recording stops once the line is in sync with the screen edges.
Step 7:
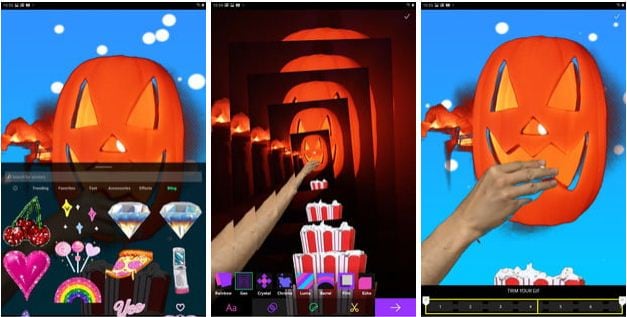
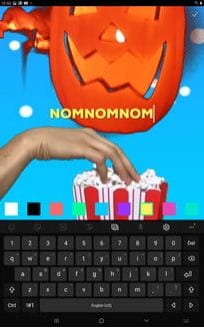
Having captured your perfect shot, you have the liberty to merge it with an image or video. However, do consider the following options to add some more elements to your capture: You can add relatable text in 9 color choices.
● Enhance your graphic presentation with 8 amazing effects like, ‘rainbow overlays’, BW film grains, etc.
● Choose from a never ending list of suitable stickers to add the feel through connect to your GIFs.
● Trim your animated GIFs to the ‘just perfect’ portion by adjusting the editing markers.
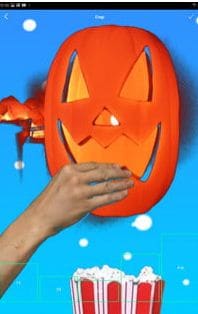
Relax; that’s no rocket science. Just tap on the respective buttons and there you go!
Step 8:
Set your GIF in a desired size frame by choosing the ‘Crop’ tool from the top-right corner of the editing screen. You are given a size flexibility of 1:1, 3:2, 16:9, 4:5 and 9:16.
Step 9:
Once you are satisfied with your creation, tap the ‘Right Arrow’ icon. In the interface that follows, add suitable share tags to the GIF.
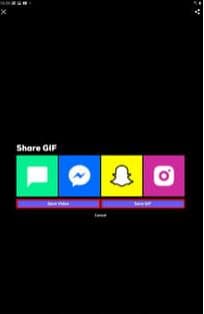
Step 10:
Tap ‘Share GIF’ to post your creation on social media platforms or share it through popular IM apps. To save your initially captured clip, click on ‘Save Video’ or tap ‘Save GIF’ to save your creation in your smartphone’s memory.
Part 1 What Are 10 Best GIF Creator to Find Brilliant Pre-made Gifs?
Having talked about GIF creation on the go, let’s take a dive into the best GIF creator solutions that are a storehouse of exciting pre-made GIFs. When browsing the web for an affordable GIF maker tool, you land across a pool of choices. Read through the further sections of this article to find out what’s best for you.
Described below are 10 best alternatives to get amazing pre-made GIFs:
● Wondershare Filmora Video Editor
This one is a popular, preferred and top rated application where you get to choose from an exciting range of pre-made GIFs under a variety of specific categories. All you need to do is, visit the app’s official site, browse to your favorite GIF category and select a desired GIF. Follow a few app instructions to save your selection and that’s it! Your selected GIF reaches your device memory within seconds.

Wondershare Filmora - Best Video Editor for Mac/Windows
5,481,435 people have downloaded it.
Build unique custom animations without breaking a sweat.
Focus on creating epic stories and leave the details to Filmora’s auto features.
Start a creative adventure with drag & drop effects and endless possibilities.
Filmora simplifies advanced features to save you time and effort.
Filmora cuts out repetition so you can move on to your next creative breakthrough.
Key Features
● This app is available to you absolutely free of cost.
● Has an intelligent and user cohesive interface.
● Loaded with tons of brilliant GIFs to choose from.
● The app supports GIF customization.
● GIFHY
Launched in 2013, this one is probably the best GIF maker and downloader tool available on the web today. It is a free tool, packed with enormous varieties of GIFs to choose from. What’s more interesting about the app is that you are free to play with your editing creativity to enhance your downloaded GIFs in the GIPHY editor.
Key Features
● It comes with an easy to use, convenient interface.
● You can edit downloaded GIFs with hundreds of effects and filters.
● The app provides you a direct sharing platform, allowing you to post GIFs to various social media platforms and also go for sharing via Instant Messaging applications.
● This is a fast processing tool that allows you to escape the notch of annoying and delayed download processes.
● Tenor
You can conveniently regard this one as the closest competitor to the GIPHY GIF creator and downloader tool. Needless to say, both are quite similar to each other in interface and usage respects. However, focusing on search results for a common keyword, you find diverse variations to your obvious surprise.
Key Features
● This is a free to use, interactive interface tool.
● It introduces a GIF Keyboard that allows you to search the most specific and relatable GIFs.
● It ensures a speedy and high quality GIF download.
● You can explore your editing skills to your heart’s content to improvise the downloaded GIFs with this tool.
● This tool gives you the liberty to directly share GIFs across different platforms.
If you like to spend ample time on choosing what’s perfect for you, refer this online tool for your GIF download solutions. It caters to your love of diversity with the most deep rooted and broad GIF range. However, this one comes with a little messy interface, demanding some patience from you to get to the right thing.
Key Features
● This tool provides you with almost all possible choices for a GIF category.
● It is available to you free of cost
● The tool site is loaded with rich and quality GIF content.
● This one is a direct save and export tool for your downloaded GIFs.
● Gfycat
You can prefer this one as a GIF hosting tool. Developed with a view to launch a common medium for GIF and HTML contents, this app ensures in-time and hassle free downloads and delivery. Though lacking a refined search bar, this tool promises you of excellence in content quality.
Key Features
● This comes to you as one of the most reliable GIF hosting tools.
● It is a free and quick content delivery tool.
● You are allowed to select the most suitable one from a variety of playback choices.
● This tool also gives you the flexibility of direct media sharing.
● GIFbin
If you are hung-over decade old nostalgia and the fever doesn’t seem to go away, you can check this site for some really satisfying retro and other similar content. This would definitely make you take a toll back to the times when MSN and Limewire were unparalleled market leaders in content sharing.
Key Features
● GIFbin is a storehouse of the best animated GIFs, that is on a continuous update to facilitate fresh and quality based content, every time you visit the site.
● It has an advanced, API enabled search mechanism.
● It boasts of having the handiest and convenient user interface.
● If you prefer GIFs of the comic genre, this tool is heaven for you.
● Imgflip
This is another GIF download site, commonly preferred for comedy and fun oriented content. Using this site, you can download and create a variety of GIF based memes that have the potential to flood your social media posts with likes and comments. This one is a complete GIF basket, suited to vast content varieties and user preferences. You will find the site’s official watermark on all its contents.
Key Features
● The site stands among the most preferred GIF-meme creation and sharing platforms.
● The tool is packed with loads of quality content under specific categories
● You can improvise the dimensions of your editing skills to modify downloaded GIFs.
● This site has a default media export feature that you can use to share your GIFs on social media.
● Imgur
Launched in 2009, this is among the most visited GIF sites, originally created for sharing meme based contents on social media. Its extensive search filters are dedicated to fetch the exact GIFs and memes you are looking for. If you are tired of browsing sites for particular content requirements, your search spree will definitely end here.
Key Features
● The site is known for its extensive and diversified content quality.
● It is a free, convenient and dependable GIF download tool.
● Imgur is highly preferred for content export across various media platforms.
● It is equipped with an advanced and updated search filter that assures you of getting fresh and top quality GIFs on almost every possible keyword.
● Tumblr
Claiming a launch date of 13 years back, this is quite a good GIF download option. You can find excellent quality GIF content on the site, particularly in the comic genre. Though not as popular as its online counterparts today, the site definitely enjoyed commendable visitor preferences at the time of its launch. You can certainly visit this site for a filling entertainment dose.
Key Features
● Tumblr is a free download site with a user friendly interface.
● The site is loaded with notable content varieties.
● You can go for direct media sharing through this site.
● Its comic GIFs are quite hilarious.
● Know Your Meme
This site uses the Wiki software to stock an inventory of classic GIFs and memes. Using this database for GIF downloads means that you don’t need to compromise on content and image quality. The site contents are periodically updated to ensure that visitors are not exposed to stale and outdated content.
Key Features
● The site offers fresh content having catchy and latest GIFs.
● This is a complete storehouse of GIFs and memes that can definitely keep you rolling.
● The site comes as a free tool and gas a user cohesive interface
● It hast the most efficient search filters that are regularly improvised to ensure quality content delivery.
● Key Takeaways from This Episode →
● GIFs are an effective and captivating means of quality content sharing and message delivery. Take them as a hilarious entertainment source or use them to enhance your marketing policies, GIFs can do it all.
● Influenced by the user credibility of GIFs, there are loads of GIF creator and download tools available online; among which Filmora by Wondershare is the current market leader. You can use this app to explore your GIF editing skills or download and share latest GIFs across media sharing platforms.
Stay tuned to find the most affordable GIF creator solutions.
In this article
01 [Why Gifs Are Essential for Every Marketer?](#Part 1)
02 [How to Make Your Own GIF?](#Part 2)
03 [What Are 10 Best GIF Creator to Find Brilliant Pre-made Gifs?](#Part 3)
Part 1 Why Gifs Are Essential for Every Marketer?
Everyone around you today is accustomed with the fact that GIFs are an interesting and impactful means of content sharing. These 3-5 second snippets are highly preferred and convenient ways to deliver information that is precise, clear and to the point. When it comes to time frames, short and quick GIFs are obvious choices over lengthy videos. Additionally, GIFs are eye-catchy and keep you captivated to see though the entire content within seconds, contradictory to those monotonous and often dull videos that sound more like a long, boring lecture.
These are an effective media tool that is not limited to sharing information that is chiefly entertainment based or fun centered. You can use them to deliver important content that addresses a specific purpose or audience. Owing to this, GIFs have become an essential marketing utility, here’s why:
● Improve Product Branding:
GIFs can serve as impressive branding tools for your products in the market. Markets today are considerably impacted by the ‘What You See is What You Buy’ concept, which puts forward the need to lay added stress on effective branding.
GIFs are ready to sort this out with their exciting range of features. From video editing choices to sound and color customization, GIFs are loaded with everything you need to improvise your product branding. All you have to do is explore your creativity to make the most of the GIF branding choices.
● Explain it Better
On a preference poll, most of us would shift to ‘watch’ over ‘read’ for a comprehensive understanding. An attractive motion visual is an even better treat. GIFs are pivotal in making viewers relate to the concept and message behind your product in a more enhanced manner.
Additionally, these are a continent means to introduce emotional mobility among your target audience with depictive emojis. You can use GIFs to develop effective content approaches to make the audience connect with your product viability, both practically band emotionally.
● Increase Visitor Attraction
Today’s changing times have brought about a rapid outlook towards everything. All of us are bounded by time constraints and when browsing the web, the prime need is to look for quick and accurate solutions to everything concerned.
Short and exact information delivery of GIFs is something that would keep visitors glued to your site because they will be assured of getting exactly what they search for and that too in an interesting and entertaining way.
Part 2 How to Make Your Own GIF?
Now that you are familiar with the creative marketing credibility of GIFs, you might naturally feel motivated towards creating a GIF of your own. In case you are, see through the following section of this article to find out interesting ways of creating interesting and catchy GIFs, either for impressive product marketing or just to make your social media posts leave your community peers in awe!
Looking for the best GIF creator solutions on the web, you can rely on GIPHY, one of the most preferred and convenient databases to create GIFs quickly. This is a smartphone compatible tool and works well with almost any device. Follow the steps given below to make GIFs with this tool:
Step 1:
Download and install the GIPHY app in your device.
Step 2:
Click on ‘Create’ in the app’s welcome screen. This will change (+) icon at the top-right corner to the ‘Camera’ symbol. You can also navigate to the ‘Profile’ at the bottom-right and tap the (+) or ‘Camera’ icon in the app’s account page.
Step 3:
Click on ‘Allow Camera Access’. You will receive two successive prompt messages from the app. Click on ‘Allow’ to grant access permissions to your device media. When you are done, click on ‘I Agree’.
Step 4:
GIFHY uses your device’s front camera for GIF creation. However, if you need to go for a camera switch, click on the ‘Camera’ sign at the bottom-right.
Step 5:
Choose a desired filter and effect for your GIF with a left or right swipe on the live feed toolbar. The app has 11 amazing and realistic effects, including VHS Static, 3D Glasses, etc.
Step 6:
You can take up either of the following:
Press either of the ‘Filter’ or ‘Effect’ buttons to take static shots to create GIF from images, or press and hold the same to create animated GIF. For simply using effects, tap the white button.
In case you choose to create a motion GIF, the app forms a ‘visual timer’ around the editor screen. The motion recording stops once the line is in sync with the screen edges.
Step 7:
Having captured your perfect shot, you have the liberty to merge it with an image or video. However, do consider the following options to add some more elements to your capture: You can add relatable text in 9 color choices.
● Enhance your graphic presentation with 8 amazing effects like, ‘rainbow overlays’, BW film grains, etc.
● Choose from a never ending list of suitable stickers to add the feel through connect to your GIFs.
● Trim your animated GIFs to the ‘just perfect’ portion by adjusting the editing markers.
Relax; that’s no rocket science. Just tap on the respective buttons and there you go!
Step 8:
Set your GIF in a desired size frame by choosing the ‘Crop’ tool from the top-right corner of the editing screen. You are given a size flexibility of 1:1, 3:2, 16:9, 4:5 and 9:16.
Step 9:
Once you are satisfied with your creation, tap the ‘Right Arrow’ icon. In the interface that follows, add suitable share tags to the GIF.
Step 10:
Tap ‘Share GIF’ to post your creation on social media platforms or share it through popular IM apps. To save your initially captured clip, click on ‘Save Video’ or tap ‘Save GIF’ to save your creation in your smartphone’s memory.
Part 1 What Are 10 Best GIF Creator to Find Brilliant Pre-made Gifs?
Having talked about GIF creation on the go, let’s take a dive into the best GIF creator solutions that are a storehouse of exciting pre-made GIFs. When browsing the web for an affordable GIF maker tool, you land across a pool of choices. Read through the further sections of this article to find out what’s best for you.
Described below are 10 best alternatives to get amazing pre-made GIFs:
● Wondershare Filmora Video Editor
This one is a popular, preferred and top rated application where you get to choose from an exciting range of pre-made GIFs under a variety of specific categories. All you need to do is, visit the app’s official site, browse to your favorite GIF category and select a desired GIF. Follow a few app instructions to save your selection and that’s it! Your selected GIF reaches your device memory within seconds.
Wondershare Filmora - Best Video Editor for Mac/Windows
5,481,435 people have downloaded it.
Build unique custom animations without breaking a sweat.
Focus on creating epic stories and leave the details to Filmora’s auto features.
Start a creative adventure with drag & drop effects and endless possibilities.
Filmora simplifies advanced features to save you time and effort.
Filmora cuts out repetition so you can move on to your next creative breakthrough.
Key Features
● This app is available to you absolutely free of cost.
● Has an intelligent and user cohesive interface.
● Loaded with tons of brilliant GIFs to choose from.
● The app supports GIF customization.
● GIFHY
Launched in 2013, this one is probably the best GIF maker and downloader tool available on the web today. It is a free tool, packed with enormous varieties of GIFs to choose from. What’s more interesting about the app is that you are free to play with your editing creativity to enhance your downloaded GIFs in the GIPHY editor.
Key Features
● It comes with an easy to use, convenient interface.
● You can edit downloaded GIFs with hundreds of effects and filters.
● The app provides you a direct sharing platform, allowing you to post GIFs to various social media platforms and also go for sharing via Instant Messaging applications.
● This is a fast processing tool that allows you to escape the notch of annoying and delayed download processes.
● Tenor
You can conveniently regard this one as the closest competitor to the GIPHY GIF creator and downloader tool. Needless to say, both are quite similar to each other in interface and usage respects. However, focusing on search results for a common keyword, you find diverse variations to your obvious surprise.
Key Features
● This is a free to use, interactive interface tool.
● It introduces a GIF Keyboard that allows you to search the most specific and relatable GIFs.
● It ensures a speedy and high quality GIF download.
● You can explore your editing skills to your heart’s content to improvise the downloaded GIFs with this tool.
● This tool gives you the liberty to directly share GIFs across different platforms.
If you like to spend ample time on choosing what’s perfect for you, refer this online tool for your GIF download solutions. It caters to your love of diversity with the most deep rooted and broad GIF range. However, this one comes with a little messy interface, demanding some patience from you to get to the right thing.
Key Features
● This tool provides you with almost all possible choices for a GIF category.
● It is available to you free of cost
● The tool site is loaded with rich and quality GIF content.
● This one is a direct save and export tool for your downloaded GIFs.
● Gfycat
You can prefer this one as a GIF hosting tool. Developed with a view to launch a common medium for GIF and HTML contents, this app ensures in-time and hassle free downloads and delivery. Though lacking a refined search bar, this tool promises you of excellence in content quality.
Key Features
● This comes to you as one of the most reliable GIF hosting tools.
● It is a free and quick content delivery tool.
● You are allowed to select the most suitable one from a variety of playback choices.
● This tool also gives you the flexibility of direct media sharing.
● GIFbin
If you are hung-over decade old nostalgia and the fever doesn’t seem to go away, you can check this site for some really satisfying retro and other similar content. This would definitely make you take a toll back to the times when MSN and Limewire were unparalleled market leaders in content sharing.
Key Features
● GIFbin is a storehouse of the best animated GIFs, that is on a continuous update to facilitate fresh and quality based content, every time you visit the site.
● It has an advanced, API enabled search mechanism.
● It boasts of having the handiest and convenient user interface.
● If you prefer GIFs of the comic genre, this tool is heaven for you.
● Imgflip
This is another GIF download site, commonly preferred for comedy and fun oriented content. Using this site, you can download and create a variety of GIF based memes that have the potential to flood your social media posts with likes and comments. This one is a complete GIF basket, suited to vast content varieties and user preferences. You will find the site’s official watermark on all its contents.
Key Features
● The site stands among the most preferred GIF-meme creation and sharing platforms.
● The tool is packed with loads of quality content under specific categories
● You can improvise the dimensions of your editing skills to modify downloaded GIFs.
● This site has a default media export feature that you can use to share your GIFs on social media.
● Imgur
Launched in 2009, this is among the most visited GIF sites, originally created for sharing meme based contents on social media. Its extensive search filters are dedicated to fetch the exact GIFs and memes you are looking for. If you are tired of browsing sites for particular content requirements, your search spree will definitely end here.
Key Features
● The site is known for its extensive and diversified content quality.
● It is a free, convenient and dependable GIF download tool.
● Imgur is highly preferred for content export across various media platforms.
● It is equipped with an advanced and updated search filter that assures you of getting fresh and top quality GIFs on almost every possible keyword.
● Tumblr
Claiming a launch date of 13 years back, this is quite a good GIF download option. You can find excellent quality GIF content on the site, particularly in the comic genre. Though not as popular as its online counterparts today, the site definitely enjoyed commendable visitor preferences at the time of its launch. You can certainly visit this site for a filling entertainment dose.
Key Features
● Tumblr is a free download site with a user friendly interface.
● The site is loaded with notable content varieties.
● You can go for direct media sharing through this site.
● Its comic GIFs are quite hilarious.
● Know Your Meme
This site uses the Wiki software to stock an inventory of classic GIFs and memes. Using this database for GIF downloads means that you don’t need to compromise on content and image quality. The site contents are periodically updated to ensure that visitors are not exposed to stale and outdated content.
Key Features
● The site offers fresh content having catchy and latest GIFs.
● This is a complete storehouse of GIFs and memes that can definitely keep you rolling.
● The site comes as a free tool and gas a user cohesive interface
● It hast the most efficient search filters that are regularly improvised to ensure quality content delivery.
● Key Takeaways from This Episode →
● GIFs are an effective and captivating means of quality content sharing and message delivery. Take them as a hilarious entertainment source or use them to enhance your marketing policies, GIFs can do it all.
● Influenced by the user credibility of GIFs, there are loads of GIF creator and download tools available online; among which Filmora by Wondershare is the current market leader. You can use this app to explore your GIF editing skills or download and share latest GIFs across media sharing platforms.
Also read:
- In 2024, How to Add Adjustment Layer (Clip) in DaVinci Resolve?
- In 2024, Step by Step to Rotate Video Using KMPlayer
- In 2024, Top 7 Color Match Paint Apps
- How to Make A Fantastic Café Vlog for 2024
- Updated Guaranteed 10 Storyboard Creators To Make Animation Easier For You for 2024
- New 2024 Approved Expolring Top 6 Best Alternatives to Clownfish Voice Changer
- Updated How to Add Adjustment Layer in Premiere Pro
- 2024 Approved Want to Learn How to Make a Fortnite Montage? This Guide Will Give You the Low-Down on Creating Epic Montage Fortnite Videos that You Can Share with Other Players on Social Media Platforms
- 2024 Approved In This Article I Will Share to You My Tips and Experiences on How to Become a YouTube Vlogger and Things You Need to Consider Being a Vlogger
- Updated 2024 Approved The Power of Music in Videos
- Complete Tutorial to Make an Impressive Countdown Timer Video for 2024
- Discover a Quick Guide to Add Personalized Video Filters in VN App. Learn How to Use Built-In Filters and Import External Ones for Creative Video Editing for 2024
- Updated Guiding Principles of Track Matte and Tracking in Adobe After Effects for 2024
- Updated In 2024, How to Add Font Effect
- New How to Perfect Quick and Efficient Video Editing | Keyboard Shortcuts in Filmora
- New Looking for the Best Websites for 3D Text PNG? Weve Covered You with Our Top 8 Picks for Your Upcoming Work
- Will the iPogo Get You Banned and How to Solve It On Honor Magic 6 | Dr.fone
- In 2024, Detailed Review of doctorSIM Unlock Service For iPhone 15
- In 2024, Overview of the Best HTC U23 Pro Screen Mirroring App | Dr.fone
- New What Is an AI Headshot Generator for 2024
- In 2024, How To Open Your iPhone 15 Pro Without a Home Button | Dr.fone
- Dose Life360 Notify Me When Someone Checks My Location On Nokia C32? | Dr.fone
- In 2024, How to Transfer Contacts from Infinix Smart 8 HD to iPhone XS/11 | Dr.fone
- Ways to trade pokemon go from far away On Samsung Galaxy A14 5G? | Dr.fone
- Dose Life360 Notify Me When Someone Checks My Location On Motorola Moto G13? | Dr.fone
- 2 Ways to Transfer Text Messages from Honor Magic 5 to iPhone 15/14/13/12/11/X/8/ | Dr.fone
- Title: In 2024, 2 Effective Ways to Add Text Behind Objects
- Author: Chloe
- Created at : 2024-05-20 03:37:40
- Updated at : 2024-05-21 03:37:40
- Link: https://ai-editing-video.techidaily.com/in-2024-2-effective-ways-to-add-text-behind-objects/
- License: This work is licensed under CC BY-NC-SA 4.0.
