In 2024, 3 Ways To Stream And Record At The Same Time

3 Ways To Stream And Record At The Same Time
The popularity of live streaming has exploded recently. A live stream is simply a video broadcast in real-time over the internet. It’s a great way to connect with people directly, whether for a gaming session, a cooking show, or a Q&A.
Many reasons are there for which why you might want to live stream and record at the same time. For instance, keep a record of your gameplay or stream highlights for future editing or use your live stream to generate content for your YouTube channel.
Whatever your reasons, this article will show you how to do live streaming and recording at the same time using three different methods.
Way 1. Use OBS To Stream And Record Video At The Same Time
OBS, or Open Broadcaster Software, is a free and open-source tool that allows you to stream and record video at the same time, which can be useful if you want to live-stream your gameplay on Twitch or record a tutorial for YouTube.
Key Features of OBS
- Compatible with Mac OS X, Linux, and Windows operating systems.
- Requires at least 4 GB of storage space and an Intel i5 2000-series processor or higher DirectX 10 capable graphics card.
- High-performance video capturing and mixing in real-time.
- With Custom Transitions, you can set up an unlimited number of scenes you can switch between seamlessly.
- Intuitive audio mixer.
- Easy-to-use and simple configuration options.
Steps
Here’s an easy and quick guide on how to use OBS Studio to stream and record videos simultaneously:
Step1 Download OBS Studio from the official website and install it on your computer or laptop.
Step2 Launch OBS Studio and go to the Settings menu. Find the Recording section under the Output tab.
Step3 Click “Start Recording” to manually start the recording or head to the General Tab and checkmark the box before “Automatically Record When Streaming.”
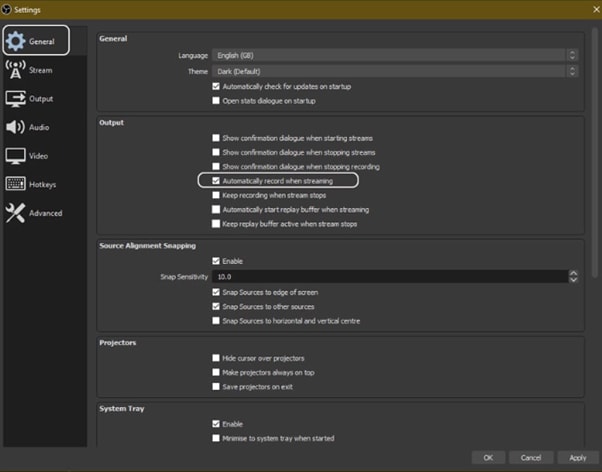
Step4 Finally, click “Apply” to save your settings. Now when you start your stream, the recording will also begin simultaneously.
Way 2. Use Twitch To Save Your Streams
Twitch is the most popular and best live streaming platform that allows gamers to broadcast their gameplay to a live audience and also gives them the ability to save their past broadcasts, or “streams.”
This feature can be useful to save your live stream for later viewing or share your stream with someone who missed it.
Features
Twitch offers a variety of features that make it a unique and powerful game streaming platform. Some of the most notable ones are:
- Live streaming: Twitch allows gamers to share their gameplay in real-time with other gamers around the world. This live aspect of the platform makes it unique and engaging.
- Social interaction: Twitch offers a variety of features that allow gamers to connect with each other, including chat rooms, forums, and user-generated content.
You can save your stream on Twitch in two ways:
- Use the “Highlights” feature, which allows you to save specific moments from your live stream.
- Download your stream’s entire VOD (video on demand) after it has ended.
Steps
Here are the quick steps to saving a stream on your PC from Twitch. But first, you need to enable Twitch VODs before starting your broadcast in the following way:
Step1 Visit Twitch and sign in to your account. Now, click the “Profile” icons and go to “Creator Dashboard.”
Step2 Head to Setting from the left-sidebar and click the “Stream” option. Scroll down and find the VOD Settings. Toggle the buttons next to “Store Past Broadcasts.”
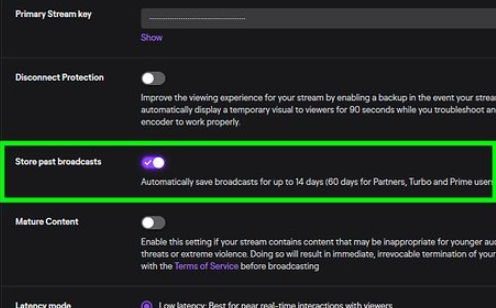
Step3 To publish your VODs instantly after broadcasting, toggle the button next to “Always Publish VODs.”
Now, to download the recordings of your broadcasts to your PC, do the following steps in sequence:
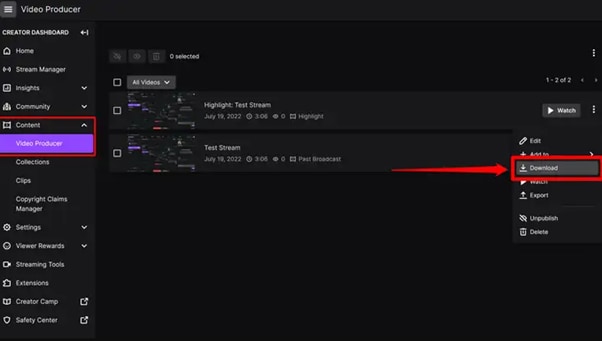
Step1 Head to the Creator Dashboard, find the “Content” section in the left sidebar, and click “Video Producer.”
Step2 Find the stream (VOD or Highlights) you want to download and on the right side, click the three dots.
Step3 Finally, click the “Download” option and let Twitch prepare your video. You will then get the stream’s recording in MP4 format.
Way 3. Use Screen Recorder To Record Your Streams
Using a screen recorder is a great way to record your live stream because it lets you capture the full screen of your PC. Although there are many different screen recorders to choose from, we recommend using Filmora.
Wondershare Filmora is a powerful editor with easy-to-use screen recording capabilities, giving you everything you need to record and stream your video at the same time. The software is free to use and has an intuitive interface.
Features of Filmora
- Support for both Mac OS X and Windows operating systems.
- Ability to record your PC screen, audio, and webcam all at once
- A variety of video editing features
- An easy-to-use interface
Steps
Here’s how to use Filmora for recording while streaming:
Step1 Head to the official Filmora website, download the software and install it on your PC.
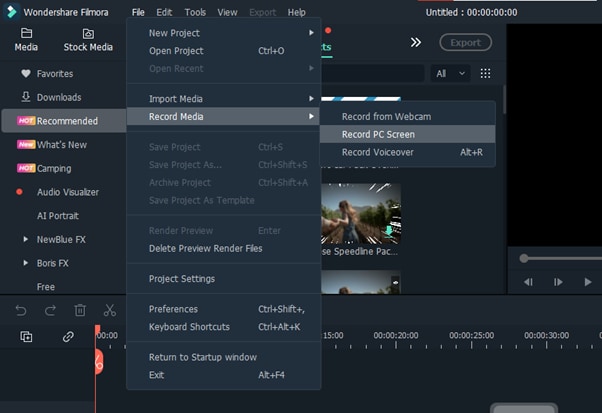
Step2 Launch Filmora 11 and click “New project” in the main interface. Click “File” from the top toolbar and scroll down to “Record media.” From the drop-down menu, select “Record PC Screen.”
Step3 A new “Wondershare Screen Recorder” window will pop up. You can set up a full screen, custom or target screen recording, speaker, and microphone settings. If you want more Settings, click the drop-down icon.
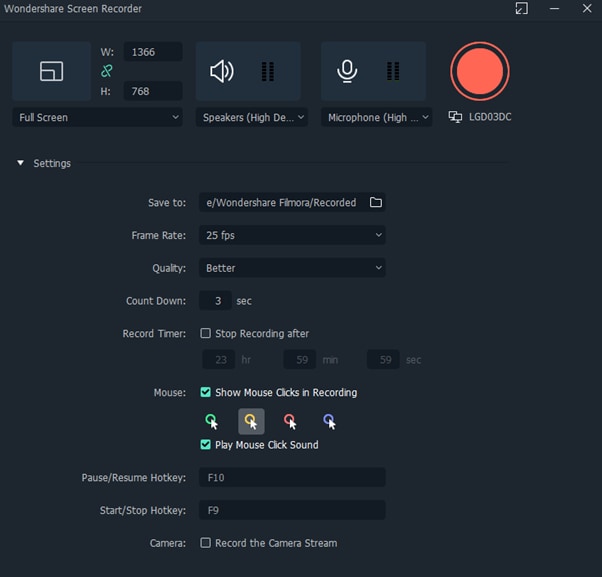
Step4 Click the Start icon to begin your recording. Afterward, click the Stop icon to stop the recording, and your stream will be saved in the selected destination.
Conclusion
In this article, we’ve discussed three step-by-step methods to help you do live streaming and recording at the same time. With these solutions at your disposal, you’ll be able to save your VODs with ease.
It is best to choose only one software to start with to avoid the time-consuming trial-and-error process. If you want to add another tool, do so later; otherwise, you will waste your precious time and resources.
Give these methods a shot, and eventually, you will find your groove—and become accustomed to just how easy it is to record and stream a video simultaneously.
Free Download For Win 7 or later(64-bit)
Free Download For macOS 10.14 or later
Free Download For macOS 10.14 or later
8 Best Sites to Get Glitch Transition for Premiere Pro
Glitch effects have made a comeback on the internet. You are free to use, download, and play with them. But the question that comes to everyone’s mind is which website is reliable for it? What are the best effects to download and use? We’ll go through 8 different websites where you can get free glitch transitions. Every website has its personality and Screen Glitchy Effects. So, let’s start looking at some of the top ones right away.
8 Best Sites to Download Glitch Transitions for Premiere Pro
1. Motion Array
You may create a variety of glitch effects with Motion Array. Adobe Premiere Pro and Adobe After Effects are among the best systems it supports. You may get some of the most excellent transitions and aesthetic effects with Adobe Premiere Pro, such as the vertical rhythmic glitchy start, geometric openers, and more.
You can make the most incredible shaky slideshow or even abstract promo slideshow. Download these fantastic effects like neon-colored glitch logos, quick glitch openers, and other bizarre effects.
2. Velosofy
Velosofy, is the next best place to download Glitch Effect for free. It features some of the most stylish effects like modern glitch intro templates, glitchy logo designs, and much more.
This site allows you to download an unlimited number of files. Other products supported by Velosofy include the well-known After Effects, Adobe Photoshop, and Premiere Pro.
3. Storyblocks
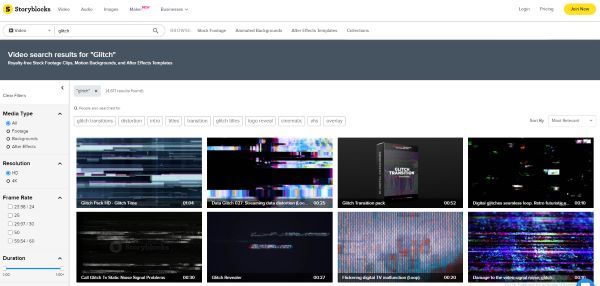
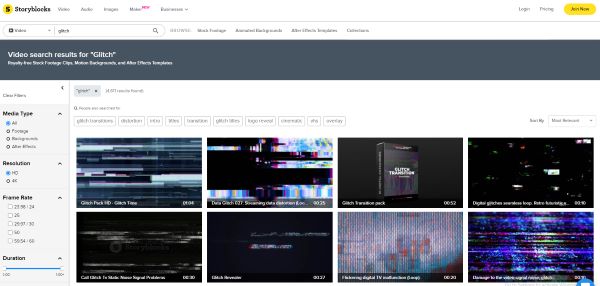
Storyblocks is the next in line. The site supports Adobe After Effects and Premiere Pro. Transitions, distortion, logo reveals, VHS, and more effects are available here. The Glitch Transition bundle includes greens and blues distortion.
Premiere Pro provides several packs containing various elements. Color Bars Data Glitches is Premiere Pro’s most impressive collection. It is a one-of-a-kind effect seen on Storyblocks, and there are plenty more like it. In addition, Storyblocks includes footage and background as well.
4. Placeit
Placeit is a website where anyone can download and use any glitch transition. Almost every application and piece of software is supported on the site. You have a long list of options on Placeit. Go ahead and select any of the numerous screen effects.
One can also make a slideshow with Placeit and its spectacular glitch effects. Add other astounding effects with a VHS feel to make the video look more impressive.

5. Adobe Stock
Adobe Stock is another excellent website that offers you free glitch transition. The site supports a variety of applications and has some incredible effects. You will like the effect that is “Simple & Bold”. As its name implies, the glitch effect is simple, yet it is highly bold because of the neon-bright colors.
Another astounding effect is 12 Glitchy Transition. The Anaglyph Glitch Effect is a photoshop effect that is perfect for video creators.
6. Motion Elements
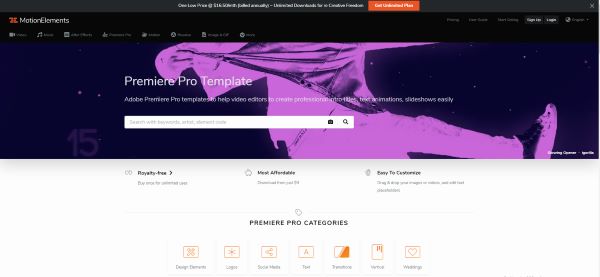
You should never limit yourself to the basics when you have sites like Motion Elements. You may create a professional film by downloading and applying the various glitch art effects.
The site works well with multiple programs, including After Effects and Premiere Pro. It features some bizarre but entertaining templates like neon glitchy transitions.
7. MixKit
With Mixkit, you can create unique and spectacular screen glitch effects.
Mixkit supports Premiere Pro and After Effects. You can easily employ its mind-blowing color effects to give your material a whole distinct feel. It includes digital static transitions, urban glitch openers, logo animation, and other elements.

8. Videohive
Videohive has over 7000 glitch templates. Each of the 7000 effects is unique and mind-blowing.
On the other hand, Premiere Pro has some jaw-dropping aesthetic effects. You can use elegant and trendy ones like the urban opener, glitch transition, and many more on Premiere Pro. Videohive’s Trailer effect is its most attractive feature.
5 Newest Glitch Transition Packs for Premiere Pro
Are you looking to add some extra colorful movement to your movie? There are many aesthetic effects and transitions available to add to the videos. You can create high-level YouTube videos, birthday clips, and holiday vlogs with Glitch art.
We’ll help explore these transition packs in Premiere Pro. Be sure to go to the website and check out the tutorials of these packs. You’ll find various effects within them.
1. FILM CRUX Glitch Transitions Vol. 1
This new pack by Film Crux has 15 free drag-and-drop free glitch transitions. These are designed specifically for Adobe Premiere Pro. You can just download the file and drag it into your Premiere Pro ‘Presets’ folder on your computer. Add the effects and enjoy the animated video!!
2. Glitch Templates for Premiere Pro by Mixxit
Mixxit has 30 Free Premiere Pro Templates for Glitch. All these templates are free to download for Premiere Pro. You can find every type of transition you need. Edit and add textures, make the videos enjoyable with zoom and outs and different sound effects.
3. 95+ Glitch Transitions - Premiere Pro by flatpackfx
You can try any of these glitch transitions and transform your videos. Simply drag and drop your videos to use with Adobe Premiere Pro. Moviemakers and video editors can save time and create unique-looking transitions all inside of Premiere Pro.
4. FREE 30 Glitch Transitions Preset for Premiere Pro by EnamAlamin
You can make your videos exciting with these 30 animated glitch transitions. The sound effects are also available to add to the videos. You’ll find detailed tutorials on the website. You don’t need any plugins. Just Drag & Drop the movie on Premiere Pro.
5. 10 Free Glitch transitions for Premiere Pro by 911templates
You can get 10 free digital distortion effects on 911templates. Import the video on Adobe Premiere Pro and turn them into art masterpieces. These effects can help you create a stunning opening of the video and the striking transitions between shots.
With these 5 newest transition packs, you can edit your video in many ways. The film industry has been using these transitions to impact the viewers. So, choose the styles that go well with your movie and catch your eyes. These are seen commonly in horror films to keep the viewers engaged. You can even add them on TikTok videos and other product description videos.
Conclusion
Glitch Transitions is a fun way to “transition” from one shot to the other. Drag and drop any of these transitions over two or more clips on your timeline. You can insert these free transitions nicely for educational videos, YouTube videos, event movies, or even documentaries. It adds fun, energetic energy to the project.
These transitions can make your work appear more professional and add to the final movie. We hope this article can help you find free assets for your next video project.
Top Animated Title Makers
You know that your video needs a title, but rather than just type in some bland text to introduce the video, you can create an animated title page that is far more attractive. Animated titles make a video more attractive and when done correctly, they can even guarantee that your target audience will stick around long enough to watch the entire video. They can also be very useful for introducing the content of the video.
But to make an effective animated title, you need a tool that is designed to do just that. In this article, we look at some of the top animated title makers that you can use to create the perfect animated title for your video.
Part 1. Animated Title Maker Online
If you don’t want to install software on your computer to create the animated title, the following are the top online tools to choose from;
Animaker
Link: https://www.animaker.com/text-animation-maker
Rating: 4.5/5
Animaker is an online tool that is specifically designed to help you create text animations that you can then add to your video project. Available online on all browsers, Animaker has a simple user interface that makes it easy to create text animations in a matter of minutes. It is so easy to use that even the average beginner can create stunning text animations.
If you don’t want to create the animations from scratch, Animaker has numerous pre-designed templates for you to choose from that you can then just edit to fit your design. It also has a lot of customizable infographics that you can repurpose.

Animatron Studio
Link: https://www.animatron.com/studio
Rating: 4.5/5
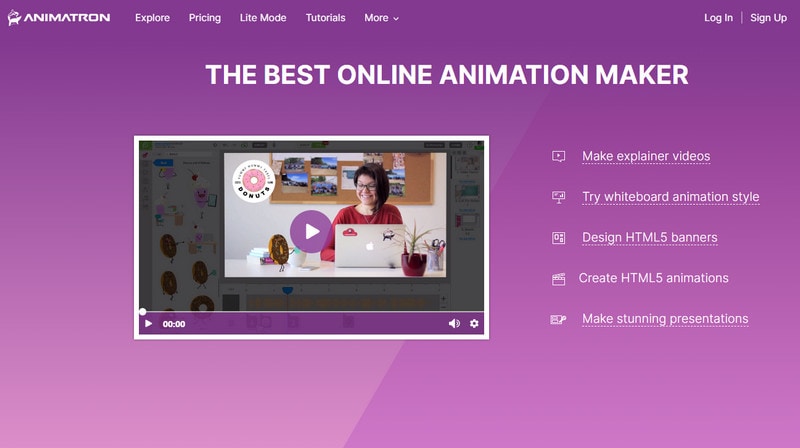
The Animatron Studio is a one-stop solution for generating all types of animated texts. You can use it to create the perfect animated title for your video, but its numerous features also mean that it is one of the best ways to create attention-grabbing animated banner ads that can be posted on various ad sites,
It has a wealth of resources that you can use to create the title including more than 500,000 royalty-free images, videos, and audio to include in your project. If you don’t want to build the animated content from the ground up, you can select from the 200 pre-animated sets that Animatron Studio provides.
Kapwing Title Maker
Link: https://www.kapwing.com/animated-text-video-maker
Rating: 4.5/5
If your goal is to do more than just create an animated title for your video, Kapwing is a good solution. It is a complete online video editor that can also be used to create animated titles. As such, you can expect Kapwing to have more advanced features that allow you to customize the animated title in various ways.
For instance, it has a huge selection of animations that you can apply to the text. But you also get the option to upload your own animations, colors, and fonts. But please note that the free version of Kapwing will add a watermark to the video.

Biteable Animated Text Maker
Link: https://biteable.com/animated/text/
Rating: 4.5/5
Biteable is one of the most popular solutions that you can use to create all kinds of animated texts. It is simple enough to use that it is useful to both professionals and amateur video creators. It has numerous useful features including custom scenes, foundations, backgrounds, and characters all of which can work together to create the perfect animated title.
One of the main benefits of choosing Biteable is that you can share the videos you edit directly on social media without having to download the video.

Flexclip Video Maker
Link: https://www.flexclip.com/editor/
Rating: 4.5/5
Flexclip is another very easy-to-use and easily accessible solution to create animated texts for videos. Rather than create the texts from scratch, Flexclip allows you to create stunning animated texts just by selecting several parameters.
There are also a lot of pre-made designer text templates that are fully customizable. All you have to do is select one of the templates, and change the text, font, and any images to make it unique to you and your video.

Part 2. Animated Title Maker for Computer
Online tools can be useful, especially since they are more easily accessible. But if you want additional features and more ways to customize your animated title, the following desktop solutions may be more applicable to you;
Filmora
Rating: 4.5/5
Wondershare Filmora is a complete suite of video editing tools that can also come in handy when creating animated titles for videos. It is a very simple video editor with a simple user interface, making it an ideal solution even for beginner users. Adding a title to your video is easy and you get to choose from more than 200 different animations that you can apply to bring the text to life.
Filmora is also very useful because it comes with advanced editing features for the professional editor. You can use it to edit all aspects of the video including the clips and even any audio that may be on the project.

Adobe Animate
Rating: 4.5/5
Adobe Animate is a great option to create various animations for your video project, including animated texts. Used by animators to create 2D animated content, Adobe Animate has a lot of features designed to facilitate this kind of animation and is, therefore, one of the go-to solutions for designers looking to create illustrations like logos and infographics.
But like other Adobe programs, Adobe Animate is not very easy to use and the beginner may find that it takes quite a long time to figure out how it works. But once you figure it out, the 800+ web fonts can make it very easy for you to customize your animated title in various ways.

Express Animate
Rating: 4.5/5
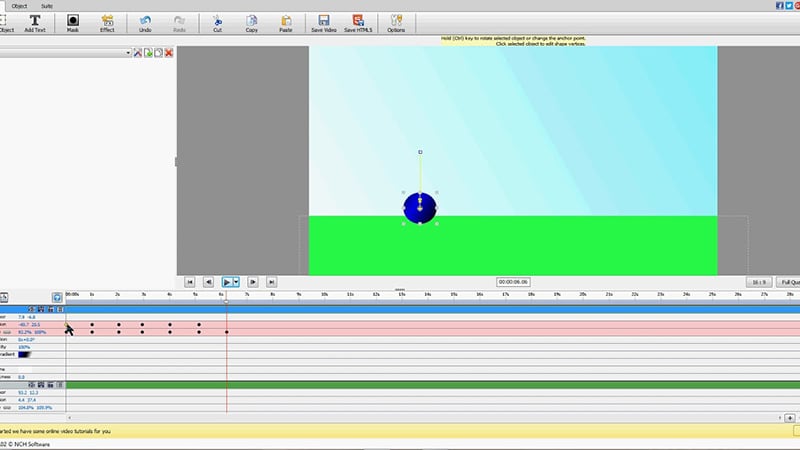
Express Animate is a completely free program that you can download on your computer. It is a complete video editor which means that you can use it to animate text and characters, but it is also a great way to edit other aspects of the video including the audio tracks and adding digital effects.
With a simple user interface, Express Animate allows users to create 2D animations that can be used to create unique videos. It is also a good way to create GIFs and memes.
Movavi Video Editor
Rating: 4.5/5
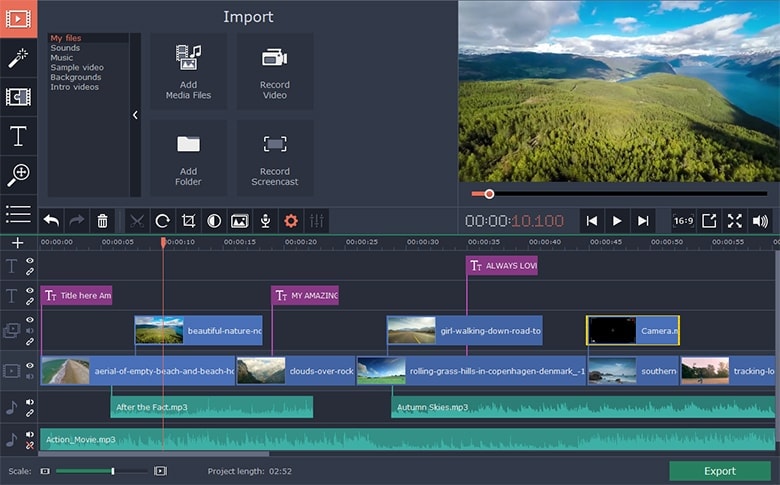
Movavi Video Editor is another complete suite of editing tools that can also come in handy when you want to create an animated title for your video. Designed for both professionals and beginners, this video has all the advanced features you will need to edit all aspects of your video, including a built-in audio editor.
When it comes to animation, Movavi has a lot of effects and transitions as well as pre-made title templates to choose from. Once you have selected the title, you can easily customize the font and color to fit into your project.
Windows Movie Maker
Rating: 4.5/5
For PC users Windows Movie Maker is a simple to use and free way to edit videos. Included with the Windows OS, you likely don’t need to install any software to use and even though it is a free solution, Windows Movie Maker does have the necessary features to create and add animated titles to any video.
It comes with numerous effects, transitions, and templates to choose from when animating text. And it can also be used to edit videos in other ways including trimming and merging clips.

Part 3. Animated Title Maker Apps
If you are editing your videos on your mobile device, the following are the top animated title-making apps to choose from;
Tomo
Rating: 4.5/5
Link: https://m.apkpure.com/tomo-animate-text-in-video/com.entzeners.app.tomo
Tomo is one of the best apps that you can use to animate text in a video. It has robust features that allow you to easily add text to the video and then animate the text using various transitions and effects. Once the edits are complete, Tomo allows you to share the completed video directly on social media apps like Instagram and Twitter.

Adobe Spark
Rating: 4.5/5
Link:https://apps.apple.com/us/app/adobe-spark-post-design-maker/id1051937863
Available for both Android and iOS devices, Adobe Spark is a video editing tool that has numerous tools to add and edit texts on videos. You can use the professionally designed templates that you have access to when using Adobe Spark to create stunning animation titles. And since it easily integrates with other apps on the device, sharing the videos is very easy.
Quik
Rating: 4.5/5
Link: https://play.google.com/store/apps/details?id=com.gopro.smarty&hl=en&gl=US
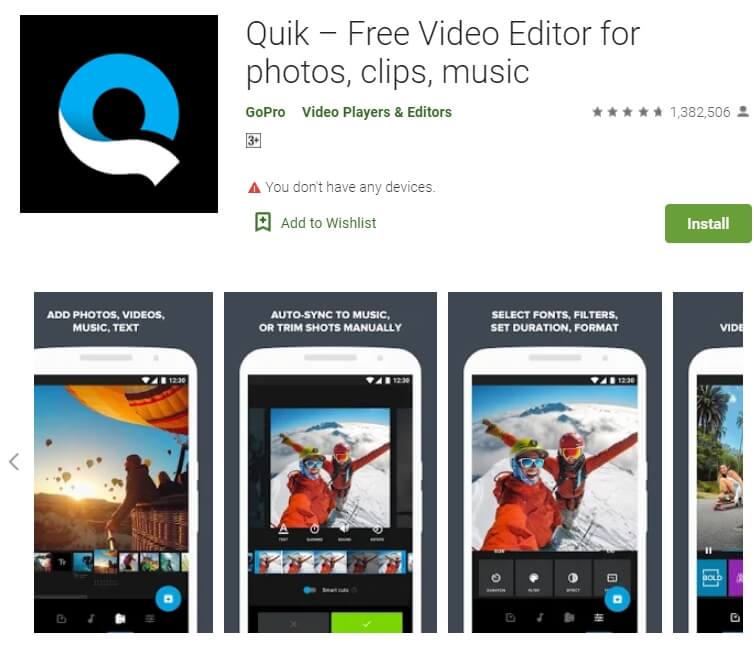
Quik is an app that is dedicated to text animations and therefore one of the best solutions when you want to add and edit texts on videos. It is available for both iOS and Android and although the free version of the app is slightly limited, its basic editing features are still better than what you find on other more expensive solutions.
Hyper-type Animated Text Videos
Rating: 4.5/5
Link: https://itunes.apple.com/us/app/hype-type-animated-text-videos
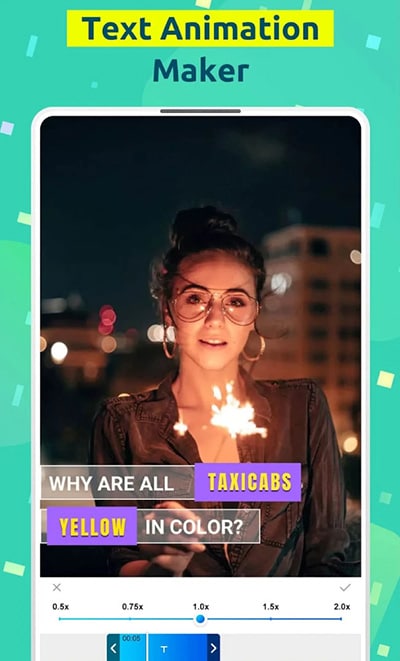
This app gives you two options when it comes to animating the text on your video; auto-motion and typography. It focuses on just adding and editing text on a video and as such may not have any of the other video editing features you will find on some of the other apps. But if your goal is to create an interactive animated video title, Hyper-type Animated Text Videos is a great solution.
Vimeo
Rating: 4.5/5
Link: https://play.google.com/store/apps/details?id=com.vimeo.android.videoapp&hl=en&gl=US
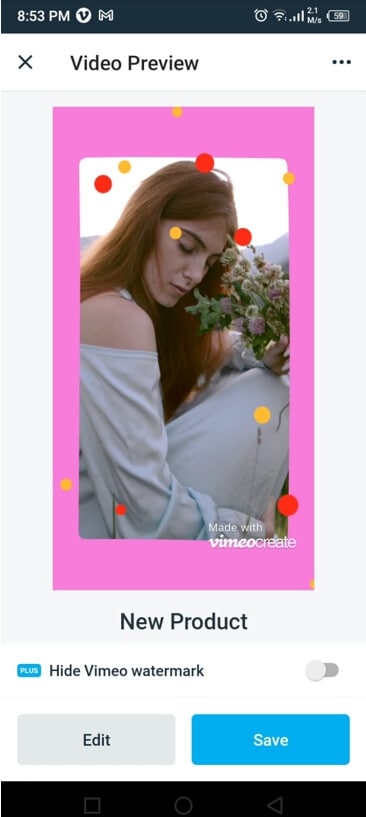
Also available for both iOS and Android devices, Vimeo can also be a handy solution for the creation and editing of animated titles for videos. It has a lot of features to edit not just the text in videos, but also all other elements including audio. You even get a wide selection of royalty-free music that you can add to the video and motion stickers to make your title stand out even more. But the free version of Vimeo will add a watermark to the video.
Free Download For Win 7 or later(64-bit)
Free Download For macOS 10.14 or later
How to Add Subtitles to Videos With Kapwing
Content creators always prefer to add subtitles to their videos for better comprehension. The reason is that some people cannot understand your language and needs subtitles to understand the content. Moreover, if your viewer is facing an audio problem and won’t be able to hear your voice, subtitles can help there. In this article, we will introduce the Kapwing subtitle maker, through which you can add subtitles in many ways.
There are some drawbacks to using online tools, such as file size restrictions or internet availability. Yet, with the Kapwing tool, you won’t get disappointed. Kapwing is an online tool that offers various options to edit videos. One of the great features of Kapwing is its subtitle maker, which can help you in adding subtitles to your videos easily. To learn how to use the Kapwing subtitles feature, continue reading this article.
Part 1: Upload the Subtitle File to Kapwing
If you have a subtitle file for your video, Kapwing can help you. If you have a subtitle file for your video, Kapwing can help you. Without creating a user account, you can upload the subtitle file on this tool. With this subtitle editor, you can upload video files from your computer or cloud storage platforms. Moreover, it supports the subtitle files of SRT and VVT format. To use Kapwing subtitle maker for uploading a subtitle file, read the below steps:
Step 1 Navigate to the official site of Kapwing and select its “Subtitles” tool. Afterward, click on “Choose a video,” which will open a new window on your screen.

Step 2 Click on the “Upload” button given on top to import your video file on this tool. Once done, click on the “Subtitle” option displayed on the left side. On the subtitles window, click on the “Upload SRT/VVT” button to import your subtitle file.

Step 3 After uploading the file, your subtitles will sync with your video. To edit your subtitles, navigate to the right panel. From that, you can select text position, background color, opacity, font, and alignment.

Step 4 Once done with making the changes on added subtitles, you can click on the “Export Project” button to save or share the file.

Part 2: Automatically Generate your Subtitle on Kapwing
Do you want to generate subtitles for your video instantly? Kapwing subtitle maker offers an Auto-Subtitle Generator that converts your voice into subtitles. This feature supports many languages so that anyone across the world can utilize this tool. Moreover, it also offers a translating feature that can help you in converting your subtitles into another language.
However, to use this feature, you must create your user account. Also, you should upgrade your account to fully use this feature without any restrictions. If you don’t have an upgraded account, you can only auto-generate subtitles for the 7 minutes video. To use the auto-subtitle generator of Kapwing, check the below steps:
Step 1 Begin by accessing the website of the Kapwing tool. Click on “Subtitles” from the “Tools” tab and then tap on the “Choose a video” button. Upload the video file on which you want to add subtitles from your PC.

Step 2 Once done with importing the video, click on “Subtitles” from the left section. From the new window, click on “Auto-generate.” The tool will automatically create subtitles for your video by detecting the language.

Step 3 Once you created the subtitles through this feature, go to the “Translate” tab to translate subtitles into your preferred language. You can also edit the subtitles to change their background, opacity, text font, and size. Once done, click on the “Export Project” button.

Part 3: Manually Add Subtitles to the Video on Kapwing
If you don’t want to use the auto-generator and do not have a subtitle file, you can use the manual option. Kapwing allows you to add subtitles manually in its friendly user interface. After adding Kapwing captions, you can choose your preferred font and style for further enhancement.
Step 1 After accessing the website of Kapwing, select the “Subtitles” tool to proceed. Now select the “Choose a video” button to open the Kapwing editor window.

Step 2 Import your video file by tapping on the “Upload” button. Afterward, go to the “Subtitles” section and click on the “Add Subtitle” button. On the typing space, enter your subtitles. You can also choose the duration for your subtitles from the same window. To add subtitles further, you can click on the “Add Subtitles” button again.

Step 3 After adding the complete subtitles, you can choose their font, style, color, and opacity from the right panel. Once done, hit the “Export Project” button.

Part 4: How to Add Subtitles to Videos with the Best Alternative of Kapwing
If you are not satisfied with the performance of the Kapwing subtitle maker, you can try the Wondershare Filmora tool. As Kapwing is an online tool, it does come with certain restrictions. For example, the time to upload video files on this tool can be time-consuming. Moreover, you would need a strong internet connection throughout. But, with Filmora, you can add subtitles to your video files without facing file size restrictions.
Free Download For Win 7 or later(64-bit)
Free Download For macOS 10.14 or later
Filmora has an easy-to-use interface that offers multiple options to edit and alter video files. This platform is compatible with a mainstream operating system such as Windows. It provides a “Speech to Text” feature that enables you to create subtitles for your video automatically. With a single tap, you can add subtitles to your video without any hassle. To use the Speech to Text feature, check the below steps:
Step 1 Import Video File from the PC
Launch Filmora on your PC and click on the “Create New Project” button to open the Filmora editor on your device. To import your video file from your PC, tap on the “Arrow” icon. After uploading the file, drag it to the timeline.

Step 2 Enable Speech to Text Feature
From the timeline, locate the feature of “Speech to Text.” Now choose the language in which you want to create the subtitles and specify the other settings as well. Afterward, tap on the “OK” button to begin the process.

Step 3 Customize Subtitles and Save the Changes
After the conversion, you can double-click the added subtitles to make modifications. After making the adjustments, hit the “OK” button. Now go to the “Export” button and select the video format in which you want to export the video, or you can also share it on social media platforms.

Conclusion
By adding subtitles to your video, you can enhance your targeted audience and can also engage with them. It also helps in making your video content diverse for people across the globe. There are various online subtitle generators like Kapwing that can help you in adding subtitles, as described in this article. However, there are some drawbacks to using the Kapwing subtitle maker that can disrupt your work. If you want to use a proficient subtitle maker, you can use Wondershare Filmora to get the best results.
Free Download For macOS 10.14 or later
Filmora has an easy-to-use interface that offers multiple options to edit and alter video files. This platform is compatible with a mainstream operating system such as Windows. It provides a “Speech to Text” feature that enables you to create subtitles for your video automatically. With a single tap, you can add subtitles to your video without any hassle. To use the Speech to Text feature, check the below steps:
Step 1 Import Video File from the PC
Launch Filmora on your PC and click on the “Create New Project” button to open the Filmora editor on your device. To import your video file from your PC, tap on the “Arrow” icon. After uploading the file, drag it to the timeline.

Step 2 Enable Speech to Text Feature
From the timeline, locate the feature of “Speech to Text.” Now choose the language in which you want to create the subtitles and specify the other settings as well. Afterward, tap on the “OK” button to begin the process.

Step 3 Customize Subtitles and Save the Changes
After the conversion, you can double-click the added subtitles to make modifications. After making the adjustments, hit the “OK” button. Now go to the “Export” button and select the video format in which you want to export the video, or you can also share it on social media platforms.

Conclusion
By adding subtitles to your video, you can enhance your targeted audience and can also engage with them. It also helps in making your video content diverse for people across the globe. There are various online subtitle generators like Kapwing that can help you in adding subtitles, as described in this article. However, there are some drawbacks to using the Kapwing subtitle maker that can disrupt your work. If you want to use a proficient subtitle maker, you can use Wondershare Filmora to get the best results.
Also read:
- [New] In 2024, Understanding the Criteria for YouTube Comment Spotlighting
- [Updated] 2024 Approved ClearView Pro 5 - Screen Mastery
- 2024 Approved Need to Learn About Halftone Effects? Learn How to Quickly Create a Halftone Effect in Adobe Photoshop with Simple, Easy-to-Follow Instructions
- 2024 Approved Premium Extensions for After Effects Magic
- 2024 Approved Streamlining Your Video Call Process with OBS & Skype
- How to Do Velocity Edits on PC for 2024
- How To Restore Audio Control in Windows 10 - Easy Solutions for Non-Responsive Volume Buttons
- In 2024, AddROM Bypass An Android Tool to Unlock FRP Lock Screen For your Asus ROG Phone 8
- In 2024, Guide to Create a Timelapse Video in After Effects
- In 2024, Pro Video Excellence with iPhone Learn 8 Crucial Techniques Today
- New 6 Ways to Mimic Professional Filming Gears
- New Discover the Process of Slowing Down Time-Lapse Videos on Your iPhone
- New Guide to Synchronizing Your Audio And Videos Properly, In 2024
- Unlocking Potential Master DVD Burning with Your Mac
- Updated 2024 Approved Guide To Creating The Perfect VHS Effect Look in Premiere Pro
- Title: In 2024, 3 Ways To Stream And Record At The Same Time
- Author: Chloe
- Created at : 2024-12-09 10:48:48
- Updated at : 2024-12-12 11:42:50
- Link: https://ai-editing-video.techidaily.com/in-2024-3-ways-to-stream-and-record-at-the-same-time/
- License: This work is licensed under CC BY-NC-SA 4.0.