
In 2024, 7 Ways to Make GIF From Videos on Mac
7 Ways to Make GIF From Videos on Mac
GIFs are being used more than ever today. Thanks to their prevalence on social media. You’ll see everything from cute kittens to cheeky celebrities, most of which will put a big smile on your face.
In addition to GIFs used for recreational purposes, there are those used for commercial ones. For example, they are good for demonstrating the steps of a process. You can even use them in articles to give you a visual aid that goes with the written word.
Whether you want to create a GIF for business or pleasure, it doesn’t have to take more than a few minutes of your time. So, here are the best GIF makers for Mac to try.
BEST FREE GIF MAKER ON MAC - FILMORA VIDEO EDITOR
Supported OS: Windows and Mac
Filmora Video Editor is used by the vast majority of inexperienced creators. Drag-and-drop allows you to add video clips and images. It contains over 130 various types of pre-set titles and text. You can also easily integrate your company’s logo into your videos.
Editing GIF files with Wondershare Filmora is quick and easy: first, import your GIF or video into the media library. Second, drag your GIFs/videos/images to the timeline after that. After you’ve placed your video to the timeline, you can edit it with a variety of tools.
For Win 7 or later (64-bit)
For macOS 10.14 or later
Features:
3D Video Editing
Media Library
Video Capture
Video Stabilization
Pros:
Expansive video editing features
Professional appearance for an affordable price
User-friendly interface
Cons:
The video saving process may lag
Bug fixes may take time to resolve
Watermarks on the free version
Premade templates lack a professional feel
Steps On How To Make GIF In Filmora
- Import Media Files
The very first task for users is to import some editable video files or collections of photos to the timeline of Wondershare Filmora.

- Drag To Timeline

- Edit Media Files

- Add Text Effect To Gif Files

- Save And Export

SMART GIF MAKER
Supported OS: Windows and Mac
Smart GIF Maker is some other loose however extraordinarily beneficial app for Mac users. To make the procedure feasible, the creators used an incredibly simple user interface which is easy like any other popular app. With this app, users can without difficulty create new GIFs even as additionally enhancing current GIFs. Smart GIF Maker makes it easy to feature or dispose of frames from a GIF or maybe a photo.
Users may even customize the loop counts and body periods for every GIF they create. Simply drag and drop the photographs right into a body even as converting the order of the frames to your liking, and you may have a GIF prepared in no time.
Users can set the duration of each frame in the app at the same time. It even handles previews much better than it used to. In order to make things easier for users, the app asks whether or not to import the created file.
Features:
Simple UI
- Easily create new, or modify existing gifs.
- Easily add and remove frames to a gif.
- Click frames to modify images, or drag images to the frames.
- Preview gifs before exporting them.
Drag and drop
- Drag images from Finder to add to the gif.
- Drag frames inside the app to change the order.
Import and export
- Import gifs or movies, or create gifs entirely from individual images.
- Imports .gif, .mov and .mp4.
- Add .png, .jpg, .bmp, .tiff or .gif images to the gif.
- Export workspace as .gif.
Settings
- Set the frame duration of an individual or all frames.
- Set the loop counter of the gif.
Editor
- Edit frames in the gif using Paint-like features.
- Draw directly on frames, with varying colors and brush sizes.
- Use eraser and eyedropper tools to make editing easier!
Extras
- Reverse gifs,
- Set all frame durations at once.
Cons:
- Restricted features for free accounts
- Slow conversion process
Steps On How To Make GIF In Smart GIF Maker
- Import Your Video

When you import your video, the app breaks it down into frames you can then work with, remove, or edit. You can also use images with the app and import them with the same type of editing options.

- With each frame, you can change the drawing size, use an eraser tool, adjust the background color, and use the eyedropper for matching colors.


- After you edit your frames, you can set the time delay for each and the number of loops on the main screen. When you finish creating your GIF, hit the Preview button at the top and then export it to your computer if you’re happy with it.
GIPHY CAPTURE
Supported OS: Mac and Windows
Because of its simplicity and ease of use, GIPHY Capture is one of the most popular and well-liked apps for creating GIFs. The app is free and allows users to capture anything on their screen and convert it into a GIF lasting up to 30 seconds. A couple of clicks are all that is required to complete the task; one click initiates the process, while another click terminates it. All that remains is to add the appropriate captions and adjust the GIF’s export size, and you’re done. If you are a professional, the app even allows you to make more precise edits and trim a clip at specific time frames.
Once you’ve completed all of this and are satisfied with the end result, the next step is simple. Users can choose to save the GIF to their GIPHY account or share it directly with their friends and family.
Features:
Capture Instantly
- Create your GIF with just a couple of clicks
- Click to start, click to stop
- Capture GIFs up to 30 seconds long
Edit Precisely
- Super simple editing lets you get creative, fast
- Pick which kind of loop you like best
- Adjust the frame rate to your liking
- Animated captions: add them, style them, animate them
- Preview the file size of your GIF before saving
Quickly Save and Share
- Email your friends your favorite videos as GIFs
Simple Upload To Giphy
- Hold onto your favorite GIF creations forever
- Easily access them whenever you want
- Share your GIFs on Facebook, Tweet them to Twitter, or send them on Facebook Messenger
Cons:
● App Notifications are not working properly
● Audio / video loading problem
● App installation issues
● Login issues or account related issues
Steps On How To Make Gif In Giphy Capture
1. Once you’ve opened GIPHY Capture - open up your browser, video, or whatever you want to record. Adjust the size of your GIPHY capture frame by grabbing any of the sides or corners and stretching to your desired frame size 

After your frame is set up, you’ll want to record a clip by pressing the red circle button. After 30-seconds (or less if you stop the recording sooner) the raw footage will be saved on the bottom of your GIPHY Capture window. This footage will be saved indefinitely, so if you close the app and reopen it at a later date you can pick up where you left off. However, if you delete the GIPHY Capture app from your computer, your videos will be deleted too.
You can take this 30-second clip and edit the length. It’s best to keep the GIF between 2-6 seconds if the intention is for the GIF to be shared in messaging apps and on the web. If you are making a “how-to” or tutorial GIF for an app or workflow you may need to make the length longer than 6 seconds.
You can choose to edit the loop type, pixel size, and frame rate. Changing these can affect the quality and file size of your GIF. In most cases leaving the standard preset options works best.

Under the Captions tab, you can easily add captions to your GIFs. Your captions can either have the regular or italicized text and come with a few preset options for changing the text color. You can edit the animation of the caption, just in case you want it to fade or drop into the frame. You can even edit the duration of the caption in your GIF. If you have a 6-second GIF but only want the caption to be in the frame for the final 2 seconds you can do so by editing the start and end time of the caption.
Now that you’ve created your GIF you can upload it directly to your GIPHY account and allow people to share it, provided you have a branded GIPHY channel.
If you don’t want to upload your new creation directly to GIPHY, you can download it as a .gif or .mp4 file locally to your computer.
GIFROCKET
Supported OS: Mac
GifRocket is the only downloadable record converter for developing GIFs. The only disadvantage is that it is only available to Mac users. This program is used to convert a video file to GIF format. That means you must already have the video file created. You can use a small clip from a previous video that you made or a clip that you downloaded. After you’ve downloaded and installed GifRocket on your computer, simply drag and drop your video file over the GifRocket tool window. The converter will begin working, and you will have a perfect GIF in a matter of seconds.
The production value must be the same as a full-length marketing video but the file size must be smaller, this tool is ideal for creating banner videos for site pages.
Features:
- Intuitive interface
- Change quality and file size of the outputted file
Cons:
- Lack of features like crop and frame rate, only available for Mac.
Steps On How To Make Gif In GIF Rocket
- After you download the app, open it, and there you will see a blank canvas. You’re supposed to drag the file here to start the conversion to GIF. But not so fast. First, click the Settings button. Here you’ll get three fields.

Enter the start and endpoint. Remember this is in the Hours: Minutes: Seconds layout so if your video is short, don’t forget to add zeros for the hours or minutes mark, or else the GIF won’t work.
Second, select the width of the GIF you want to create. The default is 320px. You can take it up to 500 or 600 if you’re dealing with a widescreen video but if you make the GIF too wide the size of the resulting file is also going to go up.
The last setting is quality. There is a slider and frankly, it’s not that helpful. There are only three points on it. I found the middle point, 50% to work the best. Once you’ve got the settings the way you want, click X, drag in the file and wait for Gifrocket to do its thing.

BEST PAID GIF MAKER ON MAC
PICGIF
Supported OS: Mac
PicGIF is yet another app for Mac users to express their contemporary entertainment in the form of a GIF. When it comes to gif creation, the app is quite versatile, and the quality of a created gif is truly astounding. PicGIF generates exceptionally eye-catching gifs with advanced high-satisfaction and stability, as opposed to other apps’ commonly crappy and blurry gifs.
You can make GIFs from movies or from a collection of photographs. All you have to do is select all of the photographs, adjust the fullness, and then select the rate at which the frames will flip. It’s a simple, easy-to-use, and brief app, but the lack of right cropping functionality can be a deterrent for users looking for it.
Features:
- Support a vast number of file formats
- Support hundreds of image formats like JPEG, TIFF, BMP, PNG, TGA, RAW, PIC, etc., and any image size.
- Support almost all common video formats: MOV, MPEG, MP4, M4V, 3GP, AVI, and more.
- Support combining multiple formats – images, GIFs, and videos into a new single GIF.
Pros:
- The PicGIF software is safe to use
- The support of PicGIF is good
Cons:
- Requires OS X 10.7 Lion or later
Steps On How To Make Gif In Pic GIF
- Importing
The picGIF app accepts many different image formats and all common video formats. The app says you can drag and drop onto the pop-up screen on opening the app, but it wouldn’t allow me to do this. However, I was able to work around it by just choosing “Add Photo” or “Add Video” in the File menu, or by doing “Command + O” or “Command + D”, respectively. Even though it says “Add Photo,” you can add multiple files at once.

2. Customization of Pictures
Once you have added the photos, you have several options to customize the gif. Under the “Properties” menu in PicGIF, you can change the size of the output or keep with the default of 360 x 240 pixels and can also choose whether they will be presented as portrait or landscape. At the bottom, you can also choose whether you want it auto optimized for quality or whether you want better quality, which will of course take longer.
Next is deciding how it will handle the photos if they don’t match the exact size of the output, whether you want them sized to fit, stretched, etc., and to choose a background color for when they don’t fit. Speed is the next option to be determined, either leave it on Auto or set the speed yourself. The photos will either be in the sequence you added them in or you can choose to have it go in reverse.


In the “Effects” menu, you can choose among popular options – Original, Vintage, Marcato, and B&W. After you make your choice, you can set the bars for Saturation, Hue, Exposure, Contrast, and Brightness. These are much like you would find in your standard photo apps
Hit the play button to test your GIF, and if it’s to your liking, click “Create GIF”. It only took seconds to create my GIF, but I only had six pictures and left it at the default size.
- Customization of Videos
There aren’t that many options for creating video GIFs. There are, but you need to buy the full version app for $4.99. For this price, you will be able to trim the video as you wish, add text, and add stickers. By sticking with the free version you are limited to either having it autoplay or changing the frames per second. You can also import existing GIFs and edit them. Saving this gif took longer than with the photos, but I was using a longer video.

GIFABLE
Supported OS: Mac
Gifable is another macOS application that enables user to create GIFs as well as save the display screen. This software is simple to use. It first takes a screenshot of the display and converts it to GIF format. This tool currently transmits data at a rate of 12 frames per second. Gifable advanced feature is that it can copy the GIF to the clipboard for clean copy and paste operations. However, there is a help menu that instructs newcomers on how to use the software. This device is ideal for blogging, tutorials, sharing with colleagues, and social media
Features:
- Currently records at 12 fps
- Shows a preview of the gif when the recording is finished
- Ability to copy the gif to your clipboard for easy copy and paste
- Quickly locate the file you created with a find in finder button
- Help menu to show you how to use Gifable
Pros:
- Click and drag to record
- Records automatically
Cons:
- Not compatible with all operating systems
- Low fps recording
Steps On How To Make Gif In Gifable
- Click the Gifable icon in your menu bar, and select record.

- Click and drag your mouse over the area you would like to record.

- Recording starts automatically!
- Click the Gifable icon, then stop recording, to stop the recording.

GIFOX
Supported OS: Mac
Gifox is yet another cutting-edge GIF generator with an appealing user interface. It is extremely simple to use and has a plethora of wonderful features. The app allows you to record your screen and then convert it to GIFs. It includes a sophisticated compression option that allows customers to tailor the output high-satisfactory and size. Gifox additionally permits you to pick the FPS for its animations.
Gifox is a cleverly specified and expertly crafted app that captures your display screen and converts it into lively gifs – a wonderful opportunity to static pix and huge videos. It’s the ideal companion for:
- Product demonstrations and micro-screencasts
- Reporting bugs and providing entertaining instructions
- Capturing precise video on the display screen
Features:
- Gifox allows us not to convert video clips, but we can also capture what is displayed on the screen, either full screen or a part of it.
- We can set the number of fps in each screen recording.
- We can also adjust the number of fps of playback when we convert the video.
- When performing video compression, we can adjust the number of colors we want to use in the conversion
- When recording the screen of our Mac to make a GIF, we can make use of keyboard shortcuts to start and stop recording.
- Once we have created the GIF, we can share it by dragging it to other apps, uploading it directly to our storage service, or even from Imgur.
Pros:
- It is vastly easy to use compared to many other apps in the market.
- It comes with the most dynamic interface.
Cons:
- File sizes of the produced GIFs are big in some cases, which leads to a slow upload on websites with huge traffic.
Steps On How To Make Gif In Gifox
1. Record Your Screen
After clicking the fox icon in the menu bar, you can find the buttons to record the screen on the left side of the interface.

Gifox provides two modes for recording the screen – area and window. This means you can record part of the window or choose to record the full window.
For an area recording, Gifox allows you the freedom to select the area. You can select any area by dragging your mouse from corner to corner.


When using the window recording mode, one great feature is that it doesn’t matter if several windows are overlapping. You can just select the one you want to record, and Gifox will ignore the other window.
Gifox also offers shortcuts so that you don’t have to always open the icon from the menu bar. This makes it even easier to use as a daily utility.

2. Flexible Setting
Gifox is not only easy to use but also a very flexible application. Here are just some of the options that you can customize:
- Mouse cursor appearance
- Window shadow
- Desktop background recording fps
- Playback fps
- Repeat count and pause
- Max colors
- Bayer scale
All of these are available in the Gifox settings window.

3. Compress
If you’re sharing a GIF on the internet, you’re going to like it to be of good quality but with the smallest file size possible. Gifox makes this possible. Available in preferences, the compress settings allow you to have full control over the quality of the GIF. You can change the color count, the palette, the dither, and the bayer scale. This eliminates the need to install a second program just for compressing your file.
WHICH SHOULD I CHOOSE: FREE OR PAID GIF MAKER ON MAC?
If the main reason you want this powerful and advanced GIF software is to create GIFs from videos, you should invest in the advanced version. Since there is not much you can do with videos and the free version.
However, if you want to make GIFs from photos, this free or open-source version will suffice.
FAQS ABOUT MAKING GIFS FROM VIDEO
- What tip can I have in editing GIFs?
You don’t need to make your GIF colorful. You need to use fewer colors. The fewer colors your GIF has, the more fun it is. Because if your GIF has a lot of colors, you will have a problem exporting it.
- Is it possible to export GIFs without watermarks?
Yes, some GIF editors have a feature to remove the watermarks using a free account. However, there are also GIF editors where you need to pay a flat amount first before exporting GIF without watermarks.
- Can I use Video Converter Ultimate offline to edit a GIF?
Absolutely, yes. Even without internet access, you can modify and quickly convert your GIF in no time.
Conclusion:
If the proper GIF editor is used, animated GIFs can be edited with little effort. There are GIF software programs that are highly recommended by users due to their ease of use and simple interface. It’s time to give them a shot
For macOS 10.14 or later
Features:
3D Video Editing
Media Library
Video Capture
Video Stabilization
Pros:
Expansive video editing features
Professional appearance for an affordable price
User-friendly interface
Cons:
The video saving process may lag
Bug fixes may take time to resolve
Watermarks on the free version
Premade templates lack a professional feel
Steps On How To Make GIF In Filmora
- Import Media Files
The very first task for users is to import some editable video files or collections of photos to the timeline of Wondershare Filmora.
- Drag To Timeline
- Edit Media Files
- Add Text Effect To Gif Files
- Save And Export
SMART GIF MAKER
Supported OS: Windows and Mac
Smart GIF Maker is some other loose however extraordinarily beneficial app for Mac users. To make the procedure feasible, the creators used an incredibly simple user interface which is easy like any other popular app. With this app, users can without difficulty create new GIFs even as additionally enhancing current GIFs. Smart GIF Maker makes it easy to feature or dispose of frames from a GIF or maybe a photo.
Users may even customize the loop counts and body periods for every GIF they create. Simply drag and drop the photographs right into a body even as converting the order of the frames to your liking, and you may have a GIF prepared in no time.
Users can set the duration of each frame in the app at the same time. It even handles previews much better than it used to. In order to make things easier for users, the app asks whether or not to import the created file.
Features:
Simple UI
- Easily create new, or modify existing gifs.
- Easily add and remove frames to a gif.
- Click frames to modify images, or drag images to the frames.
- Preview gifs before exporting them.
Drag and drop
- Drag images from Finder to add to the gif.
- Drag frames inside the app to change the order.
Import and export
- Import gifs or movies, or create gifs entirely from individual images.
- Imports .gif, .mov and .mp4.
- Add .png, .jpg, .bmp, .tiff or .gif images to the gif.
- Export workspace as .gif.
Settings
- Set the frame duration of an individual or all frames.
- Set the loop counter of the gif.
Editor
- Edit frames in the gif using Paint-like features.
- Draw directly on frames, with varying colors and brush sizes.
- Use eraser and eyedropper tools to make editing easier!
Extras
- Reverse gifs,
- Set all frame durations at once.
Cons:
- Restricted features for free accounts
- Slow conversion process
Steps On How To Make GIF In Smart GIF Maker
- Import Your Video
When you import your video, the app breaks it down into frames you can then work with, remove, or edit. You can also use images with the app and import them with the same type of editing options.
- With each frame, you can change the drawing size, use an eraser tool, adjust the background color, and use the eyedropper for matching colors.
- After you edit your frames, you can set the time delay for each and the number of loops on the main screen. When you finish creating your GIF, hit the Preview button at the top and then export it to your computer if you’re happy with it.
GIPHY CAPTURE
Supported OS: Mac and Windows
Because of its simplicity and ease of use, GIPHY Capture is one of the most popular and well-liked apps for creating GIFs. The app is free and allows users to capture anything on their screen and convert it into a GIF lasting up to 30 seconds. A couple of clicks are all that is required to complete the task; one click initiates the process, while another click terminates it. All that remains is to add the appropriate captions and adjust the GIF’s export size, and you’re done. If you are a professional, the app even allows you to make more precise edits and trim a clip at specific time frames.
Once you’ve completed all of this and are satisfied with the end result, the next step is simple. Users can choose to save the GIF to their GIPHY account or share it directly with their friends and family.
Features:
Capture Instantly
- Create your GIF with just a couple of clicks
- Click to start, click to stop
- Capture GIFs up to 30 seconds long
Edit Precisely
- Super simple editing lets you get creative, fast
- Pick which kind of loop you like best
- Adjust the frame rate to your liking
- Animated captions: add them, style them, animate them
- Preview the file size of your GIF before saving
Quickly Save and Share
- Email your friends your favorite videos as GIFs
Simple Upload To Giphy
- Hold onto your favorite GIF creations forever
- Easily access them whenever you want
- Share your GIFs on Facebook, Tweet them to Twitter, or send them on Facebook Messenger
Cons:
● App Notifications are not working properly
● Audio / video loading problem
● App installation issues
● Login issues or account related issues
Steps On How To Make Gif In Giphy Capture
1. Once you’ve opened GIPHY Capture - open up your browser, video, or whatever you want to record. Adjust the size of your GIPHY capture frame by grabbing any of the sides or corners and stretching to your desired frame size
After your frame is set up, you’ll want to record a clip by pressing the red circle button. After 30-seconds (or less if you stop the recording sooner) the raw footage will be saved on the bottom of your GIPHY Capture window. This footage will be saved indefinitely, so if you close the app and reopen it at a later date you can pick up where you left off. However, if you delete the GIPHY Capture app from your computer, your videos will be deleted too.
You can take this 30-second clip and edit the length. It’s best to keep the GIF between 2-6 seconds if the intention is for the GIF to be shared in messaging apps and on the web. If you are making a “how-to” or tutorial GIF for an app or workflow you may need to make the length longer than 6 seconds.
You can choose to edit the loop type, pixel size, and frame rate. Changing these can affect the quality and file size of your GIF. In most cases leaving the standard preset options works best.
Under the Captions tab, you can easily add captions to your GIFs. Your captions can either have the regular or italicized text and come with a few preset options for changing the text color. You can edit the animation of the caption, just in case you want it to fade or drop into the frame. You can even edit the duration of the caption in your GIF. If you have a 6-second GIF but only want the caption to be in the frame for the final 2 seconds you can do so by editing the start and end time of the caption.
Now that you’ve created your GIF you can upload it directly to your GIPHY account and allow people to share it, provided you have a branded GIPHY channel.
If you don’t want to upload your new creation directly to GIPHY, you can download it as a .gif or .mp4 file locally to your computer.
GIFROCKET
Supported OS: Mac
GifRocket is the only downloadable record converter for developing GIFs. The only disadvantage is that it is only available to Mac users. This program is used to convert a video file to GIF format. That means you must already have the video file created. You can use a small clip from a previous video that you made or a clip that you downloaded. After you’ve downloaded and installed GifRocket on your computer, simply drag and drop your video file over the GifRocket tool window. The converter will begin working, and you will have a perfect GIF in a matter of seconds.
The production value must be the same as a full-length marketing video but the file size must be smaller, this tool is ideal for creating banner videos for site pages.
Features:
- Intuitive interface
- Change quality and file size of the outputted file
Cons:
- Lack of features like crop and frame rate, only available for Mac.
Steps On How To Make Gif In GIF Rocket
- After you download the app, open it, and there you will see a blank canvas. You’re supposed to drag the file here to start the conversion to GIF. But not so fast. First, click the Settings button. Here you’ll get three fields.
Enter the start and endpoint. Remember this is in the Hours: Minutes: Seconds layout so if your video is short, don’t forget to add zeros for the hours or minutes mark, or else the GIF won’t work.
Second, select the width of the GIF you want to create. The default is 320px. You can take it up to 500 or 600 if you’re dealing with a widescreen video but if you make the GIF too wide the size of the resulting file is also going to go up.
The last setting is quality. There is a slider and frankly, it’s not that helpful. There are only three points on it. I found the middle point, 50% to work the best. Once you’ve got the settings the way you want, click X, drag in the file and wait for Gifrocket to do its thing.
BEST PAID GIF MAKER ON MAC
PICGIF
Supported OS: Mac
PicGIF is yet another app for Mac users to express their contemporary entertainment in the form of a GIF. When it comes to gif creation, the app is quite versatile, and the quality of a created gif is truly astounding. PicGIF generates exceptionally eye-catching gifs with advanced high-satisfaction and stability, as opposed to other apps’ commonly crappy and blurry gifs.
You can make GIFs from movies or from a collection of photographs. All you have to do is select all of the photographs, adjust the fullness, and then select the rate at which the frames will flip. It’s a simple, easy-to-use, and brief app, but the lack of right cropping functionality can be a deterrent for users looking for it.
Features:
- Support a vast number of file formats
- Support hundreds of image formats like JPEG, TIFF, BMP, PNG, TGA, RAW, PIC, etc., and any image size.
- Support almost all common video formats: MOV, MPEG, MP4, M4V, 3GP, AVI, and more.
- Support combining multiple formats – images, GIFs, and videos into a new single GIF.
Pros:
- The PicGIF software is safe to use
- The support of PicGIF is good
Cons:
- Requires OS X 10.7 Lion or later
Steps On How To Make Gif In Pic GIF
- Importing
The picGIF app accepts many different image formats and all common video formats. The app says you can drag and drop onto the pop-up screen on opening the app, but it wouldn’t allow me to do this. However, I was able to work around it by just choosing “Add Photo” or “Add Video” in the File menu, or by doing “Command + O” or “Command + D”, respectively. Even though it says “Add Photo,” you can add multiple files at once.
2. Customization of Pictures
Once you have added the photos, you have several options to customize the gif. Under the “Properties” menu in PicGIF, you can change the size of the output or keep with the default of 360 x 240 pixels and can also choose whether they will be presented as portrait or landscape. At the bottom, you can also choose whether you want it auto optimized for quality or whether you want better quality, which will of course take longer.
Next is deciding how it will handle the photos if they don’t match the exact size of the output, whether you want them sized to fit, stretched, etc., and to choose a background color for when they don’t fit. Speed is the next option to be determined, either leave it on Auto or set the speed yourself. The photos will either be in the sequence you added them in or you can choose to have it go in reverse.
In the “Effects” menu, you can choose among popular options – Original, Vintage, Marcato, and B&W. After you make your choice, you can set the bars for Saturation, Hue, Exposure, Contrast, and Brightness. These are much like you would find in your standard photo apps
Hit the play button to test your GIF, and if it’s to your liking, click “Create GIF”. It only took seconds to create my GIF, but I only had six pictures and left it at the default size.
- Customization of Videos
There aren’t that many options for creating video GIFs. There are, but you need to buy the full version app for $4.99. For this price, you will be able to trim the video as you wish, add text, and add stickers. By sticking with the free version you are limited to either having it autoplay or changing the frames per second. You can also import existing GIFs and edit them. Saving this gif took longer than with the photos, but I was using a longer video.
GIFABLE
Supported OS: Mac
Gifable is another macOS application that enables user to create GIFs as well as save the display screen. This software is simple to use. It first takes a screenshot of the display and converts it to GIF format. This tool currently transmits data at a rate of 12 frames per second. Gifable advanced feature is that it can copy the GIF to the clipboard for clean copy and paste operations. However, there is a help menu that instructs newcomers on how to use the software. This device is ideal for blogging, tutorials, sharing with colleagues, and social media
Features:
- Currently records at 12 fps
- Shows a preview of the gif when the recording is finished
- Ability to copy the gif to your clipboard for easy copy and paste
- Quickly locate the file you created with a find in finder button
- Help menu to show you how to use Gifable
Pros:
- Click and drag to record
- Records automatically
Cons:
- Not compatible with all operating systems
- Low fps recording
Steps On How To Make Gif In Gifable
- Click the Gifable icon in your menu bar, and select record.
- Click and drag your mouse over the area you would like to record.
- Recording starts automatically!
- Click the Gifable icon, then stop recording, to stop the recording.
GIFOX
Supported OS: Mac
Gifox is yet another cutting-edge GIF generator with an appealing user interface. It is extremely simple to use and has a plethora of wonderful features. The app allows you to record your screen and then convert it to GIFs. It includes a sophisticated compression option that allows customers to tailor the output high-satisfactory and size. Gifox additionally permits you to pick the FPS for its animations.
Gifox is a cleverly specified and expertly crafted app that captures your display screen and converts it into lively gifs – a wonderful opportunity to static pix and huge videos. It’s the ideal companion for:
- Product demonstrations and micro-screencasts
- Reporting bugs and providing entertaining instructions
- Capturing precise video on the display screen
Features:
- Gifox allows us not to convert video clips, but we can also capture what is displayed on the screen, either full screen or a part of it.
- We can set the number of fps in each screen recording.
- We can also adjust the number of fps of playback when we convert the video.
- When performing video compression, we can adjust the number of colors we want to use in the conversion
- When recording the screen of our Mac to make a GIF, we can make use of keyboard shortcuts to start and stop recording.
- Once we have created the GIF, we can share it by dragging it to other apps, uploading it directly to our storage service, or even from Imgur.
Pros:
- It is vastly easy to use compared to many other apps in the market.
- It comes with the most dynamic interface.
Cons:
- File sizes of the produced GIFs are big in some cases, which leads to a slow upload on websites with huge traffic.
Steps On How To Make Gif In Gifox
1. Record Your Screen
After clicking the fox icon in the menu bar, you can find the buttons to record the screen on the left side of the interface.
Gifox provides two modes for recording the screen – area and window. This means you can record part of the window or choose to record the full window.
For an area recording, Gifox allows you the freedom to select the area. You can select any area by dragging your mouse from corner to corner.
When using the window recording mode, one great feature is that it doesn’t matter if several windows are overlapping. You can just select the one you want to record, and Gifox will ignore the other window.
Gifox also offers shortcuts so that you don’t have to always open the icon from the menu bar. This makes it even easier to use as a daily utility.
2. Flexible Setting
Gifox is not only easy to use but also a very flexible application. Here are just some of the options that you can customize:
- Mouse cursor appearance
- Window shadow
- Desktop background recording fps
- Playback fps
- Repeat count and pause
- Max colors
- Bayer scale
All of these are available in the Gifox settings window.
3. Compress
If you’re sharing a GIF on the internet, you’re going to like it to be of good quality but with the smallest file size possible. Gifox makes this possible. Available in preferences, the compress settings allow you to have full control over the quality of the GIF. You can change the color count, the palette, the dither, and the bayer scale. This eliminates the need to install a second program just for compressing your file.
WHICH SHOULD I CHOOSE: FREE OR PAID GIF MAKER ON MAC?
If the main reason you want this powerful and advanced GIF software is to create GIFs from videos, you should invest in the advanced version. Since there is not much you can do with videos and the free version.
However, if you want to make GIFs from photos, this free or open-source version will suffice.
FAQS ABOUT MAKING GIFS FROM VIDEO
- What tip can I have in editing GIFs?
You don’t need to make your GIF colorful. You need to use fewer colors. The fewer colors your GIF has, the more fun it is. Because if your GIF has a lot of colors, you will have a problem exporting it.
- Is it possible to export GIFs without watermarks?
Yes, some GIF editors have a feature to remove the watermarks using a free account. However, there are also GIF editors where you need to pay a flat amount first before exporting GIF without watermarks.
- Can I use Video Converter Ultimate offline to edit a GIF?
Absolutely, yes. Even without internet access, you can modify and quickly convert your GIF in no time.
Conclusion:
If the proper GIF editor is used, animated GIFs can be edited with little effort. There are GIF software programs that are highly recommended by users due to their ease of use and simple interface. It’s time to give them a shot!
How to Use LUTs in Adobe Premiere Pro
Create High-Quality Video - Wondershare Filmora
An easy and powerful YouTube video editor
Numerous video and audio effects to choose from
Detailed tutorials provided by the official channel
Do you wonder how some pictures or videos look so stunning? As you keep reading you will discover the secrets of achieving similar quality for your content. You need a video or photo-editing software such as Adobe Premiere Pro and LUTS. Premier Pro luts are file types that you use to make color corrections to your content. They are available in different formats, each with varying capabilities. Below is everything you need to improve your editing skills using Adobe’s software and premiere luts.

In this article
01 How does Premiere Pro Classify LUTS?
02 How to use Luts in Adobe Premiere Pro?
03 How to save and export your LUTS?
How does Premiere Pro Classify LUTS?
A premiere pro lut can fall into two categories depending on its core function. These are:
• Looks
These are premiere luts you use to make changes to your video or photo’s appearance and color scheme. They are available as presets under the Lumetri Color Panel and offer quick fixes to your content.
• Input Lut
You use these premiere pro luts to interpret log footage. Additionally, they are the first step of your color correcting process and work best on DSLR footage. However, keep reading to discover how to use luts in Adobe Premiere Pro.
How to use Luts in Adobe Premiere Pro?
Now that you are aware of how the program classifies the Luts, here is how you can correct your footage.
1. Get the latest version of the program
You can purchase and download the program from your region’s Adobe Website. The program is available for both macOS and Windows. However, it is quite heavy on the system. According to reports, the below requirements are sufficient.
- You need a processer with 8 cores and clock speeds upwards of 3.2GHz.
- 16 GB of Ram is ideal for macOS. However, you do require upwards of 32GB if you are running Windows.
- Graphics cards from Nvidia and AMD are best if you also want to improve the program’s performance. You request one that can handle the Adobe Premiere Pro from your supplier.
- Furthermore, invest in a high-capacity storage device to save your projects since some outputs can be very large after color correction. The program allows you to render 4K files which are the largest.
- Finally, the above requirements are sufficient to run the following versions OF Adobe Premiere Pro:
i. Adobe Premiere Pro 22.2
ii. Adobe Premiere Pro 22.1.2
iii. Adobe Premiere Pro 22.1.1
iv. Adobe Premiere Pro 22.0
2. Select the video you want and put it on the timeline

3. Premiere luts are accessible from two sections of the program
Input luts are available under the Basic Correction tab from the Lumetri Panel as above.
Alternatively, you can get them by accessing the Basic Correction tab from the Lumetri Section of the Effects Control Panel.
4. Then, open the Input LUT dropdown menu and choose the premiere lut you want
Adobe Premiere Pro has preset input LUTs. However, you can also add your own by clicking browse. Doing so opens your computer’s File Explorer and you can locate your custom premiere luts. The software applies the premiere lut, after which you can use the tools to make adjustments.
Additionally, Adobe Premiere Pro allows you to install custom LUT files to use. Below is the process for macOS users.
- Create these target directories in your Adobe Premiere Installation files. • For shared devices
/Library/Application Support/Adobe/Common/LUTs/Creative
/Library/Application Support/Adobe/Common/LUTs/Technical
• You need to create these files if you have administrator access.
/Users//Library/Application Support/Adobe/Common/LUTs/Creative
/Users//Library/Application Support/Adobe/Common/LUTs/Technical - Copy your custom LUT files to each of the folders.
- These will be available in your Lumetri Panel next time you launch Adobe Premiere Pro.
The process is the same for Windows Users. However, the target directories are different.
- For shared devices:
C:\ Program Files\ Adobe\Common\LUTs\Creative
C:\ Program Files\ Adobe\Common\LUTs\Creative - You need to create these files if you have administrator access.
C:\Users\yourusername\AppData\Roaming\Adobe\Common\LUTs\Creative
C:\Users\yourusername\AppData\Roaming\Adobe\Common\LUTs\Technical
Adobe Premiere Pro accepts .look and .cube file types, allowing you more creative freedom. Additionally, you can save and export any custom premiere luts to use in other projects. The next section offers a step-by-step guide on how to do that.
Finally, Looks allow you to make quick adjustments to your videos using the presets available on the Lumetri Panel. You can access these from the Effects Panel. Furthermore, it also allows you to preview the result. The intensity of the look can vary depending on where the slider is on the effects panel.
How to save and export your LUTS?
Most filmmakers prefer to save their premier luts for later use. Here is how to do it:
- Follow the above process through to step 5.
- Once you finish your editing, click on the Lumetri Pop Up menu and choose Save Preset.
- Fill the respective fields with your custom information and click OK. The program will then save the clip to the location you specify.
- You can save custom luts in the following ways:
Scale only applies the new lut to the video. As such, all other luts you use are deleted. Therefore, if your video is one hour, your custom settings will run through the clip’s entire length.
Anchor To In Point only saves the section of the clip where your custom settings are active. Additionally, the software will add all pre-existing luts to the section without scaling. - Additionally, you can repeat the process and export your LUTs in the following formats:
.look exports the LUT as an Adobe Premiere Pro file to a location on your device.
.cube saves the Lumetri preset you can use on other color grading software. For example, you can use your .cube custom lut with Filmora.

For Win 7 or later (64-bit)
For macOS 10.12 or later
Finally, the above procedures only apply to certain versions of Adobe Premiere Pro. They may differ across devices. This is because Adobe releases new updates regularly to fix bugs and offer new functionality. So, keep checking regularly for any changes.
Conclusion
●Adobe Premiere Pro offers you fun luts to enhance the quality of your video. Additionally, the option to render videos in 4K quality allows you to output creations of the highest quality. Additionally, the option to save and export your LUTS to use with other programs like Filmora, means there is no limit to what you can create. Here is a link to some LUTs you can try on your next edit.
Do you wonder how some pictures or videos look so stunning? As you keep reading you will discover the secrets of achieving similar quality for your content. You need a video or photo-editing software such as Adobe Premiere Pro and LUTS. Premier Pro luts are file types that you use to make color corrections to your content. They are available in different formats, each with varying capabilities. Below is everything you need to improve your editing skills using Adobe’s software and premiere luts.
In this article
01 How does Premiere Pro Classify LUTS?
02 How to use Luts in Adobe Premiere Pro?
03 How to save and export your LUTS?
How does Premiere Pro Classify LUTS?
A premiere pro lut can fall into two categories depending on its core function. These are:
• Looks
These are premiere luts you use to make changes to your video or photo’s appearance and color scheme. They are available as presets under the Lumetri Color Panel and offer quick fixes to your content.
• Input Lut
You use these premiere pro luts to interpret log footage. Additionally, they are the first step of your color correcting process and work best on DSLR footage. However, keep reading to discover how to use luts in Adobe Premiere Pro.
How to use Luts in Adobe Premiere Pro?
Now that you are aware of how the program classifies the Luts, here is how you can correct your footage.
1. Get the latest version of the program
You can purchase and download the program from your region’s Adobe Website. The program is available for both macOS and Windows. However, it is quite heavy on the system. According to reports, the below requirements are sufficient.
- You need a processer with 8 cores and clock speeds upwards of 3.2GHz.
- 16 GB of Ram is ideal for macOS. However, you do require upwards of 32GB if you are running Windows.
- Graphics cards from Nvidia and AMD are best if you also want to improve the program’s performance. You request one that can handle the Adobe Premiere Pro from your supplier.
- Furthermore, invest in a high-capacity storage device to save your projects since some outputs can be very large after color correction. The program allows you to render 4K files which are the largest.
- Finally, the above requirements are sufficient to run the following versions OF Adobe Premiere Pro:
i. Adobe Premiere Pro 22.2
ii. Adobe Premiere Pro 22.1.2
iii. Adobe Premiere Pro 22.1.1
iv. Adobe Premiere Pro 22.0
2. Select the video you want and put it on the timeline
3. Premiere luts are accessible from two sections of the program
Input luts are available under the Basic Correction tab from the Lumetri Panel as above.
Alternatively, you can get them by accessing the Basic Correction tab from the Lumetri Section of the Effects Control Panel.
4. Then, open the Input LUT dropdown menu and choose the premiere lut you want
Adobe Premiere Pro has preset input LUTs. However, you can also add your own by clicking browse. Doing so opens your computer’s File Explorer and you can locate your custom premiere luts. The software applies the premiere lut, after which you can use the tools to make adjustments.
Additionally, Adobe Premiere Pro allows you to install custom LUT files to use. Below is the process for macOS users.
- Create these target directories in your Adobe Premiere Installation files. • For shared devices
/Library/Application Support/Adobe/Common/LUTs/Creative
/Library/Application Support/Adobe/Common/LUTs/Technical
• You need to create these files if you have administrator access.
/Users//Library/Application Support/Adobe/Common/LUTs/Creative
/Users//Library/Application Support/Adobe/Common/LUTs/Technical - Copy your custom LUT files to each of the folders.
- These will be available in your Lumetri Panel next time you launch Adobe Premiere Pro.
The process is the same for Windows Users. However, the target directories are different.
- For shared devices:
C:\ Program Files\ Adobe\Common\LUTs\Creative
C:\ Program Files\ Adobe\Common\LUTs\Creative - You need to create these files if you have administrator access.
C:\Users\yourusername\AppData\Roaming\Adobe\Common\LUTs\Creative
C:\Users\yourusername\AppData\Roaming\Adobe\Common\LUTs\Technical
Adobe Premiere Pro accepts .look and .cube file types, allowing you more creative freedom. Additionally, you can save and export any custom premiere luts to use in other projects. The next section offers a step-by-step guide on how to do that.
Finally, Looks allow you to make quick adjustments to your videos using the presets available on the Lumetri Panel. You can access these from the Effects Panel. Furthermore, it also allows you to preview the result. The intensity of the look can vary depending on where the slider is on the effects panel.
How to save and export your LUTS?
Most filmmakers prefer to save their premier luts for later use. Here is how to do it:
- Follow the above process through to step 5.
- Once you finish your editing, click on the Lumetri Pop Up menu and choose Save Preset.
- Fill the respective fields with your custom information and click OK. The program will then save the clip to the location you specify.
- You can save custom luts in the following ways:
Scale only applies the new lut to the video. As such, all other luts you use are deleted. Therefore, if your video is one hour, your custom settings will run through the clip’s entire length.
Anchor To In Point only saves the section of the clip where your custom settings are active. Additionally, the software will add all pre-existing luts to the section without scaling. - Additionally, you can repeat the process and export your LUTs in the following formats:
.look exports the LUT as an Adobe Premiere Pro file to a location on your device.
.cube saves the Lumetri preset you can use on other color grading software. For example, you can use your .cube custom lut with Filmora.
For Win 7 or later (64-bit)
For macOS 10.12 or later
Finally, the above procedures only apply to certain versions of Adobe Premiere Pro. They may differ across devices. This is because Adobe releases new updates regularly to fix bugs and offer new functionality. So, keep checking regularly for any changes.
Conclusion
●Adobe Premiere Pro offers you fun luts to enhance the quality of your video. Additionally, the option to render videos in 4K quality allows you to output creations of the highest quality. Additionally, the option to save and export your LUTS to use with other programs like Filmora, means there is no limit to what you can create. Here is a link to some LUTs you can try on your next edit.
Trailer Guide for Creators and Developers
Trailers are a popular means to showcase a product you are about to release to the market. Teasers and trailers are traditionally created for movies, but have eventually evolved to include book trailers, game trailers, and app trailers. In this article, we will explain the key details of a trailer, highlight some examples, and show you how to create an effective trailer.
Part 1. What is a Trailer?
A trailer is a type of video commercial advertisement made to advertise and inform audiences about a specific program or item. To persuade customers to view or use the product, it includes a brief series of previews of the entire material. It also serves as a means of creating anticipation for a show or product that is about to hit the market.

Trailers were originally made for cinema movies. Nowadays, trailers are created for different forms of media like shows, apps, programs, video games, and book videos. A typical traditional trailer lasts between 1 to 3 minutes.
Part 2. What Are the Similarities and Differences Between a Teaser and Trailer?
Teasers and trailers can often be confused with each other. After all, they pretty much have the same objective.
Both are created for the purpose of advertising an upcoming show, product, or service. Teasers and trailers are similarly shown to audiences prior to the release of the thing they are advertising. They are meant to show a small portion of the full experience to create curiosity and excitement towards a targeted market. Both videos are typically short in length - taking up only a maximum of 3 minutes in duration.

The differences between them lie in their content, timeline, and duration. A teaser is much shorter than a trailer - the former runs for only 20-30 seconds while the latter can go between 1-3 minutes in length. This is because teasers are typically made before or during the production process of a movie or feature, whilst trailers are commonly made at the end.
For films, movies, and shows, teasers generally capture only a single part of that media. It focuses on the most intense or impactful scene. Trailers are formed from a series of clips depicting striking scenes derived from the beginning, middle, and end of the show. These scenes are normally arranged in a nonlinear structure, allowing viewers to have a general understanding of the story without revealing the entirety of the plot.
Part 3. Examples of good trailers
An excellent trailer is one who can effectively attract and maintain the audience’s attention. It satisfies its objective of showcasing striking and captivating pieces of the main product and entices viewers to experience its entirety. Here are some examples of trailers who have well fulfilled the criteria of a good trailer.
1. The Suicide Squad
The Suicide Squad is a fresh take featuring DC’s anti-heroes assemble in a single chaotic and unconventional team. James Gunn’s iteration on these characters is brought to life in the trailer with a majestic cast including John Cena, Idris Elba, Margot Robbie, and David Dastmalchian. Several key scenes are shown, highlighting its standout characters in the process while portraying the movie’s setting.
2. Raya and the Last Dragon
The trailer starts out innocently and comes with an adorable and surprising twist. The brief 2-minute trailer is packed with relevant scenes that depict the character’s quest without revealing too much. Many action-packed scenes and emotional interactions are satisfactorily squeezed into the trailer. Excitement builds further with Tamara Bubble’s “I’m That Good” playing in the background on the last minute of the video.
3. Men (2022)
Ingenious combination of sound effects and background music play a distinct role in this 2022 trailer. The female lead’s voice echoing from a tunnel, the haunting piano keys gradually building up the suspense, and the common but cleverly used horror audio effects create a chilling ensemble of haunting scenes in the movie. The sounds gradually rise up as more aggressive and energized scenes flash on the screen, and eventually end back into the sombre intro that leaves the audience with questions.
4. The Farewell
Lulu Wang’s dramatic comedy The Farewell is all about a family hiding the truth of a family member’s terminal illness from the person herself. What makes the trailer special is that it steers away from the sad, melancholic direction and veers toward a feel-good movie vibe. The conflict, struggle, and the beliefs featured in the movie are depicted in the trailer. However, the clever placement of interactions and the uplifting music tug at the audience’s heartstrings and urge them to want to see more.
5. Pokémon Go
Pokémon has become a culture to several generations. Becoming a Pokémon trainer is a secret dream that almost all of us have, even as adults. Niantic’s collaboration with the Pokémon franchise brings people closer to that reality by introducing its AR and location-powered app Pokémon Go. The trailer shows people of all ages living out their trainer dreams in the real world and interacting with Pokémon. The different features of the game are dramatized in a real-life setting, inciting more excitement, and pulling out the nostalgia from its market. The trailer keeps the actual app showcase to a minimum, instead focusing on once again selling that dream to audiences and bringing out the inner child in everyone.
Part 4. How to bring your trailer to the next level?
While it may seem intimidating to create a trailer for your upcoming product, there is no need to worry. It is now easier than ever to create a well-crafted trailer by taking advantage of a program’s tools and templates.
- Stock media
Filmora makes it easy to craft a trailer with only a few clicks. Make use of the program’s media library to gain access to a wealth of resources like stock photos, videos, music, and audio files.
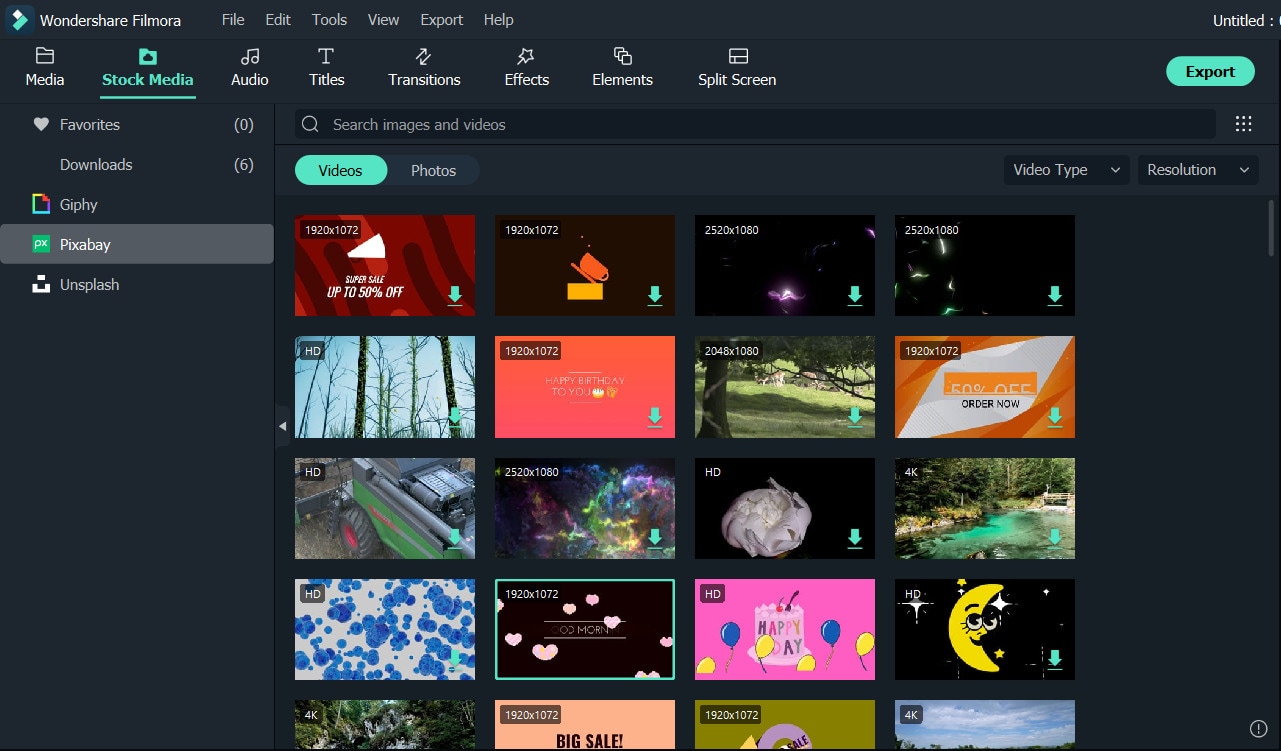
- Keyframing
Keyframing lets you smoothly transition from one scene to another, making it an effective tool for trailers. It is particularly appealing for shows that highlight motion like sports, dancing, and action. Experiment with more than 80 preset templates and create smooth scene transitions with ease.
- Speed Ramping
Speed Ramping is a feature that works perfectly with keyframing. Increase the energy and dynamics in your trailer with 6 preset speed types. You can also customize these templates. There is also no need for concern about the audio - Filmora lets you maintain the audio pitch even when using these features.
- FX Effects
The program also offers many effects and filters for an extra element in your trailer. The Borix FX is an example of that. Designed in collaboration with the award-winning developer of the same name, Boris FX and its extension Continuum features a wide array of tasteful effects for your convenience. There are over 91 customizable and adjustable presets including types like blurs, stylization, and lights. NewBlue is another option that carries choices of filters, titlers, and stylizers.
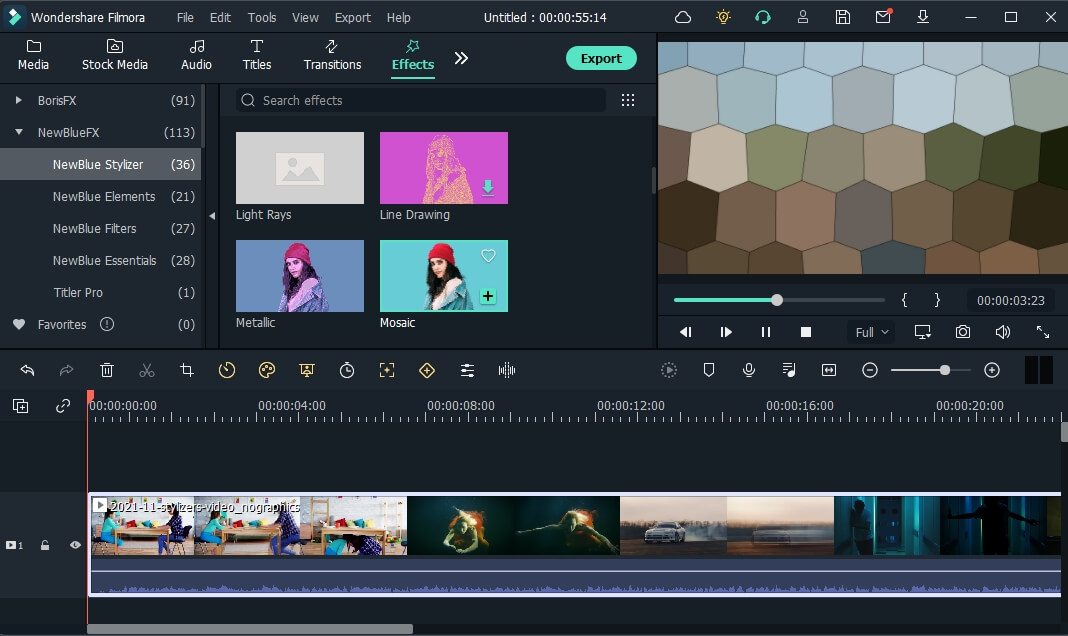
Filmora offers different features, tools, and effects to explore that can help make your trailer editing objectives easier and more convenient. Save time and resources by taking advantage of its powerful yet easy-to-use tools.
Free Download For Win 7 or later(64-bit)
Free Download For macOS 10.14 or later
2. Raya and the Last Dragon
The trailer starts out innocently and comes with an adorable and surprising twist. The brief 2-minute trailer is packed with relevant scenes that depict the character’s quest without revealing too much. Many action-packed scenes and emotional interactions are satisfactorily squeezed into the trailer. Excitement builds further with Tamara Bubble’s “I’m That Good” playing in the background on the last minute of the video.
3. Men (2022)
Ingenious combination of sound effects and background music play a distinct role in this 2022 trailer. The female lead’s voice echoing from a tunnel, the haunting piano keys gradually building up the suspense, and the common but cleverly used horror audio effects create a chilling ensemble of haunting scenes in the movie. The sounds gradually rise up as more aggressive and energized scenes flash on the screen, and eventually end back into the sombre intro that leaves the audience with questions.
4. The Farewell
Lulu Wang’s dramatic comedy The Farewell is all about a family hiding the truth of a family member’s terminal illness from the person herself. What makes the trailer special is that it steers away from the sad, melancholic direction and veers toward a feel-good movie vibe. The conflict, struggle, and the beliefs featured in the movie are depicted in the trailer. However, the clever placement of interactions and the uplifting music tug at the audience’s heartstrings and urge them to want to see more.
5. Pokémon Go
Pokémon has become a culture to several generations. Becoming a Pokémon trainer is a secret dream that almost all of us have, even as adults. Niantic’s collaboration with the Pokémon franchise brings people closer to that reality by introducing its AR and location-powered app Pokémon Go. The trailer shows people of all ages living out their trainer dreams in the real world and interacting with Pokémon. The different features of the game are dramatized in a real-life setting, inciting more excitement, and pulling out the nostalgia from its market. The trailer keeps the actual app showcase to a minimum, instead focusing on once again selling that dream to audiences and bringing out the inner child in everyone.
Part 4. How to bring your trailer to the next level?
While it may seem intimidating to create a trailer for your upcoming product, there is no need to worry. It is now easier than ever to create a well-crafted trailer by taking advantage of a program’s tools and templates.
- Stock media
Filmora makes it easy to craft a trailer with only a few clicks. Make use of the program’s media library to gain access to a wealth of resources like stock photos, videos, music, and audio files.
- Keyframing
Keyframing lets you smoothly transition from one scene to another, making it an effective tool for trailers. It is particularly appealing for shows that highlight motion like sports, dancing, and action. Experiment with more than 80 preset templates and create smooth scene transitions with ease.
- Speed Ramping
Speed Ramping is a feature that works perfectly with keyframing. Increase the energy and dynamics in your trailer with 6 preset speed types. You can also customize these templates. There is also no need for concern about the audio - Filmora lets you maintain the audio pitch even when using these features.
- FX Effects
The program also offers many effects and filters for an extra element in your trailer. The Borix FX is an example of that. Designed in collaboration with the award-winning developer of the same name, Boris FX and its extension Continuum features a wide array of tasteful effects for your convenience. There are over 91 customizable and adjustable presets including types like blurs, stylization, and lights. NewBlue is another option that carries choices of filters, titlers, and stylizers.
Filmora offers different features, tools, and effects to explore that can help make your trailer editing objectives easier and more convenient. Save time and resources by taking advantage of its powerful yet easy-to-use tools.
Free Download For Win 7 or later(64-bit)
Free Download For macOS 10.14 or later
Best Ways to Blur Zoom Background for Free
Zoom’s blurred backdrop function, as the name indicates, distorts the background of a video conversation. Use this zoom blur background download free guide if you wish to keep your personal area hidden during Zoom conversations in order to protect your privacy. There is a backdrop with a zoom blur all throughout. It hides the turmoil or other version of a mess from your colleagues, and it just slightly makes your hair appear odd. You may learn how to blur your backdrop using different operating systems from this page. We’ll walk you through a workaround to get a blurred backdrop because the functionality is presently unavailable for mobile devices.
On your updated Zoom application, this new high res zoom background tool might be useful for a variety of reasons, whether you want to protect your privacy or conceal your filthy room. Consider a scenario in which you have a Zoom meeting but your usual workspace at home is occupied. Panic sets in because you don’t have time to clean everything up or locate a private, neutral location to set up. You have features built in into Zoom to use the zoom blurred background image that would cover the area behind you, including background blurring, that’s it. This simple toggleable feature is already present in Zoom and may be used to keep your area private or to make cluttered spaces uncertain. We’ll provide you a step-by-step tutorial in this post on how to activate blurred backdrop for your next meeting.
Part 1: How to blur Zoom background on Windows
Before and during meetings, users of the official Zoom desktop client for Windows have the option to blur the backdrop. Before a meeting, login into Zoom on the desktop application to activate backdrop blur. After that, choose Settings by clicking on the profile symbol in the upper left corner. Click the “Blur” option under “Backgrounds & Filters” after making your selection. The user may attend the meeting when the backdrop becomes blurry. Here are the steps to blur a Zoom backdrop during a meeting:
During a Zoom call on Windows 10, blur your backdrop as follows:
Step1Find the bar at the bottom of the meeting screen. To make it visible, you may need to move your mouse to the bottom.

Step2Find the “Stop Video” button, which has a chevron pointing upward.

Step3Then choose “Video Settings” > “Backgrounds & Filters” by clicking the arrow.

Step4Then choose “Blur,” and your backdrop will instantly seem blurred.

Part 2: How to blur Zoom background on Mac
Backdrop blur is the next best thing when a virtual background is unsuitable for a video conference but a consumer still needs privacy. As you can see from the description above, the blurred backdrop is just another style of the Zoom background. Customers may therefore directly adjust it from the Virtual Background setting area. Prior doing anything further, confirm that your MacBook is running the Zoom desktop client (software).
Before your Zoom call on a Mac, follow these instructions to blur your background:
Step1Start Zoom and log in to your account.

Step2In the next step, Click the “Settings” gear icon in the top-right corner and then select “Backgrounds & Filters” under Settings as shown below:

Step3Then choose “Blur,” and your backdrop will instantly seem blurred. You can also Select Stop Video by clicking the arrow next to it in the list of choices in the bar below the live video. A little list will start to appear. By using the “Choose Virtual Backdrop” option, you may choose a virtual background.
Step4Select “Blur” under the “Virtual Backgrounds” tab. You may choose a virtual backdrop from this page if you’d like. You need to verify that you have the right Zoom desktop program version and all the technical specs if you can’t locate the Blur option.
Part 3: How to Blur Zoom Background on iPhone
The option isn’t accessible on all Apple devices since a simulated or blurred backdrop requires more computing power. First, you should visit the Zoom virtual background system requirements page to see whether your device is supported. You should continue using Zoom without a virtual or blurred backdrop if your device doesn’t meet the criteria. To manually conceal your backdrop, consider standing close to a wall or sitting in a corner. Here are the instructions on how to blur your backdrop for Zoom meetings on iOS devices. Take these actions:
Step1Launch the Zoom app on your iOS phone in foremost step. To begin or join a new meeting, tap the “New Meeting” or “Join” icon.

Step2During the meeting, tap anywhere on the screen to access the controls that appear below the video.
Step3Select “More” by tapping the three-dot symbol.

Step4A brief list will start to appear. Next, on your iOS device, choose “Background and Filters.”

Step5Below your camera video, you’ll see a few possibilities. Tap “Blur” to make the background blurry.

Part 4: How to blur Zoom background on Android
Additionally, Zoom blur backdrops are the ideal option for first video conversations with clients, coworkers, or supervisors. On its Android app, Zoom offers customers the option to blur their backdrop. However, there is a catch: the function can only be activated once the user has entered a meeting. If a virtual backdrop isn’t your style on Android, you may choose to blur the background instead. Everything in the backdrop will be blurred, keeping just your picture apparent throughout the conversation. Remember that all of your next meetings will have the blur function turned on. How? Read on.
Step1Only while you’re in a meeting can you alter your backdrop. Tap the More icon in the bottom right corner after joining one.

Step2Select Virtual background after that. then choose a picture from the choices offered.

Step3The backdrop of a picture or video added from your gallery using the Add icon will likewise successfully blur the background on your Zoom Android device. Now place Zoom calls as usual, and the backdrop of your live video will be automatically blurred.
Conclusion
For individuals who prefer to obscure their surroundings while on a video conversation, Zoom’s blur background function is helpful. The function was added to the video-conferencing app in 2021 and has since gained popularity. The greatest thing you can do is choose a blur out backdrop if you can’t determine which of our Zoom background categories would best fit the video chat occasion. These are impartial backdrops that don’t necessarily depict any particular environment. They only provide a lovely, unobtrusive background that will take away any possible obstructions during the video connection. Perhaps a professional setting might be too much for a particular video chat, whilst a humorous backdrop wouldn’t work. In this situation, a blurred picture backdrop will be the difference between putting little to no effort into your call and being ready to portray yourself in the best possible way.
Zoom’s blurred backdrop function, as the name indicates, distorts the background of a video conversation. Use this zoom blur background download free guide if you wish to keep your personal area hidden during Zoom conversations in order to protect your privacy. There is a backdrop with a zoom blur all throughout. It hides the turmoil or other version of a mess from your colleagues, and it just slightly makes your hair appear odd. You may learn how to blur your backdrop using different operating systems from this page. We’ll walk you through a workaround to get a blurred backdrop because the functionality is presently unavailable for mobile devices.
On your updated Zoom application, this new high res zoom background tool might be useful for a variety of reasons, whether you want to protect your privacy or conceal your filthy room. Consider a scenario in which you have a Zoom meeting but your usual workspace at home is occupied. Panic sets in because you don’t have time to clean everything up or locate a private, neutral location to set up. You have features built in into Zoom to use the zoom blurred background image that would cover the area behind you, including background blurring, that’s it. This simple toggleable feature is already present in Zoom and may be used to keep your area private or to make cluttered spaces uncertain. We’ll provide you a step-by-step tutorial in this post on how to activate blurred backdrop for your next meeting.
Part 1: How to blur Zoom background on Windows
Before and during meetings, users of the official Zoom desktop client for Windows have the option to blur the backdrop. Before a meeting, login into Zoom on the desktop application to activate backdrop blur. After that, choose Settings by clicking on the profile symbol in the upper left corner. Click the “Blur” option under “Backgrounds & Filters” after making your selection. The user may attend the meeting when the backdrop becomes blurry. Here are the steps to blur a Zoom backdrop during a meeting:
During a Zoom call on Windows 10, blur your backdrop as follows:
Step1Find the bar at the bottom of the meeting screen. To make it visible, you may need to move your mouse to the bottom.
Step2Find the “Stop Video” button, which has a chevron pointing upward.
Step3Then choose “Video Settings” > “Backgrounds & Filters” by clicking the arrow.
Step4Then choose “Blur,” and your backdrop will instantly seem blurred.
Part 2: How to blur Zoom background on Mac
Backdrop blur is the next best thing when a virtual background is unsuitable for a video conference but a consumer still needs privacy. As you can see from the description above, the blurred backdrop is just another style of the Zoom background. Customers may therefore directly adjust it from the Virtual Background setting area. Prior doing anything further, confirm that your MacBook is running the Zoom desktop client (software).
Before your Zoom call on a Mac, follow these instructions to blur your background:
Step1Start Zoom and log in to your account.
Step2In the next step, Click the “Settings” gear icon in the top-right corner and then select “Backgrounds & Filters” under Settings as shown below:
Step3Then choose “Blur,” and your backdrop will instantly seem blurred. You can also Select Stop Video by clicking the arrow next to it in the list of choices in the bar below the live video. A little list will start to appear. By using the “Choose Virtual Backdrop” option, you may choose a virtual background.
Step4Select “Blur” under the “Virtual Backgrounds” tab. You may choose a virtual backdrop from this page if you’d like. You need to verify that you have the right Zoom desktop program version and all the technical specs if you can’t locate the Blur option.
Part 3: How to Blur Zoom Background on iPhone
The option isn’t accessible on all Apple devices since a simulated or blurred backdrop requires more computing power. First, you should visit the Zoom virtual background system requirements page to see whether your device is supported. You should continue using Zoom without a virtual or blurred backdrop if your device doesn’t meet the criteria. To manually conceal your backdrop, consider standing close to a wall or sitting in a corner. Here are the instructions on how to blur your backdrop for Zoom meetings on iOS devices. Take these actions:
Step1Launch the Zoom app on your iOS phone in foremost step. To begin or join a new meeting, tap the “New Meeting” or “Join” icon.
Step2During the meeting, tap anywhere on the screen to access the controls that appear below the video.
Step3Select “More” by tapping the three-dot symbol.
Step4A brief list will start to appear. Next, on your iOS device, choose “Background and Filters.”
Step5Below your camera video, you’ll see a few possibilities. Tap “Blur” to make the background blurry.
Part 4: How to blur Zoom background on Android
Additionally, Zoom blur backdrops are the ideal option for first video conversations with clients, coworkers, or supervisors. On its Android app, Zoom offers customers the option to blur their backdrop. However, there is a catch: the function can only be activated once the user has entered a meeting. If a virtual backdrop isn’t your style on Android, you may choose to blur the background instead. Everything in the backdrop will be blurred, keeping just your picture apparent throughout the conversation. Remember that all of your next meetings will have the blur function turned on. How? Read on.
Step1Only while you’re in a meeting can you alter your backdrop. Tap the More icon in the bottom right corner after joining one.
Step2Select Virtual background after that. then choose a picture from the choices offered.
Step3The backdrop of a picture or video added from your gallery using the Add icon will likewise successfully blur the background on your Zoom Android device. Now place Zoom calls as usual, and the backdrop of your live video will be automatically blurred.
Conclusion
For individuals who prefer to obscure their surroundings while on a video conversation, Zoom’s blur background function is helpful. The function was added to the video-conferencing app in 2021 and has since gained popularity. The greatest thing you can do is choose a blur out backdrop if you can’t determine which of our Zoom background categories would best fit the video chat occasion. These are impartial backdrops that don’t necessarily depict any particular environment. They only provide a lovely, unobtrusive background that will take away any possible obstructions during the video connection. Perhaps a professional setting might be too much for a particular video chat, whilst a humorous backdrop wouldn’t work. In this situation, a blurred picture backdrop will be the difference between putting little to no effort into your call and being ready to portray yourself in the best possible way.
Also read:
- New With This Article, We Will Be Looking at Steps to Rotate a Video in Cyberlink PowerDirector to Help You when Required. We Have Also Mentioned the Steps You Will Need to Follow in Wondershare Filmora
- New Tiktok Video Aspect Ratio
- Updated Steps to Remove Background Noise From Video Sony Vegas
- Updated 2024 Approved How To Create A YouTube Intro
- New 2024 Approved LumaFusion Color Grading Achieving It Through LUTs
- New 2024 Approved How to Record Super Slow Motion Videos on Your Phone?
- How to Create Intro with Renderforest for 2024
- New In 2024, How to Use Blender Green Screen
- Best Text Animations In After Effects
- Updated How to Create Sony Vegas Freeze Frame for 2024
- New Best Free Video Editing Software to Boost Your Content Creation
- Updated 12 Best Picks of Video Enhancer Software for 2024
- Updated In 2024, How to Add Selective Color Effect to Your Videos
- New How to Edit A Time Lapse Video on iPhone for 2024
- 2024 Approved Come And Pick! Best MOV to GIF Converters
- Updated Ways to Learn Discord Game Bots – Even if Youre Just Starting Out 20
- 2024 Approved Best Ways to Blur Zoom Background for Free
- 2024 Approved Learn How to Use 3D Camera Tracking in Adobe After Effects and Take Your Skills to the Next Level
- New Ways to Make Sure Your Video Editing Course Is Worthing to Watch for 2024
- Updated In 2024, How to Make Video Slow Motion?
- In 2024, Learn How to Make a Gaming Montage - Guide & Tips
- 2024 Approved How to Merge Videos in HandBrake? Expectation Vs. Reality
- 2024 Approved How to Use the Logo Intro Templates for Your Next Video
- New Tips That Show Anybody How To Create Youtube Slideshow – Guaranteed
- Different Ways To Trim Video In Premiere Pro for 2024
- Updated 6 Free Tools To Radial Blur Photos Online
- New Some Leading AI Tools to Replace Sky Backgrounds for 2024
- In 2024, Have You Tried a Discord Boost Before? What Does a Discord Server Boost Entail, and Is It Worthwhile? What Are the Advantages? Heres a Quick Guide to Assist You in Making Your Decision
- 2024 Approved Recording Videos with Your Smartphones Is Fun and Fantastic. But Did You Know that Recording in Slo-Mo Has Become a Trend Nowadays? Read More to Learn About How to Convert Videos to Slow Motion Here
- New 2024 Approved How Much Wedding Videographer Cost
- Step by Step to Crop a Video Using Lightworks for 2024
- 2024 Approved In This Article, You Will Learn About the Top 5 Editors for Windows, Top 5 Editors for iPhone/Android, and Top 5 Editors for Animated GIF Editing
- In 2024, How to Rotate Video in iMovie with Alternative
- The Article Introduces Three Recommended Apps to Download Royalty-Free Cinematic Music and Covers an Extensive Procedure to Create a Cinematic Travel Intro for a Travel Vlog
- Updated In 2024, 2 Methods to Cut Video in VLC on Windows
- In 2024, Camtasia Vs Captivate Which Is Better
- In 2024, 4 Ways to Rotate Videos on Windows PC
- New Cropping a Video in Davinci Resolve Step by Step
- Wondering How to Add Custom Transitions in OBS Studio? Here Are the Steps to Add Stinger Transitions to OBS. Get a Better OBS Alternative to Add Transitions
- In 2024, Applications and Software Take up Your Devices Storage to Create Slow-Mo. Explore This Piece to Learn About some Slow-Motion Video Online Makers
- 2024 Approved Best Phantom Slow-Mo Camera For Recording Slow Motion Videos
- Updated Replacing Sky in Your Pictures Using Online and Offline Tools
- REVIEW Whats Best 10 Software to Make AI Upscaling Video for 2024
- Updated How to Loop a Video on Android for 2024
- Updated 2024 Approved Blender - A Video Editor for All Professor
- 2024 Approved Learn How to Add Fun and Personalized AR Emoji Stickers to Your Videos. Discover Tips and Tricks for Using These Stickers Like a Pro and Making Your Videos Stand Out
- 2024 Approved CapCut Lenta Template How It Benefits Slow Motion Video
- New Want to Find a Good Camera for YouTube? This Article Brings You some of the Best Options of Different Varieties for Your Channel
- In 2024, How To Bypass iCloud By Checkra1n Even On iPhone 12 Pro If Youve Tried Everything
- In 2024, How To Unlink Apple ID From iPhone 15 Pro
- In 2024, How To Change Your Apple ID on Apple iPhone 13 With or Without Password | Dr.fone
- Failed to play MOV movies on Galaxy S23 FE
- Fix App Not Available in Your Country Play Store Problem on Realme GT 3 | Dr.fone
- Top 7 Phone Number Locators To Track Vivo Y200 Location | Dr.fone
- In 2024, For People Wanting to Mock GPS on Realme 11 Pro+ Devices | Dr.fone
- How to Bypass Google FRP Lock on Vivo Y78t Devices
- In 2024, What Legendaries Are In Pokemon Platinum On Vivo X100 Pro? | Dr.fone
- Forgot your Honor X8b lock screen pattern, PIN or password? Here’s what to do
- How To Get the Apple ID Verification Code From Apple iPhone 12 Pro Max in the Best Ways
- Fix Realme 11 Pro Android System Webview Crash 2024 Issue | Dr.fone
- Unlock android phone if you don't have Infinix fingerprint
- In 2024, 8 Ways to Transfer Photos from Infinix Note 30 VIP Racing Edition to iPhone Easily | Dr.fone
- How do I reset my Honor X50 Phone without technical knowledge? | Dr.fone
- In 2024, Step-by-Step Tutorial How To Bypass Lava Blaze Pro 5G FRP
- In 2024, Forgotten The Voicemail Password Of Poco C65? Try These Fixes
- In 2024, How and Where to Find a Shiny Stone Pokémon For Nokia C210? | Dr.fone
- In 2024, 3 Ways to Unlock iPhone X without Passcode or Face ID
- In 2024, 8 Ways to Transfer Photos from Motorola Razr 40 Ultra to iPhone Easily | Dr.fone
- How To Unlock a ZTE Blade A73 5G Easily?
- 3 Methods to Mirror Realme Note 50 to Roku | Dr.fone
- The 10 Best Tools to Bypass iCloud Activation Lock On iPhone 15 Pro Max You Should Try Out
- In 2024, How to Bypass Apple iPhone SE (2022) Passcode Easily Video Inside
- Lava Blaze 2 5G Music Recovery - Recover Deleted Music from Lava Blaze 2 5G
- A Complete Guide To OEM Unlocking on Samsung Galaxy S23 Tactical Edition
- In 2024, How to Transfer Apps from Google Pixel 7a to Another | Dr.fone
- 7 Ways to Lock Apps on Apple iPhone 6 and iPad Securely
- Delete Gmail Account With/Without Password On Vivo T2 Pro 5G
- How to Unlock Xiaomi 14 Pro Pattern Lock if Forgotten? 6 Ways
- 3uTools Virtual Location Not Working On OnePlus Open? Fix Now | Dr.fone
- 5 Hassle-Free Solutions to Fake Location on Find My Friends Of Samsung Galaxy S23 | Dr.fone
- How to recover deleted contacts from Motorola Razr 40.
- Poco C55 Stuck on Screen – Finding Solutions For Stuck on Boot | Dr.fone
- Quickly Remove Google FRP Lock on Magic5 Ultimate
- How to Unlock Honor 100 Pro Phone Forgot Password
- Top 11 Free Apps to Check IMEI on Nokia C12 Plus Phones
- In 2024, Ultimate Guide on Samsung Galaxy XCover 6 Pro Tactical Edition FRP Bypass
- Three Solutions to Hard Reset Xiaomi 13T Pro? | Dr.fone
- How to Resolve Motorola Moto G84 5G Screen Not Working | Dr.fone
- In 2024, 4 Ways to Transfer Music from Honor 100 Pro to iPhone | Dr.fone
- Title: In 2024, 7 Ways to Make GIF From Videos on Mac
- Author: Chloe
- Created at : 2024-06-26 06:24:02
- Updated at : 2024-06-27 06:24:02
- Link: https://ai-editing-video.techidaily.com/in-2024-7-ways-to-make-gif-from-videos-on-mac/
- License: This work is licensed under CC BY-NC-SA 4.0.
