
:max_bytes(150000):strip_icc():format(webp)/should-you-buy-an-apple-tv-5248431-f35331ef36b749b9895a2c1e3705cf22.jpg)
In 2024, A Complete Guide to Use Distortion Effect in Premiere Pro
A Complete Guide to Use Distortion Effect in Premiere Pro
Create High-Quality Video - Wondershare Filmora
An easy and powerful YouTube video editor
Numerous video and audio effects to choose from
Detailed tutorials are provided by the official channel
Premiere Pro is one of the most popular timeline-based video editing software, with over 9 million users. It’s the successor to Adobe Premiere, and it comes with cool distortion effects. We’ll look at Premiere Pro distortion effects and how to use them.
In this article
01 How to Use Distortion Effect in Premiere Pro?
02 Bonus! Free Distortion Effects for Premiere Pro
Adobe Premiere Pro offers a wide variety of beneficial editing tools and effects. Below are some of the impressive distortion effects you’ll find in Premiere Pro and how to use them in your project.
1. Corner Pin Effect
This effect distorts your image by simply changing the position of its corners. You can use the Corner pin effect to twist, skew, shrink, or stretch an image. Additionally, you can use it to simulate movement or perspective pivoting from the edge of your clip like a door opening.
You can directly manipulate the properties of the Corner Pin effect in the Program monitor by clicking the Transform right next to Corner Pin. To adjust the properties, drag one of the corner handles.
- To use this effect, open Premiere Pro and click File. Choose Import from the drop-down menu. The File Explorer window will open and allow you to find your footage. Select the video file you want to import, then click Open.
- Go to Effects Control and click Distortion. Choose Corner Pin Effect from the drop-down menu.

- You can now pin each corner from its original point to another specific point by adjusting the slider on the Upper Left, Upper Right, Lower Left, and Lower Right. You can also highlight your selection tool when working with the Corner Pin effect.

2. Lens Distortion Effect
This distortion effect Premiere Pro simulates the distorted lens through which people view the clip.
1. Go to Effects Control>Distortion>Lens Distortion Effect.
2. Choose the settings you want to use from the available options and adjust the slider.
- The Vertical and Horizontal Decentering control displaces the lens’ focal and makes the image bend and smear. The image will wrap in on itself at extreme settings.
- The Curvature setting alters the curvature of the lens. You can specify a positive value to make the image convex, while the negative value makes the image concave.
- The Vertical and Horizontal Prism FX setting created results similar to horizontal decentering and vertical, but the image does not wrap in on itself at extreme values.
- Use the Fill Color option to specify the background color, and Fill Alpha to make your background transparent.

3. Magnify Effect
This effect allows you to enlarge a selected area of your clip. The Magnify effect acts as a magnifying glass set over an area of an image. You can also use this effect to scale the whole image far beyond 100 percent and still maintain resolution.
1. To use this effect, go to Effect Control>Distortion>Magnify.
2. Next, go to the left side of the Effects Control panel and make the necessary adjustments to suit your preferences.
- Shape: This control specifies the magnified area shape.
- Center: The Center control allows you to specify the center of the magnified section.
- Magnification: This setting lets users specify the percentage of the magnification of the area they have selected, while the values represent the scale percentage.
- Link: The Link control allows you to specify how the effect will link the Size, Feather, and Magnification amount, to enable them to decrease or increase proportionally. You will disable the Resize Layer option if you set the Link control to any of the available settings except None. Setting the Link control to any setting except None disables Resize Layer. Size & Feather To Magnification allows you to specify that the edge feather and size of the magnified section decrease or increase proportionally regarding the magnification adjustment.
- Size: This control allows you to specify the magnified area size in pixels.
- Feather: With the Feather option, you can specify the amount of feather the effect applies to the magnified area edge. Lower values will sharpen the edge. Higher values will soften the edge while blending the edge with the layer that’s behind it.
- Opacity: This control allows you to specify the transparency of the magnified region.
- Scaling: Use this option to specify the kind of scaling the effect is using to magnify an image.
- Blending Mode: Use this control to specify the blend mode the effect will use to combine the original clip with the magnified area. The None option shows transparent pixels around the magnified section.
- Resize Layer: Selecting this option means the effect will only use the boundaries as the clip’s edge when the magnified region extends beyond the original boundaries of the clip. Deselecting the Resize Layer means that the boundaries of the clip will crop any area of your image outside the bounding box of the original clip.

4. Mirror Effect
This distortion Premiere Pro effect splits an image along a line while reflecting one side onto the other. Where the reflection appears and which side will be reflected is determined by the reflection angles.
1. Head over to Effect Control>Distortion>Mirror to use this effect.
2. Adjust the controls until you get the results you desire.
- Reflection Angle: With the Reflection Angle control, you can specify the angle of reflection and where it appears on the clip. A zero-degree angle reflects the left-hand side on the right.
- Reflection Center: This control allows you to specify the position of the line. You need to click the box, then drag the resulting crosshair up to the area in the image where you would like to place the line.

5. Offset Effect
This effect pans your image within a clip, and visual details pushed off one side of this image will appear on the opposite side. You have to perform the offset with subpixel precision at the best quality.
Also, you can use Offset with a combination of other effects. Head over to Effect Control>Distortion>Offset to use this effect.

6. Spherize Effect
The Spherize effect allows users to wrap a video clip around a spherical shape. You can use it to give texts and objects a three-dimensional effect. Go to Effect Control>Distortion>Spherize and adjust the radius and center of the sphere.

7. Transform Effect
This effect applies 2-dimensional geometric transformations to your clip. You can use this effect to skew clips along any axis.
1. Go to Effect Control>Distortion>Transform to apply this effect to your clip.
2. Use Transform settings to adjust Opacity, Skew, Rotation, Scale, Anchor Point, and more.

8. Turbulent Displace Effect
This fun effect utilizes fractal noise to create turbulent Premiere Pro distortion effects in your image. You can use the Turbulent Displace effect to add movement to your clip.
1. Head to Effect Control>Distortion>Turbulent Displace.
2. Adjust the following controls:
- Displacement
- Amount
- Size
- Offset (Turbulence)
- Complexity
- Evolution
- Pinning
- Resize Layer
- Antialiasing For Best Quality

9. Twirl Effect
The Twirl effect allows you to rotate your clip around its center. It rotates the image more sharply in the middle than at the edge. You can use it on faces to make a funny clip. Navigate to Effect Control>Distortion>Twirl to start using this effect. Next, use the settings to adjust how much angle it twirls and the radius.

10. Wave Warp Effect
This effect is one of the most popular Premiere Pro distortion effects. It generates the appearance of a wave as it’s traveling across an image. The Wave Warp effect allows you to produce various wave shapes, including sine, circular, and square waves.
It’s automatically animated at a steady speed across the time range, and that’s without frames. You need to set keyframes to vary speeds.
1. Head to Effect Control>Distortion>Wave Warp to apply this effect in your video clip.
2. Now, change the wave speed, direction, height, width, and type to suit your preference.

Bonus! Free Distortion Effects for Premiere Pro
1. Liquid Distortion Effect
This effect can distort the content in a clip and can be used to shift into the next clip. It could be utilized in editing or used as a transition.

2. Earthquake Effect
This effect adds a shaking motion to the video clip you add it to; it works as a transition but could also be a useful editing tool.

3. Glass Effect
This effect can add various blurs to the video clip and be used to transition from one clip to the next.

4. TV Effect
This effect imitates the view of a television being turned on or off. You can use it to introduce a new video clip. It would also be a great start or end to the entire video.

5. Glitch Effect
This effect adds a glitch to the video clip. You can use it in editing or as a transition from one clip to the next.

Conclusion
● You can add any of these Premiere Pro distortion effects to make your videos more catchy. In turn, they will get more attention and views. Premiere Pro comes with tons of distortion effects and a responsive interface.
Premiere Pro is one of the most popular timeline-based video editing software, with over 9 million users. It’s the successor to Adobe Premiere, and it comes with cool distortion effects. We’ll look at Premiere Pro distortion effects and how to use them.
In this article
01 How to Use Distortion Effect in Premiere Pro?
02 Bonus! Free Distortion Effects for Premiere Pro
Adobe Premiere Pro offers a wide variety of beneficial editing tools and effects. Below are some of the impressive distortion effects you’ll find in Premiere Pro and how to use them in your project.
1. Corner Pin Effect
This effect distorts your image by simply changing the position of its corners. You can use the Corner pin effect to twist, skew, shrink, or stretch an image. Additionally, you can use it to simulate movement or perspective pivoting from the edge of your clip like a door opening.
You can directly manipulate the properties of the Corner Pin effect in the Program monitor by clicking the Transform right next to Corner Pin. To adjust the properties, drag one of the corner handles.
- To use this effect, open Premiere Pro and click File. Choose Import from the drop-down menu. The File Explorer window will open and allow you to find your footage. Select the video file you want to import, then click Open.
- Go to Effects Control and click Distortion. Choose Corner Pin Effect from the drop-down menu.
- You can now pin each corner from its original point to another specific point by adjusting the slider on the Upper Left, Upper Right, Lower Left, and Lower Right. You can also highlight your selection tool when working with the Corner Pin effect.
2. Lens Distortion Effect
This distortion effect Premiere Pro simulates the distorted lens through which people view the clip.
1. Go to Effects Control>Distortion>Lens Distortion Effect.
2. Choose the settings you want to use from the available options and adjust the slider.
- The Vertical and Horizontal Decentering control displaces the lens’ focal and makes the image bend and smear. The image will wrap in on itself at extreme settings.
- The Curvature setting alters the curvature of the lens. You can specify a positive value to make the image convex, while the negative value makes the image concave.
- The Vertical and Horizontal Prism FX setting created results similar to horizontal decentering and vertical, but the image does not wrap in on itself at extreme values.
- Use the Fill Color option to specify the background color, and Fill Alpha to make your background transparent.
3. Magnify Effect
This effect allows you to enlarge a selected area of your clip. The Magnify effect acts as a magnifying glass set over an area of an image. You can also use this effect to scale the whole image far beyond 100 percent and still maintain resolution.
1. To use this effect, go to Effect Control>Distortion>Magnify.
2. Next, go to the left side of the Effects Control panel and make the necessary adjustments to suit your preferences.
- Shape: This control specifies the magnified area shape.
- Center: The Center control allows you to specify the center of the magnified section.
- Magnification: This setting lets users specify the percentage of the magnification of the area they have selected, while the values represent the scale percentage.
- Link: The Link control allows you to specify how the effect will link the Size, Feather, and Magnification amount, to enable them to decrease or increase proportionally. You will disable the Resize Layer option if you set the Link control to any of the available settings except None. Setting the Link control to any setting except None disables Resize Layer. Size & Feather To Magnification allows you to specify that the edge feather and size of the magnified section decrease or increase proportionally regarding the magnification adjustment.
- Size: This control allows you to specify the magnified area size in pixels.
- Feather: With the Feather option, you can specify the amount of feather the effect applies to the magnified area edge. Lower values will sharpen the edge. Higher values will soften the edge while blending the edge with the layer that’s behind it.
- Opacity: This control allows you to specify the transparency of the magnified region.
- Scaling: Use this option to specify the kind of scaling the effect is using to magnify an image.
- Blending Mode: Use this control to specify the blend mode the effect will use to combine the original clip with the magnified area. The None option shows transparent pixels around the magnified section.
- Resize Layer: Selecting this option means the effect will only use the boundaries as the clip’s edge when the magnified region extends beyond the original boundaries of the clip. Deselecting the Resize Layer means that the boundaries of the clip will crop any area of your image outside the bounding box of the original clip.
4. Mirror Effect
This distortion Premiere Pro effect splits an image along a line while reflecting one side onto the other. Where the reflection appears and which side will be reflected is determined by the reflection angles.
1. Head over to Effect Control>Distortion>Mirror to use this effect.
2. Adjust the controls until you get the results you desire.
- Reflection Angle: With the Reflection Angle control, you can specify the angle of reflection and where it appears on the clip. A zero-degree angle reflects the left-hand side on the right.
- Reflection Center: This control allows you to specify the position of the line. You need to click the box, then drag the resulting crosshair up to the area in the image where you would like to place the line.
5. Offset Effect
This effect pans your image within a clip, and visual details pushed off one side of this image will appear on the opposite side. You have to perform the offset with subpixel precision at the best quality.
Also, you can use Offset with a combination of other effects. Head over to Effect Control>Distortion>Offset to use this effect.
6. Spherize Effect
The Spherize effect allows users to wrap a video clip around a spherical shape. You can use it to give texts and objects a three-dimensional effect. Go to Effect Control>Distortion>Spherize and adjust the radius and center of the sphere.
7. Transform Effect
This effect applies 2-dimensional geometric transformations to your clip. You can use this effect to skew clips along any axis.
1. Go to Effect Control>Distortion>Transform to apply this effect to your clip.
2. Use Transform settings to adjust Opacity, Skew, Rotation, Scale, Anchor Point, and more.
8. Turbulent Displace Effect
This fun effect utilizes fractal noise to create turbulent Premiere Pro distortion effects in your image. You can use the Turbulent Displace effect to add movement to your clip.
1. Head to Effect Control>Distortion>Turbulent Displace.
2. Adjust the following controls:
- Displacement
- Amount
- Size
- Offset (Turbulence)
- Complexity
- Evolution
- Pinning
- Resize Layer
- Antialiasing For Best Quality
9. Twirl Effect
The Twirl effect allows you to rotate your clip around its center. It rotates the image more sharply in the middle than at the edge. You can use it on faces to make a funny clip. Navigate to Effect Control>Distortion>Twirl to start using this effect. Next, use the settings to adjust how much angle it twirls and the radius.
10. Wave Warp Effect
This effect is one of the most popular Premiere Pro distortion effects. It generates the appearance of a wave as it’s traveling across an image. The Wave Warp effect allows you to produce various wave shapes, including sine, circular, and square waves.
It’s automatically animated at a steady speed across the time range, and that’s without frames. You need to set keyframes to vary speeds.
1. Head to Effect Control>Distortion>Wave Warp to apply this effect in your video clip.
2. Now, change the wave speed, direction, height, width, and type to suit your preference.
Bonus! Free Distortion Effects for Premiere Pro
1. Liquid Distortion Effect
This effect can distort the content in a clip and can be used to shift into the next clip. It could be utilized in editing or used as a transition.
2. Earthquake Effect
This effect adds a shaking motion to the video clip you add it to; it works as a transition but could also be a useful editing tool.
3. Glass Effect
This effect can add various blurs to the video clip and be used to transition from one clip to the next.
4. TV Effect
This effect imitates the view of a television being turned on or off. You can use it to introduce a new video clip. It would also be a great start or end to the entire video.
5. Glitch Effect
This effect adds a glitch to the video clip. You can use it in editing or as a transition from one clip to the next.
Conclusion
● You can add any of these Premiere Pro distortion effects to make your videos more catchy. In turn, they will get more attention and views. Premiere Pro comes with tons of distortion effects and a responsive interface.
Top Free Video Editing Software: Enhance Your Content with These Essential Tools
Today video content creators are more common than it ever was. The video editor tools are also more common software on the Internet and it’s also now very easy to pick one for free and utilize it for your purpose. All it needs is a little research and bingo you will get one.
So, why don’t we help you with our research to let you explore all those top 22 free video editing software tools available on different platforms such as Android, Windows, and Mac? In this article, we have got you all covered by letting you know of each of the software that you can use for editing video.
Contents
01 [Things to Consider When to Choose a Free Video Editor ](#Part 1)
02 [Free Video Editor for PC and Mac ](#Part 2)
03 [Free Video Editor for Mobile Phones](#Part 3)
04 [Tips and Tricks for Using Free Video Editing Tools ](#Part 4)
05 [Related FAQs about Free Video Editors](#Part 5)
Part 1: Things to Consider When to Choose a Free Video Editor
Before opting for a free video editing software there are many important things, we mostly miss that we should have known. But you don’t have to worry about it anymore let’s begin:
What are you planning to use it for?: You must know the use of video editing software before picking one. Whether you are using it for gaming or creating ordinary YouTube videos. These decisions are very important to take before opting for downloading it from the internet.
Learning curve: You should keep in mind which editing software is complex to learn and which one is easy in comparison with that. If you didn’t keep this in mind you might end up wasting your time by downloading and trying in vain.
Quality: Another important factor to consider in video editing software is the quality and format of the video. There are many formats and quality of video content, therefore it is important to choose the one which supports your video format.
Resources: Depending upon the requirements of the editing on your video, you should choose a video editor that should have all the video effects, music tracks, and other resources that you might need to apply to your video. Be careful not to select one with few resources.
Compatability: The most important point is whether your PC, Mac, or Android platform can run the video editor you have heard the name from your friend. Consult the internet for compatibility of the software by checking its minimum specification requirement on its manual or docs.
Part 2: Free Video Editor for PC and Mac
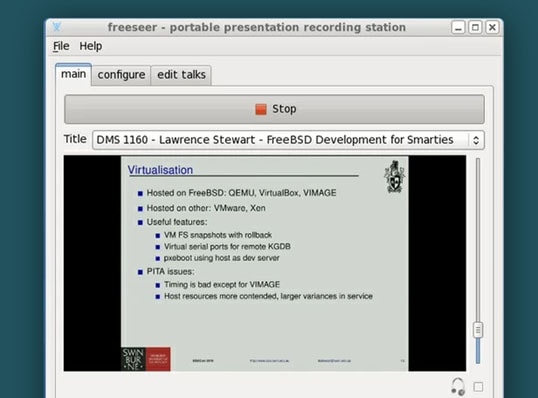
1. Active Presenter – Free video editor for eLearning purposes
Best for: Teachers and students for delivering and recording class lectures.
User rating: 4.5/5.0
System compatibility: Windows 7/ Windows 8/8.1, Windows 10, Windows 11 (only 64-bit (x64) is supported), macOS 10.12, macOS 10.13, macOS 10.14, macOS 10.15, macOS 11 (only 64-bit Intel CPU is supported)
Active Presenter is multi-functional software that edits your video as well as record it. It is equipped with a variety of tools that record screens, edit screencasts videos, and create interactive content in Html5.
Moreover, the all-in-one feature lets you record your PC screen along with audio input. You can also edit your video and voice. The app also provides eLearning authority software guides, games, and simulations.
Reason to Choose:-
- User-Friendly Interface.
- Interactive features.
- Multiple Tools in one package.
Reason to Avoid:-
- Manual volume control.
- Need amendments in volume control.
2. Blender – 3D computer graphics software for videos
Best for: Graphics Designers, Photographers, and UI/UX Designers.
User rating: 4.5/5.0
System compatibility: Windows 8.1, 10, and 11, MacOS 10.13 Intel · 11.0 Apple Silicon, Linux
Blender is an amazing 3d creation platform that is open source. The software supports modeling, 3D pipelining, rigging, animation, rendering, video editing, motion tracking, game creation, and composing.
If you are a designer of 3d graphics then this software is best suitable for you. You can also edit your videos with this software for free since it is open source. Blender 3d is a good package for all types of graphics-related activities on computers.
Reason to Choose:-
- Open-Source
- Simplest Interface
- Frequent Updates
- A vast arsenal of 3d tools.
Reason to Avoid:-
- Sometimes glitchy but overall good.
- Laggy Performance on intensive editing.
- Little Complex to learn.
3. OpenShot – a free and open-source video editor for beginners
Best for: Small Business Owners and Freelancers.
User rating: 4.4/5.0
System compatibility: Linux (most distributions are supported), Windows (version 7, 8, and 10+), OS X (version 10.15+)
OpenShot is a cross-platform video editor that trims and slices videos for you. It has an animation framework of a fade, slide, and animate anything in your project. The software has an unlimited number of tracks you can use.
Moreover, the application has video effects, audio waveforms, a title editor, slow motion, and time effects. In short, it is a wonderful package for those who are interested in their videos in animated form like small business owners and freelancers, etc.
Reason to Choose:-
- The very easy graphical interface and navigation.
- Perfect for quick edits.
- Multiple languages support.
- Open-Source.
Reason to Avoid:-
- Sometimes the software crashes.
- Poor performance in high-resolution videos.
4. Lightworks – free and easy to use a pro video editing tool
Best for: Small business owners, actors, and marketers.
User rating: 3.5/5.0
System compatibility: Windows 8, Windows 8.1, and Windows 10, Mac OS X 10.11 or higher, Linux , Ubuntu / Lubuntu / Xubuntu 20.04 or higher
Lightworks is an editing system for video edits and mastering. It is one of the oldest software developed for early computer-based non-linear editing systems. After 2010, it is also available as an open source however the source code has never been released.
Lightworks has a million users around the world since it is the oldest software. This large number of users is only due to its wide acceptance overall platform’s windows, Linux, and Mac. If you are an actor, content creator, or marketeer then this software is for you.
Reason to Choose:-
- The abundance of resources for building videos.
- Free and Open-Source.
- Better Technical Support and suggestions.
Reason to Avoid:-
- Basic Editing Features
- Limited Transitions and font settings
5. VSDC Free Video Editor – best multimedia suite for video and audio editing
Best for: Business owners, mid-marketeers, and YouTubers.
User rating: 4.0/5.0
System compatibility: Windows XP/SP3/Vista/7/8/10
VSDC is a free non-linear editing tool that can edit your videos in ultra-high definitions. It is developed by Flash-Intergro LLC. VSDC is capable of many other features that video content creators usually need such as motion tracking, liver color correction, and post-production effects.
This product is available in 13 languages which makes it an easy choice for everyone around the world. It is initially released in 2011 and has a stable release in December 2021.
Reason to Choose:-
- Good quality multimedia editing
- Free and Open-Source
- Wide acceptance of video and audio formats
- Direct publishing on social media platforms
Reason to Avoid:-
- Cannot download animated transitions
- Hight memory consumption
6. Shotcut – Free video editor with high-resolution
Best for: Graphic designers, business owners, and IT marketers.
User rating: 4.2/5.0
System compatibility: Operating system: 64-bit Windows 7 – 11, Apple macOS 10.14 - 12, 64-bit Linux with at least glibc 2.27.
Shotcut is one of the free and open-source video editing platforms that is also a cross-platform editing tool. It is available on all the operating system platforms out there. Due to this, it is widely known on the internet for video editing. This editor was first developed by Dan Dennedy and based on MLT multimedia Framework.
Reason to Choose:-
- Wide-format support
- Device and transport option
- Sleek and Intuitive Interface
- Free and Open Source
Reason to Avoid:-
- The interface is complex comparatively
- Crashing is common due to driver problems
7. Hitfilm Express – The best choice for students and projects
Best for: Gamers, Youtubers, Small business owners, entrepreneurs, and graphic designers.
User rating: 4.4/5.0
System compatibility: Apple: macOS 11.0 Big Sur, macOS 10.15 Catalina or macOS 10.14 Mojave, Windows: Microsoft Windows 10 (64-bit)

Hitfilm Express is a free and open-source amazing video editing software with professional grading VF-X tools and many awesome contents such as gaming and films. This video editor is perfect for all beginners, who have just started the editing.
Hitfilm Express is a product from the Fxhome company. Its tools are industry rated and the interface is known for its user-friendly feature. The largest VFX toolkit of Hitfilm consists of more powerful libraries and is all available for free at your service.
Reason to Choose:-
- Supports HD videos.
- Multiple imports of many audios and their mixing.
- A broad variety of tools and functions.
Reason to Avoid:-
- Animation availability is limited and repetitive.
- No Instructional videos.
8. Microsoft Video Editor 2020 – Low learning curve editor for everyone
Best for: Photographers, Freelancers, and Youtubers.
User rating: 4.0/5.0
System compatibility: Microsoft Windows 98 or later or Windows NT® 4.0 or later
The Microsoft movie maker or video editor is one of the best video editors with which you can create amazing movie clips of your pictures. You can create many slideshow pictures and play music behind them.
Microsoft video editor comes with various stickers, trimming, merging, multiple trimming and filters, etc. The application is available on the Microsoft store to download. If you want something authentic n your windows then this app is for you.
Reason to Choose:-
- Interactive and easy-to-use tools.
- Perfect for video basic editing.
- Basic and very Instinctive.
Reason to Avoid:-
- Few features in comparison with others.
- Slightly outdated interface.
9. Avidemux – video editor designed for simple cutting and encoding
Best for: Digital Marketers, web designers, and business owners.
User rating: 4.4/5.0
System compatibility: Windows OS: 98 SE, XP, 2000, Vista, 7, 8, ME, macOS X, and Linux.
Avidemux is open-source software for video editing such as simple cutting, filtering, and encoding of videos into many formats. The application let you convert to many videos encoding formats like the popular ones MPEG and ASF etc.
Moreover, Avidemux does not provide editing through basic tools only but its automated task capability through queue and power scripts lets you do anything with your video. The application works on most platforms.
Reason to Choose:-
- Sleek user interface
- Wide support of codecs
- No learning curve is necessary
Reason to Avoid:-
- Confusing options
- Very few video editing features
10. iMovie – a most well-known video editor for macOS users
Best for: Apple device users, Marketers, developers, and teachers.
User rating: 4.3/5.0
System compatibility: Microsoft Windows 7, Windows 8, Windows 10, or Windows 11, All macOS
Imoview is a read-made installed software by Apple Inc on their systems. It primarily came in macOS, iOS, and iPadOS devices. Its original release came in 1999 as MAC OS 8 bundled application.
At the start, it was given free by buying a new macOS or ios device but later, in 2013 it has been issued for free to all its users. The application is known for its editing of any type and resolution of videos.
Reason to Choose:-
- User friendly
- Open-Source
- Best for HD Videos
Reason to Avoid:-
- Some glitches have been reported while recording gameplay.
- The customer support team is not always responsive.
12. Screenrec
Best for: best premium screen recorder for beginners
User rating: 4.5/5.0
System compatibility: Windows 10/8/7/XP and Linux
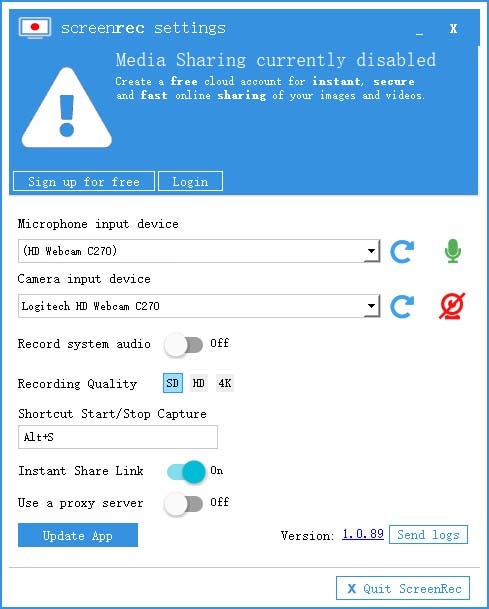
Screenrec is a premium screen recorder with a very intuitive user interface that makes it suitable for beginners. You can start and stop recording your screen with a single click. You can also record your webcam and audio from your system as well as external microphone. The software is perfect for taking screenshots and adding annotations wherever required.
The software generates a sharable link so that you can share it anywhere you want instantly. Once the link is shared, you can check its analytics. The video content management system is quite robust and the video content is fully encrypted for security and privacy.
Reason to Choose:-
- Record screen, webcam, audio with a single click.
- Very intuitive user interface with live annotation options.
- Generate instant sharable links and track analytics of videos.
- Better video content management with cloud storage.
Reason to Avoid:-
- Very limited editing options.
- Very limited customizable settings.
Part 5: Online Screen Recorders
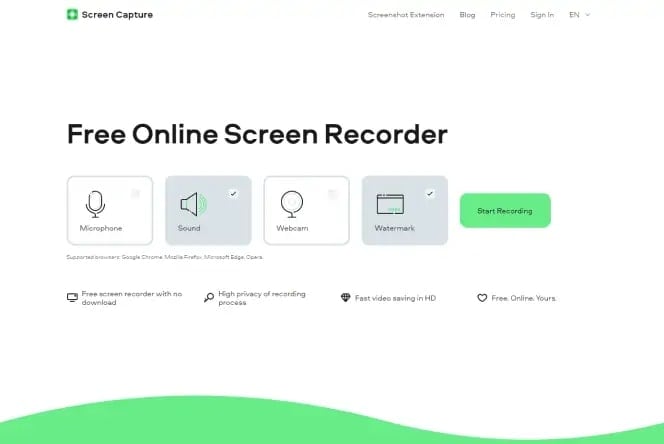
If you do not want to install any dedicated screen recording software on your computer, you have online screen recorders to record the screen on the go. There is no software to install as you can launch the online screen recorders instantly from your web browsers. Here are the best online screen recorders for you.
1. Screencastify
Best for: best online screen recorder for those who want a browser extension.
User rating: 4.4/5.0
System compatibility: Windows, Mac and Chromebook
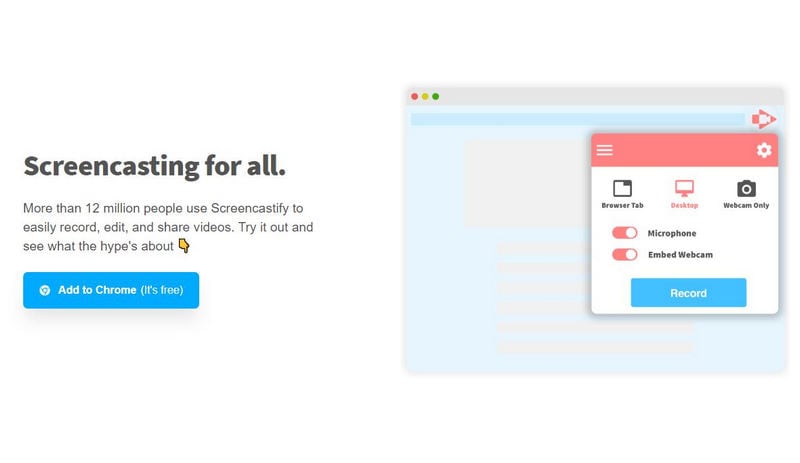
Screencastify comes in the form of a Chrome browser extension and hence, only Chrome users can use them. You can record your screen, your webcam video individually as well as together. The recording widget has options for real-time drawing while recording the video. Additionally, you can add stickers to enhance the video content.
After recording, you can upload the video on Google Drive, and you can share the video link instantly with anyone. The video editor offers you basic video editing options. You can even highlight mouse cursor. As far as saving the recorded video goes, you can export in MP4, MP3 as well as GIF file formats.
Reason to Choose:-
- Record desktop, browser, and application with webcam embedded.
- Highlight mouse movements and clicks and add stickers.
- Real-time drawing with pen and shapes and basic editing options.
- Export video to Google Drive and share video links instantly.
Reason to Avoid:-
- Limited to Chrome users only.
- Recording time limited to 5 minutes in free version.
2. Screencast-o-Matic
Best for: best online screen recorder for everyone
User rating: 4.7/5.0
System compatibility: Windows, Mac, iOS, Android and Chromebook.
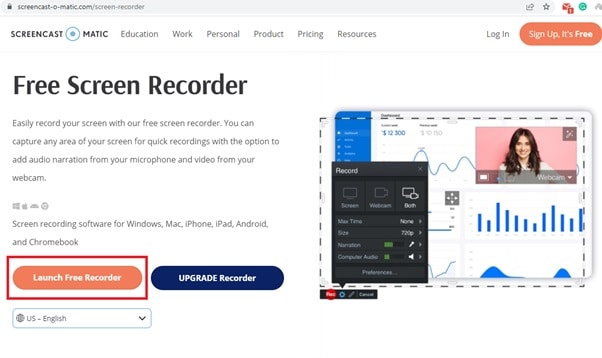
Screencast-o-Matic is the best online screen recorder in terms of features and customization. All the features are well-balanced so that everyone can use it to satisfy their requirements. You can choose screen, webcam or both for recording. You can set a maximum time so that the recording can stop automatically.
You can choose the video resolution and you can choose audio sources. You can also capture screenshots and customize the recording area. If you opt for its premium plan, you get a vast stock library to enhance your video content. In fact, you can add animations, effects, add voiceover, background audio and automated caption.
Reason to Choose:-
- Capture screen, webcam, and audio with customized recording area.
- Customize video recording parameters as per requirements.
- Real-time drawing tools and cloud hosting for instant sharing.
- Separate video editor available for free.
Reason to Avoid:-
- Advanced features are meant for premium users.
- 15-minute recording time limitation in free version.
3. Loom Online Screen Recorder
Best for: best online screen recorder for teams and collaborative works.
User rating: 4.1/5.0
System compatibility: Windows, Mac, iOS, Android and Chromebook.

Loom comes with an online screen recorder along with a Chrome extension as well as desktop app. With the online screen recorder, you can record screen only, camera only as well as screen and camera together. You can choose actual webcam as well as virtual webcam and you can select an external mic for audio recording.
The online screen recorder comes with a recording countdown and you can save your videos on the workspace that Loom provides. You can select the entire screen, the browser tab or the application window. You can instantly share the recorded video with people through emails, social media platforms and much more.
Reason to Choose:-
- Record screen and webcam together and separately.
- Save the recorded video on Loom platform and share instantly.
- Basic editing options post recording include speed change.
- Add transcription and call-to-action as well as change thumbnail.
Reason to Avoid:-
- Cannot record gameplay or select customized region.
- Very limited video parameters customization options.
4. Screencapture.com
Best for: best online screen recorder for amateurs
User rating: 4.2/5.0
System compatibility: Windows, Mac, and Chromebook.
Screencapture.com is a freemium online screen recorder as it attaches a watermark to the recorded video in free mode. You can record your screen as well as your webcam and select the audio source as per your requirements. The recording is limited to HD resolution. You can capture video in Picture in Picture format.
The platforms emphasize downloading its desktop recorder where more features are available. You get the option to select the recording screen such as entire screen, browser or application window. After recording the video, you can instantly check its preview before saving or discarding. You can save the video in different file formats.
Reason to Choose:-
- Choose webcam, audio sources while recording the screen.
- Capture entire screen, application or browser screen.
- Capture video in Picture in Picture mode.
- Preview recording and save in different file formats.
Reason to Avoid:-
- Premium plan to remove watermark only.
- No customization of video parameter options.
5. Panopto
Best for: bests online screen recorder for teachers and students
User rating: 4.7/5.0
System compatibility: Windows, Mac, and Chromebook.
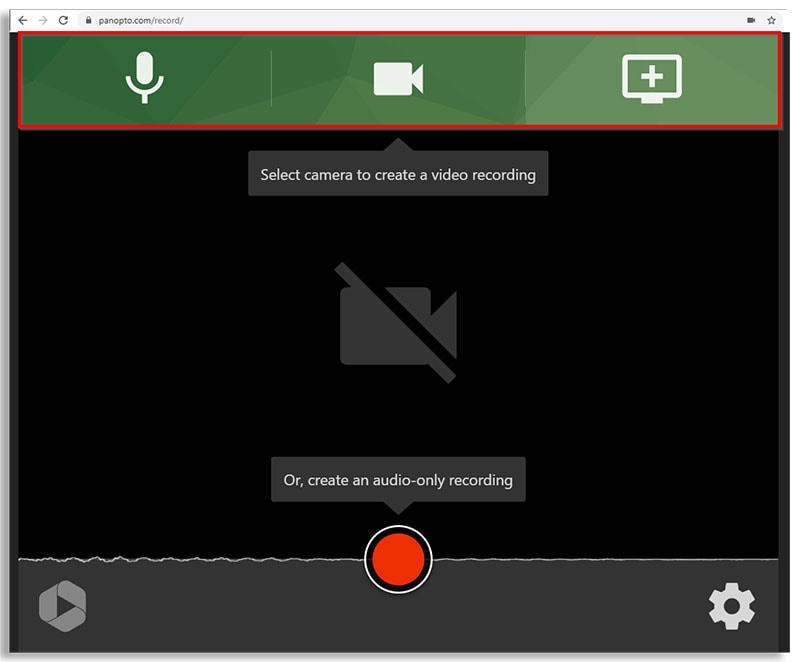
Panopto offers you a platform where you can record any video and save them on Panopto or Classroom. Therefore, it is an ideal platform for teachers and students and lecture delivery. You can even upload the recorded video on YouTube directly. You can even save the video on your local drive.
You can record any part of your screen in full HD resolution and the online recorder allows you to record webcam as well. You can also record system and external audio. The best part is that you can choose the video layout such as tile or PiP mode. Besides, you can blue the background while recording.
Reason to Choose:-
- Customize recording area and record in full HD.
- Smart camera and background selection options.
- Different saving and uploading options for recordings.
- Picture in Picture, Tile and Instant preview modes available.
Reason to Avoid:-
- The user interface is unappealing.
- No video editing options available.
6. Apowersoft Online Screen Recorder
Best for: best online screen recorder for recording demonstrative videos.
User rating: 4.8/5.0
System compatibility: Windows, Mac, and Chromebook
Apowersoft online recorder is one of the most popular and comprehensive screen recorders. You have to install its web installer on your computer for its online recorder to operate. You can record any region on your screen with the recorder. You have the option to save the recording on your local drive as well as on RecCloud. Besides, you can upload the video directly on YouTube.
The record supports different types of video output formats and you can record anything starting from live calls and video streams to demonstration videos. In fact, you can record even your webcam video along with external audio. There are also options for annotation while recording for better explanation.
Reason to Choose:-
- Record your screen, webcam, and audio smoothly.
- Customize recording area and add callouts to videos.
- Add annotation in real-time while recording.
- Save the recorded video in multiple file formats.
Reason to Avoid:-
- It lags if the computer is not a high-end one.
- No editing options are present.
Part 6: Screen Recorder for Mobile
If you want to record your mobile phone’s screen, you need to install a screen recorder app. Here is the list of the best screen video recorders for mobile users.
1. AZ screen recorder
Support OS: Android
Rating: 4.5/5.0
Download Link: https://play.google.com/store/apps/details?id=com.hecorat.screenrecorder.free&hl=en\_IN&gl=US
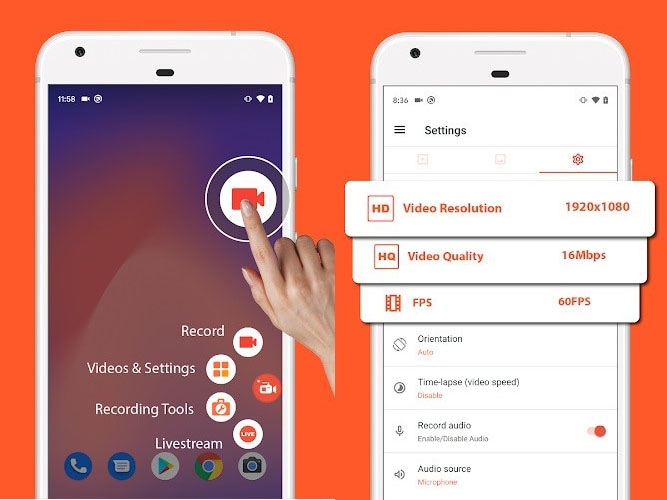
AZ screen recorder is a complete screen recorder from all perspectives. The app lets you record your screen, edit your video, go for livestream as well as take screenshots. You can record at full HD resolution and change resolution, frame rate and bitrate as required. The app can record internal sound as well as external sound through phone microphone.
You can also record your video through facecam in the overlay window. The app also comes with all the options for basic editing. You can even livestream your screen video on different video streaming platforms. Moreover, you can make GIFs from videos as well as take screenshots. The app is completely free to use without any watermark.
Reason to Choose:-
- Record screen with facecam in overlay window.
- Record gameplay with external mic audio.
- Record at 1080p resolution at 60fps.
- Floating controls, drawing tools.
- Trim, crop, merge, rotate, and convert to GIF.
Reason to Avoid:-
- It can get into glitches when recording long videos.
2. DU Recorder
Support OS: iOS and Android
Rating: 4.5/5.0
Download Link: https://apps.apple.com/us/app/du-recorder-screen-recorder/id1295647284
DU Recorder is a freemium app that is available for iOS and Android users. The free version attaches a watermark which is why you have to opt for DU Recorder Premium. You can record your screen and livestream your screen activities on YouTube, Twitch, and Facebook. The app can record gameplay, video calls, live shows and anything on the screen.
The recording can be in full HD resolution and you can adjust the video parameters. Besides, you can edit your video such as trimming, cropping, adding music, frames, stickers, texts and much more. Moreover, you can capture facecam video, change video speed, record internal and external audio, and convert video to GIFs. All in all, it is a great screen recorder with video editing and livestreaming features.
Reason to Choose:-
- Record screen and facecam video with internal and external audio.
- Livestream screen activities to video streaming platforms.
- Basic video editing options and insert frames, stickers, and filters.
- Add custom watermark, change speed, live themes in Pro version.
Reason to Avoid:-
- It can lag at times when you are recording high frame rate video.
- It adds watermark to your recorded video if you are using its free version.
3. XRecorder
Support OS: Android and iOS
Rating: 4.8/5.0
Download Link: https://play.google.com/store/apps/details?id=videoeditor.videorecorder.screenrecorder&hl=en\_IN&gl=US
XRecorder is a completely free screen recorder with no watermark. You can capture your screen video as well as take screenshots. The screen recorder allows you to select from 240p to 1080p resolution for video recording. The app provides you with a floating widget to record anything on the screen starting from live calls to live shows.
You can even livestream your screen and you can do basic editing on the recorded video. There is no time limit on the recording and hence, it is quite suitable for recording gameplay. You can record internal and external audio as well as record facecam in a small overlay window. Besides, you can add music as well as change video speed as per your requirements.
Reason to Choose:-
- Record screen and facecam along with system and mic audio.
- Record video at different resolutions up to 1080p.
- Floating widget, countdown buffer time, pause recording options.
- Capture screenshots, rotate video and basic video editing.
Reason to Avoid:-
- Some have reported glitches regarding audio recording.
- There could be some performance lags while recording at high resolution.
4. Mobizen Screen Recorder
Support OS: Android and iOS
Rating: 4.1/5.0
Download Link: https://play.google.com/store/apps/details?id=com.rsupport.mvagent&hl=en\_IN&gl=US
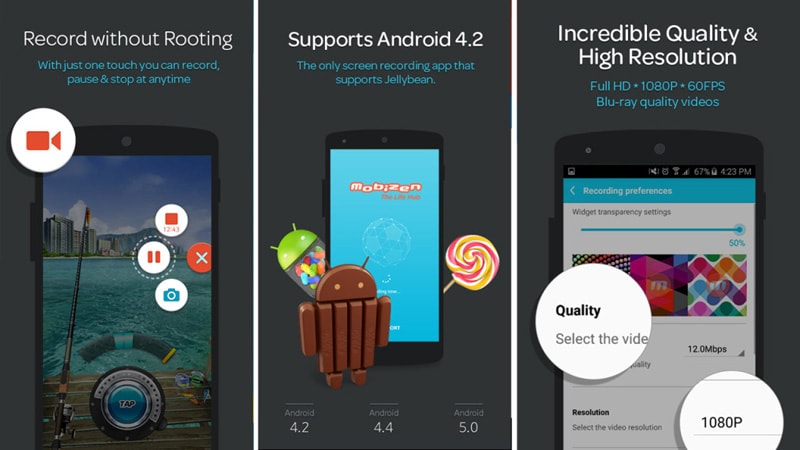
Mobizen Screen recorder belongs to the freemium app category as it adds a watermark to the recorded video in its free version. You have to purchase its premium plan to remove the watermark. Coming to its features, the app is a good combination of screen recorder and video editor. You can record your screen easily from its floating widget.
You can also add intro and outro to your recorded video as well as add background music. Besides, you can perform basic video editing. Most importantly, you can capture your screen at 2K resolution. Besides, the app allows recording through the front camera of your phone in an overlay window.
Reason to Choose:-
- Can record screen video up to 2K resolution.
- Record screen, facecam, and internal and external audio.
- Use drawing tools, control from floating widgets, and create GIFs.
- Different video editing options and customize watermark.
Reason to Avoid:-
- Free version puts a watermark on the recorded videos.
- Reports of malfunction when recording at 2K resolution.
5. ADV Screen Recorder
Support OS: Android
Rating: 4.4/5.0
Download Link: https://play.google.com/store/apps/details?id=com.blogspot.byterevapps.lollipopscreenrecorder&hl=en\_IN&gl=US
ADV screen recorder is a full-fledged app for Android users to record their screen with full customizations. You can record your front and back camera along with the screen. It operates with two different engines where the default engine has all the basic features and the advanced engine has the features for advanced users.
The app also lets you edit your recorded video and you can add texts and banners. Besides, you can draw on the video in real-time as well as trim the video as per your preference. There is also an option to pause the recording at your convenience. You can also customize the video recording parameters as required.
Reason to Choose:-
- Record your screen as well as front and back phone camera video.
- Pause recording, draw on video, and add texts.
- Trim video, add custom logo, switch between engines.
- Customize video and audio settings as required.
Reason to Avoid:-
- The user interface is not appealing.
- There are bugs reported that need to be fixed.
6. Record it
Support OS: iOS
Rating: 4.6/5.0
Download Link: https://apps.apple.com/us/app/record-it-screen-recorder/id1245356545
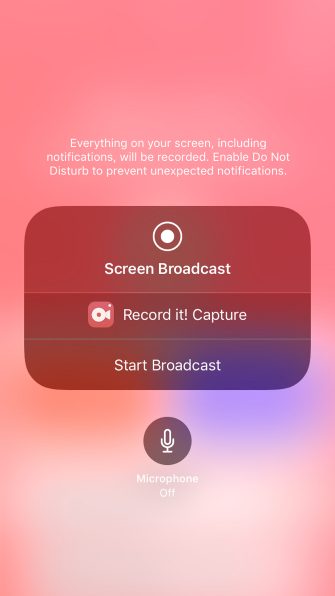
Record it! app is extremely useful in making tutorial videos where you need to record your screen. You can record the entire screen with a single tap. You can record gameplay and app screen along with your reaction through facecam. You can also customize the overlay window by changing its shape and position.
Besides, you can record your audio commentary while recording screen. It comes with video editing options to trim videos, add filters, change speed, rotate videos and much more. You can share your videos directly to YouTube as well as export through email and AirDrop. The user interface is quite intuitive and appealing.
Reason to Choose:-
- One-tap option to start recording at high resolution.
- Customization of facecam reaction overlay window.
- Support camera roll videos and add audio commentary.
- Basic video editing and instant sharing and exporting options.
Reason to Avoid:-
- It can lag at high frame rate and high resolution.
- There are reports of inconsistency with audio recording.
Part 7: How to Choose the Right Screen Recorder?
Here are the main parameters you need to keep in mind while choosing the best screen recorder for you.
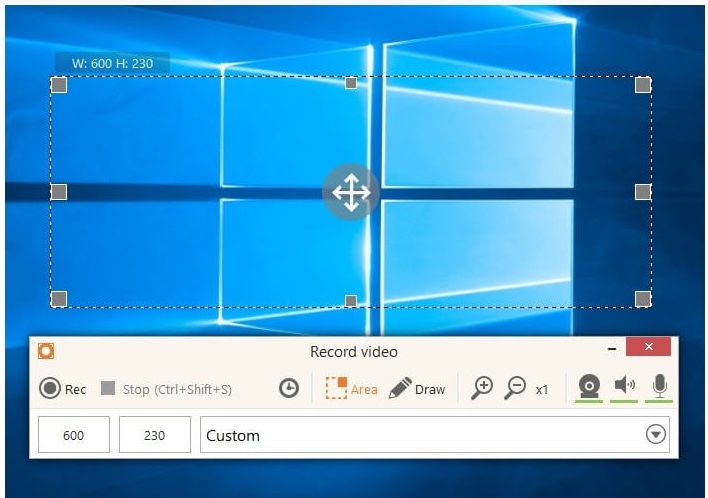
1. Recording options: An ideal screen recorder should have all the different options for recording your screen, webcam, system audio, and external audio from microphone. Besides, it should offer you the option to customize the recording area by selection. You should be able to record full screen, application window, and browser tab accurately.
2. Price: If you are serious about recording your screen video and uploading the recorded video on online platforms, you have to opt for a premium screen recorder. While purchasing a proprietary screen recorder, you need to compare the software price with its peers and ensure that you are getting more features for the price you are paying.
3. Customer support: You need to ensure that the screen recorder you are purchasing, they have a highly responsive customer support. This is a highly neglected factor but users suffer a lot when the customer support team is not responsive. Be sure that you will need to contact the customer support team at some time to learn more about certain features and troubleshoot in emergency situations.
4. Sharing options: When your ultimate goal is to share your recorded video online, you should check for the sharing options available in the screen recorder. There are screen recorders that allow sharing recorded and edited videos on online platforms, cloud storage platforms, and video streaming platforms. It should also offer you options to let you export videos in different file formats.
5. Video editing tools: You have to edit your recorded video to trim out unnecessary parts and add effects and filters to enhance your video content and video quality. Besides, you may need options to add music and voiceover as well as intro and outro. That is why you should opt for a screen recorder where a great video editor is available.
6. Customer Reviews: Last but most importantly, you should check the customer review of the screen recording software. Even when a screen recorder has loads of features, if the customer reviews are not good enough, you should not choose you. Besides, the customer reviews reveal the pros and cons of a screen recorder for your better understanding.
Part 8: Screen Recording Tips and Tricks
1. Practice before recording: Unless you are a pro, you should practice at least once before the actual recording. This will help you to execute your plan according to your script smoothly when you actually start recording. Besides, you can check if the frame, the camera, the mic, and everything else are working perfectly.
2. Only record the required screen: Screen recorders offer you the option to record the entire screen, any specific application window or any specific tab of your browser. In fact, you can even customize the screen recording area as per your requirements for better focus and better visual experience.
3. Keep it short: It is always necessary to keep the length of the video as short as possible without skipping the relevant points and important explanations. That is where a proper script before recording is crucial so that you can have a plan and execute it properly without stretching your explanation unnecessarily.
4. Speak slowly and clearly: The way you speak in the video can attract as well as repel audiences. If you speak too fast and if you have a weird accent, it is going to repel audiences. That is why it is important for you to speak slowly and clearly so that everyone can understand everything you speak and negate your accent to a greater extent.
5. Use screen drawing tools: If you are recording a video where you need to explain something, it is always better if you use screen drawing tools. In fact, it is important that you choose the screen recorder that offers drawing tools so that the video gets visually pleasing and impactful for audiences to understand effectively.
6. Cut out dead moments: When you are recording screen videos, there are going to be a lot of dead moments and boring pauses. You have to cut out those boring and dead moments while editing so that the video stays interesting and the audiences do not lose concentration. This will also help to tighten the length of the video.
7. End with a summary: Last but most importantly, you should offer a proper conclusion before ending the video. You need to summarize everything you have discussed in the video so that the audience can get a revision of all the important points. Besides, a proper ending rather than an abrupt ending can leave a positive impact regarding your video.
Part 9: Frequently Asked Questions
How do I record Windows 10 screen?
You can use Windows Game Bar that comes pre-installed on Windows 10. However, for a better screen recording experience, we recommend Wondershare Filmora where you can edit the recording as well.
Can I screen record on my Mac?
You can use QuickTime that comes pre-installed on Mac. However, for professional screen recording experience, you can use Filmora or Camtasia where you will get more recording options and tools for editing after recording.
How do I screen record on my iPhone?
You can use DU Recorder app or Record it! app to record your iPhone screen video. Besides, the latest version of iOS comes with an in-built screen recorder option that can record the screen comfortably.
Which quality is best for screen recording?
The best quality for screen recording should be the same resolution as the screen. This means if you have a 4K monitor, the screen recording will be best at 4K resolution. In today’s scenario, 1080p or full HD is the optimal quality for screen recording.
What do most YouTubers use to record their screen?
Most YouTubers use Filmora or OBS Studio to record their screen. OBS Studio is mostly used by those who livestream their screen or gameplay. Filmora is mostly used by those who emphasize heavily on editing their recorded screen video for better output.
Does screen record ruin quality?
Your screen record quality can get ruined only when you use a screen recorder that records at a lower resolution due to its inability as well as to reduce file size. When you record your screen with a proprietary screen recorder, it can record the screen at exactly the same resolution as that of your screen. Hence, the video quality and resolution will stay intact.
What do gamers record their screens?
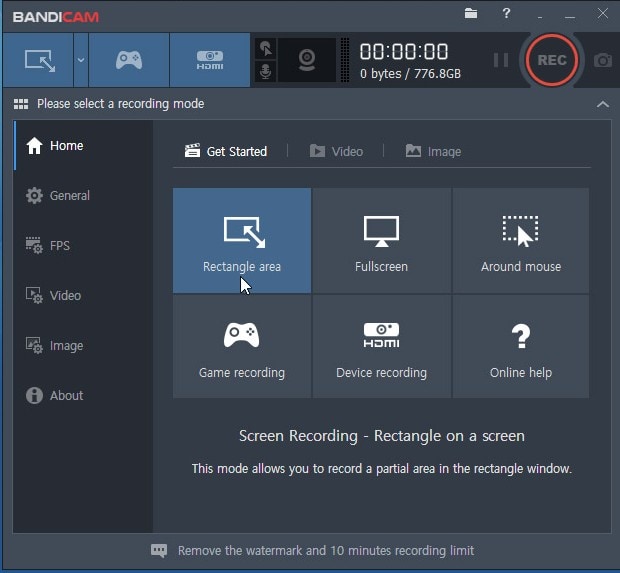
Gamers prefer Bandicam, Camtasia as well as Filmora to record their screens and showcase their gameplay to the world. Bandicam allows recording 2D and 3D games from gaming consoles at 4K resolution.
How do I make my recorded sound clear?
There are some screen recorders such as Filmora that offer you the option to remove background noise so that the recorded audio sound clearer. You can also use a pop filter to record clearer sound.
Part 4: Proprietary Screen Recorders
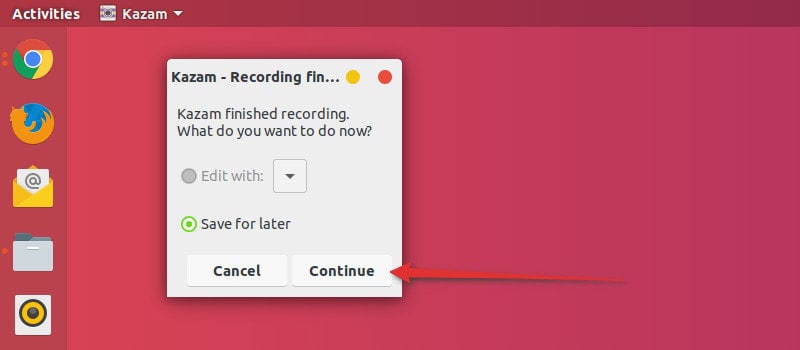
If you are serious about recording your screen and publishing the video online, you should invest in purchasing a premium screen recorder. A proprietary screen recorder is a video recorder where you have to purchase a premium plan to avail all the features. They offer all the required features for professional screen recording as well as editing the recording video. Here is the list of the best proprietary screen recorders for you.
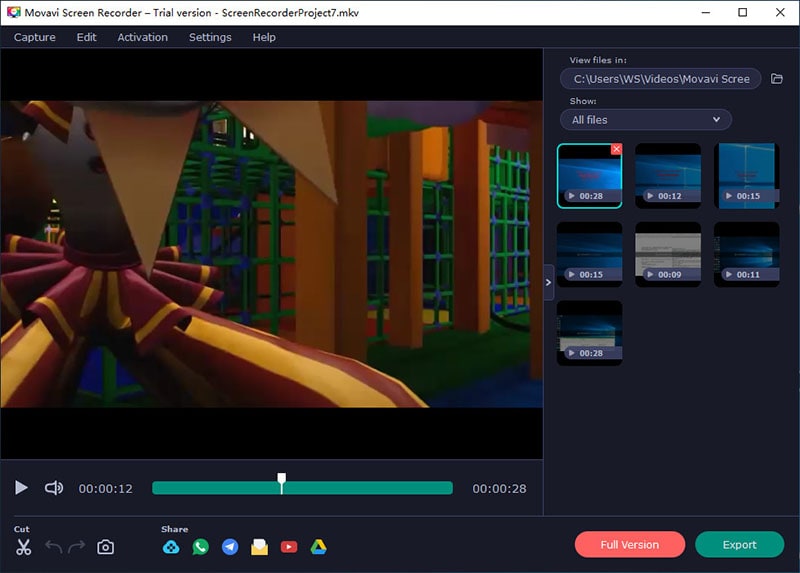
7. Filmora Recorder
Best for: best screen recorder for all video creators
User rating: 4.8/5.0
System compatibility: Windows 11/10/8/7 and Mac 10.14+

Wondershare Filmora is one of the most popular screen recorders among video creators. You can record screen and webcam simultaneously as well as capture audio from system and external mic. Most importantly, you can record at 4K resolution without any performance lag. Besides, you can highlight mouse clicks and use greenscreen effect and customize background screen.
The main reason why Filmora is a preferred choice for recording video is that it comes with a world-class video editor. Therefore, you can enhance your video quality and content that will make the video stand out. Starting from adding audio and video effects to working with multiple video and audio clips, Filmora is undoubtedly the best screen recorder cum video editor for Windows and Mac users.
For Win 7 or later (64-bit)
For macOS 10.12 or later
Reason to Choose:-
- Record screen and webcam at high-resolution.
- Customize all video capturing settings and parameters.
- Edit the recorded video like a pro with its world-class video editor.
- Export the editing video in different file formats for maximum compatibility.
Reason to Avoid:-
- Takes long time to process high-resolution videos.
02 [Free Video Editor for PC and Mac ](#Part 2)
03 [Free Video Editor for Mobile Phones](#Part 3)
04 [Tips and Tricks for Using Free Video Editing Tools ](#Part 4)
05 [Related FAQs about Free Video Editors](#Part 5)
Part 1: Things to Consider When to Choose a Free Video Editor
Before opting for a free video editing software there are many important things, we mostly miss that we should have known. But you don’t have to worry about it anymore let’s begin:
What are you planning to use it for?: You must know the use of video editing software before picking one. Whether you are using it for gaming or creating ordinary YouTube videos. These decisions are very important to take before opting for downloading it from the internet.
Learning curve: You should keep in mind which editing software is complex to learn and which one is easy in comparison with that. If you didn’t keep this in mind you might end up wasting your time by downloading and trying in vain.
Quality: Another important factor to consider in video editing software is the quality and format of the video. There are many formats and quality of video content, therefore it is important to choose the one which supports your video format.
Resources: Depending upon the requirements of the editing on your video, you should choose a video editor that should have all the video effects, music tracks, and other resources that you might need to apply to your video. Be careful not to select one with few resources.
Compatability: The most important point is whether your PC, Mac, or Android platform can run the video editor you have heard the name from your friend. Consult the internet for compatibility of the software by checking its minimum specification requirement on its manual or docs.
Part 2: Free Video Editor for PC and Mac
1. Active Presenter – Free video editor for eLearning purposes
Best for: Teachers and students for delivering and recording class lectures.
User rating: 4.5/5.0
System compatibility: Windows 7/ Windows 8/8.1, Windows 10, Windows 11 (only 64-bit (x64) is supported), macOS 10.12, macOS 10.13, macOS 10.14, macOS 10.15, macOS 11 (only 64-bit Intel CPU is supported)
Active Presenter is multi-functional software that edits your video as well as record it. It is equipped with a variety of tools that record screens, edit screencasts videos, and create interactive content in Html5.
Moreover, the all-in-one feature lets you record your PC screen along with audio input. You can also edit your video and voice. The app also provides eLearning authority software guides, games, and simulations.
Reason to Choose:-
- User-Friendly Interface.
- Interactive features.
- Multiple Tools in one package.
Reason to Avoid:-
- Manual volume control.
- Need amendments in volume control.
2. Blender – 3D computer graphics software for videos
Best for: Graphics Designers, Photographers, and UI/UX Designers.
User rating: 4.5/5.0
System compatibility: Windows 8.1, 10, and 11, MacOS 10.13 Intel · 11.0 Apple Silicon, Linux
Blender is an amazing 3d creation platform that is open source. The software supports modeling, 3D pipelining, rigging, animation, rendering, video editing, motion tracking, game creation, and composing.
If you are a designer of 3d graphics then this software is best suitable for you. You can also edit your videos with this software for free since it is open source. Blender 3d is a good package for all types of graphics-related activities on computers.
Reason to Choose:-
- Open-Source
- Simplest Interface
- Frequent Updates
- A vast arsenal of 3d tools.
Reason to Avoid:-
- Sometimes glitchy but overall good.
- Laggy Performance on intensive editing.
- Little Complex to learn.
3. OpenShot – a free and open-source video editor for beginners
Best for: Small Business Owners and Freelancers.
User rating: 4.4/5.0
System compatibility: Linux (most distributions are supported), Windows (version 7, 8, and 10+), OS X (version 10.15+)
OpenShot is a cross-platform video editor that trims and slices videos for you. It has an animation framework of a fade, slide, and animate anything in your project. The software has an unlimited number of tracks you can use.
Moreover, the application has video effects, audio waveforms, a title editor, slow motion, and time effects. In short, it is a wonderful package for those who are interested in their videos in animated form like small business owners and freelancers, etc.
Reason to Choose:-
- The very easy graphical interface and navigation.
- Perfect for quick edits.
- Multiple languages support.
- Open-Source.
Reason to Avoid:-
- Sometimes the software crashes.
- Poor performance in high-resolution videos.
4. Lightworks – free and easy to use a pro video editing tool
Best for: Small business owners, actors, and marketers.
User rating: 3.5/5.0
System compatibility: Windows 8, Windows 8.1, and Windows 10, Mac OS X 10.11 or higher, Linux , Ubuntu / Lubuntu / Xubuntu 20.04 or higher
Lightworks is an editing system for video edits and mastering. It is one of the oldest software developed for early computer-based non-linear editing systems. After 2010, it is also available as an open source however the source code has never been released.
Lightworks has a million users around the world since it is the oldest software. This large number of users is only due to its wide acceptance overall platform’s windows, Linux, and Mac. If you are an actor, content creator, or marketeer then this software is for you.
Reason to Choose:-
- The abundance of resources for building videos.
- Free and Open-Source.
- Better Technical Support and suggestions.
Reason to Avoid:-
- Basic Editing Features
- Limited Transitions and font settings
5. VSDC Free Video Editor – best multimedia suite for video and audio editing
Best for: Business owners, mid-marketeers, and YouTubers.
User rating: 4.0/5.0
System compatibility: Windows XP/SP3/Vista/7/8/10
VSDC is a free non-linear editing tool that can edit your videos in ultra-high definitions. It is developed by Flash-Intergro LLC. VSDC is capable of many other features that video content creators usually need such as motion tracking, liver color correction, and post-production effects.
This product is available in 13 languages which makes it an easy choice for everyone around the world. It is initially released in 2011 and has a stable release in December 2021.
Reason to Choose:-
- Good quality multimedia editing
- Free and Open-Source
- Wide acceptance of video and audio formats
- Direct publishing on social media platforms
Reason to Avoid:-
- Cannot download animated transitions
- Hight memory consumption
6. Shotcut – Free video editor with high-resolution
Best for: Graphic designers, business owners, and IT marketers.
User rating: 4.2/5.0
System compatibility: Operating system: 64-bit Windows 7 – 11, Apple macOS 10.14 - 12, 64-bit Linux with at least glibc 2.27.
Shotcut is one of the free and open-source video editing platforms that is also a cross-platform editing tool. It is available on all the operating system platforms out there. Due to this, it is widely known on the internet for video editing. This editor was first developed by Dan Dennedy and based on MLT multimedia Framework.
Reason to Choose:-
- Wide-format support
- Device and transport option
- Sleek and Intuitive Interface
- Free and Open Source
Reason to Avoid:-
- The interface is complex comparatively
- Crashing is common due to driver problems
7. Hitfilm Express – The best choice for students and projects
Best for: Gamers, Youtubers, Small business owners, entrepreneurs, and graphic designers.
User rating: 4.4/5.0
System compatibility: Apple: macOS 11.0 Big Sur, macOS 10.15 Catalina or macOS 10.14 Mojave, Windows: Microsoft Windows 10 (64-bit)
Hitfilm Express is a free and open-source amazing video editing software with professional grading VF-X tools and many awesome contents such as gaming and films. This video editor is perfect for all beginners, who have just started the editing.
Hitfilm Express is a product from the Fxhome company. Its tools are industry rated and the interface is known for its user-friendly feature. The largest VFX toolkit of Hitfilm consists of more powerful libraries and is all available for free at your service.
Reason to Choose:-
- Supports HD videos.
- Multiple imports of many audios and their mixing.
- A broad variety of tools and functions.
Reason to Avoid:-
- Animation availability is limited and repetitive.
- No Instructional videos.
8. Microsoft Video Editor 2020 – Low learning curve editor for everyone
Best for: Photographers, Freelancers, and Youtubers.
User rating: 4.0/5.0
System compatibility: Microsoft Windows 98 or later or Windows NT® 4.0 or later
The Microsoft movie maker or video editor is one of the best video editors with which you can create amazing movie clips of your pictures. You can create many slideshow pictures and play music behind them.
Microsoft video editor comes with various stickers, trimming, merging, multiple trimming and filters, etc. The application is available on the Microsoft store to download. If you want something authentic n your windows then this app is for you.
Reason to Choose:-
- Interactive and easy-to-use tools.
- Perfect for video basic editing.
- Basic and very Instinctive.
Reason to Avoid:-
- Few features in comparison with others.
- Slightly outdated interface.
9. Avidemux – video editor designed for simple cutting and encoding
Best for: Digital Marketers, web designers, and business owners.
User rating: 4.4/5.0
System compatibility: Windows OS: 98 SE, XP, 2000, Vista, 7, 8, ME, macOS X, and Linux.
Avidemux is open-source software for video editing such as simple cutting, filtering, and encoding of videos into many formats. The application let you convert to many videos encoding formats like the popular ones MPEG and ASF etc.
Moreover, Avidemux does not provide editing through basic tools only but its automated task capability through queue and power scripts lets you do anything with your video. The application works on most platforms.
Reason to Choose:-
- Sleek user interface
- Wide support of codecs
- No learning curve is necessary
Reason to Avoid:-
- Confusing options
- Very few video editing features
10. iMovie – a most well-known video editor for macOS users
Best for: Apple device users, Marketers, developers, and teachers.
User rating: 4.3/5.0
System compatibility: Microsoft Windows 7, Windows 8, Windows 10, or Windows 11, All macOS
Imoview is a read-made installed software by Apple Inc on their systems. It primarily came in macOS, iOS, and iPadOS devices. Its original release came in 1999 as MAC OS 8 bundled application.
At the start, it was given free by buying a new macOS or ios device but later, in 2013 it has been issued for free to all its users. The application is known for its editing of any type and resolution of videos.
Reason to Choose:-
- User friendly
- Open-Source
- Best for HD Videos
Reason to Avoid:-
- Some glitches have been reported while recording gameplay.
- The customer support team is not always responsive.
12. Screenrec
Best for: best premium screen recorder for beginners
User rating: 4.5/5.0
System compatibility: Windows 10/8/7/XP and Linux
Screenrec is a premium screen recorder with a very intuitive user interface that makes it suitable for beginners. You can start and stop recording your screen with a single click. You can also record your webcam and audio from your system as well as external microphone. The software is perfect for taking screenshots and adding annotations wherever required.
The software generates a sharable link so that you can share it anywhere you want instantly. Once the link is shared, you can check its analytics. The video content management system is quite robust and the video content is fully encrypted for security and privacy.
Reason to Choose:-
- Record screen, webcam, audio with a single click.
- Very intuitive user interface with live annotation options.
- Generate instant sharable links and track analytics of videos.
- Better video content management with cloud storage.
Reason to Avoid:-
- Very limited editing options.
- Very limited customizable settings.
Part 5: Online Screen Recorders
If you do not want to install any dedicated screen recording software on your computer, you have online screen recorders to record the screen on the go. There is no software to install as you can launch the online screen recorders instantly from your web browsers. Here are the best online screen recorders for you.
1. Screencastify
Best for: best online screen recorder for those who want a browser extension.
User rating: 4.4/5.0
System compatibility: Windows, Mac and Chromebook
Screencastify comes in the form of a Chrome browser extension and hence, only Chrome users can use them. You can record your screen, your webcam video individually as well as together. The recording widget has options for real-time drawing while recording the video. Additionally, you can add stickers to enhance the video content.
After recording, you can upload the video on Google Drive, and you can share the video link instantly with anyone. The video editor offers you basic video editing options. You can even highlight mouse cursor. As far as saving the recorded video goes, you can export in MP4, MP3 as well as GIF file formats.
Reason to Choose:-
- Record desktop, browser, and application with webcam embedded.
- Highlight mouse movements and clicks and add stickers.
- Real-time drawing with pen and shapes and basic editing options.
- Export video to Google Drive and share video links instantly.
Reason to Avoid:-
- Limited to Chrome users only.
- Recording time limited to 5 minutes in free version.
2. Screencast-o-Matic
Best for: best online screen recorder for everyone
User rating: 4.7/5.0
System compatibility: Windows, Mac, iOS, Android and Chromebook.
Screencast-o-Matic is the best online screen recorder in terms of features and customization. All the features are well-balanced so that everyone can use it to satisfy their requirements. You can choose screen, webcam or both for recording. You can set a maximum time so that the recording can stop automatically.
You can choose the video resolution and you can choose audio sources. You can also capture screenshots and customize the recording area. If you opt for its premium plan, you get a vast stock library to enhance your video content. In fact, you can add animations, effects, add voiceover, background audio and automated caption.
Reason to Choose:-
- Capture screen, webcam, and audio with customized recording area.
- Customize video recording parameters as per requirements.
- Real-time drawing tools and cloud hosting for instant sharing.
- Separate video editor available for free.
Reason to Avoid:-
- Advanced features are meant for premium users.
- 15-minute recording time limitation in free version.
3. Loom Online Screen Recorder
Best for: best online screen recorder for teams and collaborative works.
User rating: 4.1/5.0
System compatibility: Windows, Mac, iOS, Android and Chromebook.
Loom comes with an online screen recorder along with a Chrome extension as well as desktop app. With the online screen recorder, you can record screen only, camera only as well as screen and camera together. You can choose actual webcam as well as virtual webcam and you can select an external mic for audio recording.
The online screen recorder comes with a recording countdown and you can save your videos on the workspace that Loom provides. You can select the entire screen, the browser tab or the application window. You can instantly share the recorded video with people through emails, social media platforms and much more.
Reason to Choose:-
- Record screen and webcam together and separately.
- Save the recorded video on Loom platform and share instantly.
- Basic editing options post recording include speed change.
- Add transcription and call-to-action as well as change thumbnail.
Reason to Avoid:-
- Cannot record gameplay or select customized region.
- Very limited video parameters customization options.
4. Screencapture.com
Best for: best online screen recorder for amateurs
User rating: 4.2/5.0
System compatibility: Windows, Mac, and Chromebook.
Screencapture.com is a freemium online screen recorder as it attaches a watermark to the recorded video in free mode. You can record your screen as well as your webcam and select the audio source as per your requirements. The recording is limited to HD resolution. You can capture video in Picture in Picture format.
The platforms emphasize downloading its desktop recorder where more features are available. You get the option to select the recording screen such as entire screen, browser or application window. After recording the video, you can instantly check its preview before saving or discarding. You can save the video in different file formats.
Reason to Choose:-
- Choose webcam, audio sources while recording the screen.
- Capture entire screen, application or browser screen.
- Capture video in Picture in Picture mode.
- Preview recording and save in different file formats.
Reason to Avoid:-
- Premium plan to remove watermark only.
- No customization of video parameter options.
5. Panopto
Best for: bests online screen recorder for teachers and students
User rating: 4.7/5.0
System compatibility: Windows, Mac, and Chromebook.
Panopto offers you a platform where you can record any video and save them on Panopto or Classroom. Therefore, it is an ideal platform for teachers and students and lecture delivery. You can even upload the recorded video on YouTube directly. You can even save the video on your local drive.
You can record any part of your screen in full HD resolution and the online recorder allows you to record webcam as well. You can also record system and external audio. The best part is that you can choose the video layout such as tile or PiP mode. Besides, you can blue the background while recording.
Reason to Choose:-
- Customize recording area and record in full HD.
- Smart camera and background selection options.
- Different saving and uploading options for recordings.
- Picture in Picture, Tile and Instant preview modes available.
Reason to Avoid:-
- The user interface is unappealing.
- No video editing options available.
6. Apowersoft Online Screen Recorder
Best for: best online screen recorder for recording demonstrative videos.
User rating: 4.8/5.0
System compatibility: Windows, Mac, and Chromebook
Apowersoft online recorder is one of the most popular and comprehensive screen recorders. You have to install its web installer on your computer for its online recorder to operate. You can record any region on your screen with the recorder. You have the option to save the recording on your local drive as well as on RecCloud. Besides, you can upload the video directly on YouTube.
The record supports different types of video output formats and you can record anything starting from live calls and video streams to demonstration videos. In fact, you can record even your webcam video along with external audio. There are also options for annotation while recording for better explanation.
Reason to Choose:-
- Record your screen, webcam, and audio smoothly.
- Customize recording area and add callouts to videos.
- Add annotation in real-time while recording.
- Save the recorded video in multiple file formats.
Reason to Avoid:-
- It lags if the computer is not a high-end one.
- No editing options are present.
Part 6: Screen Recorder for Mobile
If you want to record your mobile phone’s screen, you need to install a screen recorder app. Here is the list of the best screen video recorders for mobile users.
1. AZ screen recorder
Support OS: Android
Rating: 4.5/5.0
Download Link: https://play.google.com/store/apps/details?id=com.hecorat.screenrecorder.free&hl=en\_IN&gl=US
AZ screen recorder is a complete screen recorder from all perspectives. The app lets you record your screen, edit your video, go for livestream as well as take screenshots. You can record at full HD resolution and change resolution, frame rate and bitrate as required. The app can record internal sound as well as external sound through phone microphone.
You can also record your video through facecam in the overlay window. The app also comes with all the options for basic editing. You can even livestream your screen video on different video streaming platforms. Moreover, you can make GIFs from videos as well as take screenshots. The app is completely free to use without any watermark.
Reason to Choose:-
- Record screen with facecam in overlay window.
- Record gameplay with external mic audio.
- Record at 1080p resolution at 60fps.
- Floating controls, drawing tools.
- Trim, crop, merge, rotate, and convert to GIF.
Reason to Avoid:-
- It can get into glitches when recording long videos.
2. DU Recorder
Support OS: iOS and Android
Rating: 4.5/5.0
Download Link: https://apps.apple.com/us/app/du-recorder-screen-recorder/id1295647284
DU Recorder is a freemium app that is available for iOS and Android users. The free version attaches a watermark which is why you have to opt for DU Recorder Premium. You can record your screen and livestream your screen activities on YouTube, Twitch, and Facebook. The app can record gameplay, video calls, live shows and anything on the screen.
The recording can be in full HD resolution and you can adjust the video parameters. Besides, you can edit your video such as trimming, cropping, adding music, frames, stickers, texts and much more. Moreover, you can capture facecam video, change video speed, record internal and external audio, and convert video to GIFs. All in all, it is a great screen recorder with video editing and livestreaming features.
Reason to Choose:-
- Record screen and facecam video with internal and external audio.
- Livestream screen activities to video streaming platforms.
- Basic video editing options and insert frames, stickers, and filters.
- Add custom watermark, change speed, live themes in Pro version.
Reason to Avoid:-
- It can lag at times when you are recording high frame rate video.
- It adds watermark to your recorded video if you are using its free version.
3. XRecorder
Support OS: Android and iOS
Rating: 4.8/5.0
Download Link: https://play.google.com/store/apps/details?id=videoeditor.videorecorder.screenrecorder&hl=en\_IN&gl=US
XRecorder is a completely free screen recorder with no watermark. You can capture your screen video as well as take screenshots. The screen recorder allows you to select from 240p to 1080p resolution for video recording. The app provides you with a floating widget to record anything on the screen starting from live calls to live shows.
You can even livestream your screen and you can do basic editing on the recorded video. There is no time limit on the recording and hence, it is quite suitable for recording gameplay. You can record internal and external audio as well as record facecam in a small overlay window. Besides, you can add music as well as change video speed as per your requirements.
Reason to Choose:-
- Record screen and facecam along with system and mic audio.
- Record video at different resolutions up to 1080p.
- Floating widget, countdown buffer time, pause recording options.
- Capture screenshots, rotate video and basic video editing.
Reason to Avoid:-
- Some have reported glitches regarding audio recording.
- There could be some performance lags while recording at high resolution.
4. Mobizen Screen Recorder
Support OS: Android and iOS
Rating: 4.1/5.0
Download Link: https://play.google.com/store/apps/details?id=com.rsupport.mvagent&hl=en\_IN&gl=US
Mobizen Screen recorder belongs to the freemium app category as it adds a watermark to the recorded video in its free version. You have to purchase its premium plan to remove the watermark. Coming to its features, the app is a good combination of screen recorder and video editor. You can record your screen easily from its floating widget.
You can also add intro and outro to your recorded video as well as add background music. Besides, you can perform basic video editing. Most importantly, you can capture your screen at 2K resolution. Besides, the app allows recording through the front camera of your phone in an overlay window.
Reason to Choose:-
- Can record screen video up to 2K resolution.
- Record screen, facecam, and internal and external audio.
- Use drawing tools, control from floating widgets, and create GIFs.
- Different video editing options and customize watermark.
Reason to Avoid:-
- Free version puts a watermark on the recorded videos.
- Reports of malfunction when recording at 2K resolution.
5. ADV Screen Recorder
Support OS: Android
Rating: 4.4/5.0
Download Link: https://play.google.com/store/apps/details?id=com.blogspot.byterevapps.lollipopscreenrecorder&hl=en\_IN&gl=US
ADV screen recorder is a full-fledged app for Android users to record their screen with full customizations. You can record your front and back camera along with the screen. It operates with two different engines where the default engine has all the basic features and the advanced engine has the features for advanced users.
The app also lets you edit your recorded video and you can add texts and banners. Besides, you can draw on the video in real-time as well as trim the video as per your preference. There is also an option to pause the recording at your convenience. You can also customize the video recording parameters as required.
Reason to Choose:-
- Record your screen as well as front and back phone camera video.
- Pause recording, draw on video, and add texts.
- Trim video, add custom logo, switch between engines.
- Customize video and audio settings as required.
Reason to Avoid:-
- The user interface is not appealing.
- There are bugs reported that need to be fixed.
6. Record it
Support OS: iOS
Rating: 4.6/5.0
Download Link: https://apps.apple.com/us/app/record-it-screen-recorder/id1245356545
Record it! app is extremely useful in making tutorial videos where you need to record your screen. You can record the entire screen with a single tap. You can record gameplay and app screen along with your reaction through facecam. You can also customize the overlay window by changing its shape and position.
Besides, you can record your audio commentary while recording screen. It comes with video editing options to trim videos, add filters, change speed, rotate videos and much more. You can share your videos directly to YouTube as well as export through email and AirDrop. The user interface is quite intuitive and appealing.
Reason to Choose:-
- One-tap option to start recording at high resolution.
- Customization of facecam reaction overlay window.
- Support camera roll videos and add audio commentary.
- Basic video editing and instant sharing and exporting options.
Reason to Avoid:-
- It can lag at high frame rate and high resolution.
- There are reports of inconsistency with audio recording.
Part 7: How to Choose the Right Screen Recorder?
Here are the main parameters you need to keep in mind while choosing the best screen recorder for you.
1. Recording options: An ideal screen recorder should have all the different options for recording your screen, webcam, system audio, and external audio from microphone. Besides, it should offer you the option to customize the recording area by selection. You should be able to record full screen, application window, and browser tab accurately.
2. Price: If you are serious about recording your screen video and uploading the recorded video on online platforms, you have to opt for a premium screen recorder. While purchasing a proprietary screen recorder, you need to compare the software price with its peers and ensure that you are getting more features for the price you are paying.
3. Customer support: You need to ensure that the screen recorder you are purchasing, they have a highly responsive customer support. This is a highly neglected factor but users suffer a lot when the customer support team is not responsive. Be sure that you will need to contact the customer support team at some time to learn more about certain features and troubleshoot in emergency situations.
4. Sharing options: When your ultimate goal is to share your recorded video online, you should check for the sharing options available in the screen recorder. There are screen recorders that allow sharing recorded and edited videos on online platforms, cloud storage platforms, and video streaming platforms. It should also offer you options to let you export videos in different file formats.
5. Video editing tools: You have to edit your recorded video to trim out unnecessary parts and add effects and filters to enhance your video content and video quality. Besides, you may need options to add music and voiceover as well as intro and outro. That is why you should opt for a screen recorder where a great video editor is available.
6. Customer Reviews: Last but most importantly, you should check the customer review of the screen recording software. Even when a screen recorder has loads of features, if the customer reviews are not good enough, you should not choose you. Besides, the customer reviews reveal the pros and cons of a screen recorder for your better understanding.
Part 8: Screen Recording Tips and Tricks
1. Practice before recording: Unless you are a pro, you should practice at least once before the actual recording. This will help you to execute your plan according to your script smoothly when you actually start recording. Besides, you can check if the frame, the camera, the mic, and everything else are working perfectly.
2. Only record the required screen: Screen recorders offer you the option to record the entire screen, any specific application window or any specific tab of your browser. In fact, you can even customize the screen recording area as per your requirements for better focus and better visual experience.
3. Keep it short: It is always necessary to keep the length of the video as short as possible without skipping the relevant points and important explanations. That is where a proper script before recording is crucial so that you can have a plan and execute it properly without stretching your explanation unnecessarily.
4. Speak slowly and clearly: The way you speak in the video can attract as well as repel audiences. If you speak too fast and if you have a weird accent, it is going to repel audiences. That is why it is important for you to speak slowly and clearly so that everyone can understand everything you speak and negate your accent to a greater extent.
5. Use screen drawing tools: If you are recording a video where you need to explain something, it is always better if you use screen drawing tools. In fact, it is important that you choose the screen recorder that offers drawing tools so that the video gets visually pleasing and impactful for audiences to understand effectively.
6. Cut out dead moments: When you are recording screen videos, there are going to be a lot of dead moments and boring pauses. You have to cut out those boring and dead moments while editing so that the video stays interesting and the audiences do not lose concentration. This will also help to tighten the length of the video.
7. End with a summary: Last but most importantly, you should offer a proper conclusion before ending the video. You need to summarize everything you have discussed in the video so that the audience can get a revision of all the important points. Besides, a proper ending rather than an abrupt ending can leave a positive impact regarding your video.
Part 9: Frequently Asked Questions
How do I record Windows 10 screen?
You can use Windows Game Bar that comes pre-installed on Windows 10. However, for a better screen recording experience, we recommend Wondershare Filmora where you can edit the recording as well.
Can I screen record on my Mac?
You can use QuickTime that comes pre-installed on Mac. However, for professional screen recording experience, you can use Filmora or Camtasia where you will get more recording options and tools for editing after recording.
How do I screen record on my iPhone?
You can use DU Recorder app or Record it! app to record your iPhone screen video. Besides, the latest version of iOS comes with an in-built screen recorder option that can record the screen comfortably.
Which quality is best for screen recording?
The best quality for screen recording should be the same resolution as the screen. This means if you have a 4K monitor, the screen recording will be best at 4K resolution. In today’s scenario, 1080p or full HD is the optimal quality for screen recording.
What do most YouTubers use to record their screen?
Most YouTubers use Filmora or OBS Studio to record their screen. OBS Studio is mostly used by those who livestream their screen or gameplay. Filmora is mostly used by those who emphasize heavily on editing their recorded screen video for better output.
Does screen record ruin quality?
Your screen record quality can get ruined only when you use a screen recorder that records at a lower resolution due to its inability as well as to reduce file size. When you record your screen with a proprietary screen recorder, it can record the screen at exactly the same resolution as that of your screen. Hence, the video quality and resolution will stay intact.
What do gamers record their screens?
Gamers prefer Bandicam, Camtasia as well as Filmora to record their screens and showcase their gameplay to the world. Bandicam allows recording 2D and 3D games from gaming consoles at 4K resolution.
How do I make my recorded sound clear?
There are some screen recorders such as Filmora that offer you the option to remove background noise so that the recorded audio sound clearer. You can also use a pop filter to record clearer sound.
Part 4: Proprietary Screen Recorders
If you are serious about recording your screen and publishing the video online, you should invest in purchasing a premium screen recorder. A proprietary screen recorder is a video recorder where you have to purchase a premium plan to avail all the features. They offer all the required features for professional screen recording as well as editing the recording video. Here is the list of the best proprietary screen recorders for you.
7. Filmora Recorder
Best for: best screen recorder for all video creators
User rating: 4.8/5.0
System compatibility: Windows 11/10/8/7 and Mac 10.14+
Wondershare Filmora is one of the most popular screen recorders among video creators. You can record screen and webcam simultaneously as well as capture audio from system and external mic. Most importantly, you can record at 4K resolution without any performance lag. Besides, you can highlight mouse clicks and use greenscreen effect and customize background screen.
The main reason why Filmora is a preferred choice for recording video is that it comes with a world-class video editor. Therefore, you can enhance your video quality and content that will make the video stand out. Starting from adding audio and video effects to working with multiple video and audio clips, Filmora is undoubtedly the best screen recorder cum video editor for Windows and Mac users.
For Win 7 or later (64-bit)
For macOS 10.12 or later
Reason to Choose:-
- Record screen and webcam at high-resolution.
- Customize all video capturing settings and parameters.
- Edit the recorded video like a pro with its world-class video editor.
- Export the editing video in different file formats for maximum compatibility.
Reason to Avoid:-
- Takes long time to process high-resolution videos.
Methods to Make Sure Your Recording Slideshow in Powerpoint Is Not Wro
Ways to Make Sure Your Recording Slideshow in Powerpoint is Not Wrong
An easy yet powerful editor
Numerous effects to choose from
Detailed tutorials provided by the official channel
Creating a presentation is a daunting task, and not everybody has enough expertise to create it. But those who know they can create the presentation are well aware of the steps they need to follow to record a slide show PowerPoint.
If you are new to it or feel confused about how you will be able to do it, keep reading till the last. Here in this read, we will help you to know whether the way you have adapted to record the presentation is favorable or not. Additionally, in the end you will have an idea about the right steps that you need to follow in order to get it done. Let’s get started!
In this article
01 [How to Record Slide Show Powerpoint](#Part 1)
02 [The 6 Best Slide Show PowerPoint Recording Tools](#Part 2)
03 [Recording Slide Show Powerpoint Q&A](#Part 3)
Part 1 How to Record Slide Show Powerpoint
Before understanding the use of tools to record slide show, one must be aware of how will they be able to do it. For the same, there are simple steps that you need to follow, these are:
Step 1: Firstly, open the slide from which you wish to start the recording.
Step 2: “Record” button is right there at the upper right corner of the PowerPoint window. Click on it.
Step 3: When you are done with making the changes or say customizations, select “Record button”. This one is round and red in appearance.
Step 4: Wait until the countdown.
Step 5: Start speaking as per the slides you have created.
Step 6: when you are done with it, you can save it and share it with others too.
Note: this one turns out to be the simplest method for recording slide shows in PowerPoint. But some users are not happy with the same because they are not in the state to make the additional editing if they need to do any. Thus, at that point, they look out for other tools available.
Part 2 The 6 Best Slide Show PowerPoint Recording Tools
In this section, you will come to know about the best slide show PowerPoint recording tools that you can consider and get the best results in return: -
01Vmaker
Vmaker is a tool that allows you to create and share your PowerPoint presentations. It records your presentation in high-quality video, audio, and text. It has many features that help you to make a great presentation. For instance, it can record your screen in real-time and automatically saves the recorded file as a video file. You can also use it to record the audio from your microphone or an external source like YouTube or SoundCloud. It also has features for editing videos and adding subtitles, watermarks, etc. It is one of the best slide show PowerPoint recording tools available on the market today.

Additionally, the tool also has an inbuilt screen recorder that lets you record your presentation in full HD resolution. It records your screen with sound as well, so you can share it on social media or embed it on websites.
02Panapto
Panapto lets users create professional-looking presentations with just a few clicks. It also supports animations, transitions, and other features for creating engaging slideshows. It is a professional tool that allows you to create a slide show of your PowerPoint presentation in just one click and share it with other people. Furthermore, It also allows you to record your presentation as a video file and publish it online for others to view. If you are looking for the best Slide Show Powerpoint Recording Tools, Panapto is the right choice for you. It works on Windows, Linux, and Mac OS X.

03Camtasia
Camtasia is software that can be used as a video recording tool for presentations. It allows you to record, edit, and share videos with ease. In general, it is an easy-to-use screen recording tool that lets you create high-quality recordings of presentations, webinars, and meetings in seconds. It also includes a number of features like color correction tools and motion tracking that make it easy to create professional-looking videos without any extra effort.

With it, you can easily create a presentation from your computer or tablet. You can also use it to record training sessions or meetings so that you can review them later.
04Ispring
Ispring is presentation software that records your presentations in real-time and allows you to review them later on. You can also share your recordings with others or embed them into websites or blogs. It saves you time, effort, and money. It allows the option of recording your screen using your webcam or microphone (with or without sound).

Furthermore, it is helpful in capturing the screen from any device on the desktop, including computers, laptops, tablets, and even smartphones. Along with that, if you are looking to edit audio files in real-time then no more waiting for hours to edit the sound.
Lastly, after creating the content, if you wish to publish it over any social media portal, the direct option is there to help you with it.
05Bandicam
Bandicam is a powerful software that allows users to record their screens in high quality with ease. It is not limited by frames per second but rather the number of frames per second it can record at different resolutions. It has the ability to take screenshots that are saved as PNG files or even take screencasts that are saved as MP4 files.n Furthermore, it is the best slide show PowerPoint recording tool. It can be used for recording gameplay, tutorials, presentations, or anything else you would like to show on a screen.

The Bandicam website also offers an online tutorial for those who are new to using the software, as well as a help center with video tutorials for those who have never used it before.
06Screenflow
Screenflow is a free and open-source screen recording tool that works on Mac. It allows you to record your computer screen, audio, and webcam. It is a really useful tool for those who want to create videos for presentations but don’t have the time or budget to hire an expensive video producer. It can be used as a screen recorder or a presentation tool. You can easily edit recorded videos with Screenflow’s inbuilt video editor.

In general, Screenflow is a tool that records your screen and lets you share it with others. It’s a great tool for both beginners and professionals to record their work, presentations, or tutorials.
Part 3 Recording Slide Show Powerpoint Q&A
01What are the advantages of recording a slide show PowerPoint?
Recording a slide show PowerPoint is an easy way to capture the information from your slides into an editable video that you can share with your audience. It’s also easy for people who missed the presentation or need to review it later, as well as for those who want to use it for other purposes like marketing collateral or educational content. By recording a slide show PowerPoint, you’re able to retain the benefits of giving a live presentation without all the hassle of actually delivering it in person.
02How can I record a slide show PowerPoint?
There are a few ways to record a slide show PowerPoint, including using the PowerPoint recording option. If you are using PowerPoint, you should be able to find the option in your presentation settings. But if you are not fond of trying it out, you can use Filmora. This is one of the best video editing tools available, with some exclusive features. This has the simplest interface, and users can get their presentation recorded needs catered for sure.
03How can I use my recorded slideshows in different presentations?
There are many ways to do this. You could export the slideshow as a .mp4 file and then import it into another presentation for reuse. You could also just load the slideshow on your laptop’s screen and use it that way instead of having a projector or screen. If you wish to integrate some effects into it, you can try out Wondershare Filmora Video Editor , the ultimate video editing tool available for people around.
For Win 7 or later (64-bit)
For macOS 10.12 or later
04How long does it take to create a single recording slide show PowerPoint?
It takes a lot of time and effort to create a single recording slide show PowerPoint. This is because of the time it takes to go through all the slides and find the right images.
It is best if you start by finding out what you want to say with your presentation. Then, select images that support your message, and finally, create slides that tell your story.
This process will save a lot of time and effort when it comes to creating slide shows for presentations.
05How long can a recording slide show PowerPoint be recorded?
The length of a PowerPoint recording is determined by the length of the slide show. The default setting for the length of the slide show is 60 minutes, but it can be changed to any duration.
● Ending Thoughts →
● Recorded slide show presentations are best to consider when one wishes to save the efforts of creating the same presentation again and again.
● Filmora is one of the best video editing tools available to users for doing the editing in the recorded slideshow presentation if needed.
● Recording a slideshow is relatively an easy task if one is aware of the right steps. But if there is a lack of knowledge, they will not be able to do it.
Creating a presentation is a daunting task, and not everybody has enough expertise to create it. But those who know they can create the presentation are well aware of the steps they need to follow to record a slide show PowerPoint.
If you are new to it or feel confused about how you will be able to do it, keep reading till the last. Here in this read, we will help you to know whether the way you have adapted to record the presentation is favorable or not. Additionally, in the end you will have an idea about the right steps that you need to follow in order to get it done. Let’s get started!
In this article
01 [How to Record Slide Show Powerpoint](#Part 1)
02 [The 6 Best Slide Show PowerPoint Recording Tools](#Part 2)
03 [Recording Slide Show Powerpoint Q&A](#Part 3)
Part 1 How to Record Slide Show Powerpoint
Before understanding the use of tools to record slide show, one must be aware of how will they be able to do it. For the same, there are simple steps that you need to follow, these are:
Step 1: Firstly, open the slide from which you wish to start the recording.
Step 2: “Record” button is right there at the upper right corner of the PowerPoint window. Click on it.
Step 3: When you are done with making the changes or say customizations, select “Record button”. This one is round and red in appearance.
Step 4: Wait until the countdown.
Step 5: Start speaking as per the slides you have created.
Step 6: when you are done with it, you can save it and share it with others too.
Note: this one turns out to be the simplest method for recording slide shows in PowerPoint. But some users are not happy with the same because they are not in the state to make the additional editing if they need to do any. Thus, at that point, they look out for other tools available.
Part 2 The 6 Best Slide Show PowerPoint Recording Tools
In this section, you will come to know about the best slide show PowerPoint recording tools that you can consider and get the best results in return: -
01Vmaker
Vmaker is a tool that allows you to create and share your PowerPoint presentations. It records your presentation in high-quality video, audio, and text. It has many features that help you to make a great presentation. For instance, it can record your screen in real-time and automatically saves the recorded file as a video file. You can also use it to record the audio from your microphone or an external source like YouTube or SoundCloud. It also has features for editing videos and adding subtitles, watermarks, etc. It is one of the best slide show PowerPoint recording tools available on the market today.
Additionally, the tool also has an inbuilt screen recorder that lets you record your presentation in full HD resolution. It records your screen with sound as well, so you can share it on social media or embed it on websites.
02Panapto
Panapto lets users create professional-looking presentations with just a few clicks. It also supports animations, transitions, and other features for creating engaging slideshows. It is a professional tool that allows you to create a slide show of your PowerPoint presentation in just one click and share it with other people. Furthermore, It also allows you to record your presentation as a video file and publish it online for others to view. If you are looking for the best Slide Show Powerpoint Recording Tools, Panapto is the right choice for you. It works on Windows, Linux, and Mac OS X.
03Camtasia
Camtasia is software that can be used as a video recording tool for presentations. It allows you to record, edit, and share videos with ease. In general, it is an easy-to-use screen recording tool that lets you create high-quality recordings of presentations, webinars, and meetings in seconds. It also includes a number of features like color correction tools and motion tracking that make it easy to create professional-looking videos without any extra effort.
With it, you can easily create a presentation from your computer or tablet. You can also use it to record training sessions or meetings so that you can review them later.
04Ispring
Ispring is presentation software that records your presentations in real-time and allows you to review them later on. You can also share your recordings with others or embed them into websites or blogs. It saves you time, effort, and money. It allows the option of recording your screen using your webcam or microphone (with or without sound).
Furthermore, it is helpful in capturing the screen from any device on the desktop, including computers, laptops, tablets, and even smartphones. Along with that, if you are looking to edit audio files in real-time then no more waiting for hours to edit the sound.
Lastly, after creating the content, if you wish to publish it over any social media portal, the direct option is there to help you with it.
05Bandicam
Bandicam is a powerful software that allows users to record their screens in high quality with ease. It is not limited by frames per second but rather the number of frames per second it can record at different resolutions. It has the ability to take screenshots that are saved as PNG files or even take screencasts that are saved as MP4 files.n Furthermore, it is the best slide show PowerPoint recording tool. It can be used for recording gameplay, tutorials, presentations, or anything else you would like to show on a screen.
The Bandicam website also offers an online tutorial for those who are new to using the software, as well as a help center with video tutorials for those who have never used it before.
06Screenflow
Screenflow is a free and open-source screen recording tool that works on Mac. It allows you to record your computer screen, audio, and webcam. It is a really useful tool for those who want to create videos for presentations but don’t have the time or budget to hire an expensive video producer. It can be used as a screen recorder or a presentation tool. You can easily edit recorded videos with Screenflow’s inbuilt video editor.
In general, Screenflow is a tool that records your screen and lets you share it with others. It’s a great tool for both beginners and professionals to record their work, presentations, or tutorials.
Part 3 Recording Slide Show Powerpoint Q&A
01What are the advantages of recording a slide show PowerPoint?
Recording a slide show PowerPoint is an easy way to capture the information from your slides into an editable video that you can share with your audience. It’s also easy for people who missed the presentation or need to review it later, as well as for those who want to use it for other purposes like marketing collateral or educational content. By recording a slide show PowerPoint, you’re able to retain the benefits of giving a live presentation without all the hassle of actually delivering it in person.
02How can I record a slide show PowerPoint?
There are a few ways to record a slide show PowerPoint, including using the PowerPoint recording option. If you are using PowerPoint, you should be able to find the option in your presentation settings. But if you are not fond of trying it out, you can use Filmora. This is one of the best video editing tools available, with some exclusive features. This has the simplest interface, and users can get their presentation recorded needs catered for sure.
03How can I use my recorded slideshows in different presentations?
There are many ways to do this. You could export the slideshow as a .mp4 file and then import it into another presentation for reuse. You could also just load the slideshow on your laptop’s screen and use it that way instead of having a projector or screen. If you wish to integrate some effects into it, you can try out Wondershare Filmora Video Editor , the ultimate video editing tool available for people around.
For Win 7 or later (64-bit)
For macOS 10.12 or later
04How long does it take to create a single recording slide show PowerPoint?
It takes a lot of time and effort to create a single recording slide show PowerPoint. This is because of the time it takes to go through all the slides and find the right images.
It is best if you start by finding out what you want to say with your presentation. Then, select images that support your message, and finally, create slides that tell your story.
This process will save a lot of time and effort when it comes to creating slide shows for presentations.
05How long can a recording slide show PowerPoint be recorded?
The length of a PowerPoint recording is determined by the length of the slide show. The default setting for the length of the slide show is 60 minutes, but it can be changed to any duration.
● Ending Thoughts →
● Recorded slide show presentations are best to consider when one wishes to save the efforts of creating the same presentation again and again.
● Filmora is one of the best video editing tools available to users for doing the editing in the recorded slideshow presentation if needed.
● Recording a slideshow is relatively an easy task if one is aware of the right steps. But if there is a lack of knowledge, they will not be able to do it.
6 Best Text to Speech Generators for YouTube Videos [Windows, Mac, Android, iPhone & Online]
Best Text To Speech Converter and Video Editor
Filmora’s Text to Speech (TTS) function allows you to convert your text files to voiceover and bring more elements to enrich your video.
Free Download Free Download Free Download Learn More >

Speech has a significant impact on the success rate of the entire YouTube adventure, whether storytelling or a standard sales pitch. It helps to have a decent voice and speaking abilities. However, not everyone gets both simultaneously; many individuals employ voice artists to provide voice-overs.
Some freelancers charge $5-$100 for a 5-minute voice-over. However, not everyone can afford an expensive voice artist, especially for longer films or just starting. Here are other options that I discovered as the most acceptable free text to voice generators for YouTube videos.
Let’s take a deeper look at the most excellent free text to speech software for YouTube videos.
Getting Started
Text to speech is a speech synthesis software that speaks aloud digital and textual content. The software offers a wide range of applications and is utilized by everyone from professionals and students to toddlers and adults.
Viewers are emotionally attached to documents such as PDFs, books, novels, and e-learning courses when they hear narration with a human voice. Text-to-speech systems are ideal for multitasking by busy professionals.
It’s no surprise that there are numerous text-to-speech options available. Audiobooks are also becoming more popular for the same reasons.
We’ll go over the best text-to-speech tools available in this guide. We’ve gathered a detailed list of the most exemplary free and commercial text-to-speech applications to help you choose the best option for your needs:
#1: Murf
It is available on Windows, Mac, Android, iPhone, and Online
Murf is a text-based voice-over maker. You can either compose your script or submit a voice clip to convert it into hyper-realistic AI voices. Murf delivers expert voice-over artists with experienced voices. You can check multiple parameters in the voices. You can use Murf to signify a brand, a product, a company, a presentation, and many more.
Features:
- Murf allows you to create voice-overs from the text. It also allows you to transform your speech into editable text, which you can subsequently edit or convert into AI voice.
- Murf Studio provides the ability to synchronize your speech with visuals.
- Murf provides over 100 authentic voices in 19 languages.
- It also gives options for inserting pauses, altering narration tempo, and emphasizing certain points.
- It also includes features such as script checking with grammar assistance, free background music, video and music cutting, and more.
- Murf offers comprehensive communication and collaboration tools, access control, a pronunciation library, and a service level agreement (SLA) for enterprises wishing to develop voice-overs in bulk.
Price
| Free | Basic | Pro | Enterprise |
|---|---|---|---|
| $0 / Month | $13 / Month | $26 / Month | $166 / Month |
| Try all 120+ voices 10 mins of voice generation 10 mins of transcription Share link for audio/video output No downloads Single User No credit card required | Unlimited Downloads 24 hours of voice generation/year Access to 60 voices (10 languages) Commercial Usage rights Chat and Email support Single User | Unlimited Downloads 96 hours of voice generation/year 48 hours of transcription/year Access 120+ voices (20 languages) Commercial Usage rights Recorded voice editing Voice changer Up to 3 users Priority Support | 5+ Users Unlimited Voice Generation Time Unlimited Transcription time Custom Voices Single-sign on (SSO) Collaboration and Access Control Dedicated Account Representative Centralized invoicing Service Agreement Deletion recovery Unlimited Storage |
Cons
- You may experience frequent technical glitches.
#2: Speechelo
It is available on Windows, Mac, Android, iPhone, and Online
Speechelo gives a realistic voice tone and expressions. This gets people more interested in voice-overs. You can use Speechelo to create sales videos, training films, and instructive videos, among other things. It includes attributes such as breathing and pauses, vocal tones, changing speed and pitch, and compatibility for 23 languages.
Features
- The text-to-speech engine in Speechelo can add intonation to the voice.
- It contains over 30 voices that sound natural.
- It has both male and female voices.
- It works with various video editing tools, including Camatasia, Adobe, Premier, and iMovie.
- Ordinary tone, cheerful tone, and serious tone are the three tones you may use to read your text.
Price
| Premium |
|---|
| $47 (Discount price) |
| One-time payment With 60-day money-back guarantee |
Cons
- The output of Speechelo will be 48kbps. If you’re familiar with sound production, you’ll see that this is a very low output.
- It might produce inaccurate output if you input long voice-overs.
#3: Synthesys
It is available on Windows, Mac, Android, iPhone, and Online
Synthesys helps to convert text into a natural-sounding voice. With Synthesis, you can choose from various tones, accents, male and female voices, languages, and reading speeds. Moreover, It simply takes three steps to create a natural-sounding artificial speech that you may use for a variety of commercial applications.
- To begin, select the gender, style, accent, and tone you want the created voice to have.
- You can paste or type the content you want to turn into speech into Synthesys’ AI voice-producing platform.
- Lastly, click ‘create’ to start creating your artificial speech in minutes. You may adjust the reading speed and pause length from here.
Features
- Cloud-based software.
- Expert and natural-sounding voices are available in an extensive collection.
- There are over 35 female voices and 30 male voices.
- You can create and sell unlimited voices.
- Extremely user-friendly interface.
Price
| Audio Synthesys | Human Studio Synthesys | Audio and Human Studio Synthesys |
|---|---|---|
| $29 / Month | #39 / Month | $59 / Month |
| Unlimited voice-overs downloads Access to 30 Real Human Voices Access to 66 Languages & 254 General Voices Fully Web-Based | Unlimited Videos Access to 73 Humatars (Extra Outfits included) Access to 66 Languages & 254 General Voices Upload Your Own Voice Full Video Customization Fully Web-Based | Unlimited Videos & Voice Overs Access to both Software All features included 20% OFF |
Cons
- It has character limitations when making a voice-over.
- It does not have a free trial version.
#4: Nuance Dragon
It is available in Windows only
Nuance Dragon is an artificial intelligence-powered voice recognition system. It offers both residential and commercial solutions. It spans across various data centers and delivers cloud services.
Its hosting platform is Microsoft Azure, which is HITRUST CSF-approved. All of their solutions follow industry-standard guidelines. Nuance Dragon protects data in transit and at rest with 256-bit encryption.
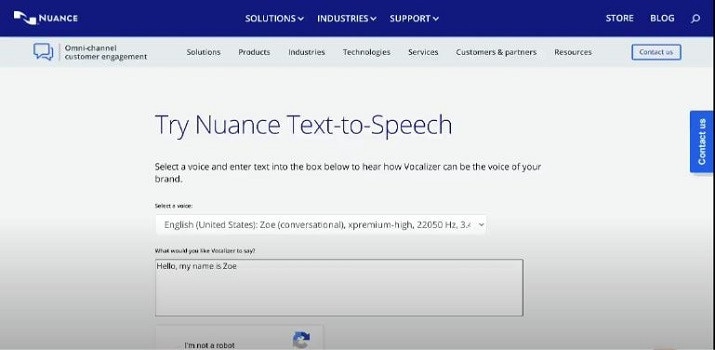
Features
- Nuance Dragon complies with HIPAA regulations, which are critical for public sector security and confidentiality.
- It applies to a wide range of professions.
- It offers complete protection.
Price
| Home | Professional |
|---|---|
| $200 | $500 |
| It has 99% recognition accuracy Immediate access to your dictation. One-time payment. | It has 99% recognition accuracy Share documents Sync custom words and commands Immediate access to your dictation. One-time payment. |
Cons
- It works only on Windows, and it is not available on Mac.
- It does not have a free trial version.
- It does not include Premium Consulting or Integration Services.
#5: Notevibes
It is available on Windows, Mac, Android, iPhone, and Online
Notevibes is a tremendous text-to-speech tool that comes in both a free and a commercial edition with many features. It offers customers over five hundred translation characters while also allowing them to modify the pronunciation.
As a result, users have access to all of their resources to learn a new language and significantly increase their reading skills. Furthermore, Notevibes features 177 distinct voices speaking in 18 different languages.
Users appreciate the natural-sounding voices that assist them in pronouncing words correctly. Users from many walks of life can profit from the tool because it has many functions.
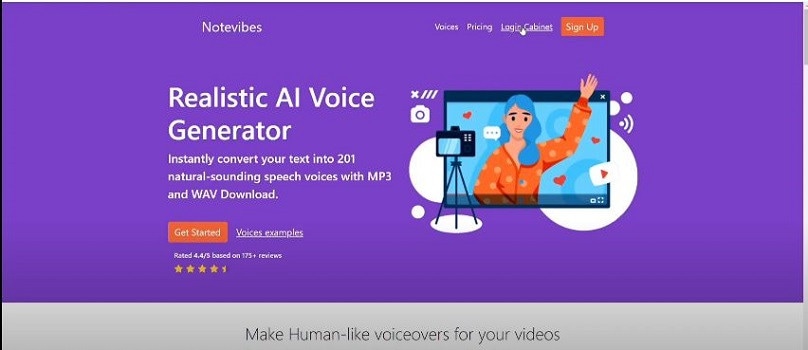
Features
- Realistic voice generator
- Aloud Speaking
- Make an MP3 of your audio speech.
- 47 Individual Voices
- Characters: 200 – 1,000,000
Price
| Personal Pack | Commercial Pack | Corporate Pack |
|---|---|---|
| $9 / Month ($107 per year) | $90 / Month ($1080 per year) | $4,000 / Year |
| For personal use only: private listening, personal e-learning 1,200,000 characters pack per year 201 Premium Voices available 18 Languages (EN, ES, DE, FR, VT, RU, PT, IT, NL, TR, JP, KO, HI and etc) MP3 Download 1 Account License | For Commercial use: YouTube, broadcasts, TV, IVR voiceover and other businesses 12,000,000 characters pack per year Advanced voice editor new 201 Premium Voices available 18 Languages (EN, ES, DE, FR, VT, RU, PT, IT, NL, TR, JP, KO, HI and etc.) SSML tags support MP3, Wav Download Audio files history You 100% own intellectual property for all files | For Corporate Users All in Commercial and 50,000,000 characters pack per year Master account for management Team License (up to 10 users) Priority email support |
Cons
- It does not have a preview. You have to generate the voice-over to listen.
- You can’t combine a single audio file out of many audio files.
- The Voiceover & Editor Page is unique in that it has two sections: one for creating the voice-over and another for obtaining audio files. Switching between them will take some time. If you’re working on a large project, moving between bot sites will be a hassle.
- No project-based organization
#6: Natural Reader
It is available on Windows, Mac, Android, iPhone, and Online
Natural Reader is among the few free text-to-speech programs with several exciting features. It’s pretty easy to use, and you can get started right away by loading texts into its library.
Furthermore, the tool allows users to manage several files in various formats. Lastly, the built-in OCR will enable you to submit images or text scans and have them read aloud.
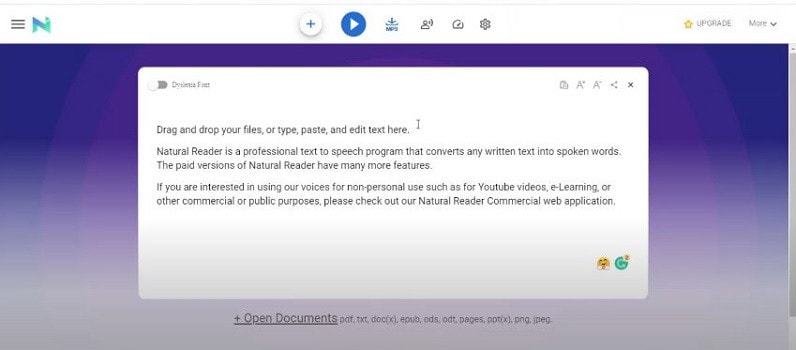
Features
- Built-in OCR
- Choice of interfaces
- Built-in browser
- Dyslexic-friendly font
Price
| Free | Personal | Professional | Ultimate |
|---|---|---|---|
| $0 (Free to use) | $99.50 (One-time payment) | $129.50 (One-time payment) | $199.50 (One-time payment) |
| Unlimited use with Free Voices Miniboard to read text in other applications Pronunciation Editor Works with PDF, Docx, TXT and ePub | 2 natural voices included All features of Free Version included Convert to MP3 | 4 natural voices included All features of Personal Version included | 6 natural voices included All features of Professional Version included 5000 images/year for OCR to read from images & scanned PDFs |
Cons
- There is no way to skip or jump around any text on the page.
- You will need internet access in the free software to access the voices.
- The paid version is very expensive in comparison to others.
- Long-term use is complex.
Pro Tip:
If you just use text-to-speech software sometimes, it’s best to utilize one of the many free options available. On the other hand, paid versions are great if you want extensive functionality and don’t mind limitations on usage.
You should check for text-to-speech software with natural voices enabled in commercial applications. A top-rated system should include real-time speech capabilities and a user-friendly UI.
Text to Speech Services’ Advantages
TTS systems can help content owners such as corporations, YouTubers, institutions, media houses, mobile app developers, e-learning solution providers, and others in comparable fields in the following ways:
- Global Reach: TTS voices that sound human, are clear, and can be customized can let you communicate with people worldwide. You can even incorporate translations in multiple languages to read the text in their own language.
- Improve User Experience: Allowing speech in pre-sales and after-sales can reduce human agent burden, provide individualized services, lower operating expenses, and speed up productivity.
- Saves Money and Time: Companies can quickly and easily implement TTS systems with little maintenance.
- Improves Productivity: E-learning experts and HR departments can create learning modules for staff training using TTS. This will allow employees to learn the information while working anywhere and at any time.
Text to speech solutions can also help online students, researchers, teachers, device users, app users, website visitors, machine users, and others in the following ways:
- People with Reading Difficulties: A considerable portion of the global population suffers from learning or reading disabilities, including language-based learning disabilities. TTS solutions in your documents might assist them in better understanding the document. It can also aid persons with vision problems and literacy issues.
- Multitasking: Listening to something allows you to execute multiple physical duties at once, such as cooking, cleaning, exercising, etc. It’s a welcome break for busy professionals who can’t find time to read the stacks of books that have accumulated on their desks for years. They can just put on their headphones and listen to them while doing other things.
- Great for Kids: Instead of being glued to their computers or phones all day, your children can listen to audio files, including their books and other study materials. It will safeguard their priceless sight. It will also increase word recognition, cognitive skills, make finding and correcting problems in their writing easier.
- Journey Mate: People can listen to information while traveling by using speech to text. You may always listen to the noises and enjoy them while riding without having to strain your eyes, regardless of how rocky the road is.
Frequently Asked Questions
What is Text to Speech Software?
TTS (text-to-speech) is an assistive technology that reads text aloud. TTS systems provide computer-generated sound, and we may vary the reading speed by increasing the speed or slowing things down.
Is Text-To-Speech Technology Handy?
According to studies, text-to-speech technology helps viewers concentrate on the content rather than the process of reading, resulting in a greater understanding of the topic and more engagement.
While some argue that audiobooks, or scripts read by paid voice actors, are superior to computer-generated voices, there is compelling proof that text to speech can be a handy tool for YouTube content creators.
Is The Voice Quality Consistent Across All Text to Speech Programs?
Voice quality ultimately depends on the service. However, some use human voices, while premium solutions employ the voices of well-known narrators like David Attenborough and Morgan Freeman.
You can even mimic the sound of youngsters speaking. Many gadgets, particularly online web page scanners and even audiobooks emphasize the text they are scanning.
What Are the Benefits of Using Text to Speech Software?
You can use this type of technology in a variety of ways. Some programs read text from a digital document or an interactive online page for users. Some programs can even convert handwritten text into speech using modern technology such as Optical Character Recognition (OCR).
Text-to-speech software is compatible with various devices and applies to all kinds of individual digital devices, including laptops, PCs, tablets, and smartphones.
What Is the Process of Converting Speech in Text to Speech Software?
The majority of text-to-speech software works in the same way. Users can either upload or input the content to convert to audio. Then they choose from the different voices to evaluate which sound is best for the voice-over.
Many TTS solutions rely on OCR technology in some form. OCR allows us to obtain text from documents and photos by recognizing written and digital text. If you click an image of a street sign, the program will read the words printed on it.
Is it possible to use Text to Speech on YouTube?
Absolutely, you can get them in YouTube videos, but to prevent advertising strikes, make sure you post videos with authentic human voices somewhere between.
What Text-To-Speech Software Does YouTube Content Creators Use?
To incorporate voice-overs on their sales pitches and informative videos, most YouTubers pay for text-to-speech software like Synthesys and Speechelo.
Is It Possible to Monetize YouTube Videos Using Text to Speech?
It varies on the text to speech engine you’re using; some TTS engines support YouTube monetization while others don’t.
Speech has a significant impact on the success rate of the entire YouTube adventure, whether storytelling or a standard sales pitch. It helps to have a decent voice and speaking abilities. However, not everyone gets both simultaneously; many individuals employ voice artists to provide voice-overs.
Some freelancers charge $5-$100 for a 5-minute voice-over. However, not everyone can afford an expensive voice artist, especially for longer films or just starting. Here are other options that I discovered as the most acceptable free text to voice generators for YouTube videos.
Let’s take a deeper look at the most excellent free text to speech software for YouTube videos.
Getting Started
Text to speech is a speech synthesis software that speaks aloud digital and textual content. The software offers a wide range of applications and is utilized by everyone from professionals and students to toddlers and adults.
Viewers are emotionally attached to documents such as PDFs, books, novels, and e-learning courses when they hear narration with a human voice. Text-to-speech systems are ideal for multitasking by busy professionals.
It’s no surprise that there are numerous text-to-speech options available. Audiobooks are also becoming more popular for the same reasons.
We’ll go over the best text-to-speech tools available in this guide. We’ve gathered a detailed list of the most exemplary free and commercial text-to-speech applications to help you choose the best option for your needs:
#1: Murf
It is available on Windows, Mac, Android, iPhone, and Online
Murf is a text-based voice-over maker. You can either compose your script or submit a voice clip to convert it into hyper-realistic AI voices. Murf delivers expert voice-over artists with experienced voices. You can check multiple parameters in the voices. You can use Murf to signify a brand, a product, a company, a presentation, and many more.
Features:
- Murf allows you to create voice-overs from the text. It also allows you to transform your speech into editable text, which you can subsequently edit or convert into AI voice.
- Murf Studio provides the ability to synchronize your speech with visuals.
- Murf provides over 100 authentic voices in 19 languages.
- It also gives options for inserting pauses, altering narration tempo, and emphasizing certain points.
- It also includes features such as script checking with grammar assistance, free background music, video and music cutting, and more.
- Murf offers comprehensive communication and collaboration tools, access control, a pronunciation library, and a service level agreement (SLA) for enterprises wishing to develop voice-overs in bulk.
Price
| Free | Basic | Pro | Enterprise |
|---|---|---|---|
| $0 / Month | $13 / Month | $26 / Month | $166 / Month |
| Try all 120+ voices 10 mins of voice generation 10 mins of transcription Share link for audio/video output No downloads Single User No credit card required | Unlimited Downloads 24 hours of voice generation/year Access to 60 voices (10 languages) Commercial Usage rights Chat and Email support Single User | Unlimited Downloads 96 hours of voice generation/year 48 hours of transcription/year Access 120+ voices (20 languages) Commercial Usage rights Recorded voice editing Voice changer Up to 3 users Priority Support | 5+ Users Unlimited Voice Generation Time Unlimited Transcription time Custom Voices Single-sign on (SSO) Collaboration and Access Control Dedicated Account Representative Centralized invoicing Service Agreement Deletion recovery Unlimited Storage |
Cons
- You may experience frequent technical glitches.
#2: Speechelo
It is available on Windows, Mac, Android, iPhone, and Online
Speechelo gives a realistic voice tone and expressions. This gets people more interested in voice-overs. You can use Speechelo to create sales videos, training films, and instructive videos, among other things. It includes attributes such as breathing and pauses, vocal tones, changing speed and pitch, and compatibility for 23 languages.
Features
- The text-to-speech engine in Speechelo can add intonation to the voice.
- It contains over 30 voices that sound natural.
- It has both male and female voices.
- It works with various video editing tools, including Camatasia, Adobe, Premier, and iMovie.
- Ordinary tone, cheerful tone, and serious tone are the three tones you may use to read your text.
Price
| Premium |
|---|
| $47 (Discount price) |
| One-time payment With 60-day money-back guarantee |
Cons
- The output of Speechelo will be 48kbps. If you’re familiar with sound production, you’ll see that this is a very low output.
- It might produce inaccurate output if you input long voice-overs.
#3: Synthesys
It is available on Windows, Mac, Android, iPhone, and Online
Synthesys helps to convert text into a natural-sounding voice. With Synthesis, you can choose from various tones, accents, male and female voices, languages, and reading speeds. Moreover, It simply takes three steps to create a natural-sounding artificial speech that you may use for a variety of commercial applications.
- To begin, select the gender, style, accent, and tone you want the created voice to have.
- You can paste or type the content you want to turn into speech into Synthesys’ AI voice-producing platform.
- Lastly, click ‘create’ to start creating your artificial speech in minutes. You may adjust the reading speed and pause length from here.
Features
- Cloud-based software.
- Expert and natural-sounding voices are available in an extensive collection.
- There are over 35 female voices and 30 male voices.
- You can create and sell unlimited voices.
- Extremely user-friendly interface.
Price
| Audio Synthesys | Human Studio Synthesys | Audio and Human Studio Synthesys |
|---|---|---|
| $29 / Month | #39 / Month | $59 / Month |
| Unlimited voice-overs downloads Access to 30 Real Human Voices Access to 66 Languages & 254 General Voices Fully Web-Based | Unlimited Videos Access to 73 Humatars (Extra Outfits included) Access to 66 Languages & 254 General Voices Upload Your Own Voice Full Video Customization Fully Web-Based | Unlimited Videos & Voice Overs Access to both Software All features included 20% OFF |
Cons
- It has character limitations when making a voice-over.
- It does not have a free trial version.
#4: Nuance Dragon
It is available in Windows only
Nuance Dragon is an artificial intelligence-powered voice recognition system. It offers both residential and commercial solutions. It spans across various data centers and delivers cloud services.
Its hosting platform is Microsoft Azure, which is HITRUST CSF-approved. All of their solutions follow industry-standard guidelines. Nuance Dragon protects data in transit and at rest with 256-bit encryption.
Features
- Nuance Dragon complies with HIPAA regulations, which are critical for public sector security and confidentiality.
- It applies to a wide range of professions.
- It offers complete protection.
Price
| Home | Professional |
|---|---|
| $200 | $500 |
| It has 99% recognition accuracy Immediate access to your dictation. One-time payment. | It has 99% recognition accuracy Share documents Sync custom words and commands Immediate access to your dictation. One-time payment. |
Cons
- It works only on Windows, and it is not available on Mac.
- It does not have a free trial version.
- It does not include Premium Consulting or Integration Services.
#5: Notevibes
It is available on Windows, Mac, Android, iPhone, and Online
Notevibes is a tremendous text-to-speech tool that comes in both a free and a commercial edition with many features. It offers customers over five hundred translation characters while also allowing them to modify the pronunciation.
As a result, users have access to all of their resources to learn a new language and significantly increase their reading skills. Furthermore, Notevibes features 177 distinct voices speaking in 18 different languages.
Users appreciate the natural-sounding voices that assist them in pronouncing words correctly. Users from many walks of life can profit from the tool because it has many functions.
Features
- Realistic voice generator
- Aloud Speaking
- Make an MP3 of your audio speech.
- 47 Individual Voices
- Characters: 200 – 1,000,000
Price
| Personal Pack | Commercial Pack | Corporate Pack |
|---|---|---|
| $9 / Month ($107 per year) | $90 / Month ($1080 per year) | $4,000 / Year |
| For personal use only: private listening, personal e-learning 1,200,000 characters pack per year 201 Premium Voices available 18 Languages (EN, ES, DE, FR, VT, RU, PT, IT, NL, TR, JP, KO, HI and etc) MP3 Download 1 Account License | For Commercial use: YouTube, broadcasts, TV, IVR voiceover and other businesses 12,000,000 characters pack per year Advanced voice editor new 201 Premium Voices available 18 Languages (EN, ES, DE, FR, VT, RU, PT, IT, NL, TR, JP, KO, HI and etc.) SSML tags support MP3, Wav Download Audio files history You 100% own intellectual property for all files | For Corporate Users All in Commercial and 50,000,000 characters pack per year Master account for management Team License (up to 10 users) Priority email support |
Cons
- It does not have a preview. You have to generate the voice-over to listen.
- You can’t combine a single audio file out of many audio files.
- The Voiceover & Editor Page is unique in that it has two sections: one for creating the voice-over and another for obtaining audio files. Switching between them will take some time. If you’re working on a large project, moving between bot sites will be a hassle.
- No project-based organization
#6: Natural Reader
It is available on Windows, Mac, Android, iPhone, and Online
Natural Reader is among the few free text-to-speech programs with several exciting features. It’s pretty easy to use, and you can get started right away by loading texts into its library.
Furthermore, the tool allows users to manage several files in various formats. Lastly, the built-in OCR will enable you to submit images or text scans and have them read aloud.
Features
- Built-in OCR
- Choice of interfaces
- Built-in browser
- Dyslexic-friendly font
Price
| Free | Personal | Professional | Ultimate |
|---|---|---|---|
| $0 (Free to use) | $99.50 (One-time payment) | $129.50 (One-time payment) | $199.50 (One-time payment) |
| Unlimited use with Free Voices Miniboard to read text in other applications Pronunciation Editor Works with PDF, Docx, TXT and ePub | 2 natural voices included All features of Free Version included Convert to MP3 | 4 natural voices included All features of Personal Version included | 6 natural voices included All features of Professional Version included 5000 images/year for OCR to read from images & scanned PDFs |
Cons
- There is no way to skip or jump around any text on the page.
- You will need internet access in the free software to access the voices.
- The paid version is very expensive in comparison to others.
- Long-term use is complex.
Pro Tip:
If you just use text-to-speech software sometimes, it’s best to utilize one of the many free options available. On the other hand, paid versions are great if you want extensive functionality and don’t mind limitations on usage.
You should check for text-to-speech software with natural voices enabled in commercial applications. A top-rated system should include real-time speech capabilities and a user-friendly UI.
Text to Speech Services’ Advantages
TTS systems can help content owners such as corporations, YouTubers, institutions, media houses, mobile app developers, e-learning solution providers, and others in comparable fields in the following ways:
- Global Reach: TTS voices that sound human, are clear, and can be customized can let you communicate with people worldwide. You can even incorporate translations in multiple languages to read the text in their own language.
- Improve User Experience: Allowing speech in pre-sales and after-sales can reduce human agent burden, provide individualized services, lower operating expenses, and speed up productivity.
- Saves Money and Time: Companies can quickly and easily implement TTS systems with little maintenance.
- Improves Productivity: E-learning experts and HR departments can create learning modules for staff training using TTS. This will allow employees to learn the information while working anywhere and at any time.
Text to speech solutions can also help online students, researchers, teachers, device users, app users, website visitors, machine users, and others in the following ways:
- People with Reading Difficulties: A considerable portion of the global population suffers from learning or reading disabilities, including language-based learning disabilities. TTS solutions in your documents might assist them in better understanding the document. It can also aid persons with vision problems and literacy issues.
- Multitasking: Listening to something allows you to execute multiple physical duties at once, such as cooking, cleaning, exercising, etc. It’s a welcome break for busy professionals who can’t find time to read the stacks of books that have accumulated on their desks for years. They can just put on their headphones and listen to them while doing other things.
- Great for Kids: Instead of being glued to their computers or phones all day, your children can listen to audio files, including their books and other study materials. It will safeguard their priceless sight. It will also increase word recognition, cognitive skills, make finding and correcting problems in their writing easier.
- Journey Mate: People can listen to information while traveling by using speech to text. You may always listen to the noises and enjoy them while riding without having to strain your eyes, regardless of how rocky the road is.
Frequently Asked Questions
What is Text to Speech Software?
TTS (text-to-speech) is an assistive technology that reads text aloud. TTS systems provide computer-generated sound, and we may vary the reading speed by increasing the speed or slowing things down.
Is Text-To-Speech Technology Handy?
According to studies, text-to-speech technology helps viewers concentrate on the content rather than the process of reading, resulting in a greater understanding of the topic and more engagement.
While some argue that audiobooks, or scripts read by paid voice actors, are superior to computer-generated voices, there is compelling proof that text to speech can be a handy tool for YouTube content creators.
Is The Voice Quality Consistent Across All Text to Speech Programs?
Voice quality ultimately depends on the service. However, some use human voices, while premium solutions employ the voices of well-known narrators like David Attenborough and Morgan Freeman.
You can even mimic the sound of youngsters speaking. Many gadgets, particularly online web page scanners and even audiobooks emphasize the text they are scanning.
What Are the Benefits of Using Text to Speech Software?
You can use this type of technology in a variety of ways. Some programs read text from a digital document or an interactive online page for users. Some programs can even convert handwritten text into speech using modern technology such as Optical Character Recognition (OCR).
Text-to-speech software is compatible with various devices and applies to all kinds of individual digital devices, including laptops, PCs, tablets, and smartphones.
What Is the Process of Converting Speech in Text to Speech Software?
The majority of text-to-speech software works in the same way. Users can either upload or input the content to convert to audio. Then they choose from the different voices to evaluate which sound is best for the voice-over.
Many TTS solutions rely on OCR technology in some form. OCR allows us to obtain text from documents and photos by recognizing written and digital text. If you click an image of a street sign, the program will read the words printed on it.
Is it possible to use Text to Speech on YouTube?
Absolutely, you can get them in YouTube videos, but to prevent advertising strikes, make sure you post videos with authentic human voices somewhere between.
What Text-To-Speech Software Does YouTube Content Creators Use?
To incorporate voice-overs on their sales pitches and informative videos, most YouTubers pay for text-to-speech software like Synthesys and Speechelo.
Is It Possible to Monetize YouTube Videos Using Text to Speech?
It varies on the text to speech engine you’re using; some TTS engines support YouTube monetization while others don’t.
Also read:
- New Step by Step to Rotate Videos in Davinci Resolve for 2024
- How to Use Canva Color Match
- New Looking for the Best Free Video Editing Software Reddit to Make Your Video Perfectly? Check Out Our List of the Best Video Editors for Reddit and You Can Choose Any of Them
- New Top 12 Best Freeze Frame Video Editing Examples for 2024
- New 4 Simple Methods for Making a High-Quality Recap Video
- 2024 Approved Know How to Make a Video Background Transparent? Export Transparent Background Video After Adding Effects. Steps to Remove White Background From Video
- In 2024, Wondering How to Rotate a Video in Windows at Any Desired Angle and Save It Permanently? Find Out All the Different Ways to Rotate Videos Temporarily as Well as Permanently
- Updated 2024 Approved Best 10 Fun Discord Bots You Need
- Learn Topaz Video Enhance AI Review and Achieve Powerful Video Conversion for 2024
- Updated Top 5 Best Video to PPT Converters for 2024
- 2024 Approved A Guide to Use Distortion Effect in Premeiere Pro
- New LUTs Can Make Ordinary-Looking Footage Look More Attractive. Read This Guide to Learn How You Can Easily Create Your Own LUTs Using Filmora
- Updated 2024 Approved 10 Best Free GIF Background Remover for PC and Online
- If You Want to Prompt Your eCommerce Business in Facebook, Then Using Facebook Video Ads Is One of the Effective Methods. This Post Will Show You How to Edit Videos for Facebook Advertisement
- New 2024 Approved Best Ways to Blur Zoom Background for Free
- Updated Your Recorded Video Footage Has some Visible Grains Making Your Video Noisy and Thus Hampering the Overall Viewing Experience. No Worries, as There AI Video Denoiser and Other Software Available to Correct the Issue
- 2024 Approved How to Create a Custom Sequence Preset in Premiere Pro
- Updated How to Time-Lapse a Video on iMovie
- In This Article, You Will Learn About the Top 5 Editors for Windows, Top 5 Editors for iPhone/Android, and Top 5 Editors for Animated GIF Editing for 2024
- In 2024, How and Where to Find a Shiny Stone Pokémon For Apple iPhone 8 Plus? | Dr.fone
- How To Transfer Data From iPhone 12 Pro Max To Android? | Dr.fone
- 8 Safe and Effective Methods to Unlock Your Apple iPhone 11 Without a Passcode | Dr.fone
- How To Unlock A Found iPhone 14 Pro? | Dr.fone
- In 2024, Dose Life360 Notify Me When Someone Checks My Location On Itel S23+? | Dr.fone
- Can't play MP4 files on Xperia 1 V
- In 2024, How to Bypass Google FRP Lock on Oppo Find X6 Devices
- In 2024, Fixing Foneazy MockGo Not Working On Vivo T2 5G | Dr.fone
- All Must-Knows to Use Fake GPS GO Location Spoofer On Vivo T2 Pro 5G | Dr.fone
- Xiaomi Redmi 13C Not Receiving Texts? 10 Hassle-Free Solutions Here | Dr.fone
- Complete Tutorial to Use GPS Joystick to Fake GPS Location On Vivo Y78t | Dr.fone
- How to Bypass FRP on Tecno Spark 10C?
- Sim Unlock Samsung Galaxy F14 5G Phones without Code 2 Ways to Remove Android Sim Lock
- Fix Poco M6 Pro 4G Android System Webview Crash 2024 Issue | Dr.fone
- Ways To Find Unlocking Codes For HTC Phones
- Title: In 2024, A Complete Guide to Use Distortion Effect in Premiere Pro
- Author: Chloe
- Created at : 2024-05-20 03:37:45
- Updated at : 2024-05-21 03:37:45
- Link: https://ai-editing-video.techidaily.com/in-2024-a-complete-guide-to-use-distortion-effect-in-premiere-pro/
- License: This work is licensed under CC BY-NC-SA 4.0.
